Mission, Job and Task Analysis: Step-By-Step Guide For … · A step-by-step process is presented...
13
Mission, Job and Task Analysis: Step-By-Step Guide For 1 st Time Users Copyright © BNH Expert Software Inc. 1 (514) 745-4010 www.bnhexpertsoft.com 1 Mission, Job and Task Analysis: Step-By-Step Guide For 1 st Time Users Latest Update: October 30, 2012 1. Introduction A step-by-step process is presented to assist analysts in conducting a mission, job and task analysis as well as identify whether training is needed to perform the tasks. For in depth information, please refer to Chapters 3 to 8 of ADVISOR “Align Training with Organizational Goals” User Guide. Remember that context sensitive help for each screen is also available by clicking on Help (button). 2. Table of Contents Setup Projects (Step 1, page 2) Setup Missions/Goals (Step 5, page 4) Setup Job Profiles (Step 8, page 5) Setup Job Tasks (Step 11, page 6) Define Performance & Enabling Objectives (Step 17, page 8) Uncover Knowledge/Skill Gaps (Step 21, page 10) Generate Reports (Step 28, page 13)
-
Upload
truongcong -
Category
Documents
-
view
222 -
download
0
Transcript of Mission, Job and Task Analysis: Step-By-Step Guide For … · A step-by-step process is presented...

Mission, Job and Task Analysis: Step-By-Step Guide For 1st Time Users
Copyright © BNH Expert Software Inc. 1 (514) 745-4010 www.bnhexpertsoft.com
1
Mission, Job and Task Analysis: Step-By-Step Guide For 1st Time Users Latest Update: October 30, 2012 1. Introduction A step-by-step process is presented to assist analysts in conducting a mission, job and task analysis as well as identify whether training is needed to perform the tasks. For in depth information, please refer to Chapters 3 to 8 of ADVISOR “Align Training with Organizational Goals” User Guide. Remember that context sensitive help for each screen is also available by clicking on Help (button).
2. Table of Contents
Setup Projects (Step 1, page 2) Setup Missions/Goals (Step 5, page 4) Setup Job Profiles (Step 8, page 5) Setup Job Tasks (Step 11, page 6) Define Performance & Enabling Objectives (Step 17, page 8) Uncover Knowledge/Skill Gaps (Step 21, page 10) Generate Reports (Step 28, page 13)

Mission, Job and Task Analysis: Step-By-Step Guide For 1st Time Users
Copyright © BNH Expert Software Inc. 1 (514) 745-4010 www.bnhexpertsoft.com
2
3. Setup Projects To find out where training budgets and resources should be allocated, as well as maximize training impact and demonstrate its value, a clear understanding of clients’ needs is required – i.e., their missions/goals, tasks needed to achieve these goals, as well as knowledge and skills needed to perform these tasks. The missions/goals of internal clients (i.e., business units) as well as external clients – including hierarchy – can be represented in this section. Step 1. To create a new Project, click on the Projects folder. Step 2. Click on the Add button (top left corner). Step 3. Input the Project Title, Contact Name and other info. Data required by ADVISOR is identified
by a red asterisk (*). Next, click on the [Defaults] tab to specify Annual Productive days, Working Hours per Day and Fringe Benefits Factor for the Client; and then the [Benchmark Data] tab to specify # of Employees in Division, Annual Payroll of Employees, # of Employees Trained [per year], # of Trainers as well as the Annual Training per Employee [hours]. Click the Save button when ready to save – i.e. create project.
Notes: To edit an existing project, click on the Projects folder then click on the project’s name.
Make required changes and click Save. If Job Profiles (Positions) have been defined and made Public by other users a [Job Profiles]
tab will also appear. To copy a Job Profile (Position) to the project, click on the [Job Profiles] tab, place checkmark next to the desired job and click Save.
You may also share your analysis with colleagues (i.e., Users assigned to the same Client) by
clicking on the [Sharing] tab, placing checkmarks next to their names and clicking Save.

Mission, Job and Task Analysis: Step-By-Step Guide For 1st Time Users
Copyright © BNH Expert Software Inc. 1 (514) 745-4010 www.bnhexpertsoft.com
3
Step 4. ADVISOR can easily mirror the hierarchy of a project. In other words, the project may be divided into multiple segments and the impact of the missions/goals within each segment on the project can be established. For example, if we are assessing the impact of missions/goals at the Squadron level on the Air Force, the Air Force project can be divided into multiple segments representing the Commands, and each Command in-turn subdivided into Wings and each Wing in-turn divided into Squadrons. The impact of missions/goals at each level on parent level can also be defined.
To set-up a Segment for a Project, click on the Segments folder under the Projects folder, and then click on the Add button. You will be prompted for the Project (Segment) Title, Contact Name and other info as indicated in the Step 3.
US Air Force
Command #1
Command #2
Command #3
Wing #1.1
Wing #1.2
Wing #2.1
Wing #3.1
Wing #3.2
Wing #3.3
Squadron #1.2.1
Squadron #1.2.2
Squadron #3.2.1
Squadron #3.2.3
Squadron #3.2.3
Mission, Job and Task Analysis: Step-By-Step Guide For 1st Time Users
Copyright © BNH Expert Software Inc. 1 (514) 745-4010 www.bnhexpertsoft.com
4
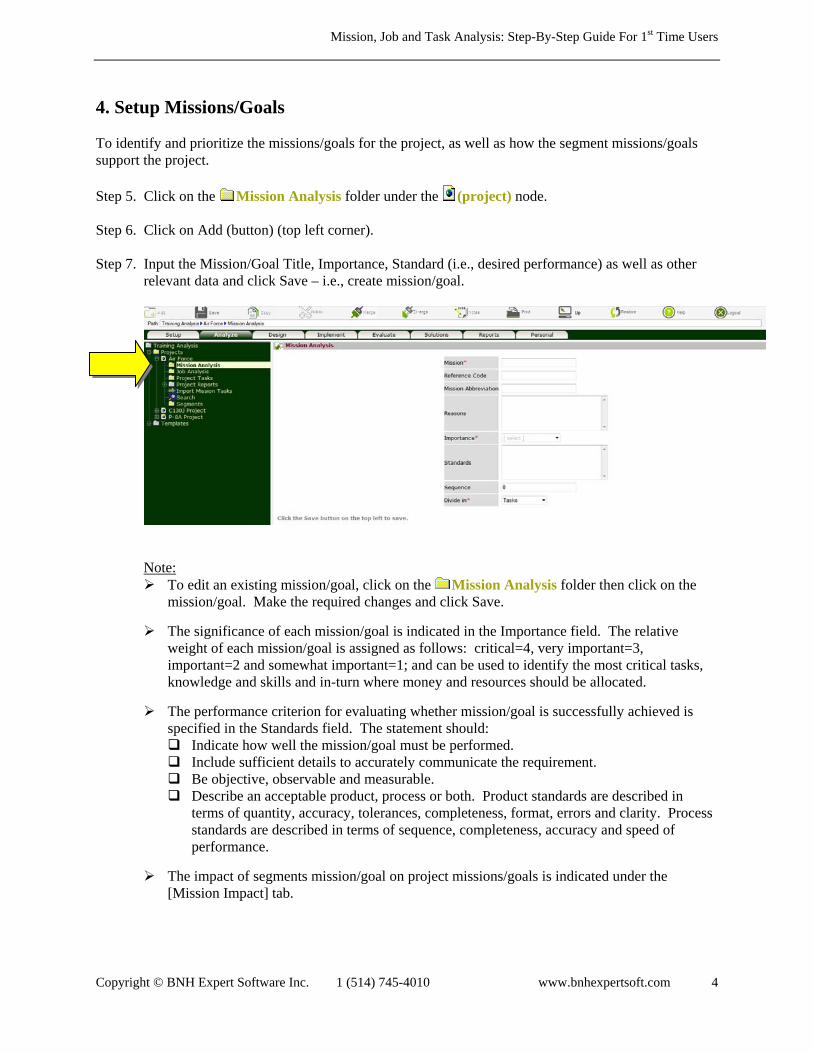
4. Setup Missions/Goals To identify and prioritize the missions/goals for the project, as well as how the segment missions/goals support the project. Step 5. Click on the Mission Analysis folder under the (project) node. Step 6. Click on Add (button) (top left corner). Step 7. Input the Mission/Goal Title, Importance, Standard (i.e., desired performance) as well as other
relevant data and click Save – i.e., create mission/goal.
Note: To edit an existing mission/goal, click on the Mission Analysis folder then click on the
mission/goal. Make the required changes and click Save.
The significance of each mission/goal is indicated in the Importance field. The relative weight of each mission/goal is assigned as follows: critical=4, very important=3, important=2 and somewhat important=1; and can be used to identify the most critical tasks, knowledge and skills and in-turn where money and resources should be allocated.
The performance criterion for evaluating whether mission/goal is successfully achieved is specified in the Standards field. The statement should: Indicate how well the mission/goal must be performed. Include sufficient details to accurately communicate the requirement. Be objective, observable and measurable. Describe an acceptable product, process or both. Product standards are described in
terms of quantity, accuracy, tolerances, completeness, format, errors and clarity. Process standards are described in terms of sequence, completeness, accuracy and speed of performance.
The impact of segments mission/goal on project missions/goals is indicated under the [Mission Impact] tab.
Mission, Job and Task Analysis: Step-By-Step Guide For 1st Time Users
Copyright © BNH Expert Software Inc. 1 (514) 745-4010 www.bnhexpertsoft.com
5
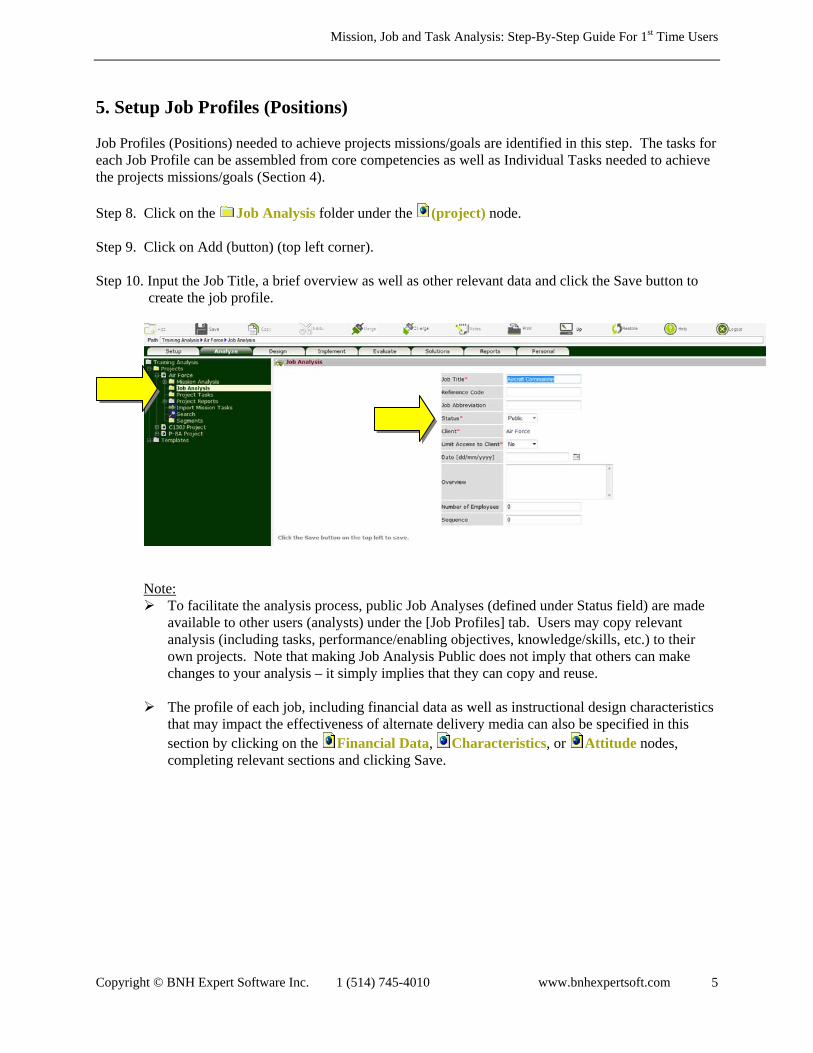
5. Setup Job Profiles (Positions) Job Profiles (Positions) needed to achieve projects missions/goals are identified in this step. The tasks for each Job Profile can be assembled from core competencies as well as Individual Tasks needed to achieve the projects missions/goals (Section 4). Step 8. Click on the Job Analysis folder under the (project) node. Step 9. Click on Add (button) (top left corner). Step 10. Input the Job Title, a brief overview as well as other relevant data and click the Save button to
create the job profile.
Note: To facilitate the analysis process, public Job Analyses (defined under Status field) are made
available to other users (analysts) under the [Job Profiles] tab. Users may copy relevant analysis (including tasks, performance/enabling objectives, knowledge/skills, etc.) to their own projects. Note that making Job Analysis Public does not imply that others can make changes to your analysis – it simply implies that they can copy and reuse.
The profile of each job, including financial data as well as instructional design characteristics
that may impact the effectiveness of alternate delivery media can also be specified in this section by clicking on the Financial Data, Characteristics, or Attitude nodes, completing relevant sections and clicking Save.

Mission, Job and Task Analysis: Step-By-Step Guide For 1st Time Users
Copyright © BNH Expert Software Inc. 1 (514) 745-4010 www.bnhexpertsoft.com
6
6. Setup Job Tasks Step 11. Click on the Task Analysis folder under the (job) node. Step 12. Click on Add (button) (top left corner). Step 13. Input the Task Title, Difficulty, Importance, Frequency as well as other attributes. Next, click on
the [Conditions], [Cues] and [Safety] tabs and complete. Click the Save button when ready to save – i.e., create task.
Notes: Based on Task’s Difficulty, Importance and Frequency (DIF) model, Task Priority (High,
Medium or Low) and Training Requirements (Over Train, Train or No Train) are determined and presented under the Training node under each (task). You may of course, override system's recommendations.
Sub Divide Tasks: A Task can also be divided into multiple levels – i.e., Sub Tasks, Steps
and Sub Steps. Since Individual Tasks require one individual to complete, each Task can only be assigned as a single unit (including all Sub Tasks) to a single Job Profile (Position). In other words, if a Task is divided into Sub Task A and Sub Task B, you cannot assign Sub Task A to Pilots for example, and Sub Task B to Maintainers.
Search. To facilitate the analysis, a [Search] tab is presented on the Task Analysis folder.
You can search for Tasks under Missions, Jobs or by Keyword. To copy, place checkmarks next to the desired Tasks and click Save. All Sub Tasks as well as Knowledge and Skills associated with the selected Task are also copied.
If References have been defined under the Master References List folder under the
Templates folder (Chapter 9 of “Align Training with Organization Goals” User Guide), a [Reference] tab will also appear after the [Safety] tab – to link Tasks to specific mandate, requirement, manual, etc., and in-turn document the reasoning behind the Task.
Mission, Job and Task Analysis: Step-By-Step Guide For 1st Time Users
Copyright © BNH Expert Software Inc. 1 (514) 745-4010 www.bnhexpertsoft.com
7
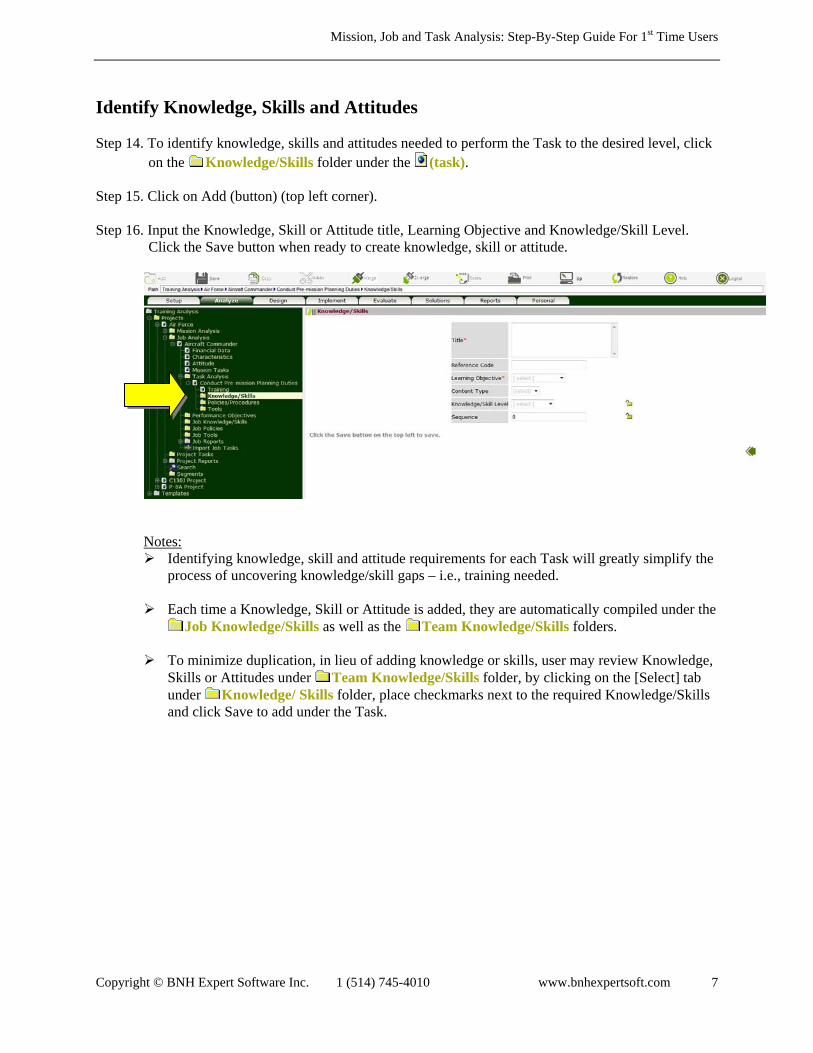
Identify Knowledge, Skills and Attitudes Step 14. To identify knowledge, skills and attitudes needed to perform the Task to the desired level, click
on the Knowledge/Skills folder under the (task). Step 15. Click on Add (button) (top left corner). Step 16. Input the Knowledge, Skill or Attitude title, Learning Objective and Knowledge/Skill Level.
Click the Save button when ready to create knowledge, skill or attitude.
Notes: Identifying knowledge, skill and attitude requirements for each Task will greatly simplify the
process of uncovering knowledge/skill gaps – i.e., training needed.
Each time a Knowledge, Skill or Attitude is added, they are automatically compiled under the Job Knowledge/Skills as well as the Team Knowledge/Skills folders.
To minimize duplication, in lieu of adding knowledge or skills, user may review Knowledge,
Skills or Attitudes under Team Knowledge/Skills folder, by clicking on the [Select] tab under Knowledge/ Skills folder, place checkmarks next to the required Knowledge/Skills and click Save to add under the Task.

Mission, Job and Task Analysis: Step-By-Step Guide For 1st Time Users
Copyright © BNH Expert Software Inc. 1 (514) 745-4010 www.bnhexpertsoft.com
8
7. Define Performance and Enabling Objectives Step 17. Click on the Performance Objectives folder under the (job) node. Step 18. Click on Add (button) (top left corner). Step 19. Input the Performance Objective, Standard (i.e., desired performance) as well as other attributes.
Next, click on the [Conditions], [Cues], [Certification], [Tasks] and [Impact on Goals] tabs and complete. Click on Save button when ready to create the objective.
Notes: Objective Priority and Training Requirements are dictated by Tasks and Sub Tasks that the
Objective supports – i.e., linked to under the [Tasks] tab. They are presented under the Training node under each (objective).
Sub Divide Objective: Performance Objective can also be divided into Enabling Objectives.
Each Performance Objective can only be assigned as a single unit (including all Enabling Objectives) to a single Job Profile (Position). In other words, if a Performance Objective is divided into Enabling Objectives A and B, you cannot assign Enabling Objective A to Pilots for example, and Enabling Objective B to Maintainers.
Status: To facilitate data sharing and minimize effort required to analyze Objectives, a Search function is provided to help analysts locate and copy existing Performance Objectives. To allow analysts to search for and copy Objectives that you have created (but not edit or delete), classify the objective as Public under the Status field. Otherwise, the Performance Objective can be classified as Private and will not in this case be accessible by the Search function.
Impact on Goals fields indicate the significance of each Objective. The relative weight of
each objective is assigned as follows: critical=4, very important=3, important=2 and somewhat important=1. Based on missions/goals and objectives weights, the relative impact of each objective and in-turn knowledge and skill is computed. In other words, which knowledge and skills are most critical and have the greatest impact on missions/goals.

Mission, Job and Task Analysis: Step-By-Step Guide For 1st Time Users
Copyright © BNH Expert Software Inc. 1 (514) 745-4010 www.bnhexpertsoft.com
9
Auto Generate. Although Scalar diagrams may be used to extract Performance and Enabling Objectives from Tasks and Sub Tasks, for simple analysis where Performance Objectives have a one to one relationship with Tasks, the [Auto Generate] tab on the Performance Objectives folder may be used to generate Performance and Enabling Objectives (including Knowledge and Skills) from Tasks and Sub Tasks – by placing checkmarks next to the desired Tasks and clicking Save.
Search. To facilitate the analysis, a [Search] tab is also presented on the Performance Objectives folder. You can search for Performance Objectives under Jobs or by Keyword. To copy, place checkmarks next to the desired Performance Objectives and click Save. All Enabling Objectives as well as Knowledge and Skills associated with the selected Performance Objectives are also copied.
If References have been defined under the Master References List folder under the Templates folder, a [Reference] tab will also appear after the [Certification] tab – to link Objectives to specific mandate, requirement, manual, etc. By establishing these links, in addition to documenting the reasoning behind the Objective, analysts can quickly identify which Objectives (including Knowledge, Skills, Attitudes, Job Aids, Policies and Tools) are affected – should there be a change in a specific mandate, requirement or manual.
Step 20. The following folders may also be presented under each (task): Steps, Cues, Measures, Knowledge/Skills, Job Aids, Policies and Tools. To add a new Step, Cue or Measure for an Objective, click on the corresponding folder, Steps, for example, then click on Add (button), input the required fields and click Save.
Mission, Job and Task Analysis: Step-By-Step Guide For 1st Time Users
Copyright © BNH Expert Software Inc. 1 (514) 745-4010 www.bnhexpertsoft.com
10
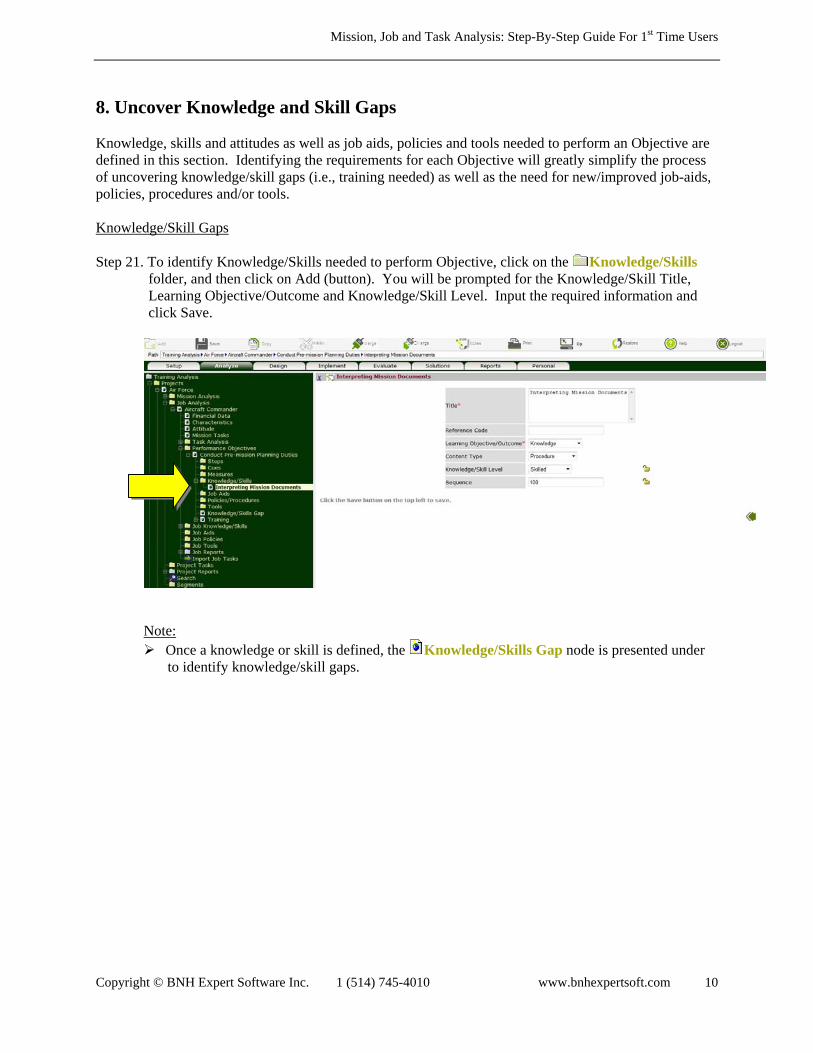
8. Uncover Knowledge and Skill Gaps Knowledge, skills and attitudes as well as job aids, policies and tools needed to perform an Objective are defined in this section. Identifying the requirements for each Objective will greatly simplify the process of uncovering knowledge/skill gaps (i.e., training needed) as well as the need for new/improved job-aids, policies, procedures and/or tools. Knowledge/Skill Gaps Step 21. To identify Knowledge/Skills needed to perform Objective, click on the Knowledge/Skills
folder, and then click on Add (button). You will be prompted for the Knowledge/Skill Title, Learning Objective/Outcome and Knowledge/Skill Level. Input the required information and click Save.
Note: Once a knowledge or skill is defined, the Knowledge/Skills Gap node is presented under
to identify knowledge/skill gaps.
Mission, Job and Task Analysis: Step-By-Step Guide For 1st Time Users
Copyright © BNH Expert Software Inc. 1 (514) 745-4010 www.bnhexpertsoft.com
11
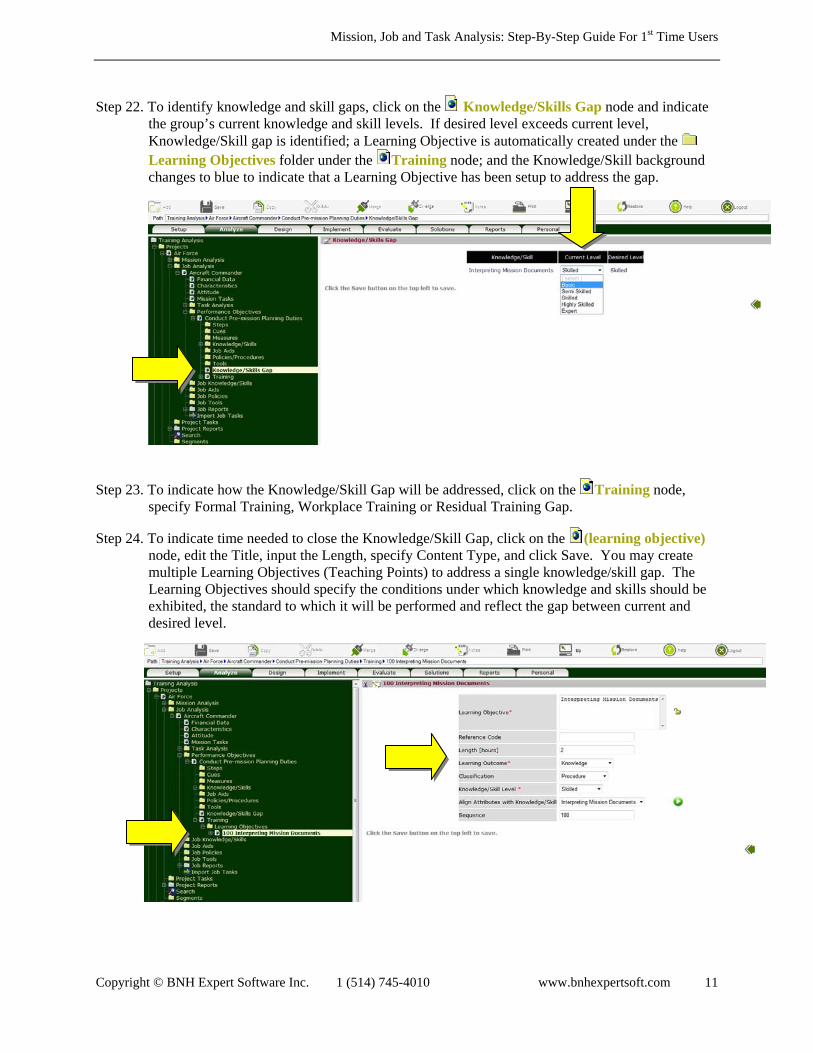
Step 22. To identify knowledge and skill gaps, click on the Knowledge/Skills Gap node and indicate the group’s current knowledge and skill levels. If desired level exceeds current level, Knowledge/Skill gap is identified; a Learning Objective is automatically created under the Learning Objectives folder under the Training node; and the Knowledge/Skill background changes to blue to indicate that a Learning Objective has been setup to address the gap.
Step 23. To indicate how the Knowledge/Skill Gap will be addressed, click on the Training node,
specify Formal Training, Workplace Training or Residual Training Gap.
Step 24. To indicate time needed to close the Knowledge/Skill Gap, click on the (learning objective) node, edit the Title, input the Length, specify Content Type, and click Save. You may create multiple Learning Objectives (Teaching Points) to address a single knowledge/skill gap. The Learning Objectives should specify the conditions under which knowledge and skills should be exhibited, the standard to which it will be performed and reflect the gap between current and desired level.
Mission, Job and Task Analysis: Step-By-Step Guide For 1st Time Users
Copyright © BNH Expert Software Inc. 1 (514) 745-4010 www.bnhexpertsoft.com
12
Notes:
To add a new Learning Objective (Teaching Point), click on the Learning Objectives folder, and then click on Add (button). You will be prompted for the Learning Objective, Length, Learning Objective/Outcome, Classification and Level. Input the required fields and click Save.
Learning Objective can be assembled in courses/training programs. Defining Learning Objectives is therefore critical for establishing clear links between training programs, objectives, tasks and missions/goals, demonstrating the value of various training programs and aligning training with project goals.
Define Job Aids, Policies and Tools Requirements for Each Objective
Step 25. To identify job aids needed to perform Tasks, click on the Job Aids folder and then click on Add (button). You will be prompted for the job aid title/description. Input the required info and click Save. Similar to Knowledge/Skills, each time a Job Aid is added, they are automatically compiled under the Job Aids as well as the Project Job Aids. To minimize duplication, in lieu of adding job aids, user may review Job Aids under Project Job Aids folder, by clicking on the [Select] tab under Job Aids folder, place checkmarks next to the required Job Aids and click Save to add under the Task or Performance Objective.
Step 26. To identify policies/procedures needed to perform Tasks, click on the Policies/Procedures
folder and then click on Add (button). You will be prompted for the policy title/description. Input the required info and click Save. Similarly, when Policy is added, they are automatically compiled under the Job Policies as well as the Project Policies. To minimize duplication, in lieu of adding policies, user may review Policies under Project Policies folder, by clicking on the [Select] tab under Policies/Procedures folder, place checkmarks next to the required Policies and click Save to add under the Task or Performance Objective.
Step 27. To identify tools needed to perform Tasks, click on the Tools folder and then click on Add
(button). You will be prompted for the tool title/description. Input the required info and click Save. Similarly, when Tool is added, they are automatically compiled under the Job Tool as well as the Project Tools. To minimize duplication, in lieu of adding tools, user may review Tools under Project Tools folder, by clicking on the [Select] tab under Tools folder, place checkmarks next to the required Tools and click Save to add under the Task or Performance Objective.

Mission, Job and Task Analysis: Step-By-Step Guide For 1st Time Users
Copyright © BNH Expert Software Inc. 1 (514) 745-4010 www.bnhexpertsoft.com
13
8. Generate Reports Comprehensive reports can be generated. These include: Training Needs Analysis Job Analysis Tasks performed by each job (position) Knowledge and skills needed by each job (position) to perform Tasks to desired standard Knowledge and skill gaps, including priority, and how these gaps can be addressed Audit trail that maps Tasks and Performance Objective to Learning Objectives – i.e., how the
requirements for each Task or Performance Objective are being addressed. How each segment supports the missions/goals of the project. Step 28. To generate a Training Needs Analysis report, click on the TNA Report node under the
Projects Reports folder, select items to be included by placing a checkmarks next to the desired sections and click Save. Note: if the Segments option is selected, the Missions, Jobs, Tasks and Objectives of all segments under this project will also be included in the report.
Since the report is in html format, you can quickly advance to any section by clicking on the corresponding title in the Table of Contents. You may print or save the report using the corresponding functions in your Browser. To return to ADVISOR, close the Report window.
Step 29. To generate a list of Tasks performed by a Job (Position) including Knowledge and Skills needed
to perform Tasks to desired level, click on the Task Report node under the Job Reports folder. The Tasks are prioritized as High, Medium or Low and the Level of each Knowledge and Skill is indicated. You may print and/or save the report using the corresponding export and print icons (top left corner). To return to ADVISOR, close the Report window.
Step 30. Executive reports that provide a clear line of sight on how various segments are supporting the
missions/goals of a project [ Goals Top Down View] as well as which project missions/goals are supported by a segment [ Goals Bottom Up View], can be easily generated by clicking on the corresponding node under the Clients Reports folder.
Since the report is in html format, you can click (drill down) on each mission/goal to find out the Tasks performed by various jobs (positions) in support of each mission/goal. You may print and/or save the report using the corresponding export and print icons (top left corner). To return to ADVISOR, close the Report window.
Step 31. To figure out how the requirements of each Task or Performance Objective are being addressed,
click on Align Tasks with Goals Report node under the Job Reports folder, select the required option and Submit. The results are presented in a Tabular format. You may print or save the report using the corresponding functions in your Browser. To return to ADVISOR, close the Report window.
Remember that context sensitive help is also available for each screen by clicking on the Help (button). Enjoy!