MIROR IMPRO and COMPO Software: The User...
66
SONY Computer Science Laboratory Paris 6 rue Amyot, 75005 Paris July 2013 Technical report n° 2013-3 MIROR IMPRO and COMPO Software: The User Guide Khatchatourov, A., Pachet, F.
Transcript of MIROR IMPRO and COMPO Software: The User...
SONY Computer Science Laboratory Paris 6 rue Amyot, 75005 Paris
July 2013
Technical report n° 2013-3
MIROR IMPRO and COMPO Software: The User Guide
Khatchatourov, A., Pachet, F.

Executive Summary This Technical Report presents the User Guide for MIROR-IMPRO and MIROR-COMPO software developed by Sony Computer Science Laboratory Paris, and released in August 2013. The software itself can be downloaded on request, by contacting the authors here: http://www.csl.sony.fr/contact.php
Acknowledgments
The work described in this report forms part of the European project MIROR Musical Interaction Relying On Reflexion http://www.mirorproject.eu/ , co-funded by the European Community under the Information and Communication Technologies (ICT) theme of the Seventh Framework Programme. (FP7/2007-2013). Grant agreement n° 258338
Sony Computer Science Laboratory Paris Technical Report 2013-3

TABLE OF CONTENTS 1 INTRODUCTION ....................................................................................................................................... 5
2 INSTALLATION ......................................................................................................................................... 6
2.1 UNINSTALL ALL PREVIOUS VERSIONS OF CONTINUATOR AND MIROR ...................................................... 6 2.2 INSTALL JAVA ............................................................................................................................................ 6
2.2.1 Case 1: 64-bit Java for 64-bit Windows .......................................................................................... 6 2.2.2 Case 2: 32-bit Java for 64-bit Windows .......................................................................................... 6 2.2.3 Case 3: Java for 32-bit Windows ..................................................................................................... 7
2.3 INSTALL AND SETUP THE SYSTEM............................................................................................................... 7 2.3.1 Run the installer .............................................................................................................................. 7 2.3.2 Setup MIDI ports ............................................................................................................................. 8 2.3.3 Score font installation ...................................................................................................................... 9
2.4 RUN THE MIROR-IMPRO AND COMPO .................................................................................................. 9 2.5 INSTALL EYESWEB XMI ........................................................................................................................... 9
3 THE MAIN MIROR-IMPRO WINDOW ............................................................................................... 10
4 PIANO ROLL PANEL .............................................................................................................................. 12
5 IMPRO INPUT SETTINGS ..................................................................................................................... 16
5.1 PHRASE THRESHOLD ................................................................................................................................ 16 5.2 MAX LEGATO RATIO ............................................................................................................................... 17 5.3 TRANSPOSE .............................................................................................................................................. 18 5.4 KEEP ONLY THE LAST N DIFFERENT MELODIES ........................................................................................ 19 5.5 MEMORY MANAGEMENT .......................................................................................................................... 19
5.5.1 Memory Panel ............................................................................................................................... 19 5.5.2 Memory Editor ............................................................................................................................... 21 5.5.3 Graph Browser (or Viewpoint Viewer) .......................................................................................... 22
5.6 OTHER INPUT SETTINGS ........................................................................................................................... 23 5.7 MIDI THRU.............................................................................................................................................. 23
6 IMPRO OUTPUT SETTINGS ................................................................................................................. 24
6.1 OUTPUT TYPES ......................................................................................................................................... 25 6.1.1 Continuation type .......................................................................................................................... 26 6.1.2 Variation type ................................................................................................................................ 27 6.1.3 Weak Variation type ...................................................................................................................... 28 6.1.4 Answer type ................................................................................................................................... 29 6.1.5 Auto type ........................................................................................................................................ 30 6.1.6 Echo type ....................................................................................................................................... 30 6.1.7 Further possible refinements of output types ................................................................................. 30
6.2 OUTPUT DURATIONS ................................................................................................................................ 31 6.2.1 Memory durations.......................................................................................................................... 31 6.2.2 Input durations .............................................................................................................................. 31 6.2.3 Linear durations ............................................................................................................................ 32 6.2.4 Quantize ......................................................................................................................................... 33
6.3 OUTPUT AMPLITUDES .............................................................................................................................. 33 6.3.1 Memory amplitudes ....................................................................................................................... 33 6.3.2 Input amplitudes ............................................................................................................................ 33
6.4 OUTPUT CLUSTERNESS ............................................................................................................................. 33 6.5 USER DEFINED TARGET FOR TERMINAL NOTE (DEACTIVATED SINCE V2.5) ............................................... 34 6.6 NUMBER OF LOOPS ................................................................................................................................... 34 6.7 MAX ORDER ............................................................................................................................................. 34 6.8 AVOID CYCLES ......................................................................................................................................... 34 6.9 GENERATE ANOTHER ............................................................................................................................... 36 6.10 HARMONY RECTIFIER .......................................................................................................................... 36
7 TO BETTER UNDERSTAND THE IMPRO PARAMETERS ............................................................. 38
7.1 DO IT YOURSELF! ..................................................................................................................................... 38 7.2 AUGMENTING THE TRAINING SET ............................................................................................................. 39
8 IMPRO SESSION MANAGEMENT ....................................................................................................... 40
8.1 STRUCTURE OF SESSIONS ......................................................................................................................... 40
Sony Computer Science Laboratory Paris Technical Report 2013-3
8.2 TO CREATE A NEW USER ........................................................................................................................... 40 8.3 TO START A SESSION ................................................................................................................................ 41 8.4 TO LOAD A PREVIOUSLY RECORDED SESSION OF A PARTICULAR USER ..................................................... 41 8.5 TO WORK WITH PREVIOUSLY RECORDED SESSIONS .................................................................................. 41
8.5.1 See the information on the parameters .......................................................................................... 41 8.5.2 Use the parameters of the session to create a new session ............................................................ 41 8.5.3 Play back the phrases of the user and the system .......................................................................... 42 8.5.4 Save the phrases ............................................................................................................................ 42 8.5.5 Use the training set(s) of selected session(s) in a new session ...................................................... 42 8.5.6 Use a partial training set of a selected session in a new session ................................................... 42 8.5.7 To replicate session behavior ........................................................................................................ 42
9 IMPRO VISUALIZATION TOOLS ........................................................................................................ 43
9.1 VISUALIZATION OF ALL USER SESSIONS ................................................................................................... 43 9.2 TIME-LINE VIEW OF A SESSION ................................................................................................................. 43 9.3 VISUALISATION OF SHORT SYSTEM’S ANSWERS: CAUTION! ...................................................................... 44
10 IMPRO EXPORT FUNCTIONS .............................................................................................................. 45
10.1 EXPORT AS IMAGE ............................................................................................................................... 45 10.1.1 Export session as image ............................................................................................................ 45 10.1.2 Export melody as image ............................................................................................................ 45 10.1.3 How to print JPG files .............................................................................................................. 45
10.2 EXPORT AS AUDIO ............................................................................................................................... 46 10.2.1 Export melody as MIDI or MP3 WAV ...................................................................................... 46 10.2.2 Export session as MIDI ............................................................................................................. 46
10.3 EXPORT THE SESSION TO A .CSV FILE ................................................................................................. 46 10.3.1 How to export to .CSV file ........................................................................................................ 46 10.3.2 Structure of the .csv file ............................................................................................................ 47 10.3.3 Duration versus nbItems: how to compare the lengths of phrases ........................................... 47 10.3.4 Non-standard output: caution! ................................................................................................. 48
11 MISCELLANEOUS: IMPRO - EYESWEB CONNECTION ............................................................... 49
11.1 APPLICATION CONNECTOR .................................................................................................................. 49 11.2 OSCRECEIVER .................................................................................................................................... 49 11.3 HOW TO PROCEED ............................................................................................................................... 50
11.3.1 Testing the installation .............................................................................................................. 50 11.3.2 Playing sounds .......................................................................................................................... 51 11.3.3 Playing continuations ............................................................................................................... 51
11.4 GESTURE FEATURES DETAILS .............................................................................................................. 51
12 IMPRO: SETTINGS FOR RUNNING EXPERIMENTS ...................................................................... 53
13 COMPO: COMPOSITOR SOFTWARE ................................................................................................ 54
13.1 LAUNCHING MIROR COMPO ............................................................................................................ 54 13.1.1 Launching MIROR COMPO from a previously recorded IMPRO session ............................... 54 13.1.2 Launching MIROR COMPO without a previously recorded IMPRO session .......................... 54
13.2 BASIC MIROR COMPO FUNCTIONALITIES ........................................................................................ 55 13.2.1 COMPO main interface ............................................................................................................ 55 13.2.2 Steps to compose a melody ....................................................................................................... 56 13.2.3 Injecting new musical material during COMPO session .......................................................... 59 13.2.4 Output types specific to COMPO .............................................................................................. 60
13.3 RECORD/EXPORT/IMPORT MIROR COMPO FUNCTIONALITIES ......................................................... 60 13.3.1 The Trace of user’s actions ....................................................................................................... 60 13.3.2 Recording pieces and action traces .......................................................................................... 60 13.3.3 Visualization and playback of the finished piece ...................................................................... 61 13.3.4 Start a new COMPO session with the same user and the same memory .................................. 62
13.4 ADDITIONAL SETTINGS ........................................................................................................................ 62 13.4.1 COMPO memory editor ............................................................................................................ 62 13.4.2 COMPO advanced parameters ................................................................................................. 63 13.4.3 Transposition in COMPO ......................................................................................................... 63 13.4.4 Keyboard shortcuts and mouse actions .................................................................................... 63 13.4.5 Interface pre-sets / personalization........................................................................................... 63
Sony Computer Science Laboratory Paris Technical Report 2013-3

Release Notes - Version 3.15
User Manual Version 3.15 updates: This version 3.15 of User Manual contains updates according to the features introduced in version 3.15. As this manual is updated progressively, please note that: - Some older illustrations of the interface are intentionally kept when they present a high explanational value about how the melody is constructed by the system (Section 5.2 and Section 6). Indeed, the last version of the interface is simplified and does not present all the detailed information, - Some minor differences may appear between the actual version you use and this document. In principle there are more features in the software than described here, but these may not be yet documented. This will be incrementally updated in future versions.
3Sony Computer Science Laboratory Paris Technical Report 2013-3

4
This page is intentionally left blank.
Sony Computer Science Laboratory Paris Technical Report 2013-3
5
1 Introduction The purpose of this document is to provide a user manual and to clarify the nature of the system outputs.
MIROR IMPRO and COMPO are based on the Continuator software which is one of its essential components. MIROR Software refers to the basic application as a whole. Continuator refers to the component that analyzes input phrases and generates output phrases.
The document contains several parts relative to:
Installation: everything you need to know to install and run the system,
Overview of the GUI,
IMPRO Input Settings: how input melodies are learned by the system,
IMPRO Output Settings: how output is generated,
IMPRO Session management: how musical inputs and outputs are recorded and stored for future use and analysis,
IMPRO Export functions: how to export data,
IMPRO: Procedure for running experiments,
COMPO user manual.
Sony Computer Science Laboratory Paris Technical Report 2013-3
6
2 Installation You have to go through steps 2.1 to 2.3 only once to install and configure the system.
Once it is installed, go directly to step 2.4.
2.1 Uninstall all previous versions of Continuator and MIROR First uninstall all previously installed versions of Continuator and MIROR-IMPRO, if any.
To do so, you can either:
- In the Windows Start Menu, go to Program files, then Continuator or MIROR, then Uninstall (do this for all previously installed versions), or
- Directly in each folder where you installed the Continuator or MIROR, double-click on unins000.exe
Please check that your data directory (see Section 8) is not deleted! If needed, backup this directory before uninstalling.
2.2 Install Java All recent PC usually come with Windows 64-bit and are supposed to run Java 64-bit, usually preinstalled. You should install the latest (Java 7) version of Java SE Standard Edition. This is described below as Case 1.
2.2.1 Case 1: 64-bit Java for 64-bit Windows Simply install the latest (Java 7) version of Java Standard Edition. Do the following:
Go to Java download page at http://www.oracle.com/technetwork/java/javase/downloads/index.html
Look for Java Platform, Standard Edition, and click on Download JRE,
Be sure to select Java SE 7 (starting with version 3.9, the MIROR software uses Java7 and not Java6),
On the next page, choose “Windows x64”,
Do NOT choose "windows x86",
Download the installer,
Run the installer you downloaded,
Reboot.
Troubleshooting If you experience problems with the installation or with some functionalities, you may want to install a different version of Java. There are 2 possible cases.
Case 2: you have a 64 bit OS (e.g., Windows 7) and want to use 32-bit Java 7;
Case 3: you have a 32-bit OS (e.g., Windows XP). Which version of Windows do you have? To know if you have 32-bit or 64-bit Windows, go to Control Panel, then System. Under System Type, you have an indication if your Windows is 32-bit or 64-bit. The 64-bit Windows can run either 32-bit or 64-bit Java, while the 32-bit Windows can run only 32-bit Java.
2.2.2 Case 2: 32-bit Java for 64-bit Windows You may want to install the 32-bit version of Java SE (or JRE) over your 64-bit version which usually comes preinstalled with your Windows. That is, the order of installation is 64-bit version first (again, usually
Sony Computer Science Laboratory Paris Technical Report 2013-3
7
preinstalled), and then the 32-bit version. If they were installed in the other order, then the reinstallation of 32-bit is necessary. Do the following:
Go to Java download page at http://www.oracle.com/technetwork/java/javase/downloads/index.html
Look for Java Platform, Standard Edition, and click on Download JRE,
Be sure to select Java SE 7 (starting with version 3.9, the MIROR software uses Java7 and not Java6),
On the next page, choose “Windows x86 Offline”,
Do NOT choose "windows x64",
Do NOT choose the on-line installation,
Download the installer,
Run the installer you downloaded,
Reboot.
2.2.3 Case 3: Java for 32-bit Windows If your Windows is 32-bit, simply install the latest (Java 7) version of Java Standard Edition. Do the following:
Go to Java download page at http://www.oracle.com/technetwork/java/javase/downloads/index.html
Look for Java Platform, Standard Edition, and click on Download JRE,
Be sure to select Java SE 7 (starting with version 3.9, the MIROR software uses Java7 and not Java6),
On the next page, choose “Windows x86 Offline”,
Do NOT choose "windows x64",
Do NOT choose the on-line installation,
Download the installer,
Run the installer you downloaded,
Reboot.
2.3 Install and setup the system
2.3.1 Run the installer When running the installer, you are prompted to indicate the path to an installation folder.
Make sure that the installation folder is accessible with your user permissions. For this end, you may want to change this path to a local folder, for example: C:\users\your_name\documents\MIROR_4_0\ or D:\Public\MIROR_4_0\.
Sony Computer Science Laboratory Paris Technical Report 2013-3
8
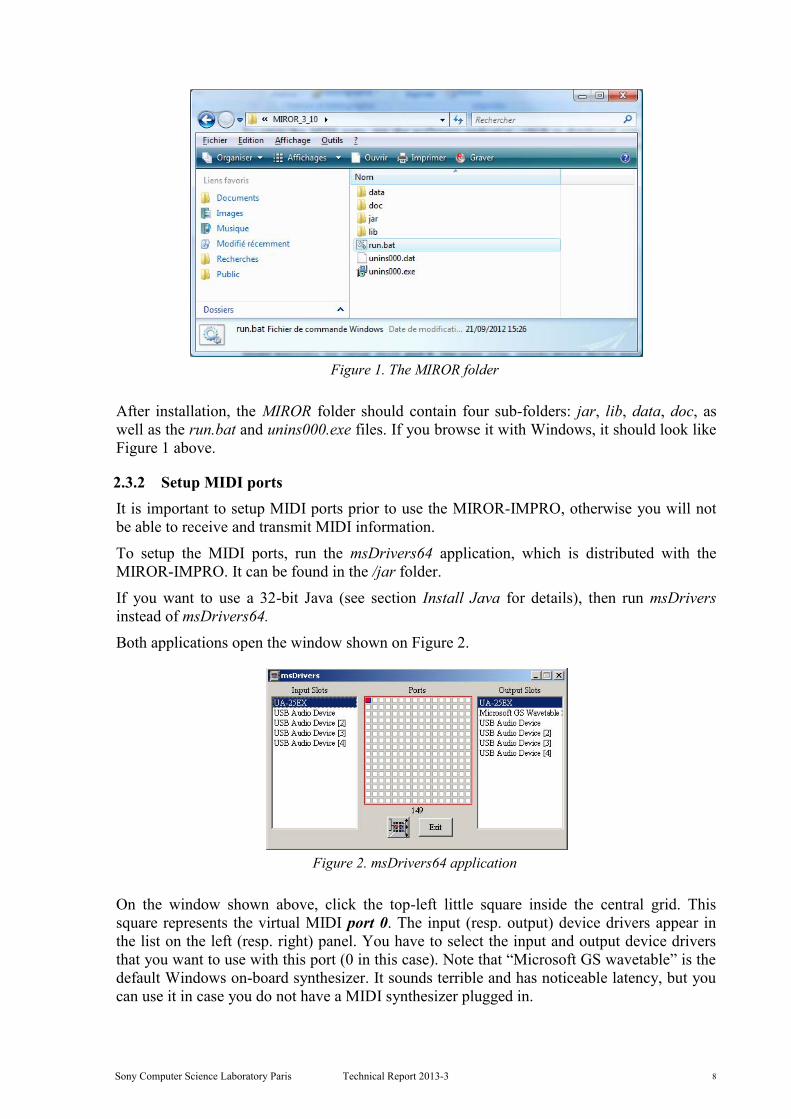
Figure 1. The MIROR folder
After installation, the MIROR folder should contain four sub-folders: jar, lib, data, doc, as well as the run.bat and unins000.exe files. If you browse it with Windows, it should look like Figure 1 above.
2.3.2 Setup MIDI ports It is important to setup MIDI ports prior to use the MIROR-IMPRO, otherwise you will not be able to receive and transmit MIDI information.
To setup the MIDI ports, run the msDrivers64 application, which is distributed with the MIROR-IMPRO. It can be found in the /jar folder.
If you want to use a 32-bit Java (see section Install Java for details), then run msDrivers instead of msDrivers64. Both applications open the window shown on Figure 2.
Figure 2. msDrivers64 application
On the window shown above, click the top-left little square inside the central grid. This square represents the virtual MIDI port 0. The input (resp. output) device drivers appear in the list on the left (resp. right) panel. You have to select the input and output device drivers that you want to use with this port (0 in this case). Note that “Microsoft GS wavetable” is the default Windows on-board synthesizer. It sounds terrible and has noticeable latency, but you can use it in case you do not have a MIDI synthesizer plugged in.
Sony Computer Science Laboratory Paris Technical Report 2013-3
9
Once you selected your input and output ports, press Exit. The MIDI port setup is saved and will be automatically reloaded when you launch MIROR-IMPRO. You have to run this procedure again only when you add new MIDI drivers to your computer, or to change the default configuration. For more details on how to setup MIDI ports, refer to the documentation file MSPortSetup.html in the continuator/doc folder written by Grame.
Nota Bene: If you have several input / output drivers on your computer, it is preferable to set up msDrivers64 so that the drivers you use are assigned to the port 0. Known issues: Do not drag the msDrivers64 dialog window out of the screen or too close to the screen's border, as it may be difficult to recover it later.
2.3.3 Score font installation You need to install a specific font to be used with the score output. This is a standard MS Windows procedure.
Go to your MIROR folder, e.g., C:\MIROR_4_0\,
Double-click on the file guido2.ttf,
A window will open, with the buttons Print and Install,
Click on Install,
Close this window after the installation is finished.
2.4 Run the MIROR-IMPRO and COMPO To run the software, click on run64.bat. If you need to run MIROR on a 32-bit Java (see Troubleshooting in the section Install Java for details), click on run32.bat.
2.5 Install EyesWeb XMI If you wish to run MIROR-GESTURE you will need to install EyesWeb, by performing the following steps:
1. To test the installation, install a webcam with 640x480 or higher resolution. To run the application, install the MS Kinect on your computer,
2. Download and install the latest version of EyesWeb XMI for MIROR at
http://www.infomus.org/eyesweb_ita.php , 4. Download the patch at http://mirorwiki.eu, section Download Software. Decompress it with WinRAR or 7-zip.
The connection with EyesWeb is described in Section 11.
Sony Computer Science Laboratory Paris Technical Report 2013-3
10
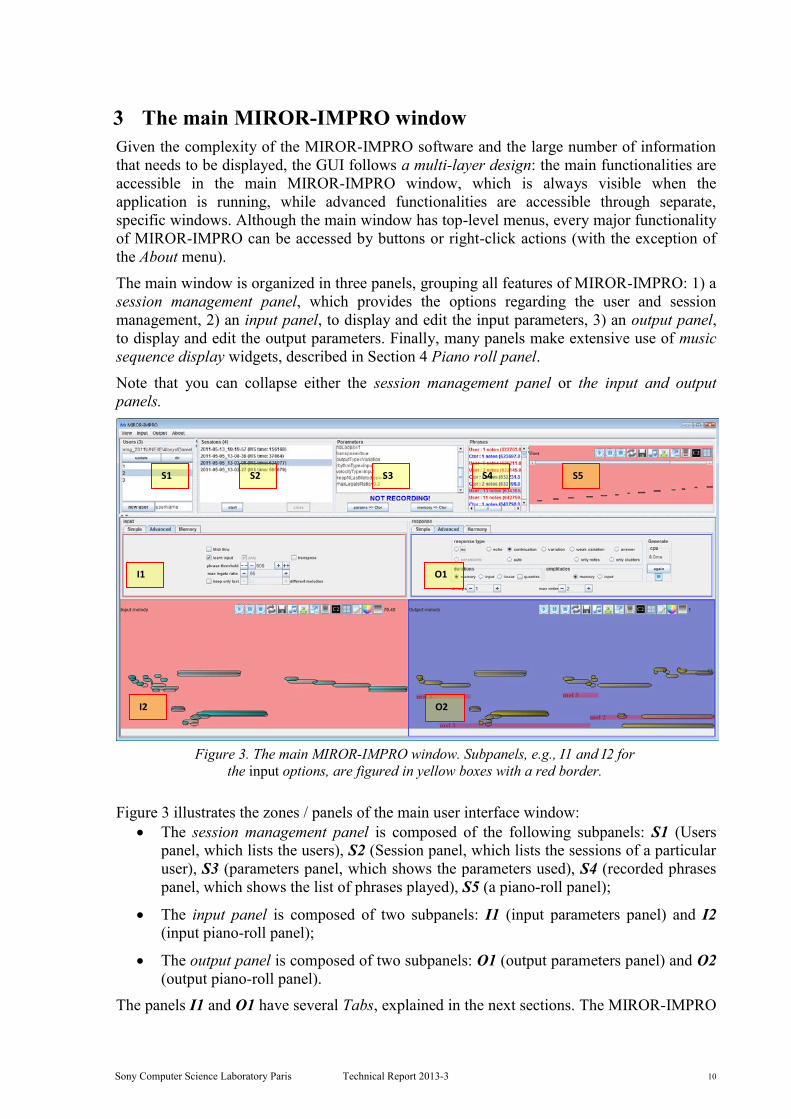
3 The main MIROR-IMPRO window Given the complexity of the MIROR-IMPRO software and the large number of information that needs to be displayed, the GUI follows a multi-layer design: the main functionalities are accessible in the main MIROR-IMPRO window, which is always visible when the application is running, while advanced functionalities are accessible through separate, specific windows. Although the main window has top-level menus, every major functionality of MIROR-IMPRO can be accessed by buttons or right-click actions (with the exception of the About menu).
The main window is organized in three panels, grouping all features of MIROR-IMPRO: 1) a session management panel, which provides the options regarding the user and session management, 2) an input panel, to display and edit the input parameters, 3) an output panel, to display and edit the output parameters. Finally, many panels make extensive use of music sequence display widgets, described in Section 4 Piano roll panel. Note that you can collapse either the session management panel or the input and output panels.
Figure 3. The main MIROR-IMPRO window. Subpanels, e.g., I1 and I2 for
the input options, are figured in yellow boxes with a red border.
Figure 3 illustrates the zones / panels of the main user interface window: The session management panel is composed of the following subpanels: S1 (Users
panel, which lists the users), S2 (Session panel, which lists the sessions of a particular user), S3 (parameters panel, which shows the parameters used), S4 (recorded phrases panel, which shows the list of phrases played), S5 (a piano-roll panel);
The input panel is composed of two subpanels: I1 (input parameters panel) and I2 (input piano-roll panel);
The output panel is composed of two subpanels: O1 (output parameters panel) and O2 (output piano-roll panel).
The panels I1 and O1 have several Tabs, explained in the next sections. The MIROR-IMPRO
S1
I1 O1
S2 S3 S4 S5
I2 O2
S1
I1 O1
S2 S3 S4 S5
I2 O2
Sony Computer Science Laboratory Paris Technical Report 2013-3
11
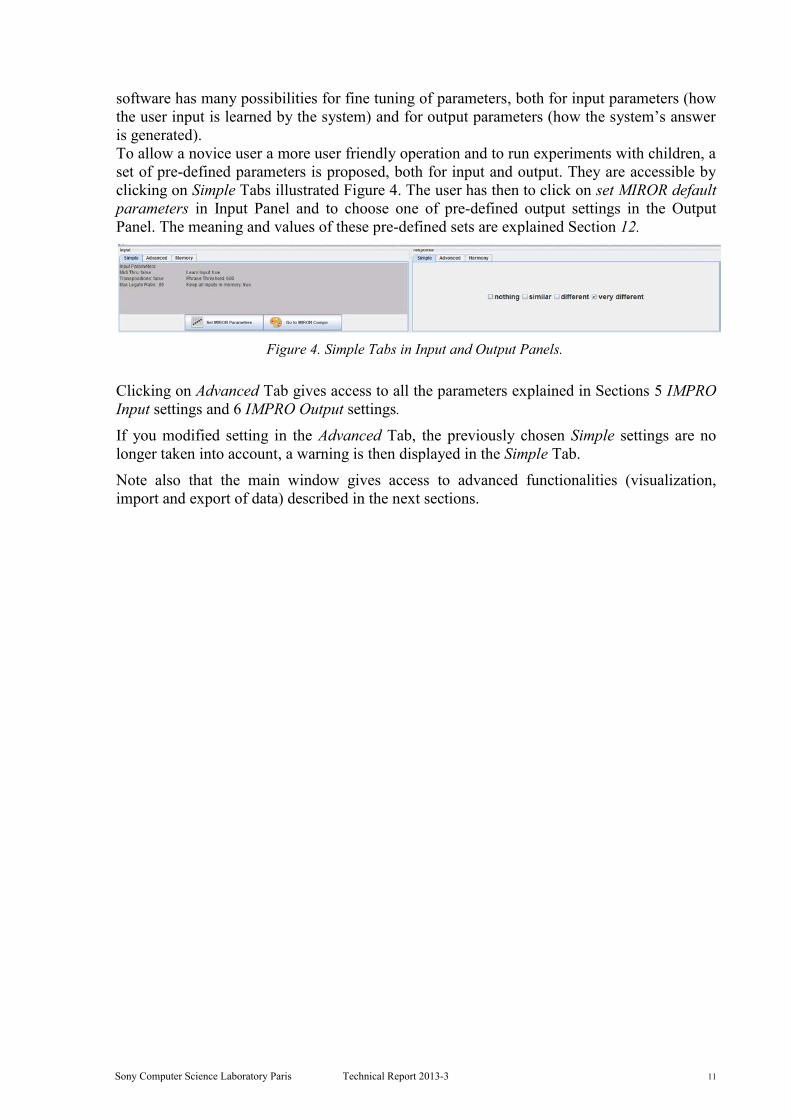
software has many possibilities for fine tuning of parameters, both for input parameters (how the user input is learned by the system) and for output parameters (how the system’s answer is generated). To allow a novice user a more user friendly operation and to run experiments with children, a set of pre-defined parameters is proposed, both for input and output. They are accessible by clicking on Simple Tabs illustrated Figure 4. The user has then to click on set MIROR default parameters in Input Panel and to choose one of pre-defined output settings in the Output Panel. The meaning and values of these pre-defined sets are explained Section 12.
Figure 4. Simple Tabs in Input and Output Panels.
Clicking on Advanced Tab gives access to all the parameters explained in Sections 5 IMPRO Input settings and 6 IMPRO Output settings. If you modified setting in the Advanced Tab, the previously chosen Simple settings are no longer taken into account, a warning is then displayed in the Simple Tab.
Note also that the main window gives access to advanced functionalities (visualization, import and export of data) described in the next sections.
Sony Computer Science Laboratory Paris Technical Report 2013-3
12
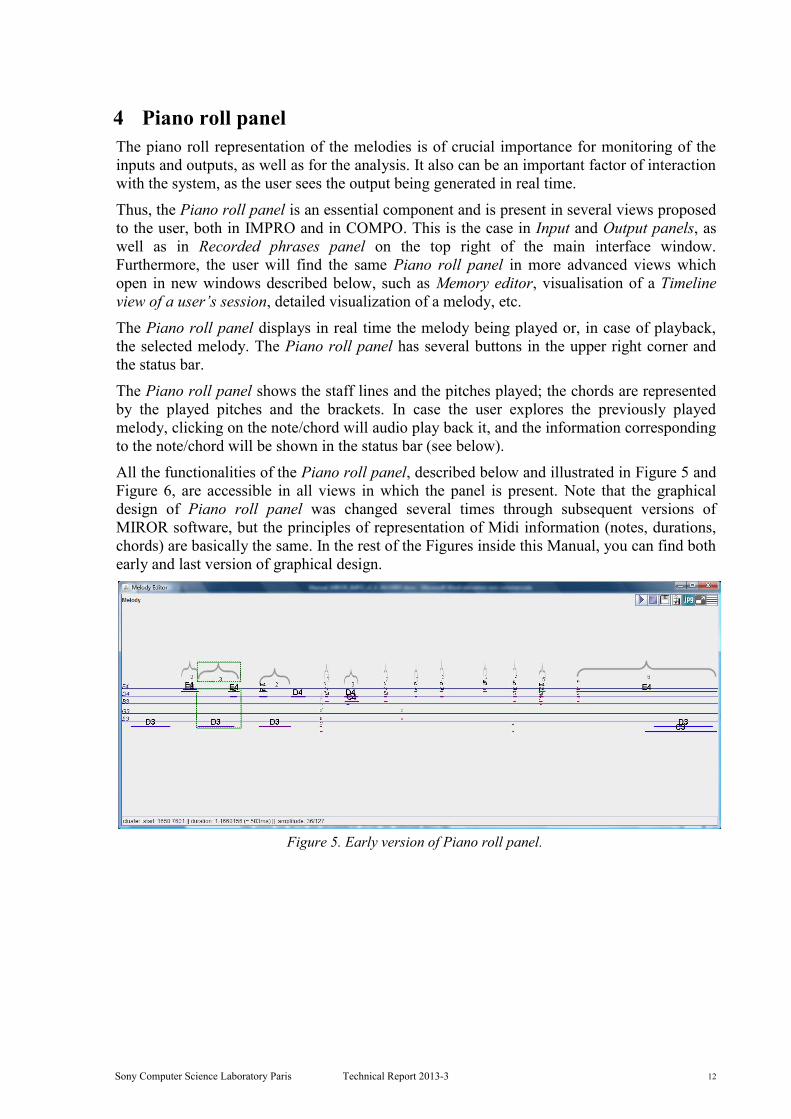
4 Piano roll panel The piano roll representation of the melodies is of crucial importance for monitoring of the inputs and outputs, as well as for the analysis. It also can be an important factor of interaction with the system, as the user sees the output being generated in real time.
Thus, the Piano roll panel is an essential component and is present in several views proposed to the user, both in IMPRO and in COMPO. This is the case in Input and Output panels, as well as in Recorded phrases panel on the top right of the main interface window. Furthermore, the user will find the same Piano roll panel in more advanced views which open in new windows described below, such as Memory editor, visualisation of a Timeline view of a user’s session, detailed visualization of a melody, etc.
The Piano roll panel displays in real time the melody being played or, in case of playback, the selected melody. The Piano roll panel has several buttons in the upper right corner and the status bar.
The Piano roll panel shows the staff lines and the pitches played; the chords are represented by the played pitches and the brackets. In case the user explores the previously played melody, clicking on the note/chord will audio play back it, and the information corresponding to the note/chord will be shown in the status bar (see below).
All the functionalities of the Piano roll panel, described below and illustrated in Figure 5 and Figure 6, are accessible in all views in which the panel is present. Note that the graphical design of Piano roll panel was changed several times through subsequent versions of MIROR software, but the principles of representation of Midi information (notes, durations, chords) are basically the same. In the rest of the Figures inside this Manual, you can find both early and last version of graphical design.
Figure 5. Early version of Piano roll panel.
Sony Computer Science Laboratory Paris Technical Report 2013-3
13
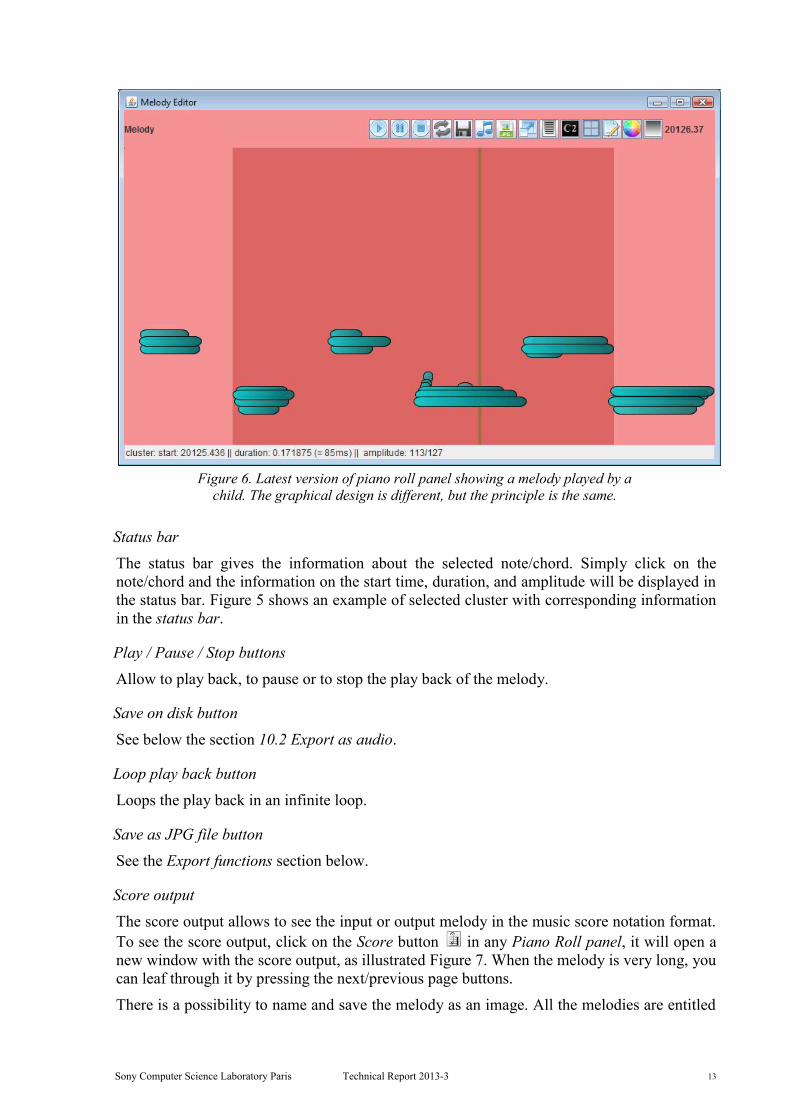
Figure 6. Latest version of piano roll panel showing a melody played by a
child. The graphical design is different, but the principle is the same.
Status bar The status bar gives the information about the selected note/chord. Simply click on the note/chord and the information on the start time, duration, and amplitude will be displayed in the status bar. Figure 5 shows an example of selected cluster with corresponding information in the status bar.
Play / Pause / Stop buttons Allow to play back, to pause or to stop the play back of the melody.
Save on disk button See below the section 10.2 Export as audio.
Loop play back button Loops the play back in an infinite loop.
Save as JPG file button See the Export functions section below.
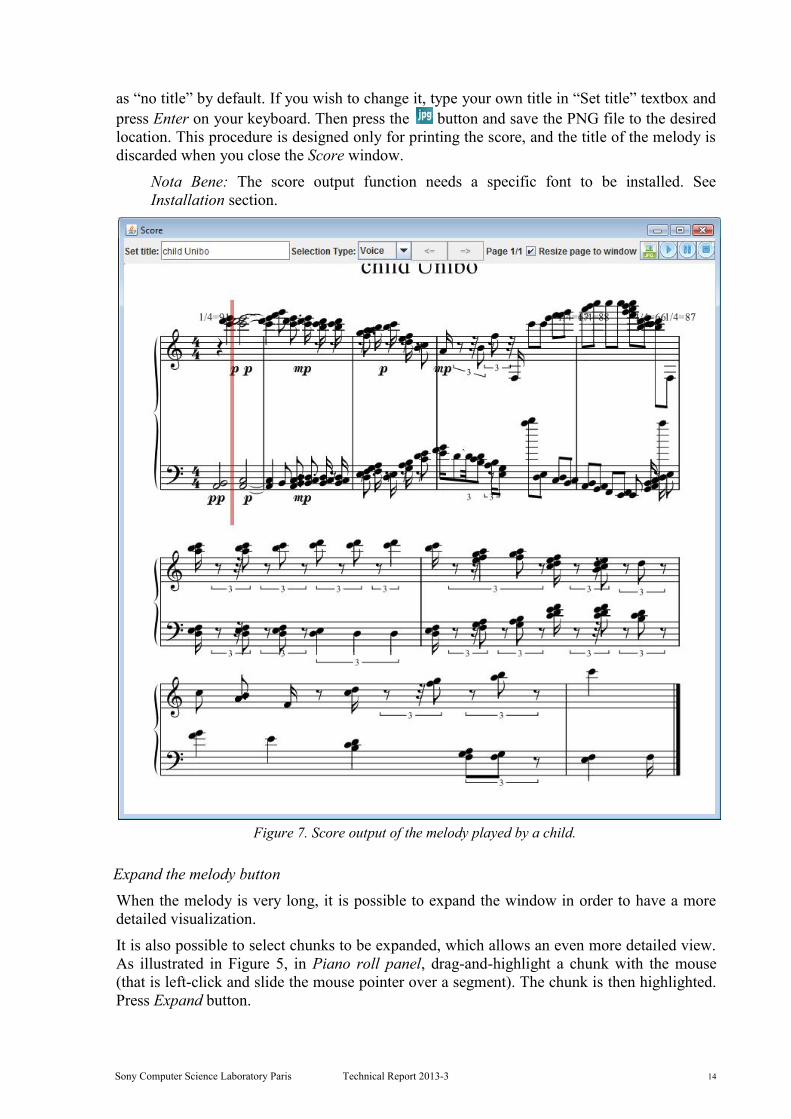
Score output The score output allows to see the input or output melody in the music score notation format. To see the score output, click on the Score button in any Piano Roll panel, it will open a new window with the score output, as illustrated Figure 7. When the melody is very long, you can leaf through it by pressing the next/previous page buttons.
There is a possibility to name and save the melody as an image. All the melodies are entitled
Sony Computer Science Laboratory Paris Technical Report 2013-3
14
as “no title” by default. If you wish to change it, type your own title in “Set title” textbox and press Enter on your keyboard. Then press the button and save the PNG file to the desired location. This procedure is designed only for printing the score, and the title of the melody is discarded when you close the Score window.
Nota Bene: The score output function needs a specific font to be installed. See Installation section.
Figure 7. Score output of the melody played by a child.
Expand the melody button When the melody is very long, it is possible to expand the window in order to have a more detailed visualization.
It is also possible to select chunks to be expanded, which allows an even more detailed view. As illustrated in Figure 5, in Piano roll panel, drag-and-highlight a chunk with the mouse (that is left-click and slide the mouse pointer over a segment). The chunk is then highlighted. Press Expand button.
Sony Computer Science Laboratory Paris Technical Report 2013-3

15
Staff lines button It is possible to hide/ show the staff lines by using this button in Piano Roll panel.
Pitch names button It is possible to hide/ show pitch names.
Boarders button It is possible to hide/ show pitch boarders.
Edit melody button Opens an advanced melody edition palette. Attention, the following actions affect the memory and the Markovian aspect may no longer hold; in addition the backtrack is not possible. This experimental feature is to use in COMPO only, once the piece is finished and you want to change one note for example.
You can transpose the whole melody, or a part of it. To transpose a single note or a selection of notes, drag-and-highlight a note or a segment with your mouse (that is left-click and slide your mouse over a segment), press Edit melody button and apply the transposition,
Set duration: do not use it at all for the moment, Set start beat: do not use it at all for the moment, Reverse: this will reverse the whole melody, or a part of it.
Colored background Switches the colored background on / off.
Shade notes Switches the notes’ shadings on / off.
Current beat counter Displays the current beat (starts at the melody current beat and not at zero).
Vertical bar indicating the current position in the melody In all the piano roll views, there is a vertical bar indicating the current position in the melody when the melody (or the entire session, see section Visualisation tools) is played back.
Sony Computer Science Laboratory Paris Technical Report 2013-3

16
5 IMPRO Input settings
For testing purposes, for instance to understand the role of the various parameters, you can play with the system and ignore the top panels, i.e. not select a user and a session. The system works, you can modify the parameters “on the fly” but nothing is recorded. For recording and managing sessions, see section 8.
The input panel contains parameters used to configure the way the input melodies are learned to constitute a training set. As Figure 8 illustrates, it is composed of input parameters panel and input piano-roll panel. This section describes all these settings.
Figure 8. MIROR-IMPRO Input panel.
5.1 Phrase threshold This parameter determines when a phrase played by the user is considered as finished. The default value is 400ms. When the system receives no input during 400ms, it considers the phrase as finished and triggers a continuation. This principle is illustrated in the Figure 9.
Sony Computer Science Laboratory Paris Technical Report 2013-3

17
Figure 9. The principle of Phrase threshold parameter.
As shown in Figure 10 a “false start” effect can occur in some cases: this happens when the system considers that the phrase is finished and triggers the output, but the user actually continues the phrase after the last note, and this interval exceeds the threshold by a small amount.
Figure 10. A “false start” behavior induced by a too small Phrase threshold.
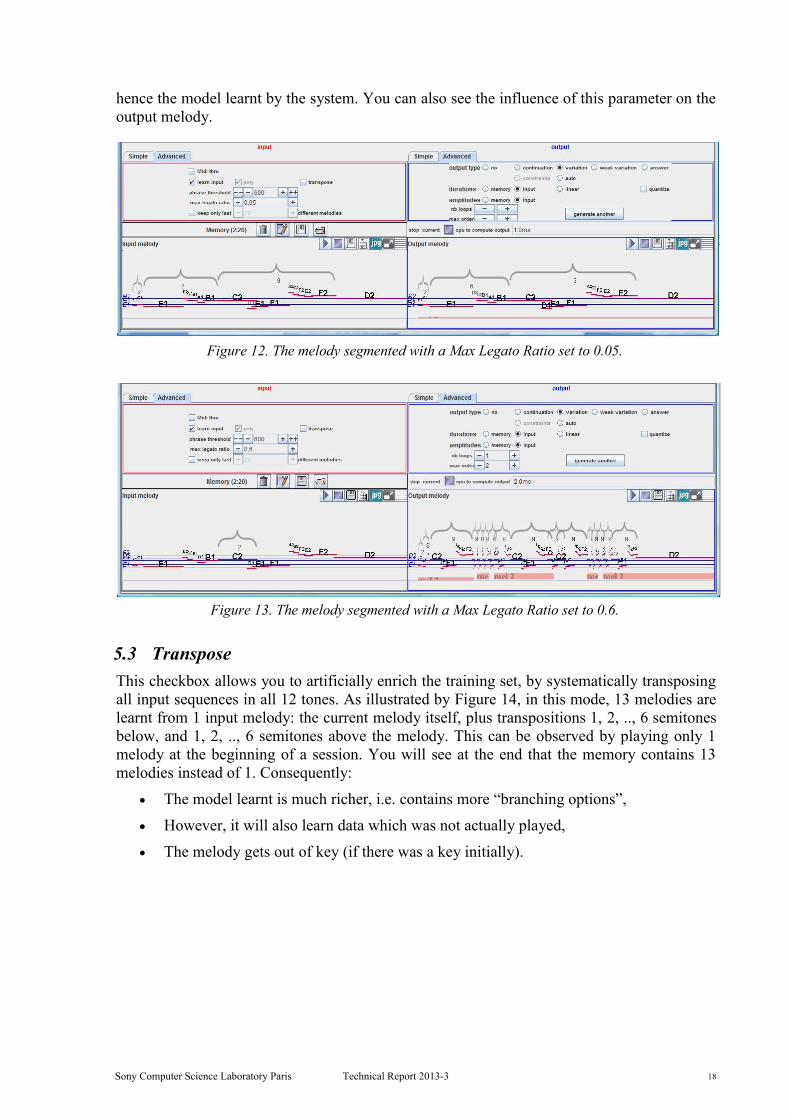
5.2 Max Legato Ratio This parameter determines the way the system segments the phrase into distinct events. The segmentation problem is undecidable in general and in many cases can be ambiguous. However, a pragmatic solution is to use the notion of “Legato Ratio” to decide when to cut overlapping notes in an input phrase.
As you can see on Figure 11, the Legato Ratio is defined as the degree of overlapping between 2 consecutive notes, and it varies from 0 to 1. Two completely overlapping notes will have a Legato Ratio of 1. Two separated notes have a ratio of 0.
Figure 11. The principle of Legato Ratio.
The parameter Max Legato Ratio determines the threshold for the segmentation: when the Legato Ratio in the input phrase is less than this threshold, the two notes are cut into distinct events. Otherwise, they are considered as part of the same chunk (chord or cluster).
The examples given in Figure 12 and Figure 13 are based on the same input melody. In this visualization, the brackets represent chords or clusters. The example shows that the larger the value of Max Legato Ratio, the more “divided” and fine-grained is the input sequence, and
Sony Computer Science Laboratory Paris Technical Report 2013-3
18
hence the model learnt by the system. You can also see the influence of this parameter on the output melody.
Figure 12. The melody segmented with a Max Legato Ratio set to 0.05.
Figure 13. The melody segmented with a Max Legato Ratio set to 0.6.
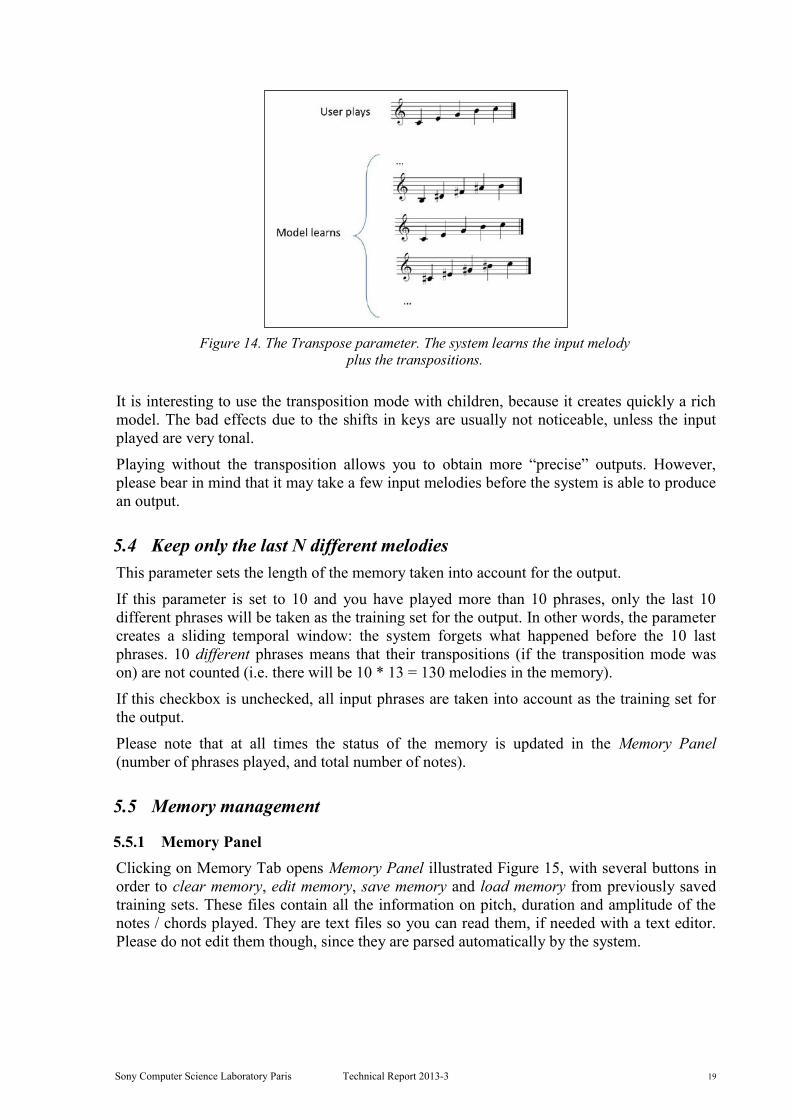
5.3 Transpose This checkbox allows you to artificially enrich the training set, by systematically transposing all input sequences in all 12 tones. As illustrated by Figure 14, in this mode, 13 melodies are learnt from 1 input melody: the current melody itself, plus transpositions 1, 2, .., 6 semitones below, and 1, 2, .., 6 semitones above the melody. This can be observed by playing only 1 melody at the beginning of a session. You will see at the end that the memory contains 13 melodies instead of 1. Consequently:
The model learnt is much richer, i.e. contains more “branching options”,
However, it will also learn data which was not actually played,
The melody gets out of key (if there was a key initially).
Sony Computer Science Laboratory Paris Technical Report 2013-3
19
Figure 14. The Transpose parameter. The system learns the input melody
plus the transpositions.
It is interesting to use the transposition mode with children, because it creates quickly a rich model. The bad effects due to the shifts in keys are usually not noticeable, unless the input played are very tonal.
Playing without the transposition allows you to obtain more “precise” outputs. However, please bear in mind that it may take a few input melodies before the system is able to produce an output.
5.4 Keep only the last N different melodies This parameter sets the length of the memory taken into account for the output.
If this parameter is set to 10 and you have played more than 10 phrases, only the last 10 different phrases will be taken as the training set for the output. In other words, the parameter creates a sliding temporal window: the system forgets what happened before the 10 last phrases. 10 different phrases means that their transpositions (if the transposition mode was on) are not counted (i.e. there will be 10 * 13 = 130 melodies in the memory).
If this checkbox is unchecked, all input phrases are taken into account as the training set for the output.
Please note that at all times the status of the memory is updated in the Memory Panel (number of phrases played, and total number of notes).
5.5 Memory management
5.5.1 Memory Panel Clicking on Memory Tab opens Memory Panel illustrated Figure 15, with several buttons in order to clear memory, edit memory, save memory and load memory from previously saved training sets. These files contain all the information on pitch, duration and amplitude of the notes / chords played. They are text files so you can read them, if needed with a text editor. Please do not edit them though, since they are parsed automatically by the system.
Sony Computer Science Laboratory Paris Technical Report 2013-3
20
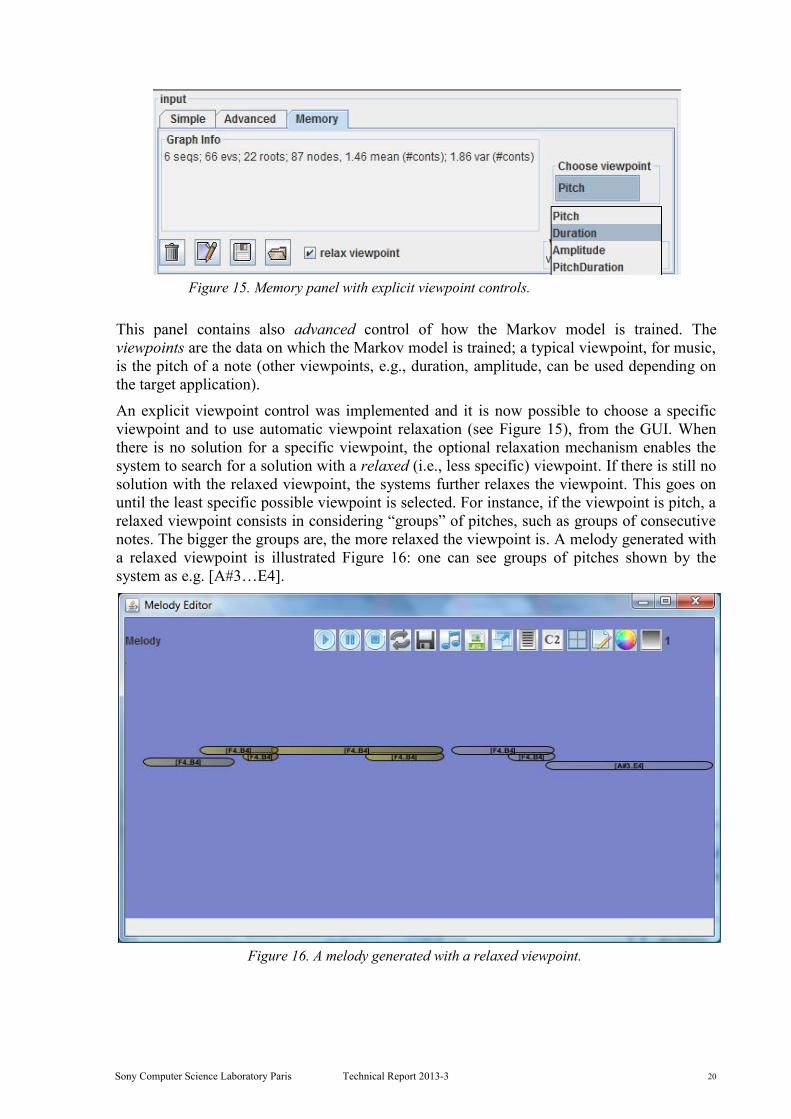
Figure 15. Memory panel with explicit viewpoint controls.
This panel contains also advanced control of how the Markov model is trained. The viewpoints are the data on which the Markov model is trained; a typical viewpoint, for music, is the pitch of a note (other viewpoints, e.g., duration, amplitude, can be used depending on the target application).
An explicit viewpoint control was implemented and it is now possible to choose a specific viewpoint and to use automatic viewpoint relaxation (see Figure 15), from the GUI. When there is no solution for a specific viewpoint, the optional relaxation mechanism enables the system to search for a solution with a relaxed (i.e., less specific) viewpoint. If there is still no solution with the relaxed viewpoint, the systems further relaxes the viewpoint. This goes on until the least specific possible viewpoint is selected. For instance, if the viewpoint is pitch, a relaxed viewpoint consists in considering “groups” of pitches, such as groups of consecutive notes. The bigger the groups are, the more relaxed the viewpoint is. A melody generated with a relaxed viewpoint is illustrated Figure 16: one can see groups of pitches shown by the system as e.g. [A#3…E4].
Figure 16. A melody generated with a relaxed viewpoint.
Sony Computer Science Laboratory Paris Technical Report 2013-3

21
5.5.2 Memory Editor The edit button will launch the Memory Editor illustrated in Figure 17. The Memory Editor has 3 panels. It can be used to visualize the content of the musical memory as well as to edit it, to some extent.
5.5.2.1 Visualization The left panel shows all the phrases contained in the memory. You can click on a phrase which is then highlighted. Then, the central panel shows the details of the highlighted phrase. The right (Melody) panel shows the phrase in piano-roll form.
You can click on the note/chord in the central panel, this note is then highlighted in the Melody Panel, and vice versa (see C6 in Figure 17). You can also see the following information about the selected note / chord / note inside the chord: the pitch, the start time, the duration (in ms) and the amplitude.
It is also possible to select an arbitrary segment of the melody. Drag-and-highlight a segment with your mouse (that is left-click and slide your mouse over a segment), it is then highlighted (see Figure 17). If you click on the Play button, the system will play only the selected segment of the phrase. Note that this functionality is available also in Graph Browser, and in the main MIROR-IMPRO interface, both in Input and Output panels.
When a melody is played, you also see a vertical bar indicating the current position in the melody.
Figure 17. Memory Editor.
5.5.2.2 Edition (experimental feature, do not use) N.B. The following features are experimental ones and are still under development. Please use with caution, there is no Undo function yet (will be implemented later if needed). However, your actions will not have effect on the recorded sessions and their associated stored files (see below, Session Management). In principle, one should not edit the melodies played by the user since this will forbid the a posteriori analysis of their “natural” behavior. These edition functions are here only for
Sony Computer Science Laboratory Paris Technical Report 2013-3
22
specific cases when 1) more controlled input have to be entered in the system or 2) some editing is needed e.g., for producing displays for documents such as papers.
In the central panel, right-click on the note. You can remove the note, set its pitch, set its start time, set its duration. In the right (Melody) panel, click on the note. The note is highlighted. Use Up and Down arrows on your keyboard to change its pitch. Use Shift+Up and Shift+Down on your keyboard to change its amplitude.
When you edit melodies, the memory of the Continuator is reparsed automatically.
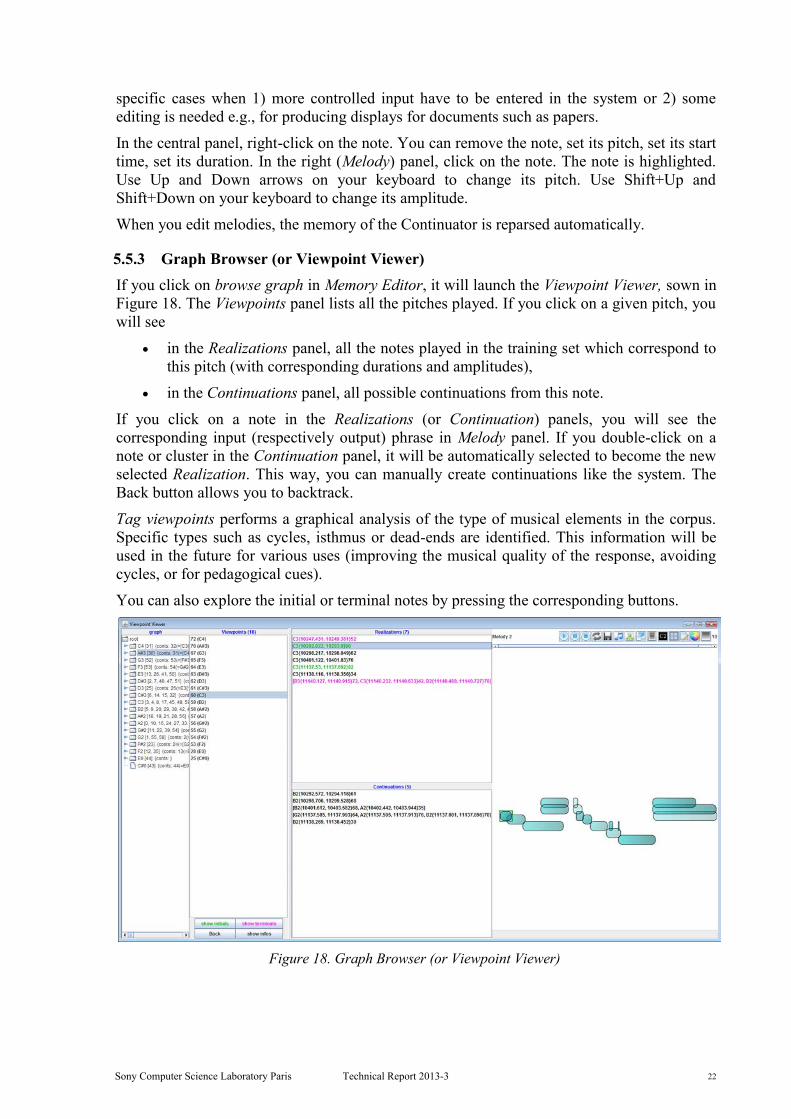
5.5.3 Graph Browser (or Viewpoint Viewer) If you click on browse graph in Memory Editor, it will launch the Viewpoint Viewer, sown in Figure 18. The Viewpoints panel lists all the pitches played. If you click on a given pitch, you will see
in the Realizations panel, all the notes played in the training set which correspond to this pitch (with corresponding durations and amplitudes),
in the Continuations panel, all possible continuations from this note.
If you click on a note in the Realizations (or Continuation) panels, you will see the corresponding input (respectively output) phrase in Melody panel. If you double-click on a note or cluster in the Continuation panel, it will be automatically selected to become the new selected Realization. This way, you can manually create continuations like the system. The Back button allows you to backtrack.
Tag viewpoints performs a graphical analysis of the type of musical elements in the corpus. Specific types such as cycles, isthmus or dead-ends are identified. This information will be used in the future for various uses (improving the musical quality of the response, avoiding cycles, or for pedagogical cues).
You can also explore the initial or terminal notes by pressing the corresponding buttons.
Figure 18. Graph Browser (or Viewpoint Viewer)
Sony Computer Science Laboratory Paris Technical Report 2013-3
23
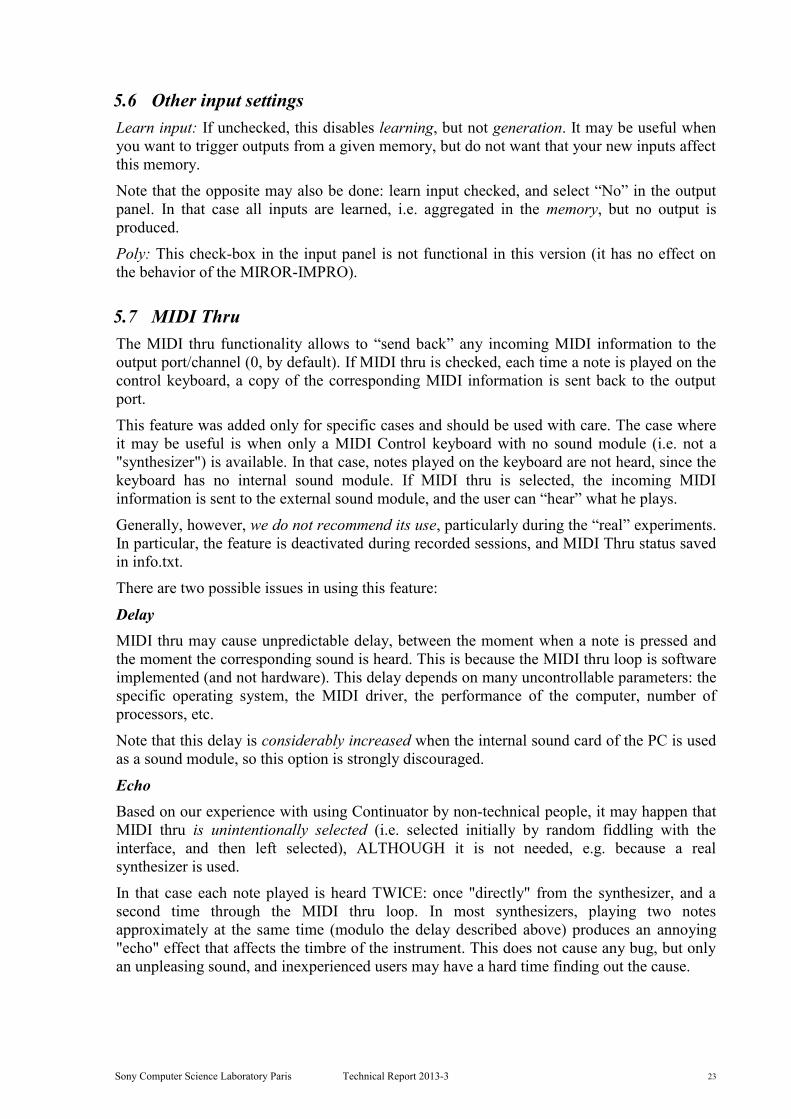
5.6 Other input settings Learn input: If unchecked, this disables learning, but not generation. It may be useful when you want to trigger outputs from a given memory, but do not want that your new inputs affect this memory.
Note that the opposite may also be done: learn input checked, and select “No” in the output panel. In that case all inputs are learned, i.e. aggregated in the memory, but no output is produced.
Poly: This check-box in the input panel is not functional in this version (it has no effect on the behavior of the MIROR-IMPRO).
5.7 MIDI Thru The MIDI thru functionality allows to “send back” any incoming MIDI information to the output port/channel (0, by default). If MIDI thru is checked, each time a note is played on the control keyboard, a copy of the corresponding MIDI information is sent back to the output port.
This feature was added only for specific cases and should be used with care. The case where it may be useful is when only a MIDI Control keyboard with no sound module (i.e. not a "synthesizer") is available. In that case, notes played on the keyboard are not heard, since the keyboard has no internal sound module. If MIDI thru is selected, the incoming MIDI information is sent to the external sound module, and the user can “hear” what he plays.
Generally, however, we do not recommend its use, particularly during the “real” experiments. In particular, the feature is deactivated during recorded sessions, and MIDI Thru status saved in info.txt.
There are two possible issues in using this feature:
Delay MIDI thru may cause unpredictable delay, between the moment when a note is pressed and the moment the corresponding sound is heard. This is because the MIDI thru loop is software implemented (and not hardware). This delay depends on many uncontrollable parameters: the specific operating system, the MIDI driver, the performance of the computer, number of processors, etc.
Note that this delay is considerably increased when the internal sound card of the PC is used as a sound module, so this option is strongly discouraged.
Echo Based on our experience with using Continuator by non-technical people, it may happen that MIDI thru is unintentionally selected (i.e. selected initially by random fiddling with the interface, and then left selected), ALTHOUGH it is not needed, e.g. because a real synthesizer is used.
In that case each note played is heard TWICE: once "directly" from the synthesizer, and a second time through the MIDI thru loop. In most synthesizers, playing two notes approximately at the same time (modulo the delay described above) produces an annoying "echo" effect that affects the timbre of the instrument. This does not cause any bug, but only an unpleasing sound, and inexperienced users may have a hard time finding out the cause.
Sony Computer Science Laboratory Paris Technical Report 2013-3
24
6 IMPRO Output settings
For testing purposes, for instance to understand the role of the various parameters, you can play with the system and ignore the top panels, i.e. not select a user and a session. The system works, you can modify the parameters “on the fly” but nothing is recorded. For recording and managing sessions, see section 8.
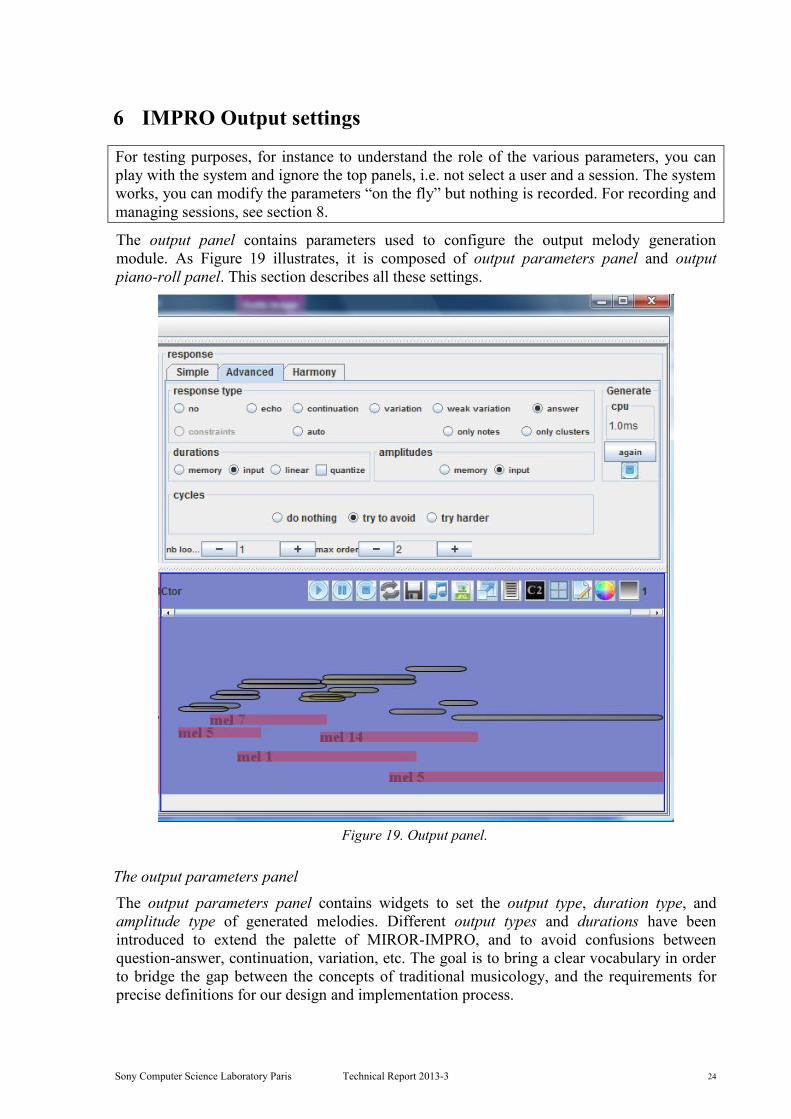
The output panel contains parameters used to configure the output melody generation module. As Figure 19 illustrates, it is composed of output parameters panel and output piano-roll panel. This section describes all these settings.
Figure 19. Output panel.
The output parameters panel The output parameters panel contains widgets to set the output type, duration type, and amplitude type of generated melodies. Different output types and durations have been introduced to extend the palette of MIROR-IMPRO, and to avoid confusions between question-answer, continuation, variation, etc. The goal is to bring a clear vocabulary in order to bridge the gap between the concepts of traditional musicology, and the requirements for precise definitions for our design and implementation process.
Sony Computer Science Laboratory Paris Technical Report 2013-3

25
There are several levels of settings, which make possible many different combinations:
type of the output: continuation / variation / weak variation / answer / auto,
durations of notes in the output: memory / input / linear,
amplitudes of notes in the output: memory / input.
Independently of the chosen output type, you can choose from 3 different ways to specify durations in the output, and 2 ways to specify amplitudes.
The next section explains the nature of the various output types, with duration and amplitude set to memory. Then, we explain the 3 different output durations, with the output type set to Continuation, and finally, the output amplitudes.
NB: To comply with the requirements of scientific evaluation, the previous implementations of the generation algorithm followed strictly the rule of Markovian generation: all the generated phrases are Markovian, given the training set at the moment of the generation. Consequently it happened sometimes that there was no possible output for a given training set and a given input sequence. In that case the system displayed a No continuation! message. In this release, a new algorithm based on a new viewpoint mechanism was implemented, so that there is a solution in 99% of cases.
The output piano-roll panel The output piano-roll panel displays clues to help users understand how the output melody was constructed from the input melodies, as illustrated in Figure 19. The panel segments the output melody into chunks that correspond to fragments of the input melodies. Each chunk (shown in pink) is labeled with a number that corresponds to the melody they come from, i.e., the label is the index of the melody in the memory. If the user clicks on a chunk, a memory editor opens and highlights the clicked chunk in the melody it comes from.
6.1 Output types This section introduces the output types. The examples are based on training set of 2 input phrases (shown Figure 20 and Figure 21); in all the examples, duration and amplitude are set to memory.
Figure 20. Memory Editor showing the 1st input phrase of the training set.
Sony Computer Science Laboratory Paris Technical Report 2013-3

26
Figure 21. Memory Editor showing the 2nd input phrase of the training set.
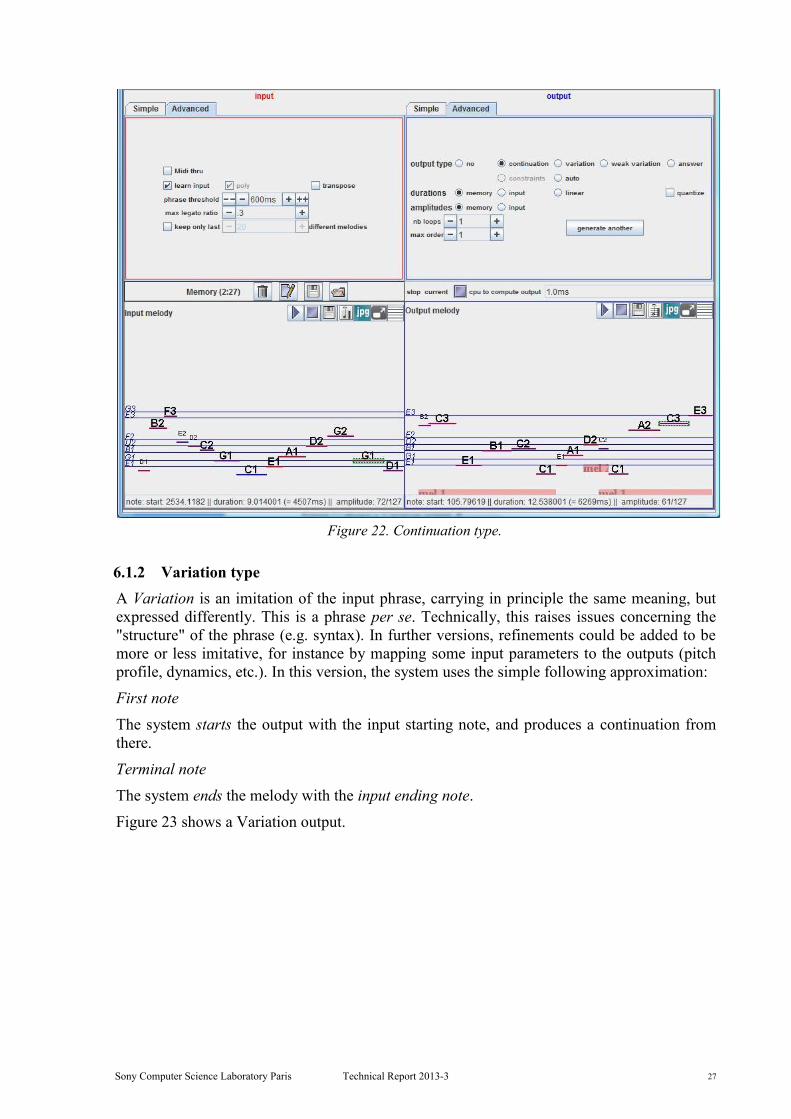
6.1.1 Continuation type This is the original idea of the Continuator: the input phrase is continued, as if produced by the same person. The continuation is not a phrase per se, its aim is to "finish" the input phrase. The continuation is based on the Markov probability of transition between the notes in the training set. Characteristics of this type are described below.
First note The system will continue from the last note of the input. Let us consider the example of the output shown in Figure 22. There is a transition D1-B2 in the training set Figure 20. If the terminal note of the input is the D1, the output will probably continue on B2, which is the case in this example of the output.
Terminal note The terminal note of the output will be the terminal note of one of the sequences in the training set. In the example below, in the output, the terminal E3 comes from sequence 1 (see Figure 21).
Intermediary notes (common to all output types) All intermediary notes obey the principles of Markovian generation (as described above for the first note), with an additional constraint not to be starting or ending notes (i.e. notes that began or ended any of the input melodies in the training set).
Note that these constraints substantially improve the musical quality of the MIROR-IMPRO. This can be perceived notably by those who experienced the earlier version. Most melodies now seem to carry a musical intention, and the system generates much less “strange” melodies than in the past.
Visualisation of the Intermediary notes (common to all output types) The output melody panel Figure 22 shows how the output is constructed. You can see the chunks in the output (in pink, with the number corresponding to the melody they come from). If you click on a chunk, Memory Editor will open and highlight the chunk in question in the melody it comes from. You can then press on play button, it will play only the selected chunk.
Sony Computer Science Laboratory Paris Technical Report 2013-3
27
Figure 22. Continuation type.
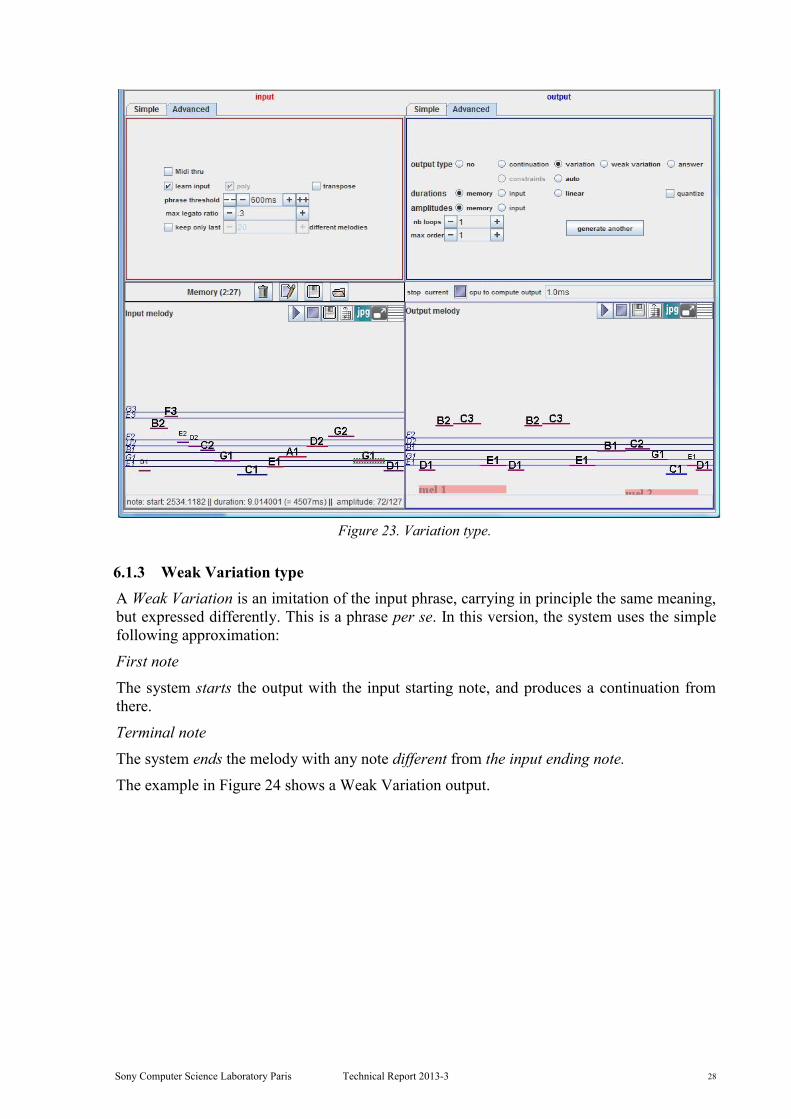
6.1.2 Variation type A Variation is an imitation of the input phrase, carrying in principle the same meaning, but expressed differently. This is a phrase per se. Technically, this raises issues concerning the "structure" of the phrase (e.g. syntax). In further versions, refinements could be added to be more or less imitative, for instance by mapping some input parameters to the outputs (pitch profile, dynamics, etc.). In this version, the system uses the simple following approximation:
First note The system starts the output with the input starting note, and produces a continuation from there.
Terminal note The system ends the melody with the input ending note.
Figure 23 shows a Variation output.
Sony Computer Science Laboratory Paris Technical Report 2013-3
28
Figure 23. Variation type.
6.1.3 Weak Variation type A Weak Variation is an imitation of the input phrase, carrying in principle the same meaning, but expressed differently. This is a phrase per se. In this version, the system uses the simple following approximation:
First note The system starts the output with the input starting note, and produces a continuation from there.
Terminal note The system ends the melody with any note different from the input ending note. The example in Figure 24 shows a Weak Variation output.
Sony Computer Science Laboratory Paris Technical Report 2013-3

29
Figure 24. Weak variation type.
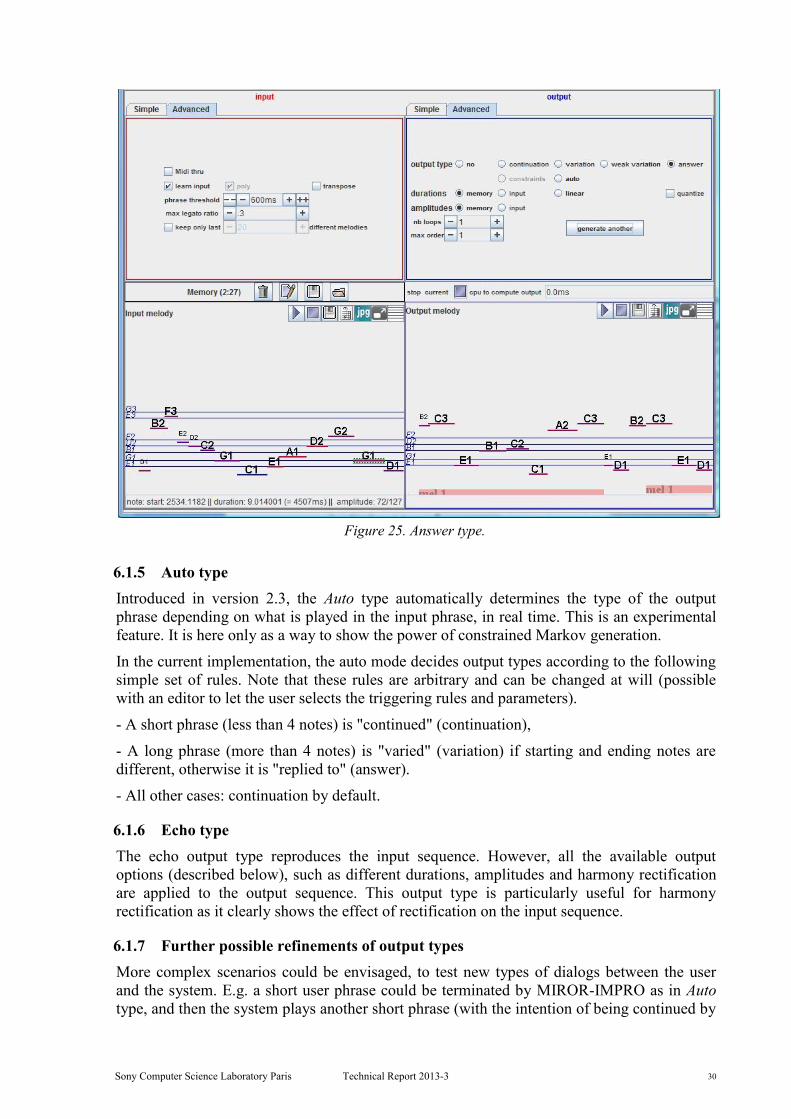
6.1.4 Answer type An answer is also a phrase per se, but whose meaning is to close the input melody. Technically this is even more difficult than variations, because there is no clear definition of what is a musical "question". In this version, the system generates a phrase according to the simple following approximation:
First note The system continues the input, like a normal Continuation.
Terminal note The system ends the melody on the first note of the input. Figure 25 illustrates the Answer output type.
Sony Computer Science Laboratory Paris Technical Report 2013-3
30
Figure 25. Answer type.
6.1.5 Auto type Introduced in version 2.3, the Auto type automatically determines the type of the output phrase depending on what is played in the input phrase, in real time. This is an experimental feature. It is here only as a way to show the power of constrained Markov generation.
In the current implementation, the auto mode decides output types according to the following simple set of rules. Note that these rules are arbitrary and can be changed at will (possible with an editor to let the user selects the triggering rules and parameters).
- A short phrase (less than 4 notes) is "continued" (continuation),
- A long phrase (more than 4 notes) is "varied" (variation) if starting and ending notes are different, otherwise it is "replied to" (answer).
- All other cases: continuation by default.
6.1.6 Echo type The echo output type reproduces the input sequence. However, all the available output options (described below), such as different durations, amplitudes and harmony rectification are applied to the output sequence. This output type is particularly useful for harmony rectification as it clearly shows the effect of rectification on the input sequence.
6.1.7 Further possible refinements of output types More complex scenarios could be envisaged, to test new types of dialogs between the user and the system. E.g. a short user phrase could be terminated by MIROR-IMPRO as in Auto type, and then the system plays another short phrase (with the intention of being continued by
Sony Computer Science Laboratory Paris Technical Report 2013-3

31
the user), etc.
6.2 Output durations This section introduces the output durations. The 3 examples below are based on the training set shown in Figure 20 and Figure 21, and Continuation output type.
6.2.1 Memory durations This option keeps duration of each note, as it was played in the training set.
The output solution, if any, will be constituted by combining notes from the memory, and will keep the original durations of the notes as they were played in the training set.
Let us consider the example of the output given in Figure 22. In the couple A2-C3 near to the end of the output, C3 has the duration of 6269ms. It means that somewhere in your training set you played C3 with the duration of 6269ms, which was preceded by A2 (of any duration). In the example (Figure 20 and Figure 21) it is the couple A2-C3 in the input phrase 1.
Note that many C3 with other durations can be present in the training set, but the system will continue only with durations of C3 which were preceded by A2 in the training set. In our example there is only one couple of A2-C3. If other instances of this couple were present in the training set, C3 in the output could have a different duration coming from these couples in the input. On the other hand, other C3 (e.g. 2nd and 6th notes in phrase 1, Figure 20) are present in the training set, but their durations are not considered as they are not preceded by A2, in this particular example, as.
6.2.2 Input durations This option will respect the global temporal structure of the last input sequence. The output solution, if any, will be constituted by combining notes from the memory, and the duration of each output note will be equal to the duration of the input note at the same position in the input melody.
As an example, let us consider C3 in 2nd position in the output, Figure 26. It has the duration of 2745ms because in the input sequence, Figure 26, the note in 2nd position (for instance B2) has the duration of 2745ms. The same principle applies to all the positions in the output.
Sony Computer Science Laboratory Paris Technical Report 2013-3

32
Figure 26. Input durations.
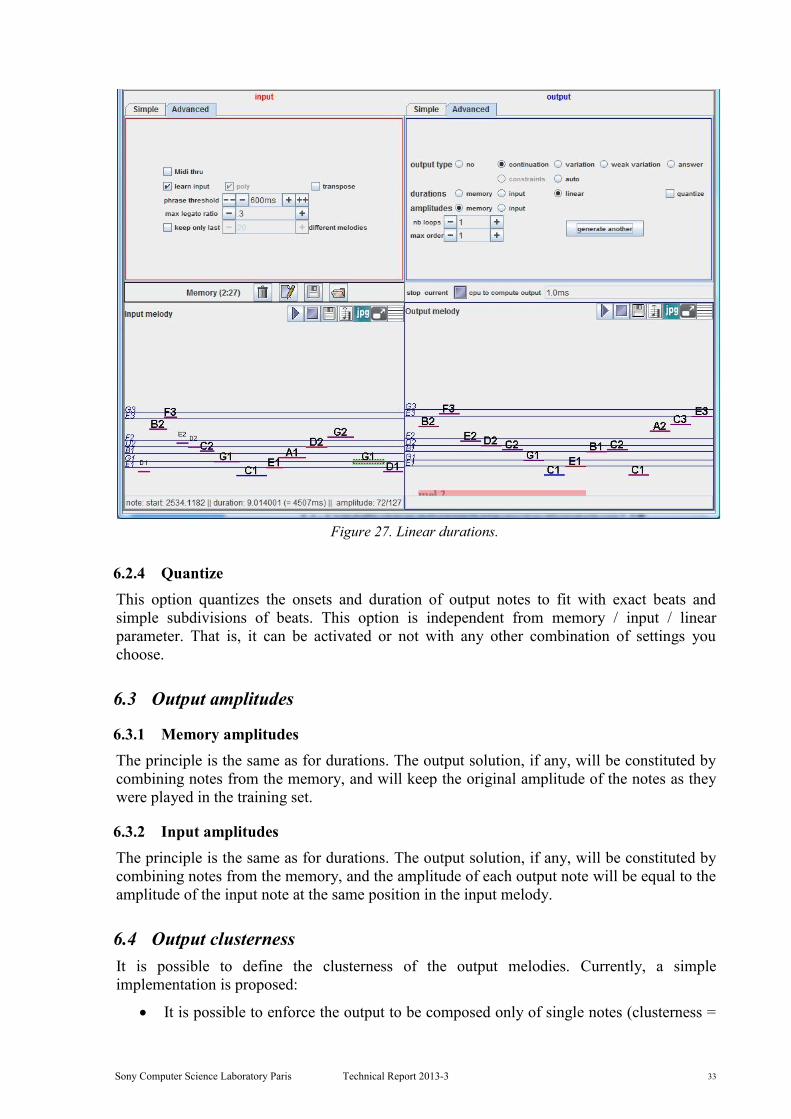
6.2.3 Linear durations This option builds the output with the notes of equal duration. The output solution, if any, will be constituted by combining notes from the memory, but will not keep their original durations.
Figure 27 shows an example. The training set is the same as in the previous section, shown in Figure 20 and Figure 21.
Sony Computer Science Laboratory Paris Technical Report 2013-3
33
Figure 27. Linear durations.
6.2.4 Quantize This option quantizes the onsets and duration of output notes to fit with exact beats and simple subdivisions of beats. This option is independent from memory / input / linear parameter. That is, it can be activated or not with any other combination of settings you choose.
6.3 Output amplitudes
6.3.1 Memory amplitudes The principle is the same as for durations. The output solution, if any, will be constituted by combining notes from the memory, and will keep the original amplitude of the notes as they were played in the training set.
6.3.2 Input amplitudes The principle is the same as for durations. The output solution, if any, will be constituted by combining notes from the memory, and the amplitude of each output note will be equal to the amplitude of the input note at the same position in the input melody.
6.4 Output clusterness It is possible to define the clusterness of the output melodies. Currently, a simple implementation is proposed:
It is possible to enforce the output to be composed only of single notes (clusterness =
Sony Computer Science Laboratory Paris Technical Report 2013-3
34
0) or only of clusters (clusterness = 1). To do so, click on only notes or only clusters radio buttons (see Figure 19),
This option activates the Answer output type. That is, if you click on only notes or only clusters radio buttons, the output type will be automatically switched to Answer, even if it was previously set to another output type,
If you re-activate Answer or any other Output Type radio button, clusterness enforcement will be forgotten by the system, and the output will be composed of notes as well as of clusters.
6.5 User defined target for terminal note (deactivated since v2.5) It is possible to indicate to the system the terminal note to be produced in the output. This is an experimental feature, which will be further developed later. In the Output Melody panel, right-click on the note you want as the terminal one. The next output will take this note as a target and end on this note (if it is possible).
Note that for the right-click, only the ordinate is taken into account, and not the abscissa. That is, when you right-click inside the Output Melody panel, the system will take only the ordinate (the height within the Output Melody panel) of your mouse position as the target pitch.
Note also that when you use this feature, the system will always produce a continuation, whatever the setting is (continuation / variation / answer). If you press generate another button, the system returns to the settings which were previously set, and which are shown in the Output Panel. This option will be refined in next versions.
6.6 Number of loops The number of loops parameter sets the length of the output as a function of the length of the input. -1 means that the system does not stop, until the user plays again.
6.7 Max order Max Markov order specifies how “long” are subsequences considered for the Markov generation.
When Max order = 0, the output is almost a random sequence.
When Max order is high (e.g., more than 5), generated sequences are almost identical to the input ones.
In practice (for children): value of 2 or 3 is a good compromise.
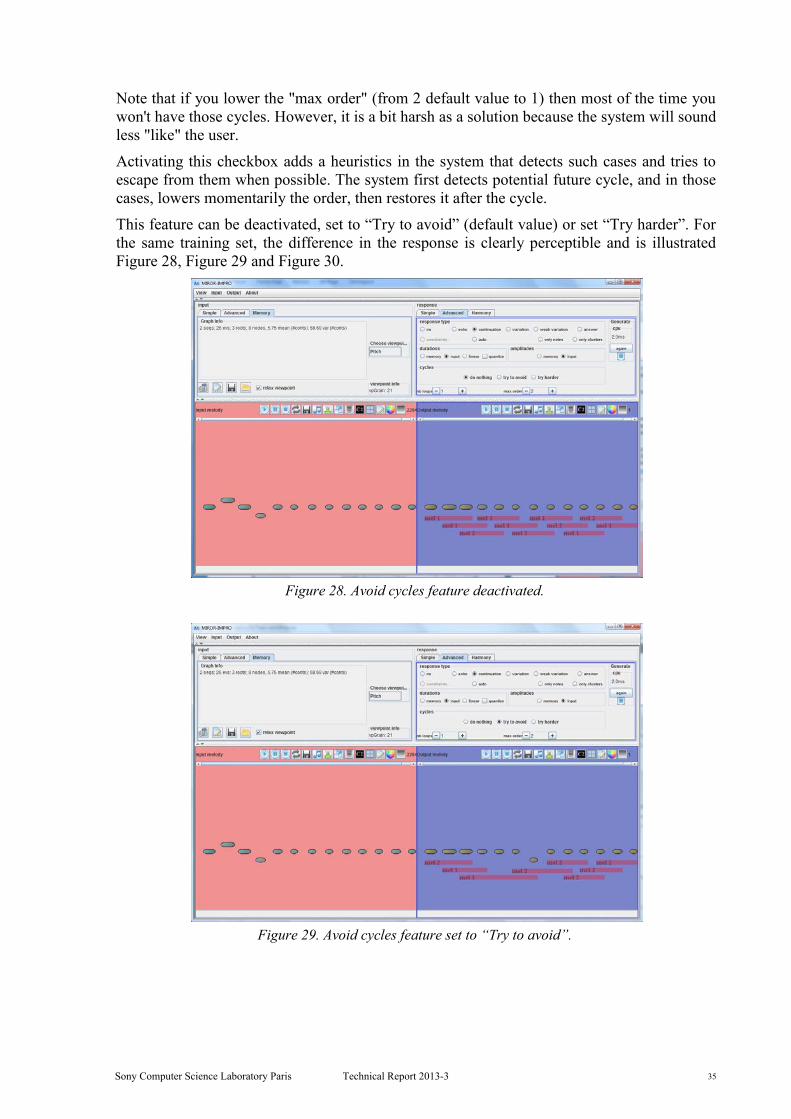
6.8 Avoid cycles This checkbox adds a “cycle detection and avoidance” feature in response generation. In some cases, the system produces a cycle of one or several notes ( “sticky patterns”) that do not sound "right” although they are "legal" in a Markovian context. There are often repetitions in music, and it is not obvious for a machine to detect them and sort out the good ones from the bad ones. Sometimes there are no solutions (for instance, if the initial corpus is just Do-Re-Do-Re-Do-Re, the system has to repeat the same sequence ad lib).
Sony Computer Science Laboratory Paris Technical Report 2013-3
35
Note that if you lower the "max order" (from 2 default value to 1) then most of the time you won't have those cycles. However, it is a bit harsh as a solution because the system will sound less "like" the user.
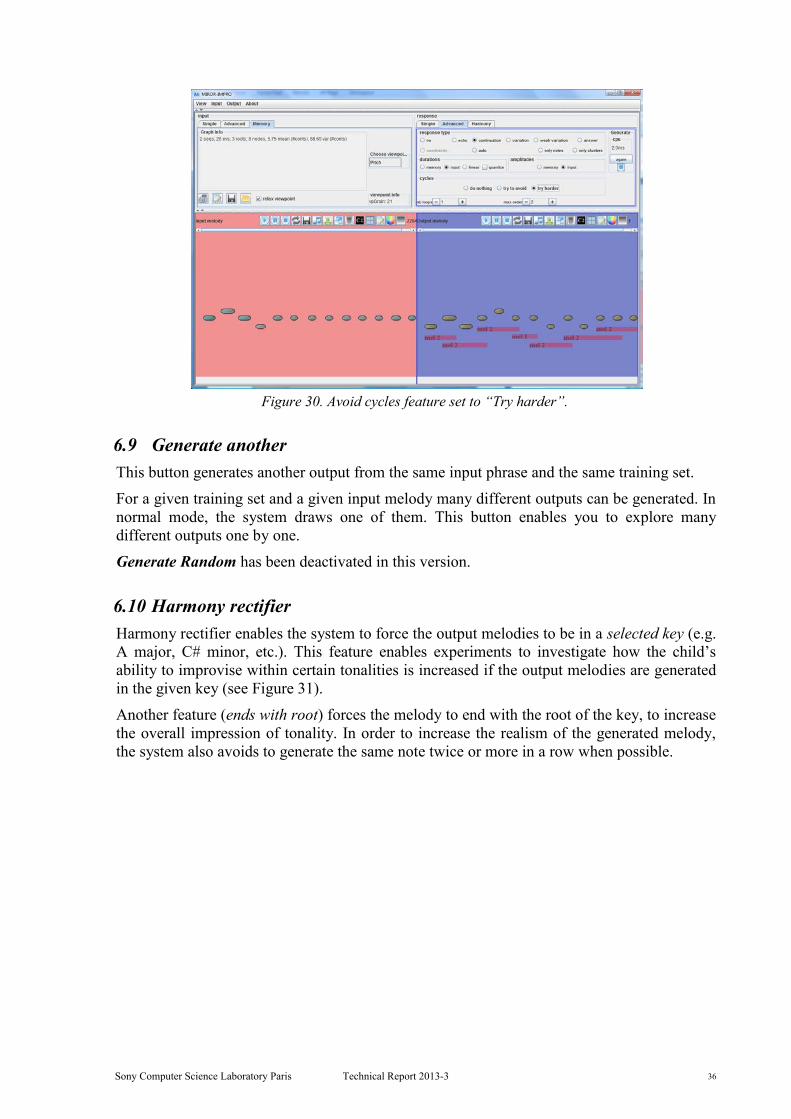
Activating this checkbox adds a heuristics in the system that detects such cases and tries to escape from them when possible. The system first detects potential future cycle, and in those cases, lowers momentarily the order, then restores it after the cycle.
This feature can be deactivated, set to “Try to avoid” (default value) or set “Try harder”. For the same training set, the difference in the response is clearly perceptible and is illustrated Figure 28, Figure 29 and Figure 30.
Figure 28. Avoid cycles feature deactivated.
Figure 29. Avoid cycles feature set to “Try to avoid”.
Sony Computer Science Laboratory Paris Technical Report 2013-3
36
Figure 30. Avoid cycles feature set to “Try harder”.
6.9 Generate another This button generates another output from the same input phrase and the same training set.
For a given training set and a given input melody many different outputs can be generated. In normal mode, the system draws one of them. This button enables you to explore many different outputs one by one.
Generate Random has been deactivated in this version.
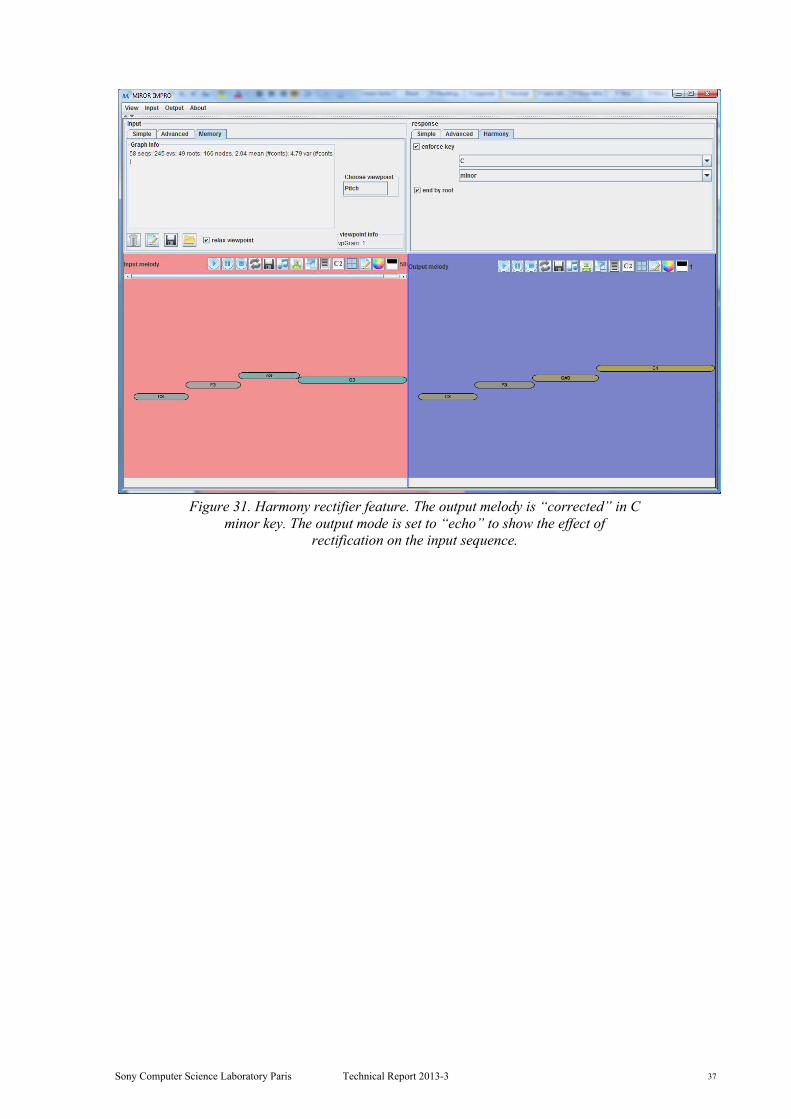
6.10 Harmony rectifier Harmony rectifier enables the system to force the output melodies to be in a selected key (e.g. A major, C# minor, etc.). This feature enables experiments to investigate how the child’s ability to improvise within certain tonalities is increased if the output melodies are generated in the given key (see Figure 31).
Another feature (ends with root) forces the melody to end with the root of the key, to increase the overall impression of tonality. In order to increase the realism of the generated melody, the system also avoids to generate the same note twice or more in a row when possible.
Sony Computer Science Laboratory Paris Technical Report 2013-3
37
Figure 31. Harmony rectifier feature. The output melody is “corrected” in C
minor key. The output mode is set to “echo” to show the effect of rectification on the input sequence.
Sony Computer Science Laboratory Paris Technical Report 2013-3
38
7 To better understand the IMPRO parameters
7.1 Do it yourself! To better understand different possibilities, we suggest the following:
1. Start the system.
2. Do not start a new session (it will allow you to switch different settings more easily).
3. Uncheck “Transpose” in the input (you will better understand what is happening).
4. Choose the output and duration types, for example “continuation” and “memory”.
5. Play several short melodies (usually two to four depending on their length: as you unchecked “transpose” trick, do not expect to get an output right after the first melody you played).
The Memory sub-panel on the left input panel displays the number of played melodies and the number of events (notes or chords) in the training set.
6. The system will produce an output when the training set is big enough.
From now on you can try different output types with the same training set. There are two options:
Generate different output from the same training set and the same last input phrase,
Generate different output from the same training set and a different last input phrase.
Option 1. Different outputs from the same training set and the same input phrase.
After step 6, continue to step 7. Do not play anymore on the keyboard.
7. Click on generate another in the output panel: this will generate a different output with the same settings (type, durations, etc).
This output will be based on the same training set and the same input phrase from this training set.
It is possible that only one output exists, depending on the training set. If this is the case, see below Augmenting the training set, or else decrease the Max order parameter (e.g., from 2 to 1).
8. Then, change the parameters: for example change the output type to variation, etc.
9. Click again on generate another: from the same training set and the same input phrase from this training set, the system will produce an output with the new settings.
It is possible that no output exists for the particular settings you chose at step 8. If this is the case, see below Augmenting the training set. → Observe the differences in the various outputs.
Option 2. Different outputs from the same training set and a different input phrase.
After step 6, continue to step 10.
10. Uncheck the learn input check box in the input panel, so that anything played will not be learnt and memorized by the system but only used to trigger outputs.
Sony Computer Science Laboratory Paris Technical Report 2013-3
39
11. Play on the keyboard.
12. The output will be based on the training set learned during steps 1 to 5.
→ Observe the differences in the various outputs.
7.2 Augmenting the training set It is possible that:
- at step (7) you have only one output – it can happen because the algorithm has only one solution for a small training set,
and/or:
- at step (9) you have no new output - it can happen because the output type you chose at this step has more constraints than the previous one (i.e. the algorithm gives no solution for this particular output type).
In these cases, different solutions are possible:
- clear the memory (“trash” button on the input panel) and repeat the step 5 with more input melodies, or
- simply play some more melodies which will be added to the training set, or
- decrease the Max Order (e.g. from 2 to 1). This should give the system more possibilities of recombination.
Sony Computer Science Laboratory Paris Technical Report 2013-3

40
8 IMPRO Session management
8.1 Structure of sessions The session management tool (Figure 32) contains an automated procedure to save, load input and output data and parameters for further analysis and study. It offers a lot of possibilities and was designed mainly for running experiments, as it freezes all the parameters during the session.
The structure of session management is hierarchical. Users (represented as directories) contain Sessions (themselves represented as directories). Each Session directory contains information about what parameters and initial memory were used, as well as all the melodies played by the user and generated by the system. More precisely:
A session is identified by the user, the date and the start time. A session contains information about parameters used. A session contains information about initial memory (training set) used for this
particular session. If you browse the session folder with Windows explorer, you will see a text file called initialMemory.txt. This file will contain initial memory only if you started this session right after playing a while and have not emptied the memory (trash button); or if you started the session after importing a training set from a previous session (see below, section 8.5.5 Use the training set(s) of selected session(s) in a new session). Otherwise, this file will be empty. In experimental conditions, one should be attentive to use or not the initial memory.
A session is a succession of phrases of the User and the MIROR-IMPRO. A phrase is a succession of notes played by the User or the MIROR-IMPRO; each
note / chord is characterized by its pitch, start and end time, and amplitude.
Once a user is created, you cannot delete it. Once a session is recorded, you cannot delete it (except for empty sessions, see below). This is done in order to avoid data mishandling.
Figure 32. The session management interface.
8.2 To create a new user In the Users panel on the top-left, select the root directory where you will store all the session data.
Please create a user directory in a different folder from MIROR-IMPRO. If your MIROR-IMPRO is in D:\Public\continuator\, browse and create D:\Public\ctor_users\ for example.
Sony Computer Science Laboratory Paris Technical Report 2013-3
41
Since you will store all the data in this folder, you should not lose it by, e.g. installing updates. You are encouraged to backup this directory regularly.
In the field near the button create user, type the name of the user. Click on create user. This creates a folder with the user name where all the data relative to this user will be stored. For example, D:\Public\continuator\ctor_users\alessandra.
The location of your user directory is automatically saved, and will be loaded when you start MIROR-IMPRO next time.
8.3 To start a session 1. Set the parameters you want, both in input and in output. You can play with the MIROR-IMPRO, nothing will be recorded until a session is created explicitly.
2. Check that the current memory do correspond to what you want to do in the session!
The current state of the memory is displayed in the Memory Panel. You can clean the memory (“trash” button on the input panel).
Be aware that if you do not, the session’s training set will include what was played before the session started.
You can keep the memory, in particular if you loaded it from a previous session (see below for details).
3. Click on “start session”.
4. All the parameters are frozen; you cannot change them during the session. This is to ensure that each session is consistent.
5. All inputs and outputs are time stamped and recorded.
6. Close the session when finished. This will stop the recording and nothing else will be stored until you create a new session.
Please note that you cannot delete a session explicitly, nor add new melodies once the session is closed. Again, this is to ensure the integrity of experimental data, and avoid confusions when dealing with many users and sessions.
8.4 To load a previously recorded session of a particular user Click on the user, this will load all the sessions recorded for this user. Then click on a particular session to load it and to work with this particular session.
You can “clean” a user repository by removing empty sessions. For this purpose, right-click on the selected user and then on “remove empty sessions”.
8.5 To work with previously recorded sessions Once a session is selected, you can perform the following actions:
8.5.1 See the information on the parameters The panel “Parameters” gives the information on the session you selected.
8.5.2 Use the parameters of the session to create a new session Click on “params=> Ctor” button, this function sends the parameters of the selected session
Sony Computer Science Laboratory Paris Technical Report 2013-3
42
to the MIROR-IMPRO. You can then start a new session with the same parameters as the previously selected session.
8.5.3 Play back the phrases of the user and the system Click on the phrase and then on “play” button on the top left of the Melody panel.
8.5.4 Save the phrases You can save the phrases one by one in text format (“save” button on the top left of the Melody panel).
8.5.5 Use the training set(s) of selected session(s) in a new session There are two ways to load the training set of a previous session.
First possibility. Click on “memory=> Ctor” button, it will send the training set of the selected session (i.e. what you played on the keyboard) to the MIROR-IMPRO. You can then start a new session with the same training set as one of the previous sessions.
Second possibility. Right-click on the session name and select Send selected session memories. With the right-click, you can also select one or several sessions (by maintaining the CTRL key on your keyboard while selecting the sessions' names).
8.5.6 Use a partial training set of a selected session in a new session To constitute a training set, you can decide to use only a selection of phrases played by user or MIROR-IMPRO. In this case, the output played by the MIROR-IMPRO becomes the input for further outputs.
To do so, select a session, then in the “phrases” panel, select one or several phrases (by maintaining the CTRL key on your keyboard while selecting the phrases); then right-click and “send these n melodies to Ctor”.
8.5.7 To replicate session behavior In some case you may want to replicate the behavior of the IMPRO given a particular input phrase. In Phrases panel, right-click on a recorded phrase and select Play melody to Continuator. This will consider the selected melody as the input phrase played on the keyboard, and produce a response accordingly.
N.B. If the Learn Input checkbox is activated (which is usually the case), the played phrase is added to the training set, and that will modify the farther behavior of the system. Deactivate the Learn Input checkbox when needed.
Sony Computer Science Laboratory Paris Technical Report 2013-3

43
9 IMPRO Visualization tools
9.1 Visualization of all user sessions In the Users panel, it is possible to right-click on user’s name, and then to select Visualize all user sessions from the drop-down menu. A window opens (see Figure 33) that shows all user’s sessions, with dates of recordings and number of melodies played. This allows to have an overview of the sessions played by the user.
It is then possible to click on a desired session and it will open a new window with a time-line view for this session.
Figure 33. User visualization window.
9.2 Time-line view of a session This functionality is designed in order to have a clear overview and playback of the user – system dialogs for the purposes of musical analysis (as well as for the export functions described in the next section).
In the File menu, it is possible to explore the other sessions of the same user by clicking Open Session, and choosing the desired session from the drop-down list. The File menu contains also export functions described in the next session. In this window, the user can playback
- Individual melodies, by pressing play melody button in the corresponding piano roll panel,
- Selected dialogs, by pressing play button next to each dialog
- Entire session, by going to Play menu at the top of the window. The play back will respect the intervals between the dialogues as it was played by the user and the system during the session recording.
In the Display menu, the user can hide/show all the buttons.
As in all Piano roll panels, clicking on a chosen note (or cluster) will highlight it, and will allow to obtain information about its pitch, start time, duration, and amplitude (see the first note of the second dialogue, Figure 34).
Sony Computer Science Laboratory Paris Technical Report 2013-3

44
Figure 34. Time-line view of a session window.
9.3 Visualisation of short system’s answers: caution! The MIROR-IMPRO answers which are shorter than the “phrase threshold” used for the current session (referred to as PhTh below), are not displayed in this view.
Please note that from this view you cannot distinguish between the two situations:
a. when there were no output from the system (No Continuation! Message - which is rare),
b. when there was an answer from the system but the User interrupted the answer at its very beginning (less than PhTh seconds after the system begun to answer).
Note that in the specific case (b) you cannot say if (b1) the user intentionally interrupted the system very quickly, or if (b2) the user just wanted to continue his initial phrase, and the false start behaviour occurred (see section 0).
The structure and the rules of visualization are the same as for the export to CSV function described in following sections, see in particular the section Non-standard output: caution! for more details.
The complete version of user-system exchanges can be found in the Recorded phrases panel, in main window. It should be used with caution, because there may be some overlapping between phrases which may influence the order of phrases in this visualization. The only exact way is to analyze the sessions data in .TXT files in your session folder, which contain exact start and stop times.
Sony Computer Science Laboratory Paris Technical Report 2013-3
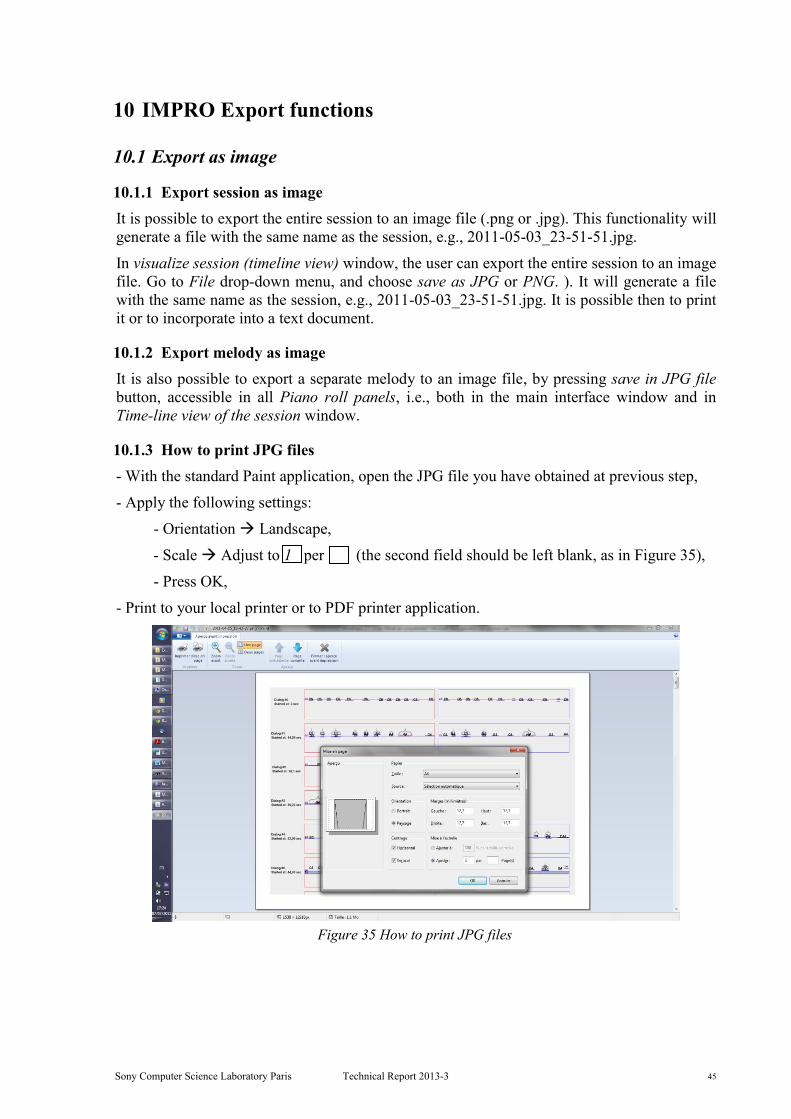
45
10 IMPRO Export functions
10.1 Export as image
10.1.1 Export session as image It is possible to export the entire session to an image file (.png or .jpg). This functionality will generate a file with the same name as the session, e.g., 2011-05-03_23-51-51.jpg.
In visualize session (timeline view) window, the user can export the entire session to an image file. Go to File drop-down menu, and choose save as JPG or PNG. ). It will generate a file with the same name as the session, e.g., 2011-05-03_23-51-51.jpg. It is possible then to print it or to incorporate into a text document.
10.1.2 Export melody as image It is also possible to export a separate melody to an image file, by pressing save in JPG file button, accessible in all Piano roll panels, i.e., both in the main interface window and in Time-line view of the session window.
10.1.3 How to print JPG files - With the standard Paint application, open the JPG file you have obtained at previous step,
- Apply the following settings:
- Orientation Landscape,
- Scale Adjust to 1 per (the second field should be left blank, as in Figure 35),
- Press OK,
- Print to your local printer or to PDF printer application.
Figure 35 How to print JPG files
Sony Computer Science Laboratory Paris Technical Report 2013-3
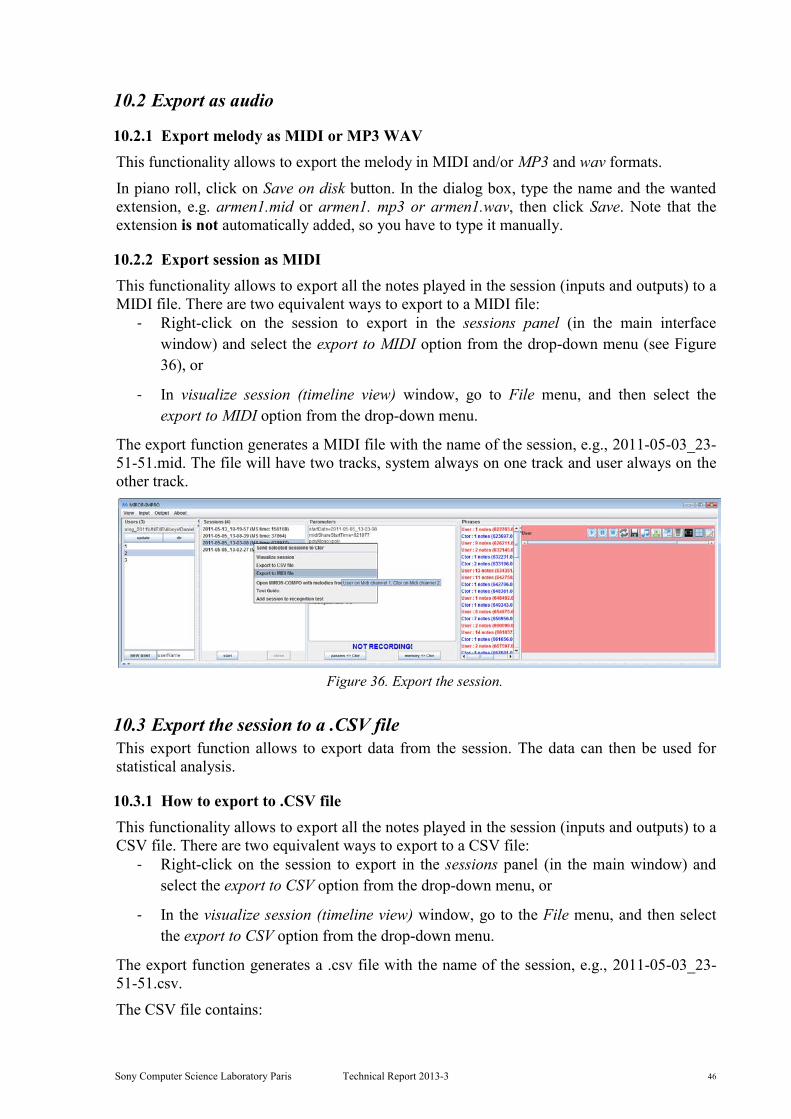
46
10.2 Export as audio
10.2.1 Export melody as MIDI or MP3 WAV This functionality allows to export the melody in MIDI and/or MP3 and wav formats.
In piano roll, click on Save on disk button. In the dialog box, type the name and the wanted extension, e.g. armen1.mid or armen1. mp3 or armen1.wav, then click Save. Note that the extension is not automatically added, so you have to type it manually.
10.2.2 Export session as MIDI This functionality allows to export all the notes played in the session (inputs and outputs) to a MIDI file. There are two equivalent ways to export to a MIDI file:
- Right-click on the session to export in the sessions panel (in the main interface window) and select the export to MIDI option from the drop-down menu (see Figure 36), or
- In visualize session (timeline view) window, go to File menu, and then select the export to MIDI option from the drop-down menu.
The export function generates a MIDI file with the name of the session, e.g., 2011-05-03_23-51-51.mid. The file will have two tracks, system always on one track and user always on the other track.
Figure 36. Export the session.
10.3 Export the session to a .CSV file This export function allows to export data from the session. The data can then be used for statistical analysis.
10.3.1 How to export to .CSV file This functionality allows to export all the notes played in the session (inputs and outputs) to a CSV file. There are two equivalent ways to export to a CSV file:
- Right-click on the session to export in the sessions panel (in the main window) and select the export to CSV option from the drop-down menu, or
- In the visualize session (timeline view) window, go to the File menu, and then select the export to CSV option from the drop-down menu.
The export function generates a .csv file with the name of the session, e.g., 2011-05-03_23-51-51.csv.
The CSV file contains:
Sony Computer Science Laboratory Paris Technical Report 2013-3

47
- The information about the exported session, such as its name and parameters used,
- Basic statistics on the session.
10.3.2 Structure of the .csv file The CSV file contains
- the information about the exported session, such as its name and parameters used,
- basic statistics in the columns described below.
Start and stop Start and stop time for each phrase. “stopCorrected” is not used.
Duration Duration of the phrase in mS (milliseconds).
nbItems, nbNotes, nbSingleNotes, nbClusters, ratioCluster In these cells you will find basic information about the structure of each user’s or system’s phrase.
nbItems: the MIROR-IMPRO algorithm is not based on mS but on items (or events); an item can be a single note or a chord (see section 5.2),
nbNotes: total number of notes played,
nbSingleNotes: number of single notes played (out of clusters),
nbClusters: number of clusters (chords),
ratioCluster: this is a simple ratio of clusterness, i.e.= nbClusters/nbItems. It will be 1 if you play only clusters and 0 if you play only single notes.
answer Indicates if there was an answer (1) or not (0) from the system (caution, see the following sub-section for details).
ctorWait Indicates the time between the end of the user’s phrase and the system’s answer. The value is normally just above the phrase threshold.
userWaits Indicates the time between the end of the system’s phrase and the next user’s phrase (next user’s phrase is the phrase that can be found in the next row in .csv file). If the user did not interrupt the system, you can see here if he waited a long time before taking his turn: it could be called ‘time-span between IMPRO and the user.
ctorInterrupted Indicates if the system was interrupted (1) or not (0) by the user (caution, see the following sub-section for details).
10.3.3 Duration versus nbItems: how to compare the lengths of phrases First, the MIROR-IMPRO algorithm is not based on mS but on items (or events). An item can be a single note or a chord. The length of output is generated in number of items, and is normally equal to the length of input, i.e. 10 items in input 10 items in output.
Sony Computer Science Laboratory Paris Technical Report 2013-3
48
However the items are not of equal duration (as they come from the training set). Thus there may be a “regular” (i.e. not interrupted interaction) situation where
(length of input in mS) > (length of output in mS) OR
(length of input in mS) < (length of output in mS).
Now let’s study the situation where the output has been interrupted. Let’s compare 2 examples.
Example 1: input: 10 items= 20 seconds output: 10 items= 15 seconds
The output is shorter. However, the output has not been interrupted. Indeed, the output items do not come from the last phrase but from the memory of the whole session, and they can have a smaller duration in seconds.
Example 2: input: 10 items= 20 seconds output: 8 items= 24 seconds
The output is longer. However, the output has been interrupted (less items). Indeed, the output items do not come from the last phrase but from the memory of the whole session, and they can have a longer duration in seconds.
To put it differently, in some cases speaking about duration in seconds just does NOT make sense. For example if you want to know if the child interrupted the system, you can absolutely NOT know it from the duration in seconds. So in this case, as in some others, the seconds is NOT the right information.
However the length in seconds could also be used as variable in some other cases. In the export output there are both durations, in seconds and in items, and it is up to you to be sure on the appropriate use of this information.
10.3.4 Non-standard output: caution! There are several situations in which the system produces no answer or an answer that is shorter than the user’s input. Let us explain how this is reflected in the exported .csv file.
On the one hand, a shorter answer is exported if the user interrupts the system after the phrase threshold, but before the end of the answer was reached. In this case, in the corresponding row in the exported .csv file, column answer contains value 1 and column ctorinterrupted contains value 1. This is what could be called an intentional interruption by the user.
On the other hand, no answer is exported in the following three cases: 1) The user intentionally interrupts the system very rapidly after the system started
playing, i.e., before the phrase threshold was reached. In this case, in the corresponding row in the exported .csv file;
2) Idem except the interruption is not intentional but rather an instance of the false-start behaviour (see section 0);
3) No continuation was found by the system (i.e., a ‘No continuation’ message was shown).
In the three last cases, the corresponding row in the exported .csv file contains value 0 in column answer and nothing in column ctorinterrupted.
It is therefore impossible to distinguish between the last three cases from the .csv file.
Sony Computer Science Laboratory Paris Technical Report 2013-3
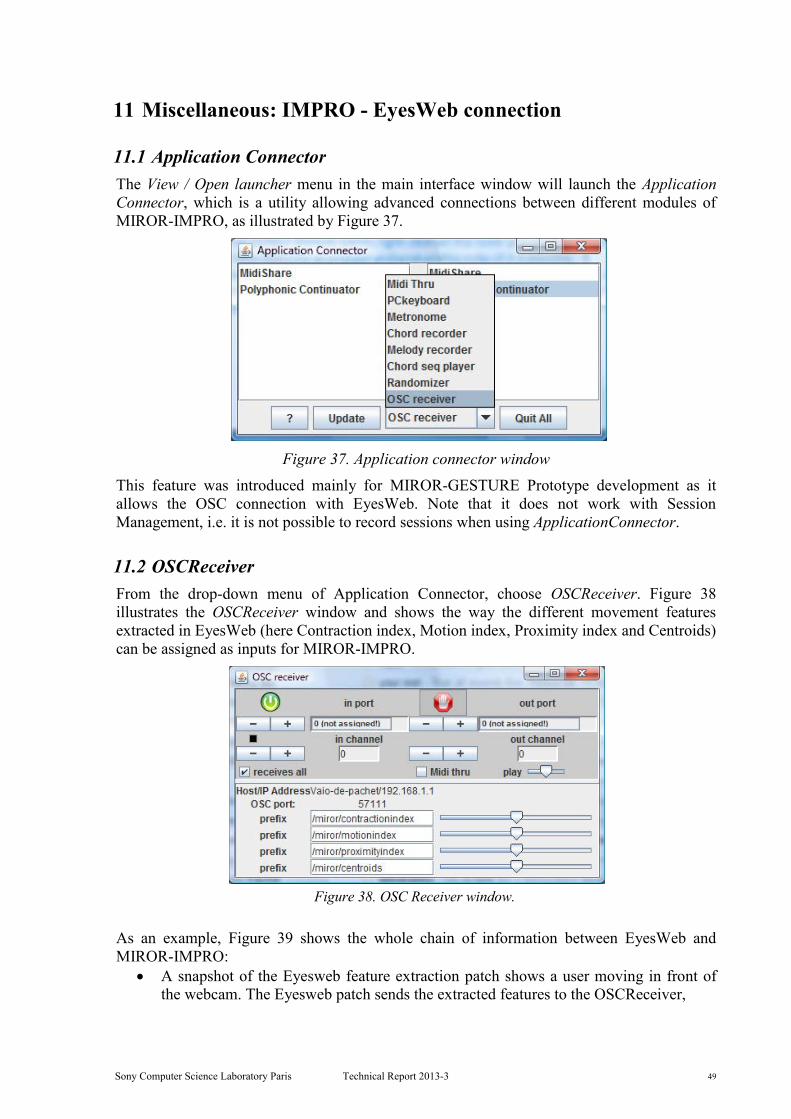
49
11 Miscellaneous: IMPRO - EyesWeb connection
11.1 Application Connector The View / Open launcher menu in the main interface window will launch the Application Connector, which is a utility allowing advanced connections between different modules of MIROR-IMPRO, as illustrated by Figure 37.
Figure 37. Application connector window
This feature was introduced mainly for MIROR-GESTURE Prototype development as it allows the OSC connection with EyesWeb. Note that it does not work with Session Management, i.e. it is not possible to record sessions when using ApplicationConnector.
11.2 OSCReceiver From the drop-down menu of Application Connector, choose OSCReceiver. Figure 38 illustrates the OSCReceiver window and shows the way the different movement features extracted in EyesWeb (here Contraction index, Motion index, Proximity index and Centroids) can be assigned as inputs for MIROR-IMPRO.
Figure 38. OSC Receiver window.
As an example, Figure 39 shows the whole chain of information between EyesWeb and MIROR-IMPRO:
A snapshot of the Eyesweb feature extraction patch shows a user moving in front of the webcam. The Eyesweb patch sends the extracted features to the OSCReceiver,
Sony Computer Science Laboratory Paris Technical Report 2013-3
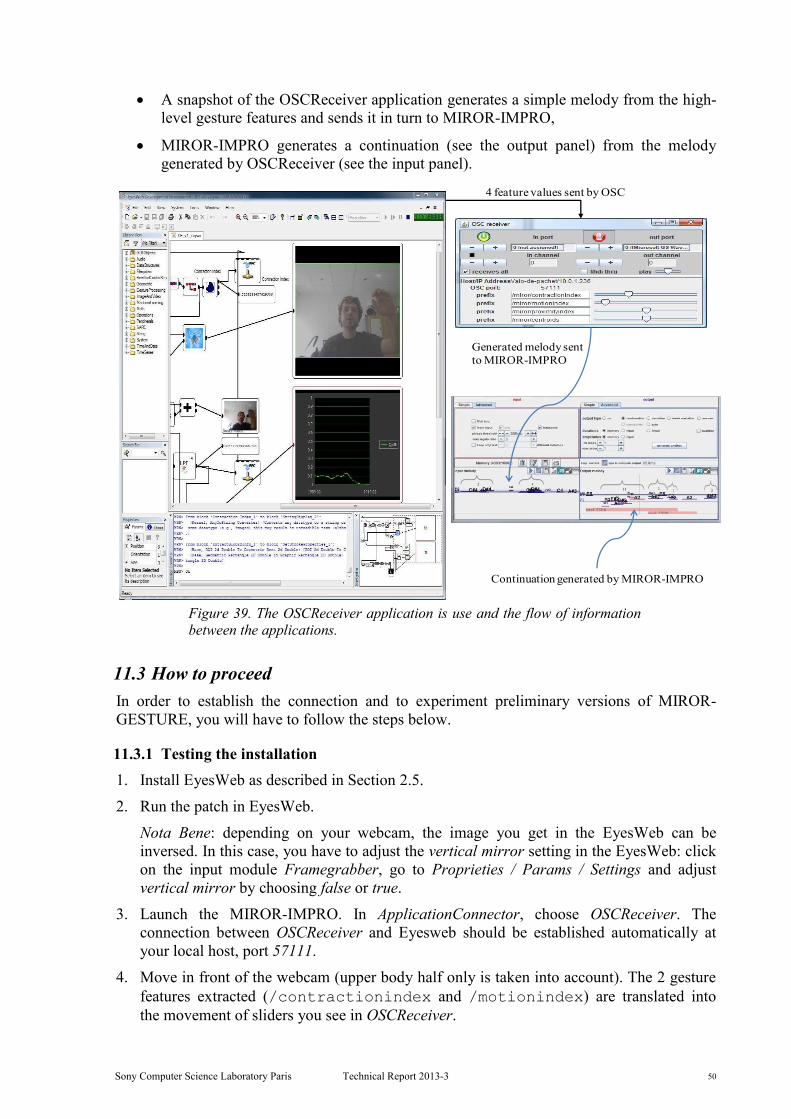
50
A snapshot of the OSCReceiver application generates a simple melody from the high-level gesture features and sends it in turn to MIROR-IMPRO,
MIROR-IMPRO generates a continuation (see the output panel) from the melody generated by OSCReceiver (see the input panel).
Figure 39. The OSCReceiver application is use and the flow of information between the applications.
11.3 How to proceed In order to establish the connection and to experiment preliminary versions of MIROR-GESTURE, you will have to follow the steps below.
11.3.1 Testing the installation 1. Install EyesWeb as described in Section 2.5.
2. Run the patch in EyesWeb.
Nota Bene: depending on your webcam, the image you get in the EyesWeb can be inversed. In this case, you have to adjust the vertical mirror setting in the EyesWeb: click on the input module Framegrabber, go to Proprieties / Params / Settings and adjust vertical mirror by choosing false or true.
3. Launch the MIROR-IMPRO. In ApplicationConnector, choose OSCReceiver. The connection between OSCReceiver and Eyesweb should be established automatically at your local host, port 57111.
4. Move in front of the webcam (upper body half only is taken into account). The 2 gesture features extracted (/contractionindex and /motionindex) are translated into the movement of sliders you see in OSCReceiver.
4 feature values sent by OSC
Generated melody sent to MIROR-IMPRO
Continuation generated by MIROR-IMPRO
Sony Computer Science Laboratory Paris Technical Report 2013-3
51
5. In the following sub-sections, your webcam is on, and your Eyesweb Software is running the patch.
11.3.2 Playing sounds In ApplicationConnector, on the left (input) panel select OSCReceiver by clicking on it - it should then be highlighted. On the right (output) panel select MidiShare (by clicking on it). The connection is now established.
Move in front of the webcam (upper body half only is taken into account). The 2 gesture features (/contractionindex and /motionindex) are translated into sounds (i.e. mapped to pitch and amplitude) as you move in front of the webcam.
11.3.3 Playing continuations In ApplicationConnector, on the left (input) panel select OSCReceiver by clicking on it - it should then be highlighted. On the right (output) panel select both MidiShare and PolyphonicContinuator (by clicking on them – both of them should then be highlighted). The connection is now established.
Move in front of the webcam (upper body half only is taken into account). The 2 gesture features (/contractionindex and /motionindex) are translated into sounds (i.e. mapped to pitch and amplitude) as you move in front of the webcam.
The MIROR-IMPRO will continue in the same way as when you play with the keyboard.
11.4 Gesture features details The features are sent from Eyesweb to the MIROR-IMPRO through a software patch specifically developed for MIROR. This patch sends to the MIROR-IMPRO two parameters: /motionindex, which computes the amount of motion detected by the video-camera; /contractionindex, which computes the contraction/expansion of the user’s body. Here are more details on the two parameters: /motionindex
As an initial step in analyzing full-body movement, it is worth computing how much a user is moving. This is a measure related to the energy of the movement. Such a measure is obtained in Eyesweb with the Motion Index (formerly Quantity of Motion), which computes the amount of movement (intended as variation of pixels) detected by the video camera. The Motion Index requires, as input, the silhouette of the subject it has to be computed on. In Eyesweb XMI such a silhouette has to be provided as a blob. This means that background subtraction and blob extraction are needed before computing the Motion Index. As output of the patch, you may see the current value, the graph of the Motion Index, and the Silhouette Motion Images (SMI). SMIs are images representing the variation of the silhouette in the last few frames. The Motion Index is proportional to their area (i.e., the red area on the display). /contractionindex
The contraction Index is a full-body feature measuring how much the body is contracted or expanded with respect to its barycenter. According to psychological studies, the Contraction Index provides information on the expressive behaviour of a user (for example, open movement may be a cue for extrovert behaviour, whereas contracted movement may express shyness, introversion, and sadness). From a computational point of view, Contraction Index is quite cheap in terms of resources since it can be computed with simple operations on the bounding rectangle of the user. Since it works on the body silhouette (a blob in Eyesweb), the
Sony Computer Science Laboratory Paris Technical Report 2013-3
52
Contraction Index requires background subtraction and blob extraction. In this patch Contraction Index is computed in three different ways:
- As the ratio between the area of the silhouette and the area of the bounding rectangle (top connector of the /contractionindex block);
- As the eccentricity of the ellipse approximating the body (middle connector of the /contractionindex block);
- As the ratio between the minimum width of the bounding rectangle and its current width: this measures requires a time window for adaptation and can be reset time to time (bottom connector of the /contractionindex block).
In the current setup, only the first way of computing the /contractionindex is sent to the MIROR-IMPRO. It is not possible, in this version, to have all three ways at the same time. Still, you can choose one of the three above-mentioned options. If you want to do so, do the following:
- disconnect the connector which goes from the top pin of the /contractionindex block to OSCReceiver and to the StringDisplay block; and
- establish a new connection from respectively middle or bottom connector of the /contractionindex block to both to the OSCReceiver block and to the StirngDisplay block.
Sony Computer Science Laboratory Paris Technical Report 2013-3
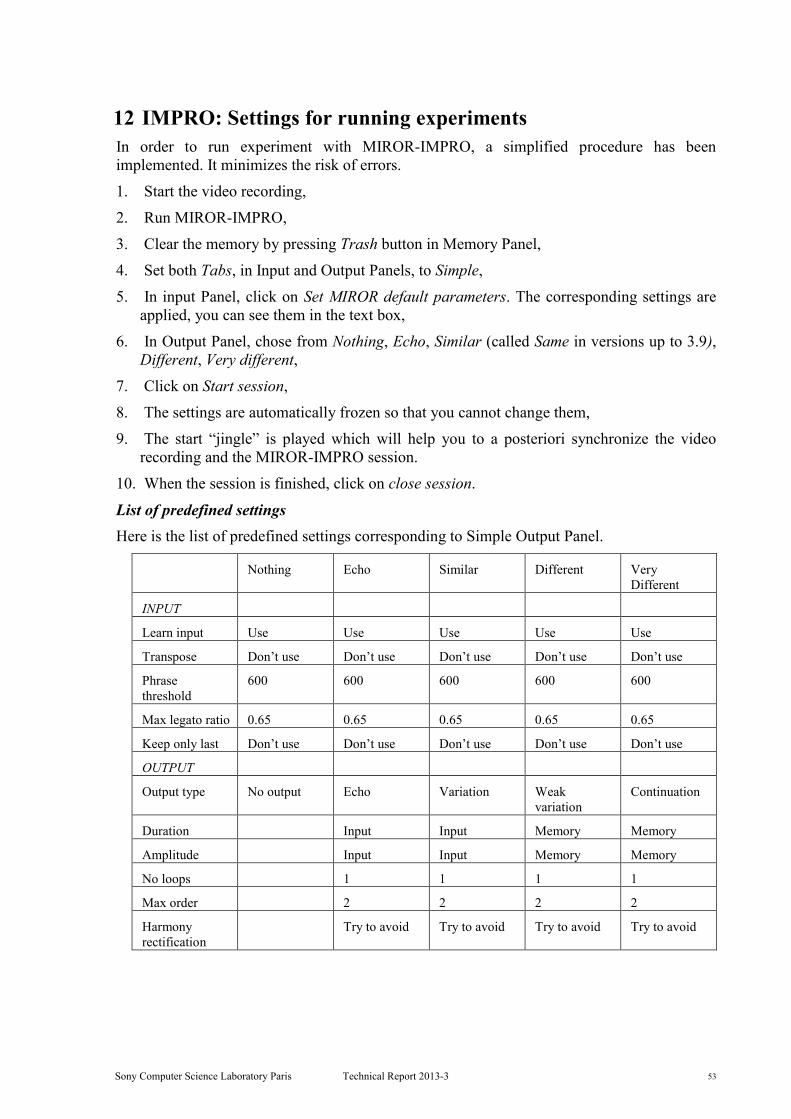
53
12 IMPRO: Settings for running experiments In order to run experiment with MIROR-IMPRO, a simplified procedure has been implemented. It minimizes the risk of errors.
1. Start the video recording,
2. Run MIROR-IMPRO,
3. Clear the memory by pressing Trash button in Memory Panel,
4. Set both Tabs, in Input and Output Panels, to Simple,
5. In input Panel, click on Set MIROR default parameters. The corresponding settings are applied, you can see them in the text box,
6. In Output Panel, chose from Nothing, Echo, Similar (called Same in versions up to 3.9), Different, Very different,
7. Click on Start session,
8. The settings are automatically frozen so that you cannot change them,
9. The start “jingle” is played which will help you to a posteriori synchronize the video recording and the MIROR-IMPRO session.
10. When the session is finished, click on close session.
List of predefined settings Here is the list of predefined settings corresponding to Simple Output Panel.
Nothing Echo Similar Different Very Different
INPUT
Learn input Use Use Use Use Use
Transpose Don’t use Don’t use Don’t use Don’t use Don’t use
Phrase threshold
600 600 600 600 600
Max legato ratio 0.65 0.65 0.65 0.65 0.65
Keep only last Don’t use Don’t use Don’t use Don’t use Don’t use
OUTPUT
Output type No output Echo Variation Weak variation
Continuation
Duration Input Input Memory Memory
Amplitude Input Input Memory Memory
No loops 1 1 1 1
Max order 2 2 2 2
Harmony rectification
Try to avoid Try to avoid Try to avoid Try to avoid
Sony Computer Science Laboratory Paris Technical Report 2013-3

54
13 COMPO: Compositor software This section introduces the MIROR COMPO software. MIROR-COMPO (or Compositor) is a melody composition application based on the MIROR-IMPRO melody generation primitives. The composition process is chunk-based, i.e., the melody is generated by successive interactions between Compositor and the user. The Greedy Constrained Markov Generation of melodies makes the chunk generation instantaneous so the application feels very responsive, which favors a pleasant interaction with the user.
13.1 Launching MIROR COMPO The composition process in COMPO is based on the idea of Reflexive Interactions, allowing the user to explore “what she could have composed” by herself. In accordance to this principle, the generation of chunks is based on a previously formed memory (training set) of what the use have played.
As in IMPRO, there are many possible alternative chunks to be generated at each step (like the button generate another in IMPRO), if the training set is big enough.
The entry point to the COMPO is the main IMPRO interface, which allows the user to constitute this memory and to launch the COMPO following different procedure’s described below.
13.1.1 Launching MIROR COMPO from a previously recorded IMPRO session Procedure 1 In Session management panel:
Select one of the previously recorded sessions. As an alternative, select several sessions by maintaining CTRL key on your keyboard while selecting the sessions you want,
Right-click and choose Open MIROR-COMPO from the drop-down menu. It will launch a new window with COMPO application, You can see in the Memory counter the number of phrases and events which
constitutes now the training set for the COMPO.
Procedure 2 In Session management panel:
Select one of the previously recorded sessions, Press Memory ==> Ctor button, Press the Mc button (which is next to Set MIROR default parameters), It will launch a new window with COMPO application, You can see in the Memory counter the number of phrases and events which
constitutes now the training set for the COMPO.
Note that in both cases only user melodies from the selected session(s) are sent to the memory of the COMPO.
13.1.2 Launching MIROR COMPO without a previously recorded IMPRO session It is also possible to play phrases on the keyboard without recording them.
The “learn” checkbox should be checked (which is the case by default),
Sony Computer Science Laboratory Paris Technical Report 2013-3
55
The output type should be on nothing (which is the case by default),, The memory of the IMPRO application is incremented as you play, You can then press the Mc button (which is next to Set MIROR default parameters), It will launch a new window with COMPO application, You can see in the Memory counter the number of phrases and events which forms
now the training set for the COMPO. NB. Note that in experimental settings, we strongly recommend not to use this procedure. Indeed, if you first record an IMPRO session before launching the COMPO session, it offers you the possibility to keep the recorded session and to launch several successive COMPO sessions from it, in case of crash for example.
In addition, when launching COMPO without a previously recorded IMPRO session, the trace saved to the server will be not identified (i.e. the name of the session will be “Unknown User”) as no particular name is known by the system. See also below, Recording pieces and action traces
To sum up, when doing experiments, first record an IMPRO session (start, play on the keyboard, close session), and then launch COMPO from this recorded session, as described above in the sub-section Launching MIROR COMPO from a previously recorded IMPRO session.
13.2 Basic MIROR COMPO functionalities
13.2.1 COMPO main interface The main COMPO main interface is composed of
The MIDI configuration management panel at the top of the window. It is collapsed by default when you start the COMPO.
The row of user’s action buttons (described in the next sub-section),
The row of auxiliary commands: o Advanced parameters button (see below, Advanced parameters),
o Start a new session with the same user and the same memory button (see below, Record/Export/Import),
o Enable/disable input recording button (see below Injecting new material), o Memory counter (see below, Additional settings)
o Play / stop buttons, to play back the whole piece composed so far. To play back with half-tempo, press down the SHIFT key while pressing Play button. You do not need to continue to hold the SHIFT key once the playback has started. The actions Play, ½ Play and Stop are recorded in the trace.
o The number of notes drop-down menu, to select the number of notes in the chunk to be generated at the following step (see below, Steps to compose a melody),
o The buttons to work with the composed piece (see below, Record/Export/Import):
Save on the local machine,
Load trace
Sony Computer Science Laboratory Paris Technical Report 2013-3
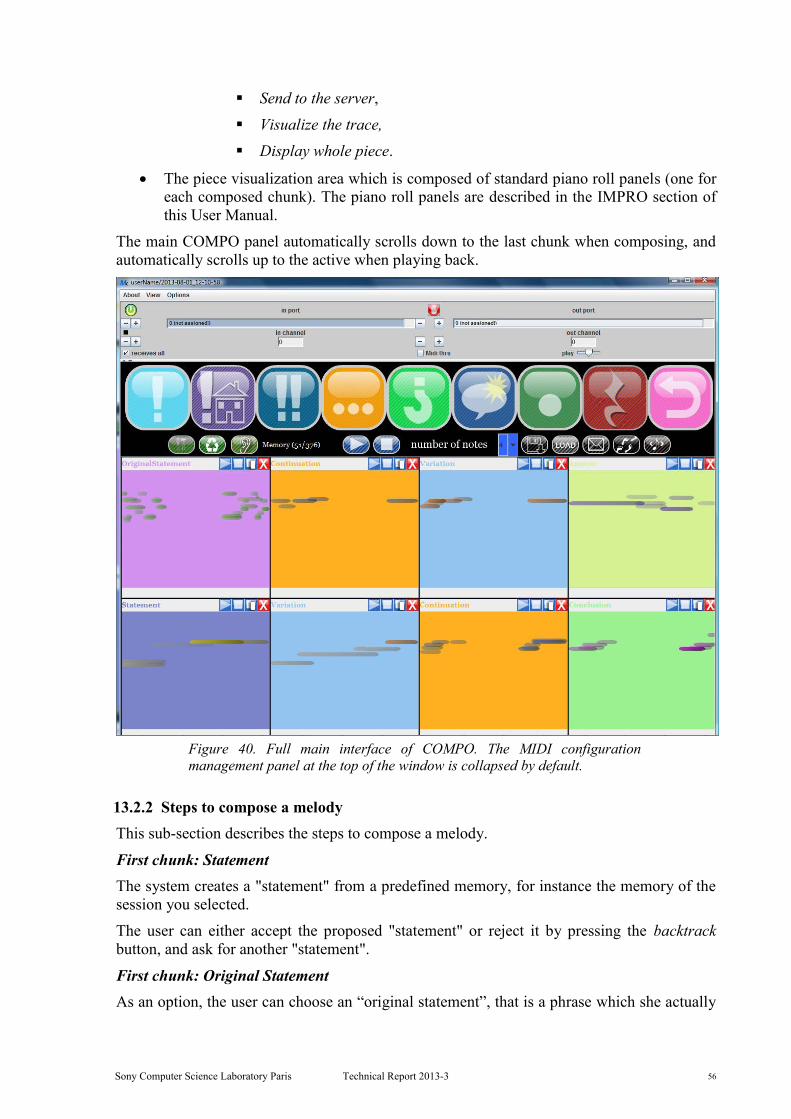
56
Send to the server,
Visualize the trace, Display whole piece.
The piece visualization area which is composed of standard piano roll panels (one for each composed chunk). The piano roll panels are described in the IMPRO section of this User Manual.
The main COMPO panel automatically scrolls down to the last chunk when composing, and automatically scrolls up to the active when playing back.
Figure 40. Full main interface of COMPO. The MIDI configuration management panel at the top of the window is collapsed by default.
13.2.2 Steps to compose a melody This sub-section describes the steps to compose a melody.
First chunk: Statement The system creates a "statement" from a predefined memory, for instance the memory of the session you selected.
The user can either accept the proposed "statement" or reject it by pressing the backtrack button, and ask for another "statement".
First chunk: Original Statement As an option, the user can choose an “original statement”, that is a phrase which she actually
Sony Computer Science Laboratory Paris Technical Report 2013-3
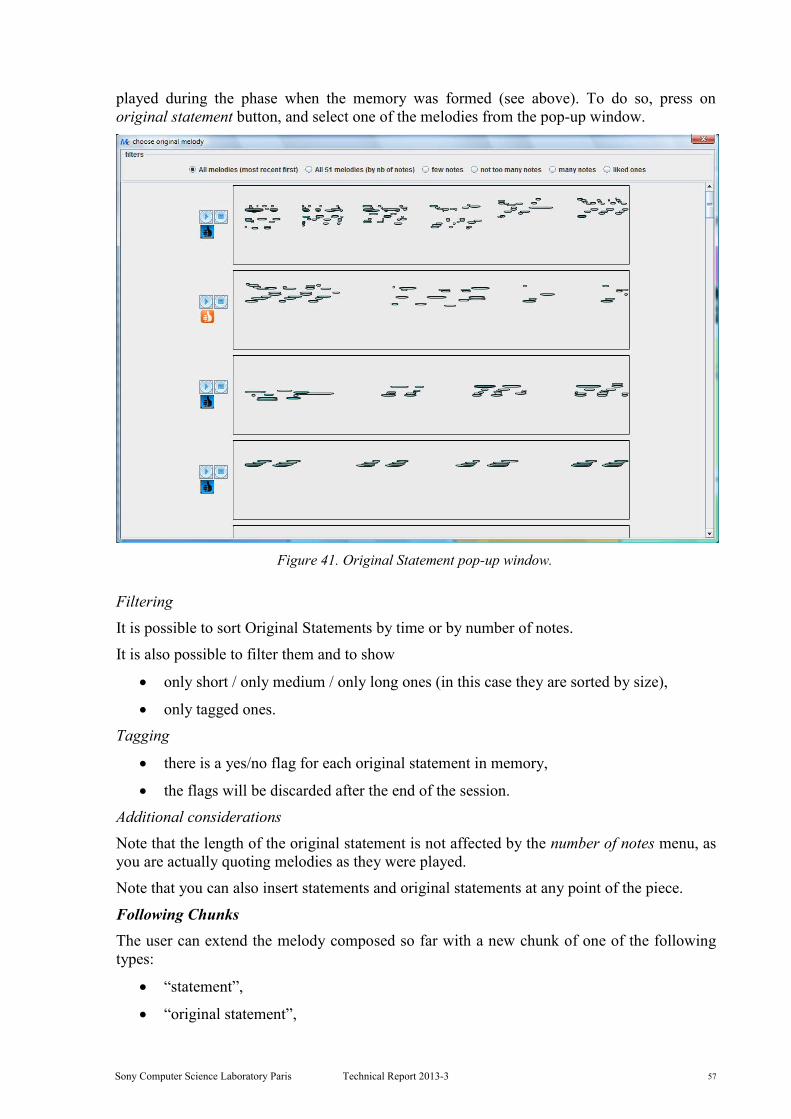
57
played during the phase when the memory was formed (see above). To do so, press on original statement button, and select one of the melodies from the pop-up window.
Figure 41. Original Statement pop-up window.
Filtering It is possible to sort Original Statements by time or by number of notes.
It is also possible to filter them and to show
only short / only medium / only long ones (in this case they are sorted by size),
only tagged ones. Tagging
there is a yes/no flag for each original statement in memory,
the flags will be discarded after the end of the session.
Additional considerations Note that the length of the original statement is not affected by the number of notes menu, as you are actually quoting melodies as they were played.
Note that you can also insert statements and original statements at any point of the piece.
Following Chunks The user can extend the melody composed so far with a new chunk of one of the following types:
“statement”,
“original statement”,
Sony Computer Science Laboratory Paris Technical Report 2013-3
58
"continuation" (of the last chunk generated),
"variation" (of the last chunk generated),
"answer" (of the last chunk generated),
"conclusion",
“repeat the last chunk” (this button will simply repeat the last chunk, whatever the type of the chunk is),
“rest” (this button will insert a rest of 2 beats (1s at 120 bpm) and can be pressed successively many times to obtain longer durations).
Those sequence types are explained in the IMPRO part of this User Manual (except output types specific to COMPO which are explained below). The composed chunks are thus based on the session memory, i.e. on what the user herself played before.
Step (2) can be repeated as many times as desired by the user, thus allowing generating arbitrarily long melodies.
Note that, at each step (1) and (2), the user can re-specify the number of notes of the chunk to generate.
Repeat arbitrary chunk(s) Click on Copy button in chunk’s label (whatever the position or the type of the chunk is), it will copy /paste it to the last position. This action is reflected in the trace.
By repeating this action on successive chunks, you can create (copies of) simple structure forms.
Backtracking / rejecting a chunk At all the steps, the user can also, as in step (1), reject the COMPO's proposed chunk if she is not satisfied with it. To do so, press the backtrack button or press the backspace button on your computer keyboard, and then press again on the chunk generation button you want.
A possible option to this procedure is to use a mouse scroll. When you are not satisfied with the generated chunk, you can simply point the mouse on this chunk and scroll your mouse wheel. The system will then generate an alternative chunk of the same output type. Note that this action is identical to (a) pressing backtrack button and then (b) pressing the chunk button of the same output type. This action will be recorded in the trace as two actions (a+b).
Not that the mouse scroll is active only when mouse is in the melody panel (not on the buttons or other areas), and affects only the last chunk.
Finally, you can also delete an arbitrary chunk (whatever the position or the type of the chunk is), by pressing Delete button in chunk’s label.
Greyed action buttons When the memory is not big enough the system may not be able to generate a response, as in IMPRO. The COMPO provides a powerful solution, based on major improvement of learning speed in the core algorithm. All the cases where no output is possible for a given memory set are automatically anticipated. All buttons corresponding to the actions which are not possible are deactivated.
When it happens, you can
Backtrack the preceding chunk,
Sony Computer Science Laboratory Paris Technical Report 2013-3

59
Try a different output type, Enrich the memory (see below), Change the number of notes in the output (the system will recalculate possible
solutions and update possible user action buttons accordingly).
When the piece is finished? The notion that the piece is “finished” is currently (v3.9) represented by fact that a conclusion was generated AND the Send button was pressed, i.e. when both conditions are met. For these purposes, the Send button is enabled only when a conclusion was generated. Note that you can deactivate the first condition, by un-checking the check-box “should end by conclusion” in advanced parameters.
13.2.3 Injecting new musical material during COMPO session In some cases, you may want to inject new musical material to the system’s memory during an on-going COMPO session, for example when the initial training set is not big enough to generate interesting piece.
Procedure First of all, this function may be enabled or disabled through Enable/disable input recording button in COMPO. Make sure that the button shows the right state.
It is then possible to inject new material by playing on the MIDI keyboard during the COMPO session, without returning to the IMPRO main window. The memory is updated and reparsed automatically, and the user can see the memory status in the Memory counter similar to the one used in IMPRO. In this way, the user can control the fact that the phrases played on the MIDI keyboard during COMPO session were added to the training set.
This action is automatically recorded in the trace.
Finally, when injecting new material, you can manually edit the memory by clicking on the Memory counter in the COMPO interface (see below for details).
Visualization There is no a priori need to keep the IMPRO window fully open during this procedure, so you can collapse it.
It is possible to display the input piano roll (i.e. what the user plays on the keyboard) as a detached window from the COMPO View menu. You can open this input piano roll and COMPO main interface together, and arrange the windows to see them both, while collapsing the main IMPRO window.
As an option, the user input can be displayed as score from the COMPO View menu.
Known limitations Be careful, depending on the sequence of user's actions, and in particular when injecting new material, the memory is not updated in the same manner in IMPRO and COMPO. The "counter" in the IMPRO Memory Panel and the “counter” in the COMPO Memory Panel are independent, and show respective memory states in order to have a control over the process.
More generally, the memory management is independent in IMPRO and COMPO; as an example, cleaning memory in IMPRO will have no effect in COMPO. Please be careful and control what is going on with the help of the two “counters” in IMPRO and COMPO.
Sony Computer Science Laboratory Paris Technical Report 2013-3

60
13.2.4 Output types specific to COMPO Statement A Statement will produce a phrase ending in a random pitch.
Original statement As explained above, this button will simply propose the list of all the melodies the user played during the phase when the memory was formed.
Conclusion This output type will continue from the previous chunk and will end on the note which was the first note of the piece (i.e. the first note of the first chunk).
13.3 Record/Export/Import MIROR COMPO functionalities
13.3.1 The Trace of user’s actions The button Trace opens a Trace window that you can keep open during the experiment (it is then updated dynamically). The trace is recorded automatically in any case, you need to use the button only to visualize it. This Trace window contains the list of actions made by the user:
Each action/chunk done by the user is labeled (Rest, Backtrack, Conclusion, Play, MelodyAdded, FailedAction, etc.),
Each label (except backtrack) opens the corresponding chunk in a standard piano roll panel inside the Trace window,
From this piano roll panel you can play back or export arbitrary chunks to a MIDI or MP3 file with a user-defined name (the "save" button in the trace interface: one-click operation).
The Trace list automatically scrolls down to the last action.
Figure 42. The Trace window with the list of actions and the piano roll panel
13.3.2 Recording pieces and action traces The COMPO software offers various ways to record composed pieces and traces of actions performed by the user.
To start with, when you launch COMPO from a recorded IMPRO session, it will
Sony Computer Science Laboratory Paris Technical Report 2013-3
61
automatically pick up the IMPRO user name and the current date, and will generated the COMPO session name as follows: [IMPRO user name]/[current date], e.g. sony_armen_1/2012-01-06_17-44-56. Note that the IMPRO session management system is independent from the COMPO process, i.e. the fact to record or not the session in IMPRO has no effect on COMPO session which will be saved in any case if you press the corresponding Save buttons explained below.
Note also that you can save the same piece at different stages of composition process (both on your local machine and on the server), but it is not possible for the moment to restore an unfinished piece.
13.3.2.1 Saving pieces and action traces on the local machine This button will save on your local machine (in the folder you will specify) 4 files:
Armen1.mem (a text file similar to those used in IMPRO with the composed piece in MIDI format),
Armen1.mid (a MIDI file of the composed piece, can be played back with standard Windows players),
Armen1.mp3 (a MP3 file of the composed piece, can be played back with standard Windows players),
Armen1.trc (a text file with the trace of all the user actions, including initial memory).
Known issues The name of the files is generated automatically. If you want to specify a different name and/or destination folder, create simple names for folders and files (do not use characters such as ".","_", etc.).
13.3.2.2 Restoring pieces and action traces from the local machine You can restore the composed piece together with the trace of all the user actions. Click on Load button and choose a previously recorded trace file, e.g. MyPiece.trc. You can continue your composition from this point on.
13.3.2.3 Save to the server This button will send to the server:
Armen1.mem (a text file similar to those used in IMPRO with the composed piece in MIDI format),
Armen1.mid (a MIDI file of the composed piece, can be played back with standard Windows players) [not used for the moment],
Armen1.trc (a text file with the trace of all the user actions, including initial memory) [not used for the moment].
Your user ID will be the name of the IMPRO user from which you launched the COMPO software (sony_armen_1 in the example above). It can be later accessed at the following address: http://ws.personiks.com/sony/displayUserSessions.aspx
13.3.3 Visualization and playback of the finished piece Visualize and playback the whole piece
Sony Computer Science Laboratory Paris Technical Report 2013-3
62
The button Display whole piece in COMPO main interface will open a new window with the piece composed so far. The visualisation we can technically obtain is the piece as a whole, without distinguishing between chunks’ background colours and output types.
You can play back / pause the whole piece from this window.
It is also possible to play from any point or to define a loop region. When you are in this “whole piece piano roll”, drag-and-highlight a segment with the mouse (that is left-click and slide the mouse pointer over a segment), the segment is then highlighted and you can play / pause / loop this segment.
These actions can be done at any time during the composition process.
Visualize, play back and export arbitrary chunks You can visualize, play back and export arbitrary chinks from the Trace window (described above).
Alternatively, if you do not want to open the Trace window during experiments, you can still easily:
Play back individual chunks from the main interface window: click on a play button in chunk’s label. The trace of this action will be recorded.
Play back individual chunks from the piano roll panel: double-click on a chunk, then play it back in its piano roll panel. Note that the trace of this action will be not recorded.
Export arbitrary chunks in MIDI or MP3 format with the name you want, while composing the piece: double-click on a chunk, then the "save" button in piano-roll which opens then (two-click operation). Note that the trace of this action will be not recorded.
These actions can be done at any time during the composition process.
NB. Be sure to close these piano roll panels when you do not need them anymore, as they do not close automatically.
13.3.4 Start a new COMPO session with the same user and the same memory This feature allows you to start a new session with the same user and the same memory. The trace will be cleared. The composed piece will be cleared as well, so you may want to save it and/or to send it to the server before pressing this button. A warning message is implemented to prevent the user from accidentally clearing the session.
Note that the melodies “injected” (played on the keyboard) during the composition process will be kept in this training set, but not in the recorded IMPRO session from which you launched COMPO. That is, pressing this button is not equivalent to closing COMPO and reopening it from the same recorded IMPRO session.
The pieces you will subsequently obtain will be identified on the server with the same user name but will have a different time stamp.
13.4 Additional settings
13.4.1 COMPO memory editor You may want to manually edit the system’s memory both in case you inject new material and in case you work from a recorded session.
Sony Computer Science Laboratory Paris Technical Report 2013-3
63
Click on the Memory counter in the COMPO interface, it will open a standard Memory editor described in the IMPRO part of this User Manual.
You can use it for example to delete a particular phrase from the training set. The memory is then reparsed automatically.
13.4.2 COMPO advanced parameters This button allows you:
To define the Max Order parameter,
To define the duration of the rest inserted by the Rest button,
To start or not the composition by statement [do not use for the moment],
To end or not the composition by conclusion.
13.4.3 Transposition in COMPO You can transpose the memory by checking the transpose box in IMPRO (be careful as any manipulation in IMPRO Advanced tab during COMPO session is not recommended during experiments with children):
All the melodies while playing on the keyboard with COMPO open (1 played melody will give 13 melodies in COMPO training set),
Or when “sending” a recorded session to COMPO (1 recorded melody in the recorded IMPRO session will give 13 melodies in COMPO training set).
You can also transpose arbitrary notes/segments in the finished piece by using Edit melody button in the piano roll panel (see the description of the Edit melody button in the Piano roll section of this User Manual).
13.4.4 Keyboard shortcuts and mouse actions Almost all the actions in COMPO can be realized by pressing the dedicated buttons on the PC keyboard (lower case letters):
s key for Statement, a key for Answer, c key for Conclusion, v key for Variation, k key for Conclusion, b or BACKSPACE for Backtrack.
To scroll among all possible solutions for a given chunk, you can use the mouse wheel. See the sub-section Backtracking / rejecting a chunk above for details.
Attention! For experiments, please use a standard mouse and not a laptop touchpad, as touchpads have advanced features (zoom, etc.) which may disrupt the scrolling feature in COMPO. It is thus even better to completely deactivate the touchpad in your Windows settings, and to use a mouse instead.
13.4.5 Interface pre-sets / personalization It is possible to remove the buttons unneeded for a particular experiment. To do so, proceed as follows.
First, you will need to create a configuration file:
Sony Computer Science Laboratory Paris Technical Report 2013-3

64
Go to your \Continuator2 folder and make a copy of compoParams_All.txt file, Rename the obtained copy, e.g. compoParams_unibo_expe_3.txt Edit the obtained txt file, i.e. remove the action words you do not need.
Second, you will need to load this configuration file:
Go to Options menu, Choose “load parameters”, Choose compoParams_unibo_expe_3.txt
You can always go back to default configuration by choosing reset to default actions.
NB. If you remove Conclusion action, be sure to un-check “should end by conclusion” checkbox in advanced parameters. Otherwise you will not be able to send the piece to the server.
Sony Computer Science Laboratory Paris Technical Report 2013-3