Milk Island - Jura Ersatzteile, Saeco, Delonghi, La Pavoni ... · una leggera rotazione. Verificare...
36
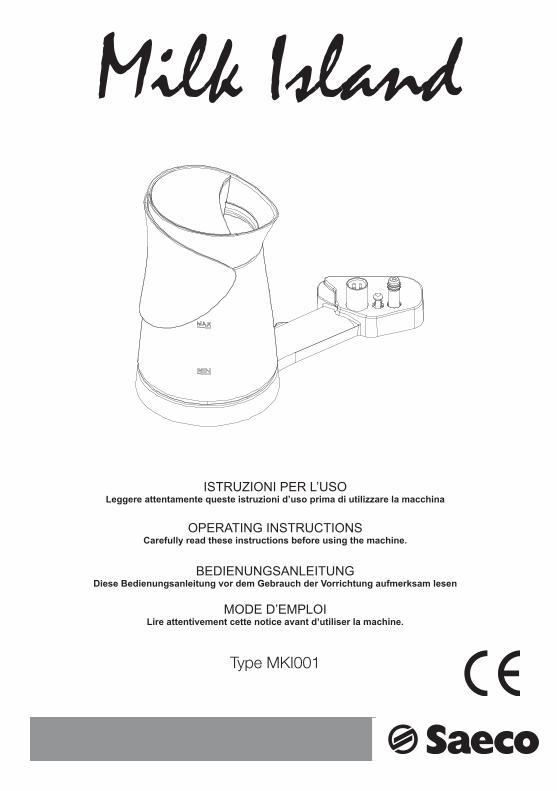
Leggere attentamente queste istruzioni d’uso prima di utilizzare la macchina ISTRUZIONI PER L’USO Type MKI001 Milk Island Carefully read these instructions before using the machine. OPERATING INSTRUCTIONS Diese Bedienungsanleitung vor dem Gebrauch der Vorrichtung aufmerksam lesen BEDIENUNGSANLEITUNG Lire attentivement cette notice avant d’utiliser la machine. MODE D’EMPLOI
Transcript of Milk Island - Jura Ersatzteile, Saeco, Delonghi, La Pavoni ... · una leggera rotazione. Verificare...
Leggere attentamente queste istruzioni d’uso prima di utilizzare la macchinaISTRUZIONI PER L’USO
Type MKI001
Milk Island
Carefully read these instructions before using the machine.OPERATING INSTRUCTIONS
Diese Bedienungsanleitung vor dem Gebrauch der Vorrichtung aufmerksam lesenBEDIENUNGSANLEITUNG
Lire attentivement cette notice avant d’utiliser la machine.MODE D’EMPLOI

2 INDICE - GENERALITÀ
GENERALITÀ
Il Milk Island è un dispositivo studiato e creato appositamente per emulsionare il latte e per riscaldare l’acqua, nel modo più semplice e veloce. Il Milk Island può essere utilizzato solo per un uso domestico; non è indicato per un funzionamento continuo di tipo professionale e per riscaldare tè e tisane.
Attenzione. Non si assumono responsabilità per eventuali danni in caso di:• Impiego errato e non conforme agli scopi previsti;• Riparazioni non eseguite presso centri d’assistenza autorizzati;• Manomissione di qualsiasi componente della macchina;• Impiego di pezzi di ricambio e accessori non originali;• Mancata manutenzione e stoccaggio in locali al di sotto di 15°C.In questi casi viene a decadere la garanzia.
Il triangolo di avvertimento indica tutte le istruzioni importanti per la sicurezza dell’utente. Attenersi scrupolosamente a tali indicazioni per evitare ferimenti gravi!
Questo simbolo evidenzia le in for ma zio ni da tenere in maggiore con si de ra zio ne, per un migliore uti liz zo della mac chi na.
Conservare queste istruzioni per l’uso in un luogo sicuro e allegarle al dispositivo qualora un’altra perso-na dovesse utilizzarla.
Per ulteriori informazioni o nel caso di problemi, non trattati del tutto o soltanto insufficientemente nelle presenti istruzioni, rivolgetevi agli specialisti competenti.
GENERALITÀ . . . . . . . . . . . . . . . . . . . . . . . . . . . . . . . . . . . . . . . . . . . . . . . . . . . . . . . 2
DATI TECNICI . . . . . . . . . . . . . . . . . . . . . . . . . . . . . . . . . . . . . . . . . . . . . . . . . . . . . . . 3
INSTALLAZIONE MILK ISLAND . . . . . . . . . . . . . . . . . . . . . . . . . . . . . . . . . . . . . . . . 4
USO MILK ISLAND . . . . . . . . . . . . . . . . . . . . . . . . . . . . . . . . . . . . . . . . . . . . . . . . . . 5
PULIZIA MILK ISLAND . . . . . . . . . . . . . . . . . . . . . . . . . . . . . . . . . . . . . . . . . . . . . . . . 6
DISINSTALLAZIONE MILK ISLAND . . . . . . . . . . . . . . . . . . . . . . . . . . . . . . . . . . . . . 7
NORME DI SICUREZZA . . . . . . . . . . . . . . . . . . . . . . . . . . . . . . . . . . . . . . . . . . . . . . 8
3 COMPONENTI - DATI TECNICI
DATI TECNICI
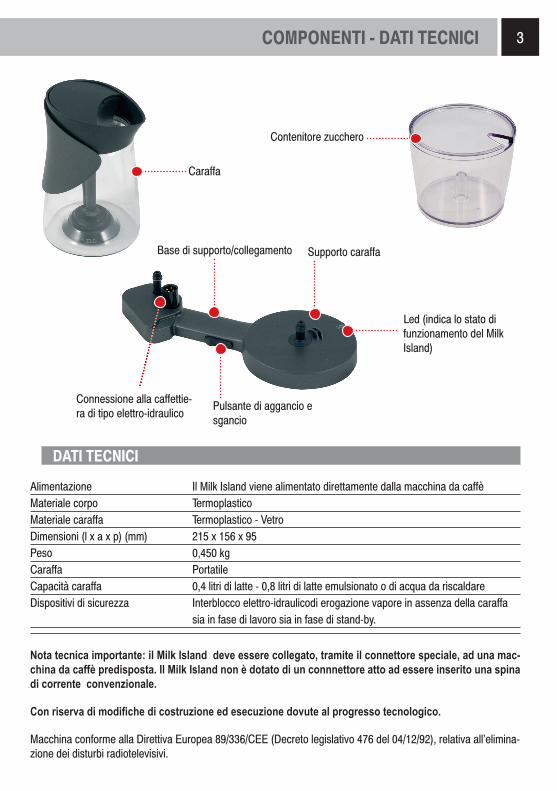
Alimentazione Il Milk Island viene alimentato direttamente dalla macchina da caffèMateriale corpo TermoplasticoMateriale caraffa Termoplastico - VetroDimensioni (l x a x p) (mm) 215 x 156 x 95 Peso 0,450 kgCaraffa PortatileCapacità caraffa 0,4 litri di latte - 0,8 litri di latte emulsionato o di acqua da riscaldareDispositivi di sicurezza Interblocco elettro-idraulicodi erogazione vapore in assenza della caraffa
sia in fase di lavoro sia in fase di stand-by.
Nota tecnica importante: il Milk Island deve essere collegato, tramite il connettore speciale, ad una mac-china da caffè predisposta. Il Milk Island non è dotato di un connnettore atto ad essere inserito una spina di corrente convenzionale.
Con riserva di modifi che di costruzione ed esecuzione dovute al progresso tecnologico.
Macchina conforme alla Direttiva Europea 89/336/CEE (Decreto legislativo 476 del 04/12/92), relativa all’elimina-zione dei disturbi radiotelevisivi.
Caraffa
Contenitore zucchero
Connessione alla caffettie-ra di tipo elettro-idraulico Pulsante di aggancio e
sgancio
Supporto caraffa
Led (indica lo stato di funzionamento del Milk Island)
Base di supporto/collegamento
4 INSTALLAZIONE
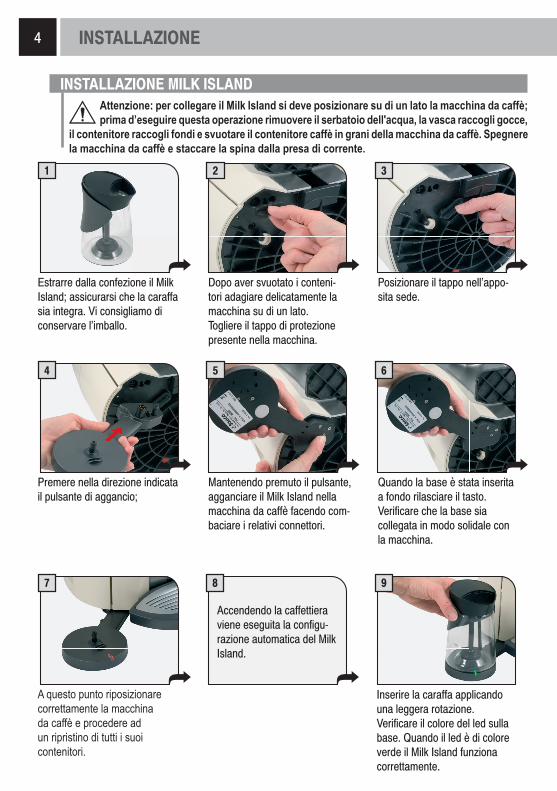
INSTALLAZIONE MILK ISLANDAttenzione: per collegare il Milk Island si deve posizionare su di un lato la macchina da caffè; prima d’eseguire questa operazione rimuovere il serbatoio dell'acqua, la vasca raccogli gocce,
il contenitore raccogli fondi e svuotare il contenitore caffè in grani della macchina da caffè. Spegnere la macchina da caffè e staccare la spina dalla presa di corrente.
1 2 3
Estrarre dalla confezione il Milk Island; assicurarsi che la caraffa sia integra. Vi consigliamo di conservare l’imballo.
Posizionare il tappo nell’appo-sita sede.
Dopo aver svuotato i conteni-tori adagiare delicatamente la macchina su di un lato.Togliere il tappo di protezione presente nella macchina.
4 5 6
Premere nella direzione indicata il pulsante di aggancio;
Quando la base è stata inserita a fondo rilasciare il tasto.Verificare che la base sia collegata in modo solidale con la macchina.
Mantenendo premuto il pulsante, agganciare il Milk Island nella macchina da caffè facendo com-baciare i relativi connettori.
97
A questo punto riposizionare correttamente la macchina da caffè e procedere ad un ripristino di tutti i suoi contenitori.
Inserire la caraffa applicando una leggera rotazione.Verificare il colore del led sulla base. Quando il led è di colore verde il Milk Island funziona correttamente.
Accendendo la caffettiera viene eseguita la configu-razione automatica del Milk Island.
8

5
USO MILK ISLANDAttenzione: prima d’utilizzare il Milk Island si deve procedere alla pulizia della caraffa e degli altri componenti. Verifi care che tutti i componenti siano installati correttamente. Il vetro della
caraffa può raggiungere temperature elevate: pericolo di scottature! Utilizzare il Milk Island solo con acqua e latte. E' vietato utilizzarlo con altri liquidi di qualsiasi natura o composizione chimica.
Nota importante: la quantità di latte nella caraffa non deve essere inferiore al livello minimo “MIN” e non deve mai superare il livello massimo “MAX”. Dopo aver utilizzato il Milk Island
procedere ad un’accurata pulizia di tutti i suoi componenti.
Per garantire un miglior risultato nella preparazione del cappuccino, il latte utilizzato deve essere freddo (0-8°C). Si consiglia l'utilizzo di un latte parzialmente scremato.
1 2
Posizionare il rubinetto per l’erogazione vapore sulla posizione “Milk Island”.
3
Riempire la caraffa del latte con la quantità di latte desiderato.
Posizionare la caraffa del latte sulla base del Milk Island.
4 5 6
Prelevare la caraffa usando l’impugnatura.
Dopo aver eseguito dei leggeri movimenti circolari, versare il latte nella tazza.
Posizionare la tazza con il latte montato sotto all'erogatore.Erogare il caffè nella tazza (vedi manuale istruzione della caffettiera).
Nota: quando la caraffa del latte non viene utilizzato, sulla base inserire il contenitore dello zucchero. Questo permette di proteggere i tubi di connessione da sporco e urti accidentali.
USO
6 PULIZIA
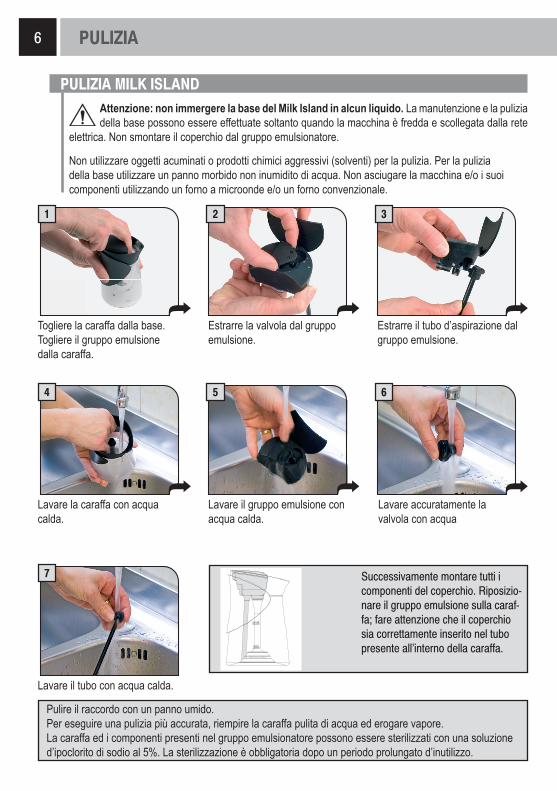
PULIZIA MILK ISLANDAttenzione: non immergere la base del Milk Island in alcun liquido. La manutenzione e la pulizia della base possono essere effettuate soltanto quando la macchina è fredda e scollegata dalla rete
elettrica. Non smontare il coperchio dal gruppo emulsionatore.
Non utilizzare oggetti acuminati o prodotti chimici aggressivi (solventi) per la pulizia. Per la pulizia della base utilizzare un panno morbido non inumidito di acqua. Non asciugare la macchina e/o i suoi componenti utilizzando un forno a microonde e/o un forno convenzionale.
1 2 3
Togliere la caraffa dalla base.Togliere il gruppo emulsione dalla caraffa.
Estrarre la valvola dal gruppo emulsione.
4 5 6
Lavare la caraffa con acqua calda.
Lavare il gruppo emulsione con acqua calda.
Lavare accuratamente la valvola con acqua
Estrarre il tubo d’aspirazione dal gruppo emulsione.
7
Lavare il tubo con acqua calda.
Successivamente montare tutti i componenti del coperchio. Riposizio-nare il gruppo emulsione sulla caraf-fa; fare attenzione che il coperchio sia correttamente inserito nel tubo presente all’interno della caraffa.
Pulire il raccordo con un panno umido.Per eseguire una pulizia più accurata, riempire la caraffa pulita di acqua ed erogare vapore.La caraffa ed i componenti presenti nel gruppo emulsionatore possono essere sterilizzati con una soluzione d’ipoclorito di sodio al 5%. La sterilizzazione è obbligatoria dopo un periodo prolungato d’inutilizzo.

7DISINSTALLAZIONE
DISINSTALLAZIONE MILK ISLANDAttenzione: per scollegare il Milk Island si deve posizionare su di un lato la macchina da caffè; prima d’eseguire questa operazione rimuovere il serbatoio dell'acqua, la vasca raccogli gocce,
il contenitore raccogli fondi e svuotare il contenitore caffè in grani della macchina da caffè.
Spegnere la macchina da caffè e staccare la spina dalla presa di corrente
1 2 3
4
A questo punto riposizionare correttamente la macchina da caffè e procedere ad un ripristino di tutti i suoi componenti.
5Accendere la macchina da caffè ed eseguire la procedura messa in funzione come descritto nel manuale istruzioni della macchina stessa.
6
Se possibile recuperare l’imballo.Estrarre dalla base la caraffa del latte.
Mantenendo premuto il pulsante, estrarre la base dalla macchina da caffè.
Dopo aver svuotato i conteni-tori della macchina adagiare delicatamente la macchina su di un lato.
Riposizionare il tappo di protezione nella sede ove era installato il Milk Island.
Successivamente lavare e sterilizzare tutti i componenti del Milk Island e riporli in un luogo sicuro per una successiva installazione; se presente, si consiglia d’utilizzare l’imballo originale.

8 RISOLUZIONE PROBLEMI - NORME DI SICUREZZA
Problemi Cause RimediLa macchina non monta il latte. Latte con tenore di grasso non
adatto.Cambiare il tipo di latte utilizzato.
La valvola posta nel coperchio è sporca
Lavare la valvola.
La spia nella base del Milk Island è rossa.
Premere a fondo la caraffa del latte.
Componenti del coperchio non installati correttamente.
Verificare il montaggio del coperchio.
La macchina da caffè non pronta per erogare vapore.
Verificare il funzionamento della macchina.
Per i guasti non contemplati dalla suddetta tabella o in caso che i rimedi suggeriti non li risolvano, rivolgersi ad un centro assistenza.
Mai mettere a contatto dell’acqua le parti sotto tensione: pericolo di cortocircuito! Il vapore surriscaldato e l’acqua calda possono provocare scottature!
DESTINAZIONE D’USOIl Milk Island è previsto esclusivamente per l’impiego domestico. Il Milk Island non può essere utilizzato singolarmente ma deve essere collegato ad una macchina da caffè predisposta.È vietato apportare modifiche tecniche e ogni impiego illecito, a causa dei rischi che essi comportano! Il Milk Island e la macchina per caffè devono essere utilizzati solo da adulti.
ALIMENTAZIONE DI CORRENTEIl Milk Island viene alimentato in bassa tensione dalla macchina per caffè alla quale è collegato tramite lo specia-le connettore elettro-idraulico.
CONNETTORE D’ALIMENTAZIONE (ELETTRO-IDRAULICO)Mai usare il Milk Island se il connettore elettro-idraulico d’alimentazione è difettoso. Se il connettore elettro-idraulico è danneggiato, deve essere sostituito dal produttore o dal suo servizio assisten-za clienti.Non mettere a contatto il connettore con liquidi, parti bagnate o altre sostanze che possano alterare l’efficacia dei contatti elettrici o provocare un corto circuito.
PROTEZIONE D’ALTRE PERSONEAssicurarsi che nessun bambino abbia la possibilità d’utilizzare con il Milk Island. I bambini non si rendono conto del pericolo connesso agli elettrodomestici.Non lasciare alla portata dei bambini i materiali utilizzati per imballare il Milk Island.
PERICOLO D’USTIONIEvitare di dirigere contro se stessi e/o altri il getto di vapore surriscaldato e/o d’acqua calda. Usare sempre l’apposita manopola.
NORME DI SICUREZZA
9NORME DI SICUREZZA
UBICAZIONESistemare il Milk Island e la macchina per caffè in un posto sicuro, dove nessuno può rovesciarla o venirne ferito. Acqua calda o vapore surriscaldato potrebbero fuoriuscire: pericolo di scottature! Non usare il Milk Island e la macchina per caffè all’aperto. Non tenere la macchina a temperatura inferiore a 0°C; c’è il pericolo che il gelo possa danneggiare la macchina.Non posare la macchina su superfici molto calde e nelle vicinanze di fiamme libere per evitare che la carcassa fonda o comunque si danneggi.
PULIZIA Mai immergere la base del Milk Island nell’acqua! È severamente vietato cercare d’intervenire all’interno della base del Milk Island.Dopo aver utilizzato il Milk Island procedere ad un’accurata pulizia della caraffa del latte con l’utilizzo dell’acqua calda e della lavastoviglie.
SPAZIO PER L’USO E LA MANUTENZIONEPer il corretto e buon funzionamento del Milk Island e della macchina per caffè si consiglia quanto segue:Scegliere un piano d’appoggio ben livellato;Scegliere un ambiente sufficientemente illuminato, igienico e con presa di corrente facilmente accessibile;Prevedere una distanza minima dalle pareti della macchina come indicato nel relativo libretto.
CUSTODIA DELLA MACCHINAQuando il Milk Island rimane inutilizzato per un periodo prolungato, disinserirlo dalla macchina. Custodirlo in luo-go asciutto e non accessibile ai bambini. Proteggerlo dalla polvere e dallo sporco. Dopo un periodo d’inutilizzo povvedere alla sterilizzazione del Milk Island prima d’utilizzarlo.
RIPARAZIONI / MANUTENZIONENel caso di guasti, difetti o sospetto di difetto dopo una caduta, staccare subito il Milk Island dalla macchina (vedi disinstallazione). Mai mettere in funzione un Milk Island difettoso. Le riparazioni vanno eseguite unicamente da un centro di assistenza autorizzato. Nel caso di interventi non eseguiti a regola d’arte, si declina ogni responsa-bilità per eventuali danni.
ANTINCENDIOIn caso di incendio utilizzare estintori ad anidride carbonica (CO2). Non utilizzare acqua o estintori a polvere.
SMALTIMENTO
Il simbolo apposto sull’ apparecchiatura indica che l’ apparecchiatura, alla fine della propria vita utile, deve essere raccolta separatamente dagli altri rifiuti.L’utente deve pertanto conferire l’apparecchiatura giunta a fine vita, agli idonei centri di raccolta differenziata dei rifiuti elettrici ed elettronici, ovvero riconsegnarla al rivenditore al momento dell’ acquisto di una nuova apparec-chiatura di tipo equivalente, in ragione di uno ad uno.L’adeguata raccolta differenziata e l’invio successivo dell’ apparecchiatura dismessa al riciclaggio, al trattamento e allo smaltimento ambientalmente compatibile contribuiscono ad evitare possibili effetti negativi sull’ambiente e sulla salute umana e favoriscono il riciclo dei materiali di cui è composta l’ apparecchiatura.Lo smaltimento abusivo dell’apparecchiatura da parte dell’utente, comporta l’applicazione delle sanzioni ammini-strative di cui al D.Lgs. n. 22/1997 (articolo 50 e seguenti del D.Lgs. n. 22/1997).

10 INDEX - GENERAL INFORMATION
GENERAL INFORMATION
Milk Island is an appliance studied and designed especially for emulsifying milk and heating water in the simplest and fastest manner possible. Milk Island should only be used for domestic use and is not suitable for continuous, professional operation nor for heating tea and herb tea.
Warning. No liability is assumed for any damage caused by:• Incorrect use not in accordance with the intended uses;• Repairs not carried out by authorised customer service centres;• Tampering with any part of the machine;• The use of non-original spare parts and accessories;• Failure to maintain the machine and its storage at temperatures below 15°C.In these cases, the warranty is not valid.
The warning triangle indicates all important instructions for the user’s safety. Please follow these instructions carefully to avoid serious injury!
This symbol is used to highlight information that is particularly important for ensuring optimal use of the machine.
Keep these operating instructions in a safe place and make them available to anyone who may use the appliance.
For further information or if you experience problems not completely or sufficiently addressed in these instruc-tions, please contact an authorised specialist.
GENERAL INFORMATION . . . . . . . . . . . . . . . . . . . . . . . . . . . . . . . . . . . . . . . . . . . . 10
TECHNICAL SPECIFICATIONS . . . . . . . . . . . . . . . . . . . . . . . . . . . . . . . . . . . . . . . . 11
INSTALLING MILK ISLAND . . . . . . . . . . . . . . . . . . . . . . . . . . . . . . . . . . . . . . . . . . . 12
USING MILK ISLAND . . . . . . . . . . . . . . . . . . . . . . . . . . . . . . . . . . . . . . . . . . . . . . . . 13
CLEANING MILK ISLAND . . . . . . . . . . . . . . . . . . . . . . . . . . . . . . . . . . . . . . . . . . . . 14
UNINSTALLING MILK ISLAND . . . . . . . . . . . . . . . . . . . . . . . . . . . . . . . . . . . . . . . . 15
SAFETY RULES . . . . . . . . . . . . . . . . . . . . . . . . . . . . . . . . . . . . . . . . . . . . . . . . . . . . 16

11 COMPONENTS – TECHNICAL SPECIFICATIONS
TECHNICAL SPECIFICATIONS
Power supply Milk Island is directly powered by the coffee machineHousing material ThermoplasticJug material Thermoplastic - GlassSize (w x h x d) (mm) 215 x 156 x 95 Weight 0,450 kgJug Removable Jug capacity 0.4 litres of milk – 0.8 litres of emulsified milk or water to be heatedSafety devices Electro-hydraulic steam dispensing interlock in the absence of the jug, both
during operating as well as stand-by phases.
Important technical note: Milk Island must be connected to a preset coffee machine using the special con-nector. Milk Island is not equipped with a connector suitable for being connected to a conventional plug.
Subject to engineering and manufacturing changes due to technological developments.
The machine conforms to European Directive 89/336/EEC (Italian Legislative Decree 476 dated 04/12/92) concerning electromagnetic compatibility.
Jug
Sugar container
Electro-hydraulic connec-tion to the coffee machine Release button
Jug support
Led (indicates the operating status of Milk Island)
Connection/support base

12 INSTALLATION
INSTALLING MILK ISLANDWarning: to connect Milk Island, position the coffee machine on its side. Before carrying out this operation, remove the water tank, drip tray and dregs drawer and empty the coffee bean
hopper. Turn the coffee machine off and unplug the plug from the socket.
1 2 3
Remove Milk Island from the packaging; ensure that the jug is intact. We recommend keeping the packaging.
Position the cap in the appro-priate housing.
After having emptied the containers, delicately turn the machine onto one side.Remove the protective cap located on the machine.
4 5 6
Push the release button in the direction indicated.
Release the button when the base has been completely inserted.Ensure that the base is firmly connected to the machine.
Keeping the button pushed, connect Milk Island to the coffee machine by joining the relevant connectors.
97
At this point, re-position the coffee machine in its correct position and put back all its containers.
Position the jug by slightly rotating it.Check the colour of the led on the base. When the led is green, Milk Island is operating correctly.
Milk Island is automatically confi gured when the coffee machine is turned on.
8
13
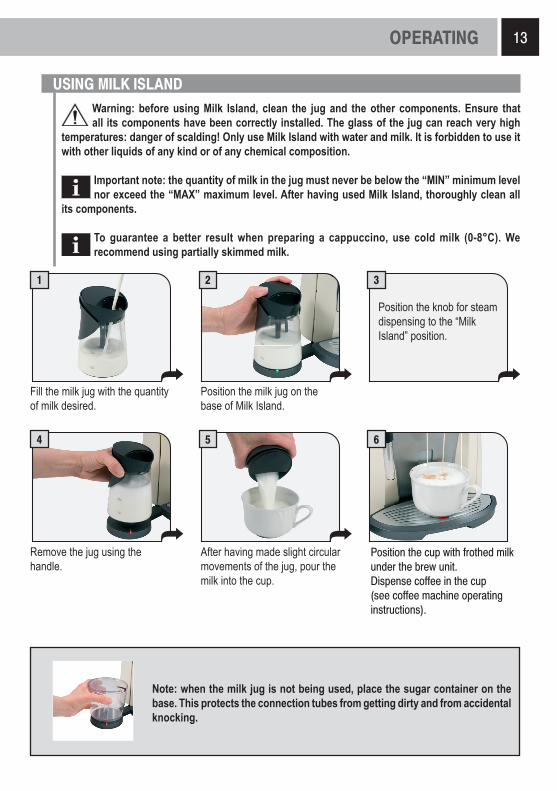
USING MILK ISLANDWarning: before using Milk Island, clean the jug and the other components. Ensure that all its components have been correctly installed. The glass of the jug can reach very high
temperatures: danger of scalding! Only use Milk Island with water and milk. It is forbidden to use it with other liquids of any kind or of any chemical composition.
Important note: the quantity of milk in the jug must never be below the “MIN” minimum level nor exceed the “MAX” maximum level. After having used Milk Island, thoroughly clean all
its components.
To guarantee a better result when preparing a cappuccino, use cold milk (0-8°C). We recommend using partially skimmed milk.
1 2
Position the knob for steam dispensing to the “Milk Island” position.
3
Fill the milk jug with the quantity of milk desired.
Position the milk jug on the base of Milk Island.
4 5 6
Remove the jug using the handle.
After having made slight circular movements of the jug, pour the milk into the cup.
Position the cup with frothed milk under the brew unit.Dispense coffee in the cup (see coffee machine operating instructions).
Note: when the milk jug is not being used, place the sugar container on the base. This protects the connection tubes from getting dirty and from accidental knocking.
OPERATING
14 CLEANING
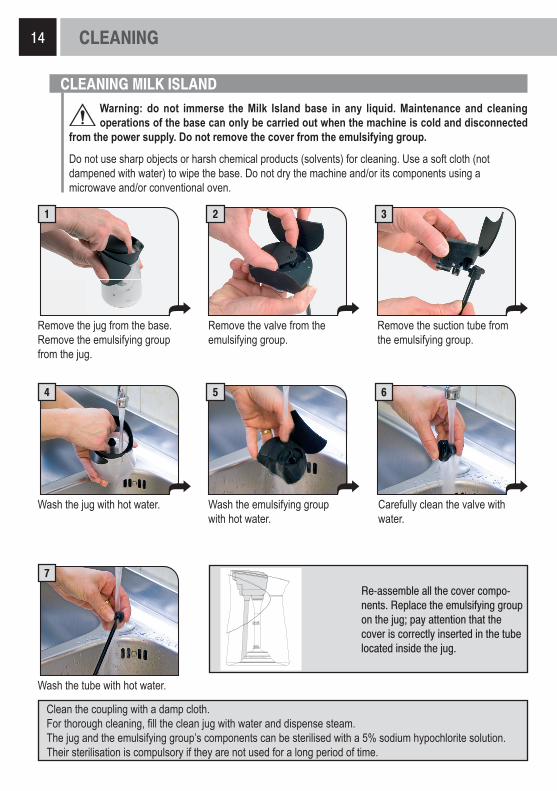
CLEANING MILK ISLANDWarning: do not immerse the Milk Island base in any liquid. Maintenance and cleaning operations of the base can only be carried out when the machine is cold and disconnected
from the power supply. Do not remove the cover from the emulsifying group.
Do not use sharp objects or harsh chemical products (solvents) for cleaning. Use a soft cloth (not dampened with water) to wipe the base. Do not dry the machine and/or its components using a microwave and/or conventional oven.
1 2 3
Remove the jug from the base.Remove the emulsifying group from the jug.
Remove the valve from the emulsifying group.
4 5 6
Wash the jug with hot water. Wash the emulsifying group with hot water.
Carefully clean the valve with water.
Remove the suction tube from the emulsifying group.
7
Wash the tube with hot water.
Re-assemble all the cover compo-nents. Replace the emulsifying group on the jug; pay attention that the cover is correctly inserted in the tube located inside the jug.
Clean the coupling with a damp cloth.For thorough cleaning, fi ll the clean jug with water and dispense steam.The jug and the emulsifying group’s components can be sterilised with a 5% sodium hypochlorite solution. Their sterilisation is compulsory if they are not used for a long period of time.

15UNINSTALLING
UNINSTALLING MILK ISLANDWarning: to disconnect Milk Island, position the coffee machine on its side. Before carrying out this operation, remove the water tank, drip tray and dregs drawer and empty the coffee
bean hopper.
Turn the coffee machine off and unplug the plug from the socket.
1 2 3
4
At this point, re-position the coffee machine in its correct position and put back all its components.
5Turn the coffee machine on and follow the start-up procedure as described in the machine’s operating instructions.
6
Use the original packaging, if available.Remove the milk jug from the base.
Keeping the button pushed, re-move the base from the coffee machine.
After having emptied the containers, delicately turn the machine onto one side.
Re-position the protective cap in the housing where Milk Island was installed.
Then wash and sterilise all Milk Island components and place them in a safe place for future installation; if available, we recommend using the original packaging.
16 TROUBLESHOOTING - SAFETY RULES
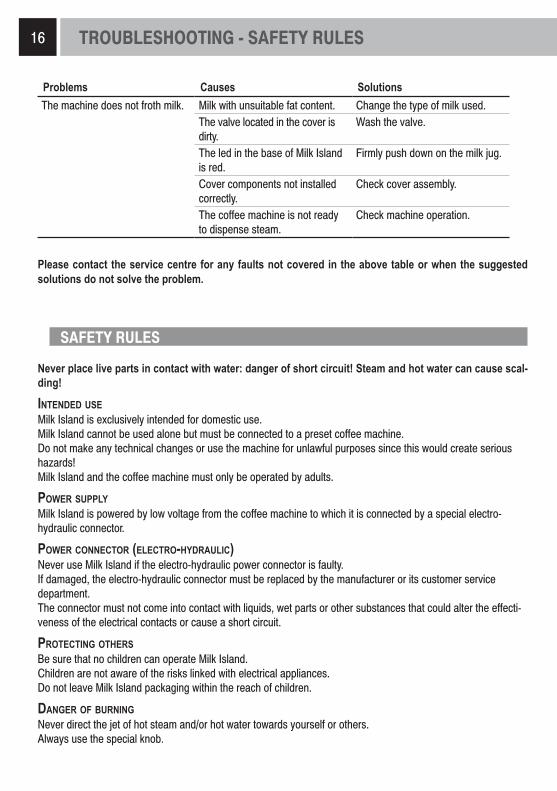
Problems Causes SolutionsThe machine does not froth milk. Milk with unsuitable fat content. Change the type of milk used.
The valve located in the cover is dirty.
Wash the valve.
The led in the base of Milk Island is red.
Firmly push down on the milk jug.
Cover components not installed correctly.
Check cover assembly.
The coffee machine is not ready to dispense steam.
Check machine operation.
Please contact the service centre for any faults not covered in the above table or when the suggested solutions do not solve the problem.
Never place live parts in contact with water: danger of short circuit! Steam and hot water can cause scal-ding!
INTENDED USEMilk Island is exclusively intended for domestic use. Milk Island cannot be used alone but must be connected to a preset coffee machine.Do not make any technical changes or use the machine for unlawful purposes since this would create serious hazards! Milk Island and the coffee machine must only be operated by adults.
POWER SUPPLYMilk Island is powered by low voltage from the coffee machine to which it is connected by a special electro-hydraulic connector.
POWER CONNECTOR (ELECTRO-HYDRAULIC)Never use Milk Island if the electro-hydraulic power connector is faulty. If damaged, the electro-hydraulic connector must be replaced by the manufacturer or its customer service department.The connector must not come into contact with liquids, wet parts or other substances that could alter the effecti-veness of the electrical contacts or cause a short circuit.
PROTECTING OTHERSBe sure that no children can operate Milk Island. Children are not aware of the risks linked with electrical appliances.Do not leave Milk Island packaging within the reach of children.
DANGER OF BURNINGNever direct the jet of hot steam and/or hot water towards yourself or others. Always use the special knob.
SAFETY RULES

17SAFETY RULES
LOCATIONPlace Milk Island and the coffee machine in a safe place, where nobody can overturn it or be injured. Hot water or steam may spill out: danger of scalding! Do not use Milk Island and the coffee machine outdoors. Do not keep the machine at a temperature below 0°C; freezing may damage the machine.Do not place the machine on hot surfaces and close to open flames to prevent the housing from melting or being damaged.
CLEANINGNever immerse the Milk Island base in water! It is strictly forbidden to tamper inside the base of Milk Island.After having used Milk Island, thoroughly clean the milk jug with hot water and in the dishwasher.
SPACE FOR USE AND MAINTENANCETo ensure that Milk Island and the coffee machine work properly and efficiently, we recommend the following:Choose a level surface;Select a location that is sufficiently well-lit, clean and near an easily reachable socket;Allow for a minimum distance from the sides of the machine, as shown in the appropriate booklet.
STORING THE MACHINEWhen Milk Island remains inactive for a long period of time, disconnect it from the machine. Store it in a dry place out of the reach of children. Keep it protected from dust and dirt. After a long period of inactivation, sterilise Milk Island before using it.
SERVICING / MAINTENANCEIn case of failure, faults or a suspected fault after a fall, immediately unplug Milk Island from the machine (see uninstalling). Never operate a faulty Milk Island. Repairs must only be carried out by an Authorised Service Centre. All liability for damages caused by works not carried out in a professional manner, is declined.
FIRE SAFETYIn the event of fire, use carbon dioxide extinguishers (CO2). Do not use water or dry-powder extinguishers.
DISPOSALThis product complies with EU Directive 2002/96/EC.
The symbol on the product or on its packaging indicates that this product may not be treated as hou-sehold waste. Instead it shall be handed over to the applicable collection point for the recycling of electrical and electronic equipment.By ensuring this product is disposed of correctly, you will help prevent potential negative consequences for the environment and human health, which could otherwise be caused by inappropriate waste handling of this product. For more detailed information about recycling of this product, please contact your local city office, your household waste disposal service or the shop where you purchased the product.
18 INHALT - ALLGEMEINES
ALLGEMEINES
Die Vorrichtung Milk Island wurde eigens zum einfachen und schnellen Aufschäumen von Milch und zum Wärmen von Wasser entwickelt und hergestellt. Die Vorrichtung Milk Island darf nur im Haushalt verwendet werden und ist nicht für den gewerblichen Dauerbetrieb und zum Wärmen von Tees geeignet.
Achtung. In folgenden Fällen wird für eventuelle Schäden keine Haftung übernommen:• Falsche und nicht den vorgesehenen Verwendungszwecken entsprechende Verwendung;• Reparaturen, die nicht in autorisierten Kundendienststellen durchgeführt wurden;• Veränderungen an beliebigen Bestandteilen der Vorrichtung;• Verwendung von anderen als originalen Ersatz- und Zubehörteilen;• Fehlende Wartung und Lagerung in Räumen bei Temperaturen unter 15°C.In diesen Fällen erlischt die Garantie.
Das Warndreieck deutet auf alle Informationen hin, die für die Sicherheit des Benutzers wichtig sind. Diese Hinweise sind strikt zu beachten, um schwere Verletzungen zu vermeiden!
Mit diesem Symbol werden Informationen gekennzeichnet, auf die besonders geachtet werden muss, um den Betrieb der Vorrichtung zu optimieren.
Diese Bedienungsanleitung an einem sicheren Ort aufbewahren und sie der Vorrichtung immer beilegen, wenn diese von anderen Personen benutzt wird.
Für weitere Fragen oder bei Problemen, die nicht oder nur unzureichend in der vorliegenden Bedienungsanleitung beschrieben sind, wenden Sie sich bitte an zuständiges Fachpersonal.
ALLGEMEINES . . . . . . . . . . . . . . . . . . . . . . . . . . . . . . . . . . . . . . . . . . . . . . . . . . . . 18
TECHNISCHE DATEN . . . . . . . . . . . . . . . . . . . . . . . . . . . . . . . . . . . . . . . . . . . . . . . 19
ANSCHLUSS DER VORRICHTUNG MILK ISLAND . . . . . . . . . . . . . . . . . . . . . . . . 20
GEBRAUCH DER VORRICHTUNG MILK ISLAND . . . . . . . . . . . . . . . . . . . . . . . . . 21
REINIGUNG DER VORRICHTUNG MILK ISLAND . . . . . . . . . . . . . . . . . . . . . . . . . 22
DEINSTALLATION DER VORRICHTUNG MILK ISLAND . . . . . . . . . . . . . . . . . . . . 23
SICHERHEITSVORSCHRIFTEN . . . . . . . . . . . . . . . . . . . . . . . . . . . . . . . . . . . . . . . 24

19BESTANDTEILE – TECHNISCHE DATEN
TECHNISCHE DATEN
Versorgung Die Vorrichtung Milk Island wird direkt über die Kaffeemaschine versorgtMaterial des Gerätekörpers Thermoplastisches MaterialMaterial der Karaffe Thermoplastisches Material - GlasAbmessungen (L x H x T) (mm) 215 x 156 x 95 Gewicht 0,450 kgKaraffe HerausnehmbarFüllmenge der Karaffe 0,4 Liter Milch - 0,8 Liter aufgeschäumte Milch oder zu wärmendes WasserSicherheitsvorrichtungen Elektrohydraulische Sperre der Dampfausgabe, wenn während der
Betriebsphase oder im Standby die Karaffe nicht vorhanden ist.
Wichtiger technischer Hinweis: Die Vorrichtung Milk Island muss über den speziellen Stecker direkt an eine entsprechend ausgelegte Kaffeemaschine angeschlossen werden. Die Vorrichtung Milk Island ist nicht mit einem Stecker ausgestattet, der in eine herkömmliche Steckdose eingesteckt werden kann.
Änderungen der Konstruktion und Ausführung sind aufgrund von technologischen Weiterentwicklungen vorbehalten.
Die Vorrichtung entspricht der europäischen Richtlinie 89/336/EWG (Gesetzesverordnung 476 vom 04.12.92) hinsichtlich der Funkentstörung.
Karaffe
Zuckerbehälter
Elektrohydraulischer Anschluss an die Kaffeemaschine Taste zum Ein- und
Aushängen
Karaffenhalterung
LED (Anzeige des Betriebsstatus der Vorrichtung Milk Island)
Basis für die Aufstellung und den Anschluss

20 ANSCHLUSS
ANSCHLUSS DER VORRICHTUNG MILK ISLANDAchtung: die Vorrichtung Milk Island für den Anschluss neben eine Kaffeemaschine stellen; zuvor den Wassertank, die Abtropfschale und den Kaffeesatzbehälter entfernen und den
Bohnenbehälter der Kaffeemaschine leeren. Die Kaffeemaschine ausschalten und den Stecker von der Steckdose abziehen.
1 2 3
Die Vorrichtung Milk Island aus der Verpackung nehmen und sicherstellen, dass die Karaffe unbeschädigt ist. Die Verpackung sollte aufbewahrt werden.
Den Verschluss in seine Aufnahme setzen.
Nachdem die Behälter geleert wurden, die Kaffeemaschine vorsichtig zur Seite legen.Den auf der Maschine vorhandenen Schutzverschluss abnehmen.
4 5 6
Die Taste zum Einhängen in die angegebene Richtung drücken.
Nach dem Einsetzen der Basis die Taste loslassen.Überprüfen, ob die Basis fest mit der Maschine verbunden ist.
Die Taste gedrückt halten und die Vorrichtung Milk Island in die Kaffeemaschine einhängen, wobei die entsprechenden Stecker in Übereinstimmung gebracht werden müssen.
97
Nun die Kaffeemaschine wieder aufstellen und alle ihre Behälter einsetzen und füllen.
Die Karaffe beim Einsetzen leicht drehen. Die Farbe der LED auf der Basis beachten. Wenn die LED grün leuchtet, funktioniert die Vorrichtung Milk Island korrekt.
Beim Einschalten der Kaffeemaschine erfolgt die automatische Konfi guration der Vorrichtung Milk Island.
8

21
GEBRAUCH DER VORRICHTUNG MILK ISLANDAchtung: vor dem Gebrauch der Vorrichtung Milk Island müssen die Karaffe und die anderen Bestandteile gereinigt werden. Überprüfen, ob alle Bestandteile korrekt installiert wurden.
Das Glas der Karaffe kann hohe Temperaturen erreichen: Verbrennungsgefahr! Die Vorrichtung Milk Island nur mit Wasser und Milch verwenden. Die Benutzung mit anderen Flüssigkeiten jeder Art oder chemischen Zusammensetzungen ist verboten.
Wichtiger Hinweis: die Milchmenge in der Karaffe darf nicht unter der Markierung der Mindestfüllhöhe “MIN” liegen und sie darf die Markierung der maximalen Füllmenge “MAX”
nicht überschreiten. Nach der Benutzung der Vorrichtung Milk Island müssen alle Bestandteile sorgfältig gereinigt werden.
Für die Zubereitung eines optimalen Cappuccinos muss die verwendete Milch kalt sein (0-8°C). Es wird empfohlen, teilentrahmte Milch zu verwenden.
1 2
Den Hahn für die Dampfausgabe auf “Milk Island” stellen.
3
Die Milchkaraffe mit der gewünschten Milchmenge füllen.
Die Milchkaraffe auf die Basis der Vorrichtung Milk Island stellen.
4 5 6
Die Karaffe am Griff anfassen und herausnehmen.
Leichte Kreisbewegungen ausführen und die Milch in die Tasse gießen.
Die Tasse mit der aufgeschäumten Milch unter den Kaffeeauslauf stellen. Den Kaffee in die Tasse ausgeben (siehe Bedienungsanleitung der Kaffeemaschine).
Hinweis: wenn die Milchkaraffe nicht benutzt wird, den Zuckerbehälter auf die Basis setzen. Damit werden die Anschlussleitungen vor Schmutz und versehentlichen Stößen geschützt.
GEBRAUCH

22 REINIGUNG
REINIGUNG DER VORRICHTUNG MILK ISLANDAchtung: die Basis der Vorrichtung Milk Island nicht in Flüssigkeiten jeder Art tauchen. Die Wartung und die Reinigung der Basis dürfen erst dann durchgeführt werden, wenn die Maschine vom
Stromnetz getrennt wurde und abgekühlt ist. Die Abdeckung nicht vom Aufschäumer abmontieren.
Für die Reinigung dürfen keine spitzen Gegenstände oder chemisch aggressive Produkte (Lösungsmittel) verwendet werden. Die Basis mit einem trockenen und weichen Tuch reinigen. Die Vorrichtung und deren Bestandteile nicht unter Verwendung eines Mikrowellen- oder herkömmlichen Backofens trocknen.
1 2 3
Die Karaffe von der Basis lösen.Den Aufschäumer aus der Karaffe nehmen.
Das Ventil aus dem Aufschäumer herausziehen.
4 5 6
Die Karaffe mit warmem Wasser waschen.
Den Aufschäumer mit warmem Wasser waschen.
Das Ventil sorgfältig mit Wasser waschen.
Den Ansaugschlauch aus dem Aufschäumer herausziehen.
7
Den Schlauch mit Wasser waschen.
Anschließend alle Bestandteile der Abdeckung montieren. Den Aufschäumer wieder auf der Karaffe anbringen. Darauf achten, dass die Abdeckung korrekt auf den Schlauch im Inneren der Karaffe gesetzt wird.
Den Anschluss mit einem feuchten Tuch reinigen.Für eine gründlichere Reinigung die saubere Karaffe mit Wasser füllen und Dampf ausgeben.Die Karaffe und die Bestandteile des Aufschäumers können mit einer 5%igen Natriumhypochloritlösung sterilisiert werden. Nach einer längeren Nichtbenutzung muss die Sterilisation unbedingt durchgeführt werden.
23DEINSTALLATION
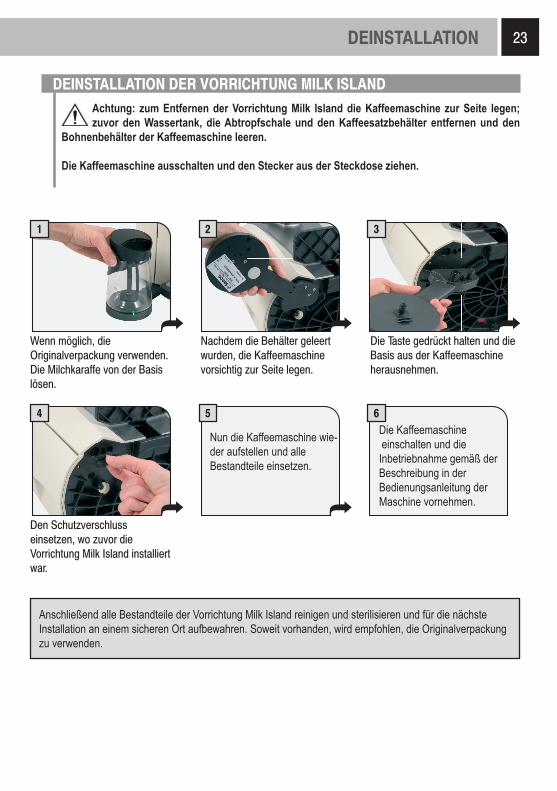
DEINSTALLATION DER VORRICHTUNG MILK ISLANDAchtung: zum Entfernen der Vorrichtung Milk Island die Kaffeemaschine zur Seite legen; zuvor den Wassertank, die Abtropfschale und den Kaffeesatzbehälter entfernen und den
Bohnenbehälter der Kaffeemaschine leeren.
Die Kaffeemaschine ausschalten und den Stecker aus der Steckdose ziehen.
1 2 3
4
Nun die Kaffeemaschine wie-der aufstellen und alle Bestandteile einsetzen.
5Die Kaffeemaschine einschalten und die Inbetriebnahme gemäß der Beschreibung in der Bedienungsanleitung der Maschine vornehmen.
6
Wenn möglich, die Originalverpackung verwenden.Die Milchkaraffe von der Basis lösen.
Die Taste gedrückt halten und die Basis aus der Kaffeemaschine herausnehmen.
Nachdem die Behälter geleert wurden, die Kaffeemaschine vorsichtig zur Seite legen.
Den Schutzverschluss einsetzen, wo zuvor die Vorrichtung Milk Island installiert war.
Anschließend alle Bestandteile der Vorrichtung Milk Island reinigen und sterilisieren und für die nächste Installation an einem sicheren Ort aufbewahren. Soweit vorhanden, wird empfohlen, die Originalverpackung zu verwenden.

24 PROBLEMLÖSUNG - SICHERHEITSVORSCHRIFTEN
Probleme Ursachen AbhilfenDie Vorrichtung schäumt die Milch nicht auf.
Der Fettgehalt der Milch ist nicht geeignet.
Die Milchsorte wechseln.
Das Ventil in der Abdeckung ist verschmutzt.
Das Ventil waschen.
Die Kontrolllampe der Basis der Vorrichtung Milk Island leuchtet rot.
Die Milchkaraffe ganz niederdrücken.
Teile der Abdeckung sind nicht richtig eingesetzt.
Die Montage der Abdeckung kontrollieren.
Die Kaffeemaschine ist nicht für die Dampfausgabe bereit.
Den Maschinenbetrieb überprüfen.
Bei Störungen, die nicht in der oben aufgeführten Tabelle behandelt werden, oder in Fällen, in denen die empfohlenen Vorgangsweisen das Problem nicht beheben, wenden Sie sich bitte an eine Kundendienststelle.
Die unter Spannung stehenden Teile dürfen niemals mit Wasser in Berührung kommen: Kurzschlussgefahr! Der heiße Dampf und das heiße Wasser können Verbrennungen verursachen!
SACHGEMÄSSER GEBRAUCHDie Vorrichtung Milk Island ist ausschließlich für den Betrieb in Haushalten vorgesehen. Die Vorrichtung Milk Island darf nicht als Einzelgerät verwendet werden, sondern muss an eine dafür ausgelegte Kaffeemaschine angeschlossen werden. Technische Änderungen und unsachgemäßer Gebrauch sind wegen der damit verbundenen Risiken verboten! Die Vorrichtung Milk Island und die Kaffeemaschine dürfen ausschließlich durch Erwachsene betrieben werden.
STROMVERSORGUNGDie Vorrichtung Milk Island wird mit Niederspannung von der Kaffeemaschine versorgt, an die die Vorrichtung mit einem speziellen elektrohydraulischen Stecker angeschlossen wird.
VERSORGUNGSSTECKER (ELEKTROHYDRAULISCH)Die Vorrichtung Milk Island darf keinesfalls mit defektem elektrohydraulischen Stecker betrieben werden. Bei Schäden am elektrohydraulischen Stecker muss dieser vom Hersteller oder von dessen Kundendienst ausgetauscht werden. Der Stecker darf keinesfalls mit Flüssigkeiten, nassen Teilen oder anderen Substanzen in Berührung kommen, die die Funktionstüchtigkeit der elektrischen Kontakte beeinträchtigen oder zu einem Kurzschluss führen könnten.
SCHUTZ ANDERER PERSONENSicherstellen, dass Kinder die Vorrichtung Milk Island nicht benutzen können. Kinder können die Gefahrensituationen, die durch Haushaltsgeräte entstehen können, nicht abschätzen. Die für die Verpackung der Vorrichtung Milk Island benutzten Materialien nicht in Reichweite von Kindern aufbewahren.
VERBRENNUNGSGEFAHRDen Heißwasser- oder Dampfstrahl keinesfalls auf sich selbst oder auf andere Personen richten. Immer den entsprechenden Griff verwenden.
SICHERHEITSVORSCHRIFTEN
25SICHERHEITSVORSCHRIFTEN
STANDORTDie Vorrichtung Milk Island an einem sicheren Ort aufstellen, an dem sie nicht umgekippt werden kann und sich niemand daran verletzen kann. Es besteht die Möglichkeit des Austritts von heißem Wasser oder Dampf: Verbrennungsgefahr! Die Vorrichtung Milk Island und die Kaffeemaschine dürfen nicht im Freien betrieben werden. Die Maschine keinen Temperaturen unter 0°C aussetzen. Es besteht die Gefahr, dass sie durch gefrierendes Wasser beschädigt wird. Die Maschine nicht auf heißen Flächen oder in der Nähe von offenem Feuer aufstellen, da das Gehäuse schmelzen oder auf andere Art beschädigt werden könnte.
REINIGUNGDie Basis der Vorrichtung Milk Island keinesfalls ins Wasser tauchen! Der Versuch von Eingriffen im Inneren der Basis der Vorrichtung Milk Island ist strengstens verboten. Nach der Verwendung der Vorrichtung Milk Island muss die Milchkaraffe sorgfältig mit warmem Wasser oder in der Spülmaschine gereinigt werden.
RAUMBEDARF FÜR DEN BETRIEB UND DIE WARTUNGFür einen korrekten und einwandfreien Betrieb der Vorrichtung Milk Island sollten folgende Empfehlungen berücksichtigt werden. Eine ebene Auflagefläche auswählen. Der Raum sollte ausreichend beleuchtet und hygienisch unbedenklich sein und die Steckdose muss leicht zugänglich sein.Gemäß den Angaben in der entsprechenden Bedienungsanleitung einen Mindestabstand von den Maschinenwänden berücksichtigen.
AUFBEWAHRUNG DER VORRICHTUNGWenn die Vorrichtung Milk Island längere Zeit nicht benutzt wird, muss sie von der Maschine getrennt werden. Die Vorrichtung an einem trockenen und für Kinder unzugänglichen Ort aufbewahren. Vor Staub und Schmutz schützen. Nach längerer Nichtbenutzung die Vorrichtung Milk Island sterilisieren, bevor sie wieder benutzt wird.
REPARATUREN/WARTUNGSARBEITENDie Vorrichtung Milk Island bei Störungen, Defekten oder dem Verdacht auf Defekte nach einem Sturz unverzüglich von der Kaffeemaschine trennen (siehe Deinstallation). Eine defekte Vorrichtung Milk Island keinesfalls in Betrieb setzen. Reparaturen dürfen nur bei einer autorisierten Kundendienststelle durchgeführt werden. Im Falle von nicht fachgerecht ausgeführten Eingriffen wird jede Haftung für eventuelle Schäden abgelehnt.
BRANDSCHUTZIm Fall eines Brandes einen Kohlensäurelöscher (CO2) verwenden. Keinesfalls sind Wasser- oder Pulverlöscher einzusetzen.
ENTSORGUNGDieses Produkt entspricht der EU-Richtlinie 2002/96/EG
Das Symbol auf dem Produkt oder seiner Verpackung weist darauf hin, dass das Produkt nicht als normaler Haushaltsabfall zu behandeln ist, sondern an einem Sammelpunkt für das Recycling von elektrischen und elektronischen Geräten abgegeben werden muss.Durch Ihren Beitrag zum korrekten Entsorgen dieses Produkts schützen Sie die Umwelt und die Gesundheit Ihrer Mitmenschen.Umwelt und Gesundheit werden durch falsches Entsorgen gefährdet. Weitere Informationen über das Recycling dieses Produkts erhalten Sie von Ihrer Gemeinde, der Müllabfuhr oder dem Geschäft, in dem Sie das Produkt gekauft haben.

26 INDEX - GÉNÉRALITÉS
GÉNÉRALITÉS
Le Milk Island est un dispositif conçu et fabriqué spécialement pour émulsionner le lait et faire chauffer l’eau, de façon simple et rapide. Le Milk Island ne doit servir qu’à un usage domestique ; il n’est pas indiqué pour un fonctionnement continu de type professionnel ni pour chauffer du thé ou de la tisane.
Attention Le fabricant décline toute responsabilité pour les dommages éventuels dans les cas suivants :• emploi inapproprié et non conforme à l’usage prévu ;• réparations n’ayant pas été faites dans un Centre d’assistance agréé ;• altération de tout composant de la machine ;• emploi de pièces de rechange et d’accessoires qui ne sont pas d’origine ;• défaut d’entretien et stockage dans un local où la température est inférieure à 15°C.Il y a alors déchéance de la garantie.
Le triangle d’avertissement indique toutes les instructions importantes pour la sécurité de l’utilisateur. Se conformer scrupuleusement à ces indications pour éviter tout risque de blessures graves !
Ce symbole indique les informations dont il faut tenir compte en priorité pour mieux utiliser la machine.
Conserver ces instructions dans un lieu sûr. Les joindre au dispositif en cas de changement de propriétai-re.
Pour de plus amples informations ou en cas de problèmes n’ayant été abordés qu’en partie dans cette notice, prière de s’adresser à un spécialiste compétent.
GÉNÉRALITÉS . . . . . . . . . . . . . . . . . . . . . . . . . . . . . . . . . . . . . . . . . . . . . . . . . . . . . 26
DONNÉES TECHNIQUES . . . . . . . . . . . . . . . . . . . . . . . . . . . . . . . . . . . . . . . . . . . . 27
MONTAGE DU MILK ISLAND . . . . . . . . . . . . . . . . . . . . . . . . . . . . . . . . . . . . . . . . . 28
UTILISATION DU MILK ISLAND . . . . . . . . . . . . . . . . . . . . . . . . . . . . . . . . . . . . . . . 29
NETTOYAGE DU MILK ISLAND . . . . . . . . . . . . . . . . . . . . . . . . . . . . . . . . . . . . . . . 30
DÉMONTAGE DU MILK ISLAND . . . . . . . . . . . . . . . . . . . . . . . . . . . . . . . . . . . . . . . 31
CONSIGNES DE SÉCURITÉ . . . . . . . . . . . . . . . . . . . . . . . . . . . . . . . . . . . . . . . . . . 32

27COMPOSANTS - DONNÉES TECHNIQUES
DONNÉES TECHNIQUES
Alimentation Le Milk Island est alimenté directement par la machine à caféMatériau du corps ThermoplastiqueMatériau de la carafe Thermoplastique - VerreDimensions (l x h x p) (mm) 215 x 156 x 95 Poids 0,450 kgCarafe AmovibleCapacité de la carafe 0,4 litres de lait – 0,8 litres de lait émulsionné ou d’eau à chaufferDispositifs de sécurité Verrouillage électro-hydraulique de distribution de la vapeur en l’absence
de la carafe, aussi bien durant la phase de fonctionnement que durant la phase de stand-by.
Remarque technique importante : le Milk Island doit être accouplé à l’aide du connecteur spécial à une machine à café prévue à cet effet. Le Milk Island n’a pas de connecteur sur lequel brancher une fi che de courant normale.
Sous réserve de modifi cations au niveau de la conception et de la fabrication suite au progrès technologique.
Machine conforme à la Directive Européenne 89/336/CEE (Décret législatif 476 du 4/12/92), relative à l’élimination des perturbations radio et TV.
Carafe
Réservoir à sucre
Accouplement de type électrique-hydraulique à la machine à café Bouton de montage et
de démontage
Support de la carafe
LED (indique l’état de fonctionnement du Milk Island)
Base de support/branchement

28 MONTAGE
MONTAGE DU MILK ISLANDAttention : coucher la machine à café sur le côté pour y accoupler le Milk Island ; avant d’exécuter cette opération, enlever le réservoir d’eau, le bac d’égouttement et le tiroir à marc et
vider le réservoir à café en grains de la machine à café. Arrêter la machine à café et la débrancher.
1 2 3
Retirer le Milk Island de l’emballage ; s’assurer que la carafe est en bon état. Il est conseillé de conserver l’emballage.
Mettre le bouchon dans le logement prévu à cet effet.
Après avoir vidé les réservoirs, coucher délicatement la machine sur le côté.Enlever le bouchon de protection qui se trouve dans cette dernière.
4 5 6
Appuyer sur le bouton de montage dans le sens indiqué.
Relâcher le bouton quand la base est encastrée à fond.Vérifier si la base est accouplée solidairement à la machine.
Tout en continuant à appuyer sur le bouton, accoupler le Milk Island à la machine à café en faisant coïncider les connecteurs correspondants.
97
Remettre la machine à café dans sa position initiale et remonter tous ses composants.
Placer la carafe en la tournant légèrement. Vérifier la couleur de la LED sur la base. La LED, quand elle est verte, indique que le Milk Island fonctionne correctement.
La confi guration du Milk Island se fait automatiquement en mettant en marche la machine à café.
8
29
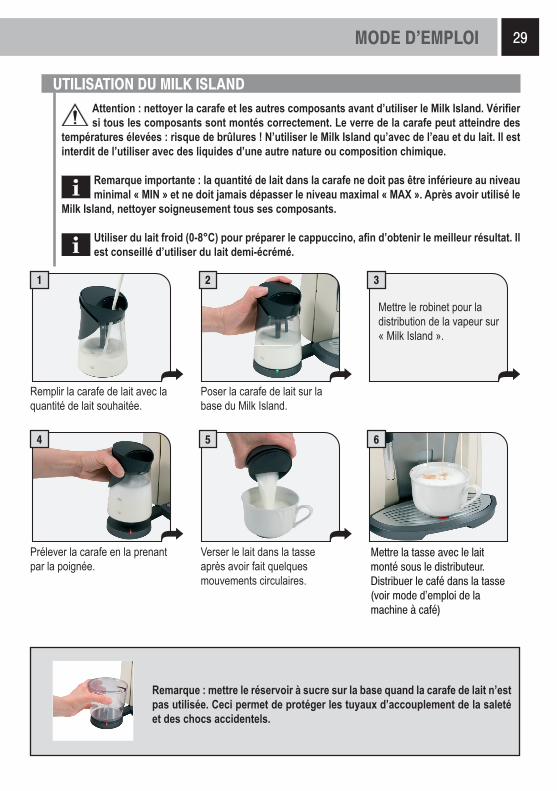
UTILISATION DU MILK ISLANDAttention : nettoyer la carafe et les autres composants avant d’utiliser le Milk Island. Vérifi er si tous les composants sont montés correctement. Le verre de la carafe peut atteindre des
températures élevées : risque de brûlures ! N’utiliser le Milk Island qu’avec de l’eau et du lait. Il est interdit de l’utiliser avec des liquides d’une autre nature ou composition chimique.
Remarque importante : la quantité de lait dans la carafe ne doit pas être inférieure au niveau minimal « MIN » et ne doit jamais dépasser le niveau maximal « MAX ». Après avoir utilisé le
Milk Island, nettoyer soigneusement tous ses composants.
Utiliser du lait froid (0-8°C) pour préparer le cappuccino, afi n d’obtenir le meilleur résultat. Il est conseillé d’utiliser du lait demi-écrémé.
1 2
Mettre le robinet pour la distribution de la vapeur sur « Milk Island ».
3
Remplir la carafe de lait avec la quantité de lait souhaitée.
Poser la carafe de lait sur la base du Milk Island.
4 5 6
Prélever la carafe en la prenant par la poignée.
Verser le lait dans la tasse après avoir fait quelques mouvements circulaires.
Mettre la tasse avec le lait monté sous le distributeur.Distribuer le café dans la tasse (voir mode d’emploi de la machine à café)
Remarque : mettre le réservoir à sucre sur la base quand la carafe de lait n’est pas utilisée. Ceci permet de protéger les tuyaux d’accouplement de la saleté et des chocs accidentels.
MODE D’EMPLOI
30 NETTOYAGE
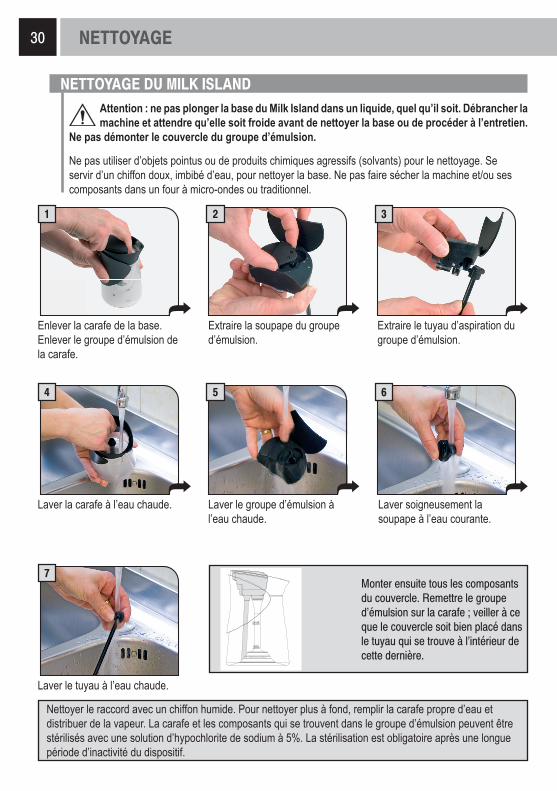
NETTOYAGE DU MILK ISLANDAttention : ne pas plonger la base du Milk Island dans un liquide, quel qu’il soit. Débrancher la machine et attendre qu’elle soit froide avant de nettoyer la base ou de procéder à l’entretien.
Ne pas démonter le couvercle du groupe d’émulsion.
Ne pas utiliser d’objets pointus ou de produits chimiques agressifs (solvants) pour le nettoyage. Se servir d’un chiffon doux, imbibé d’eau, pour nettoyer la base. Ne pas faire sécher la machine et/ou ses composants dans un four à micro-ondes ou traditionnel.
1 2 3
Enlever la carafe de la base.Enlever le groupe d’émulsion de la carafe.
Extraire la soupape du groupe d’émulsion.
4 5 6
Laver la carafe à l’eau chaude. Laver le groupe d’émulsion à l’eau chaude.
Laver soigneusement la soupape à l’eau courante.
Extraire le tuyau d’aspiration du groupe d’émulsion.
7
Laver le tuyau à l’eau chaude.
Monter ensuite tous les composants du couvercle. Remettre le groupe d’émulsion sur la carafe ; veiller à ce que le couvercle soit bien placé dans le tuyau qui se trouve à l’intérieur de cette dernière.
Nettoyer le raccord avec un chiffon humide. Pour nettoyer plus à fond, remplir la carafe propre d’eau et distribuer de la vapeur. La carafe et les composants qui se trouvent dans le groupe d’émulsion peuvent être stérilisés avec une solution d’hypochlorite de sodium à 5%. La stérilisation est obligatoire après une longue période d’inactivité du dispositif.

31DÉMONTAGE
DÉMONTAGE DU MILK ISLANDAttention : coucher la machine à café sur le côté pour démonter le Milk Island ; avant d’exécuter cette opération, enlever le réservoir d’eau, le bac d’égouttement et le tiroir à marc et vider le
réservoir à café en grains de la machine à café.
Arrêter la machine à café et la débrancher.
1 2 3
4
Remettre la machine à café dans sa position initiale et remonter tous ses composants.
5Allumer la machine à café et exécuter la procédure de mise en service comme indiqué dans le mode d’emploi de cette dernière.
6
Récupérer si possible l’emballage.Retirer la carafe de la base.
Extraire la base de la machine à café tout en appuyant sur le bouton sans le relâcher.
Après avoir vidé les réservoirs de la machine, coucher délicatement cette dernière sur le côté.
Remettre le bouchon de protection à l’endroit où le Milk Island était monté.
Laver et stériliser tous les composants du Milk Island et les ranger dans un endroit sûr pour la prochaine fois ; il est conseillé d’utiliser l’emballage d’origine, si disponible.

32 SOLUTION DES PROBLÈMES - CONSIGNES DE SÉCURITÉ
Problèmes Causes RemèdesLa machine ne monte pas le lait. Lait avec un pourcentage de
matières grasses pas approprié.Utiliser un autre type de lait.
La soupape qui se trouve dans le couvercle est sale.
Laver la soupape.
Le voyant dans la base du Milk Island est rouge.
Appuyer à fond sur la carafe du lait.
Les composants du couvercle ne sont pas bien montés.
Vérifier si le couvercle est monté correctement.
La machine à café n’est pas prête à distribuer de la vapeur.
Vérifier le fonctionnement de la machine.
Pour les pannes qui ne sont pas prévues dans le tableau ci-dessus ou si les solutions proposées ne permettent pas de résoudre le problème, s’adresser à un Centre d’assistance agréé.
Ne jamais mettre les pièces sous tension au contact de l’eau : risque de court-circuit ! La vapeur surchauf-fée et l’eau chaude peuvent provoquer des brûlures !
USAGE PRÉVULe Milk Island n’est prévu que pour un usage domestique. Le Milk Island ne peut pas être utilisé seul mais doit être accouplé à une machine à café prévue à cet effet.Les modifications techniques et l’usage impropre sont interdits car ils comportent des risques ! Le Milk Island et la machine à café ne doivent être utilisés que par un adulte.
ALIMENTATION SECTEURLe Milk Island est alimenté en basse tension par la machine à café à laquelle il est accouplé à l’aide du connecteur électro-hydraulique spécial.
CONNECTEUR D’ALIMENTATION (ÉLECTRO-HYDRAULIQUE)Ne jamais utiliser le Milk Island si le connecteur électro-hydraulique d’alimentation est défectueux. Le connecteur électro-hydraulique doit être remplacé par le fabricant ou par un Centre d’assistance agréé s’il est abîmé.Veiller à ce que le connecteur ne soit pas en contact avec des liquides, des parties mouillées ou d’autres substances pouvant réduire l’efficacité des contacts électriques ou provoquer un court-circuit.
PROTECTION DES PERSONNESS’assurer qu’aucun enfant n’ait la possibilité d’utiliser le Milk Island. En effet, les enfants ne se rendent pas compte des risques liés aux électroménagers.Les matériaux utilisés pour l’emballage du Milk Island doivent être gardés hors de la portée des enfants.
RISQUE DE BRÛLURESNe pas diriger le jet de vapeur surchauffé et/ou d’eau chaude vers soi et/ou vers d’autres personnes. Toujours utiliser le bouton prévu à cet effet.
CONSIGNES DE SÉCURITÉ
33CONSIGNES DE SÉCURITÉ
EMPLACEMENTMettre le Milk Island et la machine à café dans un endroit sûr, où personne ne peut les faire basculer ni être blessé. L’eau chaude ou la vapeur surchauffée pourrait s’échapper : risque de brûlures ! Ne pas utiliser le Milk Island et la machine à café en plein air. Éviter les températures inférieures à 0°C : le gel pourrait endommager la machine.Ne pas poser la machine sur une surface trop chaude ou à proximité d’une flamme nue : le bâti pourrait fondre ou s’abîmer.
NETTOYAGENe jamais plonger la base du Milk Island dans l’eau ! Il est strictement interdit d’essayer d’intervenir à l’intérieur de la base du Milk Island.Nettoyer soigneusement la carafe à l’eau chaude ou au lave-vaisselle après avoir utilisé le Milk Island.
ESPACE POUR L’UTILISATION ET L’ENTRETIENPour un bon fonctionnement du Milk Island et de la machine à café, il convient de :choisir un plan d’appui plat et nivelé ;choisir un endroit bien éclairé, propre et avec une prise de courant facilement accessible.prévoir une distance minimale entre la machine et le mur, comme indiqué dans la notice correspondante.
RANGEMENT DE LA MACHINEDémonter le Milk Island de la machine quand il doit rester longtemps inactif. Le conserver dans un lieu sec et non accessible aux enfants. Le protéger de la poussière et de la saleté. Stériliser le Milk Island avant de l’utiliser après une période d’inactivité.
RÉPARATIONS / ENTRETIENEn cas de panne ou de défaut possible après une chute, séparer immédiatement le Milk Island de la machine (voir démontage). Ne jamais mettre le Milk Island en marche s’il est défectueux. Les réparations ne doivent être effectuées que par un Centre d’assistance agréé. Le fabricant décline toute responsabilité en cas de dommages si les interventions n’ont pas été faites dans les règles de l’art.
EN CAS D’INCENDIEEn cas d’incendie, utiliser des extincteurs à anhydride carbonique (CO2). Ne pas utiliser d’eau ni d’extincteurs à poudre.
DÉMOLITIONL’ appareil est en conçu et fabriqué pour faciliter sa valorisation, son recyclage ou sa réutilisation conformément à la directive européenne 2002/96/CEE relative aux appareils électriques et électroniques usagés (waste electrical and electronic equipment - WEEE).
Le logo ci-contre apposé sur l’appareil indique que ce produit ne peut pas être éliminé avec les déchets ménagers non triés.Lorsque vous aurez décidé de vous en séparer définitivement, il convient de faire procéder à la collecte sélective de cet appareil en vous conformant au mode de reprise mis en place dans votre commune (collecte ponctuelle des encombrants, déchèterie), ou en faisant appel au service de reprise proposé par votre distributeur, ou bien, en le confiant à des organisations caritatives et des associations à but non lucratif.En vous assurant que ce produit est éliminé correctement, vous favorisez la prévention des conséquences négatives pour l’environnement et la santé humaine.
34

35

Saeco International Group S.p.A. - Via Torretta, 24040041 Gaggio Montano - Bologna - Italy
Tel. +39 0534.771.111 - Fax. +39 0534.31025 - http://www.saeco.com
Cod
. 150
0030
0 R
ev.0
2 de
l 15-
03-0
6TY
PE M
KI0
01