Microsoft Dynamics GP U.S. Payroll - Turnkey … · vi U.S. PAYROLL CONTENTS Chapter 28: Payroll...
258
Microsoft Dynamics® GP U.S. Payroll
-
Upload
phunghuong -
Category
Documents
-
view
216 -
download
0
Transcript of Microsoft Dynamics GP U.S. Payroll - Turnkey … · vi U.S. PAYROLL CONTENTS Chapter 28: Payroll...

Microsoft Dynamics® GPU.S. Payroll

Copyright Copyright © 2012 Microsoft. All rights reserved.
Limitation of liability This document is provided “as-is”. Information and views expressed in this document, including URL and other Internet Web site references, may change without notice. You bear the risk of using it.
Some examples depicted herein are provided for illustration only and are fictitious. No real association or connection is intended or should be inferred.
Intellectual property This document does not provide you with any legal rights to any intellectual property in any Microsoft product.
You may copy and use this document for your internal, reference purposes.
Trademarks Microsoft, Outlook, SharePoint and Microsoft Dynamics are trademarks of the Microsoft group of companies. FairCom and c-tree Plus are trademarks of FairCom Corporation and are registered in the United States and other countries.
All other trademarks are property of their respective owners.
Warranty disclaimer Microsoft Corporation disclaims any warranty regarding the sample code contained in this documentation, including the warranties of merchantability and fitness for a particular purpose.
License agreement Use of this product is covered by a license agreement provided with the software product. If you have any questions, please call the Microsoft Dynamics GP Customer Assistance Department at 800-456-0025 (in the U.S. or Canada) or +1-701-281-6500.
Publication date September 2012

U . S . P A Y R O L L i
Contents
Introduction .................................................................................................................................................2What’s in this manual...................................................................................................................................2
Symbols and conventions ............................................................................................................................3
Resources available from the Help menu..................................................................................................4
Send us your documentation comments ...................................................................................................5
Part 1: Setup ...............................................................................................................................................8
Chapter 1: Setting up Payroll .................................................................................................... 9Payment and adjustment numbers in Payroll ..........................................................................................9
Overtime in Payroll ....................................................................................................................................10
Calculating overtime pay........................................................................................................................... 11
Employee numbers in Payroll...................................................................................................................15
Options for tracking history and employees ..........................................................................................15
Payroll setup options for tips ....................................................................................................................17
Options for including year-to-date amounts ..........................................................................................17
Setting up Payroll default entries .............................................................................................................17
Required Payroll posting accounts...........................................................................................................20
Setting up Payroll posting accounts.........................................................................................................21
Setting up default transaction dimension codes for Analytical Accounting .....................................22
Employee onboarding workflow..............................................................................................................23
Employee personnel maintenance workflow .........................................................................................24
Chapter 2: Setting up codes .................................................................................................. 25Setting up location codes ...........................................................................................................................25
Setting up department codes ....................................................................................................................26
Setting up position codes...........................................................................................................................27
Setting up supervisor codes ......................................................................................................................28
Payroll pay codes and types......................................................................................................................29
Setting up pay codes...................................................................................................................................30
Setting up pay codes for tips.....................................................................................................................33
Setting up shift codes .................................................................................................................................35
Setting up secondary status codes............................................................................................................35
Chapter 3: Setting up deductions and benefits .................................................... 37Using zero benefit and deduction amounts............................................................................................38
Deduction types ..........................................................................................................................................38
Deduction tiers ............................................................................................................................................39
Setting up a standard deduction...............................................................................................................40
Setting up a garnishment...........................................................................................................................42
Setting up earnings codes ..........................................................................................................................43
Setting up maximum garnishment rules.................................................................................................44
Deducting multiple garnishments............................................................................................................45
Setting up a company-level deduction sequence...................................................................................46

ii U . S . P A Y R O L L
C O N T E N T S
Benefit types ................................................................................................................................................47
Benefit tiers ..................................................................................................................................................48
Setting up a benefit ....................................................................................................................................49
Setting and activating post-dated pay rates............................................................................................51
Modifying a pay, benefit, or deduction code ..........................................................................................51
Inactivating or deleting a pay, benefit, or deduction code....................................................................52
Chapter 4: Setting up taxes and compensation codes ................................... 53Worker’s compensation tax calculation methods ..................................................................................53
Workers’ compensation tax calculation methods for overtime............................................................54
Setting up workers’ compensation codes................................................................................................54
Local tax calculation methods...................................................................................................................55
Setting up a local tax...................................................................................................................................56
State and federal unemployment taxes ...................................................................................................57
Setting up an unemployment tax .............................................................................................................58
Setting up federal and state tax identification numbers .......................................................................60
Chapter 5: Setting up employee classes ...................................................................... 61Applying class changes..............................................................................................................................61
Accrual methods for vacation and sick time...........................................................................................62
Creating an employee class .......................................................................................................................63
Employee class and position setup options for tracking tips...............................................................64
Assigning codes to an employee class .....................................................................................................65
Deleting or changing an employee class .................................................................................................66
Part 2: Cards .........................................................................................................................................70
Chapter 6: Employee cards ....................................................................................................... 71Entering an employee card........................................................................................................................71
Entering an employee additional information card ..............................................................................74
Assigning pay, deduction, and benefit codes to an employee .............................................................75
Inactivating an employee card..................................................................................................................76
Reactivating an employee card .................................................................................................................77
Deleting or changing an employee card..................................................................................................78
Entering an employee address card .........................................................................................................79
Setting up employee Internet information..............................................................................................79
Entering an employee pay card ................................................................................................................80
Chapter 7: Tax cards ...................................................................................................................... 85W-2 boxes .....................................................................................................................................................85
States with no withholding tax .................................................................................................................85
Entering an employee tax card .................................................................................................................86
Entering an employee state tax card ........................................................................................................87
Entering an employee local tax card ........................................................................................................88
Chapter 8: Deduction and benefit cards...................................................................... 91Entering an employee deduction card.....................................................................................................91
Entering an employee-level deduction sequence...................................................................................95

U . S . P A Y R O L L iii
C O N T E N T S
Selecting a split method .............................................................................................................................96
Entering an employee benefit card...........................................................................................................97
Chapter 9: Beginning balances ........................................................................................ 101Entering beginning balances ..................................................................................................................101
Posting beginning balances ....................................................................................................................102
Part 3: Transactions ................................................................................................................ 106
Chapter 10: Batches and posting ................................................................................... 107Creating a batch .......................................................................................................................................107
Modifying or deleting a batch ................................................................................................................109
Posting a batch .........................................................................................................................................109
Chapter 11: Payroll transactions ....................................................................................... 111Entering employee mass transactions.................................................................................................... 111
Entering Payroll computer check transactions ..................................................................................... 113
Correcting Payroll computer check transactions ................................................................................. 116
Entering manual check transactions ...................................................................................................... 117
Correcting manual check transactions .................................................................................................. 119
Entering Analytical Accounting information for Payroll transactions ............................................. 119
Modifying a specific transaction in Payroll ..........................................................................................122
Processing an advance pay run...............................................................................................................122
Creating employee retroactive pay transactions ..................................................................................123
Building Payroll checks............................................................................................................................125
Calculating Payroll checks.......................................................................................................................128
Printing and posting checks ...................................................................................................................129
Voiding a Payroll check............................................................................................................................131
Reprinting paystubs and earnings statements .....................................................................................133
How Payroll calculates the minimum wage balance...........................................................................133
Chapter 12: Editable pay rates ........................................................................................... 137Hospitality industry example .................................................................................................................137
Manufacturing industry example...........................................................................................................137
Contract services industry example.......................................................................................................138
Part 4: Inquiries and reports ......................................................................................... 140
Chapter 13: Employee inquiries ........................................................................................ 141Viewing Payroll check history ................................................................................................................141
Viewing Payroll transactions ..................................................................................................................142
Viewing Payroll check distributions in Payroll ....................................................................................143
Viewing an employee’s personal information......................................................................................143
Viewing employee Payroll codes............................................................................................................144
Viewing paycheck summary information by codes ...........................................................................145
Viewing paycheck breakdown information..........................................................................................145
Viewing historical paycheck information by codes .............................................................................147

iv U . S . P A Y R O L L
C O N T E N T S
Viewing historical pay code information ..............................................................................................147
Viewing the company payroll summary...............................................................................................148
Chapter 14: Payroll card inquiries................................................................................... 151Viewing employee tips wage and tax information .............................................................................151
Viewing Payroll and tips breakdown information ..............................................................................152
Viewing Payroll audit trail information ................................................................................................152
Chapter 15: Payroll reports ................................................................................................... 155Payroll report summary...........................................................................................................................155
Cross-company reports ............................................................................................................................159
Specifying a Payroll report option..........................................................................................................159
Payroll Microsoft SQL Server Reporting Services reports ..................................................................160
Part 5: Utilities ............................................................................................................................... 164
Chapter 16: Company record utilities ......................................................................... 165Reconciling employee records ................................................................................................................165
Situations for using mass updates .........................................................................................................167
Mass update methods .............................................................................................................................167
Mass update limitations ..........................................................................................................................168
Updating a range of information for employees..................................................................................168
Calculating net-to-gross wages...............................................................................................................170
Modifying codes........................................................................................................................................170
Chapter 17: Removing records ......................................................................................... 173Removing Payroll history ........................................................................................................................173
Removing employee summary information.........................................................................................174
Removing inactive records .....................................................................................................................175
Removing year-end information ...........................................................................................................176
Removing distribution information ......................................................................................................176
Removing journal history .......................................................................................................................177
Chapter 18: Tax utilities ........................................................................................................... 179Editing federal tax liabilities ...................................................................................................................179
Viewing and editing Payroll taxes..........................................................................................................180
Tax calculation methods ..........................................................................................................................181
Chapter 19: Payroll updates ................................................................................................. 183Using the tax table update engine .........................................................................................................183
Installing year-end software updates ....................................................................................................185
Part 6: Routines ............................................................................................................................ 188
Chapter 20: Payroll checklist items............................................................................... 189Adding or modifying checklist items ...................................................................................................189
Deleting checklist items ...........................................................................................................................190

U . S . P A Y R O L L v
C O N T E N T S
Chapter 21: Payroll company routines ....................................................................... 191Printing period-end reports ....................................................................................................................191
Printing quarter-end reports ..................................................................................................................192
Closing a year ...........................................................................................................................................192
Printing the Year-End Employee Wage Report ....................................................................................193
Year-end procedures for reporting tips..................................................................................................194
Chapter 22: Government form and report routines........................................ 195Editing W-2 information ..........................................................................................................................195
Verifying W-2s for tipped employees.....................................................................................................196
Printing W-2 statements...........................................................................................................................196
Editing 1099-R information .....................................................................................................................198
Printing 1099-R statements......................................................................................................................199
Editing Form 8027 information...............................................................................................................200
Printing Form 8027 ...................................................................................................................................201
Part 7: Payroll Direct Deposit ..................................................................................... 204
Chapter 23: Payroll Direct Deposit setup ................................................................205Regular vs. deduction direct deposits....................................................................................................205
Remainder of net.......................................................................................................................................206
Payroll Direct Deposit prenotifications .................................................................................................207
Direct deposit exceptions.........................................................................................................................207
Setting up Payroll Direct Deposit ...........................................................................................................209
Entering auto-settle line information..................................................................................................... 211
Setting up Payroll Direct Deposit security ............................................................................................ 211
Chapter 24: ACH File setup ................................................................................................... 213Setting up the ACH fields .......................................................................................................................213
Creating an ACH header and footer ......................................................................................................215
Chapter 25: Deduction Direct Deposit setup ....................................................... 217Creating a direct deposit deduction.......................................................................................................217
Linking Payroll Direct Deposit deductions to direct deposits ...........................................................218
Prenotification and deduction direct deposits......................................................................................219
Chapter 26: Employee Direct Deposit maintenance ......................................221Single- and multiple-account direct deposit distribution types ........................................................221
Creating an employee direct deposit record.........................................................................................222
Updating an employee direct deposit account status .........................................................................223
Inactivating employee direct deposit accounts ....................................................................................224
Reactivating direct deposit records ........................................................................................................225
Reactivating an employee direct deposit account................................................................................226
Chapter 27: Deduction Direct Deposit maintenance ....................................227Enrolling an employee in a direct deposit deduction..........................................................................227
Creating an employee deduction direct deposit record ......................................................................228

vi U . S . P A Y R O L L
C O N T E N T S
Chapter 28: Payroll Direct Deposit routines .........................................................229Calculating Payroll Direct Deposit information...................................................................................229
Printing direct deposit earnings statements .........................................................................................230
Posting checks using Payroll Direct Deposit ........................................................................................231
Generating an ACH file ...........................................................................................................................231
Generating an ACH file with prenotes only .........................................................................................233
Chapter 29: Payroll Direct Deposit reports............................................................235Payroll Direct Deposit report summary ................................................................................................235
Payroll Direct Deposit check forms........................................................................................................237
Glossary ..................................................................................................................................................... 239
Index ............................................................................................................................................................... 245

INT
RO
DU
CT
ION

2 U . S . P A Y R O L L
IntroductionYou can use U.S. Payroll to set up, enter, and maintain employee payroll records and transactions. Employee cards are the foundation of your U.S. Payroll system and they are used to keep your U.S. Payroll information up to date. You can view current and historical payroll information and pay activity for one employee or a group of employees.
You also can use U.S. Payroll to complete the following tasks:
• Set up employee classes to create default entries that can make data entry quicker for new employee records because the payroll information is grouped according to common factors, such as pay codes and positions
• Create batches that you use just one time, or create recurring batches for transactions that you enter on a regular basis, such as weekly payroll
• Use the reconciling process to check for discrepancies in employee financial information and for differences between detail records and summary records
• Prepare U.S. Payroll reports to analyze payroll activity and identify errors in transaction entry
• Use routines to create customized checklists for processing month-end, quarter-end, or year-end tasks, such as preparing government-required W-2 and 1099-R statements
If you are using Human Resources, you can enter and maintain your employee information in Human Resources and those transactions will automatically update your Payroll records.
If you are using Direct Deposit, you can transfer funds directly to employee bank accounts when processing payroll transactions.
If you are using Bank Reconciliation, your checkbook is automatically updated when you post Payroll transactions.
This introduction is divided into the following sections:
• What’s in this manual• Symbols and conventions• Resources available from the Help menu• Send us your documentation comments
What’s in this manual
This manual is designed to give you an understanding of how to use the features of U.S. Payroll, and how it integrates with the Microsoft Dynamics® GP system.
To make best use of U.S. Payroll, you should be familiar with systemwide features described in the System User’s Guide, the System Setup Guide, and the System Administrator’s Guide.
U . S . P A Y R O L L 3
I N T R O D U C T I O N
Some features described in the documentation are optional and can be purchased through your Microsoft Dynamics GP partner.
To view information about the release of Microsoft Dynamics GP that you’re using and which modules or features you are registered to use, choose Help >> About Microsoft Dynamics GP.
The manual is divided into the following parts:
• Part 1, Setup, describes how to set up Payroll, including department and position codes, pay codes, workers’ compensation codes, and local and unemployment tax cards. It also explains how to set up deduction codes, benefit codes, and employee classes.
• Part 2, Cards, describes how to create employee cards, tax cards, and deduction and benefit cards. It also describes how to enter beginning balances.
• Part 3, Transactions, explains how to create single-use or recurring batches, and how to create and process Payroll check transactions.
• Part 4, Inquiries and reports, describes how to view current and historical employee information, employee pay activity, and how to use Payroll reports to track changes in employee pay information.
• Part 5, Utilities, explains how to help keep your Payroll records current and how to make changes to incorrect tax information.
• Part 6, Routines, describes how to create customized checklists of Payroll routines or modify existing checklists. It also describes tasks that you will complete at the end of the month, quarter, or year, and tasks that relate to government regulations and required forms.
• Part 7, Payroll Direct Deposit, explains how to set up and use Payroll Direct Deposit, create employee direct deposit cards, and create the ACH File used to transfer funds to employee bank accounts.
Symbols and conventions
For definitions of unfamiliar terms, see the glossary in the manual or refer to the glossary in Help.
Symbol Description
The light bulb symbol indicates helpful tips, shortcuts and suggestions.
The warning symbol indicates situations you should be especially aware of when completing tasks.

I N T R O D U C T I O N
4 U . S . P A Y R O L L
This manual uses the following conventions to refer to sections, navigation, and other information.
Resources available from the Help menu
The Microsoft Dynamics GP Help menu gives you access to user assistance resources on your computer, as well as on the Web.
ContentsOpens the Help file for the active Microsoft Dynamics GP component, and displays the main “contents” topic. To browse a more detailed table of contents, click the Contents tab above the Help navigation pane. Items in the contents topic and tab are arranged by module. If the contents for the active component includes an “Additional Help files” topic, click the links to view separate Help files that describe additional components.
To find information in Help by using the index or full-text search, click the appropriate tab above the navigation pane, and type the keyword to find.
To save the link to a topic in the Help, select a topic and then select the Favorites tab. Click Add.
IndexOpens the Help file for the active Microsoft Dynamics GP component, with the Index tab active. To find information about a window that’s not currently displayed, type the name of the window, and click Display.
About this windowDisplays overview information about the current window. To view related topics and descriptions of the fields, buttons, and menus for the window, choose the appropriate link in the topic. You also can press F1 to display Help about the current window.
LookupOpens a lookup window, if a window that you are viewing has a lookup window. For example, if the Checkbook Maintenance window is open, you can choose this item to open the Checkbooks lookup window.
Show Required FieldsHighlights fields that are required to have entries. Required fields must contain information before you can save the record and close the window. You can change the font color and style used to highlight required fields. On the Microsoft Dynamics GP menu, choose User Preferences and then choose Display.
Convention Description
Creating a batch Italicized type indicates the name of a section or procedure.
File >> Print or File > Print
The (>>) or (>) symbol indicates a sequence of actions, such as selecting items from a menu or toolbar, or pressing buttons in a window. This example directs you to go to the File menu and choose Print.
TAB or ENTER All capital letters indicate a key or a key sequence.

U . S . P A Y R O L L 5
I N T R O D U C T I O N
Printable ManualsDisplays a list of manuals in Adobe Acrobat .pdf format, which you can print or view.
What’s NewProvides information about enhancements that were added to Microsoft Dynamics GP since the last major release.
Microsoft Dynamics GP OnlineOpens a Web page that provides links to a variety of Web-based user assistance resources. Access to some items requires registration for a paid support plan.
Customer Feedback OptionsProvides information about how you can join the Customer Experience Improvement Program to improve the quality, reliability, and performance of Microsoft® software and services.
Send us your documentation comments
We welcome comments regarding the usefulness of the Microsoft Dynamics GP documentation. If you have specific suggestions or find any errors in this manual, send your comments by e-mail to the following address: [email protected].
To send comments about specific topics from within Help, click the Documentation Feedback link, which is located at the bottom of each Help topic.
Note: By offering any suggestions to Microsoft, you give Microsoft full permission to use them freely.

6 U . S . P A Y R O L L

PA
RT
1: S
ET
UP
8 U . S . P A Y R O L L
Part 1: SetupThis part of the documentation describes how to set up Payroll, department codes, position codes, and pay codes. It also explains how to set up local and unemployment tax codes, workers’ compensation codes, and employee classes.
The following information is discussed:
• Chapter 1, “Setting up Payroll,” explains how to use the setup routine provided with the accounting system to set up Payroll.
• Chapter 2, “Setting up codes,” describes how to set up location, department, position, supervisor, pay, and shift codes, as well as pay types. Once set up, you can assign these codes to employee records for identification purposes.
• Chapter 3, “Setting up deductions and benefits,” explains how to set up default deduction and benefit codes that will be used for setting up employee deductions and benefits.
• Chapter 4, “Setting up taxes and compensation codes,” describes how to set up default workers’ compensation, local, and unemployment tax cards that will be used for setting up employee taxes.
• Chapter 5, “Setting up employee classes,” explains how to set up employee classes according to similar characteristics to help make setting up employee records easier and save data entry time.
U . S . P A Y R O L L 9
Chapter 1: Setting up PayrollDuring the Payroll setup process, you’ll create pay cards, benefit cards, and deduction cards for each employee and can set up employee classes. Before you begin setting up Payroll, be sure you’ve completed the System Setup and General Ledger setup procedures. For more information about completing these procedures, refer to Help >> Contents >> select Setting Up the System or the General Ledger documentation.
When you set up Payroll, you can open each setup window and enter information, or you can use the Setup Checklist window (Administration >> Setup >> Setup Checklist) to guide you through the setup process. See your System Setup Guide (Help >> Contents >> select Setting up the System) for more information about the Setup Checklist window.
If you’re using Human Resources, set up benefit and deduction cards in Human Resources. Refer to the “Benefit setup” chapter in the Human Resources documentation.
This information is contained in the following sections:
• Payment and adjustment numbers in Payroll• Overtime in Payroll• Calculating overtime pay• Employee numbers in Payroll• Options for tracking history and employees• Payroll setup options for tips• Options for including year-to-date amounts• Setting up Payroll default entries• Required Payroll posting accounts• Setting up Payroll posting accounts• Setting up default transaction dimension codes for Analytical Accounting• Employee onboarding workflow• Employee personnel maintenance workflow
Payment and adjustment numbers in Payroll
Use the Payroll Setup Options window to enter or change payment and adjustment numbers.
• A payment number identifies a group of related entries that are posted collectively as a single computer or manual check.
• An adjustment number identifies a group of adjustments that you make in the Payroll Manual Check-Adjustment Entry window. You can use payment and adjustment numbers to trace transactions to the check they originated from in Payroll. These numbers will appear on reports as part of your audit trail.
• A computer check transaction number identifies a specific transaction entered in the Payroll Transaction Entry window.
• A manual check transaction number identifies a specific transaction in the Payroll Manual Check Transaction Entry window.

P A R T 1 S E T U P
10 U . S . P A Y R O L L
Each time you enter a transaction, the default numbers will increase by one to the next available number as each number is accepted. You can change the next numbers, but the default numbers will continue to be displayed for new transactions.
If you use Microsoft Dynamics GP on a network where more than one person is entering transactions at the same time, the default number might appear to increase by two or more.
Overtime in Payroll
When you set up Payroll, you can mark Automatic Overtime and make other selections in the Payroll Setup window to specify how overtime pay should be calculated.
Automatic overtime is based on the total units for a specific pay code. The overtime will reduce the hourly pay code and create an overtime pay transaction for the overtime hours, based upon the transaction that you enter for the hourly pay code, and what you’ve set up in the Regular Hours Required field. If you don’t want overtime calculated automatically, you must manually enter overtime pay transactions. For more information, refer to Entering Payroll computer check transactions on page 113.
If your company pays overtime wages and you mark Automatic Overtime in the Payroll Setup window, you must enter the number of hours an employee must work in a pay period before overtime will be paid.
For example, you might enter 40 for regular hours required if employees are paid weekly. Assume you’ve marked Automatic Overtime for a biweekly pay period and it is based on 40 hours a week. You must enter two hourly pay code transactions for each employee; each hourly pay code should have a corresponding overtime pay code.
If you enter a pay record transaction for an hourly employee who worked 35 hours the first week and 45 hours the next, you must enter 35 hours in the first hourly pay code transaction and 45 hours in the second hourly pay code transaction. The employee will then receive 75 hours of hourly pay and 5 hours of overtime pay.
If Automatic Overtime is not marked, you must enter transactions for both hourly and overtime pay codes—one hourly pay code transaction for 75 hours and one overtime pay code transaction for 5 overtime hours.
Total Pay / Total Hours = Average Pay Rate x Overtime Factor for the Overtime Pay Rate.
If your business needs require complex overtime calculations, consider using Overtime Rate Manager, which is included with Payroll Extensions. This module is part of the Human Resources and Payroll Suite, which can be installed as an additional product.

U . S . P A Y R O L L 11
C H A P T E R 1 S E T T I N G U P P A Y R O L L
Calculating overtime pay
There are several ways that overtime can be calculated. Two examples are described in detail here. Refer to online help for additional examples.
Automatic overtime without shifts and without pay rate changesThe following example shows how overtime will be calculated without shifts and without pay rate changes, using the following pay codes and pay rates:
• HOUR pay code set up with a $10.00 pay rate• HOUR2 pay code set up with a $12.00 pay rate• OT pay code set up to be determined by multiplying the HOUR pay rate by the
overtime pay factor• OT2 pay code set up to be determined by multiplying the HOUR2 pay rate by
the overtime pay factor• Payroll Setup has Automatic Overtime at 40 hours
Total gross pay equals $1,040.00.
The total pay per pay code is then divided by the number of hours for that pay code to determine the average pay rate for all the transactions. Each pay code is treated individually.
The overtime value is determined by multiplying the overtime hours by the employee’s overtime pay code and then multiplying that by the average pay rate. Each pay code is treated individually.
Pay code Hours X Hourly calculation = Amount calculation
HOUR 30 X $10.00 = $300.00
HOUR 20 X $10.00 = $200.00
HOUR2 30 X $12.00 = $360.00
HOUR2 15 X $12.00 = $180.00
Pay code Total pay
÷ Hours = Average pay rate
HOUR $500.00 ÷ 50 = $10.00
HOUR2 $540.00 ÷ 45 = $12.00
Pay code Hours X Pay factor X Average pay rate
= Overtime value
OT 10 X 1.5 X $10.00 = $150.00
OT2 5 X 1.5 X $12.00 = $90.00

P A R T 1 S E T U P
12 U . S . P A Y R O L L
Because we don’t know which pay code should have the hours of overtime removed, we need to reduce both pay code transactions by the weight each provides. To do this, the regular pay code hours are multiplied by the overtime hours and divided by the total regular hours to determine the total number of overtime hours. Each pay code is treated individually.
Each hourly weight is subtracted from each transaction to determine adjusted hours. Each pay code is treated individually.
The adjusted hours are multiplied by the pay rate to determine the transaction dollar value. Each pay code is treated individually.
The transaction dollar values are added to the overtime values to calculate the total paid to the employee.
Gross pay for this employee is $1,120.00.
Pay code Regular hours
X Overtime hours
÷ Total regular hours
= Total overtime hours
HOUR 30 X 10 ÷ 50 = 6.00
HOUR 20 X 10 ÷ 50 = 4.00
HOUR2 30 X 5 ÷ 45 = 3.33
HOUR2 15 X 5 ÷ 45 = 1.67
Pay code Regular hours
- Total overtime hours = Adjusted hours
HOUR 30 - 6.00 = 24.00
HOUR 20 - 4.00 = 16.00
HOUR2 30 - 3.33 = 26.67
HOUR2 15 - 1.67 = 13.33
Pay code Adjusted hours
X Pay rate = Transaction dollar value
HOUR 24.00 X $10.00 = $240.00
HOUR 16.00 X $10.00 = $160.00
HOUR2 26.67 X $12.00 = $320.04
HOUR2 13.33 X $12.00 = $159.96
Pay code Value Description
OT $150.00 Overtime value
OT2 $90.00 Overtime value
HOUR $240.00 Transaction dollar value
HOUR $160.00 Transaction dollar value
HOUR2 $320.04 Transaction dollar value
HOUR2 $159.96 Transaction dollar value

U . S . P A Y R O L L 13
C H A P T E R 1 S E T T I N G U P P A Y R O L L
Automatic overtime with shifts and with pay rate changesThe following example shows how overtime will be calculated with shifts and with a pay rate change, using the following pay codes and pay rates:
• HOUR pay code set up with a $10.00 pay rate• HOUR2 pay code set up with a $12.00 pay rate that changes to a $14.00 pay rate• OT pay code set up to be determined by multiplying the HOUR pay rate by the
overtime pay factor• OT2 pay code set up to be determined by multiplying the HOUR2 pay rate by
the overtime pay factor• SHIFT1 pay code set up with a $1.00 pay rate• SHIFT2 pay code set up with a $2.00 pay rate• Payroll Setup has Automatic Overtime at 40 hours.
Since the total hours on the transactions are 45 hours—5 hours over the overtime limit for HOUR—and 50 hours—10 hours over the overtime limit for HOUR2—we need to calculate overtime. However, we do not know which pay rate the overtime needs to apply to so we need to take an average of the 2 pay rates. We also need to add in the Shift pay to the pay rates. Each pay code is treated individually.
The dollar value of each transaction is calculated and the shift value is added to the dollar value. Each pay code is treated individually.
The total dollar value for the HOUR pay code is $495.00.
The total dollar value for the HOUR2 pay code is $740.00.
The total dollar value per pay code is divided by the number of hours for that pay code to determine the average pay rate. Each pay code is treated individually
Pay code Hours X Hourly calculation = Amount calculation
HOUR + SHIFT1 20 X $10.00 + $1.00 = $220.00
HOUR + SHIFT1 25 X $10.00 + $1.00 = $275.00
HOUR2 + SHIFT2 30 X $12.00 + $2.00 = $120.00
HOUR2 + SHIFT2 20 X $14.00 + $2.00 = $320.00
Pay code Hours X Hourly pay with shift code
= Dollar value
HOUR 20 X $11.00 = $220.00
HOUR 25 X $11.00 = $275.00
Pay code Hours X Hourly pay with shift code
= Dollar value
HOUR2 30 X $14.00 = $420.00
HOUR2 20 X $16.00 = $320.00
Total dollar value ÷ Hours per pay code = Average pay rate
$495.00 ÷ 45 = $11.00
$740.00 ÷ 50 = $14.80

P A R T 1 S E T U P
14 U . S . P A Y R O L L
The overtime hours are multiplied by the employee’s overtime pay code and then multiplied by the average pay code pay rate to determine the overtime pay. Each pay code is treated individually.
Because we don’t know which pay code should have the hours of overtime removed we need to reduce both pay code transactions by the weight each provides. To do this, the regular pay code hours are multiplied by the overtime hours and divided by the total regular hours to determine the total number of overtime hours. Each pay code is treated individually.
Each hourly weight is subtracted from each transaction to determine adjusted hours. Each pay code is treated individually
The adjusted hours are multiplied by the pay rate to determine the transaction dollar value. Each pay code is treated individually.
Pay code Hours X Pay factor X Average pay rate
= Overtime pay
OT 5 X 1.5 X $11.00 = $82.50
OT2 10 X 1.5 X $14.80 = $222.00
Pay code Regular hours
X Overtime hours
÷ Total regular hours
= Total overtime hours
HOUR 20 X 5 ÷ 45 = 2.22
HOUR 25 X 5 ÷ 45 = 2.78
HOUR2 30 X 10 ÷ 50 = 6.00
HOUR2 20 X 10 ÷ 50 = 4.00
Pay code Regular hours - Total overtime hours
= Adjusted hours
HOUR 20 - 2.22 = 17.78
HOUR 25 - 2.78 = 22.22
HOUR2 30 - 6 = 24.00
HOUR2 20 - 4 = 16.00
Pay code Adjusted hours X Pay rate = Transaction dollar value
HOUR 17.78 X $11.00 = $195.58
HOUR 22.22 X $11.00 = $244.42
HOUR2 24 X $14.00 = $336.00
HOUR2 16 X $16.00 = $256.00
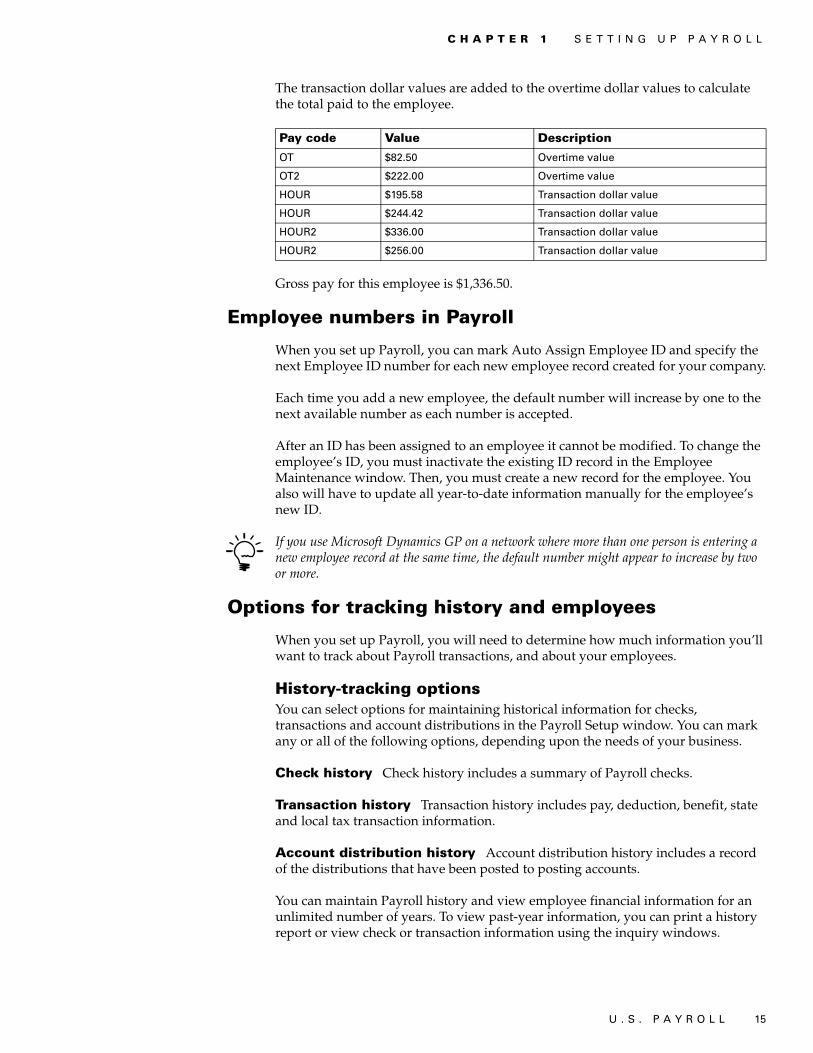
U . S . P A Y R O L L 15
C H A P T E R 1 S E T T I N G U P P A Y R O L L
The transaction dollar values are added to the overtime dollar values to calculate the total paid to the employee.
Gross pay for this employee is $1,336.50.
Employee numbers in Payroll
When you set up Payroll, you can mark Auto Assign Employee ID and specify the next Employee ID number for each new employee record created for your company.
Each time you add a new employee, the default number will increase by one to the next available number as each number is accepted.
After an ID has been assigned to an employee it cannot be modified. To change the employee’s ID, you must inactivate the existing ID record in the Employee Maintenance window. Then, you must create a new record for the employee. You also will have to update all year-to-date information manually for the employee’s new ID.
If you use Microsoft Dynamics GP on a network where more than one person is entering a new employee record at the same time, the default number might appear to increase by two or more.
Options for tracking history and employees
When you set up Payroll, you will need to determine how much information you’ll want to track about Payroll transactions, and about your employees.
History-tracking optionsYou can select options for maintaining historical information for checks, transactions and account distributions in the Payroll Setup window. You can mark any or all of the following options, depending upon the needs of your business.
Check history Check history includes a summary of Payroll checks.
Transaction history Transaction history includes pay, deduction, benefit, state and local tax transaction information.
Account distribution history Account distribution history includes a record of the distributions that have been posted to posting accounts.
You can maintain Payroll history and view employee financial information for an unlimited number of years. To view past-year information, you can print a history report or view check or transaction information using the inquiry windows.
Pay code Value Description
OT $82.50 Overtime value
OT2 $222.00 Overtime value
HOUR $195.58 Transaction dollar value
HOUR $244.42 Transaction dollar value
HOUR2 $336.00 Transaction dollar value
HOUR2 $256.00 Transaction dollar value
P A R T 1 S E T U P
16 U . S . P A Y R O L L
For more information, refer to Specifying a Payroll report option on page 159, Viewing historical paycheck information by codes on page 147, and Viewing historical pay code information on page 147.
Since historical information will consume space on your hard disk, you can clear historical information after it’s no longer needed. Refer to Removing Payroll history on page 173, Removing year-end information on page 176, Removing distribution information on page 176, and Removing journal history on page 177 for more information. However, clearing history might affect your ability to reprint posting journals. Also, to void posted checks, you must keep both check and transaction detail history.
Employee tracking optionsYou will use the Payroll Setup Options window to select options for tracking an employee’s days and weeks worked, edit financial fields throughout the Payroll system, and edit pay rates used in transactions.
Track Days Worked To track the number of days each employee worked for each pay code, you must enter the number of days worked during the salary pay period for each transaction you enter during a pay run.
Track Weeks Worked To track the number of weeks each employee worked for each pay code, you must enter the number of weeks worked for each transaction and the number of weeks worked by salaried employees during a pay run. When you enter this information in the Build Payroll Checks window, the days and weeks worked are rolled down to all automatic pay types. This information will be printed on state unemployment reports.
Edit Financial Fields You can edit an employee’s financial information, such as employee summary information. Typically, this option shouldn’t be marked, to ensure that changes aren’t made inadvertently. If you need to make changes, it’s a good idea to mark the option, make the changes, then unmark the option again after the changes have been made. This will prevent someone from making changes that weren’t meant to be made.
Display Rate on Trx Mark this option to edit pay rates in the Payroll Transaction Entry window for the following pay types:
• Hourly• Piecework• Overtime, double time, vacation, sick or holiday pay types that are based on
hourly or piecework pay types
However, the following pay types or pay types based on these cannot be edited in the Payroll Transaction Entry window:
• Salary• Commission• Business Expense• Pension• Earned Income Credit (EIC)• Other• Overtime, double time, vacation, sick or holiday pay types that are based on
salary pay types

U . S . P A Y R O L L 17
C H A P T E R 1 S E T T I N G U P P A Y R O L L
Payroll setup options for tips
Some of the tasks you’ll need to do to take advantage of tips wage tracking involve setting up various options and codes. Be sure you complete the following in the Payroll Setup Options window:
• Mark the Calculate Tip Allocation option.
• Verify the Tip Allocation Rate. Check IRS regulations for the current rate if you are unsure of what it should be.
Payroll uses the gross receipts method to calculate the tip allocation. When setting up charged and reported tips, be sure the Tips Received field is set up correctly, as it is used to determine the allocated tip amount.
Options for including year-to-date amounts
You can select options for including codes with year-to-date amounts on the check stub or earnings statements in the Payroll Setup Options window. Marking any of the following options from this window will allow you to reconcile Gross year-to-date Amounts against the check stub or earnings statements, even if the selected options are not included in the check run:
• Pay Codes• Deductions• Benefits• State Taxes• Local Taxes
Setting up Payroll default entries
Use the Payroll Setup window to set up default entries that appear throughout Payroll. Payroll history options and employee tracking options that you select can help increase your data entry time and can make compiling historical records easier for you.
To set up Payroll default entries:1. Open the Payroll Setup window.
(HR & Payroll >> Setup >> Payroll >> Payroll)

P A R T 1 S E T U P
18 U . S . P A Y R O L L
2. Enter overtime information and passwords for vacation and sick time available, if necessary. You will need to enter a password when you create a transaction for more vacation or sick time hours than the employee has available. Refer to Overtime in Payroll on page 10 for more information about setting up overtime options.
If you’re using Human Resources and have marked Human Resources as the accrue type in the Attendance Setup window, the vacation and sick time fields will not be available. Refer to the “Attendance setup” chapter in the Human Resources documentation for more information.
3. Assign the Next Employee ID for new employee records, if necessary. Refer to Employee numbers in Payroll on page 15 for more information on auto-assigning employee IDs in Payroll.
4. Mark the options to maintain historical information for checks, transactions, and account distributions, as needed. If you don’t mark any options, you won’t be able to print period-end reports or view employee financial information in summary and inquiry windows.
5. Enter the last date posted information and enter or select the checkbook from which computer and manual paychecks typically will be issued.
6. Select a check format.
7. If your organization has multiple payroll clerks who complete separate pay runs for each department or business unit, choose Multiuser to open the Multiuser Payroll Setup window.
8. Specify how concurrent payroll processing tasks are queued.
Certain tasks, such as calculating payroll checks, printing checks, and printing direct deposit earning statements can only be performed by one user at a time. If another user tries to perform one of these tasks at the same time, you can specify how long that user’s processing request will wait in the queue, and how often the processing request will be retried.
9. Choose OK in the Payroll Multiuser Setup window to save your changes.

U . S . P A Y R O L L 19
C H A P T E R 1 S E T T I N G U P P A Y R O L L
10. Choose Options to open the Payroll Setup Options window and enter additional Payroll default entries.
11. Enter the next transaction numbers and select the number of decimal places for pay rates, deductions, and benefits.
12. Enter user-defined field prompts for tracking additional employee information that might be specific to your company.
13. Mark Enable Fiscal Year Tracking to track employee payroll information by fiscal year, as well as by calendar year.
If you enable fiscal year tracking during the year, it is a good idea to reconcile your fiscal year employee information to help ensure that your historical data is summarized correctly. For more information, see Reconciling employee records on page 165.
14. Mark Track Days Worked to track the number of days an employee’s work was assigned to each pay code.
Depending upon the calculation method used by your state, this information might be needed to calculate workers’ compensation tax.
15. Mark Track Weeks Worked to track the number of weeks each employee worked for each pay code.
16. Mark Edit Financial Fields to edit employee summary information throughout the system.
17. Mark Display Pay Rate on Trx to display and edit employee pay rates when you enter transactions.
18. Mark Calculate Tip Allocation and verify the Tip Allocation Rate if you track tips wages for your employees.
19. Mark an option if you want all of its codes with year-to-date amounts to be included in the check stub or earning statement.
20. Choose OK in the Payroll Setup Options window to save your changes.
21. Choose File >> Print to print a Payroll Options Report to verify your information.

P A R T 1 S E T U P
20 U . S . P A Y R O L L
Although you can create employee classes at this time by choosing Classes to open the Employee Class Setup window, it’s a good idea to wait until you’ve set up codes. For more information, refer to Chapter 2, “Setting up codes,” and Creating an employee class on page 63.
Required Payroll posting accounts
Payroll has several posting accounts that are required and are used only for Payroll transactions. They are:
Gross Pay This account type is an expense account that can be entered for all employees’ salaries.
Federal Tax Withholding This account type is a liability account. Transactions will be posted to it for the following tax withholding codes:
• EFIC/M (Employer FICA/Medicare Tax)• EFIC/S (Employer FICA/Social Security Tax)• FED (Federal Tax Withholding)• FICA/M (FICA/Medicare Tax Withholding)• FICA/S (FICA/Social Security Tax Withholding)
State Tax Withholding This account type is a liability account that can be entered for state tax codes.
Local Tax Withholding This account type is a liability account that can be entered for local tax codes.
Deduction Withholding This account type is a liability account that can be entered for deduction codes.
Employer’s Tax Expense This account type is an expense account. Transactions will be posted to it for the following tax expense codes:
• FIC/ME (FICA/Medicare Tax Expense)• FIC/SE (FICA/Social Security Tax Expense)• FUTA (FUTA Tax Expense)• SUTA (SUTA Tax Expense)
Benefits Expense This account type is an expense account that can be entered for benefit codes.
Benefits Payable This account type is a liability account that can be entered for benefit codes.
Taxable Benefits Expense This account type is an expense account that can be entered for taxable benefit codes.
Taxable Benefits Payable This account type is a liability account that can be entered for taxable benefit codes.
SUTA Payable This account type is a liability account that can be entered for state unemployment tax liability.
FUTA Payable This account type is a liability account that will allow only FUTA to be entered for federal unemployment tax liability.

U . S . P A Y R O L L 21
C H A P T E R 1 S E T T I N G U P P A Y R O L L
Workers’ Compensation Tax Expense This account type is an expense account that can be entered for state codes to record workers’ compensation expense.
Workers’ Compensation Tax Payable This account type is a liability account that can be entered for state codes to record workers’ compensation liability.
It’s a good idea to set up default information using the Payroll Setup window before setting up posting accounts. If you haven’t set up default information yet, refer to Setting up Payroll default entries on page 17 for more information about using the Payroll Setup window.
The following table shows the posting accounts required in Payroll and the departments, positions, and codes associated with each.
Setting up Payroll posting accounts
Use the Payroll Posting Accounts Setup window to set up Payroll posting accounts. Payroll posting accounts are used to track gross pay, taxes withheld, tax expenses, and various benefit and deduction accounts. Transactions posted to these accounts will appear on the Payroll Check Posting Register.
You must set up departments and positions before setting up Payroll posting accounts. Refer to Setting up department codes on page 26 and Setting up position codes on page 27 for more information.
Before you set up posting accounts, be sure to set the account format using the Account Format Setup window. For more information, refer to Help >> Contents >> select Setting Up the System. You also should have completed Setting up Payroll default entries on page 17.
Payroll account type Dept. Position Code
Gross Pay (DR) ALL ALL ALL
Federal Tax Withholding (CR) ALLALLALLALLALL
ALLALLALLALLALL
EFIC/MEFIC/SFEDFICA/MFICA/S
State Tax Withholding (CR) ALL ALL ALL
Local Tax Withholding (CR) ALL ALL ALL
Deduction Withholding (CR) ALL ALL ALL
Employer’s Tax Expense ALLALLALLALL
ALLALLALLALL
FIC/MEFIC/SESUTAFUTA
Benefit Expense (DR) ALL ALL ALL
Benefit Payable (CR) ALL ALL ALL
Taxable Benefit Expense (DR) ALL ALL ALL
Taxable Benefit Payable (DR) ALL ALL ALL
SUTA Payable (CR) ALL ALL ALL
FUTA Payable (CR) ALL ALL FUTA
Workers’ Comp. Tax Exp. (DR) ALL ALL ALL
Workers’ Comp. Tax Pay (CR) ALL ALL ALL

P A R T 1 S E T U P
22 U . S . P A Y R O L L
To set up Payroll posting accounts:1. Open the Payroll Posting Accounts Setup window.
(Administration >> Setup >> Posting >> Payroll Accounts)
2. Select an account type and position for the employee’s Payroll code.
When you select an account type, existing accounts, and an account description for the account type chosen, will be displayed in the scrolling window. You can either accept the default entry for all departments and positions, or you can post with more detail to General Ledger if you enter departments and positions. You also can enter a department and position for the employees’ pay code transactions when you enter transactions.
The Code lookup window displays codes for the selected posting account type. For example, if you selected Gross Pay for the Payroll account type, the window displays pay codes.
3. Enter or select the posting account that transactions with the selected account type should be posted to.
4. Repeat steps 2 and 3 for all posting accounts.
5. Choose Save to save the posting accounts.
6. Choose File >> Print to print a Posting Accounts List to verify your information.
Setting up default transaction dimension codes for Analytical Accounting
Use the Analytical Payroll Default Dimensions window to set up default transaction dimension codes. This feature lets you link transaction dimension codes to ledger transactions in U.S. Payroll, which makes classifying, reporting, and analyzing transactions easier and more powerful. For more information on transaction dimensions and transaction dimension codes, see the Analytical Accounting documentation.
Before you can complete the procedure in this section, you must define the Payroll pay codes, benefits, deductions, and so on that you plan to use with Analytical Accounting. Also, you must install, activate, and set up Analytical Accounting, and create Analytical Accounting dimension codes and account classes. For more information, see the Analytical Accounting documentation.
U . S . P A Y R O L L 23
C H A P T E R 1 S E T T I N G U P P A Y R O L L
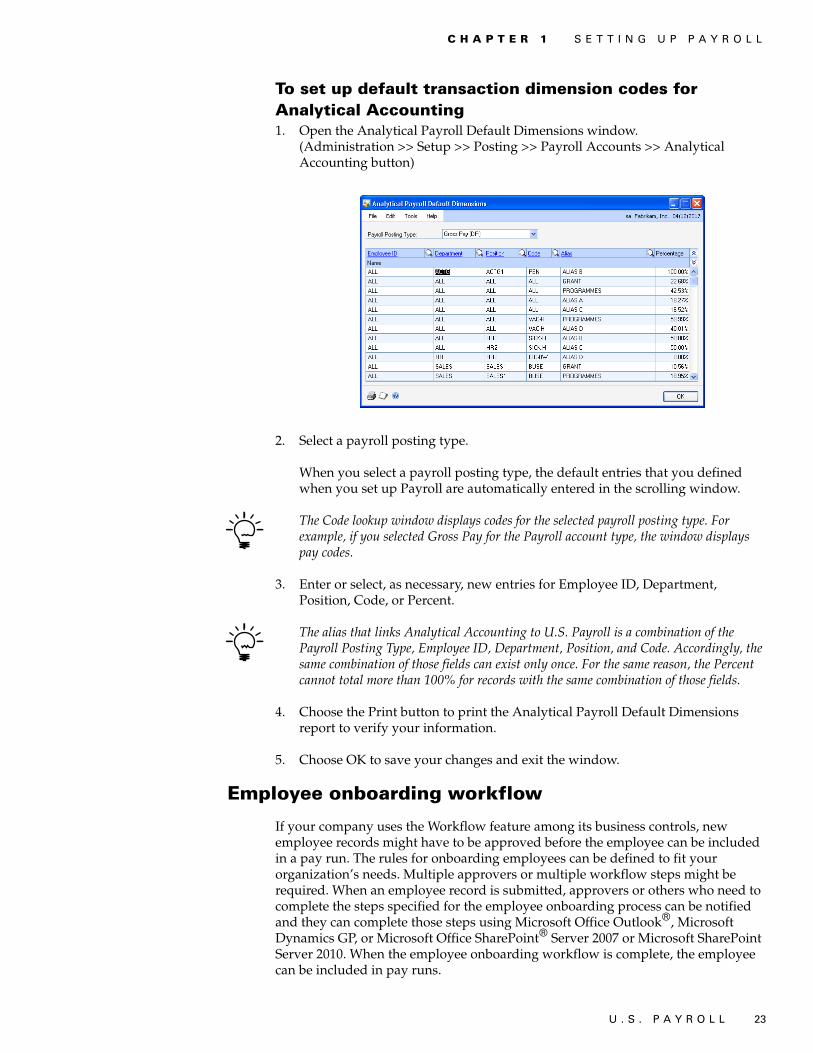
To set up default transaction dimension codes for Analytical Accounting1. Open the Analytical Payroll Default Dimensions window.
(Administration >> Setup >> Posting >> Payroll Accounts >> Analytical Accounting button)
2. Select a payroll posting type.
When you select a payroll posting type, the default entries that you defined when you set up Payroll are automatically entered in the scrolling window.
The Code lookup window displays codes for the selected payroll posting type. For example, if you selected Gross Pay for the Payroll account type, the window displays pay codes.
3. Enter or select, as necessary, new entries for Employee ID, Department, Position, Code, or Percent.
The alias that links Analytical Accounting to U.S. Payroll is a combination of the Payroll Posting Type, Employee ID, Department, Position, and Code. Accordingly, the same combination of those fields can exist only once. For the same reason, the Percent cannot total more than 100% for records with the same combination of those fields.
4. Choose the Print button to print the Analytical Payroll Default Dimensions report to verify your information.
5. Choose OK to save your changes and exit the window.
Employee onboarding workflow
If your company uses the Workflow feature among its business controls, new employee records might have to be approved before the employee can be included in a pay run. The rules for onboarding employees can be defined to fit your organization’s needs. Multiple approvers or multiple workflow steps might be required. When an employee record is submitted, approvers or others who need to complete the steps specified for the employee onboarding process can be notified and they can complete those steps using Microsoft Office Outlook®, Microsoft Dynamics GP, or Microsoft Office SharePoint® Server 2007 or Microsoft SharePoint Server 2010. When the employee onboarding workflow is complete, the employee can be included in pay runs.

P A R T 1 S E T U P
24 U . S . P A Y R O L L
To set up an employee onboarding workflow, you can open the Workflow web site from the Payroll Setup window. For more information about Workflow, see the System Setup Guide (Help >> Printable Manuals >> select System >> select System Setup Guide) or the Workflow Administrator’s Guide (Help >> Printable Manuals >> select System >> select Workflow Administrator’s Guide).
Employee personnel maintenance workflow
If your company uses the Workflow feature among its business controls, changes to employee personnel records might have to be approved before the changes can take effect. The rules for changing employee records can be defined to fit your organization’s needs. Multiple approvers or multiple workflow steps might be required. When a change to an employee record is submitted, approvers or others who need to complete the steps specified for the employee onboarding process can be notified and they can complete those steps using Microsoft Office Outlook, Microsoft Dynamics GP, or Microsoft Office SharePoint Server 2007 or Microsoft SharePoint Server 2010.
To set up an employee personnel maintenance workflow, you can open the Workflow web site from the Payroll Setup window. For more information about Workflow, see the System Setup Guide (Help >> Printable Manuals >> select System >> select System Setup Guide) or the Workflow Administrator’s Guide (Help >> Printable Manuals >> select System >> select Workflow Administrator’s Guide).

U . S . P A Y R O L L 25
C H A P T E R 2 S E T T I N G U P C O D E S
Chapter 2: Setting up codes You can set up location codes, department codes, position codes, and pay codes to which you can assign employees for identification purposes.
This information is contained in the following sections:
• Setting up location codes• Setting up department codes• Setting up position codes• Setting up supervisor codes• Payroll pay codes and types• Setting up pay codes• Setting up pay codes for tips• Setting up shift codes• Setting up secondary status codes
Setting up location codes
Use the Company Addresses Setup window to set up a location code, which includes an address, phone numbers, and a contact person for each location. If your company has multiple sites, you can track which employees are working from which sites by setting up location IDs.
To set up location codes:1. Open the Company Addresses Setup window.
(HR & Payroll >> Setup >> Payroll >> Location)
2. Enter an identification and name for the company’s location.
3. Enter contact, address, and phone information.
4. Choose Address ID Internet to enter or view Internet information for this address.
5. Choose Save.

P A R T 1 S E T U P
26 U . S . P A Y R O L L
Setting up department codes
Use the Department Setup window to enter and maintain department codes and descriptions. Department codes help you track employee cards by providing a list of all the departments and their descriptions within your company. The following are some examples of department codes you might use:
• ACTG - Accounting• SALS - Sales• PROG - Programming• MKTG - Marketing• COMM - Communications• RSDV - Research/ Development• SSUP - Sales/Support• DPT1 - Department 1• CONT - Contract Work• SRVC - Service Work• FDWK - Field Work
Before setting up department codes, you should have completed Setting up Payroll default entries on page 17. To ensure reports are printed in the correct order, each department code should have the same number of characters. The characters are sorted from left to right, and numbers take priority over letters.
To set up department codes:1. Open the Department Setup window.
(HR & Payroll >> Setup >> Payroll >> Department)
2. Enter the code and description for a department.
3. Choose Save to store the code. Continue entering codes for all your departments.
4. Choose File >> Print to print a Department Codes List to verify your information.
U . S . P A Y R O L L 27
C H A P T E R 2 S E T T I N G U P C O D E S
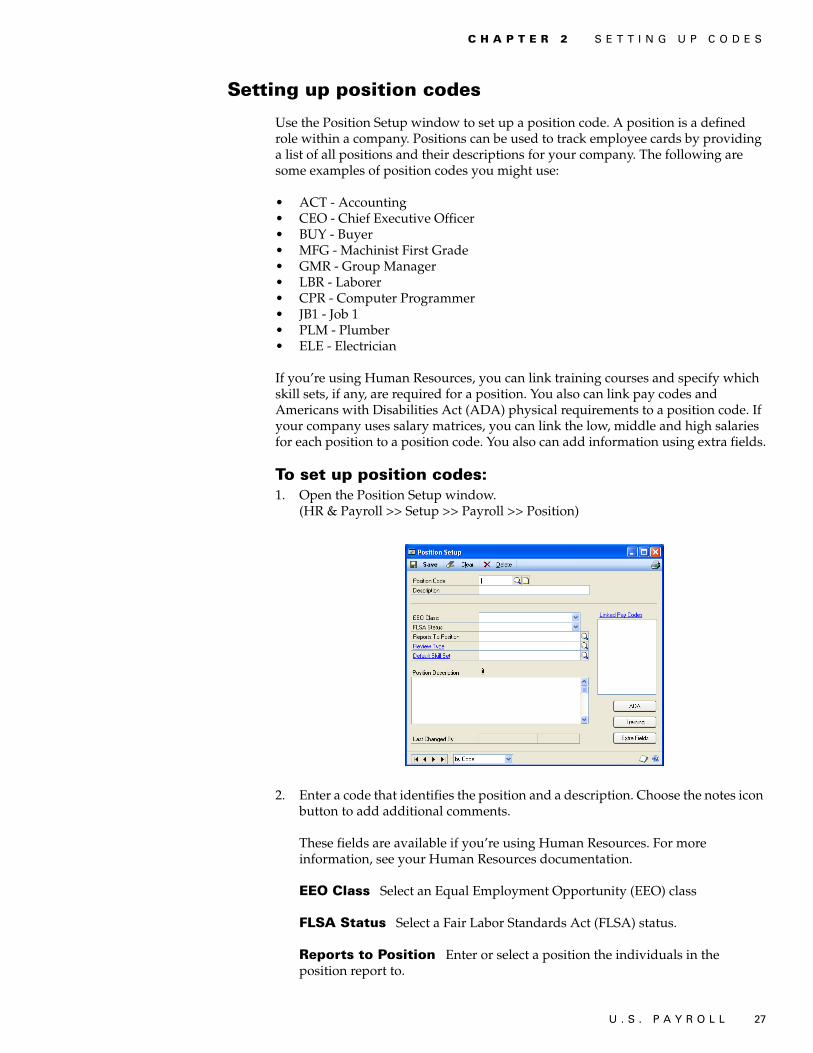
Setting up position codes
Use the Position Setup window to set up a position code. A position is a defined role within a company. Positions can be used to track employee cards by providing a list of all positions and their descriptions for your company. The following are some examples of position codes you might use:
• ACT - Accounting• CEO - Chief Executive Officer• BUY - Buyer• MFG - Machinist First Grade• GMR - Group Manager• LBR - Laborer• CPR - Computer Programmer• JB1 - Job 1• PLM - Plumber• ELE - Electrician
If you’re using Human Resources, you can link training courses and specify which skill sets, if any, are required for a position. You also can link pay codes and Americans with Disabilities Act (ADA) physical requirements to a position code. If your company uses salary matrices, you can link the low, middle and high salaries for each position to a position code. You also can add information using extra fields.
To set up position codes:1. Open the Position Setup window.
(HR & Payroll >> Setup >> Payroll >> Position)
2. Enter a code that identifies the position and a description. Choose the notes icon button to add additional comments.
These fields are available if you’re using Human Resources. For more information, see your Human Resources documentation.
EEO Class Select an Equal Employment Opportunity (EEO) class
FLSA Status Select a Fair Labor Standards Act (FLSA) status.
Reports to Position Enter or select a position the individuals in the position report to.

P A R T 1 S E T U P
28 U . S . P A Y R O L L
Review Type Enter or select the review type to be used for employees in this position.
Default Skill Set Enter or select a required skill set.
Position Description Enter a description of the position.
Choose the paperclip icon button to open the OLE (Object Linking and Embedding) container and store a position description file.
These buttons are available if you’re using Human Resources. For more information, see your Human Resources documentation.
Linked Pay Codes Opens the Position\Pay Code Setup window to link pay codes and salary ranges to this position code.
ADA Opens the ADA Physical Requirements window to add an ADA requirements record.
Training Opens the Courses Available to Link window to link courses to a position code.
Extra Fields Opens the Position Extra Fields window to set up extra fields for a position code.
3. Choose Save. Continue entering codes for all positions.
4. Choose File >> Print to print a Position Codes List to verify your information.
Setting up supervisor codes
Use the Supervisor Setup window to enter and maintain supervisor codes and descriptions. You can set up a supervisor record and assign an employee record to the position.
To set up supervisor codes:1. Open the Supervisor Setup window.
(HR & Payroll >> Setup >> Payroll >> Supervisor)
2. Enter the code and description of the supervisor.
3. Enter or select the employee ID of the employee that holds this supervisor position.
U . S . P A Y R O L L 29
C H A P T E R 2 S E T T I N G U P C O D E S
4. Choose Save to store the code. Continue entering codes for all supervisors.
5. Choose File >> Print to print a Supervisor Codes List to verify your information.
Payroll pay codes and types
With Payroll you can set up different company pay codes to be the basis of employee pay codes and to apply changes to employee pay codes. You also can assign company pay codes to employee classes.
When you define a pay code, you can assign pay types to it. The pay types you assign to a pay code will depend on how you’re using a specific pay code. For example, if you define a pay code SLRY for salaried employees, you probably wouldn’t include the overtime or double time pay types in that pay code.
Available pay types include:
Hourly Hourly pay type will be used for employees who are paid by the hour.
Salary Salary pay type will be used for employees who are paid a specific pay amount each pay period. With this pay type, the pay per period is automatically calculated. If you select this pay type, you also can enter the amount to be paid for an advance pay run. An advance pay run is a way to pay salaried employees an advance on their regular salary pay. The advanced amount will be subtracted from the employees’ net pay in the next salary pay run.
Piecework Piecework pay type will be used for employees who are paid a certain amount per unit made or completed.
Commission Commission pay type will be used for employees who earn their wages according to what and how much they sell. You can enter the maximum earnings per pay period, and you also can enter the amount to be paid for an advance pay run. An advance pay run is a way to pay commissioned employees an advance on their commission pay. The advanced amount will be subtracted from the employees’ net pay in the next commission pay run.
Business Expense Business Expense pay type will be used to track the records of employees who are reimbursed for mileage and travel expenses. You can include the pay in the gross wages amount that will be reported on the W-2 statement.
If you mark Report as Wages, the pay will be included in gross wages on the W-2 statement and will be treated as a nonaccountable plan. If you don’t mark this option, the pay won’t be included in gross wages on the W-2 statement and will be treated as an accountable plan.
Nonaccountable plans are reported as wages on the W-2 statement and are subject to taxes. Accountable plans aren’t subject to taxes and aren’t reported on the W-2 statement.
If you pay a per diem or mileage allowance and expenses exceed the Internal Revenue Service guidelines, you must tax the excess amount and report it as wages on the W-2 statement; the non-taxable portion must be reported in box 13. For more information, refer to the W-2 instructions supplied by the IRS.
P A R T 1 S E T U P
30 U . S . P A Y R O L L
Overtime Overtime pay type will be used for employees who receive pay for working more than the assigned number of hours and are paid at a different pay rate for the additional hours.
Double Time Double Time pay type will be used for employees who qualify for Double Time pay, normally paid at twice the rate of the Based on Pay Code rate.
Vacation Vacation pay type will be used for employees who receive pay while on vacation.
Sick Sick pay type will be used for employees who receive pay while they’re sick.
Holiday Holiday pay type will be used for employees who receive paid time off during holidays.
Pension Pension pay type will be used for employees who are retired and receive pension pay from the company.
Other Other pay types can be used to classify additional types of pay. Some examples of other pay types are jury duty, bonus pay, long-term disability, and short-term disability.
Earned Income Credit Select Earned Income Credit if the pay code will be used for employees who qualify for earned income credit and have filed a W-5 form.
Charged Tips Select Charged Tips if the pay code will be used for employees who receive tips from customers through a charge card or check. This amount will be included in the amount paid to employees.
Reported Tips Select Reported Tips if the pay code will be used for employees who receive tips (cash) from customers that they report to the employer. This amount will not be included in the amount paid to the employee, but will be used to determine taxes on the reported tips.
Minimum Wage Balance Select Minimum Wage Balance if the pay type will be used for employees who must earn a specified minimum hourly amount. This is available only for Charged Tip and Reported Tip pay types.
Setting up pay codes
Use the Pay Code Setup window to enter and maintain company pay codes. These codes are used as default entries when setting up employee pay codes, can be used to apply changes to employee pay codes, and also can be included in employee classes. You can enter your own identifying pay codes and a description for each type of pay. You also can assign pay types to pay codes. For example, you might assign an hourly pay type to the HOUR pay code. You can set up as many pay codes for each pay type as you need for your business.
Changes made to a pay code can be reflected in any pay codes that are based on it, causing the dependent codes, including overtime and double time codes, to recalculate their pay rates. Overtime and double time pay rates are also affected by changes made to the pay factor.
If you’re using Human Resources, changes made to pay rate values in the Pay Code Setup window are not applied to employee pay records that are assigned to a pay step. If you want to make pay rate adjustments and you have pay rates assigned to

U . S . P A Y R O L L 31
C H A P T E R 2 S E T T I N G U P C O D E S
pay steps, you must first use the Employee/Pay Step Table Assignment window to remove the pay step assignments. Refer to the Human Resources documentation for more information about pay steps.
The following are some examples of pay codes you might use:
• HOUR - Hourly• SALY - Salary• VACN - Vacation• SICK - Sick time• PCWK - Piecework• COMM - Commission• OVER - Overtime
To set up pay codes:1. Open the Pay Code Setup window.
(HR & Payroll >> Setup >> Payroll >> Pay Code)
2. Enter a pay code and description.
3. Select a pay type.
4. If you’re setting up an overtime, double time, vacation, sick time, or holiday pay code, select the Based On Pay Code the pay type is based on. For example, if you’re setting up an overtime pay code for an employee with an hourly pay type, you must base the overtime pay type on the employee’s hourly pay, or the wages won’t be calculated accurately. Enter the code for a specific hourly, salary or piecework pay code that you’re basing the overtime, vacation, sick, or holiday pay type on. If the pay type is overtime or double time, the based on pay rate appears next to the Based On Pay Code field.
When setting up pay codes, select vacation or sick as pay types for vacation and sick time. This ensures that when you enter transactions, they will automatically reduce the available amount of vacation and sick time.

P A R T 1 S E T U P
32 U . S . P A Y R O L L
5. If your pay type is overtime or double time, you also can specify a pay factor that is multiplied with the pay code’s pay rate to determine the overtime or double time pay rate. If the pay factor is selected, the overtime or double time pay rate is automatically recalculated every time the pay factor is changed. The pay factor information is saved with the pay code. When the pay rate is changed for a pay code on which overtime or double time is based, the overtime or double time pay rate is automatically recalculated by multiplying the pay rate of the based-on pay code by the pay factor.
If your business needs require complex overtime calculations, consider using Overtime Rate Manager, which is included with Payroll Extensions. This module is part of the Human Resources and Payroll Suite, which can be installed as an additional product.
6. Enter the pay rate for the amount of pay.
• If Earned Income Credit is the pay type, leave the Pay Rate field blank to use the EIC tables supplied with Payroll to calculate the EIC payment.
• Enter the name of the unit of work in the Unit of Pay field if the pay type is Piecework. This unit name will be printed on Payroll reports.
• If the pay type is Salary or is based upon a salary pay type, select the unit of pay from the list of pay periods.
• If the pay type is Charged Tips or Reported Tips, the Unit of Pay label changes to Tips Received. Select Directly or Indirectly.
7. Select the pay period for the wages and mark Data Entry Default to automatically use the information in this window when you create a transaction for the pay code during a pay run.
8. Enter or select a shift code to assign to the pay code. For more information, refer to Setting up shift codes on page 35.
9. Mark the taxes the pay is subject to.
10. If you selected a commission or business expense pay type, enter the maximum amount per pay period.
11. If you selected a salary or commission pay type, enter an amount to pay in advance if the employee is to receive an advance.
12. Enter the federal and state tax rate for the pay if the pay type is subject to federal or state taxes, and should be calculated at a flat rate. For example, bonus pay can be taxed at a 20.00 percent flat rate. You can leave these fields blank to use the tax calculations from the federal and state tax tables instead of a flat tax rate.
13. Mark Vacation and Sick Time to accrue vacation and/or sick time on this pay code.
If you’re using Human Resources and have marked Human Resources as the accrue type in the Attendance Setup window, these fields will not be available. Refer to the Human Resources documentation for more information.
14. Enter W-2 information.

U . S . P A Y R O L L 33
C H A P T E R 2 S E T T I N G U P C O D E S
If the amount of the business expense should be included with gross wages on the W-2 statement, mark Report as Wages. If the business expense should also be printed in a special box on the W-2 statement, enter the number of the box in the W-2 Box field. Then enter a label, if required, to be printed in the box on the W-2 statement.
If the amount must be reported in multiple locations on the W-2 statement, use the browse buttons to select an additional location, and enter the appropriate box number and label. You can specify as many as four locations.
The Report as Wages field is available only for the Business Expense pay type. You can skip this step if the pay type isn’t a business expense.
15. Choose Save to store the pay code.
16. Choose File >> Print to print a Company Pay Codes List to verify your information.
Setting up pay codes for tips
Use the Pay Code Setup window to set up pay codes for Charged Tips, Reported Tips, and Minimum Wage Balance, in addition to your regular hourly pay code. The following table shows possible pay codes and descriptions:
Refer to Setting up pay codes on page 30 for more information.
Suppose an employee has the four pay codes listed above—hourly weekly, minimum wage balance, charged tips, and reported tips. The first pay code would be the normal hourly pay rate and weekly pay period, as shown in the following Employee Pay Code Maintenance window.
Pay code Description
CTIPS Charged tips
RTIPS Reported tips
MINWG Minimum wage balances
HR-W Hourly weekly

P A R T 1 S E T U P
34 U . S . P A Y R O L L
The setup information shows that the employee’s minimum wage should be $2.13 per hour. Because her wages are derived primarily from tips, she also needs a charged tips and reported tips pay code.
The charged tips pay code is used to report tips included in charge cards or checks, not cash paid directly to the employee. Generally, these are paid to the employee in the paycheck on a regularly scheduled basis, in this case, weekly. The following is an example of how you could set up the charged tips pay code.
Reported tips are tips the employee receives from patrons in cash. Employees need to report this amount to employers on a regular basis so that a transaction can be entered for these tips. Taxes are calculated on the tips wages, and reported on the employee’s W-2, but not withheld from the employee’s paycheck. So, the employee also needs a pay code for reported tips, as shown in the following Employee Pay Code Maintenance window.

U . S . P A Y R O L L 35
C H A P T E R 2 S E T T I N G U P C O D E S
The employee also is guaranteed a minimum hourly wage, so she needs a minimum wage balance pay code in addition to the three pay codes already assigned to her. The following is an example of how you could set up the minimum wage balance pay code.
Setting up shift codes
Use the Shift Code Setup window to set up a shift code. You can enter a shift premium as an amount or percentage.
To set up shift codes:1. Open the Shift Code Setup window.
(HR & Payroll >> Setup >> Payroll >> Shift Code)
2. Enter a code that identifies the shift code and a description.
3. If the employees assigned to the shift code are eligible for additional pay for working this shift, mark Amount or Percent for the shift premium, and enter the shift amount or percent.
4. Choose Save.
5. Choose File >> Print to print a Shift Codes List to verify your information.
Setting up secondary status codes
Use the Secondary Status Setup window to define codes that provide more detail about an employee’s status, such as why an employee is inactive or isn’t being paid. For example, you could set up codes for inactive employees who are taking military

P A R T 1 S E T U P
36 U . S . P A Y R O L L
or family leave, or active employees who are on probation, awaiting a grant assignment, or between school terms
To set up a secondary status code:1. Open the Secondary Status Setup window.
(HR & Payroll >> Setup >> Payroll >> Secondary Status)
2. Enter a code that defines the secondary status and a description.
3. Select whether the status code applies to active or inactive employees. Active status types can only be assigned to active employees, and Inactive status types can only be assigned to inactive employees.
4. Choose Save.
5. Choose File >> Print to print a Secondary Status Codes List to verify your information.

U . S . P A Y R O L L 37
Chapter 3: Setting up deductions and benefitsYou can set up company deduction and benefit cards, also known as deduction and benefit codes, to be used as default entries for employee deductions and benefits. You can use these company cards to apply changes to several employees’ deduction and benefit cards at once, and assign them to employee classes.
If you’re using Human Resources, set up benefit and deduction cards in Human Resources. Refer to the “Benefit setup” chapter in the Human Resources documentation.
A deduction is an amount withheld from an employee’s wages. For example, donations to a charity, union dues, and contributions to retirement plans could be set up as deductions. A garnishment is a court-ordered deduction, often for child support, delinquent taxes, or bankruptcy debts. A tax-sheltered annuity (TSA) is a deduction exempt from one or more types of taxation. You can set up a deduction as a percentage of gross, net, or earnings wages, as a fixed amount, or as an amount per unit of wages.
You also can set up deduction sequences at the company or employee level to specify the order in which deductions are taken. If you do not create deduction sequences, the Payroll system applies a default sequence.
A benefit is an amount paid by the employer on the employee’s behalf. Some benefits are taxable. Examples of benefits include employer-paid portions of insurance premiums, and 401(k) matching contributions. You can set up a benefit as a percentage of gross or net wages, as a percentage of a deduction, as a fixed amount, or as an amount per unit of wages.
Before setting up a deduction or benefit, first complete Setting up Payroll default entries on page 17. To ensure reports are printed in the correct order, be sure that each deduction and benefit code has the same number of characters. The characters are sorted from left to right, and numbers take priority over letters.
Information is contained in the following sections:
• Using zero benefit and deduction amounts• Deduction types• Deduction tiers• Setting up a standard deduction• Setting up a garnishment• Setting up earnings codes• Setting up maximum garnishment rules• Deducting multiple garnishments• Setting up a company-level deduction sequence• Benefit types• Benefit tiers• Setting up a benefit• Setting and activating post-dated pay rates• Modifying a pay, benefit, or deduction code• Inactivating or deleting a pay, benefit, or deduction code
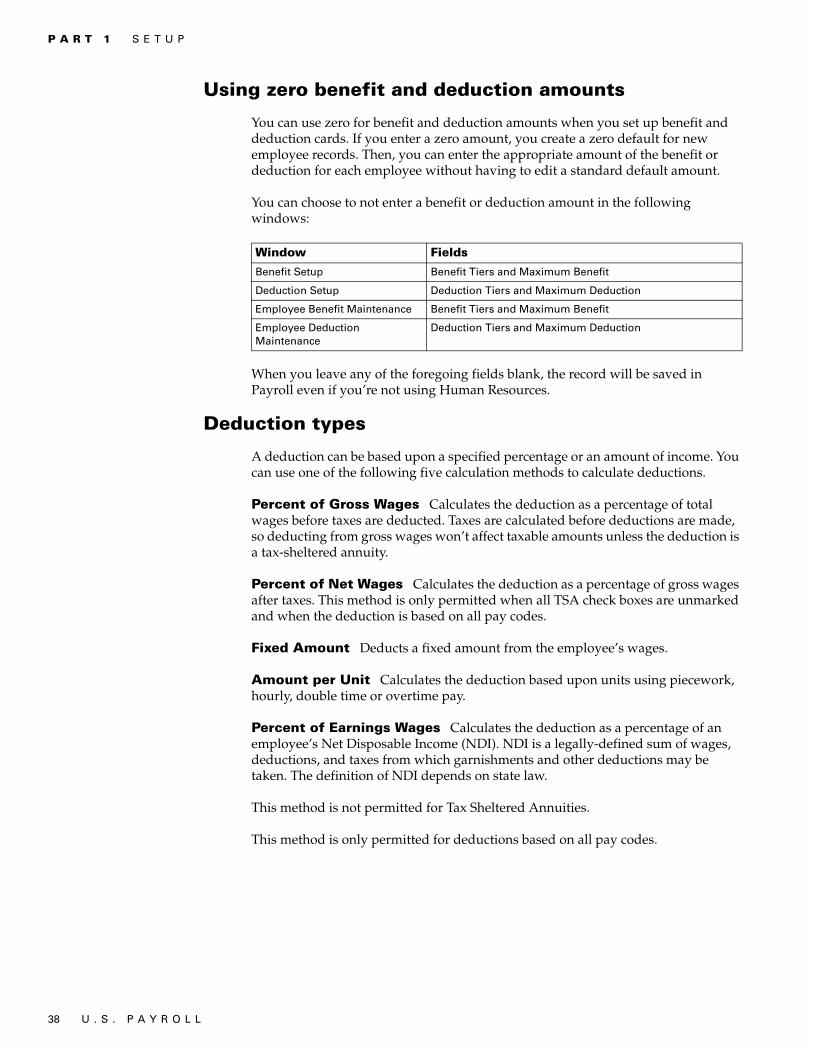
P A R T 1 S E T U P
38 U . S . P A Y R O L L
Using zero benefit and deduction amounts
You can use zero for benefit and deduction amounts when you set up benefit and deduction cards. If you enter a zero amount, you create a zero default for new employee records. Then, you can enter the appropriate amount of the benefit or deduction for each employee without having to edit a standard default amount.
You can choose to not enter a benefit or deduction amount in the following windows:
When you leave any of the foregoing fields blank, the record will be saved in Payroll even if you’re not using Human Resources.
Deduction types
A deduction can be based upon a specified percentage or an amount of income. You can use one of the following five calculation methods to calculate deductions.
Percent of Gross Wages Calculates the deduction as a percentage of total wages before taxes are deducted. Taxes are calculated before deductions are made, so deducting from gross wages won’t affect taxable amounts unless the deduction is a tax-sheltered annuity.
Percent of Net Wages Calculates the deduction as a percentage of gross wages after taxes. This method is only permitted when all TSA check boxes are unmarked and when the deduction is based on all pay codes.
Fixed Amount Deducts a fixed amount from the employee’s wages.
Amount per Unit Calculates the deduction based upon units using piecework, hourly, double time or overtime pay.
Percent of Earnings Wages Calculates the deduction as a percentage of an employee’s Net Disposable Income (NDI). NDI is a legally-defined sum of wages, deductions, and taxes from which garnishments and other deductions may be taken. The definition of NDI depends on state law.
This method is not permitted for Tax Sheltered Annuities.
This method is only permitted for deductions based on all pay codes.
Window Fields
Benefit Setup Benefit Tiers and Maximum Benefit
Deduction Setup Deduction Tiers and Maximum Deduction
Employee Benefit Maintenance Benefit Tiers and Maximum Benefit
Employee Deduction Maintenance
Deduction Tiers and Maximum Deduction

U . S . P A Y R O L L 39
C H A P T E R 3 S E T T I N G U P D E D U C T I O N S A N D B E N E F I T S
Deduction tiers
You can select either a single deduction tier or multiple tiers. The following are some examples of how you might set up your deduction method and tier.
Example 1 If you select Percent of Gross Wages as the calculation method, the tiered deduction might be set up as follows:
If the gross wages equaled $3,000, the deduction is calculated as follows:
Example 2 If you select Fixed Amount as the calculation method, the tiered deduction might be set up as follows:
If the wages equaled $3,000, the deduction is calculated as follows:
Example 3 If you select Amount per Unit as the calculation method, the tiered deduction might be set up as follows:
If the number of units equaled 250, the deduction is calculated as follows:
Percentage Wage level
4.375 percent Up to and including $2,541.66
7.25 percent Over $2,541.66
Wage Rate Deduction amount
$2,541.66 4.375 percent $111.20
$458.34 7.25 percent $33.23
Total deduction $144.43
Amount Wage level
$10 Up to $1,000
$15 Over $1,000 and up to $2,000
$20 Over $2,000
Wage Deduction amount
First $1,000 $10
Second $1,000 $15
Third $1,000 $20
Total deduction $45
Rate per unit Number of units
$0.10 Up to 100
$0.20 Over 100 units up to 500 units
$0.39 Over 500 units
Units Rate per unit Deduction amount
First 100 units $0.10 $10
Remaining 150 units $0.20 $30
Total deduction $40

P A R T 1 S E T U P
40 U . S . P A Y R O L L
Setting up a standard deduction
Use the Deduction Setup window to enter and maintain company deduction cards that you can use as default entries for setting up employee deductions. You can apply changes to employee deduction cards and can include them in employee classes. Deductions can be taken from net, unit or gross pay. Examples of deductions include donations to charities, union dues, and contributions to pension plans.
Garnishments are mandatory deductions, such as debt payments enforced by court order. To set up garnishment deductions, follow the steps in Setting up a garnishment on page 42.
Before changing a deduction code to apply a new earnings code, confirm that the earnings code does not use the same deduction code in its own definition. Such a circular reference could cause inconsistent and undesired results.
The frequency with which a deduction is taken depends on selections you make when you build the paychecks. Your selections in the Frequency field in the Deduction Setup window will be used to annualize the tax-sheltered deduction when taxes for paychecks are calculated.
If your business needs require you to track deduction balances when the employee's net pay cannot meet all deductions, or to collect mandatory arrears for employee deductions where the employee does not receive a pay check, consider using Deductions in Arrears, which is included with Payroll Extensions. This module is part of the Human Resources and Payroll Suite, which can be installed as an additional product.
The following are some examples of deduction codes you might use:
• ADV - Advance to Employee• CHD - Child Care Deduction• DEP - Family Health • 401 - 401(k) Contribution • MED - Medical• SGL - Single Insurance• UWY - United Way

U . S . P A Y R O L L 41
C H A P T E R 3 S E T T I N G U P D E D U C T I O N S A N D B E N E F I T S
To set up a standard deduction:1. Open the Deduction Setup window.
(HR & Payroll >> Setup >> Payroll >> Deduction)
2. Enter a deduction code and description.
3. Select Standard as the deduction type.
For garnishment deductions, see Setting up a garnishment on page 42.
4. Enter start and end dates for the deduction. The start date should be on or before the ending date of the pay period the first deduction is to be made; otherwise, the deduction won’t be taken. If it’s a continuous deduction, leave the end date field blank. If the ending date is on or after the ending date for the pay run, the deduction will be taken.
5. Mark Transaction Required if the dollar amount or percentage of the deduction varies each time it’s calculated. For example, if you have an employee purchase plan and the amount you withhold varies with each paycheck, or there is no withholding for some paychecks, mark Transaction Required.
If you mark the deduction as Transaction Required, you’ll need to enter a transaction for the amount or percentage of the deduction for each pay run in which the deduction is taken.
6. Mark Data Entry Default to use the information in this window when you create a transaction for the deduction code during a pay run.
7. Select the deduction frequency.
8. Mark the taxes from which the deduction is sheltered. Taxable wages will be reduced by the amount of the tax-sheltered deduction before taxes are calculated. If federal tax is marked, the amount of the deduction won’t be included in the Wages, Tips, and Other Comp field on the employee’s W-2 form.

P A R T 1 S E T U P
42 U . S . P A Y R O L L
9. Select whether to base the deduction on all pay codes or on a selected list of pay codes. To base the deduction on all pay codes, mark All. If you mark Selected, the pay codes list will be displayed. Select each code to base the deduction on and choose Insert to add the pay code to the Selected list.
10. Select a deduction method, and a single deduction tier or multiple tiers. For more information, refer to Deduction tiers on page 39 and Setting up earnings codes on page 43.
11. Enter deduction maximums. You can enter the maximum amount an employee can have deducted each pay period, each calendar year, each fiscal year, and for the entire time the employee works for your company.
12. If you need to print the year-end total amount for this deduction on the W-2 statement, enter the number of the appropriate W-2 statement box, and enter appropriate label information. See IRS rules for the applicable year for a current list of labels.
If the amount must be reported in multiple locations on the W-2 statement, use the browse buttons to select an additional location, and enter the appropriate box number and label. You can specify as many as four locations.
You can choose Sequence to specify the order in which the deductions will be deducted from the employee’s wages. For more information about setting up deduction sequences, see Setting up a company-level deduction sequence on page 46.
13. Choose Save to store the code. You can then continue to set up more deductions.
14. Choose File >> Print to print a Company Deduction Codes List to verify your information.
Setting up a garnishment
Use the Deduction Setup window to enter and maintain garnishments. Garnishments are mandatory deductions from employee pay, such as debt payments enforced by court order. For example, a bankruptcy court may order an employer to deduct wages to pay an employee’s outstanding debts.
Specify which portion of an employee’s wages are subject to garnishments. See Setting up earnings codes on page 43.
Federal and state governments also set maximum percentages for garnishments. See Setting up maximum garnishment rules on page 44.
To set up a garnishment:1. Open the Deduction Setup window.
(HR & Payroll >> Setup >> Payroll >> Deduction)
2. Enter a deduction code and description.
3. Select Garnishment as the deduction type.
4. Select a garnishment category.

U . S . P A Y R O L L 43
C H A P T E R 3 S E T T I N G U P D E D U C T I O N S A N D B E N E F I T S
5. Select a garnishment deduction method. If you select Percent of Earnings Wages, enter or select an earnings code. Earnings codes specify the amount and type of earnings that are subject to a deduction. See Setting up earnings codes on page 43.
To deduct a company fee from employee wages for processing garnishments, create a deduction code and include it in the earnings code.
6. Select the deduction frequency.
7. If you need to print the year-end total amount for this garnishment on the W-2 statement, enter the number of the appropriate W-2 statement box, and enter appropriate label information.
See IRS rules for the applicable year for a current list of labels.
8. Choose Save to store the code. You can then continue to set up more garnishments or other deductions.
You can choose Sequence to specify the order in which deductions will be taken from the employee’s wages. For more information about setting up deduction sequences, see Setting up a company-level deduction sequence on page 46.
9. Choose File >> Print to print a Company Deduction Codes List to verify your information.
Setting up earnings codes
Use the Earnings Setup window to define an employee’s Net Disposable Income (NDI). NDI is a legally-defined selection of wages, deductions and taxes from which garnishments and standard deductions may be taken. The definition of NDI depends on state law.
You can set maximum deduction amounts in the Garnishment Maximum Setup window. See Setting up maximum garnishment rules on page 44.
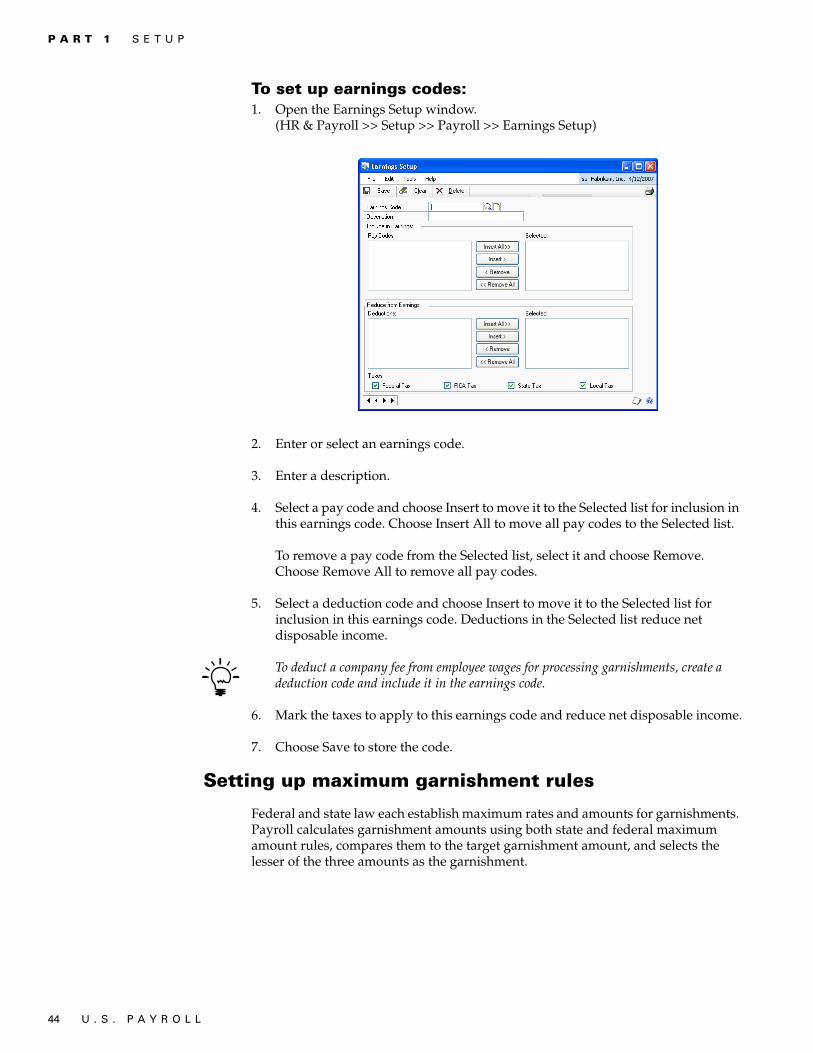
P A R T 1 S E T U P
44 U . S . P A Y R O L L
To set up earnings codes:1. Open the Earnings Setup window.
(HR & Payroll >> Setup >> Payroll >> Earnings Setup)
2. Enter or select an earnings code.
3. Enter a description.
4. Select a pay code and choose Insert to move it to the Selected list for inclusion in this earnings code. Choose Insert All to move all pay codes to the Selected list.
To remove a pay code from the Selected list, select it and choose Remove. Choose Remove All to remove all pay codes.
5. Select a deduction code and choose Insert to move it to the Selected list for inclusion in this earnings code. Deductions in the Selected list reduce net disposable income.
To deduct a company fee from employee wages for processing garnishments, create a deduction code and include it in the earnings code.
6. Mark the taxes to apply to this earnings code and reduce net disposable income.
7. Choose Save to store the code.
Setting up maximum garnishment rules
Federal and state law each establish maximum rates and amounts for garnishments. Payroll calculates garnishment amounts using both state and federal maximum amount rules, compares them to the target garnishment amount, and selects the lesser of the three amounts as the garnishment.
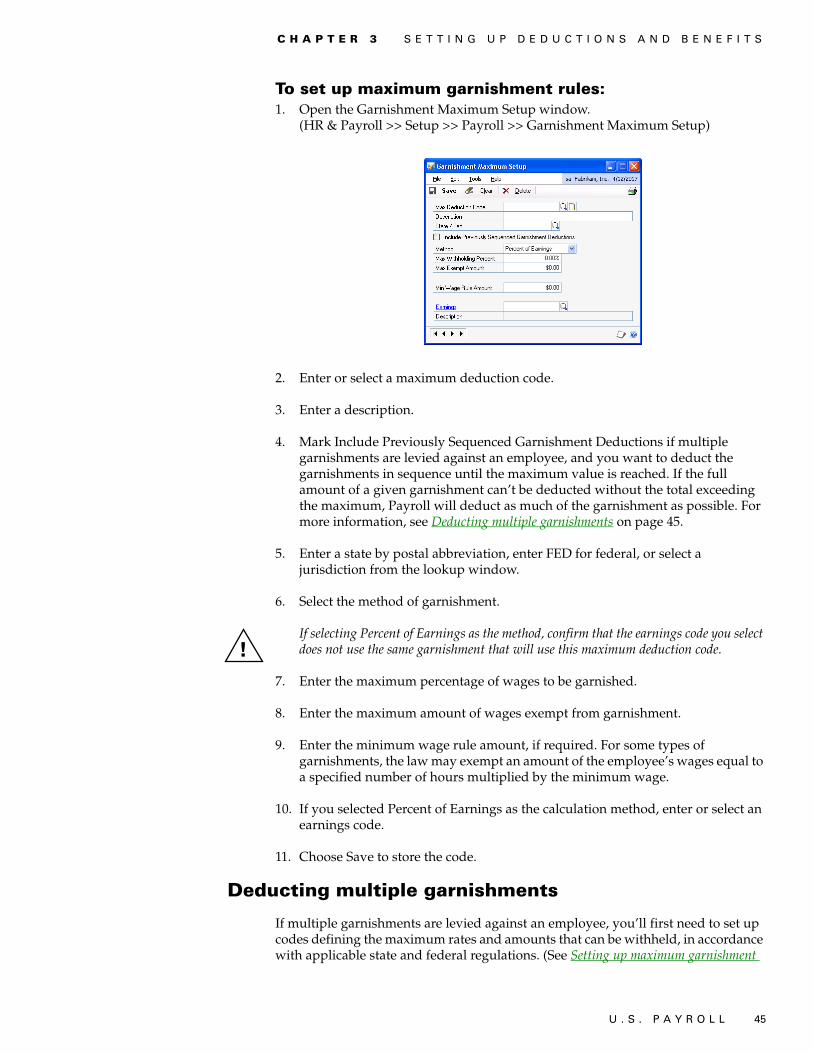
U . S . P A Y R O L L 45
C H A P T E R 3 S E T T I N G U P D E D U C T I O N S A N D B E N E F I T S
To set up maximum garnishment rules:1. Open the Garnishment Maximum Setup window.
(HR & Payroll >> Setup >> Payroll >> Garnishment Maximum Setup)
2. Enter or select a maximum deduction code.
3. Enter a description.
4. Mark Include Previously Sequenced Garnishment Deductions if multiple garnishments are levied against an employee, and you want to deduct the garnishments in sequence until the maximum value is reached. If the full amount of a given garnishment can’t be deducted without the total exceeding the maximum, Payroll will deduct as much of the garnishment as possible. For more information, see Deducting multiple garnishments on page 45.
5. Enter a state by postal abbreviation, enter FED for federal, or select a jurisdiction from the lookup window.
6. Select the method of garnishment.
If selecting Percent of Earnings as the method, confirm that the earnings code you select does not use the same garnishment that will use this maximum deduction code.
7. Enter the maximum percentage of wages to be garnished.
8. Enter the maximum amount of wages exempt from garnishment.
9. Enter the minimum wage rule amount, if required. For some types of garnishments, the law may exempt an amount of the employee’s wages equal to a specified number of hours multiplied by the minimum wage.
10. If you selected Percent of Earnings as the calculation method, enter or select an earnings code.
11. Choose Save to store the code.
Deducting multiple garnishments
If multiple garnishments are levied against an employee, you’ll first need to set up codes defining the maximum rates and amounts that can be withheld, in accordance with applicable state and federal regulations. (See Setting up maximum garnishment

P A R T 1 S E T U P
46 U . S . P A Y R O L L
rules on page 44.) Then you’ll need to decide how to apply the maximums when calculating an employee’s pay. Payroll provides several ways to apply maximums:
To each garnishment individually When you define maximum codes in the Garnishment Maximum Setup window, leave the Include Previously Sequenced Garnishment Deductions option unmarked. Each garnishment is compared to the maximum, and deducted if it does not exceed the maximum. This method works best for single garnishments; however, if you use this method for multiple garnishments, you may want to define separate maximum deduction codes for each garnishment.
To multiple garnishments, in a priority sequence In the Garnishment Maximum Setup window, mark the Include Previously Sequenced Garnishment Deductions option. Garnishments will be deducted in the order defined in the Employee Deduction Sequence window, until the maximum value is reached. If the full amount of a given garnishment can’t be deducted without the total exceeding the maximum value you define, Payroll will deduct as much of the garnishment as possible. If the same maximum deduction code applies to any garnishments with later sequence numbers, those garnishments won’t be deducted.
To multiple garnishments, without priority In the Employee Deduction Sequence window, assign the garnishments the same sequence number. In the Garnishment Maximum Setup window, define a maximum code that applies to the total of all the garnishments that have the same sequence number, and leave the Include Previously Sequenced Garnishment Deductions option unmarked. If the total of all the garnishments that have the same sequence number exceeds the maximum, the garnishments will be reduced by an even or proportional value specified in the Split Method window.
For example, assume an employee has three garnishments of differing priority. The total of all garnishments cannot exceed $200, so a maximum deduction code is set up with this amount, and applied to all three garnishments. The Include Previously Sequenced Deductions option is marked in the Garnishment Maximum Setup window.
Be aware that when there are separate state and federal maximums, Payroll will always apply the maximum that deducts the smallest amount from an employee’s pay.
Setting up a company-level deduction sequence
Use the Deduction Sequence Setup window to specify a company-level sequence in which deductions are deducted from employees’ wages.
Use the Employee Deduction Sequence window to specify sequences for individual employees. See Chapter 8, “Deduction and benefit cards.”
You can assign all types of deductions to the sequence, including standard, garnishment, and TSA types. The Payroll system will calculate the TSA deductions from pre-tax wages, regardless of the sequence.
Name Target Maximum Taken Calculation
GARN1 150 200 150
GARN2 75 200 50 200 (maximum) - 150 (previous amount)
GARN3 50 200 0 200 (maximum) - 200 (previous amount)

U . S . P A Y R O L L 47
C H A P T E R 3 S E T T I N G U P D E D U C T I O N S A N D B E N E F I T S
If you do not create deduction sequences, the Payroll system applies this default sequence:
• Standard TSA deductions (FICA sheltered), in alphanumeric order by code.• Standard TSA deductions (not FICA sheltered), in alphanumeric order by code.• Garnishment deductions, in alphanumeric order by code.• Standard non-TSA deductions, in alphanumeric order by code.
Before you set up deduction sequences, be sure to set up your deductions. Refer to Setting up a standard deduction on page 40. You should also set up Payroll default entries.
To set up a company-level deduction sequence:1. Open the Deduction Sequence Setup window.
(HR & Payroll >> Setup >> Payroll >> Deduction Sequence)
You also can open this window by choosing Sequence in the Deduction Setup window.
2. Select an unsequenced deduction from the Unsequenced Deductions list and choose Insert to add it to the Sequenced Deductions list in the lowest position.
3. To move a sequenced deduction to a higher or lower position, select it and choose the up or down arrow button.
4. Choose OK to save the deduction sequence.
Benefit types
A benefit can be based on a specified percentage or an amount of income. You can use one of the following five calculation methods to calculate the benefit.
Percent of Gross Wages Calculates the benefit using total wages before taxes are deducted.
Percent of Net Wages Calculates the benefit using gross wages minus taxes.
Percent of Deduction Calculates the benefit as a percentage of the total deduction it’s based on.
Fixed Amount Calculates the benefit as a fixed amount.

P A R T 1 S E T U P
48 U . S . P A Y R O L L
Amount per Unit Calculates the benefit based on piecework, hourly, or overtime wages.
Benefit tiers
You can select either a single benefit tier or multiple tiers. The following are some examples of how you might set up your calculation method and tier.
Example 1 If you select Percent of Gross Wages as the calculation method, the tiered benefit might be set up as follows:
If the gross wages equaled $3,000, the benefit is calculated as follows:
Example 2 If you select Fixed Amount as the calculation method, the tiered benefit might be set up as follows:
If the wages equal $3,000, then the benefit is calculated as follows:
Example 3 If you select Amount per Unit as the calculation method, the tiered benefit might be set up as follows:
Percentage Wage level
4.375 percent Up to and including $2,541.66
7.25 percent Over $2,541.66
Wage Rate Benefit amount
$2,541.66 4.375 percent $111.20
$458.34 7.25 percent $33.23
Total deduction $144.43
Amount Wage level
$10 Up to $1,000
$15 Over $1,000 and up to $2,000
$20 Over $2,000
Wage Benefit amount
First $1,000 $10
Second $1,000 $15
Third $1,000 $20
Total benefit $45
Rate per unit Number of units
$0.10 Up to 100
$0.20 Over 100 units up to 500 units
$0.39 Over 500 units

U . S . P A Y R O L L 49
C H A P T E R 3 S E T T I N G U P D E D U C T I O N S A N D B E N E F I T S
If the number of units equal 250, the benefit is calculated as follows:
Setting up a benefit
Use the Benefit Setup window to enter and maintain company benefit cards that you can use as default entries for setting up employee benefits. You can apply changes to employee benefit cards and include them in employee classes. Benefits can be calculated on net, unit or gross pay. Examples of benefits include insurance premiums and 401(k) matching contributions.
The Employer Maximum Match field stores the maximum the employer will contribute to an employee’s 401(k) fund. With this feature, you can set up one 401(k) deduction and one benefit code for an employee.
The following are some examples of benefit codes you might use:
• 401M - 401(k) Employer Match • CMCH - Contribution Match• INSU - Insurance
To set up a benefit:1. Open the Benefit Setup window.
(HR & Payroll >> Setup >> Payroll >> Benefit)
2. Enter a benefit code and description.
3. Enter start and end dates for the benefit. The start date should be on or before the ending date of the pay period the benefit should take effect; otherwise, the benefit won’t be calculated. If it’s a continuous benefit, leave the End Date field blank. If the ending date is on or after the ending date for the pay run, the benefit will be taken.
Units Rate per unit Benefit amount
First 100 units $0.10 $10
Remaining 150 units $0.20 $30
Total benefit $40

P A R T 1 S E T U P
50 U . S . P A Y R O L L
4. Mark Transaction Required if the dollar amount or percentage of the benefit varies each time it’s calculated. For example, if the amount of the benefit varies each paycheck, or some paychecks have no benefit amount, mark Transaction Required.
If you mark the benefit as transaction required, you’ll need to enter a transaction for the amount or percentage of the benefit for each pay run that the benefit is taken.
5. Mark Data Entry Default to use the information in this window when you create a transaction for the benefit code during a pay run.
6. Select the benefit frequency.
The frequency with which a benefit is taken depends upon selections made when you build paychecks. If you pay your employees biweekly, the benefit should also be calculated biweekly.
7. Mark the taxes to which the benefit is subject. If the benefit is subject to any federal or state taxes, you can enter a flat tax rate.
Even though a benefit isn’t paid to the employee, the employee still will be taxed on the value of the benefit if it’s set up as a taxable benefit.
8. Select whether to base the benefit on all pay codes, a selected list of pay codes or on a selected deduction. To base the benefit on all pay codes, mark All. If you mark Selected, the pay codes list or the deduction codes list opens. Select each code to base the benefit on and choose Insert to add the code to the Selected list.
9. Select a calculation method and a single benefit tier or multiple tiers. Refer to Benefit tiers on page 48 for more information.
If you selected Percent of Deduction as your calculation method, enter the maximum percent the employer will match for this benefit.
If you modified an existing benefit’s employer maximum percent, you may have to roll down the changes to existing employee benefit records. If you’re using Human Resources, you may have to update your benefit setup and employee records in the Reconcile Human Resources window (HR & Payroll >> Utilities >> Human Resources >> Reconcile).
10. Enter benefit maximum amounts. You can enter the maximum amount each employee can receive for this benefit for each pay period, calendar year, fiscal year, or lifetime.
11. Enter the number of the box in the W-2 Box Field if the benefit amount needs to be printed in a special box on the W-2 statement. Enter a label, if required, to be printed in the W-2 box.
If the amount must be reported in multiple locations on the W-2 statement, use the browse buttons to select an additional location, and enter the appropriate box number and label. You can specify as many as four locations.
12. Choose Save to store the code.
U . S . P A Y R O L L 51
C H A P T E R 3 S E T T I N G U P D E D U C T I O N S A N D B E N E F I T S
13. Choose File >> Print to print a Company Benefits List to verify your information.
Setting and activating post-dated pay rates
Use the Post-Dated Pay Rates window to enter a value for a pay code that you don’t want to use now but want to activate at a later date. You can enter more than one post-dated pay rate for one pay code.
To set post-dated pay rates:1. Open the Employee Post-Dated Pay Rates window.
(HR & Payroll >> Cards >> Payroll >> Post-Dated Pay Rates)
2. Select the employee ID and pay code.
3. Enter the new pay rate and effective date.
4. If desired, enter or select a reason for change.
If you are using Human Resources, the Reason for Change field selections will include Pay Step Increase and ON HOLD.
5. Choose Save to store the code.
To activate post-dated pay rates:1. Open the Activate Post-Dated Pay Rates window.
(HR & Payroll >> Transactions >> Payroll >> Activate Post-Dated)(HR & Payroll >> Transactions >> Human Resources >> Activate Post-Dated)
2. Select a range type and enter the range, or choose All.
3. Select how to sort the search results.
4. Choose Redisplay to show the range and sorting results.
5. In the Activate column, mark the check box for each post-dated pay rate you want to activate. To mark all the check boxes, choose Mark All. To unmark all the check boxes, choose Unmark All.
6. Choose Process.
Modifying a pay, benefit, or deduction code
Use the Pay Code Setup window, the Benefit Setup window or the Deduction Setup window to make changes to pay, benefit, or deduction codes. When you change information, you might have the option to “roll down” your changes to the items that belong to the item class.
To modify a pay, benefit, or deduction code:1. Open the Item Class Setup window.
(HR & Payroll >> Setup >> Payroll >> Pay Code)(HR & Payroll >> Setup >> Payroll >> Benefit)(HR & Payroll >> Setup >> Payroll >> Deduction)
2. Enter or select a pay code, deduction, or benefit.

P A R T 1 S E T U P
52 U . S . P A Y R O L L
3. Make changes, as needed.
4. Choose Save to store the code. Depending on the changes you’ve made, a message might appear, and you will have the option to roll down the changes you made to all employees with this code.
Inactivating or deleting a pay, benefit, or deduction code
Use the Pay Code Setup window, the Benefit Setup window or the Deduction Setup window to inactivate a pay, benefit, or deduction code if you’re not using it now, but don’t want to delete it because you’ll need the code in the future.
You also can delete a pay, benefit, or deduction code. For example, perhaps your company had separate insurance plans for medical and dental expenses, but now is using one insurance plan for both. You must delete the medical and dental insurance deduction codes, and enter a new code for the combined plan. However, you can’t delete a code if an employee has been paid under the code in the current year.
To inactivate a pay, benefit, or deduction code:1. Open the Item Class Setup window.
(HR & Payroll >> Setup >> Payroll >> Pay Code)(HR & Payroll >> Setup >> Payroll >> Benefit)(HR & Payroll >> Setup >> Payroll >> Deduction)
2. Choose Pay Code, Benefit or Deduction.
3. Select the code to inactivate.
4. Choose Inactive.
5. Choose Save to store the code. A message appears, giving you the option to apply the changes to existing records. If you choose Yes, all records based on the record being inactivated also will be inactivated.
You can inactivate pay, benefit, and deduction codes at any time; the codes assigned to employees also will be inactivated.
To delete a pay, benefit, or deduction code:1. Open the Item Class Setup window.
(HR & Payroll >> Setup >> Payroll >> Pay Code)(HR & Payroll >> Setup >> Payroll >> Benefit)(HR & Payroll >> Setup >> Payroll >> Deduction)
2. Choose Pay Code, Benefit, or Deduction.
3. Select the code to delete.
4. Choose Delete.
If the selected deduction code is assigned to an employee card, you can’t delete it, even if the employee card has been inactivated.
U . S . P A Y R O L L 53
Chapter 4: Setting up taxes and compensation codesYou can set up tax codes—including workers’ compensation, local, and unemployment taxes—that will be used as default entries for setting up employee taxes. You can apply changes to several employees’ tax cards at once and assign them to employee classes.
You don’t need to set up state and federal taxes, but can download the latest federal, FICA, and state tax tables from the CustomerSource Web site. We recommend that you enroll in an enhancement plan to ensure you will always be able to download the latest tax tables and any changes in supported tax forms.
Before setting up workers’ compensation codes, you should have completed Setting up Payroll default entries on page 17. To ensure reports are printed in the correct order, be sure that each deduction code has the same number of characters. The characters are sorted from left to right, and numbers take priority over letters.
Workers’ compensation codes are used to track the amount of workers’ compensation taxes for which your company, as an employer, is liable.
This information is contained in the following sections:
• Worker’s compensation tax calculation methods• Workers’ compensation tax calculation methods for overtime• Setting up workers’ compensation codes• Local tax calculation methods• Setting up a local tax• State and federal unemployment taxes• Setting up an unemployment tax• Setting up federal and state tax identification numbers
Worker’s compensation tax calculation methods
A tax liability can be based on a specified percentage or amount. You can use one of the following four methods to calculate workers’ compensation tax.
Percent of Gross Calculates the workers’ compensation tax liability as a percentage of gross earnings. If you use this method, indicate how tax on overtime pay—straight pay rate or overtime pay rate—should be calculated. Also, enter the tax percentage and the yearly wage limit established by the state for this code.
Fixed Amount Calculates workers’ compensation tax liability as a fixed amount per employee on a monthly or quarterly basis. If you use this method, enter the tax amount per month or quarter. For example, the fixed amount could be $100 per month per employee.
Number of Hours/Units Calculates the workers’ compensation tax liability as a fixed amount per hour or unit per employee that you enter. Use the number of units for a piecework pay type. For example, if the fixed amount is $2.00 an hour and the employee works 160 hours in a month, the total workers’ compensation would be $320 for this employee.
Days Worked Calculates the workers’ compensation tax liability as a fixed amount per days worked per employee. If you select this method, enter the tax
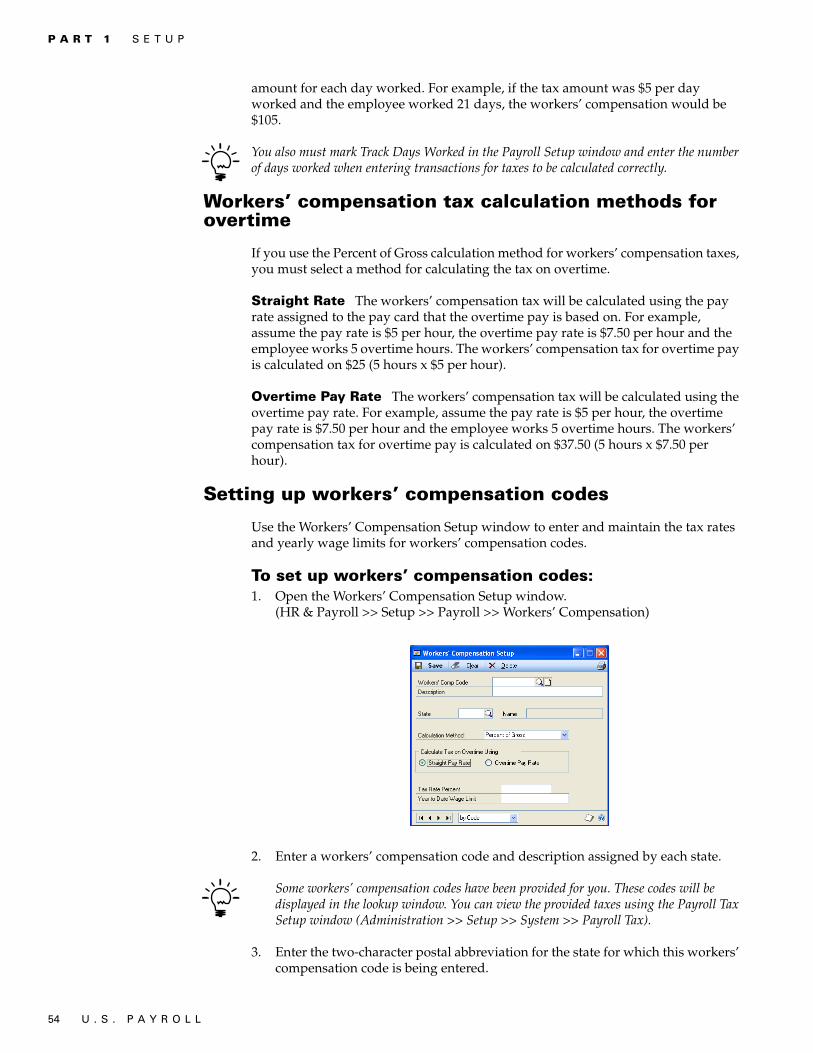
P A R T 1 S E T U P
54 U . S . P A Y R O L L
amount for each day worked. For example, if the tax amount was $5 per day worked and the employee worked 21 days, the workers’ compensation would be $105.
You also must mark Track Days Worked in the Payroll Setup window and enter the number of days worked when entering transactions for taxes to be calculated correctly.
Workers’ compensation tax calculation methods for overtime
If you use the Percent of Gross calculation method for workers’ compensation taxes, you must select a method for calculating the tax on overtime.
Straight Rate The workers’ compensation tax will be calculated using the pay rate assigned to the pay card that the overtime pay is based on. For example, assume the pay rate is $5 per hour, the overtime pay rate is $7.50 per hour and the employee works 5 overtime hours. The workers’ compensation tax for overtime pay is calculated on $25 (5 hours x $5 per hour).
Overtime Pay Rate The workers’ compensation tax will be calculated using the overtime pay rate. For example, assume the pay rate is $5 per hour, the overtime pay rate is $7.50 per hour and the employee works 5 overtime hours. The workers’ compensation tax for overtime pay is calculated on $37.50 (5 hours x $7.50 per hour).
Setting up workers’ compensation codes
Use the Workers’ Compensation Setup window to enter and maintain the tax rates and yearly wage limits for workers’ compensation codes.
To set up workers’ compensation codes:1. Open the Workers’ Compensation Setup window.
(HR & Payroll >> Setup >> Payroll >> Workers’ Compensation)
2. Enter a workers’ compensation code and description assigned by each state.
Some workers’ compensation codes have been provided for you. These codes will be displayed in the lookup window. You can view the provided taxes using the Payroll Tax Setup window (Administration >> Setup >> System >> Payroll Tax).
3. Enter the two-character postal abbreviation for the state for which this workers’ compensation code is being entered.
U . S . P A Y R O L L 55
C H A P T E R 4 S E T T I N G U P T A X E S A N D C O M P E N S A T I O N C O D E S
4. Select a tax calculation method.
• If you select Percent of Gross, mark a calculation method for tax on overtime pay. You can skip this step if you’ve selected any of the other calculation methods.
• If you select Fixed Amount, enter the tax rate amount.
• If you select Number of Hours/Units, enter the tax rate per unit.
• If you select Days Worked, enter the tax rate per day.
5. Choose Save to store the code.
6. Choose File >> Print to print a Workers’ Compensation Codes List to verify your information.
Local tax calculation methods
Local taxes include city and county income taxes. You can select up to five of the following calculation methods to be used in the calculation sequence.
Subtract Exemption Subtracts employees’ local tax exemptions. If you select this calculation, enter the amount that should be multiplied by the number of exemptions specified on each employee’s local tax records.
Check Minimum Annualized Taxable Wages You can specify a minimum taxable wages amount. For example, a jurisdiction can’t tax an individual’s income if that annual income is less than $10,000. If you select this calculation method, enter the minimum wages that must be earned before the tax will be calculated.
Apply Tax Rate Multiplies the annualized taxable wages by the tax rate entered.
Apply Tax Table Calculates the tax based on information in the tax table you’ve set up for this local tax code.
Subtract Flat Tax Amount Subtracts a flat amount each pay period.
Check Maximum Withholding You can enter a limit on the tax amount to be withheld for the year.
Check Minimum YTD Taxable Wages You can enter a minimum wage at which an employee would begin paying the local tax.
Subtract Standard Deduction Subtracts a specified amount or percentage each pay period.
Check Maximum YTD Taxable Wages You can enter a limit on the taxable wages, so that pay is reduced for the current pay run if the current pay run plus year-to-date wages is greater than the limit.
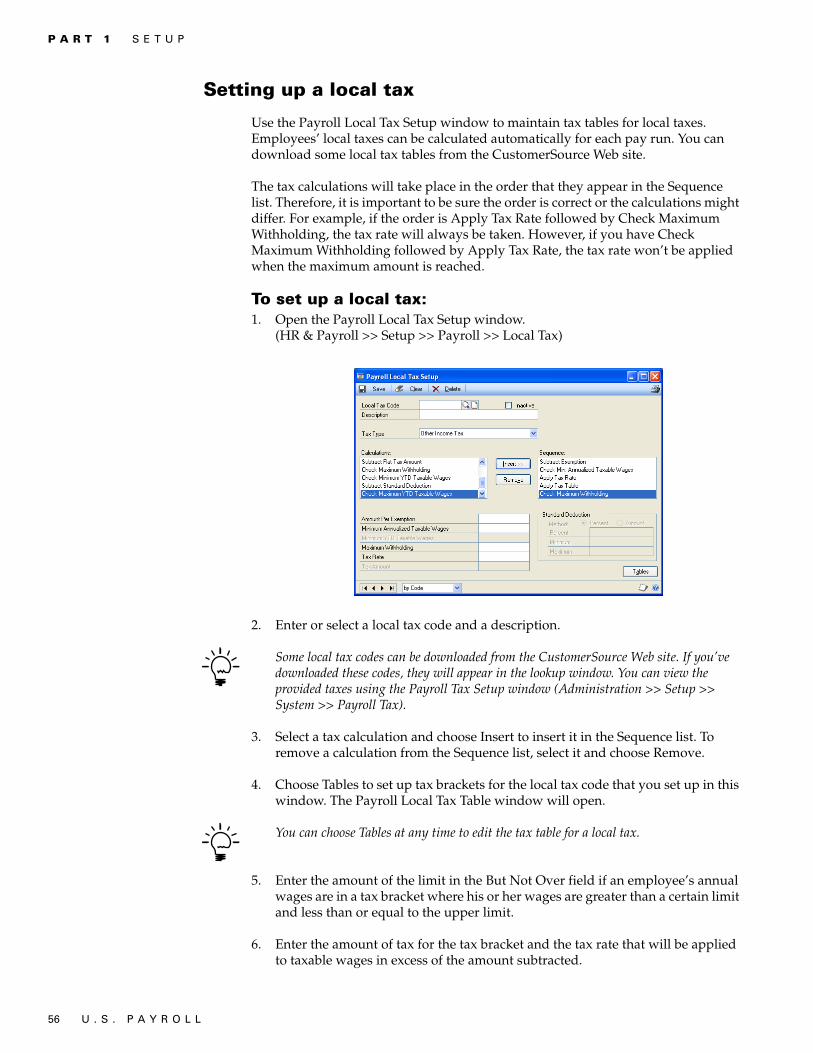
P A R T 1 S E T U P
56 U . S . P A Y R O L L
Setting up a local tax
Use the Payroll Local Tax Setup window to maintain tax tables for local taxes. Employees’ local taxes can be calculated automatically for each pay run. You can download some local tax tables from the CustomerSource Web site.
The tax calculations will take place in the order that they appear in the Sequence list. Therefore, it is important to be sure the order is correct or the calculations might differ. For example, if the order is Apply Tax Rate followed by Check Maximum Withholding, the tax rate will always be taken. However, if you have Check Maximum Withholding followed by Apply Tax Rate, the tax rate won’t be applied when the maximum amount is reached.
To set up a local tax:1. Open the Payroll Local Tax Setup window.
(HR & Payroll >> Setup >> Payroll >> Local Tax)
2. Enter or select a local tax code and a description.
Some local tax codes can be downloaded from the CustomerSource Web site. If you’ve downloaded these codes, they will appear in the lookup window. You can view the provided taxes using the Payroll Tax Setup window (Administration >> Setup >> System >> Payroll Tax).
3. Select a tax calculation and choose Insert to insert it in the Sequence list. To remove a calculation from the Sequence list, select it and choose Remove.
4. Choose Tables to set up tax brackets for the local tax code that you set up in this window. The Payroll Local Tax Table window will open.
You can choose Tables at any time to edit the tax table for a local tax.
5. Enter the amount of the limit in the But Not Over field if an employee’s annual wages are in a tax bracket where his or her wages are greater than a certain limit and less than or equal to the upper limit.
6. Enter the amount of tax for the tax bracket and the tax rate that will be applied to taxable wages in excess of the amount subtracted.

U . S . P A Y R O L L 57
C H A P T E R 4 S E T T I N G U P T A X E S A N D C O M P E N S A T I O N C O D E S
7. Enter the amount of wages that will be subtracted from the taxable wages before the tax rate is applied. The following illustration identifies key elements of the window.
8. Choose OK to redisplay the Payroll Local Tax Setup window.
9. Choose Save to store the code.
10. Choose File >> Print to print a Company Local Taxes List to verify your information.
State and federal unemployment taxes
You must download the latest payroll tax update from the Customersource web site to receive state and federal tax rates and wage limits—they are not included when you install Payroll. After you’ve downloaded the state and federal tax rates and wage limits, the wage limit for the state you entered or the federal wage limit will be displayed automatically in the Wage Limit field when you enter a two-character state abbreviation or FED (for federal unemployment tax) in the Tax Code field in the Unemployment Tax Setup window. You must manually enter the state tax rate that‘s been applied to your business.
Unemployment tax rates or limits are not included in tax updates. If these change, you’ll need to manually enter the state tax rate that’s been applied to your business.
Previous state wages If you’re setting up a state unemployment tax (SUTA), you have the option to include wages earned by the employee in other states to determine whether individual employees have met state unemployment wage limits.
For example, assume one of your employees worked at your company’s North Dakota branch for a period of time in the current year, and he or she earned $5,000. That employee then went to work at your company’s California branch, where he or she earned $12,000.
Also, assume the SUTA wage limits for these states are:
• North Dakota $6,000• California $7,000

P A R T 1 S E T U P
58 U . S . P A Y R O L L
If California doesn’t allow previously earned wages to be included in determining SUTA wage limits, you—the employer—are required to pay SUTA taxes based upon the following wages.
• To North Dakota based upon $5,000• To California based upon $7,000
The wages earned in North Dakota can’t be included in reaching the $7,000 SUTA wage limit for California. The entire $7,000 wage limit for California must be met using wages earned in California.
However, if California allows previously earned wages to be included in determining SUTA wage limits, you—the employer—are required to pay SUTA taxes based upon the following wages:
• To North Dakota based upon $5,000• To California based upon $2,000
The $5,000 of wages earned in North Dakota can be used to reach California’s SUTA wage limit. An additional $2,000 of wages earned in California is all that’s needed to meet the $7,000 limit.
Tax-sheltered annuitiesYou also have the option to include employees’ tax-sheltered annuities (TSA) in the amount of wages subject to unemployment taxes.
For example, assume an employee is paid $800 each pay period, and $20 from each paycheck is put into a tax-sheltered annuity.
If you don’t include tax-sheltered annuities in the amount of wages subject to unemployment taxes, the amount that will appear as unemployment taxable wages on the Monthly or Quarterly Unemployment Reports will be $780.
If you do include tax-sheltered annuities in the amount of wages subject to unemployment taxes, the amount that will appear as unemployment taxable wages on the reports will be $800. The $20 TSA amount won’t be deducted from the total pay amount when state and federal wage limits are determined.
The TSA Deductions list in the Unemployment Tax Setup window displays all the tax-sheltered annuity deduction codes that have been set up for your company. If TSA deduction amounts are included as taxable wages, select each TSA deduction that should be included, and choose Insert to add the deduction to the Include As Taxable Wages list.
Setting up an unemployment tax
Use the Unemployment Tax Setup window to enter unemployment tax rates used to calculate state and federal unemployment tax amounts for which your company is liable as an employer.
If you’re entering a state unemployment tax, enter the two-character postal abbreviation for the state you want to enter unemployment tax information for. If you’re entering federal unemployment tax, enter FED as the tax code.

U . S . P A Y R O L L 59
C H A P T E R 4 S E T T I N G U P T A X E S A N D C O M P E N S A T I O N C O D E S
To set up an unemployment tax:1. Open the Unemployment Tax Setup window.
(HR & Payroll >> Setup >> Payroll >> Unemployment Tax)
2. Enter or select a tax code.
3. Enter your employer ID number.
• If you’re entering federal unemployment tax (FUTA), enter your company’s federal employer identification number. This is the number that will be used on W-2 statements for the federal ID number.
• If you’re entering state unemployment tax (SUTA), enter your company’s state ID number. This is the number that will be used on W-2 statements for the state ID number.
4. Enter the unemployment tax rate. Enter state and federal unemployment tax rates using four decimal places. For example, if the unemployment tax rate is 5 percent, enter 5. or 5.0000.
5. Enter a wage limit for the unemployment tax code or accept the default wage limit.
6. Indicate whether to include previous state wages or tax-sheltered annuities.
7. Select the TSA deductions to include as taxable wages.
You can only include TSA deductions if the Tax Sheltered Annuities option was previously marked.
8. Choose Save to store the code.
9. Choose File >> Print to print an Unemployment Rates List to verify your information.
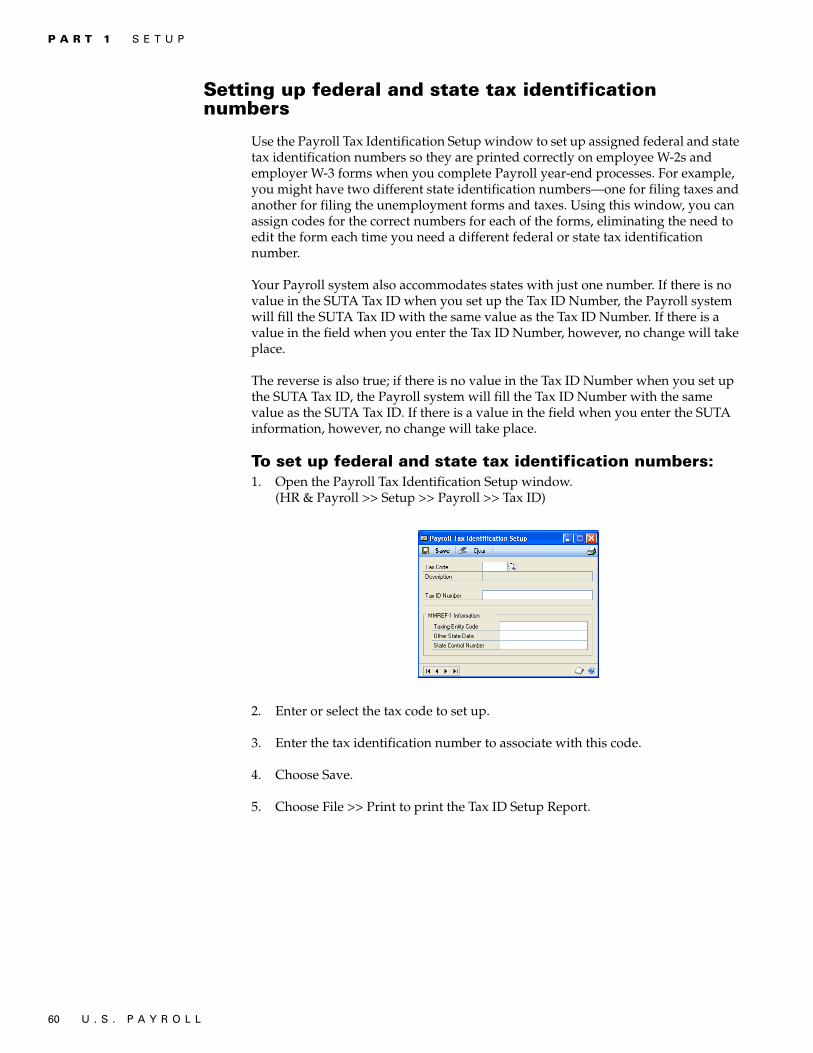
P A R T 1 S E T U P
60 U . S . P A Y R O L L
Setting up federal and state tax identification numbers
Use the Payroll Tax Identification Setup window to set up assigned federal and state tax identification numbers so they are printed correctly on employee W-2s and employer W-3 forms when you complete Payroll year-end processes. For example, you might have two different state identification numbers—one for filing taxes and another for filing the unemployment forms and taxes. Using this window, you can assign codes for the correct numbers for each of the forms, eliminating the need to edit the form each time you need a different federal or state tax identification number.
Your Payroll system also accommodates states with just one number. If there is no value in the SUTA Tax ID when you set up the Tax ID Number, the Payroll system will fill the SUTA Tax ID with the same value as the Tax ID Number. If there is a value in the field when you enter the Tax ID Number, however, no change will take place.
The reverse is also true; if there is no value in the Tax ID Number when you set up the SUTA Tax ID, the Payroll system will fill the Tax ID Number with the same value as the SUTA Tax ID. If there is a value in the field when you enter the SUTA information, however, no change will take place.
To set up federal and state tax identification numbers:1. Open the Payroll Tax Identification Setup window.
(HR & Payroll >> Setup >> Payroll >> Tax ID)
2. Enter or select the tax code to set up.
3. Enter the tax identification number to associate with this code.
4. Choose Save.
5. Choose File >> Print to print the Tax ID Setup Report.

U . S . P A Y R O L L 61
Chapter 5: Setting up employee classesYou can set up employee classes to make entering employee information easier and to save data entry time. You can use employee classes to group employee information according to common entries. For example, you can create classes for hourly employees, temporary employees, part-time employees, or any other similar characteristics. After you’ve identified the different classes that you’ll need for employee cards, group the employee cards into classes, and identify those classes by assigning class IDs. You might find it helpful if you name each class ID something that describes the class. For example, you could name a class CLERKS or MACHINISTS.
By creating and assigning classes, you can speed up data entry for new employee cards and transactions by providing default entries. For each class, you can enter as much information as you need. If default information for the specific class doesn’t pertain to a particular employee, you can change the information for that employee in the Employee Maintenance window.
Before creating an employee class, you should have completed Setting up Payroll default entries on page 17.
This information is contained in the following sections:
• Applying class changes• Accrual methods for vacation and sick time• Creating an employee class• Employee class and position setup options for tracking tips• Assigning codes to an employee class• Deleting or changing an employee class
Applying class changes
When changing information in an employee class card, you can quickly add that information to all the employee cards included in the class by applying the changes to all employee cards. For example, you can change the method of accruing vacation time in a class from Hours Worked to Set Hours and apply the changes so that for all the employee cards in the class, Set Hours is the vacation accrual method.
If you’re using Human Resources, do not assign deduction or benefit codes to employee classes. Such assignments only apply in Payroll but not in Human Resources.
You can choose not to apply the changes to existing employee cards. New employee cards added to the class will have Set Hours as the vacation accrual method, but existing cards won’t be affected by the change.
If an employee record from a particular class has been customized and changed from the original class, you will be asked if those changes should be inactive if the employee class is changed and those changes are rolled down.
P A R T 1 S E T U P
62 U . S . P A Y R O L L
Accrual methods for vacation and sick time
Use the Employee Vacation-Sick Time Maintenance window to specify an accrual method for vacation and sick time. You have the option to automatically accrue employee vacation and sick time. By doing this, the Payroll system will automatically calculate your employees’ vacation and sick time and will decrease vacation and sick time as hours are taken, whether you’re accruing vacation and sick time or not. You can have a warning displayed when the available vacation or sick time for an employee is below zero.
If you’re using Human Resources, you can accrue vacation and sick time using different accrual methods. Refer to the “Attendance setup” chapter in the Human Resources manual for more information.
You also have the option to accrue vacation and/or sick time automatically for some employees and not for others. You can set up your Payroll system so each employee’s vacation and/or sick time pay can be accrued by different methods. At least two scenarios are possible, as outlined in the following examples. The examples given are for vacation pay, but sick pay can be treated the same way.
Accrue Vacation or Accrue Sick Time is not marked If the number of hours per year for vacation and sick time is set at the beginning of each year, you must enter the number of hours that can be taken during the year. Then enter the number of vacation and sick time hours this employee has available for the year. In this case, all vacation and sick time hours will be available to the employee as soon as the new year begins.
Accrue Vacation or Accrue Sick Time is marked If an employee can accrue a specified number of vacation and sick time hours throughout the year, you must enter the number of vacation and sick time hours that can be taken during the year. Then enter the number of vacation and sick time hours this employee has remaining for the year—the number of hours currently available to the employee. The hours available will increase as hours are accrued. Employees are able to take vacation and sick time hours for greater than the amount of vacation and sick time hours available. As a result, the vacation and sick time available will be a negative amount.
Hours WorkedTo accrue vacation and sick time by the Hours Worked method, the number of hours that accrue each pay period will be calculated using the following formula:
Hours worked x (Vacation or sick time hours per year/Work hours per year) = Hours of vacation accrued
Here, hours worked per year is from your entry in the Employee Maintenance window. For example:
• Hours worked during the pay period = 40• Vacation or sick time hours per year = 80• Work hours per year = 2080• (40 x 80) / 2080 = 1.5 hours of vacation accrued

U . S . P A Y R O L L 63
C H A P T E R 5 S E T T I N G U P E M P L O Y E E C L A S S E S
Set HoursTo accrue vacation and sick time by Set Hours, enter the number of hours that should be accrued each pay period for the employee.
Available vacation and sick time might be higher than the hours per year. For example, your employees might be allowed to carry over unused vacation hours into the next year. In this case, an employee might be allowed 40 hours of vacation time each year, but he or she used only 20 hours last year. Hours Per Year would be 40 hours—the amount this employee is allowed each year—but available would be 20 hours. In this example, the Available field will be updated each pay run for the 40 hours for the year.
Creating an employee class
Use the Employee Class Setup window to set up and assign your employees to employee classes. You don’t have to enter information in every field. However, the more information you enter, the faster data entry will be when you set up new employee cards using the Employee Maintenance window.
We recommend that you enter the class with the most common entries first and mark this class as your default class. You can mark Default in the Employee Class Setup window and the information you’ve set up for this class automatically appears as the default information for every subsequent class you create. You can have only one default employee class.
To create an employee class:1. Open the Employee Class Setup window.
(HR & Payroll >> Setup >> Payroll >> Employee Class)
2. Enter an ID and description for the class.
3. Enter or select the department and position codes that apply to the majority of employees in the class.
4. Enter or select the state to which unemployment taxes are paid and the workers’ compensation code for the employees in the class.

P A R T 1 S E T U P
64 U . S . P A Y R O L L
5. Enter the minimum amount that the employees in the class must receive in each paycheck, if any, and the number of hours the employees in the class typically work in a year. This information will be used to calculate accrued vacation, sick time, and salary amounts.
6. Enter user-defined information. If you have set up user-defined fields, these fields will be displayed.
7. Mark Calculate Minimum Wage Balance if the majority of employees in the class must be paid at least the minimum wage when their regular wage plus tips does not equal the minimum wage. Calculate Minimum Wage Balance can only be used with pay codes that have charged tips or reported tip pay types.
8. Select an employment type.
9. Select where to post the net pay for the employees in the class. You can post to the cash account used for the checkbook or to an account that you can specify for each employee. If you post to the account specified for an employee, enter an account to use for each employee in the class.
10. Enter vacation and sick time accrual information. Refer to Accrual methods for vacation and sick time on page 62 for more information about accruing vacation and sick time. If you selected Human Resources as your accrue type in the Attendance Setup window, these accrue vacation and sick time fields are not available.
11. Choose Codes to assign codes to the class in the Employee Class Code Setup window. For more information, refer to Assigning codes to an employee class on page 65.
12. If you’re using Project Accounting, choose Projects to specify the employer, employment type, employee expense setting, pay code, profit settings, and posting accounts for an employee class. Refer to the Project Accounting documentation for more information.
13. Choose File >> Print to print an Employee Class List to verify your information.
14. Choose Save.
Employee class and position setup options for tracking tips
If you have many employees who receive tips, directly or indirectly, set up employee classes for these employees in the Employee Class Setup window. For example, if you have servers who receive tips directly, as well as bus persons or hosts who share tips indirectly, you might set up the following classes:
Refer to Creating an employee class on page 63 and Setting up position codes on page 27 for more information.
Employee class Employee position
SERV Servers
BUS Bus persons, salad bar workers
HOST Hosts and hostesses
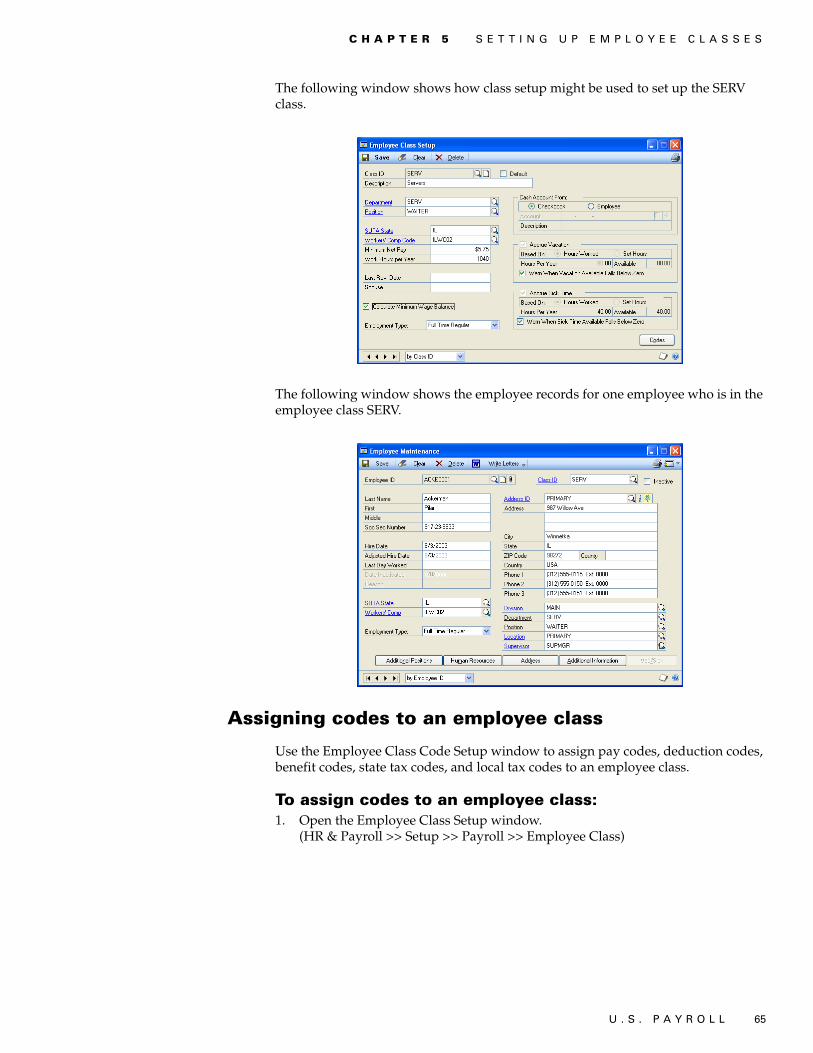
U . S . P A Y R O L L 65
C H A P T E R 5 S E T T I N G U P E M P L O Y E E C L A S S E S
The following window shows how class setup might be used to set up the SERV class.
The following window shows the employee records for one employee who is in the employee class SERV.
Assigning codes to an employee class
Use the Employee Class Code Setup window to assign pay codes, deduction codes, benefit codes, state tax codes, and local tax codes to an employee class.
To assign codes to an employee class:1. Open the Employee Class Setup window.
(HR & Payroll >> Setup >> Payroll >> Employee Class)

P A R T 1 S E T U P
66 U . S . P A Y R O L L
2. Enter or select a class ID and choose Codes to open the Employee Class Code Setup window.
3. Select a code type to assign to the employee class.
4. Select each code that you want to assign to the class from the Available Codes list.
5. Choose Insert to add the code to the Assigned Codes list.
6. Choose OK to close the window and return to the Employee Class Setup window.
Deleting or changing an employee class
If an employee class has become obsolete and you’re not planning to use it again in the future, you can delete it. In some circumstances, you might need to change an existing employee class to reflect changes, such as adding a new pay code. If you change an existing employee class, you’ll have the option to apply the changes to all employee cards in the class.
If the class that you want to change has been assigned to employees, we recommend that you print an employee list before making changes to determine how changing the class will affect those employee cards.
If an employee record from a particular class has been customized and changed from the original class, you will be asked if the employee class is changed and if those changes should be rolled down.

U . S . P A Y R O L L 67
C H A P T E R 5 S E T T I N G U P E M P L O Y E E C L A S S E S
To delete or change an employee class:1. Open the Employee Class Setup window.
(HR & Payroll >> Setup >> Payroll >> Employee Class)
2. Enter or select the ID for the employee class you want to delete or change.
3. Choose Delete to delete the class.
Deleting an employee class won’t affect the existing employee cards assigned to the class. However, you won’t be able to apply changes to this group in the future.
4. To change the class, select the field and enter the new information.
5. Choose Save to store your changes. You’ll have the option to apply changes to all the employee cards assigned to the class.

68 U . S . P A Y R O L L

PA
RT
2: C
AR
DS

70 U . S . P A Y R O L L
Part 2: Cards This part of the documentation describes how to enter employee cards, tax cards, deduction cards, and benefit cards, as well as entering beginning balances if you start using Payroll at a time other than the beginning of a calendar year.
The following information is discussed:
• Chapter 6, “Employee cards,” explains how to create employee cards to track the status of employees and to print reports.
• Chapter 7, “Tax cards,” describes how to create tax cards to track your individual employees’ tax liabilities to various government agencies.
• Chapter 8, “Deduction and benefit cards,” describes how to enter employee deduction and benefit cards based on the company deductions and benefits you have already set up.
• Chapter 9, “Beginning balances,” explains how to enter beginning balances to ensure that your monthly, quarterly, and yearly financial amounts are correct, as well as to correctly process W-2 statements at the end of the year.
U . S . P A Y R O L L 71
Chapter 6: Employee cardsEmployee cards are the foundation of your Payroll system. This information is used to track the status of employees, to write letters, and to print reports. It’s important to keep this information up to date to reflect your company’s current activity.
This information is contained in the following sections:
• Entering an employee card• Entering an employee additional information card• Assigning pay, deduction, and benefit codes to an employee• Inactivating an employee card• Reactivating an employee card• Deleting or changing an employee card• Entering an employee address card• Setting up employee Internet information• Entering an employee pay card
Entering an employee card
Use the Employee Maintenance window to enter an employee card. When entering your first employee cards, consider how to arrange your current and future employee cards. You can assign specific identification numbers or other types of IDs to different groups of employees. After you’ve determined the most appropriate numbering system for your employee cards, use it consistently for the best results when printing reports and using other Payroll windows.
To ensure reports are printed in the correct order, be sure that each employee ID has the same number of characters, if you’re using numeric characters. The characters are sorted from left to right, and numbers take priority over letters. If you don’t use the same number of characters for employee IDs, the numbering system won’t be consistent, and your employee IDs might not be listed in the order you intended.
You can automatically assign employee IDs in the Payroll Setup window. Each time an employee card is created, the default number will increase by one to the next available number as each number is accepted. After an ID has been assigned to an employee it cannot be modified. Refer to Employee numbers in Payroll on page 15 for more information about auto-assigning and modifying employee IDs in Payroll.
You can categorize employee information by classes when you enter employee cards. A class will supply default values for many fields, making data entry easier and faster. If an individual employee card requires different information, you can override the default information for that employee. Refer to Chapter 5, “Setting up employee classes,” for more information.
If you are setting up cards for employees who earn tips in addition to regular wages, refer to Employee class and position setup options for tracking tips on page 64 for more information.

P A R T 2 C A R D S
72 U . S . P A Y R O L L
To enter an employee card:1. Open the Employee Maintenance window.
(HR & Payroll >> Cards >> Payroll >> Employee)
2. Enter an employee ID.
If you don’t enter an employee ID, Payroll retrieves the next employee ID for this field if employee IDs were auto-assigned in the Payroll Setup window.
3. You can enter or select a class ID to assign this employee to a class.
4. Enter the employee’s full name and Social Security number.
The Payroll system will validate the Social Security number. If it’s not a valid number, an error message will be displayed. If you’re not sure of the number, you can enter all zeros and replace it later with the employee’s Social Security number.
5. Enter the date the employee started working. If you use adjusted hire dates for attendance or reviews, enter the adjusted hire date for the employee. If you don’t enter an adjusted hire date, the hire date will be displayed in the Adjusted Hire Date field.
6. Enter or select the primary state to which unemployment taxes are paid and enter or select the workers’ compensation code for the employee.
7. Select the employee’s employment type, and enter an address and phone number.
8. Enter or select the department code for the primary department the employee works in, as well as the position code for the employee’s primary position. If you enter a code that doesn’t already exist, you’ll have the option to enter the information needed to add the code.
If you’ve selected a class, this information will appear as a default entry. You can override any of the default information, if necessary.
9. Enter or select a location and supervisor for the employee.

U . S . P A Y R O L L 73
C H A P T E R 6 E M P L O Y E E C A R D S
10. If you’re using Human Resources, you can use the following fields and buttons to enter additional employee information.
Division Enter or select the division the employee works in.
Additional Positions Opens the Employee Positions window, where you can enter multiple positions for the employee. For more information, see the Human Resources documentation.
Human Resources Opens the Employee Human Resources Maintenance window, where you can enter information for benefit and reporting purposes, such as VETS-100 information. For more information, see the Human Resources documentation.
11. Choose Vac/Sick to open the Employee Vacation-Sick Time Maintenance window, where you can enter accrual options. For more information about accruing methods, refer to Accrual methods for vacation and sick time on page 62.
If you selected Human Resources as your accrue type in the Attendance Setup window, this button will not be available.
12. Choose Additional Information to open the Employee Additional Information Maintenance window, where you can enter employee information such as birth date and work hours per year. For more information, refer to Entering an employee additional information card on page 74.
13. Choose Address to open the Employee Address Maintenance window, where you can store additional employee addresses. For more information, refer to Entering an employee address card on page 79.
14. If you’re using Project Accounting, choose Projects to specify the employee’s employer, employment type, employee expense setting, pay code, profit settings, posting accounts, and overhead computation. Refer to the Project Accounting documentation for more information.
15. Choose File >> Print to print a Detailed Employee List to verify your information. Refer to Chapter 15, “Payroll reports,” for more information about printing reports.
16. You can choose Write Letters to open the Letter Writing Assistant to create new letters or prepare prewritten, preformatted employee letters in Microsoft Word, such as benefit enrollment notices and birthday letters. For more information, refer to Microsoft Software Integration in the System User’s Guide.
17. Choose Save in the Employee Maintenance window. If you marked the employee card as inactive, Payroll automatically inactivates all records pertaining to the employee card. For more information, see Inactivating an employee card on page 76. If you reactivated the employee card, you can select the records to inactivate using the Reactivate Employee window. For more information, see Reactivating an employee card on page 77.
If you are using employee onboarding workflow or employee personnel maintenance workflow, choose Submit to Workflow. If both workflow types are activated, select whether to submit your changes to employee onboarding workflow or employee personnel maintenance.
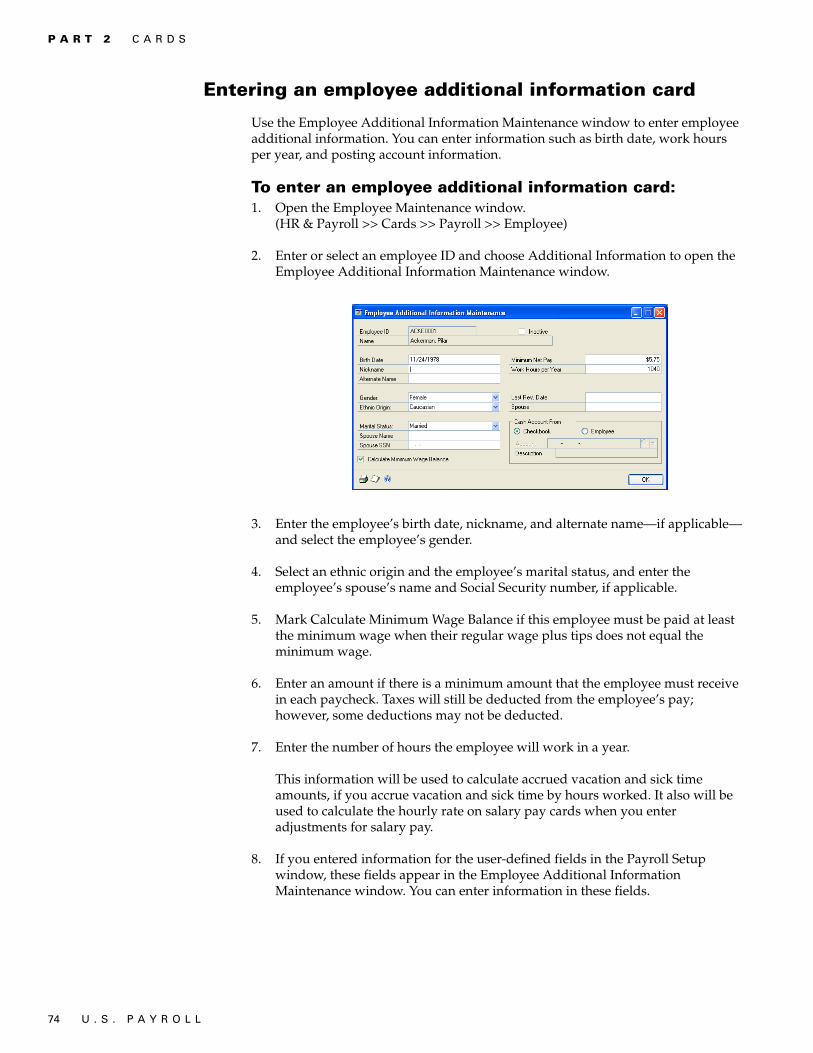
P A R T 2 C A R D S
74 U . S . P A Y R O L L
Entering an employee additional information card
Use the Employee Additional Information Maintenance window to enter employee additional information. You can enter information such as birth date, work hours per year, and posting account information.
To enter an employee additional information card:1. Open the Employee Maintenance window.
(HR & Payroll >> Cards >> Payroll >> Employee)
2. Enter or select an employee ID and choose Additional Information to open the Employee Additional Information Maintenance window.
3. Enter the employee’s birth date, nickname, and alternate name—if applicable—and select the employee’s gender.
4. Select an ethnic origin and the employee’s marital status, and enter the employee’s spouse’s name and Social Security number, if applicable.
5. Mark Calculate Minimum Wage Balance if this employee must be paid at least the minimum wage when their regular wage plus tips does not equal the minimum wage.
6. Enter an amount if there is a minimum amount that the employee must receive in each paycheck. Taxes will still be deducted from the employee’s pay; however, some deductions may not be deducted.
7. Enter the number of hours the employee will work in a year.
This information will be used to calculate accrued vacation and sick time amounts, if you accrue vacation and sick time by hours worked. It also will be used to calculate the hourly rate on salary pay cards when you enter adjustments for salary pay.
8. If you entered information for the user-defined fields in the Payroll Setup window, these fields appear in the Employee Additional Information Maintenance window. You can enter information in these fields.

U . S . P A Y R O L L 75
C H A P T E R 6 E M P L O Y E E C A R D S
9. Enter posting account information. You have the option of posting the net pay for this employee to the cash account used for the checkbook or to an account to be specified for the employee. If you post to the account specified for the employee, mark Employee and enter an account to use for the employee.
If you’re using Bank Reconciliation, it’s a good idea to use the cash account from the checkbook so that you can easily reconcile the cash account entered in the Checkbook Maintenance window for a checkbook with the cash account balance in General Ledger.
10. Choose OK to close the Employee Additional Information window and return to the Employee Maintenance window.
11. Choose Save.
Assigning pay, deduction, and benefit codes to an employee
Use the Payroll Quick Employee Assignment window to quickly assign active pay codes, deduction codes, and benefit codes to an employee.
If you’re using Human Resources, do not use the Payroll Quick Employee Assignment window to assign deduction or benefit codes. Such assignments apply only in Payroll, and not in Human Resources.
To assign pay, deduction, and benefit codes to an employee:1. Open the Payroll Quick Employee Assignment window.
(HR & Payroll >> Cards >> Payroll >> Quick Assignment)
2. Enter or select an employee ID.
3. Select the type of code to display.
4. To view all codes of that type, mark All Company Codes. To view the codes assigned to the employee, mark Only Employee Codes.
5. Mark each code to assign to the employee.
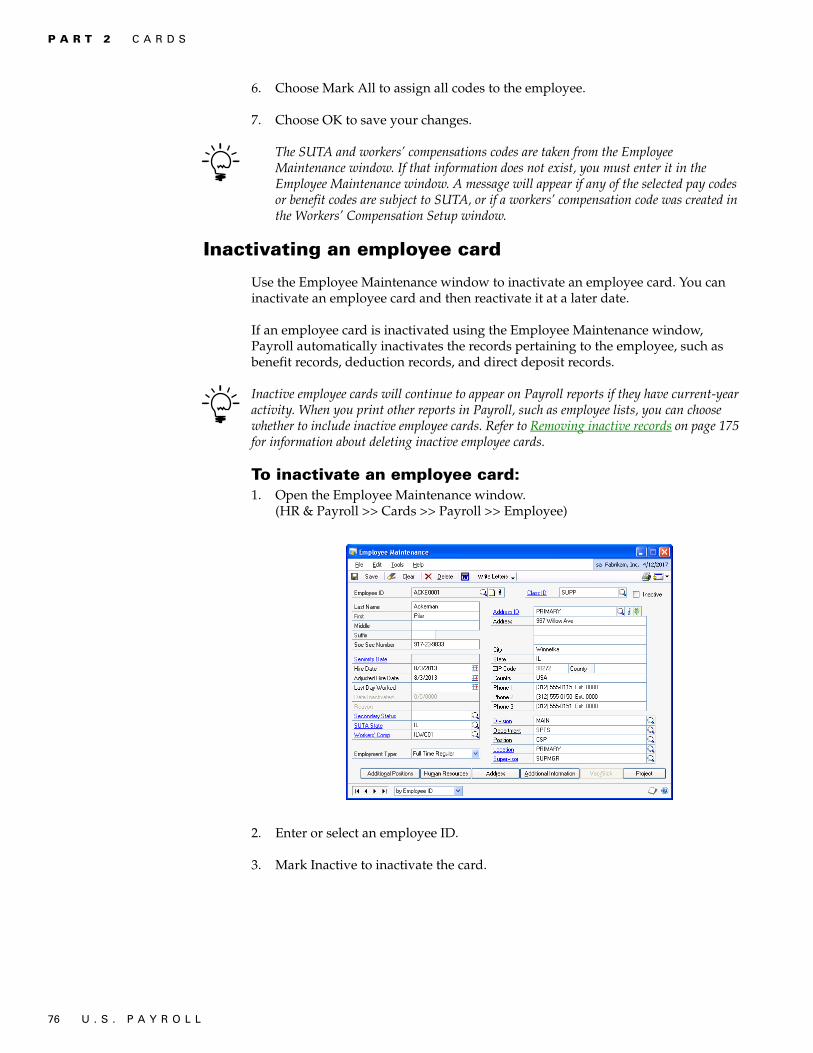
P A R T 2 C A R D S
76 U . S . P A Y R O L L
6. Choose Mark All to assign all codes to the employee.
7. Choose OK to save your changes.
The SUTA and workers’ compensations codes are taken from the Employee Maintenance window. If that information does not exist, you must enter it in the Employee Maintenance window. A message will appear if any of the selected pay codes or benefit codes are subject to SUTA, or if a workers’ compensation code was created in the Workers’ Compensation Setup window.
Inactivating an employee card
Use the Employee Maintenance window to inactivate an employee card. You can inactivate an employee card and then reactivate it at a later date.
If an employee card is inactivated using the Employee Maintenance window, Payroll automatically inactivates the records pertaining to the employee, such as benefit records, deduction records, and direct deposit records.
Inactive employee cards will continue to appear on Payroll reports if they have current-year activity. When you print other reports in Payroll, such as employee lists, you can choose whether to include inactive employee cards. Refer to Removing inactive records on page 175 for information about deleting inactive employee cards.
To inactivate an employee card:1. Open the Employee Maintenance window.
(HR & Payroll >> Cards >> Payroll >> Employee)
2. Enter or select an employee ID.
3. Mark Inactive to inactivate the card.

U . S . P A Y R O L L 77
C H A P T E R 6 E M P L O Y E E C A R D S
4. Enter the date the card was inactivated and the reason why.
5. Assign a secondary status code if you need to provide more detail about the employee’s current status.
6. Choose Save to save the change.
You can reactivate an employee card by unmarking Inactive and choosing Save. The Reactivate Employee window will open, where you can reactivate the employee cards. Choose OK when you’ve finished. For more information, refer to Reactivating an employee card on page 77.
Reactivating an employee card
Use the Employee Maintenance window to reactivate an employee card that has been inactivated. You can reactivate employee cards only if the number of active employees is less than the number your company is registered for.
To reactivate an employee card:1. Open the Employee Maintenance window.
(HR & Payroll >> Cards >> Payroll >> Employee)
2. Enter or select an employee ID.
3. Unmark Inactive to reactivate the employee card.
4. You can enter an adjusted hire date for the employee.
5. Choose Save. The Reactivate Employee window will open.
6. Mark the records to reactivate. Your options are:
• State Tax Records • Local Tax Records • Pay Records • Deduction Records • Benefit Records • Direct Deposit
If you’re using Human Resources and you selected Human Resources as your accrue type in the Attendance Setup window, you can mark the Time Records option.
7. Choose OK. All marked records will be reactivated.

P A R T 2 C A R D S
78 U . S . P A Y R O L L
Deleting or changing an employee card
Use the Employee Maintenance window to delete or change an employee card. You can delete an employee card if you’re not planning to use it in the future. You also have the option to change information on cards to reflect changes such as a pay rate or the number of exemptions.
If summary information exists for an employee, such as monthly, quarterly or yearly information, you can’t delete the employee. You can only delete the employee at the end of the year. Refer to Removing inactive records on page 175.
To delete or change an employee card:1. Open the Employee Maintenance window.
(HR & Payroll >> Cards >> Payroll >> Employee)
2. Select an employee ID.
3. Make the changes. To make changes to the employee, select the fields to change and enter the new information.
4. Choose Delete to delete the card.
5. Choose Save to save the card.
6. While the Employee Maintenance window is displayed, choose File >> Print to print the Detailed Employee List to verify your changes.

U . S . P A Y R O L L 79
C H A P T E R 6 E M P L O Y E E C A R D S
Entering an employee address card
Use the Employee Address Maintenance window to enter an employee address card. You can enter address and phone information.
To enter an employee address card:1. Open the Employee Maintenance window.
(HR & Payroll >> Cards >> Payroll >> Employee)
2. Enter or select an employee ID and choose Address to open the Employee Address Maintenance window.
3. Enter an identification to describe the address and the address information, including city, state, and postal code.
4. Enter county and country/region information and phone and fax numbers.
5. Choose Save.
Setting up employee Internet information
Use the Internet Information window to track Internet-related information about an employee, such as e-mail addresses, Web page URLs, and FTP sites.
To set up employee Internet information:1. Open the Employee Maintenance window.
(HR & Payroll >> Cards >> Payroll >> Employee)

P A R T 2 C A R D S
80 U . S . P A Y R O L L
2. Enter or select an employee ID and choose the Address ID Internet icon to open the Internet Information window.
3. Select Employees in the Select Information for field.
4. Enter or select an address in the Address ID field, if necessary.
5. Enter Internet information.
6. Choose Save.
7. To print Internet information for the current employee, choose File >> Print. The Internet Information Report is printed, showing Internet information for the current employee.
To print an Internet Information Report showing Internet information for all employees, use the Company General Report Options window. Refer to Help >> Index >> Company General Report Options window for more information.
Entering an employee pay card
Use the Employee Pay Codes Maintenance window to enter and maintain employee pay cards. You can enter your own identifying pay code and description to describe each type of pay. You also can assign pay types to pay codes. For example, you might assign an hourly pay type to the pay code, HOUR.
For overtime, double-time, vacation, sick time, and holiday pay types, select the pay code the pay type is based on. For example, if you’re setting up an overtime pay card for an employee with an hourly pay type, you need to base the overtime pay type upon the employee’s hourly pay. Refer to Setting up pay codes on page 30 for more information about the different pay types.
You can apply a pay step table to an employee’s pay code if you are using Human Resources and you have marked the Use Pay Steps/Grades option in the Human Resources Preferences window. For more information about pay steps, refer to the Human Resources documentation.
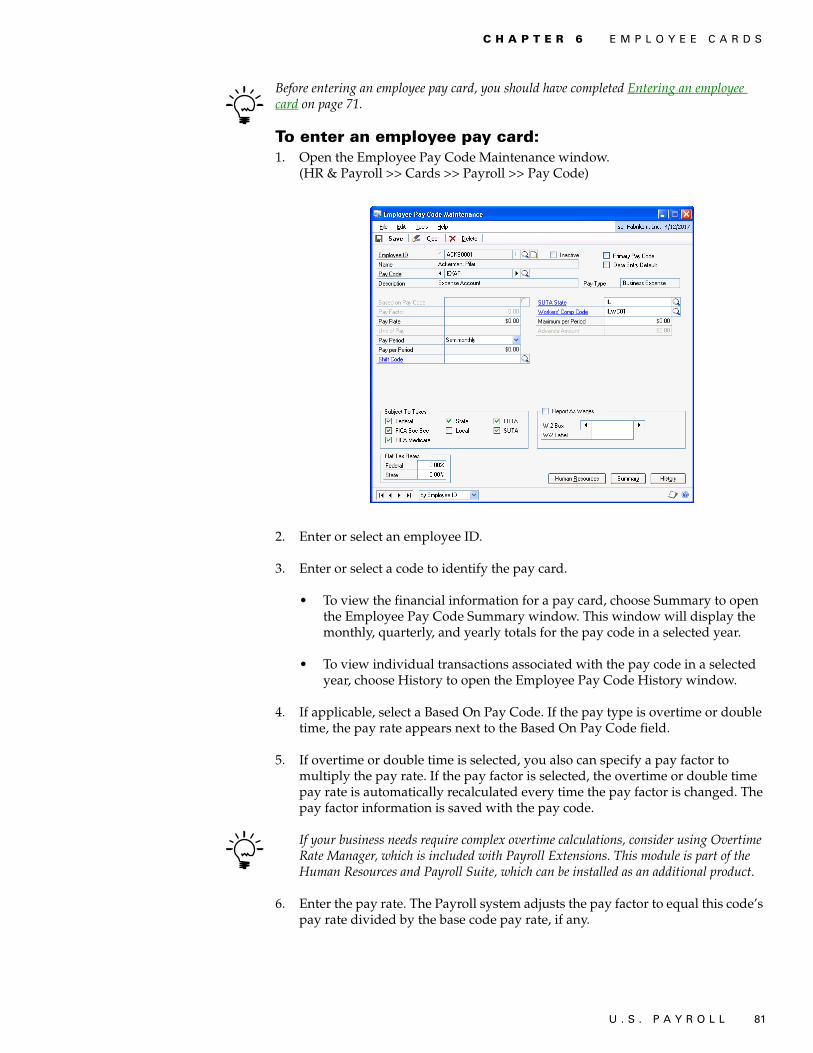
U . S . P A Y R O L L 81
C H A P T E R 6 E M P L O Y E E C A R D S
Before entering an employee pay card, you should have completed Entering an employee card on page 71.
To enter an employee pay card:1. Open the Employee Pay Code Maintenance window.
(HR & Payroll >> Cards >> Payroll >> Pay Code)
2. Enter or select an employee ID.
3. Enter or select a code to identify the pay card.
• To view the financial information for a pay card, choose Summary to open the Employee Pay Code Summary window. This window will display the monthly, quarterly, and yearly totals for the pay code in a selected year.
• To view individual transactions associated with the pay code in a selected year, choose History to open the Employee Pay Code History window.
4. If applicable, select a Based On Pay Code. If the pay type is overtime or double time, the pay rate appears next to the Based On Pay Code field.
5. If overtime or double time is selected, you also can specify a pay factor to multiply the pay rate. If the pay factor is selected, the overtime or double time pay rate is automatically recalculated every time the pay factor is changed. The pay factor information is saved with the pay code.
If your business needs require complex overtime calculations, consider using Overtime Rate Manager, which is included with Payroll Extensions. This module is part of the Human Resources and Payroll Suite, which can be installed as an additional product.
6. Enter the pay rate. The Payroll system adjusts the pay factor to equal this code’s pay rate divided by the base code pay rate, if any.

P A R T 2 C A R D S
82 U . S . P A Y R O L L
• If the pay type is Earned Income Credit, leave the Pay Rate field blank to use the EIC tables supplied with Payroll to calculate the EIC payment. If you don’t use the EIC tables that are supplied, enter an amount.
• If the pay type is Piecework, enter the name of the unit of work. This unit name will be printed on Payroll reports.
• If the pay type is Salary or is based upon a Salary pay type, select a unit of pay to define how often the total salary is paid.
When the pay rate is changed for a pay code on which overtime or double time is based, the overtime or double time pay rate is automatically recalculated by multiplying the pay rate of the base pay code by the pay factor.
7. Select the pay period to determine how the wages will be annualized for tax calculating purposes. After you select a pay period, the pay per period will be displayed. For example, if the pay type is Salary with a rate of $1,000 per month (Unit of Pay: Monthly) and it is paid semimonthly (Pay Period: Semimonthly), the amount per pay period is $500.
8. Mark Data Entry Default to use the information in this window when you create a transaction for the pay code during a pay run.
9. Enter or select a shift code to assign to this pay code, if applicable.
The SUTA state and workers’ compensation code entered in the Employee Maintenance window for this employee will appear as default entries. You have the option of changing these codes.
10. Enter or select the state (using the two-letter abbreviation) for SUTA (state unemployment tax). If you are using pay steps, current and future pay rates for the employee are calculated.
11. Enter or select the workers’ compensation code, if applicable.
12. Enter the maximum amount per pay period for commission and business expense pay types.
13. Enter an amount to pay in advance for a salary or commission pay type, if the employee is to receive an advance.
14. If you are using pay steps, select Hire Date, Adjusted Hire Date, or Seniority Date as the basis for step increases, or select Manual to enable manual entry of a step or grade number, a step effective date, and an FTE factor.
15. Enter or select a pay step table ID. You can’t change this field if the selected pay code is based on another pay code.
16. If you selected Manual for the basis of step increases, enter or select a step or grade, a step effective date, and an FTE factor.
17. Mark all taxes to which the pay is subject.

U . S . P A Y R O L L 83
C H A P T E R 6 E M P L O Y E E C A R D S
18. Enter the federal and state tax rate for the pay if it is subject to federal or state taxes and should be calculated at a flat rate. For example, bonus pay might be taxed at a 20.00 percent flat rate. You can leave this field blank if you use the federal and state tax tables instead of a flat tax rate.
19. Mark Vacation and Sick Time if vacation and/or sick time should be accrued on this pay code. Your Payroll system must be set up for automatic accrual. For more information about accruing methods, refer to Accrual methods for vacation and sick time on page 62.
If you’re using Human Resources and have Human Resources marked as the accrue type in the Attendance Setup window, these fields will not be available. Refer to the Human Resources documentation for more information.
20. Enter W-2 information if the pay type is Business Expense.
If the amount of the business expense should be included with gross wages on the W-2 statement, mark Report as Wages. If the business expense should also be printed in a special box on the W-2 statement, enter the number of the box in the W-2 Box field. Then, enter a label, if required, to be printed in the box on the W-2 statement.
If the amount must be reported in multiple locations on the W-2 statement, use the browse buttons to select an additional location, and enter the appropriate box number and label. You can specify as many as four locations.
21. If you’re using Human Resources, choose Human Resources to open the Employee Pay Code HR Maintenance window, where you can enter and edit the employee’s position and pay code information and earnings history. For more information, see the Human Resources documentation.
22. Choose Save to store the pay code.
Changes made to a pay code can be reflected in any pay codes that are based on it, causing the dependent codes, including overtime and double time codes, to recalculate their pay rates. Overtime and double time pay rates are also affected by changing the pay factor.

84 U . S . P A Y R O L L

U . S . P A Y R O L L 85
Chapter 7: Tax cards You can set up tax cards and use them to track your individual employees’ tax liabilities to various government agencies.
Before you can set up tax cards, you must download federal, state, and local tax tables from the CustomerSource Web site by using the Payroll Update. For more information, see Chapter 19, “Payroll updates.”
Before entering a tax card, you should have completed Entering an employee card on page 71.
This information is contained in the following sections:
• W-2 boxes• States with no withholding tax• Entering an employee tax card• Entering an employee state tax card• Entering an employee local tax card
W-2 boxes
When setting up employee tax cards, you can specify whether either of two boxes will appear on the W-2 statement for an employee. The two boxes are:
Statutory Employee The employee is subject to FICA withholding but not federal withholding.
Retirement Plan The employee was an active participant in a retirement plan, such as a 401(k) plan.
States with no withholding tax
The following states do not require income taxes:
• Alaska• Florida• New Hampshire• Nevada• South Dakota• Tennessee• Texas• Washington• Wyoming
* For the state of Massachusetts, special exemption amounts are for Married Both Spouses only.
** For the state of Mississippi, personal exemptions are for Blind and Blind Spouse only.

P A R T 2 C A R D S
86 U . S . P A Y R O L L
Entering an employee tax card
Use the Employee Tax Maintenance window to enter and maintain employee tax cards for federal taxes.
To enter an employee tax card:1. Open the Employee Tax Maintenance window.
(HR & Payroll >> Cards >> Payroll >> Tax)
2. Enter or select an employee ID.
3. Select the appropriate federal filing status for the employee. This status determines the tax table that will be used to calculate federal taxes. If the only option is Exempt, tax tables aren’t installed. Use the CustomerSource Web site to download tax tables.
4. If the employee is eligible for advanced earned income credit payments, select the appropriate Earned Income Credit (EIC) filing status for this employee. This status determines the tax table that will be used to calculate EIC payments. If the only option is Not Eligible, tax tables aren’t installed. Use CustomerSource to download tax tables.
5. Enter the number of exemptions the employee has claimed on his or her W-4 form.
6. Enter the additional amount, if any, that the employee specified to be withheld on the W-4 form. This amount will be added to either the calculated or estimated federal withholding to determine the total federal withholding for each pay run.
7. Enter the amount that should be withheld each pay run if the employee estimates his or her federal tax liability instead of using tax table calculations. If you entered an amount in the Additional Federal Withholding field, that additional amount will not be added to the estimated withholding amount to determine the total federal withholding for each pay run.

U . S . P A Y R O L L 87
C H A P T E R 7 T A X C A R D S
8. Enter or select the state to which the employee must pay income tax, as well as the locality to which income taxes should be paid for the employee. This information will appear as default entries when you enter pay transactions and will be used for automatic pay cards subject to state or local tax.
9. Mark Household Employee if it applies to the employee and mark Medicare Qualified Government Employee if the employee is exempt from FICA Social Security tax but is subject to FICA Medicare tax.
10. Mark the Withhold New York State Tax Difference if the employee’s state of residence is New York, but the tax withholding state is a different state.
11. Mark the W-2 boxes that apply to the employee. These boxes will be marked on the employee’s W-2 form when you print W-2 statements.
12. Choose State Tax to open the Employee State Tax Maintenance window where you can enter state tax information. For more information, refer to Entering an employee state tax card on page 87.
13. Choose Local Tax to open the Employee Local Tax Maintenance window where you can enter local tax information. For more information, refer to Entering an employee local tax card on page 88.
14. Choose Save. The pointer returns to the Employee ID field and you can continue by creating another card.
Entering an employee state tax card
Use the Employee State Tax Maintenance window to enter and maintain employee state tax cards. Employee state tax cards track individual employees’ tax liability to various state government agencies. You also have the option of setting up multiple state taxes for each employee. For example, if an employee works in two states, you might need to set up two state tax cards.
To enter an employee state tax card:1. Open the Employee State Tax Maintenance window.
(HR & Payroll >> Cards >> Payroll >> State Tax)
2. Enter or select an employee ID.
3. Enter the state code for which the employee’s income tax is withheld.
P A R T 2 C A R D S
88 U . S . P A Y R O L L
4. Select the appropriate filing status for the employee. The options available will depend on the state code you entered.
If no filing status exists for a state, Not Applicable will appear in the Filing Status list.
5. Enter the number of dependents claimed by this employee as exemptions. Don’t count the employee’s own exemption or that of his or her spouse.
6. Enter the number of personal or itemized exemptions claimed by this employee.
7. Enter the amount that should be withheld from each paycheck if the employee indicated on the state’s equivalent of the W-4 form that additional taxes should be withheld from each paycheck. This amount will be added to either the calculated or estimated state withholding to determine the total state withholding for each pay run.
8. Enter the amount of estimated state tax to be withheld from each pay run for employees who estimate their state tax liability instead of using tax table calculations.
• For the state of California, enter the number of additional withholding allowances for estimated deductions claimed on the DE-4 or W-4 forms.
• For the state of Mississippi, enter the total exemption amount claimed on the 62-420 form.
9. Mark all the exemptions that the employee has claimed on his or her state’s equivalent of the W-4 form. These exemptions are for state tax purposes only.
Choose Summary in the Employee State Tax Maintenance window to view state tax amounts or financial information for an employee.
10. Choose Save to save the employee state tax information you’ve entered.
Entering an employee local tax card
Use the Employee Local Tax Maintenance window to enter and maintain employee local tax cards. Employee local tax cards track individual employees’ tax liability to various local government agencies. You also have the option of setting up multiple local taxes for each employee. Refer to Setting up a local tax on page 56 for more information.

U . S . P A Y R O L L 89
C H A P T E R 7 T A X C A R D S
To enter an employee local tax card:1. Open the Employee Local Tax Maintenance window.
(HR & Payroll >> Cards >> Payroll >> Local Tax)
2. Enter or select an employee ID.
3. Enter or select the code for the local government to which the employee pays taxes.
4. Mark Automatically Calculate if the local tax should be automatically deducted from the pay cards that are subject to local taxes for each pay run. For example, assume you have an employee who lives in a particular city and is subject to that city’s tax, regardless of where he or she works.
5. Select a filing status. If you enter a local code that is provided with your accounting system, the Filing Status list will display a description for each filing status. If you entered a new code, Not Applicable will appear in the list.
6. Enter the number of exemptions this employee claims from local taxes if the locality allows exemptions to be taken.
7. Enter any additional withholding the employee requests.
Choose Summary in the Employee Local Tax Maintenance window to view local tax amounts or financial information for an employee.
8. Choose Save to store the employee local tax information.

90 U . S . P A Y R O L L
U . S . P A Y R O L L 91
Chapter 8: Deduction and benefit cardsAfter you’ve set up deduction and benefit company cards, also known as deduction and benefit codes, you can enter employee deduction and benefit cards based on net, unit or gross pay. Refer to Setting up a standard deduction on page 40 and Setting up a benefit on page 49 for more information.
You also can set up employee-level deduction sequences, which may be necessary to comply with tax and garnishment regulations. If an employee has multiple garnishments, you can specify a “split method” for situations in which available wages aren’t sufficient to pay the total garnishment amount.
If you also use Human Resources, refer to your Human Resources documentation for information about entering employee deduction and benefit cards.
This information is contained in the following sections:
• Entering an employee deduction card• Entering an employee-level deduction sequence• Selecting a split method• Entering an employee benefit card
Before entering deduction or benefit cards, you should have completed Entering an employee card on page 71.
Entering an employee deduction card
Use the Employee Deduction Maintenance window to enter and maintain employee deduction cards. You can set up a deduction as a percentage of gross, net, or earnings wages, as a fixed amount, or as an amount per unit of wages. Examples of deductions include donations to charities, union dues, and garnishments. After you have set up company deduction cards, also known as deduction codes, (see Chapter 3, “Setting up deductions and benefits”), you can select these deduction codes for individual employees by entering an employee deduction card.
You can choose not to enter deduction amounts in this window. For more information, refer to Using zero benefit and deduction amounts on page 38.
You can enter two types of employee deduction cards: standard and garnishment.

P A R T 2 C A R D S
92 U . S . P A Y R O L L
To enter a standard employee deduction card:1. Open the Employee Deduction Maintenance window.
(HR & Payroll >> Cards >> Payroll >> Deduction)
2. Enter or select an employee ID.
3. Enter or select a deduction code of the standard type.
4. Enter the starting date of the deduction. This date should be on or before the ending date of the pay period in which the first deduction is to be taken.
5. Enter the ending date of the deduction. This date should be on or before the ending date of the pay period in which the last deduction is to be taken. If the deduction is continuous, leave this field blank.
6. Mark Transaction Required if the dollar amount or percentage of the deduction varies each time it’s calculated. For example, if you have an employee purchase plan and the amount you withhold varies with each paycheck, or there is no withholding for some paychecks, mark this option.
If you mark the deduction as transaction-required, you’ll need to enter a transaction for the amount or percentage of the deduction for each pay run in which the deduction is taken.
7. Mark Data Entry Default to use the information in this window when you create a transaction for the deduction code during a pay run.
8. Select the frequency.
The frequency with which a deduction is taken depends upon selections you make when building paychecks. The selection you make in the Frequency field here will be used to annualize the tax-sheltered deduction when taxes for paychecks are calculated.

U . S . P A Y R O L L 93
C H A P T E R 8 D E D U C T I O N A N D B E N E F I T C A R D S
9. Mark the taxes from which the deduction is sheltered. If the deduction is a tax-sheltered annuity (TSA), the amount deducted won’t be included in the employee’s wages when federal, FICA, state or local taxes are calculated. If federal tax is marked, the amount of the deduction won’t be included in the Wages, Tips, and Other Comp field on the employee’s W-2 form.
10. To base the deduction on all pay codes, mark All. To base the deduction on selected pay codes, mark Selected. From the displayed pay codes list, select each code and choose Insert to add each to the Selected list.
11. Select a deduction method. If you select Percent of Earnings Wages, also select an earnings code.
12. Select a single deduction tier or multiple tiers. If you mark Single, enter an amount or percent. If you mark Multiple, choose the Tiers button and the Employee Tiered Deduction Maintenance window opens, where you can enter tiered deductions. Refer to Deduction tiers on page 39 for more information.
13. Enter deduction maximums. You can enter the maximum amount an employee can have deducted each pay period, each calendar year, each fiscal year, and for the entire time the employee works for your company.
14. If you need the year-end total amount for this deduction printed in a special box on the W-2 statement, enter the box number and label.
If the amount must be reported in multiple locations on the W-2 statement, use the browse buttons to select an additional location, and enter the appropriate box number and label. You can specify as many as four locations.
15. You can choose Sequence to specify the order in which the deductions will be taken from the employee’s wages. For more information about setting up deduction sequences, see Chapter 3, “Setting up deductions and benefits.”
16. Choose Summary to open the Employee Deduction Summary window and view the employee’s past amounts deducted for the specified deduction code, by month, quarter, year, and life to date.
17. Choose Save to save the standard deduction card.
To enter a garnishment employee deduction card:1. Open the Employee Deduction Maintenance window.
(HR & Payroll >> Cards >> Payroll >> Deduction)
2. Enter or select an employee ID.

P A R T 2 C A R D S
94 U . S . P A Y R O L L
3. Enter or select a deduction code of the garnishment type. When you select a garnishment deduction code, the window layout changes, as shown in the following illustration.
4. Enter the starting date of the deduction. This date should be on or before the ending date of the pay period in which the first deduction is to be taken.
5. Enter the ending date of the deduction. This date should be on or before the ending date of the pay period in which the last deduction is to be taken. If the deduction is continuous, leave this field blank.
6. Select the frequency. Make sure the deduction frequency matches the employee’s pay period.
7. Enter the court date, court name, and court document ID from the court order document requiring the garnishment.
8. As the original amount, enter the total amount to be garnished, if specified in the court order.
9. You may enter a past amount already taken from the employee’s wages for this garnishment, if applicable. Payroll will add all further amounts taken and calculate the remaining portion of the original amount.
10. Enter or select a vendor ID to identify the recipient of the garnished wages.
11. Select a garnishment deduction method.
• The Percent of Earnings Wages method is not permitted when the selected deduction code is assigned to an earnings code.
• If you select Percent of Earnings Wages, also select an earnings code.

U . S . P A Y R O L L 95
C H A P T E R 8 D E D U C T I O N A N D B E N E F I T C A R D S
12. If the court order specifies a fixed amount at a frequency different from the employee’s pay period, match the frequency to the pay period and pro-rate the amount. For example, if the garnishment is for $100 per month and the employee’s pay period is semimonthly, enter a fixed amount of $50 with a semimonthly frequency.
13. Enter or select the federal and state deduction maximums. Federal and state law establish maximum rates and amounts for garnishments, and Payroll allows you to define codes for the applicable rules. See Setting up maximum garnishment rules on page 44.
14. If you need the year-end total amount for this garnishment printed in a special box on the W-2 statement, enter the box number and label.
15. If the employee has multiple deductions and needs them deducted in a particular sequence, choose Sequence to specify the order in which the deductions will be taken from the employee’s wages. For more information about setting up deduction sequences, see Entering an employee-level deduction sequence on page 95 and Deducting multiple garnishments on page 45.
16. Choose Summary to open the Employee Deduction Summary window and view the employee’s past amounts deducted for the specified deduction code, by month, quarter, year, and life to date.
17. Choose Save to save the garnishment deduction card.
Entering an employee-level deduction sequence
Use the Employee Deduction Sequence window to specify deduction sequences for individual employees.
If you do not create a deduction sequence for an individual employee, the Payroll system applies the company-level sequence, if one was created in the Deduction Sequence Setup window, or the Payroll system’s default sequence. See Chapter 3, “Setting up deductions and benefits.”
You can assign all types of deductions to the sequence, including standard, garnishment, and TSA types. The Payroll system will calculate the TSA deductions from pre-tax wages, regardless of the sequence.
If you assign a deduction to an employee after creating that employee’s deduction sequence, Payroll will place the new deduction at the bottom of the sequence.
Before you set up deduction sequences, be sure to set up deductions. Refer to Chapter 3, “Setting up deductions and benefits.” You should also set up Payroll default entries.

P A R T 2 C A R D S
96 U . S . P A Y R O L L
To enter an employee-level deduction sequence:1. Open the Employee Deduction Sequence window.
(HR & Payroll >> Cards >> Payroll >> Deduction Sequence)
You also can open this window by choosing Sequence in the Employee Deduction Maintenance window.
2. Enter or select an employee ID.
3. Select Employee to create or change an employee-level deduction sequence. If you select Company, the company-level sequence will be used, if one exists, and any employee-level sequence you created will be deleted.
4. To move a deduction to a higher or lower position in the sequence, select it, and choose the up or down arrow button.
5. To assign one sequence number to two or more garnishments, select each garnishment’s sequence number in the Sequence column, and enter the number.
By default, the Payroll system applies the Even split method to garnishments sharing a sequence number. To change the Split Method, see Selecting a split method on page 96.
6. Choose Save to store the sequence.
Selecting a split method
Use the Split Method window to select the method of dividing available wages between two or more garnishments assigned the same sequence number in the Employee Deduction Sequence window. A split method is used to determine individual garnishment amounts if available wages aren’t sufficient to pay the total garnishment amount.
For more information about ways to handle multiple garnishments, see Deducting multiple garnishments on page 45.

U . S . P A Y R O L L 97
C H A P T E R 8 D E D U C T I O N A N D B E N E F I T C A R D S
To select a split method:1. In the Employee Deduction Sequence window, select a garnishment deduction
that has the same sequence number as another garnishment deduction. Choose the Split Method button to open the Split Method window.(HR & Payroll >> Cards >> Payroll >> Deduction Sequence >> Split Method button)
2. Select a split method, Even or Pro-Rata. The method you select will be assigned to all the deductions having this same sequence number.
The Even split method calculates the amount by which the total of these garnishments exceed available wages, and subtracts equal shares of this amount from the garnishments, reducing each by the same amount.
In transactions where the Even split method would reduce a garnishment amount to less than zero, Payroll does not process the check, and lists the transaction on the Calculate Exceptions report.
The Pro-Rata split method calculates the amount by which the total of these garnishment amount exceeds available wages, and subtracts proportional shares of this amount from the garnishments, reducing each in proportion to its share of the total garnishment amount.
3. Choose OK.
Entering an employee benefit card
Use the Employee Benefit Maintenance window to enter and maintain employee benefit cards. You can select individual employee cards and apply benefit codes to them by entering an employee benefit card. Benefits can be based upon a fixed amount, net wages, gross wages, a deduction, or amount per unit. Examples of employee benefits include insurance premiums and 401(k) contributions made by the company on behalf of an employee.
The Employer Maximum Match field stores the maximum the employer will contribute to an employee’s 401(k) fund. With this feature, you can set up one 401(k) deduction and one benefit code for an employee.
You can choose not to enter benefit amounts in this window. For more information, refer to Using zero benefit and deduction amounts on page 38.

P A R T 2 C A R D S
98 U . S . P A Y R O L L
To enter an employee benefit card:1. Open the Employee Benefit Maintenance window.
(HR & Payroll >> Cards >> Payroll >> Benefit)
2. Enter or select an employee ID.
3. Enter or select the benefit code for the benefit you’re setting up.
4. Enter the date that the benefit should take effect. This date should be on or before the ending date of the pay period the first benefit should take effect; otherwise, the benefit won’t be calculated.
5. Enter the date that the benefit should end. If it is a continuous benefit, leave this field blank, and no ending date will be specified. If the ending date is after or on the ending date for the pay run, the benefit will be taken.
6. Mark Transaction Required if the amount or percentage of the benefit varies each time it’s calculated, or there are some paychecks with no benefit. You must enter transactions to include a transaction required benefit in a pay run.
7. Mark Data Entry Default to use the information in this window when you create a transaction for the benefit code during a pay run.
8. Select the benefit frequency and mark the taxes the benefit is subject to.
9. Select pay codes or deductions to base the benefit on.
• To base the benefit on all pay codes, select Pay Codes and mark All.
• To base the benefit on certain pay codes, select Pay Codes and mark Selected. Select each code to base the benefit on and choose Insert to add the pay code to the Selected list.
• To base the benefit on certain deductions, select Deductions and mark Selected. Select each code to base the benefit on and choose Insert to add the deduction code to the Selected list.

U . S . P A Y R O L L 99
C H A P T E R 8 D E D U C T I O N A N D B E N E F I T C A R D S
10. Select a calculation method and select a single benefit tier or multiple tiers. If you select a single amount or percent, enter an amount or percent. If you select multiple tiers, choose Tiers to open the Employee Tiered Benefit Maintenance window, where you can enter tiered benefits. Refer to Benefit tiers on page 48 for more information.
If you selected Percent of Deduction as your calculation method, enter the maximum percent the employer will match for this employee benefit.
11. Enter benefit maximums. You can enter the maximum amount each employee can receive for this benefit for each pay period, calendar year, fiscal year, and lifetime.
12. Enter the number of the box in the W-2 Box field if the benefit amount needs to be printed in a special box on the W-2 statement. Enter a label, if required, to be printed in the W-2 box.
If the amount must be reported in multiple locations on the W-2 statement, use the browse buttons to select an additional location, and enter the appropriate box number and label. You can specify as many as four locations.
Choose Summary to view an employee’s benefit amounts or financial information.
13. Choose Save.

100 U . S . P A Y R O L L

U . S . P A Y R O L L 101
Chapter 9: Beginning balances If you’re setting up Payroll for the first time and the calendar year has already started, you should enter beginning balances to ensure that your monthly, quarterly, and yearly financial amounts are correct, as well as to correctly process W-2 statements at the end of the year.
This information is contained in the following sections:
• Entering beginning balances• Posting beginning balances
Entering beginning balances
Use the Payroll Manual Check-Adjustment Entry window to create a batch of transactions for your beginning balances. A batch is a group of transactions identified by a name or number. For more information, refer to Creating a batch on page 107.
You have several options when entering beginning balances:
• You can enter an amount for each month for each employee.
• You can enter an amount for each quarter for each employee. If you select this method, you won’t be able to print accurate monthly reports.
• You can enter a total amount for the year-to-date for each employee. If you select this option, you won’t be able to print accurate period-end or quarterly reports, but you’ll be able to print accurate W-2 statements at the end of the year.
To enter beginning balances:1. Open the Payroll Manual Check-Adjustment Entry window.
(HR & Payroll >> Transactions >> Payroll >> Manual Checks)
2. Mark Beginning Balances as the check type. These transactions do not update Bank Reconciliation or General Ledger information.

P A R T 2 C A R D S
102 U . S . P A Y R O L L
3. Enter an adjustment number and enter or select a batch ID. A batch ID identifies a group of related entries that are posted collectively as a single, complete transaction.
4. Enter a check date to help you track information about individual transactions. You should enter the posting date for the beginning balance transaction. This date should reflect the month the amounts are posted.
5. Enter or select an employee ID.
6. Choose Transactions to open the Payroll Manual Check Transaction window.
7. Select a transaction type and enter or select a code. Then enter the appropriate information for the code. Continue with additional transaction types and codes.
For some Transaction Types, such as Federal Tax and State Tax, you must also enter the Taxable Wage amount.
8. Choose Save and close the window.
9. Choose Distributions to open the Manual Check Distribution Entry window.
This window lets you view distributions on manual check transactions, view the Analytical Accounting transactions that are assigned to the check distributions, and make any final changes before posting.
10. Choose OK to close the window.
11. The Payroll Manual Check-Adjustment Entry window opens. Choose Save.
12. Enter beginning balance information for another employee. Repeat this process until beginning balances have been entered for all employees.
13. Choose File >> Print to print a Manual Check Edit List to verify your beginning balance information.
14. If you identify errors in transactions on the edit list, refer to Correcting manual check transactions on page 119 for more information.
Posting beginning balances
Use the Payroll Batch Entry window to post beginning balances.
Always back up your company’s accounting data before posting batches of transactions. If there is a power fluctuation or some other posting problem, you can easily restore your data and begin the posting process again. For more information about making backups, refer to the Help >> Contents >> select System Administration.
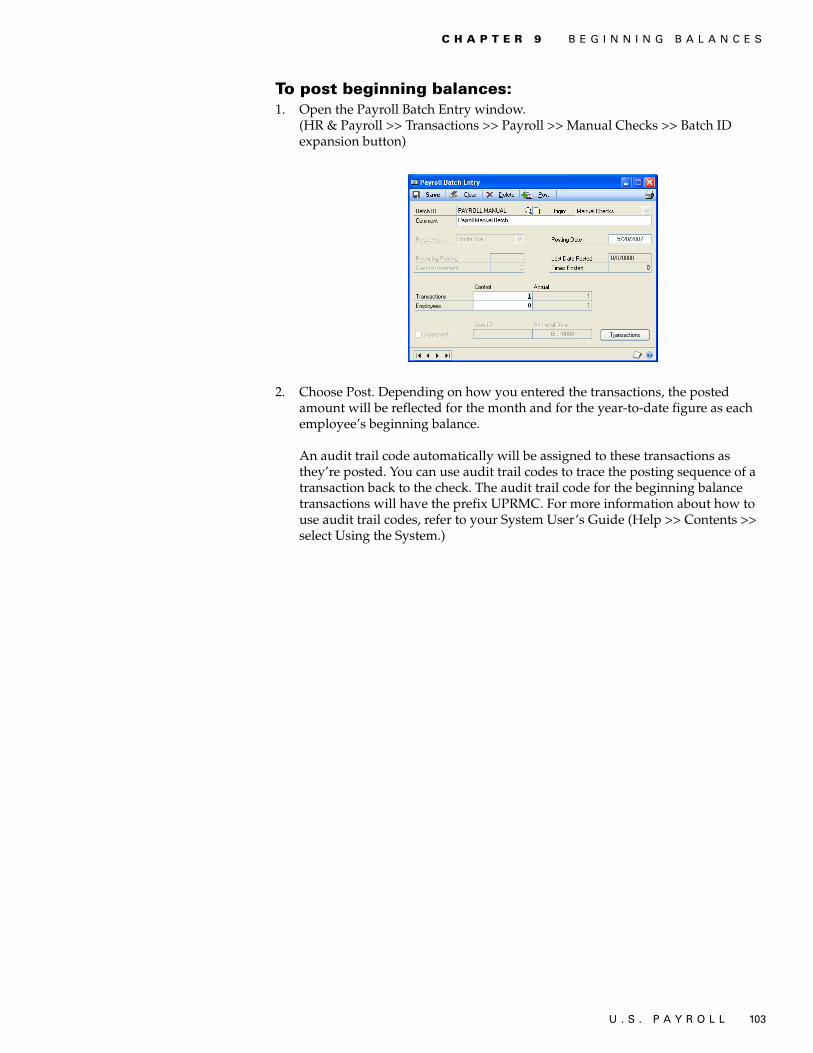
U . S . P A Y R O L L 103
C H A P T E R 9 B E G I N N I N G B A L A N C E S
To post beginning balances:1. Open the Payroll Batch Entry window.
(HR & Payroll >> Transactions >> Payroll >> Manual Checks >> Batch ID expansion button)
2. Choose Post. Depending on how you entered the transactions, the posted amount will be reflected for the month and for the year-to-date figure as each employee’s beginning balance.
An audit trail code automatically will be assigned to these transactions as they’re posted. You can use audit trail codes to trace the posting sequence of a transaction back to the check. The audit trail code for the beginning balance transactions will have the prefix UPRMC. For more information about how to use audit trail codes, refer to your System User’s Guide (Help >> Contents >> select Using the System.)

104 U . S . P A Y R O L L

PA
RT
3: T
RA
NS
AC
TIO
NS
106 U . S . P A Y R O L L
Part 3: Transactions This part of the documentation describes how to create Payroll batches and transactions.
The following information is discussed:
• Chapter 10, “Batches and posting,” explains how to create single-use batches, or recurring batches for transactions you enter on a regular basis. Batches can be identified as a group of transactions entered by a specific employee, or a group of transactions entered on a particular date.
• Chapter 11, “Payroll transactions,” describes how to create Payroll check transactions including computer check transactions and manual check transactions.
• Chapter 12, “Editable pay rates,” includes examples of how you might use editable pay rates in different industries.

U . S . P A Y R O L L 107
Chapter 10: Batches and posting Batches are groups of transactions—accounting entries that change the balance of liability, revenue, asset or expense accounts—identified by a name or a number, that are used for identification purposes and to make the posting process easier. Entering and posting transactions in batches lets you group similar transactions during data entry and review them before posting at a later time. You can create batches that you use just one time, or recurring batches for transactions you enter on a regular basis. Batches can be a group of transactions entered by a specific employee, or a group of transactions entered on a particular date.
Payroll batches have either Manual Check or Computer Check as their origin. Since batches can use only one origin, you can have batches with the same name, but different origins.
In Payroll, posting updates the balances that are displayed in the Employee Summary window, so you can view up-to-date information for your employees. If you’re using Bank Reconciliation, your checkbook also is updated when you post. For more information, refer to the Bank Reconciliation documentation.
For information about entering transactions with different origins, refer to Entering manual check transactions on page 117 or Entering Payroll computer check transactions on page 113.
This information is contained in the following sections:
• Creating a batch• Modifying or deleting a batch• Posting a batch
Creating a batch
Use the Payroll Batch Entry window to create a batch—a group of transactions identified by a name or number. Each transaction in a batch must have the same origin. Entering and posting transactions in batches lets you group similar transactions during data entry and review them before posting at a later time.
To create a batch:1. Open the Payroll Batch Entry window.
(HR & Payroll >> Transactions >> Payroll >> Batches)

P A R T 3 T R A N S A C T I O N S
108 U . S . P A Y R O L L
2. Enter a batch ID to identify the batch and select a batch origin.
3. Enter a batch comment, such as a brief description of the transactions that will be entered in the batch.
4. If you want to look up an individual check transaction in the batch you selected, choose Transactions, select Payroll Transaction Entry, and choose Go To. In the Payroll Transaction Entry window, choose the Lookup icon next to the Transaction list heading. Enter the transaction number or select a transaction from the list, then choose Open. Close the Payroll Transaction Entry window to return to the Payroll Batch Entry window.
5. If you selected Computer Check as the origin, select a frequency. If at least one Payroll transaction is linked to a Human Resources attendance transaction, this field cannot be modified.
6. If you selected Manual Check as the origin, enter a posting date. The default posting date is the user date, but it can be changed to post the batch as of a different date. If you assign a manual check to a batch, it will be posted on the posting date, whether Transaction or Batch is marked in the Posting Setup window.
If you’re using a manual check and not using a batch, you must post transactions using the date entered in the Payroll Manual Check-Adjustment Entry window.
7. Enter any requirements for posting the batch, such as recurring posting days or transaction totals.
8. Choose Save to save the batch.
9. Enter or select the batch ID and choose Transactions to enter transactions in the batch.
• If the origin is Manual Check, the Payroll Manual Check-Adjustment Entry window opens.
• If the origin is Computer Check, the Go To window opens, from which you can open the Payroll Transaction Entry window or the Payroll Mass Transaction Entry window.
For more information, refer to Entering employee mass transactions on page 111, Entering Payroll computer check transactions on page 113, or Entering manual check transactions on page 117.
10. When you’ve entered and saved all transactions for a batch, return to the Payroll Batch Entry window and select the batch ID.
11. Choose File >> Print to print a Transaction Edit List to verify your entries.
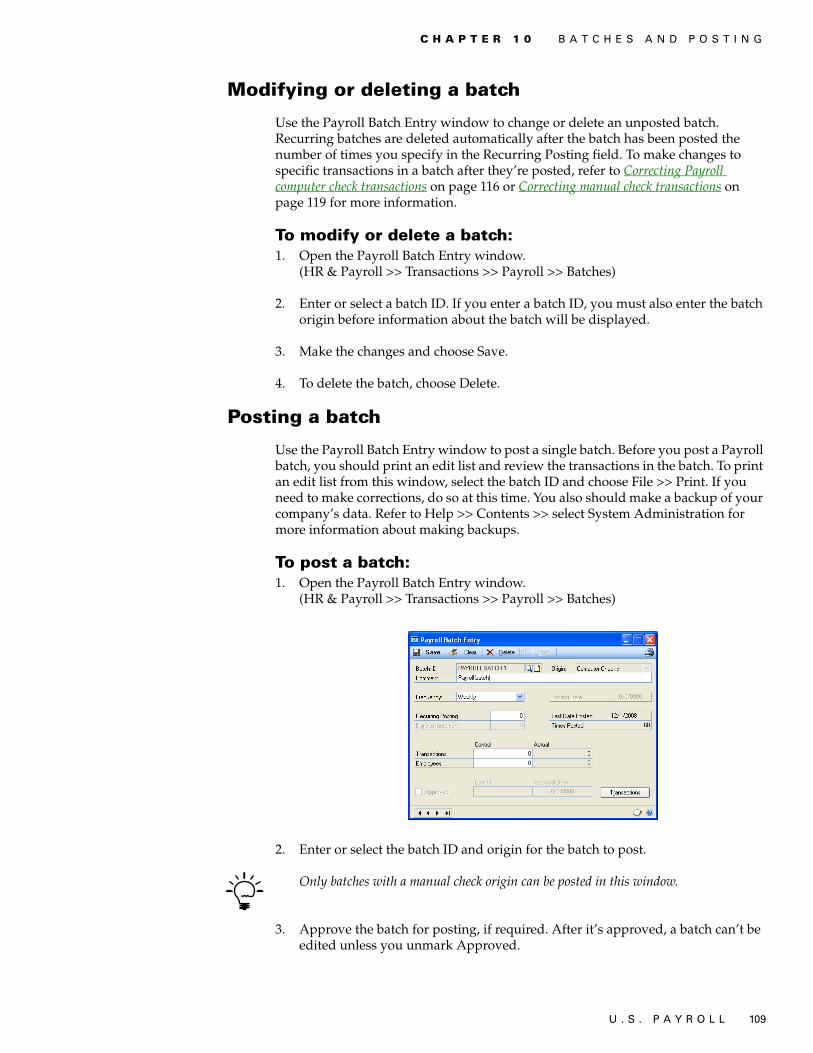
U . S . P A Y R O L L 109
C H A P T E R 1 0 B A T C H E S A N D P O S T I N G
Modifying or deleting a batch
Use the Payroll Batch Entry window to change or delete an unposted batch. Recurring batches are deleted automatically after the batch has been posted the number of times you specify in the Recurring Posting field. To make changes to specific transactions in a batch after they’re posted, refer to Correcting Payroll computer check transactions on page 116 or Correcting manual check transactions on page 119 for more information.
To modify or delete a batch:1. Open the Payroll Batch Entry window.
(HR & Payroll >> Transactions >> Payroll >> Batches)
2. Enter or select a batch ID. If you enter a batch ID, you must also enter the batch origin before information about the batch will be displayed.
3. Make the changes and choose Save.
4. To delete the batch, choose Delete.
Posting a batch
Use the Payroll Batch Entry window to post a single batch. Before you post a Payroll batch, you should print an edit list and review the transactions in the batch. To print an edit list from this window, select the batch ID and choose File >> Print. If you need to make corrections, do so at this time. You also should make a backup of your company’s data. Refer to Help >> Contents >> select System Administration for more information about making backups.
To post a batch:1. Open the Payroll Batch Entry window.
(HR & Payroll >> Transactions >> Payroll >> Batches)
2. Enter or select the batch ID and origin for the batch to post.
Only batches with a manual check origin can be posted in this window.
3. Approve the batch for posting, if required. After it’s approved, a batch can’t be edited unless you unmark Approved.

P A R T 3 T R A N S A C T I O N S
110 U . S . P A Y R O L L
4. Choose Post. Your Payroll records will be updated to reflect the information from the transactions and general ledger accounts will be updated, depending on your posting setup selections in the Posting Setup window.
• If you post to General Ledger, the batch appears in the Financial Series Posting and Master Posting windows. You can edit the transactions in the General Ledger Transactions Entry window before posting them again. Your accounts are updated when you post the transactions in General Ledger.
• If you post through General Ledger, your accounts are updated at once and you don’t need to post the batch again in General Ledger.
If you enter batch total requirements or batch approval requirements in Payroll and post a batch through General Ledger, the batch is posted regardless of the batch requirement or approval requirements that are selected in General Ledger.
One or more posting journals might be printed, depending on the options marked in the Posting Setup window.
U . S . P A Y R O L L 111
Chapter 11: Payroll transactionsA paycheck is a group of transactions involving a single employee. You might pay an employee a month’s salary, which is one transaction. You might also withhold income taxes and the employee’s portion of insurance payments, and contributions to a 401(k) plan. You also can record vacation accrued and your company’s portion of 401(k) contributions for the employee. Each of these items is a separate transaction and you can have all the transactions that apply to an employee put into a single paycheck.
You can automatically create many of the Payroll transactions for your employees during the process of building checks. If you have a group of employees who receive a regular salary, you won’t have to enter individual transactions for the salary pay; the build checks process creates them for you, along with transactions for the applicable taxes, benefits, and deductions.
Payroll check transactions include computer check transactions and manual check transactions. You must enter Payroll transactions in batches. To print edit lists for transactions, the transactions must be part of a batch. For more information, refer to Chapter 10, “Batches and posting.”
If you’re using Human Resources and accruing benefit time using Human Resources, refer to the Human Resources documentation for information about creating Payroll transactions.
If you’re using Human Resources and you import attendance transactions directly into U.S. Payroll, Human Resources tables may not be updated. In such cases you must reconcile attendance transactions using the Reconcile Human Resources window before you calculate the payroll checks.
This information is contained in the following sections:
• Entering employee mass transactions• Entering Payroll computer check transactions• Correcting Payroll computer check transactions• Entering manual check transactions• Correcting manual check transactions• Entering Analytical Accounting information for Payroll transactions• Modifying a specific transaction in Payroll• Processing an advance pay run• Creating employee retroactive pay transactions• Building Payroll checks• Calculating Payroll checks• Printing and posting checks• Voiding a Payroll check• Reprinting paystubs and earnings statements• How Payroll calculates the minimum wage balance
Entering employee mass transactions
Use the Payroll Mass Transaction Entry window to add similar pay transactions, and all transaction-required benefit and deduction transactions quickly when the same transactions apply to a range of employees.

P A R T 3 T R A N S A C T I O N S
112 U . S . P A Y R O L L
You can exclude individual employee records from a mass transaction entry. For example, you might be giving all your employees a bonus, but one of them hasn’t worked at your company long enough to be eligible for bonus pay.
To enter employee mass transactions:1. Open the Payroll Mass Transaction Entry window.
(HR & Payroll >> Transactions >> Payroll >> Mass Entry)
2. Create or select a batch ID. If you enter a new batch ID, a message appears asking if you want to add the batch. Choose Add to open the Payroll Batch Entry window. Refer to Creating a batch on page 107 for more information.
3. Select a transaction type and enter or select the appropriate code for the employees.
4. To assign an Analytical Accounting alias to the batch, enter or select one from the lookup window. This field is available only for the Pay Code transaction type when Analytical Accounting is registered and integrated with Payroll. The alias you enter here is associated with every payroll transaction in the batch. It overrides any default alias that would have been defined for any transaction in the batch. If you enter nothing here, transactions in the batch use the default Analytical Accounting data from the Analytical Payroll Default Dimensions window.
5. Enter start and end dates for the transaction. To track the number of days and weeks worked for SUTA, and workers’ compensation purposes, you must have marked the Track Days Worked and Track Weeks Worked options in the Payroll Setup window.
6. Depending on the transaction type and pay code, you might need to enter the pay amount, hours or units, transaction required deduction or transaction required benefit amount, or the transaction required deduction or transaction required benefit percentage.
If you have different amounts for the mass transaction, you can enter a zero in this field and later enter each amount separately. Or, you can enter the amount needed for most records to apply it to every record of the mass transaction, and then later change the records that require a different amount.
7. To create transactions for a specific range of employees, enter or select starting and ending ranges or mark All to include all employees.

U . S . P A Y R O L L 113
C H A P T E R 1 1 P A Y R O L L T R A N S A C T I O N S
The Payroll system will create a pay transaction, a transaction required deduction transaction or a transaction required benefit transaction for each employee within the designated range for whom corresponding cards have been set up.
8. Choose Insert to save the range.
9. Choose Preview to open the Preview Mass Entry Transactions window and view or make changes to the transactions that will be created.
10. When you’ve finished, close the window to return to the Payroll Mass Transaction Entry window.
11. To edit an individual transaction, choose Transactions. The Payroll Transaction Entry window will open. Enter or select the batch to edit, and change the appropriate information. For more information about changing or deleting transactions, refer to Correcting Payroll computer check transactions on page 116.
12. Choose Build Batch in either the Payroll Mass Transaction Entry window or the Preview Mass Entry Transactions window to create the transactions for the selected employees. Close the window when you’ve finished. You’ll have the option to print the Payroll Audit Report.
Entering Payroll computer check transactions
Use the Payroll Transaction Entry window to enter computer check transactions and to edit pay rates for hourly and piecework pay types, or overtime, vacation, sick, or holiday pay types that are based on hourly or piecework pay types. You must enter Payroll transactions in a batch. Before entering payroll computer check transactions, make sure you have saved any changes made to pay rates.
You usually won’t need to enter transactions for salary pay types. Salary pay is included automatically in a pay run. You’ll only need to enter transactions for a salary pay type to reduce dollars or hours, reallocate dollars or hours, or add an additional amount of hours. Refer to online help for the Payroll Transaction Entry window for an explanation for each option. For example, you might need to make a salary reduction if an employee takes a day off without pay, or you might need to reallocate hours if an employee worked in a department or job other than his or her regular department or job. For more information, refer to Building Payroll checks on page 125.

P A R T 3 T R A N S A C T I O N S
114 U . S . P A Y R O L L
A transaction number automatically is assigned to each transaction; the numbers are used to differentiate transactions. The transactions will be removed from the batch when checks are posted—unless they’re recurring transactions.
To enter Payroll computer check transactions:1. Open the Payroll Transaction Entry window.
(HR & Payroll >> Transactions >> Payroll >> Transaction Entry)
The first time you open the window, you’ll have the option to open the Payroll Transaction Entry window or the Payroll Mass Transaction Entry window.
2. Create or select a batch ID. For more information, refer to Creating a batch on page 107.
3. Enter the pay period dates for the transaction and the default number of days and weeks worked during the pay period, if your company tracks those worked by each employee. You can change the dates for a transaction.
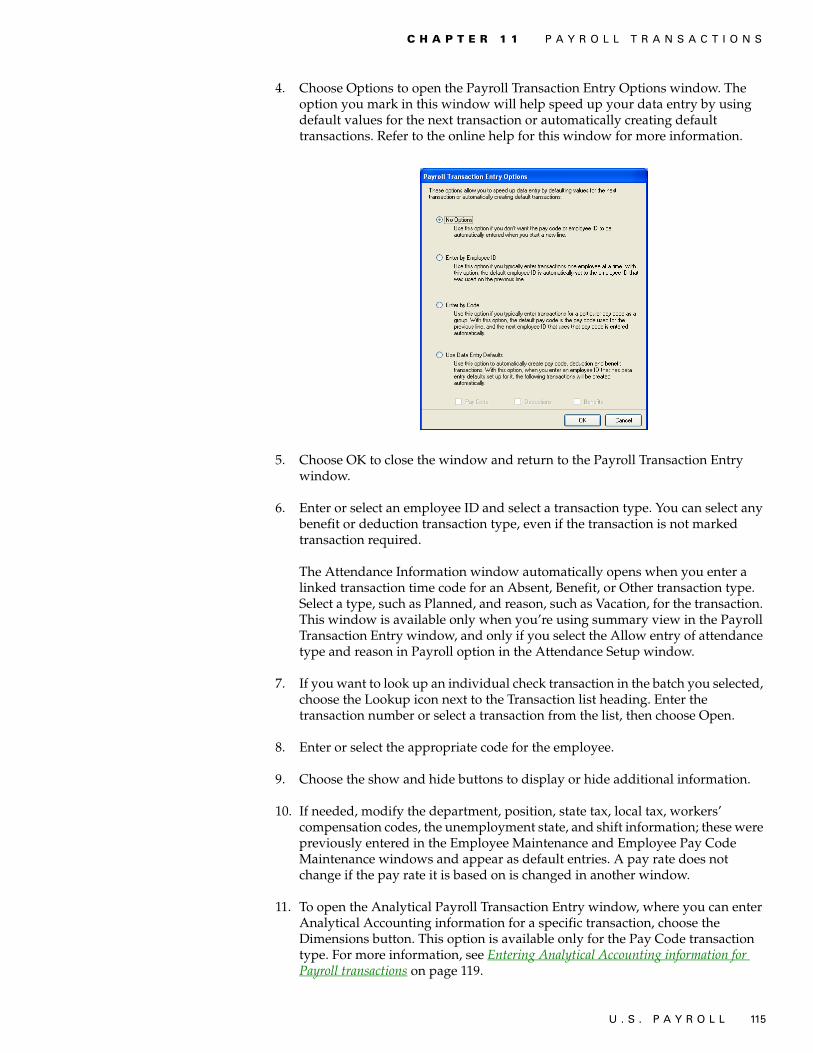
U . S . P A Y R O L L 115
C H A P T E R 1 1 P A Y R O L L T R A N S A C T I O N S
4. Choose Options to open the Payroll Transaction Entry Options window. The option you mark in this window will help speed up your data entry by using default values for the next transaction or automatically creating default transactions. Refer to the online help for this window for more information.
5. Choose OK to close the window and return to the Payroll Transaction Entry window.
6. Enter or select an employee ID and select a transaction type. You can select any benefit or deduction transaction type, even if the transaction is not marked transaction required.
The Attendance Information window automatically opens when you enter a linked transaction time code for an Absent, Benefit, or Other transaction type. Select a type, such as Planned, and reason, such as Vacation, for the transaction. This window is available only when you’re using summary view in the Payroll Transaction Entry window, and only if you select the Allow entry of attendance type and reason in Payroll option in the Attendance Setup window.
7. If you want to look up an individual check transaction in the batch you selected, choose the Lookup icon next to the Transaction list heading. Enter the transaction number or select a transaction from the list, then choose Open.
8. Enter or select the appropriate code for the employee.
9. Choose the show and hide buttons to display or hide additional information.
10. If needed, modify the department, position, state tax, local tax, workers’ compensation codes, the unemployment state, and shift information; these were previously entered in the Employee Maintenance and Employee Pay Code Maintenance windows and appear as default entries. A pay rate does not change if the pay rate it is based on is changed in another window.
11. To open the Analytical Payroll Transaction Entry window, where you can enter Analytical Accounting information for a specific transaction, choose the Dimensions button. This option is available only for the Pay Code transaction type. For more information, see Entering Analytical Accounting information for Payroll transactions on page 119.

P A R T 3 T R A N S A C T I O N S
116 U . S . P A Y R O L L
12. Enter Receipts if the pay code you’ve selected is Charged Tips or Reported Tips.
13. Select a salary change option if the pay code you selected is Salary. The Payroll Salary Adjustment window will open, where you can select a salary change and enter the amount or number of hours to adjust the salary by.
14. If you are preparing checks for salaried employees that include amounts that are in addition to regular earnings, select the In Addition to Salary option. For example, if you have vacation or sick time to be paid out in a final check for a salaried employee, select this option. This field is only active if the transaction type is Pay Code and the code that you selected is Vacation or Sick Time based on Salary.
15. To delete a transaction in the Payroll Transaction Entry window, select the row and choose Edit >> Delete Row or choose the delete row icon button. If you’ve identified errors in transactions on the edit list, refer to Correcting Payroll computer check transactions on page 116.
16. Choose File >> Print to print a Payroll Transaction Edit List to verify your entries.
You can print the Payroll Transaction Audit report when you close this window. This report shows all the transactions that were added, changed or deleted since the last time you used the Payroll Transaction Entry window.
Correcting Payroll computer check transactions
Use the Payroll Transaction Entry window to make corrections to your transactions. If you’ve identified an error on the Check File Report, the Calculate Exceptions report, or the Calculate Checks Report, you must first remove the check build. Use the Build Payroll Checks window to remove the check build. After you remove the check build, you can continue making corrections.
If the errors are caused because the wrong range of employees was included or because you forgot to include a deduction or benefit, make the change using the Build Payroll Checks window, then choose Rebuild. If the transaction has been posted, void the check using the Void Payroll Checks window (HR & Payroll >> Transactions >> Payroll >> Void Checks) and reenter the information. For more information, refer to Voiding a Payroll check on page 131.
To correct Payroll computer check transactions:1. Open the Payroll Transaction Entry window.
(HR & Payroll >> Transactions >> Payroll >> Transaction Entry)
2. Enter or select a batch ID. For more information, refer to Creating a batch on page 107.
3. To look up a transaction, choose the lookup button in the Transaction field. Enter a transaction number in the Find by Number field, and then choose Open. Or highlight a transaction in the list and choose Select.
4. Select the row that contains the information to change and change the incorrect information, if the transaction hasn’t been posted.
5. Choose File >> Print to print an edit list to verify your entries.

U . S . P A Y R O L L 117
C H A P T E R 1 1 P A Y R O L L T R A N S A C T I O N S
After you’ve checked the entries on the edit list, you can process the computer check run. For more information, refer to Building Payroll checks on page 125.
Depending on how your Payroll system has been set up, posting journals might be printed automatically when you post computer checks. Posting journals provide a record of the changes you’ve made in transaction entry. For more information about posting options, refer to Help >> Contents >> select Setting Up the System.
Entering manual check transactions
Use the Payroll Manual Check–Adjustment Entry window to record manually written paychecks. You also can reverse a previously written manual or computer check and enter adjustments to make corrections to employee financial information using this window.
A default payment number or adjustment number will be displayed from the Payroll Setup window. A payment number identifies a group of related entries that are posted collectively as a single, complete transaction or check. An adjustment number identifies a group of adjustments that you make in this window that are posted collectively as a single, complete transaction. You can change this number.
An adjustment doesn’t affect gross or net wages since you’re not issuing a check and can be posted only if the gross and net amounts are zero.
To enter manual check transactions:1. Open the Payroll Manual Check–Adjustment Entry window.
(HR & Payroll >> Transactions >> Payroll >> Manual Checks)
2. Select a check type.
3. Enter or select a batch ID. For more information, refer to Creating a batch on page 107.
4. Enter or select the checkbook ID from which this check was issued. Then, either accept the default number or enter a new check number and the date you issued the check.
If the transaction doesn’t have a batch ID assigned to it, you can enter a Posted Date. If there is a batch ID assigned, the date comes from the Payroll Batch Entry window.

P A R T 3 T R A N S A C T I O N S
118 U . S . P A Y R O L L
You can only select a checkbook ID and check number if you marked Manual Check as your check type.
5. Enter or select the ID of the employee the check was written for.
6. Choose Transactions to open the Payroll Manual Check Transaction Entry window, where you can enter transactions for the manual check.
If the manual check entry is being used to reverse a previous check, enter negative amounts. All your entries will be posted as negative amounts, offsetting the amounts of the earlier check.
7. Select the transaction type that applies to this transaction.
8. Enter or select the appropriate transaction code and enter or select the appropriate shift code, if applicable.
9. Enter the Taxable Wage amount, if applicable.
10. Enter start and end dates for the transaction and the amount or hours/units to reverse.
11. Enter the number of days and weeks worked during the pay period if your company tracks those worked by each employee.
12. If needed, edit the department, position, state tax, local tax, workers’ compensation codes, the unemployment state, and shift information; these were previously entered in the Employee Maintenance and Employee Tax information windows and appear as default entries. If you’re entering a pay code transaction, you can select other codes.
13. Choose Save to save the transaction and return to the Payroll Manual Check-Adjustment Entry window.
14. Choose Distributions to open the Manual Check Distribution Entry window.
This window lets you view distributions on manual check transactions, view the Analytical Accounting transactions that are assigned to the check distributions, and make any final changes before posting. You can edit the account number only. Choosing Default updates the list with the most current distributions.

U . S . P A Y R O L L 119
C H A P T E R 1 1 P A Y R O L L T R A N S A C T I O N S
15. Choose OK to save the information and return to the Payroll Manual Check-Adjustment Entry window.
16. Choose File >> Print in the Payroll Manual Check–Adjustment Entry window to print a Manual Check Edit List to verify your entries. If you’ve identified errors in transactions on the edit list, refer to Correcting manual check transactions on page 119 for more information.
17. Choose Post to post the check. Depending on the way your Payroll system has been set up, posting journals might be printed when you post batches. When you post transactions individually, the Check Register will be printed when the Payroll Manual Check-Adjustment Entry window is closed.
To post manual checks individually, the Batch ID field must be blank. Manual checks must be posted at this point using transaction-level posting; transactions entered individually can’t be saved and posted later. All transactions posted individually during a single data entry session will have the same audit trail code.
Correcting manual check transactions
Use the Payroll Manual Check–Adjustment Entry window to enter adjustments for manual checks. If you’ve identified an error on a check that’s been posted already, you can void the check using the Void Payroll Checks window.
If you’re not keeping check and transaction history or if you’re voiding a check from a previous year, you’ll need to reverse the check using the Payroll Manual Check–Adjustment Entry and Payroll Manual Check Transaction Entry windows. To reverse a check, enter the check information using negative amounts. After you’ve entered these amounts you can issue a correct check using either computer or manual check processes.
To correct manual check transactions:1. Open the Payroll Manual Check-Adjustment Entry window.
(HR & Payroll >> Transactions >> Payroll >> Manual Checks)
2. Enter or select a batch ID and employee ID. For more information, refer to Creating a batch on page 107.
3. Choose Transactions to change information for an unposted transaction.
4. Choose Distributions to verify distributions and Analytical Accounting transactions, as appropriate.
5. Choose File >> Print to print a Manual Check Edit List to verify your changes.
6. Choose Save.
Entering Analytical Accounting information for Payroll transactions
Use the Analytical Payroll Transaction Entry window to enter analysis information for specific Payroll transactions. The fields that appear in this window vary depending on how you accessed it.

P A R T 3 T R A N S A C T I O N S
120 U . S . P A Y R O L L
If you delete a transaction in the Analytical Payroll Transaction Entry window, any analysis information entered for the transaction is also deleted.
To enter Analytical Accounting information for Payroll transactions:1. Open the Analytical Payroll Transaction Entry window.
(HR & Payroll >> Transactions >> Payroll >> Transaction Entry >> Choose the Analytical Accounting button)(HR & Payroll >> Transactions >> Payroll >> Payroll Posting Edits >> Choose the Analytical Accounting button)(HR & Payroll >> Transactions >> Payroll >> Manual Check >> Choose the Distributions button >> Choose the Analytical Accounting button)
2. Depending on how you opened the Analytical Payroll Transaction Entry window, the information displayed will be either for the distribution or transaction that you selected. To view the other distributions or transactions, enter or select a different number in the Distribution or Transaction field.
Functional Amount This field displays the amount in the originating or functional currency based on the option selected in the currency view.
You can choose the expansion button to view multicurrency information if the originating currency differs from the functional currency. The currency icon is not displayed if the displayed account is a unit account.
Account This field displays the account related to the distribution or transaction. The expansion button will open the Account Entry window. The balance type is also displayed.
Assigned This field displays the total amount in value and percentage that has been assigned.
Unassigned This field displays the remaining amount that is to be assigned in value and percentage.

U . S . P A Y R O L L 121
C H A P T E R 1 1 P A Y R O L L T R A N S A C T I O N S
In the assignment list view, an arrow next to the Number field indicates that the analysis information displayed is for the selected assignment. Each assignment created for the distribution or transaction is displayed separately.
3. Select how to assign the amount, either as hours/units or as a percentage.
Number This field displays the number of the assignment.
Hours/Units or Percentage This field displays the assignment as an integer or percentage, based on the option you selected in the Assignment Type field. Enter the amount to assign in this field. Assignments can be entered in the functional or originating currency.
4. Enter the assignment in percentage value in the Assign% field. Initially, a single assignment is created by default. You can overwrite the assignment with more than one assignment. You can save analysis information even if the assignment is not 100%.
5. Enter or select an alias.
6. Enter reference information for the assignment in the Reference field.
7. Choose Remaining to add one assignment for the remaining unassigned amount. The new assignment will ensure that the total assigned amount equals the distribution amount. For example, the distribution amount is $100 and you’ve entered four assignments that total $75. When you choose Remaining, a fifth assignment for the remaining value, $25 is created. This button is not available if the Distribution field is blank or has a zero value.
8. Choose Default to use the current setup information specified for the account class and create a single assignment.
Trx Dimension This field displays transaction dimension ID for the transaction dimensions that are available.
Trx Dimension Description This field displays the first description for the selected transaction dimension.
9. Enter or select the code for each alphanumeric transaction dimension in the Alphanumeric column.
You can only add an alphanumeric code that the user ID you’re logged in as, and the selected account, both have access to. For more information, see the Analytical Accounting documentation.
10. Enter a transaction dimension code in the Numeric, Yes/No or Date field for a Numeric, Boolean or Date type transaction dimension.
11. To validate that the information you’ve entered can be saved, choose Validate. If errors are found, the Analytical Accounting Validation Log window opens, where you can view the errors or changes. For more information about validation, see the Analytical Accounting documentation.
12. To save changes and close the window, choose OK.
13. To save changes and clear the window, choose Save.

P A R T 3 T R A N S A C T I O N S
122 U . S . P A Y R O L L
14. To clear the window and close it without saving changes, choose Clear.
Modifying a specific transaction in Payroll
Use the Payroll Posting Edit List window to view information for a specific transaction that has already been posted, and make changes to its account number or Analytical Accounting information as necessary.
To modify a specific transaction in Payroll:1. Open the Payroll Posting Edit List window.
(HR & Payroll >> Transactions >> Payroll >> Posting Edit List)
2. In the Restrictions group, enter or select a value for each field for which you want to display data. For example, entering or selecting a range in the Employee ID field restricts the data shown in the scrolling window to a corresponding range of employee IDs.
3. To make changes to the Analytical Accounting information for the selected transaction, choose the Analytical Accounting button in the scrolling window. The Analytical Payroll Transactions Entry window opens. For information on this window, see Entering Analytical Accounting information for Payroll transactions on page 119.
4. To make changes to the account number for the selected transaction, choose the Account Number lookup button in the scrolling window.
5. Choose Redisplay to update the window with any changes.
6. Choose Clear to remove your entries and continue working in the window, or choose OK to save your changes and close the window.
Processing an advance pay run
Use the Build Payroll Checks window to process an advance pay run.
To process an advance pay run:1. Open the Build Payroll Checks window.
(HR & Payroll >> Transactions >> Payroll >> Build Checks)
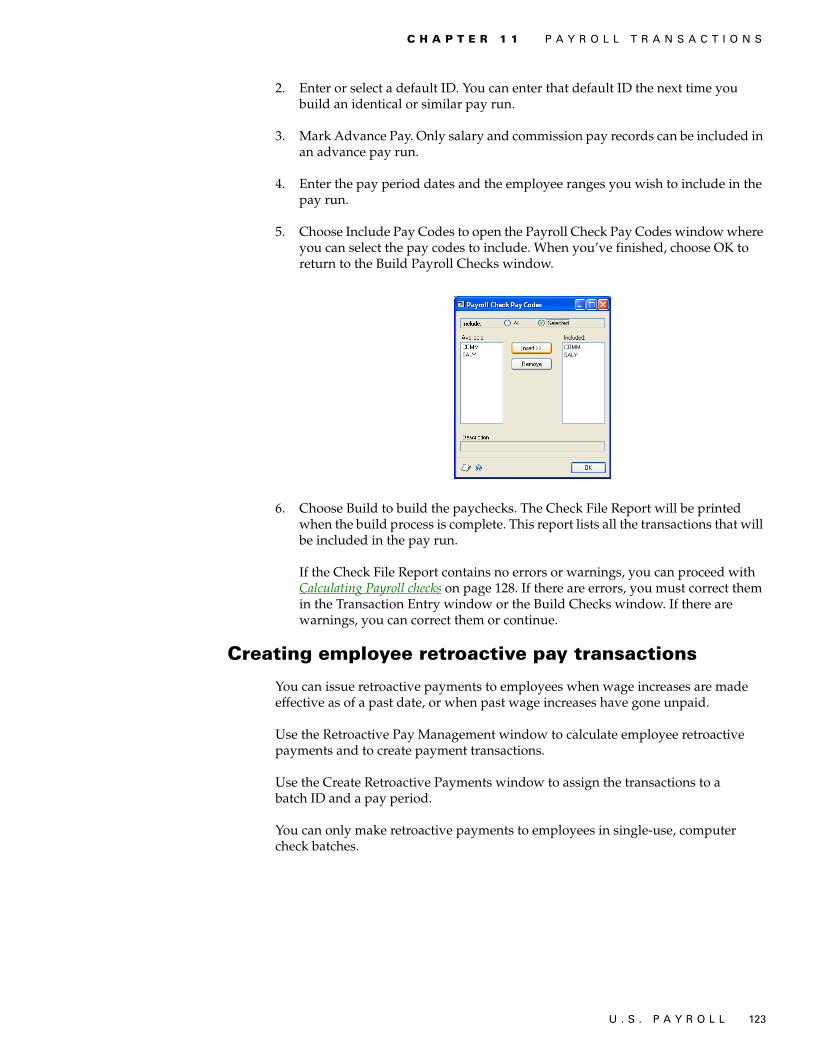
U . S . P A Y R O L L 123
C H A P T E R 1 1 P A Y R O L L T R A N S A C T I O N S
2. Enter or select a default ID. You can enter that default ID the next time you build an identical or similar pay run.
3. Mark Advance Pay. Only salary and commission pay records can be included in an advance pay run.
4. Enter the pay period dates and the employee ranges you wish to include in the pay run.
5. Choose Include Pay Codes to open the Payroll Check Pay Codes window where you can select the pay codes to include. When you’ve finished, choose OK to return to the Build Payroll Checks window.
6. Choose Build to build the paychecks. The Check File Report will be printed when the build process is complete. This report lists all the transactions that will be included in the pay run.
If the Check File Report contains no errors or warnings, you can proceed with Calculating Payroll checks on page 128. If there are errors, you must correct them in the Transaction Entry window or the Build Checks window. If there are warnings, you can correct them or continue.
Creating employee retroactive pay transactions
You can issue retroactive payments to employees when wage increases are made effective as of a past date, or when past wage increases have gone unpaid.
Use the Retroactive Pay Management window to calculate employee retroactive payments and to create payment transactions.
Use the Create Retroactive Payments window to assign the transactions to a batch ID and a pay period.
You can only make retroactive payments to employees in single-use, computer check batches.

P A R T 3 T R A N S A C T I O N S
124 U . S . P A Y R O L L
To create employee retroactive pay transactions:1. Open the Retroactive Pay Management window.
(HR & Payroll >> Utilities >> Payroll >> Retroactive Payment Management)
2. Enter the start and end date for the retroactive period. The start and end dates must be on or before the user date.
3. Enter ranges, or select All, for Class ID, Employee ID, Department, and Position.
4. Select the adjustment method, and enter an amount or a percentage.
5. Select a default code to pay, if any.
6. Choose Insert For Retro to add records to the scrolling window.
The scrolling window displays one record for each unique combination of employee, department, position, pay, and pay rate codes. Consequently, you may see more than one retroactive pay record per employee.
Retroactive pay does not apply to these pay types: Business Expense, Charged Tips, Reported Tips, EIC, Minimum Wage Balance, and Pension. Pay codes of these pay types do not generate Retroactive Pay records.
7. Unmark the check box for any record you do not want to include when you create retroactive pay transactions. To unmark all check boxes, choose Unmark All.
If needed, adjust values for individual records in the following fields:
• Amount/Percent (select the current value, or choose the arrow and select the currently unused adjustment type, $ or % , and enter a new value)
• Code to Pay (selected pay code must be of the pay type Other)
• Reduce Days By (enter a number less than or equal to Total Hours divided by eight)

U . S . P A Y R O L L 125
C H A P T E R 1 1 P A Y R O L L T R A N S A C T I O N S
• Reduce Hours By (enter a number less than or equal to Total Hours)
8. To print the Proposed Retroactive Payments report, choose Print, select one or more report destinations, and choose OK.
9. Choose Create Retro to open the Create Retroactive Payments window.
10. Enter or select a batch ID for a single-use, computer check batch.
11. Enter or select start and end dates to identify a pay period for issuing the retroactive payments.
12. Choose Finish to create the retroactive pay transactions.
13. Select one or more report destinations for the Transaction Edit List. Use this list to verify your entries.
If you’ve identified errors in transactions on the edit list, refer to Correcting Payroll computer check transactions on page 116 for more information.
Building Payroll checks
Before processing computer checks, you must first build Payroll checks. During the check building process, the Payroll system will search for all the transactions and employee cards that you’ve selected to include in the pay run. It also will verify posting accounts and other information.
Use the Build Payroll Checks window to indicate which employees, pay codes, deductions, and benefits to include in the pay run. This process is known as building Payroll checks and must be done before processing a pay run.
After the checks have been built, the Check File Report will be printed. This report lists the wages, tax codes, deduction, and benefit codes that will affect each employee’s paycheck. It also lists any errors or warnings in the build.
• Errors are problems with individual transactions that must be corrected before you can calculate the paychecks.
• Warnings don’t prevent you from calculating checks. You’ll need to decide whether you should correct the situations causing the warning.

P A R T 3 T R A N S A C T I O N S
126 U . S . P A Y R O L L
If you decide to ignore the warning, the transaction for which the warning appeared will be either totally or partially ignored, in some cases. For example, if a transaction was subject to local tax, but no local tax code was specified, the transaction would be paid but no local tax would be withheld.
You’ll need to remove a build when there are errors that require changes to transactions included in the build.
To remove a build before posting it, choose Remove in the Build Payroll Checks window. Any batches that you marked will be unmarked automatically. Since a batch can’t be edited while it’s marked, and a batch can’t be unmarked if it’s included in a build, you must remove the build before editing transactions included in the build. However, when you’ve finished editing the transaction, you can mark the batch and build the paychecks again.
You can build checks again before they’re calculated. Before you build checks, you can change any of the fields in the Build Payroll Checks window. For example, if you forgot to include salary pay in the original build, you can mark the Salary box and then choose Rebuild. A build is removed automatically after the paychecks are calculated, printed, and posted.
To build Payroll checks:1. Open the Build Payroll Checks window.
(HR & Payroll >> Transactions >> Payroll >> Build Checks)
2. Enter or select a default ID. You can enter that default ID the next time you build an identical or similar pay run.
The default ID does not select batches. After entering a default ID, you still must select the batches to process in the Payroll Check Batches window.
3. Mark the type of pay run to create; regular pay or advance pay. For more information, refer to Processing an advance pay run on page 122.
4. Enter the pay period dates and the employee ranges you wish to include in the pay run.
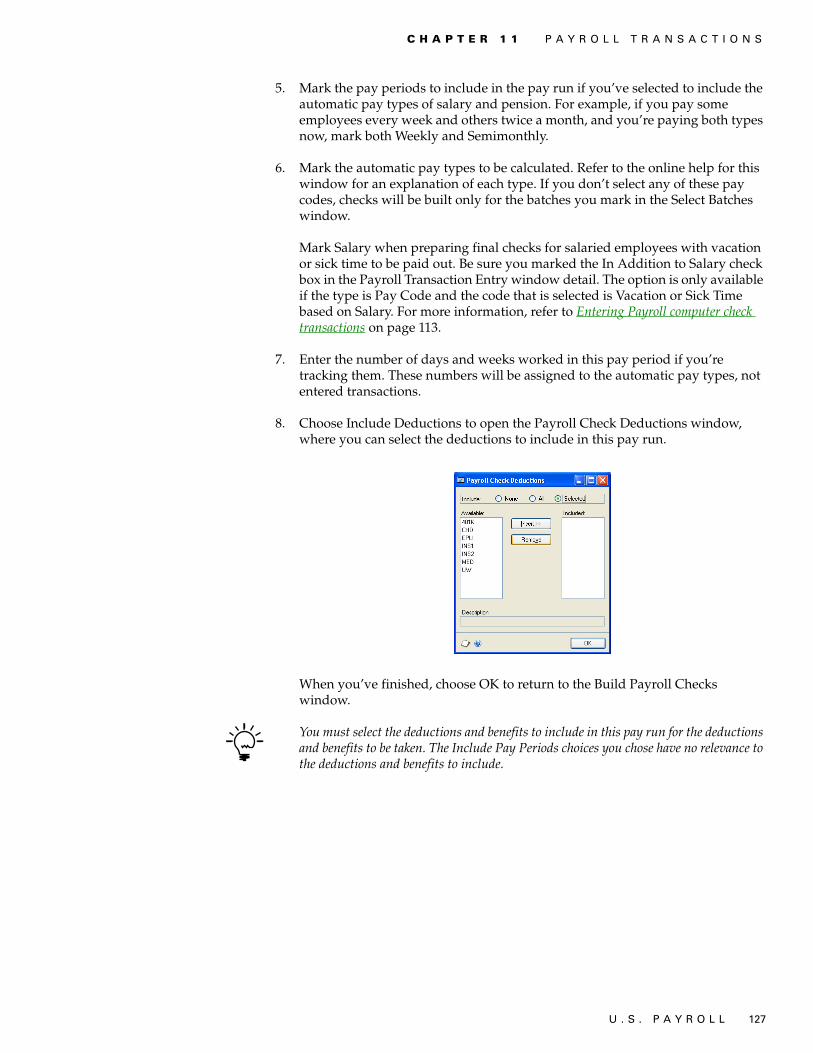
U . S . P A Y R O L L 127
C H A P T E R 1 1 P A Y R O L L T R A N S A C T I O N S
5. Mark the pay periods to include in the pay run if you’ve selected to include the automatic pay types of salary and pension. For example, if you pay some employees every week and others twice a month, and you’re paying both types now, mark both Weekly and Semimonthly.
6. Mark the automatic pay types to be calculated. Refer to the online help for this window for an explanation of each type. If you don’t select any of these pay codes, checks will be built only for the batches you mark in the Select Batches window.
Mark Salary when preparing final checks for salaried employees with vacation or sick time to be paid out. Be sure you marked the In Addition to Salary check box in the Payroll Transaction Entry window detail. The option is only available if the type is Pay Code and the code that is selected is Vacation or Sick Time based on Salary. For more information, refer to Entering Payroll computer check transactions on page 113.
7. Enter the number of days and weeks worked in this pay period if you’re tracking them. These numbers will be assigned to the automatic pay types, not entered transactions.
8. Choose Include Deductions to open the Payroll Check Deductions window, where you can select the deductions to include in this pay run.
When you’ve finished, choose OK to return to the Build Payroll Checks window.
You must select the deductions and benefits to include in this pay run for the deductions and benefits to be taken. The Include Pay Periods choices you chose have no relevance to the deductions and benefits to include.
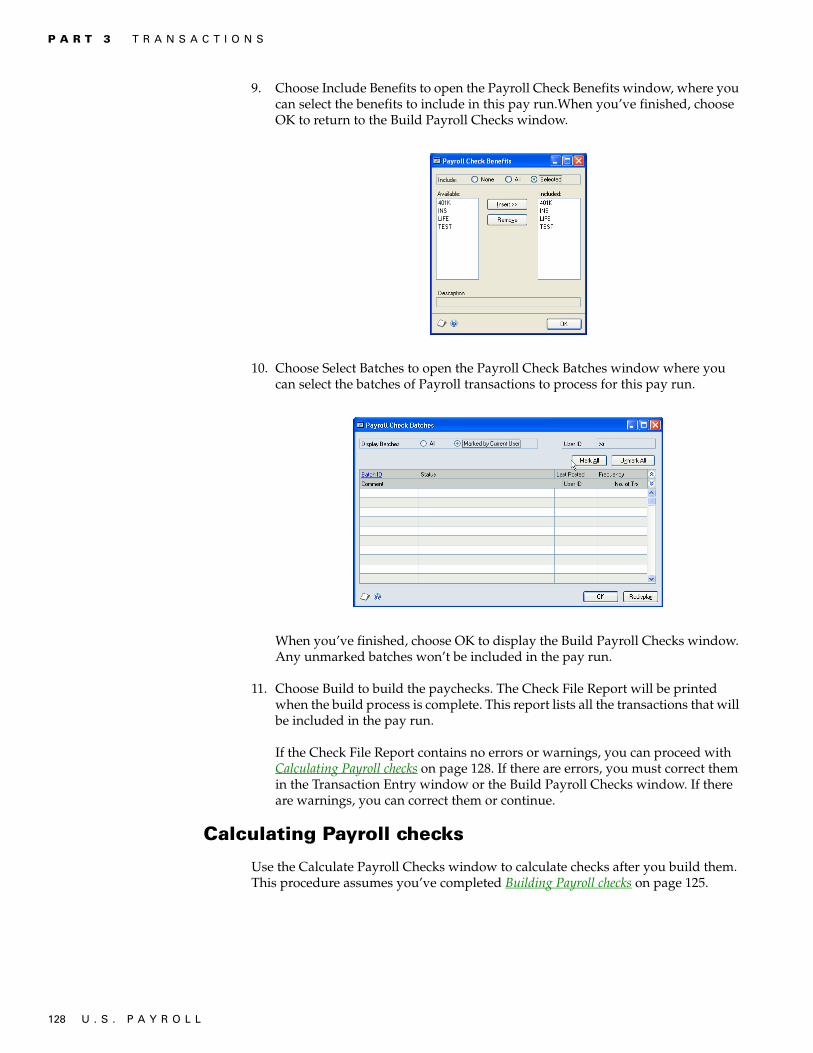
P A R T 3 T R A N S A C T I O N S
128 U . S . P A Y R O L L
9. Choose Include Benefits to open the Payroll Check Benefits window, where you can select the benefits to include in this pay run.When you’ve finished, choose OK to return to the Build Payroll Checks window.
10. Choose Select Batches to open the Payroll Check Batches window where you can select the batches of Payroll transactions to process for this pay run.
When you’ve finished, choose OK to display the Build Payroll Checks window. Any unmarked batches won’t be included in the pay run.
11. Choose Build to build the paychecks. The Check File Report will be printed when the build process is complete. This report lists all the transactions that will be included in the pay run.
If the Check File Report contains no errors or warnings, you can proceed with Calculating Payroll checks on page 128. If there are errors, you must correct them in the Transaction Entry window or the Build Payroll Checks window. If there are warnings, you can correct them or continue.
Calculating Payroll checks
Use the Calculate Payroll Checks window to calculate checks after you build them. This procedure assumes you’ve completed Building Payroll checks on page 125.

U . S . P A Y R O L L 129
C H A P T E R 1 1 P A Y R O L L T R A N S A C T I O N S
To calculate Payroll checks:1. Open the Calculate Payroll Checks window.
(HR & Payroll >> Transactions >> Payroll >> Calculate Checks)
2. Choose OK to begin calculating the checks.
When an employee’s wage calculations have conflicts in both deduction sequence and earnings codes, or have conflicts in TSA calculations, Payroll excludes the employee’s pay check from processing.
Payroll also displays a message and prints error information in the Calculate Exceptions report before printing the Calculate Checks report. Employees included in the Calculate Exceptions report are not included in the Calculate Checks report.
Payroll generates an exception batch for any manual transactions included in the Calculate Exceptions report. Payroll creates this batch during the Print Checks routine and gives it the prefix PREXP.
For information on correcting calculation conflicts, see Correcting Payroll computer check transactions on page 116.
Payroll prints the Calculated Checks report when the checks have been calculated. Verify the information and dollar amounts to be printed on the employees’ paychecks. Continue the payroll process with Printing and posting checks on page 129.
Printing and posting checks
Use the Print Payroll Checks window to print computer paychecks after the Calculate Checks Report has been printed with no errors. You also can use this window to print an alignment form to ensure the checks will be aligned correctly. If you’re using Payroll Direct Deposit, refer to Calculating Payroll Direct Deposit information on page 229, Printing direct deposit earnings statements on page 230, Setting up Payroll Direct Deposit on page 209, and Posting checks using Payroll Direct Deposit on page 231 for more information.
This procedure assumes you’ve completed Calculating Payroll checks on page 128.
If it’s necessary to reprint or void any paychecks that have been printed already, you can do so after the paychecks have been printed. However, paychecks can’t be printed after they’ve been posted.
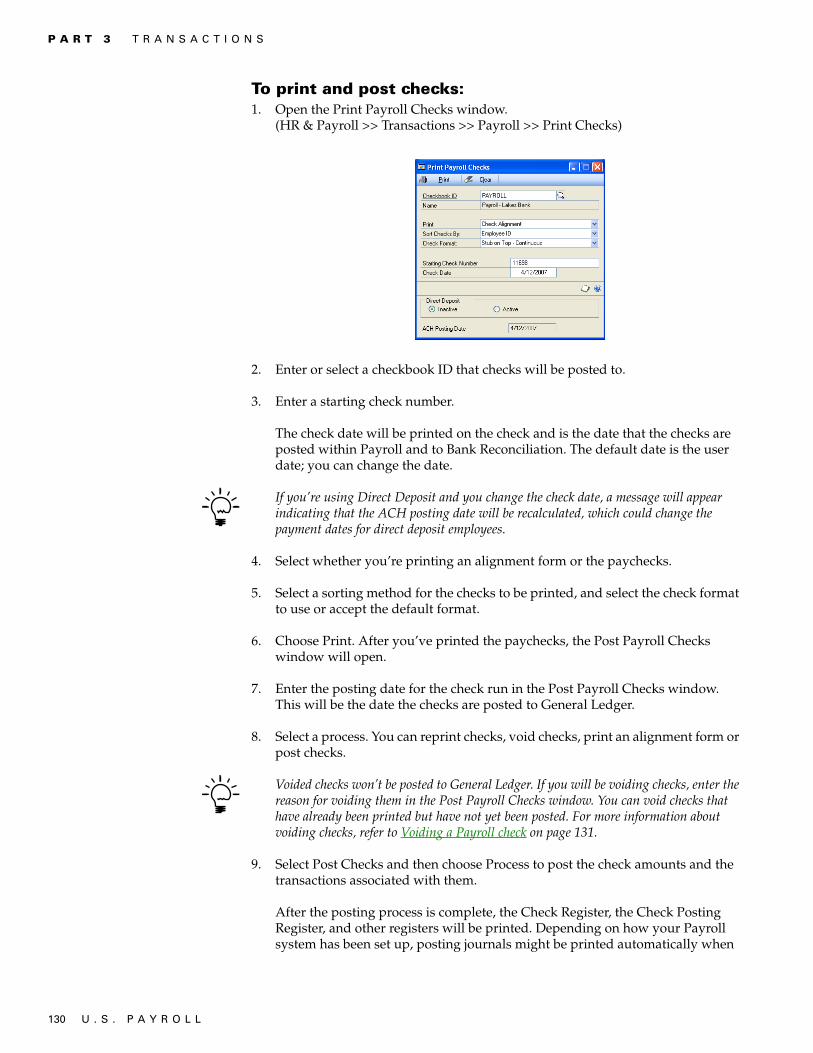
P A R T 3 T R A N S A C T I O N S
130 U . S . P A Y R O L L
To print and post checks:1. Open the Print Payroll Checks window.
(HR & Payroll >> Transactions >> Payroll >> Print Checks)
2. Enter or select a checkbook ID that checks will be posted to.
3. Enter a starting check number.
The check date will be printed on the check and is the date that the checks are posted within Payroll and to Bank Reconciliation. The default date is the user date; you can change the date.
If you’re using Direct Deposit and you change the check date, a message will appear indicating that the ACH posting date will be recalculated, which could change the payment dates for direct deposit employees.
4. Select whether you’re printing an alignment form or the paychecks.
5. Select a sorting method for the checks to be printed, and select the check format to use or accept the default format.
6. Choose Print. After you’ve printed the paychecks, the Post Payroll Checks window will open.
7. Enter the posting date for the check run in the Post Payroll Checks window. This will be the date the checks are posted to General Ledger.
8. Select a process. You can reprint checks, void checks, print an alignment form or post checks.
Voided checks won’t be posted to General Ledger. If you will be voiding checks, enter the reason for voiding them in the Post Payroll Checks window. You can void checks that have already been printed but have not yet been posted. For more information about voiding checks, refer to Voiding a Payroll check on page 131.
9. Select Post Checks and then choose Process to post the check amounts and the transactions associated with them.
After the posting process is complete, the Check Register, the Check Posting Register, and other registers will be printed. Depending on how your Payroll system has been set up, posting journals might be printed automatically when
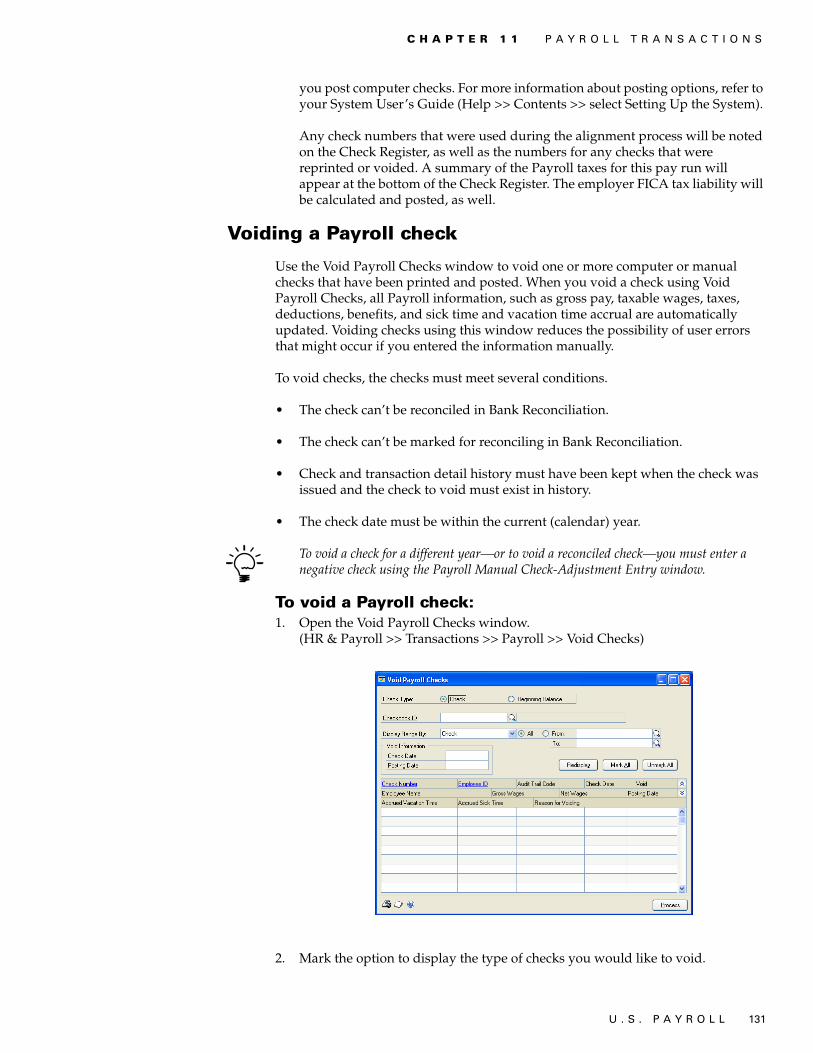
U . S . P A Y R O L L 131
C H A P T E R 1 1 P A Y R O L L T R A N S A C T I O N S
you post computer checks. For more information about posting options, refer to your System User’s Guide (Help >> Contents >> select Setting Up the System).
Any check numbers that were used during the alignment process will be noted on the Check Register, as well as the numbers for any checks that were reprinted or voided. A summary of the Payroll taxes for this pay run will appear at the bottom of the Check Register. The employer FICA tax liability will be calculated and posted, as well.
Voiding a Payroll check
Use the Void Payroll Checks window to void one or more computer or manual checks that have been printed and posted. When you void a check using Void Payroll Checks, all Payroll information, such as gross pay, taxable wages, taxes, deductions, benefits, and sick time and vacation time accrual are automatically updated. Voiding checks using this window reduces the possibility of user errors that might occur if you entered the information manually.
To void checks, the checks must meet several conditions.
• The check can’t be reconciled in Bank Reconciliation.
• The check can’t be marked for reconciling in Bank Reconciliation.
• Check and transaction detail history must have been kept when the check was issued and the check to void must exist in history.
• The check date must be within the current (calendar) year.
To void a check for a different year—or to void a reconciled check—you must enter a negative check using the Payroll Manual Check-Adjustment Entry window.
To void a Payroll check:1. Open the Void Payroll Checks window.
(HR & Payroll >> Transactions >> Payroll >> Void Checks)
2. Mark the option to display the type of checks you would like to void.

P A R T 3 T R A N S A C T I O N S
132 U . S . P A Y R O L L
3. Enter or select information for your check or range of checks. These fields are only available if you selected Check as your check type.
Checkbook ID Enter or select a checkbook ID from which the check or checks to void were issued.
Display Range By Select whether to display all or a range of checks available for voiding, employee IDs or audit trail codes.
4. Enter the check date to appear as the posting date in Payroll for the entries that will be used to reverse the checks. If your Payroll system is integrated with Bank Reconciliation, the check date will be used to update Bank Reconciliation.
5. Enter the posting date. This is the date that will appear as the posting date for the reversing entries to the general ledger accounts that offset the original transaction distributions, and is the posted date that is printed on the Payroll Check Posting Register.
6. Choose Redisplay to display the checks within the selected range that are available for voiding. If you make changes to the selected range, you’ll need to choose Redisplay again to display the checks within the new range.
If you believe a check meets all the criteria necessary to be voided, but doesn’t appear in the scrolling window, another user in the Payroll system might have reconciled the check or marked it for reconciling in Bank Reconciliation, or removed history for the check since you opened the window.
7. Mark each check to void or choose Mark All to void all of them. You can’t void more than one check for the same employee at a time. For each check, enter the reason for voiding the check.
8. Choose File >> Print to print a Void Payroll Checks Edit List. This will show all the checks that are available for voiding, based on the range you entered and the checks that have been marked for voiding—indicated by an X. The edit list also lists the checks that can’t be voided and a message explaining why.
If another user has made changes to checks in the Payroll system since you selected a range to display in the scrolling window, such as marking checks for reconciliation in Bank Reconciliation, the edit list will display messages for any checks that are no longer available for voiding.
9. Make a backup of your company Payroll data files. For more information, refer to your System User’s Guide (Help >> Contents >> select System Administration).
10. Choose Process to void the selected checks.
If you’re keeping check and transaction history, information for the original check and the voided check will be printed on history reports. The voided check amounts will be negative. The voided checks also will be indicated by an asterisk on the Check History Report.

U . S . P A Y R O L L 133
C H A P T E R 1 1 P A Y R O L L T R A N S A C T I O N S
Depending on how your Payroll system has been set up, several reports might be printed when you choose Process—including the Check Posting Register and Check Register. The Check Posting Register is similar to the Void Payroll Checks Edit List and shows the details for each transaction that has been posted.
Reprinting paystubs and earnings statements
Use the Payroll Check Inquiry window to reprint paystubs and direct deposit earnings statements in a format that closely resembles the original documents.
To reprint paystubs and earnings statements:1. Open the Payroll Check Inquiry window.
(HR & Payroll >> Inquiry >> Payroll >> Check History)
2. Enter or select an employee ID.
3. Select a range of check numbers, check dates or audit trail codes.
4. Choose Redisplay to display the checks within the selected range that are available for viewing.
5. Mark the check box next to a paycheck transaction to include it when reprinting paystubs and direct deposit earnings statements. If specific transactions aren’t marked, all records listed in the scrolling window will be included.
6. Choose Recreate Paystub to print the selected documents.
How Payroll calculates the minimum wage balance
If you have employees whose income is derived primarily from tips or piecework, but who are also guaranteed a minimum hourly wage, you can use Payroll to automatically calculate that minimum wage and generate a Payroll transaction to make up the difference, if any.
Payroll calculates the amount for the pay rate entered for the minimum wage balance pay code in the Pay Code Setup window times the hours entered for a pay period. Then the same calculation is done using the minimum wage balance pay

P A R T 3 T R A N S A C T I O N S
134 U . S . P A Y R O L L
rate entered in the Employee Maintenance window. Any other income—including Charged Tips and Reported Tips but excluding EIC—is added to the amount from the Employee Maintenance window calculation, and the two totals are compared. An employee must earn at least the amount from the minimum wage balance pay code calculation. If the amount is less than the minimum wage balance pay code amount, an automatic transaction is generated for the difference.
To ensure the correct minimum wage balance record is used, you should only have one active minimum wage record active for each employee at a time.
Using the previous example, suppose the employee worked 40 hours in a given pay period. The minimum wage balance calculation would be:
In a different pay period, the employee worked only 10 hours during a period when business was very light. The minimum wage balance calculation would be:
Amount From
$85.20 Calculated from the Payroll Transaction Entry window(40 hours multiplied by $2.13)
$150.00 Reported tips
$200.00 Charged tips
$435.20 Total compensation before minimum wage balance is taken into consideration
$206.00 Calculated from minimum wage balance pay code(40 hours multiplied by $5.15)
None Amount of automatic transaction for minimum wage balance
$435.20 Gross wages for pay period
Amount From
$21.30 Calculated from Employee Maintenance card(10 hours multiplied by $2.13)
$10.00 Reported tips
$0.00 Charged tips
$31.30 Total compensation before minimum wage balance is taken into consideration
$51.50 Calculated from minimum wage balance pay code(10 hours multiplied by $5.15)
$20.20 Amount of automatic transaction for minimum wage balance
$51.50 Gross wages for pay period

U . S . P A Y R O L L 135
C H A P T E R 1 1 P A Y R O L L T R A N S A C T I O N S
The following windows illustrate transactions for the first minimum wage balance example. The first transaction is the normal hourly pay code for the employee.
The second transaction reflects charged tips for the employee for the same period.
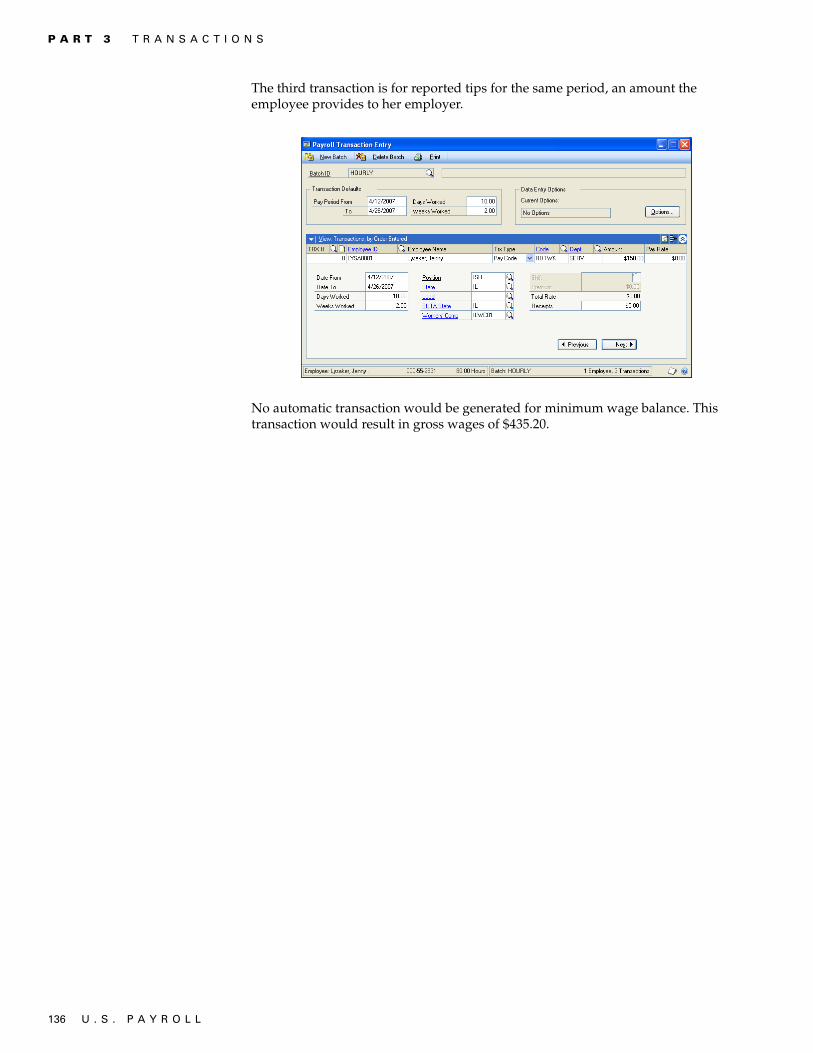
P A R T 3 T R A N S A C T I O N S
136 U . S . P A Y R O L L
The third transaction is for reported tips for the same period, an amount the employee provides to her employer.
No automatic transaction would be generated for minimum wage balance. This transaction would result in gross wages of $435.20.

U . S . P A Y R O L L 137
Chapter 12: Editable pay ratesThe following examples show typical uses for the Editable Pay Rate feature and explain how common pay situations are treated when you use this feature.
This part of the documentation contains the following sections:
• Hospitality industry example• Manufacturing industry example• Contract services industry example
Hospitality industry example
Sam works as server or host in a restaurant, depending on scheduling and other commitments. If Sam works as a server, the pay rate is $2.13 per hour (the minimum wage for servers). If Sam works as a host, the pay rate is $9.50 per hour. In a typical week, daily pay transactions for Sam might include:
• 5 hours at $2.13 per hour on Monday• 3 hours at $9.50 per hour on Tuesday• 5 hours at $2.13 per hour on Wednesday• 3 hours at $9.50 per hour on Thursday• 5 hours at $2.13 per hour on Friday• 8 hours at $2.13 per hour on Saturday
Since Sam is paid hourly, all of these transactions might use the pay code HOUR and the hourly pay type, but you could edit the pay rate to reflect the rate for the job Sam performed.
When these transactions are posted and the Check File Report printed, Sam’s pay would show two different pay categories:
• 23 hours at $2.13 per hour• 6 hours at $9.50 per hour
The gross pay amount would equal $105.99.
Manufacturing industry example
Erin normally works as an assembler in a manufacturing plant at a pay rate of $16.50 per hour. Erin sometimes also works as a machinist, with a pay rate of $18.10 per hour, depending on work load at the plant.
In this two-week pay period, Erin worked at both jobs, so pay transactions for Erin include the following:
• 24 hours as a machinist at $18.10 per hour• 16 hours as an assembler at $16.50 per hour• 28 hours as a machinist at $18.10 per hour• 16 hours as an assembler at $16.50 per hour

P A R T 3 T R A N S A C T I O N S
138 U . S . P A Y R O L L
Because Erin is paid hourly, all of these transactions might use the pay code HOUR and the hourly pay type. If you did not edit the pay rate for those hours worked as a machinist, Erin would be paid the normal pay rate of $16.50 per hour for all hours worked in this period. In addition, pay for this period would be paid based on the rate of $16.50 per hour, as well, even though Erin’s overtime work was as a machinist.
If the pay rates for the transactions as a machinist are edited, the resulting pay still depends on whether Automatic Overtime is marked in the Payroll Setup window.
With Automatic Overtime option If Automatic Overtime is marked in the Payroll Setup window, automatic overtime is based on the total units for a specific pay code; in this case, HOUR. An automatic overtime transaction is created, using the weighted average multiplied by the pay factor for the overtime pay rate specified in the Employee Pay Code Maintenance window.
This might not reflect the correct—or expected—overtime rate.
Overtime and double time pay codes are based on existing pay codes that are multiplied by the overtime or double time pay factor. Overtime and double time do not have their own pay rates.
Without Automatic Overtime option If Automatic Overtime is not marked in the Payroll Setup window, you must create an overtime transaction, using whichever rate you choose. If Erin worked the overtime while performing the job paid at $18.10 per hour, you could pay an overtime rate based on 1.5 times $18.10, or $27.15 per hour.
You would then enter the following transactions for Erin:
• 24 hours at $18.10 per hour• 16 hours at $16.50 per hour• 24 hours at $18.10 per hour• 16 hours at $16.50 per hour• 4 hours at $27.15 per hour
Contract services industry example
In a typical contract services environment, there might be many employees who are all classed as hourly workers. You could use a single pay code, HOUR, with an hourly pay type for all employees, but edit the rate depending on the job being performed. By editing the pay rate, you can avoid setting up an hourly pay type for each job or pay rate you need.

PA
RT
4: IN
QU
IRIE
S A
ND
RE
PO
RT
S

140 U . S . P A Y R O L L
Part 4: Inquiries and reportsThis part of the documentation describes how to view employee and pay activity information and how to print Payroll reports.
The following information is discussed:
• Chapter 13, “Employee inquiries,” describes how to quickly view both current and historical employee information and review information in summary or detailed form.
• Chapter 14, “Payroll card inquiries,” describes how to view important information about employee pay activity.
• Chapter 15, “Payroll reports,” explains how to use Payroll reports as employee records, to track transactions and simplify audits, and to view Payroll expenses.

U . S . P A Y R O L L 141
Chapter 13: Employee inquiriesAnalyzing your employee activity is an important part of your accounting system. You can view information using the inquiry windows. These windows provide easy access to detailed and summarized Payroll information and you can quickly view both current and historical employee information. In some of the windows, you can review information in summary or detailed form, and have the option to print the information in the window.
This information is contained in the following sections:
• Viewing Payroll check history• Viewing Payroll transactions• Viewing Payroll check distributions in Payroll• Viewing an employee’s personal information• Viewing employee Payroll codes• Viewing paycheck summary information by codes• Viewing paycheck breakdown information• Viewing historical paycheck information by codes• Viewing historical pay code information• Viewing the company payroll summary
Viewing Payroll check history
Use the Payroll Check Inquiry window to view Payroll check history information for an employee. You can view all the checks for one employee, or view a range of checks for one employee.
This window displays the audit trail code, check number, payment number, gross wages, federal and all FICA taxes on regular and tips wages, total deductions and total benefits withholding, net wages and uncollected FICA taxes on tips wages for each check. It also includes information about any voided checks.
To view Payroll check history:1. Open the Payroll Check Inquiry window.
(HR & Payroll >> Inquiry >> Payroll >> Check History)
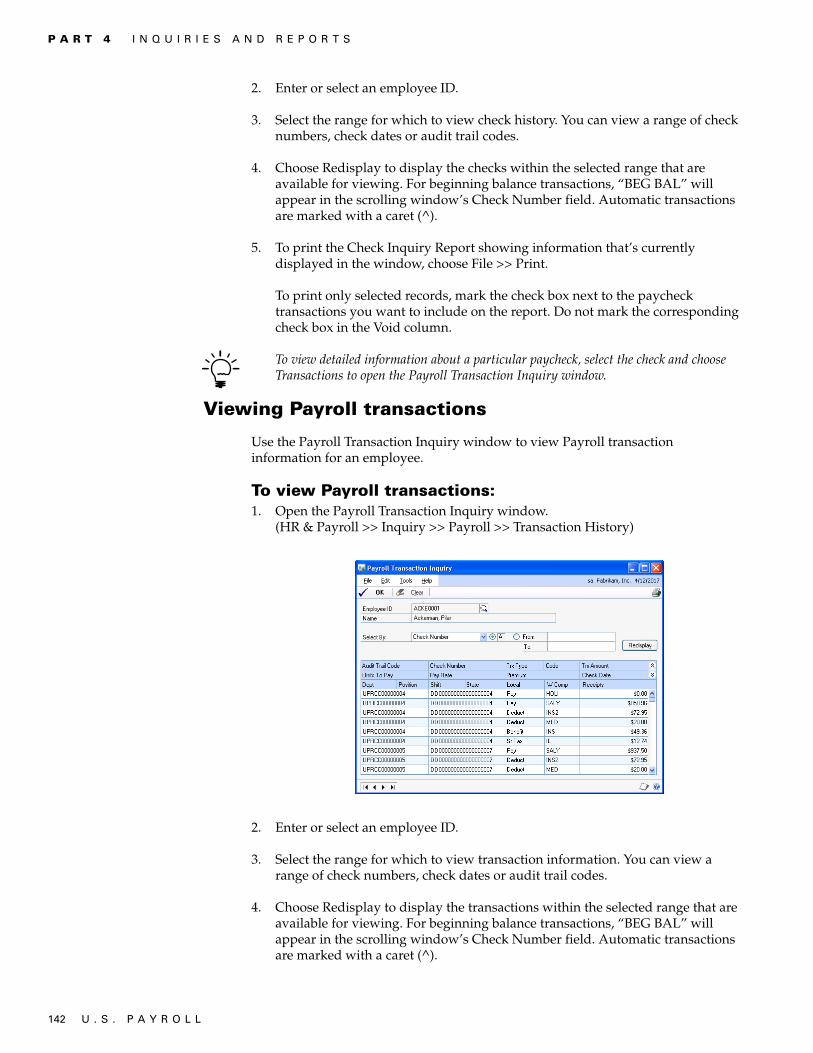
P A R T 4 I N Q U I R I E S A N D R E P O R T S
142 U . S . P A Y R O L L
2. Enter or select an employee ID.
3. Select the range for which to view check history. You can view a range of check numbers, check dates or audit trail codes.
4. Choose Redisplay to display the checks within the selected range that are available for viewing. For beginning balance transactions, “BEG BAL” will appear in the scrolling window’s Check Number field. Automatic transactions are marked with a caret (^).
5. To print the Check Inquiry Report showing information that’s currently displayed in the window, choose File >> Print.
To print only selected records, mark the check box next to the paycheck transactions you want to include on the report. Do not mark the corresponding check box in the Void column.
To view detailed information about a particular paycheck, select the check and choose Transactions to open the Payroll Transaction Inquiry window.
Viewing Payroll transactions
Use the Payroll Transaction Inquiry window to view Payroll transaction information for an employee.
To view Payroll transactions:1. Open the Payroll Transaction Inquiry window.
(HR & Payroll >> Inquiry >> Payroll >> Transaction History)
2. Enter or select an employee ID.
3. Select the range for which to view transaction information. You can view a range of check numbers, check dates or audit trail codes.
4. Choose Redisplay to display the transactions within the selected range that are available for viewing. For beginning balance transactions, “BEG BAL” will appear in the scrolling window’s Check Number field. Automatic transactions are marked with a caret (^).

U . S . P A Y R O L L 143
C H A P T E R 1 3 E M P L O Y E E I N Q U I R I E S
Viewing Payroll check distributions in Payroll
Use the Payroll Check Distribution Inquiry window to view Payroll distribution information for an employee.
To view Payroll check distributions in Payroll:1. Open the Payroll Transaction Inquiry window.
(HR & Payroll >> Inquiry >> Payroll >> Transaction History)
2. Enter or select an employee ID.
3. To open the Payroll Check Distribution Inquiry window, choose the Distributions button.
4. To open the Analytical Payroll Transaction Entry window, where you can view, edit, and enter Analytical Accounting information for this transaction, choose the Analytical Accounting button.
Viewing an employee’s personal information
Use the Employee Inquiry window to view information you’ve entered for a particular employee in the Employee Maintenance window. This window also displays the employee’s gender, ethnic origin, federal tax withholding information, user-defined field entries, and transaction entry default information.
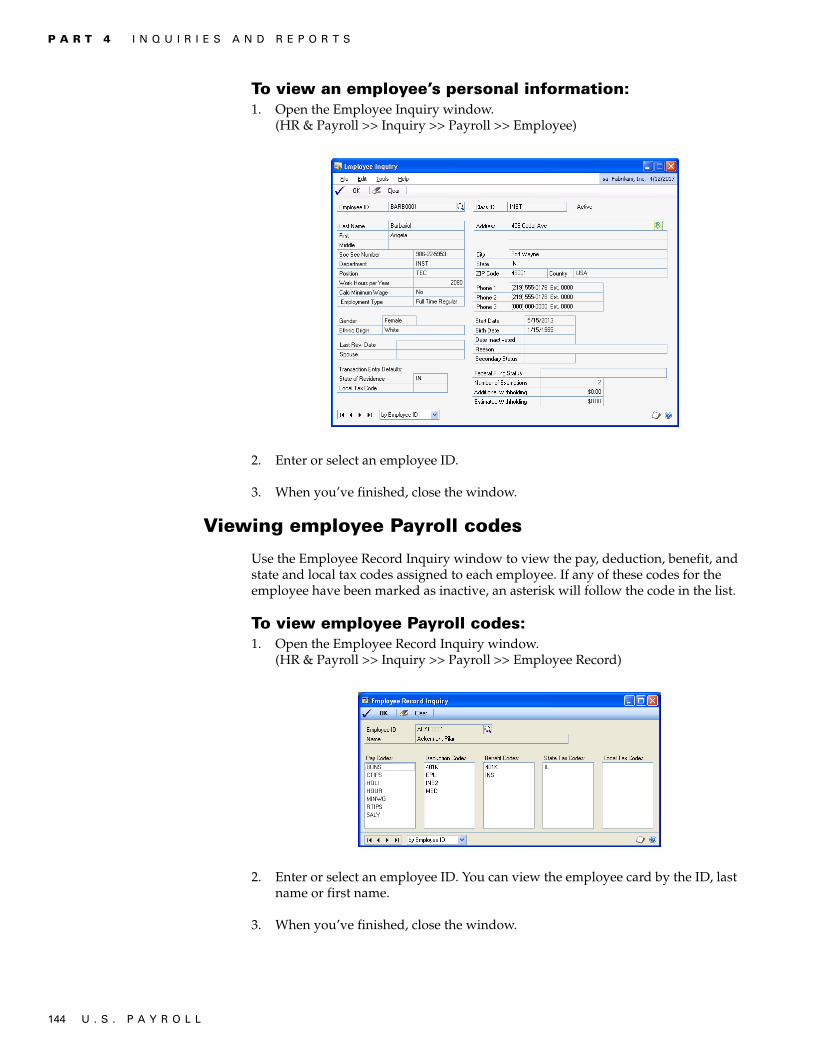
P A R T 4 I N Q U I R I E S A N D R E P O R T S
144 U . S . P A Y R O L L
To view an employee’s personal information:1. Open the Employee Inquiry window.
(HR & Payroll >> Inquiry >> Payroll >> Employee)
2. Enter or select an employee ID.
3. When you’ve finished, close the window.
Viewing employee Payroll codes
Use the Employee Record Inquiry window to view the pay, deduction, benefit, and state and local tax codes assigned to each employee. If any of these codes for the employee have been marked as inactive, an asterisk will follow the code in the list.
To view employee Payroll codes:1. Open the Employee Record Inquiry window.
(HR & Payroll >> Inquiry >> Payroll >> Employee Record)
2. Enter or select an employee ID. You can view the employee card by the ID, last name or first name.
3. When you’ve finished, close the window.
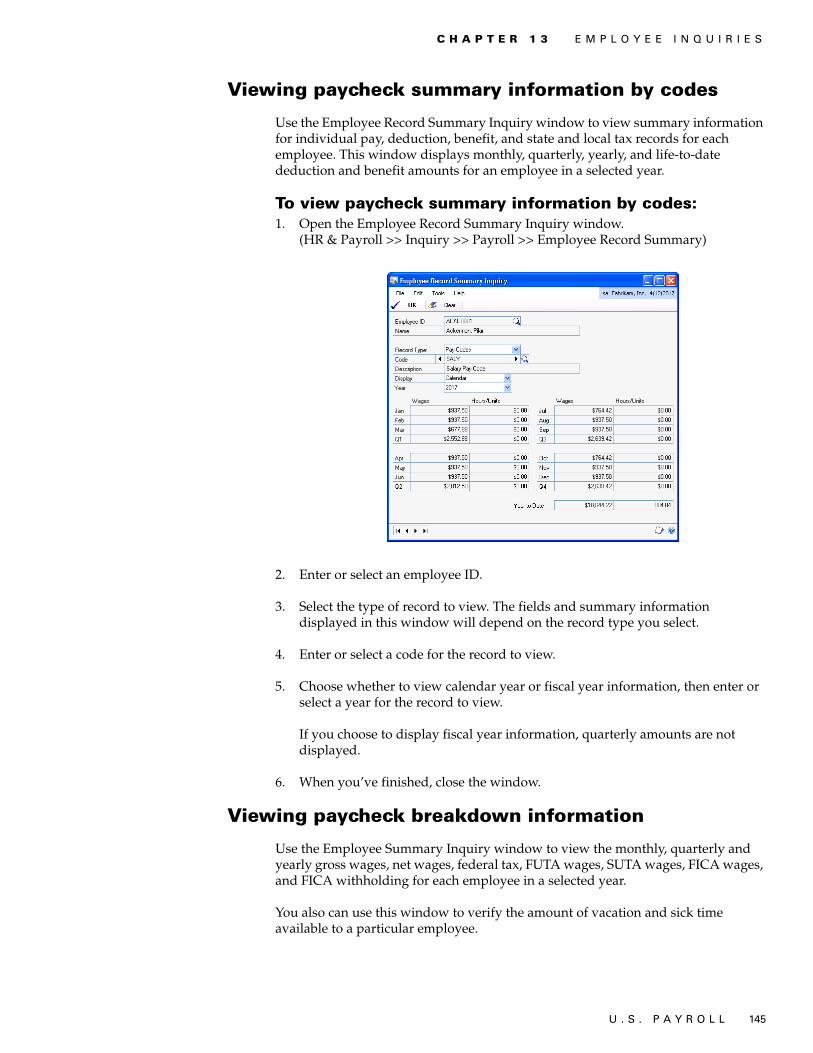
U . S . P A Y R O L L 145
C H A P T E R 1 3 E M P L O Y E E I N Q U I R I E S
Viewing paycheck summary information by codes
Use the Employee Record Summary Inquiry window to view summary information for individual pay, deduction, benefit, and state and local tax records for each employee. This window displays monthly, quarterly, yearly, and life-to-date deduction and benefit amounts for an employee in a selected year.
To view paycheck summary information by codes:1. Open the Employee Record Summary Inquiry window.
(HR & Payroll >> Inquiry >> Payroll >> Employee Record Summary)
2. Enter or select an employee ID.
3. Select the type of record to view. The fields and summary information displayed in this window will depend on the record type you select.
4. Enter or select a code for the record to view.
5. Choose whether to view calendar year or fiscal year information, then enter or select a year for the record to view.
If you choose to display fiscal year information, quarterly amounts are not displayed.
6. When you’ve finished, close the window.
Viewing paycheck breakdown information
Use the Employee Summary Inquiry window to view the monthly, quarterly and yearly gross wages, net wages, federal tax, FUTA wages, SUTA wages, FICA wages, and FICA withholding for each employee in a selected year.
You also can use this window to verify the amount of vacation and sick time available to a particular employee.

P A R T 4 I N Q U I R I E S A N D R E P O R T S
146 U . S . P A Y R O L L
To view employee state tax summaries, use the Employee State Tax Maintenance Window (HR & Payroll >> Cards >> Payroll >> State Tax) and choose the Summary button.
To view paycheck breakdown information:1. Open the Employee Summary Inquiry window.
(HR & Payroll >> Inquiry >> Payroll >> Employee Summary)
2. Enter or select an employee ID.
3. Choose whether to view calendar year or fiscal year information, and then select a year and a month, or fiscal period, to view.
If you choose Fiscal Year, only periodic and yearly amounts are displayed.
If Human Resources is selected as the accrue type in the Attendance Setup window, the vacation and sick time hours fields will not be available.
4. Choose Tips to open the Employee Tips Summary Inquiry window, where you can view employee tips by month or fiscal period. For more information, refer to Viewing employee tips wage and tax information on page 151.
5. When you’ve finished, close the window.

U . S . P A Y R O L L 147
C H A P T E R 1 3 E M P L O Y E E I N Q U I R I E S
Viewing historical paycheck information by codes
Use the Employee Pay History Inquiry window to view employee pay history information in a selected year. For example, the window will display the hours, days, and weeks worked for a pay transaction. You also can use this window to view which department, position, and workers’ compensation code was used for a particular transaction.
To view historical paycheck information by codes:1. Open the Employee Pay History Inquiry window.
(HR & Payroll >> Inquiry >> Payroll >> Employee Pay History)
2. Enter or select an employee ID and a pay code.
3. Choose whether to view calendar year or fiscal year information, and then select a year you would like to view historical paycheck information for.
4. When you’ve finished, close the window.
Viewing historical pay code information
Use the Employee Pay Codes History Inquiry window to view employee pay code history information in a selected year. For example, the window will display the amount paid for a pay code and a year-to-date summary of the amount paid for a pay code. You also can use this window to see the hours, days, and weeks worked for a specific pay code.

P A R T 4 I N Q U I R I E S A N D R E P O R T S
148 U . S . P A Y R O L L
To view historical pay code information:1. Open the Employee Pay Codes History Inquiry window.
(HR & Payroll >> Inquiry >> Payroll >> Pay Codes History)
2. Enter or select an employee ID.
3. Choose whether to view calendar year or fiscal year information, and then select a year you would like to view pay code history information for.
4. When you’ve finished, close the window.
Viewing the company payroll summary
Use the Payroll Summary Inquiry window to view company payroll information for a month of the year.
To view the company payroll summary:1. Open the Payroll Summary Inquiry window.
(HR & Payroll >> Inquiry >> Payroll >> Company Payroll Summary)

U . S . P A Y R O L L 149
C H A P T E R 1 3 E M P L O Y E E I N Q U I R I E S
2. Choose whether to view calendar year or fiscal year information, and then select a year and month, or fiscal period, to view.
If you choose to display fiscal year information, quarterly amounts are not displayed.
If Human Resources is selected as the accrue type in the Attendance Setup window, the vacation hours and sick time hours fields will not be available.
3. To view the summary of tips for the selected year and month (or fiscal period), choose Tips to open the Payroll Tips Summary Inquiry window.
4. Choose OK when you’ve finished.

150 U . S . P A Y R O L L

U . S . P A Y R O L L 151
Chapter 14: Payroll card inquiriesAnalyzing your Payroll activity is an important part of your accounting system. You can view important information about employee pay activity using the Employee Summary Inquiry and Payroll Summary Inquiry windows. These windows provide easy access to detailed and summarized Payroll information.
This information is contained in the following sections:
• Viewing employee tips wage and tax information• Viewing Payroll and tips breakdown information• Viewing Payroll audit trail information
Viewing employee tips wage and tax information
Use the Employee Summary Inquiry window and the Employee Tips Summary Inquiry window to view tips summary information for a selected year.
To view employee state tax summaries, use the Employee State Tax Maintenance Window (HR & Payroll >> Cards >> Payroll >> State Tax) and choose the Summary button.
To view employee tips wage and tax information:1. Open the Employee Summary Inquiry window.
(HR & Payroll >> Inquiry >> Payroll >> Employee Summary)
2. Enter or select an employee ID.
3. Choose whether to view calendar year or fiscal year information, then select a year and a month (or fiscal period) to view wage and tax information for.
4. Choose Tips to open the Employee Tips Summary Inquiry window.
5. Choose OK.

P A R T 4 I N Q U I R I E S A N D R E P O R T S
152 U . S . P A Y R O L L
Viewing Payroll and tips breakdown information
Use the Payroll Tips Summary Inquiry window to view monthly (or periodic), quarterly, and yearly tips wage and tax information for the entire company in a selected year.
To view Payroll and tips breakdown information:1. Open the Payroll Summary Inquiry window.
(HR & Payroll >> Inquiry >> Payroll >> Company Payroll Summary)
2. Choose whether to view calendar year or fiscal year information, then select a year and a month (or fiscal period) to view.
3. Choose Tips to open the Payroll Tips Summary Inquiry window.
In addition to tips wage and tax information, all uncollected FICA Social Security and Medicare tax information will be displayed in this window.
4. Choose OK
Viewing Payroll audit trail information
Use the Payroll Audit Trail Inquiry window to view information associated with a specific audit trail code. The window opens only if you zoom from the Transaction Entry Zoom window in General Ledger and are maintaining summary history.
You must be keeping check history to zoom from General Ledger to Payroll. You also must be posting in summary. The Create a Journal Entry Per Batch option must be marked in the Posting Setup window for whatever type of Payroll transaction you want to track.

U . S . P A Y R O L L 153
C H A P T E R 1 4 P A Y R O L L C A R D I N Q U I R I E S
If you’ve posted a computer check or manual check in detail, the Payroll Check Inquiry window will open when you zoom from the Transaction Entry Zoom window in General Ledger.
For more information about posting in summary and detail, refer to the online help for the Posting Setup window.
You can zoom from General Ledger to Payroll only to view single transactions, not posted month-end or quarter-end information.

154 U . S . P A Y R O L L

U . S . P A Y R O L L 155
Chapter 15: Payroll reportsYou can use Payroll reports to analyze payroll activity and identify errors in transaction entry. Use this information to guide you through printing reports and working with report options and report groups.
For more information about creating and printing reports, using sample reports, and modified reports from the Reports Library, and the various reporting tools that you can use with Microsoft Dynamics GP, refer to your System User’s Guide (Help >> Contents >> select Using The System).
This information is divided into the following sections:
• Payroll report summary• Cross-company reports• Specifying a Payroll report option• Payroll Microsoft SQL Server Reporting Services reports
Payroll report summary
You can print several types of reports using Payroll. Some reports automatically are printed when you complete certain procedures; for example, posting journals can automatically be printed when you post transactions, depending on how your posting options are set up. You can print some reports during procedures; for example, you can print an edit list when entering transactions by choosing Print in the Batch Entry window.
To print some reports, such as analysis or history reports, you must set up report options to specify sorting options and ranges of information to include on the report. For more information, refer to Specifying a Payroll report option on page 159.
The following table lists the report types available in Payroll and the reports in those categories.
Report type Report Printing method
Employee Lists Detailed Employee List†Empl w/o Pay CodesEmployee Address ListList by BenefitList by ClassList by DeductionList by DepartmentList by Local TaxList by LocationList by Pay CodeList by PositionList by State TaxList by SupervisorPersonnel ListVacation/Sick Time List*
Choose File >> Print in the window you use to complete the procedure or create report options in the Employee Lists window.
† Indicates reports that can be assigned to named printers. For more information, refer to your System User’s Guide (Help >> Contents >> select System Administration).
* Indicates reports that are not available when Human Resources is selected as the accrue type in the Attendance Setup window. Refer to the “Attendance setup” chapter in the Human Resources manual.

P A R T 4 I N Q U I R I E S A N D R E P O R T S
156 U . S . P A Y R O L L
Wage and Hour Reports
Department Wage and Hour Report†State Wage Report†FICA Wage Report†Earnings Register†Employee Wage and Hour
Create report options in the Wage and Hour Reports window.
History Reports Transaction HistoryCheck HistoryEmployee Pay HistoryDistribution Breakdown History
Create report options in the Payroll History Reports window.
Audit Trail Reports Employee Mass Update AuditReport
Payroll FUTA Posting JournalPayroll Benefit Posting JournalPayroll Check RegisterPayroll Deduction Posting JournalPosition Posting JournalLocal Tax Posting JournalState Tax Posting RegisterTip Allocation Posting RegisterPay Code Posting JournalShift Code RegisterSUTA Posting JournalVacation/Sick Time Accrual Register*Workers’ Compensation Posting
Journal
Choose File >> Print in the window you use to complete the procedure or some might automatically be printed when you complete the procedure.
Setup Reports Benefit CodesClass CodesDeduction CodesDepartment CodesEarnings CodesFUTA/SUTA RatesGarnishment Maximum CodesLocal Tax CodesLocation CodesPay CodesPosition CodesPosting AccountsShift CodesSupervisor CodesTax IDWorkers’ Comp Codes
Choose File >> Print in the setup windows or create report options in the Payroll Setup Reports window.
Period-end Reports Benefit SummaryDeduction SummaryDepartment Wage SummaryFUTA SummaryLocal Tax SummaryPayroll SummaryPay Code SummaryPosition SummaryState Tax SummarySUTA SummaryWorkers’ Compensation Summary
Choose File >> Print in the window you use to complete the procedure or create report options in the Period-End Payroll Reports window.
Report type Report Printing method
† Indicates reports that can be assigned to named printers. For more information, refer to your System User’s Guide (Help >> Contents >> select System Administration).
* Indicates reports that are not available when Human Resources is selected as the accrue type in the Attendance Setup window. Refer to the “Attendance setup” chapter in the Human Resources manual.

U . S . P A Y R O L L 157
C H A P T E R 1 5 P A Y R O L L R E P O R T S
Quarter-end Reports
941 Preparation Report941 Schedule B Preparation ReportForm 941Form 941 Schedule B
Choose File >> Print in the window you use to complete the procedure or create report options in the Quarter-End Payroll Reports window.
Check-processing Reports
Calculate Checks Report†Calculate ExceptionsCheck File Report†Payables Garnishment DetailPayables Garnishment SummaryPaychecks†
These reports will be printed when you complete the corresponding procedure.
Edit Lists Employee Mass Update Edit ListManual Check Edit ListPayroll Transaction Audit ListPayroll Transaction Edit ListVoid Checks Edit List
Choose File >> Print in the window you use to complete the procedure.
Year-end Reports Year-End Employee Wage ReportForm 941Form 1096†Form 80271099-R Validation1099-R statement†W-2 Validation†W-2 statement†W-3 form†
Choose Print in the window you use to complete the printing procedure.
Utility Reports Reconcile Payroll Error ReportEmployee Reconcile Error ReportProposed Retroactive PaymentsEmployee Summary ReportEmployee Tips Summary ReportEmployee Transaction Summary
ReportFederal Tax Liabilities List
These reports will be printed when you complete the corresponding procedure.
Report type Report Printing method
† Indicates reports that can be assigned to named printers. For more information, refer to your System User’s Guide (Help >> Contents >> select System Administration).
* Indicates reports that are not available when Human Resources is selected as the accrue type in the Attendance Setup window. Refer to the “Attendance setup” chapter in the Human Resources manual.

P A R T 4 I N Q U I R I E S A N D R E P O R T S
158 U . S . P A Y R O L L
Cross-Company reportsRefer to Cross-company reports on page 159 for more information.
Cross-Company Detailed EmployeeList†
Cross-Company Employee AddressList
Cross-Company List by BenefitCross-Company List by ClassCross-Company List by DeductionCross-Company List by DepartmentCross-Company List by PositionCross-Company List by Local TaxCross-Company List by LocationCross-Company List by Pay CodeCross-Company Employee List
without Pay CodesCross-Company List by State TaxCross-Company List by SupervisorCross-Company Personnel ListCross-Company Vacation/Sick TimeList*Cross-Company 941 Preparation
ReportCross-Company Form 941 Schedule B
Preparation ReportCross-Company Form 941Cross-Company Form 941 Schedule BCross-Company Benefit SummaryCross-Company Deduction
SummaryCross-Company Department
SummaryCross-Company FUTA SummaryCross-Company Local Tax SummaryCross-Company Payroll SummaryCross-Company Pay Code SummaryCross-Company Position SummaryCross-Company State Tax SummaryCross-Company SUTA SummaryCross-Company Workers’ Compensation Summary
Choose HR & Payroll >> Reports >> Payroll >> Cross-Company
Report type Report Printing method
† Indicates reports that can be assigned to named printers. For more information, refer to your System User’s Guide (Help >> Contents >> select System Administration).
* Indicates reports that are not available when Human Resources is selected as the accrue type in the Attendance Setup window. Refer to the “Attendance setup” chapter in the Human Resources manual.

U . S . P A Y R O L L 159
C H A P T E R 1 5 P A Y R O L L R E P O R T S
Cross-company reports
You can print reports that contain consolidated information from more than one company in Microsoft Dynamics GP. Cross-company reports allow you to compare information between calendar and fiscal years, including information between companies in different locations.
You can print information for multiple companies in the following reports.
• Employee Lists• Quarter-End reports• Period-End reports
For information about the cross-company reports that you can generate in Microsoft Dynamics GP, choose Help >> Microsoft Dynamics GP Online, where you can view the sample reports.
Specifying a Payroll report option
Report options include specifications for sorting options and range restrictions for a particular report. To print several Payroll reports, you must first create a report option. Each report can have several different options so that you can easily print the information you need. For example, you can create report options for the employee list that show either detailed or summary information.
A single report option can’t be used by multiple reports. You must create identical options for several reports separately.
Use the Payroll report options windows to create sorting, restriction, printing, and email options for the reports that have been included with Payroll.
To specify a Payroll report option:1. Open a reports window. There are separate windows for each report type.
(HR & Payroll >> Reports >> Payroll >> select a reports window)
2. Select a report from the Reports list.
3. Choose New to open the report options window. Your selection in step 2 determines which report options window appears.
For report options window information choose Help >> Index; then enter the name of the specific report options window.

P A R T 4 I N Q U I R I E S A N D R E P O R T S
160 U . S . P A Y R O L L
4. Name the option and enter information to define the option. The name you enter for the option won’t appear on the report. The selections available for defining report options vary, depending on the report type you’ve selected.
5. Enter range restrictions. The Ranges list shows the available options for each report. The available ranges vary, depending on the type of report.
You can enter only one restriction for each restriction type. For instance, you can insert one employee ID range restriction and one date range restriction (01/01/2017 to 06/30/2017).
6. Choose Insert to insert the range in the Restrictions List. To remove an existing range from the list, select the range and choose Remove.
7. Choose Email Options to enter email options for the report option. Once the email options are set up, you’ll be able to send the reports in an email message from this window by choosing Email. You also can send this report in an email from any list view where the report option is displayed.
8. Choose Destination to select a printing destination. Reports can be printed to the screen, to the printer, to a file, or to any combination of these options. If you select Ask Each Time, you can select printing options each time you print this report option.
For more information about printing reports, refer to Chapter 15, “Payroll reports.”
Payroll Microsoft SQL Server Reporting Services reports
You can view Payroll Reporting Services reports from the Reporting Services Reports list. If you are using Reporting Services 2008, payroll metrics for your home page also appear in the Reporting Services Reports list. You can access the Reporting Services Reports list from the navigation pane or from an area page in the Microsoft Dynamics GP application window. This report list appears if you specified the location of your Reporting Services reports using the Reporting Tools Setup window. See your System Setup Guide (Help >> Contents >> select Setting up the System) for more information.
The following Reporting Services reports are available for Payroll.
To print a Payroll Reporting Services report:1. In the navigation pane, choose the HR & Payroll button, and then choose the
Reporting Services Reports list.
2. Mark the Payroll report that you want to print.
3. In the Actions group, choose View to open the Report Viewer.
Check History Check Registry
Department Wage and Hour Report Earnings Summary
Employee Pay History Employee Wage and Hour
Payroll Summary State Wage Report
Vacation Sick Time List Employee List by Pay Code

U . S . P A Y R O L L 161
C H A P T E R 1 5 P A Y R O L L R E P O R T S
4. In the Report Viewer, select the specifications for the report and choose View Report.
5. After viewing the report, select a format and print the report.

162 U . S . P A Y R O L L

PA
RT
5: U
TILIT
IES

164 U . S . P A Y R O L L
Part 5: Utilities This part of the documentation describes how you can help keep your Payroll records current and how to edit tax information.
The following information is discussed:
• Chapter 16, “Company record utilities,” describes how to help keep your Payroll records current.
• Chapter 17, “Removing records,” describes how you can remove Payroll history information that is no longer useful to your company.
• Chapter 18, “Tax utilities,” explains how to edit federal tax liabilities, tax codes, and FICA taxes, if the amounts are incorrect.
• Chapter 19, “Payroll updates,” helps you update your Payroll system’s tax tables and software.

U . S . P A Y R O L L 165
Chapter 16: Company record utilitiesYou can help keep your Payroll records current using company record utilities. The reconciling process checks for discrepancies in employee financial information and checks for differences between detail records and summary records. Comparing the detail and summary amounts can help you verify the accuracy of your entries when you’re setting up Payroll for the first time—or any time you enter or change information in the employee financial fields.
This information is contained in the following sections:
• Reconciling employee records• Situations for using mass updates• Mass update methods• Mass update limitations• Updating a range of information for employees• Calculating net-to-gross wages
Reconciling employee records
Use the Reconcile Employee Information window to compare information shown in the Employee Summary window and the Employee Tips Summary window, if applicable, to the detail information shown in the Employee Pay Code Summary and the Employee Deduction Summary windows for the selected range of employees.
To determine total gross wages for any one employee, for example, add wages for all pay codes for the employee and subtract all tax-sheltered deductions to determine the value for the month in question. Use values from the Employee Pay Code Summary window and the Employee Deduction Summary window.
The Payroll system generates a report that flags all discrepancies for each month; you must determine which value is correct and make manual adjustments, if necessary.
You should reconcile records if a Payroll system problem occurs and you need to verify your Payroll data. The reconcile process also is useful if you discover inconsistencies in reports.
Before reconciling, back up all your company’s accounting data. For more information about making backups, refer to your System User’s Guide (Help >> Contents >> select System Administration).
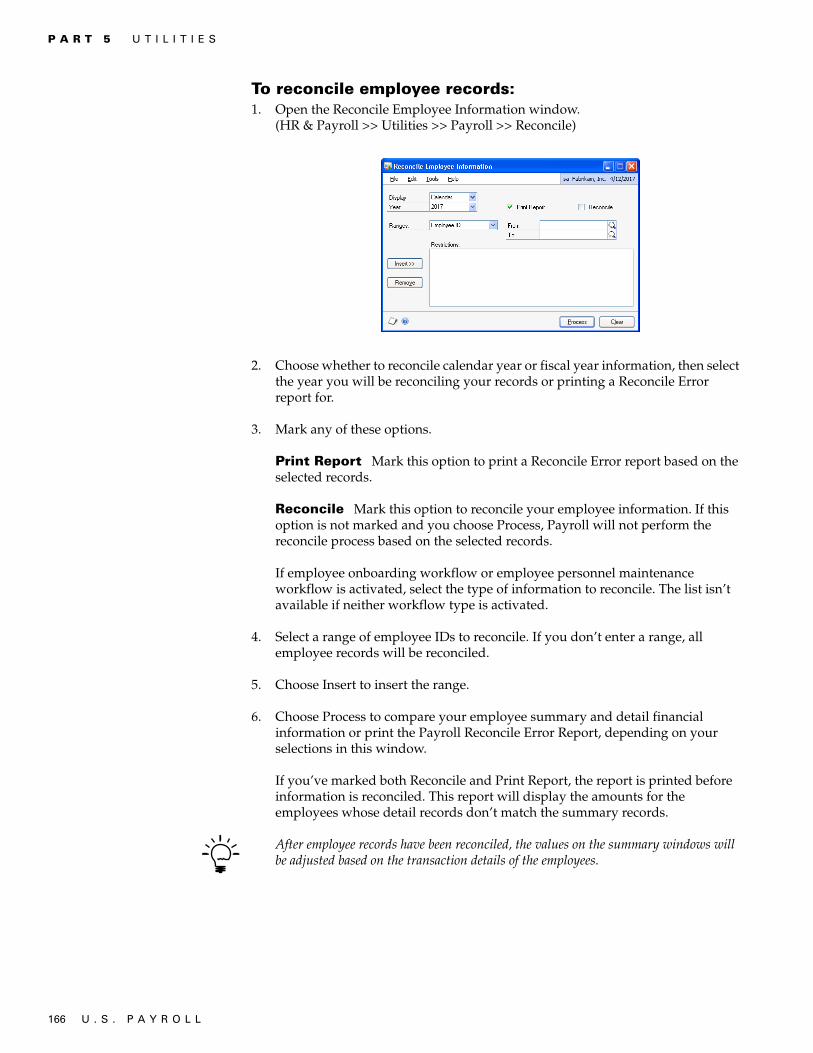
P A R T 5 U T I L I T I E S
166 U . S . P A Y R O L L
To reconcile employee records:1. Open the Reconcile Employee Information window.
(HR & Payroll >> Utilities >> Payroll >> Reconcile)
2. Choose whether to reconcile calendar year or fiscal year information, then select the year you will be reconciling your records or printing a Reconcile Error report for.
3. Mark any of these options.
Print Report Mark this option to print a Reconcile Error report based on the selected records.
Reconcile Mark this option to reconcile your employee information. If this option is not marked and you choose Process, Payroll will not perform the reconcile process based on the selected records.
If employee onboarding workflow or employee personnel maintenance workflow is activated, select the type of information to reconcile. The list isn’t available if neither workflow type is activated.
4. Select a range of employee IDs to reconcile. If you don’t enter a range, all employee records will be reconciled.
5. Choose Insert to insert the range.
6. Choose Process to compare your employee summary and detail financial information or print the Payroll Reconcile Error Report, depending on your selections in this window.
If you’ve marked both Reconcile and Print Report, the report is printed before information is reconciled. This report will display the amounts for the employees whose detail records don’t match the summary records.
After employee records have been reconciled, the values on the summary windows will be adjusted based on the transaction details of the employees.

U . S . P A Y R O L L 167
C H A P T E R 1 6 C O M P A N Y R E C O R D U T I L I T I E S
Situations for using mass updates
Situations might arise when you need to change or adjust information for a range of employees. You can do so by using the Employee Mass Update window.
If you’re using Human Resources, you can’t use the Employee Mass Update window to make changes to benefits, deductions, or sick and vacation amounts if you’re accruing sick time and vacation time using Human Resources.
When you make pay rate changes in the Employee Mass Update window, they do not apply to employee /pay code combinations assigned to pay step tables.
The following are some examples of situations that could be handled with a mass update:
• Your company has decided to give a 5 percent pay increase to all employees. You can select each hourly or salary pay code and increase the pay rate by 5 percent, and also select the option to include all pay codes based on that specific pay code. Doing so will update all hourly or salary pay cards—along with any vacation, sick time, holiday, and overtime pay cards that are based on those pay codes—for the employees.
• Your company has decided to give pay increases to employees in a specific department, to all employees with a specific position or to a specific class of employees.
• Your company has a policy that vacation accrual rates are increased after five years of service. You could update the accrual amount based on the employee start date.
• Your company has a policy that accrued vacation hours can’t exceed 80 hours if vacation isn’t used by a certain date. Using the Employee Mass Update window, you could set vacation available hours that are greater than 80 to 80.
Be sure to make a backup of your Payroll data for each company before updating employee information. For more information about making backups, refer to your System User’s Guide (Help >> Contents >> select System Administration).
Mass update methods
There are four different mass update methods.
Change by Amount Updates employee cards by increasing or decreasing the current amounts by a specific amount.
For example, suppose you have a group of hourly employees who are paid $10 an hour. To increase their wage to $12 an hour, you’d enter $2 in the Amount field and mark Increase.
Change by Percent Updates employee information, such as a pay rate, based on the current pay rate, increasing or decreasing the amounts by a certain percentage.
For example, if your company has decided to give a range of employees a 5 percent pay raise, you’d enter 5.00 and mark Increase.

P A R T 5 U T I L I T I E S
168 U . S . P A Y R O L L
Replace with Amount Updates employee information by replacing an amount with a specific amount.
For example, your company policy may be that the number of vacation hours per year for employees increases from 80 hours to 120 hours after five years of service. In this example, you’d select a range of employees, based on their start date, select Replace with Amount and enter 120 in the Amount field.
Replace with Amount if Greater Than Amount Replaces existing amounts with a specific amount if the existing amount is greater than the amount you enter.
For example, if your company has a policy that employees cannot carry more than 100 hours of vacation from one year to the next, at the end of the year you could set all vacation available hours that are greater than 100 back to 100. By doing so, employees with fewer than 100 hours of vacation will be unaffected.
In this example, you’d select Replace with Amount if Greater Than Amount and enter 100 in the Amount field. If an employee had a vacation available amount of 140 hours, that amount would be replaced with 100.
Mass update limitations
There are some limitations to updating records in the Employee Mass Update window.
• If you’re updating a benefit or deduction code and the calculation method for the code is Percent of Gross or Percent of Net, the updated method for the code can’t be more than 100 percent. For example, if you have a deduction percentage that is 20 percent of gross and you enter 90 percent to increase the percentage to 110 percent, the updated amount will be set to 100 percent.
• You can’t update tiered deductions or tiered benefits using the Employee Mass Update window.
• You can’t update Charged Tips or Reported Tips pay types.
• If you’re updating a pay or benefit code, you can’t decrease the current amount to an amount less than zero. However, if you’re updating a deduction code, you can decrease the current amount to an amount that is less than zero.
Updating a range of information for employees
Use the Employee Mass Update window to change pay rates and benefit and deduction amounts for a range of employees. You also can make adjustments to an individual employee’s amount within the range using the Edit Employee Mass Update window.
When you make pay rate changes in the Employee Mass Update window, they do not apply to employee /pay code combinations assigned to pay step tables.

U . S . P A Y R O L L 169
C H A P T E R 1 6 C O M P A N Y R E C O R D U T I L I T I E S
To update a range of information for employees:1. Open the Employee Mass Update window.
(HR & Payroll >> Utilities >> Payroll >> Mass Update)
2. Select a record type to update.
3. Select a specific code to change. This field is available only if you chose Pay Rate, Deduction Amount or Benefit Amount in the Update field.
4. Enter ranges of class IDs, employee IDs, departments, positions, and start dates to include a specific range of employees, or accept the default entry ALL to include all employees in the update.
5. Select a method for updating cards. For more information, refer to Mass update methods on page 167.
6. Enter the amount or percentage by which the selected cards are to be adjusted. Depending on the update method you selected, this field is labeled either Amount or Percentage.
If you manually update an employee’s overtime or doubletime pay rate, this will also update the pay rate for the pay code.
7. Mark Increase or Decrease, depending on whether the existing employee cards are to be increased or decreased. This field is available only if you select Change by Amount or Change by Percent as the update method.
8. Mark Round to Nearest Dollar to round the updated amount to the nearest dollar. This field is available only if you select Change by Percent as the update method.
If you change an amount in the Updated Amount column in the scrolling window of the Edit Employee Mass Update window, the amount you change in that window won’t be rounded, even if this selection is marked.
9. Mark Include Pay Codes Based on this Pay Code to update all pay codes that are based on this pay code. For example, if you’re changing the pay rate for a salary pay code, you can apply the rate change to all pay codes that are based on the salary pay code, such as vacation or overtime pay types. A new pay rate or pay factor is automatically calculated based on the old rates.

P A R T 5 U T I L I T I E S
170 U . S . P A Y R O L L
10. Choose Edit Records to display the Edit Employee Mass Update window where you can preview and edit the updated information.
The current information—the amount prior to updating—for the range of employees will be displayed in the Current Amount field in the scrolling window. The updated information, or the proposed amount, will be displayed in the Updated Percent/Amount field in the scrolling window. You can make changes to this field.
11. Choose File >> Print to print an Employee Mass Update report to verify your changes.
12. Choose Update to save the updated amounts. The Employee Mass Update Audit report will be printed, displaying the employee information that was updated.
Calculating net-to-gross wages
Use the Payroll Gross Up window to quickly determine the gross pay amount needed for an employee to net a specified dollar amount for bonuses, holiday pay or other special Payroll events. For example, if you wanted to award a bonus of $250.00 after taxes to an employee, you can use this window to calculate the amount to include in an employee’s pay for the employee to receive $250.00 after taxes.
To calculate net-to-gross wages:1. Open the Payroll Gross Up window.
(HR & Payroll >> Utilities >> Payroll >> Gross Up)
2. Enter the net amount to pay your employee.
3. Enter the employee’s federal tax percentage.
4. Enter the employee’s state and local tax percentages, if any.
5. Choose Calculate. The gross Payroll amount will be calculated and displayed.
6. Choose OK to close the window.
Modifying codes
There may be instances when the code you use for pay codes, benefit codes or deduction codes need to be changed. For example, if you have a legacy code that uses a number and you’d like to use a more descriptive code using a word, or change codes to be more meaningful to the people using the system.

U . S . P A Y R O L L 171
C H A P T E R 1 6 C O M P A N Y R E C O R D U T I L I T I E S
You can modify codes either one at a time, or by importing a text file containing multiple codes and change them at once.
If you are modifying a batch of codes, prepare the text file before you begin. The text file must be a tab-delimited, two-column format. The following criteria are checked when you validate the file:
• Old codes match the code type selected• Old codes exist in the system• New codes do not exist in the system, and only one time in the file• New codes are no longer than six characters• New codes are not named “ALL”• Only uppercase letters are used
To modify Payroll codes:1. Open the Payroll Code Modifier window.
(HR & Payroll >> Utilities >> Payroll >> Payroll Code Modifier)
2. Select the method you’ll use to change the codes, one code at a time, or a batch of codes.
3. Select the type of code to modify. You can change pay codes, benefit codes or deduction codes. If you’re changing a batch of codes, you can change only one type at a time, and skip to step 5.
4. If you’re modifying a single code, enter or select the code you want to change. Then, enter the new code you’ll use to replace it. Skip to step 7.
5. If you’re modifying a batch, select the path to the import file that contains the code changes. The file should be a tab delimited text file, containing two columns of uppercase codes. Column 1 should list the old code; Column 2 should list the new code that replaces each old code. Numbers can be used.
6. Choose Validate. This button is available only if you’re importing a file. The validation will ensure your old codes are all of the same code type that you selected and whether the old code exists. A Code Validation Report will print when the validation is complete and list any errors found during the process. If you have no errors, the Update button will be available.
7. Choose Update. The code or codes you selected will be modified in any tables in which the code exists. A Code Modification Report will be printed that displays the change.

172 U . S . P A Y R O L L

U . S . P A Y R O L L 173
Chapter 17: Removing records You can help maintain your records by removing history information from your Payroll that is no longer useful to your company.
This information is contained in the following sections:
• Removing Payroll history• Removing employee summary information• Removing inactive records• Removing year-end information• Removing distribution information• Removing journal history
Removing Payroll history
History records provide useful information for audit purposes. If you’re keeping one of the types of history available in Payroll, these records can be maintained for an unlimited number of years. Removing history might affect your ability to reprint posting journals and void posted checks.
When you remove historical records, the Payroll system removes records only for the range you specify. Normally, history is removed after the year-end closing process; however, at other times during the accounting cycle, it might be necessary to remove ranges of history that are no longer useful.
Don’t remove history until you’ve printed all government statements and reports for that year. After Payroll history is removed, you won’t be able to reprint statements and reports for that year. Before removing history, back up your company’s accounting data. For more information about making backups in Microsoft Dynamics GP, refer to your System User’s Guide (Help >> Contents >> select System Administration).
Use the Remove Payroll History window to remove Payroll history. You can remove Payroll history for a range of audit trail codes, posting dates or employees. After you’ve removed history, you can’t void checks or reprint posting journals for computer checks, manual checks or void checks for the range of transactions that were removed.
To remove Payroll history:1. Open the Remove Payroll History window.
(HR & Payroll >> Utilities >> Payroll >> Remove Payroll History)

P A R T 5 U T I L I T I E S
174 U . S . P A Y R O L L
2. Select a range from the list and enter a range restriction.
3. Choose Insert to insert the range restriction. You can select additional ranges and restrictions. If you’ve made an error in a range or a restriction, select the range and choose Remove.
4. Mark Print Check History to print the Check History Report without removing history. Mark Print Transaction History to print the Transaction History Report without removing history.
5. Mark Remove Check History, Remove Transaction History or both to remove Check History or Transaction History.
6. Choose Process to clear payroll history for the selected ranges.
Removing employee summary information
Use the Remove Employee Summary window to remove employee summary and tip information for a selected year. You also can print a summary report using this window.
Don’t remove employee summary information until you’ve printed all government statements and reports for that year. After you’ve removed employee summary information, you won’t be able to reprint statements and reports for that year.
To remove employee summary information:1. Open the Remove Employee Summary window.
(HR & Payroll >> Utilities >> Payroll >> Remove Employee Summary)
2. Choose whether to remove calendar year or fiscal year information, then select the year you would like to remove employee summary information for.
3. Select the method to use to define the range of summary and tip information to remove: employee IDs, employee classes, departments, positions, and hire date.
4. Choose Insert to add the range to the Restrictions List. To remove range from the list, select the restriction and choose Remove.

U . S . P A Y R O L L 175
C H A P T E R 1 7 R E M O V I N G R E C O R D S
5. Mark any of these options.
Print Summary Report Mark to print a summary report.
Remove Summary Information Mark to remove employee summary information. If this option is not marked and you choose Process, Payroll will not remove summary information based on the selected records.
6. Choose Process to remove summary and tip information or print the Summary Report, depending on your selections in this window.
If you’ve marked both Print Summary Report and Remove Summary Information, the report is printed after historical records are removed.
Removing inactive records
Use the Remove Inactive Records window to remove inactive employee and inactive history records for the year.
Removing inactive employee records will permanently delete information needed in creating your year-end wage file. If you still plan to create a year-end wage file, be sure to reactivate the employees first before choosing to remove inactive records.
Don’t remove inactive records until you’ve printed all government statements and reports for that year. After inactive employee records are removed, you won’t be able to reprint statements and reports for that year.
If you’re using Human Resources, removing inactive records in Payroll will also remove inactive records in Human Resources. If you’re using Direct Deposit, removing inactive employee records will also remove records of employees that were marked as inactive in the Direct Deposit Employee Maintenance window.
To remove inactive records:1. Open the Remove Inactive Records window.
(HR & Payroll >> Utilities >> Payroll >> Remove Inactive Records)
2. Select the inactive records to remove by marking any of these options.
Remove Inactive Employee Records Mark this option to remove employee records for inactive employees.
If you mark Remove Inactive Employee Records and did not mark Remove History for Inactive Employee Records, information in Payroll history reports will be retained.

P A R T 5 U T I L I T I E S
176 U . S . P A Y R O L L
Remove History for Inactive Employee Records Mark this option to remove history records for inactive employees.
If you remove inactive employee and history records, reprint journals will not print correct information.
3. Choose Process to remove the selected inactive records.
Removing year-end information
Use the Remove Payroll Year-End Information window to move year-end information to history. All the information for printing W-2 statements and 1099-R forms also is moved to history.
Before you begin, be sure you back up all company data. As long as you have a current backup, information can be restored. For more information, refer to your System User’s Guide (Help >> Contents >> select System Administration).
To remove year-end information:1. Open the Remove Payroll Year-End Information window.
(HR & Payroll >> Utilities >> Payroll >> Remove Year-End Information)
2. Select the year to remove year-end history information for.
3. Choose Insert to add the year to the Restrictions window. You can remove year-end information for multiple years. If you’ve selected the wrong year, select the year and choose Remove. The year will be removed from the Restrictions window.
4. Choose Process.
Removing distribution information
Use the Remove Payroll Distribution History window to remove Payroll distribution information. If you’re keeping distribution history, there will be detailed records of how Payroll transactions have affected the balances of posting accounts.
Before removing history, be sure there is no need to retain the distribution information. After you’ve removed history, you won’t be able to print the Reprint Check Posting Register, FUTA Posting Register, SUTA Posting Register or Workers’ Compensation Posting Register for the audit trail codes that were removed.
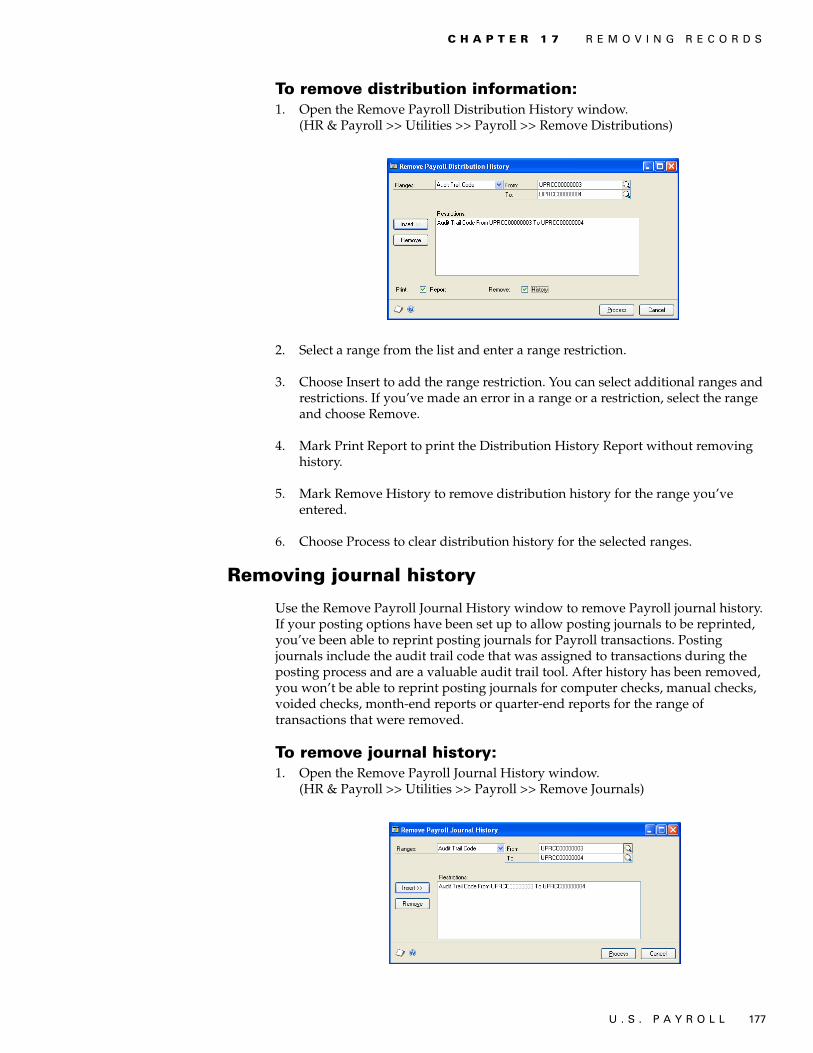
U . S . P A Y R O L L 177
C H A P T E R 1 7 R E M O V I N G R E C O R D S
To remove distribution information:1. Open the Remove Payroll Distribution History window.
(HR & Payroll >> Utilities >> Payroll >> Remove Distributions)
2. Select a range from the list and enter a range restriction.
3. Choose Insert to add the range restriction. You can select additional ranges and restrictions. If you’ve made an error in a range or a restriction, select the range and choose Remove.
4. Mark Print Report to print the Distribution History Report without removing history.
5. Mark Remove History to remove distribution history for the range you’ve entered.
6. Choose Process to clear distribution history for the selected ranges.
Removing journal history
Use the Remove Payroll Journal History window to remove Payroll journal history. If your posting options have been set up to allow posting journals to be reprinted, you’ve been able to reprint posting journals for Payroll transactions. Posting journals include the audit trail code that was assigned to transactions during the posting process and are a valuable audit trail tool. After history has been removed, you won’t be able to reprint posting journals for computer checks, manual checks, voided checks, month-end reports or quarter-end reports for the range of transactions that were removed.
To remove journal history:1. Open the Remove Payroll Journal History window.
(HR & Payroll >> Utilities >> Payroll >> Remove Journals)

P A R T 5 U T I L I T I E S
178 U . S . P A Y R O L L
2. Select a range from the list and enter a range restriction.
3. Choose Insert to add the range restriction. You can select additional ranges and restrictions. If you’ve made an error in a range or a restriction, select the range and choose Remove.
4. Choose Process to clear journal history for the selected ranges.
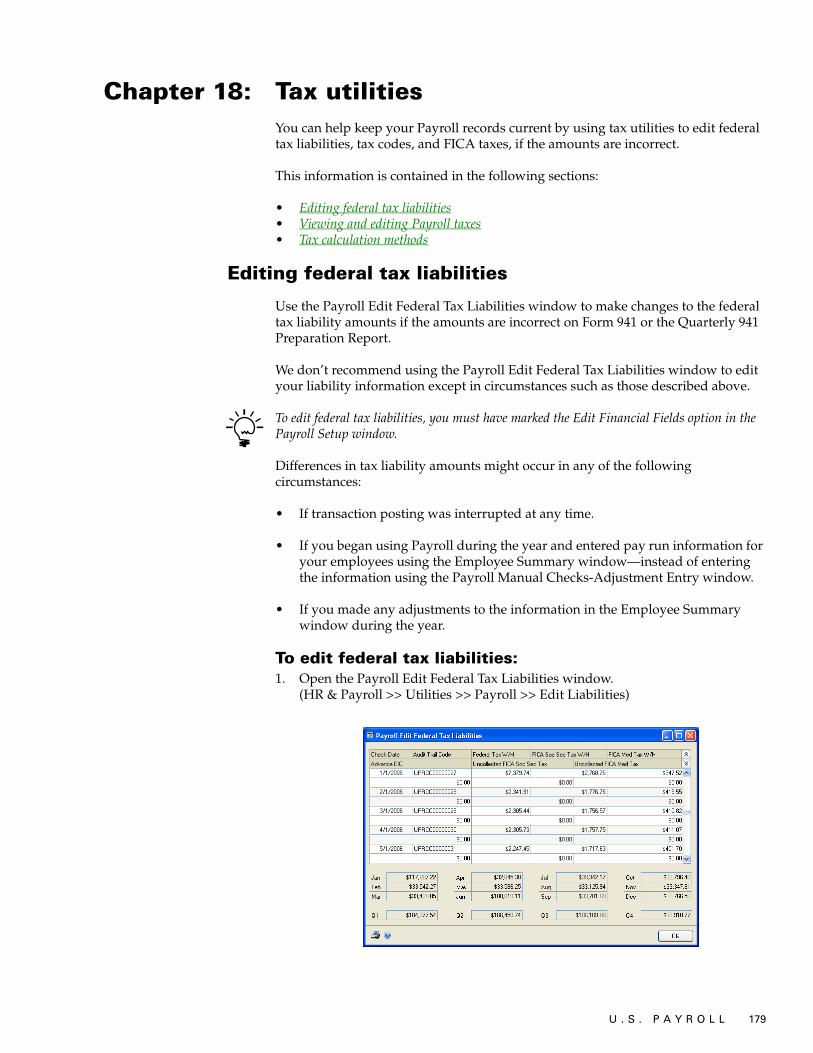
U . S . P A Y R O L L 179
Chapter 18: Tax utilitiesYou can help keep your Payroll records current by using tax utilities to edit federal tax liabilities, tax codes, and FICA taxes, if the amounts are incorrect.
This information is contained in the following sections:
• Editing federal tax liabilities• Viewing and editing Payroll taxes• Tax calculation methods
Editing federal tax liabilities
Use the Payroll Edit Federal Tax Liabilities window to make changes to the federal tax liability amounts if the amounts are incorrect on Form 941 or the Quarterly 941 Preparation Report.
We don’t recommend using the Payroll Edit Federal Tax Liabilities window to edit your liability information except in circumstances such as those described above.
To edit federal tax liabilities, you must have marked the Edit Financial Fields option in the Payroll Setup window.
Differences in tax liability amounts might occur in any of the following circumstances:
• If transaction posting was interrupted at any time.
• If you began using Payroll during the year and entered pay run information for your employees using the Employee Summary window—instead of entering the information using the Payroll Manual Checks-Adjustment Entry window.
• If you made any adjustments to the information in the Employee Summary window during the year.
To edit federal tax liabilities:1. Open the Payroll Edit Federal Tax Liabilities window.
(HR & Payroll >> Utilities >> Payroll >> Edit Liabilities)
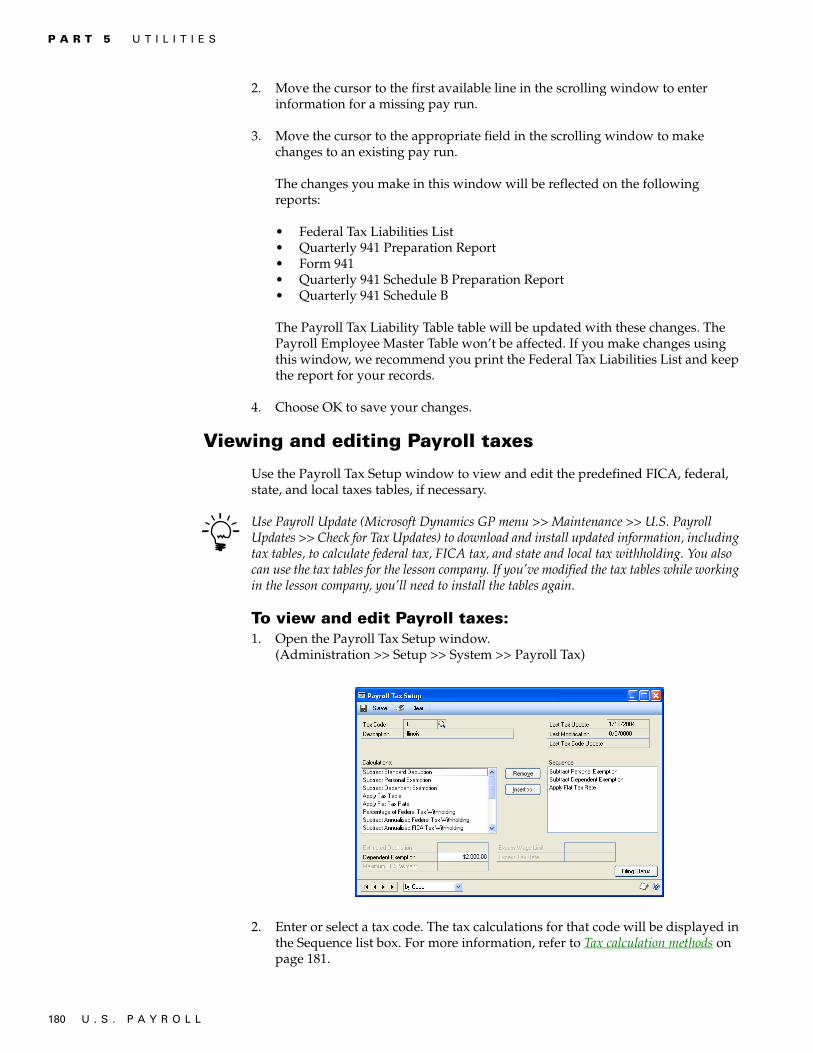
P A R T 5 U T I L I T I E S
180 U . S . P A Y R O L L
2. Move the cursor to the first available line in the scrolling window to enter information for a missing pay run.
3. Move the cursor to the appropriate field in the scrolling window to make changes to an existing pay run.
The changes you make in this window will be reflected on the following reports:
• Federal Tax Liabilities List• Quarterly 941 Preparation Report• Form 941• Quarterly 941 Schedule B Preparation Report• Quarterly 941 Schedule B
The Payroll Tax Liability Table table will be updated with these changes. The Payroll Employee Master Table won’t be affected. If you make changes using this window, we recommend you print the Federal Tax Liabilities List and keep the report for your records.
4. Choose OK to save your changes.
Viewing and editing Payroll taxes
Use the Payroll Tax Setup window to view and edit the predefined FICA, federal, state, and local taxes tables, if necessary.
Use Payroll Update (Microsoft Dynamics GP menu >> Maintenance >> U.S. Payroll Updates >> Check for Tax Updates) to download and install updated information, including tax tables, to calculate federal tax, FICA tax, and state and local tax withholding. You also can use the tax tables for the lesson company. If you’ve modified the tax tables while working in the lesson company, you’ll need to install the tables again.
To view and edit Payroll taxes:1. Open the Payroll Tax Setup window.
(Administration >> Setup >> System >> Payroll Tax)
2. Enter or select a tax code. The tax calculations for that code will be displayed in the Sequence list box. For more information, refer to Tax calculation methods on page 181.

U . S . P A Y R O L L 181
C H A P T E R 1 8 T A X U T I L I T I E S
3. Choose Filing Status to open the Payroll Tax Filing Status window, where you can view the filing status information for the selected tax code. You also can use this window to view personal exemption information, standard deduction information, and other tax information.
If the selected tax code uses a calculation that requires a tax table, you can choose Tables after you’ve entered a filing status to view the tax tables, low income tables, personal exemption tables or special tables for a filing status of a tax code. The Payroll Tax Tables window will open.
4. Close the window.
Tax calculation methods
The following information lists the tax calculation methods and how each method works.
Subtract Standard DeductionSubtracts a standard deduction amount from taxable wages. Depending on the state, the calculation method will vary. The methods include subtracting a percent of gross wages per employee’s filing status, subtracting a percent of gross wages with a minimum and maximum amount, and subtracting a flat amount per filing status.
Subtract Personal ExemptionSubtracts any personal exemptions the tax code allows. If processing federal tax, the number of personal exemptions is determined by the number of exemptions entered in the Employee Tax Maintenance window. If processing state tax, the number of exemptions is based on the Include checkboxes in the Payroll Tax Filing Status window.
For example, if Include Personal Exemptions is marked, the number of exemptions is the total personal exemptions marked in the Employee State Tax Maintenance window. If Include Additional Allowances is marked, the number of exemptions is the number entered in the Employee State Tax Maintenance window. If Include Dependents is marked, the number of exemptions is the number entered in the Employee State Tax Maintenance window.
Unique methods exist for the following states:
• Alabama: Taxable wages are reduced by the personal exemption amount specified in the Payroll Tax Filing Status window.
• Connecticut, Iowa, Massachusetts, Missouri: Personal exemption table exists in the Payroll Tax Table Setup window.
Subtract Dependent ExemptionSubtracts any dependent exemptions the tax code allows. This is a flat amount multiplied by the number of dependents, based on your entries for each employee in the Employee Tax Maintenance window.
Apply Tax TableUses the tax table set up for the code in the Payroll Tax Tables window.
P A R T 5 U T I L I T I E S
182 U . S . P A Y R O L L
Apply Flat Tax RateMultiplies a flat tax rate by the taxable wages. However, for Yonkers Resident, the flat tax rate is multiplied by the tax withholding amount. The flat tax rate is entered in the Payroll Tax Filing Status window.
Percentage of Federal Tax WithholdingApplies a percentage to the federal tax withholding per filing status for the tax code. The percentage is entered in the Payroll Tax Filing Status window.
Subtract Annualized Federal Tax WithholdingSubtracts the federal tax withholding and checks against the maximum amount. The percentage and maximum are entered in the Payroll Tax Filing Status window.
Subtract Annualized FICA Tax WithholdingSubtracts a percentage of FICA tax withholding and checks against the maximum amount. This information is entered in the Payroll Tax Filing Status window.
Check Low Income TablesChecks taxable wages against a low income limit entered in the Payroll Tax Filing Status window. For Arkansas, if the filing status equals SLI, MFJLI or HOHLI, the taxable wages are adjusted based on the special table entered in the Payroll Tax Table Setup window.
No State TaxUsed for states that don’t have an income tax.
Subtract Estimated DeductionsSubtracts the estimated deduction amount specified in this window for each estimated deduction specified in the Employee State Tax Maintenance window. This calculation applies only to state tax codes.
Apply Credit Percentage TableUses a special tax table entered in the Payroll Tax Tables window to calculate a tax credit.
Calculate Tax On Excess WagesCalculates tax on the taxable wages that exceed the wage limit for Oklahoma. This reduces the taxable wages to the maximum wage limit.
Adjust Taxable WagesMakes a special adjustment on taxable wages for Oklahoma.
Check Exception StatusChecks for wage exceptions and applies a flat tax rate for Wisconsin.
Apply Special Table For Tax CreditApplies a special table for tax credit.
Round to the Nearest DollarRounds the tax amount for the pay run to the nearest dollar.

U . S . P A Y R O L L 183
Chapter 19: Payroll updatesThe payroll update engine helps you update your Payroll system and company databases with the latest round of tax table information and all preceding tax updates for the current year.
You must download year-end updates and any changes affecting Payroll program code from the Tax Updates section of the CustomerSource Web site, and install them separately.
Use the following information to apply tax table and year-end payroll software updates.
• Using the tax table update engine• Installing year-end software updates
Using the tax table update engine
You can use the automatic update feature to update your database with the latest tax table information.
The tax update engine runs the SQL scripts required to update both the Payroll system database and each of your company databases.
To use the tax table update engine:1. Open the Payroll Tax Update window.
(Microsoft Dynamics GP menu >> Maintenance >> U.S. Payroll Updates >> Check for Tax Updates)
2. Select an update method, then choose Next.
• The Automatic option downloads all current and prior tax table updates for the year to the default location.
• The Manual option processes all current and prior tax table updates for the year from a location you specify. You might choose Manual if you need to update a computer that isn’t connected to the Internet.
If you use the Manual option, first download the update and documentation from CustomerSource, and copy the update files to a location accessible to the computer you want to update.

P A R T 5 U T I L I T I E S
184 U . S . P A Y R O L L
3. If you selected Automatic in the Payroll Tax Update window, enter your authorization number. Choose Log in to start the download.
4. If you selected Manual in the Payroll Tax Update window, specify the location where your tax update files are located.
5. Choose Process to start the update.
6. Verify that Microsoft Dynamics GP has the latest tax update (Administration >> Setup >> System >> Payroll Tax).
U . S . P A Y R O L L 185
C H A P T E R 1 9 P A Y R O L L U P D A T E S
Installing year-end software updates
Microsoft Business Solutions releases periodic updates to Payroll program code to maintain compliance with government legal requirements. These updates typically occur at calendar year end, and occasionally during the year. Collectively, Payroll code updates are called “year-end updates” or “compliance updates”.
Payroll code updates are distributed as Microsoft Windows Installer patch (.msp) files and are installed the same way as service packs. Payroll code updates do not contain tax table information. You must install each type of update separately.
You can obtain the latest downloads at:https://mbs.microsoft.com/customersource/downloads/taxupdates
For additional instructions, refer to the instructions that accompany a specific update. Instructions for year-end updates contain detailed checklists and procedures for completing year-end payroll processing.

186 U . S . P A Y R O L L

PA
RT
6: R
OU
TIN
ES
188 U . S . P A Y R O L L
Part 6: Routines This part of the documentation describes how to use Payroll checklists and routines to complete Payroll tasks. It also describes tasks that relate to government regulations.
The following information is discussed:
• Chapter 20, “Payroll checklist items,” explains how to create, modify, and delete customized checklists of Payroll routines or modify existing checklists.
• Chapter 21, “Payroll company routines,” describes tasks that are done at the end of the month, quarter, or year, and includes printing period-end reports and closing the year in Payroll.
• Chapter 22, “Government form and report routines,” describes tasks that relate to government regulations and required forms, such as the W-2 and 1099-R statements.

U . S . P A Y R O L L 189
Chapter 20: Payroll checklist itemsYou can create customized checklists of Payroll routines or modify existing checklists. For example, you can set up a checklist to ensure that your month-end reports are printed consistently each month.
This information is contained in the following sections:
• Adding or modifying checklist items• Deleting checklist items
Adding or modifying checklist items
Use the Payroll Checklists window to add or modify checklist items to Payroll routines. You can specify the frequency with which each set of routines should be completed—daily, on payday, at the end of a period, month, quarter, fiscal year or calendar year, or during setup.
To add or modify checklist items:1. Open the Payroll Checklists window.
(HR & Payroll >> Routines >> Payroll >> Checklists)
2. Select a frequency.
3. To add an item, choose Add, or to update an item, select it, then choose Modify. The Add-Modify Payroll Routines window will open.
4. Enter the item information.
5. Choose OK to save the information. The Payroll Checklists window is redisplayed. You can adjust the position of the items in the checklist using the Top, Up, Down, or Bottom buttons.
6. Choose Revert to cancel changes and return to the window in its original state.

P A R T 6 R O U T I N E S
190 U . S . P A Y R O L L
Deleting checklist items
Use the Payroll Checklists window to delete checklist items of Payroll routines. You can specify the frequency with which each set of routines should be completed—daily, on payday, at the end of a period, month, quarter, fiscal year, or calendar year.
To delete checklist items:1. Open the Payroll Checklists window.
(HR & Payroll >> Routines >> Payroll >> Checklists)
2. Select a frequency and select the checklist item to delete.
3. Choose Delete. You can adjust the position of the items in the checklist using the Top, Up, Down, or Bottom buttons.
4. Choose Revert to cancel changes and return to the window in its original state.
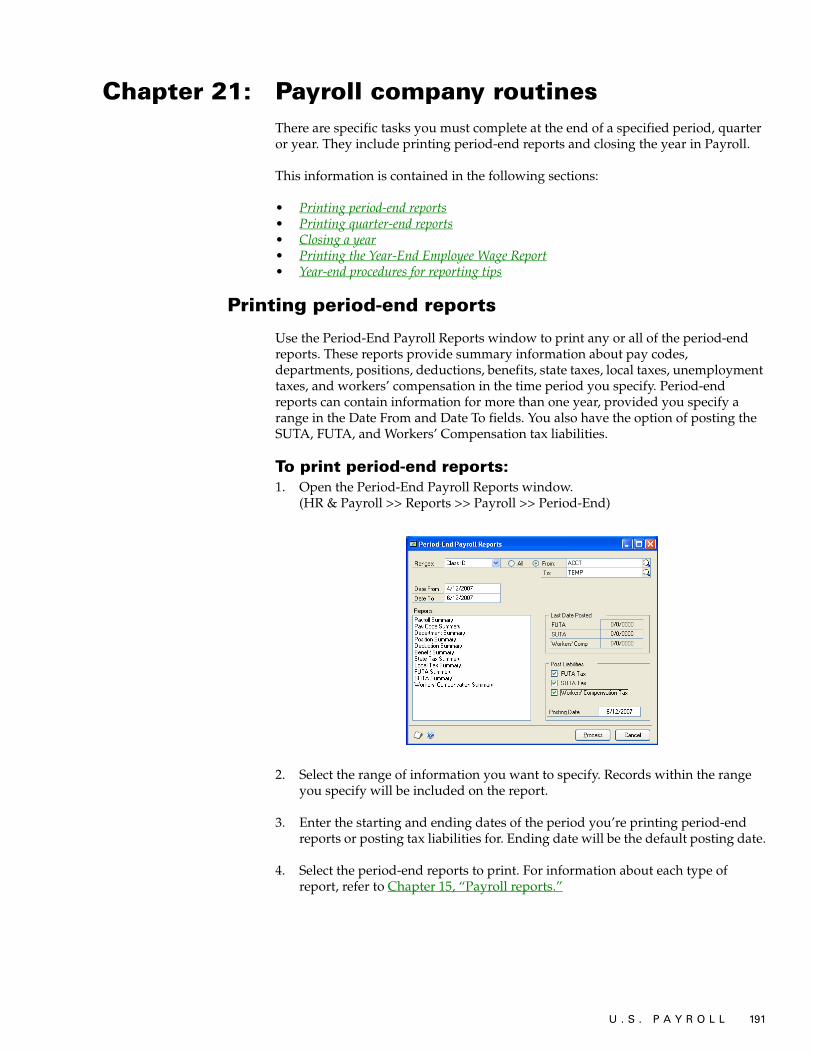
U . S . P A Y R O L L 191
Chapter 21: Payroll company routinesThere are specific tasks you must complete at the end of a specified period, quarter or year. They include printing period-end reports and closing the year in Payroll.
This information is contained in the following sections:
• Printing period-end reports• Printing quarter-end reports• Closing a year• Printing the Year-End Employee Wage Report• Year-end procedures for reporting tips
Printing period-end reports
Use the Period-End Payroll Reports window to print any or all of the period-end reports. These reports provide summary information about pay codes, departments, positions, deductions, benefits, state taxes, local taxes, unemployment taxes, and workers’ compensation in the time period you specify. Period-end reports can contain information for more than one year, provided you specify a range in the Date From and Date To fields. You also have the option of posting the SUTA, FUTA, and Workers’ Compensation tax liabilities.
To print period-end reports:1. Open the Period-End Payroll Reports window.
(HR & Payroll >> Reports >> Payroll >> Period-End)
2. Select the range of information you want to specify. Records within the range you specify will be included on the report.
3. Enter the starting and ending dates of the period you’re printing period-end reports or posting tax liabilities for. Ending date will be the default posting date.
4. Select the period-end reports to print. For information about each type of report, refer to Chapter 15, “Payroll reports.”

P A R T 6 R O U T I N E S
192 U . S . P A Y R O L L
5. Mark the appropriate options to post FUTA tax, SUTA tax, and workers’ compensation tax. When you mark these options, the Posting Date field displays the date that you’re posting these liabilities.
6. Choose Process. The reports you’ve marked will be printed and the tax liabilities will be posted if you selected to post them.
Printing quarter-end reports
Use the Quarter-End Payroll Reports window to print quarter-end reports. These include reports such as the 941 Preparation Report, Form 941, and the Form 941 Schedule B Preparation Report. Print these reports for a quarterly summary of your wages and taxes.
To print quarter-end reports:1. Open the Quarter-End Payroll Reports window.
(HR & Payroll >> Reports >> Payroll >> Quarter-End)
2. Select a quarter.
3. Select the quarter-end reports to print. For information about each type of report, refer to Chapter 15, “Payroll reports.”
4. Choose Process. The reports you’ve marked will be printed.
Closing a year
Use the Payroll Year-End Closing window to create a file of annual wage information. This file will be used to print W-2 and 1099-R statements.
If you’re enrolled in a current Microsoft Dynamics GP enhancement plan, updated year-end and tax information and detailed instructions for closing the year, processing W-2 statements, and running pay runs for the next year will be available to download from CustomerSource or by using the Payroll Update. For more information about the Payroll Update, see Chapter 19, “Payroll updates.” Information in the year-end update supercedes information in this manual.
Before you close the year, be sure you’ve completed all of your pay runs. Also, make a backup of all company data and store it in a safe place. For more information about making backups in Microsoft Dynamics GP, refer to your System User’s Guide (Help >> Contents >> select System Administration).
You can continue to work in your accounting system while year-end processing takes places. You can’t void checks or process manual or computer checks during the procedure, or complete Period-End or Quarter-End procedures.

U . S . P A Y R O L L 193
C H A P T E R 2 1 P A Y R O L L C O M P A N Y R O U T I N E S
To close a year:1. Open the Payroll Year-End Closing window.
(HR & Payroll >> Routines >> Payroll >> Year-End Closing)
2. Enter the calendar year to close and create a year-end wage file. A file will be created for printing W-2 statements and 1099-R forms.
3. Choose Process to close the year. The Year-End Wage File will be created.
Printing the Year-End Employee Wage Report
Use the Year-End Wage Report window to print the Year-End Employee Wage Report to verify W-2 amounts before printing W-2 statements. This report includes the same information that appears on the W-2 statement and includes headings for each field. You can print the Year-End Employee Wage Report only if the year-end wage file exists for the year to use.
To print the Year-End Employee Wage Report:1. Open the Year-End Wage Report window.
(HR & Payroll >> Routines >> Payroll >> Year-End Wage Report)
2. Select a year.
3. Select the employee type. Employees classified as Medicare Qualified Government Employees (MQGE) always are listed after all Regular employees.
4. Select a sorting option.
5. Enter the range of employee IDs or choose All to include all employees.
6. Choose Print to print the Year-End Employee Wage Report.

P A R T 6 R O U T I N E S
194 U . S . P A Y R O L L
Year-end procedures for reporting tips
Only one additional year-end form is required by the IRS if you are reporting tips wages, but additional information is printed on W-2 statements for tipped employees.
Form 8027 is a form used by large food and beverage establishments to report tips and receipts to the federal government. You can modify or print Form 8027 or its associated preparation report for a specific year as long as the year-end wage file exists for that year.
Be sure to print the preparation report and verify your information before you print the form for the IRS. For more information, refer to Editing Form 8027 information on page 200 and Printing Form 8027 on page 201.

U . S . P A Y R O L L 195
Chapter 22: Government form and report routinesThere are specific tasks that relate to government regulations and required forms, such as the W-2 and 1099-R statements.
This information is contained in the following sections:
• Editing W-2 information• Verifying W-2s for tipped employees• Printing W-2 statements• Editing 1099-R information• Printing 1099-R statements• Editing Form 8027 information• Printing Form 8027
Editing W-2 information
You can use the Edit W-2 Information window to verify and make changes to an employee’s W-2 information. For example, an employee’s address might have changed. You must close the year in the Payroll Year-End Closing window before you can edit or print W-2 statements for a specific year.
To edit W-2 information:1. Open the Edit W-2 Information window.
(HR & Payroll >> Routines >> Payroll >> Edit W-2s)
2. Select a sorting option at the bottom of the window. This determines how the employee IDs will be sorted in the lookup window and also the order the records will appear when using the browse buttons.
3. Select the calendar year.
4. Select an employee ID. The employee’s Social Security number and address will be displayed. You can edit this information. Changing this information here will not change the information in the Employee Maintenance window.
If the employee has a foreign address, mark the Foreign Address option. Fields specific to a foreign address will be displayed.
5. Edit the wage and withholding information for the employee, if necessary.

P A R T 6 R O U T I N E S
196 U . S . P A Y R O L L
6. Mark the boxes that apply to the employee whose W-2 information you’re editing. Your entries in the Employee Tax Maintenance window will appear as default entries and will appear on the W-2 statement. For more information about each option, refer to Chapter 7, “Tax cards.”
7. Choose Special to open the Edit W-2 Special Information window, or choose Other to open the Edit W-2 Other Information window. Use these windows to view and enter the labels and the amounts that will be printed in the appropriate boxes on the W-2 statement, if required.
8. Choose State or Local to open the Edit W-2 State Tax Information window or the Edit W-2 Local Tax Information window. Use these windows to view and change state and local tax information that will be printed on the W-2 statement.
9. Choose OK to close the window. The Edit W-2 Information window will be redisplayed, and you can continue editing W-2 information.
10. Choose Save. For more information, refer to Printing W-2 statements on page 196.
Verifying W-2s for tipped employees
Tipped employees require no extra W-2 procedures, but because additional information is printed on W-2 statements, it is a good idea to verify information for tipped employees on a random basis.
Be sure that the following items are included in the correct boxes on W-2 statements for tipped employees:
Printing W-2 statements
You can use the Print W-2 Forms window to specify the information to be printed on W-2 statements and then print the statements.
Box Information
Allocated tips check box This box should be marked
5 and 7 Gross wages and tips
13A and 13B Uncollected FICA Medicare and Social Security

U . S . P A Y R O L L 197
C H A P T E R 2 2 G O V E R N M E N T F O R M A N D R E P O R T R O U T I N E S
To print W-2 statements:1. Open the Print W-2 Forms window.
(HR & Payroll >> Routines >> Payroll >> Print W-2s)
2. Select a year to print W-2 statements for.
3. Select a printing option. To print W-2 statements for employees at the end of the year, mark Normal Year-End. To print W-2 statements for inactive employees before the end of the year, mark Pre-Year-End Inactive Employees.
4. Select an employee type. Select Regular for employees who are required to pay both FICA Social Security and FICA Medicare taxes. Select Medicare Qualified Government Employee for employees who are exempt from FICA Social Security tax but subject to FICA Medicare tax.
Medicare Qualified Government Employee must also be selected in the Employee Tax Maintenance window for each employee whose W-2 statement you’re printing.
5. Enter a range of employee IDs or mark All to print W-2 statements for all employees.
6. Enter a starting control number. This is the number you can assign to help you track the W-2 statements you print.
7. Select a sorting order for the W-2 statements.
8. Enter your company name, address, and employer identification number.
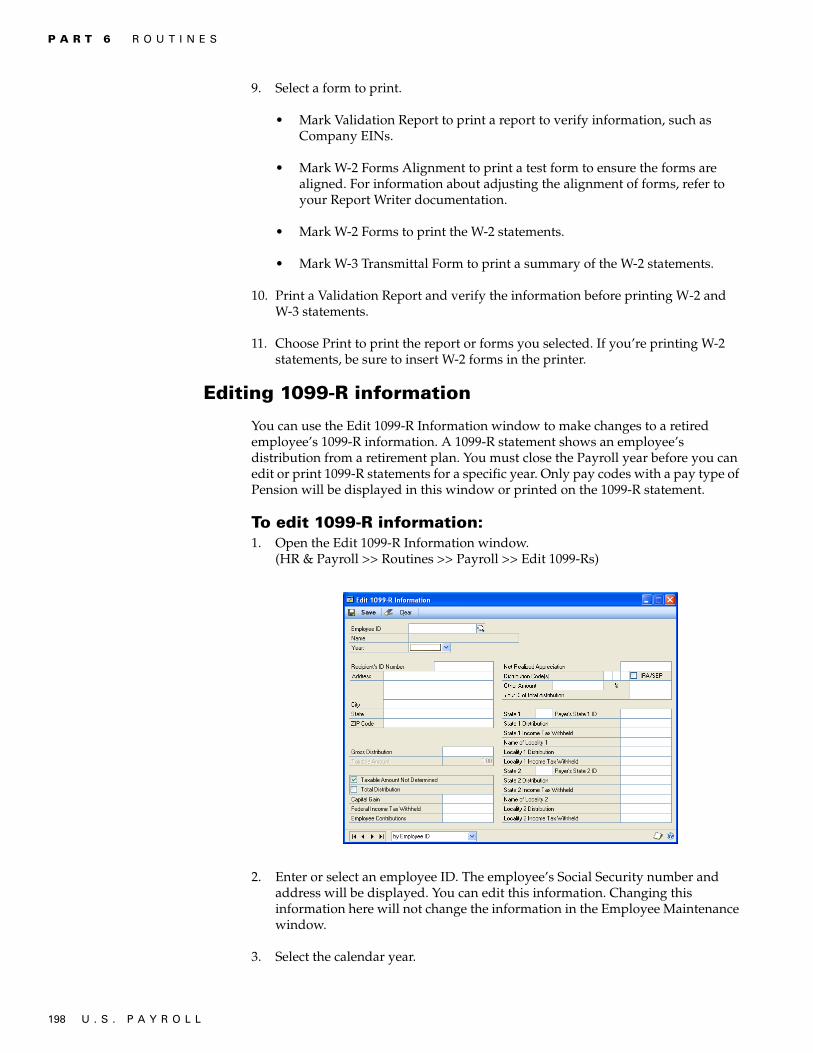
P A R T 6 R O U T I N E S
198 U . S . P A Y R O L L
9. Select a form to print.
• Mark Validation Report to print a report to verify information, such as Company EINs.
• Mark W-2 Forms Alignment to print a test form to ensure the forms are aligned. For information about adjusting the alignment of forms, refer to your Report Writer documentation.
• Mark W-2 Forms to print the W-2 statements.
• Mark W-3 Transmittal Form to print a summary of the W-2 statements.
10. Print a Validation Report and verify the information before printing W-2 and W-3 statements.
11. Choose Print to print the report or forms you selected. If you’re printing W-2 statements, be sure to insert W-2 forms in the printer.
Editing 1099-R information
You can use the Edit 1099-R Information window to make changes to a retired employee’s 1099-R information. A 1099-R statement shows an employee’s distribution from a retirement plan. You must close the Payroll year before you can edit or print 1099-R statements for a specific year. Only pay codes with a pay type of Pension will be displayed in this window or printed on the 1099-R statement.
To edit 1099-R information:1. Open the Edit 1099-R Information window.
(HR & Payroll >> Routines >> Payroll >> Edit 1099-Rs)
2. Enter or select an employee ID. The employee’s Social Security number and address will be displayed. You can edit this information. Changing this information here will not change the information in the Employee Maintenance window.
3. Select the calendar year.
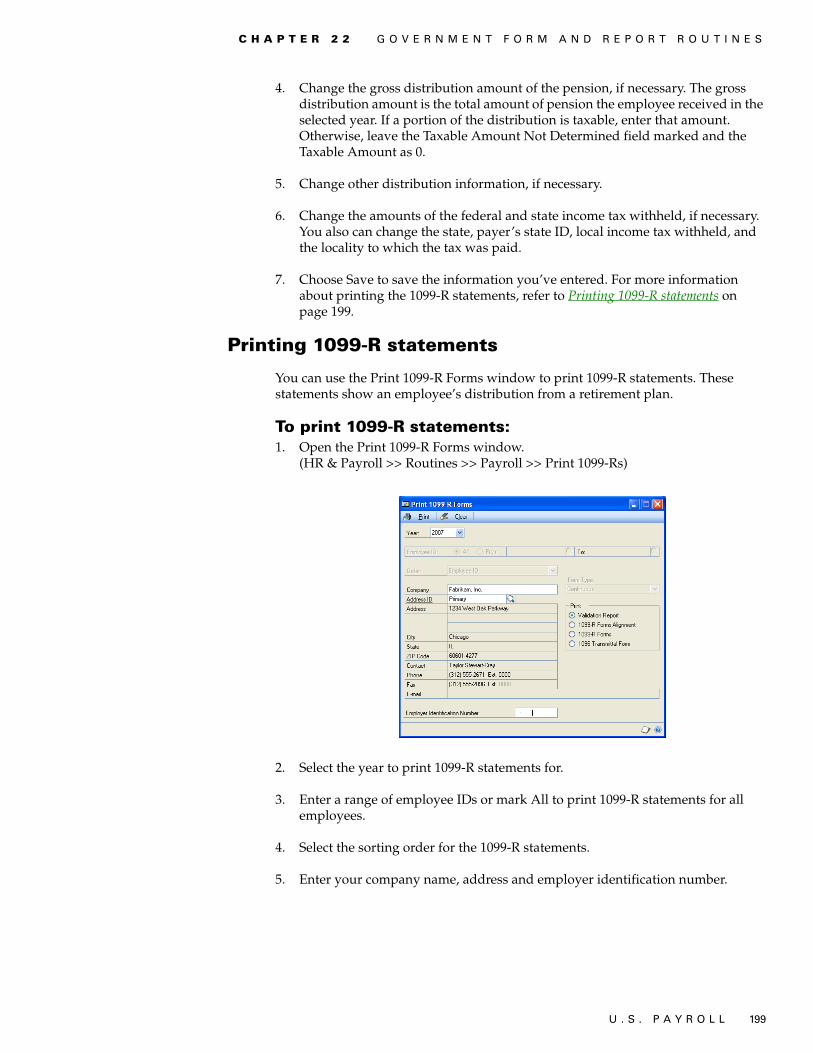
U . S . P A Y R O L L 199
C H A P T E R 2 2 G O V E R N M E N T F O R M A N D R E P O R T R O U T I N E S
4. Change the gross distribution amount of the pension, if necessary. The gross distribution amount is the total amount of pension the employee received in the selected year. If a portion of the distribution is taxable, enter that amount. Otherwise, leave the Taxable Amount Not Determined field marked and the Taxable Amount as 0.
5. Change other distribution information, if necessary.
6. Change the amounts of the federal and state income tax withheld, if necessary. You also can change the state, payer’s state ID, local income tax withheld, and the locality to which the tax was paid.
7. Choose Save to save the information you’ve entered. For more information about printing the 1099-R statements, refer to Printing 1099-R statements on page 199.
Printing 1099-R statements
You can use the Print 1099-R Forms window to print 1099-R statements. These statements show an employee’s distribution from a retirement plan.
To print 1099-R statements:1. Open the Print 1099-R Forms window.
(HR & Payroll >> Routines >> Payroll >> Print 1099-Rs)
2. Select the year to print 1099-R statements for.
3. Enter a range of employee IDs or mark All to print 1099-R statements for all employees.
4. Select the sorting order for the 1099-R statements.
5. Enter your company name, address and employer identification number.

P A R T 6 R O U T I N E S
200 U . S . P A Y R O L L
6. Select the form type to print.
• Mark Validation Report to print a report to verify information.
• Mark 1099-R Forms Alignment to print a test form to ensure the forms are aligned. For information about adjusting the alignment of forms, refer to your Report Writer documentation.
• Mark 1099-R Forms to print the 1099-R statements.
• Mark 1096 Transmittal Form to print a summary of the 1099-R statements.
7. Print a Validation Report and verify the information before printing 1099-R statements.
8. Choose Print to print the report or forms you selected. If you’re printing 1099-R statements, be sure to insert 1099-R forms in the printer.
Editing Form 8027 information
You can use the Form 8027 window to review the Form 8027 preparation report, and, if necessary, make changes to Form 8027 tips and receipts information before printing Form 8027.
Form 8027 is a form used by large food and beverage establishments to report tips and receipts to the federal government. You must close the Payroll year before you can edit or print Form 8027 or its associated preparation report for a specific year.
To edit Form 8027 information:1. Open the Form 8027 window.
(HR & Payroll >> Routines >> Payroll >> Form 8027)
2. Select a reporting year. A year-end wage file must exist for that year to prepare Form 8027.
3. Verify company name and address information.
U . S . P A Y R O L L 201
C H A P T E R 2 2 G O V E R N M E N T F O R M A N D R E P O R T R O U T I N E S
4. Select the type of establishment for which you are preparing Form 8027—Evening Meals Only, Evening and Other Meals, Meals Other than Evening Meals or Alcoholic Beverages.
5. You can enter an establishment number.
6. Choose File >> Print to verify information before you print Form 8027 to send to the IRS.
Printing Form 8027
You can use the Form 8027 window to print Form 8027, which is used by large food and beverage establishments to report tips and receipts to the federal government. You must close the Payroll year before you can edit or print Form 8027 or its associated preparation report for a specific year. For more information, refer to Editing Form 8027 information on page 200.
To print Form 8027:1. Open the Form 8027 window.
(HR & Payroll >> Routines >> Payroll >> Form 8027)
2. Select a reporting year. A year-end wage file must exist for the year to print Form 8027.
3. Verify company name and address information. You should have already verified tips information using the Form 8027 Preparation Report.
4. Select the type of establishment for which you are preparing Form 8027—Evening Meals Only, Evening and Other Meals, Meals Other than Evening Meals or Alcoholic Beverages.
5. Select the type of return, Final or Amended.
6. Choose Print.

202 U . S . P A Y R O L L

PA
RT
7: P
AY
RO
LL DIR
EC
T D
EP
OS
IT
204 U . S . P A Y R O L L
Part 7: Payroll Direct DepositThis part of the documentation describes how to use Payroll Direct Deposit to process a pay run and deposit employee Payroll funds to a bank account or credit union account.
The following information is discussed:
• Chapter 23, “Payroll Direct Deposit setup,” explains the differences between regular and deduction direct deposits. It also explains the remainder of net, prenotifications and exceptions, as well as how to set up Direct Deposit and security.
• Chapter 24, “ACH File setup,” explains how to define the bank or credit union information used to create the ACH file.
• Chapter 25, “Deduction Direct Deposit setup,” explains how to set up a direct deposit as a link to a Payroll deduction, rather than as a separate Payroll Direct Deposit account entry.
• Chapter 26, “Employee Direct Deposit maintenance,” explains how to create employee direct deposit cards when an employee requests his or her Payroll funds be directed to a checking or savings account.
• Chapter 27, “Deduction Direct Deposit maintenance,” describes how to set up employee deduction direct deposit cards if an employee requests having some Payroll funds directed to a direct deposit account and the remainder of his or her earnings paid with a check.
• Chapter 28, “Payroll Direct Deposit routines,” describes the additional steps required when you add Payroll Direct Deposit to your existing Payroll process.
• Chapter 29, “Payroll Direct Deposit reports,” describes Payroll Direct Deposit reports you can use to monitor your direct deposit transactions.

U . S . P A Y R O L L 205
Chapter 23: Payroll Direct Deposit setupPayroll Direct Deposit is a system of distributing employees’ earnings directly to their checking or savings accounts. Direct deposit relies upon the use of a standardized electronic file—called an ACH file—that summarizes basic information about the account your company uses for Payroll transactions, and it includes basic information about the employees’ accounts.
You can use Payroll Direct Deposit to generate the information you need to have Payroll funds automatically deposited into employees’ accounts at their financial institutions. You can customize the information that is given to your financial institution to meet both your company’s needs and the financial institution’s needs.
Each employee’s pay can be distributed between up to twelve bank accounts. There are two types of direct deposit accounts: direct deposit accounts—the ones most of your employees will use—and deduction direct deposit accounts.
Deduction direct deposit accounts should be used only if you have employees who want a portion of their pay sent to a direct deposit account and the remainder paid to them in a paycheck. For more information about the differences between regular direct deposit accounts and deduction direct deposit accounts, refer to Regular vs. deduction direct deposits on page 205.
When you process a pay run, you can print Payroll checks in one print job, then print Payroll Direct Deposit earnings statements in another. This lets you conserve your check stock for printing actual checks.
This information is contained in the following sections:
• Regular vs. deduction direct deposits• Remainder of net• Payroll Direct Deposit prenotifications• Direct deposit exceptions• Setting up Payroll Direct Deposit• Entering auto-settle line information• Setting up Payroll Direct Deposit security
Regular vs. deduction direct deposits
A deduction direct deposit account is set up as a link to a Payroll deduction, rather than as a separate Payroll Direct Deposit account entry. You should use deduction direct deposit only if an employee requests to have some Payroll funds deposited to a direct deposit account and the remainder of his or her earnings paid with a check.

P A R T 7 P A Y R O L L D I R E C T D E P O S I T
206 U . S . P A Y R O L L
The following table explains the differences between a regular direct deposit and a deduction direct deposit.
Remainder of net
Payroll calculates the net wages for an employee’s earnings, which can then be distributed to one or more direct deposit accounts. If all direct deposit accounts are paid and the net wages have not been fully exhausted, the remaining amount is called the remainder of net.
• If the employee is using regular direct deposit accounts, the remainder of net will be added to the amount paid to the account indicated by the Remainder of Net Line Number on the Employee Direct Deposit Maintenance window.
For example, suppose Jane’s net wages are $1,200. She has two direct deposit accounts:
• Line 1 is a $500 Direct deposit to a savings account.• Line 2 is a $500 Direct deposit to a checking account.
$1200 - $500 - $500 = $200
The Remainder of Net Line Number is 2, her checking account. The remainder of net is $200. This amount will be added to Jane’s checking account. The total deposits will be $500 to savings and $700 to checking.
• If the employee is using deduction direct deposit, those “deductions” are processed in Payroll just like any other Payroll deduction. The amount for a deduction direct deposit is determined by Payroll and is not changed by Payroll Direct Deposit. If an employee is using deduction direct deposit, the employee’s net wages—the amount left after deductions are paid—are paid with a paycheck. For more information, refer to Chapter 25, “Deduction Direct Deposit setup.”
Regular direct deposits Deduction direct deposits
Effect on wages Sends net wages to direct deposit accounts.
Reduces net wages.
Setup location Employee Direct Deposit Maintenance window.
Employee Deduction Maintenance window.
Payment order Paid in the order they appear in the Employee Direct Deposit Maintenance window, after any deduction direct deposits.
Paid first.
Remainder of net pay
Remainder of net pay over the amount of deductions and direct deposits will be sent to the direct deposit account indicated by the Remainder of Net Line Number field in the Employee Direct Deposit Maintenance window.
Net pay over the amount of the direct deposits cannot be sent to any direct deposit account, but is paid with a “real” check.
Checks If an employee has “regular” direct deposit accounts, any net pay over the amount will be sent to the direct deposit account specified in the Remainder of Net Line Number field; the employee might get a voided check or a direct deposit earnings statement.
If an employee has only a deduction direct deposit account, any net pay over the amount of the deductions will be paid with a “real” check.
U . S . P A Y R O L L 207
C H A P T E R 2 3 P A Y R O L L D I R E C T D E P O S I T S E T U P
Payroll Direct Deposit prenotifications
A prenotification or prenote is a test run of direct deposit information to help you verify the financial institution and employee account numbers you’ve entered in Payroll Direct Deposit. If you’re using deduction direct deposits, the effect of prenotes is slightly different. Refer to Chapter 25, “Deduction Direct Deposit setup,” for more information.
After you’ve entered an employee’s Direct Deposit preferences, you might be required by your financial institution to process one or more prenotifications to verify the information in the ACH file. You’ll need to check with your bank or credit union’s guidelines and process as many prenotes as required when an employee adds an account to his or her direct deposit setup.
Each time an employee begins using Direct Deposit, you’ll probably be required to complete a prenotification for that employee’s distributions. Check with your financial institution for more details about particular requirements.
If you generate an ACH file that includes an employee account that has prenote status, the ACH file line item will include financial institution and account numbers, but a zero dollar value.
Payment to employees who have entries that are in prenote status will depend on whether all or some of the employee’s accounts have prenote status:
• If all of an employee’s accounts have prenote status, the employee will not be paid by Direct Deposit. A check will be generated for the employee instead.
• If the employee has a combination of active and prenote status accounts, the employee’s distributions to the active accounts will be completed. The remainder of net will be deposited in a direct deposit account; it will not be paid by check.
Direct deposit exceptions
Occasionally, you will not be able to complete the direct deposit transactions that are specified by your employees. This causes an exception to your direct deposit process. Exceptions are the instances when direct deposit transactions are not completed as you might have intended. Payroll direct deposit groups exceptions into three categories:
• Insufficient Funds• Amount Deducted, Not Deposited• Other
Situations that might cause each of these exceptions are described here.

P A R T 7 P A Y R O L L D I R E C T D E P O S I T
208 U . S . P A Y R O L L
Insufficient fundsThe employee hasn’t earned enough funds in this pay period to pay all deposit accounts.
Situation A The amount scheduled to be directly deposited to the account exceeded the net pay for the employee.
For example, suppose that Kevin’s usual net pay is $1,000, and has only one line in his direct deposit setup, directing that $600 be sent to a savings account.
During one pay period, however, his net wages are only $500. The direct deposit for that Payroll would be $500 to the savings account. This amount—even though it is an exception to a typical Payroll run—would be transferred to the account with Direct Deposit.
Situation B Funds were allocated to other direct deposit accounts or deductions, resulting in insufficient funds to pay the direct deposit account referred to in the exception entry.
For example, suppose that Maria’s usual net pay is $1,000 and she has the following direct deposit accounts set up:
• Line 1: Savings $400• Line 2: Checking $600
During one pay period, however, her net wages are only $800. The direct deposits for that Payroll would be $400 to the savings account—since accounts are paid in the order they appear in the scrolling window—and $400 to her personal checking account. These amounts—even though they are exceptions to a typical Payroll run—would be transferred to the accounts with Direct Deposit.
Situation C The entire net pay was split by percentage between two or more direct deposit accounts and the net pay couldn’t be divided evenly.
For example, suppose that Sam’s net pay is $999.99 and he has the following direct deposit accounts set up:
• Line 1: Checking 50 percent• Line 2: Savings 50 percent
In this scenario, $500 would be sent to the first account listed in the Direct Deposit Setup window, and $499.99 would be deposited into the second account listed.
Amount deducted, not depositedThe amount was deducted but not deposited.
Situation A A Payroll deduction was linked to direct deposit in the Direct Deposit Setup window, but when the accounts were set up for the employee in the Employee Direct Deposit Maintenance window, no link was established between the deduction and the employee’s direct deposit accounts.
Situation B A deduction direct deposit account was set to Inactive or Prenote, or was deleted in the Employee Direct Deposit Maintenance window.
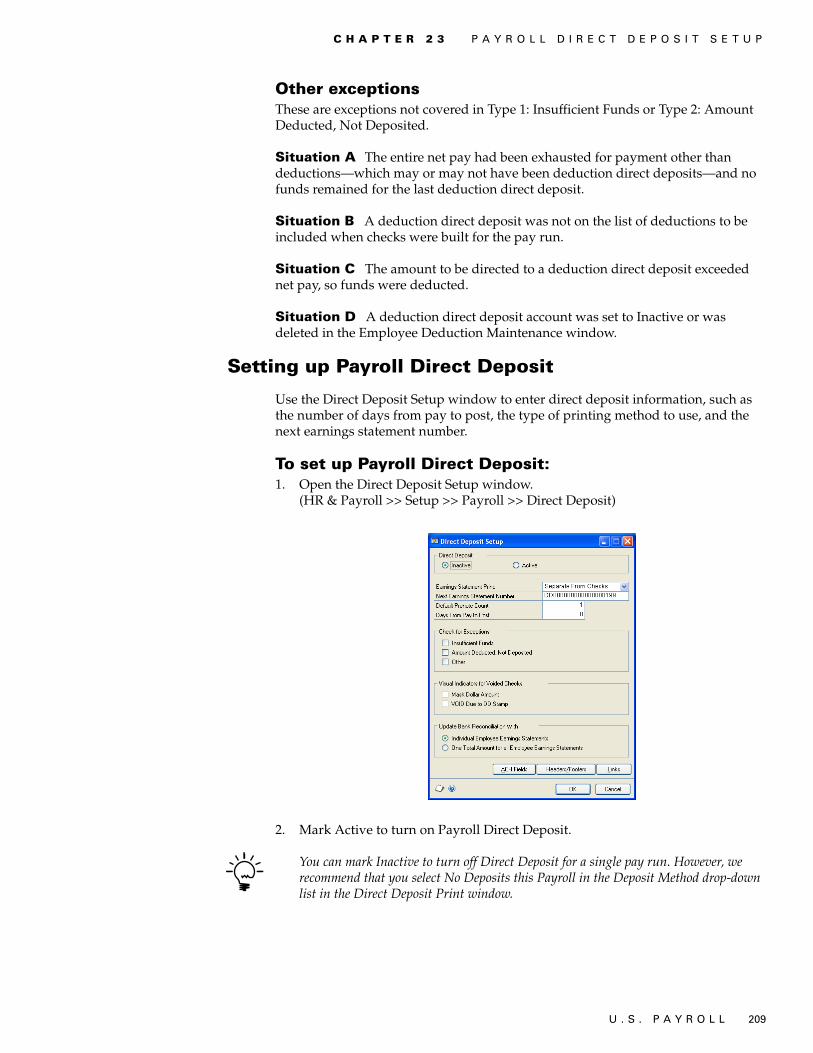
U . S . P A Y R O L L 209
C H A P T E R 2 3 P A Y R O L L D I R E C T D E P O S I T S E T U P
Other exceptionsThese are exceptions not covered in Type 1: Insufficient Funds or Type 2: Amount Deducted, Not Deposited.
Situation A The entire net pay had been exhausted for payment other than deductions—which may or may not have been deduction direct deposits—and no funds remained for the last deduction direct deposit.
Situation B A deduction direct deposit was not on the list of deductions to be included when checks were built for the pay run.
Situation C The amount to be directed to a deduction direct deposit exceeded net pay, so funds were deducted.
Situation D A deduction direct deposit account was set to Inactive or was deleted in the Employee Deduction Maintenance window.
Setting up Payroll Direct Deposit
Use the Direct Deposit Setup window to enter direct deposit information, such as the number of days from pay to post, the type of printing method to use, and the next earnings statement number.
To set up Payroll Direct Deposit:1. Open the Direct Deposit Setup window.
(HR & Payroll >> Setup >> Payroll >> Direct Deposit)
2. Mark Active to turn on Payroll Direct Deposit.
You can mark Inactive to turn off Direct Deposit for a single pay run. However, we recommend that you select No Deposits this Payroll in the Deposit Method drop-down list in the Direct Deposit Print window.

P A R T 7 P A Y R O L L D I R E C T D E P O S I T
210 U . S . P A Y R O L L
3. Select an earnings statement print option.
Separate From Checks Generates separate print jobs—one for employees who receive actual checks, and another for employees whose entire paychecks are deposited directly. With this option, you aren’t required to print voided checks for employees whose entire earnings are deposited directly; earnings statements for employees using Direct Deposit are printed.
As Voided Checks Generates a single Payroll print job that will print a Payroll check for every employee. The print job will include voided checks for employees whose pay is entirely dispersed using Direct Deposit.
4. Enter the next earnings statement number that should appear on the next deposit slip. This number will increase automatically.
5. Enter the number of prenotes required of new employee direct deposit accounts.
6. In the Days From Pay to Post field, enter the number of days after the end of the pay period that the direct deposit funds will be available to your employees. For example, if your pay period ends on Friday and the funds need to be available on the following Monday, you would enter “3.”
7. Mark the type of exceptions to check for. We recommend that you mark all three types.
8. If you print voided checks, mark one or both of the Visual Indicators for Voided Checks.
• Mark Mask Dollar Amount to place a row of X’s on the line typically used to spell out the check amount on the check portion of the paycheck. The amount displayed in the other amount field on the check will be $00.00.
• Mark VOID Due to DD Stamp for those words to appear in large letters on the signature line of the Payroll check.
9. Select whether to update bank reconciliation with individual employee earnings statements or with one total amount for all employee earnings statements.
10. Choose ACH Fields to open the ACH Fields Setup window. For more information, refer to Setting up the ACH fields on page 213.
11. Choose Headers/Footers to open the ACH File Header and Footer window. For more information, refer to Creating an ACH header and footer on page 215.
12. Choose Links to open the Link Deduction Setups to Direct Deposit window. For more information, refer to Linking Payroll Direct Deposit deductions to direct deposits on page 218.
13. Choose OK.

U . S . P A Y R O L L 211
C H A P T E R 2 3 P A Y R O L L D I R E C T D E P O S I T S E T U P
Entering auto-settle line information
The auto-settle line is an optional line of information added to some ACH files generated by Direct Deposit to bring the ACH file into balance.
Use the Checkbook Maintenance window and the Bank Maintenance window to enter Payroll Direct Deposit auto-settle line information.
Some financial institutions that process direct deposit payments require ACH files to contain the auto-settle line. Others require that the ACH files do not contain it. Check with your financial institution for its requirements.
To enter auto-settle line information:1. Open the Checkbook Maintenance window.
(Financial >> Cards >> Financial >> Checkbook)
2. Enter or select a checkbook ID.
3. You can click the Bank ID field to open the Bank Maintenance window, where you can enter the DD Transit Number. Choose Save. The Checkbook Maintenance window will be displayed.
4. Choose Direct Deposit in the Checkbook Maintenance window to open the Direct Deposit Checkbook Maintenance window.
5. Enter a bank account and account name.
6. Mark the type of account—checking or savings.
7. Choose OK to save your changes.
Setting up Payroll Direct Deposit security
To use Payroll Direct Deposit, you must have access to the Payroll Direct Deposit windows.
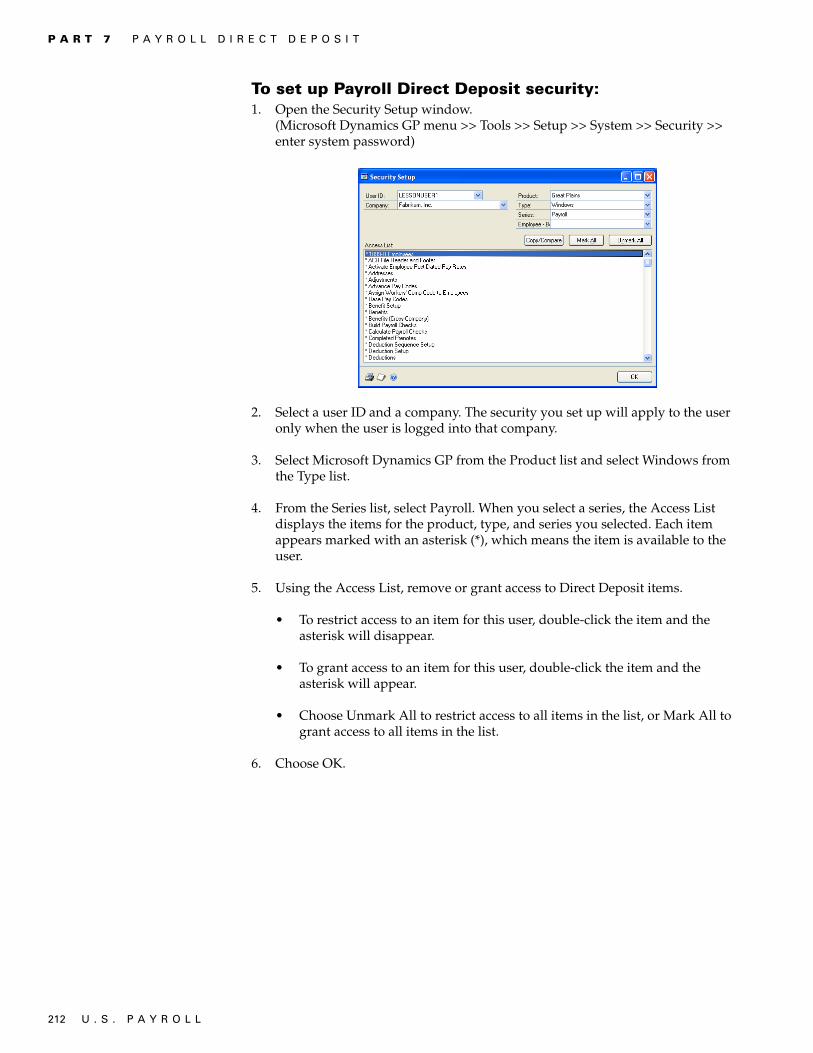
P A R T 7 P A Y R O L L D I R E C T D E P O S I T
212 U . S . P A Y R O L L
To set up Payroll Direct Deposit security:1. Open the Security Setup window.
(Microsoft Dynamics GP menu >> Tools >> Setup >> System >> Security >> enter system password)
2. Select a user ID and a company. The security you set up will apply to the user only when the user is logged into that company.
3. Select Microsoft Dynamics GP from the Product list and select Windows from the Type list.
4. From the Series list, select Payroll. When you select a series, the Access List displays the items for the product, type, and series you selected. Each item appears marked with an asterisk (*), which means the item is available to the user.
5. Using the Access List, remove or grant access to Direct Deposit items.
• To restrict access to an item for this user, double-click the item and the asterisk will disappear.
• To grant access to an item for this user, double-click the item and the asterisk will appear.
• Choose Unmark All to restrict access to all items in the list, or Mark All to grant access to all items in the list.
6. Choose OK.
U . S . P A Y R O L L 213
Chapter 24: ACH File setupAn ACH file is an Automated Clearing House transaction file—a text file containing a group of electronic payments that will be deposited into employee bank accounts in lieu of paper checks.
You will submit ACH files to a financial institution that is a member of the National Automated Clearing House Association (NACHA) to transmit the payments contained in the ACH file. You can transfer the file to the bank or credit union electronically.
This information is contained in the following sections:
• Setting up the ACH fields• Creating an ACH header and footer
Setting up the ACH fields
Use the ACH Fields Setup window to enter specific information about the bank or credit union account that your company uses to generate its Payroll. When you enter direct deposit information for your employees, it is entered into a special format that can be interpreted by banks and credit unions to complete the transactions.
Members of NACHA use the following codes to specify each type of ACH transaction:
• Checking Credits (22)• Checking Credit Prenotifications (23)• Checking Debits (27)• Checking Debit Prenotifications (28)• Savings Credits (32)• Savings Credit Prenotifications (33)• Savings Debits (37)• Savings Debit Prenotifications (38)
Part of the information you enter, like your company’s identification number, probably won’t change from one pay run to the next. You can enter that information in the ACH Fields Setup window so it is automatically included in the ACH files you generate.
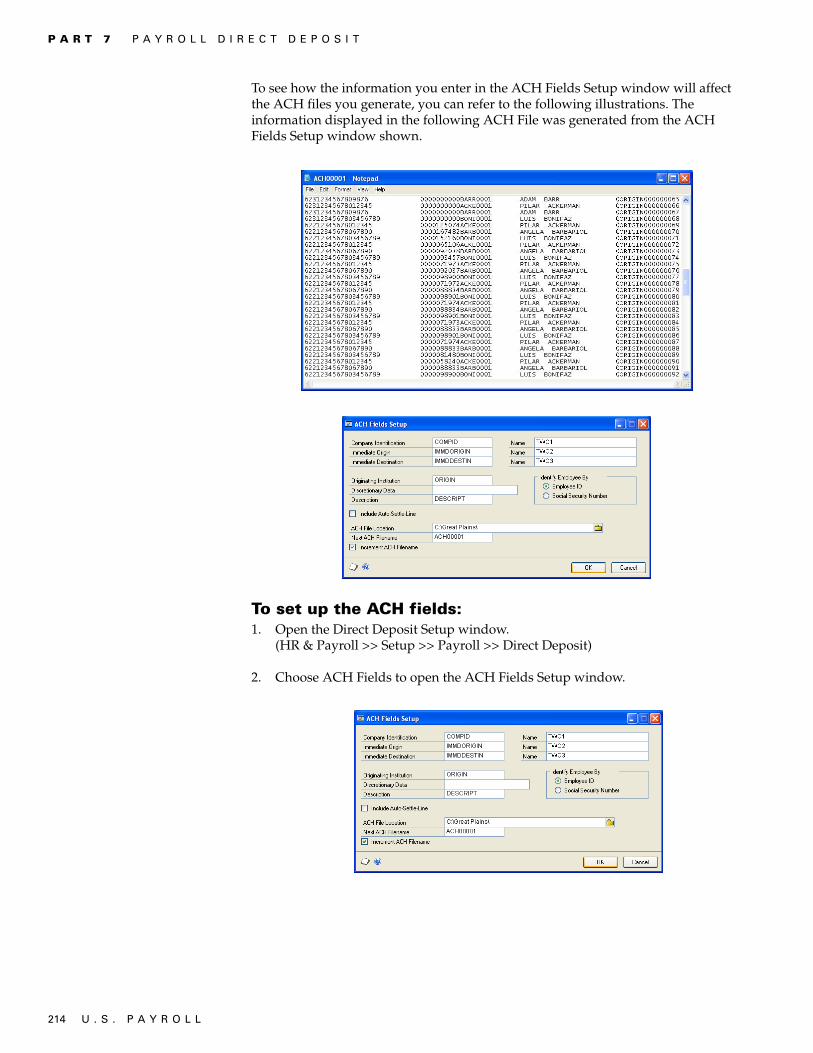
P A R T 7 P A Y R O L L D I R E C T D E P O S I T
214 U . S . P A Y R O L L
To see how the information you enter in the ACH Fields Setup window will affect the ACH files you generate, you can refer to the following illustrations. The information displayed in the following ACH File was generated from the ACH Fields Setup window shown.
To set up the ACH fields:1. Open the Direct Deposit Setup window.
(HR & Payroll >> Setup >> Payroll >> Direct Deposit)
2. Choose ACH Fields to open the ACH Fields Setup window.

U . S . P A Y R O L L 215
C H A P T E R 2 4 A C H F I L E S E T U P
3. Enter information about your company and the financial institution in the available fields. This information will be provided by the financial institution receiving your ACH File.
• Company Identification: Enter up to ten digits to identify your company.
• Company Identification Name: Enter the name of your company.
• Immediate Origin and Name: Enter the routing number and name of the financial institution sending the ACH file.
• Immediate Destination and Name: Enter the routing number and name of the financial institution receiving the ACH file.
• Originating Institution: Enter the routing number of the originating financial institution.
• Discretionary Data: Enter information given to you by your financial institution, as needed.
• Description: Enter text to appear on employee earnings statements.
4. Select whether to identify the employee in the ACH file by the employee ID or Social Security number.
5. Mark Include Auto-Settle-Line if your financial institution requires this. If it isn’t marked, the financial institution will create the balancing line. For more information, refer to Entering auto-settle line information on page 211.
You cannot generate an ACH file that includes some Payroll runs with the Auto-Settle Line option and some without; they must all have the option or all be without it.
6. In the ACH File Location field, enter or select the path where the generated ACH file will be stored.
7. Enter the file name to use for your first ACH file in the Next ACH Filename field.
8. Mark Increment ACH Filename to save each ACH file you that you generate and to have your ACH file names automatically incremented (ACH001.TXT, ACH002.TXT, etc.).
9. Choose OK.
Creating an ACH header and footer
Use the ACH File Header and Footer window to define headers and footers for your ACH File. Headers and footers are lines of data that you can create to be added to the beginning or the end of the ACH File.
Headers and footers can be used for extra information needed in the ACH File and automatically will be added to your file each time it’s generated. The lines will appear exactly as shown in the ACH File Header and Footer window and will become part of the ACH File.

P A R T 7 P A Y R O L L D I R E C T D E P O S I T
216 U . S . P A Y R O L L
Some banks or credit unions might require that you include additional information in your ACH file, such as a password or account number. Be sure to check with your financial institution for more information about specific requirements for these files.
In the ACH File Header and Footer window, all changes are saved immediately. If you delete or change a header or footer, you can only restore it by re-entering it.
To create an ACH header or footer:1. Open the Direct Deposit Setup window.
(HR & Payroll >> Setup >> Payroll >> Direct Deposit)
2. Choose Headers/Footers to open the ACH File Header and Footer window.
3. Choose Add under the appropriate scrolling window.
4. Enter your information on the first available line in the scrolling window.
Be sure to check with your financial institution for more information about specific requirements for ACH file headers and footers.
5. Repeat Steps 3 and 4 to continue creating header and footer information.
6. Enter the number of header lines and footer lines to include in the ACH file.
7. Choose Delete under the appropriate scrolling window to delete a header or footer. Choose Delete All under the appropriate scrolling window to delete all headers or footers.
8. Choose OK.

U . S . P A Y R O L L 217
Chapter 25: Deduction Direct Deposit setupA deduction direct deposit account is set up as a link to a Payroll deduction, rather than as a separate Payroll direct deposit account entry. You should use deduction direct deposit only if an employee requests to have some Payroll funds deposited to a direct deposit account and the remainder of his or her earnings paid with a check. For more information, refer to Regular vs. deduction direct deposits on page 205.
When you use a deduction direct deposit, a Bank Reconciliation entry is not made for the deposit and the deposit amount is not reflected in Payroll Check History information. You must create a manual Bank Reconciliation transaction for the deduction deposit.
If you use deduction direct deposits, you must complete the following procedures to complete a Payroll deduction setup routine. The setup routine will include:
• Creating Payroll deductions and setting the sequence for the deductions
• Establishing a link between deductions and direct deposit
• Enrolling individual employees in the deduction direct deposits
• Entering the information for employees’ specific account setups
The key difference between direct deposit accounts and deduction direct deposit accounts is the setup of each. After you’ve completed the setup, you can generate ACH files just as you would if they were regular direct deposit accounts.
This information is contained in the following sections:
• Creating a direct deposit deduction• Linking Payroll Direct Deposit deductions to direct deposits• Prenotification and deduction direct deposits
Creating a direct deposit deduction
Use the Deduction Setup window to enter and maintain company deduction cards. Examples of Payroll Direct Deposit deductions include savings deductions and checking deductions. Be sure to include the deduction with your pay run in the Build Payroll Checks window.

P A R T 7 P A Y R O L L D I R E C T D E P O S I T
218 U . S . P A Y R O L L
To create a direct deposit deduction:1. Open the Deduction Setup window.
(HR & Payroll >> Setup >> Payroll >> Deduction)
2. Create a Payroll deduction and verify that the deduction is not sheltered from taxes. For more information about setting up Payroll deductions, refer to Setting up a standard deduction on page 40.
3. Choose Save.
4. Select the deduction you created and choose Sequence to open the Deduction Sequence Setup window.
5. Add the Direct Deposit deductions to the list of Sequenced Deductions by selecting the Unsequenced Deduction and choosing Insert.
6. Choose OK.
Linking Payroll Direct Deposit deductions to direct deposits
Use the Link Deduction Setups to Direct Deposit window to link the deduction to Payroll Direct Deposit after setting up the Payroll Direct Deposit deduction.

U . S . P A Y R O L L 219
C H A P T E R 2 5 D E D U C T I O N D I R E C T D E P O S I T S E T U P
When you use a deduction direct deposit, an advice slip or earnings statement for the deduction deposit amount will not be printed for the employee. A check will be printed only for the amount of the linked deduction. Also, the linked deduction amount will not be posted to Bank Reconciliation.
To link Payroll Direct Deposit deductions to direct deposits:1. Open the Direct Deposit Setup window.
(HR & Payroll >> Setup >> Payroll >> Direct Deposit)
2. Choose Links to open the Link Deduction Setups to Direct Deposit window.
3. Select the deduction to link to Direct Deposit from the Deductions Not Linked list and choose Insert. The deduction is moved to the Deductions Linked to DD list.
You only need to link a Direct Deposit option to the Payroll process once. After the link has been established, it is available for future pay runs.
Do not link all deductions, only those you created to use with Payroll Direct Deposit.
4. Choose OK.
Prenotification and deduction direct deposits
Your financial institution will require one or more prenotifications for deduction direct deposits, as they do for regular direct deposits. For more information, refer to Payroll Direct Deposit prenotifications on page 207.
If you must complete a prenotification for a deduction direct deposit account, follow the procedure in Generating an ACH file with prenotes only on page 233. If a deduction direct deposit account is set to prenote status during a regular pay run, the amount will be deducted, but will not be transferred into an account.
During a regular pay run, deduction direct deposit accounts with prenote status will be noted in the Exceptions Report.

220 U . S . P A Y R O L L

U . S . P A Y R O L L 221
Chapter 26: Employee Direct Deposit maintenanceYou’ll need to enter employee direct deposit information when an employee requests his or her Payroll funds be directed to a direct deposit account. To set up an employee’s records so that some Payroll funds are deposited into a direct deposit account and also print a check for the employee, refer to Regular vs. deduction direct deposits on page 205. To set up a one-time check run for special payments, such as holiday bonuses, refer to Inactivating employee direct deposit accounts on page 224.
This information is contained in the following sections:
• Single- and multiple-account direct deposit distribution types• Creating an employee direct deposit record• Updating an employee direct deposit account status• Inactivating employee direct deposit accounts• Reactivating direct deposit records• Reactivating an employee direct deposit account
Single- and multiple-account direct deposit distribution types
There are two types of direct deposit distributions: single-account distributions and multiple-account distributions.
Single-account distributions Used when only one account line is entered for an employee and the entire net wages from the pay run will be deposited to that account. If you’re using a single-account distribution, it’s best to use the percentage field and set it to 100 percent. This makes distribution of any unusual Payroll amounts—for employees who earn overtime, for example—easier.
Multiple-account distributions Used when more than one account is set up for an employee and net wages are to be distributed into the accounts in a certain order. Because Payroll Direct Deposit pays each account in order, it is possible to have some accounts receive less than the entered amount.
If you specify an amount when using multiple-account distributions, the employee’s net wages will be reduced by that amount. If you enter a percent, the employee’s net wages will be multiplied by that percent. Each time an account is paid, net wages for the employee are reduced. This continues until all the net wages have been deposited or until all lines have been paid. Any funds remaining are called remainder of net and are added to the account indicated in the Remainder of Net Line Number field.
If an employee’s net wages for the pay period are not sufficient to pay all items defined for an employee, the items are paid in full from top to bottom until all net wages are deposited. In no circumstance will an employee have more or less money paid to accounts than the net wages in the pay run.
Guidelines in this section do not apply to direct deposit entries that are linked to Microsoft Dynamics GP deductions. For more information, refer to Chapter 25, “Deduction Direct Deposit setup.”

P A R T 7 P A Y R O L L D I R E C T D E P O S I T
222 U . S . P A Y R O L L
Creating an employee direct deposit record
Use the Employee Direct Deposit Maintenance window to set up direct deposit information for a specific employee.
To create an employee direct deposit record:1. Open the Employee Direct Deposit Maintenance window.
(HR & Payroll >> Cards >> Payroll >> Direct Deposit)
2. Select an Employee ID.
3. Choose Add Accounts to create a new line item. Each line is numbered automatically.
4. Enter the bank and account numbers in the appropriate fields and indicate if the account is a savings or checking account.
5. Enter amount or percentage information for this account. For example, suppose an employee wants to split his or her paycheck in the following way:
• $800 to a personal checking account• $400 (and remainder of net) to a credit union savings account
If the employee takes one week without pay, the employee’s net pay for that period is only $600. The entire $600 will be deposited to the personal checking account because it is listed first in the Employee Direct Deposit Maintenance window. No payments are made to the second account—the credit union account.
To have this noted in the exceptions report, you must mark Insufficient Funds in the Direct Deposit Setup window.

U . S . P A Y R O L L 223
C H A P T E R 2 6 E M P L O Y E E D I R E C T D E P O S I T M A I N T E N A N C E
6. Select a Status option.
Prenote Use this option if this is a trial run to verify the entries are properly set up.
Consult your bank or credit union representative to see how many prenotes are required for each account.
Active Use this option to make an actual deposit to the account.
Inactive Use this option to temporarily stop direct deposits to this account.
No deposits can be made to accounts that are marked Inactive or Prenote. If the account is marked Prenote, however, a line will be displayed in the ACH file to show a transfer of $00.00 to that account.
7. If the Status is Prenote, enter the number of prenotes that are required in the # field.
The number of prenotes that must still be completed will be tracked. If you need to complete three prenotes, for example, this number will be adjusted to 2 after you complete the first prenotification.
A prenote status does not automatically change to Active. This must be done manually.
8. If you are using a multiple-account distribution, be sure the Remainder of Net Line Number field references the line number where any remainder of net should be deposited.
9. Repeat steps 3 to 8 for each account for this employee.
10. Choose Save.
Updating an employee direct deposit account status
Use the Default Prenote Count field in the Direct Deposit Setup window to track the number of prenotifications that are required for each employee’s direct deposit account. Each time you generate an ACH file, the prenote count will change in the Employee Direct Deposit Maintenance window.
When the # field in the Employee Direct Deposit Maintenance window is zero and the status is Prenote, the Employee ID and Employee Name will appear in the Completed Prenotes window.
Use the Completed Prenotes window to update an employee direct deposit account status. This window is a shortcut to the Employee Direct Deposit Maintenance window, where you can change the employee’s account status from Prenote to Active.

P A R T 7 P A Y R O L L D I R E C T D E P O S I T
224 U . S . P A Y R O L L
To update an employee direct deposit account status:1. Open the Generate ACH File window.
(HR & Payroll >> Transactions >> Payroll >> Generate ACH File)
2. Choose View Completed Prenotes to open the Completed Prenotes window.
3. Select an employee ID and choose Select. The Direct Deposit Employee Maintenance window opens.
4. Update the status of the appropriate account or accounts. You might want to look for accounts that have zeros in the # column but are still set to Prenote status; those accounts have completed prenotes.
5. Choose Save. The Employee Direct Deposit Maintenance window closes and the Completed Prenotes window opens.
6. Repeat steps 3 through 5 for each employee whose records you are updating.
After you select an employee record in the Completed Prenotes window, the employee’s name will be removed from the scrolling window whether or not you changed the employee’s account status.
7. When you’ve finished, close the Completed Prenotes window.
Inactivating employee direct deposit accounts
The Employee Direct Deposit Maintenance window provides you with two ways to inactivate employees’ direct deposit accounts—inactivating an employee’s entire direct deposit record and inactivating individual employee direct deposit accounts. Inactivate direct deposit to run checks for special situations like one-time, holiday bonus payments.
Direct deposit records also can be inactivated in the Employee Maintenance window. If you inactivate an employee card in the Employee Maintenance window, Payroll will also inactivate the employee’s direct deposit records. If you inactivate a direct deposit record in the Employee Maintenance window, the accounts for the direct deposit accounts will not be automatically inactivated. For more information, see Inactivating an employee card on page 76.

U . S . P A Y R O L L 225
C H A P T E R 2 6 E M P L O Y E E D I R E C T D E P O S I T M A I N T E N A N C E
Inactive employee direct deposit records are automatically deleted when you choose Remove Inactive Records in the Remove Inactive Records window. Refer to Removing inactive records on page 175 for information about deleting inactive employee cards.
To inactivate a direct deposit record for an employee:1. Open the Employee Direct Deposit Maintenance window.
(HR & Payroll >> Cards >> Payroll >> Direct Deposit)
2. Enter or select an employee ID.
3. Mark Inactive to inactivate the employee’s direct deposit record.
4. Choose Save.
To inactivate individual employee direct deposit accounts:1. Open the Employee Direct Deposit Maintenance window.
(HR & Payroll >> Cards >> Payroll >> Direct Deposit)
2. Enter or select an employee ID.
3. Change the Status field for each account in the scrolling window to Inactive.
4. Choose Save.
Reactivating direct deposit records
Direct deposit records can be reactivated in the Employee Maintenance window. If you unmark Inactive in this window and mark Direct Deposit in the Reactivate Employee window, the employee’s direct deposit records will be reactivated. For more information, see Reactivating an employee card on page 77.
You also can reactivate direct deposit records from the Employee Direct Deposit Maintenance window, but you should have reactivated the records first in the Employee Maintenance window.

P A R T 7 P A Y R O L L D I R E C T D E P O S I T
226 U . S . P A Y R O L L
Reactivating an employee direct deposit account
If an account has been inactive and then is reactivated, you might need to complete more prenotifications. Rules vary, so be sure to check with your financial institution.
To reactivate an employee direct deposit account:1. Open the Employee Direct Deposit Maintenance window.
(HR & Payroll >> Cards >> Payroll >> Direct Deposit)
2. Enter or select an employee ID.
3. Unmark Inactive to activate all accounts for this employee, or change the appropriate Status field to activate individual accounts.
4. Choose Save.

U . S . P A Y R O L L 227
Chapter 27: Deduction Direct Deposit maintenanceUse employee deduction direct deposits if an employee requests having some Payroll funds deposited into a direct deposit account and the remainder of his or her earnings paid with a check.
This information is contained in the following sections:
• Enrolling an employee in a direct deposit deduction• Creating an employee deduction direct deposit record
Enrolling an employee in a direct deposit deduction
These instructions assume that you have already created Microsoft Dynamics GP deductions, set the sequence for the deductions and established a link between those deductions and Payroll Direct Deposit. For more information, refer to Creating a direct deposit deduction on page 217 and Linking Payroll Direct Deposit deductions to direct deposits on page 218.
After creating the Payroll Direct Deposit deduction and linking it to Payroll Direct Deposit, you can enroll employees in that Payroll Direct Deposit deduction.
To enroll an employee in a direct deposit deduction:1. Open the Employee Deduction Maintenance window.
(HR & Payroll >> Cards >> Payroll >> Deduction)
2. Select an employee ID.
3. Enter or select the appropriate Payroll Direct Deposit deduction.
4. Choose Save.

P A R T 7 P A Y R O L L D I R E C T D E P O S I T
228 U . S . P A Y R O L L
Creating an employee deduction direct deposit record
After the Microsoft Dynamics GP deduction has been created and linked to Payroll Direct Deposit, you can enter employee-specific deduction direct deposit information.
Inactivating deduction direct deposit accounts can be done in either of the two ways outlined in the Inactivating employee direct deposit accounts on page 224.
Deduction direct deposit accounts marked Inactive will be noted in the Exceptions Report.
To create an employee deduction direct deposit record:1. Open the Employee Direct Deposit Maintenance window.
(HR & Payroll >> Cards >> Payroll >> Direct Deposit)
2. Select an employee ID and choose Link Deduction to open the Deductions window.
3. Select a deduction and choose Select. The deduction direct deposit record is displayed in the Employee Direct Deposit Maintenance window.
4. Enter a bank number and an account number for the deduction.
5. Mark checking or savings to indicate the type of bank account the deduction will be deposited to.
6. Verify the amount or percentage for this account. You cannot change the amount or percentage in this window. Use the Employee Deduction Maintenance window to make changes.
7. Select a status for the account.
8. Enter a Remainder of Net Line Number. This should be the last line number with bank account information.
A deduction direct deposit account cannot be assigned as a Remainder of Net account.
9. Choose Save.
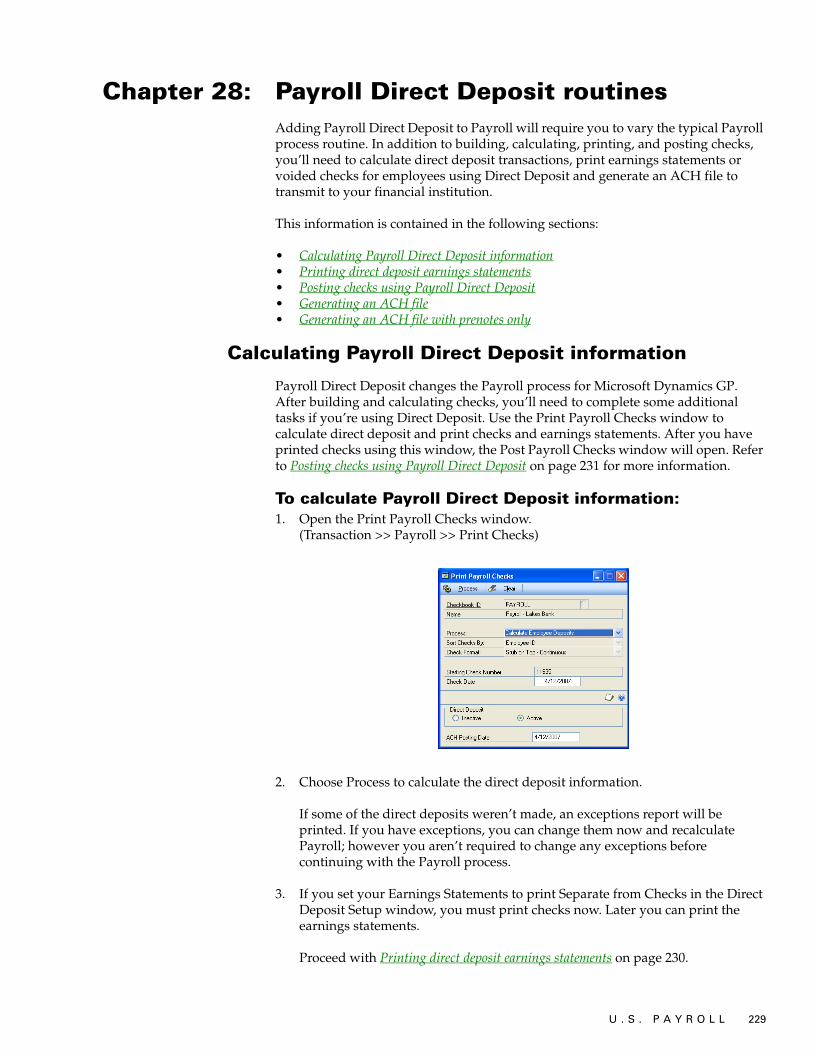
U . S . P A Y R O L L 229
Chapter 28: Payroll Direct Deposit routines Adding Payroll Direct Deposit to Payroll will require you to vary the typical Payroll process routine. In addition to building, calculating, printing, and posting checks, you’ll need to calculate direct deposit transactions, print earnings statements or voided checks for employees using Direct Deposit and generate an ACH file to transmit to your financial institution.
This information is contained in the following sections:
• Calculating Payroll Direct Deposit information• Printing direct deposit earnings statements• Posting checks using Payroll Direct Deposit• Generating an ACH file• Generating an ACH file with prenotes only
Calculating Payroll Direct Deposit information
Payroll Direct Deposit changes the Payroll process for Microsoft Dynamics GP. After building and calculating checks, you’ll need to complete some additional tasks if you’re using Direct Deposit. Use the Print Payroll Checks window to calculate direct deposit and print checks and earnings statements. After you have printed checks using this window, the Post Payroll Checks window will open. Refer to Posting checks using Payroll Direct Deposit on page 231 for more information.
To calculate Payroll Direct Deposit information:1. Open the Print Payroll Checks window.
(Transaction >> Payroll >> Print Checks)
2. Choose Process to calculate the direct deposit information.
If some of the direct deposits weren’t made, an exceptions report will be printed. If you have exceptions, you can change them now and recalculate Payroll; however you aren’t required to change any exceptions before continuing with the Payroll process.
3. If you set your Earnings Statements to print Separate from Checks in the Direct Deposit Setup window, you must print checks now. Later you can print the earnings statements.
Proceed with Printing direct deposit earnings statements on page 230.
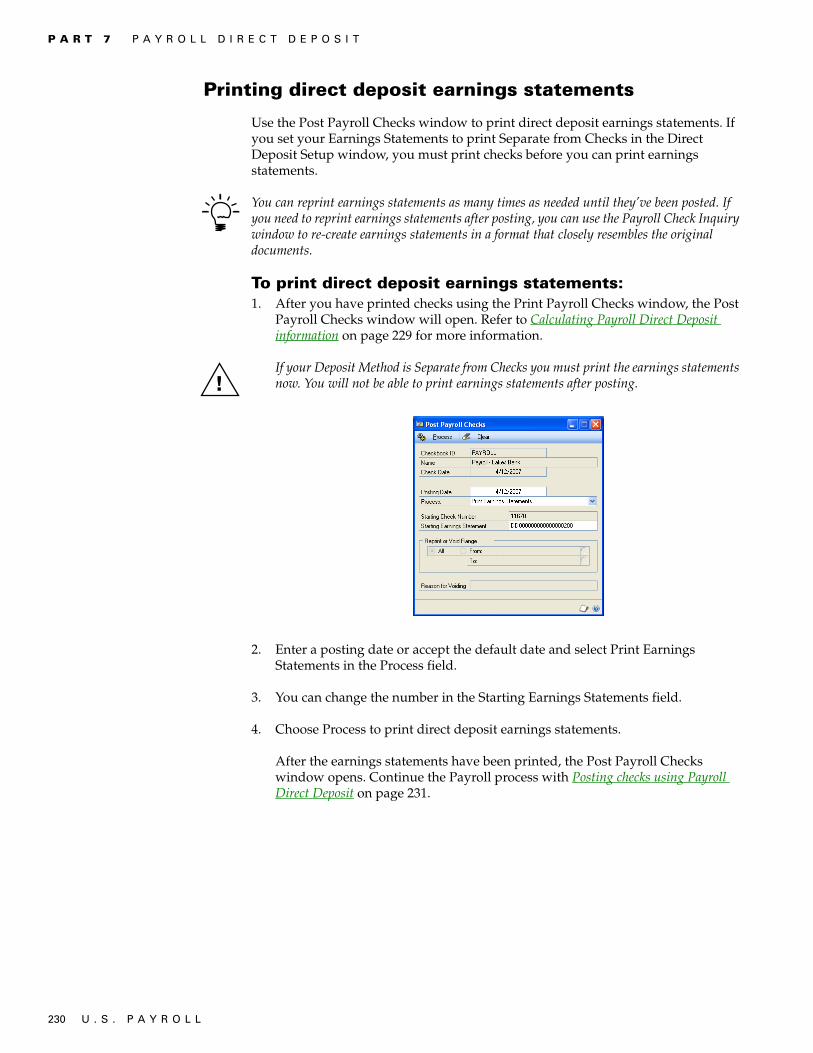
P A R T 7 P A Y R O L L D I R E C T D E P O S I T
230 U . S . P A Y R O L L
Printing direct deposit earnings statements
Use the Post Payroll Checks window to print direct deposit earnings statements. If you set your Earnings Statements to print Separate from Checks in the Direct Deposit Setup window, you must print checks before you can print earnings statements.
You can reprint earnings statements as many times as needed until they’ve been posted. If you need to reprint earnings statements after posting, you can use the Payroll Check Inquiry window to re-create earnings statements in a format that closely resembles the original documents.
To print direct deposit earnings statements:1. After you have printed checks using the Print Payroll Checks window, the Post
Payroll Checks window will open. Refer to Calculating Payroll Direct Deposit information on page 229 for more information.
If your Deposit Method is Separate from Checks you must print the earnings statements now. You will not be able to print earnings statements after posting.
2. Enter a posting date or accept the default date and select Print Earnings Statements in the Process field.
3. You can change the number in the Starting Earnings Statements field.
4. Choose Process to print direct deposit earnings statements.
After the earnings statements have been printed, the Post Payroll Checks window opens. Continue the Payroll process with Posting checks using Payroll Direct Deposit on page 231.

U . S . P A Y R O L L 231
C H A P T E R 2 8 P A Y R O L L D I R E C T D E P O S I T R O U T I N E S
Posting checks using Payroll Direct Deposit
Use the Post Payroll Checks window to post checks. If your deposit method is Separate from Checks, you must print the earnings statements before posting checks. Refer to Printing direct deposit earnings statements on page 230.
To post checks using Payroll Direct Deposit:1. The Post Payroll Checks window opens after you print checks or earnings
statements.
2. Enter a posting date or accept the default date and select Post in the Process field.
3. Choose Process to post your Payroll checks.
Continue the Payroll process with Generating an ACH file on page 231.
Generating an ACH file
After posting Payroll, you’re ready to generate your ACH file. An ACH file is an Automated Clearing House transaction file—a text file containing a group of electronic payments. The electronic payments are deposited into employee bank accounts in lieu of paper checks. Use the Generate ACH File window to create the text file that your bank can use to transfer electronic payments into employee back accounts.
These instructions assume that you have already completed the following processes— building checks, calculating checks and direct deposit, printing checks and earnings statements, and posting checks.

P A R T 7 P A Y R O L L D I R E C T D E P O S I T
232 U . S . P A Y R O L L
To generate an ACH file:1. Open the Generate ACH File window.
(HR & Payroll >> Transactions >> Payroll >> Generate ACH File)
2. Mark Include all prenotes to include all existing prenotes for employees, including those not part of this pay run.
3. Mark Delete build after use to delete the direct deposit data file after the ACH file is generated. The direct deposit information will be deleted after the Generate ACH File window is closed and the information will not be stored anywhere after the window closes.
If Delete build after use is not marked, the build will be available if you should need to generate the ACH file again.
4. Mark Include in the scrolling window for each entry to include in the ACH file.
Whether or not Include is automatically marked for a particular set of Payroll data will depend on if you marked Include Auto-Settle-Line in the ACH Fields Setup window when the data was generated. You can generate ACH files with Payroll data that includes that line, and you can generate ACH files with Payroll data that does not include that line. If you try to create an ACH file from a group of Payroll data files including some Payroll files with the line and some without, alert messages will be displayed.
5. Choose Create File to generate an ACH file. The ACH file will be written to the location you specified in the ACH File Location field. For more information, refer to Setting up Payroll Direct Deposit on page 209. The Report Destination window opens.
6. Select a print destination for the ACH Transmittal report.
This report is not the ACH file. The ACH file that you transmit to your financial institution will be written to the location specified in the ACH File Location field in the ACH Fields Setup window.

U . S . P A Y R O L L 233
C H A P T E R 2 8 P A Y R O L L D I R E C T D E P O S I T R O U T I N E S
Generating an ACH file with prenotes only
Use the Generate ACH File window to generate an ACH file that includes only prenote accounts.
A prenotes-only ACH file includes all employee accounts that have the prenote status. To generate a prenotes-only ACH file, you don’t need to complete the Payroll portion of the process. Because no Payroll builds will be included in this ACH file, marking Delete build after use will have no effect on this process.
To generate an ACH file with prenotes only:1. Open the Generate ACH File window.
(HR & Payroll >> Transactions >> Payroll >> Generate ACH File)
2. Mark Include all prenotes.
3. Unmark the Include checkbox on each line in the scrolling window. This ensures that no Payroll builds are used in the ACH file.
4. Choose Create File. The Report Destination window opens.
5. Select a print destination for the ACH Transmittal report.
This report is not the ACH file. The ACH file that you transmit to your financial institution will be written to the location specified in the ACH File Location field in the ACH Fields Setup window. For more information, refer to Setting up the ACH fields on page 213.

234 U . S . P A Y R O L L

U . S . P A Y R O L L 235
Chapter 29: Payroll Direct Deposit reportsYou can use Payroll Direct Deposit reports to help you monitor your direct deposit transactions. Use the information in this chapter to guide you through printing reports and working with report options.
For more information about creating and printing reports, using sample reports and modified reports from the Reports Library, and the various reporting tools that you can use with Microsoft Dynamics GP, refer to your System User’s Guide (Help >> Contents >> select Using The System).
This information is contained in the following sections:
• Payroll Direct Deposit report summary• Payroll Direct Deposit check forms
Payroll Direct Deposit report summary
Payroll Direct Deposit reports are printed from the Generate ACH File window. Additional reports, such as Payroll checks, earnings statements, and the Check Register, are printed during the Payroll process.
Payroll Direct Deposit reports available are:
Report Report information
Direct Deposit ACH File Report A printout of the ACH file. Creating a printout at the time you generate your ACH file saves you the work of opening and printing your ACH destination file later.
Direct Deposit ACH Transmittal Report
A combination of smaller reports, based on information you’ve entered during the Payroll process. Use transmittal reports to see the effect of the direct deposit transactions on your company’s accounts, and your employees’ savings and checking accounts. Each report is separated from the others with a page break.
Direct Deposit Check Register A check register with an asterisk (*) next to checks that have been voided during the Payroll process. A “D” indicates a check that has been voided due to direct deposit.
Direct Deposit Exceptions Report Lists any employee direct deposits that were not completed. Exceptions are divided into three categories—Insufficient Funds, Amount Deducted, Not Deposited, and Other.
Direct Deposit Detail List A list of all employee accounts—including those belonging to the employees who aren’t part of the current pay run—that have “prenote” status for any account in the Status dropdown list in the Employee Direct Deposit Maintenance window.
A descriptive summary of all employee accounts that are involved in Payroll Direct Deposit. In this report, one line is created for each employee account. If an employee is using two direct deposit accounts, for example, there will be two lines in the report representing that employee’s line items.
† Indicates reports that can be assigned to named printers. For more information, refer to your System User’s Guide (Help >> Contents >> select System Administration).

P A R T 7 P A Y R O L L D I R E C T D E P O S I T
236 U . S . P A Y R O L L
The Direct Deposit ACH Transmittal Report is a combination of smaller reports, based on information you’ve entered during the Payroll process. These are the available Transmittal reports, along with their bank transaction codes:
• Checking Credits (22)• Checking Credit Prenotifications (23)• Checking Debits (27)• Checking Debit Prenotifications (28)• Savings Credits (32)• Savings Credit Prenotifications (33)• Savings Debits (37)• Savings Debit Prenotifications (38)• Summary Table
The summary table—always the last page of the report—follows the format of a report required by many financial institutions to accompany the ACH file.
Direct Deposit List A list of all employees and their direct deposit statuses. In this report, one line item is created for each employee. It is possible for an employee to have an Active status even if their account status is set to Inactive. For an employee to have an Inactive status, Inactive must be marked in the Employee Direct Deposit Maintenance window.
Direct Deposit Register Shows the amount deposited for each employee. The report lists the employee ID, Social Security number, gross pay, net pay, and check number.
Direct Deposit Statement of Earnings†
Generated when Payroll checks are posted. Instead of printing voided checks for employees who have all their earnings deposited using direct deposit, users can print checks for only those employees who are paid with a “real” Payroll check. Employees paid entirely through direct deposit transactions can be given earnings statements that can be printed on regular printer paper. The direct deposit earnings statements include the same information as the Payroll checks and check stubs.
Direct Deposit Trxs Register A list of all direct deposit transactions completed during the pay period. The report lists all employees who were enrolled in either type of direct deposit transaction in alphabetical order. Other information is included for each employee record—the employee’s Social Security or employee ID number; the types of accounts to which the funds were deposited; and the amount deposited to each account. Prenotification transactions will also appear on this report.
Report Report information
† Indicates reports that can be assigned to named printers. For more information, refer to your System User’s Guide (Help >> Contents >> select System Administration).

U . S . P A Y R O L L 237
C H A P T E R 2 9 P A Y R O L L D I R E C T D E P O S I T R E P O R T S
Payroll Direct Deposit check forms
Microsoft Dynamics GP provides five different check forms. The report you use will depend on the type of check stock you use. The Payroll Direct Deposit check forms use the same format as the standard Microsoft Dynamics GP checks.
The five Payroll Direct Deposit check forms and the corresponding standard Microsoft Dynamics GP check forms are listed in the following table.
The Payroll Direct Deposit changes made to each of the five standard Microsoft Dynamics GP check forms are listed here:
• A restriction called Suppress Check lets you split the check-printing process into two processes—one for pay checks and one for direct deposit earnings statements.
• The array DD String30 Array10 will print “VOID Due to Direct Deposit” on the signature line of voided checks because all earnings were deposited directly.
• The following calculated fields will be created to mask the amounts on the check form in the numerical and text fields, respectively.
• DD_Mask_Dollar• DD_Mask_Words
Payroll Direct Deposit check form Standard Microsoft Dynamics GP check form
Direct Deposit Employee Checks Stub on Top-D
Employee Checks Stub on Top - Continuous
Direct Deposit Employee Checks Stub on Bottom-D
Employee Checks Stub on Bottom - Continuous
Direct Deposit Employee Checks Stub on Top and Bottom-L
Employee Checks Stub on Top and Bottom - Single Feed
Direct Deposit Employee Checks Other-D Employee Checks Other - Continuous
Direct Deposit Employee Checks Other-L Employee Checks Other - Single Feed

238 U . S . P A Y R O L L

U . S . P A Y R O L L 239
Glossary1099-R statement
A statement showing an employee’s distribution from retirement, profit-sharing or pension plans.
Account aliasA 20-character “short name” for a posting account in the chart of accounts. If the account format has a large number of segments, using aliases can speed data entry.
ACHAcronym for Automated Clearing House, a standardized format for electronic funds transfer files.
Adjustment numberA number that identifies an adjustment transaction made in the Payroll Manual Check-Adjustment Entry window.
Allocated tipsMicrosoft Dynamics GP uses the Gross Receipts method that is calculated per pay run. The allocated tips amount equals the difference between tips received and employee gross receipts divided by company gross receipts, multiplied by the tip allocation rate, provided the difference is more. Made to each directly tipped employee.
Authorization numberA number assigned to you by Microsoft Dynamics GP to identify you for support records, and to work with the payroll update engine.
Auto-Settle Line (ASL)A line that can be added to ACH files generated by Direct Deposit to bring the ACH into balance. Most ACH files generated for deposits to employee accounts include many credits to employee accounts. The auto-settle line in those instances would be a debit to the company’s Payroll account that is equal to the sum of the credits.
Some financial institutions require an unbalanced ACH file containing only credits, and create the debit themselves. Other institutions require a balanced ACH file. Check with your financial institution for more details.
Background processingA processing system that allows users to continue working while transactions are being posted or reports are being printed.
BankruptcyA garnishment category, in which a court orders the employer to deduct amounts from the employee’s wages to repay the employee’s creditor.
BatchA group of transactions identified by a unique name or number. Batches are used in computerized accounting to conveniently group transactions, both for identification purposes and to make posting the transactions easier.
Batch approvalAllows users to choose whether to approve batches of transactions before posting. If the batch approval option is being used, the ID of the user who approved the batch and the approval date will appear on edit lists and posting reports.
Batch controlValues for both the number of transactions in a batch and the number of employees in the batch. As transactions are entered, the actual totals will be displayed. These totals can be verified periodically as transactions are entered to ensure that the control number and amount of transactions match the actual number and amount that was entered.
Batch frequencyA selection that determines how often a recurring batch will be posted, such as weekly, monthly or quarterly.
Batch-level postingA posting method that allows transactions to be saved in batches and posts the batch whenever convenient. There are three types of batch-level posting: batch posting, series posting, and master posting. See also Posting.
BenefitA contribution provided by the company that may be calculated on net, unit or gross pay. Examples of benefits include insurance premiums and 401(k) contributions.
Building checksThe process of indicating which employees, pay records, deductions, and benefits should be included in the pay run.
Business expenseA pay code that’s used to pay employees who are reimbursed for expenses incurred while doing business, such as meals, mileage, and travel expenses.
Charged receiptsGross sales for the employee or establishment from sales that were charged, used to calculate allocated tips.
Charged tipMoney (a gratuity) that the employee receives from customers through a charge card or check. The employer must include this money on an employee’s Payroll check because it was not received as cash.
Charged tips are added into gross wages on the check, and are subject to FICA Social Security and Medicare, Federal, and FUTA taxes. Generally, charged tips also are subject to State, Local, and SUTA taxes.
Check numberA number assigned to a check. Payroll usually assigns check numbers automatically, but you can override the default and assign another number.
ClassA feature that allows employees, customers, vendors, users or items to be grouped according to common characteristics. For example, an employee class could be created to group employees according to credit limit or location.
Comma-delimited fileThe standard comma-separated ASCII character format used when exporting a report so that it can be read by database programs.
CommissionsThe amount, usually a percentage of the sale amount, paid to the salesperson making the sale.
Computer checkPaychecks that are calculated and printed using the Microsoft Dynamics GP system.
Data entry fieldsSpecific areas in a window, from which you can make a selection, enter information or access more information. For example, areas where you can type in an employee ID or a transaction amount are data entry fields. See also Field.
DeductionAn amount that may be withheld from an employee’s net, unit or gross pay. For example, a donation to a charity could be set up as a deduction.
Deduction direct depositA deduction direct deposit account is set up as a link to a Payroll deduction, rather than as a separate direct deposit account entry. Deduction direct deposits should be used only if an employee requests having some Payroll funds directed to a direct deposit account and the remainder of his or her earnings paid with a check.
DefaultA suggested entry that is used by Microsoft Dynamics GP, unless you make a different entry in its place.

G L O S S A R Y
240 U . S . P A Y R O L L
Default classA class whose values are used for the creation of new classes.
Department codeA unique alphanumeric name used to identify a department.
Direct depositDirect deposit is a system of distributing employees’ earnings directly to their checking or savings accounts. Direct deposit relies on the use of a standardized account from which your company pays its Payroll, and includes basic information about employees’ accounts.
Directly-tipped employeeEmployees, such as waiters or waitresses, who receive tips directly from the customer. Used to calculate allocated tips.
Earned Income CreditSee EIC.
Earnings wagesThe deduction method that calculates deductions as a percentage of an employee’s Net Disposable Income (NDI). See also NDI.
Earnings statementA report generated by Payroll Direct Deposit that summarizes Payroll information for employees who will have all their earnings deposited with direct deposit transfers.
Edit listA list of transactions in an unposted batch that you can print to check the accuracy of the transaction entries before posting.
EICAn abbreviation for Earned Income Credit. A pay code that’s used to make advance payments to employees who qualify for earned income credit and have filed a W-5 form.
EINAn abbreviation for Employer Identification Number, a number issued to companies operating in the United States. The EIN usually is used as a tax ID number for state and federal taxing agencies.
Employee Identification NumberSee EIN.
Employer MaximumThe amount of an employee’s contribution to a 401(k) that the employer matches. Expressed in percent.
ExceptionsExceptions are the instances when direct deposit transactions are not completed as the user may have intended. Direct deposit groups exceptions into three categories: no funds, deducted but not deposited and other.
Federal Insurance Contributions Act
See FICA.
Federal Unemployment Tax ActSee FUTA.
FICAAn acronym for Federal Insurance Contributions Act. An employee deduction for Social Security and Medicare. The employer matches the withholding.
FICA Medicare tipTips that are subject to FICA Medicare tax.
FICA Social Security tipTips that are subject to FICA Social Security tax.
FieldAn area in a window where you can enter a single piece of information. For instance, the area in the Employee Maintenance window where you enter the employee’s name is a field.
FootersFooters are lines of data which you create to be appended to the end of the ACH file. The lines will appear exactly as shown in the ACH File Header and Footer window and will become part of the ACH file. Some financial institutions require additional information about the ACH file, such as identifying strings or passwords. If your financial institution has no such requirements, you may not need to use this window.
Form 1096A form report that summarizes the 1099-R information.
Form 8027An IRS form used by large food and beverage establishments to report tips and receipts to the US government.
FTEAn acronym for Full-Time Equivalency, a factor multiplied by a pay step table amount to adjust an individual employee’s pay rate without changing the pay step table. FTE factors less than 1.00 decrease the pay rate, and factors above 1.00 increase the pay rate.
FUTAAn acronym for Federal Unemployment Tax Act. This, along with state unemployment taxes, provides for payments of unemployment compensation to workers who have lost their jobs.
GarnishmentA court-ordered process that takes property from a person to satisfy debt. For example, a person who owes money to a creditor may have her wages garnished if she loses a lawsuit filed by the creditor.
Also, the name of a garnishment category for student loan or creditor debts.
GradeAn employee’s rank within a position. Grade does not depend on the length of time in a position. A promotion typically raises grade rather than pay step.
Gross upAn IRS-approved formula that employers can use to determine the taxable gross payment when the employer wishes to pay the employee’s share of tax.
Gross wagesThe wages an employee earns before any deductions or taxes are taken out.
Group printingSaving and printing reports in groups. For example, you can create a report group that is used to print all employee lists before closing a year. You can create groups of reports within the same series and groups of series report groups.
HeadersHeaders are lines of data which you create to be appended to the top of the ACH file. The lines will appear exactly as shown in the ACH File Header and Footer window and will become part of the ACH file. Some financial institutions require additional information about the ACH file, such as identifying strings or passwords. If your financial institution has no such requirements, you may not need to use this window.
HelpDocumentation of Microsoft Dynamics GP features placed online for quick access. Also referred to as online documentation.
Holiday payA pay code that’s used to pay employees who receive paid time off for holidays.
Hourly payA pay code that’s used to pay employees an amount per hour worked.
InactivateThe process of making employee records inactive. If you inactivate an employee record, all of the employee’s pay, deduction, and benefit records will be inactivated, as well, and paychecks will no longer be printed for the individual.
U . S . P A Y R O L L 241
G L O S S A R Y
Indirectly tipped employeeEmployees who do not receive tips directly from the customer, such as cooks or people who clean tables. Used to calculate allocated tips.
InquiryThe Microsoft Dynamics GP feature that allows you to review open-year and historical information.
IntegrateTo join two or more accounting modules to form a system in which data is shared among modules. All Microsoft Dynamics GP modules are automatically integrated.
Local taxA tax paid to local government agencies. You can set up multiple local taxes for each employee, if you wish.
Main segmentThe segment of posting accounts that has been designated as the sorting option for accounts on financial statements. Typically, the main segment is used to indicate whether the account is an asset, liability, owners’ equity, revenue or expense account.
Manual checkA manually written paycheck; manual checks can be recorded in the Microsoft Dynamics GP system.
Mass transaction entryThe process of quickly entering similar pay transactions, variable deductions or variable benefits for many employees.
Minimum wage balanceA pay code used to make up the difference between the amount of wages, tips, and other compensation, and the minimum wage.
Multiple companiesCompanies for which separate data folders have been established. Microsoft Dynamics GP multiple-company feature allows you to keep a separate set of financial information for each company you operate.
Multiple-account distributionsMultiple-account distributions are employee direct deposit setups for which more than one account is set up and net wages are to be distributed into the accounts in a certain order. If you specify an amount when using multiple-account distributions, Direct Deposit will attempt to pay that amount. If a percent is chosen, then Direct Deposit will multiply the percent by the employee’s net wages in the Payroll run and attempt to pay that amount. Each time an account is paid, net wages for the individual are reduced. This continues until all the net wages are exhausted or until all lines have been paid. Any funds remaining are called remainder of net.
National Automated Clearing House Association (NACHA)
The National Automated Clearing House Association (NACHA) is the national regulatory body of the Automated Clearing House (ACH) Network, a nationwide electronics payments system used by more than 22,000 participating financial institutions in the United States.
NDIAn acronym for Net Disposable Income, a legally-defined selection of wages, deductions and taxes from which garnishments may be taken. The definition of NDI depends on state law.
Net payThe payment amount an employee receives after all deductions and taxes have been taken out of his or her paycheck.
Net wagesThe calculated result of an employee’s gross wages minus taxes. The net wages amount is used to calculate benefit and deduction amounts.
NotesThe Microsoft Dynamics GP feature that is used to attach messages to windows and records throughout the Microsoft Dynamics GP system. The note button shows whether a note is attached to a window. Notes can be edited and reattached, deleted or printed.
OptionPrinting specifications set up for reports. A variety of options can be used with each report.
OriginA transaction entry window within a specific Microsoft Dynamics GP module. Certain options, such as closing fiscal periods, can be selected for each transaction origin. Also, the transaction origin appears as part of the audit trail code on all posting reports in Microsoft Dynamics GP.
Overtime payA pay code that’s used to pay employees for working more than the assigned number of hours and are reimbursed at a different pay rate for the additional hours.
Pay codeA code used to identify a specific type and rate of pay. For example, an employee who is paid a specific salary may have the pay code SAL assigned to him or her.
Pay factorThe number that is multiplied by the Based on Pay Code’s pay rate to calculate overtime or double time pay rates.
Pay periodThe time period between regularly scheduled pay runs.
Pay rateThe amount an employee is paid for a specified period or amount of work.
Pay recordA Payroll record that tracks money paid to an employee, showing pay expenses by pay code, department or job.
Pay stepA pay level based on length of time in a position. When an employee’s time in a position exceeds the length of the pay step, the employee advances to the next pay step.
Pay typeA general category used to identify different kinds of pay, such as hourly or salary. For example, if an employee is paid a set amount per unit made or job completed, the pay type would be piecework.
PaycheckA printed form that is issued to employees as payment of wages earned.
Payment numberA number that identifies a group of related entries for a computer or manual check that are posted collectively as a single, complete transaction.
PensionA payment to a retired employee from a retirement plan.
PieceworkA pay code that’s used to pay employees a certain amount per unit made or completed.
PositionA unique alphanumeric name used to identify a position.
PostingA procedure that makes temporary transactions a part of your business records; permanent records are updated with the amount of these transactions. In manual accounting, to transfer journal totals to the appropriate accounts in a ledger.
Posting accountA financial account that tracks assets, liabilities, revenue or expenses. Amounts posted to these accounts appear on the Profit and Loss Statement, the Balance Sheet, and other financial reports if you are using General Ledger.
Posting dateThe date on which a specific transaction was posted to your company’s posting accounts.
G L O S S A R Y
242 U . S . P A Y R O L L
Posting journalA report printed following the posting process that shows the detail for each transaction that has been posted. Posting journals also include the audit trail code, which provides a precise record of where each transaction has been posted within Microsoft Dynamics GP.
PrenotificationA prenotification or “prenote” is a test-run of direct deposit information. After you’ve entered an employee’s direct deposit preferences, you will probably be required by your financial institution to have a prenotification run or runs to verify the information in the ACH file.
Process serverThe Microsoft Dynamics GP application that allows a user to direct the processing of some accounting functions and maintenance procedures to another computer on a network. No additional actions are required by the user. After tasks have been sent to a process server, users can begin other tasks immediately.
RangeA selection used to narrow the amount of records that are printed on a report. For example, a selected range of employee IDs could be those between 1001 and 9999.
ReactivateThe process of making employee records active. If you reactivate an employee record, all of the employee’s pay, deduction, and benefit records can be activated, as well, and paychecks can be printed for the individual.
Recurring batchA batch that can be posted repeatedly.
Remainder of netRemainder of net refers to any amount owed to the employee after any deductions and direct deposit totals.
Removing historyA procedure used to erase ranges of account, check or transaction history that are no longer useful.
Report optionA collection of entries that specify the amount of information or the type of information that appears on a report. Multiple report options can be created.
Reported tipMoney—cash—the employee receives from customers that they report to the employer.
Reported tips are not added into gross wages on the check, but are subject to FICA Social Security and Medicare, Federal, and FUTA taxes. Generally, reported tips are also subject to State, Local, and SUTA taxes.
Retroactive paySupplemental wages paid to an employee whose pay rate has been increased effective as of a past date.
Roll downTo apply changes you’ve made to a class record to all employee records within the class. For example, if you change the payment terms for the class from Net 30 to 2 percent-10/Net 30, you can roll down the change to all records in the employee class.
Salary payA pay code that’s used for employees who are paid a specific pay amount each pay period.
Sample dataData that can be used to practice Microsoft Dynamics GP procedures by entering the information listed in the online lessons. Sample data can be accessed using the lesson company, Fabrikam, Inc.
SeriesA group of Microsoft Dynamics GP modules that form an interrelated set of applications. Receivables Management is part of the Sales series, for example.
Shift codeA code used to identify a specific type and rate of pay given for different times of work. For example, an employee who works a night shift might receive an additional $1.00 per hour.
Sick timeA pay code that’s used to pay employees for time off due to sickness.
Single-account distributionsSingle-account distributions are employee direct deposit setups for which only one account line is entered and the entire net wages from the Payroll will go to that account.
SortingA method of arranging data based on the order of specified information. For example, records sorted by document list all items on a document before listing the items on the next document.
State taxA tax paid to state government agencies. You can set up multiple state taxes for each employee, if you wish.
State Unemployment Tax ActSee SUTA.
SUTAAn acronym for State Unemployment Tax Act. This is the state unemployment tax paid by an employer to provide for payments of unemployment compensation to workers who have lost their jobs.
Support orderA garnishment category, in which a court orders the employer to deduct amounts from the employee’s wages to pay support for a child or other dependent.
Tax levyA garnishment category, in which a court orders the employer to deduct amounts from the employee’s wages to pay overdue taxes.
Tax tableIn Payroll, where tax information is stored for federal, EIC, FICA, state, and pre-defined local taxes.
Taxable benefitBenefits paid on the employee’s behalf, but not directly to the employee that are subject to income tax.
Text file (text only) A file format that saves reports as text without formatting. This option should be used when the application to which you’re converting the document is unable to read any of the other file formats.
TipMoney an employee receives from customers as an acknowledgement of services rendered. Tips include both Charged Tips and Reported Tips and are tracked directly or indirectly.
Tip allocation rateThe rate—set by the IRS—used to determine the tip allocation amount.
Transaction edit listSee Edit list.
Transaction required benefitA benefit that you must create a transaction for.
Transaction required deductionA deduction that you must create a transaction for.
Transaction-level postingA posting method that allows you to enter and post transactions individually without having to create a batch.
TSAAn acronym for Tax-Sheltered Annuity, an employee deduction that reduces wages for the purpose of calculating employer and employee taxes. It also reduces the employee gross wages on the year-end W2 statement.
Uncollected FICA Medicare tax on tips
FICA Medicare tax on tips that could not be collected from the employee. This information must be reported on the employee’s W-2 form.

U . S . P A Y R O L L 243
G L O S S A R Y
Uncollected FICA Social Security tax on tips
FICA Social Security tax on tips that could not be collected from the employee. This information must be reported on the employee’s W-2 form.
User-defined fieldTwo fields in the Employee Additional Information Maintenance window that you can define to track information specific to your business.
Vacation payA pay code that’s used to pay employees while on vacation.
VoidingThe process of recording an equal and opposite transaction to undo the effect of a posted transaction.
W-2 statementWage and tax statement.
W-3 formA report that summarizes the W-2 information.
Workers’ compensation taxTaxes paid by the employer for insurance covering injuries incurred on the job. Workers’ compensation is paid to the state government.
Year-end closingThe process used to create a table for annual wage information.

244 U . S . P A Y R O L L

U . S . P A Y R O L L 245
IndexNumerics1099-R statements
editing information 198form types 199gross distribution amounts 198printing 199
Aaccounts in Payroll
account status options 222distribution history 15required posting accounts 20
accruing methodssick time 62vacation time 62
ACH fieldsauto-settle lines 213effects of 213setup 213
ACH Fields Setup windowdisplaying 214setting up ACH fields 213
ACH File Header and Footer windowcreating an ACH header or footer 215displaying 216
ACH filescreating footers 215creating headers 215example 213generating electronic payments 231generating electronic payments with
prenotes 233headers and footers 215location 213prenotifications only 233setup 213transferring 213
adjustment numbersincrementing 9using 9
Analytical Accounting in Payroll, default transaction dimension codes 22
Analytical Payroll Default Dimension window, displaying 23
Analytical Payroll Default Dimensions window, default transaction dimension codes 22
Analytical Payroll Transaction Entry window
displaying 119, 120entering Analytical Accounting
information 119attendance transactions, reconciling 111automatic deductions, local taxes 88auto-settle lines, generating 213
BBank Maintenance window, entering
auto-settle line information 211Batch Posting in Payroll
including batches in a pay run 125printing posting journals 117
batches in Payrollcorrecting 109creating 107deleting 109editing approved batches 109origin 107posting 109single-use 107
beginning balances, entering in Payroll 101
benefit codesassigning 75deleting 52examples 49inactivating 52modifying 51
Benefit Setup windowdisplaying 49setting up a benefit 49
benefitsbased on pay codes 49benefits expense account 20benefits payable account 20calculation methods 47codes 97ending dates 97entering cards 97entering maximums 49setting up for employees 49starting dates 97tiers 48variable 97W-2 statements 49
bonuses, calculating in Payroll 167Build Payroll Checks window
building Payroll checks 125displaying advance pay 122displaying regular pay 126processing an advance pay run 122
business expense pay types 29business expenses
accountable plans 29nonaccountable plans 29
CCalculate Payroll Checks window
calculating Payroll checks 128displaying 129
calculation methods in Payrollbenefits 47deductions 38
calculations, net-to-gross wages 170changes since last release, information
about 5charged tips pay types 29
check reports, creating alternate check reports 237
Checkbook Maintenance window, entering auto-settle line information 211
checklist itemsadding 189deleting 190modifying 189
checklistsadding checklist items in Payroll 189deleting checklist items in Payroll 190modifying checklist items in Payroll
189checks in Payroll
dollar amounts 209history 15history inquiries 141posting 129printing 129printing direct deposit 229printing voided 229reprinting paystubs 133voiding 131voiding due to direct deposit 209voiding requirements 131
commission pay types 29company addresses, setting up 25Company Addresses Setup window
displaying 25setting up location codes 25
company Internet information, setting up 79
Completed Prenotes windowdisplaying 224viewing or updating prenote
accounts 223computer check transaction numbers,
using 9computer checks
correcting 116entering 113processing 125transaction numbers, incrementing 9
concurrent processing, for pay runs 18Create Retroactive Payments window,
displaying 125current installation instructions, accessing
on the Web 5current upgrade information, accessing on
the Web 5
Ddeduction codes
assigning 75deleting 52examples 40garnishments 42inactivating 52modifying 51setting up 40

I N D E X
246 U . S . P A Y R O L L
deduction direct depositcreating an employee record 228defined 217inactivating employee accounts 228linking deductions 218prenotification 219remainder of net 217setup 217
Deduction Sequence Setup windowdisplaying 47entering direct deposit deduction
sequences 217setting up a company-level deduction
sequence 46deduction sequences
setting up 46, 95split method for garnishments 96
Deduction Setup windowcreating direct deposit deduction
cards 217displaying 41setting up a deduction 40setting up a garnishment 42
deduction tiers 39deduction withholding, posting account
20deductions
based on pay codes 40calculation methods 38creating 217entering employee deduction cards
91entering maximums 40linking to direct deposit 218setting up 40tiers 39variable 91viewing financial information 91W-2 statements 40
default entries, setting up in Payroll 17default transaction dimension codes in
Payroll, setting up for Analytical Accounting 22
department codesexamples 26setting up 26
Department Setup windowdisplaying 26setting up department codes 26
dependents, entering number of 87direct deposit, creating employee records
221Direct Deposit Checkbook Maintenance
windowdisplaying 211entering direct deposit accounts 211
direct deposit deduction, creating 217Direct Deposit exceptions
Amount Deducted, Not Deposited 207
Insufficient Funds 207
Direct Deposit exceptions (continued)others 207
Direct Deposit Setup windowdisplaying 209setting up Direct Deposit 209using 209
distributions, removing Payroll history 176
distributions in Payroll, inquiry 143documentation
accessing on the Web 5symbols and conventions 3
double time pay types 29
Eearned income credit
pay types 29tax table 86using EIC tables 30
earning codes, setting up 43Earnings Setup window
displaying 44setting up earning codes 43
earnings statementsprinting 230reprinting 133, 230setup 209
Edit 1099-R Information windowdisplaying 198editing 1099-R information 198
Edit W-2 Information windowdisplaying 195editing W-2 information 195
editable pay ratesdisplay on transactions 16examples 137using 137
EIC tables, earned income credit 30Employee Additional Information
Maintenance windowdisplaying 74entering additional employee
information 74Employee Address Maintenance window
displaying 79entering employee address cards 79
employee benefit cards, entering 97Employee Benefit Maintenance window
displaying 98entering employee benefit cards 97
employee cardsbenefit 97changing 78deduction 91deleting 78entering 71inactivating 76local tax 88pay 80reactivating 77state tax 87
employee cards (continued)tax 86
Employee Class Code Setup windowassigning codes to employee classes
65displaying 66
Employee Class Setup windowchanging employee classes 66creating employee classes 63deleting employee classes 66displaying 63tracking tips 65
employee classescreating 63default class 63setting up 61
employee codes, inquiries 144employee deduction cards, entering 91Employee Deduction Maintenance
windowdisplaying 92enrolling an employee in a direct
deposit deduction 227entering employee deduction cards
91Employee Deduction Sequence window
displaying 96setting up an employee-level
deduction sequence 95employee direct deposit account status
inactivating accounts 224inactivating specific accounts 224reactivating accounts 226updating accounts 223
Employee Direct Deposit Maintenance window
creating an employee deduction direct deposit record 228
creating an employee direct deposit record 222
displaying 222inactivating all employee direct
deposit accounts 224inactivating selected employee direct
deposit accounts 224reactivating an employee direct
deposit account 226employee direct deposit records
Active account status 222creating 222Inactive account status 222Prenote account status 222
employee inquirycheck history 141codes 144company payroll summary 148distributions 143historical pay codes 147historical paychecks 147paycheck breakdown 145paychecks 145

U . S . P A Y R O L L 247
I N D E X
employee inquiry (continued)personal information 143tips 151transactions 142
Employee Inquiry windowdisplaying 144viewing an employee’s personal
information 143Employee Local Tax Maintenance window
displaying 89entering employee local tax cards 88
employee local taxes, entering 88Employee Maintenance window
changing employee cards 78deleting employee cards 78displaying 72entering employee cards 71inactivating employee cards 76tracking tips 65
employee mass updateexamples 167limitations 168
Employee Mass Update windowdisplaying 169updating a range of information for
employees 168employee onboarding workflow, setting
up 23employee pay cards, entering 80Employee Pay Code Maintenance
windowdisplaying 81entering employee pay cards 80setting up minimum wage with tips
35setting up tips 33
Employee Pay Codes History Inquiry window, displaying 148
Employee Pay History Inquiry windowdisplaying 147viewing historical pay code
information 147viewing historical paycheck
information by codes 147employee personnel maintenance
workflow, setting up 24Employee Record Inquiry window
displaying 144viewing an employee’s Payroll codes
144Employee Record Summary Inquiry
windowdisplaying 145viewing paycheck summary
information by codes 145employee records
adding additional addresses 79adding additional information 74
employee state tax cards, entering 87employee state tax information 85
Employee State Tax Maintenance windowdisplaying 87entering employee state tax cards 87
Employee Summary Inquiry windowdisplaying 146viewing employee tips wage and tax
information 151viewing paycheck breakdown
information 145employee tax cards
entering 86W-2 statements 85
Employee Tax Maintenance windowdisplaying 86entering employee tax cards 86
Employee Tips Summary Inquiry window, displaying 151
employeescreating employee direct deposit
records 221enrolling in Payroll Direct Deposit
deduction 227tracking options 16updating a range 168
employer’s tax expense, posting account 20
estimated withholding, state taxes 87exemptions, local taxes 88
Ffederal tax withholding, posting account
20financial fields, editing 16fiscal years, year-end closing in Payroll
192footers, creating 215Form 8027
editing 200printing 201
Form 8027 windowdisplaying 200editing Form 8027 information 200printing Form 8027 201
forms, 1099-R statements 199FUTA payable, posting account 20
GGarnishment Maximum Setup window,
displaying 45garnishments
deducting multiple 45setting maximums 44setting up 42
Generate ACH File windowdisplaying 232generating an ACH file 231
gross distribution amount, 1099-R statements 198
gross pay, posting account 20
Hheaders, creating 215
help, displaying 4Help menu, described 4historical pay codes, inquiries 147historical paychecks, inquiries 147history in Payroll
account distributions 15checks 15journal 177Payroll distribution 176removing 173removing Payroll distribution 176removing Payroll history 173removing Payroll journal 177removing year-end 176transactions 15year-end 176
holiday pay types 29hourly pay types 29
Iicons, used in manual 3inactive records, removing in Payroll 175inquiries
breakdown information 152Payroll audit trail 152tips breakdown information 152
installation instructions, accessing on the Web 5
Internet, setting up information 79Internet Information window
displaying 80setting up employee Internet
information 79itemized exemptions, entering 87
Jjournals, removing Payroll history 177
LLink Deduction Setups to Direct Deposit
window, displaying 219local taxes
automatically deducting 88calculation methods 55entering 88exemptions 88setting up 56withholding posting account 20
locations, setting up in Payroll 25lookup window, displaying 4
Mmanual checks
correcting 119entering 117transaction numbers
incrementing 9using 9
mass transactions, entering 111mass update
examples 167limitations 168

I N D E X
248 U . S . P A Y R O L L
minimum wage balance pay types 29multiple benefit tiers 48multiple deduction tiers 39multiple-account distributions 221multiuser environment, processing
payroll 18Multiuser Payroll Setup window,
displaying 18
Nnavigation, symbols used for 3net-to-gross wages, calculating 170new features, information about 5New York State, tax difference 86
Ooptions, creating a Payroll report option
159overtime pay, calculation methods 54overtime pay types 29
Ppay cards
entering 80viewing financial information 80
Pay Code Setup windowdisplaying 31setting up pay codes 30
pay codesassigning 75deleting 52examples 30inactivating 52modifying 51setting up 30
pay rates, display on transactions 16pay rates industry examples 137pay types
based on other pay codes 30based on salary 80based on tips 30business expense 29charged tips 29commission 29double time 29earned income credit 29holiday 29hourly 29minimum wage balance 29other 29overtime 29pension 29piecework 29reported tips 29salary 29sick 29vacation 29
paychecks, inquiries 145payment numbers
incrementing 9using 9
payments in Payroll, paycheck breakdown inquiry 145
Payroll Batch Entry windowcorrecting Payroll batches 109creating Payroll batches 107deleting Payroll batches 109displaying 107posting beginning balances 102posting Payroll batches 109
Payroll Check Batches windowdisplaying 128including batches in a pay run 125
Payroll Check Benefits window, including benefits in a pay run 125
Payroll Check Deductions windowdisplaying 127including deductions in a pay run 125
Payroll Check Distribution Inquiry window
displaying 143viewing Payroll distributions 143
Payroll Check Inquiry windowdisplaying 133, 141reprinting paystubs and earnings
statements 133viewing Payroll check history 141
Payroll Check Pay Codes windowdisplaying 123including pay codes in a pay run 122
Payroll Checklists windowadding or modifying checklist items
189deleting checklist items 190displaying 189
Payroll Direct Deposit deductionenrolling an employee 227linking to direct deposits 218
Payroll Edit Federal Tax Liabilities window
displaying 179editing federal tax liabilities 179
Payroll Gross Up windowcalculating net-to-gross wages 170displaying 170
Payroll Local Tax Setup windowdisplaying 56setting up local taxes 56
Payroll Local Tax Tables windowdisplaying 57entering wage amounts 56
Payroll Manual Check Transaction Entry window
displaying 118entering manual check transactions
117Payroll Manual Check Transaction
window, entering manual check transactions 101
Payroll Manual Check-Adjustment Entry window
correcting manual check transactions 119
displaying, beginning balances 101displaying, manual check
transactions 117entering beginning balances 101entering manual check transactions
117Payroll Mass Transaction Entry window
displaying 112entering employee mass transactions
111Payroll Posting Accounts Setup window
displaying 22setting up posting accounts 21
Payroll Posting Edit List window, modifying Payroll transactions 122
Payroll Quick Employee Assignment window
assigning employee codes 75displaying 75
Payroll Setup Options windowdisplaying 19setting up additional default entries
17Payroll Setup window
displaying 17setting up Payroll default entries 17
Payroll Summary Inquiry windowdisplaying 148viewing Payroll transactions 148
Payroll Tax Identification Setup windowdisplaying 60setting up federal and state tax
identification numbers 60Payroll Tax Setup window
displaying 180editing Payroll taxes 180
Payroll Tax Update window, displaying 183
Payroll Tips Summary Inquiry windowdisplaying 152viewing Payroll and tips breakdown
information 152Payroll Transaction Entry Options
windowdisplaying 115setting transaction default options
113Payroll Transaction Entry window
calculating minimum wage balances 133
correcting computer check transactions 116
displaying 114displaying details 113entering Payroll computer check
transactions 113

U . S . P A Y R O L L 249
I N D E X
Payroll Transaction Inquiry windowdisplaying 142viewing Payroll transactions 142
Payroll Year-End Closing windowclosing a year 192displaying 193
pension pay types 29Period-End Payroll Reports window
displaying 191printing period-end reports 191
period-end reports, printing in Payroll 191personal exemptions, W-4 form 87piecework pay types 29position codes
examples 27setting up 27
Position Setup windowdisplaying 27setting up position codes 27
post-dated pay ratesactivating 51setting 51
Post-Dated Pay Rates window, setting up and activating post-dated pay rates 51
posting accounts in Payrollbenefits expense 20benefits payable 20deduction withholding 20employer’s tax expense 20federal tax withholding 20FUTA payable 20gross pay 20local tax withholding 20required 21setting up 21state tax withholding 20SUTA payable 20taxable benefits expense 20taxable benefits payable 20types 20workers’ compensation tax expense
20workers’ compensation tax payable
21posting in Payroll
through General Ledger 109to General Ledger 109with Payroll Direct Deposit 231
prenotificationsdeduction direct deposits 219defined 207effect on direct deposit 207in an ACH file 207
Preview Mass Entry Transaction windowdisplaying 113previewing employee mass
transactions 111Print 1099-R Forms window
displaying 199printing 1099-R statements 199
Print Payroll Checks windowcalculating Payroll Direct Deposit 229displaying 130posting checks 129posting direct deposit 231printing checks 129printing direct deposit earnings
statements 230Print W-2 Forms window
displaying 197printing W-2 statements 196
product documentation, accessing on the Web 5
QQuarter-End Payroll Reports window
displaying 192printing quarter-end reports 192
quarter-end reports, printing in Payroll 192
RReactivate Employee window,
reactivating employee cards 77Reconcile Employee Information window
displaying 166reconciling employee records 165
reconciling in Payrollemployee records 165Reconcile Error Report 165
regular vs. deduction direct deposits 205remainder of net
defined 206using deduction direct deposit 206
Remove Employee Summary windowdisplaying 174removing employee summary
information 174Remove Inactive Records window
displaying 175removing inactive employee records
175Remove Payroll Distribution History
windowdisplaying 177removing distribution information
176Remove Payroll History window
displaying 173removing Payroll history 173
Remove Payroll Journal History windowdisplaying 177removing journal history 177
Remove Payroll Year-End Information window
displaying 176removing year-end information 176
report options, creating in Payroll 159reported tips pay types 29Reporting Services reports
Payroll reports 160
Reporting Services reports (continued)printing Payroll reports 160
reports, Reporting Services Payroll reports 160
reports in Payrollavailable direct deposit reports 235Check History Report for void checks
131Check History Report, removing 173Check Posting Register 129Check Register 129Company Benefits List 51Company Deduction Codes List 40Company Local Taxes List 56creating alternate checks 237Department Codes List 26Detailed Employee List 71Employee Checks Other-D 237Employee Checks Other-L 237Employee Checks Stub on Bottom-D
237Employee Checks Stub on Top and
Bottom-L 237Employee Checks Stub on Top-D 237Employee Class List 63Employee Lists window
creating a report option 159displaying 159
Employee Mass Update Audit report 168
Employee Mass Update report 168list of Payroll reports 155Manual Check Edit List, beginning
balances 102Manual Check Edit List, transactions
117options, creating 159Payroll Options Report 17Payroll Transaction Edit List 113Position Codes List 27Reconcile Error report 165restricting 159sorting 159Supervisor Codes List 28suppressing check restriction 237Transaction History Report 173Void Payroll Checks Edit List 131Year-End Employee Wage report,
printing 193required fields, described 4resources, documentation 4retirement plan, W-2 box 85Retroactive Pay Management window,
displaying 124rolling down changes 61
Ssalary pay types 29secondary status codes, setting up 35Secondary Status Setup window,
displaying 36
I N D E X
250 U . S . P A Y R O L L
security, turning on and off 211Security Setup window
displaying 212setting up Payroll Direct Deposit
security 211setup in Payroll
benefits for employees 49creating employee classes 63deduction sequence split method 96deduction sequences 46, 95deductions 40default entries in Payroll 17default transaction dimension codes
for Analytical Accounting 22department codes 26earning codes 43garnishment maximums 44garnishments 42local taxes 56location codes 25multiple garnishments 45pay codes 30Payroll posting accounts 21position codes 27secondary status codes 35shift codes 35supervisor codes 28unemployment taxes 58user-defined fields 17workers’ compensation codes 54
Shift Code Setup windowdisplaying 35setting up shift codes 35
shift codes, setting up 35sick pay types 29sick time, accruing methods 62single benefit tiers 48single deduction tiers 39single-account distributions 221split method, specifying for garnishments
96Split Method window, displaying 97state tax cards, entering 87state tax withholding, posting account 20state taxes
estimated withholding 87filing status 87withholding additional taxes 87
statutory employee, W-2 box 85subtract exemption, local tax calculation
method 55subtract flat tax amount, local tax
calculation method 55summary, removing 174supervisor codes, setting up 28Supervisor Setup window
displaying 28setting up supervisor codes 28
SUTA payable, posting account 20symbols, used in manual 3
system requirements, accessing on the Web 5
Ttax calculations, in Payroll 181tax cards, entering 86tax rates, applying for Payroll 55tax table update engine, using 183tax tables
applying for Payroll 55earned income credit 86
taxable benefitsexpense posting account 20payable posting account 20
tiersbenefit 48deduction 39
tips, inquiry 151tracking
days 16weeks 16
transaction history in Payrollcorrecting manual checks 119for void checks 131removing 173tracking options 15Transaction History Report 173
transactions in Payrollcomputer check 113correcting 122correcting computer checks 116correcting manual checks 119entering Analytical Accounting
information 119entering mass 111inquiry 142, 148manual check 117processing computer checks 125retroactive employee pay 123
UUnemployment Tax Setup window
displaying 59setting up unemployment taxes 58
unemployment taxesprevious state wages 57setting up 58
upgrade information, accessing on the Web 5
user-defined fields, setting defaults 17utilities, company 165
Vvacation, accruing methods 62vacation pay types 29Void Payroll Checks window
displaying 131voiding Payroll checks 131
voided checksprinting 229using Payroll Direct Deposit 209
voided visual indicators 209
WW-2 boxes
retirement plan 85statutory employee 85
W-2 information, entering 30W-2 statements
benefits 49deductions 40editing information 195employee type 196printing 196
W-4 formadditional withholding 86federal withholding 86personal exemptions 87withholding additional taxes 87
wages, calculating net-to-gross 170weighted overtime, examples 10what’s new, accessing 5workers’ compensation codes, setting up
54Workers’ Compensation Setup window
displaying 54setting up workers’ compensation
codes 54workers’ compensation tax
calculation methods 53days worked 53expense posting account 20fixed amount 53number of hours/units 53payable posting account 21percent of gross 53
workflow typesemployee onboarding 23employee personnel maintenance 24
Yyear-end closing in Payroll, closing a
Payroll year 192year-end history, removing in Payroll 176year-end software updates, installing 185Year-End Wage Report window
displaying 193printing the year-end employee wage
report 193