Microsoft Access 2010 - CCI...
40
Microsoft ® Access 2010 Microsoft ® Office Specialist 2010 Series COURSEWARE 3245–1 EXAM 77– 885 Achieve more For Evaluation Only
Transcript of Microsoft Access 2010 - CCI...

Microsoft®
Access 2010
Microsoft® Office Specialist 2010 SeriesCOURSEWARE 3245–1 EXAM 77– 885
Achieve more
For Evaluation Only

For E
valua
tion O
nly
3245-1 v1.00 © CCI Learning Solutions Inc. 1
Microsoft® Office Specialist 2010 Series
Microsoft®
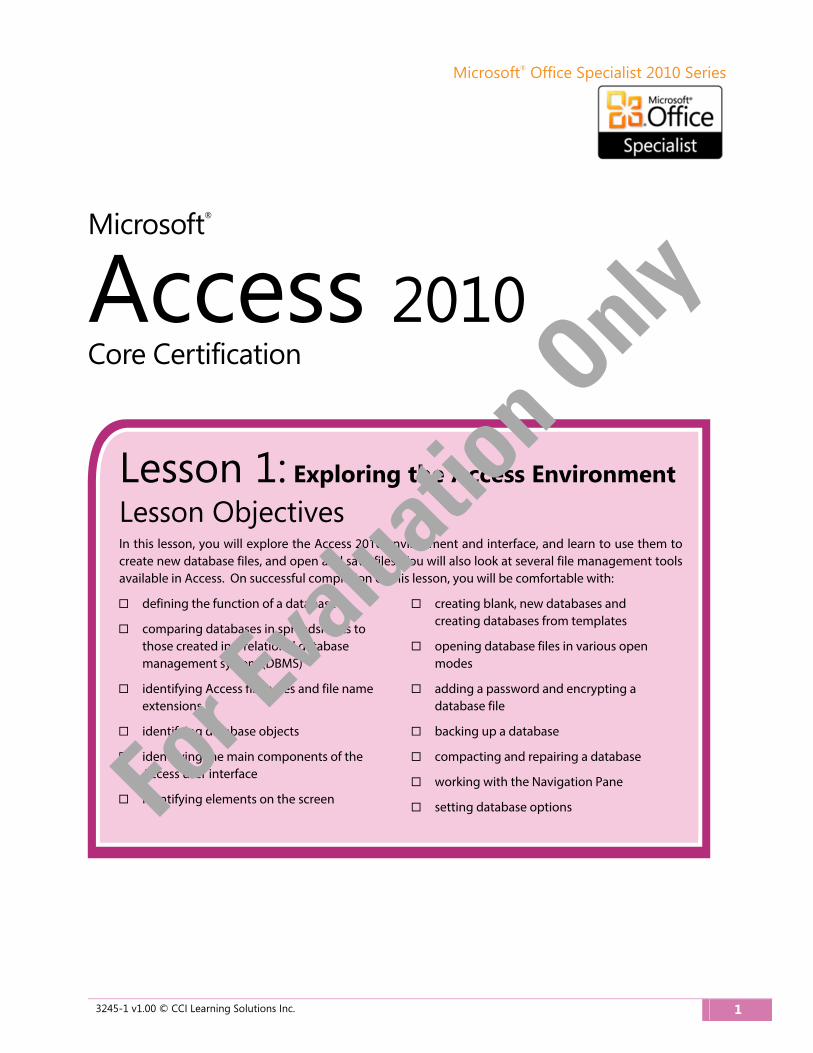
Access 2010 Core Certification
Lesson 1: Exploring the Access Environment
Lesson Objectives In this lesson, you will explore the Access 2010 environment and interface, and learn to use them to create new database files, and open and save files. You will also look at several file management tools available in Access. On successful completion of this lesson, you will be comfortable with:
defining the function of a database
comparing databases in spreadsheets to those created in a relational database management system (DBMS)
identifying Access file types and file name extensions
identifying database objects
identifying the main components of the Access user interface
identifying elements on the screen
creating blank, new databases and creating databases from templates
opening database files in various open modes
adding a password and encrypting a database file
backing up a database
compacting and repairing a database
working with the Navigation Pane
setting database options For E
valua
tion O
nly
Lesson 1 Exploring the Access Environment
2 3245-1 v1.00 © CCI Learning Solutions Inc.
An Introduction to Databases Before you begin to use Microsoft Access 2010, it is important to have a clear understanding of the nature, purpose and function of databases.
A database is an organized collection of information. The basic function of a database is to store data. If the database is well organized, retrieving the data you want is easy.
A file cabinet full of folders or a recipe box full of individual recipe cards can be considered primitive forms of a database. Each contains information. The information in the file cabinet is (we would hope) organized into separate folders, and the recipe cards in the recipe box are usually arranged either alphabetically or by food category (such as appetizer, soup, salad, main course, dessert, etc.), with each section separated from the others by a divider or other visual means of differentiation. Finding the information you want, whether it be a particular file folder or a specific recipe, may be quick and easy or time-consuming and tedious, depending on how well the information is organized.
In the computing world, databases are organized collections of information stored electronically.
Databases in Spreadsheets Many users are comfortable with spreadsheets, and many databases begin as data entered into a spreadsheet. Spreadsheets display rows and columns of data in a table format. It is easy to understand and visualize the data in a spreadsheet because the data is stored in one location.
A database in Excel is a single table that cannot include any blank rows or columns.
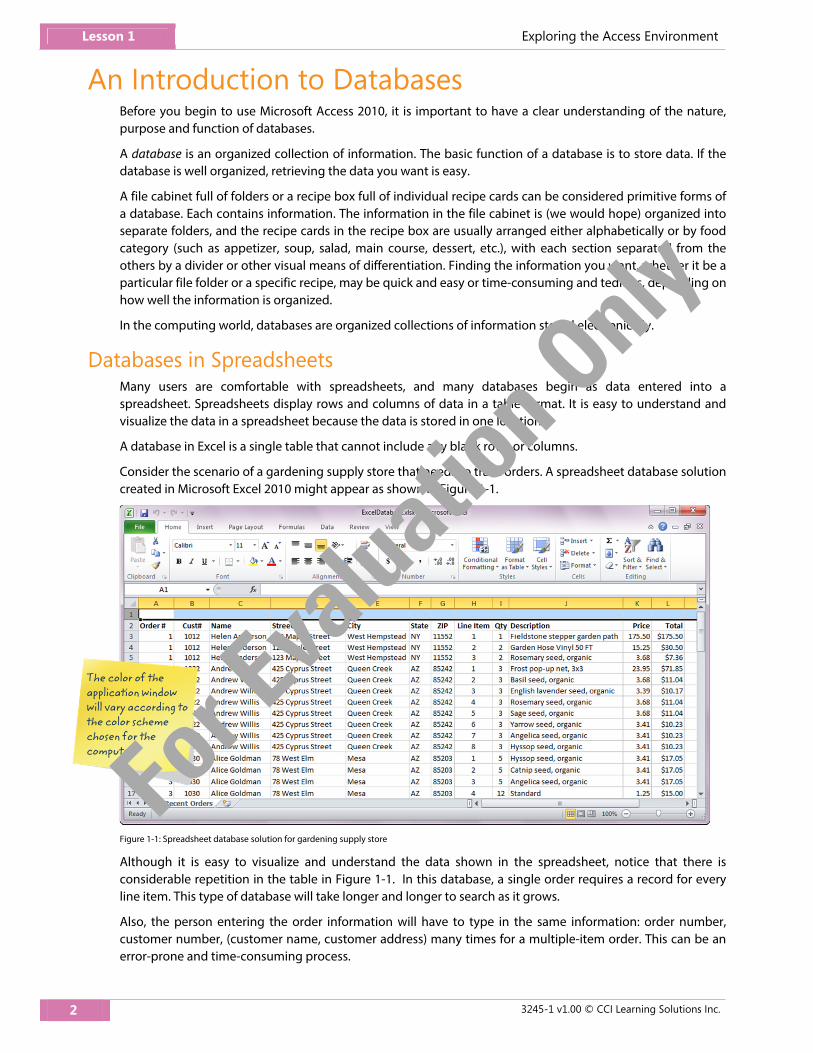
Consider the scenario of a gardening supply store that needs to track orders. A spreadsheet database solution created in Microsoft Excel 2010 might appear as shown in Figure 1-1.
Figure 1-1: Spreadsheet database solution for gardening supply store
Although it is easy to visualize and understand the data shown in the spreadsheet, notice that there is considerable repetition in the table in Figure 1-1. In this database, a single order requires a record for every line item. This type of database will take longer and longer to search as it grows.
Also, the person entering the order information will have to type in the same information: order number, customer number, (customer name, customer address) many times for a multiple-item order. This can be an error-prone and time-consuming process.
The color of the application window will vary according to the color scheme chosen for the computer.
For E
valua
tion O
nly

Exploring the Access Environment Lesson 1
3245-1 v1.00 © CCI Learning Solutions Inc. 3
The large size and repetitive nature of the data reflect the complexities of the data itself. At first thought, tracking orders might seem a simple task; but consider how the various pieces of data are related: A customer may place one or more orders, each order will consist of one or more line items, and each line item must reflect a particular product that is available in inventory. These relationships are quite complex.
Weaknesses of Spreadsheet Databases Even though you can perform complex calculations on data in a spreadsheet, a spreadsheet program itself gives you only limited control over the data that is entered, and complex data relationships are difficult if not impossible to represent.
Another difficulty with the spreadsheet solution is that the order of the rows in the spreadsheet affects how the data can be summarized. For example, the table in Figure 1-1 is currently sorted by order number. What if you wanted to see the rows by customer number instead? You would have to sort (that is, rearrange) the rows in the spreadsheet.
If you needed to print a list consisting of only customer names, customer ZIP codes and order totals, you would need to reorganize (or extract) the data in the spreadsheet before you could print the desired list.
Relational Database Management Systems (DBMS) Relational databases are a software solution quite different from spreadsheets. In general, database software is referred to as a database management system (DBMS). A DBMS allows you to define, create and maintain databases while providing controlled access to the data.
Many database applications are available on the market. Oracle, SQL Server, MySQL and Microsoft Access are just a few. These programs offer various features and interfaces, but all access stored data in a standard manner – through Structured Query Language (SQL).
Structured Query Language (SQL) is a standard language used to create professional, high-performance databases. Any interaction among a user, program and database takes place through the use of SQL.
Multiple, Related Tables Instead of all the information being stored in a single table (as it is in a spreadsheet), the data in a relational database is most often stored in multiple tables. Each table in a database stores information about a specific aspect of the information. In the case of the gardening supply company, for example, there might be a table that contains customer information, a table that contains order information, a table that contains detail information for each order and a table that contains product information.
Because the data stored in each table is “related” to data in the other tables of the database, a complete set of information can be retrieved for a desired entity. For example, you could retrieve complete information for an order from the Customer, Order, OrderItems and InventoryItems tables, as shown in Figure 1-2.
For E
valua
tion O
nly

Lesson 1 Exploring the Access Environment
4 3245-1 v1.00 © CCI Learning Solutions Inc.
Figure 1-2: Relational database solution for garden supply store
Although at first glance it might look confusing or complicated, using separate tables is efficient. Notice that in contrast to the spreadsheet solution, very little data is repeated. Minimizing the repetition of data helps to keep data valid and accurate.
Even if you are new to databases and they seem daunting, once you become accustomed to how data is stored and presented, you will find they are an easy solution for storing complex data.
What is Access? Microsoft Access 2010 is a DBMS and a complete application development environment. Unlike other DBMSs, Access includes the tools you need to develop user-friendly interfaces and reports. For users who are interested only in setting up databases and managing data, Access provides a user-friendly environment that allows you to accomplish database tasks very quickly even without prior knowledge.
As you learned earlier, any interaction among a user, program and database takes place through the use of SQL. In Access, the actual SQL code that controls and manipulates the data is used behind the scenes; users interact with a graphical environment which allows them to create tables, queries, reports and other database objects.
Access has been used by thousands of organizations to manage simple lists or design complex multi-user database applications over local area networks and the Internet. Access provides a powerful set of tools that enable you to create a database and start entering, organizing, searching, sorting, tracking, reporting and sharing information in a systematic way.
For E
valua
tion O
nly
Exploring the Access Environment Lesson 1
3245-1 v1.00 © CCI Learning Solutions Inc. 5
Access Database File An Access database is a container for a variety of database objects; it can contain one table or a collection of tables, forms, reports and queries. For example, an order tracking system (such as the one discussed earlier) that uses four tables is not four databases; it is one database that includes four tables: one for customer information, one for order information, one for order detail information and one for product information.
An Access 2010 database stores its objects in a single file with the .accdb file name extension. (Access 2007 also uses the .accdb file name extension.) Databases created in earlier versions of Access use the .mdb file name extension.
You can open and work with .mdb and .accdb databases in Access 2010. You can also use Access 2010 to create new databases and save the databases as .accdb or .mdb files for backward compatibility with earlier versions (for example, Access 2000 and Access 2002-2003).
Database Objects An Access database can contain various types of database objects, including tables, queries, forms, reports, macros and modules. The following sections will briefly introduce database objects. Individual types of database objects will be discussed in detail in later lessons.
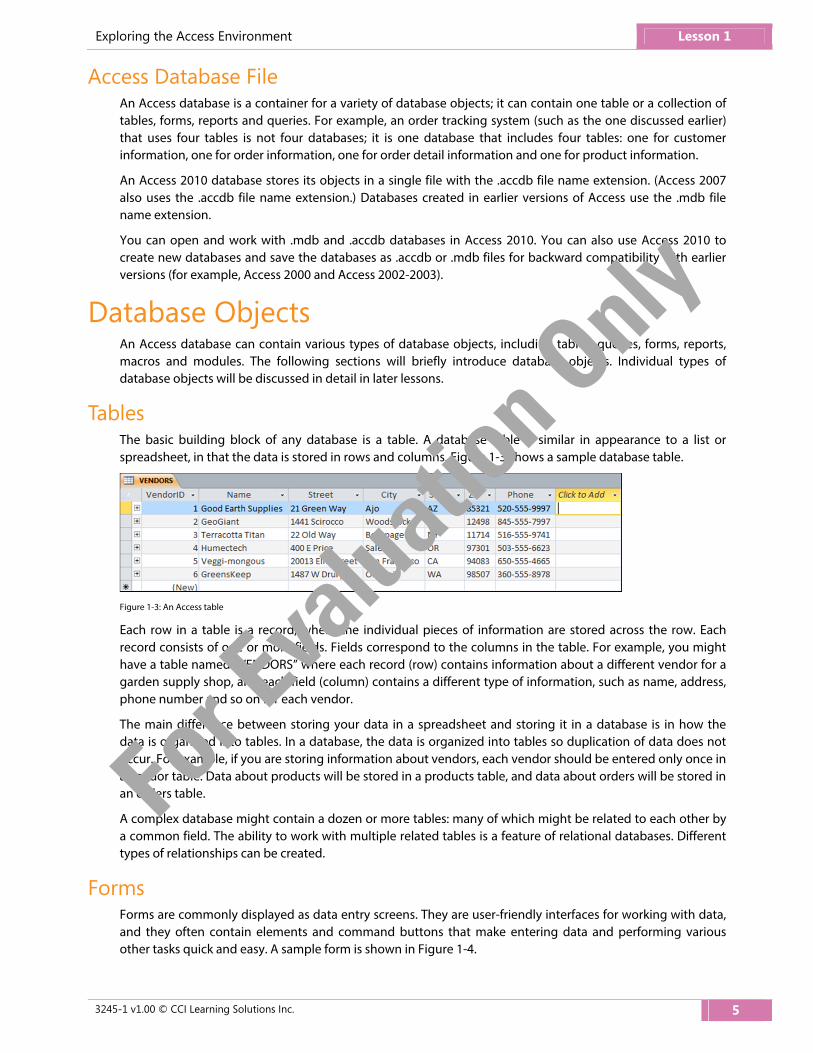
Tables The basic building block of any database is a table. A database table is similar in appearance to a list or spreadsheet, in that the data is stored in rows and columns. Figure 1-3 shows a sample database table.
Figure 1-3: An Access table
Each row in a table is a record, where the individual pieces of information are stored across the row. Each record consists of one or more fields. Fields correspond to the columns in the table. For example, you might have a table named “VENDORS” where each record (row) contains information about a different vendor for a garden supply shop, and each field (column) contains a different type of information, such as name, address, phone number and so on for each vendor.
The main difference between storing your data in a spreadsheet and storing it in a database is in how the data is organized into tables. In a database, the data is organized into tables so duplication of data does not occur. For example, if you are storing information about vendors, each vendor should be entered only once in a vendor table. Data about products will be stored in a products table, and data about orders will be stored in an orders table.
A complex database might contain a dozen or more tables: many of which might be related to each other by a common field. The ability to work with multiple related tables is a feature of relational databases. Different types of relationships can be created.
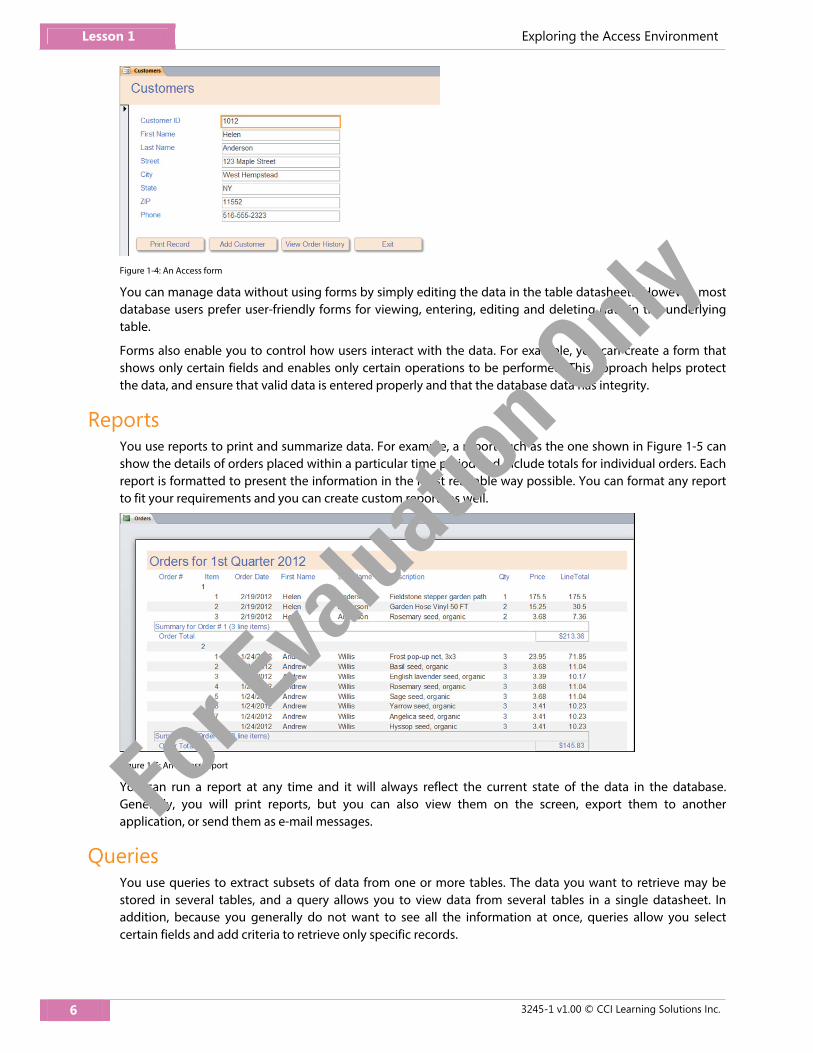
Forms Forms are commonly displayed as data entry screens. They are user-friendly interfaces for working with data, and they often contain elements and command buttons that make entering data and performing various other tasks quick and easy. A sample form is shown in Figure 1-4.
For E
valua
tion O
nly
Lesson 1 Exploring the Access Environment
6 3245-1 v1.00 © CCI Learning Solutions Inc.
Figure 1-4: An Access form
You can manage data without using forms by simply editing the data in the table datasheets. However, most database users prefer user-friendly forms for viewing, entering, editing and deleting data in the underlying table.
Forms also enable you to control how users interact with the data. For example, you can create a form that shows only certain fields and enables only certain operations to be performed. This approach helps protect the data, and ensure that valid data is entered properly and that the database data has integrity.
Reports You use reports to print and summarize data. For example, a report such as the one shown in Figure 1-5 can show the details of orders placed within a particular time period and include totals for individual orders. Each report is formatted to present the information in the most readable way possible. You can format any report to fit your requirements and you can create custom reports as well.
Figure 1-5: An Access report
You can run a report at any time and it will always reflect the current state of the data in the database. Generally, you will print reports, but you can also view them on the screen, export them to another application, or send them as e-mail messages.
Queries You use queries to extract subsets of data from one or more tables. The data you want to retrieve may be stored in several tables, and a query allows you to view data from several tables in a single datasheet. In addition, because you generally do not want to see all the information at once, queries allow you select certain fields and add criteria to retrieve only specific records.
For E
valua
tion O
nly
Exploring the Access Environment Lesson 1
3245-1 v1.00 © CCI Learning Solutions Inc. 7
The result of a query is called a record set or result set. You can view the result set on the screen, print it, copy it to the clipboard, or use the output of the query as the record source for a form or report.
Macros Macros are database objects that add functionality and automation to a database. A macro contains a series of database actions that are saved in an executable block of simplified programming language. Macro actions perform tasks, such as adding, deleting, or printing a record; opening a report; running a query; or closing a form. Most database operations that you perform manually can be automated by using macros. For example, you can attach a macro to a command button on a form so the macro runs whenever the button is clicked. Macros are timesaving devices because they automate database operations.
Modules Modules, like macros, are database objects that add functionality to a database. Modules are written in the Visual Basic for Applications (VBA) programming language. A module is a collection of declarations, statements and procedures stored together as a unit. Writing modules enables you to create procedures that run complex and intelligent time-saving automated operations in a database.
Note: This course introduces basic and intermediate skills for Access 2010. Not all the database objects listed above are covered in this course.
Components of the Access 2010 User Interface The Microsoft Access 2010 user interface provides the ability to work with a database as a complete file, and the ability to work with individual database objects. The three main components to the Access 2010 user interface are:
Ribbon A panel of command buttons and icons organized into a set of tabs. The Ribbon appearsacross the top of the program window. Each tab on the ribbon contains groups ofcommands related to specific database tasks.
Navigation Pane A pane on the left side of the program window that displays database objects
Backstage view A collection of commands on the File tab of the ribbon.
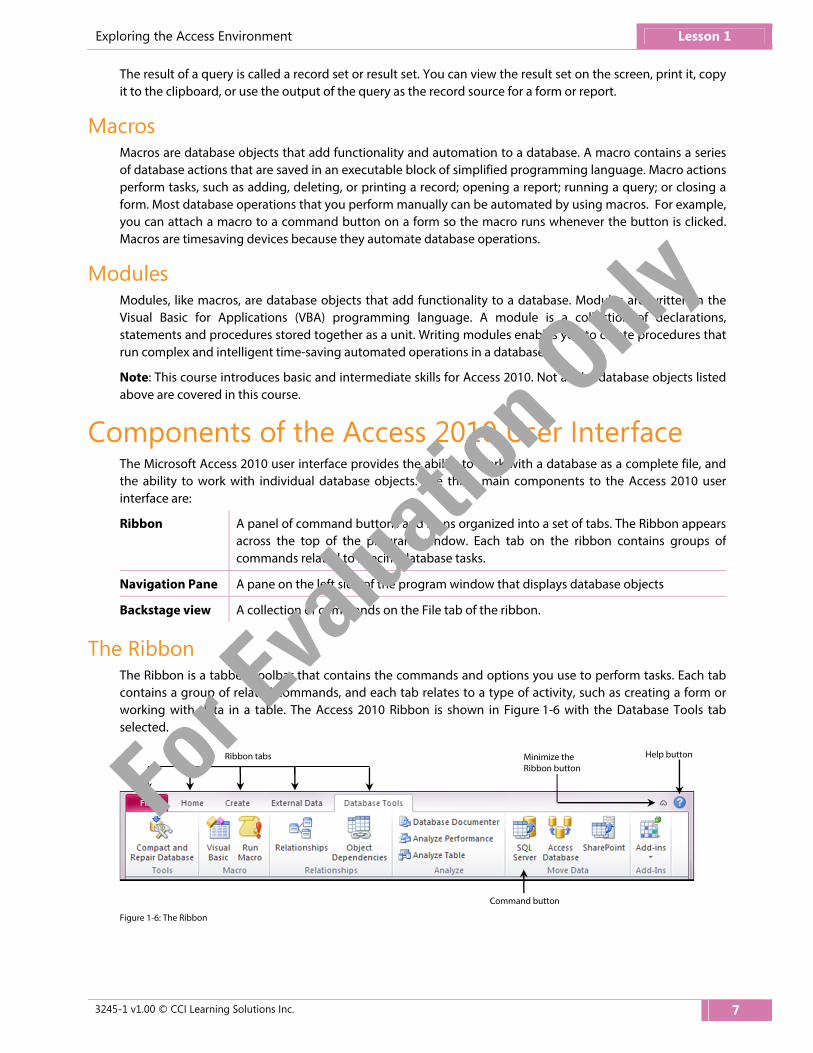
The Ribbon The Ribbon is a tabbed toolbar that contains the commands and options you use to perform tasks. Each tab contains a group of related commands, and each tab relates to a type of activity, such as creating a form or working with data in a table. The Access 2010 Ribbon is shown in Figure 1-6 with the Database Tools tab selected.
Figure 1-6: The Ribbon
Command button
Ribbon tabs Minimize the Ribbon button
Help button
For E
valua
tion O
nly
Lesson 1 Exploring the Access Environment
8 3245-1 v1.00 © CCI Learning Solutions Inc.
The Ribbon can help you find the commands you require quickly. Commands are grouped on tabs with each tab relating to a type of activity, such as working with records, creating database objects, or importing or exporting external data. You can customize the Ribbon to display the commands you use most often in a particular order, or to add or remove commands for a Ribbon tab (not covered in this course).
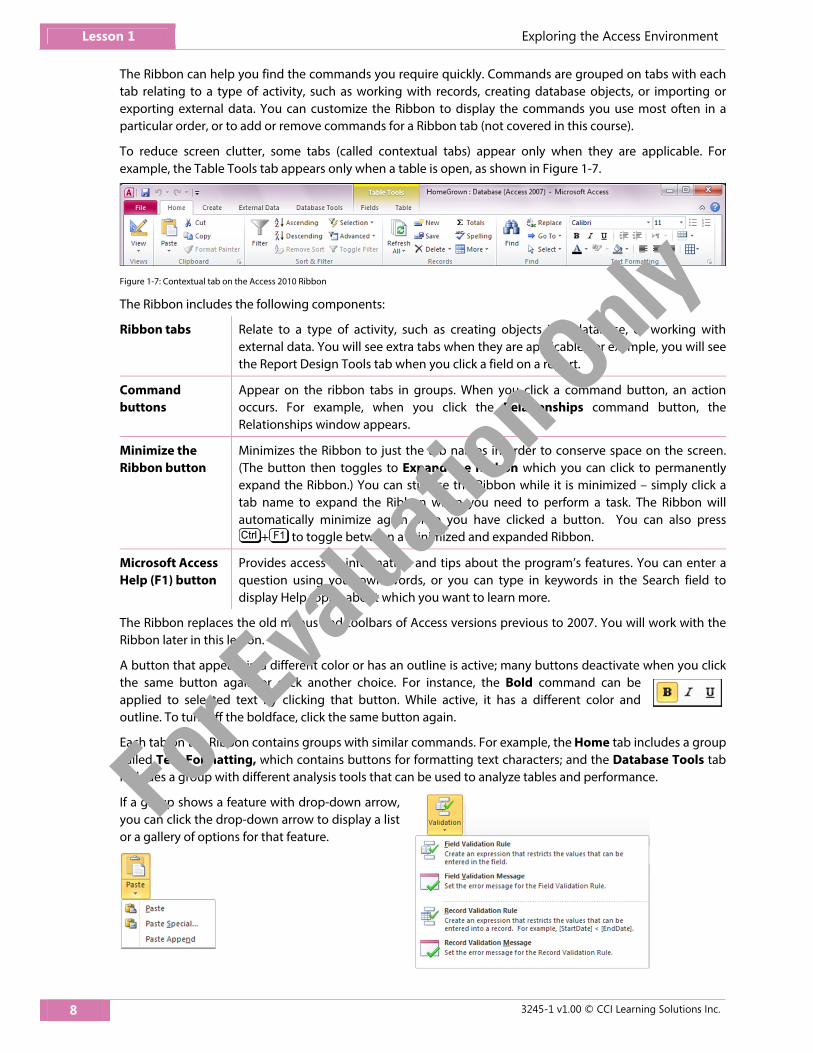
To reduce screen clutter, some tabs (called contextual tabs) appear only when they are applicable. For example, the Table Tools tab appears only when a table is open, as shown in Figure 1-7.
Figure 1-7: Contextual tab on the Access 2010 Ribbon
The Ribbon includes the following components:
Ribbon tabs Relate to a type of activity, such as creating objects in a database, or working withexternal data. You will see extra tabs when they are applicable; for example, you will seethe Report Design Tools tab when you click a field on a report.
Command buttons
Appear on the ribbon tabs in groups. When you click a command button, an actionoccurs. For example, when you click the Relationships command button, the Relationships window appears.
Minimize the Ribbon button
Minimizes the Ribbon to just the tab names in order to conserve space on the screen.(The button then toggles to Expand the Ribbon which you can click to permanently expand the Ribbon.) You can still use the Ribbon while it is minimized – simply click a tab name to expand the Ribbon when you need to perform a task. The Ribbon willautomatically minimize again once you have clicked a button. You can also press
+ to toggle between a minimized and expanded Ribbon.
Microsoft Access Help (F1) button
Provides access to information and tips about the program’s features. You can enter aquestion using your own words, or you can type in keywords in the Search field todisplay Help topics about which you want to learn more.
The Ribbon replaces the old menus and toolbars of Access versions previous to 2007. You will work with the Ribbon later in this lesson.
A button that appears in a different color or has an outline is active; many buttons deactivate when you click the same button again or click another choice. For instance, the Bold command can be applied to selected text by clicking that button. While active, it has a different color and outline. To turn off the boldface, click the same button again.
Each tab on the Ribbon contains groups with similar commands. For example, the Home tab includes a group called Text Formatting, which contains buttons for formatting text characters; and the Database Tools tab includes a group with different analysis tools that can be used to analyze tables and performance.
If a group shows a feature with drop-down arrow, you can click the drop-down arrow to display a list or a gallery of options for that feature.
For E
valua
tion O
nly

Exploring the Access Environment Lesson 1
3245-1 v1.00 © CCI Learning Solutions Inc. 9
You can click the dialog box launcher button at the lower right of a group to display a dialog box, window, or task pane offering more options for this group of features.
Dialog Box Window/Task Pane
Using a dialog box, you can change options for the selected feature, click a button to apply them, then close the dialog box. However, a task pane remains open on the screen so you can make ongoing changes; for example, the Office Clipboard task pane shows items that have been cut or copied to the clipboard and are available for pasting into one or more database objects.
You can minimize the Ribbon to conserve space on the screen. To minimize the Ribbon:
Use the button at the far right of the top of the Ribbon; or
double-click any of the Ribbon tabs; or
right-click anywhere on the Ribbon, then click Minimize the Ribbon; or
press + .
You can also access commands on the Ribbon using keyboard shortcuts. Windows programs use many of the same keyboard shortcuts; for example, you can press + to copy, + to save, and
+ to print.
To display the keyboard buttons for the commands in the Ribbon, press or .
When you press the key for the appropriate tab, Access displays that tab with all the keyboard shortcuts you need to select a command or feature from that group. For example, pressing displays the Create tab with the keyboard shortcuts you need to execute any action on that tab.
If you then press , you will access the Macro command, which will display the Macro editor.
For E
valua
tion O
nly

Lesson 1 Exploring the Access Environment
10 3245-1 v1.00 © CCI Learning Solutions Inc.
You can also use the keyboard to:
Access another tab; with the Ribbon active, press or to move to the appropriate tab.
Change the highlight or focus from the active tab, the status bar or work area by pressing . For example, press to switch view modes from the work area to the status bar; then press to move to the Design View button and, when it is highlighted, press .
Display a shortcut menu for the selected command by pressing + .
Move from the tab to the command in the first group. Press to move to the next command or + to move to the previous command. Note that you can only do this after you have pressed
or to display the keyboard shortcuts on the Ribbon.
Activate the selected command by pressing .
Exit or cancel a selection at any time by pressing . Note that you may need to press more than once to return to the work area.
The Navigation Pane Located on the left side of the screen, the Navigation Pane is a central location from which you can create and use any type of database object. It replaces the Database window found in versions of Access previous to 2007. The Navigation Pane is shown in Figure 1-8.
Figure 1-8: Navigation Pane
The Navigation Pane includes the following components:
Navigation Pane menu
Click the drop-down arrow to open a menu that allows you to specify which objects toshow. The default selection is All Access Objects.
Open/Close buttons
Collapses the Navigation Pane so only its Open/Close button and shutter bar display.Collapsing the pane provides more space on the screen for working with an object. Toreopen the Navigation Pane, click its shutter bar.
Object groups Organize the objects in a database, allowing you to find what you are looking for. Eachobject group includes an Open/Close button, which you can use to collapse or expandthe list.
Database objects
The tables, queries, forms and other objects that exist in the database. Each object appears in its appropriate group.
Search box You can type the name of an object for which you are looking and the objects thatdisplay in the Navigation Pane are filtered to match the name you enter.
Open/Close button
Database objects
Open/Close button Search box
Navigation Pane menu
Object groups
For E
valua
tion O
nly

Exploring the Access Environment Lesson 1
3245-1 v1.00 © CCI Learning Solutions Inc. 11
The Navigation Pane shown in Figure 1-8 shows all the objects in the database and does not display empty object groups. That is, the Macros and Modules groups do not appear in the Navigation Pane because the database does not contain any of these objects.
To open an object, double-click it in the Navigation Pane. You can also right-click an object to display a shortcut menu. For example, you can right-click a table and specify to open it in Design view.
Backstage View You use Backstage view to create, open, save, print and manage databases. The commands and options available here are related to things you can do with a database itself. For example, you can open a database, encrypt it, assign a password, or repair and compact it.
In contrast to Backstage view is the Access client view, which you use to work with the objects within a database. For example, you use Access client view to create tables, add records, or modify a form.
Backstage view shows the commands and options available on the File tab of the Ribbon, as shown in Figure 1-9.
Figure 1-9: Access 2010 Backstage view
The tabs within Backstage view are: File, Info, Recent, New, Print, Save & Publish, and Help. Each of these tabs includes commands and options that appear in the right pane of the window when the tab is selected. Backstage view also includes the Options button which opens the Access Options dialog box, and the Exit button which closes the application.
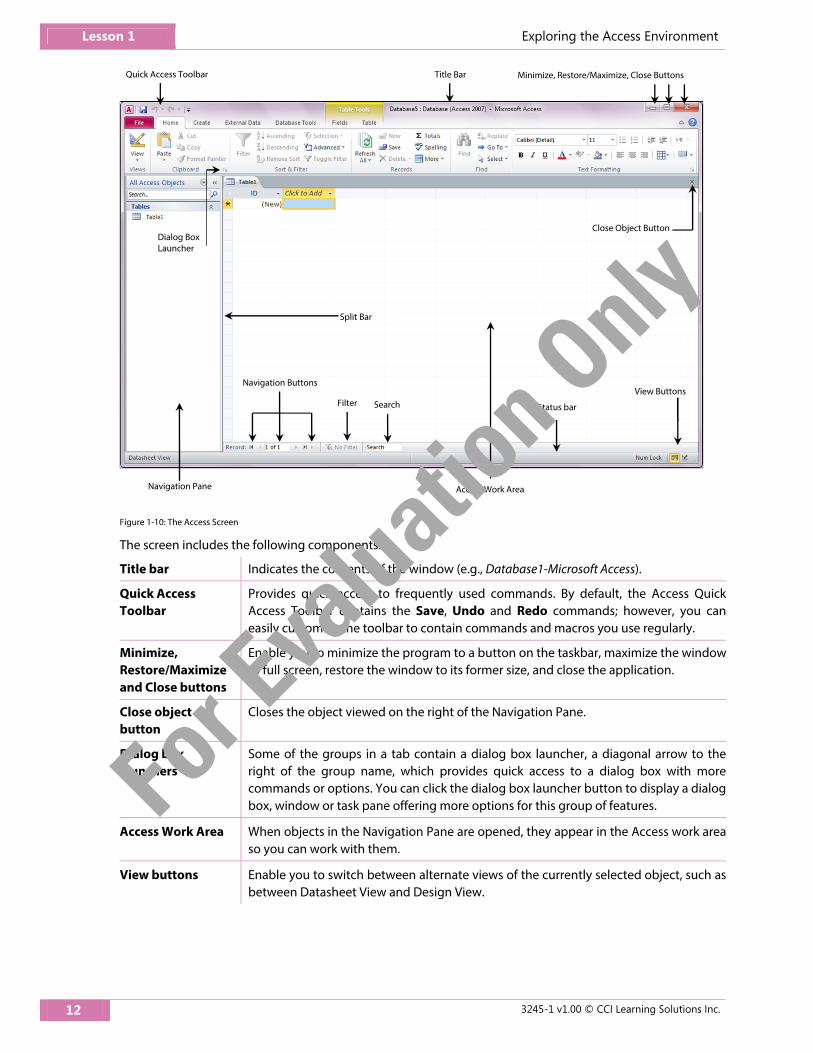
Looking at the Screen Aside from the Ribbon, the Navigation Pane and Backstage view, several other components appear on the screen at various times as you work in an Access database. These components are shown in Figure 1-10.
Commands
Tabs
Commands
For E
valua
tion O
nly
Lesson 1 Exploring the Access Environment
12 3245-1 v1.00 © CCI Learning Solutions Inc.
Figure 1-10: The Access Screen
The screen includes the following components:
Title bar Indicates the contents of the window (e.g., Database1-Microsoft Access).
Quick Access Toolbar
Provides quick access to frequently used commands. By default, the Access QuickAccess Toolbar contains the Save, Undo and Redo commands; however, you can easily customize the toolbar to contain commands and macros you use regularly.
Minimize, Restore/Maximize and Close buttons
Enable you to minimize the program to a button on the taskbar, maximize the windowto full screen, restore the window to its former size, and close the application.
Close object button
Closes the object viewed on the right of the Navigation Pane.
Dialog box launchers
Some of the groups in a tab contain a dialog box launcher, a diagonal arrow to theright of the group name, which provides quick access to a dialog box with morecommands or options. You can click the dialog box launcher button to display a dialog box, window or task pane offering more options for this group of features.
Access Work Area When objects in the Navigation Pane are opened, they appear in the Access work areaso you can work with them.
View buttons Enable you to switch between alternate views of the currently selected object, such as between Datasheet View and Design View.
View Buttons
Access Work Area Navigation Pane
Quick Access Toolbar Title Bar Minimize, Restore/Maximize, Close Buttons
SearchFilter
Navigation Buttons
Split Bar
Close Object ButtonDialog Box Launcher
Status bar
For E
valua
tion O
nly

Exploring the Access Environment Lesson 1
3245-1 v1.00 © CCI Learning Solutions Inc. 13
Status bar Indicates the currently displayed view (Datasheet View) and whether specific modes are applied. You can right-click the status bar to show or hide elements on the status bar.
Split bar Drag this bar to increase or decrease the size of the Navigation Pane, or to increase ordecrease the size of the object you are viewing to the right of the Navigation Pane.
Navigation buttons
Enable you to move between records in a table or form. The first button moves you tothe first record; the second button moves you to the previous record; the third buttonmoves you to the next record; the fourth button moves you to the last record; and the last button creates a new blank record.
Filter Enables you to remove or re-apply a filter.
Search Enables you to search and find characters in the table records.
You may notice immediately that there is no Office button. The menu commands and options accessed through the Office button in Access 2007 are now accessed through Backstage view.
Viewing Screen Tips ScreenTips help identify buttons or elements on the tabs of the Ribbon and the screen. To view a ScreenTip, position the mouse cursor over the item. A tip then displays the name of the button along with a description of its purpose. For some items, a keyboard shortcut may also display as an alternative way to activate this feature.
Using the Quick Access Toolbar The Quick Access Toolbar, at the left of the title bar above the Ribbon, includes buttons for frequently used commands. By default, this toolbar contains the Access control icon, and the Save, Undo, Redo and Customize Quick Access Toolbar buttons. Use the last button to customize or display commands you use frequently, such as new, open or print preview.
To customize the Quick Access Toolbar, use one of the following methods:
Click Customize Quick Access Toolbar and click a button from the displayed list, or click More Commands; or
Click File, click Options, and then click Quick Access Toolbar; or
Right-click anywhere on the Ribbon, click Customize Quick Access Toolbar, and either click a button from the list or click More Commands.
Access Control icon Undo Redo
Save Customize Quick Access Toolbar
For E
valua
tion O
nly

Lesson 1 Exploring the Access Environment
14 3245-1 v1.00 © CCI Learning Solutions Inc.
To move the Quick Access Toolbar to below the Ribbon: Click Customize Quick Access Toolbar, then click Show Below the Ribbon; or Right-click the Ribbon, click Customize Quick Access Toolbar, then click Show Quick Access Toolbar
Below the Ribbon.
The Access Startup Screen As you learned earlier, an Access database file is a container for a variety of database objects. The commands and options for working with the database file itself differ from those available for working with individual database objects. Backstage view is where you work with database files. The remaining tabs on the Ribbon constitute the Access client wherein you work with database objects.
Access opens in Backstage view and displays a startup screen similar to the one shown in Figure 1-11. The Startup screen provides commands and options for: saving the current database to disk making a copy of an object (e.g. table or query) in the same database by saving it with a different name saving a copy of a database to a different name or location opening an existing database closing a database viewing information about, compacting and repairing or encrypting a database creating a new database printing database information saving a database or a database object in a different form accessing various options and links for obtaining help with Microsoft Access setting Access options exiting Access
Figure 1-11: Access Startup Screen – Backstage view
For the remainder of this lesson, you will work with commands and options presented in Backstage view.
Preview area
File name
File location
Create button
Open button
Quick Access
List
Browse for a location Fo
r Eva
luatio
n Only

Exploring the Access Environment Lesson 1
3245-1 v1.00 © CCI Learning Solutions Inc. 15
Creating a New Blank Database New databases are created from database templates. The Blank database template creates an empty database file; that is, it creates a database that does not contain any database objects. By default, the Blank database template is selected when you access the New tab in Backstage view and a preview of the blank database displays in the preview area in the right pane. Access suggests a name (Databasex.accdb) and location (the Documents folder) for the new database file.
You supply your own name for the database by selecting the text in the File Name box and typing the name. You can also click the Browse for a location button to specify where you want to save your database file. When you click this button, the File New Database dialog box opens, as shown in Figure 1-12.
Figure 1-12: File New Database dialog box
You use this dialog box to navigate to where you want to save a new database file. You navigate the directory tree in the dialog box as you would in any Windows screen. Once you have specified the desired location, select the text in the File name box, type a name for the new database and click OK.
When choosing a name, consider the following:
The file name can be a maximum of 255 characters (including the drive and folder path), and may not include these characters: / \ : * ? “ < > |
Give the file a name that will help you identify its contents quickly.
Access automatically assigns the .accdb file name extension. (The default database type for Access 2010 is the Microsoft Access 2007 Database.) You need to type only the name for the database.
To save a database as a different file type, such as an Access 2003 .mdb file, display the Save as type drop-down list in the File New Database dialog box and select the appropriate file format.
Closing a Database When you have finished working with a database, you can close the database and still keep Access open to work with other databases. To close a database you use the Close Database command in Backstage view.
For E
valua
tion O
nly

Lesson 1 Exploring the Access Environment
16 3245-1 v1.00 © CCI Learning Solutions Inc.
Note: You will save all database files created for this course in the 3245 Student Files\CreatedFiles folder on the Desktop. It is assumed that you will add your first and last names to the end of every file name.
1 Click Start, All Programs, Microsoft Office, Microsoft Access 2010. Access opens in Backstage view and displays the startup screen.
2 Ensure that Blank database is selected in the Available Templates section, then in the right pane, click the Browse for a location button to open the File New Database dialog box.
3 Navigate to the 3245 Student Files folder on the Desktop, then into the CreatedFiles subfolder.
4 Click in the File name box to select the suggested file name, type: Database1‐ then type your <first name> and <last name> (without spaces). For example, if your name were Ann Smith, the file name you type in the File Name box would be Database1-AnnSmith.
5 Click OK to save your specifications. The new file name and file location should display in the right pane of the window.
6 Click the Create button to save the blank database in the specified location. Access saves the database and opens a blank datasheet with the suggested name Table1 on the datasheet tab.
Notice that Table1 appears in the Table objects list in the Navigation Pane. If you save the table, it will be saved as a database object.
7 In the Quick Access Toolbar, click the Save button to open the Save As dialog box.
8 Click OK to save the table as Table1.
9 Right-click the Table1 tab, then select Close from the shortcut menu to close the Table1 table.
10 In the Navigation Pane, double-click Table1 to reopen the empty table.
11 Click the Close object button at the upper-right corner of the work area to close the table again.
12 In the Ribbon, click the File tab to return to Backstage view. Notice that the current database appears at the top of the Quick Access list.
13 In the left pane, click the Close Database command.
14 Click the Minimize button at the upper-right corner of the Access window. You will keep the Access window minimized when you are not performing exercises.
Learn the SkillIn this exercise, you will start Access and create and save a new blank database.
For E
valua
tion O
nly

Exploring the Access Environment Lesson 1
3245-1 v1.00 © CCI Learning Solutions Inc. 17
Creating a Database From a Template Access 2010 ships with several database templates, and provides quick links to templates on the Office.com Web site. Some templates include sample data.
Templates enable you to create new databases quickly. A template is a model or boilerplate of a typical database that contains all the table, query, form and report objects required to perform a specific function. For example, templates are available to track assets or inventory, manage tasks or contacts, and administer projects.
You select a template from the Available Templates section on the New tab in Backstage view. Templates listed under Home are installed on the system. Templates are available for download on the Office.com Web site, and require an Internet connection.
When you select a template, its icon appears in the Preview area, as shown in Figure 1-13.
Figure 1-13: A selected database template
To create a new database from the selected template, click the Create button. Once you have created a database based on a template, you can enter data and customize the database to meet your requirements.
1 Restore the Access window.
2 If necessary, switch to Backstage view by clicking the File tab on the Ribbon once or twice.
3 If necessary, select the New tab in Backstage view.
Learn the SkillIn this exercise, you will create a database from a template.
1.1
For E
valua
tion O
nly
Lesson 1 Exploring the Access Environment
18 3245-1 v1.00 © CCI Learning Solutions Inc.
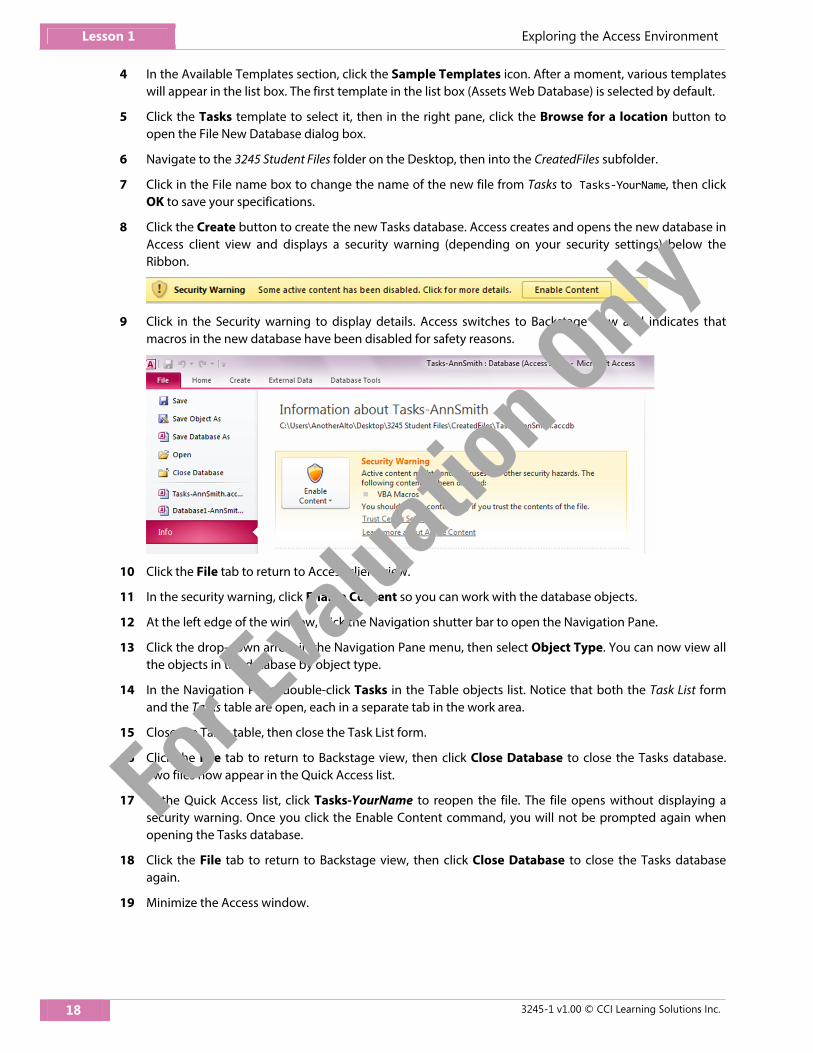
4 In the Available Templates section, click the Sample Templates icon. After a moment, various templates will appear in the list box. The first template in the list box (Assets Web Database) is selected by default.
5 Click the Tasks template to select it, then in the right pane, click the Browse for a location button to open the File New Database dialog box.
6 Navigate to the 3245 Student Files folder on the Desktop, then into the CreatedFiles subfolder.
7 Click in the File name box to change the name of the new file from Tasks to Tasks‐YourName, then click OK to save your specifications.
8 Click the Create button to create the new Tasks database. Access creates and opens the new database in Access client view and displays a security warning (depending on your security settings) below the Ribbon.
9 Click in the Security warning to display details. Access switches to Backstage view and indicates that macros in the new database have been disabled for safety reasons.
10 Click the File tab to return to Access client view.
11 In the security warning, click Enable Content so you can work with the database objects.
12 At the left edge of the window, click the Navigation shutter bar to open the Navigation Pane.
13 Click the drop-down arrow in the Navigation Pane menu, then select Object Type. You can now view all the objects in the database by object type.
14 In the Navigation Pane, double-click Tasks in the Table objects list. Notice that both the Task List form and the Tasks table are open, each in a separate tab in the work area.
15 Close the Tasks table, then close the Task List form.
16 Click the File tab to return to Backstage view, then click Close Database to close the Tasks database. Two files now appear in the Quick Access list.
17 In the Quick Access list, click Tasks-YourName to reopen the file. The file opens without displaying a security warning. Once you click the Enable Content command, you will not be prompted again when opening the Tasks database.
18 Click the File tab to return to Backstage view, then click Close Database to close the Tasks database again.
19 Minimize the Access window.
For E
valua
tion O
nly
Exploring the Access Environment Lesson 1
3245-1 v1.00 © CCI Learning Solutions Inc. 19
Managing Database Files Several facets of database management are accessible through Backstage view. The next several sections will discuss opening, encrypting, saving and publishing, backing up, and compacting and repairing database files.
Opening an Existing Database As you begin to use Access, recently used database files will display in the Quick Access list in the Startup screen. By default, as many as four files appear in the list (although you can change this number). To open a database that appears in the list, simply click the database name.
If four database files already appear in the Quick Access list and the file you want is not listed, but you have worked with it recently, you can click the Recent tab to see a list of the last seventeen database files you have accessed (you can also change this number). As with the Quick Access list, you simply click a file name to open a database.
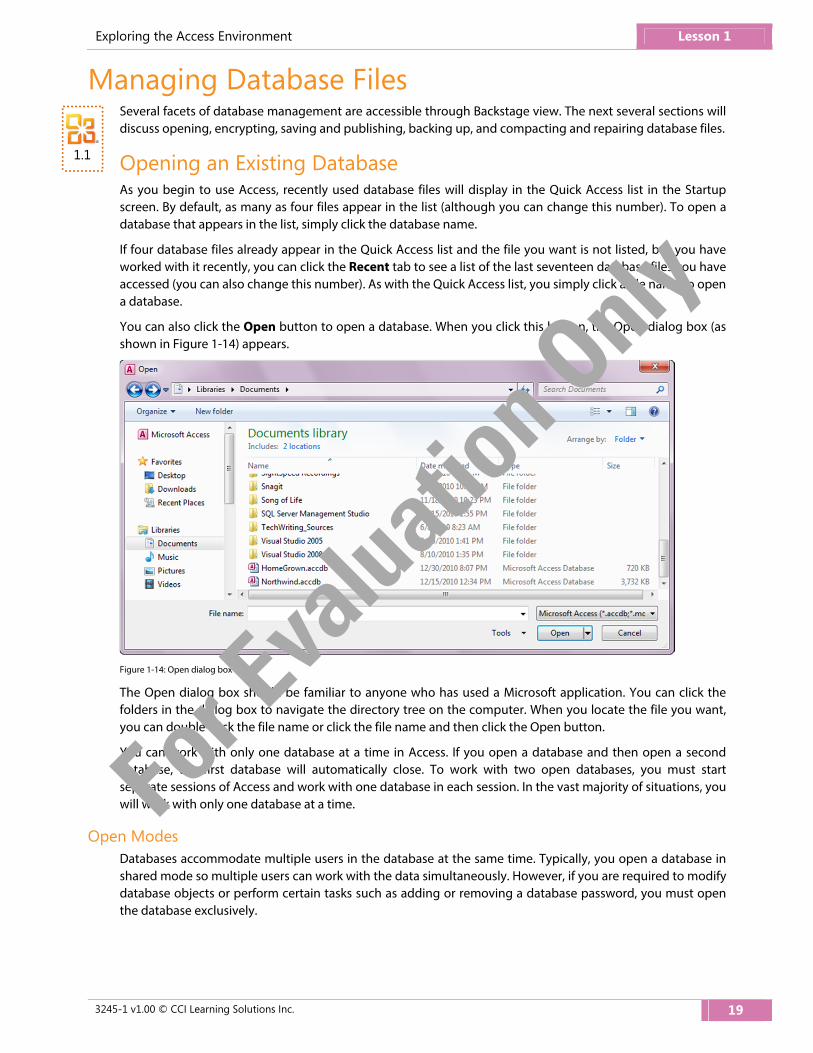
You can also click the Open button to open a database. When you click this button, the Open dialog box (as shown in Figure 1-14) appears.
Figure 1-14: Open dialog box
The Open dialog box should be familiar to anyone who has used a Microsoft application. You can click the folders in the dialog box to navigate the directory tree on the computer. When you locate the file you want, you can double-click the file name or click the file name and then click the Open button.
You can work with only one database at a time in Access. If you open a database and then open a second database, the first database will automatically close. To work with two open databases, you must start separate sessions of Access and work with one database in each session. In the vast majority of situations, you will work with only one database at a time.
Open Modes Databases accommodate multiple users in the database at the same time. Typically, you open a database in shared mode so multiple users can work with the data simultaneously. However, if you are required to modify database objects or perform certain tasks such as adding or removing a database password, you must open the database exclusively.
1.1
For E
valua
tion O
nly

Lesson 1 Exploring the Access Environment
20 3245-1 v1.00 © CCI Learning Solutions Inc.
You can specify the open mode for a database by selecting it from the Open drop-down list. In the Open dialog box, click the drop-down arrow on the Open command button and specify to open the database in one of a variety of modes:
Shared Opens a database with shared access so that you and other users can read and write to the database.
Read-Only Opens the database for you with read-only access so you can read but not edit data; other users can still read and write to the database.
Exclusive Opens the database exclusively for you, and other users cannot open the database. Youcannot use this option if other users currently have this database open. If others attempt to open the database after you have opened it with the Exclusive option, they receive amessage indicating that the file is already in use.
Exclusive Read-Only
Opens the database for read-only access. You cannot use this option if other users currently have this database open. Other users can open the database after you withread-only access, but not edit the data.
Show Previous Versions
Searches for previous versions of the selected database file.
Encrypting and Password-protecting a Database A simple way to control access to a database is to protect it with a password. When you apply a password to a database, Access will automatically encrypt it, making all data unreadable by other tools. Users must enter the correct password in order to open the database.
It is recommended that you use strong passwords that combine uppercase and lowercase letters, numbers and symbols. Passwords are case-sensitive and should include at least eight characters.
Note: It is critical that you remember the database password; if you do not, your data cannot be retrieved. Passwords should be stored in a secure location.
You must open a database in exclusive mode to add or remove a database password. Open the database in exclusive mode, then click the Encrypt with Password command on the Info tab in Backstage view to open the Set Database Password dialog box, shown in Figure 1-15.
Figure 1-15: Set Database Password dialog box
Enter the password in the Password box, press then re-enter the password in the Verify box and click OK to set the password and encrypt the database.
For E
valua
tion O
nly
Exploring the Access Environment Lesson 1
3245-1 v1.00 © CCI Learning Solutions Inc. 21
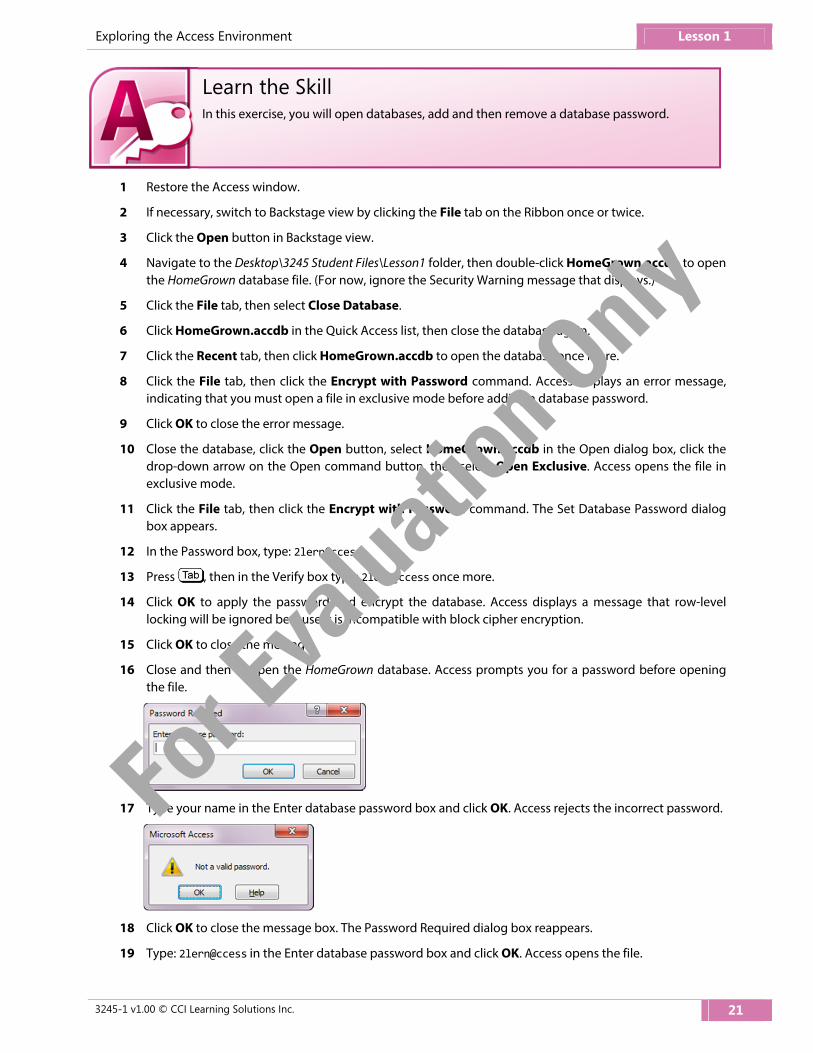
1 Restore the Access window.
2 If necessary, switch to Backstage view by clicking the File tab on the Ribbon once or twice.
3 Click the Open button in Backstage view.
4 Navigate to the Desktop\3245 Student Files\Lesson1 folder, then double-click HomeGrown.accdb to open the HomeGrown database file. (For now, ignore the Security Warning message that displays.)
5 Click the File tab, then select Close Database.
6 Click HomeGrown.accdb in the Quick Access list, then close the database again.
7 Click the Recent tab, then click HomeGrown.accdb to open the database once more.
8 Click the File tab, then click the Encrypt with Password command. Access displays an error message, indicating that you must open a file in exclusive mode before adding a database password.
9 Click OK to close the error message.
10 Close the database, click the Open button, select HomeGrown.accdb in the Open dialog box, click the drop-down arrow on the Open command button, then select Open Exclusive. Access opens the file in exclusive mode.
11 Click the File tab, then click the Encrypt with Password command. The Set Database Password dialog box appears.
12 In the Password box, type: 2lern@ccess.
13 Press , then in the Verify box type: 2lern@ccess once more.
14 Click OK to apply the password and encrypt the database. Access displays a message that row-level locking will be ignored because it is incompatible with block cipher encryption.
15 Click OK to close the message.
16 Close and then re-open the HomeGrown database. Access prompts you for a password before opening the file.
17 Type your name in the Enter database password box and click OK. Access rejects the incorrect password.
18 Click OK to close the message box. The Password Required dialog box reappears.
19 Type: 2lern@ccess in the Enter database password box and click OK. Access opens the file.
Learn the SkillIn this exercise, you will open databases, add and then remove a database password.
For E
valua
tion O
nly

Lesson 1 Exploring the Access Environment
22 3245-1 v1.00 © CCI Learning Solutions Inc.
20 Close the file and reopen it in exclusive mode. Be sure to enter the correct password.
21 Click the File tab, then click the Decrypt Database command. Access prompts you once more for the password. You must enter the password in order to remove it.
22 Enter the correct password in the Password box, then click OK. Access removes the password. The database is no longer encrypted.
23 Close and reopen the HomeGrown database once more to verify that the password protection has been removed.
24 Close the database and minimize the Access window.
Saving and Publishing a Database When you first create a database, you enter the file name in the File Name box. It is not necessary to save the database file after you have given the database a file name; as you work in the database, you will save the individual database objects. Whenever anyone adds, modifies, or deletes data, Access will save these changes to disk immediately. However, you can use the Save Database As command if you want to save the database with a different file name or save it in a different location. This command is accessible in Backstage view when a database file is open. Clicking the Save Database As command opens the Save As dialog box, shown in Figure 1-16.
Figure 1-16: Save As dialog box – database files
To save a database in a different version of Access, for example, to save an Access 2010 .accdb file as an Access 2003 .mdb file, you use the commands and options on the Save & Publish tab, shown in Figure 1-17.
For E
valua
tion O
nly

Exploring the Access Environment Lesson 1
3245-1 v1.00 © CCI Learning Solutions Inc. 23
Figure 1-17: Save & Publish tab
The options on the Save & Publish tab allow you to specify a file format, including saving a database file as a template, or as an executable file.
You also use the Save & Publish tab to publish a database to Access Services, a component of SharePoint Server. Published Web databases can be accessed through a Web browser. Publishing a database to Access Services requires a user account with appropriate permissions on a SharePoint server. Figure 1-18 shows the options for publishing a database.
Figure 1-18: Options for publishing to Access Services
For E
valua
tion O
nly

Lesson 1 Exploring the Access Environment
24 3245-1 v1.00 © CCI Learning Solutions Inc.
Backing Up a Database The data in a database is valuable to an organization and must be protected and kept accessible. Performing regular database backups is an essential part of data protection. Backups are necessary because they help you recover information if a database becomes corrupted or if data is lost due to accidental deletion, computer failure, or theft or disaster. A backup is simply a copy of a database. By default, Access appends a date to the database file name.
It is always a good idea to create a backup of an Access database before making changes to its design. Sometimes design changes can result in unforeseen difficulties and errors. Because you can copy database objects from one database to another, restoring lost data or objects from a backup file is a simple and fast solution to return a database to working order.
Backing up an Access database is fast and easy, and can save you time and money in the event of data loss. The Backup command is available on the Save & Publish tab. Simply select the Back Up Database option, click the Save As command button, then click the Save button in the Save As dialog box.
First, you will save a database to a different name and location.
1 Restore the Access window.
2 Open the HomeGrown database one more time.
3 Click the File tab, then click the Save Database As command to open the Save As dialog box.
4 Navigate to the Desktop\3245 Student Files\CreatedFiles folder to specify a new location.
5 Click the drop-down arrow in the Save as type text box. Notice that you cannot specify a different file type. You must save the file as *.accdb file.
6 Change the database name to HomeGrown1‐YourName, then click the Save button to save and automatically open the file. Notice that Access displays the security warning under the Ribbon because the HomeGrown1 database has not been opened before.
Next, you will save a database to a different version.
7 Click the File tab, then click the Save & Publish tab in Backstage view.
8 Ensure that Save Database As is selected in the File Types section, then in the Save Database As section, click Access 2002–2003 Database (*.mdb). You will save a version of the file that will be compatible with Access 2003.
9 Click the Save As command button to open the Save As dialog box. Notice that now you can save the file only as a *.mdb file.
10 Click the Save button in the Save As dialog box to save the file as HomeGrown1-YourName.mdb in the CreatedFiles folder. Again, the new file is automatically opened.
11 Click the File tab, then position the mouse pointer over the second file in the Quick Access list. Notice that the full path and file name display in a pop-up box, allowing you to tell the difference between the .mdb file and the .accdb file.
Learn the SkillIn this exercise, you will save and back up a database.
For E
valua
tion O
nly
Exploring the Access Environment Lesson 1
3245-1 v1.00 © CCI Learning Solutions Inc. 25
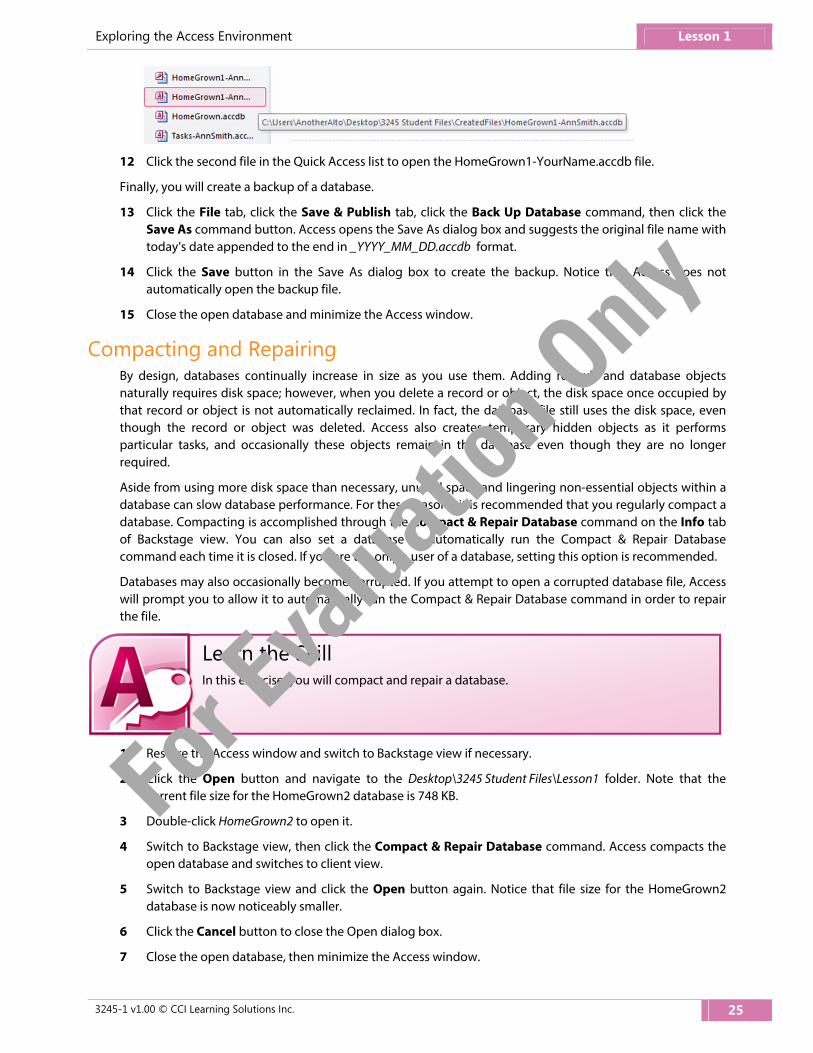
12 Click the second file in the Quick Access list to open the HomeGrown1-YourName.accdb file.
Finally, you will create a backup of a database.
13 Click the File tab, click the Save & Publish tab, click the Back Up Database command, then click the Save As command button. Access opens the Save As dialog box and suggests the original file name with today’s date appended to the end in _YYYY_MM_DD.accdb format.
14 Click the Save button in the Save As dialog box to create the backup. Notice that Access does not automatically open the backup file.
15 Close the open database and minimize the Access window.
Compacting and Repairing By design, databases continually increase in size as you use them. Adding records and database objects naturally requires disk space; however, when you delete a record or object, the disk space once occupied by that record or object is not automatically reclaimed. In fact, the database file still uses the disk space, even though the record or object was deleted. Access also creates temporary hidden objects as it performs particular tasks, and occasionally these objects remain in the database even though they are no longer required.
Aside from using more disk space than necessary, unused space and lingering non-essential objects within a database can slow database performance. For these reasons, it is recommended that you regularly compact a database. Compacting is accomplished through the Compact & Repair Database command on the Info tab of Backstage view. You can also set a database to automatically run the Compact & Repair Database command each time it is closed. If you are the only a user of a database, setting this option is recommended.
Databases may also occasionally become corrupted. If you attempt to open a corrupted database file, Access will prompt you to allow it to automatically run the Compact & Repair Database command in order to repair the file.
1 Restore the Access window and switch to Backstage view if necessary.
2 Click the Open button and navigate to the Desktop\3245 Student Files\Lesson1 folder. Note that the current file size for the HomeGrown2 database is 748 KB.
3 Double-click HomeGrown2 to open it.
4 Switch to Backstage view, then click the Compact & Repair Database command. Access compacts the open database and switches to client view.
5 Switch to Backstage view and click the Open button again. Notice that file size for the HomeGrown2 database is now noticeably smaller.
6 Click the Cancel button to close the Open dialog box.
7 Close the open database, then minimize the Access window.
Learn the SkillIn this exercise, you will compact and repair a database.
For E
valua
tion O
nly

Lesson 1 Exploring the Access Environment
26 3245-1 v1.00 © CCI Learning Solutions Inc.
Using the Navigation Pane The Navigation Pane is a central location from which you can create and use any type of database object. You can control which objects display and you can use the Navigation Pane to copy, rename or delete objects. You can also set specific options for how the Navigation Pane functions.
Viewing Objects You can control which objects display in the Navigation Pane by selecting options in the Navigation Pane menu. To access the menu, click the drop-down arrow. The Navigation Pane menu is shown in Figure 1-19.
Figure 1-19: Navigation Pane menu
By default, database objects display by object type and all objects appear in the pane. You can display objects ordered by creation date or date of last modification. You can also view tables and all their related objects (such as queries or forms based on the table).
You can also filter which objects display in the Navigation Pane. That is, you can view only tables or only forms by selecting an item in the Filter By Group list.
Copying Objects You can copy an object in the Navigation Pane by right-clicking it and selecting the Copy command from the shortcut menu. To paste a copied object, right-click in a blank area of the Navigation Pane and select Paste to open the Paste <object> As dialog box. Figure 1-20 shows the Paste Table As dialog box.
Figure 1-20: Paste Table As dialog box
Different objects have different options. When you copy and paste a table, you can specify to paste the structure only or both the structure and the data. You can also elect to add the records in the copied table to another table in the database.
You can also use the Save Object As command in Backstage view to create a copy of the current database object in the database with a new name. Clicking the Save Object As command opens a Save As dialog box such as the one shown in Figure 1-21.
1.1 1.2
For E
valua
tion O
nly

Exploring the Access Environment Lesson 1
3245-1 v1.00 © CCI Learning Solutions Inc. 27
Figure 1-21: Using the Save Object As command
The available options in the As drop-down list in the Save As dialog box vary depending on the object type. For example, a table can be saved as a table, query, form or report. A form can be saved only as a form or a report.
Renaming Objects Renaming objects in the Navigation Pane is as simple as right-clicking the object and selecting Rename in the shortcut menu. The object name is then opened for editing in the Navigation Pane. Type a new name and press .
You should take care when renaming objects, as other objects that reference a renamed object may cease to function. The default options for Access permit the application to perform Name AutoCorrect, which is a feature that keeps track of name changes made to objects in the database and automatically corrects (updates) references to the renamed objects in reports, forms and queries. For example, if you create a table and a report based on the table, and later rename the table, the Name AutoCorrect feature will automatically update the reference to the table name in the report. However, the Name AutoCorrect feature does not always catch name changes, and in some cases makes unwanted changes. Many users turn this feature off. Name AutoCorrect does not make changes in macros.
Deleting Objects To delete a database object, select the object in the Navigation Pane, then press the key or click the Delete button in the Home tab on the Ribbon. You can also right-click an object in the Navigation Pane and select Delete in the shortcut menu. Regardless of which method you use, you will be prompted to confirm the deletion. You need to be careful when deleting any object in the database; any other object that references the deleted object will cease to function until you remove the references to the deleted object.
Setting Navigation Options You can also create custom categories and groups and set options that control how objects display in the Navigation Pane. Creating custom groups is advantageous if a database contains a large number of objects. Custom groups can make it easy to find the particular objects you want.
For example, in the HomeGrown database, the CUSTOMERS, INVENTORYITEMS, ORDERSTATUSES and VENDORS tables contain data that is meaningful without needing to reference other tables in the database. These tables can stand alone. Conversely, the ORDERS and ORDERITEMS tables are dependent upon other tables for their meaning. You could create a custom category to show standalone objects apart from other objects in the database.
To create a custom category, right-click the Navigation Pane menu bar, then select Navigation Options to open the Navigation Options dialog box, shown in Figure 1-22.
For E
valua
tion O
nly

Lesson 1 Exploring the Access Environment
28 3245-1 v1.00 © CCI Learning Solutions Inc.
Figure 1-22: Navigation Options dialog box
Click the Add Item button to create a new category, type a name for the new category, such as Standalones, and press . Next, click the Add Group button, type a name for the new group, such as Items, and press
. Click OK to close the Navigation Options dialog box.
Display the Navigation Pane menu and select the new Standalones category. The new category displays two groups – Items and Unassigned. To add standalone items to the custom Items group, simply drag them from the Unassigned Objects list into the Items list, as shown in Figure 1-23.
Figure 1-23: Custom category and group
For E
valua
tion O
nly

Exploring the Access Environment Lesson 1
3245-1 v1.00 © CCI Learning Solutions Inc. 29
First, you will view objects.
1 Restore the Access window.
2 Open the Desktop\3245 Student Files\Lesson1\HomeGrown3.accdb database and enable the content. The objects in the Navigation Pane are currently grouped by object type.
3 Open the Navigation Pane menu and select Tables and Related Views. Notice that now the objects are shown in a different order. Each table constitutes one group, and each group lists the queries, forms and reports associated with the table. Notice that several objects appear multiple times in the Navigation Pane because they are related to more than one table.
4 Open the Navigation Pane menu and select Object Type to return the list to its original configuration.
5 Open the Navigation Pane menu, and, under the Filter By Group heading, select Forms to filter the objects that display in the pane. Only the database forms appear in the pane.
6 Open the Navigation Pane menu and under the Filter By Group heading, select All Access Objects to return the list to its original configuration.
Next, you will copy and paste objects.
7 In the Navigation Pane, right-click CUSTOMERS, then select Copy in the shortcut menu to copy the CUSTOMERS table to the Clipboard.
8 Right-click in a blank area in the Navigation Pane, then select Paste to open the Paste Table As dialog box.
9 In the Table Name box, type: Customers2, then click OK. Access creates a new table named Customers2 which contains the same structure and data as the CUSTOMERS table.
10 Double-click Customers2 in the Navigation Pane to view the 14 records of data, then close the Customers2 table.
11 Open the RepeatedCustomers table to verify that it is empty, then close the table.
12 Right-click in a blank area in the Navigation Pane (a copy of the CUSTOMERS table is still residing in the Clipboard), then select Paste.
13 In the Table Name box, type: RepeatedCustomers, in the Paste Options section, select Append Data to Existing Table, then click OK.
14 Open the RepeatedCustomers table to view the 14 records that were added in the Paste operation, then close the table.
15 Right-click in a blank area in the Navigation Pane once more, then select Paste.
16 In the Table Name box, type: RepeatedCustomers, in the Paste Options section, select Append Data to Existing Table, then click OK.
17 Open the RepeatedCustomers table again. Now the table contains 28 records.
18 Close the RepeatedCustomers table.
19 Open the CustomerOrders form.
20 Switch to Backstage view.
Learn the SkillIn this exercise, you will use the Navigation pane to view, copy, rename and delete objects. You will also set Navigation Pane options.
For E
valua
tion O
nly

Lesson 1 Exploring the Access Environment
30 3245-1 v1.00 © CCI Learning Solutions Inc.
21 Click the Save Object As command to open the Save As dialog box. Notice that the suggestion is to create a form named Copy of CustomerOrders.
22 Click OK. Access creates a new form named Copy of CustomerOrders.
23 Click the File tab to switch to client view. Notice that the Copy of CustomerOrders form appears in the Forms object group.
24 Close any open database objects.
25 In the Tables group in the Navigation Pane, right-click RepeatedCustomers, then select Rename in the shortcut menu.
26 Type: DuplicateCustomers, then press to rename the table.
27 Right-click DuplicateCustomers in the Navigation Pane, select Delete in the shortcut menu, then click Yes to confirm the deletion.
28 Click Customers2 in the Navigation Pane; click the Delete button in the Home tab of the Ribbon, then click Yes to confirm the deletion.
29 Click Copy of CustomerOrders in the Navigation Pane; press the key on the keyboard, then click Yes to confirm the deletion.
30 Close the HomeGrown3 database and minimize the Access window.
Setting Access Options You can set options that affect how a particular database functions as well as options that affect how Access functions. These options are set in the Access Options dialog box. The Access Options dialog box includes 11 tabs, which are briefly described here:
General Contains options for working with Access, such as the default format for new database anddefault file locations.
Current Database
Contains options that allow you to control how a user can interact with the currentdatabase. These options include enabling various views, showing or hiding the NavigationPane, and whether or not to allow full menus. These options are set separately for each database.
Datasheet Contains options that affect the appearance of datasheets in Access. The default view fortables and queries is Datasheet view.
Object Designers
Contains options that control how object designers function in Access. Object designers (which you will use in upcoming lessons) are the tools you use to create tables, queries,forms, etc. Settings include default font, default field size and error-checking options.
Proofing Contains settings for AutoCorrect and the spelling checker.
Language Contains settings that allow you to specify default editing, display and Help languages.
Client Settings Contains settings that control the behavior of the cursor, default printing margins anddefault open mode.
Customize Ribbon
Contains tools you can use to customize the Ribbon.
Quick Access Toolbar
Contains tools you can use to customize the Quick Access Toolbar.
Add-ins Contains options that allow you to view and control Microsoft Office add-ins.
Trust Center Contains links to privacy statements and a command button that opens the Trust Center,which controls security settings for Access.
1.1
For E
valua
tion O
nly
Exploring the Access Environment Lesson 1
3245-1 v1.00 © CCI Learning Solutions Inc. 31
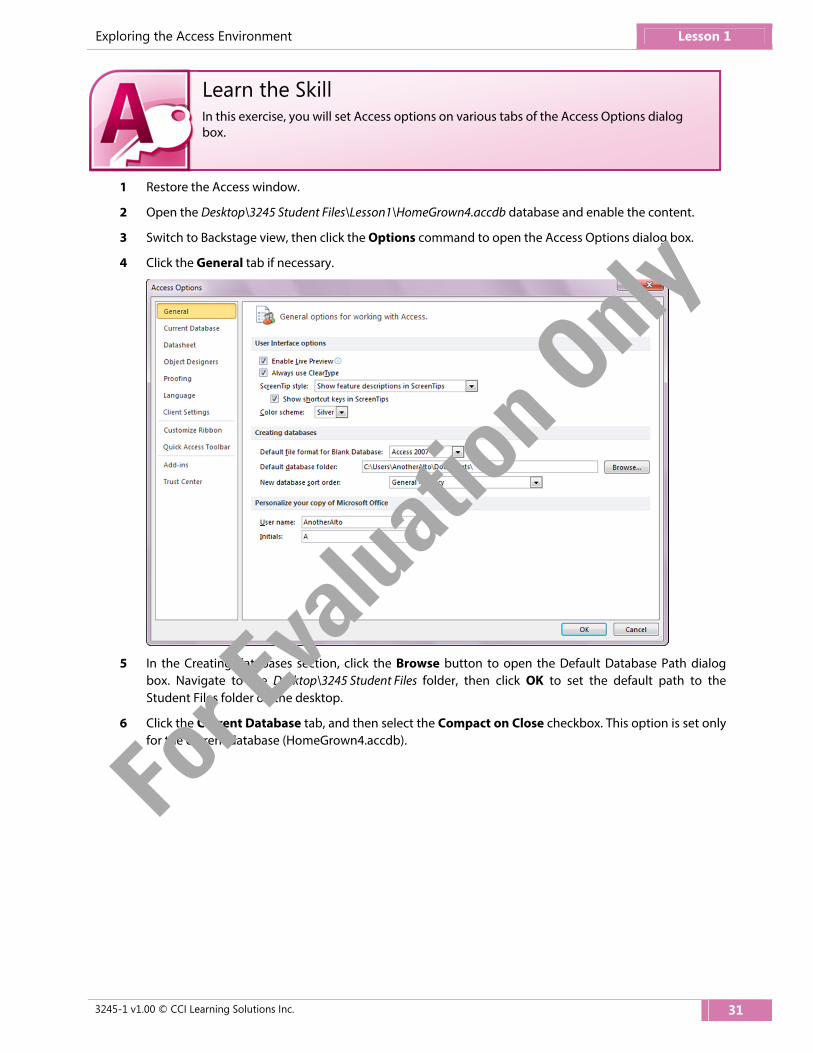
1 Restore the Access window.
2 Open the Desktop\3245 Student Files\Lesson1\HomeGrown4.accdb database and enable the content.
3 Switch to Backstage view, then click the Options command to open the Access Options dialog box.
4 Click the General tab if necessary.
5 In the Creating databases section, click the Browse button to open the Default Database Path dialog box. Navigate to the Desktop\3245 Student Files folder, then click OK to set the default path to the Student Files folder on the desktop.
6 Click the Current Database tab, and then select the Compact on Close checkbox. This option is set only for the current database (HomeGrown4.accdb).
Learn the SkillIn this exercise, you will set Access options on various tabs of the Access Options dialog box.
For E
valua
tion O
nly

Lesson 1 Exploring the Access Environment
32 3245-1 v1.00 © CCI Learning Solutions Inc.
7 Click the Datasheet tab. Note the default font size and weight, and that both horizontal and vertical gridlines display in Datasheet view.
8 Click the Object Designers tab, then change the value in the Default text field size to 50. The field size affects how much space a database will require. (You will learn about field sizes in Lesson 2.)
For E
valua
tion O
nly

Exploring the Access Environment Lesson 1
3245-1 v1.00 © CCI Learning Solutions Inc. 33
9 Click the Client Settings tab, then scroll the screen and examine each of the settings. These settings control how the Access application behaves on your screen under various conditions.
10 Click the Trust Center tab, click the Trust Center Settings button to open the Trust Center settings screen, then click the Trusted Locations tab. You can use the Trusted Locations tab to specify folders from which you trust files. If you make a folder a trusted location, you can open any database within that folder without receiving the security warning from Access.
For E
valua
tion O
nly

Lesson 1 Exploring the Access Environment
34 3245-1 v1.00 © CCI Learning Solutions Inc.
11 Click the Add new location button to open the Microsoft Office Trusted Location dialog box. The location listed in the Path box is where the Access database wizards are run.
12 Click the Browse button, navigate to the Desktop\3245 Student Files folder, then click OK. Select the Subfolders of this location are also trusted check box, then click OK to make the Student Files folder (and its subfolders) a trusted location.
13 Click OK to close the Trust Center, then click OK again to close the Access Options dialog box. If a message saying that you must close and reopen the current database for the specified option to take effect displays, click OK to close the message box.
14 Close the open database, then click the Exit command in Backstage view to quit Access. If necessary, click Yes to confirm that you want to empty the Clipboard.
15 Start Access, then click the Open button in Backstage view. Notice that the Open dialog box shows the Desktop\3245 Student Files folder. This folder is the new default location for opening and for saving files.
For E
valua
tion O
nly
Exploring the Access Environment Lesson 1
3245-1 v1.00 © CCI Learning Solutions Inc. 35
16 Navigate to the Lesson1 subfolder, then open HomeGrown5. The database opens without a security warning because it comes from a trusted location.
17 Close the HomeGrown5 database, then quit Access.
Review Questions 1. Which of the following is a benefit of storing data in multiple, related tables?
a. It makes the tables easier to understand when you view them in Datasheet view.
b. It minimizes the repetition of data.
c. It makes the database larger.
d. It makes the data accessible by all versions of Microsoft Access.
2. Which of the following types of database objects is often used as a data entry screen? a. A query.
b. A report.
c. A macro.
d. A form.
3. The commands and options in Backstage view are related to: a. file management tasks.
b. entering data into tables.
c. relating tables to one another.
d. automating tasks within a database.
Lesson SummaryIn this lesson, you used the Access 2010 user interface and learned to use Backstage view to create and manage database files. You used several file management tools, including those for creating, copying, compacting, encrypting and backing up database files. You should now be comfortable with:
defining the function of a database
comparing databases in spreadsheets to those created in a relational database management system (DBMS)
identifying Access file types and file name extensions
identifying database objects
identifying the main components of the Access user interface
identifying elements on the screen
creating blank, new databases and creating databases from templates
opening database files in various open modes
adding a password and encrypting a database file
backing up a database
compacting and repairing a database
working with the Navigation Pane
setting database options
MMM Go online for
Additional Review and
Activities
For E
valua
tion O
nly

Lesson 1 Exploring the Access Environment
36 3245-1 v1.00 © CCI Learning Solutions Inc.
4. What do the Quick Access list, the Recent tab and the Open button have in common? a. All three are part of Access client view.
b. All three are directly tied to the use of macros.
c. All three can be used to open a database file.
d. They have nothing in common.
5. Joan has forgotten the password for an Access database she created three months ago. Which of the following would provide the best chance for her to access her data?
a. The Undo command.
b. The Microsoft Knowledge Base.
c. A phone conversation with a Microsoft technical support expert.
d. The most recent backup file that has not been password-protected.
For E
valua
tion O
nly

For E
valua
tion O
nly

www.ccilearning.com
INTRODUCING MICROSOFT OFFICE SPECIALIST 2010The new Microsoft Office Specialist (MOS) 2010 certification features a series of certification levels, providing a continuum for skills qualification and validation. They include core credentials in any one of the most popular Microsoft Office 2010 products, and Expert and Master credentialing for advanced users.
Microsoft Office Specialist (Core Certification)The Microsoft Office Specialist Core certification validates skills with the Microsoft Office 2010 suite. Exams are available on these Office products: Word 2010, Excel® 2010, PowerPoint® 2010, Access® 2010, Outlook® 2010, SharePoint® 2010.
Microsoft Office ExpertThe Microsoft Office Expert certification validates advanced skills in specific Microsoft Office applications. Gaining the credential requires that a candidate pass either of these exams: Word 2010 Expert or Excel® 2010 Expert.
Microsoft Office MasterThe Microsoft Office Master Certification denotes fluency in several important Microsoft Office applications. To achieve this designation, a candidate must pass four exams: Word 2010 Expert, Excel® 2010 Expert and PowerPoint® 2010, and either Outlook 2010 or Access® 2010.
Become Certified in Microsoft Office Specialist 2010The Microsoft Office Specialist 2010 certification is Microsoft‘s only certification program for the Microsoft Office suite of products. The Microsoft Office Specialist certification is a valuable credential that recognizes the skills needed to use the full features and functionality of Office 2010 applications while improving and validating desktop computing skills. This credential provides students, information workers and job seekers with the knowledge and expertise that pave the pathway to success.
Why certification is important:There is an increasing demand for Microsoft Office skills as more and more businesses begin to embrace newer technologies. Microsoft Office Specialist certification allows users to prove their skill sets while effectively preparing them for academic, professional and personal success.
This distinguished credential helps individuals differentiate themselves in a competitive job market and enables hiring managers to simplify and shorten the hiring process. It allows teachers to prepare their students with desktop computing skills and expertise. Corporations get the most out of their technology investment by ensuring their employees have the desktop computing skills to tackle the toughest tasks and projects. Most importantly — people who are certified are able to do their jobs better and faster than ever before. Research shows that a comprehensive level of skill proficiency, proven by certification, is directly linked to an immediate increase in “on-the-job” performance.
Based on global industry standards, Microsoft Office Specialist 2010 certification is an important and prominent credential for all individuals.
Proven results:In a recent survey on digital skills, 93% of respondents in one study reported becoming more skilled in the Microsoft® Office applications they certified in—with 71% claiming “moderate” or “great” increases. In addition, six out of 10 MOS-certified respondents said they take on more complex or difficult assignments since passing their exams.1
Learn more
CCI Learning Solutions Inc
Word 2010 Exam 77‑881Excel 2010 Exam 77‑882PowerPoint 2010 Exam 77‑883Outlook 2010 Exam 77‑884Access 2010 Exam 77‑885SharePoint 2010 Exam 77‑886
Expert Word 2010 Exam 77‑887Expert Excel 2010 Exam 77‑888
For E
valua
tion O
nly