
Metagaming - Museum of Computer Adventure Game Historymocagh.org/otherbook/fantasytrip-mq3.pdf · A...
17
A p_rogrammed Adventure for use with The Fantasy Trip: IN THE LABYRINTH and/or MELEE and WIZARD Game design by Guy W. McLimore, Jr. Edited by Steve Jackson © 1980 by Metagaming To my parents, for continued encouragement and support, even when they didn't know what I was talking about ... To Greg, Lance, Samanda and Matthew, who knew, but encouraged me anyway . .. To Terri, who held the Grail all along . .. And, especially, to Steve Jackson and Howard Thompson, for bringing to print the fine set of fantasy rules that made G RAI LOU EST a joy to write, and hopefully, to play. - Guy Playtesters: John W. Colbert, Lloyd Eaker 6 Jay Rudin, Joe Vail, Jr., Draper Kauffman, Susan Kauffman, Pat wens, and Keith Gross.
Transcript of Metagaming - Museum of Computer Adventure Game Historymocagh.org/otherbook/fantasytrip-mq3.pdf · A...
A p_rogrammed Adventure for use with The Fantasy Trip: IN THE LABYRINTH and/or MELEE and WIZARD
Game design by Guy W. McLimore, Jr.
Edited by Steve Jackson
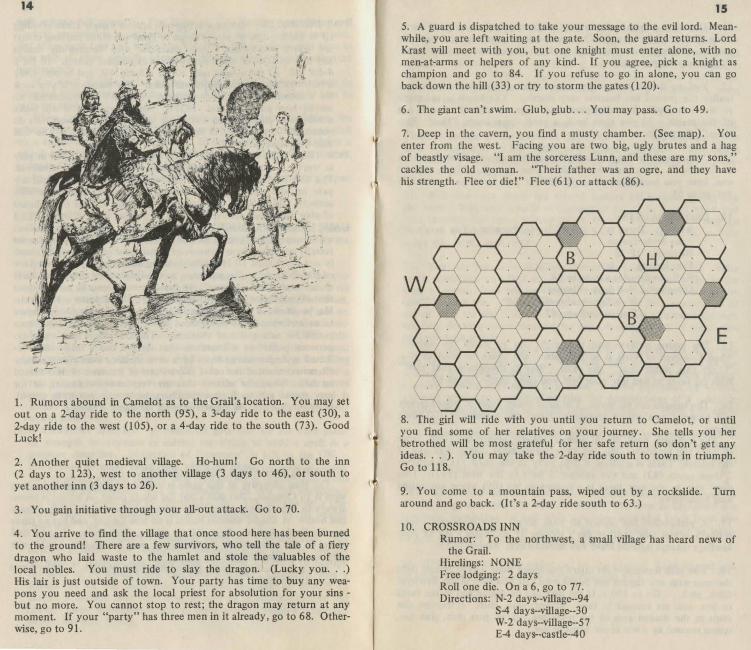
© 1980 by Metagaming
To my parents, for continued encouragement and support, even when they didn't know what I was talking about . . .
To Greg, Lance, Samanda and Matthew, who knew, but encouraged me anyway . ..
To Terri, who held the Grail all along . .. And, especially, to Steve Jackson and Howard Thompson, for
bringing to print the fine set of fantasy rules that made G RAI LOU EST a joy to write, and hopefully, to play. - Guy
Playtesters: John W. Colbert, Lloyd Eaker6
Jay Rudin, Joe Vail, Jr., Draper Kauffman, Susan Kauffman, Pat wens, and Keith Gross.
2
The year is A.O. 560; the place, Camelot - the seat of power of AJ:thur Pendragon, King of the Britons.
At the fabled Round Table meet the greatest knights in all the world. With Galahad, Lancelot and Gawain you sit, for you are a member of this famous group -- a Knight of the Round Table!
King Arthur stands to address you, famed Excalibur at his belt. "Noble knights," he begins solemnly. 'This day great news has come to Camelot in the form of a vision. Somewhere in our kingdom a Relic of. Ou~ Savior lies waiting for a man of purity, honor and courage to bnng 1t to Camelot. The Grail, the very Cup from which Our Lord drank at His Last Supper, has been shown in a divine revelation."
AJ:thur Pendragon draws the enchanted blade Excalibur and raises it high. "I challenge thee, noble knights, to quest for this Holy Grail. Wilt thou seek it, though perils of all types bar the way?"
There is a moment of silence, broken by the sound of many swords flashing from their scabbards to be raised overhead. Your sword is among them as you shout, "For the Grail!" Within days, your quest is begun.
HOW TO PLAY "GRAILQUEST" This is a programmed adventure using The Fantasy Trip: IN THE
LABYRINTH and/or both the MELEE and WIZARD MicroGames of The Fantasy Trip game system. This booklet will set up the quest for you, allowing you to make decisions and fight combat situations as you go along.
GRAILQUEST may be played several ways: Solitaire. One player takes the part of a lone knight. He also plays the
parts of the knight's squires and hirelings, and of any foes met along the way.
Two Players. One player represents-the knight and his squire and hirelings. The other player acts as the Game Master; he reads the instructions in the book and plays any foes or strangers who may be encountered.
Multi-player. Up to five may participate. One player is the Game Master, reading the booklet and acting as referee. One player is in charge of foes and monsters. The other player(s) take the Knight and his companions. Using this variation, you may have up to three Knights traveling in company. Or a Knight could begin with a squire and a trusted wizard. However, the "heroes" may never have more than three characters unless a specific scenario allows extra allies. Therefore, if two Knights travel together, only one squire or hireling may accompany the party. If three Knights go in a group, they may have no hirelings. A Game Master always has the option, of course, to go back and change the dangers in the book so they are suitable for three Knights and a small army of helpers - but start with the printtld situations, and only three heroes,
The instructions below will assume a single Knight unless specifically stated otherwise.
3
CREATING FIGURES FOR "GRAILQUEST" Create a character for your "knight" using TFT: ITL or the MELEE
rules book. (See SPECIAL NOTES below if using the more detailed TFT: ITL system.) Begin the quest with an experienced fighter - there were no beginners at the Round Table. (How experienced is up to you, but he should have an attribute total of at least 36 to have a reasonable chance at survival and success.) Your knight will set out alone though he may acquire help along the way. The road to the Grail is a long and dangerous one. You have been warned ...
A knight may start out with a horse and any non-magical equipment listed in TFT: ITL, MELEE or WIZARD that his figure could or would legitimately use. Treasure gathered along the way is carried on the horse and will not accumulate to slow down the figure. A knight may own two weapons and a dagger to carry into combat. He may keep two spare weapons on his horse. (A shield counts as a weapon for this purpose.) If a weapon is lost or broken, it may be replaced the next time the figure passes through a populated town or at a crossroads inn. Daggers will cost you nothing, as a charismatic type like you can probably charm a local craftsman into donating one to the Holy Quest. Charm only goes so far, however-any other weapon will cost your knight 50 silver pieces to purchase. Leather armor will cost 100 silver pieces; chain or plate costs 200. Your beginning weapons and armor are free.
Knights begin the game with 200 silver pieces, and may accumulate more (or spend some) on the trip. Food and water will be donated by local peasants, but you will find other uses for the money.
Each knight also begins with a warhorse; see Road Encounter rules.
SPECIAL NOTES FOR IN THE LABYRINTH When using the full TFT: ITL rules, quester characters may follow
these guidelines: -Knights must be hero (as opposed to a wizard) characters. They
may not use magic spells. -Talents are selected as per standard TFT: ITL rules. Characters
should concentrate on weapons skills, as some of the more esoteric talents will be rather useless on this adventure. All knights MUST choose the Horsemanship skill. Sword and shield are not required, but are STRONGLY recommended!
-No gunpowder or firearms allowed in this adventure. Inappropriate weapons such as nunchuks, blowguns, or lassoes are discouraged. (I would be interested, however, in hearing about the results of a quest based on A Connecticut Yankee in King Arthur's Court, where gunpowder weapons and lassoes would be quite appropriate. Just a thought. .. ) Knights NEVER use poison! Think and act chivalrously.
--Potions, gas bombs, and molotails are not knightly and may not be used.
-Use listed prices from TFT: ITL for purchase of replacement weapons at a village or inn, instead of the straight 50 silver pieces mentioned earlier.
-Use the weight-carried rules from ITL for men and horses.
4
TRAVEL TIME, REST, AND HEALING GRAILQUEST is not considered to be all one combat. Hits can
be healed by rest at a crossroads inn, for instance. Hits do NOT heal during travel periods from place to place, as the character cannot "rest" effectively on the road. Keeping track of days on the road IS important, however, since this affects payment of hirelings and acts as a measure of relative distance for mapping. It is also a method of generating road encounters.
ST loss for wizard hirelings due to spell casting is recovered more rapidly than hits. Consider ST lost due to spell-casting exhaustion to be fully recovered more rapidly than hits. Consider ST lost due to spell-casting exhaustion to be fully recovered at the end of the first day one spends on the road, or after one night's rest at a crossroads inn. (Be sure and keep a separate notation of ST hits and ST exhaustion losses.)
Each two days of rest at an inn will cure one hit of damage from wounds.
ROAD ENCOUNTERS For each day of travel along the road, roll one die. On a roll of 6,
there is a road encounter. Roll 2 dice and consult the table below. If the encounter involves combat, play it out; any survivors then continue on their way. There will only be one encounter between any two towns, so you may stop rolling after the first one.
2- You meet a wandering knight who challenges you to combat to the death.
3- You meet a wandering knight who challenges you to combat - see WANDERING KNIGHTS. Roll to see what kind of combat you will have.
4- You have to sleep out in the rain. Each figure must roll 3 dice. Any figure who rolls a number greater than his ST (in other words, fails a 3/ST saving roll) loses 1 ST point due to a bad cold. Treat this as wound damage for purposes of recovery.
5- You meet a traveling physicker on the road. He will heal 1 hit of injury for each I 0 silver pieces you pay him, up to a maximum of 3 ST healed per person.
6,7- Bad road conditions delay you an extra day. (Remember to pay any hirelings for an extra day's work.)
8- You are attacked by hobgoblins. Roll 1 die and add 2 to see how many. Each hobgoblin has ST 9, DX 10, IQ 8. Some are armed with clubs (which can be thrown); others have rapiers. They all carry daggers. If half are slain, the others will flee.
9- You are attacked by bandits; roll 1 die and subtract 2 to see how many. They are on foot. Roll from the Bandit Table to see what the bandits are like.
10-You are attacked by bandits; roll 1 die and subtract to see how many. Roll each bandit from the Bandit Table.
11- You are attacked by an ogre - a vicious, flesh-eating sort of Giant. He has ST 35, DX 10, IQ 6. He fights with a great uprooted tree which does (2+2) damage because he is so very unskilled with it.
5
Tied up by the road is a captive girl whom he was saving for lunch. 12-A single powerful sorceror, a servant of Evil , bars your way. He has
ST 14, DX 12, IQ 12, and the following spells: 3-Hex Fire, Break Weapon, Blast, Fireball, Freeze, Destroy Creation, Reverse Missiles, illusion, Summon Bear, Image, Drop Weapon, and Staff. If you slay him, you will find 400 silver pieces on his person.
BANDIT TABLE Few of the bandits and highwaymen you will meet are well-ar
mored. Most will be ordinary human riff-raff, though there will be a few non-humans among them. For each bandit, roll 2 dice and consult the table below:
2- Dwarf: ST 16, DX 12, IQ 9. Battleaxe/morningstar. 100 silver pieces.
3- Human: ST 15, DX 13, IQ 8. Pikeaxe/battleaxe. 50 silver pieces. 4- Human: ST 12, DX 14 (12) , IQ 8. Broadsword and large shield;
leather armor. 25 silver pieces. 5- Human: ST 13, DX 11, IQ 9. Morningstar/shortsword. 10 silver
pieces. 6- Ore: ST 10, DX 14 (12), IQ 8. Cutlass and small shield; leather
arm or. 7- Human: 8- Human: 9- Human:
pieces.
ST 11, DX 11 , IQ 8. Shortsword/javelin. ST 13, DX 10, IQ 8. Morningstar/halberd.
ST 10, DX 14, IQ 8. Small bow/hammer. 10 silver
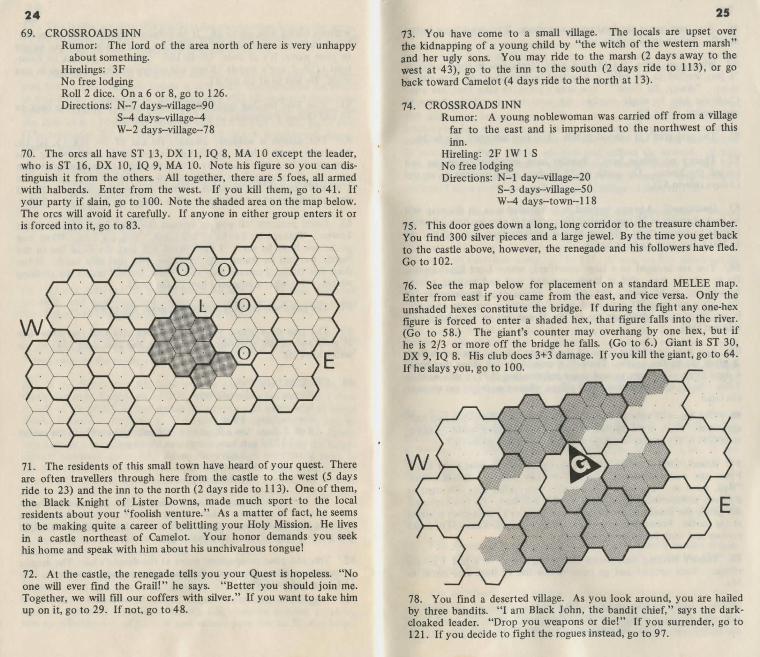
10-0rc: ST 14, DX 12, IQ 8. Halberd/two-handed sword. 25 silver pieces.
11-Human: ST 13 , DX 15 (12) , IQ 8. Light crossbow/morningstar; chainmail. 50 silver pieces.
12-Human: ST 10, DX 16 (14) , IQ ll . Cutlass and small shield ; leather arm or. 100 silver pieces.
Where two weapons are listed with a slash between them, the first is the "ready" weapon. The bandit may change to his secondary weapon after combat starts. Certain bandits have IQs of over 8. If you are using TFT: ITL, the Game Master may want to give these some unusual talents (i.e., Unarmed Combat) to make the encounter more interesting. The bandits do not have horses; they fight on foot.
The bandits set up anywhere on the east side of the board, on foot. The knight(s} and party enter on the west, either afoot or on horseback, as they choose. When attacked by bandits, the knights may do one of three things:
AVOID COMBAT, either by turning around or by trying to ride through. This is not permitted unless the bandits outnumber the fighters in the party by at least 2 to 1, AND the party is escorting a ward. Prisoners don't count. It is not honorable to avoid combat unless that combat would endanger a helpless person under your care. If you turn around, you may go back to your starting-point safely and try that road again later (or take another one). If you choose to use your speed to ride through/around, use this simplified system:
6
Riding around. What you will do is retreat down the road a ways, then turn around again at any spot you can and cut cross-country to re-join the road on the other side of the ambush. You take one extra day of travel time. Each bandit with a missile weapon gets two free shots at a DX -6 for range. You cannot attack.
Riding through. You spur your horses to charge through the bandits. Each bandit gets one attack free on any of your figures (if he has a pole weapon, it's a double-damage attack). Each of your fighters gets one attack on one bandit as he rides through (again, pole-weapon attacks do double damage). Assume that the bandits want your horses and will not strike at them. Bandits are at -2 DX for attacking you while you're on horseback. You're at -1 DX for attacking FROM horseback. Warhorses (see below) can't attack.
If any of your figures takes 8 or more hits in the process of riding through, he/she falls from the horse. You will have to abandon that figure OR re-enter from the other side of the board to try a rescue. If none of your figures is knocked down, you may continue riding on your way ; you have escaped.
FIGHT FROM HORSEBACK is your second option. If you have TFT: ITL, you may use the mounted combat rules there. Otherwise, assume that a mounted figure has a MA of 20. Also assume that a knight has a warhorse that can kick once per turn (a separate attack) for 2 dice damage. The warhorse has ST 30, DX 13, IQ 6, and fights even if the knight is not riding him. Bandits may attack the warhorse. For simplicity, if you are using MELEE/WIZARD, let the horse be a one-hex counter like a man. Actually, he's bigger.
A mounted figure attacks at -lDX. A figure on the ground attacks a mounted figure at -2DX. A mounted figure falls if he takes more than 8 or more hits in one turn.
FIGHT ON THE GROUND is your third choice. Tie up the horses and enter combat normally. If you have warhorses, you will want to let them enter combat by your side.
A note on warhorses: You may assume that each knight starts with a warhorse, able to fight as above. The warhorse will only be of help in road encounters; he cannot follow you into caves or buildings to fight for you. If a knight loses his warhorse, he must walk (walking speed is no slower, but is most humbling) back to Camelot to get another horse free, or to a village where he can buy one for 100 silver pieces. The new horse will not be a warhorse and cannot fight.
Squires and hireling do not have warhorses. When only one bandit is left, he will try to flee. You may pursue
or let him go, as you choose. It is more knightly to pursue, since he is a dangerous criminal. You may also take anything you find on the bodies of the slain bandits, up to the limits of what you are allowed to carry. Half of the silver you take, and half of the income from any weapon you sell at a village, should immediately go to charity. A weapon can ,be sold at the same price you'd pay to buy it.
The roadside bandits are a grevious menace. Your King will always be pleased to hear that you have exterminated a band of them.
Road encounters with hobgoblins, an ogre, or a sorceror are done in the same way as road encounters with bandits. They may be fought on horseback.
7
WANDERING KNIGHTS One of the greatest obstacles to any knight's questing will be ...
other knights. Some will be good, some evil, and many rather indifferent - but any of them may challenge him to fight, and for his honor he must accept.
Normally, a combat will be on foot. (If you are using TFT: ITL, you may want to have a mounted joust instead. This was not usual, though. A jousting encounter was very hazardous to the horses - and a knight would not be likely to carry full barding (jousting horse-armor) on a quest, nor yet to risk his beloved steed without it. Jousting was far more dangerous to a horse than regular battle!)
To determine the nature of the wandering knight(s) who challenge you, roll 3 dice for ST and add 2. Roll 3 dice for DX and add 3. Roll 2 dice for IQ and add 2. Bring any attribute below an 8 up to 8. The knight will use only regular (i.e., knightly) weapons. He will have the best weapons his ST allows.
To determine his armor, roll 1 die. On a l or 2, he wears no armor. On a 3, he wears leather. On a 4 or 5, he wears chainmail. On a 6 , he wears plate armor. A knight who wears no armor will always carry a shield. Knights with armor may or may not have a shield - it's up to the person playing that knight.
To determine the type of combat, roll 1 die (unless you already know it is to the death). On a 1, it is a battle to the death. On a 2, it must continue until one man falls unconscious or dies. On a 3, it can stop when one man takes 8 hits in a single turn OR has his ST reduced to 3. On a 4 or 5, it goes until the first "good blow" - that is, until one man takes a hit which does 3 or more points of damage to him. On a 6, it is combat to first blood -- the first wound decides the fight.
To determine the number of foes, roll 1 die. On a 6 , two knights are traveling together. Otherwise, there is only one.
Combat is played out in normal fashion, with the victor determined according to the type of combat. Combat is always one-to-one. Even the most debased knight will not allow his retainers to enter the battle.
Results of Challenge Fights There is no penalty attached to losing a "friendly" fight - a combat
to first blood . Both knights then go about their way. An ordinary challenge fight -- a fight until the first good blow - is
no serious matter either. It is customary for the loser to give a present to the winner - usually a weapon or something of equal value.
A serious fight - that is, any other fight - is another matter. By ancient custom, the horse, armor, and weapons of the loser are forfeit to the winner. Even if this were not the custom, the loser would not be in any shape to argue!
The victor does not take the loser's money or treasure. The loser (or his companions) may use this to ransom back some or all of the victor's spoils, at 50 silver pieces per weapon, 100 silver pieces per horse, purchase price of any suit of armor, or standard ITL prices if you are using ITL. The winner must accept this ransom if it is offered.
8
If the loser is killed, or below ST 4, the victor must escort him to the nearest village (to bury a body) or inn (to look after a convalescent). If he has silver and the wounded knight has none(or not enough), he must leave just enough to pay the innkeeper to nurse the wounded knight back to ST 4. At ST 4, it is assumed the wounded knight will be able to start for his home.
Second Challenges A knight may not immediately re-challenge a man who has defeated
him. However, if either knight had another knight as companion, the other knight could challenge the victor of the first fight. This challenge may take place immediately if the winner of the first fight did not take more than 2 hits of damage. Otherwise, everyone must go to the nearest inn, where they can rest. When the victor of the first fight regains his strength (or sooner, if he likes), the new challenge may take place. The victor of the first fight may always choose to accept a challenge in spite of his wounds, and this is most brave and honorable.
On a second challenge, roll one die to determine the type. On a l , 2, or 3, the combat is the same type as the first one. On a 4, 5, or 6, it is one degree more serious than the first - that is, if the first one was a battle to first blood, the second is a battle to the fust good blow. Knightly challenges had a tendency to escalate.
Note that all the above rules apply whether the player's knight or the wandering knight happens to win. By winning a challenge, a player can better his fortunes. Losing sets him back.
If a player loses his horse, he must travel to an inn or village where he can buy one for 100 silver pieces. If he has no money, he may return to Camelot and get a new horse, etc., free. Note that your hirelings do not lose their horses and/or weapons just because you lose yours. But it is not knightly to take their gear and continue - you must replace your own if you lose it.
MAPMAKING AND RECORDKEEPING You will need to make a record sheet (3 x 5 index cards are perfect)
for each village, castle, roadside inn, etc. that you reach. Note on the card what you found at each location, and what, if anything, you left behind. Remember to keep a standard figure record sheet for your knight and for each companion. At times you may be escorting a 'ward' - someone under your protection. Wards take no part in combat and have no listed ST, DX, etc. You will, however, need to keep track of a ward you are escorting: identity, reason for being with you, etc.
You will also wish to keep a rough map showing the relative locations of the places you visit, in case you wish to retrace your steps later. Travel times will help you estimate how far apart two places are. Graph paper is ideal for mapmaking, using the numbered instructions to denote each place, and separating them by about two squares per day of travel time. Perfect maps are not essential. Don't forget to keep track of treasure, spare weapons, and other items carried on the party's horses.
9
CAME WT You may return to Camelot at any time by retracing your steps.
When coming through, you may drop off treasure (which cannot then be taken from you), prisoners, wards, etc. The King will expect some sort of token each time you enter the city. If you have nothing to give him, you may pass through but you may not stay and rest to regain lost ST. Tokens given to the King are removed from play entirely and do not count as part of your personal treasure. Money you store in your personal coffers is useful if a knight is later killed, as it will be given to his successor.
SPLrITING A PARTY It simply can't be done unless mandated by the instructions. Hire
lings will not leave their master to go on scouting missions, nor will other companions. There are times when a knight must face danger alone, but it would be most unchivalrous to send a hireling into danger in his place. If knights begin together, they ride together until one is slain. Some instructions will require a party to be split for a short time. Follow these instructions.
ILLUSIONS, IMAGES, AND SUMMONED CREATURES Wizard-type hirelings can create images, illusions, and summoned
creatures during a combat. Remember, however, that such creatures soon fade away and cannot accompany a party on an overnight ride. When playing solitaire, remember that only a foe with an IQ of 8 or more can try to disbelieve a creation. A foe will attempt to disbelieve only if attacked by nonhumans, or if the foe actually sees the wizard cast a spell, and then only on a roll of 5 or 6 on one die.
CROSSROADS INNS A lot of game action takes place at crossroads inns, and a knight
can make good use of these centers of trade and travel. At an inn, a knight may pick up useful information in the form of rumors. A knight may also meet adventurers for hire who will accompany him on his journey. Possibly the most important function of the inn is as a haven of rest and recuperation.
Crossroads inns see many travellers come and go. For this reason, a knight may hear rumors about the Grail, or about danger on the road. Some rumors are strictly factual , some are misleading but have some truth behind them. A few have no factual basis at all.
At each inn, a knight might have a chance to hire men-at-arms to aid him. Each inn has a number listed for hirelings. If you wish to try and hire help, roll one die upon arriving at an inn. If the number rolled is equal \o or less than the listed number, a man-at-arms is available. Decide ST, DX and IQ as for a beginning character. If there is an "F" after the hireling number, the hireling is a fighter . If a "W" is there, the hireling is a wizard. You may pick the spells he knows. There may be a listed number for both at some inns, but

10
Y?U .may hire only one at any one inn. Make a separate roll for each hireling type possible, until you find one. . . ?nee i~ i~ determined that a prospect is available, and what his I~tial statistics are, you have the decision whether or not to hire this man._ The .sta.nd~rd fee is 5 silver pieces per day, in advance. After paymg a huelmg s fust day's pay, roll a die and use the following table to determine the hireling's true capabilities.
DIE ROLL
2
3
4
5
6
HIRELING MODIFICATIONS
MODIFICATION
Not as strong as he first appeared: -2 ST
Accident-prone: -2 DX
Exactly as advertised: No bonus/ penalty
Not as bright as he looks: -2 IQ (May not adjust lower than IQ 8)
Deceptively powerful: +2 ST
Highly skilled: +2 DX and +2 IQ
When creating hireling characters using the TFT: ITL rules, choose talents/spells to suit yourself, but remember that fighter-type characters may not know spells in this adventure. To fight from horseback is a road encounter. A hireling comes with his own horse, weapons, etc. The horse is not a warhorse.
Remember: One knight may have up to two hirelings at one time -no more. Two knights may take only a single hireling with them. Three knights may have no hirelings. Thus, a party will always total three.
If a knight starts with companions controlled by other players, he does not have to pay them.
A hireling who is not paid will immediately leave. These men-atarms don't work on speculation. They are not entitled to a share of the treasure you find. If the knight is killed, they will not continue the quest--you must begin with another knight.
Some inns have men-at-arms who will work just for the privilege of fighting by the side of a Knight of the Round Table. You may roll for this at any inn which shows a number for a squire. EXAMPLE: "2S" under "HIRELINGS" means that the knight may take on a squire on a roll of 2 or Jess on one die ...
Squires are fiercely loyal, and will stay with you until death. Determine the statistics of a squire as a beginning MELEE or TFT: ITL fighter-type character, then roll on the modification table after you have decided whether or not to accept him. A knight may have only
11 one squire at a time. You may NEVER dismiss him! Unless he is killed, you are stuck with him. However, he never requires pay .
Overall, one may only acquire one hireling or squire on any one visit to an inn. A knight may roll for each type available only once per visit, and he may never have more than two helpers at a time, even if he can afford to pay more. Much of the time, a knight can't afford to pay even one helper.
Crossroads inns also provide a place for a weary knight and his helpers to rest and recuperate. For each two full days a party spends resting at an inn, they each regain 1 ST. It costs 3 silver pieces per man per day to stay at an inn. One need not stay overnight to pick up hirelings or hear rumors.
If a knight decides to stay at an inn, he must pay for his own lodging, plus that of his retainers and men-at-arms. He does not have to pay for retainers hired at that inn. (No fair leaving your squire to sleep in the barn.) At some inns, it may be possible to get a night or two free for yourself and all companions on the strength of your reputation. After that, you must pay to stay longer. You need not pay for the lodging of your wards or prisoners.
Some inns may require a special roll to have (or avoid having) a special encounter. Follow the listed instructions for each inn, if there are any. You will roll for a special encounter only each time you visit an inn.
The form for a crossroads inn will look something like this:
164. CROSSROADS INN Rumor: A wandering minstrel sings a song mentioning
the Grail. He came from a village somewhere to the north of Camelot.
Hirelings: 3F 1 W lS Free lodging 1 day Roll a 7 or more on two dice to avoid having your money
stolen by a sneak thief. Directions: S-4 days-village-74
E-2 days-castle--129 W-6 days-town-137
The last set of listings under "Directions" shows the direction, distance, description, and instruction number of the next stops down the road from the inn. When ready to leave, choose a direction, roll for encounters on the road for the proper number of days travel, and go to the instruction number listed.
LOSING A KNIGHT When a Knight traveling alone is killed, a player may do one of two
things: (1) end that game, start a new Knight in Camelot, and start over from scratch, or (b) start a new Knight in Camelot as a continuation of the game. The new Knight gets the benefit of half the treasure his predecessor had deposited in Camelot or 200 pieces of silver (whichever is more). He also knows about his predecessor's travels. Any menaces that the first Knight had totally eliminated will be gone when the new Knight passes through. However, a partially eliminated menace
12
will return, full strength. For instance, if a Knight meets three evil Turkish sorcerors in a cave and kills them all, they will never reappear. But if he slays two and is slain by the third, his successor will have to deal with all three when he passes by. (Maybe the survivor re-animated his friends?)
If a dead Knight had a squire, and that squire makes it back to Camelot with a token for the crown, King Arthur will knight him to carry on the quest.
When two or three Knights travel together and one is killed, the others may go on playing. When they return to Camelot, they can pick up a replacement if they so desire. If the whole party of Knights is wiped out, the players may decide whether to start over from scratch, or begin a new party from Camelot, as above.
In no cases does a new Knight begin with his predecessor's experience points.
EXPERIENCE POINTS Knights can gain experience for their deeds. Experience points
may be traded in for attributes - but only at Camelot, never on the road.
Experience should be awarded as follows: FOR COMBAT: One experience point for every hit of damage you
put on a foe, or for every one-hit "nuisance" creature, like a rat or wasp, you kill. For killing larger nuisance creatures, like slimes, give five points to the person who puts in the death blow, and no points to anyone else. Killing a slime isn't much harder than knocking down a door, and shouldn't be worth much. NOTE: hits done by a wizard's spells - including fire and illusions -- count as experience for the wizard. ALSO: the person dealing the killing blow to any enemy (except a ST 1 to 3 nuisance monster, like a rat) gets experience points equal to that foe's basic DX. This serves two purposes: it encourages fighters to press the attack, and it makes killing a high-DX, low-ST foe (often a deadly opponent) worth something.
FOR CASTING SPELLS: A character gets one EP for each point of strength he expends in casting (or trying to cast) a spell in a pressure situation. Definition of "pressure" is left to the GM -but should normally mean only while the character is on an adventure or under attack. Under such circumstances, even missed spells count for experience. But a character does not get experience for ordinary spells cast in day-to-day life. The experience a character gains in his ordinary life is compensated for by his weekly "risk roll" - see JOBS.
Spells cast in creation of magical items are a special case: not exactly pressure, but clearly not routine. After all, the creation of magical items is one traditional way for a wizard to occupy his time as he studies and improves himself. Therefore, give a wizard 20 EP for each week he spends creating, or helping to create, a magical item--unless he is only an apprentice casting Aid spells! Thus, wizards who stay at home making things will advance surely, but very slowly.
13
FOR DIE ROLLS: Making a saving roll against danger (thus avoiding it) or putting one of your talents to good use (thus learning more) are worth experience. Any character who successfully makes any roll on four or more dice will get experience points: l 0 for a 4-die roll, 20 for a 5-die roll, 30 for a 6-die roll, and so on. Only a roll which produces results will count -- for instance, if you look for a secret door and none is there, you don't get experience, no matter how good the roll. NOTE: Sometimes the GM will make a roll for a character, so the result will be secret. These rolls do count for experience, if they are successfully made. The GM tells the player later.
FOR TIME SPENT IN PLAY : Each hour of real time spent in play is worth 5 experience points to each character actively involved. The GM should not award points to characters who don't participate or who waste time deliberately. However, characters who actively take part in the risks and triumphs of four (real) hours of play will amply deserve the extra 20 points.
GAME MASTER'S DISCRETION: The game master can give out extra experience points (or TAKE THEM AWAY) whenever he feels it proper. These bonuses or penalties should be small (usually not more than 10 at a time) and should reflect the performance of the characters. Examples: a heroic-knight-type character stands alone in a tunnel against three foes, or volunteers to open a door that is probably trapped, to save the rest of the party -- 10 points. Maybe more, if the foes are dangerous. The same heroic figure turns and runs when confronted by a bear - lose ten experience points for acting out of character. The GM might give extra experience points to a character that figured out a riddle-clue, defeated or frightened enemies by a cute trick, or even (for a sneaky character) cheated the other players out of treasure. Points should be taken away for actions that are very out-of-character, or for very stupid actions (unless the character is supposed to be stupid, in which case the GM might award EP for dumb actions!)
THE OBJECT OF YOUR "GRAILQUEST" The final objective of this game is to find the Holy Grail and return
with it to Camelot. But that's not the whole point. A knight is sworn always to right wrongs, to aid the oppressed, and to fight with courage and honor A knight without honor is no true Knight, and has no place on the Table Round. Bear this in mind as you quest. If you find some of the instructions frustrating, it may be because you're not playing your role properly.
If you are ready to begin, go to instruction number l. Your horse awaits, Sir Knight!
14
t]!· . ~1·· : ' ~ ,_ -
\ I . I
,,, -
L Rumors abound in Camelot as to the Grail's location. You may set out on a 2-day ride to the north (95), a 3-day ride to the east (30), a 2-day ride to the west (105), or a 4-day ride to the south (73). Good Luck!
2. Another quiet medieval village. Ho-hum! Go north to the inn (2 days to 123), west to another village (3 days to 46), or south to yet another inn (3 days to 26).
3. You gain initiative through your all-out attack. Go to 70.
4. You arrive to find the village that once stood here has been burned to the ground! There are a few survivors, who tell the tale of a fiery dragon who laid waste to the hamlet and stole the valuables of the local nobles. You must ride to slay the dragon. (Lucky you ... ) His lair is just outside of town. Your party has time to buy any weapons you need and ask the local priest for absolution for your sins -but no more. You cannot stop to rest; the dragon may return at any moment. If your "party" has three men in it already, go to 68. Otherwise, go to 91.
15
5. A guard is dispatched to take your message to the evil lord. Meanwhile, you are left waiting at the gate. Soon, the guard returns. Lord Krast will meet with you , but one knight must enter alone, with no men-at~arms or helpers of any kind. If you agree, pick a knight as champion and go to 84. If you refuse to go in alone, you can go back down the hill (33) or try to storm the gates (120).
6. The giant can 't swim. Glub, glub ... You may pass. Go to 49.
7. Deep in the cavern, you find a musty chamber. (See map) . You enter from the west. Facing you are two big, ugly brutes and a hag of beastly visage. "I am the sorceress Lunn, and these are my sons," cackles the old woman. "Their father was an ogre, and they have his strengtl1. Flee or die!" Flee (61) or attack (86).
8. The girl will ride with you until you return to Camelot, or until you find some of her relatives on your journey. She tells you her ?etrothed will be most grateful for her safe return (so don't get any ideas . .. ). You may take the 2-day ride south to town in triumph. Go to 118.
9. You come to a mountain pass, wiped out by a rockslide. Turn around and go back. (It's a 2-day ride south to 63.)
10. CROSSROADS INN Rumer: To the northwest, a small village has heard news of
the Grail. Hirelings: NONE Free lodging: 2 days Roll one die. On a 6, go to 77. Directions: N-2 days--village-94
S-4 days--village--30 W-2 days-village-57 E-4 days--castle--40

16
11. There are a lot of nasty whispers about your lack of good sense. "The Black Knight says the Quester is not of sound mind," says one peasant. Perhaps you should go back to 40 and change your mind. (Your honor demands it!)
12. You go deeper and deeper into a dense woods. Suddenly you realize the ground has become very marshy. The brush is too thick to move tluough. You dismount, and begin to walk the horses out of the marsh. As you start back, a gruff voice snarls, "Men! Slay them!" Go to 106.
13. "Greetings, Sir Knight," calls the rampart guard. "Welcome back to Camelot!" You are taken before King Arthur. "Well, faithful one, have you completed your quest?" If you have, go to 124. If not, go to 51.
14. CROSSROADS INN Rumor: There is a toll bridge to the west. You won't like
the bridgekeeper ... Hirelings: 2F lS Free lodging: 1 day Roll one die. On a 6, go to 98. Directions: N-8 days--village-46
W-3 days--bridge-93 E-1 day-village-67
15. The young noblewoman is brought out to watch the combat. When informed of what is to take place, she tosses her scarf to you. "Carry this, noble one!" she calls. "May it strengthen your arm!" With the favor tucked into your belt, you enter battle. Go to 60.
16. The bandits are no more. The local baron hears of your heroism and presents you with a garland of laurel and a purse of 100 silver pieces. .
The villagers have heard rumors aplenty about the Grail, from all over the kingdom. No one story seems more useful than any of the others. There is a village 8 days away to the north (112), another 2 days south (82) and yet another 3 days to the west (107). ~wo days' ride to the east there is a crossroads inn (69) where you might hear some news.
17. A pickpocket has filched all your silver! The innkeeper apologetically offers you another day's lodging at no charge - but all your hirelings (except squires) leave you immediately. Return to 55.
18. You rush forward--right into a quicksand pool. Go to 70 and fight tlie ores with any figures not in the pool. (If you were alone, bye-bye! Glub, glub ... Go to 100.) If the ores can be dispatched in ten turns or less, you are rescued in time. If not, glub, glub. If anyone else steps in the shaded area of the map (see 70), he goes glub, glub too, unless rescued by a win in ten turns or less.
17
19. In a chamber you find the dragon's stolen hoard, which you will of course return to the homeless villagers. (You may keep 200 silver pieces.) You also find a golden necklace marked with arcane symbols. If you wish to try it on at any time, or have a companion do so, go to 96. (Write down the number now, and if you try it, remember what instructions you came from.) If you aren't going to do it now, go to 59.
20. This quiet village of farmers has no knowledge of the Grail. There is an inn to the south (1 day's ride to 74) and another to the east (5 days ride to 6 6) where adventurers congregate. This village is under the dubious protection of Lord Krast, whose castle is somewhere to the northwest.
21. With the bear dead, the wizard honors his bargain, giving you the horn. You may take it to Camelot or return it, if and when you pass through the town it was stolen from. For now, you may go north on a 2-day ride (9), on a 4-day ride to the east (3 2), or on a 6-day ride to tlie west (94 ).
22. You ride into a small village that seems to be abandoned. After much searching, you find an old, old woman sitting near a fire at tl1e edge of town. You tell her why you have come. "So you seek the Grail?" says she. "What makes you worthy of this treasure? Tell me of your travels." As you begin your tale, she rummages tluough her bag, drawing out a battered tin cup. Pouring it full of water, she bids you look into it.
You see the image of a young child in a deep cavern, with two ugly men and an old crone. "Has this child been saved?" asks the woman. She passes her hand over the water and you see more images: a young woman imprisoned in a tower; a town terrorized by wolves; a young nobleman powerless to stop the depredations of a renegade knigl1t; villagers running in flight from a dragon ... "Have you aided these people?"
If you (or your predecessors on the quest) have helped with at least one of these problems, go to 108. If all these folks have been helped, go to 125. If you have done nothing to help any of them, or don't recognize any of the situations, go to 37.
23. Near a small castle, a local sage recognizes you as a representative of the King, and tells you that the knight who lives at the castle is a renegade, wandering far and wide extorting unlawful taxes from the peasantry. Approach the castle to face the renegade (72) or leave. (4 days ride north to 55 or 5 days ride east to 7 I.)
24. This village has been wiped out by the plague! Turn around and go back. (It's 3 days ride back to the village at 57.)

18
25. The local villagers have heard rumors aplenty about the Grail , from all over the kingdom. There is a village 8 days away to the north (112), a second 2 days south (82) and a third 3 days ride to the west (107). East of here, 2 days ride away, tllere is a crossroads inn where you might hear some news (69).
26. CROSSROADS INN Rumor: The village to the west has been victimized by a
renegade knight. Hirelings: 2F 1 W No free lodging Directions: N-3 days--village-2
S-3 days--village--107 W-2 days-village-101
27. The young man is elected mayor. At the ceremony, he presents you with 300 silver pieces from tl1e dragon's hoard. "Peace and long life!" he says. Go to 85.
28. The Knight is slain; your honor is protected. You may ride on, now. 3 days ride to the east is an inn (123), with a second inn 4 days away to the west (10). 2 days away, to the south, is a small village (46). Choose a direction and continue your search.
29. Take anotller look at the title of this booklet. It's "GRAILQUEST". If you want to look for something else, tllis is tl1e wrong game. Now go back to 72, and tell the renegade that your honor is more important tllan monetary gain.
30. The peasants of this village are being terrorized by groups of ravening wolves. You must fight off four of the beasts to continue. (Your party enters at one end of a MELEE board, the wolves at the oilier. If you die, go to 100.) You are told tllat the peasants once had a magic horn tllat frightened off the wolves, but it was stolen by a wizard who lives in a tower somewhere to the nortlleast. They would pay 300 silver pieces for its return. [If you happen to have this horn, return it and collect the reward. You don't have to fight the wolves, eitller! If you took tlle horn to Camelot, you must fight tlle wolves, but you get half the reward for telling them where to get tlle horn back.] From here you may ride west to Camelot (3 days to 13) or north to the nearest inn (4 days to 10).
31. CROSSROADS INN Rumor: The marsh to tlle west isn't as impassable as it is
said to be. Hirelings: 1 F 2W No free lodging Roll 2 dice. On a 7, go to 79. Directions: S-2 days--village-88
W-2 days-marsh-12 E-3 days-village-45
19
32. The local villagers, fearing a great wizard whose tower lies to the west, won't even come out and talk with you. Ride to the wizard's tower (4 days away at 63) or ride south to another village (2 days ride at 112).
33. You may now return to town (a 2-day ride south--go to 118) or go back up the hill after thinking it over. If you go back to town, you will be able to come back later. (But do you really want to keep a lady in distress waiting?) If you return now to the castle, go to 87.
34. If you offered anything Jess tllan 50 silver pieces or a magic item, go to 115. If you offered at least that much or more, he takes it and lets you pass. Go to 49.
35. You automatically have initiative. The dragon gets no movement or action this turn. Next turn, roll initiative as normal. Go to 62.
36. At the inn, you meet the town blacksmith. He is impressed by your piety and courage. He invites you to his shop, and when you go tllere the next morning, he presents you witll the weapon of your choice. This may be any ordinary (not finely-made, silver, or magic) weapon you like. Return to 113.
37. "There is notlling here for you," the woman says sadly. "You know not your duty. Farewell." Suddenly, you find yourself back at Camelot, in your own bed. This "dream" has been a warning to remind you of your obligations as a knight. Go to instruction l and begin your quest in earnest.
38. The wizard offers you the use of any one weapon you choose. (Anything from the standard weapon tables you want, or any weapon you already possess.) "My champion shall bear no arms," he says, and laughs as if chuckling at a secret joke. Choose a weapon and go to 116. One knight must face the champion alone.
39. Move three hexes, then roll a die. If anyone in the party is wearing plate armor, go to 62 if you roll a 4, 5, or 6. Otherwise, go to 62 on a roll of 6 only. If you make it, repeat until a figure moves adjacent to tlle dragon, then go to 119.
40. A local merchant informs you that you are near the castle of tl1e infamous Black Knight of Lister Downs. The Black Knight has heard of you, and sends word for you to come to his castle. Either accept his invitation (80), or ride out (11).
41. You have bested the swamp ores! They have nothing of value on their persons. (You may take their halberds, if you wish, but they are notlling special.) The swamp is truly impassable, so you must ride back to the inn at 31.

20
42. With the evil lord dead, none of his retainers wish to question your orders. You are given the noblewoman, and also Krast's magic broadsword. (+2 to your DX when using it.) You also get 100 silver pieces from the evil one's treasure room. Go to 8.
43. In the wilds of a marsh, you find a cave, as you heard you might. The horses will not fit inside. If you wish to ride on by, you may. (3 days to the west to 55, 4 days to the north to 105 , or 2 days to the east to 73.) If you intend to enter the cave, you must go on foot, leaving behind one man-at-arms or companion to watch any prisoners or non-combat personnel you have with you. (If you have none with you, tie up the horses and everyone may enter.) If you are unfortunate enough to have no one to guard prisoners or guests, you must first take them to a friendly haven like a crossroads inn or a safe town. When you are ready to enter the cave, go to 7.
44. From here, it is a 4-day ride north to the next stop (55) or a 5-day ride east to a village (71). Good journey!
45. There are dark rumors about. No one here has heard from friends or relatives in the village to the east for several days. You may ride there (7 days away at 4) , go west to a nearby inn (3 days away at 31), or go north to another village (2 days away at 67).
46. This village lies 2 days ride south of the castle of Lister Downs (40). You may go there, or 3 days ride east to another village (2), or on an 8-day ride south to a prestigious inn (14).
47. One of your weapons (you choose which one - NOT a dagger) vanishes from your room. The tltief is not to be found. Return to 66.
21
48. "You are a fool," he says quietly. "And you will die for it." He claps his hands and the floor falls from beneath your feet. You land unhurt in a huge sand-pit of a room. Place your figure on the center hex (see map). If more than one figure is involved, place your helpers on any hex in the center megahex. All of your figures start flat on the ground. (It takes one turn to stand and draw weapons.) At the "S" marks on the map are three snakes (ST 12, DX 12, IQ 4, MA 6--bite for 1-2 damage--no poison.) It is DX -3 to attack them. If you slay them, go to 65. If your party is killed, go to 100.
49. You may now ride east for 3 days to 14, or west for 4 days to 113.
50. Being so near Camelot, this village is pretty quiet most of the time. 3 days ride to the north is an inn (74) on the borders of the dominion of a Lord Krast. There are two other inns nearby, one 4 days away to the south (55), the other 3 days ride away (105), back toward Camelot in the east.
51. "That is sad news," the King says mournfully. "Have you brought a token for tl1e Crown then?" If you can, give the King 100 silver pieces or a magic item as a token. A "token" could also be a freed prisoner. One token covers all knights in a group. If you have no token, go to 122. If you have something to give, go to 117.
52. CROSSROADS INN Rumor: There are bandits on the road nearby, to the north-
east. Hirelings: 3F 1 S Free lodging: 1 day Directions: N-2 days-village-107
W-2 days-village-67 E-3 days-village-82

22 53. The leader accepts. He motions for you to meet him in the center of the clearing. Do you wish to charge-attack immediately (18) or hold back and wait for him to make the first move (110)?
54. This door leads to a stairway directly to the room you were dropped from. The renegade knight is still here, and he draws his sword as you enter. Place him in the center of a MELEE map and place your figure or figures at one end. You automatically gain initiative for the first turn. If you slay him, go to 132. If you all die, go to 100. (The renegade: ST 15, DX 15(13), IQ 12, MA 8; broadsword, dagger, leather armor)
55. CROSSROADS INN Rumor: East of here, two ugly brutes have a treasure hoard
in a marsh cave. Hirelings: 2F 1 W Free lodging: 1 day Roll 2 dice. On a 2, 3, or 4, go to 1 7. Directions: N-4 days--village-50
S-4 days-castle-23 E-3 days--marsh-43
56. As you ride out the guards laugh derisively. You have disgraced yomself, and you may not return to Camelot until you have either found the Grail or fought the evil lord. Go to 33.
57. This tiny hamlet lies between two excellent inns. (1 day's ride to 66 on the west, or 2 days ride to 10 on the east.) There is a village 3 days away to the north, as well, as 24.
58. If the figure who fell in is wearing plate armor, he drowns. (If that's the only knight, go to 100.) If wearing chainmail, roll 3 dice. A roll of his adjDX or less means he survives and may swim to either shore. Otherwise, he drowns. If wearing leather or no armor, he may swim out. (Those figures carrying shields lost them.) If all figures Y?U have in .combat end up on shore (or are killed, assuming the knight hunself survives), go to 49. Remember, though, that if you swim to the shore OPPOSITE to where you started, you must leave behind your horses and all equipment and money that is there. If combat is not now ended, go back to 76, after writing down this instruction number, in case you must return here.
59. The grateful villagers are most happy. If you were accompanied to the dragon's lair by a young man of the village, and if he is still alive, go to 27. Otherwise, go to 85.
60. Place your figure at one end of a MELEE map, with a figure for Lord Krast at the other. (Krast is ST 16, DX 14(11), IQ 10, MA 6 in chainmail with a small shield, magic broadswrod, and dagger. The ~agic broadsword adds 2 to Krast's DX when he is using it, giving hun an effective DX of 13.) If you reduce your foe to ST 4 or below
23 without killing him, go to 14. If he reduces your ST to 1, go to 131. If you kill him, go to 42. If he kills you, and you're the only knight in your party, it's all over. Go to 100. Otherwise, go back to Krasthold (118-2 day's travel). Krast will accept another challenge in one week. He will be at his full ST.
61. You hear the hag cackle delightedly as you retreat. Go back to 43 and choose a direction, or go to 7 to go back in.
62. The dragon is suddenly awake! He has ST 30, DX 13, IQ 16; his armor stops 3 hits. Battle him to the death, remembering that you are dealing with an enemy who is probably more intelligent than you are. (Of course, how intelligent can you be? You've walked into a dragon's cave ... on purpose!) If you slay the dragon, go to 19. If you are killed (and that's the only other choice, my lord ... go to 100.
63. Local peasants tell you to consult the Grey Wizard in the Great Tower. "Perhaps he knows of the Grail," you are told. When you go to see him, he says, "I have heard tell that the Grail lies in the North, but can be found only by those who first ride south. Other than this riddle, I cannot help you. Now, come," insists the grinning wizard. "See what a treasure I have!" Go to 92.
64. The giant was carrying 200 silver pieces. Go to 49.
65. The trap door above you is sealed, but you find two exits, one at each end of the chamber. Go through tlle east door (54) or the west door (7 5).
66. CROSSROADS INN Rumor: No idle talk here. Hirelings: 1 S Free lodging: 1 day Roll 2 dice. On a 9, go to 4 7 (if only knights are in the party)
or 127 (if you have a squire or hirelings). Directions: S-2 days-village-95
W-5 days-village-20 E-1 day--village--57
67. The local residents say, "Grail? What grail?" Not a very informative group. Maybe you '11 have better luck at the inns to the west (1 day's ride to 14) or to the east (2 days ride to 52). You might also try the village 2 days ride south of here at 45.
68. You and your companions arrive at the dragon's lair. The dragon is sleeping within. Place your figures on the entrance hexes of a MELEE map and go to 99.
24
69. CROSSROADS INN Rumor: The lord of the area north of here is very unhappy
about something. Hirelings : 3 F No free lodging Roll 2 dice. On a 6 or 8, go to 126. Directions: N-7 days--village-90
S-4 days--village-4 W-2 days-village-78
70. The ores all have ST 13, DX 11 , IQ 8, MA 10 except the leader, who is ST 16, DX 10, IQ 9, MA 10. Note his figure so you can distinguish it from the others. All together, there are 5 foes , all armed with halberds. Enter from the west. If you kill them, go to 41. If your party if slain, go to 100. Note the shaded area on the map below. The ores will avoid it carefully. If anyone in either group enters it or is forced into it, go to 83.
71. The residents of this small town have heard of your quest. There are often travellers through here from the castle to the west (5 days ride to 23) and the inn to the north (2 days ride to 113). One of them, the Black Knight of Lister Downs, made much sport to the local residents about your "foolish venture. " As a matter of fact, he seems to be making quite a career of belittling your Holy Mission. He lives in a castle northeast of Camelot. Your ho nor demands you seek his home and speak with him about his unchivalrous tongue!
72. At the castle, the renegade tells you your Quest is hopeless. "No one will ever find the Grail!" he says. "Better you should join me. Together, we will fill our coffers with silver." 1f you want to take him up on it, go to 29. If not, go to 48.
25
73. You have come to a small village. The locals are upset over the kidnapping of a young child by "the witch of the western marsh" and her ugly sons. You may ride to the marsh (2 days away to the west at 43), go to the inn to the south (2 days ride to 113), or go back toward Camelot (4 days ride to the north at 13).
74. CROSSROADS INN Rumor : A young noblewoman was carried off from a village
far to the east and is imprisoned to the northwest of this inn.
Hireling: 2F 1 W l S No free lodging Directions: N-1 day-village-20
S-3 days--village--50 W-4 days-town--118
75 . This door goes down a long, long corridor to the treasure chamber. You find 300 silver pieces and a large jewel. By the time you get back to the castle above, however, the renegade and his followers have fled. Go to 102.
76. See the map below for placement on a standard MELEE map. Enter from east if you came from the east, and vice versa. Only the unshaded hexes constitute the bridge. If during the fight any one-hex figure is forced to enter a shaded hex, that figure falls into the river. (Go to 58.) The giant's counter may overhang by one hex, but if he is 2/3 or more off the bridge he falls. (Go to 6.) Giant is ST 30, DX 9, IQ 8. His club does 3+3 damage. If you kill the giant, go to 64. 1f he slays you, go to 100.
78. You find a deserted village. As you look around, you are hailed by three bandits. "I am Black John, the bandit chief," says the darkcloaked leader. "Drop you weapons or die!" If you surrender, go to 121. If you decide to fight the rogues instead, go to 97.

26
79. You have upset the innkeeper somehow. You must leave immediately. Return to 31 and go.
80. When you arrive, the Black Knight meets you in the courtyard. "I just wanted to see what a true fool looked like," he says with a sneer. "Away, Sir Fool!" You aren't going to take that, are you? Challenge him to single combat, for your honor and the honor of your quest! Go to 89.
81. The ores aren't in a mood to talk. You lose initiative. Go to 70.
82. There's no village here. Bandits have murdered everyone and looted the homes. Go north to 78 (2 days ride) or west to an inn (3 days ride to 5 2).
83. Quicksand! Anyone trapped in the shaded area on the map will be sucked under in 10 turns unless the combat is over by then, allowing friends to rescue them. (If you have no companions, glub, glub . . . go to 100.) For now, go back to 70.
84. You are brought to a large courtyard, where Lord Krast awaits. He is a burly man, clad in black-enameled mail and wearing a large broadsword at his belt. The evil lord sneers at your demands for the lady's release. "If you want her, fight me for her--one on one!" If you accept the challenge, go to 15. If not, get on your horse and ride out (56).
85. You have heard that some of the dragon's hoard was stolen from a place far to the north. There is a crossroads inn along that road,
4 days away. Go there to seek more information (69) or ride west (a 7-day trip to 45) to another small village where you might get word of the Grail.
86. The hag will hide in the shadows while you fight her two halfogre sons. Each is ST 25 , DX 11, IQ 8, MA 10-they wield morningstars (2+1) . If you slay them, go to 109. If you die, go to 100.
87. Ahead, atop a lonely hill, lies the castle of the cruel Lord Krast. From the tower, you see a young woman waving a handkerchief. "Hail, good sir," she calls. "Aid me!" You realize that this must be a young noblewoman imprisoned by the evil lord. As you approach the gates, the guards in the tower above tell you to state your business at the castle. Either deliver a bold challenge to Lord Krast (5) or make excuses and slink back down the hill (33).
88. There's nothing here worth bothering with. It's just s simple village. Turn around and go back to the inn (2 days ride north to 31).
89. The Black Knight allows you to choose weapons and armor-he will use the same thing you pick, if possible. If he cannot, he will use his favorite weapon-a halberd. He is ST 16, DX 14, IQ 10, MA 10.
27 Place your figure and his on opposite ends of a MELEE map and begin combat. If you slay him, go to 28. If he kills you, go to 100, if you were the only knight. If there is a second (or third!) knight in the group, the Black Knight will accept their challenges. His injuries will magically vanish after each battle.
90. The young lord of the region welcomes you. He gives you food and drink, but he seems sad. When you inquire, he tells you that his bride-to-be has disappeared. He is offering 500 silver pieces plus a magic light crossbow (increases its user's DX by 3) for her return. If you know where she is, tell him and collect the reward. If not, you inquire of the servants, who tell you rumors about an evil lord in the far northwest who coveted the young woman. Ride south to the inn (7 days to 69) or north to a small village (5 days to 22).
91. As you prepare to ride out, a young man approaches. "Please, Sir Knight," he calls respectfully. "My parents were killed when the dragon attacked. I was in the fields and could not defend them. Take me with you so I may regain my honor and avenge them!" If you wish to take him along, go to 111. If not, let him down gently and go to 68.
92. The wizard shows you a golden horn, encrusted with jewels. "Foolish peasants used this magical horn to frighten away wolves in a village to the southwest. I. .. ah .. . obtained the horn there." The mental image of struggling peasants fighting ferocious wolves touches your noble heart. Fervently, you beg the wizard to return the horn. He refuses. "But perhaps you would do battle with my champion for it." You are a knight of the Round Table--you have little choice but to agree. Pick a knightly champion and go to 38, or cravenly leave (2 days N to 9, 4 days E to 32, or 6 days W to 94).
93. You have come to a bridge across a raging river. Standing in the center of the bridge is an extremely ugly giant. "A toll to pass here," he growls, "or I shall smash you as I have so many others!" If you want to pay him, offer him something and go to 34. If you refuse to pay, go back the way you came (a 4-day ride to 113 in the west or a 3-day ride to 14 in the east) or fight hin1 (76).
94. No news here. This is a harmless little village of peasants. You are told to try south at the inn (2 days ride to 10) or east at the tower of the Grey Wizard (6 days ride away to 63).
95. This sleepy little village is protected by Camelot's nearby forces. No news of the Grail here. Go north 2 days ride to the inn (66), or go south to Camelot (2 days ride to 13).
96. The necklace's catch vanishes. Whoever is wearing it now has it permanently. It raises a figure's ST by 2 and acts as invisible armor, absorbing 2 hits/tum without affecting DX. If the wearer dies, the necklace will lose its power. Go back to the instruction you came from.

28
97. "As you will," snarls the bandit. "Have at you!" See map below for placement of obstacles. The bandit chief, at C, is ST 12, DX 16 (14), IQ 10, MA 8 with leather armor, cutlass, dagger, and small shield. His two companions (Bl and B2) are ST 12, DX 12(10), IQ 8, MA 8 with leather armor, rapier, and dagger. You enter from the west. If you slay them, go to 16. If all die, go to 100.
98. All retainers fall sick with food poisoning. The knight(s) must go on alone. A squire will wait for you and rejoin you if you return after two weeks have passed (but no longer than a month). Ordinary hirelings are lost to you. Return to 14.
99. See the map for placement of the monster. He is a standard 4-hex dragon. He seems to be sleeping. You enter from the west, and may immediately attack, gaining surprise (go to 35) or try to sneak up on the dragon (at 3 hexes/turn) and strike at a vulnerable spot (go to 39).
29 100. In Camelot this day there is no merriment at the Round Table. A brave knight has died. The noble King Arthur prepares to send yet another knight on the Holy Quest When the new knight is ready to begin, go to 1 and seek the Holy Grail.
101. The local villagers report that a renegade knight has been extorting unlawful taxes from them. The noble lord of this region tells you the knight stole a precious jewel from him. He will give 300 silver pieces to anyone who returns it. (If you have it already, return it. If you gave it to King Arthur on a trip to Camelot, too bad! Otherwise, you may seek it to the far southwest.) There's no other information here. Go back to the inn at 26 (2 days ride to the east).
102. In searching the castle, you find a set of diaries that tells of the knight's thefts from the folk east of Camelot. The jewel belongs to them. Keep it until you return to Camelot, or until you find its rightful owners. The money is yours to keep. Go to 44.
103. The evil lord honors his agreement. (Surprise, surprise ... ) The noblewoman is released. Before you go, he tells you that his spies had been seeking the Grail. They did not find it, but Krast says you may be sure it is to the east of Camelot, not to the west. What credence you give this information is up to you. Go to 8.
104. A dragon? That's a different story! It roars and tears the gates apart, scattering guards. You enter the courtyard to find several more armed men and a grey-cloaked, solemn-looking individual. The cloaked figure gestures, and your dragon vanishes in a cloud of brimstone-scented smoke. "Very well," says the grey-clad wizard. "I will take you to Lord Krast." With several dozen archers on the walls, it would be a good idea to go along. Go to 84.
105. CROSSROADS INN Rumor: To the south, there is a witch's cave in the marsh. Hirelings: 4F 2S Free lodging: 4 days Directions: S-4 days-marsh-43
W-3 days-village--50 E-2 days-CAMELOT-13
106. You are faced by a band of five ores. You may choose to attack immediately (3), talk to them (81), or challenge the leader to single combat (53).
107. No word of the Grail here. Go north (3 days ride to 26) or south (2 days ride to 52) to an inn, or east (3 days ride to 78) to a small village.
108. "You are on the path, then," says the old woman. "Go, and use your strength in the service of others. When these tasks are all done, come back and seek the Grail." Ride back south 5 days to 90.
30
109. "My sons!" cries the hag. "You have slain my sons!" She falls, weeping, to the floor. In a small connected cavern you find a young child of the village to the east, kidnapped by the old woman. She is no sorceress, but just a crazed old woman. You take pity on her and do not slay her. Return the child to his village (2 days ride east to 73), then continue on your quest.
110. He hesitates, then attacks, avoiding an odd muddy area in the center of the clearing. The other ores attack, too, so the "single combat" is declined. Everyone will fight. Roll for initiative and go to 70.
111. The youth is ST 13, DX 10, IQ 12, MA 10 with no arm or. His only weapon is a threshing hook which strikes like a halberd. Since he is not a trained warrior, he is incapable of using armor, shield, or standard weaponry. He fights at DX -4. Go to 68.
112. Bandits from the south have sacked this village recently. You may ride south (8 days ride to 78), or north to another village (2 days to 32), or west to an inn (3 days to 123).
113. CROSSROADS INN Rumor: The infamous Black Knight of Lister Downs passed
through the town to the south. Hirelings: 3F lS Free lodging: 1 day Roll 2 dice. On a 2 or 12, go to 129. On a 3 or 11, go to 36. Directions: N-2 days--village-73
S-2 days-town-71 E-4 days-bridge-93
114. The badly-wounded Krast calls "Spare my life! The woman is free to go. I will trade information for my life!" If you spare him, go to 103. If you kill him, go to 128. If he kills you anyway, follow the instructions at 60.
115. "That's not good enough," he roars! "I want more!" Go back to 9 3 and try again.
116. You enter one end of a MELEE board, with no obstacles. At the end opposite, a huge figure stands covered by a hooded cloak. "Behold, the champion who bears no arms, but is armed for bear!" And that's what he is, too-a grizzly bear. (ST 30, DX 11, IQ 6, MA 8, 2+2 damage, fur stops 2 hits) The animal claws away his robe and snarls. Roll for initiative and attack. If the bear dies, go to 21. If you die, go to 100, unless there are other knights in your party. If you have another knight who wants to try his luck, the wizard will summon another bear.
117. ''Thank you, generous knight," says the king with a smile. "You must be tired after your long ride. Rest a bit at Camelot before continuing your quest." You may rest 14 days maximum, re~ning 1 ST each two days. When you decide to leave, go to I. Your retainers
31 will not ask for pay while in Camelot -- they consider it a privelege to be here.
118. You have arrived in the small town of Krasthold. To the north, 2 days ride away, lies the castle of the evil lord Krast. To the east, 4 days away, is a crossroads inn. Legends about Krast make him out be cruel, indeed. It is rumored that his spies seek the Grail. You may go to the castle (87) or toward the inn to the east (74).
119. The dragon is stirring. Any adjacent figures have one a~d only one chance to strike at vulnerable areas. Roll as normal to htt. If a hit is scored, it does double damage. If no hit is scored, you do half damage anyway, as you are too close to miss entirely. (No bo~us for missile weapons-hand weapons only.) The dragon gets no actlon this turn. Go to 62.
120. How did you plan to storm those gates? Any attempt brings a volley of arrows from the parapets. (Fortunately, the amused guards were just trying to scare you this time ... ) Nothing short of a dragon could smash down those gates. If you have one, or have a companion who can conjure one, go to 104. If not, go to 5.
121. When you have dropped your weapons, the three laugh and run you through. Too bad. You weren't bold enough to sit at the Round Table. Go to 100.
122. The king frowns. "Then no doubt you will wish to hurry on your way. Let me not delay you." You are given a fresh mount and set on your way. Sorry, no rest for you at Camelot this day! Go to 1.
123. CROSSROADS INN Rumor: There is a wizard to the north with a magical
relic--perhaps the Grail itself. Hirelings: 4F lW 1 S No free lodging Roll ! die. On a 6, go to 130 Directions: S-2 days-village--2
W-3 days-castle--40 E-3 days-village--112
124. "Rejoice!" cries the king. "The True Grail is found!" There is a great banquet, with you as guest of honor. Your quest is ended. A galJand knight has met his destiny.
125. "You are noble and strong," says the woman. ''Thus you now know that the joy and the aim of the Grailquest is helping others, not in helping yourself. You need no Grail to prove your worth, noble knight." She smiles softly. "But it will no doubt please your king if you bring him one." She hands you the battered tin cup, which has suddenly transformed into a golden chalice that glows with a radiance
32
of inestimable purity. "It is yours, then, for your king." A moment later, she is gone. You ride back to Camelot in awed, reverent silence. No harm can come to you. You neither eat nor sleep, nor do you feel the need for such. You are under Holy protection. After many days, the gates of Camelot can be seen in the distance. Go to 13.
126. Your hirelings are tired of adventuring. They ask that their pay be doubled. If you choose not to meet this request, they quit. Return to 69.
127. A bully picks a fight with your strongest retainer, knocking him unconscious. You come downstairs just too late to stop the fight. As the King's representative, you administer the low justice on the spot. The bully is whipped and all his weapons and possessions taken and sold. 50 silver pieces are left for the innkeeper, to look after the injured man (who will not rejoin your party). You keep 100 silver pieces as recompense for the loss of your man's services. Return to 66.
128. As you stand over the slain Krast, you hear a sob. Turning, you see the noble lady choking back tears. "And 1 thought I was saved!" she cries. "How can you call yourself a knight, you who would slay a man who begged for mercy? Krast was cruel, but at least he had honer!" She demands her favor back and refuses to ride away with you, preferring to wait for a more chivalrous escort. Abashed, you leave the tower, vowing never again to let the love of battle overcome your knightly virtue. As penance, you leave Krast's sword where it fell. Go to 118.
129. A wealthy merchant donates 200 silver pieces to aid you in your quest. Return to 113.
130. Within thirty minutes of your arrival, you break up a brawl that threatened to wreck the inn. The innkeeper (a stingy fellow) relents and offers you and your party free lodging for as long as you like whenever you pass by his hostel. Return to 123.
131. He not only spares your life, but also orders his servants to tend you, and feed your party, for a week. When you are strong enough (ST 4) to ride, he summons you. "You fought bravely, Sir Knight, but I defeated you fairly. Your horse, arms, and armor are mine. Your treasure remains yours; if you wish to ransom your gear, speak to my seneschal. You are free to go now." Go to 118 if you wish to leave, or back to 60 if another knight in the party wishes to challenge him.
132. Checking the other door that led from the snake arena, you find the castle's treasure chamber. You find 300 silver pieces and a large jewel there. Go to 102.