
MEASURING GUIDE - Medline · PDF fileMEASURING GUIDE For Cubicle Curtains and Track,...
28
MEASURING GUIDE For Cubicle Curtains and Track, Draperies, Valances and Blinds Straight Cornice Curved Cornice Step Cornice Rod Pocket Drapery Pinch Pleated Drapery Cubicle Curtains Horizontal Blind Rod Pocket Valance Pinch Pleated Valance Inverted Box Pleat Valance Medline Industries, Inc. • One Medline Place • Mundelein, IL 60060-4480 Call Toll-Free: 1-800-MEDLINE • (1-800-633-5463) Vertical Blind
Transcript of MEASURING GUIDE - Medline · PDF fileMEASURING GUIDE For Cubicle Curtains and Track,...

MEASURING GUIDE
F o r C u b i c l e C u r t a i n s a n d Tr a c k , D r a p e r i e s ,Va l a n c e s a n d B l i n d s
Straight Cornice
Curved Cornice
Step CorniceRod Pocket Drapery
Pinch Pleated Drapery
Cubicle Curtains
Horizontal Blind
Rod Pocket Valance
Pinch Pleated Valance
Inverted Box Pleat Valance
Medline Industries, Inc. • One Medline Place • Mundelein, IL 60060-4480
Call Toll-Free: 1-800-MEDLINE • (1-800-633-5463)
Vertical Blind

www.medline.com 2 1-800-633-5463
Table of Contents
General Measuring Instructions . . . . . . . . . . . . . . . . . . . . . . . . . . . . . . . . . . . . . . . . . .3
Cubicle Track Measuring Instructions . . . . . . . . . . . . . . . . . . . . . . . . . . . . . . . . . . . . .4
Cubicle Track Item Numbers . . . . . . . . . . . . . . . . . . . . . . . . . . . . . . . . . . . . . . . . . . . .5
Cubicle Curtain Measuring Instructions . . . . . . . . . . . . . . . . . . . . . . . . . . . . . . . . . . .6
Cubicle Curtain and Track Order Form . . . . . . . . . . . . . . . . . . . . . . . . . . . . . . . . . . . .7
Drapery and Valance Introduction . . . . . . . . . . . . . . . . . . . . . . . . . . . . . . . . . . . . . . . .8
Draperies – Measuring for Inside Mount . . . . . . . . . . . . . . . . . . . . . . . . . . . . . . . .9-10
Draperies – Measuring for Outside Mount . . . . . . . . . . . . . . . . . . . . . . . . . . . . .11-12
Valances – Measuring for Inside Mount . . . . . . . . . . . . . . . . . . . . . . . . . . . . . . . . . .13
Valances – Measuring for Outside Mount . . . . . . . . . . . . . . . . . . . . . . . . . . . . . .14-15
Snap Draperies – Measuring When No Rod Exists . . . . . . . . . . . . . . . . . . . . . . .16-18
Snap Draperies – Measuring When Rod Exists . . . . . . . . . . . . . . . . . . . . . . . . . . .19-21
Drapery and Valance Order Form . . . . . . . . . . . . . . . . . . . . . . . . . . . . . . . . . . . . . . .22
Blinds Introduction . . . . . . . . . . . . . . . . . . . . . . . . . . . . . . . . . . . . . . . . . . . . . . . . . .23
Blinds – Measuring for Inside Mount . . . . . . . . . . . . . . . . . . . . . . . . . . . . . . . . . .24-25
Blinds – Measuring for Outside Mount . . . . . . . . . . . . . . . . . . . . . . . . . . . . . . . .26-27
Blinds Order Form . . . . . . . . . . . . . . . . . . . . . . . . . . . . . . . . . . . . . . . . . . . . . . . . . .28

IntroductionMedline offers a wide range of custom-manufactured products, includingdraperies, valances, cubicle curtains, hardware, table linens, blinds andmuch more. You can dramatically improve the look of a room by updating these items, and we can help. The first step is getting the rightmeasurements.
This book is designed to help you do just that. Each section givesdirections and includes the appropriate order form for each type ofproduct. This is meant to be a basic guide and is not all inclusive.We offer an array of products for specialty applications also.
Regulatory ComplianceAll cubicle curtains and drapery sold by Medline are permanentlyflame-retardant and pass NFPA 701 testing. We will provide proof ofthis upon request. All cubicle curtains with mesh use 1/2" nylon meshand 20" is the preferred height. Medline will use 20" of mesh unlessinstructed otherwise. Please note that if using less than 20" of mesh, itis recommended to have approval from the local fire marshal, who isresponsible for determining acceptable mesh height standards.
Do’s and Don’ts of Measuring1. Do always measure every window, ceiling or track (depending on
the product you need) even when doing multiple rooms.Although the windows or track may look to be the same size, theymay be a little different.
2. Do consider any obstructions that may hinder operation orinstallation of the product. Possible obstructions may include:heating vents, pipes, air conditioners or columns.
3. Don’t install cubicle track over lights – you won’t be able to changethe bulbs.
4. Do round your measurements up and use the appropriate increment.Measure cubicle track, cubicles, and table linens to the nearest inch;and draperies and blinds to the nearest 1/8".
5. Do use a 1" steel measuring tape.
6. Do record all important information regarding hardware when having aproduct made to fit existing track/rods (for example, when the customerplans on using an existing drapery rod, be sure to measure rod face,projection from the wall and count the number of carriers). Refer tothe appropriate product section for information you will need togather.
7. Don’t measure only the drapery or cubicle curtain when orderingreplacements. You shouldn’t assume that the existing drapery orcubicle is the one that was made to fit the rod. Many times afterlaundering, these products are reinstalled in the wrong rooms. It issafer to measure the hardware.
8. Don’t approve a mock-up sample without installing it.
9. Do list “Width” first and “Height” second when giving
measurements (67"W X 90"H).
10. Do call/e-mail the Cubes and Drapes division for help when needed.
www.medline.com 3 1-800-633-5463
GENERAL MEASURING INSTRUCTIONS

www.medline.com 4 1-800-633-5463
Measuring Cubicle Track
DescriptionOur most popular cubicle track, “Supreme” track, is high-quality andheavy-duty, making it perfect for areas of heavy use. Carriers are self-lubricating, and three per foot are included with all standard track.It is customary to use standard track sizes and splice (join) them togetherto build the track configuration. End caps and splices (two per bend,one with straight track over 8' long) also are included with track. Pleasenote there are other styles of track and carriers available upon request.
How to Measure1. Measure along the floor and treat rounded corners as square corners for
measuring purposes (bends are softer but measure as if hard corners).Draw track shape and label each side of the track with measurement infeet. Give the entire length of each side of track right up to the squarebend (for example, 7' X 9' with a 90° bend).
2. For any bends in track, determine if they are 90° or 45°. These are the twokinds available.
3. For adjacent tracks in multibed areas, be sure to add 9" for overlap (seeimage below). This allows the tracks to create privacy where they meet.
Above: Example of track drawing. (All tracks include 90° bends.)
4. Sketching the track is a good way to record measurements and can beuseful later on for installation. Remember to note the room numbersalso.
How to OrderStandard item numbers are available for you to place orders for track directlyinto our system. You first must figure out the correct item numbers to use,which are listed on the next page. Here is how to do it. Refer to drawingon adjacent page.1. On your track drawing, begin with the corner and section off a 2' X 2'
bend, noting the degree of bend (45° or 90°). Also available are 3' X 3'foot bends, but they are more costly to ship. Item number for a 2' X 2'bend will be SUP2X2FTW90 or SUP2X2FTW45 (depending ondegree of bend).
2. Subtract from each track side length the amount taken up by the bend. Inthe case where you used a 2' X 2' bend, you would subtract 2' from eachside it attaches to. These items are the straight pieces that attach to thebend. Examples are: SUP6FTSTR (6' track section), SUP8FTSTR (8' tracksection), etc.
CUBICLE TRACK MEASURING INSTRUCTIONS
90° 45°
90° bend
(U - Shape)
Room 101 Room 102 Room 204, 205, 206
(L - Shape) (Multi-beds)
5'
8' 8'
5'
7'
5' 9"
10' 10'
5'
9" overlap needed

www.medline.com 5 1-800-633-5463
CUBICLE-SUPREMETRACK
ITEM NUMBER DESCRIPTIONSUP2FTSTR SUPREME TRACK 2' STRAIGHT SUP30INSTR SUPREME TRACK 30" STRAIGHTSUP3FTSTR SUPREME TRACK 3' STRAIGHTSUP42INSTR SUPREME TRACK 42" STRAIGHTSUP4FTSTR SUPREME TRACK 4' STRAIGHTSUP54INSTR SUPREME TRACK 54" STRAIGHTSUP5FTSTR SUPREME TRACK 5' STRAIGHTSUP66INSTR SUPREME TRACK 66" STRAIGHTSUP6FTSTR SUPREME TRACK 6' STRAIGHTSUP78INSTR SUPREME TRACK 78" STRAIGHTSUP7FTSTR SUPREME TRACK 7' STRAIGHTSUP90INSTR SUPREME TRACK 90" STRAIGHTSUP8FTSTR SUPREME TRACK 8' STRAIGHTSUP102INSTR SUPREME TRACK 102" STRAIGHT-SPLICEDSUP9FTSTR SUPREME TRACK 9' STRAIGHT-SPLICEDSUP114INSTR SUPREME TRACK 114" STRAIGHT-SPLICEDSUP10FTSTR SUPREME TRACK 10' STRAIGHT-SPLICEDSUP102INSTRU SUPREME TRACK 102" STRAIGHT-UNSPLICEDSUP9FTSTRU SUPREME TRACK 9' STRAIGHT-UNSPLICEDSUP114INSTRU SUPREME TRACK 114" STRAIGHT-UNSPLICEDSUP10FTSTRU SUPREME TRACK 10' STRAIGHT-UNSPLICEDSUP2X2FTW45 SUPREME TRACK 2' X 2' W/45° BENDSUP2X2FTW90 SUPREME TRACK 2' X 2' W/90° BENDSUP3X3FTW45 SUPREME TRACK 3' X 3' W/45° BENDSUP3X3FTW90 SUPREME TRACK 3' X 3' W/90° BEND
*Please note: Unspliced track longer than 8' is freight intensive.
Cubicle Track AccessoriesMCD114130C Supreme Chain
Carrier (old style with chain) (A)
MCD114130 Supreme StandardCarrier, plastic withmetal hook standardtype sent with track (shown left)
MCD114140 Supreme Track SpliceMCD116060 Cubicle Tie Back (minimum order 4 each, white twill tape
secures in metal part that attaches to wall)MCD114132 Supreme Spool Carrier (B)MCD114131 Supreme Break-away carrier (for psyche areas) (C)MCD114120 Supreme end cap with pull-out assemblyMCD114110 Supreme end cap (plug style)
*Note: Track parts are meant to fit their brand of track and not every part is interchangeable. In cases where your customer is asking for replacement carriers, thebest way to see if we can provide the carrier is to make a copy of it and fax it into thedivision. Also, if track length needed is not listed above, round up to the nearest sizeavailable and specify exact finished length desired in PO text. All unspliced track (continuous rail) longer than 8' will ship via common carrier and have a crating fee of$15.00.
Call the division for any special requests.
CUBICLE TRACK ITEM NUMBERS
(8' X 9' foot trackwith 90° bend)
Here are parts to use (on inside)
8'
9'
SUP6FTSTR
SUP2X2FTW90
SUP7FTSTR8'
9'
Supreme Track WithStandard Carriers
Above: Example shows how to determine parts needed to create an L-shaped cubicle track.
Spool Carriers
Chain Carriers
A B
Break-away Carriers
C
www.medline.com 6 1-800-633-5463
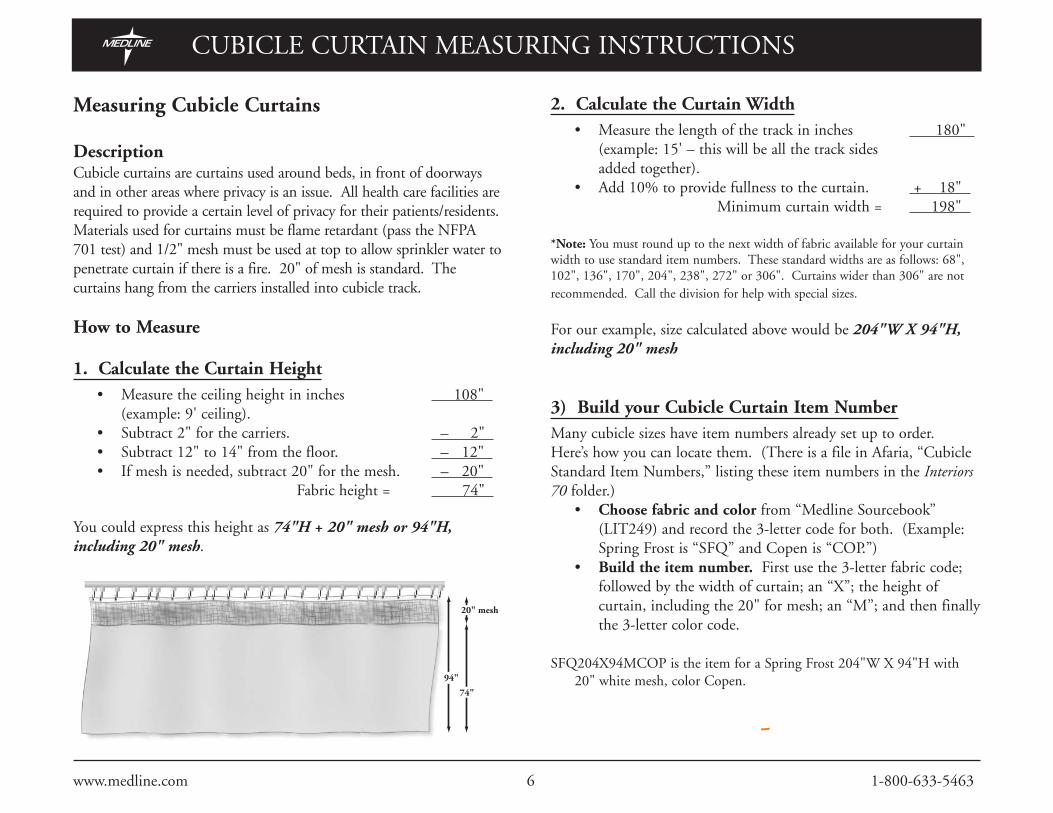
Measuring Cubicle Curtains
DescriptionCubicle curtains are curtains used around beds, in front of doorwaysand in other areas where privacy is an issue. All health care facilities arerequired to provide a certain level of privacy for their patients/residents.Materials used for curtains must be flame retardant (pass the NFPA701 test) and 1/2" mesh must be used at top to allow sprinkler water topenetrate curtain if there is a fire. 20" of mesh is standard. The curtains hang from the carriers installed into cubicle track.
How to Measure
1. Calculate the Curtain Height• Measure the ceiling height in inches 108"
(example: 9' ceiling).• Subtract 2" for the carriers. – 2" • Subtract 12" to 14" from the floor. – 12" • If mesh is needed, subtract 20" for the mesh. – 20"
Fabric height = 74"
You could express this height as 74"H + 20" mesh or 94"H,including 20" mesh.
2. Calculate the Curtain Width• Measure the length of the track in inches 180"
(example: 15' – this will be all the track sidesadded together).
• Add 10% to provide fullness to the curtain. + 18" Minimum curtain width = 198"
*Note: You must round up to the next width of fabric available for your curtainwidth to use standard item numbers. These standard widths are as follows: 68",102", 136", 170", 204", 238", 272" or 306". Curtains wider than 306" are notrecommended. Call the division for help with special sizes.
For our example, size calculated above would be 204"W X 94"H,including 20" mesh
3) Build your Cubicle Curtain Item Number Many cubicle sizes have item numbers already set up to order.Here’s how you can locate them. (There is a file in Afaria, “CubicleStandard Item Numbers,” listing these item numbers in the Interiors70 folder.)
• Choose fabric and color from “Medline Sourcebook”(LIT249) and record the 3-letter code for both. (Example:Spring Frost is “SFQ” and Copen is “COP.”)
• Build the item number. First use the 3-letter fabric code; followed by the width of curtain; an “X”; the height of curtain, including the 20" for mesh; an “M”; and then finallythe 3-letter color code.
SFQ204X94MCOP is the item for a Spring Frost 204"W X 94"H with20" white mesh, color Copen.
-
CUBICLE CURTAIN MEASURING INSTRUCTIONS
94"
20" mesh
74"

Measuring Draperies and Valances
Description
CUBICLE CURTAIN AND TRACK ORDER FORM
www.medline.com 7 1-800-633-5463

www.medline.com 8 1-800-633-5463
"We've Got Styles For You!"We offer several types of draperies and valances, but typicallysell a few basic kinds to the health care market. This guidereviews the most commonly sold styles and help in orderingall other styles can be provided upon request.
Draperies are usually operational and used to decoratewindows, provide privacy, conserve energy, and controllight and noise. Lining, a fabric backing for the drape, is anoption for all drapes. It is used to enhance light control,protect the fabric from sun damage, create a fuller-lookingtreatment and conserve energy. There are three kinds oflining: Polyester (will diffuse light), Thermal (blocks light,best for energy saving) and Blackout (blocks light).Polyester lining is the most popular.
Valances and Cornices are primarily used to decoratewindows and are not operational. Lining the valance isalso an option and should be considered. A commonheight for valances and cornices is 15".
Snap Drapery SystemsSnap draperies, often used in Alzheimer's units and psychi-atric areas, are available also. Accordia-fold draperies have deep-tailored pleats sewn andripplefold draperies have gentle folds created when it is installed on the rod. Both styleshave snaps sewn into the drapery that attach to the rod carriers (snap on), makingthem easy to remove, launder and reinstall. The hardware, made of extruded alu-minum and ordered separately, is strong but light. When ordering snap drapery to fitan existing rod, more information is required; and we recommend sending in the exist-ing drape to use as a template. Please refer to “Questionnaire for Snap Drapery” andfill out completely in those cases.
DRAPERY AND VALANCE INTRODUCTION
Straight Cornice
Curved Cornice
Step Cornice
Rod Pocket Drapery
Pinch Pleated Drapery
Rod Pocket Valance
Pinch Pleated Valance
Inverted Box Pleat Valance
DRAPERY STYLES CORNICE STYLES VALANCE STYLES
Before measuring, you need to determine the style of drapery or valance you willbe ordering. See the images below for selection.

www.medline.com 9 1-800-633-5463
Measuring Pinch Pleated and Rod Pocket Draperies – INSIDE MOUNT
1. Measure the Width and Height of WindowDecide if the drapery will be mounted inside the window opening (IM) or onthe outside of the window frame (OM). Follow instructions below for mountingdrapes inside the window. The width will be recorded as “rod width” on theorder form and height of drapery as simply “finished height.”
A. Measure the inside width of window openingfrom left to right inside the frame (A); deduct "W1/4" for clearance. Example: 56"W – 1/4" = 55 3/4"W
B. Measure the height of the window openinginside the frame (E); deduct 1/2" for – 1/2" = "Hwindow sill clearance to calculate Example: 60"H – 1/2" = 59 1/2"H
finished height.
C. Record the finished width from step 1 and finished height from step 2 on the drapery order form (see page 22).
For this example, size would be 55 3/4" wide (rod width) X 59 1/2" high (finished height).
DRAPERIES – MEASURING FOR INSIDE MOUNT
A
E

www.medline.com 10 1-800-633-5463
2. Determine DrawThe “draw” describes the operation of the drapery. Choose from the following:
C R L
–Center Draw (C): Two panels split from the center and pull to each side–Right Draw (R): One panel draws to right when stacked, cords right–Left Draw (L): One panel draws to left when stacked, cords left
draw
3. Calculate Pocket Size (for Top Pocket Drapery Only)The pocket is the sleeve needed to insert a rod on a top pocket drapery. It should be 1" larger than the rod.
rod size + 1" = " pocket sizeExamples: 1" curtain rod + 1" = 2" pocket size
2 1/2" wide rod + 1" = 3 1/2" pocket size
4. Specify Stand-up Header Size (for Top Pocket Drapery Only)The stand-up header is the ruffle sewn above the rod pocket on the drapery andis an option for all top pocket draperies. A typical header measures between 1"and 3" and is included in the drapery height when specified. Please note if astand-up header is desired and if so, how tall it should be on the order form.
stand-up header_______________"H
DRAPERIES – MEASURING FOR INSIDE MOUNT
⇐ Stand-up Header

www.medline.com 11 1-800-633-5463
Measuring Pinch Pleated and Rod Pocket Draperies – OUTSIDE MOUNT
1. Measure the Width and Height of WindowDecide if the drapery will be mounted inside the window opening (IM) or on the outside of the window frame (OM). Follow instructions below fordrapes to be mounted outside the window frame. The width will be recorded as “rod width” on the order form and height of drapery as simply “fin-ished height.”
A. Measure the outside width of window from left to right outside the frame.Add 8" for rod placement or customer + 8" = "Wpreference (B). If rod exists measure Example: 60" + 8" = 68"W
rod face without adding 8".
B. Measure the height of the window openingoutside the frame. (F). + 8" = "HAdd 8" (4" above window, 4" below) for Example: 65" + 8" = 73"H
rod placement or customer preference.
C. Record the finished width from step 1 and finished height from step 2 on the drapery order form (see page 22). Example: Finished size for above would be
68"W (rod width) X 73"H (finished height).
D. Measure the distance of projection from the wall. This measurement shouldbe recorded on the order form as the “return depth.” The return is the partof the drapery that fits over the end of the rod to cover the gap due to projec-tion. It is easiest to measure the side at one end of the rod on existing hard-ware to obtain this, however if the rod and drapery will be ordered together,you can simply suggest 3" returns or what the customer prefers. For any out-side mount draperies that butt up to a wall on one side but not the other,you only need one return, but typically there are two returns required. Notethat on order form under “number of returns.”
" return depth
DRAPERIES – MEASURING FOR OUTSIDE MOUNT
4" 4"B
F

www.medline.com 12 1-800-633-5463
2. Determine DrawThe “draw” describes the operation of the drapery. Choose from the following:
C R L
–Center Draw (C): Two panels split from the center and pull to each side (2 RETURNS)–Right Draw (R): One panel draws to right when stacked, cords right (1 RIGHT RETURN)–Left Draw (L): One panel draws to left when stacked, cords left (1 LEFT RETURN)
draw
3. Calculate Pocket Size (for Top Pocket Drapery Only)The pocket is the sleeve needed to insert a rod on a top pocket drapery. It should be 1" larger than the rod.
rod size + 1" = " pocket sizeExamples: 1" curtain rod + 1" = 2" pocket size
2 1/2" wide rod + 1" = 3 1/2" pocket size
4. Specify Stand-up Header Size (for Top Pocket Drapery Only)The stand-up header is the ruffle sewn above the rod pocket on the drapery andis an option for all top pocket draperies. A typical header measures between 1"and 3" and is included in the drapery height when specified. Please note if astand-up header is desired and if so, how tall it should be on the order form.
stand-up header_______________"H
DRAPERIES – MEASURING FOR OUTSIDE MOUNT
⇐ Stand-up Header
Helpful Hint:For patio doors, drapery should stack
on the side opposite of the point ofentry.

www.medline.com 13 1-800-633-5463
Measuring Valances and Cornices – INSIDE MOUNT
1. Measure the Width and Height of WindowDecide if the drapery will be mounted inside the window opening (IM) or on the outside ofthe window frame (OM). It is more common to mount a valance on the outside, but if there isenough window depth some people prefer to mount inside the window frame. Follow instruc-tions below for valances to be mounted inside the window opening. The width will be record-ed as “rod width” on the order form and height of the valance as simply “finished height.”
A. Measure the inside width of window openingfrom left to right inside the frame (A); width – 1/4" = "Wdeduct 1/4" for window clearance. Example: 56" – 1/4" = 55 3/4"
B. Measure the height of the valance/cornice;typical heights range from 12" – 15" high. "H
*This is a matter of preference. Be sure to show the valance height using your measuring tape and have the customer determine.
C. Record the finished width from step 1 and finished height from step 2 on the drapery order form (see page 22).
2. Calculate Pocket Size (for Top Pocket Only)The pocket is the sleeve needed to insert a rod on a top pocket drapery. It should be 1" larger than the rod.
rod size + 1"= " pocket sizeExamples: 1" curtain rod + 1" = 2" pocket size
2 1/2" wide rod + 1" = 3 1/2" pocket size
3. Specify Stand-up Header Size (for Top Pocket Drapery Only)The stand-up header is the ruffle sewn above the rod pocket on the drapery andis an option for all top pocket draperies. A typical header measures between 1"and 3" and is included in the drapery height when specified. Please note if astand-up header is desired and if so, how tall it should be on the order form.
stand-up header "H
VALANCES – MEASURING FOR INSIDE MOUNT
A
E
⇐ Stand-up Header

www.medline.com 14 1-800-633-5463
Measuring Valances and Cornices – OUTSIDE MOUNT
1. Measure the Width and Height of WindowDecide if the valance or cornice will be mounted inside the window opening (IM) oron the outside of the window frame (OM). It is more common to mount a valance onthe outside, but if there is enough window depth some people prefer to mount insidethe window frame. Follow instructions below for valances to be mounted outside thewindow. The width will be recorded as “rod width” on the order form and height ofdrapery as simply “finished height.”
A. Measure the outside width of window from left to right outside the frame;add 8" for rod placement or customer + 8"= "Wpreference (B). If rod exists, measure Example: 60" + 8" = 68"W
rod face without adding 8".
*If the valance or cornice is fitting over another product (drapery or blind), be sure to allow extra width to clear what will be behind it. Itmay be necessary to add more than 8" in some cases. Allow at least 2" on each side of the product that you need to clear. For example, ifthe blind is 50"W, the cornice fitting over it should be at least 54" (2" more on each side).
B. Measure the height of the valance/cornice;typical heights range from 12"H – 15"H "H
*This is a matter of preference. Be sure to show the valance height using your measuring tape and have the customer determine.
C. Record the finished width from step 1 and finished height from step 2 on the drapery order form (see page 22).
D. Measure the distance of projection from the wall. This measurement should be recorded on the order form as the “return depth.” Thereturn is the part of the valance/cornice that fits over the end of the rod to cover the gap due to projection. Cornices don’t need rods, butthese side parts that reach back towards the wall also are called “returns” and need to be measured. It is easiest to measure the side at oneend of the rod on existing hardware to obtain this; however, if the rod and valance will be ordered together, you can simply suggest 3"returns or what customer prefers. For any outside mount draperies that butt up to a wall on one side but not the other, you only need
VALANCES – MEASURING FOR OUTSIDE MOUNT
4" 4"B
F

www.medline.com 15 1-800-633-5463
one return, but typically there are two returns required. Note that on order form under “number of returns.”
*If the valance or cornice is to fit over another product (drapery or blind), be sure to allow extra clearance. Add at least 3" more for the“return” on any valance or cornice that will be mounted over the top of a blind or drapery. For example, if the blind projects 3 1/2" fromthe wall, the cornice or valance fitting over it should have a return of at least 6 1/2".
" return depth
# of returns
2. Calculate Pocket Size (for Top Pocket Only)The pocket is the sleeve needed to insert a rod on a top pocket drapery. It should be 1" larger than the rod.
rod size + 1" = " pocket sizeExamples: 1" curtain rod + 1" = 2" pocket size
2 1/2" wide rod + 1" = 3 1/2" pocket size
3. Specify Stand-up Header Size (for Top Pocket Drapery Only)The stand-up header is the ruffle sewn above the rod pocket on the drapery and is an option for all top pocket draperies. A typical headermeasures between 1" and 3" and is included in the drapery height when specified. Please note if a stand-up header is desired and if so,how tall it should be on the order form.
stand-up header_______________"H
⇐ Stand-up Header
VALANCES – MEASURING FOR OUTSIDE MOUNT

www.medline.com 16 1-800-633-5463
Measuring Snap Drapery – ACCORDIA-FOLD AND RIPPLEFOLD
Before measuring for snap drapery, you must determine the correct application below. Then, please refer to the appropriate section in the following pages.
Is the drapery …• Accordia-fold or ripplefold?
• Does the rod already exist or will you be ordering a new rod with the drapery?
• Will the drapery be mounted inside or outside the window frame?
Measuring When No Rod Exists
Decide if the drapery will be mounted inside the window opening (IM) or on the outside of the window frame (OM). Follow instructions below.The width will be recorded as “rod width” on the order form and height of drapery as simply “finished height.”
*Hardware is sold separately and should be ordered at the same time as the drapery to ensure proper fit. As a standard, overlap master rods willbe used and include the 30" baton to attach through the drape on the front side.Hardware can be ordered with a cord draw or hand draw for psychiatric areas wherecords are not allowed. Please specify on your order form. A mock up curtain will shipfor every order of accordia-fold or ripplefold made to fit existing hardware.
1. Determine Drapery StyleShould the drapery be accordia-fold or ripplefold style?
(record this on order form) style
SNAP DRAPERIES – MEASURING WHEN NO ROD EXISTS
Accordia-fold(Has Sewn Pleats)
Ripplefold(Flat Panel)

2. Measure Width and Height• For Inside Mounted (IM) Drapery:
A. Measure the inside width of window openingfrom left to right inside the frame (A); subtract 1/2" for rod clearance. – 1/2" = "W
Example: 56" – 1/2" = 55 1/2" W
B. Measure the height of the window opening inside the frame (E); subtract 1 1/2" for rod and sill clearance. – 11/2" = "H
Example: 60" – 1 1/2" = 58 1/2"H
C. Record the finished width from step 1 and finished height from step 2 on the drapery order form (see page 22). Example: Finished size for above would be
55 1/2"W (rod width) X 58 1/2"H (finished height).
• For Outside Mounted (OM) Drapery:
A. Measure the outside width of window from left to right outside the frame (B);add 8" (4" extra on each side). + 8" = "W
Example: 60"+ 8" = 68"W
B. Measure the height of the window openingoutside the frame (F); add 8" + 8" = "H(4" above window, 4" below). Example: 65" + 8" = 73"H
C. Record the finished width from step 1 and finished height from step 2 on the drapery order form (see page 22). Example: Finished size for above would be
68”W (rod width) X 73”H (finished height).
www.medline.com 17 1-800-633-5463
SNAP DRAPERIES – MEASURING WHEN NO ROD EXISTS
4" 4"
A
B
E
F

www.medline.com 18 1-800-633-5463
3. Determine Draw DirectionThe “draw” describes the operation of the drapery. Choose from the following:
C R L
–Center Draw (C): Two panels split from the center and pull to each side–Right Draw (R): One panel draws to right when stacked, cords right–Left Draw (L): One panel draws to left when stacked, cords left
4. Determine Draw Style*Note on order form which of the three options below the customer prefers.
• A cordless draw?
• A baton draw? If so, should the baton hang on the front side or behind the drapery?
• A cord draw, where the controls are at the end of the rod?
SNAP DRAPERIES – MEASURING WHEN NO ROD EXISTS

www.medline.com 19 1-800-633-5463
Measuring When the Rod Exists
If the drapery to be replaced can be sent into the division, that is ideal. It can be used as a template to make the new drapery that will surely fit theexisting rod. If that is not possible, please follow the directions below carefully.
Determine if the existing drapery is mounted inside the window opening (IM) or on the outside of the window frame (OM). Follow instructions belowaccordingly. The width will be recorded as “rod width” on the order form and height of drapery as simply “finished height.”
1. Determine Drapery StyleShould the drapery be accordia-fold or ripplefold style?
(record this on order form) style
2. Measure Width and Height• For Inside Mounted (IM) Drapery:
A. Measure the rod from left to right. "W
B. Measure from top of the rod to the sill; – 11/2" = "Hsubtract 11/2" for clearance. Example: 60" – 1 1/2" = 58 1/2"H
C. Record the finished width from step 1 and finished height from step 2 on the drapery order form (see page 22).
• For Outside Mounted (OM) Drapery:
A. Measure the rod from left to right. "W
B. Measure from top of rod to 4" past window + 4" = "Hsill or customer’s preference. Example: 65" + 4" = 69"H
C. Record the finished width from step 1 and finished height from step 2 on the drapery order form (see page 22).
SNAP DRAPERIES – MEASURING WHEN ROD EXISTS
Accordia-fold(Has Sewn Pleats)
Ripplefold(Flat Panel)

www.medline.com 20 1-800-633-5463
3. Determine Draw DirectionThe “draw” describes the operation of the drapery. Choose from the following:
C R L
–Center Draw (C): Two panels split from the center and pull to each side–Right Draw (R): One panel draws to right when stacked, cords right–Left Draw (L): One panel draws to left when stacked, cords left
4. Determine “Overlap Master” or “Butt Master”There are two kinds of master carriers, and it is important to specify which one the rod uses.
Images of Drapery, Top View
Butt Master Overlap Master
5. Determine Draw StyleNote on order form which of the three options below the customer prefers.• A cordless draw?
• A baton draw? If so, should the baton hang on the front side or behind the drapery?
• A cord draw, where the controls are at the end of the rod?
6. Answer the Questions on the Following PageThe form, “Questions to Ask for Ripplefold/Accordia-fold,” (p. 21) includes important information needed to manufacture the curtain. Please fill out completely and fax in with completed order (p. 22).
SNAP DRAPERIES – MEASURING WHEN ROD EXISTS
Helpful Hint:Sending the existing drapery in with
your order ensures accuracy when
making a drapery to fit an existing
rod. It’s important to have the same
number of snaps and folds.

5 Questions to Ask When Ordering Ripplefold/Accordiafold Drapery to Fit Existing Rod
1. Look at the drapery we are replacing. The end of the drapery that moves may have a plastic plate sewn in at the top where it connects to therod. This is an overlap stiffener. Do you see one there? __________
2. Is the plastic piece, or overlap stiffener, 1" X 3" or is it 3" X 3"? There are two differentkinds, and it is important to use the right one. Below are images of what they look like. Ifnone exist, please note that on order form. ______________
3" X 3" size 1" X 3" size
3. Look at the master carrier (moving part of the rod) to see if it is metal or plastic. A plastic part needs a snap sewn in the drapery, but a metalmaster carrier needs the overlap stiffener. Which kind is it? _________________
4. Next, look at the way the baton is attached. Does it screw right through the drapery or does it goup and over the drapery and attach with a snap hook?This information tells us what kind of rod they haveand how to make that part of the drapery to fit it correctly. Circle the carriers to the right.
(Baton Is Screwing Into Master Carrier) (Baton Is Going Up and Over the Drapery)
If we are supplying the rod, we will always use the 94134 series where the rod screws through the drapery and into the carrier (picture onleft). The right picture is a butt-master.
5. Lastly, count the number of carriers on the rod and the number of snaps on the drapery. Usually there are more snaps on the drapery thancarriers. You will need to remove the drapery to do this. How many carriers are on the rod? ________________
How many snaps are on the drape? ________________
*Note: Without complete, accurate information, we cannot guarantee the product will fit correctly. A mock up (sample of one) will be sent out for approvalprior to completing the entire order, for all orders where a new drapery is being manufactured for an existing rod. We encourage sending in the drapery we arereplacing if possible to be used as a template for the new one.
www.medline.com 21 1-800-633-5463
SNAP DRAPERIES – MEASURING WHEN ROD EXISTS
MASTER CARRIERS
OVERLAP STIFFENERS

www.medline.com 22 1-800-633-5463
DRAPERY AND VALANCE ORDER FORM

Measuring Blinds
Description: Several different kinds of blinds are available, and it is important to measure for the specific type that will be ordered. For thehealth care market, horizontal blinds (includes mini blinds, 2" curved PVC and faux wood blinds) and vertical blinds are the most popular. Thesestyles will be covered in this guide. Please contact your Medline representative for help ordering other styles of blinds.
Horizontal Blinds
1" Mini Blind 2" Horizontal Blind Vertical Blind
www.medline.com 23 1-800-633-5463
BLINDS INTRODUCTION

Measuring Blinds for INSIDE MOUNT
Determine if the blind will be mounted inside the window opening (IM) or on the outside of the win-dow frame (OM). Follow instructions below for blinds to be mounted inside the window opening.The width will be recorded as “finished width” on the order form and height of the blind as simply“finished height.”
*Consider the depth of the window when inside mounting the blind. Here are the required windowdepths for each style of blind to be fully recessed (flush mounted).
• Mini blind 1 3/4"• Vertical blind 3 3/4"• 2" horizontal 3"
1. Measure the WindowA. Measure the width inside the window frame to the
nearest 1/8". Measure at the top, middle and bottom of the window. Record the narrowest width. "W
B. Measure the height inside the window frame to the nearest1/8". Measure at the right, middle and left side. For horizontal blinds, use the longest measurement. For vertical blinds, use the shortest measurement. "H
C. Record the finished width from step 1 and finished height from step 2 on the blind order form (see page 28).
*Note: Take no deductions when measuring, as all necessary deductions for a proper fit are made when the blinds are manufactured as “insidemounted” blinds. Please give exact opening dimensions.
www.medline.com 24 1-800-633-5463
BLINDS – MEASURING FOR INSIDE MOUNT
B.
Insi
de m
ount
leng
th
A. Inside mount width

www.medline.com 25 1-800-633-5463
2. Determine ControlsThe controls are the mechanisms used to open, close and tilt the blinds. For both vertical and horizontal, there is a tilter (tilts the slats whenused) and cords to lift or draw the blinds off the window.
Typically mini blinds have the tilter on the left and the pull cords on the right, but you can specify them on the same side or the opposite of that.
For vertical blinds, the cords can be on the right or left side of blinds that operate as a split or center draw (half of the vanes stack on the right sideof the window, half stack on the left). If the blind operates as a one-way draw (all the vanes stack on one side of the window), the cords shouldbe placed on the same side where the vanes stack when pulled off the window.
Record this information on the blinds order form.
3. Determine Draw (for Vertical Blinds Only)The “draw” describes the operation of the blind. Choose from the following:
R C L–Center Draw (C): Two panels split from the center and pull to each side–Right Draw (R): One panel draws to right when stacked, cords right–Left Draw (L): One panel draws to left when stacked, cords left
4. Specify if a valance is needed (for Vertical Blinds Only)For vertical blinds, there is an optional, decorative valance made of the same material as the vanes to cover the headrail. If desired, please specifyto “include valance” on the order form.
BLINDS – MEASURING FOR INSIDE MOUNT
Helpful Hint:Consider the operation of window
when determining how your blind is to
operate. The blind should pull in
the same direction as the window or door.

www.medline.com 26 1-800-633-5463
Measuring Blinds for OUTSIDE MOUNT
Determine if the blind will be mounted inside the window opening (IM) or on the outside of the window frame (OM). Follow instructions belowfor blinds to be mounted outside the window frame. The width will be recorded as “finished width” onthe order form and height of the blind as simply “finished height.”
1. Measure the WindowA. Measure the desired width outside the window frame to the nearest 1/8".
For vertical blinds, add 8" for headrail placement or customer preference if no obstructions. For all other blinds, add 4" to minimize light leakage.
"W
B. Measure the desired height outside the window frame to the nearest 1/8". For vertical blinds, add 8" for headrail placement or customer preference if no obstructions. For all other blinds, add 4" to minimize light leakage.
"H
C. Record the finished width from step 1 and finished height from step 2 on the blind order form(see page 28).
2. Determine ControlsThe controls are the mechanisms used to open, close and tilt the blinds. For both verticals and horizontals, there is a tilter mechanism (tilts theslats or vanes) and cords to lift or draw the blinds off the window.
Typically mini blinds have the tilter on the left and the pull cords on the right, but you can specify them on the same side or the opposite of that.
For vertical blinds, the cords can be on the right or left side if the blind are to operate as a split or center draw (half of the vanes stack on the rightside of the window, half stack on the left). If the blind is to operate as a one-way draw (all the vanes stack on one side of the window), the cordsshould be placed on the same side as the vanes when they are stacked off the window. Record this information on the blinds order form.
BLINDS – MEASURING FOR OUTSIDE MOUNT
C. Outside mount width
D.
Out
side
mou
nt le
ngth

www.medline.com 27 1-800-633-5463
3. Determine Draw (for Vertical Blinds Only)The “draw” describes the operation of the blind. Choose from the following:
C R L
–Center Draw (C): Two panels split from the center and pull to each side–Right Draw (R): One panel draws to right when stacked, cords right–Left Draw (L): One panel draws to left when stacked, cords left
4. Specify if a Valance Is Needed (for Vertical Blinds Only)For vertical blinds, there is an optional, decorative valance made of the same material as the vanes to cover the headrail. If desired, please specifyto “include valance” on the order form.
BLINDS – MEASURING FOR OUTSIDE MOUNT
STANDARD VALANCE*Must Specify on Order to Include

BLINDS ORDER FORM
©2005 Medline Industries, Inc. Medline is a registered trademark of Medline Industries, Inc., One Medline Place, Mundelein, IL 60060. www.medline.comMKT20506/LIT199/5M


