ME204-3 Getting into thethebuildingcoder.typepad.com/files/me204-3_connectors_in_revit_mep... ·...
21
Getting into the Flow: Understanding Connectors in Revit MEP Content Martin Schmid, P.E. – Autodesk ME204‐ 3 This class will dive into the details of how connectors propagate data in Revit MEP. This class goes beyond basic geometric and data modeling of content, and demonstrates how the definition of connectors affects the data available on pipe and duct networks, as well as electrical circuits. About the Speaker: Martin has been working with customers to identify best practices and workflows using Autodesk MEP solutions for over three years. Martin is a recovering electrical engineer, and in his former life, worked for architects, contractors, and MEP firms, both as a design engineer as well as a IT/CAD administrator. Martin has Master's degrees in Engineering and Business.
Transcript of ME204-3 Getting into thethebuildingcoder.typepad.com/files/me204-3_connectors_in_revit_mep... ·...

Getting into the Flow: Understanding Connectors in Revit
MEP Content Martin Schmid, P.E. – Autodesk
ME204‐3 This class will dive into the details of how connectors propagate data in Revit MEP. This class goes beyond basic geometric and data modeling of content, and demonstrates how the definition of connectors affects the data available on pipe and duct networks, as well as electrical circuits.
About the Speaker: Martin has been working with customers to identify best practices and workflows using Autodesk MEP solutions for over three years. Martin is a recovering electrical engineer, and in his former life, worked for architects, contractors, and MEP firms, both as a design engineer as well as a IT/CAD administrator. Martin has Master's degrees in Engineering and Business.

Getting into the Flow: Understanding Connectors in Revit MEP Content
2

Getting into the Flow: Understanding Connectors in Revit MEP Content
3
Contents Introduction .................................................................................................................................................. 5
Hosted Components and Linked Models ...................................................................................................... 5
Room Air Tabulations .................................................................................................................................... 5
Air Terminal Family Settings ..................................................................................................................... 5
Task ....................................................................................................................................................... 6
Room Flows ............................................................................................................................................... 6
Task ....................................................................................................................................................... 7
Duct System Flows ........................................................................................................................................ 7
Supply Air Distribution .............................................................................................................................. 7
Duct Connector Settings ........................................................................................................................... 8
Task ....................................................................................................................................................... 8
Task ....................................................................................................................................................... 8
Task ....................................................................................................................................................... 8
Task ....................................................................................................................................................... 8
Task ....................................................................................................................................................... 9
Task ....................................................................................................................................................... 9
Creating Duct Systems .................................................................................................................................. 9
Pipe System Flows ......................................................................................................................................... 9
Chilled Water Loop ................................................................................................................................... 9
Task ..................................................................................................................................................... 10
Condenser Water Loop ........................................................................................................................... 11
Pumps Piped in Parallel (System Flow Configuration) ............................................................................ 11
Task ..................................................................................................................................................... 12
Task ..................................................................................................................................................... 12
Task ..................................................................................................................................................... 12
Fire Protection Systems .......................................................................................................................... 12
Creating Pipe Systems ................................................................................................................................. 12
Power System Tabulations .......................................................................................................................... 13
Electrical Distribution .............................................................................................................................. 13

Getting into the Flow: Understanding Connectors in Revit MEP Content
4
Task ..................................................................................................................................................... 14
Task ..................................................................................................................................................... 15
Electrical Loads ........................................................................................................................................ 15
Voltage .................................................................................................................................................... 17
Load Classification ................................................................................................................................... 17
Load ......................................................................................................................................................... 18
Number of Poles ..................................................................................................................................... 18
Task ..................................................................................................................................................... 19
Lighting Content .......................................................................................................................................... 19
Task ..................................................................................................................................................... 20
References .................................................................................................................................................. 20
Autodesk University ................................................................................................................................ 20
Product Tutorials ..................................................................................................................................... 20
Internet Postings ..................................................................................................................................... 20
Reference Matrix .................................................................................................................................... 21
Getting into the Flow: Understanding Connectors in Revit MEP Content
5
Introduction The intent of this class is to help you understand how the flow parameters on connectors in Revit MEP
content affect your modeling efforts.
There isn’t any single ‘correct’ way to build MEP content, just as there is no single correct way to design
a building. There are, however, ways that incorrectly defining content will result in the perception that
the application isn’t working as intended (i.e., flows not propagating through a VAV box, for example).
Having an understanding of how components work in a building and within Revit MEP will help you
understand how to achieve the desired result when creating content.
Following these three simple principles will help ensure that the content you create functions as
expected:
1. Don’t try to create content 100% from memory. In general, it is best when creating content to use an existing family as a basis of comparison. Looking at someone else’s work isn’t cheating.
2. Compare all Family Category and Parameters settings (Settings > Family Category and Parameters…).
3. Compare as all connector properties (the focus of this document).
Although, in most cases, there will be a family created that has the settings to achieve the result you
desire, don’t assume that this is always the case. There are always unique situations that will require a
little creativity and a deeper understanding of how Revit MEP functions to achieve a specific result.
Hosted Components and Linked Models It is not possible to host wall, ceiling, floor, roof, or line based families through a link. To accommodate
similar functionality, the concept of face based families was introduced with the initial release of Revit
MEP (Revit Systems). These families can host on any face through a link or in the same file. If the linked
host moves (i.e., ceiling shifts up, wall moves), the component will move accordingly. Note, however, if
the ceiling grid moves in plane, the component will not move accordingly.
Room Air Tabulations One of the fundamental tasks in mechanical design is distributing air. Supply air is used to deliver
tempered air to heat or cool a space. Return air facilitates circulation of air through a space and back to
the air distribution equipment. Exhaust air removes fouled air from a space.
Air Terminal Family Settings Essential to this air distribution concept in Revit MEP are Air Terminals. There are three Categories of
Air Terminals: Supply, Return, and Exhaust. The primary settings for an Air Terminal Family are shown
below.

Getting into the Flow: Understanding Connectors in Revit MEP Content
6
Supply Return Exhaust
Family Category Air Terminals
Behavior Type Normal
Table: Air Terminal Family and Category Parameters settings
Supply Return Exhaust
Flow Configuration Preset
Flow Direction (Relative to Connector) In1 Out2
Pressure Drop Per manufacturer’s catalog3
Table: Air Terminal Duct Connector settings
1. Air goes IN the diffuser from the duct. 2. Air leaves the diffuser OUT to the duct. 3. Shown below is a sample data table from a manufacturer’s catalog. The Pressure Drop is listed
as Total Pressure.
Task: Create supply, return, and exhaust air terminals from scratch, and place some of each in a
building with Spaces defined.
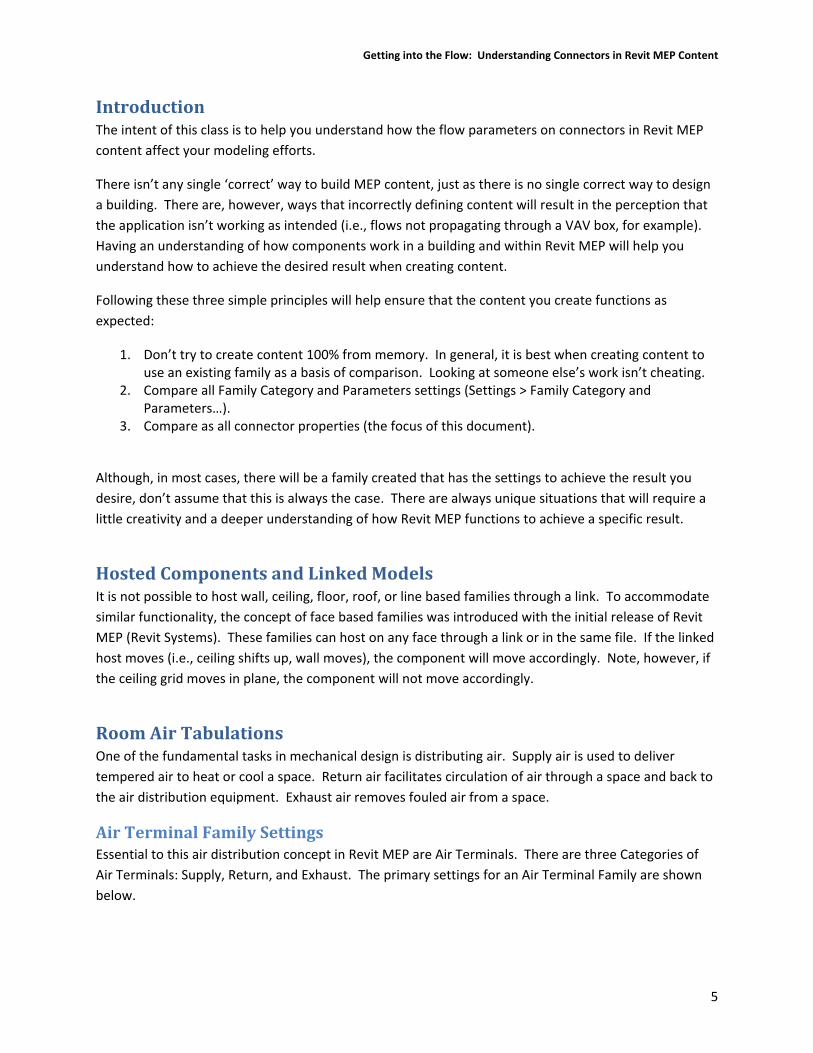
Room Flows It is easy to verify the effect of an air terminal on a Space. A schedule as shown below is a simple
engineering tool that may be used to validate the design compared to an engineering analysis.
Getting into the Flow: Understanding Connectors in Revit MEP Content
7
Task: Create a schedule similar to that shown above. Note that the Room Pressurization property is a
Calculated Value.
Duct System Flows
The flows assigned to an air terminal are propagated through systems via ducts. Ducted supply and
return tabulations are computed on the fly as the building model is iterated, and facilitates duct sizing,
pressure drop inspection, and a variety of engineering checks such as duct velocity.
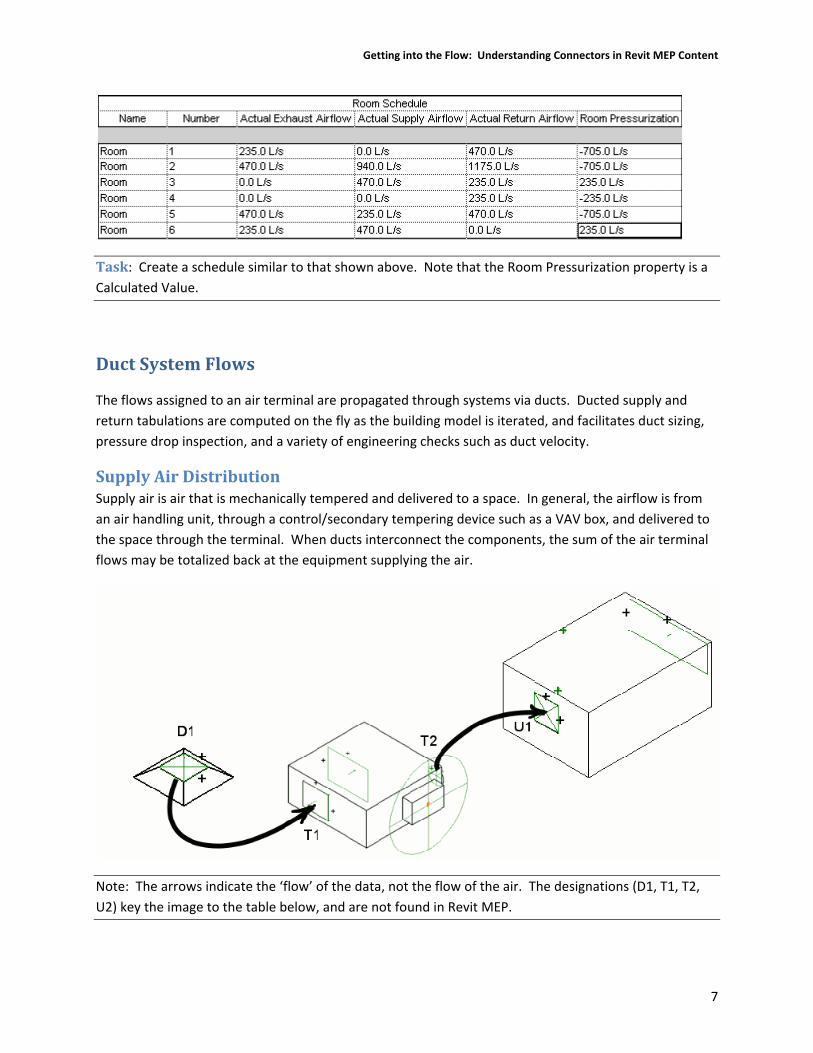
Supply Air Distribution Supply air is air that is mechanically tempered and delivered to a space. In general, the airflow is from
an air handling unit, through a control/secondary tempering device such as a VAV box, and delivered to
the space through the terminal. When ducts interconnect the components, the sum of the air terminal
flows may be totalized back at the equipment supplying the air.
Note: The arrows indicate the ‘flow’ of the data, not the flow of the air. The designations (D1, T1, T2,
U2) key the image to the table below, and are not found in Revit MEP.

Getting into the Flow: Understanding Connectors in Revit MEP Content
8
Duct Connector Settings The duct connector settings have a significant impact on the ability for data to ‘flow’ through the duct
system. Unexpected results may occur if the settings aren’t configured as needed for the desired
outcome.
Air Terminal VAV Box Air Handler
Parameter D1 T1 T2 U1
Flow Configuration Preset Calculated Preset Calculated
Flow Parameter* Flow SupplyAirFlow PrimaryAirFLow AirFlow
Flow Direction In Out In Out
System Type Supply Air Supply Air Supply Air Supply Air
Loss Method Specific Loss Not Defined Specific Loss Not Defined
Pressure Drop Parameter *
Total Pressure n/a Pressure Drop n/a
* The actual name of the parameter is user defined in the Family. As such, the names in your content or
in ‘out‐of‐the‐box’ content may be different.
Air flow is assigned to the Air Terminal by the designer at D1. The total flow from the air terminals is
calculated, and assigned to the SupplyAirFlow parameter at T1 on the VAV Box. PrimaryAirFlow is a
function of SupplyAirFlow, and is assigned at T2. The total flow from all VAV boxes is calculated, and
assigned to the AirFlow parameter at U1.
The net result is that the sum of the airflows from the air terminals is totalized into each VAV box, and
the primary air requirements at each VAV box are totalized at each air handler.
Task: Create a simple ‘air valve’ Family, and a simple AHU Family with settings as shown above. Insert
the components into a project, duct them together, and use a Duct Color Scheme Legend to show the
Flow.
Task: Modify the AHU Family you created in the previous task to include a Calculated Return air
connector.
Task: Create a ducted return system. Generally, there is no secondary component, such as a VAV box
in the return system; just air terminals, the air handler, and duct. Verify that the return airflow specified
on all the return grilles is computed back to the return connector on the air‐handling unit.
Task: Crate a simple exhaust fan, and create a ducted exhaust air system to an instance of the fan.

Getting into the Flow: Understanding Connectors in Revit MEP Content
9
Task: Verify that you are on Subscription for your AutoCAD Revit MEP Suite software!
Task: From the Subscription site, download and read the Revit Platform 2009 Model Performance
Technical Note, especially heed the item on page 35: “Create Systems”
Creating Duct Systems
Systems can be created from equipment or air terminals:
1. Supply Air systems can be created containing families with a Supply Air IN Connector 2. Return Air systems can be created containing families with a Return Air OUT Connector 3. Exhaust Air systems can be created containing families with an Exhaust Air OUT Connector
Note: You cannot create an ‘Other’ air systems.
Mechanical Equipment Families can be the ‘equipment for the system’ using the following logic. The equipment must have a….
1. …Supply Air OUT connector to be the equipment for a Supply Air system. 2. …Return Air IN connector to be the equipment for a Return Air system. 3. …Exhaust Air IN connector to be the equipment for an Exhaust Air system.
Thus, it is possible to create a system named ‘Relief Air’ by using components with Return or Exhaust system connectors. Similarly, a system named ‘Outside Air’ can be created using components with Supply system connectors.
Pipe System Flows
Chilled Water Loop Chilled water is usually generated at a single central source, and distributed to multiple air‐handlers as
Supply Chilled Water (CHWS), and returns to the chiller as Return Chilled Water (CHWR). As air flows
through the air handler, the chilled water cools and may also dehumidify the air.

Getting into the Flow: Understanding Connectors in Revit MEP Content
10
Chiller Air Handler Pumps
Parameter C1 C2 U1 U2 P1/P2 P3/P4
Flow Configuration
Calculated Calculated Preset Preset System System
Flow Parameter Chilled Water Flow
Chilled Water Flow
CHWFlow CHWFlow Flow Flow
Flow Factor Parameter
n/a n/a n/a n/a FlowFactor FlowFactor
Flow Direction Out In In Out In Out
Loss Method Specific Loss
Specific Loss
Specific Loss Specific Loss Not Defined
Not Defined
System Type Hydronic Supply
Hydronic Return
Hydronic Supply
Hydronic Return
Global Global
Pressure Drop Parameter
Chilled Water Pressure Drop
0.0 0.5 * PressureDrop
0.5 * PressureDrop
n/a n/a
Connectors Linked?1
n/a n/a Yes
1. Linked Connectors only have an effect when the System Type is set to Global, which is common for fittings and in‐line components such as dampers, valves, and pumps. Essentially, Revit MEP will try to discern the system type, flow direction, and flow values if the connectors are linked.
Task: Add chilled water connectors to the AHU created earlier. Create a Chiller, and Pump family using
the settings shown above. This is no time to be a hero, use simple ‘boxy’ geometry to learn about
connectors... you can make the families pretty after you understand the concepts of flow!
Getting into the Flow: Understanding Connectors in Revit MEP Content
11
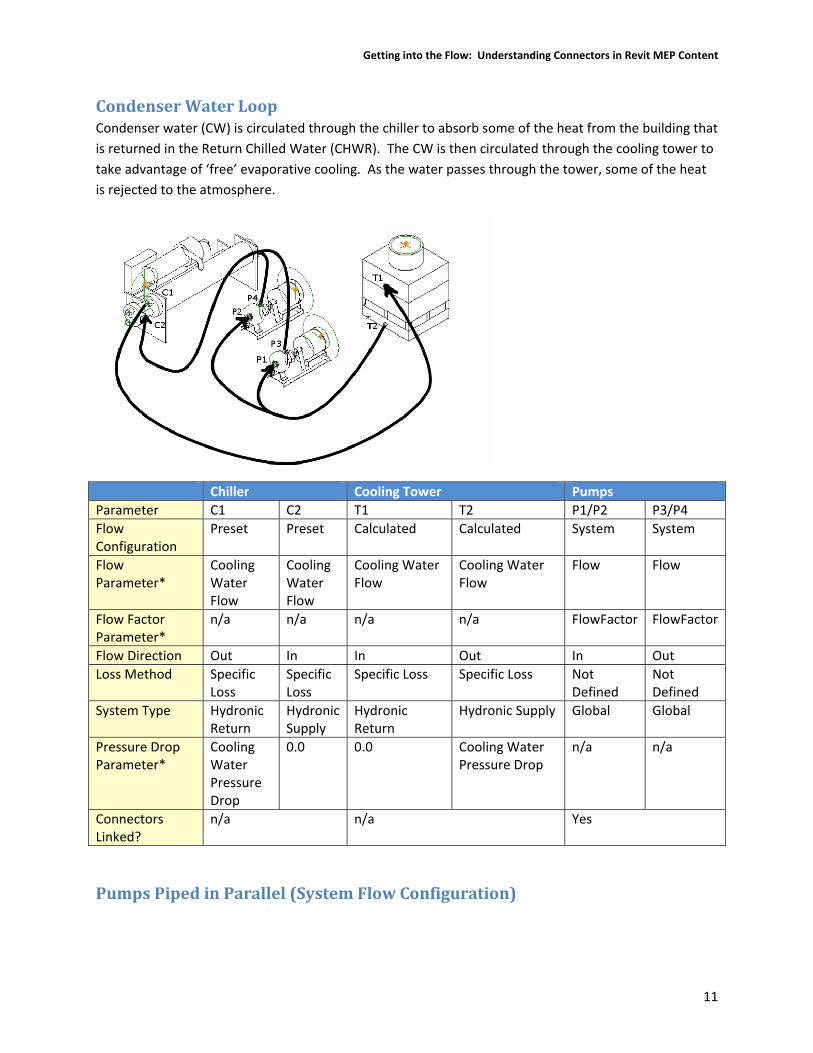
Condenser Water Loop Condenser water (CW) is circulated through the chiller to absorb some of the heat from the building that
is returned in the Return Chilled Water (CHWR). The CW is then circulated through the cooling tower to
take advantage of ‘free’ evaporative cooling. As the water passes through the tower, some of the heat
is rejected to the atmosphere.
Chiller Cooling Tower Pumps
Parameter C1 C2 T1 T2 P1/P2 P3/P4
Flow Configuration
Preset Preset Calculated Calculated System System
Flow Parameter*
Cooling Water Flow
Cooling Water Flow
Cooling Water Flow
Cooling Water Flow
Flow Flow
Flow Factor Parameter*
n/a n/a n/a n/a FlowFactor FlowFactor
Flow Direction Out In In Out In Out
Loss Method Specific Loss
Specific Loss
Specific Loss Specific Loss Not Defined
Not Defined
System Type Hydronic Return
Hydronic Supply
Hydronic Return
Hydronic Supply Global Global
Pressure Drop Parameter*
Cooling Water Pressure Drop
0.0 0.0 Cooling Water Pressure Drop
n/a n/a
Connectors Linked?
n/a n/a Yes
Pumps Piped in Parallel (System Flow Configuration)
Getting into the Flow: Understanding Connectors in Revit MEP Content
12
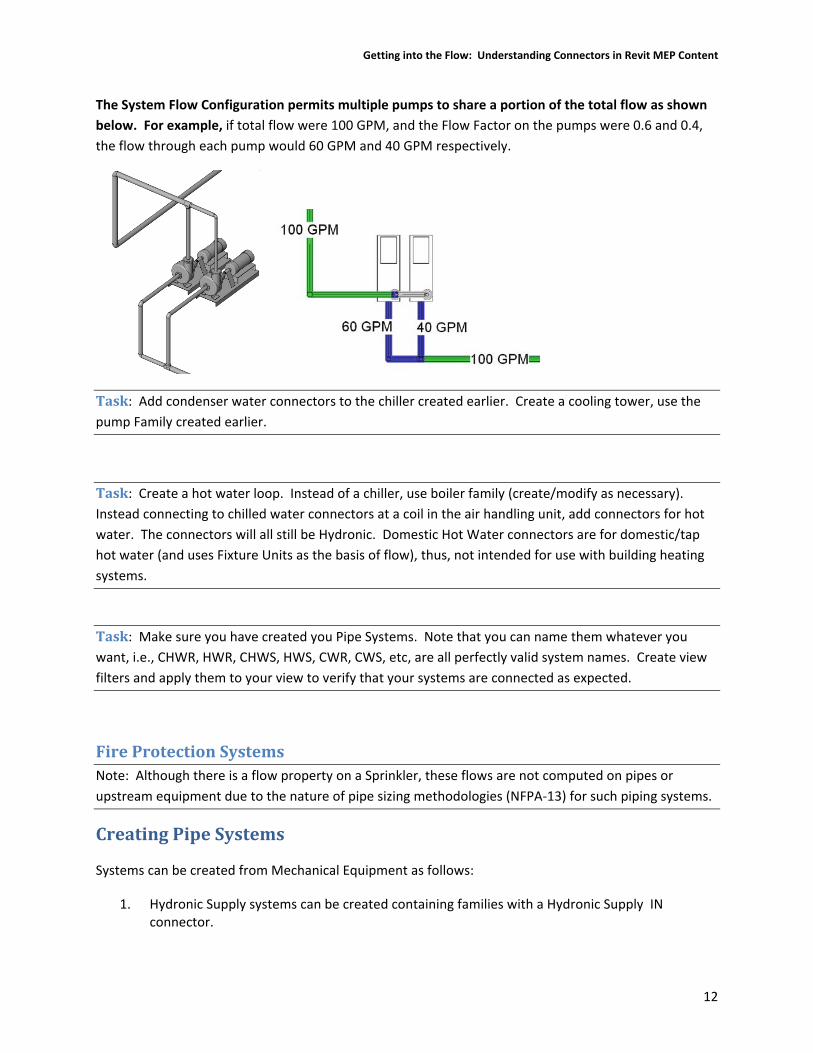
The System Flow Configuration permits multiple pumps to share a portion of the total flow as shown
below. For example, if total flow were 100 GPM, and the Flow Factor on the pumps were 0.6 and 0.4,
the flow through each pump would 60 GPM and 40 GPM respectively.
Task: Add condenser water connectors to the chiller created earlier. Create a cooling tower, use the pump Family created earlier.
Task: Create a hot water loop. Instead of a chiller, use boiler family (create/modify as necessary).
Instead connecting to chilled water connectors at a coil in the air handling unit, add connectors for hot
water. The connectors will all still be Hydronic. Domestic Hot Water connectors are for domestic/tap
hot water (and uses Fixture Units as the basis of flow), thus, not intended for use with building heating
systems.
Task: Make sure you have created you Pipe Systems. Note that you can name them whatever you
want, i.e., CHWR, HWR, CHWS, HWS, CWR, CWS, etc, are all perfectly valid system names. Create view
filters and apply them to your view to verify that your systems are connected as expected.
Fire Protection Systems Note: Although there is a flow property on a Sprinkler, these flows are not computed on pipes or
upstream equipment due to the nature of pipe sizing methodologies (NFPA‐13) for such piping systems.
Creating Pipe Systems
Systems can be created from Mechanical Equipment as follows:
1. Hydronic Supply systems can be created containing families with a Hydronic Supply IN connector.
Getting into the Flow: Understanding Connectors in Revit MEP Content
13
2. Hydronic Return systems can be created containing families with a Hydronic Return OUT connector.
The following system types can be created from families containing IN or OUT connectors:
1. Domestic Cold Water 2. Domestic Hot Water 3. Fire Protection Dry 4. Fire Protection Other 5. Fire Protection Pre‐Action 6. Fire Protection Wet 7. Other 8. Sanitary
The above system types use an instance of a Mechanical Equipment family as the equipment for the
system.
Power System Tabulations
Connectors on electrical equipment and components provide the pathway for electrical data to flow
through the project, thereby providing a total connected load for the entire electrical distribution.
Electrical Distribution Electrical distribution is the infrastructure that supports electrical loads in the building. This generally
refers to electrical equipment such as switchboards, panels, and transformers. In an electrical
distribution there are commonly high‐voltage components, such as switchboards, and high‐voltage
panels, and low‐voltage panels. To interconnect the low‐voltage panels to the high‐voltage equipment,
the load must pass through a transformer.
In this sample, 480/277v/3ph power enters the building through the conduit labelled ‘FROM UTILITY
TRANSFORMER’. The power to the building is therefore centralized at the switchboard SB1. Panel HA1
is a 480/277v/3ph/4wire panel, and as such, connects directly to SB1. Panel LA1 is a 208/120V/3ph/4w
panel, and connects to SB1 through 480:208/120vtransformer T‐LA1.
When connecting these components in Revit MEP, all connections are made ‘upstream’. That is:
1. LA1 circuited to T‐LA1 2. T‐LA1 circuited to SB1 3. HA1 circuited to SB1
Note: There is no conduit functionality in Revit MEP at this time. The conduit shown in this document
was created using Pipe, Pipe Fitting, and Flex Pipe components. The variable radius elbows were
created by defining each radius as a separate type from a type catalog.

Getting into the Flow: Understanding Connectors in Revit MEP Content
14
Switchboard High Voltage Panel
Transformer Low Voltage Panel
Power Factor 0.8 1.0 1.0 1.0
Apparent Load Phase 3 (Power ‐ Unbalanced only)
Apparent Load Phase C
Apparent Load Phase C
Apparent Load Phase C
Apparent Load Phase C
Apparent Load Phase 2 (Power ‐ Unbalanced only)
Apparent Load Phase B
Apparent Load Phase B
Apparent Load Phase B
Apparent Load Phase B
Apparent Load Phase 1 (Power ‐ Unbalanced only)
Apparent Load Phase A
Apparent Load Phase A
Apparent Load Phase A
Apparent Load Phase A
Apparent Load (Power ‐ Balanced only)
n/a n/a n/a n/a
Voltage Switchboard Voltage (Type Parameter)
480.0 Primary Voltage 208.0
System Type Power – Unbalanced Power – Unbalanced
Power ‐ Unbalanced
Power – Unbalanced
Load Classification Power Other Other Other
Power Factor State Lagging Lagging Lagging Lagging
Number of Poles Number of Poles 3 Primary Number Of Poles
3
1. With a single‐pole load, there is no difference in the result if Power – Unbalanced or Power‐Balanced are used.
Task: Create a domestic electrical distribution system. This requires changing a panel board from
208/120v/3ph (3‐pole) to 240/120v/1ph (2‐pole). Refer to AMEP 2009 Family Editor Tutorials.

Getting into the Flow: Understanding Connectors in Revit MEP Content
15
Task: Create a commercial electrical distribution system. You will first need to create the Voltage
Definitions and Distribution Systems in Settings > Electrical Settings... as appropriate for your country.
Note: Without knowing the voltage definitions and distribution systems that are utilized in your
country, it will not be possible to create lighting or power connections that are appropriate.
Electrical Loads Electrical loads are typically the power consuming components in a building: Lighting fixtures, power
devices, mechanical equipment, etc. It is not common to show the conduit between each device, or
even between the device and the panel. Rather, a schematic representation is typically sufficient to
convey the requirements.

Getting into the Flow: Understanding Connectors in Revit MEP Content
16

Getting into the Flow: Understanding Connectors in Revit MEP Content
17
Light Fixture Receptacle Appliance Mechanical Motor / Fan
Switch
Power Factor 0.95 1.0 0.9 0.8 1.0
Apparent Load Phase 3 (Power ‐ Unbalanced only)
n/a n/a n/a n/a n/a
Apparent Load Phase 2 (Power ‐ Unbalanced only)
n/a n/a n/a n/a n/a
Apparent Load Phase 1 (Power ‐ Unbalanced only)
Apparent Load
Load n/a n/a 0.0
Apparent Load (Power ‐ Balanced only)
n/a n/a Load Apparent Load
n/a
Voltage Ballast Voltage
Switch Voltage Switch Voltage
Voltage Switch Voltage2
System Type Power – Unbalanced 1
Power – Unbalanced 1
Power – Balanced
Power – Balanced
Power – Unbalanced
Load Classification Lighting Power Other HVAC Lighting
Power Factor State Lagging Lagging Lagging Lagging Lagging
Number of Poles 11 11 2 Number of Poles
1
1. With a single‐pole load, there is no difference in the result if Power – Unbalanced or Power‐Balanced are used.
2. The switch voltage is an instance family parameter.
Power Factor
The power factor applied to a connector allows one to track
true power vs. apparent power. Motors and other inductive
loads tend to have lagging power factors, whereas
capacitors have leading power factors. Purely electric loads,
such as incandescent lights and electric heat, tend to have
unity (1.0) power factors.
With a Power Factor of 1.0, the Power Factor State
(Leading/Lagging) has no affect.
Voltage
Voltage is the difference in electrical potential between two points. Voltage in a circuit is the ‘force’ that
causes energy to ‘flow’. This can be thought of as the ‘pressure’ in the circuit. In fact, in electrical
design, there are voltage losses in the system, known as ‘Voltage Drop’. However, these drops are
insignificant at individual connectors/components, and are commonly only computed in the feeders
between equipment and devices.
Load Classification

Getting into the Flow: Understanding Connectors in Revit MEP Content
18
Depending on the type of load, different demand factor computations may be applicable when
calculating equipment and feeder sizes.
A space schedule tabulating electrical loads can be a handy engineering tool for verifying power
consumption, particularly with Lighting and the International Energy Conservation Code requirements.
Load
The load is the amount of power drawn by a circuit. This can be thought of as the ‘flow’ in the circuit.
Number of Poles
The number of poles indicates how the component is circuited. Acceptable values are 1, 2, or 3.
The figure below depicts the relationship between the number of poles, and how wires are connected to
equipment bus bars to create a circuit. The vertical lines labelled A, B, C, Neutral, and Ground represent
the bus bars in a panel. The vertical dashed line represents the equipment enclosure. The vertical lines
represent the wires connected to the bus bars. Each of the three groups of wires represents a separate
circuit.
Note: A simplification of this diagram is what electrical engineers/designers refer to as the one‐line
diagram. In a one‐line, instead of diagramming each wire in a circuit, a circuit is represented as a single
line, and annotated to indicate its contents.

Getting into the Flow: Understanding Connectors in Revit MEP Content
19
Diagram Description
Three Pole Circuit: A three‐pole circuit taps off all three phases. This is also known as a 3‐phase/3‐wire circuit. A 4‐wire circuit has an additional wire for the Neutral; this is used if the circuited component has single‐pole loads. In almost all installations, a ground wire is also required.
Two Pole Circuit: A two‐pole circuit may tap off of any pair of phases, A‐B, B‐C, or A‐C. The two‐pole circuit here is tapping off of phases A‐B. In some cases, there may also be a Neutral conductor if the circuited component has single‐pole loads. In almost all installations, a ground wire is also required.
One Pole Circuit: A single‐pole circuit may tap off of any of the phases, A, B, or C. The circuit shown here is tapping off the A phase. There will always be a Neutral conductor in a one‐pole circuit. In almost all installations, a ground wire is also required.
Task: Make sure each piece of mechanical equipment requiring power in your model has a power
connector, and is circuited.
Lighting Content Lighting fixtures are made of variety of different materials, and come in a variety of different shapes and
sizes. Additionally, there are a variety of different types of lamps and ballasts. All these variables

Getting into the Flow: Understanding Connectors in Revit MEP Content
20
contribute to how light is distributed from the fixture. Lighting manufacturers subject their fixtures for
photometric testing, and generally provide an .ies file that represents the result of this test. Revit
utilizes these .ies files to compute the Average Estimated Illumination in a space.
Lighting fixtures contribute to Average Estimated Illumination (AEI) in Spaces. This calculation is
dependent on several parameters:
1. IES file name (no .ies extension) 2. Existence of electrical connector. 3. Light Loss Factor 4. Ballast Factor 5. Coefficient of Utilization 6. Lumens
Task: Find a light fixture cut‐sheet and associated .ies file on the Internet. Create the family using the
concepts in the “Creating a Light Fixture Family” section in the Metric Family Editor Tutorial. You may
want to start at a manufacturer’s website to find an .ies file of interest.
References
Autodesk University 2007 Course: ME318‐1L Creating Revit® MEP Content for Engineering Coordination
2006 Course: ME23‐1 Creating Autodesk® Revit® Systems Content for Engineering Coordination
Product Tutorials http://www.autodesk.com/revitmep‐documentation
Internet Postings http://inside‐the‐system.typepad.com/
http://discussions.autodesk.com

Getting into the Flow: Understanding Connectors in Revit MEP Content
21
Reference Matrix This matrix shows what concepts may be found in what reference.
Geometry
Shared Param
eters
Family Param
eters
Looku
p Tab
les
Types
Type Catalog
Connectors
Param
eter Map
ping
Multi‐Disciplin
e Fam
ily
Annotation
API
Duct
Pipe
Electrical
AU 2006: ME23‐1
Electric Water Heater
Valve
AU2007: ME318‐1L
Exhaust Fan
RMEP 2009 Family Editor Tutorials
Modify a Fan Family
Modify Fan VAV w/ Elec Heat
Modify Electrical Equipment
Modify a Water Closet
Modify Diffuser Annotation
Modify Light Fixture Annotation
Create Light Fixture
Create Flange
Create Elbow Pipe Fitting
Create Annotation Symbol
ADN Revit MEP ‐ API Samples
Assign Flow to Terminals
Change Size of Terminal
Calculate room CFM/SF
Find unhosted elements