MDA Getting Started - etas.com · 6 MDA V7.2 - Getting Started Introduction ETAS 1 Introduction The...
61
MDA V7.2 Getting Started
Transcript of MDA Getting Started - etas.com · 6 MDA V7.2 - Getting Started Introduction ETAS 1 Introduction The...

MDA V7.2Getting Started

2
Copyright
The data in this document may not be altered or amended without special noti-fication from ETAS GmbH. ETAS GmbH undertakes no further obligation in rela-tion to this document. The software described in it can only be used if thecustomer is in possession of a general license agreement or single license. Usingand copying is only allowed in concurrence with the specifications stipulated inthe contract.
Under no circumstances may any part of this document be copied, reproduced,transmitted, stored in a retrieval system or translated into another languagewithout the express written permission of ETAS GmbH.
© Copyright 2018 ETAS GmbH, Stuttgart
The names and designations used in this document are trademarks or brandsbelonging to the respective owners.
Document AM010300 V7.2 R04 EN - 03.2018

Content
ETAS Content
1 Introduction . . . . . . . . . . . . . . . . . . . . . . . . . . . . . . . . . . . . . . . . . . . . . . . . . . . . . . 61.1 General Description . . . . . . . . . . . . . . . . . . . . . . . . . . . . . . . . . . . . . . . . . . . 61.2 User Information . . . . . . . . . . . . . . . . . . . . . . . . . . . . . . . . . . . . . . . . . . . . . . 7
1.2.1 What You Need to Know . . . . . . . . . . . . . . . . . . . . . . . . . . . . . . . . 71.2.2 How this Manual is Organized . . . . . . . . . . . . . . . . . . . . . . . . . . . . . 71.2.3 Getting More Information . . . . . . . . . . . . . . . . . . . . . . . . . . . . . . . . 81.2.4 Using this Manual . . . . . . . . . . . . . . . . . . . . . . . . . . . . . . . . . . . . . . 8
2 New Features in MDA V7 . . . . . . . . . . . . . . . . . . . . . . . . . . . . . . . . . . . . . . . . . . . 102.1 New Features in MDA V7.2 . . . . . . . . . . . . . . . . . . . . . . . . . . . . . . . . . . . . . 10
2.1.1 Overview. . . . . . . . . . . . . . . . . . . . . . . . . . . . . . . . . . . . . . . . . . . . 102.1.2 MSI-Installer for MDA . . . . . . . . . . . . . . . . . . . . . . . . . . . . . . . . . . 102.1.3 Improve Variable Selection by Support of Wildcards. . . . . . . . . . . . 102.1.4 Search for already selected Variables in the Configuration . . . . . . . 102.1.5 Support for Channel with Multiple Conversion Formula’s. . . . . . . . 112.1.6 Create a List of Variables used in the Configuration (*.lab file). . . . 112.1.7 Support of Windows®10 . . . . . . . . . . . . . . . . . . . . . . . . . . . . . . . 112.1.8 Measure File Extractor . . . . . . . . . . . . . . . . . . . . . . . . . . . . . . . . . . 11
2.2 New Features in MDA V7.1 . . . . . . . . . . . . . . . . . . . . . . . . . . . . . . . . . . . . . 122.2.1 Overview. . . . . . . . . . . . . . . . . . . . . . . . . . . . . . . . . . . . . . . . . . . . 122.2.2 Copy Oscilloscope & Replace Signals . . . . . . . . . . . . . . . . . . . . . . . 132.2.3 Visualization of GPS Data on a Street Map Within MDA . . . . . . . . 132.2.4 Information on Devices used for the Measurement . . . . . . . . . . . . 142.2.5 Support of ETAS File Indexing . . . . . . . . . . . . . . . . . . . . . . . . . . . . 152.2.6 Support of MDF 4.1 — Standard Indexing and Data Compression . 152.2.7 Performance Improvements for Calculated Signals. . . . . . . . . . . . . 162.2.8 Filter Options for Variable Selection . . . . . . . . . . . . . . . . . . . . . . . . 162.2.9 Default Step Size of Analysis Cursor. . . . . . . . . . . . . . . . . . . . . . . . 172.2.10 Customizable Toolbars . . . . . . . . . . . . . . . . . . . . . . . . . . . . . . . . . 17
MDA V7.2 - Getting Started 3

4
Inhalt ETAS
2.2.11 Resetting the Display of Warning Messages . . . . . . . . . . . . . . . . . . 182.2.12 Automatically Showing Signal-Related Events . . . . . . . . . . . . . . . . 182.2.13 Enhanced Menu Bar and Toolbar for Configure Window. . . . . . . . 182.2.14 Marking Signals With Invalid Samples . . . . . . . . . . . . . . . . . . . . . . 192.2.15 Display of Long Signal Names . . . . . . . . . . . . . . . . . . . . . . . . . . . . 192.2.16 Display of Signal Names in Formulas for Calculated Signals . . . . . . 192.2.17 Display of Digital Signal Names in Oscilloscope . . . . . . . . . . . . . . . 202.2.18 Show Axis Index in Signal List . . . . . . . . . . . . . . . . . . . . . . . . . . . . 202.2.19 Restoring the Manually Sorted Signal List. . . . . . . . . . . . . . . . . . . . 202.2.20 Simpler MDF File Selection. . . . . . . . . . . . . . . . . . . . . . . . . . . . . . . 202.2.21 Enhanced Generate Measure File Dialog . . . . . . . . . . . . . . . . . . . . 212.2.22 Support of Windows 8 and Windows 8.1 . . . . . . . . . . . . . . . . . . . 212.2.23 Video Tutorials Explaining the Open and Configure Dialog . . . . . . 212.2.24 Direct Access to Manuals and Tutorial . . . . . . . . . . . . . . . . . . . . . . 21
2.3 New Features in MDA V7.0 . . . . . . . . . . . . . . . . . . . . . . . . . . . . . . . . . . . . . 222.3.1 Overview. . . . . . . . . . . . . . . . . . . . . . . . . . . . . . . . . . . . . . . . . . . . 222.3.2 Support of Windows 7 . . . . . . . . . . . . . . . . . . . . . . . . . . . . . . . . . 222.3.3 Enhanced Usability Through New Icons . . . . . . . . . . . . . . . . . . . . . 222.3.4 Support of the MDF V4.0 Standard . . . . . . . . . . . . . . . . . . . . . . . . 232.3.5 Enhanced Dialog Box for Writing Measure Files . . . . . . . . . . . . . . . 232.3.6 New Option for Identification of the Signals’ Source Files. . . . . . . . 242.3.7 Making Copies of Complete Oscilloscope Windows. . . . . . . . . . . . 26
3 Installation . . . . . . . . . . . . . . . . . . . . . . . . . . . . . . . . . . . . . . . . . . . . . . . . . . . . . . 283.1 Preparing to Install . . . . . . . . . . . . . . . . . . . . . . . . . . . . . . . . . . . . . . . . . . . 28
3.1.1 Package Contents . . . . . . . . . . . . . . . . . . . . . . . . . . . . . . . . . . . . . 283.1.2 MDA License . . . . . . . . . . . . . . . . . . . . . . . . . . . . . . . . . . . . . . . . . 283.1.3 System Requirements . . . . . . . . . . . . . . . . . . . . . . . . . . . . . . . . . . 283.1.4 User Privileges Required for Installation and Operation. . . . . . . . . . 30
3.2 Installing the Program . . . . . . . . . . . . . . . . . . . . . . . . . . . . . . . . . . . . . . . . . 313.2.1 Initial Installation . . . . . . . . . . . . . . . . . . . . . . . . . . . . . . . . . . . . . . 31
3.3 Customizing the Network Installation . . . . . . . . . . . . . . . . . . . . . . . . . . . . 323.4 Using Command Line Parameters . . . . . . . . . . . . . . . . . . . . . . . . . . . . . . . . 353.5 MDA V7.2 Program Group / Apps . . . . . . . . . . . . . . . . . . . . . . . . . . . . . . . . 36
4 Getting Started . . . . . . . . . . . . . . . . . . . . . . . . . . . . . . . . . . . . . . . . . . . . . . . . . . . 374.1 Introduction . . . . . . . . . . . . . . . . . . . . . . . . . . . . . . . . . . . . . . . . . . . . . . . . 374.2 Selecting Measurement Files and Measured Signals for the Analysis . . . . . . 384.3 Configuring the Display of Measure Data . . . . . . . . . . . . . . . . . . . . . . . . . . 394.4 Analyzing Measure Data . . . . . . . . . . . . . . . . . . . . . . . . . . . . . . . . . . . . . . . 404.5 Printing Measure Data . . . . . . . . . . . . . . . . . . . . . . . . . . . . . . . . . . . . . . . . 41
5 General MDA Operation . . . . . . . . . . . . . . . . . . . . . . . . . . . . . . . . . . . . . . . . . . . . 425.1 Starting the Program . . . . . . . . . . . . . . . . . . . . . . . . . . . . . . . . . . . . . . . . . 425.2 Window Structure . . . . . . . . . . . . . . . . . . . . . . . . . . . . . . . . . . . . . . . . . . . 445.3 Controls . . . . . . . . . . . . . . . . . . . . . . . . . . . . . . . . . . . . . . . . . . . . . . . . . . . 44
5.3.1 Toolbars . . . . . . . . . . . . . . . . . . . . . . . . . . . . . . . . . . . . . . . . . . . . 445.3.2 Additional Controls . . . . . . . . . . . . . . . . . . . . . . . . . . . . . . . . . . . . 48
5.4 Tips and Tricks for Operation . . . . . . . . . . . . . . . . . . . . . . . . . . . . . . . . . . . 495.4.1 Docker Windows. . . . . . . . . . . . . . . . . . . . . . . . . . . . . . . . . . . . . . 49
MDA V7.2 - Getting Started

ETAS Inhalt
5.4.2 Window Arrangement and Display Options . . . . . . . . . . . . . . . . . . 515.5 Operation Using the Keyboard . . . . . . . . . . . . . . . . . . . . . . . . . . . . . . . . . . 52
5.5.1 Hotkey Assignment in MDA. . . . . . . . . . . . . . . . . . . . . . . . . . . . . . 525.5.2 Keyboard Operation Compliant With WINDOWS® Conventions . . 52
5.6 Operation Using the Mouse . . . . . . . . . . . . . . . . . . . . . . . . . . . . . . . . . . . . 535.7 Help Functions . . . . . . . . . . . . . . . . . . . . . . . . . . . . . . . . . . . . . . . . . . . . . . 53
5.7.1 MDA Online Help – Quick Guide . . . . . . . . . . . . . . . . . . . . . . . . . . 535.7.2 Manual . . . . . . . . . . . . . . . . . . . . . . . . . . . . . . . . . . . . . . . . . . . . . 545.7.3 Video Tutorials . . . . . . . . . . . . . . . . . . . . . . . . . . . . . . . . . . . . . . . 54
6 Glossary . . . . . . . . . . . . . . . . . . . . . . . . . . . . . . . . . . . . . . . . . . . . . . . . . . . . . . . . 55
7 Appendix: Troubleshooting MDA Problems . . . . . . . . . . . . . . . . . . . . . . . . . . . . . . 597.1 General problems while working with MDA . . . . . . . . . . . . . . . . . . . . . . . . 59
7.1.1 MDA reacts only after substantial delays . . . . . . . . . . . . . . . . . . . . 597.2 Problems with Calculated Signals . . . . . . . . . . . . . . . . . . . . . . . . . . . . . . . . 60
7.2.1 While trying to select calculated signals, the error message appears: "Perl Interface: DllGetEtasDataPath() failed" . . . . . . . . . . . . . . . . . 60
8 ETAS Contact Addresses . . . . . . . . . . . . . . . . . . . . . . . . . . . . . . . . . . . . . . . . . . . . 61
MDA V7.2 - Getting Started 5

6
Introduction ETAS
1 Introduction
The Measure Data Analyzer (MDA) program is an offline instrument for display-ing and analyzing saved measurement data.
Since MDA V6.2, the MDA program can be purchased in two different productpackages:
• INCA product installation including MDA:
The INCA product package, which includes the MDA, offers comprehen-sive measuring, application and analysis functionality.
• MDA stand-alone product:
If your task consists of analyzing readily available measurement files, the required functionality can be provided by the MDA stand-alone installa-tion.
Both product packages require a valid license.
1.1 General Description
MDA (Measure Data Analyzer) is used to visualize and analyze measurementdata provided in MDF or ETAS internal ASCII format. For these purposes MDAprovides five different views:
• Oscilloscope window (YT and XY oscilloscope):
The measurement data are displayed
– as a graph with the amplitude of a channel in the y-direction and the time in the x-direction (YT oscilloscope). This type of window is best used for displaying numerical signals, especially periodic signals and signals with a large amplitude. It is also very useful to compare two signals over time.
– as a graph with the amplitude of a channel in the y-direction and the amplitude of another channel in x-direction (XY oscilloscope). It can be used for example to plot one varying voltage versus another.
• Table window:
The measurement data are displayed in a table. It is advantageous to use a table window for displaying non-numerical signals, as well as numerical signals with a very small amplitude. It is also very useful for inspecting the exact value of a numerical signal.
• Statistics window:
The statistics window displays the statistical properties of numerical sig-nals, such as the average, minimum, maximum, and standard deviation, which can give insight into a signal's character and quality. It is also very useful for comparing multiple signals.
• MDR window:
The MDR window (Measurement Data Refiller) is intended to provide a solution to prepare data for post measurement processing. For example, it is able to reduce the number of used rasters to one raster. When differ-ent rasters are used, the measurement might contain gaps for individual
MDA V7.2 - Getting Started

ETAS Introduction
timestamps. The user can determine by means of options if and how these gaps are to be filled. This might be of importance for tools that can handle only one raster. The display looks similar to the Table window.
• GPS map view:
The GPS map view displays GPS tracks in a map that are constituted of the measure signals latitude, longitude and (optionally) altitude. It is very use-ful if you want to put geographic data providing street and terrain infor-mation in relation to other measured signals. Thus, any abnormal behavior in the engine module under test can be analyzed in a better way if the GPS data like longitude, latitude and altitude are considered during the offline analysis.
The user can customize layout and content of these views. MDA provides manyuseful functions such as zooming, scrolling, synchronizing different views, orsearching for specific events. For special purposes, MDA provides an interface todefine, calculate, visualize, and analyze signals, events, and bits.
For documentation and presentation purposes, MDA offers to print out viewsaccording to user defined templates and to export measurement data files inMDF or ETAS internal ASCII format.
To be able to display mass measure data quickly, measurement data reductioncan be used to enhance the display performance. Of course it is possible to dis-able the data reduction.
1.2 User Information
1.2.1 What You Need to Know
This manual addresses qualified personnel working in the fields of automobilecontrol unit development and calibration. Specialized knowledge in the areas ofmeasurement and control unit technology is required.
Basic knowledge in operating a PC and using the WINDOWS® operating systemis a prerequisite. All users should be able to execute menu commands, to activatepush buttons, etc. Users should also be familiar with the WINDOWS file storagesystem, especially the relationship between files and directories. Users have toknow how to use the basic functions of WINDOWS Explorer. Moreover, usersshould be familiar with the “drag-and-drop” functionality.
1.2.2 How this Manual is Organized
This MDA manual consists of the following chapters:
• Chapter 1: ”Introduction” (this chapter)
This chapter provides a basic description of the MDA and other general information.
• Chapter 2: ”New Features in MDA V7”
This chapter contains a summary of the new features and changes.
You should read this section even if you are an experienced MDA user.
• Chapter 3: ”Installation”
The chapter titled “Installing the Program” is for all users who install, maintain or uninstall MDA on a PC or a network as well as system admin-istrators who provide MDA on a file server so that the program can be
MDA V7.2 - Getting Started 7
8
Introduction ETAS
installed via the network. It contains important information on the scope of delivery, hardware and software requirements for stand-alone and net-work installations and the preparation required for installation. The chap-ter also describes the procedures used to install and uninstall MDA.
• Chapter 4: ”Getting Started”
This chapter provides the user with a quick introduction to the program concept of MDA. You will receive an overview of the program functional-ity and working principles by means of practice-oriented work examples presented as flow diagrams.
• Chapter 5: ”General MDA Operation”
This chapter provides information on the window structure, control options using the mouse and the keyboard, and the help system.
• Chapter 6: ”Glossary”
The chapter titled “Glossary” explains all the technical terms used in the manual. The terms are listed in alphabetical order.
• Chapter 7: ”Appendix: Troubleshooting MDA Problems”
This troubleshooting chapter gives some information of what you can do when problems arise during your work with MDA.
1.2.3 Getting More Information
In the MDA online help, you can find further detailed information on the MDAand its functions. Information on using the online help can be found in Chapter"Help Functions" on page 53.
Subjects which can easily be shown instead of being described in words are pre-sented as video tutorials. The videos are installed locally on your PC if youselected the installation of video tutorials during installation. They are availableas mp4 files and can be called up from MDA via the menu item ? VideoclipsTutorials. If you did not install them on your PC, you can either view them in theETAS channel on YouTube, or you can download them from the ETAS DownloadCenter.
1.2.4 Using this Manual
Presentation of Information
All actions to be performed by the user are presented in a so-called “Use-Case”format. This means that the objective to be reached is first briefly defined in thetitle, and the steps required to reach the objective are then provided in a list. Thispresentation appears as follows:
Definition of Objective:
Any preliminary information...
• Step 1
Any explanation for Step 1...
• Step 2
Any explanation for Step 2...
• Step 3
Any explanation for Step 3...
MDA V7.2 - Getting Started
ETAS Introduction
Any concluding remarks...
Specific example:
To create a new file:
When creating a new file, no other file may be open.
• Choose File New.
The “Create file” dialog box is displayed.
• Type the name of the new file in the “File name” field.
• Click OK.
The new file will be created and saved under the name you specified. You cannow work with the file.
Typographic Conventions
The following typographic conventions are applied:
Important notes for the users are presented as follows:
Choose File Open. Menu options are printed in bold, blue charac-ters.
Click OK. Button labels are printed in bold characters.
Press <ENTER>. Key commands are printed in small capitals enclosed in angle brackets.
The “Open file” dialog box appears.
The names of program windows, dialog boxes, fields, etc. are enclosed in double quotes.
Select the setup.exe file. Text strings in list boxes, in program code and in path and file names are printed using the Courier font.
A conversion between Logic and Arithmetic data types is not possible.
Emphasized text portions and newly intro-duced terms are printed in italic font face.
Note
Important note for users.
MDA V7.2 - Getting Started 9

10
New Features in MDA V7 ETAS
2 New Features in MDA V7
This section contains a summary of the new features that have been introducedin MDA V7. You should read this section even if you are already an experiencedMDA user. The latest changes are listed on top.
2.1 New Features in MDA V7.2
This section contains a summary of the new features that have been introducedwith MDA V7.2.
2.1.1 Overview
The following functional extensions and improvements are contained inMDA V7.2:
• New features
– MSI-Installer for MDA
– Improve Variable Selection by Support of Wildcards
– Search for already selected Variables in the Configuration
– Support for Channel with Multiple Conversion Formula’s
– Create a List of Variables used in the Configuration (*.lab file)
– Support of Windows®10
– Measure File Extractor
2.1.2 MSI-Installer for MDA
MDAV7.2 uses a new installation technology, the MSI-Installer. MSI is an installerpackage file format used by Windows. MSI files are used for installation, storage,and removal of programs. The files are contained in a package, which is usedwith the program’s client-side installer service, an .EXE file, to open and installthe program. Of course, you can assume present user settings of a previous MDAversion. When you start MDAV7.2 for the first time, an import dialog windowopens. If you would like to import the previous user settings later, you need toadapt the file mda.ini (located in ...\ETASData\MDA7.2) and set the option"Copy User Settings From Former Versions Of MDA" back to 1.
2.1.3 Improve Variable Selection by Support of Wildcards
To enable an efficient variable selection, the variables column in the variableselections dialog is enhanced by a search field. The following wild-cards are sup-ported, and can be used in combination and multiple times:
• * is a placeholder for 0 to any number of characters including letters or figures.
• ? is a placeholder for exactly one letter of figure.
2.1.4 Search for already selected Variables in the Configuration
If you work with big configurations, you can now search for variables that arealready selected in a configuration, and you can see the assignments to instru-ments or windows. The new "Search Variables"window can be opened from themenu options Edit → Find → Find Variable. Alternatively, use the shortcut Ctrl+F.
MDA V7.2 - Getting Started

ETAS New Features in MDA V7
2.1.5 Support for Channel with Multiple Conversion Formula’s
The combination of different conversion rules for transferring raw measure datainto physical values is called "nested conversions". Typically this is used to com-bine a range of raw data having a conversion into numeric values, and a rangefor conversion into textual values often status information. MDA V7.2.0 supportsvariables with such combined computation methods and allows to display therespective signals. With MDA V7.2.1 generation of measurement files supportssignals having nested conversions. Further enhancements for using variableswith nested conversion as input signal for calculated signals are planned.
2.1.6 Create a List of Variables used in the Configuration (*.lab file)
A list of the variables used in the configuration can be created as label file. Thefile includes the signal name and the raster information. LAB files can be createdfor all variables selected in the configuration or just for those which are assignedto a specific instrument. LAB files can be loaded in INCA variable selection tofilter the variable to be selected, as well as filter for the desired signals during ameasure file extraction (see 2.1.8).
2.1.7 Support of Windows®10
MDA V7.2.1 supports the following variants of the Windows®10 operating sys-tem:
• Windows 10 — 32 bit
• Windows 10 — 64 bit in 32 bit compliance mode
2.1.8 Measure File Extractor
If a measure file (only MF3/MF4 files) is added having a number of signals, whichexceeds a preset limit, MDA offers the possibility to extract from this file only thedesired signals (limit can be set in mda.ini file). Although the extraction processwill extend the time of adding and opening the file, this is usually helpful as theextraction procedure hast to be done only once, and the performance duringanalysis will be better with the extracted file.
In case the signal number exceeds the preset limit, the extraction dialog will beopened.
When the extraction dialog is canceled the original measure file will be loaded asusual. Otherwise following settings will be used for the extraction process:
• Measure file: Defines the original file from which data will be extracted.
MDA V7.2 - Getting Started 11
12
New Features in MDA V7 ETAS
• Desired Variables: Choose a LAB (*.lab) file as a filter list for the required signals to be extracted. LAB files can be created in INCA or MDA with the “Saved Used Variables (LAB format)” function.
• File path: Defines the location for the resulting extracted file.
• File Name: Name of the result target file. The file format is automatically the same as for the source file and can’t be edited.
For extraction, a separate tool is opened in the command-line interface. WithMDA V7.2.1 only extraction of scalar signals incl. enumerations is supported.This excludes strings and event signals. At the end of the extraction, a windowwith a log file is displayed.
2.2 New Features in MDA V7.1
This section contains a summary of the new features that have been introducedwith MDA V7.1.
2.2.1 Overview
The following functional extensions and improvements are contained inMDA V7.1:
• New features
– Copy Oscilloscope & Replace Signals (2.2.2)
– Visualization of GPS Data on a Street Map Within MDA (2.2.3)
– Information on Devices used for the Measurement (2.2.4)
– Support of MDF 4.1 — Standard Indexing and Data Compression (2.2.6)
• Performance improvements
– Support of ETAS File Indexing (2.2.5)
– Performance Improvements for Calculated Signals (2.2.7)
• Enhanced Usability
– Filter Options for Variable Selection (2.2.8)
– Default Step Size of Analysis Cursor (2.2.9)
– Customizable Toolbars (2.2.10)
– Resetting the Display of Warning Messages (2.2.11)
– Automatically Showing Signal-Related Events (2.2.12)
– Enhanced Menu Bar and Toolbar for Configure Window (2.2.13)
– Marking Signals With Invalid Samples (2.2.14)
– Display of Long Signal Names (2.2.15)
– Display of Signal Names in Formulas for Calculated Signals (2.2.16)
– Display of Digital Signal Names in Oscilloscope (2.2.17)
– Show Axis Index in Signal List (2.2.18)
– Restoring the Manually Sorted Signal List (2.2.19)
– Simpler MDF File Selection (2.2.20)
– Enhanced Generate Measure File Dialog (2.2.21)
• Others
MDA V7.2 - Getting Started

ETAS New Features in MDA V7
– Support of Windows 8 and Windows 8.1 (2.2.22)
– Video Tutorials Explaining the Open and Configure Dialog (2.2.23)
– Direct Access to Manuals and Tutorial (2.2.24)
2.2.2 Copy Oscilloscope & Replace Signals
You can copy a complete oscilloscope window and replace the included signalswith signals from another measure file which is part of the configuration. Thiscan be useful for example in comparison tasks.
To copy an oscilloscope, select an oscilloscope in the tree view of the windowConfigure Windows and select Copy View & Replace Signals from the con-text menu. A dialog opens, where you can replace the signals used in the originaloscilloscope by the corresponding signals from a different measure file.
2.2.3 Visualization of GPS Data on a Street Map Within MDA
The GPS map view displays GPS tracks on a street map within MDA.This is advan-tageous if you want to put geographic data providing street and terrain informa-tion in relation to other measured signals. Thus, any abnormal behavior in theengine module under test can be analyzed in a better way if the GPS data can beconsidered during the offline analysis.
The measured signals representing latitude, longitude and altitude can be auto-matically mapped to the GPS signals constituting the GPS track. Automatic map-ping can be disabled in the global settings under GPS Automatic Mapping.
Note
It is only possible to copy oscilloscope windows in YT mode; other oscilloscope modes (i.e. XY oscilloscope mode and DTA mode), other window types (e.g. MDR window, statistics window or table windows) or other items (e.g. variables or axes) can not be copied with this function.
MDA V7.2 - Getting Started 13

14
New Features in MDA V7 ETAS
The GPS map view can include several configurable tracks at once. Moreover, itcan be synchronized with YT oscilloscopes. If cursors are enabled, the cursors areshown as markers on the maps.
By default, MDA uses a license-free open-source street map. Customer-specificmaps may be used as well.
2.2.4 Information on Devices used for the Measurement
Upon recording measurements, information on the hardware and softwaresetup that was used for a measurement and calibration experiment are saved inthe MDF file along with the measured data.
To view this information in MDA, select Show device information from thecontext menu of a signal, and information on the selected signal and all othersignals from the same measurement as well as on the device used for the mea-surement (e.g. device type, serial number, date of calibration) is displayed.
Note
If you are using a different map than the license-free open source map, please check the licensing conditions of your map provider.
MDA V7.2 - Getting Started

ETAS New Features in MDA V7
The device information is only available if the measure file was saved in MDF V4format (*.mf4).
2.2.5 Support of ETAS File Indexing
While reading huge measure files, MDA reduces samples for a given time rangeand displays the reduced data. By indexing the measure file, it is possible to savethis data reduction with the measure file, thus enhancing the performance uponreading the measure file.
If you want to use measure files in MDA that are not yet indexed, you can opti-mize them by clicking the selecting the measure file in the Open and Configuredialog and clicking the Optimize for MDA button.
ETAS measure file indexing is supported for measure files in the formats MDF V3and V4.
For further details, watch the MDA video tutorial (see „Video Tutorials Explainingthe Open and Configure Dialog“ on page 21).
2.2.6 Support of MDF 4.1 — Standard Indexing and Data Compression
MDA V7.1 can read and write measure files in the format MDF 4.1. This fileformat includes the support of standard indexing and data compression:
• Indexing adds information to the measure file which optimizes the perfor-mance when reading the file.If MFD compliant indexing is required, because the measure files will also be used with 3rd party tools, you can use standard indexing. To use stan-
MDA V7.2 - Getting Started 15

16
New Features in MDA V7 ETAS
dard indexing, open the file mda.ini and set the option Use Standard Indexing for Generation of Files to the value 1:Use Standard Indexing for Generation of Files=1I
• Data compression reduces the amount of data which is written to the file without loss of information.
2.2.7 Performance Improvements for Calculated Signals
During operation, it might be necessary to compute calculated signals time andagain, e.g. when scrolling through an oscilloscope. This leads to unnecessary per-formance losses. To avoid these performance losses during analysis, calculatedsignals can be computed in advance and saved in cache files.
Caching calculated signals to gain performance improvements in zooming andscrolling can be enabled or disabled in the global settings under Use Cache forCalculated Signals.
2.2.8 Filter Options for Variable Selection
In the Measured Variables window, new filter options allow you to select therelevant variables more easily. By using the filter icons, you can display only vari-ables of a specific data type. Additionally, you can filter the variable selection sothat only used or unused variables are shown.
Note
ETAS indexing can be applied to measure files in the formats mdf 3.0 or higher.Standard indexing can be applied to measure files in the formats mdf 3.3 or higher.
Note
Data compression may lead to reduced performance when writing measure data or reading measure data from file.Data compression is applicable only for measure files with the format MDF V4.1.Measure files with data compression may not be supported by all 3rd party tools.
MDA V7.2 - Getting Started

ETAS New Features in MDA V7
2.2.9 Default Step Size of Analysis Cursor
The step size defines the time steps taken when you move the analysis cursor inan oscilloscope by means of the cursor keys (, . You can now set the defaultstep sizes through the following global settings:
• Cursor Mode
With this option, you can set the cursor mode which will be used by default for new oscilloscope windows. The following cursor modes are available:
• Jump by Samples (Cursor Mode)
With this option, you can set the default step size for cursor movement if the cursor mode is set to Sample mode.
This setting defines that the cursor positions are shifted by the number of samples given in this field. The jump always ends on an actual sample (not between two samples).
• Jump by Time Interval (Cursor Mode)
With this option, you can set the default step size in seconds for cursor movement if the cursor mode is set to Time mode.
This setting defines that the cursor positions can be shifted only in discrete steps by multiples of this specification. The cursors can be moved to any desired time point and are not limited to the timestamps of actual sam-ples.
2.2.10 Customizable Toolbars
You can adapt the toolbars in the MDA main window and the Print Layout Editorto your own preferences.
To customize the toolbars shown in the MDA main window, select Extras Toolbars:
• You can select which toolbars shall be displayed by ticking the corre-sponding entry in the sub-menu.
• The sub-menu option Default Settings resets the toolbar display to the original settings, displaying most of the toolbars for the most common tasks: Standard, Edit Configuration, Enhanced Functionality, and Print Layout.
Sample The cursor is moved from timestamp to timestamp.
Time The cursor is moved in discrete steps along the time axis, e.g. in steps of 0.1 s.The time interval of the steps can be adjusted on the Window tab in the Legend window of the oscillo-scope.
MDA V7.2 - Getting Started 17

18
New Features in MDA V7 ETAS
• The sub-menu option Dynamic disables or enables the toolbar containing those icons that are specific to the type of analysis window.
The Print Layout Editor always displays all available toolbars.
If you want to change the position of a toolbar, you can drag it by catching itwith the mouse at its control, and drop it at the desired location within the tool-bar area.
Moreover, you can set the desired icon size in the global settings under ToolbarIcon Size.
All these changes are saved in MDA and will still be shown after restarting it.
2.2.11 Resetting the Display of Warning Messages
If you have ticked the checkbox Do not show again for a warning message, thiswarning message is no longer displayed. Now, you can enable all warningsagain.
To reset the settings, select Extras Reset ‘Do not show again’ Settings.
2.2.12 Automatically Showing Signal-Related Events
In MDA, you can show events such as pauses, snapshot events, calibration logsand comments, along with the measured signals. These events can be selectedeither manually or automatically.
If you want to assign related events automatically along with the measured sig-nal, you have to set the global setting Automatic selection of related eventsto Yes. In oscilloscopes, all event signals will be added to the Events tab of thesignal list, while the Signals tab will only show analog and digital signals, with-out any related events.
2.2.13 Enhanced Menu Bar and Toolbar for Configure Window
In the Configure Windows window, new icons are available for the followingfunctionalities:
• Add and remove elements
• Collapse and expand all elements in the tree view
The tree view options can also be selected via the new View menu.
MDA V7.2 - Getting Started

ETAS New Features in MDA V7
2.2.14 Marking Signals With Invalid Samples
MDA signalizes if a signal contains invalid samples. Generally, this is indicated byshowing the signal icon in red:
The icon can only be shown in red if the invalid range has already been read byMDA or if the measure file is indexed.
In oscilloscopes, the invalid range of the signal is displayed in a different colorthan the valid parts of the signal.
In tables, the invalid samples in the table as well as the corresponding signalheader are displayed in red color.For calculated signals referring to signals with invalid samples, only the tableheader is displayed in red color.
2.2.15 Display of Long Signal Names
Signals may have long names, which are often not completely visible. MDA nowshows the complete path and file name on mouse over of the signal. Addition-ally, the complete path is shown in the status bar of an instrument.
2.2.16 Display of Signal Names in Formulas for Calculated Signals
Formulas for calculated signals now use only an index for file name and path ofa signal to make the formula more concise. The full name and path is shown ina tooltip.
Note
Marking signals with invalid samples is only supported for the MDF V4 format.
MDA V7.2 - Getting Started 19

20
New Features in MDA V7 ETAS
Formula in MDA V7.0:
Formula in MDA V7.1 (new):
2.2.17 Display of Digital Signal Names in Oscilloscope
Digital signal names are only displayed if they can be aligned with the signals inthe oscilloscope. To make the digital signal names visible, you can enlarge thedigital signal area by dragging the line between time axis and digital signal area.
2.2.18 Show Axis Index in Signal List
You can now show in the signal list to which axes the signals belong. To displaythe axis assignment, select Show Axis from the context menu in the signal list,and a column with the axis name is added.
2.2.19 Restoring the Manually Sorted Signal List
If you have manually sorted the signals in the signal list and subsequently clickedon one of the column headers, the manually sorted order is no longer visible.Now, you can restore the manually created order by clicking the Undo auto-matic sorting icon.
2.2.20 Simpler MDF File Selection
When adding a configuration in the Open and Configure dialog box, thesearch for a file in MDF format is now simplified. You do not need to knowwhether the MDF file you want to add is in *.dat, *.mf4 or *.mdf file format. Bydefault, any MDF file is displayed. After you have selected a format "MDF V3.x(*.dat)" or "MDF V4.x (*.mf4)" and opened a file, this file format is stored asdefault for the next session.
Note
The index instead of the file name and path is only used if the global setting Source Identification is enabled.
MDA V7.2 - Getting Started
ETAS New Features in MDA V7
2.2.21 Enhanced Generate Measure File Dialog
When converting from *.mdf to *.mrf file format, the device name had beenincluded in the signal name by default. In the Generate Measure File dialog,you can now select the Suppress device name checkbox. By that, the signalname is generated without the device name in the measure file. The default forthis checkbox can be predefined in the mda.ini file via "Suppress Device NameFor Generation Of MRF Files".
2.2.22 Support of Windows 8 and Windows 8.1
MDA V7.1 supports the following variants of the Windows® 8 operating system:
• Windows 8 and Windows 8.1 — 32 bit
• Windows 8 and Windows 8.1 — 64 bit in 32 bit compliance mode
2.2.23 Video Tutorials Explaining the Open and Configure Dialog
MDA now includes videos explaining how to use the Open and Configure Dia-log:
• Composing and Managing Measure Files in the Open and Configure Dia-log
• Removing Files from a Configuration in the Open and Configure Dialog
• Optimizing Measure Files in the Open and Configure Dialog
The videos can either be accessed through the online help or via the entryVideoclips Tutorials in the ? menu.
2.2.24 Direct Access to Manuals and Tutorial
You can now directly access the manuals and tutorial in PDF format via the entryManuals and Tutorial in the ? menu.
MDA V7.2 - Getting Started 21

22
New Features in MDA V7 ETAS
2.3 New Features in MDA V7.0
This section contains a summary of the new features that have been introducedwith MDA V7.0.
2.3.1 Overview
The following functional extensions and improvements are contained inMDA V7.0:
• Support of Windows 7 (2.3.2)
• Enhanced Usability Through New Icons (2.3.3)
• Support of the MDF V4.0 Standard (2.3.4)
• Enhanced Dialog Box for Writing Measure Files (2.3.5)
• New Option for Identification of the Signals’ Source Files (2.3.6)
• Making Copies of Complete Oscilloscope Windows (2.3.7)
2.3.2 Support of Windows 7
MDA V7.0 supports the following variants of the Windows®7 operating system:
• Windows 7 — 32 bit
• Windows 7 — 64 bit in 32 bit compliance mode
2.3.3 Enhanced Usability Through New Icons
The usability of MDA V7 has been further enhanced through the introduction ofnew desktop and tool icons. The new icons
• are Windows compliant,
• provide an improved high recognition value, due to consistency between use case and symbol,
• and they provide a common look&feel with other ETAS solutions for pro-totyping and test automation (INCA, LABCAR).
MDA can now be started via the following desktop icon:
The following comparisons illustrate the enhancements in the MDA toolbaricons:
MDA V7.2 - Getting Started

ETAS New Features in MDA V7
Toolbar icons in the MDA Main Window:
Toolbar icons in the MDA Print Layout Editor:
2.3.4 Support of the MDF V4.0 Standard
MDA V7 and INCA V7 support the new ASAM MDF V4.0 standard.
MDF V4.0 has been defined to resolve limitations of the currently used MDF V3.xindustry standard.
The main benefits of the new MDF V4 standard are the following:
• Extension of the maximum file size (by now limited to 4 GByte)
• Support of meta-data information (e.g. the user having created the file, timestamp of the recording, etc.)
• Higher accuracy of the global start time (nano seconds) with additional information on time zone offsets and summer time offsets (UTC)
• Introduction of angle, distance or index for synchronization in addition to time
• Extension of comment length, record length, array size, and number of signals per group.
MDA V7 reads and writes measure files in the formats MDF V3.0, MDF V3.3,MDF V4.0, and ETAS internal ASCII format.
2.3.5 Enhanced Dialog Box for Writing Measure Files
With MDA, you can generate new measure files from the measure data in thecurrent configuration, e.g. in order to save a subset, save data from separatemeasure files in a common file, or to include derived data such as calculatedsignals.
Note
Conversion of measure formats is not supported in MDA V7. Therefore, if your configuration contains signals from source files in different formats (MDF V3, MDF V4, ETAS ASCII), the generation of new measure files is not possible.
MDA V6:
MDA V7:
MDA V6:
MDA V7:
MDA V7.2 - Getting Started 23

24
New Features in MDA V7 ETAS
This functionality is provided by the MDA — Generate Measure File dialogbox. In MDA V7.0, this dialog box has been replaced by a new one, which isdesigned in more user-friendly way.
Moreover, the following functionality has been added:
• With the checkbox Include all signals, you can determine whether only the signals from the active analysis window or all signals from all measure files of the configuration will be included in the target measure file.
Calculated signals will only be included if they are added to an analysis window.
The resulting number of signals that will be included in the target measure file is displayed next to the check-box.
• With the checkbox Include offset on channels, you can define that sig-nals with an X-offset will not be saved with their original measure values, but with their derived measure values including the defined X-offset.
2.3.6 New Option for Identification of the Signals’ Source Files
An MDA configuration often contains signals coming from several different mea-sure files. In order to allow you to distinguish the signals’ source files at a glance,you can enable the global option Source Identification.
The following option settings are available:
• None
No prefix for measure file identification will be displayed.
MDA V7.2 - Getting Started

ETAS New Features in MDA V7
• Index
In all MDA windows, MDA displays an index number in front of the signal names. This index number indicates the measure file containing the corre-sponding signal; it is the index number displayed in the Open and Con-figure dialog box.
Note
If a measure file contains two more signals with the same name, these signals are also indexed.To distinguish between the index identifying the measure file, and the occur-rence of a signal, the source identification index is set before the signal name, while the occurrence is located after the file.Example: in the string [3] TMot (2), the signal TMot comes from the mea-sure file with the index number 3; it is the second occurrence of a signal with this name within this measure file.
MDA V7.2 - Getting Started 25

26
New Features in MDA V7 ETAS
2.3.7 Making Copies of Complete Oscilloscope Windows
You can copy a complete oscilloscope window with all assigned signals, settingsand properties, and paste the copied window into the MDA configuration. Thiscan be useful, for example, in comparison tasks.
The oscilloscope window can be copied in the MDA — Open Configure Win-dows dialog box. The dialog box can be opened by selecting Edit OpenConfigure Windows, by pressing <F4>, or by clicking in the toolbar.
In the list on the left, select the oscilloscope window that you want to copy. Thenselect Copy View from the context menu or push <Ctrl> + <W>.
MDA makes an exact copy of the selected oscilloscope window and pastes it intothe MDA configuration. The copied oscilloscope window is inserted into the win-dow tree view. It contains the same signals, axes, points of interests, and analysis
Note
It is only possible to copy oscilloscope windows in YT mode; other oscilloscope modes (i.e. XY oscilloscope mode and DTA mode), other window types (e.g. MDR window, statistics window or table windows) or other items (e.g. vari-ables or axes) can not be copied with this function.
MDA V7.2 - Getting Started

ETAS New Features in MDA V7
cursor positions as the original oscilloscope window, all of them with the samesettings as in the original. Moreover, if the original oscilloscope window is part ofa synchronization group, the copied window will be part of the same group.
The window name, signal sorting order, bookmarks, zoom states, and dockingof legend and signal list will not be copied along with the other items and set-tings.
After having copied the window, you can configure the original and the copiedwindow separately from each other; the changes will apply only to the selectedwindow.
MDA V7.2 - Getting Started 27

28
Installation ETAS
3 Installation
The chapter titled “Installing the Program” is for all users who install, maintain oruninstall MDA on a PC or a network as well as system administrators whoprovide MDA on a file server so that the program can be installed via the net-work. This chapter also contains information on the scope of delivery, hardwareand software requirements for stand-alone and network installations and thepreparation required for installation. Moreover, the chapter describes the proce-dures used to install and uninstall MDA.
3.1 Preparing to Install
Check to make sure all the items have been delivered and that your workstationcomplies with the system requirements. Make sure you have the necessary userprivileges for the operating system and the network connection being used. Youmust have administrator privileges to install MDA.
3.1.1 Package Contents
Essentially the MDA installation media for the MDA stand-alone product has thefollowing contents:
• Program files for MDA
• Online help, MDA-manual in PDF format (Acrobat Reader), and video tutorials (mp4 format)
3.1.2 MDA License
You require a valid license for the use of MDA.
You can obtain the license file required for licensing either from your systemadministrator or through a self service portal on the ETAS Internet Site under http://www.etas.com/support/licensing. To request the license file you have toenter the activation number which you received from ETAS during the orderingprocess.
In the Windows Start menu, select Programs ETAS LicenseManagement ETAS License Manager.
Follow the instructions given in the dialog. For further information about, forexample, the ETAS license models and borrowing a license, press F1 in the ETASLicense Manager.
3.1.3 System Requirements
System Requirements: Minimum PC Requirements:
• Required hardware:
Note
As MDA is also provided together with INCA, either an MDA or an INCA license is required for the use of MDA.
Note
Please see the Readme file for the latest information on the MDA system requirements.
MDA V7.2 - Getting Started

ETAS Installation
– 2 GHz processor
– 4 GB RAM
– DVD-ROM drive for installation
– VGA graphics card with a resolution of at least 1024 x 768 and 16 bit colors
• Required operating system:
– WINDOWS® 7 SP1 (32 or 64 bit. On a 64 bit operating system MDA uses the 32 bit compatibility mode) or higher
– WINDOWS® 8 (32 or 64 bit. On a 64 bit operating system MDA uses the 32 bit compatibility mode)
– WINDOWS® 8.1 (32 or 64 bit. On a 64 bit operating system MDA uses the 32 bit compatibility mode) or higher
– WINDOWS® 10 (32 or 64 bit. On a 64 bit operating system MDA uses the 32 bit compatibility mode)
• Required free disk space:
– 500 MB
System Requirements: Recommended PC Requirements:
• Hardware:
– 3 GHz quad core processor or equivalent
– 8 GB RAM
– DVD-ROM drive for installation
– XGA graphics card with a resolution of at least 1024 x 768, 16 bit color and DirectX 7
• Operating system:
– WINDOWS® Vista SP1 (32 Bit) or higher
– WINDOWS® 7 SP1 (32 or 64 bit. On a 64 bit operating system MDA uses the 32 bit compatibility mode) or higher
– WINDOWS® 8 (32 or 64 bit. On a 64 bit operating system MDA uses the 32 bit compatibility mode) or higher
– WINDOWS® 10 (32 or 64 bit. On a 64 bit operating system MDA uses the 32 bit compatibility mode)
• Free disk space:
– > 10 GB
The minimum requirements for the MDA PC ensure that MDA will run smoothlywith smaller measure files, and the recommended PC configuration means thatit will operate very efficiently.
Note
English, French, Japanese, Chinese and German OS versions are supported.
Note
English, French, Japanese, Chinese and German OS versions are supported.
MDA V7.2 - Getting Started 29
30
Installation ETAS
Added performance boost depends on the hard disk’s average access time andthe power-saving modes that have been enabled for the computer components(processor, hard disk, etc.).
3.1.4 User Privileges Required for Installation and Operation
User Privileges Required for Installation:
In order to install MDA on a PC, administrator authorization access is necessary.Please contact your system administrator, if necessary.
User Privileges Required for side-by-side installations of different MDAversions:
Operating different MDA versions on the same PC requires administrator autho-rization access for COM registration. Please contact your system administrator, ifnecessary.
User Privileges Required for Operation:
In order to work with MDA, each user must obtain the following rights from theadministrator:
• Read and write access to the registry folder HKEY_LOCAL_MA-CHINE\Software\ETAS and all subfolders
• Read and write access to the TEMP directory used by MDA.
• Read and write access to the MDA installation directory(e.g. c:\ETAS\MDA7.2)
• Read and write access to shared components in ETASShared12(e.g. c:\ETAS\ETASShared12).
• Read and write access to the directory for the MDA data(e.g. c:\ETASData) and all subdirectories
Unlimited access is required for all mentioned directories.
MDA V7.2 - Getting Started

ETAS Installation
3.2 Installing the Program
The dialog boxes for installing from the CD and installing from the network driveare identical.
3.2.1 Initial Installation
To install MDA:
• Close all open ETAS programs.
• Depending on your company-specific regulations, the installation files are provided on DVD or on a network drive.
By using the DVD, the installation routine starts automatically. If this is not the case, execute the Autostart.exe file on the DVD manually.
If you install the program from a network drive, exe-cute the Setup.exe file.
• Select your preferred setup language.
• Click Next.
• Read and accept the terms in the license agreement to continue installation.
• Follow the instructions displayed on the screen and confirm each screen by clicking Next.
Most of the screens are completely self-explanatory. The following sectionsexplain only those parts of the installation procedure where additional informa-tion might be helpful.
Setting the Installation Path and Language
In the following screen, you specify destination directories for program and datafiles:
Note
After finishing installation, the computer must be restarted before MDA can be opened.
MDA V7.2 - Getting Started 31
32
Installation ETAS
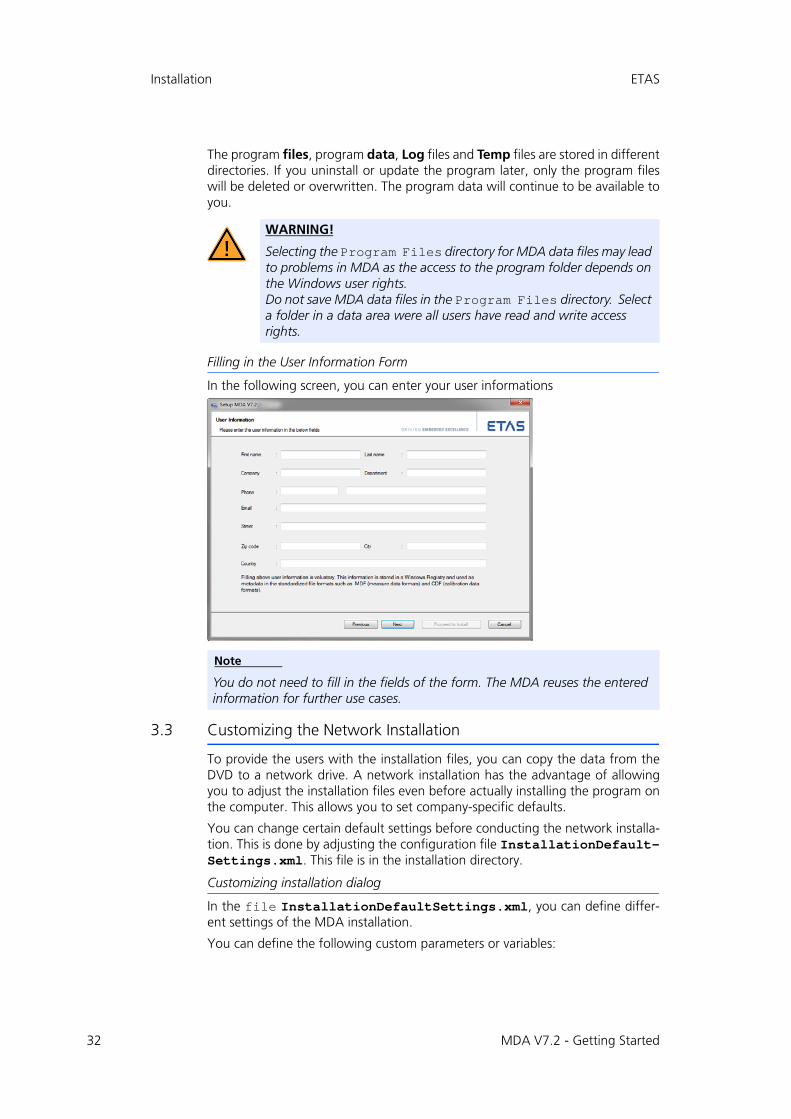
The program files, program data, Log files and Temp files are stored in differentdirectories. If you uninstall or update the program later, only the program fileswill be deleted or overwritten. The program data will continue to be available toyou.
Filling in the User Information Form
In the following screen, you can enter your user informations
3.3 Customizing the Network Installation
To provide the users with the installation files, you can copy the data from theDVD to a network drive. A network installation has the advantage of allowingyou to adjust the installation files even before actually installing the program onthe computer. This allows you to set company-specific defaults.
You can change certain default settings before conducting the network installa-tion. This is done by adjusting the configuration file InstallationDefault-Settings.xml. This file is in the installation directory.
Customizing installation dialog
In the file InstallationDefaultSettings.xml, you can define differ-ent settings of the MDA installation.
You can define the following custom parameters or variables:
WARNING!
Selecting the Program Files directory for MDA data files may lead to problems in MDA as the access to the program folder depends on the Windows user rights.Do not save MDA data files in the Program Files directory. Select a folder in a data area were all users have read and write access rights.
Note
You do not need to fill in the fields of the form. The MDA reuses the entered information for further use cases.
MDA V7.2 - Getting Started

ETAS Installation
• PRODINSTDIR
Defines the installation path for MDA.
• LIMA-INIFILE
Defines the installation path for the licensing.ini file. The licensing.ini file contains your license informations.
• PRODDATAINSTDIRALL
Defines the path of the working files (e.g configuration files, databases)
• ETAS_TEMPPATH
Defines the path of the temporary files.
• ETAS_LOGPATH
Defines the path of the Log files.
• CREATE_UNINSTALLATION_SHORTCUT
Automatically creates an uninstallation shortcut on your desktop.
• Following variables includes personal and company information. Set any default values to automatically insert them into the form within the instal-lation:
FirstName, LastName, Company, Department, AreaCode, Phone, Lan-guage, EMail, Street, ZIPCode, City, Country
Logging the Installation Information
When installing from a network drive, the information entered in the registrationdialog is saved in a file (MDA.usr). It is used for polling the license data back toETAS or for your own reference. By default, the file is stored on the installationdrive from which the installation was started, under a dedicated directory namedUser (e.g., F:\User\MDA.usr).
As already mentioned during the registration for network installation, you canchange the storage location specified in InstallationDefaultSet-tings.xml. However, you cannot disable the log function for the networkinstallation.
Setting the licensing behavior
In the Licensing.ini file, you can define the way in which MDA andother ETAS software programs access the required licenses.
To define the access to the required licenses:
• Open the Licensing.ini file with a text editor.
• Modify the settings as desired. The parameters that can be included in this section and their settings are described below.
• Save your changes.
Note
Make sure that all users have write-access to the log directory, i.e., the installa-tion directory or the directory you specified in install.ini (see below).
MDA V7.2 - Getting Started 33

34
Installation ETAS
The following parameters may be used:
• LicenseFileName
Defines the absolute path to the location of the license file which is to be added.
• LicensesToBorrow
You can use this setting if licenses can be borrowed from a license server. To enable the borrow mechanism, you must enter the name of the prod-uct or features license (e.g. MDA). If you enter more than one license, the license names must be separated by blanks.
• BorrowExpiryMode
Defines the way in which the expiration of the borrow status is given. Possible values are:
– DateIf the BorrowExpiryMode is set to Date, the borrow period will expire at a certain date which is specified under BorrowExpiryDate.
– IntervalIf the BorrowExpiryMode is set to Interval, the borrow period will expire after a certain number of days which is specified under BorrowExpiryInterval.
• BorrowExpiryDate
If the BorrowExpiryMode is set to Date, this parameter specifies the date when the borrow period expires. The format is yyyy-mm-dd.
• BorrowExpiryInterval
If the BorrowExpiryMode is set to Interval, this parameter speicifies the length of the borrow period in days.
• ExecuteBorrowAutomaticExtensionInterval
Defines at what point of time the borrow period will be automatically extended. This parameter specifies the number of days before the expira-tion of the current borrow period. When this time is reached, the borrow period is automatically extended to the interval specified under BorrowAutomaticExtensionInterval.
• BorrowAutomaticExtensionInterval
This parameter specifies the borrow interval in days that is applied when an automatic extension of the borrow period is executed (as defined under ExecuteBorrowAutomaticExtensionInterval).
• CustomLicenseFolder
Due to the fact that the default location for added license files, i.e. C:\Documents and Settings\All Users\Application Data\ETAS\FlexNet, is only writeable for users with admin rights, a different path for the license file folder may be specified with this param-eter.
MDA V7.2 - Getting Started
ETAS Installation
3.4 Using Command Line Parameters
Setup.exe /? and Setup.exe /help
Displays the available command line parameter. The full description of the com-mand line parameter and also of the error codes which can occur during aninstallation are described within the setup.pdf provided in the installation rootdirectory.
Silent Mode
/Silent: Executes the installation silent. This means, you don’t see any dialogwindow of the installation routine. All commands are hidden. For example, youcan use this option to install INCA on a computer, without interrupting the userswork.
No Restart Mode
/NoRestart: Specify this argument in combination with /silent to omit a restartthat might be necessary at the end of installation. If restart is omitted, a logmessage states this. If /silent parameter is specified either this or /AllowRestartparameter must be specified.
MDA V7.2 - Getting Started 35

36
Installation ETAS
3.5 MDA V7.2 Program Group / Apps
After having installed MDA and restarted your PC, you will find an entry for yourMDA installation:
• Windows XP and Windows 7:
A folder for MDA V7.2 has been created under ETAS in the Start menu.
Moreover, the program group License Management has been added to the Start menu under ETAS:
• Windows 8:
A tile for MDA V7.2 has been created. Moreover, the following apps have been added:
The Start menu items or respective apps provide the following access:
• ETAS License Manager
Starts the ETAS License Manager, where you can view and manage licenses for your ETAS software products (e.g. adding licenses or borrow-ing and returning licenses).
• Manuals and Tutorials
If you have installed the PDF user documentation, you can open the folder and view the desired documentation.
• MDA V7.2 - Tools
Opens a folder with the following entry:
– ReadMe
Gives you the latest information on MDA V7.2.
• Measure Data Analyzer V7.2
Starts the MDA program.
MDA V7.2 - Getting Started
ETAS Getting Started
4 Getting Started
This chapter is aimed at new users of MDA helping them to get started withMDA V7.2. You will receive an overview of the program functionality and work-ing principles by means of practice-oriented work examples presented as flowdiagrams.
The following sections give a brief overview of the individual working steps:
• "Selecting Measurement Files and Measured Signals for the Analysis" on page 38
• "Configuring the Display of Measure Data" on page 39
• "Analyzing Measure Data" on page 40
• "Printing Measure Data" on page 41
4.1 Introduction
The MDA works in display mode or in analysis mode. Display mode is used forpreparing the analysis. It provides a wide range of options for configuring theanalysis window and displaying the measured signals.
The actual analysis takes place in analysis mode. Here too there are many optionsfor displaying areas to be analyzed so that the analysis can be performed opti-mally.
You perform a measure data analysis as follows:
1. First you create an analysis configuration by selecting the measure files and the recorded signals for the analysis, distribute the signals to analysis windows and define the appearance of the windows and the display of the signals.
You then save this configuration in a configuration file (*.xda). You can save a selection of variables as a new measure file (*.dat, *.mf4, or ascii).
2. In display mode, you can optimize or change the original configuration (for example, if you want to generate a new analysis variant). The end result is saved and can be started again in this form later. In this way, you can create entire libraries of analysis variants.
3. In analysis mode, you can analyze the individual signals and analyze the values at the measurement points. You can link measure signals and/or calculated signals with each other or analyze the recorded calibration activities in the form of comment signals. You can also define and edit measurement comments in the measure files.
MDA V7.2 - Getting Started 37
38
Getting Started ETAS
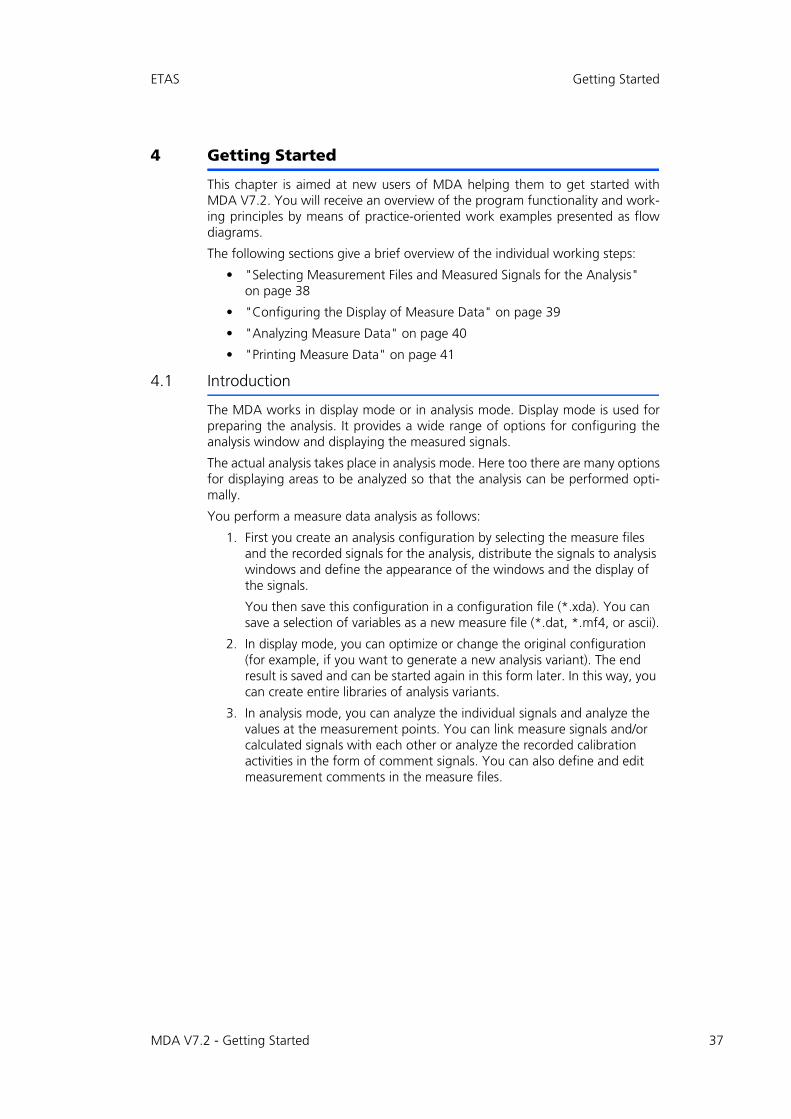
4.2 Selecting Measurement Files and Measured Signals for the Analysis
When you start the MDA for the first time, you must select one or more mea-surement files for the analysis and assign the information contained in the filesto an analysis window. You can then save this configuration to a file (*.xda).
Fig. 4-1 Preparing the measure data analysis
Load measured data andsave configuration
Selectmeasure file(s)
Selectmeasure variables
Save configuration
Start MDA
Open or create
configuration
Use Add, Replace and Exclude to select the measurement files for the analysis task.
Select measured signals and confirm by clicking OK to display them in MDA. Select the type of analysis window (oscillo-scope, table, basic statis-tics, MDR or GPS Map View).
File Save Configuration or <CTRL> + <S>
Start MDA by clicking the program icon on the desktop or selecting MDA from the Start menu
Select File Open and configure or click <CTRL>+<O>
Select existing or new configuration.
Activate Jump directly to Variable Selection and click Load Configuration to open the MDA - Measured Variables dialog.
MDA V7.2 - Getting Started

ETAS Getting Started
4.3 Configuring the Display of Measure Data
Measure data can be displayed in an oscilloscope, a table window, a basis statis-tics window, or, if different rasters are used, in an MDR window (Measure DataRefill). Displaying GPS data in a map view is also possible.
The most widely used window is the oscilloscope window. The measured numer-ical values are graphically displayed in the signal pane of the oscilloscope display.To the left you can see the Y-axes that are being used. Additional dockable childwindows can be added to the analysis window. For example, you can view a listof measured signals on the right and open a configuration window in the lowersection to facilitate modifications to the display settings.
Fig. 4-2 Configuring the display of measure data
Configure the display of measured data
Hide / show legend and signal list
Modify displaysettings
Use Edit Show Legend or <CTRL>+<M> or andEdit Oscilloscope Settings Show Signal List or <CTRL>+<L> or to hide or show the legend and the signal list.
Use Edit Open Configure Windows or <F4> or and Edit Oscilloscope Settings Oscilloscope Configuration and Edit MDR Settings andEdit Statistic Settings Configure or <ALT> + <S> andcontext menu of the Legend window Signal Configurationto configure the display in the analysis windows.
MDA V7.2 - Getting Started 39
40
Getting Started ETAS
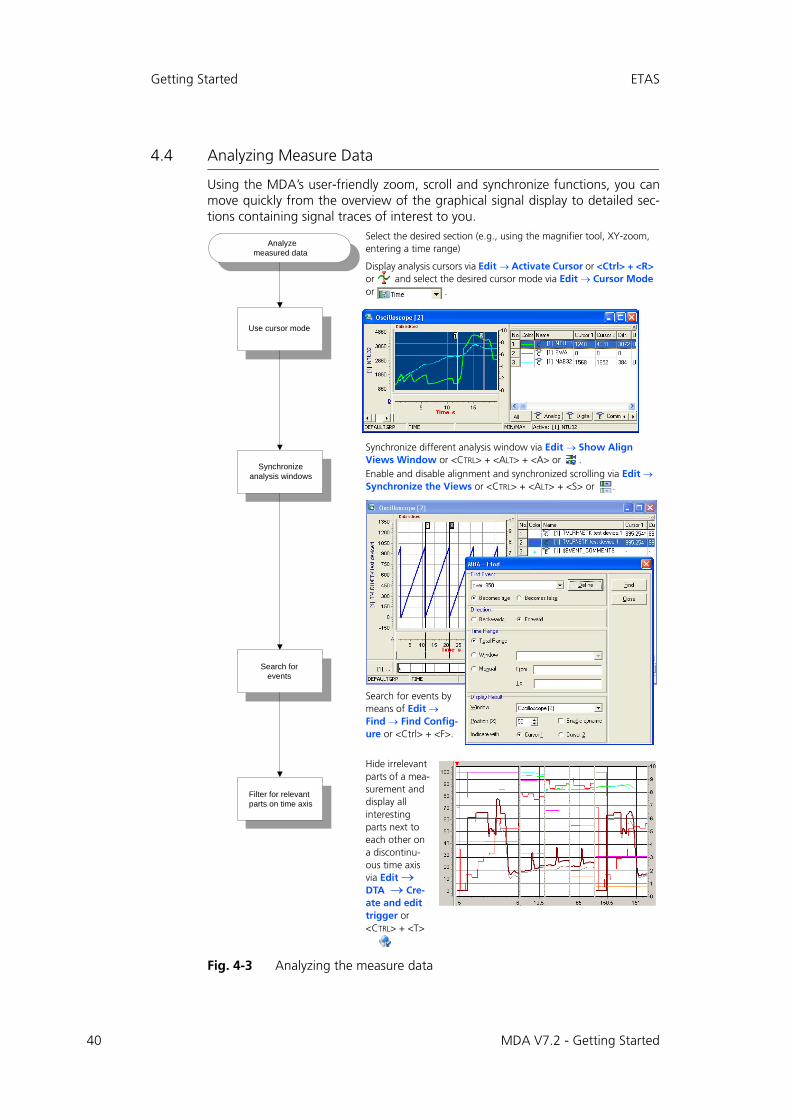
4.4 Analyzing Measure Data
Using the MDA’s user-friendly zoom, scroll and synchronize functions, you canmove quickly from the overview of the graphical signal display to detailed sec-tions containing signal traces of interest to you.
Fig. 4-3 Analyzing the measure data
Analyze measured data
Use cursor mode
Synchronizeanalysis windows
Search forevents
Filter for relevantparts on time axis
Select the desired section (e.g., using the magnifier tool, XY-zoom, entering a time range)
Display analysis cursors via Edit Activate Cursor or <Ctrl> + <R> or and select the desired cursor mode via Edit Cursor Mode or .
Synchronize different analysis window via Edit Show Align Views Window or <CTRL> + <ALT> + <A> or .Enable and disable alignment and synchronized scrolling via Edit Synchronize the Views or <CTRL> + <ALT> + <S> or .
Hide irrelevant parts of a mea-surement and display all interesting parts next to each other on a discontinu-ous time axis via Edit DTA Cre-ate and edit trigger or <CTRL> + <T>
Search for events by means of Edit Find Find Config-ure or <Ctrl> + <F>.
MDA V7.2 - Getting Started
ETAS Getting Started
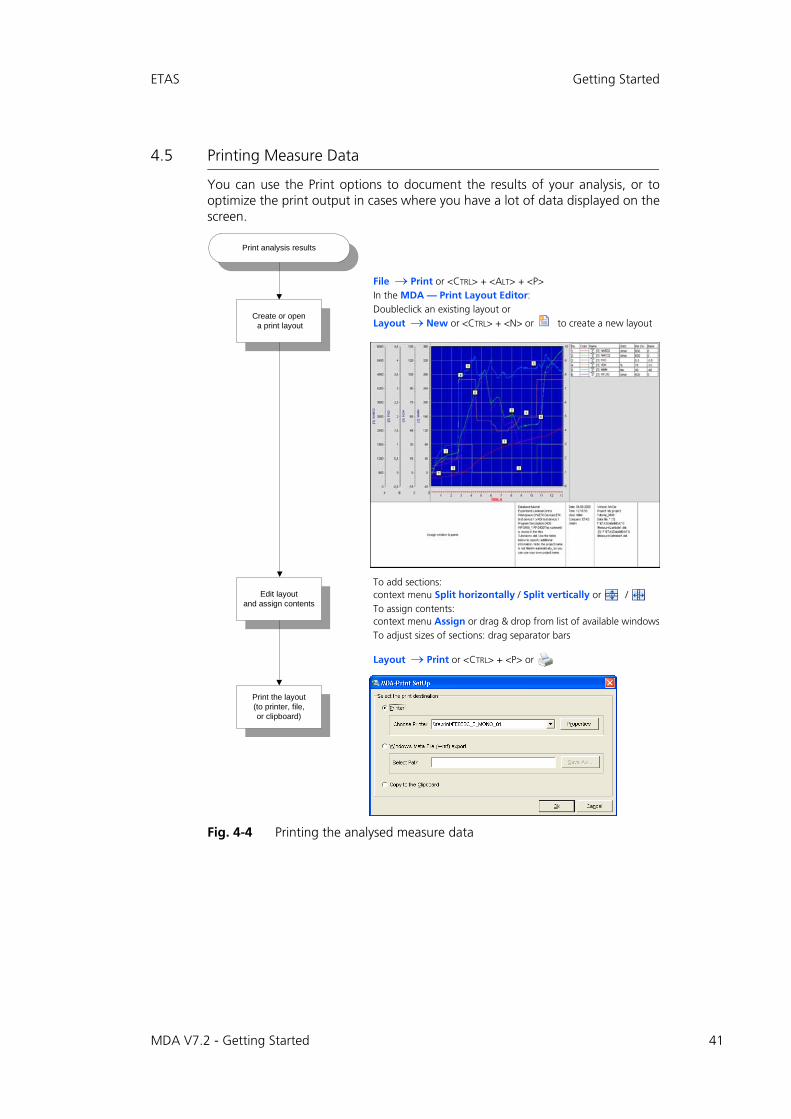
4.5 Printing Measure Data
You can use the Print options to document the results of your analysis, or tooptimize the print output in cases where you have a lot of data displayed on thescreen.
Fig. 4-4 Printing the analysed measure data
Print analysis results
Create or open a print layout
Edit layoutand assign contents
Print the layout(to printer, file,or clipboard)
File Print or <CTRL> + <ALT> + <P>In the MDA — Print Layout Editor:Doubleclick an existing layout orLayout New or <CTRL> + <N> or to create a new layout
To add sections: context menu Split horizontally / Split vertically or / To assign contents: context menu Assign or drag & drop from list of available windowsTo adjust sizes of sections: drag separator bars
Layout Print or <CTRL> + <P> or
MDA V7.2 - Getting Started 41
42
General MDA Operation ETAS
5 General MDA Operation
This chapter provides information on the window structure, control optionsusing the mouse and the keyboard, and the help system.
Be sure to read this chapter since some operational procedures are describedonly in this section. Although the presented techniques are standard Windowsoperations, they may not be familiar to the less experienced Windows user. Theyare therefore described here as a central summary.
5.1 Starting the Program
MDA can be started in one of several ways:
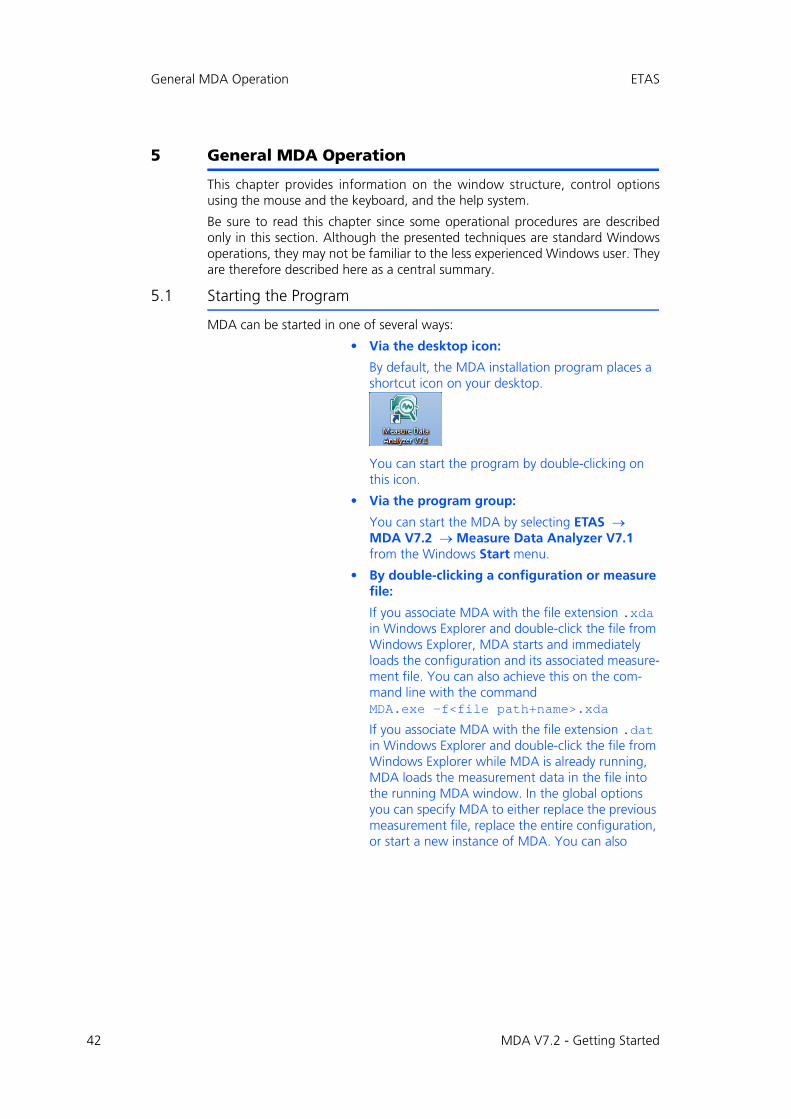
• Via the desktop icon:
By default, the MDA installation program places a shortcut icon on your desktop.
You can start the program by double-clicking on this icon.
• Via the program group:
You can start the MDA by selecting ETAS MDA V7.2 Measure Data Analyzer V7.1 from the Windows Start menu.
• By double-clicking a configuration or measure file:
If you associate MDA with the file extension .xda in Windows Explorer and double-click the file from Windows Explorer, MDA starts and immediately loads the configuration and its associated measure-ment file. You can also achieve this on the com-mand line with the command MDA.exe -f<file path+name>.xda
If you associate MDA with the file extension .dat in Windows Explorer and double-click the file from Windows Explorer while MDA is already running, MDA loads the measurement data in the file into the running MDA window. In the global options you can specify MDA to either replace the previous measurement file, replace the entire configuration, or start a new instance of MDA. You can also
MDA V7.2 - Getting Started

ETAS General MDA Operation
achieve this on the command line with the com-mand MDA.exe -r<file path+name>.dat
Note
If INCA is being installed on your PC, you can also start MDA directly from within INCA. In this case you must specify in the INCA user options the location of the MDA installation to be used. Then you have several options to call MDA from within INCA, e.g. via the Tools menu or a toolbar icon. For further infor-mation please see the INCA user documentation.
MDA V7.2 - Getting Started 43

44
General MDA Operation ETAS
5.2 Window Structure
The MDA window contains the following elements:
• Menu bar (1)
• Toolbar (2)
• Scrollbar for time axis (3)
• Step size for the scroll bar in % (4)
• Selection of active window (5)
• Input fields for time range (6)
• Selection of bookmarks (7)
• Signal pane of an oscilloscope window (8)
• Signal list of the oscilloscope window (9)
• Legend of the oscilloscope window (10)
5.3 Controls
5.3.1 Toolbars
The most common commands are also available as buttons in a toolbar. In thisway, a command can be executed simply with a click of the mouse.
Note
All commands that can be issued by clicking the specific buttons are also avail-able in the corresponding menus.
10
8 9
3
2
1
5 6 74
MDA V7.2 - Getting Started
ETAS General MDA Operation
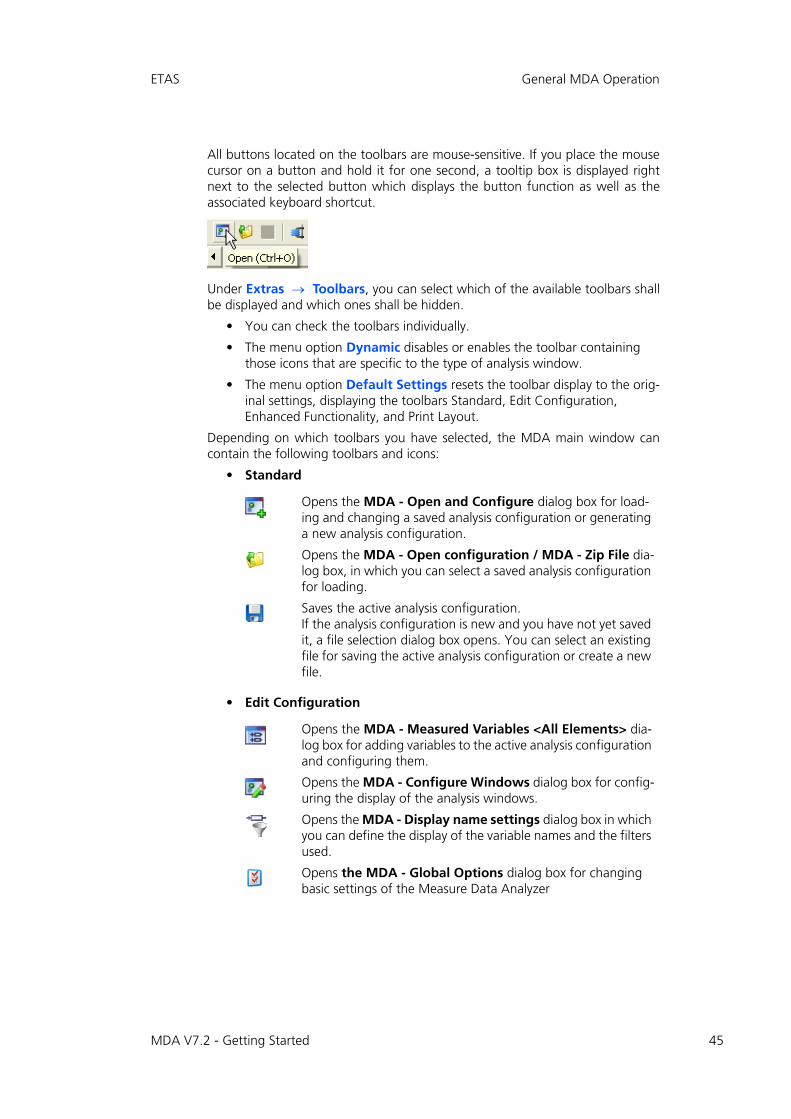
All buttons located on the toolbars are mouse-sensitive. If you place the mousecursor on a button and hold it for one second, a tooltip box is displayed rightnext to the selected button which displays the button function as well as theassociated keyboard shortcut.
Under Extras Toolbars, you can select which of the available toolbars shallbe displayed and which ones shall be hidden.
• You can check the toolbars individually.
• The menu option Dynamic disables or enables the toolbar containing those icons that are specific to the type of analysis window.
• The menu option Default Settings resets the toolbar display to the orig-inal settings, displaying the toolbars Standard, Edit Configuration, Enhanced Functionality, and Print Layout.
Depending on which toolbars you have selected, the MDA main window cancontain the following toolbars and icons:
• Standard
• Edit Configuration
Opens the MDA - Open and Configure dialog box for load-ing and changing a saved analysis configuration or generating a new analysis configuration.
Opens the MDA - Open configuration / MDA - Zip File dia-log box, in which you can select a saved analysis configuration for loading.
Saves the active analysis configuration.If the analysis configuration is new and you have not yet saved it, a file selection dialog box opens. You can select an existing file for saving the active analysis configuration or create a new file.
Opens the MDA - Measured Variables <All Elements> dia-log box for adding variables to the active analysis configuration and configuring them.
Opens the MDA - Configure Windows dialog box for config-uring the display of the analysis windows.
Opens the MDA - Display name settings dialog box in which you can define the display of the variable names and the filters used.
Opens the MDA - Global Options dialog box for changing basic settings of the Measure Data Analyzer
MDA V7.2 - Getting Started 45
46
General MDA Operation ETAS
• Enhanced Functionality
• Print Layout
• Measure File
• DTA
• Archive
• Tile
• Easy Print
Opens the Manage Calculated Signals dialog box for defin-ing calculated signals from other values.
Resets all signals which were moved along the X-axis to their original values (reset X-offset).
Opens the Print Layout Editor.
Opens the MDA - Generate Measure File dialog box for gen-erating a new measure file from the active analysis configura-tion.
Opens the MDA - Measure File Comment dialog box for defining the comment for the measure files in the active anal-ysis configuration
Opens the Trigger properties dialog box for the DTA func-tionality. Here you can determine which start and stop triggers should be used for hiding irrelevant parts of a measurement and displaying all interesting parts next to each other on a dis-continuous time axis.
Shows the time ranges selected in the trigger conditions.
Opens the MDA - Zip Utility dialog box in which you can make the settings necessary for creating a compressed file (*.zda).
Opens the MDA Unzip Utility dialog box in which you can select the compressed file to open the files contained therein in the MDA.
Cascades (overlaps) the open analysis windows.
Arranges open analysis windows under each other.
Arranges open analysis windows side by side.
Directly prints the active analysis window.
MDA V7.2 - Getting Started

ETAS General MDA Operation
• Dynamic
This toolbar is only shown if the configuration contains any signals and analysis windows. Depending on the analysis window which is currently active, some toolbar icons might not be visible.
Shows or hides the Signal List window, which is used for dis-playing the signals of the active analysis window.
Shows or hides the Legend window, which is used for config-uring the active analysis window and the signals it contains.
Enables or disables the display of cursors.
Lets you select the cursor mode. The following modes are avail-able:• Time mode, i.e. the cursor is moved in discrete steps along
the time axis, e.g. in steps of 0.1 s.• Sample mode, i.e. the cursor is moved from timestamp to
timestamp.• Fix distance mode, i.e. the two cursors are always moved
synchronously and keep a fix distance, i.e. when you move the active cursor, the other cursor moves exactly the same distance.(time, sample, or fix distance).
According to the selected cursor mode, this field provides the following information:• Time mode: Step size in seconds.• Sample mode: Step size in number of samples.• FixDistance mode: Distance in seconds between the two
cursors.
Opens the Align Views dialog box. Here you can define the way in which the analysis windows are aligned and synchro-nized.
Enables or disables alignment and synchronized scrolling of analysis windows.This function is only available if the active window is an oscillo-scope and if the oscilloscope belongs to a synchronization group. The alignment behavior is set in the Align Views dialog box.
Opens the MDA - Find dialog box in which you can define events for which measure files are searched in the analysis con-figuration.
Restores undone zoom actions stepwise.
Undoes the last zooming step (Y-axis or time/X-axis) in the active analysis window stepwise.
MDA V7.2 - Getting Started 47

48
General MDA Operation ETAS
5.3.2 Additional Controls
Below the toolbar, you find the following additional controls:
• Time Axis scrollbar
Allows you to scroll through sections of the measured range or to move the measured range on the X-axis.
• Percentage field
Enables you to set the step size for the scroll bar. A step size of 50% means that when you use the page up / page down key for scrolling or click in the time axis scrollbar on the left or on the right side of the slider, the visible part is moved by 50%.
• Windows combo-box
Determines which window becomes the active window and is affected by scrolling along the time axis or the entry in the “from” and “to” fields.
• Time Range entry fields
Allows you to enter a fixed time range (from - to) for the display on the X-axis. The total size of the current measurement file is shown to the right of the entry field. Depending on the selected entry in the Windows list box, the change affects either all or only the currently selected window.
• Bookmarks combo-box
If you have defined bookmarks for interesting points in your measure-ment, you can select a bookmark from the list and jump directly to the corresponding point on the time axis of the oscilloscope windows. The oscilloscopes scroll in such a way that the bookmark is displayed in the middle of the visible area of the time axis.
MDA V7.2 - Getting Started

ETAS General MDA Operation
5.4 Tips and Tricks for Operation
5.4.1 Docker Windows
The docking of windows is a feature allowing an effective use of the availablespace on the screen. You can, for example, integrate certain dialog boxes inanother display window.
The MDA provides two dockable window types:
• Legend window
• Signal list
As a rule, the windows can only be docked on the right side or at the bottom ofthe screen.
Legend window
Signal list
MDA V7.2 - Getting Started 49

50
General MDA Operation ETAS
To dock and undock a window:
To dock a window, you must first open it.
• Open the desired legend window with <CTRL> + <M> or by clicking in the toolbar.
• If necessary, open the signal list (only oscilloscope display) with <CTRL> + <L> or by clicking in the toolbar.
• Click with the left mouse-button on the title of the window to be docked and hold it.
• While keeping the mouse-button depressed, drag the window preferably into the bottom right area of the evaluation window.
When you pass over the border of the analysis win-dow, a frame appears at the appropriate places indicating the subsequent position of the docked window.
• Release the mouse button when you are satisfied with the position of the configuration window or the signal list.
The corresponding window is inserted in the evalu-ation window.
• To undock the window, click on its frame (double line) and hold the mouse button while moving the window.
• To remove the docked window, click the Close icon in the top right.
MDA V7.2 - Getting Started

ETAS General MDA Operation
5.4.2 Window Arrangement and Display Options
There are several ways to arrange the individual windows:
• Move the windows manually and adjust the window sizes.
• Use the Window Cascade command; the windows will overlap and have the same size.
• Use the Window Tile horizontally command; the windows will be distributed to the entire desktop and displayed horizontally in the same size.
• Use the Window Tile vertically command; the windows will be dis-tributed to the entire desktop and displayed vertically in the same size.
• Use the Window Minimize all command; all windows will be mini-mized and placed along the bottom of the screen.
• Use the Window Arrange all command; all minimized windows will be arranged sequentially along the bottom of the screen.
• Use the Window Close active window command; the active win-dow will be removed.
• Use the Window Close all windows command; all windows will be closed.
MDA V7.2 - Getting Started 51

52
General MDA Operation ETAS
5.5 Operation Using the Keyboard
MDA can be operated both with the mouse and with the keyboard.
5.5.1 Hotkey Assignment in MDA
To ease keyboard operation, a number of hotkeys have been assigned for themost important actions. You can display a complete overview of the hotkeyassignment at any time by pressing <SHIFT> + <F1>.
5.5.2 Keyboard Operation Compliant With WINDOWS® Conventions
The general operation of MDA, such as navigating in menus or activating a cer-tain windows, complies with the WINDOWS® conventions.
Pressing the underlined letter in a menu while holding down the <ALT> key acti-vates the corresponding command. You can activate a subordinate menu com-mand by pressing the underlined letter together with the <SHIFT> key.
For example, to open the Edit menu with a keyboard command, press the <ALT>+ <E> key combination.
To switch to the next window or list box within the working windows, press the<TAB> key (in the order from top left to bottom right). You can use the under-lined letter of the field or list label, while holding down the <Alt> key, to switchto the corresponding field or list box.
The arrow keys allow you to skip to the next item in list boxes. You can selectmultiple items by making your selection while pressing the <SHIFT> key.
Switching between the individual analysis windows is done—pursuant to theWindows convention—by pressing the <Ctrl> + <TAB> key combination.
General Windows compliant behavior
Key Function
<Shift> + <F10> Open shortcut menu for selected item (right mouse button)
<Alt> Activates the main menu.
<Alt> + <F4> Closes active display window; if the MDA main window is active, MDA exits.
<Alt> + <Space> Open system menu of MDA window
<Alt> + <Tab> Switch between open applications
<Alt> + <-> Open system menu of current window
<Ctrl> + <a> Select all items (e.g., in a list)
<Ctrl> + <c> Copy to clipboard
<Ctrl> + <v> Paste from clipboard
<Ctrl> + <x> Cut and put on clipboard
<Enter> Confirm input and quit input mode
<Del> Delete selected item
<Esc> Cancel input, discard changes
MDA V7.2 - Getting Started
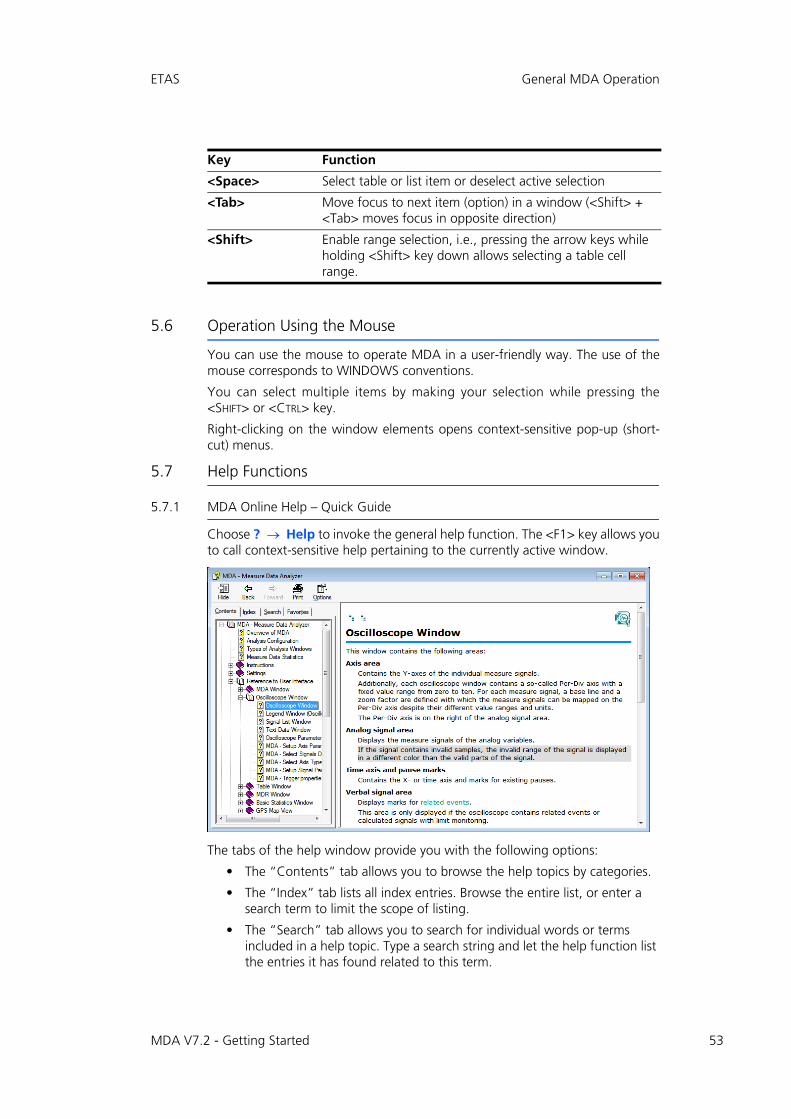
ETAS General MDA Operation
5.6 Operation Using the Mouse
You can use the mouse to operate MDA in a user-friendly way. The use of themouse corresponds to WINDOWS conventions.
You can select multiple items by making your selection while pressing the<SHIFT> or <CTRL> key.
Right-clicking on the window elements opens context-sensitive pop-up (short-cut) menus.
5.7 Help Functions
5.7.1 MDA Online Help – Quick Guide
Choose ? Help to invoke the general help function. The <F1> key allows youto call context-sensitive help pertaining to the currently active window.
The tabs of the help window provide you with the following options:
• The “Contents” tab allows you to browse the help topics by categories.
• The “Index” tab lists all index entries. Browse the entire list, or enter a search term to limit the scope of listing.
• The “Search” tab allows you to search for individual words or terms included in a help topic. Type a search string and let the help function list the entries it has found related to this term.
<Space> Select table or list item or deselect active selection
<Tab> Move focus to next item (option) in a window (<Shift> + <Tab> moves focus in opposite direction)
<Shift> Enable range selection, i.e., pressing the arrow keys while holding <Shift> key down allows selecting a table cell range.
Key Function
MDA V7.2 - Getting Started 53

54
General MDA Operation ETAS
• In the "Favorites" tab you can add your favorite topics in order to retrieve them more easily.
5.7.2 Manual
The complete MDA manual is available in digital version and can be opened onthe screen at any time.
Using the index, full text search, and hypertext links, you can find references fastand conveniently.
You can open the MDA manual via the menu item ? Manuals and Tutorial..
5.7.3 Video Tutorials
Subjects which can easily be shown instead of being described in words are pre-sented as video tutorials. The videos are installed locally on your PC if youselected the installation of video tutorials during installation. They are availableas mp4 files and can be called up from MDA via the menu item ? VideoclipsTutorials. If you did not install them on your PC, you can either view them in theETAS channel on YouTube, or you can download them from the ETAS DownloadCenter.
MDA V7.2 - Getting Started

ETAS Glossary
6 Glossary
The chapter titled “Glossary” explains all technical terms used in the manual. Theterms are listed in alphabetic order.
Analysis configuration The total set of data files and window settings used to analyze a certain set of data. The measure files used, the measure signals to be analyzed, and the individual analysis windows with their settings are saved in the configuration file (*.xda). The configuration file can be loaded, edited, and saved under different names at any time.
ASAM indexing See File indexing.
Bookmark Bookmarks can be set for points of time on the time axis. They can only be created in an oscillo-scope window, but they are applied globally in the configuration. They can be used for directly jump-ing to bookmarked points of time.
Calculated signal A signal that was not measured directly from any device, but is made up from several other signals by combining using a certain calculation that can be defined in MDA. Example: The difference of two signals, calculated by subtracting the values of the signals at each sampling time.
Compression Data compression reduces the amount of data which is written to the measure file without loss of information. Data compression is applicable only for measure files with the format MDF V4.1.
Cursor Mode The following cursor modes are available: time mode (i.e. the cursor is moved in discrete steps along the time axis, e.g. in steps of 0.1 s), Sample mode (i.e. the cursor is moved from timestamp to timestamp), and Fix distance mode (i.e. the two cursors are always moved synchronously and keep a fix distance, i.e. when you move the active cur-sor, the other cursor moves exactly the same dis-tance).
Device A hardware device serving as a data source.
DTA Discontinuous Time Axis; MDA allows you to define and use trigger conditions that can be used for classifying parts of the measurement as rele-vant or irrelevant. Irrelevant parts are hidden, and only the relevant parts are shown. This results in a discontinuous time axis, i.e. a time axis where cer-tain sections are not shown in the display.
ETAS indexing See File indexing.
Event The time at which a certain set of conditions eval-uates to true.
MDA V7.2 - Getting Started 55

56
Glossary ETAS
File indexing While reading huge measure files, MDA reduces samples for a given time range and displays the reduced data. By indexing the measure file, it is possible to save this data reduction with the mea-sure file, thus optimizing the performance when opening the file, zooming or scrolling. ETAS index-ing, which is used only by ETAS tools, is supported for mdf 3.0 and higher; standard indexing which can also be used by 3rd party tools, is supported for mdf 3.3 and higher.
GPS Map View A type on window in MDA used to display GPS data (i.e. GPS tracks constituted of the signals lat-itude, longitude and altitude) in a map.
Global options General settings which are used as default. Those settings which apply to window layout definitions are automatically applied to new windows, but can be overruled for the individual windows after-wards.
Indexing See File indexing.
Legend A window summarizing all settings, as well as con-tained signals and their settings, of an analysis window.
MDA See Measure Data Analyzer.
MDR See Measurement Data Refiller.
MDR Window The MDR window is intended to provide a solution to prepare data for post measurement processing. For example, it is able to reduce the number of used rasters to one raster. When different rasters are used, the measurement might contain gaps for individual timestamps. The user can determine by means of options if and how these gaps are to be filled. This might be of importance for tools that can handle only one raster. The display looks similar to the Table window.
MDF Measurement Data Format;MDF is a binary file format used for storing mea-sured data from sensors, ECU and bus monitoring for post measurement processing. In addition to the plain measurement data, MDF also contains descriptive and customizable meta data within the same file. The format is organized in loosely cou-pled binary blocks to ensure high performance reading and writing. The measurement data is stored channel oriented and uses master channels for synchronization which can be time, angle, dis-tance or simply index related. In contrast to other measure data formats, MDF supports none-equi-distant and multiple sample rates per file, as used in the automotive area.
MDA V7.2 - Getting Started

ETAS Glossary
Measure Data Analyzer The Measure Data Analyzer (MDA) program is an offline instrument for displaying and analyzing recorded measurement data. It runs in its own program window and works in display mode or in analysis mode. Online measurement is not possi-ble in MDA.
Measure data Term used for the data recorded during a mea-surement.
Measurement Data Refiller This method is applied when variables with differ-ent rasters are to be displayed together. When dif-ferent rasters are used, the measurement might contain gaps for individual timestamps. The user can determine by means of options if and how these gaps are to be filled.
Measure file A data file containing data acquired from one or more devices during a measurement. It is also possible to include virtual signals (e.g. calculated signals) in the measure file if these are included in the experiment during measurement. MDF display identifiers are saved in the measure file together with the name of the measure signal so that you can decide in MDA whether you would like to use the measure signal name or the display identifier.
Measure range A certain interval in time, defining a measurement of interest.
Measure variable A variable to be measured.
Oscilloscope window A type of window in MDA used to display data representing signals that vary in time as a curve very much like the curves you would see on an oscilloscope.
PDM axis See Per-Div Axis.
Per-Div axis PDM-Axis. This axis type is a relative scale from value 0 to 10 (without unit), which allows to be used for several signals in parallel, even having dif-ferent physical units. For each signal axis the min-imum value which corresponds to the per-divison value 0, is given as "base" on the per-divison axis. Additionally a factor "per-div" indicates the slope of the signal axis. It is feasible to select for the slope a multiple to 10 (like 1, 100, 0.1) to have a simple relation. The use of the per-div axis is sim-ilar to a real oscilloscope. There the display is usu-ally divided in 10 divisions. The user defines for every signal a base value (lower limit of the dis-play) and a factor (slope from one division to the next).
POI Point Of Interest.
MDA V7.2 - Getting Started 57
58
Glossary ETAS
Point of Interest In time mode, you can mark individual interesting points of a measurement, e.g. a spike, as a Point of Interest. This Point of Interest is displayed as a pink vertical bar indexed with a P . You can only mark one Point of Interest at a time per oscillo-scope. The Point of Interest can later on be used to synchronize different oscilloscopes in relation to this marker.
Posttrigger time When defining the end trigger for a measure-ment, set the posttrigger time to the time interval worth of data you would like to see added after the end trigger occurs.
Pretrigger time When defining the start trigger for a measure-ment range, set the pretrigger time to the time interval worth of data you would like to see added before the start trigger occurs.
Standard indexing See File indexing.
Trigger A trigger is a certain condition which can be defined using Calculated Signals and which is used in MDA for finding and filtering certain infor-mation or for segmentation of data streams.
MDA V7.2 - Getting Started

ETAS Appendix: Troubleshooting MDA Problems
7 Appendix: Troubleshooting MDA Problems
This chapter gives some information of what you can do when problems ariseduring your work with MDA.
7.1 General problems while working with MDA
7.1.1 MDA reacts only after substantial delays
Cause: Virus scanner settings slow down data access
Modifications in measure files can make your virus scanner program scan thedifferences in the files. As a result, operation with MDA is subject to substantialdelays. There is no possibility to stop this, apart from excluding all MDA data filesfrom virus scanning.
Cause: data files are stored on a network drive
If the data files are stored on a network drive, operation with MDA can be slowdue to low network performace (e.g. caused by high network traffic or technicalproblems on the network). It is recommended that you always store the data filesthat you use in MDA on a local disk drive.
Cause: the oscilloscope window contain too many signals
Oscilloscope windows with a great number of signals cause very high data pro-cessing effort. To limit the required capacity, make sure that you do not use morethan 100 signals in the same oscilloscope.
MDA V7.2 - Getting Started 59

60
Appendix: Troubleshooting MDA Problems ETAS
7.2 Problems with Calculated Signals
7.2.1 While trying to select calculated signals, the error message appears: "Perl Inter-face: DllGetEtasDataPath() failed"
Cause: No write permission for the required registry folder
Calculated signals can be imported and exported by means of exchange fileswith the *.xcs extension. The perl interface is used for this purpose.
In order to use the perl interface correctly, you require read and write access tothe HKEY_LOCAL_MACHINE\Software\ETAS registry folder.
MDA V7.2 - Getting Started

MDA V7.2 - Getting Started 61
ETAS ETAS Contact Addresses
8 ETAS Contact Addresses
ETAS HQ
ETAS GmbH
ETAS Subsidiaries and Technical Support
For details of your local sales office as well as your local technical support teamand product hotlines, take a look at the ETAS website:
Borsigstraße 24 Phone: +49 711 3423-0
70469 Stuttgart Fax: +49 711 3423-2106
Germany WWW: www.etas.com
ETAS subsidiaries WWW: www.etas.com/en/contact.php
ETAS technical support WWW: www.etas.com/en/hotlines.php