MATA LOMBA : Networking Support Tahun LOMBA : … · L K S N e t w o r k i n g S u p p o r t ( K h...
22
LKS Networking Support(Khairul Ilham) MATA LOMBA : Networking Support Tahun LOMBA : 2012 Tempat LOMBA: Binangun
-
Upload
phungkhuong -
Category
Documents
-
view
213 -
download
0
Transcript of MATA LOMBA : Networking Support Tahun LOMBA : … · L K S N e t w o r k i n g S u p p o r t ( K h...

L K S N e t w o r k i n g S u p p o r t ( K h a i r u l I l h a m )
MATA LOMBA : Networking Support
Tahun LOMBA : 2012
Tempat LOMBA: Binangun
L K S N e t w o r k i n g S u p p o r t ( K h a i r u l I l h a m )
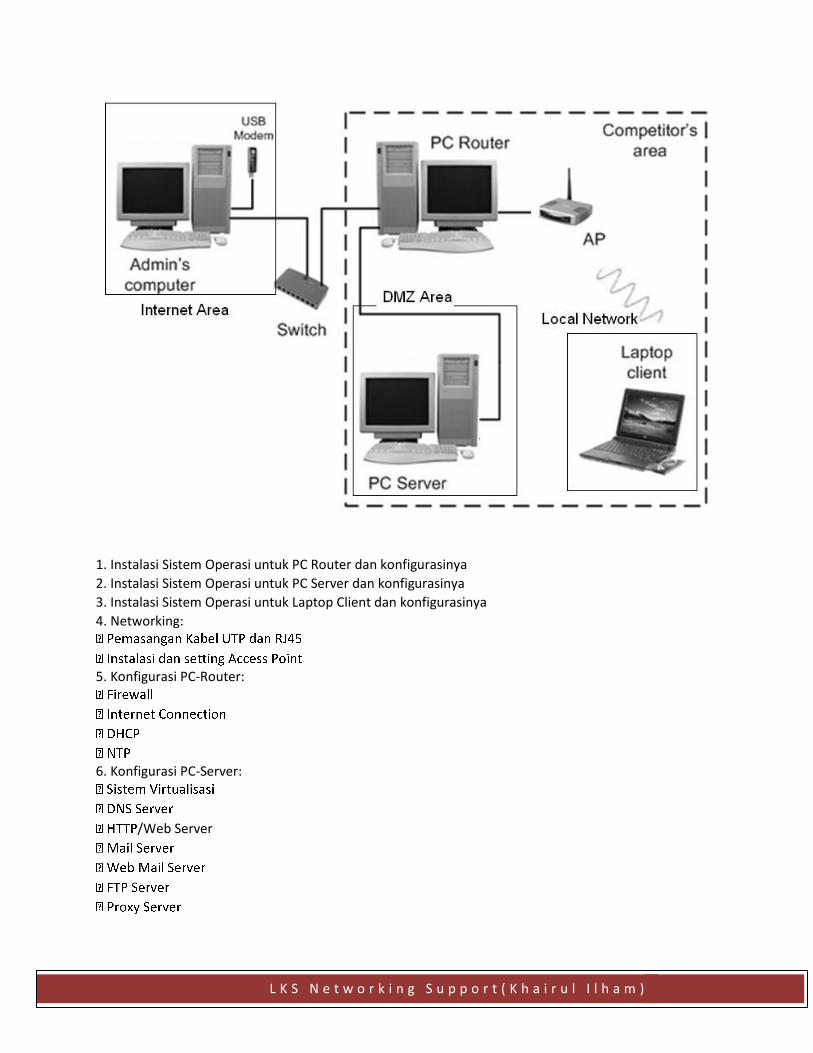
1. Instalasi Sistem Operasi untuk PC Router dan konfigurasinya
2. Instalasi Sistem Operasi untuk PC Server dan konfigurasinya
3. Instalasi Sistem Operasi untuk Laptop Client dan konfigurasinya
4. Networking:
5. Konfigurasi PC-Router:
6. Konfigurasi PC-Server:
/Web Server
L K S N e t w o r k i n g S u p p o r t ( K h a i r u l I l h a m )
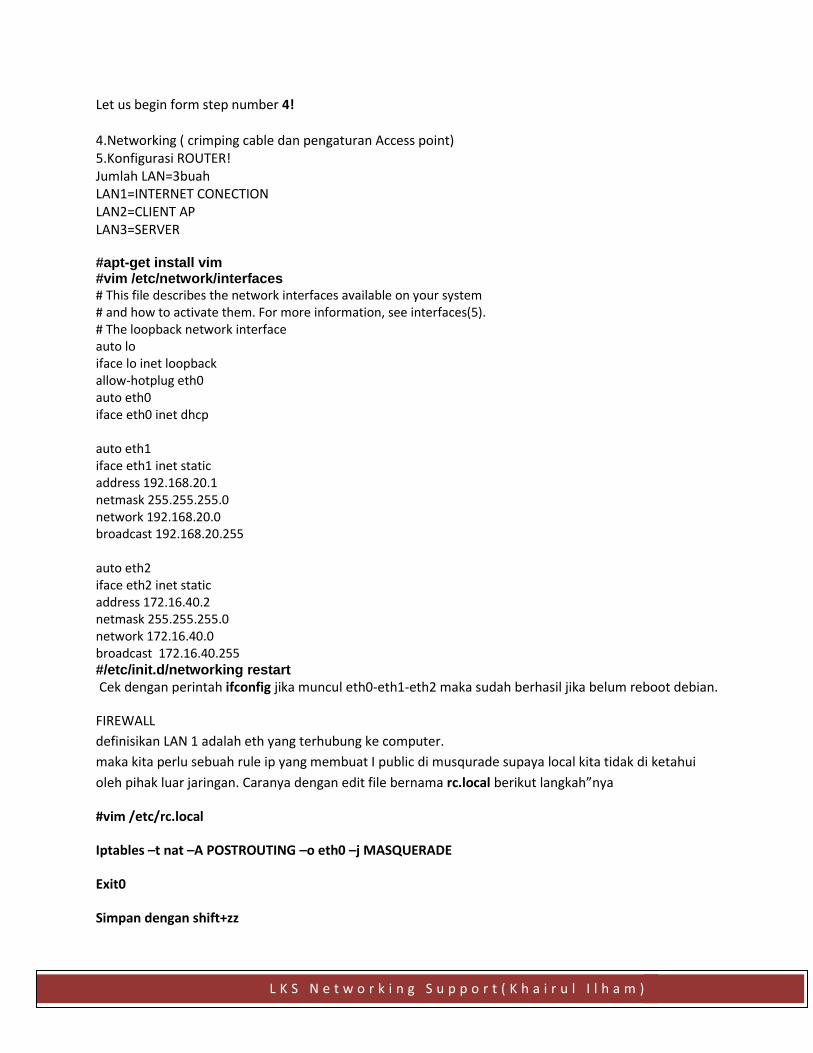
Let us begin form step number 4! 4.Networking ( crimping cable dan pengaturan Access point) 5.Konfigurasi ROUTER! Jumlah LAN=3buah LAN1=INTERNET CONECTION LAN2=CLIENT AP LAN3=SERVER #apt-get install vim #vim /etc/network/interfaces # This file describes the network interfaces available on your system # and how to activate them. For more information, see interfaces(5). # The loopback network interface auto lo iface lo inet loopback allow-hotplug eth0 auto eth0 iface eth0 inet dhcp auto eth1 iface eth1 inet static address 192.168.20.1 netmask 255.255.255.0 network 192.168.20.0 broadcast 192.168.20.255 auto eth2 iface eth2 inet static address 172.16.40.2 netmask 255.255.255.0 network 172.16.40.0 broadcast 172.16.40.255 #/etc/init.d/networking restart Cek dengan perintah ifconfig jika muncul eth0-eth1-eth2 maka sudah berhasil jika belum reboot debian.
FIREWALL
definisikan LAN 1 adalah eth yang terhubung ke computer.
maka kita perlu sebuah rule ip yang membuat I public di musqurade supaya local kita tidak di ketahui
oleh pihak luar jaringan. Caranya dengan edit file bernama rc.local berikut langkah”nya
#vim /etc/rc.local
Iptables –t nat –A POSTROUTING –o eth0 –j MASQUERADE
Exit0
Simpan dengan shift+zz
L K S N e t w o r k i n g S u p p o r t ( K h a i r u l I l h a m )
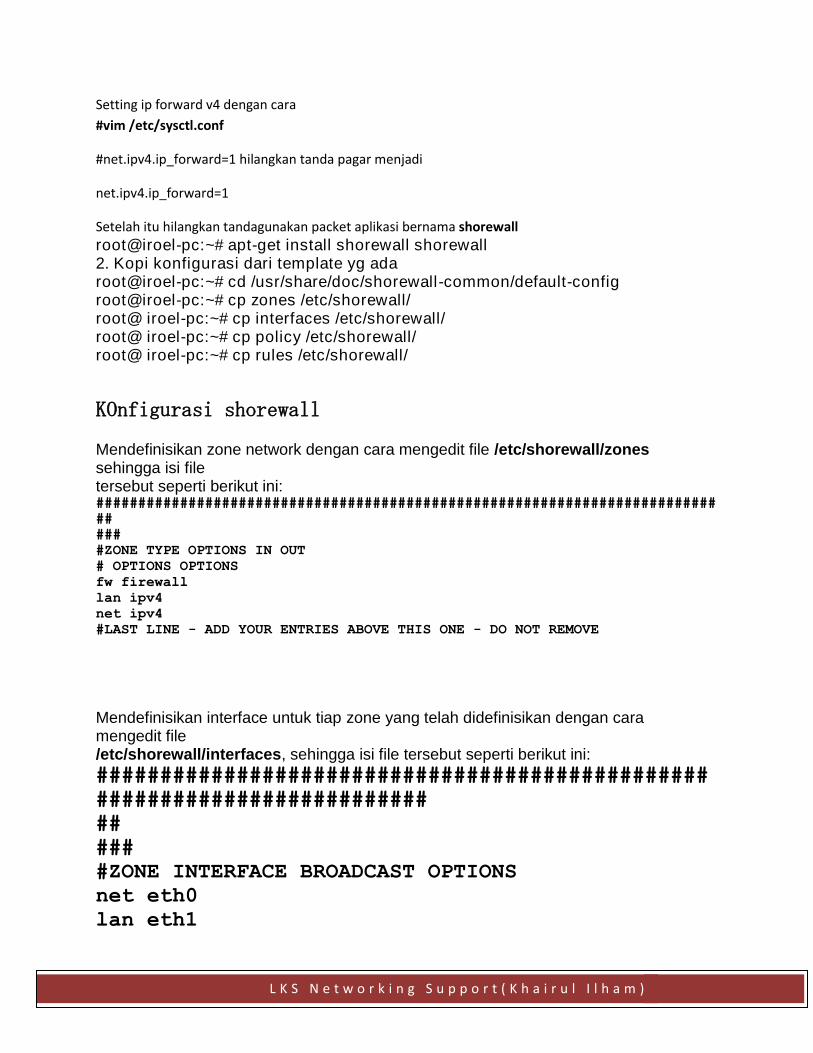
Setting ip forward v4 dengan cara
#vim /etc/sysctl.conf
#net.ipv4.ip_forward=1 hilangkan tanda pagar menjadi
net.ipv4.ip_forward=1
Setelah itu hilangkan tandagunakan packet aplikasi bernama shorewall
root@iroel-pc:~# apt-get install shorewall shorewall 2. Kopi konfigurasi dari template yg ada root@iroel-pc:~# cd /usr/share/doc/shorewall-common/default-config root@iroel-pc:~# cp zones /etc/shorewall/ root@ iroel-pc:~# cp interfaces /etc/shorewall/ root@ iroel-pc:~# cp policy /etc/shorewall/ root@ iroel-pc:~# cp rules /etc/shorewall/
KOnfigurasi shorewall
Mendefinisikan zone network dengan cara mengedit file /etc/shorewall/zones sehingga isi file tersebut seperti berikut ini: ##########################################################################
##
###
#ZONE TYPE OPTIONS IN OUT
# OPTIONS OPTIONS
fw firewall
lan ipv4
net ipv4
#LAST LINE - ADD YOUR ENTRIES ABOVE THIS ONE - DO NOT REMOVE
Mendefinisikan interface untuk tiap zone yang telah didefinisikan dengan cara mengedit file /etc/shorewall/interfaces, sehingga isi file tersebut seperti berikut ini:
################################################
##########################
##
###
#ZONE INTERFACE BROADCAST OPTIONS
net eth0
lan eth1
L K S N e t w o r k i n g S u p p o r t ( K h a i r u l I l h a m )
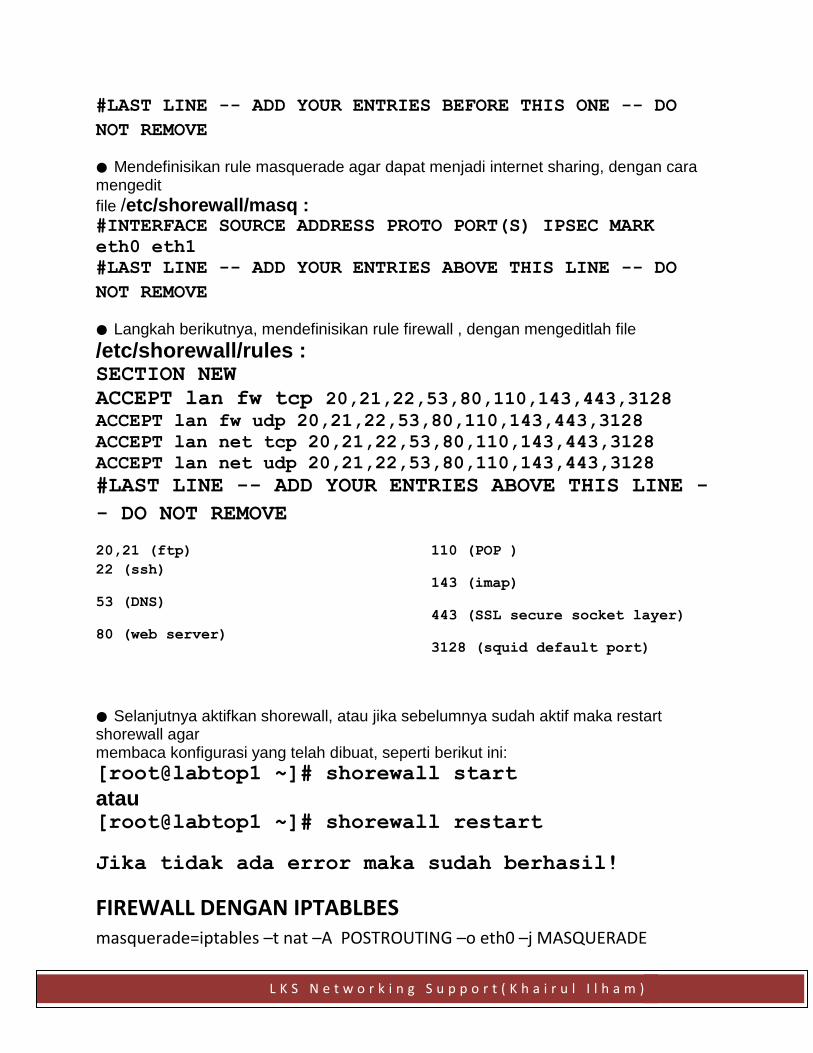
#LAST LINE -- ADD YOUR ENTRIES BEFORE THIS ONE -- DO
NOT REMOVE
● Mendefinisikan rule masquerade agar dapat menjadi internet sharing, dengan cara mengedit
file /etc/shorewall/masq : #INTERFACE SOURCE ADDRESS PROTO PORT(S) IPSEC MARK
eth0 eth1
#LAST LINE -- ADD YOUR ENTRIES ABOVE THIS LINE -- DO
NOT REMOVE
● Langkah berikutnya, mendefinisikan rule firewall , dengan mengeditlah file
/etc/shorewall/rules : SECTION NEW
ACCEPT lan fw tcp 20,21,22,53,80,110,143,443,3128 ACCEPT lan fw udp 20,21,22,53,80,110,143,443,3128
ACCEPT lan net tcp 20,21,22,53,80,110,143,443,3128
ACCEPT lan net udp 20,21,22,53,80,110,143,443,3128
#LAST LINE -- ADD YOUR ENTRIES ABOVE THIS LINE -
- DO NOT REMOVE
20,21 (ftp)
22 (ssh)
53 (DNS)
80 (web server)
110 (POP )
143 (imap)
443 (SSL secure socket layer)
3128 (squid default port)
● Selanjutnya aktifkan shorewall, atau jika sebelumnya sudah aktif maka restart shorewall agar membaca konfigurasi yang telah dibuat, seperti berikut ini:
[root@labtop1 ~]# shorewall start
atau [root@labtop1 ~]# shorewall restart
Jika tidak ada error maka sudah berhasil!
FIREWALL DENGAN IPTABLBES masquerade=iptables –t nat –A POSTROUTING –o eth0 –j MASQUERADE
L K S N e t w o r k i n g S u p p o r t ( K h a i r u l I l h a m )
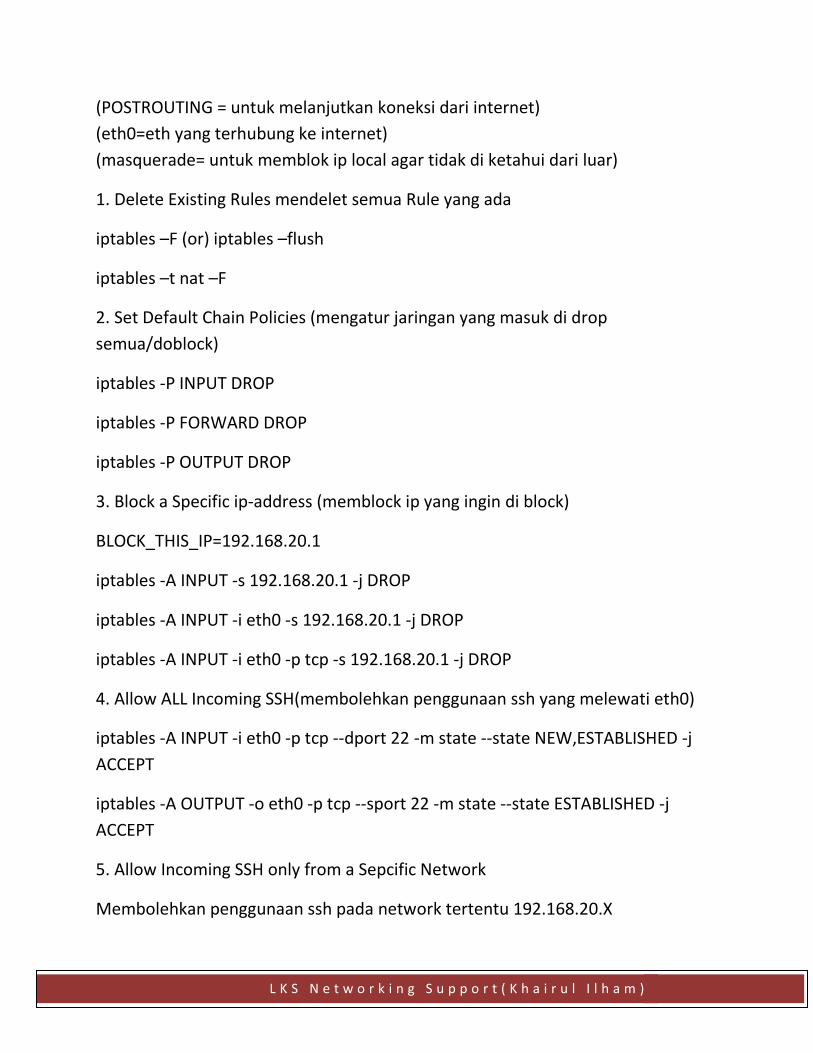
(POSTROUTING = untuk melanjutkan koneksi dari internet)
(eth0=eth yang terhubung ke internet)
(masquerade= untuk memblok ip local agar tidak di ketahui dari luar)
1. Delete Existing Rules mendelet semua Rule yang ada
iptables –F (or) iptables –flush
iptables –t nat –F
2. Set Default Chain Policies (mengatur jaringan yang masuk di drop
semua/doblock)
iptables -P INPUT DROP
iptables -P FORWARD DROP
iptables -P OUTPUT DROP
3. Block a Specific ip-address (memblock ip yang ingin di block)
BLOCK_THIS_IP=192.168.20.1
iptables -A INPUT -s 192.168.20.1 -j DROP
iptables -A INPUT -i eth0 -s 192.168.20.1 -j DROP
iptables -A INPUT -i eth0 -p tcp -s 192.168.20.1 -j DROP
4. Allow ALL Incoming SSH(membolehkan penggunaan ssh yang melewati eth0)
iptables -A INPUT -i eth0 -p tcp --dport 22 -m state --state NEW,ESTABLISHED -j
ACCEPT
iptables -A OUTPUT -o eth0 -p tcp --sport 22 -m state --state ESTABLISHED -j
ACCEPT
5. Allow Incoming SSH only from a Sepcific Network
Membolehkan penggunaan ssh pada network tertentu 192.168.20.X
L K S N e t w o r k i n g S u p p o r t ( K h a i r u l I l h a m )
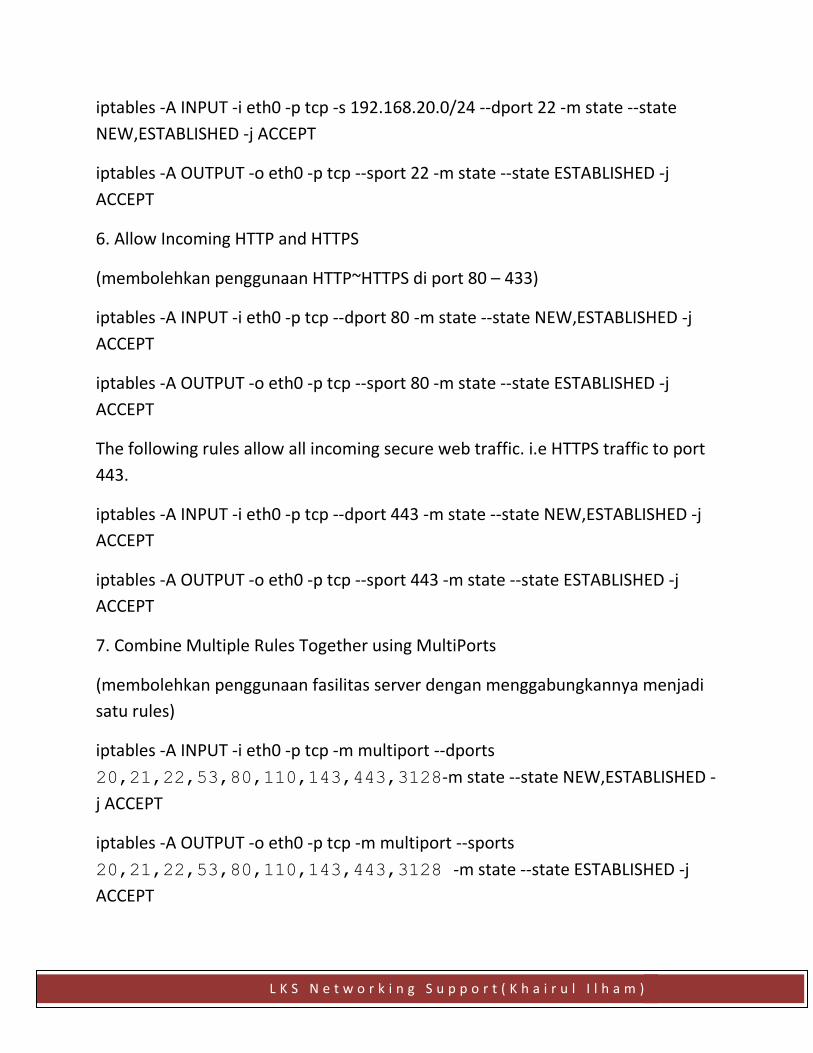
iptables -A INPUT -i eth0 -p tcp -s 192.168.20.0/24 --dport 22 -m state --state
NEW,ESTABLISHED -j ACCEPT
iptables -A OUTPUT -o eth0 -p tcp --sport 22 -m state --state ESTABLISHED -j
ACCEPT
6. Allow Incoming HTTP and HTTPS
(membolehkan penggunaan HTTP~HTTPS di port 80 – 433)
iptables -A INPUT -i eth0 -p tcp --dport 80 -m state --state NEW,ESTABLISHED -j
ACCEPT
iptables -A OUTPUT -o eth0 -p tcp --sport 80 -m state --state ESTABLISHED -j
ACCEPT
The following rules allow all incoming secure web traffic. i.e HTTPS traffic to port
443.
iptables -A INPUT -i eth0 -p tcp --dport 443 -m state --state NEW,ESTABLISHED -j
ACCEPT
iptables -A OUTPUT -o eth0 -p tcp --sport 443 -m state --state ESTABLISHED -j
ACCEPT
7. Combine Multiple Rules Together using MultiPorts
(membolehkan penggunaan fasilitas server dengan menggabungkannya menjadi
satu rules)
iptables -A INPUT -i eth0 -p tcp -m multiport --dports
20,21,22,53,80,110,143,443,3128-m state --state NEW,ESTABLISHED -
j ACCEPT
iptables -A OUTPUT -o eth0 -p tcp -m multiport --sports
20,21,22,53,80,110,143,443,3128 -m state --state ESTABLISHED -j
ACCEPT
L K S N e t w o r k i n g S u p p o r t ( K h a i r u l I l h a m )
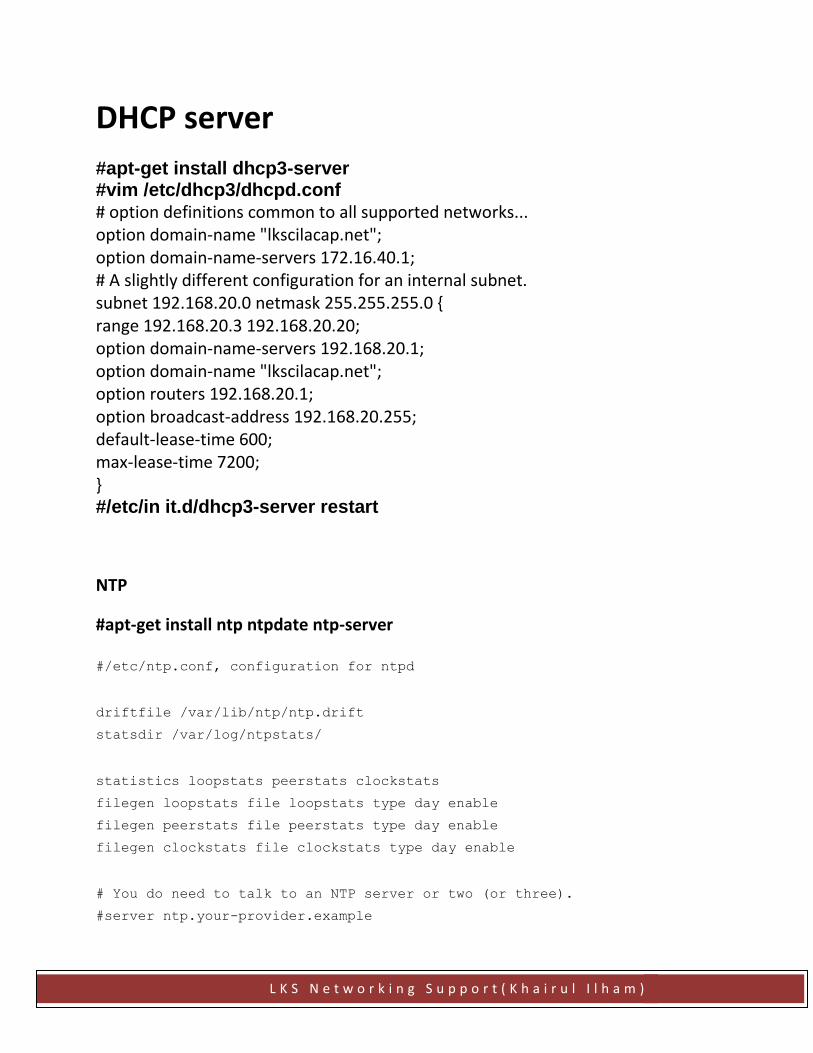
DHCP server
#apt-get install dhcp3-server #vim /etc/dhcp3/dhcpd.conf # option definitions common to all supported networks... option domain-name "lkscilacap.net"; option domain-name-servers 172.16.40.1; # A slightly different configuration for an internal subnet. subnet 192.168.20.0 netmask 255.255.255.0 { range 192.168.20.3 192.168.20.20; option domain-name-servers 192.168.20.1; option domain-name "lkscilacap.net"; option routers 192.168.20.1; option broadcast-address 192.168.20.255; default-lease-time 600; max-lease-time 7200; } #/etc/in it.d/dhcp3-server restart
NTP
#apt-get install ntp ntpdate ntp-server
#/etc/ntp.conf, configuration for ntpd
driftfile /var/lib/ntp/ntp.drift
statsdir /var/log/ntpstats/
statistics loopstats peerstats clockstats
filegen loopstats file loopstats type day enable
filegen peerstats file peerstats type day enable
filegen clockstats file clockstats type day enable
# You do need to talk to an NTP server or two (or three).
#server ntp.your-provider.example
L K S N e t w o r k i n g S u p p o r t ( K h a i r u l I l h a m )
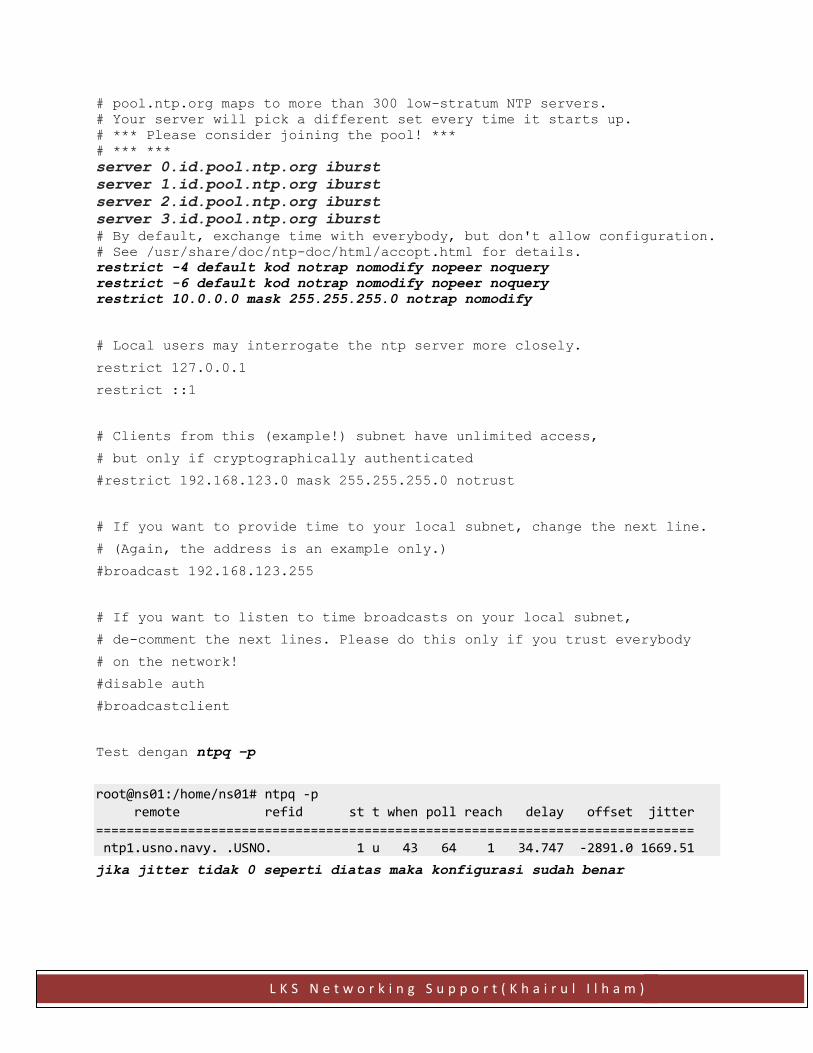
# pool.ntp.org maps to more than 300 low-stratum NTP servers.
# Your server will pick a different set every time it starts up.
# *** Please consider joining the pool! ***
# *** ***
server 0.id.pool.ntp.org iburst
server 1.id.pool.ntp.org iburst
server 2.id.pool.ntp.org iburst
server 3.id.pool.ntp.org iburst
# By default, exchange time with everybody, but don't allow configuration.
# See /usr/share/doc/ntp-doc/html/accopt.html for details.
restrict -4 default kod notrap nomodify nopeer noquery
restrict -6 default kod notrap nomodify nopeer noquery
restrict 10.0.0.0 mask 255.255.255.0 notrap nomodify
# Local users may interrogate the ntp server more closely.
restrict 127.0.0.1
restrict ::1
# Clients from this (example!) subnet have unlimited access,
# but only if cryptographically authenticated
#restrict 192.168.123.0 mask 255.255.255.0 notrust
# If you want to provide time to your local subnet, change the next line.
# (Again, the address is an example only.)
#broadcast 192.168.123.255
# If you want to listen to time broadcasts on your local subnet,
# de-comment the next lines. Please do this only if you trust everybody
# on the network!
#disable auth
#broadcastclient
Test dengan ntpq –p
root@ns01:/home/ns01# ntpq -p
remote refid st t when poll reach delay offset jitter
==============================================================================
ntp1.usno.navy. .USNO. 1 u 43 64 1 34.747 -2891.0 1669.51
jika jitter tidak 0 seperti diatas maka konfigurasi sudah benar

L K S N e t w o r k i n g S u p p o r t ( K h a i r u l I l h a m )
Konfigurasi SERVER!
Konfigurasi ipnya terlebih dahulu
1. IP ADDRESS
#apt-get install vim
#vim /etc/network/interfaces
# This file describes the network interfaces available on your system # and how to activate them. For more information, see interfaces(5). # The loopback network interface auto lo iface lo inet loopback auto eth0
iface eth0 inet static address 172.16.40.1 netmask 255.255.255.0 network 172.16.40.0 broadcast 172.16.40.255 #/etc/init.d/networking restart
Coba cek dengan cara ifconfig eth0 jika sudah muncul dan terdaftar ipnya maka hal ini sudah berhasil.
2. DNS-SERVER #apt-get install bind9 #vim /etc/bind/named.conf.local // // Do any local configuration here // // Consider adding the 1918 zones here, if they are not used in your // organization //include "/etc/bind/zones.rfc1918"; zone " lkscilacap.net " { type master; file "/etc/bind/db.lkscilacap.net"; zone "40.2.172.in-addr.arpa" { type master; file "/etc/bind/db.172"; };
SHIFT+ZZ untuk menyimpan.
Copi file default bind untuk membuat file forward & reverse
L K S N e t w o r k i n g S u p p o r t ( K h a i r u l I l h a m )
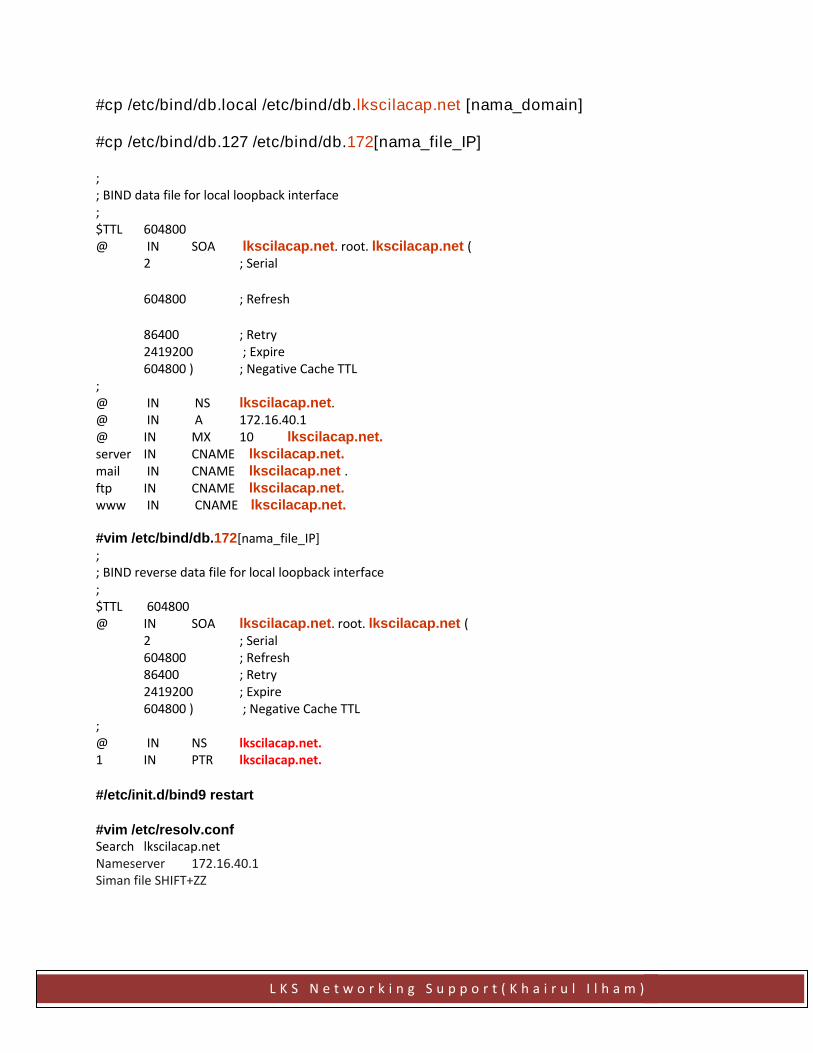
#cp /etc/bind/db.local /etc/bind/db.lkscilacap.net [nama_domain]
#cp /etc/bind/db.127 /etc/bind/db.172[nama_file_IP]
; ; BIND data file for local loopback interface ; $TTL 604800 @ IN SOA lkscilacap.net. root. lkscilacap.net (
2 ; Serial
604800 ; Refresh
86400 ; Retry 2419200 ; Expire 604800 ) ; Negative Cache TTL
; @ IN NS lkscilacap.net. @ IN A 172.16.40.1 @ IN MX 10 lkscilacap.net.
server IN CNAME lkscilacap.net.
mail IN CNAME lkscilacap.net . ftp IN CNAME lkscilacap.net.
www IN CNAME lkscilacap.net.
#vim /etc/bind/db.172[nama_file_IP] ; ; BIND reverse data file for local loopback interface ; $TTL 604800 @ IN SOA lkscilacap.net. root. lkscilacap.net (
2 ; Serial 604800 ; Refresh 86400 ; Retry 2419200 ; Expire 604800 ) ; Negative Cache TTL
; @ IN NS lkscilacap.net. 1 IN PTR lkscilacap.net.
#/etc/init.d/bind9 restart
#vim /etc/resolv.conf Search lkscilacap.net Nameserver 172.16.40.1 Siman file SHIFT+ZZ
L K S N e t w o r k i n g S u p p o r t ( K h a i r u l I l h a m )
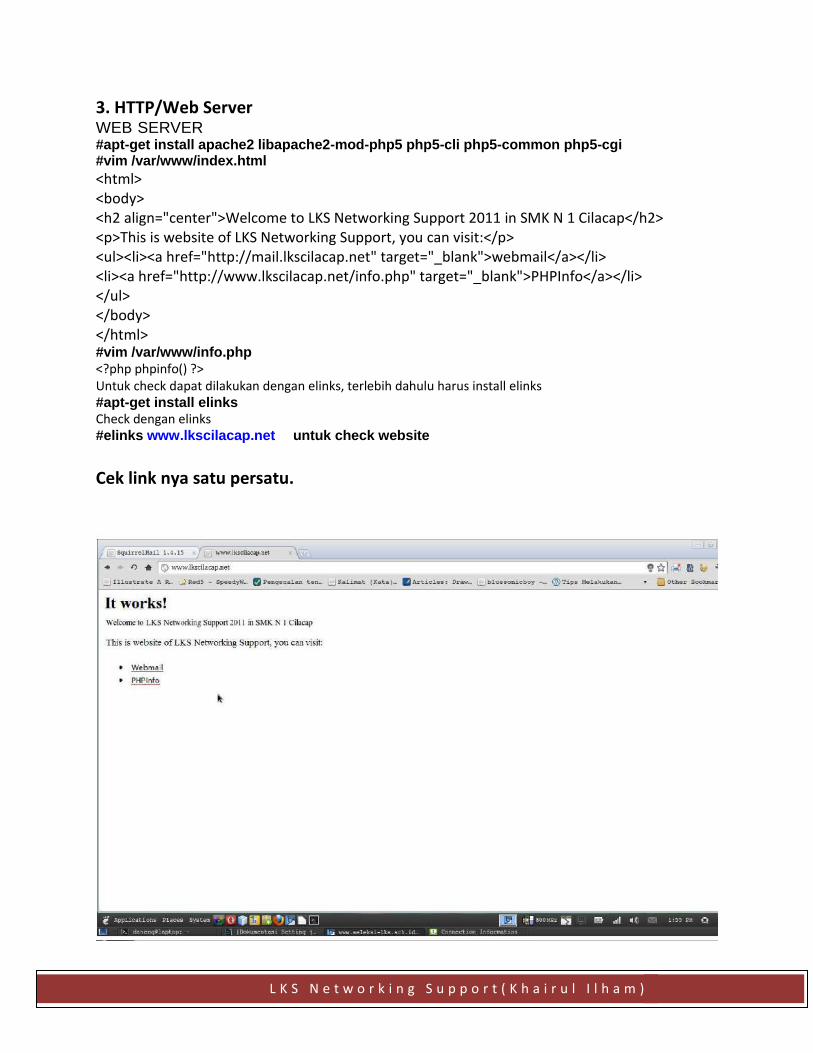
3. HTTP/Web Server WEB SERVER #apt-get install apache2 libapache2-mod-php5 php5-cli php5-common php5-cgi #vim /var/www/index.html
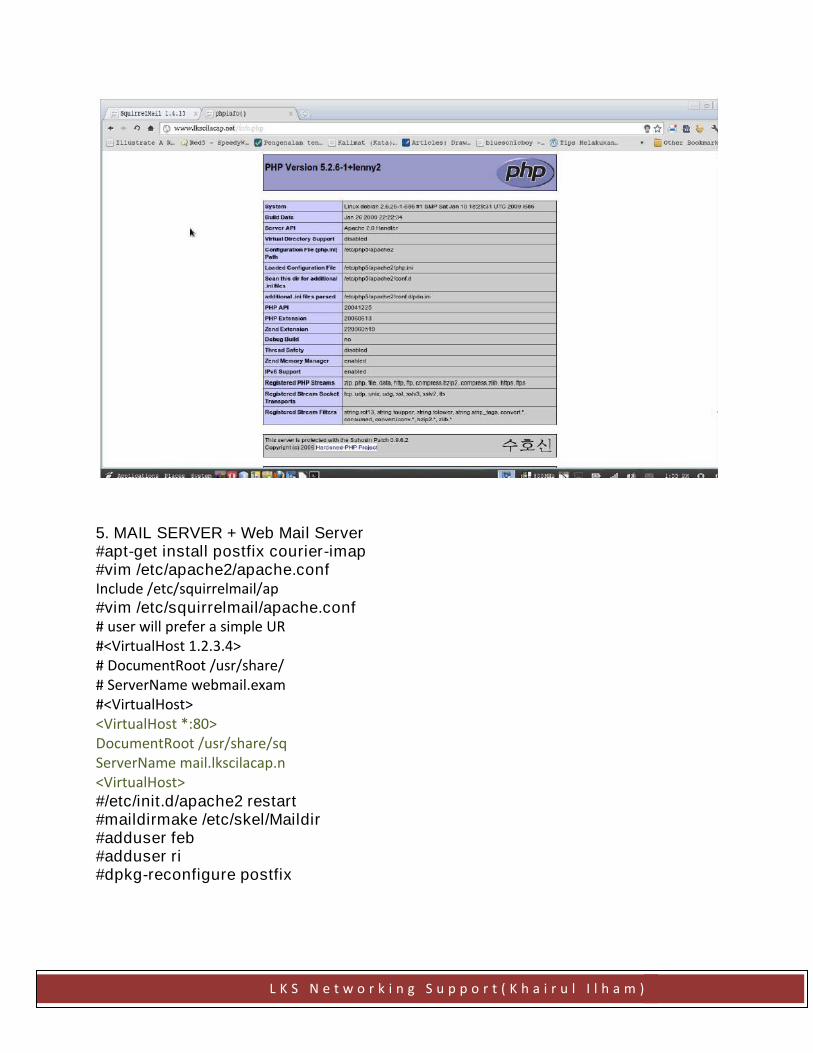
<html> <body> <h2 align="center">Welcome to LKS Networking Support 2011 in SMK N 1 Cilacap</h2> <p>This is website of LKS Networking Support, you can visit:</p> <ul><li><a href="http://mail.lkscilacap.net" target="_blank">webmail</a></li> <li><a href="http://www.lkscilacap.net/info.php" target="_blank">PHPInfo</a></li> </ul> </body> </html> #vim /var/www/info.php <?php phpinfo() ?> Untuk check dapat dilakukan dengan elinks, terlebih dahulu harus install elinks #apt-get install elinks Check dengan elinks #elinks www.lkscilacap.net untuk check website
Cek link nya satu persatu.
L K S N e t w o r k i n g S u p p o r t ( K h a i r u l I l h a m )
5. MAIL SERVER + Web Mail Server #apt-get install postfix courier-imap #vim /etc/apache2/apache.conf Include /etc/squirrelmail/ap #vim /etc/squirrelmail/apache.conf # user will prefer a simple UR #<VirtualHost 1.2.3.4> # DocumentRoot /usr/share/ # ServerName webmail.exam #<VirtualHost> <VirtualHost *:80> DocumentRoot /usr/share/sq ServerName mail.lkscilacap.n <VirtualHost> #/etc/init.d/apache2 restart #maildirmake /etc/skel/Maildir #adduser feb #adduser ri #dpkg-reconfigure postfix
L K S N e t w o r k i n g S u p p o r t ( K h a i r u l I l h a m )
NO tambahkan network kita pada akhir baris yang ada, dalam hal ini 192.168.3.0/28 [kemudian OK] NO 0 OK ipv4 #vim /etc/postfix/main.cf home_mailbox= Maildir/
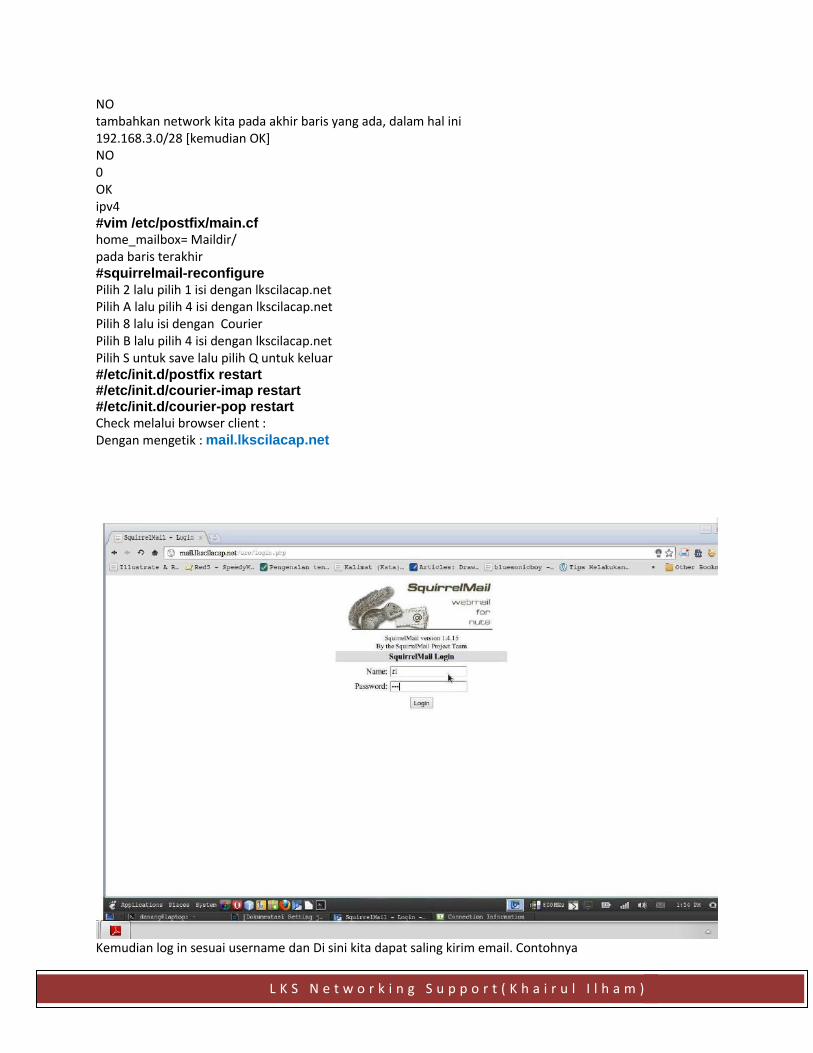
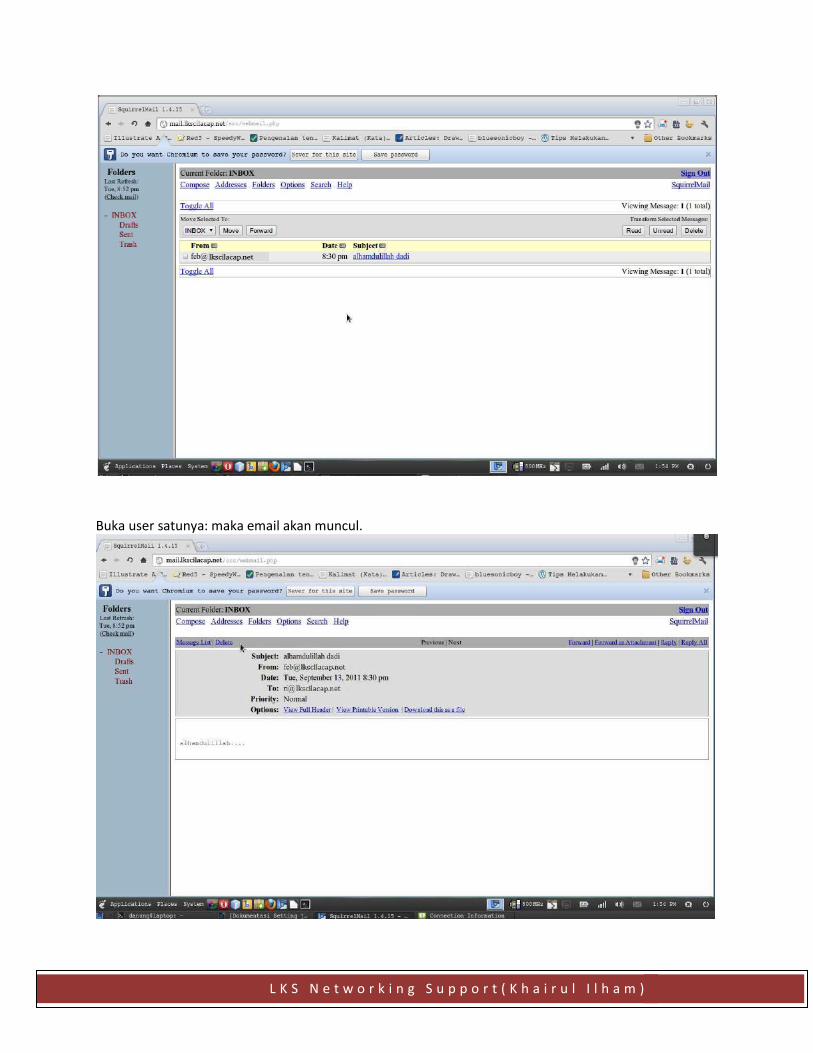
pada baris terakhir #squirrelmail-reconfigure Pilih 2 lalu pilih 1 isi dengan lkscilacap.net Pilih A lalu pilih 4 isi dengan lkscilacap.net Pilih 8 lalu isi dengan Courier Pilih B lalu pilih 4 isi dengan lkscilacap.net Pilih S untuk save lalu pilih Q untuk keluar #/etc/init.d/postfix restart #/etc/init.d/courier-imap restart #/etc/init.d/courier-pop restart Check melalui browser client : Dengan mengetik : mail.lkscilacap.net
Kemudian log in sesuai username dan Di sini kita dapat saling kirim email. Contohnya
L K S N e t w o r k i n g S u p p o r t ( K h a i r u l I l h a m )
Buka user satunya: maka email akan muncul.
L K S N e t w o r k i n g S u p p o r t ( K h a i r u l I l h a m )
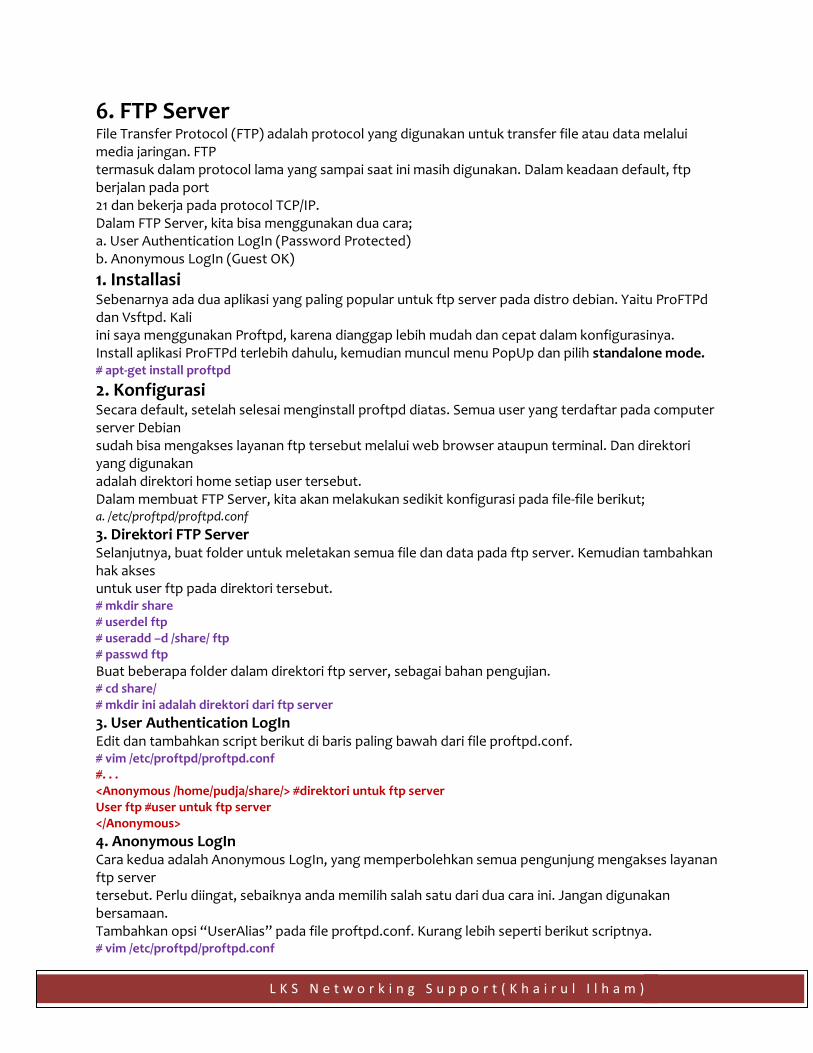
6. FTP Server File Transfer Protocol (FTP) adalah protocol yang digunakan untuk transfer file atau data melalui media jaringan. FTP termasuk dalam protocol lama yang sampai saat ini masih digunakan. Dalam keadaan default, ftp berjalan pada port 21 dan bekerja pada protocol TCP/IP. Dalam FTP Server, kita bisa menggunakan dua cara; a. User Authentication LogIn (Password Protected) b. Anonymous LogIn (Guest OK)
1. Installasi Sebenarnya ada dua aplikasi yang paling popular untuk ftp server pada distro debian. Yaitu ProFTPd dan Vsftpd. Kali ini saya menggunakan Proftpd, karena dianggap lebih mudah dan cepat dalam konfigurasinya. Install aplikasi ProFTPd terlebih dahulu, kemudian muncul menu PopUp dan pilih standalone mode. # apt-get install proftpd
2. Konfigurasi
Secara default, setelah selesai menginstall proftpd diatas. Semua user yang terdaftar pada computer server Debian sudah bisa mengakses layanan ftp tersebut melalui web browser ataupun terminal. Dan direktori yang digunakan adalah direktori home setiap user tersebut. Dalam membuat FTP Server, kita akan melakukan sedikit konfigurasi pada file-file berikut; a. /etc/proftpd/proftpd.conf
3. Direktori FTP Server Selanjutnya, buat folder untuk meletakan semua file dan data pada ftp server. Kemudian tambahkan hak akses untuk user ftp pada direktori tersebut. # mkdir share # userdel ftp # useradd –d /share/ ftp # passwd ftp
Buat beberapa folder dalam direktori ftp server, sebagai bahan pengujian. # cd share/ # mkdir ini adalah direktori dari ftp server
3. User Authentication LogIn Edit dan tambahkan script berikut di baris paling bawah dari file proftpd.conf. # vim /etc/proftpd/proftpd.conf #. . . <Anonymous /home/pudja/share/> #direktori untuk ftp server User ftp #user untuk ftp server </Anonymous>
4. Anonymous LogIn Cara kedua adalah Anonymous LogIn, yang memperbolehkan semua pengunjung mengakses layanan ftp server tersebut. Perlu diingat, sebaiknya anda memilih salah satu dari dua cara ini. Jangan digunakan bersamaan. Tambahkan opsi “UserAlias” pada file proftpd.conf. Kurang lebih seperti berikut scriptnya. # vim /etc/proftpd/proftpd.conf

L K S N e t w o r k i n g S u p p o r t ( K h a i r u l I l h a m )
#. . . <Anonymous /home/pudja/share/> User ftp UserAlias anonymous ftp #tambahkan script ini </Anonymous> # /etc/init.d/proftp restart
7. Proxy Server INSTALASI DAN KONFIGURASI SQUID
a. Install paket aplikasi “SQUID”, dengan mengetikkan perintah :
b. Edit file “squid.conf” dgn mengetikkan perintah :
Carilah dan ubah script-script berikut ini ,(cari dgn menekan Ctrl+W) :
- Cari kata "http-port 3128” tambahkan “transparent” setelah angka “3128” sehingga menjadi
seperti berikut :
- Cari kata “acl CONNECT” dan tambahkan script berikut di bawahnya (yang diarsir kuning) :
L K S N e t w o r k i n g S u p p o r t ( K h a i r u l I l h a m )
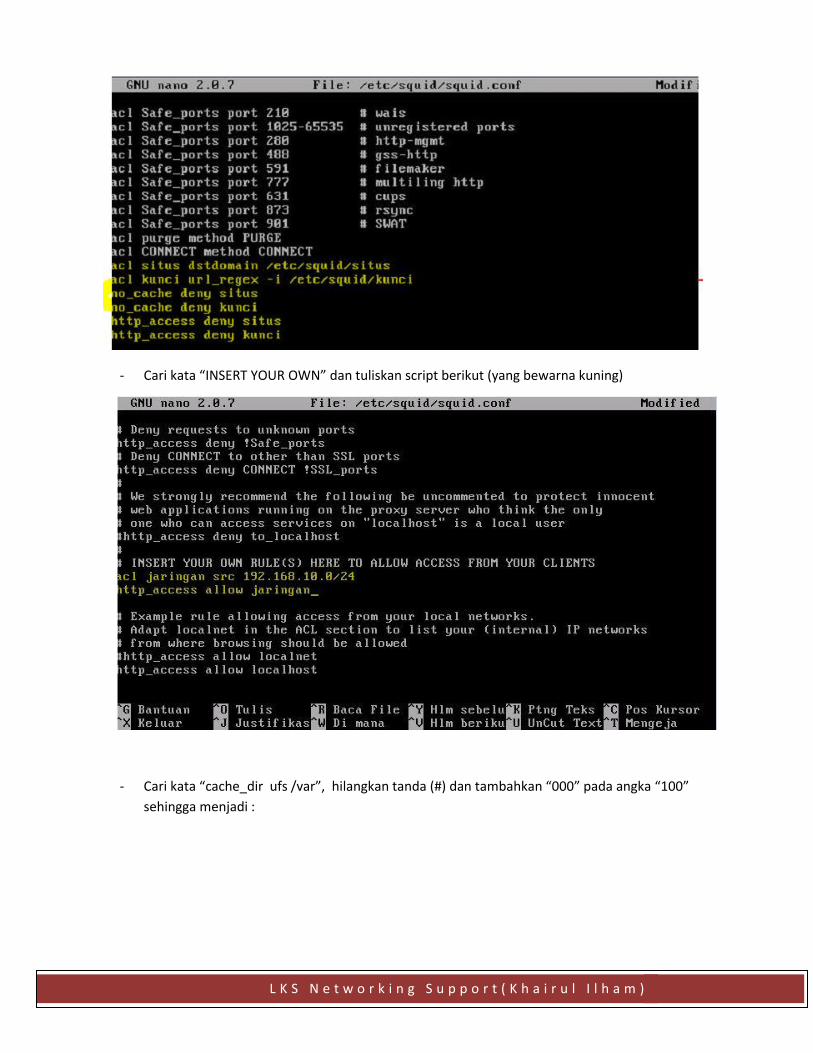
- Cari kata “INSERT YOUR OWN” dan tuliskan script berikut (yang bewarna kuning)
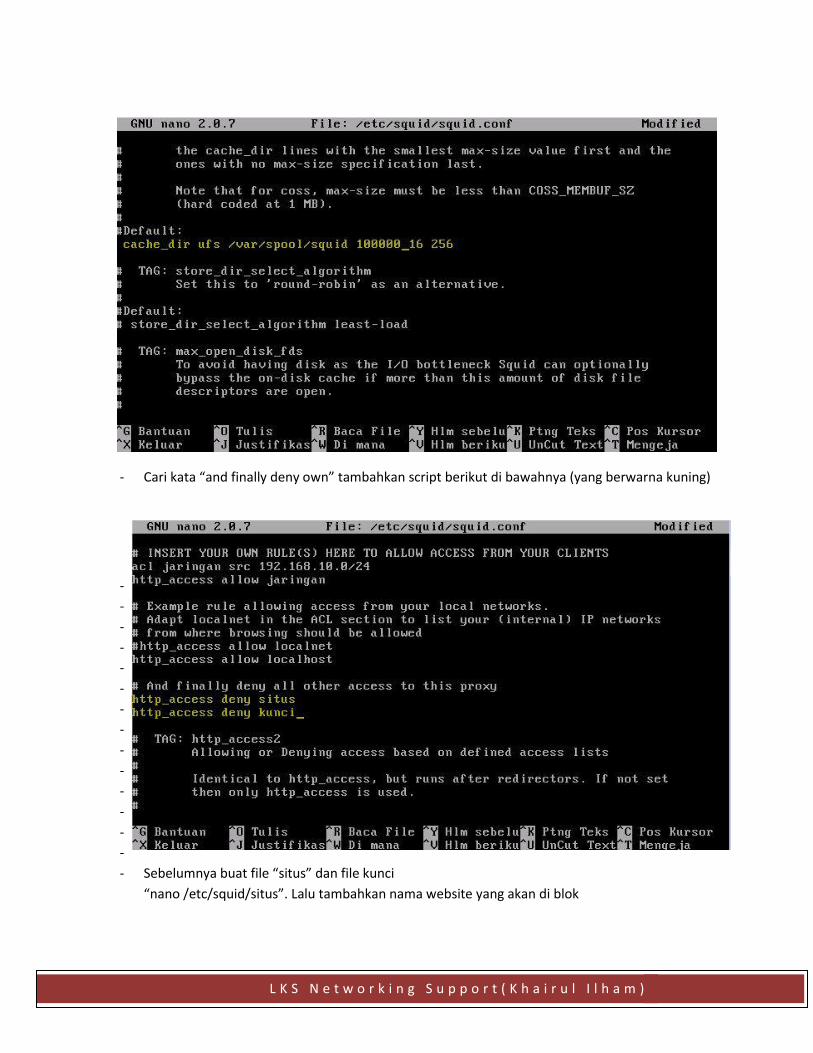
- Cari kata “cache_dir ufs /var”, hilangkan tanda (#) dan tambahkan “000” pada angka “100”
sehingga menjadi :
L K S N e t w o r k i n g S u p p o r t ( K h a i r u l I l h a m )
- Cari kata “and finally deny own” tambahkan script berikut di bawahnya (yang berwarna kuning)
-
-
-
-
-
-
-
-
-
-
-
-
-
-
- Sebelumnya buat file “situs” dan file kunci
“nano /etc/squid/situs”. Lalu tambahkan nama website yang akan di blok

L K S N e t w o r k i n g S u p p o r t ( K h a i r u l I l h a m )
- Tambahkan file “kunci” dgn cara “nano /etc/squid/kunci”
-
- Edit file “rc.local” tambahkan baris script di atas exit0
- Restar squid dgn perintah /etc/init.d/squid restart
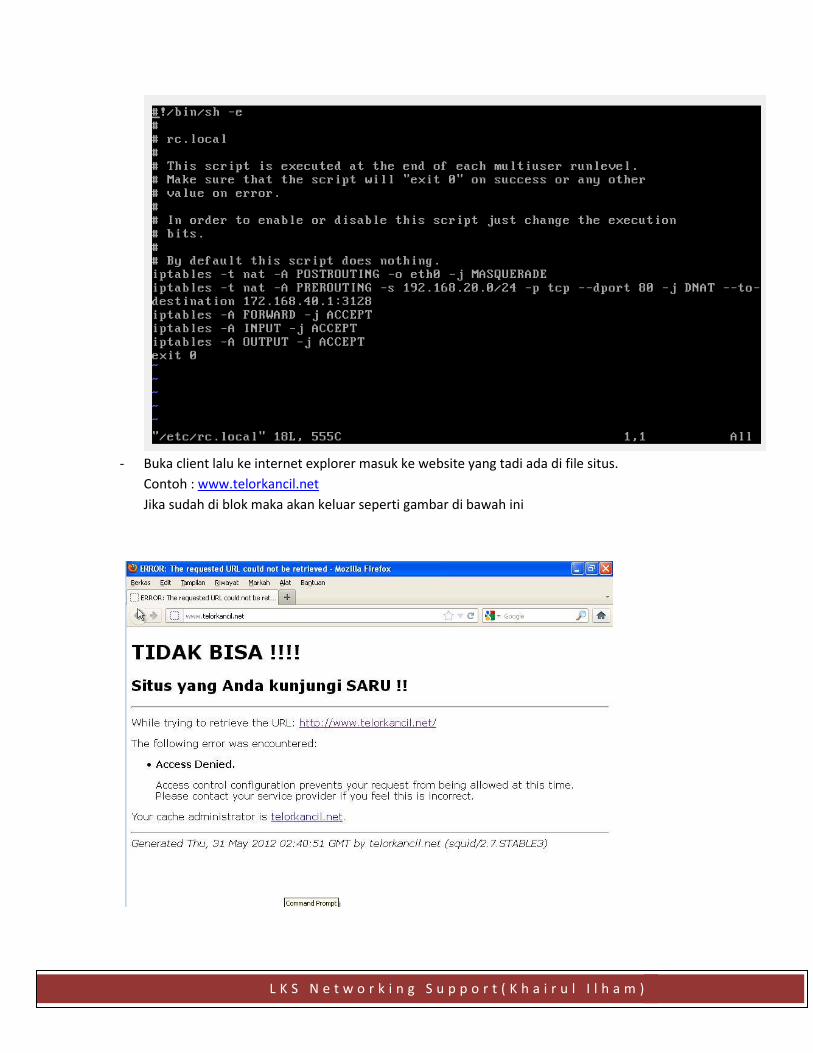
Atur kembali file rc.local di router menjadi seperti dibawah ini!
Lalu reboot computer
L K S N e t w o r k i n g S u p p o r t ( K h a i r u l I l h a m )
- Buka client lalu ke internet explorer masuk ke website yang tadi ada di file situs.
Contoh : www.telorkancil.net
Jika sudah di blok maka akan keluar seperti gambar di bawah ini

L K S N e t w o r k i n g S u p p o r t ( K h a i r u l I l h a m )
Biodata penulis:
NAMA : Khairul Ilham
Pekerjaan : Pelajar di SMK N 1 cilacap
Tmpt/tgl/lahir : Cilacap 15-november 1995
Note : never say give up !
~~~Special thank’s Too my Perent’s and may Beloved Love Yunita Cesar Wati~~~
----------------------------------------------------END---------------------------------------------------