Manual - Safescansafescandownload.safescan.com/Downloads/en/time-attendance/ta4/… · 8 English |...
38
Manual Safescan TA Software 4.0 ENGLISH | NEDERLANDS | DEUTSCH | FRANçAIS | ESPAñOL | ITALIANO | PORTUGUêS
Transcript of Manual - Safescansafescandownload.safescan.com/Downloads/en/time-attendance/ta4/… · 8 English |...
1
English | NederlaNds | deutsch | FraNçais | español | italiaNo | português
Manual safescan ta software 4.0
eNglish | NederlaNds | deutsch | FraNçais | español | italiaNo | português
2
English | NederlaNds | deutsch | FraNçais | español | italiaNo | português
Contents 1.0 Foreword 2.0 SuMMary oF the uSer Manual 2.1 using the user manual 2.2 System requirements 2.3 explanation of symbols 3.0 InStallatIon 3.1 Program installation 3.2 Setting up the software 4.0 FIrSt StePS 5.0 StatuS 5.1 Presence/real-time summary 5.1.1 Filters (free filter, department filter or user drop-down) 5.1.2 Sorting 5.1.3 Printing 5.2 System log 5.2.1 Filters (free filter, department filter or user drop-down) 5.2.2 Sorting 5.2.3 Printing 6.0 overvIew 6.1 adjusting and/or changing booking times: 6.1.1 adding bookings 6.1.2 Changing bookings 6.1.3 deleting bookings 6.1.4 Filters (free filter, department filter or user drop-down) 6.1.5 Sorting 6.1.6 exporting summaries in the CSv file format 6.2 day 6.2.1 Creating a summary 6.2.2 Filters (Free filter, department filter or user drop-down) 6.2.3 Sorting 6.2.4 exporting summaries in the CSv file format 6.3 Period 6.3.1 Creating a summary 6.3.2 Filters (free filter, department filter or user drop-down) 6.3.3 Sorting 6.3.4 exporting summaries in the CSv file format 6.4 reporting/report 6.4.1 Monthly report 6.4.2 weekly report 6.4.3 Period report 7.0 adMInIStratIon 7.1 department/group 7.1.1 Creating a department/group 7.1.2 Changing a department/group 7.1.3 deleting a department/group

3
English | NederlaNds | deutsch | FraNçais | español | italiaNo | português
7.2 users 7.2.1 Creating users in the software 7.2.2 Password 7.2.3 Creating users on the time attendance terminal 7.2.4 editing users 7.2.5 deleting users 7.2.6 System data information 7.2.7 Personal data 7.2.8 exporting summaries in the CSv file format 7.3 duty roster/weekly work schedule 7.3.1 Creating a duty roster 7.3.2 roundings 7.3.3 automatic break deduction 7.3.4 editing/changing a duty roster 7.3.5 deleting the duty roster 8.0 SettIngS 8.1 general 8.1.1 Setting the language 8.1.2 Setting the time of the end of the day 8.1.3 database connection 8.1.4 Backup 8.2 device/time attendance terminal 8.2.1 data connection with tCP/IP 8.2.2 Synchronising the user data 8.2.3 data transfer using a uSB stick 8.2.4 reading bookings on a PC 8.3 Function codes 8.3.1 adding function codes 8.3.2 editing function codes 8.3.3 deleting function codes 9.0 InFo 9.1 help 9.1.1 technical Support 9.2 Credits 9.2.1 updates and upgrades10.0 Server InStallatIon11.0 unInStallIng SaFeSCan tIMe attendanCe 4

4
English | NederlaNds | deutsch | FraNçais | español | italiaNo | português
1.0 Foreword safescan time attendance 4 is time attendance software for recording and processing personal times. the flexible system architecture means that safescan time attendance 4 can be used in small to medium size companies in almost every industry to provide powerful time evaluation. safescan time attendance 4 supports all safescan time attendance terminals with a wide range of features. For this reason, the described functions may not work with all time and attendance terminals. For more details, please refer to the performance characteristics of the supplied time attendance terminal or contact your supplier.the user manual describes the installation, function and use of the software package for software release 4.0 or higher. When using previous versions, details of differences are given in the description of functions. No special computer technology skills are needed to use the software. however, you do need to be familiar with the Microsoft Windows graphical user interface. the user manual replaces instruction and training on the system and serves as a reference. safescan time attendance 4 has been designed and tested with great care and complies with the latest state-of-the-art technology. however, as with all extensive software products, we cannot guarantee that it is absolutely error-free, and in particular we accept no liability for any consequential damage. if you want to suggest further improvements to the program or if you find any errors in the program or user manual, please let us know. 2.0 SuMMary oF the Manualthe user manual gives you an overview of the handling of safescan time attendance 4 and contains steps for frequently used operations. the screenshots shown are examples rather than specifications. 2.1 using the user manualthis user manual discusses mouse operation. "click" always refers to pressing the left mouse button. if any rows are highlighted, this indicates that the left mouse button is being used to click on the entry. other operating steps, such as working with the right mouse button, are described specifically. 2.2 System requirementsto use safescan time attendance 4, your pc should meet the following requirements.• PentiumIVprocessororhigher• Mainmemoryofatleast1024MB• USBandTCP/IPports• Freeharddiskcapacityofatleast100MB• CD-ROMdrive• Resolutionofatleast1024x768(1280x1024isrecommended)• WindowsXPoperatingsystemorhigher 2.3 explanation of symbols
add search for new hardware
edit time setting on the terminal
delete synchronisation
Refresh RetrievingUSBstick
export connection interrupted
print connection made
save close the application
Cancelled Workscheduleon/off

5
English | NederlaNds | deutsch | FraNçais | español | italiaNo | português
3.0 InStallatIon
3.1 Program installation1. insert the installation cd-roM into the drive of your computer. 2. open the [timeattendancesetup] file and the installation program will start. 3. accept the license terms.
6
English | NederlaNds | deutsch | FraNçais | español | italiaNo | português
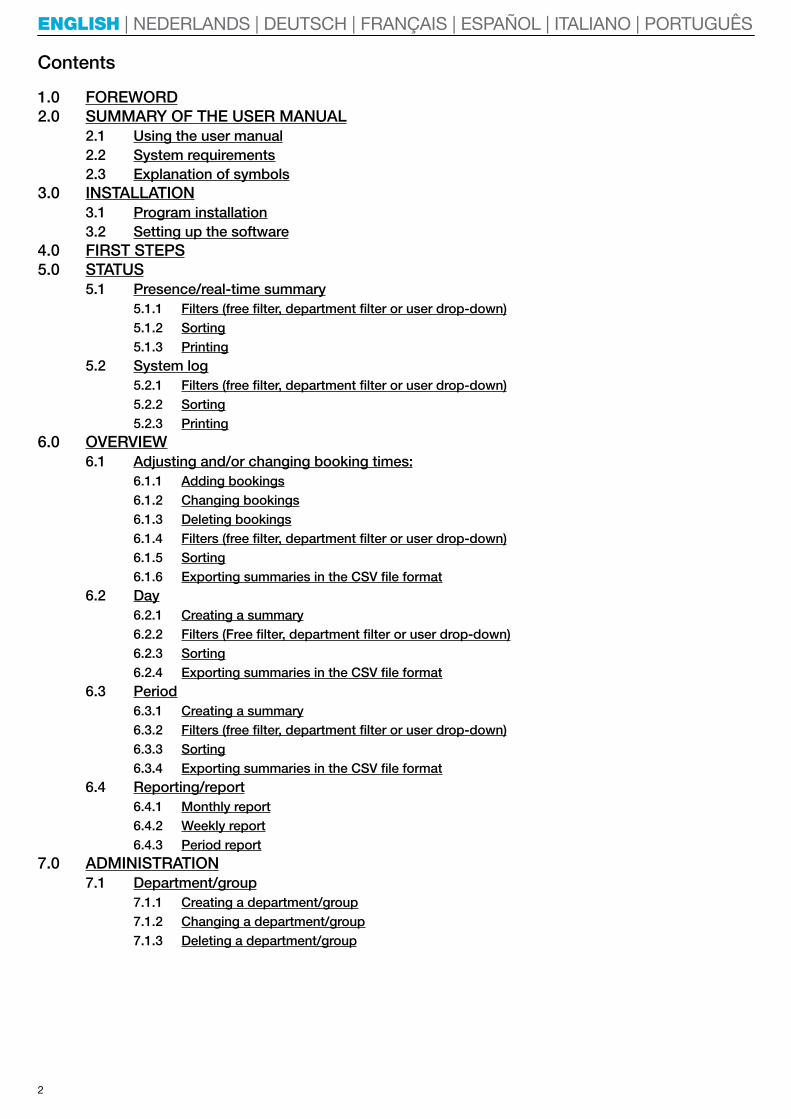
4. Specifythedestinationdirectory.c:/ProgramFiles/Safescan/TA4willbesuggestedtoyouasthedefaultpathfor adifferentstoragepath,select[Browse]andsearchforthepathyouwant. (Werecommendyouusethedefaultpath). 5. press [Next] to continue. the program will now be installed.
7
English | NederlaNds | deutsch | FraNçais | español | italiaNo | português
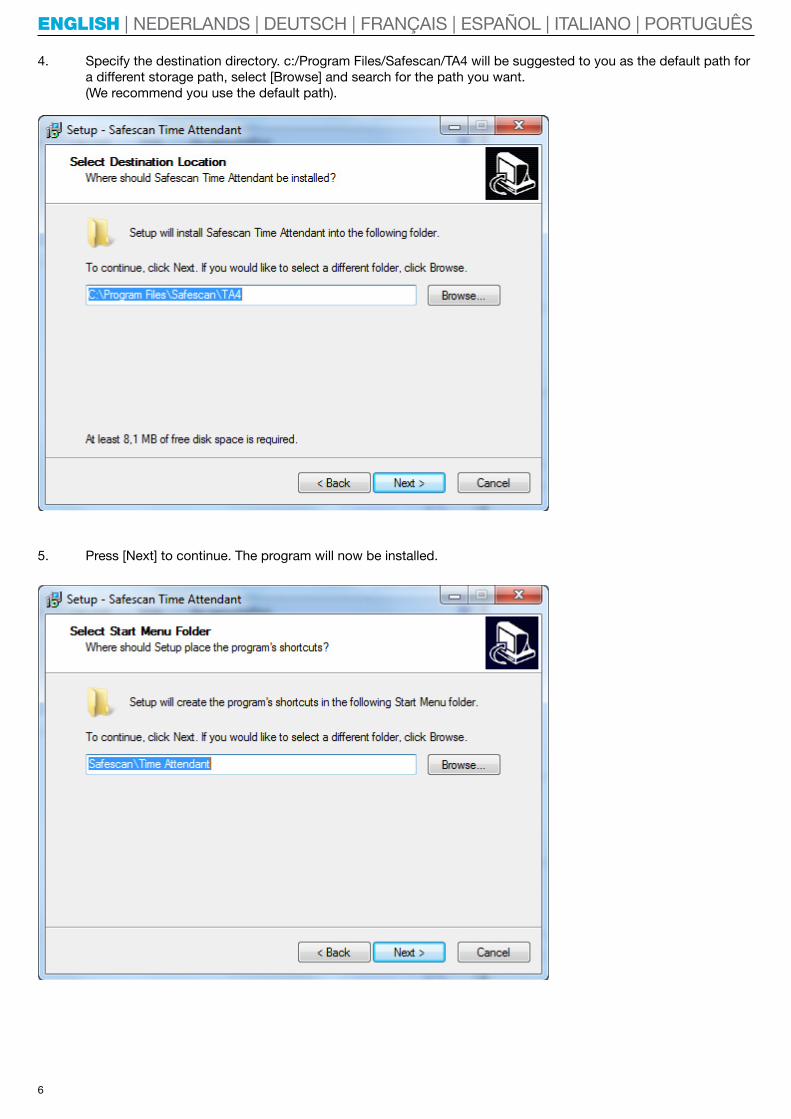
6. Use[Finish]toconfirmthattheinstallationiscomplete.

8
English | NederlaNds | deutsch | FraNçais | español | italiaNo | português
3.2 Setting up the software• UseStart/TimeAttendancetoopenthesoftware.• Enterthelicensecode,whichyouwillfindontheCDpackaging.
Thefirsttimeyouusethesoftwareorlaterifnosupervisor/administratorisset (inthesoftwareand/oronthetimeattendanceterminal),thefollowingmessagewillbedisplayed. as soon as a supervisor or administrator has been defined, you can log in using the user name and password. Forgotten your password? When asked for your user name, enter your user id and the license code as the password. (YouwillfindthelicensecodeontheCDpackaging).UseOKtoconfirm.

9
English | NederlaNds | deutsch | FraNçais | español | italiaNo | português
4.0 FIrSt StePS
1. Selectthedesiredlanguage,seechapter8.1.1.2. Ifnecessary,changetheendoftheworkingday(standard00:00clock),seechapter8.1.2.3. Creatingdutyrosters,seechapter7.3.4. Creatingfunctioncodes,seechapter8.3.5. Enteringusersonthetimeattendanceterminalorinthesoftware,seechapter7.2.1. 6. Synchronisingthesoftwarewiththetimeattendanceterminal,seechapter8.2.2.7. Startbyenteringthebookingtimesintothetimeattendanceterminal. 5.0 StatuS
5.1 Presence/real-time summaryYoucanusethereal-timesummarytocheckthepresenceandabsenceofyouremployees.Youcanseeataglancewhohas signed in or out where and at what time, or who is taking a break. With the simple filtering method you can have the information you want up on the screen in no time, or you can print out the data on your printer. Filters 5.1.1 (free filter, department filter or user drop-down)present filter: select the setting you want from the drop-down menu; present, absent, break or all.

10
English | NederlaNds | deutsch | FraNçais | español | italiaNo | português
Free filter: enter the first few letters for the user you want into the free filter. the summary will show you all users that have these same letters. the more detail of the name you enter, the more your filter result will be limited.
department filter: select the department you want from the drop-down menu. in the summary as well as in the user filter,allemployeesofthatdepartmentaredisplayed.Youcanlimittheresultsbyusingtheuserfilter. user filter: select the user you want from the drop-down menu. 5.1.2 SortingSorting via the menu bar:Youcanusethemenubartosortdataatanytimebydoubleclickingthefieldyouwant. Repeatthistoreversetheorder(A-ZorZ-A).

11
English | NederlaNds | deutsch | FraNçais | español | italiaNo | português
5.1.3 Printing
Youcanuse to print the real time summary at any time. 5.2 System logthe system log summary displays all events, modifications or other manipulations on the time attendance terminal. the system log is used to log the communication sequence in and with the time attendance terminal in chronological order. When communication problems occur you can use the error description to eliminate the causes of these.
Filters 5.2.1 (free filter, department filter or user drop-down)Free filter: enter the first few letters for the user you want into the free filter. the summary will show you all users that have these same letters. the more detail of the name you enter, the more your filter result will be limited.
department filter: select the department you want from the drop-down menu. in the summary as well as in the user filter,allemployeesofthatdepartmentaredisplayed.Youcanlimittheresultsbyusingtheuserfilter. user filter: select the user you want from the drop-down menu.

12
English | NederlaNds | deutsch | FraNçais | español | italiaNo | português
5.2.2 SortingSortingviathemenubar:Youcanusethemenubartosortdataatanytimebydoubleclickingthefieldyouwant. Repeatthistoreversetheorder(A-ZorZ-A). 5.2.3 PrintingYoucannowprintthesystemlogsummary. 6.0 overvIew
6.1 adjusting and/or changing booking times:In"Bookingtimes"youwillfindallbookingtimesenteredintothetimeattendanceterminalthathavebeentransferredtothesoftwaredirectlyviaTCP/IPorUSBstick.Incorrectbookingsormissedbookingsarestoredintheorangesummary(seefigurebelow).Pleasecheckwhetherthesequenceapplies(in/outorin-break-back-out,etc.).Addanyforgottenbookingsasdescribedinchapter6.1.1. Changeincorrectbookingstothecorrectstatus(suchasignore)asdescribedinchapter6.1.2. note: it is not possible to delete time bookings!

13
English | NederlaNds | deutsch | FraNçais | español | italiaNo | português
6.1.1 adding bookingsMissing bookings can be added later.
• Clickon "add".• Selecttheuseryouwant. • Enterthebookingtimeinthetimeentryfield.Thevaluemustbeenteredintothecomputerbasedonyour countrysettings(e.g.08:00or08.00inlinewiththecountrysettings).• Useout/intoselecttheappropriatefunction.• Assignthebookingtotheappropriatetimeattendancedevice.• Ifyouwishyoucanselectafunctioncodefromthefunctioncodelistfield,e.g.off-sitework,medical consultation.• Use"OK"tofinishmakingentries. note: the fields highlighted in red are required fields.
6.1.2 Changing bookingsBookingscanbechangedlater.
• Clickonthebookingyouwanttochange.

14
English | NederlaNds | deutsch | FraNçais | español | italiaNo | português
• Changethein/outstatus.• Ifyouwishyoucanselectafunctioncodefromthefunctioncodelistfield,e.g.off-sitework.• Use"OK"tofinishmakingentries.
note: to protect employees, times cannot be corrected or deleted. to change a time, add a new booking and set the "incorrect" one to "ignore". the booking entered into the time attendance terminal continues to exist, but is no longer calculated.
6.1.3 deleting bookingsif it is not possible to delete a booking, you can set the booking to "ignore" so that it is not taken into account in calculations.
Filters 6.1.4 (free filter, department filter or user drop-down)Free filter: enter the first few letters for the user you want into the free filter. the summary will show you all users that have these same letters. the more detail of the name you enter, the more your filter result will be limited. department filter: select the department you want from the drop-down menu. in the summary as well as in the user filter,allemployeesofthatdepartmentaredisplayed.Youcanlimittheresultsbyusingtheuserfilter.
user filter: select the user you want from the drop-down menu.

15
English | NederlaNds | deutsch | FraNçais | español | italiaNo | português
6.1.5 SortingSortingviathemenubar:Youcanusethemenubartosortdataatanytimeby doubleclickingthefieldyouwant.Repeatthistoreversetheorder(A-ZorZ-A). 6.1.6 exporting summaries in the CSv file format
Youcanexportsummariesvia asCSVfiles,thenprocessthemfurther,forexampleusingExceloranyother programthatcanuseCSVfiles.TheCSVfileformatdescribesthestructureofatextfileforstorageorfortheeasyexchangeofstructureddataorlists.• Selectthesummarythatyouwanttoexport.
• Clickonthe "CSV-Export"symbol.• NametheexportfileandselectthedirectorythatyouhavecreatedforCSVexports.• Clickon"Save".• Clickon"OK".Thedataisthenexportedtotheselecteddirectory. YoucanthenprocessthesummarywithanyprogramthatiscapableofusingCSVdata,suchasExcel.
6.2 dayall booking times from the current day that have been transferred to the software from your time attendance terminal directlyviaTCP/IPorUSBstickaredisplayed.AAllimportantinformationaboutactiveusersisalsodisplayed. the summary shows the first and last booking, the daily balance, break absences and the dedicated work schedule
which you can turn on or off by using the .Youcanadjustthedateatanytime.Datesaredisplayedchronologi-callyandcanbefilteredand/orsortedtosuittheuser'sneeds. 6.2.1 Creating a summary in "period", select the pre-defined periods or use the date picker to select your own date range.

16
English | NederlaNds | deutsch | FraNçais | español | italiaNo | português
Filters 6.2.2 (free filter, department filter or user drop-down)Free filter: enter the first few letters for the user you want into the free filter. the summary will show you all users that have these same letters. the more detail of the name you enter, the more your filter result will be limited. department filter: select the department you want from the drop-down menu. in the summary as well as in the user filter,allemployeesofthatdepartmentaredisplayed.Youcanlimittheresultsbyusingtheuserfilter. user filter: select the user you want from the drop-down menu.

17
English | NederlaNds | deutsch | FraNçais | español | italiaNo | português
6.2.3 SortingSortingviathemenubar:Youcanusethemenubartosortdataatanytimebydoubleclickingthefieldyouwant. Repeatthisandtheorderisreversed(A-ZorZ-A). 6.2.4 exporting summaries in CSv file format
Youcanexportsummariesvia asCSV.Files,thenprocessthemfurther,forexampleusingExceloranother program.
TheCSVfileformatdescribesthestructureofatextfileforstorageorfortheeasyexchangeofstructureddataorlists.
• Selectthesummarythatyouwanttoexport.
• Clickonthe "CSV-Export"symbol.• NametheexportfileandselectthedirectorythatyouhavecreatedforCSVexports.• Clickon"Save".• Clickon"OK".Thedataisthenexportedtotheselecteddirectory.
YoucanthenprocessthesummarywithanyprogramthatiscapableofusingCSVdata,suchasExcel. 6.3 Periodall booking times of the active users are displayed in the period summary in compact form in the selected period. the summary gives you the total for the entire period, the hours according to the roster and the corresponding overtimebalanceaswellaseachdailybalance.Thedataisdisplayedinusernumberorderandcanbefilteredand/orsortedtosuittheusers'needs.
6.3.1 Creating a summary in "period", you can select the pre-defined periods or use the date picker to select your own date range.

18
English | NederlaNds | deutsch | FraNçais | español | italiaNo | português
Filters 6.3.2 (free filter, department filter or user drop-down)Free filter: enter the first few letters for the user you want into the free filter. the summary will show you all users that have these same letters. the more detail of the name you enter, the more your filter result will be limited. department filter: select the department you want from the drop-down menu. in the summary as well as in the user filter,allemployeesofthatdepartmentaredisplayed.Youcanlimittheresultsbyusingtheuserfilter. user filter: select the user you want from the drop-down menu. 6.3.3 SortingSortingviathemenubar:Youcanusethemenubartosortdataatanytimebydoubleclickingthefieldyouwant. Repeatthistoreversetheorder(A-ZorZ-A).

19
English | NederlaNds | deutsch | FraNçais | español | italiaNo | português
6.3.4 exporting summaries in the CSv file format
Youcanexportsummariesvia asCSV.Files,thenprocessthemfurther,forexampleusingExceloranother program.
TheCSVfileformatdescribesthestructureofatextfileforstorageorfortheeasyexchangeofstructureddataorlists.
• Selectthesummarythatyouwanttoexport.
• Clickonthe "CSV-Export"symbol.• NametheexportfileandselectthedirectorythatyouhavecreatedforCSVexports.• Clickon"Save".• Clickon"OK".Thedataisthenexportedtotheselecteddirectory.
YoucanthenprocessthesummarywithanyprogramthatiscapableofusingCSVdata,suchasExcel.
6.4 reporting/reportto ensure that the evaluations that are performed at the month-end show the desired result, check the time bookings enteredbytheusersunder"Bookingtimes"forforgottenbookingsormissedbookingsandcompleteorcorrecttheseasnecessary(seechapter6.1.1).Addafunctioncodetothetimebookingsifnecessary.
safescan time attendance 4 is a system that performs calculations immediately. any corrections made are automatically calculated after they have been entered. this guarantees that the system is always up to date. additional calculations to perform a month-end closing are not required.
safescan time attendance 4 provides you with various prepared reports, which are sufficient for most standard evaluations.
the following predefined reports are available for you in safe scan time attendance 4: • Monthlyreport• Weeklyreport• Periodreport
6.4.1 Monthly report The"monthlyreport"providesallbookings,balancesandeventsfortheselectedperiod.Anasterisk(*)isusedto distinguish manually generated bookings from original bookings.
creating and printing a monthly report • Selectthe"Reporting"menuitem.• Selectthetimeperiodyouwant(currentmonth,lastmonth,etc.)fromthedrop-downmenu.Thecurrentmonth is displayed as standard.

20
English | NederlaNds | deutsch | FraNçais | español | italiaNo | português
the summary gives you the monthly report for all users. select to print out all reports. • Inthedepartmentfilter,selectadepartmenttogetthemonthlyreportsforthatdepartment.• Intheuserfilter,selecttheuseryouwanttogetthemonthlyreportforthatuser. note:AllreportscanbeprintedorcanbeexportedtoCSVfileformat.

21
English | NederlaNds | deutsch | FraNçais | español | italiaNo | português
6.4.2 weekly report the weekly report is the same as the monthly reports. select "Week" from the drop-down menu and proceed in the same way as for monthly reports to print the summary you want.
the weekly report displays all the essential information for the selected period and users in compact form. the first and last bookings, time of presence, nominal time and daily balance appear in the report. the accumulated balance at the time of the selected date and the reason for any absence are also printed. all values for the selected users are totalled at the bottom of the list.
creating and printing a weekly report.• Selectthe"Report"menuitem.• Selectthetimeperiodyouwant(currentweek,lastweek,etc.)fromthedrop-downmenu.Thecurrentweek is displayed as standard. the summary gives you the weekly report for all users. select "print" to print out all reports. • Inthedepartmentfilter,selectadepartmenttogettheweeklyreportsforthatdepartment.• Intheuserfilter,selecttheuseryouwanttogettheweeklyreportforthatuser. note:AllreportscanbeprintedorcanbeexportedtoCSVfileformat.
6.4.3 Period reportthe "period report" has a similar structure to the monthly and weekly reports. however, the values for a selected period are totalled. the report on displays the totals of actual hours, nominal hours and daily balances. in one column, you can also see the cumulative total balance at the end of the selected period. all values for the selected employees are totalled at the bottom of the list.
creating and printing a period report.• Selectthe"Report"menuitem.• Choose"Select"fromthedrop-downmenuandusethedatepickertoenterthedateyouwant from - to. the current month is displayed as standard. the summary gives you the period report for all users. select "print" to print out all reports. • Inthedepartmentfilter,selectadepartmenttogettheperiodreportsforthatdepartment.• Intheuserfilter,selecttheuseryouwanttogettheperiodreportforthatuser.

22
English | NederlaNds | deutsch | FraNçais | español | italiaNo | português
note:AllreportscanbeprintedorexportedintheCSVfileformat. 7.0 adMInIStratIon 7.1 department/groupdepartments and groups are used as selection and sorting criteria in safescan time attendance 4. they are used to administerusers,aswellasthedepartments/groupstowhichtheseusersareassigned.Thesecriteriacanbeusedtoselectusersanddepartments/groupsinotherpartsoftheprogram.
7.1.1 Creating a department/group
to create a new department or group, select and enter a name and description for your department or group. Redfieldsaremandatoryandmustbecompleted.PressOKtoconfirmyourentry. 7.1.2 Changing a department/group
Highlightthedepartmentyouwantandselecttomakethechanges.UseOKtosave the changes.

23
English | NederlaNds | deutsch | FraNçais | español | italiaNo | português
7.1.3 deleting a department/group
highlight the department you want to delete and click on .
note: the department can only be deleted if no users are connected to it. 7.2 usersadministering, editing or creating users has never been so easy. create your users directly in the software and use the time attendance terminal to synchronise them. all data is transferred. Younolongerneedtogototheterminaltocreateandentereverynewuser(exception:fingerprints). the user data contains all personal information that is required for time attendance data, processing and analysis. Theuser'sname,personnelnumberandusernumber,aswellastheworkinghoursmodelassignment,arelistedinthis dialog screen. the dialog screen is divided into two sections, which you can access by clicking on the appropriate tab: • Systemdata• Personaldata
the data can be changed at any time. after an employee leaves, you can delete the data or make it inactive.
7.2.1 Creating users in the softwarenote: selected user ids cannot be changed later.• Beforeyouregisteranewuserinthesoftware,synchronisethesoftwarewiththetimeattendanceterminalto ensure that the data are identical in both.
• Whenyouclickon ,thenextfreeuserIDanddepartment/group aresuggested.Youcanchoosetoacceptthedataorchangeit.TheuserIDmustbebetween1and65534. Fields highlighted in red are required fields.

24
English | NederlaNds | deutsch | FraNçais | español | italiaNo | português
• UseOKtosaveyourentry.• Youcancompletetheuserinformation,determinetheprivilege(user,admin,etc.),setthestatustoactiveand, provided your time attendance terminal is equipped with an rFid reader, save the rFid card number.
• Thensaveyourentrieswith Please note: the following information is synchronised with the time attendance terminal system:• UserID• Username• Privilege• Status• RFIDno.• Password
once you have completed all entries and changes, synchronise the software with your time attendance terminal. the newly created users will then be able to log in and out of the time attendance terminal using the registered rFid cardortheuserIDandpassword,whichareassignedautomaticallybythesoftware(seesection7.2.2).
Fingerprint:if you have a time attendance terminal that only supports fingerprints, the user can log in an out using the user id and password,whichareassignedautomaticallybythesoftware(seebelowforfurtherinformationin7.2.2"Password").Savetheuser'sfingerprintatalatertimebyfollowingyourtimeattendanceterminalinstructionsforregisteringnew users.
7.2.2 PasswordYoucanassignapasswordtoauserorchangeanexistingoneinthesoftwareatanytime.• Selecttheuserwhosepasswordyouwanttoassignorchange• Clickonchangepassword

25
English | NederlaNds | deutsch | FraNçais | español | italiaNo | português
• EnteranewpasswordandconfirmwithOK
• Thensaveyourentrieswith in the user screen.
at the next synchronisation with the time attendance terminal, the user will be able to log into the device using the user id and the "new" password. 7.2.3 Creating users on the time attendance terminal note: selected user ids cannot be changed later.• Beforeyouregisterauseronthetimeattendanceterminal,synchronisethesoftwarewiththetimeattendance terminal to ensure that the data are identical in both.• Followyourtimeattendanceterminalinstructionsforregisteringnewusers.• Synchronisethesoftwarewiththetimerecordingterminalagain.• Completetheuserinformationandsynchronisethecompletedinformationwiththetimeattendanceterminal.
7.2.4 editing usersuser data can be adapted at any time.• Doubleclickontheuserforwhichyouwanttomakechanges.
• Theeditingfieldopens.Completeorchangetheuserinformation,andsaveitwith . • Synchronisethesoftwarewiththetimeattendanceterminalaftereachchangeyoumaketooneormoreusers so that the data is identical in both.
7.2.5 deleting users
• Todeleteauser,highlighttheuserinthelistandclickon or • Doubleclickontheuserandputtheuserin"Inactive"or"Delete"instatus.(In"Inactive"theuserIDwillnot bedeletedandtheuser'sdatawillnolongerbeprocessedorappearinanysummary.In"Delete"theuserwill alsobedeletedonthetimeattendanceterminalatthenextsynchronisation).
7.2.6 System data informationuser name: enter a user name.
user Id:Enterthenumberoftheemployee'sIDcard.Thiscanconsistofuptoninedigits.TheuserIDmustbeidenticaltotheuser'sIDonthetimeattendanceterminal.

26
English | NederlaNds | deutsch | FraNçais | español | italiaNo | português
rFId no.: enter the id number of the transponder that has been assigned to the user. it is not mandatory to enter this. there are ways of transferring the transponder id to the employee master data. • TheRFIDno.isenteredintothe"Systemdata"field.Aftersynchronisationwiththe time attendance terminal, all user data for the function, including the transponder id, is sent to the time attendance terminal.• TheRFIDno.isenteredwhenauserissetuponthetimeattendanceterminalandissent to the software during synchronisation. the user data it is then transferred to the system. user privileges: use the user status to control the granting of rights on the time attendance terminal and in the software: • User:astandarduser,whocanonlyusethecommonlyavailablefunctionsonthetimeattendanceterminal. users only see their own time entries in the software and cannot make changes.• Enroller:Employeewhohaspermissiontologotherusersontothetimeattendanceterminal.Enrollersonlysee their own time entries in the software and cannot make changes.• Administrator:Employeewhohasadministrativerightsandaccesstoeverything.Canmakechangesinthe software.• Supervisor:Employeeswithallrightsontheterminalandinthesoftware. Int. phone:Youcansavetheemployee'sinternaltelephonenumberifyouwish.
duty roster: select a duty roster from the drop-down field from which the user is to be assigned. Changing your password: assign a password. When you create users via the software, the software automatically assigns a password that matches the user id no. For example, user id 22 = password = 22. the user can use this password/PINtologintothetimeattendancedevice. add image: add a photo of the user. delete image: delete the photo of the user.
7.2.7 Personal datain the "personal information" tab you can enter more information about individual employees of the company. With the exception of the personnel number, this information is of no significance to the actual time and attendance.
name and address: save the personal data of the employee, such as private address, telephone number, etc. these fields are not mandatory and can be left blank.
Personnel no.:Entertheemployee'spersonnelnumber.Thiscanconsistofuptoninedigits.Thepersonnelnumberisshown on the monthly report.
note:Pleaseenterthedateofbirthandstarting/leavingdateinthedd.mm.yyyyformatintheentryfield.
7.2.8 exporting summaries in the CSv file format
Youcanexportsummariesvia asCSV.Files,thenprocessthemfurther,forexampleusingExceloranother program.
TheCSVfileformatdescribesthestructureofatextfileforstorageorfortheeasyexchangeofstructureddataorlists. • Selectthesummarythatyouwanttoexport.
• Clickonthe “CSV-Export”symbol.• NametheexportfileandselectthedirectorythatyouhavecreatedforCSVexports.• Clickon“Save”.• Clickon“OK”.Thedataisthenexportedtotheselecteddirectory.
YoucanthenprocessthesummarywithanyprogramthatiscapableofusingCSVdata,suchasExcel. 7.3 duty roster/weekly work scheduleCreateservice/weeklyworkschedulesforyouremployees.Thedutyrosters/weeklyworkschedulesmaybeassignedindividuallyforeachuser,orforanentiregroup/department.Thedutyrosters/weeklyworkschedulesareprocessedwiththemonthlyreportandserveasthebasisforthecalculationofworkinghours/overtime.
7.3.1 Creating a duty roster• Clickonandcompletethenameandthedescription,thenconfirmwithOK. Fields highlighted in red are required fields.

27
English | NederlaNds | deutsch | FraNçais | español | italiaNo | português
• Fromthe"Weekdays"drop-downmenu,selectthedayoftheweekyouwant(youcanhighlightasmanydays asnecessary). • Thenselect"In"understarttype.Enterthetimein"Starttime"(accordingtoyourcountrysettings,e.g.09:00) and"Endtime".(seeexample).
• Thenconfirmtheentrieswith . 7.3.2 roundings Youcanassignfixedworkinghourstoyouremployees.From the drop-down menu select "round up" and "round down" and select the time period you want for both the start time and the end time. For example, if you select "10", all booking times that are signed in "in" 10 minutes before the set time are counted as fromthistime.Youremployeedoesnotthenhaveanextra10minutesofworkingtime.Thesameappliesto"Rounddown".

28
English | NederlaNds | deutsch | FraNçais | español | italiaNo | português
then confirm the entries with . 7.3.3 automatic break deductionWith safescan time attendance 4 you can deduct fixed breaks directly, i.e. your employees do not have to time stamp a lunch break, for example, as this break is automatically deducted by the system.• Producetheweeklyworkscheduleasdescribedabovein7.3.1.• Inthe2ndrow,enterthesamedaysonwhichthebreakshouldbedeductedautomatically.• Thenselect"Breakimpl."Whenyouhavedoneso,pleaseenterastarttimeandanendtime.Roundingisnot necessary here. if the breaks are not the same every day, you can set them as you want.
• Then,confirmyourentrieswith . if all information are registered you will receive the total of the work schedule.
Break impl. =Breakincluded.Theenteredbreaktimewillbedeductedautomatically.
Break incl. = break is included in the total when a break is time stamped on the time attendance terminal. this is taken into account in the calculation.
Break excl. = breaks must normally be time stamped on the time attendance terminal.
7.3.4 editing/changing a duty rosterTheweeklyworkschedulecanbeadapted/changedatanytime.
• Highlighttheweeklyworkschedulethatyouwanttochangeandclickon or double click directly on the weekly work schedule that you want to change.
• Theeditingfieldopens.Completeorchange,asdescribedin7.3.1/7.3.2or7.3.3,thenwith . Yourchangesareimmediatelytakenintoaccountinthecalculations. 7.3.5 deleting the duty roster
•Todeleteaweeklyworkschedule,selectitinthelistandclickon . note:Youcanonlydeleteaweeklyworkscheduleifithasnolinktoauser.

29
English | NederlaNds | deutsch | FraNçais | español | italiaNo | português
8.0 SettIngS
8.1 general8.1.1 Set language
select the language you want. use to save this change. For the changes to take effect, close the software, then restart it. note: after the language has been changed, the software must be restarted!
8.1.2 Setting the time of the end of the dayend of day: use "end of day" to define the calculational end of the day. the time of the end of the day is set to 00:00 as standard, i.e. the working day starts at 00:01 and ends at midnight.
When working at your company over midnight, set the time of the end of the day to a time when no employees are working(e.g.03:00.Forthesoftware,thedaythenstartsandendsat03:00eachday). the first booking after the end of the day will be valued as the first booking of the following day. Foranormalchangeofday(00:00),thedefaultremainssetat0:00.Valuesthatarelessthan00:00willleadtothe incorrectassignmentofbookings.Theendofthedayissimultaneouslycountedasthestartofthedayforthenextday'sschedule.
8.1.3 database connectionthe software automatically uses the memory location that was selected during the software installation, in which the database is stored. the database connection field is empty, and should only be filled in manually in exceptional cases. if the software and the database have been stored in different locations, this counts an exceptional case. in any such exceptional cases, please contact your it department.

30
English | NederlaNds | deutsch | FraNçais | español | italiaNo | português
8.1.4 Backupif the database is stored locally on your computer, the software will perform an automatic backup at regular intervals. set the interval you want from the drop-down menu.
8.2 device/time attendance terminalBeforetimebookingscanbeprocessedinSafescanTimeAttendance4,theymustbeenteredusingthe time attendance terminal. safescan time attendance 4 reads out the bookings on the time attendance terminal, transfers them to the pc and classifies them on the time attendance database. two options are available for the data transmission procedure: • Dataline(TCP/IP,RS232,485)• USBmemory(cable) Youcanconnectanunlimitednumberoftimeattendanceterminalstothesoftwaretocalculatetimes.IfyouhavenotconnectedyourtimeattendanceterminalviayourlocalnetworkandareworkingwithaUSBstick,selecttheUSBsticksettings(acombinationofTCP/IPandUSBstickispossible).
note: • Timebookingsareonlytransferredfromthetimeattendanceterminaltothesoftware!• Userdatamustalwaysbeupdatedandsynchronisedmanually.
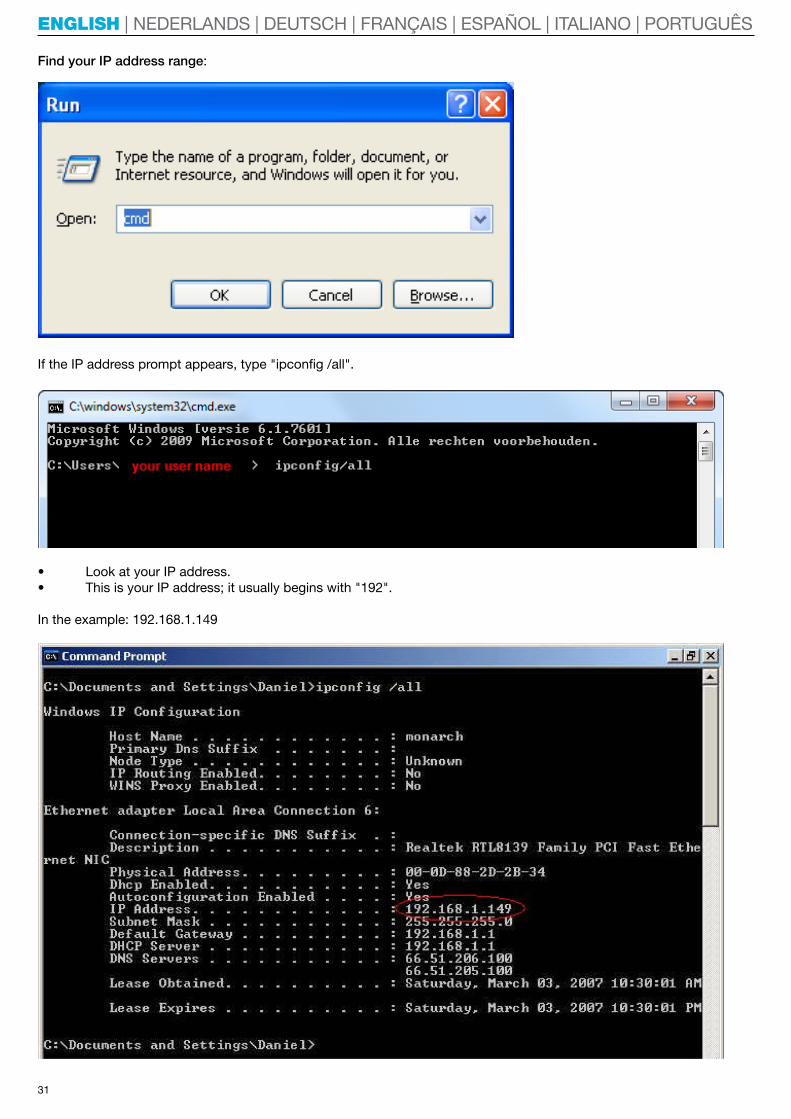
8.2.1 data connection with tCP/IPIfyouwanttoconnectyourtimeattendanceterminaltoyournetworkviaTCP/IP,youmustassignafreeIPaddressthatfallswithinyourIPaddressrangetotheterminal.TheIPaddress192.168.1.201isstoredonthetimeattendance terminal as standard.
31
English | NederlaNds | deutsch | FraNçais | español | italiaNo | português
Find your IP address range: IftheIPaddresspromptappears,type"ipconfig/all". • LookatyourIPaddress.• ThisisyourIPaddress;itusuallybeginswith"192". Intheexample:192.168.1.149

32
English | NederlaNds | deutsch | FraNçais | español | italiaNo | português
Find an unused ip address.• Type"ping",thenenteryourIPaddress.Changethelasttwodigitsandpress"Enter". Inthisexample:ping192.168.1.1once the ip address is active it receives all data packets. • ThesoftwarerequiresafreeIPaddress.Inthisexample:ping192.168.1.10 once you have found a free ip address, save it on the terminal by following the instructions of your time and attendance terminal.When you have stored the ip address on the time attendance terminal and the terminal is connected to your network.
use in"Device"tosearchfornewdevicesandconfirmwith"Yes".
33
English | NederlaNds | deutsch | FraNçais | español | italiaNo | português
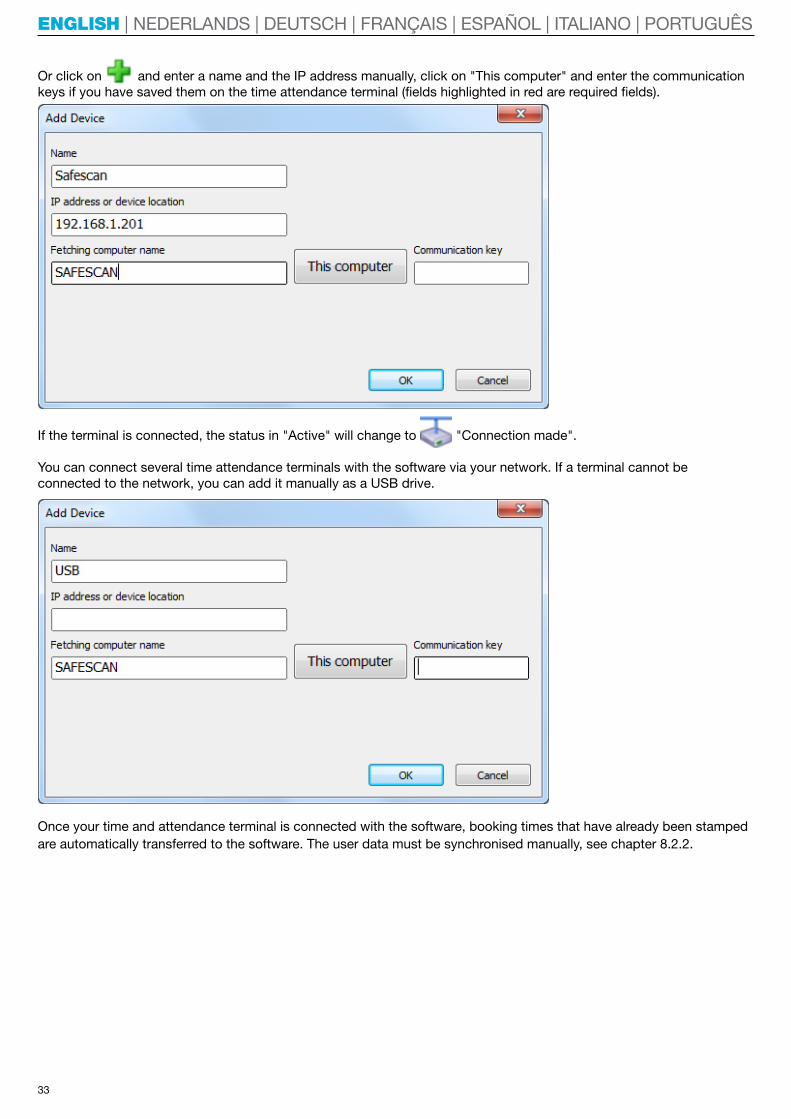
or click on and enter a name and the ip address manually, click on "this computer" and enter the communication keysifyouhavesavedthemonthetimeattendanceterminal(fieldshighlightedinredarerequiredfields).
if the terminal is connected, the status in "active" will change to "connection made".
Youcanconnectseveraltimeattendanceterminalswiththesoftwareviayournetwork.Ifaterminalcannotbe connectedtothenetwork,youcanadditmanuallyasaUSBdrive.
once your time and attendance terminal is connected with the software, booking times that have already been stamped areautomaticallytransferredtothesoftware.Theuserdatamustbesynchronisedmanually,seechapter8.2.2.

34
English | NederlaNds | deutsch | FraNçais | español | italiaNo | português
8.2.2 Synchronising the user dataif your time attendance terminal is connected to the software you must synchronise the user data from the
time attendance terminal with the software. to do this, select ; all users that have been stored on the time attendance terminal are displayed in the summary. in this case you should synchronise "device" to database and use "Run"toconfirm.Thenedittheuserdatain"User"asdescribedinchapter7.2.4.if the users have been entered into the software, please synchronise: database to device. if users have been entered into both the time attendance terminal and the software you should check, during synchronisation, the location in which the data is more up-to-date and synchronise in the direction you want, see also chapter8.2.2.if you do not want to synchronise all the data or if the data does not all have the same direction, you can select any user id individually and define the direction, or ignore it so that it will not be synchronised. to do this, click on the field next to "Resolution"togetdrop-downlist(empty=noneSynchronisation;DB/Device=database–device;Device/DB=device–database)
8.2.3 data transfer using a uSB stickto transfer the booking from the time attendance terminal to the pc, please follow the instructions below.
transferring bookings to a uSB memory.
a) time attendance terminal with an lCd display• ConnecttheUSBmemorytothetimeattendanceterminalUSBport.• Logintothetimeattendanceterminal.• Thenpressthe[Menu]key.• Usethearrowkeystoselect"USBDriveMng"(USBdrivemanager)andpress[OK].• Usethearrowkeystoselect"Downloadlogs"(USBdrivemanager)andpress[OK]. Anindicationthatthedatahasbeencopiedwillthenbedisplayed.If"CopyDataOK"appears,thedatatransfer totheUSBmemoryiscomplete.Thefilesavedwiththebookingsiscalled:1_attlog.dat• RepeattheprocessifyoualsowanttoloadthedataontotheUSBstickbyselecting"Userdat"(downloaduser data)andpressOK.Anindicationthatthedatahasbeencopiedwillthenbedisplayed.If"CopyDataOK" appears,thedatatransfertotheUSBstickiscomplete.Thefilesavedwiththeuserdataiscalled: 1_User.datorUser.dat.• RemovetheUSBstick.
note: if there are variations in the time attendance terminal user interface, please read this section in the user manual that was delivered with your time attendance terminal.

35
English | NederlaNds | deutsch | FraNçais | español | italiaNo | português
b) time attendance terminal with tFt display• ConnecttheUSBsticktothetimeattendanceterminalUSBport.• Logintothetimeattendanceterminal.• Thenpressthe[Menu]key.• Usethearrowkeystoselect"USBDrive"andpress[OK].• Usethearrowkeystoselect"Download"andpress[OK].• Usethearrowkeystoselect"Dloadbookings"andpress[OK].Anindicationthatthedatahasbeencopiedwill thenbedisplayed.Ifthewords"Downloadended"appear,press[OK].ThedatatransfertotheUSBstickis complete.• Thefilesavedwiththebookingsiscalled:1_attlog.dat• Pressthe[ESC]keyuntilyouhaveexitedthemenu.• RemovetheUSBstick.
c) time attendance terminals with a uSB cable• ConnectthetimeattendanceterminaltoyourcomputerviatheUSBcable.
• Use in"Device"tosearchfornewdevices,thenconfirmwith"OK"thatthetimeattendancedevicehas connected to the software automatically, or enter the terminal manually as described above.
• Synchronisetheuserdataasexplainedin8.2.2.• Thebookingdataistransferredtothesoftwareautomatically. OnmodelTA655,dataisreadatalowerfrequency,whichmeansthatthereisalongertimeinterval thanfortheTA-800orTA-900series(ontheTA-800andTA-900series,thedatatransfertakesamaximumof 1second).
8.2.4 reading bookings on a PCIfyouwanttosynchronisethedatawiththesoftwareforthefirsttime,youmustfirstcreateaUSBstick"Connection".
select ,thenassignaname(e.g.USB).ThefieldwiththeIPaddressmustbeempty,fieldshighlightedinredarerequired fields. press "this computer". if you have saved a communication key on the time attendance terminal, please enteritin"Communicationkey".ConfirmwithOK(seechapter8.2.1).
• ConnecttheUSBmemorytothePCUSBport.• ThebookingtimeswillbereadfromtheUSBstickautomaticallyandprocessedinthesoftware.• Toupdatetheuserdata,highlighttherowwiththeUSBdevice.
• Clickon andselectthefile1_user.datfromtheUSBmemoryandclickon"Open".

36
English | NederlaNds | deutsch | FraNçais | español | italiaNo | português
in the synchronisation window, please select the direction in which you want to perform the synchronisation. if you have data that is more up-to-date in the time attendance terminal than in the software, please select - "Device/database".Ifthedatainthesoftwareismoreup-to-date,select-"Database/device".
YoucanseeinthesummaryofeachuserIDwhethertheuserexistsinthedeviceonlyorinsoftwareonly,orwhetherthereisadifferencebetweenthesoftwareandthedevice.Youcanseewhichinformationisdifferentinthedifferencedescription. Now select the synchronisation direction.
if you do not want to synchronise all the data or if the data does not all have the same direction, you can select any user id individually and define the direction, or ignore it so that it will not be synchronised. to do this, click in the field next to "Resolution".Youwillthenseeadrop-downlist(empty=nosynchronisation;DB/Device=database-device;Device/DB=Device-database). Example of differences: A user with an ID has been created without a name on the device. If you synchronise data, you will see the following message: "Device only". Synchronise this data – device/DB and edit the user ID in "User". Add a new user name and synchronise it once again with the time attendance terminal.

37
English | NederlaNds | deutsch | FraNçais | español | italiaNo | português
During the synchronisation you will now see the following message: "Different!" And, in the description: User name different. Now synchronise "DB/Device" so that the user names on the time attendance terminal are overwritten and the user is recognised at the next login. 8.3 Function codeFunctioncodesareusedtoaddtargeteddescriptionsoftheuser'sbooking times.Functioncodesareusedforthesummaryandexplanationof(manuallyadded)absences. the function codes can be added to the booking times in the software by the supervisor or administrator.
note: With the ta-900 series, users can use the preprogrammed system keys to enter function codes directly into the time attendance terminal when time stamping in or out. WiththeTA800seriesthefunctioncodeshastobeenterdirectlytothedevice(seeuser’sGuideforTA800series).
Usethefunctioncodesforyouremployees'bookingtimessuchasbusinesstrips,holidays,medicalconsultations,etc.this information will appear on the monthly report.
8.3.1 adding function codes
select ,enterthefunctioncodeyouwantandpressOK.Thefieldshighlightedinredarerequiredfields. 8.3.2 editing function codes
highlight the function code you want to change, click on andmakeyourchanges.PressOKtoconfirmyourentry.
8.3.3 deleting function codes
highlight the function code that you want to delete, then click on .UseOKtoconfirm.

38
English | NederlaNds | deutsch | FraNçais | español | italiaNo | português
9.0 InFo
9.1 help9.1.1 technical Supporta) Support on the Safescan website our service page on our website is available 24 hours a day in is updated regularly. please go to: www.safescan.com/manuals.YouwillfindtheanswerstoyourquestionsandsuggestedsolutionsintheFAQ.
b) Support hotline our support team is available to answer any technical questions you may have by telephone from Monday to Friday, between09:00and17:00.Pleasecontact:www.safescan.com
9.2 Credits9.2.1 updates and upgradesWewillmakeupdatesand/orupgradesavailabletoyouatwww.safescan.com/manuals.Pleasecheckregularlyto ensure that you have the latest software version.
10.0 Server InStallatIonFor more information about server installation, please visit our website www.safescan.com/updates_ta or contact our help desk.
11.0 unInStallIng SaFeSCan tIMe attendanCe 4to uninstall safescan time attendance 4, please proceed as follows.
• Start/configuration/software.• SelectSafescanTimeAttendance4,thenselect[Uninstallsoftware].


![ENGLISH ESPAÑOL NEDERLANDS PORTUGUÊS KD-X352BT … · Data Size: B6L (182 mm x 128 mm) Book Size: B6L (182 mm x 128 mm) ENGLISH ESPAÑOL NEDERLANDS PORTUGUÊS B5A-2133-00 [E] KD-X352BT](https://static.fdocuments.in/doc/165x107/5c5ce6c409d3f2dc448c02fe/english-espanol-nederlands-portugues-kd-x352bt-data-size-b6l-182-mm-x-128.jpg)