MANUAL ON BREEDER, FOUNDATION AND CERTIFIED SEED …
148
MANUAL ON BREEDER, FOUNDATION AND CERTIFIED SEED PRODUCTION FIELD AND HORTICULTURE CROPS Department of Agriculture Ministry of Agriculture and Forests Royal Government of Bhutan June 2021
Transcript of MANUAL ON BREEDER, FOUNDATION AND CERTIFIED SEED …

MANUAL ON BREEDER, FOUNDATION AND CERTIFIED
SEED PRODUCTION
FIELD AND HORTICULTURE CROPS
Department of Agriculture
Ministry of Agriculture and Forests
Royal Government of Bhutan
June 2021
MANUAL ON BREEDER, FOUNDATION AND CERTIFIED
SEED PRODUCTION
FIELD AND HORTICULTURE CROPS
Department of Agriculture
Ministry of Agriculture and Forests
Royal Government of Bhutan
June 2021
ISBN 978-99936-957-8-3

i
AUTHORS
1. Mr. Mahesh Ghimiray, Specialist II, ARDC Bajo
2. Mr. Tirtha Bdr Katwal, Specialist II, NCOA Yusipang
3. Dr. Tayan Raj Gurung, Specialist I, Advisor, DoA
4. Ms. Passang Wangmo, Agriculture Officer, ARDC Wengkhar
5. Mr. Tshering Wangchen, Dy. Chief Agriculture Officer, ARED, DoA
6. Ms. Tshering Yangden, Horticulture Officer, ARDC Samtenling
7. Mr. N.B Adhikari, Dy. Chief Agriculture Officer, ARDC Samtenling
8. Mr. Loday Phuntsho, Principal Horticulture Officer, ARDC Wengkhar
9. Dr. Yadunath Bajgai, Specialist III, NCOA Yusipang
10. Ms. Tashi Gyelmo, Sr Agriculture Officer, NCOA Yusipang
11. Mr. Gyaltshen Tshering, Dy. Chief Agriculture Officer
12. Mr. Ganga Ram Ghalley, Sr Agriculture Supervisor, ARDC Samtenling
13. Mr. Sangay Dorji, Agriculture Officer, ARDC Samtenling
14. Mr. Jimba Rabgyel, Agriculture Officer, NCOA Yusipang
EDITORS
1. Mr. Wangda Dukpa, Chief Agriculture Officer, ARED, DoA
2. Mr. Lakey, Principal Agriculture Officer, ARED, DoA
3. Mr. Tshering Tobgay, Dy. Chief Agriculture Officer, ARED, DoA
4. Mr. Tshering Wangchen, Dy. Chief Agriculture Officer, ARED, DoA
5. Ms. Kuenzang Om, Dy. Chief Agriculture Officer, ARED, DoA

ii
Foreword
Agriculture is one of the most important sectors providing livelihood to more than 50 percent of
the Bhutanese population and contributing about 17.8 percent to the country’s overall Gross
Domestic Product (GDP). The farm inputs are entry points in the overall development of the
agriculture sector. The Department of Agriculture (DoA) considers seeds and planting materials
as extremely important inputs in achieving an inclusive food and nutritional security. Recognizing
the critical role that improved seeds and planting materials play, the Department focussed on seed
system development right from the commencement of the first five-year plan in 1961, the very
year DoA was established.
One of our foremost efforts has been on institutional restructuring starting from the initiation of
the model farms in the 1960s to the current National Seed Centre. The main emphasis of the
institutional realignment is to establish a robust seed system where in all the demands for
improved varieties of agriculture crops are met. Besides the government supported formal seed
system, DoA also liaise closely with private nursery entrepreneurs in an effort to complement the
growing demand of improved seeds and planting materials. We need to continue developing the
seed industry to match to the technological advancement and developments in the agriculture
sector.
Towards this, it gives me immense pleasure to publish this manual which was an outcome of a
past meeting that focussed on seed related issues deliberated on the seed production and supply
system between the Agriculture Research and Development Centre’s (ARDC) and the National
Seed Centre (NSC). Let me congratulate and commend the colleagues of the Department for
successfully publishing the manual on breeder and foundation seeds production system for field
crops and horticulture crops. I am confident that the manual will assist in establishing a robust
seed production system and guide our technical staff in production quality seeds as per the
prescribed protocols. These are the building blocks to be improved by the agriculture sector in
rendering our services to transfer the benefits of strong seed sector to the farming community.
Once again, I would like to commend the work of the Specialists of the Department and the
Commodity Coordinators led by Agriculture Research and Extension Division for coordinating
and successfully publishing this manual.
Tashi Delek
Kinlay Tshering (Ms.)
Director
iii
Table of Contents
Foreword ........................................................................................................................................ ii
Introduction ....................................................................................................................................1
FIELD CROPS SEED PRODUCTION ...............................................................................3
A. Rice seed production ................................................................................................ 4
B. Wheat seed production ........................................................................................... 14 C. Maize seed production ............................................................................................ 20 D. Rapeseed and Mustard seed production ................................................................. 27 E. Quinoa seed production .......................................................................................... 32
F. Grain legumes seed production .............................................................................. 39
VEGETABLE SEED PRODUCTION ...............................................................................49
A. Potato ...................................................................................................................... 50 B. Cole crops seed production .................................................................................... 56
i. Broccoli: .......................................................................................................... 56 ii. Cabbage: ......................................................................................................... 56 iii. Cauliflower: .................................................................................................... 56
C. Root crops seed production .................................................................................... 61 i. Carrot .............................................................................................................. 61
ii. Radish: ............................................................................................................ 61 D. Bulb crops seed production .................................................................................... 66
i. Onion............................................................................................................... 66 ii. Garlic............................................................................................................... 71
Leafy vegetable seed production ............................................................................ 74 i. Mustard Green ................................................................................................ 74 ii. Lettuce............................................................................................................. 79
Solanaceous vegetable seed production ................................................................. 82
i. Chilli ............................................................................................................... 82 ii. Tomato ............................................................................................................ 88 iii. Brinjal or Eggplant .......................................................................................... 94
FRUITS AND NUTS SEEDLINGS PRODUCTION .....................................................100
A. Standard Fruits and Nuts Seedlings Production ................................................... 101
Temperate fruits ................................................................................................... 101 Sub-tropical fruits ................................................................................................. 101
PLANTATION CROPS SEEDLING PRODUCTION ..................................................111
A. Tea seedling production ....................................................................................... 112 B. Coffee seedling production .................................................................................. 118 C. Areca nut seedling production .............................................................................. 125

iv
SPICES SEEDLING PRODUCTION..............................................................................129
A. Large cardamom seedling production .................................................................. 130 B. Ginger and Turmeric Rhizome Production .......................................................... 137
Annexure .....................................................................................................................................142
Annexure I: Quantity and Frequency of breeder seed supply to NSC ............................ 142
1
Introduction
Agriculture plays a vital role in the Bhutanese economy providing livelihood to majority of the
country’s population. Bhutanese agriculture has made significant growth over the years
transitioning from subsistence farming to semi commercial and commercial farming. This
accelerated growth and development in the agriculture can be attributed to research and
development support by the Royal Government of Bhutan. The government focussed on the seed
system development right from the start of the 1st Five Year Plan in 1961 recognizing the critical
role that improved seeds and plants play in increasing agriculture productivity. The agriculture
input supply system over the years has undergone several institutional restructuring and is now
better placed with improved facilities and more support from the growing private sector. The
Community Based Seed Production (CBSP) also supplements the formal seed sector to meet the
needs of the farmer and is a sustainable seed production model. CBSP can mainly benefit small
holder farmers who do not have access to quality seeds.
Good quality seed is the most basic input essential for improvement of agriculture crops. In order
to ensure seed self-sufficiency, the production and supply of the improved open pollinated seed
varieties and planting materials is continued through the formal seed system. The National Seed
Centre, Regional Seed Centres, agricultural farms and Agriculture Research and Development
Centres are key agencies involved in seeds research and development. The Department of
Agriculture continues to streamline the seeds services considering the agriculture transformation
over the years.
The breeder and foundation seed production manual was developed primarily to improving the
existing seed production system. The guideline clearly outlines the breeder and foundation seed
production system in the Agriculture Research and Development Centres(s) and the National Seed
Centre. This guideline can be used by seed certification officer as a monitoring guide. The
guideline also establishes the seed classes of cereals, vegetables, fruits and nuts and plantation
crop that will be commonly used under Bhutanese context. This manual highlights the seed
production schemes that will guide the formal seed sector. The following are the seed classes:
1. Classes of seed for orthodox seeds (Three generation model)
a. Breeder seed
It is the initial handful of seeds obtained from the selection of individual plants or through
breeding of two parents of the variety which is available with the original breeders or the
variety developing agencies (Government Institutes or Private Institutes). Breeder seed
should be produced and maintained by the original breeder or variety releasing agency
whoever is involved in developing the varieties. The genetic purity of the breeder seed
should be 100% as the varietal purity of subsequently multiplied foundation, and certified
seed largely depend upon the quality of the breeder’s seed.
2
b. Foundation seed
It is the progeny of breeder seed and National Seed Centre shall be responsible for
production and maintenance of foundation seeds. It should be produced under the close
supervision of original breeder or qualified plant breeders or technical officers. The genetic
purity of the foundation seed should be maintained at 99.5% level.
c. Certified Seed
It is the progeny of foundation seed and its production is supervised and approved by
National Seed Centre and Seed Certifying Agency. It can be produced by National Seed
Centre, Private seed companies and community seed producers under the close
supervision of the National Seed Centre and Seed Certifying Agency. This is the
commercial seed which is available for the growers and the genetic purity should be 99%.
2. Classification in Fruits and nuts
In fruit and nuts, different system of seedling production categories is followed. In our case the
following classification is adopted in order to be consistent with cereals and other horticultural
crops in the country. The seedlings category includes foundation stock, mother stock and
multiplication stock.
a. Foundation stock
Plants that is genetically pure and maintained under strict conditions at all times to ensure
free incidence of insect, pests and diseases. These plants which are limited in numbers are
maintained for the purpose of producing high quality scion or bud sticks following
specified management techniques. These stocks are maintained by national repository
centre or research centres with proper record of their pedigree.
b. Mother stock
Plants derived from foundation stock which are true to type and free of pests and diseases.
Good numbers of plants are maintained by agencies mainly National Seed Centre for
further propagation and distribution.
c. Multiplication stock
Plants derived from mother stock, true to type and certified for sale. These are produced
by nurseries under National Seed Centre or registered private nursery growers
3
FIELD CROPS SEED PRODUCTION

4
A. Rice seed production
Background
Rice belongs to the genus Oryza of the Poaceae or grass family. Cultivated rice belongs to two
species, O. sativa and O. glaberrima. Rice cultivated in Bhutan or in Asia is O. sativa. Within O.
sativa, three main eco-types or geographical races, namely, Indica, Japonica and Javanica are
found. In Bhutan, Japonica varieties (bold grain) are predominant in the high-altitude regions,
while Indica types (slender grain) are found in the lower foothills. Intermediate types (combination
of Japonica and Indica) are found in the mid altitude regions. Rice plant usually takes 3 - 6 months
from germination to maturity. It takes about 35 days for reproductive phase and about 30 days for
ripening phase. The difference in growth duration is due to time taken during vegetative stage. The
three growth phases of the rice plant are: Vegetative phase (germination to panicle initiation),
Reproductive phase (panicle initiation to flowering) and Ripening phase (flowering to mature
grain). Rice is basically a self-pollinated crop but cross-pollination does occur to the extent of 0 –
4 %. Hence, seed producers have to be mindful of this fact.
Since 1988, a total of 26 rice varieties have been released by different research centres (Table 1).
These varieties are recommended for different agro-climatic and altitudinal zones. Of the total, 3
varieties have been denotified by VRC. These denotified varieties are Milyang 54, BW 293 and
Barket. No seed production is required for these varieties.
Table 1: Released rice varieties in Bhutan
Variety
Year
released
Releasing
centre
Yield
(t/acre)
Recommended
altitude (m)
IR 64 1988 ARDC Bajo 2.0-3.2 600-1500
IR 20913 1989 ARDC Bajo 1.6-2.4 600-1500
No 11 1989 ARDC Bajo 1.6-2.4 Above 1500
BR 153 1989 ARDC Bhur 1.2-1.6 Up to 600
Khangma Maap 1999 ARDC Wengkhar 1.6-2.4 Above 1500
Bajo Maap 1 1999 ARDC Bajo 2.0-3.2 600-1500
Bajo Maap 2 1999 ARDC Bajo 2.0-3.0 600-1500
Bajo Kaap 1 1999 ARDC Bajo 2.0-3.4 600-1500
Bajo Kaap 2 1999 ARDC Bajo 2.0-3.4 600-1500
Yusi Ray Maap 1 2002 RDC OA
Yusipang
2.5-3.5 Above 1800
Yusi Ray Kaap 1 2002 RDC OA
Yusipang
2.5-3.5 Above 1800
Wengkhar Rey Kaap 2 2002 ARDC Wengkhar 2.0-3.0 600-1500
Wengkhar Rey Kaap-6 2006 ARDC Wengkhar 2.0-3.0 600-1500
Jakar Rey Naab 2006 RC Jakar 1.5-2.0 >2000 m
Yusi Raykaap 2 2010 RDC OA
Yusipang
2.0-3.0 >1800 m

5
Yusi Raymaap 2 2010 RDC OA
Yusipang
2.0-3.0 >1800 m
Wengkhar Raykaap 10 2010 ARDC Wengkhar 1.0-2.0 <700 m
Bhur Raykaap-1 2010 ARDC Bhur 2.0-3.0 <700 m
Bhur Raykaap 2 2010 ARDC Bhur 1.0-2.0 <700 m
Bhur Kambja 1 2010 ARDC Bhur 1.0-1.5 <700 m
Bhur Kambja 2 2010 ARDC Bhur 1.0-1.5 <700 m
YusireyKaap 3 2018 ARDC Yusipang 2.2-3.0 >1800
Yusirey Kathra-Mathra 2018 ARDC Yusipang 2.0-3.0 >1800
National seed production scheme
The three seed production stages are Breeder seed, Foundation seed and Certified seed. While the
ARDCs releasing new varieties are responsible for maintaining and supply of breeder seeds, NSC
has the responsibility of producing foundation and certified seeds. Even though rice is a self-
pollinated crop, there is cross-pollination to the extent of 4 %, hence the crop should be raised in
isolation and seeds set by open-pollination. To maintain the varietal purity an isolation distance of
3 m should be maintained in all stages of seed production. If isolation by space is not possible, use
time isolation of 21 days. Barrier isolation with polythene sheets of 2 m height or barrier crops
such as sesbania or sugarcane covering a distance of 3 m can also be used.
Variety-wise breeder seed production responsibility is assigned amongst the ARDCs (Table 2)
Table 2: Seed production schemes in rice
Altitude zone Varieties Responsibility
High (>1800 m) Khangma Maap, No 11, Yusi Ray Maap 1, Yusi
Ray Kaap 1, Jakar Rey Naab, Yusi Raykaap 2,
Yusi Raymaap 2, YusireyKaap 3, Yusirey
Kathra-Mathra
ARDC Yusipang
Mid (800-1800m)
(West)
IR 64, IR20913, Bajo Maap 1, Bajo Maap 2,
Bajo Kaap 1, Bajo Kaap 2,
ARDC Bajo
Mid (800-1800m)
(East)
Wengkhar Rey Kaap 2, Wengkhar Rey Kaap 6,
Wengkhar Raykaap 10
ARDC
Wengkhar
Low (<800 m) BR 153, Bhur Raykaap-1, Bhur Raykaap-2, Bhur
Kambja 1, Bhur Kambja 2
ARDC
Samtenling
Specific methods for breeder seed production
• Sampling of the variety to obtain breeder seed from good panicles: select about 200
panicles that are true-to-type and disease-free
• Table examination of samples: About 200 panicles of each sample should be threshed
separately and the seed should be examined on the table
• Discard any sample appearing off-type, diseased or otherwise unacceptable
6
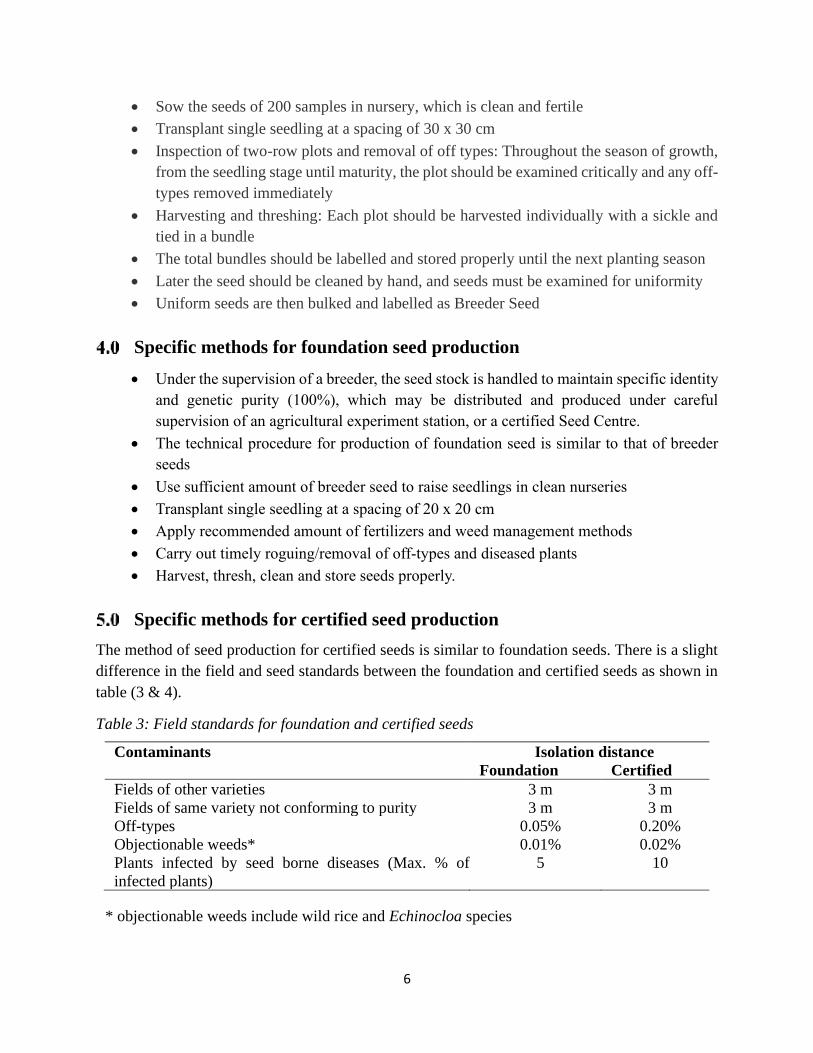
• Sow the seeds of 200 samples in nursery, which is clean and fertile
• Transplant single seedling at a spacing of 30 x 30 cm
• Inspection of two-row plots and removal of off types: Throughout the season of growth,
from the seedling stage until maturity, the plot should be examined critically and any off-
types removed immediately
• Harvesting and threshing: Each plot should be harvested individually with a sickle and
tied in a bundle
• The total bundles should be labelled and stored properly until the next planting season
• Later the seed should be cleaned by hand, and seeds must be examined for uniformity
• Uniform seeds are then bulked and labelled as Breeder Seed
Specific methods for foundation seed production
• Under the supervision of a breeder, the seed stock is handled to maintain specific identity
and genetic purity (100%), which may be distributed and produced under careful
supervision of an agricultural experiment station, or a certified Seed Centre.
• The technical procedure for production of foundation seed is similar to that of breeder
seeds
• Use sufficient amount of breeder seed to raise seedlings in clean nurseries
• Transplant single seedling at a spacing of 20 x 20 cm
• Apply recommended amount of fertilizers and weed management methods
• Carry out timely roguing/removal of off-types and diseased plants
• Harvest, thresh, clean and store seeds properly.
Specific methods for certified seed production
The method of seed production for certified seeds is similar to foundation seeds. There is a slight
difference in the field and seed standards between the foundation and certified seeds as shown in
table (3 & 4).
Table 3: Field standards for foundation and certified seeds
Contaminants Isolation distance
Foundation Certified
Fields of other varieties 3 m 3 m
Fields of same variety not conforming to purity 3 m 3 m
Off-types 0.05% 0.20%
Objectionable weeds* 0.01% 0.02%
Plants infected by seed borne diseases (Max. % of
infected plants)
5 10
* objectionable weeds include wild rice and Echinocloa species

7
Table 4: Seed standards for foundation and certified seeds
Parameters Foundation Certified
Germination (minimum) 85% 80%
Pure seed (minimum) 98% 97%
Inert matter (maximum) 2% 3%
Other crop seeds (max) 10 per kg 20 per kg
Other variety seeds (max) 10/kg 20/kg
Weed seeds (max) 10/kg 20/kg
Objectionable weed seeds* (max) 2/kg 5/kg
Seed moisture 12% 13%
Agronomic principles of seed production
Field selection
• The land selected should not be cultivated with the same crop in the previous season
• This standard requirement is applicable for both nursery and main field
• Land should be free of volunteer plants
• Land should be fertile with good irrigation and drainage facilities
• Homogeneous plot with good exposition to sun for synchronous flowering and seed
maturation
Seed selection and sowing
• Seeds should be healthy with good germination percentage
• Quality seeds can be separated from unviable seeds by soaking in water
• The unviable and damaged seeds that float on the water surface should be removed and
the good quality seeds that sink should be used for cultivation
• If there is excess of chaffy seeds in the selected seed lot, take some water in a container
(bucket) and drop an egg in it and keep adding salt till the egg reaches surface
• Then add seeds to the water and remove the chaffy unviable seeds that float on the surface
of the water
• Then wash the selected seeds in water for 2-3 times to remove the salt completely
Land preparation: Nursery bed and field
A proper land preparation is necessary to minimize competition with weeds in nursery bed as well
as in transplanted fields. Depending upon the season, location and type of variety, the seed beds
and fields should be prepared before the onset of rains. The nursery bed should be
• smooth as fine as the seeds
• well leveled with good drainage and should not be waterlogged
• raised above the ground and free from weeds and diseases
8
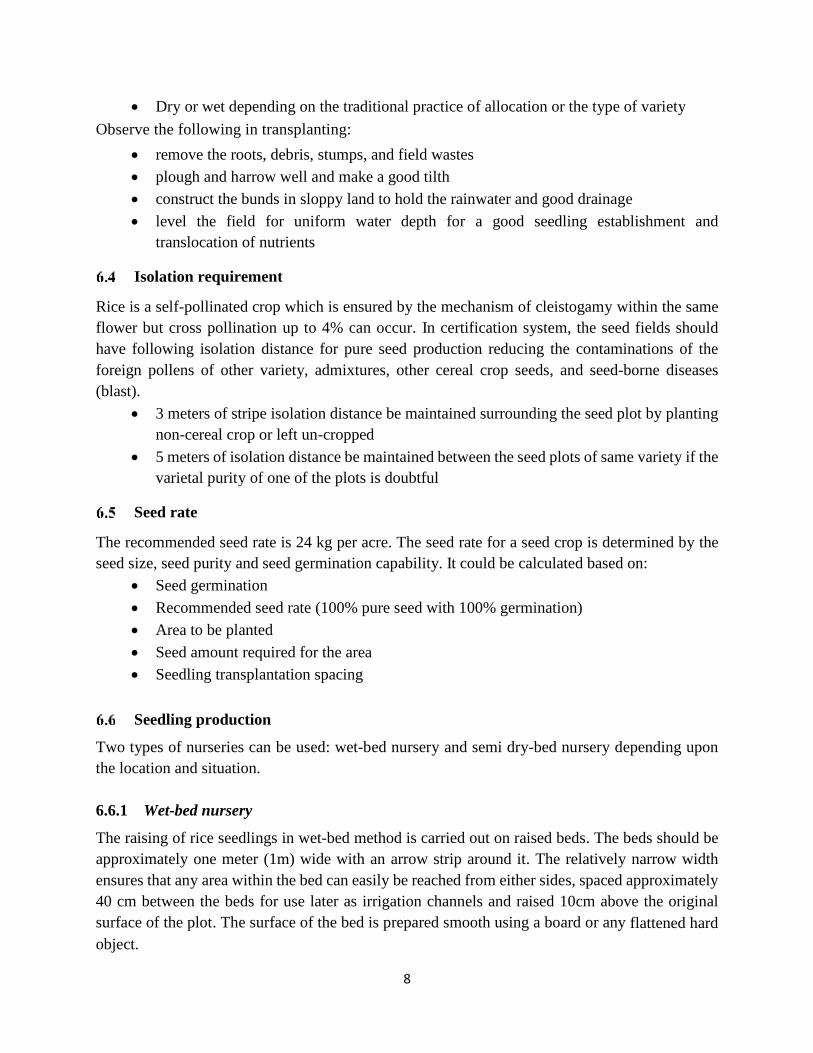
• Dry or wet depending on the traditional practice of allocation or the type of variety
Observe the following in transplanting:
• remove the roots, debris, stumps, and field wastes
• plough and harrow well and make a good tilth
• construct the bunds in sloppy land to hold the rainwater and good drainage
• level the field for uniform water depth for a good seedling establishment and
translocation of nutrients
Isolation requirement
Rice is a self-pollinated crop which is ensured by the mechanism of cleistogamy within the same
flower but cross pollination up to 4% can occur. In certification system, the seed fields should
have following isolation distance for pure seed production reducing the contaminations of the
foreign pollens of other variety, admixtures, other cereal crop seeds, and seed-borne diseases
(blast).
• 3 meters of stripe isolation distance be maintained surrounding the seed plot by planting
non-cereal crop or left un-cropped
• 5 meters of isolation distance be maintained between the seed plots of same variety if the
varietal purity of one of the plots is doubtful
Seed rate
The recommended seed rate is 24 kg per acre. The seed rate for a seed crop is determined by the
seed size, seed purity and seed germination capability. It could be calculated based on:
• Seed germination
• Recommended seed rate (100% pure seed with 100% germination)
• Area to be planted
• Seed amount required for the area
• Seedling transplantation spacing
Seedling production
Two types of nurseries can be used: wet-bed nursery and semi dry-bed nursery depending upon
the location and situation.
6.6.1 Wet-bed nursery
The raising of rice seedlings in wet-bed method is carried out on raised beds. The beds should be
approximately one meter (1m) wide with an arrow strip around it. The relatively narrow width
ensures that any area within the bed can easily be reached from either sides, spaced approximately
40 cm between the beds for use later as irrigation channels and raised 10cm above the original
surface of the plot. The surface of the bed is prepared smooth using a board or any flattened hard
object.

9
Seeds are soaked overnight and pre-germinated seeds are broadcasted on the beds in a way to
achieve an even distribution preventing dense spacing. After sowing, seeds are covered with a thin
layer of soil to protect against heavy rain or birds. The sown seeds beds could also be covered with
banana leaves, grass, or paddy straw and moistened from the top or irrigated through the channel
to be kept moist all the time.
The seedlings in wet seedbed grow very fast and become ready for transplanting from14 days
onwards. However, it depends on the variety and the nursery bed conditions. Younger seedlings
are always preferable, as they establish themselves more quickly. The "fourth leaf" stage is
generally regarded as optimal age of seedling for transplanting.
6.6.2 Semi dry-bed nursery
It is same as the wet bed nursery but the bed is dry. Dry seeds are broadcasted on the bed and
covered completely with a thin layer of soil or mulched with leaves. The beds should be watered
thoroughly immediately after planting and twice every day thereafter. The bed can be watered
along the channels or splashed onto the beds otherwise. Seedlings growing, on dry bed surface are
totally dependent on rain or irrigation/ hand splashing water from top. Dry bed seedlings will not
grow as fast as wet bed seedlings. Seedlings from the dry bed become ready for transplanting from
21 days onwards. These beds should be saturated with water before uprooting the seedlings,
making soil moist and loose.
Method of planting
For seed production purpose, transplanting is recommended. The main advantages of transplanting
are a good and uniform plant stand, easier crop and water management, and good control of weeds
and other pests. Increased labour input for transplanting is a major disadvantage. Transplanting
can be done manually, and if enough labour is available it is always advisable to transplant in
straight rows or lines. Otherwise, random transplanting is fine for certified seed production,
keeping in mind the following points:
• Random method of transplanting can be adopted if the weed pressure is expected to be
low and if herbicide such as Butachlor is intended to be used for weed control.
• Avoid wide spacing in random transplanting. A plant density of 25-35 hills per squared
meters is optimum.
• Line planting is recommended where the aim is to control weeds using a rotary weeder.
Line planting also enhances the attainment of an optimum plant population and facilitates
weeding and other operations.
• In line planting, use ropes, guides or markers to attain straight rows. Plant seedlings on
spots indicated by ropes or markers.
• Maintain row spacing of 20 cm and plant to plant spacing of 15 - 20 cm within the rows.
Transplant 2 - 3 seedlings per hill at a depth of 2 - 3 cm.
10
• There is no single spacing recommended for all varieties – it will depend on the variety,
soil fertility and planting season.
The time of rice transplanting basically depends on the altitude of a locality. Use the following
guide for different rice growing zones.
• High altitudes (above 1600 m): May - early June
• Mid altitudes (700-1600 m): June- early July
• Low altitude (below 700 m): Late June - end July
Irrigation
There are generally two types of irrigation and water management practices commonly followed
in rice seed production, depending on water availability:
• Continuous flooding with standing water: It is practised where there is abundant and
assured irrigation water, maintaining standing water in the field at depths of 3 - 4 cm.
• Intermittent irrigation or AWD (alternate wetting and drying): involves applying water
rapidly in sufficient quantities to the field from 4 - 7 days. This is then stopped and water
is completely depleted until the next irrigation period. It is common in water scarce areas
where rotational water sharing is practised. Intermittent irrigation helps to reduce
shochum pressure.
• Water is most critical during land preparation, vegetative, reproductive and ripening
stages of the rice crop. Land preparation requires a large amount of water.
• After transplanting, keep the water level as minimum as possible for about 3-6 days until
the seedlings recover.
• Water level should be gradually increased as the crop grows ensuring adequate soil
moisture from panicle initiation to dough stage.
• Flowering is the most critical stage when moisture stress should be avoided.
• It is beneficial to drain water at maximum tillering stage so that tiller formation is not
hampered.
• Drain water from the field 10 - 15 days before harvest. This will ensure dry field
conditions during harvesting and other operations.
Weed management
Weeds compete with rice for sunlight, nutrients and water, cause economic loss through increased
cost of production and reduction in the yield and quality of rice. Direct seeded (especially dry
direct seeding) and upland rice are often exposed to greater pressure of weeds than the traditional
transplanted rice. Therefore, timely control of weeds is critical for high yield and quality of rice.
Hand weeding, mulching, crop rotation, and herbicides applications are used to control the weed
infestation in rice.
11
• Start hand weeding at 2 weeks after sowing or even earlier, depending on the level of
weed infestation,
• Second weeding at 4 – 5 weeks
• Third weeding at 7 – 8 weeks, depending on the duration of maturity of the rice crop
and the level of weed infestation.
• Use mulching of direct sown rice fields and dry nursery beds with moist straws that will
reduce the growth of weeds and hand-weed after emergence of seedlings.
• Apply recommended dose of pre-planting (application before crop is planted), pre-
emergence (application after planting, but prior to emergence of weeds) or post
emergence (application after emergence of weeds) herbicides at right time depending
upon the infestation of weeds using correctly calibrated sprayer.
Field inspection and field standards
A seed crop needs to be inspected and certified by the field inspectors for genetic purity under the
scientific seed production system. The seed crop needs regular inspections and examination of
plant population from the emergence in nursery and in field after transplantation for plant growth,
weed infestation, diseases, and insect pest attacks and off-types to be removed. Field inspection is
carried out at least twice at following stages:
• At vegetative stage
• After panicle emergence and during flowering when seed has started to develop
• Later at maturity stage when panicles get complete dry and seeds have low moisture
content
• The seed inspector checks the standing crop following the pathway for meeting the
minimum field standards for off-types, other plants, weeds, and diseased plants.
Roguing
Weed plants, diseased plants, insect damaged plants, and off-types not meeting the standards
should be rogued out and the seed field should be cleaned before undertaking the field inspection
from certification agency. In general, roguing could be carried at any stage of the plant. But in
certification, 3 - 4 roguing are normally recommended to be done in seed crop of rice to avoid
mixing with other crop and contaminants. First roguing at heading but before flowering stage to
rogue out the obvious off-types at this stage, second roguing after completion of flowering and
third roguing at maturity but before harvesting.
In roguing, obvious off-types plants like different in panicle colour and shape, plants susceptible
to diseases (blast), tall plants, plants with false smut balls, early heading plants, and volunteer
plants from previous crop should be removed. In roguing the plants infected with blast and false
smut should be collected properly and buried or burned far away from the seed plot.
12
Harvesting and threshing
Timeliness and proper technology and practices of harvesting are important in rice crop for yield
and quality of the seed. It is often seen that irrigated rice tend to ripen irregularly. Therefore, the
seed crop should be allowed to mature completely on stand and soon after the harvest maturity, it
has to be harvested to avoid the losses due to shattering, sprouting on standing crops because of
the rainy and stormy weather on delayed harvest. As the harvest time approaches, following
actions should be taken to harvest a good seed crop of rice:
Inspect the plants daily most particularly the panicles on mature tillers and note the exact duration
of maturity that plants reached from days to heading.
• 85 % of panicles and grains have changed colour from green to straw
• Drain the water off and leave the standing crop to complete ripening leading to drying of
the grains at hard dough stage
• Normally, 21 - 24 % of seed moisture is suitable.
Harvest the crop by cutting the bunch of plant in the field for few days to further dry the panicles.
Rice stalks in bundle are threshed out using thresher), or manually beating on stone and farmer’s
fields. Care is taken in handling the seed during mechanical damages and admixtures.
Drying, processing and cleaning
Delayed drying may result in non-enzymatic browning (stack-burning), microbial growth, and
mycotoxin production. Harvested grain are sun-dried over tarpaulin for 2 - 3 days and constantly
turned for uniform drying and seeds are brought to 13 % moisture content for safe storage.
In humid environment, the modern novel technology of seed drying using zeolite drying beads
could be used for efficient drying and dried seeds should be stored in sealed pack at 8 - 9 % MC.
Check whether it is dried enough or remains wet following the local method:
• Take a glass jar with screw lid,
• Put a handful of dried grains and add a spoonful of salt, and seal the jar and left for 24
hours
• Examine the salt whether it is in clump or remain dispersed
• If salt is in clump, the seeds are wet and needs drying or if remains dispersed, seeds are
well dried
• Dry seeds are cleaned by winnowing during threshing in open air
• Further processed using air screen cleaner, length separator, gravity separator to remove
the empty hulls, dust particles, pieces of stalks/awns, broken seeds, weevil infested seeds,
weed seeds, and other crop seeds.
• Seeds are graded for uniform size and dried once again if necessary.
• The recommended moisture content for storage of rice seed in ambient condition is 13
%.
13
Bagging, tagging and storage
• After cleaning and drying, seeds are bagged in recommended seed containers and size
with proper labelling.
• The size of bag for rice seed is normally 30-35 kg and proper kind of seed containers
recommended by certification are 200 gauze lined jute bag, Super Grain-Pro bags, PICs
bags and improved metal bins.
• Seed is treated with Bavistin to protect the seeds in storage.
• For certification and tagging, seeds are required to be tested in seed testing laboratory for
minimum standards as follows and use the respective tags.
Seed multiplication ratio
Seed multiplication ratio means the number of seeds to be produced from a single seed when it is
sown and harvested. In rice the seed multiplication ratio is 1:70. Depending on the quantity of
seeds to be produced for different categories, seed planning can be done using this ratio.
14
B. Wheat seed production
Background
Wheat belongs to the grass family (Poaceae) and is widely cultivated for its seed, a cereal grain
which is a worldwide staple food. The many species of wheat together make up the genus Triticum;
the most widely grown is common wheat (T. aestivum). The wheat plant has long, slender leaves,
stems are hollow in most types of wheat plants and heads have many flowers ranging from 20 to
100. The flowers are grouped together in spikelets. Each spikelet has two to six flowers. In most
spikelets, two or three of the flowers become fertilized, thus producing grains.
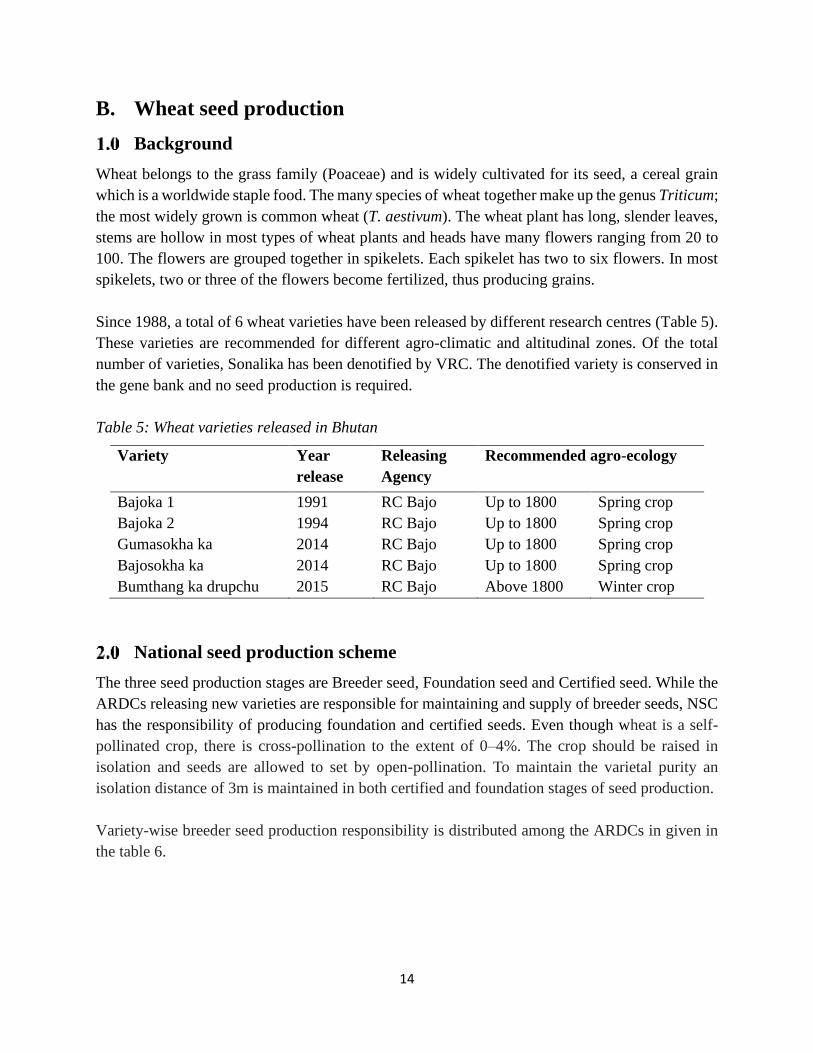
Since 1988, a total of 6 wheat varieties have been released by different research centres (Table 5).
These varieties are recommended for different agro-climatic and altitudinal zones. Of the total
number of varieties, Sonalika has been denotified by VRC. The denotified variety is conserved in
the gene bank and no seed production is required.
Table 5: Wheat varieties released in Bhutan
Variety Year
release
Releasing
Agency
Recommended agro-ecology
Bajoka 1 1991 RC Bajo Up to 1800 Spring crop
Bajoka 2 1994 RC Bajo Up to 1800 Spring crop
Gumasokha ka 2014 RC Bajo Up to 1800 Spring crop
Bajosokha ka
Bumthang ka drupchu
2014
2015
RC Bajo
RC Bajo
Up to 1800
Above 1800
Spring crop
Winter crop
National seed production scheme
The three seed production stages are Breeder seed, Foundation seed and Certified seed. While the
ARDCs releasing new varieties are responsible for maintaining and supply of breeder seeds, NSC
has the responsibility of producing foundation and certified seeds. Even though wheat is a self-
pollinated crop, there is cross-pollination to the extent of 0–4%. The crop should be raised in
isolation and seeds are allowed to set by open-pollination. To maintain the varietal purity an
isolation distance of 3m is maintained in both certified and foundation stages of seed production.
Variety-wise breeder seed production responsibility is distributed among the ARDCs in given in
the table 6.

15
Table 6: Breeder seed production responsibility
Altitude zone Varieties Responsibility
High (>1800 m) Bumthang Ka Drupchu ARDC Yusipang
Mid and Low (<1800m Bajoka 1, Bajoka 2, Gumasokha ka,
Bajosokha ka
ARDC Bajo
Specific methods for breeder seed production
• Sampling of the variety to obtain breeder seed from good ear: select about 200 ears that
are true-to-type and disease-free
• Table examination of samples: each ear should be threshed separately and the seed should
be examined on the table
• Discard any sample appearing off-type, diseased or otherwise unacceptable
• Sow the seeds of 200 ears in an ear-row nursery at a row spacing of 25-30 cm
• Inspection and removal of off-type: throughout the season of growth, from the seedling
stage until maturity, the plot should be examined critically and any off-types removed
immediately
• Harvesting and threshing: each plant should be harvested individually with a sickle and
tied in a bundle
• The total bundles should be labelled and stored properly until the next planting season
• Later the seed should be cleaned by hand, and seeds must be examined for uniformity
• Uniform seeds are then bulked and labelled as breeder seed
Specific methods for foundation seed production
• Under the supervision of a breeder, the seed stock is handled to maintain specific identity
and genetic purity (100%) which may be distributed and produced at the National Seed
Centre currently.
• The technical procedure for production of foundation seed is similar to that of breeder
seeds
• Use sufficient amount of breeder seed to produce foundation seeds
• Sow the seeds in well prepared fields at a row spacing of 25 - 30 cm
• Apply recommended amount of fertilizers and weed management methods
• Carry out timely roguing/removal of off-types and diseased plants
• Harvest, thresh, clean and store seeds properly.
Specific methods for certified seed production
The method of seed production for certified seeds is similar to foundation seeds. There is a slight
difference in the field and seed standards between the foundation and certified seeds as shown in
the table 7 and 8.
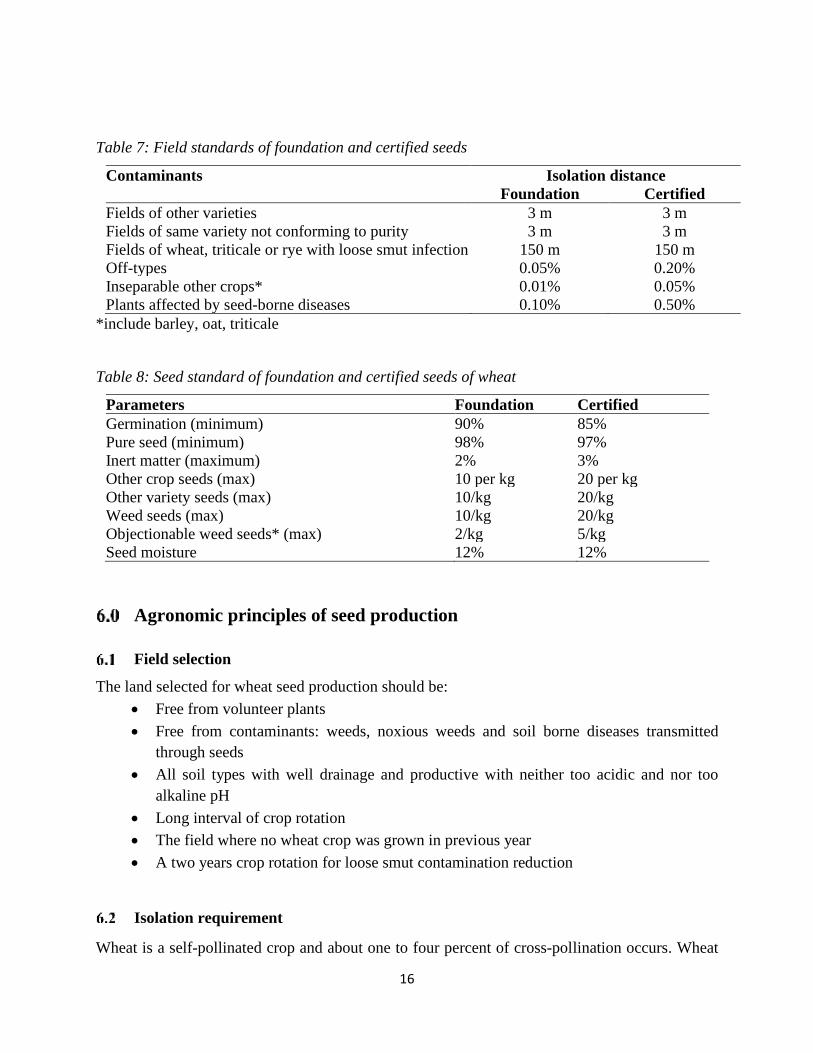
16
Table 7: Field standards of foundation and certified seeds
Contaminants Isolation distance
Foundation Certified
Fields of other varieties 3 m 3 m
Fields of same variety not conforming to purity 3 m 3 m
Fields of wheat, triticale or rye with loose smut infection 150 m 150 m
Off-types 0.05% 0.20%
Inseparable other crops* 0.01% 0.05%
Plants affected by seed-borne diseases 0.10% 0.50%
*include barley, oat, triticale
Table 8: Seed standard of foundation and certified seeds of wheat
Parameters Foundation Certified
Germination (minimum) 90% 85%
Pure seed (minimum) 98% 97%
Inert matter (maximum) 2% 3%
Other crop seeds (max) 10 per kg 20 per kg
Other variety seeds (max) 10/kg 20/kg
Weed seeds (max) 10/kg 20/kg
Objectionable weed seeds* (max) 2/kg 5/kg
Seed moisture 12% 12%
Agronomic principles of seed production
Field selection
The land selected for wheat seed production should be:
• Free from volunteer plants
• Free from contaminants: weeds, noxious weeds and soil borne diseases transmitted
through seeds
• All soil types with well drainage and productive with neither too acidic and nor too
alkaline pH
• Long interval of crop rotation
• The field where no wheat crop was grown in previous year
• A two years crop rotation for loose smut contamination reduction
Isolation requirement
Wheat is a self-pollinated crop and about one to four percent of cross-pollination occurs. Wheat
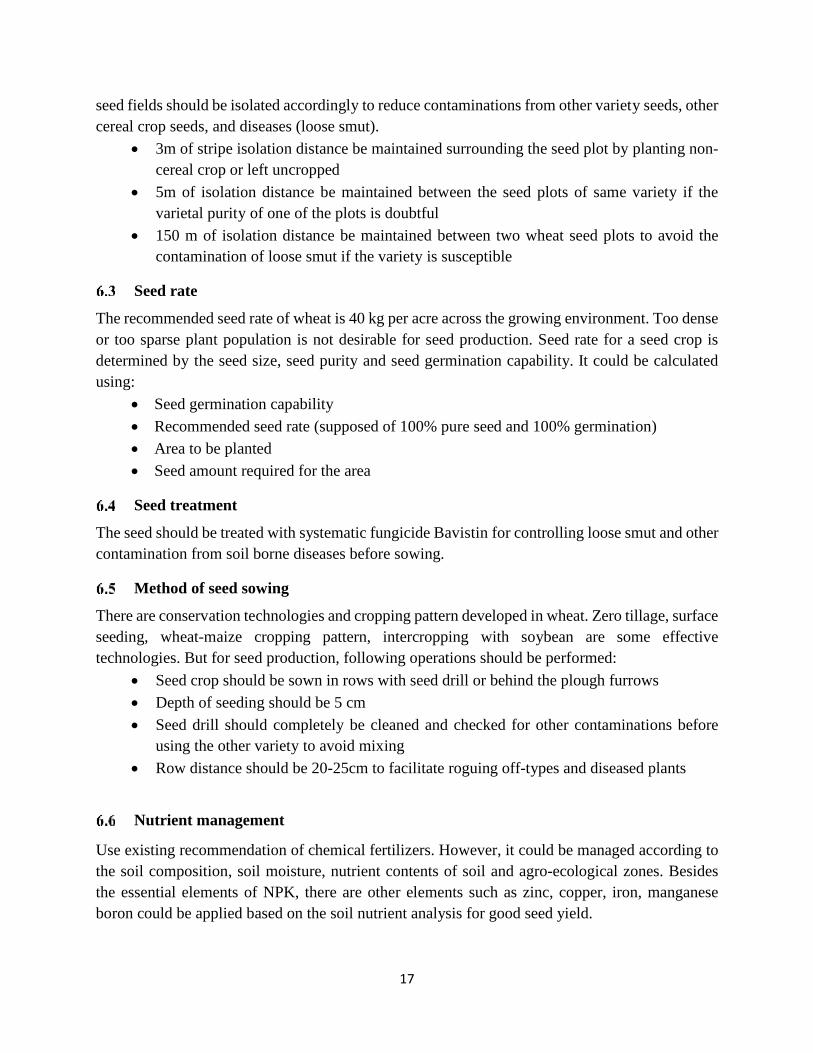
17
seed fields should be isolated accordingly to reduce contaminations from other variety seeds, other
cereal crop seeds, and diseases (loose smut).
• 3m of stripe isolation distance be maintained surrounding the seed plot by planting non-
cereal crop or left uncropped
• 5m of isolation distance be maintained between the seed plots of same variety if the
varietal purity of one of the plots is doubtful
• 150 m of isolation distance be maintained between two wheat seed plots to avoid the
contamination of loose smut if the variety is susceptible
Seed rate
The recommended seed rate of wheat is 40 kg per acre across the growing environment. Too dense
or too sparse plant population is not desirable for seed production. Seed rate for a seed crop is
determined by the seed size, seed purity and seed germination capability. It could be calculated
using:
• Seed germination capability
• Recommended seed rate (supposed of 100% pure seed and 100% germination)
• Area to be planted
• Seed amount required for the area
Seed treatment
The seed should be treated with systematic fungicide Bavistin for controlling loose smut and other
contamination from soil borne diseases before sowing.
Method of seed sowing
There are conservation technologies and cropping pattern developed in wheat. Zero tillage, surface
seeding, wheat-maize cropping pattern, intercropping with soybean are some effective
technologies. But for seed production, following operations should be performed:
• Seed crop should be sown in rows with seed drill or behind the plough furrows
• Depth of seeding should be 5 cm
• Seed drill should completely be cleaned and checked for other contaminations before
using the other variety to avoid mixing
• Row distance should be 20-25cm to facilitate roguing off-types and diseased plants
Nutrient management
Use existing recommendation of chemical fertilizers. However, it could be managed according to
the soil composition, soil moisture, nutrient contents of soil and agro-ecological zones. Besides
the essential elements of NPK, there are other elements such as zinc, copper, iron, manganese
boron could be applied based on the soil nutrient analysis for good seed yield.
18
Irrigation
In wheat, four to six irrigations at different growth stages are required for a seed crop. However, it
depends on the soil type. For example, for light soils, extra irrigation is required. Wheat is very
sensitive to moisture stress at crown root initiation and heading stages.
• First irrigation at crown root initiation stage about 30 – 35 days after sowing
• Other irrigations at late tillering, late jointing, heading/flowering, milk, and dough stages
Weed management
Timely and periodic weeding is essential to keep the field free from weeds for good seed
production. First weeding should be done after 30 - 40 days after sowing. This helps in controlling
the weeds and helps in minimizing the yield loss. In general, the weed control in wheat is done
using herbicides.
Roguing
The inspector on inspection if find weed plants, diseased plants, off-types not meeting the
standards suggests the directives to carry roguing and clean the seed crop. In general, 3 - 4 roguing
are normally practiced in wheat to bring the seed crop to seed certification standards.
• First roguing at heading or flowering stage to rogue out the obvious off-types at this stage
• Second roguing after completion of flowering and start of development of the colour in
ears
• Third roguing on complete maturity and development of ear colour
In roguing, obvious off-types plants like different in colour, plants susceptible to diseases, tall
plants, plants with smut galls, early heading plants, and ear-heads with variations in plot should be
removed. In roguing, the smutted ear-heads should be collected in paper bag and buried or burned
far away from the wheat plot.
Field inspection
A minimum of 2 field inspections should be done between flowering and harvesting stages. During
inspection parameters such as isolation requirement, off-types, volunteer plants, diseased plants
etc. are checked.
Harvesting
Harvest is done soon after the maturity of the seeds that turns from green to straw yellow. Ear-
heads should be harvested when the seeds attain maximum physiological maturity. Following tips
are suggested for right timing of harvest:

19
• When peduncle of ear-heads turns golden yellow
• Grains thresh out easily when the dried ear-heads are rubbed in between palms.
• The suitable moisture content at harvest should be 20 %
Threshing and processing
Harvested plants should be stacked on a clean floor of the threshing yard free from other varieties.
Harvested plants with a moisture content of 15% should be threshed manually or with threshers.
This level of moisture content is safe for threshing without any mechanical injury to the seeds.
Threshed grains are winnowed and cleaned. Cleaned seeds are dried to attain a safe moisture
content of 12–13% and graded using a suitable sieve to remove chaffy, under and oversized seeds.
Drying and storage
The cleaned and graded seeds are dried to attain 12-13% of moisture content. Normally the seeds
can be stored for one year under ambient storage conditions without losing much of the
germination potential.
Seed standards
The percentage of minimum physical purity of the certified and foundation seeds should be
98%, a minimum of 80% of germination capacity and 8-13% of moisture content. The presence of
inert and husk less seeds should not exceed 2.0%.
Seed multiplication ratio
Seed multiplication ratio means the number of seeds to be produced from a single seed when it is
sown and harvested. In wheat the seed multiplication ratio is 1:20. Depending on the quantity of
seeds to be produced for different categories, seed planning can be done using this ratio.

20
C. Maize seed production
Background
Maize (Zea mays) is one of the most widely cultivated food crops in Bhutan. More than 69% of
the rural households grow maize. Maize is grown from lesser than 300 to approximately 3000
meter above sea level (masl) under rainfall and irrigated conditions in cool and very hot climates
with growing cycles ranging from 3 - 10 months.
Maize is a tall annual plant growing to a height of 2 - 3 m. It belongs to family poaceae (graminae).
The maize plant possesses a simple stem of nodes and internodes. The leaves are broad and single
leaf arranged in two vertical rows on the opposite sides of an axis. A pair of large leaves extend
off each internode leaving a total of 8 - 21 leaves per plant. The leaves are linear or lanceolate
(lance-like) with an obvious midrib (primary vein) and can grow from 30 to 100 cm in length. The
male and female inflorescences are positioned separately on the plant. The male inflorescence is
known as the ‘tassel’ while the female inflorescence is the ‘ear’. The ear of the maize is a modified
spike and there may be 1 - 3 per plant. The maize grains, or ‘kernels’, are encased in husks and
total 30 - 1000 per ear. The kernels can be white, yellow, red, purple or black. Usually maize plants
take 140 - 160 days to harvest after sowing with 50 - 55 days under vegetative stage and 55 - 160
under reproductive stage. Maize is a monoceious plant and thus it is cross pollinated.
There are six improved varieties as highlighted in table 9.
Table 9: Released varieties of maize in Bhutan
Variety Year of
Release
Yield
Potential
(t/ac)
Recommended AEZ
Altitude
(masl)
Cropping suitability
Yangtsepa 1992 1.2-1.6 Upto 1800 Main Single
Khangma Ashom
1
1999 1.5-2.0 Upto 1800 Main Single
Khangma Ashom
2
1999 1.6-2.0 Upto 1800 Main Single
Chaskarpa 2012 1.6-1.9 1200-2100 Main Single/GLS
Tolerant
Shaphangma
Ashom (QPM)
2012 1.6-1.9 1200-2100 Main Single/GLS
Tolerant
Bhur Ashom 2015 1.5-1.8 600-2100 Early Variety/Double
cropping
(Source: National Maize Program, ARDC Wengkhar)
21
National seed production scheme
Specific methods for breeder seed production
• ARDC Wengkhar, the coordinating centre for maize commodity program will produce
the breeder seed.
• The quantity of breeder seed to be produced should be 30 kg for each variety.
• Plant bulk seed to obtain at least 5000 plants. Planting has to be done in rows with
adequate isolation (either distance or time isolation has to be followed)
• At flowering time convert into half sib crossing block
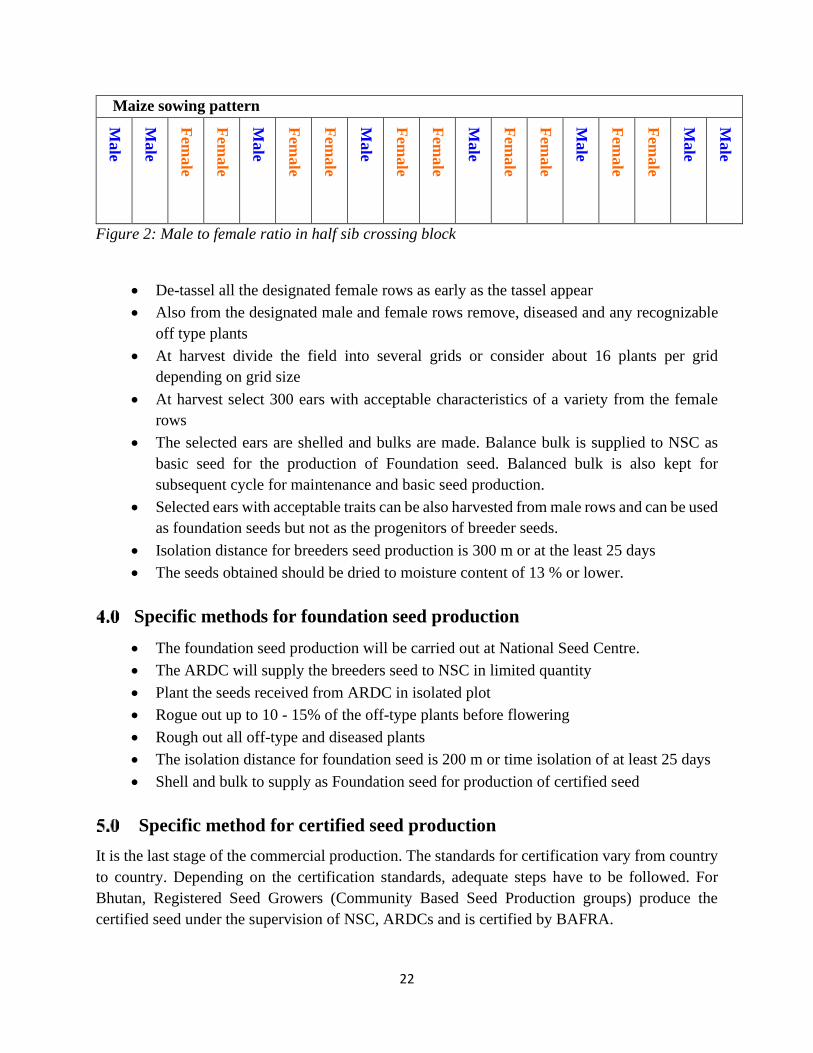
• This can be done by designating male and female rows
• The ratio of female to male has to be kept at 2:1 and additional 2 male rows on each side
(see figure 2)
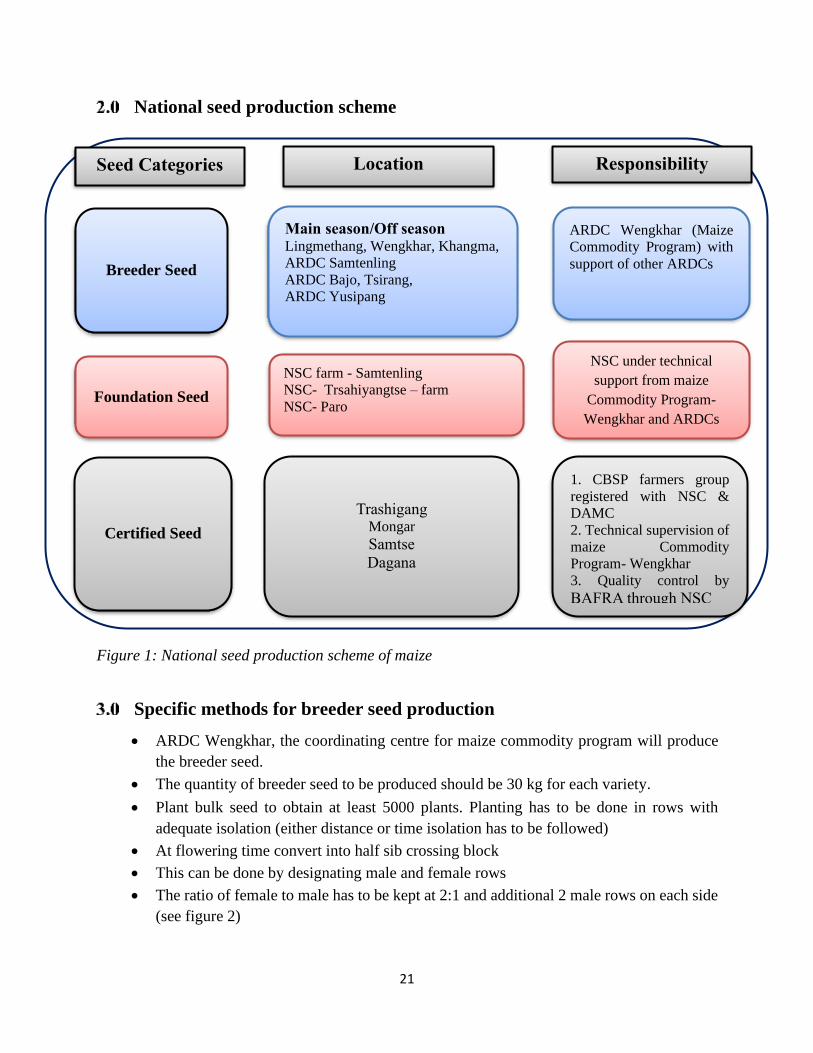
Seed Categories Location Responsibility
Breeder Seed
Certified Seed
Foundation Seed
Main season/Off season
Lingmethang, Wengkhar, Khangma,
ARDC Samtenling
ARDC Bajo, Tsirang,
ARDC Yusipang
NSC under technical
support from maize
Commodity Program-
Wengkhar and ARDCs
ARDC Wengkhar (Maize
Commodity Program) with
support of other ARDCs
Trashigang
Mongar
Samtse
Dagana
NSC farm - Samtenling
NSC- Trsahiyangtse – farm
NSC- Paro
1. CBSP farmers group
registered with NSC &
DAMC
2. Technical supervision of
maize Commodity
Program- Wengkhar
3. Quality control by
BAFRA through NSC
Figure 1: National seed production scheme of maize
22
Maize sowing pattern
Male
Male
Fem
ale
Fem
ale
Male
Fem
ale
Fem
ale
Male
Fem
ale
Fem
ale
Male
Fem
ale
Fem
ale
Male
Fem
ale
Fem
ale
Male
Male
Figure 2: Male to female ratio in half sib crossing block
• De-tassel all the designated female rows as early as the tassel appear
• Also from the designated male and female rows remove, diseased and any recognizable
off type plants
• At harvest divide the field into several grids or consider about 16 plants per grid
depending on grid size
• At harvest select 300 ears with acceptable characteristics of a variety from the female
rows
• The selected ears are shelled and bulks are made. Balance bulk is supplied to NSC as
basic seed for the production of Foundation seed. Balanced bulk is also kept for
subsequent cycle for maintenance and basic seed production.
• Selected ears with acceptable traits can be also harvested from male rows and can be used
as foundation seeds but not as the progenitors of breeder seeds.
• Isolation distance for breeders seed production is 300 m or at the least 25 days
• The seeds obtained should be dried to moisture content of 13 % or lower.
Specific methods for foundation seed production
• The foundation seed production will be carried out at National Seed Centre.
• The ARDC will supply the breeders seed to NSC in limited quantity
• Plant the seeds received from ARDC in isolated plot
• Rogue out up to 10 - 15% of the off-type plants before flowering
• Rough out all off-type and diseased plants
• The isolation distance for foundation seed is 200 m or time isolation of at least 25 days
• Shell and bulk to supply as Foundation seed for production of certified seed
Specific method for certified seed production
It is the last stage of the commercial production. The standards for certification vary from country
to country. Depending on the certification standards, adequate steps have to be followed. For
Bhutan, Registered Seed Growers (Community Based Seed Production groups) produce the
certified seed under the supervision of NSC, ARDCs and is certified by BAFRA.
23
The general steps are:
• The foundation seed shall be the source of seed
• NSC should supply Foundation seed annually to the RSGs.
• Identify suitable area for seed production
• Maintain proper isolation either through distance or time
• Natural barriers like a strip of forest can help to compromise for isolation
• If possible, select a small isolated field/block for certified seed production (damage by
wild animals could be a problem if far away field are selected)
• Ask farmers to plant foundation seeds supplied by NSC in a slightly lower than
recommended density
• Exercise strict roguing and follow procedures that meet certification standards
• Carry out field selection considering traits that are acceptable or the original traits of a
particular variety
• Harvest selected plants and bulk the seeds
• Carry out required seed treatments and pack it adequately
Agronomics principle of seed production
Ecological requirement
Maize is grown under diverse physical condition. It is one of the most widely cultivated crop and
grown in both tropical and warm temperate zones. The important ecological requirement is as
indicated in table 10.
Table 10: Maize growing environment
Agro-eco-zones Altitude (masl)
Sub-tropical Maize production <1200
Mid altitude Maize Production 1200-1800
Highland Maize Production >1800
6.1.1 Temperature
Maize is a warm weather crop and is not grown in areas where the mean daily temperature is less
than 19oC. The response to temperature varies with the stage of the crop. Optimum temperature
for germination is around 18oC and at temperature below 13oC germination is slowed down.
Temperature range of 21 - 27oC is suitable for better growth of maize plant. Maize is sensitive to
frost at all growth stages and a frost free period of 120 - 140 days is required to prevent damage.

24
6.1.2 Soil
Maize can grow on number of soil types, however it does best in rich moist soil. The ideal soil for
growing maize is well-drained, preferably sandy loam with high organic matter content. It prefers
soil with pH within 5.8 - 6.8. Maize does not tolerate water logging thus a good drainage is
necessary for quality seed production.
Water requirement
Maize is sensitive to both moisture stress and excessive moisture. For quality seed production, soil
must have adequate moisture until 40 - 45 days from sowing. The moisture requirement varies
with the crop growth stage, weather and soil condition. Soil moisture is critical during tasselling
and kernel development stage and thus should be maintained through irrigation. Irrigation is
necessary after the first weeding and during the tassel stage.
Field preparation and nutrient management
The field preparation should be done two weeks prior to seed sowing or planting. Any crop
residues from previous year’s crop should be removed from the field. Sufficient application of well
decomposed farm yard manure (FYM) should be applied before the ploughing. In general, an
application of 15 MT of well decomposed FYM is recommended for one hectare. An application
of NPK at the rate of 60:30:30 kg/ha is also applied before sowing. The 50% of nitrogen is used
as basal dose during the plantation.
Seed sowing and rate
The recommended sowing method for maize is through line sowing as it requires less seed and
facilitates easy weed control. Fields need to have adequate moisture during the sowing for faster
germination. For line sowing, 2 - 3 maize seeds should be sown in each spot at 3 - 5 cm depth. The
seeds should be sown at a spacing of 20 - 25 cm (seed to seed) and 60 - 70 cm (row to row).
The seed rate depends upon the sowing method and the spacing of the plants. For normal crop the
seed rate is 10 - 15 kg per acre. For seed production the seed rate is 10 – 15 % led to ensure good
seed set and development. It will also allow better or full expression of the plant characters type
which helps in identification of desirable plants and to eliminate off-types. Usually for line sowing
10 kg seed is recommended for one acre. However, in Bhutan where broadcasting method is
popularly practiced the recommended seed rate is 15 kg per acre.
The following sowing time (table 11) is recommended for seed production in different agro-
ecological zone.

25
Table 11: Sowing time for maize
Agro-ecological zones Altitude (masl) Sowing/Planting
Highland Maize Production
Zone
>1800 March
Subtropical Mid-altitude Zone 1200-1800 March
Subtropical Low Altitude Zone <1200 February
Intercultural practices
6.5.1 Thinning
Thinning in maize seed production refers to the practice of keeping only one healthy seedling and
removing another seedling from each spot. This practice helps to control competition for nutrition,
water and sunlight among the plants. Thinning should be done after 25 - 30 days of sowing or at
4 - 5 leaf stage. It should be done just after the first weeding at the same time.
6.5.2 Weed Management
Minimum of two weeding is necessary for seed production. First weeding should be done at 20-
25 days after crop emergence while the second weeding is recommended at 40-45 days after the
crop emergence.
6.5.3 Pest and disease management
Gray leaf spot (GLS) and Turcicum Leaf Blight (TLB) are the two major diseases in maize
growing areas. The details of the diseases can be found in the extension materials on major
diseases of maize published by NPPC.
Harvesting
Maturity of the maize depend on the variety. Complete drying of silks, leaves, stems and brownish
colouration of the cobs indicate maturity. Maize should be harvested when the husk becomes dry
or dark brownish colour. In maize, the physiological maturity is indicated by formation of black
or brown layer on the bottom of the seed. Harvesting should be done during dry days.
Consideration for selection of plants and cobs during harvesting
• The plants should be selected from the centre of the field for seed purposes due to less
chance of out-crossing.
• Always select medium sized plant that is neither short nor tall
• The stalk should be healthy and not infested with any pests and diseases.
• The cobs which are slightly bent (bend forming 45o angle) in plant should be selected.
• Select cobs of equal size with thick husks.
• Remove rotten cobs, and the cobs which are not completely covered with husk.
26
• Always select the cobs with kernels of uniform size.
• Remove the top and bottom part of a cob for selecting uniform kernel.
Seed storage
The seeds should be stored properly in a cool and dry place following traditional methods -hanging
in attics or in the ground floor. Seeds should be stored below 10oC at 13 % MC and relative
humidity between 45 – 55 % to maintain the seed quality. Seeds are stored in silos to prevent
damages.
Seed multiplication ratio
Seed multiplication ratio is the amount of seed a crop can produce. This is based on the productivity
of the crop and the volume of seed. In general, it is the number of seeds to be produced from a
single seed when it is sown and harvested.
Table 12: Seed multiplication ratio of maize
Classes of seed Seed rate
(kg/ac)
Production
(kg/ac)
Ratio SMR
Breeder seed 10 kg 1700 170 1:170
Foundation Seed 10 kg 1700 170 1:170
Certified seed 15 1500 150 1:150
Average 12.5 1600 128 1:128
27
D. Rapeseed and Mustard seed production
Background
Oilseed is a generic term referred to a group of crops valued for oil content. It is one of the basic
commodities for agriculture trade and is transacted as vegetable oils, natural food, nutritional
products and premium snacks. Rapeseed & Mustard, Soybean (Glycine max), Groundnut (Arachis
hypogea), Sunflower (Helianthus annuus) and Niger (Guizotic abyssinica) constitute oilseeds in
Bhutan. However, rapeseed & mustard particularly Brassica campestris var toria (Tori or Peka) is
predominantly grown and is the traditional oil crop in the country. It is the main oil crop from
which oil is extracted in Bhutan. Soybean is also an important crop in eastern Bhutan where it is
intercropped with maize. However, in absence of processing unit soybean is consumed as a grain
and sometimes feed to livestock.
In addition, there are a number of perennial oil-bearing trees from where seeds can be harvested
to extract oil. These include Pangtsi (Symplocus paniculata),Yika (Maduca butyretica), Karshing
or Kadam (Jatropa curcas) and Shingshe (Neolitsea sp). These trees exist on field bunds as a part
of agroforestry system and are minor oil crops of Bhutan.
Rapeseed-Mustard is a group of crops having different kinds of breeding behaviour. On one hand
it includes self-compatible (self-pollinated) crops like yellow sarson (Brassica rapa var yellow
sarson), gobhi sarson (Brassica napus) and Ethiopian mustard (Brassica carinata) while on the
other hand self - incompatible (cross pollinated) crops including toria (Brassica rapa var toria),
brown sarson (Brassica rapa var brown sarson) and taramira (Eruca sativa) are existing. In India,
mustard (B. juncea) is the major crop of the group and has cross-pollination ranging from 5 -
15%.
Varieties of rapeseed and mustard
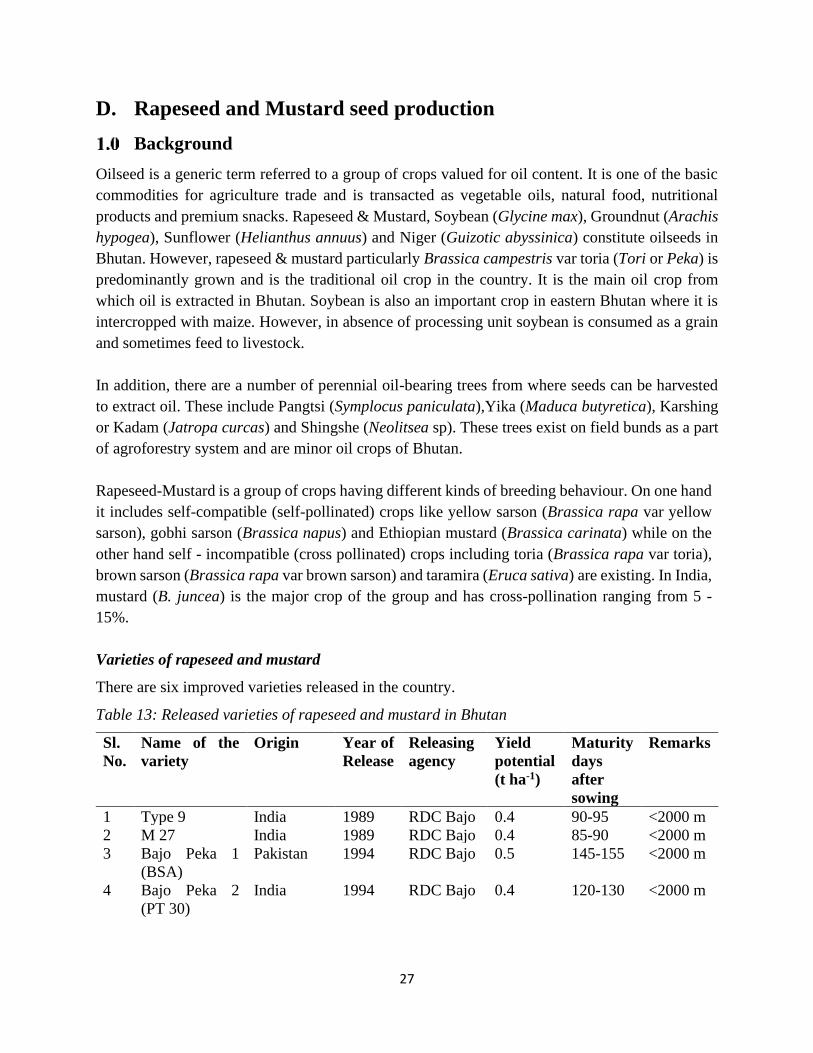
There are six improved varieties released in the country.
Table 13: Released varieties of rapeseed and mustard in Bhutan
Sl.
No.
Name of the
variety
Origin Year of
Release
Releasing
agency
Yield
potential
(t ha-1)
Maturity
days
after
sowing
Remarks
1 Type 9 India 1989 RDC Bajo 0.4 90-95 <2000 m
2 M 27 India 1989 RDC Bajo 0.4 85-90 <2000 m
3 Bajo Peka 1
(BSA)
Pakistan 1994 RDC Bajo 0.5 145-155 <2000 m
4 Bajo Peka 2
(PT 30)
India
1994
RDC Bajo 0.4 120-130 <2000 m
28
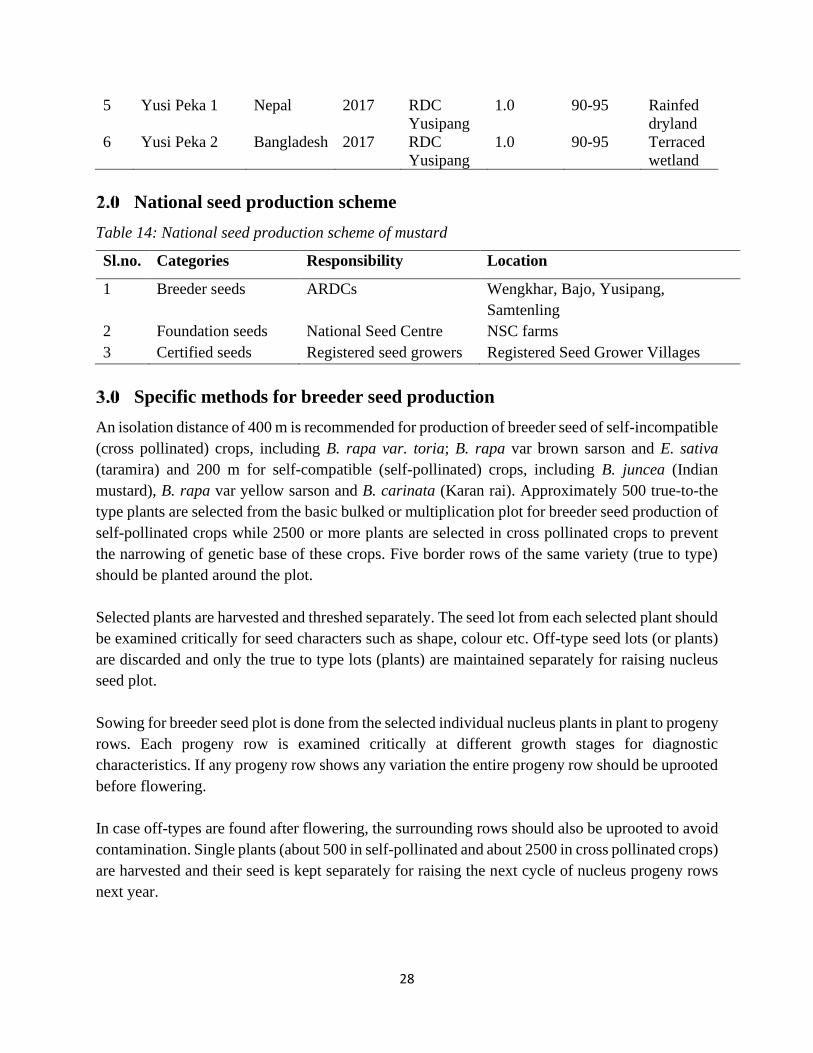
5 Yusi Peka 1 Nepal 2017 RDC
Yusipang
1.0 90-95 Rainfed
dryland
6 Yusi Peka 2 Bangladesh 2017 RDC
Yusipang
1.0 90-95 Terraced
wetland
National seed production scheme
Table 14: National seed production scheme of mustard
Sl.no. Categories Responsibility Location
1 Breeder seeds ARDCs Wengkhar, Bajo, Yusipang,
Samtenling
2 Foundation seeds National Seed Centre NSC farms
3 Certified seeds Registered seed growers Registered Seed Grower Villages
Specific methods for breeder seed production
An isolation distance of 400 m is recommended for production of breeder seed of self-incompatible
(cross pollinated) crops, including B. rapa var. toria; B. rapa var brown sarson and E. sativa
(taramira) and 200 m for self-compatible (self-pollinated) crops, including B. juncea (Indian
mustard), B. rapa var yellow sarson and B. carinata (Karan rai). Approximately 500 true-to-the
type plants are selected from the basic bulked or multiplication plot for breeder seed production of
self-pollinated crops while 2500 or more plants are selected in cross pollinated crops to prevent
the narrowing of genetic base of these crops. Five border rows of the same variety (true to type)
should be planted around the plot.
Selected plants are harvested and threshed separately. The seed lot from each selected plant should
be examined critically for seed characters such as shape, colour etc. Off-type seed lots (or plants)
are discarded and only the true to type lots (plants) are maintained separately for raising nucleus
seed plot.
Sowing for breeder seed plot is done from the selected individual nucleus plants in plant to progeny
rows. Each progeny row is examined critically at different growth stages for diagnostic
characteristics. If any progeny row shows any variation the entire progeny row should be uprooted
before flowering.
In case off-types are found after flowering, the surrounding rows should also be uprooted to avoid
contamination. Single plants (about 500 in self-pollinated and about 2500 in cross pollinated crops)
are harvested and their seed is kept separately for raising the next cycle of nucleus progeny rows
next year.

29
The removal of off type plants should be carried out at 3 stages. First, the off-type plants
distinguishable on the basis of morphological characteristics should be removed before flowering.
Second, the off-type plants, which are identified at flowering, should be removed before pod-
formation. Third, the off-type plants should be removed on the basis of siliqua and seed
characteristics and also on the basis of maturity duration. Disease infected plants should also be
removed. The field should be kept free from all kinds of weeds particularly from Argemone
maxicana (Satyanashi) which should be uprooted altogether, before it flowers.
Specific methods of foundation seed production
• The foundation seeds will be produced by the National Seed Centre.
• The releasing institute (ARDC) will supply the breeder seed to NSC.
• Plant the seeds received from ARDC in isolated plot
• The isolation distance maintained between the varieties is 50 m for self-compatible and
100 m for self-incompatible types for foundation seed production
• The isolation distance maintained between the varieties not conforming to the varietal
purity requirements for certification is 200 m for self-compatible and 100 m for self-
incompatible types
Specific methods of certified seed production
It is the last stage of the seed production. The standards for certification vary from country to
country. Depending on the certification standards, adequate steps have to be followed. The
Registered Seed Growers (Community Based Seed Production groups) produce the certified seed
under the supervision of NSC, ARDCs and is certified by BAFRA.
• The foundation seed shall be the source of seed
• NSC should supply foundation seed annually to the RSGs.
• The isolation distance maintained between the varieties is 25 m for self-compatible and
50 m for self-incompatible types.
• The isolation distance maintained between the varieties not conforming to the varietal
purity requirements for certification is 50 metres for both self-compatible and self-
incompatible types.
Table 15: Seed standards of foundation and certified seeds
Factor Class of seed
Foundation Seeds Certified seeds
Pure seed (minimum) 97.0% 97.0%
Inert matter (maximum) 3.0 % 3.0 %
Other crop seeds (Maximum) 10/ Kg 20/ Kg
Other distinguishable varieties (maximum) 10/ Kg 20/ Kg
Total weed seeds (maximum) 10/ Kg 20/ Kg

30
Objectionable weed seeds (maximum) 5/ Kg 10/ Kg
Germination (minimum) 85.0% 85.0%
Moisture (maximum) 8.0% 8.0%
For vapour proof container (maximum)
Mustard 5.0% 5.0%
Rapeseed 7.0% 7.0%
Table 16: Field standards of foundation and certified seeds of mustard
Parameters Foundation seed Certified seed
Isolation distance 200m 100m
Off types 0.10% 0.50%
Objectionable weed seed 0.05% 0.10%
Agronomic principles of seed production
Land selection
The land selected should be fertile and free from volunteer plants. It should not be cultivated with
the same crop in the previous season. The land should be tilled twice to make the soil fine.
Seed selection and sowing
Good quality certified seeds should be sourced from an authorized dealer. Seeds should be healthy
with a good germination percentage. Seed rate is 4 - 5 kg per acre. Selected seeds should be treated
with bio-control agents like Trichoderma viride @ 4 gm per kg of seeds. Mix Trichoderma in rice
gruel and mix the solution with seeds. Dry the seeds in shade for 30 minutes before sowing. This
will help in the control of root rot and wilt disease.
Treated seeds should be sown in ridges and furrows at 4 – 5 cm depth. The spacing maintained is
45 x 15 cm. After sowing, planking is done to cover the seeds.
Nutrient management
FYM or compost @ 4 tonnes per acre or vermi-compost @ 1.6 – 2 tonnes per acre should be
applied and thoroughly incorporated into the soil before the last tilling. This will help to improve
the texture as well as the nutrient content of the soil. Green manure crops like Sun hemp or
Sesbania are grown in the field and ploughed into the soil after 40 – 50 days of sowing. This
enhances the nitrogen, phosphorous and other nutrients in the soil.
Trichoderma viride @ 1.5 kg per acre is mixed with 300 kg compost and kept as such for a week
and then applied to the field as top dressing. It will protect the crop from root rot and pathogens
like Pythium and Phytophthora.

31
Weed management
In summer crop harrowing is done 25 – 30 days after sowing. The first weeding is done 45 – 50
days after sowing. Weeding is repeated before flower bud initiation stage followed by harrowing.
Pest and disease management
Mustard aphid, painted bug, sawfly, Alternaria blight and white rust are some of the common pests
and diseases affecting mustard crop. The NPPC should be contacted for IPM technologies.
Irrigation
Irrigation should be done once in 15 days. It is critical during flowering and pod filling stages.
Roguing
Roguing should be done from the vegetative to harvesting phase. Off-types are removed based on
the branching type, capsule size and colour and colour of the seeds. Maximum percentage of off-
types permitted is 0.10% for foundation seed production and 0.50% for certified seed production.
Field inspection
A minimum of three field inspections should be done from pre-flowering to maturity stage by the
Seed Certification Officer. First inspection is done before flowering followed by second inspection
during flowering. The third inspection is scheduled at maturity stage prior to harvesting.
Harvesting, threshing, drying and storage
Harvesting should be done when 75% of the pods become golden yellow in colour. The moisture
content of the seeds will be 25% in this stage. Delaying harvest may result in yield loss. The crop
is harvested at the level of lowest pods.
The harvested plants are heaped and dried under the sun for 4 – 5 days to attain 12 – 13% of
moisture level for uniform maturation of seeds. This is called swathing. During swathing the
immature pods with green seeds mature. Threshing is done after 10 – 12 days by hand using stick.
Threshed seeds are cleaned by winnowing and sieving using suitable size of sieve.
Seeds are dried under the sun to attain 8% of moisture content. This is safe for mustard seeds and
can be stored in gunny or cotton bags up to one year under open storage conditions. The minimum
percentage of purity of foundation and certified seeds should be 97% with 85% of minimum
germination capacity and 8% of maximum moisture content. Presence of other distinguishable
variety in foundation seed should be 0.10% and that of certified seed should be 0.50%.

32
E. Quinoa seed production
Background
Quinoa (Chenopodium quinoa Willd) was introduced to Bhutan from Peru in 2015 by DoA. It is
rapidly being promoted in different agro-ecological zones as nutrient dense and climate resilient
crop. Quinoa is locally called as Royal Quinoa in English, Ashi Heychum in Dzongkha, Ashi Mo
in Sharchop and Rani Bethu in Lhotsham. Quinoa is known as a pseudo-cereal because its
characteristics are very different from those of the true cereals like rice, wheat and maize. Quinoa
does not contain gluten, which most typical cereals do.
Quinoa is an annual herbaceous plant that belongs to the family Amaranthaceae. It is a
dicotyledonous plant usually erect, with a height ranging from 100–300 cm. The plant height
depends on environmental conditions and variety. Leaves are generally lobed, pubescent, powdery,
rarely smooth, and alternatively inserted on a woody central stem. The plant may be branched or
unbranched, depending on variety and sowing density. Stem colour may be green, red, or purple.
The leafy flower cluster arises predominantly from the top of the plant and may also arise from
the leaf axil on the stem. Flowers are sessile, of the same colour as the sepals, and may be
hermaphrodite, pistillate, or male sterile. The stamens have short filaments bearing basifixed
anthers; the style has two or three feathery stigma. The fruit of Quinoa is a seed. The seeds are of
different shapes depending on variety and measure 1–2.6 mm. Quinoa seeds are of different
colours: white, yellow, red, purple, brown, and blacks. The vegetative period of varies between
120 and 240 days and is related to photoperiod sensitivity. Quinoa is predominantly autogamous
or self-pollinated. It is also partially allogamous or cross-pollinated species with 10-15% cross
pollination.
Released Varieties
There are four released varieties recommended for cultivation in Bhutan, Table 17.
Table 17: Released varieties of quinoa in Bhutan
Variety Local Name Maturity
(Days)
Grain
Colour
Potential
Yield (Kg
acre-1)
Amarilla Marangani Ashi Heychum- AM 173 Yellow 750
Amarilla Saccaca Ashi Heychum- AS 170 Yellow 900
Ivory 123 Ashi Heychum- 123 150 Brownish 900
DoA-1-PMB-2015 Ashi Heychum- TW 140 Brownish 750
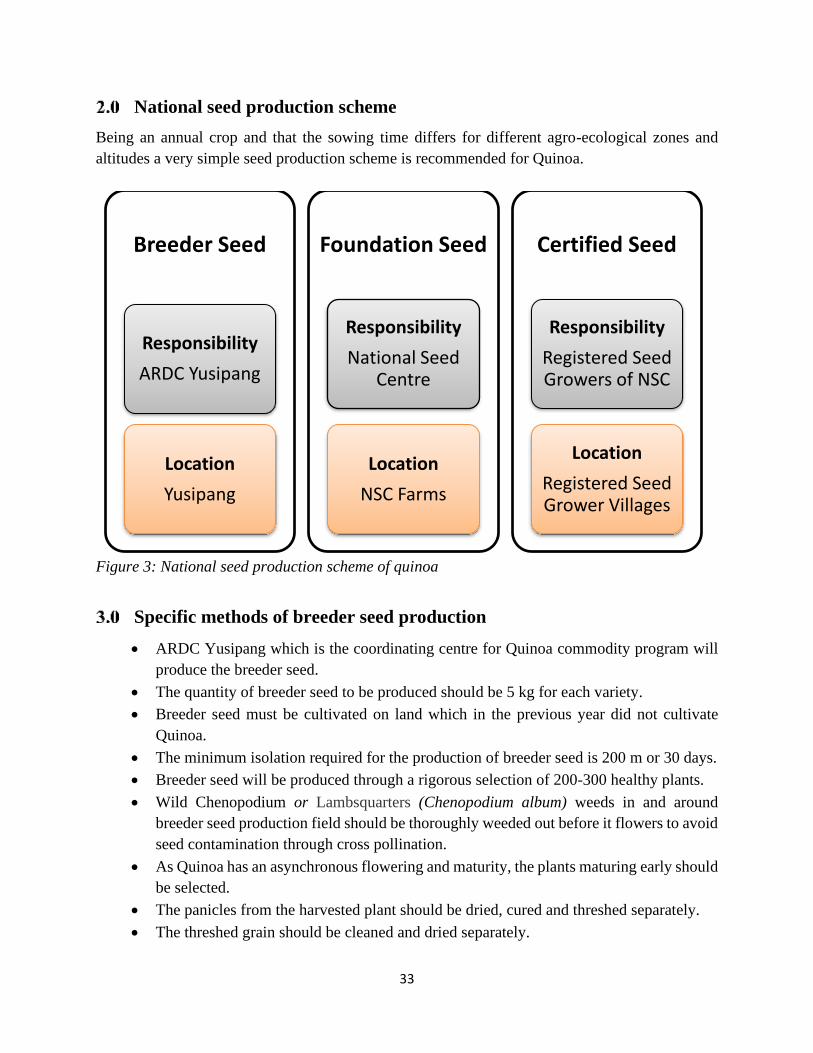
33
National seed production scheme
Being an annual crop and that the sowing time differs for different agro-ecological zones and
altitudes a very simple seed production scheme is recommended for Quinoa.
Figure 3: National seed production scheme of quinoa
Specific methods of breeder seed production
• ARDC Yusipang which is the coordinating centre for Quinoa commodity program will
produce the breeder seed.
• The quantity of breeder seed to be produced should be 5 kg for each variety.
• Breeder seed must be cultivated on land which in the previous year did not cultivate
Quinoa.
• The minimum isolation required for the production of breeder seed is 200 m or 30 days.
• Breeder seed will be produced through a rigorous selection of 200-300 healthy plants.
• Wild Chenopodium or Lambsquarters (Chenopodium album) weeds in and around
breeder seed production field should be thoroughly weeded out before it flowers to avoid
seed contamination through cross pollination.
• As Quinoa has an asynchronous flowering and maturity, the plants maturing early should
be selected.
• The panicles from the harvested plant should be dried, cured and threshed separately.
• The threshed grain should be cleaned and dried separately.
Breeder Seed
Responsibility
ARDC Yusipang
Location
Yusipang
Foundation Seed
Responsibility
National Seed Centre
Location
NSC Farms
Certified Seed
Responsibility
Registered Seed Growers of NSC
Location
Registered Seed Grower Villages

34
• The seed obtained should be dried to moisture content of less than 10%.
• The seed germination percentage should be above 90%.
• Breeder seed should be supplied to NSC annually.
Specific methods of foundation seed production
• The National Seed Centre (NSC) will produce the foundation seed.
• Breeder seed shall be the source for foundation seed.
• The quantity of foundation seed quantity to be produced should be 50 kg for each variety.
• All ARDCs can also produce the foundation seed to meet their demand for research and
outreach programs.
• Foundation seed of the same variety could be sown for two consecutive years on the same
land.
• The minimum isolation distance required for the production of foundation seed is 200 m
or 30 days.
• Wild Chenopodium or Lambsquarters (Chenopodium album) weeds in and around
foundation seed production field should be thoroughly weeded out before it flowers to
avoid seed contamination through cross pollination.
• Foundation seed will be produced through a rigorous selection of 700-1000 healthy plants
or by bulking the most uniform plants.
• As quinoa has an asynchronous flowering and maturity, the plants maturing early should
be selected or bulked.
• The panicles from the harvested plant should be dried, cured and threshed separately.
• The threshed grain should be cleaned and dried separately.
• The seed obtained should be dried to moisture content of less than 10%.
• The seed germination percentage should be above 80%.
• Foundation seed should be supplied to RSGs annually.
Specific foundation for certified seed production
• The Registered Seed Growers (RSG) registered with the National Seed Centre (NSC)
will produce the foundation seed under the supervision of NSC
• Foundation seed shall be the source for certified seed.
• NSC should supply foundation seed annually to the RSGs.
• NSC in collaboration with regional ARDCs should identify, develop and train RSG for
quinoa is the most suitable locations.
• One RSG should be given the responsibility to produce certified seed of single variety.
• The minimum isolation required for the production of certified seed is 100 m.

35
• To avoid contamination through cross pollination RSG members should be advised not
to plant other Chenopodium species at least 300 m close to the certified seed production
field.
• RSG farmers should be trained to identify and weed out all wild Chenopodium or
Lambsquarters (Chenopodium album) weeds before flowering to avoid seed
contamination through cross pollination.
• Certified seed of the same variety may be sown on the same land for unlimited
consecutive years provided adequate soil fertility is maintained.
• For certified seed all the off types should be rogued.
• As quinoa has an asynchronous flowering and maturity, the uniform plants maturing
early should be harvested as bulk.
• The late maturing plants should be harvested separately and should not be mixed with
certified seed.
• Adequate drying and curing should be done before threshing.
• Threshing and cleaning should be done separately to avoid mixtures of other grains.
• The seed obtained should be dried to moisture content of less than 10%.
• The certified seed should meet all the prescribed national seed standards.
Agronomic principles of seed production
Important considerations for seed production of quinoa
• Asynchronous flowering and maturity- flowering and ripening of grains in quinoa are not
synchronous which does not allow harvesting of all the crops together from the field at
one time. This characteristic is considered a natural defense for adaptation to adverse
climatic impacts. Harvesting often has to be repeated depending on maturity of plants in
a field.
• Flowering and grain filling are critical stages where irrigation should be considered when
there are frequent dry spells in the growing season.
• Harvesting time- It is crucial to know when the quinoa crop is ready for harvest. Usually,
the leaves turn yellow or red, depending on the variety. The appearance of grains on the
panicle is an indication of physiological maturity. Another way to test if the plant is ready
for harvest is to tap the panicle with the hand. If the grains fall out, harvesting can begin.
• Physiological maturity - The physiological maturity of quinoa is indicated by hard and
dry grains and the moisture content at this stage will be about 15%.
• Quinoa seeds lose viability more rapidly than cereals because of the porosity in the
integument, which allows a seed to easily gain or lose moisture. It may initiate
germination in the panicle or pre-harvest seed germination.
• Pre-harvest seed germination – Seeds germinate on the panicle when wetted by rain
hence time of harvesting is very important. This condition is also called vivipary and
quinoa seed are highly viviparous.

36
• The moisture content for safe storage of quinoa grain is less than 10%.
Ecological requirement
Quinoa is cultivated in dry-land as a rain-fed crop. However, provision of irrigation gives higher
grain yield. To obtain good quality seed, provision of one to two irrigations when the soil
conditions are very dry is important. The critical stages of water requirement in Quinoa are at
flowering and grain filling where irrigation should be considered. Quinoa requires short day
lengths and cool temperatures for good growth.
Temperature
In general, the adequate mean temperature for quinoa growth is 15–20∘C, but it can grow at mean
temperatures ranging from 10-25∘C. Extremely high temperatures can cause flower abortion and
no grain formation. It is very important to plan the sowing date to avoid air temperatures higher
above 32°C during the flowering stage that can cause poor seed setting. Apart from drought, frost
is one of the major growth limiting factors in high altitude areas. Frost tolerance in Quinoa depends
on the duration of the frost, the quinoa variety, the phenological stage of the plant when frost
occurs. We have observed that Quinoa is susceptible to frost at seedling stage and until grain
setting.
Soil
Quinoa grows best in loam soil with good drainage and high organic matter content, with moderate
slopes and average nutrient content. It prefers neutral soils although it is usually grown on alkaline
(up to pH 9) and acid soils (up to pH 4.5). Quinoa does not tolerate water logging conditions. Soil
mulching with rice straw after seed sowing has been found useful for weed control and moisture
conditions.
Land requirements for seed production
• Choice of land is important to obtain high quality of quinoa seed and to avoid off types
and mixtures mainly from volunteer plants.
• The land requirement specified above for breeder, foundation and certified seeds should
be strictly followed.
• Quinoa crop does not tolerate water logging.
Field preparation and nutrient management
The field preparation method for quinoa is similar to that for mustard and wheat. Quinoa requires
a leveled field, well-drained seedbed in order to avoid water logging. When power-tiller is used,
first ploughing followed by soil pulverization with rotovator is sufficient. Application of sufficient
quantity of Farm Yard Manure (FYM) ensures higher grain yield. It is recommended that
application of about 3 -5 MT of well rotten FYM per acre gives good seed yield.
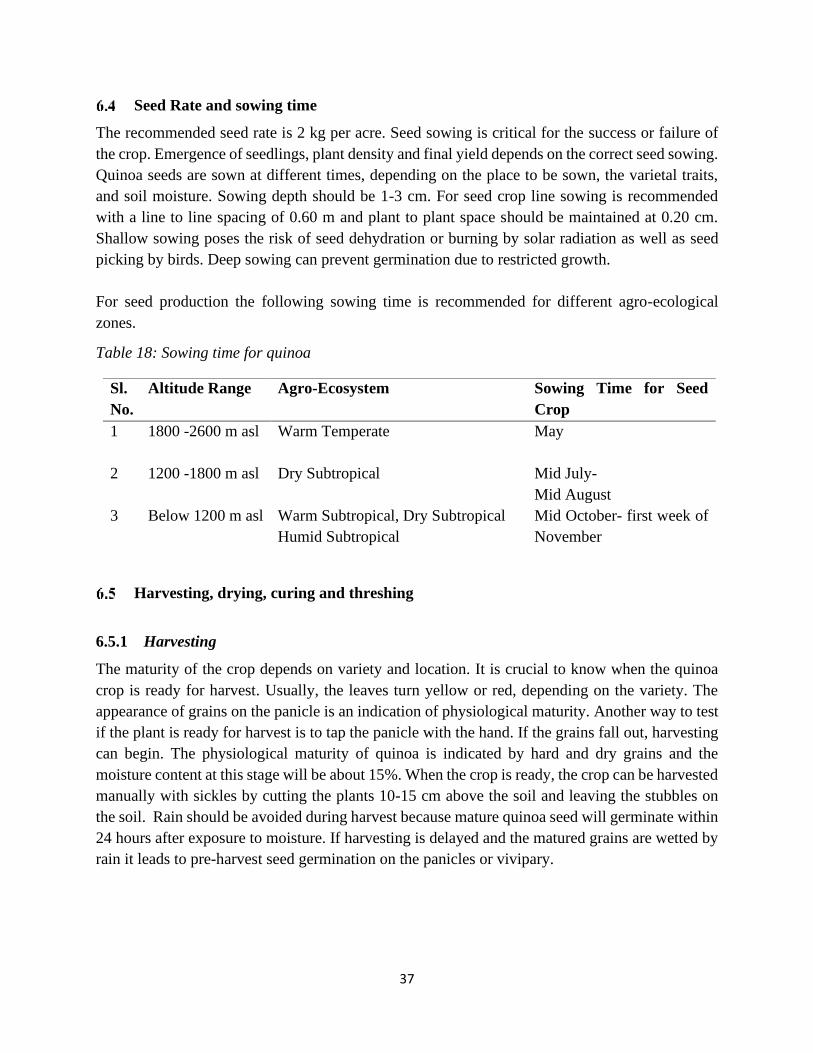
37
Seed Rate and sowing time
The recommended seed rate is 2 kg per acre. Seed sowing is critical for the success or failure of
the crop. Emergence of seedlings, plant density and final yield depends on the correct seed sowing.
Quinoa seeds are sown at different times, depending on the place to be sown, the varietal traits,
and soil moisture. Sowing depth should be 1-3 cm. For seed crop line sowing is recommended
with a line to line spacing of 0.60 m and plant to plant space should be maintained at 0.20 cm.
Shallow sowing poses the risk of seed dehydration or burning by solar radiation as well as seed
picking by birds. Deep sowing can prevent germination due to restricted growth.
For seed production the following sowing time is recommended for different agro-ecological
zones.
Table 18: Sowing time for quinoa
Harvesting, drying, curing and threshing
6.5.1 Harvesting
The maturity of the crop depends on variety and location. It is crucial to know when the quinoa
crop is ready for harvest. Usually, the leaves turn yellow or red, depending on the variety. The
appearance of grains on the panicle is an indication of physiological maturity. Another way to test
if the plant is ready for harvest is to tap the panicle with the hand. If the grains fall out, harvesting
can begin. The physiological maturity of quinoa is indicated by hard and dry grains and the
moisture content at this stage will be about 15%. When the crop is ready, the crop can be harvested
manually with sickles by cutting the plants 10-15 cm above the soil and leaving the stubbles on
the soil. Rain should be avoided during harvest because mature quinoa seed will germinate within
24 hours after exposure to moisture. If harvesting is delayed and the matured grains are wetted by
rain it leads to pre-harvest seed germination on the panicles or vivipary.
Sl.
No.
Altitude Range Agro-Ecosystem Sowing Time for Seed
Crop
1 1800 -2600 m asl Warm Temperate
May
2 1200 -1800 m asl Dry Subtropical Mid July-
Mid August
3 Below 1200 m asl Warm Subtropical, Dry Subtropical
Humid Subtropical
Mid October- first week of
November

38
6.5.2 Drying and Curing
Immediately after harvest, the crop should be sundried or made into bundles and hanged for drying
and curing. The harvested crop can be hanged in the shed or on the ceiling of store. It can also be
stacked in heaps and covered by polythene sheets to avoid wetting. Curing and drying of the crop
should be done for at least 15 days for easy threshing.
6.5.3 Threshing and Winnowing
Threshing involves the separation of the grains from the panicles. Mechanical threshers have not
yet been introduced in Bhutan and hence threshing is done manually by beating the dried panicles
with a stick. Dried panicles can also be trampled by feet to shred the grains. Each variety should
be threshed separately to avoid seed contamination. Winnowing is done to separate and clean the
grains from the bran and other unwanted materials. Winnowing is done manually using locally
made winnowers.
6.5.4 Seed Storage
After winnowing clean quinoa grains are obtained. The grains should be properly dried without
exposing to direct sunlight in order to maintain the product quality. Quinoa seed must remain dry
during storage. Grains should be stored in clean and dry environment. quinoa seeds should be
stored in air tight moisture proof bags at low temperature and relative humidity. When stored in
bags, the filled grain bags should be stacked properly on wooden planks to avoid seeds coming in
contact with the cement floor. The safe moisture content for storage is less than 10%. It is important
to properly label the bags and containers before storage.

39
F. Grain legumes seed production
Background
Legumes are flowering plants that belong to the family Leguminosae which is characterized by
podded fruits. Leguminosae is one of the largest flowering plants that constitute approximately
19780 species. The edible legumes mostly belong to sub family papilionoideae which includes
soybean, chickpea, lentil, beans, pea, peanut. Based on the consumption and uses they can be
classified as pulses or grain legumes, vegetable legumes, legumes for oil extraction and animal
feed. Legume species when harvested solely for dry grains are called pulses (dry beans, chick peas,
lentils etc). Legume species when used for vegetable (e.g. green pea, green beans) or for oil
extraction (e.g. soybean, groundnut) are not considered grain legumes or pulses.
Legumes are an important component of the Bhutanese farming systems and it grows in diverse
agro-ecological zones in various cropping systems as relay and mixed cropping with maize. There
are about 16 species grown in the country, but the most widely grown species are Glycine max,
Phaseolus vulgaris, Pisum sativum and Vigna spp. Other species include: Arachis hypogea,
Cajanus cajan, and Lens culinaris. Legumes flowers are hermaphrodite and self-pollinated crops.
Mung and Urd Bean
• It is classified into two types based on the colour of grains: Green Gram (Vigna radiata
L.) and Black Gram (Vigna mungo H.)
• The corolla of Vigna mungo is bright yellow while that of Vigna radiata is pale yellow;
mung bean pods are pendulous (hanging) whereas they are erect in black gram.
• Mung bean is slightly less hairy than black gram.
Soybean (Gycine max L.)
• The plant grows up to a height of 1.5m depending upon the varieties. The stems are erect
and hairy.
• The self-pollinated stalkless flowers are borne on the axil of the leaves. Flowers are either
yellow or purple in colour.
• The pods are hairy and bears in cluster of 3-5 in numbers
Lentil (Lens culinaris Medik)
• Leaves are pinnate which are ovate to lanceolate in shape
• Flowers are usually double or 1-4 raceme which are white to pale or purple to dark purple
in colour.
• The flowers blooms in sequence from lower branches and proceed upwards.
• Flowers pollinate before opening
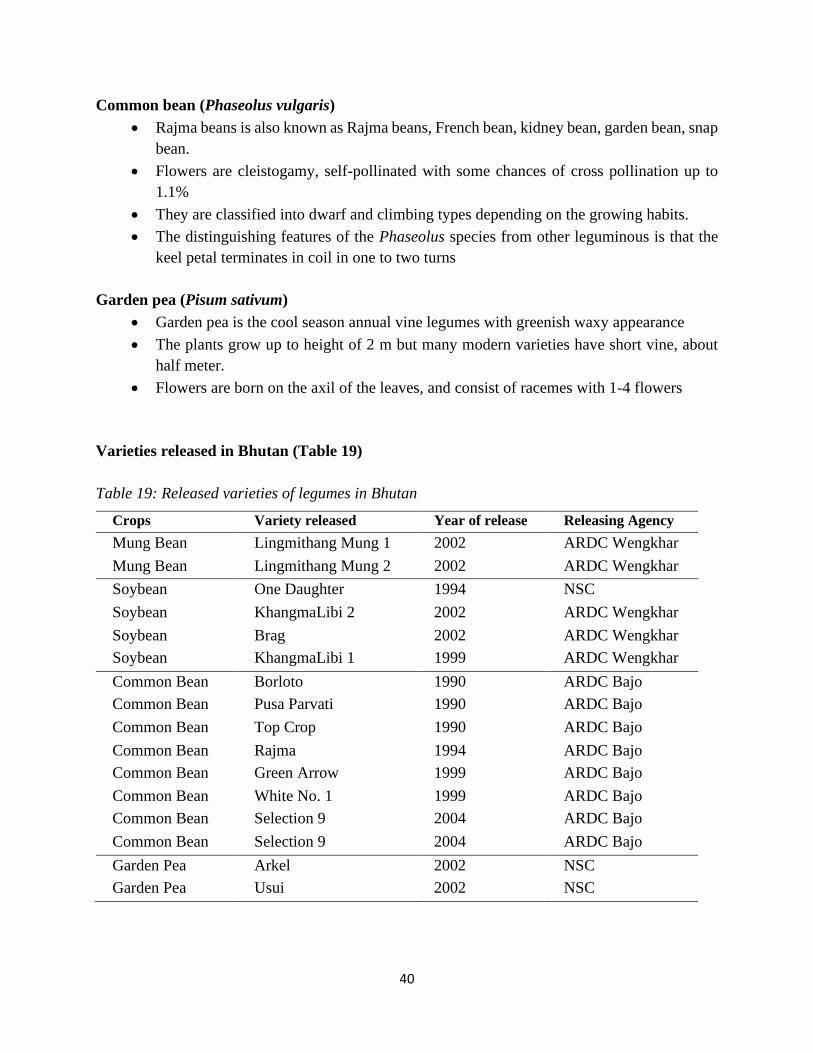
40
Common bean (Phaseolus vulgaris)
• Rajma beans is also known as Rajma beans, French bean, kidney bean, garden bean, snap
bean.
• Flowers are cleistogamy, self-pollinated with some chances of cross pollination up to
1.1%
• They are classified into dwarf and climbing types depending on the growing habits.
• The distinguishing features of the Phaseolus species from other leguminous is that the
keel petal terminates in coil in one to two turns
Garden pea (Pisum sativum)
• Garden pea is the cool season annual vine legumes with greenish waxy appearance
• The plants grow up to height of 2 m but many modern varieties have short vine, about
half meter.
• Flowers are born on the axil of the leaves, and consist of racemes with 1-4 flowers
Varieties released in Bhutan (Table 19)
Table 19: Released varieties of legumes in Bhutan
Crops Variety released Year of release Releasing Agency
Mung Bean Lingmithang Mung 1 2002 ARDC Wengkhar
Mung Bean Lingmithang Mung 2 2002 ARDC Wengkhar
Soybean One Daughter 1994 NSC
Soybean KhangmaLibi 2 2002 ARDC Wengkhar
Soybean Brag 2002 ARDC Wengkhar
Soybean KhangmaLibi 1 1999 ARDC Wengkhar
Common Bean Borloto 1990 ARDC Bajo
Common Bean Pusa Parvati 1990 ARDC Bajo
Common Bean Top Crop 1990 ARDC Bajo
Common Bean Rajma 1994 ARDC Bajo
Common Bean Green Arrow 1999 ARDC Bajo
Common Bean White No. 1 1999 ARDC Bajo
Common Bean Selection 9 2004 ARDC Bajo
Common Bean Selection 9 2004 ARDC Bajo
Garden Pea Arkel 2002 NSC
Garden Pea Usui 2002 NSC

41
National seed production schemes
Specific methods of breeder seed production
• Breeder seed is required to be grown in a minimum area of 200 m2 area for base
population for selecting true to the type single plants. The field should be uniform in
terms of topography, moisture availability and soil fertility. The recommended inter and
intra row spacing at 30 cm and 10 cm for lentil and pea, 45 cm and 10 cm for mung bean
and urd bean, should be maintained. Weed free conditions should be maintained for
quality seed production. Standard agronomic practices must be followed to raise the basic
population.
• Select 1000-1200 true-to-type plants before flowering for lentil, pea, rajma, mung bean
and urd bean. The selected plants should be tagged and observed throughout the growing
period and any plant showing variation should be rejected and uprooted before flowering.
• The selected tagged plants should be harvested separately. The seeds of individual plant
should be table examined and if the seed of any plant does not confirm to the seed
characters of the variety, it should also be rejected
• Seed should be properly dried, treated with insecticide before storage
• In the next cropping season, the individual plant progenies should be grown in rows
following recommended inter and intra row spacing in a well prepared, homogeneous
and disease-free field having no water logging and salinity problems. An isolation
distance of 5 m and leaving 1.5 m space after each bed for self-pollinated crops in seed
Breeder seed Produced by the concerned breeder/variety developing institute.
(100% genetic purity with yellow colour certification Tag)
Foundation seed Should be produced and maintained by National Seed Centres under
the close supervision of original breeders or qualified breeders
(99.5% genetic purity with white colour certification tag)
Certified seed Can be produced by private seed producers/ community seed
producers/progressive seed growers/registered seed growers with
approval and supervision of NSC and Seed Certifying Agency (99%
genetic purity with blue colour certification tag)
Distribution to the growers
Figure 4: National seed production scheme of legumes
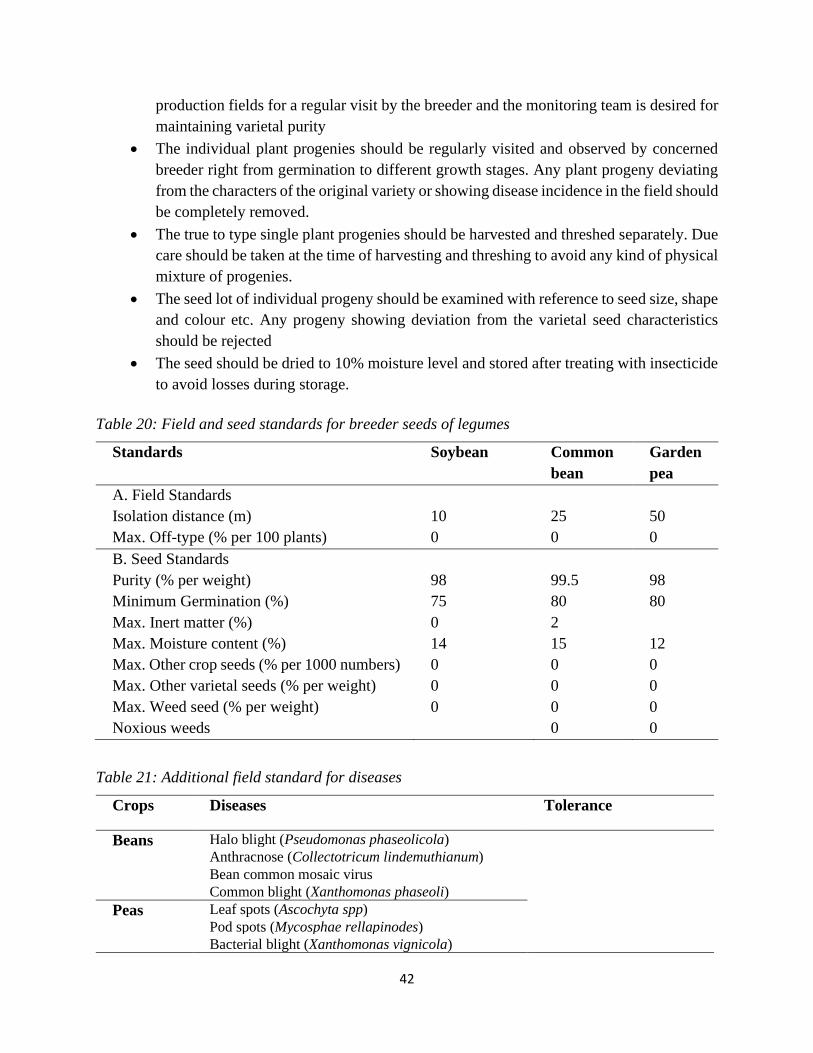
42
production fields for a regular visit by the breeder and the monitoring team is desired for
maintaining varietal purity
• The individual plant progenies should be regularly visited and observed by concerned
breeder right from germination to different growth stages. Any plant progeny deviating
from the characters of the original variety or showing disease incidence in the field should
be completely removed.
• The true to type single plant progenies should be harvested and threshed separately. Due
care should be taken at the time of harvesting and threshing to avoid any kind of physical
mixture of progenies.
• The seed lot of individual progeny should be examined with reference to seed size, shape
and colour etc. Any progeny showing deviation from the varietal seed characteristics
should be rejected
• The seed should be dried to 10% moisture level and stored after treating with insecticide
to avoid losses during storage.
Table 20: Field and seed standards for breeder seeds of legumes
Standards Soybean Common
bean
Garden
pea
A. Field Standards
Isolation distance (m) 10 25 50
Max. Off-type (% per 100 plants) 0 0 0
B. Seed Standards
Purity (% per weight) 98 99.5 98
Minimum Germination (%) 75 80 80
Max. Inert matter (%) 0 2
Max. Moisture content (%) 14 15 12
Max. Other crop seeds (% per 1000 numbers) 0 0 0
Max. Other varietal seeds (% per weight) 0 0 0
Max. Weed seed (% per weight) 0 0 0
Noxious weeds 0 0
Table 21: Additional field standard for diseases
Crops Diseases Tolerance
Beans Halo blight (Pseudomonas phaseolicola)
Anthracnose (Collectotricum lindemuthianum)
Bean common mosaic virus
Common blight (Xanthomonas phaseoli)
Peas Leaf spots (Ascochyta spp)
Pod spots (Mycosphae rellapinodes)
Bacterial blight (Xanthomonas vignicola)
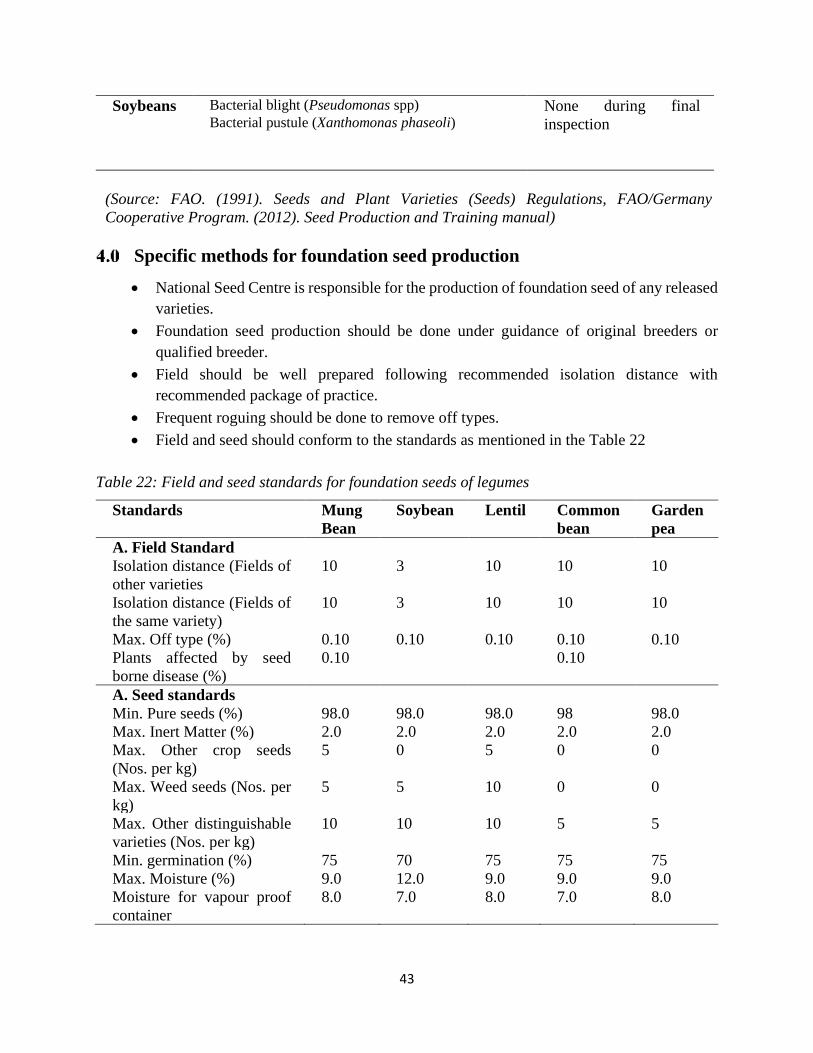
43
Soybeans Bacterial blight (Pseudomonas spp) None during final
inspection
Bacterial pustule (Xanthomonas phaseoli)
(Source: FAO. (1991). Seeds and Plant Varieties (Seeds) Regulations, FAO/Germany
Cooperative Program. (2012). Seed Production and Training manual)
Specific methods for foundation seed production
• National Seed Centre is responsible for the production of foundation seed of any released
varieties.
• Foundation seed production should be done under guidance of original breeders or
qualified breeder.
• Field should be well prepared following recommended isolation distance with
recommended package of practice.
• Frequent roguing should be done to remove off types.
• Field and seed should conform to the standards as mentioned in the Table 22
Table 22: Field and seed standards for foundation seeds of legumes
Standards Mung
Bean
Soybean Lentil Common
bean
Garden
pea
A. Field Standard
Isolation distance (Fields of
other varieties
10 3 10 10 10
Isolation distance (Fields of
the same variety)
10 3 10 10 10
Max. Off type (%) 0.10 0.10 0.10 0.10 0.10
Plants affected by seed
borne disease (%)
0.10 0.10
A. Seed standards
Min. Pure seeds (%) 98.0 98.0 98.0 98 98.0
Max. Inert Matter (%) 2.0 2.0 2.0 2.0 2.0
Max. Other crop seeds
(Nos. per kg)
5 0 5 0 0
Max. Weed seeds (Nos. per
kg)
5 5 10 0 0
Max. Other distinguishable
varieties (Nos. per kg)
10 10 10 5 5
Min. germination (%) 75 70 75 75 75
Max. Moisture (%) 9.0 12.0 9.0 9.0 9.0
Moisture for vapour proof
container
8.0 7.0 8.0 7.0 8.0

44
Additional field standards for weeds
• Spotted beans and heat damaged beans: maximum 0.5% allowed
• Rejects (insect-damaged beans, off-coloured seeds, beans with cracked skin, broken
beans, too small seeds, etc.- maximum 3 allowed.
Specific methods of certified seed production
• Certified seeds can be produced by any Private Seed Produces, Community Seed
Producers, Registered Seed Growers, and Progressive Seed Growers
• Certified seed production is done with approval and supervision of NSC and Seed
Certifying Agency
• Field should be prepared maintaining recommended isolation distance for the crops and
conforming to the field standards as mentioned in the Table 5.
• Timely field inspection and roguing should be carried at flowering and pod stage
• Harvesting should be done at right maturity of the seeds
• Cleaning and drying of seed should be done maintaining 9-10 moisture level
Table 23: Field and seed standard for certified seeds of legumes
Standards Mung
Bean
Soybean Lentil Common
bean
Garden
pea
A. Field Standard
Isolation distance (Fields of
other varieties
5 3 5 5 5
Isolation distance (Fields of
the same variety)
5 3 5 5 5
Max. Off type (%) 0.20 0.150 0.20 0.20 0.20
Plants affected by seed
borne disease (%)
0.20 0.20
A. Seed standards
Min. Pure seeds (%) 98.0 98.0 98.0 98 98.0
Max. Inert Matter (%) 2.0 2.0 2.0 2.0 2.0
Max. Other crop seeds
(Nos. per kg)
10 10 10 0 5
Max. Weed seeds (Nos. per
kg) 10 10 20 10 0
Max. Other distinguishable
varieties (Nos. per kg) 20 40 20 10 10
Min. germination (%) 75 70 75 75 75
Max. Moisture (%) 9.0 12.0 9.0 9.0 9.0
Moisture for vapour proof
container
8.0 7.0 8.0 7.0 8.0

45
Agronomic principles of seed production
Land requirement
• To avoid any mixture with the volunteer plants from the previous season’s crop, it is
essential to avoid the field that was planted with the same crop in the previous year
particularly for lentil.
• The field which are infected with any designated diseases should be rejected as some
diseases in case of rajma beans and mung bean are seed borne. Quality seed production
should be done in disease free plots
• Since most of the pulse crops are self-pollinated with few percentages of natural cross
pollination, isolation distance between the two cultivars helps to maintain varietal purity
(Isolation distance mentioned in the Tables 20, 22 & 23)
Seed Treatment
• It is recommended to treat the seeds with 3 gm Captan (50 WP) or 1 gm Carbendazim
(50 WP) per kg of seeds before sowing to avoid seed and soil borne fungal diseases.
• Treatment of seed with phosphorus solubilizing bacteria (PSB) improves the availability
of phosphorus to the plants.
• If the particular crop is being grown for the first time, it is recommended to inoculate
the seeds with Rhizobium culture. Seed should be first treated with fungicides followed
by PSB or Rhizobium and should be dried in the shade.
• If the seed is to be treated with insecticides, application of insecticides should be done
first followed by fungicides and PSB or Rhizobium
Spacing
Table 24: Spacing of legumes
Crops Mung
bean
Soybean Lentil Common bean Garden
Pea
Spacing (RR
in cm x PP in
cm)
30x5-10 30x5 30x3-4 30x15 (bed sowing)
45x30 (ridge sowing)
45x10
Seed rate
(kg/acre)
8 25-30 12-16 30 for hills
20 for plains
40
Irrigation
• Irrigate immediately after sowing
• Three to four irrigation required for legumes
• Flowering, pod setting and pod filling are the critical stage for irrigation

46
Nutrient management
Table 25: Nutrient management in legumes
Crops Mung bean Soybean Lentil Common
bean
Garden
Pea
Recommended dose
of fertilizer: NPK
(kg/acre)
5:10:5(Rain
fed)
10:20:10
(Irrigated)
8:32:16 8:16:16 36:50:0 24:32:28
FYM (MT/acre) 5 4 10 8
Field inspection
• Minimum of 2 inspections should be done at flowering and during pod stage. Additional
inspection can be done when there are particular problems
• During field inspection, the inspector should confirm that the particular variety of the
crops conform to the characteristics of variety
• The field inspection should also examine the boundary of the field to confirm the
isolation distance is satisfied
• Field should be than inspected and estimate for weeds and diseases presents. During this,
the inspector will observe 30 numbers of plants randomly each from five separate places
within the seed production field.
• Number of plants not conforming to the characteristics of the variety (off-types) and
number of plants of other legumes species are counted separately.
• If number of off-types or the number of other legume species exceeds three, the field
should be rejected.
• After field inspection, inspection report will be completed and decision has to be made
either to accept or reject the field or to recommend further remedial action
Roguing
Any off-types, objectionable weed plants, seed borne diseases noticed during field inspection
should be removed. Roguing should be done to meet the following standards
Varietal purity: At least 98 percent of the pulses must conform to the characteristics of the variety
Species purity: There shall not be more than two percent of other crop species with similar seed
size.
Weeds general: The seed field should be free from weed growth in such a way that it shall not
obstruct valid inspection of the crops.
Weeds specific: There shall not be more than the specified number of weed plants per unit area as
per the seed and field standards
Seed borne diseases: The seed field should be free from any designated seed borne diseases.

47
Other diseases: The seed field should be reasonably free from other diseases in such a way that
the amount of diseases should not be such as to prevent the valid assessment of the characteristics
of the variety
Pest management
Table 26: Major pest of legumes
Pest Damaging Symptoms Control Measure
Gram Pod borer
(Helicoverpa
armigera)
-Defoliation of leaves, Head of larvae
bore inside the pods with half of body
exposed outside, Pods with bored holes
-Removal of infested parts
-Pheromone traps (4.8 nos per
acre)
-Spray Azadiractin (0.3%) @
5/7ml/L at 10 to 15 days interval
depending on the severity
Spray Dimethoate (30EC) @
494.8ml/acre
Bean Aphid
(Aphis
craccivora)
-Leaves, inflorescence and pods covered
with black coloured aphids
-Honey dew secretion
- Spray Azadiractin (0.3%) @
5/7ml/L at 10 to 15 days interval
depending on the severity
Spray Dimethoate (30EC) @
494.8ml/acre
Spiny pod borer
(Etiella
zinckenella)
-Dropping of flowers and young pods,
pods with brown coloured holes
-Pheromone traps at distance
50m (2 traps per acre)
-Manual collection and
destruction of larvae
White Fly
(Bemisia tabaci)
-Yellow and curled leaves
- Insect spread mosaic virus
-Spray Dimethoate (30EC) @
2ml/L at 35-40DAS and repeat
after 15 days if required
Harvesting, seed extraction, cleaning, drying, curing and storage
• Time of harvesting is crucial to maintain the quality of seeds.
• Legumes seeds are usually harvested when plants start to senesce, 80% of leaves and
pods turn yellow.
• Seeds harden making rattling sound at harvesting stage.
• After harvesting, plants are dried in the sun for few days so that seed is dried well
maintaining the standard moisture content of the seeds
• After ensuring full drying of pods and seeds, manual threshing is done to extract seeds
from pods. Mechanical threshing can also be done.
• The seeds are then cleaned by winnowing to remove undesirable mechanical mixtures,
shrivelled and damaged seeds
• For cleaning: air cleaners, aspirators, indented separators, disc separators, gravity
separators, spiral separators and drum separators can be used.
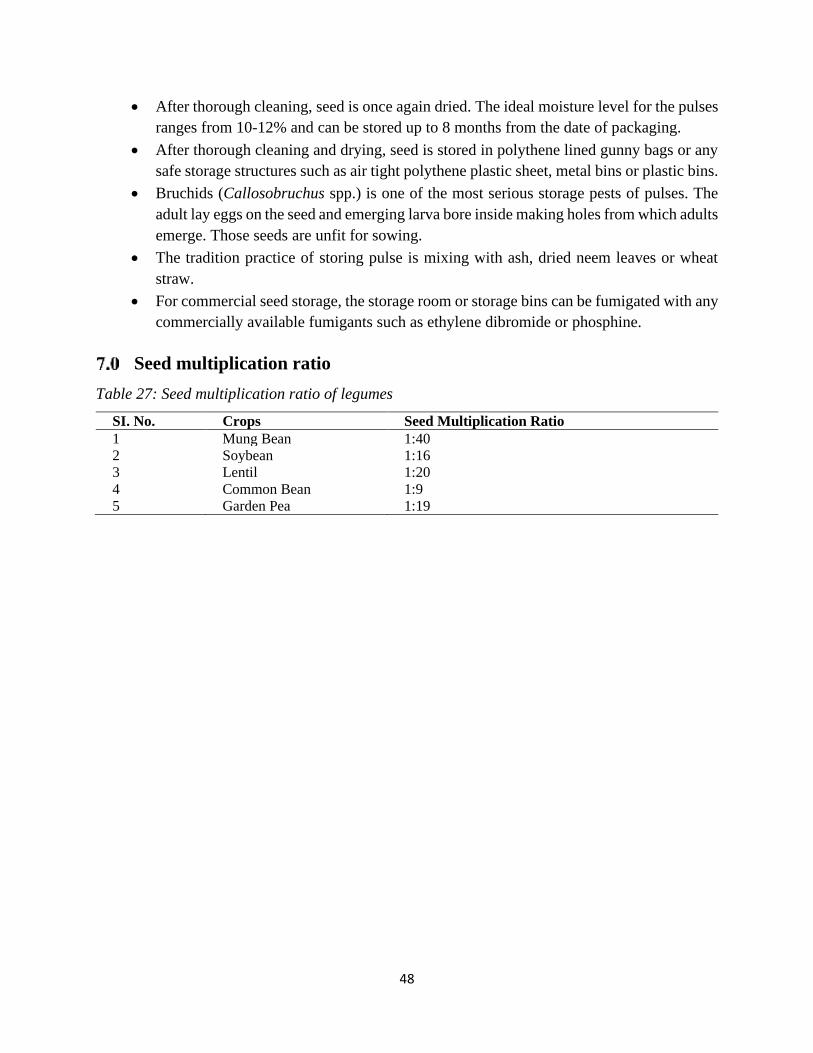
48
• After thorough cleaning, seed is once again dried. The ideal moisture level for the pulses
ranges from 10-12% and can be stored up to 8 months from the date of packaging.
• After thorough cleaning and drying, seed is stored in polythene lined gunny bags or any
safe storage structures such as air tight polythene plastic sheet, metal bins or plastic bins.
• Bruchids (Callosobruchus spp.) is one of the most serious storage pests of pulses. The
adult lay eggs on the seed and emerging larva bore inside making holes from which adults
emerge. Those seeds are unfit for sowing.
• The tradition practice of storing pulse is mixing with ash, dried neem leaves or wheat
straw.
• For commercial seed storage, the storage room or storage bins can be fumigated with any
commercially available fumigants such as ethylene dibromide or phosphine.
Seed multiplication ratio
Table 27: Seed multiplication ratio of legumes
SI. No. Crops Seed Multiplication Ratio
1 Mung Bean 1:40
2 Soybean 1:16
3 Lentil 1:20
4 Common Bean 1:9
5 Garden Pea 1:19

49
VEGETABLE SEED PRODUCTION
50
A. Potato
Background
Potato originated from the highlands of South America, particularly in Colombia, Ecuador, Peru,
Bolivia, and Chile. Potato is an annual herbaceous plant of the nightshade family, Solanaceae, thus
closely related to the tomato, eggplant, tobacco, and chili. The main potato species cultivated,
Solanum tuberosum L., is subdivided into two subspecies: Solanum tuberosum ssp. tuberosum
(adapted to long days) and Solanum tuberosum ssp. andigena (adapted to short days).
Potato is one of the widely produced, consumed and traded horticultural crops in Bhutan. It has
capabilities to provide more nutritious food from less land in less time than other crops such as
wheat, maize or rice. This is possible due to the existence of favorable conditions for the production
of high quality potato for in-country consumption and as well as for export. Potato production is
concentrated in 2000 – 3500 m asl and is the most important crop for the farmers in the altitude
above 2500 m asl. It is grown by more than 34,000 households in all 20 districts of Bhutan.
Varieties released in Bhutan
There are four main potato varieties released and grown in Bhutan for different agro-ecologies
with varying yield potentials as indicated in table 28.
Table 28: Potato varieties released in Bhutan
Sl.
No.
Variety Year of
release
Releasing agency Yield
potential
(t/ac.)
Days to
maturity
Recommended
agro-ecology
(masl)
1 Desiree 1988 BNPP 15-18 90 1000-2000
2 Khangma
Kewa Kaap
2002 RDC Wengkhar 16-20 100-105 600-2500
3 Nasephey
Kewa Kaap
2014 National Potato
Program, DoA
15-23 160-180 All agro-
ecologies
4 Yusi Maap 2017 National Potato
Program, DoA
12-17 120-140 Mid and high
altitudes
National seed production scheme
The three seed production stages are Breeder seed, Foundation seed and Certified seed. While the
National Potato Program or ARDCs releasing new varieties are responsible for maintaining and
supply of breeder seeds, NSC has the responsibility of producing foundation and certified seeds.
51
Specific methods for breeder seed production
Breeder seeds are the initial small quantity seeds in the form of miro-tubers obtained from tissue
culture laboratory or the mini-tubers from aeroponics of the National Seed Centre in Paro. The
breeder’s seed of potato is generated from sprouts of selected individual tubers of a particular
variety (nucleus) for the purposes purifying and maintaining that variety. However, new genotypes
are imported from germ-bank of the International Potato Centre, Lima. The initial small quantity
of miro-tubers or mini-tubers seed multiplied by National Potato Program, ARDC Yusipang under
supervision of a qualified breeder to produce breeder seed. The varietal purity of subsequently
multiplied foundation and certified seed largely depend upon the quality of the breeder seed. That
is why the breeder seed should be pure to begin with.
• Sampling of the variety to obtain nucleus seed from good tubers of a known plant: select
about 20 tubers that are true-to-type and disease-free
• Sampling plants of the variety to obtain nucleus seed should be indexed and properly
marked.
• Selected plants should be free from identifiable diseases like late blight or leaf roll virus
• Discard any tubers appearing to be off-type, diseased or otherwise unacceptable
• In vitro multiplication of meri-clones: that is meristem tips of apical buds collected and
micro-multiplied in tissue culture lab. Micro-plants can produce disease-free micro-tuber
and mini-tubers from tissue culture and aeroponics, respectively.
• Keep micro-tubers for 2-3 months before planting to break the dormancy.
• Harvested mini-tubers or micro-tubers should be cold stored and used as seed in the
following season.
• Altitude should be 2000 m above sea level or more to avoid disease pressure
Nucleus seed
Breeder seed (3-4 years)
Foundation seed (2 years)
Certified seed (3 years)
Figure 5: National seed production scheme of potato

52
• Micro-tubers should be planted in vermiculite (not in soil) under greenhouse to produce
mini-tubers or could obtain mini-tubers from aeroponics.
• Mini-tuber can be produced from micro-tubers under high density planting on nursery
beds made of vermiculite.
• Mini-tubers should be planted at 60 x 15 cm spacing in a shallow depth which becomes
the generation I of the crop.
• From generation II the crop can be planted in ridges of 50-70 cm as the tuber sizes then
will be of commercial seed size.
• Potato tubers are generally planted with a distance of 15-20 cm between the plants and
ridge-to-ridge distance of 50-70 cm.
• Generally planting depth of 7-8 cm is recommended and increase in plant depth can cause
difficulty in crop establishment.
• In case of new, scarce and insufficient seed, all seed sizes may be used to for
multiplication
• Crop rotation is important to avoid volunteers from previous season from contaminating
the purity – at least 2 years gap should be maintained
• Inspect the plots and remove of off types: Throughout the season of growth, from the
seedling stage until maturity, the plot should be examined critically and any off-types or
diseased-planted should be removed immediately
• Apply recommended amount of fertilizers and weed management methods applicable to
potato
• Breeder plot may be sprayed twice for the control of late blight using Metalaxyl 8% +
Mancozeb 64 % at 200 - 400 litres per acres and the concentration should 2 g/litre of
water as an insurance purposes
• At maturity harvest carefully with bruising the tubers, cure them in shade for two weeks
before packing and labelling as breeder seed.
• Curing process should facilitate hardening of skin at temperatures of 15 - 18 oC.
Specific methods for foundation seed production
• Under the supervision of a breeder, the seed stock is handled to maintain specific identity
and genetic purity (100%), which may be distributed and produced under careful
supervision of an agricultural experiment station, or a certified Seed Centre.
• The technical procedure for production of foundation seed is similar to that of breeder
seeds except that it starts production from seed size tubers and not from micro-tubers or
mini-tubers
• The seed used for production of foundation seed should be breeder seed and avoid mixing
with old generation of same variety for maintaining seed vigor and degeneration
• Crop rotation is important to avoid volunteers from previous season from contaminating
the purity – at least 2 years gap should be maintained
53
• Never cut tubers into pieces for planting to avoid contamination of seed with diseases
• Apply recommended amount of fertilizers and weed management methods applicable to
potato
• Carry out timely roguing/removal of off-types and diseased plants – this can be best
performed in flowering stages as off-types can be easily identifiable then
• Harvest, cure, clean and store seeds properly.
Specific methods of certified seed production
The method of seed production for certified seeds is similar to foundation seeds. There is a slight
difference in the field and seed standards between the foundation and certified seeds as shown in
table 29 & 30.
Table 29: Field standard for foundation and certified seed production of potato
Isolation distance Foundation Certified
Field of other crops 5 m 5 m
Fields of other potato varieties 5 m 5 m
Fields of same variety not conforming to purity 5 m 5 m
Contaminants
Off-types 0.2 % 2%
Leaf roll and severe mosaic 0.02% 1%
Total virus diseases 0.7% 1.5%
Table 30: Seed standards for foundation and certified seeds of potato
Parameters Foundation Certified
Seed tuber weight 35 to 65 g/tuber 35 to 65 g/tuber
Seed tuber sizes 30 to 60 mm 30 to 60 mm
Tuber not confirming to above weight and size ranges
(maximum)
3% 5%
Varietal Purity of seed (minimum) 99% 98%
Inert matter (maximum) 2% 3%
Cuts and bruises, cracks and other mechanical damage
(maximum)
2% 3%
Agronomic principles of seed production
Land preparation
Potato requires a deep, loose, friable and well-aerated soil. Potato is shallow rooted plant and loose
soil is required for stolons to penetrate through the soil and for ease of tuber enlargement during
bulking. That is why well suited to light soils with high organic matter content is needed. Farmyard
54
manure (FYM) or other organic manures should be spread evenly across the field before ploughing
so that ploughing operation can incorporate the manure into the soil. The land should be tilled at
least twice; large clods should be broken by harrowing or manually.
Seed rates
The seed rate of potato is 800 to 1000 kg per acre. Seed tubers of 35 – 65 gm each or tuber diameter
of 30 - 50 mm should be selected as the seed potatoes. Soil is prepared into raised ridges (rows)
with the distance of 50-70 cm between the ridges before planting.
Planting and harvesting season
Table 31: Planting and harvesting of potato
Agroecology Planting Harvesting Example dzongkhags
High altitude February/March July to September Bumthang and Haa
Mid altitude December/January June to July Trashigang and
Chukha
Low altitude Late October to
November January and February Samtse and Sarpang
Nutrient management
Well-decomposed FYM/compost should be applied at 6-8 MT per acre. For mineral fertilizers, the
recommended rate from National Soil Services Centre (NSSC) is provided in Table 32. If a
particular dzongkhag does not feature in Table 2, one is recommended to use values from a nearby
dzongkhag in a similar agro-ecological zone.
Table 32: Fertilizer recommendation in potato
Dzongkhags Low resource farmers (High return) High resource farmers (High profit)
N P2O5 K2O N P2O5 K2O
Bumthang 40 32 24 32 36 16
Chhukha 32 20 12 24 16 8
Gelephu 32 24 16 24 20 8
Haa 32 24 12 24 16 8
Paro 40 32 32 28 28 12
Thimphu 40 28 12 28 20 8
Trashigang 40 32 32 36 32 12
Tsirang 40 32 12 32 24 8
Wangdue 40 32 32 28 24 12
Source: A Guide to Fertilizer Recommendation for major crops (NSSC, 2013)
55
Irrigation
Potato should be irrigated time to time depending on field conditions. Foliar irrigation should be
avoided to prevent late blight infestation. While irrigating, the ridge should be wet and should be
done in the middle of two ridges so that water is available in the rooting zone.
Weeding and earthing up
Weeds should be removed manually by weeding at one and half months after planting. During the
first weeding earthing up should be done to reinforce ridges. The earthing up operation should be
done carefully to avoid disturbing the stolons and roots. Earthing up improves soil aeration,
reduces weed pressure and increases stem density. Second weeding can be done depending on
weed pressure. However, earthing up should be avoided once the plants approaches flowering
stage to prevent disturbance to the stolons or tuber formation. Pre- or post- emergence herbicide
(Metribuzin 70 WP) should be applied at 200 to 400 litres per acres (1 gm per litre of water) to
manage weeds.
Plant protection measures
Potato late blight is the most destructive disease in potato. Late blight can be treated using
Metalaxyl 8% + Mancozeb 64 % at 200 to 400 litres per acre (2 gm per litre of water). Early blight
can be also treated in the same way.
Harvesting, curing and storage
The harvesting time can be determined by assessing the maturity of the tubers by looking at the
plant; i.e. when the haulm turns yellow and dies. Minimizing the damage at harvesting and
handling should be main objective. It is recommended to harvest the crop during sunny and dry
weather.
Curing
For curing, the potatoes need to be placed ventilated shady area devoid of wind to avoid excessive
evaporation of moisture which might otherwise lead to tuber shrinkage. Best curing takes place at
15-18oC. For good curing, it takes 10-15 days depending on the temperature of the place.
Sorting and Grading
After properly curing the tubers, they should be sorted, graded, packed and stored in a cool store.
The potatoes should be graded into tubers of 35 to 65gm per tuber or tuber diameter of 25 mm to
50 mm into seed category which is saved or sold as seed potato.
Storage
It is better to store them in a dark, cool place (2 to 10oC) in order to keep the glycoalkaloid content
low. The store room should be cleaned before the storage to prevent of and disease infestation.

56
B. Cole crops seed production
Background
Cole crops are cultivated species of Brassica oleracea that includes Broccoli (Brassica oleracea
var italica), Brussel Sprouts (Brassica oleracea var gemmifera), Cabbage (Brassica oleracea var
capitata) and Cauliflower (Brassica oleracea var botrytis), among others and belongs to
Brassicaceae (Cruciferae). These are cool season crops and are usually grown in winter. They
prefer mean temperature of 7 to 13oC for optimal growth and development. Cole crops are cross-
pollinated and easily cross among the same species like broccoli, brussel sprouts, cabbage and
cauliflower. However, they do not cross with turnips, mustard and Chinese cabbage which are of
different species. Cole crops are self-infertile and must be grown in groups, at least 10 to 15 plants
to maintain gene base and seed viability.
i. Broccoli: It is cross-pollinated and similar to cauliflower in its curd (flower mass)
formation. It is more heat tolerant than cauliflower, but at higher temperature, seed yield
tends to decrease. Inflorescence does not exhibit polarity and hence number of secondary
curds sprout from the axil of the leaves even if the curd is removed.
ii. Cabbage: Among the cole crops, cabbage requires the lowest temperature for seed
production. Hence, thermo-period is the most critical factor for its flower induction. Flowers
are borne on terminal racemes which develop on main stem and branches and are perfect
flowers. It is a cross-pollinated crop and pollination occurs mainly through bees.
iii. Cauliflower: The floral parts are formed from curd. The inflorescence is dwarf and
umbrella shaped. There is no central main stem above where branching begins, and no leaves
develop on the flower branches. Pollination is similar to that of cabbage. One of the unique
characteristics of cauliflower is inflorescence exhibits polarity, and thus if the curd is
removed, no flower stalks will re-sprout from axils below the curd.
Varieties
Total of 17 varieties have been released/notified and recommended for cultivation in the country
(Table 33).
Table 33: Released varieties of different cole crops in Bhutan
Crop Variety
Potential
yield
(t/acres)
Maturity
(days) Remarks
Broccoli Dessico 0.8-1 100-110
Cabbage Copenhagen Market 9-10 75-85

57
Golden Acre 5-6 70-80
Green Coronet (Hybrid) 12-13 80-90
Gianty (Hybrid) 11-12 70-80
T1-163 (Hybrid) 10-11 65-75
Bondey Cross (Hybrid) 10-11 90-110
Lucky Ball (Hybrid) 9-10 80-100
Asha (Hybrid) 7.6 66
Heat
tolerant
Bengal king (Hybrid) 11.4 68
Heat
tolerant
Cauliflower
White Top 10-15 100
White Summer 10-12 90-100
19905 3-4 120
Wengkhar Metokopi I 7-8 90
Wengkhar Metokopi II 10-12 120
White Express 50
(Hybrid) 3.3 41-63
Heat
tolerant
Pragati 40 (Hybrid) 2.5 41-59
Heat
tolerant
National seed production scheme
Seeds production scheme will consist of breeder seeds maintenance by ARDCs, foundation seeds
maintained by NSC and certified seeds produced by nurseries under NSC, and Private Seed
Companies (PSCs) and Registered Seed Growers (RSGs).
Table 34: National seed production scheme for cole crops
Sl. No. Class Responsible agency
1 Breeder seed ARDCs
2 Foundation seed NSC
3 Certified seed NSC/PSCs/RSGs
Specific methods for breeder seed production
Breeder seeds will be maintained by the releasing agencies like ARDCs. Seeds should be
genetically pure or true to type: for this purpose, following practices are recommended;
• Do not grow other cole crops of the same species and/or different varieties of the same
crop within the isolation distance of 1600 m
• Time isolation of at least 20 days must be followed

58
• Caging of plants or cultivation under protected condition with occasional opening for
pollination by insects (or hand pollination) must be practiced
• Plant at least 10 - 15 plants to maintain genetic base and seed viability
• Moisture content should be 7 %
• Purity of seeds should be more than 98 %
• Germination percent should be more than 90 %
Specific methods for foundation seed production
• Breeder seeds should be the source of foundation seeds and will be maintained by
National Seed Centre
• Maintain isolation distance of 1600 m or follow time isolation of at least 15 days or
produce under net house
• Plant in groups to maintain genetic base and seed viability
• Moisture content should be less than 8%
• Purity of seeds should be 98%
• Germination percentage should be at least 70%
• ARDCs will also produce some amount of foundation seeds for demonstration of
technologies
Specific methods for certified seed production
• Foundation seeds shall be the source of certified seeds
• Foundation seeds shall be produced under supervision of NSC or other relevant agencies
• Maintain isolation distance of 1000 m or follow time isolation of 15 days or produce
under protected structures
• Plant in groups to maintain genetic base and seed viability
• Moisture content shall be less than 8%
• Purity of seeds shall be 98%
• Germination percentage shall be at least 70%
Agronomic principles of seed production
Climate
Cole crops are cool season crops. Among the cole crops, broccoli is more heat tolerant and seed
production can be done in the elevation range of 1400 - 1900 m asl. Cabbage is very sensitive to
temperature for seed production. In Bhutan, cabbage seed production is suitable between 1900 -
2500 m asl. Cauliflower also requires vernalization for flower induction and 1600 - 2300 m asl is
suitable for seed production.
59
Land requirement
Well drained loamy soil is ideal for seed production. Soil pH should be in the range of 5 to 7 and
should not be acidic. Good drainage of the field is pre-requisite and it is advisable to grow on
raised beds. The seedlings should be planted on raised beds of 15-20 cm high and 1 m wide. Cole
crops are shallow rooted and therefore field should be thoroughly prepared.
Seed rate
Though it depends on spacing, normally 100 - 150 grams is enough for an acre of land.
Spacing
Seedlings are transplanted when they are one month old or when seedlings attain 6 - 7 true leaves
stage. Spacing of 60 x 45 cm is commonly practiced. The season for transplanting depends on the
locations but ideally August to September is recommended.
Irrigation
Irrigation should be provided regularly and ensure that soil is neither dry nor muddy. Irrigation is
critical especially during bolting and pod formation stage. Lack of irrigation during these stages
severely affects seed yield.
Nutrient management
Nutrient management depends on the soil conditions. In general, 6 MT FYM, 20 kg nitrogen and
30 kg phosphorus are recommended for an acre of land.
Methods of seed production
Broccoli: Seed production is done through seed to seed method. Once flower stalks have emerged,
retain healthy ones for seed production.
Cabbage: Seed production can be done either through seed to seed or head to seed methods. To
facilitate easier emergence of flower stalks, usually three types of incisions are practiced: cross
cut, top cut and complete removal of head. However, cross cut method is usually recommended.
Cauliflower: Seed production is done through seed to seed method. To facilitate stalk emergence,
central portion of the curd is scooped out and healthy flowering stalks are maintained.
Field inspection
Minimum of three inspections should be made: before marketable stage, at the marketable stage
and flowering stage.

60
Roguing
Remove off types whenever they are observed, and it is particularly critical during:
Curd/head maturity stage: retain only those plants that conform to standard size, shape and
maturity.
Flowering stage: retain plants that are healthy and have uniform flowering. Percentage of off
types and seed borne diseases should not exceed 10% and 20% respectively for foundation and
certified seeds.
Pest management
Some of the common and important pest and diseases are discussed here:
Aphids: attacks leaves, flowers, pods and suck the juice. They can be mechanically removed or
sprayed with Malathion/ Diazinon 50 EC @ 2 ml per liter of water.
Caterpillars: feed on leaves during the vegetative production and feeds on branches, pods, and
twigs during the pod formation stages. Caterpillars can be hand-picked or controlled by spraying
Malathion/ Diazinon 50 EC @ 2 ml per liter of water.
Sclerotina rot: appears from the beginning of flowering on the main stem and branches. The
symptoms are firstly a grey irregular oval blotch appears at the dividing places of branches,
secondly becomes blackish rot and blights withering whole upper parts of the plant. This is most
serious disease in cabbage seed production and also an important pathogen in seed quarantine.
Spray wettable copper or copper-based fungicides such as copper oxychloride.
Harvesting and seed extraction
Seeds should be harvested before pods split but should be fully matured since seeds do not ripe
after harvest. Seeds are usually ripe when 60 to 70% of the pods turn brown. If need be, selective
harvesting of seeds should be done. Seeds are extracted by threshing with sticks or using machine
in advance countries.
Cleaning, drying, curing and storage
Once extracted, seeds should be properly cleaned and the seed lot should not contain more than
2% inert material. For better viability seeds are dried under shade, cooled, treated with 1.5g of
Thiram per kg of seeds, packaged in plastic pouch and store in refrigerators. If properly stored,
cole crops seeds remain viable up to 5 years.
Seed multiplication ratio
One gram of broccoli contains approximately 215 seeds, cabbage 210 and cauliflower 300 seeds.
One acre of cold crops yields about 190 kg of seeds.
61
C. Root crops seed production
Background
Carrot (Daucus carota L.) belongs to Apiaceae and radish (Raphanus sativus L.) belongs to
Brassicaceae. They are two of the most important root crops in Bhutan. The other members of the
group are turnip (Brassica rapa L.) and beet (Beta vulgaris L.).
i. Carrot: Carrot is grown in wide range of elevation barring very hot places. However, for
ideal growth and development temperature range of 15 - 18oC is required. Carrot has
compound umbel comprising primary, secondary, tertiary and quaternary umbels. Flowers
are borne mainly by primary umbel. Carrots are usually self-sterile and cross pollinated. For
seed production, the area should be free of wild carrot Queen Anne’s lace as they easily
cross-pollinate. Carrot like radish is insect pollinated.
ii. Radish: Radish is of mainly two types, annual and biennial. Annuals are of tropical in
origin and do not require chilling for flowering. Biennial which is common in Bhutan are
temperate in nature and require chilling for flowering and seed production. Inflorescence is
typical terminal raceme, and flowers are white. Radish fruits differ from other crucifers in
that it is not siliqua but pod. It is highly cross-pollinated crop. However, it crosses only
among the radishes and not with turnip.
Varieties
Total of 8 varieties have been released and recommended for commercial cultivation in the country
(Table 35).
Table 35: Released varieties of carrot and radish in Bhutan
Crop Variety Potential yield
(t/acres)
Maturity (days)
Carrot
Early Nantes 4-6 80-90
Nisa 4-6 90-100
Wengkhar Lhapu Maap 14 105
New Khuruda 8-9 100-110
All Seasons Cross (Hybrid) 8.9-10 110-120
Radish
Spring Tokinashi 8-10 50-80
Minowase 9-10 50-60
Bajo laphu 1 (Hongkong White)
Spring Tokinashi
35 days
12-20
9-10
45
50-60
62
9-10 35
National seed production scheme
Seeds production scheme will consist of breeder seeds maintenance by Agriculture Research and
Development Centres (ARDCs), foundation seeds maintained by National Seed Centre (NSC) and
certified seeds produced by nurseries under NSC, and Private Seed Companies (PSCs) and
Registered Seed Growers (RSGs)
Table 36: National seed production scheme of root crops
Sl. No. Class Responsible agency
1 Breeder seed ARDCs
2 Foundation seed NSC
3 Certified seed NSC/PSCs/RSGs
Specific methods for breeder seed production
• Breeder seeds will be maintained by the releasing agencies (ARDCs)
• Seeds should be genetically pure or true to type: for this purpose, follow either of these
practices: Do not grow plants of different varieties of the same species within the
isolation distance of 1600 m for carrot and 600 m for radish or time isolation of at least
15 days must be followed
• Caging of plants or cultivation under protected condition with occasional opening for
pollination by insects must be practiced
• Moisture content should be 6% for radish and 8% for carrot
• Purity of seeds should be 95% for carrot and 98% for radish
• Germination percent should be more than 80% for carrot and 90% for radish
• ARDCs will provide 0.5 kgs of carrot and 2 kgs of radish seeds to NSC after release of
new variety and every after 3 years for carrot and 5 years for radish if required by NSC
Specific methods for foundation seed production
• Breeder seeds should be the source of foundation seeds and will be maintained by
National Seed Centre
• Maintain isolation distance of 1000 m for carrot and 1600 m for radish. Alternatively,
follow time isolation of at least 15 days or produce under net house condition with
occasional removal of nets for insect pollination
• Moisture content should be 6% for radish and 8% for carrot
• Purity of seeds should be 95% for carrot and 98% for radish
63
• Germination percentage should be at least 60% for carrot and 70% for radish
• ARDCs will also produce some amount of foundation seeds for demonstration and
dissemination of technologies
Specific methods for certified seed production
• Foundation seeds should be the source of certified seeds
• Foundation seeds will be produced under supervision of NSC or other relevant agencies
• Maintain isolation distance of 800 m for carrot and 1000 m for radish. Alternatively,
follow time isolation of 10 days or produce under net house with occasional removal of
nets for insect pollination
• Moisture content should be 6% for radish and 8% for carrot
• Purity of seeds should be 95% for carrot and 98% for radish
• Germination percentage should be at least 60% for carrot and 70% for radish
Agronomic principles of seed production
Climate
Carrot has wide range of adaptability. However, best growth and development can be achieved
when mean temperature is 15 - 18oC. Radish is a low temperature long day plant, therefore, needs
to go through vernalization and photoperiodism in order to produce flowers and seeds. For flower
induction, it requires low temperature (vernalization) and for its flower and seed development it
requires some extent of long day length (photoperiodism). Temperature above 32oC often leads to
drying of pollen and failure in germination.
Land requirement
Root crops require well drained soil free of clods for proper root development. Excess nitrogen
leads to branching, and development of hairy and fibrous roots. Clay soils are not suitable for root
development. Preferably, soil pH should be in the range of 6.5 - 7.5.
Seed rate
Though it depends on spacing, normally 470 gm for carrot and 2.8 kg for radish are recommended
per acre of land.
Spacing
Carrot and radish are directly seeded and should not be transplanted. Spacing of 30 x 7 cm and 30
x 15 cm is commonly practiced for carrot and radish respectively. Though the sowing time is site
specific, it is usually done from mid-August to September.

64
Irrigation
Irrigation depends on the condition of the soil. However, soil should not be dry and it is critical to
provide irrigation during flowering and seed development stages.
Nutrient management
It depends on the nature of the soil. However, in general, for one acre of land, 8 kg of N, 4 kg of P
and 44 kg of K are applied in addition to 3 MT of FYM for carrot. For radish, 20 kg each of NPK
and 5 MT of FYM are applied. FYM should be properly decomposed. Undecomposed organic
materials often lead to forking or deformed roots.
Method of seed production
In root crops, both seed to seed and root to seed methods of seed production are followed. Ideally,
root to seed method of seed production is recommended since roots of required standard can be
selected. In carrot and radish, selection of root is critical as it determines the quality and yield of
the crop in root to seed production method. Root selection should be done 40 - 45 days after sowing
when 60 - 70% of root development has occurred and general quality features of the roots have
expressed. Roots should conform to the given parameter of a variety such as colour, shape and size
among others. Select the desired roots and give slant cut (about 50% of the size) and plant them
vertically.
Carrot: In European types, root should be cylindrical and orange in colour, and in Japanese type,
root should be conical and deep orange. Roots should not be forked or with thick absorbing roots.
Radish: Roots should be preferably white, conical in shape and of desired size or in conformity
with the given standard of the variety. It should not be branched or have thick roots.
Field inspection
Field inspection should be done at least four times after 20 - 30 days of sowing to remove off types,
at the time of lifting the roots to select roots, during flowering time to remove off types and at
maturity select quality and uniform seeds for harvest.
Roguing
Growing stage: In about a month after sowing, remove off types that do not conform to the growth
habit of the given variety and those that are weak and diseased.
Flowering stage: In case of carrot, only 3 - 4 main branches are retained and rest are removed.
Pest management
Aphids: attacks leaves, flowers and pods in radish. They can be mechanically removed or sprayed
with Malathion / Diazinon 50 EC @ 2 ml/ liter of water.
65
Caterpillars: feed on leaves during the vegetative production and feeds on branches and twigs.
Caterpillars can be hand-picked or controlled by spraying Malathion/ Diazinon 50 EC @ 2 ml/
liter of water.
Harvesting and seed extraction
In carrot, optimum time for harvesting is when the seeds on the umbel turn bright yellowish to
brown. Ripened umbels look swollen in the centre filled tightly with large seeds while umbels that
are not filled properly shows curving inward. Never collect seed umbels from dried or diseased
plants. The ripened umbels are harvested from the plants cutting each umbel one by one keeping
10-15 cm of their stem. Seeds are extracted by threshing the umbels. In radish, seed can be allowed
to mature fully on the plants since there is no natural dehiscence or harvest when 70% of the plants
turn yellow. Plants are cut and brought to the threshing place to dry for 7 - 10 days, and then seeds
are extracted by beating with sticks.
Cleaning, drying, curing and storage
Once seeds have been extracted, they are cleaned (never winnow in carrot since seeds are very
light), dried and stored. Impurity should not be more than 2 - 5% and seeds should be dried below
8% moisture content. If properly stored, carrot seeds can be stored up to 3 years and radish for 4 -
5 years.
Seed multiplication ratio
One-gram of carrot seeds contains approximately 640 seeds and 50 seeds in radish. One acre of
carrot yields approximately 240 kg and radish 300 kg of seeds.

66
D. Bulb crops seed production
Background
Bulb crops mainly comprises bulb onion, green onions, welsh onion, garlic, leek and shallot.
Among these, bulb onion and garlic are two of the widely grown bulb crops. Thus, in this manual
only bulb onion and garlic seed production methods are discussed:
i. Onion
Onion is one of the most economically important crops under bulb crops. The common onion,
Allium cepa L can grow from tropical to temperate zones. Bulb onion is normally grown for
consumption of basal portion of the leaves that thicken to form bulb, though upper portion of the
leaves can also be consumed at tender stage. In terms of photoperiodism, onion varieties can be
classified as long day (> 14 hours), intermediate (10 - 12 hours) and short-day (8 - 10 hours).
Flowers are borne in simple umbels at the apex of floral stem. It is a cross pollinated crop and
mainly pollinated by honey bees. Onion is a biennial crop in that it takes almost two years to
produce seeds: bulb formation takes place in the first year and seeds in the second year. Seeds are
small, black and irregularly shaped.
Varieties
Total of 4 varieties have been released/ notified for commercial cultivation as described in Table
37.
Table 37: Released varieties of onion in Bhutan
Variety Potential yield (t/acre) Maturity (days)
Bajogop 1 (Red Creole) 7–8 120-140
Bombay Red 4-6 110-160
Senshu Red 7 120-170
White Creole 5-7 120 - 160
Pune red 4-6 110-120
National seed production scheme
Seeds production scheme will consist of breeder seeds maintenance by Agriculture Research and
Development Centres (ARDCs), foundation seeds maintained by National Seed Centre (NSC) and
certified seeds produced by nurseries under NSC, and Private Seed Companies (PSCs) and
Registered Seed Growers (RSGs)
67
Table 38: National seed production scheme of bulb crops
Sl. No. Class Responsible agency
1 Breeder seed ARDCs
2 Foundation seed NSC
3 Certified seed NSC/PSCs/RSGs
Specific methods for breeder seed production
• Breeder seeds will be maintained by the releasing agencies (ARDCs)
• Seeds should be genetically pure or true to type: for this purpose, follow either of these
practices: Onion is cross pollinated and should maintain more than 1000 m isolation from
different varieties of the same crop or time isolation of at least 20 days must be followed
• Bulb to seed method is preferred over seed to seed
• Caging of plants or cultivation under protected condition with occasional opening for
pollination by insects (or hand pollination) may be practiced
• Moisture content should be less than 10 %
• Purity of seeds should be 99 %
• Germination percent should be more than 90%
• ARDCs will provide 1.5 kgs of seeds to NSC after release of new variety and every after
2 years if required by NSC
Specific methods for foundation seed
• Breeder seeds should be the source of foundation seeds and will be maintained by NSC
• Maintain isolation distance of 1000 m or follow time isolation of at least 15 days or
produce under net house
• Moisture content should be maximum of 10 %
• Purity of seeds should be 99 %
• Germination percentage should be at least 70 %
• ARDCs will also produce some amount of foundation seeds for demonstration and
dissemination of technologies
Specific methods for certified seed
• Foundation seeds should be the source of certified seeds
• Foundation seeds will be produced under supervision of NSC or other relevant agencies
• Maintain isolation distance of 500 m or follow time isolation of 15 days or may
produce under net house
• Moisture content should be maximum of 10 %
• Purity of seeds should be 99 %
• Germination percentage should be at least 70 %
68
Agronomic principles of seed production
Climate
Onion has wide range of adaptability and thus can be grown from tropical to temperate zones.
However, for flower differentiation, cool temperature is required. Mean temperature of 12 - 15oC
promotes seeds stalk initiation and thus normally short-day condition favours seed production. On
the contrary, mean temperature of 20 - 22oC favours vegetative growth. However, sudden rise in
temperature could lead to early maturity leading to formation of small sized bulbs.
Land requirement
Onion can grow on wide range of soils. However, sandy loam, silty loam and deep friable soils
that can retain enough moisture are ideal. Heavy soil with waterlogged conditions is not suitable
and pH of 6 - 7 is preferred.
Seed rate
Though it depends on spacing, normally 1 - 2 kg is more than enough for an acre of land.
Spacing
Seeds are sown at 1 cm depth in rows about 10 cm apart on the nursery bed. When the seedlings
are 4 - 5 weeks old with 3 - 5 well-formed leaves, transplant them. Seedling should not be
transplanted deeper than 2.5 cm. Seedlings are transplanted at a spacing of 45 x 30 cm. The
transplanting season depends on the site and variety but generally September - October is the
recommended time.
Irrigation
Uniform irrigation is required throughout the season. However, most critical stage to provide
irrigation is right after transplanting and during bulb formation. At bulb maturity, irrigation may
be withheld for better postharvest quality.
Nutrient management
It depends on the nature of the soil. However, in general, for one acre of land, 8 MT of FYM, 20
kg of N, 30 kg of K and 30 kg of P are recommended.
69
Method of seed production
Two methods of seed production are practiced: bulb to seed and seed to seed.
6.7.1 Bulb to seed
In this method, bulbs are produced in the first year. Bulbs are selected as per the desired
horticultural traits (size, uniformity and no bolting) and then stored in properly ventilated place. In
the following year, the selected bulbs are planted in the field to produce high quality seeds. The
method is recommended for production of high-quality basic seeds. Bulbs are ready to be harvested
when there are 75 % neck falls. Irrigation should be stopped at least 2 weeks before the bulb
harvest. Bulbs are harvested with neck attached and kept under shade for 3 - 4 days for curing, and
then necks are cut about 2 cm above the bulb. Bulb with typical colour with medium size (4-5 cm)
are selected and stored in well ventilated room for seed production.
6.7.2 Seed to seed
This is also one of the common methods to produce seeds. In this method, plants are left in the
field to produce flower stalks and seed formation. Plants that are healthy and show uniformity in
flowering are tagged and seeds harvested. However, in this method unlike in bulb to seed method,
selection of plant with desired bulb characteristics is not possible.
Field inspection
Minimum of three inspections should be made: before flowering, flowering stage and then at
maturity.
Roguing
Usually, three rounds of roguing are practiced: once to remove volunteer and off type plants
especially those that bolts too early, second at the time of flowering to remove off types and retain
only those that are healthy and uniform in flowering, and finally at maturity stage to select plant
with desired bulbs characteristics.
Pest management
Purple Blotch and Rust
It is one of the most common problems in onion and garlic. Spray with fungicide Mancozeb at the
rate of 2 gm per litre of water. The infected crop residue is reported to be source of infection.
Therefore, farmers should remove all the crop residues after harvest. Alternatively, crop rotation
also minimizes the occurrence of the disease.

70
Harvesting and seed extraction
Plants do not mature at the same time. Hence 2 - 3 times of harvest may be required. Seeds are
easily shattered and thus must be harvested before shattering. Seeds are usually harvested when
50 % of the black seeds are exposed on the umbels. Umbels are dried and seeds extracted by
threshing.
Cleaning, drying, curing and storage
Once extracted, seeds are soaked in water for 2 - 3 minutes in a bucket. Heavy and healthy seeds
settle to the bottom and inert materials and unhealthy seeds float which should be discarded. Then,
seeds are dried, preferably in shade up to 10 % moisture content and stored in porous materials
like cloth or paper bags in well aerated place. Impurity should not be more than 1 %.
Seed multiplication ratio
One gram of onion contains approximately 460 numbers of seeds. One acre of onion can yield
about 260 kg of seeds.
71
ii. Garlic
Background
Garlic, Allium sativum L is hardy plant and requires cool and moist condition for growth and
relatively dry period during bulb formation. Garlic has higher nutritive value than other bulb crops.
It is rich in proteins, phosphorus, potassium, calcium, magnesium and carbohydrates. It also
contains ascorbic acid. It is exclusively propagated through cloves or bulbils.
Varieties
Till date, there is only one local selection for garlic (table 39)
Table 39: Variety of garlic
Variety Potential yield (t/acre) Maturity (days)
Local selection 4 – 6 230-250
National seed production scheme
Seeds production scheme will consist of breeder seeds maintenance by Agriculture Research and
Development Centres (ARDCs), foundation seeds maintained by National Seed Centre (NSC) and
certified seeds produced by nurseries under NSC, and Private Seed Companies (PSCs) and
Registered Seed Growers (RSGs)
Table 40: Seed class and responsibility
Sl. No. Class Responsible agency
1 Breeder seed ARDCs
2 Foundation seed NSC
3 Certified seed NSC/PSCs/RSGs
Specific methods for breeder seed production
• Breeder seeds will be maintained by the releasing agencies (ARDCs)
• Bulb size of 8 - 10 cm in diameter is preferred
• Isolation distance of at least 5 m must be maintained
• Bulbs characteristics that do not conform to required standard should not be more than
0.1%
• ARDCs will provide 150 kgs of bulbs to NSC after release of new variety and every after
5 years if required by NSC
Specific methods for foundation seed production
• Breeder seeds should be the source of foundation seeds and will be maintained by NSC
72
• Maintain isolation distance of about 5 m
• ARDCs will also produce some amount of foundation seeds for demonstration and
dissemination of technologies
Specific methods for certified seed production
• Foundation seeds should be the source of certified seeds
• Foundation seeds will be produced under supervision of NSC or other relevant agencies
• Maintain isolation distance of up to 5 m
Agronomic principles of seed production
6.1 Climate
Garlic is a hardy crop and requires cool and moist condition during vegetative growth and
relatively dry condition during bulb formation. Longer days with high temperature favours bulb
formation and critical day length is about 12 hours.
6.2 Land requirement
Garlic can grow on wide range of soils but does well in fertile, well drained loamy soil. Ideal pH
ranges from 6 - 7.
6.3 Seed rate
The bigger cloves from outside the bulb are usually selected. Though it depends on the spacing,
normally 280 kg of cloves are recommended for one acre of land.
6.4 Spacing
Spacing of 30 x 15 cm is maintained, and usually planted from March - April though like onion, it
can also be planted from September - October.
6.5 Irrigation
Garlic requires irrigation at regular interval and especially during vegetative and early stages of
maturity. However, irrigation after long spell of dryness results in splitting of bulbs and excessive
irrigation may lead to sprouting of bulbs. Irrigation should be withheld few weeks before the
harvest.
6.6 Nutrient management
It depends on the nature of the soil. However, in general, for one acre of land, 10 MT of FYM, 40
kg of N, 20 kg of K and 20 kg of P are recommended.

73
6.7 Method of seed production
Though plants flower in some cases, seed production does not happen. Hence, cloves are
exclusively used as seeds. Healthy and compact bulbs with uniform shape and size are selected.
Then, cloves with diameter of 8 - 10 cm are selected as seeds since they give better yield and
quality. Selected cloves are sown at a spacing of 30 x 15 cm.
6.8 Field inspection
Minimum of three inspections should be made at: vegetative growth, bulb formation and maturity
stage.
6.9 Roguing
In the early stages diseased, weak and off types are rogued off and at maturity stages those plants
with uniform growth and desired bulb characteristics are maintained.
6.10 Pest management
Purple Blotch and Rust
It is one of the most common problems in onion and garlic. Spray with fungicide Mancozeb at the
rate of 2 gm per litre of water. The infected crop residue is reported to be source of infection.
Therefore, farmers should remove all the crop residues after harvest. Alternatively, crop rotation
also minimizes the occurrence of the disease.
6.11 Harvesting
Plants are ready to harvest when the tops turn yellow to brownish and plants have fallen over.
Bulbs are usually harvested along with tops.
6.12 Cleaning, drying, curing and storage
Once harvested, bulbs are properly dried to remove excess moisture, and then must be cured for 7
- 10 days in the shade to further remove moisture and enhance compactness of bulbs. Curing is
done either with 2.5 cm of the tops retained above the bulb or by retaining full tops. Properly cured
bulbs are stored in well ventilated rooms or stored by hanging with dried tops in a well-ventilated
room.
Seed multiplication ratio
Though it depends on variety and method of cultivation, usually one kilogram of garlic contains
approximately 500 cloves, and from one acre of land, 3 MT of garlic can be produced.

74
E. Leafy vegetable seed production
Leafy vegetables grown in our country include mustard green, pak choi, chinese cabbage, lettuce,
spinach, leafy beet, etc.
i. Mustard Green (Local name: Saag, Hoentshe, Momshabu)
Background
Mustard green (Brassica juncea) belongs to the family Brassicaceae, the same family as that of
cole crops. The economic plant part is the leaves, which is used for culinary purpose. Most of
introduced and released varieties available in Bhutan have broad leaves and thicker mid veins
while the local lines are less broad with thinner mid veins. The inflorescence is an elongated
raceme, borne terminally on the main stem and branches. The flowers are usually bright yellow,
though colours may vary from orange to pale yellow depending on variety.
Varieties
The varieties available for cultivation in our country are all open pollinated. The varieties released
and available for cultivation are enlisted in Table 41.
Table 41: Released varieties of mustard green in Bhutan
Variety name Release name Year of
release
Releasing agency Recommended
agro-ecology
Him Beauty Him Beauty 1990 NASEPP/NSC 1200-2600
Takana Red Takana Red 1990 NASEPP/NSC 1200-2600
Taisai Taisai 1990 NASEPP/NSC 1500-2600
Neguna Neguna 1990 NASEPP/NSC 1200-2600
Mayuri Green Wengkhar Peytshe 1 2004 ARDC-Wengkhar 600-2600
Red Rayo Wengkhar Peytshe 2 2004 ARDC-Wengkhar 600-2600
National seed production scheme
The Seed production scheme will consist of breeder seeds maintenance by the respective
Agriculture Research and Development Centres (ARDCs), foundation seeds maintained by
National Seed Centre (NSC) and certified seeds produced by nurseries under NSC, and Private
Seed Companies (PSCs) and or Registered Seed Growers (RSGs).

75
Table 42: National seed production scheme of mustard green
Sl. No. Class Responsible agency
1 Breeder seed ARDCs
2 Foundation seed NSC
3 Certified seed NSC/PSCs/RSGs
Specific methods for breeder seed production
Breeder seeds will be maintained by the releasing agencies ARDCs. Seeds should be genetically
pure or true to type. For this purpose, follow either of these practices: do not grow other leafy
vegetables or crops of the same species and/or different varieties of the same crop within the
isolation distance of 400 m for mustard green and 1000 m for spinach to avoid small amount of
natural cross pollination that can occur in the range of 1- 6% or time isolation of at least 20 days
must be followed
• Cultivation under protected condition with occasional opening for pollination by insects
(or hand pollination) must be practiced
• Moisture content should be 7- 8 %
• Purity of seeds should be more than 98 %
• Germination percent should be more than 85 %
• ARDCs will provide 0.4 kg of seeds to NSC after release of new variety and every after
5 years if required by NSC
Specific methods for foundation seed production
• Breeder seeds should be the source of foundation seeds and will be maintained by the
NSC
• Maintain isolation distance of 400 m (mustard green) and 1000 m (spinach) or follow
time isolation of at least 20 days or produce under net house.
• Moisture content should be less than 8 %
• Purity of seeds should be 98 %
• Germination percentage should be at least 70 %
• ARDCs will also produce some amount of foundation seeds for demonstration and
dissemination of technologies
Specific methods for certified seed production
• Foundation seeds will act as the source of certified seeds
• Foundation seeds will be produced under supervision of NSC or other relevant agencies
76
• Maintain isolation distance of 200 m (mustard green) or 800 m (spinach) or follow time
isolation of 15 days or may produce under net house
• Moisture content should be less than 8 %
• Purity of seeds should be 98 %
• Germination percentage should be at least 70%
Agronomic Principle of Seed Production
Climate
Seed production of mustard green is easy compared to other vegetables due to its short duration.
An ideal situation for seed production would be a place with warm winters and less rains at
harvesting time. It grows well in mean annual temperature of 6 - 27˚C and mean annual rainfall of
500 - 4200 mm.
Soil
It requires a well prepared, well drained, loose, friable loamy soil. It is not compulsory to
make raised beds to sow mustard greens in well- drained and levelled terrace or on gentle
slopes, instead they can be sown straight in the field with furrows made in the surroundings
and across the field for proper drainage. However, growing on raised beds of 40 cm wide
about 15 cm high will ensure good drainage and facilitate good crop husbandry. It can tolerate
a pH of 4.3 - 8.3.
Seed Rate and Spacing
Seed rate is 250 - 500 gm per acre and plant spacing of 40 x 60 cm is optimum.
Methods of seed production
The seed production of mustard green can be done through two types of methods viz., direct
sowing and transplanting methods.
6.4.1 Direct Sowing method
The normal sowing time of mustard green in Bhutan for seed production at an altitude of 1400-
2000 m asl is coinciding with the winter vegetable production season. The sowing time starts from
August - September depending on the elevation of the seed production sites. Earlier sowing is done
in the cooler areas while later in the warmer areas. However, the seed production calendar is
different for the areas situated at an elevation above 2000 m asl. The seed production for cooler
region is carried out in summer due to extreme winters.
The land preparation is as similar to that of other vegetable crops with an addition of adequate
FYM. Sow the seeds maintaining a row to row spacing of 80 - 90 cm and plant to plant distance

77
of 20-30cm. About 4-5 seeds per spot can be sown. Linear sowing in lines can also be done but it
becomes laborious during thinning process. Then cover the seeds thinly by soil.
6.4.2 Transplanting method
It is recommended to follow the transplanting method for seed production due to;
• Strict management of discarding of off-types at the time of transplanting.
• Convenience of rotation in the field.
• Production of uniformly good seeds due to better management.
The only drawback of this method is that it is more labour-intensive than the direct sowing method
as it requires extra labour for raising seedlings and transplanting. This is the reason why many
farmers opt for the direct sowing method.
Irrigation
Vegetative and pod formation are the most critical stages for irrigation.
Nutrient management
In one acre, apply at least 8 Mt of well decomposed farm yard manures (FYM) or fully matured
compost. Semi-decomposed organic manures should not be applied as it causes insect pests
and disease. In addition, we can also apply 20 kg N per acre before final land preparation
which is equivalent to 44 kg Urea. The optimum range of soil pH is 6.0 to 6.8 and if the soil
pH is below 6.0, It is advised to apply dolomite powder @ 1.5 Mt per acre.
Intercultural Operations
The intercultural operations similar to that of the normal vegetable production such as weeding,
irrigation and fertilization, etc, should be followed. In addition, some of the most important cultural
operations that are necessary or critical for seed production of mustard green are as follows:
i. Thinning of seedlings: The first thinning of the crops should be carried out when the crop
attends 6-7 true leaves. Subsequent thinning shall be done as and when required including
the thinning done at the beginning of the spring.
ii. Staking: For seed production staking of plants is also recommended.
iii. Earthing up: It is recommended to keep the base of the plant warm. Earthing up should
be carried out at least twice. The first earthing up should be done during the time of first
weeding and the second after the plants have sufficiently bolted in order to avoid lodging.
iv. Heading back of main flowering branch: Prune off the terminal growth of main
flowering branch down to just above lateral branch by a sharp knife or secateurs. The
practice is done mainly to remove apical dominance. This will encourage the growth of
side shoots and accordingly result in the production of more flowers and seeds.
v. Roguing: The removal of off-types is mandatory and should be done while thinning. Care
should be taken to inspect the surrounding fields for other plants that can cross-pollinate
with the crop especially at bolting time. Such plants should be removed instantly.
78
Major Pests and Diseases management
The most common pests are aphids and leaf eating caterpillars. Powdery mildew is also common
disease with the onset of the cool dry season. The pest should be managed using IPM technologies.
Harvesting, threshing and storage
Seed matures when siliqua dries and turns light brown colour. Seed shattering is common.
However, the best time to harvest the plants for seeds is when 80 % of the pods turn yellowish in
colour.
Harvest by cutting the plants from the bottom with the seed stalks intact. It is then bundled into 2
- 3 plants and hung on the drying pole for several days in shade. It is not recommended to dry the
cut plants on the ground as it may absorb moisture and deteriorate the quality of the seeds. Such
seeds are also prone to disease infection and in case of rainfall may lead to germination in pods.
Threshing
Threshing of the seed pods is done after about a week when all the pods are completely dried.
There are several methods to thresh seeds. Small harvests can be threshed by rubbing pods between
your hands or against a surface to break open. For larger harvests, place whole plants in large tubs
or on plastic sheets and thresh with legs. Discard stalks after seeds have been extracted. The
threshed seeds are then dried in shade and cleaned by winnowing.
Seed Storage
Sun drying is the best and most common method of drying seeds in the farmer’s field. Maintain
seed moisture content to about 7- 8% for storage. The dried seeds should be stored in clean airtight
containers in cool and shady dry place. For long term use, the seeds can also be stored in
refrigerator. However, most of the vegetable seeds can be stored at a temperature below 15o C.
When stored in cool dry conditions, seeds can remain viable for six years.

79
ii. Lettuce
1.0 Background
Lettuce (Lactuca sativa), king of salads can be grown easily in the cool climate. It is a nutritious
leafy vegetable, rich in mineral and a source of vitamin. Lettuce are ideal plants to produce seeds
as they do not cross pollinate, thus, producing true to type plants.
Varieties
There are five released varieties:
• Hogay petshey Thigthra (Flashy trout)
• Hogay petshey Leedo (Biscia Rosa)
• Hogay petshey Hyme (Green Oak Leaf)
• Great Lake
• Hogay petshey Oro (Blushed butter oak)
2.0 National seed production scheme
The Seed production scheme will consist of basic seeds maintenance by the respective Agriculture
Research and Development Centres (ARDCs), foundation seeds maintained by National Seed
Centre (NSC) and certified seeds produced by nurseries under NSC, and Private Seed Companies
(PSCs) and or Registered Seed Growers (RSGs).
Table 43: National seed production scheme
Sl. No. Class Responsible agency
1 Breeder seed ARDCs
2 Foundation seed NSC
3 Certified seed NSC/PSCs/RSGs
3.0 Agronomic Principle of Seed Production
3.1 Climate
It is a cool weather crop. lettuce germinates at a temperature range of between 15 - 20ºC.
Germination may be compromised at temperatures above 25ºC. The ideal temperature range for
growth is between 15 - 20ºC. It is more challenging to grow lettuce in summer, as the disease
pressure is higher than in winter and the hot conditions may induce bolting in certain cultivars.
3.2 Soil requirement
It requires well drained loamy soil with a pH range of 6 - 6.8

80
3.3 Nursery
• Prepare well pulverized raised beds measuring 1 m width with convenient length
• Sow seeds during the first week of March
• Sow seeds thinly in lines of 3 on raised beds and irrigate carefully (lettuce seeds are very
light and can be easily washed away while irrigating)
• Approximately 250 gm of seeds is sufficient to cover an acre
3.4 Field preparation and transplanting
• Plough fields a week before planting and incorporate well decomposed FYM @ 6 - 8 MT
per acre.
• Prepare raised beds of 1m width with convenient length.
• Transplant seedlings in April when it has attained 4-5 leaves.
• Planting space should be maintained at 40 cm between plants and 30 cm between rows
(three rows per bed).
• Place the seedlings firmly in the soil and irrigate immediately
3.5 Intercultural operation
Lettuce is a short duration crop and one of the easiest crops to grow. Hoe and weed at least 1-2
times. Lettuce is a high water demanding crop therefore frequent irrigation during spring will
optimize the production. Critical stage of irrigation for lettuce is during head development.
3.6 Nutrient management
Fertilizer requirement depends on the soil fertility status. However, 22.67 kg of N, 90 kg of K and
136 kg of P per acre is generally recommended.
3.7 Pest and disease management
Some of the pest and diseases include downy mildew, cottony rot, aphids and greenhouse white
fly. These pests should be managed using IPM technologies.
3.8 Harvesting, processing and storage
Harvesting for seeds can be done when two-thirds of the flowers on the stalk has turned fluffy
white, approximately about 2 - 3 weeks after flowering. Immature seeds are usually greenish and
flatter than fully matured ones. It is best to collect the heads when the seeds have matured but the
heads have not fully dried. The seed can be harvested from a single plant by shaking their heads

81
into a bag. This should be done in 2 - 3 days or you can harvest the whole plant and put it on mat
in shade. Seed will continue to ripen and shatter.
Seed Processing
After drying seeds for 2 – 3 days in shade, stripping and crushing the plant is essential. It can be
done by rubbing the seeds with hands to extract seeds and to separate from chaff. Separate again
by winnowing.
Storage
Lettuce seeds remain viable up to 3 years under ideal condition. Store seeds in jars, cloth or mesh
bags or foil envelopes. Protect from direct sun. Refrigerate the seeds below 15oC to prolong the
seed viability.

82
F. Solanaceous vegetable seed production
i. Chilli (Hot pepper- Capsicum frutescens L.) & Capsicum (Sweet pepper-Capsicum annuum
L.)
1.0 Background
Capsicum and Chilli (Capsicum annuum and Capsicum frutescens) commonly known as sweet
pepper and hot pepper are commercially important crops of the family Solanaceae. Capsicum and
chilli are often self-pollinated crops, but cross-pollination occurs to the extent of 7 – 36 % mainly
through insects. Seeds should be allowed to set by self-pollination. The flower is protogynous.
Anther dehisces only ½ - 5½ hours after stigma becomes receptive. Anthesis in chilli occurs
between 6.00 - 9.00 hr. Flower remains open for 2 - 3 days, receptivity of stigma is the highest on
the day of flower anthesis. Optimum temperature required for pollination is about 20 – 25oC.
Table 44: Released variety of chilli in Bhutan
2.0 National seed production scheme
Seeds production scheme will consist of breeder seeds maintenance by Agriculture Research and
Development Centres (ARDCs), foundation seeds maintained by National Seed Centre (NSC)
and certified seeds produced by registered nurseries under NSC, and Private Seed Companies
(PSCs) and Registered Seed Growers (RSGs).
Table 45: National seed production scheme of chilli
Sl. No. Class Responsible agency
1 Breeder seed ARDCs
2 Foundation seed NSC
3 Certified seed NSC/PSCs/RSGs
3.0 Specific methods for breeder seed production
• Breeder seeds will be maintained by the releasing agencies (ARDCs). Seeds should
be genetically pure or true to type
Sl.No. Crop (Variety) Variety/Breeding Line (s) Year of release Releasing Agency
1 California
Wonder
California Wonder 1990 ARDC-Bajo
2 Sha Ema Paro Local 1990 NSC
3 Super Solo Big Round 2004 ARDC-Wengkhar
4 Yangtse Ayema 2007 ARDC-Wengkhar

83
• Land to be planted with chili shall be free of volunteer plants.
• Do not grow other crops of the same species or different varieties of the same crop
within the isolation distance of 500 m
• Cultivation under protected condition (green house/white net house) with occasional
opening for pollination by insects (or hand pollination) must be practiced
• Moisture content should be 6 - 8 %
• Purity of seeds should be more than 98 %
• Germination percent should be more than 80 %
• ARDCs will provide 0.4 kg of seeds to NSC after release of new variety and every
after 5 years if required by NSC
4.0 Specific methods for foundation seed production
• Breeder seeds should be the source of foundation seeds and will be maintained by
NSC
• Maintain isolation distance of 500 m in open condition or produce under
greenhouse/net house
• Moisture content should be less than 6 – 8 %
• Purity of seeds should be 98 %
• Germination percentage should be at least 60 %
• ARDCs will also produce some amount of foundation seeds for demonstration and
dissemination of technologies
5.0 Specific methods for certified seed production
• Foundation seeds should be the source of certified seeds
• Foundation seeds will be produced under supervision of NSC or other relevant
agencies
• Maintain isolation distance of 250 m or follow time isolation of 15 days or may
produce under net house
• Moisture content should be less than 6 - 8 %
• Purity of seeds should be 98%
• Germination percentage should be at least 60 %
6.0 Agronomic principles of seed production
6.1 Climate
Chilli requires warm and humid climate with temperature range of 20 – 25oC. It requires sufficient
moisture in the soil during flowering and fruit formation. Dry soil condition leads to flower and
fruit drop. Too much moisture in the soil will cause root rot. Under rain-fed condition it requires
about 600 - 700 mm annual rainfall.
84
6.2 Land requirement
The land should be free from volunteer plants and weeds. There should be at least 2 years interval
between the related crops cultivated in the selected land. The soil should be fertile, free from soil
borne diseases with good drainage.
6.3 Isolation distance
Under open field conditions, minimum isolation distance of 500 m for foundation/hybrid seed and
250 m for certified seed production are necessary. It is highly recommended to grow in green
house and net house to avoid cross-pollination.
6.4 Seed selection and sowing
Seeds should be healthy and free from disease and pest infection. Remove broken, coloured seeds
and use uniformly graded seeds. Selected seeds should be treated appropriately to protect the crop
from seed borne diseases. Treat seeds with laundry bleach (4 - 5%). Seeds can also be coated with
ash and ash water. Seeds are also sterilized by dipping seeds in warm water (50oC) for 10 minutes
before sowing.
6.5 Seed rate
Seed rate is 400 gm per acre.
6.6 Nursery preparation
Plough or dig the field for 2-3 times about two weeks ahead of plantation and level the field. Apply
well decomposed Farm Yard Manure/chicken manure and sand in the ratio 2:1 and mix thoroughly.
Prepare the beds of 20-25 cm high with 1 m width and convenient length. Break the soil clods and
make the soil very fine particle. Prepare line of 2-3 cm deep and 10-15 cm (RxR spacing) gap from
one to other line. Sow the seeds in line and cover it by fine soil particle. Irrigate the nursery by
using water cane early in the morning and evening in a day. Visit the nursery site once in a day
and do weeding whenever the weeds germinate. Open the poly tunnel when the temperature rises
and close it when the temperature drop and when it rains.
When the nursery is kept inside the protected structure, hardening of the seedlings, one week
before the time of transplanting is very important. The process of hardening seedlings is by taking
the seedling in open condition and decrease the application of water. The reason of hardening, is
to prevent the seedling from transplant shock
6.7 Field Preparation
There are different ways to prepare the field.
The main field should be ploughed thoroughly for 4 - 5 times to get proper tilth before
transplanting.

85
Bed preparation and transplanting (rainy season)
Prepare raised bed of 25-30 cm high with 1m width and convenient length depending upon size of
the bed. The bed preparation in summer should be such a way that the water should not get
stagnant in order to control damping off and blight disease. The gap between beds to bed can be
maintained at 40-50 cm.
Bed preparation and transplanting (dry season)
Prepare raised bed of 15-20 cm high with 1m width and convenient length depending upon the
size of the field.
6.8 Transplanting
The seedlings of 35 - 40 days old are ready for transplanting. The seedling should be approximately
20 – 25 cm tall and have 3 - 4 leaves on the main stem. Transplanting may be done on the ridges
in the evening. The treated seedlings should be transplanted to the main field. The spacing followed
is 60 x 45 cm for hot pepper and 45 x 30 cm for sweet pepper.
6.9 Weeding
Weeding is most important during the early stages of the crop. Manual weeding is most preferred.
The crop should be hoed twice at 15 days interval starting from 30 days after transplanting.
Weeding should be done after 20 and 45 days following transplantation.
6.10 Irrigation
First irrigation is done immediately after sowing. After transplanting keep the soil wet at least for
3 days. Subsequent irrigation should be done once a week or 10 days depending on the soil
moisture. Irrigation during flowering and fruit setting stages are very crucial.
6.11 Nutrient
Apply well decomposed farm yard manure @ 4 tones/acre during the field preparation time. Apply
NPK @ 28:24:24 kg/acre, apply full dose of P and K as a basal dose during field preparation and
N in 3 split doses. 1st during transplantation, 2nd one month after transplanting and 3rd during
flowering time.
6.12 Roguing
Roguing should be done from early vegetative phase up to fruiting stage. Diseased plants and off-
types should be rogued off periodically. Maintain about 10 - 20 fruits per plant.
6.13 Field inspection
A minimum of 3 field inspections should be done from flowering to harvesting stages. The first
inspection is done before flowering in order to verify isolation, volunteer plants, and other relevant
factors; second during flowering stage to check off-types and other relevant factors. The third

86
inspection is carried out at maturity stage or prior to harvesting to verify true nature of plant and
other relevant factors.
Table 46: Field standards of foundation and certified seeds
Parameters Foundation seed Certified seed
Isolation distance (max) 500m 250m
Off types (max) 0.10% 0.20%
Plants affected by seed borne
diseases (max)
0.10% 0.50%
Table 47: Seed standards for foundation and certified seeds of chili
Factors Classes of seeds
Foundation seeds Certified seeds
Pure seed (min) 98 98
Inert matter (Max) 2 2
Other crop seeds (Max) .05 .1
Weed seeds .05 .1
Germination (min) 60 60
Moisture content (max)
i) Ordinary container 8 8
ii) Vapor proof container 6 6
6.14 Pest and disease management
Capsicum and chilli are commonly affected by pests and diseases like damping off, fruit rot,
aphids, whitefly, hoppers, mites, thrips, etc., during different growth stages of the crop.
Thrips and aphids can be controlled by spraying Dimecron (systemic pesticide), pod borer can be
controlled by spraying Nuvacron and the mites can be controlled by spraying Kelthane. The major
diseases affecting the plants are die-back or fruit end rot, powdery mildew and bacterial leaf spot.
Spray Dithane M-45 for control of die back, Karathane for powdery mildew and Agromycin for
leaf spot disease control.
6.15 Harvesting, processing, seed extraction, drying and storage
Harvesting is done once the fruits are physiologically mature and turns from green colour to red.
The matured fruits are harvested by hand picking.
Harvesting should be done in different pickings. The well ripened fruits with deep red colour
should be collected in each picking. After harvest, fruit rot infected fruits are to be discarded. The

87
harvested pods are dried under shade for 1 - 2 days and then under sun for another 2 or 3 days.
Before drying, pods are to be selected for true to type and graded for seed extraction. The seeds
are extracted from graded dried pods. The pods are taken in gunny bag and beaten with pliable
bamboo sticks. The seeds are cleaned by winnowing and dried to 10 % moisture content on
tarpaulin.
Drying and storage
The extracted seeds should be dried in the shade for a few days before storage to attain a moisture
level of 8 %. The dried seeds should be packed in cloth bags or moisture proof containers and
stored in a dry and cool place (0 to 8oC). When the seeds are kept under the cold, dark and dry
storage conditions, they will remain viable for up to five years.
7.0 Seed multiplication ratio
One gram of chilli seed contains approximately 200 seeds. The seed multiplication ratio is 1:240.

88
ii. Tomato (Solanum lycopersicum)
1.0 Background
Tomato (Solanum lycopersicum) belongs to the genus Lycopersicon under Solanaceae family.
Tomato is one of the most highly consumed vegetables and is used for soup, salad, pickles,
ketchup, puree, sauces, etc., Tomato can be grown in a variety of geographical zones in open fields
or greenhouses. Tomato plants can be indeterminate or determinate in their growth habits. Tomato
flowers are yellow in colour and are perfect, regular and hypogynous and are borne on
inflorescences that may be either determinate (cymose) or indeterminate (racemose), depending
on the species.
Varieties
There are 3 released varieties of tomato in Bhutan as shown in table 48.
Table 48: Varieties of tomato released in Bhutan
2.0 National seed production scheme
Seeds production scheme will consist of breeder seeds maintenance by Agriculture Research and
Development Centres (ARDCs), foundation seeds maintained by National Seed Centre (NSC)
and certified seeds produced by registered nurseries under NSC, and Private Seed Companies
(PSCs) and Registered Seed Growers (RSGs).
Table 49: National seed production scheme of tomato
Sl. No. Class Responsible agency
1 Breeder seed ARDCs
2 Foundation seed NSC
3 Certified seed NSC/PSCs/RSGs
Sl.
No.
Crop (Variety) Variety/Breeding
Line (s)
Year of
release
Description Releasing
Agency
1 Roma Roma 1990 Determinate, dwarf
with oval fruit
ARDC-Bajo
3 Cherry tomato CHT160 1999 Indeterminate with
round fruit
ARDC-Bajo
4 Bajo Lambenda 1 Rattan 2002 Determinate with
round fruit
ARDC-Bajo

89
3.0 Specific methods of breeder seed production
• Breeder seeds will be maintained by the releasing agencies (ARDCs). Seeds should
be genetically pure or true to type
• Land to be planted with tomato shall be free of volunteer plants
• Do not grow other crops of the same species or different varieties of the same crop
within the isolation distance of 50 m
• Cultivation under protected condition (green house/white net house) with occasional
opening for pollination by insects (or hand pollination) must be practiced
• Moisture content should be 6 - 8%
• Purity of seeds should be more than 98 %
• Germination percent should be more than 85 %
• ARDCs will provide 0.4 kg of seeds to NSC after release of new variety and every
after 5 years if required by NSC
4.0 Specific methods for foundation seed production
• Breeder seeds should be the source of foundation seeds and will be maintained by
NSC
• Maintain isolation distance of 50 m in open field or produce under greenhouse/net
house
• Moisture content should be less than 6 - 8%
• Purity of seeds should be 98 %
• Germination percentage should be at least 70%
• ARDCs will also produce some amount of foundation seeds for demonstration and
dissemination of technologies
5.0 Specific methods for certified seed production
• Foundation seeds should be the source of certified seeds
• Foundation seeds will be produced under supervision of NSC or other relevant
agencies
• Maintain isolation distance of 25 m or follow time isolation of 15 days or may
produce under net house
• Moisture content should be less than 6 -8 %
• Purity of seeds should be 97 %
• Germination percentage should be at least 70 %
6.0 Agronomic Principles of seed production
6.1 Climate
Tomato requires a long and warm growing season and is sensitive to either very hot or cold
growing temperatures. The ideal temperature required for tomato is between 15o - 25oC for fruit
90
setting. It can be grown at elevation from 300 masl up to 2200 masl. In areas below 1000 masl
tomato are grown as winter crop (September- December). In areas between 1000 - 1500 masl it is
grown as summer crop (March to June). In areas above 1500 masl it is grown from April -
September. Tomato is mainly grown as winter crop in the lower foothill. However, in the inner
Himalayas it can be grown as a summer crop.
6.2 Land requirement
Selection of suitable land is important especially for seed production where previous crop grown
should not be of the same family (chilli, egg plant, potato etc.) to avoid cross-pollination from
volunteer plants. The land should be tilled twice to make the soil fine.
6.3 Isolation requirement
Tomatoes are 50% self-pollinating and 50% insect pollinated crop. Therefore, under open field
conditions, varieties require minimum isolation distance of 50 m for foundation seed and 25 m for
certified seed. For hybrid seed production, it requires minimum of 200 m for foundation and 100
m for certified seeds. It is highly recommended to produce seed in green house and net house to
avoid cross-pollination.
6.4 Seed selection and sowing
Seeds should be healthy and free from disease and pest infection. Remove the broken, coloured
seeds and use uniformly graded seeds. Selected seeds should be treated appropriately to protect
the crop from seed borne diseases. Treat seeds with bleach (4 - 5%). Seeds can also be coated with
ash and ash water. Seeds are also sterilized by dipping seeds in warm water (50oC) for 10 minutes
before sowing.
6.5 Seed rate
Seed rate is 150 – 200 gm per acre. Sow nursery in 50 m2 to transplant one acre.
6.6 Nursery preparation
The nursery should be prepared thoroughly before sowing the seeds. Remove the stones or clods
and other unwanted materials for uniform and healthy growth of the seedlings. Raise nursery beds
of 15-20 cm high, 1 m wide and convenient length. Sow the seeds 1.5 cm deep and 8-10 cm apart
in rows. The growing season varies depending upon the altitudes. At an altitude above 1500 masl,
(growing season April to September) start nursery preparation from the first week of April.
At an altitude of 1000-1500 masl (growing season March to October) sow the seeds from first
week of March till end of May. The altitude below 1000 masl (growing season October to April)
sow the seed in the first week of October till mid of December.
It is advisable to use poly tunnel having semi-circular structure of bamboo sticks at a distance of
1 m over the nursery bed at higher altitude above 1000 masl. The plastic sheet is laid over the
structure and the sides are covered with the soil. Open the plastic during the day time and close it

91
in the evening. Do not use semi-decomposed organic manures or compost made out of city waste
in the nursery soils. Irrigate the nursery as and when require based on the soil condition.
6.7 Field Preparation
Plough the field three to four times to pulverize the soil. Good drainage of the field is important
and is a pre-requisite for cultivation of solanaceous crops especially in summer. It is advisable to
grow solanaceous crops on raised beds of 15-20 cm height and 1 m width. The length of the beds
depends upon the field condition.
6.8 Transplanting
The seedlings of 40 - 45 days old are ready for transplanting. Select seedlings with short internodes
having 6 - 7 leaves on the main stem. Transplanting may be done on the ridges. Transplant the
seedlings on the raised beds with the row to row distance of 50 cm and plant to plant 40 cm. Use
either plastic mulch or paddy straw.
6.9 Weeding
Keep away weeds both in the nursery as well as in the main field. Frequently weed the field to
keep it free from unwanted plants that will compete for water, air, light and nutrients. Avoid
disturbance of plant roots during weeding.
6.10 Irrigation
Irrigation frequency will depend on factors such as; weather, soil type and method of irrigation. It
is important to keep the soil moderately moist after transplanting to encourage vegetative growth.
Irrigation is given immediately after transplanting and continued for 2 - 3 days. Subsequent
irrigation may be given after 6 - 7 days during summer and 4 - 5 days during dry season. Generally,
14 - 15 times irrigation is necessary throughout its growing stages. After the fruit set, maintain
uniform soil moisture to avoid blossom end rot and fruit cracking. Light irrigation is required
towards the time of harvest to avoid diseases. It is important to maintain proper drainage to avoid
standing water around the root area. Avoid showering on leaves.
Using paddy straw or saw dust mulch improves yield, soil health and conserves soil moistures.
6.11 Nutrient management
About 10 tonnes of FYM or vermi compost/compost @ 1-1.5 t per acre is applied at the last
ploughing. Green manuring is recommended for areas with assured rainfall and also for irrigated
crop. 20:24:15 kg of NPK per acre as basal dose in the form of Urea, SSP and MoP. Top dress
with additional 26 kg nitrogen after one month of transplanting. Top dressing of nitrogen should
be done in the forms of rings around the plants and cover with soil.

92
6.12 Branch and fruit control
All indeterminate varieties are trained with wires, strings or stakes to prevent lodging and loss of
fruits by coming in contact with soil. It is done by providing individual stake or by stretching jute
ropes on 2 - 2.5 m long bamboo poles erected on either side of ridges. Branches of plants are
supported on poles or strings with twine. Pruning is also generally followed in indeterminate
varieties to improve size, shape and quality of fruits. Removal of unwanted shoots enhances plant
vigour. Remove first flower. Maintain about 5 - 10 fruits per plant.
6.13 Roguing
Roguing is done from the seedling stage until harvest. Off-types and plants affected by early blight,
leaf spot and mosaic diseases should be removed from the seed production field.
6.14 Field inspection
A minimum of three field inspections should be made: First at vegetative phase, second at
flowering and fruiting stage, and third before harvesting of fruits.
Table 50: Field standard for foundation and certified seed
Parameters Foundation seed Certified seed Isolation distance (max) 50m 25m
Off types (max) 0.1% 0.2%
Plants affected by seed borne
diseases (max)
0.1% 0.5%
Table 51: Seed standard for foundation and certified seed
Factors Classes of seeds
Foundation seeds Certified seeds
Pure seed (min) 98 97
Inert matter (Max) 2 2
Other crop seeds (Max) .05 .1
Weed seeds None None
Germination (min) 70 70
Moisture content (max)
i) Ordinary container 8 8
ii) Vapor proof container 6 6
6.15 Harvesting, seed extraction, drying and storage
Tomato fruits are harvested after full maturity. The fruit from first harvest and last harvest is not
recommended for seed extraction since they have better vigour and viability. For seed purpose
fruit from 6 - 7 harvest lots is kept for seed extraction. Fruits harvested for seed extraction should
be graded for true to type and medium to large size fruits for higher recovery of quality seeds.
93
Seed extraction
The extraction of seeds from ripe fruits is done by fermentation method and acid method. In
fermentation method, the crushed fruits are allowed to ferment for 1-2 days and then put in water
where the pulp and skin float and the seeds settle down at bottom.
In acid method, the fruits are crushed into pulps in a plastic bucket (do not use zinc and iron
container). Then add 100 ml of hydrochloric acid per 14 kg of crushed tomato fruits. 1 – 2 times
stirring is necessary in between. This will facilitate the separation of seed and pulp. After 30
minutes, the seed separated out from the pulp settle down at the bottom of the bucket and then the
floating fraction is removed. The settled seeds should be washed with water for 3 - 4 times. The
washed seeds are dried in a partial sun light
Drying and storage
After proper drying, the seeds should be processed to maintain high vigor and viability by
removing immature and small seeds. Remove broken, immature, diseased seeds and other inert
matters. The seeds should be dried to bring the moisture content up to 8% before storage. The
seeds may be treated with Captan or Thiram @ 3gm per kg of seeds. Place seeds in vapor proof
jars, zip lock plastic bags, plastic containers (pet bottles). Seeds should be stored in a cool, shady
and dry place. Place the seeds in a refrigerator (below 15oC is ideal) for long term storage.
7.0 Seed Multiplication Ratio
One gram of tomato seed contains approximately 250 - 380 seeds. The seed multiplication ratio is
1: 400.

94
iii. Brinjal or Eggplant (Solanum melongena)
1.0 Background
Brinjal or Eggplant (Solanum melongena) belongs to Solanaceae family grown for its edible fruits
botanically classified as berry. It is versatile crop adapted to wide agro-climatic regions. The
eggplant is delicate tropical perennial plant often cultivated as tender or half hardy annual in
temperate climates. It grows up to 40- 150 cm tall with large coarsely lobed leaves that are 10- 20
cm. The stem is often spiny; flowers are white to purple in colour with five-lobed corolla and
yellow stamens.
Varieties
The most popular cultivated brinjal varieties in Bhutan are;
Table 52: Varieties of brinjal in Bhutan
2.0 National seed production scheme
Seed production scheme will consist of breeder seeds maintenance by Agriculture Research and
Development Centres (ARDCs), foundation seeds maintained by National Seed Centre (NSC)
and certified seeds produced by registered nurseries under NSC, and Private Seed Companies
(PSCs) and Registered Seed Growers (RSGs).
Table 53: National seed production scheme
Sl. No Class Responsible agency
1 Breeder seed ARDCs
2 Foundation seed NSC
3 Certified seed NSC/PSCs/RSGs
3.0 Specific methods for breeder seed production
• Breeder seeds will be maintained by the releasing agencies (ARDCs). Seeds should
be genetically pure or true to type: for this purpose
• Land to be planted with eggplant shall be free of volunteer plants.
Sl.
No.
Variety/Breeding
Line (s)
Year of
release
Releasing
Agency
1 Pusa Purple Long 1990 ARDC-Bajo
2 Paro Local 1990 NASEPP
3 Big Round 1990 NASEPP

95
• Do not grow other crops of the same species and/or different varieties of the same crop
within the isolation distance of 200 m
• Cultivation under protected condition (green house/white net house) with occasional
opening for pollination by insects (or hand pollination) must be practiced
• Moisture content should be 6 - 8%
• Purity of seeds should be more than 98%
• Germination percent should be more than 90%
• ARDCs will provide 0.4 kg of seeds to NSC after release of new variety and every
after 5 years if required by NSC
4.0 Specific methods for foundation seed production
• Breeder seeds should be the source of foundation seeds and will be maintained by
NSC
• Maintain isolation distance of 200 m in open field or produce under greenhouse/net
house
• Moisture content should be less than 6 - 8%
• Purity of seeds should be 98%
• Germination percentage should be at least 70%
• ARDCs will also produce some amount of foundation seeds for demonstration and
dissemination of technologies
5.0 Specific methods for certified seed production
• Foundation seeds should be the source of certified seeds
• Foundation seeds will be produced under supervision of NSC or other relevant
agencies
• Maintain isolation distance of 100m or follow time isolation of 15 days or may
produce under net house
• Moisture content should be less than 6 - 8%
• Purity of seeds should be 97%
• Germination percentage should be at least 70%
6.0 Agronomic principles of seed production
6.1 Climate
Eggplant requires long growing season with high average day and night temperatures. Suitable
temperature is between 21- 32oC with maximum of 350C and minimum of 180C. Young seedlings
are sensitive to frost. For seed germination optimum temperature is 25 to 320C. In altitude below
1000 masl seed sowing is done in mid-February, potting and transplanting at the end of March.
Mid hill: seed sowing at the end of February and planting in mid-April. Since the temperature is
low at the time of seed sowing and potting, it is important to cover with plastic to increase the
96
temperature. Under Bajo condition, additional plastic tunnel is used inside the poly house to meet
the required temperature.
6.2 Land requirement
Selection of suitable land is important especially for seed production where previous crop should
not be the same crop to avoid cross-pollination from volunteer plants. The land should be tilled
twice to make the soil fine.
It is a hardy crop, which can tolerate drought and heavy rainfall. However, well drained loamy
soils are preferred for better production. An eggplant does not like weeds and weeding has to be
done carefully around them.
6.3 Isolation requirement
Eggplants are highly self-pollinated crop, but are immune to cross-pollination since the stigma
projects beyond the anther. Therefore, under open field conditions varieties require minimum
200m for foundation seed and 100 m for certified seed. It is recommended to grow in green house
and net house to avoid cross-pollination.
6.4 Seed selection and sowing
Select good quality certified seeds from the authorized dealer. Seeds should be healthy and free
from disease and pest infection. Remove the broken, coloured seeds and use uniformly graded
seeds. Selected seeds should be treated appropriately to prevent the crop from seed borne diseases.
Seeds should be soaked in a solution of fresh cow’s urine (1 part cow’s urine + 5 parts of water)
for 30 minutes prior to the sowing. This will inhibit the seed borne diseases like fruit rot and die
back. Treat seeds with laundry bleach (0.01 - 0.02%). Seeds can also be coated with ash and ash
water. Dip seeds in warm water (20 - 25oC) before sowing.
6.5 Seed rate
Seed rate is 350 - 500 gm per acre. Sow nursery in 50m2 to transplant one acre.
6.6 Nursery preparation
The nursery should be fertile with addition of well decomposed FYM and ash. About 10 numbers
of nursery beds of 2-2.5 m long and 1.25 m wide will be sufficient to transplant one acre. The bed
should be raised 15-20 cm height from the ground level. Treated seeds should be sown in the
nursery beds in rows at 2 cm depth with 3 – 4 cm spacing. Soon after sowing irrigate the beds and
cover the beds using paddy straw.
6.7 Field preparation
Plough and harrow the field alternately depending on soil type and soil moisture to obtain good
soil tilth. The soil pH should not "be higher than pH 5.5 to 6.0 for its better growth and
development. When the field is well prepared and levelled, the beds of suitable size are made in
the field before transplanting.

97
6.8 Transplanting
Seedlings should be ready for transplant after 30-35 days after sowing or when the seedlings have
developed 5-6 true leaves. Do not remove the soil adhering to the roots to minimize root injury
and promote faster recovery. Transplant during cloudy day or preferably at evening. Spacing
between seedlings varies with varieties from 50 x 30cm - 50 x 45cm. replant missing hills or wilted
plants within 3-4 days after transplanting. Water the newly transplanted seedlings immediately.
Mulching materials such as; rice straw, rice husk, saw dust and dry grasses should be used to cover
the soil (both bed and foot paths).
6.9 Weeding
It is important that crops grown for seed production are given the optimum conditions for growth
and reproduction to ensure that good seed quality and high overall seed yield will be attended.
Keep away weeds both in the nursery as well as in the main field. Frequently weed the field to
keep it free from unwanted plants that will compete with water, air, light and nutrients. Avoid
disturbance of plant roots during weeding.
6.10 Irrigation
Irrigation frequency will depend on the many factors such as; weather, climate, soil type and
method of irrigation. It is important to keep the soil moderately moist after transplanting to
encourage vegetative growth. The mulched eggplant requires lesser frequency of irrigation water.
Reduce the irrigation frequency 1-2 days after transplanting to encourage flowering and fruiting.
After the fruit set, maintain uniform soil moisture to avoid blossom end rod and fruit cracking.
Light irrigation is required towards the time of harvest to avoid diseases. It is important to keep
proper drainage to avoid standing water around the root area. Avoid showering on leaves.
6.11 Nutrient management
Incorporate organic fertilizer (FYM/Compost) with soil one –two weeks before planting at 120
bags per hectare. In brinjal 60kg nitrogen, 50kg phosphorus should be applied per hectare.
6.12 Branch control
Pruning is necessary for plant growth and fruit development. Remove the lateral branches below
the split (Y branch), except the branch near to the split to allow the air to move freely on the base
of the plants and to minimize occurrence of fungal and bacterial diseases. Prune unnecessary leave
to reduce competition of in nutrient absorption. Maintain about 3-5 fruits per plant.
6.13 Roguing
To effectively rouge; seed growers should have good knowledge with the characteristics of the
varieties. Leaf and stem characters can easily be identified at seedling stage. Roguing can be done
based on fruit size, shape and colour, and other plant characters. Off-types and plants infected with
virus diseases of other seed borne diseases should be rogued out. A minimum of three roguings is
necessary; before flowering, at flowering, and at fruiting stages.

98
6.14 Field inspection
A minimum of three field inspections should be made: First at vegetative phase, second at
flowering and fruiting stage and third before harvesting of fruits by the Seed Certification Officer.
Table 54: Field standard for foundation and certified seeds
Parameters Foundation seed Certified seed Isolation distance (max) 200m 100m
Off types (max) 0.1% 0.2%
Plants affected by seed borne
diseases (max)
0.1% 0.5%
Table 55: Seed standard for foundation and certified seeds
Factors Classes of seeds
Foundation seeds Certified seeds
Pure seed (min) 98 97
Inert matter (Max) 2 2
Other crop seeds (Max) .05 .1
Weed seeds None None
Germination (min) 70 70
Moisture content (max)
i) Ordinary container 8 8
ii) Vapor proof container 6 6
6.15 Pest and disease management
Some of the common pests and diseases affecting eggplant crop are; fruit borer (Helicoverpa
armigera and Spodoptera litura), serpentine leaf miner, aphids, mites, nematode, damping off
(nursery), leaf spot, powdery mildew, leaf curl and fruit rot.
6.16 Harvesting, processing, seed extraction, drying and storage
Eggplant fruits are allowed to ripen fully to ensure complete seed development and maturity. The
fully matured eggplant fruit colour turns to yellow from the normal. Harvest only the ripe yellow
fruits. The harvested fruits are stored for three to four days until they become soft. This allows the
seeds to mature fully. The top one-third of the fruit is removed since it contains almost no seeds.
Before seed extraction, fruits are to be graded for true to type and selection of medium to large
size fruits for getting higher recovery of quality seeds.

99
Seed extraction
The extraction of seeds from ripe fruits is done by fermentation and acid method. In fermentation
method the fruits are cut vertically into equal half and then separate the seeds with the pulp. These
are then allowed to stand overnight for fermentation. In this condition the seeds are easily separated
from the pulp. After separation, the seeds are washed two to three times until all the pulp pieces
are removed. Keep seeds in a bowl of water for about 10 minutes, all good seeds will settle down
at the bottom of the bucket and then the floating fraction is removed. The washed seeds are dried
in a cool, dry place for two to three days. Stir the seeds with hand 2-3 three times a day, turning
them over to dry uniformly. Seeds sticking together should be disaggregated.
In acid method, the pulp containing seeds are separated from the skin and put in a plastic bucket
(do not use zinc and iron container). And then add 100ml of Hydrochloric acid per 14kg of pulp
containing seeds. One to two times staring is necessary in between this time. This will facilitate
the separation of seed and pulp. After 30 minutes, the seed is separated out from the pulp settle
down at the bottom of the bucket and then the floating fraction is removed. The settled seeds should
be washed with water for three to four times. The washed seeds are dried in a partial sun light
Drying and storage
After proper drying, the seeds should be processed to maintaining high vigour and viability by
removing immature and small seeds. The seeds should be dried to bring the moisture content up
to 8% before storing. The seeds may be treated with Captan or Thiram @ 4 gm per kg of seeds.
Place seeds in jars, zip lock plastic bags, plastic containers. The packing material should be air
tight such as sealed glasses jar. Seeds should be stored in in a cool, shady and dry place. Place the
seeds in a refrigerator (below 15oC is ideal) for long term storage.
6.17 Seed Yield
About 250–300 kg seeds can be obtained from a hectare of brinjal crop.
7.0 Seed Multiplication Ratio
One gram of eggplant seed contains approximately 200-250 seeds.

100
FRUITS AND NUTS SEEDLINGS
PRODUCTION
101
A. Standard Fruits and Nuts Seedlings Production
Background
Fruits and Nuts include large number of crops. However, in this manual, only common fruits
(other than citrus) found in the country is described. Depending on the climatic adaptability, fruits
and nuts in Bhutan are classified as:
Temperate fruits: Fruits that can tolerate wide fluctuation of both diurnal and seasonal
temperatures. Fruits need distinct cold winter or exposure to specific chilling temperature for
certain period, without which they do not flower. Generally, trees are deciduous and can stand
frosts like apple, apricot, cherry, hazelnut, kiwi, peach, pear, persimmon, plum and walnut
depending on the varieties. For optimal fruitfulness, cross-pollination is important in these crops.
Crops such as hazelnut, kiwi and walnut have specific requirement for pollination. Most of the
kiwi varieties are functionally dioecious and need pollinizer (one male for 9 - 10 female plants),
and nuts have dichogamy and thus require pollinizer (Hazelnut) or more than two varieties
(Walnut) in an orchard for better pollination and fruit set.
Sub-tropical fruits: These fruit trees can withstand low temperature but not necessarily frost.
Some fruit trees require chilling for bud differentiation. They are either deciduous or evergreen
trees such as avocado, banana, guava, jackfruit, litchi, loquat, mango, papaya, pecan nut and
pomegranate. Crops such as banana, mango and papaya do well under less fluctuation of diurnal
temperature, light and darkness and require moist warm climate. Usually, avocado exhibits
protogynous dichogamy and thus categorized into two types: A type open as female in the morning
and B type opens as female in the afternoon. Hence, for better pollination and fruit set, an orchard
should have both A and B types. Pecan nut like any other nuts should be planted with more than
one variety for fruitfulness.
Varieties
There are 82 varieties of 23 different fruit crops released and recommended for commercial
cultivation in Bhutan as mentioned in table 56.
Table 56: Varieties of different fruits and nuts released in Bhutan
Crop Variety
Yield
Potential
(t/acres)
Recommended
Elevation
Apple
Red Delicious 7.0 2000-2800
Royal Delicious 7.0 2000-2800
Golden Delicious 3.7 2000-2800
Jonathan 5.0 2000-2800

102
Rich-a-Red 3.5 2000-2800
Lobo 3.2 2000-2800
Red chief 2.0-3.0 2000-2500
Red Free 3.8 2000-2500
Bajo Apple 2.5 1000-1500
Fuji 5.0-7.0 2000-2500
Mutsu 5.0-7.0 2000-2500
Root stock
MM-106 Rootstock >2000
MM9 Rootstock >2000
MM 11 Rootstock >1200
Apricot Bajo Khamchung 1 2.5-4.8 1200-2000
Shakarpara 3.0-4.0 <1800
Almond
Texas 0.12 kg/tree 1300-2500
Drake 0.45 kg/tree 1300-2500
Dhebhar Badhan 2.5 kg/tree 1300-2500
Kagzi 1.6 kg/tree 1300-2500
Avocado Bajo Gule-1 (Bacon) 1.3 1200 - 2500
Bajo Gule 2 (Haas) 0.57 1200 - 2500
Banana
Jaji 5.0-7.0 <1500
Gheukola 5.0-7.0 <1500
Chinichampa 3.0-5.0 <1500
Cherry
Jabouney 4.50-5.50 1500-2500
Royal Ann 5.0 - 5.50 1500-2500
Seneca 6.0-6.50 1500-2500
Seokham Drukchu 1-1.02 1600-2600
Dragon fruit Gyalwaringa 1 20kg/plant 300-1500
Gooseberry Bajo Amla 400-1500
Grapes Muscat of Alexandria 3 500-1800
Perlette 1 500-1800
Guava Bebsew shakha 15 -20 kg/tree 400 - 1500
Bajo- Bebsew 10 - 15 kg/tree 250 - 1300
Kiwi
Zhimpey kotong Sep 40 kg/tree 1500-1900
Zhimpey kotong Jangkhu 35 kg/tree 1500-2000
Zhimpey kotong Phoshing 1200-2100
Enza Red 1500-2100
Hayward 1500-2100
Litchi Bhur selection-1 9.0-10.0 <1200
Shahi 10.0-12.0 <1200

103
Early Bedana 8.0-9.0 <1200
Tsatpusey 85 kg/tree 200 - 700
Namsokha 80 kg/tree 200 - 700
Mango
Langra 5.0-7.0 <1500
Chausa 4.0-6.0 <1500
Dashehari 3.0-4.0 <1500
Amrapali 3.0 - 4.0 < 1000
Samtelling Amchukuli I 81kg/tree 150-1200
Samtelling Amchukuli II 69kg/tree 150-1200
Samtelling Amchukuli III 25kg/tree 150-1200
Samtelling Amchukuli IV 60kg/tree 150-1200
Passion fruit Local 1.0-2.0 <1500
Peach
Nunomewase 5.9-8.0 >1500
Bajokham 1 3.0-4.0 1000-2000
Bajokham 2 2.9-3.7 1200-2500
Bathpala Super 4.0-6.0 2000-2600
Pear
Hosui 6.0-7.0 1500-2200
Kosui 5.0-6.0 1500-2000
Bajo Lhee 1 2.0-3.0 1300-2500
Zhey Lhee 4.8-5.5 <2000
Wengkhar Lhee 1 70-80 kg/tree 1500 - 2000
Shinko 70-80 kg/tree 1500 - 2200
Pecan nut Bajo Thasa Tago 1 8kg/tree 900-1700
Bajo Thasa Tago 2 10kg/tree 900-1700
Persimmon
Fuyu 3.0-4.0 1000-1650
Jiro 3.0-4.0 1000-1650
Wengkhar anday 1 25-30 kg/tree 1500-2300
Pineapple Kiew 150-1000
Plum
Santa Rosa 3.0-5.0 >1700
Oishiwase 5.0-6.0 >1700
Jambay Lhakhang Chuli 4.0-5.0 2000-2600
Soldum 60-70 kg/tree 1600 - 2500
Pomegranate Bedana 2.5-4.0 <1500
Bajoseindu-1 27 kg/tree 400 - 1500
Strawberry
Yusi sagong 1 0.7 1500-2500
Pangtsalu Ngarm 1.37 1800-2600
Pangtsalu Maap 0.63 1800-2600
Walnut Kanthel 1.0-1.5 1400-2800
Yusipang 2 0.5-1.0 1400-2800

104
Kagzi 0.5-1.5 1400-2800
National seedling production scheme
Seedling production scheme will comprise of maintenance of foundation stock by Agriculture
Research and Development Centres (ARDCs); maintenance of mother stock by National Seed
Centre (NSC) and multiplication stock by nurseries under NSC, Private Seed Companies (PSC)
and Registered Private Nursery Growers (RPNG).
Table 57: National seedling production scheme of fruits and nuts
Sl. No Class Responsible agency
1 Foundation stock ARDCs
2 Mother stock NSC
3 Multiplication stock NSC/PSCs/RPRGs
1.0 Specific methods for foundation stock seedling production
• will be maintained by the releasing agency
• should be genetically pure
• should be maintained free of pests and diseases and preferably maintained in protected
or isolated area
• will comprise up to 10 plants
• will be specifically maintained to generate high quality buds/scion sticks through
heavy pruning
• will not be used for fruit production
• ARDCs will provide 15 - 20 foundation stock to NSC after variety has been approved
for release
2.0 Specific method for mother stock seedling production
• will be maintained by NSC
• foundation stock will be the source of mother stock
• should be true to type
• should be free of pest and diseases
• will be specifically maintained to generate high quality buds/scion sticks
• ARDCs will also produce mother stock to carry out outreach programs or establish
demonstration orchards for dissemination of technologies
• NSC will provide 15 - 20 mother stock to PSC and RPNG after variety has been
approved for release

105
3.0 Specific method for multiplication stock seedling production
• will be maintained by nurseries of NSC, PSC and RPNG
• mother stock will be the source of multiplication stock
• will be produced under the supervision of NSCs/other relevant agencies
• will be true to type and free of major pests and diseases
4.0 Agronomic principles of seedling production
4.1 Nursery preparation
The nursery site will depend on the nature of crops (temperate or subtropical fruits). However, at
an elevation of 1300 - 1500 m, both temperate and subtropical fruits nursery can be established.
Soil should not have hard pan beneath and should be free of diseases. Soil should be fumigated
or solarized to make free of pests and diseases. The ideal soil pH should be 5.5 - 7.5. Site should
not be prone to water logging. To prepare nursery bed, mix FYM with sandy loam soil uniformly;
in areas with clay soil, fine sand should be added. Prepare fine soil with repeated ploughing and
make seedbed of about 15 cm high, 1 m wide and of convenient length.
4.2 Rootstock preparation
4.2.1 Seed collection and extraction
Always collect mature seeds from a healthy plant. Fruits are picked either from the tree itself or
once the fruits have dropped to the ground (should not be diseased or infected). Seeds are
extracted either by letting them ferment in a container or by cutting open the fruits. Seeds should
be washed to remove the mucilaginous substances covering the seeds if any. Those seeds that
float on water, called floaters, should be discarded as they are usually not viable. For ensuring
better viability, dry seeds in a cool shade. Once dried, seeds should be stored at low temperature
with moisture content not more than 8 - 10% (applies only to orthodox type seeds) in air tight
container/pouch.
Table 58: Common rootstocks used for fruits and nuts in Bhutan.
Sl. No. Fruit crop Rootstocks
1 Apple M111, M9
2 Pear Local pear (both large and small fruited pears), Quince C
3 Persimmon Local persimmon, Japanese Local, Nepal Local
4 Peach Local peach, St Julian
5 Apricot Preferably apricot, St. Julian
6 Plum Local peach, plum, St. Julian
7 Kiwi Wild Kiwi or same variety
8 Walnut Local walnut
9 Pecan Preferably pecan
106
4.2.2 Seed treatment
This applies mainly to temperate fruits. To facilitate proper and easier germination, seeds are
usually subjected to two types of treatments before they are sown in the nursery.
Scarification: it is a physical cracking or chemical treatment to soften the hard seed coat to
facilitate easier and faster seed germination. Scarification can be achieved by treating seeds in
chemicals like Sulphuric acid (H2SO4) or Hydrochloric acid (HCl) for a short duration or by
rubbing in the sand, using file or hammer. But care must be taken to see that seeds are not
damaged. It is usually practised in seeds with very hard coats like apricot, peach, plum and walnut.
Stratification: It is a process of keeping seeds under low temperature (chilling) and moist
condition to aid germination. Stratification breaks the physiological dormancy in seeds when
subjected to low temperature thereby triggering germination. Thus, a pit is dug in a cool moist
area and seeds are placed in alternate layers of sand. The pit must be kept always cool and moist
by sprinkling water. Especially seeds of apricot, peach, persimmon, plum and walnut are required
to be subjected to stratification else it takes at least two years to germinate.
4.3 Sowing
Make furrows 1 - 1.5 cm depth at 15 - 20 cm apart. Seeds are sown in lines on a finely prepared
nursery bed. Seeds should not be placed too deep into the soil. It should be placed at a depth of 3
- 4 times the size of a seed for proper and easier germination. Apply suphala (15:15:15) 100 gm
/1 m wide nursery bed in a furrow and mix well with soil.
Orthodox seeds: Seeds are sown in March to 1st week of April. After the seeds are sown, beds
are covered with a mulch of dry grasses to prevent moisture loss through evaporation, and to
suppress weeds. Irrigate whenever necessary. Seedlings should attain graft-able size (pencil
thickness) in a year’s time.
Recalcitrant seeds: In case of avocado, kiwi and mango, and to certain extent persimmon, seeds
should be sown immediately after extraction since drying of seeds affects germination or fruits
should be kept as it is for later sowing.
4.4 Scion wood preparation
Temperate fruits: Scion woods are collected from healthy fruiting mother plants during the
dormant season, ideally in January. Best scion woods are obtained from the middle portion of
previous season’s growth. Scion woods are waxed by dipping into molten wax at 70 - 80oC (at
this temperature, wax is just hot enough for smooth waxing without damaging the plant cells).
Waxed scions should be packaged in a plastic bag and can be stored for 1 - 2 months in
refrigerators (4 -7oC) until grafting or top working. If waxing is not possible, scion woods should
be immediately grafted onto the rootstocks.
107
Subtropical fruits: Subtropical fruits are evergreen and do not go into dormancy and thus cannot
be waxed. In avocado, scion woods with at least two buds which are plump and green are collected
from November - February and grafted immediately or can be kept for few days in a refrigerator
(4 -7oC) if wrapped in para-film. Banana is propagated through 2 - 4 months old suckers. In
mango, stone grafting is usually done in July. Scion should be 4 -5 months old. Softwood grafting
on to 8 - 10 months rootstock is done in July - August. Scion should be defoliated at least 10 days
before. Inarching is usually done in active season, and both scion and rootstock should be at least
1 year old. In pineapple, suckers and slips are preferred over other methods of propagation. A
sucker of 400 - 500 gm and a slip of 350 - 450 gm is considered ideal propagule.
4.5 Propagation
Broadly, plant propagation can be grouped into two categories:
Reproductive: Fruits can be propagated through seeds. However, plants propagated through
seeds are not true to type and takes longer time to give fruiting. Propagation through seeds should
be done only when alternative methods are not available as in Papaya.
Vegetative: propagation through vegetative means like grafting, budding, layering, cutting and
tissue culture are recommended. It is always advisable to propagate through vegetative means.
Vegetatively propagated plants have shorter gestation period, they are true to type and carry
desirable characteristics of mother plants.
i. Grafting: There are many types of grafting methods through which a plant can be
propagated. Pome fruits, stone fruits and nuts are easily propagated through side veneer
grafting. Grafting is usually done during dormant/winter season (February - March). For
grafting, rootstocks should attain size of pencil thickness, and diameter of scion and
rootstock should be similar and graft union should be 10 - 15 cm above the ground. Only
the recommended rootstocks should be used for grafting.
ii. Budding: It is done during the active season when it is easy to slip the barks (usually
April - June). Walnut is also propagated through budding besides grafting.
iii. Cutting: Plants like fig is propagated easily through cuttings. Cuttings are collected in
dormant season and waxed to prevent from desiccation and planted in a slanting position
in the nursery in March - April. Besides grafting, grapes are also propagated through
cutting.
iv. Layering: usually done during the active growing season when there is enough sap
flow. Guava is usually propagated through air-layering though it can also be grafted. A
shoot of one year old with 1 cm diameter is used.

108
Table 59: Common methods of grafting in fruits
Fruit crops Propagation method
Grafting and
budding
Cutting, layering,
suckering
Seed
Temperate fruits
Apple Side-veneer graft Common for rootstocks
Pear Side-veneer graft Common for rootstocks
Persimmon Chip bud, whip graft, cleft graft, side-veneer
graft
Common for
rootstocks
Peach Shield bud, side-
veneer graft
Common for rootstocks; stratify for 3-4 weeks
Plum Side-veneer graft Common for rootstocks
Apricot Side-veneer graft Common for rootstocks
Kiwifruit Side-veneer graft Stem cutting Common for
rootstocks
Grape Green graft, Cleft
graft
Hardwood cutting Common for
rootstocks
Walnut Patch bud, whip
graft, cleft graft,
bark graft
Plant immediately after harvest or stratify for
8-16 weeks
Pecan Patch bud, whip
graft, cleft graft,
bark graft
Plant immediately after harvest or stratify for
8-16 weeks
Sub-tropical and tropical fruits
Avocado Chip bud, side-
veneer graft, cleft
graft
Common for
rootstocks
Loquat Shield bud, side-
veneer graft, cleft
graft
Air-layering Common for
ornamentals and
rootstocks
Pomegranate Air layering Common for
rootstocks
Guava Chip bud, side-
veneer graft
Air layering Common for
rootstocks
Mango Chip bud, side-veneer graft, Inarching Common for
rootstocks
Fig Shield bud, patch
bud, bark graft
Hardwood cutting,
air-layering
Common for
rootstocks
Litchi Side-veneer graft
Air-layering
Common for
rootstocks
109
Banana Suckers
Papaya Seeds
Pineapple Suckers and slips
4.6 Aftercare
Nursery plants are tender, thus proper care and management is critical. The nursery should be
properly mulched with dry grasses (not green grasses since it attracts more insects) or mulched
with plastic sheet. Sprouts that arise from below the graft union or those from other than the scion
wood are removed. To maintain the health/vigour, plants should not be allowed to flower or bear
fruits in the nursery. Once the proper graft union has been formed, remove the plastic tape used
for grafting/budding purposes since it will affect plant growth.
4.7 Irrigation
Nursery should be irrigated at regular interval of two weeks or depending on the nature of the
soil. However, soil should not become muddy but should be just wet enough. Water is critical
especially during dry season and at the time of sprouting.
4.8 Nutrient management
Nutrient management is essential part of nursery management. For faster growth and vigour, at
least top dressing of nitrogenous fertilizer is recommended. Alternatively, foliar application of
1% urea either in the morning or late evening can also be done. Care should be taken to ensure
that the entire foliage is thoroughly wet. Spraying on young leaves yield better compared to
spraying on the older leaves.
4.9 Pest and disease management
In the initial phase of plants in the nursery, grasshoppers are serious pests. They completely strip
grafted plants of new shoots and leaves leading to failure in graft union or death of a plant. Hence,
application of insecticide is recommended. If need be, application of winter oil is essential to
prevent scales and mites attack. Common diseases and their management are given below in table
60.
Table 60: Common diseases
Common
Diseases
Causal Organism Symptoms and Damage Management
Banana
Leaf-spot Colletotrichum
gloeosporioides
Regular to irregular spots on
leaves with dark margins
and greyish centre.
Spray Carbendazim or
Calixin (2 gm/ L) in
humid weather

110
leaf blight Macrophomina
phaseolina
Dark brown patches on leaves
especially on the leaf lamina
Spray Carbendazim (1
gm/L) or Calixin (0.7
ml/ L) during
February-March
Bunchy
top
BT Virus Stunting and bunching of
leaves. The crown leaves
are undersized, narrow and
chlorotic. Broken dark
green streaks on
pseudostem, sheaths, midrib
and secondary
veins are prominent.
Rogue and remove
diseased plants.
Control aphid (vector)
by spraying
Dimethoate (50 gm
and 25 gm)
Mango
Powdery
mildew
Oidium mangiferae White mealy growth on
leaves.
Spray Wettable sulphur
(2 gm/ L) during
December
Papaya
Powdery
mildew
Oidium caricae/
Laveilulla
taurica
White mealy growth on
leaves.
Spray Wettable sulphur
(1 gm/ L) during
September - January
Damping-
off
Complex
organisms
Drooping of seedlings which
ultimately die off
Treat seed with Captaf
(2 gm/ kg seeds)
Apple and pear
Crown gall Agrobacterium
tumefaciens
Globular, elongated or
irregular
galls or tumours are formed
at
or near the graft-union.
Plant
growth is affected.
Bio-control with related
species of bacterium is
practiced.
Apricot, Peach, Plum
Leaf curl
disease
Taphrina
deformans
Leaves become curled and
sometimes turn red
Spray copper
oxychloride 0.03%
Avocado
Root rot Phytophthora spp. Leaves wilt, turn brown and
necrotic; roots rot
Proper sanitation and
application of lime or
gypsum

111
PLANTATION CROPS SEEDLING
PRODUCTION

112
A. Tea seedling production
Background
Tea is scientifically known as Camellia sinensis L. and it belongs to the family Theaceae. Camellia
is a large genus with various species of significant economic and scientific value. Camellia sinensis
includes two main sub-species, viz. Camellia sinensis var. sinensis and Camellia sinensis var.
assamica which are used to produce different types of tea. Tea is cross-pollinated and highly
heterogeneous with broad genetic variation.
Tea plants have wide range of adaptability and it can be grown from wet sub-tropical to warm
temperate region having similar agro-ecological conditions. Few tea plants are also found to be
growing in Tsirang, Mongar, Trashigang, Sarpang, Zhemgang, Samdrup jongkhar, Chhukha,
Dagana and Samtse Dzongkhags.
National Seedling Production Scheme
The following seedling production scheme is recommended for tea:
Table 61: National seed production scheme for tea.
Sl. No. Class Responsible agency
1 Foundation stock ARDCs
2 Mother stock NSC
3 Multiplication stock NSC/PSCs/RPRGs
Specific methods for foundation stock seedling production
• will be maintained by the releasing agency
• should be genetically pure
• should be maintained free of pests and diseases and preferably maintained in protected
or isolated area
• will comprise up to 10 plants
• will be specifically maintained to generate high quality buds/scion sticks through
heavy pruning
• will not be used for fruit production
• ARDCs will provide 15 - 20 foundation stock to NSC after variety has been approved
for release
Specific method for mother stock seedling production
• will be maintained by NSC
• foundation stock will be the source of mother stock
113
• should be true to type
• should be free of pest and diseases
• will be specifically maintained to generate high quality buds/scion sticks
• ARDCs will also produce mother stock to carry out outreach programs or establish
demonstration orchards for dissemination of technologies
• NSC will provide 15 - 20 mother stock to PSC and RPNG after variety has been
approved for release
Specific method for multiplication stock seedling production
• will be maintained by nurseries of NSC, PSC and RPNG
• mother stock will be the source of multiplication stock
• will be produced under the supervision of NSCs/other relevant agencies
• will be true to type and free of major pests and diseases
Agronomic principles of seedling production
Climate
Tea cultivation has been introduced in tropical and subtropical regions; it is distributed in wide
range of soil and climatic conditions with altitudes ranging from 200 - 2600 masl depending on
the variety. The optimum tea plants growth occurs at an annual average temperature between 18
- 25℃ and relative humidity between 75 to 85%.
Soils
It prefers acidic soil of pH between 4.5 - 5.00 with good drainage and aeration. Strong winds,
frequent frost, and excessive rainfall are detrimental to the production of high quality tea.
Field selection and planting distance
Tea fields can be chosen on slopes or on flat terrain having adequate drainage. They can receive
full sun, but tea is also known to thrive in foggy or misty environments. Planting should be done
when the soil is well moistened in advance by irrigation or rainfall and it is very important to
maintain uniform soil moisture after transplanting. The site should be prepared in advance either
to establish a cover crop or apply mulch and make planting pits. Planting pits should be 45 cm by
30 cm. The suggested planting distance is 1 m between plant to plant, and 1.30 m row to row.
The recommended methods of planting are triangular, rectangular and contour planting as
detailed in figure 6.

114
Figure 6: Recommended spacing in tea
Method of propagation
In general, tea plants can be raised from seed, cuttings and tissue culture (micro propagation). In
Bhutan, tea is commercially propagated from seeds of the elite germplasm, which facilitate easy
production of seeded accessions and vegetative propagation for seedless accessions.
6.4.1 Seeds
Tea plants can readily be grown from seed, but the resulting seedling will vary from its parents.
Tea seeds are mostly collected in winter (November-December) and sown directly within a month.
Most of the seeds will germinate within 5 - 8 weeks after sowing. Pricking and potting should be
done at 10-15cm height. Gradually move the plants into full sun to prepare them for transplanting
(Hardening). Transplant them into the ground when the plants are about 30-45 cm tall with
developed leaves.
i. Seed selection and pre-treatment
It is important to use good quality seed in planting. It is important to treat seed before it is planted,
in order to improve on the level, speed and uniformity of germination. Thus, soaking seed in
cold/cool water for 48 - 72 hours depending on the tree species are recommended for tea seeds
before sowing. The Procedure includes:
• Soak the seeds in cold water, water should be 2 times the volume of seeds
• Remove all floating seeds
• Sow the remaining seeds in the polypots or sow directly in the field.
ii. Seed bed preparation and sowing
Nursery beds can be arranged in different ways. Potted seedlings can be raised on a flat bed of 1
m breadth, convenient length and 10 cm height. When planting seed in nursery beds, use the
procedure outlined below:
• Draw lines 10 cm apart
• Furrow sowing at the spacing of 1 - 2 cm between seeds
• Cover the nursery with top soil and manure, and irrigate.

115
iii. Potting seedling
This is the process of transferring young and tender seedlings from seedbeds into pots. Potting
should be carried out when the seedlings reach a height of 10 - 15 cm. This is usually about 2 - 3
months after sowing but depends on the species. The processes of transferring seedling are:
• Water the seed bed and pots properly before commencing the operation
• Ensure adequate shade is available
• Pull out the seedlings gently and immediately put them in a container with water.
• Note that if the roots of the seedlings are kept under sunshine they lose water and may
die
• Make a hole at the centre of the pot using a stick
• Clip off the root tip if the roots are too long
• Do not hold the stem of the seedling because they are tender and weak
• Transplant the seedling in polypot
• Push the soil towards the seedling to hold it tightly
• This ensures that all the air pockets around the roots are closed
6.4.2 Vegetative propagation
The vegetative propagation of tea clones is done through a single-leaf cutting. Cuttings should be
harvested from mother plants that are selected for propagation. The bush should be pruned to
induce vigorous vegetative growth. The best rooting success is obtained from recently matured
shoots containing slightly reddened bark adjacent to matured leaves with actively breaking
axillary buds. All further cutting preparations should be done in the shade.
Nursery
The following factors should be considered while selecting the site:
• Good soils with pH of about 5.6 and other planting materials such as sand should be
available easily
• The site should be protected from strong winds and from livestock should receive sun,
and should be on a gentle slope to allow drainage
Selection of cutting
• Select cuttings from healthy and vigorous mother plants
• Prune mother plants twice a year even if the cuttings are needed only once
• Remove weak and cross branches once a year during one of the pruning
• Cuttings will be ready between 5 - 7 months after pruning
• Apply adequate manure and fertilizers immediately after pruning
116
Preparation and planting of cuttings
• Single-leaf cuttings are made 1 cm above the leaf node, leaving 3 - 4 cm of stem below
the node
• Dip the cut end of the stem into rooting powder before inserting into a planting medium
• The leaf or the bud must never touch the soil
• In case the cuttings are bending backwards, the stems should be inserted into the soil at
an angle so that leaves are clear from the soil
• The cutting should be kept moist during planting by frequent watering
Nursery maintenance
Inspect all beds at least once in a week to check for weed growth, insect pests and diseases.
Maintain nursery under 50% shade.
Hardening process
Hardening is done to expose the seedlings to outside environment for survival in the field
condition. Hardening should be done 2-3 weeks before planting. The hardening processes are:
• Remove the shade when the seedlings have attained the planting size.
• Reduce watering intensity (quantity) and frequency - water twice a week and later once a
week
• Before planting, root pruning should be carried out frequently or re-arrangement of pots to
allow more adaptation to stress
Nutrient management
In general, for one acre of tea nursery; 3-5 MT of FYM; 52 kg of N; 16 kg of K and 52 kg of P are
recommended. Only 50% of nitrogen should applied during the nursery bed preparation and rest
50 % nitrogen must be split into two applications and top dressed after two months of seedling
emergence and five months after transplanting into poly-pots.
Tea pruning and tipping
Tea plants are pruned to maintain size and form, stimulate vegetative growth, keep bush frames
healthy and prevent reproductive growth phase (flowering - seeding) and accessibility for
plucking. Pruning is done when the plucking table reach 120 - 150 cm, within 3 - 4 years but may
be shorter or longer depending on plucking regime. Pruning should be done when there is
adequate soil moisture and when temperature is cool (winter months). Tipping is done after prune
to produce level plucking surface that facilitates efficient plucking and develop an adequate depth
of foliage maintenance. Never tip with a knife.

117
Major pests and diseases of tea and their control measures
Sl.
No.
Name of
pest/disease
Symptom Management recommendation
A Pest(s)
1 Beetle chafer grub
(Schizonycha
spp.)
- Leaves wilt and surface of roots
damaged just below the soil surface.
- Extensive callus growth (swelling)
around and below the collar.
- Spray Fenvelerate @ 2ml/litre of
water into holes and the soil before
planting.
B Disease(s)
1 Brown blight
(Colletotrichum
camelliaemassee)
- Attacks nursery plants (seedlings) - Use fungicides such as Mencozeb @
2 gm/litre of water.
2 Grey blight
(Pestalo tiatheae)
- Light to dark circular to oval brown
patches with greyish centre on upper
leaf surface.
-
- Use of healthy and disease-free
mother bushes.
- Seeds and cuttings must dip in
fungicide solution @ 2-4 gram/litre
of water before sowing and
transplanting seedling into poly-pot.
Tea yield
Tea plants mature within 3 - 4 years after transplanting and continue yielding for over 60 years.
The yields are influenced by agro-ecological zones, variety, soil-type, soil nutrition management
and crop management practices. The average yield of 600 - 800 kg of processed green tea per acre
per year has been harvested in the large estates and average of 200 - 280 kg under smallholder
production system has been achieved.

118
B. Coffee seedling production
Introduction
The coffee plants originated from the mountain forests of Ethiopia. Coffee is a perennial
plantation crop which belongs to genus Coffea in Rubiaceae family. It is generally grown in the
tropical and subtropical areas. Coffea arabica L. and Coffea canephora P. (syn. Coffea robusta)
are the two most important commercial species. Arabica coffee contributes over 70% of the world
coffee production. Coffee is the second most traded product after oil in the world.
Varieties
There are two principal species of commercial coffee; Coffea arabica and Coffea canephora
(Robusta) and two minor commercial species like Coffea liberica and Coffea excelsa. Coffea
arabica is of higher quality and value grown in cooler areas at tropics and sub-tropics at 1000 m
or more above sea level. Coffea canephora is a lower quality coffee and prices are normally 30-
40% less compared to Arabica.
National seedling production scheme
Seedling production scheme will comprise of maintenance of foundation stock by Agriculture
Research and Development Centres (ARDCs); maintenance of mother stock by National Seed
Centre (NSC) and multiplication stock by nurseries under NSC, Private Seed Companies (PSC)
and Registered Private Nursery Growers (RPNG).
Table 62: National seedling production scheme of coffee
Sl. No. Class Responsible agency
1 Foundation stock ARDCs
2 Mother stock NSC
3 Multiplication stock NSC/PSCs/RPRGs
Specific methods for foundation stock seedling production
• will be maintained by the releasing agency
• should be genetically pure
• should be maintained free of pests and diseases and preferably maintained in protected
or isolated area
• will comprise up to 10 plants
• will be specifically maintained to generate high quality buds/scion sticks through heavy
pruning
• will not be used for fruit production
119
• ARDCs will provide 15 - 20 foundation stock to NSC after variety has been approved
for release
Specific method for mother stock seedling production
• will be maintained by NSC
• foundation stock will be the source of mother stock
• should be true to type
• should be free of pest and diseases
• will be specifically maintained to generate high quality buds/scion sticks
• ARDCs will also produce mother stock to carry out outreach programs or establish
demonstration orchards for dissemination of technologies
• NSC will provide 15 - 20 mother stock to PSC and RPNG after variety has been
approved for release
Specific method for multiplication stock seedling production
• will be maintained by nurseries of NSC, PSC and RPNG
• mother stock will be the source of multiplication stock
• will be produced under the supervision of NSCs/other relevant agencies
• will be true to type and free of major pests and diseases
Agronomic principles of seedling production
Climate
Coffee tree is a shade loving plant but years of breeding have resulted in varieties that give good
yields in full light conditions. Arabica is grown in tropical regions with an elevation of over 500
m and is best suited from 1000 - 1500 masl. The annual precipitation should be well distributed
from 1200 – 2500 mm. Coffee cannot stand frost and the minimum temperature should be above
4 – 5 ℃. The ideal temperature for coffee cultivation ranges from 18 – 30 ℃. Coffea canephora
prefers a hotter climate and is more adapted to the lowlands below 900 masl.
Both coffee species tolerate shade and they have quite similar growth requirements as other crops
and forest trees, making them suitable for incorporation into agro-forestry ecosystems.
Windbreaks or shelter trees are recommended in areas of frequent wind. South-east facing slope
less than 15% is preferable. Steeper slopes pose major erosion risk and require terracing or special
management such as contour or preferably grass strips. Normally it is best not to plant the bottom
third of a slope as it will be colder and sometimes waterlogged.
120
Soil type
A well-drained area with adequate depth is required. Coffee prefers soil pH of 5 - 6. Good
management and applications of dolomite or lime can improve pH and fertility.
Propagation and nursery practices
Propagation can be done in numerous ways. Although Coffee can also be grown from cloned plants
as cuttings or tissue culture, seed and vegetative propagation are the most common propagation
methods.
a. The propagation by seed uses ripe cherries from a healthy tree.
b. In vegetative propagation, a leaf or shoot of the mother tree is used.
6.3.1 Preparation of coffee seed
• Pick ripe and healthy fruits from the mother plants.
• De-pulp the fruits after soaking coffee fruits in water for 24 hours in a container
• Rub inside the water to remove any traces of pulp still adhering to the seeds
• Air-dry the seeds in a well-ventilated area
• Moisture content must be maintained below 10%
• Sort seeds to remove small, abnormally-shaped, infected and infested seeds
• Selected seeds are ready for raising seedlings
• The seed viability is around 3 months and should not be used unless properly stored at
low temperature and high humidity.
• If coffee seeds are to be stored/ transported, treat with charcoal dust and fungicides.
6.3.2 Preparation of coffee cuttings
• This method produces true-to-type and uniform planting materials
• Coffee clone is used as mother plant or as source of stem cuttings
• A vertical shoot of finger size and about 1 foot-long with 3 - 4 nodes should be selected
• Leaves on the cuttings should be partially cut before transplanting in the soil medium of
the nursery
• Cuttings are set in a germination nursery and insert two third deep inside the soil
• Cuttings will produce roots and shoots within 35 - 45 days
• Rooting hormones can be used to enhance the root initiation
• Rooted cuttings are then pricked into individual plastic bags with potting mixture
• After the seedlings have developed 3 - 4 pairs of leaves, about 5 - 7 months, planting in
the farm can be done
• This type of planting material bear earlier than plants produced from seeds
121
Sowing time
Coffee seed should be planted as soon as possible after harvest. The longer it is stored, the lower
the percentage of germination and the smaller the plants will be at the time of transplanting.
Arabica and Robusta nurseries should begin in December and February respectively in Bhutan.
Water the seedbeds before sowing seeds. With the help of pointed stick or garden hoe, make
furrows of 10 cm apart across the bed. Sow seeds at 2.5 cm apart within row and cover with top
soil. Cover the beds with any straw mulch to give additional warmth and retain soil moisture. As
germination time is dependent on soil temperature, it might take about 40 - 45 days to attain button
or topee stage (appear shoots). At this stage, mulching materials should be carefully removed
without damaging the germinated seeds.
Shade house and plastic tunnels
Select a frost and flood free area with access to a suitable water supply. Fence the area completely
to keep out domestic animals. Polythene (transparent plastic) should be used to accelerate
germination and plant growth because coffee seed is very slow to germinate. Sow coffee seeds
either in polythene tunnel or green house to achieve faster seedling growth during cold weather.
The seedlings are ready to be transplanted at heights of 15 - 25 cm.
Transplanting seedlings
Depending on temperature, coffee seedlings are ready for transplanting from the primary nursery
into poly pots about 2-3 months after sowing. A mixture of well sieved fertile top soil and manure
or compost can be used. Use the healthy seedlings with a straight tap root. Transplanting should
be done in cool and cloudy weather. While pricking, seedlings should be planted to the same depth
as they were previously planted in the seedbed. The seedlings must be transplanted into poly pots
and shifted to secondary nursery. Water the seedlings immediately after transplanting.
Field management and planting trees
6.7.1 Field management
The area to be planted must be prepared at least one year before the small coffee trees are planted.
Following activities must be carried out a year before plantation.
• Land preparation
• Plant windbreaks
• Mark out the rows
• Establish shade trees
• Irrigation
6.7.2 Planting coffee trees
There are four measures to follow while planting coffee trees:
• Seedling size and planting time
122
• Pit preparation
• Selection of plants
• Planting procedure
6.7.3 Seedling size and planting time
Field planting can start when the coffee plants in bags have at least 6 - 8 leaf pairs. Plants should
be strong and healthy with no indication of pests or diseases. Planting out in the field should be
done on cloudy days, in June through to August during the wet season. Avoid planting trees when
conditions are windy, hot or dry.
6.7.4 Pit preparation
• Preparation of pits should be done one month before planting
• Mark the planting pits
• Dig pits of 60 cm depth and 60 cm diameter
• Pile top soil to one side of the pit and sub-soil to other side of pit
• Mix in 2 kg of well decomposed FYM
• Apply 250 gm of dolomite per pit
• Start filling the pit with top soil mixed with FYM and dolomite then complete filling the
pit with sub-soil mixed with FYM and dolomite
• Re-mark the centre of the pit with a stick
• The soil should be moist at time of planting
6.7.5 Selection of plants
The coffee seedlings must be healthy with dark green, well-formed foliage and a minimum of 6 -
8 leaf pairs. It should have well-developed root system with a taproot that is not distorted. Harden
the seedlings in sunlight before few weeks of planting.
6.7.6 Planting procedure
• Before planting, thoroughly water the trees in the bags
• Remove plants from plastic bags by either cutting the bag or gently sliding the plant out
of the bag
• Discard plants with damaged roots or bent roots
• If plants have been in the bags for an extended time, roots may grow around in a circle
inside the bag. It is important that these roots are gently teased out by hand or they will
continue to grow in a circular manner when planted. Carefully straighten large roots and
prune off badly twisted roots
• Ensure to remove the plastic bag
• Place the seedling upright in the pit

123
• Firmly press soil down with your feet. Do not stomp on the soil as this may damage the
young roots. Keep the final soil level slightly heaped above the surrounding undisturbed
soil as the soil will settle down after planting. Water the plants well with 1 - 2 litres of
water per plant
• Mulch the newly planted coffee seedlings with rice straw or other suitable materials.
Pest management
Sl.
No.
Name of
pest/disease
Symptom Management
recommendation
A Pest(s)
1 White stem borer
Xylotrechus
quadripes
• Wilting of leaves and dead trees or
branches.
• Affected branches are easily
broken off.
• When trees are first infested there
maybe evidence of sawdust-like
residues on the ground.
• The trunk may be ring barked.
• Burn affected trees or
branches
• Do not plant trees with
twisted tap roots.
• These deformed roots
result in weak trees that
have been shown to have
a high incidence of stem
borer infestation.
2 Mealy bugs
Planococcus
spp.
• White waxy colonies are usually
found on the under-side of tender
leaves and in soft stem areas
around berries.
• They are found on young roots
near the main root, especially
where soil is loose around the
trunk.
• They are often associated with a
heavy infestation of sooty mould.
• Parasitic wasps,
Leptmastix dactylopii,
are very effective.
Lacewings such as
• Oligochrysa lutea are
also predators of mealy
bug.
B Diseases
1 Bacterial blight
Pseudomonas
syringae
• Leaves become brown and
necrotic with yellow halos,
necrosis of shoot tips which
spreads rapidly down branches.
• Leaves turn black and die off but
remain attached to tree.
• Protective sprays of
copper based fungicide
should be applied with
the onset of rainy season.
2 Leaf spot
Cercospora
coffeicola
• Brown spots on foliage which
enlarge and develop gray-white
centre and a red-brown margin.
• Remove all crop debris
from field after pruning
to prevent build-up of
124
• Lesions may also be surrounded
by a yellow halo or may have a
burned appearance if lesions are
numerous.
• Infected leaves may drop
prematurely.
• Lesions on green berries are brown
and sunken and may have a
purplish halo.
• Infected red berries may have
large black sunken areas.
inoculum.
• Good plant spacing and
pruning to open up the
canopy promotes good
air circulation around
foliage.
• It can be controlled with
the use of copper
fungicides.
Harvesting and processing
Careful selection of red cherries during the time of harvesting is essential for good quality coffee.
To create pulping and grading easier, process only ripe and red cherries. Do not use a mixture of
red over or under-ripe cherries. In Bhutan, particularly in southern regions; harvesting for Caffea
arabica L. begins from October - November and likewise Caffea canephora L. starts from January
- February.
The harvested cherries/fruits should be collected in clean bags or baskets to avoid contamination
of fertilizers or other chemicals. Cherries should be processed in the same day without mixing
with the previous stock. Equipment and sorting areas should be checked daily and maintained
clean. Any fermented part of cherry from the previous day will contaminate the newly harvested
cherries and result in deterioration of the entire batch. Carefully wash and sort cherries before
starting the processing to remove twigs, leaves or other foreign matters.
125
C. Areca nut seedling production
Background
Areca nut (Areca catechu) is a crop of tropical region belonging to Arecaceae family. It is an
important cash crop grown in the southern Bhutan. Areca nut is consumed either in raw or cured
(processed) form. The processed form known as Supari is mainly used in India but raw areca nut
is preferred in Bhutan.
Till date, no study was conducted to identify areca nut cultivars in Bhutan. However, informally
areca nut is identified into four categories based on their nut shape, viz. round (locally known as
Jazi), oblong (locally known as Lamchey), small oblong and small round. Round type with thinner
husk is preferred because of its larger nut size and more whitish layer inside which is reported to
be less intoxicating compared to nuts with more reddish coloured endosperm. Small oblong is the
least preferred nut type.
National seedling production scheme
Seedling production scheme will comprise of maintenance of foundation stock by Agriculture
Research and Development Centres (ARDCs); maintenance of mother stock by National Seed
Centre (NSC) and multiplication stock by nurseries under NSC, Private Seed Companies (PSC)
and Registered Private Nursery Growers (RPNG).
Table 63: National seedling production scheme of fruits and nuts
Sl. No Class Responsible agency
1 Foundation stock ARDCs
2 Mother stock NSC
3 Multiplication stock NSC/PSCs/RPRGs
Specific methods for foundation stock seedling production
• will be maintained by the releasing agency
• should be genetically pure
• should be maintained free of pests and diseases and preferably maintained in protected
or isolated area
• will comprise up to 10 plants
• will be specifically maintained to generate high quality buds/scion sticks through heavy
pruning
• will not be used for fruit production
• ARDCs will provide 15 - 20 foundation stock to NSC after variety has been approved
for release
126
Specific method for mother stock seedling production
• will be maintained by NSC
• foundation stock will be the source of mother stock
• should be true to type
• should be free of pest and diseases
• will be specifically maintained to generate high quality seeds
• ARDCs will also produce mother stock to carry out outreach programs or establish
demonstration orchards for dissemination of technologies
• NSC will provide 15 - 20 mother stock to PSC and RPNG after variety has been
approved for release
Specific method for multiplication stock seedling production
• will be maintained by nurseries of NSC, PSC and RPNG
• mother stock will be the source of multiplication stock
• will be produced under the supervision of NSCs/other relevant agencies
• will be true to type and free of major pests and diseases
Agronomic principles of seedling production
Climatic requirements
Areca nut is cultivated in wet subtropical region receiving high rainfall. It can be grown up to an
altitude of 1000 masl. Endosperm become too soft if planted in higher elevation. It can grow well
in area receiving rainfall of 4500 mm annually but it can survive in area receiving rainfall above
750 mm. The mean annual temperature required is 21 – 28 ℃ but it can tolerate mean maximum
temperature of 38 ℃ and mean minimum temperature of 16 ℃.
Propagation methods
Areca nut is propagated only by seeds. Seeds should be carefully selected and planted in shaded
beds or pits until they germinate and then seedlings should be transplanted in a nursery for
growing. The land is ploughed 2 - 3 times before sowing. Seed nuts are immediately sown after
harvest or within a week after letting the husk rot.
6.2.1 Seed collection
The nut should be selected from a superior mother plant with a history of producing desirable nuts.
Fruits are harvested when bright red or yellow to yellow orange from December- February. Fruits
are harvested either by climbing the tree and cutting the fruit cluster off or by using a long bamboo
pole with a sharp knife attached.

127
Nursery management
Since it is highly cross-pollinated, uniform selection of planting materials should be done. Selected
nuts should be sown immediately or no later than 80 days after harvesting. The nut is sown on the
sand bed or trenches 30 cm deep with convenient length and breadth filled with sand under partial
shade. While sowing, stalk end should be pointing upward and covered with layer of sand. Spacing
between nuts in the nursery is maintained at 2.5 - 5 cm. The bed may be mulched lightly with areca
leaf or paddy straw. Germination starts in 30 - 40 days after sowing.
After 3 months in primary nursery, the seedlings are transplanted to secondary nursery beds of 5
cm height, 1.5 m width of convenient length. The spacing maintained in the secondary nursery is
30 cm. It can also be transplanted in the polythene bag of size (25 x 15 cm, 150 gauge) filled with
potting mixture (top soil and FYM in a ratio 2:1). Proper shade should be given to the nursery
plants to protect from sun by planting green manure crops or banana or covering by coconut and
areca leaves. Number of leaves at the time of planting should be more than 5. It should be 12-18
months old with collar girth of 20 cm.
Field preparation
Areca nut is susceptible to sun scorching. The field should therefore have protection from exposure
to south or south west sun by planting tall evergreen tree (Eg. Acacia, Kokum, Neem, Casuarina,
Pongamia etc) on the south western borders. Either it can be planted in the north south direction
aligning at an angle of 35° towards west. White washing can also be done on the trunk with lime
slurry especially from October - January. Different system of planting can be adopted such as
square system, rectangular and quincunx system.
In a well-drained soil, deep planting at a depth of 90 cm is preferred for anchorage and root
development. In heavy soils with high water table, shallow planting at depth of 60 cm is
recommended. The seedlings are planted with a ball of earth in the middle portion of the pit after
half filling of the pit with mixture of topsoil and FYM. Proper drainage should be provided since
it is sensitive to water logging. Proper drainage must be provided in every two to three rows of
arecanut seedlings with 15-30 cm depth to avoid water stagnation. These drains should be joined
to a common drain of 1 - 1.5 m depth.
Recommended seedling rate
Spacing of 2.7 x 2.7 m or 2.3 m x 2.7 m is recommended. Hence, an acre of land can accommodate
more than 554 - 550 plants depending on the spacing.
Planting
Planting of areca nut is recommended with the onset of monsoon from May - June but it can be
extended up to August - September with supplementary irrigation.
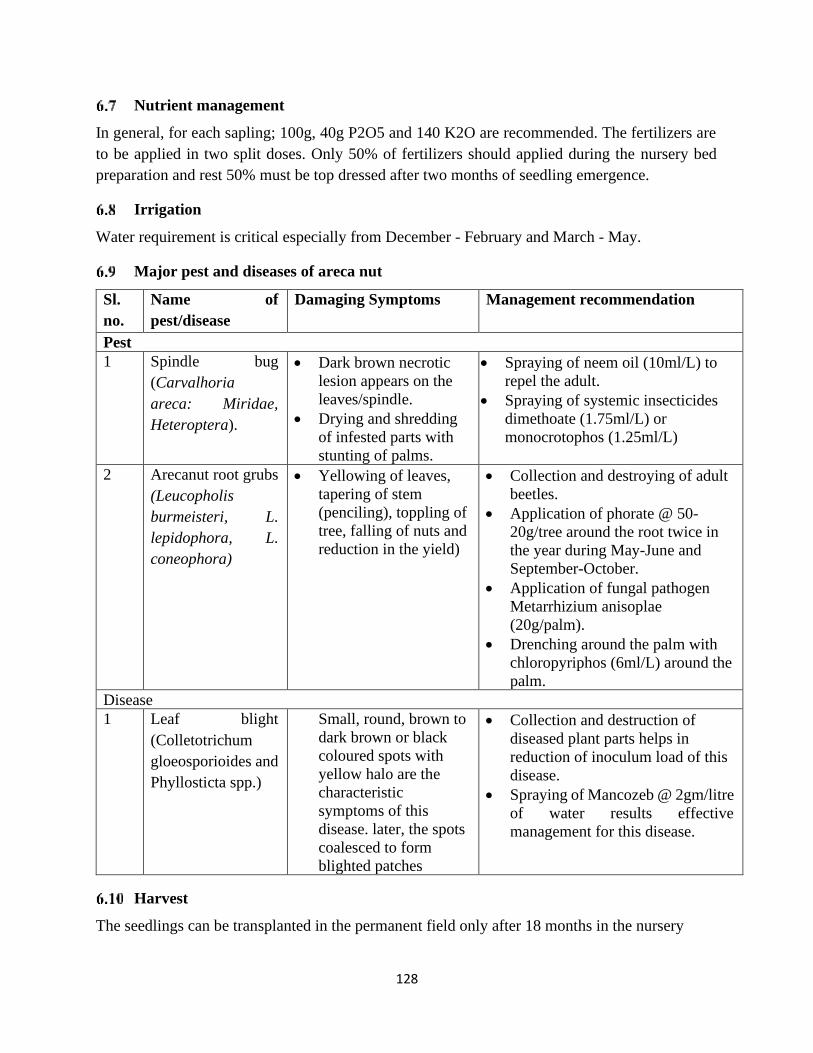
128
Nutrient management
In general, for each sapling; 100g, 40g P2O5 and 140 K2O are recommended. The fertilizers are
to be applied in two split doses. Only 50% of fertilizers should applied during the nursery bed
preparation and rest 50% must be top dressed after two months of seedling emergence.
Irrigation
Water requirement is critical especially from December - February and March - May.
Major pest and diseases of areca nut
Sl.
no.
Name of
pest/disease
Damaging Symptoms Management recommendation
a. Pest
1 Spindle bug
(Carvalhoria
areca: Miridae,
Heteroptera).
• Dark brown necrotic
lesion appears on the
leaves/spindle.
• Drying and shredding
of infested parts with
stunting of palms.
• Spraying of neem oil (10ml/L) to
repel the adult.
• Spraying of systemic insecticides
dimethoate (1.75ml/L) or
monocrotophos (1.25ml/L)
2 Arecanut root grubs
(Leucopholis
burmeisteri, L.
lepidophora, L.
coneophora)
• Yellowing of leaves,
tapering of stem
(penciling), toppling of
tree, falling of nuts and
reduction in the yield)
• Collection and destroying of adult
beetles.
• Application of phorate @ 50-
20g/tree around the root twice in
the year during May-June and
September-October.
• Application of fungal pathogen
Metarrhizium anisoplae
(20g/palm).
• Drenching around the palm with
chloropyriphos (6ml/L) around the
palm.
b. Disease
1 Leaf blight
(Colletotrichum
gloeosporioides and
Phyllosticta spp.)
Small, round, brown to
dark brown or black
coloured spots with
yellow halo are the
characteristic
symptoms of this
disease. later, the spots
coalesced to form
blighted patches
• Collection and destruction of
diseased plant parts helps in
reduction of inoculum load of this
disease.
• Spraying of Mancozeb @ 2gm/litre
of water results effective
management for this disease.
Harvest
The seedlings can be transplanted in the permanent field only after 18 months in the nursery
129
SPICES SEEDLING PRODUCTION
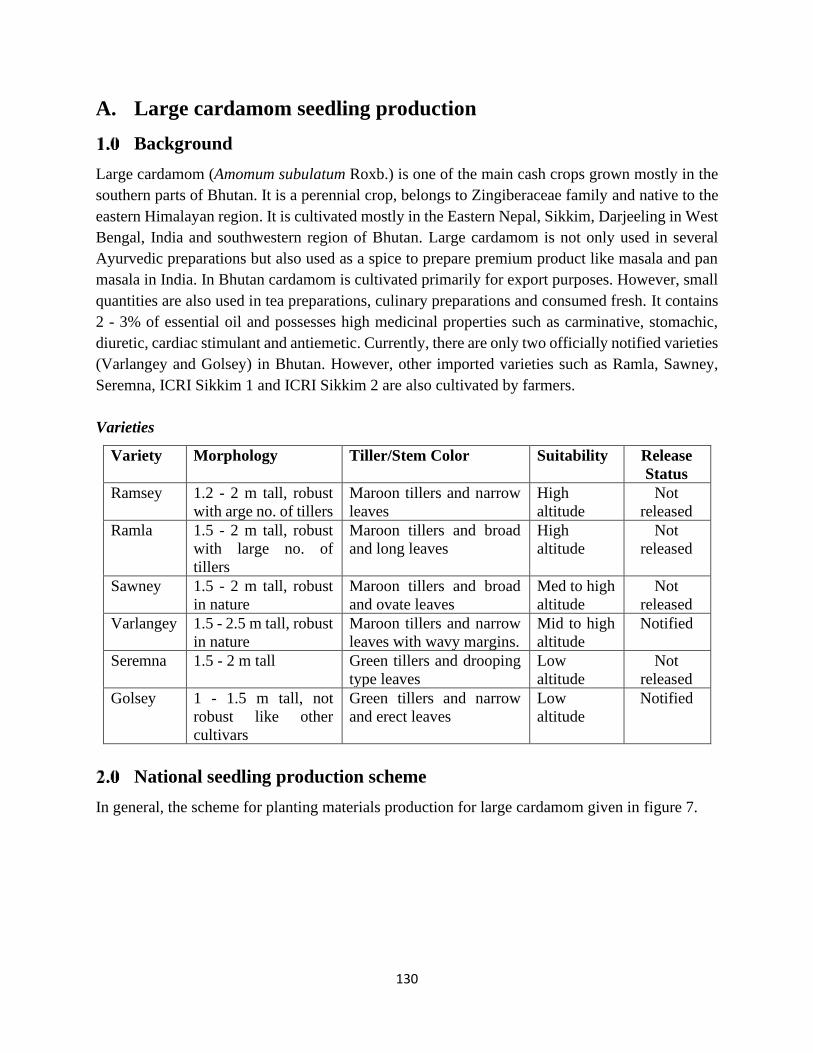
130
A. Large cardamom seedling production
Background
Large cardamom (Amomum subulatum Roxb.) is one of the main cash crops grown mostly in the
southern parts of Bhutan. It is a perennial crop, belongs to Zingiberaceae family and native to the
eastern Himalayan region. It is cultivated mostly in the Eastern Nepal, Sikkim, Darjeeling in West
Bengal, India and southwestern region of Bhutan. Large cardamom is not only used in several
Ayurvedic preparations but also used as a spice to prepare premium product like masala and pan
masala in India. In Bhutan cardamom is cultivated primarily for export purposes. However, small
quantities are also used in tea preparations, culinary preparations and consumed fresh. It contains
2 - 3% of essential oil and possesses high medicinal properties such as carminative, stomachic,
diuretic, cardiac stimulant and antiemetic. Currently, there are only two officially notified varieties
(Varlangey and Golsey) in Bhutan. However, other imported varieties such as Ramla, Sawney,
Seremna, ICRI Sikkim 1 and ICRI Sikkim 2 are also cultivated by farmers.
Varieties
Variety Morphology Tiller/Stem Color Suitability Release
Status
Ramsey 1.2 - 2 m tall, robust
with arge no. of tillers
Maroon tillers and narrow
leaves
High
altitude
Not
released
Ramla 1.5 - 2 m tall, robust
with large no. of
tillers
Maroon tillers and broad
and long leaves
High
altitude
Not
released
Sawney 1.5 - 2 m tall, robust
in nature
Maroon tillers and broad
and ovate leaves
Med to high
altitude
Not
released
Varlangey 1.5 - 2.5 m tall, robust
in nature
Maroon tillers and narrow
leaves with wavy margins.
Mid to high
altitude
Notified
Seremna 1.5 - 2 m tall Green tillers and drooping
type leaves
Low
altitude
Not
released
Golsey 1 - 1.5 m tall, not
robust like other
cultivars
Green tillers and narrow
and erect leaves
Low
altitude
Notified
National seedling production scheme
In general, the scheme for planting materials production for large cardamom given in figure 7.
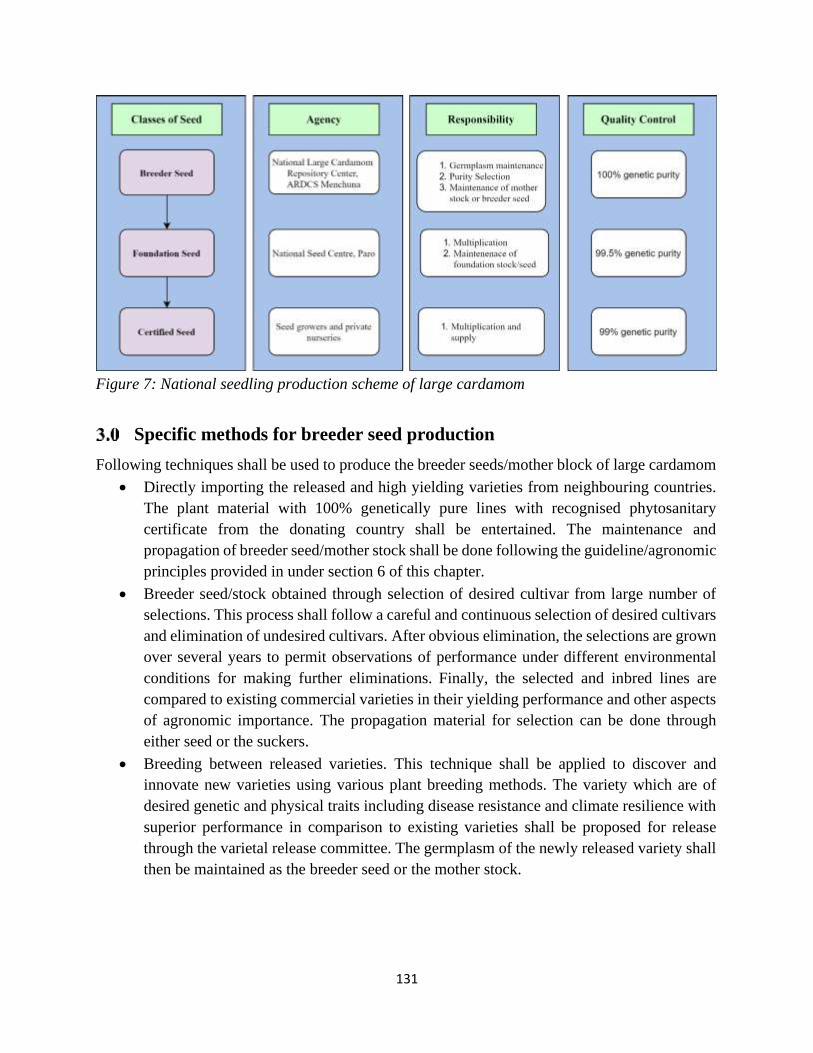
131
Figure 7: National seedling production scheme of large cardamom
Specific methods for breeder seed production
Following techniques shall be used to produce the breeder seeds/mother block of large cardamom
• Directly importing the released and high yielding varieties from neighbouring countries.
The plant material with 100% genetically pure lines with recognised phytosanitary
certificate from the donating country shall be entertained. The maintenance and
propagation of breeder seed/mother stock shall be done following the guideline/agronomic
principles provided in under section 6 of this chapter.
• Breeder seed/stock obtained through selection of desired cultivar from large number of
selections. This process shall follow a careful and continuous selection of desired cultivars
and elimination of undesired cultivars. After obvious elimination, the selections are grown
over several years to permit observations of performance under different environmental
conditions for making further eliminations. Finally, the selected and inbred lines are
compared to existing commercial varieties in their yielding performance and other aspects
of agronomic importance. The propagation material for selection can be done through
either seed or the suckers.
• Breeding between released varieties. This technique shall be applied to discover and
innovate new varieties using various plant breeding methods. The variety which are of
desired genetic and physical traits including disease resistance and climate resilience with
superior performance in comparison to existing varieties shall be proposed for release
through the varietal release committee. The germplasm of the newly released variety shall
then be maintained as the breeder seed or the mother stock.
132
Maintenance of Breeder Seed
The cardamom breeder seed/stock shall be maintained under the properly designed infrastructure
with each variety separated by barrier preferably with stainless-steel woven wire mesh with wire
diameter and opening width of less than 0.5 mm. All four sides of the infrastructure should be
covered with the same stainless steel. The roofing of the infrastructure should be done with black
agro shade net of 70% shade factor made from 100% virgin HDPE with UV treated material.
Transparent normal greenhouse plastic sheet may be used during the winters to protect the plants
from possible cold injury. At least 20 mother suckers/bushes shall be maintained for each variety
with 100% genetic purity with plant-to-plant distance of 1.5 meters. The intercultural operation
and management shall be carried out as per the general package of practice (PoP) of large
cardamom. In case of severe disease incidences, recommended chemicals prescribed in the PoP
and the seeds of the particular variety will be collected and maintained for future research.
Specific methods for foundation seed production
The foundation seed of large cardamom is the progeny of a released breeder seed. The cardamom
repository centre shall provide at least 100 numbers of breeder seed to the National Seed Centre
for multiplication of foundation stock every 5 years. The National Seed Centre in turn shall
maintain the foundation seed/stock for the all the released varieties of large cardamom. The genetic
purity for the foundation seeds shall be 99.5 %. The National Seed Centre shall also multiply the
planting materials for supply to farmers and certified seed agencies in the country.
The foundation seed shall be maintained under monocropping system without mixing with other
cardamom related varieties or cultivars. If planted under the agro-forestry based farming system,
natural shade of 60% shall be maintained at all times. In case of protected propagation or
maintenance, different varieties shall be maintained preferably under separate structure. However,
2-3 varieties can be maintained under single structure with proper barrier and distance between
adjacent variety to prevent cross pollination and crossing. At least 50 number of clumps shall be
maintained. Follow the general agronomic principle provided under section 6 of this chapter.
Specific methods for certified seed production
The certified nurseries can produce certified seed/planting material for cardamom using
foundation seeds. The genetic purity standard for the certified seed shall be maintained at 99 %.
The certified seed production can be done through both sexual and asexual propagation using the
foundation seed following the technique provided under section 6.3.1. under this chapter.

133
Agronomic principles of seedling production
Site selection
The site for planting materials repository and multiplication should be preferably located at an
altitude ranging from 600 - 2000 masl receiving an annual rainfall of 3000 - 3500 mm. Select the
site with adequate water for irrigation and located at least 500 meters away from the main
plantation to prevent disease transfer. As the crop is a shade loving plant, the nursery should be
provided with artificial shade or should be grown under natural forest with optimum shade of 60
%. The site should have good road connectivity for easy transportation of inputs and planting
materials.
Soil requirement
The large cardamom performs best in deep and well drained soils with loamy texture rich in
organic matter and nitrogen, medium in available phosphorus and medium to high in available
potash with soil pH 4.5 - 6.0. Preferably such soils should be used for multiplication of cardamom
planting materials.
Cardamom propagation methods:
Propagation of large cardamom can be done through seeds and suckers. Propagation through seeds
enables the production of large number viral free seedling through provision of adequate care to
isolate and protect the nursery from fresh infection. Multiplication from suckers either through
splitting or tissue culture technology ensures true to type and high productivity if they are collected
from high yielding mother plants.
Capsule Selection and Extraction Procedure
• Collect well matured, big and disease-free capsules from basal and middle portion of
healthy and productive spike of desired variety.
• The selected capsules should contain matured black seeds inside.
• The capsules from the tip of the spikes are small and mature late and are not
recommended for propagation purpose.
• Remove the sticky mucilage covering seeds following any of these methods;
➢ By rubbing with sand and ash mixture
➢ By rubbing with jute bags
➢ By dipping seeds in 25% nitric acid (25 ml nitric acid and 75 ml water) for 10
minutes and washing the treated seed thoroughly in the running water.
• Wash the extracted seeds with clean water and dry under shade for 3 to 4 days. The seed
obtained after drying can be sown immediately or stored. It should be stored in a cool
and dry place.

134
Primary nursery
Cardamom seeds should be collected and sown in September-October. Seed beds are prepared in
well-drained soil dug to a depth of 30 cm. Raised beds with 15 - 25 cm height, 1 m width and
convenient length are prepared. Well decomposed cattle manure is mixed with soil and the surface
of the bed is brought to a fine tilth. 80-100 gm of extracted and processed seeds are sown per bed
in lines spaced 10 cm apart. The seeds are then covered with fine soil and mulched with paddy
straw/dry grass (10-15 cm thick). Watering is done at regular intervals to keep the surface of the
bed moist. Germination of acid treated seeds commences after 25-30 days of sowing. When
average germination is noticed, the mulch materials are removed. The inter space between rows is
then re-mulched with chopped paddy straw. Shade structures are immediately erected by using
bamboo mats/reed mats or agro-shade nets. The beds are watered regularly and weeding is done
as and when required.
Secondary nursery
6.6.1 Bed Method
Beds of size 15 cm in height and 100 cm in width with convenient length are prepared and well-
decomposed cattle manure is mixed with the soil and an even surface is formed. Seedlings with 3-
4 leaves are transplanted to the beds in May-June at spacing of 15 cm between them. An overhead
structure is erected for providing shade and the soil is kept moist with irrigation. When the
seedlings attain a growth of 45-60 cm in height with 2-3 tillers, they are planted in the main field
during June-July of the subsequent year.
6.6.2 Poly Bag Method
Polythene bags of 15 x 15 cm with perforations at the base are used for planting the seedlings. The
bags are filled with a potting mixture of soil, sand and cow dung in the ratio of 4:1:1. The bags
filled with the mixture are arranged in rows of one metre width and of convenient length under
shade structures. Seedlings with 3-4 leaves are planted in the bags in April–May and watered
regularly. They become ready for field planting in 10-12 months.
Sucker multiplication nursery
Suckers should be generated only in sucker multiplication nursery where adequate precautions are
taken to ensure that viral diseases are not transmitted through the suckers produced. The site for
such a nursery should be located at least 500 metres away from large cardamom plantations. They
are established either under the shade of forest trees or under shade structures with 50% shade
using black agro shade nets.
Trenches of 30 x 30 cm are prepared at convenient lengths with an inter space of 30 cm. Well
decomposed cattle manure or compost is mixed with the soil and the trenches are filled to the brim.

135
Then the seedling or suckers with one grown up shoot with an emerging bud are planted at 30 cm
apart in the trenches. The time for planting is May–June. After planting, the plant base is mulched
with dried forest leaves. The multiplication rate in this method is about 1:8 in one year’s time. The
grown-up tillers are split into units of one tiller with an emerging bud and planted in the main field
during June-July.
Micro propagation
For rapid multiplication of high yielding clones, vegetative buds from disease free high yielding
mother plants are collected and plantlets are produced through the tissue culture technique. These
plantlets are hardened in poly bags or in secondary nurseries and once sufficient growth is attained,
they can be planted in the main field during June–July.
Mulching
To retain the soil moisture and control weed growth, mulching at the plant base should be done
after application of inputs using dried organic matter, leaves, weeds, etc.
Nutrient management
Apply well-decomposed cattle manure/compost/FYM @ 2 kg per plant at least once in two years
in April-May to replenish the nutrient loss through erosion and uptake.
Irrigation
Large cardamom plants cannot thrive well under water stress conditions. Watering should be
frequently done during dry months from September to March for better growth in coming months.
Depending on availability of water, irrigation though drip or through small channels should be
provided.
Shade Management
Large cardamom performs best under the partial shade. About 50% shade is ideal. The shade for
the nursery is mostly compensated using black agr0-shednets while in the agro-forestry based
seedling multiplication, recommended shade trees as per the package of practices should be
provided.
Weed management
Weed control in the nursey is one of the most crucial operations for maximising soil moisture and
nutrients uptake by the plants. Weeding in cardamom nursery should be carried out as and when
required.
Plant protection measures
The major pest and diseases of cardamom are Colletotrichum blight, leaf steak, wilt, leaf eating
caterpillar and stem borer. Pest and diseases should be managed using IPM technologies.

136
Points to be considered for pest management
i. Give priority to cultural and mechanical management of pest and disease
ii. Do not apply chemicals especially in cocktails and repeatedly.
iii. Give emphasis on phytosanitation.
iv. Pest infested plants/plant parts should be destroyed immediately.
Follow pest and disease management recommendations provided in the package of practices.

137
B. Ginger and Turmeric Rhizome Production
Background
Ginger (Zingiber officinale Rosc.) and turmeric (Cucurma longa) are herbaceous perennial
belonging to the plant family Zingiberaceae. The underground plant part, the modified stem called
rhizome is used as the planting material.
National seed production scheme
Seeds production scheme for ginger and turmeric is as reflected in Error! Reference source not f
ound. which consist of breeder seeds maintenance by Agriculture Research and Development
Centres (ARDCs), foundation seeds maintained by National Seed Centre (NSC) and certified
seeds produced by Registered Seed Growers (RSGs), and Private Seed Companies (PSCs).
Table 64: National seed production scheme
Sl. No. Class Responsible agency
1 Breeder seed ARDCs
2 Foundation seed NSC
3 Certified seed NSC/PSCs/RSGs
Specific methods for breeder seed production
The breeder seed of ginger and turmeric are the initial small quantity of seeds in the form of
rhizomes obtained through different selection and breeding methods or introduced, tested and
released high yielding or climate resilient varieties by the competent agency or researcher. The
breeder seed shall be directly controlled by the originating research station or institution and is
responsible to provide the initial planting material to National Seed Centre (NSC) or Registered
Seed Growers (RSG) for the production of foundation and certified seeds.
• The researcher shall mark the healthy and disease-free clumps in the field when the crop
is 6-8 months old and still green.
• Harvest the marked plants 10-15 days before harvesting bulk rhizome.
• Select bold and healthy rhizomes from disease free plants immediately after harvest and
store them in dry and shady places.
• The selected rhizomes should be true-to-type, disease-free which shows the true
characteristics of the variety.
• Selected rhizome should be free from diseases especially rhizome rot disease.
• Discard any rhizomes appearing to be off-type, diseased or otherwise unacceptable
• Before planting, stored seed rhizomes are sorted, rhizome that is large, shiny, free from
spots or marks, bud or eye injury are selected for planting.

138
• Handle seed rhizomes carefully to avoid damage to buds.
• Follow the agronomic practices provided under section 6 of this chapter.
Specific methods for foundation seed production
Foundation seed shall be stocks of clean planting materials and it should be handled carefully to
maintain specific genetic identity and purity which will be designated or distributed by ARDCs or
NSC. Production of foundation seed requires careful supervision or must be approved by
representatives of the ARDCs. Foundation seed shall be the source of all other certified seed.
Follow the agronomic practices prescribed in section 6 of this chapter.
• Under the supervision of a breeder, the seed stock is handled to maintain specific identity
and genetic purity (100%), which may be distributed and produced under careful
supervision of an agricultural experiment station, or a certified Seed Centre.
• The technical procedure for production of foundation seed is similar to that of breeder
seeds
• The seed used for production of foundation seed should be breeder seed and avoid mixing
with old generation of same variety for maintaining seed vigour and degeneration
• Crop rotation is important to avoid volunteers from previous season, disease isolation
and to get the maximum yield from unit area of land – at least 2 years gap should be
maintained
• Carry out timely rouging/removal of off-types and diseased plants
• Harvest, clean and store seeds properly.
Specific methods for certified seed production
Certified seed shall be the progeny of foundation seed, registered or certified seed, should be
maintained with satisfactory genetic identity and purity. In this respect, a farmer propagating
certified seed should only use breeder or foundation seed for multiplication. The field standard for
foundation and certified seed production is given in Table 65. The production technique is same
as that of foundation seed.
Table 65: Field standards for foundation and certified seeds
Sl.
No.
Particulars Foundation seed Certified seed
1. Ginger (Isolation distance required) 10 m 5 m
2. Turmeric (Isolation distance required) 10 m 5 m
3. Off types (%) max. permitted Nil 0.5
4. Not conforming to varietal characteristics
(should not exceed)
0.10 % 0.2%

139
5. Cut, bruised, diseased, injured rhizomes or
those damaged by maggots (should not
exceed)
0.2% by weight 0.2% by
weight
Agronomic principles of rhizome seed production
Land requirement and preparation
Ginger and turmeric thrive best in well drained loamy soils rich in humus with a pH of 6.0 - 6.5.
It is recommended to follow the crop rotation with leguminous crops for better productivity and
kill the disease inoculum in the old field. While light irrigation during drought condition is helpful,
water logging is detrimental to both the crops.
Land preparation
The land is to be ploughed 4 to 5 times or dug thoroughly after the early summer showers and
brought to fine tilth. Beds of about 1 m width, 30 cm height and of convenient length are prepared
with an inter-space of 50 cm in between beds. In the case of irrigated crop, ridges are formed 40
cm apart. In areas prone to rhizome rot disease and nematode infestations, soil solarization of beds
for 40 days using transparent polythene sheets is recommended
Seed rate
The seed rate for both ginger and turmeric varies depending upon the method of cultivation and
seed rhizome size.
Ginger: 600 kg per acre.
Turmeric: 1000 kg per acre
Spacing
Ginger
Beds of about 1 m width, 30 cm height and of convenient length are prepared with an interspace
of 50 cm in between beds. In the case of irrigated crop, ridges are formed 40 cm apart.
Flat Beds method: Plant to plant distance of 25 x 25 cm in each direction.
Ridge and furrow method: Plant to plant distance of 40-60 x 25 cm.
In areas prone to rhizome rot disease and nematode infestations, soil solarization of beds for 40
days using transparent polythene sheets is recommended.
Turmeric
• Flat Beds: Used under rainfed conditions where soils are light. Flat beds of 1 m in width
and of suitable length varying according to the slope of land are prepared.

140
• Ridges and Furrows: Under irrigated-conditions where the land is levelled or plain and
soils are heavy, planting is done on ridges and furrows, opened at 75 cm distance and
having 3-3.5 m length. Broad ridges should have 90-100 cm width and 3-6 m length
depending on the slope.
Irrigation
Both crops are generally cultivated as rainfed crop in high rainfall areas and irrigated crop in less
rainfall areas. Crop requires 1300-1500 mm of water in one crop cycle. The critical stages for
irrigation are during germination, rhizome initiation (90 DAP) and rhizome development stages
(135 DAP). The first irrigation should be done immediately after planting and subsequent
irrigations are given at intervals of 7 - 10 days in conventional irrigation (based on prevailing
weather and soil type).
Nutrient management
At the time of planting, well decomposed cattle manure or compost @ 10-15 tonnes/acre has to
be applied either by broadcasting over the beds prior to planting or applied in the pits at the time
of planting. Application of neem cake @ 800 kg per acre at the time of planting helps in reducing
the incidence of rhizome rot disease/ nematode and increasing the yield.
Weed management
2-3 hand weeding is required at 45, 90 & 120 days after planting, depending on the intensity of
weed growth.
Earthing up
Earthing up is essential to prevent exposure of rhizomes and provide sufficient soil volume for
free development of rhizomes. It is done at 45 and 90 days after planting immediately after
weeding and application of fertilizers.
Mulching
Mulching the beds with green leaves or organic wastes is essential to prevent soil splash and
erosion of soil due to heavy rain. It also adds organic matter to the soil, checks weed emergence
and conserves moisture during the latter part of the cropping season. The first mulching is done at
the time of planting. Green leave mulching is to be repeated at 45 and 90 days after planting,
immediately after weeding, application of fertilizer and earthing up.
Roughing
Removal of unwanted, off-type and diseased plants from the seed production field is known as
roughing. In ginger and turmeric, roughing at harvest time for confirmation of rhizome
characteristics is necessary.

141
Pest and disease management
Pest of ginger and turmeric include shoot borer, rhizome scale, root grubs, nematodes, soft rot,
ginger wilt and bacterial wilt. The pests should be managed using IPM technologies.
Harvesting and seed extraction
The crops attain full maturity in 7-9 months after planting depending upon the variety. The crops
should be harvested at full maturity for seed purpose. The healthy rhizomes (disease free) and
showing good varietal phenotypic characters are selected as seed rhizomes and rest are either sold
in the market for consumption or processed. Irrigation is stopped one month before harvest and
the rhizome clumps are lifted carefully with a spade or digging fork. In large scale cultivations,
tractor or power tiller drawn harvesters are also used.
Storage of seed rhizomes
The seed rhizomes should be stored under the shade covered with plant debris or stored in the
well-drained pit dug until is it being sold or planted in the field. Constant monitoring of rot in the
store is recommended.
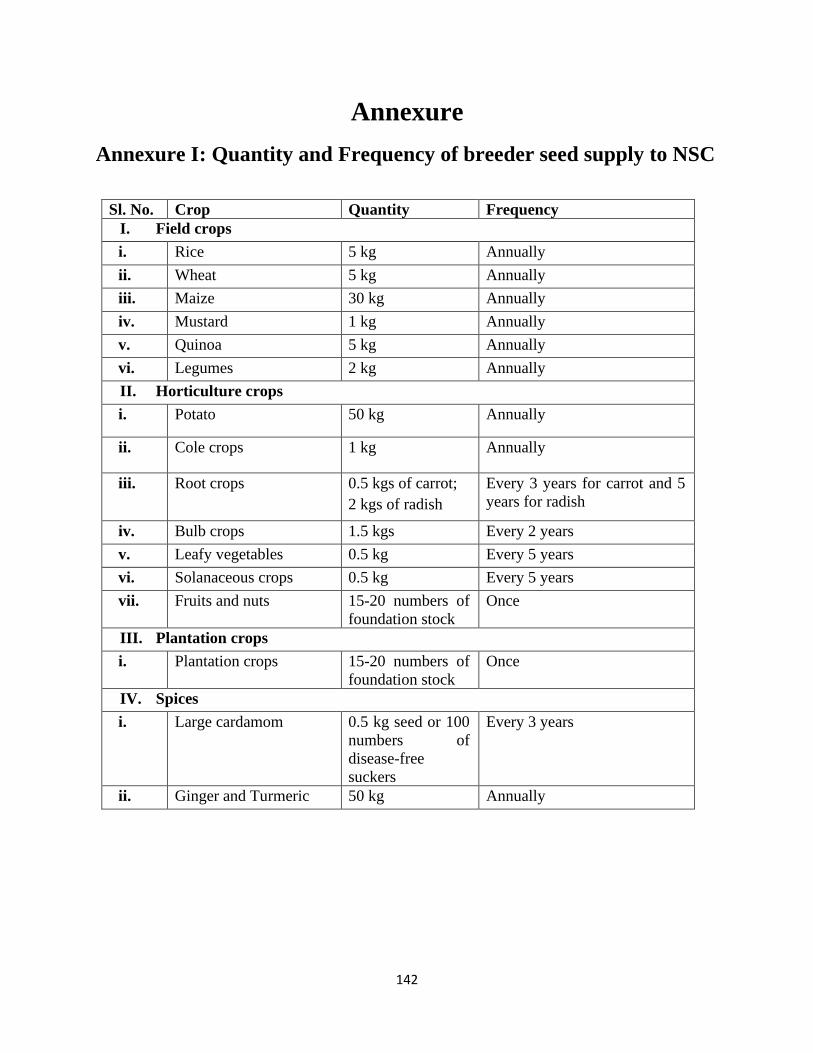
142
Annexure
Annexure I: Quantity and Frequency of breeder seed supply to NSC
Sl. No. Crop Quantity Frequency
I. Field crops
i. Rice 5 kg Annually
ii. Wheat 5 kg Annually
iii. Maize 30 kg Annually
iv. Mustard 1 kg Annually
v. Quinoa 5 kg Annually
vi. Legumes 2 kg Annually
II. Horticulture crops
i. Potato 50 kg Annually
ii. Cole crops 1 kg Annually
iii. Root crops 0.5 kgs of carrot;
2 kgs of radish
Every 3 years for carrot and 5
years for radish
iv. Bulb crops 1.5 kgs Every 2 years
v. Leafy vegetables 0.5 kg Every 5 years
vi. Solanaceous crops 0.5 kg Every 5 years
vii. Fruits and nuts 15-20 numbers of
foundation stock
Once
III. Plantation crops
i. Plantation crops 15-20 numbers of
foundation stock
Once
IV. Spices
i. Large cardamom 0.5 kg seed or 100
numbers of
disease-free
suckers
Every 3 years
ii. Ginger and Turmeric 50 kg Annually