Manual Meat Tenderizer/Cuber - Cabela's › assets › product_files › pdf › ...The two-piece...
12
1 Manual Meat Tenderizer/Cuber Model #541417 Item #04202107 WARNING: CAREFULLY REMOVE HOUSING FROM THE STYROFOAM PACKING. CAUTION! TENDERIZER/CUBER CUTTING BLADES ARE EXTERTREMELY SHARP! Handle the housing assembly with care and DO NOT place hands or fingers into the housing openings in order to prevent injury.
Transcript of Manual Meat Tenderizer/Cuber - Cabela's › assets › product_files › pdf › ...The two-piece...

1
Manual Meat Tenderizer/Cuber
Model #541417 Item #04202107
WARNING: CAREFULLY REMOVE HOUSING FROM THE STYROFOAM PACKING. CAUTION! TENDERIZER/CUBER CUTTING BLADES ARE EXTERTREMELY SHARP! Handle the housing assembly with care and DO NOT place hands or fingers into the housing openings in order to prevent injury.

2
Introduction Congratulations on your purchase of the Cabela's Manual Meat Tenderizer/Cuber. Now you can tenderize tougher portions of beef or wild game to make cube steaks, country-fried steaks, fajita meat and more. The extra-wide feeder chute easily handles meat cuts up to 7.75” wide and 1.5” thick. Dual rollers with 38 high-quality stainless steel blades provide even tenderizing across all cuts of meat. Heavy-duty cast aluminum construction will not rust or corrode. The two-piece housing assembly also includes special design features that make assembly and disassembly for cleaning quick and easy. Be sure to read these instructions thoroughly in order learn about all of the important operating features. You can count on Cabela’s for all your food preparation needs.
IMPORTANT SAFEGUARDS When using mechanical appliances, basic safety precautions should always be followed, including the following:
1. READ All INSTRUCTIONS. 2. CHECK FOR DAMAGED PARTS. Before using the Tenderizer/Cuber, check that all parts are operating properly and
perform the intended functions. Check for alignment of moving parts, binding of moving parts, mounting and any other conditions that may affect the operation.
3. Avoid contact with moving parts. NEVER PLACE HANDS OR FINGERS INTO THE TENDERIZER/CUBER CHUTE. Doing so could cause serious injury. ALWAYS USE THE TONGS PROVIDED TO PLACE MEAT IN THE FEED CHUTE.
4. KEEP FINGERS CLEAR OF THE BLADES AT ALL TIMES. Failure to do so may result in personal injury. THE CUTTING BLADES INSIDE THE BLADE HOUSING ASSEMBLY ARE EXTREMELY SHARP AND CAN CAUSE INJURY. It is recommended to wear Kevlar®, cut resistant gloves when handling the Blades and assembling the unit.
5. DO NOT press or push meat into the Chute with your fingers or any other object. Doing so may cause personal injury and/or damage to the unit.
6. DO NOT push the Tongs or other utensils into the Blades. 7. NEVER LEAVE THE TENDERIZER/CUBER UNATTENDED. Close supervision is
necessary when any appliance is used near children. 8. This appliance is NOT intended for use by children or persons with reduced physical, sensory or mental
capabilities, or lack of experience and knowledge, unless they have been given supervision or instruction concerning use of the appliance by a person responsible for their safety. Children should be supervised to ensure that they do not play with the appliance.
9. TIE BACK LOOSE HAIR AND CLOTHING and roll up sleeves before using the Tendeizer/Cuber. Remove ties, rings, watches, bracelets or other jewelry before operating.
10. Place the appliance on a firm and stable surface and always use the included C-Clamps to secure the unit to a table or work surface.
11. NEVER use abrasive cleaning agents or abrasive cloths when cleaning the Tenderizer/Cuber. 12. DO NOT use Tenderizer/Cuber while under influence of drugs or alcohol. 13. NOT DISHWASHER SAFE. 14. DO NOT use appliance for other than intended use. 15. The Manufacturer declines any responsibility in the case of improper use of MANUAL TENDERIZER/CUBER.
Improper use of the MANUAL TENDERIZER/CUBER voids the warranty.
SAVE THESE INSTRUCTIONS! Refer to them often and use them to instruct others.

3
WARNING: The warnings, cautions, and instructions discussed in this instruction manual cannot cover all possible conditions or situations that could occur. It must be understood by the operator that common sense and caution are factors which cannot be built into this product, but must be supplied by the operator.
GETTING TO KNOW YOUR MEAT TENDERIZER/CUBER
DO NOT RETURN THIS ITEM TO PLACE OF PURCHASE
If You Have Any Questions Regarding Operation, Missing Components or Need Replacement Parts, please
call Blue Sky Innovation Group Customer Service Toll Free at 1-855-939-7263 or 216-455-1101 for instructions and service support Monday-Friday,
9am to 5pm Eastern Standard Time.

4
MEAT TENDERIZER/CUBER ASSEMBLY INSTRUCTIONS
IMPORTANT: Before assembling, check to make sure all parts and screws are included in the package. Two Allen Wrenches are included for use with assembly. No other tools are required. If any parts are missing, call Customer Service toll-free at 1-855-939-7263 or 216-455-1101 for assistance (Monday - Friday, 9AM to 5PM Eastern Standard Time).
1. Stainless Steel Comb with attached Thumbscrew (2) 99 – 62002 – 11 2. Plastic Feed Chute 99 – 62002 – 09 3. Feed Chute Hex Bolt (2) 99 – 62002 – 13 4. Top Housing Thumbscrew (2) 99 – 62002 – 10 5. Top Aluminum Housing 99 – 62002 – 08 6. Stainless Steel Tenderizer/Cuber Blade Assembly 99 – 62002 – 06 7. Threaded Handle Locking Bolt 99 – 62002 – 19 8. Crank Handle Arm 99 – 62002 – 17 9. Bottom Aluminum Housing 99 – 62002 – 07
10. Support Legs (2) 99 – 62002 – 14 11. 11” X 9 ½ “ Hard Plastic Base 99 – 62002 – 13 12. Table Mount C-clamps (2) 99 – 62002 – 25 13. Large Allen Wrench (Hex Wrench) 99 – 62002 – 24 14. Small Allen Wrench (Hex Wrench) 99 – 62002 – 26 15. Metal Tongs 99 – 62002 – 23 Jerky Slicer Blade Assembly Conversion Set Model #541419 Item #04202305 99-
Description Part Number
11
5
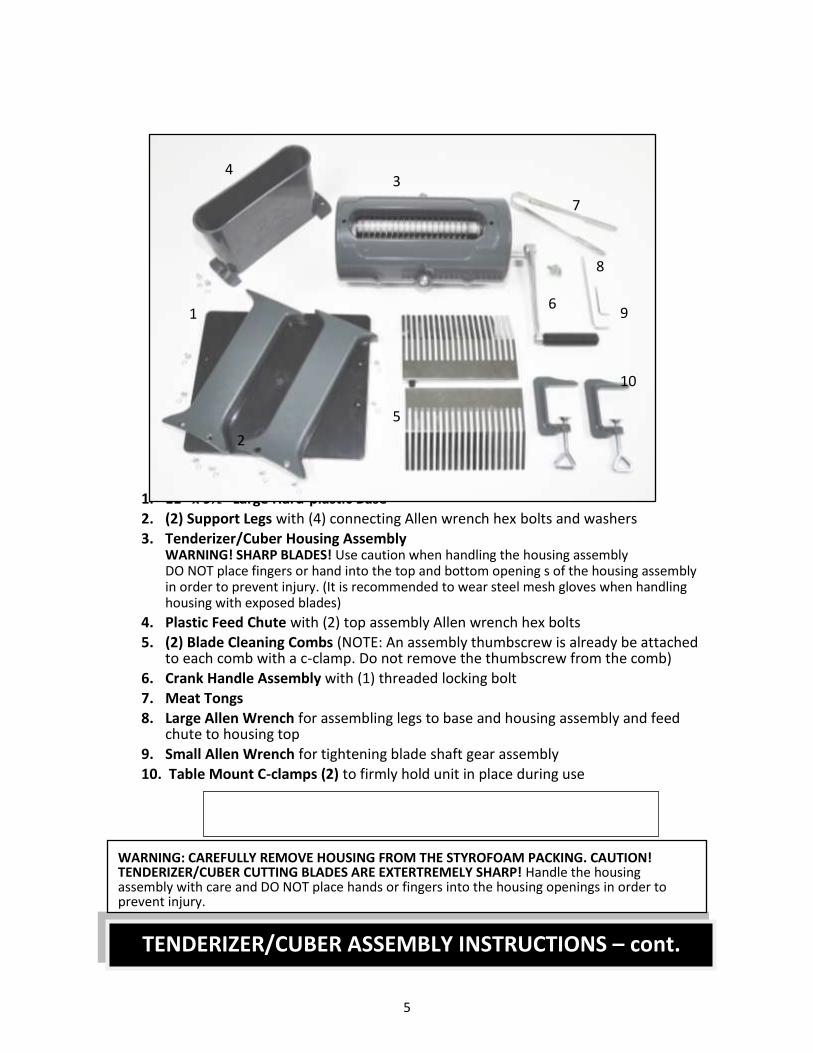
1. 11” x 9½” Large Hard-plastic Base 2. (2) Support Legs with (4) connecting Allen wrench hex bolts and washers 3. Tenderizer/Cuber Housing Assembly
WARNING! SHARP BLADES! Use caution when handling the housing assembly DO NOT place fingers or hand into the top and bottom opening s of the housing assembly in order to prevent injury. (It is recommended to wear steel mesh gloves when handling housing with exposed blades)
4. Plastic Feed Chute with (2) top assembly Allen wrench hex bolts 5. (2) Blade Cleaning Combs (NOTE: An assembly thumbscrew is already be attached
to each comb with a c-clamp. Do not remove the thumbscrew from the comb) 6. Crank Handle Assembly with (1) threaded locking bolt 7. Meat Tongs 8. Large Allen Wrench for assembling legs to base and housing assembly and feed
chute to housing top 9. Small Allen Wrench for tightening blade shaft gear assembly 10. Table Mount C-clamps (2) to firmly hold unit in place during use
TENDERIZER/CUBER ASSEMBLY INSTRUCTIONS – cont.
CAUTION: It is recommended to wear steel mesh or Kevlar® cut-resistant gloves when handling the blade assembly
WARNING: CAREFULLY REMOVE HOUSING FROM THE STYROFOAM PACKING. CAUTION! TENDERIZER/CUBER CUTTING BLADES ARE EXTERTREMELY SHARP! Handle the housing assembly with care and DO NOT place hands or fingers into the housing openings in order to prevent injury.
1
2
3
4
5
6
7
8
9
10
6
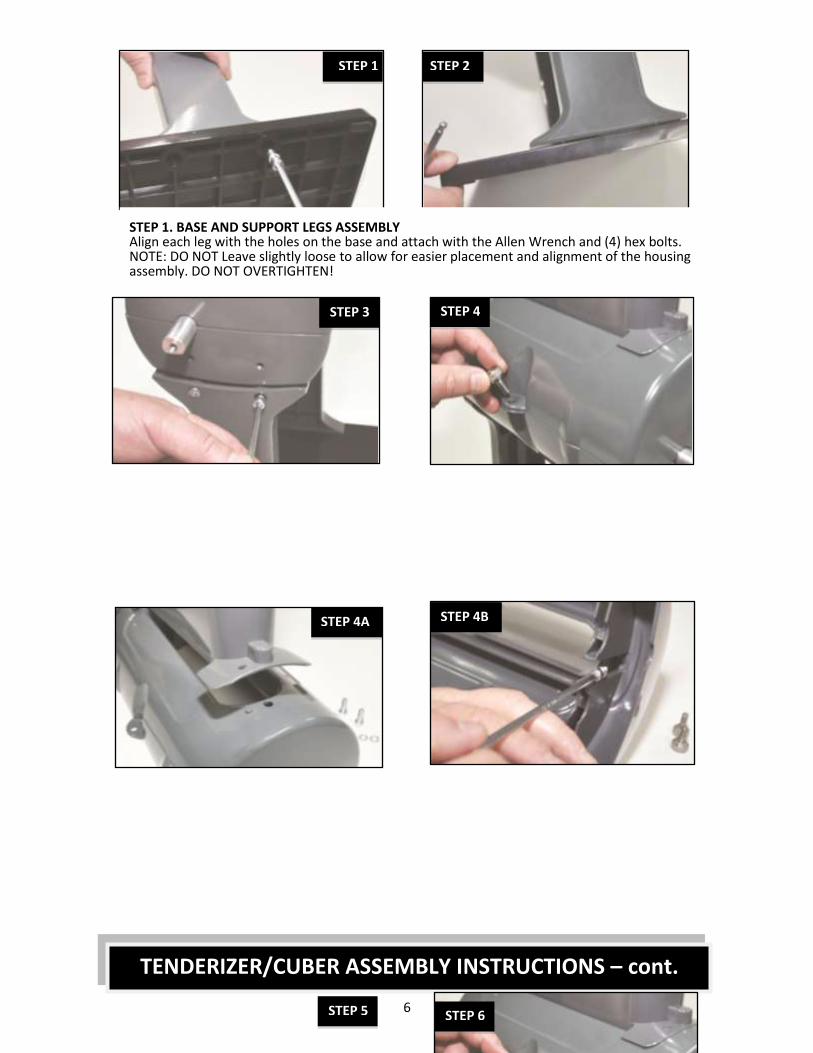
STEP 1. BASE AND SUPPORT LEGS ASSEMBLY Align each leg with the holes on the base and attach with the Allen Wrench and (4) hex bolts. NOTE: DO NOT Leave slightly loose to allow for easier placement and alignment of the housing assembly. DO NOT OVERTIGHTEN!
TENDERIZER/CUBER ASSEMBLY INSTRUCTIONS – cont.
STEP 3. PLACE HOUSING ON TOP OF LEGS, ALIGN WITH HOLES AND SECURE WITH (4) HEX BOLTS. NOTE: DO NOT tighten bolts completely until all are in place. After al bolts have been inserted, tighten with the Allen Wrench starting with the base Tighten hex-bolts until snug. DO NOT OVERTIGHTEN!
STEP 4. ATTACHING FEED CHUTE Remove the two thumbscrews from the housing assembly top. Remove top half of the housing assembly and place on flat surface.
STEP 4A. ATTACHING FEED CHUTE Attach the feed chute on the housing top by aligning the hole at the bottom of feed chute with the alignment post located on the right side of the top housing opening.
STEP 4B. ATTACHING FEED CHUTE After aligning the feed chute with the housing assembly top. Turn the assembly top and chute on its side in order to insert the two hex bolts into the feed chute from the underside of the housing top. (DO NOT tighten all the way until both screws are in place)
STEP 1 STEP 2
STEP 3 STEP 4
STEP 4A STEP 4B
STEP 5 STEP 6

7
IMPORTANT NOTE: Periodically the gears on the blade assemblies may need to be tightened using the small SMALL ALLEN WRENCH included to tighten. Be sure to inspect gears when assembling for the first time.
STEP 7. INSERT BLADE CLEANING COMBS NOTE: The blade cleaning combs include an attached thumbscrew to allow for correct placement into the left and right side of the housing assembly.
STEP 8. ADD CRANK HANDLE TO CRANKSHAFT and secure with the locking nut by hand until snug. (DO NOT force to tighten)
STEP 9. TABLE MOUNTING WITH C-CLAMPS Secure the base of the Tenderizer/Cuber to a table or work surface with the two C-clamps included. The Tenderizer/Cuber is now ready to use!
STEP 7
STEP 8
STEP 9
CAUTION: It is recommended to wear steel mesh or Kevlar® cut-resistant gloves when handling the blade assembly
8
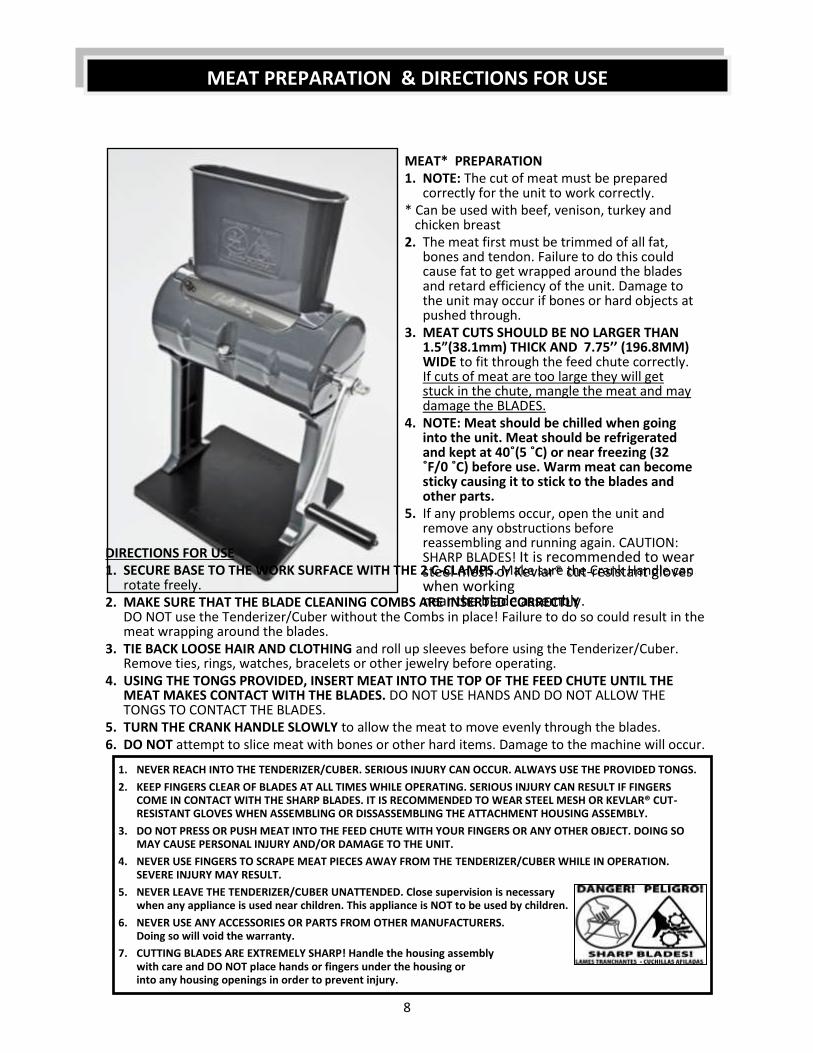
MEAT* PREPARATION 1. NOTE: The cut of meat must be prepared
correctly for the unit to work correctly. * Can be used with beef, venison, turkey and chicken breast 2. The meat first must be trimmed of all fat,
bones and tendon. Failure to do this could cause fat to get wrapped around the blades and retard efficiency of the unit. Damage to the unit may occur if bones or hard objects at pushed through.
3. MEAT CUTS SHOULD BE NO LARGER THAN 1.5”(38.1mm) THICK AND 7.75’’ (196.8MM) WIDE to fit through the feed chute correctly. If cuts of meat are too large they will get stuck in the chute, mangle the meat and may damage the BLADES.
4. NOTE: Meat should be chilled when going into the unit. Meat should be refrigerated and kept at 40˚(5 ˚C) or near freezing (32 ˚F/0 ˚C) before use. Warm meat can become sticky causing it to stick to the blades and other parts.
5. If any problems occur, open the unit and remove any obstructions before reassembling and running again. CAUTION: SHARP BLADES! It is recommended to wear steel mesh or Kevlar® cut-resistant gloves when working near the blade assembly.
DIRECTIONS FOR USE 1. SECURE BASE TO THE WORK SURFACE WITH THE 2 C-CLAMPS. Make sure the Crank Handle can
rotate freely. 2. MAKE SURE THAT THE BLADE CLEANING COMBS ARE INSERTED CORRECTLY
DO NOT use the Tenderizer/Cuber without the Combs in place! Failure to do so could result in the meat wrapping around the blades.
3. TIE BACK LOOSE HAIR AND CLOTHING and roll up sleeves before using the Tenderizer/Cuber. Remove ties, rings, watches, bracelets or other jewelry before operating.
4. USING THE TONGS PROVIDED, INSERT MEAT INTO THE TOP OF THE FEED CHUTE UNTIL THE MEAT MAKES CONTACT WITH THE BLADES. DO NOT USE HANDS AND DO NOT ALLOW THE TONGS TO CONTACT THE BLADES.
5. TURN THE CRANK HANDLE SLOWLY to allow the meat to move evenly through the blades. 6. DO NOT attempt to slice meat with bones or other hard items. Damage to the machine will occur.
MEAT PREPARATION & DIRECTIONS FOR USE
1. NEVER REACH INTO THE TENDERIZER/CUBER. SERIOUS INJURY CAN OCCUR. ALWAYS USE THE PROVIDED TONGS. 2. KEEP FINGERS CLEAR OF BLADES AT ALL TIMES WHILE OPERATING. SERIOUS INJURY CAN RESULT IF FINGERS
COME IN CONTACT WITH THE SHARP BLADES. IT IS RECOMMENDED TO WEAR STEEL MESH OR KEVLAR® CUT-RESISTANT GLOVES WHEN ASSEMBLING OR DISSASSEMBLING THE ATTACHMENT HOUSING ASSEMBLY.
3. DO NOT PRESS OR PUSH MEAT INTO THE FEED CHUTE WITH YOUR FINGERS OR ANY OTHER OBJECT. DOING SO MAY CAUSE PERSONAL INJURY AND/OR DAMAGE TO THE UNIT.
4. NEVER USE FINGERS TO SCRAPE MEAT PIECES AWAY FROM THE TENDERIZER/CUBER WHILE IN OPERATION. SEVERE INJURY MAY RESULT.
5. NEVER LEAVE THE TENDERIZER/CUBER UNATTENDED. Close supervision is necessary when any appliance is used near children. This appliance is NOT to be used by children.
6. NEVER USE ANY ACCESSORIES OR PARTS FROM OTHER MANUFACTURERS. Doing so will void the warranty.
7. CUTTING BLADES ARE EXTREMELY SHARP! Handle the housing assembly with care and DO NOT place hands or fingers under the housing or into any housing openings in order to prevent injury.
9
CLEANING & MAINTENANCE
1. Disassemble and thoroughly was all parts in warm soapy water and rinse with clean water. Dry all parts immediately. IMPORTANT: DO NOT immerse the blade assembly in sudsy water where they cannot be clearly seen. To prevent injury, keep the blade assembly visible at all times. CAUTION: BLADES ARE VERY SHARP!
2. HELPFUL HINT: It is recommended to use a long stem cleaning brush when cleaning the blade assembly. (Sold separately)
CAUTION: It is recommended to
wear steel mesh or Kevlar® cut-resistant
gloves when handling the blade assembly
LUBRICATION: It is recommended to use a food-grade silicone spray or grease to coat all metal parts to prevent oxidation and keep the Tenderizer/Cuber in good condition. Food Grade Silicone Spray #54-1250 or Lubricating Grease #54-1249 can be purchased at Cabela’s.
NOTE: DO NOT LUBRICATE WITH COOKING OIL - IT WILL CAUSE THE UNIT TO GET STICKY
x Always make sure that the unit is fully assembled, and all connections are secure before attempting to use.
x Never use the unit without the chute in place. x When feeding meat in, always use the tongs provided. x If meat has trouble feeding through the unit, make sure that the meat is fully chilled before
processing. x If meat wraps around the blades, make sure that the combs are fully and correctly inserted. x Over time with heavy use, the blades could dull and lessen the performance of the unit.
Replacement blades are available from Cabela's. x Make sure that the cut of meat does not exceed 7.75" x 1.5" in size. Anything larger will not fit
through the chute and if forced could cause damage to the unit. x With time, the gears that turn the rollers could loosen and possible disengage from each other,
check that the gears are aligned and set screws properly tightened.
HELPFUL HINTS
Lime-Curry Marinade Ingredients 3 lbs. of tenderized meat 2 limes, zest and juice 2 Tablespoons honey 3 Tablespoons red curry paste Directions Gradually mix in 1/2 to 1 cup marinade to meat until the ideal smooth constituency is reached. Save extra unused marinade in case meat mixture needs to be loosened after chilling. Chill overnight
2 Tablespoons soy sauce 2 Tablespoons rice wine or apple cider vinegar 1 Tablespoon salt 1 Tablespoon ground black pepper
RECIPE IDEAS

10
RECIPE IDEAS- cont.
Quick Cube Steaks Servings 2-4 Ingredients
2-4 Beef cube steaks 1 oz. package brown gravy mix (use 2 if you like lots of gravy)
Directions 1. Cut 2 to 4 beef steaks into 6” X 4” pieces. Trim away fat and remove all bones. 2. Run the steak pieces through the Tenderizer/Cuber 3. Chop onion. 4. Melt butter in a heavy skillet over medium heat. 5. Add the steaks and onions, browning steaks on both sides. 6. While steaks are browning, mix gravy mix according to package directions. 7. Add vinegar and brown sugar to gravy. 8. Pour gravy over steaks and lower heat. Cover and simmer 20 to 30 minutes until meat is
tender. Add water as necessary as the gravy cooks down and thickens. Check the gravy periodically to make sure liquid does not evaporate.
Venison Pepper Steaks Servings 2 -4 beef cube steaks Ingredients
2 large deer steaks ½ cup shortening 2 teaspoons salt 2 teaspoons freshly ground black pepper
Directions 1. Tenderize Venison steaks with the Tenderizer/Cuber. 2. Heat shortening on medium low heat, then roll steaks in flour, salt and pepper. 3. Place in hot shortening and brown slightly on one side then turn. 4. Add onions, green pepper and Worcestershire sauce and sauté slightly on second side. 5. Serve immediately.
Bourbon BBQ Sauce Marinade Ingredients 2 cups ketchup 1 cup Bourbon whiskey 1/2 cup brown sugar 1/2 cup water 1/4 cup balsamic vinegar 1 Tablespoon ancho or chipotle chili powder or chili powder of your choice Directions Gradually mix in 1/2 to 1 cup BBQ sauce to meat until the ideal smooth constituency is reached. Save extra unused sauce in case meat mixture needs to be loosened after chilling. Chill overnight.
3 Tablespoons chopped garlic 2 Tablespoons liquid smoke 2 Tablespoons Worcester sauce 1 Tablespoon molasses 2 Tablespoons whole grain mustard
1 Tablespoon Worcestershire sauce ½ cup flour 1 large white onion slice 2 medium green peppers sliced
1 Tablespoon butter 1 small onion, chopped 1 Tablespoon white vinegar
11
When handling food, the basic rules to follow are: COOK, SEPARATE, CLEAN, and CHILL.
COOK It’s crucial to cook food to a safe internal temperature to destroy bacteria that is present. The safety of hamburgers and other foods made with ground meat has been receiving a lot of attention lately, and with good reason. When meat is ground, the bacteria present on the surface are mixed throughout the ground mixture. If this ground meat is not cooked to at least 160oF to 165oF (71oC to 74oC), bacteria will not be destroyed and there’s a good chance you will get sick.
Solid pieces of meat like steaks and chops don’t have dangerous bacteria like E. coli on the inside, so they can be served more rare. Still, any beef cut should be cooked to an internal temperature of at least 145oF (63oC) (medium rare). The safe temperature for poultry is 180oF (82oC) and solid cuts of pork should be cooked to 160oF (71oC). Eggs should be thoroughly cooked too. If you are making a meringue or other recipe that uses uncooked eggs, buy specially pasteurized eggs or use prepared meringue powder.
SEPARATE Foods that will be eaten uncooked and foods that will be cooked before eating MUST ALWAYS be separated. Cross-contamination occurs when raw meats or eggs come in contact with foods that will be eaten uncooked. This is a major source of food poisoning. Always double-wrap raw meats and place them on the lowest shelf in the refrigerator so there is no way juices can drip onto fresh produce. Then use the raw meats within 1-2 days of purchase, or freeze for longer storage. Defrost frozen meats in the refrigerator, not on the counter.
When grilling or cooking raw meats or fish, make sure to place the cooked meat on a clean platter. Don’t use the same platter you used to carry the food out to the grill. Wash the utensils used in grilling after the food is turned for the last time on the grill, as well as spatulas and spoons used for stir-frying or turning meat as it cooks.
Make sure to wash your hands after handling raw meats or raw eggs. Washing hands with soap and water, or using a pre-moistened antibacterial towelette is absolutely necessary after you have touched raw meat or raw eggs. Not washing hands and surfaces while cooking is a major cause of cross-contamination.
CLEAN Wash your hands and work surfaces frequently when you are cooking. Washing with soap and warm water for at least 15 seconds, then dry with a paper towel.
CHILL Chilling food is very important. The danger zone where bacteria multiply is between 40oF and 140oF (4oC and 6oC). Your refrigerator should be set to 40oF (4oC) or below; your freezer should be 0oF (-17oC) or below. Simple rule: serve hot foods hot, cold foods cold. Use chafing dishes or hot plates to keep food hot while serving. Use ice water baths to keep cold foods cold. Never let any food sit at room temperature for more than 2 hours - 1 hour if the ambient temperature is 90oF (32oC) or above. When packing for a picnic, make sure the foods are already chilled when they go into the insulated hamper. The hamper won’t chill food - it just keeps food cold when properly packed with ice. Hot cooked foods should be placed in shallow containers and immediately refrigerated so they cool rapidly. Make sure to cover foods after they are cool.
NOTE: Special considerations must be made when using venison or other wild game, since it can become heavily contaminated during field dressing. Venison is often held at temperatures that could potentially allow bacteria to grow, such as when it is being transported. Refer to the USDA Meat and Poultry Department for further questions or information on meat and food safety.
FOOD SAFETY
12
Warranty Information
Save this warranty information for your records. Blue Sky Innovation Group warrants to the ORIGINAL RETAIL PURCHASER of this product that if
operated in accordance with the printed instruction accompanying it, then for a period of 1- year from the date of purchase, the product shall be free from defects in material and workmanship.
The Warranty Card, along with a copy of the original receipt, must be received by Blue Sky Innovation Group within 30 days from purchase date for the warranty to apply. Failure to send the completely filled out Warranty Card, along with a copy of the original receipt, will void the warranty.
The product must be delivered to or shipped freight prepaid to Blue Sky Innovation Group for warranty services, in either its original packaging or similar packaging affording an equal degree of protection. Damage due to shipping is not the responsibility of the company. Blue Sky Innovation Group charges a $35.00 per hour bench charge. NOTE: No repairs will be started without the authorization of the customer. The return shipping cost to the customer will be added to the repair invoice.
Blue Sky Innovation Group will repair (or at its discretion, replace) the product free of charge, if in the judgment of the company, it has been proven to be defective as to seller’s labor and material, within the warranty period.
New or rebuilt replacements for factory defective parts will be supplied for one (1) year from the date of purchase. Replacement parts are warranted for the remainder of the original warranty period.
For non-warranty repairs, contact Blue Sky Innovation Group Customer Service at 1-855-939-7263 M-F 8:00 am-5:00 pm EST to obtain a Return Merchandise Authorization Number (RMA Number). Blue Sky Innovation Group will refuse all returns that do not contain this number. DO NOT RETURN THE UNIT WITHOUT PROPER AUTHORIZATION FROM BLUE SKY INNOVATION GROUP.
LIMITATIONS: The warranty is void if the product is used for any purpose other than that for which it is designed. The product must not have been previously altered, repaired, or serviced by anyone else other than Blue Sky Innovation Group. If applicable, the serial number must not have been altered or removed. The product must not have been subjected to accident in transit or while in the customer’s possession, misused, abused, or operated contrary to the instructions contained in the instruction manual. This includes failure caused by neglect of reasonable and necessary maintenance, improper line voltage and acts of nature. This warranty is not transferable and applies only to U.S. and Canadian sales.
Except to the extent prohibited by applicable law, no other warranties whether expressed or implied, including warranty merchantability and fitness for a particular purpose, shall apply to this product. Under no circumstances shall Blue Sky Innovation Group be liable for consequential damages sustained in connection with said product and Blue Sky Innovation Group neither assumes nor authorizes any representative or other person to assume for it any obligation or liability other than such as is expressly set forth herein. Any applicable implied warranties are also limited to the one (1) year period of the limited warranty. This warranty covers only the product and its specific parts, not the food or other products processed in it.
Register your Product with Blue Sky Innovation Group by filling out and mailing the enclosed Warranty Card.