Mac OS 9 and Peripherals - lausd.k12.ca.us · Mac OS 9 and Peripherals 2 Overview Computers depend...
37
Mac OS 9 and Peripherals
Transcript of Mac OS 9 and Peripherals - lausd.k12.ca.us · Mac OS 9 and Peripherals 2 Overview Computers depend...

Mac OS 9 and Peripherals

CopyrightCopyright 2001 Los Angeles Unified School DistrictPortions copyright 2001 Education ArchiTechs.
TrademarksMicrosoft, Windows, Windows NT, Win32, MS-DOS, and MS are registered trademarksof Microsoft Corporation.
Apple, the Apple Logo, Macintosh, Power Macintosh, Mac OS, and LaserWriter areregistered trademarks of Apple Computer, Inc.
All other trademarks and registered trademarks are the property of their respectiveowners.
These materials include links to third party Web sites beyond the control of EducationArchiTechs, therefore Education ArchiTechs is not responsible for the content on anylinked web site. Education ArchiTechs has provided these links only as a convenience.The inclusion of a link does not imply that Education Architechs endorses or accepts anyresponsibility for the content on those third-party sites.

Mac OS 9 and Peripherals 2
OverviewComputers depend on an operating system to work. The operating system manages the interaction ofhardware and software to provide computer functionality.
Your iMac computer has Mac OS 9 installed and ready to go. OS 9 provides a number of featuresdesigned to make your computer using experience enjoyable and productive. The more you learnabout OS 9, the more you can refine and customize your work.
The operating system of a computer also brokers the relationship with peripherals and internal andexternal devices, such as printers, disk drives, mouse, and keyboard. This module also addressesusing the Lexmark Printer and VST Floppy Drive that came with your iMac.
Objectives• Increase familiarity with and initial proficiency using your iMac and Mac OS 9.• Develop understanding of and ability to print using your Lexmark printer.• Develop understanding of and ability to use your CD and external floppy disk drives.
PrerequisitesThis is an introductory course that requires no computer experience.
GlossaryThe following terms and definitions are useful to know for this module:
Bit, byteA bit is the smallest unit of data stored in a computer. 8 bits equals a byte. Data storage capacityis typically measured in bytes using powers of 10. A kilobyte is 1,000 bytes, a megabyte is1,000,000 bytes, and so forth.
CD/CD-ROMCompact disc, or compact disc with Read Only Memory. CDs with data burned into ROM canonly be read, not written to.
Computer interfaceThe physical means by which you use and interact with your computer.
Default settingsThe original settings for software or hardware as initially installed.
Operating systemThe software that makes your computer run by facilitating the interactions between hardware andinstalled software.

Mac OS 9 and Peripherals 3
Your New Classroom Technology BundleYou are the recipient of a classroom technology bundle that includes an iMac computer running MacOS 9, a Lexmark printer, and a VST floppy drive. These technology tools are intended to enhanceboth your work as an educator and the learning process in your classroom.
Let’s begin by reviewing the items in your classroom technology bundle and some of their mainfeatures.
Your New iMacYour iMac computer is an all-in-one unit with a number of powerful features and useful resources.
DocumentationYour iMac comes with a User Guide that provides much useful information about your iMac andits operation. This document is a good place to start for an overview of your computer.
CD-ROMsYour iMac also comes with a number of CD-ROMs, including operating system install andrestore discs and iMovie software for editing and creating digital videos.
Computer CaseThe iMac has a transparent case through which you can see the inner computer parts. The casealso has a built-in handle and a flip-up support foot on the front underside.
Monitor, CD Drive, and Speaker.The iMac s monitor is built right into the computer case. Centered just below the monitor is a CDdrive, which reads CD-ROMS and audio CDs. On either side of this drive is a built-in speaker.Headphone jacks are located by the left speaker.
Apple Pro Mouse and Apple Pro KeyboardYour iMac comes with the recently released Apple Pro Mouse and Apple Pro Keyboard. Themouse uses optics and is highly responsive. The keyboard features full-sized keys and is de-signed to be comfortable to use.
Ports, Sockets, and ButtonsAt the back of the computer case is a power cord socket for the AC cord that brings power toyour computer. Along the right side is a panel with a number of ports for connecting devices andconnecting to the Internet, including:
• USB ports for connecting USB devices, including your mouse, keyboard and floppy drive.• FireWire ports for connecting digital video cameras and other FireWire-enabled devices.• An Ethernet port for connecting an Ethernet cable to connect to a network and the Internet.• A microphone port for connecting microphones for sound input.• A speaker port for connecting external speakers for sound output.• A VGA port on the back center of the case for connecting your iMac and sending your monitorsignal to an external monitor.

Mac OS 9 and Peripherals 4
Additionally, there is an access door below the VGA port through which the inside of the com-puter can be accessed to install additional memory or a wireless network card.
On the right side panel are two buttons: a recessed programmer’s button (don’t use), and a resetbutton with a triangle on it for restarting your computer when all else fails.
Your computer is an iMac DV edition, meaning that it has high-speed FireWire ports and iMoviesoftware for importing and working with digital video.
PeripheralsA peripheral is an external or internal device that attaches to your computer and provides a certainfunction. Your computer came with all peripheral software installed. Make sure all peripherals areconnected to the computer.
Mouse and KeyboardAs typically installed, your Apple Pro Mouse connects into the USB hub in your Apple ProKeyboard, which connects to your computer via one of the USB ports on the right side controlpanel.
PrinterYour LexMark printer provides you printing capability. This printer can be connected directly toyour iMac via a USB cable, but can also be connected to the network using the includedLexmark Marknet X2000 networking device, which allows multiple computers to share the oneprinter. In a classroom with 5 computers, for example, all 5 computers can share the one net-worked printer. The printer has its own manual and software.
Floppy driveDespite the growth of networks, floppy disks are still used for storing and transferring files. YourVST floppy drive connects via USB. This floppy drive has both a guide sheet and its own soft-ware.
HeadphonesYour computer came with a pair of headphones which allows any user to hear computer-gener-ated sounds without disturbing others nearby.

Mac OS 9 and Peripherals 5
Introduction: OS 9 - The Mac Operating SystemWhen you turn on your computer, the operating system loads and begins its work of managing theactivities of the computer.
Turning on your MacWith your iMac setup and connected to a power supply, you are ready to turn on your computer. Toturn on your computer, push the round On/Off button on the front of your iMac, between the twocolored speakers on your computer.
When your computer successfully starts up:1. The computer makes a chime.
2. The screen brightens and a folder icon with a happy face on it appears in the center of thescreen.
3. The following Macintosh OS logo appears, replacing the happy face.
Mac OS 9 Logo
4. Control panel icons appear one at a time at the bottom of the screen as the computer loadsthem into memory.
5. All previous images disappear as the desktop appears and the computer concludes its startupprocess.
Troubleshooting Powering Up your iMacIf your iMac does not start up successfully, you must explore the potential causes to troubleshootthe exact cause and correct the problem. The following scenarios are the most common. Refer tothe Troubleshooting section of your iMac User Guide for additional information.
Blinking Question MarkIf a folder with a blinking question mark appears in the center of the screen instead of a folderwith a happy face, then the computer is not able to locate the installed system folder and files.This can occur for a number of reasons, including a corrupted system file, a failed hard drive, or,less likely, the lack of an installed system folder. If you encounter a blinking question mark,follow these steps:

Mac OS 9 and Peripherals 6
1. Turn the computer off, wait, then turn it back on.
2. If necessary, push and hold the On/Off button located just below the computer monitor andbetween the two colored speakers for 5-10 seconds to force a restart.
3. If steps 1 and 2 do not work, unplug the computer from the wall, wait to the count of 10, thenplug the computer back into the wall. Repeat step 2
4. If the computer still does not start up, contact your site technology coordinator or appropriateApple tech support for assistance.
Power IssuesIf the computer does not chime, make any noise, or display any light on the computer monitor,then there may be a power supply issue. Follow these steps:
1. Make sure that the power cable is plugged into the wall.
2. Make sure that the power cable is plugged into the computer
3. Make sure that the AC outlet on the wall is working properly.
4. Make sure the USB cable from the keyboard is connected to the USB port on the computer.
5. Make sure that any item associated with the computer, such as a surge protector or extensioncord has all switches in the On position.
Shutting Down Your ComputerThe computer has sensitive hardware and software components that can be damaged if thecomputer is not shut down properly. To avoid damaging these items, be sure that the computer isfully turned off and powered down before ever unplugging it.
To turn off the computer, select Shut Down from the Special menu.
Other Power Issues - Connecting and Disconnecting CablesThe computer can also be damaged immediately or over time if certain cables are connected ordisconnected while the computer is on. To avoid such damage, follow these guidelines for con-necting or disconnecting cables.
Cables that can safely be connected or disconnected while the computer is turned on include:
• USB cables, such as those that connect your mouse and keyboard or your VST external floppydrive to the computer.• FireWire cables, such as those used to connect to some scanners, CD-ROM burners, digitalcameras, and other devices.• Ethernet cables, such as the one that connects your computer to the school network.

Mac OS 9 and Peripherals 7
Cables that should only be connected or disconnected when your computer is off include:
• The Power cable which connects the computer to the AC outlet on the wall.• The Microphone cable which connects an external microphone to the computer.• Speaker and headphone cables which connect external speakers and headphones to the com-puter.

Mac OS 9 and Peripherals 8
The Mac OS9 Desktop (aka Finder)The Macintosh desktop, also known as the Finder, appears when your computer has fully started upand is ready to be used. The desktop contains several standard icons that represent elements of yourcomputer, including the hard drive (Macintosh HD) located tin the upper-right corner and the Trashlocated in the bottom right corner. Along the bottom left edge sits the control strip, and menus arelocated along the top.
Desktop or Finder
The computer interface is a metaphor for a physical world workspace, such as your classroom,which contains both a desk (and desktop) and file cabinet. In your classroom, you must managepapers. Your papers may be loose or placed into folders, and those papers and folders can sit on yourclassroom desktop or in your file cabinet. In your classroom file cabinet, you likely use some type oforganization scheme.
In your computer workspace, you have a desktop and hard drive. You must manage files. Your filesmay be loose or placed into folders. Files and folders can sit on the desktop or on your hard drive.On your hard drive you will likely use some type of organization scheme. We will discuss filemanagement and the hard drive later in this module.
NavigatingNavigation is the metaphor for moving throughout your computer. You navigate across the desktopand through the hierarchical levels of the hard drive. Once you reach a target folder, file, or appli-cation on the computer, you can then open and use it. Within an active file in an open application,you navigate to access commands and select where to create your content.
Moving the PointerMove the pointer by moving the mouse. When you move the mouse up (away from you), thepointer moves up the screen. When you move the mouse down (towards you), the pointer movesdown the screen. As you move the mouse left or right the pointer moves left or right, on thescreen. The speed at which you move the mouse correlates to the speed the pointer moves on themonitor screen.
Mac OS 9 and Peripherals 9
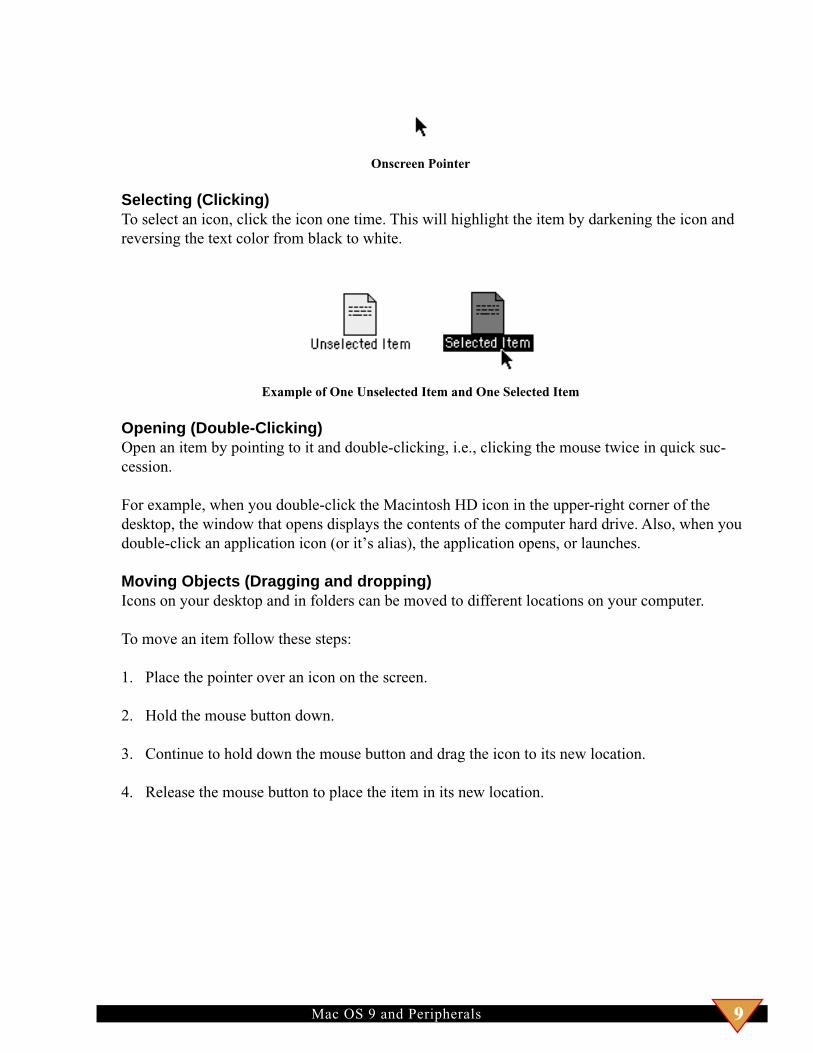
Onscreen Pointer
Selecting (Clicking)To select an icon, click the icon one time. This will highlight the item by darkening the icon andreversing the text color from black to white.
Example of One Unselected Item and One Selected Item
Opening (Double-Clicking)Open an item by pointing to it and double-clicking, i.e., clicking the mouse twice in quick suc-cession.
For example, when you double-click the Macintosh HD icon in the upper-right corner of thedesktop, the window that opens displays the contents of the computer hard drive. Also, when youdouble-click an application icon (or it’s alias), the application opens, or launches.
Moving Objects (Dragging and dropping)Icons on your desktop and in folders can be moved to different locations on your computer.
To move an item follow these steps:
1. Place the pointer over an icon on the screen.
2. Hold the mouse button down.
3. Continue to hold down the mouse button and drag the icon to its new location.
4. Release the mouse button to place the item in its new location.

Mac OS 9 and Peripherals 10
Onscreen ObjectsIn this section you will explore the different types of objects that appear onscreen and how to interactwith them.
IconsEach item stored on the computer is represented by a picture, or icon, to assist you with identifica-tion. Becoming familiar with these icons will help you efficiently use your computer.
Icons that Can Be Bound on Your Computer.
AliasesAn Alias is a small file that acts like a pointer to another file, application, folder, or remote server.You can place aliases of items in convenient locations on your computer to provide rapid access toitems. Alias icons contain a small arrow as part of the icon itself and use italic text for their name.
An Alias for Microsoft Word
For example, you may want to place an alias of a document or application you often use ontoyour desktop. When you double-click the alias, the file or application it is associated withlaunches, without you having to find that file or application on the computer. To create an aliasfollow these steps:
1. Click to select the icon of the file, folder, or application for which you want to make an alias.
2. From the File menu, select Make Alias.
3. An alias is created in the same folder as the original item or on the desktop if that is wherethe original is located. Move this alias to any desired, convenient location.
Control StripThe Control Strip sits along the bottom of the desktop in the left corner. It can be extended andretracted by clicking the tab. When extended, the Control Strip displays a variety of plug-in utili-ties that provide easy access for changing settings on your computer or accessing certain applica-tions.
Control Strip, Expanded

Mac OS 9 and Peripherals 11
Hard Drive and its ContentsAll applications and files are stored on the hard drive of the computer. Double-click the hard driveicon to view the top level contents.
FoldersA folder works the same as the folders in a file cabinet. A folder assists you with organizing yourfiles into groups for easy retrieval. You can nest folders, that is, place folders inside of folders.Certain folders, including the Applications folder, are identified by a customized icon. Double-click any folder to open it and view its contents.
Icons for Plain Folder and Applications Folder
ApplicationsApplications are programs used to create documents and other files or to perform certain func-tions such as enabling browsing of the Web. Open an application by double-clicking it’s icon.
Application Icons for Microsoft Word and Internet Explorer
Files (Documents)Files or documents are the saved work created using an application. To help you identify theapplication that was used to create a document, each application uses a unique document icon.Open a document by double-clicking its icon.
SimpleText File and Word File
System SoftwareThe most important folder on your hard drive is titled System Folder. This folder contains all ofthe necessary system files to make your computer function. The System folder also has a specialdouble smiling face icon that identifies it as the system folder. The System folder opens like aregular folder, by double-clicking its icon. Be careful, however to not move items from thisfolder, or your computer may not function properly.

Mac OS 9 and Peripherals 12
System Folder Icon
Windows, Window Elements, and Window ManagementWhen you double-click a folder or document, a window opens to display the item’s contents. Thiswindow can be manipulated a number of ways to suit your preferences and accommodate yourworkflow.
Title BarThe title bar is located at the top of each window and contains the name of the folder or docu-ment that is open. The title bar indicates if the window is the active window.
Windows and Elements of Windows
For example, if you open two windows, one will be in the foreground (active) and the other willbe in the background (inactive). The darker tint title and the presence of gray horizontal lines inthe title bar identifies the active window.
Scroll Arrows, Channels and BoxesOften times the window contains more content than will fit within the viewable section. Whenthis occurs, use the scroll arrows on the right bottom corner of the window to scroll through theentire contents of the window. As you scroll, the scroll box moves up or down or left and right inthe scroll channel, indicating the distance to the end of the window.
Scroll through the window contents by either:

Mac OS 9 and Peripherals 13
• Repeatedly clicking the up or down arrow on the scroll bar.• Click and hold either arrow to move more rapidly through the contents• Click and hold the scroll box and drag it up or down.• Click the scroll channel above or below the scroll box to jump up or down.
SizerUse the sizer to resize a window.
1. Click and hold in the lower right corner of the window.
2. Drag the window up, down, and sideways to achieve the size window you want.
Close Box and ClosingUse the close box to close a window.
1. Point the mouse over the upper left corner of the window you want to close.
2. Click inside the close box. The window closes.
Moving and Positioning WindowsWindows can be moved around the screen to make viewing objects behind it easier or for orga-nizing multiple open windows. To move a window, follow these steps:
1. Click and hold the title bar of the window OR along any either of the window.
2. Drag the window to the desired location.
3. Release the mouse button.
Mac TutorialYour iMac came with an installed multimedia tutorial which presents basic techniques for usingyour computer.
Using the Mac Tutorial to Learn/Review Mousing TechniquesThe Mac Tutorial is a visual, interactive tutorial on Macintosh Basics. One section focuses onmouse techniques. For further instruction on the topics already covered in this lesson, followthese steps to begin the Mac Tutorial:
1. Point to the Help menu.
2. Click once on the Help menu.
3. Move your mouse down to the third selection titled Mac Tutorials and click the mouse.
4. Click the blue words titled Desktop Skills.
5. Follow the instructions of the tutorial.

Mac OS 9 and Peripherals 14
The Menu Bar and MenusThe menu bar is at the top of the Desktop and contains a many menus. Think of each menu as acategory within which similar items and commands are organized. These menus change dependingon which application is currently running.
Menu Bar along the top of the Desktop
To Select from a Menu:1. Point to the word representing the menu you want to open such as File, Edit, or View.
2. Click the word. The menu opens and remains open.
3. Point to the desired item or command and click to select it. Your selected item opens or yourselected command is executed.
File Menu
Application MenuThe Application menu shows you which applications are running on your computer at any giventime. It is also an area where you can switch between running applications, hide applications, orshow hidden applications.
To view which applications are presently running on your computer:
1. Point to the Application menu icon in the upper right corner of your desktop.
2. Click to open the Application menu. The Application menu lists the open, or currently run-ning, applications. The currently active application, that is, the one you are currently using, isdenoted by a checkmark.

Mac OS 9 and Peripherals 15
Note: When viewed on a CD or web site, this training module requires both Adobe Acrobat andInternet Explorer to be running, hence their appearance in the Application menu. Because youare actually viewing this training module through Internet Explorer, it will be checked as thecurrently active application.
Application Menu with Internet Explorer Active
To hide an application:
1. Make sure the application that you want to hide is the currently active application.
2. Click the Application menu. The first item in the menu will be "Hide (name of currentlyactive application)."
Selecting Hide Internet Explorer
3. Click this first item. The window for the currently active application disappears and anotherapplication or the Finder becomes active.
To show and make active an hidden application:
1. Click the Application menu.
2. Click the name of the hidden application you want to show.
Selecting to Show Internet Explorer
3. The application’s window appears in the foreground.

Mac OS 9 and Peripherals 16
Create a Floating Application MenuYou can make the application menu float anywhere on your desktop. It will always appear in theforeground, regardless of which application is active. This technique is useful when you need tofrequently switch between applications. You can place the floating application menu at a conve-nient location, close to where you are working, and switch between applications with a singleclick. To open the floating application menu, follow these steps:
1. Point to the Application menu then press and hold down your mouse.
2. While continuing to hold the mouse button down, drag your mouse downward past thebottom of the Application menu.
3. The Application menu will be "ripped off" its original location. A rectangular ghost outlineremains as long as you hold your mouse down.
Floating Application Menu Ghost
4. Drag the ghost outline to where you want to place the Application menu.
5. Release your mouse and the floating Application menu appears.
Floating Application Menu, Icons and Application Names
6. View the Application menu with application icons and names or with icons only. Click thezoom box, second from right in the title bar of the menu, to toggle between these two options.
Floating Application Menu, Icons Only
7. To switch between applications, click the icon for the program you want to make active.
Note that the standard Application menu remains active and accessible even when the floating

Mac OS 9 and Peripherals 17
version is selected.
9. To close the floating Application menu, click the close box at the top left of the floatingApplication menu.
Apple MenuThe Apple menu is located in the upper left corner of the desktop and is represented by a multicol-ored apple icon. The Apple menu allows you to easily access frequently used applications andutilities, such as Control Panels and the Chooser.
By default, the Apple menu supports submenus, a feature that can be turned on or off in the AppleMenu Options control panel. Many of the items listed in the Apple Menu have triangular arrows onthe same line indicating a submenu for that item. When the submenus feature is active, pointing toan item with a triangle produces its submenu contents without having to open multiple windows.
Accessing the Appearance Control Panel Through the Apple menuIn a moment you will be using the Appearance control panel to customize your computer’sappearance. Open this control panel by selecting it from the Control Panels submenu followingthese steps:
1. Point to the Apple menu and press and hold down your mouse.
2. Drag down to Control Panels, but do not release. The triangular arrow indicates that theControl Panel has a submenu associated with it. The Control Panel submenu appears to the right.
3. Continuing to hold down your mouse, move to the right into the submenu then up to theAppearance control panel and release the mouse. The Appearance control panel appears.
Modify Your Desktop Using the Appearance Control PanelYou can change certain settings on the computer to customize it for your own aesthetic andpractical purposes. To change the overall appearance of the computer s background and win-dows, follow these steps
1. In the Appearance control panels, Click the Themes tab in the upper left corner.
2. Use the bottom scroll bar to view available themes.
3. Select a theme you want to apply to your computer by clicking its colored window.
4. Close the Appearance window by clicking the close box in the upper left corner of the win-dow. The selected theme is applied.
Recently Used FeatureClick the Apple menu to open it. Note the three recently used items folders:
• Recent Applications

Mac OS 9 and Peripherals 18
• Recent Documents• Recent Folders
Each of these folders automatically keeps aliases of the last 10 items you accessed. For example,if you quit Internet Explorer and then want to open it again, simply select Internet Explorer fromthe Recent Applications Apple menu item.

Mac OS 9 and Peripherals 19
OS 9 Help Resources - Help Center and Mac HelpThere are numerous options available to access additional help resources for the Macintosh operat-ing system and associated applications. All help items are available under the Help menu at the topof your screen.
Help CenterThe Help Center accessed through the Help menu is a compilation of all the help topics availableon the Macintosh. From the Apple DVD Player and AppleWorks to Mac Tutorials and QuickTimeHelp, the help files are all available here. You can type one or more words into the search field tofind particular help documents you need.
Mac HelpMac Help, a subset of the Help Center, is accessible via the Help Center or directly from the Helpmenu. The Mac Help documents reference Macintosh operating system help files only. These arethe features of the Macintosh that are referred to in this module and are helpful for productive useof the Macintosh.
To use Mac Help to Learn about Working with Icons.
1. From the Help menu, select Mac Help.
2. Click the Shortcuts and Tips.
3. In the right column of the Mac help window, click Keyboard shortcuts.
4. In the next window, click Working with Icons.
5. Review the resulting window to learn some useful techniques for working with icons.
NOTE: You could alternately use the search feature of Mac help and search for the word "icon,"which would open a window with information pertaining to icons.

Mac OS 9 and Peripherals 20
Searching and Finding with OS 9OS 9 features a search tool called Sherlock 2, named after the famous detective. Sherlock 2 helpsyou locate everything from files on your computer to Internet web sites.
Finding items and information with Sherlock 2Sherlock 2 allows you to search the Internet without even launching a web browser. Sherlock 2Uses Internet search engines to find files on the Internet. Sherlock 2 can be accessed a number ofways:
• From the File menu, select Find.• From the File menu, select Search the Internet.• From the Apple menu, select Sherlock 2.
The Sherlock 2 window opens. Sherlock 2 uses the concept of channels to organize its searchresources. Each of these methods preselects a channel to search:
• Selecting Find from the File menu preselects the Files channel.• Selecting Search the Internet from the File menu or Sherlock 2 from the Apple menu preselectsthe Internet channel.• Eight channels are available for search. Regardless of how you opened Sherlock 2, you caneasily switch between channels by clicking any channel icon. The eight channels:
• Files - The contents of the computer or local network• Internet - Internet web sites• People - People on the Internet• Shopping - Shopping web sites• News - News web sites• Apple - Apple’s web site• Reference - Reference web sites• My Channel - Your own customizable channel
Sherlock 2 Window

Mac OS 9 and Peripherals 21
Exercise: Searching for Files or Applications on the ComputerSherlock can locate files and applications on your computer hard drive and local network drives.
1. Use one of the three previously mentioned methods to open the Sherlock 2 application.
2. From the Sherlock 2 window, select the first channel titled Files.
3. Type all or part of the name of a file or application in the search field, for example, InternetExplorer.
4. Click the magnifying glass or press Return on the keyboard.
5. The results are displayed in a small window below your search string. Click one of the resultsin the results window.
6. The bottom window displays the path to locate the file, which usually begins with openingyour hard drive.
7. Alternately, you can double-click the file within the bottom Sherlock 2 window to launch theitem directly from the results window.

Mac OS 9 and Peripherals 22
Using Other Disks and DrivesYour iMac is equipped with an internal CD/DVD ROM drive and an external floppy drive.
CD DriveThe CD drive reads CDs, both audio CDs and CD-ROMs that have been inserted into the drive.CD-ROMs contain data and are typically used for installing new software or for accessing pro-grams, including games, and data, including images and movies. Audio CDs contain data in theform of sound files.
Using a CD-ROMTo use a CD-ROM disk, follow these steps:
1. Insert the CD-ROM disk, with the label side up, into the CD/DVD ROM slot between thetwo colored speakers on the computer.
2. An icon of the disk appears on the computer desktop hard drive icon.
Microsoft Office 2001 CD-ROM Icon on the Desktop
3. Double-click the CD-ROM icon to view the contents of the disk.
4. Use a CD-ROM disk as you would the hard drive or other folders on the computer bydouble-clicking icons to open them.
There are a number of ways to remove a CD-ROM from your computer:
• Click and drag the CD-ROM icon into the trash.• Press the Eject key located at the top right corner of the keyboard.• Click the CD-ROM icon to select it, then from the Special menu select Eject.• Click the CD-ROM icon to select it, then from the File menu select Put Away.
Playing an Audio CDThe computer can play audio CDs through the internal speakers or through an optional headsetplugged into the computer. To play an audio CD, follow these steps:
1. Insert the audio CD as instructed above.
2. The CD should begin playing automatically; if it does not double-click the audio CD icon onthe desktop, then double-click the first track (file) that appears in the resulting window.
3. The music will begin to play and the Apple CD player application will open. This programgives you greater control of CD playback.

Mac OS 9 and Peripherals 23
To select specific tracks and settings using the control strip plug-in, follow these steps:
4. Click the disk icon on the control strip at the bottom left corner of the screen.
5. Click the track number you want to hear or one of the commands you want to select.
Pop-up CD Menu and CD Button on Control Strip
Floppy DriveThe floppy drive is used mainly for writing and reading data, such as documents and small applica-tions to and from a floppy disk. In some cases floppies are still used to install software. A floppydisk is square and can hold up to 1.4MB of data.
Floppy Drive and Floppies (Floppy Disks)Inserting and Using a Floppy Disk
Hold the floppy disk with the label side up and the metal slider away from you, towards thefloppy disk drive.
Insert the floppy disk into the external floppy disk drive by pushing the disk all the way into thedisk drive until you hear and/or feel a click indicating that the disk is set in position.
An icon of the disk appears on the computer desktop just below the hard drive icon.
Double-click the floppy disk icon to view the contents of the disk.
The Macintosh can read both Windows (PC) formatted disks and Macintosh formatted disks.Initializing is a process that the computer uses to format a disk and to be able to read and writedata to the disk. To initialize a disk, follow these steps:
1. Insert the disk into the VST external floppy drive.
2. If the disk is not already initialized, a dialog window will prompt you to initialize the disk.

Mac OS 9 and Peripherals 24
3. To proceed, click Initialize. Note that initializing will erase all existing data on the floppydisk, however if you have never written any data to the disk, then there is no data to lose.
4. The status of the initialization process is displayed. When initialization is complete, thefloppy is ready to be used.
Initialize Disk Dialog Window Box
Ejecting a Floppy Disk• There are numerous ways to remove a floppy disk from your computer:
• Click and drag the floppy disk icon into the Trash icon.• Click the floppy disk icon to select it, then from the Special menu select Eject.• Click the floppy disk icon to select it, then from the File menu select Put Away.

Mac OS 9 and Peripherals 25
Managing Your WorkThe management of your documents, applications, and folders is very important. Like your teacher’sdesk and file cabinet, if you do not have some form of organization, it is extremely difficult to keeptrack of items and to use your resources efficiently.
Organizing Your Hard Drive (File Cabinet)The computer desktop is the starting point for the hierarchical organization of a computer, and thehard drive is the first level. Frequently used documents and aliases pointing to frequently usedapplications are often located on the desktop of a computer. Opening the hard drive is like openingyour file cabinet when you view the contents of the hard drive (double-click the hard drive icon)you will notice folders that contain additional files, folders and applications.
Creating foldersFolders are a convenient way to organize items on the computer. To create a folder, follow thesesteps:
1. Double-click the hard drive.
2. From the File menu, select the New Folder. A new folder is created in the active window,which in this case is the root level of the hard drive.
3. Click the new folder’s name and then press the Return key.
4. The folder name is highlighted and is ready to be replaced by a new name.
5. Type My Documents, then press the return key to deselect the name
Nesting FoldersPlacing folders inside of folders is a practical way to organize your documents. Inside your MyDocuments folder you may want to create additional folders and levels for organizing storedfiles.
1. Double-click the My Documents folder that you just created to open it.
2. From the File menu, select New Folder to create another folder nested inside the My Docu-ments folder.
3. Title this folder with a name useful for you, for example, Lesson Plans.
4. Within Lesson Plans, you may want to create folders for the different content areas.
There is no right or wrong way to organize. Use a scheme that best suits your own needs.

Mac OS 9 and Peripherals 26
Working with DocumentsYou will likely find that skills developed using one program and be applicable to other programs.Many commands are executed in a similar or identical way in different applications. SimpleText isa basic text editor built into the Mac OS. Let’s use it as our example application.
Open an Application (SimpleText)You must first open an application before you can create or modify documents.
1. Locate the icon for the SimpleText application in the Applications folder on your hard drive.
2. Double-click the application icon to launch (open) the SimpleText application. A new, blankSimpleText document opens.
Enter TextTo enter text into your document, be sure the cursor is blinking in your document then simplybegin typing.
Editing Text by Selecting, Cutting, Copying, and PastingEditing on the computer is easily accomplished. You can rearrange text in your document bycutting, copying, and pasting words, sentences, paragraphs, even entire documents.
1. Type a sentence into SimpleText. Use the following sentence you d like:
Learning to use the computer can have a positive effect upon my curriculum and student learningin my classroom.
2. Select the whole sentence by clicking and holding the mouse button just to the left of the firstword (Learning) and then dragging the mouse to the right side of the last word (classroom).
3. Release the mouse when all text is selected.
4. From the Edit menu, select Copy. Now the computer will remember the entire sentence thatyou selected.
5. Click the mouse after the last word in the sentence and press Return twice to move the cursordown to the next line.
6. From the Edit menu, select Paste.
The same sentence you just wrote, selected, and copied, is now pasted into the document. Youcan paste the same sentence as many times as you want and the computer will remember thissentence until you either select and copy a new letter, word, or sentence, or until you shut downthe computer.

Mac OS 9 and Peripherals 27
Undo CommandIf you paste a section by mistake, you can undo your mistake.
1. From the Edit menu, paste another sentence into your document as described above.
2. From the Edit menu, select Undo.
The text will be erased and the document will revert back to its appearance prior to the last paste.Some applications, including Microsoft Office 2001, provide an option for multiple Undo com-mands, which permits you to backtrack through the creation of your document, one step at atime.
Save a DocumentThe document you have just created needs to be saved to the hard drive for safe storage andfuture access.
1. From the File menu, select Save. The Save Dialog box opens the word Untitled is highlightedand ready to be replaced with a title of your choosing.
The Save Window
2. Type Practice Document into the field.
3. Click the Desktop button. (If the Desktop button is gray, then the computer is ready for thenext step).
4. The drop down menu at the top of the dialog box should now say Desktop and the Desktopbutton on the right should be grayed out (this indicates that the file you are about to save will besaved to the desktop location of the computer).
5. Click Save.

Mac OS 9 and Peripherals 28
The SimpleText document will reappear and the saved file will be stored on the computer desk-top close to the Hard Drive icon.
Save AsThe File menu contains an option to Save As which is used to make new versions or copies of adocument. If, for example, you want to save another copy of this document to modify, yet main-tain a copy of this document in its present state, select Save As... from the File menu and save thedocument with a different name. You will then have a duplicate of this document with a differentname that you can modify as you wish.
Saving Directly to Desired Storage LocationTo save a document into a different folder, such as the My Documents folder, instead of theDesktop, follow these steps:
1. With your SimpleText document open, select Save As from the File menu.
2. Click the Desktop button (if the Desktop button is gray, then your computer is ready for thenext step). The drop down menu at the top of the dialog box should now say Desktop.
3. Double-click the words Macintosh HD in the location window.
4. Double-click the My Documents folder in the location window. The drop down menu at thetop of the dialog box should now say My Documents which indicates that this is where the filewill be saved.
5. Click Save.
Printing Your DocumentBefore you are able to print your document, you must inform the computer what printer youwould like to use. Your iMac arrived with a companion LexMark printer. It may already be set upon your computer. Look for a LexMark printer icon on your desktop with a bold outline whichindicates that it is the active printer. If this icon is present, you are ready to print. Otherwise,follow these steps:
1. With your SimpleText document open, select Chooser from the Apple menu. In the left paneof the Chooser window are listed the various printer drivers installed on your computer.
2. Click the driver that corresponds to the type of computer you are going to use, in your case,the LexMark printer driver. (If there is no LexMark printer driver, you will need to install thesoftware or contact your technical support for assistance).
3. Available printers for this driver appear in the pane at right. Select the appropriate LexMarkprinter, that is, the one in your classroom to which you will print.
4. Close the chooser. Click the close box.

Mac OS 9 and Peripherals 29
5. From the File menu, select Print. The print dialog box opens with options including thenumber of copies you wish to print.
6. Click the lower right button titled Print.
7. The printer prints the document.
Closing the DocumentClick the close box to close the document but keep the application open. To quit the application,select Quit from the File menu.
Note, you can also Quit before closing the document window. If your document has not beensaved since the last change you made, you are to save the changes or to discard them before theapplication quits.
Additional File Management TechniquesAfter you have created a file, you may want to move it to a new location, make a duplicate copy, ordelete the file.
Moving a FileAn easy way to move a file from one location to another is to have both the original file locationand the target new location in view on the desktop. To move a file to a new location, follow thesesteps:
1. Point to the icon for the file you want to move then click and hold down the mouse.
2. Keep holding down the mouse button and drag the file to its new location.
Spring Loaded WindowsYou many need to place a file into a folder that is several layers down in the folder hierarchy. Toput the folder where you want it without having to open all the folders manually, follow thesesteps:1. Click and drag the file, and pause over the top-level folder. That folder opens automatically.
2. Keep holding down the mouse button, drag the file, and pause over the next folder. Thatfolder opens automatically.
3. Repeat step 2 until you find the folder you need, then release the mouse button to place thefile into the folder.
Duplicating a fileTo make an exact duplicate of an existing file, follow these steps:
1. Select the file by clicking its icon one time.
2. From the File menu, select Duplicate.

Mac OS 9 and Peripherals 30
3. An exact copy of the file is created in the folder (or desktop) where the original file is lo-cated.
4. The duplicate file has the same name as the original with the addition of the word Copy at theend.
Dragging or Sending a File to the TrashTo delete an unwanted file, follow these steps:
1. Click and drag the file to the trash which is located in the lower right corner of the desktop.
2. As the file passes over the top of the Trash, the icon will highlight (become darker).
Placing an Unwanted Folder in the Trash
3. While the Trash is highlighted, release the mouse button.
4. The Trash icon changes to a Trash can with it’s lid off to the side, indicating that the Trashhas items in it.
Retrieving Files from the TrashLike trash in the garbage can in your classroom, it is possible to retrieve files from the Trashuntil the Trash can is emptied. The computer’s trash acts like a folder. Double-click the Trashicon to view its contents. Drag the items you want to retrieve from the Trash window into an-other window or folder or onto the desktop.
Emptying the TrashWhen you are sure that you no longer need the files located in the Trash, you can empty the trashto free up some space on the hard drive.
1. From the Special menu, select Empty Trash.
2. A dialog box opens asking you to confirm that you want to delete all the items in the Trash.
Empty Trash Confirmation Dialog Box

Mac OS 9 and Peripherals 31
3. Click OK to empty the Trash.
Additional Techniques for Window ManagementThere are other items that are helpful to know that will assist you with window management.
View Options for Viewing Folders and Files in a Window
Window ShadeMultiple open windows can clutter the computer screen. Window Shade will assist you withminimizing window sizes and make it possible to view items that reside behind open windows.
• Click the Window Shade area of a window (top right corner) to collapse the window.• Click the Window Shade area again to restore the window.
Zoom BoxClick the Zoom Box to expand a window to the largest size necessary to view all of its contents,or to fill the entire screen. Clicking the zoom box again toggles the window back to the previoussize.
Changing Your ViewAs demonstrated in the previous graphic, you can view windows in a variety of formats. Tochange the view for an open and active window, follow these steps:
1. From the View menu, select As List.
2. The contents of the window are now displayed in list format.
3. From the View menu, select As Icon to return to the view as icon format.
Sort Column and Sort OrderWhen viewing as list, you can sort the items in the window by Name, Date Modified, Size, orKind by clicking the respective column heading within the window. You can also reverse the

Mac OS 9 and Peripherals 32
order that items are listed by clicking the Sort Order button in the upper right corner of a ViewAs List window.
Column Headers in List View and the Sort Order buttonCleanupWhen viewing by icon, you can have the computer arrange the icons in order. With an openwindow and View as icons selected, select Clean Up from the View menu. All icons in the activewindow are rearranged in an ordered manner.
Using Your Apple Pro KeyboardThe Apple Pro Keyboard is a full size keyboard designed for comfortable use. In addition to keysfor numbers, letters, and symbols, there are function keys.
Keyboard ShortcutsKeyboard shortcuts make it possible to activate certain menu items without using the mouse.
Most menu items have a keyboard shortcut equivalent listed next to the menu item. For example,under the File menu, next to the Save item is the keyboard shortcut listed as Command-S. TheCommand key is located next to the space bar and has a picture of an apple on it. Pressing thekeyboard command is equivalent to selecting the menu item with the mouse.
Command-S Keyboard Shortcut
For an extensive list of keyboard shortcuts consult, Mac Help.
Mac OS 9 and Peripherals 33
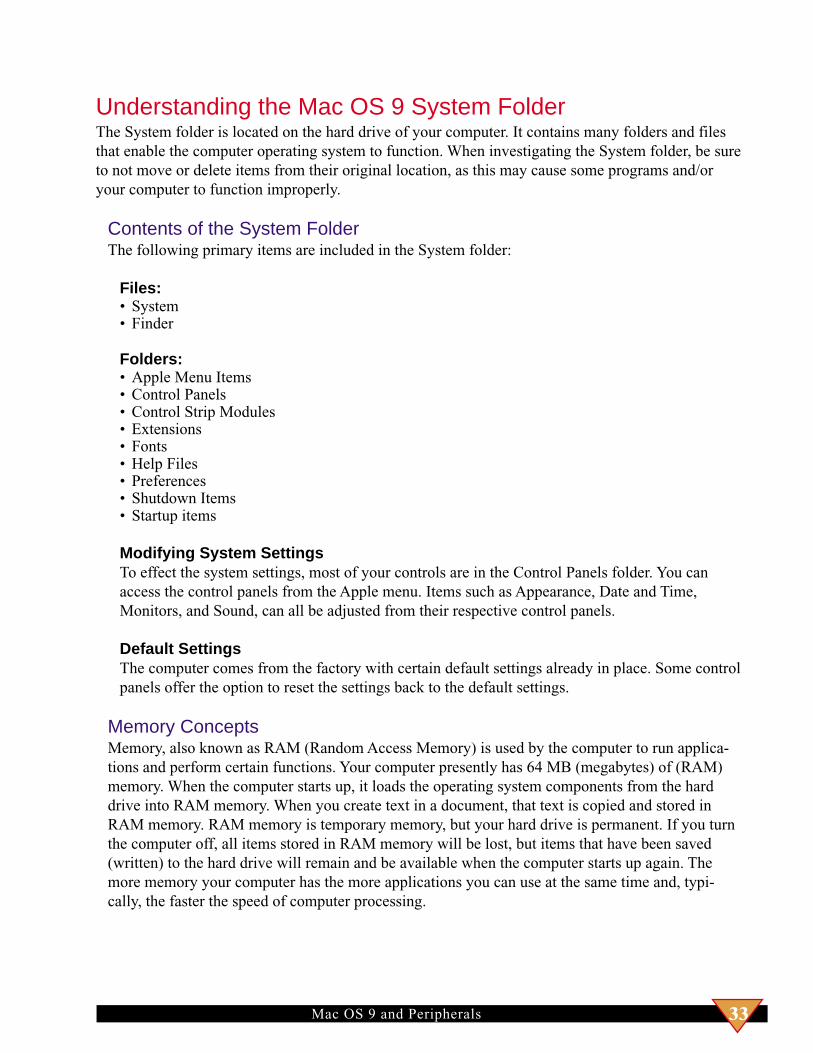
Understanding the Mac OS 9 System FolderThe System folder is located on the hard drive of your computer. It contains many folders and filesthat enable the computer operating system to function. When investigating the System folder, be sureto not move or delete items from their original location, as this may cause some programs and/oryour computer to function improperly.
Contents of the System FolderThe following primary items are included in the System folder:
Files:• System• Finder
Folders:• Apple Menu Items• Control Panels• Control Strip Modules• Extensions• Fonts• Help Files• Preferences• Shutdown Items• Startup items
Modifying System SettingsTo effect the system settings, most of your controls are in the Control Panels folder. You canaccess the control panels from the Apple menu. Items such as Appearance, Date and Time,Monitors, and Sound, can all be adjusted from their respective control panels.
Default SettingsThe computer comes from the factory with certain default settings already in place. Some controlpanels offer the option to reset the settings back to the default settings.
Memory ConceptsMemory, also known as RAM (Random Access Memory) is used by the computer to run applica-tions and perform certain functions. Your computer presently has 64 MB (megabytes) of (RAM)memory. When the computer starts up, it loads the operating system components from the harddrive into RAM memory. When you create text in a document, that text is copied and stored inRAM memory. RAM memory is temporary memory, but your hard drive is permanent. If you turnthe computer off, all items stored in RAM memory will be lost, but items that have been saved(written) to the hard drive will remain and be available when the computer starts up again. Themore memory your computer has the more applications you can use at the same time and, typi-cally, the faster the speed of computer processing.

Mac OS 9 and Peripherals 34
DefinitionsBelow are a few definitions for items pertaining to memory.
• RAM - Random Access Memory. RAM is temporary memory that the computer uses to runapplications and other functions.
• Memory - Comes in the form of a RAM chip and is installed inside the computer.
• System memory - The operating system requires a certain amount of RAM memory to run thecomputer. This is referred to as the system memory.
• Application memory - Each application requires a specific amount of RAM memory to run.This is referred to as the application memory. When you launch an application, the computerreserves this amount of memory for the application.
Adjusting Memory for Memory-Intensive ApplicationsSome applications function better when they are allotted additional memory. To boost the appli-cation memory, follow these steps:
1. Click an application icon to select it.
2. From the File menu, select Get Info then Memory from.
3. The Application Info window opens with the memory settings for the application displayed.
Get Info Window with Memory Requirements and Settings for Adobe Acrobat
4. Adjust the amount of Application Memory allotted to the application.
5. Select the numbers in the Preferred Size field and increase them by 1,000 K or more.
6. Close the window. The next time you start this application, the new memory settings will bein effect.

Mac OS 9 and Peripherals 35
Troubleshooting Computer ProblemsAt times computers will not function properly and will need assistance to recover from the mal-function. The following are some situations that may happen and ways to correct the situation.
First Line of Defense• Save often to avoid losing work.• When your computer appears to be functioning improperly, check to make sure all the cablesare securely plugged in.• Restarting the computer can often times correct a problem. From the Finder s Special menu,select Restart.
Frozen Computer, Mouse MovesIf the computer is not responding to your mouse clicks, but the cursor does move properly, youmay be able to force the application to quit by pressing the following key combination (pressingall keys simultaneously):
Command - Option - esc Key Command
This (hopefully) forces the application to quit. You will lose any unsaved work in the applicationthat quits, however, you will still have the opportunity to not only save work that may be open inother applications but also restart the computer properly. A force quit will not always work. Youmay still have to do a soft or hard restart. Always restart the computer after forcing an applica-tion to quit.
Soft RestartA soft restart, if possible, is always preferable to a hard restart. A soft restart involves a combina-tion of key strokes:
1. Simultaneously press the Command-Option-Shift keys and the Power (On/Off) button.
2. The computer should restart.
The Command-Option-Shift-Power Button Soft Restart Key Command
Hard RestartIf the computer ceases to function and a soft restart does not work, you have no option but torestart the computer. First attempt to force a restart of the computer using the following keycommand:
Force Restart Key Command (some models)

Mac OS 9 and Peripherals 36
If this does not work, press the Hard Restart button on the side of the iMac, where all the cablesconnect to the computer. The Hard Restart button is marked with a small triangle and whenpushed, the computer will immediately go dark before restarting itself.
Shutting Down Your MacIt is important to shut down (turn off) the computer properly each time you are finished using it.The computer s shutdown process involves closing utilities and small applications and if thesefunctions are not performed prior to the computer being turned off, damage may result to thesystem files.
Options for Shutting DownAll Macintosh computers can be shut down from the Special menu. By selecting Shut Down,your computer will close all open documents and applications and turn itself off.
Closing ThoughtsMac OS 9 is a sophisticated operating system that runs your iMac computer. Continuing to expandyour knowledge of the operating system will lead to a greater understanding of how your computerworks. Developing your ability to interact with the operating system will increase the ease andefficiency of using your computer.
ResourcesA list of linked web resources can be found on the Mac OS 9 Resources page.