MA Fixture Builder Manual - lightpower-files.de · The MA Fixture Builder is a tool to create ......
25
Version 1.3 | 2017-05-17 English
Transcript of MA Fixture Builder Manual - lightpower-files.de · The MA Fixture Builder is a tool to create ......

Version 1.3 | 2017-05-17 English
1

Fixture Builder User Manual
© 2017 MA Lighting Technology GmbH | Dachdeckerstr. 16 | D-97297 Waldbüttelbrunn | GermanyPhone +49 5251 688865-30 | tech.support (at)malighting.com | www.malighting.com
Version 1.3
1
1. 3
2. 4
2.1. 4
2.2. 5
2.3. 5
2.4. 6
3. 8
4. 9
4.1. 11
4.2. 11
4.3. 13
5. 14
5.1. 14
5.2. 16
5.3. 16
6. 18
6.1. 20
6.2. 20
7. 21
7.1. 21
7.2. 22
8. 23
9. 24
Table of contentsIntroduction
First Steps
System requirements
Installation on your Computer
Start the Program
Program Surface
Fixture Type Information
Attributes
Mix Color Attribute Table
Add DMX Channels
Delete DMX Channels
Channel Function Ranges
Add Channel Function Ranges
Delete Channel Function Ranges
Wizard
Function Sets
Add a Function Set
Delete a Function Set
Export and Import
Export Fixture
Import Fixture
Release Notes
Index
2

Fixture Builder User Manual
© 2017 MA Lighting Technology GmbH | Dachdeckerstr. 16 | D-97297 Waldbüttelbrunn | GermanyPhone +49 5251 688865-30 | tech.support (at)malighting.com | www.malighting.com
Version 1.3
1
1. Introduction
The MA Fixture Builder is a tool to create fixture types.
It is developed to import fixture types created with the MA Fixture Builder into MA consoles or onPC software.A fixture type created with the MA Fixture Builder ensures a visualization in the MA 3D and dot2 3D.
The following manual includes descriptions of the functions and introduce you step by step in the application.
3

Fixture Builder User Manual
© 2017 MA Lighting Technology GmbH | Dachdeckerstr. 16 | D-97297 Waldbüttelbrunn | GermanyPhone +49 5251 688865-30 | tech.support (at)malighting.com | www.malighting.com
Version 1.3
1
2. First Steps
This chapter describes how to install the MA Fixture Builder and start the program.
It shows you also the program surface for a better overview.
2.1. System requirements
If you want to run the MA Fixture Builder on your PC, here is what it takes.
Operating system Minimum Microsoft Windows® 7 Microsoft Windows® 8 Microsoft Windows® 8.1 Microsoft Windows® 10 Apple OS X 10.10.5 Yosemite
Additional requirements to use certain features:
To use the online help and download the latest version of MA Fixture Builder you need internet access.
To save on an USB stick you need an USB 2.0 or 3.0 port.
We recommend you visit your PC manufacturer´s website for information on updated drivers and hardwarecompatibility.
2.2. Installation on your Computer
4

Fixture Builder User Manual
© 2017 MA Lighting Technology GmbH | Dachdeckerstr. 16 | D-97297 Waldbüttelbrunn | GermanyPhone +49 5251 688865-30 | tech.support (at)malighting.com | www.malighting.com
Version 1.3
1
2.2. Installation on your Computer
Download the latest version from www.ma-dot2.com or www.malighting.com.
The installation is possible in every root directory or in the standard directory "MA Lighting Technologies\MA FixtureBuilder" in the folder "Program Files".
Administration rights:You should have administration rights to install the program.
If you downloaded only the MA Fixture Builder, start the installation file MA_Fixture_Builder_vx.x.exe with a doubleclick.
If you downloaded the MA software release package, extract the file into a temporary folder and start the installationfile MA_Fixture_Builder_vx.x.exe with a double click.
On the screen appears the installation program. You get detailed hints and information regarding the installation.
Watch out for the suggested directory and change it if you want to. The installation directory is not changeable inthe program.
2.3. Start the Program
5

Fixture Builder User Manual
© 2017 MA Lighting Technology GmbH | Dachdeckerstr. 16 | D-97297 Waldbüttelbrunn | GermanyPhone +49 5251 688865-30 | tech.support (at)malighting.com | www.malighting.com
Version 1.3
1
2.3. Start the Program
Start the MA Fixture Builder after installation.To open the MA Fixture Builder, double-click on the desktop icon with the name MA Fixture Builder v.x.x.
A folder called MA Fixture Builder v.x.x. is located in the start menu (Start - All Programs - MA Fixture Builder v.x.x.).
Open and uninstall the MA Fixture Builder in this folder.
To open the program, click on MA Fixture Builder v.x.x.
To uninstall the program, click on MA Fixture Builder v.x.x remove.
Start MA Fixture Builder
2.4. Program Surface
6

Fixture Builder User Manual
© 2017 MA Lighting Technology GmbH | Dachdeckerstr. 16 | D-97297 Waldbüttelbrunn | GermanyPhone +49 5251 688865-30 | tech.support (at)malighting.com | www.malighting.com
Version 1.3
1
2.4. Program Surface
The program surface is divided into four areas.
Fixture Type Information:Type basic information referred to the fixture type and modules.
Channel Function Ranges:Add and delete functions ranges of subattributes.
Function Sets:Add and delete specific functions of subattributes.
Attributes:Add and delete purpose of DMX channels.
Program surface
7
Fixture Builder User Manual
© 2017 MA Lighting Technology GmbH | Dachdeckerstr. 16 | D-97297 Waldbüttelbrunn | GermanyPhone +49 5251 688865-30 | tech.support (at)malighting.com | www.malighting.com
Version 1.3
1
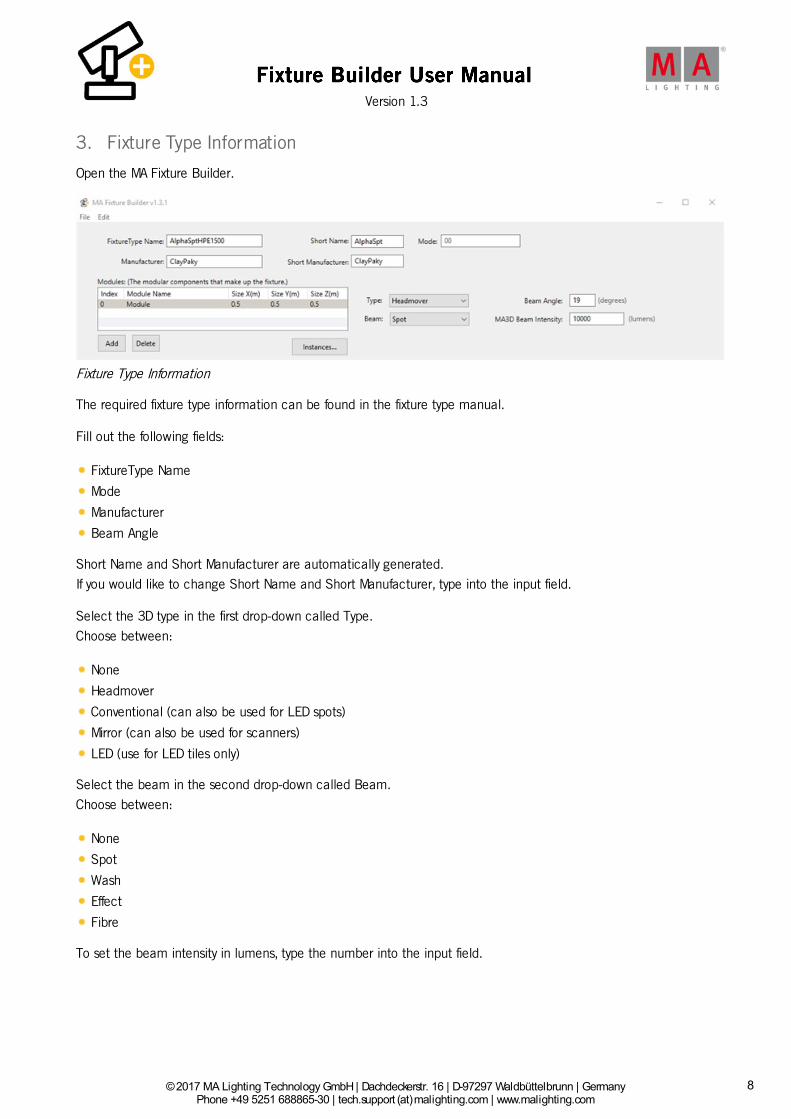
3. Fixture Type Information
Open the MA Fixture Builder.
Fixture Type Information
The required fixture type information can be found in the fixture type manual.
Fill out the following fields:
FixtureType Name
Mode
Manufacturer
Beam Angle
Short Name and Short Manufacturer are automatically generated.If you would like to change Short Name and Short Manufacturer, type into the input field.
Select the 3D type in the first drop-down called Type.Choose between:
None
Headmover
Conventional (can also be used for LED spots)
Mirror (can also be used for scanners)
LED (use for LED tiles only)
Select the beam in the second drop-down called Beam.Choose between:
None
Spot
Wash
Effect
Fibre
To set the beam intensity in lumens, type the number into the input field.
8

Fixture Builder User Manual
© 2017 MA Lighting Technology GmbH | Dachdeckerstr. 16 | D-97297 Waldbüttelbrunn | GermanyPhone +49 5251 688865-30 | tech.support (at)malighting.com | www.malighting.com
Version 1.3
1
4. Attributes
The Attributes display the purpose of each DMX channel.
It is possible to:
Add
Delete
DMX channels in the table Attributes.
To edit the attributes, double-click the cell below a column. The cell is selected and is displayed in blue. Type toedit using the keyboard of your PC.
Attributes
The table Attributes consists of six columns.
Coarse: Displays the coarse 8 bit DMX address.
Fine: Displays the fine 16 bit DMX address.
Attribute: Displays the fixture attribute.
9
Fixture Builder User Manual
© 2017 MA Lighting Technology GmbH | Dachdeckerstr. 16 | D-97297 Waldbüttelbrunn | GermanyPhone +49 5251 688865-30 | tech.support (at)malighting.com | www.malighting.com
Version 1.3
1
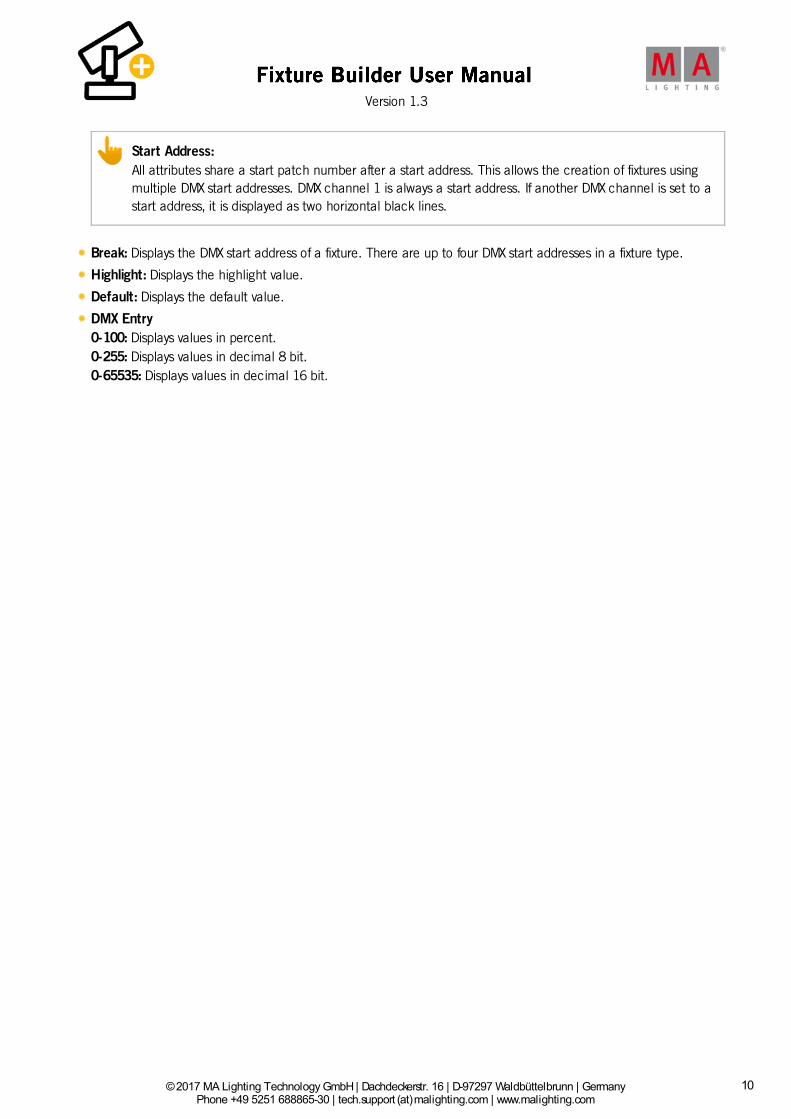
Start Address:All attributes share a start patch number after a start address. This allows the creation of fixtures usingmultiple DMX start addresses. DMX channel 1 is always a start address. If another DMX channel is set to astart address, it is displayed as two horizontal black lines.
Break: Displays the DMX start address of a fixture. There are up to four DMX start addresses in a fixture type.
Highlight: Displays the highlight value.
Default: Displays the default value.
DMX Entry0-100: Displays values in percent. 0-255: Displays values in decimal 8 bit. 0-65535: Displays values in decimal 16 bit.
4.1. Mix Color Attribute Table
10

Fixture Builder User Manual
© 2017 MA Lighting Technology GmbH | Dachdeckerstr. 16 | D-97297 Waldbüttelbrunn | GermanyPhone +49 5251 688865-30 | tech.support (at)malighting.com | www.malighting.com
Version 1.3
1
4.1. Mix Color Attribute Table
This table displays the array of the mix color attributes with their corresponding colors.
For more information on how to add DMX channels see Add DMX Channels.
Attribute ColorCOLORRGB1 RedCOLORRGB2 GreenCOLORRGB3 BlueCOLORRGB4 AmberCOLORRGB5 WhiteCOLORRGB6 Warm whiteCOLORRGB7 Cool whiteCOLORRGB8 OrangeCOLORRGB9 Red orangeCOLORRGB10 PurpleCOLORRGB11 IndigoCOLORRGB12 CyanCOLORRGB13 MagentaCOLORRGB14 YellowCOLORRGB15 UVCOLORRGB16 Green cyanCOLORRGB17 Medium whiteCOLORRGB18 Mint greenCOLORRGB19 LimeCOLORRGB20 Congo blueCOLORRGB21 Royal blueCOLORRGB22 Light green
4.2. Add DMX Channels
Hint:It is recommended that the the DMX channels be added directly in the correct order. This avoidsrearranging channels und setting correct patch breaks afterwards.
To add DMX channels to the fixture, click on Add below the table Attributes.
The window Channel Function opens.
11

Fixture Builder User Manual
© 2017 MA Lighting Technology GmbH | Dachdeckerstr. 16 | D-97297 Waldbüttelbrunn | GermanyPhone +49 5251 688865-30 | tech.support (at)malighting.com | www.malighting.com
Version 1.3
1
Add DMX channels
All DMX channels have to be added complying the selected mode.
1. Select the preset type tab of the DMX channel, for example Color.2. Select the attribute by scrolling down in the Choose Attribute, for example C1.
For more information on mix color attributes see Mix color attribute table. 3. Type the coarse DMX channel, e.g., 13.4. If the attribute has an additional fine DMX channel, check the checkbox 16-Bit.
The program automatically inserts the next number after the coarse channel number.5. Type the fine DMX channel if the automatically inserted channel number is incorrect.6. Type the highlight value corresponding to the encoder readout.
The highlight value is the output of the fixture for this attribute if you press Highlt on the console.If the field is empty and you press Highlt , the programmer values do not change.We recommend you use full dimmer and white color as highlight values. This helps you to find the fixture in arack or on the stage.
7. To save and close the window, click Save and Close.-or-To save and add the next channel, click Save and Add.To close the window Channel Function, click Cancel.
The DMX channel is now saved and added to the DMX channel list.
For information on how to delete DMX channels see Delete DMX Channels.
12

Fixture Builder User Manual
© 2017 MA Lighting Technology GmbH | Dachdeckerstr. 16 | D-97297 Waldbüttelbrunn | GermanyPhone +49 5251 688865-30 | tech.support (at)malighting.com | www.malighting.com
Version 1.3
1
4.3. Delete DMX Channels
It is possible to delete single DMX channels in the table Attributes.
Delete a single DMX channel
1. Select the DMX channel in the table Attributes and click Delete below the table Attributes.2. A warning pop-up appears.
Warning pop-up
3. To delete the DMX channel, click Delete.To abort the operation, click Cancel.
The DMX channel is now deleted.
Important:The DMX addresses Fine and Coarse may have to be adjusted for the following attributes in some cases.
13

Fixture Builder User Manual
© 2017 MA Lighting Technology GmbH | Dachdeckerstr. 16 | D-97297 Waldbüttelbrunn | GermanyPhone +49 5251 688865-30 | tech.support (at)malighting.com | www.malighting.com
Version 1.3
1
5. Channel Function Ranges
Channel Function Ranges display the subattributes of the selected DMX channel.
The basic functions will be created automatically in the Function Sets after a DMX channel was added.
It is possible to:
Add
Delete
channel function ranges.
To edit the ranges of the channel function, double-click the cell below a column. The cell is selected anddisplayed in blue. Type to edit using the keyboard on your PC.
Channel Function Ranges
The table Channel Function Ranges displays seven columns:
3D Subattributes: Displays the subattributes to the selected DMX channel.
DmxFrom: Displays on which DMX value the subattribute starts.
DmxTo: Displays on which DMX value the subattribute ends.
EncFrom: Displays the start entry of subattributes.
EncTo: Displays the end entry of subattributes.
PhysFrom: Displays the start of the physical range used by the 3D.
PhysTo: Displays the end of the physical range used by the 3D.
5.1. Add Channel Function Ranges
Requirement:
Select attribute in the table Attributes.
For more information see Attributes.
To add channel function ranges, click on Add below the table Channel Function Ranges.
14

Fixture Builder User Manual
© 2017 MA Lighting Technology GmbH | Dachdeckerstr. 16 | D-97297 Waldbüttelbrunn | GermanyPhone +49 5251 688865-30 | tech.support (at)malighting.com | www.malighting.com
Version 1.3
1
The window Add Channel Function opens.
Add channel function ranges
1. Select the 3D SubAttribute in the drop-down list. 2. Enter the DMX ranges in the columns Dmx From and Dmx To.3. Select an entry unit on the right of the window. 4. Enter the encoder ranges in the input fields Encoder From and Encoder To.5. Enter the physical range for the 3D in the input fields Physical From and Physical To. 6. To save and close the window, click Save.7. To abort the operation, click Cancel.
The channel function range is now added.
Important:Please make sure that the DMX channel ranges do not overlap.
For information on how to delete a function in the table see Delete channel function ranges.
5.2. Delete Channel Function Ranges
15

Fixture Builder User Manual
© 2017 MA Lighting Technology GmbH | Dachdeckerstr. 16 | D-97297 Waldbüttelbrunn | GermanyPhone +49 5251 688865-30 | tech.support (at)malighting.com | www.malighting.com
Version 1.3
1
5.2. Delete Channel Function Ranges
It is possible to delete channel function ranges.
1. Click to select the channel function in the table Channel Function Ranges.2. Click Delete. 3. The function is now deleted.
5.3. Wizard
The table Channel Function Ranges offers a Color Wheel or a Gobo Wheel Wizard, depending on attribute – color orgobo.
Requirement:
Add a gobo or a color wheel in the column Attributes.
To enable the corresponding wizard, click the attribute first.
The following is described on the basis of the on the Color Wheel Wizard.
Open the wizard:
1. Click the Color Wheel Wizard after enabling. 2. The wizard opens.
Using the color wheel wizard
16

Fixture Builder User Manual
© 2017 MA Lighting Technology GmbH | Dachdeckerstr. 16 | D-97297 Waldbüttelbrunn | GermanyPhone +49 5251 688865-30 | tech.support (at)malighting.com | www.malighting.com
Version 1.3
1
3. Select the manufacturer by clicking the drop-down list All.Or display the array of colors by the number:-Enter the number in the input field Search Number.
4. To add the colors to the column on the right, double-click a color.5. To remove single colors in the table on the right, click a line to mark it.
Then, click Remove Selected.6. The line is now removed.7. If you would like to remove all lines on the right, click Remove All. 8. To create new channel sets on exiting the subattributes, check the checkbox Create New ChannelSets on
Exit.
Important:Checking Create New ChannelSets on Exit overwrites all existing function sets of the subattribute.
9. If the settings are adjusted, click Done.10. The wizard closes and the settings are now applied.
To abort the operation, click Cancel.
17

Fixture Builder User Manual
© 2017 MA Lighting Technology GmbH | Dachdeckerstr. 16 | D-97297 Waldbüttelbrunn | GermanyPhone +49 5251 688865-30 | tech.support (at)malighting.com | www.malighting.com
Version 1.3
1
6. Function Sets
Function sets display the function of each subattribute and offer quick access to specific functions.
These function sets are displayed in calculators of grandMA2 and dot2.
Requirement:
Set channel function ranges
For more information see Channel Function Ranges.
Function sets
The table Function Sets consists of six columns:
Function Name: Displays the name of the channel function in the console, for example the label in the calculatoror in a preset.
Dmx From: Displays on which DMX value the subattribute starts.
Dmx To: Displays on which DMX value the subattribute ends.
Slot: Displays the slot of a wheel if the fixture has a color or a gobo wheel.
Auto-Create: Displays if a preset will be generated by the auto create function in the console (grandMA2 only)
3D Subattribte: Displays the corresponding subattribute the function set belongs to.
It is possible to:
Add
Delete
function sets in the corresponding table Function Sets.
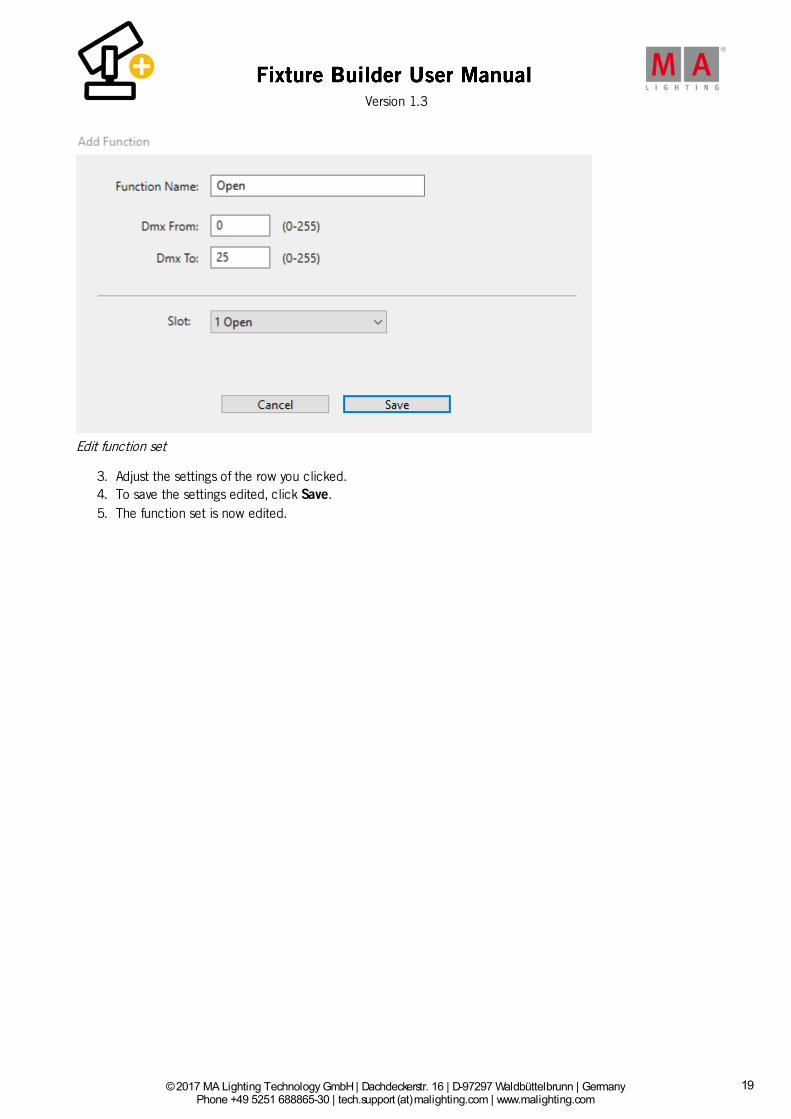
1. To edit function sets, double-click a row in the table Function Sets. 2. The window Add Function opens.
18
Fixture Builder User Manual
© 2017 MA Lighting Technology GmbH | Dachdeckerstr. 16 | D-97297 Waldbüttelbrunn | GermanyPhone +49 5251 688865-30 | tech.support (at)malighting.com | www.malighting.com
Version 1.3
1
Edit function set
3. Adjust the settings of the row you clicked.4. To save the settings edited, click Save.5. The function set is now edited.
6.1. Add a Function Set
19

Fixture Builder User Manual
© 2017 MA Lighting Technology GmbH | Dachdeckerstr. 16 | D-97297 Waldbüttelbrunn | GermanyPhone +49 5251 688865-30 | tech.support (at)malighting.com | www.malighting.com
Version 1.3
1
6.1. Add a Function Set
It is possible to add function sets:
1. Click Add below the table Function Sets. 2. The window Add Function opens.
Add a function set
3. Enter the function name in the corresponding input field. 4. Enter the DMX range in the input fields Dmx From and Dmx To.5. Select the slot in the drop-down list.6. To save the function set, click Save. 7. To abort the operation, click Cancel. 8. The settings are now saved.
6.2. Delete a Function Set
It is possible to delete function sets.
1. Click to select a row in the table Function Sets. 2. Click Delete.3. The function set is now deleted.
20

Fixture Builder User Manual
© 2017 MA Lighting Technology GmbH | Dachdeckerstr. 16 | D-97297 Waldbüttelbrunn | GermanyPhone +49 5251 688865-30 | tech.support (at)malighting.com | www.malighting.com
Version 1.3
1
7. Export and Import
It is possible to export the fixtures created from the MA Fixture Builder as an .xml file and save it to a USB drive or afolder.
This .xml file can be imported into the console or the onPC software.
You can also import .xml files from the subfolder "library" of dot2 and gma2.
This may be useful if you would like to adjust fixtures or adjust an already existing one.
7.1. Export Fixture
You can export fixtures to a USB drive or a folder.After the export it is possible to import these files to the console or the onPC software of both systems – dot2 andgrandMA2.
Export a Fixture to a USB Drive
1. Click File.2. Click Export to USB Drive.
The window Export opens.
Export fixture to USB drive
3. Select the USB device and click Save to USB.
The fixture file is exported to the selected USB drive.
The file is then saved into the subfolders "library" of dot2 and gma2.
Export a Fixture to a Folder
1. Click File.2. Click Export to Folder.3. Choose the destination and click Save To Folder.
The file is exported and saved into the selected folder.
7.2. Import Fixture
21

Fixture Builder User Manual
© 2017 MA Lighting Technology GmbH | Dachdeckerstr. 16 | D-97297 Waldbüttelbrunn | GermanyPhone +49 5251 688865-30 | tech.support (at)malighting.com | www.malighting.com
Version 1.3
1
7.2. Import Fixture
It is possible to import fixtures from:
MA Fixture Builder
The subfolder "library" of dot2
The subfolder "library" of gma2
1. Click File.2. Click Import.3. Select the .xml file and click Open.
The selected .xml file is imported into the MA Fixture Builder and can now be edited.
22

Fixture Builder User Manual
© 2017 MA Lighting Technology GmbH | Dachdeckerstr. 16 | D-97297 Waldbüttelbrunn | GermanyPhone +49 5251 688865-30 | tech.support (at)malighting.com | www.malighting.com
Version 1.3
1
8. Release Notes
The latest release of MA Fixture Builder v1.3.2.2 rolls out several enhancements that enrich your lighting experience.Read on for a quick introduction that offers more information.
Bug fix version 1.3.2.2
Fixed Bugs
DescriptionFixed: GUI draw issues with maximizing / full screen in windows.Fixed: Resizing restrictions are blocked. GUI does not resize as expected.
Enhancements/Fixed Bugs in the MA Fixture Builder
DescriptionAdded: Both applications (Microsoft and Apple) are now 64 bit.Added: It is now possible to import a fixture type, edit the wheels and export again. The new images an colorsremain intact.Added: New Module and Instance Manager. Added: Scroller and Color Wheel Manager is now implemented. Added: Gobo Wheel Manager is now implemented. Added: Open button was added to create an empty gobo slot without gobos.Added: Exiting application offers the exit option "Save As...". Added: Mac OS X now has license agreement without needing the unnecessary installer.Added: Dmx Add Highlight now respects the gobal Dmx Entry Units. Added: New attribute and feature list form Carallon.Added: Units in meters (m) were added to XYZ in the Instance Manager.Added: Information pop-up when attempting to add a second module. Fixed: Crash when opening Wheel Manager that contains media that is not in the default library. Fixed: Adding a color from the manual list after using the CMY shortcut buttons inverts the physical range.Fixed: React_To_Dim does not survive import or export.Fixed: It is possible to set highlight and default to values exceeding the range.Fixed: Rounding errors in Default / Highlight.
23

Fixture Builder User Manual
© 2017 MA Lighting Technology GmbH | Dachdeckerstr. 16 | D-97297 Waldbüttelbrunn | GermanyPhone +49 5251 688865-30 | tech.support (at)malighting.com | www.malighting.com
Version 1.3
1
9. Index16 bit 5.1.
3D SubAttribute 5.1.
8 bit 5.1.
add 6.1.
Add a Function Set 6.1.
Add channel function ranges 5.1.
Add DMX Channels 4. 4.2.
add function ranges 5.1.
add functions 5.1.
Attributes 4.
Beam 3.
channel function 5.
channel function ranges 5.
Channel Function Ranges 5.
Coarse 4.
color array 4.1.
Color Wheel Wizard 5.3.
color wizard 5.3.
colors 4.1.
delete 5.2. 6.2.
Delete a function set 6.2.
Delete channel function ranges 5.2.
Delete DMX Channel table 4.3.
Delete DMX Channels 4. 4.3.
DMX Channels Table 4.
DMX from 5.
Dmx Range 6.
DMX to 5.
Download 2.2.
Edit DMX Channels 4.
Enc from 5.
Enc to 5.
Encoder Readout 6.
Export and Import 7.
Export Fixture 7.1.
Fine 4.
First Steps 2.
Fixture Type Information 3.
Folder 7.1.
function 6.1.
24

Fixture Builder User Manual
© 2017 MA Lighting Technology GmbH | Dachdeckerstr. 16 | D-97297 Waldbüttelbrunn | GermanyPhone +49 5251 688865-30 | tech.support (at)malighting.com | www.malighting.com
Version 1.3
1
Function Name 5.1.
function set 6.1.
Function Sets 6.
Gobo Wheel Wizard 5.3.
gobo wizard 5.3.
Highlight 4. 4.2.
Import Fixture 7.2.
Installation 2.2.
Introduction 1.
MA 3D Intensity 3.
Mix color attribute table 4.1.
Mode 3.
Patch Break 4.
Phys from 5.
Phys to 5.
Physical 6.
Program Surface 2.4.
Release Notes 8.
RGB 4.1.
Start Address 4.
Start Program 2.3.
Subattribute 6.
system requirements 2.1.
USB Drive 7.1.
Wizard 5.3.
25