
M9 Ccomplete User Manualuser-guide.fiio.net/M9_Complete_User_Manual-EN.pdf · M9 Complete User...
29
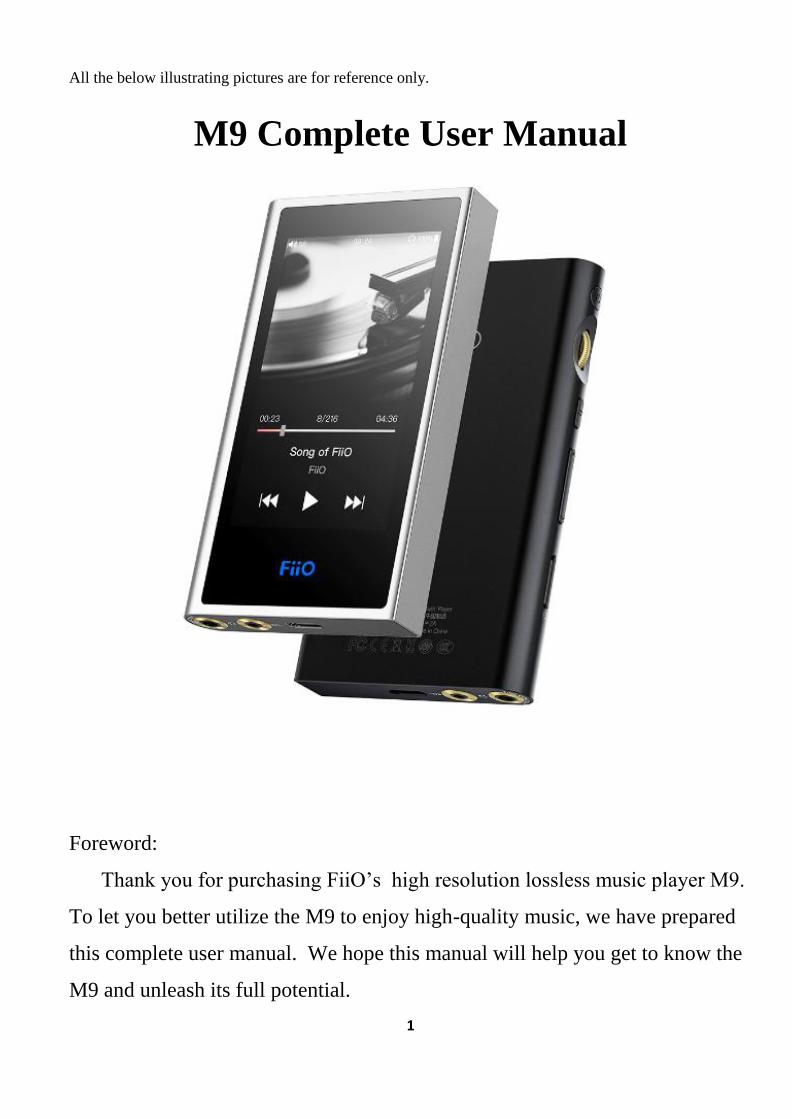
1 All the below illustrating pictures are for reference only. M9 Complete User Manual Foreword: Thank you for purchasing FiiO’s high resolution lossless music player M9. To let you better utilize the M9 to enjoy high-quality music, we have prepared this complete user manual. We hope this manual will help you get to know the M9 and unleash its full potential.
Transcript of M9 Ccomplete User Manualuser-guide.fiio.net/M9_Complete_User_Manual-EN.pdf · M9 Complete User...
1
All the below illustrating pictures are for reference only.
M9 Complete User Manual
Foreword:
Thank you for purchasing FiiO’s high resolution lossless music player M9.
To let you better utilize the M9 to enjoy high-quality music, we have prepared
this complete user manual. We hope this manual will help you get to know the
M9 and unleash its full potential.

2
Contents
●Introduction: ............................................................................... 3
1. Buttons and ports introduced ............................................................. 3
2. Buttons and ports explained .............................................................. 4
●Main menu and Drop-down menu interface: .................................................... 5
●Settings interface: .......................................................................... 6
1. WiFi ................................................................................ 6
2. Bluetooth function ..................................................................... 7
Bluetooth transmitter ................................................................. 7
Bluetooth receiver ................................................................... 8
3. Audio ............................................................................... 9
Multifunctional Output .............................................................. 9
Coaxial digital output .............................................................. 10
Gain ............................................................................. 10
Digital filter mode ................................................................. 11
Wireless playback quality ........................................................... 11
Balance .......................................................................... 12
In-line remote ..................................................................... 12
Adjustable volume at LO............................................................ 13
USB DAC ........................................................................ 14
4. LED ............................................................................... 14
5. Key-lock Settings .................................................................... 15
6. General ............................................................................ 15
About device ...................................................................... 16
Power-off Timer ................................................................... 16
Apps ............................................................................. 17
Brightness level .................................................................... 17
Sleep............................................................................. 17
Language setting .................................................................. 18
Factory data reset .................................................................. 19
●Firmware Update .......................................................................... 20
●Status bar ................................................................................ 22
●Technical Support ......................................................................... 22
●FiiO Music ............................................................................... 23
1. APP homepage ...................................................................... 23
2. Quickly locate all music ............................................................... 25
3. Gestures............................................................................ 25
4. Function menu ....................................................................... 26
5. Now playing ......................................................................... 26
6. Tap buttons .......................................................................... 27
7. Gesture operations .................................................................... 27
8. EQ ................................................................................ 28
3
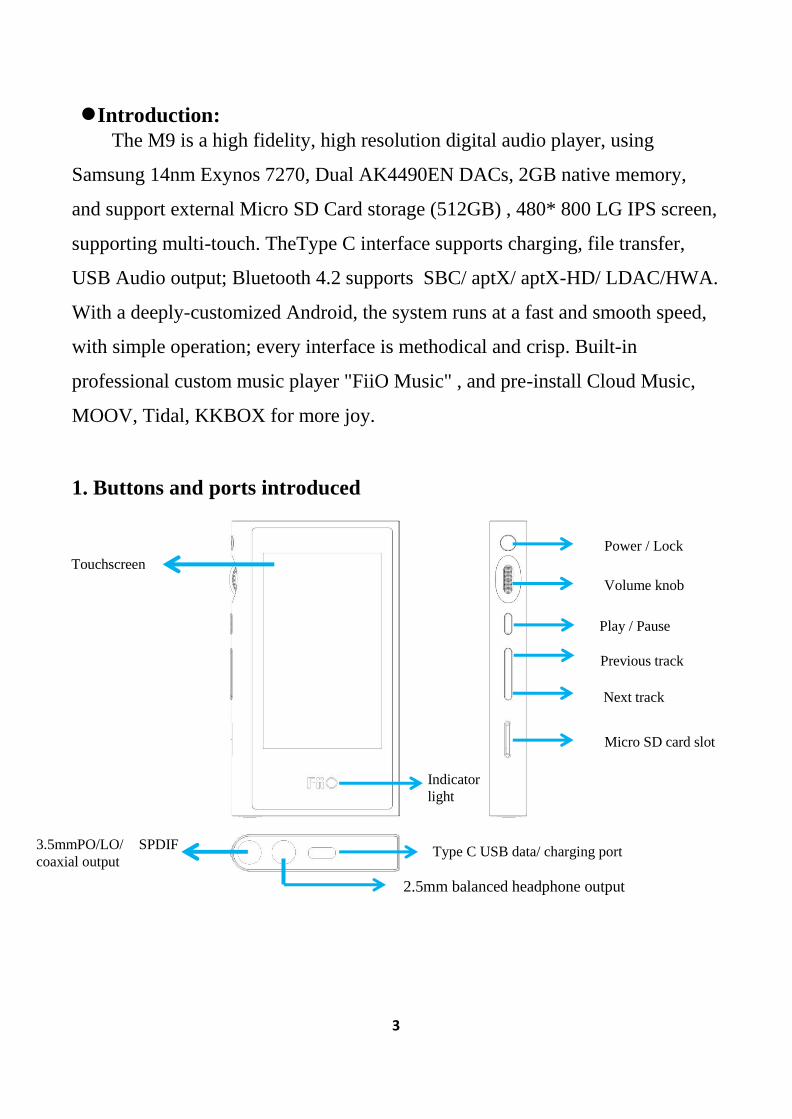
Micro SD card slot
Next track
Previous track
Play / Pause
Type C USB data/ charging port
Indicator
light
Volume knob
Power / Lock
Touchscreen
●Introduction: The M9 is a high fidelity, high resolution digital audio player, using
Samsung 14nm Exynos 7270, Dual AK4490EN DACs, 2GB native memory,
and support external Micro SD Card storage (512GB) , 480* 800 LG IPS screen,
supporting multi-touch. TheType C interface supports charging, file transfer,
USB Audio output; Bluetooth 4.2 supports SBC/ aptX/ aptX-HD/ LDAC/HWA.
With a deeply-customized Android, the system runs at a fast and smooth speed,
with simple operation; every interface is methodical and crisp. Built-in
professional custom music player "FiiO Music" , and pre-install Cloud Music,
MOOV, Tidal, KKBOX for more joy.
1. Buttons and ports introduced
3.5mmPO/LO/ SPDIF
coaxial output
2.5mm balanced headphone output
4
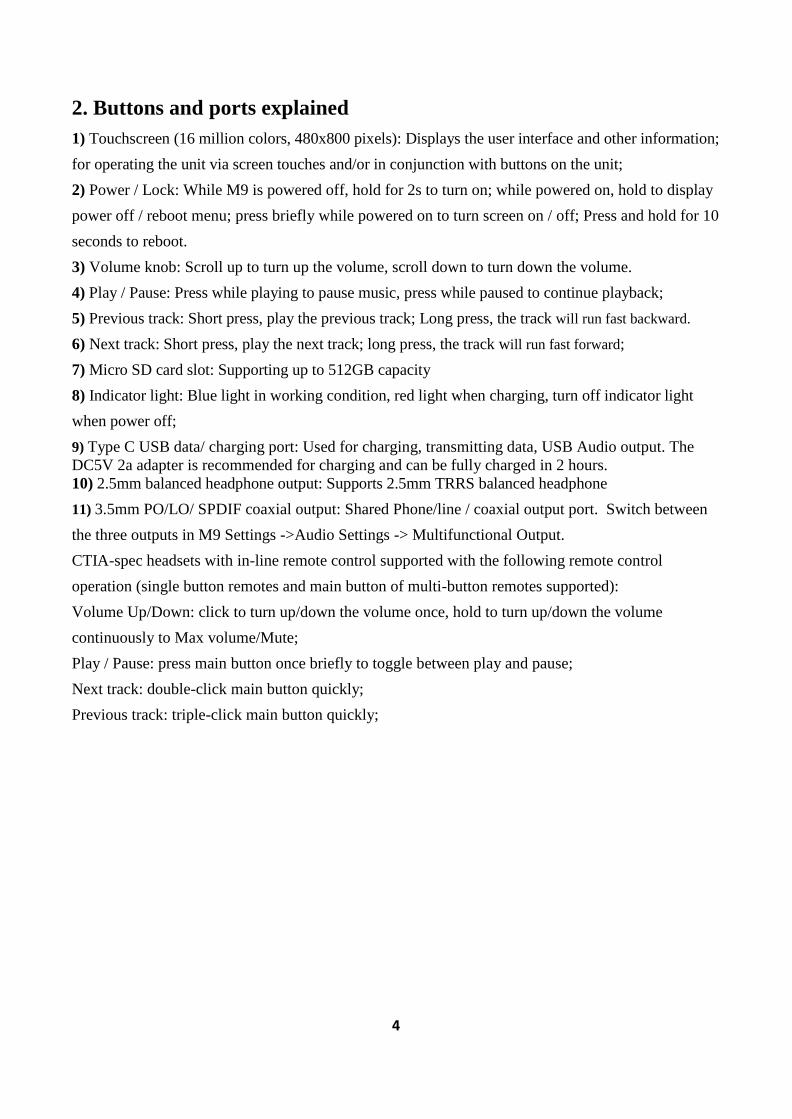
2. Buttons and ports explained
1) Touchscreen (16 million colors, 480x800 pixels): Displays the user interface and other information;
for operating the unit via screen touches and/or in conjunction with buttons on the unit;
2) Power / Lock: While M9 is powered off, hold for 2s to turn on; while powered on, hold to display
power off / reboot menu; press briefly while powered on to turn screen on / off; Press and hold for 10
seconds to reboot.
3) Volume knob: Scroll up to turn up the volume, scroll down to turn down the volume.
4) Play / Pause: Press while playing to pause music, press while paused to continue playback;
5) Previous track: Short press, play the previous track; Long press, the track will run fast backward.
6) Next track: Short press, play the next track; long press, the track will run fast forward;
7) Micro SD card slot: Supporting up to 512GB capacity
8) Indicator light: Blue light in working condition, red light when charging, turn off indicator light
when power off;
9) Type C USB data/ charging port: Used for charging, transmitting data, USB Audio output. The
DC5V 2a adapter is recommended for charging and can be fully charged in 2 hours.
10) 2.5mm balanced headphone output: Supports 2.5mm TRRS balanced headphone
11) 3.5mm PO/LO/ SPDIF coaxial output: Shared Phone/line / coaxial output port. Switch between
the three outputs in M9 Settings ->Audio Settings -> Multifunctional Output.
CTIA-spec headsets with in-line remote control supported with the following remote control
operation (single button remotes and main button of multi-button remotes supported):
Volume Up/Down: click to turn up/down the volume once, hold to turn up/down the volume
continuously to Max volume/Mute;
Play / Pause: press main button once briefly to toggle between play and pause;
Next track: double-click main button quickly;
Previous track: triple-click main button quickly;
5
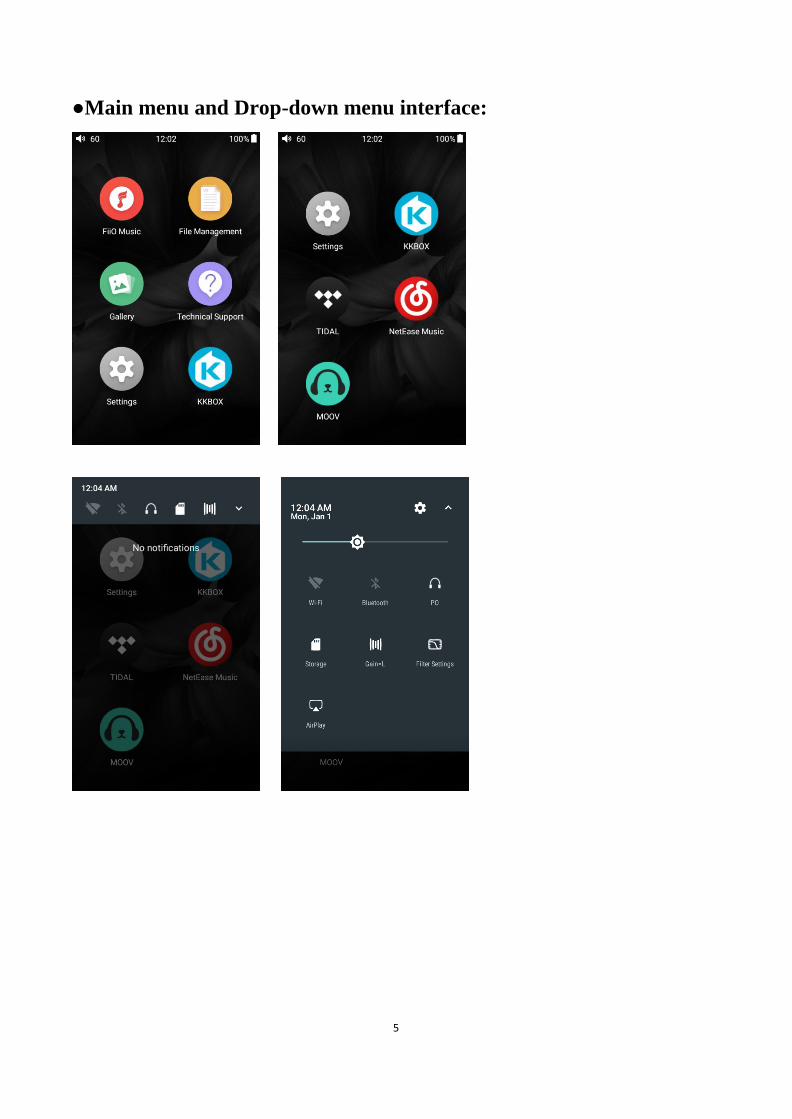
●Main menu and Drop-down menu interface:
6
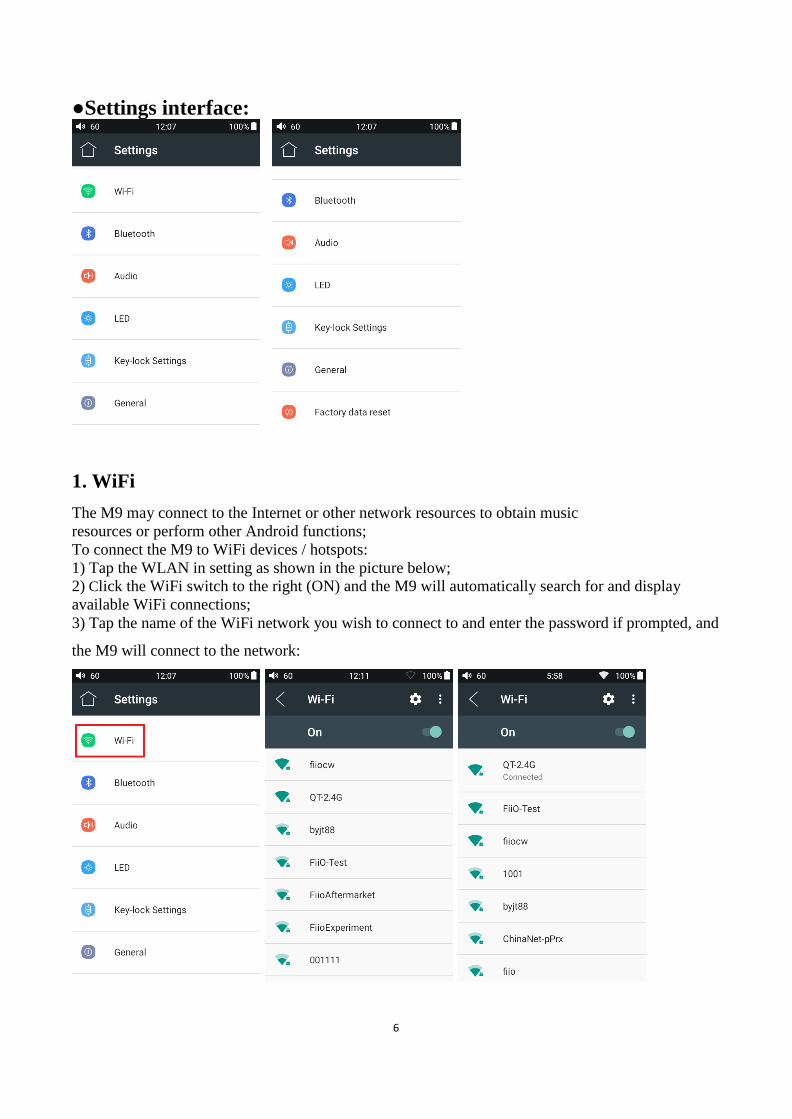
●Settings interface:
1. WiFi
The M9 may connect to the Internet or other network resources to obtain music
resources or perform other Android functions;
To connect the M9 to WiFi devices / hotspots:
1) Tap the WLAN in setting as shown in the picture below;
2) Click the WiFi switch to the right (ON) and the M9 will automatically search for and display
available WiFi connections;
3) Tap the name of the WiFi network you wish to connect to and enter the password if prompted, and
the M9 will connect to the network:
7
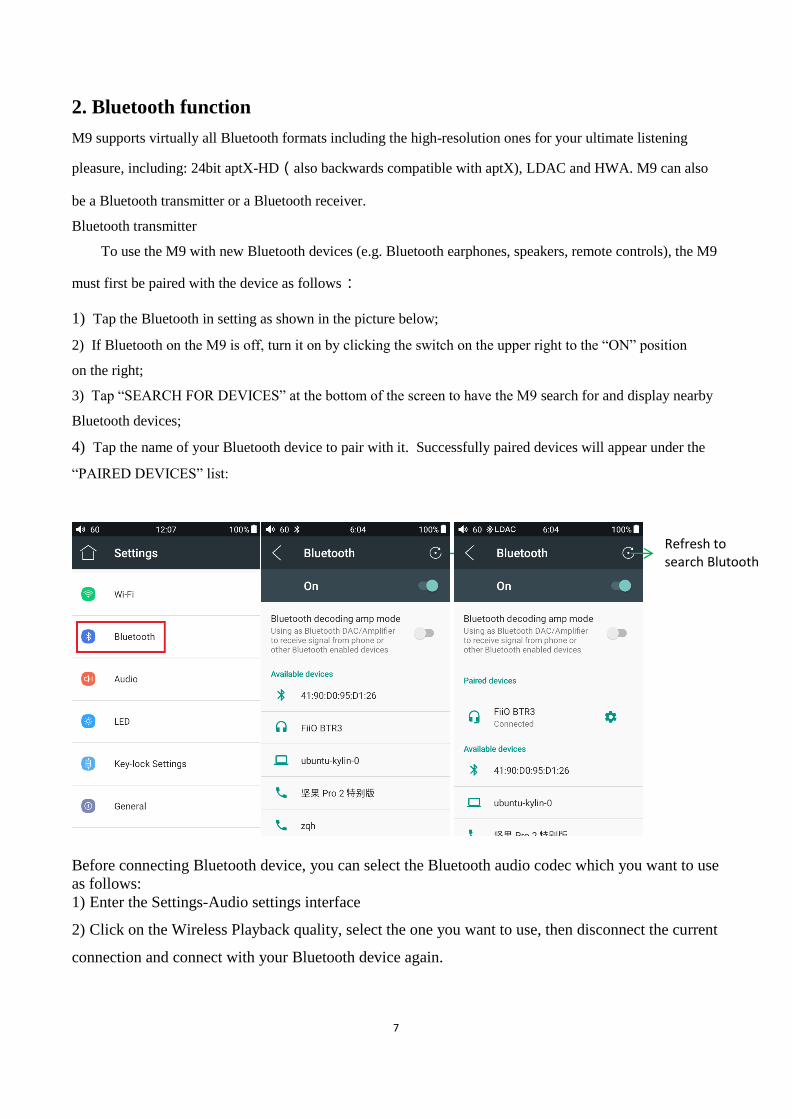
Refresh to search Blutooth
2. Bluetooth function
M9 supports virtually all Bluetooth formats including the high-resolution ones for your ultimate listening
pleasure, including: 24bit aptX-HD(also backwards compatible with aptX), LDAC and HWA. M9 can also
be a Bluetooth transmitter or a Bluetooth receiver.
Bluetooth transmitter
To use the M9 with new Bluetooth devices (e.g. Bluetooth earphones, speakers, remote controls), the M9
must first be paired with the device as follows:
1) Tap the Bluetooth in setting as shown in the picture below;
2) If Bluetooth on the M9 is off, turn it on by clicking the switch on the upper right to the “ON” position
on the right;
3) Tap “SEARCH FOR DEVICES” at the bottom of the screen to have the M9 search for and display nearby
Bluetooth devices;
4) Tap the name of your Bluetooth device to pair with it. Successfully paired devices will appear under the
“PAIRED DEVICES” list:
Before connecting Bluetooth device, you can select the Bluetooth audio codec which you want to use
as follows:
1) Enter the Settings-Audio settings interface
2) Click on the Wireless Playback quality, select the one you want to use, then disconnect the current
connection and connect with your Bluetooth device again.

8
Note:
1. If you already connect with one Bluetooth device, it is necessary to disconnect the Bluetooth connection in
order to switch the Bluetooth audio code successfully before reconnecting with the Bluetooth device. (The
switching between the three modes of LDAC can work in real time.)
2. When you turn on the Bluetooth , M9 will automatically connect to the latest available device.
Bluetooth receiver
When M9 is connected to a new Bluetooth device (such as the mobile phone) as a Bluetooth receiver,
turn on the "Bluetooth decoding amp mode" in the Bluetooth settings interface, then the Bluetooth will turned
off automatically, turn on the Bluetooth again and you are in Bluetooth receive mode now! (It only supports
SBC now, and will support LDAC in the future.)
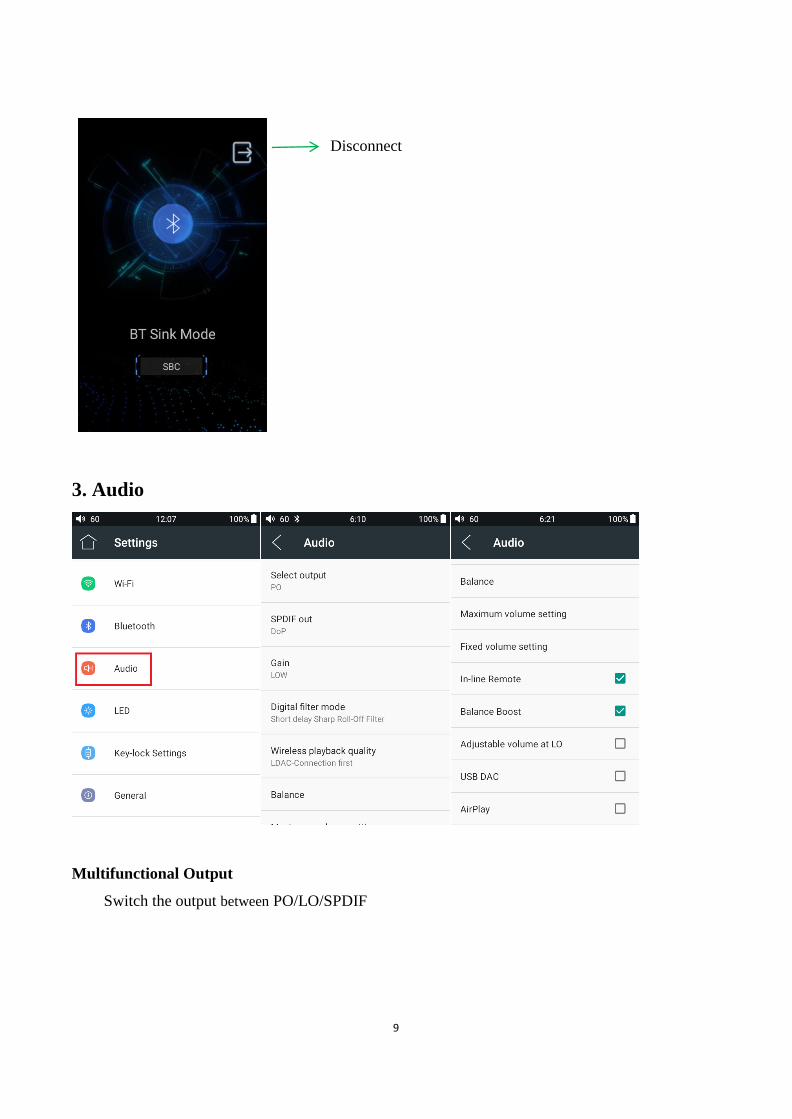
9
Disconnect
3. Audio
Multifunctional Output
Switch the output between PO/LO/SPDIF
10
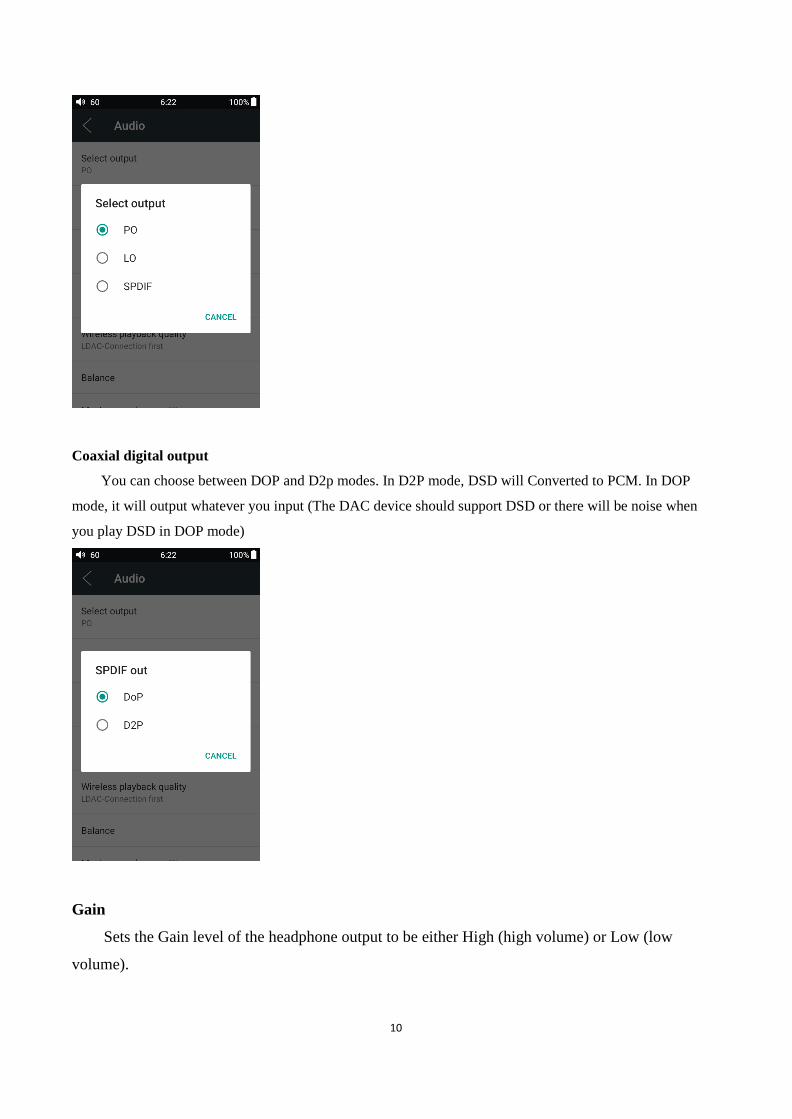
Coaxial digital output
You can choose between DOP and D2p modes. In D2P mode, DSD will Converted to PCM. In DOP
mode, it will output whatever you input (The DAC device should support DSD or there will be noise when
you play DSD in DOP mode)
Gain
Sets the Gain level of the headphone output to be either High (high volume) or Low (low
volume).
11
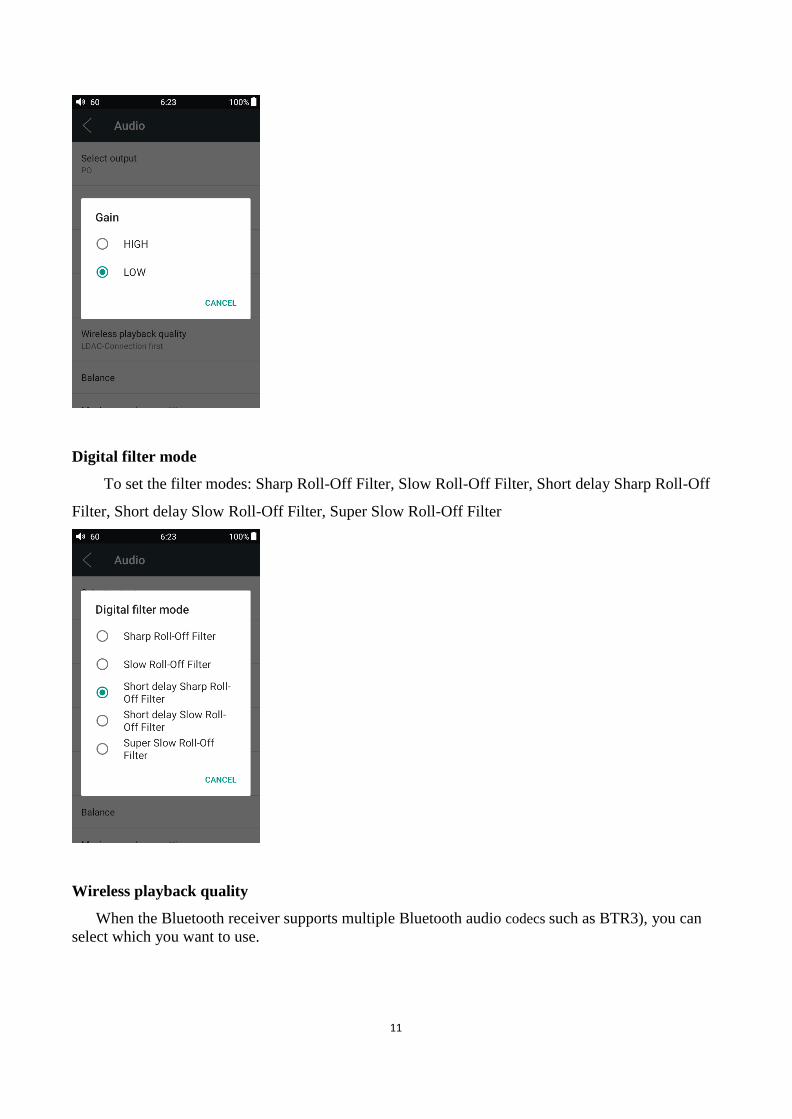
Digital filter mode
To set the filter modes: Sharp Roll-Off Filter, Slow Roll-Off Filter, Short delay Sharp Roll-Off
Filter, Short delay Slow Roll-Off Filter, Super Slow Roll-Off Filter
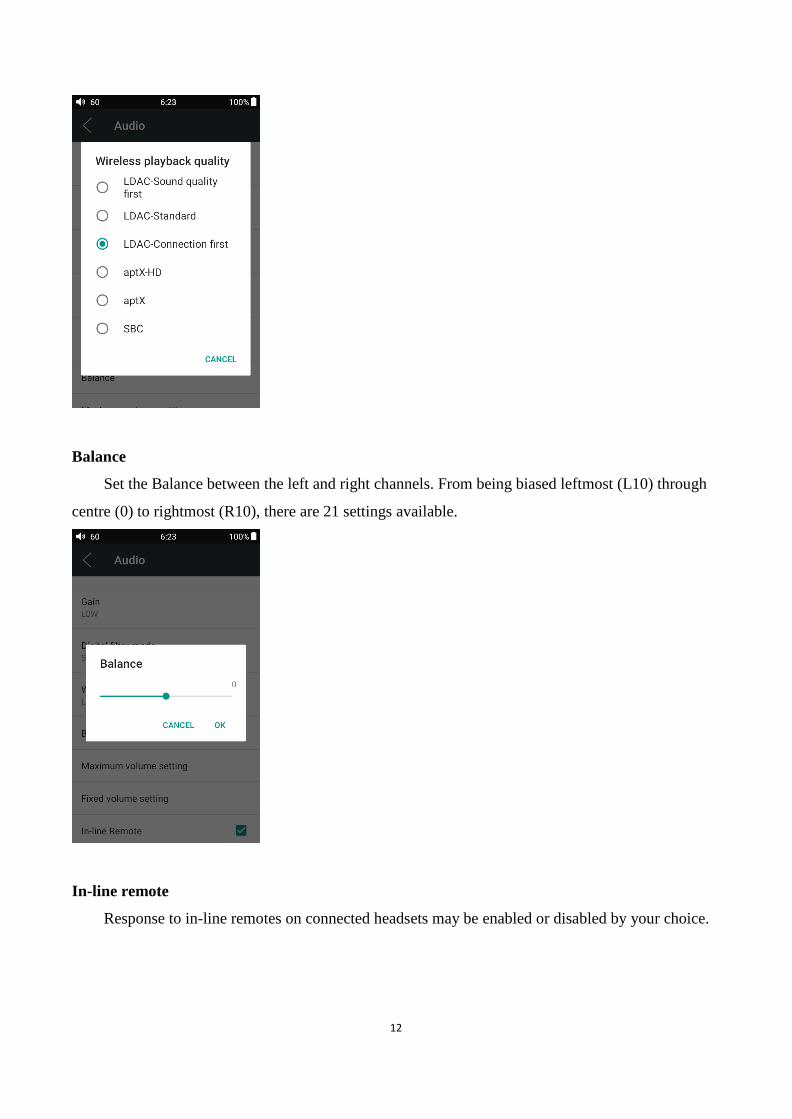
Wireless playback quality
When the Bluetooth receiver supports multiple Bluetooth audio codecs such as BTR3), you can
select which you want to use.
12
Balance
Set the Balance between the left and right channels. From being biased leftmost (L10) through
centre (0) to rightmost (R10), there are 21 settings available.
In-line remote
Response to in-line remotes on connected headsets may be enabled or disabled by your choice.
13
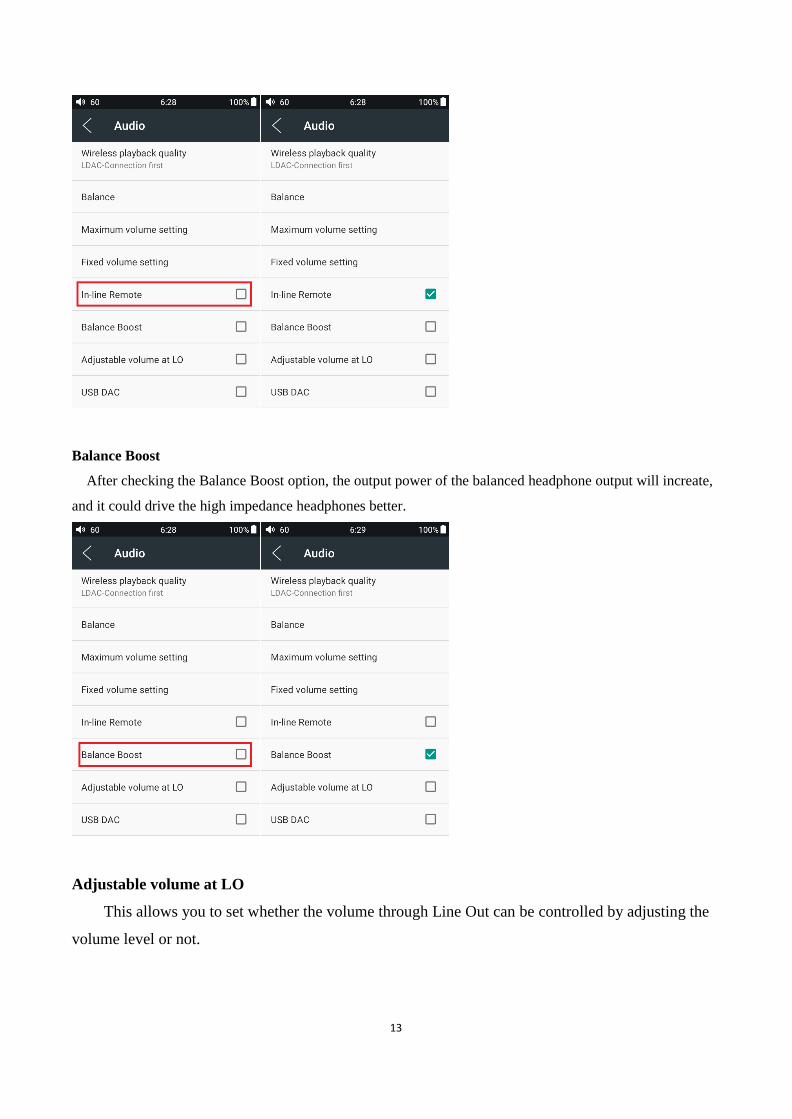
Balance Boost
After checking the Balance Boost option, the output power of the balanced headphone output will increate,
and it could drive the high impedance headphones better.
Adjustable volume at LO
This allows you to set whether the volume through Line Out can be controlled by adjusting the
volume level or not.

14
USB DAC
Check “USB DAC” and connect the M9 with computer via USB cable. (If you’re using
Windows system, please install the driver at https://www.fiio.com/supports; MAC system doesn’t
need to install the DAC driver.
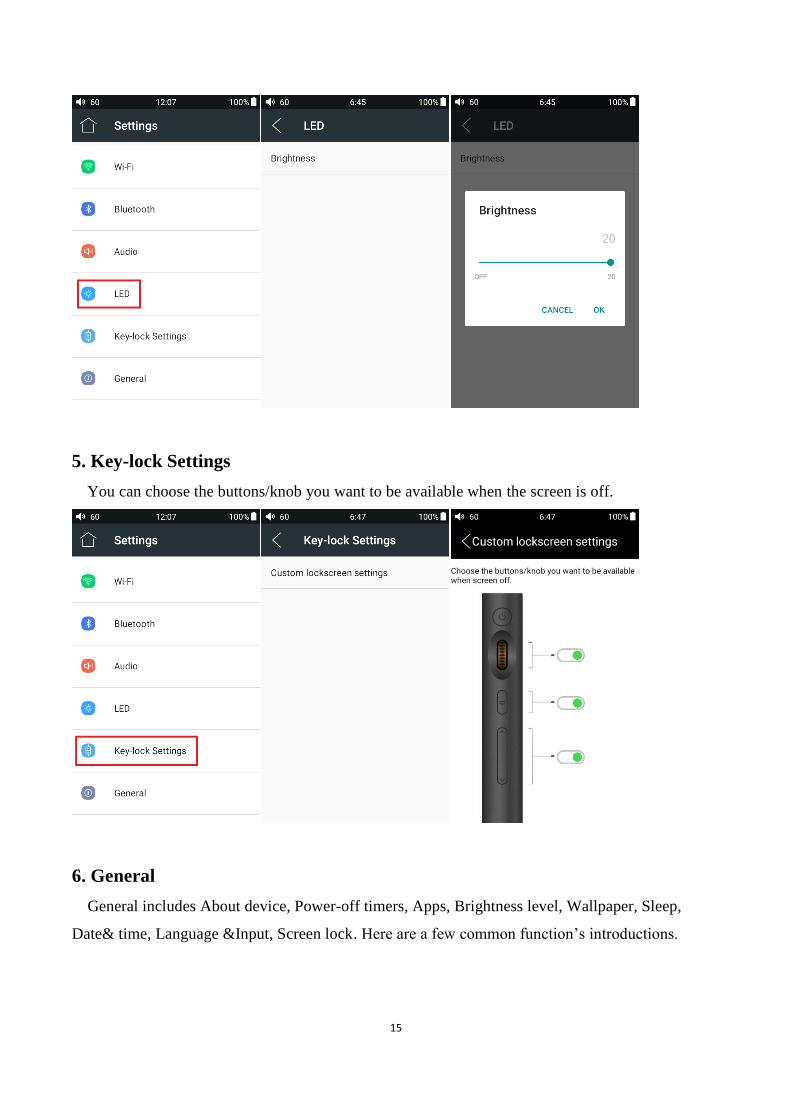
4. LED
You can adjust brightness of the indicator.
15
5. Key-lock Settings
You can choose the buttons/knob you want to be available when the screen is off.
6. General
General includes About device, Power-off timers, Apps, Brightness level, Wallpaper, Sleep,
Date& time, Language &Input, Screen lock. Here are a few common function’s introductions.
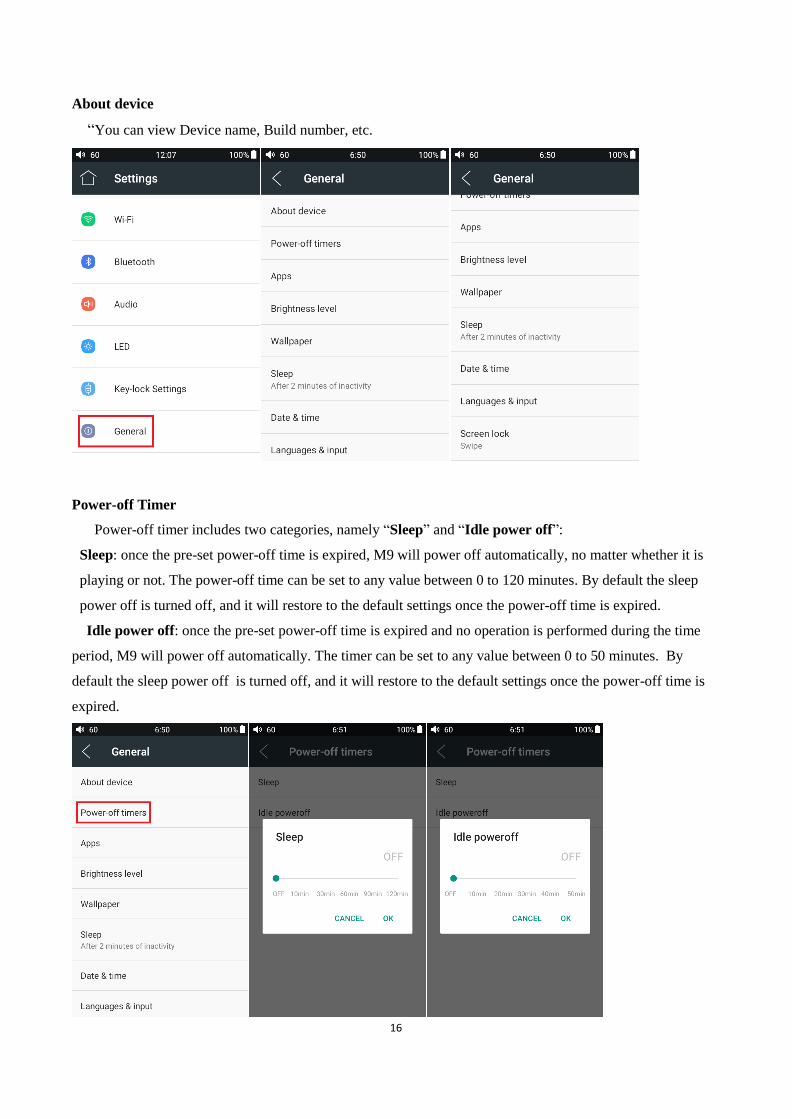
16
About device
“You can view Device name, Build number, etc.
Power-off Timer
Power-off timer includes two categories, namely “Sleep” and “Idle power off”:
Sleep: once the pre-set power-off time is expired, M9 will power off automatically, no matter whether it is
playing or not. The power-off time can be set to any value between 0 to 120 minutes. By default the sleep
power off is turned off, and it will restore to the default settings once the power-off time is expired.
Idle power off: once the pre-set power-off time is expired and no operation is performed during the time
period, M9 will power off automatically. The timer can be set to any value between 0 to 50 minutes. By
default the sleep power off is turned off, and it will restore to the default settings once the power-off time is
expired.
17
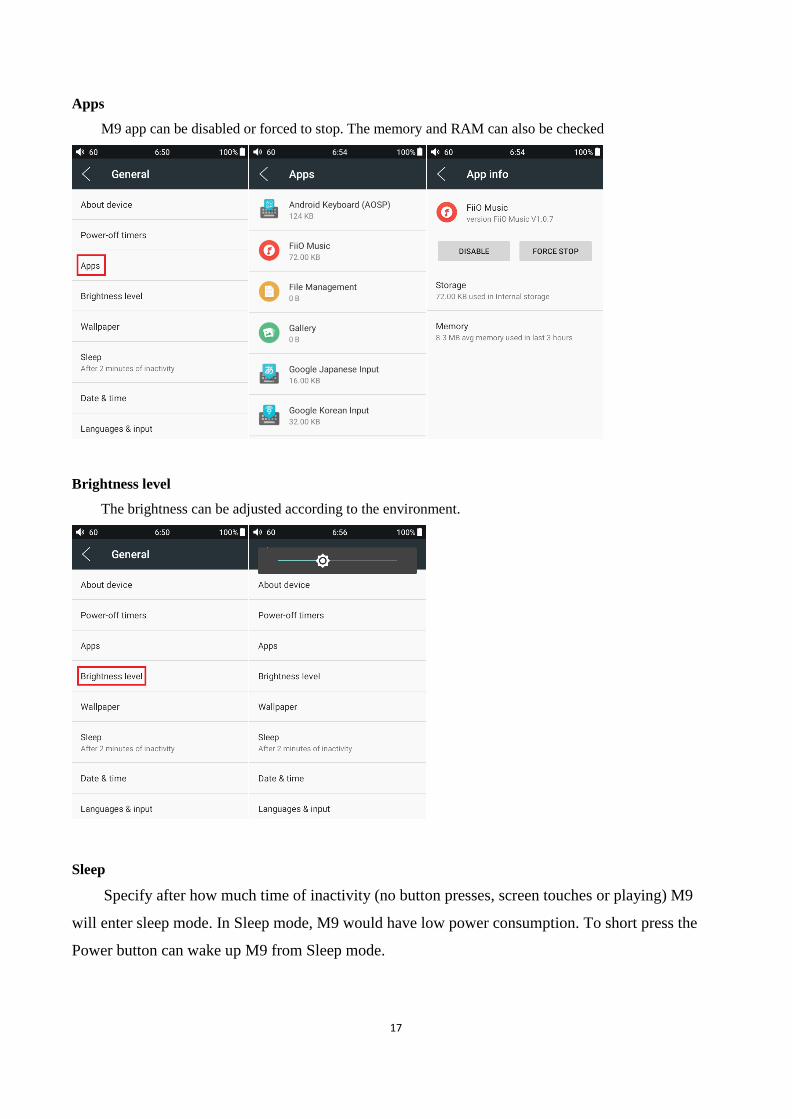
Apps
M9 app can be disabled or forced to stop. The memory and RAM can also be checked
Brightness level
The brightness can be adjusted according to the environment.
Sleep
Specify after how much time of inactivity (no button presses, screen touches or playing) M9
will enter sleep mode. In Sleep mode, M9 would have low power consumption. To short press the
Power button can wake up M9 from Sleep mode.
18
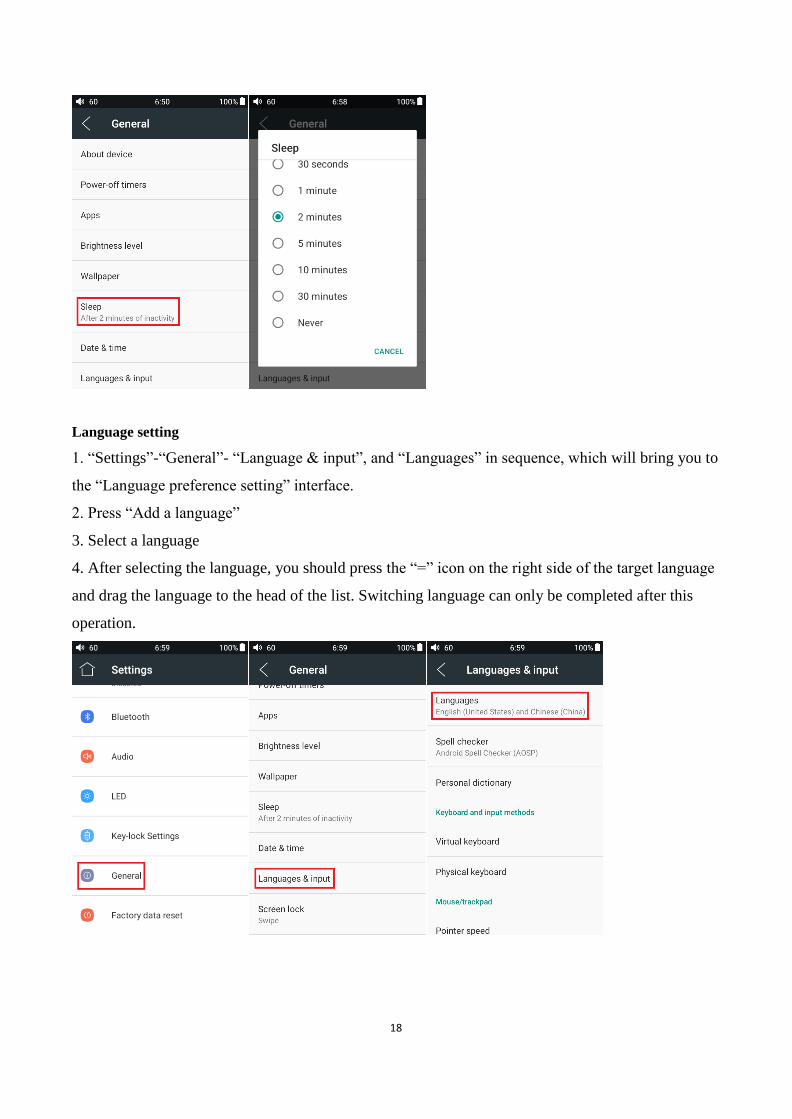
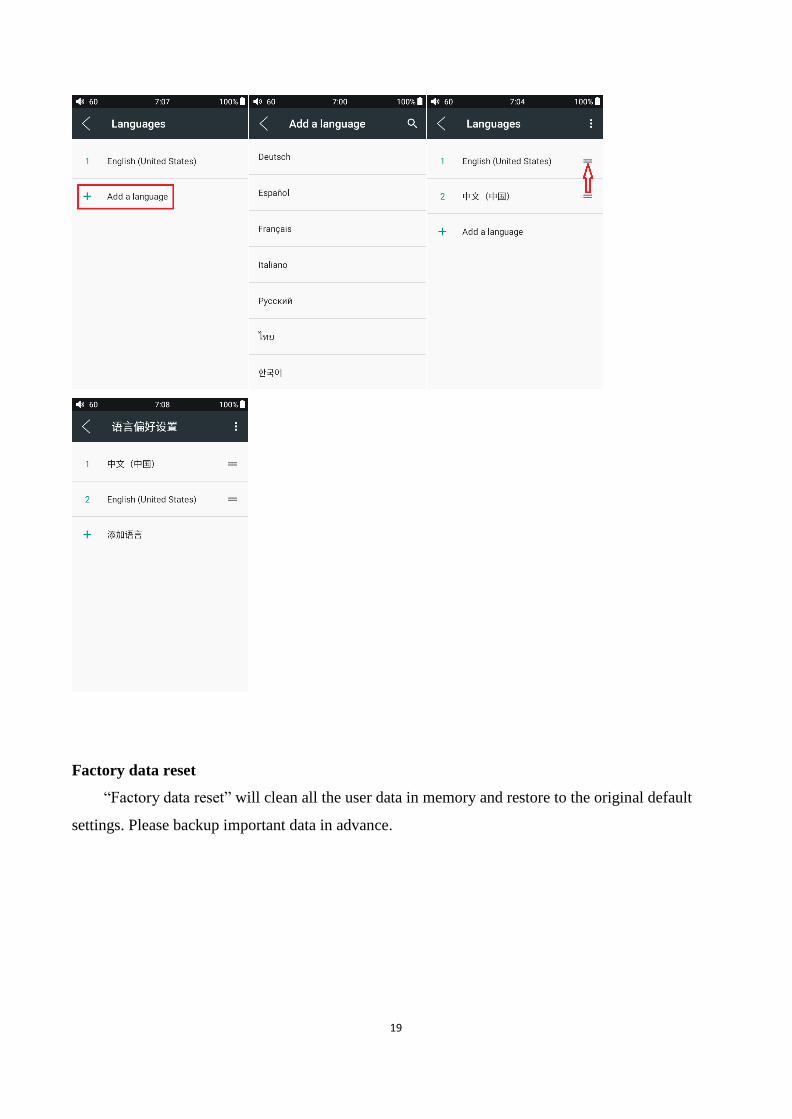
Language setting
1. “Settings”-“General”- “Language & input”, and “Languages” in sequence, which will bring you to
the “Language preference setting” interface.
2. Press “Add a language”
3. Select a language
4. After selecting the language, you should press the “=” icon on the right side of the target language
and drag the language to the head of the list. Switching language can only be completed after this
operation.
19
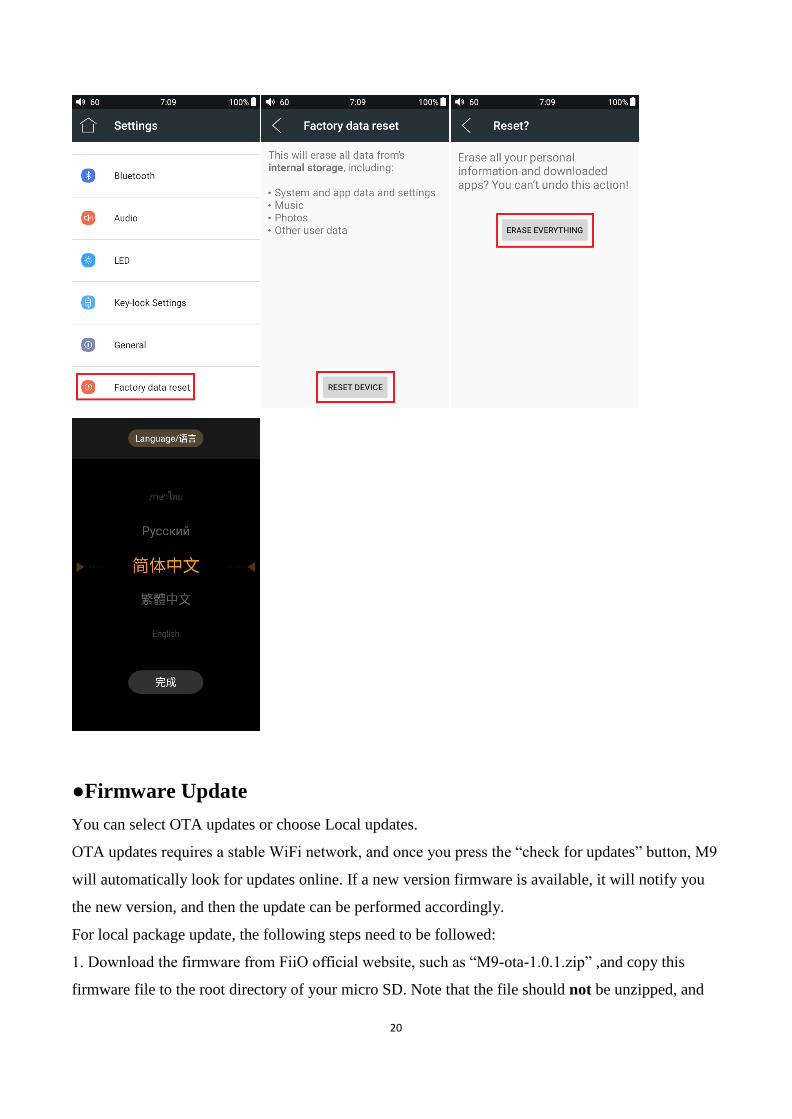
Factory data reset
“Factory data reset” will clean all the user data in memory and restore to the original default
settings. Please backup important data in advance.
20
●Firmware Update
You can select OTA updates or choose Local updates.
OTA updates requires a stable WiFi network, and once you press the “check for updates” button, M9
will automatically look for updates online. If a new version firmware is available, it will notify you
the new version, and then the update can be performed accordingly.
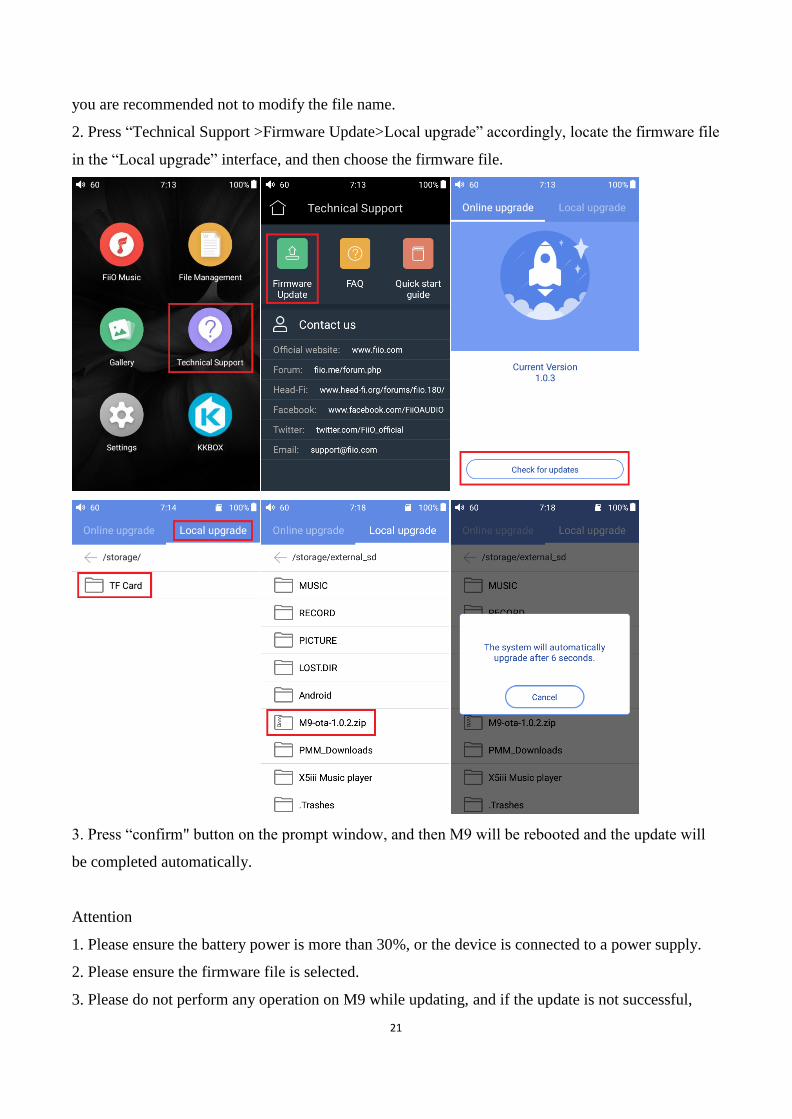
For local package update, the following steps need to be followed:
1. Download the firmware from FiiO official website, such as “M9-ota-1.0.1.zip” ,and copy this
firmware file to the root directory of your micro SD. Note that the file should not be unzipped, and
21
you are recommended not to modify the file name.
2. Press “Technical Support >Firmware Update>Local upgrade” accordingly, locate the firmware file
in the “Local upgrade” interface, and then choose the firmware file.
3. Press “confirm" button on the prompt window, and then M9 will be rebooted and the update will
be completed automatically.
Attention
1. Please ensure the battery power is more than 30%, or the device is connected to a power supply.
2. Please ensure the firmware file is selected.
3. Please do not perform any operation on M9 while updating, and if the update is not successful,

22
you can hold POWER and PLAY buttons simultaneously to reboot the device.
●Status bar The status bar on top of the screen can indicate the working status.
1—volume icon 2—current volume
3—blue tooth status 4—Blue tooth codec format
5—balanced plug 6—current time
7—POplug(included
PO,LO,spdif)
8—micro sd
9——WiFi 10—remaining battery in
percentage
●Technical Support Tap the Technical support icon on the home screen to enter the technical support menu, where the
following options are provided:
Firmware update: you can choose the online upgrade or select a local package to update the M9’s
firmware;
FAQ: List the solutions for some FAQ;
Quick start guide: tap to view the quick start guide for the M9.
23
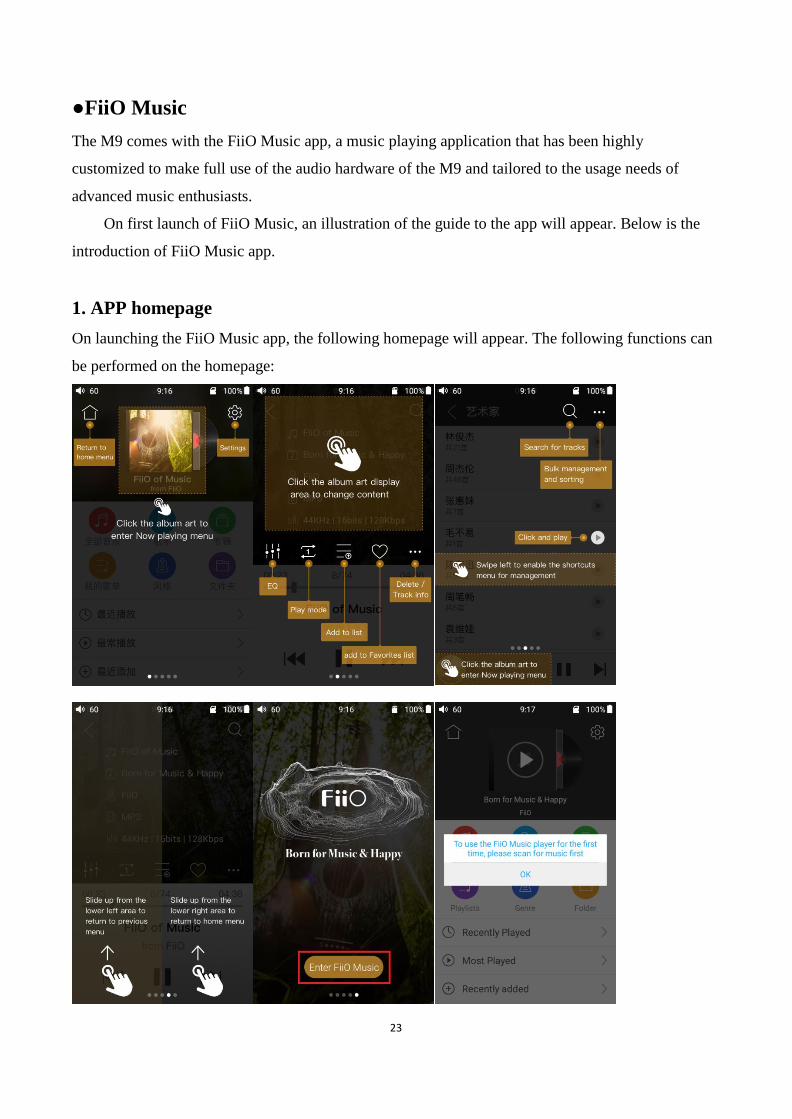
●FiiO Music The M9 comes with the FiiO Music app, a music playing application that has been highly
customized to make full use of the audio hardware of the M9 and tailored to the usage needs of
advanced music enthusiasts.
On first launch of FiiO Music, an illustration of the guide to the app will appear. Below is the
introduction of FiiO Music app.
1. APP homepage
On launching the FiiO Music app, the following homepage will appear. The following functions can
be performed on the homepage:
24
Back the Main menu inferface
Tap the icon to jump to playing
page
Settings
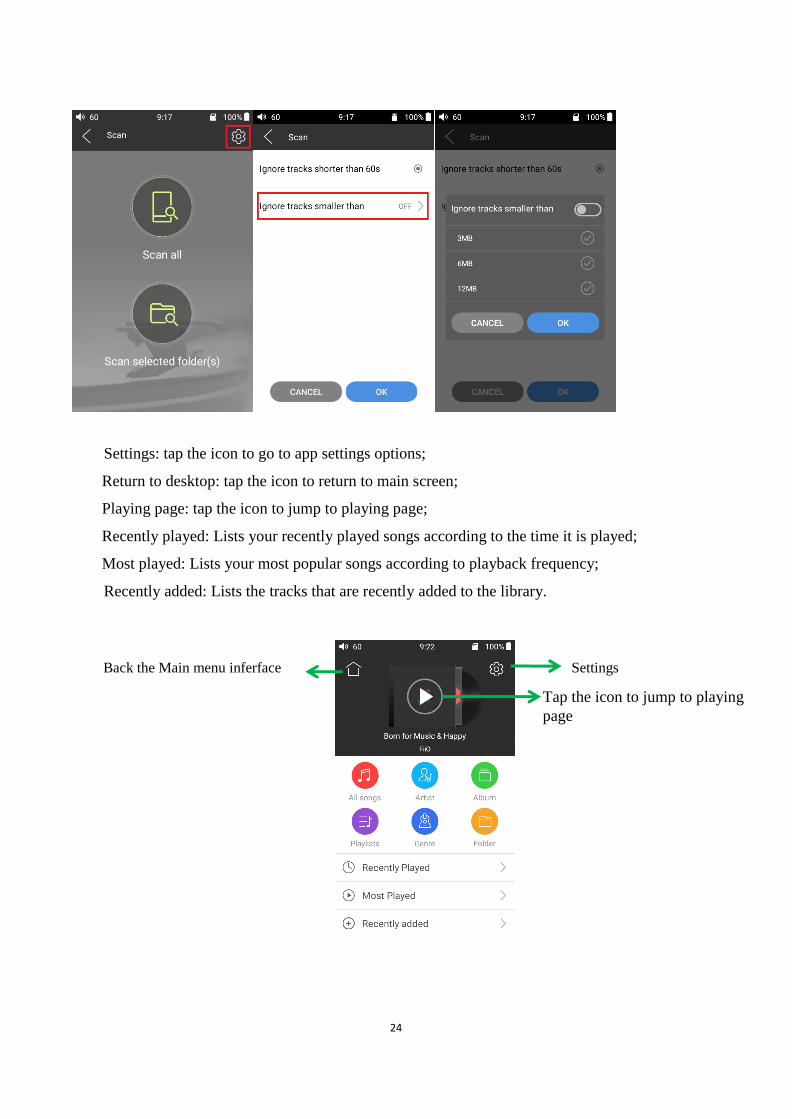
Settings: tap the icon to go to app settings options;
Return to desktop: tap the icon to return to main screen;
Playing page: tap the icon to jump to playing page;
Recently played: Lists your recently played songs according to the time it is played;
Most played: Lists your most popular songs according to playback frequency;
Recently added: Lists the tracks that are recently added to the library.
25
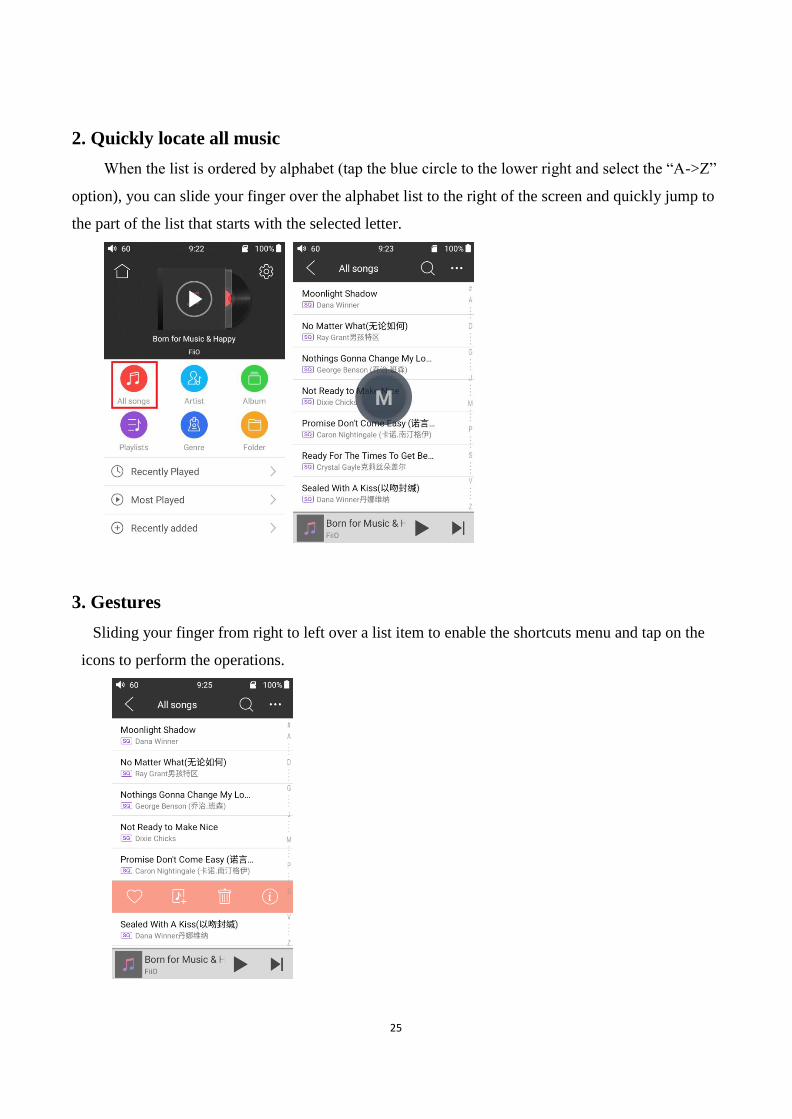
2. Quickly locate all music
When the list is ordered by alphabet (tap the blue circle to the lower right and select the “A->Z”
option), you can slide your finger over the alphabet list to the right of the screen and quickly jump to
the part of the list that starts with the selected letter.
3. Gestures
Sliding your finger from right to left over a list item to enable the shortcuts menu and tap on the
icons to perform the operations.
26
Play Mode
EQ
Search Return
More fuctions
Add to Favorites
Add to palylist
Previous track
Play/Pause
Next track
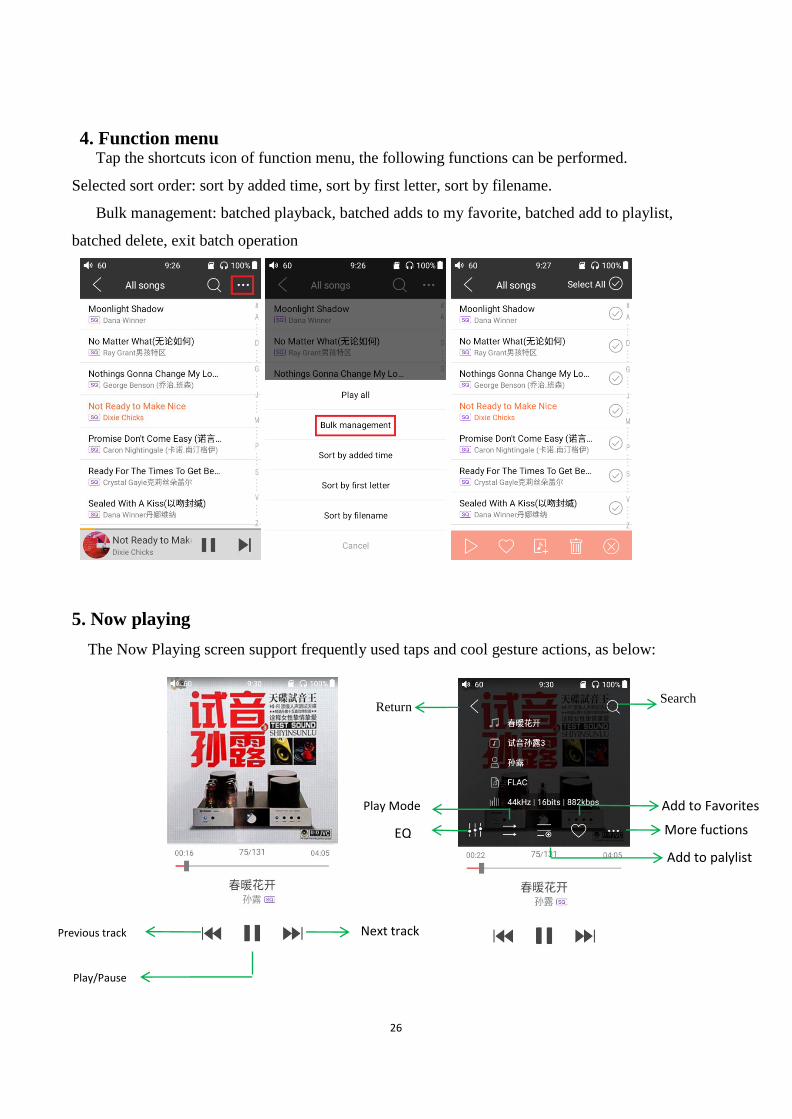
4. Function menu Tap the shortcuts icon of function menu, the following functions can be performed.
Selected sort order: sort by added time, sort by first letter, sort by filename.
Bulk management: batched playback, batched adds to my favorite, batched add to playlist,
batched delete, exit batch operation
5. Now playing
The Now Playing screen support frequently used taps and cool gesture actions, as below:

27
6. Tap buttons
The tap buttons from top to bottom on the playing screen:
1) Return: return to Original path
2) Search: Tap to show a full screen search pane for all songs on the M9. Searching for track
title, album name and artist name are supported. Recent searching history is saved;
3) Equalizer: tap to the equalizer settings;
4) Play mode: Tap to choose between Play All once, Loop Single, Shuffle and Loop All;
5) Add to playlist: Tap to show playlists screen, tap to add the present song to a playlist of your
choosing.
6) Add to Favorites: Tap to add the present track to the Favorites playlist;
7) More functions: Tap to view track info or delete the present track;
8) Previous track
9) Play / Pause: Tap to Play or Pause the present track
10) Next track
7. Gesture operations
Switch displaying information: Click on the middle of the album cover to switch between displaying
the album cover, lyrics, ID3 info.
View playlist: slide in from left edge to view the current list of songs queued for play; tap any song
on the list to jump to that song;
Adjust volume: Scroll the volume knob to show a full screen volume pane, no operation for 2s or
click "Back" button, this pane will disappear;

28
Slide to fast forward/rewind: tap anywhere on the progress bar below the album cover area to fast
forward or rewind playing;
Note: While in the lyrics display page, you can adjust the playback progress by sliding over the
lyrics, adjust lyrics timeline or adjust font size.
8. EQ
FiiO Music has built-in a graphic equalizer. One may choose between the given genre presets
directly, or adjust the ten frequency bands from 20 to 20kHz independently from -6 to +6 dB, thus
satisfying your personalized listening needs.
1) Choose preset EQ: Swipe up from the bottom of the screen to show the full list of EQ presets, tap
icon to switch the equalizer.
29
2) Customize EQ: to customize an EQ setting as below:
a. Tap the button on the upper right to the right to activate the equalizer.
b. Choose the genre preset to be adjusted (e.g. “User Defined”);
c. Drag a vertical slider to adjust its corresponding frequency up and down. The EQ curve above
changes to reflect your adjustments.
Swipe left or right over the sliders to move between the low and high frequency sliders;
d. Press the Back button to the lower right to exit and save changes;
3) Reset EQ: Tap the reset button at the upper right corner to reset the present EQ preset to its genre
default.
Note: If a factory reset is performed on the M9, all EQ settings will be reset to defaults.


