Love Ring Quilt - PellonProjects.com€¦ · A very old traditional quilt pattern based on the...
6
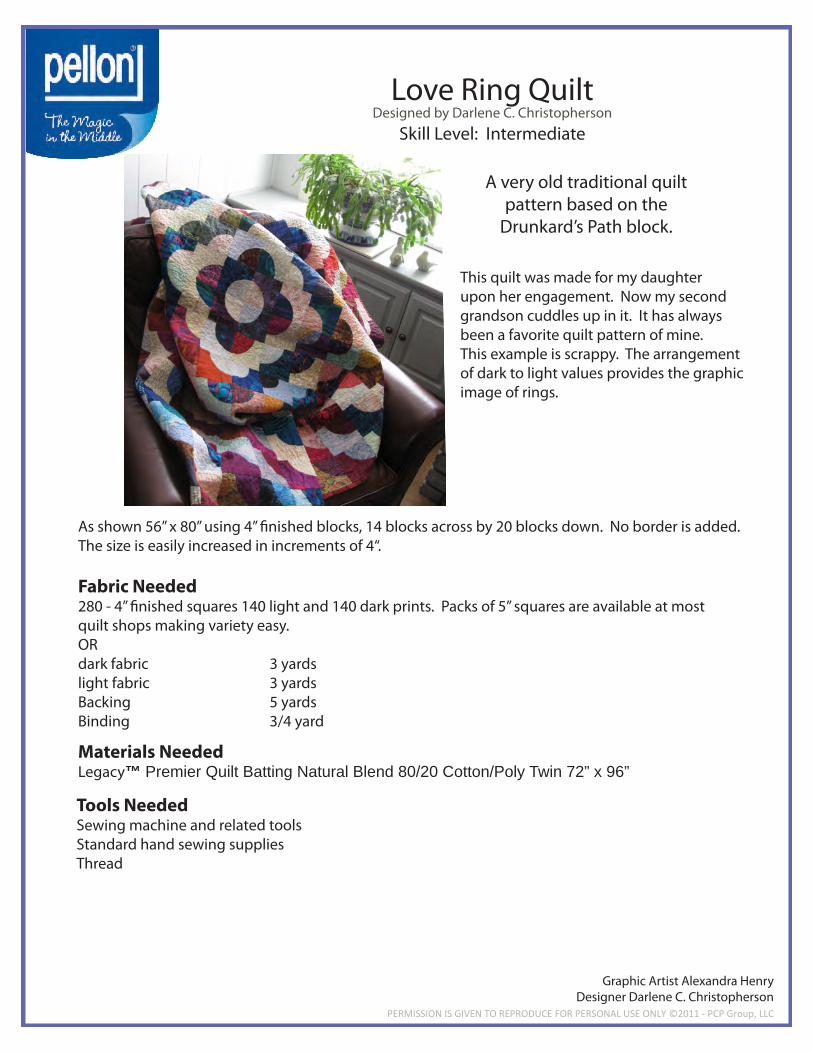
A very old traditional quilt pattern based on the Drunkard’s Path block. Love Ring Quilt Designed by Darlene C. Christopherson Skill Level: Intermediate This quilt was made for my daughter upon her engagement. Now my second grandson cuddles up in it. It has always been a favorite quilt pattern of mine. This example is scrappy. The arrangement of dark to light values provides the graphic image of rings. As shown 56” x 80” using 4” finished blocks, 14 blocks across by 20 blocks down. No border is added. The size is easily increased in increments of 4“. Fabric Needed 280 - 4” finished squares 140 light and 140 dark prints. Packs of 5” squares are available at most quilt shops making variety easy. OR dark fabric 3 yards light fabric 3 yards Backing 5 yards Binding 3/4 yard Materials Needed Legacy™ Premier Quilt Batting Natural Blend 80/20 Cotton/Poly Twin 72” x 96” PERMISSION IS GIVEN TO REPRODUCE FOR PERSONAL USE ONLY ©2011 - PCP Group, LLC Graphic Artist Alexandra Henry Designer Darlene C. Christopherson Tools Needed Sewing machine and related tools Standard hand sewing supplies Thread
Transcript of Love Ring Quilt - PellonProjects.com€¦ · A very old traditional quilt pattern based on the...
A very old traditional quiltpattern based on the
Drunkard’s Path block.
Love Ring QuiltDesigned by Darlene C. Christopherson
Skill Level: Intermediate
This quilt was made for my daughterupon her engagement. Now my secondgrandson cuddles up in it. It has alwaysbeen a favorite quilt pattern of mine.This example is scrappy. The arrangementof dark to light values provides the graphicimage of rings.
As shown 56” x 80” using 4” �nished blocks, 14 blocks across by 20 blocks down. No border is added.The size is easily increased in increments of 4“.
Fabric Needed280 - 4” �nished squares 140 light and 140 dark prints. Packs of 5” squares are available at mostquilt shops making variety easy.ORdark fabric 3 yards light fabric 3 yards Backing 5 yardsBinding 3/4 yard
Materials NeededLegacy™ Premier Quilt Batting Natural Blend 80/20 Cotton/Poly Twin 72” x 96”
PERMISSION IS GIVEN TO REPRODUCE FOR PERSONAL USE ONLY ©2011 - PCP Group, LLC
Graphic Artist Alexandra HenryDesigner Darlene C. Christopherson
Tools NeededSewing machine and related toolsStandard hand sewing suppliesThread
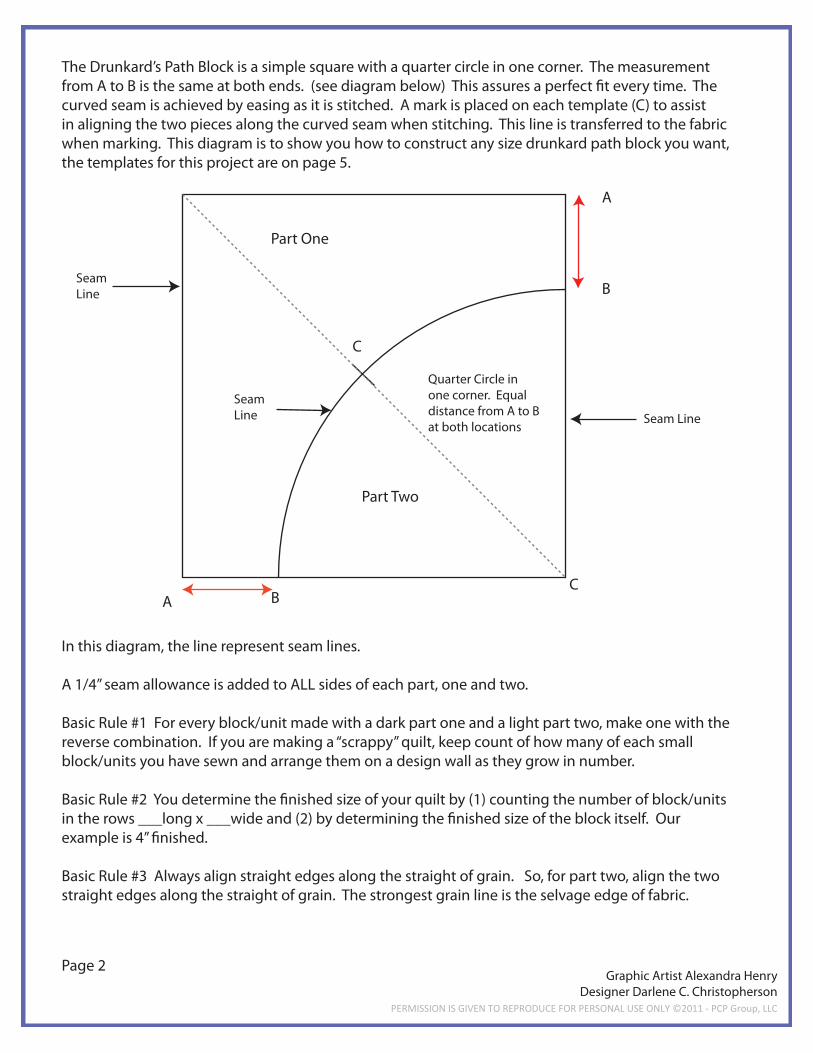
The Drunkard’s Path Block is a simple square with a quarter circle in one corner. The measurementfrom A to B is the same at both ends. (see diagram below) This assures a perfect �t every time. Thecurved seam is achieved by easing as it is stitched. A mark is placed on each template (C) to assistin aligning the two pieces along the curved seam when stitching. This line is transferred to the fabricwhen marking. This diagram is to show you how to construct any size drunkard path block you want,the templates for this project are on page 5.
In this diagram, the line represent seam lines.
A 1/4” seam allowance is added to ALL sides of each part, one and two.
Basic Rule #1 For every block/unit made with a dark part one and a light part two, make one with the reverse combination. If you are making a “scrappy” quilt, keep count of how many of each small block/units you have sewn and arrange them on a design wall as they grow in number.
Basic Rule #2 You determine the �nished size of your quilt by (1) counting the number of block/unitsin the rows ___long x ___wide and (2) by determining the �nished size of the block itself. Ourexample is 4” �nished.
Basic Rule #3 Always align straight edges along the straight of grain. So, for part two, align the two straight edges along the straight of grain. The strongest grain line is the selvage edge of fabric.
SeamLine
SeamLine
Quarter Circle inone corner. Equaldistance from A to Bat both locations
A
A
B
B
C
Part One
C
Seam Line
Page 2
PERMISSION IS GIVEN TO REPRODUCE FOR PERSONAL USE ONLY ©2011 - PCP Group, LLC
Graphic Artist Alexandra HenryDesigner Darlene C. Christopherson
Part Two
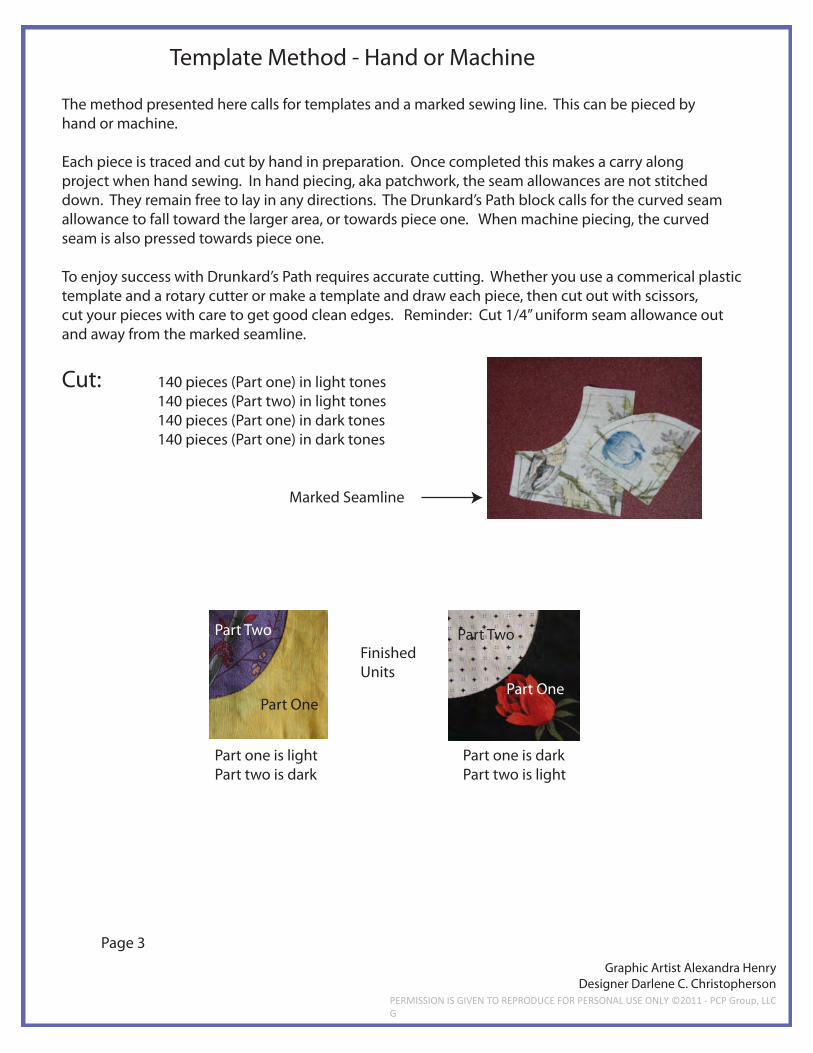
The method presented here calls for templates and a marked sewing line. This can be pieced byhand or machine.
Each piece is traced and cut by hand in preparation. Once completed this makes a carry alongproject when hand sewing. In hand piecing, aka patchwork, the seam allowances are not stitcheddown. They remain free to lay in any directions. The Drunkard’s Path block calls for the curved seam allowance to fall toward the larger area, or towards piece one. When machine piecing, the curvedseam is also pressed towards piece one.
To enjoy success with Drunkard’s Path requires accurate cutting. Whether you use a commerical plastictemplate and a rotary cutter or make a template and draw each piece, then cut out with scissors,cut your pieces with care to get good clean edges. Reminder: Cut 1/4” uniform seam allowance outand away from the marked seamline.
Cut: 140 pieces (Part one) in light tones 140 pieces (Part two) in light tones 140 pieces (Part one) in dark tones 140 pieces (Part one) in dark tones
Part one is lightPart two is dark
Part one is darkPart two is light
Page 3
Template Method - Hand or Machine
Marked Seamline
Part One
Part TwoPart Two
Part One
PERMISSION IS GIVEN TO REPRODUCE FOR PERSONAL USE ONLY ©2011 - PCP Group, LLC G
Graphic Artist Alexandra HenryDesigner Darlene C. Christopherson
FinishedUnits
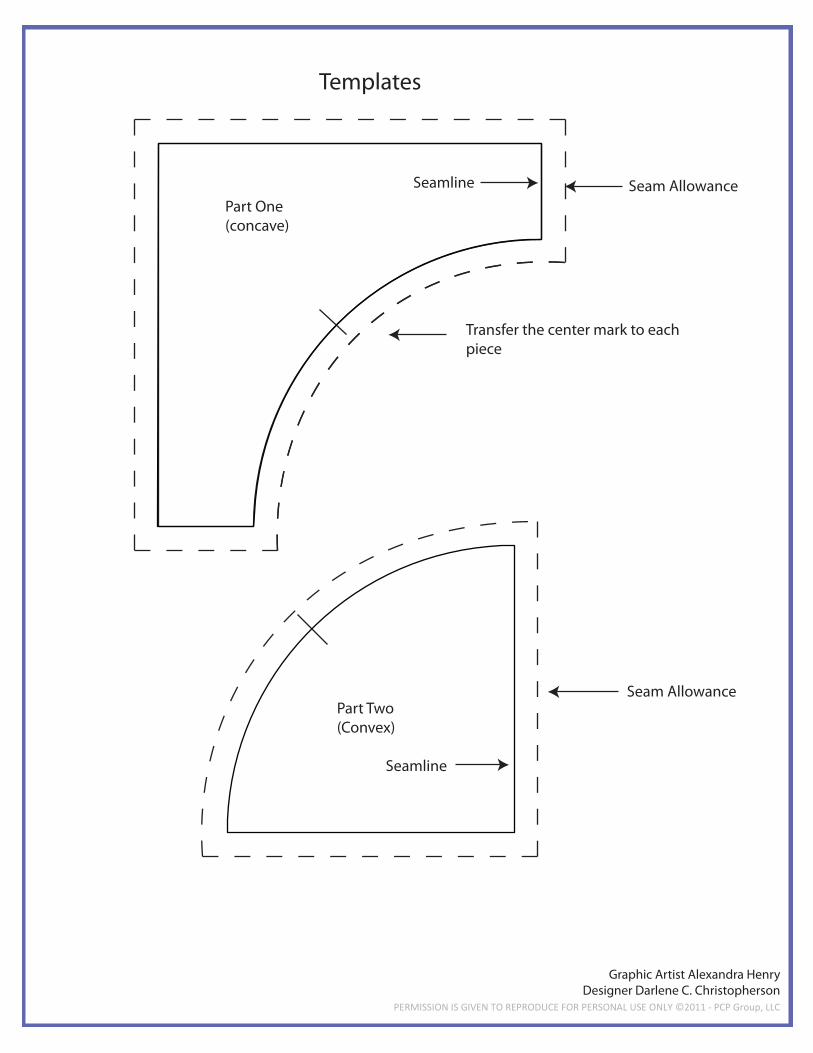
Templates
Part One(concave)
Part Two(Convex)
Seamline Seam Allowance
Seamline
Seam Allowance
PERMISSION IS GIVEN TO REPRODUCE FOR PERSONAL USE ONLY ©2011 - PCP Group, LLC
Graphic Artist Alexandra HenryDesigner Darlene C. Christopherson
Transfer the center mark to eachpiece
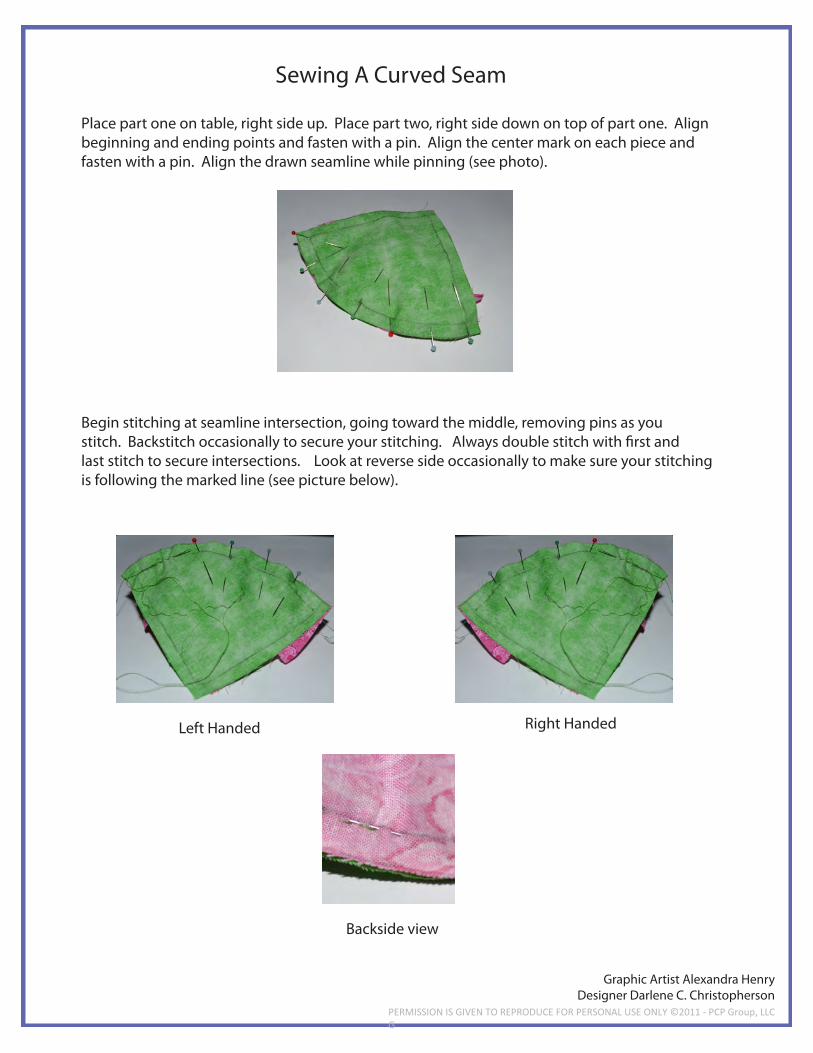
Sewing A Curved Seam
PERMISSION IS GIVEN TO REPRODUCE FOR PERSONAL USE ONLY ©2011 - PCP Group, LLC G
Graphic Artist Alexandra HenryDesigner Darlene C. Christopherson
Place part one on table, right side up. Place part two, right side down on top of part one. Alignbeginning and ending points and fasten with a pin. Align the center mark on each piece andfasten with a pin. Align the drawn seamline while pinning (see photo).
Begin stitching at seamline intersection, going toward the middle, removing pins as youstitch. Backstitch occasionally to secure your stitching. Always double stitch with �rst andlast stitch to secure intersections. Look at reverse side occasionally to make sure your stitchingis following the marked line (see picture below).
Left Handed Right Handed
Backside view

Once curved seam on all units are sewn, arrange them as in the above photos. For hand piecing, stitch units together by pinning at each intersection and stay stitching your �rst and last stitch for each unit. Do not stitch down the seam allowance.
For machine pin units together at each intersesction.
Once squares/units are sewn into rows and then sections, the four sections can be sewn together.
PERMISSION IS GIVEN TO REPRODUCE FOR PERSONAL USE ONLY ©2011 - PCP Group, LLC G
Graphic Artist Alexandra HenryDesigner Darlene C. Christopherson
Page 4
Layout