Sunny Crib Quilt Skill Level: Beginner - PellonProjects.com · Graphic Artist Alexandra Henry...
5
Graphic Artist Alexandra Henry PERMISSION IS GIVEN TO REPRODUCE FOR PERSONAL USE ONLY ©2014 - PCP Group, LLC Fabrics Needed Cotton fabric 1 fat quarter each of 8 different colors Backing 2 yards Sashing 1 yard Binding 1/2 yard Materials Needed Legacy™ by Pellon® 100% Natural Cotton Batting 1 pkg crib size 50 weight Cotton thread Tools Needed Sewing machine and related supplies Rotary cutter and related supplies. http://www.pellonprojects.com This is a great project for a beginning quilter with knowledge of basic quilt-making skills. A crib size quilt is lovely for a throw. Finished size is 40” x 56”. Sunny Crib Quilt Skill Level: Beginner Designed By Karin Jordan Sewn By Karin Jordan Quilted By Melissa Kelley http://www.leighlaurelstudios.com
Transcript of Sunny Crib Quilt Skill Level: Beginner - PellonProjects.com · Graphic Artist Alexandra Henry...
Graphic Artist Alexandra HenryPERMISSION IS GIVEN TO REPRODUCE FOR PERSONAL USE ONLY ©2014 - PCP Group, LLC
Fabrics Needed Cotton fabric 1 fat quarter each of 8 di�erent colorsBacking 2 yardsSashing 1 yardBinding 1/2 yard
Materials Needed Legacy™ by Pellon® 100% Natural Cotton Batting 1 pkg crib size50 weight Cotton thread
Tools NeededSewing machine and related suppliesRotary cutter and related supplies.
http://www.pellonprojects.com
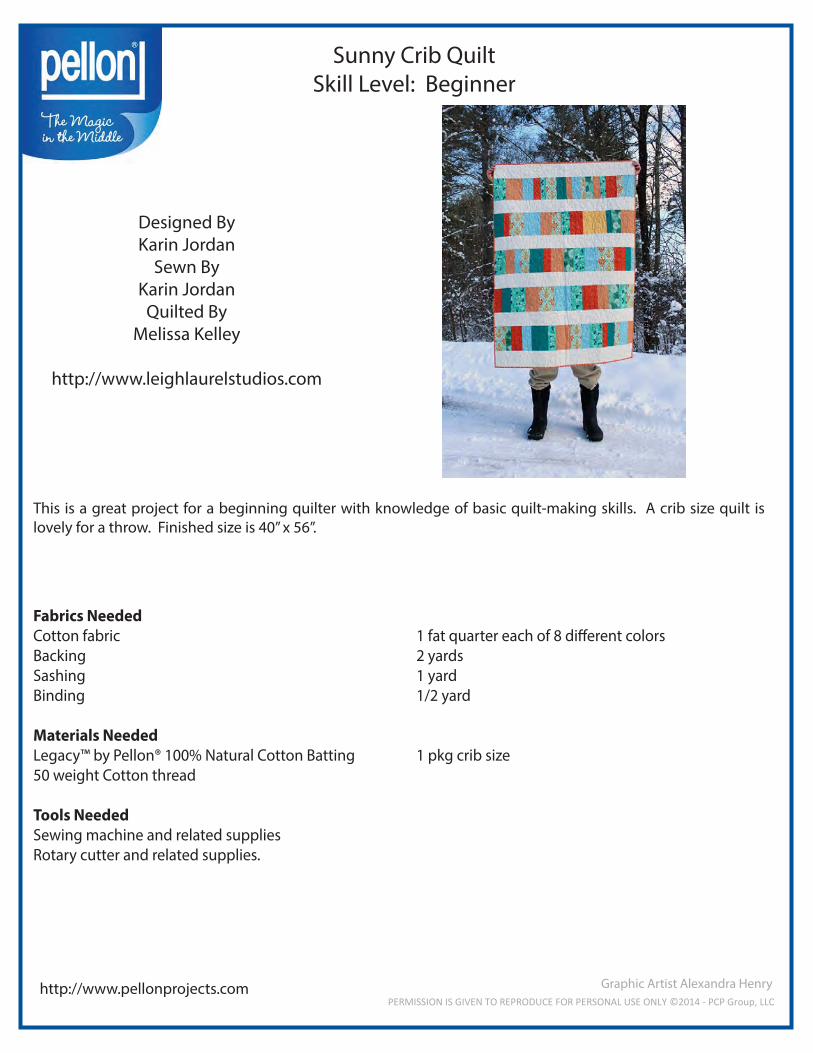
This is a great project for a beginning quilter with knowledge of basic quilt-making skills. A crib size quilt is lovely for a throw. Finished size is 40” x 56”.
Sunny Crib Quilt Skill Level: Beginner
Designed ByKarin Jordan
Sewn ByKarin Jordan
Quilted ByMelissa Kelley
http://www.leighlaurelstudios.com
Graphic Artist Alexandra HenryPERMISSION IS GIVEN TO REPRODUCE FOR PERSONAL USE ONLY ©2014 - PCP Group, LLC
http://www.pellonprojects.com
Sunny Crib Quilt Page 2
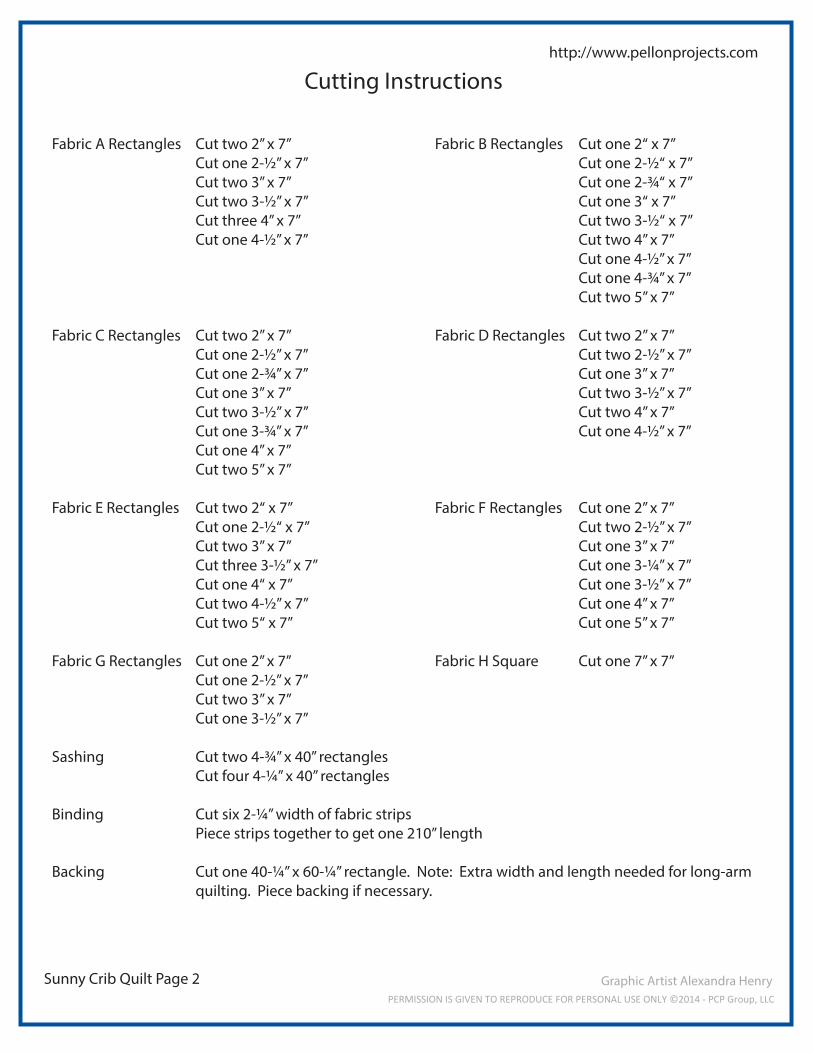
Fabric A Rectangles Cut two 2” x 7” Fabric B Rectangles Cut one 2“ x 7” Cut one 2-½” x 7” Cut one 2-½“ x 7” Cut two 3” x 7” Cut one 2-¾“ x 7” Cut two 3-½” x 7” Cut one 3“ x 7” Cut three 4” x 7” Cut two 3-½“ x 7” Cut one 4-½” x 7” Cut two 4” x 7” Cut one 4-½” x 7” Cut one 4-¾” x 7” Cut two 5” x 7”
Fabric C Rectangles Cut two 2” x 7” Fabric D Rectangles Cut two 2” x 7” Cut one 2-½” x 7” Cut two 2-½” x 7” Cut one 2-¾” x 7” Cut one 3” x 7” Cut one 3” x 7” Cut two 3-½” x 7” Cut two 3-½” x 7” Cut two 4” x 7” Cut one 3-¾” x 7” Cut one 4-½” x 7” Cut one 4” x 7” Cut two 5” x 7”
Fabric E Rectangles Cut two 2“ x 7” Fabric F Rectangles Cut one 2” x 7” Cut one 2-½“ x 7” Cut two 2-½” x 7” Cut two 3” x 7” Cut one 3” x 7” Cut three 3-½” x 7” Cut one 3-¼” x 7” Cut one 4“ x 7” Cut one 3-½” x 7” Cut two 4-½” x 7” Cut one 4” x 7” Cut two 5“ x 7” Cut one 5” x 7”
Fabric G Rectangles Cut one 2” x 7” Fabric H Square Cut one 7” x 7” Cut one 2-½” x 7” Cut two 3” x 7” Cut one 3-½” x 7” Sashing Cut two 4-¾” x 40” rectangles Cut four 4-¼” x 40” rectangles
Binding Cut six 2-¼” width of fabric strips Piece strips together to get one 210” length
Backing Cut one 40-¼” x 60-¼” rectangle. Note: Extra width and length needed for long-arm quilting. Piece backing if necessary.
Cutting Instructions

LayoutCut measurements shown
A4”
B3”
C2”
E3”
F4”
D2-½”
F3-½”
D2”
E4-½”
C5”
B3-½”
E3”
A3”
D4”
H7”
A4”
B5”
C3-½”
D2-½”
A2”
E3-½”
F3-¼”
B2”
C2-¾”
E2”
G2-½”
B2-¾”
A2”
D3-½”
E2-½”
C3-¾”
F2”
G3”
B5”
B4”
G3”
A3-½”
F3”
D3”
E4”
G2”
D3-½”
C3”
A4-½”
B4”
C2”
F2-½”
D4”
E5”
C4”
E4-½”
C5”
F5”
F2-½”
B2-½”
A2-½”
A3-½”
D4-½”
B3-½”
G3-½”
A3”
E3-½”
B4-½”
E3-½”
C2-½”
A4”
D2”
E2”
C3-½”
Graphic Artist Alexandra HenryPERMISSION IS GIVEN TO REPRODUCE FOR PERSONAL USE ONLY ©2014 - PCP Group, LLC
http://www.pellonprojects.com
Sunny Crib Quilt Page 3
Graphic Artist Alexandra HenryPERMISSION IS GIVEN TO REPRODUCE FOR PERSONAL USE ONLY ©2014 - PCP Group, LLC
http://www.pellonprojects.com
Sunny Crib Quilt Page 4
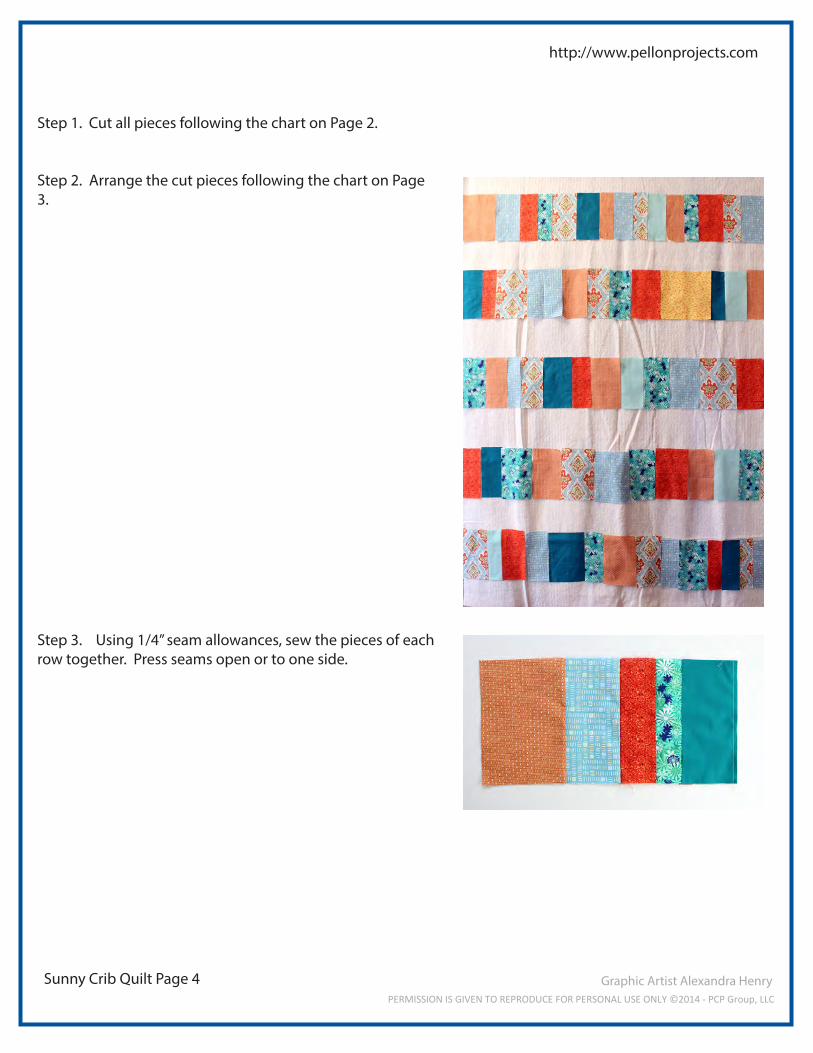
Step 1. Cut all pieces following the chart on Page 2.
Step 2. Arrange the cut pieces following the chart on Page 3.
Step 3. Using 1/4” seam allowances, sew the pieces of each row together. Press seams open or to one side.
Graphic Artist Alexandra HenryPERMISSION IS GIVEN TO REPRODUCE FOR PERSONAL USE ONLY ©2014 - PCP Group, LLC
http://www.pellonprojects.com
Sunny Crib Quilt Page 5
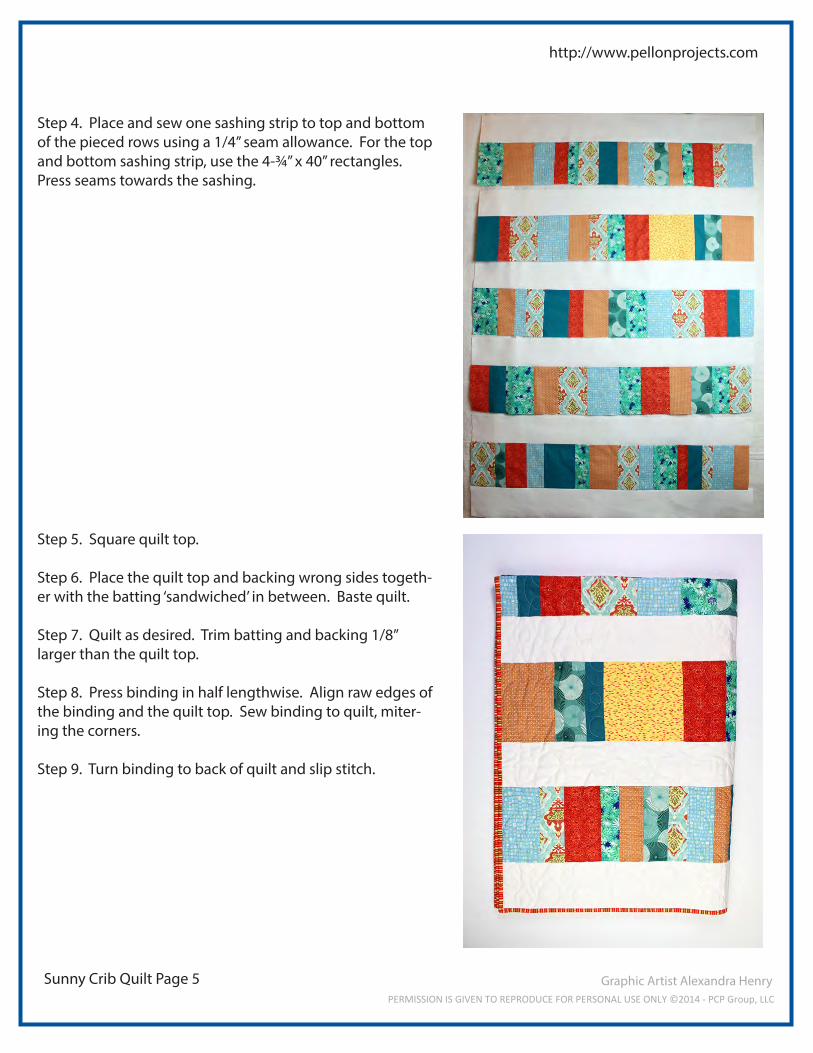
Step 4. Place and sew one sashing strip to top and bottom of the pieced rows using a 1/4” seam allowance. For the top and bottom sashing strip, use the 4-¾” x 40” rectangles. Press seams towards the sashing.
Step 5. Square quilt top.
Step 6. Place the quilt top and backing wrong sides togeth-er with the batting ‘sandwiched’ in between. Baste quilt.
Step 7. Quilt as desired. Trim batting and backing 1/8” larger than the quilt top.
Step 8. Press binding in half lengthwise. Align raw edges of the binding and the quilt top. Sew binding to quilt, miter-ing the corners.
Step 9. Turn binding to back of quilt and slip stitch.