
Losmandy GM8, G-11 & AZ8: Encoders Installation - Astro … · 2017-06-26 · Title: Microsoft Word...
7
Copyright © 2016-2017, Astro Devices. All rights reserved. 1 Losmandy GM8, G-11 & AZ8: Encoders Installation Please unpack all parts from the encoder kit. Make sure that your kit contains the following parts: Encoder resolution: 311296 steps Current consumption: 25 mA each This instruction booklet shows the installation procedure for one encoder. The installation procedure for the second encoder is identical. Tools required: - Allen key (supplied) - Philips head screw driver (not supplied) Do not subject encoder disks to magnetic fields as it may affect the magnetization of the magnetic multi-pole rings.
Transcript of Losmandy GM8, G-11 & AZ8: Encoders Installation - Astro … · 2017-06-26 · Title: Microsoft Word...

Copyright©2016-2017,AstroDevices.Allrightsreserved. 1
LosmandyGM8,G-11&AZ8:EncodersInstallation
Pleaseunpackallpartsfromtheencoderkit.Makesurethatyourkitcontainsthefollowingparts:
Encoderresolution:311296stepsCurrentconsumption:25mAeachThisinstructionbookletshowstheinstallationprocedureforoneencoder.Theinstallationprocedureforthesecondencoderisidentical.Toolsrequired:
- Allenkey(supplied)- Philipsheadscrewdriver(notsupplied)
Donotsubjectencoderdiskstomagneticfieldsasitmayaffectthemagnetizationofthemagneticmulti-polerings.
Copyright©2016-2017,AstroDevices.Allrightsreserved.2
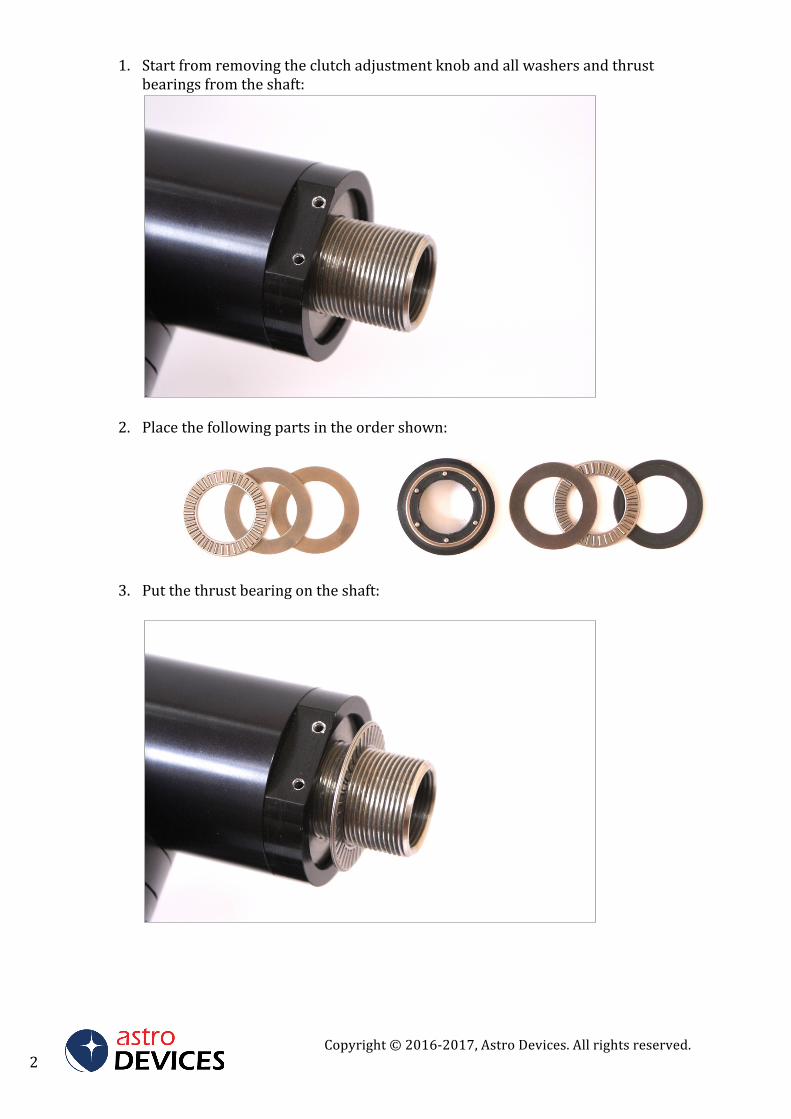
1. Startfromremovingtheclutchadjustmentknobandallwashersandthrustbearingsfromtheshaft:
2. Placethefollowingpartsintheordershown:
3. Putthethrustbearingontheshaft:
Copyright©2016-2017,AstroDevices.Allrightsreserved. 3
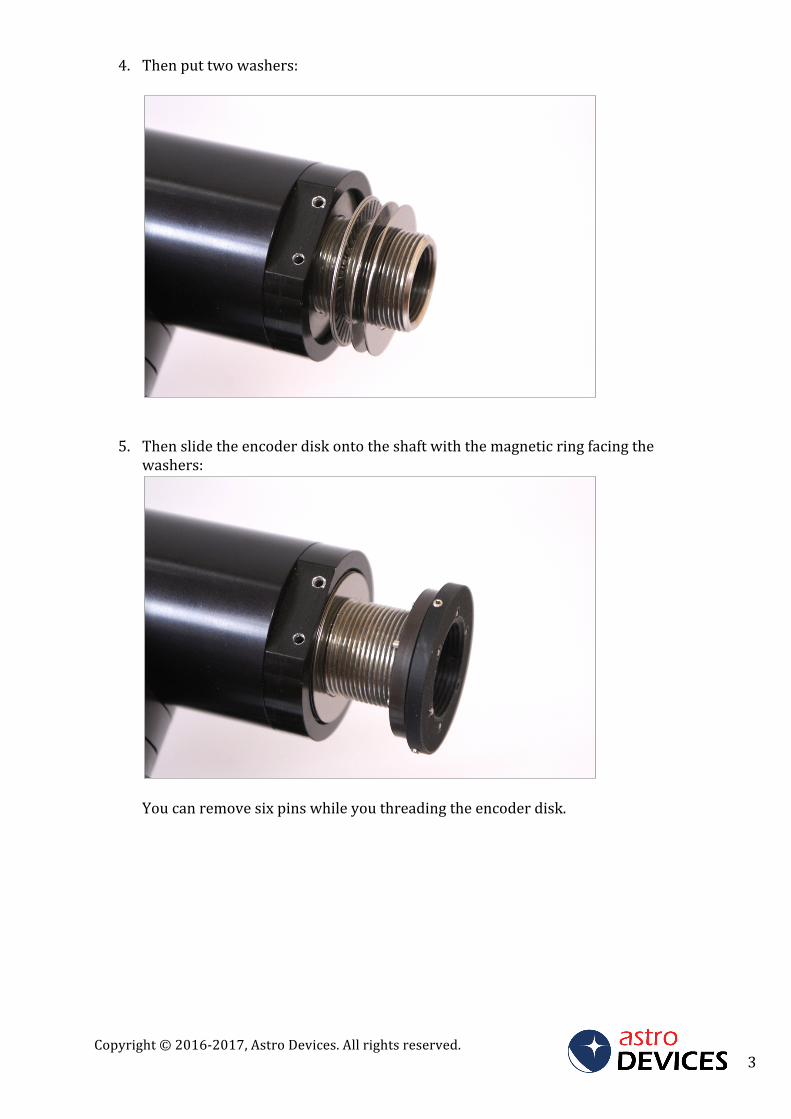
4. Thenputtwowashers:
5. Thenslidetheencoderdiskontotheshaftwiththemagneticringfacingthewashers:
Youcanremovesixpinswhileyouthreadingtheencoderdisk.
Copyright©2016-2017,AstroDevices.Allrightsreserved.4
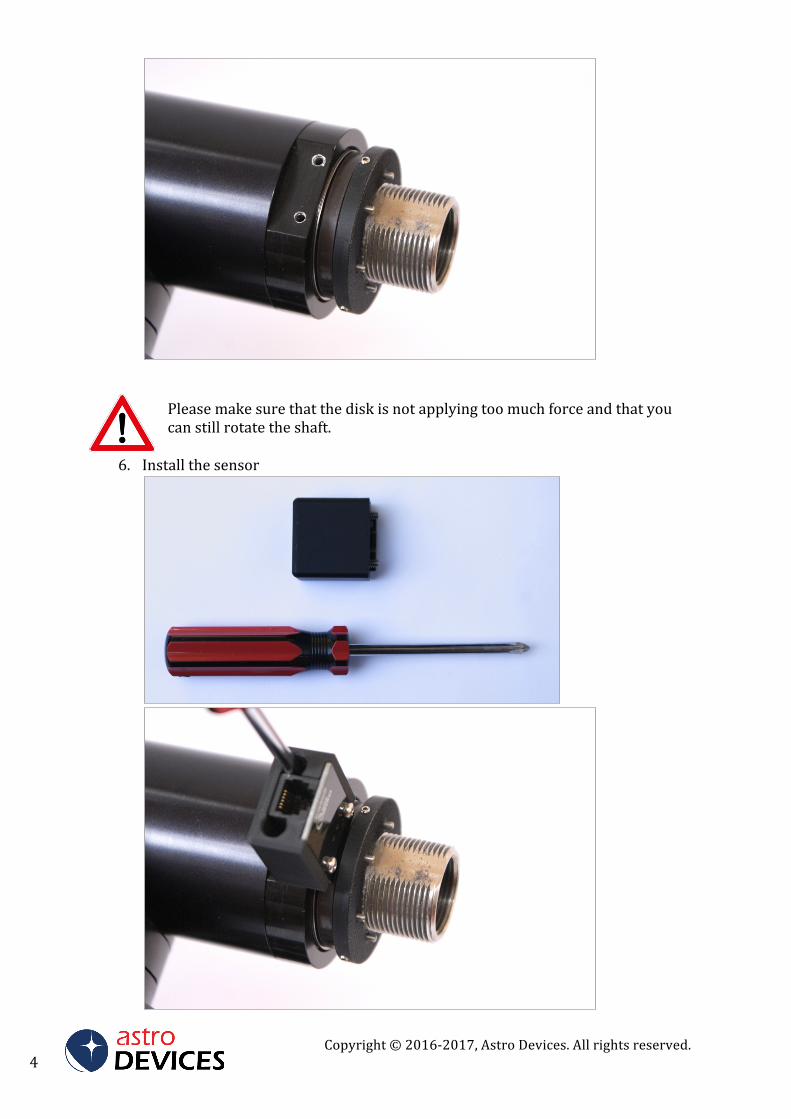
Pleasemakesurethatthediskisnotapplyingtoomuchforceandthatyoucanstillrotatetheshaft.
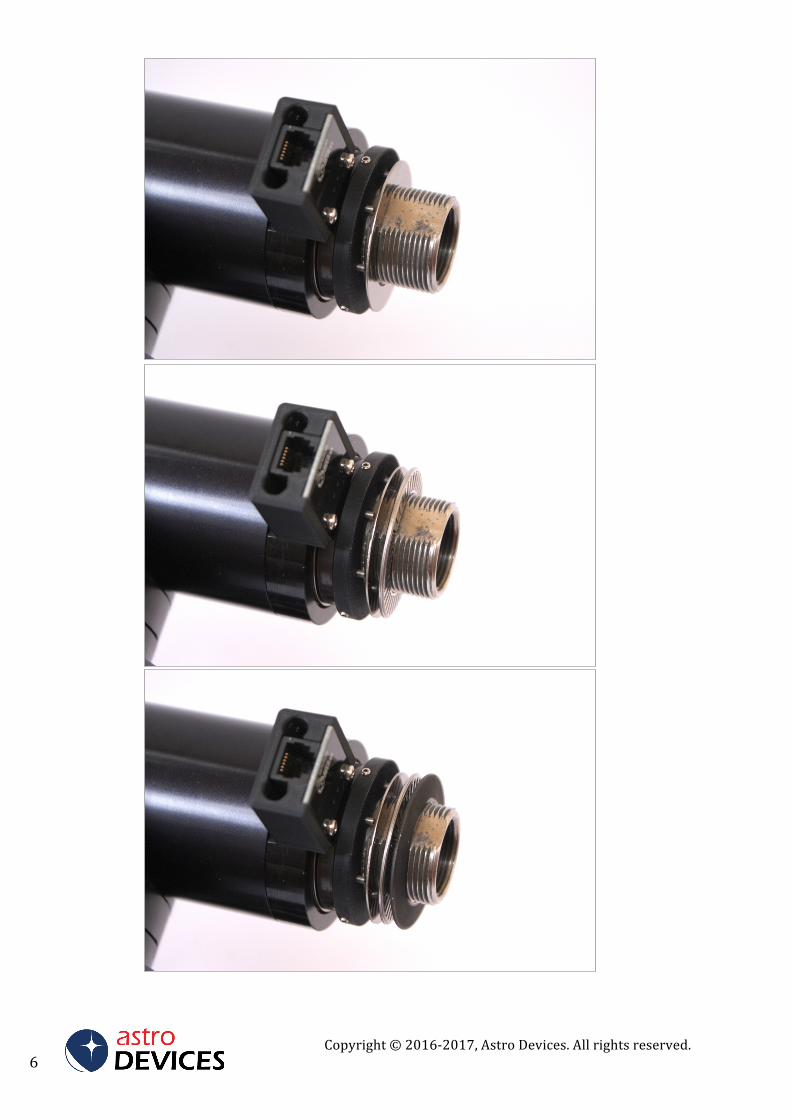
6. Installthesensor
Copyright©2016-2017,AstroDevices.Allrightsreserved. 5
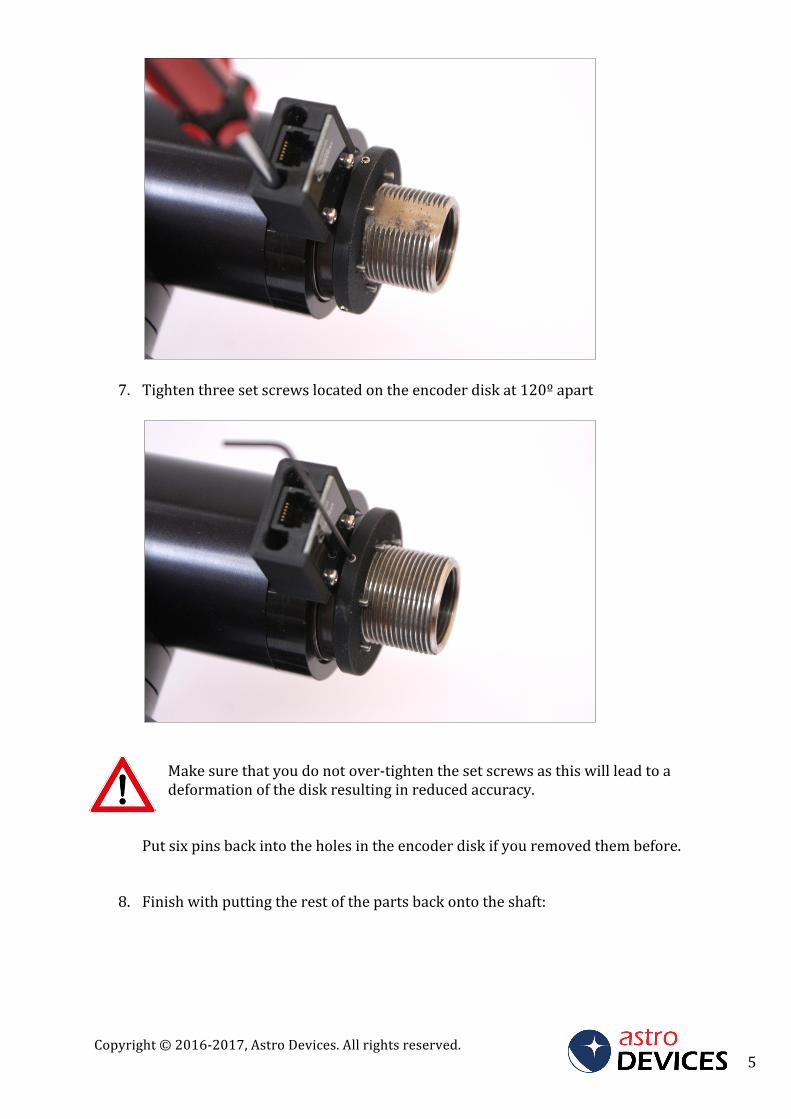
7. Tightenthreesetscrewslocatedontheencoderdiskat120ºapart
Makesurethatyoudonotover-tightenthesetscrewsasthiswillleadtoadeformationofthediskresultinginreducedaccuracy.
Putsixpinsbackintotheholesintheencoderdiskifyouremovedthembefore.
8. Finishwithputtingtherestofthepartsbackontotheshaft:
Copyright©2016-2017,AstroDevices.Allrightsreserved.6

Copyright©2016-2017,AstroDevices.Allrightsreserved. 7
9. Tightentheclutch
10. Repeatthesameinstallationprocedureforthesecondencoder.11. InserttheencodercableandconnectittotheDSCunit.12. Done.

![INSTALL GUIDE CFLI-AL(RS)-GM8-[FLCAN]-EN€¦ · 6/11/2020 · x3 x2 x1 7.5a 1 1 or without a compatible accessory with a compatible accessory. important: see the compatible accessories](https://static.fdocuments.in/doc/165x107/60871b2f6060807e9c5df361/install-guide-cfli-alrs-gm8-flcan-en-6112020-x3-x2-x1-75a-1-1-or-without.jpg)

![INSTALL GUIDE CFL-AL(RS)-GM8-[FLCAN]-EN](https://static.fdocuments.in/doc/165x107/615c348c91a18e00d418f635/install-guide-cfl-alrs-gm8-flcan-en.jpg)
![9F - jbbkpm's Blog · h.v[ klv[p 56 vf n\5lt ;fj v,u h zlt[ baz 5}kjf ht] \p vf dwidjul"i n \5lt nnl"g[ baz gf 50[ t[d t[gf vmxlsf glr[ !__ ~p s[ 5__ ~p gl gm8 ;zsfjlg[ u]5r]5 rf](https://static.fdocuments.in/doc/165x107/5ecc4c61add29a23b61a1c0c/9f-jbbkpms-blog-hv-klvp-56-vf-n5lt-fj-vu-h-zlt-baz-5kjf-ht-p-vf-dwidjuli.jpg)


![INSTALL GUIDE COL-AL(RS)-GM8-[ADS-ALCA]-EN · 7/20/2020 · patent no. us 8,856,780 ca 2759622 vehicle list - 1 of 2 make model year install type features data immobilizer bypass](https://static.fdocuments.in/doc/165x107/5f8192640a68ec76ef407d8b/install-guide-col-alrs-gm8-ads-alca-en-7202020-patent-no-us-8856780.jpg)
![INSTALL GUIDE SMA-AL(RS)-GM8-[ADS-ALCA]-ENRS)-GM8-[ADS-ALCA]-EN_20… · 30/07/2020 · patent no. us 8,856,780 ca 2759622 vehicle list - 1 of 2 make model year install type features](https://static.fdocuments.in/doc/165x107/5fa5550733f01d133f4e2afe/install-guide-sma-alrs-gm8-ads-alca-en-rs-gm8-ads-alca-en20-30072020.jpg)


![INSTALL GUIDE OEM-AL(RS)-GM8-[ADS-ALCA]-EN · 7/20/2020 · patent no. us 8,856,780 ca 2759622 vehicle list - 1 of 2 make model year install type features data immobilizer bypass](https://static.fdocuments.in/doc/165x107/5f839e50eb287675b1277185/install-guide-oem-alrs-gm8-ads-alca-en-7202020-patent-no-us-8856780.jpg)


