LoRa and LoRaWAN Radio for Raspberry Pi · 2019-11-18 · Raspberry Pi Wiring Raspberry Pi Radio...
28
LoRa and LoRaWAN Radio for Raspberry Pi Created by Brent Rubell Last updated on 2019-11-18 02:46:44 PM UTC
Transcript of LoRa and LoRaWAN Radio for Raspberry Pi · 2019-11-18 · Raspberry Pi Wiring Raspberry Pi Radio...

LoRa and LoRaWAN Radio for Raspberry PiCreated by Brent Rubell
Last updated on 2019-11-18 02:46:44 PM UTC

Overview
If you're building a Raspberry Pi project and need to send data back-and-forth, the WiFi module built into newer Pi'sshould be fine for most cases.
However, WiFi does not have a long range and also requires both investment (through your ISP) and setup (routers,access points, network security schemes).
If you're deploying your project somewhere more remotely, without WiFi or a strong cellular network, like a farm, you'llneed another option. Something that can be deployed quickly with no overhead setup and that will transmit/receiveover a long distance.
By sacrificing transmit speed and the amount of data which you're able to send, packet radios can transmit muchfarther than Bluetooth Low-Energy and WiFi.
This makes using a radio perfect for scenarios where your project would need to periodically transmit sensor and/ordevice data (such as the Pi's battery life) over a long distance. The RFM69 module can transmit up to 50m and theRFM9x module can send packets up to 2km over LoRa and even further using LoRaWAN!
Parts
© Adafruit Industries https://learn.adafruit.com/lora-and-lorawan-radio-for-raspberry-pi Page 3 of 29

All-in-One
The Adafruit LoRa Radio Bonnet for Raspberry Pi sets you up with a RFM95W Radio Module, a 128x32 OLED displayand three push-buttons for LoRa and LoRaWAN experiments.
There's also a 433MHz version which uses the amateur or license-free ISM band (ITU "Europe" license-free ISM or ITU"American" amateur with limitations).
Raspberry Pi 3 - Model B+ - 1.4GHz Cortex-A53 with 1GBRAM
$35.00IN STOCK
Add To Cart
Raspberry Pi Zero - Version 1.3
$5.00IN STOCK
Add To Cart
Your browser does not support the video tag. Adafruit LoRa Radio Bonnet with OLED - RFM95W @915MHz
$32.50IN STOCK
Add To Cart
© Adafruit Industries https://learn.adafruit.com/lora-and-lorawan-radio-for-raspberry-pi Page 4 of 29

Breadboard Parts
You'll need a way to access the GPIO (pins) from the Raspberry Pi. The T-Cobbler plus is a plug-and-play breakoutwhich works with almost every new Raspberry Pi variation.
The Pi setup used for this guide is operated as a headless Pi. This means that no monitor is plugged into the Pi and wecontrol it over SSH. We'll add a small display to monitor and interact with the code.
Sending Data using LoRa
The RFM9x LoRa comes in two different frequencies - 868/915MHz and 433MHz. It can broadcast over LoRa (longer
Adafruit LoRa Radio Bonnet RFM96W @ 433MHz
OUT OF STOCK
Out Of Stock
Assembled Pi T-Cobbler Plus - GPIO Breakout
$7.95IN STOCK
Add To Cart
Monochrome 128x32 I2C OLED graphic display
$17.50IN STOCK
Add To Cart
© Adafruit Industries https://learn.adafruit.com/lora-and-lorawan-radio-for-raspberry-pi Page 5 of 29

range than the RFM69HCW) and LoRaWAN (even longer range to gateways).
There's also a 433MHz version which uses the amateur or license-free ISM band (ITU "Europe" license-free ISM or ITU"American" amateur with limitations).
1 x LoRa Breakout RFM96WLoRa Radio Module - 433MHz Version
Add To Cart
Materials
If you don't have these parts already, grab them from the Adafruit store:
1 x Tactile Switch Buttons10-pack of medium-sized momentary switches
Add To Cart
1 x Power Supply w/MicroUSB5V 2.5A Switching Power Supply
Out Of Stock
1 x 8GB MicroSD8GB MicroSD with NooBs 2.9
Add To Cart
1 x Full sized breadboardThis is a 'full-size' breadboard, 830 tie points. Good for small and medium projects.
Out Of Stock
1 x Breadboarding wire bundle75 flexible stranded core wires with stiff ends molded
Add To Cart
Adafruit RFM95W LoRa Radio Transceiver Breakout - 868or 915 MHz
OUT OF STOCK
Out Of Stock
© Adafruit Industries https://learn.adafruit.com/lora-and-lorawan-radio-for-raspberry-pi Page 6 of 29

Raspberry PiWiring
Raspberry Pi Radio Bonnet Wiring
The Radio Bonnet for Raspberry Pi sets you up with a RFM9x (or RFM69HCW) Radio Module, a 128x32 OLED displayand three push-buttons.
If you have this bonnet, everything is already "wired up" for you - move on to setting up your Raspberry Pi.
Raspberry Pi Breadboard Wiring
Wiring the Push-Buttons
We'll start by wiring three buttons. These will the physical interface between the Raspberry Pi and the Radio - we'llwant to control the radio by pressing some buttons.
Make the following connections between the Pi and the three push-buttons:
Your browser does not support the video tag. Adafruit LoRa Radio Bonnet with OLED - RFM95W @915MHz
$32.50IN STOCK
Add To Cart
© Adafruit Industries https://learn.adafruit.com/lora-and-lorawan-radio-for-raspberry-pi Page 7 of 29

Pi GPIO #5 to Button A (orange wire)Pi GPIO #6 to Button B (blue wire)Pi GPIO #12 to Button C (green wire)Pi 3.3V to Power Rail (red wire)Pi GND to Ground Rail (black wire)
Wiring the OLED
Pi 3.3V to OLED VINPi GND to OLED GNDPi SCL to OLED SCLPi SDA to OLED SDAPi GPIO4 to OLED RST
Wiring the RFM Radio Module
Make the following connections between the Raspberry Pi and the RFM Radio Module:
Vin to Raspberry Pi 3.3VGND to Raspberry Pi GroundRFM G0 to Raspberry Pi GPIO #5RFM RST to Raspberry Pi GPIO #25
© Adafruit Industries https://learn.adafruit.com/lora-and-lorawan-radio-for-raspberry-pi Page 8 of 29

RFM CLK to Raspberry Pi SCKRFM MISO to Raspberry Pi MISORFM MOSI to Raspberry Pi MOSIRFM CS to Raspberry Pi CE1
Next, let's move on to installing the necessary files for this project.
© Adafruit Industries https://learn.adafruit.com/lora-and-lorawan-radio-for-raspberry-pi Page 9 of 29

LoRa Raspberry PiSetup
This guide assumes that you've gotten your Raspberry Pi up and running, and have CircuitPython installed.
If you have not done this yet, visit the installation guide here and come back when you're setup. (https://adafru.it/Deo)
Installing CircuitPython Libraries
We're running CircuitPython on the Raspberry Pi, installing the libraries for radio communication is simple.
To install the library for the display, enter the following into the terminal:
sudo pip3 install adafruit-circuitpython-ssd1306
You'll also need to install the framebuf module in order to write to the display.
sudo pip3 install adafruit-circuitpython-framebuf
To install the library for the RFM9x Module, enter the following into the terminal:
sudo pip3 install adafruit-circuitpython-rfm9x
RFM9x Connection Test!
The following code is for checking if the RFM9x radio is set up for transmitting and receiving. Save the code on your Pias rfm9x_check.py .
"""Wiring Check, Pi Radio w/RFM9x
Learn Guide: https://learn.adafruit.com/lora-and-lorawan-for-raspberry-piAuthor: Brent Rubell for Adafruit Industries"""import timeimport busiofrom digitalio import DigitalInOut, Direction, Pullimport board# Import the SSD1306 module.import adafruit_ssd1306# Import the RFM9x radio module.import adafruit_rfm9x
# Button AbtnA = DigitalInOut(board.D5)btnA.direction = Direction.INPUTbtnA.pull = Pull.UP
# Button BbtnB = DigitalInOut(board.D6)
Do not use this if you have a RFM69 Radio�
© Adafruit Industries https://learn.adafruit.com/lora-and-lorawan-radio-for-raspberry-pi Page 10 of 29
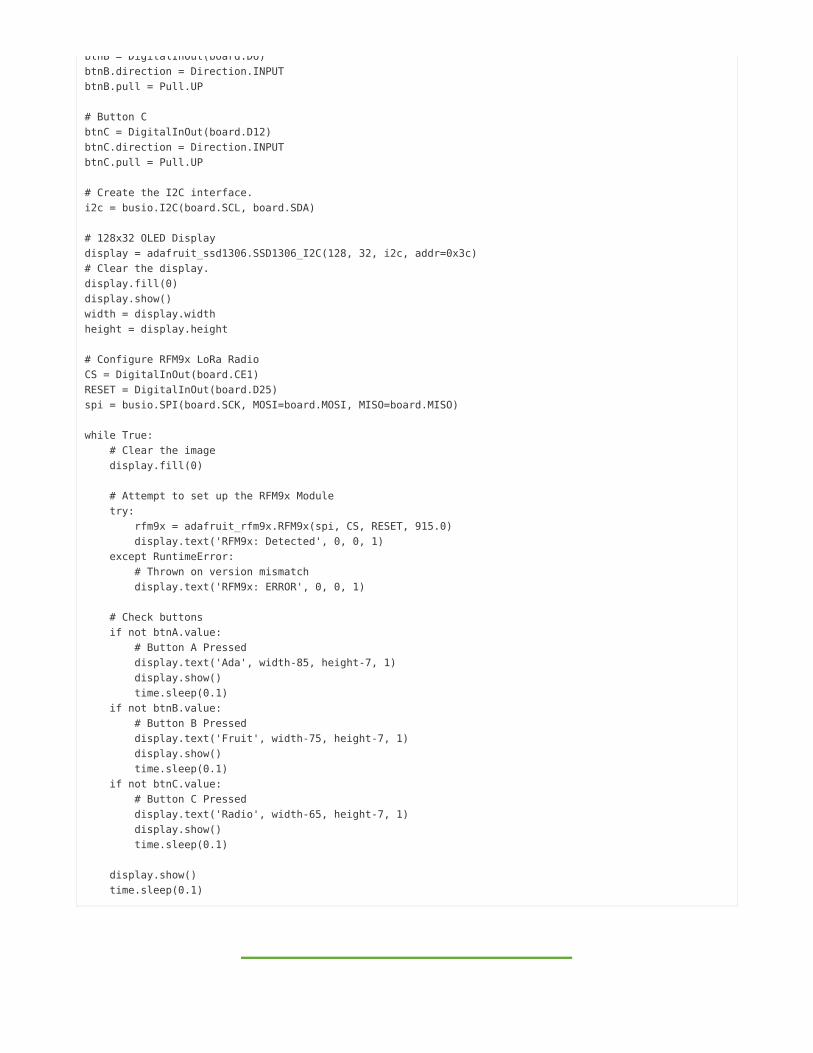
btnB = DigitalInOut(board.D6)btnB.direction = Direction.INPUTbtnB.pull = Pull.UP
# Button CbtnC = DigitalInOut(board.D12)btnC.direction = Direction.INPUTbtnC.pull = Pull.UP
# Create the I2C interface.i2c = busio.I2C(board.SCL, board.SDA)
# 128x32 OLED Displaydisplay = adafruit_ssd1306.SSD1306_I2C(128, 32, i2c, addr=0x3c)# Clear the display.display.fill(0)display.show()width = display.widthheight = display.height
# Configure RFM9x LoRa RadioCS = DigitalInOut(board.CE1)RESET = DigitalInOut(board.D25)spi = busio.SPI(board.SCK, MOSI=board.MOSI, MISO=board.MISO)
while True: # Clear the image display.fill(0)
# Attempt to set up the RFM9x Module try: rfm9x = adafruit_rfm9x.RFM9x(spi, CS, RESET, 915.0) display.text('RFM9x: Detected', 0, 0, 1) except RuntimeError: # Thrown on version mismatch display.text('RFM9x: ERROR', 0, 0, 1)
# Check buttons if not btnA.value: # Button A Pressed display.text('Ada', width-85, height-7, 1) display.show() time.sleep(0.1) if not btnB.value: # Button B Pressed display.text('Fruit', width-75, height-7, 1) display.show() time.sleep(0.1) if not btnC.value: # Button C Pressed display.text('Radio', width-65, height-7, 1) display.show() time.sleep(0.1)
display.show() time.sleep(0.1)
You'll also want to download the font file, font5x8.bin , and copy it into the same directory as the script:
© Adafruit Industries https://learn.adafruit.com/lora-and-lorawan-radio-for-raspberry-pi Page 11 of 29

https://adafru.it/DvA
https://adafru.it/DvA
To use the code, enter the following in your terminal:
python3 rfm9x_check.py
Now to check the setup:
If the RFM9x/RFM69 is detected, the OLED will display
Detected. You can test the buttons by pressing them.
If the wiring of the radio module is incorrect - the
display will show ERROR. Check over your wiring on the
Wiring Page and re-run the test. You may also need to
ensure the correct CircuitPython library is installed for
the module.
If the OLED does not turn on - first check that it is wired
correctly. Then, make sure you enabled I2C from raspi-config and installed the required libraries ( adafruit-circuitpython-framebuf and adafruit-circuitpython-ssd1306 ).
With everything working, let's move on to using the radio.
© Adafruit Industries https://learn.adafruit.com/lora-and-lorawan-radio-for-raspberry-pi Page 12 of 29

Sending Data with LoRa
The RFM9x is a more expensive module than the RFM69, but it has a trick - LoRa. LoRa is a spread spectrummodulation technique patented by Semtech (https://adafru.it/DuM). It allows your packets to be sent over fartherdistances (a few km in a city like New York and around 40km in a rural area).
It's also a low power protocol with batteries lasting in the year range, instead of a few days with WiFi. This is madepossible by only powering up the LoRa radio when packets are being sent, instead of keeping the radio always-on(like the WiFi radio on your cell phone).
When building a project which uses LoRa, keep in mind that only a few hundred bytes per-transmission can be sent,and that each transmission will cause the battery life to decrease.
If a LoRa project involves a lot of sensors, expect to cram a lot of data into a small packet which is transmittedinfrequently.
RFM9x and CircuitPython
It's easy to use the RFM9x LoRa radio with CircuitPython and the Adafruit CircuitPythonRFM9x (https://adafru.it/BjD) module. This module allows you to easily write Python code that sends and receivespackets of data with the radio.
Be careful to note this library is for the RFM9x (RFM95/96/97/98) Radio only and will not work with the RFM69.
To demonstrate how the RFM9x LoRa module sends packets, we'll build an example where we send and receive databetween two radios.
CircuitPython Transmitter/Receiver Example
Below is an example of using the RFM9x to transmit, or receive from, another RFM9x radio. Save thisas radio_rfm9x.py on your Raspberry Pi.
"""Example for using the RFM9x Radio with Raspberry Pi.
Learn Guide: https://learn.adafruit.com/lora-and-lorawan-for-raspberry-piAuthor: Brent Rubell for Adafruit Industries
Do not use this if you have a RFM69 Packet Radio, its for RFM9X radio's only!�
© Adafruit Industries https://learn.adafruit.com/lora-and-lorawan-radio-for-raspberry-pi Page 13 of 29

Author: Brent Rubell for Adafruit Industries"""# Import Python System Librariesimport time# Import Blinka Librariesimport busiofrom digitalio import DigitalInOut, Direction, Pullimport board# Import the SSD1306 module.import adafruit_ssd1306# Import RFM9ximport adafruit_rfm9x
# Button AbtnA = DigitalInOut(board.D5)btnA.direction = Direction.INPUTbtnA.pull = Pull.UP
# Button BbtnB = DigitalInOut(board.D6)btnB.direction = Direction.INPUTbtnB.pull = Pull.UP
# Button CbtnC = DigitalInOut(board.D12)btnC.direction = Direction.INPUTbtnC.pull = Pull.UP
# Create the I2C interface.i2c = busio.I2C(board.SCL, board.SDA)
# 128x32 OLED Displaydisplay = adafruit_ssd1306.SSD1306_I2C(128, 32, i2c, addr=0x3c)# Clear the display.display.fill(0)display.show()width = display.widthheight = display.height
# Configure LoRa RadioCS = DigitalInOut(board.CE1)RESET = DigitalInOut(board.D25)spi = busio.SPI(board.SCK, MOSI=board.MOSI, MISO=board.MISO)rfm9x = adafruit_rfm9x.RFM9x(spi, CS, RESET, 915.0)rfm9x.tx_power = 23prev_packet = None
while True: packet = None # draw a box to clear the image display.fill(0) display.text('RasPi LoRa', 35, 0, 1)
# check for packet rx packet = rfm9x.receive() if packet is None: display.show() display.text('- Waiting for PKT -', 15, 20, 1) else: # Display the packet text and rssi
© Adafruit Industries https://learn.adafruit.com/lora-and-lorawan-radio-for-raspberry-pi Page 14 of 29

# Display the packet text and rssi display.fill(0) prev_packet = packet packet_text = str(prev_packet, "utf-8") display.text('RX: ', 0, 0, 1) display.text(packet_text, 25, 0, 1) time.sleep(1)
if not btnA.value: # Send Button A display.fill(0) button_a_data = bytes("Button A!\r\n","utf-8") rfm9x.send(button_a_data) display.text('Sent Button A!', 25, 15, 1) elif not btnB.value: # Send Button B display.fill(0) button_b_data = bytes("Button B!\r\n","utf-8") rfm9x.send(button_b_data) display.text('Sent Button B!', 25, 15, 1) elif not btnC.value: # Send Button C display.fill(0) button_c_data = bytes("Button C!\r\n","utf-8") rfm9x.send(button_c_data) display.text('Sent Button C!', 25, 15, 1)
display.show() time.sleep(0.1)
You'll also want to download the font file, font5x8.bin , and copy it into the same directory as the script:
https://adafru.it/DvA
https://adafru.it/DvA
To run the example, enter the following into the terminal:
python3 radio_rfm9x.py
Both of the radios will listen for a new incoming packet. When they receive a new packet, they'll print the text from thepacket to the display (and to the terminal).
Press any of the three buttons to send data between radios. Pressing button a will send a packet with data 'Button A!'to the other radio, and so on!
© Adafruit Industries https://learn.adafruit.com/lora-and-lorawan-radio-for-raspberry-pi Page 15 of 29

© Adafruit Industries https://learn.adafruit.com/lora-and-lorawan-radio-for-raspberry-pi Page 16 of 29

Sending Data over LoRaWAN
Overview
LoRaWAN is a Low Power Wide Area Network (LPWAN) specification which allows connection of LoRa devices to theinternet. LoRaWAN differs from LoRa by the inclusion of a physical layer.
This may seem confusing, but it's really no different from other types of networks (like cellular), except you can use agateway (like a cell tower) that you own, or someone else owns and operates, to connect your device to the Internet.
One gateway can cover a large area, depending on the obstructions (a gateway operated in NYC would have a rangeof a few thousand kilometers vs hundreds of kilometers in the countryside)
We're going to be connecting our Raspberry Pi to The Things Network (https://adafru.it/DuN), a LoRaWAN networkmade up of volunteers operating their own gateways, using CircuitPython.
Want to learn more about The Things Network and CircuitPython? There's a full guide written on the Adafruit LearningSystem which dives into deeper detail. (https://adafru.it/DuO)
© Adafruit Industries https://learn.adafruit.com/lora-and-lorawan-radio-for-raspberry-pi Page 17 of 29

TinyLoRa TTNSetup
Before your Feather can communicate with The Things Network, you'll need to create an application.
First, we're going to register an account with TTN. Navigate to their account registration page (https://adafru.it/CyW) toset up an account.
Once logged in, navigate to the The Things Network Console (https://adafru.it/CyX). This page is where you canregister applications and add new devices or gateways. Click Applications
Click Add Application.
Fill out an Application ID to identify the application, and a description of what the application is. We set our HandlerRegistration to match our region, us-west. If you're not located in the U.S., TTN provides multiple regions for handlerregistration.
Once created, you'll be directed to the Application Overview. From here, you can add devices, view data coming into(and out of) the application, add integrations for external services, and more. We'll come back to this section later inthe guide.
Feathers running TinyLoRa require a different setup process. Be sure to follow these steps closely if you haven't set up an ABP device before.�
© Adafruit Industries https://learn.adafruit.com/lora-and-lorawan-radio-for-raspberry-pi Page 18 of 29

Click Register Device
On the Register Device Page, The Device ID should be a unique string to identify the device.
The Device EUI is the unique identifier which came in the same bag as your Radiofruit Feather. We'll pad the middle ofthe string with four zeroes. Lost your key? No worries - you can also click the "mix" icon to switch it to auto-generate.
The App Key will be randomly generated for you by TTN. Select the App EUI (used to identify the application) from thelist.
Next, we're going to switch the device settings from Over-the-Air-Activation to Activation-by-Personalization. From theDevice Overview, click Settings
© Adafruit Industries https://learn.adafruit.com/lora-and-lorawan-radio-for-raspberry-pi Page 19 of 29

�
On the settings screen, change the Activation Method
from OTAA to ABP.
Then, switch the Frame Counter Width from 32b to
16b and disable frame counter checks. TTN will display
a warning, ignore it, and click Save.
Now that the application is set up, and the device is registered to the application, let's move on to setting up Arduinowith TinyLoRa.
Why are we disabling Frame Counter Checks if The Things Network Console doesn't recommend it?
Disabling frame counter checks allows you to transmit data to The Things Network without requiring a matchbetween your device's frame counter and the console's frame counter.
If you're making a project and doing a lot of prototyping/iteration to the code, disabling these checks is okay as it'lllet you reset the device and not re-register it to the application (it'll also prevent counter overflows).
Make sure you have disabled Frame Counter Checks�
© Adafruit Industries https://learn.adafruit.com/lora-and-lorawan-radio-for-raspberry-pi Page 20 of 29

If you're deploying a project, you'll want to re-activate the frame counter for security purposes. With the framecounter disabled, one could re-transmit the messages sent to TTN using a replay attack.
The Things Network's documentation page has a full explanation about the role of the Frame Counter.
© Adafruit Industries https://learn.adafruit.com/lora-and-lorawan-radio-for-raspberry-pi Page 21 of 29

Usage
Now that we've set up our Things Network application and device, we're going to move on to installingTinyLoRa (https://adafru.it/DuP) onto our Raspberry Pi. To do this, enter the following into your terminal to install thelibrary system-wide:
sudo pip3 install adafruit-circuitpython-tinylora
Code
Unlike sending data to another device, we're going to be sending data from our device (the Pi) to a gateway (check thegateway map to find one near you (https://adafru.it/Cz9)).
While we don't have any sensors hooked up to our radio, we'll send the Raspberry Pi's CPU utilization to The ThingsNetwork.
Below is an example of using TinyLoRa to send data to The Things Network. Save this as radio_lorawan.py on yourRaspberry Pi.
"""Example for using the RFM9x Radio with Raspberry Pi and LoRaWAN
Learn Guide: https://learn.adafruit.com/lora-and-lorawan-for-raspberry-piAuthor: Brent Rubell for Adafruit Industries"""import threadingimport timeimport subprocessimport busiofrom digitalio import DigitalInOut, Direction, Pullimport board# Import thte SSD1306 module.import adafruit_ssd1306# Import Adafruit TinyLoRafrom adafruit_tinylora.adafruit_tinylora import TTN, TinyLoRa
# Button AbtnA = DigitalInOut(board.D5)btnA.direction = Direction.INPUTbtnA.pull = Pull.UP
# Button BbtnB = DigitalInOut(board.D6)btnB.direction = Direction.INPUTbtnB.pull = Pull.UP
# Button CbtnC = DigitalInOut(board.D12)btnC.direction = Direction.INPUTbtnC.pull = Pull.UP
# Create the I2C interface.
Do not use this code if you have a RFM69HCW Radio�
© Adafruit Industries https://learn.adafruit.com/lora-and-lorawan-radio-for-raspberry-pi Page 22 of 29

# Create the I2C interface.i2c = busio.I2C(board.SCL, board.SDA)
# 128x32 OLED Displaydisplay = adafruit_ssd1306.SSD1306_I2C(128, 32, i2c, addr=0x3c)# Clear the display.display.fill(0)display.show()width = display.widthheight = display.height
# TinyLoRa Configurationspi = busio.SPI(board.SCK, MOSI=board.MOSI, MISO=board.MISO)cs = DigitalInOut(board.CE1)irq = DigitalInOut(board.D22)rst = DigitalInOut(board.D25)
# TTN Device Address, 4 Bytes, MSBdevaddr = bytearray([0x00, 0x00, 0x00, 0x00])# TTN Network Key, 16 Bytes, MSBnwkey = bytearray([0x00, 0x00, 0x00, 0x00, 0x00, 0x00, 0x00, 0x00, 0x00, 0x00, 0x00, 0x00, 0x00, 0x00, 0x00, 0x00])# TTN Application Key, 16 Bytess, MSBapp = bytearray([0x00, 0x00, 0x00, 0x00, 0x00, 0x00, 0x00, 0x00, 0x00, 0x00, 0x00, 0x00, 0x00, 0x00, 0x00, 0x00])# Initialize ThingsNetwork configurationttn_config = TTN(devaddr, nwkey, app, country='US')# Initialize lora objectlora = TinyLoRa(spi, cs, irq, rst, ttn_config)# 2b array to store sensor datadata_pkt = bytearray(2)# time to delay periodic packet sends (in seconds)data_pkt_delay = 5.0
def send_pi_data_periodic(): threading.Timer(data_pkt_delay, send_pi_data_periodic).start() print("Sending periodic data...") send_pi_data(CPU) print('CPU:', CPU)
def send_pi_data(data): # Encode float as int data = int(data * 100) # Encode payload as bytes data_pkt[0] = (data >> 8) & 0xff data_pkt[1] = data & 0xff # Send data packet lora.send_data(data_pkt, len(data_pkt), lora.frame_counter) lora.frame_counter += 1 display.fill(0) display.text('Sent Data to TTN!', 15, 15, 1) print('Data sent!') display.show() time.sleep(0.5)
while True: packet = None # draw a box to clear the image display.fill(0) display.text('RasPi LoRaWAN', 35, 0, 1)
© Adafruit Industries https://learn.adafruit.com/lora-and-lorawan-radio-for-raspberry-pi Page 23 of 29

display.text('RasPi LoRaWAN', 35, 0, 1)
# read the raspberry pi cpu load cmd = "top -bn1 | grep load | awk '{printf \"%.1f\", $(NF-2)}'" CPU = subprocess.check_output(cmd, shell = True ) CPU = float(CPU)
if not btnA.value: # Send Packet send_pi_data(CPU) if not btnB.value: # Display CPU Load display.fill(0) display.text('CPU Load %', 45, 0, 1) display.text(str(CPU), 60, 15, 1) display.show() time.sleep(0.1) if not btnC.value: display.fill(0) display.text('* Periodic Mode *', 15, 0, 1) display.show() time.sleep(0.5) send_pi_data_periodic()
display.show() time.sleep(.1)
You'll also want to download the font file, font5x8.bin , and copy it into the same directory as the script:
https://adafru.it/DvA
https://adafru.it/DvA
Setting up the code for The Things Network
While we can send data to The Things Network, and our gateway might notice it, it isn't registered to a device yet. Toregister your device with The Things Network using ABP, you'll need to set three unique identifiers inradio_lorawan.py: the Network Session Key , the Device Address , and the Application Session Key .
Navigate to the Device Overview page for your
Raspberry Pi device.
Make sure the Activation Method is set to ABP.
© Adafruit Industries https://learn.adafruit.com/lora-and-lorawan-radio-for-raspberry-pi Page 24 of 29

Before adding the unique identifiers to our code, we'll need to first expand them by clicking the <> icon.
These are your keys. We're going to enter them into our code, but we need to be careful - the keys on the ThingsNetwork console use parentheses or curly braces { } instead of brackets [ ].
First, copy the Device Address from the TTN console to the devaddr variable in the code.
Then, remove the braces { } from the device address.
A device address copied from The Things Network console would look like: { 0x26, 0x02, 0x1F, 0x07 } . In the code,
it'd look like: devaddr = bytearray([0x26, 0x02, 0x1F, 0x07]) .
Then, copy the Network Session Key from the TTN console to the nwkey variable in the code. Make sure to modify
the code to remove the parentheses/curly braces { }.
Finally, copy the Application Session Key from the TTN console to the app variable in the code. Make sure to modify
the code to remove the parentheses/curly braces { }.
That's all for now - we're ready to run our code!
Usage
Enter the following into the terminal and press enter:
python3 radio_lorawan.py
© Adafruit Industries https://learn.adafruit.com/lora-and-lorawan-radio-for-raspberry-pi Page 25 of 29

The OLED should display the operating mode
(LoRaWAN).
Press Button A to send this data to the The Things
Network application you built earlier.
© Adafruit Industries https://learn.adafruit.com/lora-and-lorawan-radio-for-raspberry-pi Page 26 of 29

Press Button B to view the Raspberry Pi's CPU
utilization percentage.
Pressing Button C will periodically send a packet to the
things network. You can modify this value (in seconds)
by changing the data_pkt_delay variable in the code.
Checking Data on The Things Network Console
We want to make sure the data has been received on the other end. To do this, we'll navigate to the The ThingsNetwork Console and select the application. From the menu on the right hand side of the page, click Data.
If everything worked correctly, you'll see the payload from your device streaming into the page, in real time.
Neat, right? But while we received a payload, we still don't understand what it means. It's been sent to The ThingsNetwork and decoded on the client (Gateway) side, so it's not an AES-encrypted payload anymore. It's just notreadable by humans.
Decoding the Payload
If you're sending packets in strange formats or encodings (like we are!), The Things Network Console hasa programmable data decoder (https://adafru.it/CWk) to decode the packets, and assign useful labels to the data.
Copy and paste the decoder script below into the decoder's integrated text editor and click save.
© Adafruit Industries https://learn.adafruit.com/lora-and-lorawan-radio-for-raspberry-pi Page 27 of 29

// TinyLoRa - Raspberry Pi CPU Load Decoderfunction Decoder(bytes, port) { var decoded = {};
// Decode bytes to int var CPU_Load = (bytes[0] << 8) | bytes[1];
// Decode int to float decoded.CPU_Load = CPU_Load / 100;
return decoded;}
Then, click the data tab. Next to the raw payload data, you should see the decoded data for the CPU load.
© Adafruit Industries https://learn.adafruit.com/lora-and-lorawan-radio-for-raspberry-pi Page 28 of 29

© Adafruit Industries Last Updated: 2019-11-18 02:46:44 PM UTC Page 29 of 29