Local COBOL development using Rational Developer for System z Lab … · · 2009-09-17Local...
35
Local Development Local COBOL development using Rational Developer for System z Lab Version V2.1 Monday, 03 December, 2007
Transcript of Local COBOL development using Rational Developer for System z Lab … · · 2009-09-17Local...

Local Development Local COBOL development using Rational Developer for System z Lab Version V2.1 Monday, 03 December, 2007

© Copyright IBM Corporation 2006. All rights reserved.
12/3/2007 Local COBOL Development
Page 2 of 35
Overview This Lab will show you how to edit, compile/link and test a local COBOL program. Therefore you will work with the Application Development Tool Rational Developer for System z (RDz). You will not need a remote connection to the RDz host components in this lab. You will be guided step-by-step through the necessary tasks. The lab can be summarized in the following main tasks: 1. Preparing/loading/working with the local COBOL program 2. Compiling/linking/executing the local COBOL program 3. Testing/debugging the local COBOL program 4. Optional: Visual compare of two COBOL programs Local Development................................................................................................................ 1 1 Preparing/loading/working with the local COBOL program............................................. 3 2 Working with local COBOL program .............................................................................. 7
2.1 Editing a COBOL source file .................................................................................. 8 2.2 Checking the COBOL source file syntax ...............................................................13 2.3 Making changes to the COBOL source .................................................................14
3 Compiling, linking, executing and debugging the local COBOL program.......................20 3.1 Creating an executable COBOL program..............................................................21 3.2 Creating a Run launch configuration and executing the COBOL program.............23 3.3 Testing/debugging the local COBOL program.......................................................25
4 Write an own COBOL program .....................................................................................32 4.1 COBOL programming hints...................................................................................34
4.1.1 Display .................................................................................................34
4.1.2 Computations .......................................................................................34
4.1.3 Perform ................................................................................................34
4.1.4 Initialize ................................................................................................34
4.1.5 Level 88 ...............................................................................................34
4.1.6 Substrings ............................................................................................35
4.1.7 Userful functions ..................................................................................35 Lab Details Your RDz workspace location C:\Documents and
Settings\dev\IBM\rationalspd7.0\workspace The Workspace "Holds" the Development Environment. The Eclipse Platform incorporates the concept of a "workspace" that maintains everything needed by the developer for building and testing a project.
© Copyright IBM Corporation 2006. All rights reserved.
12/3/2007 Local COBOL Development
Page 3 of 35
1 Prepare, load and work with the local COBOL program
1. Start Rational Developer for System z (RDz) via Start � Programs � IBM Software Development Platform � IBM Rational Developer for System z � IBM Rational Developer for System z
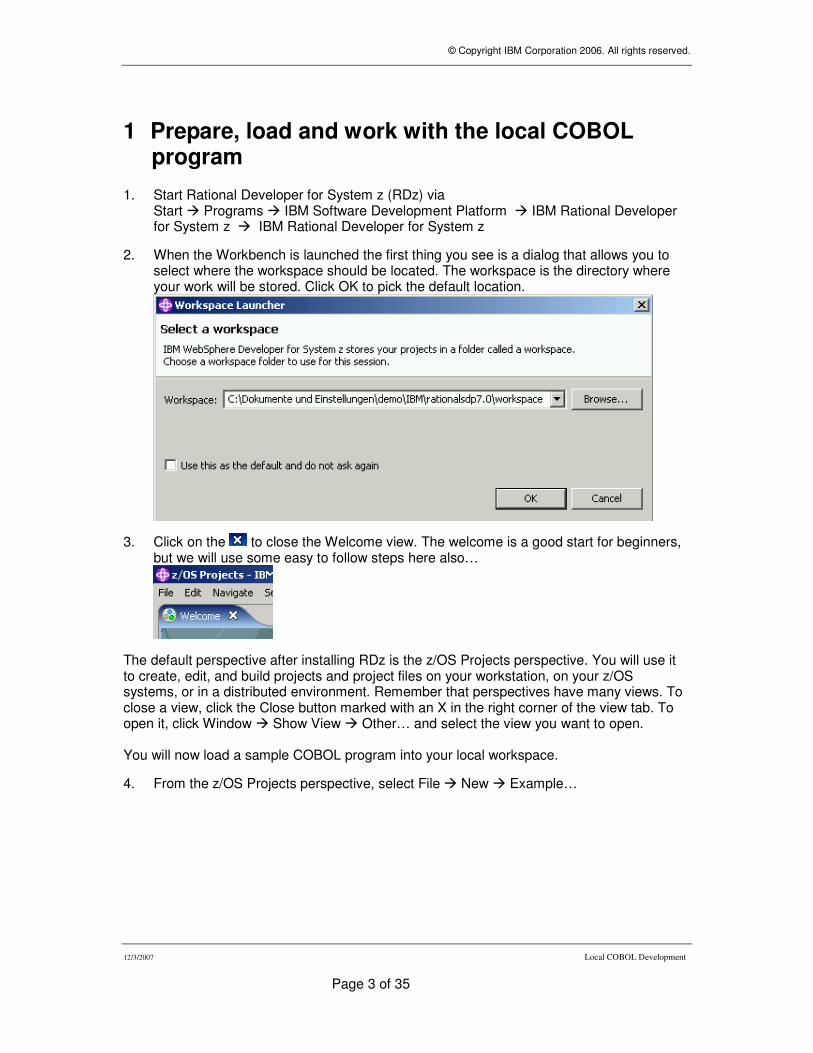
2. When the Workbench is launched the first thing you see is a dialog that allows you to select where the workspace should be located. The workspace is the directory where your work will be stored. Click OK to pick the default location.
3. Click on the to close the Welcome view. The welcome is a good start for beginners, but we will use some easy to follow steps here also…
The default perspective after installing RDz is the z/OS Projects perspective. You will use it to create, edit, and build projects and project files on your workstation, on your z/OS systems, or in a distributed environment. Remember that perspectives have many views. To close a view, click the Close button marked with an X in the right corner of the view tab. To open it, click Window � Show View � Other… and select the view you want to open. You will now load a sample COBOL program into your local workspace.
4. From the z/OS Projects perspective, select File � New � Example…

© Copyright IBM Corporation 2006. All rights reserved.
12/3/2007 Local COBOL Development
Page 4 of 35
5. Expand Workstation COBOL (click on the +) and select COBOL Sample 2. Click Next.
6. Enter LAB1 COBOL Sample as the Project name and Click Next.

© Copyright IBM Corporation 2006. All rights reserved.
12/3/2007 Local COBOL Development
Page 5 of 35
7. On the next panel be sure that TEST is specified under Compile Options... The screen should appear as follows: Click Next.
Note the default Compiler options to use with COBOL programs. The TEST compiler option provides sub-options to define debugging capabilities. Some sub-options are used only with a specific version of COBOL.
8. On the Link panel the option for Local Link is EXE. This means that when a COBOL program from this project is built, a *.exe is generated instead of a *.dll. Also note the option /de is specified; that means that the program will include debugging information. Click Finish.
© Copyright IBM Corporation 2006. All rights reserved.
12/3/2007 Local COBOL Development
Page 6 of 35
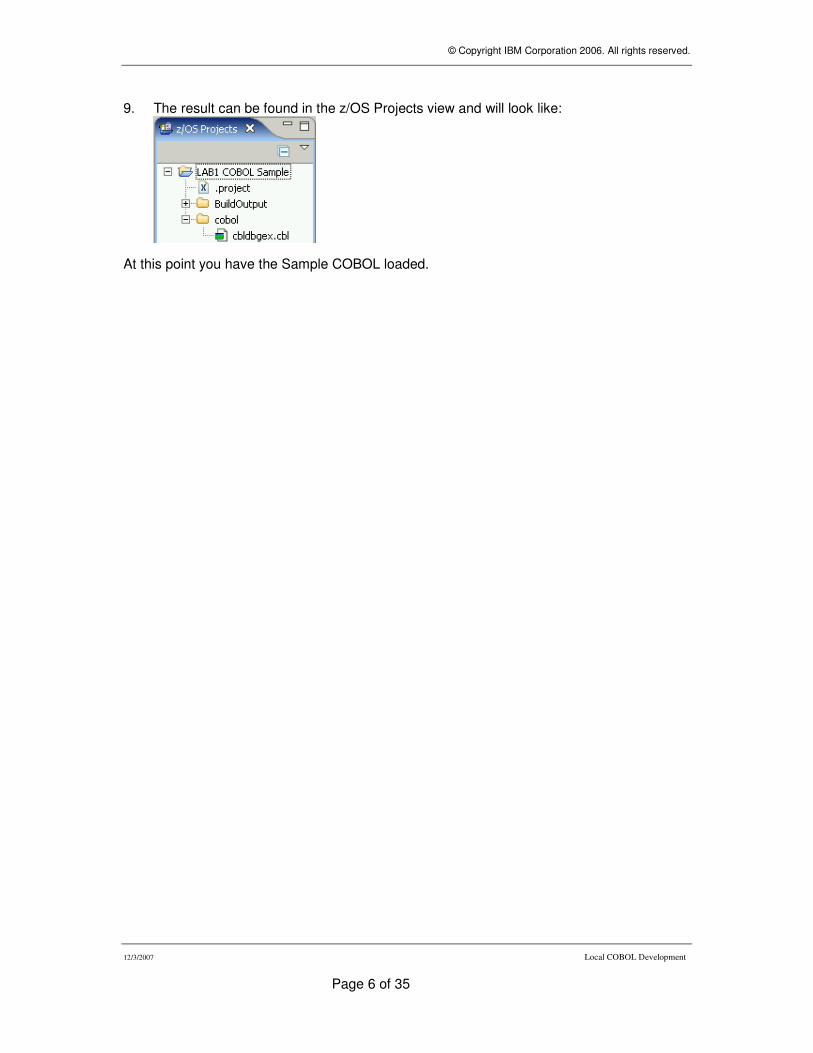
9. The result can be found in the z/OS Projects view and will look like:
At this point you have the Sample COBOL loaded.

© Copyright IBM Corporation 2006. All rights reserved.
12/3/2007 Local COBOL Development
Page 7 of 35
2 Work with local COBOL program
In this chapter you learn how to edit source code and how to perform a syntax check with the RDz COBOL editor.
© Copyright IBM Corporation 2006. All rights reserved.
12/3/2007 Local COBOL Development
Page 8 of 35
2.1 Edit a COBOL source file
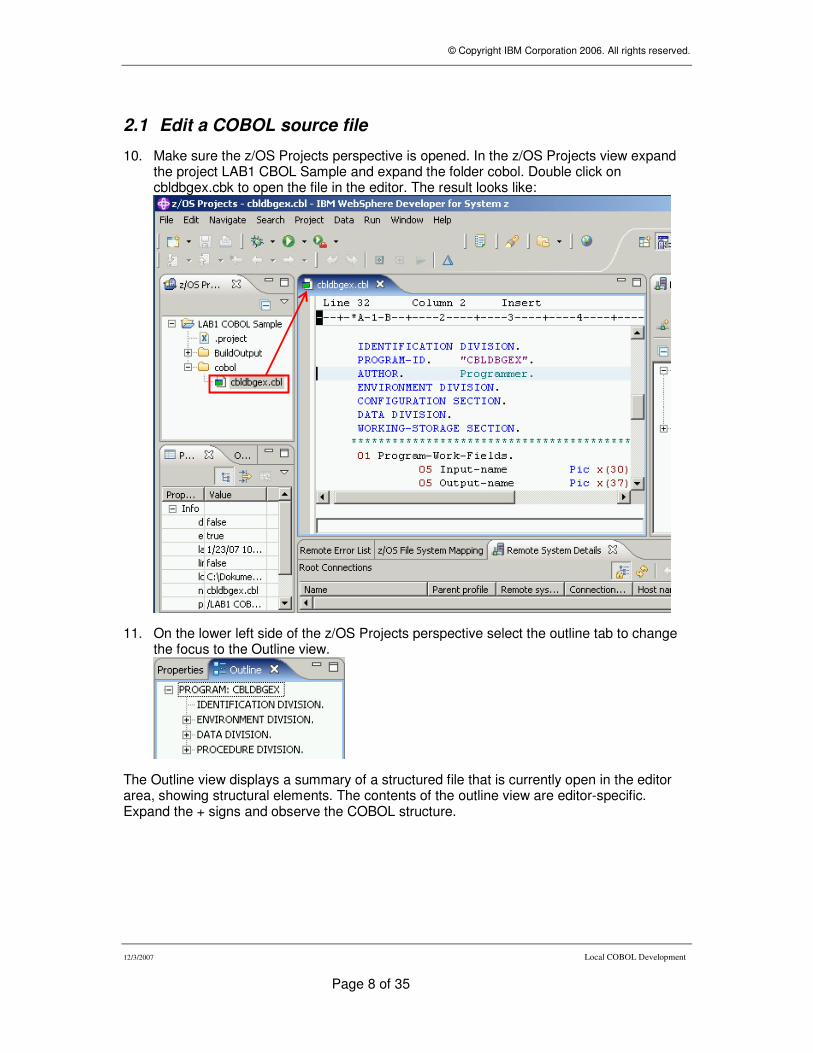
10. Make sure the z/OS Projects perspective is opened. In the z/OS Projects view expand the project LAB1 CBOL Sample and expand the folder cobol. Double click on cbldbgex.cbk to open the file in the editor. The result looks like:
11. On the lower left side of the z/OS Projects perspective select the outline tab to change the focus to the Outline view.
The Outline view displays a summary of a structured file that is currently open in the editor area, showing structural elements. The contents of the outline view are editor-specific. Expand the + signs and observe the COBOL structure.
© Copyright IBM Corporation 2006. All rights reserved.
12/3/2007 Local COBOL Development
Page 9 of 35
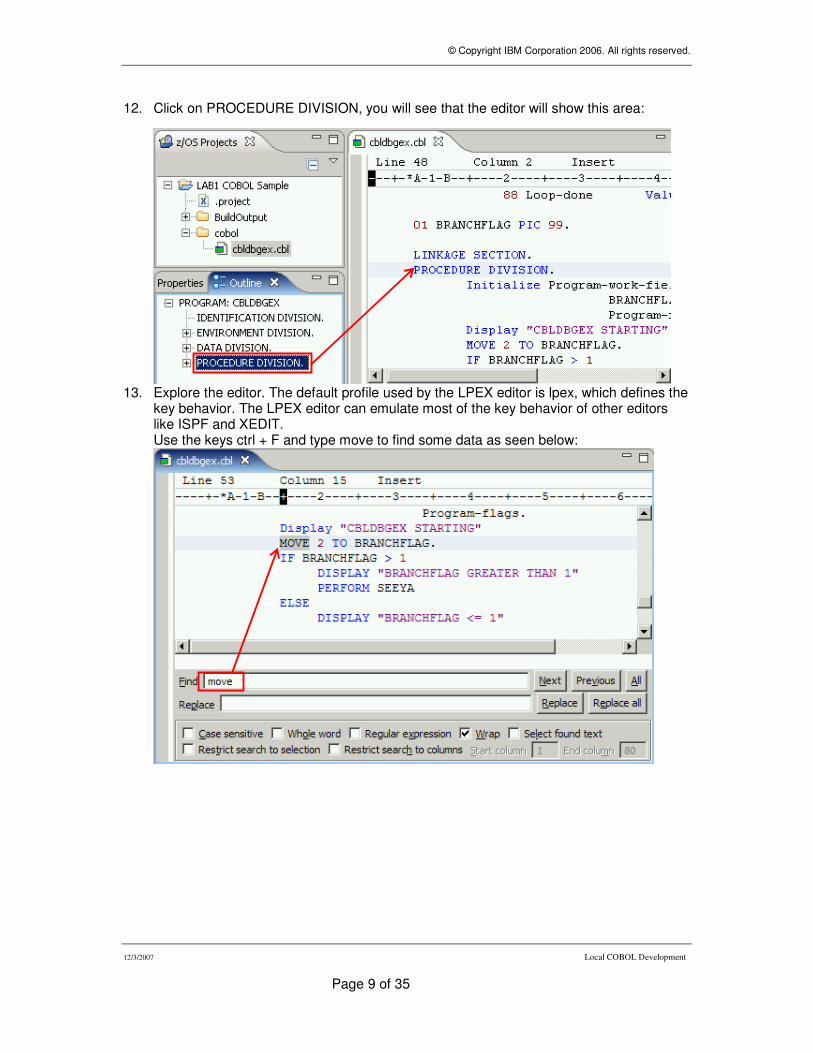
12. Click on PROCEDURE DIVISION, you will see that the editor will show this area:
13. Explore the editor. The default profile used by the LPEX editor is lpex, which defines the key behavior. The LPEX editor can emulate most of the key behavior of other editors like ISPF and XEDIT. Use the keys ctrl + F and type move to find some data as seen below:

© Copyright IBM Corporation 2006. All rights reserved.
12/3/2007 Local COBOL Development
Page 10 of 35
14. If you are used to ISPF, you can set editor profile to ISPF. Open the Preferences dialog by selecting Windows � Preferences. On the left panel, click on LPEX Editor and from the Editor Profile list, click on ispf. Do not close the window yet.
15. Creating Tabs for the Editor Since we are using COBOL is a good idea to create some TABS for easy navigation in the editor. Expand LPEX Editor, click on Tabs and enter 1 8 12 as Tab stops. Also change the Tab increment to 4 (instead of 8). Each time Tab key is pressed will move the cursor to positions 1, 8 and 12. The increment 4 will also make stops at 14, 16, 20, and so on. Click OK
Note: to apply the tab changes, close and reopen any program in the editor.
© Copyright IBM Corporation 2006. All rights reserved.
12/3/2007 Local COBOL Development
Page 11 of 35
16. You now are able to enter prefix commands in the prefix area, such as d to delete, m to move, etc... You can also use key combinations for commands, e.g. (Ctrl +L) for Locate, (Ctrl +F) for Find, etc.
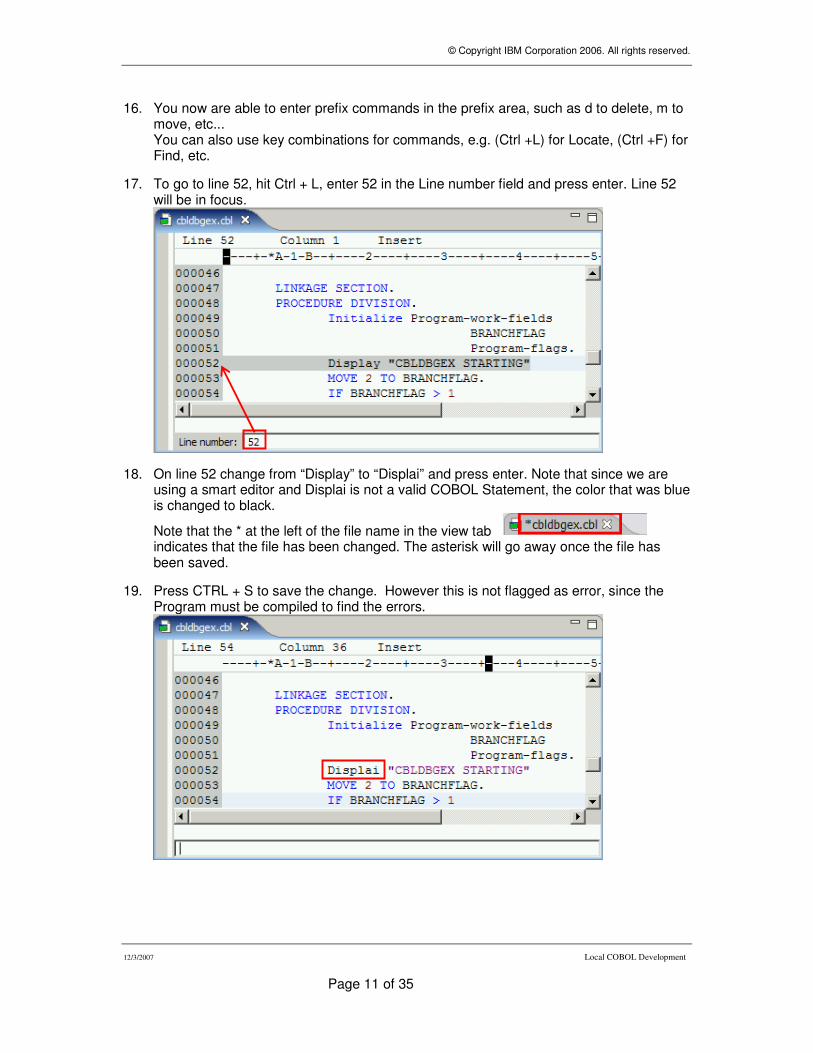
17. To go to line 52, hit Ctrl + L, enter 52 in the Line number field and press enter. Line 52 will be in focus.
18. On line 52 change from “Display” to “Displai” and press enter. Note that since we are using a smart editor and Displai is not a valid COBOL Statement, the color that was blue is changed to black.
Note that the * at the left of the file name in the view tab indicates that the file has been changed. The asterisk will go away once the file has been saved.
19. Press CTRL + S to save the change. However this is not flagged as error, since the Program must be compiled to find the errors.
© Copyright IBM Corporation 2006. All rights reserved.
12/3/2007 Local COBOL Development
Page 12 of 35
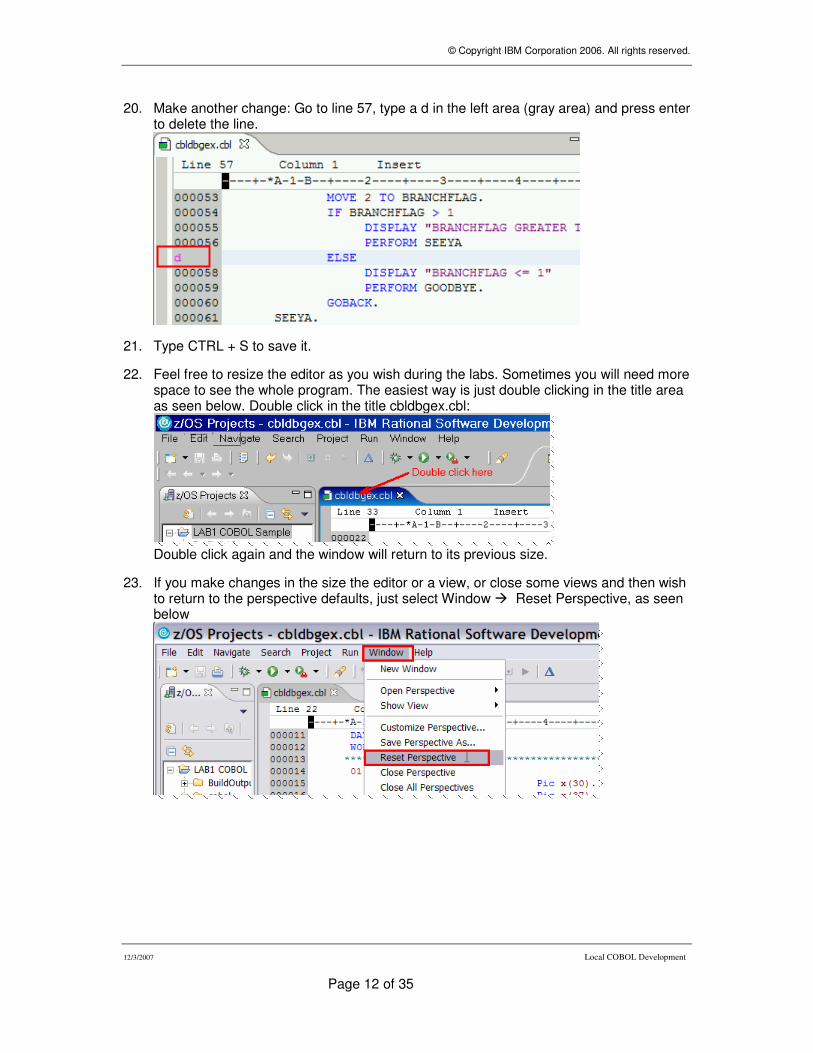
20. Make another change: Go to line 57, type a d in the left area (gray area) and press enter to delete the line.
21. Type CTRL + S to save it.
22. Feel free to resize the editor as you wish during the labs. Sometimes you will need more space to see the whole program. The easiest way is just double clicking in the title area as seen below. Double click in the title cbldbgex.cbl:
Double click again and the window will return to its previous size.
23. If you make changes in the size the editor or a view, or close some views and then wish to return to the perspective defaults, just select Window � Reset Perspective, as seen below
© Copyright IBM Corporation 2006. All rights reserved.
12/3/2007 Local COBOL Development
Page 13 of 35
2.2 Checking the COBOL source file syntax
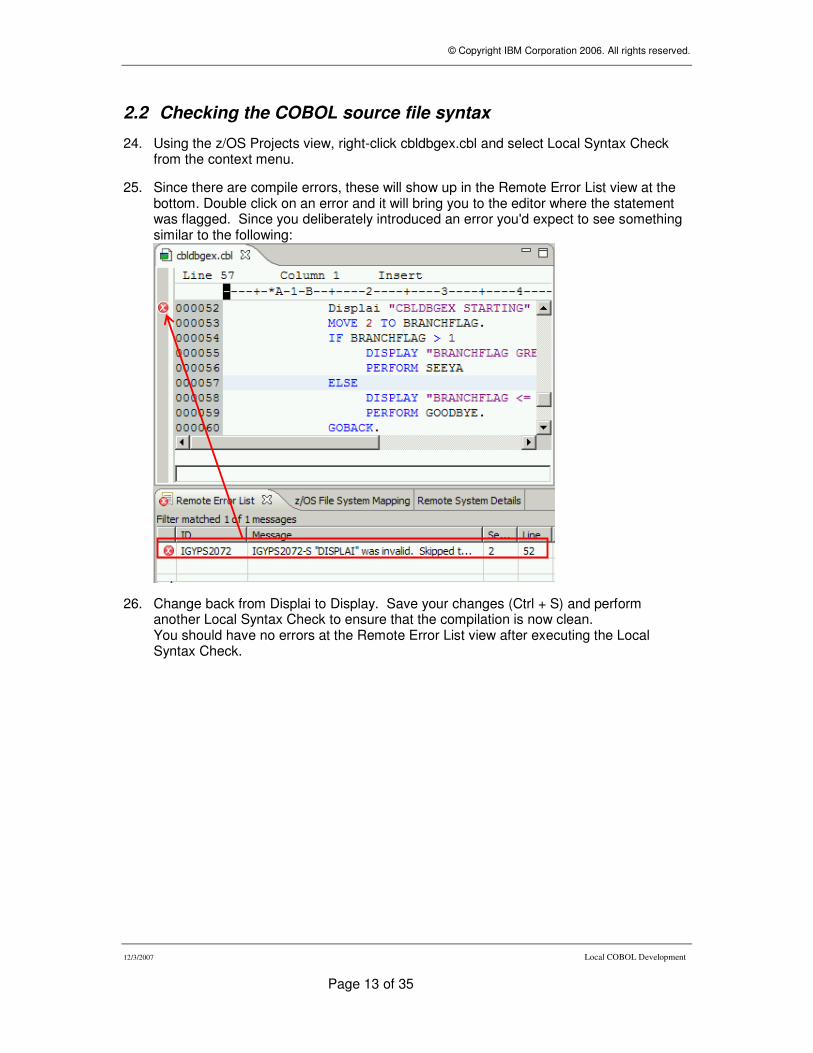
24. Using the z/OS Projects view, right-click cbldbgex.cbl and select Local Syntax Check from the context menu.
25. Since there are compile errors, these will show up in the Remote Error List view at the bottom. Double click on an error and it will bring you to the editor where the statement was flagged. Since you deliberately introduced an error you'd expect to see something similar to the following:
26. Change back from Displai to Display. Save your changes (Ctrl + S) and perform another Local Syntax Check to ensure that the compilation is now clean. You should have no errors at the Remote Error List view after executing the Local Syntax Check.

© Copyright IBM Corporation 2006. All rights reserved.
12/3/2007 Local COBOL Development
Page 14 of 35
2.3 Making changes to the COBOL source
One of the very nice features of the COBOL editor is the capability to find mistakes before compilation and help developers to write code. Let’s explore these features here. Suppose that we want to add some logic to our program. For example, if I want to add COBOL statements like: DISPLAY, ACCEPT, MOVE and IF to our source COBOL source. Here are some examples:
27. Since you are not using the views Remote Systems and Team views in this exercise, you can optionally move them to the left side to have more space for the COBOL editing. You can drag and drop the 2 views on top of z/OS Projects as seen below (note
that the mouse must changed to before you drop the view. You must do one view at a time):
28. Depending on your Windows resolution, you might click on the icon and select the z/OS Projects tab. Otherwise just click in the z/OS Projects tab.:
© Copyright IBM Corporation 2006. All rights reserved.
12/3/2007 Local COBOL Development
Page 15 of 35
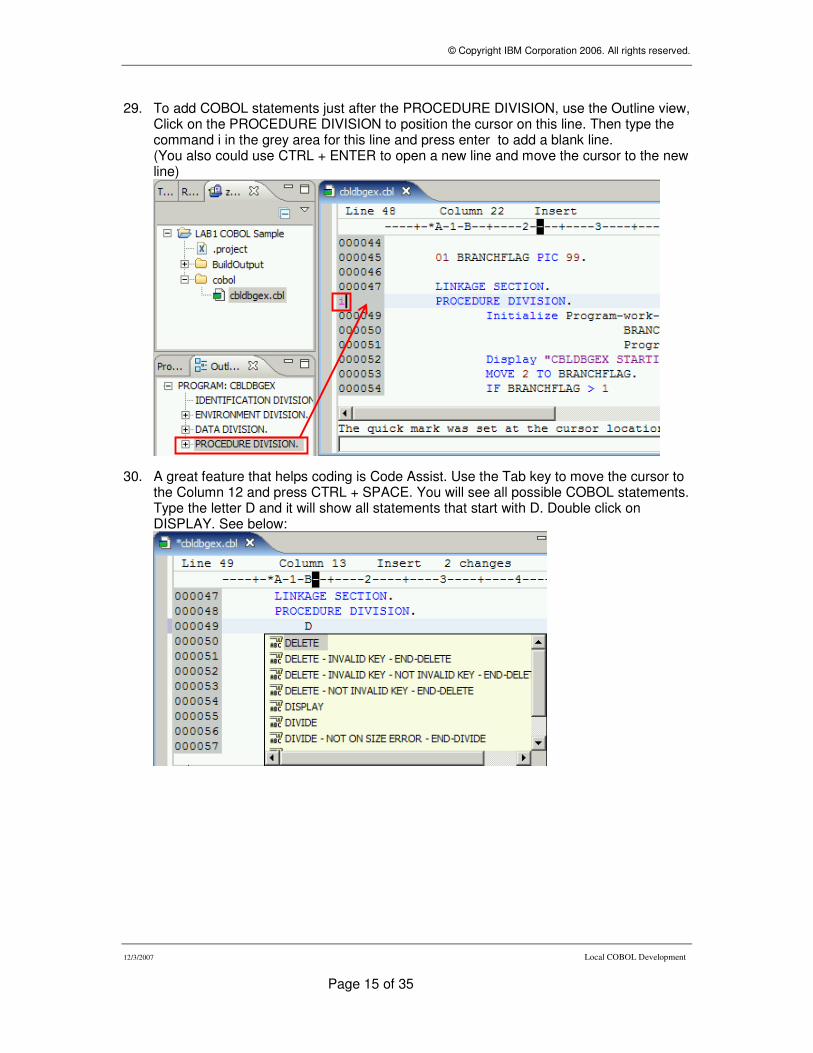
29. To add COBOL statements just after the PROCEDURE DIVISION, use the Outline view, Click on the PROCEDURE DIVISION to position the cursor on this line. Then type the command i in the grey area for this line and press enter to add a blank line. (You also could use CTRL + ENTER to open a new line and move the cursor to the new line)
30. A great feature that helps coding is Code Assist. Use the Tab key to move the cursor to the Column 12 and press CTRL + SPACE. You will see all possible COBOL statements. Type the letter D and it will show all statements that start with D. Double click on DISPLAY. See below:
© Copyright IBM Corporation 2006. All rights reserved.
12/3/2007 Local COBOL Development
Page 16 of 35
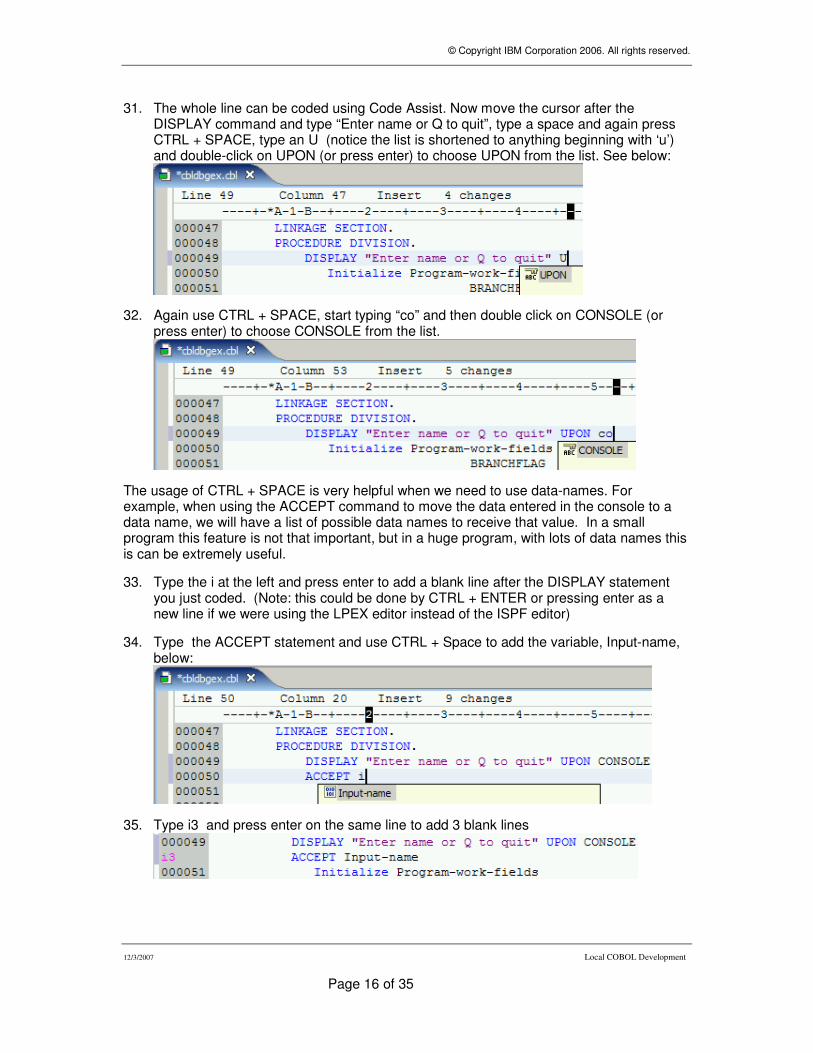
31. The whole line can be coded using Code Assist. Now move the cursor after the DISPLAY command and type “Enter name or Q to quit”, type a space and again press CTRL + SPACE, type an U (notice the list is shortened to anything beginning with ‘u’) and double-click on UPON (or press enter) to choose UPON from the list. See below:
32. Again use CTRL + SPACE, start typing “co” and then double click on CONSOLE (or press enter) to choose CONSOLE from the list.
The usage of CTRL + SPACE is very helpful when we need to use data-names. For example, when using the ACCEPT command to move the data entered in the console to a data name, we will have a list of possible data names to receive that value. In a small program this feature is not that important, but in a huge program, with lots of data names this is can be extremely useful.
33. Type the i at the left and press enter to add a blank line after the DISPLAY statement you just coded. (Note: this could be done by CTRL + ENTER or pressing enter as a new line if we were using the LPEX editor instead of the ISPF editor)
34. Type the ACCEPT statement and use CTRL + Space to add the variable, Input-name, below:
35. Type i3 and press enter on the same line to add 3 blank lines

© Copyright IBM Corporation 2006. All rights reserved.
12/3/2007 Local COBOL Development
Page 17 of 35
36. Insert an IF – END-IF statement by typing i and selecting “IF - END-IF” from the content assist dropdown menu.
37. Complete the statement like shown below:
38. Also since the COBOL editor is a smart editor some mistakes can be found at coding time. For example if we eliminate the first quotes (“) from the statement DISPLAY and press Enter or move the cursor to another line you will have an error like the one shown below :
39. Correct the error above, save (CTRL + S) Note the * on the left of the title goes away when is saved:
40. Right click on cbldbgex.cbl and select Local Syntax Check to and check the syntax again. Click in the view Remote Error List. There should be no errors listed in that view. If you have errors correct them and check the syntax again.

© Copyright IBM Corporation 2006. All rights reserved.
12/3/2007 Local COBOL Development
Page 18 of 35
41. Also another nice help when coding the program is the Help Built-in capability. Move the cursor to the statement DISPLAY and press F1. Help will open showing the selected statement. This is handy and can be used for any statement. After few moments (it can take a while the first time) the Help window will open and you will have:
© Copyright IBM Corporation 2006. All rights reserved.
12/3/2007 Local COBOL Development
Page 19 of 35
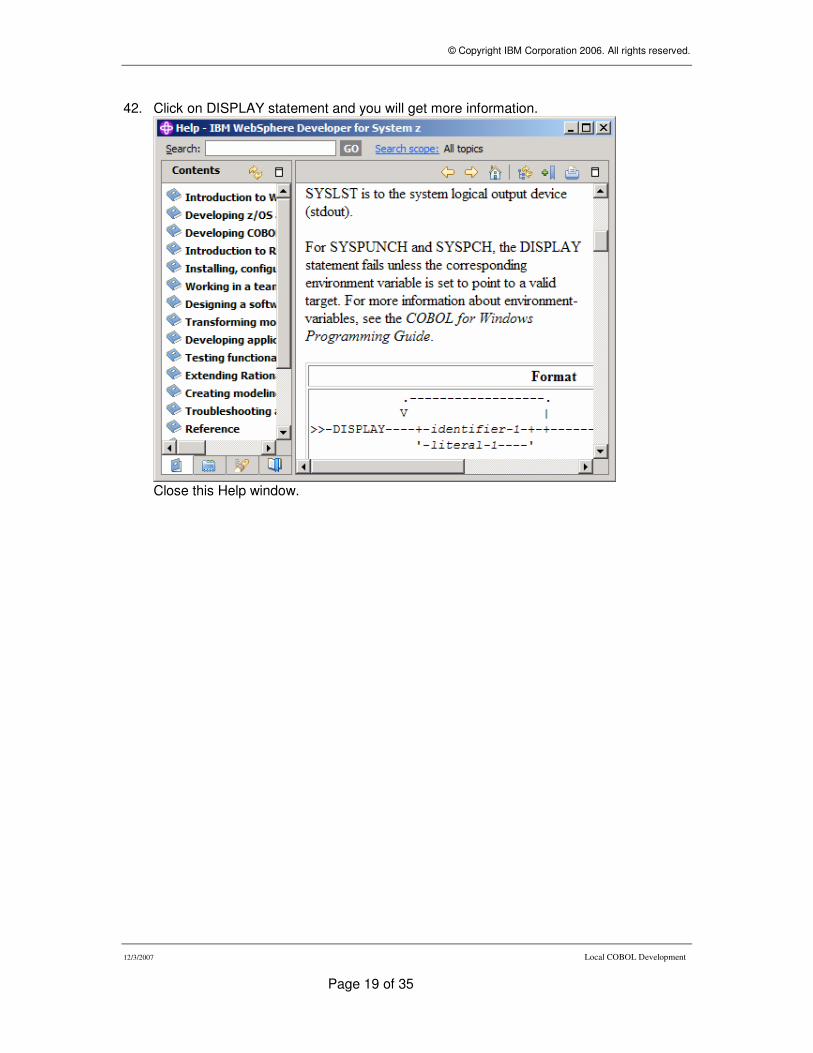
42. Click on DISPLAY statement and you will get more information.
Close this Help window.
© Copyright IBM Corporation 2006. All rights reserved.
12/3/2007 Local COBOL Development
Page 20 of 35
3 Compiling, linking, executing and debugging the local COBOL program
After you finished preparing your source code you will now execute your program. It will run in the local COBOL runtime environment that comes with RDz. In addition you will learn how to use the Debugger to step through your code at runtime.

© Copyright IBM Corporation 2006. All rights reserved.
12/3/2007 Local COBOL Development
Page 21 of 35
3.1 Creating an executable COBOL program
43. Now that you have successfully checked the syntax of your COBOL program, you can execute it locally, but before creating the executable, let’s delete the existing executable code. Select the folder BuildOutput and using the context menu delete it:
Note: The reason that we will delete the BuildOutput folder is just to show to you that it will be recreated. This is not really necessary.
44. Click on Delete when the Delete Confirmation window pops-up.
45. Using the z/OS Projects view, expand LAB1 COBOL Sample, Right-click on cbldbgex.cbl and select Nominate as Entry Point. If you don’t do that and have multiple programs in the same project, one DLL will also be generated with the project name (this is not the case, but better always do that) Nominate as Entry Point is almost the last action. Once the program has been nominated as the entry point, then a red checkmark will appear in the icon for the program.
46. To build the program, right click on the project LAB1 COBOL Sample and select Rebuild Project.
47. Note that BuildOutput is created again. See below. Also, no errors should be listed in the Remote Error List view.
48. Note that a *.exe file is created, optionally a DLL could be created instead (needed when using CICS TS).
© Copyright IBM Corporation 2006. All rights reserved.
12/3/2007 Local COBOL Development
Page 22 of 35
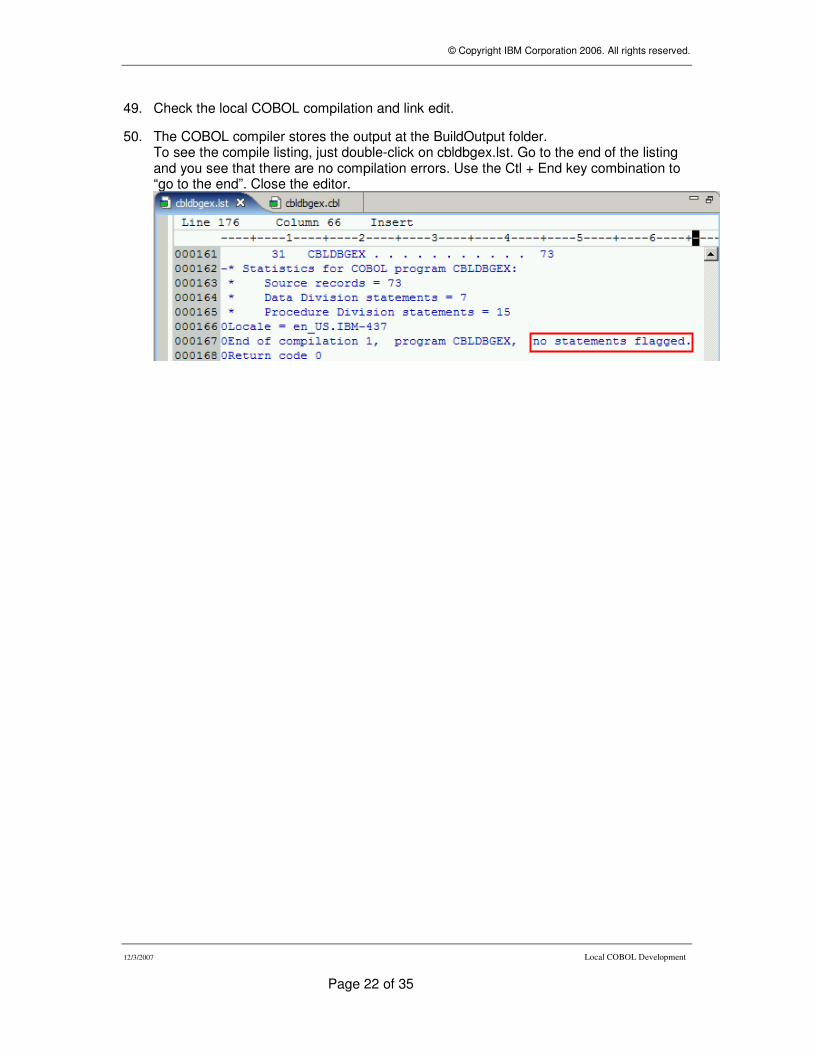
49. Check the local COBOL compilation and link edit.
50. The COBOL compiler stores the output at the BuildOutput folder. To see the compile listing, just double-click on cbldbgex.lst. Go to the end of the listing and you see that there are no compilation errors. Use the Ctl + End key combination to “go to the end”. Close the editor.
© Copyright IBM Corporation 2006. All rights reserved.
12/3/2007 Local COBOL Development
Page 23 of 35
3.2 Creating a Run launch configuration and executing the COBOL program
Since we might want to run this program many times, it’s a good idea to create a Debug launch configuration. This makes running and debugging a specific program easier. To create a launch configuration that will load the compiled COBOL program do the following:
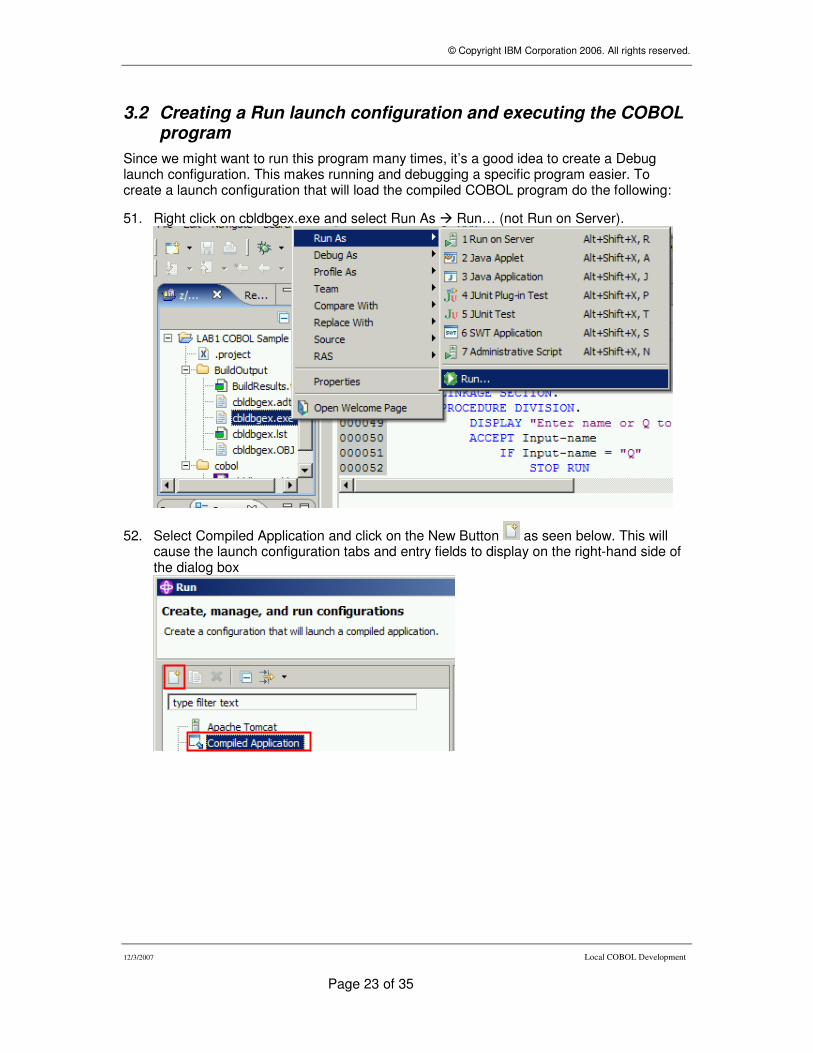
51. Right click on cbldbgex.exe and select Run As � Run… (not Run on Server).
52. Select Compiled Application and click on the New Button as seen below. This will cause the launch configuration tabs and entry fields to display on the right-hand side of the dialog box

© Copyright IBM Corporation 2006. All rights reserved.
12/3/2007 Local COBOL Development
Page 24 of 35
53. In the Name field, enter a name like RunCOBOL, use the Browse button next to Program name to locate cbldbgex.exe under the BuildOutput folder and click Open, to select it. Note that your COBOL executable should be in the location C:\Documents and Settings\dev\IBM\rationalspd7.0\workspace\LAB1 COBOL Sample\BuildOutput\cbldbgex.exe. Click Apply to save your changes and Click Run.
54. The execution begins and you will see the dialog below. Type “any data” or Q to quit and press Enter. Example:
You will not see the display listed since we did not assign the listing. But the execution goes to the end and the console is closed. If you want to be sure that the code is executing as designed, it would be a good idea to debug the code that you just executed. This will be done in the next step.

© Copyright IBM Corporation 2006. All rights reserved.
12/3/2007 Local COBOL Development
Page 25 of 35
3.3 Testing/debugging the local COBOL program
55. Since we have already created the launch configuration, just right click on cbldbgex.exe and select Debug As � Debug … When the Debug window opens select RunCOBOL and click Debug.
56. The dialog below will ask if you want to switch to the Debugger perspective. Click Yes: Note that the dialog asking to switch to the debugger perspective could be hidden by the console/dos window. You might need to minimize the console window to be able to see the dialog.

© Copyright IBM Corporation 2006. All rights reserved.
12/3/2007 Local COBOL Development
Page 26 of 35
57. The Debugger perspective is opened and the debug starts.
Using the Debug view, click in the Step Over icon ( ) or F6. (Do not use Step Into)
58. Add a breakpoint in the ACCEPT statement. Just move the mouse before the line
number and double click (see the figure below). A small circle indicates a breakpoint. As seen below:
© Copyright IBM Corporation 2006. All rights reserved.
12/3/2007 Local COBOL Development
Page 27 of 35
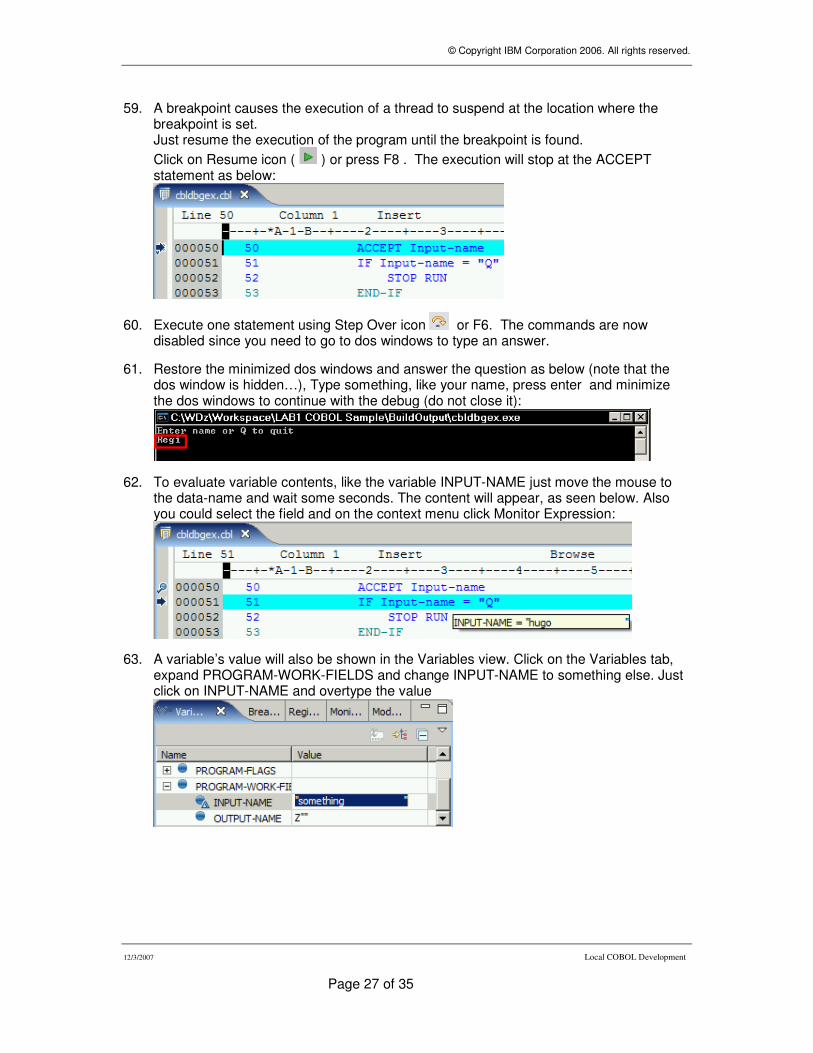
59. A breakpoint causes the execution of a thread to suspend at the location where the breakpoint is set. Just resume the execution of the program until the breakpoint is found.
Click on Resume icon ( ) or press F8 . The execution will stop at the ACCEPT statement as below:
60. Execute one statement using Step Over icon or F6. The commands are now disabled since you need to go to dos windows to type an answer.
61. Restore the minimized dos windows and answer the question as below (note that the dos window is hidden…), Type something, like your name, press enter and minimize the dos windows to continue with the debug (do not close it):
62. To evaluate variable contents, like the variable INPUT-NAME just move the mouse to the data-name and wait some seconds. The content will appear, as seen below. Also you could select the field and on the context menu click Monitor Expression:
63. A variable’s value will also be shown in the Variables view. Click on the Variables tab, expand PROGRAM-WORK-FIELDS and change INPUT-NAME to something else. Just click on INPUT-NAME and overtype the value

© Copyright IBM Corporation 2006. All rights reserved.
12/3/2007 Local COBOL Development
Page 28 of 35
64. Not that if you now move the mouse cursor over the variable Input-name its value has changed
65. Click on the Breakpoints tab to see all breakpoints assigned to this program:
66. We will now add a Watchpoint, Right click in the Breakpoint view and select Add Breakpoint � Watch…
67. Type BRANCHFLAG in the Address, 2 in the Number of byte, since we want to stop at this field when it is modified and click Next and Finish
68. Click on Resume icon ( ) or press F8 . You will get a message that tells that storage was changed.
© Copyright IBM Corporation 2006. All rights reserved.
12/3/2007 Local COBOL Development
Page 29 of 35
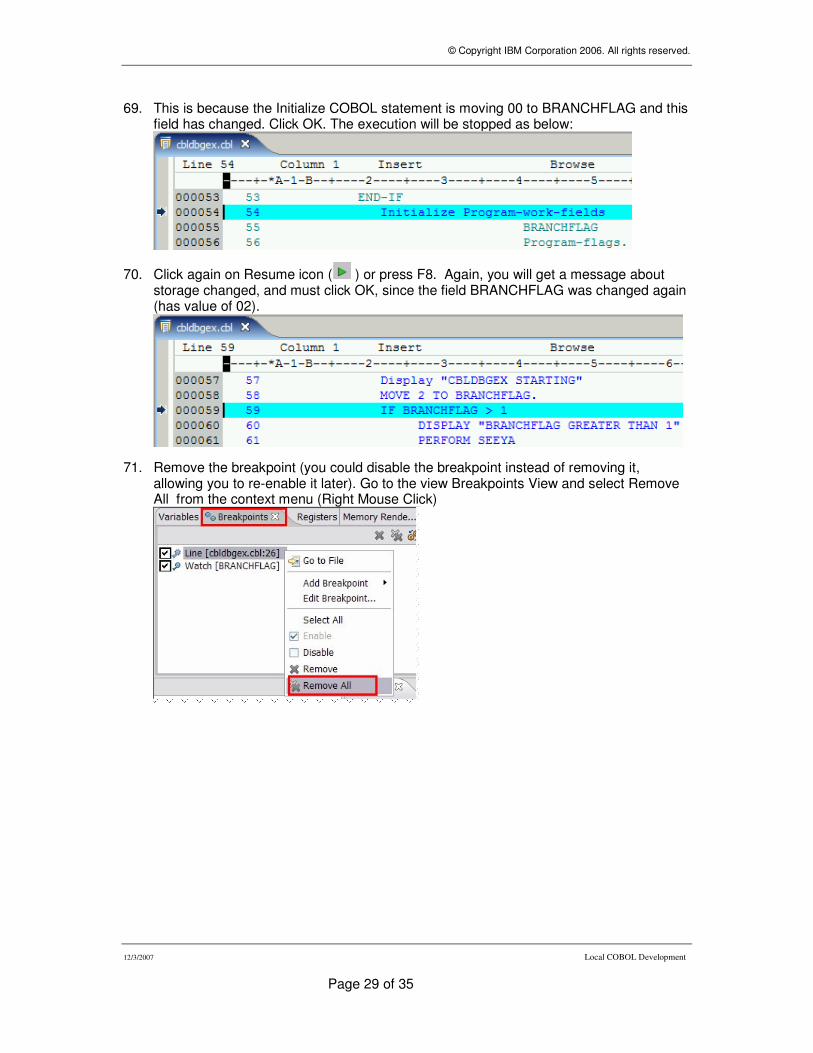
69. This is because the Initialize COBOL statement is moving 00 to BRANCHFLAG and this field has changed. Click OK. The execution will be stopped as below:
70. Click again on Resume icon ( ) or press F8. Again, you will get a message about storage changed, and must click OK, since the field BRANCHFLAG was changed again (has value of 02).
71. Remove the breakpoint (you could disable the breakpoint instead of removing it, allowing you to re-enable it later). Go to the view Breakpoints View and select Remove All from the context menu (Right Mouse Click)
© Copyright IBM Corporation 2006. All rights reserved.
12/3/2007 Local COBOL Development
Page 30 of 35
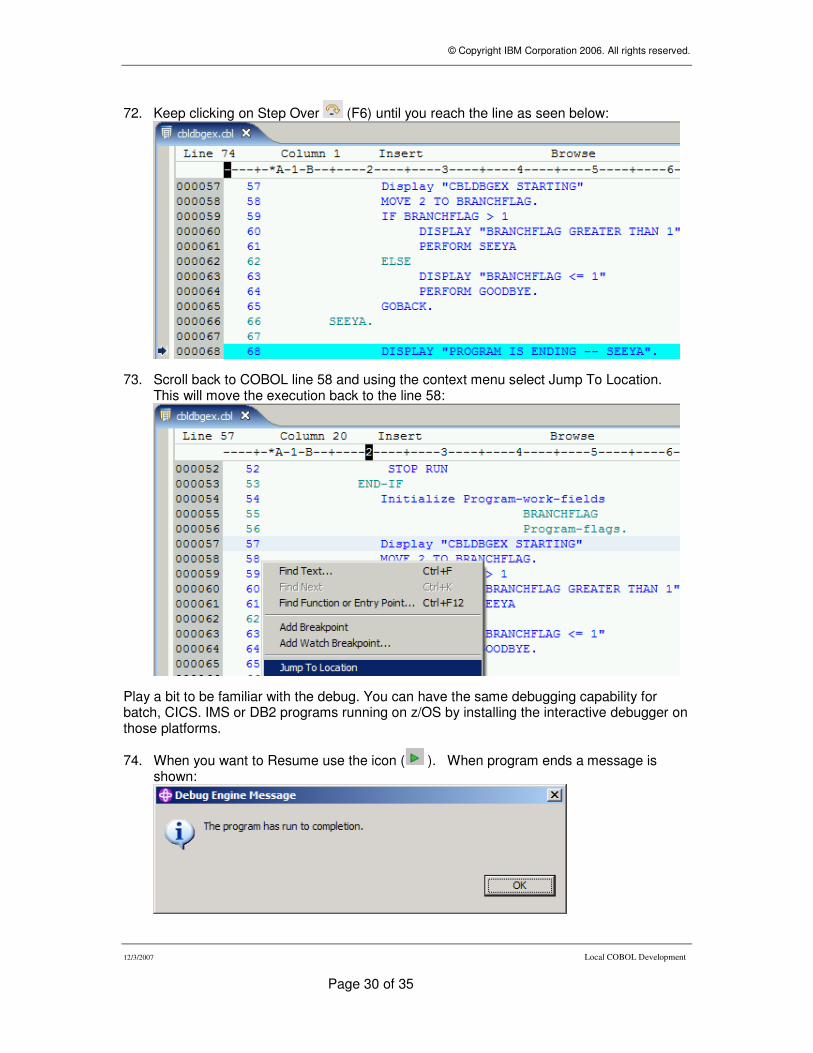
72. Keep clicking on Step Over (F6) until you reach the line as seen below:
73. Scroll back to COBOL line 58 and using the context menu select Jump To Location. This will move the execution back to the line 58:
Play a bit to be familiar with the debug. You can have the same debugging capability for batch, CICS. IMS or DB2 programs running on z/OS by installing the interactive debugger on those platforms.
74. When you want to Resume use the icon ( ). When program ends a message is shown:
© Copyright IBM Corporation 2006. All rights reserved.
12/3/2007 Local COBOL Development
Page 31 of 35
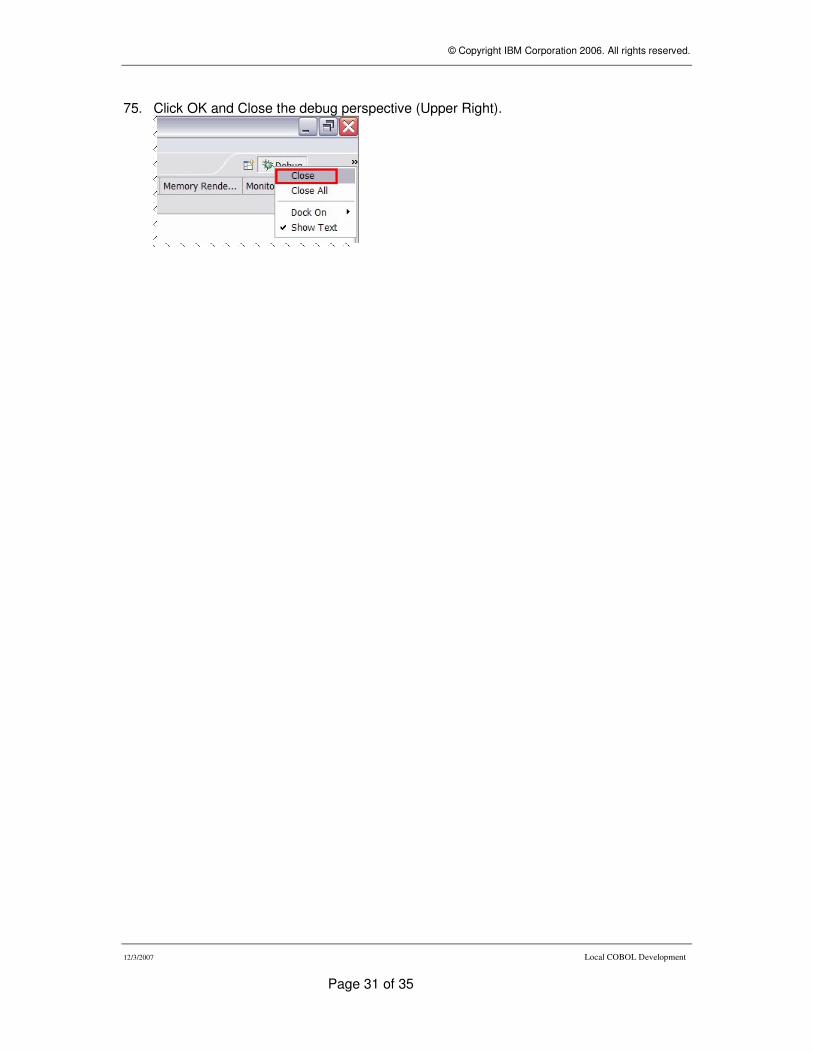
75. Click OK and Close the debug perspective (Upper Right).

© Copyright IBM Corporation 2006. All rights reserved.
12/3/2007 Local COBOL Development
Page 32 of 35
4 Write an own COBOL program
Your task is now to write the game Mastermind in COBOL. You can reuse and change the sample program we used before. If you can’t remember, here are the rules of this game: Your program will be the codemaker and has the following code and key pegs available:
Playing: 1. The Codemaker randomly chooses any four Code Pegs. The Codemaker can use any combination of colors, including using two or more of the same color. 2. The Codebreaker places four Code Pegs in the 1st row attempting to duplicate the exact colors and positions of the secret code. 3. The Codemaker places key pegs in the key holes on the 1st row as follows: * A red key peg for each Code Peg that's the right color and in the right position. * A white key peg for each Code Peg that's the right color, but not in the right position. * No key pegs indicate a color is not used in the code. The Codemaker does not put the key pegs in any particular order. It's part of the challenge for the Codebreaker to figure out which Key Pegs correspond to which Code Pegs. The Codebreaker should remember that one Key Peg corresponds to one Code Peg and a red Key Peg takes precedence over a white one. Examples

© Copyright IBM Corporation 2006. All rights reserved.
12/3/2007 Local COBOL Development
Page 33 of 35
4. The Codebreaker places another set of Code Pegs in the second row and the Codemaker places Key Pegs in his second row. The pegs played in each row are left in position until the secret code is broken. 5. The Codebreaker keeps placing rows of Code Pegs and keeps getting feedback from the Codemaker until he guesses the code exactly. When this happens, the Codemaker places four red Key Pegs and reveals the secret code. 7. If all 10 rows are used and the Code has not been broken, the game is over. Note: it might ease programming if you do not allow colors to occur twice…
© Copyright IBM Corporation 2006. All rights reserved.
12/3/2007 Local COBOL Development
Page 34 of 35
4.1 COBOL programming hints
The following syntax hints might be useful.
4.1.1 Display
Use DISPLAY to show something on the console. To concatenate several items to be displayed separate them by blanks.
4.1.2 Computations
You can compute the value of an expression using the following statement: COMPUTE identifier = arithmetic expression For example COMPUTE number = 1 + other-number
4.1.3 Perform
PERFORM <Paragraph> Performs all statements within the paragraph PERFORM <Para1> THRU <Para2> Performs all statements from Para1 to Para2 PERFORM <Section> Performs all statements within the specified Section PERFORM <Para./Sec.> <number> TIMES Performs the specified paragraph or section a number of times PERFORM <UP> UNTIL <condition>. Conditional operators (NOT) = (NOT) > (NOT) < condition concatenation via AND, OR possible PERFORM VARYING Performs a FOR loop, for example: PERFORM <UP> VARYING <Variable> FROM <startvalue> BY <Increment> UNTIL <condition>. <Variable> will be set to <Startwert> and incremented by <Inc> until <condition> is true
4.1.4 Initialize
The INITIALIZE statement sets selected categories of data fields to predetermined values. It is functionally equivalent to one or more MOVE statements.
4.1.5 Level 88
You can define a 88 condition name that can evaluated like a Boolean expression within for example an IF statement. For example in the RDz COBOL example there was a Loop-flag specified in the DATA DIVISION: 01 Program-flags. 05 Loop-flag Pic 9(01).

© Copyright IBM Corporation 2006. All rights reserved.
12/3/2007 Local COBOL Development
Page 35 of 35
88 Loop-done Value 1. IF Loop-done = TRUE would be evaluated as true (1 is the equivalent fort rue)
4.1.6 Substrings
Reference Modification allows you to treat a numeric (PIC 9) or alphanumeric (PIC X) data-item as if it were an array of characters. To access sub-strings using Reference Modification you must specify; * the name of the data-item * the start character position of the sub-string * the number of characters in the sub-string To apply Reference Modification the following syntax must be used. DataName(StartPos [:SubStrLength]) StartPos is the character position of the first character in the sub-string and SubStrLength is number of characters in the substring. As the square brackets indicate, the SubStrLength may be omitted, and in that case the substring from StartPos to the end of the string is assumed. Reference Modification may be used almost anywhere an alphanumeric data-item is permitted.
4.1.7 Useful functions
FUNCTION CURRENT-DATE Returns a 21 character string representing the current date and time, and the difference between the local time and Greenwich Mean Time. The format of the string is yyyymmddhhmmsshhxhhmm, where xhhmm is the number of hours and minutes the local time is ahead or behind GMT ( x = + or - or 0). If x = 0, the hardware cannot provide this information. FUNCTION RANDOM[(seed)] The RANDOM function returns a numeric value that is a pseudorandom number from a rectangular distribution. The function type is numeric. The argument seed can optionally be specified to force a new sequence of numbers, else your program will always produce the same secret code. If seed is specified, it must be zero or a positive integer. However, only values in the range from zero up to and including 2,147,483,645 yield a distinct sequence of pseudorandom numbers.