Legacy4 Technical Bulletin
2
Legacy™4 Fixture-Mount & IQity Impression Technique™ Technical Bulletin Fixture-mount top designed to fail at approximately 112 Ncm Index fixture-mount flat to labial or buccal Place implant into osteotomy Vial labels are color-coded with two tear-off labels Each implant is packaged in a sterile vial Open vial and release implant assembly onto a sterile surface Cap labels are color-coded by platform diameter Remove implant assembly with hex tool Hex will then be aligned for proper abutment placement Place the fixture-mount on a stable, sterile surface with the pronged end facing up If, in the unlikely event, the fixture-mount top becomes loose during insertion, remove it with the hex tool. Implant insertion may be continued via one of the Legacy4 Alternative Insertion Options Insert the appropriate pointed end of the Legacy™4 Fixture- Mount Tool [FMT] into the pronged end of the fixture- mount and press completely down to ensure the prongs are correctly positioned Legacy4 Implant is mounted on a revolutionary two-piece color-coded fixture-mount. The top fails at excessive torques to protect the interface during insertion and detaches in impression for the accuracy of an open-tray transfer with the simplicity of a closed-tray. The fixture-mount may be shortened at the line to function as a final preparable abutment. A healing collar is included in each vial.
-
Upload
implant-direct -
Category
Documents
-
view
224 -
download
0
description
Legacy4 Technical Bulletin
Transcript of Legacy4 Technical Bulletin

Legacy™4 Fixture-Mount & IQity Impression Technique™Technical Bulletin
Fixture-mount top designed to fail at approximately 112 Ncm
Index fixture-mount flat to labial or buccal
Place implant into osteotomy
Vial labels are color-coded with two tear-off labels
Each implant is packaged in a sterile vial
Open vial and release implant assembly onto a sterile surface
Cap labels are color-coded by platform diameter
Remove implant assembly with hex tool
Hex will then be aligned for proper abutment placement
Place the fixture-mount on a stable, sterile surface with the pronged end facing up
If, in the unlikely event, the fixture-mount top becomes loose during insertion, remove it with the hex tool. Implant insertion may be continued via one of the Legacy4 Alternative Insertion Options
Insert the appropriate pointed end of the Legacy™4 Fixture-Mount Tool [FMT] into the pronged end of the fixture-mount and press completely down to ensure the prongs are correctly positioned
Legacy4 Implant is mounted on a revolutionary two-piece color-coded fixture-mount. The top fails at excessive torques to protect the interface during insertion and detaches in impression for the accuracy of an open-tray transfer with the simplicity of a closed-tray. The fixture-mount may be shortened at the line to function as a final preparable abutment. A healing collar is included in each vial.
Legacy™4 Fixture-Mount & IQity Impression Technique™Technical Bulletin
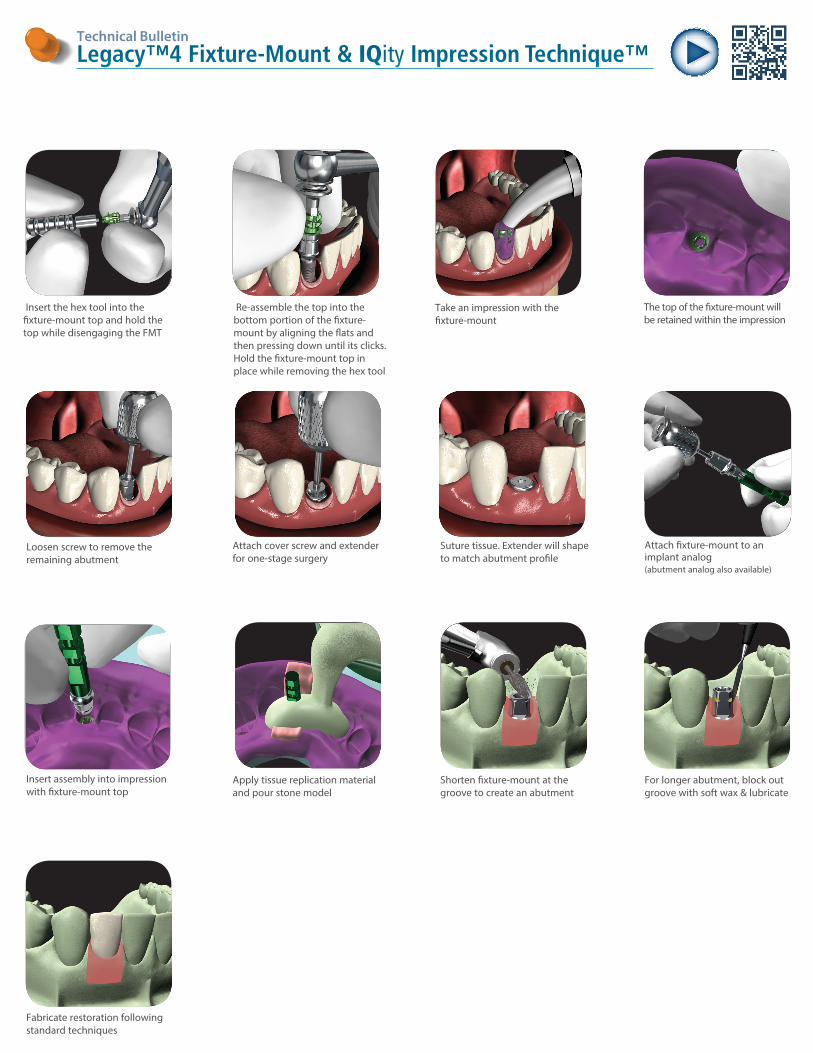
Apply tissue replication material and pour stone model
Shorten fixture-mount at the groove to create an abutment
For longer abutment, block out groove with soft wax & lubricate
Fabricate restoration following standard techniques
Insert assembly into impression with fixture-mount top
Attach fixture-mount to an implant analog (abutment analog also available)
Attach cover screw and extender for one-stage surgery
Suture tissue. Extender will shape to match abutment profile
Loosen screw to remove the remaining abutment
Insert the hex tool into the fixture-mount top and hold the top while disengaging the FMT
Re-assemble the top into the bottom portion of the fixture-mount by aligning the flats and then pressing down until its clicks. Hold the fixture-mount top in place while removing the hex tool
The top of the fixture-mount will be retained within the impression
Take an impression with the fixture-mount