LEARNING PHOTOSHOP BASICS -...
34
ADOBE PHOTOSHOP CS5 LEARNING PHOTOSHOP BASICS 2 1. Use organizational and management features 2. Use the Layers and History panels 3. Learn about Photoshop by using Help 4. View and print an image CHAPTER Copyright 2010 Cengage Learning. All Rights Reserved. May not be copied, scanned, or duplicated, in whole or in part. Due to electronic rights, some third party content may be suppressed from the eBook and/or eChapter(s). Editorial review has deemed that any suppressed content does not materially affect the overall learning experience. Cengage Learning reserves the right to remove additional content at any time if subsequent rights restrictions require it.
Transcript of LEARNING PHOTOSHOP BASICS -...

A D O B E P H O T O S H O P C S 5
LEARNING PHOTOSHOP BASICS21. Use organizational and management features
2. Use the Layers and History panels
3. Learn about Photoshop by using Help
4. View and print an image
CHAPTER
Copyright 2010 Cengage Learning. All Rights Reserved. May not be copied, scanned, or duplicated, in whole or in part. Due to electronic rights, some third party content may be suppressed from the eBook and/or eChapter(s). Editorial review has deemed that any suppressed content does not materially affect the overall learning experience. Cengage Learning reserves the right to remove additional content at any time if subsequent rights restrictions require it.

PHOTOSHOP 22
2CHAPTER LEARNING PHOTOSHOP BASICS
Working Magic with PhotoshopTh e essence of working with images in Photoshop is based on the understanding of layers. Every image opened in Photoshop is made up of one or more layers, and it is within these layers that you, as an artist, work your magic. Th e order of layers in an image, and the eff ects applied to them, can make one image very diff erent from another.
Using Management ToolsAdobe Photoshop CS5 is an amazingly rich program that has a variety of tools that you can use to manage your digital images. Using services such as CS Live and Acrobat.com, you’ll be able to increase your productivity and work more effi ciently individually and with coworkers.
Learning to Love LayersOnce you become more comfortable using Photoshop, you’ll understand the importance of each of the panels. Some panels, such as the Layers panel, are vital to using Photoshop.
Since layers are the key to creating and manipulating Photoshop images, the Layers panel is one that we depend on most, for it tells us at-a-glance the order and type of layers within an image. And if the Layers panel is the map of the Photoshop image, the History panel provides step-by-step instructions that let us know how we got to our destination.
Finding Help when You Need ItA complex program like Photoshop needs a robust Help system. You’ll fi nd that the Help system, which is accessed using your browser, doesn’t disappoint.
Viewing and PrintingWhile not everyone prints each one of their images, nearly everyone needs to zoom in and out to get a better look at diff erent areas. Using the Zoom tool, you can view the areas you need to focus on in as high or as low of a magnifi cation as you want. If you do want to print out an image, Photoshop off ers great tools to do so.
Copyright 2010 Cengage Learning. All Rights Reserved. May not be copied, scanned, or duplicated, in whole or in part. Due to electronic rights, some third party content may be suppressed from the eBook and/or eChapter(s). Editorial review has deemed that any suppressed content does not materially affect the overall learning experience. Cengage Learning reserves the right to remove additional content at any time if subsequent rights restrictions require it.

TOOLS YOU’LL USE
PHOTOSHOP 23
Copyright 2010 Cengage Learning. All Rights Reserved. May not be copied, scanned, or duplicated, in whole or in part. Due to electronic rights, some third party content may be suppressed from the eBook and/or eChapter(s). Editorial review has deemed that any suppressed content does not materially affect the overall learning experience. Cengage Learning reserves the right to remove additional content at any time if subsequent rights restrictions require it.

PHOTOSHOP 24 Learning Photoshop Basics
L E S S O N 1
Use Organizational AND MANAGEMENT FEATURES
What You’ll Do
In this lesson, you’ll learn how to use CS Live, Bridge, and Mini Bridge.
Learning About CS LiveCS Live lets you connect to Acrobat.com, which is a management feature of the Adobe Creative Suite that can be used to organize your work whether you work in groups or by yourself. CS Live and Acrobat.com are accessed through the CS Live button on the Photoshop Application bar, although Acrobat.com can be accessed without Photoshop using any browser. In addition to allowing you to share fi les with others in a virtual environment (also known as cloud computing), these services make it possible to take advantage of file versioning, which allows you to store multiple versions of your work. You can access CS Live in Photoshop from the Application bar (to the right of the
Workspace switcher). Figure 1 shows the CS Live menu in Photoshop.
Signing into Acrobat.comYou can log into Acrobat.com by clicking the CS Live button on the Photoshop Application bar, clicking Acrobat.com Home, entering your Adobe ID and password when prompted
Figure 1 CS Live menu
Copyright 2010 Cengage Learning. All Rights Reserved. May not be copied, scanned, or duplicated, in whole or in part. Due to electronic rights, some third party content may be suppressed from the eBook and/or eChapter(s). Editorial review has deemed that any suppressed content does not materially affect the overall learning experience. Cengage Learning reserves the right to remove additional content at any time if subsequent rights restrictions require it.

Lesson 1 Use Organizational and Management Features PHOTOSHOP 25
(or registering for one), and then clicking Sign In. Th e Acrobat.com home screen is shown in Figure 2: your screen may look diff erent as this screen can look diff erent with each user and changes oft en.
Using Acrobat.comWhen you log into Acrobat.com, one of the documents you’ll see is called “10 Cool Th ings You Can Do With Acrobat.com.” Click this link and an explanatory document on this
feature opens. From within Acrobat.com, you can conduct meetings and share screens, collaborate with coworkers to create and edit documents, presentations, and tables, and store documents for easy access by others.
Figure 3 Project Complexity triangle
If you ask any client what they want in their project, they’ll most likely say something to the eff ect that they want it now, they want it done well, and they want it to not cost a lot. These three variables (performance, time, and cost) that are shown in Figure 3 comprise the project scope and illustrate the complexity that exists in any project.
■ If the project is a low price and completed quickly, will the quality be satisfactory? ■ If the project is completed quickly and the quality is good, will the price be aff ordable?
Ask the client, and they’ll say that they want all three elements. But is this a realistic expectation?
The Complexity of Projects
Figure 2 Acrobat.com Home screen
Click to return to the Home screen
“10 Cool Things” document
Adobe product screenshot(s) reprinted with permission from Adobe Systems Incorporated
Copyright 2010 Cengage Learning. All Rights Reserved. May not be copied, scanned, or duplicated, in whole or in part. Due to electronic rights, some third party content may be suppressed from the eBook and/or eChapter(s). Editorial review has deemed that any suppressed content does not materially affect the overall learning experience. Cengage Learning reserves the right to remove additional content at any time if subsequent rights restrictions require it.

PHOTOSHOP 26 Learning Photoshop Basics
Understanding MetadataMetadata is descriptive standardized information about a fi le, and includes information such as the author’s name, copyright, and keywords associated with it. In Bridge, you can also fi nd information such as when the image was created, last modifi ed, current size, resolution, bit depth, and color mode in the Metadata panel, shown in Figure 4. Metadata information is stored using the Extensible Metadata Platform (XMP), which is commonly
Reusing Housekeeping Tasks in Bridge and Mini BridgeAll those little housekeeping tasks you do, such as renaming fi les and copying fi les and folders from one location on your hard drive to another, can be easily carried out in Bridge and Mini Bridge. Once you select fi le thumbnails in Bridge or Mini Bridge, you can copy them to another location by dragging-and-dropping. Files can be renamed by clicking the fi lename until it is selected, typing the new name, and then pressing [Enter] (Win) or [return] (Mac).
Figure 4 Metadata panel in Bridge Figure 5 Keywords panel in Bridge
shared by other Adobe products. Sometimes metadata is stored separately in a sidecar fi le. Th is fi le can be applied to other fi les, making it possible to use metadata from one fi le as a template for another.
Assigning Keywords to an ImageTh e Keywords panel, as seen in Figure 5, is grouped with the Metadata panel and can be used to create your own system of identifying fi les based on their content.
Copyright 2010 Cengage Learning. All Rights Reserved. May not be copied, scanned, or duplicated, in whole or in part. Due to electronic rights, some third party content may be suppressed from the eBook and/or eChapter(s). Editorial review has deemed that any suppressed content does not materially affect the overall learning experience. Cengage Learning reserves the right to remove additional content at any time if subsequent rights restrictions require it.
Lesson 1 Use Organizational and Management Features PHOTOSHOP 27
In conjunction with the Filter panel (located beneath the Favorites and Folders panels on the left side of the screen in Bridge), keywords can be used to fi nd images that meet specifi c criteria. Say, for example, that you have hundreds of images downloaded
from your digital camera. Some could be assigned the keyword “New York,” others “Paris,” and still others “Rome.” Viewing all images with the keyword “Rome” is as simple as making the folder containing all the images active, and then clicking the
keyword Rome in the fi lter panel. Any fi le can be assigned multiple keywords, and those keywords can be renamed, deleted, or applied to other fi les.
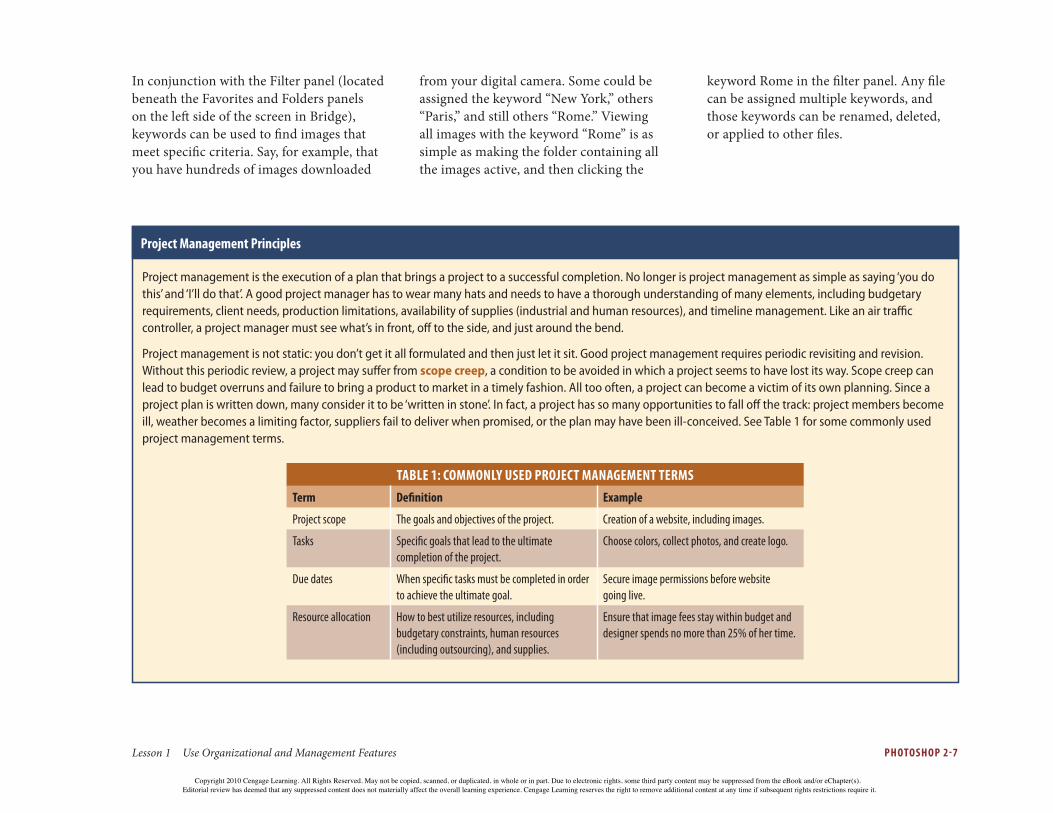
Project management is the execution of a plan that brings a project to a successful completion. No longer is project management as simple as saying ‘you do this’ and ‘I’ll do that’. A good project manager has to wear many hats and needs to have a thorough understanding of many elements, including budgetary requirements, client needs, production limitations, availability of supplies (industrial and human resources), and timeline management. Like an air traffi c controller, a project manager must see what’s in front, off to the side, and just around the bend.
Project management is not static: you don’t get it all formulated and then just let it sit. Good project management requires periodic revisiting and revision. Without this periodic review, a project may suff er from scope creep, a condition to be avoided in which a project seems to have lost its way. Scope creep can lead to budget overruns and failure to bring a product to market in a timely fashion. All too often, a project can become a victim of its own planning. Since a project plan is written down, many consider it to be ‘written in stone’. In fact, a project has so many opportunities to fall off the track: project members become ill, weather becomes a limiting factor, suppliers fail to deliver when promised, or the plan may have been ill-conceived. See Table 1 for some commonly used project management terms.
TABLE 1: COMMONLY USED PROJECT MANAGEMENT TERMSTerm Defi nition Example
Project scope The goals and objectives of the project. Creation of a website, including images.
Tasks Specifi c goals that lead to the ultimate completion of the project.
Choose colors, collect photos, and create logo.
Due dates When specifi c tasks must be completed in order to achieve the ultimate goal.
Secure image permissions before website going live.
Resource allocation How to best utilize resources, including budgetary constraints, human resources (including outsourcing), and supplies.
Ensure that image fees stay within budget and designer spends no more than 25% of her time.
Project Management Principles
Copyright 2010 Cengage Learning. All Rights Reserved. May not be copied, scanned, or duplicated, in whole or in part. Due to electronic rights, some third party content may be suppressed from the eBook and/or eChapter(s). Editorial review has deemed that any suppressed content does not materially affect the overall learning experience. Cengage Learning reserves the right to remove additional content at any time if subsequent rights restrictions require it.
PHOTOSHOP 28 Learning Photoshop Basics
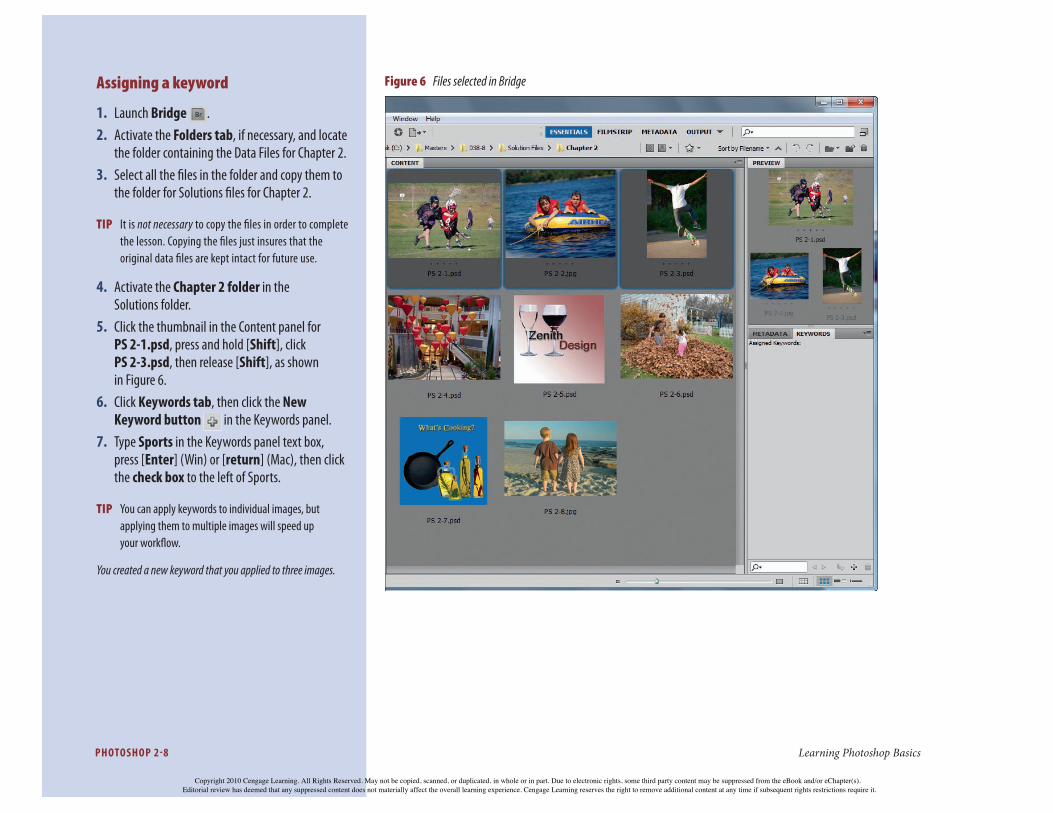
Assigning a keyword
1. Launch Bridge .2. Activate the Folders tab, if necessary, and locate
the folder containing the Data Files for Chapter 2.3. Select all the fi les in the folder and copy them to
the folder for Solutions fi les for Chapter 2.
TIP It is not necessary to copy the fi les in order to complete the lesson. Copying the fi les just insures that the original data fi les are kept intact for future use.
4. Activate the Chapter 2 folder in the Solutions folder.
5. Click the thumbnail in the Content panel for PS 2-1.psd, press and hold [Shift], click PS 2-3.psd, then release [Shift], as shown in Figure 6.
6. Click Keywords tab, then click the New Keyword button in the Keywords panel.
7. Type Sports in the Keywords panel text box, press [Enter] (Win) or [return] (Mac), then click the check box to the left of Sports.
TIP You can apply keywords to individual images, but applying them to multiple images will speed up your workfl ow.
You created a new keyword that you applied to three images.
Figure 6 Files selected in Bridge
Copyright 2010 Cengage Learning. All Rights Reserved. May not be copied, scanned, or duplicated, in whole or in part. Due to electronic rights, some third party content may be suppressed from the eBook and/or eChapter(s). Editorial review has deemed that any suppressed content does not materially affect the overall learning experience. Cengage Learning reserves the right to remove additional content at any time if subsequent rights restrictions require it.

Lesson 1 Use Organizational and Management Features PHOTOSHOP 29
Filtering with Bridge
1. Display the Filter panel, click the Keywords section, click Sports, then close the Keyword panel.A check mark appears next to Sports in the Filter panel, as seen in Figure 7, and only the images with the keyword Sports are displayed.
2. Click Sports in the Keywords section in the Filter panel to restore all the images in the folder.
3. Close Bridge.
You used the Filter panel to see only those images that had a specifi c keyword applied, then you closed Bridge.
Figure 7 Files selected in Bridge
Check mark means keyword fi lter is on
The basics of project management include knowledge of the project scope, the tasks at hand, due dates for task completion, and eff ective resource allocation. And while all of this is extremely complicated, you must remember that most projects don’t operate in a bubble: they are usually one of many projects competing for the same resources. In addition to competing with other projects, many tasks within a given project may be occurring simultaneously and repetitively. Not every project will have the same constraints. Some manufacturing projects, for example, may require more rigorous testing than others, and some projects may rely more heavily on outsourcing that others. Most projects will have deliverables, but the type and scope of those will vary.
Basics of Project Management
Copyright 2010 Cengage Learning. All Rights Reserved. May not be copied, scanned, or duplicated, in whole or in part. Due to electronic rights, some third party content may be suppressed from the eBook and/or eChapter(s). Editorial review has deemed that any suppressed content does not materially affect the overall learning experience. Cengage Learning reserves the right to remove additional content at any time if subsequent rights restrictions require it.

PHOTOSHOP 210 Learning Photoshop Basics
L E S S O N 2
Use the Layers AND HISTORY PANELS
You can think of layers in a Photoshop image as individual sheets of clear plastic that are in a stack. It’s possible for your fi le to quickly accumulate dozens of layers. Th e Layers panel displays all the individual layers in an open fi le. You can use the Layers panel to create, copy, delete, display, hide, merge, lock, group, or reposition layers.
Learning About LayersA layer is a section within an image that can be manipulated independently. Layers allow you to control individual elements within an image and create great dramatic eff ects and variations of the same image. Layers enable you to easily manipulate individual characteristics within an image. Each Photoshop fi le has at least one layer, and can contain many individual layers, or groups of layers.
QUICK TIP
In Photoshop, using and understanding layers is the key to success.
Understanding the Layers PanelTh e order in which the layers appear on the Layers panel matches the order in which they appear in the image; the top layer in the
What You’ll Do
In this lesson, you’ll hide and display a layer, move a layer on the Layers panel, and then undo the move by deleting the Layer Order state on the History panel.
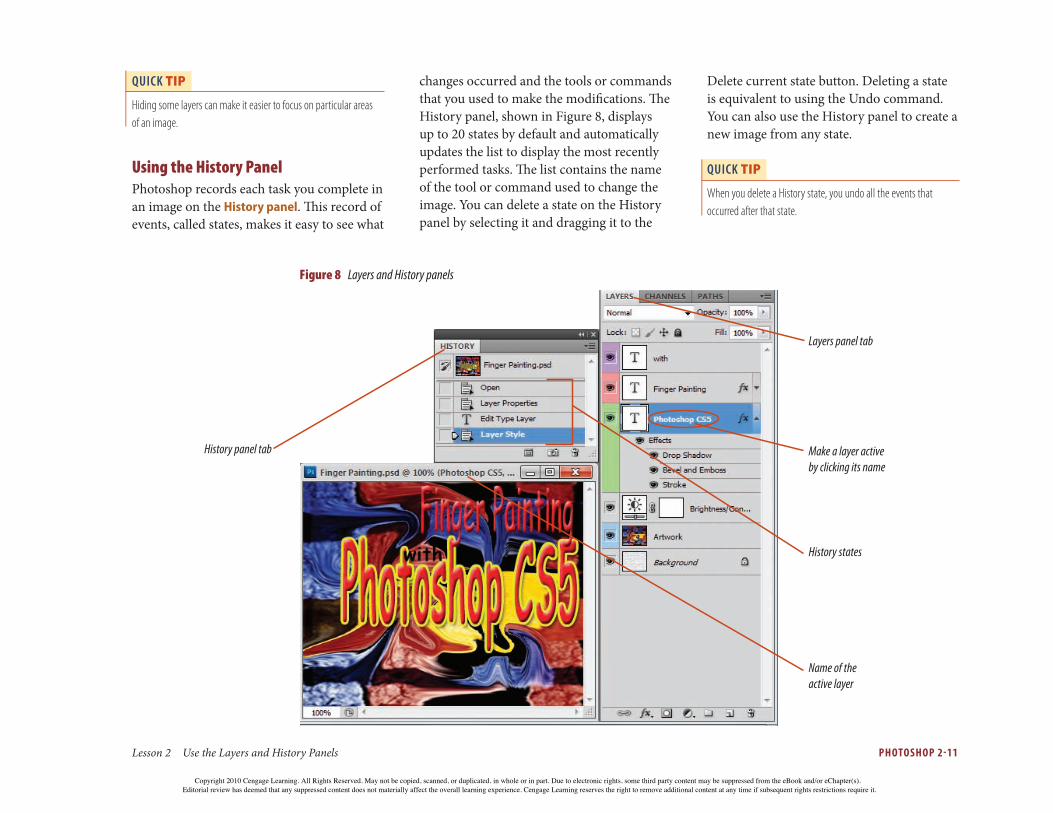
Layers panel is the top layer on the image. You can make a layer active by clicking its name on the Layers panel. When a layer is active, it is highlighted on the Layers panel, and the name of the layer appears in parentheses in the image title bar. Only one layer can be active at a time. Figure 8 shows an image with its Layers panel. Do you see that this image contains six layers? Each layer can be moved or modifi ed individually on the panel to give a diff erent eff ect to the overall image. If you look at the Layers panel, you’ll see that the Photoshop CS5 type layer is blue, indicating that it is currently active.
QUICK TIP
Get in the habit of shifting your eye from the image in the work area to the Layers panel. Knowing which layer is active will save you time and help you troubleshoot an image.
Displaying and Hiding LayersYou can use the Layers panel to control which layers are visible in an image. You can show or hide a layer by clicking the Indicates layer visibility button next to the layer thumbnail. When a layer is hidden, you are not able to merge it with another, select it, or print it.
Copyright 2010 Cengage Learning. All Rights Reserved. May not be copied, scanned, or duplicated, in whole or in part. Due to electronic rights, some third party content may be suppressed from the eBook and/or eChapter(s). Editorial review has deemed that any suppressed content does not materially affect the overall learning experience. Cengage Learning reserves the right to remove additional content at any time if subsequent rights restrictions require it.
Lesson 2 Use the Layers and History Panels PHOTOSHOP 211
QUICK TIP
Hiding some layers can make it easier to focus on particular areas of an image.
Using the History PanelPhotoshop records each task you complete in an image on the History panel. Th is record of events, called states, makes it easy to see what
changes occurred and the tools or commands that you used to make the modifi cations. Th e History panel, shown in Figure 8, displays up to 20 states by default and automatically updates the list to display the most recently performed tasks. Th e list contains the name of the tool or command used to change the image. You can delete a state on the History panel by selecting it and dragging it to the
Delete current state button. Deleting a state is equivalent to using the Undo command. You can also use the History panel to create a new image from any state.
QUICK TIP
When you delete a History state, you undo all the events that occurred after that state.
Figure 8 Layers and History panels
History panel tab
Layers panel tab
Make a layer active by clicking its name
History states
Name of the active layer
Copyright 2010 Cengage Learning. All Rights Reserved. May not be copied, scanned, or duplicated, in whole or in part. Due to electronic rights, some third party content may be suppressed from the eBook and/or eChapter(s). Editorial review has deemed that any suppressed content does not materially affect the overall learning experience. Cengage Learning reserves the right to remove additional content at any time if subsequent rights restrictions require it.

PHOTOSHOP 212 Learning Photoshop Basics
Hide and display a layer
1. Open the fi le PS 2-4.psd, then rename it Balloons and Escalator.psd.
2. Click the Purple balloon layer on the Layers panel, then click the Move tool .
TIP Depending on the size of the window, you might only be able to see the initial characters of the layer name.
3. Verify that the Show Transform Controls check box on the options bar is not checked, then click the Indicates layer visibility button on the Purple balloon layer to display the image, as shown in Figure 9.
TIP By default, transparent areas of an image have a checkerboard display on the Layers panel.
4. Click the Indicates layer visibility button on the Purple balloon layer to hide the layer.
You made the Purple balloon layer active on the Layers panel, then clicked the Indicates layer visibility button to display and hide the layer. Hiding layers is an important skill that can be used to remove distracting elements. Once you’ve fi nished working on a specifi c layer, you can display the additional layers.
Figure 9 Balloons and Escalator
Visible Purple balloon layer Indicates layer visibility button
Copyright 2010 Cengage Learning. All Rights Reserved. May not be copied, scanned, or duplicated, in whole or in part. Due to electronic rights, some third party content may be suppressed from the eBook and/or eChapter(s). Editorial review has deemed that any suppressed content does not materially affect the overall learning experience. Cengage Learning reserves the right to remove additional content at any time if subsequent rights restrictions require it.

Lesson 2 Use the Layers and History Panels PHOTOSHOP 213
Move a layer on the Layers panel and delete a state on the History panel
1. Click the Indicates layer visibility button on the Purple balloon layer on the Layers panel to display the layer.
2. Click on the Green balloon layer on the Layers panel to display the layer.
3. Display the Legacy workspace you created in Chapter 1.
4. Click and drag the Green balloon layer on the Layers panel beneath the Purple balloon layer, so your Layers panel looks like Figure 10.The green balloon is no longer visible even though the visibility of both layers is on. See Figure 11.
5. Click Layer Order on the History panel, then drag it to the Delete current state button on the History panel, as shown in Figure 12.
TIP Each time you close and reopen an image, the History panel is cleared.
The original order of the layers in the Layers panel is restored.
6. Click File on the Application bar, then click Save.
You moved the Green balloon layer beneath the Purple balloon layer, then returned it to its original position by dragging the Layer Order state to the Delete current state button on the History panel. You can easily use the History panel to undo what you’ve done.
Figure 10 Layer moved in Layers panel
Figure 11 Result of moved layer
Result of moved layerFigure 12 Deleting a History state
Selected state
Pointer when dragging a history state to the Delete current state button
Copyright 2010 Cengage Learning. All Rights Reserved. May not be copied, scanned, or duplicated, in whole or in part. Due to electronic rights, some third party content may be suppressed from the eBook and/or eChapter(s). Editorial review has deemed that any suppressed content does not materially affect the overall learning experience. Cengage Learning reserves the right to remove additional content at any time if subsequent rights restrictions require it.

PHOTOSHOP 214 Learning Photoshop Basics
L E S S O N 3
Learn About Photoshop BY USING HELP
What You’ll Do
In this lesson, you’ll open Help, and then view and fi nd information from the list of topics and the Search feature.
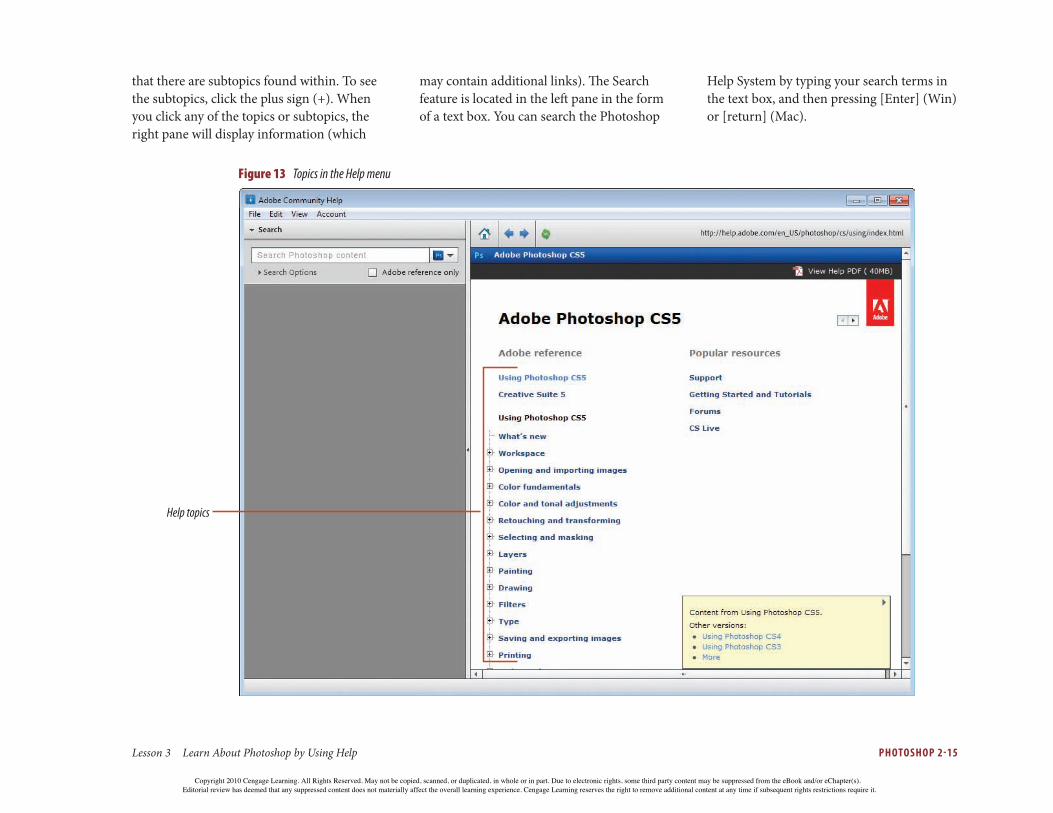
Understanding the Power of HelpPhotoshop features an extensive Help system that you can use to access defi nitions, explanations, and useful tips. Help information is displayed in a browser window, so you must have web browser soft ware installed on your computer to view the information; however, you do not need an Internet connection to use Photoshop Help.
Using Help TopicsTh e Home page of the Adobe Community Help window, shown in Figure 13, displays a Search pane on the left that you can use to retrieve information about Photoshop commands and features. In the right pane is a list of topics from which you can choose. Help items have a plus sign (+) to the left of the topic name. Th e plus sign (+) indicates
Copyright 2010 Cengage Learning. All Rights Reserved. May not be copied, scanned, or duplicated, in whole or in part. Due to electronic rights, some third party content may be suppressed from the eBook and/or eChapter(s). Editorial review has deemed that any suppressed content does not materially affect the overall learning experience. Cengage Learning reserves the right to remove additional content at any time if subsequent rights restrictions require it.
Lesson 3 Learn About Photoshop by Using Help PHOTOSHOP 215
that there are subtopics found within. To see the subtopics, click the plus sign (+). When you click any of the topics or subtopics, the right pane will display information (which
may contain additional links). Th e Search feature is located in the left pane in the form of a text box. You can search the Photoshop
Help System by typing your search terms in the text box, and then pressing [Enter] (Win) or [return] (Mac).
Figure 13 Topics in the Help menu
Help topics
Copyright 2010 Cengage Learning. All Rights Reserved. May not be copied, scanned, or duplicated, in whole or in part. Due to electronic rights, some third party content may be suppressed from the eBook and/or eChapter(s). Editorial review has deemed that any suppressed content does not materially affect the overall learning experience. Cengage Learning reserves the right to remove additional content at any time if subsequent rights restrictions require it.

PHOTOSHOP 216 Learning Photoshop Basics
Figure 14 Contents section of the Help window
Image resolution is determined by the number of pixels per inch (ppi) that are printed on a page. Pixel dimensions (the number of pixels along the height and width of a bitmap image) determine the amount of detail in an image, while resolution controls the amount of space over which the pixels are printed. Think of the diff erences between the picture quality on a standard-defi nition 480i television versus a high-defi nition 1080i television. The high-defi nition image will be crisper and have more vibrant colors, whereas the standard-defi nition image may look weak and washed out. High resolution images show greater detail and more subtle color transitions than low resolution images. Lower resolution images can look grainy, like images in older newspapers.
Device resolution or printer resolution is measured by the ink dots per inch (dpi) produced by printers. You can set the resolution of your computer monitor to determine the detail with which images will be displayed. Each monitor should be calibrated to describe how the monitor reproduces colors. Monitor calibration is one of the fi rst things you should do because it determines whether your colors are being accurately represented, which in turn determines how accurately your output will match your design intentions. Printer calibration ensures that what you see on your monitor is translated to paper.
Understanding the Diff erences Between Monitor, Images, and Device Resolution
Find information in Adobe reference titles
1. Click Help on the Application bar, then click Photoshop Help.
TIP You can also open the Help window by pressing [F1] (Win) or [ / ] (Mac).
2. Click the Expand Selection button to the left of the words Color fundamentals in the left pane.
3. Click to the left of Choosing colors, then click Adobe Color Picker overview. See Figure 14.
TIP You can maximize the window or change the width of the Search pane if you want to take advantage of the full screen display.
Bear in mind that Help is web-driven and, like any website, can change as errors and inconsistencies are found.
4. Close the Adobe Community Help window.
You used the Photoshop Help command on the Help menu to open the Help window and view a topic in Contents.
Copyright 2010 Cengage Learning. All Rights Reserved. May not be copied, scanned, or duplicated, in whole or in part. Due to electronic rights, some third party content may be suppressed from the eBook and/or eChapter(s). Editorial review has deemed that any suppressed content does not materially affect the overall learning experience. Cengage Learning reserves the right to remove additional content at any time if subsequent rights restrictions require it.

Lesson 3 Learn About Photoshop by Using Help PHOTOSHOP 217
Get help and support
1. Click Help on the Application bar, then click Photoshop Help.
2. Click Support beneath the Popular resources section to navigate to the Photoshop Help and Support Community Help section of the Adobe website (www.adobe.com/ support/photoshop). Compare your Help window to Figure 15.
You accessed the Community Help feature.
Figure 15 Topics in the Index window
Adobe product screenshot(s) reprinted with permission from Adobe Systems Incorporated
Copyright 2010 Cengage Learning. All Rights Reserved. May not be copied, scanned, or duplicated, in whole or in part. Due to electronic rights, some third party content may be suppressed from the eBook and/or eChapter(s). Editorial review has deemed that any suppressed content does not materially affect the overall learning experience. Cengage Learning reserves the right to remove additional content at any time if subsequent rights restrictions require it.
PHOTOSHOP 218 Learning Photoshop Basics
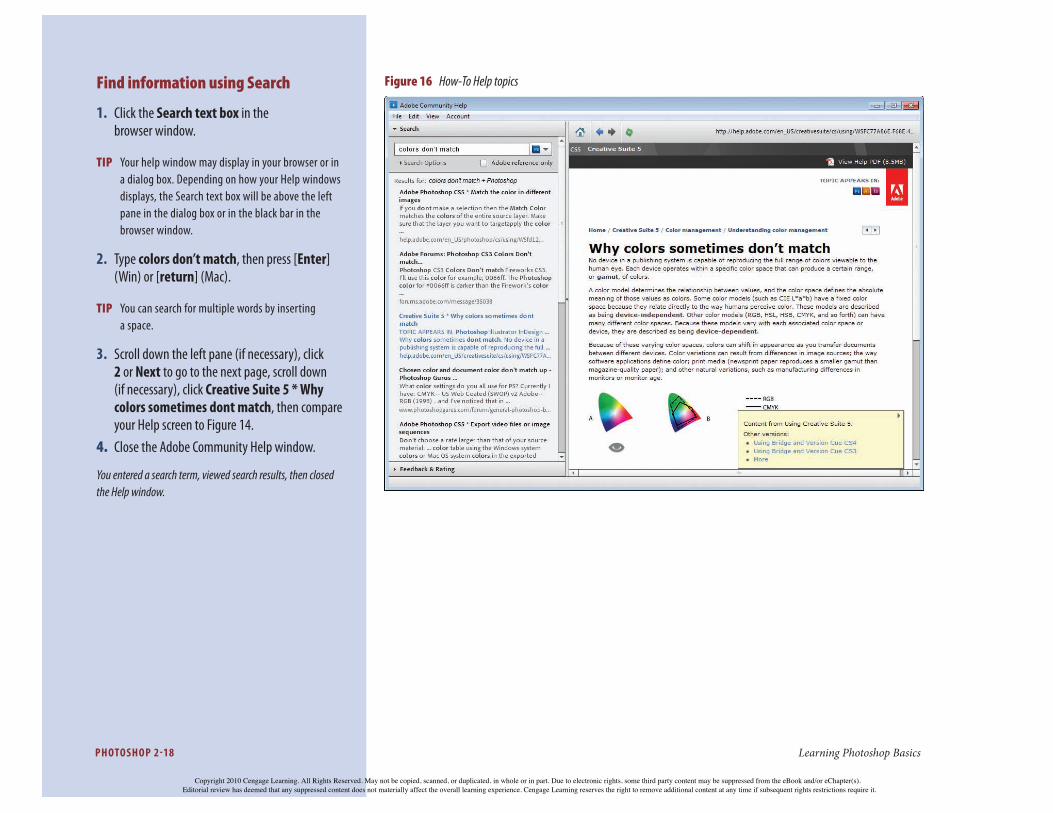
Find information using Search
1. Click the Search text box in the browser window.
TIP Your help window may display in your browser or in a dialog box. Depending on how your Help windows displays, the Search text box will be above the left pane in the dialog box or in the black bar in the browser window.
2. Type colors don’t match, then press [Enter] (Win) or [return] (Mac).
TIP You can search for multiple words by inserting a space.
3. Scroll down the left pane (if necessary), click 2 or Next to go to the next page, scroll down (if necessary), click Creative Suite 5 * Why colors sometimes dont match, then compare your Help screen to Figure 14.
4. Close the Adobe Community Help window.
You entered a search term, viewed search results, then closed the Help window.
Figure 16 How-To Help topics
Copyright 2010 Cengage Learning. All Rights Reserved. May not be copied, scanned, or duplicated, in whole or in part. Due to electronic rights, some third party content may be suppressed from the eBook and/or eChapter(s). Editorial review has deemed that any suppressed content does not materially affect the overall learning experience. Cengage Learning reserves the right to remove additional content at any time if subsequent rights restrictions require it.

Lesson 3 Learn About Photoshop by Using Help PHOTOSHOP 219
Figure 17 List of new features in Help Learning what’s new in Photoshop CS5
TIP If you have some experience with a previous version of Photoshop or you just want to cut-to-the-chase and find out what’s new in this version. You can find a list of new features in this version of Photoshop by clicking Help on the Application bar, clicking Photoshop Help, and then clicking What’s new under the Using Photoshop CS5 heading. The list of new features, shown in Figure 17, contains a brief description of each feature and a link to more information.
Copyright 2010 Cengage Learning. All Rights Reserved. May not be copied, scanned, or duplicated, in whole or in part. Due to electronic rights, some third party content may be suppressed from the eBook and/or eChapter(s). Editorial review has deemed that any suppressed content does not materially affect the overall learning experience. Cengage Learning reserves the right to remove additional content at any time if subsequent rights restrictions require it.

PHOTOSHOP 220 Learning Photoshop Basics
L E S S O N 4
View and PRINT AN IMAGE
What You’ll Do
In this lesson, you’ll use the Zoom tool on the Application bar and Tools panel to increase and decrease your views of the image. You’ll also change the page orientation settings in the Print dialog box, and print the image.
Getting a Closer LookWhen you edit an image in Photoshop, it is important that you have a good view of the area on which you want to focus. Photoshop has a variety of methods that allow you to enlarge or reduce your current view. You can use the Zoom tool by clicking the image to zoom in on (magnify the view) or zoom out of (reduce the view) areas of your image. Zooming in or out enlarges or reduces your view, not the actual image. Th e maximum zoom factor is 3200%. Th e current zoom percentage appears in the document’s title bar, on the Navigator panel, on the status bar, and on the Application bar. When the Zoom tool is selected, the
options bar provides additional choices for changing your view, as shown in Figure 18. For example, the Resize Windows To Fit check box automatically resizes the window whenever you magnify or reduce the view. You can also change the zoom percentage using the Navigator panel and the status bar by typing a new value in the Zoom text box, and then pressing [Enter] (Win) or [return] (Mac).
Viewing an Image in Multiple ViewsYou can use the New Window for fi lename command (accessed by pointing to Arrange on the Window menu) to open multiple
Selected check box resizes window
Fits the image on the screen
Zooms the window to the print resolution
Displays image at 100% magnifi cation
Figure 18 Zoom tool options bar
Copyright 2010 Cengage Learning. All Rights Reserved. May not be copied, scanned, or duplicated, in whole or in part. Due to electronic rights, some third party content may be suppressed from the eBook and/or eChapter(s). Editorial review has deemed that any suppressed content does not materially affect the overall learning experience. Cengage Learning reserves the right to remove additional content at any time if subsequent rights restrictions require it.

Lesson 4 View and Print an Image PHOTOSHOP 221
views of the same image. You can change the zoom percentage in each view so you can spotlight the areas you want to modify, and then modify the specifi c area of the image in each view. Because you are working on the same image in multiple views, not in multiple versions, Photoshop automatically applies the changes you make in one view to all views. Although you can close the views you no longer need at any time, Photoshop will not save any changes until you save the fi le.
Printing Your ImageIn many cases, a professional print shop might be the best option for printing a Photoshop image to get the highest quality. Lacking a professional print shop, you can print a Photoshop image using a standard black-and-white or color printer from within Photoshop, or you can switch to Bridge and then choose to send output to a PDF or Web Gallery. Th e printed image will be a composite of all visible layers. Th e quality of your printer and paper will aff ect the appearance of your output. Th e Print dialog box displays options for printing, such as paper orientation. Orientation is the direction in which an image appears on the
page. In portrait orientation, the image is printed with the shorter edges of the paper at the top and bottom. In landscape orientation, the image is printed with the longer edges of the paper at the top and bottom.
Use the Print command when you want to print multiple copies of an image. Th e Print dialog box allows you to handle color values using color management and printer profi les. Use the Print One Copy command to print a single copy without making dialog box selections.
Understanding Color Handling in PrintingTh e Print dialog box that opens when you click Print on the File menu lets you determine how colors are output. You can click the Color Handling list arrow to choose whether Photoshop or the printing device should manage the colors. If you let Photoshop determine the colors, Photoshop performs any necessary conversions to color values appropriate for the selected printer. If you choose to let the printer determine the colors, the printer will convert document color values to the
corresponding printer color values. In this scenario, Photoshop does not alter the color values. If no color management is selected, no color values will be changed when the image is printed.
Choosing a Photoshop VersionTh e release of the Adobe Creative Suite 5 off ers two versions of Photoshop: Adobe Photoshop CS5 and Adobe Photoshop CS5 Extended. Th e Extended version has additional animation and measurement features and is ideal for multimedia creative professionals, fi lm and video creative professionals, graphic and web designers who push the limits of 3D and motion, as well as those professionals in the fi elds of manufacturing, medicine, architecture, engineering and construction, and science and research. Photoshop CS5 is ideal for professional photographers, serious amateur photographers, graphic and web designers, and print service providers.
Copyright 2010 Cengage Learning. All Rights Reserved. May not be copied, scanned, or duplicated, in whole or in part. Due to electronic rights, some third party content may be suppressed from the eBook and/or eChapter(s). Editorial review has deemed that any suppressed content does not materially affect the overall learning experience. Cengage Learning reserves the right to remove additional content at any time if subsequent rights restrictions require it.

PHOTOSHOP 222 Learning Photoshop Basics
Using the Photoshop File Info Dialog BoxYou can use the File Info dialog box to identify a fi le, add a caption or other text, or add a copyright notice. Th e Description text box, shown in Figure 19, allows you to enter text that can be printed with the image. For example, to add information to an image, click File on the Application bar, click File Info, and then click the Description text box. (You can move from fi eld to fi eld by pressing [Tab] or by clicking individual text boxes.) Type your name, course number, or other identifying information in the Description text box, or click stars to assign a rating. You can enter additional information in the other
text boxes, and then save all the File Info data by clicking OK. To print data from the Description fi eld of the File Info dialog box, click File on the Application bar, and then click Print. Click the Color Management list arrow, click Output, and then select the Description check box. Additional printable
options are listed. To print the fi lename, select the Labels check box. You can also select check boxes that let you print crop marks and registration marks. If you choose, you can even add a background color or border to your image. Aft er you select the items you want to print, click Print.
Figure 19 File Info dialog box
Type information to be printed here
Figure 20 Navigator panel
Viewed area of image
You can change the magnifi cation factor of an image using the Navigator panel or the Zoom tool on the Tools panel. You can open the Navigator panel by clicking Window on the Application bar, and then clicking Navigator. By double-clicking the Zoom text box on the Navigator panel, you can enter a new magnifi cation factor, and then press [Enter] (Win) or [return] (Mac). The magnifi cation factor—shown as a percentage—is displayed in the lower-left corner of the Navigator panel, as shown in Figure 20. The red border in the panel, called the proxy view area, defi nes the area of the image that is magnifi ed. You can drag the proxy view area inside the Navigator panel to view other areas of the image at the current magnifi cation factor.
Using the Navigator Panel
Copyright 2010 Cengage Learning. All Rights Reserved. May not be copied, scanned, or duplicated, in whole or in part. Due to electronic rights, some third party content may be suppressed from the eBook and/or eChapter(s). Editorial review has deemed that any suppressed content does not materially affect the overall learning experience. Cengage Learning reserves the right to remove additional content at any time if subsequent rights restrictions require it.

Lesson 4 View and Print an Image PHOTOSHOP 223
Use the Zoom tool
1. Click the Indicates layer visibility button on the Layers panel for the Green balloon layer so the layer is no longer displayed.
2. Click the Zoom tool on the Tools panel.
TIP You can also change the magnification level by clicking the Zoom Level list arrow on the Application bar.
3. Select the Resize Windows To Fit check box (if it is not already selected) on the options bar.
4. Position the Zoom in pointer over the center of the image, then click the image.
TIP Position the pointer over the part of the image you want to keep in view.
5. Press [Alt] (Win) or [option] (Mac), then when the Zoom out pointer appears, click the center of the image twice with the Zoom out pointer .
6. Release [Alt] (Win) or [option] (Mac), then compare your image to Figure 21.The zoom factor for the image is 50%. Your zoom factor may diff er.
You selected the Zoom tool on the Tools panel and used it to zoom in to and out of the image. The Zoom tool makes it possible to see the detail in specifi c areas of an image, or to see the whole image at once, depending on your needs.
Figure 21 Reduced image
Zoom percentage changed
Zoom tool on the Tools panel
Copyright 2010 Cengage Learning. All Rights Reserved. May not be copied, scanned, or duplicated, in whole or in part. Due to electronic rights, some third party content may be suppressed from the eBook and/or eChapter(s). Editorial review has deemed that any suppressed content does not materially affect the overall learning experience. Cengage Learning reserves the right to remove additional content at any time if subsequent rights restrictions require it.

PHOTOSHOP 224 Learning Photoshop Basics
Modify print settings
1. Click File on the Application bar, then click Print to open the Print dialog box.
TIP If you have not selected a printer using the Print Center, a warning box might appear.
2. Click the Print paper in landscape orientation button , then click OK.
3. Make sure that 1 appears in the Copies text box, compare your dialog box to Figure 22, click Print, click Print to verify that the correct printer is selected, then click Proceed in the message box that opens.
TIP You can use the handles surrounding the image preview in the Print dialog box to scale the print size.
4. Save your work and exit Photoshop.
You used the Print command on the File menu to open the Print dialog box, changed the page orientation, then printed the image. Changing the page orientation can make an image fi t better on a printed page.
Figure 22 Print dialog box
Selected printer
Copies to be printed
Orientation options
Positioning options
Scaling options
You can create and save a Proof Setup, which lets you preview your image to see how it will look when printed on a specifi c device. This feature lets you see how colors can be interpreted by diff erent devices. By using this feature, you can decrease the chance that the colors on the printed copy of the image will vary from what you viewed on your monitor. Create a custom proof by clicking View on the Application bar, pointing to Proof Setup, and then clicking Custom. Specify the conditions in the Customize Proof Condition dialog box, and then click OK. Each proof setup has the .psf extension and can be loaded by clicking View on the Application bar, pointing to Proof Setup, clicking Custom, and then clicking Load.
Previewing and Creating a Proof Setup
Copyright 2010 Cengage Learning. All Rights Reserved. May not be copied, scanned, or duplicated, in whole or in part. Due to electronic rights, some third party content may be suppressed from the eBook and/or eChapter(s). Editorial review has deemed that any suppressed content does not materially affect the overall learning experience. Cengage Learning reserves the right to remove additional content at any time if subsequent rights restrictions require it.

Lesson 4 View and Print an Image PHOTOSHOP 225
Create a PDF with Bridge
1. Click the Launch Bridge button on the Application bar.
2. Click the Folders tab (if necessary), then click Chapter 2 in the location where your Data Files are stored in the Folders tab (if necessary).
3. Click Output on the Bridge Workspace switcher.4. Click the PDF button in the Output tab.5. Click Balloons and Escalator.psd, hold
[Shift], click PS 2-3.psd in the Content tab, then release [Shift].
6. Click the Template list arrow in the Output panel, click 4*5 Contact Sheet, click Refresh Preview, then compare your screen to Figure 23.
(continued)
Figure 23 PDF Output options in Bridge
PDF option
Click to refresh preview screen
Click to Save
Copyright 2010 Cengage Learning. All Rights Reserved. May not be copied, scanned, or duplicated, in whole or in part. Due to electronic rights, some third party content may be suppressed from the eBook and/or eChapter(s). Editorial review has deemed that any suppressed content does not materially affect the overall learning experience. Cengage Learning reserves the right to remove additional content at any time if subsequent rights restrictions require it.

PHOTOSHOP 226 Learning Photoshop Basics
7. Click Save (at the bottom of the Output panel), locate the folder where your Data Files are stored, type your name Chapter 2 contact sheet in the text box, then click Save.
8. Click OK to acknowledge that the contact sheet was successfully processed.
You displayed Adobe Bridge, then generated a PDF that can be printed later using Adobe Acrobat.
Using Bridge you can create a PDF Presentation (a presentation in the PDF fi le format). Such a presentation can be viewed fullscreen on any computer monitor, or in Adobe Acrobat Reader as a PDF fi le. You can create such a presentation by opening Bridge, locating and selecting images using the fi le hierarchy, and then clicking the Output button on the Bridge Application bar. The Output panel, shown in Figure 24, opens and displays the images you have selected. You can add images by pressing [Ctrl] (Win) or (Mac) while clicking additional images.
Creating a PDF
Click to create output
Click to create PDF
Output preview
Figure 24 Output panel in Bridge
Selected thumbnails
Copyright 2010 Cengage Learning. All Rights Reserved. May not be copied, scanned, or duplicated, in whole or in part. Due to electronic rights, some third party content may be suppressed from the eBook and/or eChapter(s). Editorial review has deemed that any suppressed content does not materially affect the overall learning experience. Cengage Learning reserves the right to remove additional content at any time if subsequent rights restrictions require it.

Lesson 4 View and Print an Image PHOTOSHOP 227
DESIGNTIP
Using Contrast to Add EmphasisContrast is an important design principle that uses opposing elements, such as colors or lines, to produce an intensifi ed eff ect in an image, page, or publication. Just as you can use a font attribute to make some text stand out from the rest, you can use contrasting elements to make certain graphic objects stand out. You can create contrast in many ways: by changing the sizes of objects; by varying object weights, such as making a line surrounding an image heavier; by altering the position of an object, such as changing the its location on the page or rotating it so that it is positioned on an angle; by drawing attention-getting shapes or a colorful box behind an object that makes it stand out (called a matte); or by adding carefully selected colors that emphasize an object.
Create a Web Gallery with Bridge
1. Verify that Bridge is open.2. Click the Web Gallery button in the Output
tab, click Refresh Preview, then compare your screen to Figure 25.
3. Click the View Slideshow button in the Output Preview window, then click the Play Slideshow button.
4. Scroll down the Output panel to the Create Gallery section, click the Browse button, navigate to the locate where your Data Files are stored, click OK (Win) or Open (Mac) in the Choose a Folder dialog box, then click Save at the bottom of the Output panel.
5. Click OK to close the Create Gallery dialog box.6. Click File on the Bridge menu, then click Exit
(Win) or click Adobe Bridge CS5, then click Quit Adobe Bridge CS5 (Mac).
You generated a Web Gallery using Adobe Bridge.
Figure 25 Web Gallery options in Bridge
Web Gallery button
Click to view slideshow
Copyright 2010 Cengage Learning. All Rights Reserved. May not be copied, scanned, or duplicated, in whole or in part. Due to electronic rights, some third party content may be suppressed from the eBook and/or eChapter(s). Editorial review has deemed that any suppressed content does not materially affect the overall learning experience. Cengage Learning reserves the right to remove additional content at any time if subsequent rights restrictions require it.

PHOTOSHOP 228 Learning Photoshop Basics
S K I L L S R E F E R E N C E
POWER USER SHORTCUTSTo do this: Use this method:
Drag a layer
Hide a layer
Open Help [F1] (Win) [/] (Mac)
Print File File ¾ Print[Ctrl][P] (Win)
[P] (Mac)
Show a layer
Show History panel Window ¾ History
Zoom in
[Ctrl][+] (Win) [+] (Mac)
Zoom out [Alt] [Ctrl][-] (Win)
[–] (Mac)
Zoom tool or Z
Key: Menu items are indicated by ¾ between the menu name and its command. Blue bold letters are shortcuts for selecting tools on the Tools panel.
Copyright 2010 Cengage Learning. All Rights Reserved. May not be copied, scanned, or duplicated, in whole or in part. Due to electronic rights, some third party content may be suppressed from the eBook and/or eChapter(s). Editorial review has deemed that any suppressed content does not materially affect the overall learning experience. Cengage Learning reserves the right to remove additional content at any time if subsequent rights restrictions require it.
Learning Photoshop Basics PHOTOSHOP 229
S K I L L S R E V I E W
Use organizational and management features. 1. Open Adobe Bridge. 2. Click the Folders tab, then locate the folder that
contains your Data Files. 3. Close Adobe Bridge.
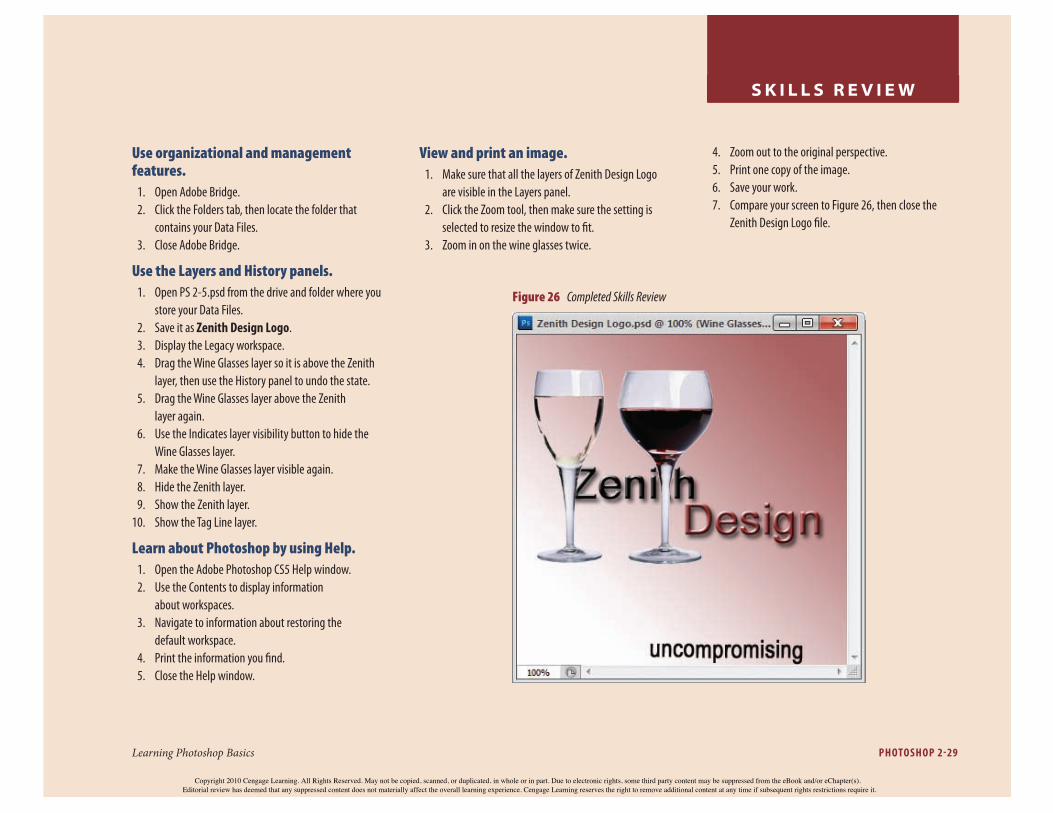
Use the Layers and History panels. 1. Open PS 2-5.psd from the drive and folder where you
store your Data Files. 2. Save it as Zenith Design Logo. 3. Display the Legacy workspace. 4. Drag the Wine Glasses layer so it is above the Zenith
layer, then use the History panel to undo the state. 5. Drag the Wine Glasses layer above the Zenith
layer again. 6. Use the Indicates layer visibility button to hide the
Wine Glasses layer. 7. Make the Wine Glasses layer visible again. 8. Hide the Zenith layer. 9. Show the Zenith layer.10. Show the Tag Line layer.
Learn about Photoshop by using Help. 1. Open the Adobe Photoshop CS5 Help window. 2. Use the Contents to display information
about workspaces. 3. Navigate to information about restoring the
default workspace. 4. Print the information you fi nd. 5. Close the Help window.
View and print an image. 1. Make sure that all the layers of Zenith Design Logo
are visible in the Layers panel. 2. Click the Zoom tool, then make sure the setting is
selected to resize the window to fi t. 3. Zoom in on the wine glasses twice.
Figure 26 Completed Skills Review
4. Zoom out to the original perspective. 5. Print one copy of the image. 6. Save your work. 7. Compare your screen to Figure 26, then close the
Zenith Design Logo fi le.
Copyright 2010 Cengage Learning. All Rights Reserved. May not be copied, scanned, or duplicated, in whole or in part. Due to electronic rights, some third party content may be suppressed from the eBook and/or eChapter(s). Editorial review has deemed that any suppressed content does not materially affect the overall learning experience. Cengage Learning reserves the right to remove additional content at any time if subsequent rights restrictions require it.

PHOTOSHOP 230 Learning Photoshop Basics
P R O J E C T B U I L D E R 1
1. Open the Photoshop Help window. 2. Expand the Workspace topic in the topics list. 3. Expand the Panels and menus subtopic in the left
pane, then click Enter values in panels, dialog boxes, and the options bar topic.
4. Return to the Panels and menus subtopic (by clicking the Panels and menus link beneath the Search box), click the Display and defi ne menus topic, then read this topic.
As a new Photoshop user, you are comforted knowing that Photoshop’s Help system provides defi nitions, explanations, procedures, and other helpful information. It also includes examples and demonstrations to show how Photoshop features work. You use the Help system to learn about image size and resolution.
5. Return to the Help Home page, then expand the Opening and importing images topic in the topics list.
6. Expand the Image size and resolution subtopic in the left pane, then click About monitor resolution. Print out this topic, then compare your screen to the sample shown in Figure 27.
Figure 27 Sample Project Builder 1
Copyright 2010 Cengage Learning. All Rights Reserved. May not be copied, scanned, or duplicated, in whole or in part. Due to electronic rights, some third party content may be suppressed from the eBook and/or eChapter(s). Editorial review has deemed that any suppressed content does not materially affect the overall learning experience. Cengage Learning reserves the right to remove additional content at any time if subsequent rights restrictions require it.

Learning Photoshop Basics PHOTOSHOP 231
P R O J E C T B U I L D E R 2
Kitchen Experience, your local specialty cooking shop, has just added herb-infused oils to its product line. Th ey have hired you to draft a fl yer that features these new products. You use Photoshop to create this fl yer.
1. Open PS 2-7.psd, then save it as Cooking. 2. Display the Essentials workspace (if necessary). 3. Make the Measuring Spoons layer visible. 4. Drag the Oils layer so the content appears behind the
Skillet layer content. 5. Drag the Measuring Spoons layer above the
Skillet layer. 6. Save the fi le, then compare your image to the sample
shown in Figure 28.
Figure 28 Sample Project Builder 2
Copyright 2010 Cengage Learning. All Rights Reserved. May not be copied, scanned, or duplicated, in whole or in part. Due to electronic rights, some third party content may be suppressed from the eBook and/or eChapter(s). Editorial review has deemed that any suppressed content does not materially affect the overall learning experience. Cengage Learning reserves the right to remove additional content at any time if subsequent rights restrictions require it.

PHOTOSHOP 232 Learning Photoshop Basics
D E S I G N P R O J E C T
As an avid, albeit novice Photoshop user, you have grasped the importance of how layers aff ect your image. With a little practice, you can examine a single-layer image and guess which objects might display on their own layers. Now, you’re ready to examine the images created by Photoshop experts and critique them on their use of layers.
Figure 29a Sample Design Project Figure 29b File info dialog box for sample Design Project
1. Connect to the Internet, and use your browser to fi nd interesting artwork located on at least two websites.
2. Download a single-layer image (in its native format) from each website.
3. Start Photoshop, then open the downloaded images. 4. Save one image as Critique-1 and the other as
Critique-2 in the Photoshop format (use the .psd extension).
5. Analyze each image for its potential use of layers.
6. Open the File Info dialog box for Critique-1.psd, then type in the Description section your speculation as to the number of layers there might be in the image, their possible order on the Layers panel, and how moving the layers would aff ect the image. Use the File Info dialog box to add a description for Critique-2.psd.
7. Close the dialog box. 8. Compare your image to the sample shown in
Figure 29, then close the fi les.
Copyright 2010 Cengage Learning. All Rights Reserved. May not be copied, scanned, or duplicated, in whole or in part. Due to electronic rights, some third party content may be suppressed from the eBook and/or eChapter(s). Editorial review has deemed that any suppressed content does not materially affect the overall learning experience. Cengage Learning reserves the right to remove additional content at any time if subsequent rights restrictions require it.
Learning Photoshop Basics PHOTOSHOP 233
P O R T F O L I O P R O J E C T
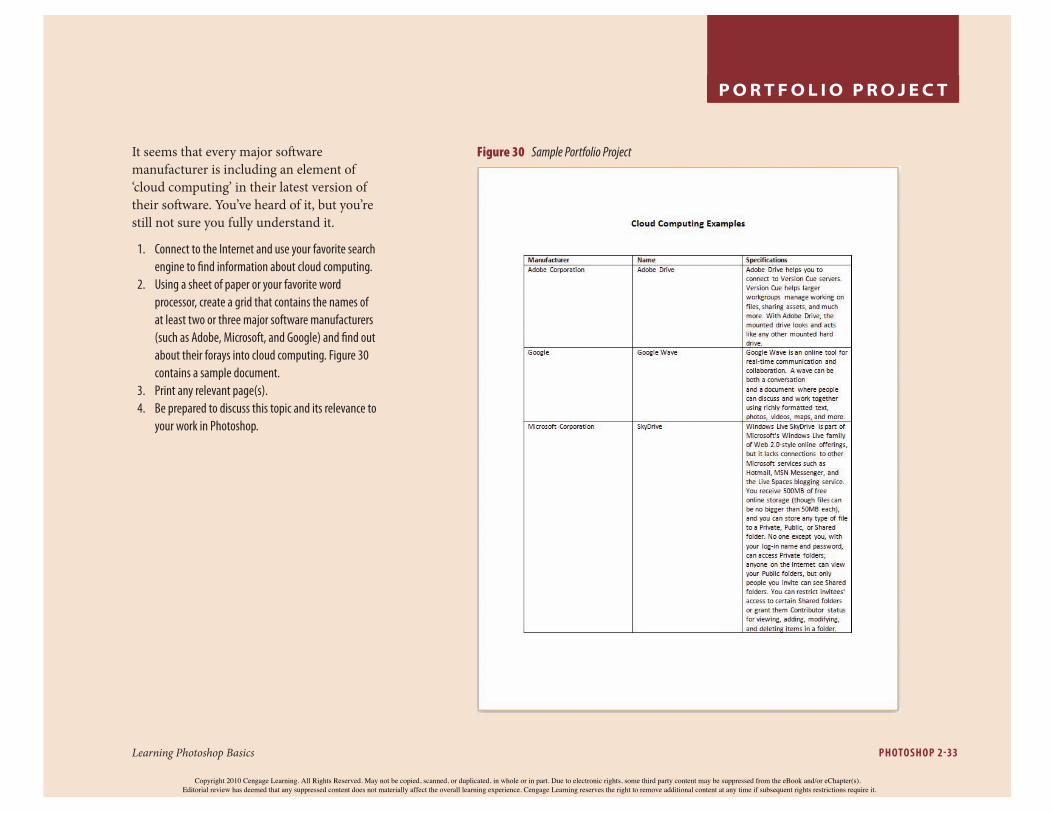
It seems that every major soft ware manufacturer is including an element of ‘cloud computing’ in their latest version of their soft ware. You’ve heard of it, but you’re still not sure you fully understand it.
1. Connect to the Internet and use your favorite search engine to fi nd information about cloud computing.
2. Using a sheet of paper or your favorite word processor, create a grid that contains the names of at least two or three major software manufacturers (such as Adobe, Microsoft, and Google) and fi nd out about their forays into cloud computing. Figure 30 contains a sample document.
3. Print any relevant page(s). 4. Be prepared to discuss this topic and its relevance to
your work in Photoshop.
Figure 30 Sample Portfolio Project
Copyright 2010 Cengage Learning. All Rights Reserved. May not be copied, scanned, or duplicated, in whole or in part. Due to electronic rights, some third party content may be suppressed from the eBook and/or eChapter(s). Editorial review has deemed that any suppressed content does not materially affect the overall learning experience. Cengage Learning reserves the right to remove additional content at any time if subsequent rights restrictions require it.

Copyright 2010 Cengage Learning. All Rights Reserved. May not be copied, scanned, or duplicated, in whole or in part. Due to electronic rights, some third party content may be suppressed from the eBook and/or eChapter(s). Editorial review has deemed that any suppressed content does not materially affect the overall learning experience. Cengage Learning reserves the right to remove additional content at any time if subsequent rights restrictions require it.