Learning Media Design Photoshop CS4 - Murrieta … · Title: Microsoft PowerPoint - Learning Media...
41
Media Design Adobe Photoshop CS4
Transcript of Learning Media Design Photoshop CS4 - Murrieta … · Title: Microsoft PowerPoint - Learning Media...

Media Design
Adobe Photoshop CS4
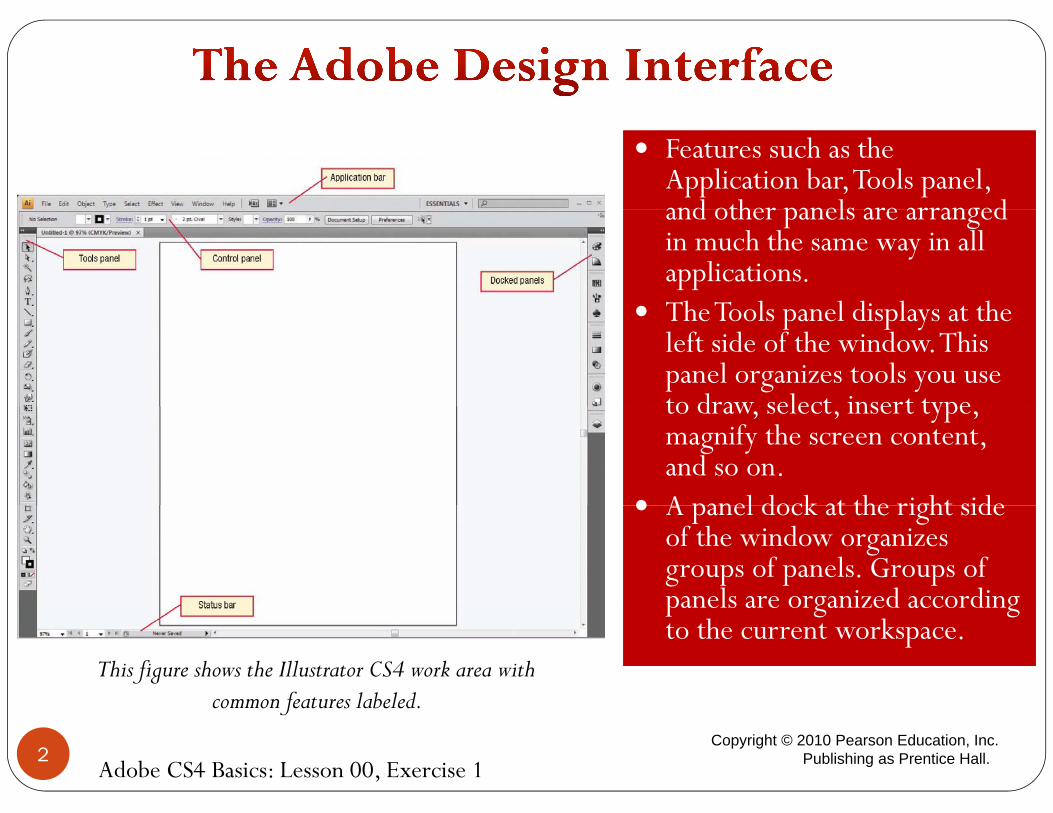
Features such as the Application bar, Tools panel, and other panels are arranged
Features such as the Application bar, Tools panel, and other panels are arranged and other panels are arranged in much the same way in all applications.
Th T l l di l t th
and other panels are arranged in much the same way in all applications.
Th T l l di l t th The Tools panel displays at the left side of the window. This panel organizes tools you use to draw select insert type
The Tools panel displays at the left side of the window. This panel organizes tools you use to draw select insert type to draw, select, insert type, magnify the screen content, and so on.
A panel dock at the right side
to draw, select, insert type, magnify the screen content, and so on.
A panel dock at the right side A panel dock at the right side of the window organizes groups of panels. Groups of panels are organized according
A panel dock at the right side of the window organizes groups of panels. Groups of panels are organized according panels are organized according to the current workspace. panels are organized according to the current workspace.
This figure shows the Illustrator CS4 work area with common features labeled
Adobe CS4 Basics: Lesson 00, Exercise 1
common features labeled.
2Copyright © 2010 Pearson Education, Inc.
Publishing as Prentice Hall.

The CS4 Design Standard applications display open documents as tabbed d t i d A d t’ t b
The CS4 Design Standard applications display open documents as tabbed d t i d A d t’ t b document windows. A document’s tab displays its name and other important information, as shown in the diagram to
document windows. A document’s tab displays its name and other important information, as shown in the diagram to the right.
The active document’s tab is light gray; inactive document tabs are darker gray
the right.
The active document’s tab is light gray; inactive document tabs are darker gray inactive document tabs are darker gray.
In the diagram to the right, choosing one of these options makes it easy to see all
inactive document tabs are darker gray.
In the diagram to the right, choosing one of these options makes it easy to see all p yopen documents on the screen at the same time. Options available on this palette depend on how many documents are
p yopen documents on the screen at the same time. Options available on this palette depend on how many documents are depend on how many documents are open. Choosing one of these options makes it easy to see all open documents on h h i
depend on how many documents are open. Choosing one of these options makes it easy to see all open documents on h h ithe screen at the same time.the screen at the same time.
Adobe CS4 Basics: Lesson 00, Exercise 1Arrange Documents Palette
3 Copyright © 2010 Pearson Education, Inc. Publishing as Prentice Hall.
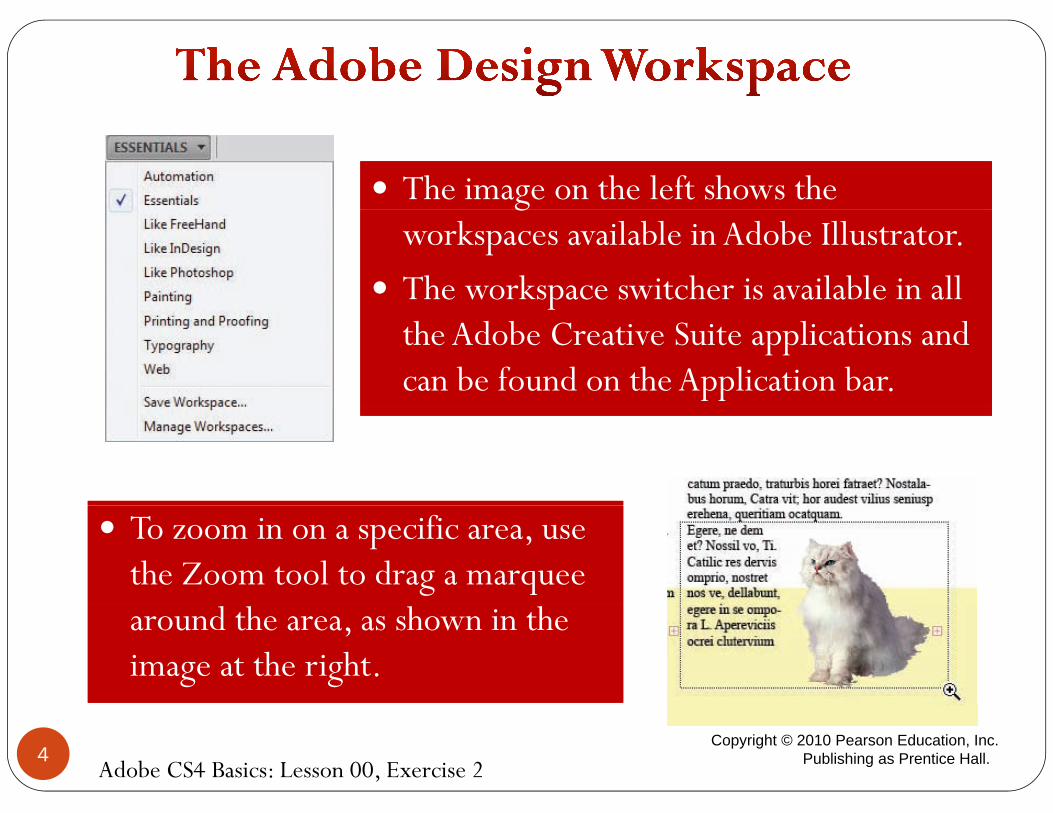
The image on the left shows the The image on the left shows the gworkspaces available in Adobe Illustrator.
The workspace switcher is available in all
gworkspaces available in Adobe Illustrator.
The workspace switcher is available in all pthe Adobe Creative Suite applications and can be found on the Application bar.
pthe Adobe Creative Suite applications and can be found on the Application bar.
To zoom in on a specific area, use the Zoom tool to drag a marquee
To zoom in on a specific area, use the Zoom tool to drag a marquee around the area, as shown in the image at the right.around the area, as shown in the image at the right.
Adobe CS4 Basics: Lesson 00, Exercise 24
Copyright © 2010 Pearson Education, Inc. Publishing as Prentice Hall.
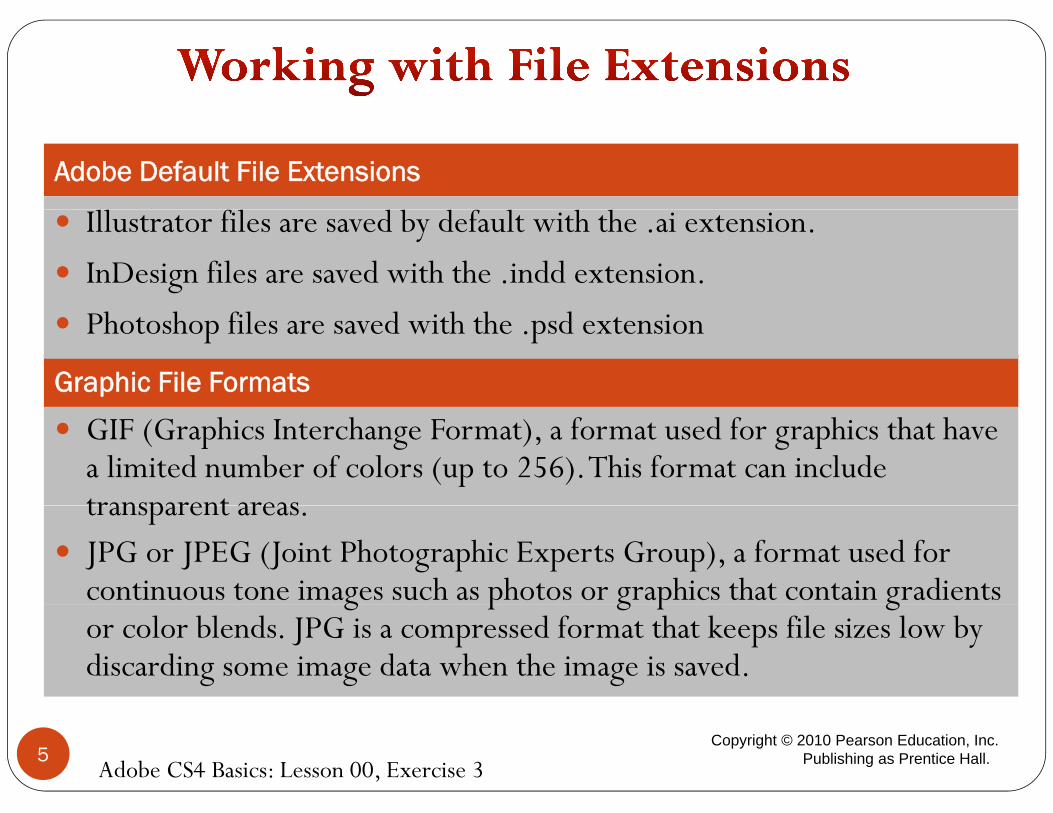
Adobe Default File Extensions
Illustrator files are saved by default with the .ai extension.
InDesign files are saved with the .indd extension.
Graphic File Formats
Photoshop files are saved with the .psd extension
GIF (Graphics Interchange Format), a format used for graphics that have a limited number of colors (up to 256). This format can include transparent areastransparent areas.
JPG or JPEG (Joint Photographic Experts Group), a format used for continuous tone images such as photos or graphics that contain gradients g p g p gor color blends. JPG is a compressed format that keeps file sizes low by discarding some image data when the image is saved.
Adobe CS4 Basics: Lesson 00, Exercise 35
Copyright © 2010 Pearson Education, Inc. Publishing as Prentice Hall.
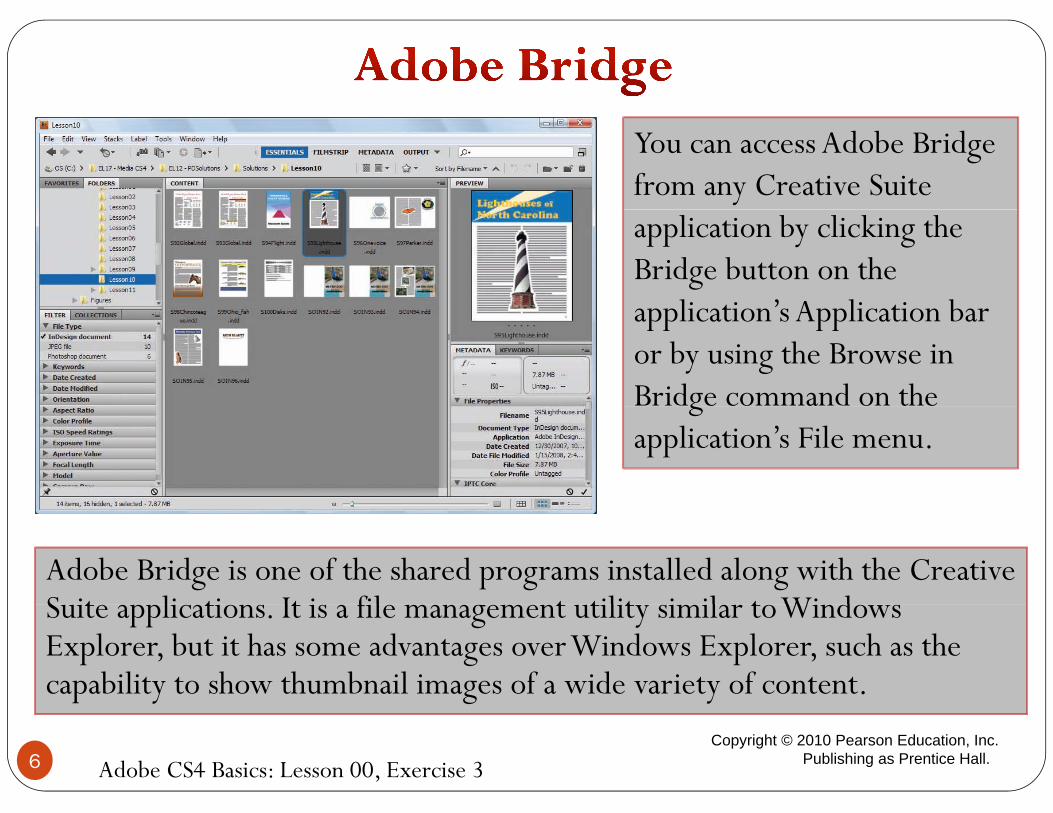
You can access Adobe Bridge from any Creative Suite application by clicking the Bridge button on the
li ti ’ A li ti b application s Application bar or by using the Browse in Bridge command on the gapplication’s File menu.
Adobe Bridge is one of the shared programs installed along with the Creative S it li ti It i fil t tilit i il t Wi d Suite applications. It is a file management utility similar to Windows Explorer, but it has some advantages over Windows Explorer, such as the capability to show thumbnail images of a wide variety of content. p y g y
Adobe CS4 Basics: Lesson 00, Exercise 36Copyright © 2010 Pearson Education, Inc.
Publishing as Prentice Hall.
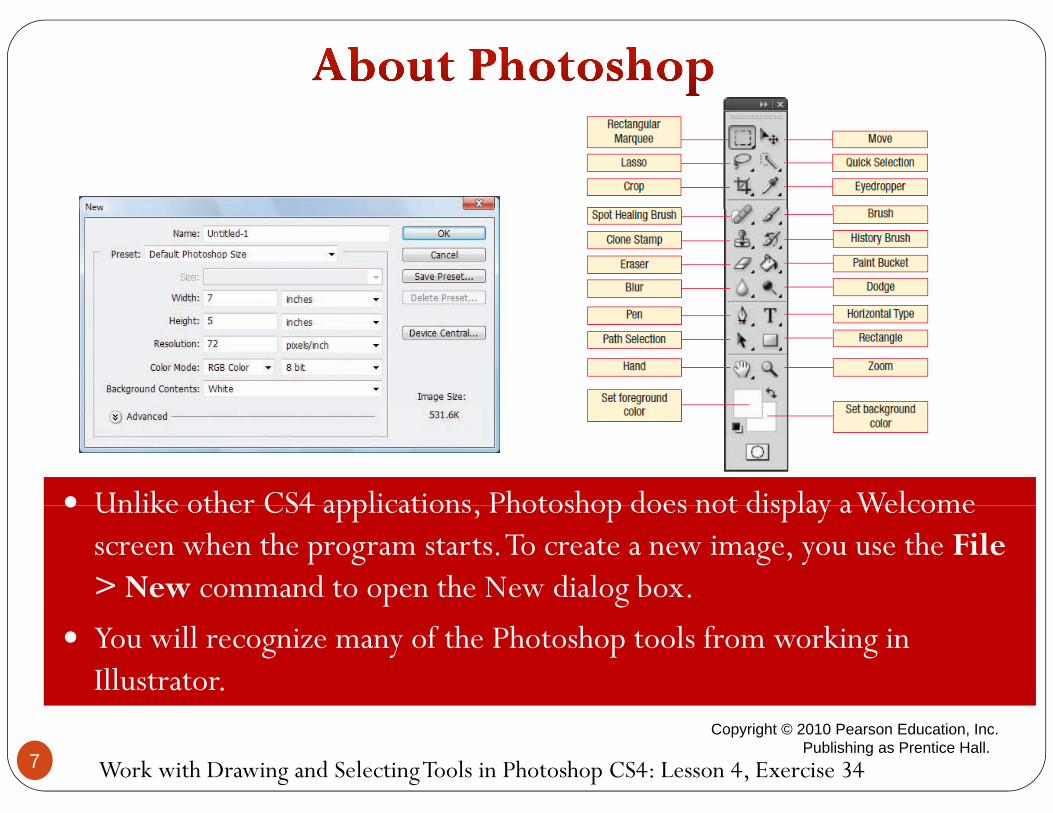
Unlike other CS4 applications Photoshop does not display a Welcome Unlike other CS4 applications Photoshop does not display a Welcome Unlike other CS4 applications, Photoshop does not display a Welcome screen when the program starts. To create a new image, you use the File > New command to open the New dialog box.
Unlike other CS4 applications, Photoshop does not display a Welcome screen when the program starts. To create a new image, you use the File > New command to open the New dialog box. p g
You will recognize many of the Photoshop tools from working in Illustrator.
p g
You will recognize many of the Photoshop tools from working in Illustrator.
Work with Drawing and Selecting Tools in Photoshop CS4: Lesson 4, Exercise 347
Copyright © 2010 Pearson Education, Inc. Publishing as Prentice Hall.
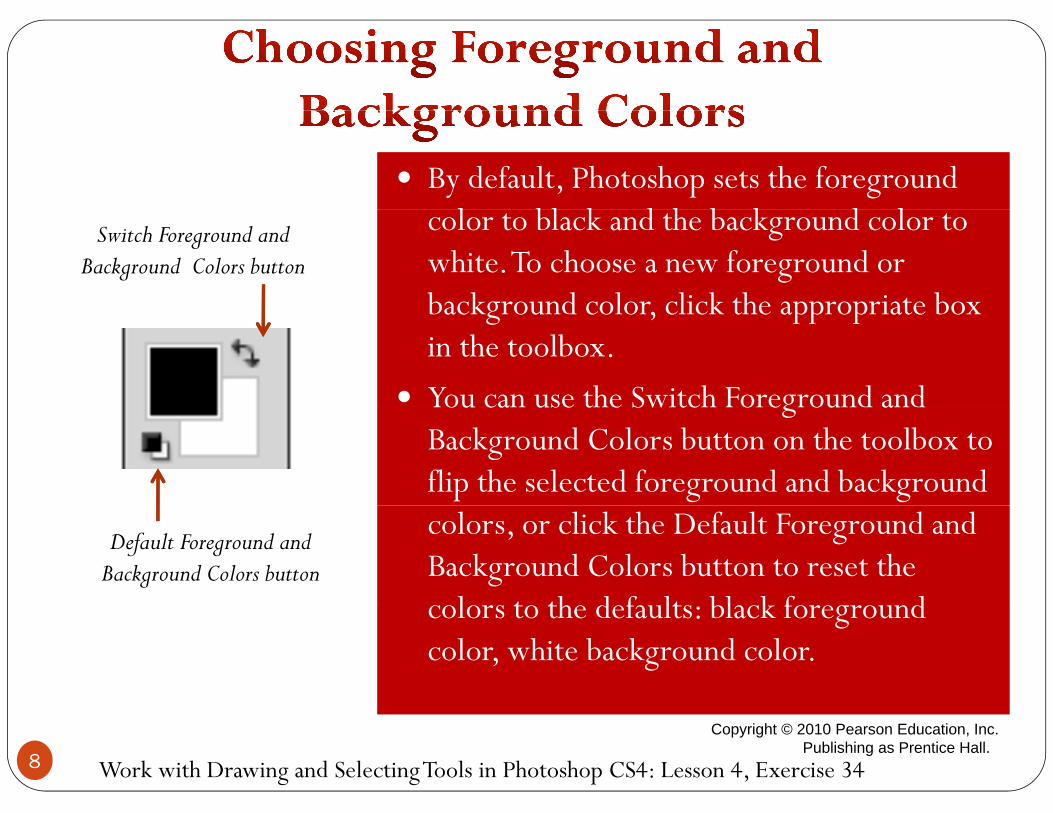
By default, Photoshop sets the foreground l bl k d h b k d l
By default, Photoshop sets the foreground l bl k d h b k d l color to black and the background color to
white. To choose a new foreground or background color click the appropriate box
color to black and the background color to white. To choose a new foreground or background color click the appropriate box
Switch Foreground and Background Colors button
background color, click the appropriate box in the toolbox.
You can use the Switch Foreground and
background color, click the appropriate box in the toolbox.
You can use the Switch Foreground and You can use the Switch Foreground and Background Colors button on the toolbox to flip the selected foreground and background
You can use the Switch Foreground and Background Colors button on the toolbox to flip the selected foreground and background colors, or click the Default Foreground and Background Colors button to reset the
l t th d f lt bl k f d
colors, or click the Default Foreground and Background Colors button to reset the
l t th d f lt bl k f d
Default Foreground and Background Colors button
colors to the defaults: black foreground color, white background color.colors to the defaults: black foreground color, white background color.
Work with Drawing and Selecting Tools in Photoshop CS4: Lesson 4, Exercise 348
Copyright © 2010 Pearson Education, Inc. Publishing as Prentice Hall.

The Color panel for the Grayscale model has only one slider which shows 100% black (K) at
The Color panel for the Grayscale model has only one slider which shows 100% black (K) at only one slider, which shows 100% black (K) at the right end and 0% black at the left end.
The CMYK model was developed for use in full
only one slider, which shows 100% black (K) at the right end and 0% black at the left end.
The CMYK model was developed for use in full pcolor printing, where four basic ink colors—cyan (blue), magenta, yellow, and black—are combined to create desired colors
pcolor printing, where four basic ink colors—cyan (blue), magenta, yellow, and black—are combined to create desired colors combined to create desired colors.
The Color panel for a spot color is similar to the panel for the Grayscale model: only one color
combined to create desired colors.
The Color panel for a spot color is similar to the panel for the Grayscale model: only one color p y yis displayed.
The HSB model is based on how humans
p y yis displayed.
The HSB model is based on how humans perceive color. The three characteristics we register when we see a color are hue, saturation, and brightness.
perceive color. The three characteristics we register when we see a color are hue, saturation, and brightness.
Working with Colors, Effects and Styles: Lesson 3, Exercise 23
and brightness.and brightness.
9Copyright © 2010 Pearson Education, Inc.
Publishing as Prentice Hall.
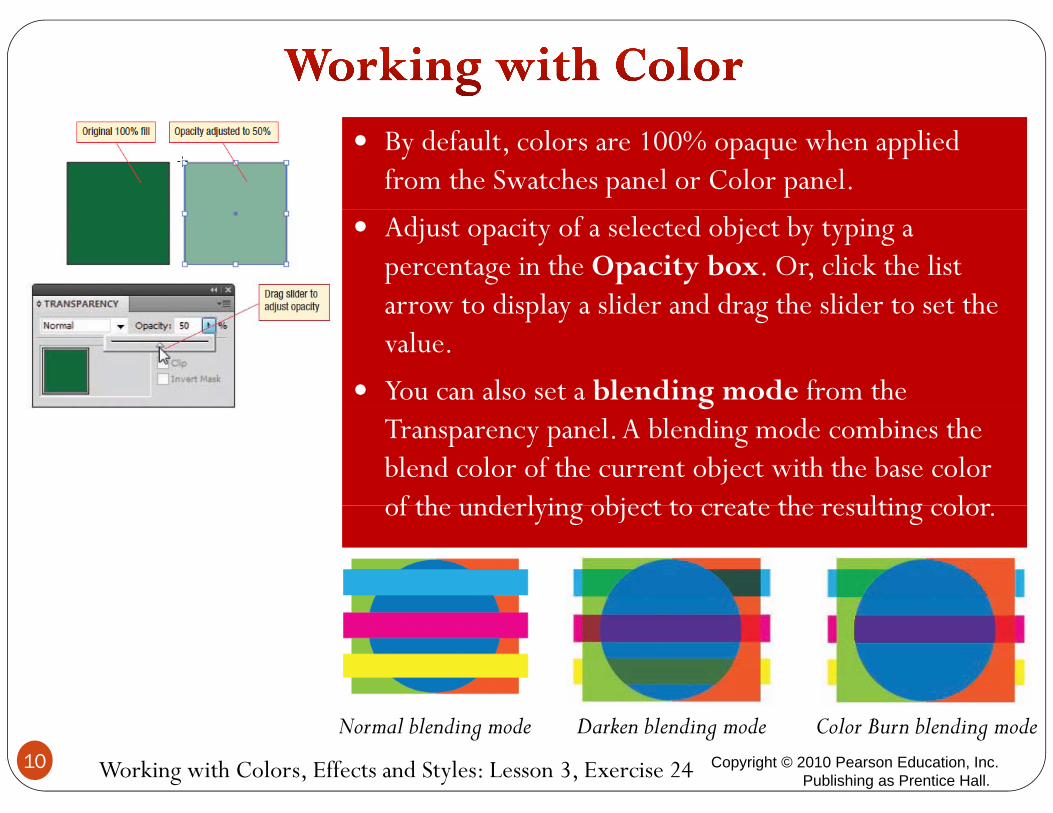
By default, colors are 100% opaque when applied from the Swatches panel or Color panel.
By default, colors are 100% opaque when applied from the Swatches panel or Color panel.
Adjust opacity of a selected object by typing a percentage in the Opacity box. Or, click the list arrow to display a slider and drag the slider to set the
Adjust opacity of a selected object by typing a percentage in the Opacity box. Or, click the list arrow to display a slider and drag the slider to set the arrow to display a slider and drag the slider to set the value.
You can also set a blending mode from the
arrow to display a slider and drag the slider to set the value.
You can also set a blending mode from the gTransparency panel. A blending mode combines the blend color of the current object with the base color of the underlying object to create the resulting color
gTransparency panel. A blending mode combines the blend color of the current object with the base color of the underlying object to create the resulting colorof the underlying object to create the resulting color.of the underlying object to create the resulting color.
Working with Colors, Effects and Styles: Lesson 3, Exercise 24
Normal blending mode Darken blending mode Color Burn blending mode10 Copyright © 2010 Pearson Education, Inc.
Publishing as Prentice Hall.

Radial Gradient (left) and Linear Gradient (right)
Gradient box in Tools panel
The small color boxes beneath the gradient slider are gradient stops. You use gradient
The small color boxes beneath the gradient slider are gradient stops. You use gradient
Radial Gradient (left) and Linear Gradient (right).
g p gstops to specify the colors for the gradient.
The gradient stop at the left of the gradient l d h h l h b h
g p gstops to specify the colors for the gradient.
The gradient stop at the left of the gradient l d h h l h b h slider shows the color that begins the
gradient, and the stop at the right shows the color that ends the gradient.
slider shows the color that begins the gradient, and the stop at the right shows the color that ends the gradient.gg
Working with Colors, Effects and Styles: Lesson 3, Exercise 2611 Copyright © 2010 Pearson Education, Inc. Publishing as Prentice Hall.

Click to display Brush Preset menu
The Brush Preset menu allows you to set The Brush Preset menu allows you to set
Click to display Brush Preset menuAirbrush
The Brush Preset menu allows you to set the Master Diameter and Hardness of a brush.
The Brush Preset menu allows you to set the Master Diameter and Hardness of a brush.
Brush diameters are measured in pixels (px) by default.
Brush diameters are measured in pixels (px) by default.
The Hardness setting determines the size of the hard center of the brush
l ll h l
The Hardness setting determines the size of the hard center of the brush
l ll h l relative to its overall size. The lower the Hardness percentage, the softer the brush edges appear
relative to its overall size. The lower the Hardness percentage, the softer the brush edges appearthe brush edges appear.the brush edges appear.
Click the panel menu button to open a menu with additional brush commands.
Work with Drawing and Selecting Tools in Photoshop CS4: Lesson 4, Exercise 3512
Copyright © 2010 Pearson Education, Inc. Publishing as Prentice Hall.
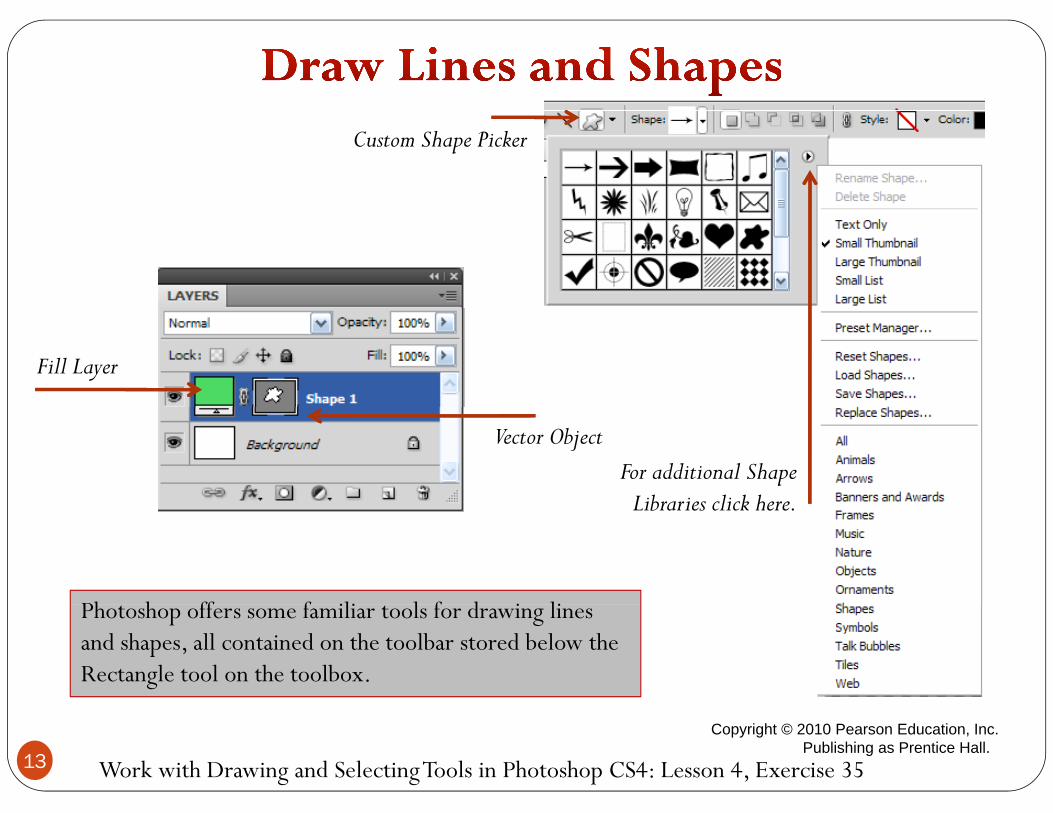
Custom Shape Picker
Fill Layer
For additional Shape Libraries click here
Vector Object
Libraries click here.
Ph h ff f ili l f d i li Photoshop offers some familiar tools for drawing lines and shapes, all contained on the toolbar stored below the Rectangle tool on the toolbox.
Work with Drawing and Selecting Tools in Photoshop CS4: Lesson 4, Exercise 3513
Copyright © 2010 Pearson Education, Inc. Publishing as Prentice Hall.

I Ph h U d ll l h In Photoshop, Undo will reverse only the most recent change. If you want to reverse a series of changes, you Undo the first and then use the Step Backward command
th Edit t ti i hon the Edit menu to continue reversing changes.
Photoshop always adds text (type) on a new layer in the image. Thi i i t b t bj t t bj t (d fi d This is in part because type objects are vector objects (defined by their outlines and easily resizable) rather than raster images.
Type Options Bar Reject /Commit Buttons
Work with Drawing and Selecting Tools in Photoshop CS4: Lesson 4, Exercise 3514
Copyright © 2010 Pearson Education, Inc. Publishing as Prentice Hall.
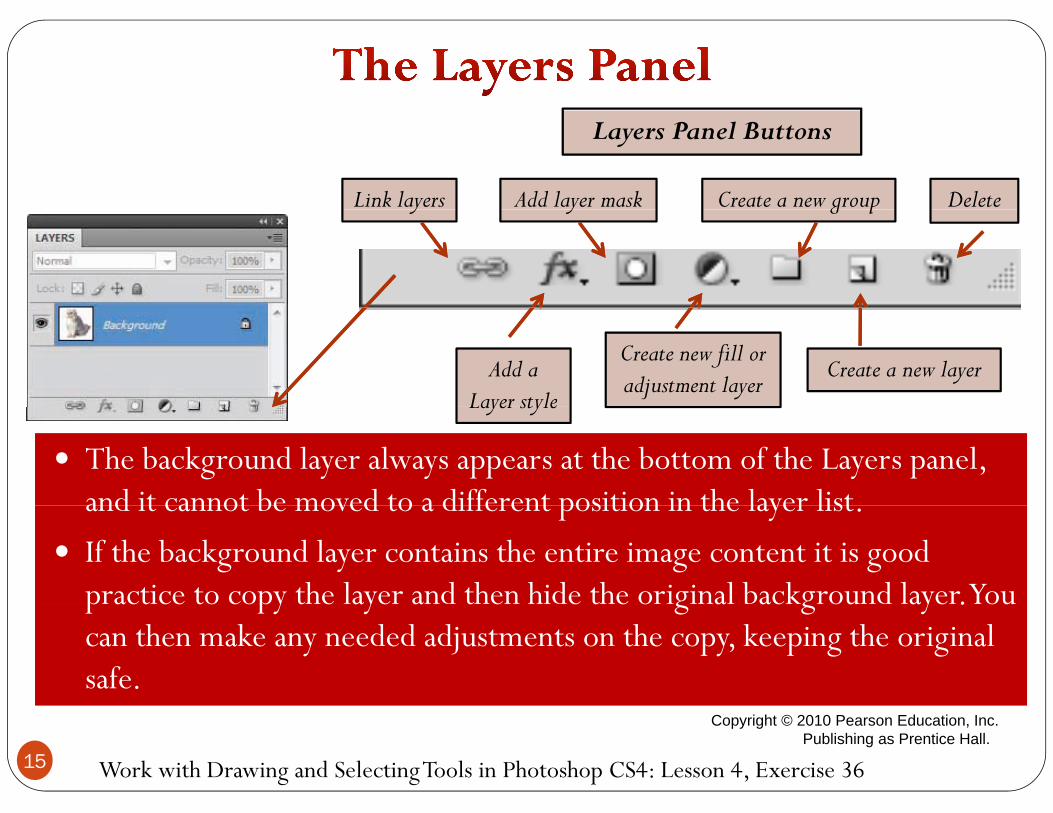
Link layers Add layer mask
Layers Panel Buttons
Create a new group Deletey y g p
Add a Layer style
Create new fill or adjustment layer
Create a new layer
The background layer always appears at the bottom of the Layers panel, and it cannot be moved to a different position in the layer list
The background layer always appears at the bottom of the Layers panel, and it cannot be moved to a different position in the layer list
Layer style
and it cannot be moved to a different position in the layer list.
If the background layer contains the entire image content it is good practice to copy the layer and then hide the original background layer. You
and it cannot be moved to a different position in the layer list.
If the background layer contains the entire image content it is good practice to copy the layer and then hide the original background layer. You p act ce to copy t e aye a t e e t e o g a ac g ou aye . ou can then make any needed adjustments on the copy, keeping the original safe.
p act ce to copy t e aye a t e e t e o g a ac g ou aye . ou can then make any needed adjustments on the copy, keeping the original safe.
Work with Drawing and Selecting Tools in Photoshop CS4: Lesson 4, Exercise 3615
Copyright © 2010 Pearson Education, Inc. Publishing as Prentice Hall.
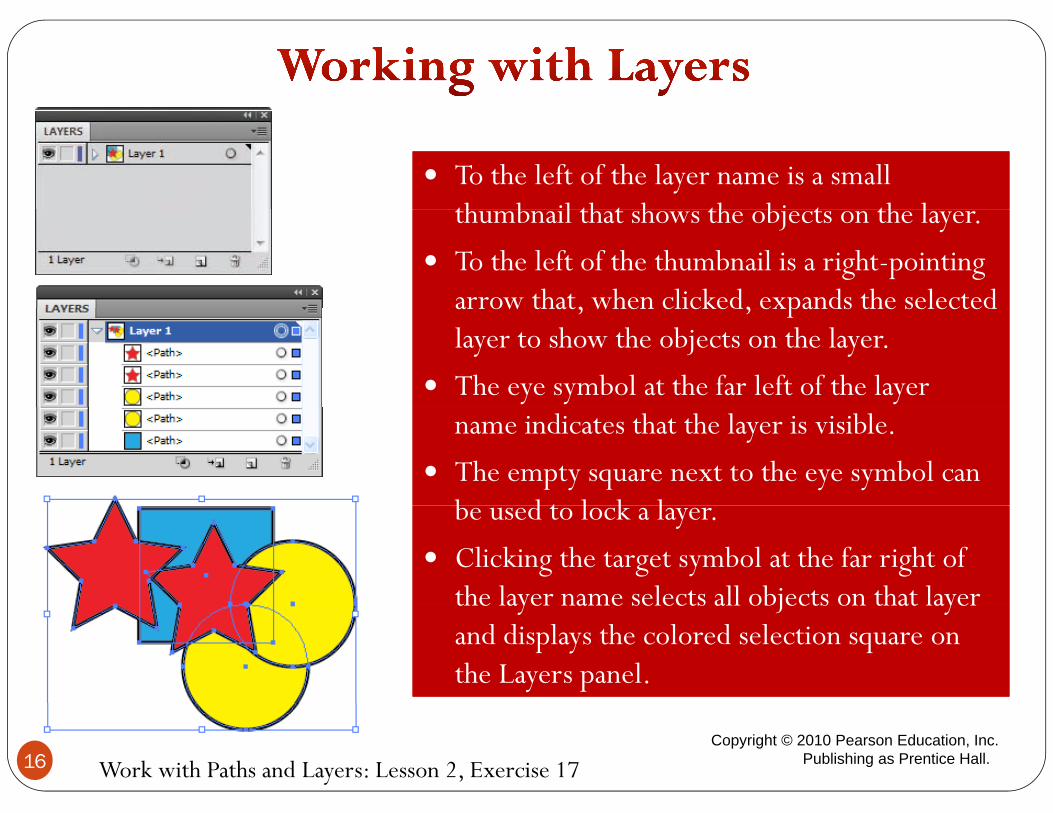
To the left of the layer name is a small th b il th t h th bj t th l
To the left of the layer name is a small th b il th t h th bj t th lthumbnail that shows the objects on the layer.
To the left of the thumbnail is a right-pointing arrow that, when clicked, expands the selected
thumbnail that shows the objects on the layer.
To the left of the thumbnail is a right-pointing arrow that, when clicked, expands the selected arrow that, when clicked, expands the selected layer to show the objects on the layer.
The eye symbol at the far left of the layer
arrow that, when clicked, expands the selected layer to show the objects on the layer.
The eye symbol at the far left of the layer name indicates that the layer is visible.
The empty square next to the eye symbol can b d t l k l
name indicates that the layer is visible.
The empty square next to the eye symbol can b d t l k lbe used to lock a layer.
Clicking the target symbol at the far right of the layer name selects all objects on that layer
be used to lock a layer.
Clicking the target symbol at the far right of the layer name selects all objects on that layer the layer name selects all objects on that layer and displays the colored selection square on the Layers panel.
the layer name selects all objects on that layer and displays the colored selection square on the Layers panel.
Work with Paths and Layers: Lesson 2, Exercise 1716Copyright © 2010 Pearson Education, Inc.
Publishing as Prentice Hall.
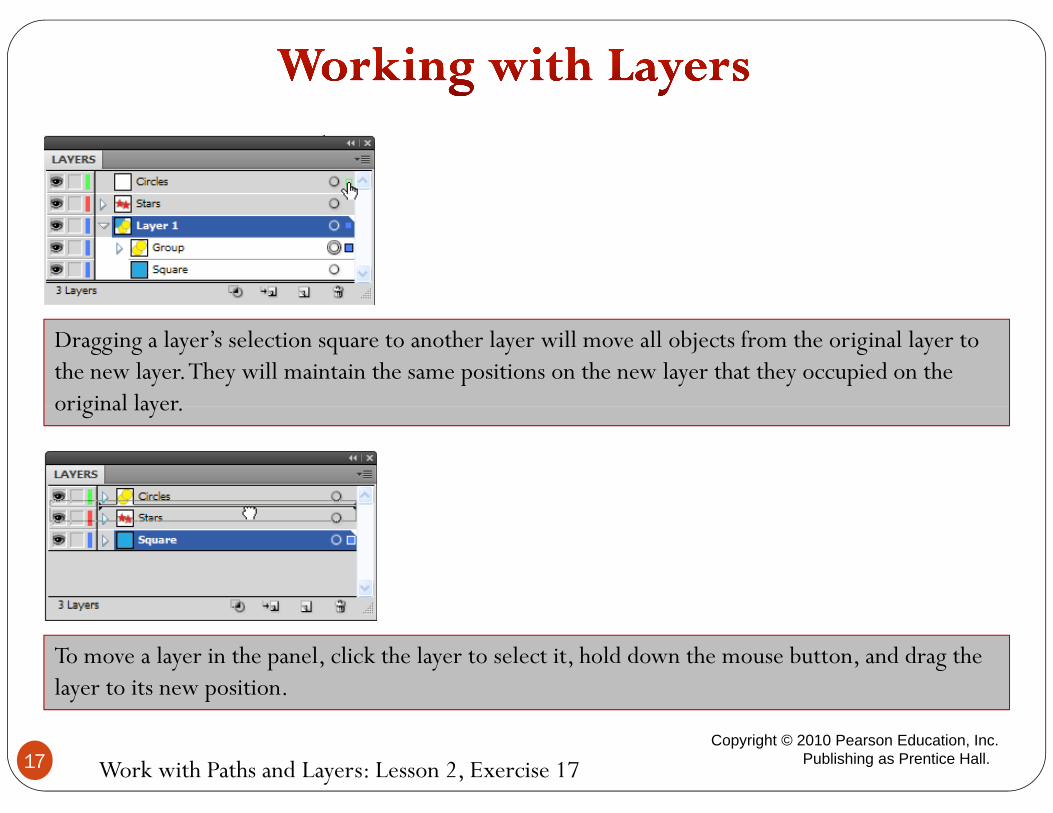
Dragging a layer’s selection square to another layer will move all objects from the original layer to the new layer. They will maintain the same positions on the new layer that they occupied on the original layeroriginal layer.
To move a layer in the panel, click the layer to select it, hold down the mouse button, and drag thelayer to its new position.
Work with Paths and Layers: Lesson 2, Exercise 1717Copyright © 2010 Pearson Education, Inc.
Publishing as Prentice Hall.

Click visibility box to unhide Stars sublayer.
Lock a layer by clicking the edit box.
Work with Paths and Layers: Lesson 2, Exercise 1818Copyright © 2010 Pearson Education, Inc.
Publishing as Prentice Hall.

Photoshop’s Eraser tools let you remove portions of an image You have a Photoshop’s Eraser tools let you remove portions of an image You have a Photoshop s Eraser tools let you remove portions of an image. You have a choice of the Eraser tool, the Background Eraser tool, and the Magic Eraser tool.
Photoshop s Eraser tools let you remove portions of an image. You have a choice of the Eraser tool, the Background Eraser tool, and the Magic Eraser tool.
The Eraser tool enables you to remove or change pixels on a layer using brush or pencil strokes.
The Eraser tool enables you to remove or change pixels on a layer using brush or pencil strokes.p
The Background Eraser tool erases pixels to transparency on any layer.
The Magic Eraser tool enables you to delete areas of color by clicking on
p
The Background Eraser tool erases pixels to transparency on any layer.
The Magic Eraser tool enables you to delete areas of color by clicking on g y y ga specific color. All areas of that color are then erased to transparency on a normal layer.
g y y ga specific color. All areas of that color are then erased to transparency on a normal layer.
Work with Drawing and Selecting Tools in Photoshop CS4: Lesson 4, Exercise 3619
Copyright © 2010 Pearson Education, Inc. Publishing as Prentice Hall.
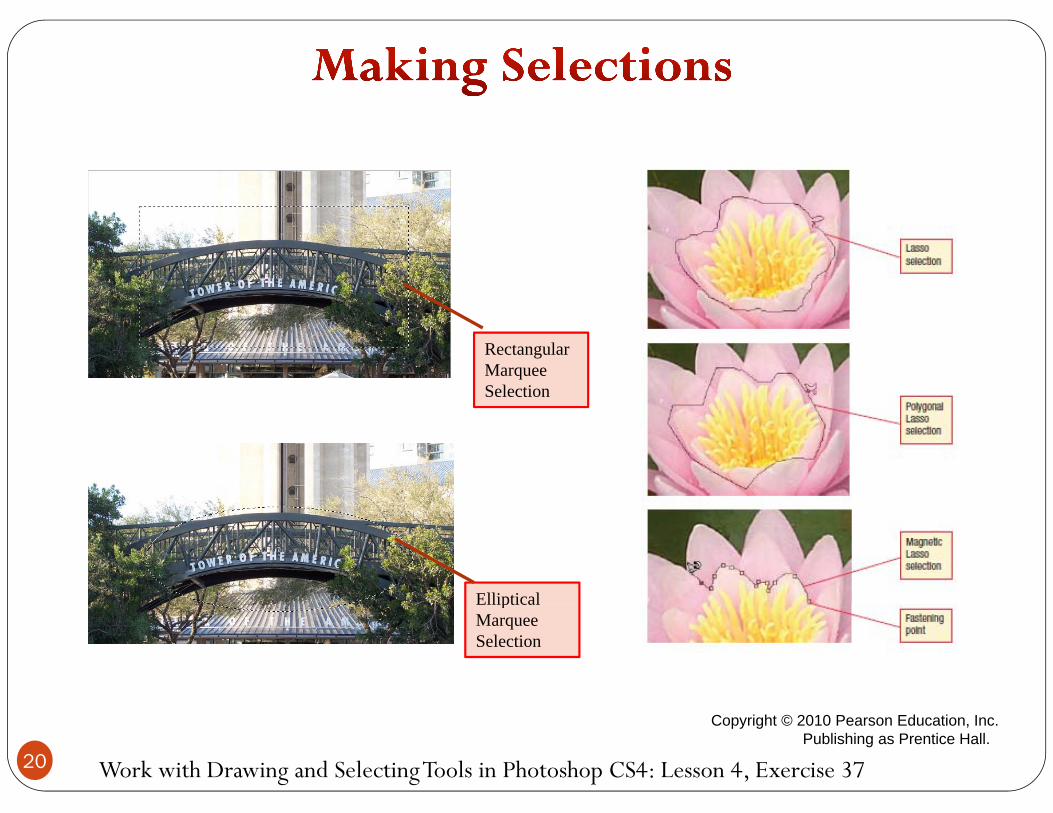
Rectangular MarqueeSelection
EllipticalElliptical MarqueeSelection
Work with Drawing and Selecting Tools in Photoshop CS4: Lesson 4, Exercise 3720
Copyright © 2010 Pearson Education, Inc. Publishing as Prentice Hall.
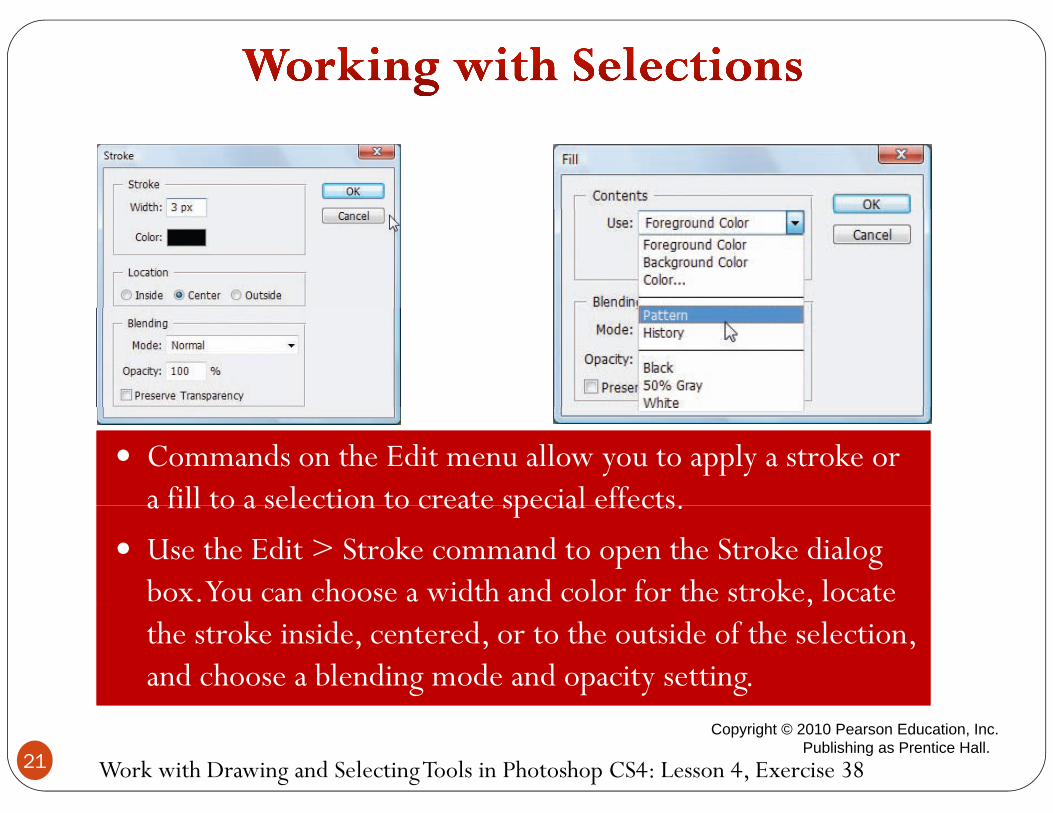
Commands on the Edit menu allow you to apply a stroke or a fill to a selection to create special effects
Commands on the Edit menu allow you to apply a stroke or a fill to a selection to create special effectsa fill to a selection to create special effects.
Use the Edit > Stroke command to open the Stroke dialog box. You can choose a width and color for the stroke, locate
a fill to a selection to create special effects.
Use the Edit > Stroke command to open the Stroke dialog box. You can choose a width and color for the stroke, locate ,the stroke inside, centered, or to the outside of the selection, and choose a blending mode and opacity setting.
,the stroke inside, centered, or to the outside of the selection, and choose a blending mode and opacity setting.
Work with Drawing and Selecting Tools in Photoshop CS4: Lesson 4, Exercise 3821
Copyright © 2010 Pearson Education, Inc. Publishing as Prentice Hall.
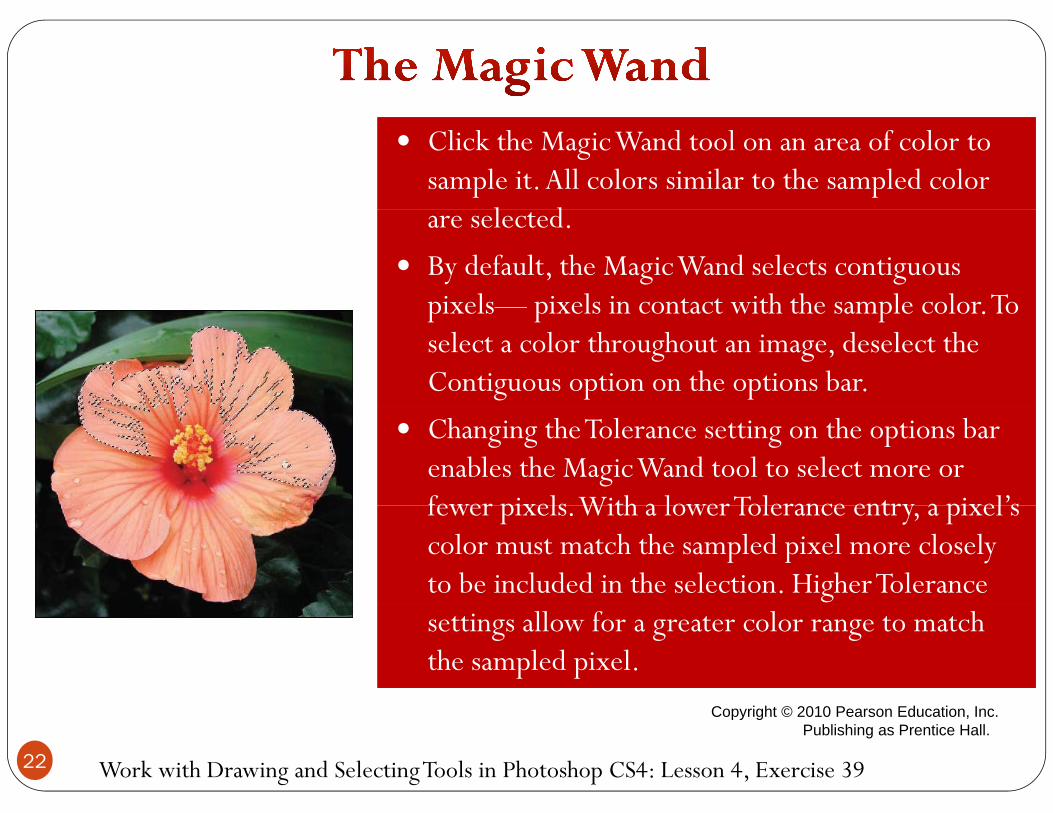
Click the Magic Wand tool on an area of color to sample it. All colors similar to the sampled color
l d
Click the Magic Wand tool on an area of color to sample it. All colors similar to the sampled color
l dare selected.
By default, the Magic Wand selects contiguous pixels— pixels in contact with the sample color To
are selected.
By default, the Magic Wand selects contiguous pixels— pixels in contact with the sample color To pixels pixels in contact with the sample color. To select a color throughout an image, deselect the Contiguous option on the options bar.
pixels pixels in contact with the sample color. To select a color throughout an image, deselect the Contiguous option on the options bar.
Changing the Tolerance setting on the options bar enables the Magic Wand tool to select more or fewer pixels With a lower Tolerance entry a pixel’s
Changing the Tolerance setting on the options bar enables the Magic Wand tool to select more or fewer pixels With a lower Tolerance entry a pixel’s fewer pixels. With a lower Tolerance entry, a pixel s color must match the sampled pixel more closely to be included in the selection. Higher Tolerance
fewer pixels. With a lower Tolerance entry, a pixel s color must match the sampled pixel more closely to be included in the selection. Higher Tolerance settings allow for a greater color range to match the sampled pixel.settings allow for a greater color range to match the sampled pixel.
Work with Drawing and Selecting Tools in Photoshop CS4: Lesson 4, Exercise 3922
Copyright © 2010 Pearson Education, Inc. Publishing as Prentice Hall.

The adjustment options on the Image > Adjustments submenu alter h l l f O
The adjustment options on the Image > Adjustments submenu alter h l l f O the actual pixels of an image. Once
you have applied an adjustment from this submenu, the changes can be
the actual pixels of an image. Once you have applied an adjustment from this submenu, the changes can be , greversed only by using Undo or Step Backward.
, greversed only by using Undo or Step Backward.
When you add an adjustment layer, by contrast, you apply adjustments to a layer that will affect all layers
When you add an adjustment layer, by contrast, you apply adjustments to a layer that will affect all layers to a layer that will affect all layers below it. In this way, you can modify the look of an image without actually h
to a layer that will affect all layers below it. In this way, you can modify the look of an image without actually h
Adjustments PanelColor Balance
changing it.changing it.
Adjustment Layer
Correct and Modify Images: Lesson 5, Exercise 44
Adjustment Layer
23 Copyright © 2010 Pearson Education, Inc. Publishing as Prentice Hall.
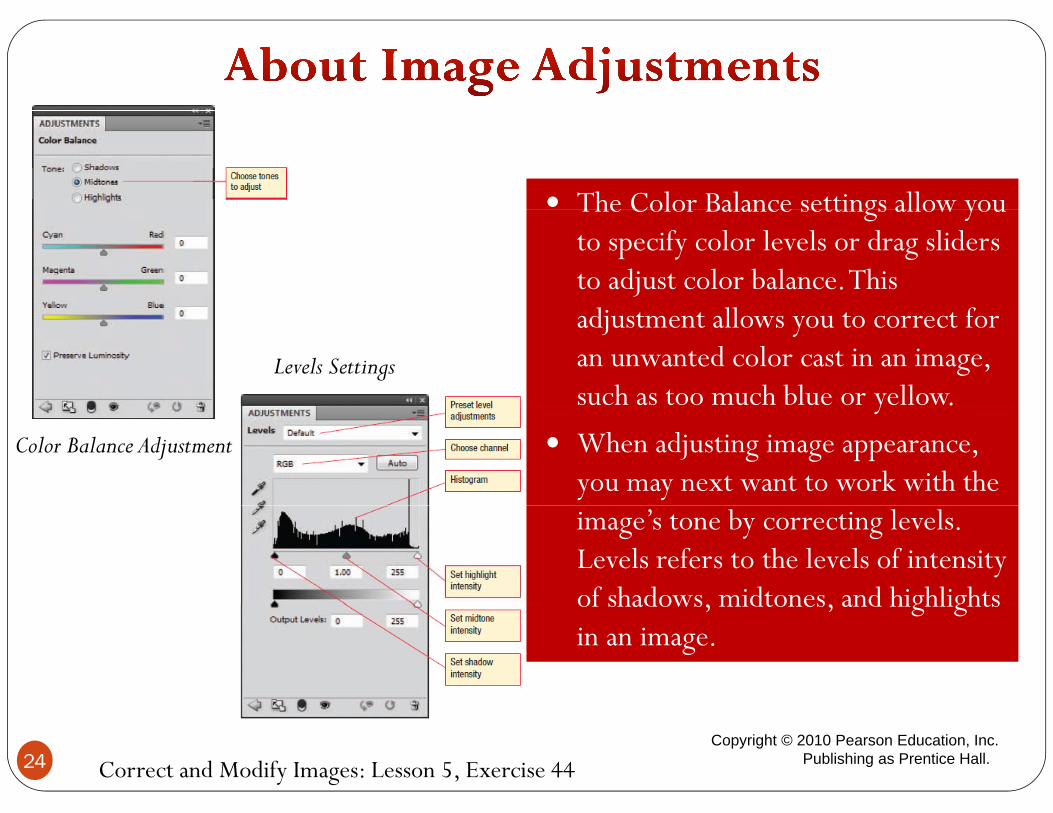
The Color Balance settings allow you The Color Balance settings allow you The Color Balance settings allow you to specify color levels or drag sliders to adjust color balance. This d ll f
The Color Balance settings allow you to specify color levels or drag sliders to adjust color balance. This d ll f adjustment allows you to correct for
an unwanted color cast in an image, such as too much blue or yellow.
adjustment allows you to correct for an unwanted color cast in an image, such as too much blue or yellow.
Levels Settingsy
When adjusting image appearance, you may next want to work with the
y
When adjusting image appearance, you may next want to work with the
Color Balance Adjustment
image’s tone by correcting levels. Levels refers to the levels of intensity of shadows midtones and highlights
image’s tone by correcting levels. Levels refers to the levels of intensity of shadows midtones and highlights of shadows, midtones, and highlights in an image.of shadows, midtones, and highlights in an image.
Correct and Modify Images: Lesson 5, Exercise 4424Copyright © 2010 Pearson Education, Inc.
Publishing as Prentice Hall.
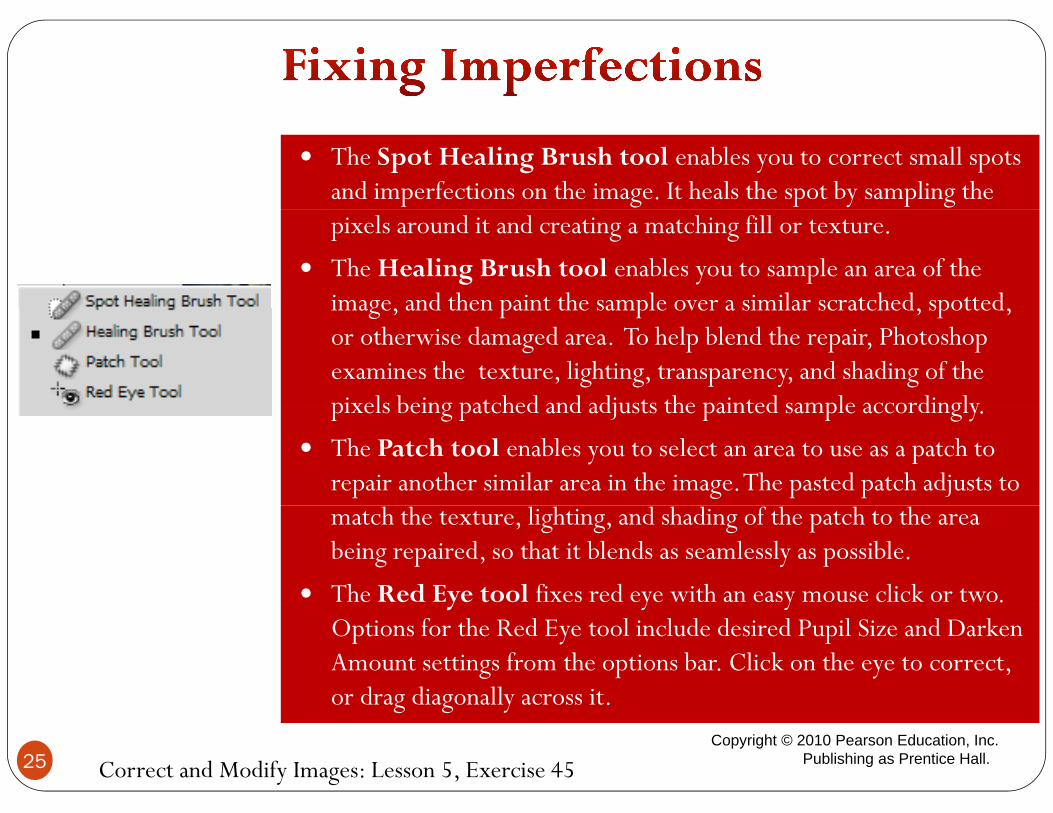
The Spot Healing Brush tool enables you to correct small spots and imperfections on the image. It heals the spot by sampling the
The Spot Healing Brush tool enables you to correct small spots and imperfections on the image. It heals the spot by sampling the pixels around it and creating a matching fill or texture.
The Healing Brush tool enables you to sample an area of the image and then paint the sample over a similar scratched spotted
pixels around it and creating a matching fill or texture.
The Healing Brush tool enables you to sample an area of the image and then paint the sample over a similar scratched spotted image, and then paint the sample over a similar scratched, spotted, or otherwise damaged area. To help blend the repair, Photoshop examines the texture, lighting, transparency, and shading of the pixels being patched and adjusts the painted sample accordingly
image, and then paint the sample over a similar scratched, spotted, or otherwise damaged area. To help blend the repair, Photoshop examines the texture, lighting, transparency, and shading of the pixels being patched and adjusts the painted sample accordinglypixels being patched and adjusts the painted sample accordingly.
The Patch tool enables you to select an area to use as a patch to repair another similar area in the image. The pasted patch adjusts to
pixels being patched and adjusts the painted sample accordingly.
The Patch tool enables you to select an area to use as a patch to repair another similar area in the image. The pasted patch adjusts to match the texture, lighting, and shading of the patch to the area being repaired, so that it blends as seamlessly as possible.
The Red Eye tool fixes red eye with an easy mouse click or two.
match the texture, lighting, and shading of the patch to the area being repaired, so that it blends as seamlessly as possible.
The Red Eye tool fixes red eye with an easy mouse click or two. y y yOptions for the Red Eye tool include desired Pupil Size and Darken Amount settings from the options bar. Click on the eye to correct, or drag diagonally across it.
y y yOptions for the Red Eye tool include desired Pupil Size and Darken Amount settings from the options bar. Click on the eye to correct, or drag diagonally across it.
Correct and Modify Images: Lesson 5, Exercise 45
or drag diagonally across it.or drag diagonally across it.
25Copyright © 2010 Pearson Education, Inc.
Publishing as Prentice Hall.

The Clone Stamp tool enables you to The Clone Stamp tool enables you to Sampling the
i i l b fl The Clone Stamp tool enables you to sample (copy) an area in an image, and then to paint all or part of the duplicate in
The Clone Stamp tool enables you to sample (copy) an area in an image, and then to paint all or part of the duplicate in
original butterfly
another location.
After you choose the Clone Stamp tool f h lb Alt + li k h
another location.
After you choose the Clone Stamp tool f h lb Alt + li k h from the toolbox, Alt + click on the center of the area to sample. Select the desired brush from the Brush Preset picker
from the toolbox, Alt + click on the center of the area to sample. Select the desired brush from the Brush Preset picker pand choose the desired blending mode, opacity, flow, and other settings as desired. Then click or drag back and forth with the
pand choose the desired blending mode, opacity, flow, and other settings as desired. Then click or drag back and forth with the
Painting the clone
Then, click or drag back and forth with the mouse to paint the clone onto the layer.Then, click or drag back and forth with the mouse to paint the clone onto the layer.
Correct and Modify Images: Lesson 5, Exercise 4526Copyright © 2010 Pearson Education, Inc.
Publishing as Prentice Hall.
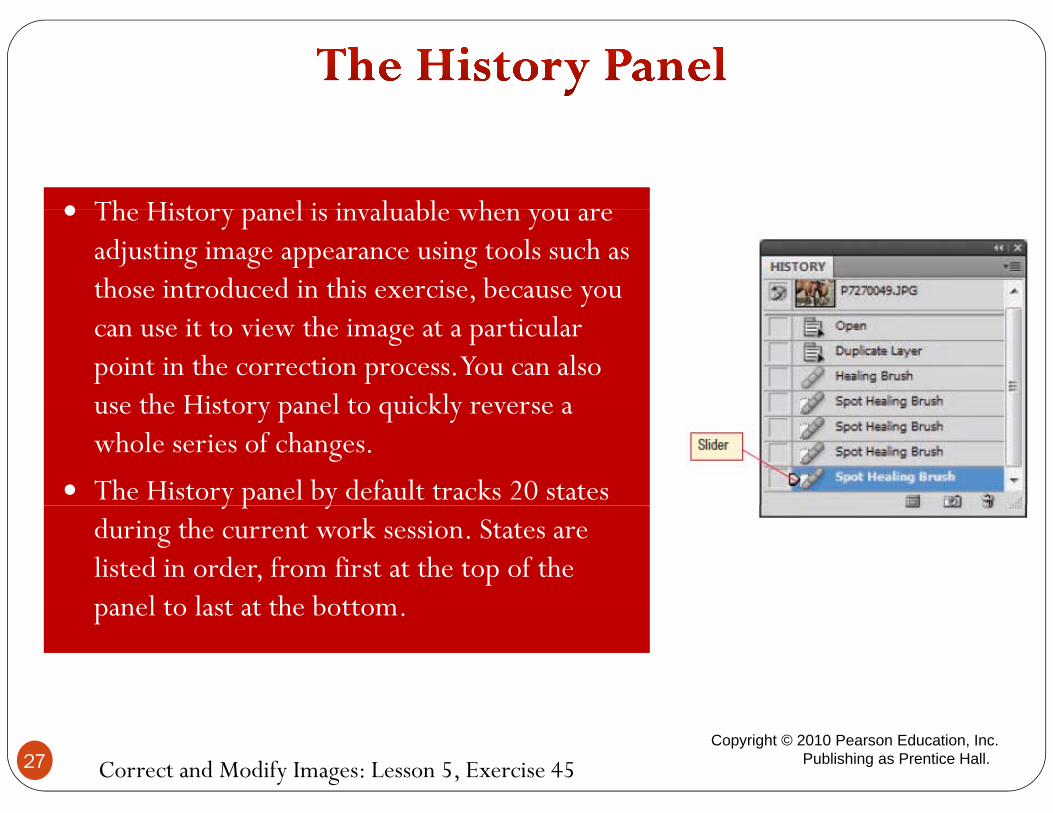
The History panel is invaluable when you are The History panel is invaluable when you are The History panel is invaluable when you are adjusting image appearance using tools such as those introduced in this exercise, because you
The History panel is invaluable when you are adjusting image appearance using tools such as those introduced in this exercise, because you can use it to view the image at a particular point in the correction process. You can also use the History panel to quickly reverse a
can use it to view the image at a particular point in the correction process. You can also use the History panel to quickly reverse a use the History panel to quickly reverse a whole series of changes.
The History panel by default tracks 20 states
use the History panel to quickly reverse a whole series of changes.
The History panel by default tracks 20 states y p yduring the current work session. States are listed in order, from first at the top of the panel to last at the bottom
y p yduring the current work session. States are listed in order, from first at the top of the panel to last at the bottompanel to last at the bottom.panel to last at the bottom.
Correct and Modify Images: Lesson 5, Exercise 4527Copyright © 2010 Pearson Education, Inc.
Publishing as Prentice Hall.

A skilled photographer can attach a photo filter to a l t t th l b l d
A skilled photographer can attach a photo filter to a l t t th l b l d camera lens to correct the color balance and
temperature (warm tones versus cool tones) of the image or apply a special effect.
camera lens to correct the color balance and temperature (warm tones versus cool tones) of the image or apply a special effect.g pp y p
For example, a photographer might add a filter to eliminate the blue-green cast common in photos taken
d fl l h dd l f l
g pp y p
For example, a photographer might add a filter to eliminate the blue-green cast common in photos taken
d fl l h dd l f l under fluorescent lighting, add a polarizing filter to reduce glare and reflections and intensify colors, or add a filter that yields a special effect, such as making
under fluorescent lighting, add a polarizing filter to reduce glare and reflections and intensify colors, or add a filter that yields a special effect, such as making y p , gthe image look foggy or adding a starburst effect.
For an image shot without the benefit of a physical
y p , gthe image look foggy or adding a starburst effect.
For an image shot without the benefit of a physical filter, Photoshop offers the Photo Filter adjustment in the Adjustments panel.filter, Photoshop offers the Photo Filter adjustment in the Adjustments panel.
Correct and Modify Images: Lesson 5, Exercise 4628Copyright © 2010 Pearson Education, Inc.
Publishing as Prentice Hall.
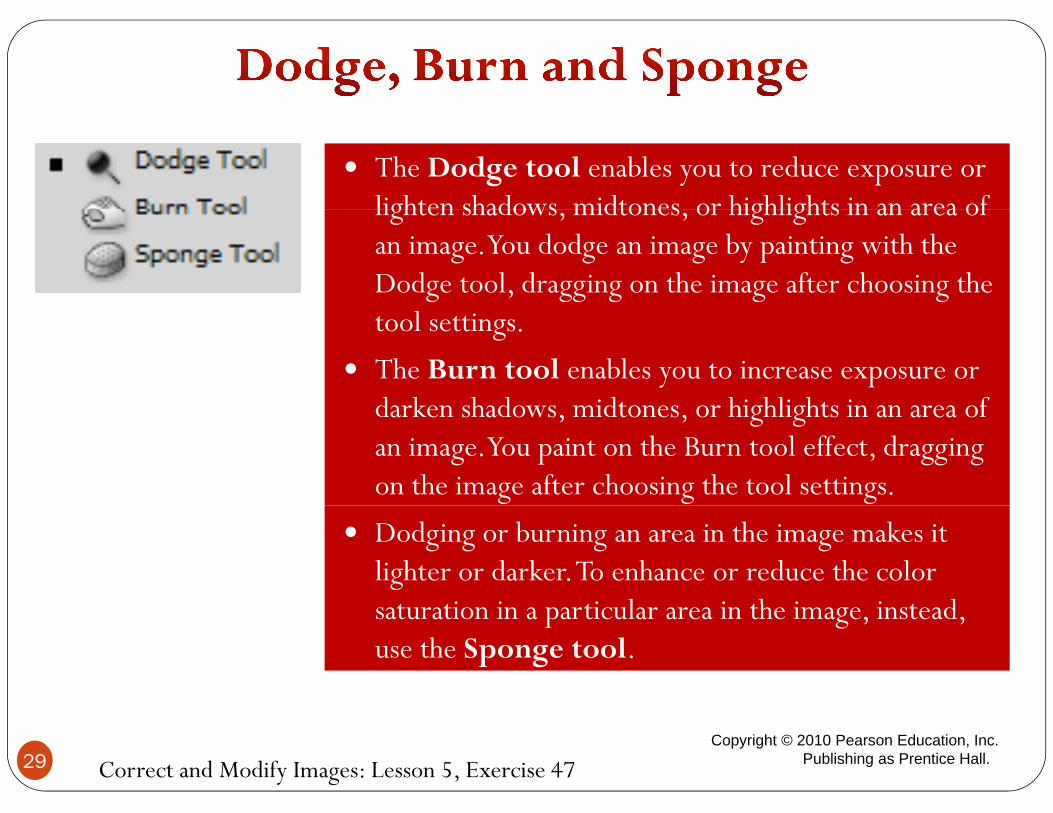
The Dodge tool enables you to reduce exposure or lighten shadows midtones or highlights in an area of
The Dodge tool enables you to reduce exposure or lighten shadows midtones or highlights in an area of lighten shadows, midtones, or highlights in an area of an image. You dodge an image by painting with the Dodge tool, dragging on the image after choosing the
lighten shadows, midtones, or highlights in an area of an image. You dodge an image by painting with the Dodge tool, dragging on the image after choosing the tool settings.
The Burn tool enables you to increase exposure or darken shadows midtones or highlights in an area of
tool settings.
The Burn tool enables you to increase exposure or darken shadows midtones or highlights in an area of darken shadows, midtones, or highlights in an area of an image. You paint on the Burn tool effect, dragging on the image after choosing the tool settings.
darken shadows, midtones, or highlights in an area of an image. You paint on the Burn tool effect, dragging on the image after choosing the tool settings.
Dodging or burning an area in the image makes it lighter or darker. To enhance or reduce the color
t ti i ti l i th i i t d
Dodging or burning an area in the image makes it lighter or darker. To enhance or reduce the color
t ti i ti l i th i i t d saturation in a particular area in the image, instead, use the Sponge tool.saturation in a particular area in the image, instead, use the Sponge tool.
Correct and Modify Images: Lesson 5, Exercise 4729Copyright © 2010 Pearson Education, Inc.
Publishing as Prentice Hall.

Use the Blur tool to paint blurring onto i
Use the Blur tool to paint blurring onto ian image.
The Sharpen tool can help enhance detail, particularly in an edge where two
an image.
The Sharpen tool can help enhance detail, particularly in an edge where two detail, particularly in an edge where two colors abut in the image.
The Smudge tool enables you to distort
detail, particularly in an edge where two colors abut in the image.
The Smudge tool enables you to distort and reposition content in an image, as if the image is a puddle of paint that you drag your finger through
and reposition content in an image, as if the image is a puddle of paint that you drag your finger throughyour finger through.your finger through.
Correct and Modify Images: Lesson 5, Exercise 4730Copyright © 2010 Pearson Education, Inc.
Publishing as Prentice Hall.
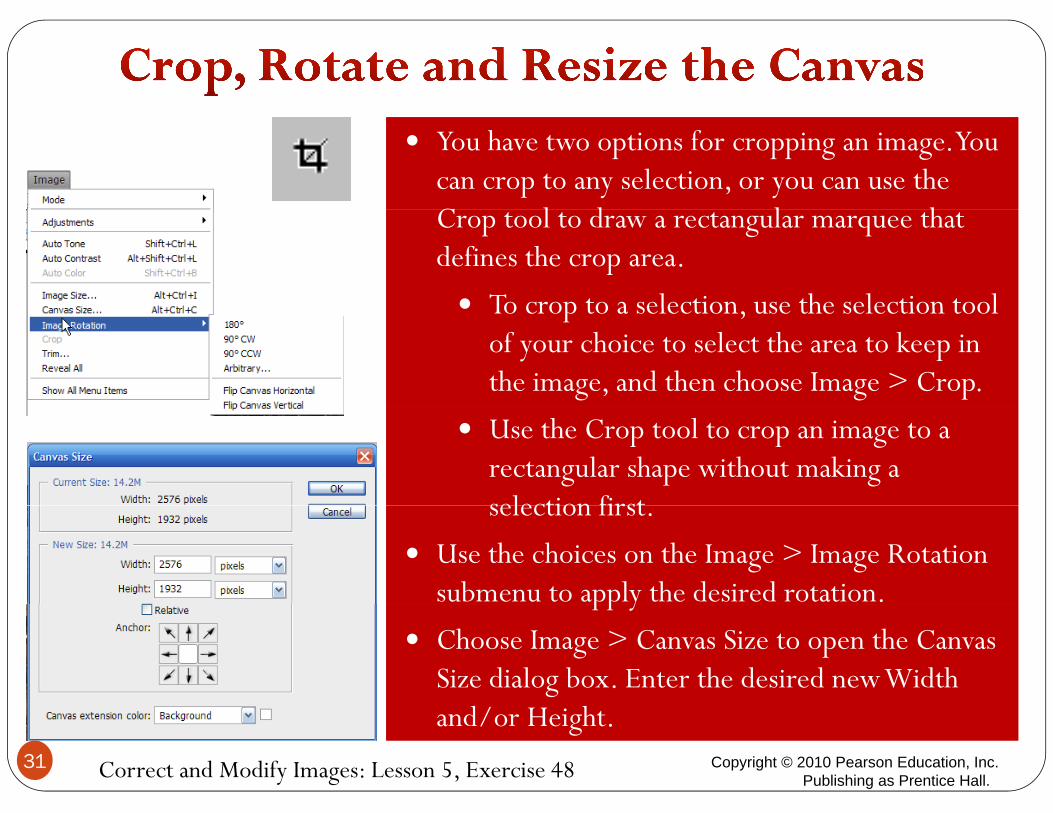
You have two options for cropping an image. You can crop to any selection, or you can use the C l d l h
You have two options for cropping an image. You can crop to any selection, or you can use the C l d l h Crop tool to draw a rectangular marquee that defines the crop area.
To crop to a selection use the selection tool
Crop tool to draw a rectangular marquee that defines the crop area.
To crop to a selection use the selection tool To crop to a selection, use the selection tool of your choice to select the area to keep in the image, and then choose Image > Crop.
To crop to a selection, use the selection tool of your choice to select the area to keep in the image, and then choose Image > Crop.
Use the Crop tool to crop an image to a rectangular shape without making a selection first
Use the Crop tool to crop an image to a rectangular shape without making a selection firstselection first.
Use the choices on the Image > Image Rotation submenu to apply the desired rotation.
selection first.
Use the choices on the Image > Image Rotation submenu to apply the desired rotation.pp y
Choose Image > Canvas Size to open the Canvas Size dialog box. Enter the desired new Width
pp y
Choose Image > Canvas Size to open the Canvas Size dialog box. Enter the desired new Width
Correct and Modify Images: Lesson 5, Exercise 48
and/or Height.and/or Height.31 Copyright © 2010 Pearson Education, Inc.
Publishing as Prentice Hall.

A path is a vector-based outline that you can use to add content or save selections in an image file. Paths do not print until you
k f ll h
A path is a vector-based outline that you can use to add content or save selections in an image file. Paths do not print until you
k f ll hstroke or fill them.
You have several options for creating a path:
As you learned in the first Photoshop lesson, you can create a
stroke or fill them.
You have several options for creating a path:
As you learned in the first Photoshop lesson, you can create a A k h h P h l
y p , ypath when drawing any line or shape if you select the Paths button on the options bar.
You can create a path from any selection you make in an
y p , ypath when drawing any line or shape if you select the Paths button on the options bar.
You can create a path from any selection you make in an
A working path in the Paths panel
You can create a path from any selection you make in an image.
You can use the Pen tool to draw a path.• You can load a saved path as a selection marquee in the shape of
You can create a path from any selection you make in an image.
You can use the Pen tool to draw a path.• You can load a saved path as a selection marquee in the shape of • You can load a saved path as a selection marquee in the shape of
the path on any layer in the image file.• To load a path as a selection, first select the layer where you want
to make the selection in the Layers panel Then select the path in
• You can load a saved path as a selection marquee in the shape of the path on any layer in the image file.
• To load a path as a selection, first select the layer where you want to make the selection in the Layers panel Then select the path in to make the selection in the Layers panel. Then select the path in the Paths panel. Click the Load path as a selection button at the bottom of the Paths panel.
to make the selection in the Layers panel. Then select the path in the Paths panel. Click the Load path as a selection button at the bottom of the Paths panel.
Selected path
Explore Advanced Image Techniques: Lesson 6, Exercise 5332Copyright © 2010 Pearson Education, Inc.
Publishing as Prentice Hall.

Rather than drag the Pen tool pointer to create a line or shape, you must Rather than drag the Pen tool pointer to create a line or shape, you must g p p , yspecify a starting point and direction and then click and/or drag the pointer at a new location to continue the line.
g p p , yspecify a starting point and direction and then click and/or drag the pointer at a new location to continue the line.
To create a closed shape, return the Pen tool pointer to the first endpoint. The Pen tool pointer displays a small o to the right of the pointer.
To turn off the Pen tool after drawing one or more lines select another tool
To create a closed shape, return the Pen tool pointer to the first endpoint. The Pen tool pointer displays a small o to the right of the pointer.
To turn off the Pen tool after drawing one or more lines select another tool To turn off the Pen tool after drawing one or more lines, select another tool, such as the Selection tool.
Use the Direct Selection tool to move an anchor point on a curve.
To turn off the Pen tool after drawing one or more lines, select another tool, such as the Selection tool.
Use the Direct Selection tool to move an anchor point on a curve.pp
Work with Paths and Layers: Lesson 2, Exercise 1433 Copyright © 2010 Pearson Education, Inc. Publishing as Prentice Hall.

Illustrations produced in d
Illustrations produced in d drawing or painting programs create either vector graphics or bitmap images.
drawing or painting programs create either vector graphics or bitmap images.
Illustrator illustrations are vector graphics. Vectorgraphics are created using
h i l i
Illustrator illustrations are vector graphics. Vectorgraphics are created using
h i l i mathematical expressions called vectors and retain their detail and clarity if the graphic is resized
mathematical expressions called vectors and retain their detail and clarity if the graphic is resized is resized.
Bitmap images, on the other hand, are formed of tiny
ll d i l Pi l
is resized. Bitmap images, on the other
hand, are formed of tiny ll d i l Pi l B squares called pixels. Pixels
remain the same size when a bitmap image is resized.
squares called pixels. Pixels remain the same size when a bitmap image is resized.
Vector Bitmap
Work with Basic Graphic Tools in Illustrator CS4: Lesson 1, Exercise 434Copyright © 2010 Pearson Education, Inc.
Publishing as Prentice Hall.
L l i l ff l l dif h l k f h L l i l ff l l dif h l k f h
Add a layer style button
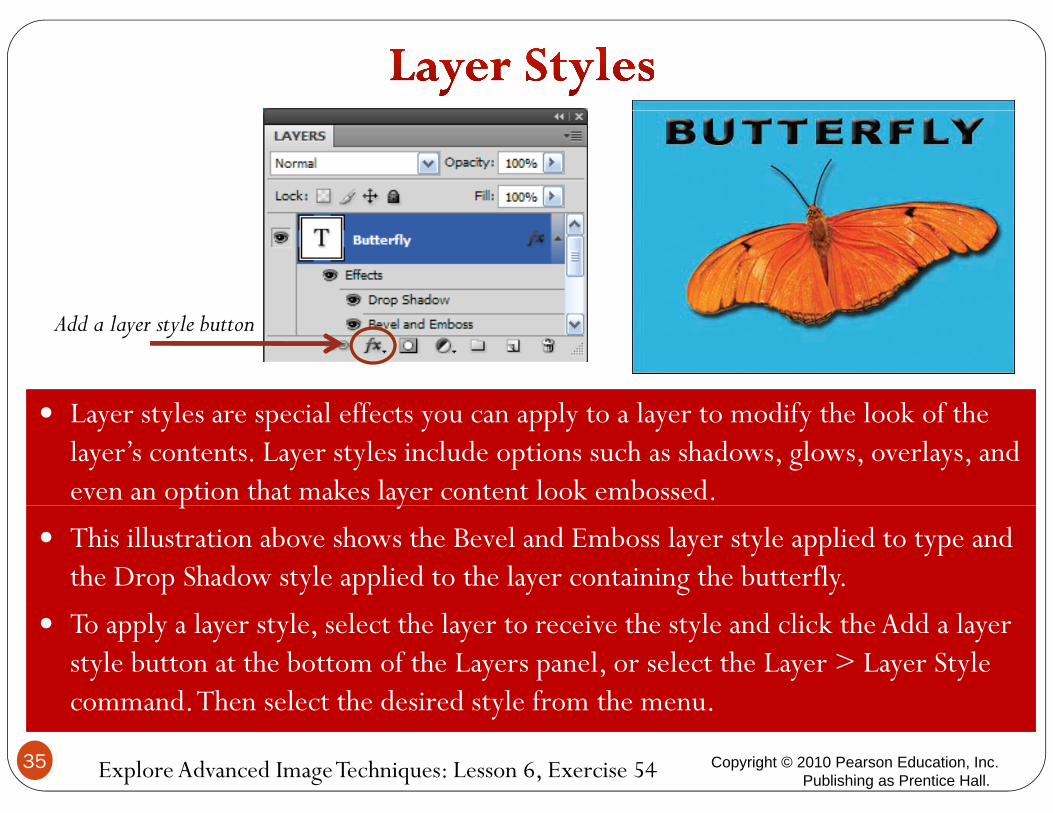
Layer styles are special effects you can apply to a layer to modify the look of the layer’s contents. Layer styles include options such as shadows, glows, overlays, and even an option that makes layer content look embossed.
Layer styles are special effects you can apply to a layer to modify the look of the layer’s contents. Layer styles include options such as shadows, glows, overlays, and even an option that makes layer content look embossed.p y
This illustration above shows the Bevel and Emboss layer style applied to type and the Drop Shadow style applied to the layer containing the butterfly.
p y
This illustration above shows the Bevel and Emboss layer style applied to type and the Drop Shadow style applied to the layer containing the butterfly.
To apply a layer style, select the layer to receive the style and click the Add a layer style button at the bottom of the Layers panel, or select the Layer > Layer Style command Then select the desired style from the menu
To apply a layer style, select the layer to receive the style and click the Add a layer style button at the bottom of the Layers panel, or select the Layer > Layer Style command Then select the desired style from the menu
Explore Advanced Image Techniques: Lesson 6, Exercise 54
command. Then select the desired style from the menu.command. Then select the desired style from the menu.
35 Copyright © 2010 Pearson Education, Inc. Publishing as Prentice Hall.
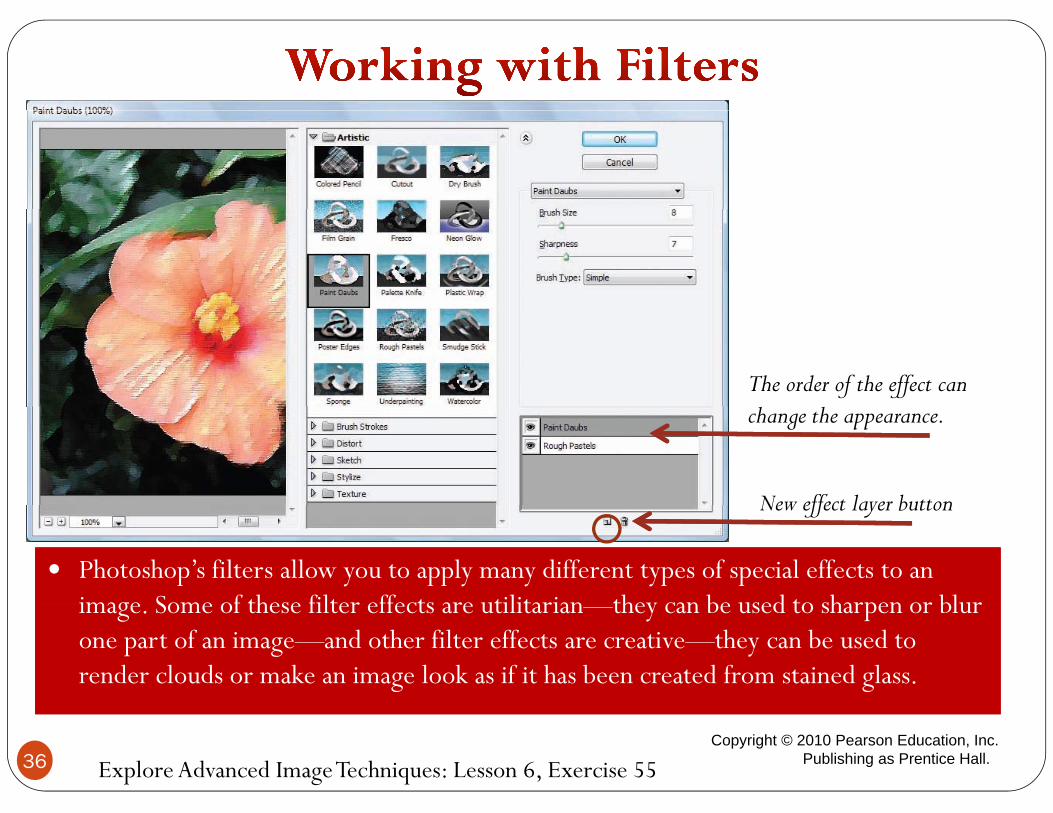
The order of the effect can
New effect layer button
change the appearance.
Photoshop’s filters allow you to apply many different types of special effects to an image Some of these filter effects are utilitarian they can be used to sharpen or blur
Photoshop’s filters allow you to apply many different types of special effects to an image Some of these filter effects are utilitarian they can be used to sharpen or blur
New effect layer button
image. Some of these filter effects are utilitarian—they can be used to sharpen or blur one part of an image—and other filter effects are creative—they can be used to render clouds or make an image look as if it has been created from stained glass.
image. Some of these filter effects are utilitarian—they can be used to sharpen or blur one part of an image—and other filter effects are creative—they can be used to render clouds or make an image look as if it has been created from stained glass.
Explore Advanced Image Techniques: Lesson 6, Exercise 5536Copyright © 2010 Pearson Education, Inc.
Publishing as Prentice Hall.

Effects in the Photoshop group on the Effect menu can be applied to either vector or raster objects.
Sponge Effect
Spatter Effect
Diffuse Glow Effect
Working with Colors, Effects and Styles: Lesson 3, Exercise 2737Copyright © 2010 Pearson Education, Inc.
Publishing as Prentice Hall.

In the world of graphic design, a mask In the world of graphic design, a mask g p gprotects one area of an image while leaving another area available to be modified.
h h ’ h l d l f
g p gprotects one area of an image while leaving another area available to be modified.
h h ’ h l d l f Photoshop’s channels display information for each color in an image. Splitting out the colors in this way allows you to work with
Photoshop’s channels display information for each color in an image. Splitting out the colors in this way allows you to work with y yeach color separately if you wish, or adjust an image by changing the way the separate
l i d t th
y yeach color separately if you wish, or adjust an image by changing the way the separate
l i d t thcolors are mixed together.colors are mixed together.Quick Mask displayed in the Channels panel
Explore Advanced Image Techniques: Lesson 6, Exercise 5638Copyright © 2010 Pearson Education, Inc.
Publishing as Prentice Hall.

The layer thumbnail and the layer mask thumbnail The layer to be clipped must be on top
A layer mask is used to conceal part or all of a layer. You can easily create a layer mask by using a selection tool to define an area and then click the Add layer mask button on the Layers panel. The mask is applied immediately to crop away the part of the layer not enclosed by the
A layer mask is used to conceal part or all of a layer. You can easily create a layer mask by using a selection tool to define an area and then click the Add layer mask button on the Layers panel. The mask is applied immediately to crop away the part of the layer not enclosed by the
y y pp p
panel. The mask is applied immediately to crop away the part of the layer not enclosed by the selection.
You can also create layer masks from selections using the Layer > Layer Mask command. With the selection in place click Reveal Selection on the Layer Mask submenu to show only the
panel. The mask is applied immediately to crop away the part of the layer not enclosed by the selection.
You can also create layer masks from selections using the Layer > Layer Mask command. With the selection in place click Reveal Selection on the Layer Mask submenu to show only the the selection in place, click Reveal Selection on the Layer Mask submenu to show only the selected area. Click Hide Selection to show everything but the selected area.
After you have positioned layers correctly, select the top layer and use the Layer > Create Cli i M k d t t th k
the selection in place, click Reveal Selection on the Layer Mask submenu to show only the selected area. Click Hide Selection to show everything but the selected area.
After you have positioned layers correctly, select the top layer and use the Layer > Create Cli i M k d t t th k
Explore Advanced Image Techniques: Lesson 6, Exercise 57
Clipping Mask command to create the mask.Clipping Mask command to create the mask.
39 Copyright © 2010 Pearson Education, Inc. Publishing as Prentice Hall.

When you choose to optimize an image, you must decide which of the standard Web formats best suit
When you choose to optimize an image, you must decide which of the standard Web formats best suit your image.
For images that have a limited palette of colors or large blocks of color, GIF is the best format to
your image.
For images that have a limited palette of colors or large blocks of color, GIF is the best format to g ,choose. GIF images can display up to 256 colors and can include transparency. GIF images are compressed without loss of data.
g ,choose. GIF images can display up to 256 colors and can include transparency. GIF images are compressed without loss of data.p
For continuous-tone images such as photos or images that use gradients, JPEG is the best format to choose. When a JPEG file is compressed, a certain
p
For continuous-tone images such as photos or images that use gradients, JPEG is the best format to choose. When a JPEG file is compressed, a certain . J p ,amount of data is lost. Compression occurs each time the file is saved, so save as few times as possible.
. J p ,amount of data is lost. Compression occurs each time the file is saved, so save as few times as possible.
Optimize a GIF file
p
The PNG format is similar to GIF in that it supports a limited number of colors and transparency and features lossless compression. Some browsers
p
The PNG format is similar to GIF in that it supports a limited number of colors and transparency and features lossless compression. Some browsers
Explore Advanced Image Techniques: Lesson 6, Exercise 58
features lossless compression. Some browsers require special support for PNG images.features lossless compression. Some browsers require special support for PNG images.
40 Copyright © 2010 Pearson Education, Inc. Publishing as Prentice Hall.

Color management system System that translates color information from one device to another.
Color management system System that translates color information from one device to another.
By default, color management is turned on in the Adobe Design Creative Suite so that all applications in the suite share the same color settings. If you
By default, color management is turned on in the Adobe Design Creative Suite so that all applications in the suite share the same color settings. If you g ywant to adjust color settings for an application, you can do so by clicking Edit > Color Settings to open the Color Settings dialog box.
g ywant to adjust color settings for an application, you can do so by clicking Edit > Color Settings to open the Color Settings dialog box.g g
The default color setting is North America General Purpose 2. As you would guess from the name, this setting is suitable for a range of output options,
g g
The default color setting is North America General Purpose 2. As you would guess from the name, this setting is suitable for a range of output options, g g p p ,including both print and screen output.
If you intend to print your output rather than use it for Web or device content a better setting option is
g g p p ,including both print and screen output.
If you intend to print your output rather than use it for Web or device content a better setting option is for Web or device content, a better setting option is North America Prepress 2.for Web or device content, a better setting option is North America Prepress 2.
Explore Advanced Image Techniques: Lesson 6, Exercise 5941Copyright © 2010 Pearson Education, Inc.
Publishing as Prentice Hall.