LAN Driver Installation Guide (Broadcom …...LAN Driver Installation Guide (Broadcom v17.2/QLogic...
38
- 1 - Mar 2016 808-882328-317-A LAN Driver Installation Guide (Broadcom v17.2/QLogic T7.12) Target OS : Windows Server 2008 x86 Windows Server 2008 x64 Windows Server 2008 R2
Transcript of LAN Driver Installation Guide (Broadcom …...LAN Driver Installation Guide (Broadcom v17.2/QLogic...

- 1 -
Mar 2016
808-882328-317-A
LAN Driver Installation Guide
(Broadcom v17.2/QLogic T7.12) Target OS : Windows Server 2008 x86
Windows Server 2008 x64 Windows Server 2008 R2

- 2 -
Mar 2016
808-882328-317-A
Contents Preface ............................................................................................................................................ 3 1.1.1. The target server........................................................................................................................ 3 1.2. Target software .......................................................................................................................... 3 1.3. Target Driver Version ................................................................................................................. 3 1.4. Registration Trademark ............................................................................................................. 4 Workflow LAN driver update process ............................................................................................. 5 2. Preparation ...................................................................................................................................... 6 3.3.1. Workflow preparation process ................................................................................................... 6 3.2. Confirmation of LAN driver version............................................................................................ 7
3.2.1. Confirmation of 1G LAN driver version ............................................................................ 7 3.2.2. Confirmation of 10G LAN driver version .......................................................................... 8
3.3. Preparation of module ............................................................................................................. 10 3.3.1. Prepare the update module ........................................................................................... 10 3.3.2. Prepare the recovery module ......................................................................................... 10
3.4. Stop the WSFC node service .................................................................................................. 11 3.5. Stop the EXPRESSCLUSTER service .................................................................................... 13 3.6. Delete the team........................................................................................................................ 13 LAN driver update ......................................................................................................................... 15 4.4.1. Existing LAN driver uninstallation ............................................................................................ 15 4.2. New LAN driver installation ..................................................................................................... 15 After LAN driver install .................................................................................................................. 17 5.5.1. Workflow after LAN driver install ............................................................................................. 17 5.2. Setup the Team ........................................................................................................................ 18 5.3. Reset LAN driver...................................................................................................................... 27
5.3.1. Setting up common ........................................................................................................ 27 5.3.2. Setting up Optional LAN boards .................................................................................... 27
5.4. Start the WSFC node service .................................................................................................. 28 5.5. Start the EXPRESSCLUSTER service .................................................................................... 30 Rollback procedure of LAN driver ................................................................................................. 31 6.6.1. New teaming driver uninstallation ............................................................................................ 31 6.2. New LAN driver uninstallation ................................................................................................. 32 6.3. Old LAN driver installation ....................................................................................................... 32 Notice ............................................................................................................................................ 33 7.7.1. About the operation by remote desktop .................................................................................. 33 7.2. Account of operation ................................................................................................................ 33 7.3. Notice of using Hyper-V ........................................................................................................... 33 7.4. Notice of using Team ............................................................................................................... 33 7.5. Uninstall the driver ................................................................................................................... 33 7.6. Notice of update ....................................................................................................................... 33 7.7. About the affixed number at the end of the 10G LAN board name ......................................... 33 7.8. Notice of using N8104-128/134 ............................................................................................... 33 7.9. Notice of using teaming utility(BACS/QCS) ............................................................................. 33 Appendix ....................................................................................................................................... 34 8.8.1. List of stored path of recovery driver ....................................................................................... 34
- 3 -
Mar 2016
808-882328-317-A
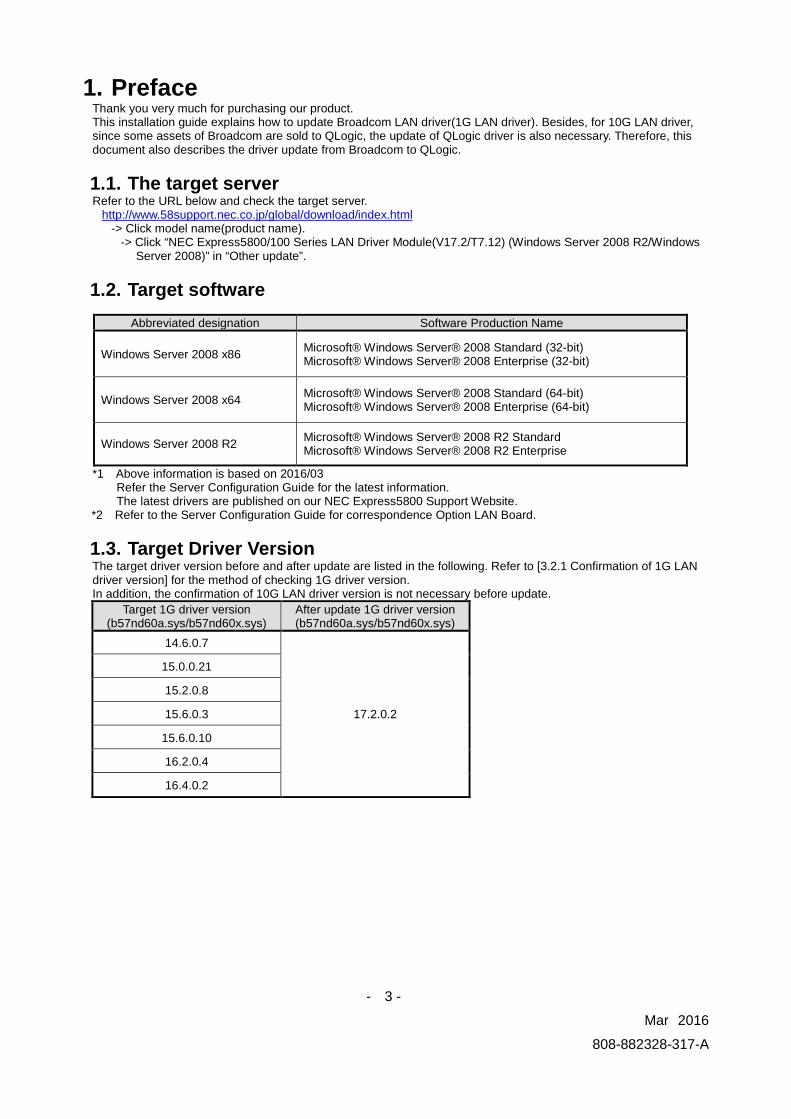
Preface 1.Thank you very much for purchasing our product. This installation guide explains how to update Broadcom LAN driver(1G LAN driver). Besides, for 10G LAN driver, since some assets of Broadcom are sold to QLogic, the update of QLogic driver is also necessary. Therefore, this document also describes the driver update from Broadcom to QLogic.
1.1. The target server Refer to the URL below and check the target server.
http://www.58support.nec.co.jp/global/download/index.html -> Click model name(product name).
-> Click “NEC Express5800/100 Series LAN Driver Module(V17.2/T7.12) (Windows Server 2008 R2/Windows Server 2008)” in “Other update”.
1.2. Target software
*1 Above information is based on 2016/03 Refer the Server Configuration Guide for the latest information. The latest drivers are published on our NEC Express5800 Support Website.
*2 Refer to the Server Configuration Guide for correspondence Option LAN Board. 1.3. Target Driver Version The target driver version before and after update are listed in the following. Refer to [3.2.1 Confirmation of 1G LAN driver version] for the method of checking 1G driver version. In addition, the confirmation of 10G LAN driver version is not necessary before update.
Target 1G driver version (b57nd60a.sys/b57nd60x.sys)
After update 1G driver version (b57nd60a.sys/b57nd60x.sys)
14.6.0.7
17.2.0.2
15.0.0.21
15.2.0.8
15.6.0.3
15.6.0.10
16.2.0.4
16.4.0.2
Abbreviated designation Software Production Name
Windows Server 2008 x86 Microsoft® Windows Server® 2008 Standard (32-bit) Microsoft® Windows Server® 2008 Enterprise (32-bit)
Windows Server 2008 x64 Microsoft® Windows Server® 2008 Standard (64-bit) Microsoft® Windows Server® 2008 Enterprise (64-bit)
Windows Server 2008 R2 Microsoft® Windows Server® 2008 R2 Standard Microsoft® Windows Server® 2008 R2 Enterprise

- 4 -
Mar 2016
808-882328-317-A
1.4. Registration Trademark Microsoft, Windows, Windows Server, Hyper-V are registered trademark or trademarks of the Microsoft in the U.S. and other countries. QLogic is a trademark or registered trademark of QLogic Corporation. Broadcom, the pulse logo, Connecting everything, the Connecting everything logo, NetXtreme, Ethernet@Wirespeed, LiveLink™, and Smart Load Balancing™ are among the trademarks of Broadcom Corporation and/or its affiliates in the United States, certain other countries, and/or the EXPRESSCLUSTER is registered trademark of the NEC corporation. In addition, TM and an R mark are not specified in the test.

- 5 -
Mar 2016
808-882328-317-A
Workflow LAN driver update process 2.
Important
This document is based on using the Windows Server Failover Clustering (Afterward WSFC) and EXPRESSCLUSTER. If WSFC is not used, skip step [3.4 Stop the WSFC node service] and [5.4 Start the WSFC node]. If EXPRESSCLUSTER is not used, skip step [3.5 Stop the EXPRESSCLUSTER service] and [5.5 Start the EXPRESSCLUSTER service].
Start
End
3. Preparation
4. LAN driver update
5. After LAN driver install
- 6 -
Mar 2016
808-882328-317-A
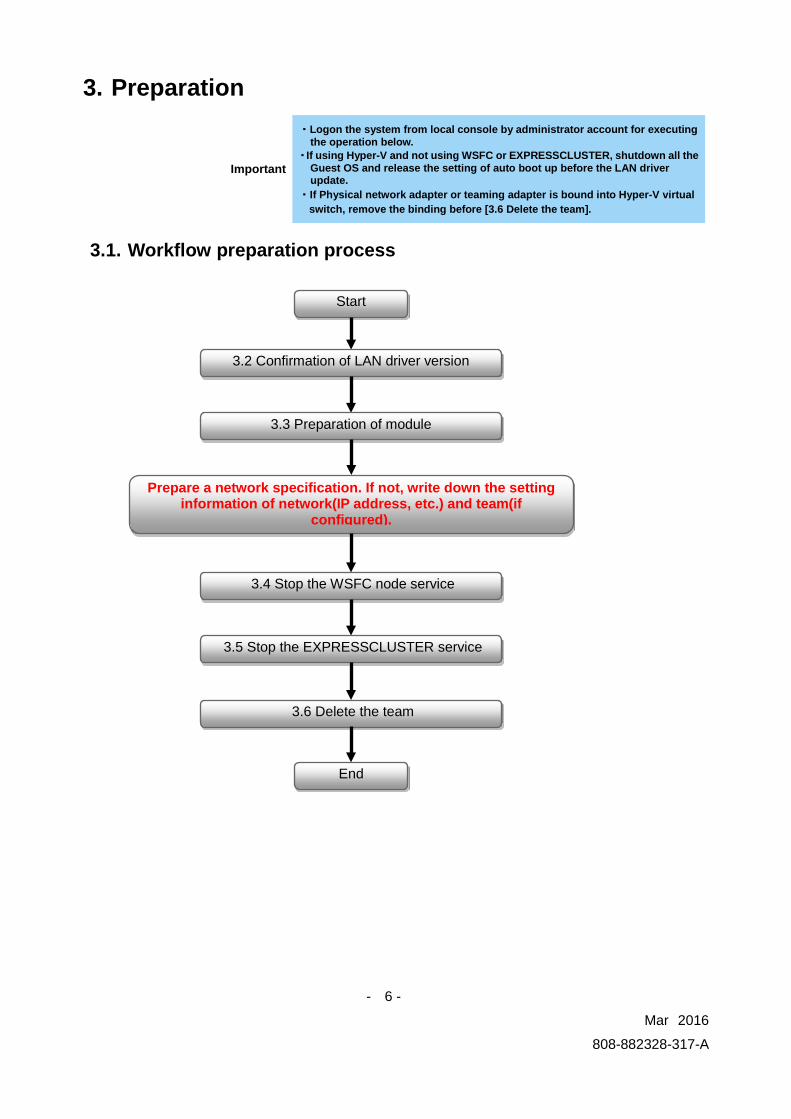
Preparation 3.
3.1. Workflow preparation process
Important
・Logon the system from local console by administrator account for executing the operation below.
・If using Hyper-V and not using WSFC or EXPRESSCLUSTER, shutdown all the Guest OS and release the setting of auto boot up before the LAN driver update.
・If Physical network adapter or teaming adapter is bound into Hyper-V virtual switch, remove the binding before [3.6 Delete the team].
Start
End
3.2 Confirmation of LAN driver version
3.3 Preparation of module
3.4 Stop the WSFC node service
3.5 Stop the EXPRESSCLUSTER service
3.6 Delete the team
Prepare a network specification. If not, write down the setting information of network(IP address, etc.) and team(if
configured).

- 7 -
Mar 2016
808-882328-317-A
3.2. Confirmation of LAN driver version Check the driver version by the procedure below. When the version is equal or newer than the following version, installation is not necessary.
3.2.1. Confirmation of 1G LAN driver version
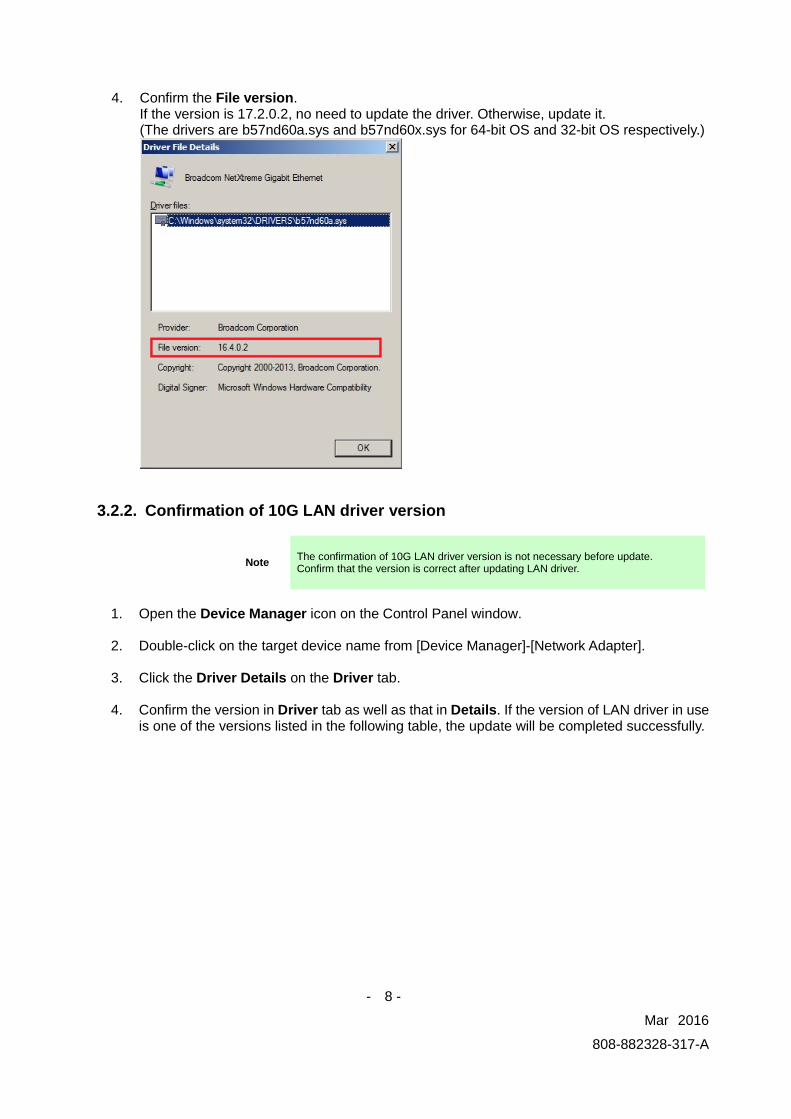
1. Open the Device Manager icon on the Control Panel window.
2. Double-click the Broadcom NetXtreme Gigabit Ethernet icon on the Device Manager.
3. Click the Driver Details on the Driver tab.
- 8 -
Mar 2016
808-882328-317-A
4. Confirm the File version.
If the version is 17.2.0.2, no need to update the driver. Otherwise, update it. (The drivers are b57nd60a.sys and b57nd60x.sys for 64-bit OS and 32-bit OS respectively.)
3.2.2. Confirmation of 10G LAN driver version
Note The confirmation of 10G LAN driver version is not necessary before update. Confirm that the version is correct after updating LAN driver.
1. Open the Device Manager icon on the Control Panel window.
2. Double-click on the target device name from [Device Manager]-[Network Adapter].
3. Click the Driver Details on the Driver tab.
4. Confirm the version in Driver tab as well as that in Details. If the version of LAN driver in use
is one of the versions listed in the following table, the update will be completed successfully.

- 9 -
Mar 2016
808-882328-317-A
Device name Driver file name
After update version
Broadcom BCM5709C NetXtreme II GigE ※1 (QLogic BCM5709C Gigabit Ethernet)
bxvbda.sys (64-bit OS)
bxvbdx.sys (32-bit OS)
7.12.0.0
Broadcom BCM57711 NetXtreme II 10 GigE (QLogic BCM57711 10 Gigabit Ethernet)
Broadcom BCM57800 NetXtreme II GigE (QLogic BCM57800 Gigabit Ethernet)
Broadcom BCM57800 NetXtreme II 10 GigE (QLogic BCM57800 10 Gigabit Ethernet)
Broadcom BCM57810 NetXtreme II 10 GigE (QLogic BCM57810 10 Gigabit Ethernet)
evbda.sys (64-bit OS)
evbdx.sys (32-bit OS)
7.12.3.0
Broadcom BCM5709C NetXtreme II GigE (NDIS VBD Client) ※1 (QLogic BCM5709C Gigabit Ethernet (NDIS VBD Client))
Broadcom BCM57711 NetXtreme II 10 GigE (NDIS VBD Client) (QLogic BCM57711 10 Gigabit Ethernet (NDIS VBD Client))
Broadcom BCM57800 NetXtreme II GigE (NDIS VBD Client) (QLogic BCM57800 Gigabit Ethernet (NDIS VBD Client))
Broadcom BCM57800 NetXtreme II 10 GigE (NDIS VBD Client) (QLogic BCM57800 10 Gigabit Ethernet (NDIS VBD Client))
Broadcom BCM57810 NetXtreme II 10 GigE (NDIS VBD Client) (QLogic BCM57810 10 Gigabit Ethernet (NDIS VBD Client))
bxnd60a.sys (64-bit OS)
bxnd60x.sys (32-bit OS)
7.12.3.0
Broadcom BCM57711 NetXtreme II 10 GigE iSCSI Adapter ※2 (QLogic BCM57711 10 Gigabit Ethernet iSCSI Adapter) bxois.sys 7.12.0.0
*1 Broadcom BCM5709C NetXtreme II GigE is 1000GBASE-T, but is included in 10G LAN driver.
*2 Broadcom BCM57711 NetXtreme II 10 GigE iSCSI Adapter is not displayed when you invalidate iSCSI Offload Engine.
*3 The device name will become the one in bracket after update.

- 10 -
Mar 2016
808-882328-317-A
3.3. Preparation of module
3.3.1. Prepare the update module
1. Refer to the URL below and download the GVO-007598-G01_xxxxxxxxxxxxxxxxxx.zip (x
is an expression of arbitrary numbers). http://www.58support.nec.co.jp/global/download/index.html
-> Click model name(product name). -> Click “NEC Express5800/100 Series LAN Driver Module(V17.2/T7.12) (Windows
Server 2008 R2/Windows Server 2008)” in “Other update”.
2. Create a temp folder directly under the system drive. (e.g., C:\temp\)
3. Unzip GVO-007598-G01_xxxxxxxxxxxxxxxxxx.zip, copy the BCOM172 folder and
QLC712 folder in the temp folder. (e.g., C:\temp\BCOM172\) (e.g., C:\temp\QLC712\)
3.3.2. Prepare the recovery module For recovering to the original module, please use the DVD of EXPRESSBUILDER, support kit or the released module in Website. Regarding the source for obtaining the recovery module, please refer to [8.1 List of stored path of recovery driver] to prepare it in advance. Besides, if the recovery module is downloaded from Website, please extract it to an arbitrary folder. * If you want to use the DVD of EXPRESSBUILDER, DVD device is necessary for reading the
DVD.
- 11 -
Mar 2016
808-882328-317-A
3.4. Stop the WSFC node service
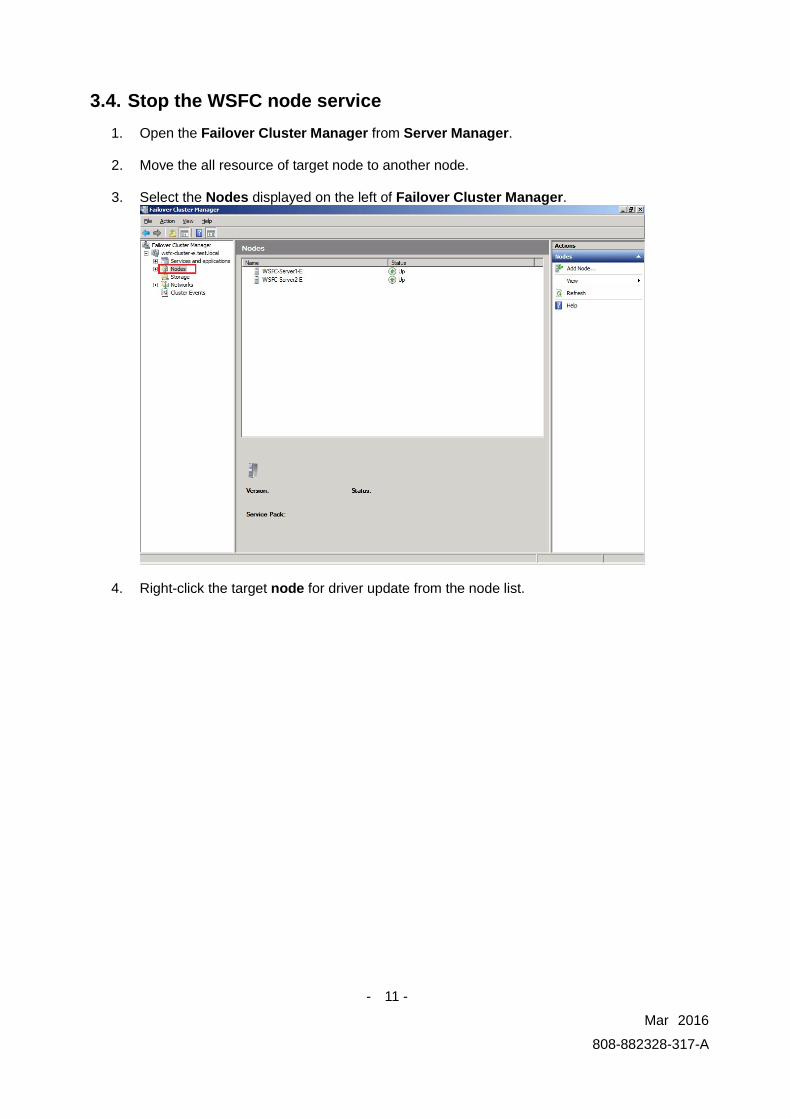
1. Open the Failover Cluster Manager from Server Manager.
2. Move the all resource of target node to another node.
3. Select the Nodes displayed on the left of Failover Cluster Manager.
4. Right-click the target node for driver update from the node list.
- 12 -
Mar 2016
808-882328-317-A
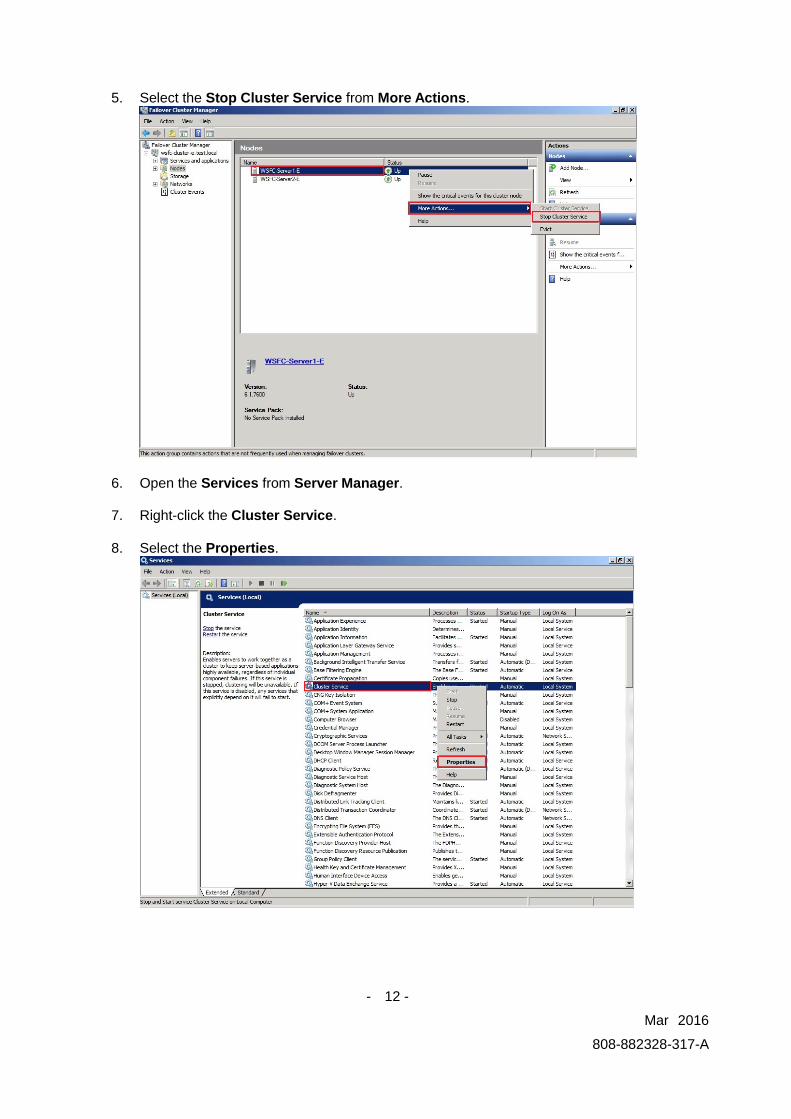
5. Select the Stop Cluster Service from More Actions.
6. Open the Services from Server Manager.
7. Right-click the Cluster Service.
8. Select the Properties.

- 13 -
Mar 2016
808-882328-317-A
9. Change the Startup type on General Tab to Disabled. Select the OK.
3.5. Stop the EXPRESSCLUSTER service
Refer the following website for more information.
http://www.nec.com/en/global/prod/expresscluster/en/support/manuals.html -> Reference Guide
-> Chapter 10 The system maintenance information -> Replacing the network card
* Perform the procedures prior to the replace of network card. Shut down the system and then start up it again. After that, Go to [3.6 Delete the team].
3.6. Delete the team
Important Please delete the team from [Broadcom Advanced Control Suite]. It cannot be deleted from Device Manager.
Note
For 10G LAN board, if you want to delete a team after updating the LAN driver, you have to do it from [QLogic Control Suite](QCS). The procedures of [Broadcom Advanced Control Suite] (BACS) and [Broadcom Control Suite] in the following are exactly same as [QLogic Control Suite] so you can delete Team by the following procedures. Besides, Step 3 and 4 are not necessary for deleting the team.
1. Open the Broadcom Control Suite icon on the Control Panel window.
Broadcom Advanced Control Suite starts.

- 14 -
Mar 2016
808-882328-317-A
2. Set the Filter to TEAM VIEW, right-click the target team adapter, and then select Delete
Team from the short-cut menu.
Note When the below message is displayed, select [Yes]. “The selected team will be deleted from system, do you want to proceed? NOTE: Applying the changes will temporarily interrupt the network connection. The process may take several minutes and the connection will resume afterwards.”
3. Double-click the following file (this example is using the C drive)
C:\temp\BCOM172\lan\AddLVlanStats.vbs
(For file info, refer the [3.3.1 Prepare the update module])
4. When the following message is displayed, click the OK Registry Addition Completed, Reboot the system
5. Restart the system
Team removal is now completed.
- 15 -
Mar 2016
808-882328-317-A
LAN driver update 4.Refer the notice before driver update.
Important Logon the system from local console by administrator account for executing the operation below.
4.1. Existing LAN driver uninstallation
Important If team is existed, remove it first.
1. Open the Program and Function icon on the Control Panel window.
2. Click the Broadcom Gigabit Integrated Controller in the list, right-click it and select
Uninstall. Continue the uninstallation according to the popup message.
3. Click the Broadcom NetXtreme II Driver Installer in the list, right-click it and select
Uninstall. Continue the uninstallation according to the popup message.
4. The dialogue of requesting the restart of system is displayed. Click on [Yes] to restart the system.
4.2. New LAN driver installation
1. Run a command prompt as administrator. Enter the following command at the command
prompt. cd C:\temp\BCOM172\
(For file info, refer to [3.3.1 Prepare the update module])
2. Enter the following, and then press Enter key.
Windows Server 2008 x86 INSTALL_WS2008x86.bat
Windows Server 2008 x64
INSTALL_WS2008x64.bat Windows Server 2008 R2
INSTALL_WS2008R2.bat
3. When the following message is displayed, restart the system. Installation Completed!

- 16 -
Mar 2016
808-882328-317-A
4. Enter the following, and then press Enter key.
cd C:\temp\QLC712\
5. Enter the following, and then press Enter key.
Windows Server 2008 x86 INSTALL_WS2008x86.bat
Windows Server 2008 x64
INSTALL_WS2008x64.bat Windows Server 2008 R2
INSTALL_WS2008R2.bat
6. When the following message is displayed, restart the system. Installation Completed!
7. Perform [3.2 Confirmation of LAN driver version] to confirm that the 1G LAN or 10G LAN
driver version is correct after the update.

- 17 -
Mar 2016
808-882328-317-A
After LAN driver install 5.
Important
・Logon the system from local console by administrator account for executing the operation below.
・If physical network adapter or teaming adapter is bound into Hyper-V Virtual Switch, rebind it after [5.2 Setup the Team].
・If using Hyper-V and not using WSFC or EXPRESSCLUSTER, shutdown all the Guest OS if necessary and reset the system to auto boot up after this chapter.
5.1. Workflow after LAN driver install
Start
End
5.3 Reset LAN driver
5.4 Start the WSFC node service
5.5 Start the EXPRESSCLUSTER service
5.2 Setup the Team
Set the network information (IP address etc.). In case of resetting, you can follow the prepared specifications.

- 18 -
Mar 2016
808-882328-317-A
5.2. Setup the Team
Note
For 10G LAN board, if you want to create a team after updating the LAN driver, you have to do it from [QLogic Control Suite](QCS). The procedures of [Broadcom Advanced Control Suite] (BACS) and [Broadcom Control Suite] in the following are exactly same as [QLogic Control Suite] so you can create Team by the following procedures.
1. Open the Broadcom Control Suite icon on the Control Panel window.
Broadcom Advanced Control Suite starts.
2. Set the Filter to TEAM VIEW, right-click the target team adapter, and then select Create Team from the short-cut menu.
The Broadcom Teaming wizard appears.
3. Click the Next.
Important Do not use Expert Mode.

- 19 -
Mar 2016
808-882328-317-A
4. Enter the specified name in the team name textbox, and then click the Next.
5. Select the type of team that you want to create from Team Type, and then click the Next.
Note
・If FEC/GEC Generic Trunking is selected, the following message will be displayed. Then Click [OK]. “Verify that the network switch connected to the team members is configured correctly for the team type.”
・When using Hyper-V, check “Enable HyperV Mode” box.
- 20 -
Mar 2016
808-882328-317-A
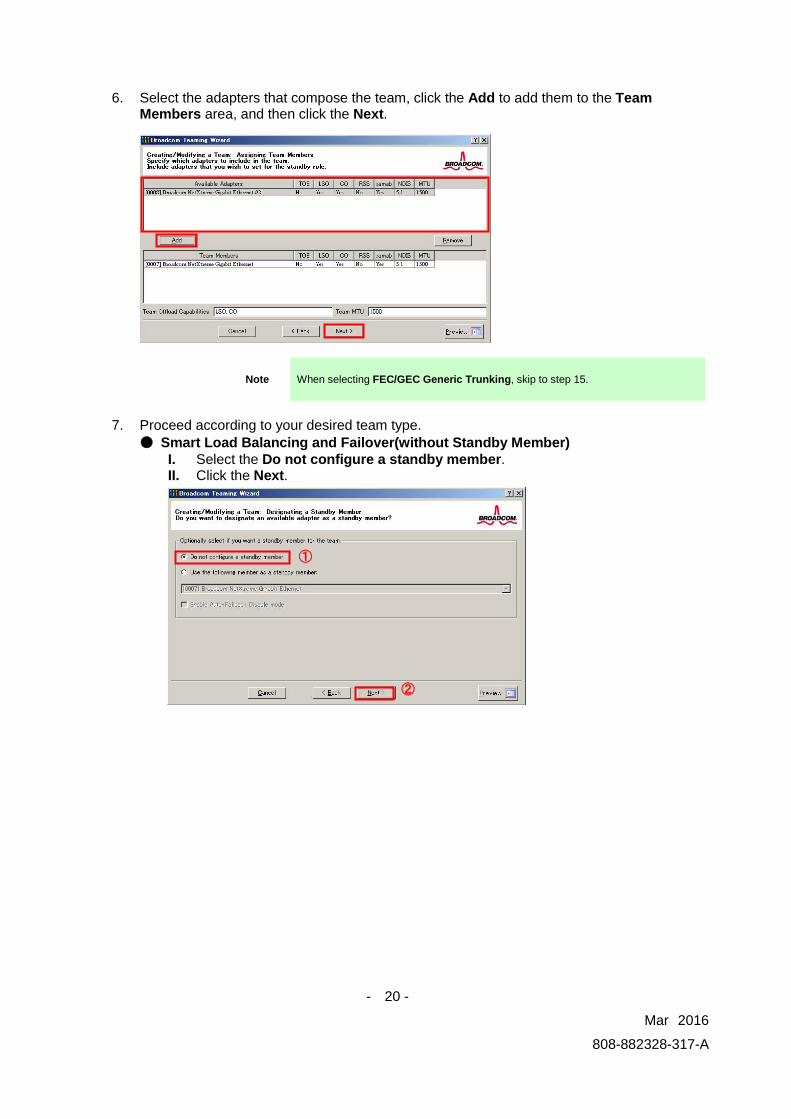
6. Select the adapters that compose the team, click the Add to add them to the Team
Members area, and then click the Next.
Note When selecting FEC/GEC Generic Trunking, skip to step 15.
7. Proceed according to your desired team type.
● Smart Load Balancing and Failover(without Standby Member) I. Select the Do not configure a standby member. II. Click the Next.
①
②
- 21 -
Mar 2016
808-882328-317-A
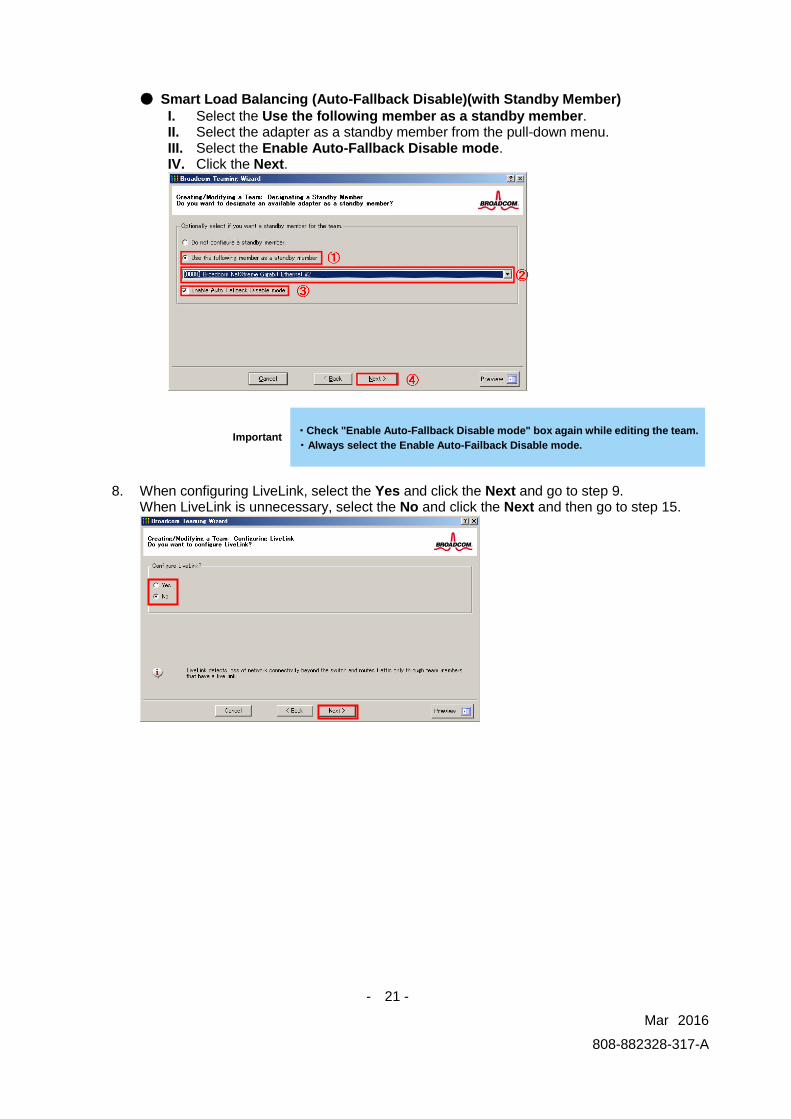
● Smart Load Balancing (Auto-Fallback Disable)(with Standby Member)
I. Select the Use the following member as a standby member. II. Select the adapter as a standby member from the pull-down menu. III. Select the Enable Auto-Fallback Disable mode. IV. Click the Next.
Important ・Check "Enable Auto-Fallback Disable mode" box again while editing the team. ・Always select the Enable Auto-Failback Disable mode.
8. When configuring LiveLink, select the Yes and click the Next and go to step 9.
When LiveLink is unnecessary, select the No and click the Next and then go to step 15.
- 22 -
Mar 2016
808-882328-317-A
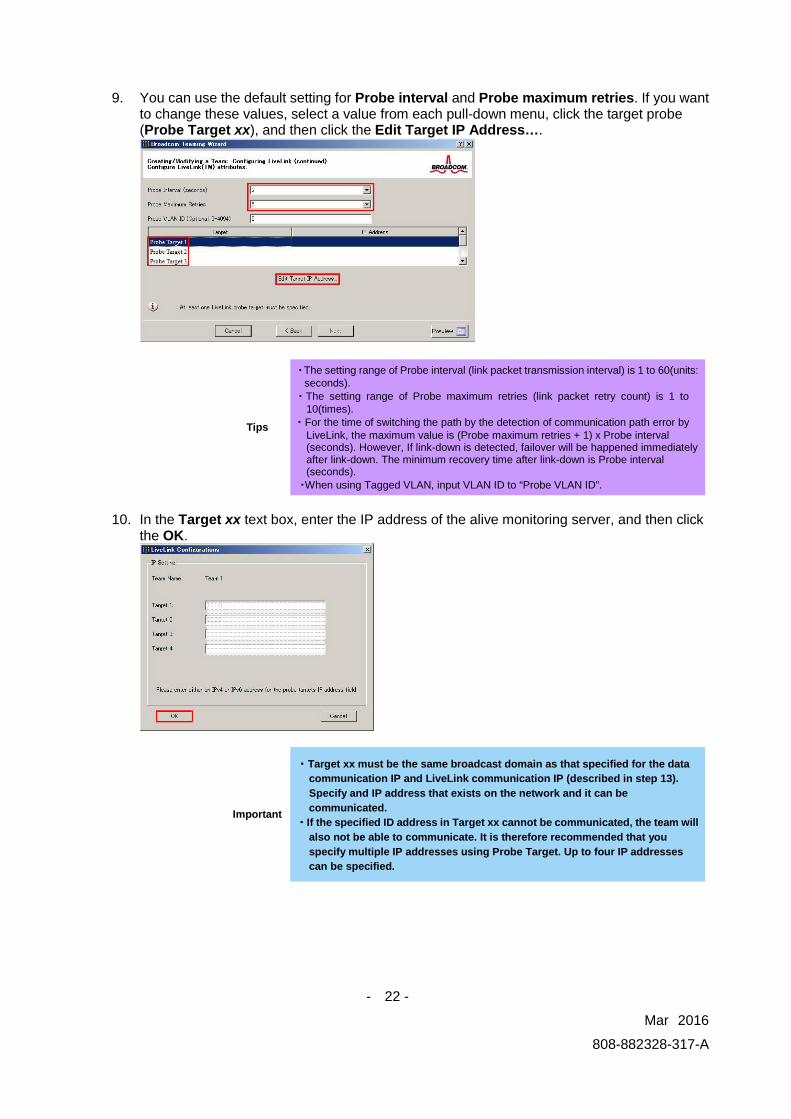
9. You can use the default setting for Probe interval and Probe maximum retries. If you want
to change these values, select a value from each pull-down menu, click the target probe (Probe Target xx), and then click the Edit Target IP Address….
Tips
・The setting range of Probe interval (link packet transmission interval) is 1 to 60(units: seconds).
・The setting range of Probe maximum retries (link packet retry count) is 1 to 10(times).
・For the time of switching the path by the detection of communication path error by LiveLink, the maximum value is (Probe maximum retries + 1) x Probe interval (seconds). However, If link-down is detected, failover will be happened immediately after link-down. The minimum recovery time after link-down is Probe interval (seconds).
・When using Tagged VLAN, input VLAN ID to “Probe VLAN ID”.
10. In the Target xx text box, enter the IP address of the alive monitoring server, and then click
the OK.
Important
・Target xx must be the same broadcast domain as that specified for the data communication IP and LiveLink communication IP (described in step 13). Specify and IP address that exists on the network and it can be communicated.
・If the specified ID address in Target xx cannot be communicated, the team will also not be able to communicate. It is therefore recommended that you specify multiple IP addresses using Probe Target. Up to four IP addresses can be specified.
- 23 -
Mar 2016
808-882328-317-A
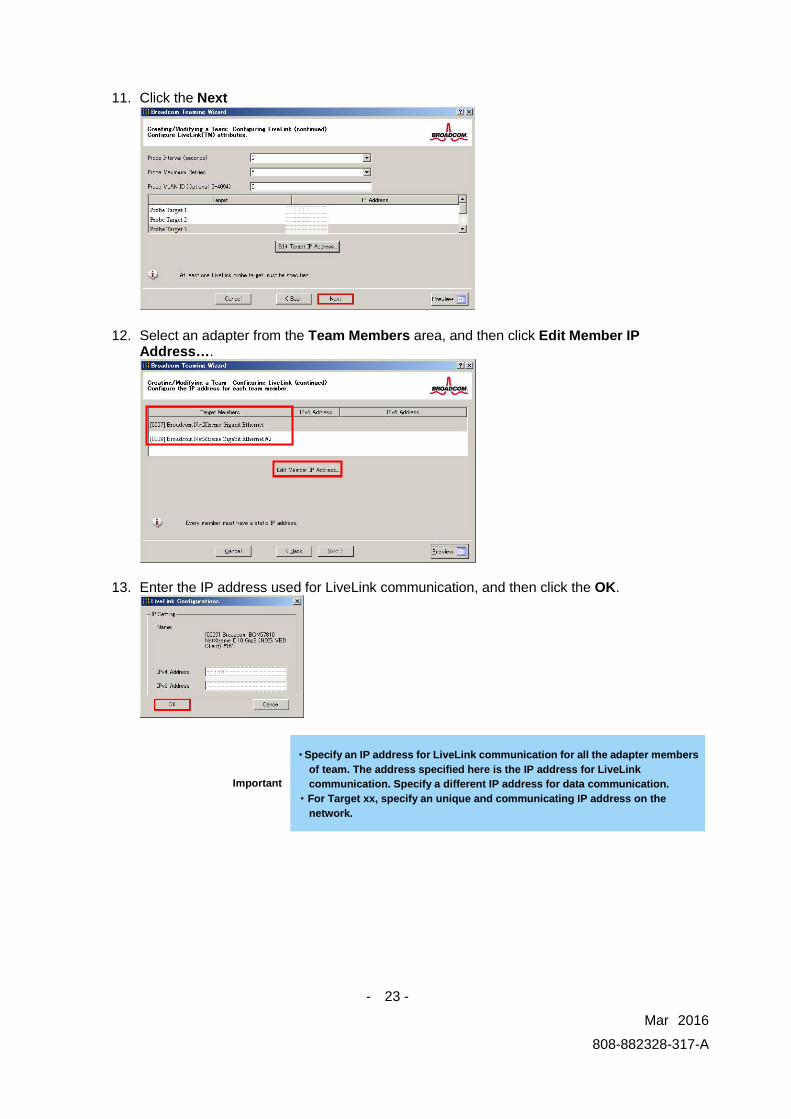
11. Click the Next
12. Select an adapter from the Team Members area, and then click Edit Member IP
Address….
13. Enter the IP address used for LiveLink communication, and then click the OK.
Important
・Specify an IP address for LiveLink communication for all the adapter members of team. The address specified here is the IP address for LiveLink communication. Specify a different IP address for data communication.
・For Target xx, specify an unique and communicating IP address on the network.
- 24 -
Mar 2016
808-882328-317-A
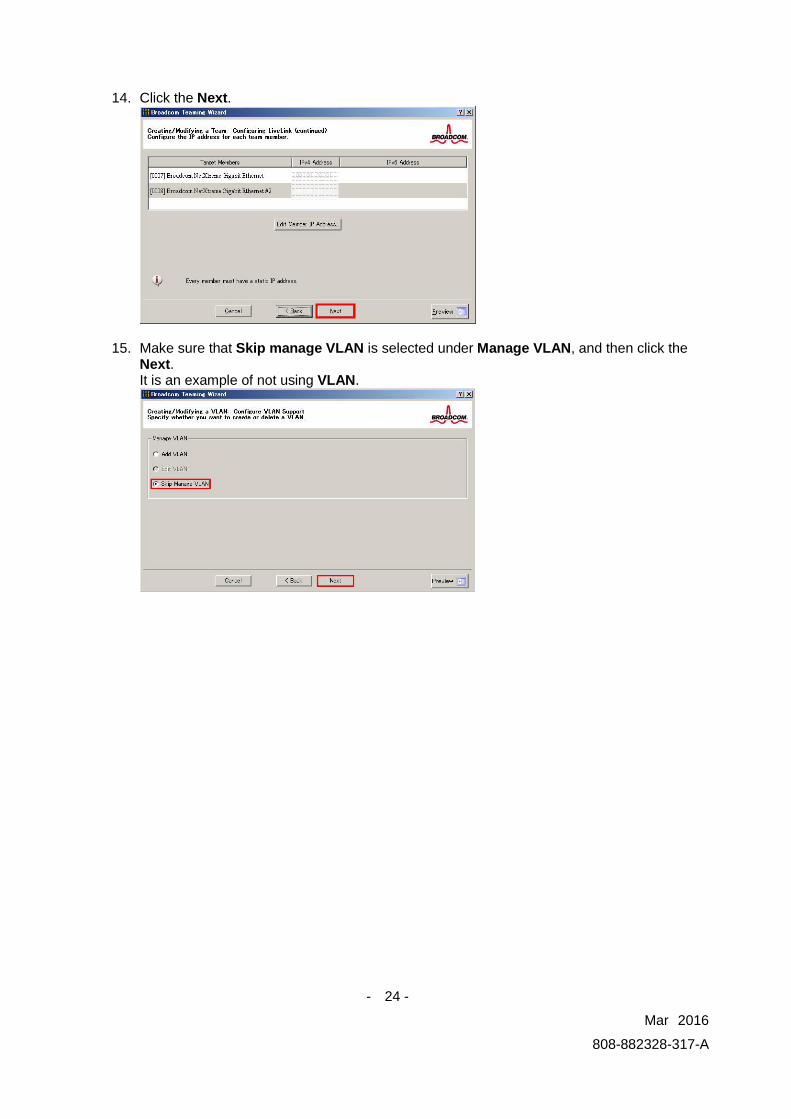
14. Click the Next.
15. Make sure that Skip manage VLAN is selected under Manage VLAN, and then click the Next. It is an example of not using VLAN.

- 25 -
Mar 2016
808-882328-317-A
16. Make sure that Commit changes to system and Exit the wizard is selected under Commit
changes, and then click the Finish.
Note When the message below is displayed, select [Yes]. ”Applying the changes will temporarily interrupt the network connection. The process may take several minutes and the connection will resume afterwards. Do you want to continue?”
Tips
After creating the team, if it is displayed as the following image, perform Step 8 - 14 again and correct the LiveLink settings. If all the adapter members of team are linking-down, the team adapter will also be displayed as the following image. Therefore, make sure all the adapter members are in link-up state.
17. Restart the system.

- 26 -
Mar 2016
808-882328-317-A
18. After the system is started up, follow step 1 to start the Broadcom Control Suite(Open the
Broadcom Control Suite icon from Control Panel) to confirm that the team is created. The team settings cab be confirmed on the right Information window.
● Smart Load Balancing and Failover(Without Standby Member)
● Smart Load Balancing (Auto-Fallback Disable)(With Standby Member)
● FEC/GEC Generic Trunking
- 27 -
Mar 2016
808-882328-317-A
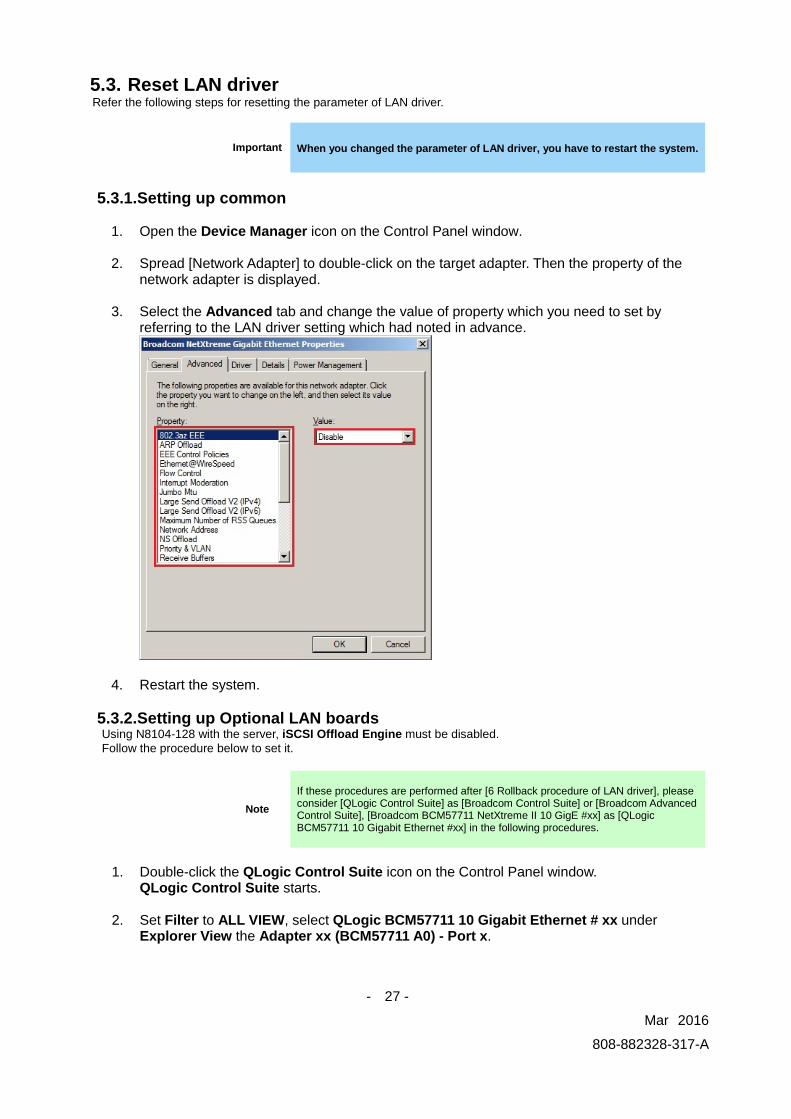
5.3. Reset LAN driver Refer the following steps for resetting the parameter of LAN driver.
Important When you changed the parameter of LAN driver, you have to restart the system.
5.3.1. Setting up common
1. Open the Device Manager icon on the Control Panel window.
2. Spread [Network Adapter] to double-click on the target adapter. Then the property of the
network adapter is displayed.
3. Select the Advanced tab and change the value of property which you need to set by referring to the LAN driver setting which had noted in advance.
4. Restart the system.
5.3.2. Setting up Optional LAN boards Using N8104-128 with the server, iSCSI Offload Engine must be disabled. Follow the procedure below to set it.
Note If these procedures are performed after [6 Rollback procedure of LAN driver], please consider [QLogic Control Suite] as [Broadcom Control Suite] or [Broadcom Advanced Control Suite], [Broadcom BCM57711 NetXtreme II 10 GigE #xx] as [QLogic BCM57711 10 Gigabit Ethernet #xx] in the following procedures.
1. Double-click the QLogic Control Suite icon on the Control Panel window.
QLogic Control Suite starts.
2. Set Filter to ALL VIEW, select QLogic BCM57711 10 Gigabit Ethernet # xx under Explorer View the Adapter xx (BCM57711 A0) - Port x.

- 28 -
Mar 2016
808-882328-317-A
3. Select Configurations tab at the right side screen and then expand Resource Reservations.
4. Click the [Configure] button on the Click the button to configure. The Hardware and Resource Configuration Wizard appears.
5. Remove a checkmark from [iSCSI] under Protocols, if checked.
Select [Next], and then click the [Apply] button.
6. When the following message appears, click [OK]. Applying the changes will temporarily interrupt the network connection. The process may take several minutes and the connection will resume afterwards. Do you want to continue?
7. Complete steps 2 to 6 for each N8104-128 network adapter.
Then, close the QLogic Control Suite.
8. Restart the system. Setup is now completed.
5.4. Start the WSFC node service Refer the following steps for starting the service of node which has been stopped in [3.4 Stop the WSFC node service].
1. Open the Services from Server Manager in the node which LAN driver updated.
2. Right-click the Cluster Service in service screen and select the Properties.

- 29 -
Mar 2016
808-882328-317-A
3. Change the Startup type to Automatic on General Tab then select OK.
4. Right-click the Cluster Service at service screen and select the Start.
5. Open the Failover Cluster Manager from Server Manager.
6. Select the node from the left side of Failover Cluster Manager.
7. Right-click the target node for driver update from the node list. Select the Start Cluster Service from More Actions.

- 30 -
Mar 2016
808-882328-317-A
5.5. Start the EXPRESSCLUSTER service
Refer to the following URL.
http://www.nec.com/en/global/prod/expresscluster/en/support/manuals.html -> Reference Guide
-> Chapter 10 The system maintenance information -> Replacing the network card
* Perform the procedures beyond replacing network card procedure. In addition, no need to reset the network configuration.
- 31 -
Mar 2016
808-882328-317-A
Rollback procedure of LAN driver 6.
Important
・Logon in the system from local console by administrator account for executing the operation below.
・If necessary, execute [3.4 Stop the WSFC node service], [3.5 Stop the EXPRESSCLUSTER service] and [3.6 Delete the team] in advance.
・If physical network adapter or teaming adapter is bound into Hyper-V Virtual Switch, stop the guest OS and remove the binding before [3.6 Delete the team].
・After rollback, execute [5 After LAN driver install] and reset the network setting.
6.1. New teaming driver uninstallation
Important If team is already existed, refer to [3.6 Delete the team] for deleting all the teams before uninstallation.
1. Open the Program and Function icon on the Control Panel window.
2. Click the Broadcom Management Programs in the list, right-click it and select the
Uninstall. Continue the installation according to the popup message.
3. A popup message of restarting the system is displayed. Click OK.
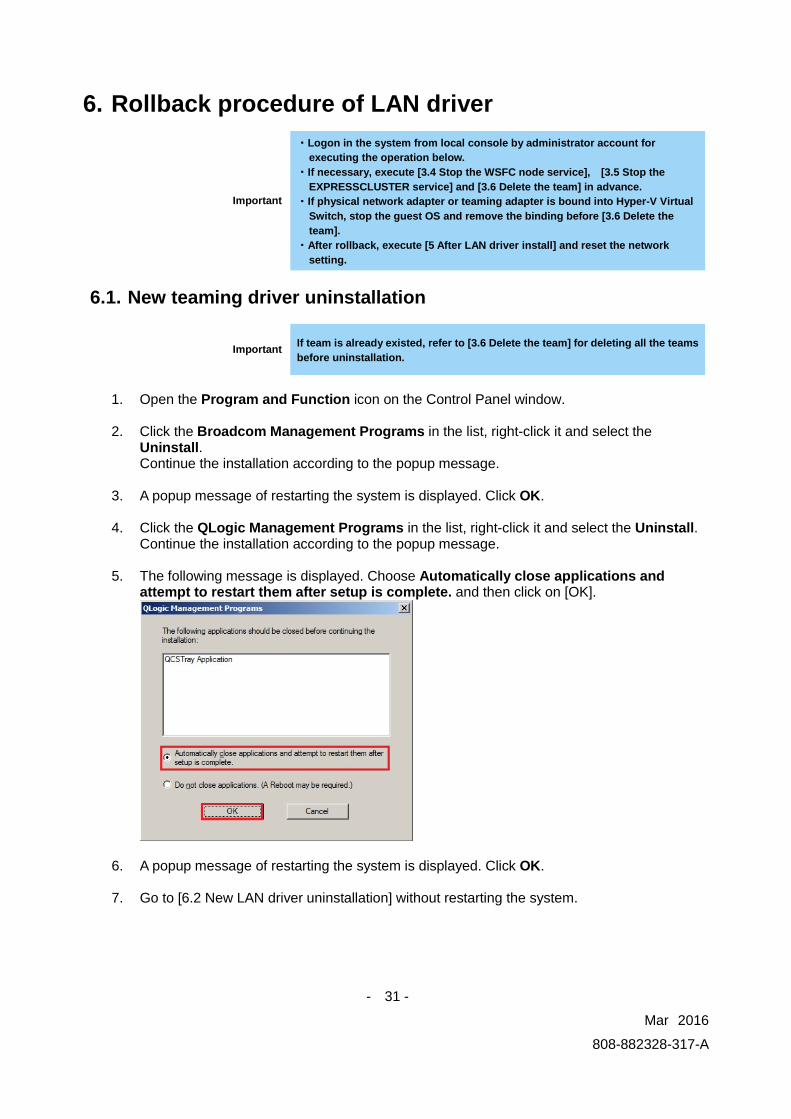
4. Click the QLogic Management Programs in the list, right-click it and select the Uninstall. Continue the installation according to the popup message.
5. The following message is displayed. Choose Automatically close applications and attempt to restart them after setup is complete. and then click on [OK].
6. A popup message of restarting the system is displayed. Click OK.
7. Go to [6.2 New LAN driver uninstallation] without restarting the system.

- 32 -
Mar 2016
808-882328-317-A
6.2. New LAN driver uninstallation
1. Open the Program and Function icon on the Control Panel window.
2. Click the Broadcom Gigabit Integrated Controller in the list, right-click it and select
Uninstall. Continue the uninstallation according to the popup message.
3. Click the QLogic Driver Installer in the list, right-click it and select Uninstall.
Continue the uninstallation according to the popup message.
4. The dialogue of requesting the restart of system is displayed. Click on [Yes] to restart the system.
6.3. Old LAN driver installation Install the LAN driver by following the below procedures and [8.1 List of stored path of recovery driver].
When the old version is the one at the time of shipment
1. Insert the [EXPRESSBUILDER] DVD in the optical device.
2. Refer to the installation guide for installing Starter Pack. After the installation, restart the
system.
3. After the system is restarted, confirm that the version is the one before update by following [3.2 Confirmation of LAN driver version].
4. After the confirmation of version, perform [5 After LAN driver install]. When the old version is released from Website
1. Refer the corresponding installation guide from website to install the driver. Restart the
system after the installation.
2. After the system is restarted, confirm that the version is the one before update by following [3.2 Confirmation of LAN driver version].
3. After the confirmation of version, perform [5 After LAN driver install].
- 33 -
Mar 2016
808-882328-317-A
Notice 7.This section describes notice of LAN driver. Read the following notes or information before installation.
7.1. About the operation by remote desktop For all the operation described in this document, it has to be performed from the local console. Remote desktop of OS or remote operation tool is not supported.
7.2. Account of operation For all the operation described in this document, it has to be performed by logging on with an administrator account. In addition, open command prompt as Administrator.
7.3. Notice of using Hyper-V If you use Hyper-V and not use WSFC or EXPRESSCLUSTER, shut down all the Guest OS before the LAN driver installation.
7.4. Notice of using Team If you want to uninstall the LAN driver in teaming environment, please remove the team adapter before the uninstallation. In addition, if the team is bound into Hyper-V virtual adapter, remove the binding before the removal of team.
7.5. Uninstall the driver Note the setting information of network(IP Address etc...), teaming(when it is team environment) and default gateway. Set it again after LAN driver install or teaming setup (when it was team environment).
7.6. Notice of update The network is disconnected when updating the LAN driver. Please stop all the jobs of using network before the update.
7.7. About the affixed number at the end of the 10G LAN board name The affixed number at the end of the adapter name might be greater than two digits. There is no problem in the quality and operation as the network communication.
Example: QLogic BCM57711 10 Gigabit Ethernet (NDIS VBD Client) #54
QLogic BCM57810 10 Gigabit Ethernet (NDIS VBD Client) #297 7.8. Notice of using N8104-128/134 If the setting of Flow Control of N8104-128/134 is not Disabled, NEC recommends the below setting. For N8104-128, set Jumbo Mtu(Jumbo Packet) to be less than 4000 bytes. For N8104-134, set Jumbo Mtu(Jumbo Packet) to be less than 7000 bytes.
7.9. Notice of using teaming utility(BACS/QCS) If you want to create or remove team from teaming utility, you have to login the system by the account with installed teaming utility.
- 34 -
Mar 2016
808-882328-317-A
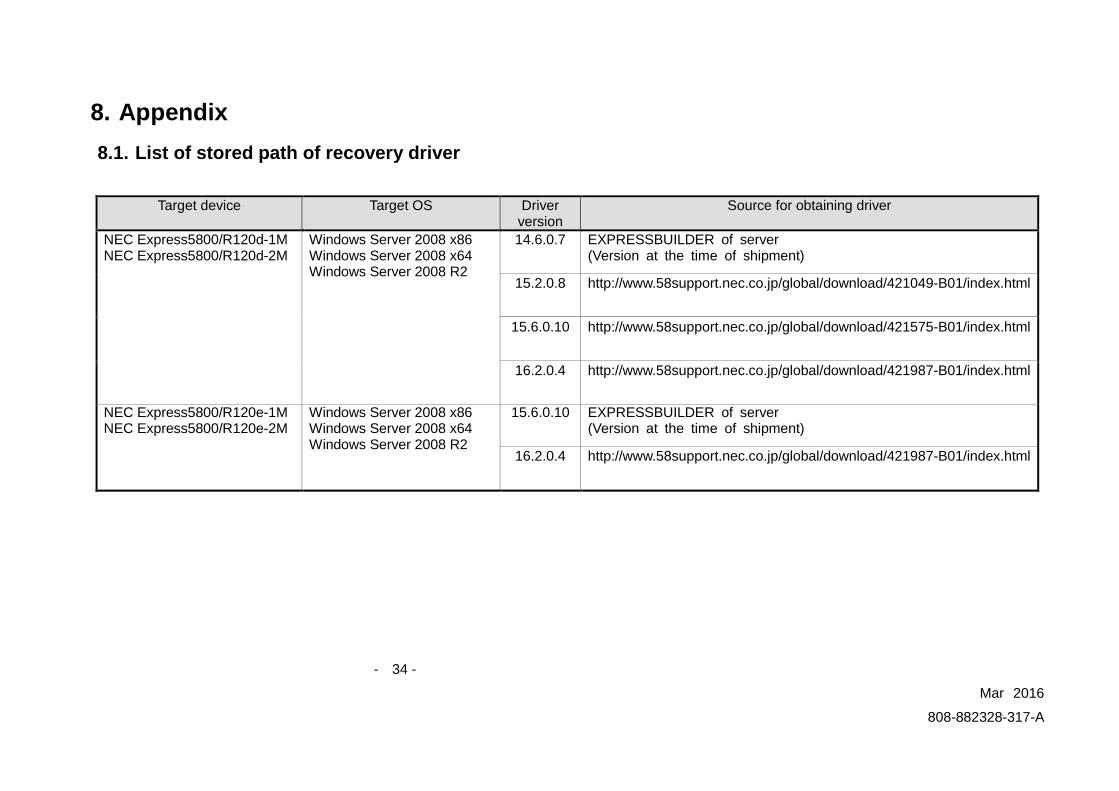
Appendix 8. 8.1. List of stored path of recovery driver
Target device Target OS Driver version
Source for obtaining driver
NEC Express5800/R120d-1M NEC Express5800/R120d-2M
Windows Server 2008 x86 Windows Server 2008 x64 Windows Server 2008 R2
14.6.0.7 EXPRESSBUILDER of server (Version at the time of shipment)
15.2.0.8 http://www.58support.nec.co.jp/global/download/421049-B01/index.html
15.6.0.10 http://www.58support.nec.co.jp/global/download/421575-B01/index.html
16.2.0.4 http://www.58support.nec.co.jp/global/download/421987-B01/index.html
NEC Express5800/R120e-1M NEC Express5800/R120e-2M
Windows Server 2008 x86 Windows Server 2008 x64 Windows Server 2008 R2
15.6.0.10 EXPRESSBUILDER of server (Version at the time of shipment)
16.2.0.4 http://www.58support.nec.co.jp/global/download/421987-B01/index.html

- 35 -
Mar 2016
808-882328-317-A
NEC Express5800/E110d-1 NEC Express5800/GT110d NEC Express5800/GT110d-S NEC Express5800/R110d-1E
Windows Server 2008 x86 Windows Server 2008 x64 Windows Server 2008 R2
14.6.0.7 EXPRESSBUILDER of server (Version at the time of shipment)
15.2.0.8 http://www.58support.nec.co.jp/global/download/421049-B01/index.html
15.6.0.10 http://www.58support.nec.co.jp/global/download/421575-B01/index.html
16.2.0.4 http://www.58support.nec.co.jp/global/download/421987-B01/index.html
NEC Express5800/GT110e NEC Express5800/GT110e-S NEC Express5800/R110e-1E
Windows Server 2008 x86 Windows Server 2008 x64 Windows Server 2008 R2
15.0.0.21 EXPRESSBUILDER of server (Version at the time of shipment)
15.2.0.8 http://www.58support.nec.co.jp/global/download/421049-B01/index.html
15.6.0.10 http://www.58support.nec.co.jp/global/download/421575-B01/index.html
16.2.0.4 http://www.58support.nec.co.jp/global/download/421987-B01/index.html

- 36 -
Mar 2016
808-882328-317-A
NEC Express5800/R120d-1E NEC Express5800/R120d-2E
Windows Server 2008 x86 Windows Server 2008 x64 Windows Server 2008 R2
15.0.0.21 EXPRESSBUILDER of server (Version at the time of shipment)
15.2.0.8 http://www.58support.nec.co.jp/global/download/421049-B01/index.html
15.6.0.10 http://www.58support.nec.co.jp/global/download/421575-B01/index.html
16.2.0.4 http://www.58support.nec.co.jp/global/download/421987-B01/index.html
NEC Express5800/R120e-1E NEC Express5800/R120e-2E
Windows Server 2008 x86 Windows Server 2008 x64 Windows Server 2008 R2
15.6.0.10 EXPRESSBUILDER of server (Version at the time of shipment)
16.2.0.4 http://www.58support.nec.co.jp/global/download/421987-B01/index.html
NEC Express5800/T120d Windows Server 2008 x86 Windows Server 2008 x64 Windows Server 2008 R2
15.0.0.21 EXPRESSBUILDER of server (Version at the time of shipment)
15.2.0.8 http://www.58support.nec.co.jp/global/download/421049-B01/index.html
15.6.0.10 http://www.58support.nec.co.jp/global/download/421575-B01/index.html
16.2.0.4 http://www.58support.nec.co.jp/global/download/421987-B01/index.html
NEC Express5800/T120e Windows Server 2008 x86 Windows Server 2008 x64 Windows Server 2008 R2
15.6.0.10 EXPRESSBUILDER of server (Version at the time of shipment)
16.2.0.4 http://www.58support.nec.co.jp/global/download/421987-B01/index.html
- 37 -
Mar 2016
808-882328-317-A
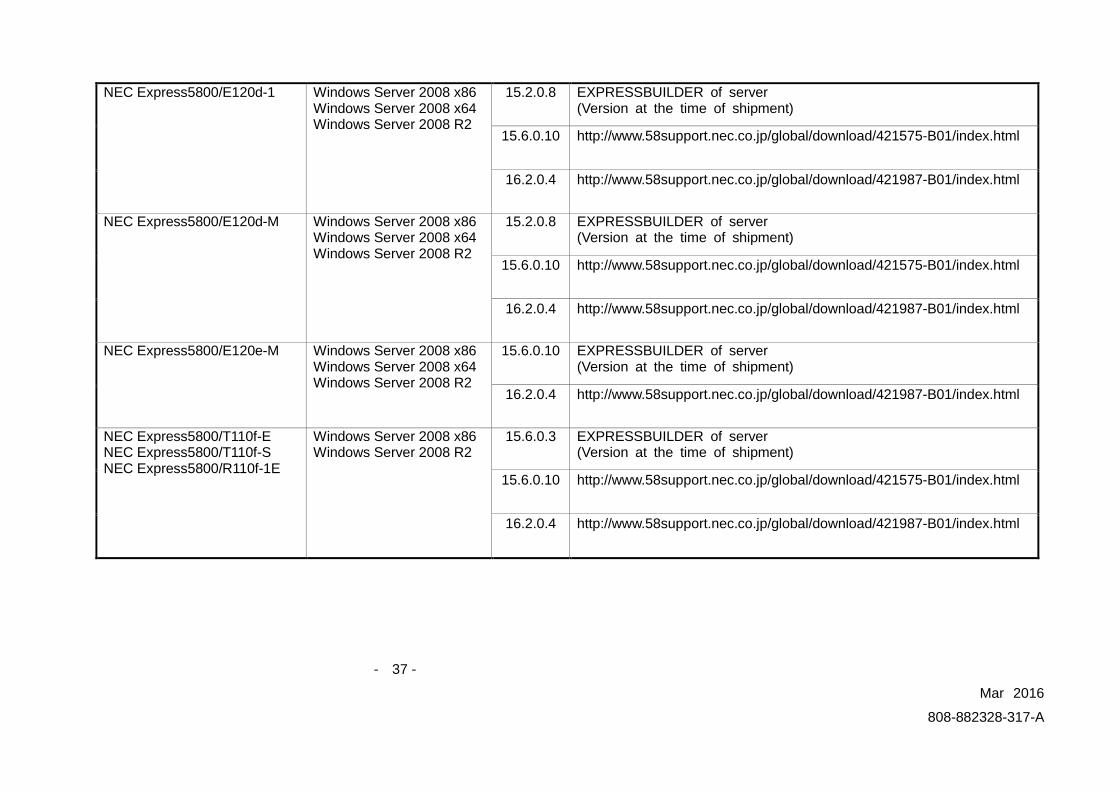
NEC Express5800/E120d-1 Windows Server 2008 x86 Windows Server 2008 x64 Windows Server 2008 R2
15.2.0.8 EXPRESSBUILDER of server (Version at the time of shipment)
15.6.0.10 http://www.58support.nec.co.jp/global/download/421575-B01/index.html
16.2.0.4 http://www.58support.nec.co.jp/global/download/421987-B01/index.html
NEC Express5800/E120d-M Windows Server 2008 x86 Windows Server 2008 x64 Windows Server 2008 R2
15.2.0.8 EXPRESSBUILDER of server (Version at the time of shipment)
15.6.0.10 http://www.58support.nec.co.jp/global/download/421575-B01/index.html
16.2.0.4 http://www.58support.nec.co.jp/global/download/421987-B01/index.html
NEC Express5800/E120e-M Windows Server 2008 x86 Windows Server 2008 x64 Windows Server 2008 R2
15.6.0.10 EXPRESSBUILDER of server (Version at the time of shipment)
16.2.0.4 http://www.58support.nec.co.jp/global/download/421987-B01/index.html
NEC Express5800/T110f-E NEC Express5800/T110f-S NEC Express5800/R110f-1E
Windows Server 2008 x86 Windows Server 2008 R2
15.6.0.3 EXPRESSBUILDER of server (Version at the time of shipment)
15.6.0.10 http://www.58support.nec.co.jp/global/download/421575-B01/index.html
16.2.0.4 http://www.58support.nec.co.jp/global/download/421987-B01/index.html

- 38 -
Mar 2016
808-882328-317-A
NEC Express5800/T110g-E NEC Express5800/T110g-S NEC Express5800/R110g-1E
Windows Server 2008 x86 Windows Server 2008 R2
16.2.0.4 EXPRESSBUILDER of server (Version at the time of shipment)
NEC Express5800/R120f-1M NEC Express5800/R120f-2M
Windows Server 2008 x86 Windows Server 2008 R2
16.4.0.2 EXPRESSBUILDER of server (Version at the time of shipment)
NEC Express5800/R120f-1E Windows Server 2008 x86 Windows Server 2008 R2
16.4.0.2 EXPRESSBUILDER of server (Version at the time of shipment)
NEC Express5800/E120f-M Windows Server 2008 R2 16.4.0.2 EXPRESSBUILDER of server (Version at the time of shipment)
NEC Express5800/R120f-2E NEC Express5800/T120f
Windows Server 2008 x86 Windows Server 2008 R2
16.4.0.2 EXPRESSBUILDER of server (Version at the time of shipment)