LAGUNA SERIES - crlaurence.com · CRL LAGUNA SERIES SLIDING GLASS DOOR SYSTEM AL crlaurence.com |...
22
INSTALLATION INSTRUCTIONS 2503 E. Vernon Avenue, Los Angeles, CA 90058-1826 (800) 421-6144 Ext. 17700 Fax (800) 262-3299 email: [email protected] website: www.crlaurence.com ALUMINUM LAGUNA SERIES SLIDING DOOR KITS 11M0154_REV A
Transcript of LAGUNA SERIES - crlaurence.com · CRL LAGUNA SERIES SLIDING GLASS DOOR SYSTEM AL crlaurence.com |...

INSTALLATION INSTRUCTIONS
2503 E. Vernon Avenue, Los Angeles, CA 90058-1826(800) 421-6144 Ext. 17700 Fax (800) 262-3299email: [email protected] website: www.crlaurence.comALUMINUM
LAGUNA SERIESSLIDING DOOR KITS
11M0154_REV A

CRL LAGUNA SERIES SLIDING GLASS DOOR SYSTEM
ALUMINUM2crlaurence.com | crl-arch.com
ORDER OF ASSEMBLY AND INSTALLATIONPARTS LIST � � � � � � � � � � � � � � � � � � � � � � � � � � � � � � � � � � � � � � � � � � � � � � � � � � � � � � � � � � � � � � � � � � � � � � � � � � � � � � � � � � � � � � � � � � 3INTRODUCTION � � � � � � � � � � � � � � � � � � � � � � � � � � � � � � � � � � � � � � � � � � � � � � � � � � � � � � � � � � � � � � � � � � � � � � � � � � � � � � � � � � � � � 4SYSTEM LIMITATIONS � � � � � � � � � � � � � � � � � � � � � � � � � � � � � � � � � � � � � � � � � � � � � � � � � � � � � � � � � � � � � � � � � � � � � � � � � � � � � � � 4GLASS FABRICATION � � � � � � � � � � � � � � � � � � � � � � � � � � � � � � � � � � � � � � � � � � � � � � � � � � � � � � � � � � � � � � � � � � � � � � � � � � 4 - 10
LSWM5_ Wall Mount Single Slider � � � � � � � � � � � � � � � � � � � � � � � � � � � � � � � � � � � � � � � � � � � � � � � � � � � � � � � � � � � � � � � � � 5LSWM6_ Wall Mount Bi-Parting Sliders� � � � � � � � � � � � � � � � � � � � � � � � � � � � � � � � � � � � � � � � � � � � � � � � � � � � � � � � � � � � � 6LSGM5_ Glass Mount Single Slider � � � � � � � � � � � � � � � � � � � � � � � � � � � � � � � � � � � � � � � � � � � � � � � � � � � � � � � � � � � � � � � � 7LSGM6_ Glass Mount Single Slider with Sidelites � � � � � � � � � � � � � � � � � � � � � � � � � � � � � � � � � � � � � � � � � � � � � � � � � � � 8LSWM7_ Wall Mount Single Slider with Softbrake � � � � � � � � � � � � � � � � � � � � � � � � � � � � � � � � � � � � � � � � � � � � � � � � � � � 9LSWM8_ Wall Mount Bi-Parting Sliders with Softbrake � � � � � � � � � � � � � � � � � � � � � � � � � � � � � � � � � � � � � � � � � � � � � 10
INSTALL HARDWARE: WALL MOUNT � � � � � � � � � � � � � � � � � � � � � � � � � � � � � � � � � � � � � � � � � � � � � � � � � � � � � � � � � � � � � � 11Attach Wall Mount Clamps to Sliding Tube � � � � � � � � � � � � � � � � � � � � � � � � � � � � � � � � � � � � � � � � � � � � � � � � � � � � � � 11Position Level to Wall � � � � � � � � � � � � � � � � � � � � � � � � � � � � � � � � � � � � � � � � � � � � � � � � � � � � � � � � � � � � � � � � � � � � � � � � � � � � 11Mount the Wall Mount Clamps � � � � � � � � � � � � � � � � � � � � � � � � � � � � � � � � � � � � � � � � � � � � � � � � � � � � � � � � � � � � � � � � � � � 12Install Left and Right Door Stops � � � � � � � � � � � � � � � � � � � � � � � � � � � � � � � � � � � � � � � � � � � � � � � � � � � � � � � � � � � � � � � � 12
INSTALL HARDWARE: GLASS MOUNT � � � � � � � � � � � � � � � � � � � � � � � � � � � � � � � � � � � � � � � � � � � � � � � � � � � � � � � � � � � � � 13Attach Glass Mount Clamps � � � � � � � � � � � � � � � � � � � � � � � � � � � � � � � � � � � � � � � � � � � � � � � � � � � � � � � � � � � � � � � � � � � � � 13Assemble Glass Mount Clamps � � � � � � � � � � � � � � � � � � � � � � � � � � � � � � � � � � � � � � � � � � � � � � � � � � � � � � � � � � � � � � � � � 13Install Left and Right Door Stops � � � � � � � � � � � � � � � � � � � � � � � � � � � � � � � � � � � � � � � � � � � � � � � � � � � � � � � � � � � � � � � � 13
PREPARE AND HANG DOOR � � � � � � � � � � � � � � � � � � � � � � � � � � � � � � � � � � � � � � � � � � � � � � � � � � � � � � � � � � � � � � � � � � � � � � � 14Prepare Top Rollers � � � � � � � � � � � � � � � � � � � � � � � � � � � � � � � � � � � � � � � � � � � � � � � � � � � � � � � � � � � � � � � � � � � � � � � � � � � � � 14Mount Top Rollers Onto Door � � � � � � � � � � � � � � � � � � � � � � � � � � � � � � � � � � � � � � � � � � � � � � � � � � � � � � � � � � � � � � � � � � � � 14Hang Door � � � � � � � � � � � � � � � � � � � � � � � � � � � � � � � � � � � � � � � � � � � � � � � � � � � � � � � � � � � � � � � � � � � � � � � � � � � � � � � � � � � � � 15Install Floor Guide � � � � � � � � � � � � � � � � � � � � � � � � � � � � � � � � � � � � � � � � � � � � � � � � � � � � � � � � � � � � � � � � � � � � � � � � � � � � � � � 16Install Anti-Lift Block � � � � � � � � � � � � � � � � � � � � � � � � � � � � � � � � � � � � � � � � � � � � � � � � � � � � � � � � � � � � � � � � � � � � � � � � � � � � 17Install Floor Mount Door Stops � � � � � � � � � � � � � � � � � � � � � � � � � � � � � � � � � � � � � � � � � � � � � � � � � � � � � � � � � � � � � � � � � � 17Place Glass Edge Protectors � � � � � � � � � � � � � � � � � � � � � � � � � � � � � � � � � � � � � � � � � � � � � � � � � � � � � � � � � � � � � � � � � � � � 18Install Sliding Tube End Caps � � � � � � � � � � � � � � � � � � � � � � � � � � � � � � � � � � � � � � � � � � � � � � � � � � � � � � � � � � � � � � � � � � � � 18
INSTALL ACCESSORIES � � � � � � � � � � � � � � � � � � � � � � � � � � � � � � � � � � � � � � � � � � � � � � � � � � � � � � � � � � � � � � � � � � � � � � � 19 - 21Install Wall Mount End Cap (For LSGM5BS Only) � � � � � � � � � � � � � � � � � � � � � � � � � � � � � � � � � � � � � � � � � � � � � � � � 19Install Thru-Glass Pull FP214BS (Optional) � � � � � � � � � � � � � � � � � � � � � � � � � � � � � � � � � � � � � � � � � � � � � � � � � � � � � � 19Install Ceiling Mount Clamp LS412BS (Optional) � � � � � � � � � � � � � � � � � � � � � � � � � � � � � � � � � � � � � � � � � � � � � � � � � 20Install Softbrake (Optional for Wall Mount Applications) � � � � � � � � � � � � � � � � � � � � � � � � � � � � � � � � � � � � � � � � � � 21
MAINTENANCE � � � � � � � � � � � � � � � � � � � � � � � � � � � � � � � � � � � � � � � � � � � � � � � � � � � � � � � � � � � � � � � � � � � � � � � � � � � � � � � � � � � � � 22CARE AND CLEANING OF STAINLESS STEEL � � � � � � � � � � � � � � � � � � � � � � � � � � � � � � � � � � � � � � � � � � � � � � � � � � � � � 22

L2400_ L2500_ LS104_ LS240_
Anti-Lift Top Roller with Flush and Surface Mount Fittings
Anti-Lift Top Roller with Softbrake Bracket and
Flush and Surface Mount FittingsTop Sliding Tube with
Two End Cap 240” (6096 mm) Top Sliding Tube
LS405L_ LS405R_ LS505L_ LS505R_
Left Hand Door Stop Right Hand Door Stop Left Hand Softbrake Kit Right Hand Softbrake Kit
LS403_ LS402_ LS407_ LS407_
Glass Mount Clamp with Flush and Surface Mount Fittings Wall Mount Clamp Wall / Floor Mount Door Stop Wall / Floor Mount Door Stop
LS106_ LS104CAP FP214_ CB1PK
Wall Mount End Cap for Top Sliding Tube
Replacement End Cap for Top Sliding Tube Thru-Glass Pull
CRL Silicone Bumpons 5 x 11�1 mm
LS412_ 48LP_
Ceiling Mount Clamp for Top Sliding Tube 48” Straight Ladder Pull
LSWM5_ LSWM6_ LSGM5_
Wall Mount Single Slider Kit Wall Mount Bi-Parting Sliders Kit Glass Mount Single Slider Kit
LSWM7_ LSWM8_ LSGM6_
Wall Mount Single Slider with Softbrake Kit Wall Mount Bi-Parting Sliders with Softbrake Kit Glass Mount Single Slider with Sidelites Kit
104”
2642 mm240”
6096 mm
2 LS407_1 LS405L_1 LS405R_
Kit Contains:2 LS400_1 LS104_7 LS403_1 LS307_
2 LS407_1 LS405L_1 LS405R_1 LS106_
Kit Contains:
2 LS400_1 LS104_6 LS403_1 LS307_
2 LS405L_2 LS405R_2 LS505L_2 LS505R_
Kit Contains:4 LS400_1 LS104_6 LS402_2 LS307_2 LS407_
1 LS405L_1 LS405R_1 LS505L_1 LS505R_
Kit Contains:2 LS400_1 LS104_3 LS402_1 LS307_2 LS407_
2 LS407_2 LS405L_2 LS405R_
Kit Contains:4 LS400_1 LS104_10 LS402_2 LS307_
2 LS407_1 LS405L_1 LS405R_
Kit Contains:2 LS400_1 LS104_5 LS402_1 LS307_
CRL LAGUNA SERIES SLIDING GLASS DOOR SYSTEM
ALUMINUM3crlaurence.com | crl-arch.com
PARTS LIST
48” (1219 mm)

Countersunk Hole for Flush Mount Fastener Straight Hole for Surface Mount Fastener
Gla
ss
thic
knes
s
Gla
ss
thic
knes
s
OR
1-1/4” (32 mm) Dia
90°
1”(26 mm) Dia1/8”
(3 m
m)
5/8” (16 mm) Dia
CRL LAGUNA SERIES SLIDING GLASS DOOR SYSTEM
ALUMINUM4crlaurence.com | crl-arch.com
INTRODUCTIONThank you for purchasing the CRL Laguna Series Sliding Glass Door System� We have upgraded our popular Laguna Series Sliding Glass Door System to now include an 'anti-lift' feature� Through a combination of additions and very subtle changes, we have improved the performance, safety, and security while maintaining a clean, simple look� The Laguna Series Sliding Glass Door System can be attached to glass or directly to the side of a sufficiently reinforced wall. The adjustable Top Rollers make final adjustments quick and easy, without the need to remove the door� Their smooth operation and solid stainless steel construction minimizes maintenance issues. CRL provides you with all the glass attachment fasteners for either flush mounting, requiring a countersunk hole, or surface mounting, requiring a straight hole. The glass attachment fasteners accommodate either 3/8" or 1/2" (10 or 12 mm) tempered glass� Standardized sets allow you to make planning and purchasing quick and easy for basic installations. We offer four different kits; two for wall mounting, and two for glass mounting� Available accessories give you the opportunity to customize the standard sets to accommodate the most imaginative designers�
SYSTEM LIMITATIONSMinimum Door Width: 37-13/16" (960 mm)Maximum Door Width: 53-9/16" (1�36 m)Maximum Door Height: 98-7/16” (2�5 m)Maximum Weight: 220 lbs (100 kg)NOTE: Laminated glass cannot be used in these systems�
GLASS FABRICATIONHole fabrication is required prior to tempering. The placement and type of hole is determined by each configuration. First determine if the system is a glass mount or wall mount and whether it has one or more sliding doors� The glass fabrication for each of the following basic layouts are detailed in this section:Wall Mount: Single Slider, Bi-Parting SlidersWall Mount with Softbrake: Single Slider, Bi-Parting Sliders Glass Mount: Single Slider, Single Slider with SideliteAll kits include both flush and surface mount fasteners. Identify your specific kit model and refer to the following pages for specific hole locations. PLEASE NOTE: SYSTEMS WITH SOFTBRAKES REQUIRE DIFFERENT GLASS FABRICATION�
IMPORTANT: READ THIS MANUAL THOROUGHLY BEFORE BEGINNING INSTALLATION�

2” [51 mm]
2” [51 mm]
2” [51 mm]5-5/8”
[143 mm]
1-9/16” [40 mm]
5-5/8” [143 mm]
Center of Door Opening
Wall Mount Clamp Location
NOTE: Adequate structural framing required to support Wall Mount fasteners and weight of glass door.
3/8”[10 mm]
B
B
C
E
A = DOH + ½” [12 mm]
= ( ÷ 2) - 1" [25 mm]
D = DOW ÷ 2
= DOW + 4” [102 mm]
= (DOW x 2) + 6” [152 mm]
D D E E
2-5/16”[59 mm]
DOH(Door Opening Height)
Finished Floor
1/8” [3 mm]
1/2” [13 mm] Center Line of tube
Reference point above top of door opening
Wall Mount Clamp
LS402BS
TRACK LENGTH
DOOR GLASS WIDTH
DOOR GLASS WIDTH
DOOR GLASS HEIGHT
DOOR GLASS HEIGHT
TRACK LENGTH
B
C
A
DOW(Door Opening Width)
Note: Dotted line indicates edge of finished opening.
CRL LAGUNA SERIES SLIDING GLASS DOOR SYSTEM
ALUMINUM5crlaurence.com | crl-arch.com
GLASS FABRICATION (CONTINUED)LSWM5_ Wall Mount Single Slider

1/4” [6 mm]
5-5/8” [143 mm]
5-5/8” [143 mm]
2” [51 mm]
DOOR GLASS HEIGHT
A
5-5/8” [143 mm]
5-5/8” [143 mm]
2” [51 mm]
[51 mm]1-9/16” [40 mm]
2”
Tracks to be butted in center
E E E E
2-5/16”[59 mm]
DOOR GLASS WIDTH B DOOR GLASS WIDTH B
TRACK LENGTH C TRACK LENGTH C
3/8”[10 mm]
D D D D
B
C
E
A = DOH + ½” [12 mm]
D = DOW ÷ 4
= (DOW ÷ 2) + 1⅞” [48 mm]
= (DOW x 2) + 2” [51 mm]
= DOW ÷ 4
1/8” [3 mm]
1/2” [13 mm] CL of tube
Reference point above top of door opening
Wall Mount Clamp
LS402BS
DOOR GLASS WIDTH
DOOR GLASS HEIGHT
TRACK LENGTH
DOH(Door Opening Height)
Finished Floor
DOW(Door Opening Width)
Wall Mount Clamp LocationNOTE: Adequate structural framing required to support Wall Mount fasteners and weight of glass door.
Note: Dotted line indicates edge of finished opening.
CRL LAGUNA SERIES SLIDING GLASS DOOR SYSTEM
ALUMINUM6crlaurence.com | crl-arch.com
GLASS FABRICATION (CONTINUED)LSWM6_ Wall Mount Bi-Parting Sliders
1/8” Glass Gap [3 mm]
2-5/16”[59 mm]
2”[51 mm]
3/8”[10 mm]
1/8” Wall to Glass Gap[3 mm]
5-5/8” [143 mm]
5-5/8”[143 mm]
5-5/8”[143 mm]
Finished Floor
B
C
E
A
= ( x 2) - 3” [76 mm]
= DOH + ½” [12 mm]
= DOW ÷ 2 - 1” [25 mm]
= DOW + 2” [51 mm]
= ( ÷ 2) - 4 [116 mm]
F = DOW - ¼” [6 mm]
B
FD
D D
Note: Dotted line indicates edge of fixed glass.
E E
2” [51 mm]
1-9/16” [40 mm]
DOHDoor
Opening Height
DOW(Door Opening Width)
GLA
SS
TR
AN
SO
M
DOOR GLASS WIDTH B
TRACK LENGTH
TRANSOM WIDTH
C
DOOR GLASS WIDTH
DOOR GLASS HEIGHT
TRACK LENGTH
TRANSOM WIDTH
FIXED SIDELITE WIDTH = BF
DOOR GLASS HEIGHT
A
3-9/16” [90 mm]
2-5/16”Glass Mount
ClampLS403BS
[59 mm]
Center Line of tube and fastenerReference point above
top of door opening
Fixed SideliteSliding Glass Panel
Overlap
7/8” [20 mm]
Fixed Transom Panel W
ALL2” [51 mm]
CRL LAGUNA SERIES SLIDING GLASS DOOR SYSTEM
ALUMINUM7crlaurence.com | crl-arch.com
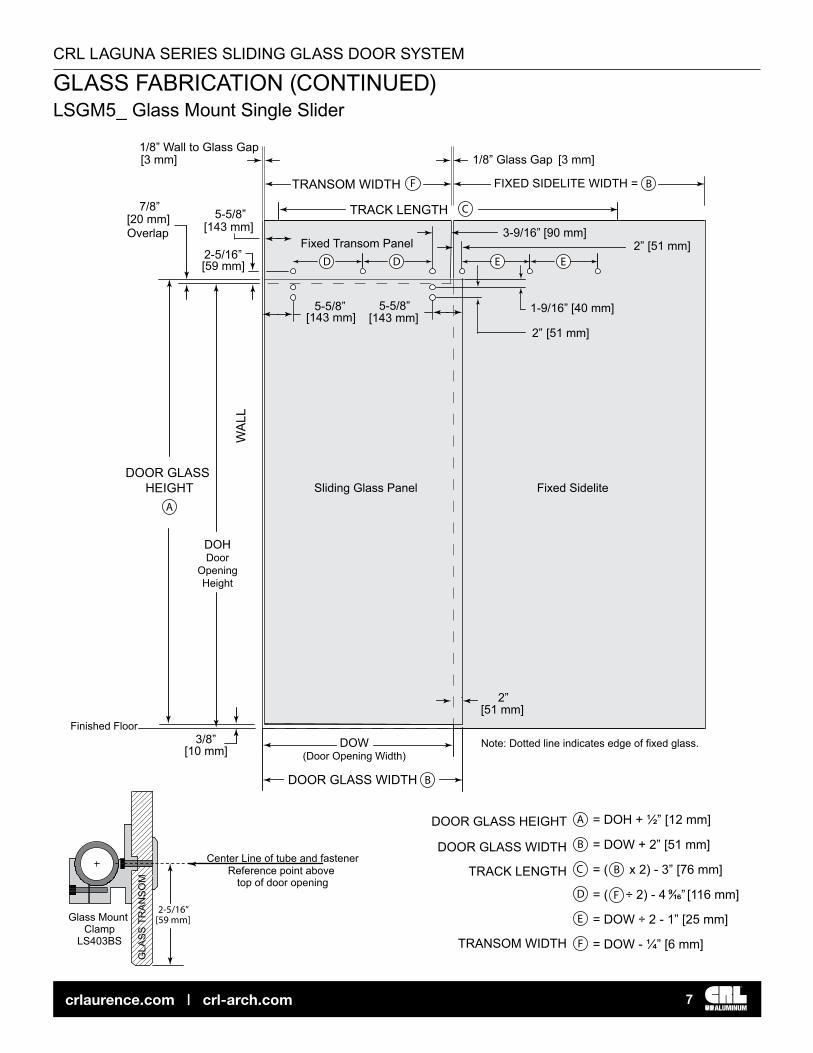
GLASS FABRICATION (CONTINUED)LSGM5_ Glass Mount Single Slider
1/8” Glass Gap[3 mm]
2” [51 mm] 2” [51 mm]
2” [51 mm]
2” [51 mm]5-5/8”
[143 mm]5-5/8”
[143 mm]
3/8”[10 mm]
DOOR GLASS HEIGHT
A
2-5/16”[59 mm]
1/8” Glass Gap[3 mm]
Note: Dotted line indicates edge of fixed glass.Finished Floor
E ED D
1-9/16” [40 mm]
DOH(Door Opening
Height)
DOW(Door Opening Width)
DOOR GLASS WIDTH B
TRACK LENGTH
TRANSOM WIDTH
C
F
B
C
E
A
= x 2
= DOH + ½” [12 mm]
= DOW ÷ 2
= DOW + 4” [102 mm]
= ( ÷ 2) - 3 [90 mm]
F = DOW - ¼” [6 mm]
B
FD
DOOR GLASS WIDTH
DOOR GLASS HEIGHT
TRACK LENGTH
TRANSOM WIDTH
FIXED SIDELITE WIDTH =B
3-9/16” [90 mm]
Fixed SideliteSliding Glass Panel Fixed Sidelite
2-5/16”Glass Mount
ClampLS403BS
[59 mm]
Center Line of tube and fastenerReference point above
top of door opening
3-9/16” [90 mm]
CRL LAGUNA SERIES SLIDING GLASS DOOR SYSTEM
ALUMINUM8crlaurence.com | crl-arch.com
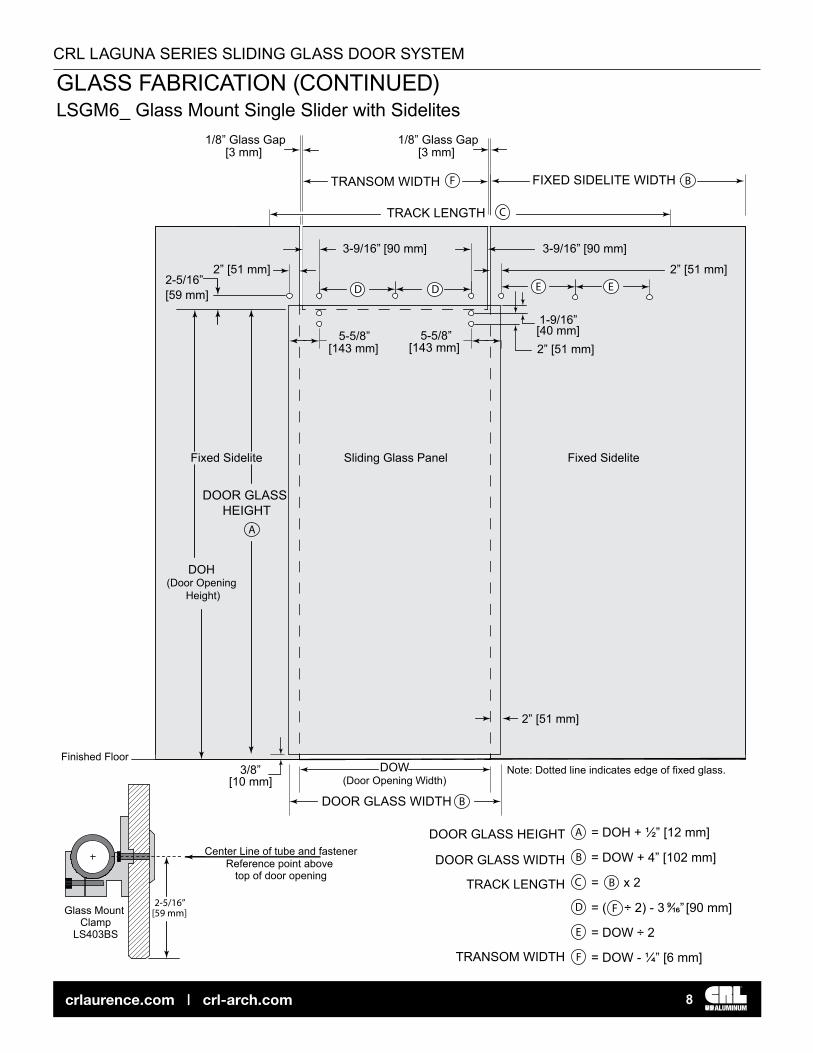
GLASS FABRICATION (CONTINUED)LSGM6_ Glass Mount Single Slider with Sidelites

Wall Mount Clamp Location
NOTE: Adequate structural framing required to support Wall Mount fasteners and weight of glass door.
NOTE: Softbrakes handed with fixed mount 1-11/16” from end. Center next clamp at joint. Install Softbrakes to track before mounting clamps to wall.
B
C
E
A = DOH + ½” [12 mm]
= ÷ 3CD
= 12-5/16” [313 mm]
= 14” [356 mm] with End Cap
= DOW + 4” [102 mm]
= (DOW x 2) - 21-3/4” [553 mm] - GP1/8”
[3 mm]
1/2” [13 mm] Center Line of tube
Reference point above top of door opening
Wall Mount Clamp
LS402BS
DOOR GLASS WIDTH
DOOR GLASS HEIGHT
TRACK LENGTH
SOFTBRAKE LENGTH
2”[51 mm]
2”[51 mm]
2” [51 mm]9”
[229 mm]9”
[229 mm]
1-9/16” [40 mm]
SoftbrakeClamp
Center Clampat Joint
3/8”[10 mm]
DDDE E2-5/16”[59 mm]
DOH(Door Opening Height)
Finished Floor
TRACK LENGTHLEFT HANDSOFTBRAKE
RIGHT HANDSOFTBRAKE
DOOR GLASS WIDTH B
C
DOORGLASS HEIGHT
A
DOW(Door Opening Width)
Note: Dotted line indicates edge of finished opening.
1-11/16”[43 mm]
GP = Glass ProjectionNOTE: Standard Glass Projection fromwall with door fully open is 4” [102 mm].
7/16”[11 mm]
1-11/16”[43 mm]
LeftSoftbrakeEnd Cap
DoorOpening
DoorGlass
SoftbrakeClamp
NOTE: Plan installation so Softbrake Clamp is positioned as shown.
CRL LAGUNA SERIES SLIDING GLASS DOOR SYSTEM
ALUMINUM9crlaurence.com | crl-arch.com
GLASS FABRICATION (CONTINUED)LSWM7_ Wall Mount Single Slider with Softbrake

Softbrakes to be butted in center.
SoftbrakeClamp
SoftbrakeClamp
GP = Glass ProjectionNOTE: Standard Glass Projectionwith door fully open is 4” [102 mm].
1-11/16”[43 mm]
1-11/16”[43 mm]
E
3-3/8”[86 mm]
E EED D D D D D D
DOOR GLASS WIDTH B DOOR GLASS WIDTH B
TRACK LENGTH C TRACK LENGTH CLEFT HANDSOFTBRAKE
RIGHT HANDSOFTBRAKE
LEFT HANDSOFTBRAKE
RIGHT HANDSOFTBRAKE
3/8”[10 mm]
1/8” [3 mm]
1/2” [13 mm] Center Line of tube
Reference point above top of door opening
Wall Mount Clamp
LS402BS
DOH(Door Opening Height)
Finished Floor
DOW(Door Opening Width)
Wall Mount Clamp Location
NOTE: Adequate structural framing required to support Wall Mount fasteners and weight of glass door.
Note: Dotted line indicates edge of finished opening.
DOOR GLASS HEIGHT
A
2”[51 mm]
1-9/16”[40 mm]
1/4” [6 mm]
2”[51 mm]
2”[51 mm]
2-5/16”[59 mm]
NOTE: Softbrake are handed with a fixed clamp 1-11/16” from end. Center next clamp at joint. Install right and left Softbrake for each door with ends butted at center. Begin installation at center.
B
C
A = DOH + ½” [12 mm]
C= ÷ 3
= 12- 5/16” [313 mm]
= 14” [356 mm]
= DOW - 26” [660 mm] - GP
= (DOW ÷ 2) + 1⅞” [48 mm]
E
D
DOOR GLASS WIDTH
DOOR GLASS HEIGHT
TRACK LENGTH
SOFTBRAKE LENGTH
9” [229 mm]
9” [229 mm]
9” [229 mm]
9” [229 mm]
SoftbrakeClamp
SoftbrakeClamp
A
CRL LAGUNA SERIES SLIDING GLASS DOOR SYSTEM
ALUMINUM10crlaurence.com | crl-arch.com
GLASS FABRICATION (CONTINUED)LSWM8_ Wall Mount Bi-Parting Sliders with Softbrake
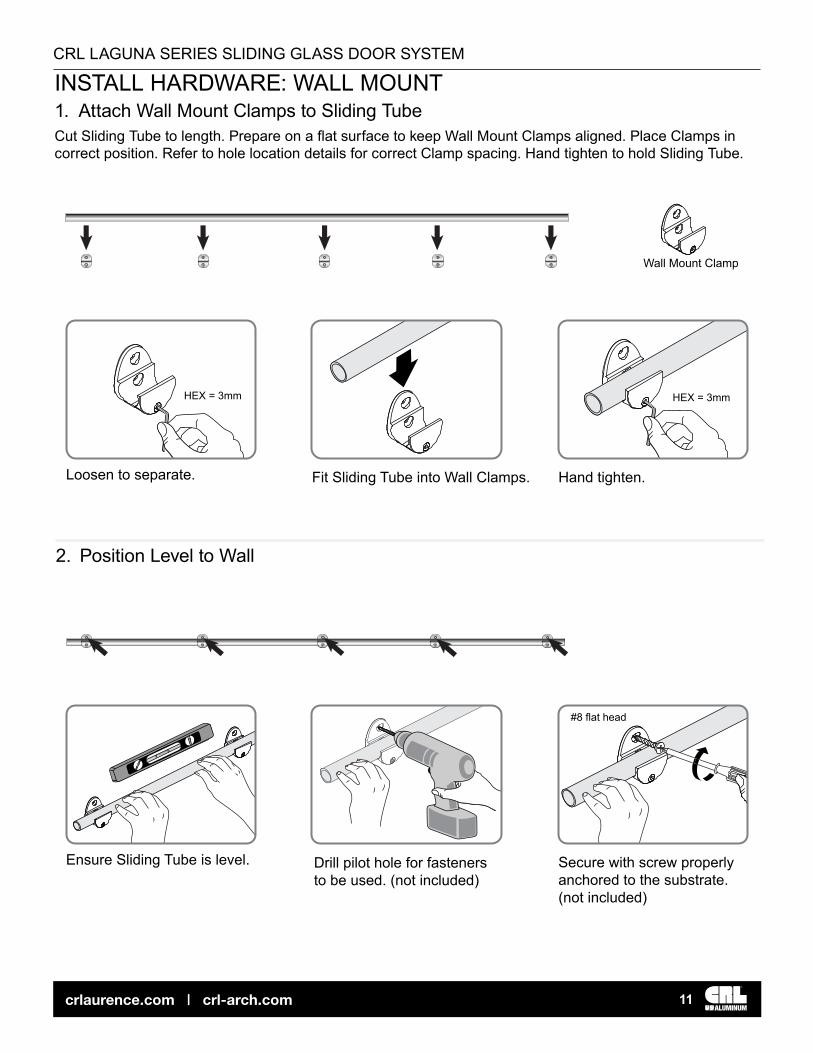
Fit Sliding Tube into Wall Clamps.
Wall Mount Clamp
Hand tighten.Loosen to separate.
HEX = 3mm HEX = 3mm
Ensure Sliding Tube is level. Drill pilot hole for fastenersto be used. (not included)
Secure with screw properly anchored to the substrate.(not included)
#8 flat head
CRL LAGUNA SERIES SLIDING GLASS DOOR SYSTEM
ALUMINUM11crlaurence.com | crl-arch.com
INSTALL HARDWARE: WALL MOUNT1� Attach Wall Mount Clamps to Sliding Tube Cut Sliding Tube to length. Prepare on a flat surface to keep Wall Mount Clamps aligned. Place Clamps in correct position� Refer to hole location details for correct Clamp spacing� Hand tighten to hold Sliding Tube�
2� Position Level to Wall

Loosen Wall Clamp and remove Sliding Tube. Move bottom part of Clamp down to drill pilot hole.
Secure to substrate with adequate fastener (not included).
Return bottom part of Clamp to upright position.
#8 flat head
HEX = 3mm
Slide left and right Door Stops onto Sliding Tube.
Ensure each Stop clears outboard Clamp when replacing Tube.
Left and Right Door Stops
When Tube is level, tightenthe Wall Clamps.
HEX = 3mmBlue Loctite Threadlocker*
Blue Loctite Threadlocker is recommended on all screw threads during final assembly.*
CRL LAGUNA SERIES SLIDING GLASS DOOR SYSTEM
ALUMINUM12crlaurence.com | crl-arch.com
3� Mount the Wall Mount Clamps
4� Install Left and Right Door Stops

Countersunk Hole Straight Hole
Flush Mount Fittings with Glass Mount Clamp. Surface Mount Fittings with Glass Mount Clamp.
OR
Glass Mount Clamp Parts
Blue Loctite Threadlocker Blue Loctite Threadlocker
Tighten to 11 ft-lbs, 15Nm
Loosely assemble Hand tighten
HEX = 3mm
When Tube is level, tighten the Glass Clamps.
HEX = 3mmBlue Loctite Threadlocker*
Blue Loctite Threadlocker is recommended on all screw threads during final assembly.*
Left and Right Door Stops
Slide left and right Door Stops onto Sliding Tube.
Ensure each Stop clears outboard Clamp when replacing Tube.
CRL LAGUNA SERIES SLIDING GLASS DOOR SYSTEM
ALUMINUM13crlaurence.com | crl-arch.com
INSTALL HARDWARE: GLASS MOUNT1� Attach Glass Mount ClampsUse either Surface or Flush Mount�
2� Assemble Glass Mount Clamps
3� Install Left and Right Door Stops

Top Roller
Remove Anti-lift Block and store in a safe place.
Remove Mounting Fittings and store in a safe place.
Use spanner head tool to remove Anti-Lift and Door Mount Fittings and loosen Top Roller.
Loosen Top Roller so it easily moves up and down.
Surface Mount Fittings with Top Roller
Straight HoleCountersunk Hole
Flush Mount Fittings with Top Roller
NOTE: Mounting posts have minimal adjustment to help with incorrectly located holes in glass.
Tighten to 11 ft-lbs, 15Nm
OR
Blue Loctite Threadlocker Blue Loctite Threadlocker
CRL LAGUNA SERIES SLIDING GLASS DOOR SYSTEM
ALUMINUM14crlaurence.com | crl-arch.com
PREPARE AND HANG DOOR4� Prepare Top Rollers
5� Mount Top Rollers Onto Door

Ensure door is level and plumb.Place Top Rollers onto Tube.
Support door weight and use Set Screw in Top Roller to adjust height.
Tighten Top Roller with SpannerHead Tool.
HEX= 2.5mm
CRL LAGUNA SERIES SLIDING GLASS DOOR SYSTEM
ALUMINUM15crlaurence.com | crl-arch.com
6� Hang Door Place Top Rollers onto Sliding Tube� Support weight of door at level and tighten Set Screw at top of Roller�

The door overlaps 2” (51 mm). Remove door. Position Floor Guide so it is aligned to wall.
Mark, drill and install.
Hang door again making sure it is engaged with the floor guide.
Plumb door to vertical. Mark centerline.
Adjust to fit ⅜” (10 mm) or ½” (12 mm) glass doors.
PLAN VIEW
WALL
2”(51 mm)
DOOR
ALI
GN
#10 Flat Head
Ø=⅛”
CRL LAGUNA SERIES SLIDING GLASS DOOR SYSTEM
ALUMINUM16crlaurence.com | crl-arch.com
7� Install Floor Guide

Lift Rubber Cover to install.
Install Floor Mount Door Stops below Left and Right Door Stops. Rubber side faces door.
Drill holes. Install using proper fastener for substrate. Close Rubber Cover.
#10 flat head
⅝” (16 mm)
NOTE: The Floor Mount Door Stops may also be mounted to the wall.
Slide Track Stop until it contacts Bracket.
Position door in open and closed locations and then adjust Track Stop.
Position Floor Stop so glass contacts it at same time.
Anti-Lift Block
Anti-Lift Block
RollerTubeMounting Clamp
GAP =
Tighten with Spanner Head Tool. Adjust Anti-Lift Block so Roller movesfreely through Mounting Clamps.
Fit Anti-Lift Block under Sliding Tube.
1/16”(2 mm)
CRL LAGUNA SERIES SLIDING GLASS DOOR SYSTEM
ALUMINUM17crlaurence.com | crl-arch.com
8� Install Anti-Lift Block
9� Install Floor Mount Door Stops

Sliding Tube End Cap
Use a dab of RTV408C silicone to hold cap in place.
Insert into each end of Sliding Tube.
Remove from backing and place on door edge.
Position one inch from bottom of door.
NOTE: For use with double doors.
CB1PK Clear Silicone Bumpons
CRL LAGUNA SERIES SLIDING GLASS DOOR SYSTEM
ALUMINUM18crlaurence.com | crl-arch.com
10� Place Glass Edge Protectors
11� Install Sliding Tube End Caps
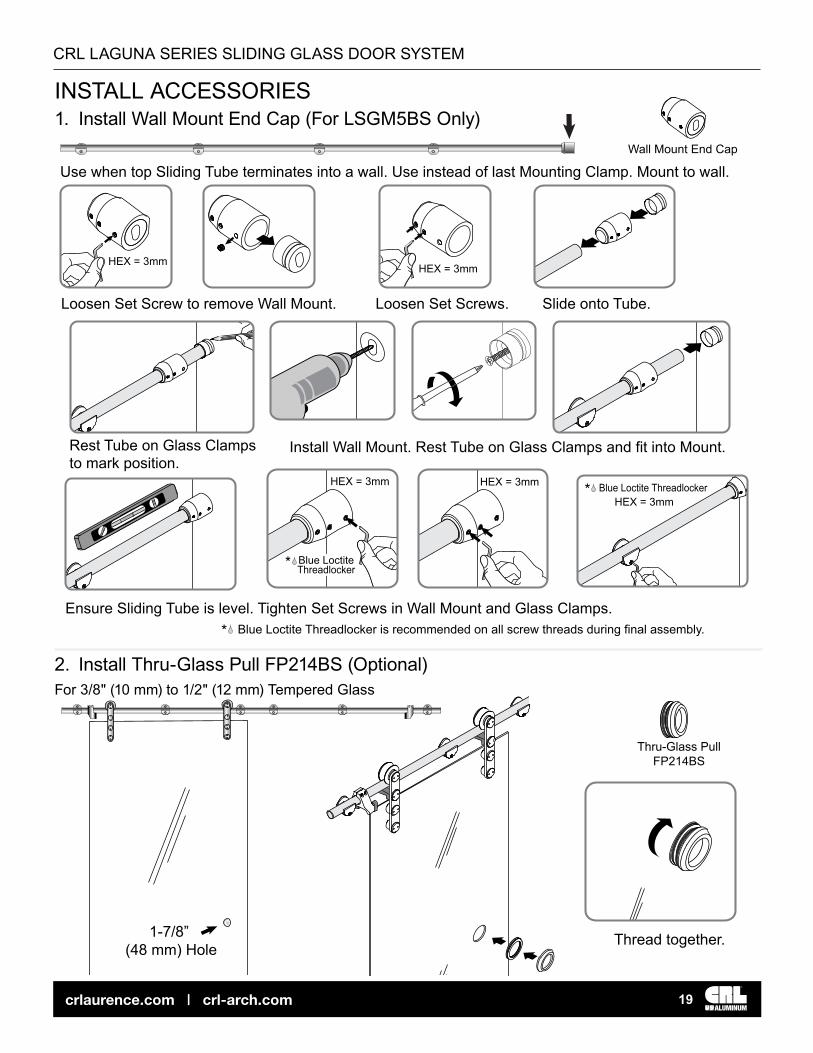
Thread together.
Thru-Glass PullFP214BS
1-7/8” (48 mm) Hole
Wall Mount End Cap
Ensure Sliding Tube is level. Tighten Set Screws in Wall Mount and Glass Clamps.
Loosen Set Screws.
Use when top Sliding Tube terminates into a wall. Use instead of last Mounting Clamp. Mount to wall.
Loosen Set Screw to remove Wall Mount.
Rest Tube on Glass Clamps to mark position.
Install Wall Mount. Rest Tube on Glass Clamps and fit into Mount.
Slide onto Tube.
HEX = 3mmHEX = 3mm
Blue LoctiteThreadlocker*
Blue Loctite Threadlocker is recommended on all screw threads during final assembly.*
HEX = 3mmHEX = 3mm
HEX = 3mmBlue Loctite Threadlocker*
CRL LAGUNA SERIES SLIDING GLASS DOOR SYSTEM
ALUMINUM19crlaurence.com | crl-arch.com
INSTALL ACCESSORIES1� Install Wall Mount End Cap (For LSGM5BS Only)
2� Install Thru-Glass Pull FP214BS (Optional)For 3/8" (10 mm) to 1/2" (12 mm) Tempered Glass

Ceiling Mount Clamp
Ensure Sliding Tube is level.
Loosen set screws. Tighten set screws.Turn base to raise or lower.
Slide trim plate down. Secure to ceiling with screws properly anchored to the substrate.
Loosen clamp to install sliding tube.
HEX = 3mm
HEX = 2.5 mm
HEX = 6mm
HEX = 3mm
Blue LoctiteThreadlocker*
Blue Loctite Threadlocker is recommended on all screw threads during final assembly.*
HEX = 2.5 mm
Tighten Clamp again.
CRL LAGUNA SERIES SLIDING GLASS DOOR SYSTEM
ALUMINUM20crlaurence.com | crl-arch.com
3� Install Ceiling Mount Clamp LS412BS (Optional)Use to replace wall mount clamps. Attaches to structural ceiling sufficient to support the load of the sliding glass doors up to 220 lbs (100 kg)� Position the centerline of the Sliding Tube 4-7/16” (113 mm) down from ceiling with 3/16” (5 mm) up or down adjustment.

Left and Right Softbrakewith Softbrake Clamp
NOTE: Cut Sliding Track per instructions.See Pages 9 and 10.
NOTE: For Bi-Parting Doors refer to hole location details on Page 10 for Clamp spacing. Butt Left and Right Softbrakes at center of opening. Center Wall Clamps at all other joints.
Center MountingClamp at Joint.
Adjust Anti-Lift Height soSoftbrake Triggers.
Single Door
Butt Left and RightSoftbrakes with End Caps
at Center.
LeftSoftbrake
RightSoftbrake
Bi-Parting Doors
Center WallClamp at Joint. Softbrake
Clamps.
Loosen and removeSoftbrake Clamp
from each Softbrake.
SoftbrakeClamp Pin
Right Softbrake shown.Left Softbrake similar.
NOTE: Softbrake Clamp pin fits in hole in bottom of Softbrake to hold Sliding Tube in position. Install Softbrake Clamps after Wall Clamps are installed to ensure proper location. Follow Steps 1 through 4 on Pages 11 and 12 to install Wall Clamps and Sliding Tube.
A
B
Slide Right Door Stop onto Right Softbrake.
Install Right Softbrake on other end of Sliding Tube.
Slide Left Door Stop onto Left Softbrake.
Install Left Softbrake in one end of Sliding Tube.
CRL LAGUNA SERIES SLIDING GLASS DOOR SYSTEM
ALUMINUM21crlaurence.com | crl-arch.com
Cut Sliding Tube per instructions� Insert Left Softbrake with Left Door Stop into one end and Right Softbrake with Right Door Stop into the other� Follow instructions for Wall Mount Hardware on Pages 11 - 12, centering a Clamp at each joint. Continue on Pages 14 - 17 to finish the installation. NOTE: When adjusting Anti-Lift height on Page 15 make sure it triggers Softbrake.
4� Install Softbrake (Optional for Wall Mount Applications)

CRL LAGUNA SERIES SLIDING GLASS DOOR SYSTEM
ALUMINUM22crlaurence.com | crl-arch.com
MAINTENANCEInspect roller assemblies at routine intervals for smooth operation� Remove debris that might accumulate on the upper track surface� Assure that each roller assembly is straight and tight� Also check all spanner nuts and tighten if necessary� Do not overtighten. Glass fracturing could occur� Replace any glass panel that shows fracturing or chipping on edges or around drilled holes� Worn or broken components should be replaced immediately by qualified personnel.Do not lubricate the track or rollers� Lubricants will attract dirt, creating a dirty roller surface and interfering with the system’s smooth operation� See below for cleaning procedures�
CARE AND CLEANING OF STAINLESS STEELSatin polished Stainless Steel is one of the most durable and easiest finishes to maintain. Although stainless steel is generally resistant to corrosion, the surface is susceptible to cosmetic deterioration by the effects of salt water and air-borne chemicals which may result in small brown spots appearing on its surface (this process is likely to be accelerated in coastal areas)� These spots in no way affect the strength, integrity or longevity of the product, they are simply superficial discolorations that require cleaning to restore the stainless steel to its original appearance�Stainless steel finishes should be cleaned with rubbing motions in the same direction as the grain texture with a foam spray cleaner, such as CRL Cat. No. CRL841 Stainless Steel Polish & Cleaner, which cleans, polishes and protects stainless steel without hard rubbing and polishing. A coating of CRL841 resists finger prints, grease and water splatter and helps preserve the factory finish.Wipe with a clean, dry cloth such as CRL Cat. No. 1550 Lint-Free Glass Wipes, which are made with four plies of strong, white paper and reinforced in both directions with an extra ply of tough nylon� These highly absorbent rugged wipes will stand up to the most demanding shop work�For repair of damaged finishes, satin stainless steel can be rubbed with one of the following abrasive pads:
CRL Cat. No. SB7447F - CRL 3M™ Scotch-Brite™ Fine Pad
Stainless steel finishes should be rubbed in the same direction as the grain texture.For LONG TERM PROTECTION and use on REPAIRED AREAS, CRL offers an unsurpassed surface treatment system specifically designed to protect both glass and stainless steel. CRL 6K Hydrophobic Surface Protection product is a two-step system�
Step One: CRL Cat. No. PC6025 - 6K Pre-Clean Solution (250 ml bottle)
Step Two: CRL Cat. No. 6K6025 - 6K Protectant Formula (250 ml bottle)
Proper application of the 6K system will offer surface protection for three years� Visit crlaurence.com for more details�