Leaflet OnScreen C2 INT Cont.qxp Leaflet OnScreen C2 INT ...
Upload
mohdsyahmi1223Category
view
223download
0
8/3/2019 Lab 2 - 1 OnScreen Digitizing
http://slidepdf.com/reader/full/lab-2-1-onscreen-digitizing 1/10
Kursus GIS dan Remote Sensing
19-29 Nov 2007
DATA PREPARATION IN ARCGIS 9.X
(ON-SCREEN DIGITIZING)
SECTION 1
INTRODUCTION
There are two ways in performing on screen digitizing; on ArcMap and on Arc Tools
(Arc Info Workstation). Both results are compatible with each other. However, some
restrictions might need to be considered and taken into account.
OBJECTIVE
This practical will open up participant’s capabilities in trying GIS software rather thanthe conventional AutoCAD in doing digitizing. (Not that AutoCAD is not good!). By
using the most current GIS software, it is hope that by the end of this practical,
participant will be familiar with the software and be able to do an on screen digitizing
work.
Before starting the digitizing work, we need the map to be digitized placed as a digital
format. This digital map is known as the base map or the background mapping. This map
could be in any raster image format. (.pcx, bmp, jpg…..).
Q1. What about vector format?
METHODOLOGY
We have been given one image in . jpg format ( H_Langat.jpg) and one text file
(CtrlPt.txt) as the starting point. First open the image file in Arc Map, observe the
image and identify the potential features for digitizing.
For example, the potential layers:
1. Contour
2. Roads
Siti Aekbal Salleh
JSUG, UiTM 1
8/3/2019 Lab 2 - 1 OnScreen Digitizing
http://slidepdf.com/reader/full/lab-2-1-onscreen-digitizing 2/10
Kursus GIS dan Remote Sensing
19-29 Nov 2007
3. Rivers
4. Building
5. Land use, water bodies (polygon)
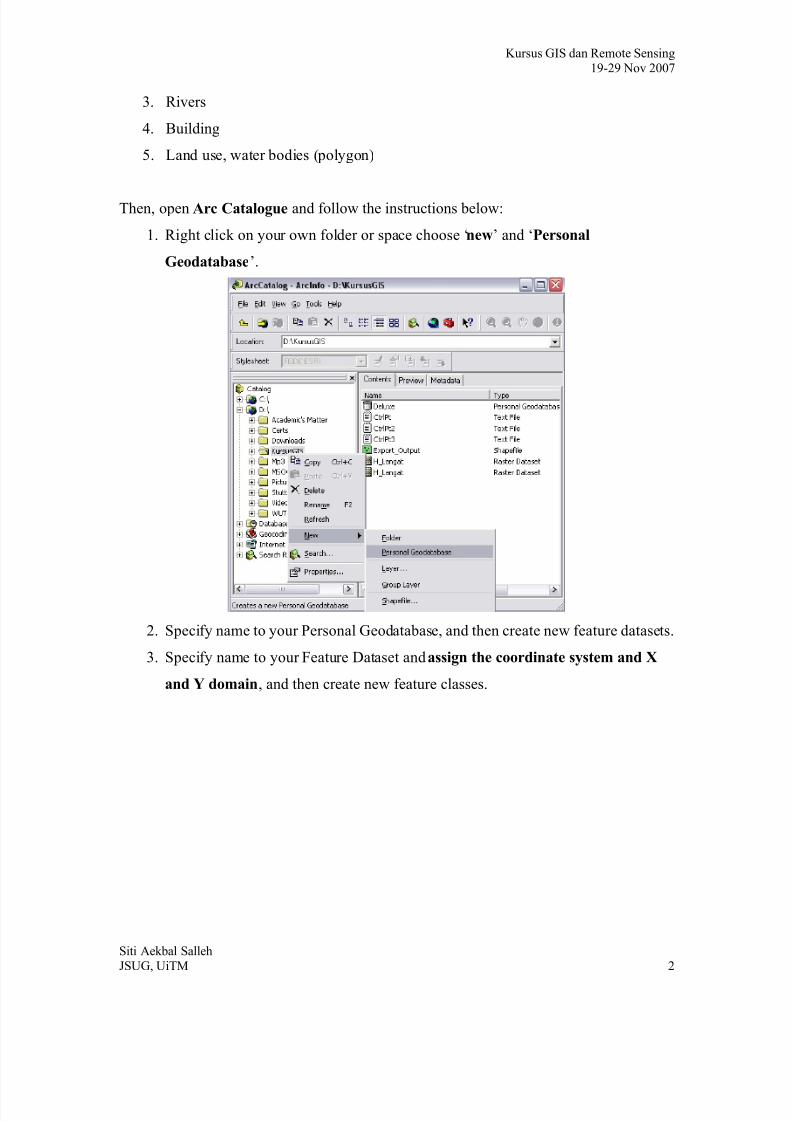
Then, open Arc Catalogue and follow the instructions below:
1. Right click on your own folder or space choose ‘new’ and ‘Personal
Geodatabase’.
2. Specify name to your Personal Geodatabase, and then create new feature datasets.
3. Specify name to your Feature Dataset and assign the coordinate system and X
and Y domain, and then create new feature classes.
Siti Aekbal Salleh
JSUG, UiTM 2

8/3/2019 Lab 2 - 1 OnScreen Digitizing
http://slidepdf.com/reader/full/lab-2-1-onscreen-digitizing 3/10
Kursus GIS dan Remote Sensing
19-29 Nov 2007
1.0 IMAGE REGISTRATION
Now that we have already managed our Geodatabase, we need to proceed on the image
registration. Check back the .txt file that is provided. Open Arc Map and follow the
instruction accordingly.
1. Right click on the empty view and go to Properties. Define the coordinate system.
Then check the Data Frame info.
Siti Aekbal Salleh
JSUG, UiTM 3
8/3/2019 Lab 2 - 1 OnScreen Digitizing
http://slidepdf.com/reader/full/lab-2-1-onscreen-digitizing 4/10
Kursus GIS dan Remote Sensing
19-29 Nov 2007
The coordinates system for the working space is defined and at real below of the view on
the right hand side we can see that the unit is in meters.
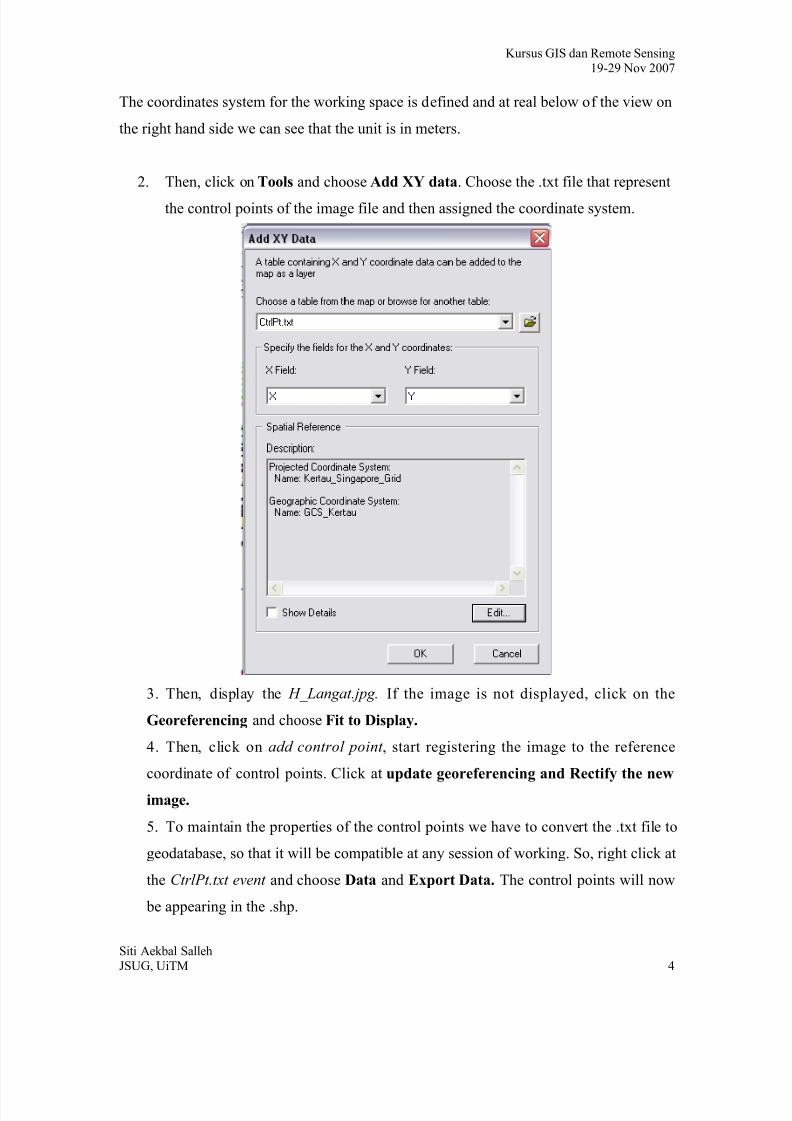
2. Then, click on Tools and choose Add XY data. Choose the .txt file that represent
the control points of the image file and then assigned the coordinate system.
3. Then, display the H_Langat.jpg. If the image is not displayed, click on the
Georeferencing and choose Fit to Display.
4. Then, click on add control point , start registering the image to the reference
coordinate of control points. Click at update georeferencing and Rectify the new
image.
5. To maintain the properties of the control points we have to convert the .txt file to
geodatabase, so that it will be compatible at any session of working. So, right click at
the CtrlPt.txt event and choose Data and Export Data. The control points will now
be appearing in the .shp.
Siti Aekbal Salleh
JSUG, UiTM 4
8/3/2019 Lab 2 - 1 OnScreen Digitizing
http://slidepdf.com/reader/full/lab-2-1-onscreen-digitizing 5/10
8/3/2019 Lab 2 - 1 OnScreen Digitizing
http://slidepdf.com/reader/full/lab-2-1-onscreen-digitizing 6/10
Kursus GIS dan Remote Sensing
19-29 Nov 2007
ADDING ATTRIBUTE DATA
OBJECTIVE
In this practical session, you will be introduce to the steps involves in getting the attribute
into spatial data using ArcGIS software. At the end of this session, you are expected to
have the ability to input the attribute data into any of GIS software package.
INTRODUCTION
There are many approach can be use to add attribute data into GIS. The very simple and
straightforward process is by entering directly into ArcMap. Arc Catalogue on the other
hands enables you to construct your attribute tables while you create your feature classes.
In some cases, you might already have the attribute data in different file format such as
Access, Excel, Dbase, etc (sometimes it call external database). It is waste of time to
enter all the data again in GIS software. Here, what you can do is to join or relate external
database that you have with standard attribute table in ArcMap. However, the main
requirement is to have common identifier or key in both of data.
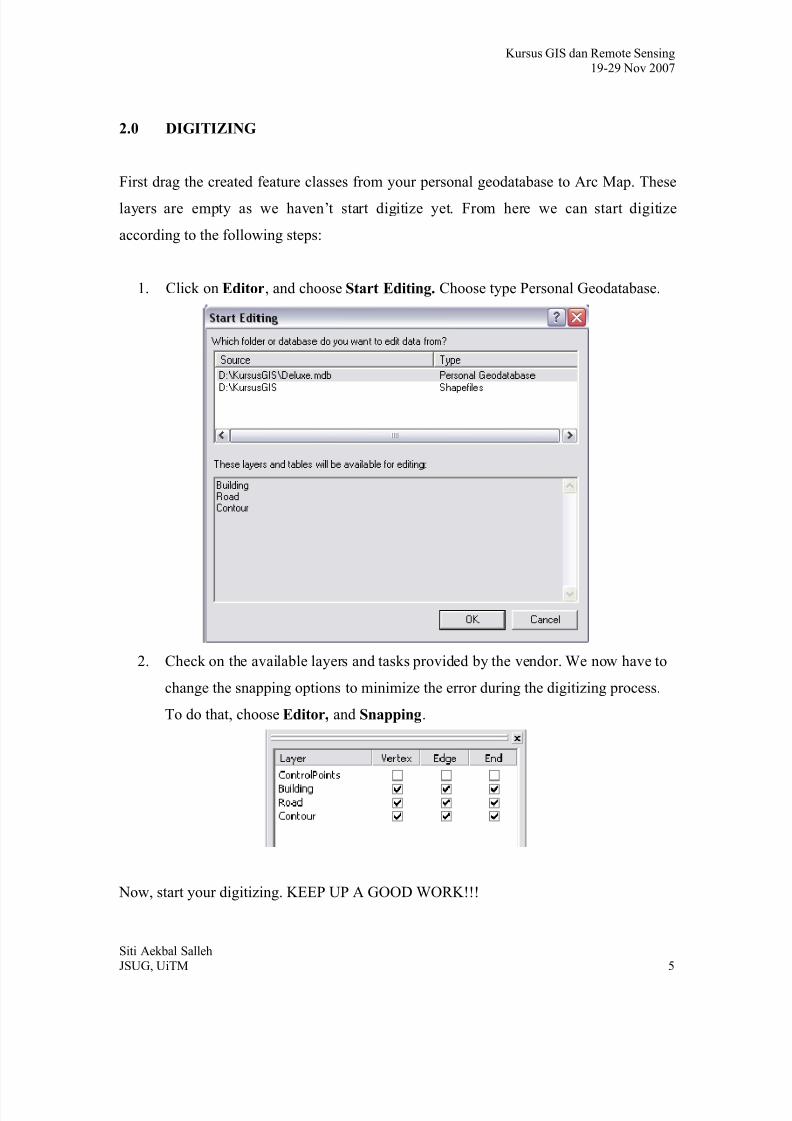
1. Adding attribute data directly using ArcMap
The data that you have digitized in your previous session will be used in this session.
a) Adding fields to the layer
Open ArcMap
Add a new layer by clicking Add Data
Right-click the layer and click Open Attribute Table
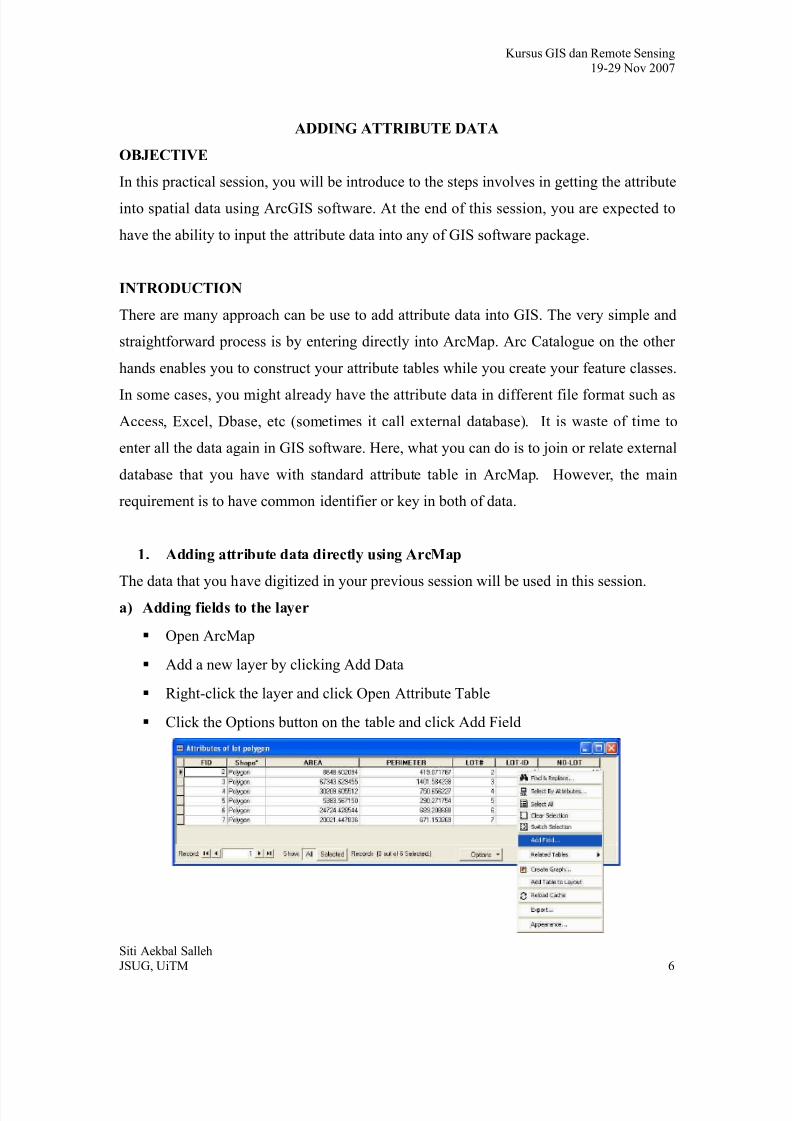
Click the Options button on the table and click Add Field
Siti Aekbal Salleh
JSUG, UiTM 6
8/3/2019 Lab 2 - 1 OnScreen Digitizing
http://slidepdf.com/reader/full/lab-2-1-onscreen-digitizing 7/10
Kursus GIS dan Remote Sensing
19-29 Nov 2007
The add field dialog box appears
Name: The name for a new field
Type: Types of field for example Text, Short Integer, Long Integer, Date etc.
Field properties: The length or precision of field
Click OK and you can find a new field in the attribute table
You can add any new fields in your table in the same manner.
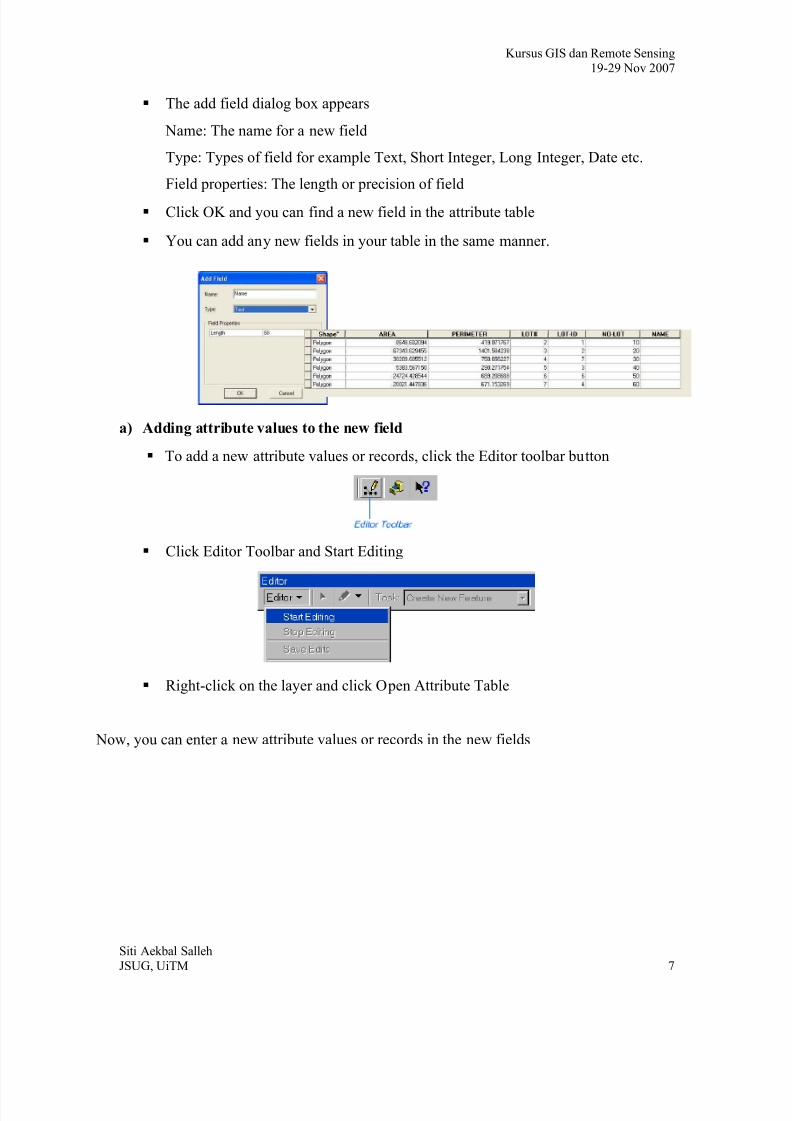
a) Adding attribute values to the new field
To add a new attribute values or records, click the Editor toolbar button
Click Editor Toolbar and Start Editing
Right-click on the layer and click Open Attribute Table
Now, you can enter a new attribute values or records in the new fields
Siti Aekbal Salleh
JSUG, UiTM 7
8/3/2019 Lab 2 - 1 OnScreen Digitizing
http://slidepdf.com/reader/full/lab-2-1-onscreen-digitizing 8/10
Kursus GIS dan Remote Sensing
19-29 Nov 2007
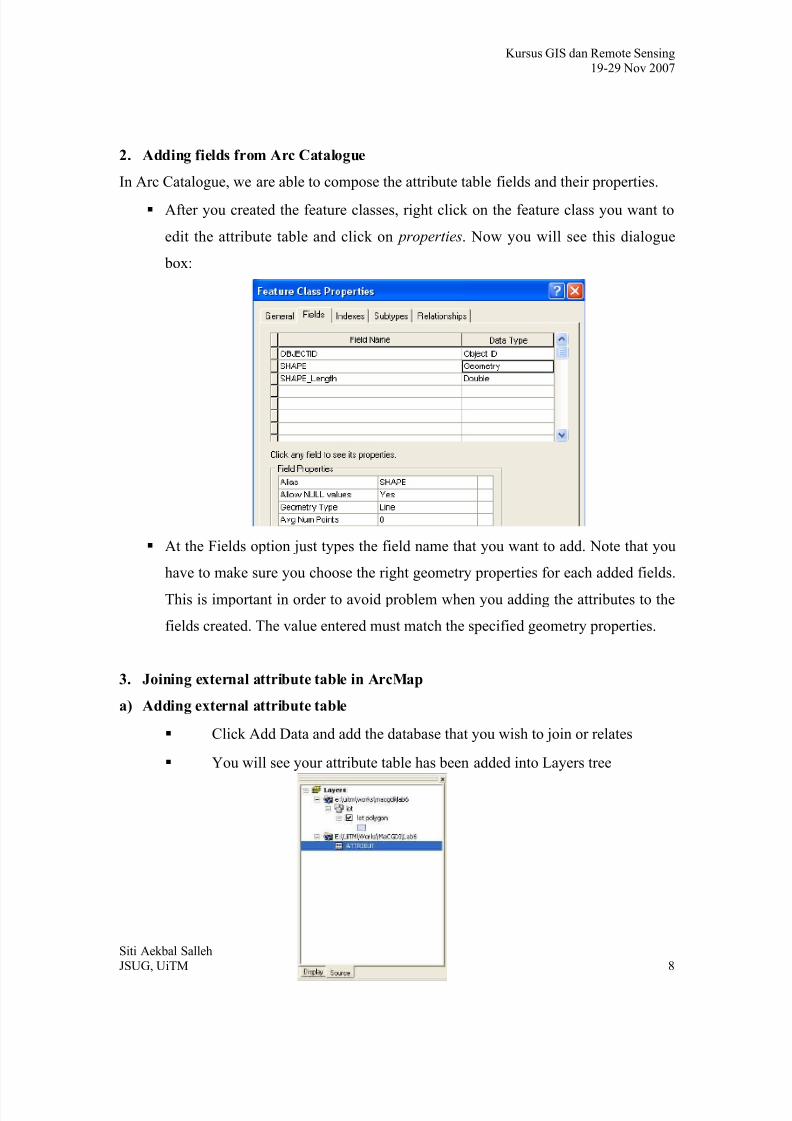
2. Adding fields from Arc Catalogue
In Arc Catalogue, we are able to compose the attribute table fields and their properties.
After you created the feature classes, right click on the feature class you want to
edit the attribute table and click on properties. Now you will see this dialogue
box:
At the Fields option just types the field name that you want to add. Note that you
have to make sure you choose the right geometry properties for each added fields.
This is important in order to avoid problem when you adding the attributes to the
fields created. The value entered must match the specified geometry properties.
3. Joining external attribute table in ArcMap
a) Adding external attribute table
Click Add Data and add the database that you wish to join or relates
You will see your attribute table has been added into Layers tree
Siti Aekbal Salleh
JSUG, UiTM 8
8/3/2019 Lab 2 - 1 OnScreen Digitizing
http://slidepdf.com/reader/full/lab-2-1-onscreen-digitizing 9/10
Kursus GIS dan Remote Sensing
19-29 Nov 2007
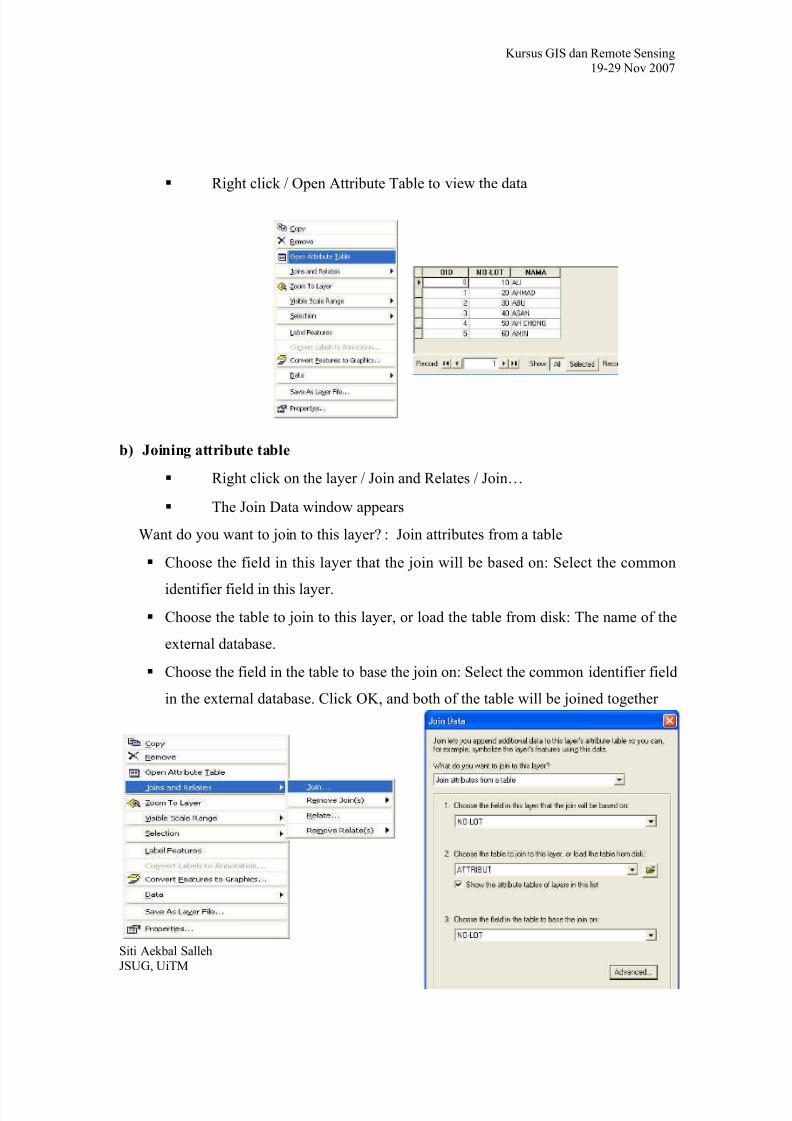
Right click / Open Attribute Table to view the data
b) Joining attribute table
Right click on the layer / Join and Relates / Join…
The Join Data window appears
Want do you want to join to this layer? : Join attributes from a table
Choose the field in this layer that the join will be based on: Select the common
identifier field in this layer.
Choose the table to join to this layer, or load the table from disk: The name of the
external database.
Choose the field in the table to base the join on: Select the common identifier field
in the external database. Click OK, and both of the table will be joined together
Siti Aekbal Salleh
JSUG, UiTM 9

8/3/2019 Lab 2 - 1 OnScreen Digitizing
http://slidepdf.com/reader/full/lab-2-1-onscreen-digitizing 10/10
Kursus GIS dan Remote Sensing
19-29 Nov 2007
GOOD LUCK AND HAPPY TRYING!!!
Siti Aekbal Salleh
JSUG, UiTM 10