Kramer VIA Connect Pro User Guide - James Cook University€¦ · Kramer VIA Connect Pro User Guide...
16
Kramer VIA Connect Pro User Guide James Cook University Townsville CBD Campus Contents Downloading and Running VIA Connect PRO Software ........................................................ 4 Logging In to VIA Connect PRO ............................................................................................ 5 Windows and Mac OS ....................................................................................................... 5 VIA Connect PRO Functions and What They Do .................................................................. 6 Main Menu ............................................................................................................................ 8 Enabling Control ................................................................................................................. 10 Chatting with Participants.................................................................................................... 11 Sharing Files ....................................................................................................................... 12 Accessing Cloud Data ......................................................................................................... 13 Whiteboard Collaboration .................................................................................................... 14 Whiteboard Functions .................................................................................................. 15 Show Desktop.............................................................................................................. 16
Transcript of Kramer VIA Connect Pro User Guide - James Cook University€¦ · Kramer VIA Connect Pro User Guide...

Kramer VIA Connect Pro User Guide James Cook University Townsville CBD Campus
Contents
Downloading and Running VIA Connect PRO Software ........................................................ 4
Logging In to VIA Connect PRO ............................................................................................ 5
Windows and Mac OS ....................................................................................................... 5
VIA Connect PRO Functions and What They Do .................................................................. 6
Main Menu ............................................................................................................................ 8
Enabling Control ................................................................................................................. 10
Chatting with Participants .................................................................................................... 11
Sharing Files ....................................................................................................................... 12
Accessing Cloud Data ......................................................................................................... 13
Whiteboard Collaboration .................................................................................................... 14
Whiteboard Functions .................................................................................................. 15
Show Desktop .............................................................................................................. 16


Downloading and Running VIA Connect PRO Software All participants in a meeting must download and run either the Kramer VIA executable file (PC, Mac) or the appropriate Android/iOS app.
To access the PC and Mac executable files:
Open your Web browser and enter the IP address for your VIA Connect PRO unit
Click on the file format (Win7/8, Mac OS) for your computer. You are prompted to
save this file to your computer. Select “OK” and download.
Once downloaded, locate the file on your computer (under “Downloads”) and click to
launch it. You then see the VIA Connect PRO login screen. (For faster access, move
the file to your desktop)
For tablets and smartphones, the Kramer VIA app is found in the App Store (iOS) and Google Play (Android). Download the app to your tablet/phone and install. When you run the app, you see the following screen:

Logging In to VIA Connect PRO
Windows and Mac OS
1. Choose a username (nickname) for your device (it can be any mix of letters and
numbers) then enter it on the login screen
2. Next, enter the room code, seen on the lower right part of the screen. This lets you
access VIA Connect PRO iOS and Android
3. First, enter the IP address for the VIA Connect PRO. This is found on the main
display screen in the lower left
4. Next, choose a username (nickname) for your device (it can be any mix of letters and
numbers) then enter it on the login screen of your device
5. Finally, enter the room code as seen on the lower right part of the screen. This lets
you access VIA Connect PRO. Now, you’re ready to go!

VIA Connect PRO Functions and What They Do VIA Connect PRO presents two types of screens depending whether it is being used by the Admin or by a User. The following screen shots illustrate both types.
Figure 3 shows the VIA Connect PRO main Admin screen and its functions:
Figure 3: VIA Connect PRO Admin Screen and Features
Item Icon Action
1 Features Allows user to see and access all available features of VIA Connect PRO
2 Whiteboard Opens a canvas to annotate, draw, and update document collaboratively over a live stream
3 Participants Provides a list of all participants in the session
4 Cloud Drag and drop files to the cloud to share instantly with everyone in the session
5 Shutdown Shuts down VIA Connect PRO system
6 Reboot Reboots VIA Connect PRO System
7 Settings Performs settings on the LAN, configurations related to room code, system controls, wallpaper and activation center
1 2 3
4
5 6 7

Figure 4 shows the VIA Connect PRO main User screen and its functions:
Figure 4: VIA Connect PRO Main User Screen and Features
Item Icon Action
1 Features Allows user to see and access all available features of VIA Connect PRO
2 Step-In/ Step-Out
Allows the user to show his device's screen on main display, or to step out
3 Participants Provides a list of all participants in the session
4 Multimedia Supports video formats: avi, vob, mp4, mov, mpx (ex. mpg). Shares smooth full-motion video (up to 1080p/60), MP3 files and photos
5 Cloud Drag and drop files to the cloud to share instantly with everyone in the session
6 Enable Control
Gives participants control over the presenters Mac or PC laptop
7 File Transfer Shares files between the available participants during the session
8 Start Collaboration
Click to collaborate through a common display using your own device. Multiple users can interact and control the main display at the same time
9 Chat Allows sending chat messages among available participants during that session
1 2 3
4 5 6 7
8 9

Main Menu This section refers to the user's experience.
The VIA Connect PRO User main menu has three tabs across the top – Features, Step-In/Out, and Participants.
Clicking on the Features icon on the main menu allows the user to see and access all
available functions of VIA Connect PRO
Clicking on the Step-In icon on the main menu displays your PC/device screen on the
main screen. Clicking Step-Out removes your device screen from the main screen
Clicking on the Participants icon (Figure 5) reveals a list of all participants in the
session
Figure 5: The Participant List

Under Participants, the following icons are used:
Item Icon Meaning
Display Status
Start a presentation at a display
The user is currently presenting
Chat Status
Start a chat session with any available participants
The participant is currently chatting with you. Click to open the chat session
File Transfer
Start a file transfer with another participant
File transfer is already active with that participant
Enable Control
Take control of any user while the user is displaying
Admin has the control of that user

Enabling Control This function allows the admin to take control of a participant's PC (Windows or Mac OS). (In our example, Figure 6, user Dave has stepped in and the Admin has taken control of Dave):
The admin can work on Dave's system as he has taken control. (Admin can play media or work on a document or presentation file collaboratively with Dave).
Any other participant who wants to take control or collaborate with Dave's system can click on the Start Collaboration icon and drag his laptop mouse to the top and off their local screen. That cursor now moves to the VIA Connect PRO unit and appears on the main display of Dave. Buttons are shown in the picture below:
Figure 6: Enable Control
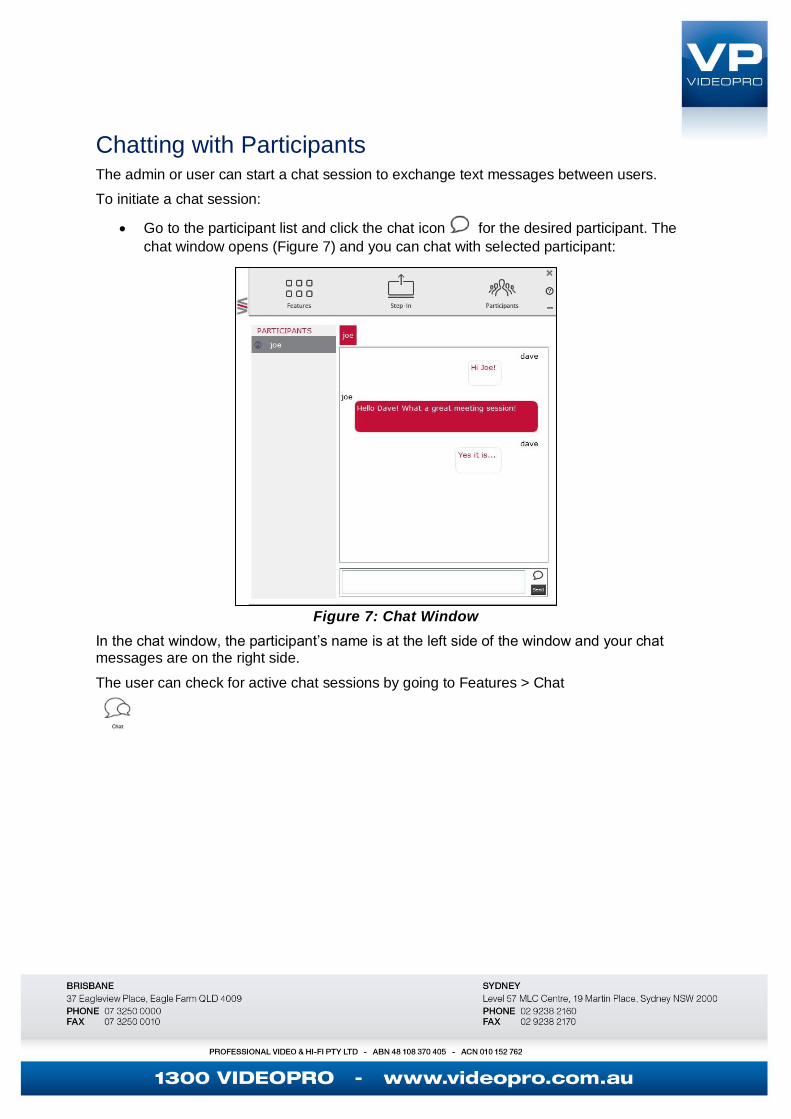
Chatting with Participants The admin or user can start a chat session to exchange text messages between users.
To initiate a chat session:
Go to the participant list and click the chat icon for the desired participant. The
chat window opens (Figure 7) and you can chat with selected participant:
Figure 7: Chat Window
In the chat window, the participant’s name is at the left side of the window and your chat messages are on the right side.
The user can check for active chat sessions by going to Features > Chat

Sharing Files VIA Connect PRO can transfer files between PC/Mac logged in users.
To share a file:
Go to the participant list and click on the file share icon for the desired participant with whom you wish to share a file.
In the cloud directory, select the desired file on your device. Then, click Share
Figure 8: Admin File Sharing
The target participant needs to select a location to save the file and start the file transfer process. Once completed, the file is saved on that participant’s system.
Figure 9: User File Sharing
When completed, the file is saved at receiver’s system.
You can check or cancel currently sharing file from Features > File Transfer.

Accessing Cloud Data The cloud is used by the admin to access all data that has been shared by participants using VIA Connect PRO hub.
To access cloud data:
Click on Features in the Admin main menu and then click on the cloud icon to go to
the Cloud directory where all the users’ shared files were saved.
Figure 10: Shared Files on the Cloud
To delete all files from the cloud directory:
Click on Clean Directory
A warning note appears that this is a permanent delete action

Whiteboard Collaboration The whiteboard function, used by the admin, creates a canvas on the VIA Connect PRO hub. With whiteboard, the admin can:
Access a wide range of drawing and annotating tools
Insert any kind of images
To open Whiteboard by the admin:
1. Go to the main menu and click on the Whiteboard icon. This starts a whiteboard
session on VIA Connect PRO.
Users can collaborate on a shared document using their own device.
To comment on content shown on main display user needs to:
1. Click on Start Collaboration icon
2. Drag the cursor to the main display
3. Start annotate by using whiteboard tools
Multiple users can interact, annotate and control the main display at the same time.

Whiteboard Functions
Figure 11: Whiteboard Toolbar
Item Icon Action
1 Pen Enables drawing on the whiteboard
2 Colors Changes the color of line with various available colors
3 Size Chooses the line thickness
4 Eraser Erases your annotations
5 Erase All Cleans the page
6 Text Inserts text at your whiteboard page
7 Font Changes text font of your whiteboard page
8 File Share Shares files between the available participants during the session
9 Notes Creates comments or remarks about your annotation at whiteboard page
10 Keyboard Opens a virtual keyboard at whiteboard to insert text
11 Save Saves all your activities either as PDF or as JPEG format
12 Show Desktop Displays your desktop with all running applications, user can also annotate at the running application using desktop stylus
13 Arrow Selects any object or image
14 Capture Area Tool
The mouse pointer turns into plus sign. Click the upper left corner of the area you want to capture and drag along the screen to the limit of the capture. The selected area is displayed in gray. The area is then included in the current or new page as an object
15 Previous page Moves to previous page (when multiple pages added)
16 New page Creates a new page or to add a new page
17 Next page Moves to next page (when multiple pages added)
18 Close Closes the whiteboard

Show Desktop
Show Desktop allows you to hide the whiteboard and to navigate freely on your desktop. A toolbar is available for making annotations on your desktop and capturing an object. For example, capture an area of the screen and add it as an object in your current page.
Icon Name Action
Whiteboard
Press this button to immediately return to your board page
Pencil Writes on the whiteboard
Eraser Erases precisely what you have written on the whiteboard
Selection Tool Selects any object to move it and apply changes
Capture Area Tool
The mouse pointer turns into plus sign. Click and drag over the desired area
Window Selection Directly captures a window and all of its content.
Save Saves your activity in either.jpg or .pdf format
Show/Hide Show/hide annotations
Exit Exits the whiteboard