Knürr® DCM® Heavy Duty Rack – Schwerlast …© du présent manuel Le présent manuel concerne...
24
n Integrated Rack Systems Knürr® DCM® Heavy Duty Rack – Schwerlast-Serverschrank Knürr® DCM® Heavy Duty Rack – Heavy duty server rack Knürr® DCM® Heavy Duty Rack – Armoire pour serveur lourdes charges Assembly Instructions
Transcript of Knürr® DCM® Heavy Duty Rack – Schwerlast …© du présent manuel Le présent manuel concerne...

n Integrated Rack Systems
Knürr® DCM® Heavy Duty Rack – Schwerlast-Serverschrank
Knürr® DCM® Heavy Duty Rack – Heavy duty server rack
Knürr® DCM® Heavy Duty Rack – Armoire pour serveur lourdes charges
Assembly Instructions

2Vertiv | Knürr® DCM® Heavy Duty Rack – Schwerlast-Serverschrank | 01.147.992.9 | Index E | ECR no. 18375 I 02/18
DEUTSCH ENGLISH FRANÇAIS
A consulter impérativement1.1 Consignes générales . . . . . . . . . . . . . . . 3
1.2 Mises en évidence et symboles . . . . . . 4
1.3 Travailler en toute sécurité . . . . . . . . . . 4
1.4 Garantie. . . . . . . . . . . . . . . . . . . . . . . . . . 5
1.5 Service . . . . . . . . . . . . . . . . . . . . . . . . . . . 5
1.6 Normes et prescriptions . . . . . . . . . . . . 5
Préparatifs au montage2.1 Livraison. . . . . . . . . . . . . . . . . . . . . . . . . . 6
2.2 Transport. . . . . . . . . . . . . . . . . . . . . . . . . 6
2.3 Installation . . . . . . . . . . . . . . . . . . . . . . . 7
2.4 Protection anti-basculement . . . . . . . . 8
2.5 Charge maximale . . . . . . . . . . . . . . . . . . 8
2.6 Consignes de montage . . . . . . . . . . . . . 9
Portes 3.1 Décrochage et accrochage. . . . . . . . 10
3.2 Changement d’arrête-porte . . . . . . 10
Paroi latérale4.1 Dépose. . . . . . . . . . . . . . . . . . . . . . . . . 15
4.2 Montage . . . . . . . . . . . . . . . . . . . . . . . 15
Couvercle5.1 Dépose. . . . . . . . . . . . . . . . . . . . . . . . . 16
5.2 Montage . . . . . . . . . . . . . . . . . . . . . . . 16
5.3 Passage du câble . . . . . . . . . . . . . . . . 17
Plaque 19"6.1 Dépose. . . . . . . . . . . . . . . . . . . . . . . . . 18
6.2 Montage . . . . . . . . . . . . . . . . . . . . . . . 19
Châssis de base7.1 Raccords d’angles . . . . . . . . . . . . . . . 20
7.2 Mise à la terre . . . . . . . . . . . . . . . . . . . 21
Please read1.1 General information . . . . . . . . . . . . . . . 3
1.2 Markings and symbols . . . . . . . . . . . . . 4
1.3 Safe operation . . . . . . . . . . . . . . . . . . . . 4
1.4 Warranty . . . . . . . . . . . . . . . . . . . . . . . . . 5
1.5 Service . . . . . . . . . . . . . . . . . . . . . . . . . . . 5
1.6 Standards and regulations . . . . . . . . . . 5
Before assembly2.1 Delivery . . . . . . . . . . . . . . . . . . . . . . . . . . 6
2.2 Transport. . . . . . . . . . . . . . . . . . . . . . . . . 6
2.3 Installation . . . . . . . . . . . . . . . . . . . . . . . 7
2.4 Tilt protection. . . . . . . . . . . . . . . . . . . . . 8
2.5 Maximum load . . . . . . . . . . . . . . . . . . . . 8
2.6 Assembly instructions. . . . . . . . . . . . . . 9
Doors 3.1 Unhinge and hinge . . . . . . . . . . . . . . 10
3.2 Door reversal . . . . . . . . . . . . . . . . . . . 10
Side panel4.1 Removal. . . . . . . . . . . . . . . . . . . . . . . . 15
4.2 Fitting. . . . . . . . . . . . . . . . . . . . . . . . . . 15
Top cover5.1 Removal. . . . . . . . . . . . . . . . . . . . . . . . 16
5.2 Fitting. . . . . . . . . . . . . . . . . . . . . . . . . . 16
5.3 Thread the cables. . . . . . . . . . . . . . . . 17
19" level6.1 Removal. . . . . . . . . . . . . . . . . . . . . . . . 18
6.2 Fitting. . . . . . . . . . . . . . . . . . . . . . . . . . 19
Base frame7.1 Corner connectors. . . . . . . . . . . . . . . 20
7.2 Earthing . . . . . . . . . . . . . . . . . . . . . . . . 21
1 Bitte beachten Sie1.1 Allgemeine Hinweise. . . . . . . . . . . . . . . 3
1.2 Hervorhebungen und Symbole . . . . . . 4
1.3 Sicheres Arbeiten . . . . . . . . . . . . . . . . . . 4
1.4 Garantie . . . . . . . . . . . . . . . . . . . . . . . . . . 5
1.5 Service . . . . . . . . . . . . . . . . . . . . . . . . . . . 5
1.6 Normen und Vorschriften. . . . . . . . . . . 5
2 Vor der Montage2.1 Lieferung . . . . . . . . . . . . . . . . . . . . . . . . . 6
2.2 Transport . . . . . . . . . . . . . . . . . . . . . . . . . 6
2.3 Aufstellen . . . . . . . . . . . . . . . . . . . . . . . . 7
2.4 Kippsicherung. . . . . . . . . . . . . . . . . . . . . 8
2.5 Maximale Beladung . . . . . . . . . . . . . . . . 8
2.6 Montagehinweise . . . . . . . . . . . . . . . . . 9
3 Türen3.1 Aus- und Einhängen. . . . . . . . . . . . . . 10
3.2 Türanschlag wechseln. . . . . . . . . . . . 10
4 Seitenwand4.1 Abnehmen. . . . . . . . . . . . . . . . . . . . . . 15
4.2 Montage . . . . . . . . . . . . . . . . . . . . . . . . 15
5 Deckel5.1 Abnehmen. . . . . . . . . . . . . . . . . . . . . . 16
5.2 Montage . . . . . . . . . . . . . . . . . . . . . . . 16
5.3 Kabel durchführen . . . . . . . . . . . . . . . 17
6 19"-Ebene6.1 Ausbauen. . . . . . . . . . . . . . . . . . . . . . . 18
6.2 Montage . . . . . . . . . . . . . . . . . . . . . . . 19
7 Grundgestell7.1 Eckverbinder . . . . . . . . . . . . . . . . . . . . 20
7.2 Erdung . . . . . . . . . . . . . . . . . . . . . . . . . 21
Inhalt Content Sommaire
3Vertiv | Knürr® DCM® Heavy Duty Rack – Schwerlast-Serverschrank | 01.147.992.9 | Index E | ECR no. 18375 I 02/18
Bitte beachten Sie Please read A consulter impérativement
DEUTSCH ENGLISH FRANÇAIS
Das DCM-SystemWir freuen uns, dass Sie sich für einen DCM Serverschrank der Vertiv Integrated Systems GmbH entschieden haben.DCM steht für DataCenter Module und umfasst alle wichtigen Komponenten für un-terschiedlich ausgestattete Serverschränke.
Gültigkeit dieser AnleitungDiese Anleitung gilt für folgende DCM-Komponenten der Vertiv Integrated Systems GmbH:
– Grundgestell – Türen – Seitenwand – Deckel – 19"-Ebene
Bestimmungsgemäße VerwendungDie Komponenten des DCM Serverschranks sind vorgesehen für industrielle bzw. IT-Anwendungen in Rechenzentren mit trockener Industrieumgebung. Die Verwen-dung z. B. in einem Feuchtraum, im Freien oder jenseits der IT-Anwendung gilt als nicht bestimmungsgemäß.Bei Schäden, die aus nicht bestimmungsge-mäßer Verwendung oder aus eigenmäch-tigen An- oder Umbauten entstehen, ist jeglicher Gewährleistungs- und Haftungsan-spruch ausgeschlossen.
The DCM systemWe are delighted that you have decided to buy a DCM server rack from Vertiv Inte-grated Systems GmbH.DCM stands for DataCenter Module and comprises all the main components for server racks with a range of different equipment.
Validity of this manualThis document applies to the following DCM components from Vertiv Integrated Systems GmbH:
– Basic rack – Doors – Side panel – Top cover – 19" level
Proper usageThe components of the DCM server rack are designed for industrial or IT applications in computer centres with a dry industrial environment. Their use in other areas, for example in a wet room, outdoors or for applications other than IT ones shall be deemed improper.The manufacturer will refuse all warranty and liability claims caused by improper usage or if components are added or modified without authorisation.
Le système DCMNous sommes heureux que vous ayez choisi une armoire pour serveur DCM de Vertiv Integrated Systems GmbH.DCM est l’abréviation de DataCenter Module et comprend tous les composants essentiels pour des armoires pour serveurs diversement équipés.
Validité du présent manuelLe présent manuel concerne les éléments DCM de Vertiv Integrated Systems GmbH suivants :
– Châssis de base – Portes – Paroi latérale – Couvercle – Plaque 19"
Utilisation conformeLes composants de l’armoire pour serveur DCM sont prévus pour des applications industrielles ou informatiques dans des centres de calcul situés dans un environne-ment industriel sec. Leur utilisation par ex. dans un local humide, en plein air ou hors domaine informatique n’est pas considérée comme conforme.En cas de dommages dus à une utilisa-tion non conforme ou à des ajouts ou des transformations effectués de votre propre initiative, nous déclinons toute responsabi-lité et tout recours à la garantie est exclu.
General Information
CopyrightAll rights to this manual are owned by Vertiv Integrated Systems. Reproduction and reprinting of this manual, in whole or in part, are permitted only if the source of the information is specified.
Technical statusTechnical status of the manual 11/2015Vertiv Integrated Systems reserves the right
– to modify the design or the components or to use equivalent components other than those shown where this serves tech-nical progress and
– to modify the information contained in this manual without prior notice.
LiabilityVertiv Integrated Systems can not accept responsibility for the completeness and correctness of the in formation. In particular, we accept no liability for damages which result from incorrect use or operation of the product.
Consignes générales
Droits d’auteurTous les droits relatifs au présent manuel reviennent à la société Vertiv Integrated Sys-tems. Toute re pro duction ou réimpression intégrale ou partielle du présent manuel est autorisée uniquement avec indication des sources.
Etat techniqueEtat technique 11/2015La société Vertiv Integrated Systems se réserve le droit, sans avis préalable,
– d’apporter des modifications relatives à la construction et aux pièces, d’utiliser à la place des pièces indiquées d’autres pièces équivalentes servant le progrès technique,
– de modifier les informations contenues dans le présent manuel.
ResponsabilitéVertiv Integrated Systems ne donne aucune garantie en ce qui concerne l’exactitude totale des indications. Par ailleurs, aucune responsabilité n’est assumée pour les dommages découlant d’une utilisation non conforme des appareils.
1.1 Allgemeine Hinweise
UrheberrechtAlle Rechte an diesem Handbuch liegen bei Vertiv Integrated Systems. Wiedergabe und Nachdruck auch von Teilen dieses Handbuches sind nur mit Quellenangabe gestattet.
Technischer StandTechnischer Stand: 11/2015Vertiv Integrated Systems behält sich das Recht vor, ohne Vorankündigung
– Konstruktions- und Bauteileverände-rungen vorzunehmen, sowie anstelle der angegebenen Bauteile äquivalente andere Bauteile zu verwenden, die dem technischen Fortschritt dienen,
– Informationen dieses Handbuches zu ändern.
HaftungVertiv Integrated Systems übernimmt kei-nerlei Gewähr für die vollständige Richtig-keit der Angaben. Ins besondere wird keine Haftung für Schä den übernommen, die aus unsach ge mäßer Handhabung der Produkte entstehen.
4Vertiv | Knürr® DCM® Heavy Duty Rack – Schwerlast-Serverschrank | 01.147.992.9 | Index E | ECR no. 18375 I 02/18
Bitte beachten Sie Please read A consulter impérativement
DEUTSCH ENGLISH FRANÇAIS
Safe operation
The DCM server rack is delivered in perfectly safe working conditions.Vertiv Integrated Systems GmbH can only guarantee the safety and reliability and function of the DCM system if it is as-sembled, used, extended and modified as described in this manual.
• Keep this manual for future use.• Check for external damages before
putting into operation! If damage or some kind of defect is determined, the rack may not be operated.
• Have any damage and defects rectified without delay by authorised personnel.
• Do not use the rack in damp rooms.• Assembly, installation and operation
start-up only by specialist personnel. Only carry out the work described in this manual yourself.
• If a fault occurs please contact the customer service (see 1.5)!
• Refer also to the documentation supplied for connected devices.
Travailler en toute sécurité
L’armoire pour serveur DCM est livrée dans un état de sécurité technique parfaite.La société Vertiv Integrated Systems GmbH ne peut garantir la sécurité, la fiabilité et les performances du système DCM que si le montage, l’utilisation, le montage des accessoires et les transformations sont ef-fectués conformément au présent manuel.
• Il faut toujours conserver le manuel.• Vérifier qu’il n’y a pas de dommages
extérieurs avant la mise en service ! Si vous constatez un dommage ou un autre défaut, n’utilisez pas l’armoire.
• Faire réparer immédiatement dommages et défauts par des personnes autorisées.
• Ne pas utiliser l’armoire dans des locaux humides.
• Confier le montage, l’installation et la mise en service uniquement à des spécialistes. N’effectuez vous-même que les tâches décrites dans le présent manuel.
• En cas de perturbation, veuillez contacter le service clients (voir 1.5) !
• Observez également les documentations des appareils qui y sont raccordés.
1.3 Sicheres Arbeiten
Der DCM Serverschrank wird in einem sicherheitstechnisch ein wandfreien Zustand ausgeliefert.Die Vertiv Integrated Systems GmbH kann die Sicherheit und Zuverlässigkeit und Leistung des DCM-Systems nur dann gewährleisten, wenn Montage, Bedienung, An- und Umbauten nach diesem Handbuch ausgeführt werden.
• Handbuch für weitere Verwendung aufbewahren.
• Vor der Inbetriebnahme auf äußere Beschädigungen kontrollieren! Wird eine Beschädigung oder ein anderer Mangel festgestellt, darf der Serverschrank nicht betrieben werden.
• Schäden und Mängel umgehend von au-torisierten Fachkräften beseitigen lassen.
• Serverschrank nicht in Feuchträumen einsetzen.
• Montage, Installation und Inbetriebnah-me nur durch Fachpersonal. Nur die in diesem Handbuch beschriebe-nen Tätigkeiten selbst durchführen.
• Im Falle einer Störung bitte den Kunden-dienst kontaktieren (siehe 1.5)!
• Beachten Sie auch weitere Dokumen-tationen von angeschlossenen Geräten.
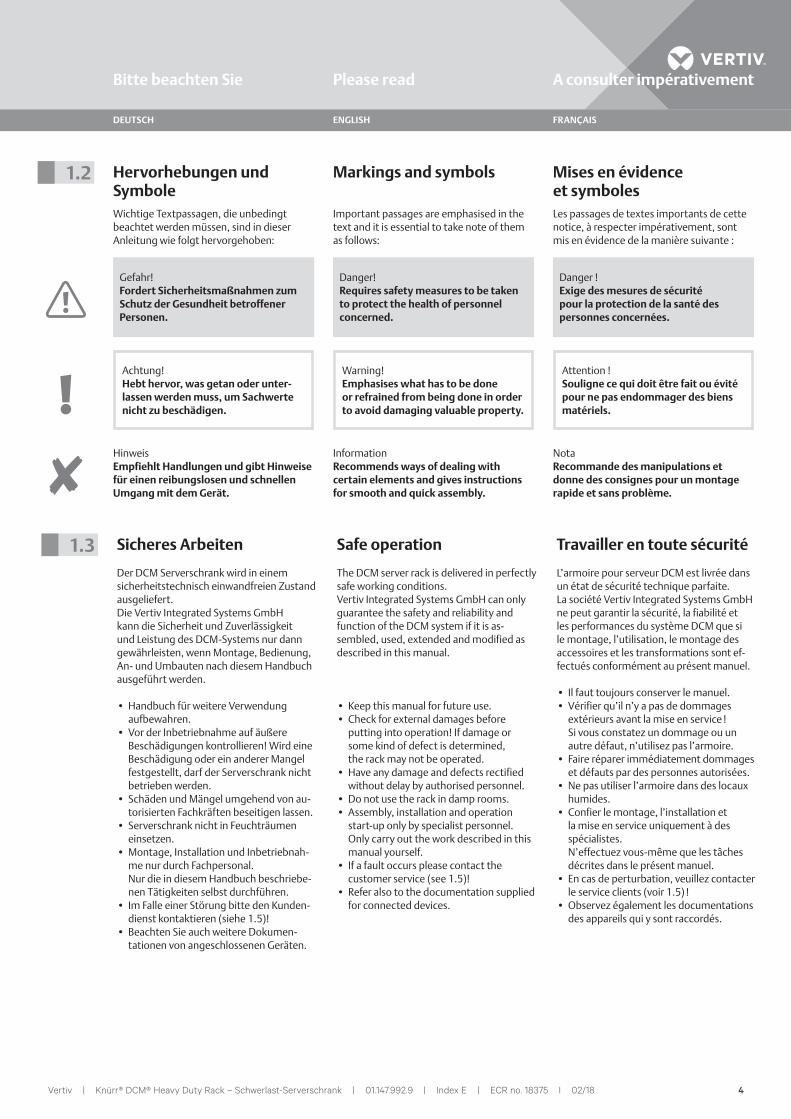
HinweisEmpfiehlt Handlungen und gibt Hinweise für einen reibungslosen und schnellen Umgang mit dem Gerät.
InformationRecommends ways of dealing with certain elements and gives instructions for smooth and quick assembly.
NotaRecommande des manipulations et donne des consignes pour un mon tage rapide et sans problème.
Achtung!Hebt hervor, was getan oder unter-lassen werden muss, um Sachwerte nicht zu beschädigen.
Warning!Emphasises what has to be done or refrained from being done in order to avoid damaging valuable property.
Attention !Souligne ce qui doit être fait ou évité pour ne pas endommager des biens matériels.
Gefahr!Fordert Sicherheitsmaß nah men zum Schutz der Gesundheit betroffener Personen.
Danger!Requires safety measures to be taken to protect the health of personnel concerned.
Danger !Exige des mesures de sécurité pour la protection de la santé des personnes concernées.
Markings and symbols
Important passages are emphasised in the text and it is essential to take note of them as follows:
Mises en évidence et symbolesLes passages de textes importants de cette notice, à respecter impérativement, sont mis en évidence de la manière suivante :
1.2 Hervorhebungen und SymboleWichtige Textpassagen, die unbedingt beachtet werden müssen, sind in dieser Anleitung wie folgt hervorgehoben:

5Vertiv | Knürr® DCM® Heavy Duty Rack – Schwerlast-Serverschrank | 01.147.992.9 | Index E | ECR no. 18375 I 02/18
Bitte beachten Sie Please read A consulter impérativement
DEUTSCH ENGLISH FRANÇAIS
Warranty
The warranty period is 24 months, starting on the date of delivery.Further details can be found in the enclosed General Business Conditions of Vertiv Inte-grated Systems GmbH.
Garantie
La période de garantie est de 24 mois. La date de livraison sert de date de référence.Vous trouverez d’autres précisions dans les conditions générales de vente de la société Vertiv Integrated Systems GmbH.
1.4 Gewährleistung
Die Gewährleistung beträgt 24 Monate. Als Stich tag wird das Lieferdatum gerechnet. Weitere Details entnehmen Sie bitte den allgemeinen Geschäftsbedingungen der Vertiv Integrated Systems GmbH.
Service
Vertiv Integrated Systems Technical Support will be glad to assist you with any queries. Please contact:
Vertiv Integrated Systems GmbHMariakirchener Straße 38D-94424 Arnstorf & +49 (0) 87 23/27-0Fax +49 (0) 87 23/27-154e-mail [email protected]
Service
Pour toutes questions, contacter le S.A.V. technique de Vertiv Integrated Systems à l’adresse suivante.
Vertiv Integrated Systems GmbHMariakirchener Straße 38D-94424 Arnstorf & +49 (0) 87 23/27-0Fax +49 (0) 87 23/27-154e-mail [email protected]
1.5 Service
Für alle Fragen steht Ihnen der technische Support von Vertiv Integrated Systems un-ter folgender Adresse gerne zur Verfügung.
Vertiv Integrated Systems GmbHMariakirchener Straße 38D-94424 Arnstorf & +49 (0) 87 23/27-0Fax +49 (0) 87 23/27-154E-Mail [email protected]
Standards and Regulations
The DCM server rack by Vertiv Integrated Systems GmbH has been constructed and tested in accordance with the relevant standards and regulations.
DIN EN 60950-1: 2006
Normes et prescriptions
L’armoire pour serveur de Vertiv Integrated Systems GmbH est conçue selon les normes, prescriptions et directives pertinentes et homologué en conséquence.
DIN EN 60950-1 : 2006
1.6 Normen und Vorschriften
Der DCM Serverschrank der Vertiv Integra-ted Systems GmbH ist in Übereinstimmung mit den relevanten Normen und Vorschrif-ten gebaut und geprüft worden.
DIN EN 60950-1: 2006
6Vertiv | Knürr® DCM® Heavy Duty Rack – Schwerlast-Serverschrank | 01.147.992.9 | Index E | ECR no. 18375 I 02/18
Vor der Montage Before assembly Préparatifs au montage
DEUTSCH ENGLISH FRANÇAIS
A
Delivery
Shipping damage
Livraison
Dommages liés au transport
2.1 Lieferung
Transportschäden
Gefahr!Bei erkennbaren Transportschä-den ist die Sicherheit nicht mehr gewährleistet!• Transportschaden sofort nach Anliefe-
rung der Spedition und dem Hersteller melden.
Danger!If the components have clearly suf-fered shipping damage, we cannot guarantee that they are safe.• Report shipping damage to
the forwarder or manufacturer immediately after delivery.
Danger !La sécurité n’est plus assurée en cas de dommages apparents liés au transport !• Les dommages liés au transport
doivent être signalés au transporteur et au constructeur immédiatement après la livraison.
Items suppliedThe supplied items are listed in the catalogue. The elements of the DCM system are partly assembled by the manufacturer before delivery.
ColisageColisage d’après le catalogue.Les éléments du système DCM sont livrés partiellement assemblés en usine.
LieferumfangLieferumfang nach Katalog.Die Elemente des DCM-Systems werden ab Werk teilmontiert geliefert.
Transport Transport2.2 Transport
Read before transporting to the installation site• Note the accident prevention regulations
when working with a lift truck, a fork lift truck or a crane.
• Place the pallet containing the rack as close as possible to the installation site.
Avant le transport sur le lieu d’installation• Respecter les consignes de prévoyance des
accidents lors des manœvres avec un cha-riot élévateur, un transpalette ou une grue.
• Déposer la palette avec l’armoire le plus près possible du lieu d’installation.
Vor dem Transport zum Aufstellort beachten• Unfallverhütungsvorschriften beim Um-
gang mt Hubwagen, Gabelstapler oder Kran beachten.
• Palette mit dem Schrank möglichst nah am Aufstellort absetzen.
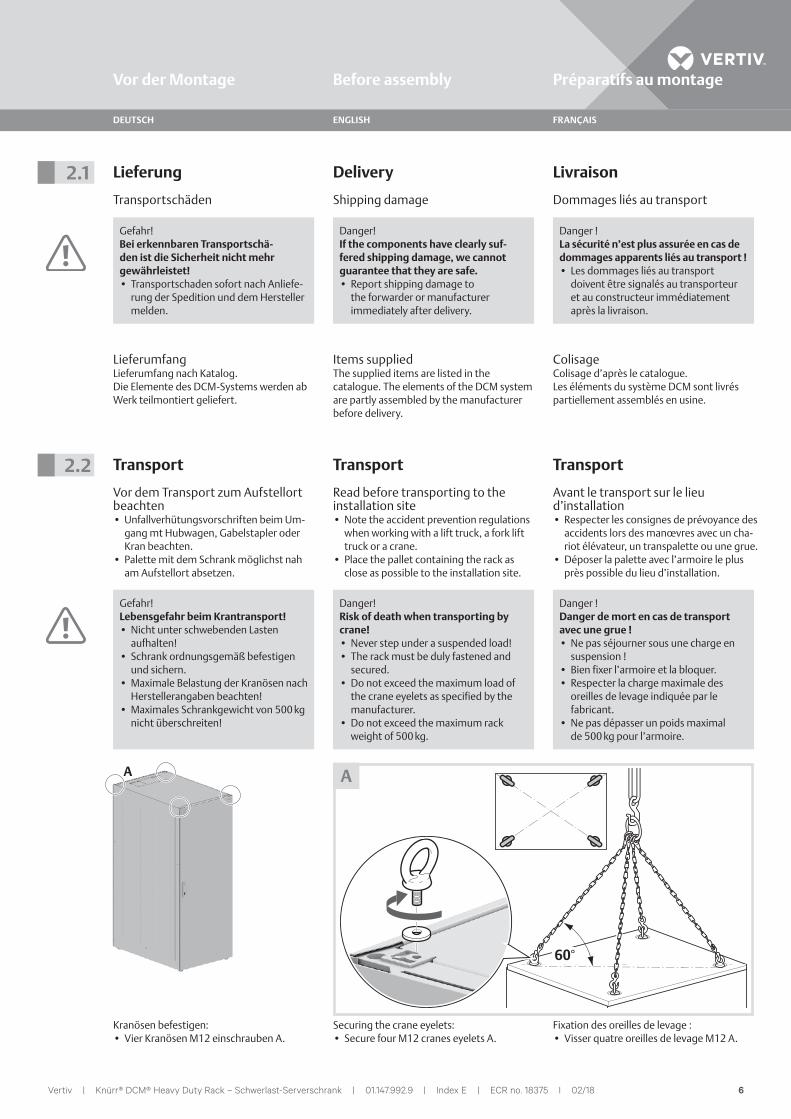
Gefahr!Lebensgefahr beim Krantransport!• Nicht unter schwebenden Lasten
aufhalten!• Schrank ordnungsgemäß befestigen
und sichern.• Maximale Belastung der Kranösen nach
Herstellerangaben beachten!• Maximales Schrankgewicht von 500 kg
nicht überschreiten!
Danger!Risk of death when transporting by crane!• Never step under a suspended load!• The rack must be duly fastened and
secured.• Do not exceed the maximum load of
the crane eyelets as specified by the manufacturer.
• Do not exceed the maximum rack weight of 500 kg.
Danger !Danger de mort en cas de transport avec une grue !• Ne pas séjourner sous une charge en
suspension !• Bien fixer l’armoire et la bloquer.• Respecter la charge maximale des
oreilles de levage indiquée par le fabricant.
• Ne pas dépasser un poids maximal de 500 kg pour l’armoire.
60°
A
Securing the crane eyelets:• Secure four M12 cranes eyelets A.
Fixation des oreilles de levage :• Visser quatre oreilles de levage M12 A.
Kranösen befestigen:• Vier Kranösen M12 einschrauben A.
7Vertiv | Knürr® DCM® Heavy Duty Rack – Schwerlast-Serverschrank | 01.147.992.9 | Index E | ECR no. 18375 I 02/18
Vor der Montage Before assembly Préparatifs au montage
DEUTSCH ENGLISH FRANÇAIS
Installation
Remove the packaging
Installation
Retirer l’emballage
2.3 Aufstellen
Verpackung entfernen
• Remove all the foil and take off the edge protector.
Waste disposalAll the materials used in the packaging can be recycled.• Disposal of all waste in an environmen-
tally friendly manner using local facilities. • Comply with current regulations relating
to environmental protection and waste disposal.
Remove the strapping from the pallet• Remove four fastening lugs.• Remove the strapping if necessary.
• Enlever entièrement le film plastique et retirer la protection des arêtes.
Elimination des déchetsTous les matériaux utilisés pour l’emballage se prêtent à un recyclage matière.• Eliminez tous les déchets dans le respect
de l’environnement en fonction des possibilités locales.
• Respectez les dispositions légales en vigueur concernant la protection de l’environnement et le traitement des déchets.
Retrait de la fixation sur la palette• Retirer les quatre pattes de fixation.• En cas de besoin, enlever la bande de
cerclage.
• Folie vollständig entfernen und Kanten-schutz abnehmen.
EntsorgungAlle verwendeten Materialien der Verpa-ckung können stofflich wiederverwertet werden.• Entsorgen Sie alle anfallenden Abfälle
umweltfreundlich, entsprechend den Möglichkeiten vor Ort.
• Beachten Sie die geltenden Vorschriften zu Umweltschutz und Abfallentsorgung.
Befestigung auf der Palette entfernen• Vier Befestigungslaschen entfernen.• Bei Bedarf Umreifungsband abnehmen.
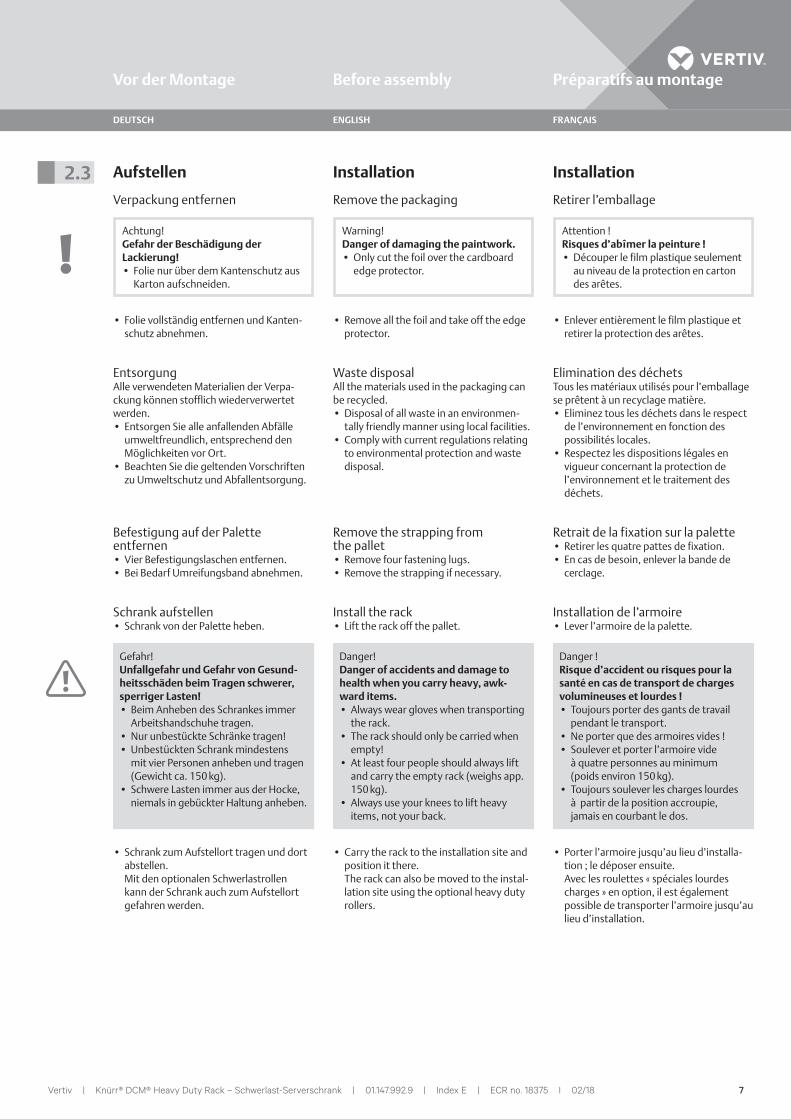
Achtung!Gefahr der Beschädigung der Lackierung!• Folie nur über dem Kantenschutz aus
Karton aufschneiden.
Warning!Danger of damaging the paintwork.• Only cut the foil over the cardboard
edge protector.
Attention !Risques d’abîmer la peinture !• Découper le film plastique seulement
au niveau de la protection en carton des arêtes.
Gefahr!Unfallgefahr und Gefahr von Gesund-heitsschäden beim Tragen schwerer, sperriger Lasten!• Beim Anheben des Schrankes immer
Arbeitshandschuhe tragen.• Nur unbestückte Schränke tragen!• Unbestückten Schrank mindestens
mit vier Personen anheben und tragen (Gewicht ca. 150 kg).
• Schwere Lasten immer aus der Hocke, niemals in gebückter Haltung anheben.
Danger!Danger of accidents and damage to health when you carry heavy, awk-ward items.• Always wear gloves when transporting
the rack.• The rack should only be carried when
empty!• At least four people should always lift
and carry the empty rack (weighs app. 150 kg).
• Always use your knees to lift heavy items, not your back.
Danger !Risque d’accident ou risques pour la santé en cas de transport de charges volumineuses et lourdes !• Toujours porter des gants de travail
pendant le transport.• Ne porter que des armoires vides !• Soulever et porter l’armoire vide
à quatre personnes au minimum (poids environ 150 kg).
• Toujours soulever les charges lourdes à partir de la position accroupie, jamais en courbant le dos.
Install the rack• Lift the rack off the pallet.
Installation de l’armoire• Lever l’armoire de la palette.
Schrank aufstellen• Schrank von der Palette heben.
• Carry the rack to the installation site and position it there. The rack can also be moved to the instal-lation site using the optional heavy duty rollers.
• Porter l’armoire jusqu’au lieu d’installa-tion ; le déposer ensuite. Avec les roulettes « spéciales lourdes charges » en option, il est également possible de transporter l’armoire jusqu’au lieu d’installation.
• Schrank zum Aufstellort tragen und dort abstellen. Mit den optionalen Schwerlastrollen kann der Schrank auch zum Aufstellort gefahren werden.
8Vertiv | Knürr® DCM® Heavy Duty Rack – Schwerlast-Serverschrank | 01.147.992.9 | Index E | ECR no. 18375 I 02/18
Vor der Montage Before assembly Préparatifs au montage
DEUTSCH ENGLISH FRANÇAIS
C
12
6
C
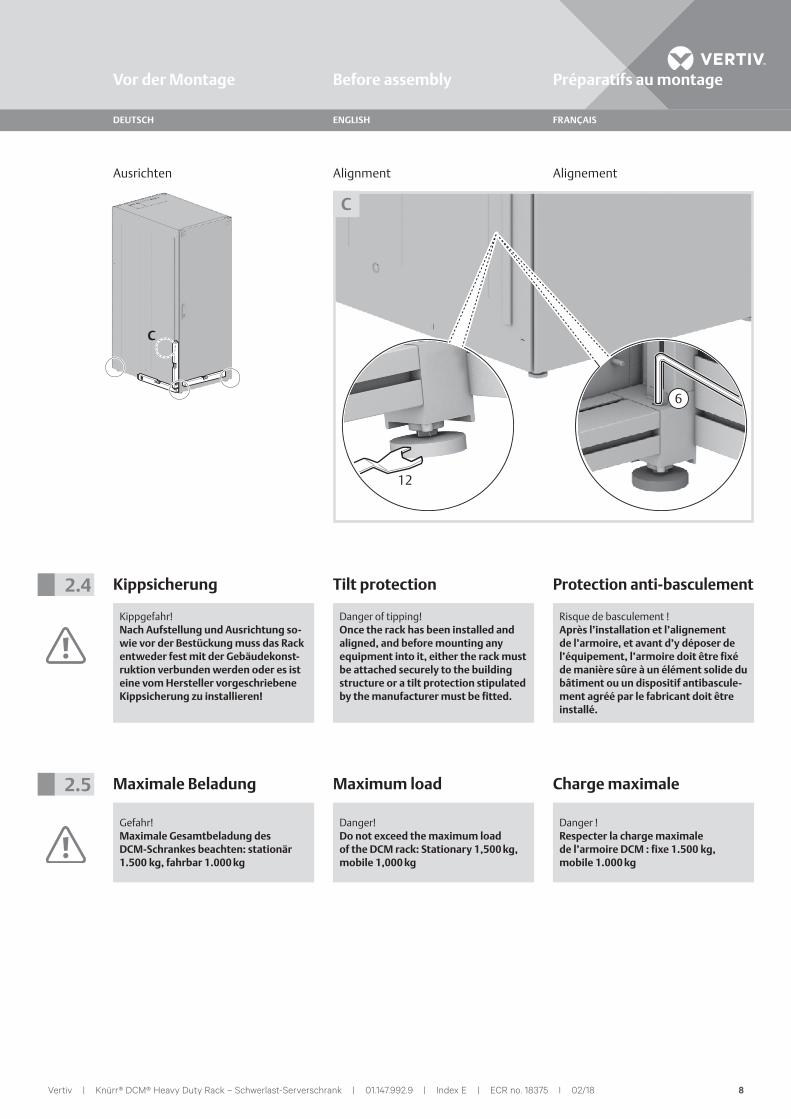
Tilt protection Protection anti-basculement2.4 Kippsicherung
Maximum load Charge maximale2.5 Maximale Beladung
Alignment AlignementAusrichten
Kippgefahr!Nach Aufstellung und Ausrichtung so-wie vor der Bestückung muss das Rack entweder fest mit der Gebäudekonst-ruktion verbunden werden oder es ist eine vom Hersteller vorgeschriebene Kippsicherung zu installieren!
Danger of tipping!Once the rack has been installed and aligned, and before mounting any equipment into it, either the rack must be attached securely to the building structure or a tilt protection stipulated by the manufacturer must be fitted.
Risque de basculement !Après l’installation et l’alignement de l’armoire, et avant d’y déposer de l’équipement, l’armoire doit être fixé de manière sûre à un élément solide du bâtiment ou un dispositif antibascule-ment agréé par le fabricant doit être installé.
Gefahr!Maximale Gesamtbeladung des DCM-Schrankes beachten: stationär 1.500 kg, fahrbar 1.000 kg
Danger!Do not exceed the maximum load of the DCM rack: Stationary 1,500 kg, mobile 1,000 kg
Danger !Respecter la charge maximale de l’armoire DCM : fixe 1.500 kg, mobile 1.000 kg
1
2
3
4
5
1
4
9Vertiv | Knürr® DCM® Heavy Duty Rack – Schwerlast-Serverschrank | 01.147.992.9 | Index E | ECR no. 18375 I 02/18
Vor der Montage Before assembly Préparatifs au montage
DEUTSCH ENGLISH FRANÇAIS
D
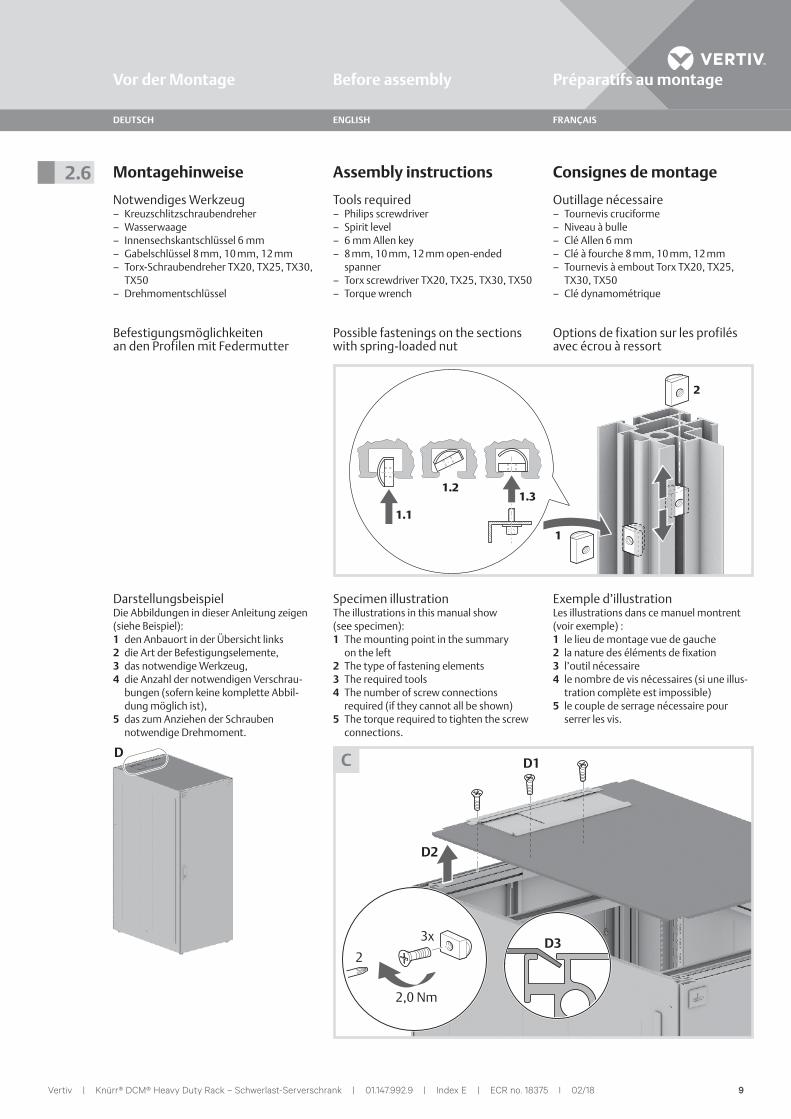
Assembly instructions
Tools required – Philips screwdriver – Spirit level – 6 mm Allen key – 8 mm, 10 mm, 12 mm open-ended
spanner – Torx screwdriver TX20, TX25, TX30, TX50 – Torque wrench
Possible fastenings on the sections with spring-loaded nut
Consignes de montage
Outillage nécessaire – Tournevis cruciforme – Niveau à bulle – Clé Allen 6 mm – Clé à fourche 8 mm, 10 mm, 12 mm – Tournevis à embout Torx TX20, TX25,
TX30, TX50 – Clé dynamométrique
Options de fixation sur les profilés avec écrou à ressort
2.6 Montagehinweise
Notwendiges Werkzeug – Kreuzschlitzschraubendreher – Wasserwaage – Innensechskantschlüssel 6 mm – Gabelschlüssel 8 mm, 10 mm, 12 mm – Torx-Schraubendreher TX20, TX25, TX30,
TX50 – Drehmomentschlüssel
Befestigungsmöglichkeiten an den Profilen mit Federmutter
2
1
1.1
1.21.3
2,0 Nm
3x
2
D1
D2
D3
C
Specimen illustrationThe illustrations in this manual show (see specimen):1 The mounting point in the summary
on the left2 The type of fastening elements3 The required tools4 The number of screw connections
required (if they cannot all be shown)5 The torque required to tighten the screw
connections.
Exemple d’illustrationLes illustrations dans ce manuel montrent (voir exemple) :1 le lieu de montage vue de gauche2 la nature des éléments de fixation3 l’outil nécessaire4 le nombre de vis nécessaires (si une illus-
tration complète est impossible)5 le couple de serrage nécessaire pour
serrer les vis.
DarstellungsbeispielDie Abbildungen in dieser Anleitung zeigen (siehe Beispiel):1 den Anbauort in der Übersicht links2 die Art der Befestigungselemente,3 das notwendige Werkzeug,4 die Anzahl der notwendigen Verschrau-
bungen (sofern keine komplette Abbil-dung möglich ist),
5 das zum Anziehen der Schrauben notwendige Drehmoment.

10Vertiv | Knürr® DCM® Heavy Duty Rack – Schwerlast-Serverschrank | 01.147.992.9 | Index E | ECR no. 18375 I 02/18
DEUTSCH ENGLISH FRANÇAIS
A2
A1
A2
A3
A
• Lift the door leaf out of the hinges A3.
• Hinge in reverse order of steps.
• Soulever le battant de la porte hors des charnières A3.
• Accrochage dans l’ordre inverse.
• Türblatt aus den Scharnieren heben A3.
• Türblatt in umgekehrter Reihenfolge einhängen.
Unhinge and hinge
The following shows the single door version. The procedure is the same for fitting and removal of the swing doors.
• Open the door by more than 90° A1.
Décrochage et accrochage
Ci-dessous, la porte représentée est à simple battant ; le décrochage et l’accrochage des portes à double battant s’effectuent de la même manière.
• Ouvrir la porte à plus de 90° A1.
3.1 Aus- und Einhängen
Dargestellt ist im folgenden die Einfachtür, das Aus- und Einhängen der Flügeltüren erfolgt analog.
• Tür um mehr als 90° öffnen A1.
Door reversal
Only reverse the hinges on the single door.
• Remove the door (see 3.1).
Changement d’arrête-porte
Remplacement de l’arrête-porte unique-ment pour la porte à simple battant.
• Décrocher la porte (cf. 3.1).
3.2 Türanschlag wechseln
Wechsel des Türanschlags nur bei der Einfachtür!
• Tür aushängen (siehe 3.1).
Türen Doors Portes

11Vertiv | Knürr® DCM® Heavy Duty Rack – Schwerlast-Serverschrank | 01.147.992.9 | Index E | ECR no. 18375 I 02/18
DEUTSCH ENGLISH FRANÇAIS
C1, C2C3
C3
5,2 Nm
4xTX 30
5,2 Nm
1xTX 25
C2
C2C1
C1
C1
C
• Adjust the hinge B2 and refit it.• Refit the earth cable on the bottom of the
door leaf B3.
Reverse the hinges and earth cable on the base frame
• Faire coulisser l’élément de charnière B2, puis le remonter.
• Remonter le câble de mise à la terre en bas du battant de porte B3.
Modification des charnières et du câble de mise à la terre sur le châssis de base
• Scharnierteil verschieben B2 und wieder montieren.
• Erdungskabel unten am Türblatt wieder montieren B3.
Scharniere und Erdungskabel am Grundgestell umbauen
B
5,2 Nm
3xTX 25
B1
B3
B2
B1, B3
B
Reverse the hinges and earth cable on the door leaf
Modification des charnières et du câble de mise à la terre sur le battant de porte
Scharniere und Erdungskabel am Türblatt umbauen
• Turn the hinges through 180° and refit them on the other side of the rack C3.
• Refit the earth plug C2 on the other side of the rack.
• Faire pivoter les charnières de 180°, puis les remonter de l’autre côté de l’armoire C3.
• Remonter la fiche de mise à la terre C2 de l’autre côté de l’armoire.
• Scharniere um 180° drehen und auf der an-deren Schrankseite wieder montieren C3.
• Erdungsstecker C2 auf der gegenüberlie-genden Schrankseite wieder montieren.
Türen Doors Portes

12Vertiv | Knürr® DCM® Heavy Duty Rack – Schwerlast-Serverschrank | 01.147.992.9 | Index E | ECR no. 18375 I 02/18
DEUTSCH ENGLISH FRANÇAIS
5,2 Nm
4xTX 25
D1
D
D
D2
D2
Reverse the locking plates on the base frame
Modification des plaques de fermeture sur le châssis de base
Schließbleche am Grundgestell umbauen
E
• Refit the locking plates on the other side of the rack D2.
Hinge• Turn the door through 180° E and hinge it
on the other side of the rack (see 3.1).• Reconnect the earth cable.
• Remonter les plaques de fermeture de l’autre côté de l’armoire D2.
Accrochage• Faire pivoter la porte de 180° E. Accrocher la
porte de l’autre côté de l’armoire (cf. 3.1).• Rebrancher le câble de mise à la terre.
• Schließbleche auf der gegenüberliegen-den Schrankseite wieder montieren D2.
Einhängen• Türblatt um 180° drehen E und auf der
anderen Seite einhängen (siehe 3.1).• Erdungs kabel wieder aufstecken.
Türen Doors Portes
13Vertiv | Knürr® DCM® Heavy Duty Rack – Schwerlast-Serverschrank | 01.147.992.9 | Index E | ECR no. 18375 I 02/18
DEUTSCH ENGLISH FRANÇAIS
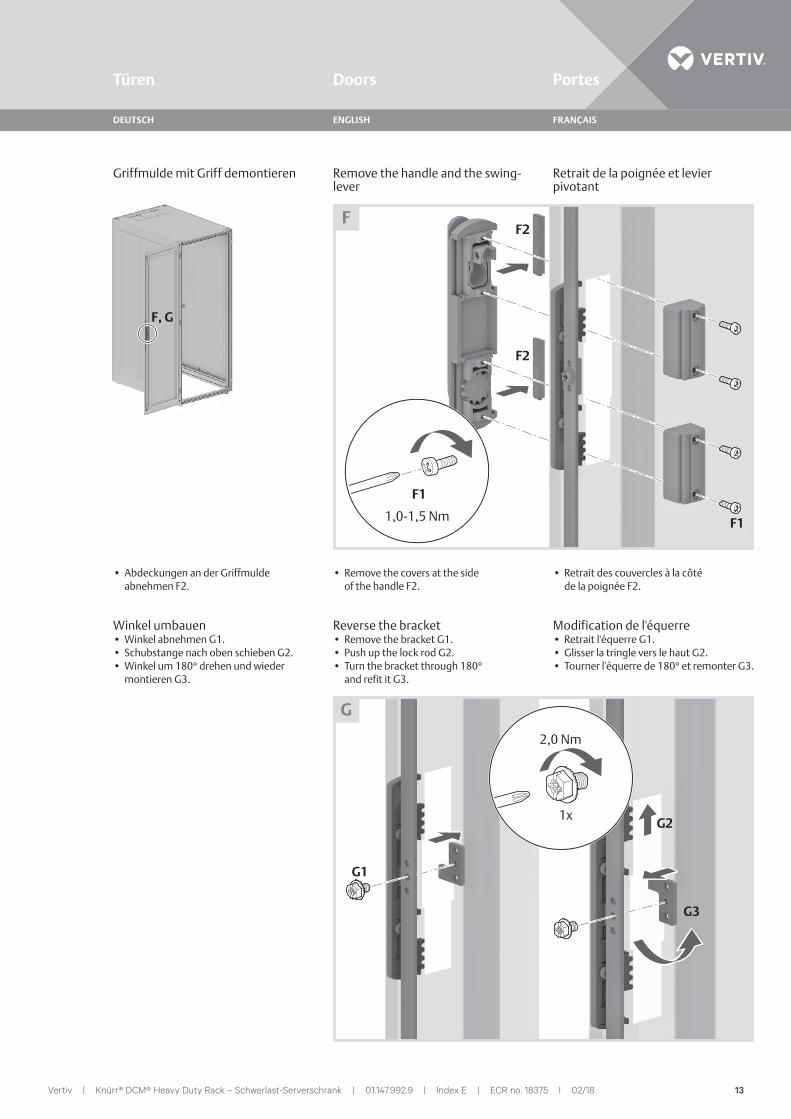
• Remove the covers at the side of the handle F2.
Reverse the bracket• Remove the bracket G1.• Push up the lock rod G2. • Turn the bracket through 180°
and refit it G3.
• Retrait des couvercles à la côté de la poignée F2.
Modification de l'équerre• Retrait l'équerre G1.• Glisser la tringle vers le haut G2. • Tourner l'équerre de 180° et remonter G3.
• Abdeckungen an der Griffmulde abnehmen F2.
Winkel umbauen• Winkel abnehmen G1.• Schubstange nach oben schieben G2. • Winkel um 180° drehen und wieder
montieren G3.
1,0-1,5 Nm
F1
F2
F2
F1
F
F, G
Remove the handle and the swing- lever
Retrait de la poignée et levier pivotant
Griffmulde mit Griff demontieren
2,0 Nm
1x
G1
G2
G3
G
Türen Doors Portes
14Vertiv | Knürr® DCM® Heavy Duty Rack – Schwerlast-Serverschrank | 01.147.992.9 | Index E | ECR no. 18375 I 02/18
DEUTSCH ENGLISH FRANÇAIS
1,0-1,5 Nm
H3
H2
H2
H3
H1
H
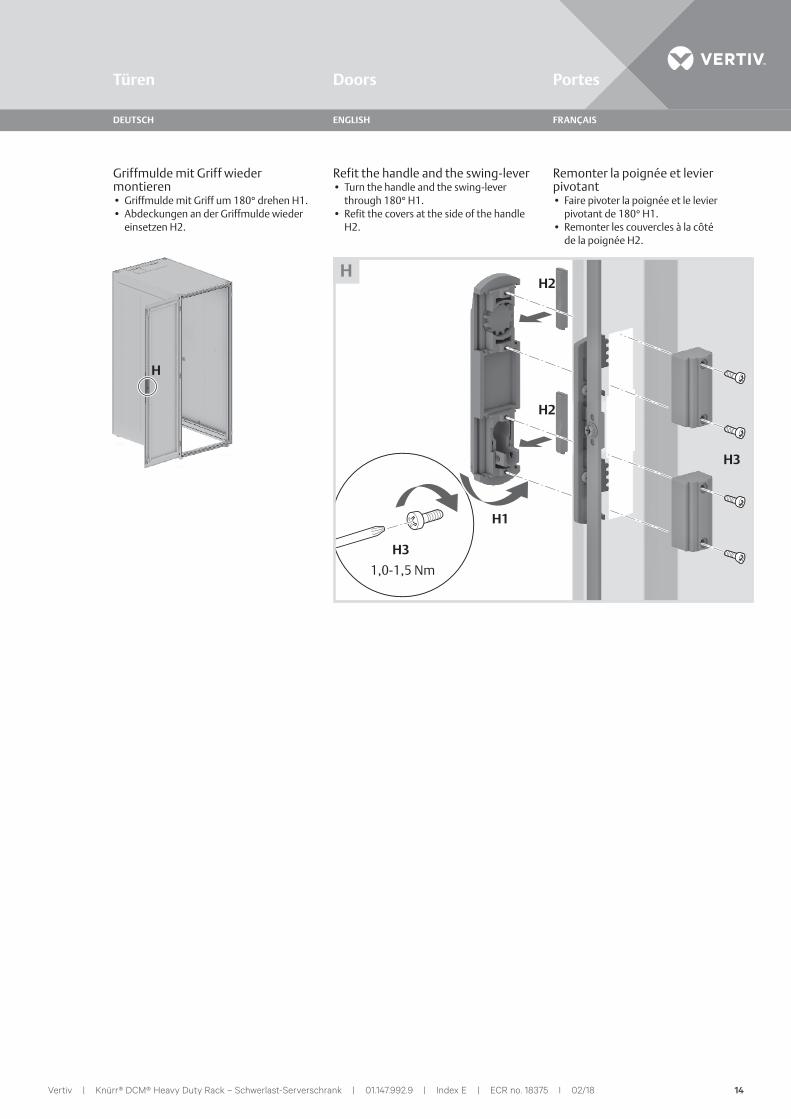
Refit the handle and the swing-lever• Turn the handle and the swing-lever
through 180° H1.• Refit the covers at the side of the handle
H2.
Remonter la poignée et levier pivotant• Faire pivoter la poignée et le levier
pivotant de 180° H1.• Remonter les couvercles à la côté
de la poignée H2.
Griffmulde mit Griff wieder montieren• Griffmulde mit Griff um 180° drehen H1.• Abdeckungen an der Griffmulde wieder
einsetzen H2.
H
Türen Doors Portes
15Vertiv | Knürr® DCM® Heavy Duty Rack – Schwerlast-Serverschrank | 01.147.992.9 | Index E | ECR no. 18375 I 02/18
DEUTSCH ENGLISH FRANÇAIS
B3
B1
B2
A
A
90°
A
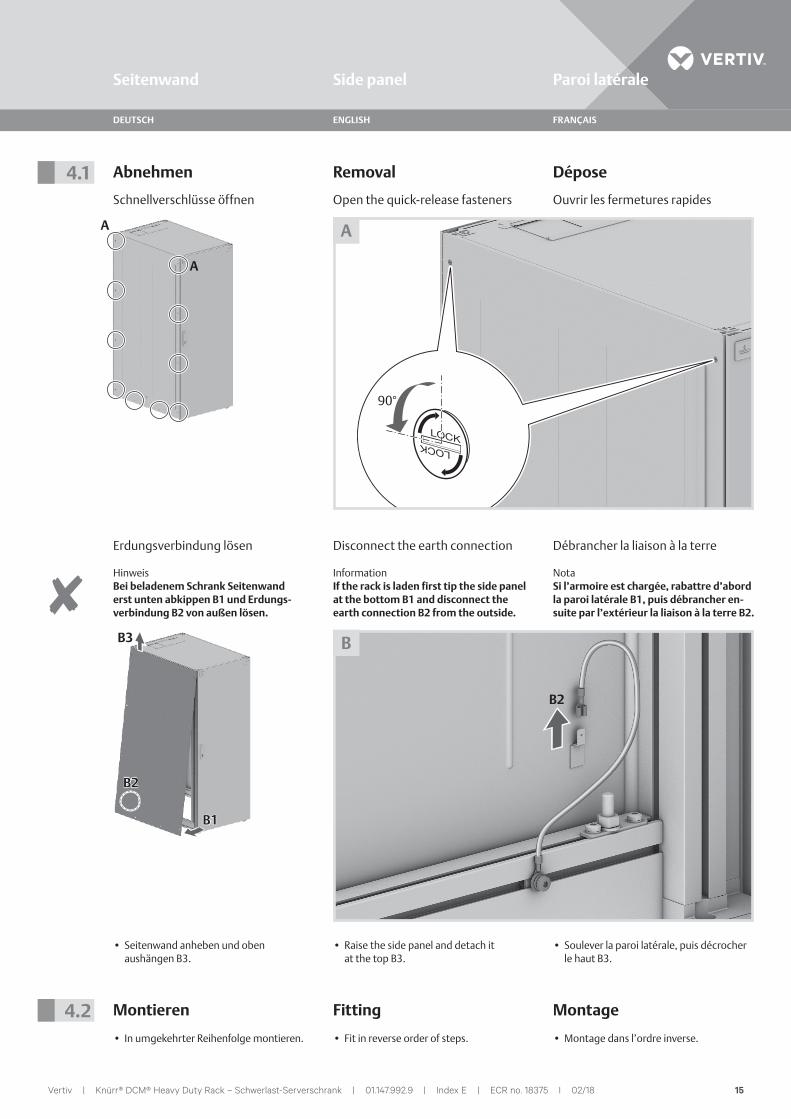
Disconnect the earth connection Débrancher la liaison à la terreErdungsverbindung lösen
B2
B
Fitting
• Fit in reverse order of steps.
Montage
• Montage dans l’ordre inverse.
4.2 Montieren
• In umgekehrter Reihenfolge montieren.
• Raise the side panel and detach it at the top B3.
• Soulever la paroi latérale, puis décrocher le haut B3.
• Seitenwand anheben und oben aus hängen B3.
Removal
Open the quick-release fasteners
Dépose
Ouvrir les fermetures rapides
4.1 Abnehmen
Schnellverschlüsse öffnen
HinweisBei beladenem Schrank Seitenwand erst unten abkippen B1 und Erdungs-verbin dung B2 von außen lösen.
InformationIf the rack is laden first tip the side panel at the bottom B1 and disconnect the earth connection B2 from the outside.
NotaSi l’armoire est chargée, rabattre d’abord la paroi latérale B1, puis débrancher en-suite par l’extérieur la liaison à la terre B2.
Seitenwand Side panel Paroi latérale

16Vertiv | Knürr® DCM® Heavy Duty Rack – Schwerlast-Serverschrank | 01.147.992.9 | Index E | ECR no. 18375 I 02/18
DEUTSCH ENGLISH FRANÇAIS
CC
D
2,0 Nm
3x
2
D1
D2
D3
D
• First raise the cover at the rear D2 and detach it at the front D3.
• Soulever d’abord l’arrière du couvercle D2, puis décrocher celui-ci par l’avant D3.
• Deckel erst hinten anheben D2 und vorn aushängen D3.
Fitting
• Fit in reverse order of steps.• Note tightening torque.
Montage
• Montage dans l’ordre inverse.• Respecter le couple de serrage.
5.2 Montieren
• In umgekehrter Reihenfolge montieren.• Anziehdrehmoment beachten.
Removal
Disconnect the earth connection
Dépose
Débrancher la liaison à la terre
5.1 Abnehmen
Erdungsverbindung lösen
Remove top cover Déposer la couvercleDeckel abnehmen
Deckel Top cover Couvercle
17Vertiv | Knürr® DCM® Heavy Duty Rack – Schwerlast-Serverschrank | 01.147.992.9 | Index E | ECR no. 18375 I 02/18
DEUTSCH ENGLISH FRANÇAIS
E
D
2,0 Nm
3x
2xE1
E3E2
E
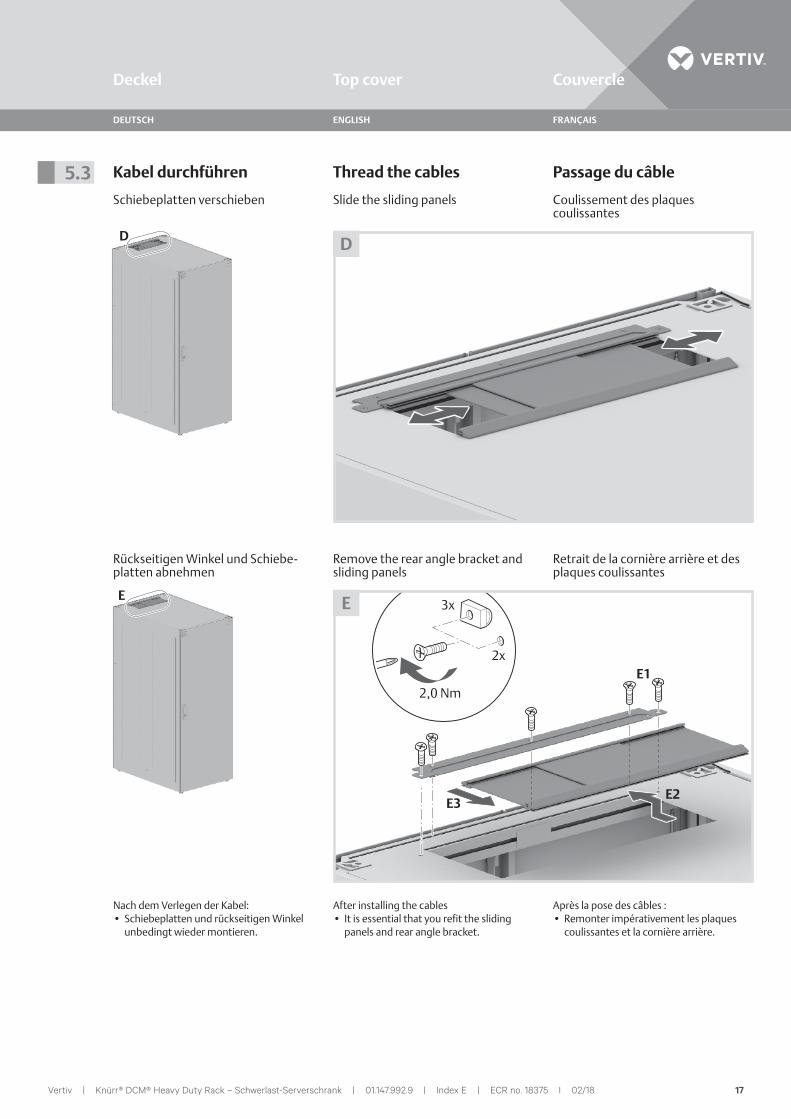
After installing the cables• It is essential that you refit the sliding
panels and rear angle bracket.
Après la pose des câbles :• Remonter impérativement les plaques
coulissantes et la cornière arrière.
Nach dem Verlegen der Kabel:• Schiebeplatten und rückseitigen Winkel
unbedingt wieder montieren.
D
Thread the cables
Slide the sliding panels
Passage du câble
Coulissement des plaques coulissantes
5.3 Kabel durchführen
Schiebeplatten verschieben
Remove the rear angle bracket and sliding panels
Retrait de la cornière arrière et des plaques coulissantes
Rückseitigen Winkel und Schiebe-platten abnehmen
Deckel Top cover Couvercle
18Vertiv | Knürr® DCM® Heavy Duty Rack – Schwerlast-Serverschrank | 01.147.992.9 | Index E | ECR no. 18375 I 02/18
DEUTSCH ENGLISH FRANÇAIS
A
B
5,2 Nm
8xTX 30
A
5,2 Nm
8xTX 30
B
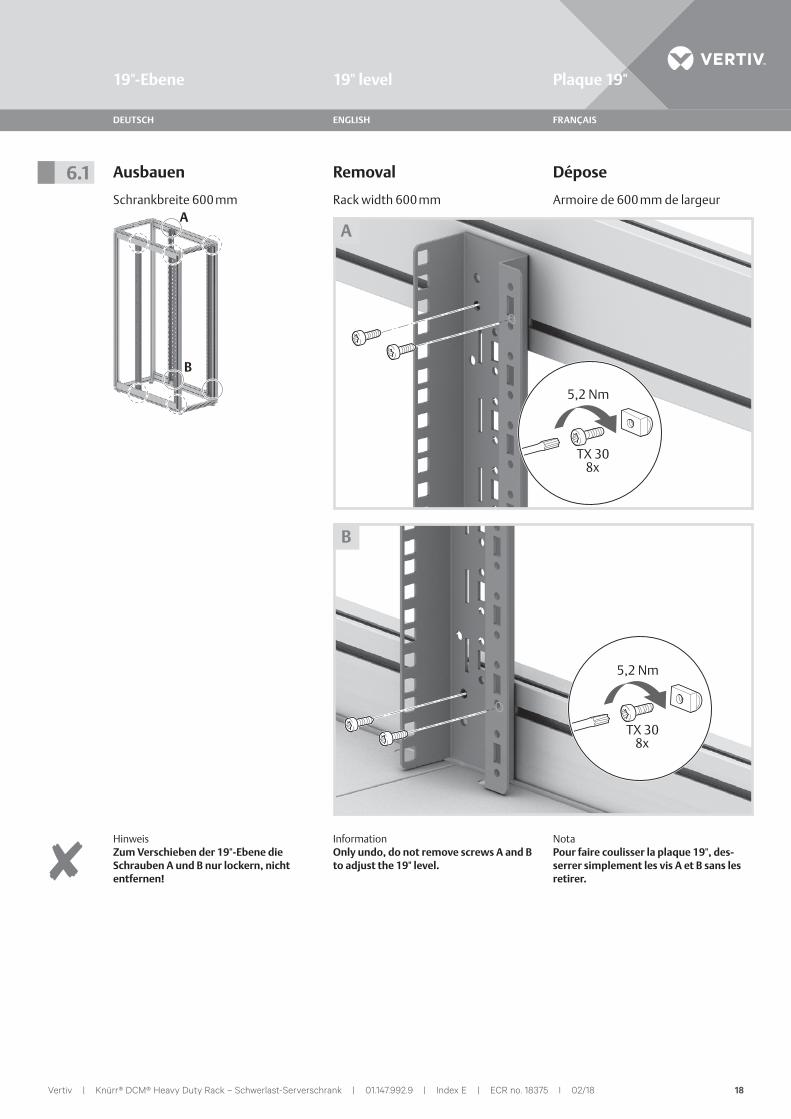
Removal Dépose6.1 Ausbauen
HinweisZum Verschieben der 19"-Ebene die Schrauben A und B nur lockern, nicht entfernen!
InformationOnly undo, do not remove screws A and B to adjust the 19" level.
NotaPour faire coulisser la plaque 19", des-serrer simplement les vis A et B sans les retirer.
Rack width 600 mm Armoire de 600 mm de largeurSchrankbreite 600 mm
19"-Ebene 19" level Plaque 19"
19Vertiv | Knürr® DCM® Heavy Duty Rack – Schwerlast-Serverschrank | 01.147.992.9 | Index E | ECR no. 18375 I 02/18
DEUTSCH ENGLISH FRANÇAIS
C
D
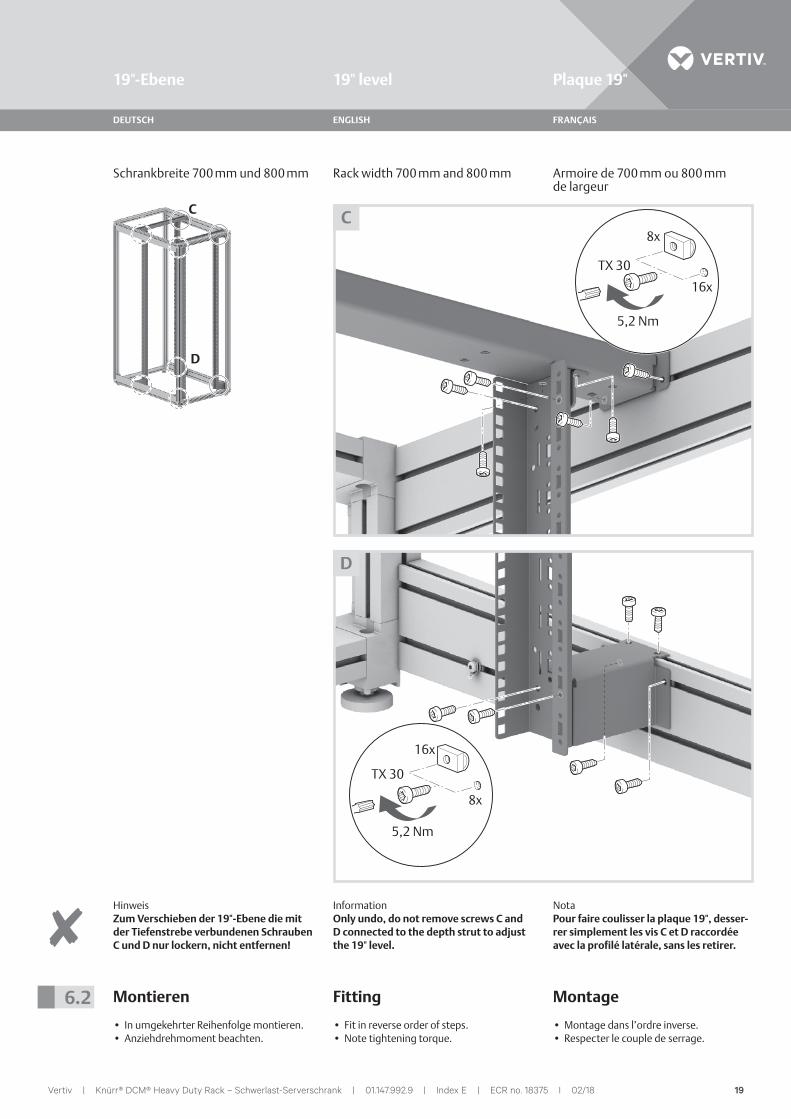
Fitting
• Fit in reverse order of steps.• Note tightening torque.
Montage
• Montage dans l’ordre inverse.• Respecter le couple de serrage.
6.2 Montieren
• In umgekehrter Reihenfolge montieren.• Anziehdrehmoment beachten.
5,2 Nm
8x
16x
TX 30
C
5,2 Nm
16x
8x
TX 30
D
Rack width 700 mm and 800 mm Armoire de 700 mm ou 800 mm de largeur
Schrankbreite 700 mm und 800 mm
HinweisZum Verschieben der 19"-Ebene die mit der Tiefenstrebe verbundenen Schrauben C und D nur lockern, nicht entfernen!
InformationOnly undo, do not remove screws C and D connected to the depth strut to adjust the 19" level.
NotaPour faire coulisser la plaque 19", desser-rer simplement les vis C et D raccordée avec la profilé latérale, sans les retirer.
19"-Ebene 19" level Plaque 19"

20Vertiv | Knürr® DCM® Heavy Duty Rack – Schwerlast-Serverschrank | 01.147.992.9 | Index E | ECR no. 18375 I 02/18
DEUTSCH ENGLISH FRANÇAIS
A
TX 50
A1
A2A3
A4
35 Nm
A
Corner connectors
Screw connectors A1-A4 in the corner connectors for installing or removing the aluminium sections.
Raccords d’angles
Vissages A1–A4 dans les raccords d’angles pour le montage ou le démontage des profilés en aluminium.
7.1 Eckverbinder
Verschraubungen A1–A4 in den Eckverbin-dern für die Montage oder Demontage der Alu-Profile.
Grundgestell Base frame Châssis de base

21Vertiv | Knürr® DCM® Heavy Duty Rack – Schwerlast-Serverschrank | 01.147.992.9 | Index E | ECR no. 18375 I 02/18
DEUTSCH ENGLISH FRANÇAIS
Earthing Mise à la terre7.2 Erdung
5,2 Nm
2xTX 25
B
Gefahr!Jedes DCM Rack muss vor Inbetrieb-nahme fachgerecht mit der Erdung am Aufstellungsort verbunden werden.Hierzu wird die Verwendung des im Lieferumfang enthaltenen, zentralen Erdungspunkts empfohlen.Die Erdung darf nur von geschultem Fachpersonal mit entsprechender Zulassung durchgeführt werden!
Danger!Prior to start-up, every DCM rack must be professionally grounded at the installation site. Use of the central grounding point supplied is recom-mended for this purpose.Grounding may only be carried out by trained and certified specialists!
Danger !Le raccordement de chaque armoire DCM avec la prise de mise à la terre du site d’installation doit être réalisé de manière appropriée préalablement à la mise en service. Pour ce faire, il est conseillé d’utiliser les points de mise à la terre centraux fournis.La mise à la terre ne doit être réalisée que par le personnel formé avec l’habili-tation correspondante !
Grundgestell Base frame Châssis de base
22Vertiv | Knürr® DCM® Heavy Duty Rack – Schwerlast-Serverschrank | 01.147.992.9 | Index E | ECR no. 18375 I 02/18
DEUTSCH ENGLISH FRANÇAIS
Notizen Notes Notes

23Vertiv | Knürr® DCM® Heavy Duty Rack – Schwerlast-Serverschrank | 01.147.992.9 | Index E | ECR no. 18375 I 02/18
DEUTSCH ENGLISH FRANÇAIS
Notizen Notes Notes

VertivCo.com | Vertiv Integrated Systems GmbH, Mariakirchener Straße 38, 94424 Arnstorf, Germany© 2016 Vertiv Co. All rights reserved. Vertiv, the Vertiv logo and Vertiv Liebert DSE are trademarks or registered trademarks of Vertiv Co. All other names and logos referred to are trade names, trademarks or registered trademarks of their respective owners. While every precaution has been taken to ensure accuracy and completeness herein, Vertiv Co. assumes no responsibility, and disclaims all liability, for damages resulting from use of this information or for any errors or omissions. Specifications are subject to change without notice.