Knitted Patchwork Recipe v3static-sympoz.s3.amazonaws.com/upload/599970/pattern/... ·...
4
Pattern update: 9 May 2014 1 © Copyright 2013 Martine Ellis All rights reserved this pattern is for personal use only, email [email protected] if you have any questions www.imakegsy.com iMake on Ravelry Knitted Patchwork Recipe by Martine Ellis (iMake) This knitting “recipe” is for a mitered square project. What you do with your lovely mitered squares is completely up to you. You could make a blanket, a scarf, a cushion cover… the possibilities are endless. If you are interested in joining a leisurely, longterm knitalong then read on to the end of this recipe. There will also be the opportunity for sharing and swapping leftover yarn. A note on yarn This pattern was originally written for using up leftover sock yarn, but actually, it will work with any weight yarn. Just adjust your needle size accordingly and use the same weight yarn (or thereabouts) for each square.
-
Upload
vuongthien -
Category
Documents
-
view
215 -
download
0
Transcript of Knitted Patchwork Recipe v3static-sympoz.s3.amazonaws.com/upload/599970/pattern/... ·...

Pattern update: 9 May 2014 1
© Copyright 2013 Martine Ellis All rights reserved -‐ this pattern is for personal use only, email [email protected] if you have any questions
www.imakegsy.com -‐ iMake on Ravelry
Knitted Patchwork Recipe by Martine Ellis (iMake)
This knitting “recipe” is for a mitered square project. What you do with your lovely mitered squares is completely up to you. You could make a blanket, a scarf, a cushion cover… the possibilities are endless. If you are interested in joining a leisurely, long-‐term knit-‐a-‐long then read on to the end of this recipe. There will also be the opportunity for sharing and swapping leftover yarn.
A note on yarn This pattern was originally written for using up leftover sock yarn, but actually, it will work with any weight yarn. Just adjust your needle size accordingly and use the same weight yarn (or thereabouts) for each square.
Pattern update: 9 May 2014 2
© Copyright 2013 Martine Ellis All rights reserved -‐ this pattern is for personal use only, email [email protected] if you have any questions
www.imakegsy.com -‐ iMake on Ravelry
You will need
• A pair of size 2.75mm straight knitting needles (US size 2) or equivalent circular needle if you prefer.
• Lots and lots of leftover sock yarn. A ball about the size of a small walnut is more than enough for one square. The yarn needs to be roughly the same weight (sock/fingering weight yarn). To find out how to get your hands on lots of leftover yarn, check out “swap notes & social stuff” at the end of this recipe.
• A stitch marker. • Tapestry/yarn needle.
Gauge Whilst gauge is not important for this recipe, it’s recommended that you use the same weight yarn for all your squares.
Pattern notes Slip the first stitch of every row as if to purl. Your decreases only occur on the right side (RS) of the work.
Abbreviations k knit k2tog knit 2 together k2tog tbl knit 2 together through the back loops rs right side ws wrong side
Making your first square Row 1 (rs): loosely cast on 16 stitches, place stitch marker, cast on a further 16 stitches (32 stitches in total). Row 2 (ws): k all stitches. Row 3 (rs): (decrease row) k until 2 stitches before the marker, k2tog, slip marker, k2tog tbl, k to end of row.
Pattern update: 9 May 2014 3
© Copyright 2013 Martine Ellis All rights reserved -‐ this pattern is for personal use only, email [email protected] if you have any questions
www.imakegsy.com -‐ iMake on Ravelry
Row 4 (ws): k all stitches. Repeat rows 3 and 4 until you are left with just 2 stitches on the needle (ws), pass the left stitch over the right stitch so you have just one stitch left and then fasten off.
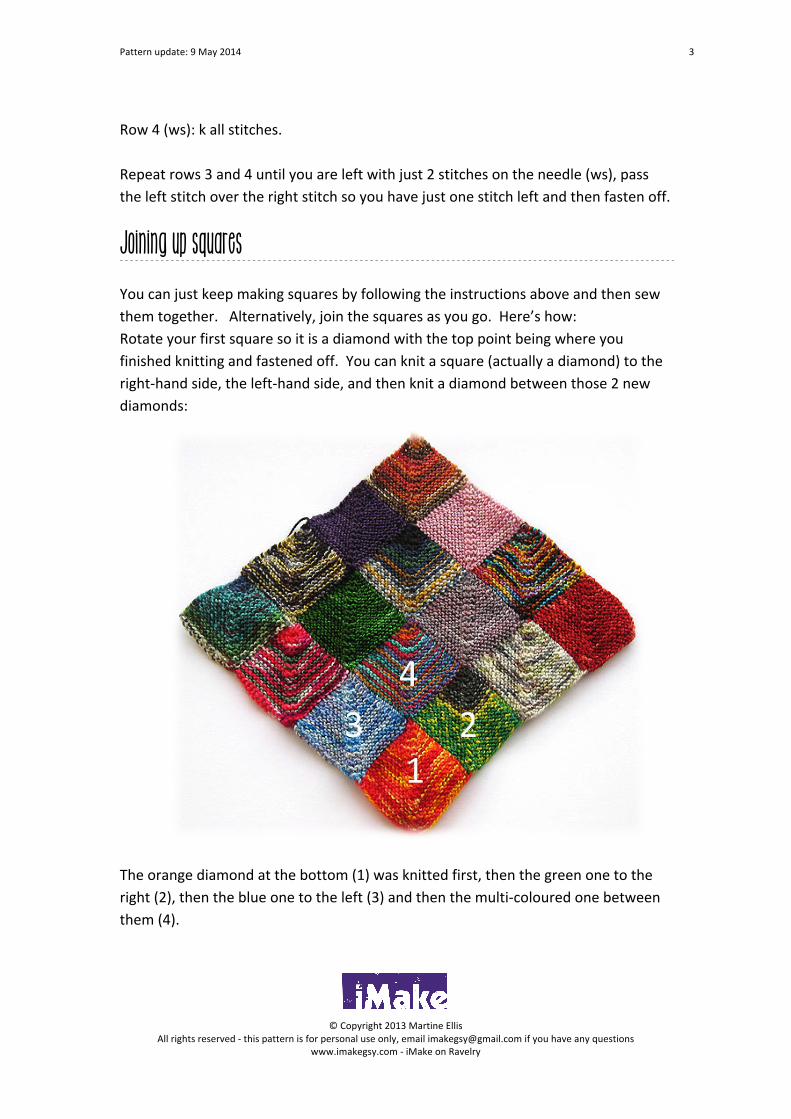
Joining up squares You can just keep making squares by following the instructions above and then sew them together. Alternatively, join the squares as you go. Here’s how: Rotate your first square so it is a diamond with the top point being where you finished knitting and fastened off. You can knit a square (actually a diamond) to the right-‐hand side, the left-‐hand side, and then knit a diamond between those 2 new diamonds: The orange diamond at the bottom (1) was knitted first, then the green one to the right (2), then the blue one to the left (3) and then the multi-‐coloured one between them (4).

Pattern update: 9 May 2014 4
© Copyright 2013 Martine Ellis All rights reserved -‐ this pattern is for personal use only, email [email protected] if you have any questions
www.imakegsy.com -‐ iMake on Ravelry
When starting diamonds that are on the right edge of the blanket (see diamond 2), loosely cast on 16 stitches using the long tail cast on, place marker, then pick up 16 stitches along the top, right-‐hand edge of diamond 1. For diamonds that are on the left edge of the blanket (see diamond 3), pick up 16 stitches along the top, left-‐hand edge of diamond 1, place marker, then loosely cast on 16 stitches using the cable cast on. For diamonds that are not on the edges (see diamond 4), pick up 16 stitches from the side of the diamond on the right (2), place marker, pick up centre stitch from the tip of the diamond below, then pick up 15 stitches on the side of the diamond to the left (3). Note that stitches are picked up with the right side of the work facing you, so the first row you knit when joining squares in this way is row 2.
Finishing It’s recommended that you weave in your ends after every couple of squares. If you are making a blanket, perhaps consider adding a knitted or crocheted edge.
Swap notes & social stuff If you are interested in joining an informal knitalong for a project that uses yarn leftovers, then please check out the iMake Knitted Patchwork thread on Ravelry: http://bit.ly/ZBQ7sH. Feel free to swap yarn leftovers via the thread and share your progress.