
Kaseya Service Desk Workshop DAY TWOusers.cis.fiu.edu/~sadjadi/Teaching/IT...
118
1 Kaseya Service Desk Workshop Developed by Kaseya University Powered by IT Scholars Kaseya Version 6.2 Last updated on June 27, 2012 DAY TWO
Transcript of Kaseya Service Desk Workshop DAY TWOusers.cis.fiu.edu/~sadjadi/Teaching/IT...

1
Kaseya Service Desk Workshop
Developed by
Kaseya University Powered by
IT Scholars Kaseya Version 6.2
Last updated on June 27, 2012
DAY TWO

3
Roadmap! Day One
Introduc3on to Workshop and Virtual Labs
Kaseya Service Desk Overview Crea3ng Your First Service Desk Defining Your Ini3al Service Desk Users
• Day Two – Day One Recap – Configuring Your Service Desk Users – Adding Automa3on to Your Service Desk
Day One Introduc3on to Workshop and Virtual Labs
Kaseya Service Desk Overview Crea3ng Your First Service Desk Defining Your Ini3al Service Desk Users
• Day Two Day One Recap – Configuring Your Service Desk Users – Adding Automa3on to Your Service Desk

4
Kaseya Service Desk Workshop
Day One Recap

6
Service Desk Crea3on Checklist • Check your licenses for desks and users • Define your desk using a desk template
• Review the service desk fields/proper3es • Review the service desk stages/workflow • Define a default policy with coverage hours • Review message templates
• Review procedure variables • Setup an email reader
• Ac3vate the new desk
Check your licenses for desks and users Define your desk using a desk template
Review the service desk fields/proper3es Review the service desk stages/workflow Define a default policy with coverage hours Review message templates
Review procedure variables Setup an email reader
Ac3vate the new desk

7
Lab Review Defining Your Ini3al Users
1. Create the user roles for your desk 2. Create the scopes for your desk 3. Create the users for your desk
Create the user roles for your desk Create the scopes for your desk Create the users for your desk

8
Scopes \ User Roles SD Admin SD
Technician Contact
Machine User
FIU John Doe Ted, Tia, Tim, Tod, Tom, Tru
FIU SCIS Cat
FIU SCIS ws1 Eli
FIU MR Cat
FIU MR dc Ena
FIU GL Cay
FIU GL guest1 Eve
FIU CEC Con
FIU CEC pc1 Evy
FIU CEC laptop1 Ewa
User Roles & Scopes

9
Organiza3onal Structure &
Service Desk Users
FIU UTS
Manager:
John Doe
Tier 1:
Ted, Tia, Tim, Tod
Tier 2:
Tom and Tru
SCIS
Contact:
Cat
ws1 user:
Eli
MR
Contact:
Cat
dc user:
Ena
GL
Contact:
Cay
guest1 user:
Eve
CEC
Contact:
Con
pc1 user:
Evy
laptop1 user:
Ewa

10
SD Admin, SD Techs, and Contacts

11
Machine Users

14
Service Desk Lab
Part 10 Resource Pools
Service Desk Users

160
Resource Pools • List of users that can be assigned a 3cket
– Define the list of users for a specific Pool under the Desk Defini)on – Access – Pools
• To u3lize your resources efficiently, learn the skill set of your team members, assign them accordingly to the appropriate resource pools.
• Service Desk procedures can reference the email addresses of all the members in a pool.

165
Adding SD Techs to Tier 1 Support Pool

170
Note • As you may recall, there are four global procedure variables, namely, Email_SupportManagement, Email_Tier1Support, Email_Tier2Support, and Email_Tier3Support, that must be ini3ally set to the emails of the 3er 1, 3er 2, 3er 3, and support management team members of your desk.
• These variables are not necessary as you just created four pools for the same purpose.
• In addi3on, any future changes to these variables will not be reflected to their corresponding pools (and vice versa), causing inconsistency in your desk.

171
Note
• Therefore, you decide to delete these variables to avoid possible inconsistencies in your desk.
• But before doing so, you would need to make sure that any references to these variables are properly replaced by [$pool$], which is a 3cket variable.
• In a future LAB, when we review the contents of your service desk procedures, we will address this issue.

174
Kaseya Service Desk Workshop
Adding Automation to
Your Service Desk

175
Roadmap! Day One
Introduc3on to Workshop and Virtual Labs
Kaseya Service Desk Overview Crea3ng Your First Service Desk Defining Your Ini3al Service Desk Users
• Day Two Day One Recap Configuring Your Service Desk Users – Adding Automa3on to Your Service Desk
Day One Introduc3on to Workshop and Virtual Labs
Kaseya Service Desk Overview Crea3ng Your First Service Desk Defining Your Ini3al Service Desk Users
Day Two Day One Recap Configuring Your Service Desk Users Adding Automa3on to Your Service Desk

177
Service Desk Lab
Part 11 Automation Using
Service Procedures

178
SD Automa3on • Enabling Automa3on in SD
1. Service Procedures 2. Inbound Emails and Alerts 3. Policies
• Case Studies 1. Field Valida3on 2. Wai3ng for User Feedback 3. Suspending Tickets 4. Collec3ng Data
• Enabling Automa3on in SD Service Procedures 2. Inbound Emails and Alerts 3. Policies
• Case Studies 1. Field Valida3on 2. Wai3ng for User Feedback 3. Suspending Tickets 4. Collec3ng Data

179
1. Service Procedures • Automa3c processing of 3ckets in Service Desk can be triggered by – the crea3on of the 3cket
• Begin Stage Entry Procedure • Ticket Request Mapping/De-‐Dup Procedures
– the transi3on from one stage to another • Stage Entry or Exit Procedures
– any changes to the 3cket • Ticket Change Procedure
– a 3cket remaining in a stage or not closed beyond some 3me • Goal and Escala3on Procedures

180
Note • Service procedures can call/execute sub-‐procedures, enabling code reuse and modular automa3on.
• Service procedures can also trigger the running of an agent procedure on a managed machine using the Schedule Procedure step.

181
High-‐Level Steps to Modify the Automa3on in Your Desk
• To modify the automa3on in your desk, you need to follow these steps: 1. Specify the Required Behavior 2. Iden3fy the Affected Procedures 3. Adjust the Procedures 4. Verify the Changes
• The required behavior of your desk will be given to you piece-‐by-‐piece in the following slides.

182
Recap: Workflow in Your Desk
Tier1 Entry: Incident enters Tire1
Escala3on: Stage Escalated 1 hour Goal: Tier1 Goal 4 hours
IdenDfied Entry: Incident enters Iden3fied Escala3on: Stage Escalated 1 hour Goal: Iden3fied Goal 1 Hours
Tier2 Entry: Incident enters Tire2
Escala3on: Stage Escalated 1 hour Goal: Tier2 Goal 4 hours
Closed Entry: Incident enters Clolsed Goal: Closed Goal 4 hours
Solved Entry: Incident enters Solved
Escala3on: Solu3on Unconfirmed by User

185
AutomaDc CategorizaDon Iden3fy the Affected Procedures • You no3ce that only the Auto Assign
Category and SubCategory sub-‐procedure, called by Incident enters Iden)fied, needs to be modified.
• Recap the Current Behavior: – Its current implementa3on looks for different
keywords in Summary; if a match is found, then the Category is set to Kaseya and the SubCategory is set to according.
– You realize that this procedure was meant to categorize 3ckets created by alarms.

186
AutomaDc CategorizaDon Adjust the Procedures
• You know that if a 3cket is not created by a user (i.e., created by an alarm), the Submi3erType 3cket property is set to UNKNOWN; therefore, you use this to dis3nguish between the two situa3ons.
• If the 3cket is created by a user and the user has not set the category, you will look for the specified keywords, and if one detected in that order, you will set the category and sub-‐category accordingly.

195
AutomaDc Priority Assignment Specify the Requirements
• Priority level must be calculated based on Severity and Urgency as follows.
Severity/Urgency High Medium Low
High Priority 1 Priority 2 Priority 3
Medium Priority 2 Priority 3 Priority 4
Low Priority 3 Priority 4 Priority 5

196
AutomaDc Priority Assignment Specify the Requirements
• Escala)on Time, Stage Goal Time, and Ticket Goal Time must be set as follows.
• Values in the table are in hours.
Priority Default_SLA
Escalation Time Stage Goal Time Ticket Goal Time
Priority 1 4 9 36
Priority 2 8 17 68
Priority 3 16 33 132
Priority 4 32 65 260
Priority 5 64 129 516

197
Note • You may have no3ced that the stage goal 3mes for different priori3es allows for two stage escala3ons.
• Also, the 3cket goal 3mes for different priori3es are 4 3mes the corresponding stage goal 3mes, coun3ng for the Iden)fied, Tier1, Tier2, and Solved stage goal 3mes.
• This is just one way of coming up with the related values for stage and 3cket goal 3mes; your desk may be very different.

198
AutomaDc Priority Assignment Iden3fy the Affected Procedures
• You no3ce that Incident enters Iden8fied and Calculate Priority must be adjusted.
• Recall that Calculate Priority also sets the stage escala3on 3me and stage goal 3me, while the procedure name implies that it only calculates priority.
• Recall that Incident enters Iden)fied overwrites escala3on 3me and set it to 15 minutes regardless of the calculated priority of the 3cket.

199
AutomaDc Priority Assignment Adjust the Procedures
• To adjust Calculate Priority, you make sure that all the steps segng the escala3on and goal 3mes are eliminated.
• Next, you need to create three procedures that separately set the escala3on 3me, stage goal 3me, and 3cket goal 3me, based on the calculated priority.
• Also, you need to fix the values for the exis3ng procedure variables, and add new variable, if need be.

200
AutomaDc Priority Assignment Adjust the Procedures
• To adjust the Calculate Priority sub-‐procedure based on the issues that you iden3fied, you need to follow these steps.
1. Go to Service Desk > Procedure Defini)on > Sub-‐Procedure.
2. Navigate to Shared > ITIL Sub-‐procedures > Calculate Priority.
3. Click on Edit Procedure. 4. Delete all the steps that set the stage
escala3on and goal 3me. The resul3ng sub-‐procedures should reflect priority calcula3on depicted in the graph on the leh side.
5. Click on Save and Close

201
AutomaDc Priority Assignment: Adjust the Procedures

218
Reminder: The Coverage Schedule for Default_SLA

219
AutomaDc Priority Assignment: Verify the Changes
220
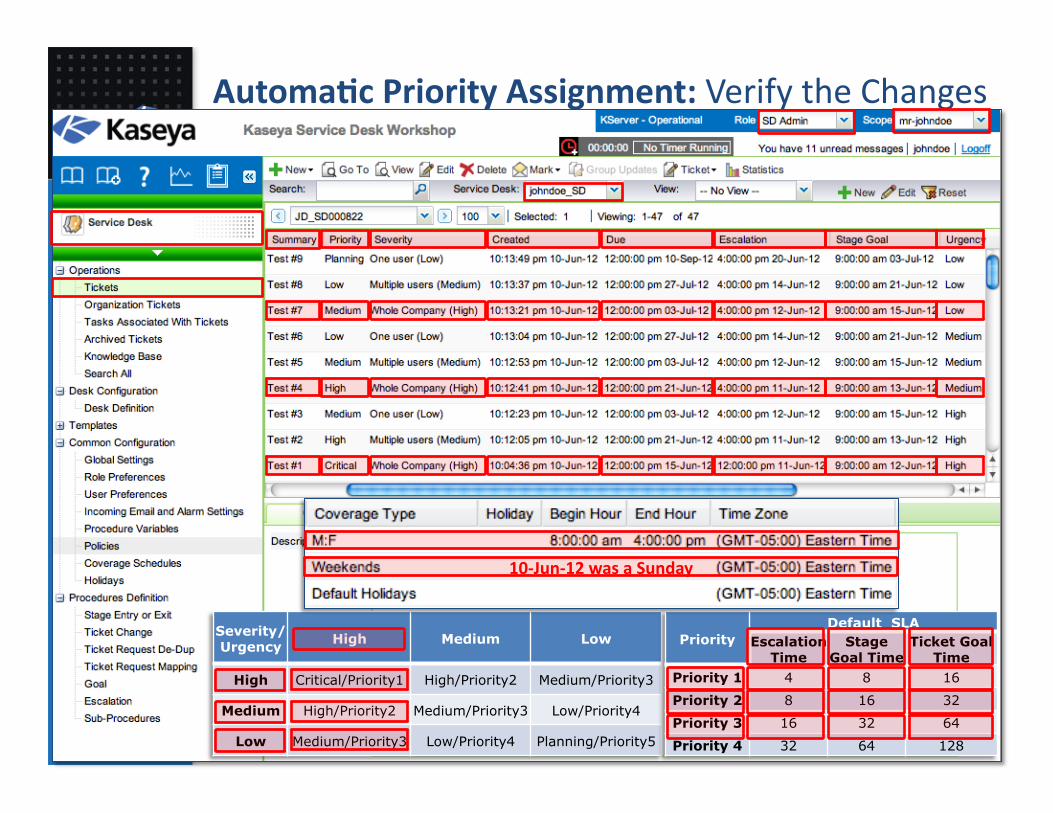
AutomaDc Priority Assignment: Verify the Changes
Severity/ Urgency High Medium Low
High Critical/Priority1 High/Priority2 Medium/Priority3
Medium High/Priority2 Medium/Priority3 Low/Priority4
Low Medium/Priority3 Low/Priority4 Planning/Priority5
Priority Default_SLA
Escalation Time
Stage Goal Time
Ticket Goal Time
Priority 1 4 8 16
Priority 2 8 16 32
Priority 3 16 32 64
Priority 4 32 64 128
10-‐Jun-‐12 was a Sunday

224
List of Procedures 1. Ticket enters Tier1
2. Ticket enters Tier2 3. Ticket enters Saved
4. Ticket enters Closed 5. Stage escalated
6. Solu3on unconfirmed by user
7. Iden3fied Goal 8. Tier1 Goal
9. Tier2 Goal 10. Solved Goal 11. Incident Goal – All Stages 12. Incident is Changed
Ticket enters Tier1
Ticket enters Tier2 Ticket enters Solved
Ticket enters Closed 5. Stage escalated
6. Solu3on unconfirmed by user
7. Iden3fied Goal 8. Tier1 Goal
9. Tier2 Goal 10. Solved Goal 11. Incident Goal – All Stages 12. Incident is Changed

225
1. Ticket enters Tier1 Specify the Requirements
• When a 3cket enters Tier1, do the following – If the 3cket has already been assigned to an individual, make that individual to be the owner of the 3cket. The owner of a 3cket is the person who is ul3mately responsible for resolving the 3cket.
– The stage escala3on and goal 3mes must be reset based on the freshly calculated priority.
– The status of the 3cket should reflect that it is in progress.
226
Note • When a VSA user sets the Assigned To field (in the 3cket edi3ng form) to a specific SD technician, the Assignee 3cket property is set to the SD technician and the Pool 3cket property does not exist anymore.
• Vice versa, when a VSA user sets the Assigned To field (in the 3cket edi3ng form) to a specific pool, the Pool 3cket property is set to the pool and the Assignee 3cket property does not exist anymore.

227
Note • When a 3cket transits to a new stage, the Escala)on Level is reset to 0, and the Escala)on Time and Stage Goal Time are reset to the values defined in the stage.
• If you want to set the Escala)on Time and Stage Goal Time based on the calculated Priority of the 3cket, you need to set them using the Set Escala)on Time and Set Goal Time commands.

228
1. Ticket enters Tier1 Adjust the Procedure
• To adjust Incident enters Tier1 – You need to first test the existence of
Assignee and if it exists, set Owner to Assignee.
– You need to call the sub-‐procedures for calcula3ng the priority and for segng the escala3on and stage goal 3mes.
– You need to check the Status, if it is not In Progress, you need to set it to In Progress.

229
1. Ticket enters Tier1 Adjust the Procedure
• To adjust Incident enters Tier1, you need to follow these steps. 1. Go to Service Desk > Procedures Defini)on > Stage Entry or Exit.
2. Navigate to Shared > <USERNAME>_SD > Incident enters Tier1.
3. Click on Edit Procedure.
4. Add Test if Assignee Exists.
5. Add a step to execute the ITIL Sub-‐procedures.Calculate Priority sub-‐procedure.
6. Add a step to execute the ITIL Sub-‐procedures.Set Escala)on Time sub-‐procedure.
7. Add a step to execute the ITIL Sub-‐procedures.Set Stage Goal Time sub-‐procedure.
8. Add Test if Status DoesNotContain In Progress.
9. Add Sets Status to In Progress.
10. Click on Save and Close.

230
1. Ticket enters Tier1: Adjust the Procedure

238
4. Ticket enters Closed Specify the Requirements
• No3fy the submiper by email.
• Status must be Closed.
239
4. Ticket enters Closed Adjust the Procedure
• To adjust the procedure, you need to follow these steps. 1. Go to Service Desk > Procedures Defini)on > Stage Entry or Exit.
2. Navigate to Shared > <USERNAME>_SD > Incident enters Closed.
3. Click on Edit Procedure.
4. Add Test if Status DoesNotContain Closed.
5. Add Sets Status to Closed. 6. Click on Save and Close.

240
4. Ticket enters Closed: Adjust the Procedure

241
List of Procedures Ticket enters Tier1
Ticket enters Tier2 Ticket enters Saved
Ticket enters Closed 5. Stage escalated
6. Solu3on unconfirmed by user
7. Iden3fied Goal 8. Tier1 Goal
9. Tier2 Goal 10. Solved Goal 11. Incident Goal – All Stages 12. Incident is Changed
Ticket enters Tier1
Ticket enters Tier2 Ticket enters Saved
Ticket enters Closed Stage escalated
Solu3on unconfirmed by user
7. Iden3fied Goal 8. Tier1 Goal
9. Tier2 Goal 10. Solved Goal 11. Incident Goal – All Stages 12. Incident is Changed

242
5. Stage escalated Specify the Requirements
• For the Iden)fied, Tier1, and Tier2 stages: – If the 3cket has been assigned to an individual, no3fy the individual by email.
– Make sure that the 3cket is assigned properly to the pool associated with the stage and then no3fy the pool by email.
– Ticket should be escalated at most twice in a stage.

243
5. Stage escalated Adjust the Procedure
• If Assignee exists, no3fy by email.
• Set Pool to Tier1Support, if in Iden)fied or Tier1 stage; Set Pool to Tier2Support, if in Tier2 stage. No3fy the pool by email.
• If Escala)onLevel is equal to one, then call Set Escala)on Time sub-‐procedure.
Note: We add a note for tes3ng purposes at the beginning of this procedure; you can remove it when done with tes3ng.

244
5. Stage escalated: Adjust the Procedure

245
6. SoluDon unconfirmed by user Specify the Requirements
• For the Solved stage: – No3fy the submiper by email that a solu3on has been applied by a Helpdesk technician.
– Ticket should be escalated at most twice in this stage – If a user does not reply to the email no3fica3on that a 3cket solu3on is not acceptable, the 3cket will be closed aher 2 escala3ons.

248
List of Procedures Ticket enters Tier1
Ticket enters Tier2 Ticket enters Saved
Ticket enters Closed Stage escalated
Solu3on unconfirmed by user
7. Iden3fied Goal 8. Tier1 Goal
9. Tier2 Goal 10. Solved Goal 11. Incident Goal – All Stages 12. Incident is Changed
Ticket enters Tier1
Ticket enters Tier2 Ticket enters Saved
Ticket enters Closed Stage escalated
Solu3on unconfirmed by user
Iden3fied Goal Tier1 Goal
Tier2 Goal Solved Goal
Incident Goal – All Stages 12. Incident is Changed

249
7-‐11. Goal Procedures Specify the Requirements
• Recall that all the goal procedures were leh empty.
• The support management shoud be no3fied if a 3cket misses its goal.
• If the 3cket is in Iden)fied or Tier1, it should move to Tier1 or Tier2, respec3vely.
• If the 3cket misses its goal in Tier2, the support management must be no3fied.
• If the 3cket misses its goal in Solved, the Assignee or Pool must be no3fied.

250
Note • We add a note for tes3ng purposes at the beginning of each goal procedure.
• If you add notes for tes3ng purposes, you should remove them when done with your tes3ng.

251
7. IdenDfied Goal: Adjust the Procedure

252
8. Tier1 Goal: Adjust the Procedure

253
9. Tier2 Goal: Adjust the Procedure

254
10. Solved Goal: Adjust the Procedure

255
10. Solved Goal: Adjust the Procedure

256
11. Incident Goal – All Stages: Adjust the Procedure

257
11. Incident Goal – All Stages: Adjust the Procedure

259
List of Procedures Ticket enters Tier1
Ticket enters Tier2 Ticket enters Saved
Ticket enters Closed Stage escalated
Solu3on unconfirmed by user
Iden3fied Goal Tier1 Goal
Tier2 Goal Solved Goal
Incident Goal – All Stages 12. Incident is Changed
Ticket enters Tier1
Ticket enters Tier2 Ticket enters Saved
Ticket enters Closed Stage escalated
Solu3on unconfirmed by user
Iden3fied Goal Tier1 Goal
Tier2 Goal Solved Goal
Incident Goal – All Stages Incident is Changed

260
12. Ticket is Changed Specify the Behavior
• If a SD technician changes a 3cket while it is in the Iden3fied stage and its Status is new, then the 3cket should transit to Tier1 and be assigned to the SD technician.
• If the stage of the 3cket has not changed, but the content of the 3cket has been modified, you should no3fy the submiper.

261
12. Ticket is Changed: Adjust the Procedure

264
AutomaDc Ticket Tracking: Verify the Changes
IdenDfied
Tier1
Tier2
Missed Due
Solved
265
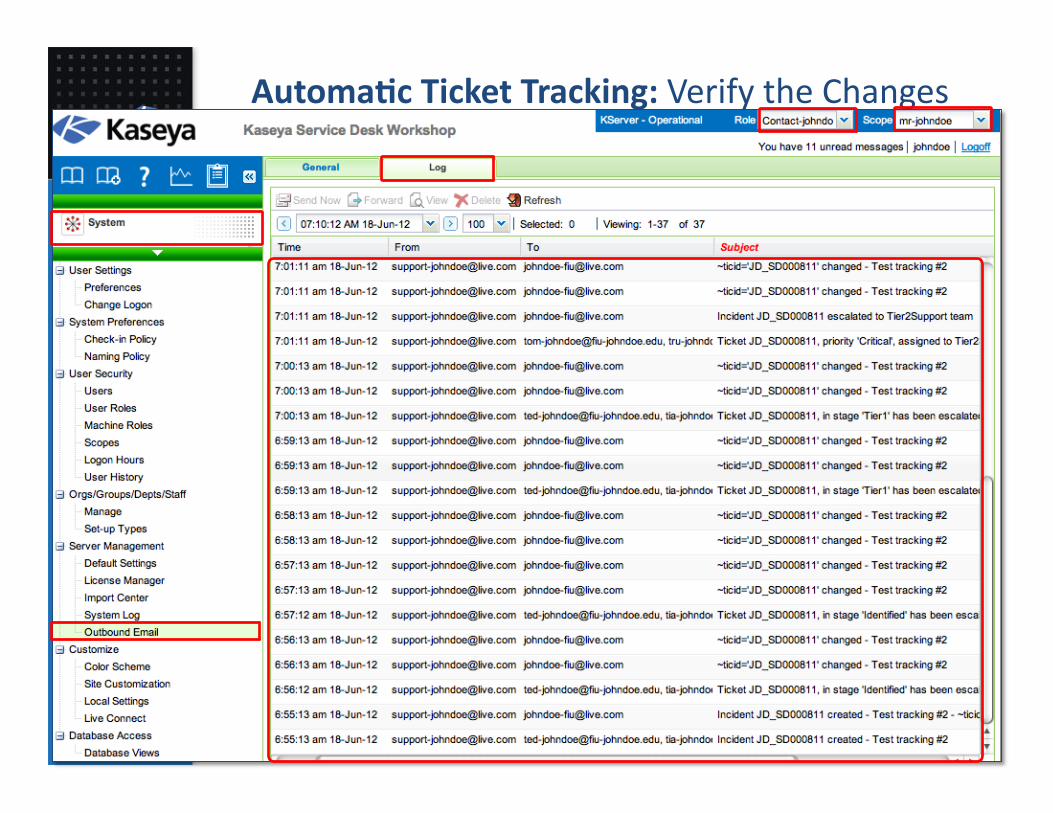
AutomaDc Ticket Tracking: Verify the Changes

266
Service Desk Lab
Part 12 Automation Using
Emails & Alerts

267
SD Automa3on • Enabling Automa3on in SD
Service Procedures 2. Inbound Emails and Alerts 3. Policies
• Case Studies 1. Field Valida3on 2. Wai3ng for User Feedback 3. Suspending Tickets 4. Collec3ng Data
• Enabling Automa3on in SD Service Procedures Inbound Emails and Alerts 3. Policies
• Case Studies 1. Field Valida3on 2. Wai3ng for User Feedback 3. Suspending Tickets 4. Collec3ng Data

268
Ticket Request Mapping • A Ticket Request Mapping procedure sets the apributes of a 3cket request, just before the 3cket is created, including the desk defini3on used to create the 3cket.
• Ticket requests are created from either inbound emails or system events, such as alarm condi3ons.
• A Ticket Request Mapping procedure determines what service desk is used to create the 3ckets, and whether 3cket requests are canceled.

269
Ticket Request De-‐Dup • A Ticket Request De-‐Dup procedure compares a 3cket request with exis3ng 3ckets to determine if the 3cket request is a duplicate.
• If a 3cket request is a duplicate of exis3ng 3ckets, the 3cket crea3on is canceled. – Test for Condi3ons to match proper3es of the incoming Ticket request.
– The 3cket receipts proper3es checks are AND condi3ons.

270
Specify the Behavior • All the 3ckets created from inbound emails and alarms must be associated with your desk.
• Replies to a 3cket crea3on acknowledgement or its follow up no3fica3ons must not create new 3ckets; they should simply be added as new notes to the original 3cket.

271
Ticket Request Mapping Adjust the Procedure
• To adjust the 3cket request mapping service procedure associated with your desk, you need to follow these steps
1. Go to Service Desk > Procedures Defini)on > Ticket Request Mapping.
2. Navigate to Shared > <USERNAME>_SD > Incident Mapping.
3. Click on Edit Procedure. 4. Select the Set ServiceDesk to Incident step.
5. In the right pane, make sure that <USERNAME>_SD is defined to be set to the ServiceDesk property.
6. Click Save and Close.

272
Ticket Request Mapping: Adjust the Procedure

273
Ticket Request De-‐Dup Adjust the Procedures
• To adjust the 3cket request de-‐dup service procedure associated with your desk, you need to follow these steps
1. Go to Service Desk > Procedures Defini)on > Ticket Request De-‐Dup.
2. Navigate to Shared > <USERNAME>_SD > Incident Mapping.
3. Click Edit Procedure. 4. Add a step to check whether the email is a duplicate by looking for a
matching email sent in the past 24 hours with the same source type, first and second reference field, and the same machine id and group.
5. If the email is a duplicate, add a note to the original 3cket that indicates a duplicate email was sent.
6. Click Save and Close.

274
Reviewing & Adjus3ng the Ticket Request De-‐Dup

275
Service Desk Lab
Part 13 Automation Using
Policies

276
SD Automa3on • Enabling Automa3on in SD
Service Procedures Inbound Emails and Alerts 3. Policies
• Case Studies 1. Field Valida3on 2. Wai3ng for User Feedback 3. Suspending Tickets 4. Collec3ng Data
Enabling Automa3on in SD Service Procedures Inbound Emails and Alerts Policies
• Case Studies 1. Field Valida3on 2. Wai3ng for User Feedback 3. Suspending Tickets 4. Collec3ng Data

277
Defining Unique Policies • Unique Policies
1. Policies with their unique associated Coverage Hours can be assigned to a Organiza3on, Organiza3on Type, or Machine Group
2. For example a 24 / 7 coverage to override your default 8 to 4 coverage.

278
LAB • You realized that you should not treat handling the issues related to the servers in the mr the same way you treat the issues related to the instruc3onal computers in scis and cec and guest computers in gl.
• In addi3on to the default policy that you defined before, you decide to define three policies, namely, Gold_SLA, Silver_SLA, and Bronze_SLA, and associate them to machines in mr, scis/cec, and gl, respec3vely.

279
The Gold_SLA Policy

280
Redefining Values for the Procedure Variables for
Gold_SLA
Priority
Gold_SLA
Escalation (h) Stage Goal (h) Ticket Goal (h)
Priority 1 1 3 12
Priority 2 2 5 20
Priority 3 4 9 36
Priority 4 8 17 68

281
Redefining the Values for Gold_SLA

282
Defining Coverage Schedule for Gold_SLA

291
Associa3ng Policies with Your Desk

292
Verify the Changes • We leave this part to you to develop some representa3ve test suites to verify that – Tickets created by the end users of different machines will end up with different policies.
– Accordingly, the escala3on, stage goal, and 3cket due 3mes will be overwripen by the corresponding policy.

293
Service Desk Lab
Part 14 Automation Case Study
Field Validation

294
SD Automa3on Enabling Automa3on in SD
Service Procedures Inbound Emails and Alerts Policies
• Case Studies 1. Field Valida3on 2. Wai3ng for User Feedback 3. Suspending Tickets 4. Collec3ng Data
Enabling Automa3on in SD Service Procedures Inbound Emails and Alerts Policies
• Case Studies Field Valida3on 2. Wai3ng for User Feedback 3. Suspending Tickets 4. Collec3ng Data

295
Procedure Changes
• ORDER OF STEPS MATTER • Command steps will apply to the 3cket immediately • Last Step will take PRECEDENCE • Changing STAGES during an Escala3on or Changed procedure will automa3cally run the Stage Exit of the Previous Stage and the Entry Procedure of the new stage, then return to the original procedure’s next step.
• When modifying procedures,
“YOU ARE NOT WORKING IN A VACUUM”

296
Failing Ticket’s Edit Changes
• There might be a requirement that you need to prevent any further changes to a 3cket unless a set of pre-‐defined condi3ons are met. • How do we create a “Forcing Func3on” within the Service Desk Procedure?
• How do we no3fy the edi3ng user what the prerequisites are?
• In the example we are segng up an approval request that can only be approved by One User (Username=Tim Contact).
contact-‐scis-‐wbproserv

297
Failing Ticket’s Edit Changes
• Steps are: • Crea3ng a Request for Approval Status • Edi3ng the Change Procedures to check for the Condi3onals
• Check for the Request for Approval status • Check whether the right edi3ng user is allowed to make the changes
• Ensure that the Status is set to reflect the State of the 3cket.

298
Failing Ticket’s Edit Changes
• Changed Procedure Addi3ons

299
Service Desk Lab
Part 15 Automation Case Study
Solved Stage

300
SD Automa3on Enabling Automa3on in SD
Service Procedures Inbound Emails and Alerts Policies
• Case Studies Field Valida3on 2. Wai3ng for User Feedback 3. Suspending Tickets 4. Collec3ng Data
Enabling Automa3on in SD Service Procedures Inbound Emails and Alerts Policies
• Case Studies Field Valida3on Change Procedure for Solved Stage 3. Wai3ng for User Feedback and Suspending
Tickets 4. Collec3ng Data

301
Change Procedure for solved stage • When a 3cket is in Solved Stage and end user replied that
the issue s3ll exists, we need to insert a process to reopen that 3cket.
• NOTE: Ticket in an end stage cannot be reopened. This is the reason why we add a Solved stage to ensure that the end user no longer is experiencing the issue.
• Steps: Check for 3cket in solved stage • Check that the person edi3ng the 3cket is the submiper
or end user. • If both condi3ons are TRUE, Then reopen the 3cket.
• Op3onal : Create a new Status for reopen 3ckets

302
Change Procedure for solved stage
• We also added a check if the user added a note.

303
Service Desk Lab
Part 16 Automation Case Study
Suspending Tickets

304
SD Automa3on Enabling Automa3on in SD
Service Procedures Inbound Emails and Alerts Policies
• Case Studies Field Valida3on Wai3ng for User Feedback 3. Suspending Tickets 4. Collec3ng Data
Enabling Automa3on in SD Service Procedures Inbound Emails and Alerts Policies
• Case Studies Field Valida3on Change Procedure for Solved Stage Wai3ng for User Feedback and Suspending
Tickets 4. Collec3ng Data

305
Adding a Suspended Stage • Why add a suspended stage?
• Stop escala3ons • Add the new Suspended Stage
• Configure stage workflow to direct how 3ckets can move between the stages.
• Create a new Entry Procedure for the Suspended Stage.
• Set escala3on and goal 3me to 0, NO ESCALATION, in the stage defini3ons.
• Add change procedure when status changed

306
Adding a Suspended Stage • Suspended Stage Defini3ons
• Suspending Escala3on set no Escala3on Procedures with Escala3on Time set to 0

307
Suspended Stage • In the Change Procedure, check for the Suspended Status
to move the 3cket to the suspended stage – Also add a test condi3on if anything else has change to move the
3cket from the suspended stage to a func3onal ac3ve stage.
– For example set the stage to either a Tier 2 or to the [$PreviousStage$]
• If you need a reminder set the Escala3on Time in the Entry Procedure for the Suspended Stage to set the Escala3on Time.

308
Suspended Stage Change Procedure addi3ons
• Test when status is set to Suspended
• Test when status is to move 3cket out of Suspended stage

309
Wai3ng For User Feedback • Items to consider to complete the procedure automa3on: • The Helpdesk Technicians assigns the status of WaiDng For User Feedback for the status.
• Suspend Escala3on or move the 3cket to suspended stage
• Send email to end user asking for more feedback • Send email to the Assignee of the 3cket when the end user replies back with more informa3on
• Change 3cket status back to In Progress

310
Wai3ng For User Feedback • Items to consider to complete the procedure
automa3on: • The Helpdesk Technicians assigns the status of WaiDng For User
Feedback for the status. • Add new Status entry if status does not exist
• Suspend Escala3on or move the 3cket to suspended stage • Add a step in the change procedure to suspend escala3on
• Send email to end user asking for more feedback • Add a step in the change procedure to the end user • Review or add a Message Template for the email content
• Send email to the Assignee of the 3cket when the end user replies back with more informa3on
• Check when a informa3on is received and send out the email
• Change 3cket status from WaiDng For User Feedback • Add a step in change procedure aher the email no3fica3on to the Assignee

311
Wai3ng For User Feedback • Changed Procedure • Added 2 condi3onals in the changed procedure
• First to send a no3fica3on to End User for the request for more informa3on
• Second to relay the informa3on from the end user to the Ticket Assignee
• Escala3on Procedure • Test to sent reminder to submiper that
technicians is wai3ng for more informa3on. • Set the escala3on level to how many 3mes you
want to send the reminder.
• If pass the reminder limit 3me we will then send an email to close the 3cket and change the Stage and Status to Closed.

312
Service Desk Lab
Part 17 Automation Using
Collecting Data

313
SD Automa3on Enabling Automa3on in SD
Service Procedures Inbound Emails and Alerts Policies
• Case Studies Field Valida3on Wai3ng for User Feedback Suspending Tickets 4. Collec3ng Data
Enabling Automa3on in SD Service Procedures Inbound Emails and Alerts Policies
Case Studies Field Valida3on Change Procedure for Solved Stage Wai3ng for User Feedback and Suspending
Tickets Collec3ng Data

314
LAB • Execute a VSA Agent Procedure to collect informa3on and append the informa3on into the NOTES field of the 3cket.
• Leverage VSA Agent Procedure to collect informa3on
• Working the process backwards. – Create an Agent Procedure to (a) collect informa3on and (b) store it on the Kaseya Server
– Create Service Desk Procedure to check of the existence of the Collected Data in the stored loca3on defined in the Agent Procedure.
• If data exist, then append the informa3on to the Notes of a Ticket

315
LAB
• When a CPU U3liza3on Alert occur, Kaseya can automa3cally create a 3cket.
• When the 3cket is created, check for the Monitor Set name in the 3cket descrip3on. • Assign a specific category and execute an Agent Procedure on the machine that created the alert
• The agent procedure collects the data and upload the informa3on to the Kaseya Server in the machine specific folders.
• Move the 3cket to another stage, CollectData stage to pull the data and append it to the Ticket note sec3on.

316
Downloading the Sample
• Crea3ng Agent Procedures to collect data • For our example we are looking at performance issues • Need to download a u3lity to format the collected data
• Text2HTML converter u3lity hpp://www.cyber-‐matrix.com/txt2html.html
• Download the Service Desk and Agent procedures, as well as the and Kperfmon.exe u3lity to perform the process list gathered from :
hpp://demo1.kaseya.com/handouts/ServiceDeskLAB.zip

317
Downloading the Sample 1. Download and Extract the contents of the ServiceDeskLAB.zip
2. Copy the Text2Html.exe file to VSASHAREDFILES\TextToHTMLConverter • NOTE Create the TextToHTMLConverter first
3. Copy the Kpermon.exe file to VSASHAREDFILES • NOTE If you imported IT Service Delivery Kit and copied the Kperfmon.exe, then you can skip
this step.
4. Under Agent Procedures Module, create a new folder under the Shared Cabinet and import the Agent Procedure (AgentProcedureKperfmonSD.XML) into the new shared folder.
5. Under Service Desk Procedure Defini3ons – Sub-‐Procedures, import the sub procedures to collect data and auto assigned categories. (Procedure Folder SDW.xml)
6. Edit the Auto Assign Category for Collec3ng Data procedure – Edit the Schedule procedure command to point to the correct Agent Procedure
that you just imported.

318
Fixing the References • Ensure that the correct references for Agent procedures and Sub
procedures are performed
• Edit the Iden3fied Entry procedure to add a command step to execute the Sub-‐Procedure Auto Assign Category For Collecting Data

319
Edi3ng the Escala3on Procedure • Edit the escala3on procedure
• Add a new stage CollectData set the escala3on 3me for 2 minutes. • Set the Stage Procedure
• Leave the Entry Stage Procedure Blank
• Review the Incoming Email and Alarm Segngs • Alarm Mapping Procedure
• Alarm Default Service Desk

320
Test Automa3on • Create a monitor set labeled “CPU U3liza3on” to test for CPU
Performance • Monitor Processor Object, % Processor Counter, Total Instance.
• Use Set threshold value very low to set off the alarm (i.e. 10%)
• Assign the new Monitor set to an endpoint. • Set the no3fica3on to Create Ticket

321
Test Automa3on • Review the Note Field and Escala3on Time to check the progress
• Note there are delays in crea3ng 3ckets from alarms.
• Data collected will list the process list into the Note fields

322
It Is Your Turn!
Ques3ons? • Please type your ques3ons in the chat sec3on of your GoToMee3ng window.
• Remember that you can always send your ques3ons to [email protected] too.
• If you are falling behind the steps in the lab, please just watch the presenta3on, take some notes, and perform your labs aher the lecture.

323
Wrap Up! • Day One
– Introduc3on to Workshop and Virtual Labs
– Kaseya Service Desk Overview – Crea3ng Your First Service Desk – Defining Your Ini3al Service Desk Users
• Day Two – Day One Recap – Configuring Your Service Desk Users – Adding Automa3on to Your Service Desk
Day One Introduc3on to Workshop and Virtual Labs
Kaseya Service Desk Overview Crea3ng Your First Service Desk Defining Your Ini3al Service Desk Users
Day Two Day One Recap Configuring Your Service Desk Users Adding Automa3on to Your Service Desk

324
What is next? • 4 more weeks of pracDce
– You need to finish all the lab assignments within the 35 days of your program.
– Unlimited access to training videos, interac3ve videos, self-‐assessment quizzes, and reading material available 24x7.
– 40 hours of virtual labs; 10 hours per week.
• 1 CerDficaDon Test – The passing grade is 90 out of 100 – Includes two parts
• Theory: 30 points • Hands-‐on: 70 points

325
It Is Your Turn!
Ques3ons? • Please type your ques3ons in the chat sec3on of your GoToMee3ng window.
• Remember that you can always send your ques3ons to [email protected] too.
• If you are falling behind the steps in the lab, please just watch the presenta3on, take some notes, and perform your labs aher the lecture.

326
Some Recommenda3ons • The front face of the support should be customer service, who have soh skills and broad understanding of the product.
• Make use of views to be able to handle large volumes of 3ckets.
• Do not create 3ckets on end user’s behalf. The end users should do that, as they are the ones who can best fill out the form.
• Encourage the use of portal rather than emails for crea3ng new 3ckets.
• Do not make changes directly to your service procedures. Use Save As and do version control.

327
THE END!


![IDA - KSD Overview Template R2[1]kenwoodsolutiondevelopers.com/developers/IDA-KSD Overview.pdf · KenCall – CAD Solution ... •Emergency!Route!Management!! ... Title: IDA - KSD](https://static.fdocuments.in/doc/165x107/5ac7854c7f8b9a51678b89a7/ida-ksd-overview-template-r21kenwo-overviewpdfkencall-cad-solution-.jpg)