JoneSoft Generic Mod Enabler v2 - Cadetes del Espacio...
21
8 August 2010 JoneSoft Generic Mod Enabler v2.6 User Guide
Transcript of JoneSoft Generic Mod Enabler v2 - Cadetes del Espacio...

8 August 2010
JoneSoft
Generic Mod Enabler v2.6
User Guide

i
Contents Introduction ............................................................................................................................................ 2
Installation .............................................................................................................................................. 3
1. Central installation .......................................................................................................................... 3
2. Separate installation ....................................................................................................................... 4
Installing over an existing installation................................................................................................. 4
Uninstalling ............................................................................................................................................. 4
Initialising ................................................................................................................................................ 5
Adding mods ........................................................................................................................................... 6
Enabling mods ......................................................................................................................................... 9
Mod conflicts .................................................................................................................................... 11
JSGME is Not Responding ................................................................................................................. 11
Disabling mods ...................................................................................................................................... 12
How JSGME works................................................................................................................................. 13
Navigating the interface........................................................................................................................ 13
Tasks ...................................................................................................................................................... 14
Load mod profile… / Save mod profile… ........................................................................................... 14
Import mod… .................................................................................................................................... 14
Find mod… ........................................................................................................................................ 15
Refresh lists ....................................................................................................................................... 16
Generate snapshot of game files ...................................................................................................... 16
Compare game files to snapshot ...................................................................................................... 16
Export activated mods list to ............................................................................................................ 16
Languages ............................................................................................................................................. 17
Notes for modders ................................................................................................................................ 17
Notes for developers ............................................................................................................................ 17
Command line parameters ............................................................................................................... 17
Return value ...................................................................................................................................... 18
License agreement, copyright and release information ....................................................................... 19
Acknowledgements ............................................................................................................................... 19
Contact Us ............................................................................................................................................. 19

JoneSoft Generic Mod Enabler
2
Introduction As all gamers know, the number of “must have” mods for any single game can run into the
hundreds. Manually adding mods to a game can be a real headache, with conflicts and
incompatibilities, let alone just trying to determine exactly where to put the files! And unless original
files are manually backed up every time a new mod is added, it can never be easily removed.
The JoneSoft Generic Mod Enabler (JSGME) provides a simple and intuitive interface that takes all
the hassle out of enabling and disabling mods. With JSGME you can:
- enable and disable single or groups of mods with one click
- identify mods that potentially conflict with each other before you enable them
- identify “quarantined” mods, that is, mods that can’t be disabled because they have files
that have been overridden by subsequent mods
- save and load groups of mods with just a single click
- search through your mods and determine whether they are enabled or not
- rename, delete, import and create new mods without having to leave the interface
- take snapshots of your game files to monitor what changes mods are making
- create a list of enabled mods for posting in forums
- view a brief description of the mod (when supported by the mod author) and read included
readme files
and much more!
JSGME manages the tedium of backups and file overwrites to ensure that your original game files
stay in perfect shape.
Further, JSGME has been developed with the emphasis on the ‘G’ – Generic. It has been coded as
dynamically as possible to make it compatible with just about any game that you own. This means
that you only need to learn one interface regardless of how many games you have.
The latest version of JSGME can be downloaded from the JoneSoft webpage.

User Guide
3
Installation JSGME can be installed one of two ways:
1. Central installation
You can install JSGME to a central location and point it to each of your games through creating
shortcuts. To do this:
1. install JSGME to a central location (for example, “C:\Games\Generic Mod Enabler”). Keep the
Create a desktop icon option selected in the installer
2. once installed, DO NOT RUN! Copy and paste the newly created JSGME desktop shortcut as
many times as you have games and change the Start in folder of each shortcut to point to each
game’s base folder. To change the Start in folder, right-click the shortcut, select Properties and
then the Shortcut tab. See Figure 1
3. rename each shortcut to something meaningful, such as “JSGME - GameName1”, “JSGME -
GameName2”, “JSGME - GameName3” and so on. To rename a shortcut, simply right-click the
shortcut and select Rename
Figure 1
Using JSGME with subsequently installed games is simply a matter of copying, pasting and editing an
existing shortcut (steps 2 and 3 above). And whenever JSGME is updated, you only need to install it
once.
JoneSoft Generic Mod Enabler
4
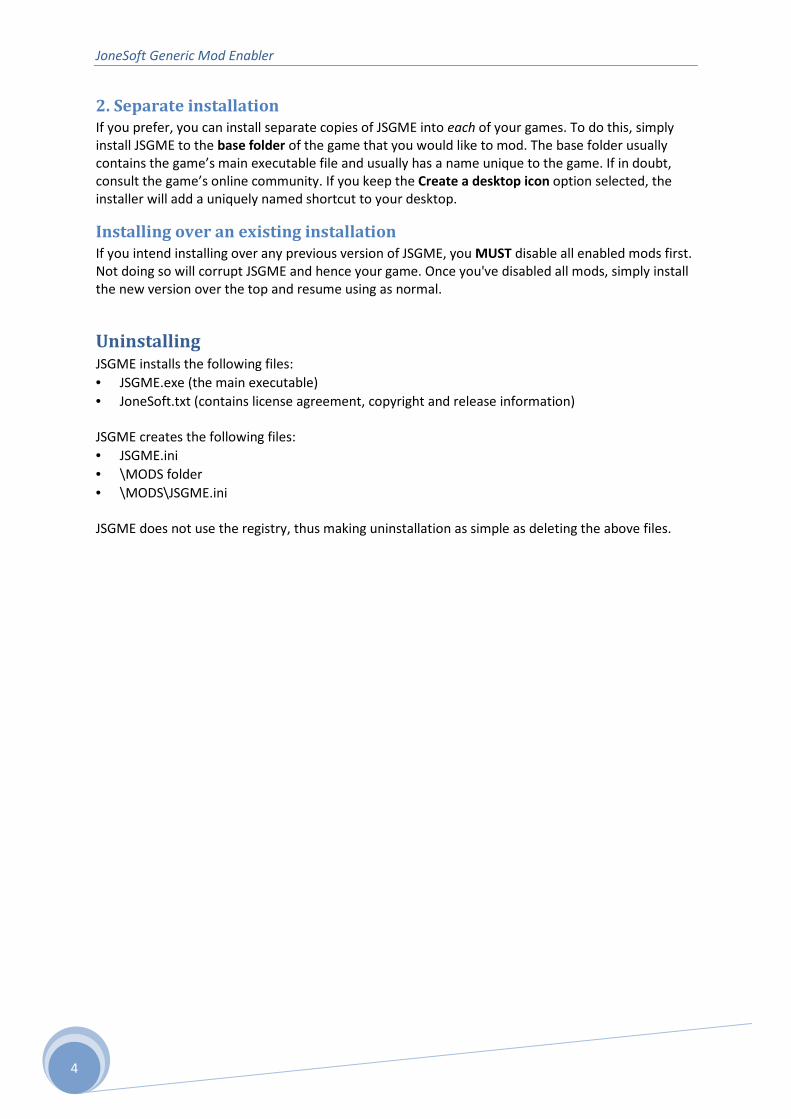
2. Separate installation
If you prefer, you can install separate copies of JSGME into each of your games. To do this, simply
install JSGME to the base folder of the game that you would like to mod. The base folder usually
contains the game’s main executable file and usually has a name unique to the game. If in doubt,
consult the game’s online community. If you keep the Create a desktop icon option selected, the
installer will add a uniquely named shortcut to your desktop.
Installing over an existing installation
If you intend installing over any previous version of JSGME, you MUST disable all enabled mods first.
Not doing so will corrupt JSGME and hence your game. Once you've disabled all mods, simply install
the new version over the top and resume using as normal.
Uninstalling JSGME installs the following files:
• JSGME.exe (the main executable)
• JoneSoft.txt (contains license agreement, copyright and release information)
JSGME creates the following files:
• JSGME.ini
• \MODS folder
• \MODS\JSGME.ini
JSGME does not use the registry, thus making uninstallation as simple as deleting the above files.

User Guide
5
Initialising To run JSGME, double-click the desktop shortcut that corresponds to the game that you want to
mod. If this is the first time that you have run JSGME, you will then see the below screen:
Figure 2
Unless your game already uses a folder called MODS, it is recommended that you simply click OK to
accept the default MODS name. The chosen folder will be created within the game folder if it does
not already exist.
Regardless of where you install JSGME, the MODS folder and all mods are stored within each game.
Within this document all references to the MODS folder means the folder that you created at this
step.

JoneSoft Generic Mod Enabler
6
Adding mods Once you have entered a mods folder name, the main screen will open:
Figure 3
At the moment there is not much to see, apart from the path details of your MODS folder displayed
in the grey panel at the top of the screen. At this point you should take a snapshot of your “clean”
game files by selecting the Generate snapshot of game files Task (see “Tasks” section for more
information).
For JSGME to be useful, you will need to add mods to your MODS folder. There will undoubtedly be
many online resources containing mods for all your favourite games. After downloading a mod, use
your preferred file archiver/compression utility to unzip it anywhere on your hard drive. Please
ensure at this point that you follow the mod author’s installation instructions if they have been
provided.
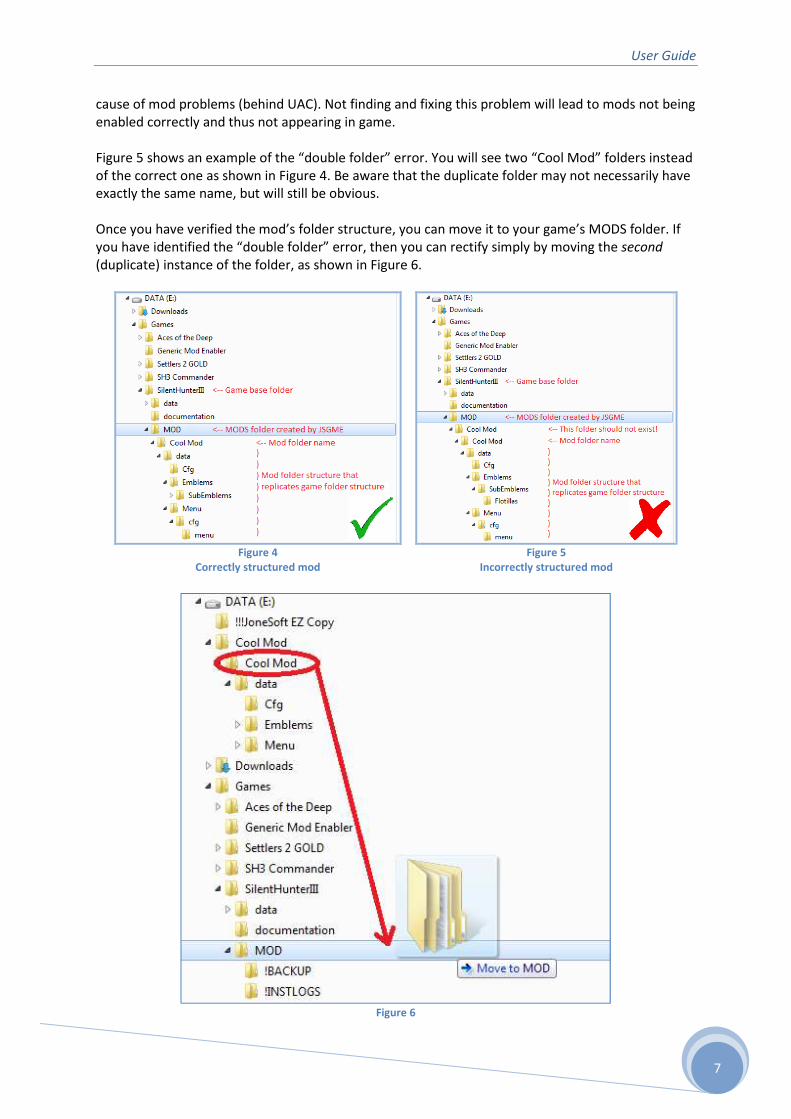
Once you have unzipped the mod, and regardless of how or where you have unzipped the mod, you
need to verify the mod’s folder structure to ensure that it replicates the game’s folder structure. For
JSGME to work correctly, it is imperative that the folders and files under the mod folder mirror
exactly the structure of the game itself. Not all mods are “JSGME ready”. Further, just as there are
numerous ways of unzipping files, there are numerous ways of zipping files as well. One common
problem that occurs when extracting mods is known as the “double folder” error. Sometimes you
may find that when you extract a mod, instead of the intended folder structure, an extra “layer” has
been added. For example, “C:\Games\My Game\MODS\Cool Mod\Cool Mod\data\etc” instead of
“C:\Games\My Game\MODS\Cool Mod\ data\etc”. This “double folder” error is the second largest
User Guide
7
cause of mod problems (behind UAC). Not finding and fixing this problem will lead to mods not being
enabled correctly and thus not appearing in game.
Figure 5 shows an example of the “double folder” error. You will see two “Cool Mod” folders instead
of the correct one as shown in Figure 4. Be aware that the duplicate folder may not necessarily have
exactly the same name, but will still be obvious.
Once you have verified the mod’s folder structure, you can move it to your game’s MODS folder. If
you have identified the “double folder” error, then you can rectify simply by moving the second
(duplicate) instance of the folder, as shown in Figure 6.
Figure 4
Correctly structured mod
Figure 5
Incorrectly structured mod
Figure 6
JoneSoft Generic Mod Enabler
8
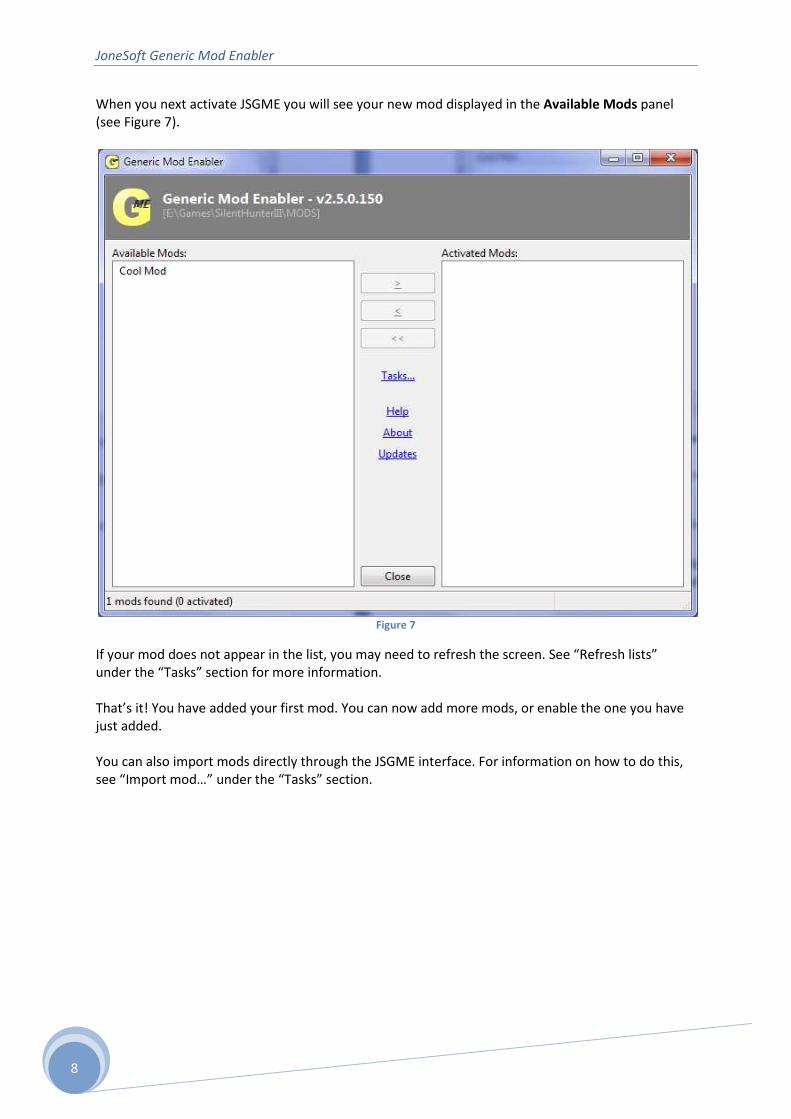
When you next activate JSGME you will see your new mod displayed in the Available Mods panel
(see Figure 7).
Figure 7
If your mod does not appear in the list, you may need to refresh the screen. See “Refresh lists”
under the “Tasks” section for more information.
That’s it! You have added your first mod. You can now add more mods, or enable the one you have
just added.
You can also import mods directly through the JSGME interface. For information on how to do this,
see “Import mod…” under the “Tasks” section.
User Guide
9
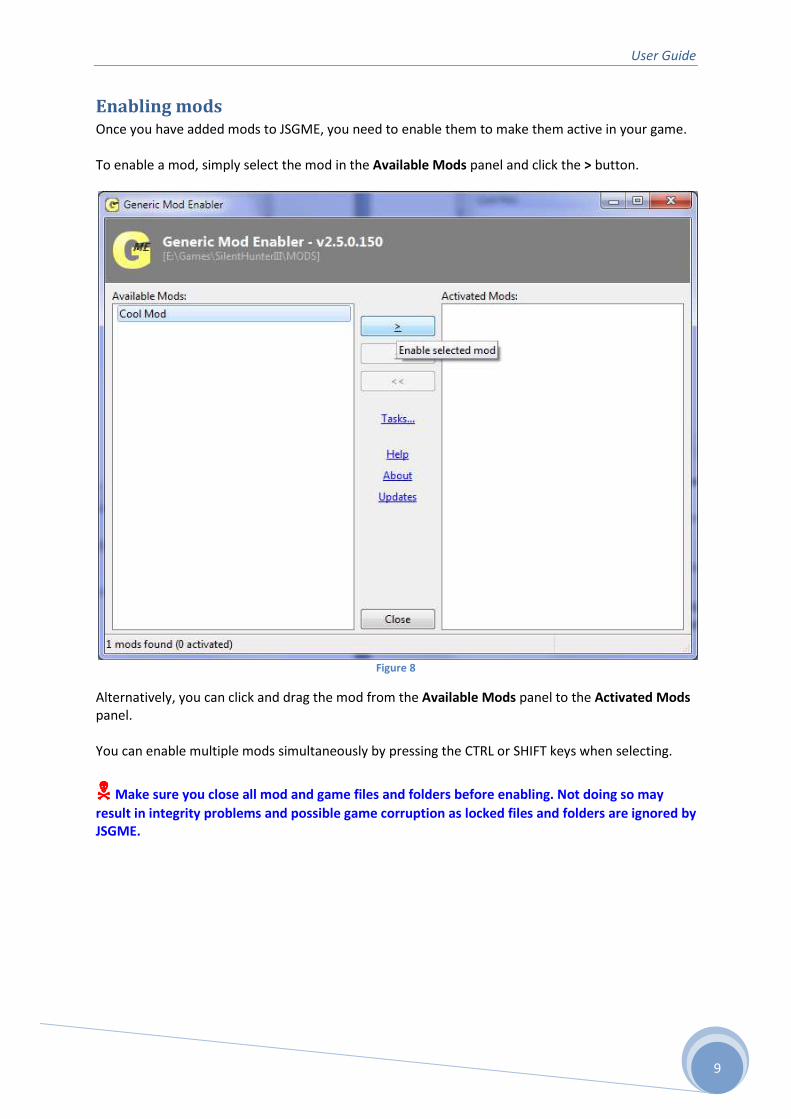
Enabling mods Once you have added mods to JSGME, you need to enable them to make them active in your game.
To enable a mod, simply select the mod in the Available Mods panel and click the > button.
Figure 8
Alternatively, you can click and drag the mod from the Available Mods panel to the Activated Mods
panel.
You can enable multiple mods simultaneously by pressing the CTRL or SHIFT keys when selecting.
���� Make sure you close all mod and game files and folders before enabling. Not doing so may
result in integrity problems and possible game corruption as locked files and folders are ignored by
JSGME.

JoneSoft Generic Mod Enabler
10
Figure 9
That’s it! You have enabled your first mod. You can now close JSGME and run your newly modded
game.
User Guide
11
Mod conflicts
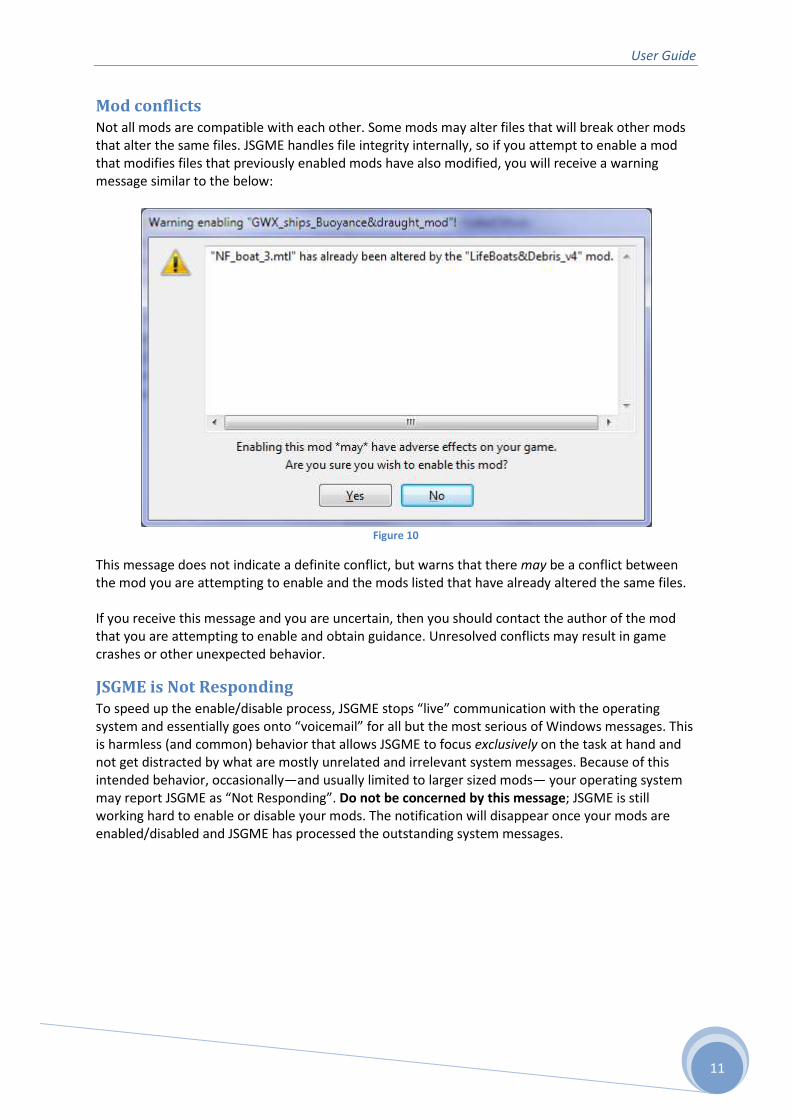
Not all mods are compatible with each other. Some mods may alter files that will break other mods
that alter the same files. JSGME handles file integrity internally, so if you attempt to enable a mod
that modifies files that previously enabled mods have also modified, you will receive a warning
message similar to the below:
Figure 10
This message does not indicate a definite conflict, but warns that there may be a conflict between
the mod you are attempting to enable and the mods listed that have already altered the same files.
If you receive this message and you are uncertain, then you should contact the author of the mod
that you are attempting to enable and obtain guidance. Unresolved conflicts may result in game
crashes or other unexpected behavior.
JSGME is Not Responding
To speed up the enable/disable process, JSGME stops “live” communication with the operating
system and essentially goes onto “voicemail” for all but the most serious of Windows messages. This
is harmless (and common) behavior that allows JSGME to focus exclusively on the task at hand and
not get distracted by what are mostly unrelated and irrelevant system messages. Because of this
intended behavior, occasionally—and usually limited to larger sized mods— your operating system
may report JSGME as “Not Responding”. Do not be concerned by this message; JSGME is still
working hard to enable or disable your mods. The notification will disappear once your mods are
enabled/disabled and JSGME has processed the outstanding system messages.

JoneSoft Generic Mod Enabler
12
Disabling mods As the name suggests, disabling a mod removes the mod files from the game and returns the game
to the pre-mod state.
To disable a mod, simply select the mod in the Activated Mods panel and click the < button.
Figure 11
Alternatively, you can click and drag the mod from the Activated Mods panel to the Available Mods
panel.
If you attempt to disable a mod that has had files updated by subsequent enabled mods, you will
receive the following error message:
Figure 12

User Guide
13
You must first disable the listed mods before disabling the selected mod.
You can disable multiple mods simultaneously by pressing the CTRL or SHIFT keys when selecting.
You can disable all mods in one action by clicking the << button (useful for when patching your game
or updating JSGME.exe). Click Yes when asked to confirm your action.
���� Make sure you close all mod and game files and folders before disabling. Not doing so may
result in integrity problems and possible game corruption as locked files and folders are ignored by
JSGME.
How JSGME works When you run JSGME, all the folder names under the MODS folder are collected and displayed in the
Available Mods panel. Enabling a mod copies the associated files across into the game folder
structure, backing up any files that it overwrites by appending the mod’s name to the file extension
and moving to a backup folder. This is why it is important that the folders and files under the mod
folder mirror exactly the structure of the game itself (with the exception of case sensitivity). Also,
once you enable a mod, it is good practice not to alter files in the source mod folder. If you want to
modify or update files in a mod folder, disable the mod first then re-enable again after the files are
updated (ie if a newer version of the mod is released).
Navigating the interface The JSGME interface has been designed to be intuitive and easy to use without the need to learn
complex commands. In addition to the numerous ways of enabling and disabling mods mentioned
above, there are a number of other commands that are at your fingertips. Specifically, you can:
• explore an available (not activated) mod’s file contents through Windows Explorer by right-
clicking the mod and selecting Explore. See Figure 13.
• remove an available (not activated) mod from your computer by right-clicking the mod and
selecting Delete (see Figure 13), or by selecting the mod and pressing the Delete key. Confirm
the deletion by clicking Yes and the mod will be moved to your Recycle Bin. If you later change
your mind, you can restore the mod from your Recycle Bin like any other file.
• rename an available (not activated) mod by right-clicking the mod and selecting Rename (see
Figure 13), or selecting the mod once, and after a short pause, selecting it again, or by selecting
the mod and pressing the F2 key. You then simply type the new name required and press the
Enter key when done; JSGME will ensure that only valid characters are used.
• view a list of all files in a mod’s “documentation” folder (if any exist) by right-clicking the mod.
See Figure 13. To open a file in the list, simply click on it.
• display a brief description of a mod by hovering your mouse over the mod. A description will
only appear, however, if the modder has provided a text file with a “.jsgme” extension in either
the mod’s “documentation” folder or base folder (see “Notes for modders” section for more
information).
• refresh the mod list at any time by pressing the F5 key, or by selecting Refresh lists from the
Tasks… list (see “Tasks” section for more information).
• create new mod folders by pressing the F7 key and typing the required name, pressing the Enter
key when done; JSGME will ensure that only valid characters are used. New folders will be
created in Windows Explorer ready for you to copy in your modded files.

JoneSoft Generic Mod Enabler
14
Figure 13
Tasks Clicking on the Tasks… label will display the following list of tasks:
Figure 14
Load mod profile… / Save mod profile…
A mod profile contains a list of activated mods, in the correct activated sequence, for easy one-click
re-enabling whenever you want. This means that you do not need to remember what mods you
have enabled or the enabled order in the likely event that you need to disable them all, such as
when installing a new game patch. Further, you can set up multiple mod profiles for each game,
meaning, for example, that when you want to make in-game movies you can load up a different set
of mods than the set you’d use were you wanting to play the game.
You create a mod profile by first ensuring that you have enabled the mods you want to include and
then selecting the Save mod profile... task. In the Save As dialog that appears, type a file name for
your new mod profile and select where you want to save it (you can save it wherever you like). Your
newly created mod profile can be reloaded anytime through the Load mod profile… task.
To load a mod profile, select the Load mod profile… task. In the Open dialog box that appears,
navigate to the mod profile that you wish to load. Mod profiles carry the file extension .mep. Once
you have selected a mod profile, JSGME will disable any existing enabled mods and enable, in the
correct sequence, the mods listed in the chosen profile. If any mod listed in the profile cannot be
found in your MODS folder, you will receive an error message and the mod profile will not be
loaded.
Import mod…
You can import a mod by unzipping it anywhere on your hard drive and then selecting it via the
Import mod… task (see Figure 15), or by dragging and dropping the mod folder onto JSGME’s
Available Mods panel. The folder and contents will be moved into the MODS folder ready for

User Guide
15
enabling. Press the CTRL key when you click OK or drop the folder into JSGME and the mod will be
copied instead of moved.
Figure 15
Find mod…
You can search your available and activated mods by selecting the Find mod... task or pressing F3.
Type in all or part of a mod name that you want to find and click the Find button (see Figure 16). All
matches will be listed in the Results box. Double-click an entry to highlight the mod entry in the
main screen. This feature is useful for users with large numbers of mods.
Figure 16
JoneSoft Generic Mod Enabler
16
Refresh lists
You can refresh the lists of available and activated mods by selecting the Refresh lists task or
pressing F5. This task is useful if you have added mods to your MODS folder while JSGME is open and
you want the new mods to appear in the Available Mods panel.
Generate snapshot of game files
Selecting the Generate snapshot of game files task creates a snapshot of all game files (excluding
the MODS folder and JSGME-related files) that can be used to verify the integrity of game files at a
later date, for example after you have installed and uninstalled mods. Best used immediately after
you first install JSGME.
Compare game files to snapshot
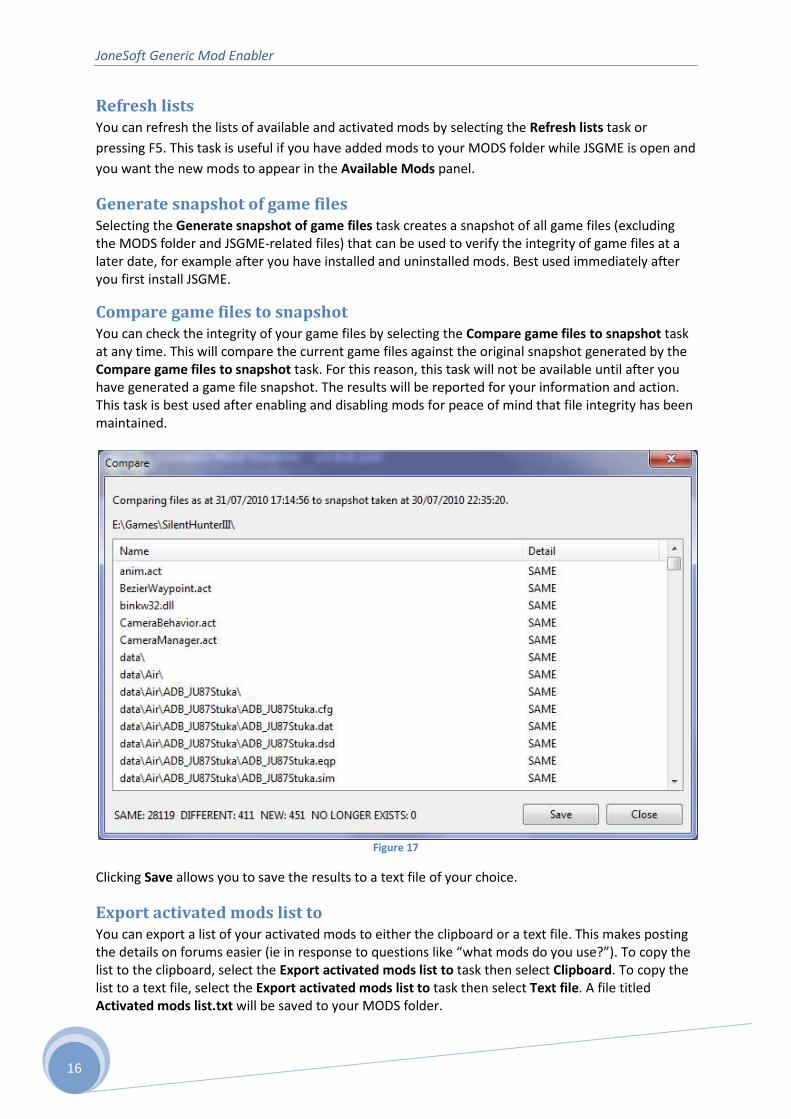
You can check the integrity of your game files by selecting the Compare game files to snapshot task
at any time. This will compare the current game files against the original snapshot generated by the
Compare game files to snapshot task. For this reason, this task will not be available until after you
have generated a game file snapshot. The results will be reported for your information and action.
This task is best used after enabling and disabling mods for peace of mind that file integrity has been
maintained.
Figure 17
Clicking Save allows you to save the results to a text file of your choice.
Export activated mods list to
You can export a list of your activated mods to either the clipboard or a text file. This makes posting
the details on forums easier (ie in response to questions like “what mods do you use?”). To copy the
list to the clipboard, select the Export activated mods list to task then select Clipboard. To copy the
list to a text file, select the Export activated mods list to task then select Text file. A file titled
Activated mods list.txt will be saved to your MODS folder.

User Guide
17
Languages You can change the display language of JSGME by visiting the JSGME website and downloading an
available language pack. Simply follow the installation instructions included in the language pack.
Language translations are always welcome—email [email protected] if you would like to
contribute a translation in your language.
Notes for modders You can remove files from the game by including in your package empty text files with -remove
added to the filename (ie filename.ext-remove ). Files will be returned when your mod is
disabled.
Add a text file to your “documentation” or base folder with the extension .jsgme and the contents
(up to 255 characters) will be displayed whenever the user hovers their mouse over your mod within
JSGME’s interface. This is a great way to quickly “remind” users what your mod does. Files included
in your “documentation” folder will not be copied into the game when your mod is enabled, thus
reducing duplicate files and hard drive usage.
There are many file archivers/compression utilities out in the market. Most provide “Extract to” and
“Extract here” options. The correct extraction method for users of your mod will depend on how you
zipped it up to begin with. Using the wrong method to extract your mod may result in a “double
folder” error, where instead of the intended folder structure, an extra “layer” has been added. For
example, “C:\Games\My Game\MODS\Cool Mod\Cool Mod\data\etc” instead of “C:\Games\My
Game\MODS\Cool Mod\ data\etc”. This “double folder” error is the second largest cause of mod
problems (behind Vista/Win7 UAC). To avoid users encountering this problem, you may want to
stipulate the appropriate extraction method in your installation instructions.
Notes for developers
Command line parameters
JSGME accepts a number of command line parameters, giving you the ability to enable and disable
mods from your applications. This feature is very useful for setup file builders, who can now, for
example, disable all mods automatically prior to installing a mod update. Accepted command line
parameters and usage are:
/l “C:\Path\File.mep”
This loads the specified mod profile file. Return value (see below) is the number of mods enabled.
/s “C:\Path\File.mep”
This creates a mod profile with the specified file name. Return value is the number of mods included
in the profle.
/e “modfoldername 1” “modfoldername 2” .. “modfolde rname n”
This enables the specified mods. Return value is the actual number of mods enabled.
/d “modfoldername 1” “modfoldername 2” .. “modfolde rname n”
This disables the specified mods. Return value is the actual number of mods disabled.
/da

JoneSoft Generic Mod Enabler
18
This disables ALL mods. Return value is the number of mods still enabled.
You cannot combine these switches. In addition to these switches, there is also:
/x
If your application opened JSGME, it will close automatically once processing is finished.
/h<application handle>
It is recommended that you include your application’s handle for post-message handling as JSGME
will pass it back when it passes its return value.
While you can combine these parameters, /l, /e, /d, or /da must be the first parameter passed.
If using the ShellExecute (or derivative) API call, make sure you include the game’s working directory
as the lpDirectory parameter. An example call may look like:
ShellExecute(handle, ‘open’, ‘C:\Games\Generic Mod Enabler\JSGME.exe’, ‘/da /x /h123456’, ‘C:\Games\SilentHunterIII’, SW_NORMAL );
You can obtain the path to JSGME.exe by querying the FullPath key in the JSGME DETAILS section of
JSGME.ini (located in the working directory, ie, the base folder, of the game; which you should
already know).
Return value
Once JSGME has handled your request, it will send a message (via SendNotifyMessage) to your
application’s handle (retrieved from the passed /h parameter) with the wParam being your
application’s handle and the lParam being the return value.
To accept the message you’ll need to define a new windows message in your application:
WM_JSGME : UINT; ... WM_JSGME := RegisterWindowMessage(‘JSGME’);
and then capture the message in your message handler:
... if Msg.Message = WM_JSGME then <do stuff with Msg.lParam> ...
If lParam is negative, or not what you are expecting (ie you’re trying to disable 5 mods but get a
return value of 4), then you need to do further investigation internally; JSGME.ini is an easy file to
query for this purpose.

User Guide
19
License agreement, copyright and release information The license agreement, copyright and release information is outlined in the accompanying
JoneSoft.txt file.
Acknowledgements Thanks and credit to:
• Ian “Beery” Cooper who indirectly motivated me to release this tool to the community (two
years after I first developed it)!
• The many users who have provided continued feedback and suggestions. JSGME would not be
what it is now without your feedback!
• The many beta testers who have helped out along the way.
• The language translators—names can be found in each .lng file.
Contact Us Our website: http://www.users.on.net/~jscones/software/ or http://jonesoft.jaennahre.com
Our email addresses for support related issues: [email protected] or
Please be advised that we can only provide support on using JSGME. We cannot provide support for
individual mods or individual games.