JasperReports Server Ultimate Guide - TIBCO Software · JasperReportsServerUltimateGuide...
206
5.6
-
Upload
truongminh -
Category
Documents
-
view
245 -
download
0
Transcript of JasperReports Server Ultimate Guide - TIBCO Software · JasperReportsServerUltimateGuide...
5.6

Copyright ©2005-2014, TIBCO Software Inc. All rights reserved. Printed in the U.S.A. Jaspersoft, the Jaspersoftlogo, Jaspersoft iReport Designer, JasperReports Library, JasperReports Server, Jaspersoft OLAP, JaspersoftStudio, and Jaspersoft ETL are trademarks and/or registered trademarks of TIBCO Software Inc. in the UnitedStates and in jurisdictions throughout the world. All other company and product names are or may be tradenames or trademarks of their respective owners.
This is version 0814-JSP56-13 of the JasperReports Server Ultimate Guide.
TABLE OF CONTENTS
Chapter 1 Introduction 91.1 Community and Commercial Editions 101.2 User Descriptions and Document Maps 101.2.1 Technical Business Analyst 101.2.2 Report Developer 101.2.3 System Developer 101.2.4 System Administrator and Database Administrator 11
1.3 Other Resources 111.3.1 Documentation 111.3.2 Jaspersoft Community Site 12
1.4 Getting Started 12
Chapter 2 Ad Hoc Views and Data Exploration 152.1 Ad Hoc Editor User Interface 162.1.1 Ad Hoc User Interface Components 162.1.2 Ad Hoc Tables 182.1.3 Ad Hoc Charts 212.1.4 Standard Ad Hoc Crosstabs 232.1.5 Ad Hoc OLAP Crosstabs 252.1.6 Ad Hoc Context Menus 27
2.2 Setting the Data Format 272.3 Administering Ad Hoc Views 282.3.1 Administering Topics 282.3.2 Administering Domains 282.3.3 Scalability 29
Chapter 3 The Report Viewer 313.1 Working with Report Templates 313.1.1 Creating a Report Template 313.1.2 Report Template Styles in Jaspersoft Studio 35
3.2 Working with Conditional Text 36
Chapter 4 Dashboards 394.1 User Interface Components 40
3

JasperReports Server Ultimate Guide
4.2 Context Menus 414.3 Dashboard Tips and Tricks 42
Chapter 5 Custom Data Sources 455.1 Data Sources in JasperReports Library 455.1.1 Query Executers 46
5.2 Custom Data Source Examples 465.2.1 Installing the Custom Data Source Examples 475.2.2 Custom Bean Data Source 475.2.3 Webscraper Custom Data Source 48
5.3 Creating a Custom Data Source 495.3.1 Implementing the ReportDataSourceService Interface 495.3.2 Defining Custom Data Source Properties 495.3.3 Implementing Optional Interfaces 505.3.4 Creating theMessage Catalog 515.3.5 Defining the Custom Data Source in Spring 515.3.6 Configuring theMessage Catalog 535.3.7 Adding the Custom Query Language to the UI 53
5.4 Installing a Custom Data Source 53
Chapter 6 Securing Data in a Domain 556.1 Business Case 566.2 Process Overview 566.3 Sales Domain 576.4 Roles, Users, and Profile Attributes 586.4.1 Roles 586.4.2 Users 596.4.3 Profile Attributes 59
6.5 Setting Up Logging and Testing 606.5.1 Enabling Logging 606.5.2 Creating a Test Report 61
6.6 Creating a Domain Security File 616.6.1 Row-level Security 626.6.2 Column-level Security 646.6.3 CZS’s Item Group Access Grants for Sales Data 646.6.4 Uploading the Security File 65
6.7 Testing and Results 656.8 Domain and Security Recommendations 676.9 Domain ReferenceMaterial 686.9.1 Domain Design in XML Format 686.9.2 Domain Security File 71
Chapter 7 Application Security 737.1 Using SSL in theWeb Server 747.1.1 Setting Up an SSLCertificate 747.1.2 Enabling SSL in theWeb Server 757.1.3 Configuring JasperReports Server to UseOnly SSL 75
4
7.2 Disabling Unused HTTP Verbs 767.3 Setting the Secure Flag on Cookies 767.4 Setting httpOnly for Cookies 777.4.1 Setting httpOnly for Tomcat 7 787.4.2 Setting httpOnly for Tomcat 6 79
7.5 Using a Protection Domain Infrastructure 797.5.1 Enabling the JVM Security Manager 797.5.2 Restoring Disallowed Permissions 807.5.3 Additional Customizations for Previous Versions of Tomcat 80
7.6 Encrypting Passwords in URLs 81
Chapter 8 JasperReports Server APIs 838.1 Web Services APIs 838.2 Visualize.js API 848.3 Repository HTTP API 868.3.1 Executing ReportUnits 868.3.2 Linking to Content 898.3.3 Viewing Resources in the Repository 89
8.4 The Public JasperReports Server API 898.4.1 Accessing API Implementations Using the Spring Framework 908.4.2 Repository API 928.4.3 Engine Service 968.4.4 Report Data Source Service API 968.4.5 Report Scheduling API 978.4.6 Users and Roles API 1038.4.7 Object Permissions API 1048.4.8 OLAP Connection API 1048.4.9 Flushing the OLAP Cache Using the API 105
8.5 Ad Hoc Launcher Java API 1068.5.1 Communicating with the Ad Hoc Editor using AdhocTopicMetadata 1068.5.2 Integration with JasperReports Server 1088.5.3 A Sample Ad Hoc Launcher 109
Chapter 9 Customizing the User Interface 1159.1 Changing the UI With Themes 1169.1.1 Changing the Logo and Favicon 1179.1.2 Changing Colors and Fonts 1189.1.3 Changing Dialog Boxes 1199.1.4 Hiding UI Elements 1229.1.5 Changing the Layout of the UI 1239.1.6 Using Themes to Remove Branding 1249.1.7 Replacing the Default Theme 126
9.2 Customizing the UI WithWeb App Files 1269.2.1 Location of Interpreted Files 1279.2.2 Location of JSP Files 1289.2.3 Customizing JavaScript Files 1289.2.4 CustomizingWAR Files 129
5

JasperReports Server Ultimate Guide
9.2.5 Reloading the JasperReports ServerWeb App 1299.3 Customizing the Branding with SiteMesh 1309.3.1 web.xml 1319.3.2 sitemesh.xml and decorators.xml 1319.3.3 main.jsp and decorator.jsp 1319.3.4 Editing decorator.jsp for Rebranding 133
9.4 Customizing the Login Page 1349.5 Setting the HomePage 1369.6 Restricting Access to a Location in the Repository 1379.7 CustomizingMenus 1389.7.1 Removing aMenu Item 1389.7.2 Restricting Access by Role 1409.7.3 Adding an Item to theMainMenu 1439.7.4 Adding a New MainMenu 1459.7.5 Changing Other Menus 1479.7.6 ActionModel Reference 147
9.8 Customizing the Report Rendering Page 1549.8.1 Customizing Input Controls 1549.8.2 Customizing the Report Viewer 156
9.9 WorkingWith Custom Java Classes 1579.10 Adding a Custom JSP Page in a SpringWeb Flow 1589.11 Adding Custom Export Channels 1649.11.1 About Export Parameters 1649.11.2 Adding the Exporter to the Report Viewer 1649.11.3 Adding the Export Format to the Scheduler 166
9.12 UpgradingWith UI Customizations 168
Chapter 10 Designing a Cluster 17110.1 Sample Cluster Architecture 17210.1.1 JasperReports Server Clients 17310.1.2 Load Balancer 17310.1.3 JasperReports Server Instances 17410.1.4 Shared Repository Database 17510.1.5 Job Schedulers 17510.1.6 Other Shared Resources 176
10.2 Jaspersoft OLAP in a Cluster 17710.3 SessionManagement and Failover 17710.3.1 Impact on Browser Users 17910.3.2 Impact onWeb Services Clients 18010.3.3 Sample Configuration for Failover 18110.3.4 Load Balancer Configuration 183
10.4 Cluster Design Process 18510.4.1 Performance Requirements 18610.4.2 Availability Requirements 18710.4.3 Scalability Requirements 187
10.5 Sizing a Cluster 187
6
10.5.1 Load Balancer 18810.5.2 Cluster Nodes 18810.5.3 Software Configuration 18910.5.4 Databases 18910.5.5 Network 18910.5.6 Policies and Procedures 190
Glossary 191
Index 201
7

JasperReports Server Ultimate Guide
8

CHAPTER 1 INTRODUCTIONJasperReports Server builds on JasperReports Library as a comprehensive family of Business Intelligence (BI)products, providing robust static and interactive reporting, report server, and data analysis capabilities. Thesecapabilities are available as either stand-alone products or as part of an integrated end-to-end BI suite utilizingcommon metadata and providing shared services, such as a repository, security, and scheduling.
The heart of the Jaspersoft BI Suite is the server, which provides the ability to:• Easily create new reports based on views designed in an intuitive, web-based, drag and drop Ad Hoc
Editor.• Efficiently and securely manage many reports.• Interact with reports, including sorting, changing formatting, entering parameters, and drilling on data.• Schedule reports for distribution through email and storage in the repository.• Arrange reports and web content to create appealing, data-rich Jaspersoft Dashboards that quickly convey
business trends.
For business intelligence users, Jaspersoft offers Jaspersoft OLAP, which runs on the server.
While the Ad Hoc Editor lets users create simple reports, more complex reports can be created outside of theserver. You can either use Jaspersoft Studio or manually write JRXML code to create a report that can be run inthe server. Jaspersoft recommends that you use Jaspersoft Studio unless you have a thorough understanding ofthe JasperReports file structure. See the JasperReports Server User Guide for more information.
Jaspersoft provides several other sources of information to help extend your knowledge of JasperReports Server:• Our free Business Intelligence Tutorials let you learn at your own pace, and cover topics for developers,
system administrators, business users, and data integration users. The tutorials are available online fromProfessional Services section of our website.
• Our free samples, which are installed with JasperReports Library, Jaspersoft Studio, and JasperReportsServer, are documented online. The samples documentation can be found on our community website.
This chapter contains the following sections:• Community and Commercial Editions• User Descriptions and Document Maps• Other Resources• Getting Started
9

JasperReports Server Ultimate Guide
1.1 Community and Commercial EditionsJasperReports Server is a component of both a community project and commercial offerings. Each integrates thestandard features such as security, scheduling, a web services interface, and much more for running and sharingreports. Commercial editions provide additional features, including Ad Hoc charts, flash charts, dashboards,Domains, auditing, and a multi-organization architecture for hosting large BI deployments.
Both community and commercial editions use the same Spring framework for easy integration into yourapplications, as well as an interface based on CSS for easy customization.
This guide discusses all editions. Sections of the guide that apply only to the commercial editions are indicatedwith a special note.
1.2 User Descriptions and Document MapsBecause this Ultimate Guide is a comprehensive resource for users with many different needs, it includesinformation that may not be relevant to you. The following user descriptions and document maps can help youfind the information that pertains to you in this guide. Other guides are listed in “Documentation” on page 11.
1.2.1 Technical Business AnalystTechnical business analysts know their business, data, and processes. They are power users who generatebusiness intelligence for themselves and others.
If you are a technical business analyst, refer to the following:• “Dashboards” on page 39• “Securing Data in a Domain” on page 55• “Ad Hoc Launcher Java API” on page 106• “Changing the UI With Themes” on page 116• “Customizing Menus” on page 138• “Working With Custom Java Classes” on page 157
1.2.2 Report DeveloperReport developers understand their business and its data and create reports for other users.
If you are a report developer, refer to the following:• “Ad Hoc Views and Data Exploration” on page 15• “Custom Data Sources” on page 45
1.2.3 System DeveloperSystem developers leverage JasperReports Server functionality in their own product. They extend and changethe source code, system configurations, and other low-level options.
If you are a system developer, refer to the following:• “Application Security” on page 73• “JasperReports Server APIs” on page 83• “Customizing the User Interface” on page 115
10
Chapter 1 Introduction
1.2.4 System Administrator and Database AdministratorSystem administrators install, deploy, maintain, and troubleshoot JasperReports Server, along with other systemsin their environment. They also manage the server, including the creation and maintenance of users, roles,organizations, the assignment of permissions, and configure authorization and authorization in general. Databaseadministrators (DBAs) administer database management systems (DBMS), and are familiar with both relationaland Online Analytical Processing databases. They plan, configure, tune, and maintain the schemas that storebusiness data.
If you are a system or database administrator, refer to the following:• “Ad Hoc Views and Data Exploration” on page 15• “Custom Data Sources” on page 45• “Securing Data in a Domain” on page 55• “Application Security” on page 73• “Restricting Access by Role” on page 140• “Working With Custom Java Classes” on page 157• “Designing a Cluster” on page 171
1.3 Other ResourcesThe following sections list other sources of documentation and information to help you work withJasperReports Server.
1.3.1 DocumentationThis guide references other JasperReports Server documentation available at http://community.jaspersoft.com.
The standard documentation is also found in the <js-install>/docs directory when you install JasperReportsServer:• JasperReports Server Installation Guide• JasperReports Server Upgrade Guide• JasperReports Server User Guide• JasperReports Server Administrator Guide• JasperReports Server Web Services Guide• JasperReports Server Programming Guide• Jaspersoft Studio User Guide• Jaspersoft OLAP User Guide
The following document is found in the source code distribution package:• JasperReports Server Source Build Guide
Premium guides can be downloaded from the community site:• JasperReports Library Ultimate Guide• iReport Ultimate Guide• Jaspersoft OLAP Ultimate Guide• JasperReports Server External Authentication Cookbook• JasperReports Server Mobile Developer Guide• Jaspersoft for AWS User Guide
11

JasperReports Server Ultimate Guide
1.3.2 Jaspersoft Community SiteThe Jaspersoft community site at http://community.jaspersoft.com is the place to do everything Jaspersoft.Whether you are a developer using our community edition tools or a Product Manager guiding the integrationof BI into your solutions using our commercial products, this site provides you with the information andresources you need to be successful. The community site offers answers, documentation, wiki articles, andtracker items for all products. This is the resource for all of our community members regardless of the editionyou use, the goals you’ve set, or your role in your organization.
If you would like the assistance of Jaspersoft’s Professional Services team, see:
http://www.jaspersoft.com/jaspersoft-professional-services
1.4 Getting StartedJasperReports Server must be installed and configured before you can use it. For information, refer to theinstallation guide for your product edition.
The directory where JasperReports Server is installed is referred to as <js-install> in this guide. The defaultinstallation directory is:
Windows: C:\Program Files\jasperreports-server-5.6
Linux: <USER_HOME>/jasperreports-server-5.6
Mac: /Applications/jasperreports-server-5.6
To connect to JasperReports Server, make sure your database and application server are running, then enter thecorresponding URL in a supported browser:
Commercial Editions: http://<hostname>:<port>/jasperserver-pro/login.html
Community Project: http://<hostname>:<port>/jasperserver/login.html
Where:
<hostname> is the name of the computer hosting the application server where JasperReports Server isinstalled.
<port> is the number of the port specified when the application server was installed.
For example, if you installed the Jaspersoft BI Suite evaluation software, the default URL is:
http://localhost:8080/jasperserver-pro/login.html
If JasperReports Server is secured using SSL (Secure Socket Layer) encryption, both the protocol and the portdiffer. For example, a typical SSL-secured URL for JasperReports Server Professional follows this format:
https://localhost:443/jasperserver-pro/login.html
12
Chapter 1 Introduction
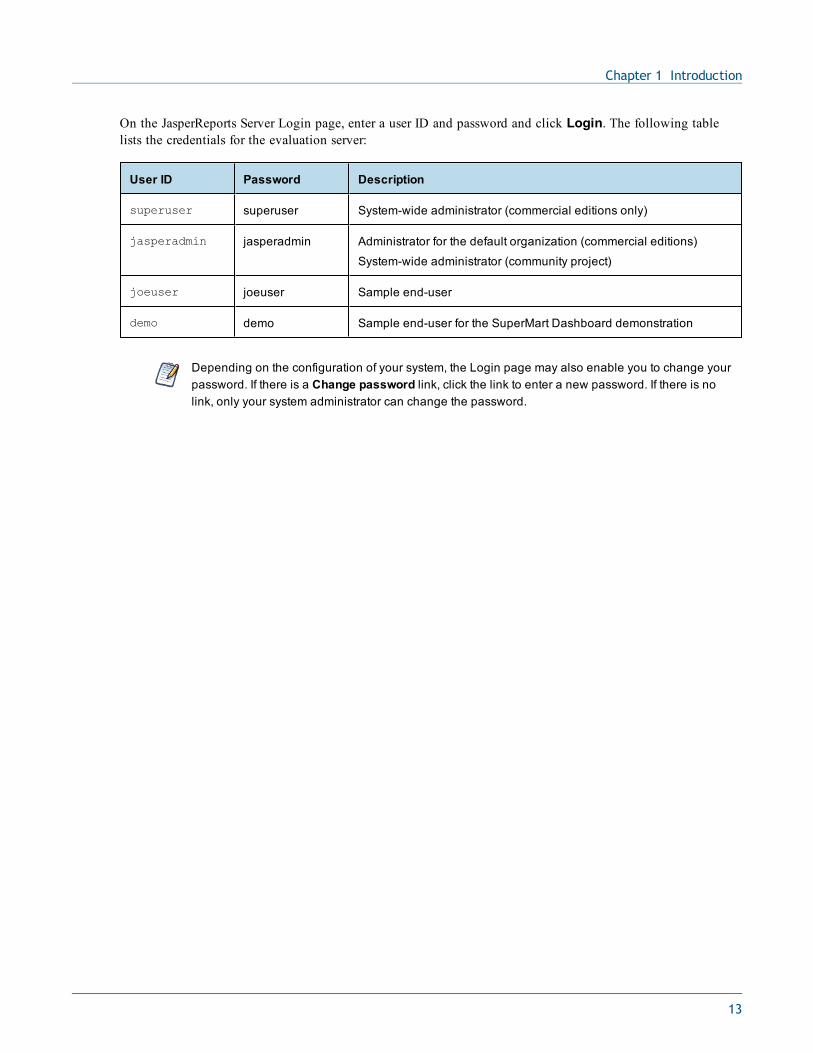
On the JasperReports Server Login page, enter a user ID and password and click Login. The following tablelists the credentials for the evaluation server:
User ID Password Description
superuser superuser System-wide administrator (commercial editions only)
jasperadmin jasperadmin Administrator for the default organization (commercial editions)
System-wide administrator (community project)
joeuser joeuser Sample end-user
demo demo Sample end-user for the SuperMart Dashboard demonstration
Depending on the configuration of your system, the Login page may also enable you to change yourpassword. If there is a Change password link, click the link to enter a new password. If there is nolink, only your system administrator can change the password.
13

JasperReports Server Ultimate Guide
14

CHAPTER 2 AD HOC VIEWS AND DATA EXPLORATION
This section describes functionality that can be restricted by the software license forJasperReports Server.If you don’t see some of the options described in this section, your license may prohibit you from usingthem. To find out what you're licensed to use, or to upgrade your license, contact Jaspersoft.
JasperReports Server’s Ad Hoc Editor is a browser-based, interactive tool for designing views and exploringyour data:• As a designer, the Ad Hoc Editor lets you easily create and edit views and then use them to create reports.
To create a view, select a Topic, Domain, or OLAP client connection, each of which defines a query anddata source, and a view type. Then select the fields in your data source that should appear in your view.The Ad Hoc Editor’s interactive display of your results lets you evaluate your design without having to runthe entire data set first. Finally, you can save the view, create one or more reports from it, and export it toseveral file formats.
• As a data explorer, the Ad Hoc Editor provides analysis options (such as slice, pivot, and filter) to help yourecognize trends and outliers in your data. You can drill into specific details or analyze your data at a veryhigh level. For example, you might create a crosstab that shows the kinds of products a customer purchasestogether. Though your intention in creating the crosstab was to rank the popularity of certain items, thecrosstab might also reveal correlation between customers’ purchases. These correlations, which you weren’taware of before, may give you insight into how you can improve your business. For example, you mightrun a promotion to encourage the correlation, or change your store layout to expose customers to moreoptions. Understanding your data can help you make better decisions.
The interesting trends and anomalies revealed by data exploration can lead you to create a view or reporthighlighting your findings. Conversely, while creating an Ad Hoc view, you may identify a trend that warrantsfurther investigation. You can move seamlessly between the two activities—view creation and data exploration.
This chapter contains the following sections:• Ad Hoc Editor User Interface• Setting the Data Format• Administering Ad Hoc Views
15
JasperReports Server Ultimate Guide
2.1 Ad Hoc Editor User InterfaceThe Ad Hoc Editor is an interactive tool that displays the data fields retrieved from your data sources. Theeffects of your changes are evident immediately, and you can adjust the display to highlight the most relevantand compelling aspects of your data.
With the Ad Hoc Editor, you can switch between table, chart, and crosstab views. The user interface for eachview type includes options specific to the current view type in addition to the basic Ad Hoc user interfacecomponents shared across all views. Context menus are available in all view types.
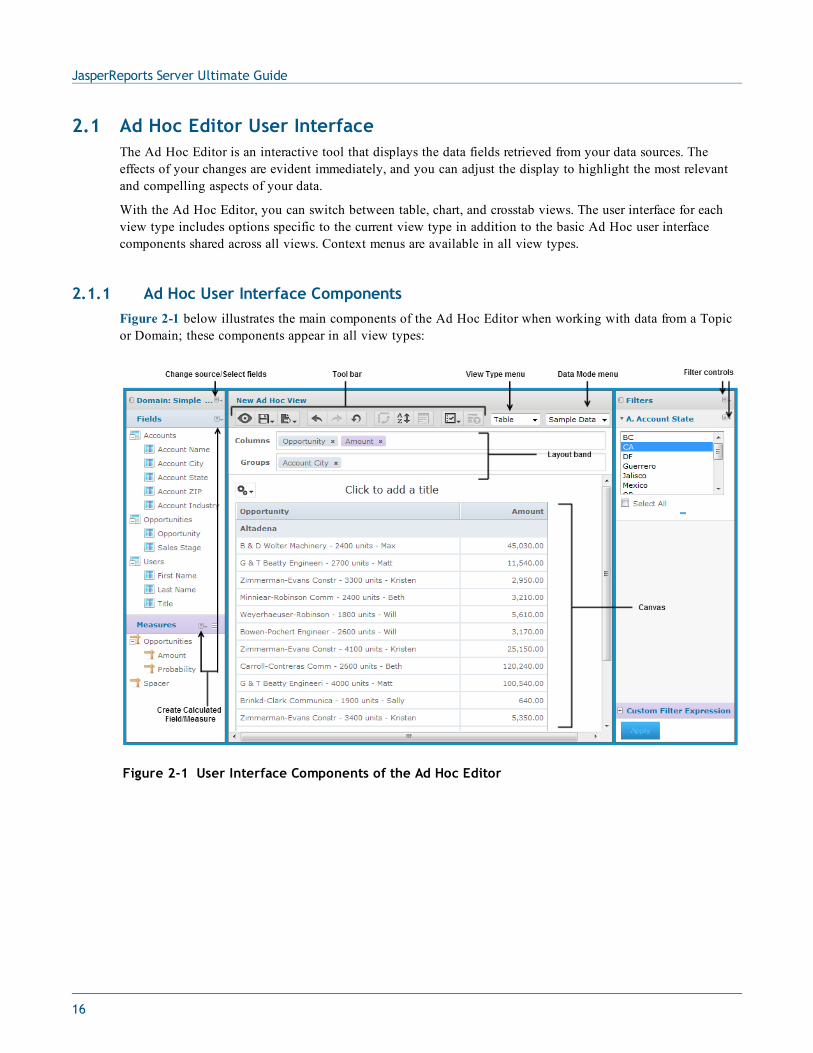
2.1.1 Ad Hoc User Interface ComponentsFigure 2-1 below illustrates the main components of the Ad Hoc Editor when working with data from a Topicor Domain; these components appear in all view types:
Figure 2-1 User Interface Components of the Ad Hoc Editor
16

Chapter 2 Ad Hoc Views and Data Exploration
Component Description
Data Selectionpanel
The Data Selection panel shows the list of available fields, which can be added to any bar inthe Layout Band, and measures, which are summarized values that cannot be added asgroups. Typically, measures are created from numeric fields in the Topic or Domain, but insome circumstances, it makes sense to use string fields when summarized as a count. Forexample, you might want to display the number of unique customers that made purchases ina given quarter.
Use the icon beside the set name to expand or collapse a set of fields or measures. To hidethis panel, click the icon in the top left corner; click the same icon on the minimized panelto expand it.
Change sourceSelect fields
This menu lets you select a different Topic or Domain for your view. All data and formattingare lost when you select a different Topic or Domain. When creating a view from a Domain,you can also select different fields to change the list that appears in this panel.
CreateCalculatedField/Measure
Click to open the New Calculated Field/Measure dialog box and define a calculated field () or calculated measure ).
The names of calculated fields are bold in the Data Selection panel; calculated fields in useare shown as bold and italic.
Tool bar The tool bar at the top of the canvas provides access to many of the Ad Hoc Editor’sfunctions, such as saving the view or creating a report from the view, undoing and redoingchanges, and changing the view’s sort order. For more information, refer to theJasperReports Server User Guide.
Data modemenu
Click to select the amount of data displayed from the menu. Use Sample Data or No Data todesign a view more quickly, or use Full Data to see all your data used in the same view.When you choose display mode, full data is displayed regardless of the selection shown inthe editor.
View type menu Click Chart, Table, or Crosstab to see your data in that type of view. Changes made in onetype of view apply to the data displayed on another.
Title bar The top portion of the canvas; click to add or edit the title of the view. To remove the title,point to the Properties menu and select Toggle the Title Bar.
Layout band The layout band immediately below the tool bar has two boxes where you can drag anddrop fields and measures from the Data Selection panel to add them to the canvas. You canchange the order of the selected fields canvas by dragging them to a different location in thelayout band. The boxes have different labels and functions, depending on the type of view;see the section for the individual view types for more information.To hide the layout band, point to the Properties menu and select
Hide Layout Band.
17

JasperReports Server Ultimate Guide
Component Description
Canvas Occupying the middle of the editor, the canvas shows your data subject to the constraintsyou have created. This is also a sample of how your data will appear in any report youcreate from the view. To see the view without interface components, click for design
mode.
Filters panel This panel displays any filters defined for the view. You can set the filter values and see theresulting change in the canvas.To hide the filters panel, click the icon in the top leftcorner of the panel. Click the same icon on the minimized panel to expand it again.
Filter controls These menus let you change the display of filters, either collectively or individually. Themenu on the filter panel lets you collapse all filters or remove all filters. The menu on eachfilter lets you view the filter operation, for example “is one of,” or delete the filter. To minimizethe view of an individual filter, click the icon beside its name.
2.1.2 Ad Hoc TablesThe following figure illustrates the canvas when working on Ad Hoc tables with Details and Totals selected:
Figure 2-2 Ad Hoc Editor’s Table Layout
18

Chapter 2 Ad Hoc Views and Data Exploration
Component Description
Columns area Drag fields and measures from the Data Selection panel to this area to create columns.
Groups area Drag fields from the Data Selection panel to this area to create groups. Measures cannot beadded to the Groups area.
Canvas Options Click to select Detailed Data (default), Totals Data, or Details and Totals.
Column labels Displays the label for each column above the table in a header row. Highlight the columnand right-click to change or remove the label. When you remove a column label, itsdatabase name is shown in the editor, but the label does not appear in reports created fromthe view.
Group header Displays the label of the group and its current value. Groups and sub-groups can be nested,and their first occurrence headers are all found at the top of the view. Right-click the firstoccurrence of a group to access group options such as removing the group from the table,changing the label, or creating a filter on that field. You can reorder the first headers tochange the group nesting order.
Group summary If Totals Data or Details and Totals is selected, shows the group value and group total, ifany. To select a different summary function, modify the column summary.
ColumnSummary
Gives a total value for all the rows in the column. To see all summaries, select Totals Dataor Details and Totals from the Canvas Options menu. To add or remove a summary, right-click on the column and select Add Summary or Remove Summary. To select a differentsummary function, right-click on the column and select Change Function.
Column ofValues
A vertical region in the canvas representing data from a single field. Right click on a columnto access column options such as sorting on that column, adding or removing a columnsummary, changing the column’s data format or label, and creating a custom field or filterbased on the column’s field.
Common tasks when working with Ad Hoc tables include:
Action Description
Resize acolumn
Click the right-hand border of the column header and drag it horizontally. For moreprecision, click the column to highlight its borders before dragging them.
The minimum width of a column is determined by its longest visible member (be it a row orthe label itself). When the data doesn’t fit the column width, it wraps (in Excel and HTMLformats) or is truncated (in PDF format). By default, the canvas only displays the first 15 rowsof data. To verify that the column widths are sufficient, click Full Data to display the full set ofdata.
19

JasperReports Server Ultimate Guide
Action Description
Add blankcolumns
To add white space between columns, drag the Spacer from the list of available measuresand drop it in the Columns area. Drag the spacer’s edges to widen or narrow it. You can addany number of spacers to a view.
To create space between the leftmost column and the group labels in a table, drag a spacerto the leftmost position; the margin provides a buffer between the first column and thegroups summaries.
Sort a column Click or right click on a column in the Canvas and selectUse for Sorting
. You can add
fields and change the sort direction from ascending to descending. You can sort by multiplefields, including those not displayed in the view.
Filter a column Right-click a field or a column in the layout band or the Canvas and select Create Filter tofilter your results by the values in that field. To select a filter operation other than the default,click the filter’s icon and select Toggle Operation.
Show allgroups
When a table is grouped by multiple fields, you may only see a few groups or even a single,partial group. Click Full Data to view the full dataset; click Sample Data to return to thesmaller subset.
20
Chapter 2 Ad Hoc Views and Data Exploration
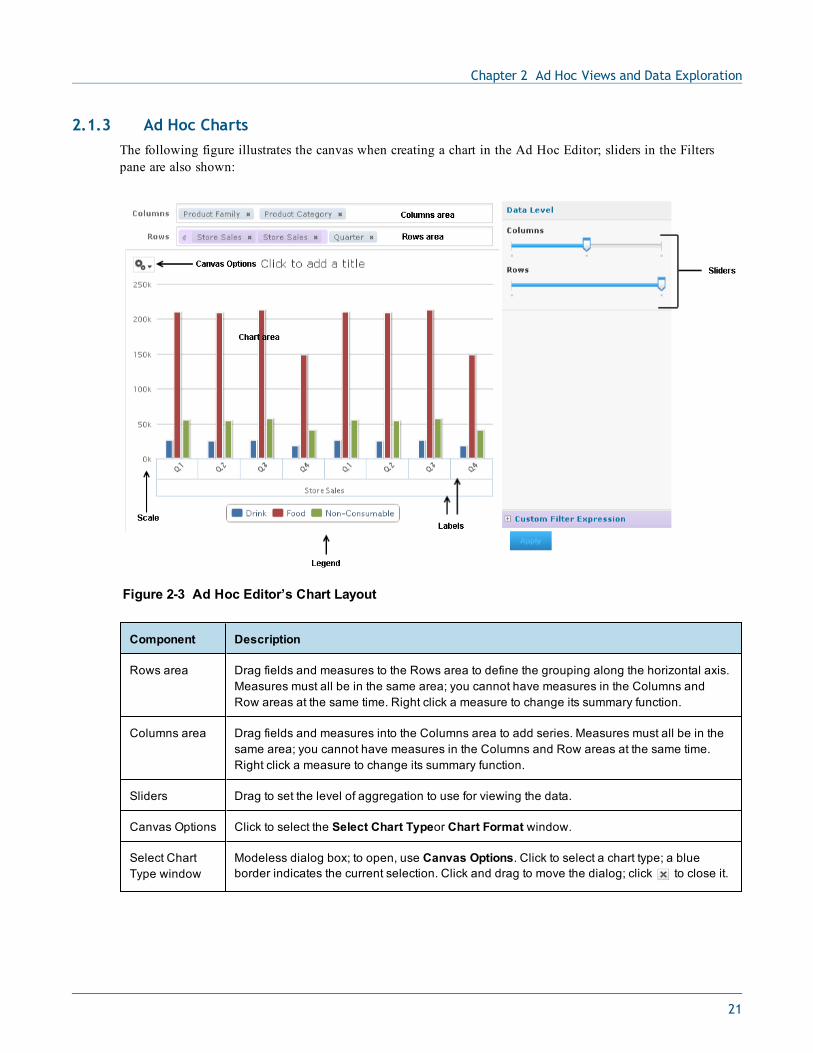
2.1.3 Ad Hoc ChartsThe following figure illustrates the canvas when creating a chart in the Ad Hoc Editor; sliders in the Filterspane are also shown:
Figure 2-3 Ad Hoc Editor’s Chart Layout
Component Description
Rows area Drag fields and measures to the Rows area to define the grouping along the horizontal axis.Measures must all be in the same area; you cannot have measures in the Columns andRow areas at the same time. Right click a measure to change its summary function.
Columns area Drag fields and measures into the Columns area to add series. Measures must all be in thesame area; you cannot have measures in the Columns and Row areas at the same time.Right click a measure to change its summary function.
Sliders Drag to set the level of aggregation to use for viewing the data.
Canvas Options Click to select the Select Chart Typeor Chart Format window.
Select ChartType window
Modeless dialog box; to open, use Canvas Options. Click to select a chart type; a blueborder indicates the current selection. Click and drag to move the dialog; click to close it.
21
JasperReports Server Ultimate Guide
Component Description
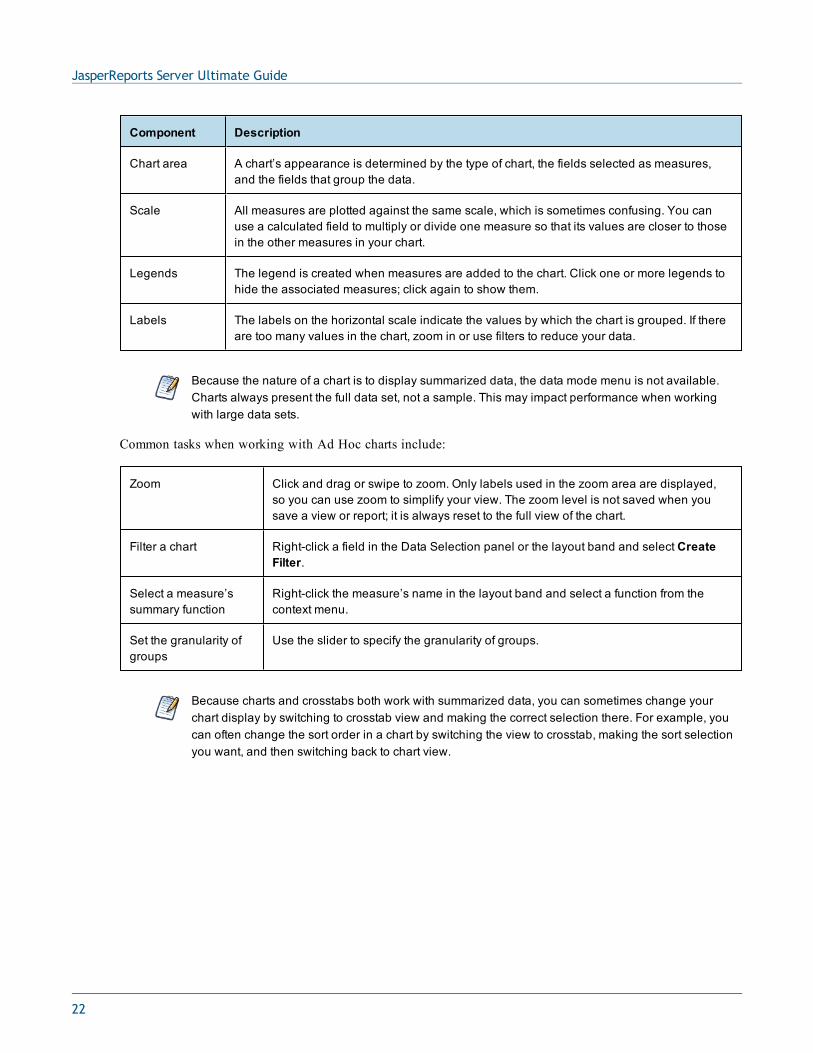
Chart area A chart’s appearance is determined by the type of chart, the fields selected as measures,and the fields that group the data.
Scale All measures are plotted against the same scale, which is sometimes confusing. You canuse a calculated field to multiply or divide one measure so that its values are closer to thosein the other measures in your chart.
Legends The legend is created when measures are added to the chart. Click one or more legends tohide the associated measures; click again to show them.
Labels The labels on the horizontal scale indicate the values by which the chart is grouped. If thereare too many values in the chart, zoom in or use filters to reduce your data.
Because the nature of a chart is to display summarized data, the data mode menu is not available.Charts always present the full data set, not a sample. This may impact performance when workingwith large data sets.
Common tasks when working with Ad Hoc charts include:
Zoom Click and drag or swipe to zoom. Only labels used in the zoom area are displayed,so you can use zoom to simplify your view. The zoom level is not saved when yousave a view or report; it is always reset to the full view of the chart.
Filter a chart Right-click a field in the Data Selection panel or the layout band and select CreateFilter.
Select a measure’ssummary function
Right-click the measure’s name in the layout band and select a function from thecontext menu.
Set the granularity ofgroups
Use the slider to specify the granularity of groups.
Because charts and crosstabs both work with summarized data, you can sometimes change yourchart display by switching to crosstab view and making the correct selection there. For example, youcan often change the sort order in a chart by switching the view to crosstab, making the sort selectionyou want, and then switching back to chart view.
22
Chapter 2 Ad Hoc Views and Data Exploration
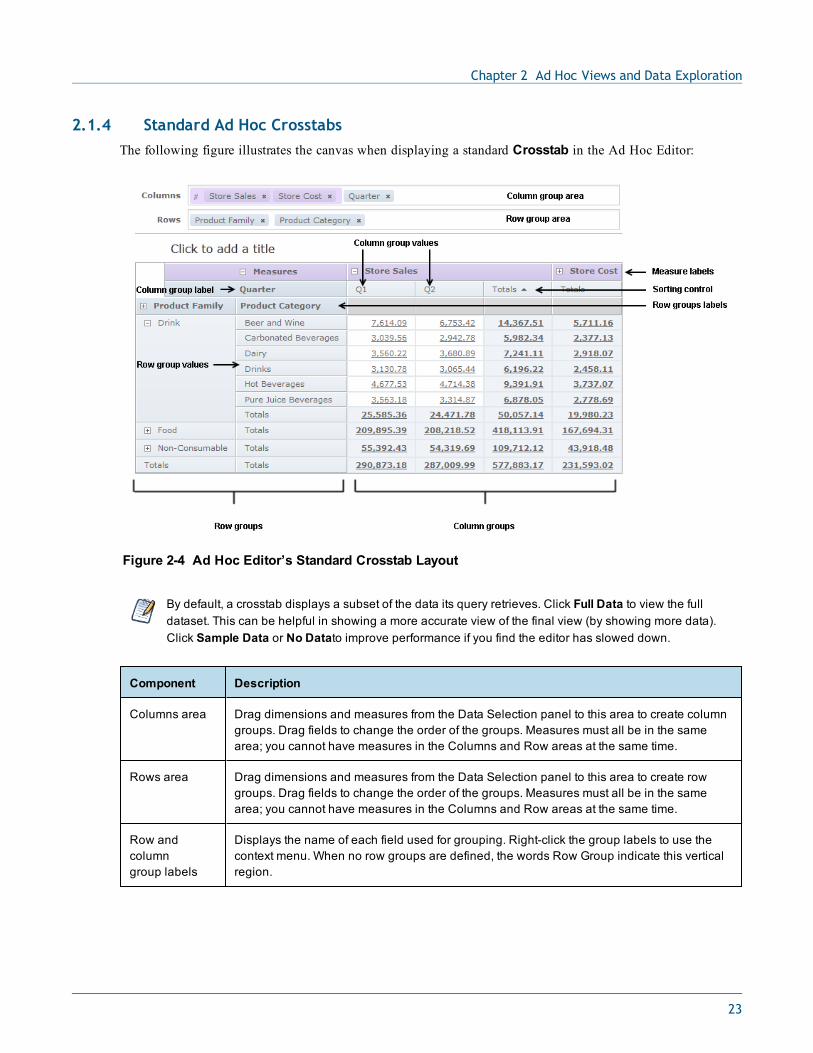
2.1.4 Standard Ad Hoc CrosstabsThe following figure illustrates the canvas when displaying a standard Crosstab in the Ad Hoc Editor:
Figure 2-4 Ad Hoc Editor’s Standard Crosstab Layout
By default, a crosstab displays a subset of the data its query retrieves. Click Full Data to view the fulldataset. This can be helpful in showing a more accurate view of the final view (by showing more data).Click Sample Data or No Datato improve performance if you find the editor has slowed down.
Component Description
Columns area Drag dimensions and measures from the Data Selection panel to this area to create columngroups. Drag fields to change the order of the groups. Measures must all be in the samearea; you cannot have measures in the Columns and Row areas at the same time.
Rows area Drag dimensions and measures from the Data Selection panel to this area to create rowgroups. Drag fields to change the order of the groups. Measures must all be in the samearea; you cannot have measures in the Columns and Row areas at the same time.
Row andcolumngroup labels
Displays the name of each field used for grouping. Right-click the group labels to use thecontext menu. When no row groups are defined, the words Row Group indicate this verticalregion.
23

JasperReports Server Ultimate Guide
Component Description
Row andcolumn groupvalues
Heading cells that show the group values. When there is more than one level of grouping,use the icons on the outer groups to expand or collapse the inner groups. Right-click agroup value to exclude it or to keep only that value from among all group values of the samelevel.
Sorting controls An icon beside a label shows the current sorting. Right-click a label to apply or changesorting. You can sort on multiple groups, but only one measure; sorting on a measure willreset all other measure columns to Don’t Sort.
Measure labels Display the name of each measure in the crosstab. Right-click the measure label to changethe summary function or data format of the measure.
Measures Measures show an aggregated value in each cell of the crosstab, as well as row andcolumn totals for each level of grouping. Click on a measure value to open an Ad Hoc tableview in a new window showing the individual values that make up the aggregated value.
Common tasks when working with Ad Hoc crosstabs include:
Set the granularity ofdate groups
When you select a date field as a group, you can specify the granularity of the groupvalues. Right-click the group label, select Change Grouping and select Year,Quarter,Month, or Day.
Pivot a single group To pivot any group from row to column or vice-versa, select the group by clicking itslabel, then drag it to the other area. You can also right-click the group label andselectMove to Column Group for row groups or Move to Row Group for columngroups.
Pivot entire crosstab To pivot all row groups to column groups and vice-versa at the same time, click .
Filtering Right-click a group label and select Create Filter to filter your data by the membersin that group. Note that creating a filter from a group is very similar to slicing (KeepOnly).
Keep Only Slice out a single group by right-clicking its group value and selecting Keep Only.Use Ctrl-click to select multiple members to keep.
Exclude Remove a group value from any group by right-clicking it and selecting Exclude. UseCtrl-click to select multiple members to exclude.
Summaries (Totals) By default, the crosstab includes grand totals of all row groups, shown in a Totals rowat the bottom, and of all column groups, shown in a Totals column to the right.
To toggle the row totals, right-click the left-most row group and select Delete RowSummary or Add Row Summary. To toggle the column totals, right-click the top-most column group and select Delete Column Summary or Add Column Summary.You cannot hide the inner totals of an expanded row or column group.
24
Chapter 2 Ad Hoc Views and Data Exploration
Change SummaryFunctions
Right-click a measure label and click Change Summary Function to select asummary function. For example, you may want to display an average rather than atotal.
Column group limits In some cases, the editor prompts you to confirm that you want it to return largeamounts of data. When the number of column groups exceeds a configurable limit,the editor displays an ellipsis (...); its ToolTip indicates the number of remaininggroups. Click the ellipsis to display them. For more information on configuration, seethe JasperReports Server Administrator Guide.
Sorting Crosstabs support multiple levels of sorting:• Right-click Measures to sort measure groups by label.• Right-click a row or group label to sort its values. When your selection contains
inner groups, they are also sorted.• Right-click an inmost column header to sort the column values. Sorting can only
be set for one column at a time.
Drill to detail Click a measure to drill to open an Ad Hoc table that displays a summarized columnfor each measure in your crosstab; the table is filtered by the group values for themeasure you clicked. The original crosstab and the summarized table operateindependently.
2.1.5 Ad Hoc OLAP CrosstabsThe Ad Hoc Editor shows some minor differences when working with OLAP-based views. For example, onlyChart and Crosstab are available in the view type menu, and you can only use full data. The Data Selectionpanel shows a special icon for dimensions. Some options are different: for example, you can add levels to adimension using the context menu. For information about OLAP-based crosstabs, see the Jaspersoft OLAP UserGuide and Jaspersoft OLAP Ultimate Guide.
25

JasperReports Server Ultimate Guide
The following figure illustrates the canvas when displaying an OLAP-based crosstab in the Ad Hoc Editor:
Figure 2-5 Ad Hoc Editor’s OLAP-based Crosstab Layout
Component Description
Column Groups Drag dimensions and measures from the Data Selection panel to this area to create columngroups.
Row Groups Drag dimensions and measures from the Data Selection panel to this area to create rowgroups.
AvailableDimensions
Displays all the dimensions defined in the current OLAP cube. Drag them to the Columnsand Rows areas to add them to the crosstab.
AvailableMeasures
Displays all the measures defined in the current OLAP cube. Drag them to the Columns orRows areas to add them to the crosstab.
MeasureLabels
Displays the label of each measure in the crosstab.
Dimensions Displays the levels that have been added to the crosstab from each dimension. Note thatdimensions can be added as both rows and columns.
26

Chapter 2 Ad Hoc Views and Data Exploration
Component Description
Measures Displays the measures that have been added to the crosstab. Note that measures can beadded as either rows or columns.
Columns Displays dimensions and measures as columns.
Rows Displays dimensions and measures as rows.
2.1.6 Ad Hoc Context MenusContext menus appear when you right-click elements in the Ad Hoc Editor. Each menu offers options for theselected element. If a context menu blocks your view, close it by clicking anywhere outside the menu or bypressing Escape.
Figure 2-6 shows the following examples:• Right-clicking a column in a table opens a context menu with options for that column’s settings.• Right-clicking a group value in a standard crosstab’s row or column lets you slice the crosstab.
Table column menu
Standard crosstab group menu
Figure 2-6 Sample Context Menus
2.2 Setting the Data FormatYou can set the format of data in tables and crosstabs. Click a row or column header and select Change DataFormat from the context menu. In tables, the format is applied to all rows as well as the group- and view-levelsummaries. In crosstabs, the format is applied to the measures.
The options that appear in the menu are the formats available for objects of the given datatype. For example, formonetary datatypes, the menu might list $1,234.56, -$1,234.56 and ($1,234.56), while for date datatypes itmight list December 31, 2008, and 12/31/2008. By default, non-integer fields use the -1,234.56 data format;integers use -1234.
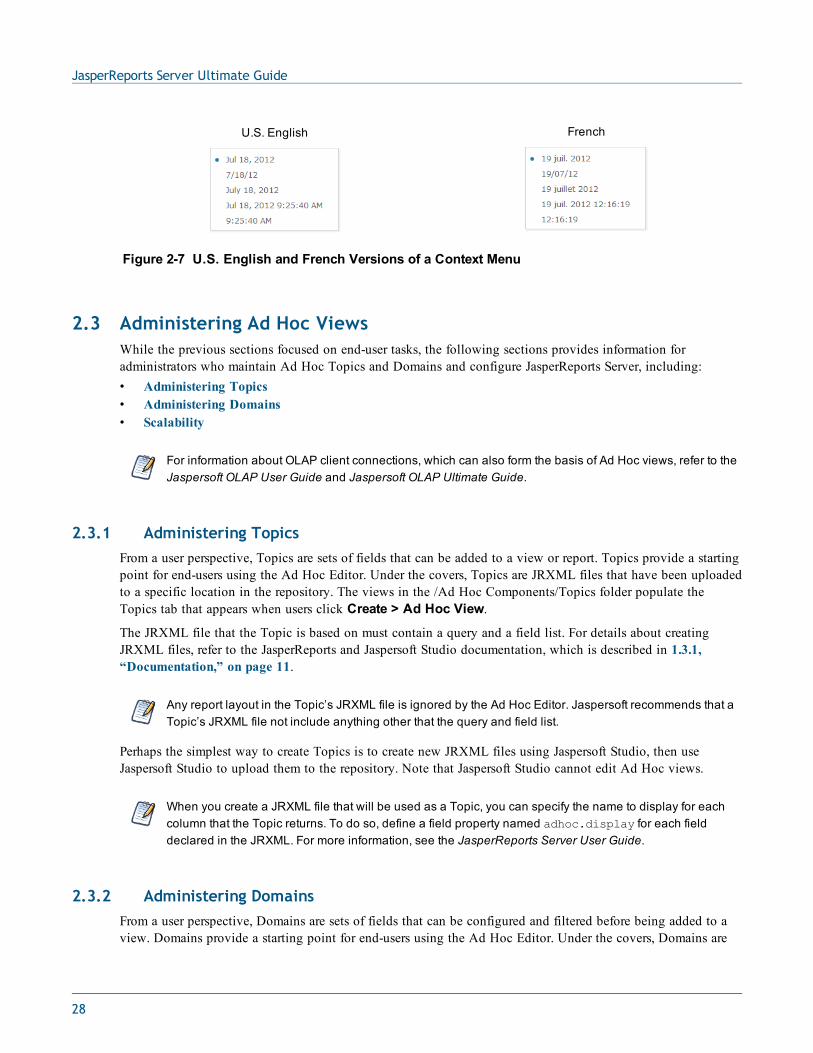
In some cases, the options in the Change Data Format menu are affected by the locale; for example:
27
JasperReports Server Ultimate Guide
U.S. English French
Figure 2-7 U.S. English and French Versions of a Context Menu
2.3 Administering Ad Hoc ViewsWhile the previous sections focused on end-user tasks, the following sections provides information foradministrators who maintain Ad Hoc Topics and Domains and configure JasperReports Server, including:• Administering Topics• Administering Domains• Scalability
For information about OLAP client connections, which can also form the basis of Ad Hoc views, refer to theJaspersoft OLAP User Guide and Jaspersoft OLAP Ultimate Guide.
2.3.1 Administering TopicsFrom a user perspective, Topics are sets of fields that can be added to a view or report. Topics provide a startingpoint for end-users using the Ad Hoc Editor. Under the covers, Topics are JRXML files that have been uploadedto a specific location in the repository. The views in the /Ad Hoc Components/Topics folder populate theTopics tab that appears when users click Create > Ad Hoc View.
The JRXML file that the Topic is based on must contain a query and a field list. For details about creatingJRXML files, refer to the JasperReports and Jaspersoft Studio documentation, which is described in 1.3.1,“Documentation,” on page 11.
Any report layout in the Topic’s JRXML file is ignored by the Ad Hoc Editor. Jaspersoft recommends that aTopic’s JRXML file not include anything other that the query and field list.
Perhaps the simplest way to create Topics is to create new JRXML files using Jaspersoft Studio, then useJaspersoft Studio to upload them to the repository. Note that Jaspersoft Studio cannot edit Ad Hoc views.
When you create a JRXML file that will be used as a Topic, you can specify the name to display for eachcolumn that the Topic returns. To do so, define a field property named adhoc.display for each fielddeclared in the JRXML. For more information, see the JasperReports Server User Guide.
2.3.2 Administering DomainsFrom a user perspective, Domains are sets of fields that can be configured and filtered before being added to aview. Domains provide a starting point for end-users using the Ad Hoc Editor. Under the covers, Domains are
28

Chapter 2 Ad Hoc Views and Data Exploration
defined by a design that can be uploaded to the server and exported as XML. Unlike Topics, which must bestored in a specific folder in the repository, Domains are detected regardless of their location in the repository.The /Domains folder is included for your convenience, but the Domains tab in the Source dialog (which appearswhen users click Create > Ad Hoc View) displays all the Domains to which you have access in the repository.
For details about creating Domains, refer to the JasperReports Server User Guide.
2.3.3 ScalabilityWhen you open views in the Ad Hoc Editor, the query’s entire result set is retrieved. If your Topics, Domains,or OLAP client connections return large result sets, your server instance requires more memory. Similarly, manyactions users take in the Ad Hoc Editor (such as adding groups) require the server to re-sort the data on theserver; if the query returns a large result set, the user may notice a delay when making such changes.
To reduce delays, decrease the memory requirement, and support more users, Jaspersoft recommends that thequeries in Topics, Domains, and OLAP client connections return a reasonable amount of data for your hardwareand system capacity.
If you encounter scalability or performance issues around Ad Hoc views, examine the server’s memory usagefirst. Then consider optimizing your Topics and Domains.
A Domain very often returns a large volume of data, which can impact performance of the Domain designer, theAd Hoc Editor, and the final views and reports. If your Domain’s performance is slow, try the followingremedial steps:• Set your data policies and other Ad Hoc settings to reasonable values for your data and system
configuration. In the case of data policies, you can configure the server to use less memory but performmore queries, which may perform better under certain circumstances. For more information, refer to theJasperReports Server Administrator Guide.
• The Java Virtual Machine (JVM) that the server runs in may need to be configured for higher memoryusage. For information, refer to the documentation associated with your JVM. For more information, refer tothe JasperReports Server Installation Guide.
• Use the smallest number of joins that creates the data islands you need. Complex join relationships canimpact performance drastically.
• If your end-users experience time out messages or views and reports that seem to never complete, considerchanging the governors defined for views and reports. For more information, refer to the JasperReportsServer Administrator Guide.
• Use filters to narrow the data returned by Domains or Domain Topics to improve performance of viewsbased on large or complex Domains: limit the initial load time of a Domain by defining a filter in theChoose Data wizard. Set it to prompt to allow your users to edit it or remove it in the Ad Hoc Editor’s filterpane.
• When running a view that relies on a Domain, the server uses the filters and security defined for theparticular view and user to limit the query. Running many views with slightly different security or filtersmay cause problems with the server’s memory usage. In this case, similar data is duplicated in memory,which can impact performance. Increasing the memory allocated to the application server that hostsJasperReports Server can mitigate this issue.
For more information about designing Domains, refer to 6.8, “Domain and Security Recommendations,” onpage 67.
29

JasperReports Server Ultimate Guide
30
CHAPTER 3 THE REPORT VIEWER
This section describes functionality that can be restricted by the software license for JasperReportsServer. If you don’t see some of the options described in this section, your license may prohibit you fromusing them. To find out what you're licensed to use, or to upgrade your license, contact Jaspersoft.
The interactive Report Viewer lets you and your users interact with saved reports to visualize the data indifferent ways. Report users can select a report template, format tables and charts, filter reports, and highlighttable values using conditional formatting.
3.1 Working with Report TemplatesYou can add custom report templates to your JasperReports Server instance by uploading a JRXML file to aTemplates directory. In addition to font and color choice, reports templates can contain images such as logos. Ina template, the absolute path of image is in the repository and cannot be overwritten. Users can apply yourtemplate by selecting Custom Report Template when they create a report from an Ad Hoc View.
3.1.1 Creating a Report TemplateWhen creating a template it is easiest to start with an existing template in JasperReports Server and change thevalues for the properties you want (colors, fonts, logos, etc.) in Jaspersoft Studio. Then, publish the newtemplate to the server. This example shows how to change the font for a chart title.
To create a template:1. From Jaspersoft Studio, connect to JasperReports Server as superuser.
31
JasperReports Server Ultimate Guide
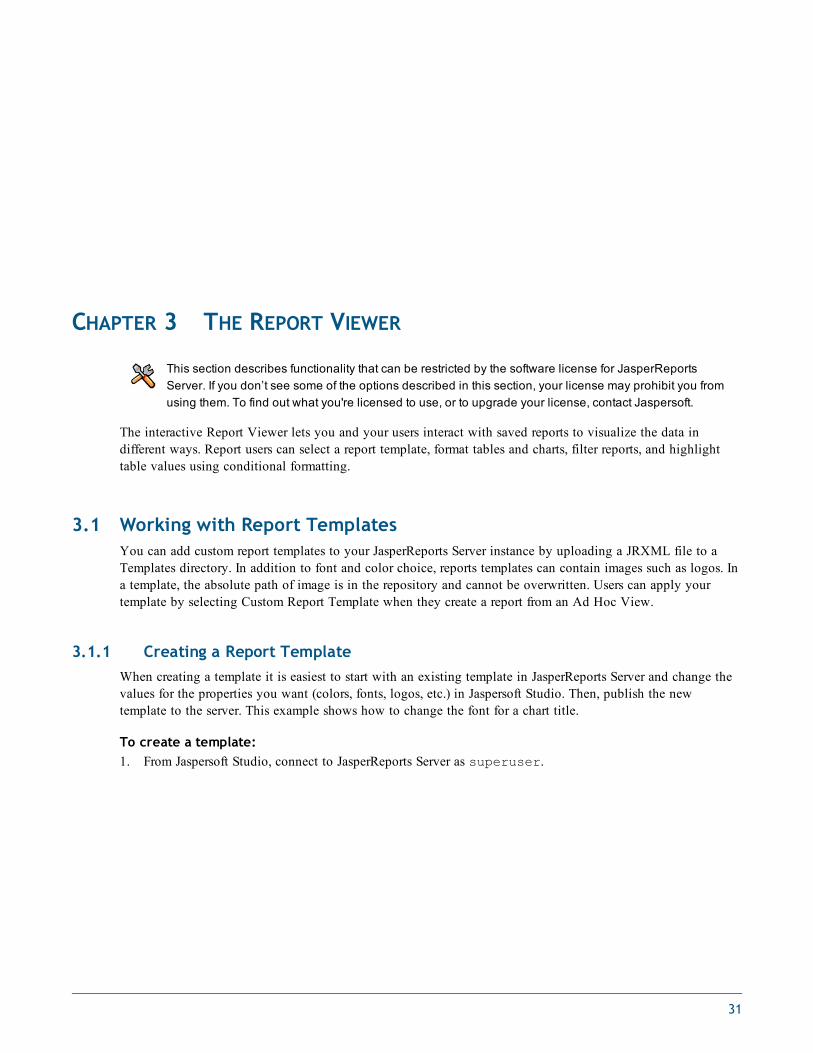
2. In the Repository pane, navigate to the Public/Templates directory.
Figure 3-1 Accessing the Templates directory from Jaspersoft Studio
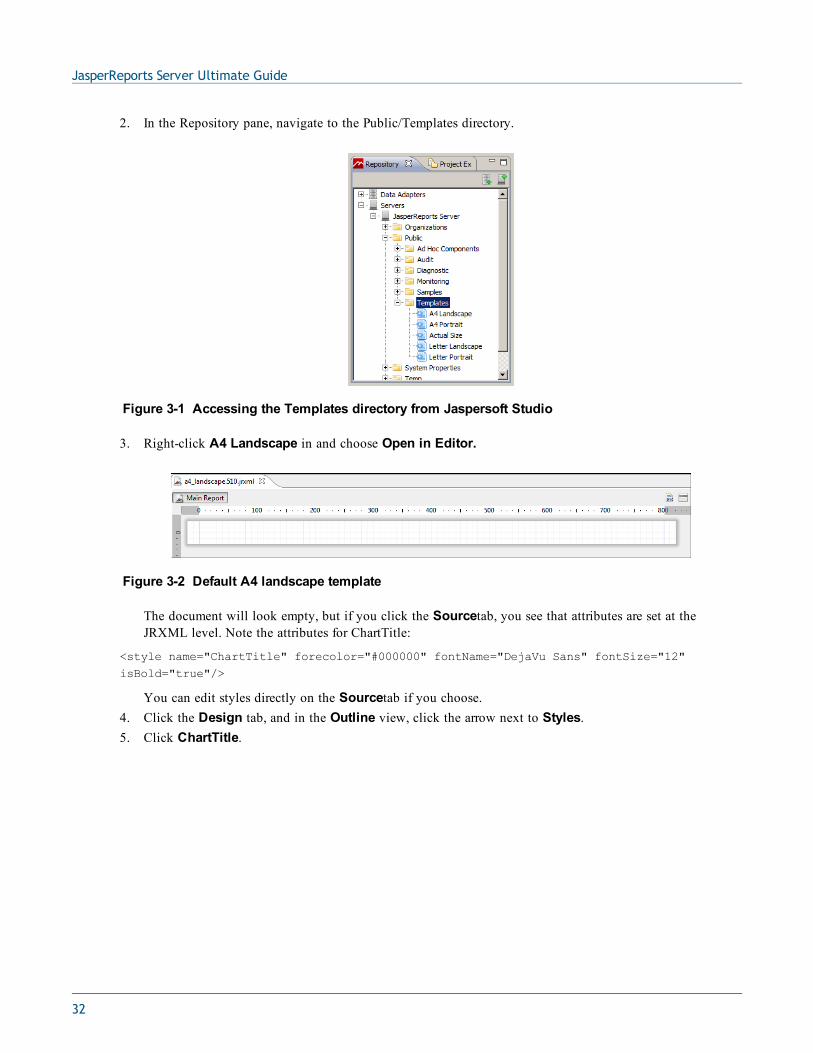
3. Right-click A4 Landscape in and choose Open in Editor.
Figure 3-2 Default A4 landscape template
The document will look empty, but if you click the Sourcetab, you see that attributes are set at theJRXML level. Note the attributes for ChartTitle:
<style name="ChartTitle" forecolor="#000000" fontName="DejaVu Sans" fontSize="12"isBold="true"/>
You can edit styles directly on the Sourcetab if you choose.4. Click the Design tab, and in the Outline view, click the arrow next to Styles.5. Click ChartTitle.
32
Chapter 3 The Report Viewer
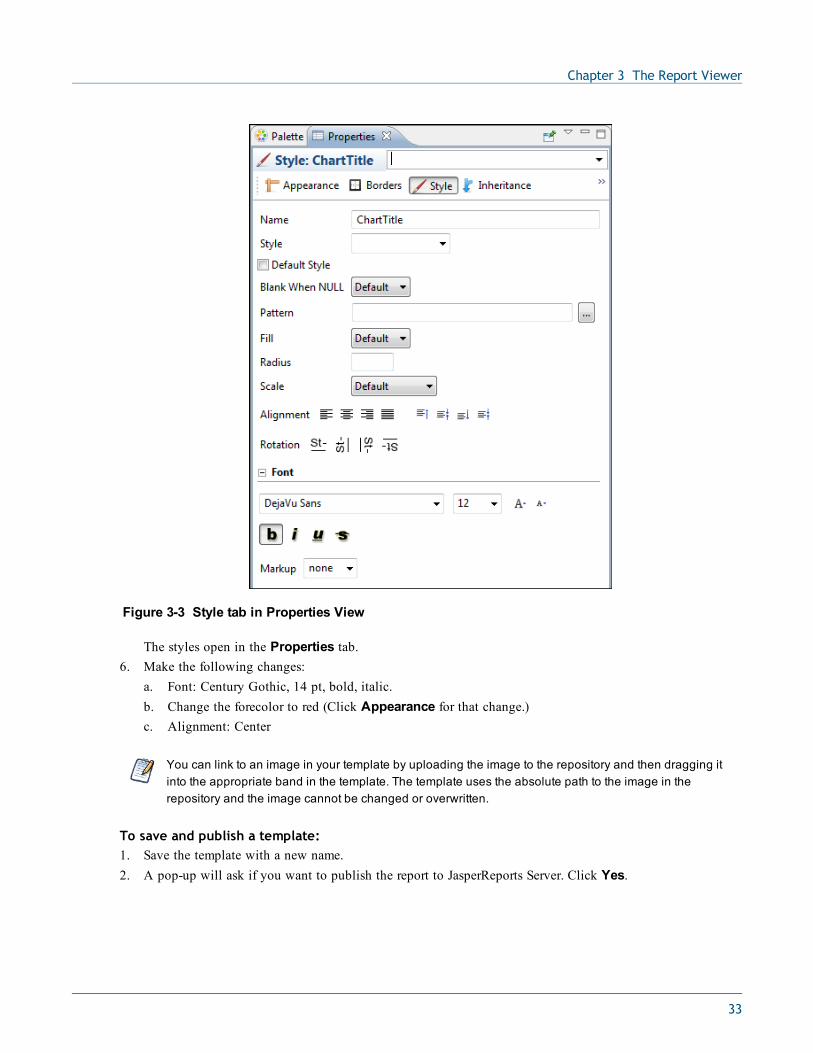
Figure 3-3 Style tab in Properties View
The styles open in the Properties tab.6. Make the following changes:
a. Font: Century Gothic, 14 pt, bold, italic.b. Change the forecolor to red (Click Appearance for that change.)c. Alignment: Center
You can link to an image in your template by uploading the image to the repository and then dragging itinto the appropriate band in the template. The template uses the absolute path to the image in therepository and the image cannot be changed or overwritten.
To save and publish a template:1. Save the template with a new name.2. A pop-up will ask if you want to publish the report to JasperReports Server. Click Yes.
33
JasperReports Server Ultimate Guide
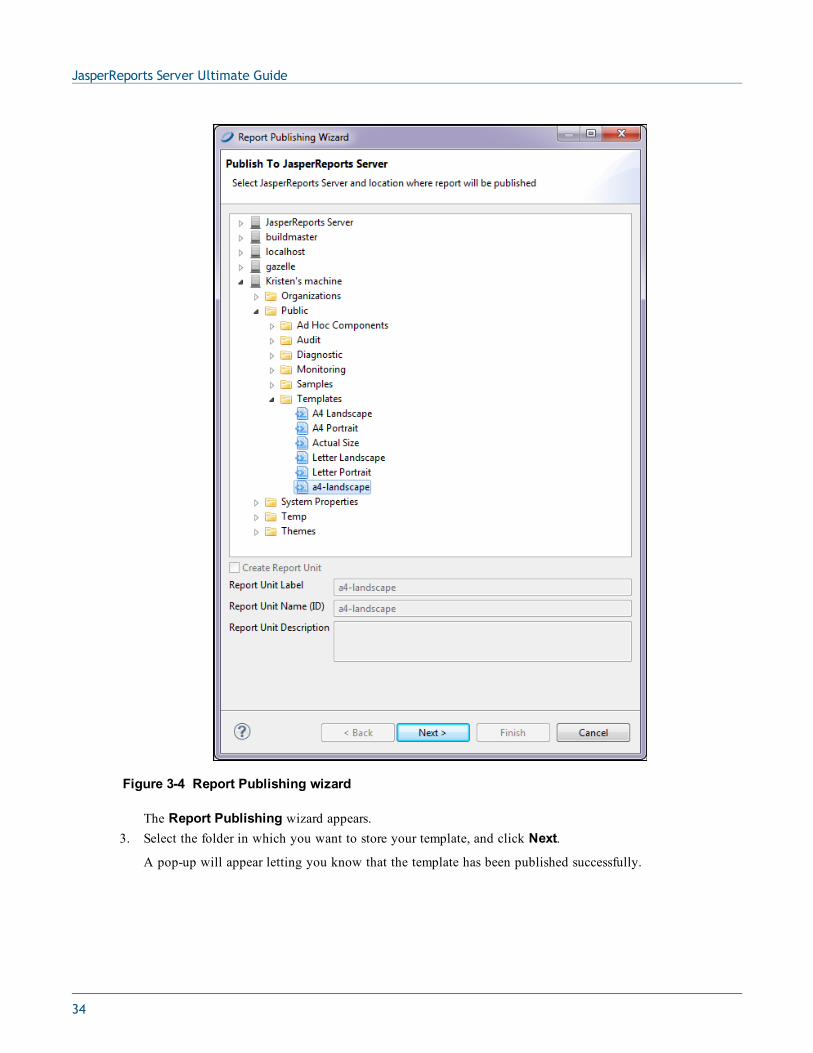
Figure 3-4 Report Publishing wizard
The Report Publishing wizard appears.3. Select the folder in which you want to store your template, and click Next.
A pop-up will appear letting you know that the template has been published successfully.
34
Chapter 3 The Report Viewer
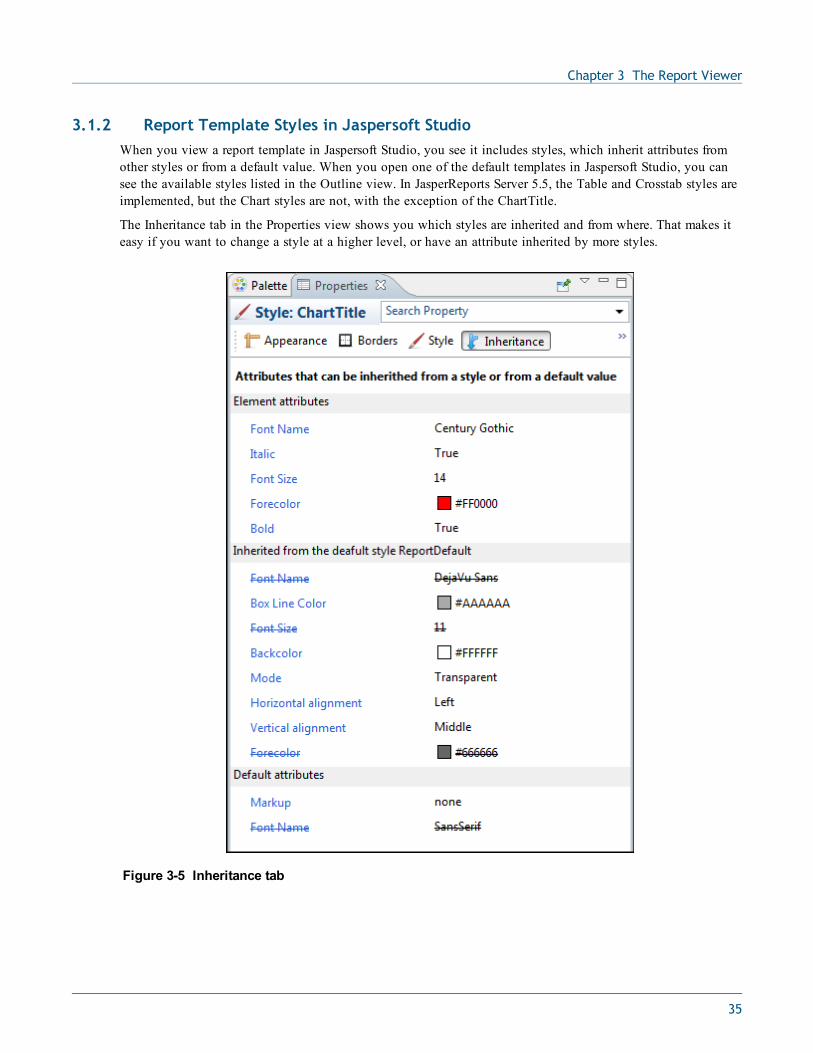
3.1.2 Report Template Styles in Jaspersoft StudioWhen you view a report template in Jaspersoft Studio, you see it includes styles, which inherit attributes fromother styles or from a default value. When you open one of the default templates in Jaspersoft Studio, you cansee the available styles listed in the Outline view. In JasperReports Server 5.5, the Table and Crosstab styles areimplemented, but the Chart styles are not, with the exception of the ChartTitle.
The Inheritance tab in the Properties view shows you which styles are inherited and from where. That makes iteasy if you want to change a style at a higher level, or have an attribute inherited by more styles.
Figure 3-5 Inheritance tab
35

JasperReports Server Ultimate Guide
3.2 Working with Conditional TextThis section shows how to use multiple conditions in a table to create a stoplight format based on ranges. To setup this format, you need to use the inheritance feature of conditional formatting. For colored backgrounds, thisspecifies that when a table cell satisfies multiple conditions, the condition that appears highest in the list ofconditions is applied.
To create the Ad Hoc table for use in the example:1. Select Create > Ad Hoc View from the menu. The Data Chooser wizard opens.2. Click Domains, select SuperMart Domain, and click Choose Data. The Data Chooser opens to the Select
Fields page.3. In the Source panel, double-click Sales to move it to the Selected Fields panel.4. Click Table. The Ad Hoc Editor is displayed with the selected fields.5. Double-click the following fields and measures to add them to the Columns area: Product Name,
Recyclable Packaging, Store Sales. The Ad Hoc view appears as shown in the following figure.
Figure 3-6 Ad Hoc View for Conditional Text
6. Hover over and select Save Ad Hoc View and Create Report. The Save Ad Hoc View dialog opens.7. Fill in the required fields as follows:
a. Data View Name: Conditional Text Example Viewb. Data View Description: Created in Ultimate Guidec. Report Name: Conditional Text Example Reportd. Report Description: Created in Ultimate Guide
8. For Save Location, click Browse, select Public > Samples > Reports, and click OK.9. Click Save. A message confirms that the view was saved.
To open the report in the viewer:1. Select View > Repository.2. Navigate to Public > Samples > Reports and click Conditional Text Example Report. The report opens
in the interactive report viewer.
36
Chapter 3 The Report Viewer
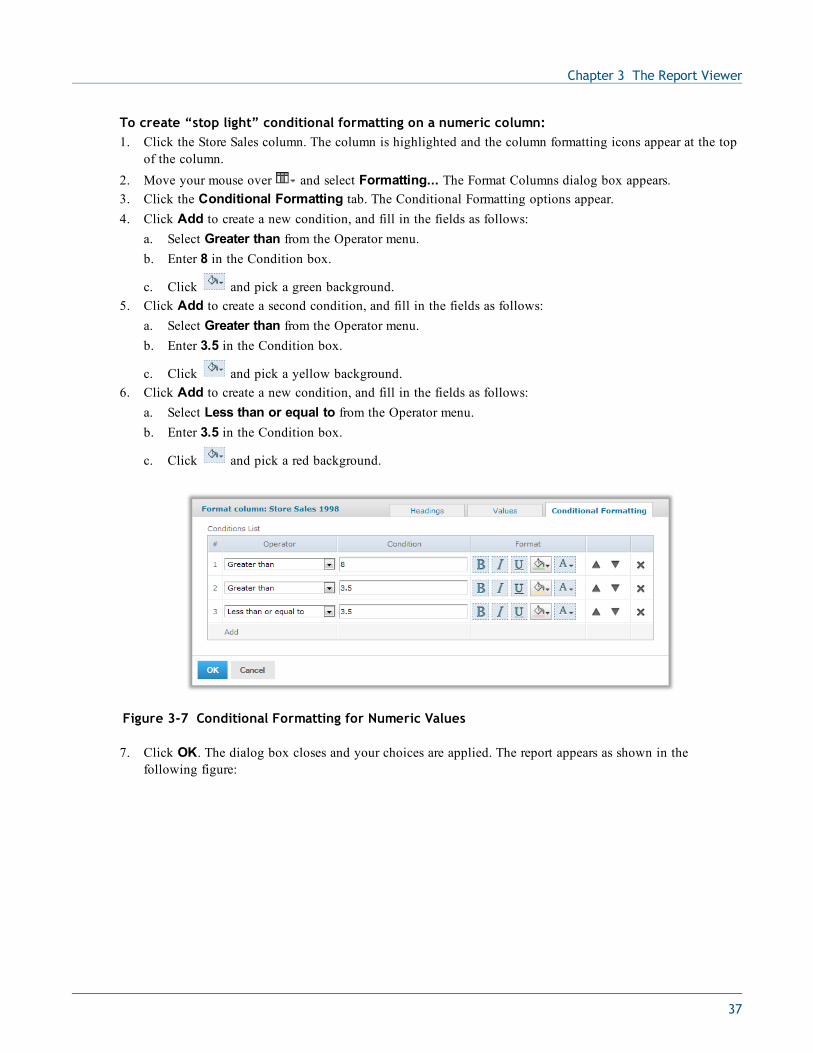
To create “stop light” conditional formatting on a numeric column:1. Click the Store Sales column. The column is highlighted and the column formatting icons appear at the top
of the column.2. Move your mouse over and select Formatting... The Format Columns dialog box appears.3. Click the Conditional Formatting tab. The Conditional Formatting options appear.4. Click Add to create a new condition, and fill in the fields as follows:
a. Select Greater than from the Operator menu.b. Enter 8 in the Condition box.
c. Click and pick a green background.5. Click Add to create a second condition, and fill in the fields as follows:
a. Select Greater than from the Operator menu.b. Enter 3.5 in the Condition box.
c. Click and pick a yellow background.6. Click Add to create a new condition, and fill in the fields as follows:
a. Select Less than or equal to from the Operator menu.b. Enter 3.5 in the Condition box.
c. Click and pick a red background.
Figure 3-7 Conditional Formatting for Numeric Values
7. Click OK. The dialog box closes and your choices are applied. The report appears as shown in thefollowing figure:
37

JasperReports Server Ultimate Guide
Figure 3-8 Report with Conditional Formatting
Notice that numbers greater than 8 satisfy the first two conditions; the first condition they satisfy is the one thatis applied.
38

CHAPTER 4 DASHBOARDS
This section describes functionality that can be restricted by the software license for JasperReportsServer. If you don’t see some of the options described in this section, your license may prohibit you fromusing them. To find out what you're licensed to use, or to upgrade your license, contact Jaspersoft.
A dashboard displays several reports in a single, integrated view. A dashboard can also include input controlsthat determine the data displayed in one or more reports, other dashboards, and any other web content. Bycombining different types of related content, you can create appealing, data-rich dashboards that quickly conveybusiness trends.
This chapter provides details about the dashboard designer and includes the following sections:• User Interface Components• Context Menus• Dashboard Tips and Tricks
39
JasperReports Server Ultimate Guide
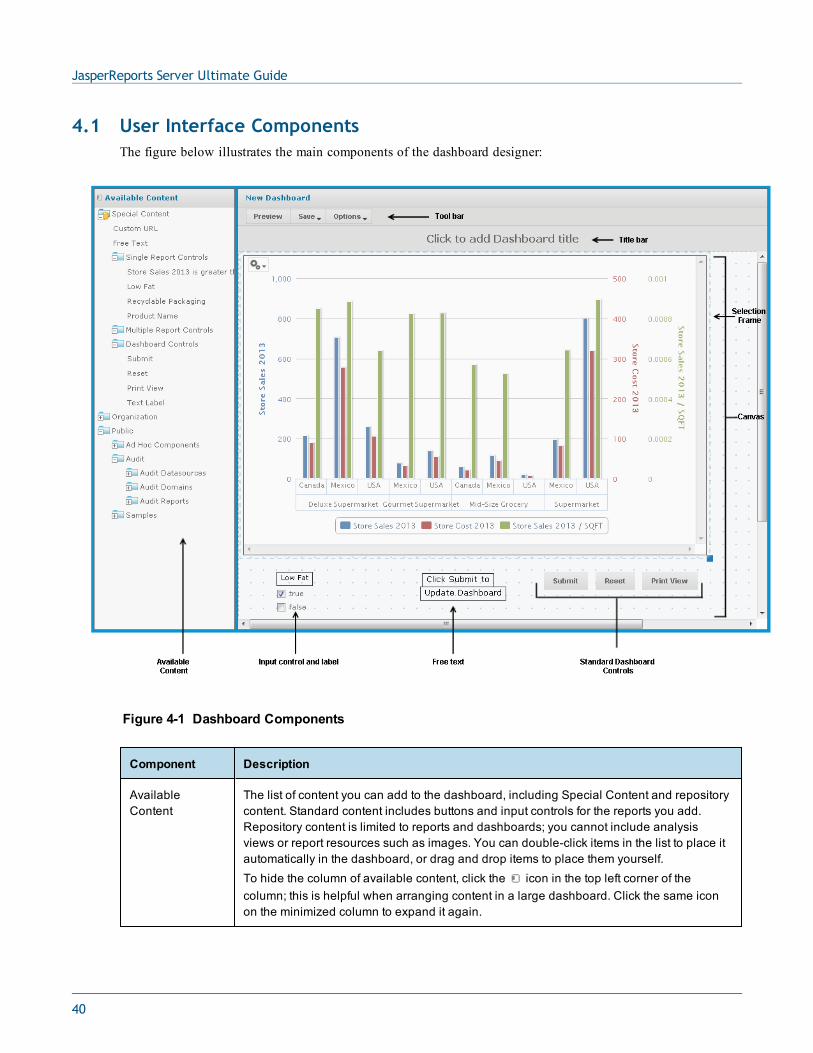
4.1 User Interface ComponentsThe figure below illustrates the main components of the dashboard designer:
Figure 4-1 Dashboard Components
Component Description
AvailableContent
The list of content you can add to the dashboard, including Special Content and repositorycontent. Standard content includes buttons and input controls for the reports you add.Repository content is limited to reports and dashboards; you cannot include analysisviews or report resources such as images. You can double-click items in the list to place itautomatically in the dashboard, or drag and drop items to place them yourself.To hide the column of available content, click the icon in the top left corner of thecolumn; this is helpful when arranging content in a large dashboard. Click the same iconon the minimized column to expand it again.
40
Chapter 4 Dashboards
Component Description
Canvas Occupying the right side of the designer, the canvas area is a visual editor for yourdashboard content. It displays an example of how the dashboard will look, but the contentsare not interactive. To interact with the dashboard as it will appear to users, click Preview.Before frames and other content have been added, the dashboard area only displays thetitle area and the grid, which is helpful in aligning content. Optionally, you can set guidelines to show you the edge of common screen sizes.
Tool bar These buttons let you interact with the dashboard as a whole or change your view of thedesigner. The Save button gives you the choice of saving with the current name(overwriting) or saving a copy as a different name. The Options button lets you control thesize of the optional guide lines on the canvas.
Title bar The area of the dashboard where the title is generally displayed. If you do not use this titlefield, it displays as blank in a dashboard and you can place content over it.
Selection frame Shows the active element in the dashboard for moving or resizing. Drag anywhere insidethe selection frame to move the element. Drag the blue square in the lower left corner toresize it. Click or right-click in any other element to change the selection.
Input controland label
If your dashboard contains reports that include input controls, they appear in the SpecialContent folder of the Available Content list. Once you add an input control to the canvas,you can edit its associated label and change the default value. The value of these inputcontrols determine the content of any frames that refer to them.
Free text Similar to a label, Free Text fields allow you to add text directly to the dashboard. Such textmight include instructions about input controls or a description of the dashboard’spurpose. Unlike labels, the font size of Free Text changes when you change the size of itsframe.
Standard controls JasperReports Server provides these standard dashboard controls:• Submit. When this button is included in a dashboard, changes to input control values
only update the frame when you click Submit. For more information, refer to theJasperReports Server User Guide.
• Reset. Reverts the value of all input controls to their default values saved in thedashboard.
• Print. Opens the browser’s Print Preview window and strips off the server’s pageheaders and footers. In the Print Preview, the Print button is hidden.
4.2 Context MenusContext menus appear when you right-click elements in the dashboard designer. Each menu offers additionaloptions for the selected element.
41
JasperReports Server Ultimate Guide
On labels and free text: On other elements:
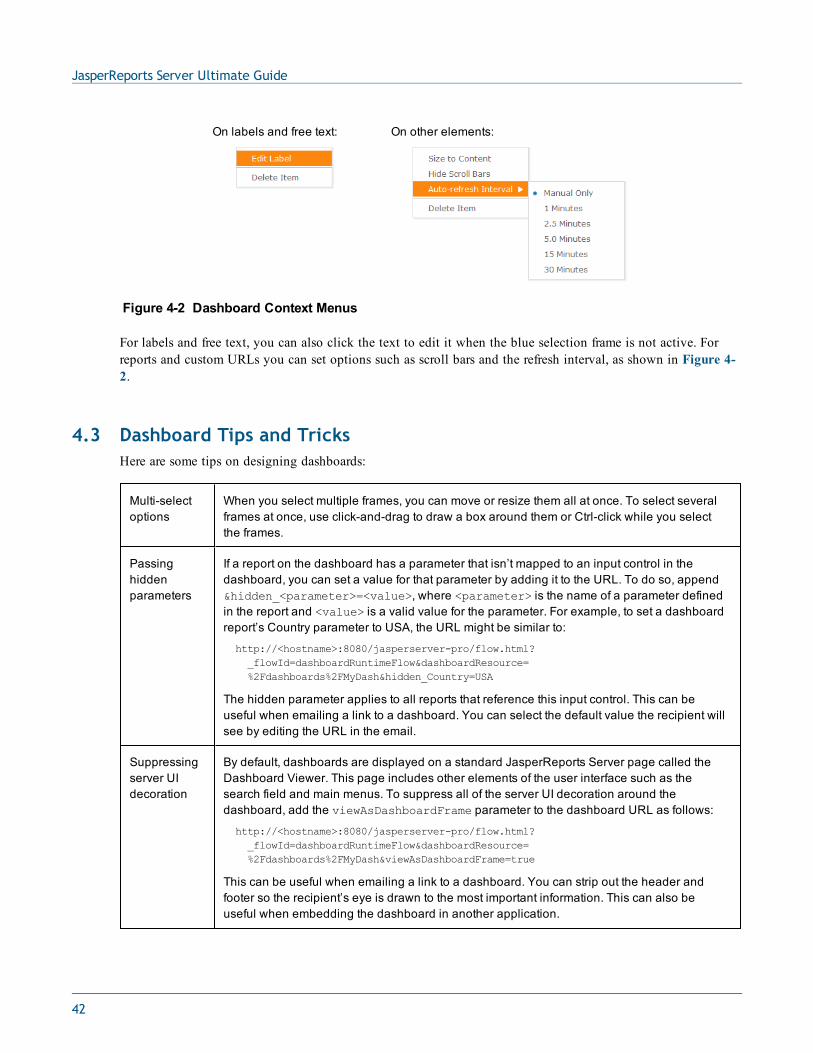
Figure 4-2 Dashboard Context Menus
For labels and free text, you can also click the text to edit it when the blue selection frame is not active. Forreports and custom URLs you can set options such as scroll bars and the refresh interval, as shown in Figure 4-2.
4.3 Dashboard Tips and TricksHere are some tips on designing dashboards:
Multi-selectoptions
When you select multiple frames, you can move or resize them all at once. To select severalframes at once, use click-and-drag to draw a box around them or Ctrl-click while you selectthe frames.
Passinghiddenparameters
If a report on the dashboard has a parameter that isn’t mapped to an input control in thedashboard, you can set a value for that parameter by adding it to the URL. To do so, append&hidden_<parameter>=<value>, where <parameter> is the name of a parameter definedin the report and <value> is a valid value for the parameter. For example, to set a dashboardreport’s Country parameter to USA, the URL might be similar to:
http://<hostname>:8080/jasperserver-pro/flow.html?_flowId=dashboardRuntimeFlow&dashboardResource=%2Fdashboards%2FMyDash&hidden_Country=USA
The hidden parameter applies to all reports that reference this input control. This can beuseful when emailing a link to a dashboard. You can select the default value the recipient willsee by editing the URL in the email.
Suppressingserver UIdecoration
By default, dashboards are displayed on a standard JasperReports Server page called theDashboard Viewer. This page includes other elements of the user interface such as thesearch field and main menus. To suppress all of the server UI decoration around thedashboard, add the viewAsDashboardFrame parameter to the dashboard URL as follows:
http://<hostname>:8080/jasperserver-pro/flow.html?_flowId=dashboardRuntimeFlow&dashboardResource=%2Fdashboards%2FMyDash&viewAsDashboardFrame=true
This can be useful when emailing a link to a dashboard. You can strip out the header andfooter so the recipient’s eye is drawn to the most important information. This can also beuseful when embedding the dashboard in another application.
42

Chapter 4 Dashboards
Embedding adashboard inanother page
You can embed a dashboard in another HTML page outside of JasperReports Server bycreating an iFrame and specifying the dashboard’s URL as the iFrame’s src attribute.The dashboard icons and (normally visible when you hover over a dashboard
component) may be missing when the dashboard is embedded in an iFrame. To ensure theseicons are visible, add the JasperReports Server CSS class outerDashboardFrame to youriFrame.
Usingkeyboardshortcuts
You can move or delete dashboard content using your keyboard:• Arrow keys: move up, down, left, or right.• Delete key: delete the selected content.• Escape: close the dialog or cancel edit, depending on your selection.• Ctrl: select multiple frames or buttons. When you are dragging or resizing content, Ctrl
disables the snap-to-grid behavior.
Adding labelson inputcontrols
When you add an input control to the dashboard, its label is automatically added as well; youcan also add labels manually by dragging the Text Label standard control from the AvailableContent list. Text labels are like free text elements, but they cannot be resized.
Adding localcontent, suchas images
You can add images and other types of web content to a dashboard. To create a Custom URLframe that displays custom content, either:• Publish the content to a URL-addressable location and create a Custom URL frame that
points to it; or• Add the file under the jasperserver-pro directory in your installation, by default <js-
install>/apache-tomcat/webapps/jasperserver-pro/. For example, you could create thejasperserver-pro/content directory to hold a file named cow_logo.jpg. The URL to thiscontent would be http://<hostname>:8080/jasperserver-pro/content/cow_logo.jpg.
Custom URLs in dashboards support any content that can be displayed in an iFrame. See theexample in Figure 4-3 on page 44.
Sizing frames To automatically fit the frame around a report or dashboard, right-click the item and select Sizeto Content. You can also hide and show scroll bars in frames with other options on thecontext menu.
43

JasperReports Server Ultimate Guide
Figure 4-3 Dashboard Tips and Tricks
44
CHAPTER 5 CUSTOM DATA SOURCESJasperReports Server provides built-in support for many commonly used data sources, such as JDBC, JNDI, andJavaBeans, as described in the JasperReports Server Administrator Guide. However, JasperReports Server doesnot include all JasperReports Library data sources, and you may want to use a custom JasperReports Librarydata source. In either case, you can extend JasperReports Server to support additional data sources by addingfiles to your configuration.
In order to perform many of the tasks described in this section, you must have the administrator role andadministrator access to the computer where JasperReports Server is installed.
This chapter contains the following sections:• Query Executers• Custom Data Source Examples• Creating a Custom Data Source• Creating a Custom Data Source
5.1 Data Sources in JasperReports LibraryWhile a JasperReports Library data source is a different object from a JasperReports Server data source, theywork together closely:• A JasperReports Library data source is an implementation of the JRDataSource interface that provides data
organized in rows and columns to the JasperReports Library filler; it produces a JasperPrint object. Eachfield declared in the JRXML corresponds to a column in the JRDataSource output.
• A JasperReports Server data source is a persistent object in the repository; it is typically created by steppingthrough a wizard. The data source stores properties that tell JasperReports Server how to create aJRDataSource (typically in collaboration with a JRQueryExecuter). These properties vary with the typeof data source; for example, a JDBC data source needs a JDBC driver, URL, user, and password. A datasource can be defined as a public repository object that can be used by any report unit (for example, therepository includes the /datasources/JserverJdbcDS if you installed the sample data), or as a local objectdefined during the creation of a specific report unit.
When JasperReports Server receives a request to run a report unit, it maps the report unit’s data source to animplementation of ReportDataSourceService, which returns a JRDataSource based on the data source’spersistent properties. The JRDataSource is used to fill the report and produce a JasperPrint object, from whichthe server generates HTML or other supported output formats.
45

JasperReports Server Ultimate Guide
Each JasperReports Server data source implementation must support the following features:• Read and write persistent properties in the JasperReports Server repository.• Provide a user interface for creating and editing instances that are integrated with the JasperReports Server
web interface.• Create a JRDataSource using the property values for a specific data source instance, or pass parameters to a
JRQueryExecuter that produces the JRDataSource.
JasperReports Server’s built-in data sources rely on several Java classes, along with specialized Spring bean files,WebFlow configurations, message files, and JSP files. The custom data source framework provides the samefunctionality by using a Spring bean file, a message catalog, and a minimum of one Java file (more are requiredto support optional features).
5.1.1 Query ExecutersA query executer is an implementation of the JRQueryExecuter interface in JasperReports Library. It interpretsthe queryString in the JRXML and produces a JRDataSource. JasperReports Library (either standalone orrunning in JasperReports Server) determines which query executer to use by looking at the language attributeof the queryString and looking up a query executer factory registered for that language.
JasperReports Server data sources can use two different methods to create a JRDataSource:• The JasperReports Server data source can create a JRDataSource directly, without a queryString in the
JRXML; or• The server can pass implementation-specific objects to the query executer through the report parameter map.
The query executer then uses the objects from the parameter map, as well as the contents of thequeryString, to create the JRDataSource.
Selecting the method to use depends on the nature of the data source, as well as whether you want to use aqueryString to control your data source. A good example of a data source using a query executer is the JDBCdata source: it passes a JDBC connection to the JDBC query executer, which it uses to pass the SQLqueryString to the database.
The examples described in the following sections demonstrate both methods:• The custom bean data source creates a JRDataSource directly, which returns a hard-coded list of
JavaBeans.• The webscraper data source can either create a JRDataSource directly, using the properties supplied by the
data source instance, or it can get those properties from a queryString in the JRXML. In this case, a datasource instance isn’t required. The sample reports for this data source each demonstrate one of theseapproaches.
5.2 Custom Data Source ExamplesJaspersoft provides two example custom data sources:• Custom Bean Data Source• Webscraper Data Source
The examples are found in the <js-install>/samples/customDataSource directory. Once you have deployedJasperReports Server to your application server, you can use Apache Ant to build and deploy the examples.
The custom data source examples have been verified with 4.7.1.
46
Chapter 5 Custom Data Sources
5.2.1 Installing the Custom Data Source Examples
5.2.1.1 Java Development Kit
Because you must recompile the Java source files, you need the Java Development Kit (JDK). Custom datasources are supported only with JDK 1.6. Ensure that the JAVA_HOME environment variable points to a fullJDK installation.
5.2.1.2 About Apache Ant
If you used an installer to install JasperReports Server, you have Ant installed already. Run Ant using thefollowing command:Linux: <js-install>/apache-ant/bin/ant <ant-arguments>
Windows: <js-install>\apache-ant\bin\ant.bat <ant-arguments>
If you installed JasperReports Server manually with a WAR file, you must download Ant fromhttp://ant.apache.org. Ant 1.8.1 was used for testing, but earlier versions may also work.
5.2.1.3 Installation
Each sample directory includes:• build.xml: The Ant build file.• src: Java source directory.• webapp: A directory containing other files required by the examples, such as JSPs and Spring configuration
files, which are copied directly to the JasperReports Server web application directory.• reports: A directory containing example JRXML files that use the sample custom data sources.
To install the samples in your JasperReports Server web application:1. At the command line, change directories to the custom data source sample directory (<js-
install/samples/customDataSource).2. Edit build.xml and set the webAppDir property to the root of the JasperReports Server web application.3. Run the Ant command (as described in ) with no arguments; this executes the default target, which is
named deploy. The deploy target initiates these actions:• Compiles the Java source under the src directory.• Deploys the compiled Java class files to the web application.• Deploys files under the webapp directory to the web application.
4. Restart the application server.
These steps only make the example custom data sources themselves available in JasperReports Server.To test the data sources, you must also create instances of the custom data sources in JasperReportsServer, then upload the reports that accompany the samples.
5.2.2 Custom Bean Data SourceThe custom bean data source implementation creates a data source from a collection of Java beans declared inthe source code. Its Spring bean definition file is in <js-install>/samples/customDataSource/webapp/WEB-INF/applicationContext-sampleCDS.xml. Jaspersoft provides an example report that uses this data source; it iscalled simpleCDS.jrxml and is located in the <js-install>/samples/customDataSource/reports directory.
47
JasperReports Server Ultimate Guide
5.2.3 Webscraper Custom Data SourceThe webscraper custom data source implementation fetches a web page, decodes its HTML, and extractsselected data that is turned into field values in the data source. Its Spring bean definition file is located in <js-install>/samples/customDataSource/webapp/WEB-INF/applicationContext-webscraperDS.xml.
The example reports for this data source read a web page from http://www.craigslist.org and extract a list ofitems for sale.
The webscraper data source configuration includes these elements:• URL: An HTTP URL that refers to the HTML page containing the desired content.• DOM path: An XPath expression that locates HTML elements to be turned into rows in the data source.• Field paths: XPath expressions for each field defined in the JRXML. JasperReports Server uses these paths
to locate the field value in each row selected by the DOM path.
The implementation creates a data source by:• Using the URL to issue a GET request for an HTML page.• Converting the HTML response into XML using JTidy (http://jtidy.sourceforge.net).• Using the DOM path to select XML elements from the converted response.• Creating a new data source row for each selected element.• Determining the context for each field based on its field path.• The data source takes two parameters: the URL of the web page and the XPath that determines how
elements in the HTML page become rows in the data source. The parameters can either be specified by adata source definition in the repository or by a query string in the JRXML. JasperReports Server includessample reports that each show one of these approaches:• The <js-install>/samples/reports/webscrapertest.jrxml report has no query. Instead, it relies on an
instance of the custom data source that you must create in the repository. Typical parameters to usewith this data source are:
URL:: http://sfbay.craigslist.org/search/cta/eby?query=&srchType=T&minAsk=&maxAsk=&nh=66
DOM Path: /html/body/blockquote[2]/p• The <js-install>/samples/reports/webscraperQEtest.jrxml example contains a queryString element that
specifies the URL and the DOM path. It should be used without defining a data source instance,because JasperReports Server doesn’t run the query executer for this particular implementation if a datasource is defined for the report unit.
The URL above is an example of the type of query parameter that might work with an external websource. Note that web sites are frequently redesigned and the URLs used by any website are subject tochange.
In order to use the webscraper data source, you must first register the webscraper query executer factory. Oneway to do this is as follows:1. Open the file <js-install>/WEB-INF/classes/jasperreports.properties for editing2. Add the following at the end of the file:
# registering query executer for webscraperQEtest.jrxml examplenet.sf.jasperreports.query.executer.factory.webscraper=example.cds.WebScraperQueryExecuterFactory
3. Save the file.4. Restart your application server.
48

Chapter 5 Custom Data Sources
For more information about registering query executors, see the Report Query section in the JasperReportsLibrary Ultimate Guide.
5.3 Creating a Custom Data SourceA custom data source consists of Java code, a message catalog, and a Spring bean definition file that configuresall the parts of the implementation with JasperReports Server. This section describes the implementation of acustom data source.
Type Path (relative to web application directory) Description
Spring beandefinition
WEB-INF/applicationContext-<name>.xml
where <name> uniquely identifies your customdata source
Defines Spring beans needed toconfigure the data source. Choose aunique name starting withapplicationContext- and ending with.xml
Message catalog WEB-INF/bundles/<cat_name>.properties
where <cat_name> uniquely identifies yourcustom data source
Defines messages used by the datasource implementation (this path isreferenced in the Spring bean definitionfile).
Implementationclasses
WEB-INF/lib or WEB-INF/classes Any Java code required by theimplementation.
UI configuration WEB-INF/flows/queryBeans.xml Add the query language for yourcustom data source to the UI.
Table 5-1 Files Used by a Custom Data Source Implementation
5.3.1 Implementing the ReportDataSourceService InterfaceA custom data source requires an implementation of the ReportDataSourceService interface, which sets upand tears down data source connections in JasperReports Server. It relies on:• void setReportParameterValues(Map parameterValues): called before running a report; it creates
resources needed by JasperReports Library to obtain a JRDataSource, and adds them to the parameter map.• void closeConnection(): cleans up any resources allocated in setReportParameterValues().
5.3.2 Defining Custom Data Source PropertiesA custom data source can define properties that help users configure each data source instance differently, in thesame way that a JDBC data source has properties for JDBC driver class, URL, user name, and password. Whileimplementing your ReportDataSourceService, Jaspersoft recommends that you consider which propertiesyou’ll need.
There are two kinds of properties:• Editable properties that must be string values. When you use the JasperReports Server data source wizard to
create an instance of your custom data source, you can enter values for the editable properties using textfields. These values are persisted when you save the data source.
49

JasperReports Server Ultimate Guide
• Hidden properties that can be of any type. These property’s values are determined by the Springconfiguration file: they are not persisted, nor are they visible in the data source wizard. Use them to giveyour ReportDataSourceService implementation access to a Spring bean instance.
For an example of both types of properties, see the custom bean data source definition in the XML example in5.3.5, “Defining the Custom Data Source in Spring,” on page 51.
These property values are set by the custom data source framework after it instantiates yourReportDataSourceService implementation. You need property setters and getters corresponding to eachproperty name; for example, if you defined a property with the name foo, you need getFoo() and setFoo()methods.
5.3.3 Implementing Optional InterfacesIf you want to use the value of the queryString in the JRXML to obtain your data source, you must createimplementations of the JRQueryExecuter and JRQueryExecuterFactory interfaces.
Optional Interfaces
Interface Method to Implement Notes
JRQueryExecuterFactory JRQueryExecutercreateQueryExecuter(JRDatasetdataset, Map parameters)
Returns a JRQueryExecuter for thegiven dataset and parameter map.
JRQueryExecuter JRDataSource createDatasource()
Returns the actual data sourcebased on the parameter mappassed to theJRQueryExecuterFactory; mostlikely, you will create aJRDataSource implementationsuitable for your data source.
close() Called when the report fillingprocess is done with the datasource.
cancelQuery() Called to clean up resources if thereport filling process is interrupted.
Cus-tomDataSourceValidator
validatePropertyValues(CustomReportDataSource ds,Errors errors)
Use this to provide validation in theJasperReports Server data sourcecreation wizard. It checksparameters and callserrors.rejectValue() with theappropriate property name anderror code (defined in a messagecatalog; for more information, referto 5.3.4, “Creating the MessageCatalog,” on page 51).
50
Chapter 5 Custom Data Sources
5.3.4 Creating the Message CatalogThe message catalog contains messages displayed by JasperReports Server’s data source wizard when creatingand editing custom data source instances. The various types of messages are shown in the following table, alongwith message naming conventions:
Messages about Instances of Custom Data Sources
Message Type Naming Convention
Name of the custom data sourcetype
Cdsname.name (where cdsname is the value of the name property ofthe custom data source).
Name of the custom data sourceproperty
Cdsname.properties.propname (where propname is the name of theproperty that the user must define when creating a custom data source).
Validation messages The CustomDataSourceValidator implementation will callerrors.rejectValue() for errors detected in property values for thecustom data source. The second argument to errors.rejectValue()must match one of the messages defined in this catalog.
For example, the webscraper message catalog contains the following:
webScraperDataSource.name=Web Scraper Data SourcewebScraperDataSource.properties.url=URLwebScraperDataSource.properties.path=DOM PathwebScraperDataSource.url.required=A value is required for the URLwebScraperDataSource.path.required=A value is required for the DOM path
5.3.5 Defining the Custom Data Source in SpringTo configure your data source, you must add an instance of CustomDataSourceDefinition to the Spring beandefinition file. This class has the following properties:
Properties of CustomDataSourceDefinition Class
Name Required Value
factory Yes A fixed value of ref="customDataSourceFactory"
This bean manages all the custom data sources.
name Yes A unique name that identifies this data source to the custom datasource framework. It is also used as a prefix for all messages in themessage catalog. Choose the name that is not used by other customdata sources.
serviceClassName Yes A class name for your ReportDataSourceService implementation.
51
JasperReports Server Ultimate Guide
Properties of CustomDataSourceDefinition Class
Name Required Value
validator — An instance of your CustomDataSourceValidatorimplementation.
propertyDefinitions
— Information describing each property used by the data sourceimplementation, structured as a list of maps.
The propertyDefinitions property is a list of maps, each one describing a property of the custom data sourceimplementation. It includes these entry keys:
Entry Keys for propertyDefinitions Property
Name Required Value
name Yes Name of property that matches a Java Bean property in theReportDataSourceService implementation; it is also used in message catalogkeys.
default — A default value for the property.
hidden — If a property has the hidden entry key set to true, then its value is fixed to that ofthe default entry key. Such properties are not be editable in the JasperReportsServer data source wizard, nor are they persisted. This is handy for making Springbeans accessible to ReportDataSourceService implementations.
The following XML defines a CustomDataSourceDefinition bean for the custom bean data source example:
<bean id="myCustomDataSource" class="com.jaspersoft.jasperserver.api.engine.jasperreports.util.CustomDataSourceDefinition"><property name="factory" ref="customDataSourceServiceFactory"/><property name="name" value="myCustomDataSource"/><property name="serviceClassName" value="example.cds.CustomSimplifiedDataSourceService"/>
<property name="validator"><bean class="example.cds.CustomTestValidator"/>
</property><property name="propertyDefinitions"><list><map><entry key="name" value="foo"/>
</map><map><entry key="name" value="bar"/><entry key="default" value="b"/>
</map><map><entry key="name" value="repository"/><entry key="hidden" value="true"/><entry key="default" value-ref="repositoryService"/>
52

Chapter 5 Custom Data Sources
</map></list>
</property></bean>
5.3.6 Configuring the Message CatalogTo configure your message catalog, add a bean definition such as the following to the Spring definition file thatyou created in Defining the Custom Data Source in Spring:
<bean class="com.jaspersoft.jasperserver.api.common.util.spring.GenericBeanUpdater"><property name="definition" ref="addMessageCatalog"/><property name="value" value="WEB-INF/bundles/cdstest"/>
</bean>
For the value property, substitute the location of your message catalog file, omitting the .propertiesextension. Setting the addMessageCatalog property precludes the need to edit the messageSource beandefinition in applicationContext.xml. Note that, if you also supply localized versions of the message catalogthat follow the Java conventions for naming resource bundles, users with other locales automatically see thelocalized strings when creating a new data source of this type.
5.3.7 Adding the Custom Query Language to the UITo make the query language for your custom data source appear in the UI, you must edit the file described inthis section. Query languages can be selected from a drop down list when defining query resources such asquery-based input controls. The server matches the name of the query language to your data source to use itscustom query executor class.
Edit the file <js-webapp>/WEB-INF/applicationContext-rest-services.xml and locate the queryLanguagesCelist. Add the name of your query language to the list, for example:
<util:list id="queryLanguagesCe"><value>sql</value><value>hql</value><value>domain</value><value>HiveQL</value><value>MongoDbQuery</value><value>cql</value><value>MyQueryLanguage</value>
</util:list>
The name must be a language supported by your query executor. After saving the file, restart JasperReportsServer.
5.4 Installing a Custom Data SourceTo install your custom data source in JasperReports Server, add all the files it requires to the server webapplication directory. For the correct locations, refer to Table 5-1, “Files Used by a Custom Data SourceImplementation,” on page 49. After adding the files and making the configuration changes specified in theprevious section, restart JasperReports Server.
53
JasperReports Server Ultimate Guide
When you create a new data source in JasperReports Server, the new custom data source type appears in the listof available data source types. If the new type is selected, JasperReports Server displays a form containing thelist of properties you configured.
When the form is submitted, the parameter values are validated with your CustomDataSourceValidatorimplementation and appropriate validation messages are displayed. Once the data source is validated, save it tothe repository. The data source can now be used in a report or analysis connection.
When defining <queryString> in JRXML, use a language setting that your custom data source supports.
When you add a report to the repository, you can define a local data source or you can select one of the datasources in the repository. In either case, you can use a data source based on your custom data sourceimplementation. In the case of a data source in the repository, you must create it before adding the report. If,during the creation of your data source, the custom data source is not listed as an available data source type, thecustom data source is not properly installed.
54

CHAPTER 6 SECURING DATA IN A DOMAIN
This section describes functionality that can be restricted by the software license for JasperReportsServer. If you don’t see some of the options described in this section, your license may prohibit you fromusing them. To find out what you're licensed to use, or to upgrade your license, contact Jaspersoft.
This chapter describes a number of tasks that only administrative users can perform.
You may need to restrict access to the data in a Domain when it is accessed by different people. For example,you may allow managers to analyze data across their department but only allow individual contributors to seedata related to themselves. For this purpose, Domains support security files.
When Domain security is properly configured, a user only sees the data that the organization wants them to see.To define this access, you write data access filtering rules (access grants) in XML and upload them as a newsecurity file using the Domain designer. These rules are powerful and flexible, and can be based on a number ofaspects, such as user roles or profile attributes.
The power of this solution is best presented as an example business case. This section describes a fictionalcompany’s implementation of Domains in JasperReports Server—from both a business perspective and animplementation perspective.
For details about the basics of Domains, refer to the JasperReports Server User Guide.
This chapter includes the following sections:• Business Case• Process Overview• Sales Domain• Roles, Users, and Profile Attributes• Setting Up Logging and Testing• Creating a Domain Security File• Testing and Results• Domain and Security Recommendations• Domain Reference Material
55
JasperReports Server Ultimate Guide
6.1 Business CaseCZS is an up-and-coming consumer electronics company with operations in the U.S. and Japan. CZS usesJasperReports Server to track sales data, such as sales revenue and operating cost.
The CZS Sales organization employs the following personnel:• Rita is the regional sales manager in the Western U.S. She uses the Sales Domain to create reports that track
sales trends in her region.• Pete is a sales representative selling televisions in Northern California. He uses reports based on the same
Domain to track his quarterly progress.• Yasmin is a sales representative selling cell phones in Northern California. She uses reports based on the
same Domain to track her quarterly progress.• Alexi is the regional sales manager in Kansai, Japan. He uses reports based on the same Domain to track
sales trends in his region.
CZS stores its data in a MySQL database. The data is exposed by the Sales Domain, which displays informationabout CZS’s consumer electronics sales across the world. It is filtered depending on each employee’s cities ofoperation and product. In addition, only managers can access cost information.
6.2 Process OverviewThis chapter shows how to implement this business case using a Domain. The table below summarizes the stepsCZS could take to create the Sales Domain and configure it to secure their data using user profile attributes androles. The following sections describe these steps in more detail.
Steps Described in…
1. Define a Domain. The CZS business case is met by aSales Domain that includes the following fields from theirJDBC data source: city, state, product department, salesamount, cost amount, and unit sales.
6.3, “Sales Domain,” on page 57
2. Identify and create access roles. CZS needs two roles:one for managers, and another for sales representatives.Both are granted access to the Sales Domain.
6.4.1, “Roles,” on page 58
3. Create users and assign appropriate roles to each one. 6.4.2, “Users,” on page 59
4. Identify and create profile attributes that determine eachuser’s access to data in the Domain. CZS needs twoattributes: Cities and ProductDepartment.
6.4.3, “Profile Attributes,” on page 59
5. Prepare to test the security implementation by enablinglogging and creating an example report.
6.5, “Setting Up Logging and Testing,” onpage 60
6. Iteratively create, upload, and test an XML file that definesthe access granted to users based on the attributesdefined in step 4.
6.6, “Creating a Domain Security File,” onpage 61
7. Test the Domain as various users. 6.7, “Testing and Results,” on page 65
56

Chapter 6 Securing Data in a Domain
6.3 Sales DomainThe first step is to create a Domain that presents the relevant data. CZS is primarily interested in the volume andrevenue of their sales, as well as their operational cost. These metrics are represented in the Sales Domain asfields: unit sales, store sales, and store cost. The Domain also includes fields to establish context for the salesdata, such as product department, city, and state. The following figures show the configuration of this Domainin the designer.
Figure 6-1 Tables Tab in the Domain Designer
Figure 6-2 Joins Tab in the Domain Designer
57

JasperReports Server Ultimate Guide
Figure 6-3 Display Tab in the Domain Designer
The XML representation of this Domain design is shown in 6.9.1, “Domain Design in XML Format,” onpage 68.
6.4 Roles, Users, and Profile Attributes
6.4.1 RolesDomain security can reference a user’s roles to determine the access permissions to grant. The following rolesmeet CZS’s needs:• ROLE_SALES_MANAGER is assigned to sales managers.• ROLE_SALES_REP is assigned to sales representatives.
CZS grants each role access to view the Sales Domain. For details about creating roles and assigning privileges,refer to the JasperReports Server Administrator Guide. The following shows CZS’s ROLE_SALES_REP:
Figure 6-4 CZS Sales Representative Role
58

Chapter 6 Securing Data in a Domain
6.4.2 UsersCZS created a user for each of their employees and assigned roles based on each employee’s level ofresponsibility:
User Role
Alexi ROLE_SALES_MANAGER
Pete ROLE_SALES_REP
Rita ROLE_SALES_MANAGER
Yasmin ROLE_SALES_REP
For details about creating users, refer to the JasperReports Server Administrator Guide.
6.4.3 Profile AttributesA profile attribute is a name-value pair defined at the user level that corresponds to some data in a Domain. CZSwants to be able to describe their users in terms of product lines that they sell and the cities where they sellthem. Thus, each CZS user is assigned two profile attributes in addition to the users’ roles:
User Profile Attributes
Cities Product/Department
Rita San Francisco, Los Angeles, Sacramento Television, Wireless Devices
Pete San Francisco Television
Yasmin San Francisco Wireless Devices
Alexi Osaka, Sakai Wireless Devices
Table 6-1 Profile Attributes of All CZS Users
The security file shown in 6.9.2, “Domain Security File,” on page 71 refers to two of these profile attributes:• The Cities profile attribute corresponds to the City field in the Geography item group in the Sales
Domain.• The ProductDepartment attribute corresponds to the Department field in the Product item group in the
Sales Domain.
Each user’s attributes determine the data returned to him by the Domain, based on an access grant definitionthat refers to profile attributes. For example, Rita’s attribute value for Cities is San Francisco,LosAngeles,Sacramento while Pete’s is San Francisco. Thus, Pete sees less data than Rita does.
As of JasperReports Server 5.0, user profile attributes can be created via the JasperReports Server user interface.Refer to the JasperReports Server Administrator Guide for details. For information on configuring profileattributes in earlier versions of JasperReports Server, see the JasperReports Library Ultimate Guidecorresponding to your version.
59
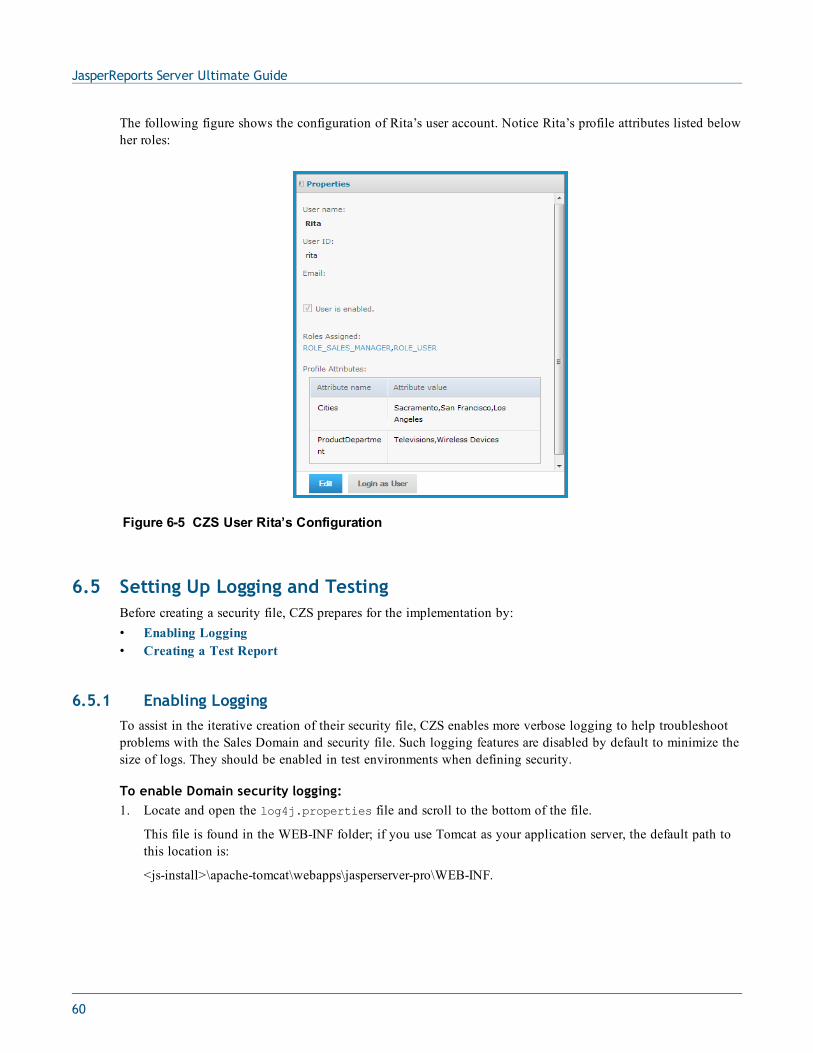
JasperReports Server Ultimate Guide
The following figure shows the configuration of Rita’s user account. Notice Rita’s profile attributes listed belowher roles:
Figure 6-5 CZS User Rita’s Configuration
6.5 Setting Up Logging and TestingBefore creating a security file, CZS prepares for the implementation by:• Enabling Logging• Creating a Test Report
6.5.1 Enabling LoggingTo assist in the iterative creation of their security file, CZS enables more verbose logging to help troubleshootproblems with the Sales Domain and security file. Such logging features are disabled by default to minimize thesize of logs. They should be enabled in test environments when defining security.
To enable Domain security logging:1. Locate and open the log4j.properties file and scroll to the bottom of the file.
This file is found in the WEB-INF folder; if you use Tomcat as your application server, the default path tothis location is:
<js-install>\apache-tomcat\webapps\jasperserver-pro\WEB-INF.
60

Chapter 6 Securing Data in a Domain
2. Add the following lines after the last line in the file:
log4j.logger.com.jaspersoft.commons.semantic.datasource.impl.SemanticLayerSecurityResolverImpl=debug
log4j.logger.com.jaspersoft.commons.semantic.dsimpl.JdbcTableDataSet=DEBUG, stdout,fileout
log4j.logger.com.jaspersoft.commons.util.JSControlledJdbcQueryExecuter=DEBUG,stdout, fileout
3. Save the file.4. Restart JasperReports Server.
Information about Domains and their security will now be written to the log and to the console.
The additional information written to the log can be very verbose, and your log files will grow more quicklywith these properties enabled. You can manage your logs in the file system; they are found in the WEB-INF/logs folder under your JasperReports Server installation. For more information, refer to the log4jdocumentation, which is available at:http://logging.apache.org/log4j/docs/manual.html
Because these options are so verbose, Jaspersoft recommends that they only be used during debugging;these options should be disabled in production environments.
6.5.2 Creating a Test ReportCZS creates an Ad Hoc crosstab based on the Sales Domain to assist in testing the security file as they createeach access grant.The report displays store sales amount, store sales cost, and store units sold for all cities anddepartments.
Figure 6-6 Administrator’s View When Creating CZS Ad Hoc Crosstab
Each user’s limited view of this report is shown in 6.7, “Testing and Results,” on page 65.
6.6 Creating a Domain Security FileA Domain’s security file contains item and resource access grants that specify access based on certain aspects ofa user, such as roles. Typically, access grants check a user’s roles and grant access to the columns and rowsavailable to that role.
61

JasperReports Server Ultimate Guide
A Domain’s security file consists of access definitions of two types:• Row-level access, which determines the rows in the data source that can be displayed to a specific user.• Column-level access, which determines the columns in the data source that can be displayed to specific
users.
This section illustrates both kinds of access grant.
Note the comments in the XML examples in this section; for example: <!-- Comment -->. It’s goodpractice to comment the access grants you define, and to format your XML neatly. Jaspersoft recommendsthat you use an XML editor when creating security files. See also 6.8, “Domain and SecurityRecommendations,” on page 67.
6.6.1 Row-level SecurityThis section gives an overview of row-level security and then shows how CZS uses row-level security to restrictaccess based on Cities and ProductDepartment.
6.6.1.1 Understanding Row-level security
Row-level access determines the rows in the data source that can be displayed to a specific user.
For example, consider a table that includes values for the cities where products are sold. You could define aresource access grant that finds users for which a city has been defined as a profile attribute and, for each suchuser, limits access to rows where the city value is the user’s specific city.
For example, take Rita and Alexi. Both have the same role and the same access to the Sales Numbers analysisview, but CZS doesn’t want them to see the same data—Rita should see data about San Francisco, Sacramento,and Los Angeles; and Alexi should see data about Osaka and Sakai. Without profile attributes, this would onlybe possible if CZS’s access roles were defined along geographic lines.
The following resource grant gives access to users whose Cities profile attribute is San Francisco. Theprinciple expression determines the users to whom the resource access grant applies, that is, users whose Citiesprofile attribute is San Francisco. The filter expression determines the rows to display, that is, those rowswhere the store_city field is San Francisco:
<resourceAccessGrant id="Jointree_1_row_access_grant_2"><principalExpression><![CDATA[authentication.getPrincipal().getAttributes().any{it.getAttrName() in ['Cities'] && it.getAttrValue() in ['San Francisco'] }]]></principalExpression>
<filterExpression>store.store_city in ('San Francisco')</filterExpression></resourceAccessGrant>
Access grant IDs must be unique within the scope of the security file.
You can define several similar resource access grants for each resource defined in your Domain. Bydefault, the server assumes access grants are chained together with a logical AND. You can force theserver to use a logical OR by setting the orMultipleExpressions property to TRUE.
6.6.1.2 The testProfileAttribute Function
The expression in the previous section is limited. You do not want to write a separate expression for eachinstance of the Cities profile attribute — for example, one expression for San Francisco and another
62
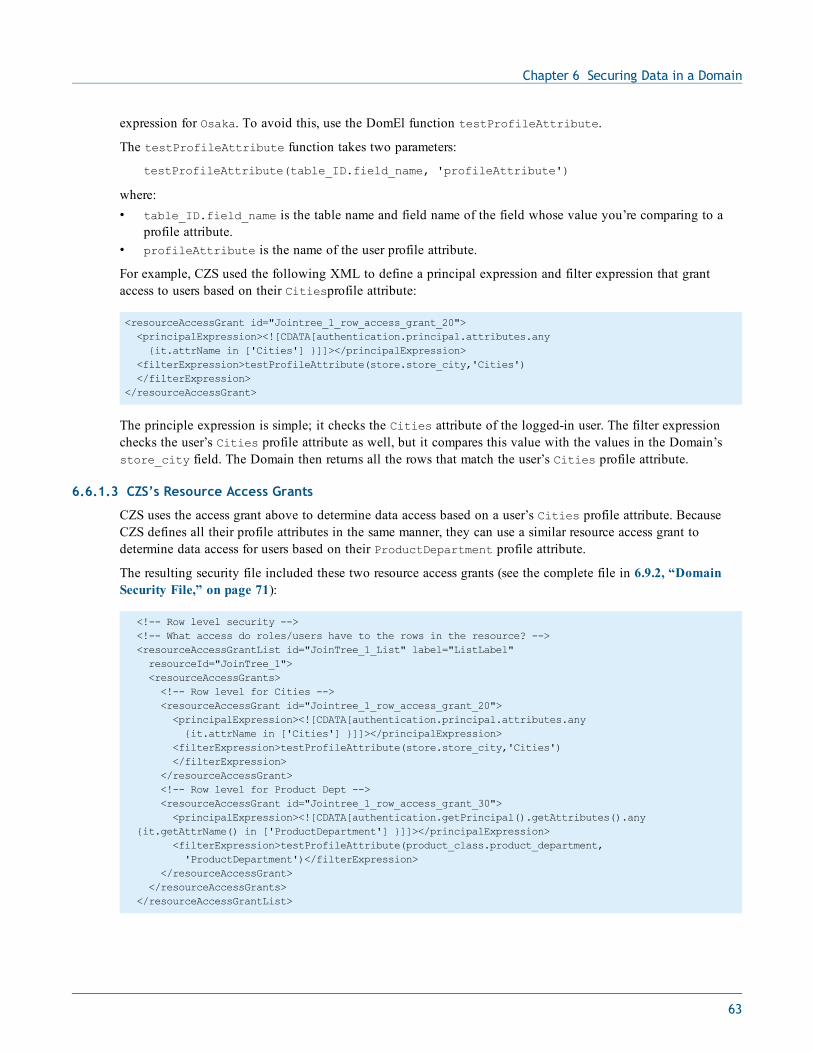
Chapter 6 Securing Data in a Domain
expression for Osaka. To avoid this, use the DomEl function testProfileAttribute.
The testProfileAttribute function takes two parameters:
testProfileAttribute(table_ID.field_name, 'profileAttribute')
where:• table_ID.field_name is the table name and field name of the field whose value you’re comparing to a
profile attribute.• profileAttribute is the name of the user profile attribute.
For example, CZS used the following XML to define a principal expression and filter expression that grantaccess to users based on their Citiesprofile attribute:
<resourceAccessGrant id="Jointree_1_row_access_grant_20"><principalExpression><![CDATA[authentication.principal.attributes.any{it.attrName in ['Cities'] }]]></principalExpression>
<filterExpression>testProfileAttribute(store.store_city,'Cities')</filterExpression>
</resourceAccessGrant>
The principle expression is simple; it checks the Cities attribute of the logged-in user. The filter expressionchecks the user’s Cities profile attribute as well, but it compares this value with the values in the Domain’sstore_city field. The Domain then returns all the rows that match the user’s Cities profile attribute.
6.6.1.3 CZS’s Resource Access Grants
CZS uses the access grant above to determine data access based on a user’s Cities profile attribute. BecauseCZS defines all their profile attributes in the same manner, they can use a similar resource access grant todetermine data access for users based on their ProductDepartment profile attribute.
The resulting security file included these two resource access grants (see the complete file in 6.9.2, “DomainSecurity File,” on page 71):
<!-- Row level security --><!-- What access do roles/users have to the rows in the resource? --><resourceAccessGrantList id="JoinTree_1_List" label="ListLabel"resourceId="JoinTree_1"><resourceAccessGrants><!-- Row level for Cities --><resourceAccessGrant id="Jointree_1_row_access_grant_20"><principalExpression><![CDATA[authentication.principal.attributes.any{it.attrName in ['Cities'] }]]></principalExpression>
<filterExpression>testProfileAttribute(store.store_city,'Cities')</filterExpression>
</resourceAccessGrant><!-- Row level for Product Dept --><resourceAccessGrant id="Jointree_1_row_access_grant_30"><principalExpression><![CDATA[authentication.getPrincipal().getAttributes().any
{it.getAttrName() in ['ProductDepartment'] }]]></principalExpression><filterExpression>testProfileAttribute(product_class.product_department,'ProductDepartment')</filterExpression>
</resourceAccessGrant></resourceAccessGrants>
</resourceAccessGrantList>
63

JasperReports Server Ultimate Guide
6.6.2 Column-level SecurityColumn-level access determines the columns in the data source that can be displayed to specific users.
6.6.2.1 Understanding Column-level Security
Consider a table that includes employee contact and salary information. You could define item group accessgrants that check the user’s role and grant access to the salary field only if the user has the Human Resourcesrole. For example, the following code sample modifies access for the ROLE_SALESREP role, first by revokingthe default access for that role and then granting access to sales information only. The principle expressiondetermines the users to whom the item group access grant applies, that is, users with the ROLE_SALES_REProle. The item access grants determine the specific access of the users, that is, all role-specific access is revokedthen access to the StoreSales and StoreCost item is granted:
<itemGroupAccessGrant id="Jointree_1_item_group_access_grant_2" access="granted"><principalExpression>authentication.getPrincipal().getRoles().any{ it.getRoleName() in ['ROLE_SALES_REP'] }</principalExpression><itemAccessGrantList id="Jointree_1_grant2_item_group_items"defaultAccess="denied"><itemAccessGrants><itemAccessGrant id="Jointree_1_grant2_items_grant1" itemId="StoreSales"access="granted" />
<itemAccessGrant id="Jointree_1_grant2_items_grant2" itemId="UnitSales"access="granted" />
</itemAccessGrants></itemAccessGrantList>
</itemGroupAccessGrant></itemGroupAccessGrants>
6.6.3 CZS’s Item Group Access Grants for Sales DataTo ensure that sales representatives don’t have access to cost information, CZS adds item group access grants;the first grants full access to managers and the administrator:
<!-- Column-level access for Sales Manager and Admins--><itemGroupAccessGrant id="Jointree1_item_group_access_grant_MNG" access="granted"><principalExpression>authentication.getPrincipal().getRoles().any{ it.getRoleName() in ['ROLE_ADMINISTRATOR','ROLE_SALES_MANAGER'] }</principalExpression>
</itemGroupAccessGrant>
CZS then adds an item group access grant that grants limited access to sales representatives; the following XMLgrants access to the Store Sales and Sales Units fields while revoking access to the Store Cost field:
<!-- Column-level access for Sales Reps--><itemGroupAccessGrant id="Jointree_1_item_group_access_grant_REP"access="granted"><principalExpression>authentication.getPrincipal().getRoles().any{ it.getRoleName() in ['ROLE_SALES_REP'] }</principalExpression>
<itemAccessGrantList id="Jointree_1_grant2_item_group_items"defaultAccess="denied"><itemAccessGrants><itemAccessGrant id="Jointree_1_grant2_items_grant1" itemId="StoreSales"access="granted" />
64
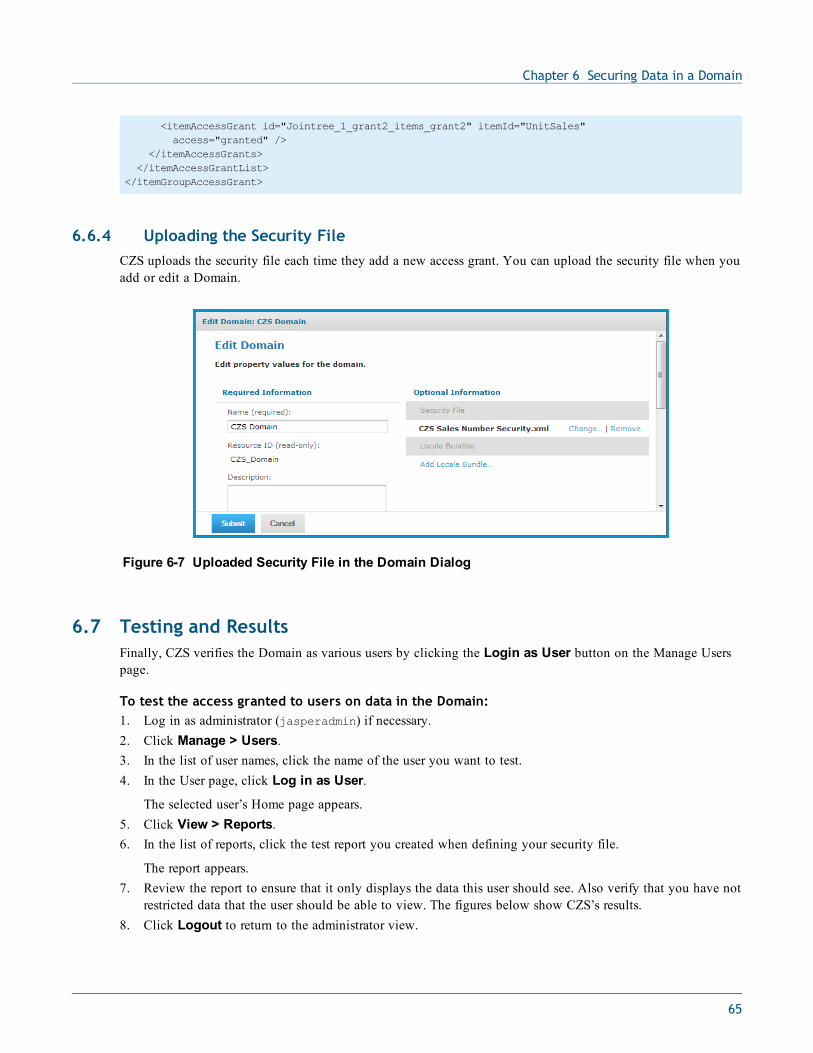
Chapter 6 Securing Data in a Domain
<itemAccessGrant id="Jointree_1_grant2_items_grant2" itemId="UnitSales"access="granted" />
</itemAccessGrants></itemAccessGrantList>
</itemGroupAccessGrant>
6.6.4 Uploading the Security FileCZS uploads the security file each time they add a new access grant. You can upload the security file when youadd or edit a Domain.
Figure 6-7 Uploaded Security File in the Domain Dialog
6.7 Testing and ResultsFinally, CZS verifies the Domain as various users by clicking the Login as User button on the Manage Userspage.
To test the access granted to users on data in the Domain:1. Log in as administrator (jasperadmin) if necessary.2. Click Manage > Users.3. In the list of user names, click the name of the user you want to test.4. In the User page, click Log in as User.
The selected user’s Home page appears.5. Click View > Reports.6. In the list of reports, click the test report you created when defining your security file.
The report appears.7. Review the report to ensure that it only displays the data this user should see. Also verify that you have not
restricted data that the user should be able to view. The figures below show CZS’s results.8. Click Logout to return to the administrator view.
65
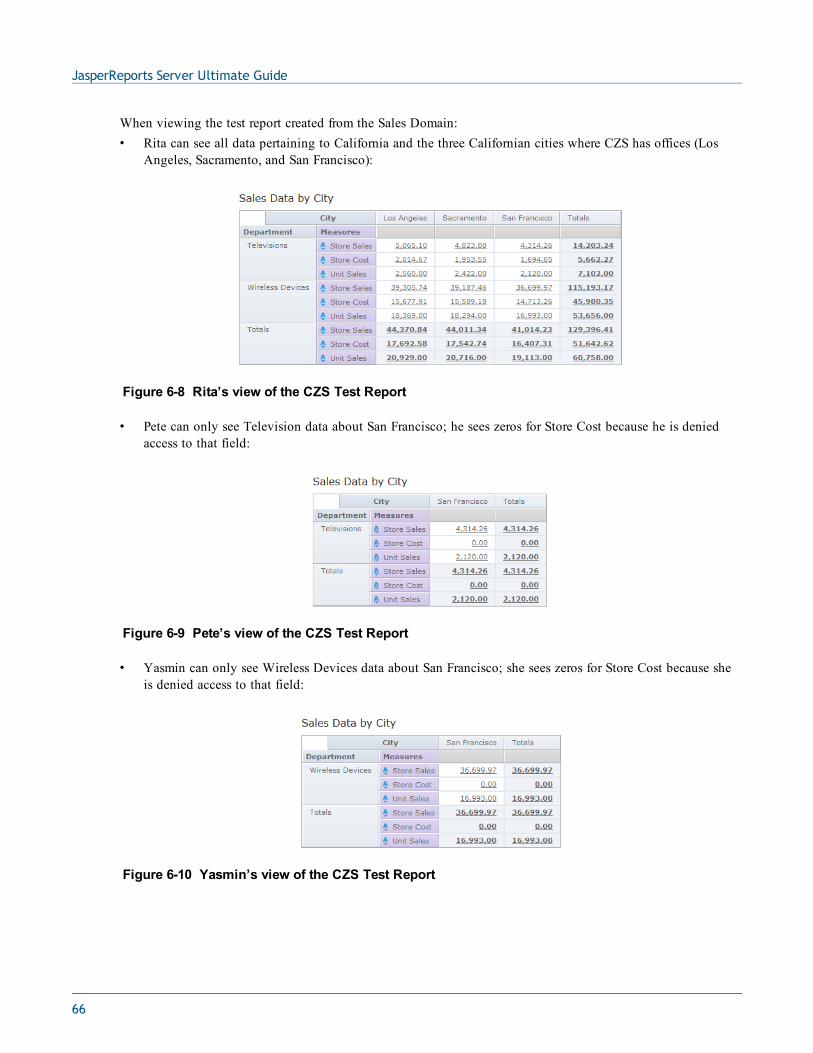
JasperReports Server Ultimate Guide
When viewing the test report created from the Sales Domain:• Rita can see all data pertaining to California and the three Californian cities where CZS has offices (Los
Angeles, Sacramento, and San Francisco):
Figure 6-8 Rita’s view of the CZS Test Report
• Pete can only see Television data about San Francisco; he sees zeros for Store Cost because he is deniedaccess to that field:
Figure 6-9 Pete’s view of the CZS Test Report
• Yasmin can only see Wireless Devices data about San Francisco; she sees zeros for Store Cost because sheis denied access to that field:
Figure 6-10 Yasmin’s view of the CZS Test Report
66

Chapter 6 Securing Data in a Domain
• Alexi can see all data pertaining to the two Japanese cities where CZS has stores (Osaka and Sakai):
Figure 6-11 Alexi’s view of the CZS Test Report
6.8 Domain and Security RecommendationsWhen defining a Domain and its security, keep these recommendations in mind:• A Domain should cover a large subject area and include data with multiple uses. Define joins to create data
islands that each contain related information; the data islands themselves can contain completely unrelateddata. For example, you could include both human resources and sales data in a single Domain; differentusers would see only the information relevant to their job responsibilities. For an example of this type ofDomain, refer to the SuperMart example that can be installed with JasperReports Server.
• When defining a Domain, don’t create too many item groups, and avoid very deep structures with manylevels. Such complexity makes the Domain harder to use.
• Logging can help you troubleshoot any problems you encounter while implementing Domain security. Formore information, refer to 6.5.1, “Enabling Logging,” on page 60.
• Refer to http://groovy.codehaus.org for information on the Groovy expressions that Domain security filessupport. Note that, while the server does validates Groovy expressions, the validation is very light weight:it doesn’t detect all improperly formed expressions.
• If the names of tables and fields in your data source change, you can edit the Domain design XML file sothat the resource names match the new names in the database. Then, upload the new version of the file;your reports that rely on the Domain will work properly without being updated individually. If you havedefined a security file for this Domain, you must also edit the resource names in the security file, as well.
• Start with the simplest item or resource grant, and when that works, expand upon it. Start simple and iterateuntil you have the full set of access grants needed. Follow good troubleshooting practices, such as onlychanging a single aspect of the security file before testing the results of the change.
• Use an XML editor to create your security file. While the server validates the schema against its own XMLdefinition, a typical XML editor can identify such issues as tags that aren’t properly closed. For example,open the security file with Internet Explorer; if it returns errors, use them to identify and correct your XML.
• Once your Domain is created, create several Domain Topics that focus on specific aspects of the Domain orspecific data your end-users will want to review regularly. To do so, click Create > Ad Hoc Report, selectyour Domain, and use the Data, Filters, and Display pages to customize the contents and the way it isdisplayed, then use the Topics page to save the new Domain Topic.
For tips on improving the performance of Domains and reports that rely on them, refer to 2.3.3, “Scalability,”on page 29.
67

JasperReports Server Ultimate Guide
6.9 Domain Reference Material
6.9.1 Domain Design in XML FormatThe CZS-sales-Domain.xml file defines a Domain that returns data from the sales_fact_2006 table stored in aMySQL database. It includes the three fields that CZS is interested in displaying, as well as the data thatcorresponds to the profile attributes described in the security file.
<schema xmlns="http://www.jaspersoft.com/2007/SL/XMLSchema" version="1.0"><itemGroups><itemGroup description="Product family and department" descriptionId=""id="Products" label="Products" labelId="" resourceId="JoinTree_1"><items><item description="Family" descriptionId="" id="Family" label="Family"labelId="" resourceId="JoinTree_1.product_class.product_family" />
<item description="Department" descriptionId="" id="Department"label="Department" labelId=""resourceId="JoinTree_1.product_class.product_department" />
</items></itemGroup><itemGroup description="Geography" descriptionId="" id="Geography"label="Geography" labelId="" resourceId="JoinTree_1">
<items><item description="City" descriptionId="" id="City" label="City" labelId=""resourceId="JoinTree_1.store.store_city" />
<item description="Country" descriptionId="" id="Country" label="Country"labelId="" resourceId="JoinTree_1.store.store_country" />
<item description="State" descriptionId="" id="State" label="State"labelId="" resourceId="JoinTree_1.store.store_state" />
</items></itemGroup><itemGroup description="Sales Data" descriptionId="" id="SalesData" label="SalesData" labelId="" resourceId="JoinTree_1"><items><item description="Store Cost" descriptionId="" id="StoreCost" label="StoreCost" labelId="" resourceId="JoinTree_1.sales_fact_2006.store_cost" />
<item description="Store Sales" descriptionId="" id="StoreSales" label="StoreSales" labelId="" resourceId="JoinTree_1.sales_fact_2006.store_sales" />
<item description="Unit Sales" descriptionId="" id="UnitSales" label="UnitSales" labelId="" resourceId="JoinTree_1.sales_fact_2006.unit_sales" />
</items></itemGroup>
</itemGroups>
<resources><jdbcTable datasourceId="czsdata" id="product" tableName="product"><fieldList><field id="brand_name" type="java.lang.String" /><field id="gross_weight" type="java.lang.Double" /><field id="net_weight" type="java.lang.Double" /><field id="product_class_id" type="java.lang.Integer" /><field id="product_id" type="java.lang.Integer" />
<field id="product_name" type="java.lang.String" /><field id="recyclable_package" type="java.lang.Boolean" />
68
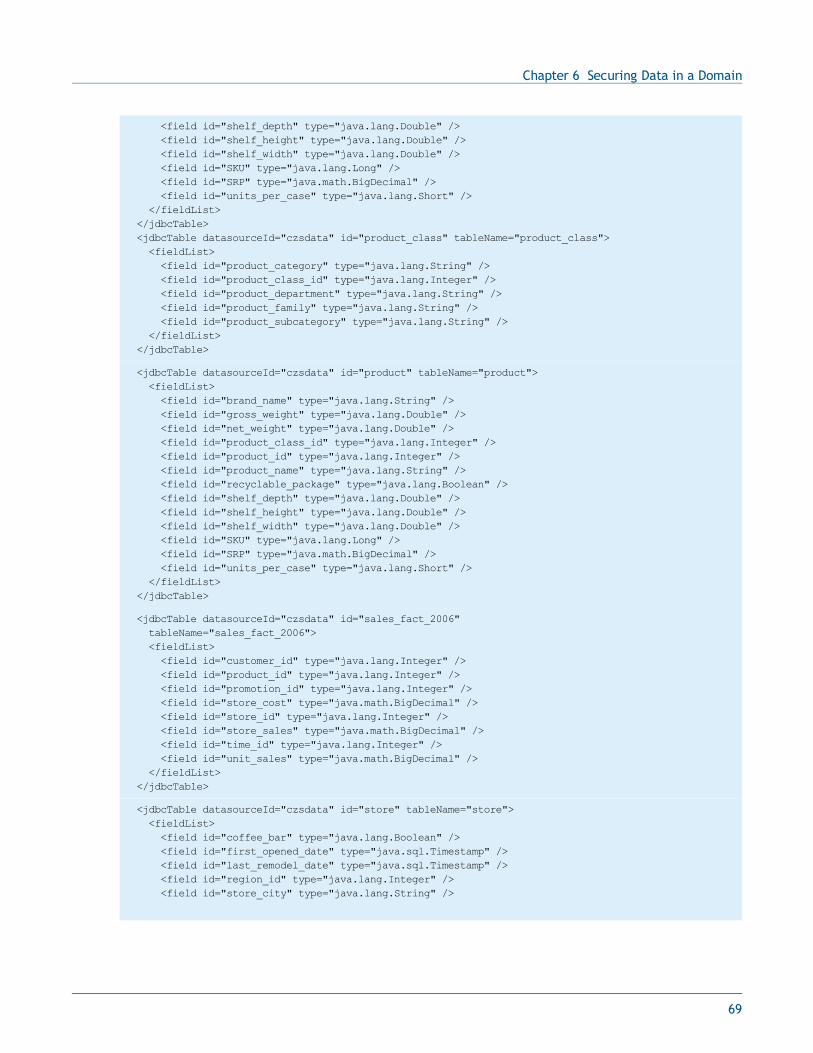
Chapter 6 Securing Data in a Domain
<field id="shelf_depth" type="java.lang.Double" /><field id="shelf_height" type="java.lang.Double" /><field id="shelf_width" type="java.lang.Double" /><field id="SKU" type="java.lang.Long" /><field id="SRP" type="java.math.BigDecimal" /><field id="units_per_case" type="java.lang.Short" />
</fieldList></jdbcTable><jdbcTable datasourceId="czsdata" id="product_class" tableName="product_class"><fieldList><field id="product_category" type="java.lang.String" /><field id="product_class_id" type="java.lang.Integer" /><field id="product_department" type="java.lang.String" /><field id="product_family" type="java.lang.String" /><field id="product_subcategory" type="java.lang.String" />
</fieldList></jdbcTable>
<jdbcTable datasourceId="czsdata" id="product" tableName="product"><fieldList><field id="brand_name" type="java.lang.String" /><field id="gross_weight" type="java.lang.Double" /><field id="net_weight" type="java.lang.Double" /><field id="product_class_id" type="java.lang.Integer" /><field id="product_id" type="java.lang.Integer" /><field id="product_name" type="java.lang.String" /><field id="recyclable_package" type="java.lang.Boolean" /><field id="shelf_depth" type="java.lang.Double" /><field id="shelf_height" type="java.lang.Double" /><field id="shelf_width" type="java.lang.Double" /><field id="SKU" type="java.lang.Long" /><field id="SRP" type="java.math.BigDecimal" /><field id="units_per_case" type="java.lang.Short" />
</fieldList></jdbcTable>
<jdbcTable datasourceId="czsdata" id="sales_fact_2006"tableName="sales_fact_2006"><fieldList><field id="customer_id" type="java.lang.Integer" /><field id="product_id" type="java.lang.Integer" /><field id="promotion_id" type="java.lang.Integer" /><field id="store_cost" type="java.math.BigDecimal" /><field id="store_id" type="java.lang.Integer" /><field id="store_sales" type="java.math.BigDecimal" /><field id="time_id" type="java.lang.Integer" /><field id="unit_sales" type="java.math.BigDecimal" />
</fieldList></jdbcTable>
<jdbcTable datasourceId="czsdata" id="store" tableName="store"><fieldList><field id="coffee_bar" type="java.lang.Boolean" /><field id="first_opened_date" type="java.sql.Timestamp" /><field id="last_remodel_date" type="java.sql.Timestamp" /><field id="region_id" type="java.lang.Integer" /><field id="store_city" type="java.lang.String" />
69

JasperReports Server Ultimate Guide
<field id="store_country" type="java.lang.String" /><field id="store_fax" type="java.lang.String" /><field id="store_id" type="java.lang.Integer" /><field id="store_manager" type="java.lang.String" /><field id="store_name" type="java.lang.String" /><field id="store_number" type="java.lang.Integer" /><field id="store_phone" type="java.lang.String" /><field id="store_postal_code" type="java.lang.String" /><field id="store_sqft" type="java.lang.Integer" /><field id="store_state" type="java.lang.String" /><field id="store_street_address" type="java.lang.String" /><field id="store_type" type="java.lang.String" /><field id="video_store" type="java.lang.Boolean" />
</fieldList></jdbcTable>
<jdbcTable datasourceId="czsdata" id="JoinTree_1" tableName="product"><fieldList><field id="product_class.product_category" type="java.lang.String" /><field id="product_class.product_class_id" type="java.lang.Integer" /><field id="product_class.product_department" type="java.lang.String" /><field id="product_class.product_family" type="java.lang.String" /><field id="product_class.product_subcategory" type="java.lang.String" /><field id="sales_fact_2006.customer_id" type="java.lang.Integer" /><field id="sales_fact_2006.product_id" type="java.lang.Integer" /><field id="sales_fact_2006.promotion_id" type="java.lang.Integer" /><field id="sales_fact_2006.store_cost" type="java.math.BigDecimal" /><field id="sales_fact_2006.promotion_id" type="java.lang.Integer" /><field id="sales_fact_2006.store_cost" type="java.math.BigDecimal" /><field id="sales_fact_2006.store_id" type="java.lang.Integer" /><field id="sales_fact_2006.store_sales" type="java.math.BigDecimal" />
<field id="sales_fact_2006.time_id" type="java.lang.Integer" /><field id="sales_fact_2006.unit_sales" type="java.math.BigDecimal" /><field id="product.brand_name" type="java.lang.String" /><field id="product.gross_weight" type="java.lang.Double" /><field id="product.net_weight" type="java.lang.Double" /><field id="product.product_class_id" type="java.lang.Integer" /><field id="product.product_id" type="java.lang.Integer" /><field id="product.product_name" type="java.lang.String" /><field id="product.recyclable_package" type="java.lang.Boolean" /><field id="product.shelf_depth" type="java.lang.Double" /><field id="product.shelf_height" type="java.lang.Double" /><field id="product.shelf_width" type="java.lang.Double" /><field id="product.SKU" type="java.lang.Long" />
<field id="product.SRP" type="java.math.BigDecimal" /><field id="product.units_per_case" type="java.lang.Short" /><field id="store.coffee_bar" type="java.lang.Boolean" /><field id="store.first_opened_date" type="java.sql.Timestamp" /><field id="store.grocery_sqft" type="java.lang.Integer" /><field id="store.last_remodel_date" type="java.sql.Timestamp" /><field id="store.meat_sqft" type="java.lang.Integer" /><field id="store.region_id" type="java.lang.Integer" /><field id="store.store_city" type="java.lang.String" /><field id="store.store_country" type="java.lang.String" /><field id="store.store_fax" type="java.lang.String" /><field id="store.store_id" type="java.lang.Integer" />
70
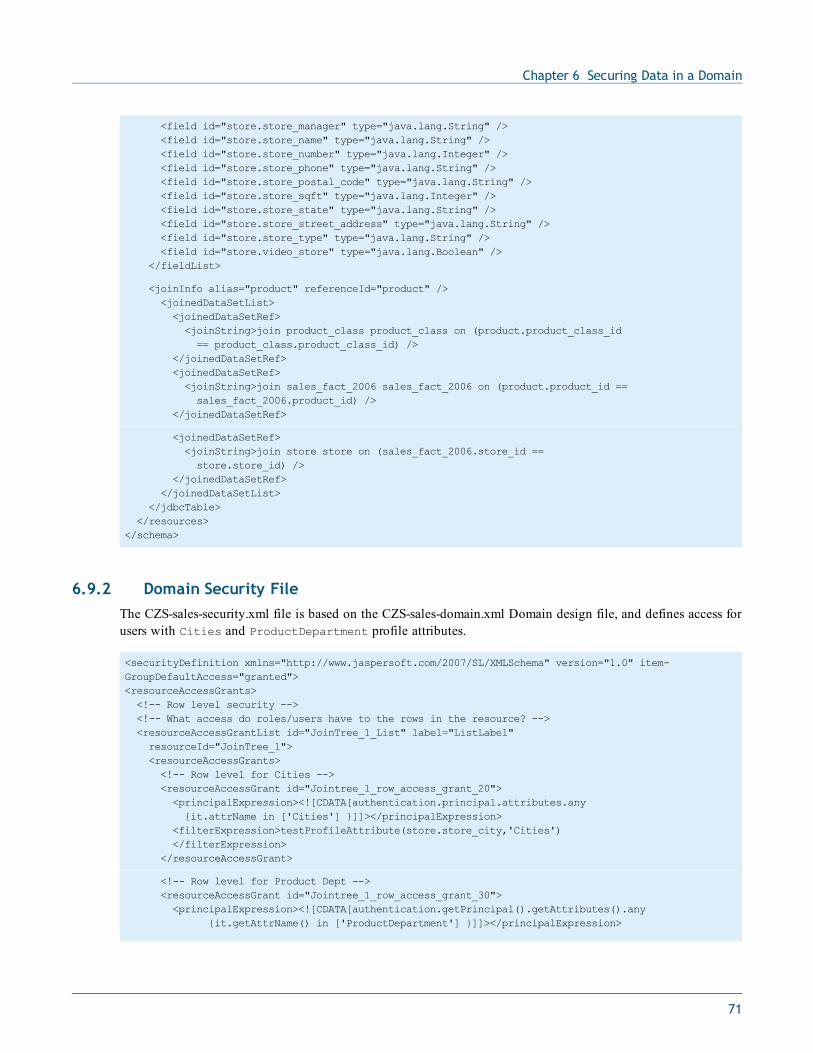
Chapter 6 Securing Data in a Domain
<field id="store.store_manager" type="java.lang.String" /><field id="store.store_name" type="java.lang.String" /><field id="store.store_number" type="java.lang.Integer" /><field id="store.store_phone" type="java.lang.String" /><field id="store.store_postal_code" type="java.lang.String" /><field id="store.store_sqft" type="java.lang.Integer" /><field id="store.store_state" type="java.lang.String" /><field id="store.store_street_address" type="java.lang.String" /><field id="store.store_type" type="java.lang.String" /><field id="store.video_store" type="java.lang.Boolean" />
</fieldList>
<joinInfo alias="product" referenceId="product" /><joinedDataSetList><joinedDataSetRef><joinString>join product_class product_class on (product.product_class_id== product_class.product_class_id) />
</joinedDataSetRef><joinedDataSetRef><joinString>join sales_fact_2006 sales_fact_2006 on (product.product_id ==sales_fact_2006.product_id) />
</joinedDataSetRef>
<joinedDataSetRef><joinString>join store store on (sales_fact_2006.store_id ==store.store_id) />
</joinedDataSetRef></joinedDataSetList>
</jdbcTable></resources>
</schema>
6.9.2 Domain Security FileThe CZS-sales-security.xml file is based on the CZS-sales-domain.xml Domain design file, and defines access forusers with Cities and ProductDepartment profile attributes.
<securityDefinition xmlns="http://www.jaspersoft.com/2007/SL/XMLSchema" version="1.0" item-GroupDefaultAccess="granted"><resourceAccessGrants><!-- Row level security --><!-- What access do roles/users have to the rows in the resource? --><resourceAccessGrantList id="JoinTree_1_List" label="ListLabel"resourceId="JoinTree_1"><resourceAccessGrants><!-- Row level for Cities --><resourceAccessGrant id="Jointree_1_row_access_grant_20"><principalExpression><![CDATA[authentication.principal.attributes.any{it.attrName in ['Cities'] }]]></principalExpression>
<filterExpression>testProfileAttribute(store.store_city,'Cities')</filterExpression>
</resourceAccessGrant>
<!-- Row level for Product Dept --><resourceAccessGrant id="Jointree_1_row_access_grant_30"><principalExpression><![CDATA[authentication.getPrincipal().getAttributes().any
{it.getAttrName() in ['ProductDepartment'] }]]></principalExpression>
71
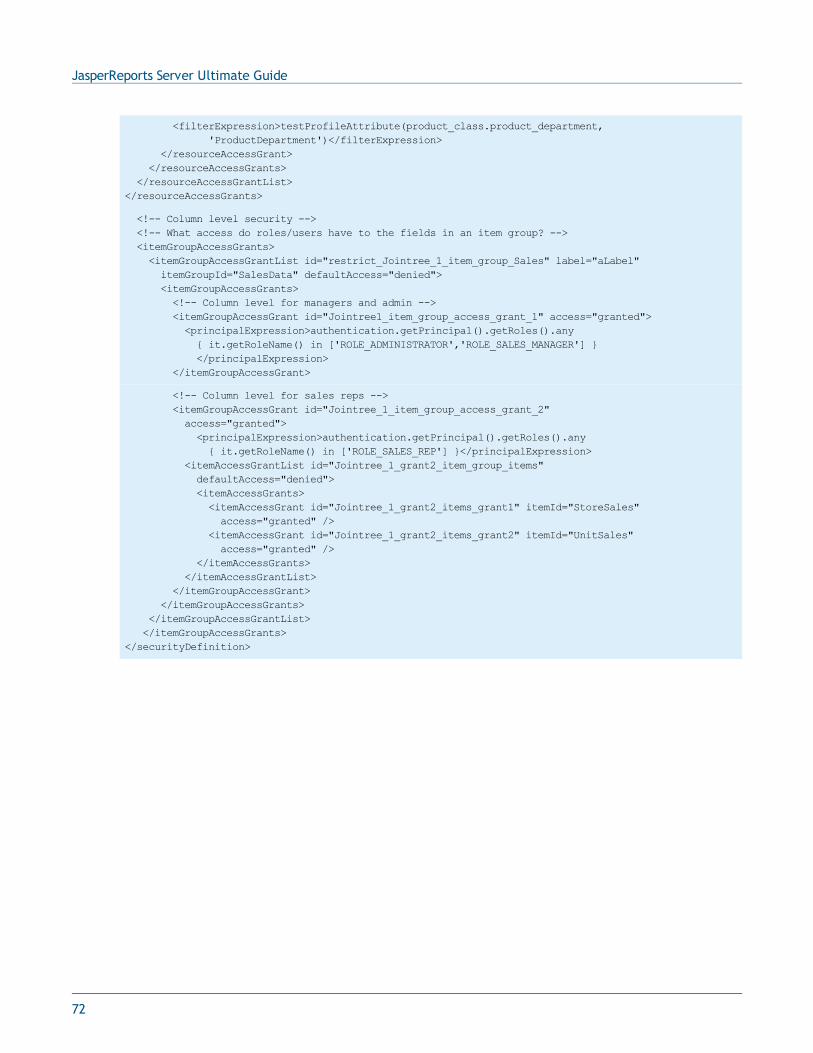
JasperReports Server Ultimate Guide
<filterExpression>testProfileAttribute(product_class.product_department,'ProductDepartment')</filterExpression>
</resourceAccessGrant></resourceAccessGrants>
</resourceAccessGrantList></resourceAccessGrants>
<!-- Column level security --><!-- What access do roles/users have to the fields in an item group? --><itemGroupAccessGrants><itemGroupAccessGrantList id="restrict_Jointree_1_item_group_Sales" label="aLabel"itemGroupId="SalesData" defaultAccess="denied"><itemGroupAccessGrants><!-- Column level for managers and admin --><itemGroupAccessGrant id="Jointree1_item_group_access_grant_1" access="granted"><principalExpression>authentication.getPrincipal().getRoles().any{ it.getRoleName() in ['ROLE_ADMINISTRATOR','ROLE_SALES_MANAGER'] }</principalExpression>
</itemGroupAccessGrant>
<!-- Column level for sales reps --><itemGroupAccessGrant id="Jointree_1_item_group_access_grant_2"access="granted"><principalExpression>authentication.getPrincipal().getRoles().any{ it.getRoleName() in ['ROLE_SALES_REP'] }</principalExpression>
<itemAccessGrantList id="Jointree_1_grant2_item_group_items"defaultAccess="denied"><itemAccessGrants><itemAccessGrant id="Jointree_1_grant2_items_grant1" itemId="StoreSales"access="granted" />
<itemAccessGrant id="Jointree_1_grant2_items_grant2" itemId="UnitSales"access="granted" />
</itemAccessGrants></itemAccessGrantList>
</itemGroupAccessGrant></itemGroupAccessGrants>
</itemGroupAccessGrantList></itemGroupAccessGrants>
</securityDefinition>
72

CHAPTER 7 APPLICATION SECURITYApplication security protects the JasperReports Server web application from unwarranted changes, maliciousintrusions, and malware. This chapter explains measures you can take in order to provide such protection on theTomcat server. These measures do not offer 100% protection—no measures can guarantee that except possiblypulling the plug—but they do create an acceptable level of protection, and they are a foundation upon whichmore thorough measures can be built.
The JasperReports Server Administrator Guide contains important information about configurationsettings for security. Apply those security settings to the server before applying the following settings to theapplication server.
What follows is not a complete tutorial on securing your web application. To do so would take volumes.Instead, we have written instructions on the basic components of a secure Tomcat environment; we also addedrelated code in the default installation. These additions demonstrate the basic procedures you should follow, butyou may have to adapt the procedures to your installation.
The example instructions in this chapter apply only to the indicated versions of Tomcat. They have notbeen tested on any other server. We offer them as a useful model for implementing security on yourserver, regardless of its type.
Additional measures that you might take include disabling unnecessary applications and resources,encrypting usernames and passwords, closing unused ports, and avoiding memory leaks.
The tutorials assume the following system configuration:• JasperReports Server 5.6• JDK 1.6.0.18• Apache Tomcat 7• Web App Deployed Name: jasperserver
For more information on the components of a secure environment, see the OpenSSL web site and the Javadocumentation.
The chapter includes the following sections:• Using SSL in the Web Server• Disabling Unused HTTP Verbs• Setting the Secure Flag on Cookies• Setting httpOnly for Cookies• Using a Protection Domain Infrastructure
73

JasperReports Server Ultimate Guide
• Encrypting Passwords in URLs
7.1 Using SSL in the Web ServerSecure Sockets Layer (SSL) is a widely-used protocol for secure network communications. It encrypts networkconnections at the Transport Layer and is used in conjunction with HTTPS, the secure version of the HTTPprotocol. This section shows how to install SSL on Tomcat 7 and to configure JasperReports Server to use onlySSL in Tomcat.
7.1.1 Setting Up an SSL CertificateTo use SSL, you need a valid certificate in the Tomcat keystore. In the Java Virtual Machine (JVM), certificatesand private keys are saved in a keystore. This is the repository for your keys and certificates. By default, it isimplemented as a password-protected file (public keys and certificates are stored elsewhere).
If you already have a suitable certificate, you can import it into the keystore, using the import switch on theJVM keytool utility. If you don't have a certificate, you can use the keytool utility to generate a self-signedcertificate (one signed by your own certificate authority). Self-signed certificates are acceptable in most cases,although certificates issued by certificate authorities are even more secure. And they do not require your users torespond to a security warning every time they login, as self-signed certificates do.
The following command is an example of how to import a certificate. In this case, it is a self-signed certificateimported into a PKCS12 keystore using OpenSSL:
openssl pkcs12 \-export \-in mycert.crt \-inkey mykey.key \-out mycert.p12 \-name tomcat \-CAfile myCA.crt \-caname root \-chain
Next in this example, you create key.bin, the keystore file, in the Tomcat home folder. Use one of thesecommands:
OS Command
Windows %JAVA_HOME%\bin\keytool -genkey -alias tomcat -keyalg RSA -keystore %CATALINA_HOME%\conf\key.bin
Unix $JAVA_HOME/bin/keytool -genkey -alias tomcat -keyalg RSA -keystore $CATALINA_HOME/conf/key.bin
The basic install requires certain data. With the above commands, you are prompted for the data:• Enter two passwords twice. The default for both is “changeit”. If you use the default, be sure to set better,
stronger passwords later.• Specify information about your organization, including your first and last name, your organization unit, and
organization. The normal response for first and last name is the domain of your server, such asjasperserver.mycompany.com. This identifies the organization the certificate is issued to. For organizationunit, enter your department or similar-sized unit; for organization, enter the company or corporation. Theseidentify the organization the certificate is issued by.
• Keytool has numerous switches. For more information about it, see the Java documentation.
74
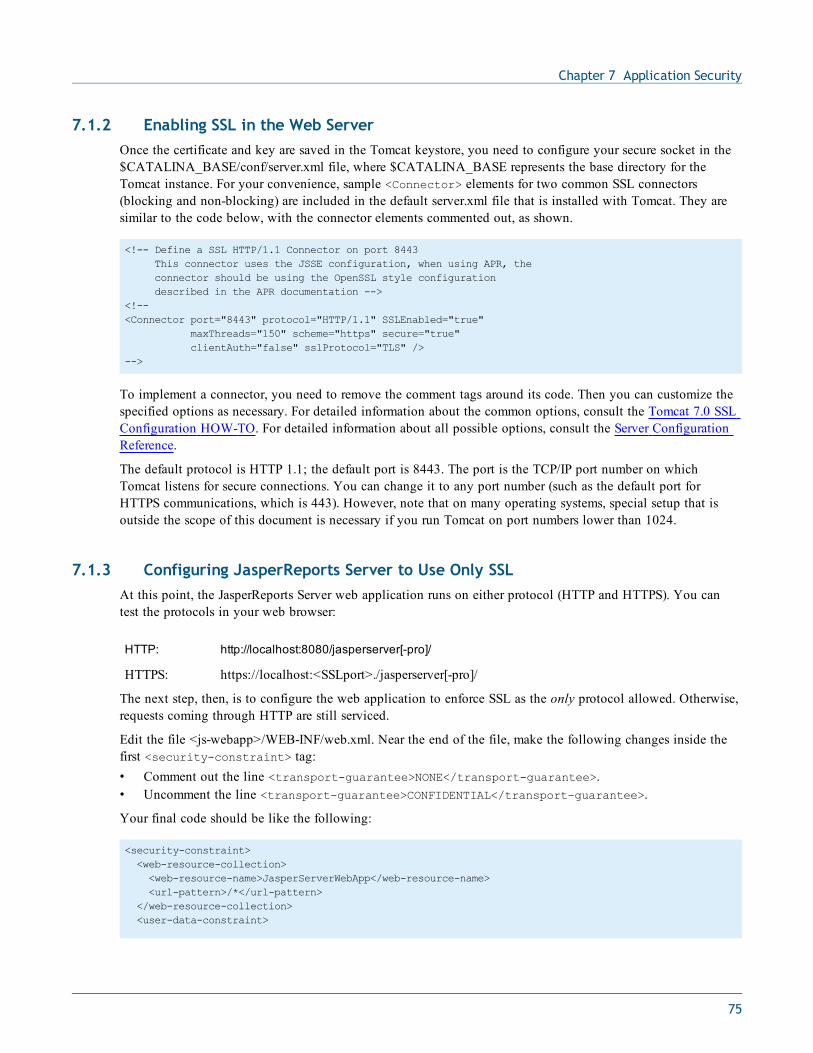
Chapter 7 Application Security
7.1.2 Enabling SSL in the Web ServerOnce the certificate and key are saved in the Tomcat keystore, you need to configure your secure socket in the$CATALINA_BASE/conf/server.xml file, where $CATALINA_BASE represents the base directory for theTomcat instance. For your convenience, sample <Connector> elements for two common SSL connectors(blocking and non-blocking) are included in the default server.xml file that is installed with Tomcat. They aresimilar to the code below, with the connector elements commented out, as shown.
<!-- Define a SSL HTTP/1.1 Connector on port 8443 This connector uses the JSSE configuration, when using APR, the connector should be using the OpenSSL style configuration described in the APR documentation -->
<!--<Connector port="8443" protocol="HTTP/1.1" SSLEnabled="true"
maxThreads="150" scheme="https" secure="true" clientAuth="false" sslProtocol="TLS" />
-->
To implement a connector, you need to remove the comment tags around its code. Then you can customize thespecified options as necessary. For detailed information about the common options, consult the Tomcat 7.0 SSLConfiguration HOW-TO. For detailed information about all possible options, consult the Server ConfigurationReference.
The default protocol is HTTP 1.1; the default port is 8443. The port is the TCP/IP port number on whichTomcat listens for secure connections. You can change it to any port number (such as the default port forHTTPS communications, which is 443). However, note that on many operating systems, special setup that isoutside the scope of this document is necessary if you run Tomcat on port numbers lower than 1024.
7.1.3 Configuring JasperReports Server to Use Only SSLAt this point, the JasperReports Server web application runs on either protocol (HTTP and HTTPS). You cantest the protocols in your web browser:
HTTP: http://localhost:8080/jasperserver[-pro]/
HTTPS: https://localhost:<SSLport>./jasperserver[-pro]/
The next step, then, is to configure the web application to enforce SSL as the only protocol allowed. Otherwise,requests coming through HTTP are still serviced.
Edit the file <js-webapp>/WEB-INF/web.xml. Near the end of the file, make the following changes inside thefirst <security-constraint> tag:• Comment out the line <transport-guarantee>NONE</transport-guarantee>.• Uncomment the line <transport-guarantee>CONFIDENTIAL</transport-guarantee>.
Your final code should be like the following:
<security-constraint><web-resource-collection><web-resource-name>JasperServerWebApp</web-resource-name><url-pattern>/*</url-pattern>
</web-resource-collection><user-data-constraint>
75

JasperReports Server Ultimate Guide
<!-- SSL not enforced --><!-- <transport-guarantee>NONE</transport-guarantee> --><!-- SSL enforced --><transport-guarantee>CONFIDENTIAL</transport-guarantee>
</user-data-constraint></security-constraint>
In the code, the term CONFIDENTIAL forces the server to accept only SSL connections through HTTPS. Andbecause of the URL pattern /*, all web services must also use HTTPS. If you need to turn off SSL mode, youcan set the transport guarantee back to NONE or delete the entire <security-constraint> tag.
7.2 Disabling Unused HTTP VerbsIt is prudent to disable all unused HTTP verbs so that they cannot be used by intruders.
In the default JasperReports Server installation, the following HTTP verbs are not used, but they are allowed.However, to facilitate your disabling the verbs, they are listed in a single block of code in <js-webapp>/WEB-INF/web.xml. As in the code immediately above, the URL pattern /* applies the security constraint to all accessto the server, including web service requests.
The list is commented out by default because it has not been exhaustively tested with all systemconfigurations and platforms.
After uncommenting the security constraint, your final code should be like the following:
<!-- This constraint disables the listed HTTP methods, which are not used by JS --><security-constraint><web-resource-collection><web-resource-name>RestrictedMethods</web-resource-name><url-pattern>/*</url-pattern><http-method>HEAD</http-method><http-method>CONNECT</http-method><http-method>COPY</http-method><http-method>LOCK</http-method><http-method>MKCOL</http-method><http-method>OPTIONS</http-method><http-method>PATCH</http-method><http-method>PROPFIND</http-method><http-method>PROPPATCH</http-method><http-method>SEARCH</http-method><http-method>TRACE</http-method><http-method>UNLOCK</http-method>
</web-resource-collection></security-constraint>
7.3 Setting the Secure Flag on CookiesJasperReports Server uses cookies in several ways:• userTimezone and userLocale to store user settings• Repository tree information (all cookies have the prefix tree*)• Other UI settings such as lastFolderUri and inputControlsPanelWidth
76
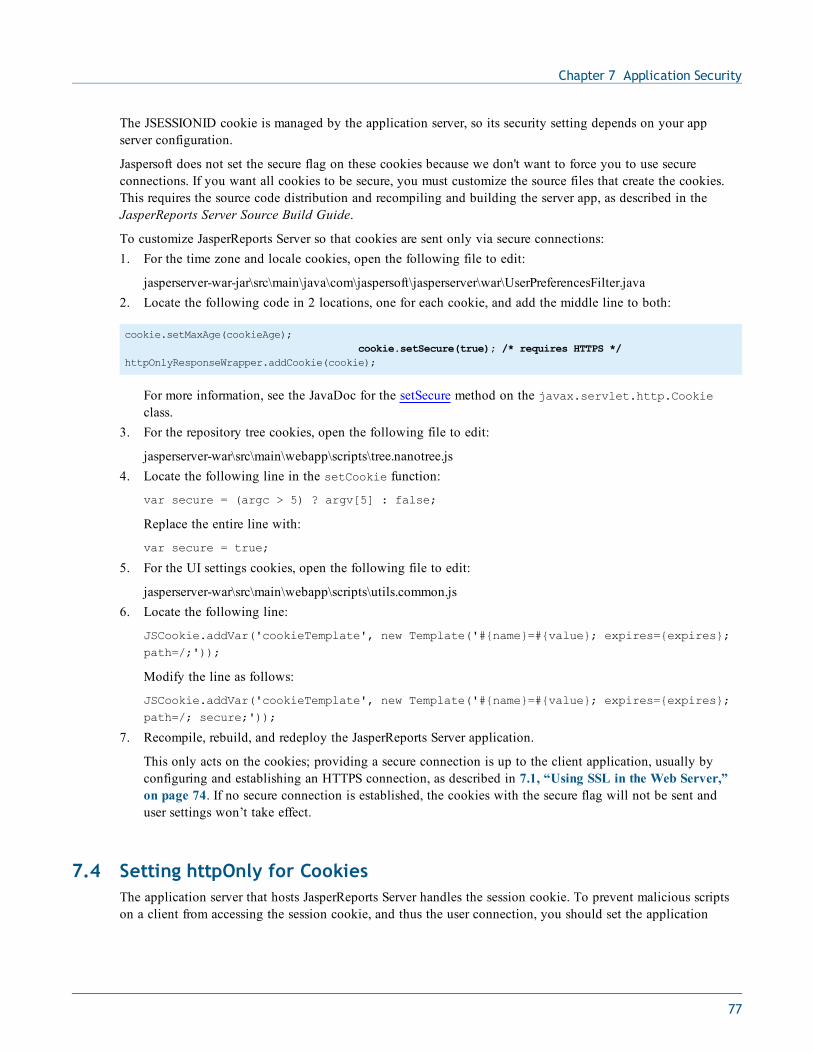
Chapter 7 Application Security
The JSESSIONID cookie is managed by the application server, so its security setting depends on your appserver configuration.
Jaspersoft does not set the secure flag on these cookies because we don't want to force you to use secureconnections. If you want all cookies to be secure, you must customize the source files that create the cookies.This requires the source code distribution and recompiling and building the server app, as described in theJasperReports Server Source Build Guide.
To customize JasperReports Server so that cookies are sent only via secure connections:1. For the time zone and locale cookies, open the following file to edit:
jasperserver-war-jar\src\main\java\com\jaspersoft\jasperserver\war\UserPreferencesFilter.java2. Locate the following code in 2 locations, one for each cookie, and add the middle line to both:
cookie.setMaxAge(cookieAge);cookie.setSecure(true); /* requires HTTPS */
httpOnlyResponseWrapper.addCookie(cookie);
For more information, see the JavaDoc for the setSecure method on the javax.servlet.http.Cookieclass.
3. For the repository tree cookies, open the following file to edit:
jasperserver-war\src\main\webapp\scripts\tree.nanotree.js4. Locate the following line in the setCookie function:
var secure = (argc > 5) ? argv[5] : false;
Replace the entire line with:
var secure = true;
5. For the UI settings cookies, open the following file to edit:
jasperserver-war\src\main\webapp\scripts\utils.common.js6. Locate the following line:
JSCookie.addVar('cookieTemplate', new Template('#{name}=#{value}; expires={expires};path=/;'));
Modify the line as follows:
JSCookie.addVar('cookieTemplate', new Template('#{name}=#{value}; expires={expires};path=/; secure;'));
7. Recompile, rebuild, and redeploy the JasperReports Server application.
This only acts on the cookies; providing a secure connection is up to the client application, usually byconfiguring and establishing an HTTPS connection, as described in 7.1, “Using SSL in the Web Server,”on page 74. If no secure connection is established, the cookies with the secure flag will not be sent anduser settings won’t take effect.
7.4 Setting httpOnly for CookiesThe application server that hosts JasperReports Server handles the session cookie. To prevent malicious scriptson a client from accessing the session cookie, and thus the user connection, you should set the application
77
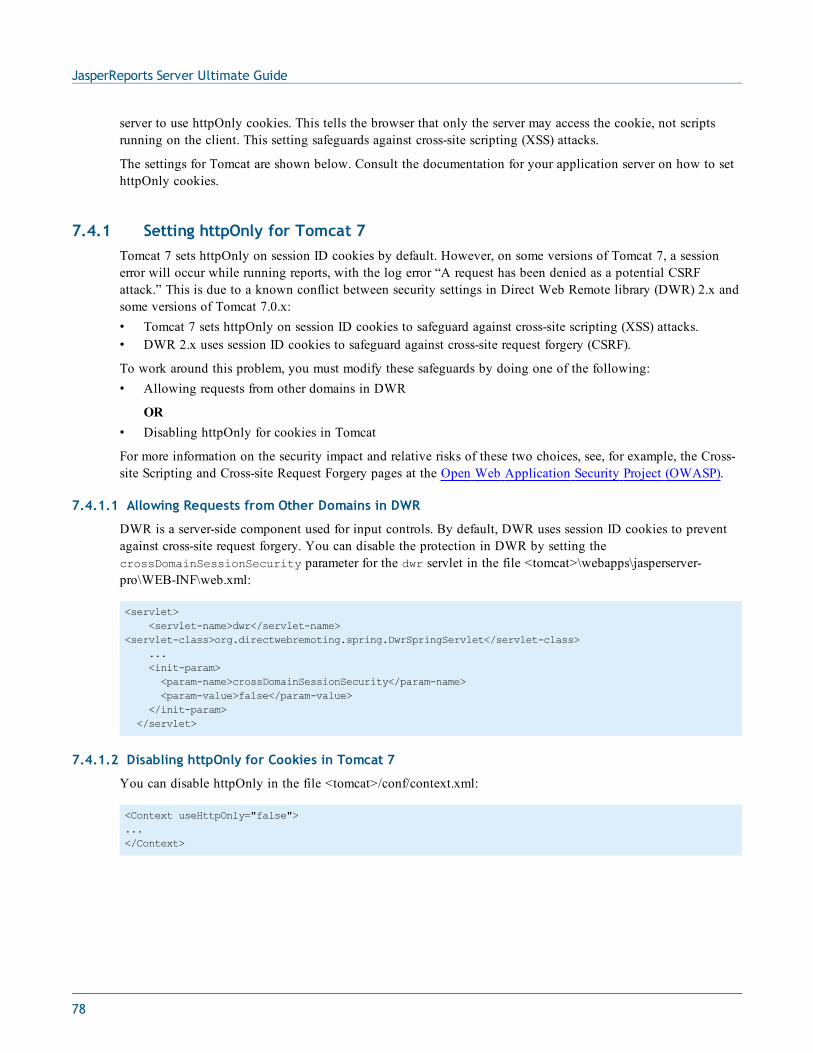
JasperReports Server Ultimate Guide
server to use httpOnly cookies. This tells the browser that only the server may access the cookie, not scriptsrunning on the client. This setting safeguards against cross-site scripting (XSS) attacks.
The settings for Tomcat are shown below. Consult the documentation for your application server on how to sethttpOnly cookies.
7.4.1 Setting httpOnly for Tomcat 7Tomcat 7 sets httpOnly on session ID cookies by default. However, on some versions of Tomcat 7, a sessionerror will occur while running reports, with the log error “A request has been denied as a potential CSRFattack.” This is due to a known conflict between security settings in Direct Web Remote library (DWR) 2.x andsome versions of Tomcat 7.0.x:• Tomcat 7 sets httpOnly on session ID cookies to safeguard against cross-site scripting (XSS) attacks.• DWR 2.x uses session ID cookies to safeguard against cross-site request forgery (CSRF).
To work around this problem, you must modify these safeguards by doing one of the following:• Allowing requests from other domains in DWR
OR• Disabling httpOnly for cookies in Tomcat
For more information on the security impact and relative risks of these two choices, see, for example, the Cross-site Scripting and Cross-site Request Forgery pages at the Open Web Application Security Project (OWASP).
7.4.1.1 Allowing Requests from Other Domains in DWR
DWR is a server-side component used for input controls. By default, DWR uses session ID cookies to preventagainst cross-site request forgery. You can disable the protection in DWR by setting thecrossDomainSessionSecurity parameter for the dwr servlet in the file <tomcat>\webapps\jasperserver-pro\WEB-INF\web.xml:
<servlet><servlet-name>dwr</servlet-name>
<servlet-class>org.directwebremoting.spring.DwrSpringServlet</servlet-class>...<init-param><param-name>crossDomainSessionSecurity</param-name><param-value>false</param-value>
</init-param></servlet>
7.4.1.2 Disabling httpOnly for Cookies in Tomcat 7
You can disable httpOnly in the file <tomcat>/conf/context.xml:
<Context useHttpOnly="false">...</Context>
78
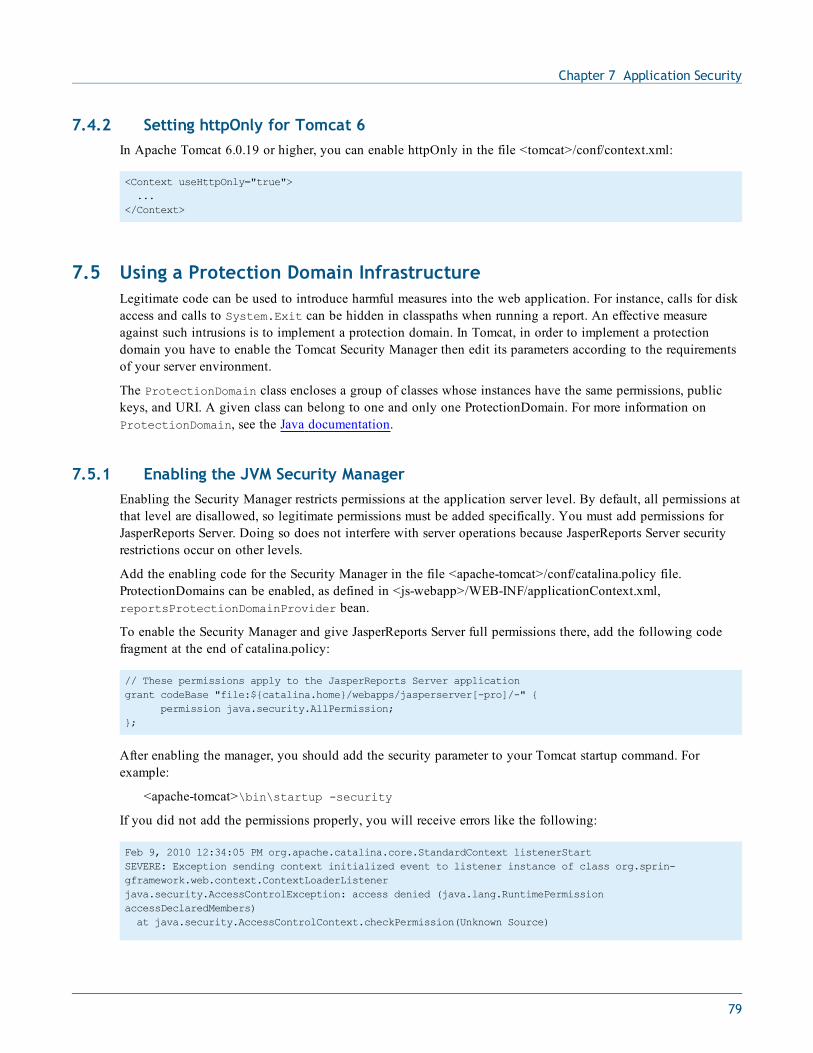
Chapter 7 Application Security
7.4.2 Setting httpOnly for Tomcat 6In Apache Tomcat 6.0.19 or higher, you can enable httpOnly in the file <tomcat>/conf/context.xml:
<Context useHttpOnly="true">...
</Context>
7.5 Using a Protection Domain InfrastructureLegitimate code can be used to introduce harmful measures into the web application. For instance, calls for diskaccess and calls to System.Exit can be hidden in classpaths when running a report. An effective measureagainst such intrusions is to implement a protection domain. In Tomcat, in order to implement a protectiondomain you have to enable the Tomcat Security Manager then edit its parameters according to the requirementsof your server environment.
The ProtectionDomain class encloses a group of classes whose instances have the same permissions, publickeys, and URI. A given class can belong to one and only one ProtectionDomain. For more information onProtectionDomain, see the Java documentation.
7.5.1 Enabling the JVM Security ManagerEnabling the Security Manager restricts permissions at the application server level. By default, all permissions atthat level are disallowed, so legitimate permissions must be added specifically. You must add permissions forJasperReports Server. Doing so does not interfere with server operations because JasperReports Server securityrestrictions occur on other levels.
Add the enabling code for the Security Manager in the file <apache-tomcat>/conf/catalina.policy file.ProtectionDomains can be enabled, as defined in <js-webapp>/WEB-INF/applicationContext.xml,reportsProtectionDomainProvider bean.
To enable the Security Manager and give JasperReports Server full permissions there, add the following codefragment at the end of catalina.policy:
// These permissions apply to the JasperReports Server applicationgrant codeBase "file:${catalina.home}/webapps/jasperserver[-pro]/-" {
permission java.security.AllPermission;};
After enabling the manager, you should add the security parameter to your Tomcat startup command. Forexample:
<apache-tomcat>\bin\startup -security
If you did not add the permissions properly, you will receive errors like the following:
Feb 9, 2010 12:34:05 PM org.apache.catalina.core.StandardContext listenerStartSEVERE: Exception sending context initialized event to listener instance of class org.sprin-gframework.web.context.ContextLoaderListenerjava.security.AccessControlException: access denied (java.lang.RuntimePermissionaccessDeclaredMembers)at java.security.AccessControlContext.checkPermission(Unknown Source)
79
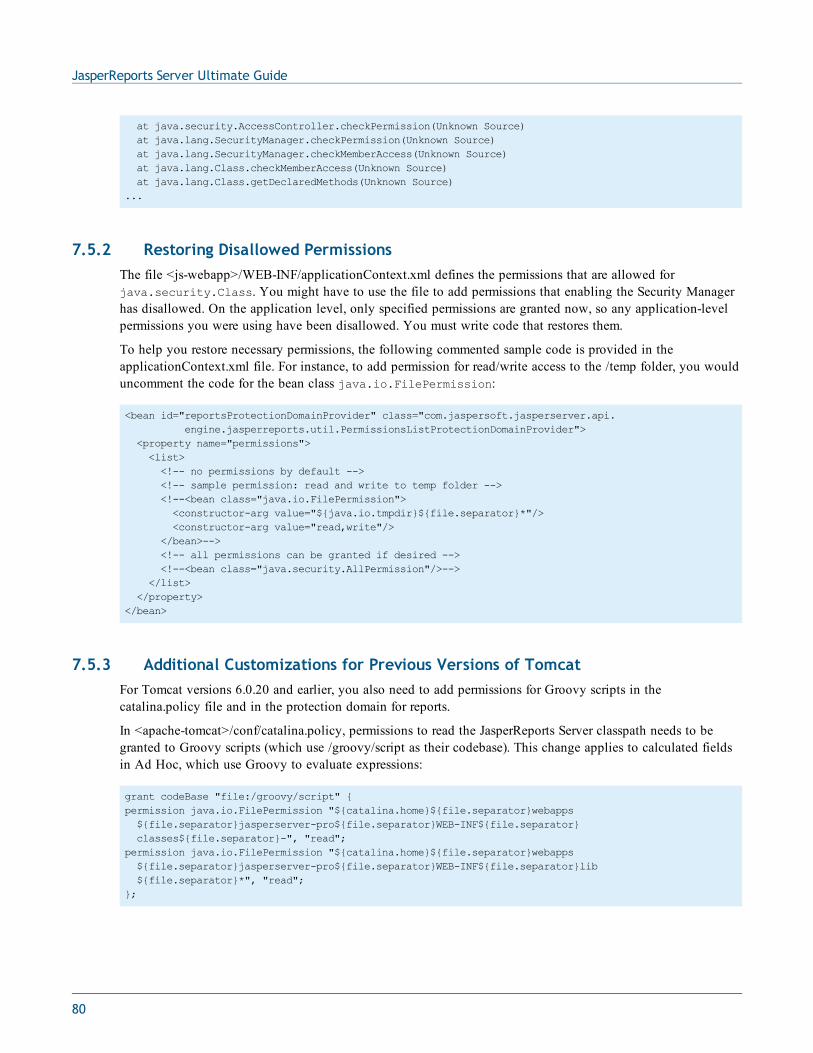
JasperReports Server Ultimate Guide
at java.security.AccessController.checkPermission(Unknown Source)at java.lang.SecurityManager.checkPermission(Unknown Source)at java.lang.SecurityManager.checkMemberAccess(Unknown Source)at java.lang.Class.checkMemberAccess(Unknown Source)at java.lang.Class.getDeclaredMethods(Unknown Source)
...
7.5.2 Restoring Disallowed PermissionsThe file <js-webapp>/WEB-INF/applicationContext.xml defines the permissions that are allowed forjava.security.Class. You might have to use the file to add permissions that enabling the Security Managerhas disallowed. On the application level, only specified permissions are granted now, so any application-levelpermissions you were using have been disallowed. You must write code that restores them.
To help you restore necessary permissions, the following commented sample code is provided in theapplicationContext.xml file. For instance, to add permission for read/write access to the /temp folder, you woulduncomment the code for the bean class java.io.FilePermission:
<bean id="reportsProtectionDomainProvider" class="com.jaspersoft.jasperserver.api.engine.jasperreports.util.PermissionsListProtectionDomainProvider">
<property name="permissions"><list><!-- no permissions by default --><!-- sample permission: read and write to temp folder --><!--<bean class="java.io.FilePermission"><constructor-arg value="${java.io.tmpdir}${file.separator}*"/><constructor-arg value="read,write"/>
</bean>--><!-- all permissions can be granted if desired --><!--<bean class="java.security.AllPermission"/>-->
</list></property>
</bean>
7.5.3 Additional Customizations for Previous Versions of TomcatFor Tomcat versions 6.0.20 and earlier, you also need to add permissions for Groovy scripts in thecatalina.policy file and in the protection domain for reports.
In <apache-tomcat>/conf/catalina.policy, permissions to read the JasperReports Server classpath needs to begranted to Groovy scripts (which use /groovy/script as their codebase). This change applies to calculated fieldsin Ad Hoc, which use Groovy to evaluate expressions:
grant codeBase "file:/groovy/script" {permission java.io.FilePermission "${catalina.home}${file.separator}webapps${file.separator}jasperserver-pro${file.separator}WEB-INF${file.separator}classes${file.separator}-", "read";
permission java.io.FilePermission "${catalina.home}${file.separator}webapps${file.separator}jasperserver-pro${file.separator}WEB-INF${file.separator}lib${file.separator}*", "read";
};
80
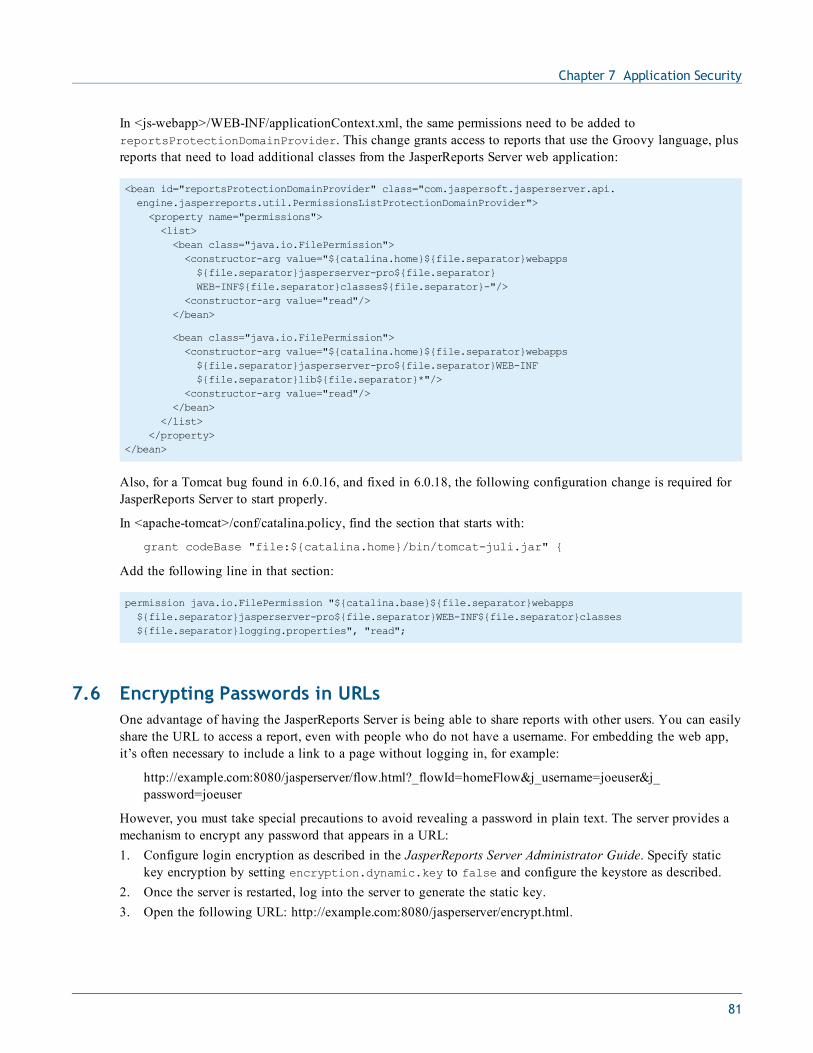
Chapter 7 Application Security
In <js-webapp>/WEB-INF/applicationContext.xml, the same permissions need to be added toreportsProtectionDomainProvider. This change grants access to reports that use the Groovy language, plusreports that need to load additional classes from the JasperReports Server web application:
<bean id="reportsProtectionDomainProvider" class="com.jaspersoft.jasperserver.api.engine.jasperreports.util.PermissionsListProtectionDomainProvider"><property name="permissions"><list><bean class="java.io.FilePermission"><constructor-arg value="${catalina.home}${file.separator}webapps${file.separator}jasperserver-pro${file.separator}WEB-INF${file.separator}classes${file.separator}-"/>
<constructor-arg value="read"/></bean>
<bean class="java.io.FilePermission"><constructor-arg value="${catalina.home}${file.separator}webapps${file.separator}jasperserver-pro${file.separator}WEB-INF${file.separator}lib${file.separator}*"/>
<constructor-arg value="read"/></bean>
</list></property>
</bean>
Also, for a Tomcat bug found in 6.0.16, and fixed in 6.0.18, the following configuration change is required forJasperReports Server to start properly.
In <apache-tomcat>/conf/catalina.policy, find the section that starts with:
grant codeBase "file:${catalina.home}/bin/tomcat-juli.jar" {
Add the following line in that section:
permission java.io.FilePermission "${catalina.base}${file.separator}webapps${file.separator}jasperserver-pro${file.separator}WEB-INF${file.separator}classes${file.separator}logging.properties", "read";
7.6 Encrypting Passwords in URLsOne advantage of having the JasperReports Server is being able to share reports with other users. You can easilyshare the URL to access a report, even with people who do not have a username. For embedding the web app,it’s often necessary to include a link to a page without logging in, for example:
http://example.com:8080/jasperserver/flow.html?_flowId=homeFlow&j_username=joeuser&j_password=joeuser
However, you must take special precautions to avoid revealing a password in plain text. The server provides amechanism to encrypt any password that appears in a URL:1. Configure login encryption as described in the JasperReports Server Administrator Guide. Specify static
key encryption by setting encryption.dynamic.key to false and configure the keystore as described.2. Once the server is restarted, log into the server to generate the static key.3. Open the following URL: http://example.com:8080/jasperserver/encrypt.html.
81
JasperReports Server Ultimate Guide
4. Enter the password that you want to encrypt, for example joeuser, then click Encrypt. The script on thispage will use the public key to encrypt the password.
5. Paste the encrypted password into the URL instead of the plain text password (log out of the server to testthis):
http://example.com:8080/jasperserver/flow.html?_flowId=homeFlow&j_username=joeuser&j_password=<encrypted>
6. Use the URL with the encrypted password to share a report.
For complex web applications that are generating report URLs on the fly, you can also encrypt the passwordprogrammatically. Your JavaScript should perform the same operations as the encrypt.js script that is used by theencrypt.html page at the URL indicated above. Using the encryptData() function in encrypt.js, your JavaScriptcan generate the encrypted password and use it to create the URL.
Static key encryption is very insecure and is recommended only for intranet server installation where thenetwork traffic is more protected. Anyone who sees the username and encrypted password can use themto log into JasperReports Server. Therefore, Jaspersoft recommends creating user IDs with very specificpermissions to control access from URLs.
The only advantage of encrypting passwords in URLs is that passwords cannot be deciphered and usedto attack other systems where users might have the same password.
82

CHAPTER 8 JASPERREPORTS SERVER APISOne of the main goals of JasperReports Server is to expose a set of reusable application programming interfaces(APIs) that are easy to understand, extend, and customize. This facilitates adapting JasperReports Server to theunique requirements of different deployments.
JasperReports Server provides two types of APIs. The client APIs are used to create other applications that callfunctionality on the server, and the server APIs are used to customize and extend the server itself.
Using the client APIs, you can embed BI functionality into your own application. The client APIs let youaccess the server, browse its repository, set input controls, and run reports. These APIs depend on an instance ofthe JasperReports Server that is already configured and running. The APIs have different uses depending onwhat functionality you need and which protocol you wish to use.
The client APIs are described in the following sections:• Web Services APIs• Visualize.js API• Repository HTTP API
The server APIs are the public interfaces and classes that can be used to extend or customize the behavior of theserver itself. Using the server APIs, you can write classes that change the behavior or the user interface of theserver, or both. Depending on which behavior you want to extend or customize, you can either integrate yourcode through the Spring framework and redeploy the server, or you may need to work with the source codedistribution and recompile the whole server.
The server APIs are described in the following sections:• The Public JasperReports Server API• Ad Hoc Launcher Java API
8.1 Web Services APIsJasperReports Server’s web services allow client applications to interact with the server programmatically. Usingthe web services APIs, your application can query a running instance of JasperReports Server to displayrepository contents and run reports that are embedded into your application's own UI. This section gives a briefsummary of the web services APIs; for complete documentation, see the JasperReports Server Web ServicesGuide.
83
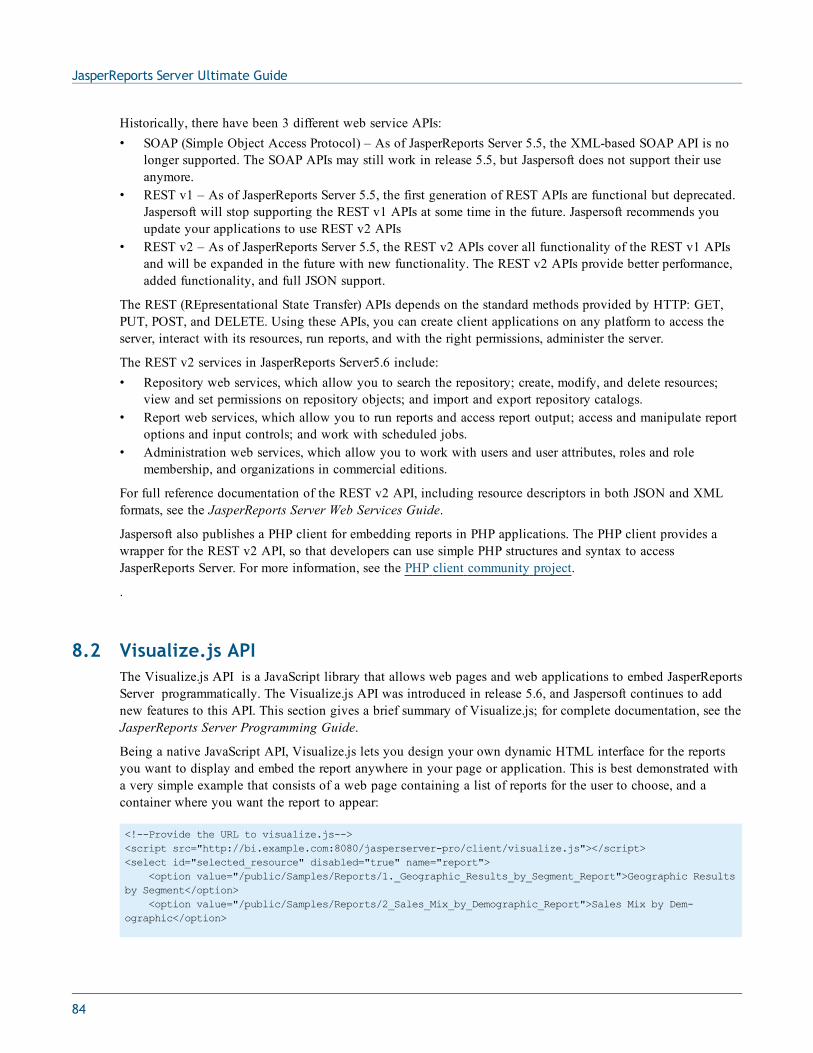
JasperReports Server Ultimate Guide
Historically, there have been 3 different web service APIs:• SOAP (Simple Object Access Protocol) – As of JasperReports Server 5.5, the XML-based SOAP API is no
longer supported. The SOAP APIs may still work in release 5.5, but Jaspersoft does not support their useanymore.
• REST v1 – As of JasperReports Server 5.5, the first generation of REST APIs are functional but deprecated.Jaspersoft will stop supporting the REST v1 APIs at some time in the future. Jaspersoft recommends youupdate your applications to use REST v2 APIs
• REST v2 – As of JasperReports Server 5.5, the REST v2 APIs cover all functionality of the REST v1 APIsand will be expanded in the future with new functionality. The REST v2 APIs provide better performance,added functionality, and full JSON support.
The REST (REpresentational State Transfer) APIs depends on the standard methods provided by HTTP: GET,PUT, POST, and DELETE. Using these APIs, you can create client applications on any platform to access theserver, interact with its resources, run reports, and with the right permissions, administer the server.
The REST v2 services in JasperReports Server5.6 include:• Repository web services, which allow you to search the repository; create, modify, and delete resources;
view and set permissions on repository objects; and import and export repository catalogs.• Report web services, which allow you to run reports and access report output; access and manipulate report
options and input controls; and work with scheduled jobs.• Administration web services, which allow you to work with users and user attributes, roles and role
membership, and organizations in commercial editions.
For full reference documentation of the REST v2 API, including resource descriptors in both JSON and XMLformats, see the JasperReports Server Web Services Guide.
Jaspersoft also publishes a PHP client for embedding reports in PHP applications. The PHP client provides awrapper for the REST v2 API, so that developers can use simple PHP structures and syntax to accessJasperReports Server. For more information, see the PHP client community project.
.
8.2 Visualize.js APIThe Visualize.js API is a JavaScript library that allows web pages and web applications to embed JasperReportsServer programmatically. The Visualize.js API was introduced in release 5.6, and Jaspersoft continues to addnew features to this API. This section gives a brief summary of Visualize.js; for complete documentation, see theJasperReports Server Programming Guide.
Being a native JavaScript API, Visualize.js lets you design your own dynamic HTML interface for the reportsyou want to display and embed the report anywhere in your page or application. This is best demonstrated witha very simple example that consists of a web page containing a list of reports for the user to choose, and acontainer where you want the report to appear:
<!--Provide the URL to visualize.js--><script src="http://bi.example.com:8080/jasperserver-pro/client/visualize.js"></script><select id="selected_resource" disabled="true" name="report">
<option value="/public/Samples/Reports/1._Geographic_Results_by_Segment_Report">Geographic Resultsby Segment</option>
<option value="/public/Samples/Reports/2_Sales_Mix_by_Demographic_Report">Sales Mix by Dem-ographic</option>
84
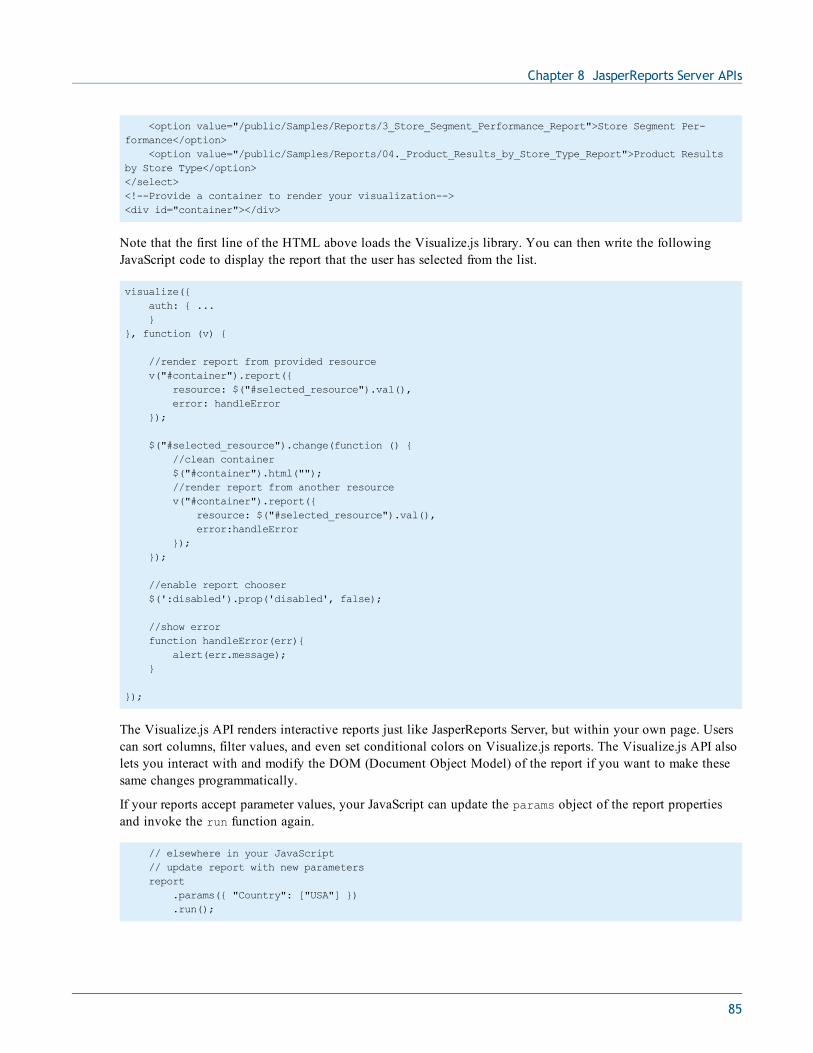
Chapter 8 JasperReports Server APIs
<option value="/public/Samples/Reports/3_Store_Segment_Performance_Report">Store Segment Per-formance</option>
<option value="/public/Samples/Reports/04._Product_Results_by_Store_Type_Report">Product Resultsby Store Type</option></select><!--Provide a container to render your visualization--><div id="container"></div>
Note that the first line of the HTML above loads the Visualize.js library. You can then write the followingJavaScript code to display the report that the user has selected from the list.
visualize({auth: { ...}
}, function (v) {
//render report from provided resourcev("#container").report({
resource: $("#selected_resource").val(),error: handleError
});
$("#selected_resource").change(function () {//clean container$("#container").html("");//render report from another resourcev("#container").report({
resource: $("#selected_resource").val(),error:handleError
});});
//enable report chooser$(':disabled').prop('disabled', false);
//show errorfunction handleError(err){
alert(err.message);}
});
The Visualize.js API renders interactive reports just like JasperReports Server, but within your own page. Userscan sort columns, filter values, and even set conditional colors on Visualize.js reports. The Visualize.js API alsolets you interact with and modify the DOM (Document Object Model) of the report if you want to make thesesame changes programmatically.
If your reports accept parameter values, your JavaScript can update the params object of the report propertiesand invoke the run function again.
// elsewhere in your JavaScript// update report with new parametersreport
.params({ "Country": ["USA"] })
.run();
85

JasperReports Server Ultimate Guide
The API also provides functions to list the reports in the repository and get the list of report parameters. Theexample above is trivial, but the power of Visualize.js comes from this simple code. You can create dynamicuser interfaces that allow your users to select the reports they want to see and to set the parameters they want.
Furthermore, with JavaScript you can perform database lookups or your own calculations to provide values.Your values could be based on 3rd party API calls that get triggered from other parts of the page or other pagesin your app. When your reports can respond to dynamic events, they become truly embedded and much morerelevant to the user.
For further examples and reference documentation, see the JasperReports Server Programming Guide.
8.3 Repository HTTP APIThe HTTP interface provides an easy way to implement the API for accessing repository objects. However, theHTTP interface is not embeddable in the same way that the web services and Visualize.js APIs can beembedded in non-Jaspersoft applications. Rather, the HTTP interface is used primarily as shortcuts or entrypoints to commonly used features or content. Typically, the HTTP interface is accessed programmatically bygenerating the URL that returns HTML that displays either the desired object (in the case of report executionand repository URLs) or the content of repository objects (such as report output in the form of contentresources).
For example, the SuperMart demonstration data that ships with JasperReports Server commercial editions makesfrequent use of the HTTP interface. This simple API allows users to interact with the SuperMart dashboard,dynamically pass parameters from a report to an analysis view, and display the user’s personal folder based onthe login ID.
As shown in the following examples, the major entry points are:• flow.html• olap/**• fileview/**
The examples in this section are generalized to describe both the community and commercial editions ofJasperReports Server. For simplicity, this section refers to the deployment context generically. Forexample:
http://<host>:<port>/<context>/flow.html?_flowId=viewReportFlow&reportUnit=/reports/test
With the default deployments, the <context> refers to:• jasperserver-pro in the commercial editions• jasperserver in the community project
The Spring Web Flow has quite different syntax for flow files as compared to earlier versions, so if a userhas a custom flow, it needs to be upgraded. Spring offers a special tool, WebFlowUpgrader, which helpsto upgrade the flows. For information about migrating from Spring Web Flow 1.0 to Spring Web Flow 2.0,see the Webflow documentation.
8.3.1 Executing ReportUnitsThe following sections provide examples and details about URLs that execute reports.
86
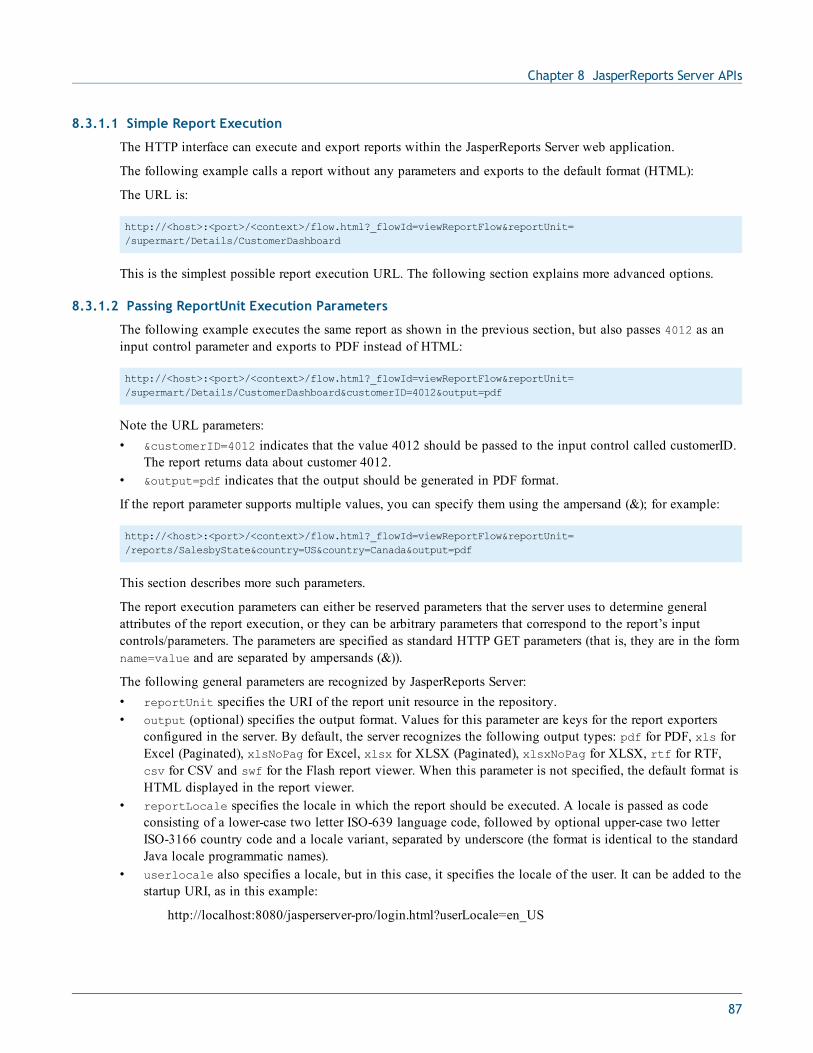
Chapter 8 JasperReports Server APIs
8.3.1.1 Simple Report Execution
The HTTP interface can execute and export reports within the JasperReports Server web application.
The following example calls a report without any parameters and exports to the default format (HTML):
The URL is:
http://<host>:<port>/<context>/flow.html?_flowId=viewReportFlow&reportUnit=/supermart/Details/CustomerDashboard
This is the simplest possible report execution URL. The following section explains more advanced options.
8.3.1.2 Passing ReportUnit Execution Parameters
The following example executes the same report as shown in the previous section, but also passes 4012 as aninput control parameter and exports to PDF instead of HTML:
http://<host>:<port>/<context>/flow.html?_flowId=viewReportFlow&reportUnit=/supermart/Details/CustomerDashboard&customerID=4012&output=pdf
Note the URL parameters:• &customerID=4012 indicates that the value 4012 should be passed to the input control called customerID.
The report returns data about customer 4012.• &output=pdf indicates that the output should be generated in PDF format.
If the report parameter supports multiple values, you can specify them using the ampersand (&); for example:
http://<host>:<port>/<context>/flow.html?_flowId=viewReportFlow&reportUnit=/reports/SalesbyState&country=US&country=Canada&output=pdf
This section describes more such parameters.
The report execution parameters can either be reserved parameters that the server uses to determine generalattributes of the report execution, or they can be arbitrary parameters that correspond to the report’s inputcontrols/parameters. The parameters are specified as standard HTTP GET parameters (that is, they are in the formname=value and are separated by ampersands (&)).
The following general parameters are recognized by JasperReports Server:• reportUnit specifies the URI of the report unit resource in the repository.• output (optional) specifies the output format. Values for this parameter are keys for the report exporters
configured in the server. By default, the server recognizes the following output types: pdf for PDF, xls forExcel (Paginated), xlsNoPag for Excel, xlsx for XLSX (Paginated), xlsxNoPag for XLSX, rtf for RTF,csv for CSV and swf for the Flash report viewer. When this parameter is not specified, the default format isHTML displayed in the report viewer.
• reportLocale specifies the locale in which the report should be executed. A locale is passed as codeconsisting of a lower-case two letter ISO-639 language code, followed by optional upper-case two letterISO-3166 country code and a locale variant, separated by underscore (the format is identical to the standardJava locale programmatic names).
• userlocale also specifies a locale, but in this case, it specifies the locale of the user. It can be added to thestartup URI, as in this example:
http://localhost:8080/jasperserver-pro/login.html?userLocale=en_US
87
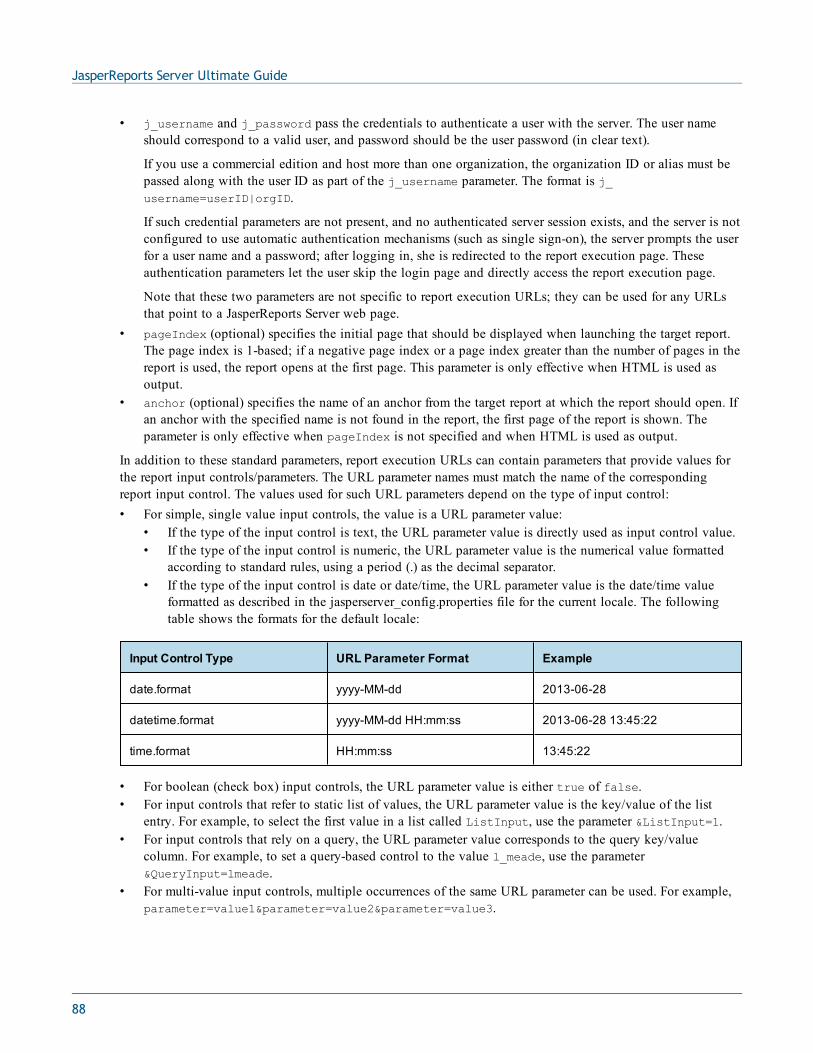
JasperReports Server Ultimate Guide
• j_username and j_password pass the credentials to authenticate a user with the server. The user nameshould correspond to a valid user, and password should be the user password (in clear text).
If you use a commercial edition and host more than one organization, the organization ID or alias must bepassed along with the user ID as part of the j_username parameter. The format is j_username=userID|orgID.
If such credential parameters are not present, and no authenticated server session exists, and the server is notconfigured to use automatic authentication mechanisms (such as single sign-on), the server prompts the userfor a user name and a password; after logging in, she is redirected to the report execution page. Theseauthentication parameters let the user skip the login page and directly access the report execution page.
Note that these two parameters are not specific to report execution URLs; they can be used for any URLsthat point to a JasperReports Server web page.
• pageIndex (optional) specifies the initial page that should be displayed when launching the target report.The page index is 1-based; if a negative page index or a page index greater than the number of pages in thereport is used, the report opens at the first page. This parameter is only effective when HTML is used asoutput.
• anchor (optional) specifies the name of an anchor from the target report at which the report should open. Ifan anchor with the specified name is not found in the report, the first page of the report is shown. Theparameter is only effective when pageIndex is not specified and when HTML is used as output.
In addition to these standard parameters, report execution URLs can contain parameters that provide values forthe report input controls/parameters. The URL parameter names must match the name of the correspondingreport input control. The values used for such URL parameters depend on the type of input control:• For simple, single value input controls, the value is a URL parameter value:
• If the type of the input control is text, the URL parameter value is directly used as input control value.• If the type of the input control is numeric, the URL parameter value is the numerical value formatted
according to standard rules, using a period (.) as the decimal separator.• If the type of the input control is date or date/time, the URL parameter value is the date/time value
formatted as described in the jasperserver_config.properties file for the current locale. The followingtable shows the formats for the default locale:
Input Control Type URL Parameter Format Example
date.format yyyy-MM-dd 2013-06-28
datetime.format yyyy-MM-dd HH:mm:ss 2013-06-28 13:45:22
time.format HH:mm:ss 13:45:22
• For boolean (check box) input controls, the URL parameter value is either true of false.• For input controls that refer to static list of values, the URL parameter value is the key/value of the list
entry. For example, to select the first value in a list called ListInput, use the parameter &ListInput=1.• For input controls that rely on a query, the URL parameter value corresponds to the query key/value
column. For example, to set a query-based control to the value l_meade, use the parameter&QueryInput=lmeade.
• For multi-value input controls, multiple occurrences of the same URL parameter can be used. For example,parameter=value1¶meter=value2¶meter=value3.
88

Chapter 8 JasperReports Server APIs
You can use a special marker URL parameter for multi-value input controls to specify that an empty listshould be used as the input control value. In this case, the name of the marker URL parameter is the nameof the input control, prefixed by an underscore; it doesn't require any value. This is useful when a multi-value input control has a non-empty list as its default value, and the user wants to override the defaultvalue with an empty list.
For example, consider a multi-value input control named MultiInput. By default, this parameter is a list oftwo values. To override this list of values with another set of two values, you could use the parameter&MultiInput=item1&MultiInput=item2, where item1 and item2 are the overriding list values. Tooverride the default with an empty list, use the parameter &_MultiInput.
If the report parameter values included in a report execution URL are not valid (for example, if a requiredparameter is missing or a parameter value is not valid), the user is prompted with the input controls so he cancorrect the values.
8.3.2 Linking to ContentThe HTTP interface can return generated content saved to the repository in PDF, HTML, Excel, or RTF format.
The following example links to a PDF file stored in the repository:
http://<host>:<port>/<context>/fileview/fileview/supermart/Details/CustomerDetail.pdf
8.3.3 Viewing Resources in the RepositoryThe following example displays all resources saved in the /reports/test folder in the repository:
http://<host>:<port>/<context>/flow.html?_flowId=searchFlow&folderUri=/reports/test
The repository search mechanism was upgraded in 4.0 and the syntax for selecting a folder in therepository was updated in 4.7. HTTP interfaces developed prior to 4.7 should be updated to use thesearchFlow&folderUri syntax to access a folder in the upgraded repository. HTTP interfacesdeveloped in versions 4.0 - 4.5.1 may have trouble accessing a folder in the repository.
The following example displays all resources of type olapview (analysis view) saved in all folders in therepository:
http://<host>:<port>/<context>/flow.html?_flowId=olapViewListFlow
8.4 The Public JasperReports Server APIThis section describes some of the important Java interfaces available in JasperReports Server, includingcommercial editions and Jaspersoft OLAP modules.
A subset of the Java classes and interfaces in JasperReports Server has been designated as the publicJasperReports Server API. These classes are marked with an @JasperServerAPI annotation, as demonstrated inthe example below.
89

JasperReports Server Ultimate Guide
package com.jaspersoft.jasperserver.api.metadata.jasperreports.domain;import com.jaspersoft.jasperserver.api.JasperServerAPI;import com.jaspersoft.jasperserver.api.metadata.common.domain.DataSource;@JasperServerAPIpublic interface ReportDataSource extends DataSource{…
The JavaDoc for the JasperReports Server API classes can be downloaded from the Support Portal (for thecommercial editions) or from the Jaspersoft community site (for the community project).
Classes included in the public API are more likely to be stable from release to release, so Java developers shoulduse them in preference to other classes which are not part of the API. Developers should note, however, that thepublic API is a small subset of all JasperReports Server classes; it doesn’t provide all of the functionality thatdevelopers may need, in which case you must create and use other classes. The public API will continue to beexpanded to provide APIs for new features, and future releases may fill some current gaps. Also note that thissection does not cover all JasperReports Server API classes.
These JasperReports Server Java APIs are a contract between JasperReports Server (includingJaspersoft OLAP) and other applications and services that are exposed as Java interfaces. If the APIschange in the future, the changes will be gradual.
8.4.1 Accessing API Implementations Using the Spring FrameworkMany of the implementations of the API interfaces are singletons, usually services, which are instantiated by theSpring Framework. The Spring bean configuration files control how these singletons are created and configured,so it is important to understand the files before writing Java code that will run in JasperReports Server using theAPI.
The following is a brief overview of Spring 3.1.0 and is not meant to cover all the possible ways to configureSpring. For more information on Spring, refer to its reference documentation athttp://static.springsource.org/spring/docs/3.1.x/spring-framework-reference/html/.
The Spring configuration files use XML to define Java singleton instances, called beans. In the JasperReportsServer web application, these files are located under the WEB-INF directory. Their file names begin withapplicationContext and end in .xml, for example, the file WEB-INF/applicationContext-adhoc.xml contains AdHoc-related beans:• Each instance of a singleton is defined by a <bean> element.• Its type is specified by the class attribute.• Its reference ID is specified by the id attribute.• Properties of the instance are set with the <property> element:JasperReports Server
• The name attribute corresponds to a Java property that follows JavaBean conventions. For example, aproperty with name abc should have a getter method getAbc() and a setter method setAbc().
• JasperReports ServerUsing the value attribute, properties can be set with a constant value.• Using the ref attribute, properties can be set with a reference to another bean.
Below is part of a definition from a sample custom data source implementation. It demonstrates all of theconventions above; the original file is samples/customDataSource/webapp/WEB-INF/applicationContext-hibernateDS.xml in the JasperReports Server distribution.
90
Chapter 8 JasperReports Server APIs
<!-- define a custom data source --><bean id="hibernateDataSource" class="com.jaspersoft.jasperserver.api.engine.jasperreports.util.CustomDataSourceDefinition"><!-- this property is always the same; it registers the custom ds --><property name="factory" ref="customDataSourceServiceFactory"/><!-- name used in message catalog and elsewhere --><property name="name" value="hibernateDataSource"/>
To add your own instances to the server, you first need information about the specific enhancement that youwant to implement. This determines the Java implementations that are required. A good example is creating acustom data source, which is documented in the JasperReports Server Administrator Guide. Samples of customdata sources are located in the JasperReports Server distribution under samples/customDataSource.
Once you have a Java class that you want instantiated along with JasperReports Server, you can deploy it bymodifying the webapp directory as follows:• Add your compiled Java class files to WEB-INF/classes, or create a JAR and add it to WEB-INF/lib.• Create a new Spring bean file under WEB-INF, using the naming convention described above.• Add a <bean> element for each object instance you want to create.• For each property you want to set, you must have a public setter and getter.• For each API implementation you want to access:
• Add a setter and getter to your implementation whose types match the Java type of the API.• Find out the ID of the API instance you want; some IDs are listed in the table below.• Add a <property> element to your bean with a ref attribute whose value is the ID of the API
instance.
As an example of a reference to another bean, please refer to the factory property in the Spring file excerptabove. The CustomDataSourceDefinition instance uses the factory property to refer to a singletonimplementation of CustomReportDataSourceServiceFactory, which has a bean ID of custom-DataSourceServiceFactory:• The CustomDataSourceDefinition implementation defines a factory JavaBean property by implementing the
following setter and getter:• public void setFactory(CustomReportDataSourceServiceFactory factory).• public CustomReportDataSourceServiceFactory getFactory().
• The <bean> element contains a <property> element with name set to factory and ref set tocustomDataSourceServiceFactory.
The following table contains the APIs described in the rest of this section, along with their corresponding beanIDs and descriptions of their functions.
API Bean ID Function
RepositoryService repositoryService Search, retrieve, and modify persistentobjects in the repository.
EngineService engineService Run reports and handle reportmetadata.
ReportDataSourceService andReportDataSourceServiceFactory
n/a Implement data sources used forrunning reports and other purposes.
Table 8-1 JasperReports Server Public Java API
91

JasperReports Server Ultimate Guide
API Bean ID Function
ReportSchedulingService reportSchedulingService Manage report schedules.
UserAuthorityService userAuthorityService Manage internal users and roles.
OlapConnectionService olapConnectionService Manage OLAP-specific repository andmodel runtime.
OlapManagementService olapManagementService Manage OLAP server run time.
ObjectPermissionService objectPermissionService Search, retrieve, and modify metadatarepository object permissions.
8.4.2 Repository APIIt’s easy to populate the repository (using metadata or output content) and subsequently exploit it. Thisfunctionality relies on a limited set of interfaces and classes.
8.4.2.1 Object Model and Service
The com.jaspersoft.jasperserver.api.metadata.common.service.RepositoryService interface iscentral to accessing the metadata repository. It exposes various methods to store, lookup, and retrieve contentfrom the repository. The repository is hierarchical; it is very similar to a file system. However, instead of files,the repository stores resources in a metadata representation of a tree structure.
All resources must have a name, label (display name), description, and type; the names must be unique within afolder. Resources reference their parent folder and are uniquely identified by their absolute URI. This URIconsists of the full folder path within the repository, suffixed with the resource name. For example, the URI forthe ContentFiles folder created when you run the installer is /ContentFiles.
From the object model perspective, all resources are instances of thecom.jaspersoft.jasperserver.api.metadata.common.domain.Resourceinterface and represent various entities that constitute the metadata (such as reports, data sources, datatypes,analysis views, and fonts), or generated content (such as generated report output in PDF or XLS format).
Even folders are special types of resources. Thecom.jaspersoft.jasperserver.api.metadata.common.domain.Folderinterface, which represents folders, directly inherits fromcom.jaspersoft.jasperserver.api.metadata.common.domain.Resource.
All interfaces that represent the main object model of the repository have convenience class implementations inthe com.jaspersoft.jasperserver.api.metadata.common.domain.client package; they have the Implsuffix added to their corresponding interface name. These implementations are shown in the examples thatfollow when you instantiate folders and resources.
8.4.2.2 Working with Folders
With the most minimal setup (manual WAR file deployment), the repository includes a single folder by default;it serves as the repository’s root directory. In this setup, Jaspersoft recommends that you create sensible folders(within root) to hold all your repository resources.
92
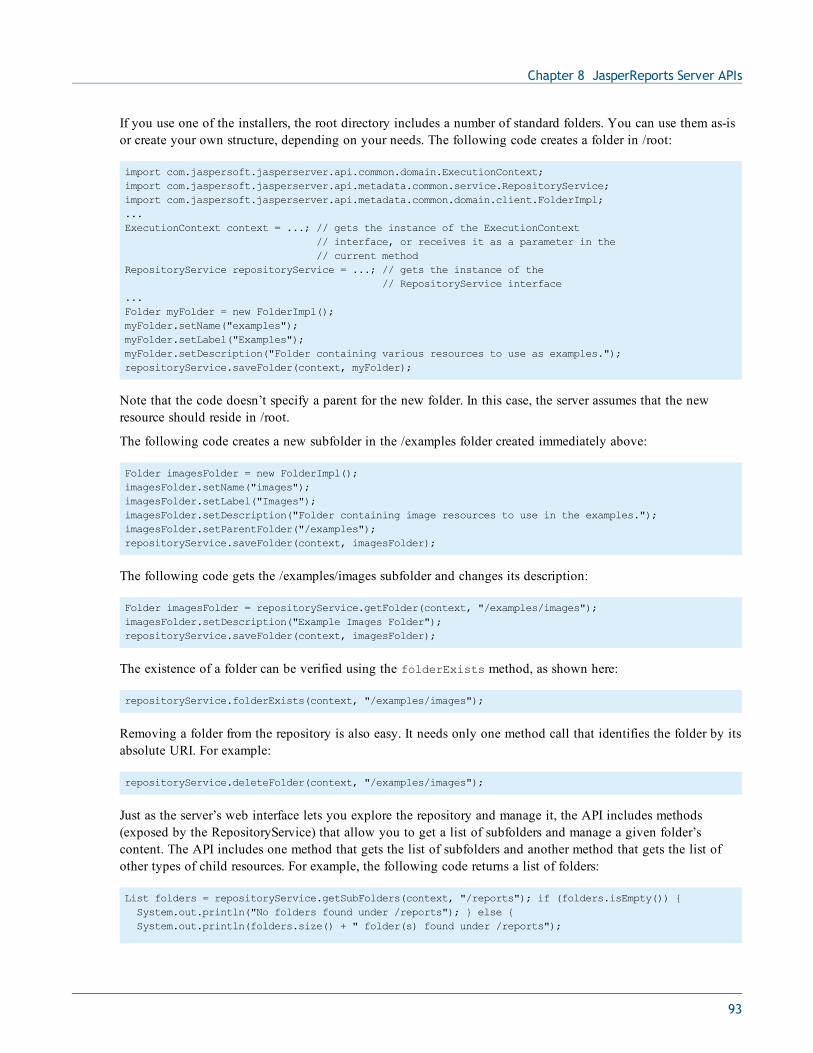
Chapter 8 JasperReports Server APIs
If you use one of the installers, the root directory includes a number of standard folders. You can use them as-isor create your own structure, depending on your needs. The following code creates a folder in /root:
import com.jaspersoft.jasperserver.api.common.domain.ExecutionContext;import com.jaspersoft.jasperserver.api.metadata.common.service.RepositoryService;import com.jaspersoft.jasperserver.api.metadata.common.domain.client.FolderImpl;...ExecutionContext context = ...; // gets the instance of the ExecutionContext
// interface, or receives it as a parameter in the// current method
RepositoryService repositoryService = ...; // gets the instance of the // RepositoryService interface
...Folder myFolder = new FolderImpl();myFolder.setName("examples");myFolder.setLabel("Examples");myFolder.setDescription("Folder containing various resources to use as examples.");repositoryService.saveFolder(context, myFolder);
Note that the code doesn’t specify a parent for the new folder. In this case, the server assumes that the newresource should reside in /root.
The following code creates a new subfolder in the /examples folder created immediately above:
Folder imagesFolder = new FolderImpl();imagesFolder.setName("images");imagesFolder.setLabel("Images");imagesFolder.setDescription("Folder containing image resources to use in the examples.");imagesFolder.setParentFolder("/examples");repositoryService.saveFolder(context, imagesFolder);
The following code gets the /examples/images subfolder and changes its description:
Folder imagesFolder = repositoryService.getFolder(context, "/examples/images");imagesFolder.setDescription("Example Images Folder");repositoryService.saveFolder(context, imagesFolder);
The existence of a folder can be verified using the folderExists method, as shown here:
repositoryService.folderExists(context, "/examples/images");
Removing a folder from the repository is also easy. It needs only one method call that identifies the folder by itsabsolute URI. For example:
repositoryService.deleteFolder(context, "/examples/images");
Just as the server’s web interface lets you explore the repository and manage it, the API includes methods(exposed by the RepositoryService) that allow you to get a list of subfolders and manage a given folder’scontent. The API includes one method that gets the list of subfolders and another method that gets the list ofother types of child resources. For example, the following code returns a list of folders:
List folders = repositoryService.getSubFolders(context, "/reports"); if (folders.isEmpty()) {System.out.println("No folders found under /reports"); } else {System.out.println(folders.size() + " folder(s) found under /reports");
93

JasperReports Server Ultimate Guide
for (Iterator it = folders.iterator(); it.hasNext();) {Folder folder = (Folder) it.next();System.out.println("Subfolder: " + folder.getName());
}}
8.4.2.3 Repository Resources
Adding a new resource in the repository differs from adding a folder, despite the fact that folders are themselvesresources. Unlike folders, which are simple in structure and behavior, other types of resources might need to beinitialized in a special way, and the initialization logic would probably reside in a service. As a result, wecreated a unique API for managing repository resources; you can use it regardless of type and internal structure.
New resource instances are created by making a special request to the RepositoryService, not by directinstantiation. This can be seen in the following example, where you create a new image resource and put it inthe repository by loading it from an image file on disk:
FileResource img = (FileResource) repositoryService.newResource(context, FileResource.class);img.setFileType(FileResource.TYPE_IMAGE);img.setName("logo.gif");img.setLabel("Logo Image");img.setDescription("Example Logo Image");img.readData(new FileInputStream("C:\\Temp\\MyImages\\logo.gif"));img.setParentFolder("/examples/images");repositoryService.saveResource(context, img);
To retrieve a resource from the repository, you could call the following method on the RepositoryServiceinstance:
// retrieve a data source resource from the repositoryResource resource = repositoryService.getResource(context,
"/datasources/mydatasource");if (resource == null) {throw new RuntimeException("Resource not found at /datasources/mydatasource"); }if (resource instanceof JdbcReportDataSource){JdbcReportDataSource datasource = (JdbcReportDataSource) resource;System.out.println("JDBC data source URI: " + datasource.getConnectionUrl()); }
else if (resource instanceof JndiJdbcReportDataSource) {JndiJdbcReportDataSource datasource = (JndiJdbcReportDataSource) resource;System.out.println("JNDI data source name: " + datasource.getJndiName()); }
else {throw new RuntimeException("Was expecting /datasources/mydatasource to be a datasource"); }
You can save or persist a resource in the repository by calling the following (as already seen above where youcreated the image resource) on the RepositoryService instance:
public void saveResource(ExecutionContext context, Resource resource);
Removing a resource from the repository is done by calling repositoryService.deleteResource:
try {repositoryService.deleteResource(context, "/reports/myreport");System.out.println("Resource /reports/myreport deleted");
94

Chapter 8 JasperReports Server APIs
} catch (Exception e) {System.err.println("Not able to delete resource /reports/myreport");e.printStackTrace();
}
8.4.2.4 Content Files
Content resources are specially-created resource objects that hold binary data. The data is usually the result ofusing some of the BI tools available in JasperReports Server, such as the report-generating services, whichproduce PDF and XLS output. The output can be stored in the repository for later use, especially if the reportswere generated in the background as scheduled jobs.
Creating a content resource and adding it to the repository is similar to what you've seen in the previoussection, where you created an image resource:
ContentResource pdfResource = new ContentResourceImpl();pdfResource.setFileType(ContentResource.TYPE_PDF);pdfResource.setName("report.pdf");pdfResource.setLabel("PDF Report");pdfResource.setDescription("Example PDF File");pdfResource.readData(new FileInputStream("C:\\Temp\\MyReports\\report.pdf"));pdfResource.setParentFolder("/examples");repositoryService.saveResource(context, pdfResource);
Retrieving the binary data of a content resource from the repository is achieved by using thegetContentResourceData method of the RepositoryService, as follows:
FileResourceData fileResourceData =repositoryService.getContentResourceData(context, "/examples/report.pdf");
byte[] pdfContentBytes = fileResourceData.getData();
8.4.2.5 Repository Search
You get the list of child resources within a given folder by using filter criteria. The server expects an instance ofthe com.jaspersoft.jasperserver.api.metadata.view.domain.FilterCriteria class as a parameter inthe method call; the list of returned resources matches certain the selected filter conditions.
The only required condition for a FilterCriteria instance is that the returned resources’ parent folder mustmatch a given folder. For example:
FilterCriteria filterCriteria = FilterCriteria.createFilter();filterCriteria.addFilterElement(FilterCriteria.createParentFolderFilter(folderURI));List resources = repositoryService.loadResourcesList(context, filterCriteria);
The loadResourcesList method returns a list of ResourceLookup objects that contain basic resourceattributes (such as the name and label). To retrieve the full resource definition, you must use the getResourcemethod. Further filtering can be applied to get a refined list of resources based on a given resource type, or otherconditions. For example, the following retrieves all the images and JRXMLs in a folder:
FilterCriteria filterCriteria = FilterCriteria.createFilter(FileResource.class);filterCriteria.addFilterElement(FilterCriteria.createParentFolderFilter(folderURI));FilterElementDisjunction fileTypeDisj = filterCriteria.addDisjunction();fileTypeDisj.addFilterElement(FilterCriteria.createPropertyEqualsFilter("fileType",FileResource.TYPE_IMAGE);
95

JasperReports Server Ultimate Guide
fileTypeDisj.addFilterElement(FilterCriteria.createPropertyEqualsFilter("fileType",FileResource.TYPE_JRXML);
List resources = repositoryService.loadResourcesList(context, filterCriteria);
To develop a more detailed understanding of the filter criteria, please refer to the API Javadoc.
8.4.3 Engine ServiceThe engine service includes methods related to report execution. The engineService interface includes thegetReportExecutionStatusList and getSchedulerReportExecutionStatusList methods for listingrunning report jobs or scheduled running report jobs.
The engineService is used internally for report execution. Except for thegetReportExecutionStatusList and getSchedulerReportExecutionStatusListmethods,methods in the engineService service should not be accessed directly.
To retrieve the list of all instances of the All Accounts report that are currently running, you would use codesimilar to this. The list of report jobs retrieved includes scheduled jobs as well as jobs users are running via theUI:
ReportExecutionStatusSearchCriteria criteria = newReportExecutionStatusSearchCriteria();
criteria.setJobLabel("All Accounts");List<ReportExecutionStatusInformation> reportExecutionList =engineService.getReportExecutionStatusList(criteria);
To retrieve only scheduled instances of the All Accounts report that are currently running, you would use codesimilar to this:
SchedulerReportExecutionStatusSearchCriteria criteria = newSchedulerReportExecutionStatusSearchCriteria();
criteria.setJobLabel("All Accounts");List<ReportExecutionStatusInformation> reportExecutionList =engineService.getSchedulerReportExecutionStatusList(criteria);
Once you have a list of jobs, you can cancel those jobs using the reportExecutionStatusInformationinterface:
for (ReportExecutionStatusInformation reportExecution : reportExecutionList) {reportExecution.cancel();
}
8.4.4 Report Data Source Service APIJasperReports Server comes with built-in support for JDBC, JNDI, Mondrian, and XML/A data sources forreporting purposes. Each of these custom data sources has an implementation ofcom.jaspersoft.jasperserver.api.metadata.jasperreports.service.ReportDataSourceServiceinterface. This service is responsible for setting up and tearing down data source connections in the server.
The setReportParameterValues(Map parameterValues) is called before running a report and creates theresources needed by JasperReports to obtain a JRDataSource, then it adds them to the parameter map.
96

Chapter 8 JasperReports Server APIs
The closeConnection() method cleans up any resources allocated in setReportParameterValues().
The custom data source API enables easy integration of a new ReportDataSourceService implementation.
You can find further details on creating and configuring custom data sources in Chapter 5, “Custom DataSources,” on page 45.
8.4.5 Report Scheduling APIReports on the server can be executed asynchronously using the Report Scheduling API. Asynchronous reportexecution involves defining the report job and using the report scheduling service to schedule it.
8.4.5.1 Report Jobs
A report job definition consists of:• Report attributes. Each job must be linked to a single JasperReport on the server. If applicable, the job must
also contain values for the report input parameters.• Scheduling attributes. Instruct the scheduler when to execute the job. A report job can be a one-time job
that can be launched immediately or at a specified moment, or a recurring job that runs repeatedly atspecified times.
Two types of recurrence are supported by default:• Simple recurrence can be used to schedule a job to repeat at fixed time intervals, such as every 4 hours,
every 2 days, or every week. The job start date attribute is used to specify the moment of the firstoccurrence. The user can specify the number of times the job should occur or an end date for the job.
• Calendar recurrence can be used to schedule a job to repeat at specified calendar moments, such as at 8PM every work day or on the first of every month.
• Output attributes. Instruct the scheduling service on what to do with the report output. The job creator hasto specify the report output formats and the repository location where the report output is saved. It can alsospecify one or more addresses to which email notifications is sent. The notifications can include the reportoutput.
A report job definition is an instance of thecom.jaspersoft.jasperserver.api.engine.scheduling.domain.ReportJobbean class. To instantiate a new report job definition, you would use code similar to the following:
ReportJob job = new ReportJob();job.setLabel("foo"); //set the job labeljob.setDescription("bar"); //set the job description
The job source is created as a sub-bean:
ReportJobSource source = new ReportJobSource();source.setReportUnitURI("/test/reportURI"); //set the report to runMap params = new HashMap();params.put("param1", new Integer(5));params.put("param2", "value2");source.setParametersMap(params); //set the report input parameter values
job.setSource(source); //set the job source
The job trigger is used to specify when the job should occur. The basiccom.jaspersoft.jasperserver.api.engine.scheduling.domain.ReportJobTriggerbean type is abstract; two concrete types extend it:
97

JasperReports Server Ultimate Guide
com.jaspersoft.jasperserver.api.engine.scheduling.domain.ReportJobSimpleTrigger andcom.jaspersoft.jasperserver.api.engine.scheduling.domain.ReportJobCalendarTrigger.
For example, to create a job that fires 20 times every 10 days you would use code similar to this:
Date startDate = ...ReportJobSimpleTrigger trigger = new ReportJobSimpleTrigger();trigger.setStartDate(startDate);trigger.setOccurrenceCount(20);trigger.setRecurrenceInterval(10);trigger.setRecurrenceIntervalUnit(ReportJobSimpleTrigger.INTERVAL_DAY);job.setTrigger(trigger);
Next, you need to specify the job output attributes. To set the output filename and format, use code similar tothe following:
job.setBaseOutputFilename("foo"); //the base output file namejob.addOutputFormat(ReportJob.OUTPUT_FORMAT_PDF); //output PDFjob.addOutputFormat(ReportJob.OUTPUT_FORMAT_HTML); //and HTML
You can send your output to several different locations; the most common output destination is the repository.Alternative output locations include an FTP server or a user’s local drive. To output to the jasperserverrepository, use code similar to this:
ReportJobRepositoryDestination repositoryDestination = newReportJobRepositoryDestination();
repositoryDestination.setFolderURI("/test/scheduled");// the repository folder where to output the files
repositoryDestination.setSequentialFilenames(true);//append a timestamp to the file names
job.setContentRepositoryDestination(repositoryDestination);
To upload the output to an FTP server instead of the repository, use code similar to this:
FTPInfo ftpInfo = new FTPInfo();ftpInfo.setUserName("jsmith$mycompany");ftpInfo.setPassword("_________________");ftpInfo.setFolderPath("/Shared/Users/JSmith");ftpInfo.setServerName("ftp-mycompany.ftpserver.com");job.getContentRepositoryDestination().setOutputFTPInfo(ftpInfo);
To send the output to a user’s local drive, use code similar to this:
Optionally, you can instruct the reporting scheduler to send a notification once the job completes. This noticenormally goes to the user who created the report:
ReportJobMailNotification mailNotification = new ReportJobMailNotification();mailNotification.addTo("[email protected]"); //the recipientmailNotification.setSubject("Scheduled report"); //the subjectmailNotification.setMessageText("Executed report.\n"); //the message bodymailNotification.setResultSendType(ReportJobMailNotification.RESULT_SEND_ATTACHMENT);
98
Chapter 8 JasperReports Server APIs
//send the report output as attachmentsmailNotification.setSkipNotificationWhenJobFails(true);//prevents email for failed jobsjob.setMailNotification(mailNotification);
ReportJobMailNotification has a number of field types, including RESULT_SEND, which embeds a link inthe email, RESULT_SEND_ATTACHMENT which sends the results as a zipped attachment, RESULT_SEND_ATTACHMENT_NOZIP, and RESULT_SEND_EMBED, which embeds the results as HTML content in the email.RESULT_SEND can only be used when the output is saved to the repository usingsetContentRepositoryDestination().
You can also optionally email an alert to the job creator, an administrative user, or both. For example, to sendan alert when the job fails, use code similar to the following:
ReportJobAlert alert = new ReportJobAlert();alert.setRecipient(ReportJobAlert.Recipient.ADMIN);// sets first recipient. Other options are OWNER, BOTH, NONEalert.setMessageText("Report failed"); //the message bodyalert.setJobState(ReportJobAlert.JobState.FAIL_ONLY);ArrayList<String> to_Addresses = new ArrayList<String>();//list of additional addresses to receive ccto_Addresses.add("[email protected]");to_Addresses.add("[email protected]");alert.setToAddresses(to_Addresses);job.setAlert(alert);
The ADMIN recipient is set by role; the default is ROLE_ADMINISTRATOR. The ADMIN recipient canbe changed in the administratorRole bean in <js-src>/jasperserver/jasperserver-war/src/main/webapp/WEB-INF/applicationContext-report-scheduling.xml.
For example, suppose you have used Manage > Roles in the JasperServer user interface to add therole ROLE_SCHEDULER_ADMIN. To set that user as the recipient for all ADMIN email alerts, modifythe administratorRole bean as follows:<entry key="administratorRole" value="ROLE_SCHEDULER_ADMIN">
8.4.5.2 Report Job Model
A report job model allows you to specify scheduling and output attributes for multiple report jobs at the sametime. A report job model takes a list of report job IDs and a single set of attributes for all report jobs in the list.
A report job model definition consists of:• Scheduling attributes. Instruct the scheduler when to execute the job. A report job model can specify a one-
time job, a simple recurring job, or a calendar recurring job.• Output attributes. Instruct the scheduling service what to do with the report output.
You only need to define those attributes you wish to update; empty attributes are left unchanged in the originalreport jobs.
A report job model definition is an instance of thecom.jaspersoft.jasperserver.api.engine.scheduling.domain.ReportJobModelbean class, which extends ReportJob.
To instantiate a new report job model definition, you would use code similar to the following:
ReportJobModel jobModel= new ReportJobModel();
99
JasperReports Server Ultimate Guide
To set the destination, mail notification, and schedule for a report job model, you would use code similar to thefollowing:
ReportJobRepositoryDestinationModel destinationModel = newReportJobRepositoryDestinationModel();
destinationModel.setFolderURI("/test/operations");jobModel.setContentRepositoryDestinationModel(destinationModel);
ReportJobMailNotificationModel mailNotificationModel = newReportJobMailNotificationModel();
mailNotificationModel.setSkipNotificationWhenJobFails(false);//send email even when job failsmailNotificationModel.setIncludeStackTraceWhenJobFails//send stack trace when job failsjobModel.setMailNotificationModel(mailNotificationModel);
Date startDate = ...ReportJobSimpleTriggerModel trigger = new ReportJobSimpleTriggerModel();trigger.setStartDate(startDate);trigger.setOccurrenceCount(20);trigger.setRecurrenceInterval(10);trigger.setRecurrenceIntervalUnit(ReportJobSimpleTrigger.INTERVAL_DAY);jobModel.setTriggerModel(trigger);
Any report job attributes not updated by ReportJobModel remain unchanged. In the example above, theexisting email recipient, subject, and message remain the same for the updated jobs, as well as any existingalerts.
The report scheduling service also uses ReportJobModel to retrieve a list of all active report jobs that matchthe attributes specified in the report job model. The list of report jobs retrieved via ReportJobModel can besorted using the ReportJobSortType subclass of ReportJobModel. See 8.4.5.5, “Report Scheduling Service,”on page 100 for more information.
8.4.5.3 Report Job Summary
Report job summaries hold information returned by the scheduler service. The ReportJobSummary class has anumber of methods that allow you to retrieve specific information about the summary. Some useful methods are:• getStateCode: This method returns the execution state of the report job, such as STATE_COMPLETE,
STATE_EXECUTING, etc.• getNextFireTime: This method returns the next time the job is scheduled to run; returns null if not
scheduled in the future.• getPreviousFireTime: This method returns the last time the job was run; returns null if the job has not
yet been executed.
8.4.5.4 Report Job ID Holder
The ReportSchedulingService assigns every active report job a report job ID. This ID can be wrapped usingthe ReportJobIDHolder class; ReportJobIDHolder is used by some report scheduling API methods.
8.4.5.5 Report Scheduling Service
The scheduling service is used to schedule a report job and provide information about existing jobs. The built-in scheduling service implementation consists of a Hibernate-based component that persists job definitions anda Quartz scheduler that schedules and fires the jobs.
100
Chapter 8 JasperReports Server APIs
Once a report job definition is created, it is passed to the scheduling service:
ReportSchedulingService schedulingService = ...ReportJob job = ...schedulingService.scheduleJob(executionContext, job);
The ReportSchedulingService is not a Java object that is included in the API; instead, you mustinject a ReportSchedulingService instance (that is, define a bean calledreportSchedulingService using Spring). Your bean should include custom code the producesthe desired behavior. For more information on defining a bean, see 8.4.1, “Accessing APIImplementations Using the Spring Framework,” on page 90.
The scheduling service also contains methods for the removal of one or several existing report jobs:removeScheduledJob and removeScheduledJobs.
To load the full report job definition for a job, use the getScheduledJob method. The job definition can bealtered then updated using the updateScheduledJob service method.
A list of report jobs can be altered and updated using the updateScheduledJobs service method.updateScheduledJobs takes a ReportJobModel and updates the specified jobs to match the attributes in theReportJobModel; unspecified attributes remain unchanged. The trigger is handled somewhat differently fromthe other attributes. A Boolean parameter, replaceTriggerIgnoreType, specifies one of two options:• true: Replace the trigger in all listed report jobs with the trigger in the ReportJobModel.• false: If a trigger is present in the report job model, check that all listed report jobs have the same trigger
type (SimpleTrigger or CalendarTrigger) as the report job model. If one or more report jobs have adifferent trigger type, update will fail for all report jobs.
For example, to update two report jobs, including the trigger, to match the parameters in a specified report jobmodel, you would use code similar to the following:
List<ReportJob> reportJobs = new ArrayList<ReportJob>();reportJobs.add(job_01);reportJobs.add(job_02);
ReportJobModel jobModel = ...updateScheduledJobs(executionContext, reportJobs, jobModel,true) //replaceTriggerIgnoreType - when true, replace trigger in the report jobs
with the trigger from the model.
Caution is advised when updating the job trigger, since the original Quartz trigger is dropped and a newtrigger that corresponds to the updated attributes is created.
Two methods of the scheduling service let you retrieve a list of jobs. The retrieved list consists of instances ofcom.jaspersoft.jasperserver.api.engine.scheduling.domain.ReportJobSummary that contain basicjob attributes, plus runtime attributes such as job status and previous/next fire times.• getScheduledJobSummaries can be used as follows:
• Retrieves job summaries of all active report jobs defined in the scheduler.• With a reportUnitURI, retrieves the list of job summaries for scheduled jobs for a report unit.• With a ReportJobModel along with other parameters, retrieves the list of scheduled job summaries that
match the criteria specified by the ReportJobModel.• getJobsByNextFireTime retrieves the list of all jobs with a next fire time in a specified time interval.
101
JasperReports Server Ultimate Guide
For example to get all active jobs that match a report job model, you would use code similar to the following:
ReportJobModel reportJobCriteria = ...int startIndex = 5 //return all jobs after the first 5 (starts with 0)int numberOfRows = 30 //number of jobs returned per pagegetScheduledJobSummaries(executionContext, reportJobCriteria,startIndex,numberOfRows,SORTBY_REPORTNAME, //value of enum class ReportJobModel.ReportJobSortTypetrue); //when true, sort in ascending order
To get all jobs that are scheduled with their next fire time between startDate and endDate, you would usecode similar to the following. The next fire time is the value retrieved byReportJobSummary.getNextFireTime.
List<ReportJobSummary> jobList = newDate startDate = ...Date endDate = ...List<ReportJobSummary> jobList =schedulingService.getJobsByNextFireTime(executionContext,null, startDate, endDate, null);
The pause and resume methods let you pause or resume a list of jobs. To pause all the jobs retrieved by theprevious call, use code similar to the following. If an alert is set, pausing the job triggers the alert:
schedulingService.pause(jobList, true);
The pauseByID and resumeByID methods let you pause or resume a ReportJobIDHolder list.
8.4.5.6 Report Jobs Scheduler
The ReportJobsScheduler service includes methods for adding, getting, and deleting calendars. Calendars inReportJobsScheduler service are implementations of the Quartz Calendar interface. They specify timesduring which scheduled jobs do not fire. For information about Quartz calendars, see the Quartz APIdocumentation.
The ReportJobsScheduler service is used internally by the central scheduling service. Except forthe calendar methods, most other methods in the ReportJobsScheduler service should not beaccessed directly by the report scheduling code.
For example, to register a Quartz calendar, myHolidayCalendar(), with the ReportJobsScheduler, youwould use code similar to the following:
ReportJobsScheduler.addCalendar("US Holiday Calendar",myHolidayCalendar(),true, //overwrite any existing calendar with the same nametrue) //update existing triggers that refer to this calendar
Other methods allow you to delete a calendar, retrieve a calendar by name, or get a list of the names of allregistered calendars: deleteCalendar, getCalendar, and getCalendarNames.
102
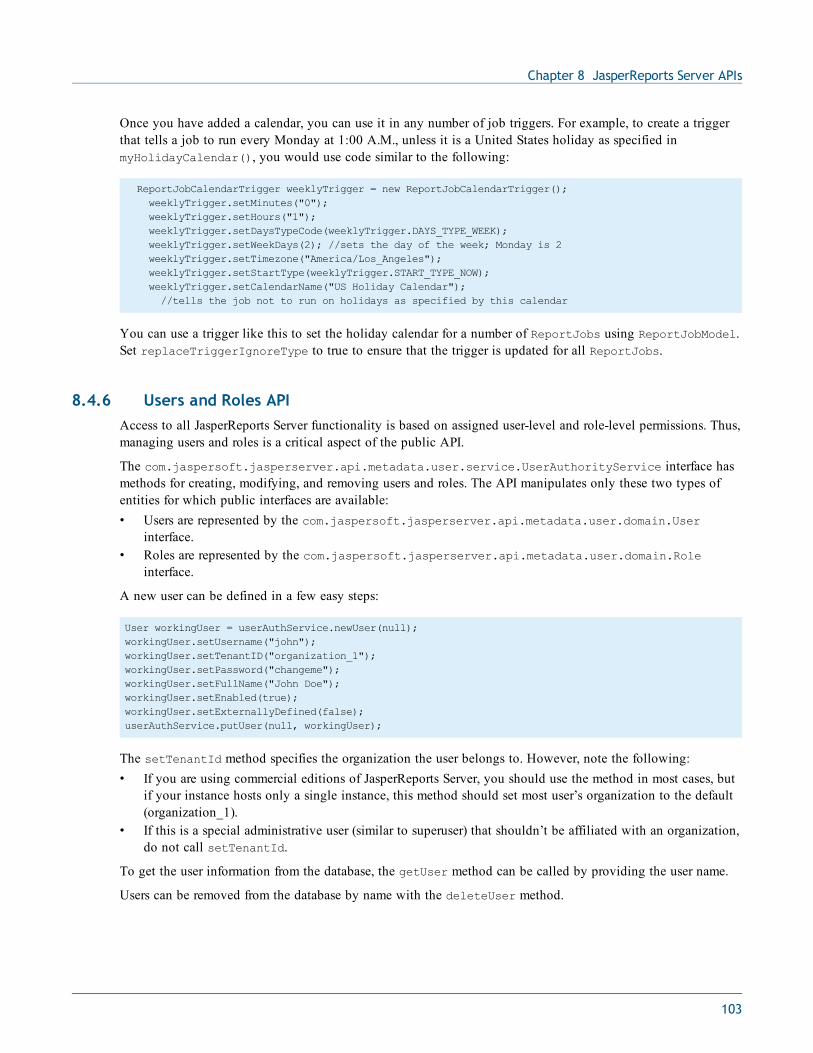
Chapter 8 JasperReports Server APIs
Once you have added a calendar, you can use it in any number of job triggers. For example, to create a triggerthat tells a job to run every Monday at 1:00 A.M., unless it is a United States holiday as specified inmyHolidayCalendar(), you would use code similar to the following:
ReportJobCalendarTrigger weeklyTrigger = new ReportJobCalendarTrigger();weeklyTrigger.setMinutes("0");weeklyTrigger.setHours("1");weeklyTrigger.setDaysTypeCode(weeklyTrigger.DAYS_TYPE_WEEK);weeklyTrigger.setWeekDays(2); //sets the day of the week; Monday is 2weeklyTrigger.setTimezone("America/Los_Angeles");weeklyTrigger.setStartType(weeklyTrigger.START_TYPE_NOW);weeklyTrigger.setCalendarName("US Holiday Calendar");//tells the job not to run on holidays as specified by this calendar
You can use a trigger like this to set the holiday calendar for a number of ReportJobs using ReportJobModel.Set replaceTriggerIgnoreType to true to ensure that the trigger is updated for all ReportJobs.
8.4.6 Users and Roles APIAccess to all JasperReports Server functionality is based on assigned user-level and role-level permissions. Thus,managing users and roles is a critical aspect of the public API.
The com.jaspersoft.jasperserver.api.metadata.user.service.UserAuthorityService interface hasmethods for creating, modifying, and removing users and roles. The API manipulates only these two types ofentities for which public interfaces are available:• Users are represented by the com.jaspersoft.jasperserver.api.metadata.user.domain.User
interface.• Roles are represented by the com.jaspersoft.jasperserver.api.metadata.user.domain.Role
interface.
A new user can be defined in a few easy steps:
User workingUser = userAuthService.newUser(null);workingUser.setUsername("john");workingUser.setTenantID("organization_1");workingUser.setPassword("changeme");workingUser.setFullName("John Doe");workingUser.setEnabled(true);workingUser.setExternallyDefined(false);userAuthService.putUser(null, workingUser);
The setTenantId method specifies the organization the user belongs to. However, note the following:• If you are using commercial editions of JasperReports Server, you should use the method in most cases, but
if your instance hosts only a single instance, this method should set most user’s organization to the default(organization_1).
• If this is a special administrative user (similar to superuser) that shouldn’t be affiliated with an organization,do not call setTenantId.
To get the user information from the database, the getUser method can be called by providing the user name.
Users can be removed from the database by name with the deleteUser method.
103

JasperReports Server Ultimate Guide
Equivalent methods for managing roles are available in the UserAuthorityService. You can assign users toroles using the following two methods:
public void addRole(ExecutionContext context, User aUser, Role role);public void removeRole(ExecutionContext context, User aUser, Role role);
Additional methods for finding users with specific roles are available; you can find details about them if youconsult the Javadoc for the UserAuthorityService interface.
8.4.7 Object Permissions APIAn object permission represents the right to perform a certain action on a repository resource by a user. Accessto all functionality relies on a security mechanism that checks if the user has the right to perform the currentaction on the given object or resource. Thecom.jaspersoft.jasperserver.api.metadata.user.service.ObjectPermissionServiceinterface grants or revokes permissions on an object to users and roles; it has methods for creating andremoving permissions on objects and recipients.
An object permission is represented by an implementation instance of thecom.jaspersoft.jasperserver.api.metadata.user.domain.ObjectPermissioninterface and holds information about the recipient (User or Role instance), the type of permissions granted tothe user (combination of numeric constants defined in the Spring Security classorg.springframework.security.acl.basic.SimpleAclEntry), and the resource to which they apply.
The following illustrates how to create an object permission on an image resource within the repository:
Resource resource = ..an existing repository resource..ObjectPermission permission = objectPermissionService.newObjectPermission(null);permission.setURI(resource.getURIString());permission.setPermissionRecipient(user);permission.setPermissionMask(SimpleAclEntry.READ);objectPermissionService.putObjectPermission(null, permission);
Revoking object permissions can be done with one of the following public methods exposed by this service:
public void deleteObjectPermission(ExecutionContext context,ObjectPermission objPerm);
public void deleteObjectPermissionForObject(ExecutionContext context,Object targetObject);
public void deleteObjectPermissionsForRecipient(ExecutionContext context,Object recipient);
8.4.8 OLAP Connection API
This section describes functionality that is available only in Jaspersoft OLAP. Contact Jaspersoft to obtainthe software.
OLAP interactions through the Jaspersoft OLAP user interface and web services based on XML/A are supportedby the repository and dedicated APIs. The repository can contain the following OLAP-related objects:• OlapUnit. This is the data needed for an analysis view. It contains an MDX query and an
OLAPClientConnection.
104

Chapter 8 JasperReports Server APIs
• MondrianConnection. Implementor of OLAPClientConnection. It contains a Mondrian schema and a JDBCor JNDI connection.
• XMLAConnection. Implementor of OLAPClientConnection. It contains a URL to an XML/A service andan optional data security definition.
• MondrianXMLADefinition. Jaspersoft OLAP can operate as an XML/A server on top of Mondrianconnections. These objects catalog what can be accessed through XML/A.
The OLAP Connection API provided by Jaspersoft OLAP is simple, as most of the underlying functionality iswithin Mondrian (OLAP query engine, XML/A server) or JPivot (OLAP user interface). This call creates aJPivot-compatible OlapModel, based on the relevant OlapUnit:
public OlapModel createOlapModel(ExecutionContext context, OlapUnit olapUnit );
The call should be made and the model object put into the user session before redirecting to the JPivot JSPviewOlap.jsp. An example is in ViewOlapModelAction:
OlapUnit olapUnit = (OlapUnit)getRepository().getResource(executionContext,viewUri);
OlapModel model =getOlapConnectionService().createOlapModel(executionContext, olapUnit);
The following call retrieves the server-wide Mondrian properties:
// create a local Mondrian OLAP connection corresponding to a Mondrian connection resource defined inthe repository MondrianConnection connectionResource = ..get the resource from the repository.mondrian.olap.Util.PropertyList connectProperties =olapConnectionService.getMondrianConnectProperties(context,connectionResource);
mondrian.olap.Connection olapConnection =mondrian.olap.DriverManager.getConnection(connectProperties, null, false);mondrian.olap.Query query = olapConnection.parseQuery(..MDX query..);mondrian.olap.Result olapResult = olapConnection.execute(query); ...
See the Mondrian Technical Guide for details
These calls can be used to validate an OlapUnit object while you are editing in the UI:
public ValidationResult validate(ExecutionContext context, OlapUnit unit);public ValidationResult validate(ExecutionContext context,OlapUnit unit,FileResource schema,OlapClientConnection conn,ReportDataSource dataSource);
8.4.9 Flushing the OLAP Cache Using the APIJaspersoft OLAP maintains a cache of previously-retrieved results in order to achieve high performance. There isa simple interface for flushing the entire cache programmatically, an action that is required when new data isinserted into databases while Jaspersoft OLAP is running.
public interface OlapManagementService {public void flushOlapCache();}
105

JasperReports Server Ultimate Guide
The interface can be configured as a Spring bean or instantiated with a standard Java constructor call.com.jaspersoft.jasperserver.api.metadata.olap.service.impl.OlapManagementServiceImplis the default implementation of the interface.
8.5 Ad Hoc Launcher Java API
This section describes functionality that can be restricted by the software license for JasperReportsServer. If you don’t see some of the options described in this section, your license may prohibit you fromusing them. To find out what you're licensed to use, or to upgrade your license, contact Jaspersoft.
When users want to create a new view in the Ad Hoc Editor, they are normally presented with a page thatallows them to choose the Topic, Domain, or OLAP client connections that will form the basis of the view. Theselected Topic or Domain provides a query and a list of fields that can be used in the new view.
The Ad Hoc Launcher API allows a developer to replace the Source dialog with an alternative user interface forselecting data. This replacement for the Source dialog is referred to as an Ad Hoc launcher because the user canlaunch the Ad Hoc Editor interface after selecting and setting up the data. Whereas the Source dialog can onlygive users a choice of the queries previously stored in the repository, an Ad Hoc launcher implementationenables them to have full control over the data source, query, and fields to be used. This gives developers awide latitude for creating data selection interfaces tailored to the needs of their users.
Creating an Ad Hoc launcher involves modifying the JasperReports Server web application by adding one ormore servlet pages that gather user input for the setup required by the Ad Hoc Editor. When the user is ready tostart laying out the view, the Ad Hoc launcher starts up the Ad Hoc Editor by redirecting to its URL.
Examples of possible Ad Hoc launcher applications include the following:• A generic SQL query builder which allows the user to choose a JDBC data source, view the tables
available from it, and build a query against one or more of the tables. This approach is demonstrated inbrowseDB, the sample Ad Hoc launcher that is described below.
• A query builder based on application-specific metadata, such as a list of pre-defined queries maintained inits own table.
• An interface for constructing queries against a custom data source that has metadata facilities, such asHibernate.
• A “dumb” query builder in which the user chooses a data source from the repository and enters query textand field definitions manually. This would be analogous to creating a JasperReport by editing the JRXML.
The details of the setup required in an Ad Hoc launcher are described in the next section.
8.5.1 Communicating with the Ad Hoc Editor using AdhocTopicMetadataThis section describes how the Ad Hoc Editor initializes its reporting data, both when a Topic is selected andwhen an Ad Hoc launcher is active.
The Ad Hoc Editor uses the AdhocTopicMetadata Java class to represent an Ad Hoc Topic. Topics aretypically stored in the repository as ReportUnits, but they can also be created by an Ad Hoc Launcherimplementation. If the user starts the Ad Hoc Editor from the Topics page, AdhocTopicMetadata is set up asfollows:1. A new instance of AdhocTopicMetadata is created.2. The report representing the selected Topic is read.3. AdhocTopicMetadata.initDatasource() is called with the URI of the data source used by the Topic.
106

Chapter 8 JasperReports Server APIs
4. The JRXML resource for the Topic’s report is read.5. AdhocTopicMetadata.setQueryText() is called with the query from the JRXML.6. AdhocTopicMetadata.setQueryLanguage() is called with the query language from the JRXML.7. The list of fields defined in the JRXML is read.8. Each field is turned into an AdhocField instance and passed to AdhocTopicMetadata.addField().9. If the user is creating a new view, the desired Ad Hoc type (table, crosstab, chart) is passed to
AdhocTopicMetadata.setReportType().
If an Ad Hoc launcher is being used, it needs to place an instance of AdhocTopicMetadata in the servletsession, where the Ad Hoc Editor can use it. The following code examples are from theBrowseDBController.java source file from the browseDB example in 8.5.3, “A Sample Ad Hoc Launcher,”on page 109.
To initialize an instance of the AdhocTopicMetadata class for use by the Ad Hoc Editor:1. Create a new AdhocTopicMetadata instance, then initialize the data source by calling initDatasource()
with the URI of a data source in the repository (which in this example is coming from an HTTP requestparameter). Use SessionAttributeManager to create a new client key and store the AdhocDate instancein the session:
String datasourceURI = req.getParameter(DATASOURCE_URI);AdhocTopicMetadata data;long clientKey;
// if you have a datasource URI, you just started...// so we need to init AdhocTopicMetadata and put it in sessionif (datasourceURI != null) {data = engine.getAdhocMetadataFactory().getTopicMetadata();data.setLocale(req.getLocale());data.initDatasource(engine, datasourceURI);// get new client key for Ad HocclientKey = SessionAttributeManager.getInstance().createClientKey();SessionAttributeManager.getInstance().setSessionAttribute(AdhocConstants.ADHOC_DATA, data, clientKey, req);
} else {// code to handle existing view
}
2. Initialize the query to be used for the Topic by calling setQueryText() and setQueryLanguage():
String tableName = dbdata.getSelectedTable().getName();data.setQueryLanguage("sql");StringBuffer query = new StringBuffer("select * from " + tableName);Iterator sfi = dbdata.getSelectedTable().getFieldList().iterator();while (sfi.hasNext()) {DBField f = (DBField) sfi.next();DBField jf = f.getJoinField();if (jf != null) {query.append("\n");String fromField = f.getTable().getName() + "." + f.getName();String toField = jf.getTable().getName() + "." + jf.getName();query.append("join " + jf.getTable().getName() +" on (" + fromField + " = " + toField + ")");
}}data.setQueryText(query.toString());
107

JasperReports Server Ultimate Guide
3. Add field definitions by creating new AdhocField instances and calling addField():
if (jf != null) {Iterator jtfi = jf.getTable().getFieldList().iterator();while (jtfi.hasNext()) {DBField jtf = (DBField) jtfi.next();AdhocField af = new AdhocField(jtf.getName(), getJRType(jtf.getDbType()));af.setDisplay(jtf.getLabel());data.addField(af);
}}
AdhocField instances require the following information:• Name. The name of the field (set in the AdhocField constructor, or by calling setName()).• Type. The name of the Java class representing the type of the field's data (set in the AdhocField
constructor, or by calling setType()).• Display. The string used as a label for the field in the Ad Hoc Editor (set by calling setDisplay()).
4. Set the type by calling AdhocTopicMetadata.setAdhocReportType(). Valid values are table,crosstab, and chart:
String viewType = req.getParameter(AdhocAction.REPORT_TYPE);if (viewType != null) {data.setAdhocReportType(viewType);}
8.5.2 Integration with JasperReports ServerYou can register your launcher with the Ad Hoc Editor so that, if the user starts a view with your launcher andlater saves it, the launcher can be started again when the new view is edited.
To register an Ad Hoc launcher:1. Choose a reference name for the Ad Hoc Launcher; this example assumes the name is test.2. Define a Spring bean that registers the launcher’s name and URI. The following shows a portion of the
<js-install>\samples\customAdHoc\webapp\WEB-INF\applicationContext-adhoc-custom.xml file:
<bean class="com.jaspersoft.jasperserver.api.common.util.spring.GenericBeanUpdater"><property name="definition" ref="setCustomAdhocProps"/><property name="key" value="test"/><property name="valueType" value="idRefMap"/><property name="value"><idref bean="sampleAdHocLauncher"/>
</property></bean><util:map id="sampleAdHocLauncher"><entry key="editorURI" value="browseDB/browseDB.html?action=displayTables"/>
</util:map>
In this example, note the property named key with the value test; this element defines the name describedin step 1.
3. Before you launch the Ad Hoc Editor, call AdhocTopicMetadata.setCustomType()with the name usedto register the application.
108
Chapter 8 JasperReports Server APIs
AdhocTopicMetadata data = (AdhocTopicMetadata)SessionAttributeManager.getInstance().getSessionAttribute(AdhocConstants.ADHOC_DATA, req);
data.setCustomType("test");
The launcher can also be used to store custom data in a saved Ad Hoc view, so that when you relaunch theview, you can retrieve the data conveniently. The data is persisted as a byte stream resource in the Ad Hocview.
To store data in a view:1. Create an implementation of CustomAdhocDataHandler, which tells the Ad Hoc Editor how to create,
serialize, and deserialize the object you want to persist.2. Call AdhocTopicMetadata.setCustomDataHandler() with an instance of your implementation:
data.setCustomDataHandler(new BrowseDBDataHandler());BrowseDBData dbdata = (BrowseDBData) data.getCustomData();
3. Call AdhocTopicMetadata.getCustomData() to access your custom data object.
8.5.3 A Sample Ad Hoc LauncherbrowseDB is an example of how you might use the Ad Hoc Launcher API to create your own query editor.While it illustrates the API’s basic functionality, and is a useful example for administrators and developers whoplan to implement their own launcher, it isn’t intended for end users. The application supports only the mostbasic SQL functions; it does not support such operations as a 2-column primary key or joins from parent tochild (you must join child to parent).
In order to construct queries in browseDB, you must know the primary keys of the tables in the data sourceand any database constraints on joins.
8.5.3.1 Installing the Sample Editor
To install the browseDB editor:1. Determine the location of the JasperReports Server web application; for the default installation with the
bundled Tomcat, it is <js_install>\apache-tomcat\webapps\jasperserver-pro\.2. In an appropriate editor, open the file <js_install>\samples\customAdHoc\build.xml.3. In the file, set the webAppDir property to the web application location in step 1.
Figure 8-1 Setting the webAppDir Property
4. Save and close the file.
109

JasperReports Server Ultimate Guide
5. On a command line, change directory to <js_install>\samples\customAdHoc.6. Run <js-install>\apache-ant\bin\ant deploy.
The ant utility compiles the Java source, deploys the browseDB files to the appropriate folders, and displaysa BUILD SUCCESSFUL message.
If there are permissions errors, make sure you have ownership or write permission in the <js-install>folder.
7. Restart JasperReports Server.
8.5.3.2 Using browseDB
To define a simple query in browseDB:1. In a web browser, start JasperReports Server and login with administrator privileges.2. Point your web browser to http://<host>:<port>/jasperserver-pro/browseDB/.html?action=pickDatasource.
The Pick datasource page appears.
Figure 8-2 BrowseDB Pick Data Source Page
3. Select a data source from the drop-down and click Display Tables. In this example, select theFoodmartDataSourceJNDI.
A list of the tables in the data source appears.
Figure 8-3 Tables From the Selected Data Source
4. To select the main table for the query, click that table’s name. In this example, click the employee table.
The selected table appears at the top of the list as the Main query table. It is expanded to show all thecolumns in the table.
110
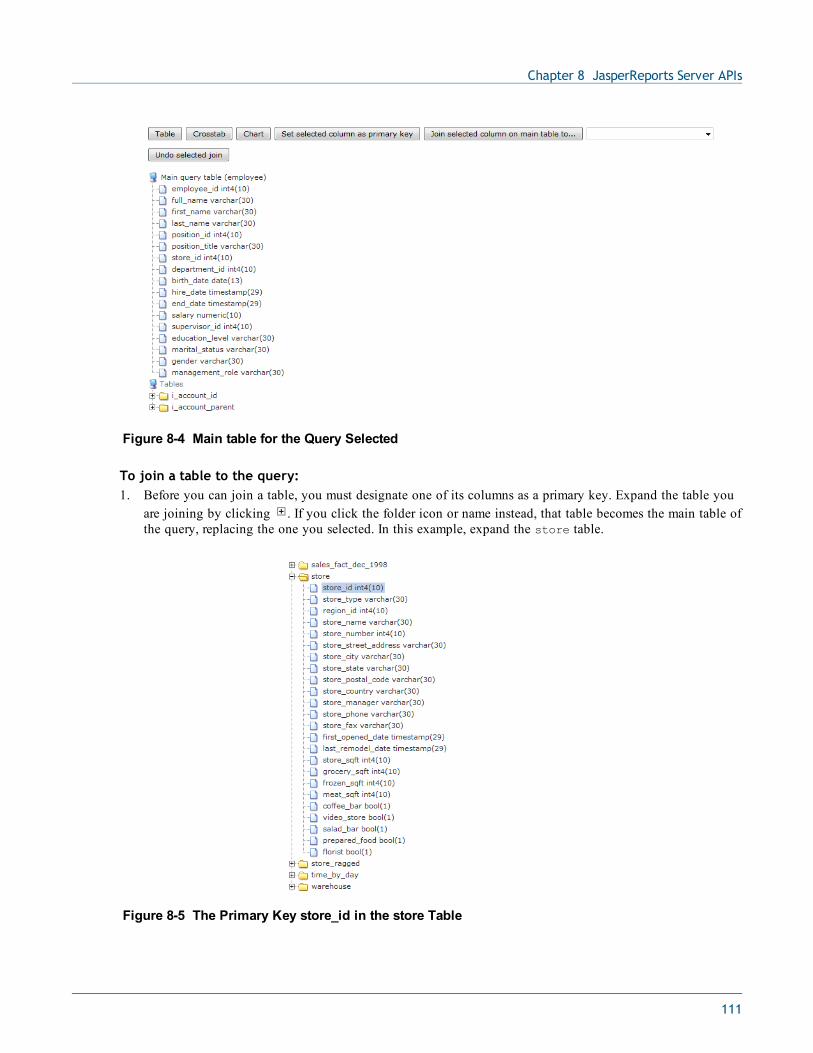
Chapter 8 JasperReports Server APIs
Figure 8-4 Main table for the Query Selected
To join a table to the query:1. Before you can join a table, you must designate one of its columns as a primary key. Expand the table you
are joining by clicking . If you click the folder icon or name instead, that table becomes the main table ofthe query, replacing the one you selected. In this example, expand the store table.
Figure 8-5 The Primary Key store_id in the store Table
111
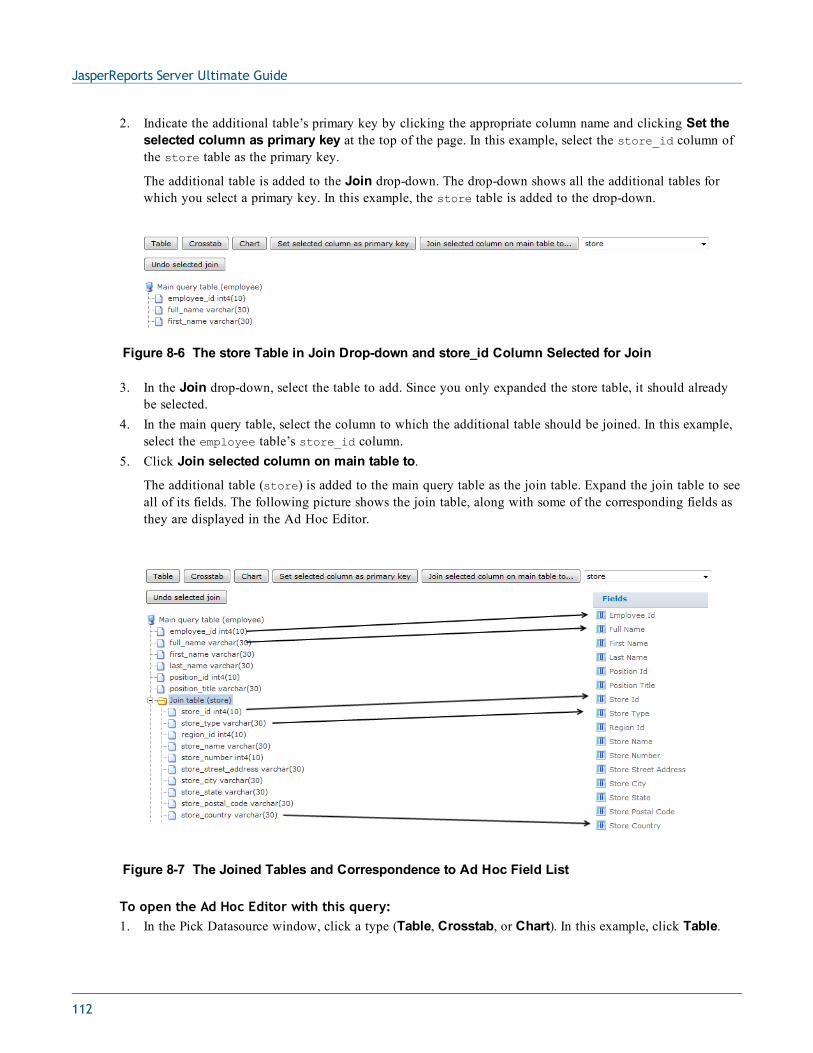
JasperReports Server Ultimate Guide
2. Indicate the additional table’s primary key by clicking the appropriate column name and clicking Set theselected column as primary key at the top of the page. In this example, select the store_id column ofthe store table as the primary key.
The additional table is added to the Join drop-down. The drop-down shows all the additional tables forwhich you select a primary key. In this example, the store table is added to the drop-down.
Figure 8-6 The store Table in Join Drop-down and store_id Column Selected for Join
3. In the Join drop-down, select the table to add. Since you only expanded the store table, it should alreadybe selected.
4. In the main query table, select the column to which the additional table should be joined. In this example,select the employee table’s store_id column.
5. Click Join selected column on main table to.
The additional table (store) is added to the main query table as the join table. Expand the join table to seeall of its fields. The following picture shows the join table, along with some of the corresponding fields asthey are displayed in the Ad Hoc Editor.
Figure 8-7 The Joined Tables and Correspondence to Ad Hoc Field List
To open the Ad Hoc Editor with this query:1. In the Pick Datasource window, click a type (Table, Crosstab, or Chart). In this example, click Table.
112

Chapter 8 JasperReports Server APIs
The Ad Hoc Editor opens. All the columns of the selected query tables appear in the editor’s list ofavailable fields.
2. Define and save your view in the usual way. For more information, refer to the JasperReports Server UserGuide.
To open a saved Ad Hoc Report created with the sample Ad Hoc launcher:1. Locate the view saved from browseDB in the repository.2. Click the view.3. Because this view was saved, there is no longer the choice of Table, Crosstab, or Chart. The view will open
to the format in which it was saved.
113

JasperReports Server Ultimate Guide
114

CHAPTER 9 CUSTOMIZING THE USER INTERFACEJasperReports Server is highly customizable because it is built on the Spring Framework and uses web standardssuch as Cascading Style Sheets (CSS) and JavaServer Pages (JSP). When the server is embedded in a webapplication or portal, its user interface (UI) can be customized to extend functionality and better reflect theparent application.
As with any large web application, the logic to generate the JasperReports Server UI is complex and relies onseveral mechanisms. They are listed here from simplest to most complex.• Themes – The themes mechanism exposes the CSS of the UI through the repository. This makes it easy for
administrators change to the appearance of the UI, such as images, colors, font size, spacing, and even thegeneral layout. The theme mechanism is described in detail in the JasperReports Server AdministratorGuide. Refer to that document first.
• SiteMesh – The SiteMesh decorator mechanism creates the header and footer for every page of the server.Decorators provide a quick way to edit the overall appearance of the web app, such as branding andcopyright.
• Java Server Pages (JSP) and JavaScript – These are the templates and logic, respectively, that generate thepages of JasperReports Server. Edit these files to change the content of individual pages or the way a pageis generated. This chapter assumes you are familiar with JSP and JavaScript syntax.
• Action Model – This mechanism provides a simple way to edit any menu in JasperReports Server. Thesimple XML syntax lets you remove default menu items, restrict their visibility based on roles, and add newmenu items if you have implemented an action.
• Spring MVC (Model, View, and Controller) and Spring Web Flow are frameworks for creating states andtransitions that represent a business process in a web application. By creating custom flows, you can addyour own sequence of pages that integrate with the server.
Themes can be modified in a running server and changes can be seen immediately by all users. For all othertypes of customization, you need to edit the files that are deployed in the web app. If you are modifying files inthe web application, you then need to redeploy the web app in the app server. In some cases, you need tomodify source code, in which case you must re-compile the source code and redeploy the web app in the appserver.
This chapter includes the following sections:• Changing the UI With Themes• Customizing the UI With Web App Files• Customizing the Branding with SiteMesh• Customizing the Login Page• Setting the Home Page
115

JasperReports Server Ultimate Guide
• Customizing the Report Rendering Page• Customizing Menus• Working With Custom Java Classes• Adding a Custom JSP Page in a Spring Web Flow• Adding Custom Export Channels
The information in this chapter applies to JasperReports Server 4.7 and later. For previous versions of theserver, refer to the corresponding version of the JasperReports Server Ultimate Guide.
The set of files in the default theme was updated in 4.7. Custom themes developed prior to 4.7 mayrequire upgrading in order to work with the new set of files. For more information see the upgradeprocedures in the JasperReports Server Installation Guide.
This chapter assumes that you are proficient with CSS and with J2EE application development andconfiguration.
Some of the changes described here are cosmetic, but others affect the core behavior of the server. Useextreme caution when making the described edits, because inadvertent changes might causeJasperReports Server to fail. Jaspersoft recommends that you make all customizations in an isolated testenvironment before applying them in your production environment.
9.1 Changing the UI With ThemesYou can modify the look of theJasperReports Server user interface by creating a theme: a collection of CSS filesand associated images that specify the appearance for all or part of the user interface. A theme controls how theinterface appears - for example fonts, colors, spacing, lines, and image elements of the UI. The followingsections show how to use themes to change the logo and favicon, change colors and fonts, change the amountof white space in the user interface, and hide user interface elements. Using themes, you customize the brandingof the server or completely remove the branding for embedding.
A theme does not control what appears, such as the contents of menus or the effect of clicking a button. Atheme also does not provide any security; hidden elements can still be accessed using the correct URL. For moreextensive changes, you need to change the JSP files that control the logic of the server and determine what userssee, not just how they see it. These additional customizations are described elsewhere in this guide.
Theme files are stored in the repository and can be downloaded, uploaded, and made active through the UIwhile the server is running. You don’t need to recompile any JasperReports Server source code, or to restart theserver. For information on how to create, upload, and administer themes, see the JasperReports ServerAdministrator Guide.
Keep the following tips in mind when working with themes:• Plan your theme deployment carefully and test it with end-users to ensure it works the way you intend.• The server must be running and you must be logged in as an administrator to modify themes. Modifications
take effect when you make your new theme files active. You not do not need to recompile any code orrestart the server.
• You must create or modify your CSS files in an external editor. Once you have modified the files you want,you can create a theme folder directly in the repository, or you can create a theme folder offline and uploadit as a ZIP archive file. Use the method that works best for you.
• Your themes can be as simple or as complex as you want. You can combine multiple customizations in asingle theme; you can also override one file in your theme with another file.
• In multi-organization deployments, themes defined in a parent organization are expressed in childorganizations. Depending on your needs, you may want to implement your theme at the root level or at an
116
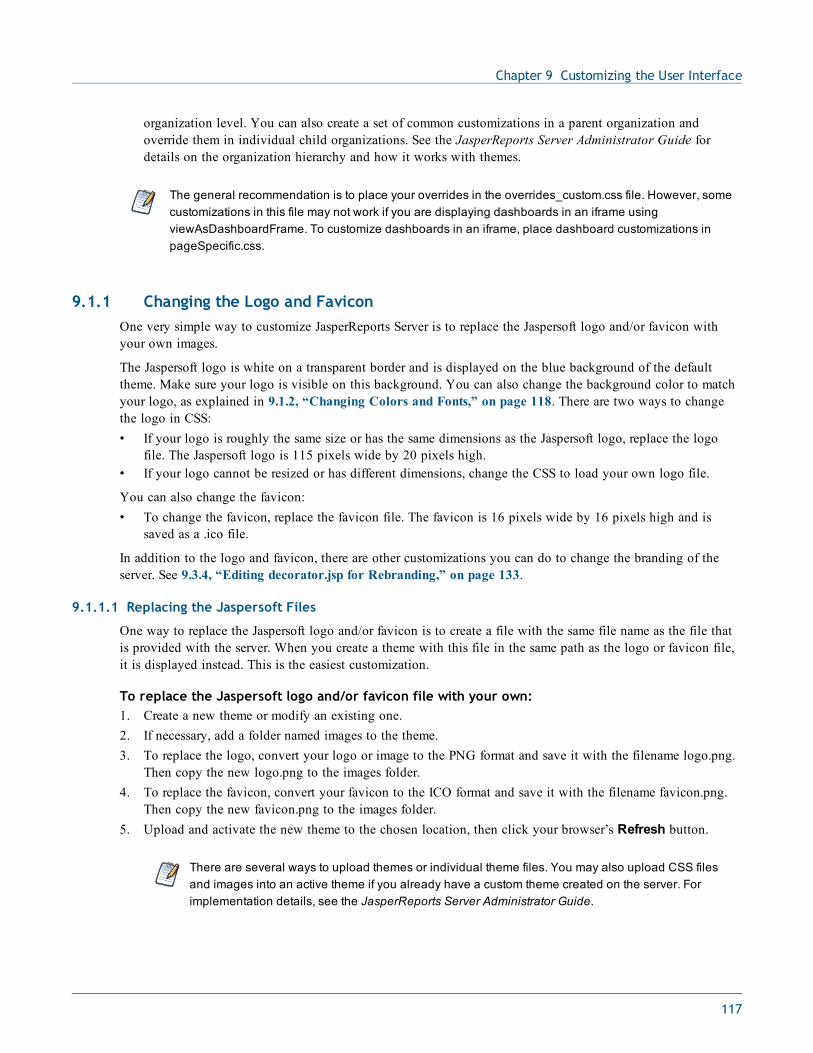
Chapter 9 Customizing the User Interface
organization level. You can also create a set of common customizations in a parent organization andoverride them in individual child organizations. See the JasperReports Server Administrator Guide fordetails on the organization hierarchy and how it works with themes.
The general recommendation is to place your overrides in the overrides_custom.css file. However, somecustomizations in this file may not work if you are displaying dashboards in an iframe usingviewAsDashboardFrame. To customize dashboards in an iframe, place dashboard customizations inpageSpecific.css.
9.1.1 Changing the Logo and FaviconOne very simple way to customize JasperReports Server is to replace the Jaspersoft logo and/or favicon withyour own images.
The Jaspersoft logo is white on a transparent border and is displayed on the blue background of the defaulttheme. Make sure your logo is visible on this background. You can also change the background color to matchyour logo, as explained in 9.1.2, “Changing Colors and Fonts,” on page 118. There are two ways to changethe logo in CSS:• If your logo is roughly the same size or has the same dimensions as the Jaspersoft logo, replace the logo
file. The Jaspersoft logo is 115 pixels wide by 20 pixels high.• If your logo cannot be resized or has different dimensions, change the CSS to load your own logo file.
You can also change the favicon:• To change the favicon, replace the favicon file. The favicon is 16 pixels wide by 16 pixels high and is
saved as a .ico file.
In addition to the logo and favicon, there are other customizations you can do to change the branding of theserver. See 9.3.4, “Editing decorator.jsp for Rebranding,” on page 133.
9.1.1.1 Replacing the Jaspersoft Files
One way to replace the Jaspersoft logo and/or favicon is to create a file with the same file name as the file thatis provided with the server. When you create a theme with this file in the same path as the logo or favicon file,it is displayed instead. This is the easiest customization.
To replace the Jaspersoft logo and/or favicon file with your own:1. Create a new theme or modify an existing one.2. If necessary, add a folder named images to the theme.3. To replace the logo, convert your logo or image to the PNG format and save it with the filename logo.png.
Then copy the new logo.png to the images folder.4. To replace the favicon, convert your favicon to the ICO format and save it with the filename favicon.png.
Then copy the new favicon.png to the images folder.5. Upload and activate the new theme to the chosen location, then click your browser’s Refresh button.
There are several ways to upload themes or individual theme files. You may also upload CSS filesand images into an active theme if you already have a custom theme created on the server. Forimplementation details, see the JasperReports Server Administrator Guide.
117
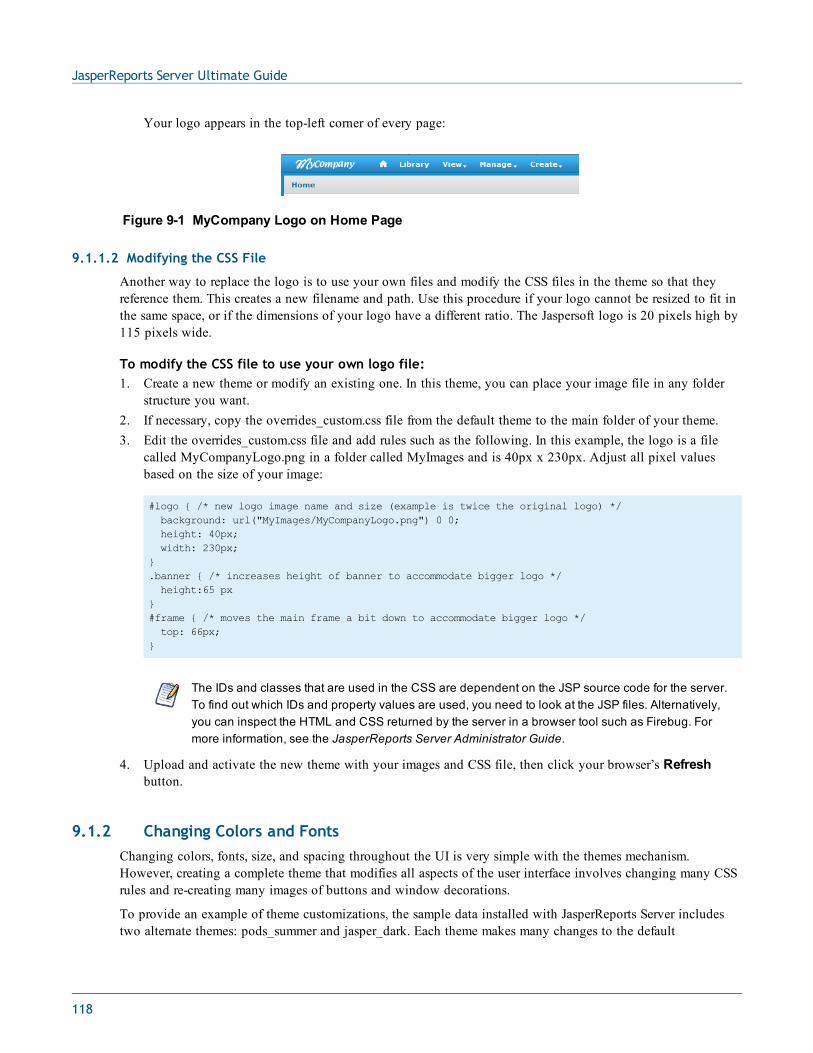
JasperReports Server Ultimate Guide
Your logo appears in the top-left corner of every page:
Figure 9-1 MyCompany Logo on Home Page
9.1.1.2 Modifying the CSS File
Another way to replace the logo is to use your own files and modify the CSS files in the theme so that theyreference them. This creates a new filename and path. Use this procedure if your logo cannot be resized to fit inthe same space, or if the dimensions of your logo have a different ratio. The Jaspersoft logo is 20 pixels high by115 pixels wide.
To modify the CSS file to use your own logo file:1. Create a new theme or modify an existing one. In this theme, you can place your image file in any folder
structure you want.2. If necessary, copy the overrides_custom.css file from the default theme to the main folder of your theme.3. Edit the overrides_custom.css file and add rules such as the following. In this example, the logo is a file
called MyCompanyLogo.png in a folder called MyImages and is 40px x 230px. Adjust all pixel valuesbased on the size of your image:
#logo { /* new logo image name and size (example is twice the original logo) */background: url("MyImages/MyCompanyLogo.png") 0 0;height: 40px;width: 230px;
}.banner { /* increases height of banner to accommodate bigger logo */height:65 px
}#frame { /* moves the main frame a bit down to accommodate bigger logo */top: 66px;
}
The IDs and classes that are used in the CSS are dependent on the JSP source code for the server.To find out which IDs and property values are used, you need to look at the JSP files. Alternatively,you can inspect the HTML and CSS returned by the server in a browser tool such as Firebug. Formore information, see the JasperReports Server Administrator Guide.
4. Upload and activate the new theme with your images and CSS file, then click your browser’s Refreshbutton.
9.1.2 Changing Colors and FontsChanging colors, fonts, size, and spacing throughout the UI is very simple with the themes mechanism.However, creating a complete theme that modifies all aspects of the user interface involves changing many CSSrules and re-creating many images of buttons and window decorations.
To provide an example of theme customizations, the sample data installed with JasperReports Server includestwo alternate themes: pods_summer and jasper_dark. Each theme makes many changes to the default
118
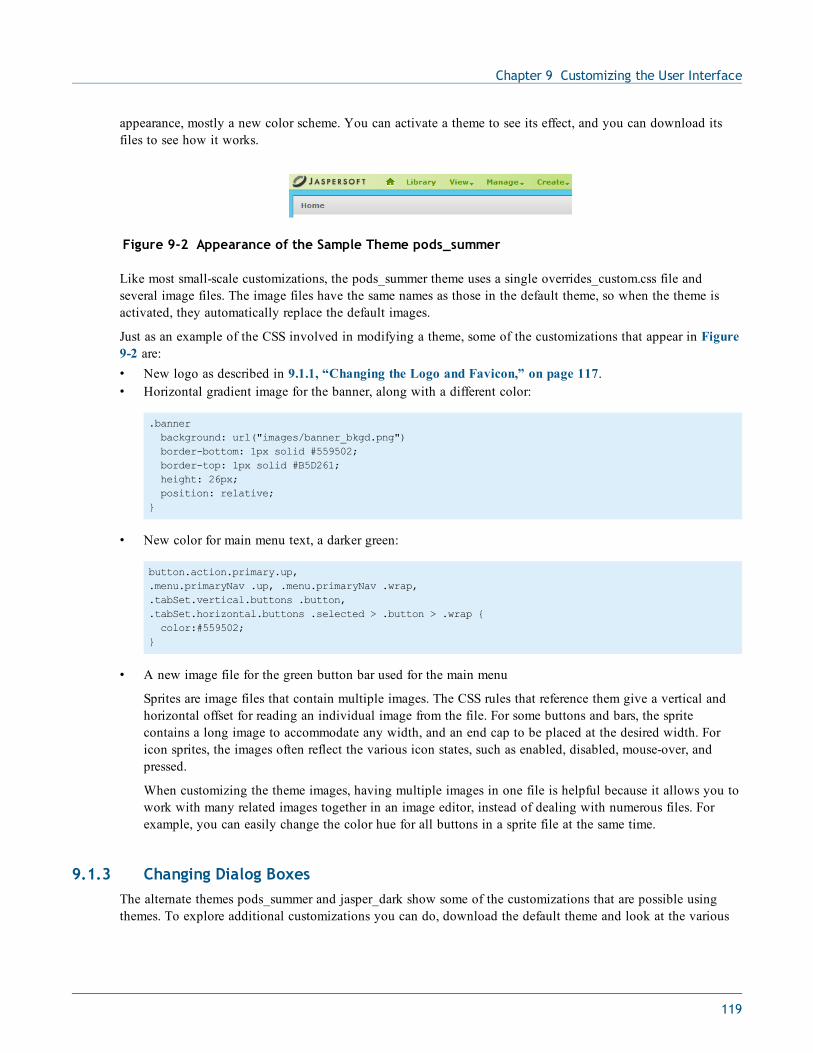
Chapter 9 Customizing the User Interface
appearance, mostly a new color scheme. You can activate a theme to see its effect, and you can download itsfiles to see how it works.
Figure 9-2 Appearance of the Sample Theme pods_summer
Like most small-scale customizations, the pods_summer theme uses a single overrides_custom.css file andseveral image files. The image files have the same names as those in the default theme, so when the theme isactivated, they automatically replace the default images.
Just as an example of the CSS involved in modifying a theme, some of the customizations that appear in Figure9-2 are:• New logo as described in 9.1.1, “Changing the Logo and Favicon,” on page 117.• Horizontal gradient image for the banner, along with a different color:
.bannerbackground: url("images/banner_bkgd.png")border-bottom: 1px solid #559502;border-top: 1px solid #B5D261;height: 26px;position: relative;
}
• New color for main menu text, a darker green:
button.action.primary.up,.menu.primaryNav .up, .menu.primaryNav .wrap,.tabSet.vertical.buttons .button,.tabSet.horizontal.buttons .selected > .button > .wrap {color:#559502;
}
• A new image file for the green button bar used for the main menu
Sprites are image files that contain multiple images. The CSS rules that reference them give a vertical andhorizontal offset for reading an individual image from the file. For some buttons and bars, the spritecontains a long image to accommodate any width, and an end cap to be placed at the desired width. Foricon sprites, the images often reflect the various icon states, such as enabled, disabled, mouse-over, andpressed.
When customizing the theme images, having multiple images in one file is helpful because it allows you towork with many related images together in an image editor, instead of dealing with numerous files. Forexample, you can easily change the color hue for all buttons in a sprite file at the same time.
9.1.3 Changing Dialog BoxesThe alternate themes pods_summer and jasper_dark show some of the customizations that are possible usingthemes. To explore additional customizations you can do, download the default theme and look at the various
119

JasperReports Server Ultimate Guide
CSS files. For example, you can customize the color of dialog boxes by overriding the CSS in the .dialogsection of containers.css.
The containers.css file supports several subclasses of dialog boxes. The dialog.overlay and dialog.overlay.widgetclasses are used for free-standing dialog boxes. The dialog.inlay class is used for some special dialog boxes,usually dialog boxes that are integrated into the page where they appear, such as the login box on the loginscreen.
To change the background color for dialog boxes:1. Create a new theme or modify an existing one.2. If necessary, copy the overrides_custom.css file from the default theme to the main folder of your theme.3. Download overrides.css from your theme and open the downloaded file in a text editor.4. To identify the properties you want to modify, open the containers.css file from the default theme in another
window of the text editor, and find the .dialog section.5. Copy the CSS you want to modify from containers.css and paste it in your overrides.css.6. Modify the overrides_custom.css file. To change the background, add rules such as the following:
.dialog.overlay .header {background: #663300 !important;
}
.dialog.overlay {background-color: #CC9966;
}
.dialog .sub.header {background-color: #CC9966;
}
.dialog.inlay {background-color: #CC9966;
}
7. Upload overrides.css to your chosen location.8. Activate your new theme, then click your browser’s Refresh button.
Figure 9-3 Customization of dialog box using themes
120

Chapter 9 Customizing the User Interface
To limit the scope of a customization to a specific dialog box, used the ID of the dialog box. For example, tochange the background of the #standardConfirm dialog box displayed when a user is required to confirm anaction such as deletion, use code such as the following:
#standardConfirm.dialog.overlay {background-color: red;
}
Figure 9-4 Customization of specific dialog box using themes
You can find the IDs for common dialog boxes in the Dialogs section of the UI Sample Galleries. See theJasperReports Server Administrator Guide for more information.
9.1.3.1 Changing Font and Color for Input Controls
Some input controls allow you to choose from a list of options. You can customize the font and color of this listby overriding the .sList properties in the pageSpecific.css file.
To modify input controls:1. Create a new theme or modify an existing one.2. If necessary, copy overrides.css file from the default theme to the main folder of your theme.3. Download overrides.css from your theme and open the downloaded file in a text editor.4. Open the pageSpecific.css file from the default theme in another window of the text editor, find the .sList
section, and select the CSS you want to modify.5. Copy the CSS you want to modify from pageSpecific.css and paste it in your overrides.css.6. Make your desired modifications to overrides.css. For example, the following changes set the font color to
#B8860B and the font style to serif, and set the background color when an item is selected to#8b4513:
.sList {/* fonts */font-family:serif;color: #B8860B;
}
.sList li.active, .mSelect-svList > .active .mSelect-svList-button {background-color: #8b4513;
}
7. Upload overrides.css to your chosen location.8. Activate your new theme, then click your browser’s Refresh button.
JasperReports Server can display the input controls form in a pop-up window (the default), in a separatepage, in a separate column, or at the top of the report page. The overrides you make show in all reports with
121

JasperReports Server Ultimate Guide
input controls.
Figure 9-5 Input Control Dialog Modified Using Themes
9.1.4 Hiding UI ElementsSetting the parameter display:none; is a convenient way to hide any element through the CSS. If you setdisplay:none; as an override, the corresponding element is not rendered in the browser. display:none; canbe used alone or in conjunction with other CSS parameters.
The hidden element still exists in the HTML transmitted to browsers, so do not use this parameter to hidesensitive information. For example, if you hide a menu item, a user with the FireBug plug-in to Firefox canremove the display:none; attribute to reveal the menu and use it. For a more secure way to removemenu items, see 9.7.2, “Restricting Access by Role,” on page 140.
The following example shows how to use this parameter to remove the logo or the search box from the UI.
To remove the logo and/or the search box:1. Create a new theme or modify an existing one.2. If necessary, copy the overrides_custom.css file from the default theme to the main folder of your theme.3. To remove the logo, edit the overrides_custom.css file and add the following CSS rules:
#logo {display:none;
}
122

Chapter 9 Customizing the User Interface
4. To remove the search box, edit the overrides_custom.css file and add the following CSS rules:
.searchLockup {display: none}
5. Upload and activate the new theme with your image and CSS file, then click your browser’s Refreshbutton.
9.1.5 Changing the Layout of the UIOne advantage of customizing CSS in themes is that you can drastically change the appearance of the UI withvery few overrides. CSS controls the spacing and layout of contents on the page, and by changing a few rules,you can rearrange the default layout in many ways.
In the following example, you will remove the Jaspersoft logo entirely, move the main navigation further left,and remove the margins and borders on the home page content area.1. Create a new theme or modify an existing one.2. If necessary, copy the overrides_custom.css file from the default theme to the main folder of your theme.3. Edit the overrides_custom.css file and add the following CSS rules:
#logo {display:none;
}
.menu.primaryNav{margin-left: 0px;position: relative;
}
.column.decorated{border: medium none;bottom: 0;margin: 0;min-width: 150px;overflow: visible;top: 0;
}
123
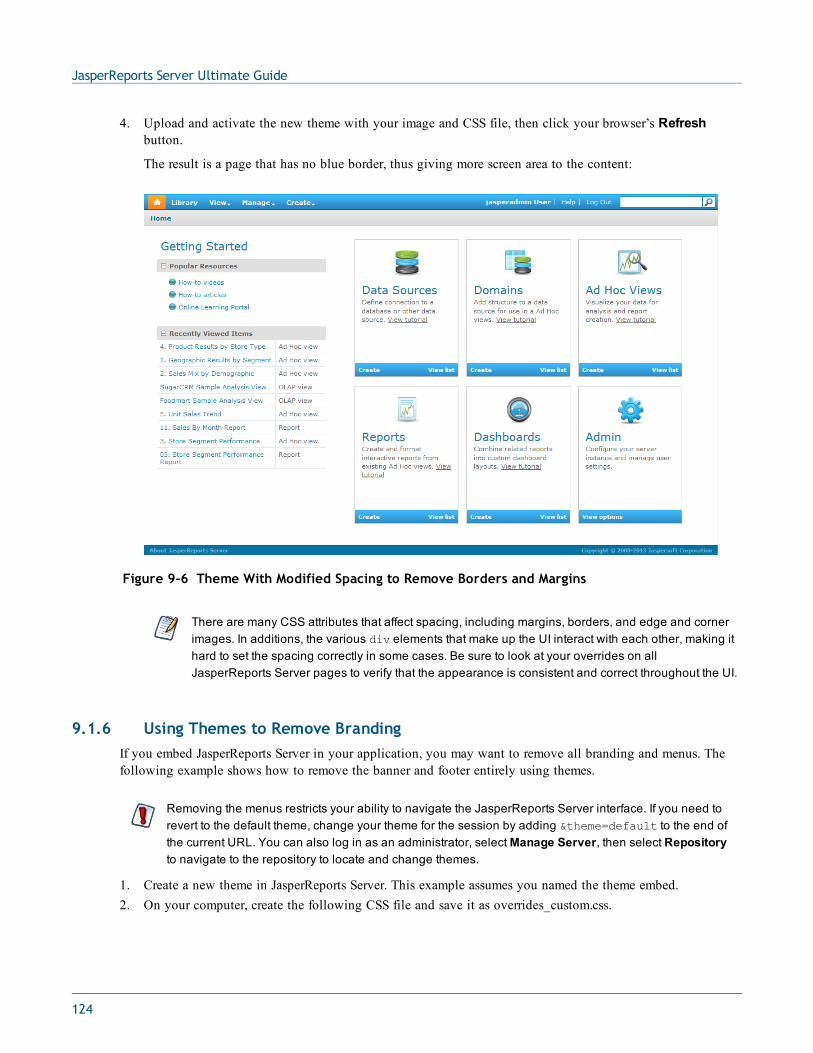
JasperReports Server Ultimate Guide
4. Upload and activate the new theme with your image and CSS file, then click your browser’s Refreshbutton.
The result is a page that has no blue border, thus giving more screen area to the content:
Figure 9-6 Theme With Modified Spacing to Remove Borders and Margins
There are many CSS attributes that affect spacing, including margins, borders, and edge and cornerimages. In additions, the various div elements that make up the UI interact with each other, making ithard to set the spacing correctly in some cases. Be sure to look at your overrides on allJasperReports Server pages to verify that the appearance is consistent and correct throughout the UI.
9.1.6 Using Themes to Remove BrandingIf you embed JasperReports Server in your application, you may want to remove all branding and menus. Thefollowing example shows how to remove the banner and footer entirely using themes.
Removing the menus restricts your ability to navigate the JasperReports Server interface. If you need torevert to the default theme, change your theme for the session by adding &theme=default to the end ofthe current URL. You can also log in as an administrator, selectManage Server, then select Repositoryto navigate to the repository to locate and change themes.
1. Create a new theme in JasperReports Server. This example assumes you named the theme embed.2. On your computer, create the following CSS file and save it as overrides_custom.css.
124
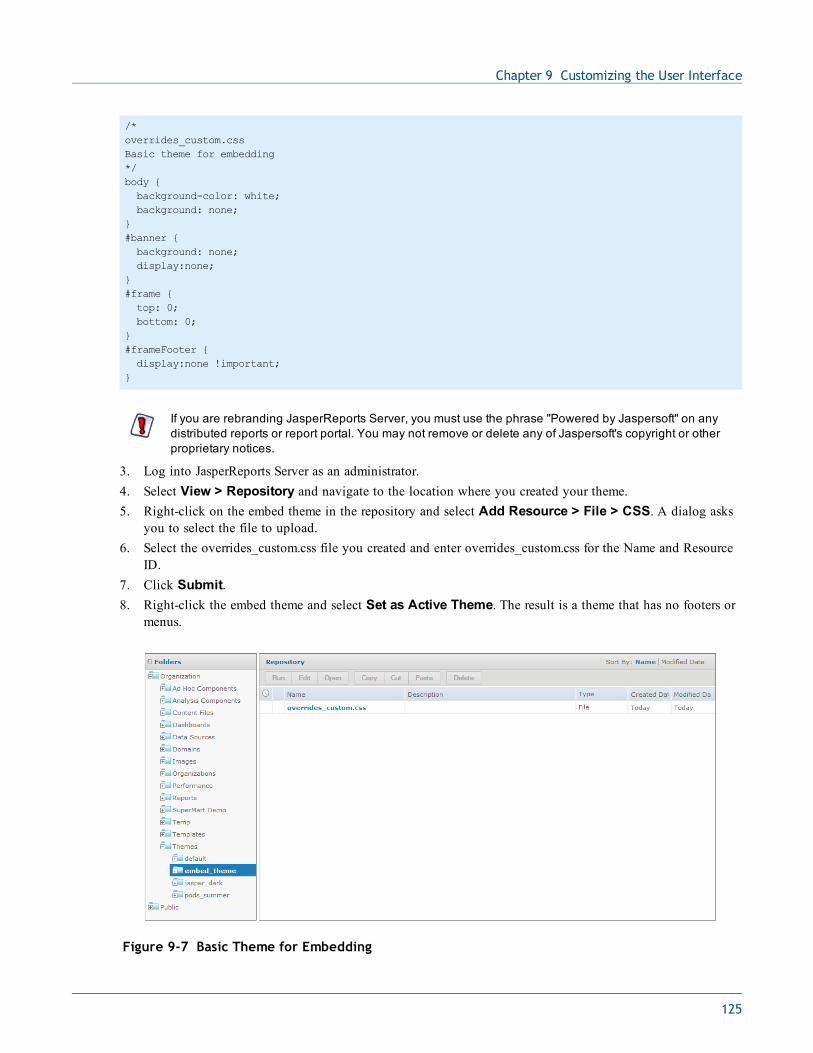
Chapter 9 Customizing the User Interface
/*overrides_custom.cssBasic theme for embedding*/body {background-color: white;background: none;
}#banner {background: none;display:none;
}#frame {top: 0;bottom: 0;
}#frameFooter {display:none !important;
}
If you are rebranding JasperReports Server, you must use the phrase "Powered by Jaspersoft" on anydistributed reports or report portal. You may not remove or delete any of Jaspersoft's copyright or otherproprietary notices.
3. Log into JasperReports Server as an administrator.4. Select View > Repository and navigate to the location where you created your theme.5. Right-click on the embed theme in the repository and select Add Resource > File > CSS. A dialog asks
you to select the file to upload.6. Select the overrides_custom.css file you created and enter overrides_custom.css for the Name and Resource
ID.7. Click Submit.8. Right-click the embed theme and select Set as Active Theme. The result is a theme that has no footers or
menus.
Figure 9-7 Basic Theme for Embedding
125
JasperReports Server Ultimate Guide
9.1.7 Replacing the Default ThemeIn general, Jaspersoft recommends creating new themes with CSS and image files that override those of thedefault theme. However, there may be some cases where the default theme provided with the server must bereplaced.
The <js-webapp>/themes folder contains a copy of the default theme and other sample themes. Thesefiles are provided as examples for copying and creating new themes. Even though these theme filesappear in the source code and in the deployed web application, they are never used to render the UI.
It is possible to configure the server to load the theme from files, but this disables the dynamic thememechanism and has other effects. Jaspersoft does not recommend such a configuration.
Like all themes, the default theme is stored in the repository, in the server’s private database. In order for thetheme mechanism’s propagation and inheritance to work, the theme files must exist in the repository before theserver is started. There are two ways to achieve this:• Using the import utility to import your theme as the default root theme while the server is stopped (the
repository database must be running). In commercial editions that have the organizations architecture, whenthe server restarts, it propagates your new default theme to all other theme folders.
• During the installation process, there are scripts or manual commands that create the repository database andpopulate it with the initial contents by performing an import before the server starts. Those initial contentsinclude the default root theme. If you are proficient with buildomatic commands and database initialization,you can locate the files used to populate the repository and insert your own default theme.
In both cases, you must create a valid repository catalog containing your custom theme in the /Themes/defaultfolder of the catalog. Your catalog must contain the valid XML description for each of the files, for example byexporting a copy of your theme and renaming contents of the exported catalog. The details of changing thedefault theme through either of these methods is beyond the scope of this guide.
Creating a default theme is difficult and prone to error:• Your version of the default theme must be a complete theme that contains all files named in <js-
webapp>/WEB-INF/decorators/decoratorCommonImports.jsp.• Your default theme must provide rules for rendering all the elements used by the UI, otherwise pages
may not render properly.• Your default theme cannot use the overrides_custom.css file, because themes that override your
default theme may include this file. By convention, this file is reserved for non-default themes tooverride the default theme.
• During an upgrade of the server, your default theme may be overwritten or the new version may not bebackwardly compatible with your theme. See 9.12, “UpgradingWith UI Customizations,” onpage 168.
9.2 Customizing the UI With Web App FilesMany components of the user interface are created from the source code. The entire process from designing theUI in source files to displaying the UI in the server is very complex, with several interacting mechanisms.JasperReports Server uses the Spring Framework based on compiled Java beans, but the layout of the UI is alsocontrolled by Java Server Pages (JSP files), the SiteMesh framework that decorates pages, and the CSS files seenin the previous section. Some of these mechanisms use additional XML files for configuration.
126
Chapter 9 Customizing the User Interface
There are several kinds of files that are involved in creating the UI:• Interpreted files such as JSP, XML, and CSS that the server processes in order to generate the UI. The
advantage of interpreted files is that you can modify them in a running instance and have them take effectimmediately (as with CSS), or after restarting the server (as with JSP). Much of the UI can be customizedwith interpreted files.
• Compiled Java files that define the underlying behavior of the server, for example, what happens when youclick a button to run a report. These are Java beans that are used in the Spring framework, where they arealso called Spring beans.
In order to change the behavior of a Java file, you must recompile it, rebuild the server, and redeploy it inan application server. Therefore, to change UI features controlled by Java files, you must have the sourcecode distribution and a testing environment to build and deploy the server. For more information, see 9.9,“Working With Custom Java Classes,” on page 157.
9.2.1 Location of Interpreted FilesInterpreted files are located in the JasperReports Server web application, known as <js-webapp>. Depending onyour deployment and your needs, there are several ways to work with the interpreted files, which in turndetermine the definition of <js-webapp> that you use.
File Location <js-webapp> Path
Installed server Once you have installed your server, either through a platform installer or any otherdeployment, the files are deployed in a running application server. The location dependson the application server where you installed JasperReports Server. If you used thebundled Apache Tomcat application server, the files are located in:
<js-webapp> = <js-install>/apache-tomcat/webapps/jasperserver[-pro]
For other application servers, see CustomizingWAR Files.After modifying the UI files (except CSS), reload the web app to see the changes. This isthe easiest way to customize files, because you can see your changes almostimmediately. However, your changes are limited to this one instance of the server.
WAR filedistribution
When you download the WAR (web archive) file distribution, you can customize yourdeployment of JasperReports Server and possibly install it on several machines. TheWAR file distribution also includes the UI files in the following location:
<js-webapp> = <js-install>/jasperserver[-pro].war
To modify files with the WAR file, see CustomizingWAR Files. After modifying the WARfile distribution, you need to deploy it to your application server, as described in theJasperReports Server Installation Guide. But every time you redeploy your modifiedWAR file, your UI changes are included.
Source code The JasperReports Server source code also contains the original versions of theinterpreted files. If you maintain other customizations in the source code, you can modifythe UI files as well. The files in the source code are located in:
<js-webapp> = <js-src>/jasperserver/jasperserver-war/src/main/webapp
When building the source, these files are copied into the WAR file that you must thendeploy into a running application server. See the JasperReports Server Source BuildGuide for more information. The advantage of working with the source code is that youcan always generate the server with your customized UI files.
127

JasperReports Server Ultimate Guide
When working with the WAR file distribution or source code, you usually modify files in an installedserver for testing. But after testing, you copy the changes into your WAR file or source code.
9.2.2 Location of JSP FilesInside the JasperReports Server web application, the JSP files are organized as follows:• JSP files are split up under the <js-webapp>/WEB-INF/jsp folder:
• The <js-webapp>/WEB-INF/jsp/templates folder contains UI components such as panels, lists, menu,and dialogs.
• The <js-webapp>/WEB-INF/jsp/modules folder contains flow-specific pages:• The main layout and subpanel JSP files are directly in modules.• Each feature has subfolders for its various JSPs.
9.2.3 Customizing JavaScript FilesAs of version 5.6, the JavaScript files have been optimized to improve performance. If you make customizationsto any JavaScript files, you need to download the optimization tools, optimize the files and restart JasperReportsServer.
Inside the JasperReports Server web application, the JavaScript files are in the <js-webapp>/scripts and <js-webapp>/fusion folders. File names contain module and subcomponent names, for example <js-webapp>/scripts/adhoc.chart.js.
To optimize and implement custom JavaScript files:
For convenience, these steps assume that you place the JavaScript files from JasperReports Server and the scriptsnecessary to optimize them in a single Working directory. You can place the files and scripts wherever youwant; if you do so, modify the paths accordingly.1. Create a working directory where you can copy JavaScript files and install and run the required scripts. In
this example, the directory is called Working.2. Create a subdirectory for a copy of the JavaScript files from JasperReports Server. This directory is called js-
sources.3. Copy the following directories from the JasperReports Server directory, <js-webapp>, to js-sources:
• Copy <js-webapp>/scripts to js-sources/scripts.• Copy <js-webapp>/fusion to js-sources/fusion
4. Back up your js-sources directory.5. Create a js-optimization-output directory for the output of the optimization process.6. Download and install node.js from http://nodejs.org/. Place the nodejs folder directly in your Working
folder.7. Download r.js, a requirejs optimization file, from http://requirejs.org and place it directly in the Working
folder.8. Make your changes to the JavaScript files in Working/js-sources.
128

Chapter 9 Customizing the User Interface
9. Open a command line tool and run the commands to optimize the JavaScript. The following example is forWindows, it places the output in the js-optimization-output folder:
% cd Working
% nodejs\node r.js -o js-sources\scripts\build.js appDir=js-sources\scripts baseUrl=.
optimize=uglify2 dir=js-optimization-output
10. Copy the optimized scripts from js-optimization-output to <webapp>/optimized-scripts.11. Reload the web app in the app server to see the changes as described in 9.2.5, “Reloading the
JasperReports Server Web App,” on page 129.
You can disable JavaScript optimization by setting javascript.optimize=false in the<js-webapp>/WEB-INF/js.config.properties file and then reloading the web application. In this case, youcan edit your JavaScript files directly in the <js-webapp>/fusion and js/webapp<scripts> directly. You onlyhave to do this once.
This option can be useful while developing and testing your JavaScript. You can temporarily disableoptimization and try out your changes. When you have your final version, you can enable optimizationand copy and optimize your files as described above.
9.2.4 Customizing WAR FilesWhen modifying UI files in application servers other than Apache Tomcat or in the WAR file distribution, theweb application is kept as a single WAR (web archive) file. To modify files inside the WAR file, you mustextract, modify and replace the files. The following example shows one way to do this from the Windowscommand line (the commands are similar in Linux).
In this example, <path/filename> refers to the relative path and name of the file to modify within the WAR file:
cd <js-webapp>"%JAVA_HOME%\bin\jar" xf jasperserver[-pro].war <path/filename><edit> <path\filename>"%JAVA_HOME%\bin\jar" uf jasperserver[-pro].war <path/filename>delete <path\filename>
After modifying files in the running application or reloading the web application, you may need to perform thefollowing steps, depending on your application server:1. Clear the application server's work folder. In the case of Apache Tomcat, you would delete all files and
folders in the <tomcat>/work folder.2. Click Refresh on your browser.3. In some cases, you may need to restart the application server.
9.2.5 Reloading the JasperReports Server Web AppWhen you customize interpreted files such as the JSP, JavaScript, and properties files, you need to reload themin the JasperReports Server web application to take effect. The standard installation of the server only includesshortcut actions for starting and stopping the bundled application server and database server. If you have otherweb applications that you don’t want to stop, or if you are doing a lot of customization and testing, it is simplerand quicker to simply reload the web app without restarting the application server.
129
JasperReports Server Ultimate Guide
Each different application server has its own management console that lets you view and control the web appsthat are deployed. This example shows how to manage the JasperReports Server web app in the bundled ApacheTomcat.1. If you have not configured any users on your Apache Tomcat server, you must first add a user and give him
the manager role. To do this:a. Edit the file <js-install>/apache-tomcat/conf/tomcat-users.xml.b. Create a user if necessary and give it the manager role. You can give the user any name and password
you prefer.
<tomcat-users><user username="tomcat" password="tomcat" roles="manager"/>
</tomcat-users>
c. Restart your Apache Tomcat server for this change to take effect.2. Once you have created a manager user, open the Apache Tomcat Manager page in a browser:
http://<host>:<port>/manager/html/, where <host> and <port> are where you installed the server. For adefault installation, use http://localhost:8080/manager/html/.
3. When prompted, log in with your manager user credentials.4. On the Apache Tomcat management interface, scroll down to find the jasperserver[-pro] application, and
click Reload.5. After you confirm you want to reload the web app, wait until the page reloads, then open the JasperReports
Server login page to see your changes. If the manager doesn’t reload, there was likely an error in the files,and you must then stop and restart the app server.
9.3 Customizing the Branding with SiteMeshJasperReports Server uses the SiteMesh framework to lay out and decorate nearly every page. The decoration isthe HTML for the headers and footers that are nearly identical on every page.
The SiteMesh framework is controlled by the following files:• <js-webapp>/WEB-INF/web.xml• <js-webapp>/WEB-INF/sitemesh.xml• <js-webapp>/WEB-INF/decorators.xml• <js-webapp>/WEB-INF/decorators/main.jsp• <js-webapp>/WEB-INF/decorators/decorators.jsp
Essentially, the XML files specify how UI pages should be generated, and the JSP files generate the pages. Thefollowing sections describe these files and how to customize the JSPs to change the overall branding thatappears in the UI.
130

Chapter 9 Customizing the User Interface
9.3.1 web.xmlThe <js-webapp>/WEB-INF/web.xml configuration file contains the configuration information that enablesSiteMesh. You can see that SiteMesh’s PageFilter class is applied to all targeted URLs (that is, <url-pattern>/*</url-pattern>):
<filter><filter-name>sitemesh</filter-name><filter-class>com.opensymphony.module.sitemesh.filter.PageFilter</filter-class>
</filter>...
<filter-mapping><filter-name>sitemesh</filter-name><url-pattern>/*</url-pattern><dispatcher>FORWARD</dispatcher>
</filter-mapping>
9.3.2 sitemesh.xml and decorators.xmlThe SiteMesh page filter assumes that the <js-webapp>/WEB-INF/sitemesh.xml file specifies furtherconfigurations. You can see that the main decorator’s definition points to decorators.xml. In addition, you seethe SiteMesh mapping that handles the default locale (U. S. English):
<property name="decorators-file" value="/WEB-INF/decorators.xml"/><!-- Mapper for localization --><mapper class="com.opensymphony.module.sitemesh.mapper.LanguageDecoratorMapper"><param name="match.en" value="en"/>...
</mapper>
Next, look at the <js-webapp>/WEB-INF/decorators.xml file. First, it defines URL patterns that SiteMesh shouldskip. Then, it defines the main decorator JSP page that is used by JasperReports Server:
<excludes><pattern>*adhoc/crosstab*</pattern><pattern>*adhoc/table*</pattern>...
</excludes><decorator name="main" page="main.jsp"><pattern>/*</pattern>
</decorator>...
For more detailed information about SiteMesh and decorators, seehttp://www.opensymphony.com/sitemesh/decorators.html.
9.3.3 main.jsp and decorator.jspIn <js-webapp>/WEB-INF/decorators/, the main.jsp includes the decorator.jsp file, and together they set theappearance and layout of the JasperReports Server web interface. Figure 9-8 shows the display elements as theyappear in JasperReports Server.
131
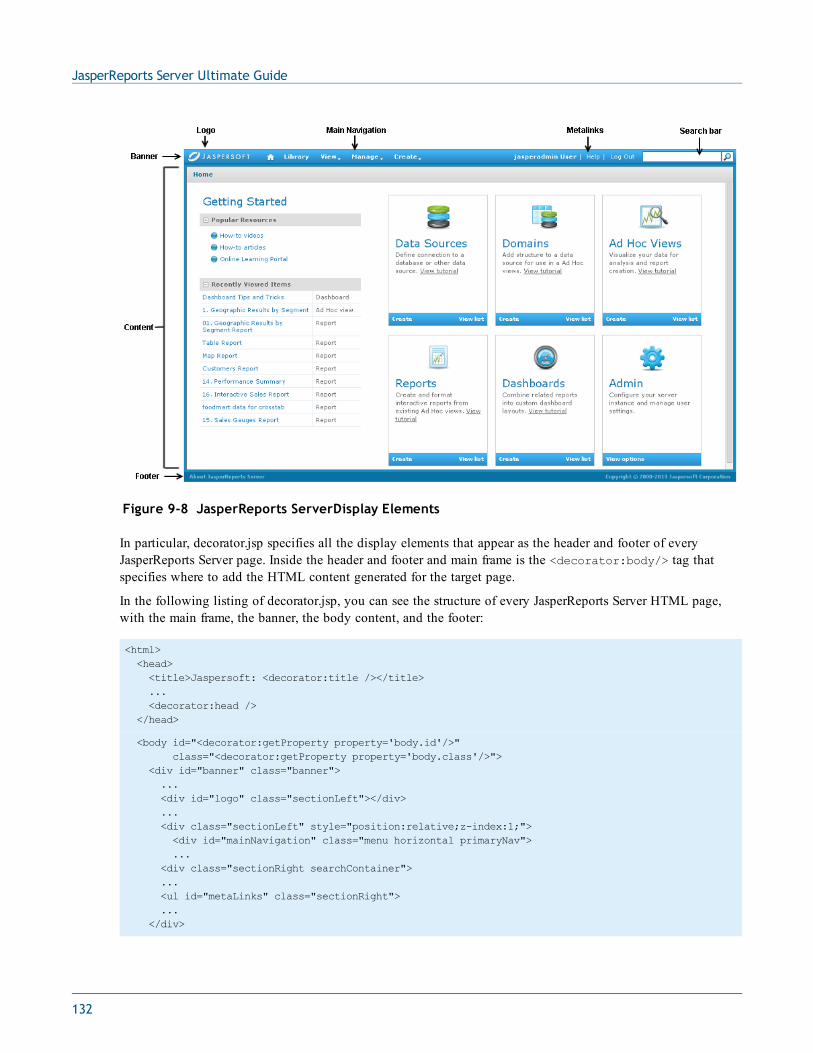
JasperReports Server Ultimate Guide
Figure 9-8 JasperReports ServerDisplay Elements
In particular, decorator.jsp specifies all the display elements that appear as the header and footer of everyJasperReports Server page. Inside the header and footer and main frame is the <decorator:body/> tag thatspecifies where to add the HTML content generated for the target page.
In the following listing of decorator.jsp, you can see the structure of every JasperReports Server HTML page,with the main frame, the banner, the body content, and the footer:
<html><head><title>Jaspersoft: <decorator:title /></title>...<decorator:head />
</head>
<body id="<decorator:getProperty property='body.id'/>"class="<decorator:getProperty property='body.class'/>">
<div id="banner" class="banner">...<div id="logo" class="sectionLeft"></div>...<div class="sectionLeft" style="position:relative;z-index:1;"><div id="mainNavigation" class="menu horizontal primaryNav">...
<div class="sectionRight searchContainer">...<ul id="metaLinks" class="sectionRight">...
</div>
132

Chapter 9 Customizing the User Interface
<div id="frame"><div class="content"><decorator:body />
</div></div>
<div id="frameFooter"><a id="about" href="#"><spring:message code="decorator.aboutLink"/></a><p id="copyright"><spring:message code="decorators.main.copyright"/></p></div>
...</body>
</html>
For example, if the user clicks View > Reports, the WEB-INF/jsp/modules/ListReports.jsp is executed. TheListReports.jsp generates the HTML content. Before this content is emitted, the SiteMesh page filter inserts thecontent into the location specified by <decorator:body/>. Then, the whole HTML content is sent to theuser’s browser.
9.3.4 Editing decorator.jsp for RebrandingNow that you know how decorator.jsp defines the main page of the server UI, you can customize the file. If youuse JasperReports Server as part of your suite of business applications, you may not want the Jaspersoft brandingon the page. Editing the decorators.jsp file in the deployed webapp lets you remove the branding. Thefollowing elements make up the Jaspersoft branding:• The company logo: to change or remove the logo , see 9.1.1, “Changing the Logo and Favicon,” on
page 117.• The browser icon (favicon): to change or remove the browser icon, see 9.1.1, “Changing the Logo and
Favicon,” on page 117.• The page title appearing in the browser.• The About link and copyright footer on every page.
To edit the page title:1. Edit the file <js-webapp>/WEB-INF/decorators/decorator.jsp.2. Change the title text, for example:
<html><head><title>My Company: <decorator:title /></title>...<decorator:head />
</head>...
3. After saving your changes to the JSP file, restart your application server or reload the JasperReports Serverweb app.
To remove the footer text:1. Edit the file <js-webapp>/WEB-INF/decorators/decorator.jsp.
133
JasperReports Server Ultimate Guide
2. Change the footer text, for example to comment out the about and copyright lines:
...<div id="frameFooter"><!-- <p id="about"><a href="#"><spring:message code="decorator.aboutLink"/></a><c:if test="${isDevelopmentEnvironmentType}"><span id="license">(<spring:message code="LIC_023_license.envtype.development.label"/>)
</span></c:if></p><p id="copyright"><spring:message code="decorators.main.copyright"/></p>
--></div>
...
3. After saving your changes to the JSP file, restart your application server or reload the JasperReports Serverweb app.
If you are rebranding JasperReports Server, you must use the phrase "Powered by Jaspersoft" on anydistributed reports or report portal. You may not remove or delete any of Jaspersoft's copyright or otherproprietary notices.
9.4 Customizing the Login PageIf you want to replace the Jaspersoft branding, the login page requires extensive changes. Rebranding with anew theme and with the SiteMesh decorators are necessary but not sufficient. To completely customize the loginpage, you also need to edit the following files that define the content on the page:• The page title can be changed through the SiteMesh decorators, as described in 9.3.4, “Editing
decorator.jsp for Rebranding,” on page 133.• There are several specific CSS rules for the login page that you may customize in a theme.• The content of the login page is located in a JSP file that you can edit to remove sections of the login page.• The URL for a button you need to keep is located in a JavaScript page.• All strings on the login page are stored in properties files. Most of these don’t need to change, but several
do mention Jaspersoft.
The following example shows how the CSS, JSP, JavaScript, and properties files all need to be modifiedtogether to make a uniform change such as removing the branding from the login page.
To change the branding on the login page:1. Create a new theme or modify an existing one.2. If necessary, copy the overrides_custom.css file from the default theme to the main folder of your theme.3. Edit the overrides_custom.css file and add the following CSS rules:
#loginPage #copy {background:#fff;top:0;
134

Chapter 9 Customizing the User Interface
left:268px;bottom:0;right:0;position:absolute;/* overrides to .info selector of old login page */overflow-y:auto;overflow-x:hidden;margin:0;border:1px solid #666;border-radius: 0;-moz-border-radius: 0;-webkit-border-radius: 0;
}
#loginPage #loginForm {border:1px solid #666;position: absolute;top: 0;left: 0;bottom: 0;background:#fff;width:260px;
}
This example swaps the login form and information panel left and right, respectively. You could alsochange the size and vertical position of the panels.
4. If you want to change the image on the login page, create an images folder if necessary, and save yourimage in the JPG format with the following name. Your image should be the same size, approximately 700pixels wide and 240 pixels high, otherwise you may need to adjust the spacing on the login page throughthe theme as well:
Community Project: images/login_welcome_ce_bkgd.jpg
Commercial Editions: images/login_welcome_bkgd.jpg
The picture below shows the standard image replaced by an image of a fictional MyCompany logo.5. Upload and activate the new theme with your image and CSS file, then click your browser’s Refresh
button.
In commercial editions with the organizations architecture, you must upload and activate the theme atthe root level. The theme at the root level applies to the login page for all users, regardless of theusers’ organization. You must login as system admin (superuser) to set the theme at the root level.
6. To change or remove the links under the image, edit the correct file for your version:<js-webapp>/WEB-INF/jsp/modules/login/rotating/login_rotating_pro_0.jspor login_rotating_community_0.jsp.
7. Edit the file <js-webapp>/WEB-INF/bundles/jasperserver_messages.properties.8. Change the following string to customize your login page:
#Welcome Login PageLOGIN_WELCOME_OS=Welcome to MyCompany
9. If you support multiple locales, modify the same message keys in the other language bundles:
jasperserver_messages_de.properties
135

JasperReports Server Ultimate Guide
jasperserver_messages_es.properties
jasperserver_messages_fr.properties
jasperserver_messages_ja.properties
jasperserver_messages_zh_CN.properties10. Restart the app server or reload the JasperReports Server web app as shown in the following section.11. When combining these customizations with those in 9.3, “Customizing the Branding with SiteMesh,” on
page 130, the login page has a new appearance that removes all Jaspersoft branding, as shown in thefollowing figure:
Figure 9-9 Custom Layout and Rebranding of Login Page
9.5 Setting the Home PageThe home page is the first page a user sees when logging in to JasperReports Server. You can direct the homepage to a specified flow based on user role. The following example shows how to set the home page for a non-administrative user to the library page:1. Open the file <js-webapp>\WEB-INF\jasperserver-servlet-pro.xml (commercial editions) or jasperserver-
servlet.xml (community edition) for editing.2. Locate the home page bean:
proHomePageByRole (commercial editions)
homePageByRole (community edition)3. Locate the line under this bean for ROLE_USER and modify it to direct to the library page:
<bean id="proHomePageByRole" class="java.util.ArrayList"><constructor-arg><list><value>ROLE_ADMINISTRATOR|redirect:/flow.html?_flowId=homeFlow</value><value>ROLE_USER|redirect:/flow.html?_flowId=searchFlow&mode=library</value></list></constructor-arg></bean>
136

Chapter 9 Customizing the User Interface
For a user with multiple roles, the proHomePageByRole bean redirects the user to the page specified bythe first matching role on the list. For example, for an administrator with ROLE_ADMINISTRATOR andROLE_USER roles, the ROLE_ADMINSTRATOR redirect is applied because it appears first in the bean.When adding your own roles to this bean, make sure to insert them in the order which has the effect youdesire.
4. Save the modified file and reload the web app in the app server to see the changes (see 9.2.5, “Reloadingthe JasperReports Server Web App,” on page 129).
5. When the web app has reloaded, log into JasperReports Server as joeuser. The library page is displayed.
This method does not work with viewReportFlow or dashboardRuntimeFlow.
9.6 Restricting Access to a Location in the RepositoryYou can use role-based permissions to control access to repository locations. For example, by default, thePublic > Samples > Ad Hoc Views folder is set to Read Only for ROLE_USER. This allows users to see thefolder contents and to create new reports from the Ad Hoc views in this folder, but they cannot edit thoseviews.
You can hide the contents of this folder from ROLE_USER by setting repository permissions to execute only.To do this:1. Log in as jasperadmin.2. Select View > Repository from the menu.3. Navigate to the Public/Samples folder.4. Right-click on the Ad Hoc Views folder and select Permissions...5. Change the permissions for ROLE_USER to Execute Only.
Figure 9-10 Setting Permissions to Execute Only
6. Click OK.
137
JasperReports Server Ultimate Guide
With these permissions, when users with no additional permissions select Library view, they do not see theAd Hoc views in this folder, nor do they see the folder in the Repository. They are still able to open reportsbased on the views in this folder.
When you restrict access based on file location in the repository, if a user saves an Ad Hoc view to adifferent location, users will still be able to access the view according to the permissions set on thatlocation. You can also restrict access based on the Spring web flow. See 9.7.2, “Restricting Access byRole,” on page 140 for more information.
9.7 Customizing MenusA very common customization is the removal, addition, or restriction of access to the main menu ofJasperReports Server. Although you can remove access to the main menu items by simply hiding the menuelements with CSS in a theme, as described in 9.1.4, “Hiding UI Elements,” on page 122, users can bypass thisrestriction. Customizing the menu structure is more robust, more secure, and lets you fine tune the functionalityavailable to users. In particular, you can restrict access to menus based on roles, so that users see different menuchoices depending on their roles.
The mechanism that implements the main menu is called the actionModel, and it is defined in a set ofactionModel-*.xml files in the <js-webapp>/WEB-INF/ folder. The action model is a way to represent menus,sub-menus, and menu items in XML, giving each item an action when selected, as well as optional role-basedrestriction. The actionModel is also used to define context menus on folders and resources listed on repositorybrowse and search pages.
The actionModel represents the structure of the menus through the structure of the XML. When pages areprocessed, the actionModel mechanism converts the XML into the JavaScript that generates menus.
9.7.1 Removing a Menu ItemIn this example, suppose that neither users nor administrators have been trained to work with Domains, and toprevent users from accidentally creating Domain resources, system administrators decide to remove any referenceto Domains in the user interface.
Removing Domains from the menu hides Domains but does not disable them. Users can still accessDomains by entering the URI for the Domain webflow. See 9.9, “WorkingWith Custom Java Classes,”on page 157 for information on how to restrict a webflow.
To remove the Domain menu items:1. Edit the file <js-webapp>/WEB-INF/actionModel-navigation.xml. This file defines the main menu visible
by default on all pages of the server. In the XML that defines the actionModel, there are many conditiontests that determine when each menu and menu item should be displayed.
...<context name="main_create_mutton" test="isProVersion"><condition test="!banUserRole"><condition test="!isMainFeaturesDisabled"><selectAction labelKey="NAV_005_CREATE">
138

Chapter 9 Customizing the User Interface
<condition test="isAvailableProFeature" testArgs="AHD"><option labelKey="NAV_051_ADHOC_REPORT"
action="primaryNavModule.navigationOption"actionArgs="designer"/>
</condition><condition test="isAvailableProFeature" testArgs="DB"><option labelKey="NAV_050_DASHBOARD"
action="primaryNavModule.navigationOption"actionArgs="dashboard"/>
</condition><!--
<condition test="isAvailableProFeature" testArgs="AHD"><condition test="checkAuthenticationRoles" testArgs="ROLE_ADMINISTRATOR"><option labelKey="NAV_056_DOMAIN"
action="primaryNavModule.navigationOption"actionArgs="domain"/>
</condition></condition>
--></selectAction>
</condition></condition>
</context>
“Mutton” is a term that means menu-button, and designates a button that creates a drop-down menu.
2. Find the section at the end for the Create menu and insert comments to remove the last menu item, asshown in the code sample above.
3. Edit the file <js-webapp>/WEB-INF/actionModel-search.xml. This file defines the context menu itemsvisible when right-clicking on folders and resources in repository listings.
<?xml version="1.0" encoding="UTF-8"?><actions><context name="folder_mutton"><simpleAction labelKey="SEARCH_CREATE_FOLDER" action="invokeFolderAction"
actionArgs="CreateFolder" clientTest="canCreateFolder"className="up"/>
<condition test="checkAuthenticationRoles" testArgs="ROLE_USER,ROLE_ADMINISTRATOR">
<selectAction labelKey="SEARCH_CREATE_RESOURCE"clientTest="canResourceBeCreated" className="flyout">
<condition test="checkAuthenticationRoles" testArgs="ROLE_ADMINISTRATOR"><option labelKey="RM_NEW_RESOURCE_DATA_SOURCE" action="invokeCreate"
actionArgs="ReportDataSource" clientTest="canResourceBeCreated"clientTestArgs="ReportDataSource" className="up"/>
<option labelKey="RM_NEW_RESOURCE_DATATYPE" action="invokeCreate"actionArgs="DataType" clientTest="canResourceBeCreated"clientTestArgs="DataType" className="up"/>
<!--<condition test="isProVersion"><option labelKey="RM_NEW_DOMAIN" action="invokeCreate"
actionArgs="SemanticLayerDataSource"clientTest="canResourceBeCreated"clientTestArgs="SemanticLayerDataSource" className="up"/>
</condition>-->
139

JasperReports Server Ultimate Guide
4. Find the section at the top of the file that creates the Add Resources sub-menu. Then add comments toremove the lines that define the Add Resources > Domain menu item, as shown in the code sampleabove.
5. Save the modified files and reload the web app in the app server to see the changes (see 9.2.5, “Reloadingthe JasperReports Server Web App,” on page 129).
6. When the web app has reloaded, log into JasperReports Server as jasperadmin. Click on the Create menuand right-click on a folder in the repository. In both cases, the menu item for Domain is no longer available.
When you remove a menu item, it is removed for all users, even administrators. Often it is preferable toprevent only non-administrators from viewing a menu item, as shown in the next section.
9.7.2 Restricting Access by RoleYou can use role-based customizations to control access to many user interface components, including menus,Java Server Pages, and web flows. This example shows how to control access to existing UI components; thesame techniques work with custom components you create.
In this example scenario, suppose end users haven’t had training in creating reports with the Ad Hoc Editor, andyou wish to hide it from users, but make it accessible to administrators. To hide access to the Ad Hoc Editor,you need to customize the UI in three ways:• Customize the Create menu to restrict access to Ad Hoc creation to administrators• Customize the JSP content on the home page to hide the Create Ad Hoc View button from non-
administrative users.• Customize the Ad Hoc web flow to restrict access to administrators.
The following sections show how to perform each of these actions.
Be very careful when editing the JSP or XML files that define the UI. Simple typos or bugs such asunclosed tags can cause the server to appear in an incorrect state, or make it impossible to log in. Afterfixing the problem, you may need to restart the app server; reloading the web app doesn’t always resolvethe issue.
9.7.2.1 Restricting a Menu Item by Role1. Edit the file <js-webapp>/WEB-INF/actionModel-navigation.xml. The actionModel for Create > Ad Hoc
View is near the end of the file.
...<context name="main_create_mutton" test="isProVersion"><condition test="!banUserRole"><condition test="!isMainFeaturesDisabled"><selectAction labelKey="NAV_005_CREATE"><condition test="isAvailableProFeature" testArgs="AHD">
<condition test="checkAuthenticationRoles" testArgs="ROLE_ADMINISTRATOR"><option labelKey="NAV_051_ADHOC_REPORT"
action="primaryNavModule.navigationOption"actionArgs="designer"/>
</condition></condition>
...
140
Chapter 9 Customizing the User Interface
</selectAction></condition>
</condition></context>
2. Following the pattern of conditions for other administrator-only functionality, insert the condition tag forchecking role authentication around the option tag to display the Ad Hoc menu item, as shown in thecode sample above.
In commercial editions, you must specify the role’s organization ID when restricting access to rolesdefined in an
organization. There are three ways to specify a role in the commercial edition:• ORG_ROLE|orgID – Explicitly specify a role belonging to an organization.• ORG_ROLE|* – Match the role name in any organization in the user’s scope (parent organizations
and root).• SYSTEM_ROLE – Explicitly specify a role defined at the root or system level, such as ROLE_
ADMINISTRATOR.
If you want to hide an entire menu, follow the pattern of the Manage menu, which is hidden from non-administrators. In this case, add the test and testArgs attributes to the context tag that displaysthe menu, as shown in the following sample:
...<!-- The Manage menu is displayed only to administrators --><context name="main_manage_mutton"
test="checkAuthenticationRoles" testArgs="ROLE_ADMINISTRATOR"><selectAction labelKey="menu.administration"></selectAction>
</context>...
9.7.2.2 Restricting a Section of a JSP File by Role
You can use Spring Security’s authorization tags to set up access control on JSP pages:1. Make sure that the line to import the Spring authz tag is near the beginning of the file. This line is
necessary in any JSP file that implements access control:
<%@ taglib uri="http://www.springframework.org/security/tags" prefix="authz"%>
...<%@ taglib prefix="t" uri="http://tiles.apache.org/tags-tiles" %><%@ taglib uri="http://www.springframework.org/security/tags" prefix="authz"%><%@ taglib prefix="c" uri="http://java.sun.com/jstl/core_rt" %><%@ taglib uri="/spring" prefix="spring"%>...
<authz:authorize ifAllGranted="ROLE_ADMINISTRATOR"><a id="createReports" class="button action jumbo up"><spanclass="wrap"><spring:message code="home.create" javaScriptEscape="true"/></span><span class="icon"></span></a>
</authz:authorize>
...
141
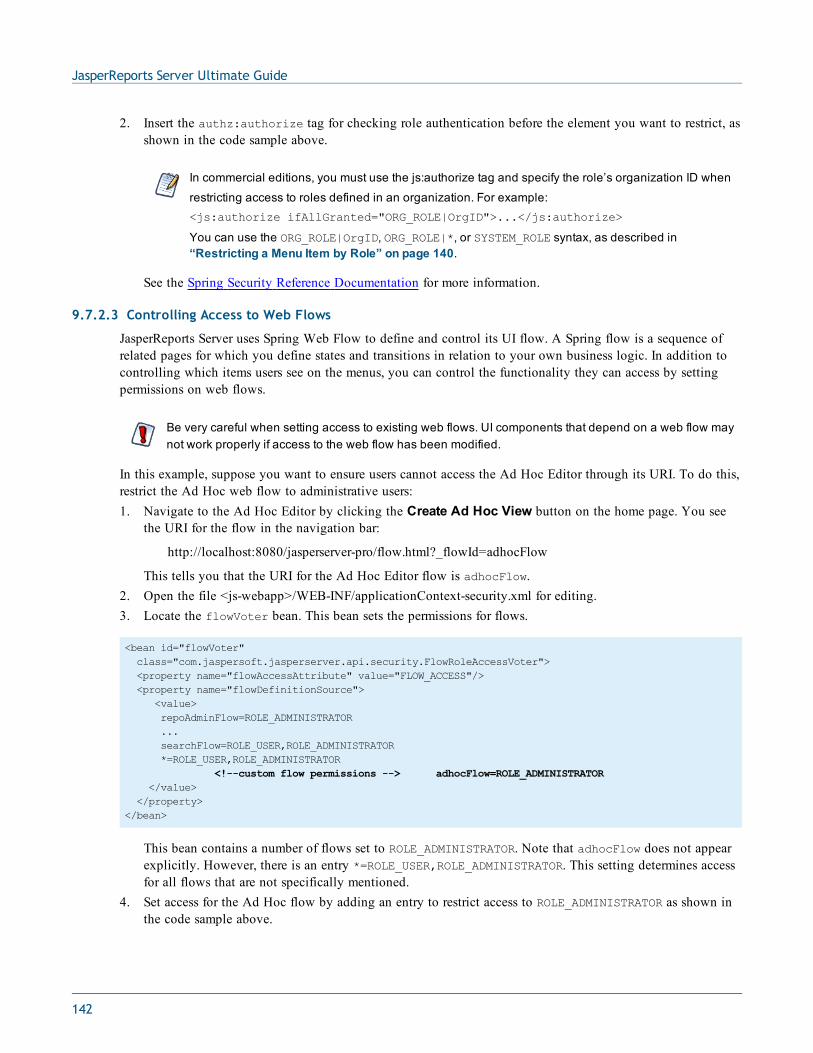
JasperReports Server Ultimate Guide
2. Insert the authz:authorize tag for checking role authentication before the element you want to restrict, asshown in the code sample above.
In commercial editions, you must use the js:authorize tag and specify the role’s organization ID when
restricting access to roles defined in an organization. For example:<js:authorize ifAllGranted="ORG_ROLE|OrgID">...</js:authorize>
You can use the ORG_ROLE|OrgID, ORG_ROLE|*, or SYSTEM_ROLE syntax, as described in“Restricting a Menu Item by Role” on page 140.
See the Spring Security Reference Documentation for more information.
9.7.2.3 Controlling Access to Web Flows
JasperReports Server uses Spring Web Flow to define and control its UI flow. A Spring flow is a sequence ofrelated pages for which you define states and transitions in relation to your own business logic. In addition tocontrolling which items users see on the menus, you can control the functionality they can access by settingpermissions on web flows.
Be very careful when setting access to existing web flows. UI components that depend on a web flow maynot work properly if access to the web flow has been modified.
In this example, suppose you want to ensure users cannot access the Ad Hoc Editor through its URI. To do this,restrict the Ad Hoc web flow to administrative users:1. Navigate to the Ad Hoc Editor by clicking the Create Ad Hoc View button on the home page. You see
the URI for the flow in the navigation bar:
http://localhost:8080/jasperserver-pro/flow.html?_flowId=adhocFlow
This tells you that the URI for the Ad Hoc Editor flow is adhocFlow.2. Open the file <js-webapp>/WEB-INF/applicationContext-security.xml for editing.3. Locate the flowVoter bean. This bean sets the permissions for flows.
<bean id="flowVoter"class="com.jaspersoft.jasperserver.api.security.FlowRoleAccessVoter"><property name="flowAccessAttribute" value="FLOW_ACCESS"/><property name="flowDefinitionSource">
<value>repoAdminFlow=ROLE_ADMINISTRATOR...searchFlow=ROLE_USER,ROLE_ADMINISTRATOR*=ROLE_USER,ROLE_ADMINISTRATOR
<!--custom flow permissions --> adhocFlow=ROLE_ADMINISTRATOR</value>
</property></bean>
This bean contains a number of flows set to ROLE_ADMINISTRATOR. Note that adhocFlow does not appearexplicitly. However, there is an entry *=ROLE_USER,ROLE_ADMINISTRATOR. This setting determines accessfor all flows that are not specifically mentioned.
4. Set access for the Ad Hoc flow by adding an entry to restrict access to ROLE_ADMINISTRATOR as shown inthe code sample above.
142

Chapter 9 Customizing the User Interface
9.7.2.4 Loading Your Changes1. Save the modified files and reload the web app in the app server to see the changes (see 9.2.5, “Reloading
the JasperReports Server Web App,” on page 129).2. When the web app has reloaded, log into JasperReports Server as joeuser. You can see that the button for
creating a report is removed, and there is no Create > Create Ad Hoc Report menu item. Log out and logback in as jasperadmin. Both the button and the menu item are visible to administrators.
9.7.3 Adding an Item to the Main MenuAdding menu items involves three files:• The actionModel file for the menu item.• The properties file that labels the menu item.• An action file that handles events for the menu item.
This example adds a special menu item so that MyCompany employees can easily find their accounts reports.1. Edit the file <js-webapp>/WEB-INF/actionModel-navigation.xml. Locate the actionModel for the View
menu near the beginning of the file.
<!--context for view option on primary menu--><context name="main_view_mutton" test="!banUserRole"><selectAction labelKey="menu.repository"><option labelKey="menu.search" action="primaryNavModule.navigationOption"
actionArgs="search"/>...
<separator/>
<option labelKey="NAV_028_ACCOUNTS" action="primaryNavModule.navigationOption" actionArgs="accounts"/></selectAction>
</context>...
2. Add a separator tag and an option tag for the menu item. The option tag has attributes to specify thelabel key and the name of the action to perform.
3. Open one of these files. The name of the properties file depends on your edition of JasperReports Server:
Commercial Editions: <js-webapp>/WEB-INF/bundles/pro_nav_messages.properties
Community Project: <js-webapp>/WEB-INF/bundles/jasperserver_messages.properties
The names of the keys are slightly different depending on the file. The following example is based on thecontents of the commercial edition pro_nav_messages.properties.
NAV_001_HOME=HomeNAV_002_VIEW=ViewNAV_003_MANAGE=ManageNAV_004_LOGOUT=Log OutNAV_005_CREATE=Create...NAV_027_SEARCH=Search ResultsNAV_028_ACCOUNTS=MyCompany Accounts...
143

JasperReports Server Ultimate Guide
4. Add the line for the NAV_028_ACCOUNTS property with an appropriate value, in this case MyCompanyAccounts.
5. If you support multiple locales, add the same message key to the other language bundles.6. Create a working directory where you can edit and optimize JavaScript files, as described in 9.2.3,
“Customizing JavaScript Files,” on page 128.7. Edit your working copy of the file <js-webapp>/scripts/actionModel.primaryNavigation.js.
var primaryNavModule = {NAVIGATION_MENU_CLASS : "menu vertical dropDown",ACTION_MODEL_TAG : "navigationActionModel",CONTEXT_POSTFIX : "_mutton",NAVIGATION_MUTTON_DOM_ID : "navigation_mutton",NAVIGATION_MENU_PARENT_DOM_ID : "navigationOptions",JSON : null,
/*** Navigation paths used in the navigation menu*/
navigationPaths : {library : {url : "flow.html", params : "_flowId=searchFlow"},home : {url : "home.html"},logOut : {url : "exituser.html"},search : {url : "flow.html", params : "_flowId=searchFlow&mode=search"},report : {url : "flow.html", params : "_flowId=searchFlow&mode=search&filterId=resourceTypeFilter&filterOption=resourceTypeFilter-reports&searchText="},accounts : {url : "flow.html", params : "_flowId=searchFlow&mode=search&filterId=resourceTypeFilter&filterOption=resourceTypeFilter-reports&searchText=account"},
...
Because of space limitations, the line is shown broken across two lines. In your application, make sure itis on a single line.
8. Add a URL and parameters to load the desired page in response to selecting the new accounts menu item.In the case of this example, the action is to perform a search for all reports with the word account in theirname or description.
9. Optimize the JavaScript files in your working directory and copy the output back to JasperReports Server asdescribed in 9.2.3, “Customizing JavaScript Files,” on page 128.
10. Save the modified files and reload the web app in the app server to see the changes (see 9.2.5, “Reloadingthe JasperReports Server Web App,” on page 129).
11. When the web app has reloaded, log into JasperReports Server as joeuser. You can see the View >MyCompany Accounts menu item was created and selecting it performs a customized search. The followingfigure shows both the menu item and the search results on the same page.
144
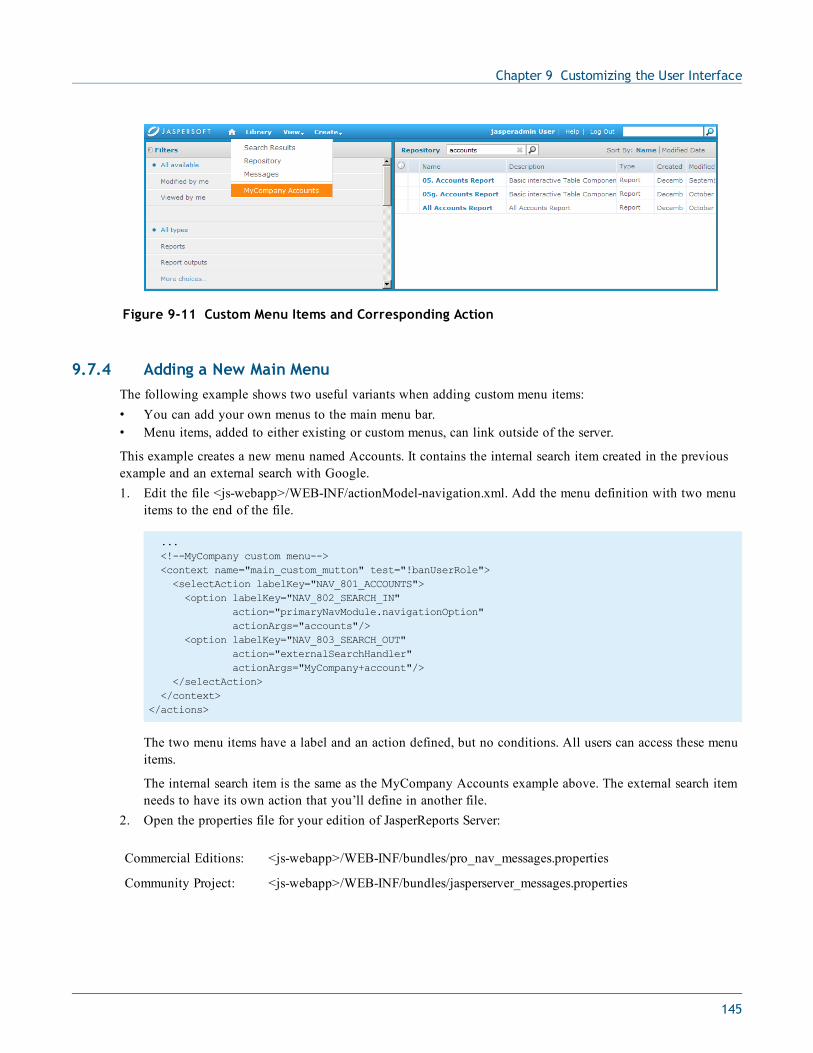
Chapter 9 Customizing the User Interface
Figure 9-11 Custom Menu Items and Corresponding Action
9.7.4 Adding a New Main MenuThe following example shows two useful variants when adding custom menu items:• You can add your own menus to the main menu bar.• Menu items, added to either existing or custom menus, can link outside of the server.
This example creates a new menu named Accounts. It contains the internal search item created in the previousexample and an external search with Google.1. Edit the file <js-webapp>/WEB-INF/actionModel-navigation.xml. Add the menu definition with two menu
items to the end of the file.
...<!--MyCompany custom menu--><context name="main_custom_mutton" test="!banUserRole"><selectAction labelKey="NAV_801_ACCOUNTS"><option labelKey="NAV_802_SEARCH_IN"
action="primaryNavModule.navigationOption"actionArgs="accounts"/>
<option labelKey="NAV_803_SEARCH_OUT"action="externalSearchHandler"actionArgs="MyCompany+account"/>
</selectAction></context>
</actions>
The two menu items have a label and an action defined, but no conditions. All users can access these menuitems.
The internal search item is the same as the MyCompany Accounts example above. The external search itemneeds to have its own action that you’ll define in another file.
2. Open the properties file for your edition of JasperReports Server:
Commercial Editions: <js-webapp>/WEB-INF/bundles/pro_nav_messages.properties
Community Project: <js-webapp>/WEB-INF/bundles/jasperserver_messages.properties
145
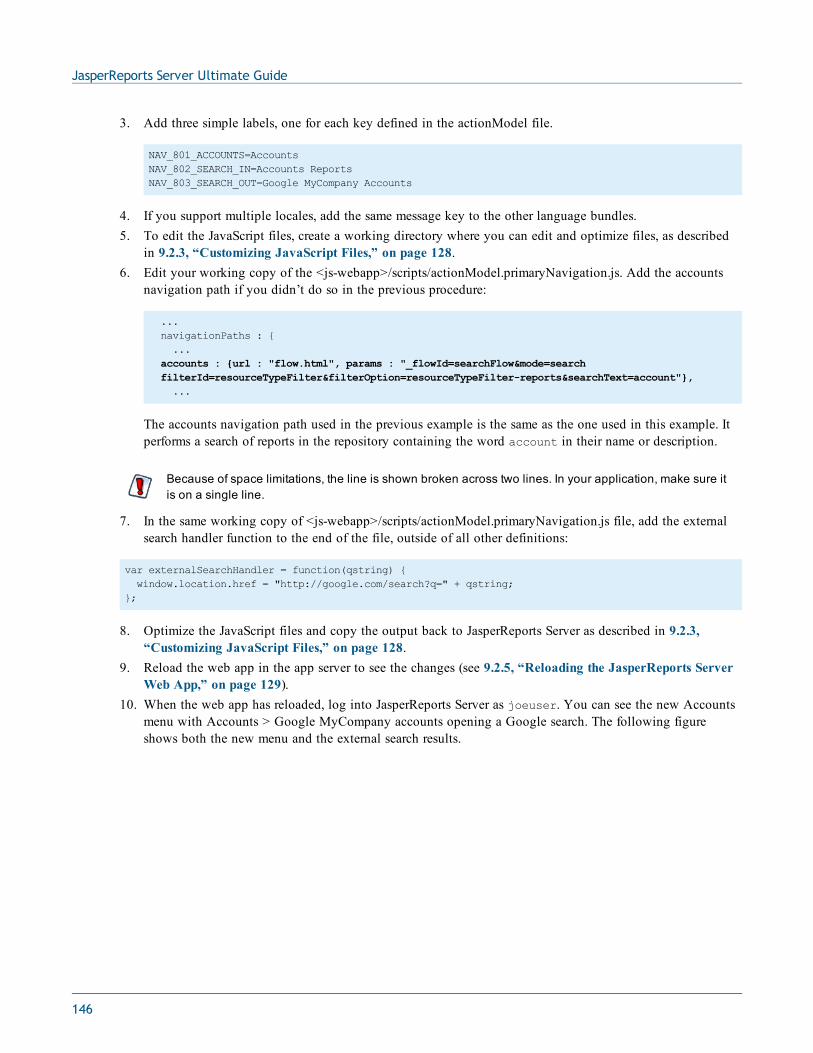
JasperReports Server Ultimate Guide
3. Add three simple labels, one for each key defined in the actionModel file.
NAV_801_ACCOUNTS=AccountsNAV_802_SEARCH_IN=Accounts ReportsNAV_803_SEARCH_OUT=Google MyCompany Accounts
4. If you support multiple locales, add the same message key to the other language bundles.5. To edit the JavaScript files, create a working directory where you can edit and optimize files, as described
in 9.2.3, “Customizing JavaScript Files,” on page 128.6. Edit your working copy of the <js-webapp>/scripts/actionModel.primaryNavigation.js. Add the accounts
navigation path if you didn’t do so in the previous procedure:
...navigationPaths : {...
accounts : {url : "flow.html", params : "_flowId=searchFlow&mode=searchfilterId=resourceTypeFilter&filterOption=resourceTypeFilter-reports&searchText=account"},...
The accounts navigation path used in the previous example is the same as the one used in this example. Itperforms a search of reports in the repository containing the word account in their name or description.
Because of space limitations, the line is shown broken across two lines. In your application, make sure itis on a single line.
7. In the same working copy of <js-webapp>/scripts/actionModel.primaryNavigation.js file, add the externalsearch handler function to the end of the file, outside of all other definitions:
var externalSearchHandler = function(qstring) {window.location.href = "http://google.com/search?q=" + qstring;
};
8. Optimize the JavaScript files and copy the output back to JasperReports Server as described in 9.2.3,“Customizing JavaScript Files,” on page 128.
9. Reload the web app in the app server to see the changes (see 9.2.5, “Reloading the JasperReports ServerWeb App,” on page 129).
10. When the web app has reloaded, log into JasperReports Server as joeuser. You can see the new Accountsmenu with Accounts > Google MyCompany accounts opening a Google search. The following figureshows both the new menu and the external search results.
146
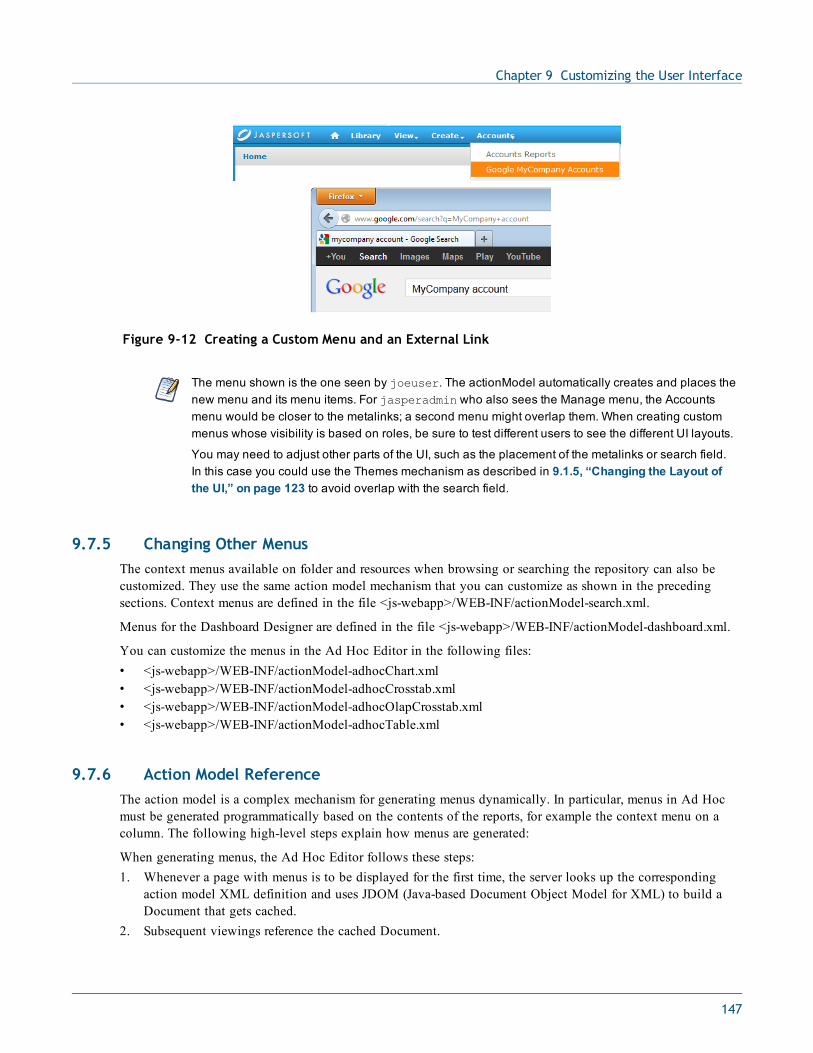
Chapter 9 Customizing the User Interface
Figure 9-12 Creating a Custom Menu and an External Link
The menu shown is the one seen by joeuser. The actionModel automatically creates and places thenew menu and its menu items. For jasperadmin who also sees the Manage menu, the Accountsmenu would be closer to the metalinks; a second menu might overlap them. When creating custommenus whose visibility is based on roles, be sure to test different users to see the different UI layouts.
You may need to adjust other parts of the UI, such as the placement of the metalinks or search field.In this case you could use the Themes mechanism as described in 9.1.5, “Changing the Layout ofthe UI,” on page 123 to avoid overlap with the search field.
9.7.5 Changing Other MenusThe context menus available on folder and resources when browsing or searching the repository can also becustomized. They use the same action model mechanism that you can customize as shown in the precedingsections. Context menus are defined in the file <js-webapp>/WEB-INF/actionModel-search.xml.
Menus for the Dashboard Designer are defined in the file <js-webapp>/WEB-INF/actionModel-dashboard.xml.
You can customize the menus in the Ad Hoc Editor in the following files:• <js-webapp>/WEB-INF/actionModel-adhocChart.xml• <js-webapp>/WEB-INF/actionModel-adhocCrosstab.xml• <js-webapp>/WEB-INF/actionModel-adhocOlapCrosstab.xml• <js-webapp>/WEB-INF/actionModel-adhocTable.xml
9.7.6 Action Model ReferenceThe action model is a complex mechanism for generating menus dynamically. In particular, menus in Ad Hocmust be generated programmatically based on the contents of the reports, for example the context menu on acolumn. The following high-level steps explain how menus are generated:
When generating menus, the Ad Hoc Editor follows these steps:1. Whenever a page with menus is to be displayed for the first time, the server looks up the corresponding
action model XML definition and uses JDOM (Java-based Document Object Model for XML) to build aDocument that gets cached.
2. Subsequent viewings reference the cached Document.
147

JasperReports Server Ultimate Guide
3. After the page is modified (usually triggered by an Ajax Request) the server generates a client side actionmodel in the form of a JSON expression. Based on the current page state, the client model is a filteredversion of the full action model in which internationalized names and generated options are resolved, andso forth.
4. Every time a menu is requested on the client, the server looks up the context in the JSON model, and foreach action, clones the appropriate HTML template for the menu and tweaks its attributes accordingly.
Some pages have mostly static menus that don’t change based on page contents. Other pages, suchas the Ad Hoc Editor, have dynamic menus that are updated in this way in response to changes theuser makes on a page.
The following sections document the XML elements used in the action model definition files. In particular, youcan define various conditions at several levels so that menus only appear to certain users or based on the currentstate of the page.
9.7.6.1 Context
Each context represents a distinct menu type and refers to the part of the design page that launches that menu.Examples are reportLevel, columnLevel, fieldLevel. They are directly equivalent to the menu levelsdefined in the popup-style JSP files used in previous releases.
9.7.6.2 Condition
A condition element invokes the specified server side test as a method on the view model. The enclosed actionsare only included in the client action model if the test returns true.
If the test has a leading exclamation point (!), the condition tests for false:• test – The name of the java method to be invoked on the view model.• testArgs – Array of parameters to be passed to the above test, expressed as a comma-separated string.
9.7.6.3 Actions
Each defined action produces a row or rows in the generated menu. The following tables describe the severalaction types.
simpleAction
A standalone menu action that, when clicked, fires the specified JavaScript method.
Attributes
id The ID of the menu row DOM object.
disabled If set to true, disable this row initially (shows a gray block instead).
labelKey The text the menu should display. If it corresponds to an localization bundle key itis translated, otherwise it is displayed as is.
labelCondition Sometimes the label value is contingent on the current state. The label conditionreferences a Java method on the view model and should return a boolean. AlabelCondition defines two labelOption sub elements (see below).
148
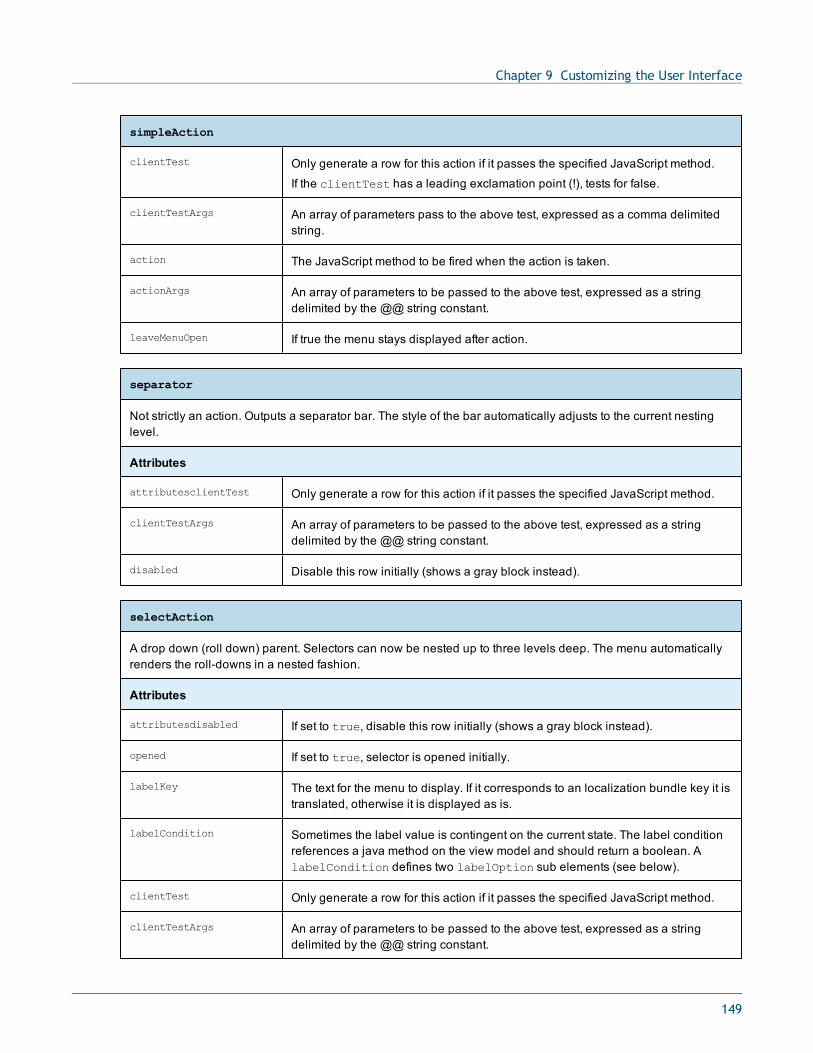
Chapter 9 Customizing the User Interface
simpleAction
clientTest Only generate a row for this action if it passes the specified JavaScript method.
If the clientTest has a leading exclamation point (!), tests for false.
clientTestArgs An array of parameters pass to the above test, expressed as a comma delimitedstring.
action The JavaScript method to be fired when the action is taken.
actionArgs An array of parameters to be passed to the above test, expressed as a stringdelimited by the @@ string constant.
leaveMenuOpen If true the menu stays displayed after action.
separator
Not strictly an action. Outputs a separator bar. The style of the bar automatically adjusts to the current nestinglevel.
Attributes
attributesclientTest Only generate a row for this action if it passes the specified JavaScript method.
clientTestArgs An array of parameters to be passed to the above test, expressed as a stringdelimited by the @@ string constant.
disabled Disable this row initially (shows a gray block instead).
selectAction
A drop down (roll down) parent. Selectors can now be nested up to three levels deep. The menu automaticallyrenders the roll-downs in a nested fashion.
Attributes
attributesdisabled If set to true, disable this row initially (shows a gray block instead).
opened If set to true, selector is opened initially.
labelKey The text for the menu to display. If it corresponds to an localization bundle key it istranslated, otherwise it is displayed as is.
labelCondition Sometimes the label value is contingent on the current state. The label conditionreferences a java method on the view model and should return a boolean. AlabelCondition defines two labelOption sub elements (see below).
clientTest Only generate a row for this action if it passes the specified JavaScript method.
clientTestArgs An array of parameters to be passed to the above test, expressed as a stringdelimited by the @@ string constant.
149
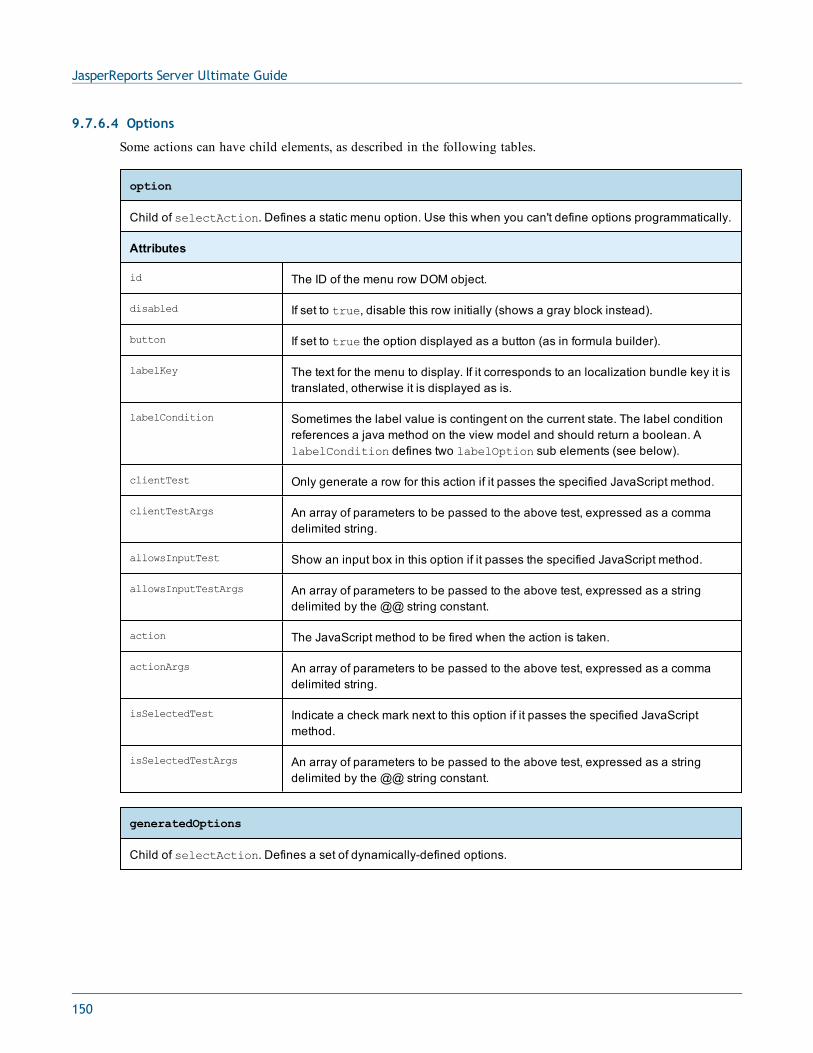
JasperReports Server Ultimate Guide
9.7.6.4 Options
Some actions can have child elements, as described in the following tables.
option
Child of selectAction. Defines a static menu option. Use this when you can't define options programmatically.
Attributes
id The ID of the menu row DOM object.
disabled If set to true, disable this row initially (shows a gray block instead).
button If set to true the option displayed as a button (as in formula builder).
labelKey The text for the menu to display. If it corresponds to an localization bundle key it istranslated, otherwise it is displayed as is.
labelCondition Sometimes the label value is contingent on the current state. The label conditionreferences a java method on the view model and should return a boolean. AlabelCondition defines two labelOption sub elements (see below).
clientTest Only generate a row for this action if it passes the specified JavaScript method.
clientTestArgs An array of parameters to be passed to the above test, expressed as a commadelimited string.
allowsInputTest Show an input box in this option if it passes the specified JavaScript method.
allowsInputTestArgs An array of parameters to be passed to the above test, expressed as a stringdelimited by the @@ string constant.
action The JavaScript method to be fired when the action is taken.
actionArgs An array of parameters to be passed to the above test, expressed as a commadelimited string.
isSelectedTest Indicate a check mark next to this option if it passes the specified JavaScriptmethod.
isSelectedTestArgs An array of parameters to be passed to the above test, expressed as a stringdelimited by the @@ string constant.
generatedOptions
Child of selectAction. Defines a set of dynamically-defined options.
150

Chapter 9 Customizing the User Interface
generatedOptions
Reserved Variables (in addition to standard reserved variables)
${optionId} Programmatically assigned ID. If function returns a Map this is the key part of eachkey-value pair, if it returns a Collection it is the toString value of each element.
${optionValue} Programmatically assigned display value. If function returns a Map this is thevalue part of each key-value pair, if it returns a Collection it is the toString valueof each element.
$R{<String>} When used in a label expression attempts to internationalize the enclosed Stringand if it fails it returns the literal value.
Attributes
id The ID of the menu row DOM object.
function The name of the java method to invoke on the view model that is used to generatethe options. The function can return either a Map or a Collection. The type ofobject returned affects how the ${optionValue} and ${optionId} reservedvariables are interpreted (see above).
functionArgs An array of parameters to pass to the above test, expressed as a string delimitedby the @@ string constant.
labelKey The text for the menu to display. If it corresponds to an localization bundle key it istranslated, otherwise it is displayed as is.
labelCondition Sometimes the label value is contingent on the current state. The label conditionreferences a java method on the view model and should return a boolean. AlabelCondition defines two labelOption sub elements (see below).
labelExpression Allows a custom label to be defined and allows full use of all reserved variables.(for example, labelExpression="${optionValue}") $R{ADH_252_DATA_ROWS}").
clientTest Only generate a row for this action if it passes the specified JavaScript method.
clientTestArgs An array of parameters to be passed to the above test, expressed as a stringdelimited by the @@ string constant. If no actionArgs are specified, the${optionId} variable is automatically assigned as an argument.
allowsInputTest Show an input box in this option if it passes the specified JavaScript method.
allowsInputTestArgs An array of parameters to be passed to the above test, expressed as a stringdelimited by the @@ string constant. If no actionArgs are specified, the${optionId} variable is automatically assigned as an argument.
action The JavaScript method to be fired when the action is taken.
151

JasperReports Server Ultimate Guide
generatedOptions
actionArgs An array of parameters to be passed to the above test, expressed as a commadelimited string. If no actionArgs are specified, the ${optionId} variable isautomatically be assigned as an argument.
leaveMenuOpen If true the menu stays displayed after action (for all generated options).
isSelectedTest Indicate a check mark next to this option if it passes the specified JavaScriptmethod.
isSelectedTestArgs An array of parameters to be passed to the above test, expressed as a stringdelimited by the @@ string constant. If no actionArgs are specified, the${optionId} variable is automatically assigned as an argument.
Default Settings (DOM attributes set automatically on each generated Option)
id If not specified as an a attribute defaults to the ${optionId} variable.
clientTestArgs If not specified as an a attribute defaults to the ${optionId} variable.
actionArgs If not specified as an a attribute defaults to the ${optionId} variable.
isSelectedArgs If not specified as an a attribute defaults to the ${optionId} variable.
labelOption
Child of labelFunction. Every labelFunction element should have two labelOption elements aschildren. One of them is used to define the action label depending on the result of the labelCondition.
Attributes
attributesfunctionResponse
A boolean string. If the parent labelCondition result matches this booleanvalue, this labelOption is used.
labelKey The text for the menu to display. If it corresponds to an localization bundle key it istranslated, otherwise it is displayed as isgenerateFromTemplate.
generateFromTemplate
Programmatically generates multiple actions by specifying a function to iterate over the enclosed template. Thetemplate can be any valid action structure, it can include multiple actions and/or nested actions.
Reserved Variables (in addition to standard reserved variables)
${templateInjectionIndex}
The zero-based index of the current iteration.
152
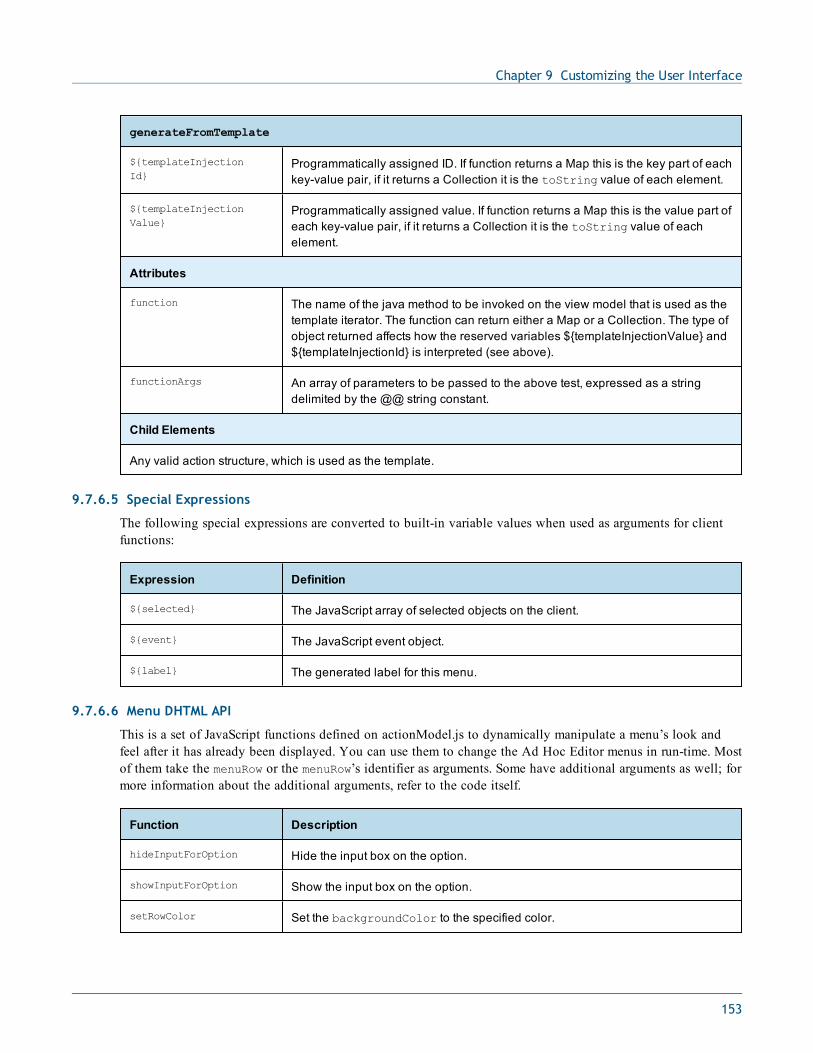
Chapter 9 Customizing the User Interface
generateFromTemplate
${templateInjectionId}
Programmatically assigned ID. If function returns a Map this is the key part of eachkey-value pair, if it returns a Collection it is the toString value of each element.
${templateInjectionValue}
Programmatically assigned value. If function returns a Map this is the value part ofeach key-value pair, if it returns a Collection it is the toString value of eachelement.
Attributes
function The name of the java method to be invoked on the view model that is used as thetemplate iterator. The function can return either a Map or a Collection. The type ofobject returned affects how the reserved variables ${templateInjectionValue} and${templateInjectionId} is interpreted (see above).
functionArgs An array of parameters to be passed to the above test, expressed as a stringdelimited by the @@ string constant.
Child Elements
Any valid action structure, which is used as the template.
9.7.6.5 Special Expressions
The following special expressions are converted to built-in variable values when used as arguments for clientfunctions:
Expression Definition
${selected} The JavaScript array of selected objects on the client.
${event} The JavaScript event object.
${label} The generated label for this menu.
9.7.6.6 Menu DHTML API
This is a set of JavaScript functions defined on actionModel.js to dynamically manipulate a menu’s look andfeel after it has already been displayed. You can use them to change the Ad Hoc Editor menus in run-time. Mostof them take the menuRow or the menuRow’s identifier as arguments. Some have additional arguments as well; formore information about the additional arguments, refer to the code itself.
Function Description
hideInputForOption Hide the input box on the option.
showInputForOption Show the input box on the option.
setRowColor Set the backgroundColor to the specified color.
153
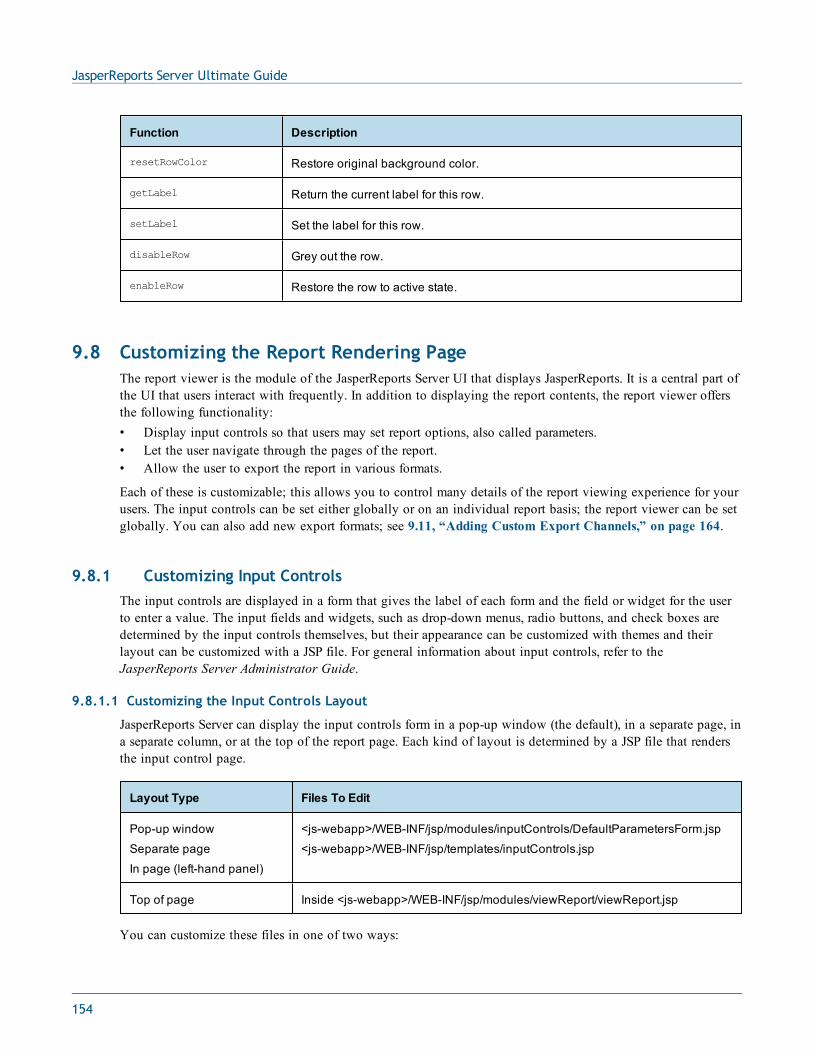
JasperReports Server Ultimate Guide
Function Description
resetRowColor Restore original background color.
getLabel Return the current label for this row.
setLabel Set the label for this row.
disableRow Grey out the row.
enableRow Restore the row to active state.
9.8 Customizing the Report Rendering PageThe report viewer is the module of the JasperReports Server UI that displays JasperReports. It is a central part ofthe UI that users interact with frequently. In addition to displaying the report contents, the report viewer offersthe following functionality:• Display input controls so that users may set report options, also called parameters.• Let the user navigate through the pages of the report.• Allow the user to export the report in various formats.
Each of these is customizable; this allows you to control many details of the report viewing experience for yourusers. The input controls can be set either globally or on an individual report basis; the report viewer can be setglobally. You can also add new export formats; see 9.11, “Adding Custom Export Channels,” on page 164.
9.8.1 Customizing Input ControlsThe input controls are displayed in a form that gives the label of each form and the field or widget for the userto enter a value. The input fields and widgets, such as drop-down menus, radio buttons, and check boxes aredetermined by the input controls themselves, but their appearance can be customized with themes and theirlayout can be customized with a JSP file. For general information about input controls, refer to theJasperReports Server Administrator Guide.
9.8.1.1 Customizing the Input Controls Layout
JasperReports Server can display the input controls form in a pop-up window (the default), in a separate page, ina separate column, or at the top of the report page. Each kind of layout is determined by a JSP file that rendersthe input control page.
Layout Type Files To Edit
Pop-up window
Separate page
In page (left-hand panel)
<js-webapp>/WEB-INF/jsp/modules/inputControls/DefaultParametersForm.jsp
<js-webapp>/WEB-INF/jsp/templates/inputControls.jsp
Top of page Inside <js-webapp>/WEB-INF/jsp/modules/viewReport/viewReport.jsp
You can customize these files in one of two ways:
154

Chapter 9 Customizing the User Interface
• If you directly modify one or both of the files listed above and save them in the same location in your webapplication, your changes apply to all reports. The procedure is similar to 9.4, “Customizing the LoginPage,” on page 134. After making your changes and redeploying the web app, every user would see yournew input controls form. For example, to change the background color of all your input controls, youwould modify these files.
• In the case of the file DefaultParametersForm.jsp, you can create a JSP file with a different name and use itin individual reports, without affecting the default appearance of input controls for other reports.
Input controls were modified in 5.5. Custom input controls developed prior to 5.5 may requiremodifications in order to work with the new input control design.
In addition to changes to the jsp pages above, for JasperReports Server 5.5 and 5.6, you may need tomodify the main report viewer (<js-webapp>/scripts/report.viewer.main.js) to listen for controls. This is notnecessary in JasperReports Server 5.6.1 and higher:jQuery(document).trigger('report:controls_initialized', {});
As of JasperReports Server 5.6, if you make any changes to a JavaScript file, such asreport.viewer.main.js, you need to re-optimize the JavaScript files, as described in 9.2.3, “CustomizingJavaScript Files,” on page 128.
Once you have created the file you want, save the file in your server instance. For example, you could create a<js-webapp>/WEB-INF/jsp/custom directory, and save your customizations there, for example asCustomShippingParametersForm.jsp.
JSP files rely on other JSP file to reuse parts of the user interface. In the file that you modify, you caneither reference the default JSP helper files, or make copies of them to modify and reference instead.
To use custom JSP input controls in a report, you need to add the JSP file to the report as a resource. Forexample, suppose the JSP for the input controls above was saved as <js-webapp>/WEB-INF/jsp/custom/customShippingParametersForm.jsp in your server instance. To attach this file to your shippingreport, first locate the report in your repository and right-click to edit the JasperReport resource. Then go to theControls and Resources page and set the Optional JSP location to the path of your file relative to <js-webapp>/WEB-INF/jsp/. In this example, you would enter custom/CustomShippingParametersForm.jsp.
155
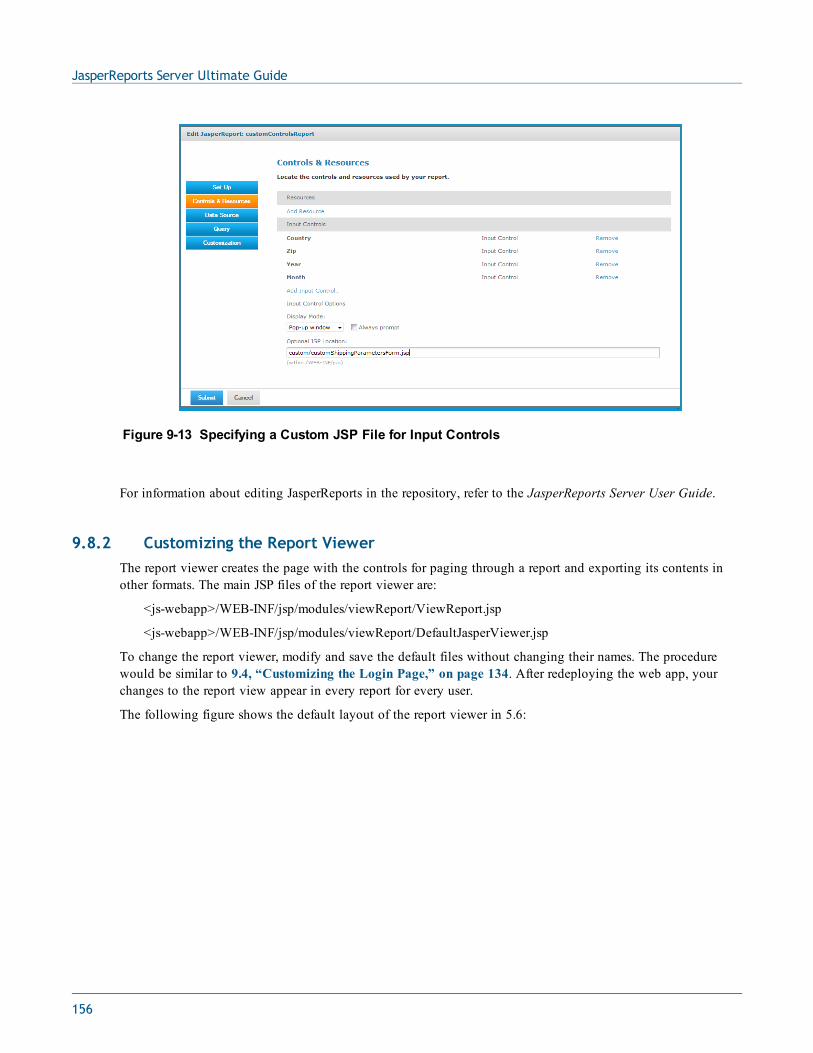
JasperReports Server Ultimate Guide
Figure 9-13 Specifying a Custom JSP File for Input Controls
For information about editing JasperReports in the repository, refer to the JasperReports Server User Guide.
9.8.2 Customizing the Report ViewerThe report viewer creates the page with the controls for paging through a report and exporting its contents inother formats. The main JSP files of the report viewer are:
<js-webapp>/WEB-INF/jsp/modules/viewReport/ViewReport.jsp
<js-webapp>/WEB-INF/jsp/modules/viewReport/DefaultJasperViewer.jsp
To change the report viewer, modify and save the default files without changing their names. The procedurewould be similar to 9.4, “Customizing the Login Page,” on page 134. After redeploying the web app, yourchanges to the report view appear in every report for every user.
The following figure shows the default layout of the report viewer in 5.6:
156
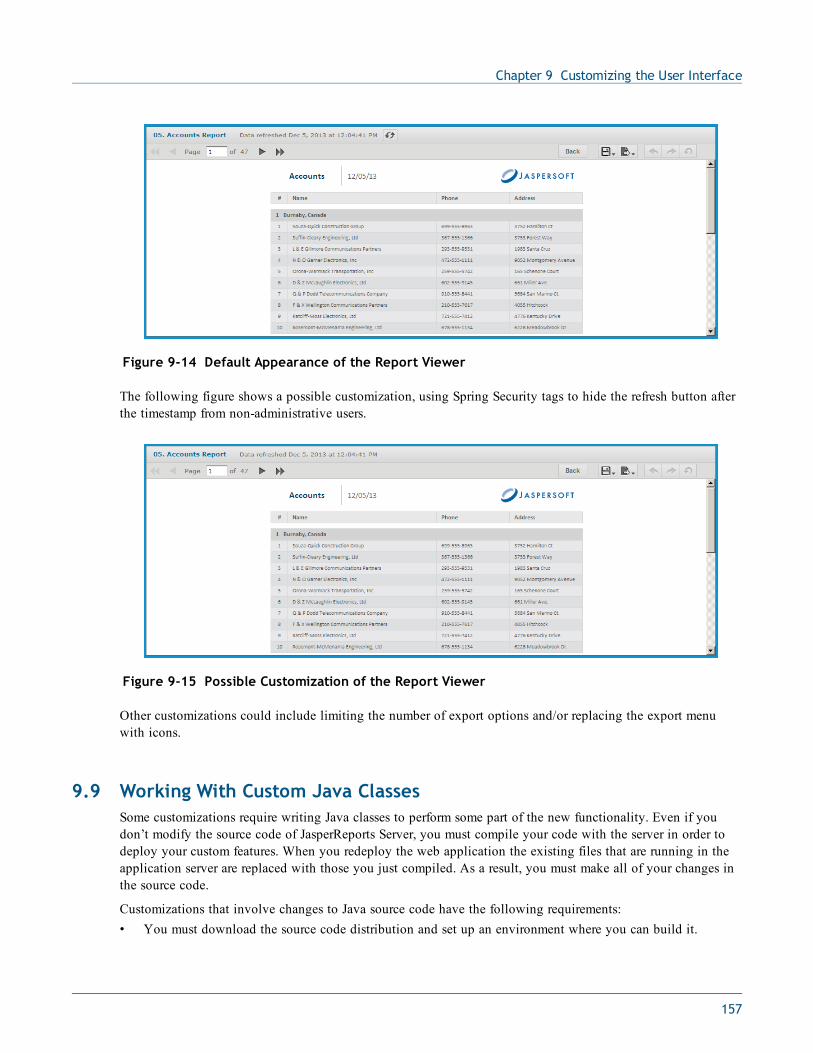
Chapter 9 Customizing the User Interface
Figure 9-14 Default Appearance of the Report Viewer
The following figure shows a possible customization, using Spring Security tags to hide the refresh button afterthe timestamp from non-administrative users.
Figure 9-15 Possible Customization of the Report Viewer
Other customizations could include limiting the number of export options and/or replacing the export menuwith icons.
9.9 Working With Custom Java ClassesSome customizations require writing Java classes to perform some part of the new functionality. Even if youdon’t modify the source code of JasperReports Server, you must compile your code with the server in order todeploy your custom features. When you redeploy the web application the existing files that are running in theapplication server are replaced with those you just compiled. As a result, you must make all of your changes inthe source code.
Customizations that involve changes to Java source code have the following requirements:• You must download the source code distribution and set up an environment where you can build it.
157
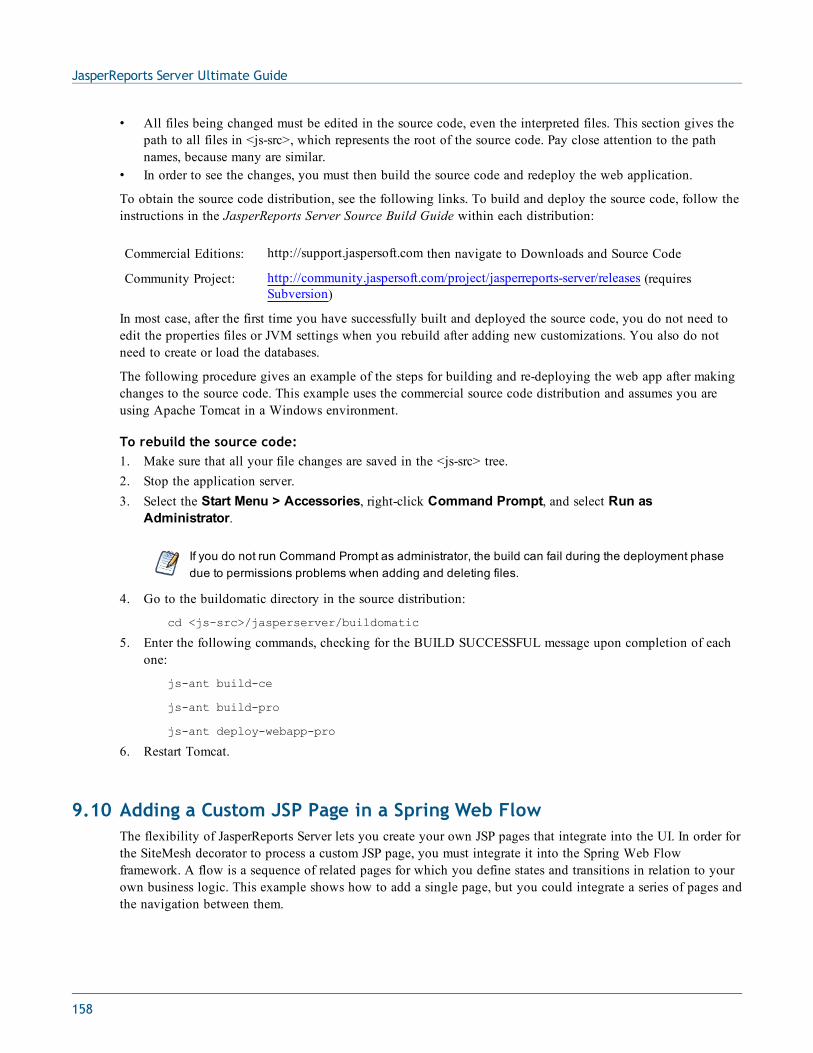
JasperReports Server Ultimate Guide
• All files being changed must be edited in the source code, even the interpreted files. This section gives thepath to all files in <js-src>, which represents the root of the source code. Pay close attention to the pathnames, because many are similar.
• In order to see the changes, you must then build the source code and redeploy the web application.
To obtain the source code distribution, see the following links. To build and deploy the source code, follow theinstructions in the JasperReports Server Source Build Guide within each distribution:
Commercial Editions: http://support.jaspersoft.com then navigate to Downloads and Source Code
Community Project: http://community.jaspersoft.com/project/jasperreports-server/releases (requiresSubversion)
In most case, after the first time you have successfully built and deployed the source code, you do not need toedit the properties files or JVM settings when you rebuild after adding new customizations. You also do notneed to create or load the databases.
The following procedure gives an example of the steps for building and re-deploying the web app after makingchanges to the source code. This example uses the commercial source code distribution and assumes you areusing Apache Tomcat in a Windows environment.
To rebuild the source code:1. Make sure that all your file changes are saved in the <js-src> tree.2. Stop the application server.3. Select the Start Menu > Accessories, right-click Command Prompt, and select Run as
Administrator.
If you do not run Command Prompt as administrator, the build can fail during the deployment phasedue to permissions problems when adding and deleting files.
4. Go to the buildomatic directory in the source distribution:
cd <js-src>/jasperserver/buildomatic
5. Enter the following commands, checking for the BUILD SUCCESSFUL message upon completion of eachone:
js-ant build-ce
js-ant build-pro
js-ant deploy-webapp-pro
6. Restart Tomcat.
9.10 Adding a Custom JSP Page in a Spring Web FlowThe flexibility of JasperReports Server lets you create your own JSP pages that integrate into the UI. In order forthe SiteMesh decorator to process a custom JSP page, you must integrate it into the Spring Web Flowframework. A flow is a sequence of related pages for which you define states and transitions in relation to yourown business logic. This example shows how to add a single page, but you could integrate a series of pages andthe navigation between them.
158

Chapter 9 Customizing the User Interface
To further integrate with the server, your pages should use the CSS building blocks provided in themes toreplicate the menu and column layout of the server. You can then apply the default theme of the UI or designyour own style in a custom theme.
Spring Web Flow relies on the Spring MVC (Model, View, and Controller) module to implement the webinterface, where the controller is a Java class. As a result, adding business logic to a web flow involves creatingJava methods to implement the logic. In general, the server UI contains most of the functionality in action classcode that can be associated with one or more JSP pages. The JSP files have minimal functionality because JSPcode logic can become very cluttered and hard to follow. The action classes are pure Java and thus easier toorganize. In this example, the Java method simply returns success whenever it is invoked.
For more information, refer to the Spring documentation for flows and MVC.
This example requires you to work with the JasperReports Server source code, as explained in 9.9, “WorkingWith Custom Java Classes,” on page 157.
This example is divided into several parts:1. Adding a custom JSP file integrated into the server as a web flow.2. Creating an action and adding it to the web flow.3. Adding the web flow to a menu.
Example of adding a custom JSP file integrated into the server as a web flow:1. Create a subdirectory named sampleFlow for the JSP files in your flow module in <js-src>/jasperserver-
pro/jasperserver-war/src/main/webapp/WEB-INF/jsp/. For example:
cd <js-src>/jasperserver-pro/jasperserver-war/src/main/webapp/WEB-INF/jsp/
mkdir sampleFlow2. Create the following JSP file and save it as sampleView.jsp in <js-src>/jasperserver-pro/jasperserver-
war/src/main/webapp/WEB-INF/jsp/sampleFlow:
<html><head><title>Sample Page</title></head><body class="oneColumn primary column"><h1 class="textAccent">Hello World!</h1></body></html>
Design the layout of your custom content based on the UI components in the server. The UIcomponents are defined in the CSS files in the <js-src>/jasperserver/jasperserver-war/src/main/webapp/themes/default/ directory. You can see a gallery of samples by logging in asjasperadmin and selecting View > UI Samples.This example uses a one-column layout and the textAccent font.
3. Create the following XML file with a flow container element and an empty view-state element. In a laterstep, you will add an action state:
<?xml version="1.0" encoding="UTF-8"?><flow xmlns="http://www.springframework.org/schema/webflow"
xmlns:ns0="http://www.w3.org/2001/XMLSchema-instance"ns0:schemaLocation="http://www.springframework.org/schema/webflowhttp://www.springframework.org/schema/webflow/spring-webflow-2.0.xsd"
159

JasperReports Server Ultimate Guide
start-state="sampleView">
<view-state id="sampleView" view="modules/sampleFlow/sampleView"></view-state>
<end-state id="done"/>
</flow>
4. Name the file docSampleFlow.xml and save it in the <js-src>/jasperserver/jasperserver-war/src/main/webapp/WEB-INF/flows directory.
Example of setting flow permissions:5. Set permissions for your flow. To do this:
a. Edit the file <js-src>/jasperserver/common/shared-config/applicationContext-security.xml.b. Locate the flowVoter bean. This bean sets the permissions for flows.c. Add a line for your flow and set the permissions to ROLE_ADMINISTRATOR.
<bean id="flowVoter"class="com.jaspersoft.jasperserver.api.security.FlowRoleAccessVoter">
<property name="flowAccessAttribute" value="FLOW_ACCESS"/><property name="flowDefinitionSource"><value>repoAdminFlow=ROLE_ADMINISTRATOR...docSampleFlow=ROLE_ADMINISTRATOR<!--objectPermissionToUserFlow=ROLE_ADMINISTRATOR-->searchFlow=ROLE_USER,ROLE_ADMINISTRATOR*=ROLE_USER,ROLE_ADMINISTRATOR
</value></property>
</bean>
The final entry in the flowVoter bean, *=ROLE_USER,ROLE_ADMINISTRATOR, sets the defaultpermissions for all flows not specified directly. If you do not create an entry for your flow, thesepermissions apply.
Example of creating an action and adding it to the flow:6. Create a java class that defines the controller in the Spring MVC framework. In this example, this file
always returns success when it is invoked.a. Go to the <js-src>/jasperserver/jasperserver-war-jar/src/main/java/com/jaspersoft/ji/war/ directory. This is
where the JasperReports Server source looks for java files used by the Spring web flow framework.b. Create a subdirectory for your flow package, <js-src>/jasperserver/jasperserver-war-
jar/src/main/java/com/jaspersoft/ji/war/sampleFlow/c. Create a java file and save it as <js-src>/jasperserver/jasperserver-war-
jar/src/main/java/com/jaspersoft/ji/war/sampleFlow/SampleAction.java.
package com.jaspersoft.ji.war.sampleFlow;
import org.springframework.webflow.action.MultiAction;
160
Chapter 9 Customizing the User Interface
import org.springframework.webflow.execution.Event;import org.springframework.webflow.execution.RequestContext;
public class SampleAction extends MultiAction {public Event start(RequestContext context) throws Exception{
// implement some logic
return success();}
}
7. Create a bean for the SampleAction class that you created. To this, create the following file and save it as<js-src>/jasperserver/jasperserver-war/src/main/webapp/WEB-INF/flows/docSampleBeans.xml:
<beans xmlns="http://www.springframework.org/schema/beans"xmlns:xsi="http://www.w3.org/2001/XMLSchema-instance"xmlns:util="http://www.springframework.org/schema/util"xsi:schemaLocation="http://www.springframework.org/schema/beanshttp://www.springframework.org/schema/beans/spring-beans-3.1.xsdhttp://www.springframework.org/schema/utilhttp://www.springframework.org/schema/util/spring-util-3.1.xsd">
<bean id="sampleAction" class="com.jaspersoft.ji.war.sampleFlow.SampleAction"></bean></beans>
8. Modify docSampleFlow.xml to start with an action state that calls the SampleAction class you created:a. Change the start-state to start.b. Create an action state start that calls sampleAction and transitions to the view-state sampleView on
success. Insert this state before sampleView.c. At the end of the flow, import docSampleBeans.xml as a resource.
<?xml version="1.0" encoding="UTF-8"?><flow xmlns="http://www.springframework.org/schema/webflow"
xmlns:ns0="http://www.w3.org/2001/XMLSchema-instance"ns0:schemaLocation="http://www.springframework.org/schema/webflowhttp://www.springframework.org/schema/webflow/spring-webflow-2.0.xsd"
start-state="start">
<action-state id="start"><evaluate expression="sampleAction"/><transition on="success" to="sampleView"/></action-state>
<view-state id="sampleView" view="modules/sampleFlow/sampleView"></view-state>
<view-state id="errorPage" view="modules/system/errorPage"/>
<end-state id="done"/>
<global-transitions><transition on="backFromErrorPage" to="backFromError"/><transition on-exception="java.lang.Throwable" to="errorPage"/>
161
JasperReports Server Ultimate Guide
</global-transitions>
<!-- end exceptions handling -->
<bean-import resource="docSampleBeans.xml"/>
</flow>
9. Add error handling as shown in the code sample above:a. Add a view-state errorPage to your flow. In this example, you add it immediately after sampleView.b. Add a global-transitions state that handles Java exceptions by displaying errorPage.
10. (Optional) If you wish, you can rebuild the source code and view your page:• Rebuild the source code and redeploy the web application according to the instructions in the Building
JasperReports Server section in the JasperReports Server Source Build Guide within your distribution.See 9.9, “Working With Custom Java Classes,” on page 157 for an overview of this process.
• Log in to your JasperReports Server.• Navigate to the page you created using this URL:
http://<hostname>:<port>/jasperserver-pro/flow.html?_flowId=docSampleFlow
Example:
http://localhost:8080/jasperserver-pro/flow.html?_flowId=docSampleFlow
Example of creating a menu item to call your flow:
Now you can add a menu item to call the flow you created. The process is similar to the one described in 9.7.3,“Adding an Item to the Main Menu,” on page 143, but because you are modifying the source, the filelocations are different in this example.
Because the commercial source code includes the community source, most modifications to themenu are made in the community source files.
11. Edit the file <js-src>/jasperserver/common/shared-config/actionModel-navigation.xml. Locate theactionModel for the View menu in the file.
12. Add an option tag for the menu item, as shown in the following code sample. The option tag hasattributes to specify the label key and the name of the action to perform.
<!--context for view option on primary menu--><context name="main_view_mutton" test="!banUserRole"><selectAction labelKey="menu.repository">...<condition test="checkAuthenticationRoles" testArgs="ROLE_ADMINISTRATOR"><separator/><option labelKey="menu.samples" clientTest="!isIPad"action="primaryNavModule.navigationOption" actionArgs="samples"/>
</condition>
<separator/><condition test="checkAuthenticationRoles" testArgs="ROLE_ADMINISTRATOR"><option labelKey="NAV_028_DOC_SAMPLE" action="primaryNavModule.navigationOption"
actionArgs="docSample"/></condition>
</selectAction></context>
162

Chapter 9 Customizing the User Interface
13. Add a condition tag for the menu item, as shown in the code sample above.
The condition tag prevents the menu item from being displayed to users without the specifiedpermissions. However to ensure that the flow cannot be accessed via URL, set flow permissions asshown in step 5.
14. Add the label key to the file <js-src>/jasperserver-pro/jasperserver-war/src/main/webapp/WEB-INF/bundles/pro_nav_messages.properties, as shown in the following code sample:
NAV_001_HOME=Home...NAV_027_SEARCH=Search ResultsNAV_028_DOC_SAMPLE=Hello WorldNAV_031_USERS=Users...
15. Create a working directory where you can edit and optimize JavaScript files, as described in 9.2.3,“Customizing JavaScript Files,” on page 128.
16. In a text editor, open your working copy of the file <js-src>/jasperserver/jasperserver-war/src/main/webapp/scripts/actionModel.primaryNavigation.js, and locate the navigationPaths section.Add a line that specifies the accounts flow to begin when the menu item is selected. If you are adding yourline at the end of the section, make sure to add a comma to the previous line.
var primaryNavModule = {...
navigationPaths : {...logSettings : {url : "log_settings.html"},docSample : {url : "flow.html", params : "_flowId=docSampleFlow"}
},
Compile code and view changes:17. Optimize the JavaScript files in your working directory and copy the output back to JasperReports Server as
described in 9.2.3, “Customizing JavaScript Files,” on page 128.18. Rebuild the source code and redeploy the web application according to the instructions in the
JasperReports Server Source Build Guide within your distribution. See 9.9, “Working With Custom JavaClasses,” on page 157 for an overview of this process.
19. Log in as an administrator. If your changes were successful, this example displays the View >MyCompany Accounts menu item to users, and selecting it displays the custom page defined in thesampleView.jsp file:
163
JasperReports Server Ultimate Guide
Figure 9-16 Custom JSP in a Custom FlowThe page uses the single column layout and the orange text is the textAccent class in CSS.
9.11 Adding Custom Export ChannelsWhen users run reports in JasperReports Server, they can export the results in several formats, such as PDF andODT. If your users need to export to other file formats, you can create a custom export channel. You mustimplement a custom Java class that generates the required file format then integrate the new class into the server.As a result, this customization must be made in the source code of JasperReports Server.
In the following example, a custom export channel is added to the server’s pluggable, flexible export channellist. The example adds the export channel in three places: the report viewer, the scheduler, and web services.
This section assumes the following:• You are familiar with the underlying technologies, such as Java, Spring, JSPs, and web services.• You have downloaded and tested the source code distribution, as described in 9.9, “Working With Custom
Java Classes,” on page 157. Paths and filenames in this section are based on the <js-src> location.• You have implemented an exporter class that can be integrated with JasperReports Server. The section
further assumes that your exporter class creates files with a .<MyFormat> file extension and format.• That, where the instructions read <MyFormat>, you have used the correct name for your export format. For
example, if you are creating an exporter that generates .DBF files, where the instructions describe theReport<MyFormat>Exporter class, your class is called ReportDBFExporter.
9.11.1 About Export ParametersExport parameters define how JasperReports Server generates your output format. For example, consider thepaginated Excel exporter. Its export parameters determine how a report is converted to the XLS file format. Theparameter settings have such information as whether each page of the report should be represented as a separatesheet in the Excel spreadsheet (IS_ONE_PAGE_PER_SHEET).
Export parameters have default values that can be set at the report- or application-level. Many of the parametersare optional; others are valid only for certain export channels. When you create an export channel, you candefine such parameters to control how your reports are exported in the new format. If you don’t need to specifysuch settings when reports are run, you might not need to define any parameters.
9.11.2 Adding the Exporter to the Report ViewerThe most prominent place that the export channel should be available is the page that appears when the reportis run. The drop-down list of export channels in the default report viewer is shown in 9.11.2, “Adding theExporter to the Report Viewer” . Adding a new exporter to the report viewer involves:• Implementing a new exporter action class that extends AbstractReportExporter.• Implementing a new export parameters bean class that extends AbstractExportParameters.• Creating a new export configuration bean of type ExporterConfigurationBean.• Adding a resource bundle property for the label in the menu.
To add the exporter to the default report viewer:1. Create a new exporter action class that extends the abstract
com.jaspersoft.jasperserver.war.action.AbstractReportExporterclass. Name it Report<MyFormat>Exporter.
164
Chapter 9 Customizing the User Interface
For guidance about creating such a class, look at the ReportCsvExporter class, which is similar. It isfound in the com.jaspersoft.jasperserver.war.action package.
2. Create a new export parameters Java bean class, which should implement Serializable and extend thecom.jaspersoft.jasperserver.api.engine.jasperreports.common.AbstractExportParametersclass. It should implement the public void setPropertyValues(Object object) method, which isrequired to perform dynamic data binding and validation. Give the class a unique name, such as<MyFormat>ExportParametersBean, and ensure that it contains only user-customizable export parameters(that is, it should not contain the JRExporterParameter.JASPER_PRINT orJRExporterParameter.OUTPUT_FILE_NAME parameters, which are already set). For an example, see theXlsExportParametersBean class in thecom.jaspersoft.jasperserver.api.engine.jasperreports.common package.
3. Now that you have everything you need to view the new export format, and you must configure it forSpring.
There are two ways to set export parameter values:• Application-level settings. These settings set the defaults for all reports in the repository, including all
export parameter values. They apply in the absence of report-level settings. This is the server’s defaultbehavior.
• Report-level settings. These settings allow an individual report to have different values from thedefault. Every report in the repository can have user-defined export parameter values.
To enable report-level settings, edit the file <js-src>/jasperserver/common/shared-config/applicationContext.xml. Locate the configurationBean bean, and set thereportLevelConfigurable property to true. This enables the report-level settings mode; otherwise,parameter values are inherited from the application-level settings. If a report includes exporter hintproperties, they override the application-level values.
4. Edit the file <js-src>/jasperserver/jasperserver-war/src/main/webapp/WEB-INF/flows/viewReportBeans.xml.
The configurable list of exporters is controlled by the configuredExporters property in thereportExporter bean. The list of exporters is defined by the exporterConfigMap at the end of the file.Its keys are important because it is the key name that is sent to the server when a user clicks an exportbutton. Key names are also part of some state names in the associated web flow, so you must be careful touse correctly-implemented names when adding a new object in the exporterConfigMap map.
As a rule, all key names should correspond with the extension name of the file generated by the givenexporter (for example, the key for Excel exporter is xls, and the key for PDF exporter is pdf). While usingfile extensions as key names is not mandatory, Jaspersoft strongly recommends it, as in the case of<MyFormat>.
Add a new entry in the exporterConfigMap element:
<entry key="<MyFormat>" value-ref="<MyFormat>ExporterConfiguration"/>
5. The values in the exporterConfigMap object arecom.jaspersoft.jasperserver.war.action.ExporterConfigurationBeanobjects, which defines a custom type that stores configuration information about any given exporter.
Create a bean named <MyFormat>ExporterConfiguration with the following properties. For guidance,refer to the similar objects in the viewReportBeans.xml file.• iconSrc – A context-relative path to the icon for the tool bar button; usually icons are stored in the
/images location. Any new exporter should have a related icon image saved in that directory. The iconshould be 18 pixels by 18 pixels.
165

JasperReports Server Ultimate Guide
• descriptionKey – A key in the jasperserver_messages.properties resource bundle file thatshould be displayed as the tooltip when the mouse is held over exporter’s icon; you’ll add this key tothe jasperserver_messages.properties file in step 7.
• exportParameters – Acom.jaspersoft.jasperserver.api.engine.jasperreports.common.ExportParametersXML bean, which wraps a specific export parameters class that contains export parameter defaultvalues. In the case of this example, use the <MyFormat>ExportParametersBean class you created instep 2. Name it <MyFormat>ExportParameters.
• currentExporter – An AbstractReportExporter type object that contains specific export businesslogic; for example, the Report<MyFormat>Exporter class you created.
6. Still in the file viewReportBeans.xml, write a bean with an element named report<MyFormat>Exporterfor your new exporter class. For guidance, refer to the similar reportCsvExporter bean.
7. In the file <js-src>/jasperserver/jasperserver-war/src/main/webapp/WEB-INF/bundles/jasperserver_messages.properties, add a new key for your exporter’s name and tooltip:
jasper.report.view.hint.export.<MyFormat>=<MyFormat Tooltip Description>
If your server instance supports multiple languages, be sure to add the correct entries in the properties filefor each supported language.
8. Finally, edit the file <js-src>/jasperserver/common/shared-config/applicationContext.xml to add theadditional export parameters. Create a bean with the name <MyFormat>ExportParameters and configureit. For guidance, refer to the similar ExportParameters beans in the file. You must also edit theapplicationContext-report-scheduling.xml file found in the same location; this file defines the parametersused when reports are scheduled. For more information about configuring the exporter for scheduled reports,refer to the following section.
9. The new output format is now configured. Compile the source code and redeploy the web application, asdescribed in 9.9, “Working With Custom Java Classes,” on page 157.
Your new exporter appears in the list of exporters when you run a report. When selected, the report isexported in the new file format.
9.11.3 Adding the Export Format to the SchedulerWhen users schedule reports, they specify the file format to generate when the report runs. The report schedulingmechanism is more complicated that the mechanism that displays reports directly to users, so the process ofadding an export format to the scheduler is also more complicated.
Figure 9-17 Default Export Formats on the Scheduler Output Page
Adding a new export format to the scheduler requires these steps:• Implement the Output interface.• Define a key for your exporter.• Implement a new export parameters bean class.• Register the new export format in Spring configuration files.
166
Chapter 9 Customizing the User Interface
To add the exporter to the report scheduler:1. Create a class that implements the
com.jaspersoft.jasperserver.api.engine.scheduling.quartz.Output interface and name it<MyFormat>ReportOutput. You must implement the getOutput() method, which generates the output tothe new myformat format and returns acom.jaspersoft.jasperserver.api.engine.scheduling.quartz.ReportOutput object. If yourformat required custom default values for the export parameters at the application level, this class shouldcontain also acom.jaspersoft.jasperserver.api.engine.jasperreports.common.ExportParameters property,named exportParams. For guidance, refer to thecom.jaspersoft.jasperserver.api.engine.scheduling.quartz.XlsReportOutput class.
2. Associate a new key with your <MyFormat>ReportOutput business class and name this key <MyFormat>.In order to preserve backward compatibility, the keys and integer numbers must correspond. Edit the file<js-src>/jasperserver/jasperserver-war/src/main/webapp/WEB-INF/bundles/jasperserver_config.properties toadd a new row:
report.scheduling.output.format.{number}=<MyFormat>
Replace the {number} placeholder with the next greater integer number to continue the series defined inthe properties file.
3. Edit the file <js-src>/jasperserver/common/shared-config/applicationContext-reportscheduling.xml to makethe following changes:a. Associate a new key with your <MyFormat>ReportOutput business class and name this key
<MyFormat>. In order to preserve backward compatibility, the keys and integer numbers mustcorrespond.
Add a new entry in the outputKeyMapping bean similar to the following:
<entry key="{number}" value="<MyFormat>"/>
Replace the {number} placeholder with the next consecutive integer key number to continue the series.For example, if you were adding a DBF exporter and the last key number in the map is 10, the linemight be similar to:
<entry key="11" value="DBF"/>
b. Create a new job<MyFormat>ExportParameters bean and specify a parent listed in theapplicationContext.xml file. If necessary, the new bean should contain scheduling-specific values forexport parameters. If no values are set, the default values are read from the parent bean. For guidance,refer to the jobXlsExportParameters bean.
If no job<MyFormat>ExportParameters is created, the server assumes the export parameters weren’tset, and the JasperReports engine automatically handles their values.
c. Add the new job<MyFormat>ExportParameters bean in the jobExportParametersMap map object.Follow the pattern used by the existing map entries.
d. Create a new myformatOutput bean object of typecom.jaspersoft.jasperserver.api.engine.scheduling.quartz.<MyFormat>ReportOutput, which wraps the <MyFormat>ReportOutput object you created in step 1. If the exportParamsproperty is present, the <MyFormat>Output bean should contain a property named exportParams, aswell. For guidance, refer to the htmlOutput and xlsOutput objects.
e. Add the new <MyFormat>Output bean in the outputFormatMap map object. Follow the pattern set bythe existing map entries.
167
JasperReports Server Ultimate Guide
4. Edit the file <js-src>/jasperserver/jasperserver-war/src/main/webapp/WEB-INF/flows/reportJobBeans.xml toadd the new output format in the allOutputFormats list:
<bean class="com.jaspersoft.jasperserver.war.dto.ByteEnum"><property name="code"><value type="java.lang.Byte">{number}</value>
</property><property name="labelMessage"><value>report.output.<MyFormat>.label</value>
</property></bean>
The {number} and <MyFormat> values are the same as you used previously in step 2.5. If you didn’t add the label in 9.11.2, “Adding the Exporter to the Report Viewer,” on page 164, add it
now. In the jasperserver_messages.properties file (found in WEB-INF/bundles), add the newreport.output.<MyFormat>.label key introduced in the reportJobBeans.xml. For example:
report.output.<MyFormat>.label=<MyFormat>
If your server instance supports multiple languages, be sure to add the correct entries in the properties filefor each supported language.
6. The new scheduler output format is now configured. Compile the source code and redeploy the webapplication, as described in 9.9, “Working With Custom Java Classes,” on page 157.
Your new export channel is added to the scheduler’s Output page, and when selected a scheduled reportgenerates the output in your new format.
9.12 Upgrading With UI CustomizationsOne consideration when customizing the user interface is how those customizations can be maintained duringupgrades to JasperReports Server. As explained in 9.2, “Customizing the UI With Web App Files,” onpage 126, where and how you make changes affects how easy it is to maintain them.• Changes to the CSS files and images of a theme are stored in the repository, which is preserved through
updates. However, the CSS in the new version may refer to different IDs and classes, or to image files withdifferent names. Also, the overrides in an old theme may not have the desired appearance when applied to anew theme.
• As of version 5.1, commercial versions of JasperReports Server on Tomcat have an overlay upgradeprocedure. Overlay upgrade allows you to pause the upgrade after the new files have been installed andmanually migrate your customizations. Be careful to copy only your modifications from the saved file intothe new server files. In some cases, the existing modifications no longer apply to the files or mechanisms inthe new server. See the JasperReports Server Upgrade Guide for more information.
• Because the server is distributed as a WAR file, changes to files in an installed version or an existing WARfile are likely to be overwritten during regular upgrade. Sometimes, you can save a copy of the modifiedfiles and redo the changes in the new installation or WAR file. In this case, you must be careful to copyonly your modifications from the saved file into the new server files. In other cases, the existingmodifications no longer apply to the files or mechanisms in the new server.
• Keeping your changes in a copy of the source code lets you take advantage of source control to update andmerge your changes into the code for the new server. However, in the case of major releases UI mechanismssometimes change, and the files with your modifications may no longer exist or be relevant in the newcode.
168
Chapter 9 Customizing the User Interface
In general, new releases of the server attempt to provide backward compatibility of the mechanismsdescribed in this chapter, especially minor (“dot”) releases. However, in order to improve the UI andprovide new features, Jaspersoft cannot guarantee that all customizations still apply, or even that they willuse the same mechanism, especially in major releases.
169

JasperReports Server Ultimate Guide
170

CHAPTER 10 DESIGNING A CLUSTERTo provide scalability and high availability of your business intelligence infrastructure, you can deploy a clusterof JasperReports Server instances behind a load balancer. You can implement a cluster with either JasperReportsServer community or commercial editions, as long as all instances are the same edition, the same version, and allare configured identically.
JasperReports Server supports cluster deployments by using thread-safe access to its private repository database.As a result, any number of JasperReports Server instances can share the same repository and thus present thesame environment to users. Of course, your repository database must be properly sized to handle the number ofserver instances, and it must have its own mechanism for providing scalability and high availability.
With a properly designed cluster, you can support many more users and organizations, avoid unintendeddowntime, and plan for future growth. The load balancer makes sure that user load is spread evenly, and whenneeded, you can add new instances of JasperReports Server to the cluster.
One important detail of any cluster is how sessions are managed in case of a failure. JasperReports Serversupports partial replication of sessions. In case of a node failure, the session is transferred automatically betweennodes so that users are not logged out. However, work in the Ad Hoc editor and report viewer will beinterrupted, though work saved in the repository can be resumed on the new node.
This chapter introduces a sample architecture for JasperReports Server cluster environments and explains itscomponents. It also discusses design considerations and deployment constraints, such as session management.This document is not intended as a tutorial, nor as a detailed deployment plan, but should only be used as ahigh level overview.
This chapter contains the following sections:• Sample Cluster Architecture• Jaspersoft OLAP in a Cluster• Session Management and Failover• Cluster Design Process• Performance Requirements• Availability Requirements• Scalability Requirements• Sizing a Cluster
171

JasperReports Server Ultimate Guide
10.1 Sample Cluster ArchitectureA cluster refers to a group of servers, along with any associated computers, dedicated hardware, and other serversoftware that perform the same task as a single server. Each server instance runs on its own node, a real orvirtual computer with the necessary software. When properly configured, the cluster architecture is transparent tousers. All users access the same URL and see the same data, but each session is handled by a different node.
A cluster typically provides load balancing among nodes and some form of failover, both of which lead tohigher availability and scalability. A cluster design must also take into account all of the resources that theJasperReports Server instances must access and scale them appropriately.
In general, a cluster may incorporate computers of different hardware and software configurations. For simplicity,Jaspersoft recommends deploying JasperReports Server as a cluster of identical nodes, with one instance on eachnode and each instance configured the same.
The following diagram shows the architecture of a sample JasperReports Server cluster:
Figure 10-1 Architecture of a Sample JasperReports Server Cluster
The major components of the sample JasperReports Server cluster architecture are:• JasperReports Server clients:
• Browser users – Administrators and end users who log into the JasperReports Server web interface.• Web services clients – Applications that access JasperReports Server through the web services API.
• Load balancer – Specialized hardware or software that redirects client requests to instances in the cluster.• JasperReports Server instances – Identically configured instances running on separate computers, real or
virtual.• Shared resources:
• Repository database – Defines users, roles, organization, folders, and resources for the cluster. Therepository is a single logical database that should also be configured for high availability and failover.
172

Chapter 10 Designing a Cluster
• Data sources – Contain the data that JasperReports Server queries when creating or running a report.Data sources should be able to handle the load of simultaneous queries expected from the cluster.
• Email services – Send email notifications and output of scheduled reports. Email services are optional,but almost always implemented.
• External authentication – Provides alternative login policies such as corporate directories or single sign-on. External authentication is optional and more complicated to configure, but it is often desired in anenterprise deployment.
The requirements and considerations for each of these components are given in the following sections. Forsimplicity, the sample architecture assumes that all components of the cluster are in the same geographiclocation. Distributed clusters to serve distributed users are possible, but require extra network and performanceconsiderations that are beyond the scope of this chapter.
10.1.1 JasperReports Server ClientsJasperReports Server supports two types of clients that are fundamentally different:• Browser users – Through the web interface, users interact with all the features of JasperReports Server, such
as viewing and scheduling reports. Working with Ad Hoc reports and Dashboards, in product editions thatprovide these features, is an interactive process for the user, with multiple requests to access data, display it,and modify its appearance. Users with the proper permissions can upload JasperReports and use the wizardsto define the required resources.
• Web services clients – Web services are web-based APIs that applications call to access the features ofJasperReports Server. For example, Jaspersoft Studio relies on web services to access the JasperReportsServer repository for reading and writing reports and their associated resources. For more information, seethe JasperReports Server Web Services Guide.
A web services client is an application that sends requests programmatically, and the server performs anaction or provides structured information in a reply to the client. Web services calls are generally statelessoperations, meaning that an entire operation is performed in a single request and does not rely on anyprevious requests. Complex structures such as a report resource must be fully defined and managed by theclient before being sent in a request, as opposed to the interactive nature of the browser user.
User sessions in a cluster are further explained in 10.3, “Session Management and Failover,” on page 177.
A significant task in the design of your cluster is to characterize client usage, such as total number of potentialclients, fraction of browser users and web services clients, peak client load, average request size, and typicalclient bandwidth. This information will help you optimize the size and number of servers in your cluster to meetyour service availability goals. For more information, see 10.5, “Sizing a Cluster,” on page 187.
10.1.2 Load BalancerA load balancer is a hardware device or software application that uses any number of techniques to spreadtraffic between the nodes of the cluster, usually so that all servers have an equal load. The load balancerprovides a single address that all clients can access, and it behaves like an internet router, maintaining eachclient’s connection with the chosen server in the cluster.
The load balancer is the gateway to the cluster because it directs client traffic and thus optimizes theperformance of your servers. At a minimum, the load balancer can determine that a server is not operating anddirect traffic to the remaining functioning servers. Some load balancers offer capabilities such as analyzing clientrequests and server load to optimize server response times for clients. The JasperReports Server itself does not
173
JasperReports Server Ultimate Guide
communicate with load balancers, but some load balancers may communicate with the application server todetermine availability and load.
Because JasperReports Server supports partial session replication but not full replication, the load balancer mustbe configured so that browser users are always connected to the same server during a continuous session.Transferring sessions should only happen if a node becomes disabled. For more information, see SessionManagement and Failover. Beyond that requirement, JasperReports Server can work with any HTTP loadbalancer, both hardware or software-based. The load balancer module in the Apache HTTP server is a commonsoftware solution.
If you have high concurrent user loads and rigorous availability requirements, you may need a load balancerwith more advanced features for balancing client traffic. Also, the load balancer capabilities and configurationsometimes limit the maximum number of servers in your cluster, an important consideration for scalability. Thus,your cluster requirements ultimately determine your choice of load balancer.
10.1.3 JasperReports Server InstancesThe JasperReports Server instances deployed in a cluster are normal servers with no special configuration for thecluster. As with all server instances, they run in a Java servlet container that is usually implemented as anapplication server. While the load balancer may interact with the application server, JasperReports Server is notaware of the cluster environment in which it is deployed.
This document considers only the case of deploying a single JasperReports Server as the only application in asingle application server on each computer. Therefore, in this document, a node refers to the real or virtualcomputer hosting a JVM, an application server, and a single instance of JasperReports Server.
Each node can be a physical computer or a cloud-based virtual computer, as long as the operating system issupported by JasperReports Server. For performance and stability reasons, Jaspersoft recommends that the onlyother software installed be the required Java Virtual Machine (JVM) and the application server. This designallows you to allocate as much memory as possible to the JVM and to JasperReports Server.
Jaspersoft recommends that you use a lightweight application server such as Apache Tomcat or Glassfish. Forexample, Tomcat is a well-tested application server with JasperReports Server. A typical configuration forhandling most reporting uses 64-bit Java with 2 gigabytes of memory allocated to the Java heap. See theJasperReports Server Installation Guide for guidelines and instructions to install JasperReports Server in yourchoice of application server and to configure your JVM.
In order to implement the partial session replication that JasperReports Server supports, the applicationservers must be configured to communicate with each other within the cluster. Some application serversalso support more advanced cluster operations that are beyond the scope of this document, for exampleto deploy applications across all instances automatically.
Finally, every instance must have an identical configuration, at least for certain key settings. While it is possiblefor each instance to be configured differently, this is not recommended. When instances are deployed ondiffering hardware with different configurations, the load balancer’s algorithm may not be effective. This is whywe recommend that every server in the cluster be deployed on the same hardware and software, and haveexactly the same configuration.
To deploy identical JasperReports Server instances, install a single instance from the WAR file distribution andconfigure it completely. Then copy the deployed WAR file to each of the other computers in the cluster. Whenusing JNDI data sources provided by the application server, you must make sure they are pre-configured andidentical on every application server. Often, the entire application server with JasperReports Server deployed
174
Chapter 10 Designing a Cluster
within it can be copied as well. This is sometimes called “cloning” the server. Upgrades can be handled in thesame way. Having identical JasperReports Server instances in your cluster greatly simplifies its installation andmaintenance.
Another way to deploy identical instances to each node is to implement the configured WAR file on a sharedfile system and to access it from each application server with a symbolic link. You must make sure that workingdirectories such as javaiotemp are not shared, and the shared file system should have its own redundancy andfailover plan. Shared WAR files are an advanced configuration, and further details are beyond the scope of thisdocument.
10.1.4 Shared Repository DatabaseThe keystone of the JasperReports Server cluster is the shared repository database. All JasperReports Serverinstances must be configured to access the same repository, thus ensuring that they display the same folders, thesame reports, and the same resources. Because the repository also stores users, roles, organizations, and securitydefinitions, every server in the cluster behaves identically regardless of which instance actually processes theclient connection.
For example, when a user logs in, the user account, organization, and roles are retrieved from the sharedrepository. When the user browses folders, all resources are the same as seen from any instance in the cluster,and all access permissions apply. If the user runs a report based on a Domain Topic, the report, the DomainTopic, the Domain, and any security files are all retrieved from the repository.
All repository operations are thread-safe, meaning that all JasperReports Server instances can perform operationssimultaneously, while internal locks in the software prevent operations that would conflict. If a user edits andsaves a report, another user running the report sees either the old report or the new one based on exactly whenthe request was made. As with many large systems serving numerous clients, users must coordinate their work toavoid overwriting each others’ changes. For the same reason, administrators should make changes to sharedresources during off-hours to prevent conflicts with active user sessions.
Because the repository database is such a critical element of the JasperReports Server cluster, you shouldimplement it on an equally scalable and available system, based on the predicted peak load and average load inyour cluster. For example, the repository could be a cluster itself, with its own load balancer, or any otherarchitecture that is compatible with a database product supported by JasperReports Server. In addition, therepository database must implement data protection measures you require, such as on-site and off-site backups.
Regardless of the architecture of the repository database, it is critical that it act as a single logical repositorywhich is identified with a single IP address that all JasperReports Server instances can access.
10.1.5 Job SchedulersThe JasperReports Server scheduler is a module that exists in every server instance to run reports scheduled torun at a later time, either once or repeatedly. Schedules, also known as jobs, are stored in the repository to betriggered by the scheduler whenever necessary. For simplicity, schedulers are not shown in Figure 10-1 onpage 172.
To prevent every instance from triggering the same job at the same time, the scheduler uses a software lockingmechanism when accessing jobs in the repository. This allows the scheduler to be deployed on every instance ina cluster environment but ensure that any job is triggered only once. Jobs can be created by client sessions onany instance, then be run by the scheduler on any instance, and the client sees no difference. Job output willthen be emailed as necessary, and if saved in the repository, accessible from any instance.
175
JasperReports Server Ultimate Guide
The scheduler is based on the Quartz scheduler, an open source library. The JasperReports Server includessettings for the scheduler in the file <WAR-file>/WEB-INF/js.quartz.properties. The default configuration of thescheduler includes the following settings that allow it to work in both stand-alone servers and clusters:
org.quartz.scheduler.instanceId = AUTO
org.quartz.jobStore.isClustered = true
Be sure to synchronize the clocks on every node, so that the scheduler doesn’t always run jobs on the node withthe earliest time. For further details, see the online documentation for the Quartz scheduler.
There are advantages to running jobs on all the server instances. If several long jobs are scheduled at the sametime, a single server must process them sequentially, and some won’t start at exactly the designated time.Multiple servers in a cluster can process those jobs in parallel, and they will start on time, at least for a numberof jobs up to the number of instances.
10.1.6 Other Shared ResourcesAs with the repository database, the server instances in the cluster usually share any other resource that theyneed to access, including:• Data sources – These are defined in the shared repository, therefore all servers in the cluster access the same
data sources. Queries, reports, and Domains are all stored in the repository as well, so that a report hasaccess to exactly the same data, regardless of which instance the user session or job is running on. Makesure that data source and OLAP connections defined in the repository are be able to handle connectionsfrom multiple nodes simultaneously..
Data sources can be defined as either JDBC connections directly to a database or JDBC connectionsfrom the application server to the database that are exposed through JNDI. Jaspersoft recommendsusing JNDI data sources because the application server often has better connection pooling andmanagement than JasperReports Server.
However, JNDI data sources require two definitions, one in the repository and one in the applicationserver. You must make sure that the JNDI definitions are identical on every application server in thecluster. Otherwise, the JNDI data source defined in the shared repository won’t work for everyinstance of JasperReports Server. For more information, see 10.1.3, “JasperReports ServerInstances,” on page 174.
• Email services – These are defined in each server instance’s configuration files for sending the output offinished jobs. When servers are configured identically, every instance uses the same email services.
• External authentication – An optional server configuration that allows JasperReports Server to access anexternal user database to verify login credentials. As described in the JasperReports Server ExternalAuthentication Cookbook, external authentication requires extensive configuration and sometimescustomization. When implementing external authentication in a cluster, all instances must be configuredidentically to avoid security holes.
For resources that are configured in server files, such as email and external authentication, each node could haveits own custom configuration. For example, each node could have its own email server to handle thenotifications it sends. However, the dedicated resource then becomes a point of failure that disables thecorresponding server instance if the resource fails. In either case, shared resources are often clusters themselves,in order to provide the same reliability and scalability as the JasperReports Server cluster.
When resources are shared, they have a single address and set of credentials for access. This means that allJasperReports Server instances have identical configurations and are thus easier to deploy and maintain.
176

Chapter 10 Designing a Cluster
10.2 Jaspersoft OLAP in a ClusterJaspersoft OLAP (On Line Analytical Processing) is a module of JasperReports Server that uses different dataschemas, queries, and views to perform interactive data analysis such as slicing, drill-down, and drill-through.As with JRXML and JasperReports, all of the analysis schemas, MDX queries, and analysis views are stored inthe repository and accessible from any node of the cluster. Therefore, the basic configuration of Jaspersoft OLAPwill run without modification in a cluster.
However, Jaspersoft OLAP is composed of two parts: an XML/A client that displays data and an XML/Aprovider or server that retrieves and processes the data. As described in the Jaspersoft OLAP User Guide, thesetwo parts can run on separate instances of JasperReports Server. In a cluster, how you define the XML/Aconnection will result in different behavior:• In the default case, the definition of the XML/A provider is points to the localhost, so the same node that
receives the user request will perform both the analysis and display it.• You can change the definition of the provider so that it points to the URL of the load balancer for the
cluster. In this case, the node that receives the user request will ask another node to retrieve the data for it,and the results will be sent back to the first node for display.
Because of the extra communication and connections, whether this configuration increasesperformance depends on your overall cluster load. If you have lots of analysis users at the same time,the load will be uniformly high, and there will be no benefit to calling the XML/A provider on a nodethat is equally busy. In fact, the extra overhead may impact performance, in particular if theconnection loops back to the same node.
On the other hand, if your nodes are occasionally idle or if your load balancer detects real-time loadon each node, this configuration will spread the analysis load and optimize performance for all users.
• You can set the connection to the URL of a specific XML/A provider. This could be a dedicated instanceof JasperReports Server running Jaspersoft OLAP that is not connected to the cluster. You would need tosize this instance to handle your expected analysis load and possibly implement two nodes as a cluster foravailability. The advantage of having a dedicated XML/A provider instance is that it would centralize thecache for XML/A connections, thereby increasing cache hits.
Factors such as the size of your data and the ratio of JasperReports load to OLAP load can help you determinehow to configure your XML/A connections in a cluster. If you don’t perform much analysis, use the defaultconfiguration with localhost for your connections. If you have many analysis requests to the same data, adedicated instance of Jaspersoft OLAP could provide a central cache and increase performance. Remember thatconnection behavior is determined by the XML/A connection defined in the repository, not by the nodes.
For simplicity, Jaspersoft recommends that every XML/A connection be configured the same way, so thatXML/A connections are uniform across the cluster. However, if you have advanced analysis needs, you mightbenefit from having different behaviors for different XML/A connections. How to determine and configureoptimal Jaspersoft OLAP performance in a cluster is beyond the scope of this document.
10.3 Session Management and FailoverFailover is the ability of the cluster to minimize the impact of a node failure and continue serving clients withthe remaining nodes. A failure is assumed to be any unplanned incident that causes a node, either its software orhardware, to become and remain unavailable. In order to implement failover, you need to understand howJasperReports Server manages client sessions. This allows you to configure the cluster for optimal performanceand set user expectations.
177

JasperReports Server Ultimate Guide
A client session is an in-memory object that represents the user to the server at run-time. After a user logs in or aweb services client sends a request with credentials, the session contains the user profile such as organizationand role membership for use in enforcing permissions. For browser users, the session also stores informationabout the state of the web interface, for example the last folder viewed in the repository, the last search term, orthe data entered in a wizard. In commercial editions with the Ad Hoc Editor and Dashboard Designer, the usersession also stores the on-screen state of the report or dashboard that the user creates interactively through thebrowser.
There are several types of session management in cluster design, each of which determines a different failoverscenario:• Fully replicated sessions – The state of every client session is continuously communicated between all
nodes and stored on every node or in a shared location. This is usually managed by the app server. Uponfailure, the load balancer automatically redirects client connections to a remaining node. Because everynode has access to a copy of the client session, the user can continue work from the previous state, oftenwithout even being aware of the failure or the change. Some load balancers can transfer sessions when anode is overloaded but hasn't failed.
JasperReports Server does not support fully replicated sessions. See explanation below.
• Sticky or pinned sessions – Client sessions are created and managed privately by each server instance andcannot be transferred to another node. When a failure shuts down an instance, all of its client sessions arelost. When users reconnect, the load balancer directs them to another node where they login and thus begina new session on the new node.
• Partially replicated sessions – In this hybrid solution, only the vital parts of the session are replicated toallow some failover, but in the absence of node failure, sessions must remain pinned to a node.
Unlike small e-commerce sessions, JasperReports Server has larger and more complex sessions that woulddegrade performance if fully replicated. In particular, the JasperPrint object for an executed report ismeasured in megabytes and stored in the user session. To store and replicate the JasperPrint objects for allusers across all nodes would impact performance significantly. Therefore, JasperReports Server uses partialreplication so that user login information is replicated, but not large state objects such as JasperPrintobjects.
JasperReports Server introduced partially replicated sessions in version 5.5. Prior versions supportedonly pinned sessions.
By using partially replicated sessions, JasperReports Server balances the performance of the cluster with the risksand consequences of a failure. If a failure occurs when the user is browsing the repository, the load balancer willconnect the user to a new node and work can continue because the login information and repository state in thesession were replicated. If a failure occurs when a user is creating or viewing a report, the load balancer willconnect the user to a new node, but the report cannot be replicated. In this case users may lose unsaved reports,but they can resume work right away. The chance of a user experiencing a failure is much lower and theconsequences are less severe than when working on a non-clustered server.
Even though the risk of failure occurring is low, cluster designers should understand the impact on users. Thefollowing sections explain the exact impact of failures with partial session replication in JasperReports Server.
178
Chapter 10 Designing a Cluster
10.3.1 Impact on Browser UsersThanks to partial session replication, a node failure has no impact on most users. If they are browsing therepository or scheduling a report, they will not even notice when failover to another node occurs. A node failuremainly affects interactive sessions where the user has unsaved work, such as in the Ad Hoc Editor andDashboard Designer. In those cases, users are redirected to the home page on the new node, and they may needto re-create a report or dashboard, but they do not lose any critical functionality or data.
The following table lists the elements of the user session that cannot be replicated, and it explains the impact offailover on a user.
Non-Replicated Session Element Interactive Feature Impacted upon Failover
State of Ad Hoc fields and data The Ad Hoc editor display consists of fields placed inthe canvas and the various filters and mode settingsthat determine what values are displayed, as well asvisualizations such as table columns, crosstabs, andcharts. These items are displayed with data from thedata source. Upon failover, the state and data in theAd Hoc editor cannot be restored, so any unsavedchanges are lost.
State of Dashboard designer The Dashboard designer displays reports andcontrols in a grid layout. Upon failover, the contentsand state of the canvas cannot be restored, so anyunsaved changes are lost.
JasperPrint object from running a report Reports in the report viewer rely on the JasperPrintobject for pagination and exporting in other formats.Upon failover, reports in the report viewer cannot berestored, and any unsaved changes such asinteractive sorting and filtering are lost.
State of the Domain designer The Domain designer is a set of tabs for defining thetables, joins, filters, calculated fields, and defaultnames for the fields of a Domain. Upon failover, thechanges made in the Domain designer tabs cannotbe restored and any unsaved changes are lost.
OLAP viewer state The OLAP viewer lets you explore the dimensionsand values in an OLAP cube by changing the MDXexpression that defines the view. Upon failover anyunsaved view is lost and would need to be createdagain through the same transformations (slicing anddicing).
Administration dialogs (when creating or editing anorganization, user, or role)
Any information entered in an administration dialog islost if it was not submitted before node failure.
For example, when a node failure happens during interaction with the Ad Hoc editor, the user is redirected bythe load balancer to another node, which like all nodes, only has the partially replicated user session. Because itdoes not have the state of the user's Ad Hoc changes, it cannot save or even display the work started on the
179

JasperReports Server Ultimate Guide
failed node. In this event, the interactive work is lost, and users see an error message on the new node. Uponacknowledging the message, users are redirected to the home page.
The standard precaution against lost work is for users to save their work at regular intervals or significantmilestones. Both the Ad Hoc Editor and the Dashboard Designer let users save their current view as a report ordashboard that can be opened to the same state. Work that is explicitly saved by the user is stored in the sharedrepository and can be reopened in the new session on the new node. This includes any resources that arecreated, moved, or saved for any Save or Save As operation that completes before a failure.
For all other cases not listed in the table above, all work in progress is preserved upon failover, and the user cancontinue to work immediately on the new node. For example, if the user was searching the repository at thetime of failure, all parts of the session that are needed for search are replicated. Therefore, the user can continueinteracting with search results immediately on the new node--usually without even noticing there was a failureand that the session was transferred to a new node.
Also, information for the following dialogs are part of the replicated session, and thus will be successfullytransferred to a new node in case of a failover:• Repository permissions dialog• Add folder dialog• Add resource dialogs, including adding or editing a data source, JasperReport, and other repository objects• Copy, cut, and pasting resources in the repository• Scheduling a report
10.3.2 Impact on Web Services ClientsWeb services are the SOAP and REST APIs that other applications can invoke to interact programmatically withJasperReports Server. Web services calls can also be interrupted by a node failure, but because operations arequicker, consisting of a short request and almost immediate response, this is much less likely. Applications thatcall web services should implement a reasonable timeout and verify the return value to determine if the serverinstance completed the operation or had a failure. In the case of a timeout or an error, the application should callthe same operation again, which the load balancer should automatically direct to a remaining node.
In general, web service calls are stateless, meaning that the server does not store any information about theoperation or the caller from one API call to the next. This is why web services do not support interactive worksuch as designing an Ad Hoc view, a dashboard, a Domain, or exploring data in OLAP, all of which require theserver to store an intermediate state.
In the case of the interactive wizards for creating and editing complex repository resources, web service calls todo the equivalent operations are also stateless. In the web services model, the calling application has theresponsibility to remember the state of the interaction between it and the server. For example, in the UI, aninteractive wizard helps administrators define nested resources such as queries and input controls. When usingweb services, the client application must remember which nested resources have been created and how toreference them.
In practice, the REST API is not entirely stateless because it supports a login that allows the client to use thesession cookie instead of HTTP authentication with every call. However, login information is included in thepartially replicated session and therefore handled transparently in the case of node failure and failover. Thus, if alogin request completes on one node but that node eventually fails, the load balancer sends further requests to anew node that accepts the same session cookie because it has the partially replicated session.
There is one more case where web services rely on a session object: the JasperPrint object cannot be replicated,as explained in the following table.
180
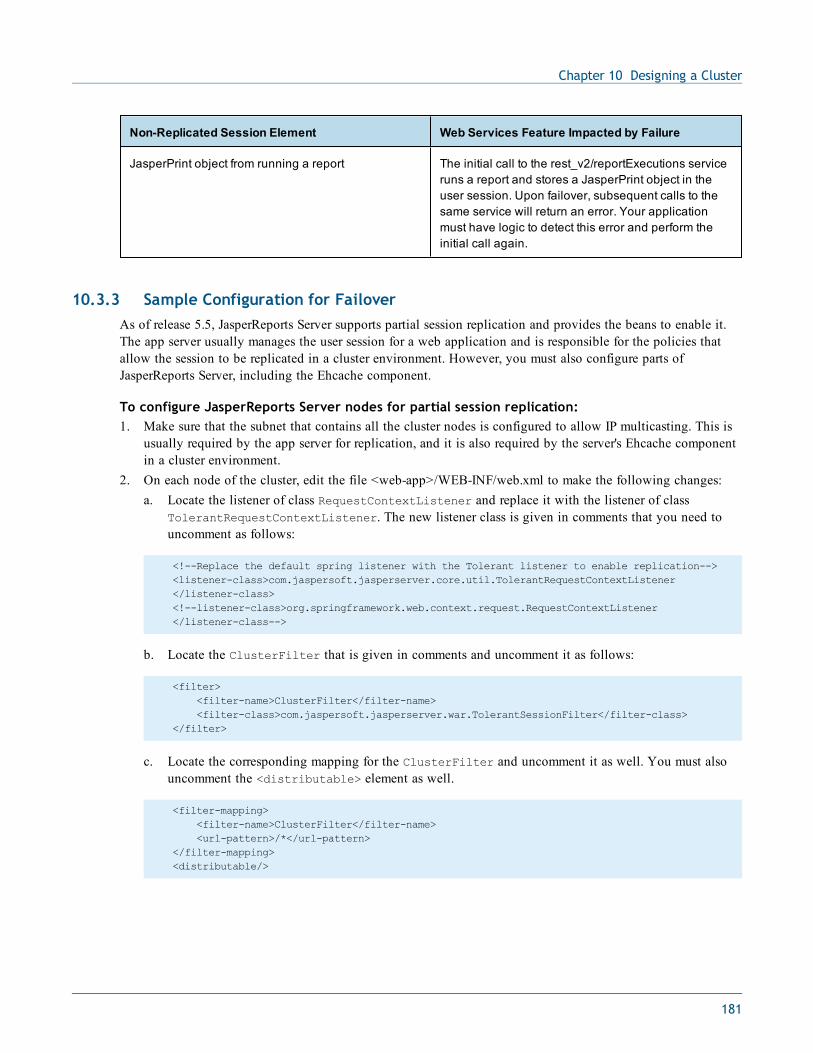
Chapter 10 Designing a Cluster
Non-Replicated Session Element Web Services Feature Impacted by Failure
JasperPrint object from running a report The initial call to the rest_v2/reportExecutions serviceruns a report and stores a JasperPrint object in theuser session. Upon failover, subsequent calls to thesame service will return an error. Your applicationmust have logic to detect this error and perform theinitial call again.
10.3.3 Sample Configuration for FailoverAs of release 5.5, JasperReports Server supports partial session replication and provides the beans to enable it.The app server usually manages the user session for a web application and is responsible for the policies thatallow the session to be replicated in a cluster environment. However, you must also configure parts ofJasperReports Server, including the Ehcache component.
To configure JasperReports Server nodes for partial session replication:1. Make sure that the subnet that contains all the cluster nodes is configured to allow IP multicasting. This is
usually required by the app server for replication, and it is also required by the server's Ehcache componentin a cluster environment.
2. On each node of the cluster, edit the file <web-app>/WEB-INF/web.xml to make the following changes:a. Locate the listener of class RequestContextListener and replace it with the listener of class
TolerantRequestContextListener. The new listener class is given in comments that you need touncomment as follows:
<!--Replace the default spring listener with the Tolerant listener to enable replication--><listener-class>com.jaspersoft.jasperserver.core.util.TolerantRequestContextListener</listener-class><!--listener-class>org.springframework.web.context.request.RequestContextListener</listener-class-->
b. Locate the ClusterFilter that is given in comments and uncomment it as follows:
<filter><filter-name>ClusterFilter</filter-name><filter-class>com.jaspersoft.jasperserver.war.TolerantSessionFilter</filter-class>
</filter>
c. Locate the corresponding mapping for the ClusterFilter and uncomment it as well. You must alsouncomment the <distributable> element as well.
<filter-mapping><filter-name>ClusterFilter</filter-name><url-pattern>/*</url-pattern>
</filter-mapping><distributable/>
181

JasperReports Server Ultimate Guide
3. On each node of the cluster, enable session replication in your app server or web container. For example, toenable session replication on Apache Tomcat 6.x, edit the file <tomcat>/conf/server.xml as follows.
Add the Cluster definition within the <Engine name="Catalina" defaultHost="localhost">configuration. In this example, 123.45.6.701 is the IP address of the node being configured. This exampleuses Delta Manager, but you can also use Backup Manager:
<Cluster className="org.apache.catalina.ha.tcp.SimpleTcpCluster"channelSendOptions="8">
<Manager className="org.apache.catalina.ha.session.DeltaManager"expireSessionsOnShutdown="false"notifyListenersOnReplication="true"/>
<Channel className="org.apache.catalina.tribes.group.GroupChannel"><Membership className="org.apache.catalina.tribes.membership.
McastService"address="228.0.0.4"port="45564" frequency="500"dropTime="3000"/>
<Sender className="org.apache.catalina.tribes.transport.ReplicationTransmitter"><Transport className="org.apache.catalina.tribes.
transport.nio.PooledParallelSender"/></Sender><Receiver className="org.apache.catalina.tribes.transport.
nio.NioReceiver"address="123.45.6.701" port="4000" autoBind="100"selectorTimeout="5000" maxThreads="6"/>
<Interceptor className="org.apache.catalina.tribes.group.interceptors.TcpFailureDetector"/>
<Interceptor className="org.apache.catalina.tribes.group.interceptors.MessageDispatch15Interceptor"/>
</Channel>
<!--<Valve className="org.apache.catalina.ha.tcp.ForceReplicationValve"/>--><Valve className="org.apache.catalina.ha.tcp.ReplicationValve" filter=""/><Valve className="org.apache.catalina.ha.session.JvmRouteBinderValve"/><ClusterListener className="org.apache.catalina.ha.session.JvmRouteSessionIDBinderListener"/><ClusterListener className="org.apache.catalina.ha.session.ClusterSessionListener"/>
</Cluster>
4. On each node, locate the following two files and uncomment the same two sections in each file:• <web-app>/WEB-INF/ehcache.xml• <web-app>/WEB-INF/ehcache_hibernate.xml
In this example, 123.45.6.701 is the IP address of the node being configured:
<cacheManagerPeerProviderFactoryclass="net.sf.ehcache.distribution.RMICacheManagerPeerProviderFactory"properties="peerDiscovery=automatic,multicastGroupAddress=224.0.0.1,
multicastGroupPort=4446,timeToLive=1"/>
<cacheManagerPeerListenerFactoryclass="net.sf.ehcache.distribution.RMICacheManagerPeerListenerFactory"properties="hostName=123.45.6.701,port=40001,socketTimeoutMillis=120000"/>
182
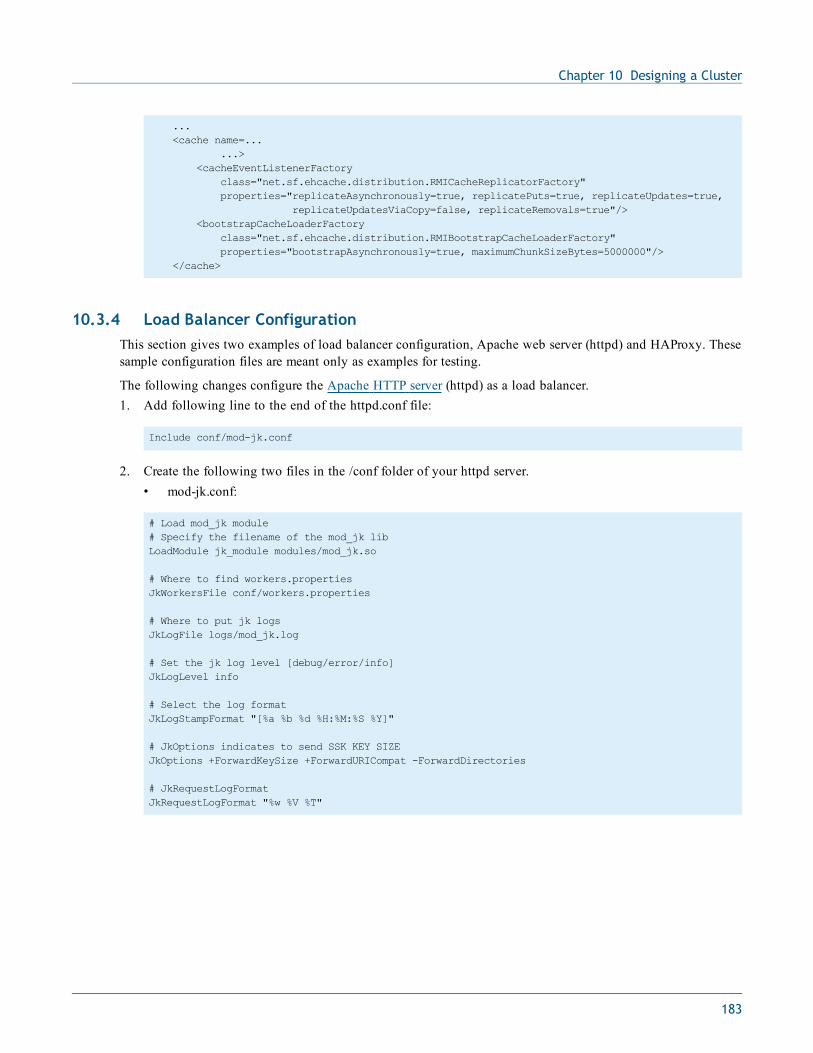
Chapter 10 Designing a Cluster
...<cache name=...
...><cacheEventListenerFactory
class="net.sf.ehcache.distribution.RMICacheReplicatorFactory"properties="replicateAsynchronously=true, replicatePuts=true, replicateUpdates=true,
replicateUpdatesViaCopy=false, replicateRemovals=true"/><bootstrapCacheLoaderFactory
class="net.sf.ehcache.distribution.RMIBootstrapCacheLoaderFactory"properties="bootstrapAsynchronously=true, maximumChunkSizeBytes=5000000"/>
</cache>
10.3.4 Load Balancer ConfigurationThis section gives two examples of load balancer configuration, Apache web server (httpd) and HAProxy. Thesesample configuration files are meant only as examples for testing.
The following changes configure the Apache HTTP server (httpd) as a load balancer.1. Add following line to the end of the httpd.conf file:
Include conf/mod-jk.conf
2. Create the following two files in the /conf folder of your httpd server.• mod-jk.conf:
# Load mod_jk module# Specify the filename of the mod_jk libLoadModule jk_module modules/mod_jk.so
# Where to find workers.propertiesJkWorkersFile conf/workers.properties
# Where to put jk logsJkLogFile logs/mod_jk.log
# Set the jk log level [debug/error/info]JkLogLevel info
# Select the log formatJkLogStampFormat "[%a %b %d %H:%M:%S %Y]"
# JkOptions indicates to send SSK KEY SIZEJkOptions +ForwardKeySize +ForwardURICompat -ForwardDirectories
# JkRequestLogFormatJkRequestLogFormat "%w %V %T"
183

JasperReports Server Ultimate Guide
# Mount your applicationsJkMount /* loadbalancer
# You can use external file for mount points.# It will be checked for updates each 60 seconds.# The format of the file is: /url=worker# /examples/*=loadbalancer#JkMountFile conf/uriworkermap.properties
# Add shared memory.# This directive is present with 1.2.10 and# later versions of mod_jk, and is needed for# for load balancing to work properlyJkShmFile logs/jk.shm#JkShmFile /var/log/httpd/mod_jk.shm
# Add jkstatus for managing runtime data<Location /jkstatus>JkMount statusOrder deny,allow
Allow from all</Location>
• workers.properties:
# Define list of workers that will be used# for mapping requestsworker.list=loadbalancer,status
# Define Node1# modify the host as your host IP or DNS name.worker.node1.port=8009worker.node1.host=123.45.6.701worker.node1.type=ajp13worker.node1.lbfactor=1
# Define Node2# modify the host as your host IP or DNS name.worker.node2.port=8009worker.node2.host=123.45.6.702worker.node2.type=ajp13worker.node2.lbfactor=1
# Load-balancing behaviourworker.loadbalancer.type=lbworker.loadbalancer.balance_workers=node1,node2worker.loadbalancer.sticky_session=1#worker.list=loadbalancer
# Status worker for managing load balancerworker.status.type=status
The following example is a configuration for the HAProxy load balancer. HAProxy is a high-performance, freeand open source load balancer for Linux/x86 and Solaris/Sparc.
184
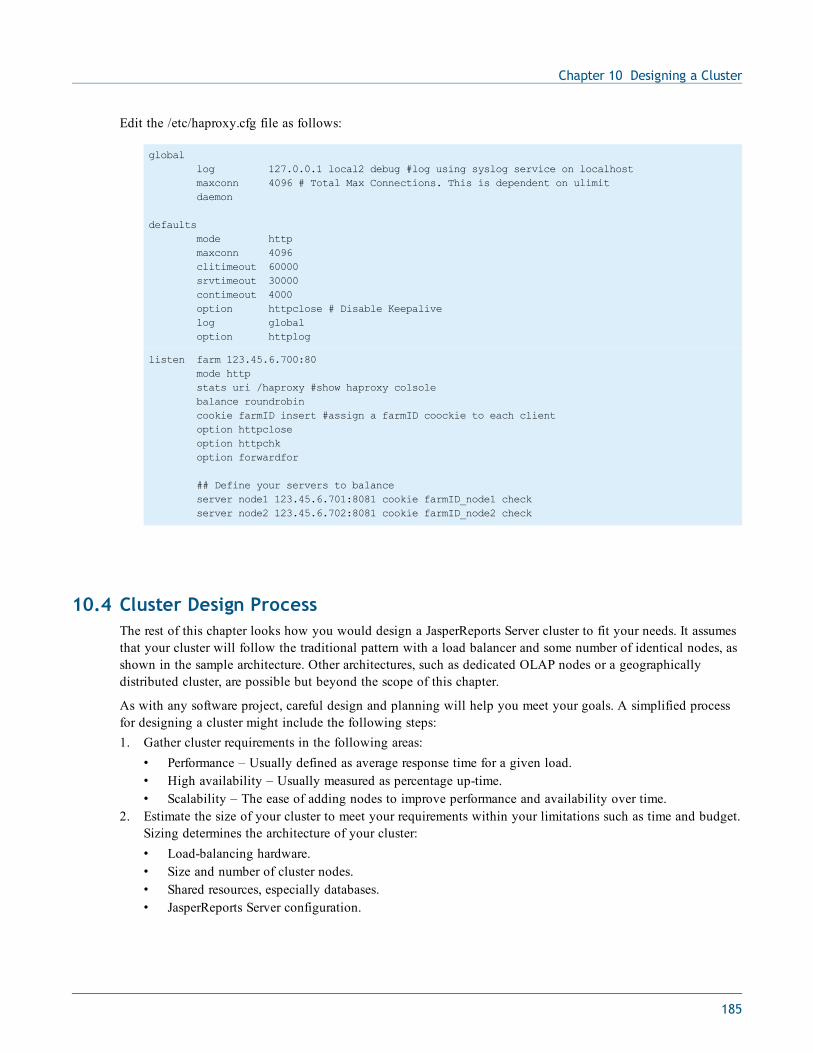
Chapter 10 Designing a Cluster
Edit the /etc/haproxy.cfg file as follows:
globallog 127.0.0.1 local2 debug #log using syslog service on localhostmaxconn 4096 # Total Max Connections. This is dependent on ulimitdaemon
defaultsmode httpmaxconn 4096clitimeout 60000srvtimeout 30000contimeout 4000option httpclose # Disable Keepalivelog globaloption httplog
listen farm 123.45.6.700:80mode httpstats uri /haproxy #show haproxy colsolebalance roundrobincookie farmID insert #assign a farmID coockie to each clientoption httpcloseoption httpchkoption forwardfor
## Define your servers to balanceserver node1 123.45.6.701:8081 cookie farmID_node1 checkserver node2 123.45.6.702:8081 cookie farmID_node2 check
10.4 Cluster Design ProcessThe rest of this chapter looks how you would design a JasperReports Server cluster to fit your needs. It assumesthat your cluster will follow the traditional pattern with a load balancer and some number of identical nodes, asshown in the sample architecture. Other architectures, such as dedicated OLAP nodes or a geographicallydistributed cluster, are possible but beyond the scope of this chapter.
As with any software project, careful design and planning will help you meet your goals. A simplified processfor designing a cluster might include the following steps:1. Gather cluster requirements in the following areas:
• Performance – Usually defined as average response time for a given load.• High availability – Usually measured as percentage up-time.• Scalability – The ease of adding nodes to improve performance and availability over time.
2. Estimate the size of your cluster to meet your requirements within your limitations such as time and budget.Sizing determines the architecture of your cluster:• Load-balancing hardware.• Size and number of cluster nodes.• Shared resources, especially databases.• JasperReports Server configuration.
185
JasperReports Server Ultimate Guide
3. Deploy your cluster:• Hardware purchases and installation.• Network configuration.• Software configuration, including JasperReports Server configuration.• Testing of all components individually and in the cluster architecture• Rollout to end-users.• Administration, maintenance, and scaling procedures.
Deployment and implementation are beyond the scope of this chapter. The following sections give more detailsabout gathering cluster requirements and sizing.
10.4.1 Performance RequirementsThere are two sides to performance: performance requirements and load estimates. The goal is to anticipate thenumber of users and their activities, so that you can design a cluster that responds their needs with minimaldelay.
Performance requirements ensure that the cluster is responsive to user requests. Such requirements are usuallydefined in terms of the system response relative to an amount of traffic in a given period, like “5 secondresponse for all pages regardless of system load” or “maximum 10 second response time for up to 20simultaneous users”. There are often different requirements for expected average load versus maximum load.
The requirements should be based on realistic estimates of the number of users and how they will interact withthe features of JasperReports Server. First, you should determine what volume of users will be browser clients(real people) and web services clients (applications making API calls) and the ratio between them. See 10.3,“Session Management and Failover,” on page 177 for information about these two types of clients and howtheir client sessions differ.
Then, you must estimate what kinds of operations your users perform, for example:• How many users will just run reports and save the output?• How many users will create reports or explore data interactively?• How large are your typical reports, in terms of data retrieved and processing required, and how often do
they run?• What times of day will have the highest user load?• Will users or web services clients access the repository extensively?
In addition to user sessions, the server instances must also process scheduled jobs, so you should estimate theirvolume and nature. For example, what volume of jobs are critical to run at exact times, what volume of jobsmust run during business hours when user load will be high? Can you educate users to run jobs outside ofbusiness hours?
Long jobs contribute to server load and may slow down user sessions. If the scheduled job load is very high atthe same time as the user load, it may be desirable to configure a dedicated server instance to run jobs. Thisadvanced cluster architecture is beyond the scope of this document. For more information about runningscheduled jobs, see 10.1.5, “Job Schedulers,” on page 175.
Client connectivity is also an issue, because the slowest link in the network creates a bottleneck. There is adifference in system performance and scalability between users who work remotely over DSL and those whowork in the office on your corporate T1 network.
186
Chapter 10 Designing a Cluster
10.4.2 Availability RequirementsHigh availability is the ability of the cluster to effectively avoid downtime. In general, failover prevents totalsystem unresponsiveness that would happen if a single server failed, but a properly designed cluster must alsoaddress the failure of other cluster components.
High availability is usually defined in terms of uptime, such as 99.999%, 24/7/365 (always), or business hoursduring business days. To design for high availability, all system components must be made redundant orrecoverable enough so that no single component can fail and bring the entire environment to a stop in a waythat violates the high availability requirements.
Identifying the failure modes of a cluster is good practice for any deployment. For every component in thecluster, analyze what happens to users and overall availability when that component fails. See 10.3, “SessionManagement and Failover,” on page 177 for an explanation of what happens to users on a server instance thatfails; you should also consider the overall performance degradation of the cluster and the impact of failures inother cluster components.
A further aspect of high availability is sizing the cluster so that should one server (hardware or software)become unavailable, the rest can still respond to anticipated user demand. If you have strict availability andperformance requirements, you may need to plan for additional nodes. As you design your JasperReports Servercluster, you should take all these issues into account in order to properly express your availability requirements.
Another aspect of high availability is the ability of certain clusters to keep operating during plannedmaintenance and upgrades, called rolling upgrades. JasperReports Server does not support rolling upgrades,because different versions can require different schemas in the shared repository. So your availability planningmust include the time to stop the entire cluster and perform upgrades as necessary.
10.4.3 Scalability RequirementsScalability refers to the ability of the environment to meet the needs of an increasing number of users andexternal services in a way that is predictable in terms of performance.
The main scalability consideration is whether the cluster architecture is dynamic and additional servers can beadded to increase the number of users (simultaneous or not). Additionally, you should consider whether othercomponents of the cluster can be added to the design later. It may be simple to expand the size of the sharedrepository because database servers are usually made to scale, but it may be more complex to change loadbalancers or implement redundant load balancers.
There is often a relationship between scalability and high availability. If the system works under normalcircumstances but stops functioning under load, this may violate your availability requirements. You shouldalso consider whether availability requirements will change along with increased user load. For example, as thecluster-based BI solution is rolled out to more and more users, high-availability of the cluster becomes morecritical. In this case, you may need to add redundant load-balancers or other component upgrades to increaseavailability in the future. Your initial cluster design should recognize this need allow for this expansion.
Once you have defined your scalability requirements in detail, use this information when sizing your cluster.
10.5 Sizing a ClusterSizing a cluster is the process of determining the number and architecture of components to meet yourperformance, availability, and scalability requirements. During this phase, you also need to perform load tests todetermine the best configuration for your needs.
187
JasperReports Server Ultimate Guide
For a traditional cluster, your design should specify the following:• Load-balancing hardware, software, and policies.• Size and number of cluster nodes, with characteristics such as processors and memory.• JasperReports Server configuration optimizing for the user load and cluster environment.• Shared resources, especially databases for the repository and data sources.• Network service levels or upgrades.• Policies and procedures for scaling and maintaining performance.
The following sections look at the trade-offs of various designs for each component.
10.5.1 Load BalancerDetermine whether you need a dedicated hardware load-balancer or whether a basic software load-balancer willmeet your requirements. You should also specify the load-balancing techniques you will use, such round-robin,load-based, or some other configuration. If the load balancer communicates with the nodes to optimize traffic,specify how this happens.
Much of the load balancer requirement is based on the size and complexity of your cluster. A small cluster oftwo to three nodes can use a software load-balancer with a simple algorithm. But if you have many nodes or afew powerful nodes with high traffic, you need a dedicated load-balancer for the cluster.
If you have very strict performance requirements and need to closely monitor the load across the cluster, youmay need a load-based balancer that communicates with the nodes. The trade-offs for these advanced load-balancing techniques are more maintenance and a more complex configuration on each node.
And finally, if the cluster is intended to scale over time, the load balancer must be able to handle moreincoming traffic and more cluster nodes.
10.5.2 Cluster NodesThe size and number of nodes is the determinant of your cluster design. Based on your expected load, you needto specify enough processing power to meet your performance and availability requirements. This includeshardware specifications such as processors and memory, or their equivalent for virtual servers.
One of the design decisions you must make for hardware is whether to have few instances on powerful hardwareor many instances on cheaper hardware. If high availability is a key requirement, having more instancesdecreases the risk and impact of any one failure. Other issues such as maintenance and cost must also befactored into this decision.
Hardware availability can be another issue. Does your budget include the new servers, either real or virtual, tohandle the loads you expect? Or can you reuse existing hardware. Remember that having mismatched hardwareis possible in the cluster, but it complicates the server configuration and may lead to sub-optimal load-balancing.
Because the node architecture is the key to cluster, running tests with various options can help you choose theright hardware. By performing load tests, you can determine how many users can run on a single node and scalethe number of nodes accordingly. You can also run tests with various numbers of processors and memory todetermine what configuration is optimal for your expected user load. If you plan on using virtual servers,performing load tests can help uncover any issues with connectivity and stability.
188

Chapter 10 Designing a Cluster
10.5.3 Software ConfigurationOnce you have the server hardware to handle your user load, you need to determine the optimal softwareconfiguration for your nodes. This includes:• JVM settings to optimize processor and memory usage.• Application server settings, mostly to provide connection pooling.• JasperReports Server settings.
Server settings can help optimize performance based on the types and number of reports that you expect users torun:• Data policies in Ad Hoc can help speed up Domain-based reports• Cache settings in Ad Hoc can boost performance when there are many users accessing the same data.• Query limits (for Ad Hoc reports and for JasperReports) can help prevent slow responses when users request
huge data sets during peak usage times.• Custom virtualization settings can help servers deal with large reports (greater than 300 pages).
For JVM setting to optimize performance, see the JasperReports Server Installation Guide. For details aboutquery limits, data policies, and cache settings, see the chapter on configuration in the JasperReports ServerAdministrator Guide.
Also turning off features such as auditing and logging can improve performance in highly-loaded machines.
10.5.4 DatabasesJasperReports Server relies heavily on database access, and cluster deployments add extra load to these sharedresources:• The shared repository is a critical part of the cluster with very high loads compared to a traditional single-
server deployment. With multiple simultaneous connections from multiple nodes, you must ensure that therepository database doesn’t become a bottleneck. Therefore, the architecture, size, and speed of the databasethat hosts the shared repository must be carefully evaluated and specified in the cluster design.
• A JasperReports Server cluster enables and encourages a large population of uses to process more and moredata–this is a good thing. But the cluster may stress your reporting databases to their limits if they aren’tconsidered and given adequate hardware and software. This is another case where knowing what data yourusers access the most can help you optimize database configuration such as indexing.
• If you implement external authentication or single sign-on, make sure those resources can handle the loadthat the cluster is expected to generate.
10.5.5 NetworkFinally, your cluster architecture may need to take into consideration the availability and quality of yournetwork. How remote are your users and what kind of connection do they have to the cluster?
There are two main concerns about your network:• Network availability and capacity affects the availability and scalability of the cluster to the users. If you
have strict availability requirements, you may need redundant network connections from different providers.For scalability, your network needs to handle the load of the planned maximum number of users, or haveplans to scale the network along with the number of users. Be aware that this creates external dependencieson meeting your performance requirements.
• Network bandwidth can affect server load by slowing down individual connections. JasperReports Servercan generate multiple large documents simultaneously that are sent to the web browser or web services
189
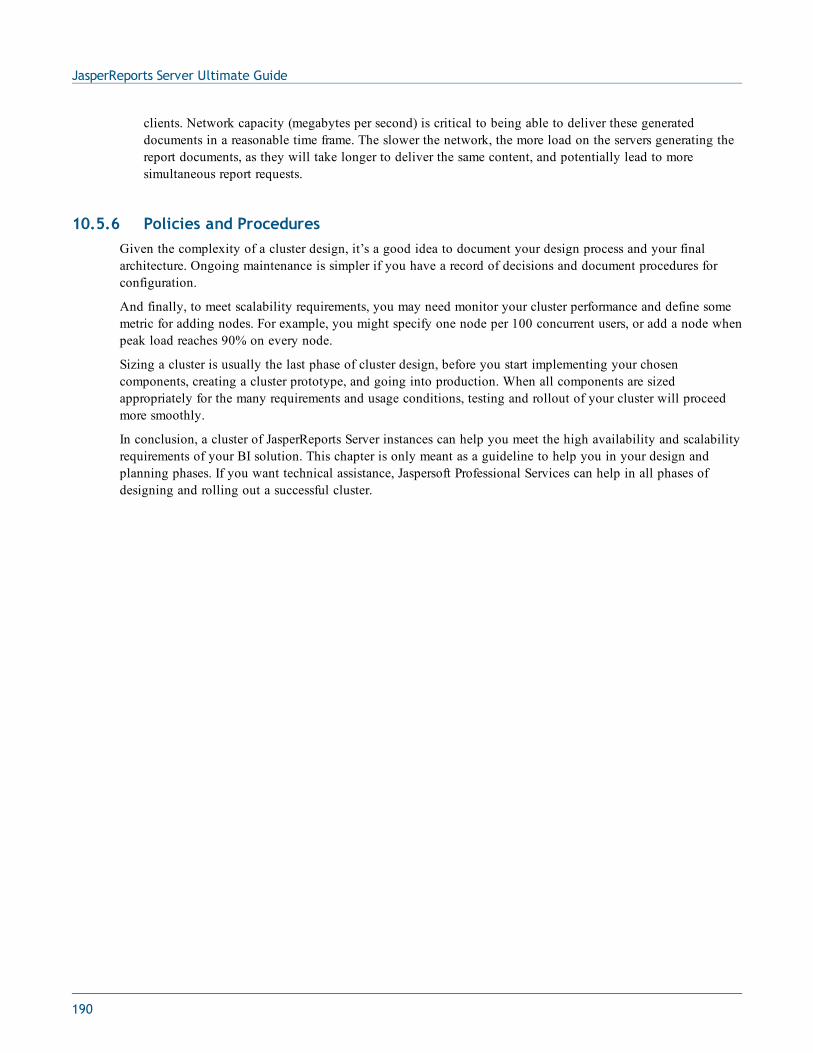
JasperReports Server Ultimate Guide
clients. Network capacity (megabytes per second) is critical to being able to deliver these generateddocuments in a reasonable time frame. The slower the network, the more load on the servers generating thereport documents, as they will take longer to deliver the same content, and potentially lead to moresimultaneous report requests.
10.5.6 Policies and ProceduresGiven the complexity of a cluster design, it’s a good idea to document your design process and your finalarchitecture. Ongoing maintenance is simpler if you have a record of decisions and document procedures forconfiguration.
And finally, to meet scalability requirements, you may need monitor your cluster performance and define somemetric for adding nodes. For example, you might specify one node per 100 concurrent users, or add a node whenpeak load reaches 90% on every node.
Sizing a cluster is usually the last phase of cluster design, before you start implementing your chosencomponents, creating a cluster prototype, and going into production. When all components are sizedappropriately for the many requirements and usage conditions, testing and rollout of your cluster will proceedmore smoothly.
In conclusion, a cluster of JasperReports Server instances can help you meet the high availability and scalabilityrequirements of your BI solution. This chapter is only meant as a guideline to help you in your design andplanning phases. If you want technical assistance, Jaspersoft Professional Services can help in all phases ofdesigning and rolling out a successful cluster.
190
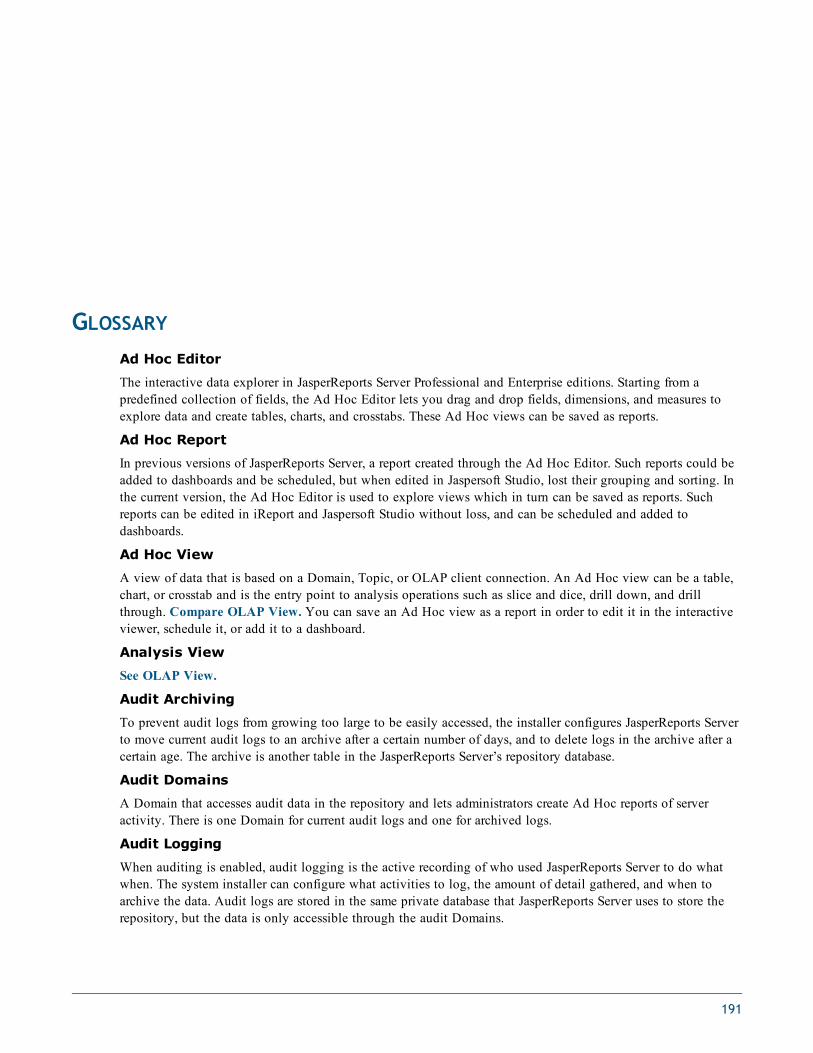
GLOSSARYAd Hoc Editor
The interactive data explorer in JasperReports Server Professional and Enterprise editions. Starting from apredefined collection of fields, the Ad Hoc Editor lets you drag and drop fields, dimensions, and measures toexplore data and create tables, charts, and crosstabs. These Ad Hoc views can be saved as reports.
Ad Hoc Report
In previous versions of JasperReports Server, a report created through the Ad Hoc Editor. Such reports could beadded to dashboards and be scheduled, but when edited in Jaspersoft Studio, lost their grouping and sorting. Inthe current version, the Ad Hoc Editor is used to explore views which in turn can be saved as reports. Suchreports can be edited in iReport and Jaspersoft Studio without loss, and can be scheduled and added todashboards.
Ad Hoc View
A view of data that is based on a Domain, Topic, or OLAP client connection. An Ad Hoc view can be a table,chart, or crosstab and is the entry point to analysis operations such as slice and dice, drill down, and drillthrough. Compare OLAP View. You can save an Ad Hoc view as a report in order to edit it in the interactiveviewer, schedule it, or add it to a dashboard.
Analysis View
See OLAP View.
Audit Archiving
To prevent audit logs from growing too large to be easily accessed, the installer configures JasperReports Serverto move current audit logs to an archive after a certain number of days, and to delete logs in the archive after acertain age. The archive is another table in the JasperReports Server’s repository database.
Audit Domains
A Domain that accesses audit data in the repository and lets administrators create Ad Hoc reports of serveractivity. There is one Domain for current audit logs and one for archived logs.
Audit Logging
When auditing is enabled, audit logging is the active recording of who used JasperReports Server to do whatwhen. The system installer can configure what activities to log, the amount of detail gathered, and when toarchive the data. Audit logs are stored in the same private database that JasperReports Server uses to store therepository, but the data is only accessible through the audit Domains.
191
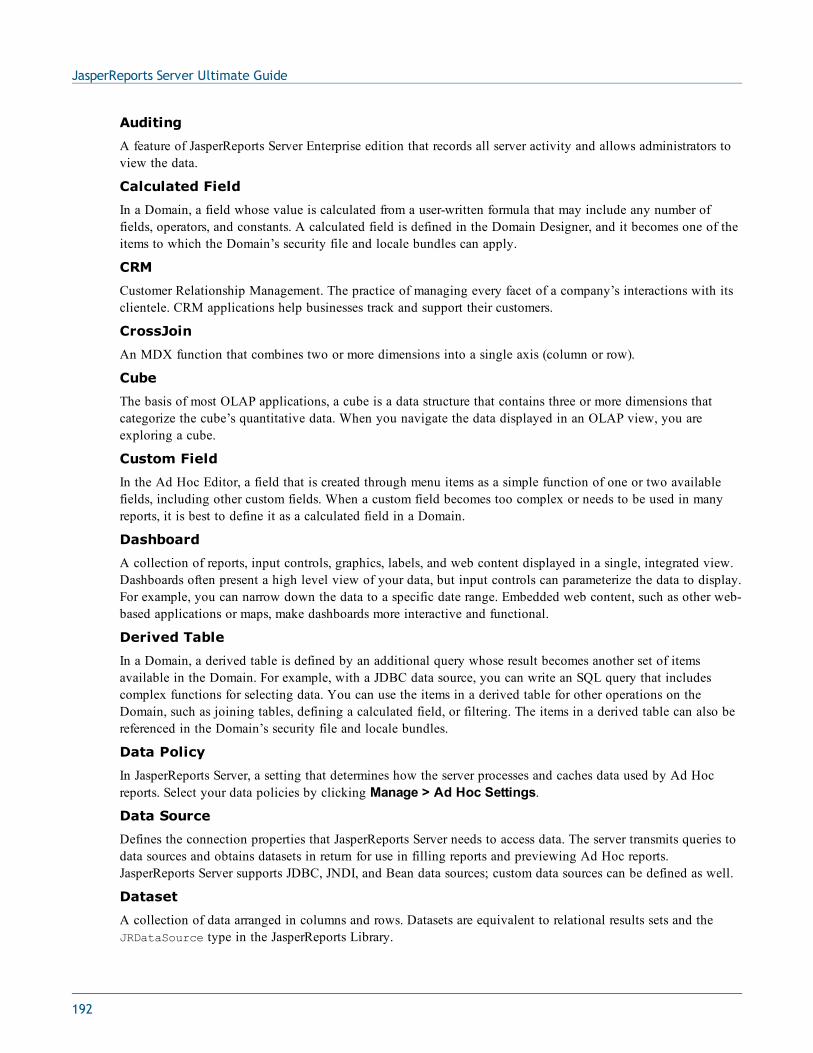
JasperReports Server Ultimate Guide
Auditing
A feature of JasperReports Server Enterprise edition that records all server activity and allows administrators toview the data.
Calculated Field
In a Domain, a field whose value is calculated from a user-written formula that may include any number offields, operators, and constants. A calculated field is defined in the Domain Designer, and it becomes one of theitems to which the Domain’s security file and locale bundles can apply.
CRM
Customer Relationship Management. The practice of managing every facet of a company’s interactions with itsclientele. CRM applications help businesses track and support their customers.
CrossJoin
An MDX function that combines two or more dimensions into a single axis (column or row).
Cube
The basis of most OLAP applications, a cube is a data structure that contains three or more dimensions thatcategorize the cube’s quantitative data. When you navigate the data displayed in an OLAP view, you areexploring a cube.
Custom Field
In the Ad Hoc Editor, a field that is created through menu items as a simple function of one or two availablefields, including other custom fields. When a custom field becomes too complex or needs to be used in manyreports, it is best to define it as a calculated field in a Domain.
Dashboard
A collection of reports, input controls, graphics, labels, and web content displayed in a single, integrated view.Dashboards often present a high level view of your data, but input controls can parameterize the data to display.For example, you can narrow down the data to a specific date range. Embedded web content, such as other web-based applications or maps, make dashboards more interactive and functional.
Derived Table
In a Domain, a derived table is defined by an additional query whose result becomes another set of itemsavailable in the Domain. For example, with a JDBC data source, you can write an SQL query that includescomplex functions for selecting data. You can use the items in a derived table for other operations on theDomain, such as joining tables, defining a calculated field, or filtering. The items in a derived table can also bereferenced in the Domain’s security file and locale bundles.
Data Policy
In JasperReports Server, a setting that determines how the server processes and caches data used by Ad Hocreports. Select your data policies by clicking Manage > Ad Hoc Settings.
Data Source
Defines the connection properties that JasperReports Server needs to access data. The server transmits queries todata sources and obtains datasets in return for use in filling reports and previewing Ad Hoc reports.JasperReports Server supports JDBC, JNDI, and Bean data sources; custom data sources can be defined as well.
Dataset
A collection of data arranged in columns and rows. Datasets are equivalent to relational results sets and theJRDataSource type in the JasperReports Library.
192
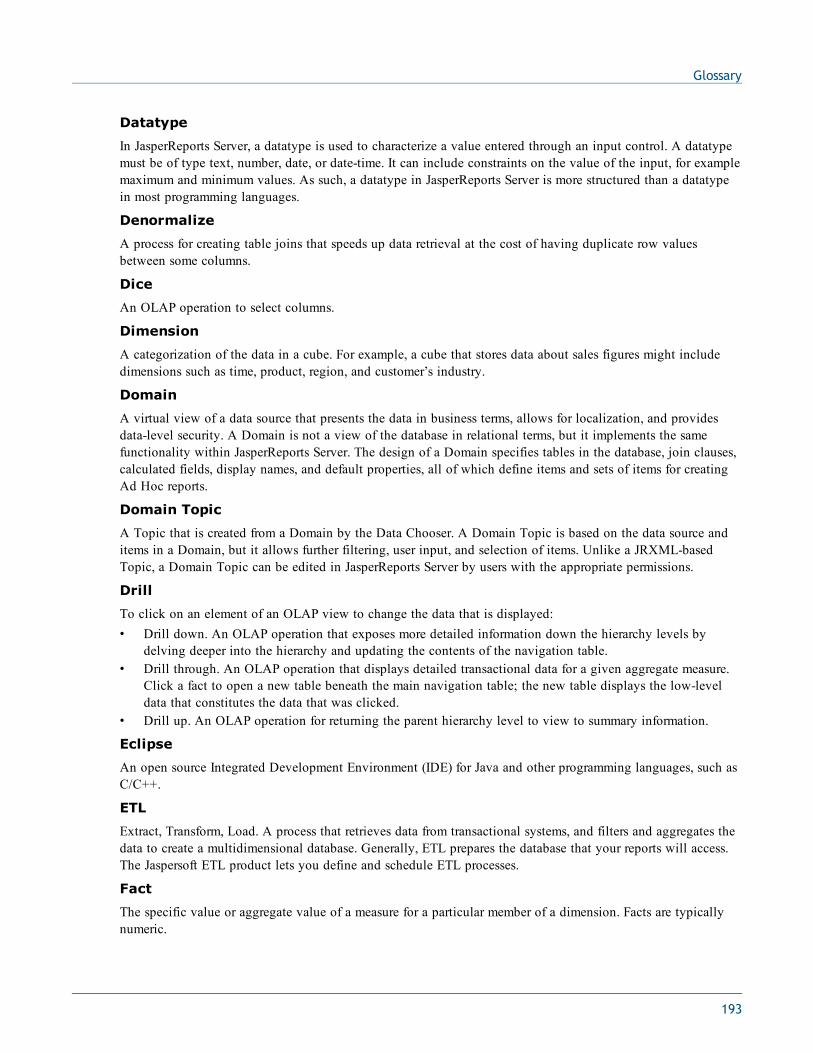
Glossary
Datatype
In JasperReports Server, a datatype is used to characterize a value entered through an input control. A datatypemust be of type text, number, date, or date-time. It can include constraints on the value of the input, for examplemaximum and minimum values. As such, a datatype in JasperReports Server is more structured than a datatypein most programming languages.
Denormalize
A process for creating table joins that speeds up data retrieval at the cost of having duplicate row valuesbetween some columns.
Dice
An OLAP operation to select columns.
Dimension
A categorization of the data in a cube. For example, a cube that stores data about sales figures might includedimensions such as time, product, region, and customer’s industry.
Domain
A virtual view of a data source that presents the data in business terms, allows for localization, and providesdata-level security. A Domain is not a view of the database in relational terms, but it implements the samefunctionality within JasperReports Server. The design of a Domain specifies tables in the database, join clauses,calculated fields, display names, and default properties, all of which define items and sets of items for creatingAd Hoc reports.
Domain Topic
A Topic that is created from a Domain by the Data Chooser. A Domain Topic is based on the data source anditems in a Domain, but it allows further filtering, user input, and selection of items. Unlike a JRXML-basedTopic, a Domain Topic can be edited in JasperReports Server by users with the appropriate permissions.
Drill
To click on an element of an OLAP view to change the data that is displayed:• Drill down. An OLAP operation that exposes more detailed information down the hierarchy levels by
delving deeper into the hierarchy and updating the contents of the navigation table.• Drill through. An OLAP operation that displays detailed transactional data for a given aggregate measure.
Click a fact to open a new table beneath the main navigation table; the new table displays the low-leveldata that constitutes the data that was clicked.
• Drill up. An OLAP operation for returning the parent hierarchy level to view to summary information.
Eclipse
An open source Integrated Development Environment (IDE) for Java and other programming languages, such asC/C++.
ETL
Extract, Transform, Load. A process that retrieves data from transactional systems, and filters and aggregates thedata to create a multidimensional database. Generally, ETL prepares the database that your reports will access.The Jaspersoft ETL product lets you define and schedule ETL processes.
Fact
The specific value or aggregate value of a measure for a particular member of a dimension. Facts are typicallynumeric.
193
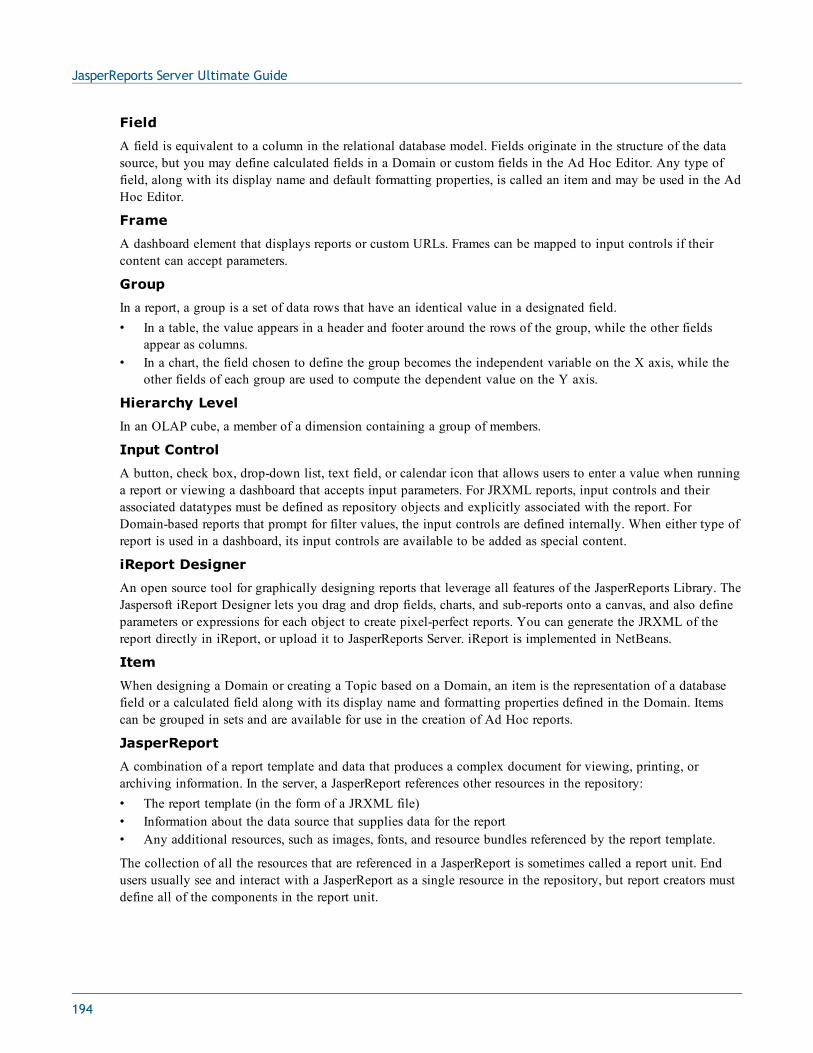
JasperReports Server Ultimate Guide
Field
A field is equivalent to a column in the relational database model. Fields originate in the structure of the datasource, but you may define calculated fields in a Domain or custom fields in the Ad Hoc Editor. Any type offield, along with its display name and default formatting properties, is called an item and may be used in the AdHoc Editor.
Frame
A dashboard element that displays reports or custom URLs. Frames can be mapped to input controls if theircontent can accept parameters.
Group
In a report, a group is a set of data rows that have an identical value in a designated field.• In a table, the value appears in a header and footer around the rows of the group, while the other fields
appear as columns.• In a chart, the field chosen to define the group becomes the independent variable on the X axis, while the
other fields of each group are used to compute the dependent value on the Y axis.
Hierarchy Level
In an OLAP cube, a member of a dimension containing a group of members.
Input Control
A button, check box, drop-down list, text field, or calendar icon that allows users to enter a value when runninga report or viewing a dashboard that accepts input parameters. For JRXML reports, input controls and theirassociated datatypes must be defined as repository objects and explicitly associated with the report. ForDomain-based reports that prompt for filter values, the input controls are defined internally. When either type ofreport is used in a dashboard, its input controls are available to be added as special content.
iReport Designer
An open source tool for graphically designing reports that leverage all features of the JasperReports Library. TheJaspersoft iReport Designer lets you drag and drop fields, charts, and sub-reports onto a canvas, and also defineparameters or expressions for each object to create pixel-perfect reports. You can generate the JRXML of thereport directly in iReport, or upload it to JasperReports Server. iReport is implemented in NetBeans.
Item
When designing a Domain or creating a Topic based on a Domain, an item is the representation of a databasefield or a calculated field along with its display name and formatting properties defined in the Domain. Itemscan be grouped in sets and are available for use in the creation of Ad Hoc reports.
JasperReport
A combination of a report template and data that produces a complex document for viewing, printing, orarchiving information. In the server, a JasperReport references other resources in the repository:• The report template (in the form of a JRXML file)• Information about the data source that supplies data for the report• Any additional resources, such as images, fonts, and resource bundles referenced by the report template.
The collection of all the resources that are referenced in a JasperReport is sometimes called a report unit. Endusers usually see and interact with a JasperReport as a single resource in the repository, but report creators mustdefine all of the components in the report unit.
194
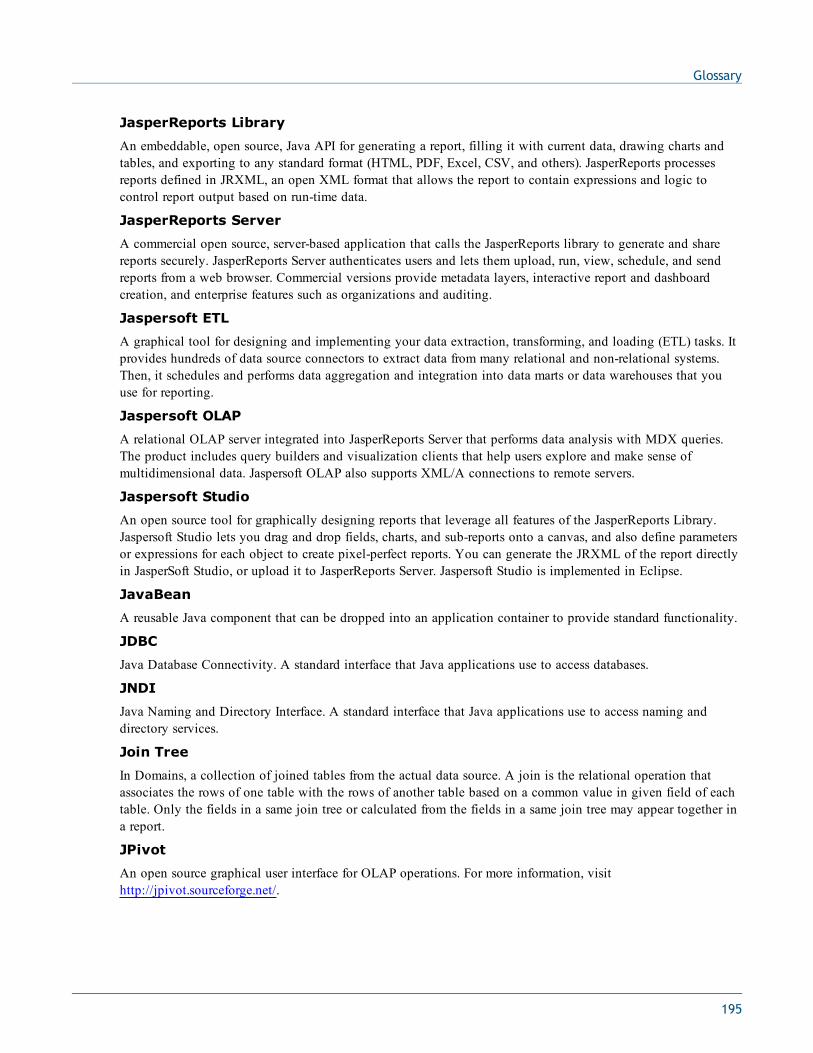
Glossary
JasperReports Library
An embeddable, open source, Java API for generating a report, filling it with current data, drawing charts andtables, and exporting to any standard format (HTML, PDF, Excel, CSV, and others). JasperReports processesreports defined in JRXML, an open XML format that allows the report to contain expressions and logic tocontrol report output based on run-time data.
JasperReports Server
A commercial open source, server-based application that calls the JasperReports library to generate and sharereports securely. JasperReports Server authenticates users and lets them upload, run, view, schedule, and sendreports from a web browser. Commercial versions provide metadata layers, interactive report and dashboardcreation, and enterprise features such as organizations and auditing.
Jaspersoft ETL
A graphical tool for designing and implementing your data extraction, transforming, and loading (ETL) tasks. Itprovides hundreds of data source connectors to extract data from many relational and non-relational systems.Then, it schedules and performs data aggregation and integration into data marts or data warehouses that youuse for reporting.
Jaspersoft OLAP
A relational OLAP server integrated into JasperReports Server that performs data analysis with MDX queries.The product includes query builders and visualization clients that help users explore and make sense ofmultidimensional data. Jaspersoft OLAP also supports XML/A connections to remote servers.
Jaspersoft Studio
An open source tool for graphically designing reports that leverage all features of the JasperReports Library.Jaspersoft Studio lets you drag and drop fields, charts, and sub-reports onto a canvas, and also define parametersor expressions for each object to create pixel-perfect reports. You can generate the JRXML of the report directlyin JasperSoft Studio, or upload it to JasperReports Server. Jaspersoft Studio is implemented in Eclipse.
JavaBean
A reusable Java component that can be dropped into an application container to provide standard functionality.
JDBC
Java Database Connectivity. A standard interface that Java applications use to access databases.
JNDI
Java Naming and Directory Interface. A standard interface that Java applications use to access naming anddirectory services.
Join Tree
In Domains, a collection of joined tables from the actual data source. A join is the relational operation thatassociates the rows of one table with the rows of another table based on a common value in given field of eachtable. Only the fields in a same join tree or calculated from the fields in a same join tree may appear together ina report.
JPivot
An open source graphical user interface for OLAP operations. For more information, visithttp://jpivot.sourceforge.net/.
195

JasperReports Server Ultimate Guide
JRXML
An XML file format for saving and sharing reports created for the JasperReports Library and the applicationsthat use it, such as iReport Designer and JasperReports Server. JRXML is an open format that uses the XMLstandard to define precisely all the structure and configuration of a report.
MDX
Multidimensional Expression Language. A language for querying multidimensional objects, such as OLAP (OnLine Analytical Processing) cubes, and returning cube data for analytical processing. An MDX query is thequery that determines the data displayed in an OLAP view.
Measure
Depending on the context:• In a report, a formula that calculates the values displayed in a table’s columns, a crosstab’s data values, or a
chart’s dependent variable (such as the slices in a pie).• In an OLAP view, a formula that calculates the facts that constitute the quantitative data in a cube.
Mondrian
A Java-based, open source multidimensional database application.
Mondrian Connection
An OLAP client connection that consists of an OLAP schema and a data source. OLAP client connectionspopulate OLAP views.
Mondrian Schema Editor
An open source Eclipse plug-in for creating Mondrian OLAP schemas.
Mondrian XML/A Source
A server-side XML/A source definition of a remote client-side XML/A connection used to populate an OLAPview using the XML/A standard.
MySQL
An open source relational database management system. For information, visit http://www.mysql.com/.
Navigation Table
The main table in an OLAP view that displays measures and dimensions as columns and rows.
ODBO Connect
Jaspersoft ODBO Connect enables Microsoft Excel 2003 and 2007 Pivot Tables to work with Jaspersoft OLAPand other OLAP servers that support the XML/A protocol. After setting up the Jaspersoft ODBO data source,business analysts can use Excel Pivot Tables as a front-end for OLAP analysis.
OLAP
On Line Analytical Processing. Provides multidimensional views of data that help users analyze current and pastperformance and model future scenarios.
OLAP Client Connection
A definition for retrieving data to populate an OLAP view. An OLAP client connection is either a direct Javaconnection (Mondrian connection) or an XML-based API connection (XML/A connection).
196
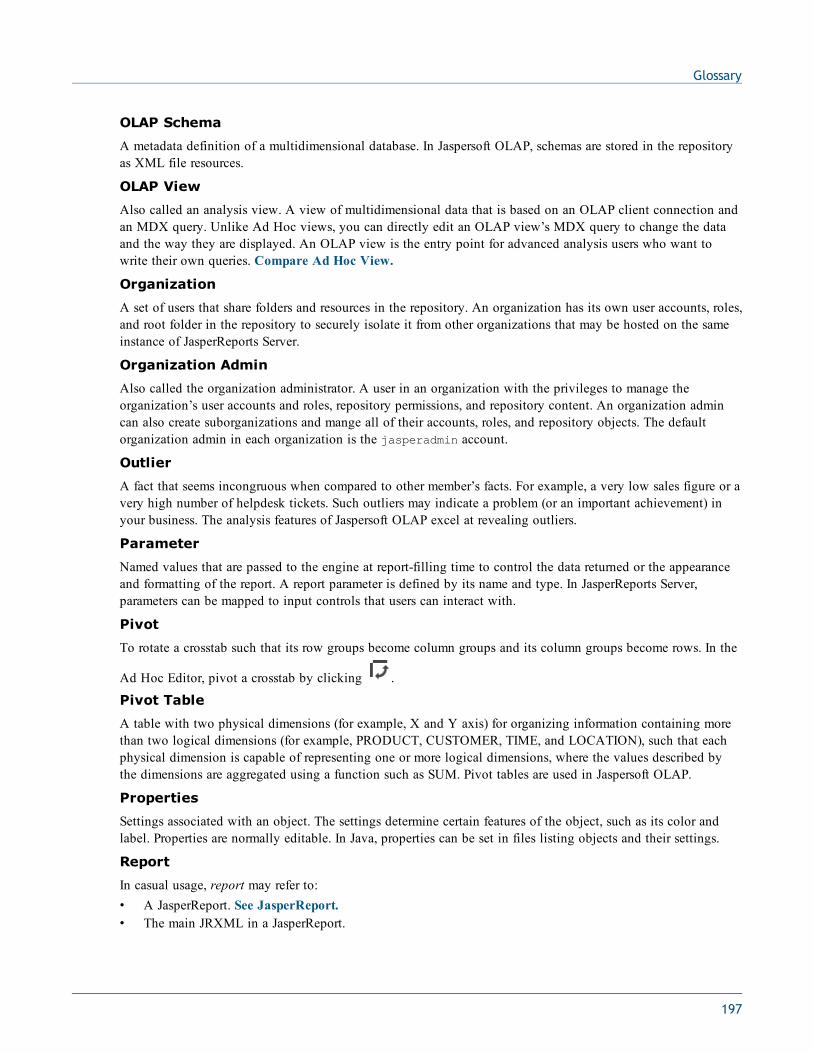
Glossary
OLAP Schema
A metadata definition of a multidimensional database. In Jaspersoft OLAP, schemas are stored in the repositoryas XML file resources.
OLAP View
Also called an analysis view. A view of multidimensional data that is based on an OLAP client connection andan MDX query. Unlike Ad Hoc views, you can directly edit an OLAP view’s MDX query to change the dataand the way they are displayed. An OLAP view is the entry point for advanced analysis users who want towrite their own queries. Compare Ad Hoc View.
Organization
A set of users that share folders and resources in the repository. An organization has its own user accounts, roles,and root folder in the repository to securely isolate it from other organizations that may be hosted on the sameinstance of JasperReports Server.
Organization Admin
Also called the organization administrator. A user in an organization with the privileges to manage theorganization’s user accounts and roles, repository permissions, and repository content. An organization admincan also create suborganizations and mange all of their accounts, roles, and repository objects. The defaultorganization admin in each organization is the jasperadmin account.
Outlier
A fact that seems incongruous when compared to other member’s facts. For example, a very low sales figure or avery high number of helpdesk tickets. Such outliers may indicate a problem (or an important achievement) inyour business. The analysis features of Jaspersoft OLAP excel at revealing outliers.
Parameter
Named values that are passed to the engine at report-filling time to control the data returned or the appearanceand formatting of the report. A report parameter is defined by its name and type. In JasperReports Server,parameters can be mapped to input controls that users can interact with.
Pivot
To rotate a crosstab such that its row groups become column groups and its column groups become rows. In the
Ad Hoc Editor, pivot a crosstab by clicking .
Pivot Table
A table with two physical dimensions (for example, X and Y axis) for organizing information containing morethan two logical dimensions (for example, PRODUCT, CUSTOMER, TIME, and LOCATION), such that eachphysical dimension is capable of representing one or more logical dimensions, where the values described bythe dimensions are aggregated using a function such as SUM. Pivot tables are used in Jaspersoft OLAP.
Properties
Settings associated with an object. The settings determine certain features of the object, such as its color andlabel. Properties are normally editable. In Java, properties can be set in files listing objects and their settings.
Report
In casual usage, report may refer to:• A JasperReport. See JasperReport.• The main JRXML in a JasperReport.
197

JasperReports Server Ultimate Guide
• The file generated when a JasperReport is scheduled. Such files are also called content resources or outputfiles.
• The file generated when a JasperReport is run and then exported.• In previous JasperReports Server versions, a report created in the Ad Hoc Editor. See Ad Hoc Report.
Repository
The tree structure of folders that contain all saved reports, dashboards, OLAP views, and resources. Users accessthe repository through the JasperReports Server web interface or through iReport. Applications can access therepository through the web service API. Administrators use the import and export utilities to back up therepository contents.
Resource
In JasperReports Server, anything residing in the repository, such as an image, file, font, data source, Topic,Domain, report element, saved report, report output, dashboard, or OLAP view. Resources also include thefolders in the repository. Administrators set user and role-based access permissions on repository resources toestablish a security policy.
Role
A security feature of JasperReports Server. Administrators create named roles, assign them to user accounts, andthen set access permissions to repository objects based on those roles. Certain roles also determine whatfunctionality and menu options are displayed to users in the JasperReports Server interface.
Schema
A logical model that determines how data is stored. For example, the schema in a relational database is adescription of the relationships between tables, views, and indexes. In Jaspersoft OLAP, an OLAP schema is thelogical model of the data that appears in an OLAP view; they are uploaded to the repository as resources. ForDomains, schemas are represented in XML design files.
Schema Workbench
A graphical tool for easily designing OLAP schemas, data security schemas, and MDX queries. The resultingcube and query definitions can then be used in Jaspersoft OLAP to perform simple but powerful analysis oflarge quantities of multi-dimensional data stored in standard RDBMS systems.
Set
In Domains and Domain Topics, a named collection of items grouped together for ease of use in the Ad HocEditor. A set can be based on the fields in a table or entirely defined by the Domain creator, but all items in aset must originate in the same join tree. The order of items in a set is preserved.
Slice
An OLAP operation for filtering data rows.
SQL
Structured Query Language. A standard language used to access and manipulate data and schemas in arelational database.
System Admin
Also called the system administrator. A user who has unlimited access to manage all organizations, users, roles,repository permissions, and repository objects across the entire JasperReports Server instance. The system admincan create root-level organizations and manage all server settings. The default system admin is the superuseraccount.
198
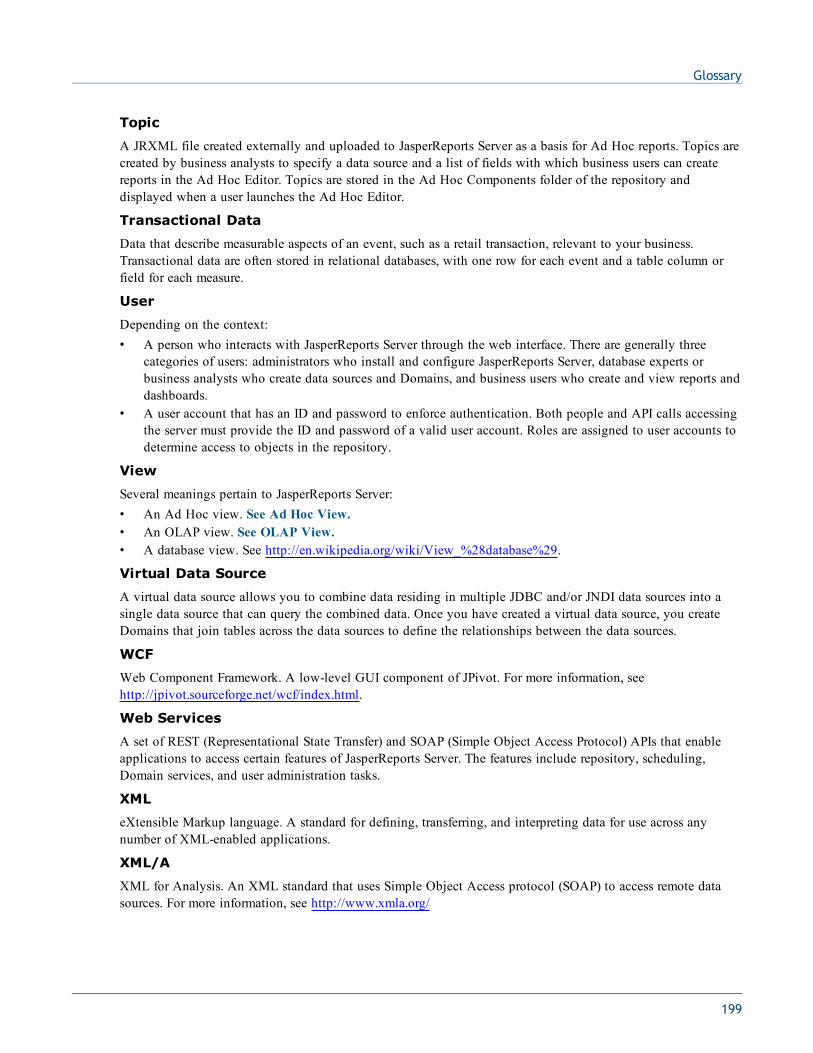
Glossary
Topic
A JRXML file created externally and uploaded to JasperReports Server as a basis for Ad Hoc reports. Topics arecreated by business analysts to specify a data source and a list of fields with which business users can createreports in the Ad Hoc Editor. Topics are stored in the Ad Hoc Components folder of the repository anddisplayed when a user launches the Ad Hoc Editor.
Transactional Data
Data that describe measurable aspects of an event, such as a retail transaction, relevant to your business.Transactional data are often stored in relational databases, with one row for each event and a table column orfield for each measure.
User
Depending on the context:• A person who interacts with JasperReports Server through the web interface. There are generally three
categories of users: administrators who install and configure JasperReports Server, database experts orbusiness analysts who create data sources and Domains, and business users who create and view reports anddashboards.
• A user account that has an ID and password to enforce authentication. Both people and API calls accessingthe server must provide the ID and password of a valid user account. Roles are assigned to user accounts todetermine access to objects in the repository.
View
Several meanings pertain to JasperReports Server:• An Ad Hoc view. See Ad Hoc View.• An OLAP view. See OLAP View.• A database view. See http://en.wikipedia.org/wiki/View_%28database%29.
Virtual Data Source
A virtual data source allows you to combine data residing in multiple JDBC and/or JNDI data sources into asingle data source that can query the combined data. Once you have created a virtual data source, you createDomains that join tables across the data sources to define the relationships between the data sources.
WCF
Web Component Framework. A low-level GUI component of JPivot. For more information, seehttp://jpivot.sourceforge.net/wcf/index.html.
Web Services
A set of REST (Representational State Transfer) and SOAP (Simple Object Access Protocol) APIs that enableapplications to access certain features of JasperReports Server. The features include repository, scheduling,Domain services, and user administration tasks.
XML
eXtensible Markup language. A standard for defining, transferring, and interpreting data for use across anynumber of XML-enabled applications.
XML/A
XML for Analysis. An XML standard that uses Simple Object Access protocol (SOAP) to access remote datasources. For more information, see http://www.xmla.org/
199

JasperReports Server Ultimate Guide
XML/A Connection
A type of OLAP client connection that consists of Simple Object Access Protocol (SOAP) definitions used toaccess data on a remote server. OLAP client connections populate OLAP views.
200

A
access controlcreating profile attributes 59data 55, 72data example 56Domains 55, 72JavaServer Pages 141menu items 140object permission APIs 104profile attributes 56, 60roles 58, 137Spring Web Flow 142, 160user and role APIs 103using repository permissions 137
access grants 55action model for menus 115Ad Hoc Editor
administering 28and Ad Hoc launcher 106, 113as a designer 15charts 21Domains and 28exploring data 15layout band 17summarizing data 25summary functions 27tables 16testing Domain security 61tool bar 17user interface 16
Ad Hoc Launcher API 106, 113Ad Hoc views. See views. 15administering
Domain security 55, 72memory usage 29repository 45views 28
alerts, creating with API 99anomalies 15APIs
Ad Hoc Launcher 106, 113content files 95engine service 96flushing the analysis cache 105folders 92Java 89, 106metadata resources 94object permissions 104OLAP connection 104public API 89, 106report execution 96report scheduling 97, 103Repository HTTP API 86Repository Java API 92singletons 90types 83users and roles 103Visualize.js 84web services 83
application security. See security. 73
INDEX
201

JasperReports Server Ultimate Guide
B
browseDB 109business case, CZS 56
C
cache, flushing analysis data 105cascading style sheets 115, 118charts
creating filters 22interface elements 21
colors, customizing 118column-level security 62, 64-65conditional text 31, 36configuring
Domains 57content files, accessing with API 95cookies 77creating
Ad Hoc launchers 106custom data sources 96custom queries in Ad Hoc launchers 110JRXML files 28profile attributes 59report templates 31
crosstabscreating filters 24interface elements 23, 25
custom data sourcesand report data source service API 96creating 49examples 45-46installing 53message catalogs 51, 53query executers 46Spring configuration 51, 53
customizingAd Hoc launcher queries 110adding a Spring Web Flow 159, 164and upgrade 168cascading style sheets 118colors 118dialog boxes 119fonts 118hiding UI elements 122home page 136
input controls 121, 154, 156JavaScript 128JavaServer Pages 141login page 134logo 117menus 138, 153report export channels 164reports 154Spring Web Flow 142theme for embedding 124user interface 115, 126, 154
CZS 56
D
dashboardsinput controls 40refresh interval 42user interface components 40
dataaccess control 55, 72access control example 56
data formats 27data sources
JasperReports Library and JasperReports Server 45repository and 45See also custom data sources.[data sources
aaa] 45decorators 115, 126, 131documentation
guide to using Ultimate Guide 10premium documentation 11standard documentation 11
Domainsaccess control 55, 72best practices 67column-level security 62complex 67creating 29creating profile attributes 59example 57-58example design file 68example security file 71in Ad Hoc Editor 28performance 67row-level security 62security 58-59
202

Index
tables tab 57testing security 61, 65-66Topics based on 67
drill through, in Ad Hoc Editor 25
E
embedding JasperReports server 124examples
Ad Hoc Launcher 109browseDB 109CZS business case 56Domain design 58, 68Domain security file 71Domain tables 57fields 57joins 57report 66roles 58users 59
excluding data, in Ad Hoc Editor 24exploring data 15
F
favicon,customizing 117fields
summary functions 27filters
creating in charts 22creating in crosstabs 24creating in tables 20filter expressions 63in the Ad Hoc Editor 18scalability and 29
foldersaccessing with API 92
fonts, customizing 118
G
Groovy 63, 67
H
home page 136HTTP Repository APIs 86HTTPS only, configuring 75
I
input controlscustomizing 154, 156in dashboards 40
installing JasperReports Server 12interfaces. See APIs. 89item groups 67
J
JasperAnalysis. See Jaspersoft OLAP. 104JasperReports Library 9
data sources 45JasperReports Server
business intelligence platform 9installation 12memory usage 29
JasperServer. See JasperReports Server. 9Jaspersoft Business Intelligence Suite 9Jaspersoft OLAP
flushing the analysis cache 105OLAP connection API 104prerequisites 9
Java APIs 89, 106JAVA_HOME 47JavaScript 115
API 84customization 128optimization 128
JavaServer Pagesadding 159adding in a Spring Web Flow 159, 164controlling access 141customizing 115, 131flows and 159
JDK 47joins 57, 67JRXML files
and Topics 28creating 28
K
keep only 24keystore 74
L
launcher. See Ad Hoc Launcher API 106, 113
203

JasperReports Server Ultimate Guide
layout band 17list scheduled jobs 101locale 87log4j 60logging 60logo
hiding 122logo, customizing 117
M
memory usage 29menus
action model reference 147, 153adding a menu 145adding a menu item 143customizing 138, 153customizing context menus 147deleting a menu item 138restricting access by role 140Spring Web Flow and 162
metadata resources 92, 94
O
object permissions APIs 104OLAP connection API 104outliers 15
P
parameters See input controls 154passwords
changing 13PKC12 keystore 74prerequisites for Jaspersoft OLAP 9principal expressions 63profile attributes
creating 59CZS example 56, 63Domain security 59, 63in user account 60
protection domains 79public API
and Spring Framework 90overview 89
Q
queriescustom data sources and 46in Ad Hoc launchers 106, 110, 113
R
redo, in Ad Hoc Editor 17report developer 10report execution API 96report jobs 97report templates 31
and JSS 35report viewer 31reports
custom export channels 164customizing 154designing 15example 66exporting 164report execution API 96report scheduling API 97, 103running 154scheduling APIs 100
repositoryaccess control 137administering 45data sources 45Java API 92
resourcescontent files 95folders 92metadata resources 94
REST API 83roles
Domain security 58example 58
row-level security 62-63, 65
S
scheduling APIs 97, 103bulk scheduling 101calendars 102canceling jobs 96creating alerts 99holidays 102
204

Index
pause report job 102report jobs 97report scheduling service 100resume report job 102retrieving list of running jobs 96
Secure Sockets Layer. See SSL. 74security
application 73configuring HTTPS only 75cookies 77Domains 55, 72httpOnly 77keystore 74protection domains 79SSL 74Tomcat 73web application 73
Security Manager 79singletons 90SiteMesh 115, 126, 130slice 24SOAP API 83Spring Framework 115Spring MVC 115Spring Security
Spring Framework 90Spring Web Flow 115
access control 142, 160adding 159, 164adding a flow 159flow files 86menus and 162WebFlowUpgrader 86
SSL 74-75startup URI 87summary functions 27system administrator 11system developer 10
T
tablescreating filters 20interface elements 16
technical business analyst 10testing Domain security 65-66themes 115, 118
TLS. See SSL. 74Tomcat 73tool bar 17Topics
and Ad Hoc launcher 106, 113based on JRXML files 28Domains and 67in Ad Hoc Editor 28
trends 15troubleshooting 60
U
undo, in Ad Hoc Editor 17user interface
Ad Hoc Editor 16Ad Hoc launchers 106customizing 115, 154default configuration 126SiteMesh and 126
user typesdatabase administrator 11report developer 10system administrator 11system developer 10technical business analyst 10
usersexample 59profile attributes 59
using the Ad Hoc Editoranalyzing data 15charts 21crosstabs 23, 25designing views and reports 15drill through 25excluding data 24exploring data 15filtering 18slice 24sorting 20summarizing data 25tables 16testing Domain security 61with Ad Hoc launcher 106, 113
205

JasperReports Server Ultimate Guide
V
viewsAd Hoc launchers and 106administering 28chart views 21crosstabs 23, 25designing 15excluding data 24tables 16
Visualize.js 84
W
web services APIs 83
206