JAMS 7.X Installation Guide · 2020-02-21 · Table of Contents JAMS Installation Guide 2-37 Agents...
151
Table of Contents JAMS Installation Guide 2-37 Agents in JAMS 38-39 OpenVMS Agent 40-43 JAMS Agent for System i 44 JAMS Agent for Windows 45 JAMS Agentd for Linux/Unix 46-53 zOS 54-56 Integration Packs 57 Banner 58-68 Dynamics AX 69-75 JD Edwards 76-77 Informatica Cloud 78-79 Micro Focus 80-82 Microsoft SCOM 83-88 NeoBatch 89-91 Netezza 92-95 Paladin 96-116 PeopleSoft 117-126 SAS 127 SAP Execution Methods 128-133 SAP Business Objects Data Services 134-135 Symitar 136-144 zOS 145-147 Oracle EBS Integration 148 Automating Oracle EBS Jobs 149-150 Configuring The OracleStoredProc Execution Method 151 JAMS 7.X Installation Guide 1 ©2020 HelpSystems, LLC. All Rights Reserved.
Transcript of JAMS 7.X Installation Guide · 2020-02-21 · Table of Contents JAMS Installation Guide 2-37 Agents...

Table of Contents
JAMS Installation Guide 2-37
Agents in JAMS 38-39
OpenVMS Agent 40-43
JAMS Agent for System i 44
JAMS Agent for Windows 45
JAMS Agentd for Linux/Unix 46-53
zOS 54-56
Integration Packs 57
Banner 58-68
Dynamics AX 69-75
JD Edwards 76-77
Informatica Cloud 78-79
Micro Focus 80-82
Microsoft SCOM 83-88
NeoBatch 89-91
Netezza 92-95
Paladin 96-116
PeopleSoft 117-126
SAS 127
SAP Execution Methods 128-133
SAP Business Objects Data Services 134-135
Symitar 136-144
zOS 145-147
Oracle EBS Integration 148
Automating Oracle EBS Jobs 149-150
Configuring The OracleStoredProc Execution Method 151
JAMS 7.X Installation Guide
1 ©2020 HelpSystems, LLC. All Rights Reserved.

JAMS Installation Guide
Installed ComponentsThe JAMS environment incorporates several key components that work together to create a unique and powerfulscheduling system.
JAMS Desktop ClientThe JAMS Desktop Client provides the primary user controls for JAMS and includes:
Windows-based GUI (JAMS Client)PowerShell CmdletsJAMS PowerShell provider.NET-based Class LibraryJAMS.exe command line tool
JAMS Scheduler for WindowsThis is essentially the heart of the JAMS system. The scheduler provides background services that maintain, scheduleand execute JAMS Jobs.
JAMS Scheduler Services InstallationJAMS Scheduler installation also contains other important JAMS components, including:
JAMS Scheduler ServicesJAMS Server ServicesJAMS Executor Services
NOTE: If this is the initial installation of the JAMS Scheduler, you will be prompted for additional informationwhen the installer configures the JAMS Database.
JAMS AgentsThere are many different Agents available for JAMS, each designed and configured for a specific platform and purpose.See Agents in JAMS for more information.
JAMS Web Client / REST APIOptional. Installing the JAMS Web Client allows you to run and manage the automation environment from any web-connected device. If you do not install the JAMS Web Client during the initial install of JAMS, you can install the WebClient at a later time. See Installing the JAMS Web Client for more information.
JAMS Desktop Client Installation ComponentsThe JAMS Desktop Client installation includes the following items:
A Start Menu shortcut to JAMSWin.exeThe JAMSShr.dll Class LibraryThe JAMS PowerShell Modules (PowerShell must be installed before you install JAMS)The JAMS.exe command line toolJAMS Help files
JAMS Command Line EnvironmentIn addition to the JAMS Client, the JAMS PowerShell Modules, and the .NET Controls, JAMS offers a command lineinterpreter to manage your scheduling environment. When the JAMS Desktop Client is installed, it also includes acommand line tool (JAMS.EXE).
1. Start JAMS.EXE from the command line to see the JAMS> prompt. This establishes the connection to the JAMSServer.
2. Type HELP to view all the supporting commands.3. Type HELP COMMAND to get additional assistance for a command, such as HELP EXPORT JOB.
JAMS 7.X Installation Guide
2 ©2020 HelpSystems, LLC. All Rights Reserved.

Preparing for the JAMS Installation
JAMS Scheduler JAMS Agent JAMS Client
SoftwarePrerequisites
.NET Framework 4.6 (orhigher)Microsoft Message Queue(installed with JAMS)Microsoft SQL Server 2012or newer
.NETFramework4.6 (orhigher)
.NETFramework4.6(or higher)
Hardware Server
(minimum)
Processor: Dual Core ~2.5GHZ (x86 or X64)Memory: 8 GBDisk Space: 10 GB, inaddition to the disk spacerequired by the OS
Processor:1 GHZ(x86 orx64)Memory: 1GBDiskSpace: 75MB
Processor: 1GHZ (x86 orX64)Memory: 1 GBDisk Space:300 MB
Hardware Server
(50,000 to100,000 Jobs per
Day)
Processor: 8 Core ~3.2GHZ (x86 or X64)Memory: 32+ GBDisk Space: 1+TBRecommended: A separateSQL Cluster for the JAMSSQL back-end
Processor:1 GHZ(x86 orx64)Memory: 1GBDiskSpace: 75MB
Processor: 1GHZ (x86 orX64)Memory: 1 GBDiskSpace: 300MB
Hardware Server
(>100,000 jobsper day)
Processor: 16 Cores,~3.2GHZMemory: 64+ GBDisk Space: 1+ TBOne server hosting theJAMS SchedulerOne server reserved for theSQL Server with multiplehigh-speed SCSI drives
Processor:1 GHZ(x86 orx64)Memory: 1GBDiskSpace: 75MB
Processor: 1GHZ (x86 orX64)Memory: 1 GBDisk Space:300 MB
JAMS 7.X Installation Guide
3 ©2020 HelpSystems, LLC. All Rights Reserved.
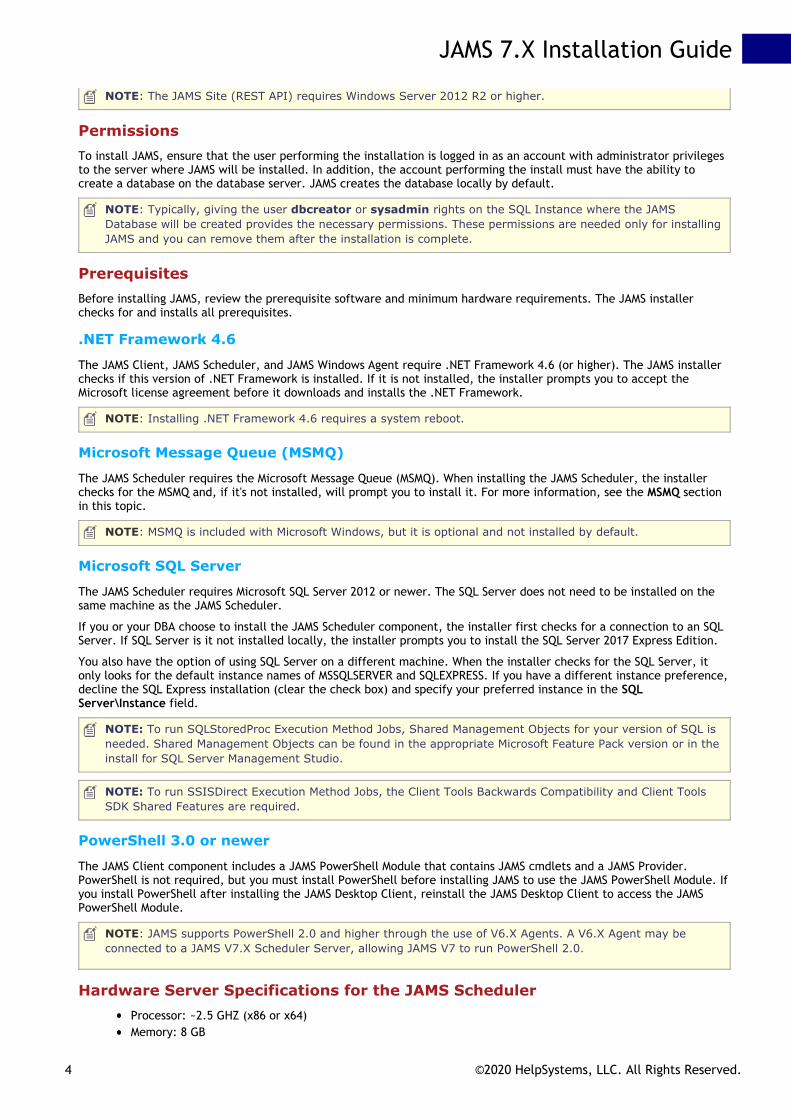
NOTE: The JAMS Site (REST API) requires Windows Server 2012 R2 or higher.
PermissionsTo install JAMS, ensure that the user performing the installation is logged in as an account with administrator privilegesto the server where JAMS will be installed. In addition, the account performing the install must have the ability tocreate a database on the database server. JAMS creates the database locally by default.
NOTE: Typically, giving the user dbcreator or sysadmin rights on the SQL Instance where the JAMSDatabase will be created provides the necessary permissions. These permissions are needed only for installingJAMS and you can remove them after the installation is complete.
PrerequisitesBefore installing JAMS, review the prerequisite software and minimum hardware requirements. The JAMS installerchecks for and installs all prerequisites.
.NET Framework 4.6
The JAMS Client, JAMS Scheduler, and JAMS Windows Agent require .NET Framework 4.6 (or higher). The JAMS installerchecks if this version of .NET Framework is installed. If it is not installed, the installer prompts you to accept theMicrosoft license agreement before it downloads and installs the .NET Framework.
NOTE: Installing .NET Framework 4.6 requires a system reboot.
Microsoft Message Queue (MSMQ)
The JAMS Scheduler requires the Microsoft Message Queue (MSMQ). When installing the JAMS Scheduler, the installerchecks for the MSMQ and, if it's not installed, will prompt you to install it. For more information, see the MSMQ sectionin this topic.
NOTE: MSMQ is included with Microsoft Windows, but it is optional and not installed by default.
Microsoft SQL Server
The JAMS Scheduler requires Microsoft SQL Server 2012 or newer. The SQL Server does not need to be installed on thesame machine as the JAMS Scheduler.
If you or your DBA choose to install the JAMS Scheduler component, the installer first checks for a connection to an SQLServer. If SQL Server is it not installed locally, the installer prompts you to install the SQL Server 2017 Express Edition.
You also have the option of using SQL Server on a different machine. When the installer checks for the SQL Server, itonly looks for the default instance names of MSSQLSERVER and SQLEXPRESS. If you have a different instance preference,decline the SQL Express installation (clear the check box) and specify your preferred instance in the SQLServer\Instance field.
NOTE: To run SQLStoredProc Execution Method Jobs, Shared Management Objects for your version of SQL isneeded. Shared Management Objects can be found in the appropriate Microsoft Feature Pack version or in theinstall for SQL Server Management Studio.
NOTE: To run SSISDirect Execution Method Jobs, the Client Tools Backwards Compatibility and Client ToolsSDK Shared Features are required.
PowerShell 3.0 or newer
The JAMS Client component includes a JAMS PowerShell Module that contains JAMS cmdlets and a JAMS Provider.PowerShell is not required, but you must install PowerShell before installing JAMS to use the JAMS PowerShell Module. Ifyou install PowerShell after installing the JAMS Desktop Client, reinstall the JAMS Desktop Client to access the JAMSPowerShell Module.
NOTE: JAMS supports PowerShell 2.0 and higher through the use of V6.X Agents. A V6.X Agent may beconnected to a JAMS V7.X Scheduler Server, allowing JAMS V7 to run PowerShell 2.0.
Hardware Server Specifications for the JAMS SchedulerProcessor: ~2.5 GHZ (x86 or x64)Memory: 8 GB
JAMS 7.X Installation Guide
4 ©2020 HelpSystems, LLC. All Rights Reserved.

Disk Space: 10 GB, in addition to the disk space required by the OS.
These are the minimum system requirements that can support running thousands of jobs per day. Heavy loads, forexample, over 100,000 jobs per day, require more resources.
For database planning, the JAMS test lab runs approximately 1,000 jobs per day using one instance of JAMS. Retaining 30days of information generates a database approximately 110 Mb in size.
For Sites Running Over 100,000 Jobs per Day
Based on customer implementations where more than 100,000 jobs are executed each day, the JAMS installation shouldinclude:
Two Windows servers, each with Dual Quad 2.0 GHz CPUs and 32 GB of RAM (or more).Specifically, one of the above servers hosting the JAMS Scheduler and the second server reserved for the SQLServer with multiple high-speed SCSI drives.
Hardware Server Specs for JAMS AgentsProcessor: 1 GHZ (x86 or x64)Memory: 1 GBDisk Space: 75 MB
Hardware Server Specs for the JAMS ClientProcessor: 1 GHZ (x86 or x64)Memory: 1 GBDisk Space: 300 MB
Supporting JAMS in a Virtual EnvironmentHelpSystems supports customers running JAMS on any supported operating system in a virtualized environment, such asVMware and HyperV.
Installing JAMSFollow the steps below to install JAMS on a Windows computer.
1. Log on to Windows using an account with administrator privileges and the ability to create the JAMS Database inSQL Server. (Typically, using an account with dbcreator or sysadmin rights in SQL Server provides the necessarypermissions.)
NOTE: Users must also be able to create a database on the database server. The default databaseserver is the local machine.
2. Right-click the SetupJAMS executable and select Run as Administrator to start the JAMS installer.3. On the Welcome page, verify this installation is the proper edition and version.4. Click Next.
JAMS 7.X Installation Guide
5 ©2020 HelpSystems, LLC. All Rights Reserved.
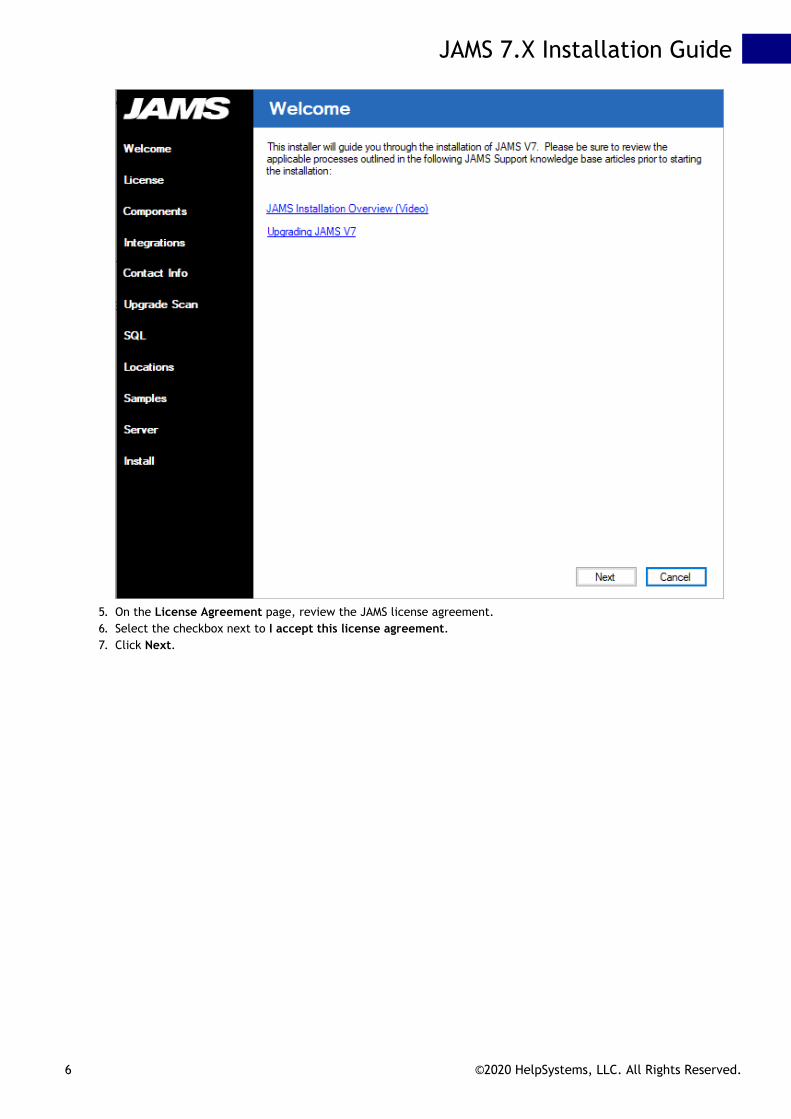
5. On the License Agreement page, review the JAMS license agreement.6. Select the checkbox next to I accept this license agreement.7. Click Next.
JAMS 7.X Installation Guide
6 ©2020 HelpSystems, LLC. All Rights Reserved.

8. On the Core Components page, select the JAMS Components to install. If this is a new installation where no JAMSScheduler exists, the JAMS Client and JAMS Scheduler should be installed.
9. Click Next.
JAMS 7.X Installation Guide
7 ©2020 HelpSystems, LLC. All Rights Reserved.

10. On the Message Queue (MSMQ) page, view the message regarding installing MSMQ.11. Click Next.
JAMS 7.X Installation Guide
8 ©2020 HelpSystems, LLC. All Rights Reserved.

12. On the Integration Packs page, select the packs to install, if needed. Note that Integration Packs are notrequired to install JAMS.
13. Click Next.
JAMS 7.X Installation Guide
9 ©2020 HelpSystems, LLC. All Rights Reserved.

14. On the Contact Information step, enter the information that will be used when working with the JAMS technicalteam.Completing this page is optional but entering accurate information can help JAMS Support improve its supportcapabilities. If you are unsure about the information, leave it blank and enter it at a later date.
15. Click Next.
NOTE: The installer includes an Upgrade Scan page to review the installation prior to upgrading from aprevious version of JAMS. For a new installation of JAMS, the installer skips this step and displays theSQL page.
JAMS 7.X Installation Guide
10 ©2020 HelpSystems, LLC. All Rights Reserved.
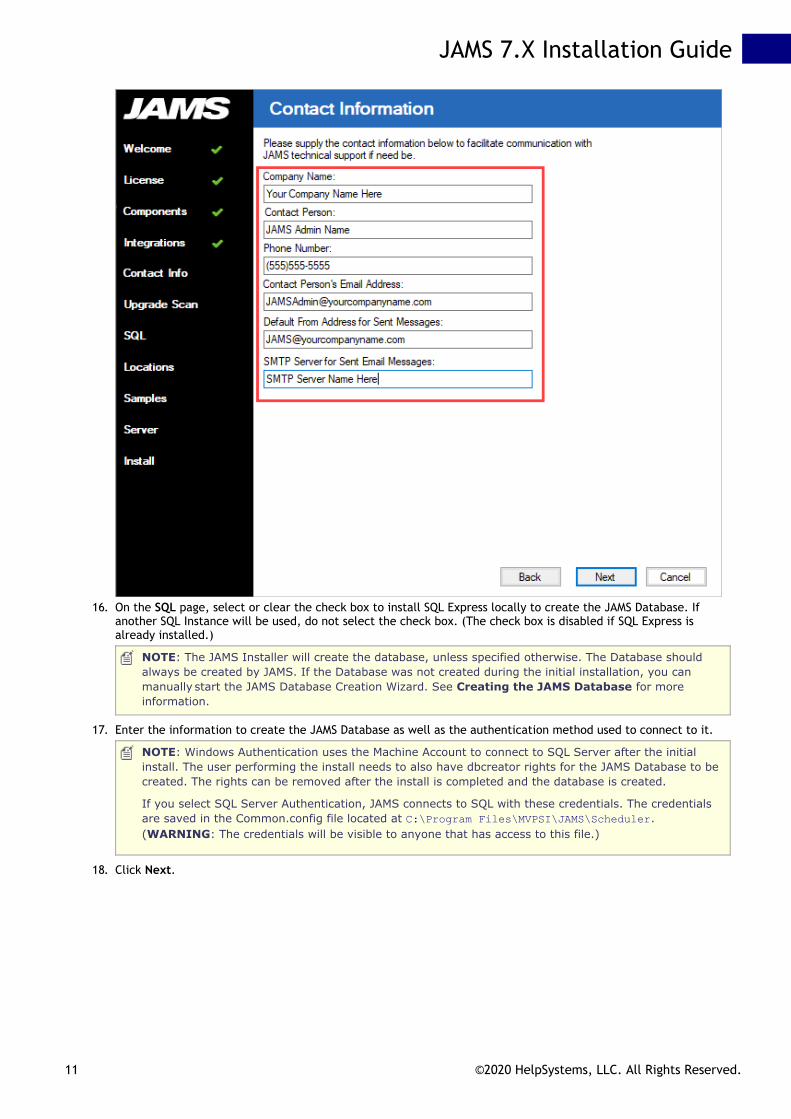
16. On the SQL page, select or clear the check box to install SQL Express locally to create the JAMS Database. Ifanother SQL Instance will be used, do not select the check box. (The check box is disabled if SQL Express isalready installed.)
NOTE: The JAMS Installer will create the database, unless specified otherwise. The Database shouldalways be created by JAMS. If the Database was not created during the initial installation, you canmanually start the JAMS Database Creation Wizard. See Creating the JAMS Database for moreinformation.
17. Enter the information to create the JAMS Database as well as the authentication method used to connect to it.
NOTE: Windows Authentication uses the Machine Account to connect to SQL Server after the initialinstall. The user performing the install needs to also have dbcreator rights for the JAMS Database to becreated. The rights can be removed after the install is completed and the database is created.
If you select SQL Server Authentication, JAMS connects to SQL with these credentials. The credentialsare saved in the Common.config file located at C:\Program Files\MVPSI\JAMS\Scheduler.(WARNING: The credentials will be visible to anyone that has access to this file.)
18. Click Next.
JAMS 7.X Installation Guide
11 ©2020 HelpSystems, LLC. All Rights Reserved.

NOTE: The JAMS Scheduler Service will not start until the JAMS Database is created.
NOTE: Users should NEVER attempt to manually create the JAMS Database.
19. On the Locations page, accept or change the target directory where JAMS will be installed. The location for theJAMS Database files is a location on the SQL Server. If you change the location, verify the new location exists.
20. Click Next.
JAMS 7.X Installation Guide
12 ©2020 HelpSystems, LLC. All Rights Reserved.

21. On the JAMS Sample Jobs page, select or clear the check box to install sample jobs.22. If you select to install the sample jobs, define a JAMS user to run the sample jobs.
NOTE: To run jobs in JAMS, an Execute As user must be specified.
23. Click Next.
JAMS 7.X Installation Guide
13 ©2020 HelpSystems, LLC. All Rights Reserved.

24. On the Web Client Details page, select where the JAMS Web Client should be installed. (This page is displayedonly if the JAMS Web Client was selected on the Core Components page.)
25. Click Next. The installation begins.
JAMS 7.X Installation Guide
14 ©2020 HelpSystems, LLC. All Rights Reserved.

26. View the progress of the installation. You may also see a progress bar displaying the SQL Express installation, ifyou selected to install it in a previous step.
JAMS 7.X Installation Guide
15 ©2020 HelpSystems, LLC. All Rights Reserved.
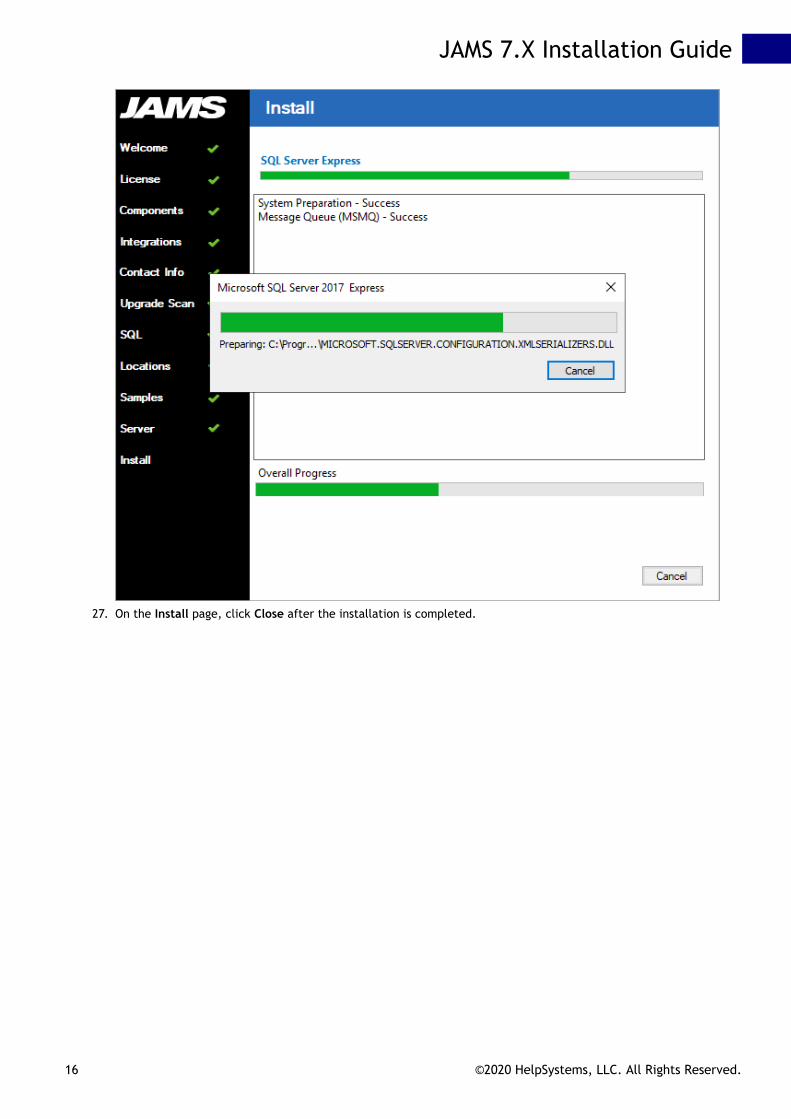
27. On the Install page, click Close after the installation is completed.
JAMS 7.X Installation Guide
16 ©2020 HelpSystems, LLC. All Rights Reserved.

Applying the JAMS License JAMS licenses are sent out as XML files. To apply a JAMS license, copy the license key file(s) into the C:\ProgramFiles\MVPSI\JAMS\Scheduler directory. No other actions should be necessary.
If a license is properly placed in the C:\Program Files\MVPSI\JAMS\Scheduler directory and it is not recognized, thelicense file may be blocked by the File Blocking feature in Windows. To check the status and unblock files:
1. Right-click the license file and select Properties.2. In the Properties dialog, ensure the General tab is selected.3. Check the lower right corner to see if an Unblock button is displayed. If it is displayed, the file is
blocked. Otherwise, the file is not blocked.4. Click Unblock.5. Click OK or Apply to save the changes.
If the license file is not recognized and is not blocked, restart the JAMS Scheduler Service:
1. Close the JAMS Client.2. Open Windows Services on the JAMS Server.3. Restart the JAMS Scheduler Service.4. Open the JAMS Client. The license should be recognized. If problems persist, contact Support.
For more information about the JAMS license, see Licenses in JAMS.
Creating the JAMS Database (If Not Selected During Install)The JAMS Installer will create the JAMS Database, unless you specify otherwise. The Database should always be createdby JAMS. If it was not created during the initial installation, you can manually start the JAMS Database Creation Wizardto create the JAMS Database.
JAMS 7.X Installation Guide
17 ©2020 HelpSystems, LLC. All Rights Reserved.

NOTE: Installing JAMS without a database won’t affect the JAMS installation, but JAMS cannot functionwithout it. To reinstall the JAMS Database, start the wizard as described in the section below.
Starting the JAMS Database Creation WizardTo install the JAMS Database after JAMS has been installed, do the following:
1. Go to the JAMS Scheduler default directory (C:\Program Files\MVPSI\JAMS\Scheduler).2. Right-click JAMSDBA.exe and select Run as administrator.3. If the Common.config file exists in C:\Program Files\MVPSI\JAMS\Scheduler, delete it.4. In the JAMSDBA> prompt, enter Install and press Enter.5. Follow the prompts in the wizard to create the database.
Installing the JAMS Web Client/REST API (If Not Selected During Install)If the JAMS Web Client was not installed during the initial installation of JAMS, you can install it by following the stepsbelow. By default, it will be installed on the JAMS Server, but the JAMS Web Client can be installed on any Windows IISServer.
PrerequisitesJAMS V7.0 or higherWindows Server 2012 R2 or higher.NET Framework 4.6 or higherIIS 8 or higherEdge, Chrome, or Firefox for the best experience
Installing IISThe installer attempt to enable the roles and features shown below within JAMS if the user performing the install hasadministrator rights. When installing roles and features, it may be necessary to supply a path to the Windows Sourcefiles (SxS). If this is true, manually install the roles and features shown below before installing the JAMS Web Client.
1. Enable the Web Server IIS Role.
JAMS 7.X Installation Guide
18 ©2020 HelpSystems, LLC. All Rights Reserved.

2. Ensure the components listed below are enabled.
Installing the JAMS Web Client1. Run the JAMS installer.2. Follow the prompts until you see the Core Components page.3. On the Core Components page, ensure the JAMS Web Client component is selected.
Caution: If you install the JAMS Web Client on a server where the JAMS Scheduler has already beeninstalled, do not clear any Components that are already selected. This will uninstall those Components.
If you install the JAMS Web Client on a server where the JAMS Scheduler is not installed, select only theJAMS Web Client Component.
4. Click Next.
JAMS 7.X Installation Guide
19 ©2020 HelpSystems, LLC. All Rights Reserved.

5. Follow the prompts until you see the Web Client Details page.6. On the Web Client Details page, select the web site where the JAMS Web Client should be installed. Default Web
Site is the default.7. Click Next.
JAMS 7.X Installation Guide
20 ©2020 HelpSystems, LLC. All Rights Reserved.
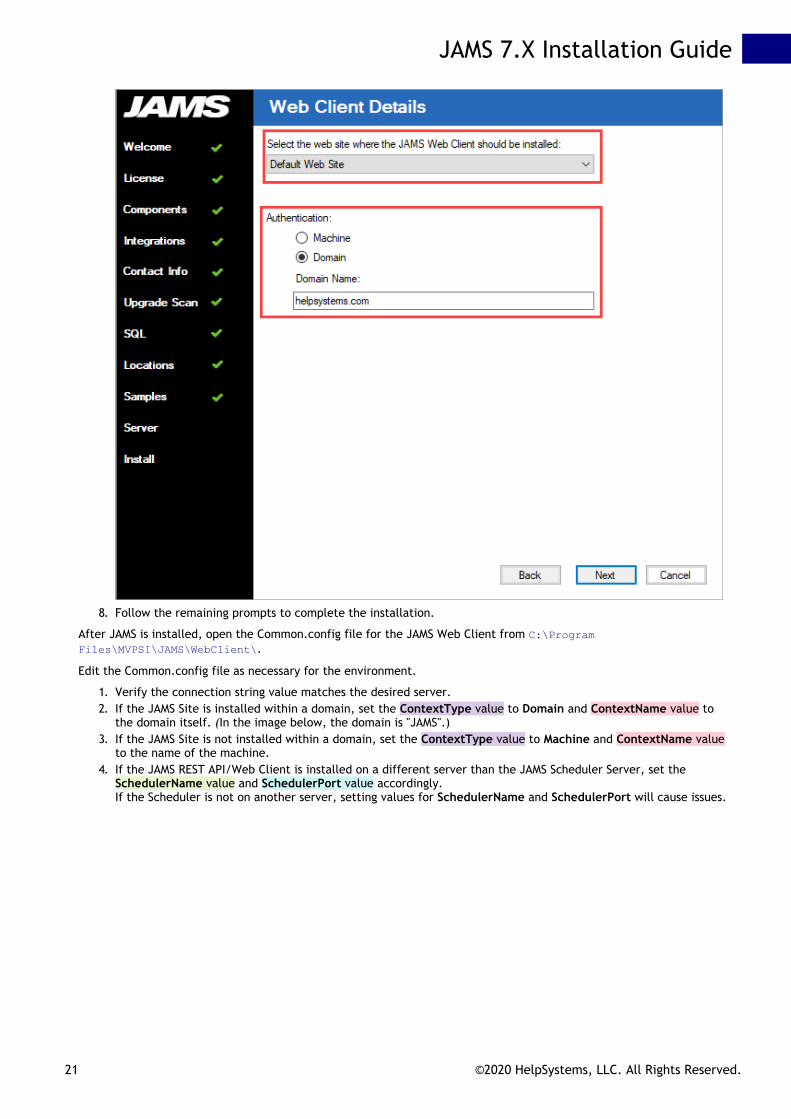
8. Follow the remaining prompts to complete the installation.
After JAMS is installed, open the Common.config file for the JAMS Web Client from C:\ProgramFiles\MVPSI\JAMS\WebClient\.
Edit the Common.config file as necessary for the environment.
1. Verify the connection string value matches the desired server.2. If the JAMS Site is installed within a domain, set the ContextType value to Domain and ContextName value to
the domain itself. (In the image below, the domain is "JAMS".)3. If the JAMS Site is not installed within a domain, set the ContextType value to Machine and ContextName value
to the name of the machine.4. If the JAMS REST API/Web Client is installed on a different server than the JAMS Scheduler Server, set the
SchedulerName value and SchedulerPort value accordingly.If the Scheduler is not on another server, setting values for SchedulerName and SchedulerPort will cause issues.
JAMS 7.X Installation Guide
21 ©2020 HelpSystems, LLC. All Rights Reserved.
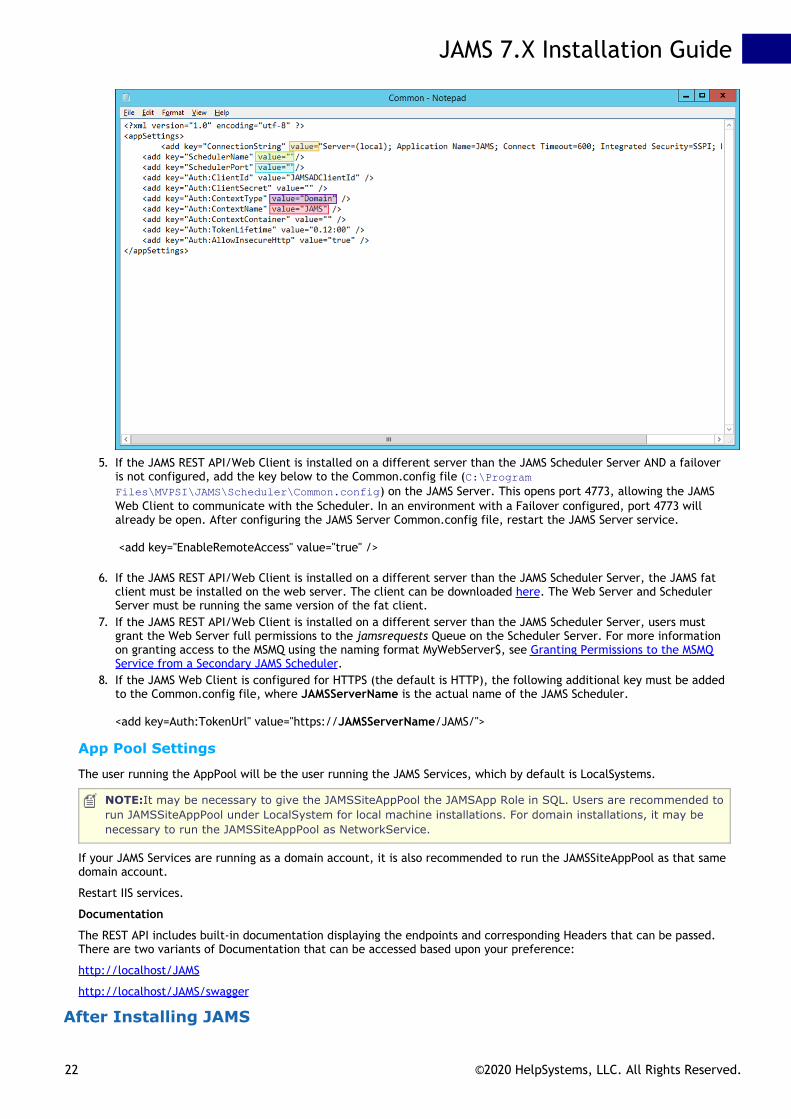
5. If the JAMS REST API/Web Client is installed on a different server than the JAMS Scheduler Server AND a failoveris not configured, add the key below to the Common.config file (C:\ProgramFiles\MVPSI\JAMS\Scheduler\Common.config) on the JAMS Server. This opens port 4773, allowing the JAMSWeb Client to communicate with the Scheduler. In an environment with a Failover configured, port 4773 willalready be open. After configuring the JAMS Server Common.config file, restart the JAMS Server service.
<add key="EnableRemoteAccess" value="true" />
6. If the JAMS REST API/Web Client is installed on a different server than the JAMS Scheduler Server, the JAMS fatclient must be installed on the web server. The client can be downloaded here. The Web Server and SchedulerServer must be running the same version of the fat client.
7. If the JAMS REST API/Web Client is installed on a different server than the JAMS Scheduler Server, users mustgrant the Web Server full permissions to the jamsrequests Queue on the Scheduler Server. For more informationon granting access to the MSMQ using the naming format MyWebServer$, see Granting Permissions to the MSMQService from a Secondary JAMS Scheduler.
8. If the JAMS Web Client is configured for HTTPS (the default is HTTP), the following additional key must be addedto the Common.config file, where JAMSServerName is the actual name of the JAMS Scheduler.
<add key=Auth:TokenUrl" value="https://JAMSServerName/JAMS/">
App Pool Settings
The user running the AppPool will be the user running the JAMS Services, which by default is LocalSystems.
NOTE:It may be necessary to give the JAMSSiteAppPool the JAMSApp Role in SQL. Users are recommended torun JAMSSiteAppPool under LocalSystem for local machine installations. For domain installations, it may benecessary to run the JAMSSiteAppPool as NetworkService.
If your JAMS Services are running as a domain account, it is also recommended to run the JAMSSiteAppPool as that samedomain account.
Restart IIS services.
Documentation
The REST API includes built-in documentation displaying the endpoints and corresponding Headers that can be passed.There are two variants of Documentation that can be accessed based upon your preference:
http://localhost/JAMS
http://localhost/JAMS/swagger
After Installing JAMS
JAMS 7.X Installation Guide
22 ©2020 HelpSystems, LLC. All Rights Reserved.

Here are some additional details you may need to know to continue using or evaluating JAMS.
Access ControlBy default, NT AUTHORITY\Authenticated Users have full access to JAMS Objects in new installations. It is recommendedto set up JAMS Security as described in JAMS Security: Setting Access Control Lists (on-line documentation). However,to work with all JAMS functions, you must be part of the administrators group because administrators, by default, havefull access into JAMS.
NOTE: In JAMS V7.0.1367 and later, removing all ACEs on an object behaves the same as in Windows. Whenall ACEs are removed from an object, only the GrantAdministratorsByPass group have access to the object.Previously, removing all ACEs from an object would give all authenticated users access to that object.
The Server ACL controls who may connect to a specific server. The administrators group retains full access whileauthenticated users have limited access. When you open the JAMS Client, you will not be in the administrators group.To open the JAMS Client with administrator rights, right-click the JAMS Client icon in the Windows Start menu andselect Run as administrator. This gives you permissions to adjust the ACLs for other users.
Setting an Execute As UserFor security purposes, JAMS will not run Jobs without an Execute As user defined. An Execute As user may be defined atthe Job or Folder level. To allow all Jobs in the environment to run, users may set an Execute As user on the root folder.
To add the Execute As user:
1. Go to the Properties tab of the Job or Folder definition.2. Click Add Property.3. Select Execute As from the property list. 4. Click OK.
With the Execute As property added, users are able to select a JAMS Credential from the drop-down list. To create aCredential in JAMS, see JAMS Security: Working with User Credential Definitions (on-line documentation) for moreinformation.
NOTE: JAMS Properties that are disabled must be added to the object before their value can be defined. Toadd a Property to a Folder or Job Definition, see Working with Jobs (on-line documentation).
Adding a Server DefinitionIf you are running the JAMS Client on the same machine as the JAMS Scheduler, the JAMS Client can automaticallylocate the Scheduler. However, if the Scheduler is running on a different machine, you must include a server definitionto tell the JAMS Client where to find the Scheduler.
To add a Server definition, click on Client Settings in the upper right corner of the JAMS Client and select Servers toopen the JAMS Servers dialog.
NOTE: You can have many servers defined within the JAMS Client.
JAMS 7.X Installation Guide
23 ©2020 HelpSystems, LLC. All Rights Reserved.

Installing JAMS Integration PacksJAMS natively supports automation using many leading business applications. “Integration Packs” for these preferredapplications are selected using a check box during the JAMS installation process. Once an Integration Pack for a productis enabled, you can create, manage, deploy and monitor almost any kind of JAMS Job using the following products:
SAP Integration PackSAP Data Services Integration PackInformatica Cloud Integration PackJ.D. Edwards Integration PackDynamics AX Integration PackNetezza Integration PackOracle EBS Integration PackPeopleSoft Integration PackSymitar Integration PackBanner Integration PackMicroFocus Integration PackNeoBatch Integration Pack
When installing JAMS, select the Product Integration Pack you want to include. If you have already installed JAMSwithout the necessary Integration Pack, re-run the JAMS installer, and select the Integration Packs to install.
NOTE: In JAMS upgrades, clearing the component check boxes will uninstall those components.
The JAMSDBA UtilityThe JAMSDBA.exe utility is used to manage the JAMS Database and to perform other installation and management tasks.JAMSDBA is a command line utility located in the Scheduler installation directory (C:\ProgramFiles\MVPSI\JAMS\Scheduler by default).
When starting the JAMSDBA, you will see a JAMSDBA> prompt. You can enter the command you want to execute or enterHELP to access online help. You can also start JAMSDBA with a command appending the command you want to execute;for example:
JAMSDBA UPDATE/LOG
Microsoft Messaging Queueing (MSMQ)JAMS uses Microsoft Message Queue (MSMQ) to reliably pass messages between the JAMS Services. It does this bycreating a private queue named JAMSRequests. MSMQ is included with Windows, but it is not installed by default. IfMSMQ is not installed before installing JAMS, the JAMS installer will install MSMQ using the default minimum settings.
NOTE: If you want to control how MSMQ is installed, it is best to install MSMQ before installing JAMS.
To change the way that MSMQ is installed after installing JAMS:
1. Stop the JAMS Services.2. Reinstall MSMQ.
JAMS 7.X Installation Guide
24 ©2020 HelpSystems, LLC. All Rights Reserved.

3. Restart the JAMS Services.
Configuration SettingsJAMS contains a number of configuration settings that are listed below. You can change these settings using theConfiguration shortcut on the JAMS Menu.
Contact
Contact DescriptionCompany Name The company name to include in error reports.
Contact Name The person in your organization responsible for JAMS deployment.
Contact Phone The responsible person’s phone number.
Contact Email The responsible person’s email address.
Automatically Report Exceptions When set to true, failures of the JAMSServices will be automatically sent toJAMS technical support.
E-Mail DescriptionDefault Notify Email Address A comma separated list of e-mail addresses that will receive all notifications.
You can remove inherited addresses by prefixing the address with a minus (-)sign. You can remove all inherited addresses by entering -*.
From Address The from email address used when sending the e-mail from JAMS.
Maximum Log Size Log files that are larger than this value will not be attached to notification e-mails.
SMTPServer The name of the SMTP server used for JAMS. This must be configured to senderror reports to JAMS Support.
SMTP Retry Count The retry count used to resend SMTP emails if an attempt to send one isunsuccessful.
SMTP Retry Delay The time to wait to resend SMTP emails if an attempt to send one isunsuccessful.
System
Options DescriptionSchedule Examples Examples of natural language date specifications displayed in date editors.
Base URL The base URL for this JAMS Scheduler web site.
ACL Security Bypass DescriptionGrant Administrators Bypass Option to allow individuals in the Administrator group to bypass ACL security.
Grant Bypass Group Individuals listed in a specified group to bypass ACL security.
Encoding DescriptionDefault input Encoding The default input encoding for routine jobs.
Default Output Encoding The default output encoding for routine jobs.
File Locations DescriptionDefault Log Location* The default location for Job log files.
Common Log Location Used in a failover configuration to define a location that is common to bothservers.
Temporary File Location The location for temporary files.
History DescriptionHistory Lookback Period The number of days in the past to query history inside a detail dialog.
History Query Limit Maximum number of history records to return in a single query? (zero meansunlimited)
History Query Time Limit The maximum time to wait (in seconds) for a response to a history query.
JAMS 7.X Installation Guide
25 ©2020 HelpSystems, LLC. All Rights Reserved.
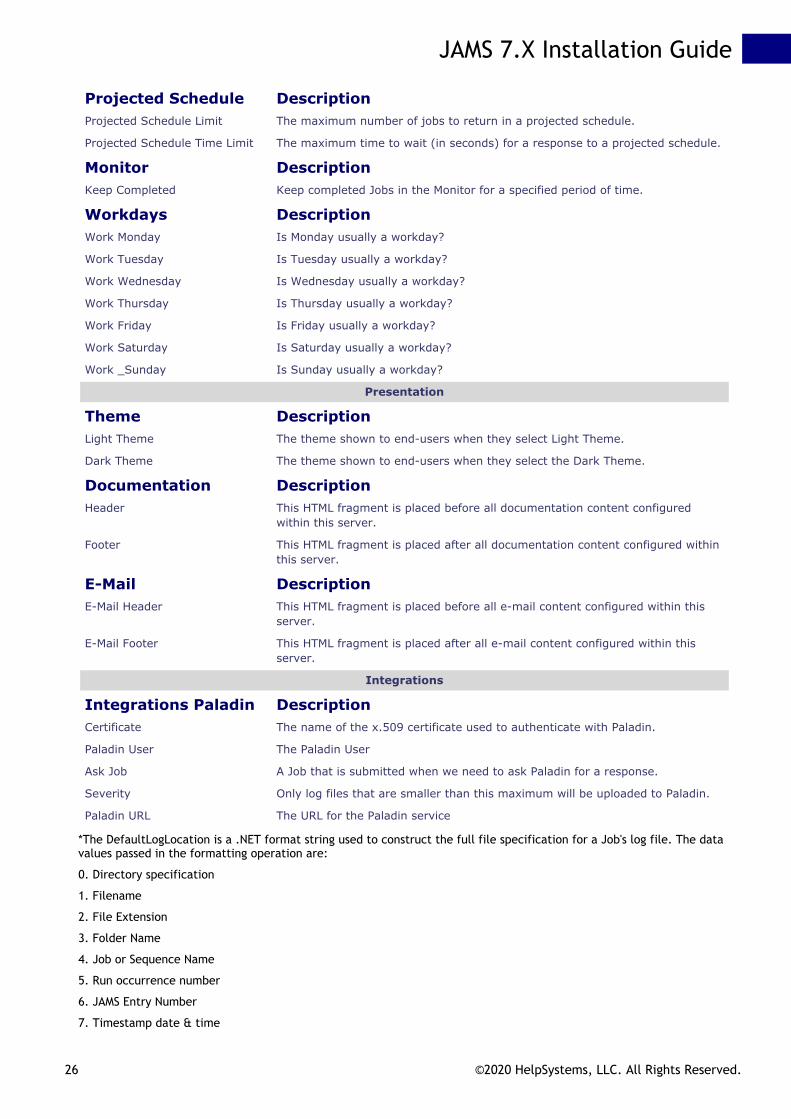
Projected Schedule DescriptionProjected Schedule Limit The maximum number of jobs to return in a projected schedule.
Projected Schedule Time Limit The maximum time to wait (in seconds) for a response to a projected schedule.
Monitor DescriptionKeep Completed Keep completed Jobs in the Monitor for a specified period of time.
Workdays DescriptionWork Monday Is Monday usually a workday?
Work Tuesday Is Tuesday usually a workday?
Work Wednesday Is Wednesday usually a workday?
Work Thursday Is Thursday usually a workday?
Work Friday Is Friday usually a workday?
Work Saturday Is Saturday usually a workday?
Work _Sunday Is Sunday usually a workday?
Presentation
Theme DescriptionLight Theme The theme shown to end-users when they select Light Theme.
Dark Theme The theme shown to end-users when they select the Dark Theme.
Documentation DescriptionHeader This HTML fragment is placed before all documentation content configured
within this server.
Footer This HTML fragment is placed after all documentation content configured withinthis server.
E-Mail DescriptionE-Mail Header This HTML fragment is placed before all e-mail content configured within this
server.
E-Mail Footer This HTML fragment is placed after all e-mail content configured within thisserver.
Integrations
Integrations Paladin DescriptionCertificate The name of the x.509 certificate used to authenticate with Paladin.
Paladin User The Paladin User
Ask Job A Job that is submitted when we need to ask Paladin for a response.
Severity Only log files that are smaller than this maximum will be uploaded to Paladin.
Paladin URL The URL for the Paladin service
*The DefaultLogLocation is a .NET format string used to construct the full file specification for a Job's log file. The datavalues passed in the formatting operation are:
0. Directory specification
1. Filename
2. File Extension
3. Folder Name
4. Job or Sequence Name
5. Run occurrence number
6. JAMS Entry Number
7. Timestamp date & time
JAMS 7.X Installation Guide
26 ©2020 HelpSystems, LLC. All Rights Reserved.

8. Timestamp year
9. Timestamp month
10. Timestamp day
11. Timestamp hour
12, Timestamp minute
13. Timestamp second
14. Timestamp millisecond
Working with JAMS ServicesJAMS Scheduler installation includes four Windows Services:
JAMS Scheduler ServicesJAMS Server ServiceJAMS Executor ServiceJAMS Agent Service
NOTE: Installing JAMS Agents on Windows also includes the JAMS Agent Windows Service.
JAMS Scheduler ServiceThe JAMS Scheduler Service is responsible for automatically scheduling jobs, firing triggers, and checking dependencies,etc. The JAMS Scheduler must include access to the JAMS Database or the service will fail. However, JAMS is designed tobe resilient. Job execution is handled by the JAMS Executor service, so if the JAMS Scheduler service fails, no jobexecution information is lost.
JAMS Server ServiceThe JAMS Server provides middle-tier services to all JAMS Client components (GUI, PowerShell, .NET Class Library, andWeb services). While the JAMS Server service is not involved in the execution of Jobs, many jobs can use the JAMSPowerShell client, which does utilize this service.
JAMS Executor and Agent ServicesThe JAMS Executor is responsible for executing and monitoring Jobs. This service does not access the JAMS Database.
The JAMS Agent service is an extension of the JAMS Executor service. When the JAMS Executor needs to execute a Jobon a different machine, it does so using the JAMS Agent running on that machine.
Troubleshooting JAMS ServicesEach JAMS Service generates a ServiceName.log, such as JAMSScheduler.log, in the installation directory. These logs arereset every Sunday with the previous weeks log files renamed to ServiceNameArchive.log, suchas JAMSSchedulerArchive.log. The default location is C:\Program Files\MVPSI\JAMS\Scheduler.
NOTE: JAMS Services writes any serious errors to the Windows Event log. When troubleshooting JAMS, alwayscheck the event log and the .log files.
If you suspect there are problems with JAMS, shutting down one of the three services may resolve your issues. The listbelow provides some guidelines from the least to most disruptive option.
Restart the JAMS Scheduler
While the JAMS Scheduler Service does the most work, restarting it is the least disruptive. Restarting the JAMSScheduler Service does not cause any Jobs failures and all job completion information remains intact. While the JAMSScheduler service is stopped, no new Jobs can enter into the Schedule.
Stop the JAMS Server Service
The JAMS Server service may be stopped without losing any job execution information. The JAMS Client will not functionwhile the JAMS Server service is shut down.
Shut down the JAMS Executor Service
Stopping the JAMS Executor service should be a last resort, as it will not typically resolve JAMS issues. This serviceexecutes and monitors Jobs. When this service is halted, completion information for any executing Jobs will be lost and
JAMS 7.X Installation Guide
27 ©2020 HelpSystems, LLC. All Rights Reserved.

some executing Jobs may fail. The JAMS Executor service does not access the JAMS database, so stopping this servicewon’t be necessary during SQL service maintenance.
Service AccountsBy default, JAMS Services are set to run under the LocalSystem account, but this can be modified to run on a WindowsDomain based account. See Change the Account Running JAMS for more information.
In general, it is recommended that you leave the JAMS Executor and JAMS Agent services running under LocalSystem.These services require access to the database or network and require the privileges associated with the LocalSystemaccount.
Use the Service Control application to change the account for the JAMS Scheduler and JAMS Server services in order tocontrol network and database access.
When modifying the account, you may need to adjust the security settings on:
C:\Program Files\MVPSI\JAMS\Scheduler folderC:\Program Files\MVPSI\JAMS\Scheduler\JAMSScheduler.log
MSMQ JAMSRequests private queueJAMS Database
You need to modify the security on the MSMQ JAMSRequests private queue to grant the domain account full access tothe queue. This may require you to take ownership of the MSMQ queue.
The following local security policies should also be granted for the domain-based account:
Log on as a Batch jobLog on as a ServiceAdjust memory quotas for a processBypass traverse checkingReplace a process level token
If the domain-based user account is not in the administrators group, create an Active Directory Group, add the user tothe group, and make the following changes in the Common.config file located at: ProgramFiles\MVPSI\JAMS\Scheduler<directory>
<add key=AuthorizedGroup" value="domain\YourGroup"/>
Managing the JAMS DatabaseThe JAMS Database provides critical features to the JAMS Scheduler and stores JAMS definitions. The following sectioncontains information on managing the JAMS SQL database back end.
Manually Creating the JAMS DatabaseTypically, the JAMS Database is created with the JAMS Scheduler during the installation process. However, in somecases, when installing the JAMS Scheduler you may prefer not to create the JAMS Database. See Creating the JAMSDatabase for more information.
NOTE: The JAMS Database should always be created using the JAMS Installer or JAMSDBA utility. Manuallycreating the JAMS Database outside of these tools will cause various issues in JAMS.
SecurityJAMS supports either Windows Integrated Authentication or SQL Server Authentication. This can be modified afterinstallation by changing the connection string found in the Common.config file. The default installation requires theJAMS Services to be running under the LocalSystem account. To facilitate this, the installation executes the followingSQL commands:
exec sp_grantlogin @loginame='BUILTIN\Administrators' exec sp_grantdbaccess @loginame='BUILTIN\Administrators', @name_in_db='JAMSService' exec sp_addrolemember @rolename='JAMSApp', @membername='JAMSService'
The effect of using Windows Integrated authentication is that anyone in the administrators group can map theJAMSService Database user and become a part of the JAMSApp Database role.
NOTE: You can modify the security to fit your needs, but the JAMS Services must be included in the JAMSAppDatabase role.
Backing up the JAMS Database
JAMS 7.X Installation Guide
28 ©2020 HelpSystems, LLC. All Rights Reserved.

It is critical to back up the JAMS Database. Since the JAMS Database is a standard SQL Server database, simply add it toyour existing SQL Server backup procedures. You can also use the JAMS Job named JAMSBackup, located in the JAMSfolder, to back up the JAMS Database.
Choosing the Recovery Model
Before implementing a backup plan, select the recovery model to use with the JAMS database. The default installationuses the Simple Recovery Model. The other option is the Full Recovery Model. The main difference between the two is inthe amount of journaling performed by the database.
Simple Recovery Model
The Simple Recovery Model is the easiest to use. You periodically backup the JAMS database only, not the journal file.The downside to this model is a lack of recovery options. If the JAMS Database becomes corrupted, you can recover itfrom a backup but all database changes since the last backup will be lost. This includes job execution history, so Jobdependencies may not work as expected.
Full Recovery Model
This model contains more robust recovery features. However, the disadvantage of this model is that you must managethe journal file for the JAMS Database. Each time a change is made to the JAMS Database it is also written to the journalfile.
For example, if a hardware failure occurs or you have otherwise corrupted the JAMS Database, you can restore a backupand then recover it using the journal files up to a specific point in time.
Restoring the JAMS Database from a BackupRestoring a JAMS Database from a backup requires a standard SQL Server restore operation, but there are some detailsto consider before attempting the restoration process.
The JAMS Database includes the current schedule. Often, you may not want the current schedule to be restored. Forexample, if the database was backed up on Monday and you restore it on Friday, you probably don’t want to startrunning Monday’s Jobs along with the rest of the week’s processing.
You can use JAMSDBA.exe to reset the Schedule.
CD C:\Program Files\MVPSI\JAMS\Scheduler" JAMSDBA RESET SCHEDULE
CD C:\Program Files\MVPSI\JAMS\Scheduler" JAMSDBA UPDATE/LOG
Moving or Restoring the JAMS SQL DatabaseThe process for moving the SQL database used by JAMS does not require reinstalling JAMS.
1. Ensure there are no Jobs currently running or are scheduled to run in the near future. You can manually put allJobs on hold by using the Monitor view or by using a Maintenance Resource as described in the Creating aMaintenance Window article. When restoring the Database and activating the JAMS Server, you may not wantjobs to run at that time.
2. Use the JAMSBackup Job in the JAMS folder to back up the SQL database and restore to the target server.3. Edit the connection string property of the Common.config file located at C:\Program
Files\MVPSI\JAMS\Scheduler\ by default.4. Update the server location and the database name, if the name of the database is being changed.5. Update the permissions to the JAMS Scheduler Server to connect to the restored JAMS Database.6. Replace YourDomain\YourMachineName with your own name in both lines of the query:
exec_sp_grantlogin @loginame='YourDomain\YourMachineName$'exec_spgrantdbaccess @loginame='YourDomain\YourMachineName$', @name_in_db='JAMSMachine2'exec_sp_addrolemember @rolename='JAMSApp', @membername='JAMSMachine2'
NOTE: If you have a failover server, change the JAMSMachine2 to JAMSMachine1 in the query andrun the query again. You need to truncate the Failover table of the JAMS Database regardless of thefailover configuration.
7. Restart the JAMS Scheduler Service from the Windows Control Panel.8. If you are running JAMS V6.4X or older, run JAMS_DB_ERRORs.sql, located in the JAMS Scheduler directory, on the
master database within the same SQL instance where the JAMS Database resides.
NOTE: Moving a SQL/JAMS database does not require reinstalling JAMS.
JAMS 7.X Installation Guide
29 ©2020 HelpSystems, LLC. All Rights Reserved.

The Common.config file contains the connection string used by JAMS services to link to the SQL database. Below are twoexamples of connection strings: one for Windows Authentication and another for SQL Authentication.
Windows Authentication
<?xml version="1.0" encoding="utf-8" ?><appSettings><add key="ConnectionString" value="Server=SQLA\INST1; Failover Partner=SQLB\INST1; Database=JAMS; ApplicationName=JAMS; Connect Timeout=600; Integrated Security=SSPI"/></appSettings>
SQL Account Authentication
<?xml version="1.0" encoding="utf-8" ?><appSettings><add key="ConnectionString" value="Server=SQLA\INST1; Failover Partner=SQLB\INST1; Database=JAMS; ApplicationName=JAMS; Connect Timeout=600;Trusted_Connection=False;uid=YOURSQLACCOUNT;pwd=YOURPASSWORD" /></appSettings>
SettingsPath for the JAMS ClientJAMS can override all saved client settings at any installed locations. This can be useful when you want multiple JAMSClients to default to the same shortcuts and themes. It also simplifies how new layouts and shortcuts changes can bestandardized across-the-network with only one location needed as a template.
Configure the SettingsPath for each JAMS Client by modifying the user.config file as described below:
1. Open the configuration file that is by default located at: C:\Program Files\MVPSI\JAMS\Client\User.config2. Add a new entry within the <appSettings> tags called “CommonSettingsPath” with a value of the location where
you want to save the client settings. For example:
<appSettings file="User.config"><add key="ClientSettingsProvider.ServiceUri" value="" /><add key="CommonSettingsPath" value="\\AppServer\ClientSettings\" /></appSettings>
3. Optionally, if you want the JAMS Client to save changes back to this common location simply add an entry forWriteToCommonSettings with a value of “true”. By default, any new changes will be saved to the user-specificlocation.
add key="WriteToCommonSettings" value="true" />
4. Copy the desired client settings into the new common location. By default, JAMS stores the client settings byversion number for each user and stores it in the .XML files found in:
%HOMEPATH%\Local Settings\Application Data\MVP Systems, Inc\JAMS\X.X.X.
You can replicate settings from one client to the next by copying these flat files.
Two critical files in this group include: Servers.xml and JAMSPage.xml. The former stores the JAMSServer definitions and the latter defines shortcut settings on the JAMS page. In most cases, these arethe only files that are required, with other files controlling more user specific setting such as columnsand column widths.
JAMS 7.X Installation Guide
30 ©2020 HelpSystems, LLC. All Rights Reserved.

Or you can copy the entire folder to the new location. These files contain the current client settings,but make sure you select the folder that corresponds to the current installed version of JAMS.JAMS will attempt to load files from the common location that it does not find in the user-specificlocation. To force an existing JAMS Client to load from the common location, you need to delete theuser-specific settings.
These user settings can be helpful if you want to have varying client layouts for different user groups suchas administrators, developers, and users. For example, you could set up three directories that contain theappropriate settings for each group. After configuring the Client config file for the members of thesegroups, you could then manage the settings independently.
If the WriteToCommonSettings option is “true” for multiple JAMS Clients, they can overwrite thecommon settings.JAMS will only load from the common location if it doesn’t find the files in the user-specificlocation.You can prevent users from making changes to the server definitions by adding:
<add Key="LockServer" value="true" />
Prevent users from changing shortcuts by adding:
<add Key="LockShortcutbar" value="true" />
When Configuration files exist in the Common location and the user's local settings, ensure theClient loads Configuration files from the Common location by adding:
<add Key=" PrioritizeCommonSettings" value="true" />
The following is a sample of a Configuration file using PrioritizeCommonSettings:
<?xml version="1.0" encoding="utf-8" ?><appSettings> <add key="PrioritizeCommonSettings" value="True" /> <add key="CommonSettingsPath" value="\\az-win019-test\share\ClientSettings" /> <add key="LockShortcutBar" value="False" /> <add key="LockServer" value="False" /> <add key="LockQuery" value="False" /> <add key="LockUsername" value="False" /> <add key="PromptForSearchKeys" value="False" /> <add key="DefaultServer" value="" /> <add key="DefaultPort" value="773" /></appSettings>
Managing Encryption KeysJAMS encrypts password and private key information when it is stored in the database. The standard JAMS installationuses a predefined encryption key, which is adequate for many sites. For additional protection you can generate a uniqueencryption key but must ensure that it is properly backed up and secured.
When generating a unique encryption key, JAMS uses Advanced Encryption Standard (AES) to re-encrypt all password andprivate key information within the database. The generated key is then encrypted and stored using the Windows DataProtection API (DPAPI). The protected key is then linked to user account associated with the JAMS Server and Schedulerservices.
To manage encryption keys, use the JAMSDBA Utility as described below:
1. Go to C:\Program Files\MVPSI\JAMS\Scheduler.2. Right-click JAMSDBA and select Run as administrator.3. Run the following commands:
GENERATE KEY - Generates a new 256-bit encryption key, decrypts the password with the old key then encrypts it withthe new key. The new encryption key is then stored using DPAPI.
JAMS 7.X Installation Guide
31 ©2020 HelpSystems, LLC. All Rights Reserved.

EXPORT KEY - Pulls the encryption key from DPAPI and writes it to a text file.
Caution: It is critical that you protect the EXPORT file because this key is not encrypted.
IMPORT KEY – This is similar to the GENERATE KEY. In this case the new key is pulled from a text file instead of beinggenerated. If recovering from backup or configuring the secondary server in a failover configuration, you should use the/NOENCRYPT qualifier to skip the decryption and re-encryption of the current data.
For additional information on protecting/restoring a JAMS Server as well as working in failover environments, go to thecomplete topic: JAMS Security: Managing Encryption Keys (on-line documentation).
Protecting a Standalone JAMS ServerTo protect a standalone JAMS Server, follow the steps below:
1. Log on to the server as a user with Execute access to the JAMS configuration settings. (Users in the JAMSAdministrator Group bypass security in JAMS and have all of the needed permissions.)
2. Go to your default directory to the JAMS Scheduler installation directory. The default is: C:\ProgramFiles\MVPSI\JAMS\Scheduler.
3. Right-click JAMSDBA.EXE and select Run as administrator to open a JAMSDBA> prompt.4. Enter GENERATE KEY and press Enter.5. Enter EXPORT KEY YourFileName.txt and press Enter.6. Enter EXIT and press Enter.7. Then move the exported text file to a safe location.
Restoring a Standalone JAMS ServerWhen restoring a backup of the JAMS Database to different server, the encrypted passwords cannot be decryptedbecause of the encryption key DPAPI protection associated with the original machine/user. To restore the encryptionkey from a backup, follow these steps:
1. Log on to the server as a user with Execute access to JAMS configuration settings. (Users in the JAMSAdministrator Group bypass security in JAMS and have all of the needed permissions.)
2. Go to the default directory to the JAMS Scheduler installation directory. The default is: C:\ProgramFiles\MVPSI\JAMS\Scheduler
3. Copy the exported text file (YourFileName.txt) from your safe location to the current directory.4. Right-click JAMSDBA.EXE and select Run as administrator to open a JAMSDBA> prompt.5. Enter IMPORT KEY/NOENCRYPT and press Enter.6. Enter EXIT and press Enter.
Failover EnvironmentsTo protect the servers in a failover environment, follow the steps below:
1. Ensure your primary JAMS Server is running.2. Log on to the primary server as a user with Execute access to the JAMS configuration settings. (Users in the JAMS
Administrator Group bypass security in JAMS and have all of the needed permissions.)3. Go to the default directory to the JAMS Scheduler installation directory. The default is: C:\Program
Files\MVPSI\JAMS\Scheduler.
4. Right-click JAMSDBA.EXE and select Run as administrator to open a JAMSDBA> prompt.5. Enter GENERATE KEY and press Return.6. Enter EXPORT KEY YourFileName.txt and press Enter.7. Enter EXIT and press Return.8. Move the exported text file to a safe location.9. Log on to the secondary server as a user with Execute access to the JAMS configuration settings. (Users in the
JAMS Administrator Group bypass security in JAMS and have all of the needed permissions.)10. Go to the default directory to the JAMS Scheduler installation directory. The default is: C:\Program
Files\MVPSI\JAMS\Scheduler.
11. Copy the exported text file (YourFileName.txt) from your safe location to the current directory.12. Right-click JAMSDBA.EXE and select Run as administrator to open a JAMSDBA> prompt.13. Enter IMPORT KEY/NOENCRYPT and press Enter.14. Enter EXIT and press Enter.
High Availability
The Benefits of a JAMS Failover Scheduler
JAMS 7.X Installation Guide
32 ©2020 HelpSystems, LLC. All Rights Reserved.
Often, it is beneficial to ensure a secondary Failover environment has been configured for the JAMS installation. TheFailover ensures that there is a completely redundant instance of JAMS residing on a secondary server, often off site,relying on a heartbeat connection between the two.
By default, this heartbeat is set to a 60 second interval. If the Failover does not get a response from the Primary within3 consecutive beats, the Failover will take over as the Primary Scheduler, ensuring that the schedule continuesunharmed.
JAMS Failover Architecture
The JAMS Failover Architecture should consist of at least three servers:
JAMS Primary Scheduler ServerJAMS Failover Scheduler ServerJAMS Agent Server(s), where Jobs are run
If a failure occurs, the Failover Scheduler takes over for the Primary Scheduler, ensuring the schedule of Jobs remainsintact. If Jobs are executing locally on the Primary Scheduler Server, a failure would cause all Jobs executing on theScheduler server to fail. Running Jobs on JAMS Agent Servers insulates those Jobs from Primary Scheduler Server failure.To further insulate the executing JAMS Jobs from server failure, the JAMS Agent can be configured in a cluster.
Installing and Configuring the JAMS Failover
NOTE: An additional license needs to be purchased to install a Failover Server. Contact your Account Managerfor more details.
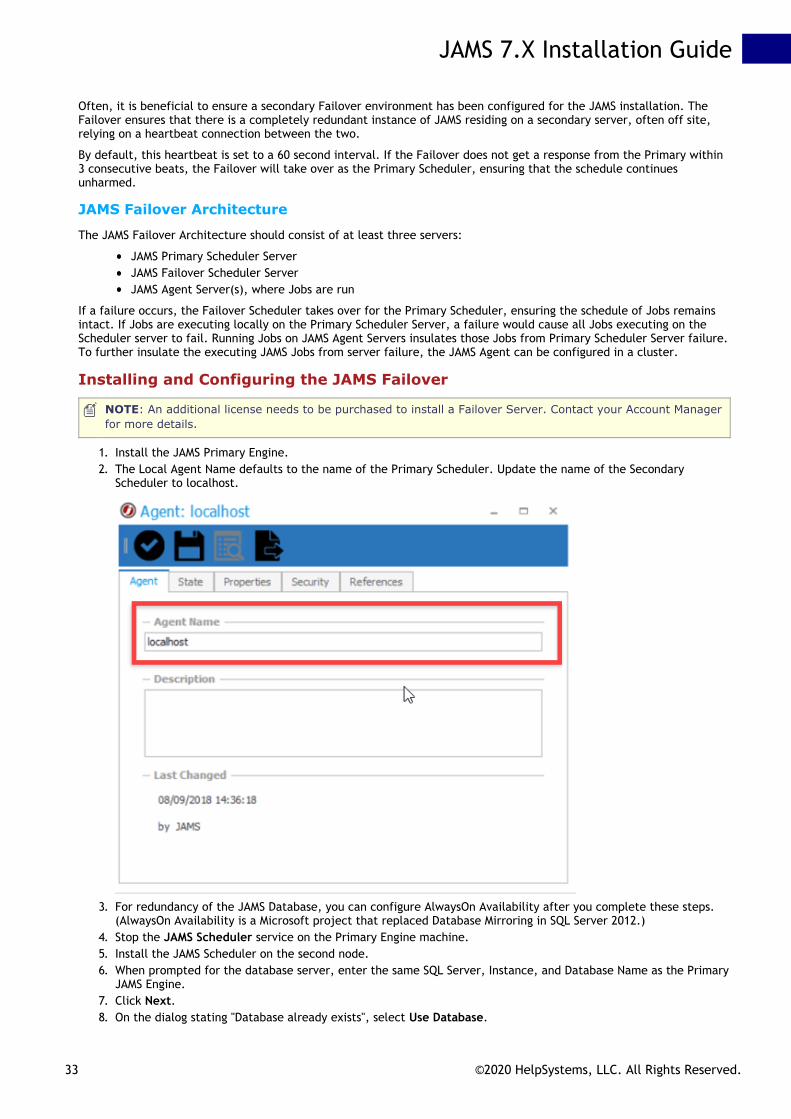
1. Install the JAMS Primary Engine.2. The Local Agent Name defaults to the name of the Primary Scheduler. Update the name of the Secondary
Scheduler to localhost.
3. For redundancy of the JAMS Database, you can configure AlwaysOn Availability after you complete these steps.(AlwaysOn Availability is a Microsoft project that replaced Database Mirroring in SQL Server 2012.)
4. Stop the JAMS Scheduler service on the Primary Engine machine.5. Install the JAMS Scheduler on the second node.6. When prompted for the database server, enter the same SQL Server, Instance, and Database Name as the Primary
JAMS Engine.7. Click Next.8. On the dialog stating "Database already exists", select Use Database.
JAMS 7.X Installation Guide
33 ©2020 HelpSystems, LLC. All Rights Reserved.
9. Stop the JAMS Scheduler service on the secondary server.10. Create and edit a Failover.config file in the C:\Program Files\MVPSI\JAMS\Scheduler\directory on the
Primary server. A sample Failover file is shown below.11. Start the JAMS Scheduler server the Primary machine.12. Start the JAMS Scheduler server on the Failover machine.13. If the Primary and Failover share a database, run the following SQL statements on the JAMS Database to add a
user to the JAMS Database to allow the Secondary engine to connect.
NOTE: Make sure to replace the login name with your machine name as shown below.
exec sp_grantlogin @loginame='YourDomain\YourMachineName$'exec sp_grantdbaccess @loginame='YourDomain\YourMachineName$', @name_in_db='JAMSMachine2'exec sp_addrolemember @rolename='JAMSApp', @membername='JAMSMachine2'
A Sample Failover config
<FailoverConfig><Primary>Server1</Primary><Secondary>Server2</Secondary><Port>4773</Port><Interval>60</Interval></FailoverConfig>
Common Log Output LocationTo have a common log output location on network share for both Primary and Secondary schedulers, see Setting acommon log output location for JAMS in a Failover Environment for more information.
After you configure the location for the common log, ensure the default log location exists on the Primary andSecondary schedulers.
Disaster Recovery Configuration
Recommended DR ModelThe JAMS Server and Agents should have DR equivalents, named differently than the production servers. This will ensurethe boxes are not seen on the network with the same name as their production equivalents.
JAMS 7.X Installation Guide
34 ©2020 HelpSystems, LLC. All Rights Reserved.

With the JAMS DR architecture set up as outlined above, the DR Process includes:
Restoring the Production JAMS database to the DR Server and running any necessary database SQL scriptsReplacing references to the JAMS Production nodes with DR equivalents
Disaster Recovery Process
Before Beginning the DR ProcessOn the DR Server, ensure the following are true:
The JAMS Services are disabled (Includes the JAMS Executor, JAMS Scheduler, and JAMS Server)Host files on the JAMS Server and Agent Nodes are pointing to the DR ServersCommon.config is pointing to the local SQL Server (located at C:\ProgramFiles\MVPSI\JAMS\Scheduler\Common.config by default)
1. Restore the SQL Database
Create a backup of the JAMS Production Database and then restore the JAMS Production Database in DR.
2. Truncate the Failover Table
Truncate the failover table on the DR Server.
JAMS 7.X Installation Guide
35 ©2020 HelpSystems, LLC. All Rights Reserved.

NOTE: The failover table details the GUID of the JAMS Server that is running against this database. This GUIDshould match the Installed GUID found in the Server Configuration file (located at C:\ProgramFiles\MVPSI\JAMS\Scheduler\Server.config by default).
3. Backup the Current Monitor View state
On the JAMS DR Server:
Start the JAMS Server Service.Within the JAMS DR Client, go to the Monitor View and take screenshots of the current Jobs within the MonitorView.Stop the JAMS Server service.
NOTE: The Failover table on the DR Server must be truncated before the JAMS Server is started. The JAMSServer will then automatically add the required entries to the table.
4. Update the JAMS Server Agents/Nodes to Point to the DR Servers
The JAMS Nodes must be updated to point to the DR Servers instead of Production Servers. In this example, allSequences and Jobs within JAMS refer to a JAMS Queue, rather than point to an Agent Node directly. With this Queueconfiguration, re-directing the Nodes will be a simple case of updating the Production Queues to point to the DR Nodes.
JAMS will not allow existing nodes to be deleted if any running or pending Jobs that point to those Queues/Nodes arewithin the Schedule/Monitor view. Therefore, in order to allow the nodes to be updated, all Jobs will need to becleared from the Monitor View using the Reset Schedule process detailed below.
5. Reset the JAMS Schedule
On the JAMS DR Server
Ensure the JAMS Scheduler Service is stopped. The JAMS Scheduler service should be stopped so the ResetSchedule command (explained later) does not re-schedule Jobs before the queue nodes have been updated.Run the JAMSDBA executable as an administrator.Enter RESET SCHEDULE and press Enter.
When JAMS starts up against a restored database, it checks to see if the Schedule is more than 48 hours old. If it is, itautomatically rebuilds the schedule from the current time. Otherwise, it will continue with the current schedule as-is.As the JAMS Database will likely be less than 48 hours old on DR, the 'Reset Schedule" process will have to be manuallyrun using the JAMSDBA utility.
Once the Scheduler Service starts, the Schedule will be built based on the current time. To rebuild the Schedule againsta different time, the /Restart switch can be specified.
6. Enable Access to the JAMS Client
Start the JAMS Server Service on the DR Server. To successfully connect to the Server from a JAMS Client, the JAMSServer service needs to be enabled and started. View the status of the JAMS Server at the bottom left corner of theJAMS client.
7. Update the JAMS Server Nodes
Ensure the JAMS Client is opening against the DR Server and that all Jobs have been cleared from the MonitorView.Run the Update Queues PowerShell script to update the JAMS Queues to point to DR Nodes.
NOTE: Because the JAMS Scheduler is still disabled, run the Update Queues script outside JAMS.
Ensure the Queues have been successfully re-pointed in the front end by viewing the Agents and Queue Nodes.
8. Start the JAMS Services
On the DR Server, manually start the JAMS Scheduler Service and the JAMS Executor Service. Starting the JAMSScheduler results in the Schedule being rebuilt within the Monitor view, as defined by the JAMSDBA utility.
NOTE: Sequences or Jobs that were scheduled before DR that were still pending when production went offlinemay need manual attention.
9. Run Test Processes
JAMS 7.X Installation Guide
36 ©2020 HelpSystems, LLC. All Rights Reserved.
On the DR Server, run a test process in JAMS to validate that the Scheduler is working as expected.
Licensing DRThe JAMS DR Server requires a unique JAMS License.
Agents will be consumed as follows:The JAMS License is on the JAMS Server and it will detail the number of available Agent licenses. When the JAMS Serveris restarted, the number of allocated Agent licenses is set to zero. As Jobs consume Agents, the allocated License countis incremented.
JAMS TCP/IP PortsJAMS uses the following TCP/IP Ports for both outgoing and incoming connections.
JAMSAgent.exe: The JAMS Agent listens on port 77 for requests to execute Jobs from other machines running JAMS.
JAMSServer.exe: The JAMS Server listens on port 773 for connection requests from JAMS Clients.
JAMSScheduler.exe: The JAMS Scheduler listens on port 2773 for connections from the JAMS Server and JAMSDebugger. This is usually confined to the local machine.
JAMSExecutor.exe: The JAMS Executor listens on port 3773 for connections from the JAMS Scheduler and JAMSDebugger. This is usually confined to the local machine.
JAMSScheduler.exe: The JAMS Scheduler listens on port 4773 for connections from the Failover JAMS Scheduler. This isconfigured in the Failover.config file.
Common Configuration: If no port is specified in the Common.config file in C:\ProgramFiles\MVPSI\JAMS\Scheduler (default location), the default SQL port of 1433 is used.
Web Interface HTTP: The JAMS Web Interface uses port 80 by default for HTTP.
Web Interface HTTPS: The JAMS Web Interface uses port 443 by default for HTTPS.
JAMS 7.X Installation Guide
37 ©2020 HelpSystems, LLC. All Rights Reserved.
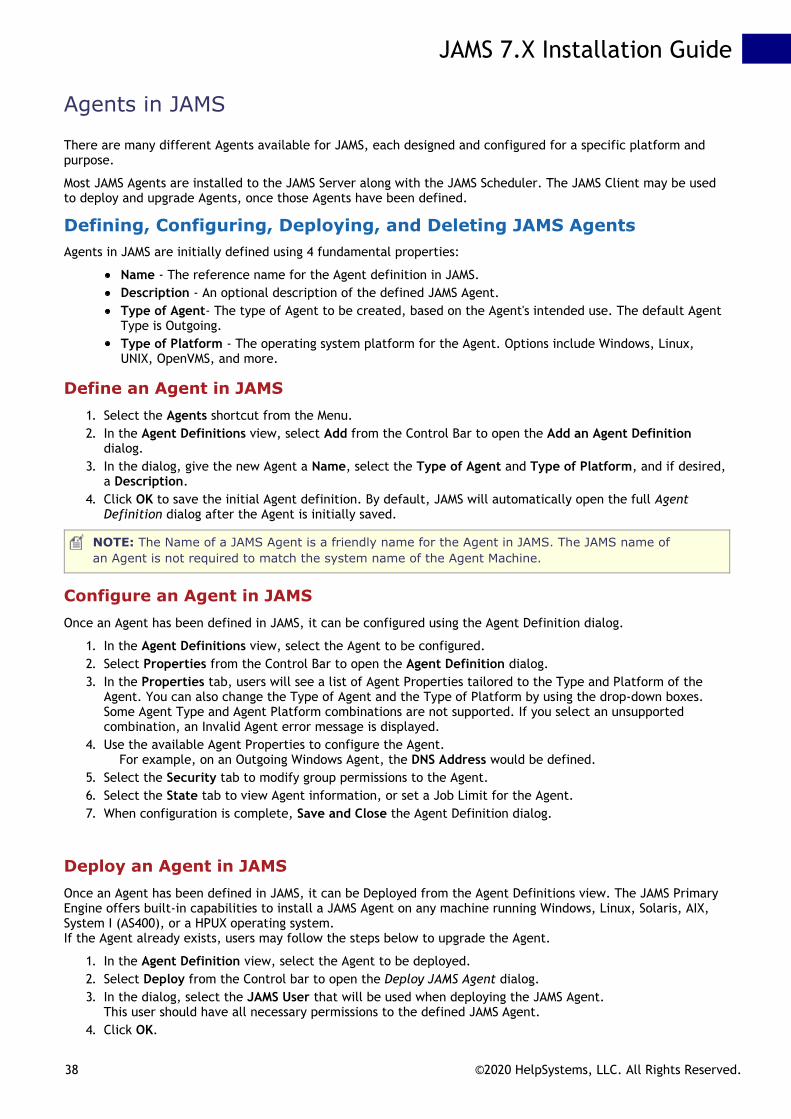
Agents in JAMS
There are many different Agents available for JAMS, each designed and configured for a specific platform andpurpose.
Most JAMS Agents are installed to the JAMS Server along with the JAMS Scheduler. The JAMS Client may be usedto deploy and upgrade Agents, once those Agents have been defined.
Defining, Configuring, Deploying, and Deleting JAMS AgentsAgents in JAMS are initially defined using 4 fundamental properties:
Name - The reference name for the Agent definition in JAMS.Description - An optional description of the defined JAMS Agent.Type of Agent- The type of Agent to be created, based on the Agent's intended use. The default AgentType is Outgoing.Type of Platform - The operating system platform for the Agent. Options include Windows, Linux,UNIX, OpenVMS, and more.
Define an Agent in JAMS1. Select the Agents shortcut from the Menu.2. In the Agent Definitions view, select Add from the Control Bar to open the Add an Agent Definition
dialog.3. In the dialog, give the new Agent a Name, select the Type of Agent and Type of Platform, and if desired,
a Description.4. Click OK to save the initial Agent definition. By default, JAMS will automatically open the full Agent
Definition dialog after the Agent is initially saved.
NOTE: The Name of a JAMS Agent is a friendly name for the Agent in JAMS. The JAMS name ofan Agent is not required to match the system name of the Agent Machine.
Configure an Agent in JAMSOnce an Agent has been defined in JAMS, it can be configured using the Agent Definition dialog.
1. In the Agent Definitions view, select the Agent to be configured.2. Select Properties from the Control Bar to open the Agent Definition dialog.3. In the Properties tab, users will see a list of Agent Properties tailored to the Type and Platform of the
Agent. You can also change the Type of Agent and the Type of Platform by using the drop-down boxes.Some Agent Type and Agent Platform combinations are not supported. If you select an unsupportedcombination, an Invalid Agent error message is displayed.
4. Use the available Agent Properties to configure the Agent. For example, on an Outgoing Windows Agent, the DNS Address would be defined.
5. Select the Security tab to modify group permissions to the Agent. 6. Select the State tab to view Agent information, or set a Job Limit for the Agent.7. When configuration is complete, Save and Close the Agent Definition dialog.
Deploy an Agent in JAMSOnce an Agent has been defined in JAMS, it can be Deployed from the Agent Definitions view. The JAMS PrimaryEngine offers built-in capabilities to install a JAMS Agent on any machine running Windows, Linux, Solaris, AIX,System I (AS400), or a HPUX operating system.If the Agent already exists, users may follow the steps below to upgrade the Agent.
1. In the Agent Definition view, select the Agent to be deployed.2. Select Deploy from the Control bar to open the Deploy JAMS Agent dialog.3. In the dialog, select the JAMS User that will be used when deploying the JAMS Agent.
This user should have all necessary permissions to the defined JAMS Agent.4. Click OK.
JAMS 7.X Installation Guide
38 ©2020 HelpSystems, LLC. All Rights Reserved.

NOTE: When initially deploying an Agent to a Linux/Unix machine, the JAMSAgentX Job will fail on themonitor the first time it executes. This is because JAMS initially caches the host fingerprint. Uponredeployment, JAMS Agents can also be manually installed. For more information, please use thefollowing links:
JAMS Agent for Windows Manual Installation
Manual Installation of JAMS Agent for Unix and Linux
NOTE: OpenVMS Agents cannot be push deployed from the JAMS Server.
NOTE: for more information on working with specific JAMS Agents, please refer to the Agent topics.
Delete an Agent in JAMSAny JAMS Agent can be Deleted from the Agent Definitions view. Note that removing the Agent from the JAMSGUI will not remove the JAMS Agent software from the given Agent Machine.
1. In the Agent Definition view, select the Agent to be deleted.2. Select Delete from the Control bar, or right-click the desired Job, and then select Delete from the Agent
Options menu to open the Delete Agent dialog.3. If the desired Agent was selected for deletion, click Yes. If the incorrect Agent was selected, click No or
Cancel.
Agents and Queue Definitions (Delete an Agent from a Queue)JAMS Jobs can be submitted to run on Queues with specified Agent nodes. To remove an Agent from a Queue,open the Queue Definition View and double-click the desired Queue. On the Queue's definition Status tab, clickon the box with the black arrow pointing to the agent node listing, then press the Delete key to remove it fromthe list. Select either the Save or Save and Close buttons at the top of the definitions window to complete theprocess.
Defining Incoming Agents1. Navigate to C:/Program Files/MVPSI/JAMS/Scheduler/ on the JAMS Server and run JAMSRegister.exe2. Enter the following code in JAMSRegister to create a root certificate authority, if one does not already
exist.create root ca /storekey /makedefault
3. Add an incoming Agent executor with the following in the JAMS Register:add exec incoming /newcert /fw
4. On the Agent machine, install the agent software, then open JAMSRegister.exe from C:/ProgramFiles/MVPSI/JAMS/Agent
5. In JAMS Register on the Agent machine, enter:add agent incoming /reqcert/server="SERVERPATH" /prompt /agentname="AGENTNAME"Where SERVERPATH is the url for the rest interface, and AGENTNAME is the name for the new incomingagent.
6. When prompted for a password, enter the password used to log onto the JAMS Server.7. On the JAMS Server, check the agent list and ensure the new Agent appears on the Agent list, with a state
of Online.
JAMS 7.X Installation Guide
39 ©2020 HelpSystems, LLC. All Rights Reserved.
JAMS Agent for OpenVMS
The JAMS Agent for OpenVMS is an optional component that provides background processes for executing JAMSJobs under the direction of a JAMS Scheduler located on a different machine running Windows or OpenVMS.
Prerequisite SoftwareThis version of the JAMS Agent for OpenVMS requires:
OpenVMS/VAX version 6.2 or higherOpenVMS/AXP V6.2 or higher or . . .OpenVMS/Itanium V8.2 or higher
Decompressing Zip FilesThe JAMS Agent comes as a self-extracting zip archive when downloaded over the Internet. Once decompressedthe file is named: JAMSAGENT???042x.EXE where "???" is "AXP," "IA," or "VAX" and "x" is replaced by the patch levelof the kit.
These self-extracting zip archives are OpenVMS executable images and are unpacked by running them. Thearchives contain the following files:
JAMSAGENT???042.AJAMSAGENT???042.B
License RegistrationThe JAMS Agent can be installed and run on any machine. All license restrictions occur on the machine runningthe JAMS Scheduler. The JAMS Agent does not require a LMF License PAK.
Installation Procedure RequirementsThe installation takes 5–10 minutes depending on the type of media and your system configuration. Beforeinstalling JAMS, you must have the following privileges and resources:
SETPRV privileges or CMKRNL, WORLD, and SYSPRV privileges.At least 1000 free blocks of disk space on the device to hold the JAMS executable files.A minimum of 50 free global pages.A minimum of 100 free global sections.
The installation procedure initially checks for the required resources before the installation. However, if anyresources are deficient, the procedure will issue an error message and identify the resource(s) before terminatingthe installation.
To determine the number of free global pages on your system, type the following DCL command:
$ WRITE SYS$OUTPUT F$GETSYI("FREE_GBLPAGES")[Return]
The number displayed equals the total number of free global pages. If this number is too small, you can increasethe GBLPAGES system parameter by editing the file SYS$SYSTEM:MODPARAMS.DAT and invoking theSYS$UPDATE:AUTOGEN.COM command procedure.
For more information on adjusting SYSGEN parameters and using AUTOGEN, refer to the appropriate VMSdocumentation.
To determine the number of free global sections on your system, type the following DCL command:
$ WRITE SYS$OUTPUT F$GETSYI("FREE_GBLSECTS")[Return]
The number displayed equals the total number of free global sections. If this number is too small, you canincrease the GBLSECTIONS system parameter by editing the file SYS$SYSTEM:MODPARAMS.DAT and invoking theSYS$UPDATE:AUTOGEN.COM command procedure.
For more information on adjusting SYSGEN parameters and using AUTOGEN, please refer to the appropriate VMSdocumentation.
JAMS 7.X Installation Guide
40 ©2020 HelpSystems, LLC. All Rights Reserved.

Using VMSINSTALLVMSINSTAL is a command procedure used to install software onto an OpenVMS operating system. In step 2 of theinstallation process, described below, you must invoke VMSINSTAL. The format of the VMSINSTAL command is asfollows:
$ @SYS$UPDATE:VMSINSTAL upivvv ddnn:[dir] [OPTIONS N][Return]
upi: is the unique product identifier; in this case, JAMSAGENTAXP, JAMSAGENTIA, or JAMSAGENTVAX.
vvv: is the placeholder for the version number of the product. Refer to the label on the JAMS distribution mediato determine the version you will be installing. For example, the complete product name for Alpha JAMS AgentVersion 4.2 is: JAMSAGENTAXP042.
ddnn:[dir]: represents the device and directory location for the distribution kits. If installing from a CD-ROM,the distribution kits are located in the [JAMS042.KIT] directory. If JAMS was downloaded over the Internet, insertthe device and directory where you unpacked the Zip archives. DKA400:[JAMSAGENT042.KIT] is the device anddirectory used in the example on the following page.
Options NIf this optional parameter is supplied, the installation procedure will ask to display or print the release notesbefore performing the actual installation.
When invoking VMSINSTAL, the installer will check to see if:
You are logged into the system manager's account. You should install layered software from the systemmanager's account on the default device with the directory set to SYS$UPDATE.You have adequate quotas for installing layered products.There are any user processes running on the system.
If VMSINSTAL detects any user processes running on the system, you will be asked if you want to proceed with theinstallation.
To continue, type YES and press Return. If you choose to stop the installation, press Return.
The JAMS Agent Installation Process on OpenVMSTo install the JAMS Agent on OpenVMS, follow the steps below.
To abort the installation procedure at any time, press CTRL/Y. The installation procedure cleans up any files ithas created and returns you to the DCL prompt.
1. Log in to a privileged account and set your default device and directory to SYS$UPDATE.
2. Invoke VMSINSTAL
$ @VMSINSTAL JAMSAGENTAXP042 DKA400:[JAMS040.KIT] [Return]
3. Answer the standard VMSINSTAL questions. VMSINSTAL will ask if you are satisfied with the backup of yoursystem disk. Also, it may ask additional questions if you are not logged on as SYSTEM or it detects otherunusual conditions.
4. Provide a device name for the JAMS executables. You will be asked what disk device should be used forthe JAMS executables.
Note: You can install Alpha, Itanium, and VAX executables on the same device. JAMS will createdifferent directories for each installation.
5. Provide a device name for JAMS data. You will then be requested to select a disk device to use for theJAMS data files.
Note: You can store the data files on the same disk as the executables. However, the JAMS datadisk must be the same on all nodes in the VMScluster.
6. Start JAMS when the installation is complete? To execute the JAMS startup procedure when the installation
JAMS 7.X Installation Guide
41 ©2020 HelpSystems, LLC. All Rights Reserved.

is complete, press Return; otherwise enter No and press Return.
Note: To abort the installation procedure at any time, press CTRL/Y. The installation procedurecleans up any files it has created and returns to the DCL prompt.
7. Purge Files? Do you want to purge the files replaced by this installation. To purge, press Return;otherwise, enter No and press Return.
8. Run the IVP? Do you want to run the installation verification procedure (IVP) after the installation. Toproceed, press the Return key; otherwise, enter No and press Return
9. Read the informational messages. As the installation proceeds, scan the on-screen informational messagesfor potential problems. JAMS puts all files in its own directory tree with the exception of the followingfiles:
SYS$STARTUP:JAMS_AGENT_STARTUP.COMSYS$STARTUP:JAMS_SITE_STARTUP.COM
Configuring and Managing the JAMS Agent for OpenVMSAfter successfully installing the JAMS Agent, it is important that you perform the following tasks.
Insert JAMS_AGENT_STARTUP.COM into System Start-UpYou must execute the JAMS Agent startup procedure on every node that will be using the JAMS Agent. If youinstall the JAMS Agent on a node that also has the JAMS Agent already installed, execute theJAMS_AGENT_STARTUP.COM procedure before starting any batch queues.
To ensure that the JAMS Agent startup procedure is executed every time the system reboots, insert the followingline into the system startup procedure: SYS$MANAGER:SYSTARTUP_VMS.COM
$ @SYS$STARTUP:JAMS_AGENT_STARTUP.COM
Note: Make sure to insert the above line after the disk containing the JAMS data files has beenmounted and before initiating any batch queues.
The JAMS startup procedure can also be defined as a startup file using the VMS SYSMAN utility.
Initialize the JAMS Agent on all NodesThe JAMS Agent is fully initialized on the node where the installation is performed. In order to initialize the JAMSAgent on other nodes in a VMScluster, issue the following command for every node where the JAMS Agent willexecute:
$ @SYS$STARTUP:JAMS_AGENT_STARTUP.COM
Check TCP/IP port 77The JAMS Agent listens on TCP/IP port 77. Make sure this port isn't blocked by a firewall. You can modify the portsetting by defining a logical name, for example:
$ DEFINE/SYSTEM/EXECUTIVE JAMS_AGENT_PORT 7777
In this example, the command would tell the JAMS Agent to listen on port 7777. Make sure to restart the JAMSAgent after defining the logical name.
Managing the JAMS AgentYou can run JAMS_EXE:JAMS_AGENT_MANAGER.EXE to manage the JAMS Agent. The utility has commands forstarting, stopping, and displaying the status of the JAMS Agent. You can get more information by running theutility and using the Help command at the JAMS_AGENT> prompt.
Error Conditions
JAMS 7.X Installation Guide
42 ©2020 HelpSystems, LLC. All Rights Reserved.

If the installation procedure fails for any reason, a message is displayed and the installation will terminate. Tryto determine what caused the installation to fail. If you can correct the problem, do so and then restart theinstallation.
If you cannot determine the cause of the problem or have any questions about JAMS, please contact JAMStechnical support at:
Phone: (800) 261-5267
E-Mail: [email protected]
NOTE: When configuring the OpenVMS Agent on the JAMS Scheduler, users must type OpenVMS intothe Agent Platform field.
JAMS 7.X Installation Guide
43 ©2020 HelpSystems, LLC. All Rights Reserved.

JAMS Agent for System i
The JAMS Agent for System i is designed to support the IBM System i operating system (aka i5/OS and OS/400).JAMS connects to the IBM System iServer using TCP/IP protocols.
Deploying the JAMS Agent for System i The JAMS Agent for IBM System i is installed along with the JAMS Scheduler, but must be pushed outto the agent machines. Specifically, deployment is controlled from the Agents view in the JAMSClient.
Before attempting to deploy, make sure you have provided each JAMS user the appropriate System iaccess along with the privileges required to deploy the agent.
NOTE: If the library JAMSLIB is present in both the system library list and user library list,remove JAMSLIB from the system library list.
Upgrading the JAMS Agent for System iInstalling an updated version of JAMS may already include the JAMS Agent. To deploy the update, select one ormore agents from the Agent Definitions view, right-click, and select Deploy.
Troubleshooting the JAMS Agent for System i DeploymentThe most common issues with the JAMS Agent deployment are:
The user selected for the deployment job does not have sufficient privileges on the target machine.FTP settings are disabled or blocked.
To gain a more detailed view of the deployment, review the Job Log of the DeploySystemi in Job History.
If the JAMS DeploySeriesi job does not work because of access restrictions (e.g., the FTP is blocked), you canmanually deploy the agent by following steps described below:
1. Create a JAMS user profile: CRTUSRPRF USRPRF(JAMS) PASSWORD(*NONE) SPCAUT(*JOBCTL)2. Create a library: CRTLIB LIB(JAMSLIB)3. Create a save file: CRTSAVF FILE(JAMSLIB/JAMSSAVF)4. Copy the JAMSSAVF.SAVF from the JAMS Scheduler to the AS/400 server (JAMSSAVF.SAVF is located at
C:\Program Files\MVPSI\JAMS\Scheduler\Agents\IBMSeriesi by default)5. Restore the objects: RSTOBJ OBJ(*ALL) SAVLIB(JAMSLIB) DEV(*SAVF) SAVF(JAMSLIB/JAMSSAVF)
MBROPT(*ALL) RSTLIB(JAMSLIB)
6. Start the JAMS subsystem: STRSBS SBSD(JAMSLIB/JAMS)
JAMS 7.X Installation Guide
44 ©2020 HelpSystems, LLC. All Rights Reserved.

JAMS Agent for Windows
The JAMS Agent for Windows includes background services that execute JAMS Jobs under the direction of a JAMSScheduler on a different machine.
Manually Installing the JAMS Agent for Windows1. To manually install the JAMS Windows agent, go to the JAMS Primary Engine (Scheduler) machine and
navigate to the following path: Program Files\MVPSI\JAMS\Scheduler\Agents\Windows
2. Once there, obtain either the SetupAgent.msi or SetupAgentx64.msi file and copy it to the remoteAgent machine.
3. From the remote agent machine, double-click to run the installer and follow the prompts. When theinstallation is complete you will see a Windows service called 'JAMS Agent' running.
4. The installer package set up an agent service on the machine called 'JAMS Agent', and a directory isexpanded containing the executable files in C:\program files\MVPSI\JAMS\Agent by default.
5. The JAMS Agent service listens on port 77 in order to communicate with the JAMS Scheduler.6. The agent must then be defined in the JAMS Client.
Select the Agents shortcut and click the Add button on the Ribbon bar to open the Agent DefinitionWizard.Enter the appropriate information to define the agent.
Note: the agent deployment is not necessary, leave the Deploy JAMS Agent box unchecked, asyou have already performed a manual install of the agent.
7. It is recommended that the JAMS Agent Service run as 'Local System'.
Push Deploy the Windows Agent using Local User AccountsWhen deploying a remote JAMS Agent to a Windows server, the standard practice is to use a domain account userwith Administrator privileges on both the JAMS Primary Engine (Scheduler) and the remote JAMS Agent machine.
However, if you don’t have an environment that uses domain accounts, there are two alternative options forsetting up the remote JAMS Agent software for a Windows server:
Manually install the JAMS Agent for Windows (see the preceding section) or . . .Modify the registry setting changes on the Agent Machine. In order to allow the push deployment of theWindows JAMS Agent to a remote server when not using domain user accounts, make sure that the JAMSPrimary Engine (Scheduler) and remote Agent server utilize the same administration level user accountand password. Once that step is complete, perform the following registry edit on the remote agentmachine:
CAUTION: Improperly modifying the registry can harm your system. It is always recommendedthat you back up your registry prior to making any changes.
1. Browse to the following folder:HKEY_LOCAL_MACHINE\SOFTWARE\Microsoft\Windows\CurrentVersion\Policies\system\
2. Right-click a blank area in the right pane.3. Click New.4. Click DWORD Value and Name it LocalAccountTokenFilterPolicy.5. Double-click the item you just created and Type “1” into the Value Data box and click the OK button.6. Restart your computer.
You should now be able to push deploy the JAMS Agent to the remote machine.
JAMS 7.X Installation Guide
45 ©2020 HelpSystems, LLC. All Rights Reserved.

JAMS Agentd for Linux/Unix
Agents IntroductionAgents allow users to define specific actions that can run locally or remotely throughout a JAMS network. By default,JAMS can only run Jobs and Sequences on the Primary Engine. Agents allow users to extend that capability to run Jobson a variety of different environments. For example, by using JAMS Agents, a single JAMS Scheduler can execute taskson many systems.
The JAMS Agentd is a version of the JAMS Agent that runs as a background process on Linux/Unix machines. This topicdetails how to install this Agent to your primary machine.
NOTE: Jobs running on an AgentD Agent must use or be based on either the UnixShell or UnixScriptexecution methods.
Installing the AgentThere are two ways to install the Agent:
Install from a package (.rpm or .deb): You need to use appropriate package management tools (rpm, yum,apt-get, yast, etc). The .rpm and .deb packages are preferred if you need to install in the standard location asroot. The package can also be installed in a non-standard location, but it only handles installation as root. Italso has the advantage of allowing the package system to check for updated versions automatically. (See thenotes on the system distribution specific Repo page.)Install from the tarball (.tgz): The is an archive of the files necessary for the install, which needs to bemanually installed by following the instructions in the README file included with the .tgz file. This is thepreferred method if you need a non-root install.
Installing the Agent from a Package1. Go to the JAMS Scheduler Repository at: http://download.jamsscheduler.com/repo/. 2. Select the repository for your system.3. Download the appropriate jams-agentd package (.rpm [Red Hat packages], .deb [Debian packages], or .rpm [SUSE
packages]. For Red Hat, there are different builds for each release.
4. Copy the package to the target machine and become root.5. Use the package manager to install the package.6. It may be necessary to open the firewall for the JAMS Server to connect to the Agent. In this case, the default
port 77.
For example, use the following for Red Hat rpm. You can use the --prefix PATH option to relocate the RPMpackage. (This is not available for the Debian packages.)
# rpm -I jams-agentd-6.5.31-1.el7.x86_64.rpm
NOTE: JAMS AgentD must be installed as root.
The installer adds the following files:
JAMS 7.X Installation Guide
46 ©2020 HelpSystems, LLC. All Rights Reserved.

Root Installation Directory File Name Description/usr/sbin jams-agentd Service daemon
andmanagementcommand.
jams-register Connectionsecuritymanagementcommand.
/usr/share/doc/jams-agentd CHANGES The list ofversion changes.
COPYRIGHT The copyrightstatement.
NEWS Additionaldetails for thelist of changes.
README Additionalinformationaboutinstallation andmanagement.
/usr/share/doc/jams-agentd/openssl License The OpenSSLlicense.
/usr/share/man/man8 jams-agentd.8.gz The manualpage for jams-agentd.
jams-register.8.gz The manualpage for jams-register.
The installer also creates a standard configuration, if one is not present. This includes the following certificates anddirectories:
Root Installation Directory File Name Description/etc/init.d jams-agentd The service
control script.
/etc/jams agent-client.config The Connectionconfigurationfile.
jams-agentd.config The Serviceconfigurationfile.
/etc/jams/certs The Secure SSLcertificatestorage.
/etc/pam.d jams-agentd The PAMauthenticationfile for theAgent.
/var/log/jams The JAMSrelated log files.
/var/run jams-agentd.pid The executingAgent process idfile.
JAMS 7.X Installation Guide
47 ©2020 HelpSystems, LLC. All Rights Reserved.

/var/tmp/jams JAMS Jobtemporary files(Job scripts).
The jams-agentd daemon has the following built-in commands for managing the daemon service:
Command Descriptionjams-agentd -E Stop the service.
jams-agentd -F Restart the service.
jams-agentd -G Start the service.
jams-agentd -T Report service status.
The jams-agentd daemon can also be managed directly, if the service interface is not being used. Use the followingcommands:
Command Descriptionjams-agentd -d Start the jams-agentd daemon in the
background.
jams-agentd -K Stop the jams-agentd daemon.
jams-agentd -Q Test if the daemon is running. Exit code 1 ifnot.
NOTE: Making any modifications to the configuration file will require a daemon restart. The configuration fileincludes comments describing the various available options.
Avoid stopping and restarting the daemon directly because it may cause problems with the service managementsoftware.
Testing the Connection and Connecting from the JAMS SchedulerEnsure the correct ports are open/listening on the agentd machine. Port 77 is the default port that jams-agentd uses.You will want to test this connection from the JAMS Scheduler machine by using Telnet or PowerShell. See the examplebelow:
telnet YourAgent 77
test-netconnection YourAgent -port 77
Creating the Agent DefinitionAfter you verify the connection from the JAMS Scheduler machine to the agentd machine, you can create the AgentDefinition in the JAMS Client.
1. In the JAMS Client, click Agents from the Shortcut menu.2. Click the Add (+) button to add an Agent.3. Enter the Name, Description, Type of Agent, and Type of Platform.4. Click OK.
JAMS 7.X Installation Guide
48 ©2020 HelpSystems, LLC. All Rights Reserved.
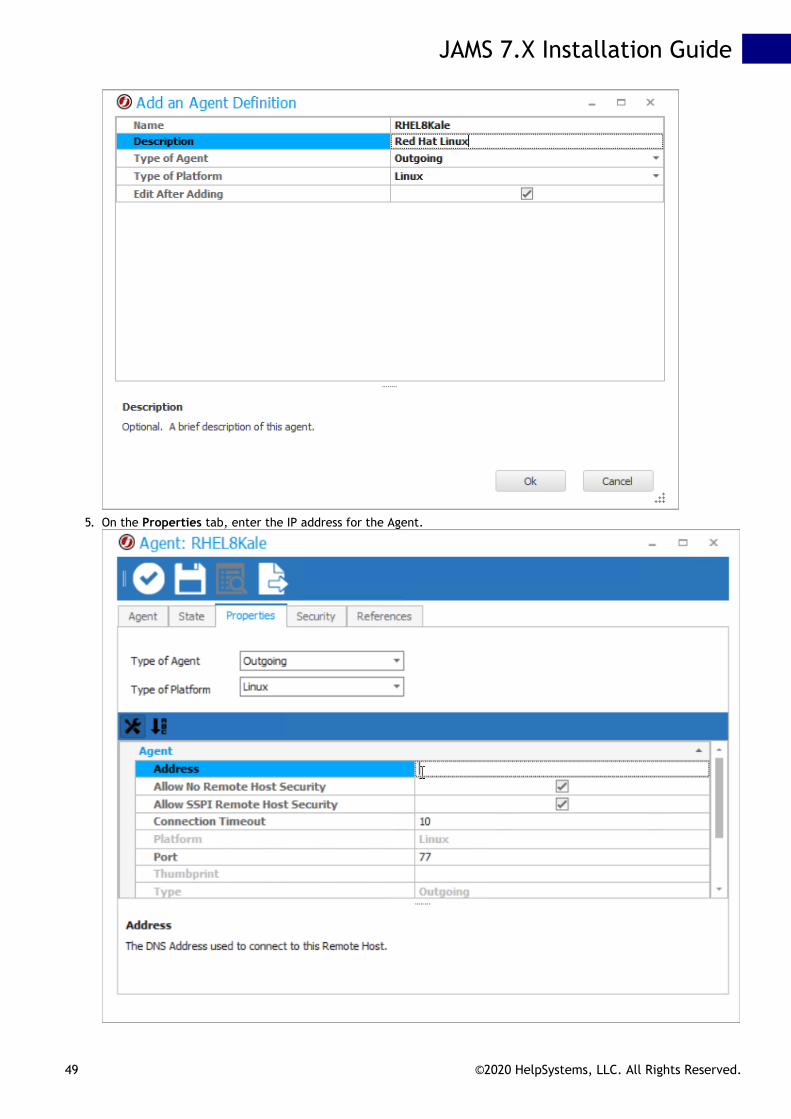
5. On the Properties tab, enter the IP address for the Agent.
JAMS 7.X Installation Guide
49 ©2020 HelpSystems, LLC. All Rights Reserved.

6. Click the State tab.7. View the License Allocated section. The License Allocated section is blank until you execute the first Job on the
Agent. The State section displays "Idle" when the JAMS AgentD is currently not executing Jobs.8. Click OK.
Creating a CredentialCreate a Credential for a user on the Linux machine that has the ability to log in and execute the process that is definedin the JAMS Job.
NOTE: It is not necessary to create a root credential to run Jobs. The Credential should give the Job theminimum permissions necessary to run the required Job. If a root Credential is required, it should be verycarefully protected against unauthorized use.
1. In the JAMS Client, click Credentials from the Shortcut menu.2. Click the Add (+) button to add a new Credential.3. On the Add a New JAMS Credential dialog, enter the Logon As and Password fields. Ensure you use the
information for the root account on the Linux machine.4. Click OK.
Creating a Job Definition1. In the JAMS Client, click Definitions from the Shortcut menu.2. Click the Add (+) button to add a new Definition.3. On the Add a New JAMS Job Definition dialog, select an Execution Method.
JAMS 7.X Installation Guide
50 ©2020 HelpSystems, LLC. All Rights Reserved.

4. Click the Source tab.5. Enter the following:
#!/bin/bashls
JAMS 7.X Installation Guide
51 ©2020 HelpSystems, LLC. All Rights Reserved.
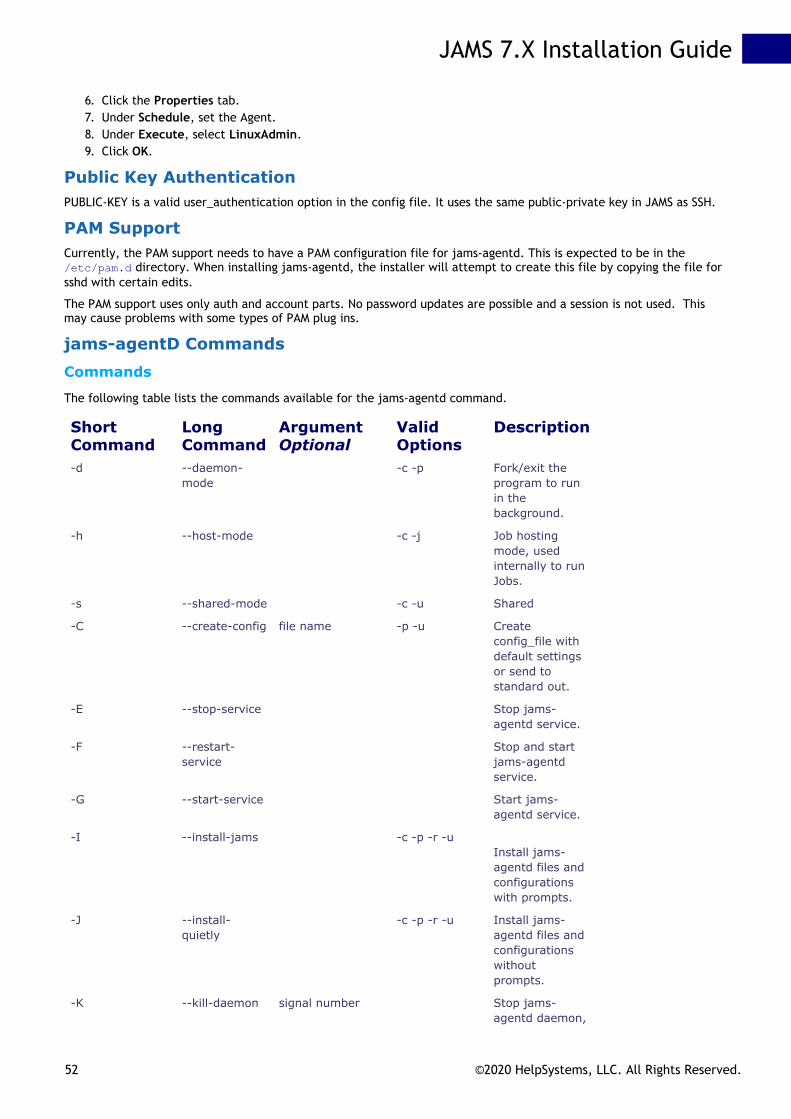
6. Click the Properties tab.7. Under Schedule, set the Agent.8. Under Execute, select LinuxAdmin.9. Click OK.
Public Key AuthenticationPUBLIC-KEY is a valid user_authentication option in the config file. It uses the same public-private key in JAMS as SSH.
PAM SupportCurrently, the PAM support needs to have a PAM configuration file for jams-agentd. This is expected to be in the/etc/pam.d directory. When installing jams-agentd, the installer will attempt to create this file by copying the file forsshd with certain edits.
The PAM support uses only auth and account parts. No password updates are possible and a session is not used. Thismay cause problems with some types of PAM plug ins.
jams-agentD CommandsCommands
The following table lists the commands available for the jams-agentd command.
ShortCommand
LongCommand
ArgumentOptional
ValidOptions
Description
-d --daemon-mode
-c -p Fork/exit theprogram to runin thebackground.
-h --host-mode -c -j Job hostingmode, usedinternally to runJobs.
-s --shared-mode -c -u Shared
-C --create-config file name -p -u Createconfig_file withdefault settingsor send tostandard out.
-E --stop-service Stop jams-agentd service.
-F --restart-service
Stop and startjams-agentdservice.
-G --start-service Start jams-agentd service.
-I --install-jams -c -p -r -uInstall jams-agentd files andconfigurationswith prompts.
-J --install-quietly
-c -p -r -u Install jams-agentd files andconfigurationswithoutprompts.
-K --kill-daemon signal number Stop jams-agentd daemon,
JAMS 7.X Installation Guide
52 ©2020 HelpSystems, LLC. All Rights Reserved.

using theoptional signal.
-P --pam-config file name Create standardPAM config fileor send tostandard out.
-Q --query-status Check forrunningdaemon.
-R --remove-service
Removethe jams-agentdservice.
-S --service-file file name -c -u Create thestandard Servicecontrol file orsend to standardout.
-T --service-status
Report thestatus of jams-agentd service.
-U --update-config
Update theconfig file withlatest settings(planned).
-V --version Report thecurrent versionandconfigurationlocations.
-? --help List ofcommands andoptions.
Options
The following table lists options available for the jams-agentd command.
Short Option Long Option Argument Description-c --config-file file Use an alternate
configuration file.
-j --job-id job-id The ID of therunning Job.
-l --log-level log-level Set the logginglevel to ERROR,WARN, INFO,DEBUG, or TRACE.
-p --port-number port Listen on alternateport.
-r --root path install-dir Directory to use asthe root forinstallation.
-u --user-name user name User environment.
JAMS 7.X Installation Guide
53 ©2020 HelpSystems, LLC. All Rights Reserved.

z/OS Integration Pack
JAMS for z/OS incorporates z/OS Job scheduling into the JAMS platform and requires nothing to install on thez/OS host. When creating the agent used with the z/OS integration, you must select the z/OS agent type and theFTP platform.
Use this step-by-step guide to define a new z/OS Job using the JAMS Client.
Setting up the Connection with JAMS as a TSO UserTo set up a connection with JAMS you will need to first define a TSO user on the mainframe as well as in JAMS(from the Credentials shortcut).
1. Open the Credential Definitions view from the JAMS Menu.2. Click the Add button on the Control Bar.3. The JAMS Credential definition dialog opens.4. Set the Credential Name, Logon As, Password, and Password Confirmation values.5. Click OK. By default, JAMS will open the full Credential Definition dialog after the Credential definition is
initially saved.6. On the Security tab of the Credential dialog, Add the ACE for the TSO user.
Please note: this user must have login rights as well as rights to execute items that will be added in laterJAMS jobs.
7. Save and Close the Credential definition.
For further information on adding a new username in JAMS, go to the topic: JAMS Security: Working with UserDefinitions ('JAMS Security: Working with User Credential Definitions' in the on-line documentation).
JAMS interfaces with JES as a TSO user. The TSO login ID is interpreted by JAMS as a valid JAMS User, which isencrypted on the JAMS side and controlled by RACF on the z/OS side. The TSO user must have permissions tosubmit and receive Jobs on both platforms and the TSO username must contain 7 characters or less.
On the JAMS side, the z/OS Integration must be installed on the JAMS Server.
Setting up a z/OS Job in JAMS1. To create a z/OS Job in JAMS2. Select the desired folder for the z/OS Job, then ensure the Job Definitions tab is selected. 3. Click the Add button from the Control Bar to open the Add a New JAMS Job Definition dialog.4. In the dialog, give the new Job a Name, Description (optional), and Execution Method.
In this case, select z/OS to create a z/OS Job.5. By default, the full Job Definition dialog will open when the Job is initially saved. Click OK.6. The Job Definition dialog will open.7. Define Elements, Parameters, Security, Properties, and Documentation as desired.
NOTE: An Execute As property should be configured with the previously defined TSO user.NOTE: An Agent property should be configured with the Mainframe Agent hostname or IP address.
8. On the Source tab, insert the JCL code.9. Save and Close the Job definition.
How does JAMS run a Mainframe Job?Jobs are stored on an FTP server located on the mainframe using a proprietary IBM-based FTP language. JAMScommunicates with the mainframe using this FTP language. Once a Job is executed in JAMS an FTP connection isopened to the FTP Daemon in JES and the Job is sent to the mainframe and executed.
JAMS monitors the Job spool output and waits for the Job to complete by polling the FTP connection. Once theoutput files are complete JAMS purges the files from the JES spool.
Steps can be run in JES in the same way as tasks in a JAMS Sequence. JCL defines the behavior of the Jobdepending on what is happening with a particular Job task.
What Information does JES Return?The JAMS Scheduler retrieves all Job related output from the JES Spool. This includes any DD statements withSYSOUT held on the spool. The output appears in the JAMS log and can be used by operations administrators to
JAMS 7.X Installation Guide
54 ©2020 HelpSystems, LLC. All Rights Reserved.

debug problems and, if necessary, restart the Job.
JAMS for z/OS parses the Job output and provides job success (“0”) or failure information for the JAMS Schedulerto react and report on a variety of message codes, including HASP and return code analysis.
What happens when a Job fails?If a Job fails due to a network outage or other problem all relevant information is included in the output and alsodisplayed in the JAMS log. Customization of these messages can be set using a configuration file.
A special option in the Job definition includes a listing of Jobs on the JES Spool allowing a Job to rerun on theJAMS side for output recovery.
JAMS for z/OS Capabilities
Manages and Submits JCL Files to JES2 on z/OS for ExecutionJAMS provides the ability to store a JCL source in its internal database. The JCL then becomes a part of the JAMSJob Definition along with other parameters and information needed to run the job.
Schedules Jobs with Dependencies on Multiple z/OS HostsThe JAMS Scheduler can support multiple z/OS hosts and track Job dependencies between them and non-z/OShosts.
The JAMS Scheduler Retrieves and Displays the Job OutputThe JAMS Scheduler retrieves all job related output from the JES Spool. This includes any DD statements withSYSOUT held on the spool. The output appears in the JAMS log and can be used by operations administrators todebug problems and, if necessary, restart the jobs.
Includes Automatic Determination for all Job ResultsJAMS for z/OS parses the job output and provides job success or failure information for the JAMS Scheduler toreact and report on a variety of message codes, including HASP and return code analysis.
Utilizes Standard JES SettingsJAMS for z/OS uses JESINTERFACELEVEL 1 and doesn’t require special customization of Parmlib settings.
Requires No installation on z/OS HostsJAMS for z/OS uses z/OS FTP with JES and requires no additional mainframe software installation.
Provides Automatic Job Purging CapabilitiesJAMS for z/OS automatically purges the job output files for the JES2 Spool after each Job has completed andbeen retrieved.
Provides Reliable Tracking of Jobs Running on the MainframeThe JAMS Scheduler can recover its connection to JES if it is lost due to a network outage or other problem, evenwhen a job is in the middle of executing on z/OS. In the event of failure on the JAMS server, JAMS can restart forthat specific job and seamlessly recover.
Uses a Secure TSO User LoginJAMS interfaces with JES as a TSO user. The TSO login ID is interpreted by JAMS as a valid JAMS user andencrypted on the JAMS side and controlled by RACF on the z/OS side.
Provides Full Integration with the JAMS SchedulerJAMS for z/OS becomes part of the integrated capabilities of the JAMS Scheduler across different platformsallowing it to control jobs based on dependencies on all supported hosts.
JAMS 7.X Installation Guide
55 ©2020 HelpSystems, LLC. All Rights Reserved.
JAMS for z/OS is Easy to Set UpSetting up a z/OS job is now as easy as defining any other JAMS Job.
Provides a Listing of Pending Jobs on the z/OS SpoolA special option in the JOB definition includes a listing of JOBS on the JES Spool allowing a job to rerun on theJAMS side for output recovery.
Scenario: Synchronizing Data with JAMS for z/OSSuppose an organization has the need to reliably synchronize data from an OLTP system based on a MS SQL Serveror Oracle with a mainframe-based database. This scenario is easily implemented with JAMS for z/OS.
In order to accomplish this the JAMS Scheduler would initially run a job, based on an event, that generates filescomprised of data extracted from a MS SQL Server database. It would then upload those files to the z/OSplatform via FTP before submitting JCL through JAMS for z/OS. These uploaded files would then update amainframe database. The reverse scenario is just as easy where a MS SQL Server is updated with files generatedby the mainframe.
JAMS 7.X Installation Guide
56 ©2020 HelpSystems, LLC. All Rights Reserved.

Integration Packs
JAMS 7.X Installation Guide
57 ©2020 HelpSystems, LLC. All Rights Reserved.

Banner in JAMS
IntroductionJAMS offers two robust and user-friendly integrations with Ellucian Banner. The V2 Banner Procedure option comes with updatesto the Execution Method to support direct integration with the Banner Oracle database, while the V1 Banner option may still beconfigured if desired.
Both Banner integrations allows JAMS users to take advantage of Banner’s core functionality such as registration, gradedistribution, human resource information, financial aid processing, and other financial information.
When the adapter runs, it initiates communication with the Banner application server and instructs executing Banner Jobs asconfigured in JAMS. The process can then be monitored, canceled, and restarted in either Banner or JAMS.
Setting up the V2 Banner Procedure Integration
Load the Banner Integration PackYou can load the Banner Integration Pack by using the JAMS installer.
NOTE: The V2 Banner Integration requires the Oracle Integration Pack to be installed. It also requires the OracleConnection Store Objects, which are part of the Integration Pack.
1. Run the JAMS installer.2. Follow the prompts until you see the Integration Packs page.3. Select the Banner Integration Pack.4. Click Next.
5. Follow the remaining prompts in the installer to complete the installation.
If needed, you can run the LOAD/BANNER command in JAMSDBA to reset the Execution Methods back to their default states, if youselected the Banner Integration Pack during install.
1. Go to C:\Program Files\MVPSI\JAMS\Scheduler.2. Right-click JAMSDBA.exe and select Run as administrator.3. At the JAMSDBA prompt, run the LOAD/BANNER command.
JAMS 7.X Installation Guide
58 ©2020 HelpSystems, LLC. All Rights Reserved.

Install the JAMS Oracle Integration the JAMS ServerAfter the Banner Integration Pack is installed, install the JAMS Oracle Integration.
1. In the JAMSDBA, run the LOAD/ASSEMBLY=JAMSOracleIntegration command.
2. Verify the following screen is displayed after the assembly loads.
Install the Oracle Stored Procedure on the Banner Database 1. Log in to the Banner Oracle database as "baninst1".2. Compile the custom package Z_HS_JAMS_JOBUTIL. For JAMS V7.1.389 installations, download this custom package. For
JAMS V7.1.407 or higher installations, download this custom package.
NOTE: The package contains functions and procedures for running Ellucian Banner Jobs through the JAMSScheduler. Refer to the package definitions for additional details.
3. Create a public synonym for the package by running the command below.
CREATE PUBLIC SYNONYM Z_HS_JAMS_JOBUTIL FOR BANINST1.Z_HS_JAMS_JOBUTIL;
4. Create a custom role to be assigned to the database user that will be used by JAMS by running the command below.
CREATE ROLE HS_JAMS_ROLE;
5. Add the required grants to the role by running the commands below.
GRANT EXECUTE ON Z_HS_JAMS_JOBUTIL TO HS_JAMS_ROLE;GRANT SELECT,INSERT,UPDATE ON GJBPRUN TO HS_JAMS_ROLE;
6. Create a database user that will be used by JAMS by running the commands below. Replace <password> with a validpassword for the database user.
CREATE USER JAMSADMIN IDENTIFIED BY <password>;GRANT CREATE SESSION TO JAMSADMIN;GRANT HS_JAMS_ROLE TO JAMSADMIN;
Creating a JAMS Connection to the Banner Oracle Database1. From the Common Activities pane on the Home screen, click Create a Connection. (You can also access click Connection
Store from the Shortcuts menu. ) 2. Define the Name (BannerConnection), Description (Connection for Banner Server), and Type of Connection
(Oracle) options.3. Click OK.
JAMS 7.X Installation Guide
59 ©2020 HelpSystems, LLC. All Rights Reserved.

4. Prepare your Oracle Connection String to the Banner database. Within the string below, replace HOST with the Bannerdatabase host name and SID WITH THE Banner database service name.
(DESCRIPTION = (ADDRESS = (PROTOCOL = TCP)(HOST = <HOST>)(PORT = 1521))(CONNECT_DATA = (SERVICE_NAME =<SID>)));
NOTE: After updating the HOST and SID, copy the Connection String because you need this when you updatethe Connection String field. Use tnsnames. ora as the reference to lookup the required values for the ConnectionString.
5. Under the Properties tab, click in the Connection String field. The Oracle Connection Properties is displayed.
JAMS 7.X Installation Guide
60 ©2020 HelpSystems, LLC. All Rights Reserved.
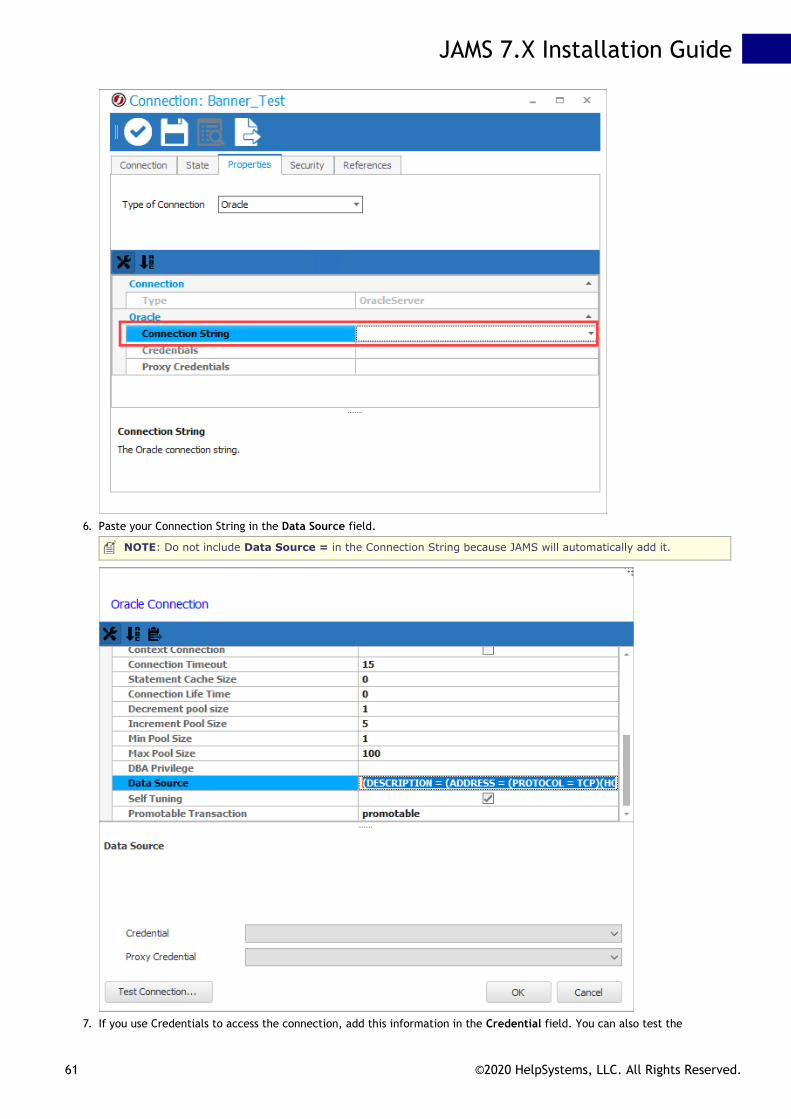
6. Paste your Connection String in the Data Source field.
NOTE: Do not include Data Source = in the Connection String because JAMS will automatically add it.
7. If you use Credentials to access the connection, add this information in the Credential field. You can also test the
JAMS 7.X Installation Guide
61 ©2020 HelpSystems, LLC. All Rights Reserved.
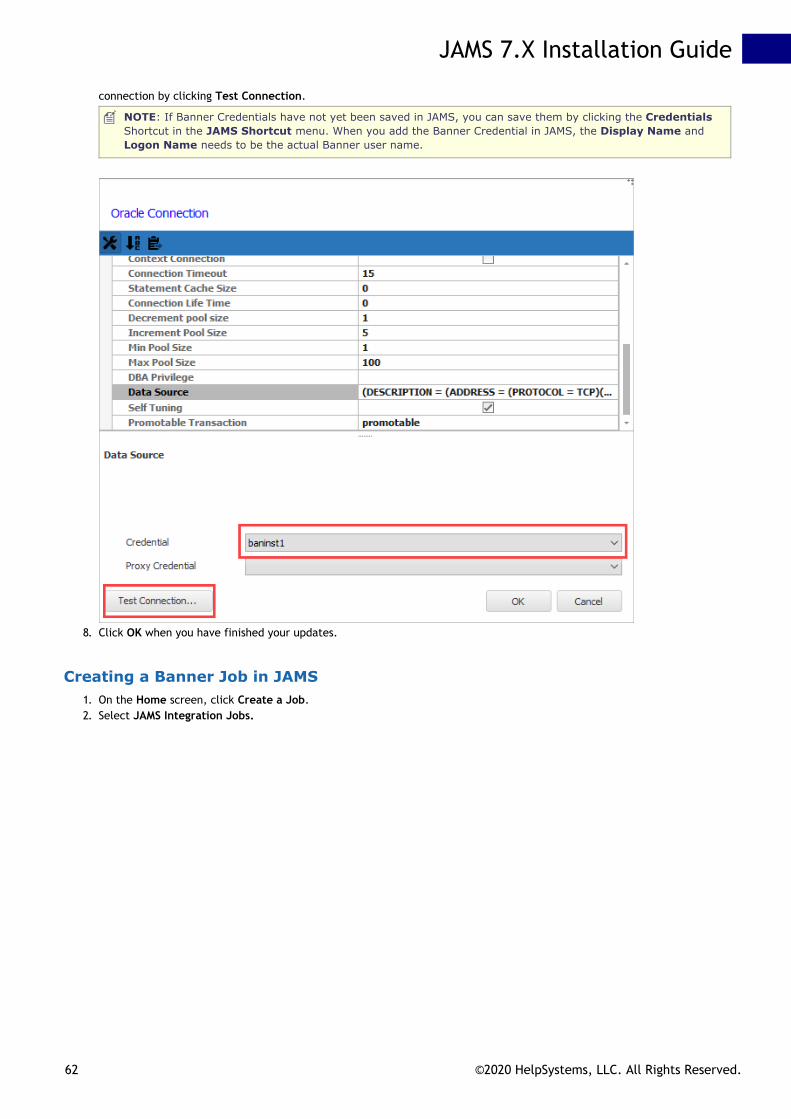
connection by clicking Test Connection.
NOTE: If Banner Credentials have not yet been saved in JAMS, you can save them by clicking the CredentialsShortcut in the JAMS Shortcut menu. When you add the Banner Credential in JAMS, the Display Name andLogon Name needs to be the actual Banner user name.
8. Click OK when you have finished your updates.
Creating a Banner Job in JAMS1. On the Home screen, click Create a Job.2. Select JAMS Integration Jobs.
JAMS 7.X Installation Guide
62 ©2020 HelpSystems, LLC. All Rights Reserved.

3. Select Create a Banner Procedure job. If you do not see the Jobs as shown below, close JAMS, install the Integration Packagain, and reopen JAMS.
4. On the Add a New JAMS Job Definition dialog, do the following:In the Folder field, select the Folder where the Job will be saved.In the Name field, enter a name for the Banner Job.Click OK. The Banner Job is created. The Source tab is displayed.
JAMS 7.X Installation Guide
63 ©2020 HelpSystems, LLC. All Rights Reserved.

5. On the Source tab of the Job, do the following:In the Banner Connection field, select your Banner Connection that was created in the Connection Store.In the Banner Job field, view the list of the available Jobs in Banner.In the Banner User field, select a JAMS Credential for the Banner user.In the Parameter Set field, select the Parameter Set that will be used when executing the Job. The ParameterSet will populate the Parameter tab within the JAMS Job.Review the Include .log File and Include .lis File check boxes. If there is sensitive information within the .logand .lis files and you do not want them in the JAMS Job log file, clear the check boxes for these two options.Click the Save and Close button.
JAMS 7.X Installation Guide
64 ©2020 HelpSystems, LLC. All Rights Reserved.

NOTE: If Banner Credentials have not yet been saved in JAMS, save them by clicking the Credentials Shortcutwithin the JAMS Shortcut Menu in the JAMS Client. When adding the Banner Credential in JAMS, ensure theDisplay Name and Logon Name are the actual Banner user name.
Setting up the V1 Banner Integration1. Install AgentX on the Banner application server. This Agent can be automatically deployed or manually installed,
specifically where the gjajobs.shl is stored.Use the links at the end of this topic to learn more about deploying JAMS Agents.
NOTE: If the Banner server is running Windows, you may deploy a JAMS Windows Agent to the Bannerserver.
2. From the JAMS Client, create a JAMS user that has permission to access the Banner application server and can also connectto the remote Linux server. This can also be the same user that was used to deploy the Agent.
3. From the JAMS Client, select the Execution Methods Shortcut to access the list of available Execution Method options.4. Double-click the Banner Execution Method to open its properties.5. Select the Template tab.6. Customize the template settings in the areas shown in the following screenshots.
Line 6 through 16- Set the source options for Oracle and Java.Line 21 - Source the Banner environment. Line 26 - Change the value to the Banner directory.Line 28 through 33 - This section is used to increment the Banner One-Up-Number. This section should not need to bechanged.Line 35 through 40 - This section ensures the Parameters on the JAMS Job are passed to the Banner server. This sectionshould not need to be changed. Line 44 - Ensure gjajobs.shl is referenced properly. You may need to SSH into the Banner server and manually confirm thisinformation.Line 53 through 66 - This section pulls the .lis and .log files from Banner. This section should not need to be changed.
JAMS 7.X Installation Guide
65 ©2020 HelpSystems, LLC. All Rights Reserved.

NOTE: The Banner Environment may also be set using a bash profile (source ~/.bash_profile) if theBanner environment variables have been set on the default bash profile.
NOTE: The Banner directory and the directory containing the gjajobs.shl need to be configured.
JAMS 7.X Installation Guide
66 ©2020 HelpSystems, LLC. All Rights Reserved.

NOTE: If sensitive data would be included in the Banner .log and .lis files, you may want to create a copyof the Banner Execution Method, and then remove the logging options from the copy's template. This newBanner Execution Method could be used in situations where Banner writes sensitive data to the Banneroutput files.
7. Make sure that any folder containing a JAMS Banner Job (including sub-folders) includes a path to the Banner Macro. Thispath must be populated in the Folders Properties (Properties -> Source Options -> Template Library).
By default, this path is C:\Program Files\MVPSI\JAMS\Scheduler\BannerMacros.xml
8. With the configuration complete, create a new JAMS Job and select the Banner Execution Method in the Job Definitiondialog.
9. On the Job Definition Source page, set the Banner User, select a Job Type from the list, and then enter the Job Name.
NOTE: The Job name should not include the folder path or the .shl extension. The Job name in JAMS mustbe in the same case as what is stored on the Banner server.
10. Double-click the newly completed JAMS Job to access its properties.11. Click the Properties tab and go to the Submit Options section.12. Edit the Job by selecting the Execute As and Agent properties. The Execute As should be a UNIX account with access to
JAMS AgentX.
Banner ParametersBanner parameters always have an associated number, as seen in the left side of the example below.
To pass parameters from JAMS to Banner, create JAMS Parameters with names that match the Banner parameter numbers on thegiven Job. Set the default value of the JAMS Parameter to what the value would be in Banner. Finally, you may set the ParameterPrompt in JAMS to match the Banner parameter name.
The example below shows how the above Banner Parameters would look when set on a JAMS Job:
JAMS 7.X Installation Guide
67 ©2020 HelpSystems, LLC. All Rights Reserved.

You may also specify multiple values for a single parameter by separating the values with pipe characters "|".
For example, if parameter 01 had a value of |Val1|Val2|Val3|, JAMS would send the following to Banner:
01 = Val1
01 = Val2
01 = Val3
Parameter 88 is special as it can include a "label" before each value. JAMS removes the value and then inserts it to the 88parameter so a value of “This,That” will be passed as: 88This = That.
For example, a value of |One,Federal|Two,Grant is passed as:
88One = Federal
88Two = Grant
You can also define the parameter as 88This and then the value only needs to contain "That".
JAMS 7.X Installation Guide
68 ©2020 HelpSystems, LLC. All Rights Reserved.

Dynamics AX Integration Pack
Configuring the .NET Business Connector
To ensure JAMS will run Dynamics AX Jobs, a Local Client (Where JAMS will retrieve the Job List) and a BusinessConnector (Where JAMS will run Jobs) must be properly configured.
Begin by opening Microsoft Dynamics
Open the Start MenuNavigate to Administrative ToolsOpen Microsoft Dynamics AX Configuration
NOTE: To properly configure Dynamics AX with JAMS, ensure Dynamics AX and the installed JAMS Add-on are forthe same MS Dynamics AX version. Installers for Dynamics AX versions can be found on the JAMS Support site.
Configure the Local ClientSet the Configuration Target to "Local Client" using the drop-down menuIn the Connection tab, verify the Application Object Server and Instance Name are correct.
If the server name cannot be changed, a new configuration must be created.
Click the Manage button, then select Create Configuration In the dialog box, give the configuration a name, select Active Configuration, then click OKHighlight the Server Name in the list of available servers and click Edit.
JAMS 7.X Installation Guide
69 ©2020 HelpSystems, LLC. All Rights Reserved.

In the dialog box that appears, fill in the Server Name, Instance Name, TCP Port and WSDL Port, then click OK.
Click ApplyClick Refresh ConfigurationClick OK to save the Configuration
NOTE: You will need the TCP/IP and WSDL ports open from the machine running the JAMS client to the AOS server in orderto create Dynamics AX jobs.
Configure the Business ConnectorThe Business Connector Configuration Target is the AOS where the JAMS job will connect to when the job actually runs.
Set the Configuration target to "Business Connector" using the drop down menu.In the Connection tab, verify the Application Object Server is correct and that the Instance Name is correct.
If the server name cannot be changed, a new configuration must be created.
Click the Manage button, then select Create configuration Give the configuration a name, select Active Configuration, then click OK
JAMS 7.X Installation Guide
70 ©2020 HelpSystems, LLC. All Rights Reserved.

Highlight the Server Name in the list of available servers and click Edit.In the dialog box that appears, fill in the Server Name, Instance Name, TCP Port and WSDL Port, then click OK.
JAMS 7.X Installation Guide
71 ©2020 HelpSystems, LLC. All Rights Reserved.

Click ApplyClick Refresh ConfigurationClick OK to save the configuration
NOTE: You will need these ports open from the machine running the JAMS client to the AOS server in order to createDynamics AX jobs.
Creating a User Credential for Dynamics AX Job ExecutionJAMS natively supports automation using many leading business applications, including Microsoft Dynamics AX solutions.Integration Packs for these and other preferred applications are selected during the JAMS installation process. Once theintegration is enabled, users can create, manage, deploy and monitor almost any kind of Dynamics AX job.
The JAMS Integration Pack for Microsoft Dynamics AX allows users to initiate Dynamics AX processes and take advantage ofmonitoring and report distribution capabilities using JAMS scheduling software.
When the integration runs, it initiates communication with and instructs Dynamics AX to schedule, execute AX jobs, batchjobs and reports as configured in JAMS. The process can then be monitored, canceled and restarted in either Dynamics AXor JAMS.
Follow the steps below to quickly add new JAMS user credentials.
1. Open the Credential Definitions view from the JAMS Menu.2. Click the Add button on the Control Bar.3. The JAMS Credential definition dialog opens.4. Set the Credential Name, Logon As, Password, and Password Confirmation values.
NOTE: The user defined here must have the authority to use the .NET Business Connector.
A Microsoft Dynamics AX User is only allowed to use the .NET Business Connector if they satisfy one of thefollowing Criteria:
JAMS 7.X Installation Guide
72 ©2020 HelpSystems, LLC. All Rights Reserved.
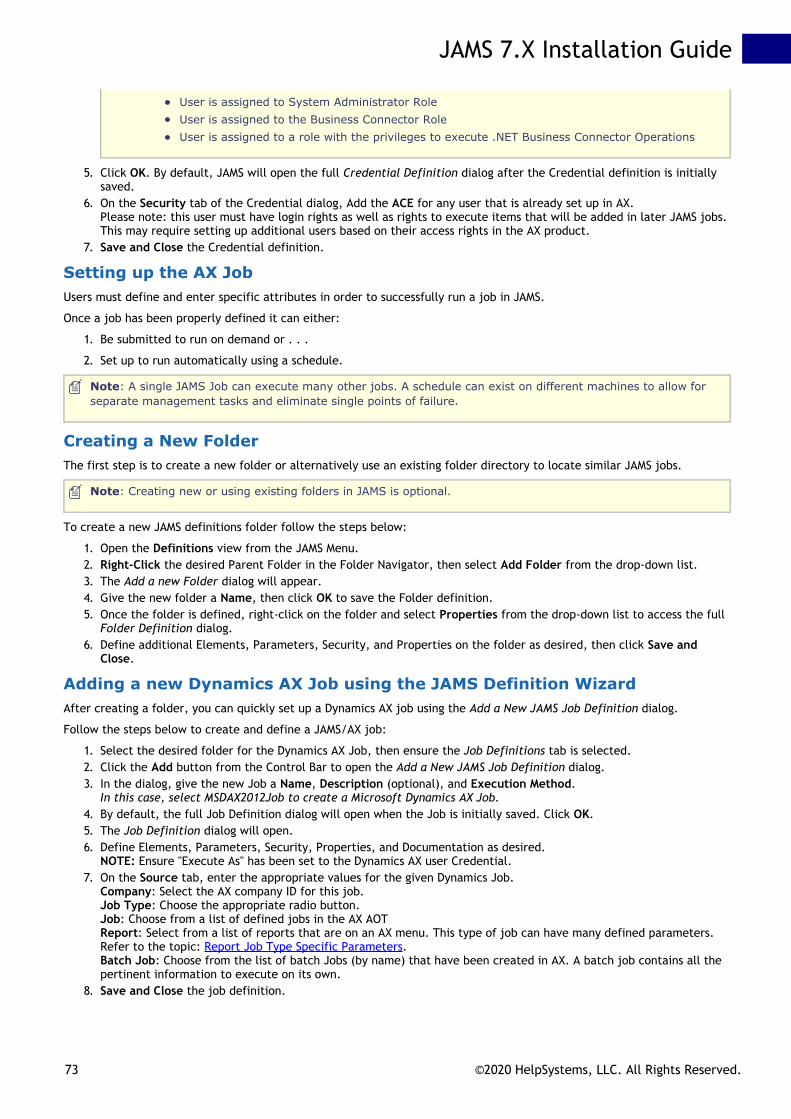
User is assigned to System Administrator RoleUser is assigned to the Business Connector RoleUser is assigned to a role with the privileges to execute .NET Business Connector Operations
5. Click OK. By default, JAMS will open the full Credential Definition dialog after the Credential definition is initiallysaved.
6. On the Security tab of the Credential dialog, Add the ACE for any user that is already set up in AX.Please note: this user must have login rights as well as rights to execute items that will be added in later JAMS jobs.This may require setting up additional users based on their access rights in the AX product.
7. Save and Close the Credential definition.
Setting up the AX JobUsers must define and enter specific attributes in order to successfully run a job in JAMS.
Once a job has been properly defined it can either:
1. Be submitted to run on demand or . . .
2. Set up to run automatically using a schedule.
Note: A single JAMS Job can execute many other jobs. A schedule can exist on different machines to allow forseparate management tasks and eliminate single points of failure.
Creating a New FolderThe first step is to create a new folder or alternatively use an existing folder directory to locate similar JAMS jobs.
Note: Creating new or using existing folders in JAMS is optional.
To create a new JAMS definitions folder follow the steps below:
1. Open the Definitions view from the JAMS Menu.2. Right-Click the desired Parent Folder in the Folder Navigator, then select Add Folder from the drop-down list.3. The Add a new Folder dialog will appear.4. Give the new folder a Name, then click OK to save the Folder definition.5. Once the folder is defined, right-click on the folder and select Properties from the drop-down list to access the full
Folder Definition dialog.6. Define additional Elements, Parameters, Security, and Properties on the folder as desired, then click Save and
Close.
Adding a new Dynamics AX Job using the JAMS Definition WizardAfter creating a folder, you can quickly set up a Dynamics AX job using the Add a New JAMS Job Definition dialog.
Follow the steps below to create and define a JAMS/AX job:
1. Select the desired folder for the Dynamics AX Job, then ensure the Job Definitions tab is selected.2. Click the Add button from the Control Bar to open the Add a New JAMS Job Definition dialog.3. In the dialog, give the new Job a Name, Description (optional), and Execution Method.
In this case, select MSDAX2012Job to create a Microsoft Dynamics AX Job.4. By default, the full Job Definition dialog will open when the Job is initially saved. Click OK.5. The Job Definition dialog will open.6. Define Elements, Parameters, Security, Properties, and Documentation as desired.
NOTE: Ensure "Execute As" has been set to the Dynamics AX user Credential.7. On the Source tab, enter the appropriate values for the given Dynamics Job.
Company: Select the AX company ID for this job.Job Type: Choose the appropriate radio button.Job: Choose from a list of defined jobs in the AX AOTReport: Select from a list of reports that are on an AX menu. This type of job can have many defined parameters.Refer to the topic: Report Job Type Specific Parameters.Batch Job: Choose from the list of batch Jobs (by name) that have been created in AX. A batch job contains all thepertinent information to execute on its own.
8. Save and Close the job definition.
JAMS 7.X Installation Guide
73 ©2020 HelpSystems, LLC. All Rights Reserved.

Available AX Job ParametersGeneric to all Job TypesInclude MS Dynamics Log
Debug
Language: Specify the language setting to be used when logging into AX Job.
ObjectServer: Specify the object server setting to be used when logging into AX Job.
Configuration: Specify the object server setting to be used when logging into AX Job.
Report Job Type Specific ParametersQuery: Specify the name of a query to be applied to the report before rendering it. This Query is set up in AX.
Destination: Specify where the report should be sent once rendered.
Possible Values
Value Meaning
1 Printer
3 Email
4 File
Printer Printer
Email Email
File File
Default value:
1. Printer
FileFormat: Specify the format of the file being exported by processing a report.
Possible Values
Value Meaning
ASCII Ascii
RTF Rich Text Format
HTML HTML
PDF PDF
PDFEMBEDFONTS PDF with embedded fonts
TEXTUTF8 Text in UTF8 encoding
1 Ascii
2 Rich Text Format
3 HTML
4 PDF
5 PDF with embedded fonts
6 Text in UTF8 encoding
Default value:
1. Ascii
FileName: Specify the name of the file the report will be exported to when the destination is set to File.
PrinterName: Specify the printer name report will be printed when the destination is set to Printer.
FirstPage:
Specify
Default
JAMS 7.X Installation Guide
74 ©2020 HelpSystems, LLC. All Rights Reserved.

0
LastPage:
Specify
Default
0
Copies:
Specify
Default
0
Subject: Specify the subject of an Email. Used when the destination is set to Email.
To: Enter an email address to send the report,
Job Specific ParametersParm: Specify a single parameter to be sent to a Job. Note the job in AX must be designed in such a way to accept a‘parm’
JAMS 7.X Installation Guide
75 ©2020 HelpSystems, LLC. All Rights Reserved.
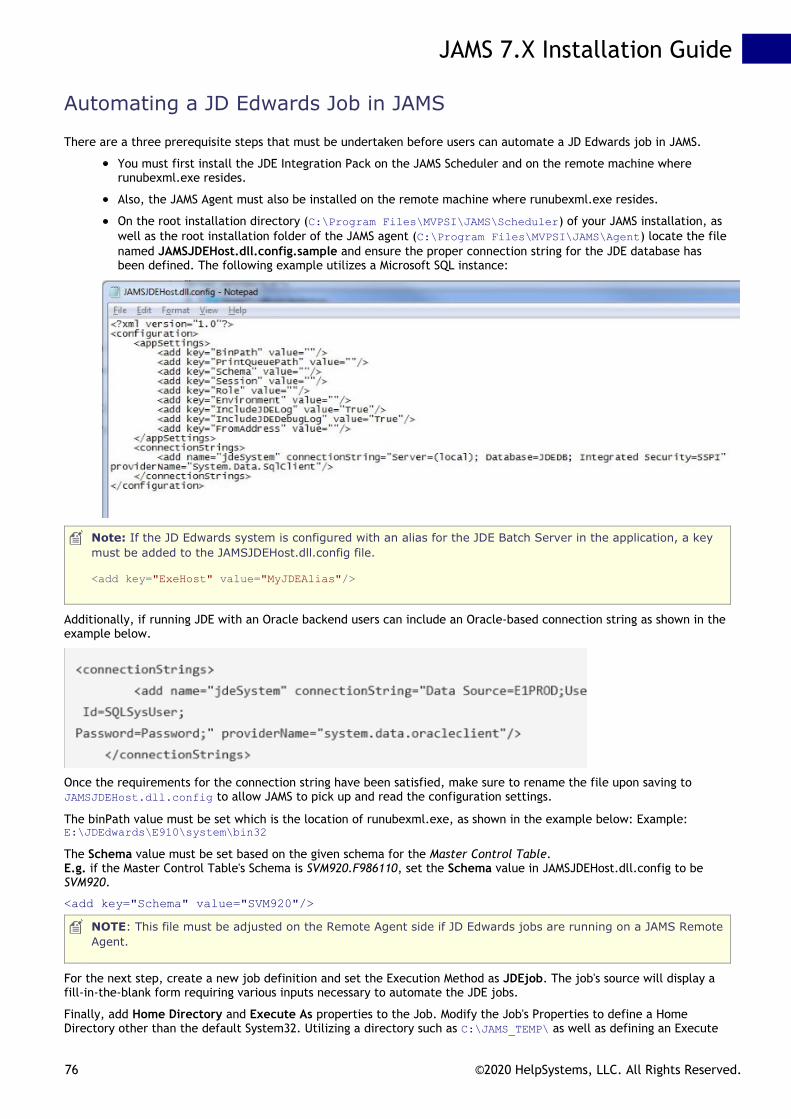
Automating a JD Edwards Job in JAMS
There are a three prerequisite steps that must be undertaken before users can automate a JD Edwards job in JAMS.
You must first install the JDE Integration Pack on the JAMS Scheduler and on the remote machine whererunubexml.exe resides.
Also, the JAMS Agent must also be installed on the remote machine where runubexml.exe resides.
On the root installation directory (C:\Program Files\MVPSI\JAMS\Scheduler) of your JAMS installation, aswell as the root installation folder of the JAMS agent (C:\Program Files\MVPSI\JAMS\Agent) locate the filenamed JAMSJDEHost.dll.config.sample and ensure the proper connection string for the JDE database hasbeen defined. The following example utilizes a Microsoft SQL instance:
Note: If the JD Edwards system is configured with an alias for the JDE Batch Server in the application, a keymust be added to the JAMSJDEHost.dll.config file.
<add key="ExeHost" value="MyJDEAlias"/>
Additionally, if running JDE with an Oracle backend users can include an Oracle-based connection string as shown in theexample below.
Once the requirements for the connection string have been satisfied, make sure to rename the file upon saving toJAMSJDEHost.dll.config to allow JAMS to pick up and read the configuration settings.
The binPath value must be set which is the location of runubexml.exe, as shown in the example below: Example:E:\JDEdwards\E910\system\bin32
The Schema value must be set based on the given schema for the Master Control Table.E.g. if the Master Control Table's Schema is SVM920.F986110, set the Schema value in JAMSJDEHost.dll.config to beSVM920.
<add key="Schema" value="SVM920"/>
NOTE: This file must be adjusted on the Remote Agent side if JD Edwards jobs are running on a JAMS RemoteAgent.
For the next step, create a new job definition and set the Execution Method as JDEjob. The job's source will display afill-in-the-blank form requiring various inputs necessary to automate the JDE jobs.
Finally, add Home Directory and Execute As properties to the Job. Modify the Job's Properties to define a HomeDirectory other than the default System32. Utilizing a directory such as C:\JAMS_TEMP\ as well as defining an Execute
JAMS 7.X Installation Guide
76 ©2020 HelpSystems, LLC. All Rights Reserved.
AS User Account that has permissions to run this job on Windows is recommended (See Defining RunAs User Accounts inJAMS).
This is the user accessing the C:\JAMS_TEMP directory on the remote JDE batch server, as well as accessing the MasterControl Database from within JDE if the Connection String is set for Integrated Security.
JAMS 7.X Installation Guide
77 ©2020 HelpSystems, LLC. All Rights Reserved.

Informatica Cloud In JAMS
The InformaticaCloud Execution Method allows users to automate any existing Informatica Cloud task, utilizingInformatica's REST API.
In This Topic:Installing the Informatica Cloud Add-onConfiguring the InformaticaCloud Execution MethodCreating Informatica Cloud Jobs in JAMS
Installing the Informatica Cloud Add-on1. Run the JAMS Installer2. On the Feature Selection step, ensure the JAMS Add-on for Informatica Cloud component is checked3. Complete the installation
NOTE: Un Checking components will uninstall those components.
Configuring the Informatica Cloud Execution Method
1. Run the JAMS Client as an administrator2. Select the Execution Methods shortcut from the JAMS Shortcuts Menu.3. Double click the InformaticaCloud execution method to open the Execution Method dialog.4. Select the Parameters tab, then double click the InformaticaEndpoint parameter to open the Parameters
dialog.5. Set the Default Value to the InformaticaEndpoint value that reflects the given environment
JAMS 7.X Installation Guide
78 ©2020 HelpSystems, LLC. All Rights Reserved.

6. Save and Close the Parameters dialog7. Save and Close the Execution Method dialog
NOTE: The user running Informatica Cloud Jobs must have full access to the Informatica Cloud.
Creating an Informatica Cloud Job in JAMS1. Select the desired folder for the Informatica Cloud Job, then ensure the Job Definitions tab is selected.2. Click the Add button from the Control Bar to open the Add a New JAMS Job Definition dialog.3. In the dialog, give the new Job a Name, Description (optional), and Execution Method.
In this case, select InformaticaCloud to create an Informatica Cloud Job.4. By default, the full Job Definition dialog will open when the Job is initially saved. Click OK.5. The Job Definition dialog will open.6. Define Elements, Parameters, Security, Properties, and Documentation as desired.7. On the Source tab, set the User (must have access to Informatica Cloud environment) and Task Type for
the relevant Informatica Cloud Task8. The Task list will automatically populate with all of the Tasks of the selected Type. Select the relevant
Task using the drop-down list9. When the relevant Informatica Cloud task has been configured in the new JAMS Job, click Save and Close
JAMS 7.X Installation Guide
79 ©2020 HelpSystems, LLC. All Rights Reserved.
Micro Focus in JAMS
In this Topic:Installing the Micro Focus Integration PackConfiguring Micro Focus Execution MethodCreating Micro Focus Jobs
Installing the Micro Focus Add-onTo work with Micro Focus in JAMS, users must install the JAMS Add-on for MicroFocus on the JAMS SchedulerServer, and must install a JAMS Agent and the JAMS Add-on for MicroFocus on the Micro Focus Server. If the JAMSScheduler and Micro Focus are installed on the same server, an Agent is not required.
Install the Micro Focus Add-on on the JAMS Scheduler Server
On the JAMS Scheduler Server, run the JAMS Installer.On the Feature Selection step, ensure the JAMS Add-on for MicroFocus component is checked inaddition to the required components. Do not un-check any components unless those components shouldbe uninstalled.Finish the installation.
NOTE: Un Checking components in the Feature Selection step will uninstall those components.
NOTE: The JAMS Server and Micro Focus Server should be running the same version of JAMS.
Install the JAMS Add-on for MicroFocus on the Micro Focus Server
On the Micro Focus Server, run the JAMS Installer.On the Feature Selection step, ensure the JAMS Agent and JAMS Add-on for MicroFocus componentsare checked.Finish the installation.
Deploy a JAMS Agent to the Micro Focus Server
1. Start the JAMS Client as an Administrator. 2. Select the Agents shortcut from the Menu.3. In the Agent Definitions view, select Add from the Control Bar to open the Add an Agent Definition dialog.4. In the dialog, give the new Agent a Name, select the Agent Type and Agent Platform, and if desired, a
Description.5. Click OK to save the initial Agent definition. By default, JAMS will automatically open the full Agent
Definition dialog after the Agent is initially saved.6. Set Agent Properties in the Agent Definition dialog, then Save and Close the Agent Definition dialog.7. In the Agent Definition view, select the Agent to be deployed.8. Select Deploy from the Control bar to open the Deploy JAMS Agent dialog.9. In the dialog, select the JAMS User that will be used when deploying the JAMS Agent.
This user should have all necessary permissions to the defined Micro Focus Agent.10. Click OK.
Configuring the Micro Focus Execution Method1. Run the JAMS Client as an Administrator.2. Select the Execution Methods shortcut from the Shortcuts Menu.3. Double-click the MFJob Execution Method to open the Properties dialog, then select the Parameters Tab.
JAMS 7.X Installation Guide
80 ©2020 HelpSystems, LLC. All Rights Reserved.

4. Use the Properties button to open the Parameter Properties dialog. Configure Micro Focus parameters as
needed for the given Micro Focus environment.
Parameter Description
MFBINPort Enter the MFBINP listener port. The default in JAMS is 9122. Listenerconfigurations are stored in the Micro Focus listener configuration file,seelistener.exe.config. If a listener port must be created for JAMS,reference the Micro Focus documentation.
MFServer Enter the name of the Micro Focus Server.
MFSubmitType Set the relevant Submit type from JES2 (Job Entry Subsystem 2), JES3,or VSE. The default is JES2.
5. Save and Close the Parameters dialog, then Save and Close the MFJob Execution Method.
Creating a Micro Focus Job1. Select the desired folder for the MicroFocus Job, then ensure the Job Definitions tab is selected. 2. Click the Add button from the Control Bar to open the Add a New JAMS Job Definition dialog.3. In the dialog, give the new Job a Name, Description (optional), and Execution Method.
In this case, select MFJob to create a Micro Focus Job.4. By default, the full Job Definition dialog will open when the Job is initially saved. Click OK.5. The Job Definition dialog will open.6. Define Elements, Parameters, Security, Properties, and Documentation as desired.
NOTE: An Execute As property should be configured with a user that has access to the Micro Focus Server.7. Paste or write the desired code in the Source.
JAMS 7.X Installation Guide
81 ©2020 HelpSystems, LLC. All Rights Reserved.

8. Save and Close the Job definition.
NOTE: The JCL Code in JAMS should match the syntax of Micro Focus code.
For more information on Micro Focus, consult the Official Micro Focus Documentation.
JAMS 7.X Installation Guide
82 ©2020 HelpSystems, LLC. All Rights Reserved.
The JAMS Management Pack for MS SCOM
The JAMS Management Pack provides monitoring of JAMS components and services using Microsoft SCOM 2007R2, 2012and 2012 R2. The monitoring includes availability, health and performance data collection. In addition to thesemonitoring capabilities, the Management Pack supports Agent tasks and Dashboard views. The Management Packsupports monitoring of JAMS on the Windows operating system only. Support for other operating systems may be addedat a later date.
Preparing to Import the Management PackTo ensure that target JAMS computers are managed by the SCOM Agents (preferably using LocalSystem account), theaccount used by the SCOM Agent must have adequate permissions to access JAMS program directory, the system registryand access JAMS data via its PowerShell provider.
Note: You can use local accounts on managed computers and/or dedicated domain accounts to executeManagement Pack rules and monitors; however, you will also need to configure the JAMS ‘Run As’ profileaccount using SCOM’s operations console as outlined below.
It is recommended the target computer with the JAMS Scheduler role have the PowerShell feature enabled or installed.Please refer to the JAMS Installation Guide for additional information. It is also recommended that you install the JAMSInstrumentation Integration for each managed JAMS Scheduler machine in order to reduce overhead and improvefunctionality of the Management Pack.
Importing the Management PackThe Management Pack consists of a single file: MVP.JAMS.mp
For general import instructions go to the article: http://technet.microsoft.com/en-us/library/cc974494.aspx
1. Log on to the computer using an account that is a member of the Operations Manager Administrators role withinthe Operations Manager management group.
2. From the Operations console, click Administration. When you run the Operations console on a computer that isnot a management server, the ‘Connect To Server’ dialog box appears. In the Server name text box type thename of the management server that you want the Operations console to connect to.
3. Right-click the Management Packs node and then click Import Management Packs.
4. The Import Management Packs wizard opens. Click the Add button and then select Add from disk.5. The Select Management Packs to import dialog box appears. Change to the directory that contains the JAMS
Management Pack file. Select MVP.JAMS and then click Open.6. On the Select Management Packs page the management pack that you selected for import should be listed.
Choose Import.7. The Import Management Packs page appears and displays the import progress. If there is a problem at any stage
of the import process select the management pack to view the status details. Click Close.
DiscoveryAfter importing the JAMS Management Pack, SCOM runs a discovery process on all managed Windows computers in orderto locate the JAMS installations. By default SCOM discovers all JAMS installations on Windows. No additionalconfiguration should be necessary for most customer environments.
Customizing the Management PackThe JAMS Management Pack is ‘sealed’, preventing any setting changes in the original Management Pack file. However,you can still perform and save customizations such as overrides for monitors, alert rules and views, and save them to adifferent management pack.
By default SCOM saves all customizations to the Default Management Pack. As a best practice you should instead createa new management pack for each sealed management pack you want to customize.
For more information about management pack customizations and the Default Management Pack, link to thearticle: http://go.microsoft.com/fwlink/?LinkId=217006
The Management Pack includes the following customizations:
JAMS Scheduler Performance Monitor. Note that there are 2 monitors targeting the JAMS Scheduler with andwithout the Instrumentation Integration installed (JAMS Instrumented Scheduler and JAMS Non-InstrumentedScheduler). Both monitors have identical thresholds for the number of currently executed or pending Job witha specific status.
You can disable these monitors and/or provide the overrides for the frequency as well as warning and error
JAMS 7.X Installation Guide
83 ©2020 HelpSystems, LLC. All Rights Reserved.
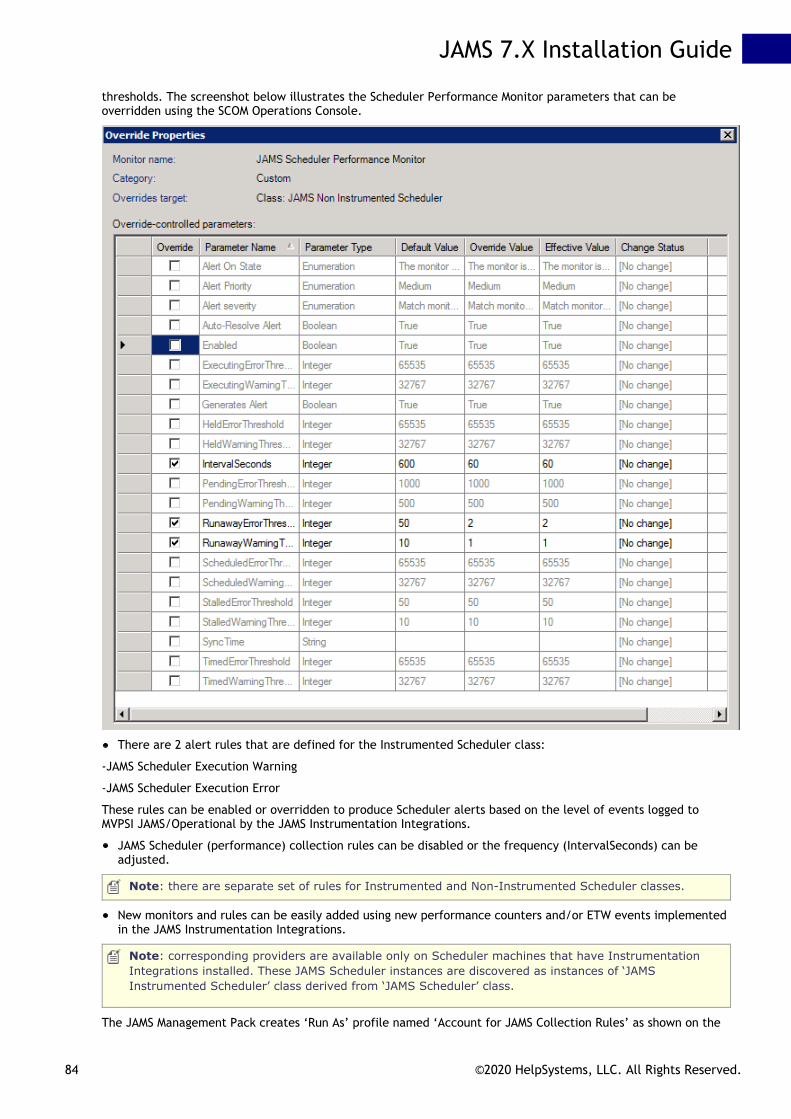
thresholds. The screenshot below illustrates the Scheduler Performance Monitor parameters that can beoverridden using the SCOM Operations Console.
There are 2 alert rules that are defined for the Instrumented Scheduler class:
-JAMS Scheduler Execution Warning
-JAMS Scheduler Execution Error
These rules can be enabled or overridden to produce Scheduler alerts based on the level of events logged toMVPSI JAMS/Operational by the JAMS Instrumentation Integrations.
JAMS Scheduler (performance) collection rules can be disabled or the frequency (IntervalSeconds) can beadjusted.
Note: there are separate set of rules for Instrumented and Non-Instrumented Scheduler classes.
New monitors and rules can be easily added using new performance counters and/or ETW events implementedin the JAMS Instrumentation Integrations.
Note: corresponding providers are available only on Scheduler machines that have InstrumentationIntegrations installed. These JAMS Scheduler instances are discovered as instances of ‘JAMSInstrumented Scheduler’ class derived from ‘JAMS Scheduler’ class.
The JAMS Management Pack creates ‘Run As’ profile named ‘Account for JAMS Collection Rules’ as shown on the
JAMS 7.X Installation Guide
84 ©2020 HelpSystems, LLC. All Rights Reserved.
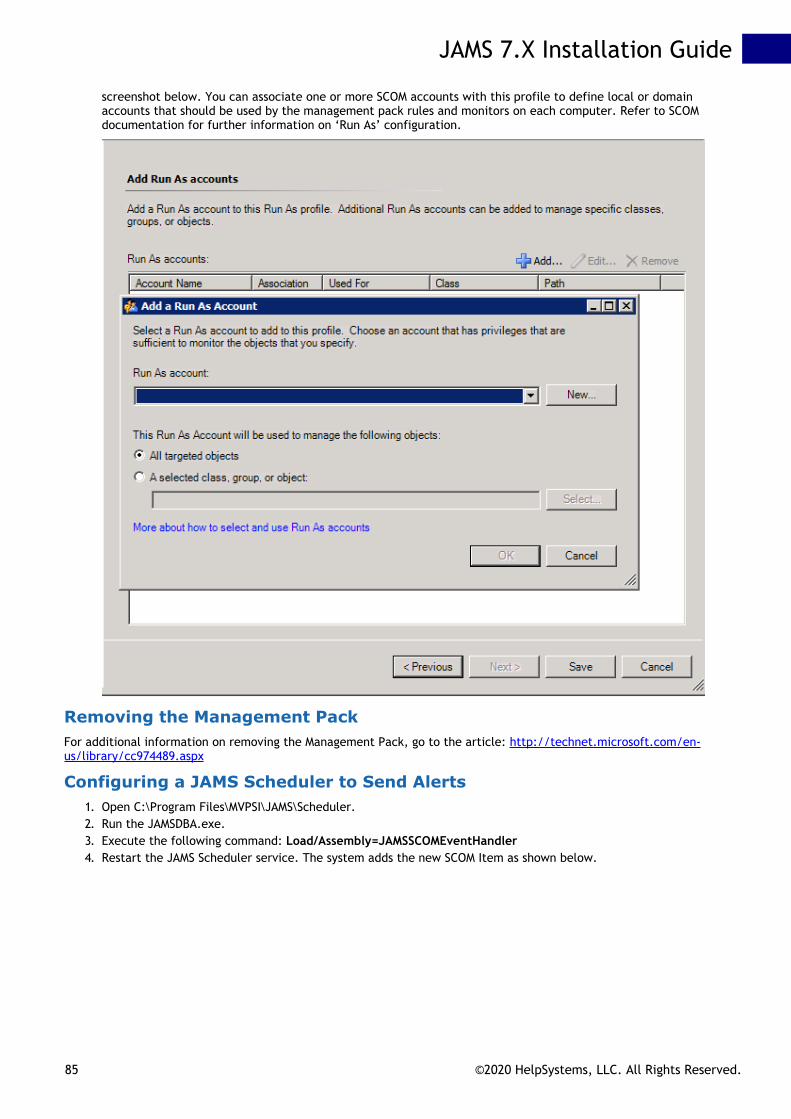
screenshot below. You can associate one or more SCOM accounts with this profile to define local or domainaccounts that should be used by the management pack rules and monitors on each computer. Refer to SCOMdocumentation for further information on ‘Run As’ configuration.
Removing the Management PackFor additional information on removing the Management Pack, go to the article: http://technet.microsoft.com/en-us/library/cc974489.aspx
Configuring a JAMS Scheduler to Send Alerts1. Open C:\Program Files\MVPSI\JAMS\Scheduler.2. Run the JAMSDBA.exe.3. Execute the following command: Load/Assembly=JAMSSCOMEventHandler4. Restart the JAMS Scheduler service. The system adds the new SCOM Item as shown below.
JAMS 7.X Installation Guide
85 ©2020 HelpSystems, LLC. All Rights Reserved.

5. Create a Job.6. Go to the Schedule tab.7. Add the new SCOM Item.
JAMS looks for the following parameters before sending an alert to SCOM. These parameters can originate from theJob’s execution method, the Job itself, or the folder the Job is located in.
SCOMPriority: sets the priority of the alert. This parameter should be one of three integer values, with 0 =low, 1 = medium, and 2 = high.
SCOMSeverity: sets the severity of the alert. The parameter also should include one of three values, with 0 =informational, 1= warning, and 2 = critical.
SCOMCustomField0 through SCOMCustomField9: these fields are passed to SCOM and intended for end-usercustomizations. The values are strings with JAMS performing symbol substitution, allowing you to referenceany JAMS property using the standard <<JAMS.Name>> syntax.
View Information in the Operations Manager ConsoleOnce imported, the JAMS Management Pack creates a root folder, MVP JAMS, that can be accessed via the SCOMOperations Console Monitoring pane using the following subfolders and views:
These Folders and Views display different aspects of monitoring data.
Root: MVP JAMS folderAlerts: Alert View for all JAMS AlertsComputer: State view for all computers within the JAMS computer group.Tasks: Task view of all JAMS Scheduler and Agent tasks queued via the SCOM Operations console to run on
JAMS 7.X Installation Guide
86 ©2020 HelpSystems, LLC. All Rights Reserved.

SCOM Agent computer.Components folder
-Scheduler State View
-Agent State View
-Client State View
Health Monitoring Folder
-Agent Health dashboard view displays JAMS Agent State View and Alerts.
-Scheduler Health dashboard view displays JAMS Scheduler state views and alerts.
Performance Folder
-Scheduler Performance View
JAMS Management Pack Agent TasksThe JAMS Management Pack provides a set of admin tasks that can be queued to run on a SCOM Agent machine; forexample, to start/stop the JAMS component services, query or submit JAMS Jobs, etc.
Some of these tasks are available via the Management Pack Alerts Knowledge links, while you can access JAMS Agent orScheduler tasks via the Operations console Actions pane in the Management Pack Agents and Schedulers status views.
The following tasks are available for JAMS Agents:
Start JAMS Agent Service
Stop JAMS Agent Service
The following task are available for the JAMS Scheduler:
Get Scheduler Jobs
Restart Jobs
Resume Jobs
Start JAMS Scheduler Executor Service
Start JAMS Scheduler Server Service
Start JAMS Scheduler Service
Start Job
Stop JAMS Scheduler Executor Service
Stop JAMS Scheduler Server Service
Stop JAMS Scheduler Service
Stop Job
Submit Job
Suspend Job
Troubleshooting the Management PackIf the Scheduler Performance Monitor and/or collection and alert rules are not working it may indicate that PowerShellis not available or JAMS PowerShell module is not installed on the target system. Please check the SCOM Active Alertsview and the SCOM application event log on the management server or management computers for the alerts or loggedevent notifications indicating PowerShell is not properly installed on the target computer or script execution errorssuch as insufficient Windows or JAMS permissions assigned to accounts used to run the management pack workflows.
By default these workflows use the account assigned to the SCOM Agent (such as LocalSystem), but you can customizethe ‘Run As’ settings as described in the topic: Importing and Customizing the JAMS Management Pack for MS SCOM.
Troubleshooting AlertsIf you are not receiving alerts from JAMS to SCOM, check the following:
Review the four steps made in the first section of this topic: Configuring a JAMS Scheduler to Send Alerts.Check the security permissions on the jamstoscom msmq private queue. Make sure that your SCOM activityuser or Run As user has full control over the queue.If you don't have a Run As account configured for JAMS in SCOM, the default Activity user(s) needs to have full
JAMS 7.X Installation Guide
87 ©2020 HelpSystems, LLC. All Rights Reserved.
control over the jamstoscom queue.Restart the JAMS Server after installing the SCOM Monitoring Agent Service.
JAMS 7.X Installation Guide
88 ©2020 HelpSystems, LLC. All Rights Reserved.
NeoBatch In JAMS
In This Topic:Installing the NeoBatch Integration PackConfiguring NeoBatch Execution MethodsCreating NeoBatch Jobs
Installing the NeoBatch Integration PackTo work with NeoBatch in JAMS, complete the following installations, then deploy an Agent to the NeoBatchServer.
On the NeoBatch Server:
NeoBatch Add-onJAMS Agent
NOTE: The NeoBatch Server must be running NeoBatch Server Edition. Developer or Client editions ofNeoBatch will not function with JAMS.
On the JAMS Clients that need to edit NeoBatch Jobs:
NeoBatch Add-onJAMS Client
NOTE: If the JAMS Scheduler is installed on the NeoBatch Server, an Agent is not required.
Install the NeoBatch Integration Pack and JAMS Agent on the NeoBatch Server
Run the JAMS Installer.On the Feature Selection step, check the JAMS Agent and JAMS Add-on for NeoBatch components.
NOTE: Un Checking components will uninstall those components.
NOTE: The JAMS Server and NeoBatch Server should be running the same version of JAMS.
Install the JAMS Add-on for NeoBatch on JAMS Clients
Run the JAMS Installer.On the Feature Selection step, check the JAMS Client and JAMS Add-on for NeoBatch components.
NOTE: Un Checking components will uninstall those components.
Deploy a JAMS Agent to the NeoBatch Server
1. Start the JAMS Client as an Administrator. 2. Select the Agents shortcut from the Menu.3. In the Agent Definitions view, select Add from the Control Bar to open the Add an Agent Definition dialog.4. In the dialog, give the new Agent a Name, select the Agent Type and Agent Platform, and if desired, a
Description.5. Click OK to save the initial Agent definition. By default, JAMS will automatically open the full Agent
Definition dialog after the Agent is initially saved.6. Set Agent Properties in the Agent Definition dialog, then Save and Close the Agent Definition dialog.7. In the Agent Definition view, select the Agent to be deployed.8. Select Deploy from the Control bar to open the Deploy JAMS Agent dialog.9. In the dialog, select the JAMS User that will be used when deploying the JAMS Agent.
JAMS 7.X Installation Guide
89 ©2020 HelpSystems, LLC. All Rights Reserved.

This user should have all necessary permissions to the defined NeoBatch Agent.10. Click OK.
Configuring NeoBatch Execution MethodsBefore creating Jobs with NeoBatch in JAMS, users must configure the NeoBatch Execution Methods. This willallow JAMS to connect to the NeoBatch Database when running Jobs.
1. Run the JAMS Client as an administrator.2. Select the Execution Methods shortcut from the JAMS Menu.3. Double-click the NeoBatchCatalog execution method to open the Execution Method Definition dialog.4. Select the Parameters tab, then double click on any parameter to open the Parameter Definition dialog.5. Configure the NeoBatch parameters as needed for the given NeoBatch environment:
Parameter Description
NeoBatchClassName Any alphanumeric string as determined by NeoBatchclasses - the name of the mainframe class name thatNeoBatch Jobs will run as.
NeoBatchDbConnectionString The connection string to the NeoBatch Database.Update this for the given environment.
NeoBatchSubmitAssembly The assembly used by NeoBatch. e.g.(Alchemy.NeoBatch.Submit, Version=3.2.1.30,Culture=neutral, PublicKeyToken=722c951c23d7c1ea)
The NeoBatch Submit Assembly Version and Key Token can be found by running the following powershellscript. Note that the PowerShell script should be edited to reflect the path toAlchemy.NeoBatch.Submit.dll for the given environment.
Return Submit Assembly and Public Key Token([system.reflection.assembly]::loadfile("c:\MyDLL.dll")).FullName
6. Click the Save and Close button to finalize the changes7. Repeat Steps 3-7 for the NeoBatchJcl execution method.
Creating NeoBatch Jobs in JAMSWith the Execution Methods properly configured in JAMS, NeoBatch Jobs may be run by:
Using NeoBatchJcl to run JCL code directly in JAMSUsing NeoBatchCatalog to reference and run an existing Job in the NeoBatch catalog
Run JCL directly in JAMS
1. Select the desired folder for the NeoBatch Job, then ensure the Job Definitions tab is selected. 2. Click the Add button from the Control Bar to open the Add a New JAMS Job Definition dialog.3. In the dialog, give the new Job a Name, Description (optional), and Execution Method.
In this case, select NeoBatchJcl to create a NeoBatch JCL Job.4. By default, the full Job Definition dialog will open when the Job is initially saved. Click OK.5. The Job Definition dialog will open.6. Define Elements, Parameters, Security, Properties, and Documentation as desired.
NOTE: An Execute As property should be configured with a user that has access to the NeoBatch Server.7. Paste or write the desired JCL code in the Source.
JAMS 7.X Installation Guide
90 ©2020 HelpSystems, LLC. All Rights Reserved.
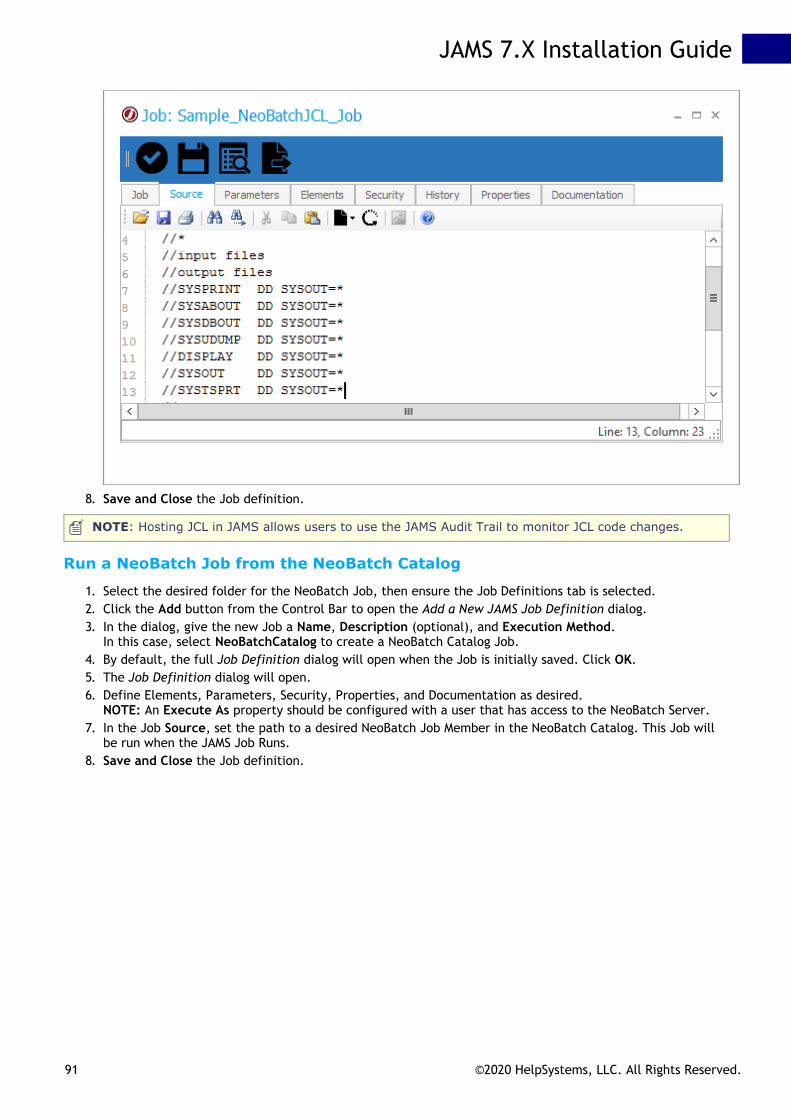
8. Save and Close the Job definition.
NOTE: Hosting JCL in JAMS allows users to use the JAMS Audit Trail to monitor JCL code changes.
Run a NeoBatch Job from the NeoBatch Catalog
1. Select the desired folder for the NeoBatch Job, then ensure the Job Definitions tab is selected. 2. Click the Add button from the Control Bar to open the Add a New JAMS Job Definition dialog.3. In the dialog, give the new Job a Name, Description (optional), and Execution Method.
In this case, select NeoBatchCatalog to create a NeoBatch Catalog Job.4. By default, the full Job Definition dialog will open when the Job is initially saved. Click OK.5. The Job Definition dialog will open.6. Define Elements, Parameters, Security, Properties, and Documentation as desired.
NOTE: An Execute As property should be configured with a user that has access to the NeoBatch Server.7. In the Job Source, set the path to a desired NeoBatch Job Member in the NeoBatch Catalog. This Job will
be run when the JAMS Job Runs.8. Save and Close the Job definition.
JAMS 7.X Installation Guide
91 ©2020 HelpSystems, LLC. All Rights Reserved.

Netezza in JAMS
In This Topic:Installing the Netezza Integration PackCreating Netezza Jobs
Installing the Netezza Integration PackTo use the JAMS Add-on for Netezza, users must complete the following installations:
Install the JAMS Scheduler and JAMS Add-on for Netezza on the JAMS ServerInstall JAMS AgentX on the Netezza Server, or on a Linux Machine with access to the Netezza Server
Installing Netezza for JAMS
1. On the JAMS Scheduler Server, run the JAMS Installer.2. On the Feature Selection step, ensure the JAMS Integration Pack for Netezza Integration Pack is
checked. Do not un-check any components unless those components should be uninstalled.3. Finish the installation.4. Deploy JAMS AgentX from the JAMS Scheduler Server to the Linux Machine, or install JAMS AgentX directly
onto the Linux Machine. See AgentX Documentation for detailed instructions on deploying JAMS AgentX.
NOTE: Un Checking components in the Feature Selection step will uninstall those components.
NOTE: To deploy and use JAMS AgentX, a user must be configured in JAMS with permissions to therelevant Netezza or Linux box where AgentX will be used.
Creating Netezza Jobs in JAMSJAMS Offers NetezzaLoad, NetezzaBackup, and NetezzaSQL Execution Methods to automate Netezza.
The NetezzaLoad Execution Method allows users to automate loads to the Netezza Server.
The NetezzaBackup Execution Method allows users to automate backups of Netezza Databases.
The NetezzaSQL Execution Method allows users to run a SQL Query on a Netezza system.
Creating NetezzaLoad Jobs in JAMS
1. Create a Job in the desired folder and choose the NetezzaLoad Execution Method.2. Select the desired folder for the NetezzaLoad Job, then ensure the Job Definitions tab is selected. 3. Click the Add button from the Control Bar to open the Add a New JAMS Job Definition dialog.4. In the dialog, give the new Job a Name, Description (optional), and Execution Method.
In this case, select NetezzaLoad to create a Netezza Load Job.5. By default, the full Job Definition dialog will open when the Job is initially saved. Click OK.6. The Job Definition dialog will open.7. Define Elements, Parameters, Security, Properties, and Documentation as desired.
NOTE: An Execute As property should be configured with a user that has access to Netezza.8. On the Source tab, define the available properties as follows:
Property Description
CA CertificateFile
Specified the pathname of the root CA certificate file on the clientsystem. This argument is used by Netezza clients who use peerauthentication to verify the Netezza host system. The default value isNULL, which skips the peer authentication process.
Security Specifies the security level that should be used for the session. The
JAMS 7.X Installation Guide
92 ©2020 HelpSystems, LLC. All Rights Reserved.

Level argument has 4 available values:0 - preferredUnsecured - This is the default value. Specify this optionwhen you would prefer an unsecured connection, but you will accept asecured connection if the Netezza system requires one.1 - OnlyUnsecured - Specify this option when you want an unsecuredconnection to the Netezza system. If the Netezza system requires asecured connection, the connection will be rejected.2 - preferredSecured - Specify this option when you want a securedconnection to the Netezza system, but you will accept an unsecuredconnection if the Netezza system is configured to use only unsecuredconnections.3 - onlySecured - Specify this option when you want a securedconnection to the Netezza system. If the Netezza system accepts onlyunsecured connections, or if you are attempting to connect to a Netezzasystem that is running a release prior to 4.5, the connection will berejected.
Table Specifies the table name. You can specify a fully qualified name for thisvalue.
Port Specifies the port to use, allowing users to override the default. Leave 0to use the default value.
LoginTimeout
Allows you to enter a different value, expressed in seconds, for the logintimeout. This overrides the default value of 30 seconds.
User Database username. [NZ_USER] by default.
Password Database password. [NZ_PASSWORD] by default.
Database Database name. [NZ_DATABASE] by default.
Host Netezza hostname or IP address. [NZ_HOST] by default.
Delimiter Specifies field-delimiter character.
Control File Specifies the control file.
Data File Specifies the datafile to load.
Log File Specifies the log file name. If the file exists, this appends to it.
Bad/RejectedRows File
Specifies the bad/rejected rows filename (overwrite if the file exists).
OutputDirectory
Specifies the output directory for the log and bad/rejected rows files.
Log File Size Session variable (LOAD_LOG_MAX_FILESIZE) that specifies the size (inMB) of the log and bad/rejected rows files. The default is 2000MB (2GB).
File BufferSize
Specifies the chunk size (MB for fileBufSize or bytes for fileBufByteSize)at which to read the data from the source file. Leave 0 to use defaultvalue.
Allow Replay Session variables (LOAD_REPLAY_REGION and MAX_QUERY_RESTARTS)that specify the number of query restarts for load continuation if a SPUhas been reset or failed over. If n is a valid non-zero number, it specifiesthe number of allowable query restarts. If n is 0, the system defaults tothe postgres default setting.
9. Save and Close the Job definition.
Creating NetezzaBackup Jobs in JAMS
1. Select the desired folder for the Netezza Backup Job, then ensure the Job Definitions tab is selected. 2. Click the Add button from the Control Bar to open the Add a New JAMS Job Definition dialog.
JAMS 7.X Installation Guide
93 ©2020 HelpSystems, LLC. All Rights Reserved.

3. In the dialog, give the new Job a Name, Description (optional), and Execution Method.In this case, select NetezzaBackup to create a Netezza Backup Job.
4. By default, the full Job Definition dialog will open when the Job is initially saved. Click OK.5. The Job Definition dialog will open.6. Define Elements, Parameters, Security, Properties, and Documentation as desired.
NOTE: An Execute As property should be configured with a user that has access to Netezza.7. On the Source tab, define the available properties as follows:
Property Description
User Database username. [NZ_USER] by default.
Password Database password. [NZ_PASSWORD] by default.
Database Database name. [NZ_DATABASE] by default.
Host Netezza hostname or IP address. [NZ_HOST] by default.
Directory Specifies a list of one or more space-separated, full pathnames of thedirectories where the data is to be stored. This option applies to filesystemonly (not veritas or tivoli). Users can specify up to 16 directories.
DirectoryFile
Specifies a file with a list of backup target directories, one per line.
Connector Names the connector to which you are sending the backup, eitherfilesystem, veritas, or tivoli.
ConnectorArguments
Specifies a colon-separated list of passthrough arguments for theconnector.
BackupType
Specifies backup type.
BackupUsers
Backs up all users and groups, and any privileges which were defined in thesystem database. Note that the command backs up all users and groupsregardless of whether they are referenced by any permission grants. Thesystem backs up all global adminlevel permissions (those that are notassociated with particular databases). The system does not back uppermissions associated with specific databases, because they are savedduring regular database backup of each database.
BackupSchemaOnly
Saves only the schema of the specified database, but not the user data intables or views. The schema includes the definitions of objects such astables, views, synonyms, sequences, and others, as well as any accessprivileges defined in the database. This option is an easy way to replicatean empty database schema within a Netezza system.
Number ofStreams
Backs up the data using the specified number of streams.
Backup SetID
Specifies the backup users with to user for incremental backup, rather thanthe default. Note: the default backup set is the most recent backup set ofthe database you specify. You can override the default by using this option.
SecretKeyword
Specifies a string value needed to generate a 256-bit symmetric key, whichis used to encrypt the host key in the backed up data.
8. Save and Close the Job definition.
Creating NetezzaSQL Jobs in JAMS
1. Create a Job in the desired folder and choose the NetezzaSQL Execution Method.2. Select the desired folder for the Netezza Job, then ensure the Job Definitions tab is selected. 3. Click the Add button from the Control Bar to open the Add a New JAMS Job Definition dialog.4. In the dialog, give the new Job a Name, Description (optional), and Execution Method.
JAMS 7.X Installation Guide
94 ©2020 HelpSystems, LLC. All Rights Reserved.

In this case, select NetezzaSQL to create a Netezza SQL Job.5. By default, the full Job Definition dialog will open when the Job is initially saved. Click OK.6. The Job Definition dialog will open.7. Define Elements, Parameters, Security, Properties, and Documentation as desired.
NOTE: An Execute As property should be configured with a user that has access to Netezza.8. On the Source tab, define the available properties as needed:
Property Description
User Database username. [NZ_USER] by default.
Password Database password. [NZ_PASSWORD] by default.
Database Database name. [NZ_DATABASE] by default.
Host Netezza hostname or IP address. [NZ_HOST] by default.
Query Specifies SQL query to run.
Query File Execute queries from this file.
UnalignedTableOutput
Specifies unaligned table output mode. Normally, output is well formattedwith white space added so that columns align. If you use this option, thenzsql command removes extra white space. Use this option when you wantto compare results between two systems or when you want to transferdata.
Print RowsOnly
Normally the nzsql command includes column headings and a summaryrow for all SQL queries. Use 'Print Rows Only' option to eliminate thecolumn headings and summary row. Use this option with the 'UnalignedTable Output' option to produce data in a transportable format.
ExpandTableOutput
Users may use this option to display the query results vertically instead ofin the default table/2D grid.
HTML TableOutput
Format the nzsql output to use HTML tags.
FieldSeparator
Set the field separator.
Output File File to send the output to.
9. Save and Close the Job definition.
JAMS 7.X Installation Guide
95 ©2020 HelpSystems, LLC. All Rights Reserved.

Paladin Setup and Configuration Guide
Paladin is a powerful event alerting application that integrates with your organization’s network.
Use this guide to get specific details on how to download, register and configure Paladin to define a customizedand effective monitoring and alerting environment for your organization.
In This Topic:Installing and Configuring Paladin
Registering PaladinCompleting the Paladin ProfileDownloading Certifications
Paladin NavigationViewing and Editing Objects
SecurityManaging Profiles and Inviting UsersMonitorsGroupsResponse TeamsResolving EventsSetting up the Paladin Alert in JAMS
Installing and Configuring PaladinTo get Paladin up and running, users at minimum need to install Paladin, Authenticate and Complete theirUser definition, and Download and run the Paladin Certificate Installer on the JAMS Server.
Installing JAMS and PaladinTo get started, you will need to download and install JAMS. After confirming the Paladin license purchase withyour account representative, download the production ready JAMS installer from the support site.
Next, Install JAMS and make sure that the JAMS Integration Pack for Paladin Event Handling has beeninstalled. If not, re-run the installer and enable the checkbox for Paladin on the Integration Packs step. Notethat unchecking any previously installed components will uninstall those items. For a detailed information onhow to install JAMS, please refer to the JAMS Installation Guide.
JAMS 7.X Installation Guide
96 ©2020 HelpSystems, LLC. All Rights Reserved.

NOTE: Un Checking components in the Integration Selection step will uninstall those components.
Back to Top
Registering PaladinAs a part of the purchase, your company profile is created by the account representative, triggering an emailinvitation to register Paladin.
1. Open the Email Invitation and click the Paladin link.
2. A web page will open. Click Select Authorization to open the Auth0 popup and begin the authorizationprocess for Paladin.
JAMS 7.X Installation Guide
97 ©2020 HelpSystems, LLC. All Rights Reserved.

3. In the Auth0 popup, click the Sign Up tab, then select from one of the authentication methods. Usershave the option of social network credentials, or using a standard Email & Password with the Sign Upbutton.In this example, Microsoft is used. Clicking the Microsoft button immediately takes the new user to theMicrosoft Login page.NOTE: If the Email/Password option is used, a confirmation email will be sent to the listed emailaddress. Users must follow the instructions in that email to verify their account.
4. Enter the credentials for the given authentication method, and resolve any additional dialog boxes thatmay appear.
JAMS 7.X Installation Guide
98 ©2020 HelpSystems, LLC. All Rights Reserved.

5. With the verification process complete, users will be taken to the Paladin site,https://paladinweb.mvpsi.com/
6. On any first login, users should immediately complete their Paladin profile before navigating throughor editing Paladin.
Back to Top
Completing the Paladin ProfileThe first action any user should take in Paladin is to complete their Paladin Profile. Failure to complete thePaladin Profile may result in errors.
1. From the Paladin Site, click the Vertical Ellipses in the upper right-hand corner. A drop-down willappear.
2. Select the Edit Profile option from the drop-down list.
JAMS 7.X Installation Guide
99 ©2020 HelpSystems, LLC. All Rights Reserved.
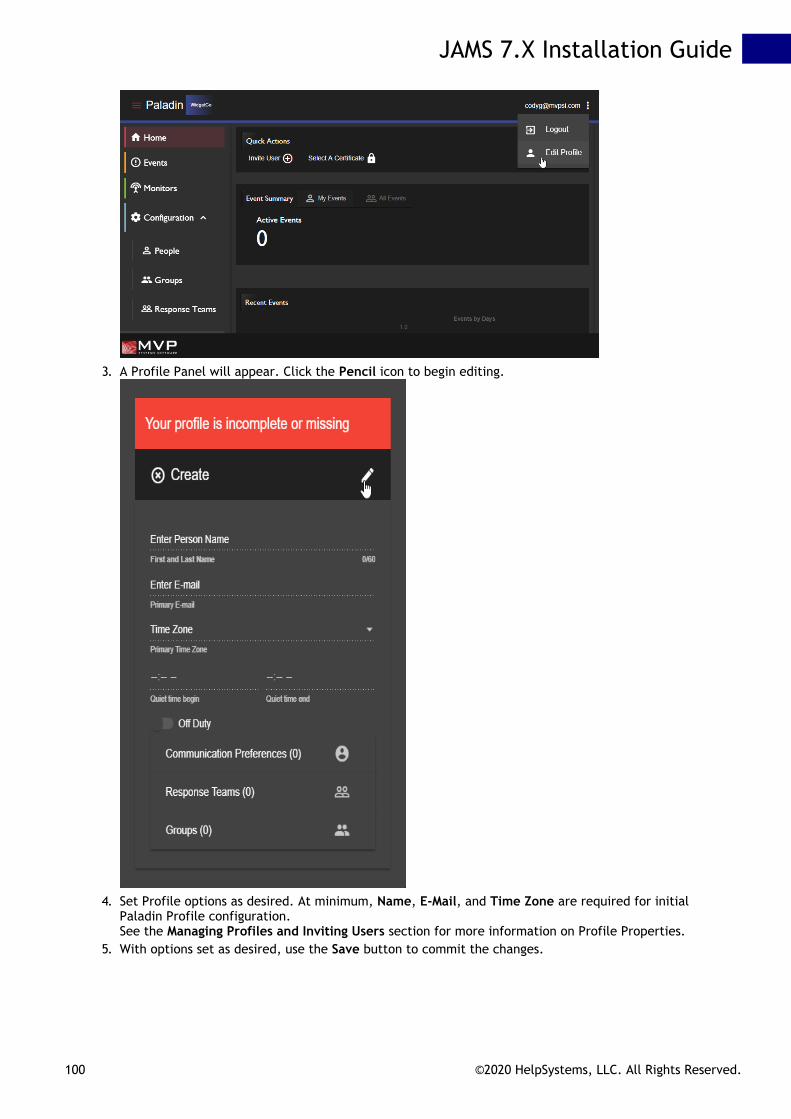
3. A Profile Panel will appear. Click the Pencil icon to begin editing.
4. Set Profile options as desired. At minimum, Name, E-Mail, and Time Zone are required for initialPaladin Profile configuration.See the Managing Profiles and Inviting Users section for more information on Profile Properties.
5. With options set as desired, use the Save button to commit the changes.
JAMS 7.X Installation Guide
100 ©2020 HelpSystems, LLC. All Rights Reserved.

Back to Top
Installing the Paladin CertificatePaladin must be able to send and receive messages on port 443 to function properly. Ensure port 443 is open,then follow the instructions below to download and install the Paladin certificate.
1. Navigate to the Paladin Home page, then click on Select a Certificate in the Quick Actions section.2. Select the certificate from the pop-up list, then use the Download button to download the Certificate
Installer.
JAMS 7.X Installation Guide
101 ©2020 HelpSystems, LLC. All Rights Reserved.

3. Open the PaladinApiCertificateInstaller from the download location.NOTE: Users MUST run the installer on the JAMS Server.
4. Read and accept the License Agreement, then click Install.The Installer will add the Paladin certificate to the Local Computer's Personal Certificates.
5. Once the installer has completed, click Finish.
JAMS 7.X Installation Guide
102 ©2020 HelpSystems, LLC. All Rights Reserved.

6. Open the JAMS Client as an administrator on the JAMS Server.NOTE: If the JAMS Client was open when the certificate was installed, restart the JAMS Client.
7. Open the Configuration shortcut, then select the Integrations tab to view the Paladin IntegrationProperties.
8. Set the Certificate property to the Friendly Name of the Paladin Certificate,"ApiPFXCertificate_wixCert_0". Users that attempt to rename the Paladin Certificate must use theircustom Friendly Name as the Certificate value.
9. Save the Certificate value change. Do Not edit any other Paladin Properties.10. JAMS is now ready to send Paladin alerts through the use of Paladin Event Elements.
Back to Top
Paladin NavigationThe Navigation Panel, located on the left side of the Paladin UI, contains a set of shortcuts for each Paladin
JAMS 7.X Installation Guide
103 ©2020 HelpSystems, LLC. All Rights Reserved.
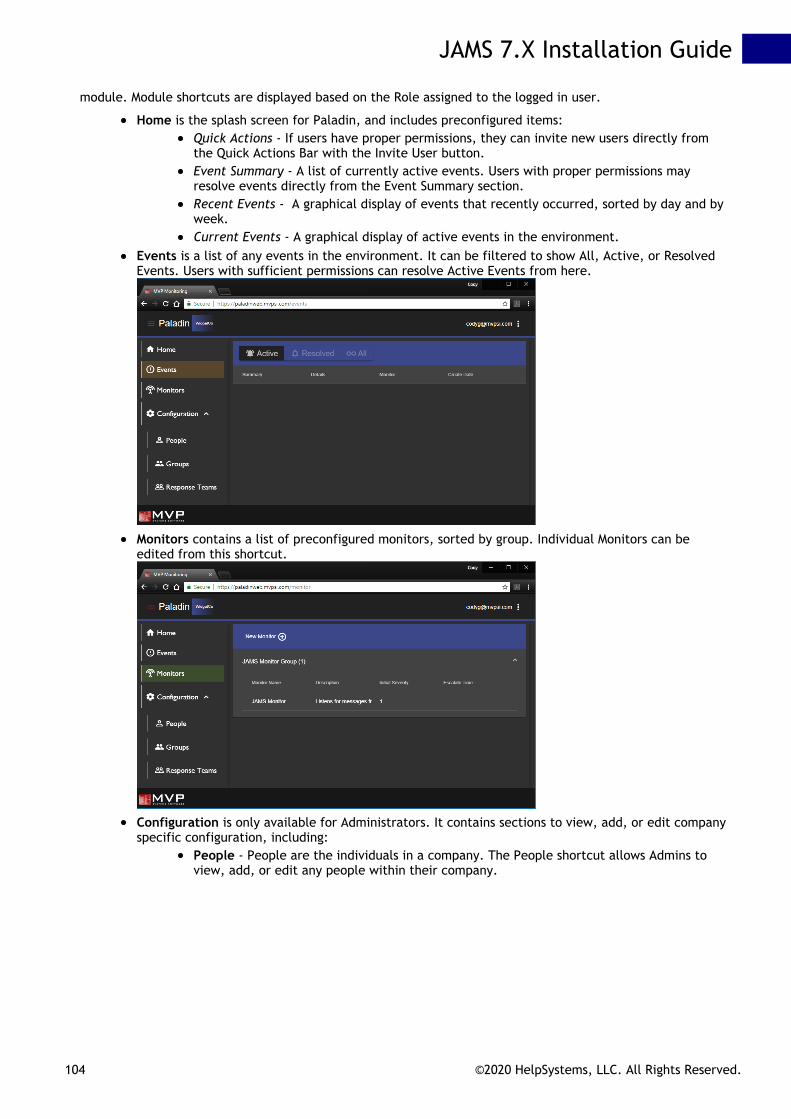
module. Module shortcuts are displayed based on the Role assigned to the logged in user.
Home is the splash screen for Paladin, and includes preconfigured items:Quick Actions - If users have proper permissions, they can invite new users directly fromthe Quick Actions Bar with the Invite User button.Event Summary - A list of currently active events. Users with proper permissions mayresolve events directly from the Event Summary section.Recent Events - A graphical display of events that recently occurred, sorted by day and byweek.Current Events - A graphical display of active events in the environment.
Events is a list of any events in the environment. It can be filtered to show All, Active, or ResolvedEvents. Users with sufficient permissions can resolve Active Events from here.
Monitors contains a list of preconfigured monitors, sorted by group. Individual Monitors can beedited from this shortcut.
Configuration is only available for Administrators. It contains sections to view, add, or edit companyspecific configuration, including:
People - People are the individuals in a company. The People shortcut allows Admins toview, add, or edit any people within their company.
JAMS 7.X Installation Guide
104 ©2020 HelpSystems, LLC. All Rights Reserved.

Groups - Groups are used to logically organize other objects, including People. The Groupsshortcut allows Admins to view, add, or edit any Groups within their company.
Response Teams - Response teams are logical assortments of People or Groups used todetermine who will be notified when an event occurs. The Response Teams shortcut allowsAdmins to view, add, or edit any Response Teams within their company.
Status Manager - View and update the status of Response Team members todetermine availability to receive notifications.
JAMS 7.X Installation Guide
105 ©2020 HelpSystems, LLC. All Rights Reserved.
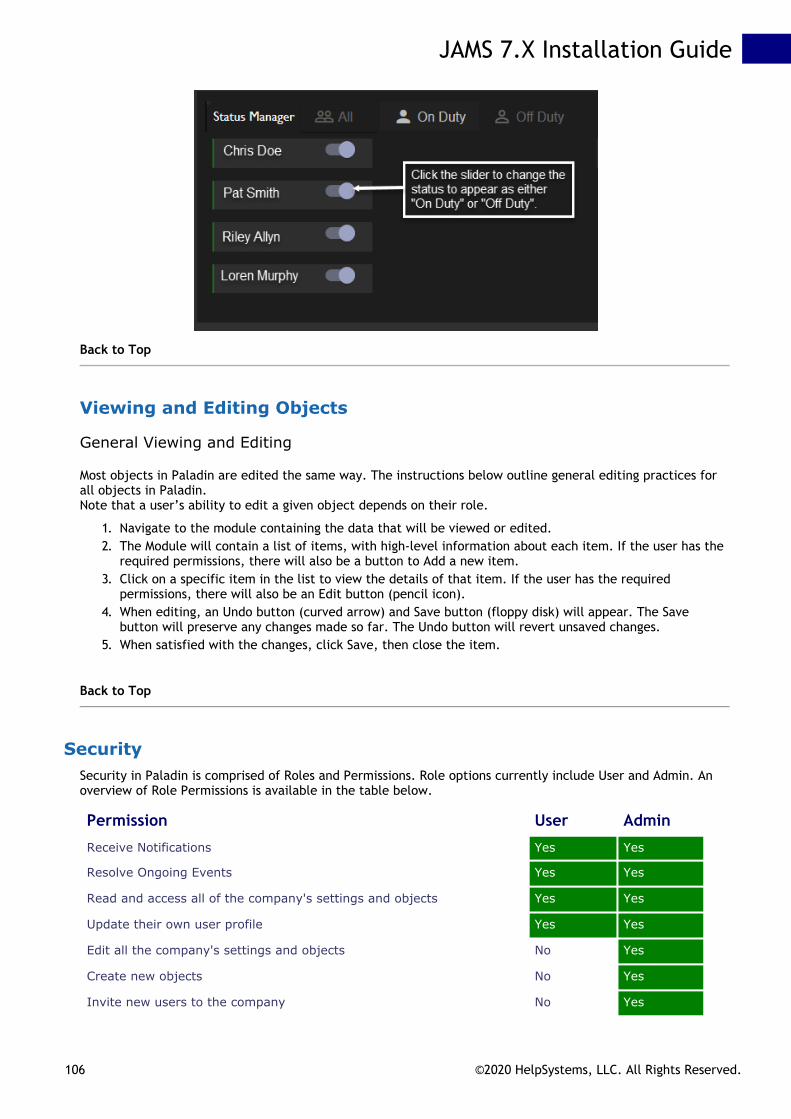
Back to Top
Viewing and Editing Objects
General Viewing and Editing
Most objects in Paladin are edited the same way. The instructions below outline general editing practices forall objects in Paladin.Note that a user’s ability to edit a given object depends on their role.
1. Navigate to the module containing the data that will be viewed or edited.2. The Module will contain a list of items, with high-level information about each item. If the user has the
required permissions, there will also be a button to Add a new item.3. Click on a specific item in the list to view the details of that item. If the user has the required
permissions, there will also be an Edit button (pencil icon).4. When editing, an Undo button (curved arrow) and Save button (floppy disk) will appear. The Save
button will preserve any changes made so far. The Undo button will revert unsaved changes.5. When satisfied with the changes, click Save, then close the item.
Back to Top
SecuritySecurity in Paladin is comprised of Roles and Permissions. Role options currently include User and Admin. Anoverview of Role Permissions is available in the table below.
Permission User Admin
Receive Notifications Yes Yes
Resolve Ongoing Events Yes Yes
Read and access all of the company's settings and objects Yes Yes
Update their own user profile Yes Yes
Edit all the company's settings and objects No Yes
Create new objects No Yes
Invite new users to the company No Yes
JAMS 7.X Installation Guide
106 ©2020 HelpSystems, LLC. All Rights Reserved.
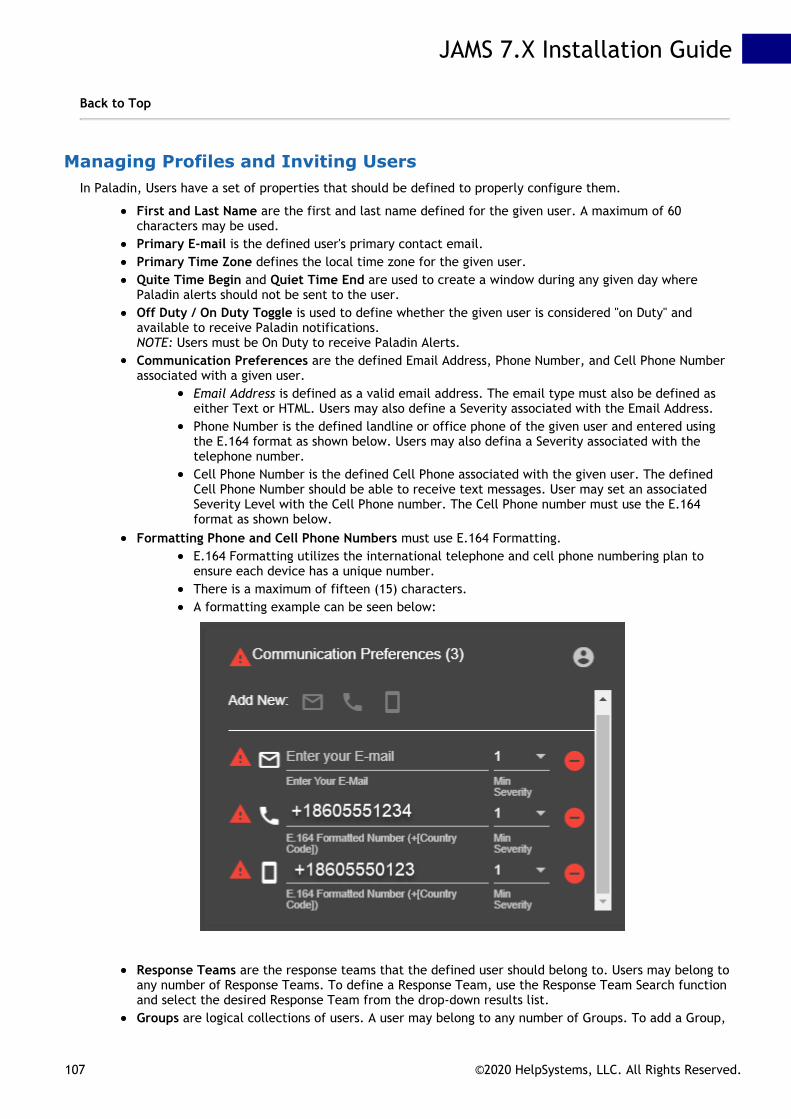
Back to Top
Managing Profiles and Inviting UsersIn Paladin, Users have a set of properties that should be defined to properly configure them.
First and Last Name are the first and last name defined for the given user. A maximum of 60characters may be used.Primary E-mail is the defined user's primary contact email.Primary Time Zone defines the local time zone for the given user.Quite Time Begin and Quiet Time End are used to create a window during any given day wherePaladin alerts should not be sent to the user.Off Duty / On Duty Toggle is used to define whether the given user is considered "on Duty" andavailable to receive Paladin notifications.NOTE: Users must be On Duty to receive Paladin Alerts.Communication Preferences are the defined Email Address, Phone Number, and Cell Phone Numberassociated with a given user.
Email Address is defined as a valid email address. The email type must also be defined aseither Text or HTML. Users may also define a Severity associated with the Email Address.Phone Number is the defined landline or office phone of the given user and entered usingthe E.164 format as shown below. Users may also defina a Severity associated with thetelephone number.Cell Phone Number is the defined Cell Phone associated with the given user. The definedCell Phone Number should be able to receive text messages. User may set an associatedSeverity Level with the Cell Phone number. The Cell Phone number must use the E.164format as shown below.
Formatting Phone and Cell Phone Numbers must use E.164 Formatting.E.164 Formatting utilizes the international telephone and cell phone numbering plan toensure each device has a unique number.There is a maximum of fifteen (15) characters.A formatting example can be seen below:
Response Teams are the response teams that the defined user should belong to. Users may belong toany number of Response Teams. To define a Response Team, use the Response Team Search functionand select the desired Response Team from the drop-down results list.Groups are logical collections of users. A user may belong to any number of Groups. To add a Group,
JAMS 7.X Installation Guide
107 ©2020 HelpSystems, LLC. All Rights Reserved.
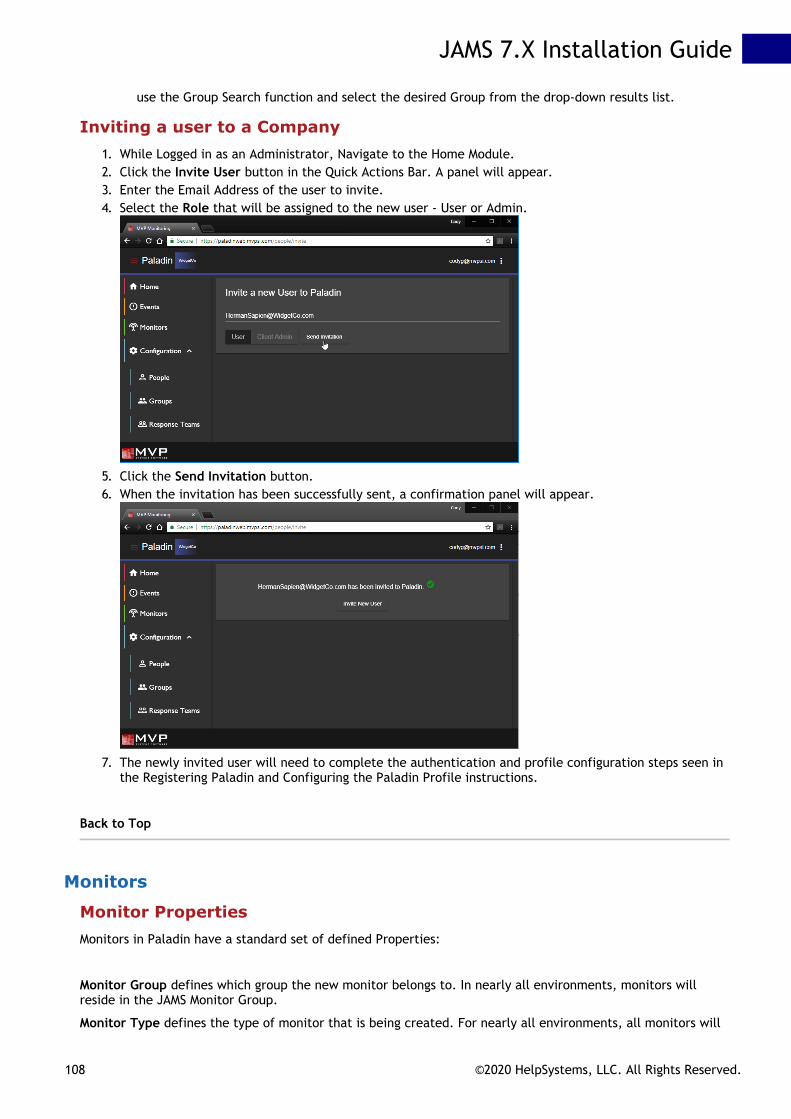
use the Group Search function and select the desired Group from the drop-down results list.
Inviting a user to a Company1. While Logged in as an Administrator, Navigate to the Home Module.2. Click the Invite User button in the Quick Actions Bar. A panel will appear.3. Enter the Email Address of the user to invite.4. Select the Role that will be assigned to the new user - User or Admin.
5. Click the Send Invitation button.6. When the invitation has been successfully sent, a confirmation panel will appear.
7. The newly invited user will need to complete the authentication and profile configuration steps seen inthe Registering Paladin and Configuring the Paladin Profile instructions.
Back to Top
Monitors
Monitor PropertiesMonitors in Paladin have a standard set of defined Properties:
Monitor Group defines which group the new monitor belongs to. In nearly all environments, monitors willreside in the JAMS Monitor Group.
Monitor Type defines the type of monitor that is being created. For nearly all environments, all monitors will
JAMS 7.X Installation Guide
108 ©2020 HelpSystems, LLC. All Rights Reserved.

be the JAMS Monitor Type.
Monitor Name is the friendly name used to reference the monitor.
Description is the long-text reference of the monitor.
Default Severity for new events is the severity that will be assigned to events coming into the monitor whenno severity was set on the Paladin Element. Severity levels range from 1 to 10.
Event Escalation is a slider that defines how often Event severity should be raised for the given monitor.
Primary Response Team is the response team that should be responsible for responding to events on the givenmonitor.
Creating Monitors1. Navigate to the Monitors section, then use the New Monitor button to open the create panel.
2. On the Create panel, enter the properties as necessary, using the JAMS Monitor Group and JAMSMonitor Type.
3. When the properties have been set as desired, Save and Close the create panel.
JAMS 7.X Installation Guide
109 ©2020 HelpSystems, LLC. All Rights Reserved.

Back to Top
GroupsGroups are collections of objects and may include any number of defined People, Groups, or Response Teams.
Group PropertiesGroup Name is the friendly name used to reference the group.
Description is the long-text reference of the group.
Creating Groups1. Navigate to the Groups section, then use the New Group button to open the create panel.
JAMS 7.X Installation Guide
110 ©2020 HelpSystems, LLC. All Rights Reserved.

2. On the Create panel, enter the properties and add People, Groups, or Response Teams as necessary.
3. When the properties have been set as desired, save and close the create panel.
JAMS 7.X Installation Guide
111 ©2020 HelpSystems, LLC. All Rights Reserved.

Back to Top
Response Teams
Response Team PropertiesResponse Team Name is the friendly name used to reference the Response Team.
Description is the long-text reference of the monitor.
Ignore on Duty? is a toggle used to determine whether the Response Team should ignore the "On Duty" statusset at the user level.
Ignore Quiet Time? is a toggle used to determine whether the Response Team should ignore the "Quiet Time"set at the user level.
Escalation Response Team is a secondary response team that will be notified if the given response team doesnot resolve an event.
Notification Interval defines how often notifications should be repeated.
Notification Repeat Count defines how many times notifications should repeat on the defined NotificationInterval.
Minimum Notification Severity is the minimum Event Severity that will trigger notifications to the responseteam.
Creating Response Teams1. Navigate to the Response Teams section, then use the New Response Team button to open the create
panel.
JAMS 7.X Installation Guide
112 ©2020 HelpSystems, LLC. All Rights Reserved.

2. On the Create panel, enter the properties as necessary.
3. When the properties have been set as desired, save and close the create panel.
JAMS 7.X Installation Guide
113 ©2020 HelpSystems, LLC. All Rights Reserved.

Back to Top
Resolving EventsPaladin's new UI allows users to resolve events directly from the Paladin Web App. To Resolve Events:
From the Home Module
1. Navigate to the Event Summary in the Home Module.2. Find the event in the Event Summary list and click the Resolve button.3. The Event will be resolved with the default messages of "Manually resolved by <<user>>." The current
date and time are recorded on the resolution.
From the Events Module
1. Navigate to the Events Module.2. Find the event that should be resolved and click it. A panel will appear.3. Toggle the message to either default or custom as desired.4. Click the Resolve button.5. If the event was resolved with the custom message option set, a panel will appear for entering the
custom message.
JAMS 7.X Installation Guide
114 ©2020 HelpSystems, LLC. All Rights Reserved.
Back to Top
Setting up the Paladin Alert in JAMSUsers must set up the Paladin Alerts in JAMS. To set up these Alerts, a Paladin Event Element is added to a Jobor Folder.
Configuring a Paladin Alert1. Open the Properties dialog for the Job or Folder where the Paladin alert will be added.2. Click on the Elements tab, the use the Add... button to open the Add Element dialog.3. Select Paladin Event from the EventHandler section, then click Next >.4. Set the Element Properties as desired, then click Finish.5. Save & Close the Job or Folder.
Paladin Properties
Property Description
Paladin
Monitor ID The Monitor(s) that should receive the event. Use a comma separated list to definemultiple Monitors.
Severity The defined severity of this event. If left as 0, the severity will be set to the Monitor'sdefault severity.
Summary A summary of the event.
Detail A detailed description of the event.
Ask for aresponse
Should JAMS ask for a response from Paladin and take action based on the response?
Upload theLog file
Should the Job's log file be uploaded to Paladin?
Events
Entry Success Defines whether the event should be triggered when the entry completes with asuccessful completion severity.
EntryInformational
Defines whether the event should be triggered when the entry completes with aninformational completion severity.
Entry Warning Defines whether the event should be triggered when the entry completes with a warningcompletion severity.
Entry Error Defines whether the event should be triggered when the entry completes with an errorcompletion severity.
Entry Fatal Defines whether the event should be triggered when the entry completes with a fatalcompletion severity.
Entry Started Defines whether the event should be triggered when the Job has started executing.
Normal Event Defines whether the event should be triggered when a normal event occurs.
Low Event Defines whether the event should be triggered when a low event occurs.
ModerateEvent
Defines whether the event should be triggered when a moderate event occurs.
JAMS 7.X Installation Guide
115 ©2020 HelpSystems, LLC. All Rights Reserved.

High Event Defines whether the event should be triggered when a high event occurs.
Urgent Event Defines whether the event should be triggered when an urgent event occurs.
Critical Event Defines whether the event should be triggered when a critical event occurs.
Status
Enabled A toggle used to enable or disable the Event Handler.
Back to Top
JAMS 7.X Installation Guide
116 ©2020 HelpSystems, LLC. All Rights Reserved.
PeopleSoft Integration Pack
The JAMS Integration Pack for PeopleSoft allows users to initiate PeopleSoft processes and take advantage ofPeopleSoft’s monitoring and report distribution capabilities using the sophisticated and reliable JAMS schedulingsoftware.
The JAMS Integration Pack acts as an intermediary between JAMS and PeopleSoft. When the adapter runs itinitiates communication with the PeopleSoft Process Scheduler and instructs PeopleSoft to execute thePeopleSoft jobs as configured in JAMS. The process can then be monitored, canceled and restarted in eitherPeopleSoft or JAMS.
Supported Process TypesThe JAMS Integration Pack for PeopleSoft can initiate the following process types delivered by PeopleSoft:
Application Engine
COBOL SQL
CRW Online
Crystal
Crystal Check
nVision
nVision-Report
nVision-ReportBook
PS Job
SQR Process
SQR Report
XML Publisher
In addition, the JAMS Integration Pack for PeopleSoft can initiate custom process types that you have created.For best results, these custom processes must be “API Aware".
For more information, please refer to the PeopleSoft Process Scheduler PeopleBook under “Using Process RequestAPIs”.
Supported PeopleTools VersionsThe JAMS Integration Pack for PeopleSoft works with PeopleTools versions 8.48 or newer.
To request certification for additional PeopleTools releases, please contact your JAMS customer servicerepresentative.
Supported Operating SystemsThe JAMS Integration Pack for PeopleSoft works with any Unix/Linux or Windows operating system that issupported by Oracle.
Note: the Windows operating system must run Microsoft PowerShell.
JAMS Integration Overview and Process FlowThe JAMS Integration Pack for PeopleSoft consists of two parts:
1. The JAMS components that capture information about any PeopleSoft processes that you want to scheduleand . . .
2. An Application Engine process called MVP_SCHDPRCS that schedules the jobs through the PeopleSoftProcess Scheduler API, monitors and cancels the job when necessary.
The following diagram illustrates the detailed process flow of the JAMS Integration for PeopleSoft.
JAMS 7.X Installation Guide
117 ©2020 HelpSystems, LLC. All Rights Reserved.

Installing the JAMS Integration Pack for PeopleSoftThe JAMS Integration for PeopleSoft contains an Application Engine program and supporting app designer objectsto schedule the jobs. These objects are included in a project that must be installed and operating in thePeopleSoft environment.
1. Launch the Application Designer and connect to your PeopleSoft instance in 2-tier Mode.2. Navigate to Tools > Copy Project > From File.
JAMS 7.X Installation Guide
118 ©2020 HelpSystems, LLC. All Rights Reserved.

3. From your JAMS Scheduler machine, copy the MVP_JAMS_ADDON_FOR_PS.ini andMVP_JAMS_ADDON_FOR_PS.xml files from the Program Files\MVPSI\JAMS\Scheduler directory. Pastethem into a folder named, MVP_JAMS_ADDON_FOR_PS that is manually created on the PeopleSoft server.
Browse to the location of that newly created folder. The Project name “MVP_JAMS_ADDON_FOR_PS”appears in the lower box. Click the Select button.
4. The Copy from File dialog box appears. Select the Copy button.
JAMS 7.X Installation Guide
119 ©2020 HelpSystems, LLC. All Rights Reserved.

5. Set the default tablespace.
The JAMS Integration for PeopleSoft requires one table to maintain its scheduling process. Your DBA willlikely want to specify which tablespace to utilize, depending on your organization’s database platform.
Set the tablespace using the steps below:
Expand the “Records” node in the project tree.Double-click MVP_SCHD_LOG to open the record definition.Navigate to Tools > Data Administration > Set Tablespace. The Change Space windowappears.Select the appropriate Platform and Tablespace Name depending on your organizations databaseplatform and click OK.Save the record.
JAMS 7.X Installation Guide
120 ©2020 HelpSystems, LLC. All Rights Reserved.

6. Build the Project to create the PS_MVP_SCHD_RCNTL table:
Navigate to Build > Project.Select the Create Tables and Create Indexes checkboxes.Choose the Execute SQL Now button.Select the Build buttonTo complete the installation process, review the log file for errors.
Configuring the Execution MethodBefore JAMS can execute a Job, additional information about your PeopleSoft environment will need to beprovided. To get started, follow the steps below.
1. Open the JAMS Client as an administrator.2. Select the Execution Methods shortcut from the Menu.3. Locate the listed PeopleSoft Job Execution Methods.
If your organization’s PeopleSoft Process Scheduler runs on Unix or Linux, open thePeopleSoftJobSsh.If your PeopleSoft Process Scheduler runs on Windows, open PeopleSoftJobWindows.
4. When the definition dialog opens, navigate to the Parameters tab.
5. Locate the parameter PS_ORACLE_HOME. Open the parameter definition dialog by double clicking theparameter or highlight it and choose the Properties button.
6. Enter the correct information in the Default Value field.
JAMS 7.X Installation Guide
121 ©2020 HelpSystems, LLC. All Rights Reserved.

8. Click the right arrow on the window header to move to the next parameter. Define parameters asnecessary to connect to the PeopleSoft environment.
9. Save and Close the Parameters dialog10. Save and Close the Execution Method dialog.
Note: All but the "Additional_Param_#" parameters must be reviewed. Below is a reference tablethat describes each parameter.
Parameter Description Example
DBInstance DatabaseInstance/Name
EP91DMO
DBType Database Type ORACLEMSSQLDB2SYBASE
PS_ORACLE_HOME Oracle Home /u01/app/oracle/product/11.1.0/db_1
PS_ORACLE_SID Oracle DatabaseName
EP91DMO
PS_TUXDIR Tuxedo Directory /usr/local/psoft/Oracle/Middleware/tuxedo10gR3
PS_HOME PeopleSoft Home. Youcan use$ORACLE_SID as avariable.
/usr/local/psoft$ORACLE_SID
PS_CFG_HOME Configuration Home /usr/local/psoft/cfg850
PS_SQRDIR SQR Directory. Youcan use$ORACLE_SID as avariable.
/usr/local/psoft$ORACLE_SID/bin/sqr/ORA/bin
PS_SERVER_CFG Server Configuration $PS_CFG_HOME/appserv/prcs$ORACLE_SID/psprcs.cfg
JAMS 7.X Installation Guide
122 ©2020 HelpSystems, LLC. All Rights Reserved.
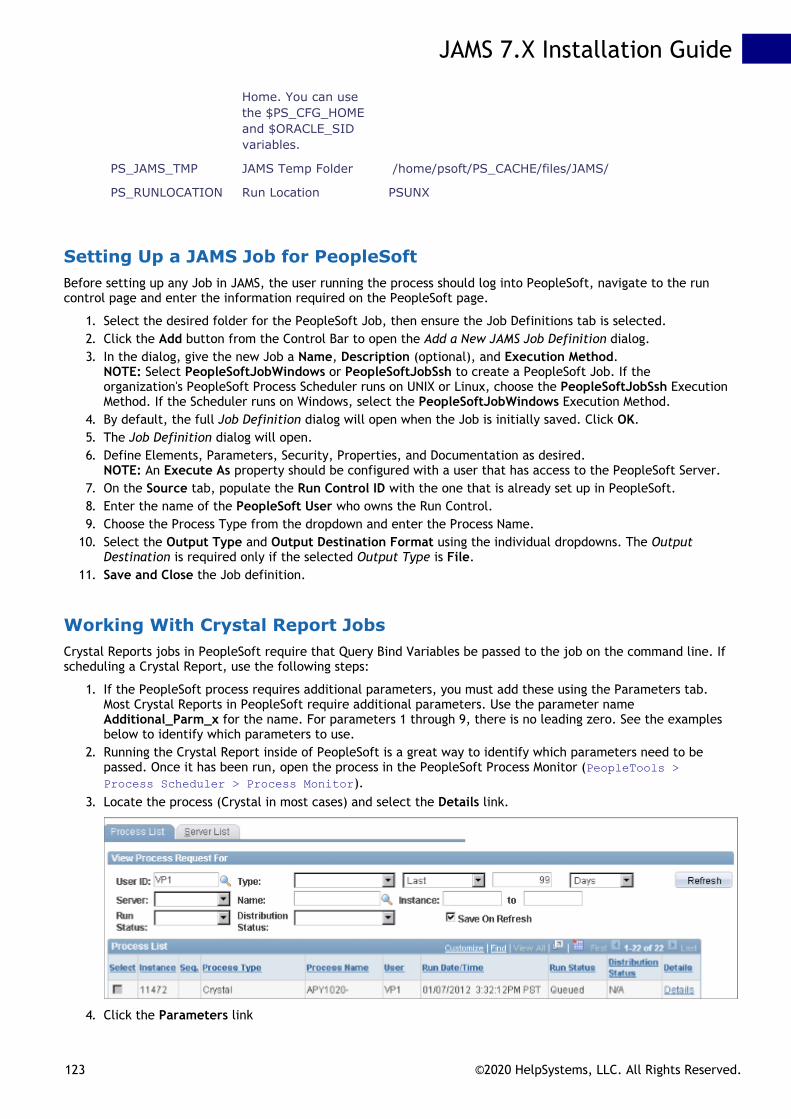
Home. You can usethe $PS_CFG_HOMEand $ORACLE_SIDvariables.
PS_JAMS_TMP JAMS Temp Folder /home/psoft/PS_CACHE/files/JAMS/
PS_RUNLOCATION Run Location PSUNX
Setting Up a JAMS Job for PeopleSoftBefore setting up any Job in JAMS, the user running the process should log into PeopleSoft, navigate to the runcontrol page and enter the information required on the PeopleSoft page.
1. Select the desired folder for the PeopleSoft Job, then ensure the Job Definitions tab is selected. 2. Click the Add button from the Control Bar to open the Add a New JAMS Job Definition dialog.3. In the dialog, give the new Job a Name, Description (optional), and Execution Method.
NOTE: Select PeopleSoftJobWindows or PeopleSoftJobSsh to create a PeopleSoft Job. If theorganization's PeopleSoft Process Scheduler runs on UNIX or Linux, choose the PeopleSoftJobSsh ExecutionMethod. If the Scheduler runs on Windows, select the PeopleSoftJobWindows Execution Method.
4. By default, the full Job Definition dialog will open when the Job is initially saved. Click OK.5. The Job Definition dialog will open.6. Define Elements, Parameters, Security, Properties, and Documentation as desired.
NOTE: An Execute As property should be configured with a user that has access to the PeopleSoft Server.7. On the Source tab, populate the Run Control ID with the one that is already set up in PeopleSoft.8. Enter the name of the PeopleSoft User who owns the Run Control.9. Choose the Process Type from the dropdown and enter the Process Name.
10. Select the Output Type and Output Destination Format using the individual dropdowns. The OutputDestination is required only if the selected Output Type is File.
11. Save and Close the Job definition.
Working With Crystal Report JobsCrystal Reports jobs in PeopleSoft require that Query Bind Variables be passed to the job on the command line. Ifscheduling a Crystal Report, use the following steps:
1. If the PeopleSoft process requires additional parameters, you must add these using the Parameters tab.Most Crystal Reports in PeopleSoft require additional parameters. Use the parameter nameAdditional_Parm_x for the name. For parameters 1 through 9, there is no leading zero. See the examplesbelow to identify which parameters to use.
2. Running the Crystal Report inside of PeopleSoft is a great way to identify which parameters need to bepassed. Once it has been run, open the process in the PeopleSoft Process Monitor (PeopleTools >Process Scheduler > Process Monitor).
3. Locate the process (Crystal in most cases) and select the Details link.
4. Click the Parameters link
JAMS 7.X Installation Guide
123 ©2020 HelpSystems, LLC. All Rights Reserved.

5. Locate the Command Line and review all data, especially at the end of the command line. Most of thetime the required parameters come after the “ORIENTL” parameter. In the following example, the fiverequired parameters are: "US001" "2007-11-07" "2011-11-07" "VP1" "posted_voucher_listing". When addingthese parameters into JAMS make sure to exclude the double quotes.
6. In the following example, the Crystal APY1020 requires additional parameters.
JAMS 7.X Installation Guide
124 ©2020 HelpSystems, LLC. All Rights Reserved.

7. Here’s an example of Parameter 1. Notice the Default Value is US001 without the double quotes.
8. Create the remaining parameters (2007-11-07" "2011-11-07" "VP1" "posted_voucher_listing").9. Save and Close the Parameters dialog.
JAMS 7.X Installation Guide
125 ©2020 HelpSystems, LLC. All Rights Reserved.

10. Save and Close the Job Definition.11. When the JAMS Job is submitted, the five parameters will appear (as long as the parameters are not
hidden).
Note: The additional parameters do not necessarily have to be populated when creating theJAMS Job, but the parameter name itself must be set up at that time.
JAMS 7.X Installation Guide
126 ©2020 HelpSystems, LLC. All Rights Reserved.

Running SAS Jobs with JAMS
Windows Command Procedure MethodJAMS can execute SAS programs using the Windows Command Procedure Execution Method.
Below is an example of an SAS job-source:
c:\YourSASPath\sas.exe
-autoexec d:\sas\autoexec.sas
-config d:\sas\config.sas
-nologo
-log d:\work\logs\pull_sample200102131244.log
-sysin d:\YourDir\YourProgram.sas
SAS Execution MethodAs an alternative, you can create a SAS execution method from within JAMS. This allows the source tab of a Jobdefinition to contain the contents of your SAS program.
1. Select the Execution Methods shortcut from the Menu.2. Click the Add button from the Control Bar to open the Add an Execution Method dialog.3. In the Add an Execution Method dialog, give the Execution Method a Name, Description (optional), and
Base Method.NOTE: Use the Command Base Method for SAS.
4. Click OK. By default, JAMS will open the full Execution Method Definition dialog when the ExecutionMethod is initially saved.
5. Edit the Parameters, Template, Properties, and Job Properties as necessary.6. Save and Close the Execution Method.
JAMS VBScript Execution MethodSAS Projects (EGP files) can be saved as Visual Basic scripts from the SAS Enterprise Guide and executed usingthe JAMS VBScript Execution Method.
JAMS 7.X Installation Guide
127 ©2020 HelpSystems, LLC. All Rights Reserved.

Using SAP Execution Methods to Run JAMS Jobs
JAMS offers two Execution Methods that support job execution processes using SAP outside of the SAP BusinessObjects Data Services Integration Pack.
SAPJobV2 acts as a replacement for the current SAPJob and SAPStandardJob Execution Methods.SAPProcessChain provides process chain execution handling in JAMS
To use the SAP Process Chain and SAP Job Execution Methods, users must have the following:
SAP ERP Central Component (ECC) 6.0, with SAP Enhancement Package 7 (EHP) or newerSAP NetWeaver 7.4 or newerSAP Environment must be a Unicode system
The two screenshots below highlights these new Execution Methods along with their respective Parameters.
JAMS 7.X Installation Guide
128 ©2020 HelpSystems, LLC. All Rights Reserved.
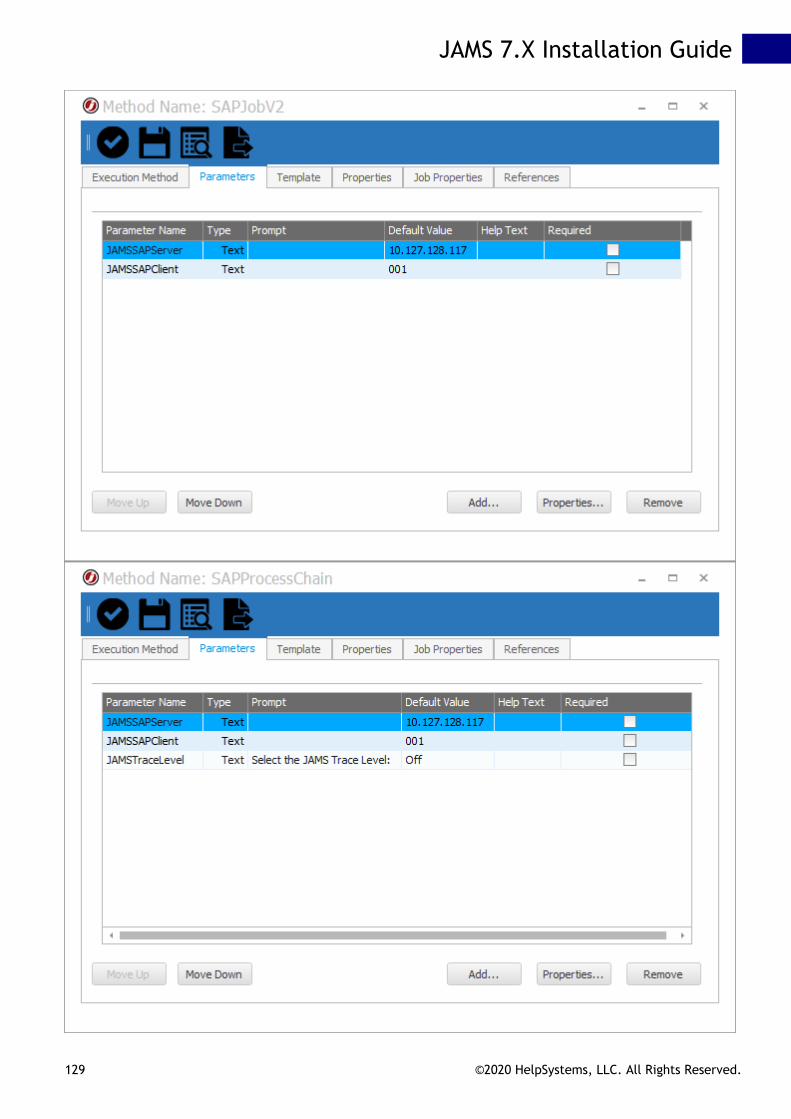
JAMS 7.X Installation Guide
129 ©2020 HelpSystems, LLC. All Rights Reserved.
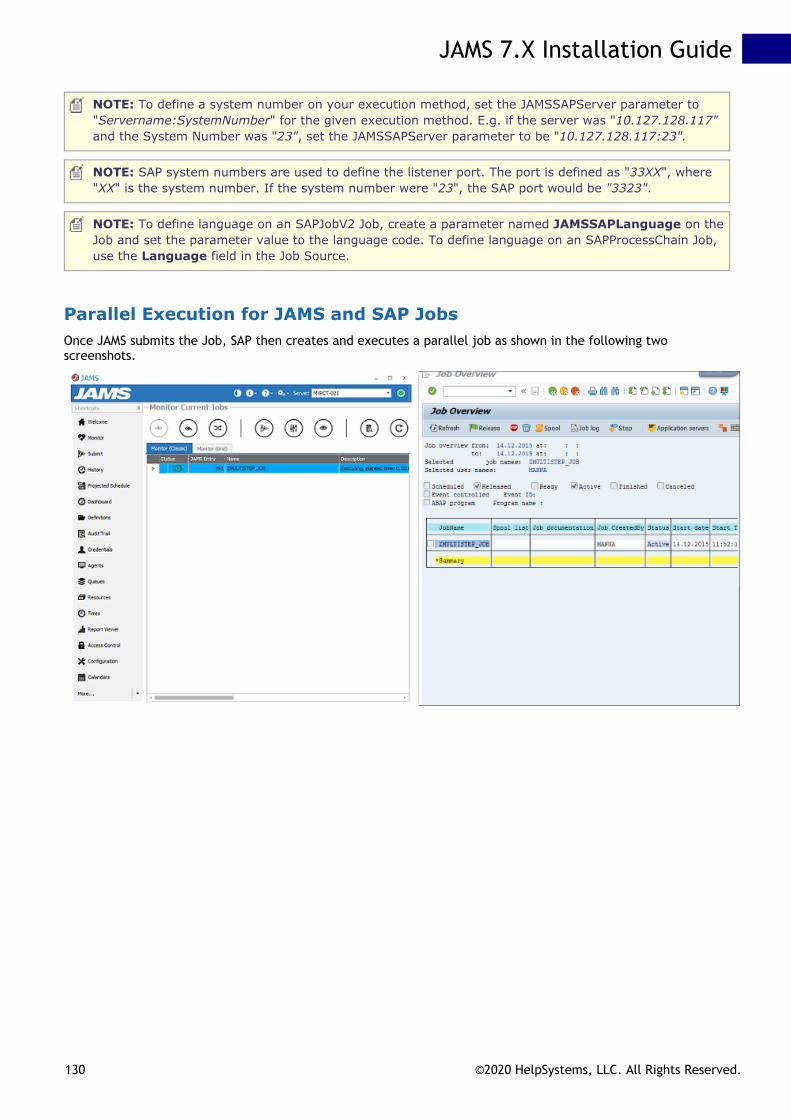
NOTE: To define a system number on your execution method, set the JAMSSAPServer parameter to"Servername:SystemNumber" for the given execution method. E.g. if the server was "10.127.128.117"and the System Number was "23", set the JAMSSAPServer parameter to be "10.127.128.117:23".
NOTE: SAP system numbers are used to define the listener port. The port is defined as "33XX", where"XX" is the system number. If the system number were "23", the SAP port would be "3323".
NOTE: To define language on an SAPJobV2 Job, create a parameter named JAMSSAPLanguage on theJob and set the parameter value to the language code. To define language on an SAPProcessChain Job,use the Language field in the Job Source.
Parallel Execution for JAMS and SAP JobsOnce JAMS submits the Job, SAP then creates and executes a parallel job as shown in the following twoscreenshots.
JAMS 7.X Installation Guide
130 ©2020 HelpSystems, LLC. All Rights Reserved.

Job Execution LogsOnce a Job executes, logs can be viewed from either the JAMS or SAP environments.
Authorized users may, in certain cases, cancel a currently executing Job. In SAP, such a job would go into acancelled state. Logs can then be checked in both environments.
Running a JAMS Job using the SAPProcessChain Execution Method
NOTE: Users may set the SAP System Language on SAPProcessChain Jobs by using the Language fieldin the Job Source.
JAMS 7.X Installation Guide
131 ©2020 HelpSystems, LLC. All Rights Reserved.

When the user creates a Job using the SAPProcessChain execution method it is then submitted and executednormally in JAMS. The Job’s output includes a process chain number (log ID). The JAMS log file then displays theoutput of the process chain.
Using the SAP.Net Connector with the JAMS AdaptorThese permissions describe the necessary roles and permissions in SAP to allow users to run a Job using the newJAMS adapter.
SAP_BC_BATCH_ADMIN -- This role contains all authorizations for background processing administration,including the creation of background jobs and general administrations functions (SMxx transaction codes, inparticular SM36, SM37, SM50, and SM51).
SAP_BC_ENDUSER -- This role contains non-critical basis authorizations for all users, including job creation andjob release.
S_BTCH_ADM -- this role allows user the ability toPerform any operation on any job, including:
Selecting jobs from all clients (from the Job Overview, Transaction SM37)Deleting any jobReleasing jobs to startChanging jobs, including copying, canceling, checking, repeating, and capturing and debugging Displaying jobs, job steps, and job logsTriggering events manually (transaction SM64)Editing system eventsWorking with raised events in the event history (transaction SM62)Using restricted job classes A or BScheduling an external program in a job
Five User Type are available in SAP. And as per SAP recommendations, the User should be “System”.
Type Purpose
Dialog Individual, interactive system access.
System Background processing and communication within a system (such as RFC users for ALE,Workflow, TMS, and CUA).
Communication Dialog-free communication for external RFC calls.
Service Dialog user available to a larger, anonymous group of users.
Reference General, non-person related users that allows the assignment of additional identicalauthorizations, such as for Internet users created with transaction SU01. No logon ispossible.
Overview of the properties of users with different user types.
Property \ User Type Dialog Communication System Service
Dialog Logon (SAP GUI) X - - X
Multiple Logons - X X X
RFC Logon X X X X
JAMS 7.X Installation Guide
132 ©2020 HelpSystems, LLC. All Rights Reserved.

Background Job Execution X - X X
Password Change X X - -
Logon Ticket can be Generated X X - -
"X" represents Yes
Property \ User Type Dialog Communication System Service
JAMS 7.X Installation Guide
133 ©2020 HelpSystems, LLC. All Rights Reserved.
Run SAP Business Objects Data Services in JAMS
The SAPDataService execution method allows users to automate any job that already exists in an SAP BusinessObjects Server environment.
In This Topic: Installing the SAP Business Objects Data Services Integration PackConfiguring the SAPDataServices Execution MethodCreating SAP Business Objects Data Services Jobs in JAMS
Installing the SAP Data Services Integration Pack1. Run the JAMS Installer2. On the Feature Selection step, ensure the JAMS Integration Pack for SAP Data Services component is
checked3. Complete the installation
NOTE: Un Checking components will uninstall those components.
Configuring the SAP Data Service Execution Method
1. Run the JAMS Client as an administrator.2. Select the Execution Methods shortcut from the JAMS Menu.3. Double-click the SAPDataService execution method to open the Execution Method Definition dialog.4. Select the Parameters tab, then double click on any parameter to open the Parameter Definition dialog.5. Set the SAPAuthentication and SAPEndpoint values to reflect the given environment.
JAMS 7.X Installation Guide
134 ©2020 HelpSystems, LLC. All Rights Reserved.

6. Save and Close the Parameters dialog.7. Save and Close the Execution Method dialog.
NOTE: The user running SAP Data Service Jobs must have full access to the SAP BODS server.
Creating an SAP Data Services Job in JAMS1. Select the desired folder for the SAP BODS Job, then ensure the Job Definitions tab is selected. 2. Click the Add button from the Control Bar to open the Add a New JAMS Job Definition dialog.3. In the dialog, give the new Job a Name, Description (optional), and Execution Method.
In this case, select SAPDataService to create an SAP Business Objects Data Services Job.4. By default, the full Job Definition dialog will open when the Job is initially saved. Click OK.5. The Job Definition dialog will open.6. Define Elements, Parameters, Security, Properties, and Documentation as desired.
NOTE: An Execute As property should be configured with a user that has access to the SAP BODS Server.7. Open the Source tab to set the SAP BODS Job options.8. Use the drop down list to select a CMS Authentication method for your environment9. Use the Repository drop-down list to select the relevant directory where the SAP Job is stored
10. Use the Job Name drop-down list to select the desired SAP Job from the specified Repository11. When the relevant SAP Job has been configured in the new JAMS Job, Save and Close the Job definition.
JAMS 7.X Installation Guide
135 ©2020 HelpSystems, LLC. All Rights Reserved.

Symitar in JAMS
In This Topic:Installing the Symitar Integration PackCreating a Symitar JobDefining a Symitar Job using the Workflow InterfaceSymitar Activities
Installing the Symitar Integration PackIf the JAMS Integration Pack for Symitar is not installed, run the JAMS Installer and check the "JAMS IntegrationPack for Symitar" component in the Feature Selection step.
NOTE: Un Checking other components will uninstall those components.
NOTE: In some installations, the host.config file must be configured in order to allow a machine toaccess the Symitar server.
Creating a Symitar Job1. Create a Job in the Desired folder and choose the Workflow Execution Method2. Select the desired folder for the Symitar Job, then ensure the Job Definitions tab is selected. 3. Click the Add button from the Control Bar to open the Add a New JAMS Job Definition dialog.4. In the dialog, give the new Job a Name, Description (optional), and Execution Method.
In this case, select Workflow to create the Symitar Job.5. By default, the full Job Definition dialog will open when the Job is initially saved. Click OK.6. The Job Definition dialog will open.7. Define Elements, Parameters, Security, Properties, and Documentation as desired.
NOTE: An Execute As property should be configured with a user that has access to the Symitar Server.8. Select the Source tab, and define the Job using the Workflow Interface.
(Keep reading this document for more information on the Workflow Interface and Symitar Activities)9. Save and Close the Job Definition dialog.
Defining a Symitar Job using the Workflow InterfaceWorkflow Interface
The source for a Symitar Job displays the Workflow Interface. This interface is comprised of three panels: theToolbox panel, Activity panel, and Properties panel. Symitar Activities can be found in the Toolbox panel, underthe "SYM" group. Activities will be used to define the Symitar Job.
JAMS 7.X Installation Guide
136 ©2020 HelpSystems, LLC. All Rights Reserved.
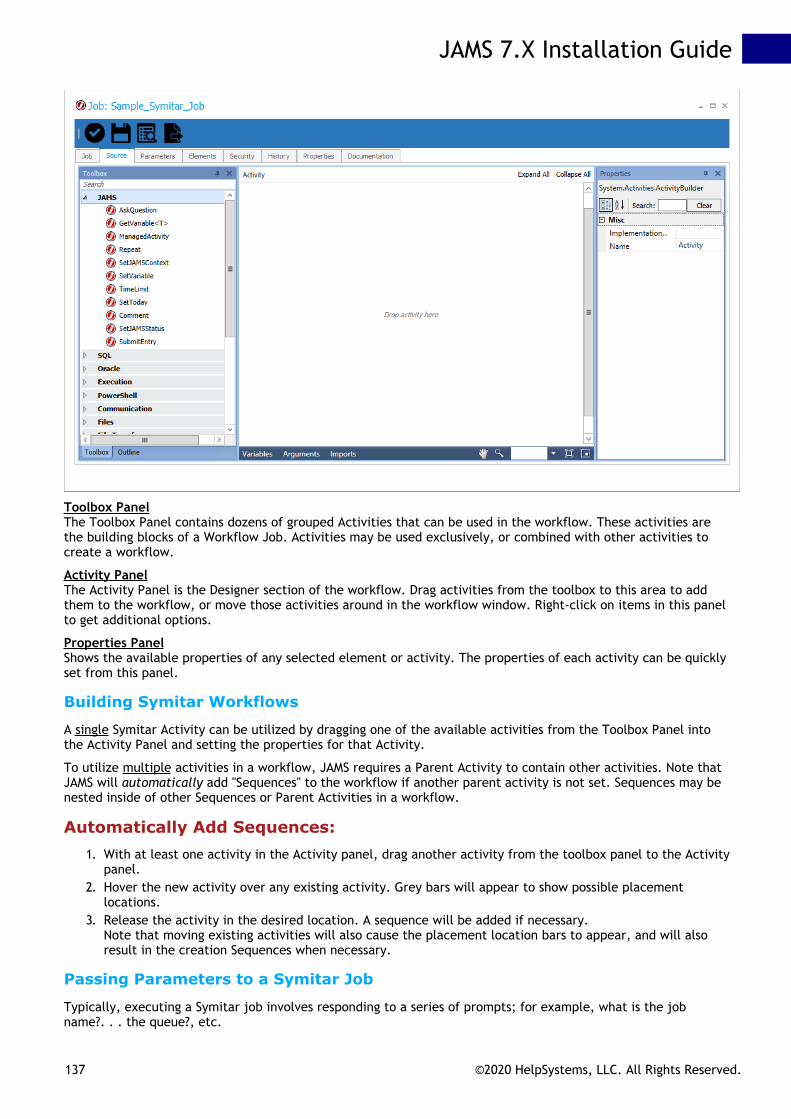
Toolbox PanelThe Toolbox Panel contains dozens of grouped Activities that can be used in the workflow. These activities arethe building blocks of a Workflow Job. Activities may be used exclusively, or combined with other activities tocreate a workflow.
Activity PanelThe Activity Panel is the Designer section of the workflow. Drag activities from the toolbox to this area to addthem to the workflow, or move those activities around in the workflow window. Right-click on items in this panelto get additional options.
Properties PanelShows the available properties of any selected element or activity. The properties of each activity can be quicklyset from this panel.
Building Symitar Workflows
A single Symitar Activity can be utilized by dragging one of the available activities from the Toolbox Panel intothe Activity Panel and setting the properties for that Activity.
To utilize multiple activities in a workflow, JAMS requires a Parent Activity to contain other activities. Note thatJAMS will automatically add "Sequences" to the workflow if another parent activity is not set. Sequences may benested inside of other Sequences or Parent Activities in a workflow.
Automatically Add Sequences:1. With at least one activity in the Activity panel, drag another activity from the toolbox panel to the Activity
panel.2. Hover the new activity over any existing activity. Grey bars will appear to show possible placement
locations.3. Release the activity in the desired location. A sequence will be added if necessary.
Note that moving existing activities will also cause the placement location bars to appear, and will alsoresult in the creation Sequences when necessary.
Passing Parameters to a Symitar Job
Typically, executing a Symitar job involves responding to a series of prompts; for example, what is the jobname?. . . the queue?, etc.
JAMS 7.X Installation Guide
137 ©2020 HelpSystems, LLC. All Rights Reserved.

A Symitar job may include other prompts that are unique to the job. When starting a Symitar job, if JAMSencounters an unexpected prompt, it looks for a workflow variable/JAMS parameter named "SymParam1". If thisparameter is found, JAMS inserts its value as the response to the prompt. However, if this variable/parameter isnot found, JAMS uses the default value defined in the Symitar job.
Note: When looking for a “SymParam”, JAMS searches first for a Workflow variable with that name. Ifthat variable doesn’t exist, it then looks for a JAMS Parameter with that name. Each time JAMS looks fora parameter it increments the number, so the second parameter would be "SymParam2”, etc.
Symitar ActivitiesA small overview of properties and function of each Symitar Activity are listed here. When defining SymitarActivities, it is important to keep in mind:
Symitar pathways will be case sensitive in UNIX or LINUX environmentsDateTime values are formatted as YYYYMMDD
DataFiletoPCDownloads a DataFile from the FTP Server to the PC. DataFile is downloaded from the SYMnnn/DATAFILESdirectory, where nnn is a three-digit SYM Number (e.g., ‘007’).
Property Description
JAMSUsername The User ID for AIX Login. Any JAMS user.
LocalDirectory The local directory is the download location for the SYM DataFile.
DisplayName Use to modify the property name as displayed in the activity panel.
Password The AIX password. Use when overriding the value in the SymConfig Activity.As an alternative, if you wish to hide the password from viewing, (1) create auser in JAMS, (2) set the "Logon As" to the AIX Username, (3) click thepassword button and (4) enter the password for this account, and (5) thenuse that JAMS User Name in the JAMSUserName workflow property.
ServerFileName The name of the DataFile on the SYM Server in the '/SYMnnn/DATAFILES'directory.
Servername The name of the AIX server. Use when overriding the value set in theSymConfig activity.
SymNumber The Sym Number. Use when overriding the value in the SymConfig activity.This parameter defaults to '000'.
UserName The AIX UserName. Use when overriding the value in the SymConfig activity.
DeleteLetterFileDeletes a LetterFile from the '/SYMnnn/LETTERSPECS' directory
Property Description
JAMSUsername The User ID for AIX Login. Any JAMS user.
DisplayName Use to modify the property name as displayed in the activity panel.
Password The AIX Password (Use when overriding the value in the SymConfig Activity).As an alternative, if you wish to hide the password from viewing, create aUser in JAMS, set the "Logon As" to the AIX Username, click the passwordbutton and enter the password for this account, and then use that JAMS UserName in the JAMSUserName workflow property.
ServerFileName The name of the LetterFile to delete from the '/SYMnnn/LETTERSPECS'
JAMS 7.X Installation Guide
138 ©2020 HelpSystems, LLC. All Rights Reserved.

Directory on the SYM Server.
ServerName The name of the AIX Server. Use when overriding the value set in theSymConfig activity.
SymNumber The Sym Number. Use when overriding the value in the SymConfig Activity.The parameter defaults to '000'.
UserName The AIX UserName. Use when overriding the value in the SymConfig activity.
EmailReportsSend a report generated from ReportFileToPC as an email attachment. The report must be assigned to aWorkflow Variable of type SymReport.
Property Description
BCCAddress The address of user(s) to receive blind carbon copies of the email.
CCAddress The address of user(s) to receive carbon copies of the email.
FromAddress The address to be used to send the email.
Reports The report(s) to be sent as attachments to the email.
Subject The subject of the email to be sent.
ToAddress The address of the user(s) to receive the email.
BodyMessage The body of the message to be sent.
SMTPServer The SMTP server to be used to email handling.
JAMSUsername The User ID for AIX Login. Any JAMS user.
DisplayName Use to modify the property name as displayed in the activity panel.
Password The AIX Password (Use when overriding the value in the SymConfig Activity).As an alternative, if you wish to hide the password from viewing, create aUser in JAMS, set the "Logon As" to the AIX Username, click the passwordbutton and enter the password for this account, and then use that JAMS UserName in the JAMSUserName workflow property.
ServerName The name of the AIX Server. Use when overriding the value set in theSymConfig activity.
SymNumber The Sym Number. Use when overriding the value in the SymConfig Activity.The parameter defaults to '000'.
UserName The AIX UserName. Use when overriding the value in the SymConfig activity.
FileToPCDownloads a SYM File from the FTP Server to the PC. The File is downloaded from the specified directory.
Property Description
JAMSUsername The User ID for AIX Login. Any JAMS user.
LocalDirectory The download location for the SYM File.
DisplayName Used to modify the property name as displayed in the activity panel.
Password The AIX Password (Use when overriding the value in the SymConfig Activity).As an alternative, if you wish to hide the password from viewing, create aUser in JAMS, set the "Logon As" to the AIX Username, click the passwordbutton and enter the password for this account, and then use that JAMS UserName in the JAMSUserName workflow property.
JAMS 7.X Installation Guide
139 ©2020 HelpSystems, LLC. All Rights Reserved.
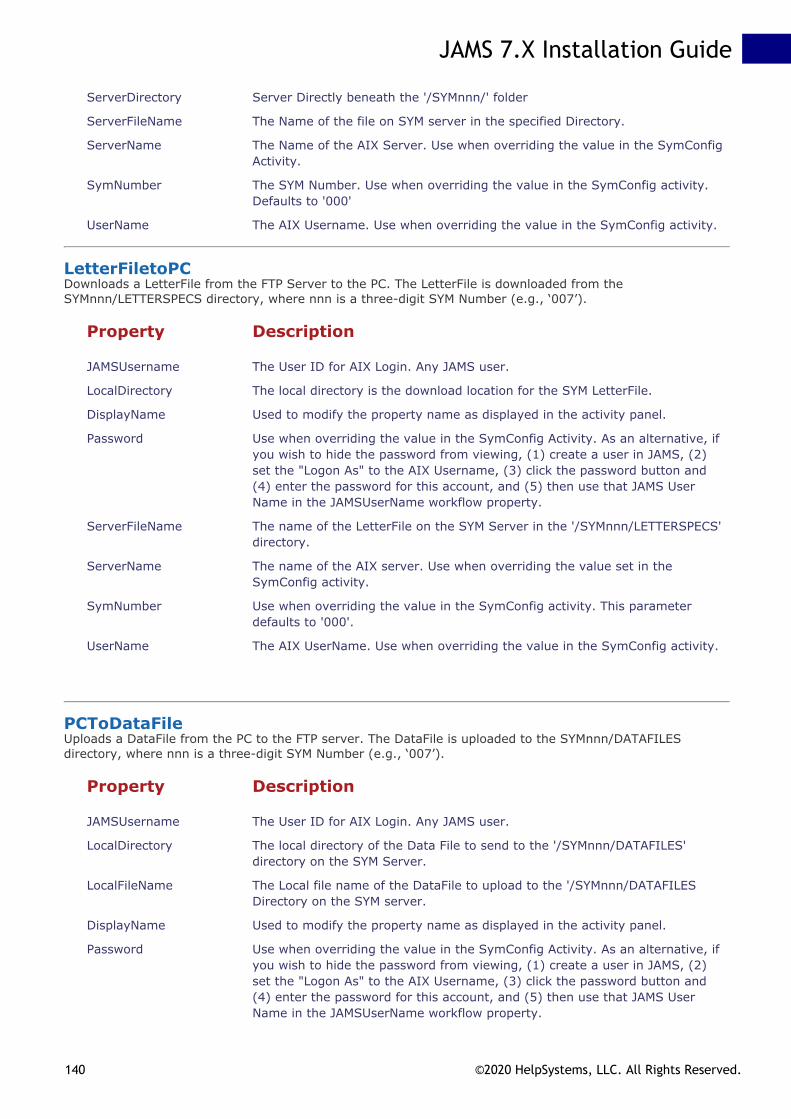
ServerDirectory Server Directly beneath the '/SYMnnn/' folder
ServerFileName The Name of the file on SYM server in the specified Directory.
ServerName The Name of the AIX Server. Use when overriding the value in the SymConfigActivity.
SymNumber The SYM Number. Use when overriding the value in the SymConfig activity.Defaults to '000'
UserName The AIX Username. Use when overriding the value in the SymConfig activity.
LetterFiletoPCDownloads a LetterFile from the FTP Server to the PC. The LetterFile is downloaded from theSYMnnn/LETTERSPECS directory, where nnn is a three-digit SYM Number (e.g., ‘007’).
Property Description
JAMSUsername The User ID for AIX Login. Any JAMS user.
LocalDirectory The local directory is the download location for the SYM LetterFile.
DisplayName Used to modify the property name as displayed in the activity panel.
Password Use when overriding the value in the SymConfig Activity. As an alternative, ifyou wish to hide the password from viewing, (1) create a user in JAMS, (2)set the "Logon As" to the AIX Username, (3) click the password button and(4) enter the password for this account, and (5) then use that JAMS UserName in the JAMSUserName workflow property.
ServerFileName The name of the LetterFile on the SYM Server in the '/SYMnnn/LETTERSPECS'directory.
ServerName The name of the AIX server. Use when overriding the value set in theSymConfig activity.
SymNumber Use when overriding the value in the SymConfig activity. This parameterdefaults to '000'.
UserName The AIX UserName. Use when overriding the value in the SymConfig activity.
PCToDataFileUploads a DataFile from the PC to the FTP server. The DataFile is uploaded to the SYMnnn/DATAFILESdirectory, where nnn is a three-digit SYM Number (e.g., ‘007’).
Property Description
JAMSUsername The User ID for AIX Login. Any JAMS user.
LocalDirectory The local directory of the Data File to send to the '/SYMnnn/DATAFILES'directory on the SYM Server.
LocalFileName The Local file name of the DataFile to upload to the '/SYMnnn/DATAFILESDirectory on the SYM server.
DisplayName Used to modify the property name as displayed in the activity panel.
Password Use when overriding the value in the SymConfig Activity. As an alternative, ifyou wish to hide the password from viewing, (1) create a user in JAMS, (2)set the "Logon As" to the AIX Username, (3) click the password button and(4) enter the password for this account, and (5) then use that JAMS UserName in the JAMSUserName workflow property.
JAMS 7.X Installation Guide
140 ©2020 HelpSystems, LLC. All Rights Reserved.
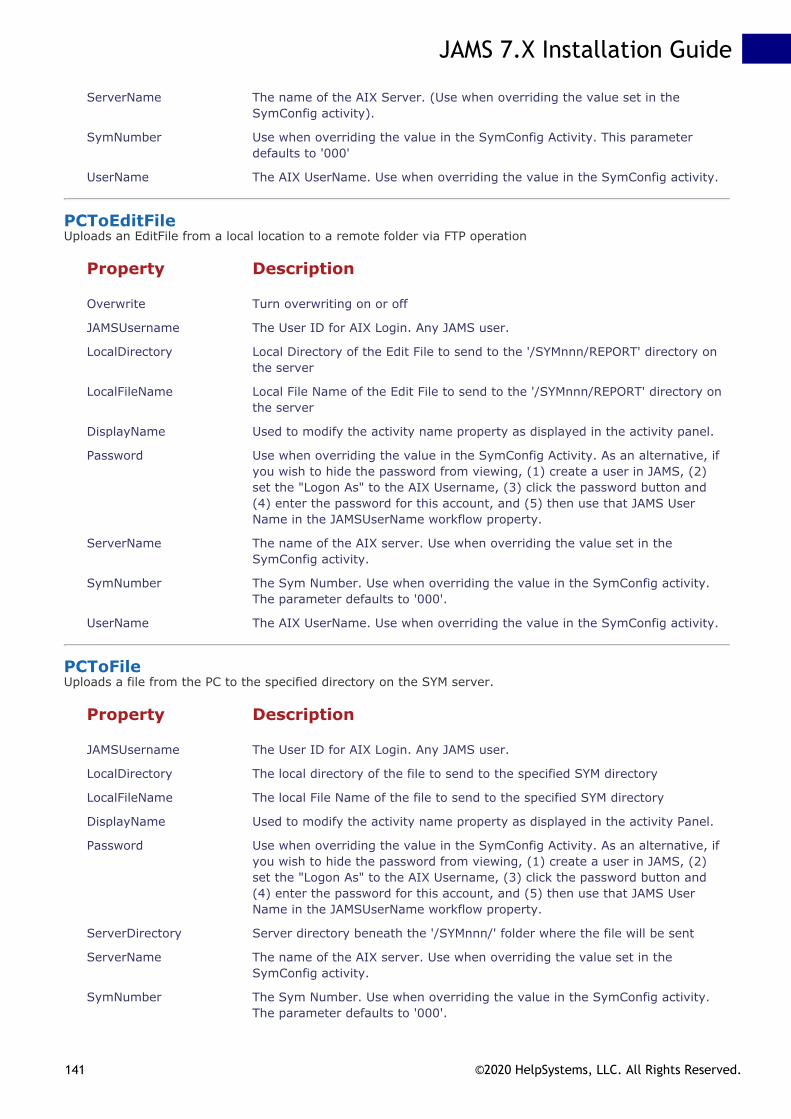
ServerName The name of the AIX Server. (Use when overriding the value set in theSymConfig activity).
SymNumber Use when overriding the value in the SymConfig Activity. This parameterdefaults to '000'
UserName The AIX UserName. Use when overriding the value in the SymConfig activity.
PCToEditFileUploads an EditFile from a local location to a remote folder via FTP operation
Property Description
Overwrite Turn overwriting on or off
JAMSUsername The User ID for AIX Login. Any JAMS user.
LocalDirectory Local Directory of the Edit File to send to the '/SYMnnn/REPORT' directory onthe server
LocalFileName Local File Name of the Edit File to send to the '/SYMnnn/REPORT' directory onthe server
DisplayName Used to modify the activity name property as displayed in the activity panel.
Password Use when overriding the value in the SymConfig Activity. As an alternative, ifyou wish to hide the password from viewing, (1) create a user in JAMS, (2)set the "Logon As" to the AIX Username, (3) click the password button and(4) enter the password for this account, and (5) then use that JAMS UserName in the JAMSUserName workflow property.
ServerName The name of the AIX server. Use when overriding the value set in theSymConfig activity.
SymNumber The Sym Number. Use when overriding the value in the SymConfig activity.The parameter defaults to '000'.
UserName The AIX UserName. Use when overriding the value in the SymConfig activity.
PCToFileUploads a file from the PC to the specified directory on the SYM server.
Property Description
JAMSUsername The User ID for AIX Login. Any JAMS user.
LocalDirectory The local directory of the file to send to the specified SYM directory
LocalFileName The local File Name of the file to send to the specified SYM directory
DisplayName Used to modify the activity name property as displayed in the activity Panel.
Password Use when overriding the value in the SymConfig Activity. As an alternative, ifyou wish to hide the password from viewing, (1) create a user in JAMS, (2)set the "Logon As" to the AIX Username, (3) click the password button and(4) enter the password for this account, and (5) then use that JAMS UserName in the JAMSUserName workflow property.
ServerDirectory Server directory beneath the '/SYMnnn/' folder where the file will be sent
ServerName The name of the AIX server. Use when overriding the value set in theSymConfig activity.
SymNumber The Sym Number. Use when overriding the value in the SymConfig activity.The parameter defaults to '000'.
JAMS 7.X Installation Guide
141 ©2020 HelpSystems, LLC. All Rights Reserved.
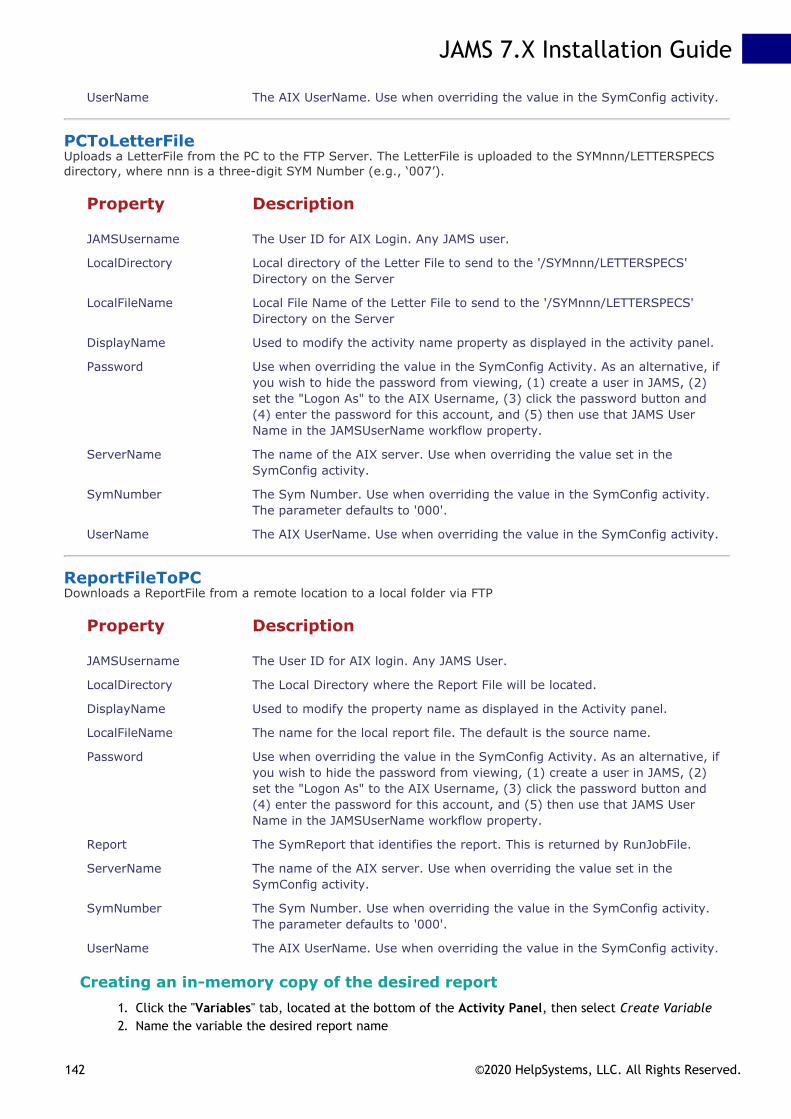
UserName The AIX UserName. Use when overriding the value in the SymConfig activity.
PCToLetterFileUploads a LetterFile from the PC to the FTP Server. The LetterFile is uploaded to the SYMnnn/LETTERSPECSdirectory, where nnn is a three-digit SYM Number (e.g., ‘007’).
Property Description
JAMSUsername The User ID for AIX Login. Any JAMS user.
LocalDirectory Local directory of the Letter File to send to the '/SYMnnn/LETTERSPECS'Directory on the Server
LocalFileName Local File Name of the Letter File to send to the '/SYMnnn/LETTERSPECS'Directory on the Server
DisplayName Used to modify the activity name property as displayed in the activity panel.
Password Use when overriding the value in the SymConfig Activity. As an alternative, ifyou wish to hide the password from viewing, (1) create a user in JAMS, (2)set the "Logon As" to the AIX Username, (3) click the password button and(4) enter the password for this account, and (5) then use that JAMS UserName in the JAMSUserName workflow property.
ServerName The name of the AIX server. Use when overriding the value set in theSymConfig activity.
SymNumber The Sym Number. Use when overriding the value in the SymConfig activity.The parameter defaults to '000'.
UserName The AIX UserName. Use when overriding the value in the SymConfig activity.
ReportFileToPCDownloads a ReportFile from a remote location to a local folder via FTP
Property Description
JAMSUsername The User ID for AIX login. Any JAMS User.
LocalDirectory The Local Directory where the Report File will be located.
DisplayName Used to modify the property name as displayed in the Activity panel.
LocalFileName The name for the local report file. The default is the source name.
Password Use when overriding the value in the SymConfig Activity. As an alternative, ifyou wish to hide the password from viewing, (1) create a user in JAMS, (2)set the "Logon As" to the AIX Username, (3) click the password button and(4) enter the password for this account, and (5) then use that JAMS UserName in the JAMSUserName workflow property.
Report The SymReport that identifies the report. This is returned by RunJobFile.
ServerName The name of the AIX server. Use when overriding the value set in theSymConfig activity.
SymNumber The Sym Number. Use when overriding the value in the SymConfig activity.The parameter defaults to '000'.
UserName The AIX UserName. Use when overriding the value in the SymConfig activity.
Creating an in-memory copy of the desired report1. Click the "Variables" tab, located at the bottom of the Activity Panel, then select Create Variable2. Name the variable the desired report name
JAMS 7.X Installation Guide
142 ©2020 HelpSystems, LLC. All Rights Reserved.

3. Click on the listed Variable Type. A drop-down list will appear. Select Browse for Types from thedropdown list
4. In the dialog that appears, type "SymReport" into the search box or navigate to the SymReportvariable type. Select the SymReport variable type and click "OK"
5. Ensure the Scope is set to "Sequence"6. Leave the "Default" column blank7. Select the ReportFileToPC activity in the Activity Panel, and set the "Report" property to the name
of the created variable
RunJobFileRuns a JobFile on the Symitar System. By default JobFiles are run in synchronous mode which means that theprogram will wait for the JobFile to finish.
Property Description
JAMSSymUserID For this JAMS user, enter the SymUserId as the "logon as" name, and set thepassword by clicking the "Set Password" button. When JAMS executes a jobfile, it will assemble the JAMSSymUserID as "username.password" (sansquotes).
JAMSUsername The User ID for AIX Login. Any JAMS user.
BatchSequenceNumber Returns the batch sequence number of the Job.
JobFileBatchQueue A numeric value (0-3) that will determine the batch queue to run the JobFile.Use 99 to find the first available empty queue. 0 will be used if 99 is specifiedand all queues are busy.
JobFileName The name of the JobFile to run.
ReportsProduced Returns a collection of reports produced by the job.
SymOperatorId Operator ID to log into SYMOP. In most cases this will be \"0000\" or thesame as the user's SymUserId
SymUserId SYM specific userid. Must be in the format of symuserid.password. As analternative, if you want to hide your symuserid/password from viewing, (1)create a user in JAMS, (2) set the “Logon As” to the symuserid, (3) click thepassword button and enter the password for this symuserid, and then (4) usethat JAMS User Name in the JAMSSymUserID workflow property. JAMS willthen correctly format the symuserid and password.
DisplayName Use to modify the property name as displayed in the Activity panel.
Password The AIX Password (Use when overriding the value in the SymConfig Activity).As an alternative, if you wish to hide the password from viewing, (1) create aUser in JAMS, (2) set the "Logon As" to the AIX Username, (3) click thepassword button and enter the password for this account, and then (4) usethat JAMS User Name in the JAMSUserName workflow property.
ServerName The name of the AIX server. Use when overriding the value set in theSymConfig activity.
Sym The Sym Number. Use when overriding the value in the SymConfig Activity.This parameter defaults to '000'.
TelnetPort Enter the port number. This parameter defaults to ‘23’.
Username The AIX UserName. Use when overriding the value in the SymConfig activity.
SymConfigCreates a parent-child relationship for all SYM activities nested within SymConfig and set the default valuesfor these child activities. If the child activities contain their own settings, those values will be used in place ofthe values set in the SymConfig activity
JAMS 7.X Installation Guide
143 ©2020 HelpSystems, LLC. All Rights Reserved.

Property Description
JAMSUsername The User ID for AIX Login. Any JAMS user.
DisplayName Use to modify the property name as displayed in the Activity panel.
Password The AIX password. As an alternative, if you wish to hide the password fromviewing, (1) create a user in JAMS, (2) set the "Logon As" to the AIXUsername, (3) click the password button and (3) enter the password for thisaccount, and then (4) use that JAMS User Name in the JAMSUserNameworkflow property.
ServerFolderDirectory The Path of the SYM Server File.
ServerName The name of the AIX Server
ServerRunTimeoutInSecs A numeric value (in seconds).
ServerTransferMode ASCII or Binary.
SymNumber The Sym Number.
UserName The AIX UserName.
Still have questions about Symitar or Workflows? Try watching our JAMS Workflow Video.NOTE: This video was recorded in JAMS V6. The sample Workflow principles shown there apply to JAMS V7.
JAMS 7.X Installation Guide
144 ©2020 HelpSystems, LLC. All Rights Reserved.
z/OS Integration Pack
JAMS for z/OS incorporates z/OS Job scheduling into the JAMS platform and requires nothing to install on thez/OS host. When creating the agent used with the z/OS integration, you must select the z/OS agent type and theFTP platform.
Use this step-by-step guide to define a new z/OS Job using the JAMS Client.
Setting up the Connection with JAMS as a TSO UserTo set up a connection with JAMS you will need to first define a TSO user on the mainframe as well as in JAMS(from the Credentials shortcut).
1. Open the Credential Definitions view from the JAMS Menu.2. Click the Add button on the Control Bar.3. The JAMS Credential definition dialog opens.4. Set the Credential Name, Logon As, Password, and Password Confirmation values.5. Click OK. By default, JAMS will open the full Credential Definition dialog after the Credential definition is
initially saved.6. On the Security tab of the Credential dialog, Add the ACE for the TSO user.
Please note: this user must have login rights as well as rights to execute items that will be added in laterJAMS jobs.
7. Save and Close the Credential definition.
For further information on adding a new username in JAMS, go to the topic: JAMS Security: Working with UserDefinitions ('JAMS Security: Working with User Credential Definitions' in the on-line documentation).
JAMS interfaces with JES as a TSO user. The TSO login ID is interpreted by JAMS as a valid JAMS User, which isencrypted on the JAMS side and controlled by RACF on the z/OS side. The TSO user must have permissions tosubmit and receive Jobs on both platforms and the TSO username must contain 7 characters or less.
On the JAMS side, the z/OS Integration must be installed on the JAMS Server.
Setting up a z/OS Job in JAMS1. To create a z/OS Job in JAMS2. Select the desired folder for the z/OS Job, then ensure the Job Definitions tab is selected. 3. Click the Add button from the Control Bar to open the Add a New JAMS Job Definition dialog.4. In the dialog, give the new Job a Name, Description (optional), and Execution Method.
In this case, select z/OS to create a z/OS Job.5. By default, the full Job Definition dialog will open when the Job is initially saved. Click OK.6. The Job Definition dialog will open.7. Define Elements, Parameters, Security, Properties, and Documentation as desired.
NOTE: An Execute As property should be configured with the previously defined TSO user.NOTE: An Agent property should be configured with the Mainframe Agent hostname or IP address.
8. On the Source tab, insert the JCL code.9. Save and Close the Job definition.
How does JAMS run a Mainframe Job?Jobs are stored on an FTP server located on the mainframe using a proprietary IBM-based FTP language. JAMScommunicates with the mainframe using this FTP language. Once a Job is executed in JAMS an FTP connection isopened to the FTP Daemon in JES and the Job is sent to the mainframe and executed.
JAMS monitors the Job spool output and waits for the Job to complete by polling the FTP connection. Once theoutput files are complete JAMS purges the files from the JES spool.
Steps can be run in JES in the same way as tasks in a JAMS Sequence. JCL defines the behavior of the Jobdepending on what is happening with a particular Job task.
What Information does JES Return?The JAMS Scheduler retrieves all Job related output from the JES Spool. This includes any DD statements withSYSOUT held on the spool. The output appears in the JAMS log and can be used by operations administrators to
JAMS 7.X Installation Guide
145 ©2020 HelpSystems, LLC. All Rights Reserved.

debug problems and, if necessary, restart the Job.
JAMS for z/OS parses the Job output and provides job success (“0”) or failure information for the JAMS Schedulerto react and report on a variety of message codes, including HASP and return code analysis.
What happens when a Job fails?If a Job fails due to a network outage or other problem all relevant information is included in the output and alsodisplayed in the JAMS log. Customization of these messages can be set using a configuration file.
A special option in the Job definition includes a listing of Jobs on the JES Spool allowing a Job to rerun on theJAMS side for output recovery.
JAMS for z/OS Capabilities
Manages and Submits JCL Files to JES2 on z/OS for ExecutionJAMS provides the ability to store a JCL source in its internal database. The JCL then becomes a part of the JAMSJob Definition along with other parameters and information needed to run the job.
Schedules Jobs with Dependencies on Multiple z/OS HostsThe JAMS Scheduler can support multiple z/OS hosts and track Job dependencies between them and non-z/OShosts.
The JAMS Scheduler Retrieves and Displays the Job OutputThe JAMS Scheduler retrieves all job related output from the JES Spool. This includes any DD statements withSYSOUT held on the spool. The output appears in the JAMS log and can be used by operations administrators todebug problems and, if necessary, restart the jobs.
Includes Automatic Determination for all Job ResultsJAMS for z/OS parses the job output and provides job success or failure information for the JAMS Scheduler toreact and report on a variety of message codes, including HASP and return code analysis.
Utilizes Standard JES SettingsJAMS for z/OS uses JESINTERFACELEVEL 1 and doesn’t require special customization of Parmlib settings.
Requires No installation on z/OS HostsJAMS for z/OS uses z/OS FTP with JES and requires no additional mainframe software installation.
Provides Automatic Job Purging CapabilitiesJAMS for z/OS automatically purges the job output files for the JES2 Spool after each Job has completed andbeen retrieved.
Provides Reliable Tracking of Jobs Running on the MainframeThe JAMS Scheduler can recover its connection to JES if it is lost due to a network outage or other problem, evenwhen a job is in the middle of executing on z/OS. In the event of failure on the JAMS server, JAMS can restart forthat specific job and seamlessly recover.
Uses a Secure TSO User LoginJAMS interfaces with JES as a TSO user. The TSO login ID is interpreted by JAMS as a valid JAMS user andencrypted on the JAMS side and controlled by RACF on the z/OS side.
Provides Full Integration with the JAMS SchedulerJAMS for z/OS becomes part of the integrated capabilities of the JAMS Scheduler across different platformsallowing it to control jobs based on dependencies on all supported hosts.
JAMS 7.X Installation Guide
146 ©2020 HelpSystems, LLC. All Rights Reserved.

JAMS for z/OS is Easy to Set UpSetting up a z/OS job is now as easy as defining any other JAMS Job.
Provides a Listing of Pending Jobs on the z/OS SpoolA special option in the JOB definition includes a listing of JOBS on the JES Spool allowing a job to rerun on theJAMS side for output recovery.
Scenario: Synchronizing Data with JAMS for z/OSSuppose an organization has the need to reliably synchronize data from an OLTP system based on a MS SQL Serveror Oracle with a mainframe-based database. This scenario is easily implemented with JAMS for z/OS.
In order to accomplish this the JAMS Scheduler would initially run a job, based on an event, that generates filescomprised of data extracted from a MS SQL Server database. It would then upload those files to the z/OSplatform via FTP before submitting JCL through JAMS for z/OS. These uploaded files would then update amainframe database. The reverse scenario is just as easy where a MS SQL Server is updated with files generatedby the mainframe.
JAMS 7.X Installation Guide
147 ©2020 HelpSystems, LLC. All Rights Reserved.

Oracle EBS Integration
JAMS 7.X Installation Guide
148 ©2020 HelpSystems, LLC. All Rights Reserved.

Automating Oracle EBS Jobs
JAMS natively supports automation using many leading business applications, including the Oracle E-Business Suite. Integration Packs for this and other preferred applications are selected during the JAMS installationprocess. Once the Oracle E-Business Suite integration is enabled, users can create, manage, deploy and monitor every kind of Oracle EBS batch process job, regardless of where it resides.
In This Topic:Installing the Oracle EBS Integration PackConfiguring Oracle EBS Connection StringsCreating Oracle EBS Jobs
Creating OracleEBSConcurrent JobsCreating OracleEBSJobSsh JobsCreating OracleEBSRequestSet Jobs
Installing the Oracle E-Business Suite Integration PackTo work with Oracle EBS in JAMS, users must install the Oracle E-Business Suite Integration Pack on the JAMS Scheduler Server and deploy an Agent to the Oracle Server. For more information on deploying Agents,see Agent D and Agent X ('JAMS AgentX' in the on-line documentation) sections.
On the JAMS Scheduler Server, run the JAMS Installer.On the Feature Selection step, ensure the JAMS Integration Pack for Oracle E-Business Suite component is checked. Do not un-check any components unless those components should be uninstalled.Finish the installation.
NOTE: Un Checking components in the Feature Selection step will uninstall those components.
Configuring Oracle EBS Connection Strings The Oracle EBS Connection String allows users to connect to Oracle from within JAMS. This connection string must be properly configured to run Oracle Jobs in JAMS. The Oracle EBS connection should be configuredon each Oracle EBS Execution Method in JAMS.
Users may override the connection string configured on an Execution Method by configuring a Connection String Parameter at the Folder level or Job level.
NOTE: If the User on an Oracle EBS Job has OS Authentication permissions to Oracle, then JAMS will pass the credentials from the User into the defined connection string during execution, and anOracle user is not needed in the Job's source. If the User on the Job does not have OS Authentication, an Oracle user must be defined in the dropdown list that has permissions to the oracle Database.
Configure the Oracle EBS Connection on the Execution Method1. Run the JAMS Client as an administrator.2. Select the Execution Methods shortcut from the Menu.3. Double click on the given Oracle EBS Execution Method to open the Execution Method Properties dialog.4. On the Parameters tab, select the OEBSConnectionString Parameter, then click Properties to open the Parameter Properties dialog. 5. Set the Default Value to the following, with "Host=Orchid64" and "SERVICE_NAME=MVP" adjusted to values that match the given environment.
User Id = {0}; Password = {1}; Data Source = (DESCRIPTION = (ADDRESS = (PROTOCOL = TCP)(HOST = Orchid64)(PORT = 1521))(CONNECT_DATA = (SERVICE_NAME = MVP)));
6. Save and Close the Parameter Properties dialog.7. Save and Close the Execution Method dialog.
Configure the Oracle EBS Connection on the Folder levelA Connection String should ONLY be defined at the Folder level if users wish to override the Execution Method level Connection Strings. Note that the Folder level Connection String will apply to all Oracle EBS Jobswithin that folder.
1. Right click on the desired Folder and select Properties from the drop-down list to open the Folder Properties dialog.2. Select the Parameters tab, and check for a Parameter named OEBSConnectionString. If this Parameter does not yet exist on the folder, click the Add button.3. In the Add a Parameter dialog, name the Parameter OEBSConnectionString.4. Ensure the Data Type is set to Text. 5. Set the Default Value to the following, with "Host=Orchid64" and "SERVICE_NAME=MVP" adjusted to values that match the given environment.
User Id = {0}; Password = {1}; Data Source = (DESCRIPTION = (ADDRESS = (PROTOCOL = TCP)(HOST = Orchid64)(PORT = 1521))(CONNECT_DATA = (SERVICE_NAME = MVP)));
6. Save and Close the Folder Properties.
Configure the Oracle EBS Connection on the Job levelA Connection String Parameter should ONLY be defined at the Job level if users wish to override Execution Method or Folder level Connection Strings.
1. Right click on a Job and select Properties from the drop-down list to open the Job Properties dialog.2. Select the Parameters tab, and check for a Parameter named OEBSConnectionString. If this Parameter does not yet exist on the Job, click the Add button.3. In the Add a Parameter wizard, name the Parameter OEBSConnectionString.4. Ensure the Data Type is set to Text.5. On the Parameter Value step, set the Default Value to the following, with "Host=Orchid64" and "SERVICE_NAME=MVP" adjusted to values that match the given environment.
User Id = {0}; Password = {1}; Data Source = (DESCRIPTION = (ADDRESS = (PROTOCOL = TCP)(HOST = Orchid64)(PORT = 1521))(CONNECT_DATA = (SERVICE_NAME = MVP)));
6. Save and Close the Job Properties.
Creating Oracle EBS Jobs in JAMSJAMS offers OracleEBSConcurrent, OracleEBSJobSsh, and OracleEBSRequestSet Execution Methods to run Oracle EBS Jobs.
The OracleEBSConcurrent Execution Method gives users a series of automatically populated drop-down fields to run Concurrent Jobs, including the ability to view and set each parameter on the Concurrent Jobfrom within JAMS.
The OracleEBSJobSsh Execution Method gives users a fill in the blank style form to run Concurrent Jobs from within JAMS. The advantage of the fill in the blank form over the OracleEBSConcurrent ExecutionMethod is that field values in the Job Source may be defined as JAMS Parameters. By using Parameters in the Job Source, users can create a self-service Oracle Job from within JAMS.
The OracleEBSRequestSet Execution Method gives users a series of automatically populated drop-down fields to run Request Sets, including the ability to see each Concurrent Job (and modify the Concurrent Job'sParameters) within the Request Set.
JAMS 7.X Installation Guide
149 ©2020 HelpSystems, LLC. All Rights Reserved.

Creating OracleEBSConcurrent Jobs in JAMS1. Select the desired folder for the OEBSConcurrent Job, then ensure the Job Definitions tab is selected.2. Click the Add button from the Control Bar to open the Add a New JAMS Job Definition dialog.3. In the dialog, give the new Job a Name, Description (optional), and Execution Method.
In this case, select OracleEBSConcurrent to create an Oracle EBS Concurrent Job.4. By default, the full Job Definition dialog will open when the Job is initially saved. Click OK.5. The Job Definition dialog will open.6. Define Elements, Parameters, Security, Properties, and Documentation as desired.7. On the Source. tab, set the Oracle User. This user should have access to the Oracle Database.8. Select the Application User from the automatically populated drop-down list. 9. Select the Responsibility group from the automatically populated drop-down list.
10. Select the relevant Application from the automatically populated drop-down list.11. Select the Concurrent Program to be run from the automatically populated drop-down list.12. The Parameters section of the Source will automatically populate with the Concurrent Program's available Parameters.13. Set Source Parameters as desired, ensuring that required Parameters have values.14. Click Save and Close to finish editing the Job definition.
Creating OracleEBSJobSsh Jobs in JAMSOracleEBSJobSsh Jobs in JAMS provide a fill-in-the-blank style form for users to configure their Concurrent Oracle Jobs in JAMS. The benefit of the fill-in-the-blank form over the automatically populated drop-down list of the OracleEBSConcurrent Execution Method is the parametrization of field values. By using Parameters in the Job Source, users can create a self-service Oracle Job from within JAMS.
Create an OracleEBSJobSsh Job in JAMS:
1. Select the desired folder for the OracleEBSJobSsh Job, then ensure the Job Definitions tab is selected.2. Click the Add button from the Control Bar to open the Add a New JAMS Job Definition dialog.3. In the dialog, give the new Job a Name, Description (optional), and Execution Method.
In this case, select OracleEBSJobSsh to create an Oracle EBS Ssh Job.4. By default, the full Job Definition dialog will open when the Job is initially saved. Click OK.5. The Job Definition dialog will open.6. Define Elements, Parameters, Security, Properties, and Documentation as desired.7. In the Source, specify the information on the Job to run in Oracle EBS. See the available fields and their Oracle counterparts below.
JAMS OracleJob Name Program Shortname
Application Short Name Program Application Shortname
Responsibility Short name Responsibility App Shortname
Responsibility Name Responsibility Name
Username Username
Parameters Parameters
Note that Parameters in the Parameters field are space delimited.8. Save and Close the Job definition.
Creating OracleEBSRequestSet Jobs in JAMS1. Select the desired folder for the OracleEBSRequestSet Job, then ensure the Job Definitions tab is selected. 2. Click the Add button from the Control Bar to open the Add a New JAMS Job Definition dialog.3. In the dialog, give the new Job a Name, Description (optional), and Execution Method.
In this case, select OracleEBSRequestSet to create an Oracle EBS Request Set Job.4. By default, the full Job Definition dialog will open when the Job is initially saved. Click OK.5. The Job Definition dialog will open.6. Define Elements, Parameters, Security, Properties, and Documentation as desired.7. On the Source tab, set the Oracle User. This user should have access to the Oracle Database.8. Select the Application User from the automatically populated drop-down list.9. Select the Responsibility group from the automatically populated drop-down list.
10. Select the relevant Application from the automatically populated drop-down list.11. Select the Request Set to be run from the automatically populated drop-down list.12. The Request Set Jobs section will populate with a list of the Concurrent Programs in the Request Set.13. Select a Concurrent Program and then click the Parameters button to open the parameters of a Concurrent Program within the Request Set.14. In the Parameters dialog, set Parameter values as desired, then click OK.15. Click Save and Close to finish editing the Job.
JAMS 7.X Installation Guide
150 ©2020 HelpSystems, LLC. All Rights Reserved.
Configuring The OracleStoredProc Execution Method
Configuring the OracleStoredProc Execution Method:In order to use the Oracle Stored Procedure Execution Method you will first need to have a user name, passwordand a datasource. As long as the datasource is in a format that is compatible with an Oracle Connection String, itwill open a connection to the Oracle DB server.
The Oracle Stored Procedure relies on a default value being present in the parameters of the Execution Method,which can be overridden at the Folder or Job level.
The default format for the Execution Method is:
User Id={0}Password={1}DataSource={2}
NOTE: By default, the User Id, Password, and DataSource set on the given OracleStoredProc Job will bepassed into the "{}" braces on the Execution Method. Users do not need to edit theOracleConnectionString parameter by default.
If using a different connection string, you will need to override the original connection string by creating a newParameter at the Folder or Job level called OracleConnectionString.
Once the ConnectionString format has been set, include a datasource and User Name in the Execution Method’sSource tab. Establish the connection. Once the User has authorized access to the Oracle DB Server, click on thedropdown list to view a populated listing of stored procedures.
NOTE: Users without a Data Source Name (DSN) for their Oracle Connection will need to specify theentire traditional Oracle Connection String in the Data Source field of the OracleStoredProc Job's Sourcetab.
When a stored procedure is selected, the executable will display the parameter values associated with the storedprocedure and prepend a “@” symbol in order to distinguish the procedure parameters from the executableparameters.
Once all the properties have been populated, save and submit the Job.
Note: Submit Options located in the Job properties can now be used to manually enter your parametervalues.
JAMS 7.X Installation Guide
151 ©2020 HelpSystems, LLC. All Rights Reserved.