
Identity Manager 4.0.2 Driver for Linux and UNIX Settings - NetIQ

Installation GuideNetIQ Agent Manager™
January 2017

Legal Notice
For information about NetIQ legal notices, disclaimers, warranties, export and other use restrictions, U.S. Government restricted rights, patent policy, and FIPS compliance, see http://www.netiq.com/company/legal/.
Copyright © 2017 NetIQ Corporation. All Rights Reserved.
For information about NetIQ trademarks, see http://www.netiq.com/company/legal/. All third-party trademarks are the property of their respective owners.

Contents
About this Book and the Library 5About NetIQ Corporation 7
1 Introduction 9
1.1 What Is Agent Manager? . . . . . . . . . . . . . . . . . . . . . . . . . . . . . . . . . . . . . . . . . . . . . . . . . . . . . . . . . . . 91.2 How Agent Manager Works . . . . . . . . . . . . . . . . . . . . . . . . . . . . . . . . . . . . . . . . . . . . . . . . . . . . . . . . . 91.3 Understanding Requirements and Permissions . . . . . . . . . . . . . . . . . . . . . . . . . . . . . . . . . . . . . . . . . 14
2 Planning to Install Sentinel Agent Manager 15
2.1 Implementation Checklist . . . . . . . . . . . . . . . . . . . . . . . . . . . . . . . . . . . . . . . . . . . . . . . . . . . . . . . . . . 152.2 Planning to Roll Out Your Configuration Groups . . . . . . . . . . . . . . . . . . . . . . . . . . . . . . . . . . . . . . . . 162.3 Installing Microsoft SQL Server . . . . . . . . . . . . . . . . . . . . . . . . . . . . . . . . . . . . . . . . . . . . . . . . . . . . . 172.4 Configuring Microsoft SQL Server . . . . . . . . . . . . . . . . . . . . . . . . . . . . . . . . . . . . . . . . . . . . . . . . . . . 182.5 Understanding Ports and Firewalls . . . . . . . . . . . . . . . . . . . . . . . . . . . . . . . . . . . . . . . . . . . . . . . . . . 192.6 Understanding Microsoft SQL Server Permissions . . . . . . . . . . . . . . . . . . . . . . . . . . . . . . . . . . . . . . 232.7 Planning to Install Your Database Server. . . . . . . . . . . . . . . . . . . . . . . . . . . . . . . . . . . . . . . . . . . . . . 232.8 Planning to Install Your Central Computers . . . . . . . . . . . . . . . . . . . . . . . . . . . . . . . . . . . . . . . . . . . . 242.9 Planning to Install Your Agents. . . . . . . . . . . . . . . . . . . . . . . . . . . . . . . . . . . . . . . . . . . . . . . . . . . . . . 272.10 Agent Manager Console Requirements . . . . . . . . . . . . . . . . . . . . . . . . . . . . . . . . . . . . . . . . . . . . . . . 302.11 Understanding Sentinel Agent Manager Requirements and Permissions . . . . . . . . . . . . . . . . . . . . . 31
3 Installing Sentinel Agent Manager 33
3.1 Sentinel Agent Manager Installation Checklist . . . . . . . . . . . . . . . . . . . . . . . . . . . . . . . . . . . . . . . . . . 333.2 Permissions . . . . . . . . . . . . . . . . . . . . . . . . . . . . . . . . . . . . . . . . . . . . . . . . . . . . . . . . . . . . . . . . . . . . 343.3 Creating a Service Account . . . . . . . . . . . . . . . . . . . . . . . . . . . . . . . . . . . . . . . . . . . . . . . . . . . . . . . . 343.4 Disabling Active Directory Integration with Message Queuing. . . . . . . . . . . . . . . . . . . . . . . . . . . . . . 363.5 Installing Sentinel Agent Manager . . . . . . . . . . . . . . . . . . . . . . . . . . . . . . . . . . . . . . . . . . . . . . . . . . . 373.6 Installing Agents . . . . . . . . . . . . . . . . . . . . . . . . . . . . . . . . . . . . . . . . . . . . . . . . . . . . . . . . . . . . . . . . . 393.7 Configuring Sentinel Agent Manager . . . . . . . . . . . . . . . . . . . . . . . . . . . . . . . . . . . . . . . . . . . . . . . . . 413.8 Configuring the Agent Manager Connector . . . . . . . . . . . . . . . . . . . . . . . . . . . . . . . . . . . . . . . . . . . . 423.9 Configuring Collectors . . . . . . . . . . . . . . . . . . . . . . . . . . . . . . . . . . . . . . . . . . . . . . . . . . . . . . . . . . . . 42
4 Manually Installing Unmanaged Windows Agents 45
4.1 Understanding Unmanaged Windows Agent Installation . . . . . . . . . . . . . . . . . . . . . . . . . . . . . . . . . . 454.2 Installing and Configuring a Windows Agent Manually . . . . . . . . . . . . . . . . . . . . . . . . . . . . . . . . . . . 464.3 Installing an Unmanaged Windows Agent Manually . . . . . . . . . . . . . . . . . . . . . . . . . . . . . . . . . . . . . 464.4 Uninstalling Unmanaged Windows Agents . . . . . . . . . . . . . . . . . . . . . . . . . . . . . . . . . . . . . . . . . . . . 47
5 Upgrading Sentinel Agent Manager 49
5.1 Prerequisites . . . . . . . . . . . . . . . . . . . . . . . . . . . . . . . . . . . . . . . . . . . . . . . . . . . . . . . . . . . . . . . . . . . 495.2 Preparing to Upgrade. . . . . . . . . . . . . . . . . . . . . . . . . . . . . . . . . . . . . . . . . . . . . . . . . . . . . . . . . . . . . 495.3 Upgrading Central Computers and the Database Server. . . . . . . . . . . . . . . . . . . . . . . . . . . . . . . . . . 505.4 Upgrading Managed Agents. . . . . . . . . . . . . . . . . . . . . . . . . . . . . . . . . . . . . . . . . . . . . . . . . . . . . . . . 51
Contents 3

5.5 Upgrading Unmanaged Agents . . . . . . . . . . . . . . . . . . . . . . . . . . . . . . . . . . . . . . . . . . . . . . . . . . . . . 51
A Backing Up and Restoring Data Collection Policies 53
B Backing Up and Restoring Certificates Data 55
C Installing Sentinel Agent Manager Components Silently 57
C.1 Silent Installation . . . . . . . . . . . . . . . . . . . . . . . . . . . . . . . . . . . . . . . . . . . . . . . . . . . . . . . . . . . . . . . . 57C.2 Installation Program Options . . . . . . . . . . . . . . . . . . . . . . . . . . . . . . . . . . . . . . . . . . . . . . . . . . . . . . . 59C.3 Installing Unmanaged Agents Silently . . . . . . . . . . . . . . . . . . . . . . . . . . . . . . . . . . . . . . . . . . . . . . . . 61C.4 Verifying Silent Installation . . . . . . . . . . . . . . . . . . . . . . . . . . . . . . . . . . . . . . . . . . . . . . . . . . . . . . . . . 62
DUninstalling Sentinel Agent Manager 63
D.1 Uninstalling Sentinel Agent Manager Overview . . . . . . . . . . . . . . . . . . . . . . . . . . . . . . . . . . . . . . . . . 63D.2 Uninstalling Windows Agents . . . . . . . . . . . . . . . . . . . . . . . . . . . . . . . . . . . . . . . . . . . . . . . . . . . . . . . 63D.3 Uninstalling Sentinel Agent Manager Components . . . . . . . . . . . . . . . . . . . . . . . . . . . . . . . . . . . . . . 65D.4 Uninstalling the Database . . . . . . . . . . . . . . . . . . . . . . . . . . . . . . . . . . . . . . . . . . . . . . . . . . . . . . . . . 66
4 NetIQ Agent Manager Installation Guide

About this Book and the Library
The Installation Guide provides planning and installation information for the NetIQ Sentinel Agent Manager product (Sentinel Agent Manager). The installation guide includes planning considerations, specific installation procedures, and product configuration procedures.
Intended AudienceThis book provides information for individuals responsible for installing and configuring Sentinel Agent Manager.
Other Information in the LibraryThe library provides the following information resources:
User Guide
Provides information for individuals responsible for understanding Sentinel Agent Manager concepts and for individuals designing and implementing a security solution for their enterprise network.
Plug-in Documentation
Provides information to help you configure specific products to monitor with Sentinel Agent Manager.
Help
Provides context-sensitive information and step-by-step guidance for common tasks, as well as definitions for each field on each window.
About this Book and the Library 5

6 NetIQ Agent Manager Installation Guide

About NetIQ Corporation
NetIQ, an Attachmate business, is a global leader in systems and security management. With more than 12,000 customers in over 60 countries, NetIQ solutions maximize technology investments and enable IT process improvements to achieve measurable cost savings. The company’s portfolio includes award-winning management products for IT Process Automation, Systems Management, Security Management, Configuration Audit and Control, Enterprise Administration, and Unified Communications Management. For more information, please visit www.netiq.com.
Contacting Sales SupportFor questions about products, pricing, and capabilities, please contact your local partner. If you cannot contact your partner, please contact our Sales Support team.
Contacting Technical SupportFor specific product issues, please contact our Technical Support team.
Contacting Documentation SupportOur goal is to provide documentation that meets your needs. If you have suggestions for improvements, click the Comment icon on any page in the HTML versions of the documentation posted at www.netiq.com/documentation. You can also email [email protected]. We value your input and look forward to hearing from you.
Worldwide: www.netiq.com/about_netiq/officelocations.asp
United States and Canada: 888-323-6768
Email: [email protected]
Web Site: www.netiq.com
Worldwide: www.netiq.com/Support/contactinfo.asp
North and South America: 1-713-418-5555
Europe, Middle East, and Africa: +353 (0) 91-782 677
Email: [email protected]
Web Site: www.netiq.com/support
About NetIQ Corporation 7

8 NetIQ Agent Manager Installation Guide

1 1Introduction
As IT environments become increasingly complex, it becomes more difficult and costly for IT professionals to meet important objectives such as:
Mitigating risks from internal and external attacks
Leveraging existing investments in security sensors
Improving security knowledge
Complying with government regulations and audits
Agent Manager allows you to meet these objectives by:
Boosting operational performance and improving the return on investment (ROI) by consolidating security information from across your organization into a central location, filtering out noise and false positives, and presenting the real, true incidents.
Assuring compliance by capturing and securing event log data for auditing, daily analysis, and archival purposes.
Section 1.1, “What Is Agent Manager?,” on page 9
Section 1.2, “How Agent Manager Works,” on page 9
Section 1.3, “Understanding Requirements and Permissions,” on page 14
1.1 What Is Agent Manager?Agent Manager is a component of NetIQ Sentinel, an automated security information and event management (SIEM) solution that addresses security management challenges.
Agent Manager provides host-based data collection for Sentinel. Event sources from the Windows Event Log and Log files are supported.
1.2 How Agent Manager WorksAgent Manager provides data collection rules that allow Sentinel to provide real-time data collection.
Understanding Product Components
Agent Manager includes a number of software components that you can distribute and install as needed to meet your security management objectives and environment.
If you are evaluating Agent Manager, you can install all the components on one computer. However, this approach is not recommended for a production installation. You should plan to distribute the workload over a number of computers, installing components strategically.
Introduction 9

The following table defines the major purposes of the product components.
Understanding the Architecture
Because of the inherent adaptability of Agent Manager, there is no “one-size-fits-all” solution for installing Agent Manager. When you install Agent Manager, you can decide where to install the product components based on your environment and requirements for load balancing, failover, and performance.
The agent computers, central computer, and database server make up a product installation. You can control where to install various components of the configuration group, including where to install the database server and how many central computers to install.
Software Component Purpose
Windows Agent Services running on Windows computers to monitor the operating system, devices, or applications, such as antivirus products.
Windows Central Computer Components
Software running on central computers that receive data from agents and send log data to Sentinel. Central computers also install, uninstall, and configure Windows agents, distribute rules to Windows agent computers, and control data flow between all agents and the Sentinel servers.
Databases Databases located on the database server store configuration data.
Agent Manager includes the AgentManager database and AgentManagerCommon database in a Microsoft SQL Server repository.
NetIQ recommends that you use a dedicated SQL Server instance for Agent Manager.
Agent Manager Consoles The Agent Manager Console customizes data collection rules, and other Agent Manager components for your environment.
10 NetIQ Agent Manager Installation Guide

A choice of configuration options is especially important in large distributed enterprises or when communicating over slower network links, such as WANs.
The best way to choose a deployment model is to conduct a pilot study that emulates the data collection you want to install, the production hardware you plan to use, and the anticipated event volume.
The following model illustrates a typical way to deploy Agent Manager in a production environment.
This model uses many agents that report to distributed central computers, and one Sentinel server configured to gather event data and store configuration information for Agent Manager. For more information about the roles agent servers serve in a configuration group, see “Anticipating Your Hardware Needs” on page 12.
Introduction 11

Anticipating Your Hardware Needs
The following table outlines the major purpose of each component running on computers in the configuration group and identifies important hardware considerations.
Understanding Windows Component Communication
Agent Manager Agents installed on Windows computers communicate with the central computer at specified intervals to transfer data and receive data collection rules. Data collection rules define how Agent Manager collect information.
Your enterprise can adjust the following default communication intervals to meet your needs:
Agent Manager Agents initiate a heartbeat every 5 minutes to report status and request updates from the central computer. A heartbeat is a periodic communication from agents that contain information related to their viability.
central computers check for data collection rule changes every 5 minutes.
central computers scan managed agent computers daily at 2:05 AM to install, uninstall, and configure managed agents.
Allow the appropriate time for any configuration or rule changes you make to take effect. The product can take up to 15 minutes to automatically begin enforcing the rule on monitored Windows computers.
A monitored computer is a computer from which Agent Manager collects and processes information. Collected information can indicate critical security events occurring on the monitored computer.
Computer Roles Software Components
Central Computers Agent Administrator – installs, configures, identifies, updates, and uninstalls agents on Windows computers.
Consolidator – receives event data from data collection policies, and periodically distributes to Windows agents. The Consolidator also acts as an agent on its local computer. If a central computer becomes unavailable, another central computer continues to collect event data from agents.
Core Service –sends queued events to Sentinel.
Data Access Server – interacts with the database server and provides database access control.
Database server AgentManager database – stores configuration data.
AgentManagerCommon database – stores user settings for the configuration group.
12 NetIQ Agent Manager Installation Guide

Understanding Windows Agent Communication Security
Agent Manager uses the Secure Sockets Layer (SSL)/Transport Layer Security (TLS) protocols included in the Microsoft Secure Channel (SChannel) security package to encrypt data.
Agent Manager supports all SChannel cipher suites, including the Advanced Encryption Standard (AES), adopted as a standard by the U.S. government. central computers and agents authenticate one another by validating client and/or server certificates, an industry-standard technique for establishing trust.
Out of the box, Agent Manager uses a default self-signed certificate, installed on the central computer, for communication between the central computer and monitored Windows agents. If you want to enable authenticated communication, you can implement your own Public Key Infrastructure (PKI) and deploy custom certificates on central computers and agents, replacing the default central computer certificate.
The following Agent Manager core service components comply with the requirements of the FIPS 140-2 Inside logo program:
central computer
database server
Agent Manager Windows agents
Understanding Self-Scaling Windows Operations
Agent Manager automatically adds agents to Windows computers throughout your network. As you add Windows computers to your network, Agent Manager automatically detects those computers, checks them for the role they serve in the network, such as an IIS server, and installs agents as necessary.
As your Windows network changes, Agent Manager automatically changes with it. Agent Manager ensures that the right knowledge is applied to the right computers at the right time.
The low-overhead components in Agent Manager allow you to monitor hundreds of servers in your enterprise with little system degradation. Agent Manager also regularly updates Windows agents with new or modified data collection rules. Central computers automatically apply updated data collection rules to the appropriate monitored Windows computers.
Understanding Supported Windows Platforms
For the list of Microsoft Windows endpoint event sources that Agent Manager can monitor, see the Sentinel Technical Information page.
Understanding Supported Data Formats
Agent Manager can receive and process data in both Internet Protocol version 4 (IPv4) and Internet Protocol version 6 (IPv6) formats. In addition, you can install Agent Manager components on dual-stack computers, which are computers that have both IPv4 and IPv6 running at the same time.
However, you cannot install Agent Manager components on computers running only IPv6. Agent Manager requires that IPv4 be installed, either by itself or along with IPv6.
Introduction 13

NOTE: If you want to use your Agent Manager agent to receive data that contains IPv6 format IP addresses, you must install IPv6 on the agent computer. For more information about installing IPv6, see the Microsoft Windows Server Help.
1.3 Understanding Requirements and PermissionsAgent Manager uses OnePointOp groups and database roles to restrict access to product functionality. These permissions are typically defined at the end of installation with the Agent Manager Access Configuration utility (Access Configuration). The Access Configuration utility is an interface that allows you to control Agent Manager permissions by managing membership in OnePointOp groups.
Access Configuration enforces the use of global or universal domain groups in the OnePointOp groups and creates appropriate database log ins. If you need to add a user account, add it to the appropriate domain group you specified with the Access Configuration utility. You can use the Active Directory Users and Computers Administrative Tool to add user accounts to domain groups.
If you need to add an additional domain group, or if you did not specify a domain group at the end of installation, use the Access Configuration utility.
NOTE: The following Agent Manager functions also require you to use an account that is a member of the local Administrators group:
Installing or upgrading Agent Manager
Uninstalling Agent Manager
Using the Access Configuration utility
Using the Agent Manager Console
Agent Manager Groups
Agent Manager provides the following groups to which you can add domain groups during setup.
OnePointOp ConfgAdms
User accounts in the OnePointOp ConfgAdms group can modify the information that Agent Manager collects and can configure all settings in the Agent Manager Console.
OnePointOp System
The OnePointOp System group is created by the installation process and populated with the specified Agent Manager service account. Modify the membership in the OnePointOp System group only when you change Agent Manager service accounts.
14 NetIQ Agent Manager Installation Guide
2 2Planning to Install Sentinel Agent Manager
This chapter guides you through the planning issues to consider before installing Sentinel Agent Manager. If you want to install a configuration that is not identified in the sections that follow, or if you have any questions, contact NetIQ Technical Support.
Section 2.1, “Implementation Checklist,” on page 15
Section 2.2, “Planning to Roll Out Your Configuration Groups,” on page 16
Section 2.3, “Installing Microsoft SQL Server,” on page 17
Section 2.4, “Configuring Microsoft SQL Server,” on page 18
Section 2.5, “Understanding Ports and Firewalls,” on page 19
Section 2.6, “Understanding Microsoft SQL Server Permissions,” on page 23
Section 2.7, “Planning to Install Your Database Server,” on page 23
Section 2.8, “Planning to Install Your Central Computers,” on page 24
Section 2.9, “Planning to Install Your Agents,” on page 27
Section 2.10, “Agent Manager Console Requirements,” on page 30
Section 2.11, “Understanding Sentinel Agent Manager Requirements and Permissions,” on page 31
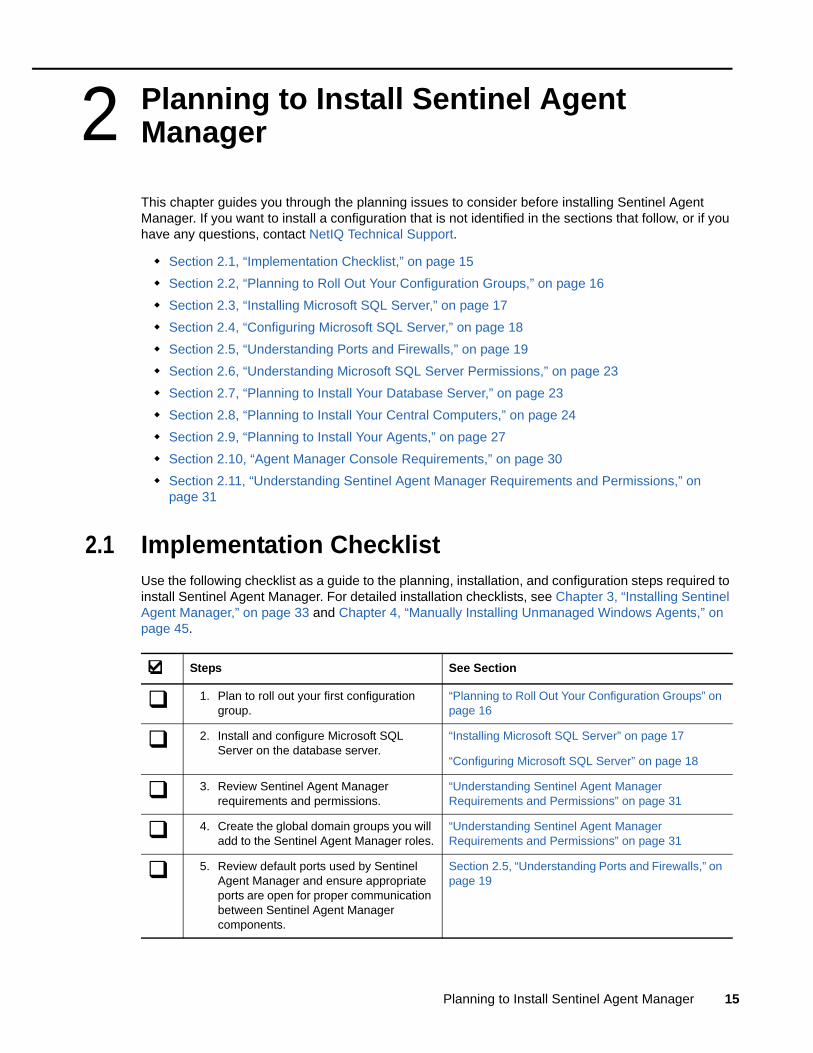
2.1 Implementation ChecklistUse the following checklist as a guide to the planning, installation, and configuration steps required to install Sentinel Agent Manager. For detailed installation checklists, see Chapter 3, “Installing Sentinel Agent Manager,” on page 33 and Chapter 4, “Manually Installing Unmanaged Windows Agents,” on page 45.
Steps See Section
1. Plan to roll out your first configuration group.
“Planning to Roll Out Your Configuration Groups” on page 16
2. Install and configure Microsoft SQL Server on the database server.
“Installing Microsoft SQL Server” on page 17
“Configuring Microsoft SQL Server” on page 18
3. Review Sentinel Agent Manager requirements and permissions.
“Understanding Sentinel Agent Manager Requirements and Permissions” on page 31
4. Create the global domain groups you will add to the Sentinel Agent Manager roles.
“Understanding Sentinel Agent Manager Requirements and Permissions” on page 31
5. Review default ports used by Sentinel Agent Manager and ensure appropriate ports are open for proper communication between Sentinel Agent Manager components.
Section 2.5, “Understanding Ports and Firewalls,” on page 19
Planning to Install Sentinel Agent Manager 15

2.2 Planning to Roll Out Your Configuration GroupsConfiguration groups provide you the ability to have different parts of your business able to collect events using a single agent on the monitored server. Each configuration group includes the following computers:
Database server
A configuration group includes a single database server. The database server includes the AgentManager and AgentManagerCommon databases, depending on your configuration, in a Microsoft SQL Server repository. For more information about the database server, see Section 2.7, “Planning to Install Your Database Server,” on page 23.
Central computers
A configuration group includes one or more central computers. A central computer manages Sentinel Agent Manager components and the collected data. The central computer performs the following functions:
Installs, uninstalls, and configures Windows agents
Distributes rules to Windows agent computers
Receives data from Windows agents
Controls data flow between all agents and the database server
For more information about the central computer and its components, see Section 2.8, “Planning to Install Your Central Computers,” on page 24.
Agent computers
Includes Windows agent computers that send events to the central computer. For more information about agents, see Section 2.9, “Planning to Install Your Agents,” on page 27.
This section guides you through the planning process, helping you determine how many configuration groups you need and plan for each of the configuration group computers.
NOTE
NetIQ recommends you install all central computers and database servers in a configuration group on computers using the same version of Microsoft Windows.
In addition to installing Sentinel Agent Manager on physical computers, you can install Sentinel Agent Manager components on one or more virtual machines (VMs) and use Sentinel Agent Manager to monitor VMs.
NetIQ recommends that you install Sentinel Agent Manager components on dedicated hardware - either on physical computers or on virtual machine hardware.
For performance reasons, NetIQ does not recommend installing Sentinel Agent Manager central computer components or the database server on a computer with a NetIQ Secure Configuration Manager or NetIQ Aegis core component already installed.
6. Roll out your first configuration group. “Installing Sentinel Agent Manager” on page 33
Steps See Section
16 NetIQ Agent Manager Installation Guide

Supporting Foreign Languages
Sentinel Agent Manager supports Microsoft Windows and Microsoft SQL Server in English and Western European languages. The database server and central computers must all use the same language for Microsoft Windows and Microsoft SQL Server.
Naming Your Configuration Groups
Each configuration group in an enterprise must have a unique name. Sentinel Agent Manager uses this name to distinguish one configuration group from another.
Once you name a configuration group, you cannot change the name without uninstalling, then reinstalling all Sentinel Agent Manager components, including all agents.
Select a unique name for your configuration group. Configuration group names cannot exceed 50 characters.
Understanding Configuration Group Passwords
Multiple central computers in a configuration group share configuration data. The data resides in a central AgentManager database in a single configuration group. This information is encrypted. To enable computers to access the shared information, each central computer must have access to a shared encryption key.
During installation of the first central computer in a configuration group, the setup program prompts you to supply a configuration group password. When you install additional central computers in the configuration group, the setup program prompts you for a configuration group password. Provide the same password you supplied when installing the first central computer. If you provide a different password, the central computer is unable to access shared information. For more information about changing this password, see the NetIQ Agent Manager™ User Guide.
2.3 Installing Microsoft SQL ServerInstall Microsoft SQL Server on the database server. For the list of supported Microsoft SQL Server versions, see the Sentinel Technical Information page.
Sentinel Agent Manager supports clustered and named instances of the Standard and Enterprise versions of Microsoft SQL Server. You can specify named instances during the database server installation.
Whether you install Microsoft SQL Server or use an existing Microsoft SQL Server implementation, ensure the implementation supports the following requirements:
TCP/IP network protocol. By default, the Microsoft SQL Server setup program installs and configures the Net-Libraries to listen and respond to clients using the TCP/IP protocol. Ensure you configure Microsoft SQL Server on the database server and reporting server to use TCP/IP as the primary protocol. For more information about protocol support or enabling TCP/IP, see the Microsoft SQL Server documentation.
Audit level set to None or Failure
Dictionary order, case-insensitive sort order
Planning to Install Sentinel Agent Manager 17
WARNING: Ensure you install all Microsoft SQL Server components at once. If you install some components during the initial setup and try to add other Microsoft SQL Server components later, your Microsoft SQL Server installation may not function properly.
NOTE: The Sentinel Agent Manager setup program uses OLE Automation to validate the file system during database installations on the database server. If OLE Automation is not already “on,” Sentinel Agent Manager turns it “on” for the installation, and then turns it “off” when installation is complete.
For more information about installing Microsoft SQL Server, see the Microsoft SQL Server documentation.
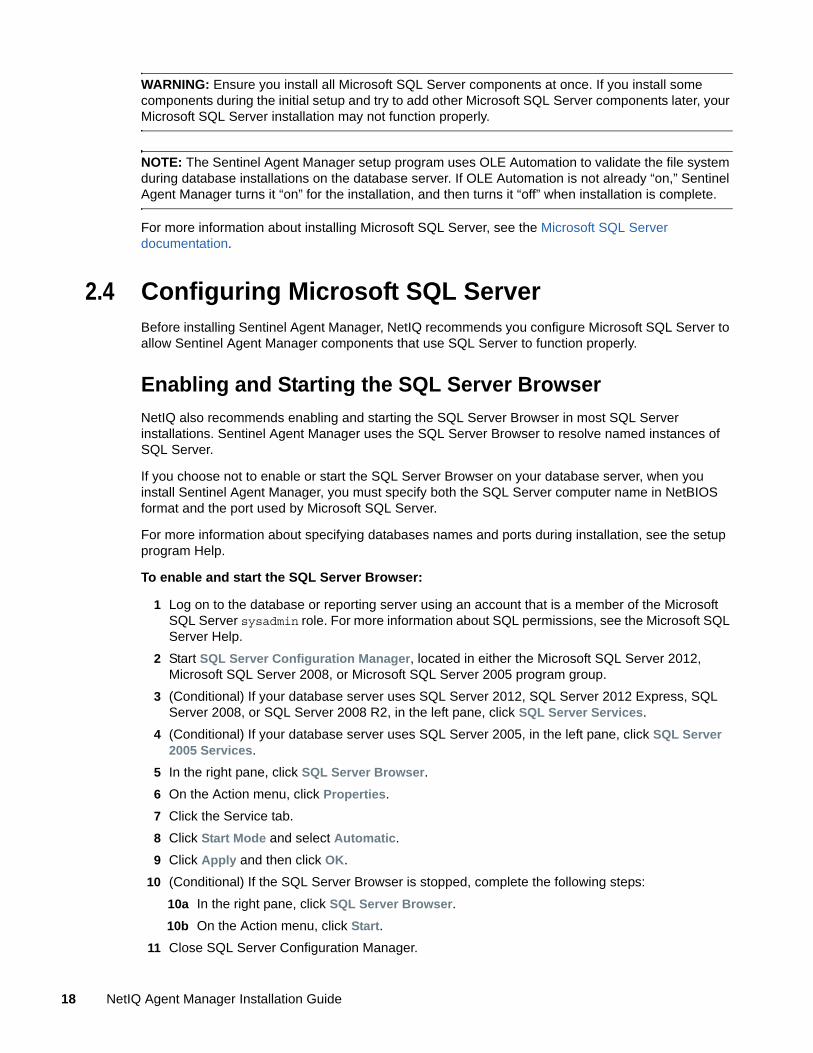
2.4 Configuring Microsoft SQL ServerBefore installing Sentinel Agent Manager, NetIQ recommends you configure Microsoft SQL Server to allow Sentinel Agent Manager components that use SQL Server to function properly.
Enabling and Starting the SQL Server Browser
NetIQ also recommends enabling and starting the SQL Server Browser in most SQL Server installations. Sentinel Agent Manager uses the SQL Server Browser to resolve named instances of SQL Server.
If you choose not to enable or start the SQL Server Browser on your database server, when you install Sentinel Agent Manager, you must specify both the SQL Server computer name in NetBIOS format and the port used by Microsoft SQL Server.
For more information about specifying databases names and ports during installation, see the setup program Help.
To enable and start the SQL Server Browser:
1 Log on to the database or reporting server using an account that is a member of the Microsoft SQL Server sysadmin role. For more information about SQL permissions, see the Microsoft SQL Server Help.
2 Start SQL Server Configuration Manager, located in either the Microsoft SQL Server 2012, Microsoft SQL Server 2008, or Microsoft SQL Server 2005 program group.
3 (Conditional) If your database server uses SQL Server 2012, SQL Server 2012 Express, SQL Server 2008, or SQL Server 2008 R2, in the left pane, click SQL Server Services.
4 (Conditional) If your database server uses SQL Server 2005, in the left pane, click SQL Server 2005 Services.
5 In the right pane, click SQL Server Browser.
6 On the Action menu, click Properties.
7 Click the Service tab.
8 Click Start Mode and select Automatic.
9 Click Apply and then click OK.
10 (Conditional) If the SQL Server Browser is stopped, complete the following steps:
10a In the right pane, click SQL Server Browser.
10b On the Action menu, click Start.
11 Close SQL Server Configuration Manager.
18 NetIQ Agent Manager Installation Guide

2.5 Understanding Ports and FirewallsTo allow Sentinel Agent Manager to monitor computers in a firewall environment, ensure you open the appropriate ports to allow communication between Sentinel Agent Manager components and monitored computers and within Sentinel Agent Manager itself, as well as the Sentinel server.
The following sections provide information necessary for installing and configuring Sentinel Agent Manager to work properly with firewalls. For more information about configuring firewalls and Sentinel Agent Manager, contact NetIQ Technical Support.
Supported Environments
NetIQ Corporation does not support managed agents separated from the central computer by a firewall or other device or configuration that can impede RPC or NetBIOS functionality.
When monitoring computers behind a firewall, NetIQ Corporation recommends manually installing unmanaged agents on your remote computers. For more information about manually installing unmanaged Windows agents, see Section 4.1, “Understanding Unmanaged Windows Agent Installation,” on page 45.
To install Sentinel Agent Manager in a firewall environment, you must configure all firewalls to allow the domains in which you want to install Sentinel Agent Manager components to trust one another. For more information about configuring a firewall to allow trust, see the Microsoft Knowledge Base Article 179442.
Ports Used
The ports listed in the following sections are the default ports used for communication between Sentinel Agent Manager components. Ensure that these ports are open on the firewall.
NOTE
All SQL ports listed are default ports. If you want to use named instances for any Sentinel Agent Manager SQL Server databases or services, configure named instances before installing Sentinel Agent Manager and specify the named instances during installation.
If you want to use a non-default port and have stopped the SQL Server Browser service, you must open the non-default port and create an alias for the port on all central computers and user interface computers.
Sentinel Agent Manager does not support using SQL aliases when installing the database server.
For more information about configuring Microsoft SQL Server ports on the firewall, see the Microsoft SQL Server documentation.
Central Computer Ports
The central computer uses the following ports for communication with other Sentinel Agent Manager components.
Planning to Install Sentinel Agent Manager 19

Sentinel Server Ports
The Sentinel server uses the following ports for communication with other Sentinel Agent Manager components.
Port Number To Component Direction Required/Optional
Purpose
TCP 1433 Database server Outbound Required By default, the central computer uses this port to connect to the OnePoint database on the database server.
This port is the default port for Microsoft SQL Server. Instances use alternate ports configured during installation.
UDP 1434 Database server Outbound Required If using a SQL Server instance, the browser service uses UDP 1434 to identify the port for the named instance.
TCP 135 Database server Bidirectional Required The database server uses this port to discover the Microsoft Distributed Transaction Coordinator (MSDTC) listening port on the central computer.
TCP (random) Database server Inbound Optional MSDTC on the database server computer uses RPC dynamic port allocation to randomly select a port number ranging from 1024 to 65535 for communication with the central computer.
If you use a firewall to separate the database server from the central computer, the database server cannot communicate with the central computer unless you restrict RPC port usage to a specific number of ports higher than 1024 and then open those ports.
For more information about configuring MSDTC and RPC port usage, see Microsoft Knowledge Base Articles 250367, 300083, and 826852.
TCP 1590 Agent Manager Connector
Outbound Required By default, the central computer uses this port to connect to the Agent Manager Connector on the Sentinel server.
20 NetIQ Agent Manager Installation Guide
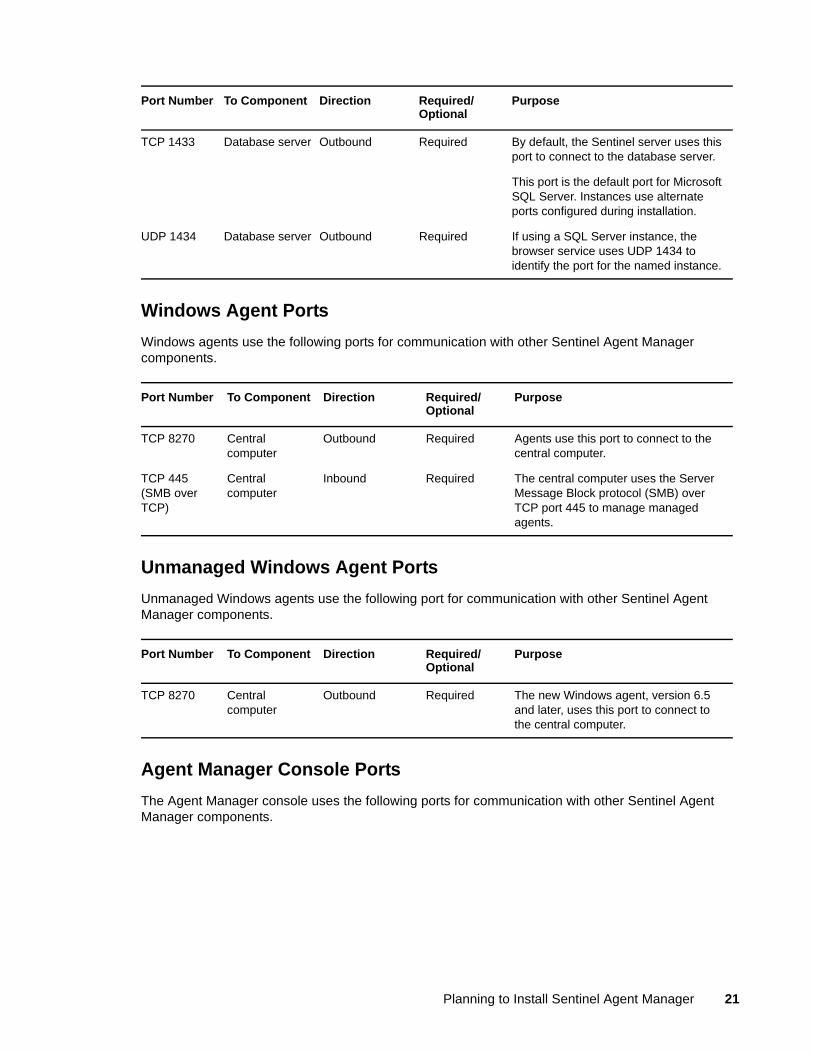
Windows Agent Ports
Windows agents use the following ports for communication with other Sentinel Agent Manager components.
Unmanaged Windows Agent Ports
Unmanaged Windows agents use the following port for communication with other Sentinel Agent Manager components.
Agent Manager Console Ports
The Agent Manager console uses the following ports for communication with other Sentinel Agent Manager components.
Port Number To Component Direction Required/Optional
Purpose
TCP 1433 Database server Outbound Required By default, the Sentinel server uses this port to connect to the database server.
This port is the default port for Microsoft SQL Server. Instances use alternate ports configured during installation.
UDP 1434 Database server Outbound Required If using a SQL Server instance, the browser service uses UDP 1434 to identify the port for the named instance.
Port Number To Component Direction Required/Optional
Purpose
TCP 8270 Central computer
Outbound Required Agents use this port to connect to the central computer.
TCP 445 (SMB over TCP)
Central computer
Inbound Required The central computer uses the Server Message Block protocol (SMB) over TCP port 445 to manage managed agents.
Port Number To Component Direction Required/Optional
Purpose
TCP 8270 Central computer
Outbound Required The new Windows agent, version 6.5 and later, uses this port to connect to the central computer.
Planning to Install Sentinel Agent Manager 21
Troubleshooting Firewall Related Issues
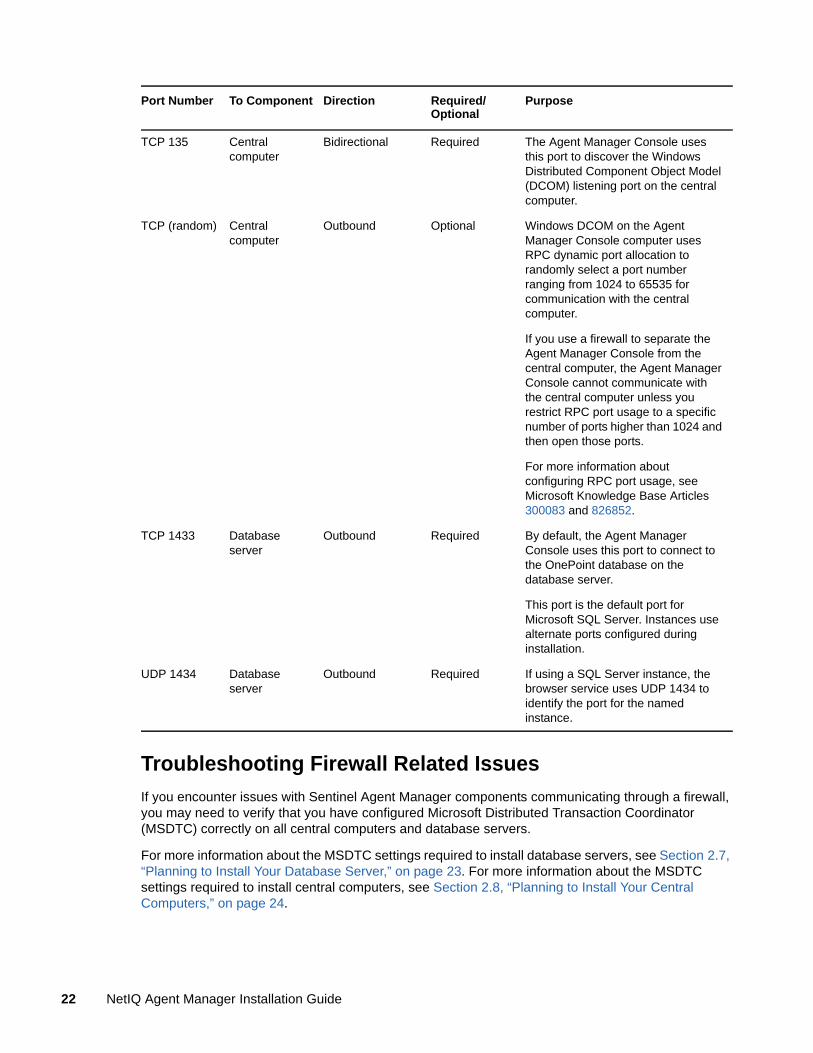
If you encounter issues with Sentinel Agent Manager components communicating through a firewall, you may need to verify that you have configured Microsoft Distributed Transaction Coordinator (MSDTC) correctly on all central computers and database servers.
For more information about the MSDTC settings required to install database servers, see Section 2.7, “Planning to Install Your Database Server,” on page 23. For more information about the MSDTC settings required to install central computers, see Section 2.8, “Planning to Install Your Central Computers,” on page 24.
Port Number To Component Direction Required/Optional
Purpose
TCP 135 Central computer
Bidirectional Required The Agent Manager Console uses this port to discover the Windows Distributed Component Object Model (DCOM) listening port on the central computer.
TCP (random) Central computer
Outbound Optional Windows DCOM on the Agent Manager Console computer uses RPC dynamic port allocation to randomly select a port number ranging from 1024 to 65535 for communication with the central computer.
If you use a firewall to separate the Agent Manager Console from the central computer, the Agent Manager Console cannot communicate with the central computer unless you restrict RPC port usage to a specific number of ports higher than 1024 and then open those ports.
For more information about configuring RPC port usage, see Microsoft Knowledge Base Articles 300083 and 826852.
TCP 1433 Database server
Outbound Required By default, the Agent Manager Console uses this port to connect to the OnePoint database on the database server.
This port is the default port for Microsoft SQL Server. Instances use alternate ports configured during installation.
UDP 1434 Database server
Outbound Required If using a SQL Server instance, the browser service uses UDP 1434 to identify the port for the named instance.
22 NetIQ Agent Manager Installation Guide
You can also use the DTCPing tool to verify connectivity between Sentinel Agent Manager computers. DTCPing tests name resolution, RPC communication, and MSDTC communication between two computers that have the tool installed and displays MSDTC settings.
For more information about troubleshooting MSDTC-related issues and using the DTCPing tool, see Microsoft Knowledge Base Articles 250367, 306843, and 918331.
2.6 Understanding Microsoft SQL Server PermissionsWhen you install the Sentinel Agent Manager database server or reporting server components, the setup program automatically grants specific Microsoft SQL Server roles to the Sentinel Agent Manager service account you specify. These roles represent the minimum level of permissions required in SQL Server for Sentinel Agent Manager to function.
The setup program grants the following roles to the service account on the database server:
public server role
bulkadmin server role
db_owner role in the AgentManager and AgentManagerCommon databases
NOTE: You must use an account that is a member of the Microsoft SQL Server sysadmin role on the database server to use the Access Configuration utility.
2.7 Planning to Install Your Database ServerA configuration group includes a single database server. The database server includes the AgentManager database and the AgentManagerCommon database.
Because you can deploy Sentinel Agent Manager in a wide variety of situations, there is no simple formula for determining database server location and required hardware.
The database server should be a server-class computer and should be located to allow maximum bandwidth between the database server and the central computers in its configuration group.
Depending on your event rate and number of computers or devices you are monitoring, you may be able to obtain adequate performance running the product on lesser equipment. Consider conducting a pilot study to determine the event load in your environment.
The following table lists system requirements and recommendations for the database server.
Category Requirements
Processor See the Sentinel Technical Information page.
Disk Space
Memory
Operating System
Software
Planning to Install Sentinel Agent Manager 23
NOTE: NetIQ recommends installing the latest Microsoft Windows service packs and hotfixes on all computers before installing Sentinel Agent Manager components.
2.8 Planning to Install Your Central ComputersA central computer manages configuration group components and the collected data. Configuration groups can have multiple central computers. The central computer performs the following functions:
Installs, uninstalls, and configures Windows agents
Distributes rules to Windows agent computers
Controls data flow between all agents and the Sentinel server
Understanding Central Computer Components
The setup program installs the following Sentinel Agent Manager components on the central computer:
Agent Administrator
Installs and configures agents on Windows computers.
Network Access Install in a domain environment with access to a domain controller. Do not change the domain of the database server computer after installing Sentinel Agent Manager.
All Sentinel Agent Manager components must be in domains that trust each other.
All Sentinel Agent Manager components must be installed on computers with either Internet Protocol version 4 (IPv4) installed and enabled or both IPv4 and Internet Protocol version 6 (IPv6) installed and enabled.
Ensure the domain containing the database server trusts the domain in which the service account is a member. A service account is a Windows security account used by services to log on to a Windows computer.
On Windows Server 2003 and Windows Server 2008 computers, ensure you enable MSDTC and configure Network DTC Access in the Component Services administrative tool to enable the following minimum required settings:
Allow Remote Clients
Allow Inbound
Allow Outbound
Mutual Authentication Required
You must specify the same type of authentication for all Sentinel Agent Manager components in order for Windows servers to communicate with one another.
For more information about configuring DTC security, see the Help for Component Services. For more information about configuring Sentinel Agent Manager to work with firewalls, see Section 2.5, “Understanding Ports and Firewalls,” on page 19.
Category Requirements
24 NetIQ Agent Manager Installation Guide

Consolidator
Receives collected information from Windows agents.
If a change occurs to a processing rule that applies to a Windows agent on a Windows computer, the Consolidator ensures that the change reaches the Windows agent. The Consolidator sends processing rules to agents on Windows computers when the Windows agent is installed and whenever the rules change. You can configure how often the Consolidator polls for rule changes.
Core Service
Processes queued event data using the Business Services, Log Handler, and Log Watcher subcomponents.
Data Access Server (DAS)
Allows the Agent Manager database to access agent configuration.
Multiple Central Computers
Configuration groups can contain more than one central computer. Configuring more than one central computer in a configuration group could be necessary for the following reasons:
Load balancing
When assigning agents to central computers, assign no more agents to the central computer than it can handle.
NOTE: The number of agents you can assign to a central computer depends on your environment, such as the total number of events you expect agents to send to the central computer. If you need help planning your Sentinel Agent Manager environment, contact NetIQ Technical Support.
Following installation of central computers and agents, you can rebalance the distribution of agents across central computers, using the Agent Administrator to assign agents to different central computers. If you install more than one central computer, use the Agent Administrator to reassign agents among central computers
Redundancy (Failover)
If a central computer fails, or a managed or unmanaged agent cannot otherwise contact the central computer, the agent can temporarily send event and alert data to another central computer. If you want to ensure data is delivered to the databases when a central computer is unavailable, you can install multiple central computers for redundancy. The central computer assigned to manage the agent still retains control over the agent for upgrade, installation, and uninstallation purposes. For more information about configuring failover, see “Specifying Central Computers for Failover” on page 41.
Multiple domains
If you want a configuration group to monitor computers in different supported domains and do not want the central computers to share a common service account, you can install multiple central computers, with different service accounts. For more information about creating service accounts, see Section 3.3, “Creating a Service Account,” on page 34.
Planning to Install Sentinel Agent Manager 25
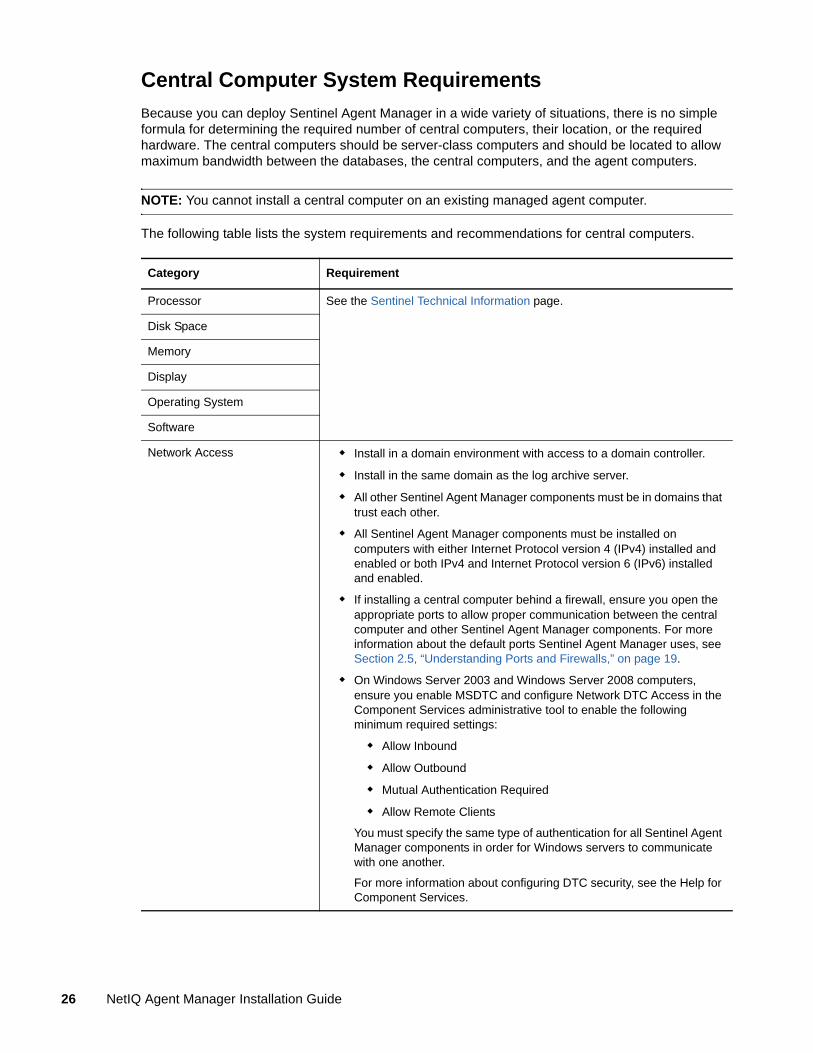
Central Computer System Requirements
Because you can deploy Sentinel Agent Manager in a wide variety of situations, there is no simple formula for determining the required number of central computers, their location, or the required hardware. The central computers should be server-class computers and should be located to allow maximum bandwidth between the databases, the central computers, and the agent computers.
NOTE: You cannot install a central computer on an existing managed agent computer.
The following table lists the system requirements and recommendations for central computers.
Category Requirement
Processor See the Sentinel Technical Information page.
Disk Space
Memory
Display
Operating System
Software
Network Access Install in a domain environment with access to a domain controller.
Install in the same domain as the log archive server.
All other Sentinel Agent Manager components must be in domains that trust each other.
All Sentinel Agent Manager components must be installed on computers with either Internet Protocol version 4 (IPv4) installed and enabled or both IPv4 and Internet Protocol version 6 (IPv6) installed and enabled.
If installing a central computer behind a firewall, ensure you open the appropriate ports to allow proper communication between the central computer and other Sentinel Agent Manager components. For more information about the default ports Sentinel Agent Manager uses, see Section 2.5, “Understanding Ports and Firewalls,” on page 19.
On Windows Server 2003 and Windows Server 2008 computers, ensure you enable MSDTC and configure Network DTC Access in the Component Services administrative tool to enable the following minimum required settings:
Allow Inbound
Allow Outbound
Mutual Authentication Required
Allow Remote Clients
You must specify the same type of authentication for all Sentinel Agent Manager components in order for Windows servers to communicate with one another.
For more information about configuring DTC security, see the Help for Component Services.
26 NetIQ Agent Manager Installation Guide

NOTE
On Windows Server 2003 computers, enable Network COM+ access for the Application Server using the Add/Remove Windows Components wizard, which is available from Add or Remove Programs in the Control Panel.
On Windows Server 2012 and Windows Server 2008 computers, enable Network COM+ access for the Application Server by using the Server Manager Administrative Tool to install the Application Server role and the COM+ Network Access service.
When you install central computer components on a Windows Server 2012 or Windows Server 2008 computer, the setup program prompts you to restart the central computer to finish the installation process. The setup program does not require that you restart Windows Server 2003 computers.
NetIQ recommends installing the latest Microsoft Windows service packs and hotfixes on all computers before installing Sentinel Agent Manager components.
After you install the Microsoft Message Queuing prerequisite, NetIQ recommends disabling the Active Directory Integration sub-component of MSMQ. For more information about disabling Active Directory Integration, see Section 3.4, “Disabling Active Directory Integration with Message Queuing,” on page 36.
2.9 Planning to Install Your AgentsSentinel Agent Manager monitors computers using host-based agents and proxy agents. An agent is a service that runs on a monitored computer to collect events. Windows agents that a central computer deploys and manages are called managed agents. Windows agents you manually install and that require manual installation of software upgrades are unmanaged agents.
You can configure Sentinel Agent Manager to automatically install agents on Windows computers using the Agent Administrator. The Agent Administrator allows you to create discovery rules, deploy managed agents, authorize unmanaged agents, and configure agentless Windows monitoring.
Additional Requirements On each central computer and agent computer you scan for viruses, configure your antivirus software to exclude from scanning the specified folders and files.
On Windows Server 2003 computers, exclude:
All files in the service account and All Users user profile folders, USERSPROFILE\Application Data\NetIQ, where USERSPROFILE is the path to the user profile on the computer.
All *.dat files in the installation folder\NetIQ Sentinel Agent Manager\OnePoint folder, where installation folder is the location where you installed Sentinel Agent Manager user interfaces.
On Windows Server 2012 and Windows Server 2008 computers, exclude:
All files in the ProgramData\NetIQ folder
All *.dat files in the installation folder\NetIQ Sentinel Agent Manager\OnePoint folder, where installation folder is the location where you installed Sentinel Agent Manager user interfaces.
Any computer on which you want to install central computer components must have a NetBIOS-compliant name.
Category Requirement
Planning to Install Sentinel Agent Manager 27

You can also configure central computer Global Settings to require approval before installing agents on Windows computers.
Understanding Relationships Between Agents and Central Computers
When you deploy a managed agent or install an unmanaged agent you assign that agent to a central computer.
For a managed agent, a central computer performs the following functions:
Installs and upgrades the managed agent
Scans the managed agent to check for configuration changes
Sends rules and configuration information to the managed agent
Receives events from the managed agent
For an unmanaged agent, a central computer performs the following functions:
Sends rules and configuration information to the unmanaged agent
Receives events from the unmanaged agent
The central computer cannot install, upgrade, or scan, an unmanaged agent.
Understanding Agent Deployment and Manual Agent Installation
This section describes when you can automatically deploy agents and when you must manually install them.
Installing Windows Agents
You can configure Sentinel Agent Manager to automatically deploy agents to Windows computers using the Agent Administrator in the Agent Manager console. The Agent Administrator allows you to deploy agents to Windows computers by name or by domain with matching criteria. For example, you can specify that Sentinel Agent Manager deploy agents to all Windows computers in a specified domain that contain a prefix in the computer name. You can also specify that certain computers be excluded from Windows agent deployment. For more information about automatically deploying Windows agents on Windows computers, see Section 3.6, “Installing Agents,” on page 39.
Sentinel Agent Manager cannot deploy managed Windows agents to remote Windows computers that are located outside a firewall. In this circumstance, manually install an unmanaged agent. For more information about installing agents in firewall environments, see Section 2.5, “Understanding Ports and Firewalls,” on page 19.
You should also consider installing an unmanaged agent to access the network over a WAN or a slow connection. For more information about manually installing the unmanaged agent on a Windows computer, see Chapter 4, “Manually Installing Unmanaged Windows Agents,” on page 45.
28 NetIQ Agent Manager Installation Guide

The following table lists the system requirements for a Windows agent computer.
NOTE: NetIQ recommends installing the latest Microsoft Windows service packs and hotfixes on all computers before installing Sentinel Agent Manager components.
Deploying Agents to Workstation Computers
Since Windows workstation computers typically send relatively few events to the central computer compared with Windows servers, Sentinel Agent Manager agents deployed on workstation computers may need to communicate less frequently with their central computer than agents deployed on server computers. A workstation is a computer with Microsoft Windows 2000 Professional, Windows XP, Windows Vista, Windows 7, or Windows 8 installed.
However, even when an agent has few events to send to the central computer, the agent must heartbeat regularly and keep in communication with the central computer in order to remain active. This requirement limits the number of agents a central computer can monitor, in spite of usage.
Sentinel Agent Manager uses a workstation scalability multiplier setting to allow workstation agents to communicate at longer intervals than server agents. Sentinel Agent Manager multiplies default agent communication settings, including heartbeat, computer availability, and connection retry intervals, by the scalability multiplier value for all workstation computers.
Category Requirement
Processor See the Sentinel Technical Information page.
Disk Space
Memory
Operating Systems
Network Access All Sentinel Agent Manager components must be in domains that trust each other.
All Sentinel Agent Manager components must be installed on computers with either Internet Protocol version 4 (IPv4) installed and enabled or both IPv4 and Internet Protocol version 6 (IPv6) installed and enabled.
Additional Requirements
Any computer on which you want to install a managed or unmanaged agent must have a NetBIOS-compliant name.
On each agent computer you scan for viruses, configure your antivirus software to exclude the \Application Data\NetIQ folder for each Windows user profile and all *.dat files in the installation folder\NetIQ Sentinel Agent Manager\OnePoint folder, where installation folder is the location where you installed the agent.
On each Windows Server 2012 and Windows Server 2008 agent computer you scan for viruses, configure your antivirus software to exclude the ProgramData\NetIQ folder and all *.dat files in the installation folder\NetIQ Sentinel Agent Manager\OnePoint folder, where installation folder is the location where you installed the agent.
Any computer using Windows Server 2008 R2 Server Core on which you want to install an agent must have the Windows-on-Windows 64-bit (WoW64) feature installed.
For more information about additional module-specific requirements, see the documentation for your installed modules.
Planning to Install Sentinel Agent Manager 29
For example, when a central computer uses the default multiplier value of 36 for all workstations, all workstation computers heartbeat every 3 hours instead of the default 300 seconds. The delay reduces the performance load on the central computer, allowing one central computer to monitor a large number of workstation computers.
If your configuration group includes no workstation computers, changes to the workstation scalability multiplier setting do not affect your agent computers.
NOTE: When you deploy an agent to a workstation computer, the workstation uses the server agent heartbeat setting until the central computer sends initial configuration information to the workstation agent. After receiving configuration information, the workstation agent uses the scalability multiplier when heartbeating.
Using the Agent Manager Console, you can modify the default scalability multiplier setting. For more information about modifying global agent settings in the Agent Manager Console, see the NetIQ Agent Manager™ User Guide.
2.10 Agent Manager Console RequirementsSentinel Agent Manager provides a Agent Manager Console based on Microsoft Management Console (MMC) technology. The Agent Manager Console is the central configuration point for configuration groups.
Tasks within the Agent Manager Console require your user account to be a member of the OnePointOp ConfgAdms group. For more information about the group membership required for particular tasks, see Section 2.11, “Understanding Sentinel Agent Manager Requirements and Permissions,” on page 31.
The following table lists the system requirements for the Development Console.
NOTE: NetIQ recommends installing the latest Microsoft Windows service packs and hotfixes on all computers before installing Sentinel Agent Manager components.
Category Requirement
Processor See the Sentinel Technical Information page.
Disk Space
Memory
Graphics
Operating System
Software
Network Access All Sentinel Agent Manager components must be in domains that trust each other.
All Sentinel Agent Manager components must be installed on computers with either Internet Protocol version 4 (IPv4) installed and enabled or both IPv4 and Internet Protocol version 6 (IPv6) installed and enabled.
30 NetIQ Agent Manager Installation Guide

2.11 Understanding Sentinel Agent Manager Requirements and PermissionsSentinel Agent Manager uses Windows groups and database roles to restrict access to product functionality. The Sentinel Agent Manager setup program creates the Windows groups and database roles, and then adds the service account and installation account to appropriate groups and roles.
NOTE: Members of the local Administrators group on a central computer have permission to use all Sentinel Agent Manager user interfaces on the computer, regardless of their OnePointOp group memberships.
At the end of installation, you can launch the Sentinel Agent Manager Access Configuration utility to add global groups you want to give access to the Sentinel Agent Manager user interfaces. The Access Configuration utility allows you to control Sentinel Agent Manager permissions by managing membership in OnePointOp groups. Access Configuration enforces the use of global groups in OnePointOp groups and creates appropriate database logins. Later, when you want to change who has access to the user interfaces, you can modify the global group membership.
NOTE: The Sentinel Agent Manager Access Configuration utility does not manage membership in global groups. Use Active Directory Users and Computers to manage account memberships within the global domain groups that are members of the OnePointOp groups.
For more information about the Sentinel Agent Manager Access Configuration utility, see the NetIQ Agent Manager™ User Guide. To use the Sentinel Agent Manager Access Configuration utility, you must be a member of the local Administrators group on the central computer and the Microsoft SQL Server sysadmin role on the database server.
Understanding Sentinel Agent Manager OnePointOp Groups
Sentinel Agent Manager provides the following Windows local groups to which you can add Windows global or universal groups following Sentinel Agent Manager installation.
NOTE: Sentinel Agent Manager does not support using nested Active Directory groups within OnePointOp groups.
OnePointOp System
OnePointOp System is a very powerful administrator group that the installation process populates with the Agent Manager service account. Modify the membership in the OnePointOp System group only when you change Agent Manager service accounts.
OnePointOp ConfgAdms
User accounts in the OnePointOp ConfgAdms group can modify the computers where Sentinel Agent Manager installs agents, as well as configure settings in the Configuration Wizard.
WARNING: Maintain tight control over members of the OnePointOp System and OnePointOp ConfgAdms groups. Members of these groups can define rules that can make widespread changes throughout your enterprise.
Planning to Install Sentinel Agent Manager 31

Understanding Console Requirements
Agent Manager Console
To use the Development Console, your user account must be a member of the OnePointOp ConfgAdms group. Your account must also be a member of the EeaDasLocator role in the OnePoint database.
Creating Global Domain Groups
Following installation, you use the Sentinel Agent Manager Access Configuration utility to populate Sentinel Agent Manager OnePointOp groups and database roles with global groups that contain the users to whom you want to grant Sentinel Agent Manager access permissions.
Create your global groups and populate them with users before installing Sentinel Agent Manager. You can use Active Directory Users and Computers to create and populate your global groups. When you run the Sentinel Agent Manager Access Configuration utility, the utility adds the global groups to the appropriate OnePointOp groups and creates the necessary database logon permissions.
32 NetIQ Agent Manager Installation Guide

3 3Installing Sentinel Agent Manager
This chapter documents how to install Sentinel Agent Manager in a production environment. In a production environment, you install components on multiple computers to allow Sentinel Agent Manager to support the following features:
Monitor computers
Maintain dedicated databases
Install redundant components
Complete the steps described in Chapter 2, “Planning to Install Sentinel Agent Manager,” on page 15 before installing Sentinel Agent Manager.
Section 3.1, “Sentinel Agent Manager Installation Checklist,” on page 33
Section 3.2, “Permissions,” on page 34
Section 3.3, “Creating a Service Account,” on page 34
Section 3.4, “Disabling Active Directory Integration with Message Queuing,” on page 36
Section 3.5, “Installing Sentinel Agent Manager,” on page 37
Section 3.6, “Installing Agents,” on page 39
Section 3.7, “Configuring Sentinel Agent Manager,” on page 41
Section 3.8, “Configuring the Agent Manager Connector,” on page 42
Section 3.9, “Configuring Collectors,” on page 42
3.1 Sentinel Agent Manager Installation ChecklistThis section guides you through the process of rolling out a configuration group.
Install Sentinel Agent Manager by completing the following checklist.
Steps See Section
1. Review planning and system requirements.
“Planning to Install Sentinel Agent Manager” on page 15
2. Verify logon account permissions. “Permissions” on page 34
3. Create service accounts. “Creating a Service Account” on page 34
4. Disable MSMQ Active Directory Integration, if not needed.
“Disabling Active Directory Integration with Message Queuing” on page 36
5. Install Sentinel Agent Manager components.
“Installing Sentinel Agent Manager” on page 37
6. Install any additional central computers. “Installing Additional Central Computers” on page 39
Installing Sentinel Agent Manager 33
3.2 PermissionsBefore installing Sentinel Agent Manager, ensure your logon account is a member of the local Administrators group on the computers where you install Sentinel Agent Manager components. Also ensure your logon account is a member of the Microsoft SQL Server sysadmin role on the database server.
NOTE
You do not need an Administrator account or SQL Server sysadmin account to run most Sentinel Agent Manager consoles or utilities after installation.
You must use an account that is a member of the Microsoft SQL Server sysadmin role on the database server to use the Access Configuration utility.
In Windows Server 2012, Windows Server 2008, and Windows Vista environments, users added to the Administrators group do not have built-in administrator privileges by default and are subject to User Account Control restrictions.
When you manually install an agent on a computer with Windows Server 2012, Windows Server 2008, or Windows Vista installed, you may need to run the setup program using the built-in administrator account. To run ManualAgent.msi as the administrator, open the command-line interface using the runas command:
runas /user:administrator cmd
In the command-line interface, run the .msi according to the installation instructions.
3.3 Creating a Service AccountThe central computer uses a service account, which is a Windows user account, to log on to the database server, central computer, and agent computers.
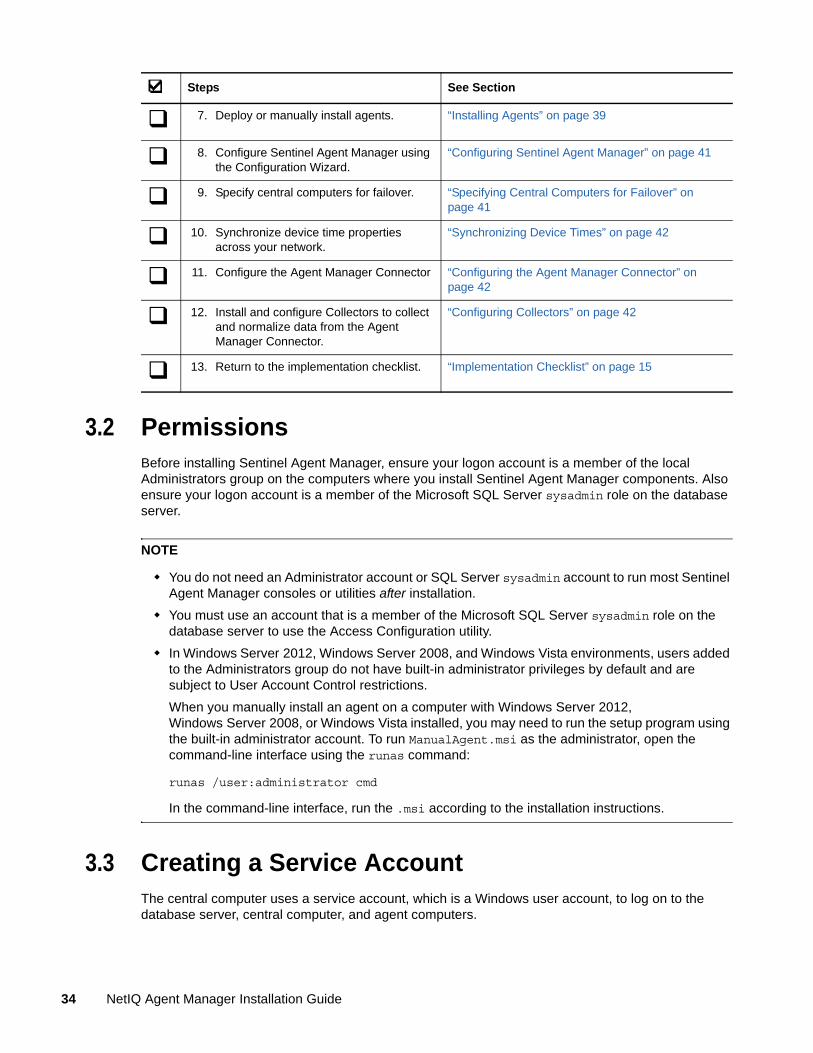
7. Deploy or manually install agents. “Installing Agents” on page 39
8. Configure Sentinel Agent Manager using the Configuration Wizard.
“Configuring Sentinel Agent Manager” on page 41
9. Specify central computers for failover. “Specifying Central Computers for Failover” on page 41
10. Synchronize device time properties across your network.
“Synchronizing Device Times” on page 42
11. Configure the Agent Manager Connector “Configuring the Agent Manager Connector” on page 42
12. Install and configure Collectors to collect and normalize data from the Agent Manager Connector.
“Configuring Collectors” on page 42
13. Return to the implementation checklist. “Implementation Checklist” on page 15
Steps See Section
34 NetIQ Agent Manager Installation Guide
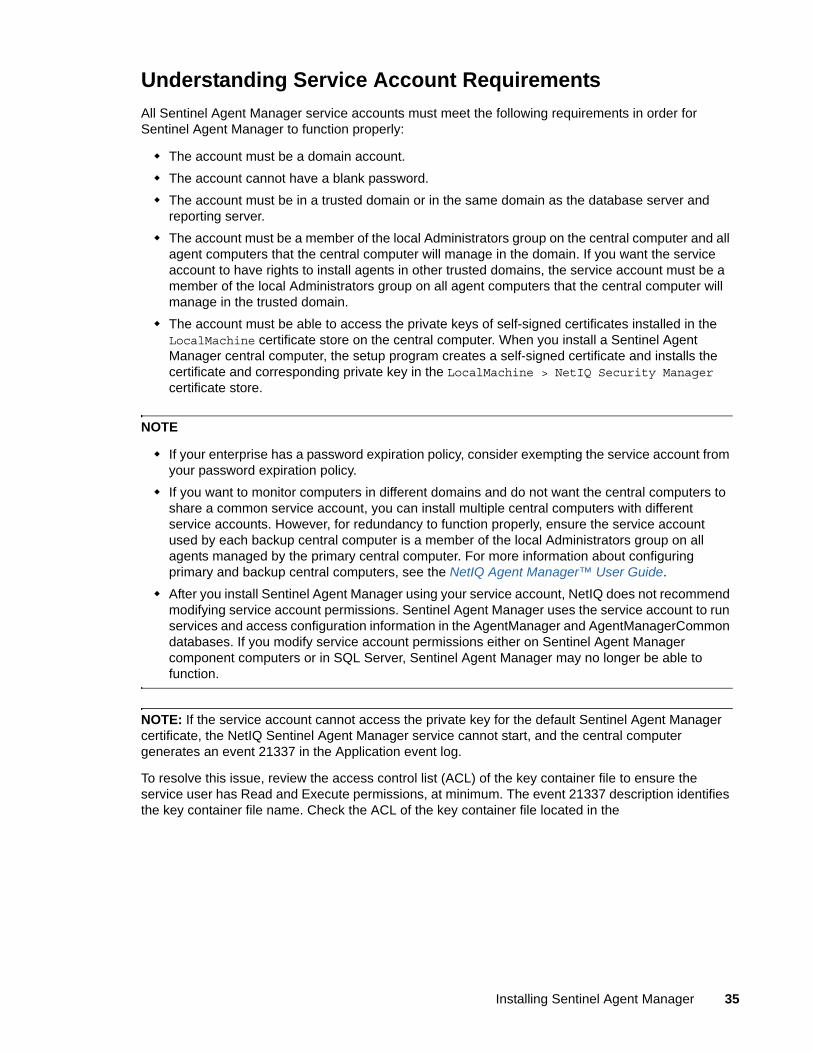
Understanding Service Account Requirements
All Sentinel Agent Manager service accounts must meet the following requirements in order for Sentinel Agent Manager to function properly:
The account must be a domain account.
The account cannot have a blank password.
The account must be in a trusted domain or in the same domain as the database server and reporting server.
The account must be a member of the local Administrators group on the central computer and all agent computers that the central computer will manage in the domain. If you want the service account to have rights to install agents in other trusted domains, the service account must be a member of the local Administrators group on all agent computers that the central computer will manage in the trusted domain.
The account must be able to access the private keys of self-signed certificates installed in the LocalMachine certificate store on the central computer. When you install a Sentinel Agent Manager central computer, the setup program creates a self-signed certificate and installs the certificate and corresponding private key in the LocalMachine > NetIQ Security Manager certificate store.
NOTE
If your enterprise has a password expiration policy, consider exempting the service account from your password expiration policy.
If you want to monitor computers in different domains and do not want the central computers to share a common service account, you can install multiple central computers with different service accounts. However, for redundancy to function properly, ensure the service account used by each backup central computer is a member of the local Administrators group on all agents managed by the primary central computer. For more information about configuring primary and backup central computers, see the NetIQ Agent Manager™ User Guide.
After you install Sentinel Agent Manager using your service account, NetIQ does not recommend modifying service account permissions. Sentinel Agent Manager uses the service account to run services and access configuration information in the AgentManager and AgentManagerCommon databases. If you modify service account permissions either on Sentinel Agent Manager component computers or in SQL Server, Sentinel Agent Manager may no longer be able to function.
NOTE: If the service account cannot access the private key for the default Sentinel Agent Manager certificate, the NetIQ Sentinel Agent Manager service cannot start, and the central computer generates an event 21337 in the Application event log.
To resolve this issue, review the access control list (ACL) of the key container file to ensure the service user has Read and Execute permissions, at minimum. The event 21337 description identifies the key container file name. Check the ACL of the key container file located in the
Installing Sentinel Agent Manager 35

%ALLUSERSPROFILE%\Application Data\Microsoft\Crypto\RSA\MachineKeys folder to ensure the Sentinel Agent Manager service account has at least Read and Execute permissions. For more information about key containers, see the Microsoft Key Storage and Retrieval documentation.
Understanding Service Account Permissions Added by Sentinel Agent Manager
When you install Sentinel Agent Manager, the setup program adds the following user rights to your new service account:
Act as part of the operating system
Create a token object
Log on as a batch job
Log on as a service
3.4 Disabling Active Directory Integration with Message QueuingSentinel Agent Manager requires that you install the Message Queuing Windows component on a computer before installation of some Sentinel Agent Manager components. However, unless you actively use the Active Directory Integration sub-component of the Message Queuing Windows component, NetIQ recommends you disable Active Directory Integration. You can either disable Active Directory Integration when installing Message Queuing or disable it after installation.
For more information about Sentinel Agent Manager prerequisites, see Chapter 2, “Planning to Install Sentinel Agent Manager,” on page 15.
NOTE: In Windows Server 2012 and Windows Server 2008, the Active Directory Integration sub-component is called Directory Services Integration.
To disable Active Directory Integration after installing Message Queuing:
1 Log on to the computer on which you installed the Message Queuing Windows component and you want to install Sentinel Agent Manager components, using an account that is a member of the local Administrators group.
2 If the computer uses Windows Server 2003, perform the following steps:
2a Open the Add or Remove Programs Control Panel.
2b Click Add/Remove Windows Components.
2c Select Application Server and click Details.
2d Select Message Queuing and click Details.
2e Clear the Active Directory Integration check box.
2f Click OK.
2g Click OK.
2h Click Next. The Windows Component Wizard configures Message Queuing.
2i Click Finish.
2j Close the Control Panel.
36 NetIQ Agent Manager Installation Guide
3 If the computer uses Windows Server 2012, Windows Server 2008, or Windows Server 2008 R2, perform the following steps:
3a Open the Server Manager.
3b In the left pane, click Features.
3c In the right pane, click Remove Features.
3d Expand Message Queuing > Message Queuing Services.
3e Clear the Directory Service Integration check box.
3f Click Next.
3g Click Remove. The Remove Features Wizard removes the Directory Service Integration feature.
3h Click Close.
3i Close the Server Manager.
4 Log off of the computer.
3.5 Installing Sentinel Agent ManagerThis section explains how to use the setup program to install Sentinel Agent Manager components. Follow the procedures to install a database server, central computers, and the Agent Manager console. For more information about hardware requirements and other planning considerations, see Section 2.2, “Planning to Roll Out Your Configuration Groups,” on page 16.
After installation, use the Configuration Wizard to configure Sentinel Agent Manager to monitor your environment.
Choosing Components to Install
The setup program allows you to select which Sentinel Agent Manager components you want to install.
The components are listed in the order indicated:
Steps Description
1. Database Server Select this component to install the database server on the local computer or to a remote location.
2. Central Computer Select this component to install the central computer on the local computer. You can also select the Database Server component and install the database server remotely during the same installation run.
You cannot install a central computer on an existing managed agent computer.
3. Agent Manager Console Select this component to install the Agent Manager Console on the local computer.
You can choose to install the Agent Manager Console during the same installation run with other components.
Installing Sentinel Agent Manager 37

NOTE
Ensure you install all Sentinel Agent Manager components in an environment with access to a domain controller.
Before installing Sentinel Agent Manager components, review the group policy for your environment and ensure the policy does not contain any specific requirements that could restrict communication between component computers. For example, if your group policy requires LDAP server signing on a server where you want to install Sentinel Agent Manager, other computers may not be able to communicate with that server.
After you install all Sentinel Agent Manager components, you should use the Agent Administrator to deploy agents to monitor the database server. The setup program only automatically installs an agent on the central computer. For more information about installing agents, see “Installing Windows Agents” on page 39.
Running the Setup Program
Before running the setup program, ensure the computer on which you are installing Sentinel Agent Manager has access to a domain controller. The following procedure guides you through the process of installing Sentinel Agent Manager components. Repeat this procedure to install additional Sentinel Agent Manager components, as necessary.
To install Sentinel Agent Manager:
1 Log on to the computer on which you want to install the Sentinel Agent Manager component using an account that is a member of the local Administrators group. Also ensure your logon account is a member of the Microsoft SQL Server sysadmin role on the database server and reporting server.
NOTE: You do not need an Administrator account or SQL Server sysadmin account to run most Sentinel Agent Manager consoles or utilities after installation.
You must use an account that is a member of the Microsoft SQL Server sysadmin role on the database server to use the Access Configuration utility.
2 Close all open applications.
3 Run the setup program from the Sentinel Agent Manager installation kit.
4 On the Select Sentinel Agent Manager Components window, select the components you want to install and click Next.
5 Follow the instructions in the setup program until you reach the Finished window.
6 If you are installing a central computer and want to add global domain groups to the OnePointOp groups and database roles, click Launch Access Configuration. For more information about fields on a window, see the Help.
NOTE: You can also launch the Sentinel Agent Manager Access Configuration utility at a later time. However, you must complete this step on each central computer before other user accounts can access the Sentinel Agent Manager user interfaces. For more information about user interface permissions, see the NetIQ Agent Manager™ User Guide.
7 Click Finish.
38 NetIQ Agent Manager Installation Guide
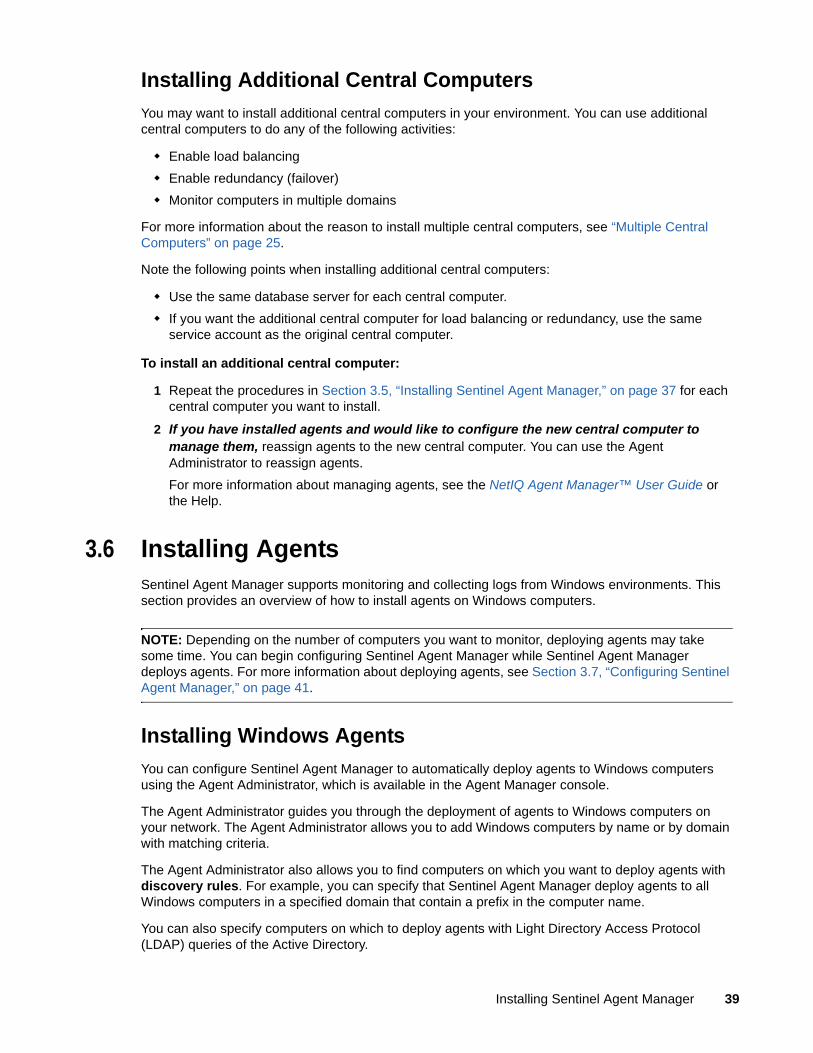
Installing Additional Central Computers
You may want to install additional central computers in your environment. You can use additional central computers to do any of the following activities:
Enable load balancing
Enable redundancy (failover)
Monitor computers in multiple domains
For more information about the reason to install multiple central computers, see “Multiple Central Computers” on page 25.
Note the following points when installing additional central computers:
Use the same database server for each central computer.
If you want the additional central computer for load balancing or redundancy, use the same service account as the original central computer.
To install an additional central computer:
1 Repeat the procedures in Section 3.5, “Installing Sentinel Agent Manager,” on page 37 for each central computer you want to install.
2 If you have installed agents and would like to configure the new central computer to manage them, reassign agents to the new central computer. You can use the Agent Administrator to reassign agents.
For more information about managing agents, see the NetIQ Agent Manager™ User Guide or the Help.
3.6 Installing AgentsSentinel Agent Manager supports monitoring and collecting logs from Windows environments. This section provides an overview of how to install agents on Windows computers.
NOTE: Depending on the number of computers you want to monitor, deploying agents may take some time. You can begin configuring Sentinel Agent Manager while Sentinel Agent Manager deploys agents. For more information about deploying agents, see Section 3.7, “Configuring Sentinel Agent Manager,” on page 41.
Installing Windows Agents
You can configure Sentinel Agent Manager to automatically deploy agents to Windows computers using the Agent Administrator, which is available in the Agent Manager console.
The Agent Administrator guides you through the deployment of agents to Windows computers on your network. The Agent Administrator allows you to add Windows computers by name or by domain with matching criteria.
The Agent Administrator also allows you to find computers on which you want to deploy agents with discovery rules. For example, you can specify that Sentinel Agent Manager deploy agents to all Windows computers in a specified domain that contain a prefix in the computer name.
You can also specify computers on which to deploy agents with Light Directory Access Protocol (LDAP) queries of the Active Directory.
Installing Sentinel Agent Manager 39
NOTE
Ensure the Remote Registry Service is started on the Windows computer and central computer before attempting to deploy Windows agents. You can review services using the Component Services Administrative tool, located in the Control Panel.
Ensure the service account is a member of the local Administrators group on all agent computers that the central computer will deploy and manage.
NetIQ Corporation does not support monitoring managed agents located on the outside of a firewall from the central computer. If you want to monitor computers behind a firewall, NetIQ Corporation recommends installing unmanaged agents on your remote computers. For more information about installing unmanaged agents, see Chapter 4, “Manually Installing Unmanaged Windows Agents,” on page 45.
To deploy managed agents to Windows computers using the Agent Administrator:
1 Log on to the central computer as a member of the OnePointOp ConfgAdms group.
2 Start the Agent Manager console in the NetIQ Sentinel Agent Manager program group.
3 Click Launch Agent Administrator.
4 In the left pane, click Managed Agents.
5 In the right pane, click Configure Agent Discovery Rules.
6 Click Add.
7 Select Include Computers, and then click Next.
8 Complete the wizard, specifying parameters that select the computers you want to discover. For more information about fields on a window, see the Help.
9 Select the check box and row corresponding to the rule you created with the wizard.
10 Click Next.
11 If you want to deploy agents to the discovered computers at the next scan, click No.
12 If you want to immediately deploy agents to the discovered computers, click Yes.
13 If you clicked Yes, select the central computer that will manage the computers.
14 Click Yes again to deploy agents immediately.
15 Click Next.
16 Select the discovered computers to which you want to deploy agents.
17 Click Next.
18 Click Finish.
19 Click Close.
NOTE
When you deploy a managed agent to a new computer, Sentinel Agent Manager does not immediately begin receiving data from the new agent. The agent first sends a heartbeat to the central computer and receives configuration data from Sentinel Agent Manager. At the next agent heartbeat, the agent sends configuration information back to the central computer. The agent then starts sending data to the central computer.
Do not change the agent share and system share settings for the configuration group after you have installed the agents. If you change the agent share and system share settings, the system might become unstable.
40 NetIQ Agent Manager Installation Guide

For more information about installing the Windows agent manually, see Chapter 4, “Manually Installing Unmanaged Windows Agents,” on page 45.
3.7 Configuring Sentinel Agent ManagerThe Configuration Wizard guides you through the configuration of critical global settings and parameters. You can run the Configuration Wizard at any time to reconfigure these parameters.
To configure Sentinel Agent Manager for your environment using the Configuration Wizard:
1 Log on to the central computer as a member of the OnePointOp ConfgAdms group.
2 Start the Sentinel Agent Manager console in the NetIQ Sentinel Agent Manager program group.
3 Click Global Tasks > Launch Configuration Wizard.
4 Click any link in the left pane, then follow the instructions in the Configuration Wizard until you have completed configuring Sentinel Agent Manager for your environment. For more information about fields on a window, see the Help.
You may also need to complete additional configuration for third-party products you want to monitor. For more information about monitoring third-party products, see the module documentation for your product.
Specifying Central Computers for Failover
Under certain circumstances, such as maintenance or communication problems, an agent may not be able to communicate with the central computer to which it is assigned. Sentinel Agent Manager does not leave any agent without a central computer. Instead, Sentinel Agent Manager temporarily assigns the agent to another central computer, chosen from a list you specify.
When failover to another central computer occurs, the backup central computer provides many of the functions the primary central computer provided until the primary central computer is again accessible. Following failover, agents send events to the backup central computer. The backup central computer can pass rules and configuration to the agent and can scan the agent. The backup central computer cannot install updates or new agent software on the agent.
By default, Sentinel Agent Manager specifies one or more central computers managed and unmanaged agents can contact in the event that their assigned central computer is unavailable. However, you can disable this setting and specify backup central computers for each central computer in your configuration group.
Each central computer can have more than one backup computer specified. Failover occurs in the order you specify.
To manually specify central computers for failover:
1 If the central computers use different service accounts, ensure the service account used by each backup central computer is a member of the local Administrators group on all agents managed by the primary central computer.
2 Log on to the Agent Manager Console computer using an account that is a member of the OnePointOp ConfgAdms group. For more information about groups and permissions, see Section 2.11, “Understanding Sentinel Agent Manager Requirements and Permissions,” on page 31.
3 Start the Agent Manager Console in the NetIQ Sentinel Agent Manager program group.
Installing Sentinel Agent Manager 41
4 Disable automatic failover by completing the following steps:
4a In the left pane, expand Sentinel Agent Manager Console> Configuration > Global Settings.
4b In the right pane, click Central Computers.
4c On the Action menu, click Properties.
4d Click Redundancy Policy.
4e Clear System Controlled.
4f Click OK.
5 In the left pane, expand Sentinel Agent Manager Console > Configuration > Central Computers.
6 In the right pane, select a central computer for which you want to specify backup central computers.
7 On the Action menu, click Properties.
8 Click Redundant Central Computers.
9 In Available Central Computers, select a computer.
10 Click >>.
11 Repeat these steps for each central computer you want to designate as a backup central computer.
12 Click Move Up and Move Down to arrange the computers in the order you want failover to occur.
13 Click OK.
Synchronizing Device Times
To ensure Sentinel Agent Manager displays the correct time for detected events, periodically synchronize the time properties for all computers and devices across your network.
3.8 Configuring the Agent Manager ConnectorThe Agent Manager Connector allows a Sentinel system to receive events from Agent Manager agents.
Events received by the Agent Manager Connector are in the JavaScript Object Notation (JSON) format. The Agent Manager Connector helps in routing the events to a broader variety of Collectors to get higher quality of events. The Agent Manager Connector routes the events to the appropriate Collector.
By default, Sentinel server connects with the Agent Manager Connector on port 1590. However, it can also be configured.
For more information about configuring the Agent Manager Connector, see the Agent Manager Connector Guide on the NetIQ Sentinel Plug-ins website.
3.9 Configuring CollectorsCollectors normalize and collect the information from the Connectors. Collectors are written in JavaScript, and they define the logic for the following:
Receiving raw data from the Connectors.
42 NetIQ Agent Manager Installation Guide

Parsing and normalizing the data.
Applying repeatable logic to the data.
Translating device?specific data into Sentinel specific data.
Formatting the events.
Passing the normalized, parsed, and formatted data to the Collector Manager.
You can download Collectors from the NetIQ Sentinel Plug-ins website.
If you are upgrading from a previous version of Sentinel, you need to ensure you have the most recent Collectors installed. Older versions of Collectors will not be route events to the Collector properly and events are handled by the Generic Event Collector.
Collectors that have not yet been updated with Agent Manager application tags are still compatible with Agent Manager data collection. You can use the Agent Manager event source server advanced configuration to define a custom application tag to route Agent Manager events to the proper Collector.
The following list describes the source for the application tag included in each event.
WMS connection method application tag is defined by the event Source. For example, “Event.System.Provider Name” in the XML view.
FILE connection method application tag is defined in the Application Log provider configuration.
Installing Sentinel Agent Manager 43

44 NetIQ Agent Manager Installation Guide

4 4Manually Installing Unmanaged Windows Agents
Under certain circumstances, installing an agent manually on a Windows computer is preferable to allowing the central computer to automatically deploy the Windows agent. Consider the following situations where manually installing a Windows agent could save time, money, security, and configuration costs:
The monitored Windows computer accesses the network over a WAN connection. Manual Windows agent installation saves both connectivity time and expense.
The monitored Windows computer is outside your interior network firewall. Manual Windows agent installation saves configuration time and allows you to monitor this computer without jeopardizing network security. For more information about installing unmanaged agents in a firewall environment, see Section 2.5, “Understanding Ports and Firewalls,” on page 19.
The monitored Windows computer is in a controlled environment that requires you to know exactly what, when, and how Windows agents are installed, and you need to retain complete control over the process. Manual Windows agent installation gives you this control.
You manually install and upgrade unmanaged agents. System requirements are the same for managed (automatically deployed) and unmanaged (manually installed) Windows agents. For more information about Windows agent system requirements, see “Installing Windows Agents” on page 28.
Section 4.1, “Understanding Unmanaged Windows Agent Installation,” on page 45
Section 4.2, “Installing and Configuring a Windows Agent Manually,” on page 46
Section 4.3, “Installing an Unmanaged Windows Agent Manually,” on page 46
Section 4.4, “Uninstalling Unmanaged Windows Agents,” on page 47
4.1 Understanding Unmanaged Windows Agent InstallationThe unmanaged Windows agent setup program installs an agent on the local Windows computer.
When you manually install an unmanaged agent on a Windows computer, the unmanaged agent attempts to connect to the central computer that you specify in the setup program. An unmanaged agent identifies itself to the central computer at the time of the first successful connection. However the central computer does not accept communication from the agent until you authorize it with the Agent Administrator.
NOTE
You cannot install an unmanaged agent on a Sentinel Agent Manager central computer or user interface computer. However, you can install an unmanaged agent on a database server.
You cannot install Sentinel Agent Manager components on a computer that already has an unmanaged agent installed.
Manually Installing Unmanaged Windows Agents 45

4.2 Installing and Configuring a Windows Agent ManuallyYou can manually install an unmanaged agent on a Windows computer. After you install an unmanaged agent, you can make changes to its configuration. For more information about reassigning an unmanaged agent to a different central computer, see the NetIQ Agent Manager™ User Guide.
You must first authorize the new unmanaged agent, after which the agent sends a heartbeat to the central computer. Sentinel Agent Manager sends the unmanaged agent configuration data, and at the next agent heartbeat, the agent sends configuration information back to the central computer. Sentinel Agent Manager then assigns the new unmanaged agent computer to all applicable device groups and displays the agent in the Agents view.
For more information about configuring the heartbeat interval for agents, see the NetIQ Agent Manager™ User Guide.
4.3 Installing an Unmanaged Windows Agent ManuallyThe manual Windows agent setup program installs an agent on the local Windows computer and guides you through Windows agent configuration. You can also silently run the setup program. For more information about installing unmanaged agents silently, see Section C.3, “Installing Unmanaged Agents Silently,” on page 61.
To manually install an agent on a Windows computer:
1 Log on with an administrator account to the computer on which you want to install an unmanaged agent.
2 Close all open applications.
3 Run the MAISetup.exe program located in the Additional Setups\Manual Agent Installation folder in the installation kit.
NOTE: When you manually install an agent on a computer with Windows Server 2012, Windows Server 2008, or Windows Vista installed, you may need to run the setup program using the built-in administrator account.
To run MAISetup.exe as the administrator, open the command-line interface using the runas command:
runas /user:administrator cmd
In the command-line interface, enter the following command:
c:\installation folder\Additional Setups\Manual Agent Installation\MAISetup.exe
where installation folder is the location where you saved the installation kit.
4 Follow the instructions until you have finished manually installing the unmanaged Windows agent.
5 Log on to the central computer as a member of the OnePointOp ConfgAdms group.
6 Start the Sentinel Agent Manager console in the NetIQ Sentinel Agent Manager program group.
7 Click Launch Agent Administrator.
46 NetIQ Agent Manager Installation Guide

8 In the left pane, click Unmanaged Agents.
9 In the right pane, click Authorize Unmanaged Agents.
10 Select the unmanaged agent you want to authorize.
11 Click OK.
12 Select Apply configuration changes now.
13 Click OK.
14 Verify the selected central computer and click OK.
15 Click Close.
4.4 Uninstalling Unmanaged Windows AgentsWhen you no longer want to monitor an unmanaged agent computer, uninstall the unmanaged agent with the Add or Remove Programs utility. For more information about uninstalling unmanaged Windows agents, see “Uninstalling Unmanaged Agents” on page 64.
Manually Installing Unmanaged Windows Agents 47

48 NetIQ Agent Manager Installation Guide

5 5Upgrading Sentinel Agent Manager
To upgrade the Sentinel Agent Manager, you need to upgrade the following components:
Central computers and database server
Managed agents
Unmanaged agents
When you upgrade the Agent Manager, the setup program automatically deletes any unused or obsolete files located on the local computer, but it does not delete any Agent Manager configuration files. If you have customized your SQL environment, the upgrade setup program may overwrite your customizations.
Section 5.1, “Prerequisites,” on page 49
Section 5.2, “Preparing to Upgrade,” on page 49
Section 5.3, “Upgrading Central Computers and the Database Server,” on page 50
Section 5.4, “Upgrading Managed Agents,” on page 51
Section 5.5, “Upgrading Unmanaged Agents,” on page 51
5.1 PrerequisitesFollowing are the prerequisites before you upgrade the Agent Manager:
Minimum 40% free log and data space in the AgentManager database.
Minimum 700 MB of free space on the local computer.
Back up the databases.
Ensure that you have the service account and configuration group credentials. You need to specify the credentials to complete the upgrade.
5.2 Preparing to UpgradeBefore upgrading, you must configure your computer and stop certain services locally.
1 Log in to the Agent Manager Computer as a OnePointOp ConfgAdms group user. For more information about groups and permissions, see Section 1.3, “Understanding Requirements and Permissions,” on page 14.
2 Open the Agent Manager Console in the NetIQ Agent Manager program folder.
3 Expand Agent Manager Console (Default) > Configuration.
Upgrading Sentinel Agent Manager 49
4 Complete the pending agent installations:
4a Click Central Computers, Click Action > Properties.
4b In the Global Central Computer Setting (AgentManager) window, click Agent Installation, and select the following options:
Do not install agents automatically. Add computers to the Pending Agents Installation list with a disapproved status.
Do not uninstall agents automatically. Add computers to the Pending Agents Uninstallation list with a disapproved status.
4c Click OK.
5 Close the Agent Manger Console.
6 Log in to the database server as a local administrators group user.
7 Back up the databases.
5.3 Upgrading Central Computers and the Database ServerWhen you upgrade the central computers, the Agent Manager automatically upgrades the database server. You must first upgrade the central computer closest to the database server on the network, before upgrading central computers on the remote network subnets. Before you upgrade the central computer, ensure that you back up the databases.
1 Log in to the central computer as a local administrator.
2 Close all the open applications, including the Performance Monitoring tool.
3 Run the Agent Manager setup file in the Agent Manager installation folder.
4 Follow the instructions in the setup program. When prompted, specify the service account and configuration group credentials.
NOTE: If the setup program displays an error about not being able to install NetIQ Agent Manager Communication performance counters, ignore it. Performance counters are successfully installed during the upgrade.
5 Click Finish.
6 Repeat the procedure to upgrade all the central computers in the configuration group.
50 NetIQ Agent Manager Installation Guide

5.4 Upgrading Managed AgentsThe Agent Manager scans the managed agents for pending upgrades every day at 2.05 A.M. You can also force the Agent Manager to scan the agents to check for pending upgrades. If any pending upgrades for agents are detected, you need to approve these agents to complete the upgrade.
Perform the following steps to upgrade the managed agents:
1 (Optional) Initiate the Agent Manager scan for pending upgrades to the agents:
1a In the left pane, expand Agent Manager Console (Default) > Configuration, click Global Settings.
1b In the right pane, double-click Central Computers.
1c In the Global Central Computer Setting (AgentManager) window, click Managed Computer Scan > Scan managed computers now.
2 To view the list of agents with pending upgrades, expand Pending Agents, click Installation.
3 To refresh the list of agents, click Action> Refresh.
4 To approve the agents with pending upgrades, click Action > Approve All Pending Installations.
5 (Conditional) If the Agent Manager displays a restart warning, click OK to restart the agent computer.
6 To install the upgrades to the approved agents, click Action > Install All Approved Agent Now.
7 To view the upgrade status of the agents, click Action > Refresh until Agent Manager finishes upgrading all agents.
5.5 Upgrading Unmanaged AgentsYou need to upgrade all the unmanaged agents manually in the agent computers.
To upgrade an unmanaged agent:
1 In the agent computer, run the Agent Manager\Additional Setups\Manaual Agent Installation\MAISetup.exe file.
2 Follow the instructions in the setup program. Click Finish.
Upgrading Sentinel Agent Manager 51

52 NetIQ Agent Manager Installation Guide
A ABacking Up and Restoring Data Collection Policies
You can back up and restore the Agent Manager data collection policies by using the content backup utility. The content backup utility is available in the Onepoint folder under the Agent Manager installation path.
The following table describes the parameters that you need to specify to run the content backup utility:
To back up or restore the Agent Manger data collection policies, run the backup utility using the following command:
<Installation_path>\OnePoint\ContentBackup.exe -d:<Database Server Name> -a:{I | E} -f:<Filename> -c:{A | O} [-e]
For example, if you want to back up the data collection policies in the AgentManager database located in the database server 172.16.0.0 and export the data into the file C:\backup_timestamp.xml, use the following command:
C:\Program Files\NetIQ Agent Manager\AgentManager\ContentBackup.exe -d:172.16.0.0 -a:E -f:C:\backup_timestamp.xml -c:A
The backup utility generates a new file C:\backup_timestamp.xml, which contains the backed up data collection policies.
NOTE: When restoring the data collection policies, the backup utility deletes the existing data collection policies in the AgentManager database and replaces it with the backed up data. If an error occurs during restore, you might lose the existing data collection policies.
To import the data collection policies from the file C:\backup_timestamp.xml and restore them in the AgentManager database, use the following command:
Parameter Description
-d:<Database Server Name> Specify the name of the database server that contains the AgentManager database.
-a:{I | E} Specify the action you want to perform. Specify E to back up and I to restore the data collection policies.
-f:<Filename> Specify the filename to export or import the backed up data. When exporting the backed up data, if you specify the name of a file that already exists, the backup utility overwrites the file.
-c:{A | O} Specify the database containing the data collection policies. Specify A for AgentManager database and O for Legacy Security Manager Onepoint database.
[-e] (Optional) If you specify this option, the backup utility encodes the data during backup to prevent data corruption.
Backing Up and Restoring Data Collection Policies 53
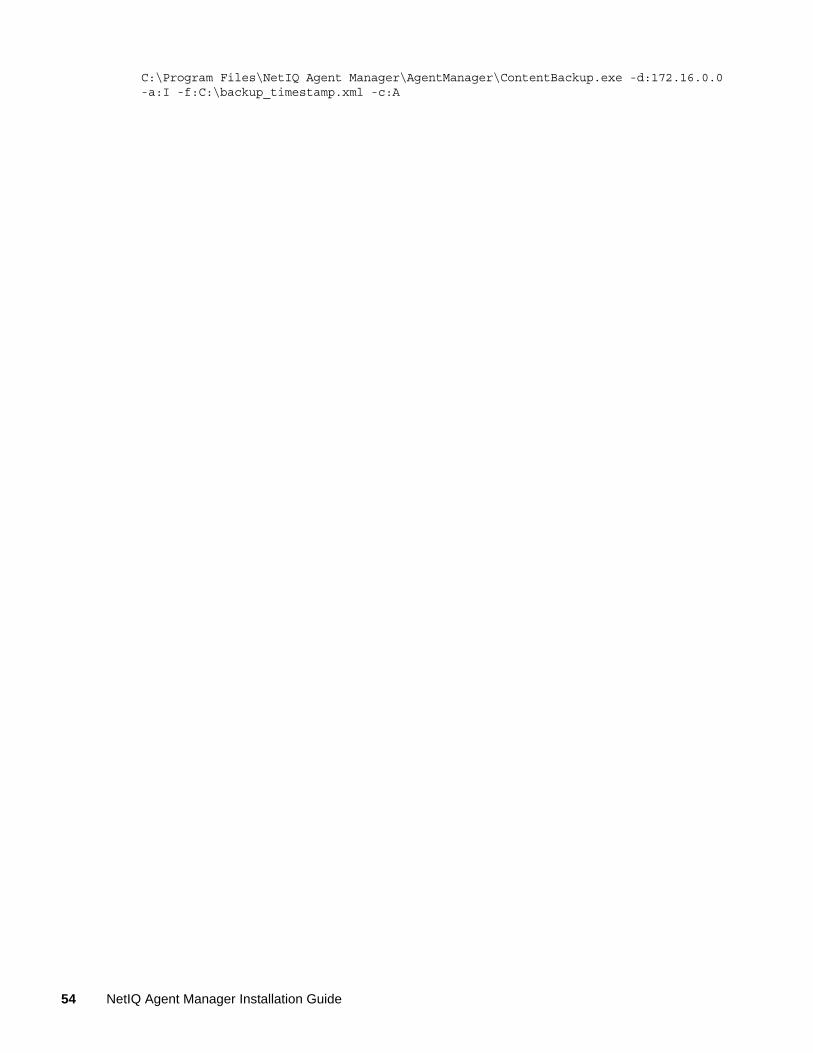
C:\Program Files\NetIQ Agent Manager\AgentManager\ContentBackup.exe -d:172.16.0.0 -a:I -f:C:\backup_timestamp.xml -c:A
54 NetIQ Agent Manager Installation Guide

B BBacking Up and Restoring Certificates Data
The Agent Manager uses certificates for authentication between Central Computer and Agents. When you upgrade the Microsoft Windows operating system, it deletes some of these certificates and prevents the Agent Manager from restarting after the upgrade.
Before you upgrade Windows, back up the Agent Manager system certificates and restore them after you upgrade Windows, by performing the following steps:
1 Export the registry key:
1a Open the command prompt as an administrator and enter the command regedit.
1b In the Registry Editor, Expand HKEY_LOCAL_MACHINE > SOFTWARE > Microsoft > SystemCertificates.
1c Under SystemCertificates, right-click the NetIQ Security Manager folder and select Export. Save the registry key as a .reg file.
1d Back up the.reg file.
2 (Conditional) If you have changed the default location for the SAM certificate installation, back up the certificates from the custom location.
3 (Conditional) If you have installed any custom certificates for authentication between the Central Computer and Agents, back up the custom certificates.
4 Perform the Windows upgrade.
5 Double-click the.reg file generated in Step 1 to import the certificates into the registry.
6 (Conditional) Reinstall the certificates that were backed up in Step 2 and Step 3 at the appropriate locations.
7 Restart the Agent Manager service.
Backing Up and Restoring Certificates Data 55

56 NetIQ Agent Manager Installation Guide

C CInstalling Sentinel Agent Manager Components Silently
This appendix provides information about silent installation of Agent Manager components.
Section C.1, “Silent Installation,” on page 57
Section C.2, “Installation Program Options,” on page 59
Section C.3, “Installing Unmanaged Agents Silently,” on page 61
Section C.4, “Verifying Silent Installation,” on page 62
C.1 Silent InstallationYou can silently install Sentinel Agent Manager components by running the installation program from the command line using the following basic syntax:
msiexec /i setup.msi /quiet /l*v LogFile.txt OPTIONS
This command instructs the installation program to run without showing a user interface. However, you still need to supply all of the necessary OPTIONS information on the command line when installing silently. For more information on possible silent installation options, see Section C.2, “Installation Program Options,” on page 59.
WARNING: NetIQ recommends only advanced users who have experience with Microsoft Installer (MSI)-based applications install Sentinel Agent Manager components silently.
The following procedure describes how to use the silent installation capability to install a Sentinel Agent Manager configuration group.
Before installing Sentinel Agent Manager components silently, be aware of the following considerations:
The installation program does not validate any of the information you enter on the command line. Ensure you have entered the required information correctly before executing the command.
If the installation program cannot install Sentinel Agent Manager, the installation program notifies the user only by logging the failure in the installation log. The installation program does not display any errors or warnings during the process. When running the Sentinel Agent Manager installation program silently, ensure logging is enabled.
To enable logging, include the option /l*v LogFile.txt in the command line, where LogFile.txt is the name of the text file where you want the installation program to log installation progress and any errors.
NetIQ recommends you do not install Sentinel Agent Manager database server components silently. Instead, you should install the necessary databases using the user interface-based setup program.
Installing Sentinel Agent Manager Components Silently 57

You can use the silent installation procedure to install Sentinel Agent Manager components or upgrade previously installed Sentinel Agent Manager components using the INSTALL_TYPE option. If you want to upgrade Sentinel Agent Manager, you must specify all components currently installed on the local computer using the ADDLOCAL option.
Ensure the computers on which you install Sentinel Agent Manager components, including the database server, have all the necessary prerequisites already installed. For more information about Sentinel Agent Manager prerequisites, see Chapter 2, “Planning to Install Sentinel Agent Manager,” on page 15.
If you want to silently install a central computer, you must run the installation program from the complete installation kit. The installation program requires several specific files located in a standard location in the installation kit.
If you install Sentinel Agent Manager components on a computer running Microsoft Windows Server 2012 or Microsoft Windows Server 2008, the installation program automatically restarts the computer at the end of the installation process.
To silently install Sentinel Agent Manager components:
1 Log on to the computer you want to use as your database server using an account that is a member of the local Administrators group. Also ensure your logon account is a member of the Microsoft SQL Server sysadmin role on the database server.
2 Close all open applications.
3 Run the setup program from the Sentinel Agent Manager installation kit.
4 On the Select Sentinel Agent Manager Components window, select Database Server.
5 Follow the instructions in the setup program until you reach the Finished window.
6 Click Finish.
7 After the setup program finishes installing database server components, log on to the computer on which you want to install one or more Sentinel Agent Manager components using an account that is a member of the local Administrators group. Also ensure your logon account is a member of the Microsoft SQL Server sysadmin role on the database server.
8 Close all open applications.
9 Open a command-line interface.
10 In the command-line interface, navigate to the location of the Sentinel Agent Manager installation kit.
11 In the Sentinel Agent Manager installation kit, open the INTEL folder.
12 Enter the following command, including all applicable options:
msiexec /i Setup.msi /quiet /l*v LogFile.txt CONFIGGROUP_NAME="ConfigGroup" CONFIGGROUP_ID="ConfigID" CONFIGGROUP_PASSWORD="Password" IS_SQLSERVER_SERVER="DatabaseServer" INSTALLDIR="C:\InstallDirectory\" INSTALL_TYPE="InstallType" ADDLOCAL="ComponentsToInstall" IS_NET_API_LOGON_USERNAME="Domain\ServiceAccount" IS_NET_API_LOGON_PASSWORD="ServiceAccountPassword"
where LogFile, ConfigGroup, ConfigID, Password, DatabaseServer, InstallDirectory, InstallType, ComponentsToInstall, Domain, ServiceAccount, and ServiceAccountPassword are the appropriate values for your configuration group.
For more information about installation program options, see Section C.2, “Installation Program Options,” on page 59.
58 NetIQ Agent Manager Installation Guide
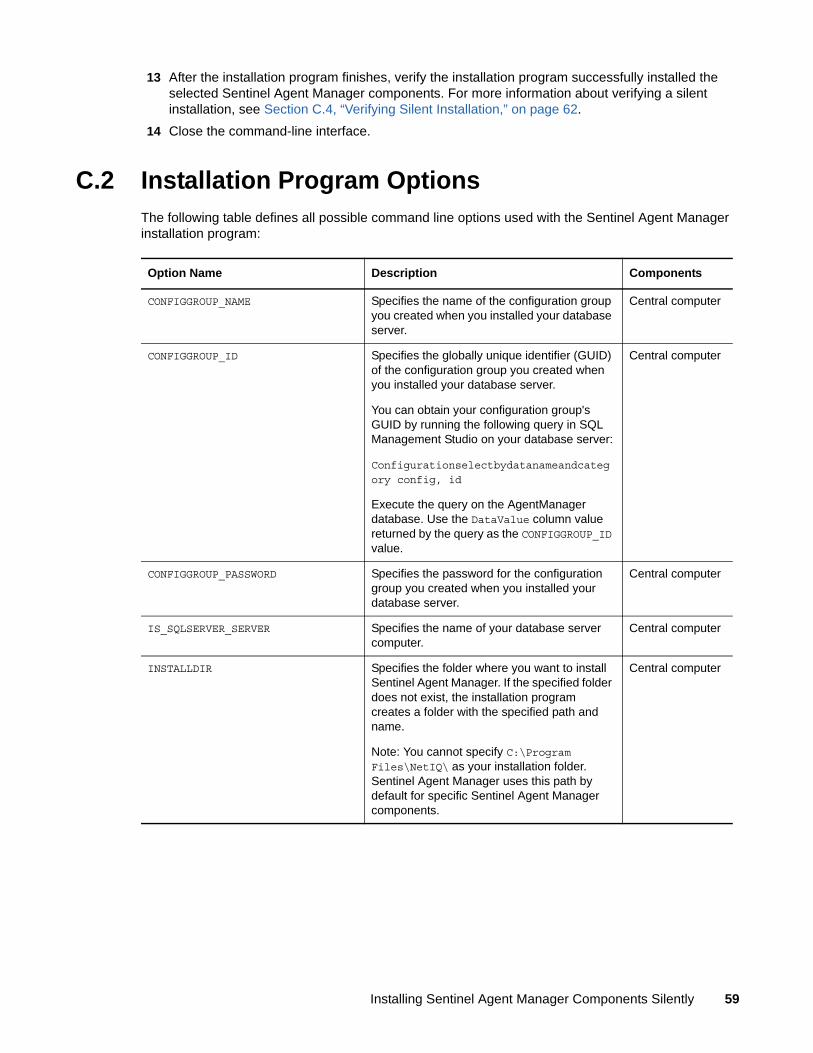
13 After the installation program finishes, verify the installation program successfully installed the selected Sentinel Agent Manager components. For more information about verifying a silent installation, see Section C.4, “Verifying Silent Installation,” on page 62.
14 Close the command-line interface.
C.2 Installation Program OptionsThe following table defines all possible command line options used with the Sentinel Agent Manager installation program:
Option Name Description Components
CONFIGGROUP_NAME Specifies the name of the configuration group you created when you installed your database server.
Central computer
CONFIGGROUP_ID Specifies the globally unique identifier (GUID) of the configuration group you created when you installed your database server.
You can obtain your configuration group's GUID by running the following query in SQL Management Studio on your database server:
Configurationselectbydatanameandcategory config, id
Execute the query on the AgentManager database. Use the DataValue column value returned by the query as the CONFIGGROUP_ID value.
Central computer
CONFIGGROUP_PASSWORD Specifies the password for the configuration group you created when you installed your database server.
Central computer
IS_SQLSERVER_SERVER Specifies the name of your database server computer.
Central computer
INSTALLDIR Specifies the folder where you want to install Sentinel Agent Manager. If the specified folder does not exist, the installation program creates a folder with the specified path and name.
Note: You cannot specify C:\Program Files\NetIQ\ as your installation folder. Sentinel Agent Manager uses this path by default for specific Sentinel Agent Manager components.
Central computer
Installing Sentinel Agent Manager Components Silently 59

INSTALL_TYPE Specifies the type of Sentinel Agent Manager installation you want to perform, whether a new installation or an upgrade of existing Sentinel Agent Manager components. Possible values are install or upgrade.
Note: You need to specify the installation type only if you want to upgrade an existing Sentinel Agent Manager installation. The default value of this property is install unless you specify upgrade.
All components
ADDLOCAL Specifies the Sentinel Agent Manager components you want to install, in a comma-separated list.
The following items are possible values for this option:
AgentManager
CentralComputer
Agent
CommonFiles_CC_UI
CommonFiles_UI
DevConsole
You must start the ADDLOCAL list with SecurityManager. Specify additional components depending on what you want to install.
Notes: If you want to install user interface components, you must include both CommonFiles_CC_UI and CommonFiles_UI in the list of options.
If you want to upgrade Sentinel Agent Manager, you must specify all components currently installed in the ADDLOCAL list.
Central computer, user interfaces, log archive server
If you want to install Sentinel Agent Manager central computer components, specify the following options: AgentManager,Agent,CentralComputer,CommonFiles_CC_UI
Central computer
IS_NET_API_LOGON_USERNAME Specifies the name of the service account you used when you installed your database server, using the format Domain\User.
Central computer
IS_NET_API_LOGON_PASSWORD Specifies the password for the service account you used when you installed your database server.
Central computer
Option Name Description Components
60 NetIQ Agent Manager Installation Guide

The following command is an example of the command line text you would need to input in order to install a Sentinel Agent Manager central computer silently:
msiexec /i Setup.msi /quiet /l*v test.txt CONFIGGROUP_NAME="test" CONFIGGROUP_ID="4F0180D9-2D47-4BA7-924F-4599B9C1447A" CONFIGGROUP_PASSWORD="testtest" IS_SQLSERVER_SERVER="sqlserver002" INSTALLDIR="C:\silentinstall\" ADDLOCAL="AgentManager,Agent,CommonFiles_CC_UI,CentralComputer" IS_NET_API_LOGON_USERNAME="domainA\bobr" IS_NET_API_LOGON_PASSWORD="*******"
C.3 Installing Unmanaged Agents SilentlyIn addition to main Sentinel Agent Manager components, you can install unmanaged Sentinel Agent Manager agents silently using the following procedure. You can also silently apply service packs or hotfixes to unmanaged agents if applicable.
NOTE
If the installation program cannot install or upgrade the unmanaged agent, the installation program notifies the user only by logging the failure in the installation log. The installation program does not display any errors or warnings during the process. When running the Sentinel Agent Manager installation program silently, ensure logging is enabled.
To enable logging, include the option /l*v LogFile.txt in the command line, where LogFile.txt is the name of the text file where you want the installation program to log installation progress and any errors.
Ensure the computers on which you install unmanaged Sentinel Agent Manager agents have all the necessary prerequisites already installed. For more information about Sentinel Agent Manager prerequisites, see Chapter 2, “Planning to Install Sentinel Agent Manager,” on page 15.
To silently install an unmanaged agent:
1 Log on to the unmanaged agent computer using an account that is a member of the local Administrators group.
2 Close all open applications.
3 Open a command-line interface.
4 If you want to install an agent, complete the following steps:
4a In the command-line interface, navigate to the location of the Sentinel Agent Manager installation kit.
4b In the Sentinel Agent Manager installation kit, navigate to the Additional Setups/Manual Agent Installation folder.
4c Enter the following command:
msiexec /i ManualAgent.msi /quiet /l*v LogFile.txt SM_CENTRALCOMPUTER=”MyCCNameHere” SM_CONFIGURATIONGROUP="MyConfigGroupNameHere"
Where LogFile.txt is the name of the text file where you want the installation program to log installation progress and any errors, MyCCNameHere is the name of the central computer, and MyConfigGroupNameHere is the name of the configuration group.
Installing Sentinel Agent Manager Components Silently 61

5 If you want to apply a service pack or hotfix to an existing agent, complete the following steps:
5a In the command-line interface, navigate to the location of the Sentinel Agent Manager service pack or hotfix.
5b Enter the following command:
"Manual Agent SP1.msp" /quiet /l*v LogFile.txt
Where LogFile.txt is the name of the text file where you want the installation program to log installation progress and any errors
6 After the installation program finishes, verify the installation program successfully installed the selected Sentinel Agent Manager components. For more information about verifying a silent installation, see Section C.4, “Verifying Silent Installation,” on page 62.
7 Close the command-line interface.
C.4 Verifying Silent InstallationBecause the command-line installation process is silent, the installation program does not notify you of any errors encountered during the process. If you enter incorrect information for your installation environment and the installation program cannot install Sentinel Agent Manager, the installation program stops the process and does not display an error message.
If you want to verify that you successfully installed one or more Sentinel Agent Manager components, you can search for an event in the Application event log containing the status of the installation.
To verify silent installation of Sentinel Agent Manager components:
1 On the computer where you silently installed Sentinel Agent Manager components, open the Event Viewer located in the Control Panel.
2 Click Application.
3 Click the Source column to sort by event source.
4 Scroll down until you find one or more events with the source msiexec or MsiInstaller.
5 Right-click the first msiexec or MsiInstaller event and select Properties.
6 Use the down arrows to search through all msiexec or MsiInstaller events.
7 If you find an Information event with the Description Successfully installed X, the installation program installed Sentinel Agent Manager successfully.
If you find an Error event, the installation program could not install all Sentinel Agent Manager components.
8 Navigate to the log file created during the installation process.
9 Open the log file and search for logged failure messages that may indicate why the installation program could not successfully install Sentinel Agent Manager.
62 NetIQ Agent Manager Installation Guide

D D
Uninstalling Sentinel Agent Manager
If necessary, you can uninstall Sentinel Agent Manager by completing the procedures in the following sections. These procedures completely remove a Sentinel Agent Manager configuration group from your enterprise, and ensure you do not leave Windows agents on monitored computers. Leaving Windows agents on monitored computers may require you to manually delete the Windows agents from those computers.
Section D.1, “Uninstalling Sentinel Agent Manager Overview,” on page 63
Section D.2, “Uninstalling Windows Agents,” on page 63
Section D.3, “Uninstalling Sentinel Agent Manager Components,” on page 65
Section D.4, “Uninstalling the Database,” on page 66
D.1 Uninstalling Sentinel Agent Manager OverviewYou can uninstall your Sentinel Agent Manager implementation by completing the following checklist:
D.2 Uninstalling Windows AgentsTo ensure you remove Sentinel Agent Manager agents from the monitored Windows computers in your enterprise, uninstall all managed and unmanaged agents from computers assigned to each central computer.
NOTE
When you uninstall Sentinel Agent Manager components from a central computer, you automatically uninstall the managed agent installed on the central computer. You do not need to uninstall the managed agent on the central computer itself prior to uninstalling Sentinel Agent Manager components.
If you remove agents, Sentinel Agent Manager no longer collects data or evaluates rules.
Steps See Section
1. Remove all agents on monitored computers.
Section D.2, “Uninstalling Windows Agents,” on page 63.
2. Remove Sentinel Agent Manager components from your computers.
Section D.3, “Uninstalling Sentinel Agent Manager Components,” on page 65
3. Remove the Sentinel Agent Manager databases.
Section D.4, “Uninstalling the Database,” on page 66
Uninstalling Sentinel Agent Manager 63
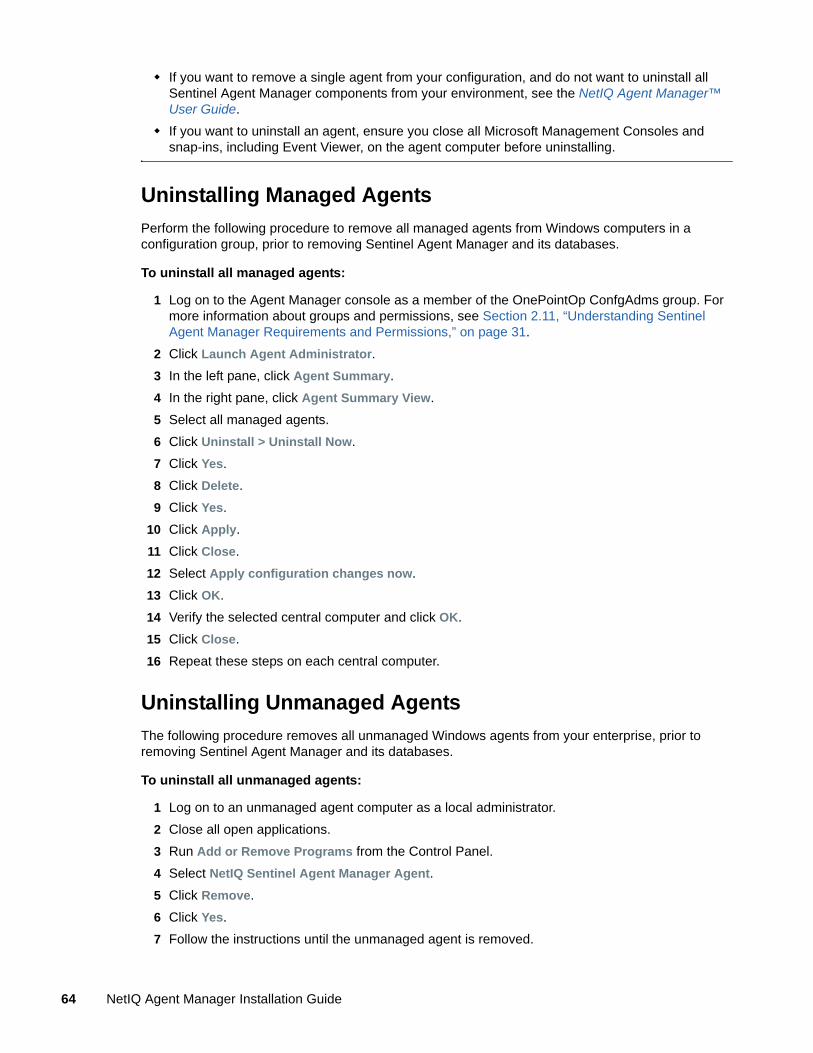
If you want to remove a single agent from your configuration, and do not want to uninstall all Sentinel Agent Manager components from your environment, see the NetIQ Agent Manager™ User Guide.
If you want to uninstall an agent, ensure you close all Microsoft Management Consoles and snap-ins, including Event Viewer, on the agent computer before uninstalling.
Uninstalling Managed Agents
Perform the following procedure to remove all managed agents from Windows computers in a configuration group, prior to removing Sentinel Agent Manager and its databases.
To uninstall all managed agents:
1 Log on to the Agent Manager console as a member of the OnePointOp ConfgAdms group. For more information about groups and permissions, see Section 2.11, “Understanding Sentinel Agent Manager Requirements and Permissions,” on page 31.
2 Click Launch Agent Administrator.
3 In the left pane, click Agent Summary.
4 In the right pane, click Agent Summary View.
5 Select all managed agents.
6 Click Uninstall > Uninstall Now.
7 Click Yes.
8 Click Delete.
9 Click Yes.
10 Click Apply.
11 Click Close.
12 Select Apply configuration changes now.
13 Click OK.
14 Verify the selected central computer and click OK.
15 Click Close.
16 Repeat these steps on each central computer.
Uninstalling Unmanaged Agents
The following procedure removes all unmanaged Windows agents from your enterprise, prior to removing Sentinel Agent Manager and its databases.
To uninstall all unmanaged agents:
1 Log on to an unmanaged agent computer as a local administrator.
2 Close all open applications.
3 Run Add or Remove Programs from the Control Panel.
4 Select NetIQ Sentinel Agent Manager Agent.
5 Click Remove.
6 Click Yes.
7 Follow the instructions until the unmanaged agent is removed.
64 NetIQ Agent Manager Installation Guide

8 Close the Add or Remove Programs window.
9 Log off of the unmanaged agent computer.
10 Repeat Step 1 through Step 9 for each unmanaged agent you want to uninstall.
11 Log on to a central computer as a member of the OnePointOp ConfgAdms group. For more information about groups and permissions, see Section 2.11, “Understanding Sentinel Agent Manager Requirements and Permissions,” on page 31.
12 Start the Agent Manager console in the NetIQ Agent Manager program group.
13 Click Launch Agent Administrator.
14 In the left pane, click Agent Summary.
15 In the right pane, click Agent Summary View.
16 Select all unmanaged agents.
17 Click Uninstall > Pending.
18 Click Yes.
19 Click Apply.
20 Click Close.
21 Select Apply configuration changes now.
22 Click OK.
23 Verify the selected central computer and click OK.
24 In the left pane, click Agent Summary.
25 In the right pane, click Agent Summary View.
26 Select Show Hidden Computers.
27 Select all unmanaged agents.
28 Click Delete.
29 Click Yes.
30 Click Close.
31 Select Apply configuration changes now.
32 Click OK.
33 Verify the selected central computer and click OK.
34 Click Close.
D.3 Uninstalling Sentinel Agent Manager ComponentsAfter uninstalling all agents from your monitored computers, you can remove Sentinel Agent Manager from your enterprise. This procedure must be performed on every computer where a Sentinel Agent Manager component was installed, typically the database server and central computers.
To uninstall Sentinel Agent Manager components on each computer with Sentinel Agent Manager components installed:
1 Log on with an administrator account to a computer where you installed a component.
2 Close all open applications.
3 Open the Control Panel and select Add or Remove Programs.
4 Select NetIQ Sentinel Agent Manager.
Uninstalling Sentinel Agent Manager 65

5 Click Remove.
6 Restart the computer.
D.4 Uninstalling the DatabaseCompletely removing Sentinel Agent Manager from your enterprise requires removing the Sentinel Agent Manager database from the database server.
The setup program does not automatically remove the database. Use the Microsoft SQL Server administrator tools to remove the databases from the database server. For more information about removing databases, see the Microsoft SQL Server documentation.
66 NetIQ Agent Manager Installation Guide


