IRM Server Administrator’s Guide, Version 3.4 · In This Guide ... Providing the BES with IRM BES...
156
March 2007 IRM Server Version 3.4.x Administrator’s Guide
-
Upload
truongkhuong -
Category
Documents
-
view
221 -
download
0
Transcript of IRM Server Administrator’s Guide, Version 3.4 · In This Guide ... Providing the BES with IRM BES...
March 2007
IRM ServerVersion 3.4.x
Administrator’s Guide

Copyright © 2007 EMC Corporation. All rights reserved.
The material in this guide may not in whole or in part be copied, photocopied, reproduced, translated, or converted to any electronic or machine-read-able form without the prior written consent of EMC.
The information in this guide is for informational use only, is subject to change without notice, and should not be construed as a commitment by EMC. EMC assumes no responsibility or liability for any errors or inaccuracies that may appear in this guide.
This guide and the software described in this guide are furnished under a license accompanying the software and may be used only in accordance with the terms of such license. By using this guide, you agree to the terms and conditions of that license.
EMC, and any logos associated therewith, are trademarks or registered trademarks of EMC Corporation in the United States and other countries.
Adobe, Acrobat, Acrobat Reader, and the Acrobat logo are either registered trademarks or trademarks of Adobe Systems Incorporated.
MAILsweeper is a trademark of Clearswift Limited.
BlackBerry is a registered trademark of Research in Motion Limited.
Lotus Notes is a registered trademark of IBM Corporation.
iPlanet Directory Server is a trademark of Sun Microsystems, Inc.
Microsoft, Outlook, PowerPoint, and SQL Server are registered trademarks of Microsoft Corporation.
RSA and the RSA logo are trademarks of RSA Security, Inc.
All other product names mentioned herein may be trademarks or registered trademarks of their respective companies.
Contents
Preface ...................................................................................................................................................................................................... viiAbout This Book ............................................................................................................................................................................... viiUsing the Documentation and Help .................................................................................................................................................. viiConventions....................................................................................................................................................................................... viiIn This Guide.................................................................................................................................................................................... viiiSupport ............................................................................................................................................................................................... ix
Chapter 1, Introducing the IRM Server.................................................................................................................................................... 11What is IRM Server?......................................................................................................................................................................... 11Why is Content Security Important? ................................................................................................................................................. 11IRM Products .................................................................................................................................................................................... 12Understanding Who Does What........................................................................................................................................................ 13How IRM Server Protects Content.................................................................................................................................................... 13Deciding on Authentication Methods ............................................................................................................................................... 14
Public Key Cryptography............................................................................................................................................................ 14How to Obtain a Certificate ........................................................................................................................................................ 15How IRM Server Uses Certificates............................................................................................................................................. 15
Understanding Authorization ............................................................................................................................................................ 15Default Authorization Settings.................................................................................................................................................... 16Hierarchy of Authorization ......................................................................................................................................................... 16Permissions ................................................................................................................................................................................. 19
Allowing Guest Access....................................................................................................................................................... 20Working Offline.................................................................................................................................................................. 20
Monitoring Through the Log............................................................................................................................................................. 21Setting Up IRM Server for the First Time ........................................................................................................................................ 21
Chapter 2, Logging In and Setting Login Restrictions............................................................................................................................. 23Overview of Administrator Account................................................................................................................................................. 23Logging In as Full Administrator...................................................................................................................................................... 23Overview of Network Entities and Time Specifications................................................................................................................... 25
Creating Network Entities........................................................................................................................................................... 25Creating Time Specifications...................................................................................................................................................... 26
Overview of Login Restrictions ........................................................................................................................................................ 27Adding Network Entities and Time Specifications to Login Restrictions ........................................................................................ 27
Chapter 3, Adding Authentication Domains ............................................................................................................................................ 29Overview of Authentication Domains............................................................................................................................................... 29Adding a Password Domain.............................................................................................................................................................. 30Adding a SecurID Domain................................................................................................................................................................ 31Adding a Certificate Domain ............................................................................................................................................................ 32Editing Shared Secret Domain to Manage Passwords ...................................................................................................................... 33Selecting a Default Password Authentication Domain ..................................................................................................................... 34
Chapter 4, Using LDAP with Authentication Domains ........................................................................................................................... 35Overview of LDAP and Authentication Domains ............................................................................................................................ 35Specifying a Directory Service ......................................................................................................................................................... 36Setting Directory Properties .............................................................................................................................................................. 38Creating Directory Queries ............................................................................................................................................................... 39
Contents — iii

Setting Up Certificate Mapping ........................................................................................................................................................ 42Creating Attribute Name/Value Pairs ............................................................................................................................................... 43Setting Up LDAP Search Filters ....................................................................................................................................................... 44
Chapter 5, Managing Users and Groups................................................................................................................................................... 45Overview of User and Group Management ...................................................................................................................................... 45Creating or Editing Shared Secret User Accounts ............................................................................................................................ 45Unlocking a Shared Secret User Account ......................................................................................................................................... 47Creating or Editing a Group .............................................................................................................................................................. 48
Adding or Excluding Members................................................................................................................................................... 49Groups................................................................................................................................................................................. 50Password Domains or Users ............................................................................................................................................... 50SecurID Domains or Users ................................................................................................................................................. 51Certificate Domains or Users.............................................................................................................................................. 52
Setting Login Restrictions........................................................................................................................................................... 54Setting Content Permissions and Administrative Rights ............................................................................................................ 56
Chapter 6, Setting Up Server Restrictions................................................................................................................................................ 59Overview of Server Restrictions ....................................................................................................................................................... 59Adding Authorization for Groups, Domains, or Users ..................................................................................................................... 59Setting Permissions in Server Restrictions........................................................................................................................................ 61Setting Key Duration for Expired Content........................................................................................................................................ 62Setting Time to Expire E-Mail Messages ......................................................................................................................................... 63Controlling Frequency of Offline Access Refreshes......................................................................................................................... 63Setting PDF Protection Level............................................................................................................................................................ 64
Chapter 7, Setting Up E-Mail Users and Addresses................................................................................................................................. 65Overview of Mapping User E-Mail Addresses ................................................................................................................................. 65Mapping Known E-Mail Addresses .................................................................................................................................................. 65Overview of Setting Up Unknown E-Mail Addresses ...................................................................................................................... 67
Sending E-Mail to Mapped Recipients Only .............................................................................................................................. 68Allowing Certificate Authentication Requiring a Matching E-Mail Address ............................................................................ 68Allowing Authentication with Existing Group, Authentication Domain, or User...................................................................... 68Automatically Creating Shared Secret User Account and Mapping the Address....................................................................... 69Notifying Administrator to Manually Map Recipients ............................................................................................................... 69
Setting Unmapped E-Mail Address Rules ........................................................................................................................................ 70Modifying Default Welcome Messages ............................................................................................................................................ 71
Chapter 8, Setting Up Policies for Documents......................................................................................................................................... 73Overview of Setting Up Policies ....................................................................................................................................................... 73Setting Up the Default Policy............................................................................................................................................................ 74Creating a Document Policy Template ............................................................................................................................................. 75Defining Default Authorizations ....................................................................................................................................................... 76Adding an Item to a Category ........................................................................................................................................................... 76
Adding Groups, Domains and Users........................................................................................................................................... 77Adding Network Entities and Time Restrictions ........................................................................................................................ 78
Setting Permissions ........................................................................................................................................................................... 79
Chapter 9, Managing Policies................................................................................................................................................................... 81Overview of Managing Policies ........................................................................................................................................................ 81Searching for Protected E-Mail Messages ........................................................................................................................................ 82Searching for Protected Documents .................................................................................................................................................. 84Modifying E-Mail Policies................................................................................................................................................................ 86Modifying Document or Page Policies ............................................................................................................................................. 87
iv — Contents

Changing the Owner of Content........................................................................................................................................................ 89Deleting Content ............................................................................................................................................................................... 89
Chapter 10, Working with Watermarks.................................................................................................................................................... 91Overview of Watermarks .................................................................................................................................................................. 91Components of the Watermark File .................................................................................................................................................. 92
Watermarking Variables ............................................................................................................................................................. 94Using the Page Number Variable................................................................................................................................................ 95
Conditional Watermark Sections ...................................................................................................................................................... 95Preprocessor Statements ............................................................................................................................................................. 95Nesting ........................................................................................................................................................................................ 97Other Watermark Possibilities .................................................................................................................................................... 98Tips for Using Watermarks......................................................................................................................................................... 98
Creating a Watermark File ................................................................................................................................................................ 99Adding a Watermark Definition...................................................................................................................................................... 100
Chapter 11, Monitoring and Managing the IRM Server ........................................................................................................................ 101Setting Up and Viewing Activity Log............................................................................................................................................. 101Setting Up Notifications.................................................................................................................................................................. 103Managing Automatic Client Software Installations ........................................................................................................................ 105
Setting Up Automatic Installations on Your Web Server......................................................................................................... 106Changing the Default Access Denied Image ............................................................................................................................ 107
Overview of Trusted Plug-Ins ......................................................................................................................................................... 107Adding Trusted Plug-Ins ................................................................................................................................................................. 108
Chapter 12, Setting Up a Sample Security Hierarchy ............................................................................................................................ 109Defining Your Security Needs ........................................................................................................................................................ 109Creating Network Entities and Time Specifications ....................................................................................................................... 110Setting Login Restrictions............................................................................................................................................................... 110Creating Group Rights .................................................................................................................................................................... 111Setting Server Restrictions .............................................................................................................................................................. 114Creating a Document Policy Template ........................................................................................................................................... 115
Chapter 13, Deploying IRM Client for E-Mail and IRM Extranet Server ............................................................................................. 117Planning a Deployment Strategy..................................................................................................................................................... 117
Overview of Deploying IRM Client for E-Mail ....................................................................................................................... 118Overview of Deploying IRM Extranet Server .......................................................................................................................... 118
Deploying IRM Client for E-Mail at Acme Trust........................................................................................................................... 119Setting Up Internal Users to Protect E-Mail ............................................................................................................................. 119Setting Up External Users to Open Protected E-Mail............................................................................................................... 123
Deploying IRM Extranet Server at XYZ Agency........................................................................................................................... 125Setting Up Internal Users to Open Protected E-Mail................................................................................................................ 125Setting Up External Users to Open Protected E-Mail............................................................................................................... 129Setting up IRM Extranet Server to Protect E-Mail ................................................................................................................... 132
Chapter 14, Configuring IRM Client for RIM BlackBerry.................................................................................................................... 135Overview of IRM Client for RIM BlackBerry................................................................................................................................ 135
How a BlackBerry Receives a Protected E-Mail Message ....................................................................................................... 135Server Components for IRM Client for RIM BlackBerry............................................................................................................... 136Configuring Server Components..................................................................................................................................................... 137
Providing the BES with IRM BES Extension Information....................................................................................................... 137Providing MDS with the IRM Server Certificate ..................................................................................................................... 138Providing IRM Server Settings ................................................................................................................................................. 139
Using Keys for Protected E-Mail Messages ................................................................................................................................... 139
Contents — v

Managing RIM BlackBerry User Information ................................................................................................................................ 139Finding and Viewing Information about a BlackBerry User .................................................................................................... 140Adding a User to the RIM BlackBerry List .............................................................................................................................. 140Disabling a User’s Entry ........................................................................................................................................................... 141Enabling a User’s Entry ............................................................................................................................................................ 141Deleting a User’s Entry............................................................................................................................................................. 142Renewing a Key ........................................................................................................................................................................ 142Resetting a Key ......................................................................................................................................................................... 143Reverting Changes .................................................................................................................................................................... 143
Setting RIM BlackBerry Options.................................................................................................................................................... 144
Appendix A, IRM Server Maintenance Utilities and Reports............................................................................................................... 147Managing the IRM Server............................................................................................................................................................... 147Viewing Activity Using IRM Server Reports ................................................................................................................................. 148
Glossary.................................................................................................................................................................................................. 149
Index ....................................................................................................................................................................................................... 153
vi — Contents

PrefaceWelcome to the Information Rights Management (IRM) family of products, which includes the IRM Server and various IRM clients. Together they provide a complete solution for security of electronic information.
About This BookThis book is intended for IRM Server administrators who configure and maintain the IRM Server. This includes setting up and managing policies. It explains the IRM Server concepts that administrators need to understand before they can perform administrative functions. This is followed by step-by-step instructions for common administrator tasks.
This book assumes that you read and used the IRM Server Installation Guide (for Windows or Solaris) to set up your IRM Server by adding a license file, adding a server certificate, starting the IRM Server, and configuring the administrator account.
To use this book you must have a working knowledge of your operating system and its conventions, Windows or UNIX system administration, and system and network security.
Using the Documentation and HelpThe IRM Server is packaged with the following documentation. Each IRM client includes its own documentation. Some of these are available in PDF files that you can view using Adobe® Acrobat® Reader®. For Windows, the documentation files are available in the EMC IRM Program group. For Solaris, the files are available in the directory where you installed the IRM Server software.
• IRM Server Installation Guide for Windows contains installation and configuration procedures for the IRM Server on a Windows platform.
• IRM Server Installation Guide for Solaris contains installation and configuration instructions for the IRM Server on Solaris.
• IRM Server Release Notes contain technical notes and known issues with the current version of the IRM Server and the IRM Server Administrator.
• IRM Server Administrator Help contains procedures and dialog box-specific information that help you use the IRM Server Administrator application.
ConventionsThe following conventions are used in this book:
Example Description
File > Open Choose the File menu, then the Open submenu.
boldface type Indicates the first instance of terms defined in the text. It also indicates terms found in the user interface.
italic type Indicates variable values.
monospace type Indicates system displays and user input.
Preface — vii

In This GuideThis guide is divided into the following chapters:
“Chapter 1, Introducing the IRM Server” begins with a description of the IRM Server then describes the other IRM products. It also gives you the basic concepts you need to administer the IRM Server, including authentication and authorization, and outlines how to set up the IRM Server for the first time.
“Chapter 2, Logging In and Setting Login Restrictions” provides an overview of the full administrator account and describes how to create an account and log in to the IRM Server. It then provides information on creating network entities and time specifications and adding them to login restrictions.
“Chapter 3, Adding Authentication Domains” contains information about adding IRM Server authentication domains. It describes how to add password, certificate, and SecurID authentication domains. It also explains how to edit the shared secret password domain to manage passwords and how to select a default password authentication domain.
“Chapter 4, Using LDAP with Authentication Domains” contains information on how to use LDAP with IRM Server authentication domains. It describes how to add Windows domains with LDAP capabilities, LDAP password domains, and certificate domains with LDAP capabilities. It also explains how to create custom mapping expressions and set up LDAP filters.
“Chapter 5, Managing Users and Groups” provides an overview of user and group management. It describes how to create individual shared secret user accounts stored on the IRM Server. It then describes how to view, create, and add groups and how to give different types of authorizations to a group.
“Chapter 6, Setting Up Server Restrictions” provides an overview of the server restrictions. It describes how to add authorizations for groups, authentication domains, or users, set permissions, determine a key duration for expired content, and define when you want e-mail policies to expire.
“Chapter 7, Setting Up E-Mail Users and Addresses” describes how to set up and manage known and unknown e-mail addresses for recipients of protected e-mail messages. It includes steps to map e-mail addresses, set up unmapped e-mail address rules to manage unknown e-mail addresses, and includes steps to modify the Welcome message the IRM Server may send to unknown recipients when they first receive protected e-mail messages.
“Chapter 8, Setting Up Policies for Documents” describes the policies that apply to documents and protected with the IRM Server. This includes the default policy, document policy templates, the corresponding policies that the templates create, and page policies for PDF documents.
“Chapter 9, Managing Policies” describes how to manage policies and offline access for protected e-mail messages, documents, and web pages. It includes procedures to access the policies of current and expired content policies so you can review the information, make modifications, or delete them permanently.
“Chapter 10, Working with Watermarks” provides an overview of watermarks, describes each part of the watermark file, then describes the process of creating and editing a watermark file.
“Chapter 11, Monitoring and Managing the IRM Server” describes how to monitor your IRM Server by setting up and viewing activity in the activity log, and setting up notifications of log activity. It then provides steps for managing the IRM Server by setting up automatic client installations and adding trusted plug-ins.
“Chapter 12, Setting Up a Sample Security Hierarchy” guides you through the creation of an example security hierarchy for an organization. It illustrates the IRM Server’s ability to provide your organization with multiple levels of highly-manageable security. You can use the guidelines in this chapter to help you set up your own security hierarchy for your organization.
“Chapter 13, Deploying IRM Client for E-Mail and IRM Extranet Server” describes how to deploy IRM Client for E-Mail and IRM Extranet Server. It helps you devise a deployment strategy for either application or both applications then provides an overview of the tasks involved in deploying each. It also describes two example deployment procedures. You can use these example procedures as guidelines to help you set up e-mail protection in your own organization.
viii — Preface

SupportFor technical support, go to the technical support web site at:
http://www.authentica.com/support
Preface — ix


Chapter 1Introducing the IRM Server
This chapter introduces you to the Information Rights Management (IRM) Server. It begins with a description of the IRM Server then describes other products that work with the IRM Server. It also gives you an overview of the basic concepts you need to understand to administer the IRM Server, including authentication and authorization, and outlines how to set up the IRM Server for the first time.
What is IRM Server?The IRM Server gives you the ability to control the access and use of your e-mail messages and documents. Supported documents include Portable Document Format (PDF), web files, and Microsoft Word, PowerPoint, and Excel documents. The documents are protected with various IRM clients, such as IRM Client for Microsoft Office and IRM Client for Adobe Acrobat.
The client/server system uses strong encryption to protect your content and ensures its control by keeping the keys securely within the IRM Server database. By using policies, you can control who can view, print, or copy your protected content. The IRM Server does not store the content itself; instead, it stores the keys that allow users to access protected content.
You also use policies to specify that the actions can only take place from a specific network location or to apply time restrictions to these actions. You can even recall a protected content, making it permanently inaccessible wherever it resides. You can do this before or after users access the protected content. When users connect to the IRM Server to view protected content, they must prove their identities through the process of authentication. Then, if the policies grant a user access to the content, it opens.
Why is Content Security Important?The increasing practice of using e-mail messages and various types of documents to communicate important information over wide and local area networks, intranets, and the Internet increases the likelihood that unintended or unauthorized users will discover the content or interrupt its transfer. When content is confidential, it is important to ensure its security.
Historically, information exchange has lacked one or more of the following critical security characteristics:
• Authentication, which guarantees that computers, users, or companies accessing protected content are who they claim to be
• Access control, which requires that users have the appropriate permission for viewing sensitive data
• Content integrity, which guarantees that no one altered the protected content
• Accountability, which provides an audit trail for tracking electronic transactions
• Recall, which dynamically denies access to data at any time
• Persistent control, which gives you control over content during, and after delivery
The IRM family of products provides all of these functions for extensive security and offer significant flexibility when you distribute protected content.
Introducing the IRM Server — 11

IRM ProductsThe IRM family of products uses Information Rights Management (IRM), a unique technology that allows businesses and individuals to share digital content without giving up the rights to determine what happens to that content. This family of products is made up of several client applications that are part of the IRM client/server solution. These client applications allow you to protect content using the IRM Server.
The IRM Server is a secure server containing a database that stores the encryption keys needed by authorized users to access protected content. The database also stores policies that specify who can access the information and what they can do with it.
The various IRM applications include:
• IRM Server Administrator, an application that allows an administrator to set up and maintain policies. These policies control access to protected content. You can grant and restrict access to content based on individual users or groups, what network entity the users access it from, or when they access it. You can also track which users access each protected item, when they access it, and what action they perform.
• IRM Client for Adobe Acrobat, an Adobe Acrobat and Reader plug-in that allows you to protect and view protected PDF documents. When you protect a document, you can grant and restrict access to specific pages in a document.
• IRM Client for E-Mail allows you to open and send protected e-mail messages. There is a separate IRM Client for E-Mail for Notes® and Outlook®. IRM Client for E-Mail integrates with the mail application. If you use a different mail application or you only want to view protected e-mail messages, use the IRM Client for HTML.
• IRM Client for HTML, a web browser plug-in that allows you to view protected e-mail messages or web pages. However, this plug-in does not allow you to protect e-mail messages or web pages. To protect content, you must install the appropriate IRM client.
• IRM Client for Microsoft Office, a Microsoft Office plug-in that allows you to securely protect, manage, and view Microsoft® Word, PowerPoint®, or Excel® documents.
• IRM Extranet Server, a service that automatically protects e-mail messages, documents, or web files using organizational rules. An administrator can update and enforce the rules even after users receive the message.
• IRM Repository Server, a web application that securely distributes and manages messages and files. When you protect content, you choose the level of protection, standard or advanced. Standard protection protects your content during the delivery process. Advanced protection ensures secure delivery and provides you with control over the content after delivery.
• IRM Services for Documentum, a Documentum extension that provides additional persistent security for documents managed within a Documentum repository.
• IRM Services for eRoom, an eRoom extension that provides additional security for documents managed in the EMC eRoom web-based collaborative workspace.
The client applications and services must access the IRM Server before any processing can take place. Therefore, installing the IRM Server is the first step in using the client/server system.
12 — Introducing the IRM Server

Understanding Who Does WhatDepending on your organization, you may have one or more roles. The following lists the types of client application users:
• Viewers receive and view protected content. In most cases, viewers must log in and authenticate with the IRM Server through an IRM client to open protected content. If the content is a protected e-mail message, the user is called a recipient. If the IRM Server allows guest access, users can open protected content without logging in, but administrators can still track the protected content, expire it, or revoke access to it.
• Owners can modify and manage content policies that they own. An original owner is the user who first protected the content with the IRM Server using one of the IRM clients. A sender is another term for an original owner who protects e-mail messages. IRM Server administrators can change the owner of protected content, if they have the appropriate administrative rights. The new owner then controls the policy that applies to the content.
For information on creating or modifying your own document policy templates, see “Chapter 8, Setting Up Policies for Documents”.
In addition to the different client users, there are different types of administrators:
• An IRM Server administrator uses the IRM Server Administrator application to set up and manage policies. Your organization can have multiple IRM Server administrators with different levels of administrative rights. For example, an administrator may have the right to set up login restrictions, server restrictions, and add, modify, or remove users and information. An administrator with full administrative rights can create and modify groups of other administrators.
As part of setting up users and groups, the administrator must decide how users authenticate with the server. The administrator can also monitor activity through the log and set up automatic notification mechanisms. If your organization uses IRM Client for E-Mail or IRM Extranet Server, you may want to map IRM Client for E-Mail users, set up unmapped e-mail address rules, or create an IRM Extranet Server account. Also, the IRM Server administrator is responsible for mapping and setting other options that allow receipt of IRM Client for E-Mail messages on each mapped BlackBerry device.
• A Research in Motion BlackBerry® Enterprise Server (BES) administrator installs the IRM BES Extension on the BES. Also, the BES administrator runs the IRM BES Extension Configuration Utility that provides the BES Extension with information about the IRM Server – its name, port number, and IRM Server account name and password.
• An IRM Extranet Server administrator sets up a mail server with MAILsweeper for SMTP and configures it to use IRM Extranet Server. The administrator creates an IRM Extranet Server scenario and applies it to scenario folders that require e-mail protection. IRM Extranet Server automatically protects e-mail in the scenarios folder as it passes through the mail server. For more information, see the IRM Extranet Server Help.
How IRM Server Protects ContentContent protected by the IRM Server can reside in any location. The IRM Server does not store content. When you protect content, the IRM Server creates a random key and sends a copy of the key to the client. The client uses the copy of the key to encrypt the content. The server retains the original key, but the client destroys its copy once it encrypts the content. You can then distribute the content any way you choose. When a user tries to view the encrypted content, the IRM Server determines if the user has permission to view the content; if the user does, the server sends the key to the client. The client uses the key to decrypt and display the content then destroys the key. The user never gets direct access to the key and cannot save the content in an unencrypted form. This means that you can distribute the content in any manner, because the IRM Server protects the content by controlling the keys.
Introducing the IRM Server — 13

Deciding on Authentication MethodsIRM Server administrators decide on the type of authentication used to connect to the IRM Server, based on organizational needs and the level of security required to ensure the protection of content. You can use different types of authentication for different users or groups of users.
Each type of authentication method, except for shared secret password, requires that you set up a domain. Shared secret, LDAP, and Windows domain authentication methods appear together when you log in to the IRM Server and are collectively called Password as a type of authentication method.
If you choose to authenticate users with a shared secret, which is a user name and password unique to that user, you must set up a user account for each shared secret user on the IRM Server. The server stores these accounts in the server database. Then you add these users to a group or policy and set their authorization rights.
If you choose to authenticate users with Windows domain passwords, you must set up an authentication domain on the IRM Server. This authentication domain uses the names and passwords already configured in your Windows domain. This allows the IRM Server to authenticate users directly using an existing Windows domain server. As part of adding a Windows domain, you can add LDAP authentication and authorization capabilities to the domain. You may want to do this if your organization has users that log in to their computers using a Windows domain and password, but you also have an LDAP directory service for defining users and groups. For more information on LDAP, see “Chapter 4, Using LDAP with Authentication Domains.”
If you choose to authenticate users with LDAP passwords, you must set up an authentication domain. This authentication method uses the user names and passwords already configured in an LDAP directory service. For more information, see “Chapter 4, Using LDAP with Authentication Domains.”
A SecurID is a card (token) initialized by a SecurID (ACE) server containing a number that dynamically changes at specific intervals of time. The SecurID server also assigns you a PIN. When you log in to the IRM Server, you enter your passcode. This is either the PIN followed by the number that appears at that moment in time on the SecurID card, or the number that appears on your card after you enter the PIN on it. The IRM Server contacts the SecurID server and uses the passcode to verify your identity and that you have access to the IRM Server.
Certificate authentication takes advantage of digital certificates and public key cryptography. As part of adding a certificate domain, you can add LDAP authentication and authorization capabilities to the domain. You may want to do this if your organization has users that log in to their computers using a certificate, but you also have an LDAP directory service defining users and groups. For more information on LDAP, see “Chapter 4, Using LDAP with Authentication Domains.” The following sections describe various aspects of certificates so that you can make an informed decision about how you want to use certificates with the IRM products.
Public Key CryptographyIf you choose to authenticate users with certificates, the IRM Server uses public key cryptography to ensure the identity of users. Public key cryptography is based on an asymmetric model of encryption. In an asymmetric model there are always two keys. Each user has a private key and a public key that are a pair of numbers with a special relationship. If you encrypt information with one of the keys, you can only decrypt it with the other key. You can distribute your public key to anyone, but you should never distribute your private key.
You can use public and private keys to authenticate the identity of a user. For example, you can encrypt a random number or phrase with a user’s public key then send that user the encrypted number or phrase. If the user can decrypt it and send it back to you, then you know that the user must be who the user claims to be, because only that user has that private key.
14 — Introducing the IRM Server

How to Obtain a CertificateIf you plan on having users connect to the IRM Server using certificates, you need to decide how to create and distribute those certificates. You can set up your own certificate server and distribute certificates to users, or users can obtain certificates from a commercial certification authority (CA). A CA is a trusted entity that signs certificates and can vouch for the identity of the user. The IRM Client for E-Mail Help and the IRM Client for Adobe Acrobat Help describe how to obtain a user certificate. The IRM Server Installation Guide describes the process for obtaining a server certificate.
If you choose to use a CA, you can choose a public CA, such as VeriSign (www.verisign.com), Thawte (www.thawte.com), or various other public CAs. You can instruct users to go to the CA’s web site to obtain a certificate.
If you want to control the certification process, you can become your own CA. To do this, you need to install a certificate server and issue your own certificates. You can then configure your IRM Server with authentication domains that trust only those certificates issued by your CA server.
How IRM Server Uses CertificatesWhen you connect to an IRM Server to authenticate using a certificate, your system presents the server with the certificate containing your public key and your CA’s signature. The IRM Server first verifies that the signature on your certificate is valid and considered trusted. If valid, the IRM Server authenticates you by creating a random message called a challenge. The server then uses your public key to encrypt the challenge and send the encrypted challenge back to your client. Your client decrypts the encrypted random message with your private key then sends it back to the IRM Server. The IRM Server checks to make sure that the decrypted challenge it receives from you matches the one it sent to you. If it does, you successfully authenticate with the server.
Understanding AuthorizationIRM Server administrators control authorization. When you try to open protected content, first you authenticate with the IRM Server. The IRM Server verifies your identity then checks your authorization. Authorization is the process of determining your set of permissions. The IRM Server determines your authorization by examining login restrictions, user and group rights, server restrictions, and policies associated with the content you want to access.
Users with permission to protect content control one level of authorization. They can create e-mail policies or document policy templates and apply them at protection time. Users who protect content, own that content unless an administrator changes the owner. The owner controls authorization. There are several levels of authorization:
• Login restrictions govern the entire IRM Server and determine the network addresses and times when users can log in to the IRM Server.
• Group rights include group membership, group login restrictions, and group content permissions for users who access the IRM Server.
• Server restrictions govern an entire IRM Server and the access granted to every user and permissions for all content. The server restrictions define the upper boundary on permissions. For example, if the server restrictions deny printing, no groups defined on that IRM Server can print protected content.
• E-mail policies restrict access to specific protected e-mail messages.
• Document policy templates that users apply to protected documents during protection to restrict access. An administrator can create a document policy template and make it available to all users who protect documents. Users can also define their own document policy templates.
• Document policies restrict access to protected documents. A document policy is originally a copy of a document policy template. When you apply a document policy template to a document, it becomes the document policy. The document policy applies to a single document. Owners can modify document polices at any time. For example, an owner may want to remove users or groups from the list of authorized viewers.
Introducing the IRM Server — 15
• The default policy is a document policy template defined by the IRM Server administrator. It is used with earlier versions of some IRM clients to protect documents when the user does not specify a document policy template. The default policy can not be selected by users of the current IRM clients.
The Authorizations sections in the Server Restrictions, Edit Document Policy, Policy Templates, and Default Policy dialog boxes are almost identical. The Authorizations list box shows the categories associated with authorization. The categories are Users and Groups, Network Entities, and Time Restrictions. In the Server Restrictions dialog box, only the Users and Groups category appears. You can expand each category. For example, if you expand Users and Groups, you can see all the users and groups that a policy authorizes.
Default Authorization SettingsDefault authorization settings can apply to the Users and Groups and Network Entities categories in any of the authorizations, except for the server restrictions. In the server restrictions, you can only add and delete users and groups.
A category with the default authorization setting allow all others next to it, means that, except for items listed in the category as denied (with a red X through the icon), all users and groups or network entities have access to information at this level of authorization. A category with the default authorization setting deny all others next to it, means that, except for items listed as allowed (without a red X through the icon), all groups or network entities do not have access to information at this level of authorization.
The IRM Server evaluates users, groups, and network entities in the order listed. For example, if you want a document policy to allow everyone in a group but you want to deny one member of that group, you should add the individual member and specify Deny. Then add the entire group and specify Allow.
Hierarchy of AuthorizationWhen determining to allow or deny access, the IRM Server checks a hierarchy of authorization, which governs different levels of server access. The following table shows the different levels of authorization in the hierarchy and who sets each type:
The IRM Server administrator sets the login restrictions, group rights, server restrictions, and default policy. The administrator or a user with permission to protect content can also set the document policy. Senders set the e-mail policy for the messages they send. IRM Extranet Server administrators set the e-mail policy for e-mail messages sent through IRM Extranet Server.
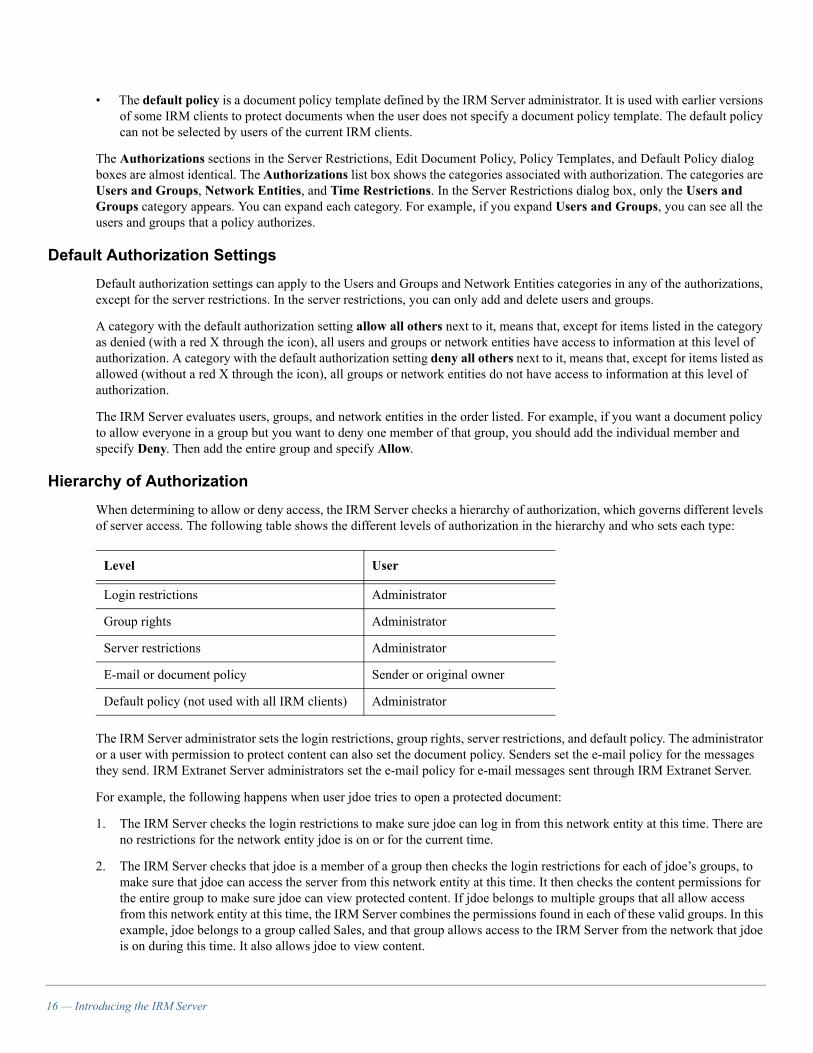
For example, the following happens when user jdoe tries to open a protected document:
1. The IRM Server checks the login restrictions to make sure jdoe can log in from this network entity at this time. There are no restrictions for the network entity jdoe is on or for the current time.
2. The IRM Server checks that jdoe is a member of a group then checks the login restrictions for each of jdoe’s groups, to make sure that jdoe can access the server from this network entity at this time. It then checks the content permissions for the entire group to make sure jdoe can view protected content. If jdoe belongs to multiple groups that all allow access from this network entity at this time, the IRM Server combines the permissions found in each of these valid groups. In this example, jdoe belongs to a group called Sales, and that group allows access to the IRM Server from the network that jdoe is on during this time. It also allows jdoe to view content.
Level User
Login restrictions Administrator
Group rights Administrator
Server restrictions Administrator
E-mail or document policy Sender or original owner
Default policy (not used with all IRM clients) Administrator
16 — Introducing the IRM Server

3. The IRM Server checks the server restrictions to make sure they allow jdoe and this action. The server restrictions do not contain jdoe in the Users and Groups category. At this level of the hierarchy, when the server restrictions do not explicitly allow or deny access to jdoe, the IRM Server checks the next level for a decision.
4. The IRM Server checks the specific document policy to make sure it allows jdoe and this action. The document policy contains the deny all others authorization next to Users and Groups, meaning that by default, no groups can access the protected content. But, the user who protected the content added the group Sales and gave that group access. Therefore, jdoe can access the server and view the protected content.
This chart illustrates the process described in the previous example on viewing a protected document:
None
Sales group2. Group RightsJdoe is a member of the Sales group, which has access to the IRM Server and rights to view protected content.
1. Login RestrictionsThere are no restrictions on the network entity or current time.
None3. Server RestrictionsThe Users and Groups category does not explicitly allow or deny access to jdoe.
4. Document PolicyThe document policy denies all groups, but allows Sales.
Users and Groups (deny all others)
Introducing the IRM Server — 17
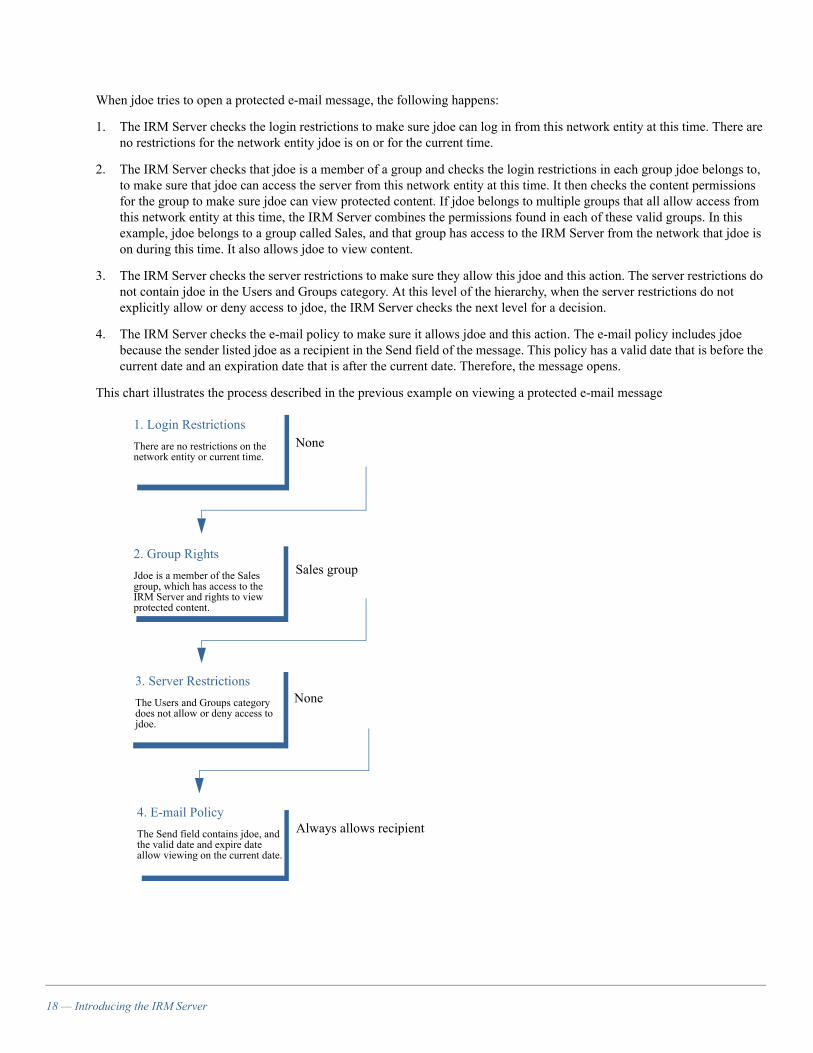
When jdoe tries to open a protected e-mail message, the following happens:
1. The IRM Server checks the login restrictions to make sure jdoe can log in from this network entity at this time. There are no restrictions for the network entity jdoe is on or for the current time.
2. The IRM Server checks that jdoe is a member of a group and checks the login restrictions in each group jdoe belongs to, to make sure that jdoe can access the server from this network entity at this time. It then checks the content permissions for the group to make sure jdoe can view protected content. If jdoe belongs to multiple groups that all allow access from this network entity at this time, the IRM Server combines the permissions found in each of these valid groups. In this example, jdoe belongs to a group called Sales, and that group has access to the IRM Server from the network that jdoe is on during this time. It also allows jdoe to view content.
3. The IRM Server checks the server restrictions to make sure they allow this jdoe and this action. The server restrictions do not contain jdoe in the Users and Groups category. At this level of the hierarchy, when the server restrictions do not explicitly allow or deny access to jdoe, the IRM Server checks the next level for a decision.
4. The IRM Server checks the e-mail policy to make sure it allows jdoe and this action. The e-mail policy includes jdoe because the sender listed jdoe as a recipient in the Send field of the message. This policy has a valid date that is before the current date and an expiration date that is after the current date. Therefore, the message opens.
This chart illustrates the process described in the previous example on viewing a protected e-mail message
None
Sales group2. Group RightsJdoe is a member of the Sales group, which has access to the IRM Server and rights to view protected content.
1. Login RestrictionsThere are no restrictions on the network entity or current time.
None3. Server RestrictionsThe Users and Groups category does not allow or deny access to jdoe.
4. E-mail PolicyThe Send field contains jdoe, and the valid date and expire date allow viewing on the current date.
Always allows recipient
18 — Introducing the IRM Server

PermissionsPolicy permissions determine what users can do with protected content. The following permissions appear in policies at different levels of the hierarchy:
• View allows users to view protected content. This permission appears in groups. To set this permission in groups, see “Chapter 5, Managing Users and Groups.”
• Print allows users to print protected content. This permission appears in server restrictions, groups, e-mail policies, the default policy, and document policies. For information on setting this permission at each of these levels of the hierarchy, see “Chapter 6, Setting Up Server Restrictions,” “Chapter 5, Managing Users and Groups,” “Chapter 7, Setting Up E-Mail Users and Addresses,” and “Chapter 8, Setting Up Policies for Documents.”
• Select Text and Graphics or Copy/Paste allows users to copy protected content. This permission appears in server restrictions, groups, e-mail policies, the default policy, and document policies. For information on setting this permission at each of level of hierarchy, see “Chapter 6, Setting Up Server Restrictions,” “Chapter 5, Managing Users and Groups,” “Chapter 7, Setting Up E-Mail Users and Addresses,” and “Chapter 8, Setting Up Policies for Documents.”
• Edit allows users to edit protected content. This only applies to Microsoft Office documents. This permission appears in server restrictions, groups, the default policy, and document policies. For information on setting this permission at each of level of hierarchy, see “Chapter 6, Setting Up Server Restrictions,” “Chapter 5, Managing Users and Groups,” and “Chapter 8, Setting Up Policies for Documents.”
• Protect allows users to protect content. This permission appears in groups. For information on setting this permission, see “Chapter 5, Managing Users and Groups.”
• Guest Access, when selected in a group, allows the user to protect content with an e-mail policy or a document policy template that allows guest access. If a user in that group then protects content and selects guest access in the e-mail policy or document policy template, viewers do not have to authenticate with the IRM Server to view the protected content. For information on setting this permission, see “Allowing Guest Access” on page 20.
• Delete Own allows users to delete the keys to content they own and permanently remove it from the IRM Server. This permission appears in groups. Users with Delete Any Document administrative rights can delete the keys to content they do not own. For information on setting this permission, see “Chapter 5, Managing Users and Groups.”
• Expire allows users to expire content. Expiring content makes it inaccessible, but does not permanently delete the keys from the IRM Server unless you set the server restrictions to delete the keys after the content expiration date. This permission appears in groups. If you set the server restrictions to keep the keys after the content expiration date, a user with read-write document management administrative rights can reactivate the content making it accessible again. To set this permission, see “Chapter 5, Managing Users and Groups.”
• Maximum Lease Duration or Offline Viewing allows users to access protected content while not connected to the IRM Server. For more information, see “Working Offline” on page 20.
• Watermark allows users to specify text that appears on a protected document governed by the document policy template when a user views or prints the document. For more information, see “Chapter 10, Working with Watermarks.”
When the IRM Server determines whether or not a user can access content, it checks the permission settings at each level of the hierarchy. Continue to the next sections to understand how to set the permission at each level of the hierarchy.
Introducing the IRM Server — 19

Allowing Guest Access
You can set up the IRM Server to allow users to create an e-mail policy or select a document policy template that allows guest access. When a sender allows guest access, the viewer of the protected content can view it without authenticating with the IRM Server.
With IRM Client for E-Mail, allowing guest access eliminates the need for you to map e-mail addresses of recipients. However, guest access provides a lower level of security. To map e-mail addresses, see “Chapter 7, Setting Up E-Mail Users and Addresses.”
To set the Guest Access permission on e-mail policies, document policy templates or the default policy, you must set the Guest Access permission in the server restrictions. See “Setting Permissions in Server Restrictions” on page 61. To allow users to set the guest access permission when they protect content, you must select the Protect with Guest Access permission for one of their groups on the IRM Server, as described in “Creating or Editing a Group” on page 48. To protect e-mail messages with guest access, see the IRM Client for E-Mail Help. To protect documents with guest access, see “Chapter 8, Setting Up Policies for Documents.”
Working Offline
A document owner can grant offline access permission to allow users to access protected content when they cannot connect to the IRM Server (for example, they are traveling or out of the office). Offline access permission contains policy information and access keys that allow users to access content offline. This ensures that the protected content has the same permissions set for it offline as online.
Note: A user can also access protected content using a Research in Motion BlackBerry handheld synchronized with the user’s desktop e-mail application. For information, see “Chapter 14, Configuring IRM Client for RIM BlackBerry.”
As the IRM Server administrator, you may want to set the Maximum Lease Duration (Offline Viewing) permission for users. You must also set this permission in the server restrictions and in at least one of the user’s groups, or the IRM Server will not allow the user to work offline. After you set the appropriate permissions, document owners are allowed to set offline access permission for protected content.
Note: When offline access has been granted by a content owner, the client downloads the keys for that content and holds them in an encrypted container on the client machine. Revoking access or changing policy does not take effect until the IRM client rechecks the permission with the IRM Server. This is a less secure mode of operation and may not be appropriate for use with highly sensitive protected content.
Once users are granted permission to work offline, they log in to their client application offline to view the content using the same IRM Server name, account, and computer they used before they started to work offline. The IRM Server protects the content with their account password. If users log in using a SecurID account, they cannot view protected content.
Offline access lasts for a specific number of days, as determined by the IRM Server administrator and document owner.
The IRM system enforces security when users attempt unauthorized activities. For example, if users modify their system clock, they can no longer access the protected content and a warning appears in the server log when they next connect online. Depending on what the user does to the protected content, a number of log messages may appear. The IRM client tracks the offline activity, detects times, and transfers activity messages to the log file when the user connects to the server.
You set the number of days you want a user or group to have offline access through the Maximum Lease Duration (days) field in groups and server restrictions. Then you set it in the document policy template or in the Offline Viewing section in an e-mail policy. When you enter the number of days, you activate the work offline feature at that level of the authorization hierarchy. The IRM Server checks each level of the hierarchy to determine if the user or group can work offline on specific protected content. For more information on hierarchy, see “Hierarchy of Authorization” on page 16.
20 — Introducing the IRM Server

To set or modify the Maximum Lease Duration (Offline Viewing) field for offline capabilities, see the following sections:
• For a user or group, see “Creating or Editing a Group” on page 48.
• For the IRM Server, see “Overview of Server Restrictions” on page 59.
• For an e-mail policy, see “Modifying E-Mail Policies” on page 86.
• For a document policy, see “Modifying Document or Page Policies” on page 87.
If you have to disable the Maximum Lease Duration (Offline Viewing) permission, you can reset it in the group, server restrictions, e-mail, default policy, or document policy. Your changes apply the next time a user attempts to work offline.
Monitoring Through the LogIn addition to controlling authorization, IRM Server administrators can monitor all activity on the IRM Server through a comprehensive activity log. This log lets you see the actions of users protecting content and attempting to view protected content. It also allows you to track the activity of protected content when a user accesses it offline. This allows you to acknowledge receipt of protected content and analyze security compliance. You can track unauthorized and unsuccessful attempts to access protected content and configure the server to notify you when unauthorized activities are in progress. You have the opportunity to intercept any unauthorized activity as it occurs. The notification process defines actions associated with log entries based on severity. For example, an e-mail could notify you every time there is an emergency level log entry. This lets you actively monitor the IRM Server for suspicious activity, where you define what you consider suspicious.
Setting Up IRM Server for the First TimeOnce you understand the basic IRM Server administration concepts, you must set up authorizations for the IRM Server. The remainder of this book provides details on how to do this. The following lists the general steps you should take to set up an IRM Server:
1. Set up the login restrictions that apply to all users logging in to the IRM Server, as described in “Chapter 2, Logging In and Setting Login Restrictions.”
2. Set up the authentication domains you plan to use as described in “Chapter 3, Adding Authentication Domains” and “Chapter 4, Using LDAP with Authentication Domains.”
3. Set up group rights for other administrators and different types of users as described in “Chapter 5, Managing Users and Groups.”
4. Set up the server restrictions as described in “Chapter 6, Setting Up Server Restrictions.”
5. Set up the default policy as described in “Chapter 8, Setting Up Policies for Documents.”
Once you complete these steps, you can optionally do the following:
• Set up global document policies, document policies, and document policy templates as described in “Chapter 8, Setting Up Policies for Documents.”
• Set up e-mail users and addresses and view, delete, and modify e-mail policies as described in “Chapter 7, Setting Up E-Mail Users and Addresses.” For information on e-mail policies for IRM Client for E-Mail or IRM Extranet Server, see the respective IRM client online help.
• Manage policies and offline access as described in “Chapter 9, Managing Policies.”
• Set up watermarks as described in “Chapter 10, Working with Watermarks.”
• Set up notifications and trusted plug-ins, and manage offline access as described in “Chapter 11, Monitoring and Managing the IRM Server.”
Introducing the IRM Server — 21


Chapter 2Logging In and Setting Login Restrictions
This chapter describes the full administrator account, and how log in and to create an account using the IRM Server Administrator application. It then provides information on how to restrict access based on time and location.
Overview of Administrator AccountAn administrator account with full administrative rights was created during the IRM server installation in the Server Configure application. See the IRM Server Installation Guide (Windows or Solaris) for this procedure. The administrator account with full administrative rights has the ability to add other administrator accounts and add groups of administrators. It uses a shared secret password as its authentication method and account type.
It is recommended that you use this account only to log in to the IRM Server for the first time and set up new administrator accounts. You can create administrator accounts that use other authentication methods, such as Windows password, LDAP password, SecurID or certificate. For information on creating additional accounts, see the online help for your IRM client. For security, you should then delete the initial administrator account.
Logging In as Full AdministratorTo log in to the IRM Server Administrator for the first time:
1. Choose Start > Programs > EMC IRM > IRM Server Administrator > IRM Server Administrator. The Account Login dialog box appears.
2. Enter the IP address or DNS name of your IRM Server in the IRM Server field. To connect to the IRM Server on a port other than the default port of 466, specify the server machine name and the port using the following syntax:
<server_machine_name>:<port number>
3. Enter the administrator user name and password. This account was created during installation using the Server Configure application.
4. If you do not want to use the proxy settings in your default browser to connect to the IRM Server, click the Properties button and do one of the following:
• Select Use the following proxy settings and enter the proxy server name and proxy port number if you want to connect through a specific proxy server. IRM Server Administrator continues to log you in through the proxy server even if you create another account later. Click OK.
• Select Do not use a proxy (connect directly to the server) if you do not want to connect through a proxy, and click OK.
5. In the Account Login dialog box, click OK. If you connect through a proxy that requires authentication, enter your proxy user name and password in the Enter Proxy Authentication dialog box and click OK.
Logging In and Setting Login Restrictions — 23

6. In the Accept Server Connection dialog box, click Accept to accept a connection to the server. The fingerprint of the server certificate should match the fingerprint in this dialog box. IRM Server Administrator opens.
24 — Logging In and Setting Login Restrictions

Overview of Network Entities and Time SpecificationsYou can allow or deny connections to the IRM Server from certain network entities, and you can allow connections to the IRM Server only during certain days of the week and times of the day. To do this, you need to create IRM Server network entities and time specifications. You can then add them to the login restrictions, groups, or document policy templates.
A network entity is an IP address, a subnetwork, or a domain from which users connect to the IRM Server. A host represents a single machine on a network. A subnet entity defines an entire network or a subnet of a network. A domain entity is registered within the Internet community and usually ends in .com, .edu, .gov, .org, or a country code. A time specification is a block of time; for example, Monday through Friday from 9:00 A.M. to 5:00 P.M.
As an administrator, you must have read-write policy management rights to create global network entities and time specifications that are available to all users to add to their document policies. If you log in using the full administrator account, you have this level of access.
When you create a network entity on the IRM Server, you define a host, subnet or domain that connects to the IRM Server. Once you create a network entity, you can add it to a policy and allow or deny authorization to users from the entity. For example, to allow only users who connect to the IRM Server from abc.com to access protected content, you create a network entity for abc.com, create a document policy template that allows access from only that network entity, and then apply the template to the document you want to protect.
When you create a time specification on the IRM Server, you define a block of time. Once you create a time specification, you can add it to a policy to specify when users can access protected content. For example, to allow users to connect to the IRM Server only on weekdays during business hours, you create a time specification for Monday through Friday from 9:00 A.M. to 5:00 P.M., create a document policy template and add that time specification, then apply the template to the document you want to protect.
Creating Network EntitiesTo create a network entity:
1. From the Administrator menu bar, choose Policy > Network Entities. The Network Entities dialog box appears with a list of existing entities, if any.
2. Click Add. The Add Network Entity dialog box appears.
3. Enter a name for the new network entity in the Name field. This can be any name you choose.
4. Enter the description of the network entity in the Description field.
Logging In and Setting Login Restrictions — 25
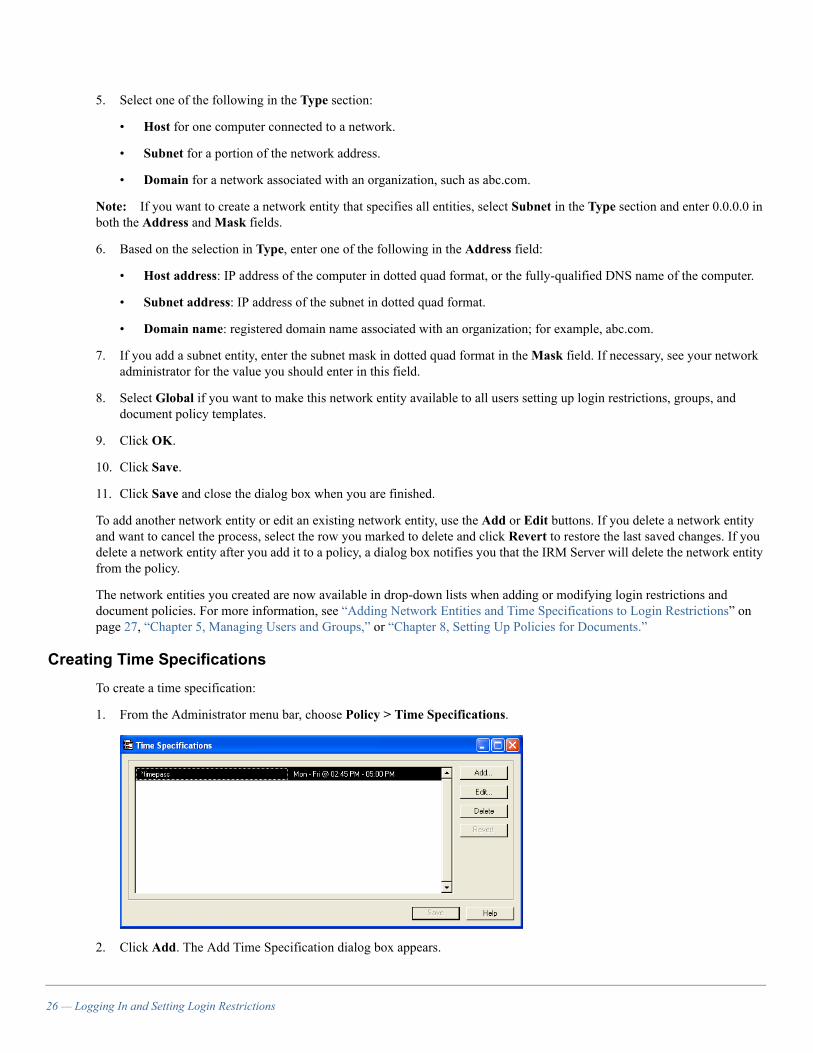
5. Select one of the following in the Type section:
• Host for one computer connected to a network.
• Subnet for a portion of the network address.
• Domain for a network associated with an organization, such as abc.com.
Note: If you want to create a network entity that specifies all entities, select Subnet in the Type section and enter 0.0.0.0 in both the Address and Mask fields.
6. Based on the selection in Type, enter one of the following in the Address field:
• Host address: IP address of the computer in dotted quad format, or the fully-qualified DNS name of the computer.
• Subnet address: IP address of the subnet in dotted quad format.
• Domain name: registered domain name associated with an organization; for example, abc.com.
7. If you add a subnet entity, enter the subnet mask in dotted quad format in the Mask field. If necessary, see your network administrator for the value you should enter in this field.
8. Select Global if you want to make this network entity available to all users setting up login restrictions, groups, and document policy templates.
9. Click OK.
10. Click Save.
11. Click Save and close the dialog box when you are finished.
To add another network entity or edit an existing network entity, use the Add or Edit buttons. If you delete a network entity and want to cancel the process, select the row you marked to delete and click Revert to restore the last saved changes. If you delete a network entity after you add it to a policy, a dialog box notifies you that the IRM Server will delete the network entity from the policy.
The network entities you created are now available in drop-down lists when adding or modifying login restrictions and document policies. For more information, see “Adding Network Entities and Time Specifications to Login Restrictions” on page 27, “Chapter 5, Managing Users and Groups,” or “Chapter 8, Setting Up Policies for Documents.”
Creating Time SpecificationsTo create a time specification:
1. From the Administrator menu bar, choose Policy > Time Specifications.
2. Click Add. The Add Time Specification dialog box appears.
26 — Logging In and Setting Login Restrictions

3. Enter a name for your time specification in the Name field.
4. Select the days and times when users can view protected content. For example, select Monday through Friday 9:00 A.M. to 5:00 P.M. to have users view the document only during business hours.
5. Select Global if you want to make this time specification available to all users setting up policies for login restrictions, groups, and documents.
6. Click OK.
7. Click Save.
To add or edit a time specification, use the Add or Edit buttons. If you delete a time specification and want to cancel the process, select the row you marked to delete and click Revert before you click Save. If you delete a time specification that has been added it to a policy, a dialog box notifies you that the IRM Server will delete the time specification from the policy.
The time specifications you created are now available in drop-down lists when adding or modifying login restrictions and document policies. For more information, see “Adding Network Entities and Time Specifications to Login Restrictions” on page 27, “Chapter 5, Managing Users and Groups,” or “Chapter 8, Setting Up Policies for Documents.”
Overview of Login RestrictionsThe login restrictions govern when, and from where, users can connect to the IRM Server. The IRM Server enforces any networks and times set in the login restrictions for every user who accesses the server. For example, if the login restrictions specify that only one network entity (company.com) can access the server on weekdays, only users who connect from computers on the company.com network on weekdays can access protected content. If a network has a time set to allow or deny access, the IRM Server enforces that time for every user accessing that server over that network. Even if another type of policy specifically states that users can access content from a specific network at a particular time, if the login restrictions on the server do not allow it, users cannot connect to open protected content.
Adding Network Entities and Time Specifications to Login RestrictionsYou can use network entities and time specifications created in the last section to allow or deny entities and times for all connections to the IRM Server through the login restrictions. You must have read-write policy management administrative rights to access and modify the login restrictions. If you log in using the full administrator account, you have this level of access. To add network entities and time specifications to the login restrictions:
1. Choose Policy > Login Restrictions. The Login Restrictions dialog box appears:
Logging In and Setting Login Restrictions — 27

An asterisk (*) under Network and Time indicates all network entities or all times. A check under Login indicates that the IRM Server allows access. By default, all network entities and time specifications can connect to the IRM Server. You can leave the default row, or delete this row and add your own login restrictions.
If you add one or more network entities, users can only access the IRM Server from those network entities. This denies users accessing the server from any other network entities.
Note: If you leave the Login Restrictions dialog box empty, no client application, except IRM Server Administrator, can connect to the IRM Server.
2. Click Add. The Add Login Rule dialog box appears.
3. Select the item you want to add from the Network Entity drop-down list. This list only contains the global network entities on the IRM Server. To select all available network entities, select the asterisk [*]. Text describing the network entity you select appears under the field.
4. Select a time specification from the Time Specification drop-down list. This list only contains the global time specifications on the IRM Server. To choose all available time specifications, select the asterisk [*]. Text describing the network entity you select appears under the field.
5. Select Allow or Deny depending on whether or not you want users or groups connecting from that network entity or at that time to have the ability to log in to the IRM Server.
6. Click OK. The Login Restrictions dialog box appears with any modifications you made.
7. The IRM Server evaluates the login restrictions in the order listed. To change the order, use the Up or Down button. For example, to allow everyone access from the company network at all times, but always deny access from a specific host computer in the company, add the host network entity first and select Deny. Then add the Mycompany.com domain network and select Allow as shown in the following dialog box. Otherwise, users will be able to connect from that host. To deny access from one host in the company domain, the login restrictions should have this order:
8. Click Save.
To remove your settings and retain the last saved settings, click Revert before you click Save. To delete a network entity or time specification, select the row and click Delete. If you want to cancel the delete process, select the row you marked to delete and click Revert. To review information on a login rule, select a row and click Info.
28 — Logging In and Setting Login Restrictions

Chapter 3Adding Authentication Domains
This chapter contains information about adding IRM Server authentication domains, including how to add password, certificate, and SecurID authentication domains. It also explains how to edit the shared secret password domain to manage passwords and how to select a default password authentication domain.
Overview of Authentication DomainsAll users, except those that connect with guest access, are part of an IRM Server authentication domain. This allows users to authenticate with the IRM Server. You create authentication domains based on the authentication method you want them to use to connect to the server. The IRM Server supports the following authentication methods:
• Password
• Certificate
• SecurID
If you want to set up password authentication, the IRM Server supports the following types of password authentication. The type you choose depends on how your organization stores and allows access to information.
• Shared secret
• Windows
• Lightweight Directory Access Protocol (LDAP)
The IRM Server automatically creates a shared secret domain (\\pvserver) to store all shared secret password users. The IRM Server only allows this one domain of shared secret password users. The shared secret domain also contains the full administrator account that you used to log in to the IRM Server for the first time.
If the only authentication method you want to use is shared secret, use the \\pvserver domain. You do not need to create additional authentication domains. You can create individual user accounts in this authentication domain that map directly to the user accounts in IRM client applications.
If you want some users to authenticate with the IRM Server using a shared secret password and some users to authenticate using another authentication method, you must create an authentication domain for the additional method using the procedures in this chapter or the following chapter then create the individual accounts for the shared secret password users in the shared secret domain. For information on creating user accounts, see “Chapter 5, Managing Users and Groups.”
If you decide to authenticate password users with information in an existing domain, such as your Windows domain or LDAP directory service, you must add a password authentication domain to the IRM Server. This password domain corresponds to your Windows domain or LDAP directory service.
You can also add a SecurID or certificate domain to the IRM Server. A SecurID domain allows you to specify a SecurID server and use the information from the server to authenticate users. A certificate domain allows you to specify the trusted CA for a group of users authenticating with certificates and establish a chain of trust.
Note: If users in an authentication domain protect content or create network entities and time specifications then you delete that authentication domain, the IRM Server deletes these network entities and time specifications but will prompt you to change the owner of the e-mail or document policies to an administrator or delete them.
To add each type of domain, see the corresponding section in this chapter.
Adding Authentication Domains — 29
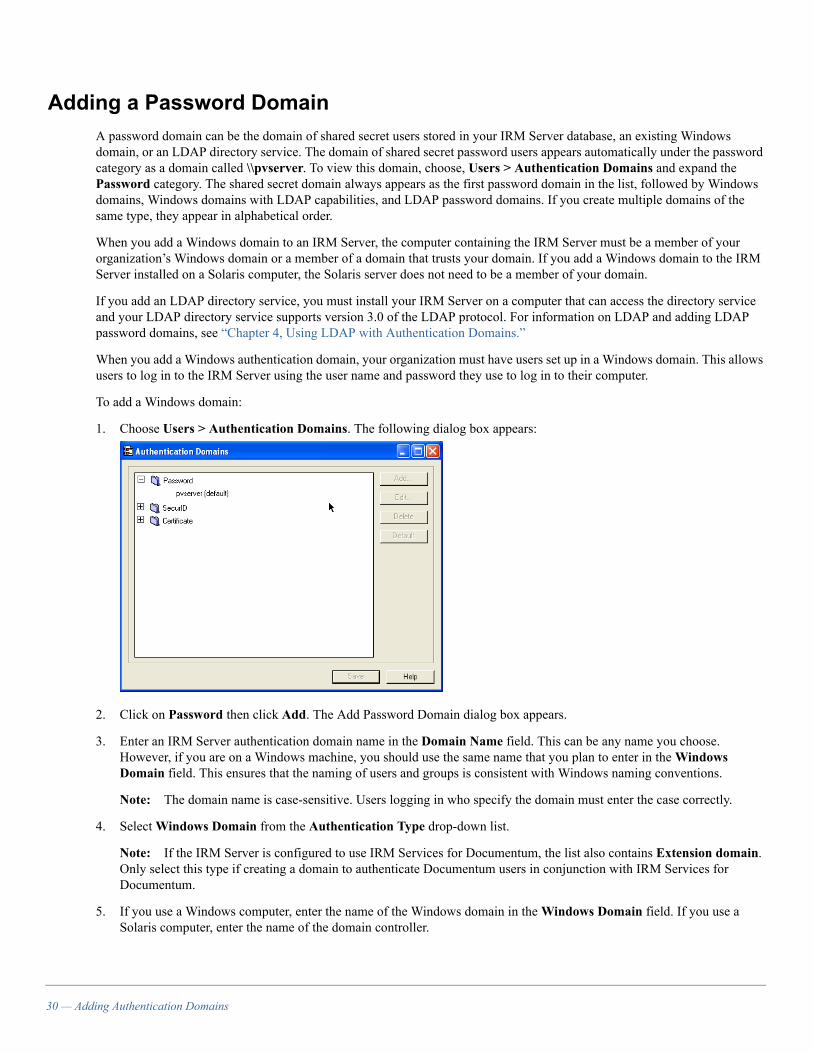
Adding a Password DomainA password domain can be the domain of shared secret users stored in your IRM Server database, an existing Windows domain, or an LDAP directory service. The domain of shared secret password users appears automatically under the password category as a domain called \\pvserver. To view this domain, choose, Users > Authentication Domains and expand the Password category. The shared secret domain always appears as the first password domain in the list, followed by Windows domains, Windows domains with LDAP capabilities, and LDAP password domains. If you create multiple domains of the same type, they appear in alphabetical order.
When you add a Windows domain to an IRM Server, the computer containing the IRM Server must be a member of your organization’s Windows domain or a member of a domain that trusts your domain. If you add a Windows domain to the IRM Server installed on a Solaris computer, the Solaris server does not need to be a member of your domain.
If you add an LDAP directory service, you must install your IRM Server on a computer that can access the directory service and your LDAP directory service supports version 3.0 of the LDAP protocol. For information on LDAP and adding LDAP password domains, see “Chapter 4, Using LDAP with Authentication Domains.”
When you add a Windows authentication domain, your organization must have users set up in a Windows domain. This allows users to log in to the IRM Server using the user name and password they use to log in to their computer.
To add a Windows domain:
1. Choose Users > Authentication Domains. The following dialog box appears:
2. Click on Password then click Add. The Add Password Domain dialog box appears.
3. Enter an IRM Server authentication domain name in the Domain Name field. This can be any name you choose. However, if you are on a Windows machine, you should use the same name that you plan to enter in the Windows Domain field. This ensures that the naming of users and groups is consistent with Windows naming conventions.
Note: The domain name is case-sensitive. Users logging in who specify the domain must enter the case correctly.
4. Select Windows Domain from the Authentication Type drop-down list.
Note: If the IRM Server is configured to use IRM Services for Documentum, the list also contains Extension domain. Only select this type if creating a domain to authenticate Documentum users in conjunction with IRM Services for Documentum.
5. If you use a Windows computer, enter the name of the Windows domain in the Windows Domain field. If you use a Solaris computer, enter the name of the domain controller.
30 — Adding Authentication Domains
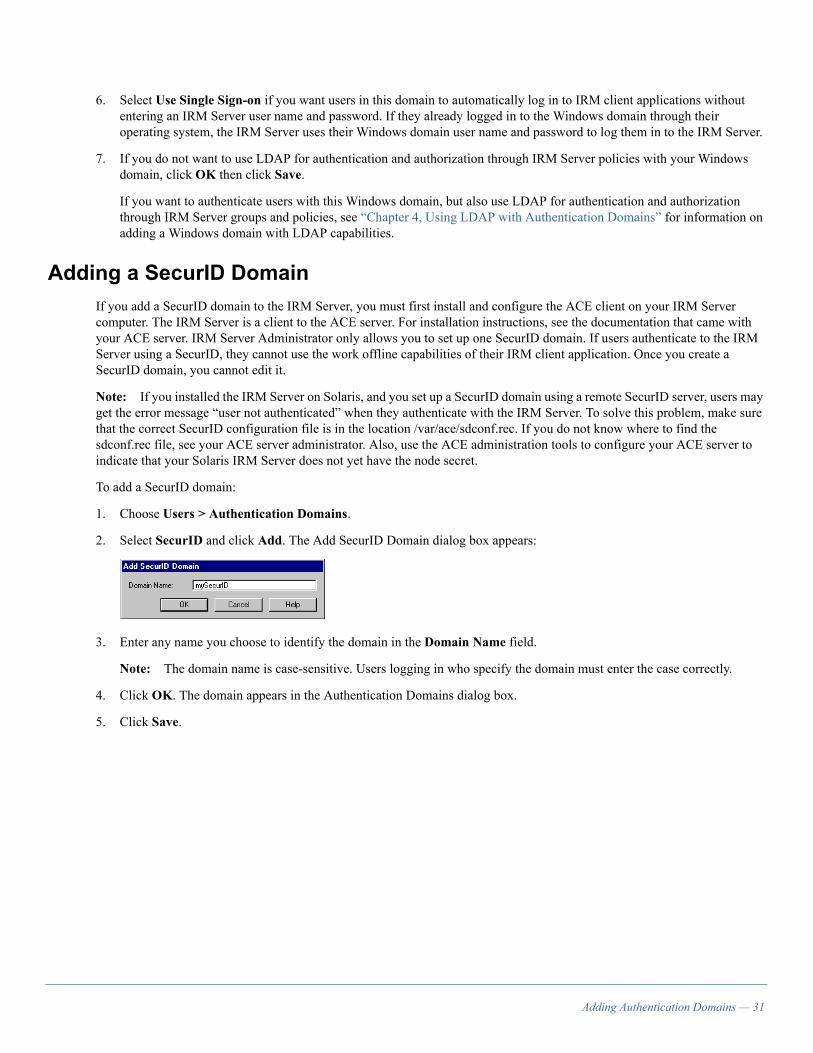
6. Select Use Single Sign-on if you want users in this domain to automatically log in to IRM client applications without entering an IRM Server user name and password. If they already logged in to the Windows domain through their operating system, the IRM Server uses their Windows domain user name and password to log them in to the IRM Server.
7. If you do not want to use LDAP for authentication and authorization through IRM Server policies with your Windows domain, click OK then click Save.
If you want to authenticate users with this Windows domain, but also use LDAP for authentication and authorization through IRM Server groups and policies, see “Chapter 4, Using LDAP with Authentication Domains” for information on adding a Windows domain with LDAP capabilities.
Adding a SecurID DomainIf you add a SecurID domain to the IRM Server, you must first install and configure the ACE client on your IRM Server computer. The IRM Server is a client to the ACE server. For installation instructions, see the documentation that came with your ACE server. IRM Server Administrator only allows you to set up one SecurID domain. If users authenticate to the IRM Server using a SecurID, they cannot use the work offline capabilities of their IRM client application. Once you create a SecurID domain, you cannot edit it.
Note: If you installed the IRM Server on Solaris, and you set up a SecurID domain using a remote SecurID server, users may get the error message “user not authenticated” when they authenticate with the IRM Server. To solve this problem, make sure that the correct SecurID configuration file is in the location /var/ace/sdconf.rec. If you do not know where to find the sdconf.rec file, see your ACE server administrator. Also, use the ACE administration tools to configure your ACE server to indicate that your Solaris IRM Server does not yet have the node secret.
To add a SecurID domain:
1. Choose Users > Authentication Domains.
2. Select SecurID and click Add. The Add SecurID Domain dialog box appears:
3. Enter any name you choose to identify the domain in the Domain Name field.
Note: The domain name is case-sensitive. Users logging in who specify the domain must enter the case correctly.
4. Click OK. The domain appears in the Authentication Domains dialog box.
5. Click Save.
Adding Authentication Domains — 31
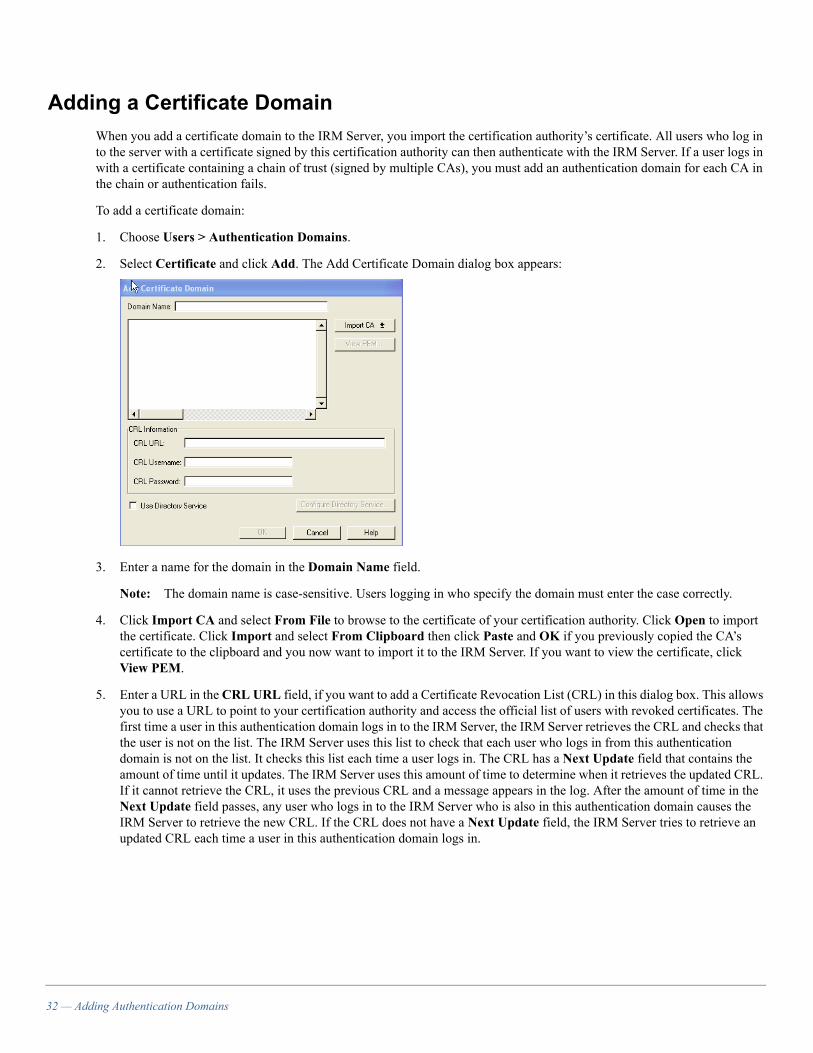
Adding a Certificate DomainWhen you add a certificate domain to the IRM Server, you import the certification authority’s certificate. All users who log in to the server with a certificate signed by this certification authority can then authenticate with the IRM Server. If a user logs in with a certificate containing a chain of trust (signed by multiple CAs), you must add an authentication domain for each CA in the chain or authentication fails.
To add a certificate domain:
1. Choose Users > Authentication Domains.
2. Select Certificate and click Add. The Add Certificate Domain dialog box appears:
3. Enter a name for the domain in the Domain Name field.
Note: The domain name is case-sensitive. Users logging in who specify the domain must enter the case correctly.
4. Click Import CA and select From File to browse to the certificate of your certification authority. Click Open to import the certificate. Click Import and select From Clipboard then click Paste and OK if you previously copied the CA’s certificate to the clipboard and you now want to import it to the IRM Server. If you want to view the certificate, click View PEM.
5. Enter a URL in the CRL URL field, if you want to add a Certificate Revocation List (CRL) in this dialog box. This allows you to use a URL to point to your certification authority and access the official list of users with revoked certificates. The first time a user in this authentication domain logs in to the IRM Server, the IRM Server retrieves the CRL and checks that the user is not on the list. The IRM Server uses this list to check that each user who logs in from this authentication domain is not on the list. It checks this list each time a user logs in. The CRL has a Next Update field that contains the amount of time until it updates. The IRM Server uses this amount of time to determine when it retrieves the updated CRL. If it cannot retrieve the CRL, it uses the previous CRL and a message appears in the log. After the amount of time in the Next Update field passes, any user who logs in to the IRM Server who is also in this authentication domain causes the IRM Server to retrieve the new CRL. If the CRL does not have a Next Update field, the IRM Server tries to retrieve an updated CRL each time a user in this authentication domain logs in.
32 — Adding Authentication Domains

For example, you can enter an LDAP URL:
ldap://ldap.yourcompany.com/cn=YourCompany CA,o=YourCompany,c=US?crl
The first part of the URL, ldap.yourcompany.com, is the address of the LDAP server. The next part, cn=YourCompany CA,o=YourCompany,c=US, is the distinguished name of the LDAP entry. This tells the IRM Server how to find the record in the LDAP database. The crl after the ? is an attribute name. You can only use an attribute name that corresponds to your CRL.
You can also enter a file URL. The file URL format is file:// followed by a file name, for example:
file://\\server\share\crl.der
6. Enter the user name and password for the URL.
7. If you do not want to use LDAP for authentication and authorization through IRM Server groups and policies with your certificate domain, click OK then click Save. The domain appears in the Authentication Domains dialog box and you completed this procedure.
If you want to authenticate users with this certificate domain but also use LDAP for authentication and authorization through IRM Server groups and policies, see “Chapter 4, Using LDAP with Authentication Domains” for information on adding certificate domains with LDAP capabilities.
Editing Shared Secret Domain to Manage PasswordsThe IRM Server allows you to edit the shared secret password domain, \\pvserver, to manage the passwords for shared secret users. You can set up the IRM Server to ensure that shared secret users:
• Use passwords of a specific minimum length.
• Enter an incorrect password only a specific number of times before the server no longer allows them to log in. The lockout lasts for a set time or until an IRM Server administrator allows them to log in.
To edit the shared secret password domain and set password restrictions:
1. Choose Users > Authentication Domains.
2. In the Authentication Domains dialog box, expand the Password category and select \\pvserver.
3. Click Edit. The Edit Shared Secret Password Domain dialog box appears:
4. Select Enforce a minimum password length of and enter the number of characters if you want to require a minimum password length for shared secret user password accounts.
5. Select Lockout users after and enter the number of login failures if you want to require the IRM Server to lock out a shared secret password user account after the user enters an incorrect password a specific number of times.
Adding Authentication Domains — 33

6. If you selected Lockout users after login failures and you want the IRM Server to unlock locked accounts after a certain amount of time, select Timed unlock after. Then set the time by entering a number and selecting minutes, hours, or days. If you do not select this option, an IRM Server administrator must unlock locked accounts. You can always unlock accounts even if you set the IRM Server to automatically unlock them. To unlock an account, see “Unlocking a Shared Secret User Account” on page 47.
7. Click Save.
Selecting a Default Password Authentication DomainOnce you set up your domains, you may want to select a default domain for your password domains. This helps users by making it unnecessary for them to enter the path to the domain before their user name in the User Name field of the Account Login dialog box. If a user needs to connect to a domain that is not the default, that user must enter:
\\domain name\user name
The domain name is the name that you assigned to that domain when you created it.
To set a default password domain:
1. Select the domain in the Authentication Domains dialog box.
2. Click Default.
3. Click Save.
34 — Adding Authentication Domains

Chapter 4Using LDAP with Authentication Domains
This chapter contains information on how to use LDAP with IRM Server authentication domains. It describes how to add Windows domains with LDAP capabilities, LDAP password domains, and certificate domains with LDAP capabilities. It also explains how to set up LDAP search filters.
Overview of LDAP and Authentication DomainsYou can use an LDAP directory service to authenticate and authorize users connecting to the IRM Server. The users must be members of an authentication domain that you set up to use the directory service. There are three types of IRM Server authentication domains that you can set up to use an LDAP directory service:
• A Windows domain with LDAP capabilities
• An LDAP password domain
• A certificate domain with LDAP capabilities
As part of adding a Windows domain or a certificate domain, you can add LDAP authentication and authorization capabilities to the domain. You may want to do this if your organization has users that log in to their computers using a Windows domain and password or a certificate, but you also have an LDAP directory service set up containing users and groups in your organization. You can also add an LDAP password domain if you want to use LDAP authentication and authorization and your organization does not use Windows domains and passwords or certificates.
Using LDAP with authentication domains allows you to query the LDAP directory service for users and groups when you set up server restrictions, groups, e-mail policies, or document policies on the IRM Server. The IRM Server uses queries to retrieve user information from the LDAP directory server. You can then add this information to the policy, or you can place a query in the policy.
When a user accesses protected content, the IRM Server checks the Windows domain or certificate to authenticate the user. If the domain is an LDAP password domain, the IRM Server checks the LDAP directory service to make sure the user name and password are valid. With all types of LDAP domains the IRM Server also checks the validity of the user by locating the user in the LDAP directory service and retrieving the user’s distinguished name. The IRM Server then checks the appropriate levels of the policy hierarchy and executes any LDAP queries added to the policies in the hierarchy. The IRM Server also checks that the policies allow the distinguished name of the user or group or the full IRM Server user name at each level of the policy hierarchy. The full IRM Server user name for a user is the authentication domain name followed by the user name, for example, \\pvserver\jdoe.
The LDAP protocol allows directory servers to specify referrals. These referrals allow a directory server to have an entry that references another entry on that server, or even an entry on another directory. When retrieving user information from a directory server, the IRM Server automatically follows referrals that reference local entries. For example, the IRM Server follows referrals to directory entries that reside in that directory service. The IRM Server does not follow any referral that references entries on a different directory service.
Note: If you upgraded from a previous version of the IRM Server and your organization uses a Windows domain and an LDAP directory service, it is recommended that you add LDAP capabilities to your Windows domain instead of adding an LDAP password domain. This allows users to use existing accounts to log in to the IRM Server.
Using LDAP with Authentication Domains — 35

To add a Windows domain with LDAP capabilities or a certificate domain with LDAP capabilities, you must first add the domain without the LDAP capabilities by following the procedures in either “Adding a Password Domain” on page 30 or “Adding a Certificate Domain” on page 32. Then, to add LDAP capabilities to each of these types of authentication domains or to set up an LDAP password domain you must follow the procedures in this chapter to:
• Specify a directory service
• Set the directory properties
• Create directory queries
When you add a certificate domain with LDAP capabilities, you must also set up certificate mapping, as described in “Setting Up Certificate Mapping” on page 42.
Specifying a Directory ServiceWhen you specify a directory service, you set up the LDAP directory server information that the IRM Server uses to log in to the directory server. The IRM Server logs in to the directory server to authenticate and determine authorization levels for the user. For example, if a user named Karen Jones logs in to the IRM Server and is a member of a Windows domain with LDAP capabilities, the IRM Server uses the information you specify for the directory service to log in to the LDAP directory service and check that Karen Jones is a valid user in the directory.
To specify a directory service as part of adding a Windows domain with LDAP capabilities, an LDAP password domain, or a certificate domain with LDAP capabilities:
1. Do one of the following:
• Follow the steps in “Adding a Password Domain” on page 30, if you want to specify a directory service for a Windows domain with LDAP capabilities.
• Choose Users >Authentication Domains, click on Password then click Add if you want to specify a directory service for an LDAP password domain. Enter an IRM Server authentication domain name for the domain in the Domain Name field. This can be any name you choose. Then, select LDAP Password Domain from the drop-down list in the Authentication Type field.
• Follow the steps in “Adding a Certificate Domain” on page 32, if you want to specify a directory service for a certificate domain with LDAP capabilities.
36 — Using LDAP with Authentication Domains
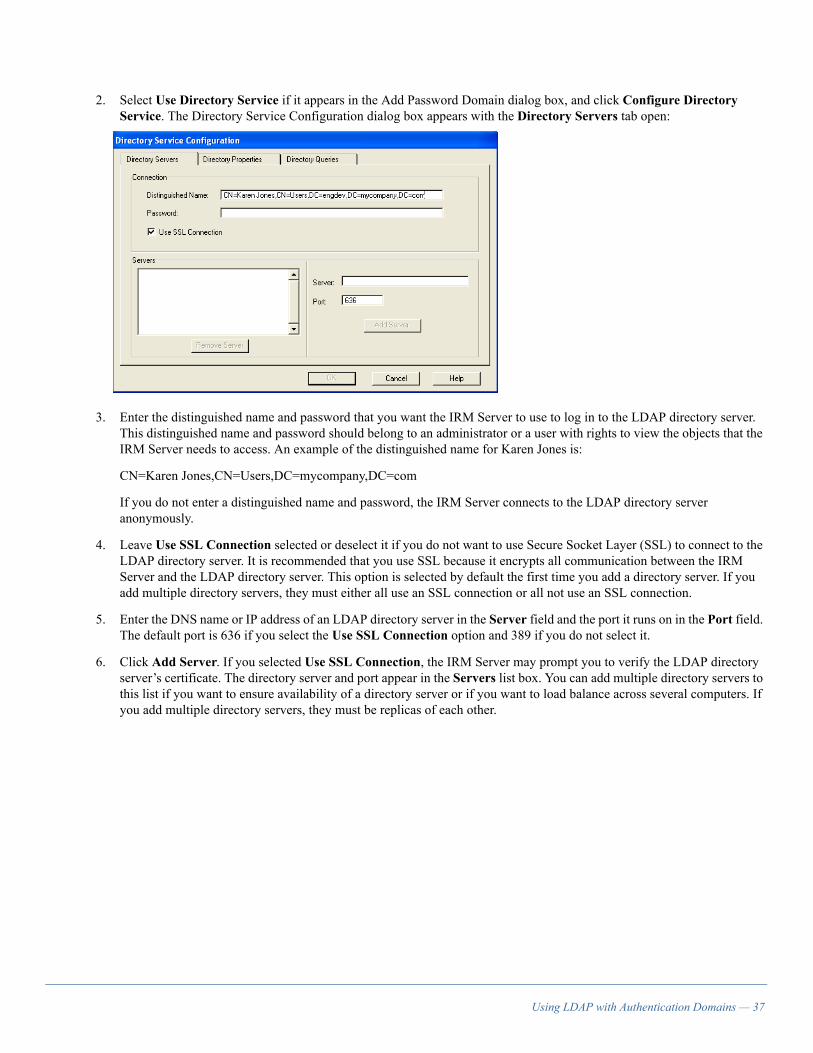
2. Select Use Directory Service if it appears in the Add Password Domain dialog box, and click Configure Directory Service. The Directory Service Configuration dialog box appears with the Directory Servers tab open:
3. Enter the distinguished name and password that you want the IRM Server to use to log in to the LDAP directory server. This distinguished name and password should belong to an administrator or a user with rights to view the objects that the IRM Server needs to access. An example of the distinguished name for Karen Jones is:
CN=Karen Jones,CN=Users,DC=mycompany,DC=com
If you do not enter a distinguished name and password, the IRM Server connects to the LDAP directory server anonymously.
4. Leave Use SSL Connection selected or deselect it if you do not want to use Secure Socket Layer (SSL) to connect to the LDAP directory server. It is recommended that you use SSL because it encrypts all communication between the IRM Server and the LDAP directory server. This option is selected by default the first time you add a directory server. If you add multiple directory servers, they must either all use an SSL connection or all not use an SSL connection.
5. Enter the DNS name or IP address of an LDAP directory server in the Server field and the port it runs on in the Port field. The default port is 636 if you select the Use SSL Connection option and 389 if you do not select it.
6. Click Add Server. If you selected Use SSL Connection, the IRM Server may prompt you to verify the LDAP directory server’s certificate. The directory server and port appear in the Servers list box. You can add multiple directory servers to this list if you want to ensure availability of a directory server or if you want to load balance across several computers. If you add multiple directory servers, they must be replicas of each other.
Using LDAP with Authentication Domains — 37

Setting Directory PropertiesDirectory properties are a collection of properties that the IRM Server uses either as part of authentication, when a user logs in to the IRM Server, or as part of authorization, through queries set up in policies. To set the directory properties:
1. Select the Directory Properties tab in the Directory Service Configuration dialog box:
2. Select the Enforce Directory Cache Lifetime field to set the length of time that the IRM Server retains query results. You can enter duration in minutes, hours, or days. The default is 30 minutes. Allowing a longer cache duration allows the IRM Server to reuse queries and improves the performance of your IRM Server.
3. Select the Enforce Maximum Query Duration of field, enter a duration, and select Seconds, Minutes, Hours, or Days. This allows you to limit the amount of time a query runs. Reducing the amount of time you allow a query to run can improve the performance of your IRM Server, but it can also cause the IRM Server to show incomplete query results.
4. Enter the attribute name that contains the e-mail addresses of users in the LDAP directory in the E-mail Address Attribute field. This allows the IRM Server access to the e-mail addresses of users who use IRM Client for E-Mail. The IRM Server handles these users as though they are mapped in the IRM Client for E-Mail Users dialog box, although only the e-mail address appears in that dialog box, not a full mapping to a user or group. These users are not unknown recipients. For information on setting up IRM Client for E-Mail users, see “Chapter 7, Setting Up E-Mail Users and Addresses.” The default e-mail address attribute is mail. This is the recommended value for both Active Directory and iPlanet Directory Server™. Leave this field empty if you do not want the IRM Server to handle users e-mail addresses as though they are mapped.
5. Enter the attribute name that contains the members of the LDAP group object in the Group Membership Attribute field. This allows you to use LDAP group membership in policies. The default value is member. The default value for the iPlanet Directory Server is uniquemember. If you use the iPlanet Directory Server, you may want to enter uniquemember. Leave this field empty if you do not want to use LDAP group membership.
6. Do one of the following to add a Windows domain with LDAP capabilities or an LDAP password domain:
• If you chose to add a Windows domain with LDAP capabilities, enter the attribute name in the LDAP directory that contains the Windows domain user name in the Username Attribute field. The IRM Server uses this attribute to verify that a user logging in to the IRM Server is a valid user on the directory server. The default attribute name is sAMAccountName. You must enter an attribute name in this field to create a Windows domain with LDAP capabilities.
38 — Using LDAP with Authentication Domains

• If you chose to add an LDAP password domain, enter the attribute name in the LDAP directory that contains a unique user identifier in the Username Attribute field. The IRM Server allows users to authenticate with an LDAP password domain using their full distinguished name, or this unique user identifier. The default object attribute is userPrincipalName. The recommended value for the iPlanet Directory Server is uid. If you use the iPlanet Directory Server and this value is unique for each user, you may want to enter uid.
Leave this field empty if you want users to authenticate using only their full distinguished name.
7. Enter the distinguished name of the location on the directory server where you want the IRM Server to begin searching for the user name attribute of each user who logs in to the IRM Server in the Search Root for User Lookup field. The IRM Server searches all locations lower than this location in the hierarchy. You must enter a distinguished name in this field. For example, you can enter: DC=sales,DC=mycompany,DC=com
8. Enter a filter that narrows the scope of the search the IRM Server performs when it searches for the user name attribute in the Search Filter for User Lookup field. The IRM Server performs this search to verify that the user is valid on the directory server as part of authenticating the user. This field supports all standard LDAP filter rules. For example, to search for all users on the directory, you can enter: objectclass=person
For more information on LDAP filter rules, see “Setting Up LDAP Search Filters” on page 44 or your LDAP directory server documentation. You must enter a filter in this field to create any type of LDAP authentication domain.
Creating Directory QueriesDirectory queries allow you or users who set up policies to search the LDAP directory for users and groups when setting up server restrictions, groups, e-mail policies, document policy templates, and document policies. Users can run the query to retrieve user information from the LDAP directory server and add it to the policy. They can also place the query itself in the policy. This allows users who do not understand LDAP to set up policies and easily use queries to access LDAP user information.
To create directory queries that you can add to policies:
1. Select the Directory Queries tab in the Directory Service Configuration dialog box:
2. Click New. The New Query dialog box appears.
3. Enter a name for the query in the Query Name field.
Using LDAP with Authentication Domains — 39
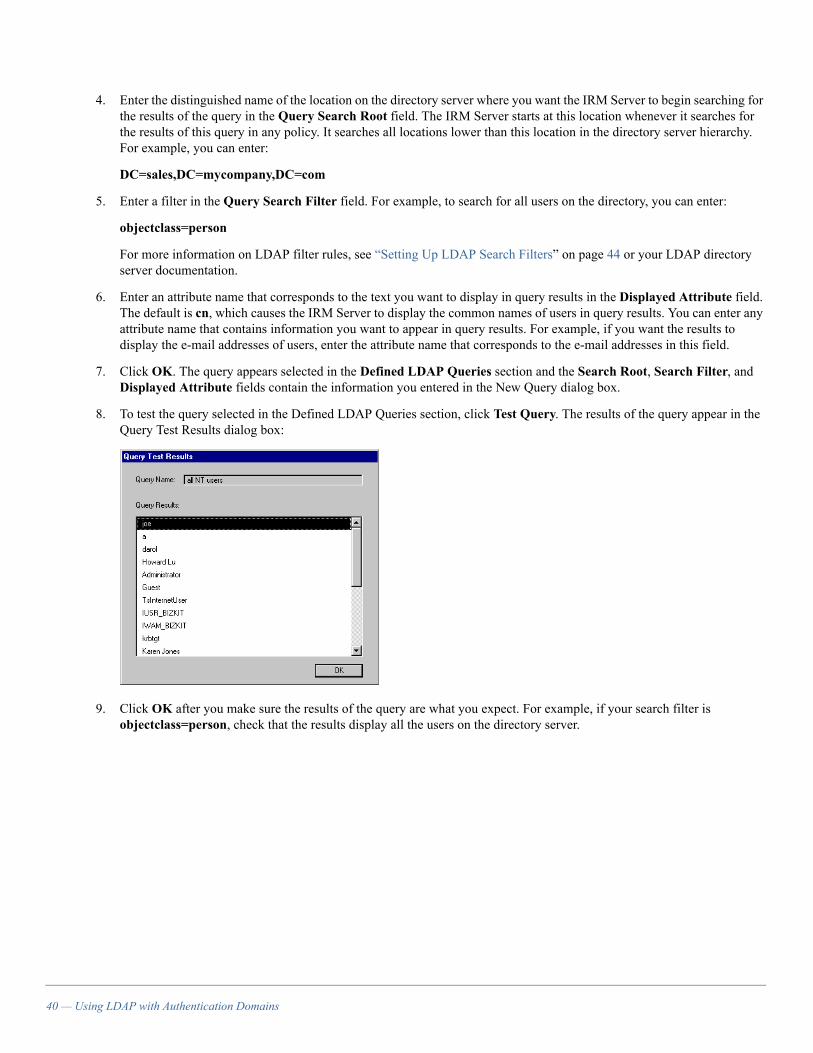
4. Enter the distinguished name of the location on the directory server where you want the IRM Server to begin searching for the results of the query in the Query Search Root field. The IRM Server starts at this location whenever it searches for the results of this query in any policy. It searches all locations lower than this location in the directory server hierarchy. For example, you can enter:
DC=sales,DC=mycompany,DC=com
5. Enter a filter in the Query Search Filter field. For example, to search for all users on the directory, you can enter:
objectclass=person
For more information on LDAP filter rules, see “Setting Up LDAP Search Filters” on page 44 or your LDAP directory server documentation.
6. Enter an attribute name that corresponds to the text you want to display in query results in the Displayed Attribute field. The default is cn, which causes the IRM Server to display the common names of users in query results. You can enter any attribute name that contains information you want to appear in query results. For example, if you want the results to display the e-mail addresses of users, enter the attribute name that corresponds to the e-mail addresses in this field.
7. Click OK. The query appears selected in the Defined LDAP Queries section and the Search Root, Search Filter, and Displayed Attribute fields contain the information you entered in the New Query dialog box.
8. To test the query selected in the Defined LDAP Queries section, click Test Query. The results of the query appear in the Query Test Results dialog box:
9. Click OK after you make sure the results of the query are what you expect. For example, if your search filter is objectclass=person, check that the results display all the users on the directory server.
40 — Using LDAP with Authentication Domains

10. Select Restrict viewing of Query Results to the following and click Add to add users who can view the results of directory queries. Leave this option empty to allow all users to view the results of a query. Users with read-write user management administrative rights can always view the results of a query. The Add Policy User or Group dialog box appears:
In the drop-down list in this field, groups appear first, listed alphabetically by name. Authentication domains preceded by \\ appear after the groups. If no groups appear, see “Chapter 5, Managing Users and Groups” to learn how to create groups. For more information on authentication domains, see “Chapter 3, Adding Authentication Domains.”
11. Do one of the following in the Add Policy User or Group field:
• Select a group. The group description appears in the Group Description field.
• Select the shared secret password (\\pvserver) domain. The User field defaults to All. You can click Find Now to list all the users in that domain under the Select User Name field. You can then select a user from that domain in the list, or you can leave the list set to the empty row to add all the users in that domain. If you want to find a particular user in the domain, select Begins With or Exactly from the drop-down list in the User field. Then enter the appropriate text and click Find Now. The user you wanted to find appears in the Select User Name list for you to select.
• Select a Windows domain. You can enter a user’s domain user ID or a group in the Enter optional Windows domain user or group name field. You can also leave the field blank to add all the users in your Windows domain. If you select a Windows domain with LDAP capabilities, you can select Query Directory Service for Groups and Users instead of entering information in the Enter optional Windows domain user or group name field. If you choose to query the LDAP directory service, you can select a predefined LDAP query in the Select Directory Server Query field. You can also click Run and the query results appear below the query. Select the users or groups you want to add.
• Select an LDAP password domain. You can enter the user name or distinguished name of the LDAP user or group in the Optionally Enter Username or the Distinguished Name of a User or Group field, or select Query Directory Service for Groups and Users. If you choose to query the LDAP directory service, you can select a predefined LDAP query in the Select Directory Server Query field. You can also click Run and the query results appear below the query. Select the users or groups you want to add.
• Select a SecurID domain. You can enter a user’s SecurID user name to add only a specific user, or you can leave the field blank to add all the users in your SecurID domain.
• Select a certificate domain. You can enter the common name that appears in a recipient’s certificate, or any other certificate attributes, to add a specific certificate user. If you select a certificate domain with LDAP capabilities, you can select a predefined LDAP query in the Select Directory Server Query field. You can also click Run and the query results appear below the query. Select the users or groups you want to add.
Using LDAP with Authentication Domains — 41
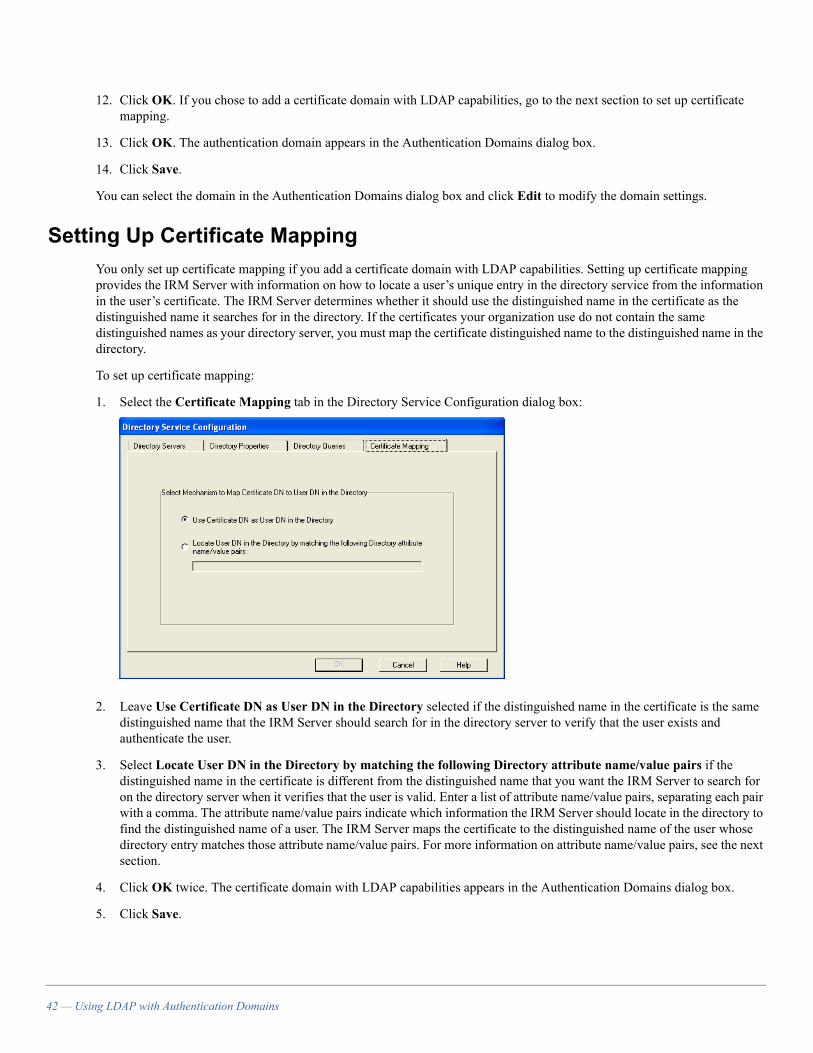
12. Click OK. If you chose to add a certificate domain with LDAP capabilities, go to the next section to set up certificate mapping.
13. Click OK. The authentication domain appears in the Authentication Domains dialog box.
14. Click Save.
You can select the domain in the Authentication Domains dialog box and click Edit to modify the domain settings.
Setting Up Certificate MappingYou only set up certificate mapping if you add a certificate domain with LDAP capabilities. Setting up certificate mapping provides the IRM Server with information on how to locate a user’s unique entry in the directory service from the information in the user’s certificate. The IRM Server determines whether it should use the distinguished name in the certificate as the distinguished name it searches for in the directory. If the certificates your organization use do not contain the same distinguished names as your directory server, you must map the certificate distinguished name to the distinguished name in the directory.
To set up certificate mapping:
1. Select the Certificate Mapping tab in the Directory Service Configuration dialog box:
2. Leave Use Certificate DN as User DN in the Directory selected if the distinguished name in the certificate is the same distinguished name that the IRM Server should search for in the directory server to verify that the user exists and authenticate the user.
3. Select Locate User DN in the Directory by matching the following Directory attribute name/value pairs if the distinguished name in the certificate is different from the distinguished name that you want the IRM Server to search for on the directory server when it verifies that the user is valid. Enter a list of attribute name/value pairs, separating each pair with a comma. The attribute name/value pairs indicate which information the IRM Server should locate in the directory to find the distinguished name of a user. The IRM Server maps the certificate to the distinguished name of the user whose directory entry matches those attribute name/value pairs. For more information on attribute name/value pairs, see the next section.
4. Click OK twice. The certificate domain with LDAP capabilities appears in the Authentication Domains dialog box.
5. Click Save.
42 — Using LDAP with Authentication Domains

Creating Attribute Name/Value PairsThe syntax for attribute name/value pairs is:
DirectoryAttribute1=Value1, DirectoryAttribute2=Value2,... DirectoryAttributeN=ValueN
The directory attributes are the attributes of the directory entry that you want to find and map to the certificate user to. The values can be text or a pre-defined variable that references the value of an attribute in the certificate. You can also use the $OID ( ) function to specify attribute values in the certificate that do not have predefined variables. To use this function, specify:
$OID (parameter)
The parameter is a hexadecimal string, for example 0x550403, that represents the object ID of the attribute you want to reference.
You can use the following variables as values in attribute name/value pairs:
For example, if the distinguished name in the certificate is:
cn=John Doe,uid=jdoe,ou=sales,o=Acme
You can specify the following name/value pairs using variables and text:
cn=$UID,ou=$OU,o=$O,c=us
The IRM Server searches for a directory entry that has the following attributes:
cn=jdoe,ou=sales,o=Acme,c=us
Certificate attribute
Description Variable for certificate attribute
sn serial number $SN
c country $C
st state $ST
l locality $L
o organization $O
ou organizational unit $OU
cn common name $CN
t title $T
sa street address $SA
pc postal code $PC
email e-mail address $EMAIL
uid user ID $UID
Using LDAP with Authentication Domains — 43

If the IRM Server finds a unique directory entry, it maps the certificate to the distinguished name of that entry. If the certificates that your organization uses have multiple attributes of the same name in their distinguished names, you can use a function to specify attributes other than the first attribute by specifying, in 0-based notation:
$variable[N]
The N is the index in the 0-based list of attributes of that name where the variable that you want to reference appears. For example, if the distinguished name in the certificate is:
cn=John,cn=Jim,cn=Jan,ou=sales,o=Acme,c=us
You can specify the following name/value pairs:
cn=$CN[2],o=$O,c=$C
The IRM Server searches for a directory entry that has the following attributes:
cn=Jan,o=Acme,c=us
If the IRM Server finds a unique directory entry, it maps the certificate to the distinguished name of that entry.
Setting Up LDAP Search FiltersFilters narrow the scope of the search that the IRM Server performs when it searches for the results of a query. The IRM Server supports all standard LDAP filter rules. The basic syntax for an LDAP search filter is:
(attribute operator value)
For example:
(cn=Karen Jones)
The attribute in this example is cn, the operator is = and the value is Karen Jones. You can use the following operators:
The syntax for combining search filters is:
( boolean_operator (filter1)(filter2)(filter3) )
Use the & boolean operator to match all filter criteria. Use the | boolean operator to match one or more of the filter criteria. For example, ( | (sn=jones) (sn=doe)) searches for all entries with the last name Jones or the last name Doe.You can also use the ! boolean operator with one filter to search for all the entries for which the filter is not true.
Operator Description Example
= Equal to (cn=Karen Jones) searches for the entry cn=Karen Jones
<= Less than or equal to (sn<=Jones) searches all entries from sn=a... to sn=jones
>= Greater than or equal to (sn>=Jones) searches all entries from sn=Jones to sn=z...
=* Equal to all (sn =*) searches for all entries that contain the sn attribute
~= Approximately equal to (sn ~=jones) searches for all entries that contain an sn attribute that sound like jones, for example junes.
44 — Using LDAP with Authentication Domains

Chapter 5Managing Users and Groups
This chapter provides an overview of user and group management. It describes how to create individual shared secret user accounts stored on the IRM Server. It then describes how to view, create, and add groups and how to give different types of authorizations to a group.
Overview of User and Group ManagementIf you decide to authenticate any users with shared secrets, you need to create individual user accounts for them in IRM Server Administrator. These users automatically become part of the shared secret password (\\pvserver) domain for all shared secret users. For information on authentication domains, see “Chapter 3, Adding Authentication Domains.”
Once you create authentication domains and individual shared secret accounts, you can add users or groups to any type of policy. This allows you to control authorization. While an authentication domain or shared secret account allows users to authenticate to the IRM Server, a group identifies one or more users and specifies what those users have the authority to do.
Every user who accesses the IRM Server must belong to at least one group. You can also query an LDAP directory service for users and groups or add an LDAP query to a group if you set up an LDAP authentication domain or an authentication domain with LDAP capabilities. If a user is in more than one group, the IRM Server combines the rights of all the user’s groups. You can specify that users or groups can access the IRM Server from a particular network entity or at a particular time, view, print, or copy protected content, protect content with or without guest access, delete or expire protected content they own, or allow users to work offline.
When you first log in to IRM Server Administrator and choose Users > Groups, one group already exists. This group contains the first administrator account user and allows full administrative rights. You can add administrators to this group, or you can create a different administrator group, add administrators to the new group, and delete the original group.
Creating or Editing Shared Secret User AccountsWhenever you create a shared secret user, that user automatically becomes part of the shared secret password (\\pvserver) domain. Therefore, you do not need to create other domains if you only allow shared secret users to authenticate with the IRM Server.
If you delete an existing shared secret user and that user previously protected content or created network entities and time specifications, the IRM Server deletes the network entities and time specifications. It prompts you to change the owner of the e-mail or document policies to an administrator or delete them.
Perform the following to create or edit shared secret users. After you create shared secret user accounts, you must add those accounts to groups. For information on adding users to a group to control their access to information, see “Creating or Editing a Group” on page 48.
Managing Users and Groups — 45

1. Choose Users > Shared Secret Users. The Shared Secret Users dialog box appears:
2. The User field defaults to All. Click Find Now to list all the users in the shared secret password (\\pvserver) domain in the list box below the Find Users section. Unless you deleted it, there is one shared secret user listed in the Shared Secret Users dialog box and that is the first administrator account that you used to log in. To find a specific user in the domain, select Begins With or Exactly from the User field, enter the appropriate text then click Find Now. The users you specified appear in the list box.
3. Select a user name and click Add to add the user account, or click Edit to edit a new user. The Add Shared Secret User or Edit Shared Secret User dialog box appears:
4. Enter a user name in the User ID field. You cannot edit an existing user name.
5. Enter or modify the description in the Description field.
6. Enter a password for the user and enter it again to confirm it.
46 — Managing Users and Groups

7. Select User cannot change password if you do not want to allow the user to change the password. Otherwise, do one of the following:
• Select the Secret Periodically Expires option and enter the number of days in Secret Lifetime (days), to expire the password after the number of days you specify.
• Select the Must change password at next login option to force the user to change the password the next time the user logs in.
8. Click OK.
9. Click Save.
The user who uses this account must log in to the IRM Server with the user name and password you specified in this dialog box. However, the user will not have access to any information on the IRM Server until you create a group or add the user to a group.
Unlocking a Shared Secret User AccountYou can set up your shared secret user authentication domain to prevent shared secret users from logging in to the IRM Server after they enter the wrong password for a specific number of times, as described in “Adding a Password Domain” on page 30. This locks the user account. You can unlock a shared secret user account at any time, even before the time you schedule a timed unlock to take place.
To unlock a shared secret user account:
1. Choose Users > Shared Secret Users. The Shared Secret Users dialog box appears.
2. Select a locked user and click Unlock.
3. Click Save.
Managing Users and Groups — 47
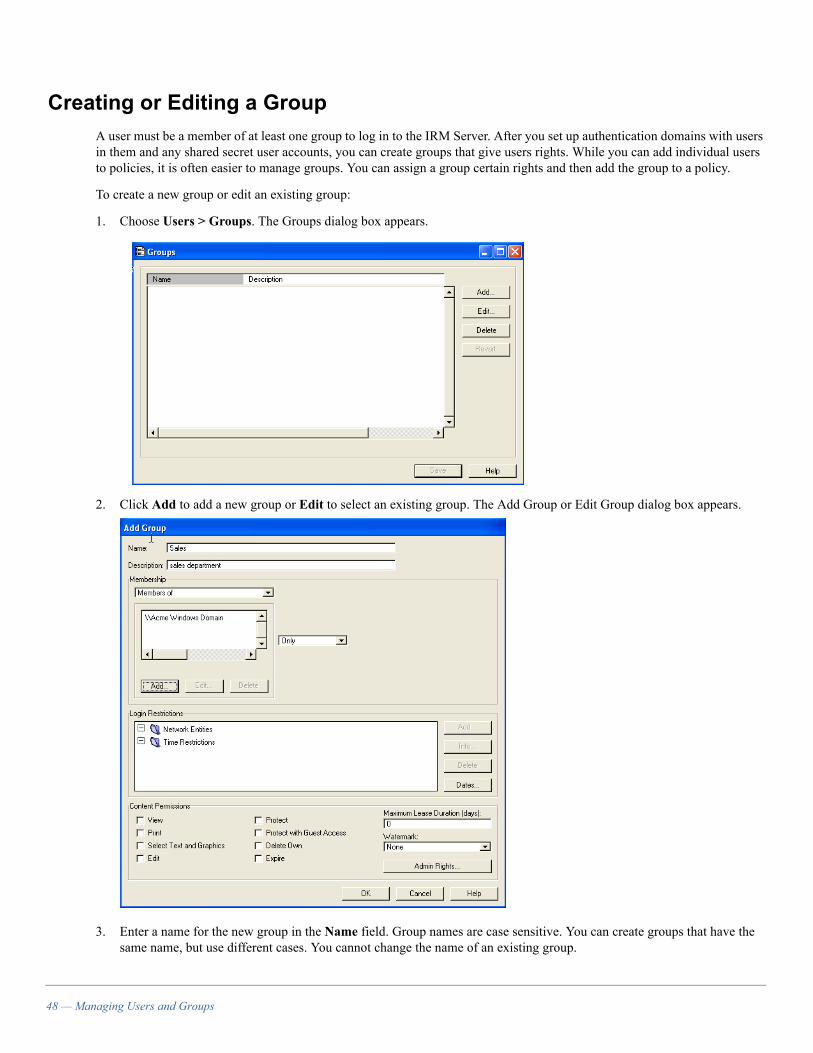
Creating or Editing a GroupA user must be a member of at least one group to log in to the IRM Server. After you set up authentication domains with users in them and any shared secret user accounts, you can create groups that give users rights. While you can add individual users to policies, it is often easier to manage groups. You can assign a group certain rights and then add the group to a policy.
To create a new group or edit an existing group:
1. Choose Users > Groups. The Groups dialog box appears.
2. Click Add to add a new group or Edit to select an existing group. The Add Group or Edit Group dialog box appears.
3. Enter a name for the new group in the Name field. Group names are case sensitive. You can create groups that have the same name, but use different cases. You cannot change the name of an existing group.
48 — Managing Users and Groups

4. Enter or modify the description of the group in the Description field.
5. Continue to the next section to add or exclude other groups, authentication domains, or users in a domain as part of this group.
Adding or Excluding MembersWhen you create or edit a group, you can include other groups, entire authentication domains, or users in a domain in your group. You can also exclude other groups, domains, or specific users in a domain from your group. If you set up an LDAP password domain or another type of authentication domain with LDAP capabilities, you can also query the LDAP directory service for users and groups, or you can add or exclude an LDAP query directly within an IRM Server group. To add authentication domains, see “Chapter 3, Adding Authentication Domains.”
To add or exclude groups, authentication domains, users, or LDAP queries:
1. Select one of the following in the drop-down list in the Membership section:
• Select Everyone if you want to include all users that can authenticate with the IRM Server in the group.
• Select Members of to add specific groups or domains, specific members of groups or domains, or LDAP queries to the group you create. If you select Only in the drop-down list next to the list box, you only include the members of the groups or domains listed in the list box in your group. If you select But Not in the drop-down list next to the list box, you include the members of the groups or domains listed in the list box in your group, but you can exclude other groups or domains in the new list box that appears.
• Select Everyone but members of to exclude specific groups or domains, specific members of groups or domains, or LDAP queries from your group. If you select Only in the drop-down list next to the list box, you only exclude the members of the groups or domains listed in the list box from your group. If you select And Also in the drop-down list next to the list box, you exclude the members of the groups or domains listed in the first list box, but you can include other groups or domains in the new list box that appears.
2. If you select either of the last two options, click the Add button that appears in the Membership section to add or exclude the members of a group or domain. The Add Group Member dialog box appears:
This dialog box changes based on the type of group or domain you select in the Groups and Authentication Domains field. Groups appear first, listed alphabetically by name. Authentication domains, preceded by \\, appear after the groups. Even if you have not set up any groups or domains, a group may exist for the full administrator account that you used to log in to IRM Server Administrator for the first time. A shared secret password domain called \\pvserver may also exist containing the first full administrator user and any shared secret users you defined.
Managing Users and Groups — 49
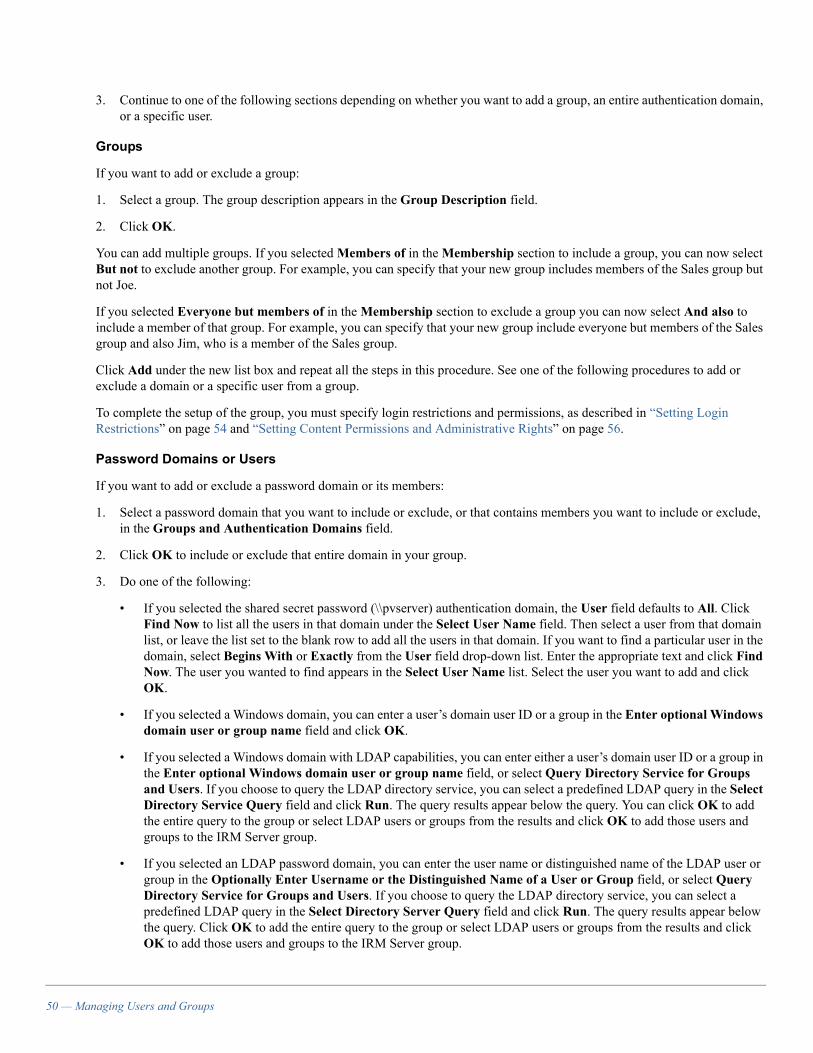
3. Continue to one of the following sections depending on whether you want to add a group, an entire authentication domain, or a specific user.
Groups
If you want to add or exclude a group:
1. Select a group. The group description appears in the Group Description field.
2. Click OK.
You can add multiple groups. If you selected Members of in the Membership section to include a group, you can now select But not to exclude another group. For example, you can specify that your new group includes members of the Sales group but not Joe.
If you selected Everyone but members of in the Membership section to exclude a group you can now select And also to include a member of that group. For example, you can specify that your new group include everyone but members of the Sales group and also Jim, who is a member of the Sales group.
Click Add under the new list box and repeat all the steps in this procedure. See one of the following procedures to add or exclude a domain or a specific user from a group.
To complete the setup of the group, you must specify login restrictions and permissions, as described in “Setting Login Restrictions” on page 54 and “Setting Content Permissions and Administrative Rights” on page 56.
Password Domains or Users
If you want to add or exclude a password domain or its members:
1. Select a password domain that you want to include or exclude, or that contains members you want to include or exclude, in the Groups and Authentication Domains field.
2. Click OK to include or exclude that entire domain in your group.
3. Do one of the following:
• If you selected the shared secret password (\\pvserver) authentication domain, the User field defaults to All. Click Find Now to list all the users in that domain under the Select User Name field. Then select a user from that domain list, or leave the list set to the blank row to add all the users in that domain. If you want to find a particular user in the domain, select Begins With or Exactly from the User field drop-down list. Enter the appropriate text and click Find Now. The user you wanted to find appears in the Select User Name list. Select the user you want to add and click OK.
• If you selected a Windows domain, you can enter a user’s domain user ID or a group in the Enter optional Windows domain user or group name field and click OK.
• If you selected a Windows domain with LDAP capabilities, you can enter either a user’s domain user ID or a group in the Enter optional Windows domain user or group name field, or select Query Directory Service for Groups and Users. If you choose to query the LDAP directory service, you can select a predefined LDAP query in the Select Directory Service Query field and click Run. The query results appear below the query. You can click OK to add the entire query to the group or select LDAP users or groups from the results and click OK to add those users and groups to the IRM Server group.
• If you selected an LDAP password domain, you can enter the user name or distinguished name of the LDAP user or group in the Optionally Enter Username or the Distinguished Name of a User or Group field, or select Query Directory Service for Groups and Users. If you choose to query the LDAP directory service, you can select a predefined LDAP query in the Select Directory Server Query field and click Run. The query results appear below the query. Click OK to add the entire query to the group or select LDAP users or groups from the results and click OK to add those users and groups to the IRM Server group.
50 — Managing Users and Groups
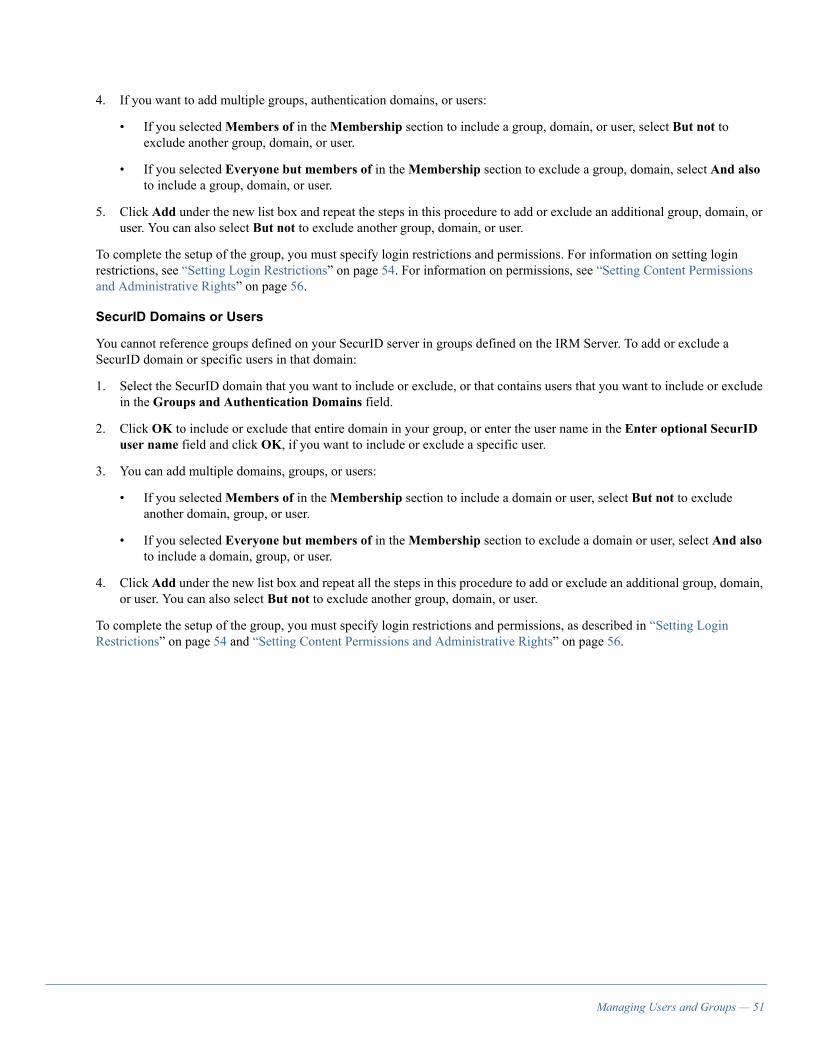
4. If you want to add multiple groups, authentication domains, or users:
• If you selected Members of in the Membership section to include a group, domain, or user, select But not to exclude another group, domain, or user.
• If you selected Everyone but members of in the Membership section to exclude a group, domain, select And also to include a group, domain, or user.
5. Click Add under the new list box and repeat the steps in this procedure to add or exclude an additional group, domain, or user. You can also select But not to exclude another group, domain, or user.
To complete the setup of the group, you must specify login restrictions and permissions. For information on setting login restrictions, see “Setting Login Restrictions” on page 54. For information on permissions, see “Setting Content Permissions and Administrative Rights” on page 56.
SecurID Domains or Users
You cannot reference groups defined on your SecurID server in groups defined on the IRM Server. To add or exclude a SecurID domain or specific users in that domain:
1. Select the SecurID domain that you want to include or exclude, or that contains users that you want to include or exclude in the Groups and Authentication Domains field.
2. Click OK to include or exclude that entire domain in your group, or enter the user name in the Enter optional SecurID user name field and click OK, if you want to include or exclude a specific user.
3. You can add multiple domains, groups, or users:
• If you selected Members of in the Membership section to include a domain or user, select But not to exclude another domain, group, or user.
• If you selected Everyone but members of in the Membership section to exclude a domain or user, select And also to include a domain, group, or user.
4. Click Add under the new list box and repeat all the steps in this procedure to add or exclude an additional group, domain, or user. You can also select But not to exclude another group, domain, or user.
To complete the setup of the group, you must specify login restrictions and permissions, as described in “Setting Login Restrictions” on page 54 and “Setting Content Permissions and Administrative Rights” on page 56.
Managing Users and Groups — 51
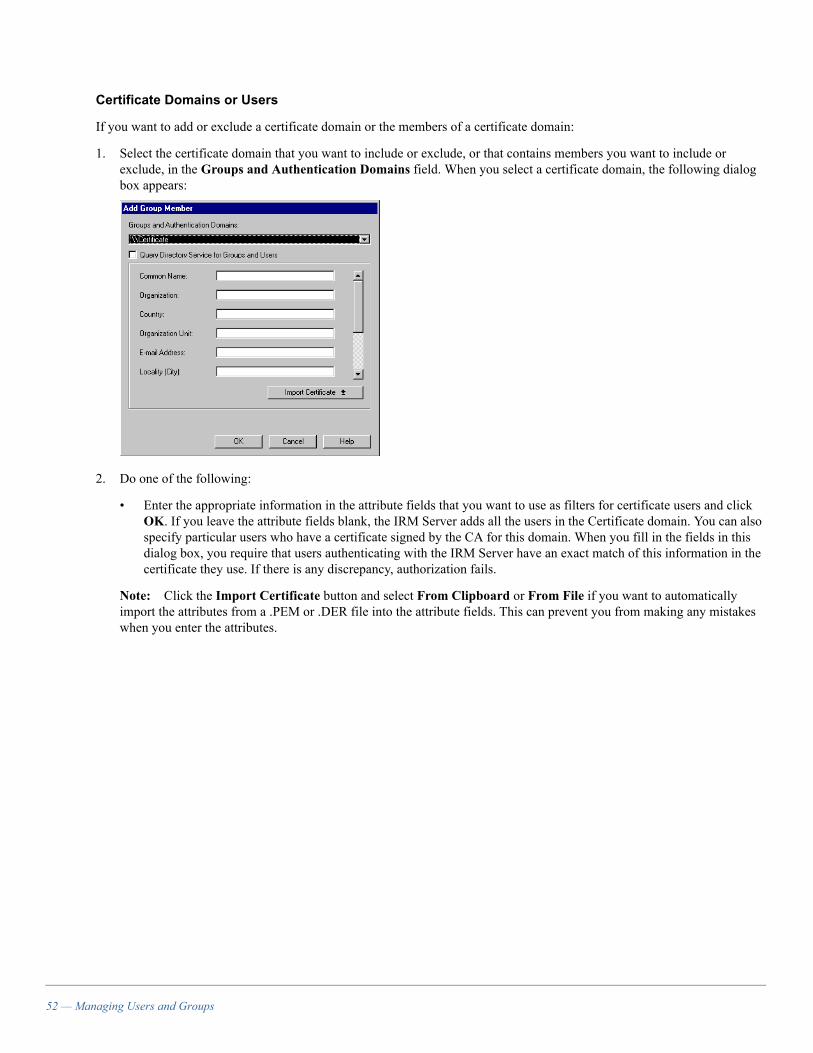
Certificate Domains or Users
If you want to add or exclude a certificate domain or the members of a certificate domain:
1. Select the certificate domain that you want to include or exclude, or that contains members you want to include or exclude, in the Groups and Authentication Domains field. When you select a certificate domain, the following dialog box appears:
2. Do one of the following:
• Enter the appropriate information in the attribute fields that you want to use as filters for certificate users and click OK. If you leave the attribute fields blank, the IRM Server adds all the users in the Certificate domain. You can also specify particular users who have a certificate signed by the CA for this domain. When you fill in the fields in this dialog box, you require that users authenticating with the IRM Server have an exact match of this information in the certificate they use. If there is any discrepancy, authorization fails.
Note: Click the Import Certificate button and select From Clipboard or From File if you want to automatically import the attributes from a .PEM or .DER file into the attribute fields. This can prevent you from making any mistakes when you enter the attributes.
52 — Managing Users and Groups

• If the Query Directory Service for Groups and Users option appears because you have a certificate domain with LDAP capabilities, you can select it to query the LDAP directory service. This option only appears if the certificate domain you selected has LDAP capabilities. If you choose to query the LDAP directory service, select a predefined LDAP query in the Select Directory Server Query field and click Run. The query results appear below the query. Click OK to add the entire query to the group or select LDAP users or groups from the results to add those specific users and groups to the IRM Server group. If you add a query, the IRM Server runs the query when users in this group log in. This allows you to set up a query for all users with top secret clearance and change who has this level of clearance without changing the IRM Server group:
3. You can add multiple groups, domains, or users:
• If you selected Members of in the Membership section to include a group, domain or user, select But not to exclude another group, domain, or user.
• If you selected Everyone but members of in the Membership section to exclude a group, domain, or user select And also to include a group, domain, or user.
4. Click Add under the new list box and repeat all the steps in this procedure to add or exclude an additional group, domain, or user. You can also select But not to exclude another group, domain, or user.
To complete the setup of the group, you must specify login restrictions and permissions, as described in “Setting Login Restrictions” on page 54 and “Setting Content Permissions and Administrative Rights” on page 56.
Managing Users and Groups — 53
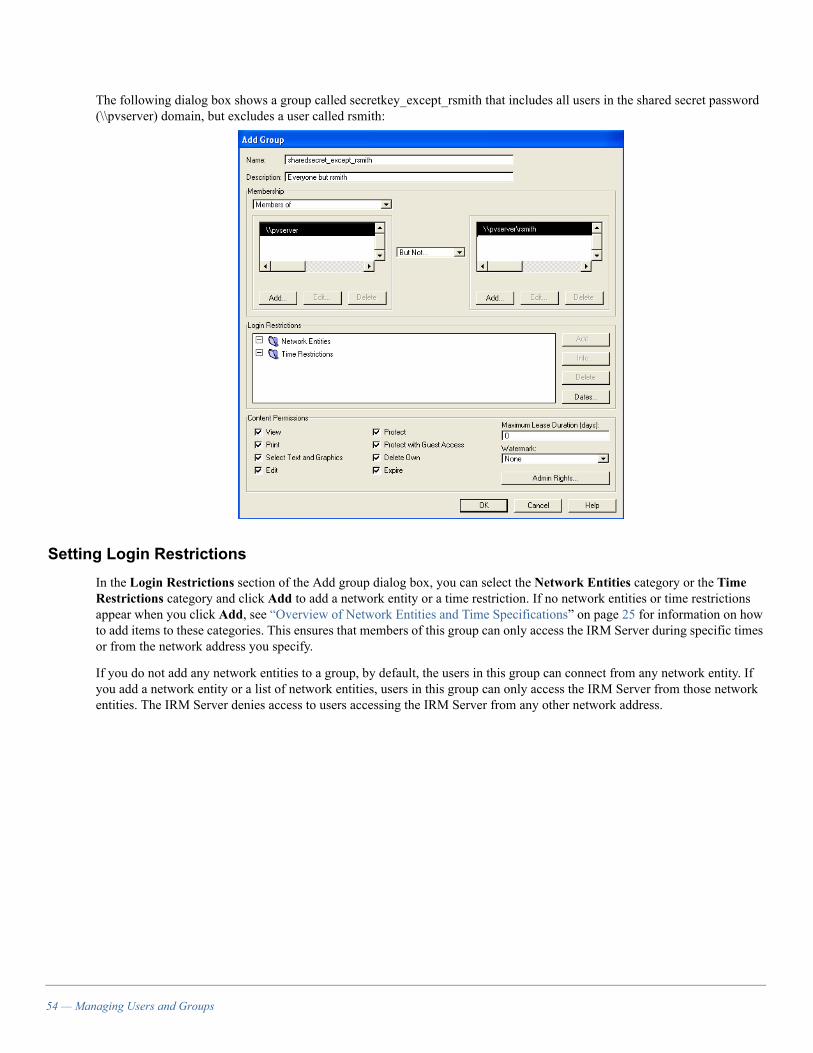
The following dialog box shows a group called secretkey_except_rsmith that includes all users in the shared secret password (\\pvserver) domain, but excludes a user called rsmith:
Setting Login RestrictionsIn the Login Restrictions section of the Add group dialog box, you can select the Network Entities category or the Time Restrictions category and click Add to add a network entity or a time restriction. If no network entities or time restrictions appear when you click Add, see “Overview of Network Entities and Time Specifications” on page 25 for information on how to add items to these categories. This ensures that members of this group can only access the IRM Server during specific times or from the network address you specify.
If you do not add any network entities to a group, by default, the users in this group can connect from any network entity. If you add a network entity or a list of network entities, users in this group can only access the IRM Server from those network entities. The IRM Server denies access to users accessing the IRM Server from any other network address.
54 — Managing Users and Groups
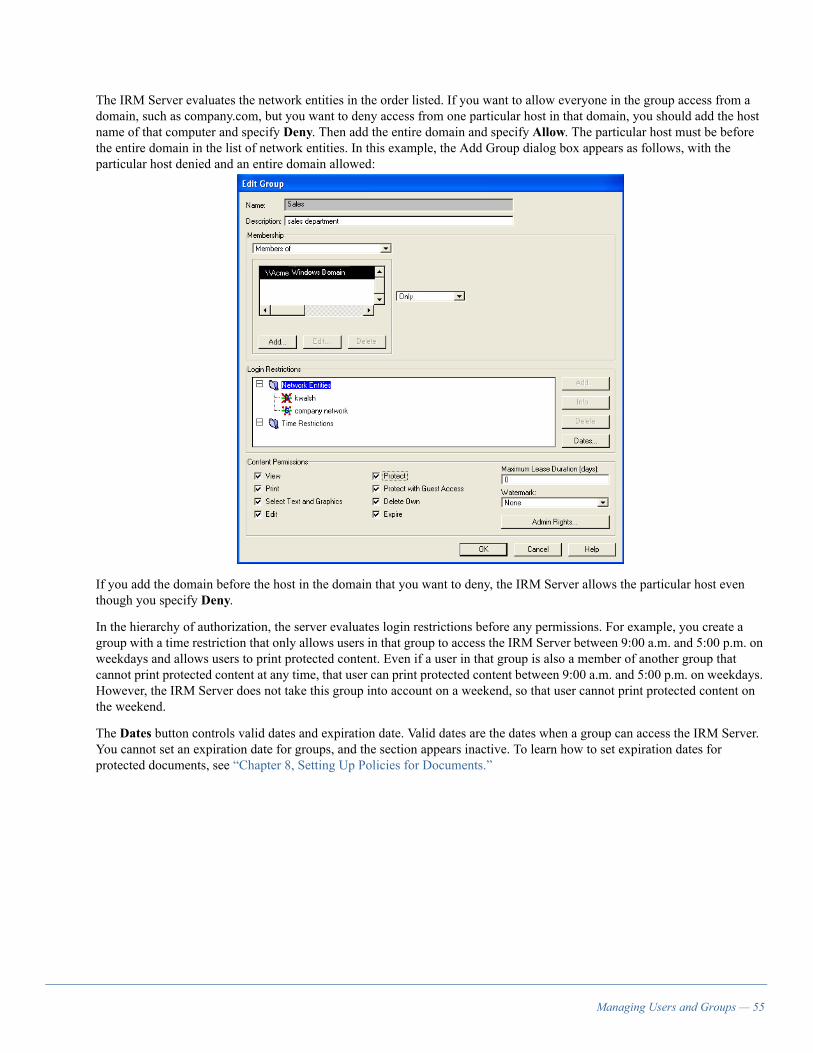
The IRM Server evaluates the network entities in the order listed. If you want to allow everyone in the group access from a domain, such as company.com, but you want to deny access from one particular host in that domain, you should add the host name of that computer and specify Deny. Then add the entire domain and specify Allow. The particular host must be before the entire domain in the list of network entities. In this example, the Add Group dialog box appears as follows, with the particular host denied and an entire domain allowed:
If you add the domain before the host in the domain that you want to deny, the IRM Server allows the particular host even though you specify Deny.
In the hierarchy of authorization, the server evaluates login restrictions before any permissions. For example, you create a group with a time restriction that only allows users in that group to access the IRM Server between 9:00 a.m. and 5:00 p.m. on weekdays and allows users to print protected content. Even if a user in that group is also a member of another group that cannot print protected content at any time, that user can print protected content between 9:00 a.m. and 5:00 p.m. on weekdays. However, the IRM Server does not take this group into account on a weekend, so that user cannot print protected content on the weekend.
The Dates button controls valid dates and expiration date. Valid dates are the dates when a group can access the IRM Server. You cannot set an expiration date for groups, and the section appears inactive. To learn how to set expiration dates for protected documents, see “Chapter 8, Setting Up Policies for Documents.”
Managing Users and Groups — 55

For example, you hire a consultant for 90 days, you could set the valid dates for the consultant’s group as today’s date through the date 90 days from now. This ensures that the user cannot log in to the IRM Server to access any information after 90 days even if an e-mail or document policy has an expiration date later than 90 days from now. To set valid dates:
1. Click Dates. The following dialog box appears:
2. Select Apply to Group in the Valid Dates section to change the group’s effective dates.
3. Select the From and Until dates and times using the drop-down lists provided.
4. Click OK to save your changes.
Setting Content Permissions and Administrative RightsIn the Content Permissions section of the Add/Edit Group dialog box, you can set the permissions that you want to grant to group members. These permissions combine with the permissions granted in the server restrictions and the document policy to determine what rights a user has regarding protected content. These permissions include viewing, printing, protecting, and deleting protected content.
For information on permissions, see “Permissions” on page 19. For information on setting permissions in server restrictions and document policy templates, see “Chapter 6, Setting Up Server Restrictions,” and “Chapter 8, Setting Up Policies for Documents.” For information on setting permissions in protected e-mail messages, see the IRM Client for E-Mail Help. For information on modifying policy permissions, see “Chapter 9, Managing Policies.”
The Content Permissions section also allows you access to configure a group’s administrative rights. By default, groups have no administrative rights. There are six types of administrative rights:
• User Management rights give the group access to all other groups, users, authentication domains, mail users, and any options in the Users menu in IRM Server Administrator. If you are in a group with Read-Write set in this field, it also allows you to view the results of a restricted LDAP query when you do not appear in the list of users who can view the query results. However, even with Read-Write set in this field, no member of the group can grant other groups any of the administrative rights.
• Policy Management rights give the group access to login restrictions, server restrictions, the default policy, global document policy templates, global network entities, global time specifications, and watermarks.
• Content Management rights give the group access to all of the protected content on the IRM Server.
• Log Management rights give the group access to the IRM Server activity log and notifications.
• Delete Any Content rights give the group the ability to delete keys for any protected content on the IRM Server. Selecting this administrative right also effectively allows read-only content management rights.
• Full Administrator rights allow the group to automatically turn on all the previous rights (giving them each a Read-Write setting). When you select Yes next to Full Administrator Rights, the members of this group can grant group administration rights and modify the membership of administrator groups.
56 — Managing Users and Groups
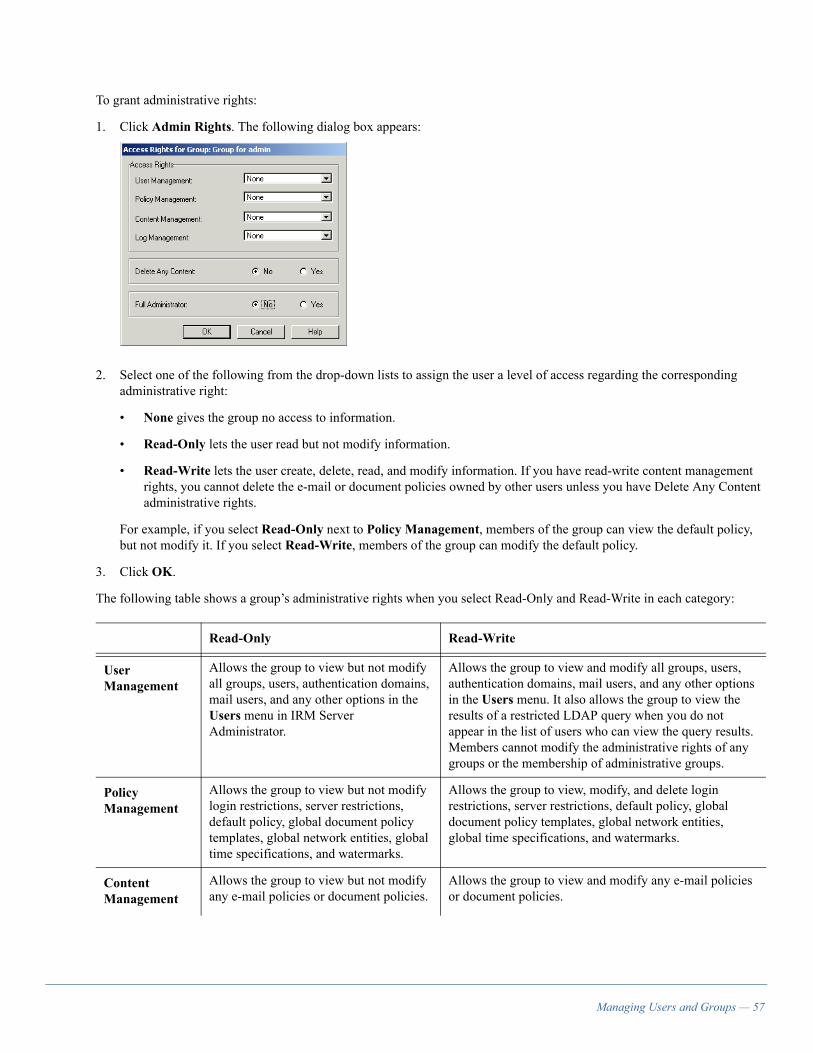
To grant administrative rights:
1. Click Admin Rights. The following dialog box appears:
2. Select one of the following from the drop-down lists to assign the user a level of access regarding the corresponding administrative right:
• None gives the group no access to information.
• Read-Only lets the user read but not modify information.
• Read-Write lets the user create, delete, read, and modify information. If you have read-write content management rights, you cannot delete the e-mail or document policies owned by other users unless you have Delete Any Content administrative rights.
For example, if you select Read-Only next to Policy Management, members of the group can view the default policy, but not modify it. If you select Read-Write, members of the group can modify the default policy.
3. Click OK.
The following table shows a group’s administrative rights when you select Read-Only and Read-Write in each category:
Read-Only Read-Write
User Management
Allows the group to view but not modify all groups, users, authentication domains, mail users, and any other options in the Users menu in IRM Server Administrator.
Allows the group to view and modify all groups, users, authentication domains, mail users, and any other options in the Users menu. It also allows the group to view the results of a restricted LDAP query when you do not appear in the list of users who can view the query results. Members cannot modify the administrative rights of any groups or the membership of administrative groups.
Policy Management
Allows the group to view but not modify login restrictions, server restrictions, default policy, global document policy templates, global network entities, global time specifications, and watermarks.
Allows the group to view, modify, and delete login restrictions, server restrictions, default policy, global document policy templates, global network entities, global time specifications, and watermarks.
Content Management
Allows the group to view but not modify any e-mail policies or document policies.
Allows the group to view and modify any e-mail policies or document policies.
Managing Users and Groups — 57
Log Management
Allows the group to view the IRM Server activity log and notifications.
Allows the group to view the IRM Server activity log, but not modify it, and modify notifications.
Read-Only Read-Write
58 — Managing Users and Groups

Chapter 6Setting Up Server Restrictions
This chapter provides an overview of the server restrictions. It describes how to add authorizations for groups, authentication domains, or users, set permissions, determine a key duration for expired content, and define when you want e-mail policies to expire.
Overview of Server RestrictionsThe server restrictions govern the entire IRM Server. They are one of the levels of authorization that an IRM Server administrator sets up after setting the login restrictions and creating groups, authentication domains, or users. The IRM Server enforces any authorizations set in the server restrictions for every user who accesses the server and all content protected by the server. For example, if the server restrictions do not allow printing, users cannot print any of the content protected by the server, regardless of the policy protecting that content.
In the server restrictions, you can allow a user or group to access all content protected by this server. You can also set permissions to determine whether or not you want to allow printing, copying, guest access, ability to work offline, or ability to select watermarks. In addition, you can choose whether or not you want the IRM Server to delete the keys to protected content when the content expires, or keep the keys on the server for a set amount of time after the policy expiration date. When you delete protected content, you remove the policy and content keys from the IRM Server, making the protected content permanently inaccessible to anyone. When you expire content, you set an expiration date in the policy so users cannot access the protected content once that date arrives. Depending on how you set up the server restrictions, the expired policy and its keys may remain on the IRM Server and administrators can reactivate the content by accessing the policy and changing the expiration date.
You can also set when you want the IRM Server to expire protected e-mail messages. The IRM Server expires the messages after the amount of time even if senders set a different expiration time for them.
If you allow the permission to work offline, you determine how long users can access the protected content while offline. When users reconnect to the IRM Server, they may wish to restart the offline access duration period so that they can work offline again. This is called refreshing offline access. Some IRM clients perform this refresh automatically. Since too many refresh requests can affect the server performance, you can control how often users can refresh the offline access duration period.
You must have read-write policy management administrative rights set in one of your groups to access and modify the server restrictions. If you only have read policy management administrative rights, you can only access the server restrictions. You cannot modify them. For more information on setting these rights, see “Setting Content Permissions and Administrative Rights” on page 56.
Adding Authorization for Groups, Domains, or UsersWhen you add a group, authentication domain, or user under the Authorizations section, you allow those users to access all protected content whether or not they are allowed access by the document policy. Only use this section if you want to create a “superuser” who can view all content. Otherwise, leave this section empty.
Note: If you specify Deny, the user or group cannot access any protected content regardless of permissions granted in a document policy. This is not normally used; instead, you should disable the account.
Setting Up Server Restrictions — 59

Perform the following to allow users access to all protected content:
1. Choose Policy > Server Restrictions. The Server Restrictions dialog box appears:
2. Select Users and Groups and click Add. The following dialog box appears:
The Groups and Authentication Domains field lists all the groups and authentication domains defined on the IRM Server. The list is alphabetical by group then by authentication domain. Authentication domains begin with \\. If no groups appear, see “Chapter 5, Managing Users and Groups” to create groups. For information on authentication domains, see “Chapter 3, Adding Authentication Domains.”
60 — Setting Up Server Restrictions

3. Do one of the following:
• Select a group. The group description appears in the Group Description field.
• Select the shared secret password (\\pvserver) domain. The User field defaults to All. Click Find Now to list all the users in that domain under the Select User Name field. You can select a user from that domain list, or leave the list set to the blank row to add all the users in that domain. To find a particular user in the domain, select Begins With or Exactly from the drop-down list in the User field. Then enter the appropriate text and click Find Now. The user you wanted to find appears in the Select User Name list for you to select.
• Select a Windows domain. You can enter a user’s name or a group name in the Enter optional Windows domain user or group name field. You can also leave the field blank to add all the users in your Windows domain. If you select a Windows domain with LDAP capabilities, you can select Query Directory Service for Groups and Users instead of entering information in the Enter optional Windows domain user or group name field. If you choose to query the LDAP directory service, you can select a predefined LDAP query in the Select Directory Server Query field and click Run. The query results appear below the query.
• Select an LDAP password domain. You can enter the user name or distinguished name of the LDAP user or group in the Optionally Enter Username or the Distinguished Name of a User or Group field, or select Query Directory Service for Groups and Users. You can also leave the field blank to add all the users in your LDAP password domain. If you choose to query the LDAP directory service, you can select a predefined LDAP query in the Select Directory Server Query field and click Run. The query results appear below the query.
• Select a SecurID domain. You can enter a user’s SecurID user name to add only a specific user, or leave the field blank to add all the users in your SecurID domain.
• Select a certificate domain. You can enter the common name that appears in a user’s certificate, or any other certificate attributes, to add a specific certificate user. If you select a certificate domain with LDAP capabilities, you can select a predefined LDAP query in the Select Directory Server Query field and click Run. The query results appear below the query.
4. Select Allow.
5. Click OK.
6. Continue to the following section to set the permissions for the IRM Server. If you do not want to set or change the server permissions, click Save.
You can optionally select an item in the Authorizations section and click Info to view its details. To delete an item in the Users and Groups category, expand the category, select the item, and click Delete.
Setting Permissions in Server RestrictionsYou determine which permissions are allowed for users and policies on this IRM Server. Any permission that you do not enable cannot be used by users and IRM clients when protecting content. You can enable or disable the following permissions:
Print Allows users to print protected content.
Select Text and Graphics
Allows users to copy text and graphics from protected content.
Guest Access Allows users to view content without logging in to the IRM Server. For more information, see “Allowing Guest Access” on page 20.
Edit Allows users to edit documents. This applies only to Microsoft Office documents.
Setting Up Server Restrictions — 61

Continue to the following sections to set the key duration, determine when you want to expire e-mail messages, and control refresh offline access requests.
To cancel your settings, click Revert before you click Save to retain the last saved settings.
Setting Key Duration for Expired ContentThe Key Duration section allows you to delete or retain the keys to expired content. When users protect content or access policies, they can set an expiration date and time for the protected content. When the expiration date and time arrives, the IRM Server expires the content and deletes its keys unless you set the key duration to retain the keys. Without the keys, no one can ever access the protected content again. Select one of the following to determine key duration for expired content:
• Delete keys when content when expires. Upon content expiration, the keys are deleted an no one can access that content again.
• Retain keys minimum of <number> days after document creation. Document creation is when the user protects the content. Upon content expiration, the keys remain available for the number of days you set. During that time, users with read-write content management administrative rights can access and modify protected content.
• Never automatically delete keys; however, keys can be deleted manually.
For example, you can set the IRM Server key duration to retain the keys to expired content for 90 days. A user then creates a protected document on December 3, 2005 with an expiration date of December 31, 2005. On January 1, 2006, an IRM Server administrator with the appropriate rights can reactivate the content for another 60 days. Reactivating the content does not change the key duration set in the server restrictions. For more information on reactivating expired content, see “Chapter 9, Managing Policies.”
If you later decide to expire content you reactivated, you can change the expiration date of the policy again. If you want to permanently delete the content, you must delete its keys. You can do this by accessing the protected content from the Content menu. The Content menu has options that allow you to view all the policies on the server. You can then select the content you want to delete from the list. This process permanently deletes the keys to the content even if your IRM Server has an extended or unlimited key duration time setting since you delete the keys when you delete the policy.
Continue to the following sections to determine when you want to expire e-mail messages, or allow users to refresh offline access. To cancel your settings, click Revert before you click Save to retain the last saved settings.
Maximum Lease Duration (days)
Sets the number of days a user can access protected content while offline. For more information, see “Working Offline” on page 20.
Watermark Allows you to select an existing watermark to apply to protected documents. If you select a watermark, it appears on all documents even if the users do not select watermarks in the policies they apply to documents. If no watermarks appear in the drop-down list, see “Chapter 10, Working with Watermarks”.
62 — Setting Up Server Restrictions

Setting Time to Expire E-Mail MessagesThis section of the server restrictions allows you to set when to expire protected e-mail messages. If the user set an expiration time for the e-mail message in the policy, the server applies the most restrictive time to expire the message. For example, if a user protects an e-mail message on December 17 with a policy that has an expiration date set of December 26, but the server restrictions has an Expire e-mail messages setting of 5 days, the IRM Server expires that e-mail message on December 22. If a user protects an e-mail message on December 17 with a policy that has an expiration date set of December 18, but the server restrictions has an Expire e-mail messages setting of 5 days, the IRM Server expires that e-mail message on December 18. If the user never specifies an expiration time in the policy, the IRM Server expires the message at the time set in the server restrictions.
If you and the user who protects the e-mail message do not specify an expiration time for e-mail messages, they remain active indefinitely. To set e-mail expiration in the server restrictions:
1. Select Expire e-mail messages.
2. Enter a number up to three digits and select Years, Months, Days, Hours, Minutes, or Seconds from the drop-down menu. The time you enter begins the day the user protects the e-mail message. If you leave the number set to zero (the default), this setting remains inactive and the IRM Server does not automatically expire e-mail messages.
3. Continue to the following section to allow users to refresh offline access. Otherwise, click Save.
If you decide to cancel your settings, click Revert before you click Save to retain the last saved settings.
Controlling Frequency of Offline Access RefreshesUnder Permissions, you determine the maximum amount of time a user can access protected content while not connected to the IRM Server. When users reconnect to the IRM Server, they may wish to restart the offline access duration period so that they can work offline again. This is called refreshing offline access. Some IRM clients perform this refresh automatically. Since too many refresh requests can affect the server performance, you can control how often users are allowed to refresh the offline access duration period in the Refresh Offline Access When section of the Server Restrictions dialog box.
For example, Maximum Lease Duration (days) is 5 days. On the 3rd day, the user reconnects to the IRM Server and refreshes offline access for a protected document. The offline access time for that document is now 5 days from the time the refresh occurred. For more information, see “Working Offline” on page 20.
To limit the frequency of requests for an offline access refresh, configure the following conditions:
1. In access expires within # days, you determine that only offline access due to expire within a specific number of days are eligible for a refresh. Specify the number of days (1 to 999). This condition is always true if you enter a number equal to or larger than the number in the Maximum Lease Duration (days) field.
2. In content has been accessed within # days, you determine that protected content must be accessed by a client user within a specific number of days to be eligible for an offline access refresh. Specify the number of days (1 to 999).
3. In access has not been refreshed within # hours, you determine that offline access cannot be refreshed more than once within a specific number of hours. Specify the number of hours (1 to 24).
4. Click Save.
An IRM client can only refresh offline access when ALL these conditions are true.
NOTE: For performance reasons, you should minimize the number of times the IRM Server allows clients to refresh offline access. Do this by increasing the number of days in the first two fields, and decreasing the number of hours in the last field.
Setting Up Server Restrictions — 63

Setting PDF Protection LevelThe IRM Server allows two protection levels for PDF documents:
• Document Level applies a single policy and 128-bit encryption key to the document and all the pages.
• Page Level applies a different 256-bit encryption key to each page. In addition, client users have the ability to apply a different set of permissions to selected pages within the protected document.
You specify the protection level for all PDF documents. In addition, you can allow client users to choose between the two protection levels. If you allow users to choose, the protection level you specified becomes the default setting.
NOTE: Selecting the Page Level option in a large document may decrease performance.
To set the protection level, choose Settings > PDF Settings from the IRM Server Administrator menu bar.
64 — Setting Up Server Restrictions

Chapter 7Setting Up E-Mail Users and Addresses
This chapter describes how to set up and manage known and unknown e-mail addresses for recipients of protected e-mail messages. It includes steps to map the e-mail addresses of known users then describes how to set an unmapped e-mail address rule to manage unknown e-mail addresses. It also includes steps to modify the Welcome message the IRM Server may send to unknown recipients when they first receive protected e-mail messages. If none of the users who access your IRM Server use protected e-mail, you do not need to read this chapter.
Overview of Mapping User E-Mail AddressesIf you know that users receive protected e-mail messages at certain e-mail addresses, you can map these e-mail addresses on the IRM Server before users receive their first protected e-mail message. The IRM Server must authenticate e-mail recipients and map their e-mail addresses to existing groups, authentication domains, or users to allow the recipients to open their messages. The mapping process permanently associates the e-mail address with the group, domain, or user you specify. For example, you may want to add e-mail addresses for each user in your organization if they need to exchange confidential e-mail messages.
If you do not want to map the e-mail addresses you know manually, or you do not know all the e-mail addresses of the e-mail recipients, you must set the rule for unknown e-mail users. The rule you choose determines whether or not unknown recipients can authenticate and open protected e-mail messages. For more information, see “Overview of Setting Up Unknown E-Mail Addresses” on page 67.
Note: If you have e-mail addresses already defined on an LDAP server and you set the E-mail Attribute field in your LDAP directory properties, you do not need to add the e-mail addresses manually and the IRM Server does not treat them as unknown. When users log in with LDAP, their e-mail addresses appear in the map, but they are not mapped to a group or user. Note that the LDAP users do not appear in the Mapped Users and Groups section of the E-Mail Users dialog box until an e-mail is sent to that user. The IRM Server treats these users as though they are mapped. You should still set up the rule for unknown e-mail recipients. To set your LDAP directory properties, see “Chapter 4, Using LDAP with Authentication Domains.”
Mapping Known E-Mail AddressesWhen you map e-mail addresses on the IRM Server before users send protected e-mail messages, you make it easier for the recipients. For example, if you send messages to unmapped recipients, the IRM Server sends a Welcome message with their first protected e-mail message. The Welcome message allows the recipients to register their e-mail address with the IRM Server. Mapped recipients do not receive a Welcome message with their first protected e-mail message since they already have registered addresses. By reducing the number of messages the recipient receives, you simplify the process of opening the first protected e-mail message. Mapping users before they receive their first message also ensures the correct mapping of mailing lists.
If your organization uses an Exchange server, the IRM Server automatically supports e-mail mailing lists defined on it, without specific mappings defined. It also supports e-mail mailing lists defined locally within your mail application, for example, lists in your contacts in Microsoft Outlook. The IRM Server does not automatically support mailing lists defined on a Sendmail server, but you can manually map those mailing lists. For example, you can map the mailing list [email protected] to \\pvserver\jdoe and \\pvserver\nweston. These are two members of the Sales team who have shared secret password user accounts on the IRM Server.
Setting Up E-Mail Users and Addresses — 65
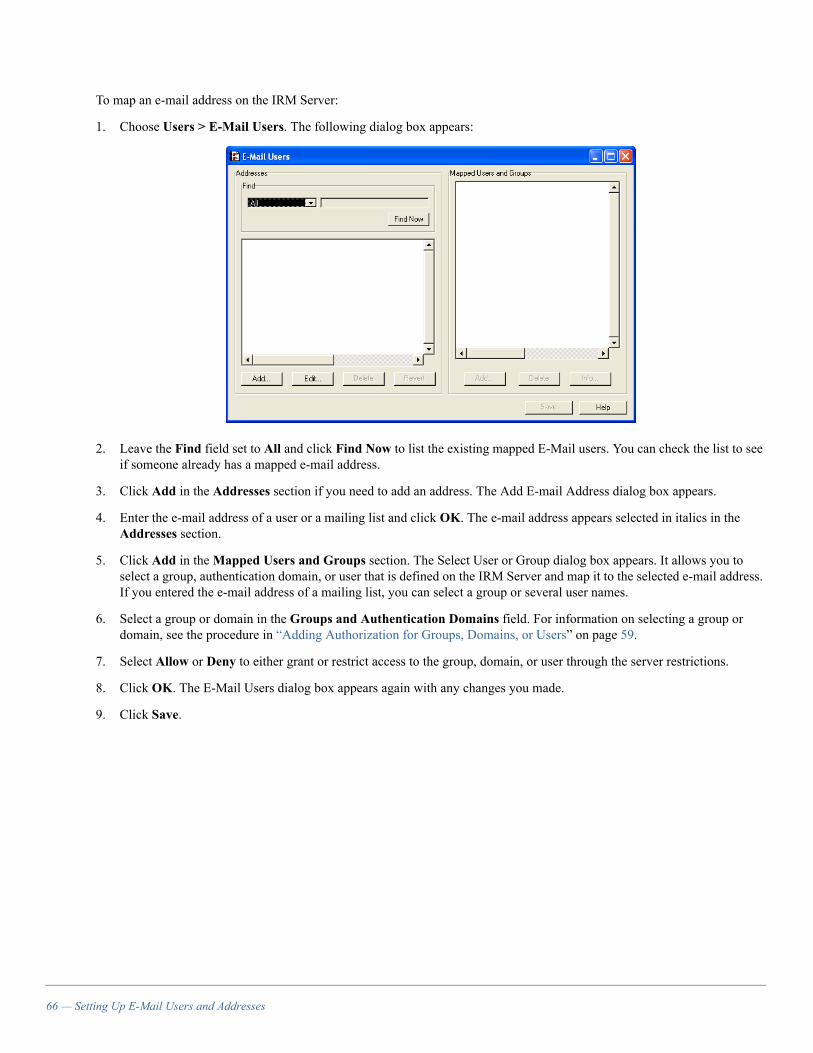
To map an e-mail address on the IRM Server:
1. Choose Users > E-Mail Users. The following dialog box appears:
2. Leave the Find field set to All and click Find Now to list the existing mapped E-Mail users. You can check the list to see if someone already has a mapped e-mail address.
3. Click Add in the Addresses section if you need to add an address. The Add E-mail Address dialog box appears.
4. Enter the e-mail address of a user or a mailing list and click OK. The e-mail address appears selected in italics in the Addresses section.
5. Click Add in the Mapped Users and Groups section. The Select User or Group dialog box appears. It allows you to select a group, authentication domain, or user that is defined on the IRM Server and map it to the selected e-mail address. If you entered the e-mail address of a mailing list, you can select a group or several user names.
6. Select a group or domain in the Groups and Authentication Domains field. For information on selecting a group or domain, see the procedure in “Adding Authorization for Groups, Domains, or Users” on page 59.
7. Select Allow or Deny to either grant or restrict access to the group, domain, or user through the server restrictions.
8. Click OK. The E-Mail Users dialog box appears again with any changes you made.
9. Click Save.
66 — Setting Up E-Mail Users and Addresses

Overview of Setting Up Unknown E-Mail AddressesIf you do not know all the e-mail addresses of users who will receive protected e-mail messages or you do not want to map the e-mail addresses you know manually, you can set up the IRM Server so recipients can open their protected e-mail messages. To do this, you need to set an unmapped e-mail address rule. An unmapped recipient is someone who receives a protected e-mail message at an e-mail address that is not mapped to a defined group, authentication domain, or user in the E-Mail Users dialog box. Usually, unmapped recipients are recipients outside of your organization whose e-mail addresses are unknown to you.
Note: You can continue to add mapped addresses even after you set up the IRM Server to manage unmapped recipients.
To set up rules for unmapped recipients, choose Users > Unmapped E-Mail Address Rules. The following dialog box opens:
The E-mail Domains section allows you to add and delete e-mail domains that may contain unmapped recipients. This allows you to manage unmapped addresses based on their Domain Name Server (DNS) domains. The E-mail Domains section also contains a <default> domain linked to a default unmapped e-mail address rule. This allows you to control what happens if you did not map the recipient in the E-Mail Users dialog box and the e-mail domain does not appear in the Unmapped E-Mail Address Rules dialog box.
The Rule section of the dialog box contains the options you can select for unmapped recipients in a particular e-mail domain. The rule you select for an e-mail domain only applies to the unmapped recipients in the domain. The rule does not apply to mapped recipients in the domain. The <default> e-mail domain has a default unmapped e-mail address rule of Automatically create a shared secret user and map e-mail address, but you can change it to any rule you want. For example, you can choose any one of the following rules:
• Do not allow the user’s message to be sent if the user is not mapped. For information on this rule, see “Sending E-Mail to Mapped Recipients Only” on page 68.
• Allow certificate authentication, requiring a matching e-mail address, and map e-mail address. For information on this rule, see “Allowing Certificate Authentication Requiring a Matching E-Mail Address” on page 68.
• Allow authentication with an existing authentication domain, group, or user and map e-mail address. For information on this rule, see “Allowing Authentication with Existing Group, Authentication Domain, or User” on page 68.
• Automatically create a shared secret user and map e-mail address. For information on this rule, see “Automatically Creating Shared Secret User Account and Mapping the Address” on page 69.
Setting Up E-Mail Users and Addresses — 67

• Notify administrator when message is sent. For information on this rule, see “Notifying Administrator to Manually Map Recipients” on page 69.
The IRM Server applies the rule you choose to the first protected e-mail message the unmapped user receives. The IRM Server may also send one of three different E-Mail Welcome messages to unmapped users with their first protected e-mail message. The Welcome message describes IRM Client for E-Mail and provides steps the user can follow to authenticate with the IRM Server and open the message. If you chose a rule that automatically maps users when they authenticate, the IRM Server maps their e-mail addresses when they open their Welcome message. You can set up the IRM Server to use the default Welcome message or modify it to suit you needs. To modify the Welcome message, see “Modifying Default Welcome Messages” on page 71.
Sending E-Mail to Mapped Recipients OnlyWhen you select the Do not allow the user’s message to be sent if the user is not mapped rule for an e-mail domain, the IRM Server does not allow senders to send protected e-mail messages to unmapped recipients in the e-mail domain. Senders can only send protected e-mail messages to mapped recipients whose e-mail addresses are listed and mapped to an authentication domain, group, or user in the E-Mail Users dialog box or to LDAP users who are known because the E-mail Attribute field is set in the Directory Properties tab of the Directory Service Configuration dialog box. For information on setting up LDAP authentication domains, see “Chapter 4, Using LDAP with Authentication Domains.”
When you select this rule for an e-mail domain, make sure that you mapped all recipients in the domain. This is the highest level of security you can enforce. When a sender tries to send a protected e-mail message in this e-mail domain and the e-mail address is not mapped on the IRM Server, the sender receives a message stating that the e-mail cannot be sent. For details, see “Setting Unmapped E-Mail Address Rules” on page 70.
Allowing Certificate Authentication Requiring a Matching E-Mail AddressWhen you select the Allow certificate authentication, requiring a matching e-mail address, and map e-mail address rule for an e-mail domain, recipients must authenticate with certificates where the certificate e-mail address matches the e-mail address in the protected e-mail message’s To, Cc, or Bcc field. You can also specify that the certificate match other attributes, in addition to the e-mail address, for authentication to take place.
When an unmapped recipient opens a protected e-mail message for the first time, the recipient’s e-mail address is permanently mapped on the IRM Server and appears in the E-Mail Users dialog box. Thereafter, the IRM Server handles the address as that of a known mapped recipient. Selecting this certificate authentication option for an e-mail domain ensures a high level of security because recipients must have certificates that match the criteria you specify. For details, see “Setting Unmapped E-Mail Address Rules” on page 70.
Allowing Authentication with Existing Group, Authentication Domain, or UserWhen you select the Allow authentication with an existing group, authentication domain, or user and map e-mail address rule for an e-mail domain, recipients must authenticate using an authentication domain, group, or user that is already defined on the IRM Server.
When unmapped recipients already have an account on the IRM Server, they receive an “Existing User” Welcome message with their first protected e-mail message. The Welcome message instructs the recipient to click on the message attachment, then install the IRM Client for HTML with or without the option to also install IRM Client for E-Mail and create an account on the IRM Server. For information on Welcome messages, see “Modifying Default Welcome Messages” on page 71.
When the recipient enters the correct user name and password, the IRM Server associates the recipient’s e-mail address with the recipient’s existing account on the IRM Server. This also creates a mapping in the E-Mail Users dialog box. Users can then open their protected e-mail messages using their account and password, just as known E-Mail users open messages.
68 — Setting Up E-Mail Users and Addresses

If you select this rule for an e-mail domain, you provide an intermediate level of security since a defined user could intercept and open the protected e-mail messages of another user. However, if someone does this, you can identify the e-mail address of the “hacker” from the mapping. You can also review the activity log on the IRM Server since it records the activity on protected content. For more information, see “Setting Unmapped E-Mail Address Rules” on page 70 and “Chapter 11, Monitoring and Managing the IRM Server.”
Automatically Creating Shared Secret User Account and Mapping the AddressWhen you select the Automatically create a shared secret user and map e-mail address rule for an e-mail domain, unmapped recipients authenticate with automatically created shared secret user accounts. When a user sends a protected e-mail message to an unknown recipient, the IRM Server:
• Creates a shared secret account for the recipient with a user ID of \\pvserver\<recipient mailaddress> and sends the recipient a New User Welcome message that contains a Welcome token.
• Creates an Automatically initialized users group (if not already created) and adds the recipient’s shared secret user account to the group.
When the recipient opens the New User Welcome message and clicks on the attachment, the following happens:
• The recipient installs the IRM Client for HTML or IRM Client for E-Mail.
• The recipient enters and confirms a password that completes the shared secret account setup on the IRM Server.
• The IRM Server maps the e-mail address of the recipient to the shared secret user account.
This rule provides the least secure method of managing unmapped recipients since a user could intercept the protected e-mail message and Welcome message of another user, create an account through the Welcome message, and view the protected e-mail message.
When the first user in an e-mail domain with this rule opens a protected e-mail message, the IRM Server creates a group for automatically created shared secret users called Automatically initialized users. This group appears when you open the Groups dialog box from Users > Groups.
By default, the Automatically initialized users group has permission to view protected e-mail messages only, but you can modify the group permissions, as described in “Creating or Editing a Group” on page 48. For information on Welcome messages, see “Modifying Default Welcome Messages” on page 71. For details, see “Setting Unmapped E-Mail Address Rules” on page 70.
Notifying Administrator to Manually Map RecipientsWhen you select the Notify administrator when message is sent rule for an e-mail domain, the IRM Server sends the specified administrator an e-mail whenever a sender sends a protected e-mail message to an unmapped recipient. The e-mail notifies the IRM Server administrator that the recipient needs an account on the IRM Server.
Since the IRM Server must authenticate e-mail recipients so they can open their messages, unmapped recipients receive an “Existing User (Manual)” Welcome message with their first protected e-mail messages. The Welcome message instructs them to click on the message attachment, and then install the IRM Client for HTML with or without the option to also install IRM Client for E-Mail. It also indicates that they should contact the IRM Server administrator for information to set up an account.
When the IRM Server notifies you that a protected e-mail message was sent to an unmapped recipient, you must set up a new user account on the IRM Server by adding the recipient to an existing group or authentication domain (as described in “Chapter 3, Adding Authentication Domains” and “Chapter 5, Managing Users and Groups.”). You can then map the recipient’s e-mail address to the new account and contact the recipient with the user ID, password, and any additional information. The recipient can then log in to the IRM Server, authenticate, and open the protected e-mail message.
Selecting this rule provides a high level of security as long as you make sure you contact the right recipient and you use a secure communication method. For details, see “Setting Unmapped E-Mail Address Rules” on page 70.
Setting Up E-Mail Users and Addresses — 69

Setting Unmapped E-Mail Address RulesTo set up the IRM Server to manage unmapped recipients for an e-mail domain:
1. Choose Users > Unmapped E-Mail Address Rules. The following dialog box appears:
2. Click Add in the E-mail Domains section. The Add E-mail Domain dialog box appears.
3. Enter a new e-mail domain that contains users who may receive protected e-mail messages in the E-mail Domain field. You can also enter a partial e-mail domain. For example, you can enter mycompany.com or com or edu.
4. Click OK. The e-mail domain you entered appears selected in the E-mail Domains list.
5. Select one of the following options in the Rules section to set the rule for mapping the unmapped recipients who receive protected e-mail messages in this e-mail domain:
• Do not allow the user’s message to be sent if the recipient is not mapped. Click Save. You completed this procedure.
• Allow certificate authentication, requiring a matching e-mail address, and map e-mail address. Click Add. The Select Certificate Domain dialog box appears. Select a certificate domain in the Groups and Authentication Domains field. If you want to increase security, specify additional certificate attributes or click From Clipboard or From File to import the certificate attributes from a .PEM, .DER, or .CER file. Click OK then click Save. You completed this procedure.
• Allow authentication with an existing group, authentication domain, or user and map e-mail address. Click Add. The Select Group, Domain, or User dialog box appears. The Groups and Authentication Domains field lists all the groups and authentication domains defined on the IRM Server. Continue on to the following step. (For information on groups, see “Chapter 5, Managing Users and Groups.” For information on authentication domains, see “Chapter 3, Adding Authentication Domains.”)
• Automatically create a shared secret user and map e-mail address. Click Save. You completed this procedure.
• Notify administrator when message is sent. Enter your e-mail address in the Administrator’s e-mail field. Click Save. You completed this procedure.
70 — Setting Up E-Mail Users and Addresses

6. If you selected Allow authentication with an existing group, authentication domain, or user and map e-mail address rule, select a group or domain in the Groups and Authentication Domains field. For information on selecting a group or domain in this dialog box, see the procedure “Adding Authorization for Groups, Domains, or Users” on page 59.
7. Select Allow or Deny to either grant or restrict access to the group, domain, or user through the server restrictions.
8. Click OK.
9. Click Save.
Modifying Default Welcome MessagesIRM Server Administrator comes with three E-Mail Welcome messages for unmapped recipients. You can use the defaults provided or you can modify the messages to suit your needs.
The Welcome message that unmapped recipients receive depends on the rule set for their e-mail domain in the Unmapped E-Mail Address Rules dialog box. Unmapped recipients receive one of the following:
• A New User Welcome message, when the rule is Automatically create a shared secret user and map e-mail address. This Welcome message instructs the recipient to click the message attachment, install the IRM Client for HTML with or without the option to install IRM Client for E-Mail, and create an account.
• An Existing User Welcome message, when the rule is Allow authentication with an existing authentication domain, group, or user and map e-mail address. This Welcome message instructs the recipient to click the message attachment, install the IRM Client for HTML with or without the option to install IRM Client for E-Mail, and log in to the IRM Server with an existing account.
• A New User (Manual) Welcome message, when the rule is Notify administrator when message is sent. This Welcome message instructs the recipient to contact the IRM Server administrator to set up an account. It also instructs the recipient to click the message attachment, install the IRM Client for HTML with or without the option to install IRM Client for E-Mail, and use the information from the administrator to create an account.
To view or modify default Welcome messages:
1. Choose Users > E-Mail Welcome Messages. The following dialog box appears:
2. Select the name of the Welcome message you want to view or modify from the Select a message to modify drop-down list.
Setting Up E-Mail Users and Addresses — 71

3. Enter an e-mail address in the Reply To field. If a recipient replies to the Welcome message, this is the e-mail address where the reply is sent. You should enter an IRM Server administrator’s address or a mail alias such as, [email protected], in this field.
4. Make any modifications to the default message or enter a new message in the Message field. The default messages use the following variables:
• <RECIPIENT> automatically inserts the name of the recipient who receives the Welcome message.
• <AUTHOR> automatically inserts the name of the account that registered and encrypted the E-Mail message. The name appears as the full IRM Server user name, which is the authentication domain the sender is part of, followed by the user name.
• <SUBJECT> automatically inserts the information you enter in the Subject field.
• <DATE> automatically inserts the date the user sent the protected e-mail message.
• <ADMIN EMAIL> applies to the New User (Manual) Welcome message only. This variable inserts the e-mail address you entered in the Administrator’s e-mail field of the Unmapped E-Mail Address Rules dialog box. The administrator at this e-mail address has to set up new user accounts and map e-mail addresses for recipients of the New User (Manual) Welcome message.
5. Click Save.
72 — Setting Up E-Mail Users and Addresses

Chapter 8Setting Up Policies for Documents
A policy determines how users access and interact with protected content. This chapter describes the policies that apply to documents protected with the IRM Server.
Overview of Setting Up PoliciesUsers and administrators can create document policy templates and apply them to the documents that they protect. Applying a template to a document creates a document policy, which is associated with a single document. Only the owner who creates the document policy template can use and modify that template (unless it is a global document policy template). For users to create and modify document policy templates, they must belong to a group that has the permission set to protect content. For information about setting up permissions for groups, see “Chapter 5, Managing Users and Groups.”
The owner and administrators have equal authority over the document policies. For example, the administrator can edit other users’ document policies through IRM Server Administrator. The owner can modify their document policies using their IRM client. If necessary, an IRM Administrator with read-write content management administrative rights can change the owner of a document, as described in “Changing the Owner of Content” on page 89.
When administrators and users create document policy templates, they can select the Global option, which makes the templates available to all users. Global document policy templates have an asterisk (*) in front of their names.
The IRM Server administrator can also set up the default policy. It is used with previous versions (prior to V4.1) of the IRM Client for Adobe Acrobat to protect PDF documents when a template is not chosen. The IRM Server applies the default policy to a document by reference. This means that if you protect a document with the default policy and later modify the default policy, the document reflects those modifications. You must have read-write policy management administrative rights to access and modify the default policy.
The following graphic illustrates how the policies appear on the IRM Server:
When you modify the default policy or create a document policy template, you can change or set the default authorization settings and add users, groups, network entities, or time restrictions to the categories. You can also set whether or not you want to allow printing, copying, guest access, the ability to work offline, or the ability to select watermarks. If you create a document policy template, you can also set a restriction date to limit access to the content and set a date to expire the content. When you modify a document policy template, it does not affect documents already protected with those templates. To modify the document policies of protected documents, see “Chapter 9, Managing Policies.” Refer to the IRM client online help to apply a policy to a document.
See one of the following sections for steps to modify the default policy or create a document policy template. The remaining sections in this chapter describe how to change or set the authorizations and permissions.
*blue*green*red
Global policy templates created by an administrator are preceded by an asterisk (*)
accountingproject_x
Policy templates created by users appear after those created by the administrator and do not have an asterisk (*) before their names
Setting Up Policies for Documents — 73
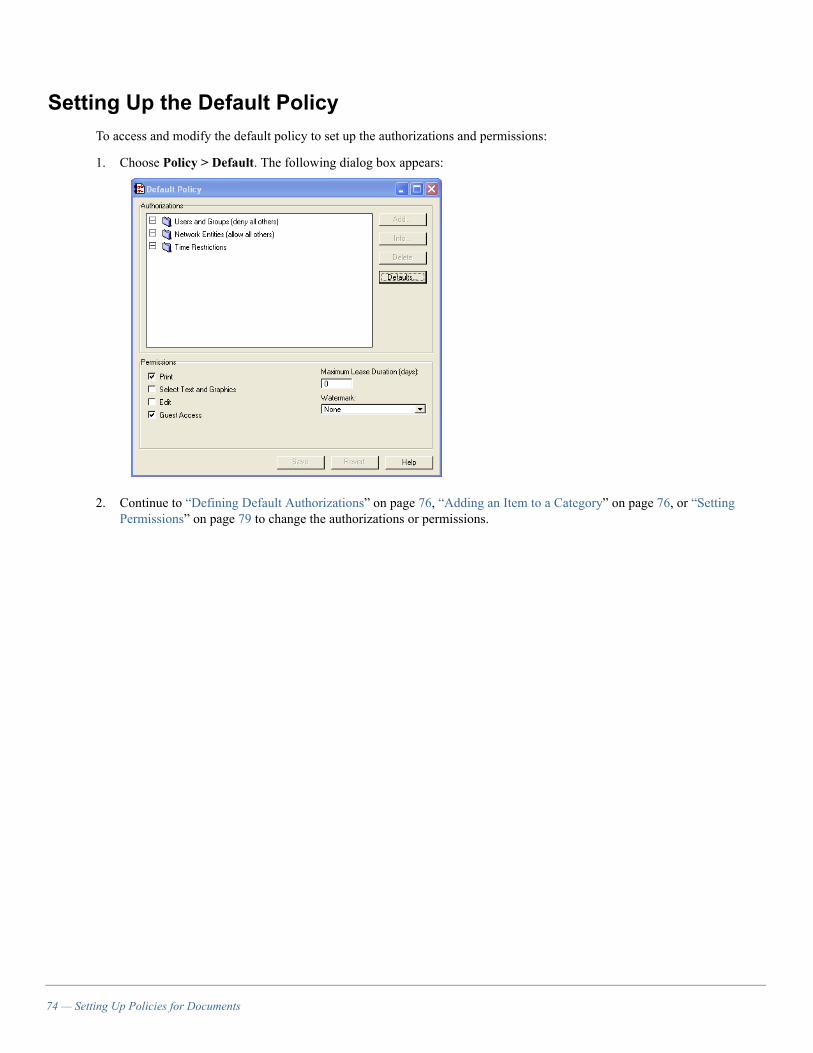
Setting Up the Default PolicyTo access and modify the default policy to set up the authorizations and permissions:
1. Choose Policy > Default. The following dialog box appears:
2. Continue to “Defining Default Authorizations” on page 76, “Adding an Item to a Category” on page 76, or “Setting Permissions” on page 79 to change the authorizations or permissions.
74 — Setting Up Policies for Documents

Creating a Document Policy TemplateTo create a document policy template or a global document policy template:
1. Choose Policy > Policy Templates. The following dialog box appears:
2. Click New. The New Policy dialog box appears.
3. Enter a name for your policy. Select Global Template if you want all IRM Server users to have access to the template when they protect documents.
4. Click OK.
The name of your new policy appears in the Policies section and allow all others appears next to Users and Groups by default in the Authorizations section. If you apply this document policy template to protect a document, by default, the policy allows all users access to the protected content. To limit the access to the document, you can tailor the policy to fit your needs. See the following sections for details.
Setting Up Policies for Documents — 75

Defining Default AuthorizationsOnce you access the default policy or create a document policy template as described in the previous sections, you can define the default authorizations. These settings allow you define default authorizations for users, groups, and network entities associated with the default policy or the document policy template. You can change these settings by selecting a category and clicking the Defaults button. For more information, see “Default Authorization Settings” on page 16.
To change the default authorizations settings:
1. Select an Authorizations category and click Defaults to change any of the settings. The following dialog box appears:
2. If you want to change the user and group or network entity default authorizations, select the appropriate setting.
3. Click OK.
Adding an Item to a CategoryYou can add items, such as groups, authentication domains, users, network entities, and time restrictions under the Authorizations categories.
The IRM Server evaluates groups and network entities in the order listed. For example, if you want the policy to allow everyone in a group, but you want to deny one member of that group, you should add the individual member and specify Deny and then add the entire group and specify allow. Follow the steps in the section that corresponds to the item you want to add.
76 — Setting Up Policies for Documents
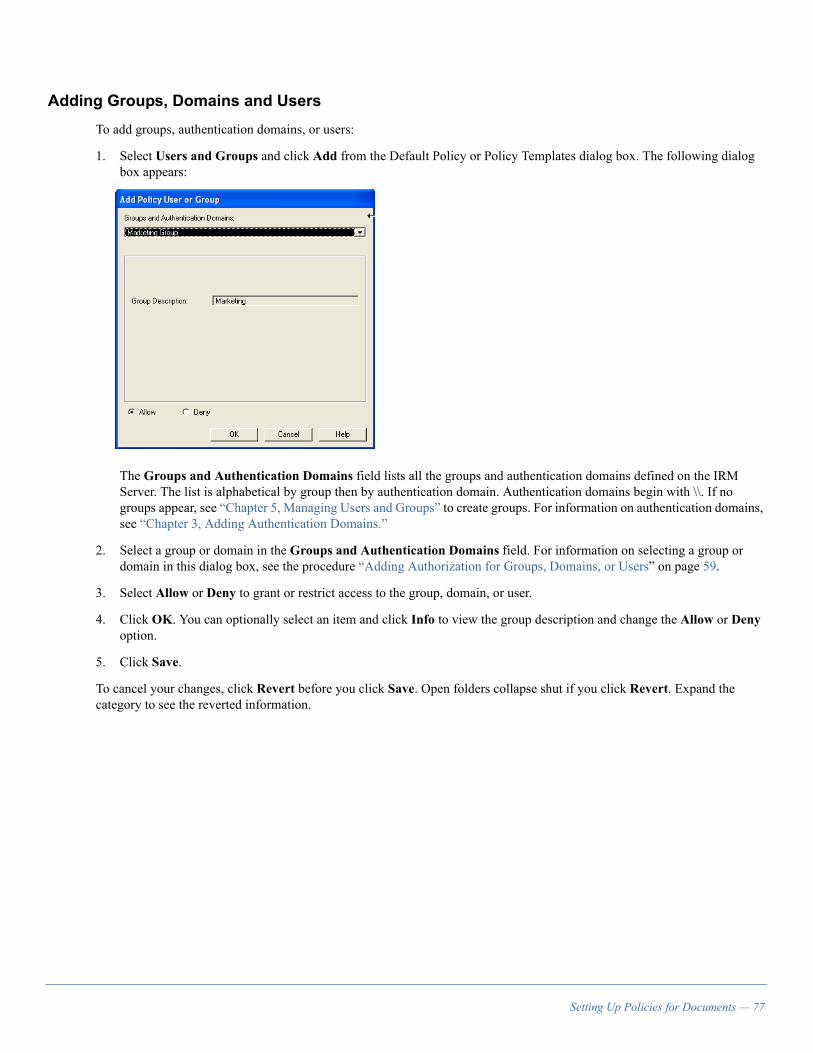
Adding Groups, Domains and UsersTo add groups, authentication domains, or users:
1. Select Users and Groups and click Add from the Default Policy or Policy Templates dialog box. The following dialog box appears:
The Groups and Authentication Domains field lists all the groups and authentication domains defined on the IRM Server. The list is alphabetical by group then by authentication domain. Authentication domains begin with \\. If no groups appear, see “Chapter 5, Managing Users and Groups” to create groups. For information on authentication domains, see “Chapter 3, Adding Authentication Domains.”
2. Select a group or domain in the Groups and Authentication Domains field. For information on selecting a group or domain in this dialog box, see the procedure “Adding Authorization for Groups, Domains, or Users” on page 59.
3. Select Allow or Deny to grant or restrict access to the group, domain, or user.
4. Click OK. You can optionally select an item and click Info to view the group description and change the Allow or Deny option.
5. Click Save.
To cancel your changes, click Revert before you click Save. Open folders collapse shut if you click Revert. Expand the category to see the reverted information.
Setting Up Policies for Documents — 77

Adding Network Entities and Time RestrictionsYou must create network entities and time restrictions before you can add them to your default policy or document policy template. If you do not add any network entities to a policy, the server allows connections from all network entities. If you add network entities to a policy, the IRM Server only allows access from those entities. Time restrictions specify that you can only view a protected document during certain specified hours. For example, you can restrict access to Monday through Friday from 9:00 A.M. to 5:00 P.M. For information on creating network entities or time restrictions, see “Overview of Network Entities and Time Specifications” on page 25. To add a network entity or time restriction:
1. Select Network Entities or Time Restrictions and click Add from the Default Policy or the Policy Templates dialog box. The Add Network Entities or Add Time Restrictions dialog box appears. For the default policy, it lists the available global network entities or time restrictions. For policy templates, it lists global and non-global ones. If no network entities or time restrictions appear, see “Chapter 2, Logging In and Setting Login Restrictions.”
2. Select the item you want to add. For a network entity, click Allow or Deny depending on whether you want to allow or deny users or group access from that network entity.
3. Click OK. You can optionally select an item and click Info to view its details.
4. Click Save.
To cancel changes in the default policy, click Revert to retain the last saved settings. Open folders collapse shut if you click Revert. Expand the category to see the reverted information.
78 — Setting Up Policies for Documents

Setting PermissionsWhen you set the permissions in the default policy or a document policy template, you can set whether or not users can print, copy text, or access content with guest access when they apply the policy to content. You can also set the permission for users to work offline, and specify a watermark that appears on all viewed or printed documents protected with the default policy or a document policy template.
If you modify a document policy template, you can set up a restriction date to limit when users can access the content and set a date to expire the content. If you choose to set an expiration date and time, the IRM Server expires the document when that date arrives and may delete the keys to the document. Once the IRM Server expires the document, users can no longer access it. However, if you set the IRM Server restrictions to retain keys to expired documents, you may still have access to the document policy through IRM Server Administrator. If you do, you can reactivate the document, if necessary. You can then delete the keys permanently, when necessary. Once you delete the keys from the IRM Server, no one can access the document again. For information on setting the server restrictions to retain keys to expired documents, see “Chapter 6, Setting Up Server Restrictions.” To delete keys to documents permanently, see “Chapter 9, Managing Policies.”
These permissions combine with the permissions set in each of the user’s groups and the server restrictions to determine the rights a user has on content protected with the policy. If the server restrictions are more restrictive than the template or default policy permissions, the server restrictions apply when a document policy is created. For information on setting permissions in groups and server restrictions, see “Chapter 5, Managing Users and Groups” and “Chapter 6, Setting Up Server Restrictions.”
To set permissions:
1. Select the permissions you want to give users in the Default Policy dialog box or the Policy Templates dialog box, depending on what you accessed. For information on the various permissions, see “Permissions” on page 19.
2. If you accessed a document policy template and you want to set the restrict dates or an expire date, click Restrict Dates. The following dialog box appears:
3. Select Apply to Policy in each section to activate them.
4. The Valid Dates are the dates when a protected document is readable. Enter the desired range.
5. The Expire Date is used to determine when the document can be deleted. The actual deletion depends on your retention policy. Select Using Absolute Date to enter a specific date and time that the protected document will become unreadable, or select Using Relative Date to enter a length of time after which the protected document is marked for deletion. The time starts when the document is protected.
6. Click OK.
7. Click Save.
If you want to cancel your changes, click Revert to retain the last saved settings. Open folders collapse shut if you click Revert. Expand the category to see the reverted information.
Setting Up Policies for Documents — 79


Chapter 9Managing Policies
This chapter describes how to manage policies for protected e-mail messages, documents, and web pages.
Overview of Managing PoliciesYou can access e-mail or document policies through the Content menu. Since the IRM Server may contain numerous policies, you can search for them in a number of different ways. For example, you can search for the content by owner, title (or subject for e-mail policies), e-mail recipients (for e-mail policies), protection date, and status. You can always access the policies you own to review the authorizations and permissions and make any necessary changes. You can also delete your own policies if you belong to a group with Delete Own permission.
The owner and IRM Server administrators with read-write content management administrative rights have equal authority over the document policies. For example, the administrator can edit other users’ document policies through IRM Server Administrator. The owner can modify their document policies using their IRM client. To prevent the owner from changing a policy, you can change the owner of the document to yourself, as described in “Changing the Owner of Content” on page 89. Also, you can delete the policies of other owners if you belong to a group that has Delete Any Content selected in the administrative rights. For information on administrative rights, see “Setting Content Permissions and Administrative Rights” on page 56.
To delete content, delete the policy. This removes the keys from the IRM Server making the protected content permanently inaccessible. To expire content, set an expiration date. When the expiration date arrives, users can no longer access the content. However, the keys may remain on the IRM Server if the server restrictions allow extended key duration for expired content. If the keys remain, you could access the expired policy and reactive it to make the content accessible again. For more information, see “Chapter 6, Setting Up Server Restrictions.”
The following sections describe how to search and manage e-mail and document policies.
Managing Policies — 81
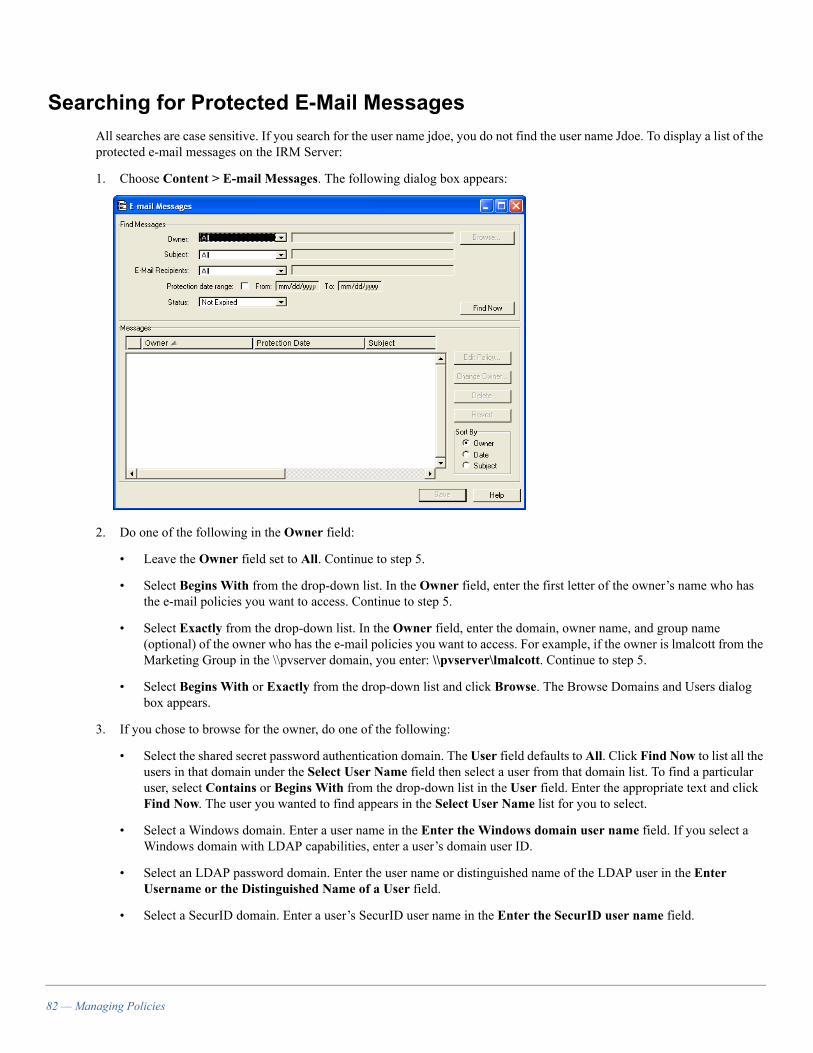
Searching for Protected E-Mail MessagesAll searches are case sensitive. If you search for the user name jdoe, you do not find the user name Jdoe. To display a list of the protected e-mail messages on the IRM Server:
1. Choose Content > E-mail Messages. The following dialog box appears:
2. Do one of the following in the Owner field:
• Leave the Owner field set to All. Continue to step 5.
• Select Begins With from the drop-down list. In the Owner field, enter the first letter of the owner’s name who has the e-mail policies you want to access. Continue to step 5.
• Select Exactly from the drop-down list. In the Owner field, enter the domain, owner name, and group name (optional) of the owner who has the e-mail policies you want to access. For example, if the owner is lmalcott from the Marketing Group in the \\pvserver domain, you enter: \\pvserver\lmalcott. Continue to step 5.
• Select Begins With or Exactly from the drop-down list and click Browse. The Browse Domains and Users dialog box appears.
3. If you chose to browse for the owner, do one of the following:
• Select the shared secret password authentication domain. The User field defaults to All. Click Find Now to list all the users in that domain under the Select User Name field then select a user from that domain list. To find a particular user, select Contains or Begins With from the drop-down list in the User field. Enter the appropriate text and click Find Now. The user you wanted to find appears in the Select User Name list for you to select.
• Select a Windows domain. Enter a user name in the Enter the Windows domain user name field. If you select a Windows domain with LDAP capabilities, enter a user’s domain user ID.
• Select an LDAP password domain. Enter the user name or distinguished name of the LDAP user in the Enter Username or the Distinguished Name of a User field.
• Select a SecurID domain. Enter a user’s SecurID user name in the Enter the SecurID user name field.
82 — Managing Policies

• Select a certificate domain or a certificate domain with LDAP capabilities. Enter the common name that appears in a recipient’s certificate, or any other certificate attributes, to add a specific certificate or certificate with LDAP capabilities user.
4. Click OK after selecting or entering an individual user name.
5. In the Subject field, select All, Contains, Begins With, or Exactly from the drop-down list. Enter the appropriate information in the Subject text field.
6. In the E-mail Recipients field, select All, Begins With, Ends With, or Exactly from the drop-down list. Enter the appropriate information in the E-mail Recipients text field.
7. To specify a date range when the user protected the message, select Protection date range. Enter the month, day, and year in the From and To fields. For example, 07/25/05 to 08/08/05.
8. In the Status field, select Not Expired, Expired or All from the drop-down list. This field does not appear unless you have read-write policy and content management administrative rights and the IRM Server has a key duration setting that kept the keys on the IRM Server longer than the policy expiration date.
9. Click Find Now. IRM Server Administrator performs the search. It also displays a Finding Messages status dialog box for you to stop the search at any time. Once it finds the message, the full user name (domain and owner), protection date, and subject appear in the Messages section. Messages you own appear in bold. You can change the sorting order of the list by selecting Owner, Date, and Subject in the Sort By section. For example:
10. See “Modifying E-Mail Policies” on page 86, “Changing the Owner of Content” on page 89, or “Deleting Content” on page 89 to modify the policy, change the owner, or delete one or more e-mail messages.
Managing Policies — 83
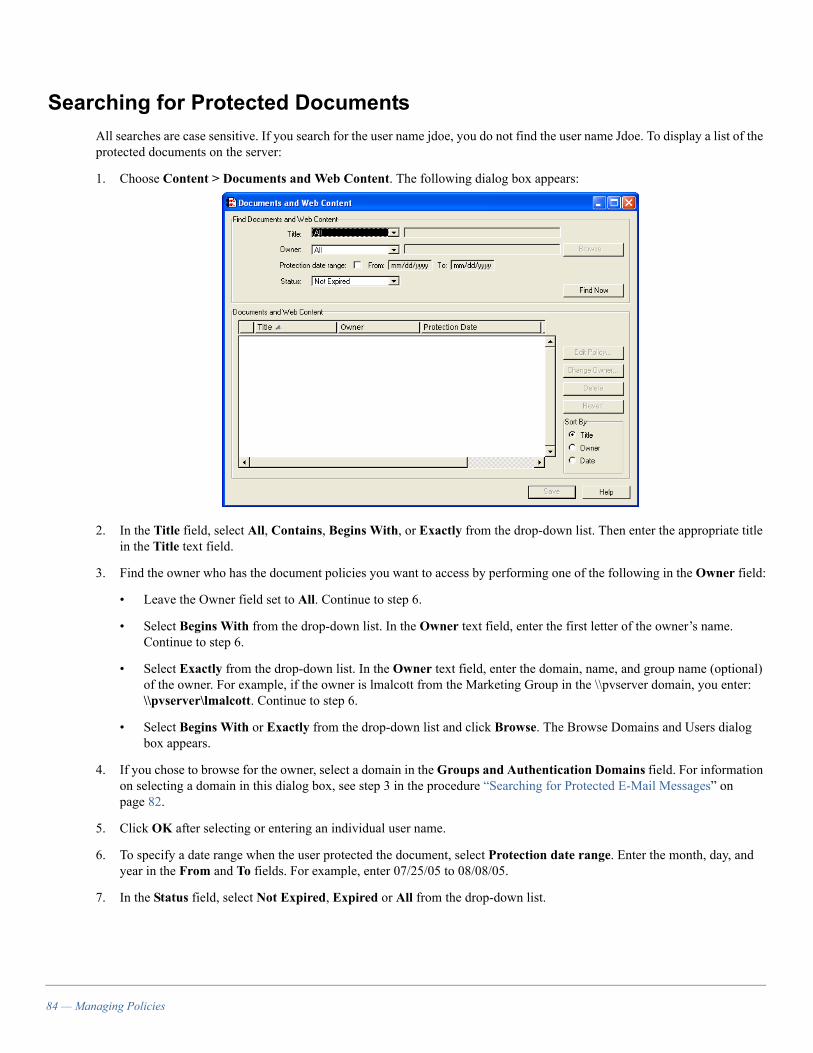
Searching for Protected DocumentsAll searches are case sensitive. If you search for the user name jdoe, you do not find the user name Jdoe. To display a list of the protected documents on the server:
1. Choose Content > Documents and Web Content. The following dialog box appears:
2. In the Title field, select All, Contains, Begins With, or Exactly from the drop-down list. Then enter the appropriate title in the Title text field.
3. Find the owner who has the document policies you want to access by performing one of the following in the Owner field:
• Leave the Owner field set to All. Continue to step 6.
• Select Begins With from the drop-down list. In the Owner text field, enter the first letter of the owner’s name. Continue to step 6.
• Select Exactly from the drop-down list. In the Owner text field, enter the domain, name, and group name (optional) of the owner. For example, if the owner is lmalcott from the Marketing Group in the \\pvserver domain, you enter: \\pvserver\lmalcott. Continue to step 6.
• Select Begins With or Exactly from the drop-down list and click Browse. The Browse Domains and Users dialog box appears.
4. If you chose to browse for the owner, select a domain in the Groups and Authentication Domains field. For information on selecting a domain in this dialog box, see step 3 in the procedure “Searching for Protected E-Mail Messages” on page 82.
5. Click OK after selecting or entering an individual user name.
6. To specify a date range when the user protected the document, select Protection date range. Enter the month, day, and year in the From and To fields. For example, enter 07/25/05 to 08/08/05.
7. In the Status field, select Not Expired, Expired or All from the drop-down list.
84 — Managing Policies

8. Click Find Now. IRM Server Administrator performs the search. It also displays a Finding Documents status dialog box for you to stop the search at any time. Once it finds the documents, the document title, full user name (domain and owner), and protection date appear in the Contents section of the dialog box. Documents and web pages you own appear in bold. You can change the sorting order of the list by selecting Title, Owner, or Date in the Sort By section. For example:
9. See “Modifying Document or Page Policies” on page 87, “Changing the Owner of Content” on page 89, or “Deleting content” on page 165 to modify the policy, change the owner, or delete one or more documents or web pages.
Managing Policies — 85

Modifying E-Mail PoliciesOnce you access a list of e-mail policies through the E-Mail Messages dialog box, you can modify the policies that you own. If you have read-write content management administrative rights in your group, you can modify the policies of other owners. However, e-mail message owners can always change their e-mail policies. To stop an owner from modifying an e-mail policy, you must change the owner to another account, as described in “Changing the Owner of Content” on page 89.
To modify an e-mail policy:
1. Select a protected e-mail message with a policy that you want to edit from the Messages list.
2. Click Edit Policy. The Edit E-mail Policy dialog box appears:
3. Modify the list of e-mail addresses that can view a protected e-mail message in the Recipients section, if necessary. Click Add to add a recipient. In the Add Recipient dialog box, click Find Now to list all the recipients. You can select a recipient and click Info to view information about the recipient or you can click OK to add the recipient to the list of users who can view the protected e-mail message. Click Delete to remove a recipient from the list of users who can view the protected e-mail message.
4. Modify the permissions associated with the e-mail policy by selecting or deselecting Copy/Paste, Print, or Guest Access in the Permissions section or by changing the number of days in the Maximum Lease Duration field that a recipient can view the protected e-mail message while working offline.
5. Modify the valid date or expiration date of the e-mail policy in the Valid Date or the Expiration sections. The valid date indicates when recipients can view the protected e-mail message. The expiration date indicates when recipients can no longer view the protected e-mail message and determines when the IRM Server expires it. Once expired, users can no longer access it (unless you set the server restrictions with extended key duration). To set the server restrictions, see “Chapter 6, Setting Up Server Restrictions.”
6. Click Save when you finish your modifications. You do not need to click Save again in the E-mail Messages dialog box. If you decide to cancel your policy edits, you cannot use the Revert button. Instead, select the messages you changed and change the settings back.
86 — Managing Policies

Modifying the e-mail policy of a message has an immediate effect on that message. However, if you modify an e-mail policy for a message that the owner has granted offline access, your changes do not affect the offline message until the recipient accesses the message online again.
Modifying Document or Page PoliciesYou can modify the policy of a specific document using the Documents and Web Content dialog box. To change a document policy, you must be the document owner or an IRM Server administrator with read-write content management administrative rights.
NOTE: If you change the policy of a document you do not own, be aware that the content owner can always change the document policy back to the original settings. To prevent this, you must change the owner to yourself, as described in “Changing the Owner of Content” on page 89.
When you encrypt a PDF document, you can also assign a page policy. A page policy is a document policy template applied to one page or a range of pages within a protected PDF document. (Page policies do not apply to web pages since each page is considered an individual file.) Assigning page policies to a document allows you to establish different levels of security. This allows different users to have certain permissions for one page, but not others. You may want to use page policies to eliminate the viewing of certain pages. Any pages you do not assign a policy are governed by the policy used by the document. For example, if you want users to have access to the first 10 pages of a document, but deny access to the last five pages, you must apply the document policy that allows those users access to the first 10 pages of the protected PDF document. Then apply another document policy template that denies those users (or their group) access to the last five pages of that document. For information on how to protect PDF documents with page policies, see the IRM Client for Adobe Acrobat Help.
To modify document or page policies:
1. Select one or more documents with policies that you want to edit from the Documents and Web Content list. To select multiple documents, hold down the Shift key and select each row individually.
2. Click Edit Policy. The Document and Page Policy dialog box lists the document policies of the documents you selected. Protected documents are listed by title.
3. Click the plus sign next to a list item to expand it. Each document expands as follows:
• For a Microsoft Office document, all versions of the document appear. By default, all versions use the same policy. It is recommended that you modify the document policies of Microsoft Office Documents using IRM Client for Microsoft Office.
• For a PDF document, all the pages appear along with an icon called DocInfo. This icon represents some of the PDF metadata. It should always use the same policy used by the document. A PDF document may have pages protected by several different policies.
• Web pages and images are listed with their paths and file names. Under each web page, a single page called Main appears that corresponds to the web page or the image file.
• In addition, an icon appears next to each list item. The letter D on an icon indicates that the document uses the default policy. If an icon has text on it, the content uses a document policy created from a document policy template. If you see an up arrow on the icon, the page uses the same policy (default or document) as the parent document, located at the next level above it.
Managing Policies — 87
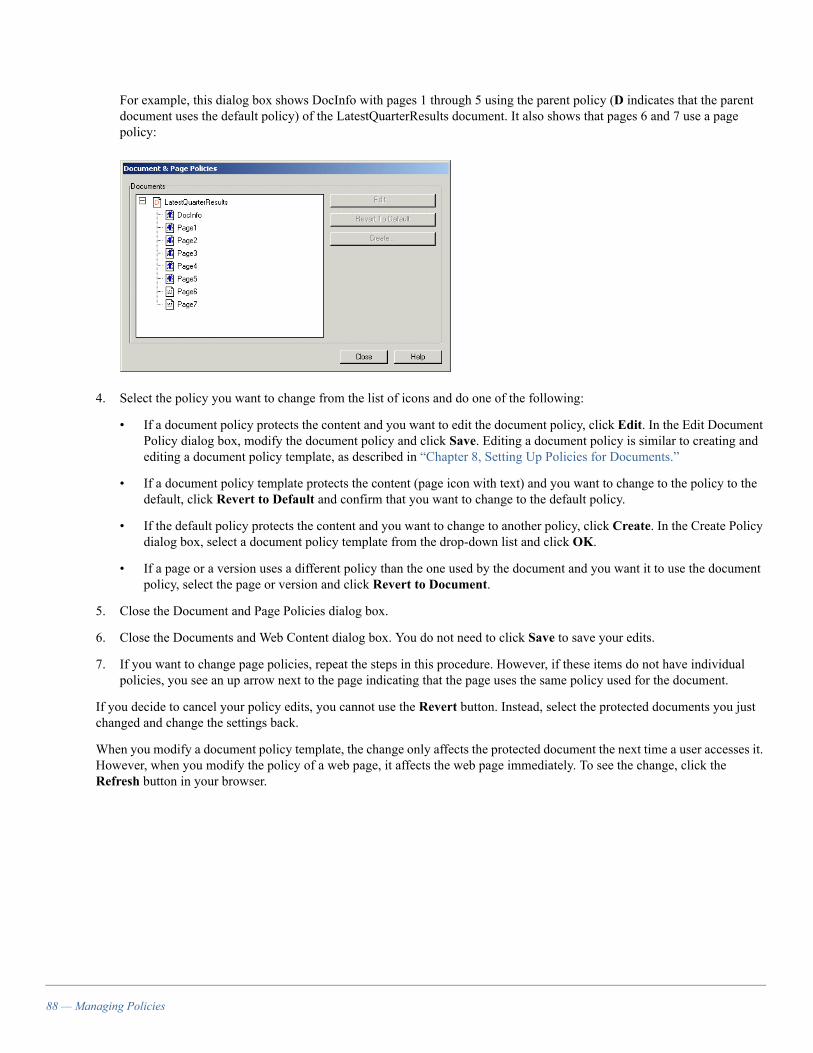
For example, this dialog box shows DocInfo with pages 1 through 5 using the parent policy (D indicates that the parent document uses the default policy) of the LatestQuarterResults document. It also shows that pages 6 and 7 use a page policy:
4. Select the policy you want to change from the list of icons and do one of the following:
• If a document policy protects the content and you want to edit the document policy, click Edit. In the Edit Document Policy dialog box, modify the document policy and click Save. Editing a document policy is similar to creating and editing a document policy template, as described in “Chapter 8, Setting Up Policies for Documents.”
• If a document policy template protects the content (page icon with text) and you want to change to the policy to the default, click Revert to Default and confirm that you want to change to the default policy.
• If the default policy protects the content and you want to change to another policy, click Create. In the Create Policy dialog box, select a document policy template from the drop-down list and click OK.
• If a page or a version uses a different policy than the one used by the document and you want it to use the document policy, select the page or version and click Revert to Document.
5. Close the Document and Page Policies dialog box.
6. Close the Documents and Web Content dialog box. You do not need to click Save to save your edits.
7. If you want to change page policies, repeat the steps in this procedure. However, if these items do not have individual policies, you see an up arrow next to the page indicating that the page uses the same policy used for the document.
If you decide to cancel your policy edits, you cannot use the Revert button. Instead, select the protected documents you just changed and change the settings back.
When you modify a document policy template, the change only affects the protected document the next time a user accesses it. However, when you modify the policy of a web page, it affects the web page immediately. To see the change, click the Refresh button in your browser.
88 — Managing Policies

Changing the Owner of ContentTo have complete control over a content policy, you must own it. To change the owner to yourself or another account, you must have read-write policy and content management administrative rights. When you change the owner, you need to browse for a user name in a group or domain and select the new owner name.
To change the owner:
1. In the Messages or Documents and Web Content list, depending on what you accessed, select one or more of the content polices you want to change. To select multiple items, hold down the Shift key and select each row individually. Then click Change Owner. The Select User or Group dialog box appears.
2. Select a domain in the Groups and Authentication Domains field. For information on selecting a domain in this dialog box, see step 3 in the procedure “Searching for Protected E-Mail Messages” on page 82.
3. Click OK after selecting or entering an individual user name. The new owner you selected, including the domain of the owner, appears in the Owner column of the list. You also see the envelope icon (for E-Mail policies) or the page icon (for documents or web pages) in the first column change to a face icon with a red exclamation point on it so you can identify the rows with the owners you just changed.
4. Click Save.
If you decide to cancel your owner changes, select the rows with the new changed owners and click Revert before you click Save to restore the last saved changes.
Deleting ContentOnce you have a list of policies in the E-mail Messages dialog box or the Documents and Web Content dialog box, you can delete the keys to the content you select. To delete the keys to policies you own, you must belong to a group that has Delete Own permissions or Delete Any Content selected in the administrative rights. To delete the keys to policies of other owners, you must have Delete Any Content administrative rights or change the owner to yourself.
When you delete content, you delete the policy and its encryption keys. This makes the content permanently inaccessible. For protected e-mail messages, you can also set a time when the IRM Server automatically deletes all protected e-mail messages through server restrictions. For protected documents, you can also extend the key duration of expired content through the server restrictions. This could allow you to access the policy of expired content since the keys remain on the server. Once you access the policy, you can reactivate the content, if necessary. You can never access deleted content. To set administrative rights, see “Setting Content Permissions and Administrative Rights” on page 56. To set server restrictions to expire protected e-mail messages automatically or set extended key duration, see “Chapter 6, Setting Up Server Restrictions.”
To delete content:
1. In the Messages or Documents and Web Content list, depending on what you accessed, select one or more of the content policies that you want to delete. To select multiple items, hold down the Shift key and select each row individually.
2. Click Delete. A red X appears through the icon, the text changes to italic, and a line runs through the row(s) you selected.
3. Click Save. Then click Yes when prompted to delete the encryption keys for the content. This makes the content permanently inaccessible and deletes the rows you selected from the list.
If you decide to cancel the delete process, select the rows you marked to delete and click Revert before you click Save to restore the last saved changes.
Managing Policies — 89


Chapter 10Working with Watermarks
This chapter describes the IRM Server’s watermarking feature. It provides an overview of watermarks, describes each part of the watermark file, and then describes the process of creating and editing a watermark file. You can only create watermarks for PDF, Word, Excel and PowerPoint documents. Watermarks cannot be created for e-mail messages or web pages.
Overview of WatermarksA watermark is text that appears on a protected PDF, Word, Excel and PowerPoint document when a user prints the document. The watermark also shows up on the screen while viewing PDF documents. The IRM Server administrator defines watermarks and associates them with groups, document policy templates, document policies, page policies, and server restrictions. For specific information about how to add a watermark to each type of policy, see the chapter that corresponds to that policy in this book.
IMPORTANT: If you associate different watermarks with each type of policy, the watermarks overlay each other on the document.
A watermark can appear at the top or bottom of a page or it can be positioned diagonally across a page. It can be displayed in any color, any shade of gray (for example, any shade from 100% white to 100% black) and any opacity (to allow text and images to show through the watermark). A typical watermark would be the word “confidential” across the top of a company confidential document. Watermarks can also include header information such as a document ID, time, and so on.
Working with Watermarks — 91

Components of the Watermark FileThe IRM Server watermarks a document with information you specify in a stamp file. The stamp file is a text file that contains a description of the watermark, including the margin settings, text to stamp, and formatting information for each watermark item.
You can change one of the sample watermarks files provided in c:\Program Files\EMC IRM\IRM Server Administrator. You can also create your own watermark file. A watermark file includes a stamp item for each piece of information that you want to stamp. In addition, it includes margin settings.
You can create one or more stamp items in one stamp file. In the following example, the watermark has two stamps, a header and a watermark:
For example, you might want to watermark a document by stamping the date and time at the top of its pages and stamping page numbers at the bottom of its pages. Or you might want to stamp different information on different page ranges.
The information you stamp on the document pages appears in message blocks. A message block contains the parameters for one piece of information that can be stamped on one or more pages. A message block begins with the keyword begin_message on a line by itself. The message block contains required and optional information that you use to create and position the stamped information. A message block ends with the keyword end_message on a separate line.
# Options
begin_optionsVersion (1)TopMargin (12)BottomMargin (12)LeftMargin (0)RightMargin (0)end_options
# -- Stamp Item --
begin_messageName (Left Header)StartPage (1)EndPage (-1)Size (12)Color (0)Text (%x, %X)Position (top)Justification (left)Underlay (no)end_message
# -- Stamp Item --
begin_messageName (Watermark)StartPage (1)EndPage (-1)Size (36)Color (50)Text (Confidential)Position (diag-topleft)Justification (left)Underlay (yes)end_message
92 — Working
with Watermarks
The following table shows each of the parameters included in a message block. Optional parameters use their default values if you do not change them:
In addition, there are a number of variables you can use to format text that you want to stamp. For example, you can stamp the date and time on document pages. There are several date formats you can choose. These variables allow you to indicate exactly how the date appears.
Note: In a protected PowerPoint document, only overlayed watermarks are displayed. If the watermark is marked as underlay, the watermark will only appear on the outer 1/2 inch of the page.
Note: Watermarks with a position of diag-topleft or diag-bottomleft may fill the page with multiple instances of the watermark text. If this happens, try increasing the size of the text.
Parameter Required Definition Values Default
Name Yes Identifies stamp item Text New Item
StartPage Yes First page to stamp Numeric or -1 for last page
A watermark within a page policy overrides this setting.
1
EndPage No Last page to stamp Numeric or -1 for last page
A watermark within a page policy overrides this setting.
-1
Size No Point size of message text Numeric 12
Color No Color of message text 0 for black, 100 for white, 1-99 for shades of gray 0
Text Yes Information to stamp on document pages
Text and variables (see next section) None
Position No Page location to stamp text Top, bottom, diag-topleft,
diag-bottomleft
Top
Justification No Text alignment Left, center, right Center
Underlay No Text appears under (underlay) or over (overlay) text
Yes to underlay or No to overlay Yes
Opacity No Level of opacity of the watermark text
Floating point number between 0 and 1 (e.g., .75). A value of 0 makes the text completely transparent for text underneath. A value of 1 makes the text completely opaque.
1.0
Red No Red component of the text color 0-255 0
Green No Green component of the text color
0-255 0
Blue No Blue component of the text color 0-255 0
Outline No Use an outlined font Yes to outline; no to not outline No
Working with Watermarks — 93

Watermarking VariablesThe following table shows the variables, such as dates, times, and page numbers, you can use to watermark documents. When you use the Text parameter listed in the previous section, you can use these variables to specify text. Each variable is case-sensitive and has a specific format. For example, a date stamp of %a %b %d appears as Wed Oct 07. The information that appears in the watermark is based on when a user views or prints the watermarked document.
Note: The percent sign (%) character must precede all variables. If the % character is missing, the variable itself appears in the stamped text.
Variable Definition Example
%A Full weekday name Friday
%a Abbreviated weekday name Fri
%B Full month name October
%b Abbreviated month name Oct
%c Local date and time on the IRM client system 10/01/05 05:00:00
%d Day of month 15
%G Total number of pages 20
%<page number>g
Number with which to begin page numbering 2
%H Hour, 00–23 13
%I Hour, 01–12 01
%i(<info field name>)
Outputs the value of <info field name> from the document information dictionary. The <info field name> can contain values such as Author, Title, Subject, Keyword, and Creator. For example: %i(Author)
Sample.pdf, Jane Smith, Security
%j Day of the year, 001–366 099
%M Minutes, 00–59 25
%m Month, 1–12 10
%N Document filename Sample.pdf
%n IP address of the client computer 172.36.27.53
%P Full document pathname, including filename c:/Documents/Sample.pdf
%p Local equivalent of AM or PM PM
%S Seconds, 00–61 10
%U Week of the year, 01–53, where Sunday is the first day of the week 36
%u User name without authentication domain path nweston
94 — Working with Watermarks

Using the Page Number VariableThe variable %<page number>g lets you begin page numbering with the number you specify. For example, %2g stamps the StartPage with 2, the next page with 3, and so on. Any watermark settings that you specify using IRM Server policies override this setting.
To skip page 1 of a document and begin including page numbers on the second page:
1. Enter (2) for the StartPage parameter in the stamp file.
2. Enter (%2g) for the Text parameter.
To begin page numbering on page 1 with the number 1:
1. Enter (1) for the StartPage parameter in the stamp file.
2. Enter (%g) for the Text parameter.
Conditional Watermark SectionsFor security reasons, if an IRM client receives a watermark definition that it does not understand, it will refuse to render the protected content. To address this issue, the IRM Server has the ability to perform conditional watermark preprocessing based on the type and version of the client accessing it. This enables an administrator to define watermarks that perform consistently across all types and versions of IRM clients.
Preprocessor StatementsThe conditional watermark feature uses conditional statements included in the stamp definition to control what watermarks are provided to a given client. By creatively including these conditional statements, the IRM Server Administrator has very fine-grained control over the watermarks displayed with protected content.
%u:<attribute>[:<number>]
LDAP user name and attributes. The <attribute> is cn or uid, and must be in the user’s distinguished name (DN) or defined in the user’s container. If the attribute is not defined or the attribute is an invalid entry for the watermark, the DN is displayed. Entering %u without an attribute also displays the DN.
The optional <number> specifies which attribute, if you have duplicates. If your DN is cn=John Doe,cn=sales,dc=mycompany,dc=com and you want the watermark to contain John Doe (Sales), specify: %u:cn (%u:cn:2).
John Doe
%W Numeric week of the year, 00–53, where Monday is the first day of the week 36
%w Numeric weekday, 0–6, where Sunday is 0 5
%X Local time representation on the IRM client system 05:35:10
%x Local date representation 10/02/05
%Y Year with century 2005
%y Year without century, 00–99 05
%% % %
Variable Definition Example
Working with Watermarks — 95

The following conditional preprocessor statements are supported.
Statement Description
if_version_eq version_num<statements>[else<statements2> ]end_if
If the client’s version number is equal to version_num, then include <statements> in the returned watermark. Otherwise include <statements2> (if specified).
if_version_neq version_num <statements>[else <statements2>]end_if
If the client’s version number is not equal to version_num, then include <statements> in the returned watermark. Otherwise include <statements2> (if specified).
if_version_gt version_num <statements>[else <statements2>]end_if
If the client’s version number is greater than version_num, then include <statements> in the returned watermark. Otherwise include <statements2> (if specified).
if_version_gte version_num <statements>[else <statements2>]end_if
If the client’s version number is greater than or equal to version_num, then include <statements> in the returned watermark. Otherwise include <statements2> (if specified).
if_version_lt version_num <statements>[else <statements2>]end_if
If the client’s version number is less than version_num, then include <statements> in the returned watermark. Otherwise include <statements2> (if specified).
if_version_lte version_num <statements>[else <statements2>]end_if
If the client’s version number is less than or equal to version_num, then include <statements> in the returned watermark. Otherwise include <statements2> (if specified).
if_client_eq client_name <statements>[else <statements2>]end_if
If the client’s name is equal to client_name, then include <statements> in the returned watermark. Otherwise include <statements2> (if specified).
if_client_neq client_name <statements>[else <statements2>]end_if
If the client’s name is not equal to client_name, then include <statements> in the returned watermark. Otherwise include <statements2> (if specified).
96 — Working with Watermarks
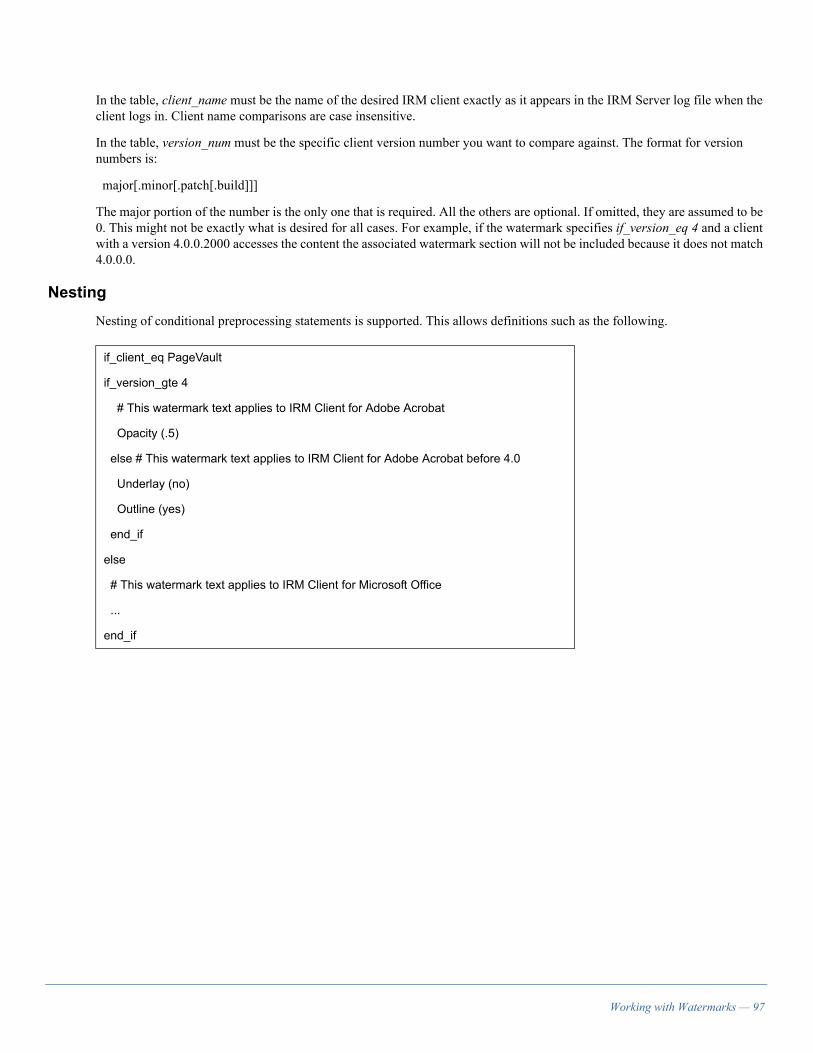
In the table, client_name must be the name of the desired IRM client exactly as it appears in the IRM Server log file when the client logs in. Client name comparisons are case insensitive.
In the table, version_num must be the specific client version number you want to compare against. The format for version numbers is:
major[.minor[.patch[.build]]]
The major portion of the number is the only one that is required. All the others are optional. If omitted, they are assumed to be 0. This might not be exactly what is desired for all cases. For example, if the watermark specifies if_version_eq 4 and a client with a version 4.0.0.2000 accesses the content the associated watermark section will not be included because it does not match 4.0.0.0.
NestingNesting of conditional preprocessing statements is supported. This allows definitions such as the following.
if_client_eq PageVault
if_version_gte 4
# This watermark text applies to IRM Client for Adobe Acrobat
Opacity (.5)
else # This watermark text applies to IRM Client for Adobe Acrobat before 4.0
Underlay (no)
Outline (yes)
end_if
else
# This watermark text applies to IRM Client for Microsoft Office
...
end_if
Working with Watermarks — 97
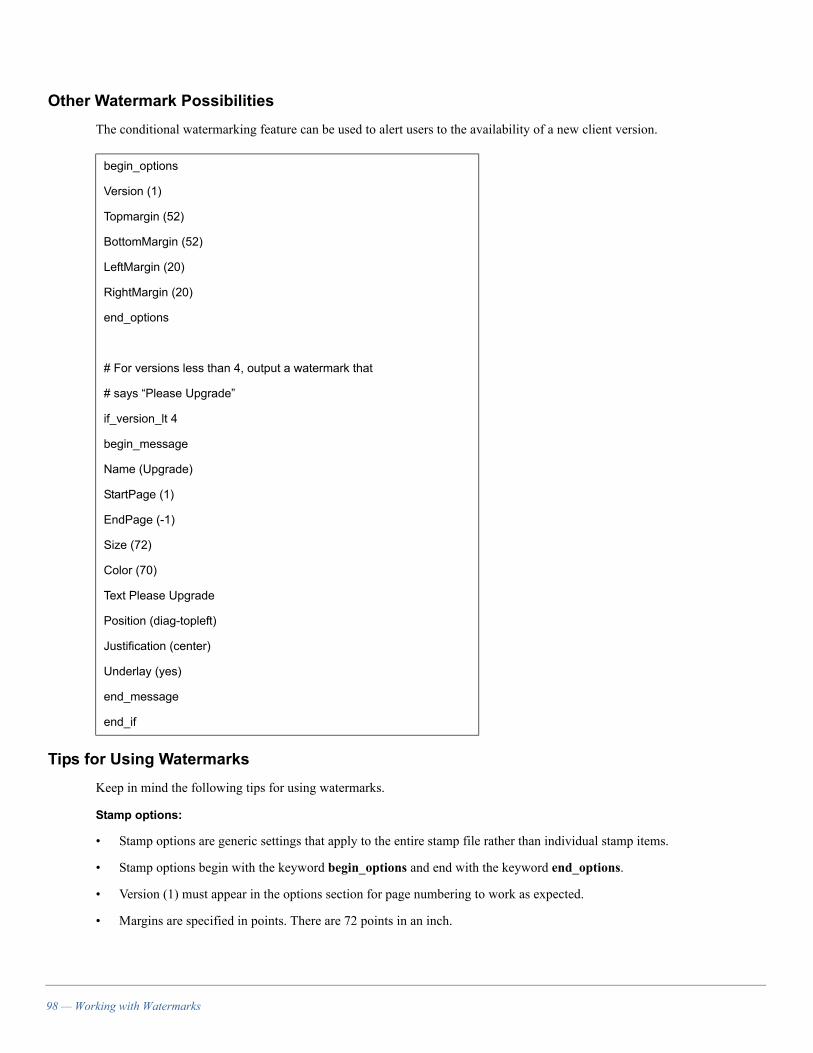
Other Watermark PossibilitiesThe conditional watermarking feature can be used to alert users to the availability of a new client version.
Tips for Using WatermarksKeep in mind the following tips for using watermarks.
Stamp options:
• Stamp options are generic settings that apply to the entire stamp file rather than individual stamp items.
• Stamp options begin with the keyword begin_options and end with the keyword end_options.
• Version (1) must appear in the options section for page numbering to work as expected.
• Margins are specified in points. There are 72 points in an inch.
begin_options
Version (1)
Topmargin (52)
BottomMargin (52)
LeftMargin (20)
RightMargin (20)
end_options
# For versions less than 4, output a watermark that
# says “Please Upgrade”
if_version_lt 4
begin_message
Name (Upgrade)
StartPage (1)
EndPage (-1)
Size (72)
Color (70)
Text Please Upgrade
Position (diag-topleft)
Justification (center)
Underlay (yes)
end_message
end_if
98 — Working with Watermarks
Stamp item formatting:
• The keyword begin_message must appear on a separate line at the beginning of a stamp item.
• The keyword end_message must appear on a separate line at the end of a stamp item.
• To stamp only the last page of a document, enter -1 for the StartPage parameter.
Stamp text formatting:
• The text you want to stamp must be enclosed in parentheses; for example, (Last revised %x). Do not use parentheses in the text of the stamp as this produces unwanted results.
• Text appears exactly as you type it.
• If you want punctuation to appear between variable text, you must type it (for example, “%a., %x” stamps “Wed., 10/07/00” whereas “%a %x” stamps “Wed 10/07/00)”.
• Most text that you read ranges from 10–12 points. For example, newspaper text is usually 10 points. To create a watermark that fills an entire page, try selecting a large point size. For example, “confidential” stamped in 128 points fills a page diagonally.
Text color and placement:
• A color value of 0 is black and a color value of 100 is white. Numbers between 0 and 100 give you varying shades of black (grayscale).
• Stamped text color is opaque, regardless of the color value you select.
• Text you stamp over document text (underlay set to No) obscures the text and covers any images regardless of their color.
• Text you stamp under document text (underlay set to Yes) obscures the text if the stamp text is the same shade of gray as the document text.
• Gray text you stamp under document text may make the text difficult to read, depending on the contrast between the text and the stamp.
• Some PDF files contain hidden text and images. Underlaid text does not work with hidden images. Overlay stamped text to avoid this problem.
Creating a Watermark FileYou can create a watermark file by opening a text editor and entering the information described in the previous section into a file and saving the file. You can then make changes to the file in the text editor. If you use one of the sample watermark files that come with the IRM Server, you can open it in a text editor, modify it, and save it. Once you have a watermark file, you can add it to the IRM Server and edit it in IRM Server Administrator.
Working with Watermarks — 99

Adding a Watermark DefinitionTo add the watermark definition to the IRM Server:
1. Choose Policy > Watermarks. The Watermarks dialog box appears:
Any watermarks that you already created appear with their names and descriptions.
2. Click Add to add a watermark. The Add Watermark dialog box appears:
3. Enter a name for the watermark.
4. Enter a description for the watermark.
5. Enter or paste the watermark description into the StampPDF section or click Browse to browse to the stamp file, select it, and click Open. To edit the watermark definition, place your cursor in the StampPDF list box and make any changes. To include additional watermarks as part of this watermark, add them by clicking the Add button in the Included Watermarks section.
6. Click OK.
7. Click Save.
100 — Working with Watermarks

Chapter 11Monitoring and Managing the IRM Server
This chapter describes how to monitor your IRM Server by setting up and viewing activity in the activity log, and setting up notifications of log activity. It then provides steps for managing the IRM Server by setting up automatic client installations and adding trusted plug-ins to it.
Setting Up and Viewing Activity LogThe IRM Server maintains a comprehensive log of all server activity. The server activity log records activities, whether they are successful or unsuccessful. The server log is always active and resides on the IRM Server. These messages allow you to monitor the server and therefore add an extra layer of security to the server. Messages recorded in the server log include any of the following:
• When a user connects to the IRM Server
• When a user logs into the IRM Server through any of the IRM client applications
• Who protects content and when
• Who views or tries to view content and when
• When a connection terminates
• When system exceptions occur, such as connection timeouts
• When content expires
Each entry in the activity log displays the date and time of the entry, followed by the user name and a session ID that identifies each client session. For example, if a user logs on, the server creates a session ID number. This number appears in the entry each time that user does something that generates a log entry. Next, the log message appears. Each log message consists of the message number, the severity level, and the message. Messages are also color-coded to help you quickly identify their severity.
The activity log lets you acknowledge receipt of content and analyze security compliance. You can use the activity log as an audit trail of server activity.
The log file rolls over into a backup file at midnight every night. This helps you keep your log files organized. All log files appear in the logs directory located under your IRM Server directory. The current log file is called logdb. Rolled log files are called year-month-day. To view log files from previous days, use the IRM Server reports, as described in “Appendix A, IRM Server Maintenance Utilities and Reports.”
Monitoring and Managing the IRM Server — 101

To view the log:
1. Choose Logging > View Log. The following dialog box appears:
Activity messages appear in the list box at the top of the dialog box. The messages appear based on the options selected below the list box.
2. Change the criteria for messages that appear by selecting one of the following and, if necessary, fill out its corresponding tab:
• Select Auto refresh (all messages) if you want the IRM Server to automatically refresh the Activity dialog box every 30 seconds so you can view all new messages logged to the server. This option overrides any other selections in this dialog box.
• Select Relative time to view messages from a specific point in time relative to the current time. In the Relative tab enter a number and select Days, Hours, Minutes, or Seconds from the drop-down list to view all messages within that time period. For example, you could view messages from the last ten minutes by entering 10 and selecting minutes.
• Select Absolute time to view all messages from a specific time period. In the Absolute tab define a specific time period from which to view messages.
• Select All times to view all messages logged to the IRM Server that day.
3. Click the Severities tab to limit the messages displayed in the Activity Log dialog box based on severity. Select the severity levels of the messages that you want to view.
4. Click the Refresh button to update the messages displayed in the list box in the Activity Log dialog box.
102 — Monitoring and Managing the IRM Server

Setting Up NotificationsYou can receive a notification when the server logs messages matching criteria that you specify. If you do not want to check the log very often, you can configure the server to notify you when unauthorized activities are in progress. This gives you the opportunity to intercept the unauthorized activity as it occurs. You can specify:
• The severity about which to notify you
• The method used to notify you
• The time period during which to notify you
Before you set up notifications, you need to create time specifications. To use a time specification in a notification rule, it must be marked as a global time specification. To create time specifications, see “Creating Time Specifications” on page 26. To set up notifications:
1. Select Logging > Notifications. The following dialog box appears. Notifications that you already set up appear with action, time, and severity code:
2. Click Add to add a notification. The following dialog box appears:
Monitoring and Managing the IRM Server — 103

3. Select one or more severities. Severities are the events that you want the IRM Server to notify you about. For example, if you want the IRM Server notify you when unauthorized users try to access protected content, you should select Notice. The following table lists the severity names, codes, and definitions.
4. Select the notification method under Action and enter the corresponding information under Action Arguments.
• Audio plays a sound file at the server. Enter the path and file name of a .WAV file (or an .AU file on Solaris) and select the volume you want the system to use when it plays the file.
• Mail sends an e-mail message containing the severity to the address you specify in the Mail Recipient field. E-mail notifications use the SMTP server and the return e-mail address you specified in the server parameters in Server Configure. For information about setting up server parameters, see the IRM Server Installation Guide for your operating system.
• Client starts a client application; enter the path and file name of the client application, executable file, and any arguments to pass to the application in the Client Application and Client Arguments fields.
• SNMP v1 triggers an SNMP trap. SNMP v1 is a protocol used by network devices to provide status information. Enter the SNMP version 1 management station, community, and trap port you want to use. The Community field defaults to public. The trap port defaults to 162.
5. Select a date and time when the server should notify you from the Applicable Date & Time section. If the desired date and time does not appear in the list, see “Creating Time Specifications” on page 26. Make sure that the desired time specification is marked as global.
6. Click OK.
7. Click Save.
Once you create a notification, you can select the notification in the list, then click Edit to change the information, Delete to remove it from the IRM Server, or Revert to restore a notification immediately after you edit or delete it. When you finish, click Save to save your changes and close the dialog box.
Severity (Code) Notifies you of...
Emergency (700 level) Serious server errors that prevent the registration and viewing of protected content.
Alert (600 level) The failure of ancillary services. These are internal errors that are less serious than emergency errors.
Critical (500 level) Security policies that have been triggered.
Error (400 level) Normal server operations that cannot be completed.
Warning (300 level) Recoverable errors.
Notice (200 level) Non-error conditions that require your attention.
Info (100 level) Standard operational server activities. These occur regularly, so you probably do not want to set a notification for this level.
104 — Monitoring and Managing the IRM Server

Managing Automatic Client Software InstallationsIRM Server Administrator is set up to allow users to automatically install the IRM Client for HTML from the web site the first time they open a protected e-mail message or web page. To view this setting, open the IRM Server Administrator and choose Settings > Client Installation. The Client Installation Settings dialog box appears with the default option selected and a URL to a page on the web site that contains links for installing the IRM Client for HTML as well as IRM Client for E-Mail:
The default setting is Allow automatic installation of IRM Client for HTML. This setting allows first time recipients of protected e-mails to open them without having to manually install any IRM software. Generally, customers find this to be a better first time experience for users.
Some caveats may apply. The automatic installation applies only to Internet Explorer users with security settings that allow ActiveX downloads and JavaScript. These users as well as users of Netscape Navigator or Mozilla Firefox will be redirected to a download page where they can download the IRM Client for HTML or IRM Client for E-Mail for installation.
Note: If you select Do not allow automatic installation in the Client Installations Settings dialog box, Internet Explorer users with security settings that allow ActiveX downloads and JavaScript will be redirected to the download page. For information on the user installation experience, see the online help for IRM Client for E-Mail.
If you choose to leave the URL field with the address of the EMC web site, be aware that as EMC releases newer versions of the software, users who receive protected e-mail messages or access web pages for the first time download the new version of the software. If you want more control over upgrades, or if your organization only allows web access to internal web servers, you can set up the automatic installation on your web server and modify the URL field to contain an address that points to the files on your web server that are necessary to perform an automatic installation. See “Setting Up Automatic Installations on Your Web Server” on page 106, for details on how to set up automatic installations on your web server and allow access to the online help files. See “Changing the Default Access Denied Image” on page 107 for details on how to change the default access denied image, which appears on web pages when users access an image protected with a policy that does not allow them access to the page.
When you allow automatic installations, the IRM Server places the address in the URL field in each protected e-mail message and web page during protection. If you change the address in the URL field while a user protects content using IRM Client for E-Mail the change does not apply to the content. It only applies to content protected after the user logs out and logs back in to the IRM Server through one of these clients.
You can also select Do not allow automatic installation in the Client Installation Settings dialog box. Select this option if your organization does not allow installations from a web server (for example, you may prohibit downloading ActiveX controls through a browser), or if you want to distribute the software using:
• IRM Client for E-Mail CD. For information on installing the software from the CD, see the IRM Client for E-Mail Release Notes.
• An automated distribution system such as Microsoft Systems Management Server (SMS).
Monitoring and Managing the IRM Server — 105

Setting Up Automatic Installations on Your Web ServerTo control the version of the client software that users receive, you may want users to automatically install IRM Client for HTML and IRM Client for E-Mail from your organization’s web site. To set up the installations on your web server:
1. Unzip the WebServerComponents directory located on your IRM Client for E-Mail CD. Extract the files to a location on your web server. You must preserve the directory structure so that the installations can operate correctly. The IRM Client for HTML and IRM Client for E-Mail Help files are also in the WebServer Components directory so that users can access Help from your web site.
2. Create a virtual directory on your web server for the WebServerComponents directory. For information on creating virtual directories, see the documentation that came with your web server software. Set the permissions for your virtual directory to Scripts only.
3. Open IRM Server Administrator and choose Settings > Client Installation.
4. In the Client Installation Settings dialog box, do one of the following:
• Select Allow automatic installation of the IRM Client for HTML to allow users to automatically install the IRM Client for HTML from your web site.
• Select Do not allow automatic installation to provide users with links to both the IRM Client for HTML and IRM Client for E-Mail. For information on using the links to install either application, see “Managing Automatic Client Software Installations” on page 105.
5. Enter the URL that corresponds to the virtual directory you created for the WebServerComponents directory in the URL field.
6. Click Save.
If you use Microsoft Internet Information Server (IIS) 4 or 5, you also must add the .jar file type to the MIME map for the virtual directory. This allows users to automatically install the client software using a Netscape file browser. To add a file type to the MIME map using IIS:
1. Select the virtual directory that corresponds to the WebServerComponents directory on your web server.
2. Click the Action button, and select Properties from the drop-down menu.
3. In the Properties dialog box, select the HTTP Headers tab, click the File Types button, then click the New Type button. The File Type dialog box appears.
4. Enter .jar in the Associated Extension field.
5. Enter application/java-archive in the Content Type (MIME) field. For information on MIME types, see your IIS documentation.
6. Click OK three times.
106 — Monitoring and Managing the IRM Server

Changing the Default Access Denied ImageThe WebServerComponents directory contains the following image that can appear on web pages when users access an image protected with a policy that does not allow them access to the page. You can optionally change this image to one that is specific to your organization.
To replace the default access denied image:
1. Create your own image in each of the following supported image formats: jpg, gif, bmp, and png.
2. Name the files NRAccessDenied.jpg, NRAccessDenied.gif, NRAccessDenied.bmp, and NRAccessDenied.png.
3. Copy the image files into the WebServerComponents directory on your web server.
Overview of Trusted Plug-InsSince it is possible that a user could create a plug-in for Adobe Acrobat that tries to extract protected information from PDF documents, you can add a list of Adobe Acrobat plug-ins that you consider trusted to the IRM Server. These are called trusted plug-ins. The IRM Server only checks for trusted plug-ins if a user accesses a protected PDF document. It does not enforce trusted plug-ins when a user accesses a protected e-mail message or web page. When the user logs in, the IRM Server checks for Adobe Acrobat plug-ins on the user’s machine that have not been listed as trusted by the administrator. If the server finds plug-ins installed on the client machine that are not listed on the IRM Server, IRM Client for Adobe Acrobat denies access to the document, even if the user provided a valid account and password.
If you want to specify a list of trusted plug-ins, you must first select the Enforce Trusted Plug-Ins option in the IRM Server’s Parameters tab in the Server Configure application then restart the server. For information on setting this option, see the IRM Server Installation Guide for your operating system. You also need to instruct users installing the IRM Client for Adobe Acrobat to select the Enable Trusted Plug-Ins option during the IRM Client for Adobe Acrobat installation. For more information, see the IRM Client for Adobe Acrobat Release Notes.
Monitoring and Managing the IRM Server — 107
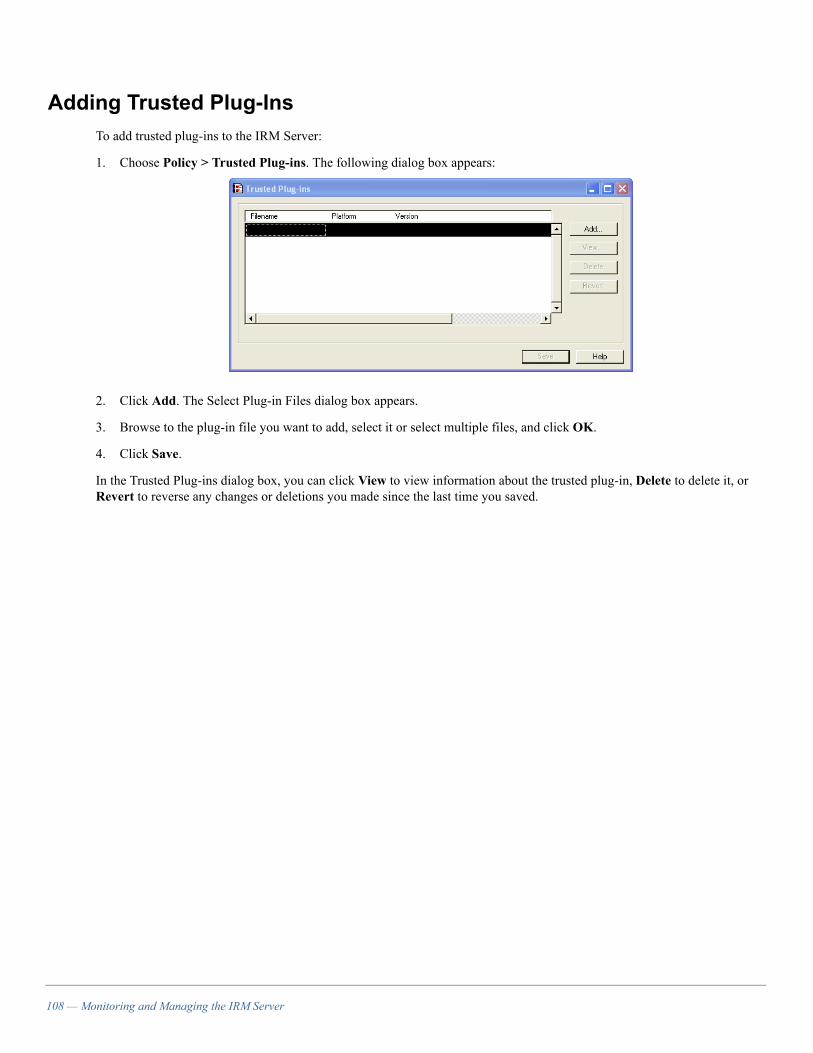
Adding Trusted Plug-InsTo add trusted plug-ins to the IRM Server:
1. Choose Policy > Trusted Plug-ins. The following dialog box appears:
2. Click Add. The Select Plug-in Files dialog box appears.
3. Browse to the plug-in file you want to add, select it or select multiple files, and click OK.
4. Click Save.
In the Trusted Plug-ins dialog box, you can click View to view information about the trusted plug-in, Delete to delete it, or Revert to reverse any changes or deletions you made since the last time you saved.
108 — Monitoring and Managing the IRM Server
Chapter 12Setting Up a Sample Security Hierarchy
This chapter guides you through the creation of an example security hierarchy. It illustrates the IRM Server’s ability to provide your organization with multiple levels of highly-manageable security. You can use these guidelines to set up your own security hierarchy. If you need example information on setting up users for IRM Client for E-Mail or IRM Extranet Server, see “Chapter 13, Deploying IRM Client for E-Mail and IRM Extranet Server.”
Defining Your Security NeedsThe first step in setting up a security hierarchy for your organization is defining your security needs. You should ask yourself the following questions:
• What global network and time specifications do you want to allow or deny when users attempt to log in to the IRM Server?
• With what type of authentication method do you want users to authenticate with the IRM Server?
• If you organized your entire organization into groups based on levels of security, how many groups would you have, how would you name the groups, and what rights would each group have?
• Is there anyone in your organization who must have access to all information, at all times?
• Are there any other authorizations or permissions that apply to everyone in your organization? For example, do users need to view information while offline?
• Do you want to keep the keys to expired content on the IRM Server for a set length of time so you can access the expired content again, if necessary?
• What level of security would your organization like to have for most protected documents?
To illustrate how to set up a sample security hierarchy, let us assume you answered these questions with the following responses:
• You want to allow access to the IRM Server from all computers in the company network from 5:00 a.m. until 11:00 p.m.
• Users in your organization authenticate with the IRM Server using shared secret passwords.
• Your organization has the following groups: CEO, Administrators, Accounting, All Others.
• You want to allow the CEO to access all protected content during the times that the IRM Server allows.
• You want the name of your organization to appear as a watermark across the top of protected documents.
• You want to keep the keys to expired content on the IRM Server for 90 days after users create protected content so you can access the content again if it expires in less than 90 days.
• By default, when users protect documents, you only want them to view protected documents and pages. You do not want to permit users to print or copy protected content. You only want users to access protected documents from your own organization’s network on Monday through Friday between 9 a.m. and 5 p.m.
You can make this security hierarchy a reality by setting it up in IRM Server Administrator. You must have full administrator rights to perform the procedures in this chapter.
Setting Up a Sample Security Hierarchy — 109

Creating Network Entities and Time SpecificationsIn your example organization, you must first create the global network entities and time specifications to add to the login restrictions and groups. To create network entities and time specifications:
1. Choose Policy > Network Entities and create a global network entity called my company. For more information on creating network entities, see “Creating Network Entities” on page 25.
2. Choose Policy > Time Specifications and create a global time specification called workdays and set the time as Monday through Friday from 9:00 a.m. to 5:00 p.m. For more information on creating time specifications, see “Creating Time Specifications” on page 26.
3. Create another global time specification called long workdays and set the time as Monday through Friday from 5:00 a.m. to 11:00 p.m.
Setting Login RestrictionsThe IRM Server enforces any login restrictions for all users connecting to the IRM Server, regardless of what other policies specify. In your example organization, you want to allow access to the IRM Server from all computers in the company network from 5:00 a.m. until 11:00 p.m. To set the login restrictions:
1. Choose Policy > Login Restrictions. By default, an asterisk (*) appears under Network and Time with a check under Login to indicate that users can connect to the IRM Server at all network entities and times.
2. Select the existing row and click Delete to delete this row and add your own login restrictions.
3. Click Add. The Add Login Rule dialog box appears.
4. Select the my company network entity you created in the Select Network Entity field.
5. Select long workdays in the Select Time Specifications field.
6. Select Allow and click OK. The following dialog box appears:
110 — Setting Up a Sample Security Hierarchy

Creating Group RightsGroup rights allow you to easily manage large numbers of users by separating them into logical groupings. Your organization would has the following groups:
• CEO
• Administrators
• Accounting department
• All Others
Users in your organization authenticate with the IRM Server using shared secret passwords. The shared secret password (\\pvserver) authentication domain already automatically exists. If users authenticate using any method other than a shared secret password, you must set up an authentication domain, as described in “Chapter 5, Managing Users and Groups.”
To create and set up the CEO group with one member, your CEO, who has rights to access all company information at all times:
1. Choose Users > Groups.
2. Click Add.
3. Enter the name CEO and a description for the group.
4. Select Members of from the drop-down menu in the Membership section to add members to a group.
5. Click Add, select the shared secret user (\\pvserver) domain and click Find Now to list all the users in that domain under the Select User Name field. Then select the user that is your CEO and click OK.
You do not set any network entities or time restrictions because the CEO can access the IRM Server from any network during the times the login restrictions allow. You also do not set valid or expire dates because the CEO is always a valid user with no set expiration date.
6. Select View, Print, Select Text and Graphics, Protect, Protect with Guest Access, Delete Own, and Expire. This gives the CEO the ability to perform all these activities in relation to protected content.
7. Set Maximum Lease Duration (days) to 10 days so the CEO can access the protected content offline.
8. Click Admin Rights and select Read-Only in all the Access Rights fields. Select No in the Delete Any Content and the Full Administrator fields. As CEO, this user has the right to view all company information. However, the CEO wants to leave the ability to modify or delete the information with the administrators.
9. Click OK and Save.
The Administrators group has two members. One from each of the other two groups: Accounting and All Others. This allows the accounting department to have one person who administers the information for that department. To create and set up the Administrators group:
1. Choose Users > Groups.
2. Click Add.
3. Enter the name Administrators and a description for the group.
4. Select Members of from the drop-down menu in the Membership section to add members to a group.
Setting Up a Sample Security Hierarchy — 111

5. Click Add, select the shared secret user (\\pvserver) domain and click Find Now to list all the users in that domain under the Select User Name field. Then select users that you want to be administrators and click OK.
You do not set any network entity or time restrictions because the administrators can access the IRM Server from any network during the times the login restrictions allow. You also do not set valid or expire dates because the administrators are always valid users with no set expiration date. You do not set any content permissions because administrators do not view or protect content.
6. Click Admin Rights and select Read-Write in all the Access Rights fields. Select Yes in the Delete Any Content field. Select No in the Full Administrator field. (Selecting Yes would allow them to grant administrative rights to other groups.) These administrators have rights to view, modify, change the owner of, and delete all the information on the server. However, they only plan to use the right to modify the information for their individual departments. The Access Rights for Group dialog box appears as follows:
7. Click OK and Save.
The Accounting group includes the entire Accounting department. To create and set up the Accounting group:
1. Choose Users > Groups.
2. Click Add.
3. Enter the name Accounting and a description for the group.
4. Select Members of from the drop-down menu in the Membership section to add members to a group.
5. Click Add, select the shared secret user (\\pvserver) domain and click Find Now to list all the users in that domain under the Select User Name field. Then select users in the accounting department and click OK.
6. Select Time Restrictions, click Add, and select workdays. This allows users in the group access to the server only between the hours of 9 a.m. and 5 p.m., Monday through Friday. Do not set valid or expire dates because the administrators are always valid users with no set expiration date.
7. Select View, Print, Select Text and Graphics, Protect, Delete Own, and Expire. This gives the members of the Accounting department the ability to perform all these activities in relation to protected content.
Leave Maximum Lease Duration (days) at zero (0) so the Accounting department cannot access protected content while offline. Do not click Admin Rights; instead, leave the None default setting. Delete any Content and Administrator Rights have No selected. This gives the members of the Accounting department no administrative rights. Members can only modify their own document policy templates and e-mail and document policies. They cannot create global document policy templates, change the owner of a policy, or delete the policies of other owners.
112 — Setting Up a Sample Security Hierarchy

The All Others group includes all employees. Those users who are part of other groups you set up, have the rights of those groups and the All Others group. Those who are not members of any other group only have the rights in this group. To create and set up All Others group:
1. Choose Users > Groups.
2. Click Add.
3. Enter the name All Others and a description for the group.
4. Select Everyone from the drop-down menu in the Membership section to add all users who can connect to the IRM Server.
5. Select Time Restrictions, click Add, and select workdays. This allows users in the group access to the server only between the hours of 9 a.m. and 5 p.m., Monday through Friday. Do not set valid or expire dates because all employees are always valid users with no set expiration date.
6. Select View, but leave Print, Select Text and Graphics, Protect, Protect with Guest Access, Delete Own, and Expire deselected. This gives the members of the All Others group the ability to view protected documents only. They cannot edit or delete their own document policy templates and e-mail or document policies.
Leave Maximum Lease Duration (days) at zero (0) so the All Others group cannot access protected content while offline. Do not click Admin Rights; instead, leave the None default setting. Delete any Documents and Administrator Rights have No selected. This gives the members of the All Others group no administrative rights. Members can only modify their own document policy templates and e-mail or document policies. They cannot create global document policy templates, change the owner of a policy, or delete other owners policies. The Add Group dialog box appears as follows:
Setting Up a Sample Security Hierarchy — 113

You just set up the general structure of the group hierarchy for your sample organization. Any users who belong to the groups that can protect documents (all groups except the All Others group) can create, edit, or delete their own document policy templates, e-mail policies, and document policies. However, if a user creates a document policy that grants levels of access that are not appropriate, you can access the policy and change the permissions. To have complete control over the policy, change the owner to yourself. You can also edit the policy or change the owner of a policy for protected e-mail messages. To access policies for protected content, see “Chapter 7, Setting Up E-Mail Users and Addresses” and “Chapter 8, Setting Up Policies for Documents.”
Setting Server RestrictionsThe IRM Server enforces any server restrictions regardless of what other policies specify. Since this policy is strictly enforced, it is recommended that you set this policy with the least number of restrictions. In your example organization, you need to set the server restrictions to ensure that your CEO group can access all the information on the server at all times and to ensure that your company watermark appears on all documents. You also want to keep the keys to expired content on the IRM Server for 90 days after users create protected content so you can access the content again if it expires in less than 90 days. To set up your server restrictions:
1. Choose Policy > Server Restrictions.
2. Select Users and Groups. Click Add. The Add Policy User or Group dialog box appears.
3. Select CEO from the Group Authentication Domains drop-down list to specify that the CEO group has access to all protected content.
4. Select Allow at the bottom of the dialog box then click OK.
5. Select the Print permission to ensure that when groups and protected content allow printing, users can print protected content.
6. Select the Select text and graphics permission to ensure that when groups and protected content allow selecting text and graphics, users can copy and paste protected content.
7. Enter 10 in the Maximum Lease Duration (days) field so authorized groups can access protected content offline for 10 days when the protected content allows printing.
8. Specify a watermark by choosing it from the drop-down list in the Watermarks field. The watermark appears when a protected document is printed.
9. Select Retain key for minimum of and enter 90 as the number of days.
10. Leave the default settings for Refresh offline access.
11. Leave Expire e-mail messages deselected.
114 — Setting Up a Sample Security Hierarchy

12. Click OK. The server restrictions appear as follows:
13. Click Save.
Creating a Document Policy TemplateYou should have at least one document policy template that IRM client users can select when protecting documents. Since the template may cover the majority of protected content, it should represent the level of security that you want to put in place for most information. In your example organization, you want the template to prevent users from cutting and pasting and printing protected documents. You also want to make sure that users can access these protected documents only from 9 a.m. to 5 p.m., Monday through Friday and only from the company network. To create your template:
1. Choose Policy > Policy Templates.
2. Leave Print deselected since you do not want users to print content protected with this template. This allows your organization to maintain control of the distribution of all protected information.
3. Leave Select Text and Graphics deselected. This denies copying and pasting of content protected with this template.
4. Leave Guest Access deselected. This means that users must log in to the IRM Server to access protected content.
5. Set the Maximum Lease Duration (days) field to 10 so authorized users can access protected content while offline. The only users who can take advantage of this permission are those who belong to groups (for example, the CEO group) that have this same permission. For more information, see “Working Offline” on page 20.
6. Leave the Watermark field set to none. You already selected one watermark in the server restrictions, so you do not need to set another one.
7. Leave the Users and Groups Authorization set to the default setting of allow all others. All employees can view content protected with the template.
Setting Up a Sample Security Hierarchy — 115
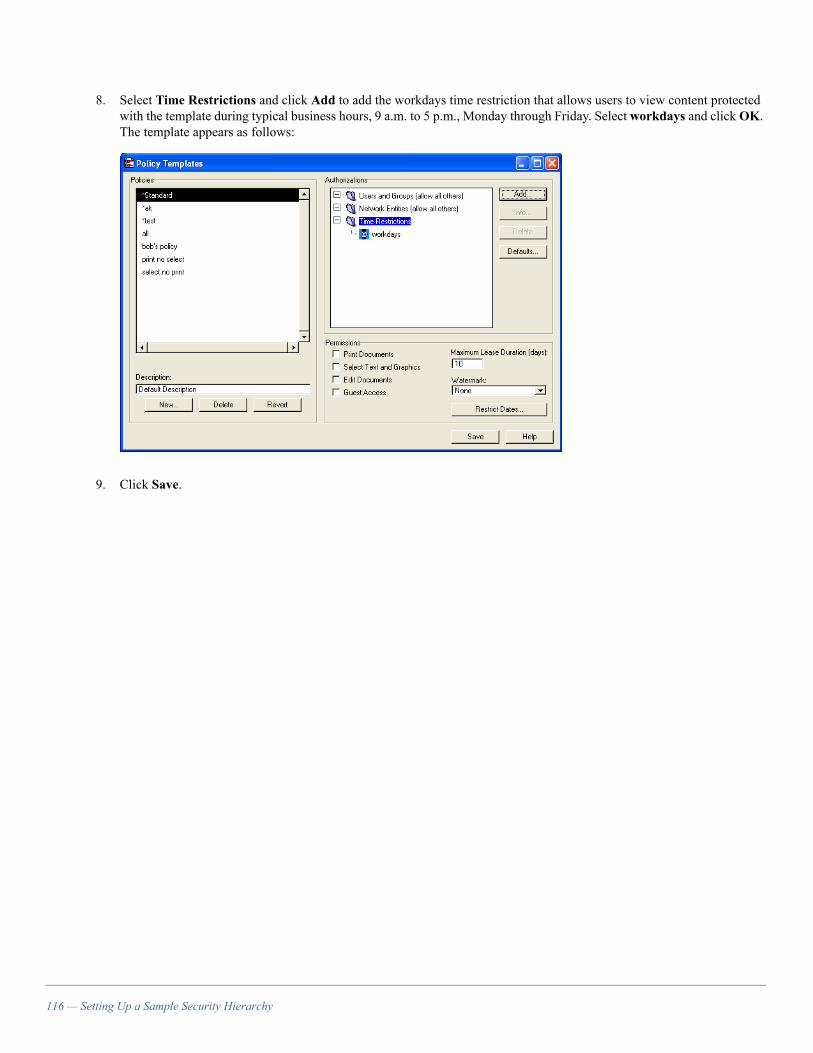
8. Select Time Restrictions and click Add to add the workdays time restriction that allows users to view content protected with the template during typical business hours, 9 a.m. to 5 p.m., Monday through Friday. Select workdays and click OK. The template appears as follows:
9. Click Save.
116 — Setting Up a Sample Security Hierarchy

Chapter 13Deploying IRM Client for E-Mail and IRM Extranet Server
This chapter describes how to deploy IRM Client for E-Mail and IRM Extranet Server. It helps you devise a deployment strategy for either application or both applications and then provides an overview of the tasks involved in deploying each. It also describes two example deployment procedures. The first example procedure, “Deploying IRM Client for E-Mail at Acme Trust” on page 119, shows how a fictitious corporation set up IRM Client for E-Mail. The second example procedure, “Deploying IRM Extranet Server at XYZ Agency” on page 125, shows how a fictitious government organization set up IRM Extranet Server for automatic e-mail protection. You can use these example procedures as guidelines to help you set up e-mail protection in your own organization.
Planning a Deployment StrategyWhen planning to protect e-mail using the IRM products, you must first determine which e-mail protection method suits your organization best. You have to decide if you should rely on your internal users to protect e-mail at their discretion, or if you should implement automatic e-mail protection on your organization’s mail server. IRM Client for E-Mail is the solution when you want internal users to protect their own e-mail messages. IRM Extranet Server is the solution for automatic e-mail message protection.
Some organizations may choose to use both IRM products. For example, you may allow the executives in your organization to protect the e-mail messages they consider confidential using IRM Client for E-Mail, but also set up IRM Extranet Server to protect all e-mail messages sent by any member of your organization to a partner corporation. Your executives, or another group in your organization, could log in to the IRM Server and protect e-mail messages using their Windows domain user names and passwords, and partners could log in to the IRM Server and open protected messages using a shared secret password account automatically created when they open their first protected e-mail message.
This diagram shows how IRM Client for E-Mail and IRM Extranet Server could function in this example:
Deploying IRM Client for E-Mail and IRM Extranet Server — 117
Overview of Deploying IRM Client for E-MailIf your organization plans to use IRM Client for E-Mail, there are several things you must do to set it up for internal users, who are part of your organization, and external users, who access the IRM Server from outside of your firewall:
• Decide for both internal and external users if you want them to only view protected e-mail messages, or to view protected e-mail messages and protect their own e-mail messages. You can set up installation of either the IRM Client for HTML or IRM Client for E-Mail, or you can set up an external application to distribute the software. For information on installations, see “Managing Automatic Client Software Installations” on page 105.
• Set up the appropriate login restrictions, authentication domains, groups and users, and server restrictions to allow both internal and external users to log in to the IRM Server. For more information, see “Overview of Login Restrictions” on page 27, “Overview of Authentication Domains” on page 29, “Overview of User and Group Management” on page 45, and “Overview of Server Restrictions” on page 59.
• Manually map or set up unmapped e-mail address rules for both internal and external users. This associates the user accounts on the IRM Server with the e-mail addresses of users and allows recipients to open protected e-mail messages. Some unmapped e-mail address rules send the recipient a Welcome message, in addition to their protected e-mail message, the first time they receive a protected message. For more information, see “Mapping Known E-Mail Addresses” on page 65 and “Setting Unmapped E-Mail Address Rules” on page 70.
How you choose to handle these tasks depends on your organization’s security needs. For an example of how one organization chose to set up IRM Client for E-Mail, see “Deploying IRM Client for E-Mail at Acme Trust” on page 119.
Overview of Deploying IRM Extranet ServerIf you plan to use IRM Extranet Server, there are several things you must do to set it up:
• Decide if you want any users to protect e-mail messages on their desktops using IRM Client for E-Mail or if you want to protect all e-mail messages automatically using IRM Extranet Server. You can set up installation of either the IRM Client for HTML or IRM Client for E-Mail, or you can set up an external application to distribute the software. For information on installations, see “Managing Automatic Client Software Installations” on page 105.
• Set up the appropriate login restrictions, authentication domains, groups, users, and server restrictions on the IRM Server. This allows both internal and external users to log in to the IRM Server. For more information, see “Overview of Login Restrictions” on page 27, “Overview of Authentication Domains” on page 29, “Overview of User and Group Management” on page 45, and “Overview of Server Restrictions” on page 59.
• Manually map or set up unmapped e-mail address rules for both internal and external users. This links the user accounts on the IRM Server with specific e-mail addresses and allows users to open protected e-mail messages. Some unmapped e-mail address rules send the recipient a Welcome message, in addition to their protected e-mail message, the first time they receive a protected e-mail message. For more information, see “Mapping Known E-Mail Addresses” on page 65 and “Setting Unmapped E-Mail Address Rules” on page 70.
• Install IRM Extranet Server on a computer that has a supported e-mail scanning solution, such as MAILsweeper for SMTP, and set up IRM Extranet Server to protect e-mail. You must set up a shared secret password account in IRM Server Administrator and create an IRM Extranet Server protection path for protecting messages saved to a folder. Configure the e-mail scanning solution to quarantine messages needing protection to the same folder. For more information, see the IRM Extranet Server Help.
How you choose to handle these tasks depends on your organization’s security needs. For an example IRM Extranet Server configuration, see “Deploying IRM Extranet Server at XYZ Agency” on page 125.
118 — Deploying IRM Client for E-Mail and IRM Extranet Server
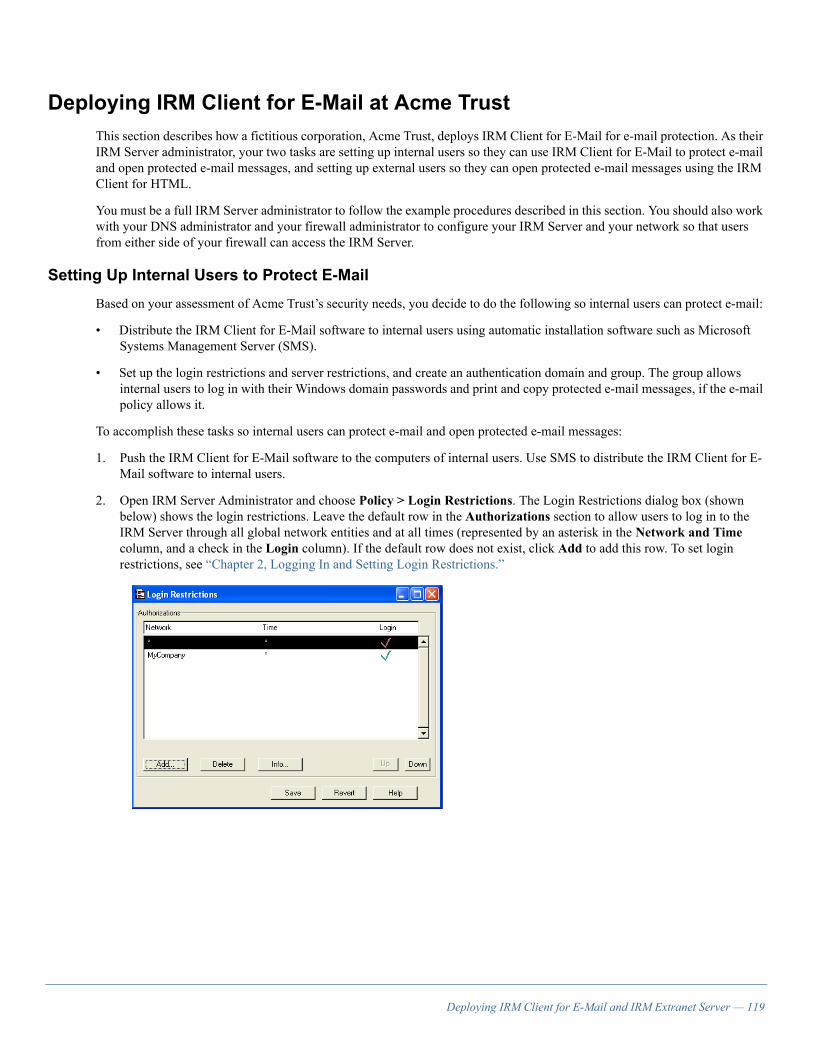
Deploying IRM Client for E-Mail at Acme TrustThis section describes how a fictitious corporation, Acme Trust, deploys IRM Client for E-Mail for e-mail protection. As their IRM Server administrator, your two tasks are setting up internal users so they can use IRM Client for E-Mail to protect e-mail and open protected e-mail messages, and setting up external users so they can open protected e-mail messages using the IRM Client for HTML.
You must be a full IRM Server administrator to follow the example procedures described in this section. You should also work with your DNS administrator and your firewall administrator to configure your IRM Server and your network so that users from either side of your firewall can access the IRM Server.
Setting Up Internal Users to Protect E-MailBased on your assessment of Acme Trust’s security needs, you decide to do the following so internal users can protect e-mail:
• Distribute the IRM Client for E-Mail software to internal users using automatic installation software such as Microsoft Systems Management Server (SMS).
• Set up the login restrictions and server restrictions, and create an authentication domain and group. The group allows internal users to log in with their Windows domain passwords and print and copy protected e-mail messages, if the e-mail policy allows it.
To accomplish these tasks so internal users can protect e-mail and open protected e-mail messages:
1. Push the IRM Client for E-Mail software to the computers of internal users. Use SMS to distribute the IRM Client for E-Mail software to internal users.
2. Open IRM Server Administrator and choose Policy > Login Restrictions. The Login Restrictions dialog box (shown below) shows the login restrictions. Leave the default row in the Authorizations section to allow users to log in to the IRM Server through all global network entities and at all times (represented by an asterisk in the Network and Time column, and a check in the Login column). If the default row does not exist, click Add to add this row. To set login restrictions, see “Chapter 2, Logging In and Setting Login Restrictions.”
Deploying IRM Client for E-Mail and IRM Extranet Server — 119

3. Choose Users > Authentication Domains. In the Authentication Domains dialog box, add a Windows authentication domain with LDAP capabilities called Acme Trust that corresponds to Acme Trust’s Active Directory. When you configure the directory service as part of setting up the authentication domain, set the E-Mail Attribute field in the Directory Properties tab to the attribute name in the directory service that contains the user’s e-mail addresses. The policy handles these users as though they are mapped in the E-Mail Users dialog box, although full mapped entries do not appear in that dialog box. (The e-mail address appears in the Addresses section of the dialog box, but no user or group appears in the Mapped Users and Groups section.) These users are not unknown recipients. Click Save. For more information on creating password domains, see “Adding a Password Domain” on page 30.
120 — Deploying IRM Client for E-Mail and IRM Extranet Server
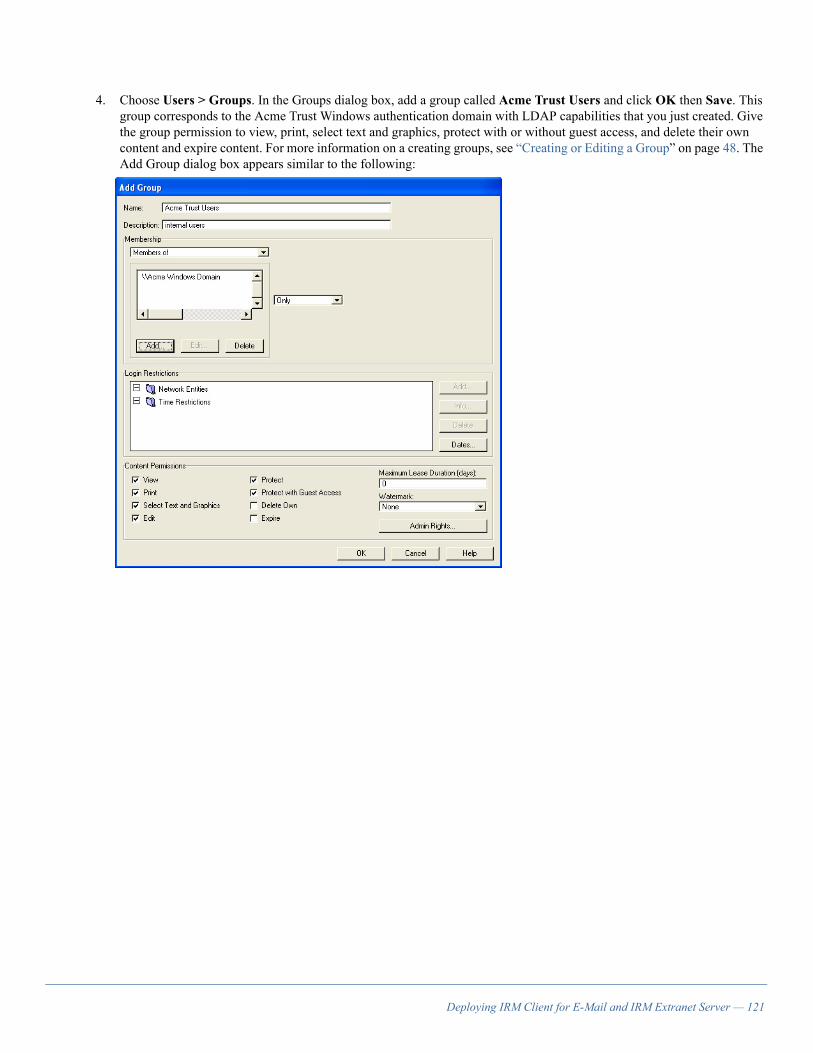
4. Choose Users > Groups. In the Groups dialog box, add a group called Acme Trust Users and click OK then Save. This group corresponds to the Acme Trust Windows authentication domain with LDAP capabilities that you just created. Give the group permission to view, print, select text and graphics, protect with or without guest access, and delete their own content and expire content. For more information on a creating groups, see “Creating or Editing a Group” on page 48. The Add Group dialog box appears similar to the following:
Deploying IRM Client for E-Mail and IRM Extranet Server — 121

5. Open IRM Server Administrator and choose Policy > Server Restrictions. The Server Restrictions dialog box (shown below) shows the authorizations and permissions that govern the entire IRM Server. Leave the Authorizations section as it appears and do not add any specific groups. Select Print, Select Text and Graphics, and Guest Access in the Content Permissions section, and click Save. (Edit does not apply to e-mail policies. Also, you do not want to activate the work offline feature, set a key duration rule for expired content, or expire e-mail messages at set time.) For more information, see “Chapter 6, Setting Up Server Restrictions.”
6. Open IRM Server Administrator and choose Users > Unmapped E-Mail Address Rules. In the Unmapped E-Mail Address Rules dialog box, add the e-mail domain for your company in the E-mail Domains section and select Allow authentication with an existing group, authentication domain, or user and map e-mail address in the Rules section and click Save.
This ensures that any internal recipients with accounts on the IRM Server who are not defined in the Active Directory, can open protected e-mail messages. For information, see “Allowing Authentication with Existing Group, Authentication Domain, or User” on page 68.
122 — Deploying IRM Client for E-Mail and IRM Extranet Server

Setting Up External Users to Open Protected E-MailWhen you set up external users, the server restrictions that you specified when you set up internal users also apply to external users. Based on your assessment of Acme Trust’s security needs, you decide to do the following so external users can open protected e-mail messages:
• Allow automatic installation of the IRM Client for HTML from the EMC web site. This setting applies to all users, both external and internal, who do not have the IRM Client for HTML installed when they receive their first protected e-mail message.
• Set up an unmapped e-mail address rule that allows external users to automatically create shared secret user accounts to log in to the IRM Server, and maps their e-mail addresses to the default shared secret password authentication domain (\\pvserver) when they open their first protected e-mail messages. Then modify the New User Welcome message that external users receive to include the address and telephone number of Acme Trust.
• Send a test message. When you send the test message, the IRM Server automatically creates the Automatically initialized users group. You can then add the Print permission to that group and allow external users to print protected e-mail messages, if the e-mail policy allows printing.
To accomplish these tasks so external users can open their protected e-mail messages:
1. Open IRM Server Administrator and choose Settings > Client Installations. In the Client Installation Settings dialog box (below), select Allow automatic installation of IRM Client for HTML. Leave the download URL in the Web Server Components URL field and click Save. For information on client installation settings, see “Managing Automatic Client Software Installations” on page 105.
Deploying IRM Client for E-Mail and IRM Extranet Server — 123
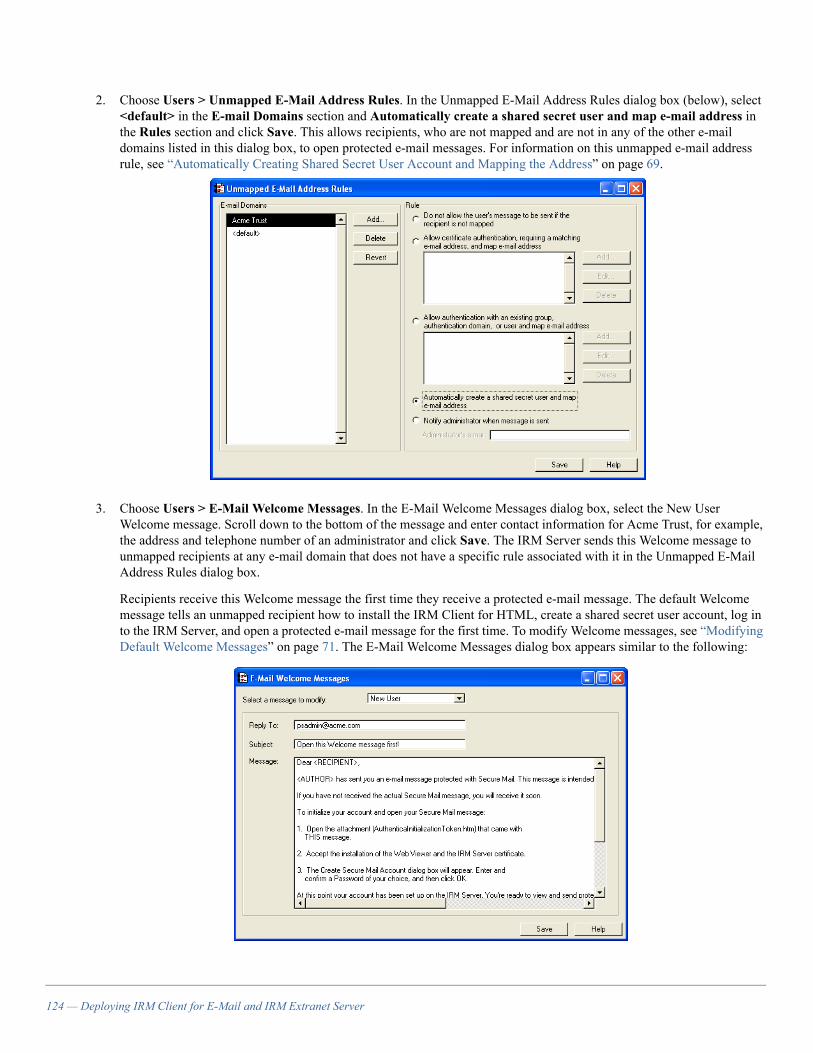
2. Choose Users > Unmapped E-Mail Address Rules. In the Unmapped E-Mail Address Rules dialog box (below), select <default> in the E-mail Domains section and Automatically create a shared secret user and map e-mail address in the Rules section and click Save. This allows recipients, who are not mapped and are not in any of the other e-mail domains listed in this dialog box, to open protected e-mail messages. For information on this unmapped e-mail address rule, see “Automatically Creating Shared Secret User Account and Mapping the Address” on page 69.
3. Choose Users > E-Mail Welcome Messages. In the E-Mail Welcome Messages dialog box, select the New User Welcome message. Scroll down to the bottom of the message and enter contact information for Acme Trust, for example, the address and telephone number of an administrator and click Save. The IRM Server sends this Welcome message to unmapped recipients at any e-mail domain that does not have a specific rule associated with it in the Unmapped E-Mail Address Rules dialog box.
Recipients receive this Welcome message the first time they receive a protected e-mail message. The default Welcome message tells an unmapped recipient how to install the IRM Client for HTML, create a shared secret user account, log in to the IRM Server, and open a protected e-mail message for the first time. To modify Welcome messages, see “Modifying Default Welcome Messages” on page 71. The E-Mail Welcome Messages dialog box appears similar to the following:
124 — Deploying IRM Client for E-Mail and IRM Extranet Server

4. Open your mail application and send a test protected e-mail message to an e-mail address at an e-mail domain that does not have a specific rule associated with it. IRM Server Administrator automatically creates a group called Automatically initialized users, containing the test user. To modify the permissions of this group, open IRM Server Administrator and choose Users > Groups. In the Groups dialog box, select the Automatically initialized users group and edit it to allow users in the group to print protected e-mail messages, if the e-mail policy allows it. Click Save when you finish. For more information on changing group permissions, see “Creating or Editing a Group” on page 48. The Groups dialog box appears similar to the following:
Deploying IRM Extranet Server at XYZ AgencyThis section describes how a fictitious agency, the XYZ Agency, uses IRM Extranet Server for e-mail protection. As their IRM Server administrator, you must set up internal users so they can open protected e-mail messages with the IRM Client for HTML, set up external users so they can open protected e-mail messages from XYZ Agency’s internal users, and set up IRM Extranet Server to protect e-mail.
You must be a full IRM Server administrator to follow the procedures described in this section. When you use IRM Extranet Server, you should work with your organization’s mail administrator to make sure that MAILsweeper for SMTP is properly configured. You should also work with your DNS administrator and your firewall administrator to configure your IRM Server and your network so that users from either side of your firewall can access the IRM Server.
Setting Up Internal Users to Open Protected E-MailBased on your assessment of the XYZ Agency’s security needs, you decide to do the following so internal users can open protected e-mail messages:
• Allow automatic installation of the IRM Client for HTML from the XYZ Agency’s web site. This setting applies to all users, both external and internal, who do not have the IRM Client for HTML installed when they receive their first protected e-mail message.
• Set up the login restrictions, create an authentication domain and group that allows internal users to log in with their certificates and print protected e-mail messages, if the e-mail policy allows printing, and set the server restrictions.
• Set up an unmapped e-mail address rule that allows internal users to use their certificate accounts to log in to the IRM Server and maps their e-mail address to the certificate account when they open their first protected e-mail message.
Deploying IRM Client for E-Mail and IRM Extranet Server — 125

To accomplish these tasks so internal users can open protected e-mail messages:
1. Set up your organization’s web site to allow users to download the IRM Client for HTML from it. Copy the files in the WebServerComponents directory on your IRM Client for E-Mail CD to your web server and create a virtual directory for them called IRMClientforHTML. For information on setting up automatic installations, see “Setting Up Automatic Installations on Your Web Server” on page 106.
2. Open IRM Server Administrator, log in to the IRM Server as an administrator, and choose Settings > Client Installations. In the Client Installation Settings dialog box, select Allow automatic installation of IRM Client for HTML. Enter http://downloads.xyzagency.com/IRMClientforHTML in the Web Server Components URL field and click Save. The Client Installation Settings dialog box appears.
3. Choose Policy > Login Restrictions. The Login Restrictions dialog box shows the login restrictions that govern from where and when all users can or cannot log in to the IRM Server. Leave the default row in the Authorizations section to allow users to log in to the IRM Server through all available global network entities and times (represented by an asterisk in the Network and Time columns and a check in the Login column). If the default row does not exist, click Add to add this row. To set login restrictions, see “Chapter 2, Logging In and Setting Login Restrictions.” The Login Restrictions dialog box appears similar to the following:
4. Choose Users > Authentication Domains. In the Authentication Domains dialog box, add a certificate authentication domain called Certificate and click Save. This refers to the XYZ Agency’s certificate domain. To create certificate domains, see “Adding a Certificate Domain” on page 32. The Authentication Domains dialog box appears similar to the following:
126 — Deploying IRM Client for E-Mail and IRM Extranet Server

5. Choose Users > Groups. In the Groups dialog box, create a group called Certificate Users. Specify enough details in the distinguished name to limit access to users in your company. For example, specify organization or organizational unit. Click OK and Save. This group corresponds to the Certificate authentication domain you just created. Give the group permission to view and print protected content.To create a group, see “Creating or Editing a Group” on page 48. The Add Group dialog box appears similar to the following:
Deploying IRM Client for E-Mail and IRM Extranet Server — 127

6. Choose Policy > Server Restrictions. The Server Restrictions dialog box shows the authorizations and permissions that govern the entire IRM Server and all protected e-mail messages protected with that IRM Server. Leave the Authorizations section set without adding any specific groups. Select Print in the Content Permissions section, and click Save. (You do not want to activate the work offline feature, set a key duration rule for expired content, or expire e-mail messages at a set time.) To set up the server restrictions, see “Chapter 6, Setting Up Server Restrictions.” The Server Restrictions dialog box appears similar to the following:
7. Choose Users > Unmapped E-Mail Address Rules. In the resulting dialog box, add an E-mail Domain called xyzagency.com, select it and select Allow certificate authentication requiring a matching e-mail address, and map e-mail address. Add the Certificate authentication domain and click Save.
128 — Deploying IRM Client for E-Mail and IRM Extranet Server

This option allows certificate domain users to open protected e-mail messages. When an XYZ internal user opens a protected e-mail message for the first time and authenticates with a certificate, the IRM Server maps the e-mail address of the user to the certificate account. For more information, see “Allowing Certificate Authentication Requiring a Matching E-Mail Address” on page 68. The Unmapped E-Mail Address Rules dialog box appears similar to the following:
Setting Up External Users to Open Protected E-MailWhen you set up external users, you can use the same automatic installation of the IRM Client for HTML that you set up for internal users. You can also use the server restrictions that you specified for internal users. Based on your assessment of the XYZ Agency’s security needs, you decide to do the following so external users can open their protected e-mail message:
• Set an unmapped e-mail address rule on the IRM Server that allows external users to create shared secret user accounts and log in, and maps their e-mail addresses to the shared secret password account when they open their first protected e-mail messages. Then, modify the New User Welcome message to include your administrator e-mail address so users can contact you if they need more information.
• Send a test message. When you send a test message, the IRM Server automatically creates the Automatically initialized users group. You can then add the Print permission to that group allowing external users to print protected e-mail messages if the e-mail policy allows printing.
Deploying IRM Client for E-Mail and IRM Extranet Server — 129

To accomplish these tasks so external users can open protected e-mail messages:
1. Open IRM Server Administrator and choose Users > Unmapped E-Mail Address Rules. In the resulting dialog box, select <default> in the E-mail Domains section and Automatically create a shared secret user and map e-mail address in the Rules section and click Save. This allows recipients, who are not mapped and who are not in any of the other e-mail domains listed in this dialog box, to open protected e-mail messages. For more information, see “Automatically Creating Shared Secret User Account and Mapping the Address” on page 69. The Unmapped E-Mail Address Rules dialog box appears similar to the following:
2. Choose Users > E-Mail Welcome Messages. In the resulting dialog box, select the New User Welcome message. Scroll down to the bottom of the message and enter contact information for XYZ Agency, for example, the address and telephone number of an administrator and click Save. The IRM Server sends this Welcome message to unmapped recipients. The default message tells an unmapped recipient how to install the IRM Client for HTML, create a shared secret user account, log in to the IRM Server, and open a protected e-mail message for the first time. For more information, see “Modifying Default Welcome Messages” on page 71. The E-Mail Welcome Messages dialog box appears similar to the following:
130 — Deploying IRM Client for E-Mail and IRM Extranet Server

3. Open your mail application and send a test protected e-mail message to an e-mail address that is unmapped and outside of the XYZ Agency domain. IRM Server Administrator automatically creates a group called Automatically initialized users containing the test user. To modify the permissions of this group, open IRM Server Administrator and choose Users > Groups. In the Groups dialog box, select the Automatically initialized users group and edit it to allow users in the group to print protected e-mail messages, if the e-mail policy allows it. Click Save. For information on changing group permissions, see “Creating or Editing a Group” on page 48. The Groups dialog box appears similar to the following:
Deploying IRM Client for E-Mail and IRM Extranet Server — 131

Setting up IRM Extranet Server to Protect E-MailTo set up IRM Extranet Server to protect e-mail:
• Create an IRM Extranet Server account that is a shared secret password account in IRM Server Administrator and add a group that contains this account.
• Install IRM Extranet Server on a computer that has MAILsweeper for SMTP installed.
• Create an IRM Extranet Server scenario in MAILsweeper for SMTP.
To set up IRM Extranet Server to protect e-mail:
1. Open IRM Server Administrator and choose Users > Shared Secret Users. In the Shared Secret Users dialog box (below), add a shared secret user password account called IRM Extranet Server and click Save. For information on creating shared secret user accounts, see “Creating or Editing Shared Secret User Accounts” on page 45.
132 — Deploying IRM Client for E-Mail and IRM Extranet Server

2. Choose Users > Groups. In the Groups dialog box, create a group called Gateway and click OK and Save. Add the IRM Extranet Server shared secret user account you just created to this group. Select all of the permissions in the Content Permissions section. For information on creating a group, see “Creating or Editing a Group” on page 48. The Add Group dialog box appears similar to the following:
3. Install IRM Extranet Server on the mail server in your organization where MAILsweeper for SMTP is installed. For installation information, see the IRM Extranet Server Release Notes.
4. Open MAILsweeper for SMTP and create an IRM Extranet Server scenario within an outgoing scenario folder that protects all e-mail message going to a partner agency called ABC Agency. When you create an IRM Extranet Server scenario, you:
• Specify the shared secret user account you created in the IRM Server Administrator.
• Define the e-mail policy that determines what recipients can do with protected content.
• Specify the unprotected greeting that appears at the top of a protected e-mail message.
• Specify if you want the sender to receive a copy of the protected message or a read receipt.
• Set a MAILsweeper classification for e-mail messages that fail protection.
For example, set the expiration of messages to 10 days and check the Send Copy to Sender option in the Message Options dialog box so that internal senders receive copies of the protected e-mail messages they send. The first time they get a copy, they can install the IRM Client for HTML, create an account, and log in to open the message. For more information on using IRM Extranet Server, see the IRM Extranet Server Help.
Each time an XYZ agency internal user sends an e-mail message to someone at ABC agency, it passes through MAILsweeper and triggers IRM Extranet Server. The IRM Extranet Server account logs in to the IRM Server, applies the e-mail policy, and protects the contents of the e-mail message before sending it on to its destination. The e-mail message arrives as a protected e-mail message.
Deploying IRM Client for E-Mail and IRM Extranet Server — 133

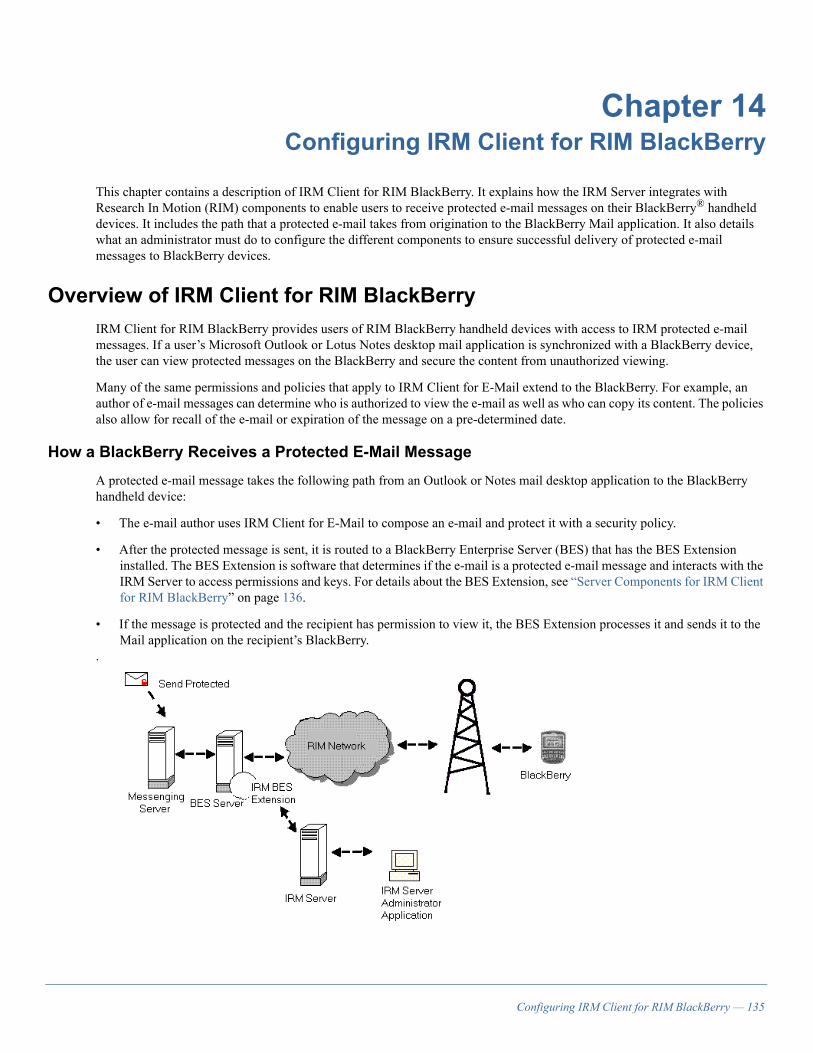
Chapter 14Configuring IRM Client for RIM BlackBerry
This chapter contains a description of IRM Client for RIM BlackBerry. It explains how the IRM Server integrates with Research In Motion (RIM) components to enable users to receive protected e-mail messages on their BlackBerry® handheld devices. It includes the path that a protected e-mail takes from origination to the BlackBerry Mail application. It also details what an administrator must do to configure the different components to ensure successful delivery of protected e-mail messages to BlackBerry devices.
Overview of IRM Client for RIM BlackBerryIRM Client for RIM BlackBerry provides users of RIM BlackBerry handheld devices with access to IRM protected e-mail messages. If a user’s Microsoft Outlook or Lotus Notes desktop mail application is synchronized with a BlackBerry device, the user can view protected messages on the BlackBerry and secure the content from unauthorized viewing.
Many of the same permissions and policies that apply to IRM Client for E-Mail extend to the BlackBerry. For example, an author of e-mail messages can determine who is authorized to view the e-mail as well as who can copy its content. The policies also allow for recall of the e-mail or expiration of the message on a pre-determined date.
How a BlackBerry Receives a Protected E-Mail MessageA protected e-mail message takes the following path from an Outlook or Notes mail desktop application to the BlackBerry handheld device:
• The e-mail author uses IRM Client for E-Mail to compose an e-mail and protect it with a security policy.
• After the protected message is sent, it is routed to a BlackBerry Enterprise Server (BES) that has the BES Extension installed. The BES Extension is software that determines if the e-mail is a protected e-mail message and interacts with the IRM Server to access permissions and keys. For details about the BES Extension, see “Server Components for IRM Client for RIM BlackBerry” on page 136.
• If the message is protected and the recipient has permission to view it, the BES Extension processes it and sends it to the Mail application on the recipient’s BlackBerry.
.
Configuring IRM Client for RIM BlackBerry — 135
Server Components for IRM Client for RIM BlackBerryIRM Client for RIM BlackBerry uses the following server components:
• Messaging Server: Either a Microsoft Exchange server for Outlook mail or a Domino server for Notes mail. The messaging server receives, delivers, and stores the e-mail. The server interacts with the BlackBerry Enterprise Server (BES) to ensure delivery of e-mail to BlackBerry handhelds.
• BlackBerry Enterprise Server (BES): The link between the user’s Messaging Server account and the BlackBerry device.
• BES Extension: An IRM plugin for the BES in the form of a Windows dll file. The Extension determines if a message is a protected message.
If it is a protected message, the Extension communicates with the IRM Server to establish:
— The recipient’s right to view the message along with other permissions.
— The viewing duration for the message.
— A device-specific encryption key.
— The maximum message size.
If this is a protected message, the BES Extension also does the following:
— Removes any attachments in the message sent to the BlackBerry. Note that the attachments are kept in Outlook or Notes.
— Packages the protected message text so that it can be decrypted and displayed securely on the BlackBerry.
—Provides an introductory message to the e-mail letting the BlackBerry recipient know that the message is an IRM protected message and how to view it.
Note: If the recipient is not authorized to view the message, the BES Extension sends a different message indicating that the protected content was not included in the e-mail and advises the recipient to contact the sender for further information.
• IRM Server: The IRM Server and its database maintain the policies and encryption keys relating to protected messages. The IRM Server also stores one key for each BlackBerry device known to it. It contains a mapping of the BlackBerry’s e-mail address to this device-specific key. The IRM Server administrator is responsible for configuring the mapping and setting other options that allow receipt of protected messages on each mapped BlackBerry device. See “Managing RIM BlackBerry User Information” on page 139.
• Mobile Data Service (MDS): Facilitates a secure communication between the IRM Server and the BlackBerry. The MDS acts as a proxy between the two. This allows the BlackBerry to initiate HTTPS-based communications with the IRM Server to extend the amount of time for viewing a protected message. See “Providing MDS with the IRM Server Certificate” on page 138.
136 — Configuring IRM Client for RIM BlackBerry

Configuring Server ComponentsTo use the BES with IRM Client for RIM BlackBerry, you must configure these server components:
• The BES with information about the IRM BES Extension.
• The MDS with the IRM Server certificate.
• The IRM Server with RIM BlackBerry user information and options.
Providing the BES with IRM BES Extension InformationTo process IRM Client for RIM BlackBerry messages, the BES Extension needs information about the IRM Server – its name, port number, and an IRM Server account name and password. You use the IRM Mobile Mail Configuration Utility (ammconfig) to enter this information.
To run the IRM Mobile Mail Configuration Utility:
1. At the command prompt, cd to Program Files\EMC IRM\IRM Client for RIM BlackBerry.
2. Run ammconfig by constructing a command using the following syntax with one or more of the acceptable arguments:
Sample syntax:
ammconfig -server <myirmserver.mycompany.com> -port 443 -user <irmserveradmin> -pwd <irmserveradminpwd> -cachedir “C:\Program Files\EMC IRM\IRM Client for RIM BlackBerry” -attfilename IRM.htm
Arguments:
-server <DNS name of the IRM Server>
-port <port number of the IRM Server>
-user <username of an account with administrator privileges belonging to a group that permits viewing and selecting text>
-pwd <password of the administrator account>
-cachedir <name of directory path where cached message files should be stored>
-attfilename <name of the protected e-mail attachment file>
-help
3. Stop then restart the BES BlackBerry Dispatcher Service.
Note: The IRM Mobile Mail Configuration Utility can be used whenever you want to change one or more of the settings.
Configuring IRM Client for RIM BlackBerry — 137

Providing MDS with the IRM Server CertificateThe MDS service is used with IRM Client for RIM BlackBerry to extend the time limits for viewing a protected message on the BlackBerry. To do this, each BlackBerry device must interact with the IRM Server through the MDS in proxy mode. You set up this interaction by configuring the MDS with the IRM Server certificate so that the MDS trusts the IRM Server.
Note: If the MDS is already configured to Allow outbound connections to untrusted servers over HTTPS, you do not need to provide the MDS with the IRM Server certificate. You should understand that this makes for a less secure environment.
To configure the MDS with the IRM Server’s certificate:
1. On the IRM Server, choose Start > Programs > EMC IRM > IRM Server > Server Configure.
2. Click Configure > Open Server.
3. Select an IRM Server.
4. Enter your password then click OK.
5. From the Server Certificate tab, click View PEM.
6. Click Save As to save the certificate to a PEM file.
7. Browse to a directory, enter a file name then click OK.
8. Copy the PEM file you just created to the java runtime lib\security directory on the MDS server. For example:
Program Files\java\j2re1.4.2_xx\lib\security
9. Use the keytool supplied with java to import the PEM file into the existing cacerts keystore with the following command:
keytool -import -trustcacerts -file <your PEM file name> -keystore cacerts -alias <my IRM Server name>
10. When you are prompted for the keystore password, enter it. The default password for the cacerts keystore is changeit.
11. Verify that your entry has been added to the cacerts keystore by entering one of the following:
keytool -list -keystore cacerts and the password changeit
or to see a single file
keytool -list -keystore cacerts -alias <your alias> and the password changeit
12. Launch the BlackBerry Manager.
13. Right-click on your BES, select the Mobile Data Service Properties option then press Enter. A tabbed dialog box appears.
14. Select the TLS/HTTPS tab.
15. Uncheck Allow outbound connections to untrusted servers over HTTPS. This option should be unchecked so that MDS only does HTTPS with servers that have been explicitly trusted. If you do not uncheck this option, any server will be trusted and the certificate is not needed.
16. Click OK.
17. Start and stop the MDS service.
138 — Configuring IRM Client for RIM BlackBerry

Providing IRM Server SettingsFrom the IRM Server Administrator, you set options that affect the BlackBerry user. These include how long a message on the BlackBerry can be viewed before the IRM Client on the BlackBerry checks with the IRM Server, the required password length, and various informative messages that facilitate the use of IRM Client for RIM BlackBerry. Another important option determines whether or not all BlackBerry handhelds that are synchronized with Outlook or Notes will automatically receive protected messages. The defaults for these options take effect as soon as the BES Extension is configured. To change any default, see “Setting RIM BlackBerry Options” on page 144.
Each RIM BlackBerry user entry is also managed from the IRM Server. For details, see “Managing RIM BlackBerry User Information” on page 139.
Using Keys for Protected E-Mail MessagesTo ensure that an IRM e-mail message is protected, its content is encrypted with a randomly generated key, the message key, that the IRM Server supplies. When the BES Extension receives a protected message, it retrieves the message key from the IRM Server, puts it into the message header along with the policies that apply to the message. The BES Extension then encrypts the message header with another unique key, the device-specific key.
When a BlackBerry receives its first protected message, the IRM Client for RIM BlackBerry software on the BlackBerry uses a key known only to it to decrypt the message header and extract the information that it needs. This includes a new device-specific key, the message ID, the time allowed to view the message, and the message key used to decrypt the message content.
If the IRM Client for RIM BlackBerry software is unable to decrypt messages due to unforeseen message loss or other delivery problems, the software can be reset to its initial state. For information, see “Resetting a Key” on page 143.
To maintain constant security of the protected messages on each BlackBerry, you can renew the device-specific key periodically. For information, see “Renewing a Key” on page 142.
Managing RIM BlackBerry User InformationIRM Client for RIM BlackBerry users need authorization to receive and view protected e-mail messages. For this authorization to occur, you are responsible for maintaining user information on the IRM Server. To manage user information, you can do one or more of the following:
• Find a user’s entry in the RIM BlackBerry list. In addition to the e-mail address, the user’s entry also includes the user’s authorization state and information about current and new keys.
• Add an entry for a user to the RIM BlackBerry list so that the user can view protected e-mail.
• Disable a user’s entry in the list to prevent access to protected e-mail on the BlackBerry.
• Enable (reinstate) a user’s entry in the list if it has been disabled.
• Renew a device-specific key periodically to ensure continued security.
• Reset a key if an authorized user is having difficulty accessing protected content.
Configuring IRM Client for RIM BlackBerry — 139

Finding and Viewing Information about a BlackBerry UserYou can view information about a user such as the user’s e-mail address, the current state of the user’s activity, the date and time when the current key became effective, and, if applicable, the date and time when a new key was created. To find and view information about a user:
1. Choose Users > RIM BlackBerry Users. The RIM BlackBerry Users dialog box appears:
2. To list all of the users, make sure that All appears in the User field. To find a specific user, do one of the following in the User field:
—Select Begins With and enter the beginning text of the e-mail address.
—Select Ends With and enter the ending text of the e-mail address.
—Select Contains and enter a portion of the e-mail address.
—Select Exactly and enter the entire e-mail address.
3. Click Find Now. One or more user entries appear in the RIM BlackBerry Users dialog box.
Adding a User to the RIM BlackBerry ListAdding an entry to the list of RIM BlackBerry users can be done in one of two ways:
• You can have the entry added automatically. If you do this, all of the users who receive e-mail on their BlackBerry handhelds are authorized to receive protected e-mail messages.
• You can add an entry for a user manually. This allows you to choose which users are authorized to receive protected e-mail messages.
To automatically add user entries to the RIM BlackBerry users list:
1. Choose Policy > RIM BlackBerry Options. The RIM BlackBerry Options dialog box appears.
2. Under Auto Initialization, click On.
Any BlackBerry that receives e-mail is automatically authorized to receive IRM protected e-mail. The first time a protected e-mail message is sent to a user’s BlackBerry, a device-specific key is generated and transmitted to the BlackBerry. The user’s e-mail address is automatically added to the RIM BlackBerry Users dialog box.
140 — Configuring IRM Client for RIM BlackBerry

3. Click Save.
To manually add a user to the RIM BlackBerry list:
1. Choose Users > RIM BlackBerry Users. The RIM BlackBerry Users dialog box appears.
2. Click Add.
3. In the Add Mail User dialog box, enter the user’s e-mail address then click OK. The State in the RIM BlackBerry Users dialog box is set to Unknown.
4. Click OK.
5. From the RIM BlackBerry Users dialog box, click Save.
The State changes to Pending until a protected message is sent to the new user. After one message is sent to the new user, the State changes to Normal.
Disabling a User’s EntryTo deny a user access to protected e-mail messages on a BlackBerry, you can disable the entry in the RIM BlackBerry list. If Auto Initialization is set to On, the information about the user will not be reinstated automatically.
To disable a user’s entry:
1. Choose Users > RIM BlackBerry Users. The RIM BlackBerry Users dialog box appears.
2. Select a user’s entry.
3. Click Disable. The Disable message box appears.
4. Click Yes to prevent the user from receiving protected e-mail on the BlackBerry.
Note: The State in the RIM BlackBerry Users dialog box changes to Disabled/Pending or Disabled/Normal. A label of Pending indicates that the IRM Server is waiting for the first protected message to be sent. Normal indicates that message transfer has occurred. If the entry is reinstated, it reverts to the State it was in before it was disabled.
Enabling a User’s EntryTo allow a user to receive protected e-mail messages on a BlackBerry again, you can enable the user’s RIM BlackBerry entry.
To enable a user’s entry:
1. Choose Users > RIM BlackBerry Users. The RIM BlackBerry Users dialog box appears.
2. Select an entry that has been disabled. The State is Normal/Disabled.
3. Click Enable. The Enable message box appears.
4. Click Yes to allow the user to receive protected e-mail on the BlackBerry.
Configuring IRM Client for RIM BlackBerry — 141

Deleting a User’s EntryIf a user is no longer authorized to receive protected e-mail messages on a BlackBerry, you can delete the entry for the user from the RIM BlackBerry list.
Note: If Auto Initialization is set to On, the entry that you deleted will be re-added to the RIM BlackBerry list automatically. To ensure that this does not occur, you should disable the entry instead of deleting it. See “Disabling a User’s Entry” on page 141.
To delete a user’s entry from the RIM BlackBerry list:
1. Make sure that Auto Initialization is set to Off.
2. Choose Users > RIM BlackBerry Users. The RIM BlackBerry Users dialog box appears.
3. Select the user then click Delete. The Delete message box appears.
4. Click Yes.
Renewing a KeySince keys are used to provide encryption and to ensure the security of protected messages on the BlackBerry, it is advisable to renew device-specific keys on a regular basis. After a new device-specific key is renewed, the key is encrypted in the message header and sent with the next protected message to the device. This key then becomes the current, device-specific key. It remains the current device-specific key until there is another key renewal or a key reset is performed.
To renew a key:
1. Choose Users > RIM BlackBerry Users. The RIM BlackBerry Users dialog box appears.
2. Select the entry for the user.
3. Click Renew Key. The Renew Key message box appears.
4. Click Yes to renew the key. A new key is generated. The date and time is added to the user’s information in the RIM BlackBerry User dialog box under New Key Creation Date.
5. Click Save.
142 — Configuring IRM Client for RIM BlackBerry
Resetting a KeyIf an authorized user is unable to open a protected message, the key may have to be reset. Resetting a key removes the current device-specific key and replaces it with a new one in the next protected message sent to the recipient. The recipient and the administrator have to coordinate key resets since there is no information passed between the device and the server when resetting a key.
To coordinate a key reset:
1. Contact the BlackBerry user and ask the user to do the following:
—Go to the main screen of the BlackBerry.
—Scroll to Options or Tools.
—Click the trackwheel.
—Scroll to IRM Client for RIM BlackBerry.
—Click the trackwheel.
—Click Reset Keys.
—Click Yes to respond to the question Encryption keys reset?
—Click OK.
2. After the user has reset the IRM Client for RIM BlackBerry software on the BlackBerry, do the following:
—From the IRM Server Administrator, choose Users > RIM BlackBerry Users. The RIM BlackBerry Users dialog box appears.
—Select the entry for the user.
—Click Reset Key. The Reset Key message box appears.
—Click Yes to reset the key.
A new key is generated. The date and time is added to the user’s information in the RIM BlackBerry Users dialog box under New Key Creation Date.
Reverting ChangesIf you make a change to a user’s entry then decide that you do not want to keep the change, you can revert the change before you save it. You can revert a change to any of the actions (except Find) in the RIM BlackBerry Users dialog box.
To revert a change:
1. After you make a change and before you click Save, select the entries that you do not want to change. (Use Ctrl-Shift to select more than one entry.)
2. Click Revert.
3. Click Save when you are ready to save any information that you have changed.
Configuring IRM Client for RIM BlackBerry — 143

Setting RIM BlackBerry OptionsAfter IRM Client for RIM BlackBerry and the IRM Server Administrator applications are installed, there are some options that you need to set that affect the BlackBerry user. These options include days allowed to view a message before the IRM Client for RIM BlackBerry software checks with the IRM Server, message size, password requirements, and message texts sent to users. Another option enables you to automatically add e-mail addresses for BlackBerry users to the RIM BlackBerry Users dialog box.
To set options for the BlackBerry on the IRM Server:
1. Choose Policy > RIM BlackBerry Options. The RIM BlackBerry Options dialog box appears:
144 — Configuring IRM Client for RIM BlackBerry

2. Accept the defaults or enter information in the following fields:
Viewing Window Duration (days): The number of days that a user can view a protected message before the IRM Client for RIM BlackBerry software checks back with the IRM Server for policy updates. The BlackBerry checks with the IRM Server to find out if there are changes to the policies set for the message. The IRM Server either grants or denies the extension of the viewing window.
Granting the viewing window extension: If the BlackBerry user attempts to access the message after the viewing window has expired, the device automatically checks back with the IRM Server via the MDS and requests renewal of the time limit. The viewing window can only be extended if the user still has permission to access the message. The new window duration reflects changes that the administrator makes to the Viewing Window Duration and/or that the author makes to the expiration date since the message was originally sent or since the last renewal request. A longer viewing window generates less network traffic and load on the IRM Server, but it also reduces the granularity of control over the protected messages viewed on the BlackBerry.
Denying the viewing window extension: If the policy for the message has changed and the user no longer has permission to access the message, the IRM Server responds to the viewing window extension request. The IRM Server sends a message to the application on the BlackBerry denying the extension. The application then informs the user that the message has expired. The e-mail message in the client application’s Inbox is left intact until the user deletes it either from the BlackBerry or from the client application.
Maximum Message Size (kB): The allowable length of the text for an IRM protected message sent to the BlackBerry. If a message exceeds the maximum size, the text is truncated.
Minimum Password Length: The minimum acceptable length of the password required for the user to access the IRM Client for RIM BlackBerry application on the BlackBerry. If the value is zero (0), a password is not required.
Password Timeout (minutes): The number of minutes that the BlackBerry can remain inactive – not used – before the password must be re-entered.
Auto Initialization: An On/Off switch that determines if BlackBerry handhelds should automatically be initialized to receive protected messages.
—On: Any BlackBerry serviced by the BES Extension is automatically initialized to receive IRM protected e-mail. A unique device key is generated and sent to the BlackBerry. The user’s e-mail address is automatically added to the RIM BlackBerry Users dialog box. See “Managing RIM BlackBerry User Information” on page 139.
—Off: Only e-mail addresses for BlackBerry users that the administrator adds manually to the RIM BlackBerry Users dialog box can receive IRM protected e-mail.
Select text to modify: Allows you to change the text that is sent to a recipient when a protected message is delivered or when it cannot be delivered for some reason.
—Normal Text: Descriptive text that is inserted in all protected messages that are successfully processed and sent to a BlackBerry. The text should indicate that the message is a protected e-mail message and instruct the recipient about how to view the protected portion of the message.
—Not Authorized Text: Descriptive text that is inserted in a protected message to indicate that the recipient is not authorized to view the message.
—Error Text: Descriptive text that indicates that an error occurred during processing of the message to be sent. The message can be accessed from the desktop e-mail application.
3. After making changes in the RIM BlackBerry Options dialog box, click Save.
Configuring IRM Client for RIM BlackBerry — 145


Appendix AIRM Server Maintenance Utilities and Reports
The IRM Server comes with utilities that can help you with server maintenance tasks. The server manager utility allows you to shutdown an IRM Server through the command line, roll over your log file, and list and shut off connections to a server. The IRM Server also comes with IRM Server reports that allow you to view activity on the IRM Server. This appendix describes the utilities and how to use them.
Managing the IRM ServerThe IRM Server has a utility that allows you to shutdown an IRM Server through the command line, roll over your log file, and list and shut off connections to an IRM Server. This utility is only available when the IRM Server is installed on a Windows platform.
To run the server manager utility, open a command prompt, go to the bin subdirectory of the directory where you installed the IRM Server, and enter:
pvmanager
Entering this command displays the usage information for the utility. The pvmanager command has the following options: • -server <servername>: Name of the server to manage. Instead of specifying this option, you can include the
PVS_SERVER environment variable in your path. If you declare this variable and specify the -server option, the option overrides the environment variable.
• -id <sessionID>: You can use this option with the killchild argument listed in this section. The sessionID displays when you use the list argument.
• -version: Use this option to display the version of the server manager utility.
The pvmanager command has the following arguments. You can only specify one argument each time you run the command.• list: Lists all the connections to the server. • shutdown: Stops the server.• killchild: Shuts down a specific connection, which you specify using the -id option.• roll-log: Starts a new log file in the log directory of your server.
You can specify these options and arguments as follows:
pvmanager [-server <server>] [list|shutdown|killchild|roll-log][-id <sessionID>]version
For example, to roll over your log file, enter the following at the command line:
pvmanager -server server1 roll-log
Now the log file appears in the log directory of your IRM Server.
IRM Server Maintenance Utilities and Reports — 147
Viewing Activity Using IRM Server ReportsThe IRM Server reports are Active Server Pages (ASP) that extract information from the XML log files that the IRM Server automatically creates each day. The reports allow you to view activity on the IRM Server. If the reports do not provide the information you want to view, you can use them as examples and create your own reports using third-party software tools.
To install the IRM Server reports, perform a custom installation of the IRM Server and select IRM Server reports. For installation instructions, see the IRM Server Installation Guide. The IRM Server reports install to c:\Program Files\EMC IRM\IRM Server\reports.
To view the IRM Server reports:
1. Edit the xmlsource.inc file located in the reports directory using a text editor. Change the xmlSource variable to point to the IRM Server log directory. The path to the log directory is c:\Program Files\EMC IRM\IRM Server\<irmserverdirectory>\log. When you change the xmlSource variable, use forward slashes, for example, var xmlSource="c:/Program Files/EMC IRM/IRM Server/server1/log".
2. Create a virtual directory that points to the reports directory and to add reports.html as the default document using the Microsoft Internet Information Services application. To view the reports home page, open a web browser and enter http://<machinename>/<nameofreportsvirtualdirectory>. For example, if you created a virtual directory called IRMServerReports on a machine named waltham, you would enter http://waltham/IRMServerReports.
For more information on creating a virtual directory and adding a default document, see the Microsoft Internet Information Server (IIS) documentation.
The IRM Server Reports home page (reports.html) lists the following reports:• Viewing activity by day: This report shows daily activity when you select a date or a date range.• Most active viewers by day: This report shows the most active viewers when you enter the number of viewers and select a
date or a date range.• Most viewed documents by day: This report shows the protected content that users view most often when you enter the
number of content items and select a date or a date range.• Specific user activity by day: This report shows the activity for a user name when you enter the user name and select a
date or date range.• Specific message activity by day: This report shows the activity for a specific message when you enter the message
number and select a date or date range.• Viewing activity by hour of day: This report shows the activity for each hour of the day when you select a date or a date
range.• Specific user activity by hour of day: This report shows the activity for each hour of the day for a user name when you
enter a user name and select a date or a date range.• Specific message activity by hour of day: This report shows the activity for each hour of the day for a message when you
enter a message number and select a date or a date range.• Ad Hoc: This report shows activity based on the criteria you choose for the date or date range you select. You can view a
summary (shown as charts) or detail activity (shown as text) for one or more of the following: message number, user name, session ID.
148 — IRM Server Maintenance Utilities and Reports

Glossary
A access control list. (ACL) A list of users or groups who are authorized to read a protected document or file.
account. A collection of information you use to authenticate with the IRM Server.
authentication. The process of validating a user’s identity in order to allow access to secured information.
C certificate. An electronic document that binds the identity of an individual or organization to a public key. It is generated using identifying information, such as name, address, public key. (Also referred to as a digital certificate.)
certification authority. (CA) A trusted third party who generates digital certificates that vouch for the identity of the public key holder.
certificate chain. A list of certificates ordered in such a way that each certificate is certified by the next certificate. The final certificate in the chain is a self-signed certificate that certifies itself. Used together with a user’s public key to identify the user’s identity.
certificate revocation list. (CRL) Supplied by a certificate authority. Lists the certificates that have been prematurely revoked. For example, certificates may be revoked because their private keys have been compromised or the user has left the organization.
client/server protocol. Provides secure communication between a client and the server over the Internet. Allows for either public key or secret key cryptography.
cryptography. The mathematical manipulation of data for the purpose of securing data.
D default policy. A policy used by default when no document policy template is assigned to a PDF document at the time of protection. Only used with versions of IRM Client for Adobe Acrobat prior to V4.1.
DER. (Distinguished Encoding Rules) A binary encoding format used to encode ASN.1 structures. PKCS12 and PKCS10 certificate requests and X.509 certificates are ASN.1 formats that can be encoded as DER. (See also PEM.)
digital certificate. An electronic document that binds the identity of an individual or organization to a public key. Generated using identifying information, such as name, address, public key. (Also referred to as certificate.)
digital signature. A number associated with a message and its sender that can be verified as authentic by others. Only the sender can generate it.
document policy. A policy created by a user that applies to one specific document. It specifies who can access the document, the network entities from which users can access the content, the times when users can access the content, and the activities that can or cannot be performed on the content.
document policy template. A template used to protect content. Contains the security defaults which include who can access content, the network entities from which users can access content, the times when users can access content, and the activities that can or cannot be performed on the content. When applied to a document, the template creates a document policy.
E e-mail policy. A policy that defines what authorized users can do with a protected e-mail message.
encrypt. To encode content for the purpose of securing it. Only users who know the appropriate secret password can decrypt the content and access the original data.
G group. Identifies one or more users and specifies what those users have the authority to do. If a user is in more than one group, the IRM Server combines the rights of all the groups the user belongs to.
Glossary — 149

guest access. A policy setting that allows viewers of protected content to view the content without having to log in to an IRM Server.
I IRM Client for Adobe Acrobat. The Adobe Acrobat plug-in that allows users to protect documents with the IRM Server. It also allows users to view documents that have already been protected.
IRM Client for E-Mail. An application that allows you to create and open protected e-mail messages.
IRM Client for E-Mail Welcome token. An encrypted version of an unmapped recipient’s e-mail address which allows the IRM Server to identify the recipient.
IRM Client for HTML. An application that allows you to open protected e-mail messages or web pages.
IRM Client for RIM BlackBerry. An application that provides users of RIM BlackBerry handheld devices with access to protected e-mail messages sent to their Microsoft Outlook or Lotus Notes desktop mail application.
IRM Extranet Server. An application that integrates with a variety of folder or e-mail based workflows and automatically protects documents and e-mail.
IRM Extranet Server administrator. An administrator who sets up a mail server with MAILsweeper for SMTP and configures it to use IRM Extranet Server.
IRM Server. The central component of the IRM products that manages keys and all records associated with groups and documents.
IRM Server administrator. The user who is in charge of the IRM Server. The administrator can override actions performed by other users.
IRM Server Administrator. The application an IRM Server administrator uses to manage the IRM Server. Can also accessed by users to manage their personal set of policy templates, document policies, network entities, and time restrictions.
K key. Used to encrypt or decrypt data.
L lease. Contains policy information and access keys that allow users to access a protected information offline.
M mutual authentication. A process where two parties verify their identities to each other.
N network entity. Describes a computer, domain, or subnetwork from which the IRM Server may be accessed. Users can each have their own set of network entities.
notification. An action to be performed, such as audio signal or e-mail, when certain types of messages are logged in the IRM Server activity log. Notifications alert the administrator of any suspicious activity.
O offline access. The ability of an IRM client user to work offline if the owner of the protected content granted offline access and if the IRM Server restrictions and group policies permit it.
owner. Users who can modify and manage content policies that they own. An original owner is the user who first protected the content with the IRM Server using an IRM client.
P password. A secret word or phrase used to validate a user’s identity. Works in conjunction with key files or smart cards and the IRM Server to fully authenticate a user’s identity.
PDF. (Portable Document Format) A document format that can be read on any computer (such as, Windows, Macintosh, Unix) using applications such as Adobe Acrobat.
150 — Glossary

PEM. (Privacy Enhanced Mail) The base64 encoding of a DER format, which allows you to send e-mail in ASCII format. (See also DER.)
PIN. (Personal Identification Number) A sequence of characters and numbers used with a SecurID.
policy. Allows restriction of access to content that the IRM Server protects. For example, only a specified group can view content from a specified network between 9:00 a.m. and 5:00 p.m.
private key. Used to decrypt information that has been encrypted using your public key.
protect. The process of registering, encrypting, and assigning an e-mail policy, or document policy template to an e-mail message, document, or web page.
protected content. Any type of information protected with IRM applications.To view this kind of content a user must have a valid key (public or secret), authenticate with the IRM Server, and have authorization.
protected e-mail message. An e-mail message protected by the IRM Server.
proxy. Allows direct Internet access from behind a firewall. Opens a socket on a server and allows communication to the Internet through that socket.
public key. Used to encrypt information that only you can access. It cannot decrypt information; therefore, you can share it with anyone who needs to provide you with sensitive information.
public key cryptography. A method used to encrypt and decrypt information that does not require the author and user to use the same password or key. Includes a key pair made up of a public key and a private key, generated at the same time.
R recipient. A user who receives and views protected e-mail messages.
S secret key cryptography. A method by which data is encrypted and decrypted using the same key.
secure server. The computer where policies, users, user and document groups, security logs, and public/private keys are stored.
sender. A user who sends protected e-mail messages.
server restrictions. Set up by an administrator and used to govern all content registered with a particular IRM Server. Authorizations set in the server restrictions apply to every e-mail message, document, web page and user that accesses information on that server. The server restrictions act as an upper boundary for the level of permission that a sender can grant.
shared secret. Used to authenticate a user to the server and the server to a user. Also used to protect data sent between a user and the server.
signature. Verifies secured data was protected only by someone with knowledge of your private key.
V viewer. A user who only views protected information.
W Welcome message. An e-mail message that is separate from, but comes with, a protected e-mail message and contains information to help users access their first protected message.
Glossary — 151


Index
Symbols% character for variables 94
Aaccess denied image 107accounts
creating 23Active Directory 38activity log
changing 102setting up 101using reports 148viewing 101
administrative rights 57administrator account
creating 23logging in with 23overview 23
allow all others 16ammconfig 137authentication domains 29authentication methods 14authorization 15, 16auto initialization 145automatic installations 106
Bbegin_message keyword 99BES
administrator 13server component 136
BES Extension 135, 136BlackBerry Enterprise Server
See BES
CCAs
importing 32categories 76certificate domains
adding to a group 52creating 32excluding from a group 52with LDAP capabilities 35, 42
Certificate Revocation Listsusing 32
certificatescreating custom mapping expressions 43mapping 42
obtaining 15overview 14using with MDS 138using with the IRM Server 15
client installations 105content
accessing protected 84changing the owner 89deleting 89setting permissions 56
custom mapping 43
Ddefault authorization settings
changing in document policy template 76changing in the default policy 76overview 16
default domains 34default policy
adding items to categories 76creating 74default authorizations 76in hierarchy 16overview 73setting permissions 79
deny all others 16deployment
of IRM Client for E-Mail 117of IRM Extranet Server 117
directory caching 38directory properties 38directory services 36distinguished names 37distribution lists 65document policies
defined 73in hierarchy 15modifying 87
document policy templateadding items to categories 76creating 75default authorizations 76defined 73in hierarchy 15sample setup 115setting permissions 79
documentation viidocuments
searching for 84
Index — 153

setting up policies for 73Documentum 12domains
certificate 32defined 25password 30SecurID 31selecting a default 34Windows 30
Ee-mail address attribute 38e-mail addresses
adding automatically for IRM Client for RIM Blackberry 144
adding for IRM Client for RIM Blackberry 140allowing certificate authentication with matching 68automatically creating shared secret user account and
mapping 69mapping to authentication domain, group, or user 68overview of mapping 65requiring mapping 68
e-mail mailing lists 65e-mail message
changing owner 89expiring 63modifying e-mail policy 86searching for 82
e-mail policiesin hierarchy 15modifying 86
end_message keyword 99eRoom 12Exchange servers 65expiration 62, 63
Gglobal document policy templates 73group membership attribute 38groups
adding members 49administrative rights 57creating 48defined 45editing 48excluding members 49sample setup 111setting content permissions 56setting expiration date 55setting login restrictions 54
guest access 13, 19, 20
Hhierarchy 16
host 25
Iinstallations 105iPlanet Directory Server 38IRM Client for Adobe Acrobat
changing owners 89defined 12deleting 89modifying policies 87searching for 84
IRM Client for E-Maildefined 12sample deployment 117setting up users and addresses 65
IRM Client for HTMLdefined 12installations 106installing 105
IRM Client for Microsoft Officedefined 12modifying policies 87
IRM Client for RIM Blackberryconfiguration utility 137configuring server components 137managing user information 139
adding 140deleting 142disabling 141enabling 141finding 140reverting changes 143viewing 140
overview 135server components 136setting options 144text messages 145
IRM Extranet Serverdefined 12sample deployment 117
IRM products 12IRM Repository Server
defined 12IRM Server
administrator 13connecting offline 20defined 11maintaining 101management 147monitoring 21, 101overview 11protecting content with 13reports 148settings for BlackBerry users 139
154 — Index

use with a BlackBerry 136IRM Server Administrator
defined 12logging in to 23
IRM Services for Documentumdefined 12
IRM Services for eRoomdefined 12
Kkey
device-specific 139message 139renewing 142resetting 143
key duration 62keywords
begin_message 99end_message 99
LLDAP authentication domains
certificate 35creating custom mapping 43creating queries 39LDAP password 35overview 35setting directory properties 38setting up certificate mapping 42setting up search filters 44specifying a directory service 36Windows domains 35
LDAP filters 39, 44LDAP password domains 35leases
managing 21setting duration
for default policy 79for e-mail policies 86for server restrictions 61
logging in as an administrator 23login restrictions 27
adding network entities 27adding time specifications 27sample setup 110setting group 54
Mmailing lists 65mapping
certificates 42creating custom expressions 43e-mail addresses 65unknown recipients 67
MDSadding IRM Server certificate 138definition 136
message block 92, 93messaging server 136Mobile Data Service
See MDSMobile Mail Configuration Utility 137
Nnetwork entities
creating 25defined 25sample setup 110
notifications 103
Ooffline
See leases, working offlineoffline access
overview 20refresh 63
offline access permissiondefined 20
ownerschanging 89defined 13
Ppage number variable 95page policies 87password domains
adding to a group 50excluding from a group 50overview 30
passwords 33, 145permissions 19, 56, 79policies
changing owners 89default 16, 73deleting 89e-mail 15hierarchy 16managing 81overview 73searching for 84
private key 14protected content
changing owners 89deleting 59, 89expiring 59setting key duration 62
public key 14
Index — 155
Qqueries
creating 39defined 35restricting the viewing of results 41setting duration 38testing 40
Rrecipients 13reporting 148restrictions
login 27server 59
SSecure Socket Layer (SSL) 37SecurID domains
adding to a group 51excluding from a group 51overview 31
security 11, 13security hierarchy sample 109senders 13Sendmail servers 65server log 101server manager utility 147server restrictions
accessing 59adding authorization 59expiring e-mail messages 63overview 59refresh offline access 63sample setup 114setting key duration 62setting permissions 61
shared secret domainediting 33managing passwords 33overview 30
shared secret user accountsautomatically creating and mapping e-mail address 69creating 45unlocking 47
special characters 94SSL 37stamp files 92stamping tips
formatting items 99options 98text
color 99
formatting 99placement 99
subnet entity 25
Ttemplates for document policies 73time specifications 26, 110trusted plug-ins
adding 108defined 107viewing 108
Uunmapped recipients
notifying administrator of 69overview 67setting rules for 70
user and group management 45username attribute 38users
adding to a group 50, 51, 52excluding from a group 50, 51, 52who does what 13
Vvalid dates 55variables for defining watermarks
formats for 94using % character 94using a page number 95
viewers 13viewing window 145
Wwatermarks
adding to IRM Server 100creating 99defined 91file formatting tips 98page number variable 95parameters for defining 93parts of 92variables 94
Web pagessearching for 84setting up policies for 73
Welcome messages 71Windows domains 30, 35working offline
overview 20See also offline access
156 — Index