![[Typ hier] [Typ hier] [Typ hier] - Kees van der Westen · INSTALLATION MANUAL - resume Slim Jim Installation manual page 3 Installation resume Check location 1. Check water quality.](https://static.fdocuments.in/doc/165x107/5f1306afc9765c030046c97c/typ-hier-typ-hier-typ-hier-kees-van-der-installation-manual-resume-slim.jpg)
IQSweb Installation Instructions - vdatasys.com · Installation Check List Please use the following...
33
IQSweb Installation Instructions Version 5.0
Transcript of IQSweb Installation Instructions - vdatasys.com · Installation Check List Please use the following...
IQSweb
Installation Instructions Version 5.0

11/15/2017
IQSweb V5.0 Install Instructions
Page 2 of 33
Contents Additional References ....................................................................................................................... 3 IQSweb ROSS Connection ................................................................................................................ 3 IQSweb V5.0 Install/Upgrade Scenarios ........................................................................................... 4 IQSweb Configuration Options ......................................................................................................... 5
A. Single Computer/Server (e.g., laptop, non-networked PC, single networked server) ................ 5 B. Two computers (Web Application and Database Servers) ........................................................ 6 Installation Prerequisites ............................................................................................................... 7 Microsoft .NET Framework 4.5.2 .................................................................................................. 7
Crystal Reports 2013 Runtime ....................................................................................................... 7 Internet Information Services (IIS) ................................................................................................ 7
SQL Server 2008 or higher (or SQL Server Express 2008 or higher) ............................................. 9 Installation Check List ...................................................................................................................... 9 Installation Instructions ....................................................................................................................11
Step 1: Download the IQSweb Installation Files .......................................................................11 Step 2: Make Sure SQL Server Accepts Remote Connections...................................................11
Step 3: Create an Empty IQS Database and User Account in SQL Server .................................16 Step 4: Uninstall the IQSweb Web Service and Application (if upgrading from IQSweb v3.1.2
or earlier) .................................................................................................................................22
Step 5: Install the IQSweb Application .....................................................................................23

11/15/2017
IQSweb V5.0 Install Instructions
Page 3 of 33
Additional References The following documents, which can be downloaded separately, provide additional support for the
installation, upgrade and backup processes used for IQSweb.
IQSweb Reference A – System Security Requirements
This document describes the system requirements the three basic scenarios in which IQSweb
can be configured. Security is discussed for each scenario.
IQSweb Reference B – SQL Server Install Instructions (2008 R2 and Express)
This document contains instructions for installing SQL Server 2008 R2 and SQL Server 2008
R2 Express.
IQSweb Reference C – IQSweb Uninstall Instructions
This document details the steps to un-install any version of IQSweb.
IQSweb Reference D – IQSweb Database Backup/Restore Instructions
If your IT department does not have scheduled periodic backups for your IQSweb database,
this document contains instructions to manually create a backup of your IQSweb database. It
is recommended that you talk to your IT department to understand what backup procedures
are in place before manually backing up your database.
IQSweb Reference E –ROSS Migration/Preregistration
This document outlines the requirements for connecting to ROSS via the web services
interface. This applies to IQSweb V2.0 and higher.
IQSweb Reference F – Export ROSS Certificate
This document lists the steps for exporting a ROSS SSL certificate and then importing it to a
different location. These steps are necessary if you are moving your IQSweb installation
(V2.0 or higher) to a different location and you are currently connecting to ROSS.
IQSweb Reference G – Microsoft Workstation Firewall Settings
This document addresses the Microsoft Windows Workstation Firewall settings related to IIS,
when using Desktop Operating Systems for IQSWeb servers for Windows 7 and later.
Note: If you find errors or other problems during installation, please email or call your IQSweb
representative.
IQSweb ROSS Connection
If you are installing for the first time and intend to send information from IQSweb to ROSS,
reference the IQSweb ROSS Migration document that can be downloaded from
http://www.vdatasys.com/ .

11/15/2017
IQSweb V5.0 Install Instructions
Page 4 of 33
IQSweb V5.0 Install/Upgrade Scenarios Determine the install or upgrade scenario that applies to you in the Upgrade Path below. Then,
follow the guidance in the Special Instructions column before continuing.
Upgrade Path Special Instructions 1. Installing IQSweb for
the first time
Follow the installation instructions.
2. Upgrading from
Legacy IQS V5 or V6
After following the installation instructions, contact your IQSweb
representative for advice on transferring persons between systems.
NOTE: It is recommended that you upgrade to IQS V6 prior to
installing IQSweb. ROSS users must upgrade to V6 prior to installing
IQSweb.
3. Upgrading from
IQSweb V3.1.2 or
lower
Uninstall IQSweb. Be sure to validate the database server and login
information for your existing IQSweb database when prompted for the
location of the database (lines 3, 4, 5 and 6 in the Installation Check List).
Your IQSweb database will be automatically upgraded during the
installation.
4. Upgrading from
IQSweb V4.0.0 or
later
Run the installer. The installer will import the configuration settings,
upgrade the database and application.
5. Re-installing IQSweb Use my existing IQSweb database
o Create a backup of the IQSweb database.
o Uninstall IQSweb.
o Follow the installation instructions as if installing IQSweb for
the first time.
Start with a new IQSweb database
o Follow the instructions for upgrade scenario #1.
Use my Legacy IQS V5/6 database
o Follow the instructions for upgrade scenario #2.
Use my IQSweb database
o Follow the instruction for upgrade scenarios #3 or #4.
6. Moving IQSweb to a
new server
Create a backup of the IQSweb database on the existing server using
Reference F for instruction. Restore the IQSweb database on the new
server, creating a new user account for the IQSweb database. Follow the
installation instructions as if installing IQSweb for the first time with the
exception of Step 3 which can be omitted due to the database already
existing.
11/15/2017
IQSweb V5.0 Install Instructions
Page 5 of 33
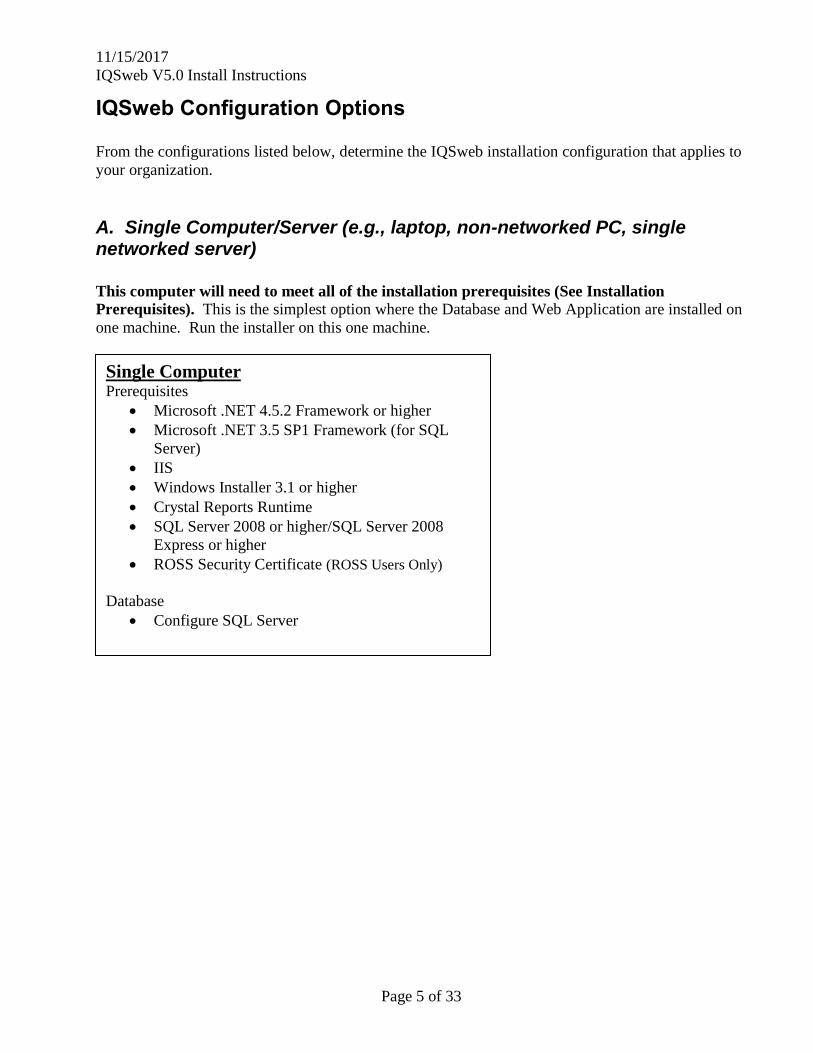
IQSweb Configuration Options
From the configurations listed below, determine the IQSweb installation configuration that applies to
your organization.
A. Single Computer/Server (e.g., laptop, non-networked PC, single networked server)
This computer will need to meet all of the installation prerequisites (See Installation
Prerequisites). This is the simplest option where the Database and Web Application are installed on
one machine. Run the installer on this one machine.
Single Computer Prerequisites
Microsoft .NET 4.5.2 Framework or higher
Microsoft .NET 3.5 SP1 Framework (for SQL
Server)
IIS
Windows Installer 3.1 or higher
Crystal Reports Runtime
SQL Server 2008 or higher/SQL Server 2008
Express or higher
ROSS Security Certificate (ROSS Users Only)
Database
Configure SQL Server
Web Application

11/15/2017
IQSweb V5.0 Install Instructions
Page 6 of 33
B. Two computers (Web Application and Database Servers)
The web application server will need to have the Microsoft .NET 4.5.2 Framework installed. The
database server will need to have Microsoft .NET 3.5 SP1 Framework installed along with SQL
Server 2008 or higher (or SQL Server 2008 Express or higher). The Web server will need to have IIS
and the Crystal Reports Runtime (distributed specifically for IQSweb) installed. Run IQSweb.exe on
the Web Application Server.
Web Application Server Prerequisites
Microsoft .NET 4.5.2
Framework or higher
IIS
Windows Installer 3.1 or
higher
Crystal Reports Runtime
ROSS Security Certificate (ROSS Users Only)
Web Application
IQSweb64.exe (or
IQSweb32.exe)
Database Server
Prerequisites
Microsoft .NET 3.5 SP1
Framework
Windows Installer 3.1 or higher
SQL Server 2008 or higher/SQL
Server 2008 Express or higher
Database
Configure SQL Server

11/15/2017
IQSweb V5.0 Install Instructions
Page 7 of 33
Installation Prerequisites
The following software is required on the appropriate PC or server (based on your configuration
identified in the previous section) before installing the IQSweb software. You will need
administrator rights to the server or PC where IQSweb will be installed. Involve your IT staff if you
need assistance.
If installed, these prerequisites appear in the Add/Remove Programs dialog in the Control Panel with
the exception of the Windows Operating System.
NOTE: IQSweb has a 64-bit and 32-bit versions. If you have a 64-bit operating system, it is highly
recommended to download the 64-bit version of IQSweb and the Crystal Reports Runtime. A 32-bit
version is provided for servers that are 32-bit only. IQSweb will not work with Crystal Reports if
you mix the 32 and 64-bit versions. Solely use 64-bit versions or 32-bit versions. Determine if
you have a 32-bit or 64-bit operating system before downloading perquisite software. If you don’t
know, follow the instructions at http://support.microsoft.com/kb/827218.
Microsoft .NET Framework 4.5.2
NOTE: Higher versions of .NET Framework (e.g. 4.6 or 4.7) will also work with IQSweb.
If installed, appears as ‘Microsoft .NET Framework 4.5.2’
If not installed, download and install from http://www.microsoft.com/en-
us/download/details.aspx?id=42642. If not already installed, this will also install Microsoft
.NET Framework 4.0.
Important NOTES:
o This install may require a reboot of the PC or Server!
o If you are using Windows 2012 or Windows 2012 R2, please download and run the
4.5.2 installer. These versions of Windows include .NET 4.5.1, but 4.5.2 is needed in
addition to run IQSweb.
Crystal Reports 2013 Runtime
If installed, appears as ‘SAP Crystal Reports Runtime Engine for .NET Framework.’ The version
number will be 13.0.13.1597 Crystal Reports Basic for Visual Studio 2008.’
If not installed:
o Download and install the file CRforVS_redist_install_64bit_13_0_13.zip (if doing a 64-
bit installation) or CRforVS_redist_install_32bit_13_0_13.zip (if doing a 32-bit
installation) from http://www.vdatasys.com/
Windows 7 (and later) or Windows Server 2008 (and later)
Right-click on My Computer, click on Properties, and look at the version listed under System to
find your Windows OS version.
Internet Information Services (IIS)
Windows 7, 8, 10: Go to Control Panel->Programs>Programs and Features ->Turn Windows
Features On or Off.
11/15/2017
IQSweb V5.0 Install Instructions
Page 8 of 33
If IIS is installed, there will be a grayed out checkbox by ‘Internet Information Services (IIS)’
in the dialog that appears.
Install by going to Add or Remove Programs in the Control Panel and selecting Add/Remove
Windows Components. Select the Internet Information Services (IIS) checkbox in the dialog
that appears, click Next, and follow the prompts. Note: You may need your Windows
installation cd.
After the installation is complete
o Check to make sure that any firewalls that might be running on the PC or Server are
configured to allow http traffic on TCP port 80.
o Apply any security updates to IIS.
o Please test that IIS is running by starting your browser and going to http://<computer
name>.
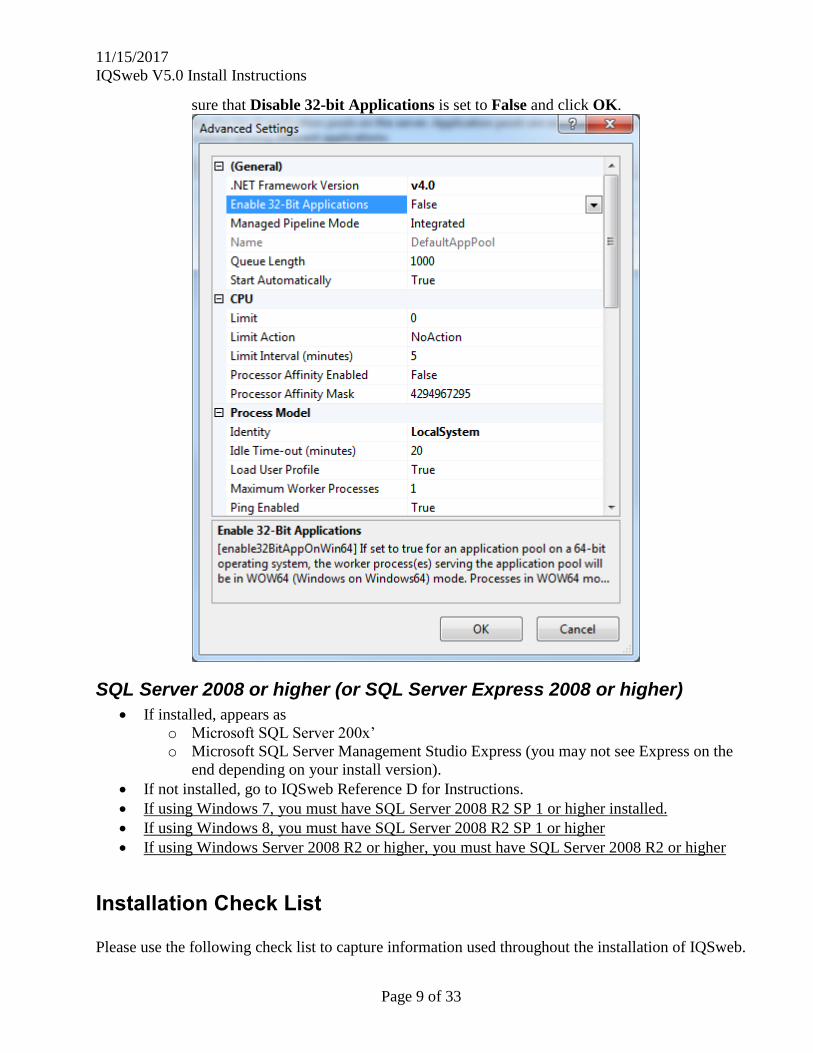
Ensure that the desired application pool has the correct settings for IQSweb. The .NET
Framework version must be set to v4.0 and 32-bit applications must be disabled for a 64-bit
computer.
o Open Internet Information Services (IIS) Manager.
o Go to the Application Pools section.
o Make sure that the desired application pool has a .NET Framework version of
v4.0.30319. This can be changed by selecting the application and clicking on Basic
Settings in the Actions pane.
o To disable 32-bit applications (only applicable for 64-bit computers), select the
desired application pool and click on Advanced Settings in the Actions Pane. Make
11/15/2017
IQSweb V5.0 Install Instructions
Page 9 of 33
sure that Disable 32-bit Applications is set to False and click OK.
SQL Server 2008 or higher (or SQL Server Express 2008 or higher)
If installed, appears as
o Microsoft SQL Server 200x’
o Microsoft SQL Server Management Studio Express (you may not see Express on the
end depending on your install version).
If not installed, go to IQSweb Reference D for Instructions.
If using Windows 7, you must have SQL Server 2008 R2 SP 1 or higher installed.
If using Windows 8, you must have SQL Server 2008 R2 SP 1 or higher
If using Windows Server 2008 R2 or higher, you must have SQL Server 2008 R2 or higher
Installation Check List
Please use the following check list to capture information used throughout the installation of IQSweb.
11/15/2017
IQSweb V5.0 Install Instructions
Page 10 of 33
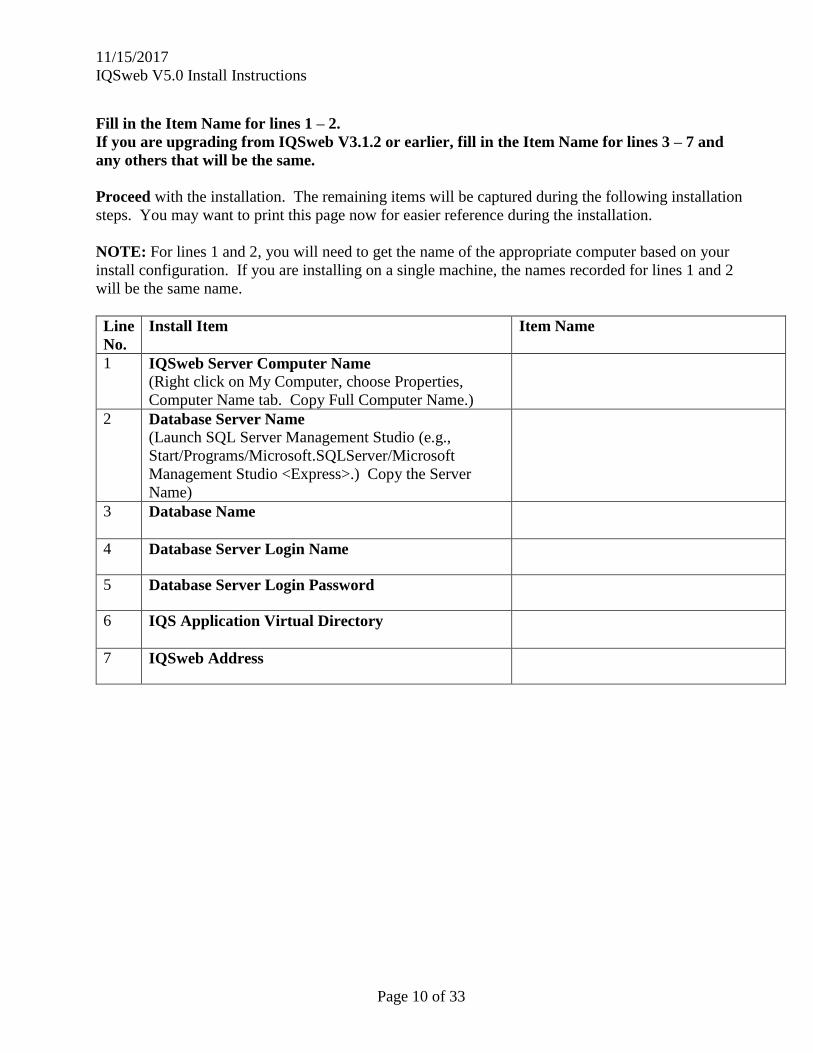
Fill in the Item Name for lines 1 – 2.
If you are upgrading from IQSweb V3.1.2 or earlier, fill in the Item Name for lines 3 – 7 and
any others that will be the same.
Proceed with the installation. The remaining items will be captured during the following installation
steps. You may want to print this page now for easier reference during the installation.
NOTE: For lines 1 and 2, you will need to get the name of the appropriate computer based on your
install configuration. If you are installing on a single machine, the names recorded for lines 1 and 2
will be the same name.
Line
No.
Install Item Item Name
1 IQSweb Server Computer Name
(Right click on My Computer, choose Properties,
Computer Name tab. Copy Full Computer Name.)
2 Database Server Name
(Launch SQL Server Management Studio (e.g.,
Start/Programs/Microsoft.SQLServer/Microsoft
Management Studio <Express>.) Copy the Server
Name)
3 Database Name
4 Database Server Login Name
5 Database Server Login Password
6 IQS Application Virtual Directory
7 IQSweb Address
11/15/2017
IQSweb V5.0 Install Instructions
Page 11 of 33
Installation Instructions
IMPORTANT NOTE:
If an error occurs during installation of the web application, a log file called
IQSWebSetup.log is written to the desktop of the PC from where the installation is running.
Step 1: Download the IQSweb Installation Files
There is one setup file for IQSweb. This file comes in 64 and 32-bit versions. If you are using a 64-
bit operating system, it is highly recommended that you use the 64-bit installer.
Download the IQSweb setup file from IQSweb64.exe from http://www.vdatasys.com in the
Software/Downloads section. (If you are using a 32-bit operating system, download IQSweb32.exe.)
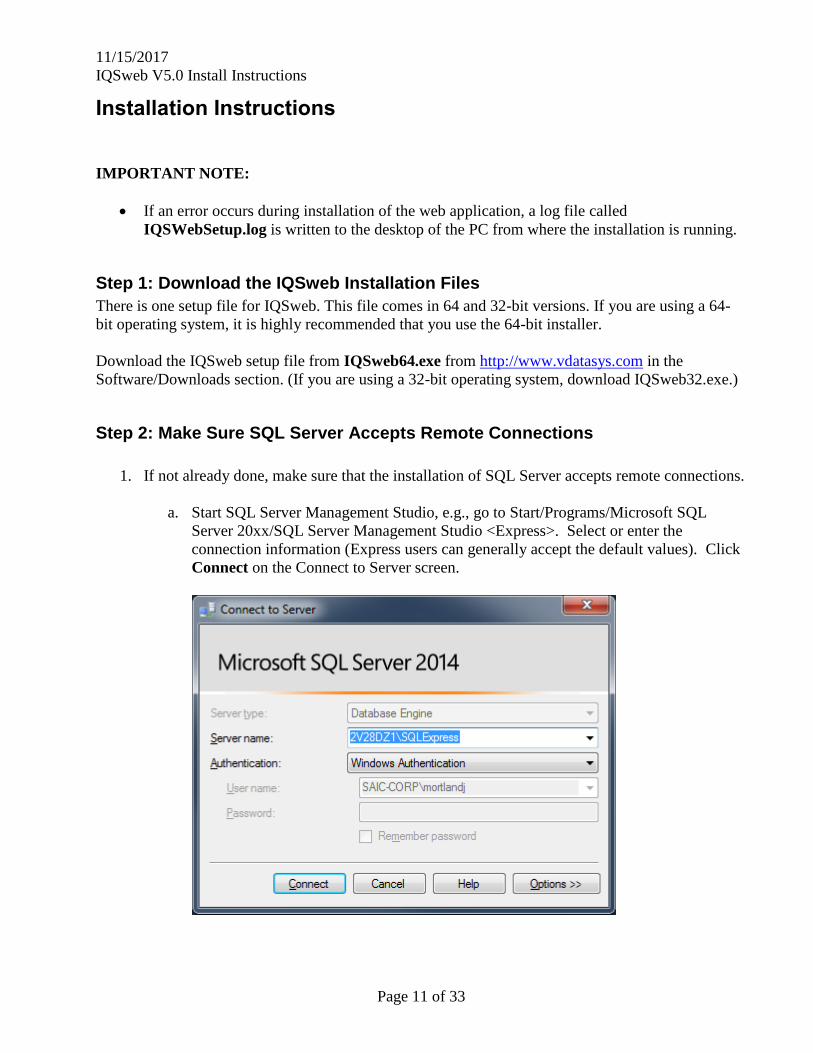
Step 2: Make Sure SQL Server Accepts Remote Connections
1. If not already done, make sure that the installation of SQL Server accepts remote connections.
a. Start SQL Server Management Studio, e.g., go to Start/Programs/Microsoft SQL
Server 20xx/SQL Server Management Studio <Express>. Select or enter the
connection information (Express users can generally accept the default values). Click
Connect on the Connect to Server screen.

11/15/2017
IQSweb V5.0 Install Instructions
Page 12 of 33
b. In the Object Explorer (left panel), right-click on the database server and select
Properties.
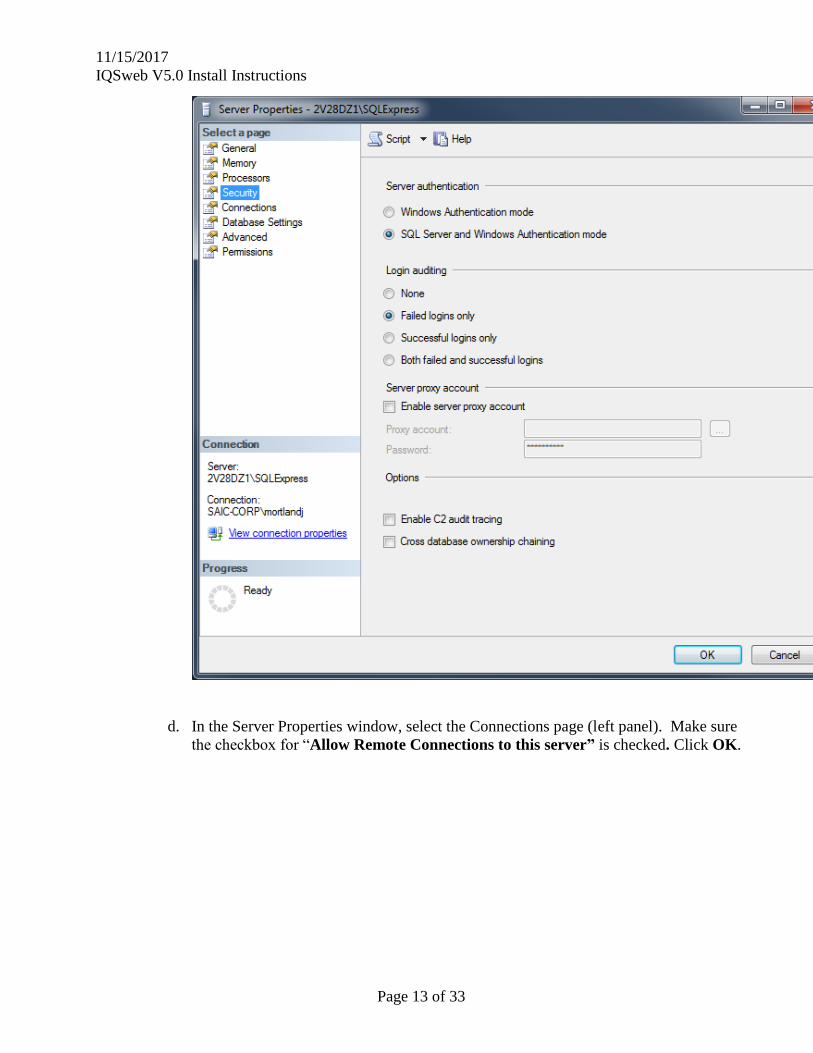
c. In the Server Properties window, select the Security page (left panel). Make sure that
SQL Server and Windows Authentication mode under Server Authentication is
selected.
11/15/2017
IQSweb V5.0 Install Instructions
Page 13 of 33
d. In the Server Properties window, select the Connections page (left panel). Make sure
the checkbox for “Allow Remote Connections to this server” is checked. Click OK.

11/15/2017
IQSweb V5.0 Install Instructions
Page 14 of 33
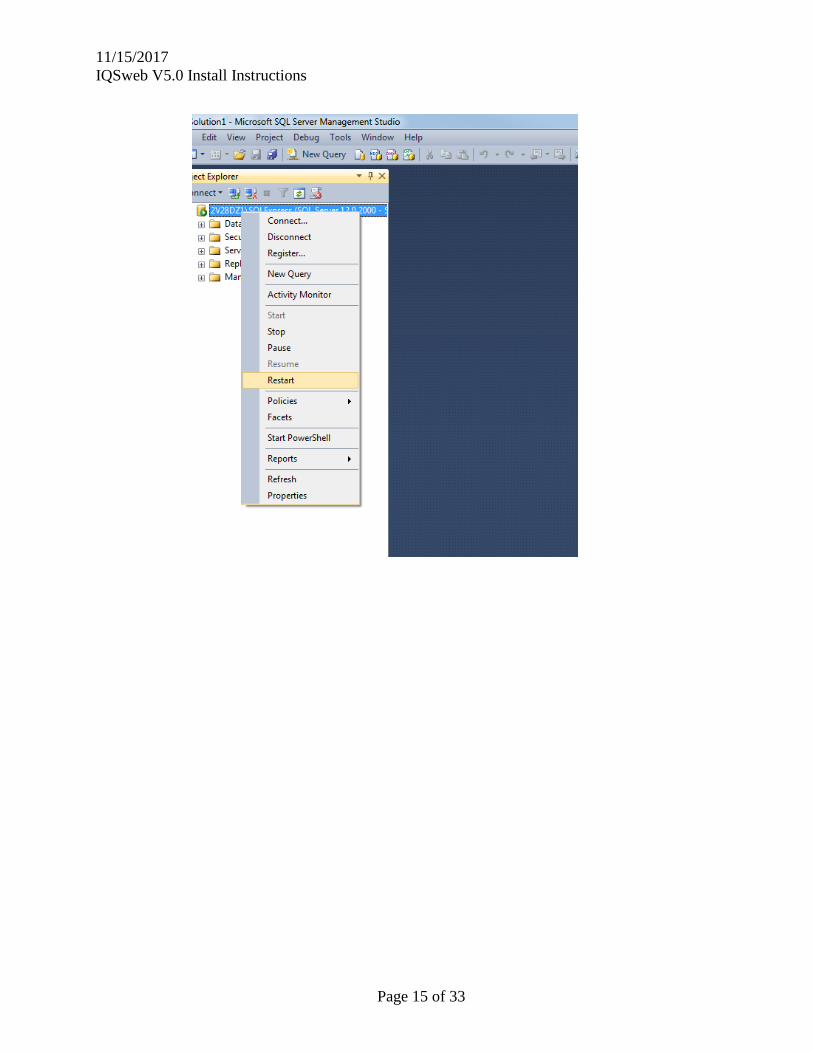
e. In the Object Explorer (left-panel), right-click on the Database Server, and then click
on Restart.
11/15/2017
IQSweb V5.0 Install Instructions
Page 15 of 33
11/15/2017
IQSweb V5.0 Install Instructions
Page 16 of 33
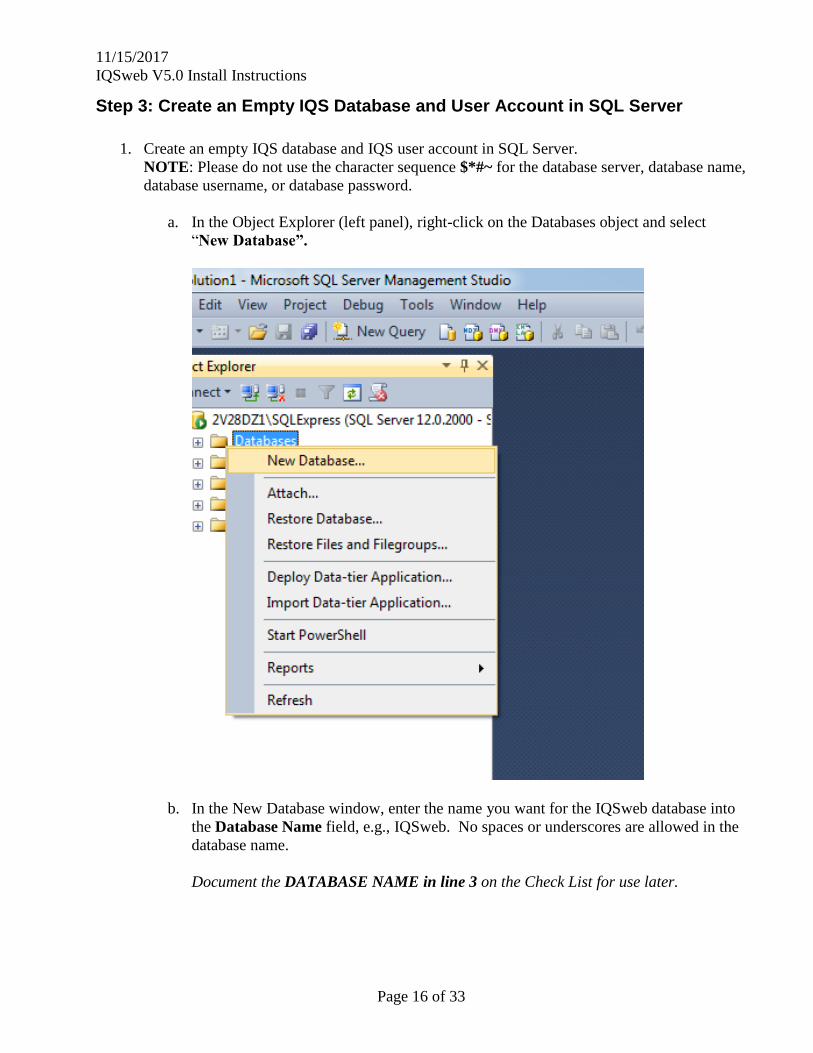
Step 3: Create an Empty IQS Database and User Account in SQL Server
1. Create an empty IQS database and IQS user account in SQL Server.
NOTE: Please do not use the character sequence $*#~ for the database server, database name,
database username, or database password.
a. In the Object Explorer (left panel), right-click on the Databases object and select
“New Database”.
b. In the New Database window, enter the name you want for the IQSweb database into
the Database Name field, e.g., IQSweb. No spaces or underscores are allowed in the
database name.
Document the DATABASE NAME in line 3 on the Check List for use later.

11/15/2017
IQSweb V5.0 Install Instructions
Page 17 of 33
c. Click OK.
NOTE: If you happened to click Add before clicking OK you might get an error.
Remove any blank lines showing in the Database Files section before clicking OK.
Do this by highlighting the line and clicking Remove.
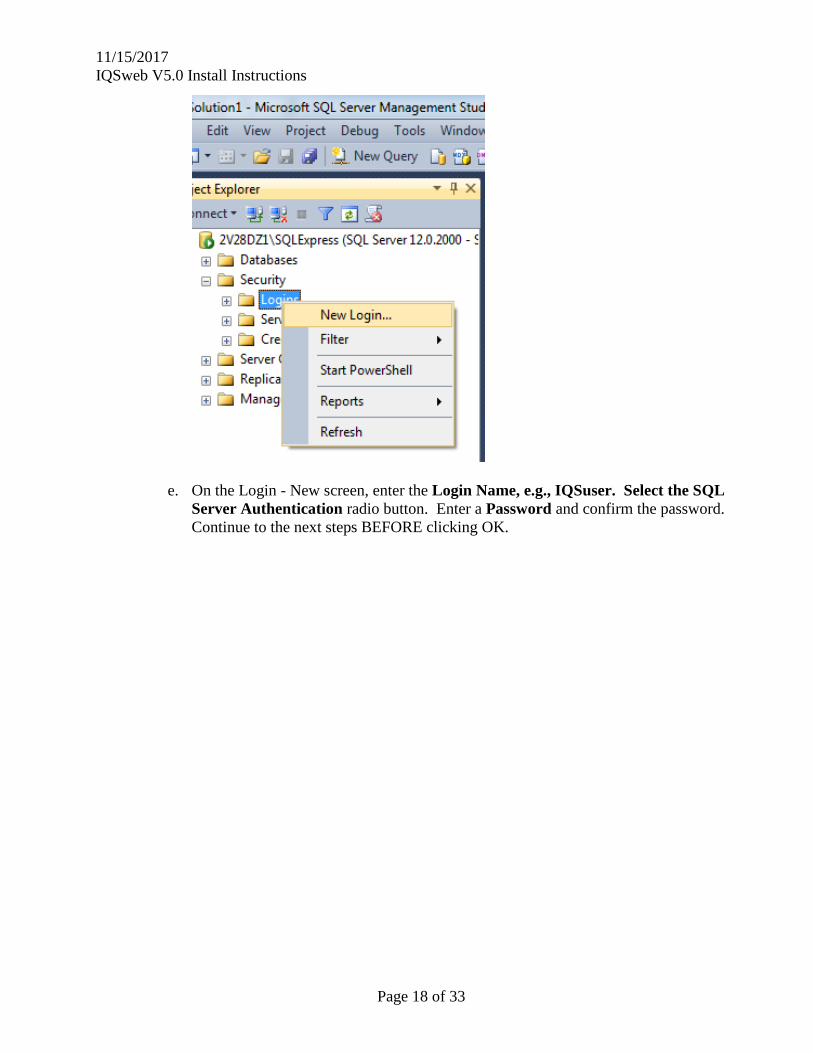
d. In the Object Explorer (left panel), expand the Security object and right-click on
Logins. Select “New Login”.
11/15/2017
IQSweb V5.0 Install Instructions
Page 18 of 33
e. On the Login - New screen, enter the Login Name, e.g., IQSuser. Select the SQL
Server Authentication radio button. Enter a Password and confirm the password.
Continue to the next steps BEFORE clicking OK.

11/15/2017
IQSweb V5.0 Install Instructions
Page 19 of 33
f. Document the value you enter for Login Name in Line 4 of the Check list,
DATABASE SERVER LOGIN NAME
g. Document the value you entered for password in Line 5 of the Check list, DATABASE
SERVER LOGIN PASSWORD
h. Uncheck the User must change password at next login and Enforce password
expiration checkboxes. You can optionally uncheck the Enable password policy
checkbox, depending on your organization’s security policies.
i. Click OK.
11/15/2017
IQSweb V5.0 Install Instructions
Page 20 of 33
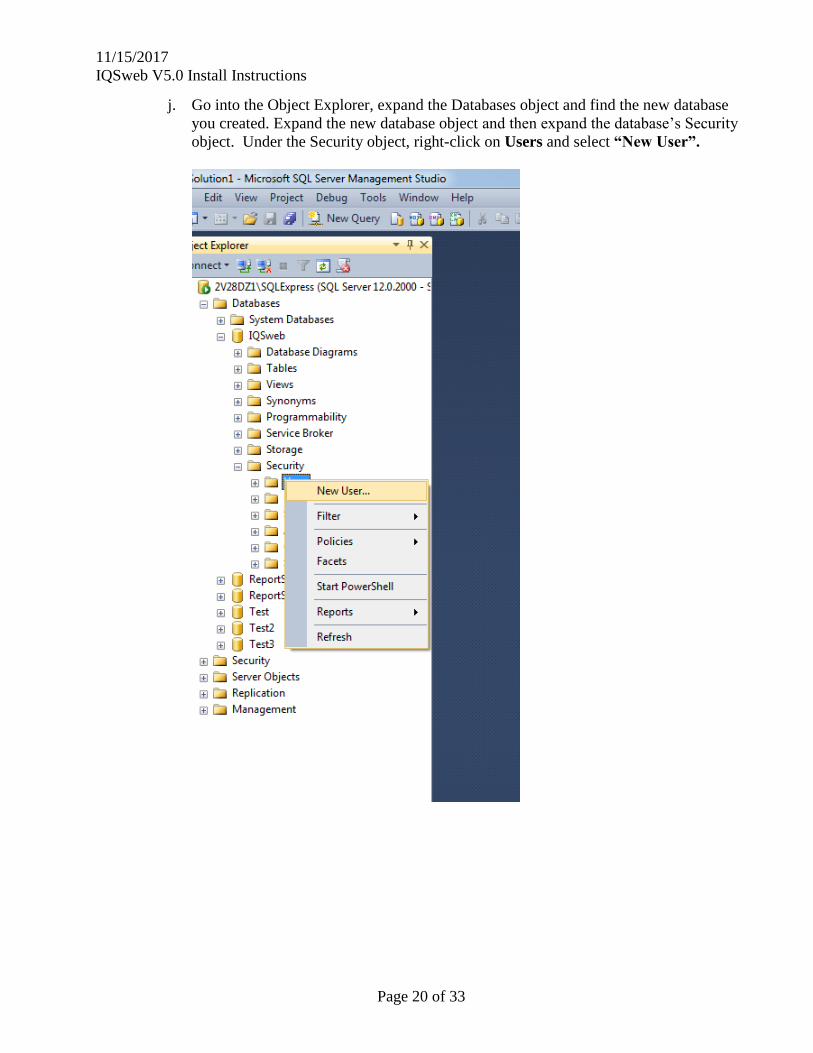
j. Go into the Object Explorer, expand the Databases object and find the new database
you created. Expand the new database object and then expand the database’s Security
object. Under the Security object, right-click on Users and select “New User”.
11/15/2017
IQSweb V5.0 Install Instructions
Page 21 of 33
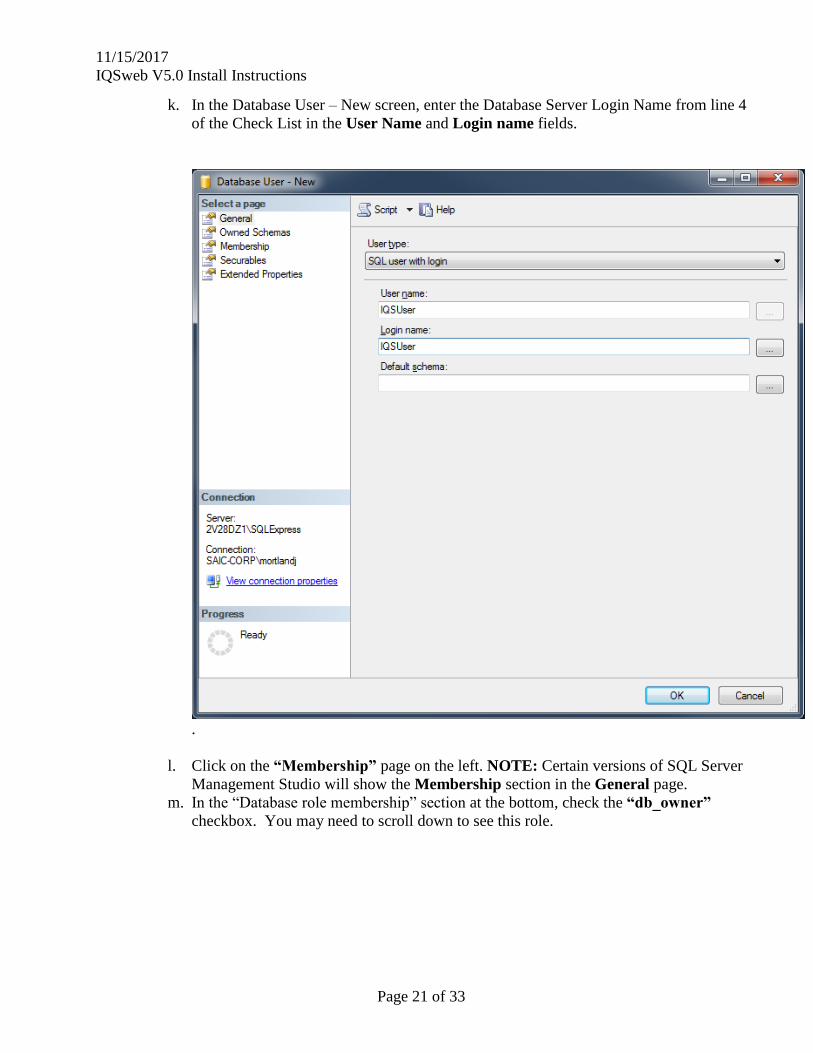
k. In the Database User – New screen, enter the Database Server Login Name from line 4
of the Check List in the User Name and Login name fields.
.
l. Click on the “Membership” page on the left. NOTE: Certain versions of SQL Server
Management Studio will show the Membership section in the General page.
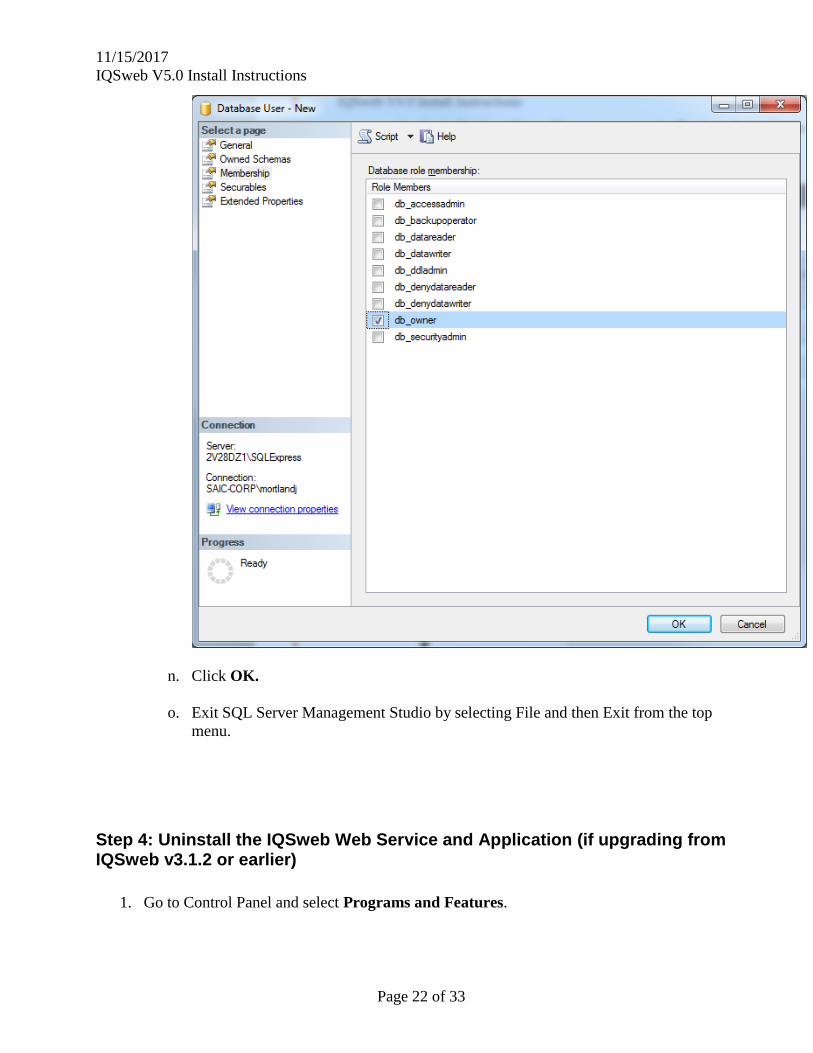
m. In the “Database role membership” section at the bottom, check the “db_owner”
checkbox. You may need to scroll down to see this role.
11/15/2017
IQSweb V5.0 Install Instructions
Page 22 of 33
n. Click OK.
o. Exit SQL Server Management Studio by selecting File and then Exit from the top
menu.
Step 4: Uninstall the IQSweb Web Service and Application (if upgrading from IQSweb v3.1.2 or earlier)
1. Go to Control Panel and select Programs and Features.
11/15/2017
IQSweb V5.0 Install Instructions
Page 23 of 33
2. If you are upgrading from a version of IQSweb, uninstall the applications titled IQSweb Vx
and IQSweb Service Vx.
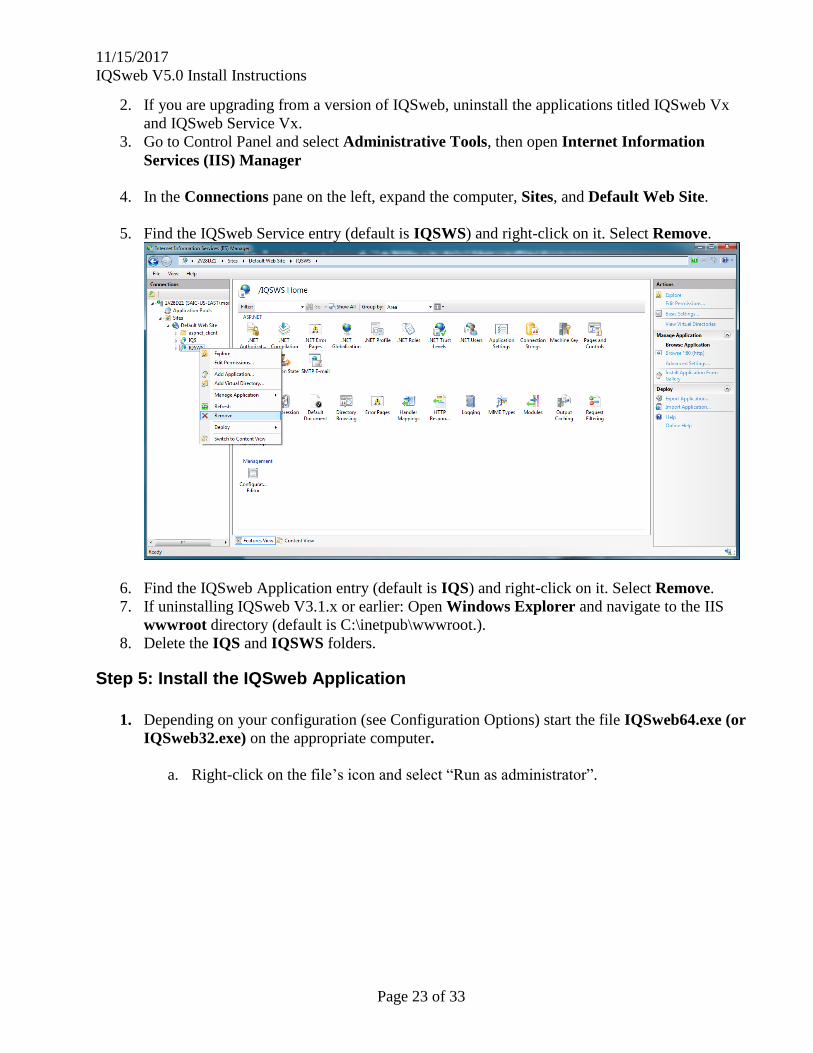
3. Go to Control Panel and select Administrative Tools, then open Internet Information
Services (IIS) Manager
4. In the Connections pane on the left, expand the computer, Sites, and Default Web Site.
5. Find the IQSweb Service entry (default is IQSWS) and right-click on it. Select Remove.
6. Find the IQSweb Application entry (default is IQS) and right-click on it. Select Remove.
7. If uninstalling IQSweb V3.1.x or earlier: Open Windows Explorer and navigate to the IIS
wwwroot directory (default is C:\inetpub\wwwroot.).
8. Delete the IQS and IQSWS folders.
Step 5: Install the IQSweb Application
1. Depending on your configuration (see Configuration Options) start the file IQSweb64.exe (or
IQSweb32.exe) on the appropriate computer.
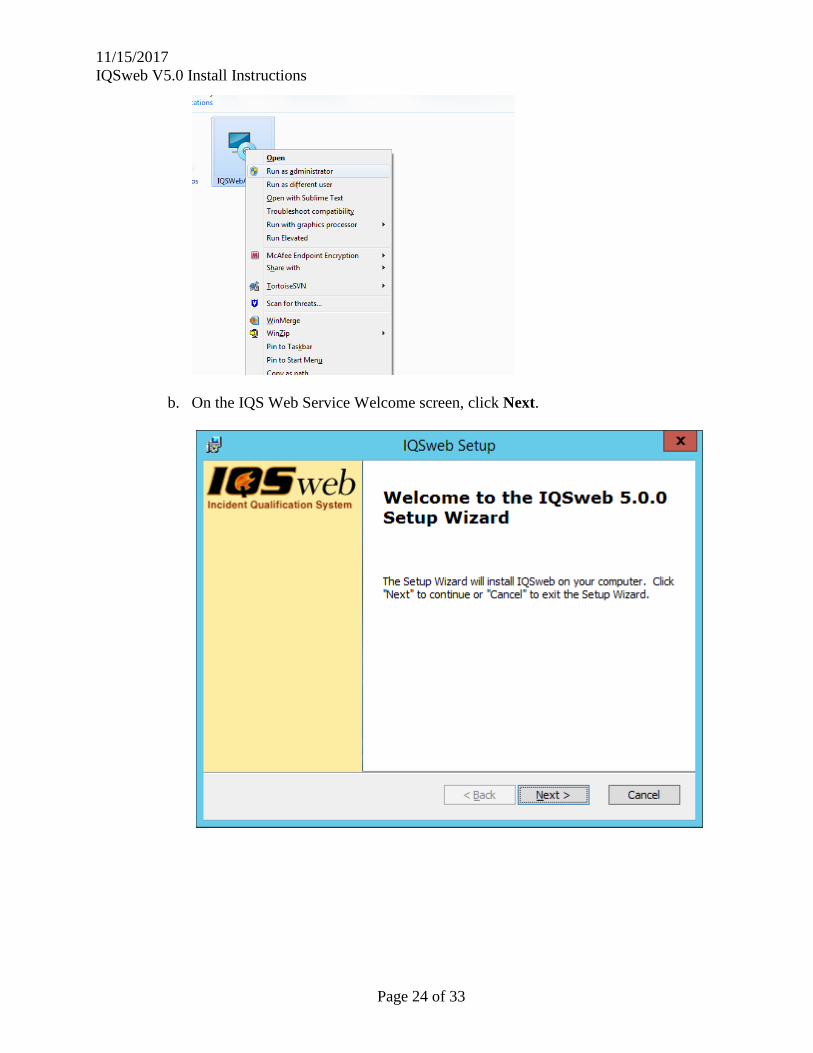
a. Right-click on the file’s icon and select “Run as administrator”.
11/15/2017
IQSweb V5.0 Install Instructions
Page 24 of 33
b. On the IQS Web Service Welcome screen, click Next.

11/15/2017
IQSweb V5.0 Install Instructions
Page 25 of 33
c. Read the IQSweb License Agreement and select ‘I accept the terms in the License
Agreement’ to continue the installation. Click Next.

11/15/2017
IQSweb V5.0 Install Instructions
Page 26 of 33
d. Read through the Crystal Reports License Agreement and click Next.
11/15/2017
IQSweb V5.0 Install Instructions
Page 27 of 33
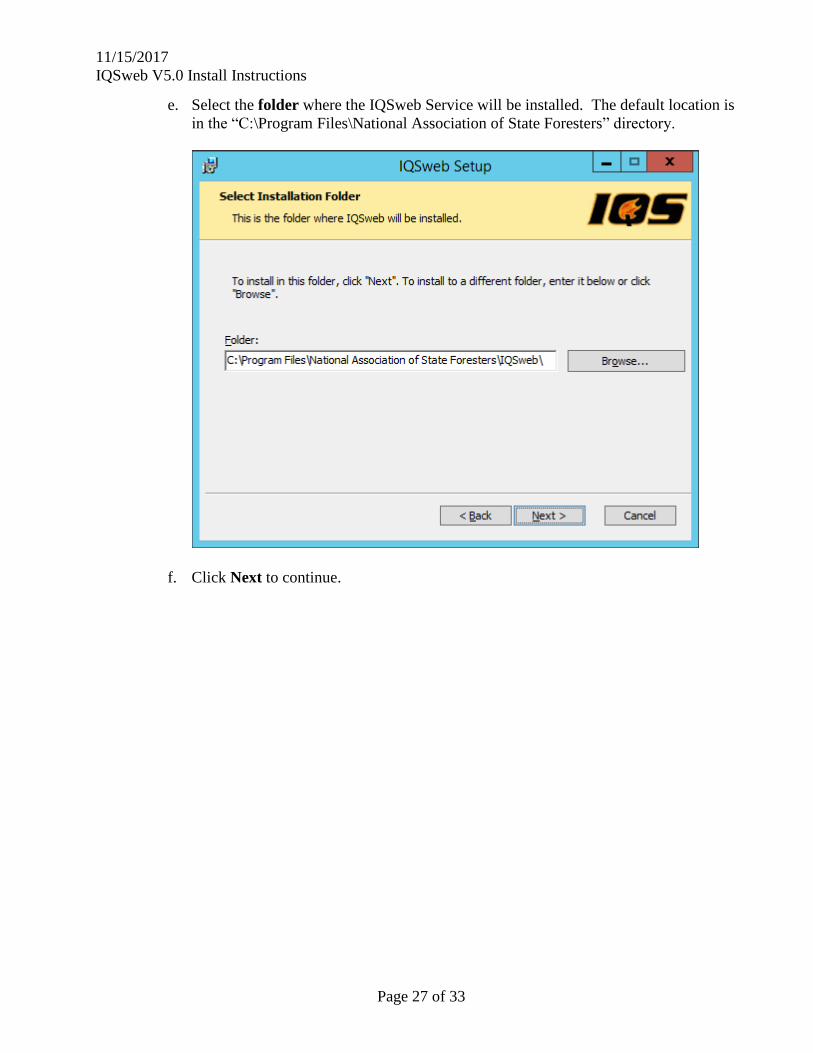
e. Select the folder where the IQSweb Service will be installed. The default location is
in the “C:\Program Files\National Association of State Foresters” directory.
f. Click Next to continue.
11/15/2017
IQSweb V5.0 Install Instructions
Page 28 of 33
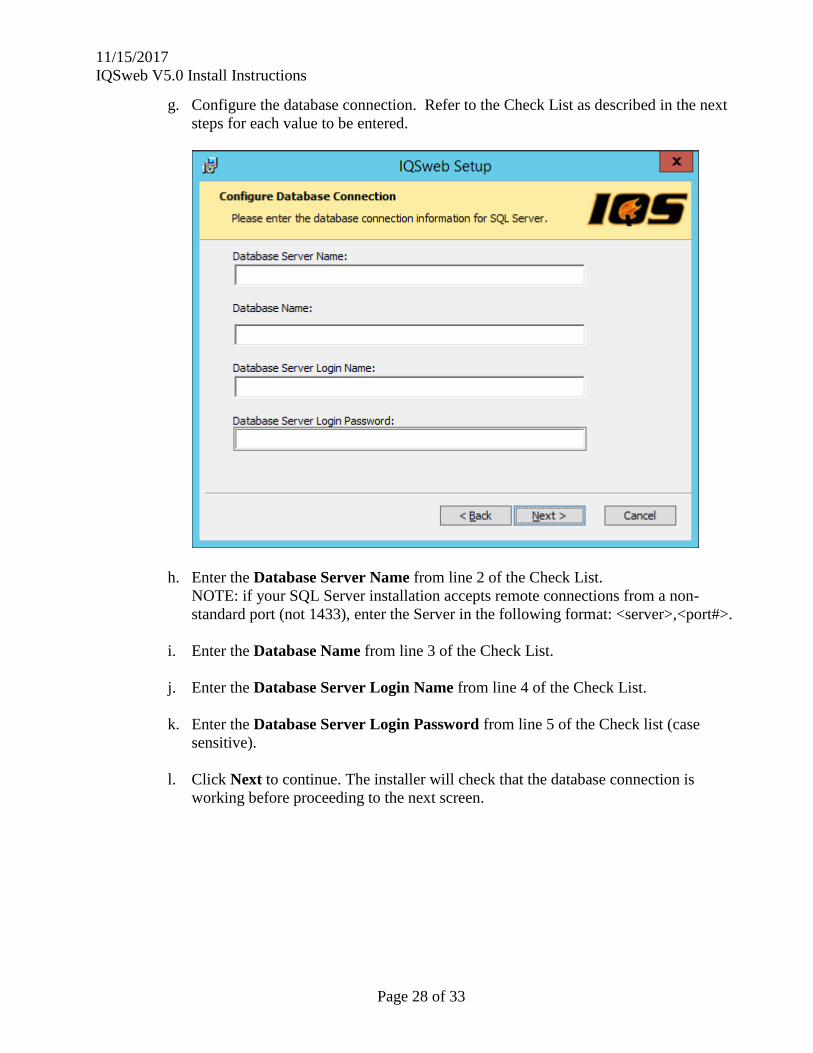
g. Configure the database connection. Refer to the Check List as described in the next
steps for each value to be entered.
h. Enter the Database Server Name from line 2 of the Check List.
NOTE: if your SQL Server installation accepts remote connections from a non-
standard port (not 1433), enter the Server in the following format: <server>,<port#>.
i. Enter the Database Name from line 3 of the Check List.
j. Enter the Database Server Login Name from line 4 of the Check List.
k. Enter the Database Server Login Password from line 5 of the Check list (case
sensitive).
l. Click Next to continue. The installer will check that the database connection is
working before proceeding to the next screen.

11/15/2017
IQSweb V5.0 Install Instructions
Page 29 of 33
m. Enter the virtual directory you want to use for IQS. This will be part of the URL that
your end users will use when they access IQSweb. Generally you can select the
default Virtual Directory of IQS.
The Optional IIS Settings group holds advanced settings for IIS. The Site and
Application Pool have the default values automatically selected. If you want to ensure
the IQSweb applications have the proper settings, select ‘Create a new IQS Pool’ or
‘IQSWebPool’ in the Application Pool drop-down. If you select ‘Create a new IQS
Pool’, it will be created by the installer and this pool will be configured specifically
for IQSweb. Advanced users can check these settings via the Internet Information
Services Manager to ensure the settings in the selected pool match the prerequisites
specified in the Installation Prerequisites section of this document.
n.
o. Document the value you entered for Virtual Directory in Line 6 of the Check list, IQS
APPLICATION VIRTUAL DIRECTORY.
p. Document the IQSweb ADDRESS in line 7 on the Check List for use later. The
format for this URL will be http://<IQS Web Application Server Computer Name (line
1)>/<IQS Application Virtual Directory (line 6)>.
q. Click Next.

11/15/2017
IQSweb V5.0 Install Instructions
Page 30 of 33
Click Next to confirm that you want to start the installation.
r. The installer will run. This process may take a few minutes.

11/15/2017
IQSweb V5.0 Install Instructions
Page 31 of 33
s. The installer will finish. Click Finish.
t. You can test the installation by opening a web browser and going to the IQS web
application. The address will be line 7 from the Check List. The first time the
application loads may take longer than normal.
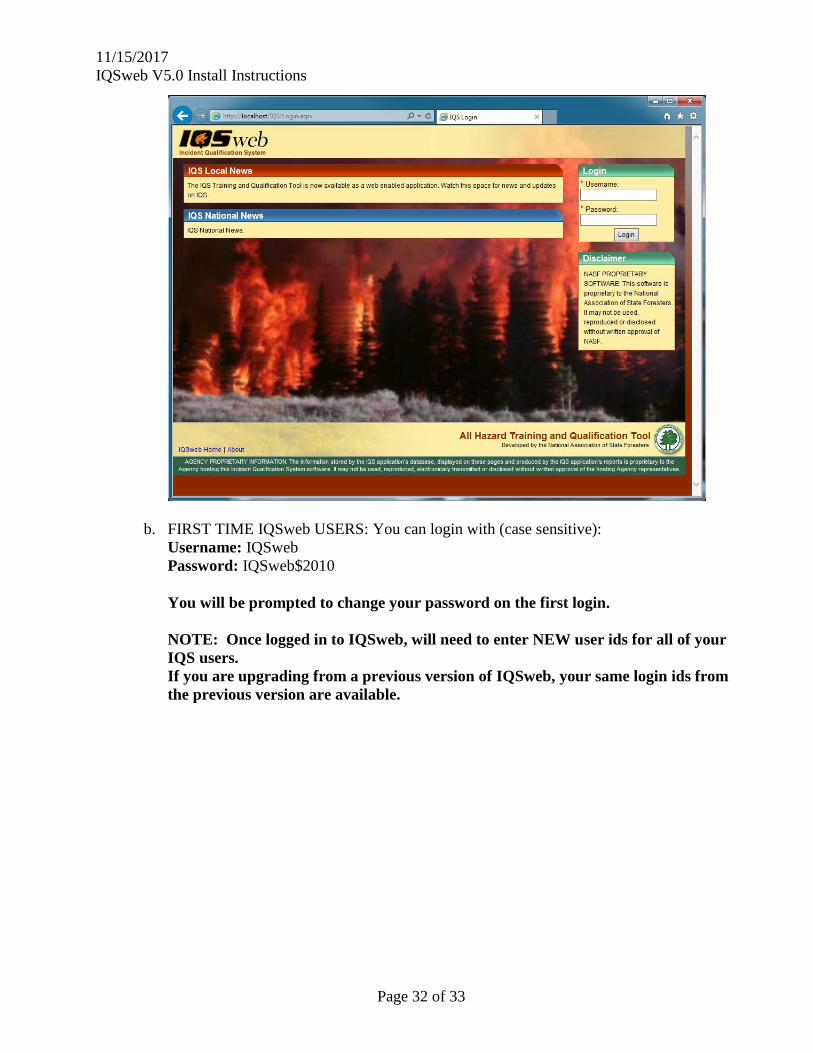
a. You should see a login page as follows:
11/15/2017
IQSweb V5.0 Install Instructions
Page 32 of 33
b. FIRST TIME IQSweb USERS: You can login with (case sensitive):
Username: IQSweb
Password: IQSweb$2010
You will be prompted to change your password on the first login.
NOTE: Once logged in to IQSweb, will need to enter NEW user ids for all of your
IQS users.
If you are upgrading from a previous version of IQSweb, your same login ids from
the previous version are available.
11/15/2017
IQSweb V5.0 Install Instructions
Page 33 of 33
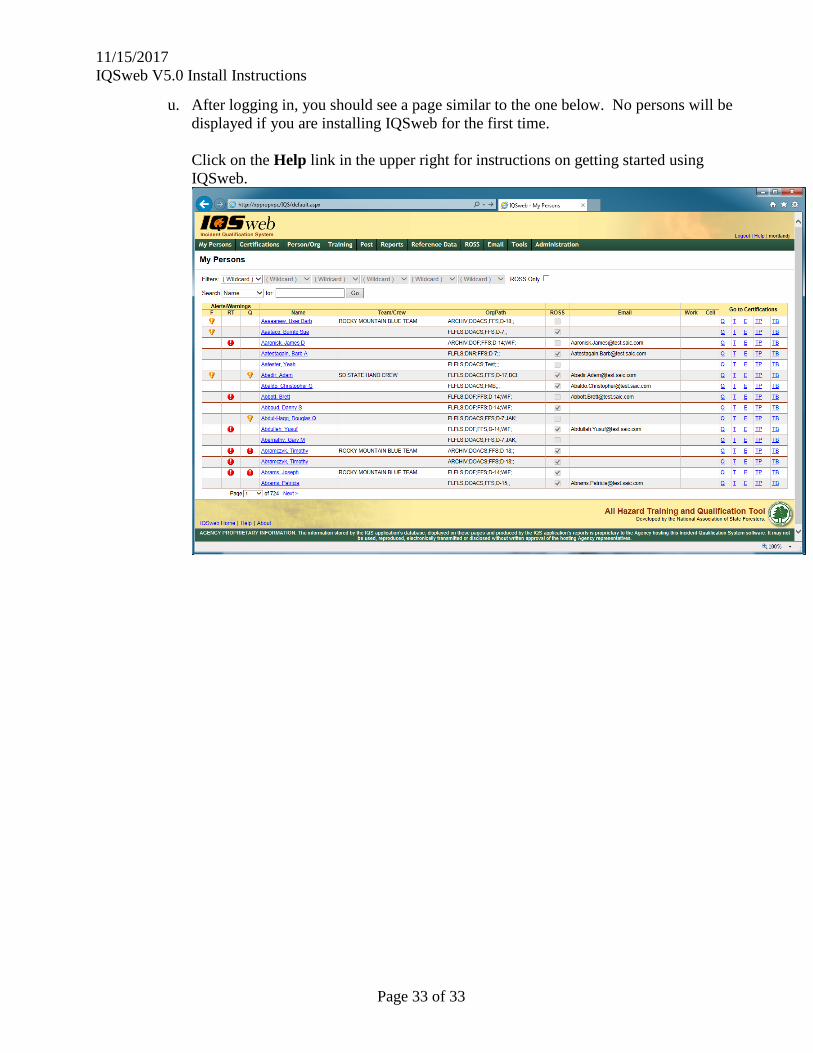
u. After logging in, you should see a page similar to the one below. No persons will be
displayed if you are installing IQSweb for the first time.
Click on the Help link in the upper right for instructions on getting started using
IQSweb.