iPhone 4 Logic Board
15
Installing iPhone 4 Logic Board Written By: Walter Galan TOOLS: Phillips #00 Screwdriver (1) Plastic Opening Tools (1) Small Flathead Screwdriver (1) Spudger (1) iPhone 4 5-Point Pentalobe Screwdriver (1) (if iPhone has external pentalobe screws) iPhone SIM Card Eject Tool (1) SUMMARY Use this guide to replace your iPhone 4's logic board. Installing iPhone 4 Logic Board © iFixit — CC BY-NC-SA www.iFixit.com Page 1 of 15
-
Upload
yosjmp9760 -
Category
Documents
-
view
48 -
download
0
Transcript of iPhone 4 Logic Board

Installing iPhone 4 Logic BoardWritten By: Walter Galan
TOOLS:
Phillips #00 Screwdriver (1)
Plastic Opening Tools (1)
Small Flathead Screwdriver (1)
Spudger (1)
iPhone 4 5-Point Pentalobe Screwdriver (1)(if iPhone has external pentalobe screws)
iPhone SIM Card Eject Tool (1)
SUMMARY
Use this guide to replace your iPhone 4's logic board.
Installing iPhone 4 Logic Board
© iFixit — CC BY-NC-SA www.iFixit.com Page 1 of 15

Step 1 — Rear Panel
Apple has recently substituted the two Phillips screws with 5-Point "Pentalobe"screws. If your iPhone 4 has 5-Point "Pentalobe" screws instead of Phillips, pleaserefer to the second picture.
Remove the two 3.6 mm Pentalobe screws next to the dock connector.
During reassembly, we recommend you replace the 5-point screws with equivalentPhillips screws. Our Liberation Kit provides the tools and screws needed to replacethe Pentalobe screws with Phillips screws.
The 5-Point Screwdriver should only be used once, as it has the potential to stripthe screws.
Installing iPhone 4 Logic Board
© iFixit — CC BY-NC-SA www.iFixit.com Page 2 of 15
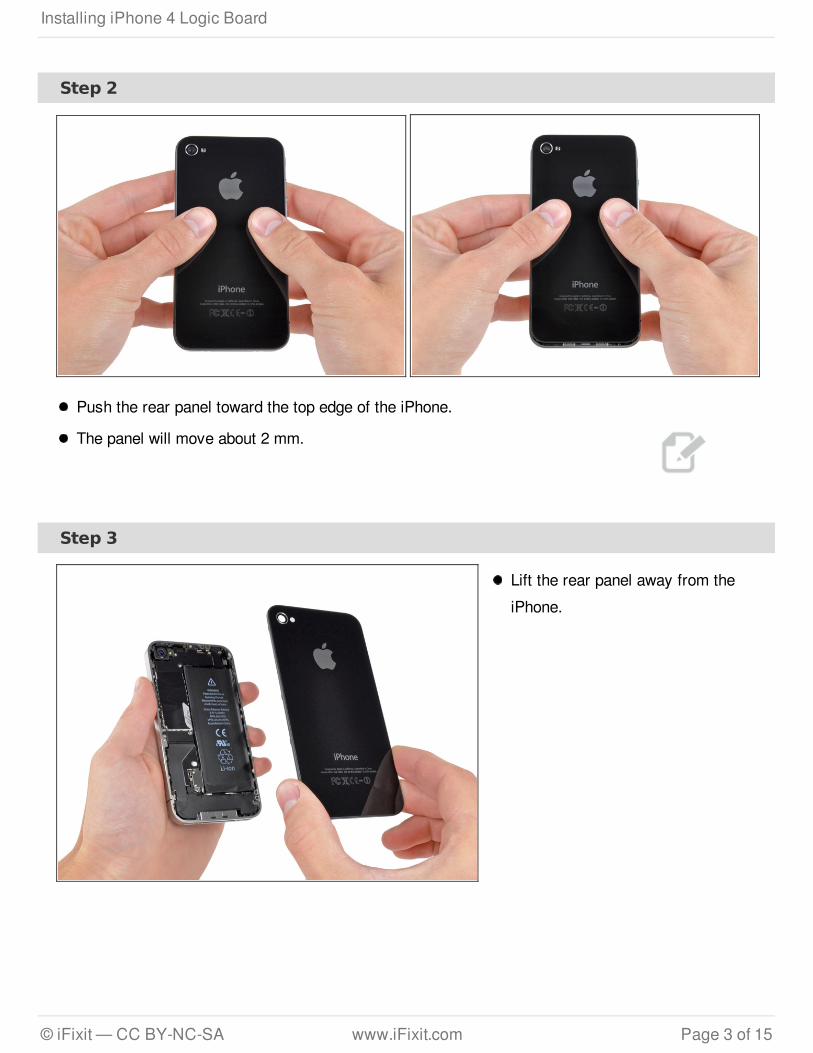
Step 2
Push the rear panel toward the top edge of the iPhone.
The panel will move about 2 mm.
Step 3
Lift the rear panel away from theiPhone.
Installing iPhone 4 Logic Board
© iFixit — CC BY-NC-SA www.iFixit.com Page 3 of 15

Step 4 — Battery
Remove the single 2.5 mm Phillipsscrew securing the batteryconnector to the logic board.
Some devices may havetwo screws, one of whichholds down the contact padwhich is located above thescrew indicated in red in thephoto.
Step 5
Use an iPod opening tool to carefully pry the battery connector up from the ends closest tothe top and bottom edges of the iPhone.
Do not pry against the contact clip.
Remove the contact clip from the iPhone.
Installing iPhone 4 Logic Board
© iFixit — CC BY-NC-SA www.iFixit.com Page 4 of 15
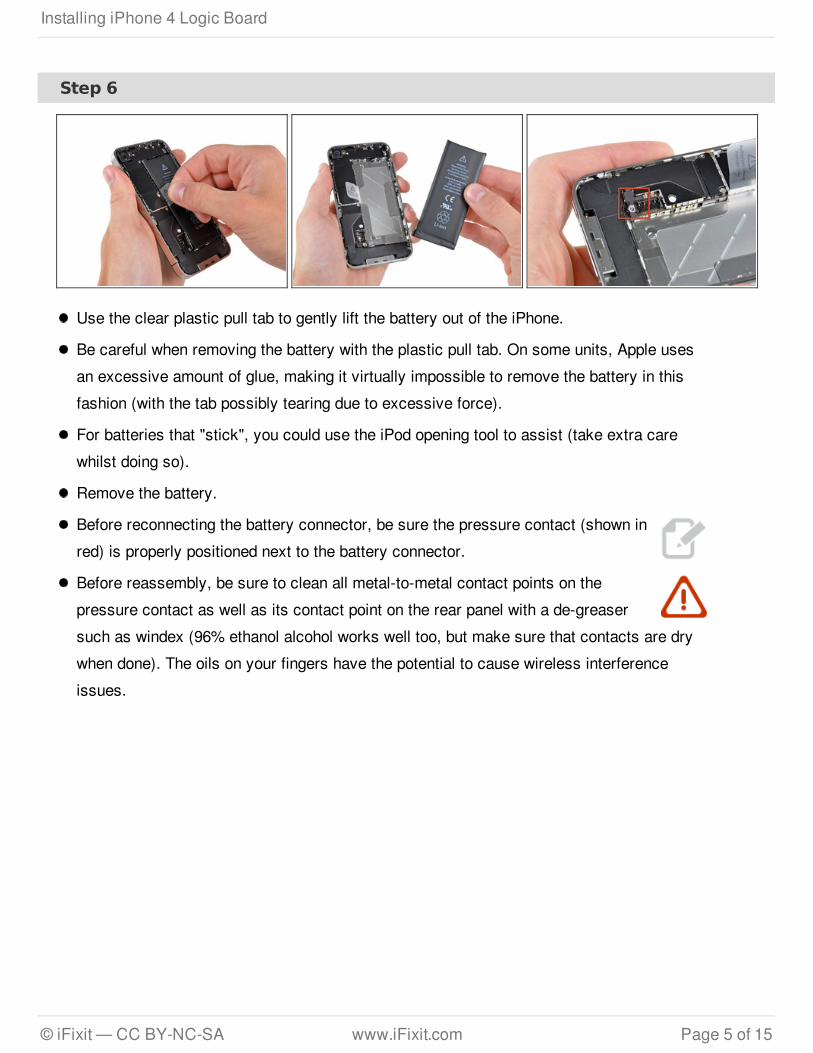
Step 6
Use the clear plastic pull tab to gently lift the battery out of the iPhone.
Be careful when removing the battery with the plastic pull tab. On some units, Apple usesan excessive amount of glue, making it virtually impossible to remove the battery in thisfashion (with the tab possibly tearing due to excessive force).
For batteries that "stick", you could use the iPod opening tool to assist (take extra carewhilst doing so).
Remove the battery.
Before reconnecting the battery connector, be sure the pressure contact (shown inred) is properly positioned next to the battery connector.
Before reassembly, be sure to clean all metal-to-metal contact points on thepressure contact as well as its contact point on the rear panel with a de-greasersuch as windex (96% ethanol alcohol works well too, but make sure that contacts are drywhen done). The oils on your fingers have the potential to cause wireless interferenceissues.
Installing iPhone 4 Logic Board
© iFixit — CC BY-NC-SA www.iFixit.com Page 5 of 15

Step 7 — Logic Board
Use a SIM card eject tool or a paperclip to eject the SIM card and its holder.
This may require a significant amount of force.
Remove the SIM card and its holder.
Installing iPhone 4 Logic Board
© iFixit — CC BY-NC-SA www.iFixit.com Page 6 of 15

Step 8
Remove the following two screws:
One 1.2 mm Phillips
One 1.6 mm Phillips
Remove the thin steel dock connector cable cover from the iPhone.
Before reassembly, be sure to clean all metal-to-metal contact points on the dockconnector cable cover with a de-greaser such as windex. The oils on your fingershave the potential to cause wireless interference issues.
Step 9
Use an iPod opening tool to gently pry the dock cable connector up off the logic board fromboth short ends of the connector.
Installing iPhone 4 Logic Board
© iFixit — CC BY-NC-SA www.iFixit.com Page 7 of 15

Step 10
Carefully peel the dock ribbon cable off the logic board and the lower speaker enclosure.
Do not use excessive force to peel the dock ribbon cable off the logic board. Doingso may tear the cable.
Step 11
Use an iPod opening tool to pry thelower antenna connector up off itssocket on the logic board.
Installing iPhone 4 Logic Board
© iFixit — CC BY-NC-SA www.iFixit.com Page 8 of 15

Step 12
Remove the 1.9 mm Phillips screwsecuring the bottom of the logicboard to the inner case.
Installing iPhone 4 Logic Board
© iFixit — CC BY-NC-SA www.iFixit.com Page 9 of 15

Step 13
Remove the following five screwssecuring the wi-fi antenna to to thelogic board:
One 2.3 mm Phillips
Two 1.6 mm Phillips
One 1.4 mm Phillips
One 4.8 mm Phillips
When re-assembling, startoff with replacing the 4.8mm Philips screw first, then the 2.3mm. This is to ensure there is nomix-up, and avoid rendering theLCD and digitizer useless.
Also make sure to put thelong 4.8 mm Philips back incorrectly when reassembling. Thisis the ground for the Wi-Fi antennaand is often the culprit if you arehaving bad wi-fi reception afterreassembly.
Installing iPhone 4 Logic Board
© iFixit — CC BY-NC-SA www.iFixit.com Page 10 of 15

Step 14
Use an iPod opening tool to slightly lift the top edge of the wi-fi antenna away from thelogic board.
Use the tip of a spudger to pull the wi-fi retaining clips away from the inner frame.
Remove the wi-fi antenna from the iPhone. Make sure you don't lose the metal clips on thetop of the cover where the 4.8mm screw attaches or the 4.8mm screw. That's the primaryreason for abnormal Wi-Fi performance after the reassembly.
Before reassembly, be sure to clean all metal-to-metal contact points on theconnector cover with a de-greaser such as Windex. The oils on your fingers havethe potential to cause wireless interference issues. Do not clean the connectorsthemselves with Windex.
Installing iPhone 4 Logic Board
© iFixit — CC BY-NC-SA www.iFixit.com Page 11 of 15

Step 15
Use an iPod opening tool to carefully lift the rear camera connector up off its socket on thelogic board.
Remove the rear camera.
Step 16
Remove the small circular white sticker (warranty sticker and water indicator) covering thescrew near the battery pull tab.
Remove the 2.4 mm Phillips screw that was hidden underneath the sticker.
Installing iPhone 4 Logic Board
© iFixit — CC BY-NC-SA www.iFixit.com Page 12 of 15

Step 17
Disconnect the followingconnectors from the top of the logicboard:
Digitizer cable (From Bottom)
LCD cable (From Bottom)
Headphone jack/volume buttoncable (From Top)
Top Microphone/sleep buttoncable (From Top)
Front camera cable (From Top)
It is helpful to use the edgeof an iPod opening tool togently lift the connectors up andout of their sockets on the logicboard.
Installing iPhone 4 Logic Board
© iFixit — CC BY-NC-SA www.iFixit.com Page 13 of 15

Step 18
Use a small flathead screwdriver toremove the 4.8 mm standoff nearthe headphone jack.
When reassembling thedevice, this standoff setsthe height of the wi-fi shieldremoved in step 14. If not torqueddown, the shield will be above theplane of the frame and the back willnot slide into place in step 2. Theshield should be flush with theheadphone jack.
When reassembling themotherboard, ensure that its edgesits under the circled standoff,otherwise the screws will not fit.
Step 19
Carefully remove the logic boardfrom the iPhone, minding anycables that may get caught.
Installing iPhone 4 Logic Board
© iFixit — CC BY-NC-SA www.iFixit.com Page 14 of 15

To reassemble your device, follow these instructions in reverse order.
This document was last generated on 2012-08-29 09:50:00 AM.
Installing iPhone 4 Logic Board
© iFixit — CC BY-NC-SA www.iFixit.com Page 15 of 15