Introducing Bounded Task Flow - AMIS Technology Blog · Introducing Bounded Task Flow Objective...
12
Introducing Bounded Task Flow Objective Create a Dept-Emp master-detail page; the EMP table only contains Empno and Ename columns. When an Employee record is selected in the table, next to the table a ‘context form’ is presented that contains the overflow details for the selected Employee. We will use Bounded Task Flow that presents data for an Employee. The task flow has an input parameter that takes the primary key for the Employee. Its first action is to execute the setCurrentRowWithKey action binding. Next the flow presents the View. The Task Flow can be included in the Dep-Emp page in a region. The selection listener on the Emp table sets the rowkey for the selected Employee on a managed bean. The input parameter for the region draws its value from this managed bean. Whenever the selection changes, the selected rowkey changes and the region is refreshed. The steps for creating this functionality 1. Create Fusion Web Application 2. In Model Project, create default Dept and Emp Entity and View Objects, with ViewLink between Dept and Emp. Ensure to set Deptno and Empno to be Primary Key attributes. 3. Create a new JSF page - DeptEmp.jspx. Drag EmpView from Data Control palette and drop as Master Form Detail Table. Only include Empno and Ename in the Emp table.
Transcript of Introducing Bounded Task Flow - AMIS Technology Blog · Introducing Bounded Task Flow Objective...

Introducing Bounded Task Flow
Objective Create a Dept-Emp master-detail page; the EMP table only contains Empno and Ename columns.
When an Employee record is selected in the table, next to the table a ‘context form’ is presented that
contains the overflow details for the selected Employee.
We will use Bounded Task Flow that presents data for an Employee. The task flow has an input
parameter that takes the primary key for the Employee. Its first action is to execute the
setCurrentRowWithKey action binding. Next the flow presents the View.
The Task Flow can be included in the Dep-Emp page in a region. The selection listener on the Emp
table sets the rowkey for the selected Employee on a managed bean. The input parameter for the
region draws its value from this managed bean. Whenever the selection changes, the selected
rowkey changes and the region is refreshed.
The steps for creating this functionality
1. Create Fusion Web Application
2. In Model Project, create default Dept and Emp Entity and View Objects, with ViewLink
between Dept and Emp. Ensure to set Deptno and Empno to be Primary Key attributes.
3. Create a new JSF page - DeptEmp.jspx.
Drag EmpView from Data Control palette and drop as Master Form Detail Table. Only include
Empno and Ename in the Emp table.

4. Create a class EmpTableManager. Configure a managed bean EmpTableManager based on
this class.
<managed-bean>
<managed-bean-name>EmpTableManager</managed-bean-name>
<managed-bean-class>view.EmpTableManager</managed-bean-class>
<managed-bean-scope>session</managed-bean-scope>
</managed-bean>
Add private member employeeKeyString and method processSelectionEvent() in the class:
String employeeKeyString;
public void processSelectionEvent(SelectionEvent selectionEvent) {
RowKeySet rks = selectionEvent.getAddedSet();
List k = (List)rks.iterator().next();
Key empKey = (Key)k.get(0);
employeeKeyString = empKey.toStringFormat(false);
}
5. Set the selectionListener attribute on the Employee table. Make sure the
EmpTableManager’s processSelectionEvent is called whenever a row is selected in the table:
<af:table …
selectionListener="#{EmpTableManager.processSelectionEvent}"
6. You can run the page and see a perfectly ordinary Master-Detail page with Form-Table
layout, navigation buttons for the Form to browse through departments
Now things start getting more interesting: we are about to first create and then embed a bounded
task flow.

7. Create New Bounded Task Flow. Go to the New Gallery (main menu File, New)
Name the task flow employee-form. Ensure that the checkbox Create as Bounded Task Flow
is checked (that is the default so it should be).
8. Create Method Binding for AllEmloyeesView setCurrentRowWithKey action: drag the
SetCurrentRowWithKey action from the Data Controls Pallet and drop it on the task flow
diagram.
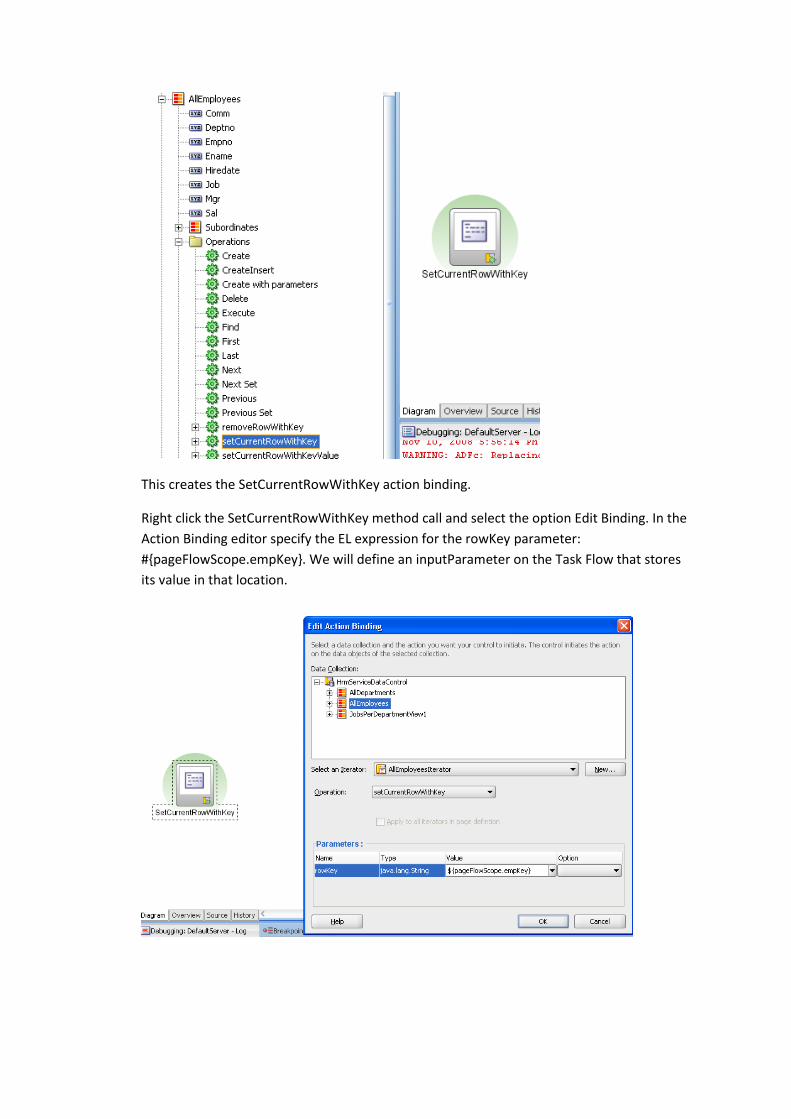
This creates the SetCurrentRowWithKey action binding.
Right click the SetCurrentRowWithKey method call and select the option Edit Binding. In the
Action Binding editor specify the EL expression for the rowKey parameter:
#{pageFlowScope.empKey}. We will define an inputParameter on the Task Flow that stores
its value in that location.

9. Also create View EmployeeForm, by dragging a View activity from the Component Palette to
the task flow diagram.
10. Create a navigation flow between the two, using the default outcome of the MethodCall -
setCurrentRowWithKey - as we will always go to the EmployeeForm View after setting the
current row.
The diagram should now look like this:
11. Configure an input parameter on the task flow: select the task-flow in the Application
Navigator. In the Structure Window, select the task-flow-definition root node. In the
property inspector, you can now edit the parameters.
Add a new inputParameter by clicking on the green Plus icon, after disclosing the Parameters
panel.
It is called employeeKey to the outside world. The value passed for that parameter is stored
in #{pageFlowScope.empKey} where it can be used in the SetCurrentRowWithKey call.
12. Time to create the View: the Employee Form.

Double click on the EmployeeForm view activity in the Task Flow. This will take you to the JSF
Visual Page Editor.
Drag the Employees collection to the page and drop it as an ADF Form. Include a Submit
Button.
This concludes the construction of the Bounded Task Flow - at least for now. We will return to the
DeptEmp page to embed the Task Flow in order to add additional functionality using this reusable
component.
13. Go to the DeptEmp.jspx page.
Drag the employee-form task flow from the Application Navigator and drop it on the page,
next to the Employees Table.
Set the value for the employeeKey input parameter of the task flow to
#{EmpTableManager.employeeKeyString}.
The Task Flow Binding - the usage by the page of the Task Flow - is added to the Page
Definition of the page, that also has all data binding definitions. You can edit the Task Flow
Binding, for example to change the values passed into input variables. Or to change the
Refresh settings for the Task Flow.
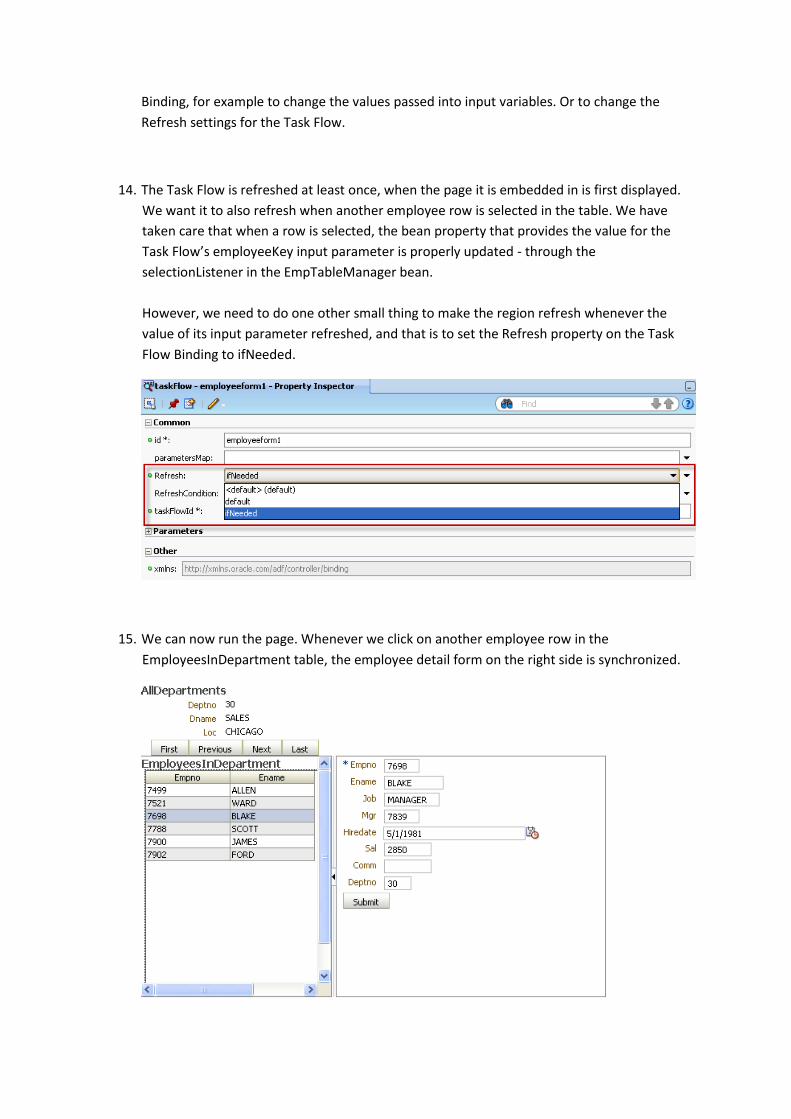
14. The Task Flow is refreshed at least once, when the page it is embedded in is first displayed.
We want it to also refresh when another employee row is selected in the table. We have
taken care that when a row is selected, the bean property that provides the value for the
Task Flow’s employeeKey input parameter is properly updated - through the
selectionListener in the EmpTableManager bean.
However, we need to do one other small thing to make the region refresh whenever the
value of its input parameter refreshed, and that is to set the Refresh property on the Task
Flow Binding to ifNeeded.
15. We can now run the page. Whenever we click on another employee row in the
EmployeesInDepartment table, the employee detail form on the right side is synchronized.
Bonus Practice: Synchronize when browsing Departments When we switch departments, the Employee Form is not automatically synchronized. It only
refreshes when the #{EmpTableManager.employeeKeyString} changes, which currently only happens
when a row is selected in the Employees table. So in order to have the Employee Form synchronized
with a new Department, we have to ensure that we set the employeeKeyString to correct employee
key when a new Department becomes the current one - that is when either of the four navigation
buttons is activated.
We can capture the First/Last/Previous/Next actions and invoke the EmpTableManager and have it
determine the current Employee in the EmployeesInDepartmentIterator then set the key for that
Employee in the employeeKeyString property.
1. Add this action attribute to each of the four navigation buttons:
action="#{EmpTableManager.synchronizeWithCurrentEmployee}"
2. Add the synchronizeWithCurrentEmployee() method to the EmpTableManager class:
public String synchronizeWithCurrentEmployee() {
Object bc = BindingContext.getCurrent().getCurrentBindingsEntry();
DCIteratorBinding ib =
((JUFormBinding)bc).findIteratorBinding("EmployeesInDepartmentIterator");
this.employeeKeyString = ib.getCurrentRowKeyString();
return null;
}
3. Now run the page and see that whenever you navigate to a different Department, the region
with the embedded employee-form task flow is synchronized.
Bonus Practice: Split the Employee Form into a two-page overview One of the interesting features of the Bounded Task Flow infrastructure is that it allows the creation
of a multi-step, multi-page task flow that can be embedded in its entirety in another page. That
means that we can navigate between the steps in the task flow within the context of the host page.
We will see that in action.
1. Open the employee-form task-flow.
Add a new View activity. Call it EmployeeFormPartTwo.
Create Control Flow Case from EmployeeForm to EmployeeFormPartTwo; set the from-
outcome to parttwo. Create Control Flow Case from EmployeeFormPartTwo to
EmployeeForm; set the from-outcome to partone.

The task flow diagram should now look like this:
2. Double click on the new View activity. Accept the dialog that appears and go to the editor for
the EmployeeFormPartTwo.jsff page fragment.
Copy the entire contents from EmployeeForm.jsff and paste it in EmployeeFormPartTwo.jsff.
3. Go to the file DataBindings.cpx and copy the line for EmployeeForm.jsff in the pageMap
element. Change EmployeeForm.jsff to EmployeeFormPartTwo.jsff in the new line:
<pageMap>
<page path="/DeptEmp.jspx" usageId="view_DeptEmpPageDef"/>
<page path="/WEB-INF/employee-form.xml#employee-
form@SetCurrentRowWithKey"
usageId="view_employee_form_employee_form_SetCurrentRowWithKeyPageDef"/>
<page path="/EmployeeForm.jsff" usageId="view_EmployeeFormPageDef"/>
<page path="/EmployeeFormPartTwo.jsff"
usageId="view_EmployeeFormPageDef"/>
</pageMap>
This associates the Page Definition created for EmployeeForm.jsff also with
EmployeeFormPartTwo.jsff.
4. Now remove the form fields for Hiredate, Sal, Comm and Deptno from EmployeeForm.jsff
and remove the fields Empno, Ename, Job and Mgr from EmployeeFormPartTwo.jsff.
5. Add a button to EmployeeForm.jsff; its label should be Next (or Part Two). Its action should
be parttwo.
<af:commandButton text="Part Two" action="parttwo"/>
Add a button to EmployeeFormPartTwo.jsff; its label should be Previuous (or Part One). Its
action should be partone.
<af:commandButton text="Part One" action="partone"/>

6. Now you can run the page again, and watch the two-step bounded task flow in action:
Press the Part Two button - and you get to see the rest of the Employee Details:
Bonus Practice: Show the Bounded Task Flow in a Popup Oftentimes it is convenient to have information at your fingertips - but always in your face. Real
estate on the pages of a web application is somewhat scarce and has to be used with care. Popups
come to the rescue - though they too should be used with some care.
In this practice, we will provide a popup on the Employees table that provides the user with all
details about an employee. Right mouse click on the employee and the popup appears with the
details. The popup contains the region that references the Bounded Task Flow.

1. Add a showPopupBehavior child to the Table EmpTable:
<af:table …>
<af:showPopupBehavior triggerType="contextMenu"
popupId="::empdetails"/>
2. Drag a popup component to the page, drop it on the af:form element in the structure
window. Set the popup’s Id to empdetails - the same value we used in the
showPopupBehavior. Set its contentDelivery attribute to lazyUncached. This ensures that the
popups content is refreshed when another employee is right clicked - every time the popup
opens, the contents is re-retrieved from the server.
3. Drag a panelWindow component to the popup.
4. Drag the region from the second facet of the panelSplitter to within the panelWindow:
<af:popup id="empdetails" contentDelivery="lazyUncached">
<af:panelWindow id="empdetailspw" title="Employee Details">
<af:region value="#{bindings.employeeform1.regionModel}"/>
</af:panelWindow>
</af:popup>
5. And now you can run the page.
Right click on any of the employee records. The popup will open with the panelWindow that
contains the bounded task flow employee-form.

Inside the popup you can browse to second page of details: