Intro to ArcGIS ModelBuilder
31
Intro to ArcGIS ModelBuilder Created for DUSPViz by Luke Mich | Spring 2016
-
Upload
duspviz -
Category
Data & Analytics
-
view
516 -
download
0
Transcript of Intro to ArcGIS ModelBuilder
Intro to ArcGIS ModelBuilderCreated for DUSPViz by Luke Mich | Spring 2016

Intro to ModelBuilder | DUSPViz | Spring 2016 | Page 2
What is ModelBuilder?ModelBuilder is part of the ESRI ArcGIS suite. Accessible from either ArcMap or ArcCatalog, ModelBuilder allows you to combine a series of geoprocessing tools in a flowchart-style visual model in order to streamline iterative mapping processes. In this tutorial, we’ll use ModelBuilder to create a buffer around a feature and use that buffer to clip another feature.
Intro to ModelBuilder | DUSPViz | Spring 2016 | Page 3
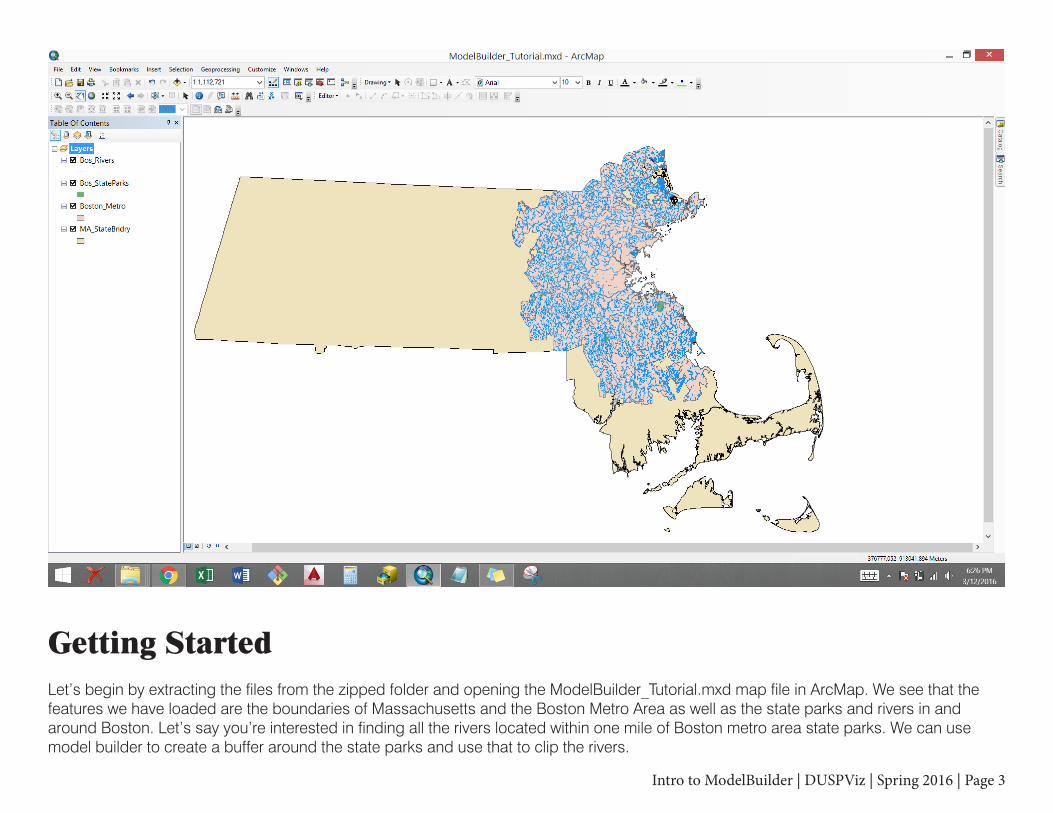
Getting StartedLet’s begin by extracting the files from the zipped folder and opening the ModelBuilder_Tutorial.mxd map file in ArcMap. We see that the features we have loaded are the boundaries of Massachusetts and the Boston Metro Area as well as the state parks and rivers in and around Boston. Let’s say you’re interested in finding all the rivers located within one mile of Boston metro area state parks. We can use model builder to create a buffer around the state parks and use that to clip the rivers.

Intro to ModelBuilder | DUSPViz | Spring 2016 | Page 4
Using the ArcCatalog WindowOpen the ArcCatalog Window in ArcMap, either by clicking on the tab docked on the left side of the screen, or going to Windows>ArcCatalog. Go ahead and pin it open by clicking on the thumbtack icon in the top right corner of the window. We’ll do most of our model-building work by pulling files and processes from this window.
Intro to ModelBuilder | DUSPViz | Spring 2016 | Page 5
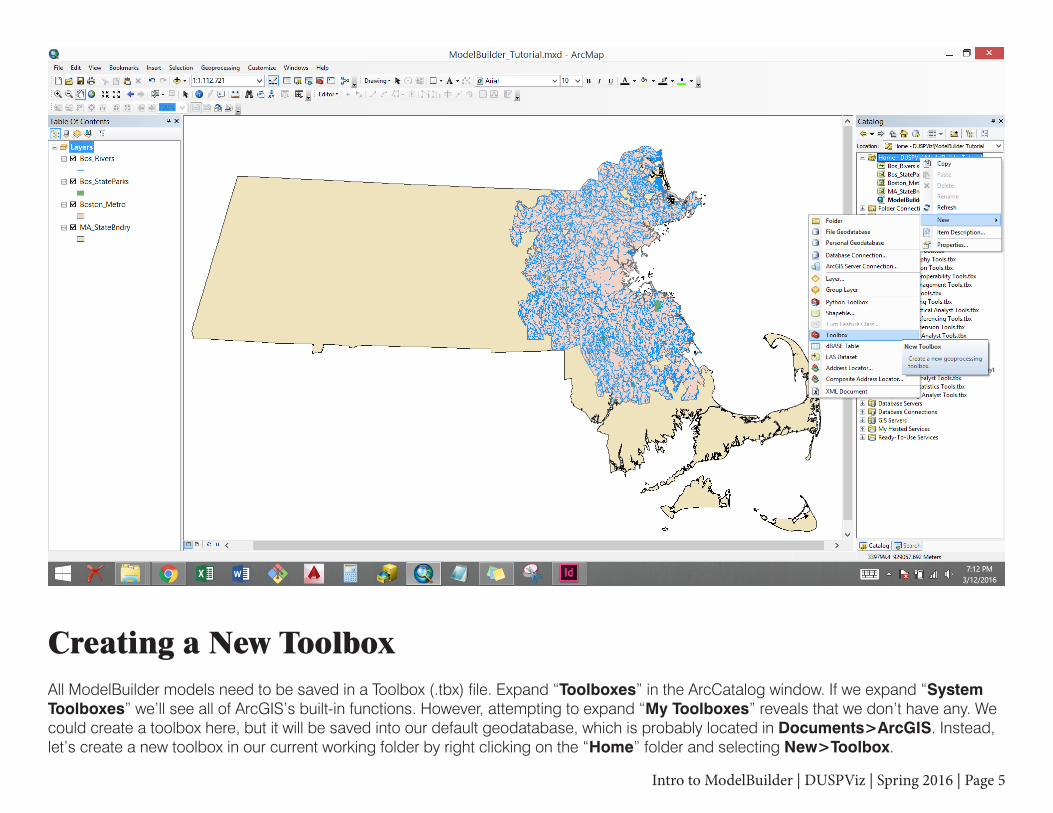
Creating a New ToolboxAll ModelBuilder models need to be saved in a Toolbox (.tbx) file. Expand “Toolboxes” in the ArcCatalog window. If we expand “System Toolboxes” we’ll see all of ArcGIS’s built-in functions. However, attempting to expand “My Toolboxes” reveals that we don’t have any. We could create a toolbox here, but it will be saved into our default geodatabase, which is probably located in Documents>ArcGIS. Instead, let’s create a new toolbox in our current working folder by right clicking on the “Home” folder and selecting New>Toolbox.

Intro to ModelBuilder | DUSPViz | Spring 2016 | Page 6
Creating a New ModelYou can rename the Toolbox.tbx file if you want. Then, right-click on the toolbox and select New>Model. This will automatically open the ModelBuilder window. We can use this window to organize our input files and the processes we want to use. Let’s close this window for now so we can rename our model. Right-click on the model you just created, and select Rename. Let’s call our model “CliptoBuffer” since that’s what the model does (it’s good practice to give your models and your toolboxes descriptive names when you can).

Intro to ModelBuilder | DUSPViz | Spring 2016 | Page 7
Opening the ModelYou’ll notice that if you double-click our model (or right-click and select Open) that a different window pops up than before, stating that “This tool has no parameters.” This is the dialog box for our model. Later, we’ll use this to enter in certain parameters (such as input files or geoprocessing properties) to run our model. For now, let’s close this window.

Intro to ModelBuilder | DUSPViz | Spring 2016 | Page 8
Editing the Model - adding a fileRight-click on the CliptoBuffer model and select Edit. Now we can start adding files and processes to the model. We can do this by selecting Insert>Add Data or Tool from the menu, clicking the Add Data button (plus sign in a yellow diamond) in the menu toolbar, or by dragging and dropping. Let’s start by adding the file to create the buffer around. Click and drag the Bos_StateParks.shp file from the Home folder in the ArcCatalog window to the ModelBuilder window.

Intro to ModelBuilder | DUSPViz | Spring 2016 | Page 9
Editing the Model - adding the buffer toolNow let’s add the buffer tool. Expand the System Toolboxes in the ArcCatalog window, then select Analysis Tools>Proximity>Buffer and drag it into the ModelBuilder window. Great! Now we have an input file and a tool. Next we’ll tell ModelBuilder to use the input file when running the tool.

Intro to ModelBuilder | DUSPViz | Spring 2016 | Page 10
Editing the Model - connecting the file and toolGreat! Now we can link the input file to the buffer tool. Click the Connect button (small blue square and green square connected with a line) to bring up the magic wand tool. Then click and drag a connection arrow from the Bos_StateParks.shp file to the buffer tool and select Input Features from the pop-up window.
Intro to ModelBuilder | DUSPViz | Spring 2016 | Page 11
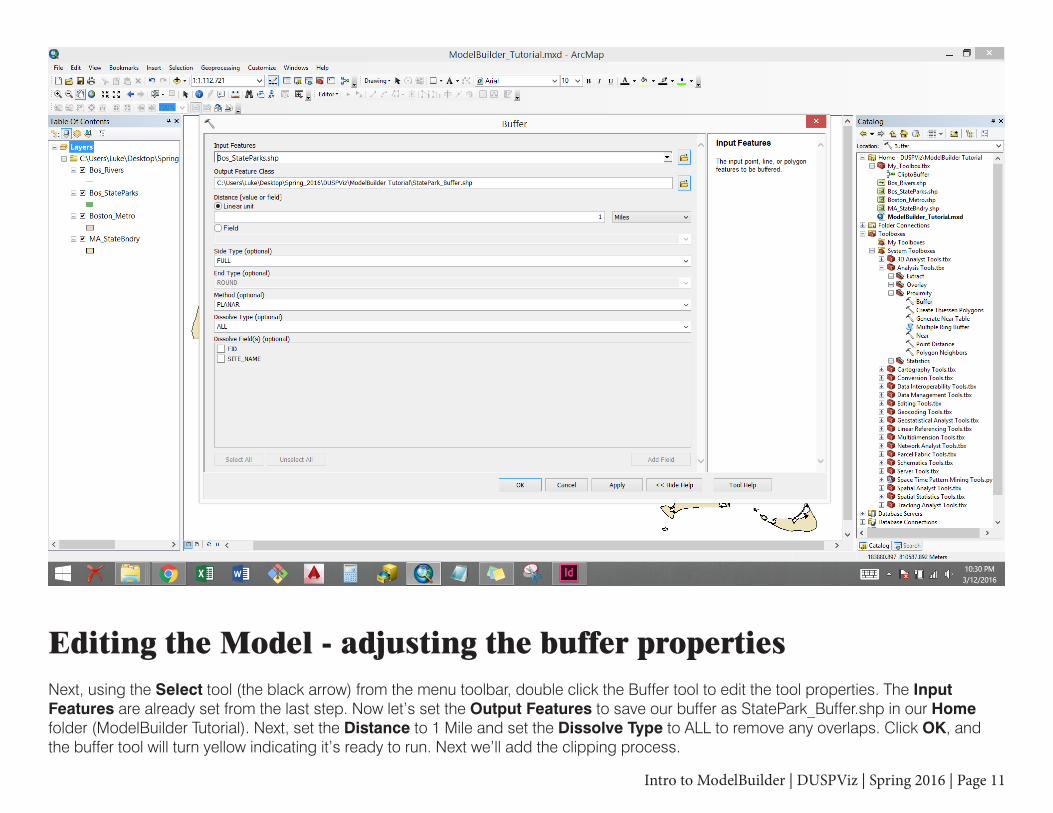
Editing the Model - adjusting the buffer propertiesNext, using the Select tool (the black arrow) from the menu toolbar, double click the Buffer tool to edit the tool properties. The Input Features are already set from the last step. Now let’s set the Output Features to save our buffer as StatePark_Buffer.shp in our Home folder (ModelBuilder Tutorial). Next, set the Distance to 1 Mile and set the Dissolve Type to ALL to remove any overlaps. Click OK, and the buffer tool will turn yellow indicating it’s ready to run. Next we’ll add the clipping process.

Intro to ModelBuilder | DUSPViz | Spring 2016 | Page 12
Editing the Model - adding the clipping componentsRepeat the steps above to add the Bos_Rivers.shp file and the Clip tool (Analysis Tools>Extract>Clip) to the ModelBuilder window.
Intro to ModelBuilder | DUSPViz | Spring 2016 | Page 13
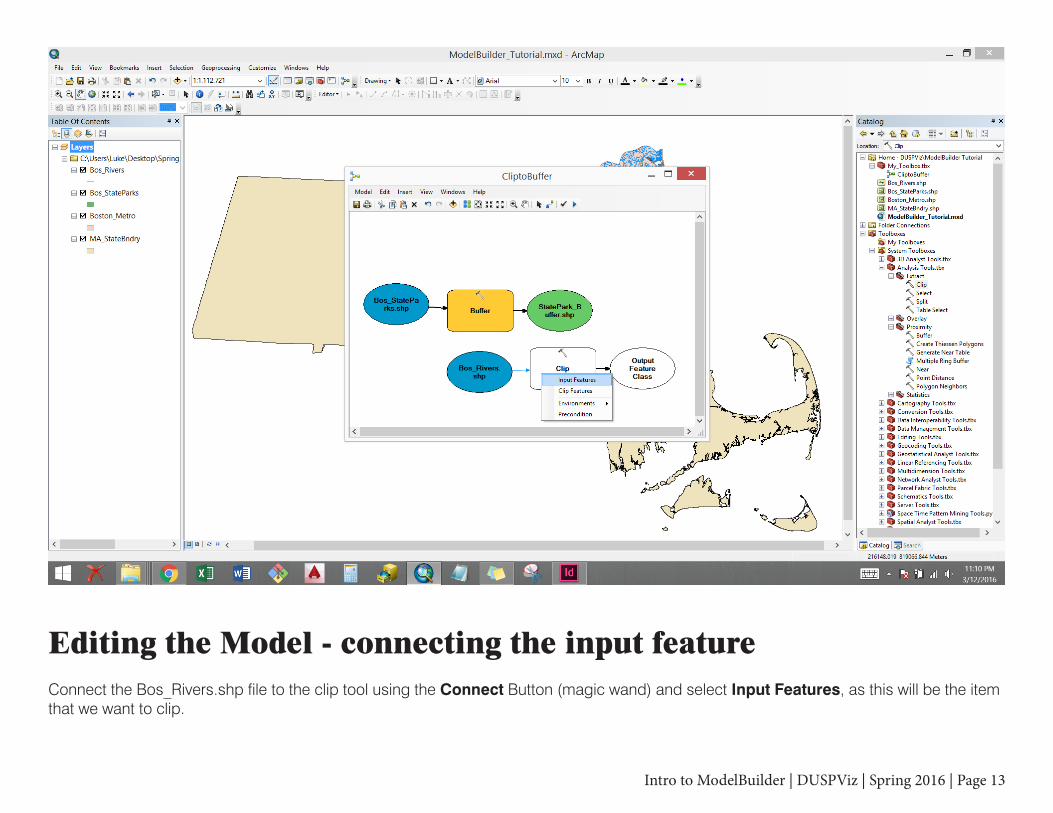
Editing the Model - connecting the input featureConnect the Bos_Rivers.shp file to the clip tool using the Connect Button (magic wand) and select Input Features, as this will be the item that we want to clip.

Intro to ModelBuilder | DUSPViz | Spring 2016 | Page 14
Editing the Model - connecting the clip featureRepeat the connection process for the StatePark_Buffer.shp file, but select Clip Features as this will be the file we use to clip the rivers.
Intro to ModelBuilder | DUSPViz | Spring 2016 | Page 15
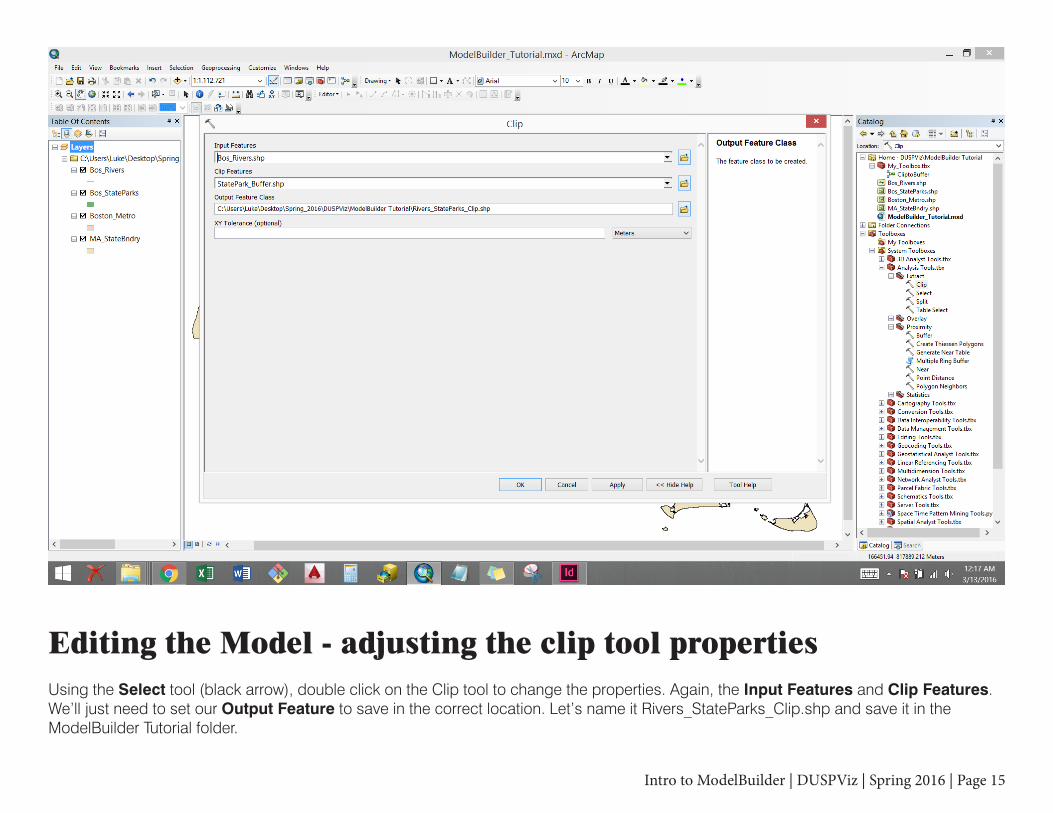
Editing the Model - adjusting the clip tool propertiesUsing the Select tool (black arrow), double click on the Clip tool to change the properties. Again, the Input Features and Clip Features. We’ll just need to set our Output Feature to save in the correct location. Let’s name it Rivers_StateParks_Clip.shp and save it in the ModelBuilder Tutorial folder.

Intro to ModelBuilder | DUSPViz | Spring 2016 | Page 16
Editing the Model - adjusting the layout, saving the outputBy clicking the Auto Layout button in the menu toolbar, ModelBuilder will rearrange our model to clean it up. This will come in handy as we start adding additional files and tools.

Intro to ModelBuilder | DUSPViz | Spring 2016 | Page 17
Testing the ModelOkay, so now we have a model that takes our State Parks file, creates a 1-mile buffer, and uses that buffer to clip our Rivers file. We can run the file from the ModelBuilder window to make sure our output is created correctly. Click the Run button (the blue “play” symbol) in the menu toolbar to cycle through our model. Once the process is completed, you can close the Run dialog box. If the Run fails, the text in the dialog box will explain why.

Intro to ModelBuilder | DUSPViz | Spring 2016 | Page 18
Testing the Model - viewing the resultsThe StatePark_Buffer.shp and Rivers_StatePark_Clip.shp files have been added to our Home folder in the ArcCatalog window. Close the ModelBuilder window (don’t forget to save!) and drag our new files over to our map (we can also add them automatically by right-clicking the output components in the ModelBuilder window and selecting Add to Display prior to running). Adjust your Table of Contents panel to match mine. The model worked! Next, we’ll adjust the model to allow users to select their own files and tool parameters.

Intro to ModelBuilder | DUSPViz | Spring 2016 | Page 19
Resetting the ModelNext, remove our buffer and clip output files from the map document and delete them from the ArcCatalog window. This way there won’t be any conflicts when we try to save over them in future steps. Also, you’ll notice that several components now have drop shadows indicating that the model has been run. If we were to attempt to run it again from within the ModelBuilder window, it would tell us the process has already been completed (even after we delete the output files). To reset, click Model>Validate Entire Model.

Intro to ModelBuilder | DUSPViz | Spring 2016 | Page 20
Creating Parameters - input filesRight-click the Bos_StateParks.shp component and select Model Parameter. This will allow anyone who uses our CliptoBuffer tool to select the file around which they’d like to create a buffer. Do the same for the Bos_StateParks.shp to allow them to select the feature they’d like to clip.
Intro to ModelBuilder | DUSPViz | Spring 2016 | Page 21
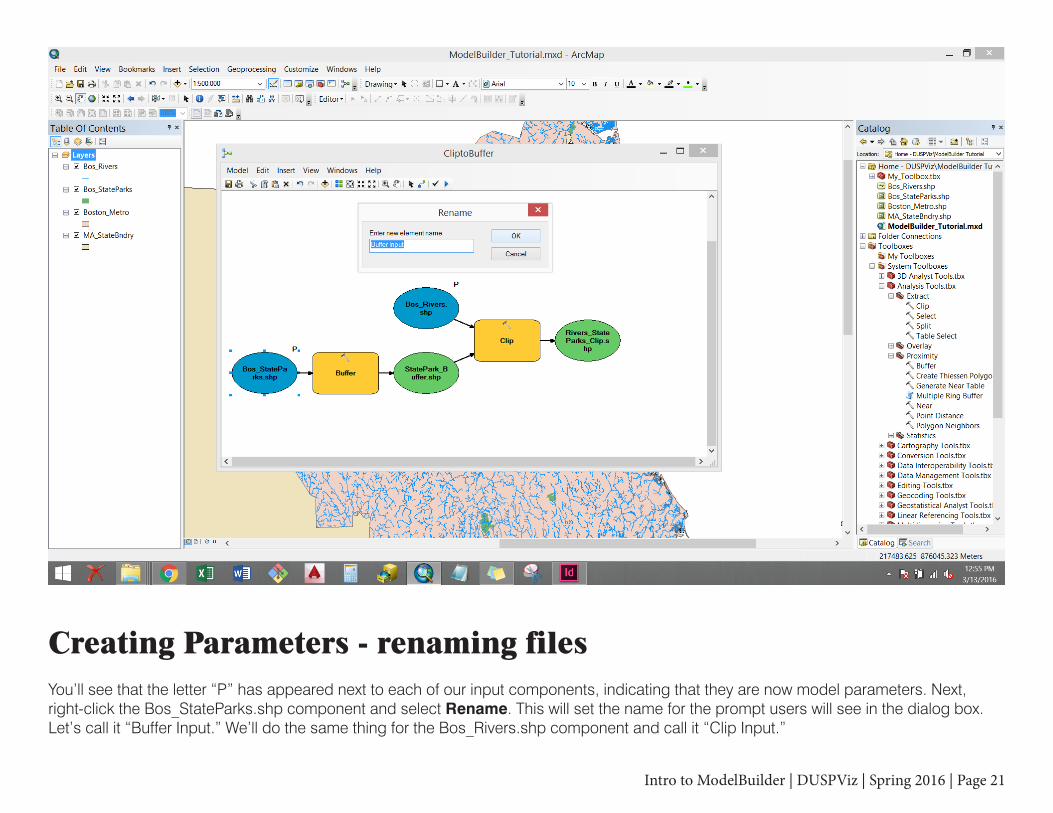
Creating Parameters - renaming filesYou’ll see that the letter “P” has appeared next to each of our input components, indicating that they are now model parameters. Next, right-click the Bos_StateParks.shp component and select Rename. This will set the name for the prompt users will see in the dialog box. Let’s call it “Buffer Input.” We’ll do the same thing for the Bos_Rivers.shp component and call it “Clip Input.”
Intro to ModelBuilder | DUSPViz | Spring 2016 | Page 22
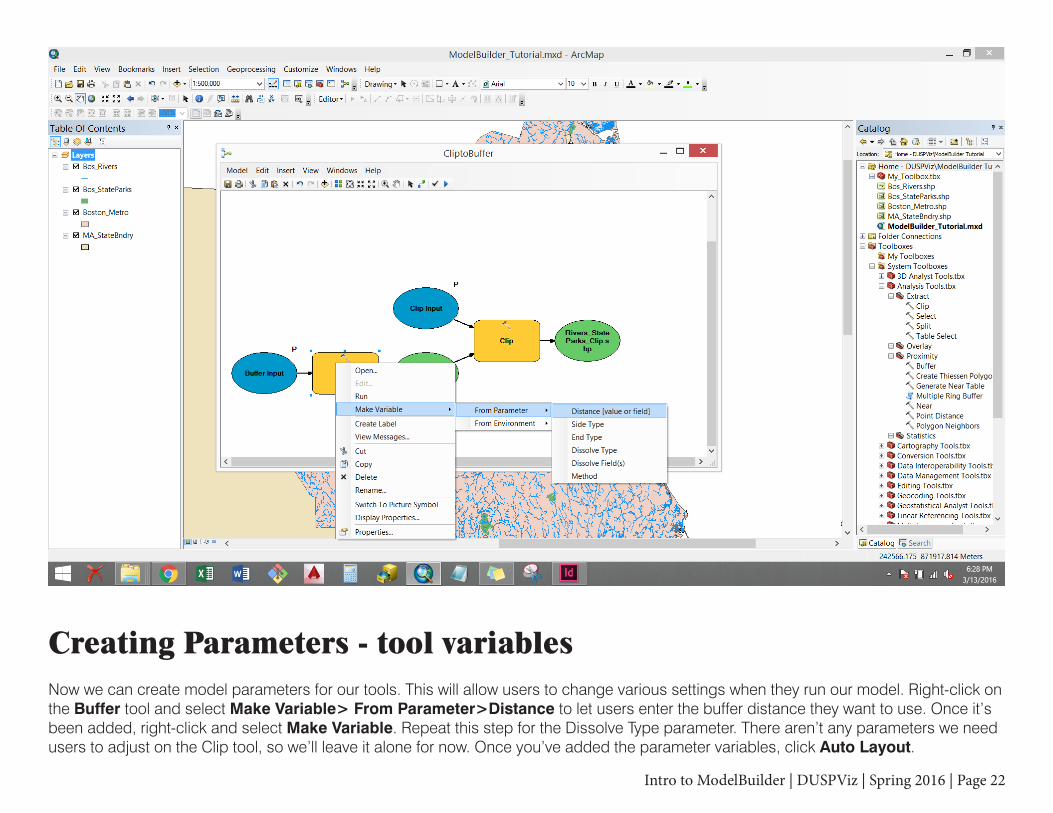
Creating Parameters - tool variables Now we can create model parameters for our tools. This will allow users to change various settings when they run our model. Right-click on the Buffer tool and select Make Variable> From Parameter>Distance to let users enter the buffer distance they want to use. Once it’s been added, right-click and select Make Variable. Repeat this step for the Dissolve Type parameter. There aren’t any parameters we need users to adjust on the Clip tool, so we’ll leave it alone for now. Once you’ve added the parameter variables, click Auto Layout.

Intro to ModelBuilder | DUSPViz | Spring 2016 | Page 23
Parsing Paths - inserting the parse paths tool Right now, our model is set up to save our output file as Rivers_StatePark_Clip.shp. This won’t make much sense if someone chooses to use different files for the inputs. We could double-click on the output component and change it’s name to take the names of the input files as variables, but first we need to parse the paths, which means pulling just the file name from the full file path (if we don’t, the model won’t run correctly). Select Insert>Model Only Tools>Parse Path to bring in the tool.
Intro to ModelBuilder | DUSPViz | Spring 2016 | Page 24
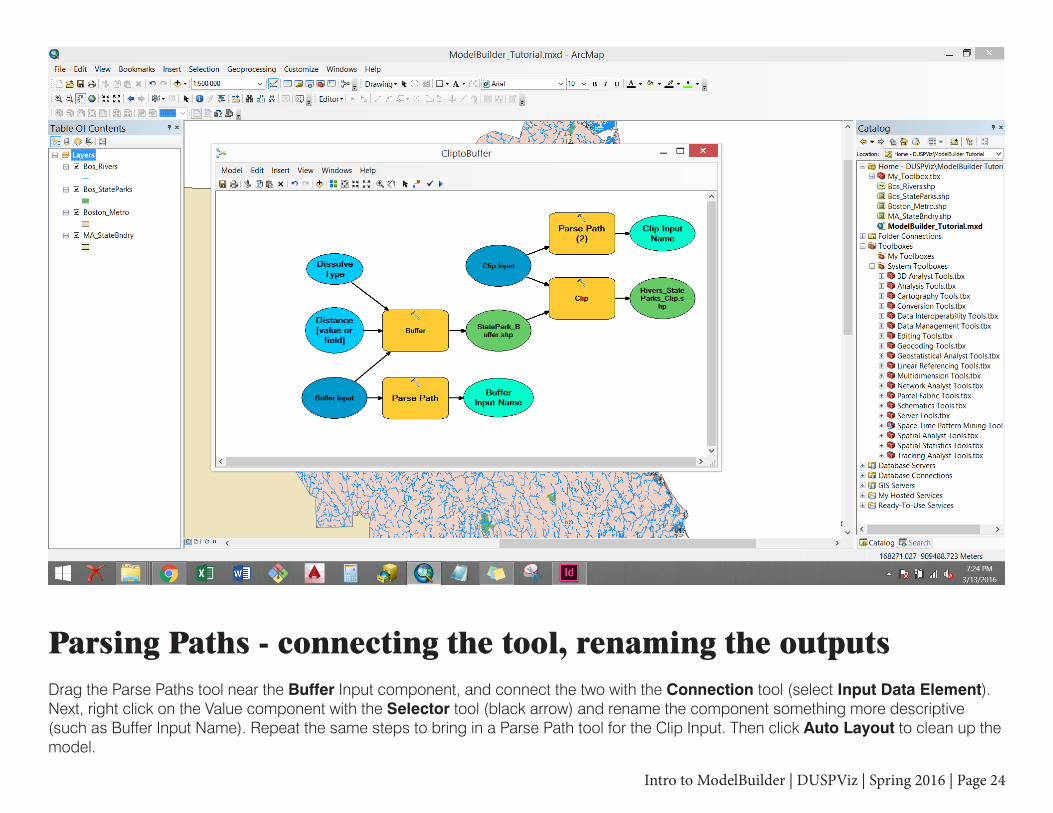
Parsing Paths - connecting the tool, renaming the outputs Drag the Parse Paths tool near the Buffer Input component, and connect the two with the Connection tool (select Input Data Element). Next, right click on the Value component with the Selector tool (black arrow) and rename the component something more descriptive (such as Buffer Input Name). Repeat the same steps to bring in a Parse Path tool for the Clip Input. Then click Auto Layout to clean up the model.
Intro to ModelBuilder | DUSPViz | Spring 2016 | Page 25
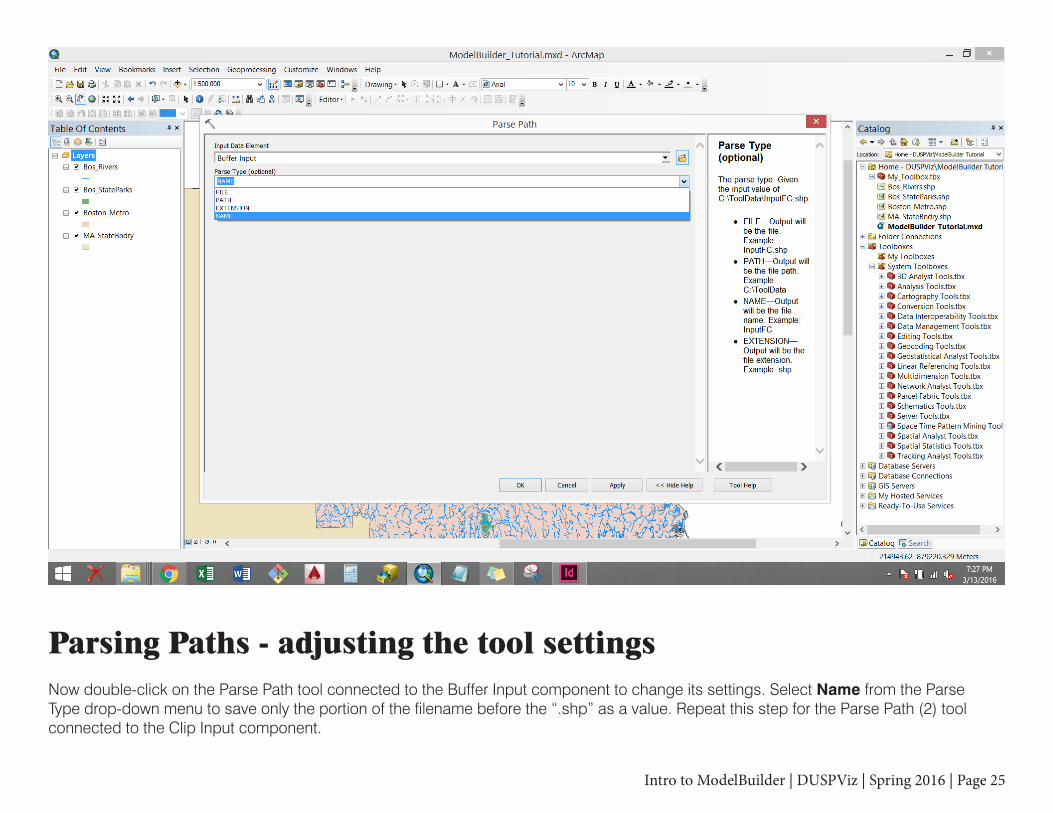
Parsing Paths - adjusting the tool settings Now double-click on the Parse Path tool connected to the Buffer Input component to change its settings. Select Name from the Parse Type drop-down menu to save only the portion of the filename before the “.shp” as a value. Repeat this step for the Parse Path (2) tool connected to the Clip Input component.

Intro to ModelBuilder | DUSPViz | Spring 2016 | Page 26
Renaming the Output File Double-click on the Rivers_StatePark_Clip.shp output file component to rename it. We’ll use the “%” symbol to indicate that the filename should be based on the filenames of our inputs. Type in the parsed filenames from the inputs, surround each with % symbols and separate them with an underscore: “%Buffer Input Name%_%Clip Input Name%”. Be sure to type everything just as you did when you named the variables - including spaces. We can repeat a similar process for the intermediate Buffer output component if we want.

Intro to ModelBuilder | DUSPViz | Spring 2016 | Page 27
Closing the ModelBuilder Window Great! Make sure all of our components are named correctly, click Auto Layout one last time, then Save and Close the ModelBuilder window. We won’t run our model from here. Instead we’ll use the model’s dialog box to select our parameters. But first, let’s add some metadata.

Intro to ModelBuilder | DUSPViz | Spring 2016 | Page 28
Adding Metadata Metadata provides information about the files and tools you use in ArcGIS. Since we’ve just created a model that we might share with others, it’s good practice to add metadata to explain what our tool does. Right-click on the CliptoBuffer model in the ArcCatalog window and select Item Description. In the pop up window, click Edit at the top, and add some keyword tags and a short description. We can also add descriptions of specific variables and creation credits. Then save and close this window.
Intro to ModelBuilder | DUSPViz | Spring 2016 | Page 29
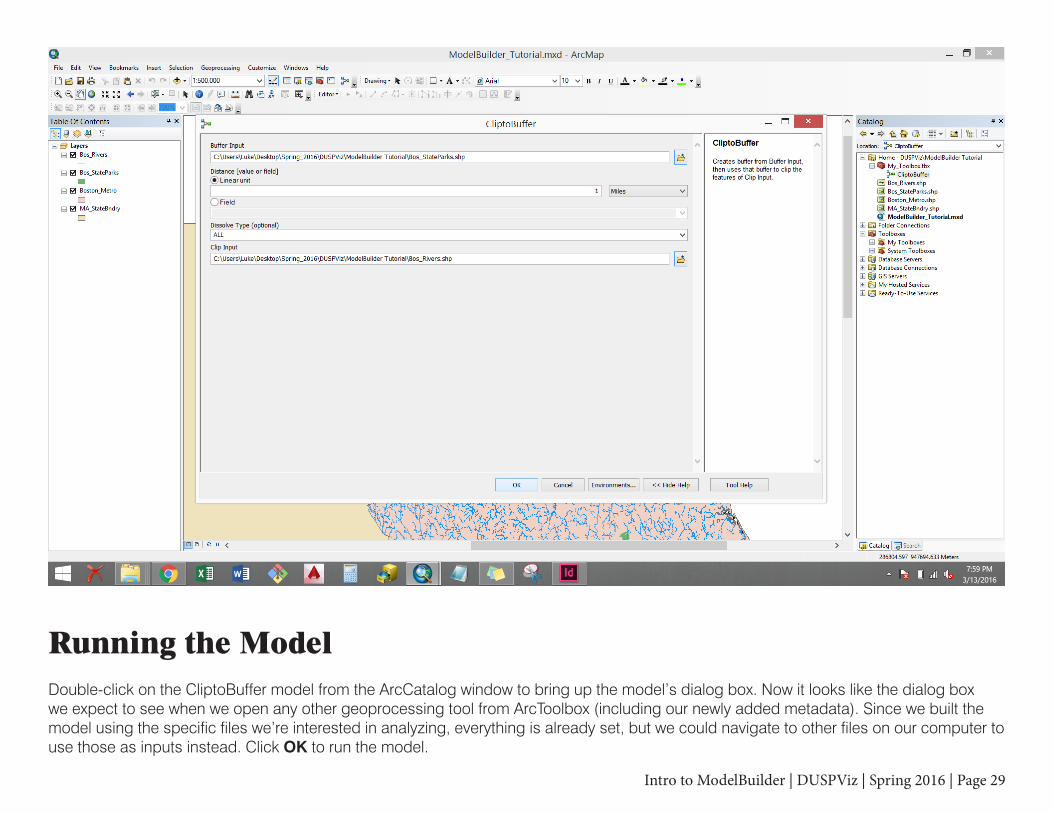
Running the Model Double-click on the CliptoBuffer model from the ArcCatalog window to bring up the model’s dialog box. Now it looks like the dialog box we expect to see when we open any other geoprocessing tool from ArcToolbox (including our newly added metadata). Since we built the model using the specific files we’re interested in analyzing, everything is already set, but we could navigate to other files on our computer to use those as inputs instead. Click OK to run the model.

Intro to ModelBuilder | DUSPViz | Spring 2016 | Page 30
Viewing the Results Once the model has run, we can close the run dialog box and bring our resulting output files into the map to review. It looks great! In the future, not only can we add other geoprocessing tools to our model if we wish, we can also automate other tasks, such as saving the outputs in various folders, deleting intermediate data (like our buffer output), and loading the outputs directly into our open map document. You can explore more advanced ModelBuilder options on the ESRI website (or your favorite search engine).

Intro to ModelBuilder | DUSPViz | Spring 2016 | Page 31
Exporting to Python ModelBuilder is a great tool for automating our geoprocessing work, but it can be a bit limited and clunky if we want to do more complicated tasks. This is where Python scripting comes in. We’ll learn more about what Python is and how to use it in a different session, but for now, let’s simply export our CliptoBuffer model as a Python script. Right-click on our CliptoBuffer model from the ArcCatalog window and select Edit. Then, in the ModelBuilder window menu, select Model>Export>To Python Script. Save the script as CliptoBuffer.py.