Internet Banking User Guide - Sterling Federal
45
Internet Banking User Guide 1
Transcript of Internet Banking User Guide - Sterling Federal

Internet Banking User Guide
1

Internet Banking User Guide
2
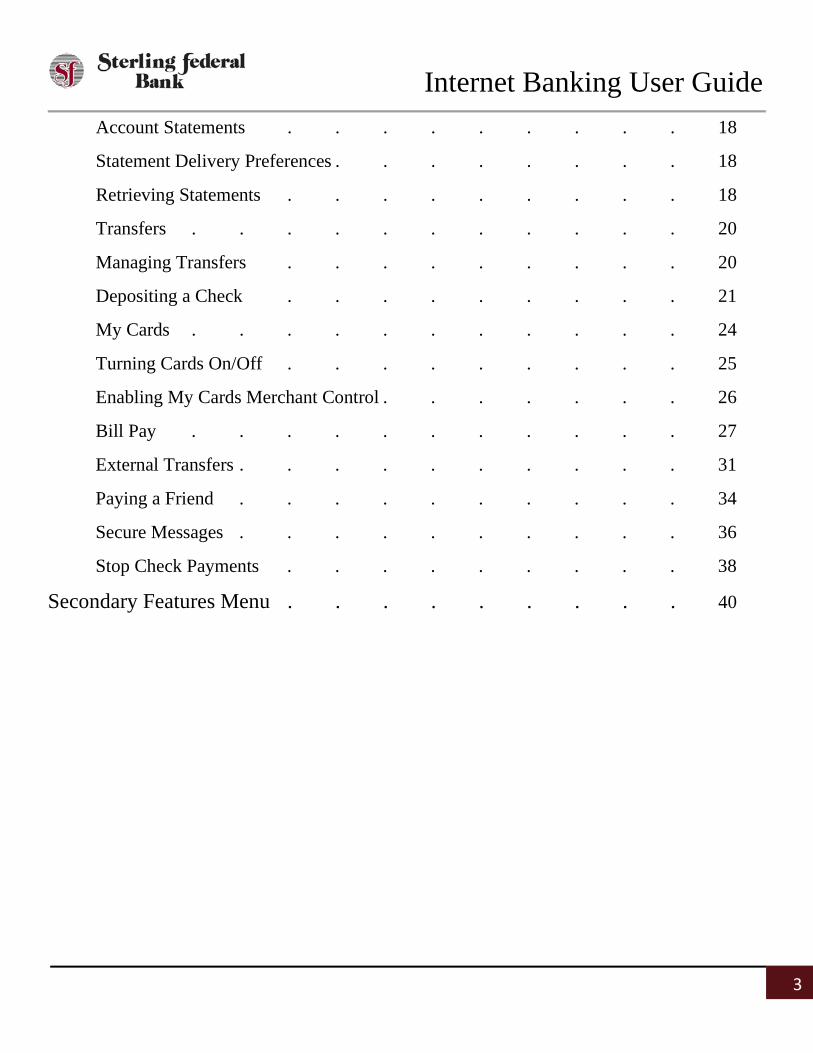
Table of Contents Accessing Internet Banking . . . . . . . . . 4
User Enrollment and Login . . . . . . . . . 4 Existing Internet Banking Users . . . . . . . 4
New Customer Self – Registration . . . . . . . 5
Out of Band Authentication . . . . . . . . 6
Forgotten Username/Password . . . . . . . . 7 Forgot Username . . . . . . . . . . 7
Forgot Password . . . . . . . . . . 8
Too Many Password Attempts . . . . . . . . 10
Customers Who Have Been Locked Out by Sterling Federal Bank . . 11
Internet Banking Features . . . . . . . . . 11
Account Tiles . . . . . . . . . . 12
Nicknaming and Hiding Accounts Using Account Tiles . . . . 13
Account List View . . . . . . . . . . 13
Transaction Detail . . . . . . . . . . 14
Check/Deposit Imaging . . . . . . . . . 14
Transaction Images . . . . . . . . . 14
Viewing and Exporting Account Details . . . . . . 15
Account Reporting . . . . . . . . . 16
Saving a Report . . . . . . . . . . 17
Retrieving a Saved Report . . . . . . . . 17
Printing Account History . . . . . . . . . 17
Internet Banking User Guide
3
Account Statements . . . . . . . . . 18
Statement Delivery Preferences . . . . . . . . 18
Retrieving Statements . . . . . . . . . 18
Transfers . . . . . . . . . . . 20
Managing Transfers . . . . . . . . . 20
Depositing a Check . . . . . . . . . 21
My Cards . . . . . . . . . . . 24
Turning Cards On/Off . . . . . . . . . 25
Enabling My Cards Merchant Control . . . . . . . 26
Bill Pay . . . . . . . . . . . 27
External Transfers . . . . . . . . . . 31
Paying a Friend . . . . . . . . . . 34
Secure Messages . . . . . . . . . . 36
Stop Check Payments . . . . . . . . . 38
Secondary Features Menu . . . . . . . . . 40

Internet Banking User Guide
4
Accessing Sterling Federal Bank’s Digital Internet Banking The Sterling Federal Bank Internet Banking platform can be accessed from our website (www.sterlingfederal.com) on any of the following browsers: Internet Explorer, Chrome, Safari, and Fire Fox.
User Enrollment and Login Existing Internet Banking Users If you are already enrolled in Sterling Federal Bank’s Internet Banking, the first time you log in to the new Internet Banking system on or after April 5th, 2021:
1. Enter the same Internet Banking username you use today. 2. Enter the same password you use today. 3. Click Login. 4. The system opens the Terms & Conditions page:
5. Review the Terms & Conditions. If you agree with the Terms & Conditions, click “Accept.” If you do not agree with the Terms & Conditions, click “Decline.” If you decline the Terms & Conditions you will not be able to enroll in Sterling Federal Bank’s Internet Banking.

Internet Banking User Guide
5
6. Once accepted, the verification page opens. This page asks you to enter information that will validate against our system. Select your account type from the drop-down menu, enter your Social Security Number, and Birth Date, then click Verify:
7. After your information is successfully validated against our system, the system displays your username and prompts you to create a new password.
8. Create a new password based on the requirements displayed on the screen. 9. Click Submit. 10. After successfully creating a new password, click Confirm to open the login page. 11. Log in to Internet Banking using your new credentials.
New Customer Self-Registration If you are new to Sterling Federal Bank’s Internet Banking:
1. After you have opened your account(s) at Sterling Federal Bank, the following steps should be followed to create a username and password.
2. From our website (www.sterlingfederal.com), under Online Banking, click “Personal,” then click New User Registration:
3. Read and accept the Terms & Conditions to move forward with enrollment.

Internet Banking User Guide
6
4. Select your account type from the list. 5. Enter our Social Security Number. 6. Enter your Date of Birth. 7. Enter your Zip Code. 8. Click Verify. 9. Enter a username, then click Continue. 10. Create a new password based on the password requirements displayed on the screen. 11. Click Submit. 12. Click “Confirm” to open the login page. 13. Log in to Internet Banking using your new credentials.
Out of Band Authentication You will be required to complete the Out of Band Authentication steps the first time you log in on a new or different device or browser.
Additionally, if two account holders with different login names share a device, each one will be required to complete Out of Band Authentication each time they log in after the other account holder.
For example, if a husband and wife share an iPad and the wife logged in the night before to check her balance, she would simply log in the next morning to check her balances again. Then, if her husband, who has a separate login name, wants to check his balances in the evening, he would be presented with the Out of Band Authentication steps before he could log in. Similarly, the next time the wife needed to log in after the husband she would be presented with the Out of Band Authentication steps.
The steps below outline the process for you to complete the Out of Band Authentication process before logging into Sterling Federal Bank’s Internet Banking.
1. Enter your Username and Password, then click “Login.” 2. Select your Delivery Preference. This is where your passcode will be delivered. Select your Passcode Message
Preference. Your options are Text Message Voice Message, or Email. Click Submit:
3. Once you receive your Authentication Code, enter it here and click Submit:
Internet Banking User Guide
7
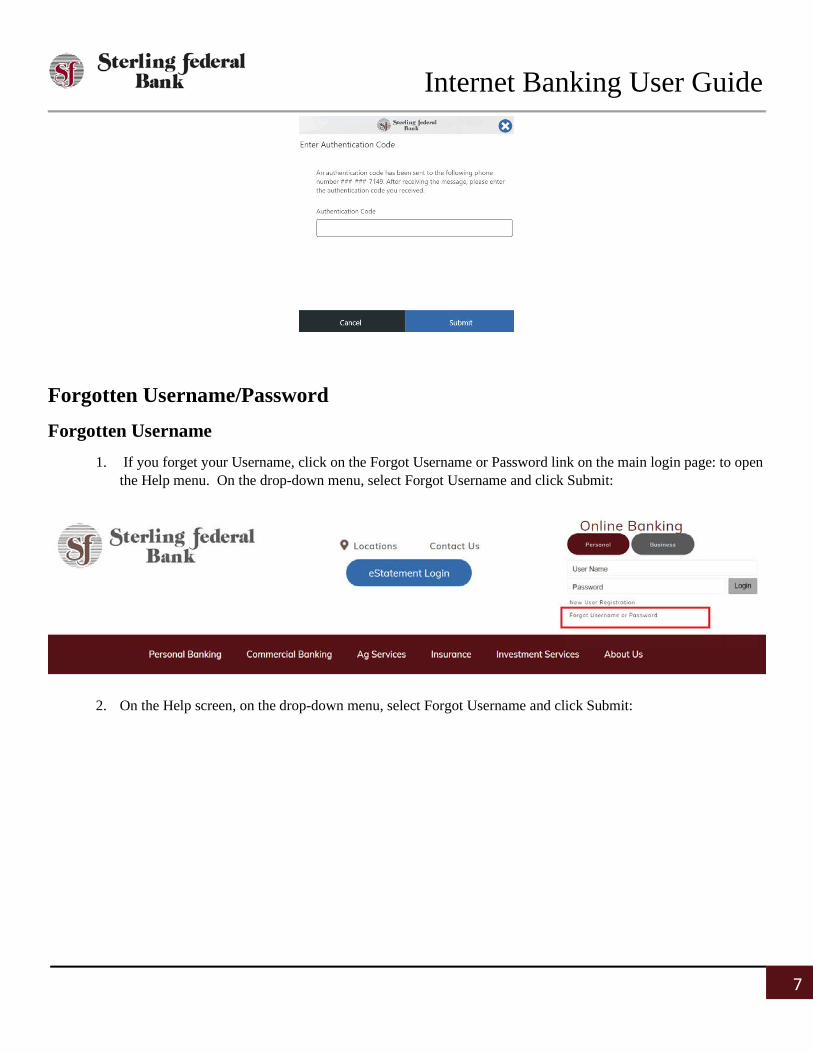
Forgotten Username/Password Forgotten Username
1. If you forget your Username, click on the Forgot Username or Password link on the main login page: to open the Help menu. On the drop-down menu, select Forgot Username and click Submit:
2. On the Help screen, on the drop-down menu, select Forgot Username and click Submit:

Internet Banking User Guide
8
3. Verify your information by selecting your Account Type from the drop-down menu, enter your Social Security Number, and your Birth Date. Click Verify:
4. You may be required to complete the Out of Band authentication passcode process. Your Username will then be displayed on your screen.
Forgotten Password 1. If you forget your password, you can click on the “Forgot Username or Password” link on the main login
page:

Internet Banking User Guide
9
2. On the Help screen, on the drop-down menu, select Forgot or Reset Password and click Submit:
3. Verify your information by selecting your Account Type from the drop-down menu, enter your Social Security Number, and your Birth Date. Click Verify:

Internet Banking User Guide
10
4. You will be prompted to create a new password:
Too Many Password Attempts If you enter your password incorrectly too many times, your account will be locked. You can follow the steps above to reset your password and log in to the system.
If you are locked out of your account because of unsuccessful password attempts, you can use the Forgot Username or Password link on the main login page to reset the password.
You will be required to enter validation information to prove your identity.

Internet Banking User Guide
11
Customers Who Have Been Locked Out by Sterling Federal Bank If you are locked out by Sterling Federal Bank because of an identified business need, you cannot reset your password.
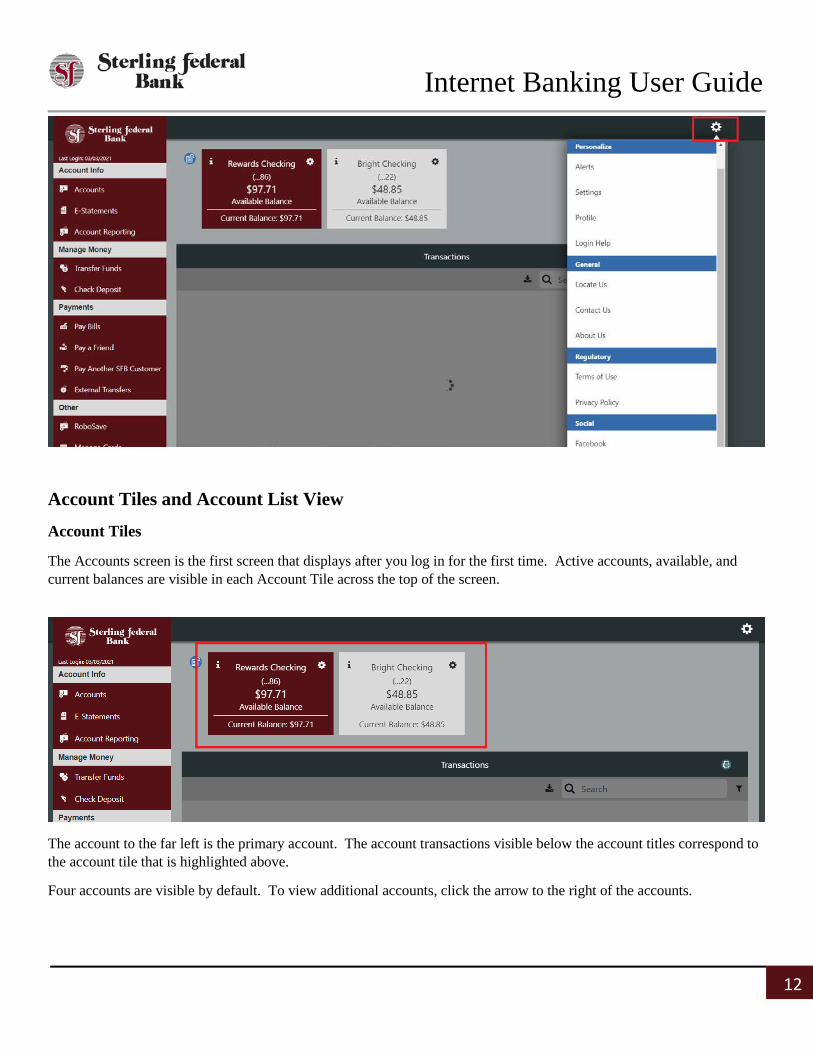
Internet Banking Features After successfully logging in, you will see the Transactions page by default. The workspace also has account tiles at the top of the page. An Account’s heading is shown above the side-bar menu upon first login.
The side-bar menu is a menu on the left side of the screen that enables you to navigate between features. As you move through the other features, you can click the Accounts button to navigate back to the Transactions page if necessary:
On the right side of the screen there is a gear icon. Clicking on this icon will pull up a menu of secondary features including Alerts, Settings, Profile, Login Help, Locate Us, Contact Us, About Us, Terms of Use, Privacy Policy, and Facebook:
Internet Banking User Guide
12
Account Tiles and Account List View
Account Tiles
The Accounts screen is the first screen that displays after you log in for the first time. Active accounts, available, and current balances are visible in each Account Tile across the top of the screen.
The account to the far left is the primary account. The account transactions visible below the account titles correspond to the account tile that is highlighted above.
Four accounts are visible by default. To view additional accounts, click the arrow to the right of the accounts.

Internet Banking User Guide
13
The “i” icon at the top of each Account Tile shows important account details such as an applicable interest earned, interest rates, loan balances, date of next payment and so on.
Nicknaming and Hiding Accounts Using Account Tiles
The gear icon to the top right of each Account Tile allows you to nickname accounts and to hide accounts.
Note: Accounts can be unhidden in the Account Settings feature, which is covered in detail later in this guide. The order in which accounts are displayed is customizable in Account Settings.
When you click on an Account Tile, the transaction details screen below the Account Tile feature changes to display the transactions that correspond to the respective accounts.
Account List View
To the left of the Account Tiles there is a small list view icon. The list view icon brings up a vertical list of your accounts.
Internet Banking User Guide
14
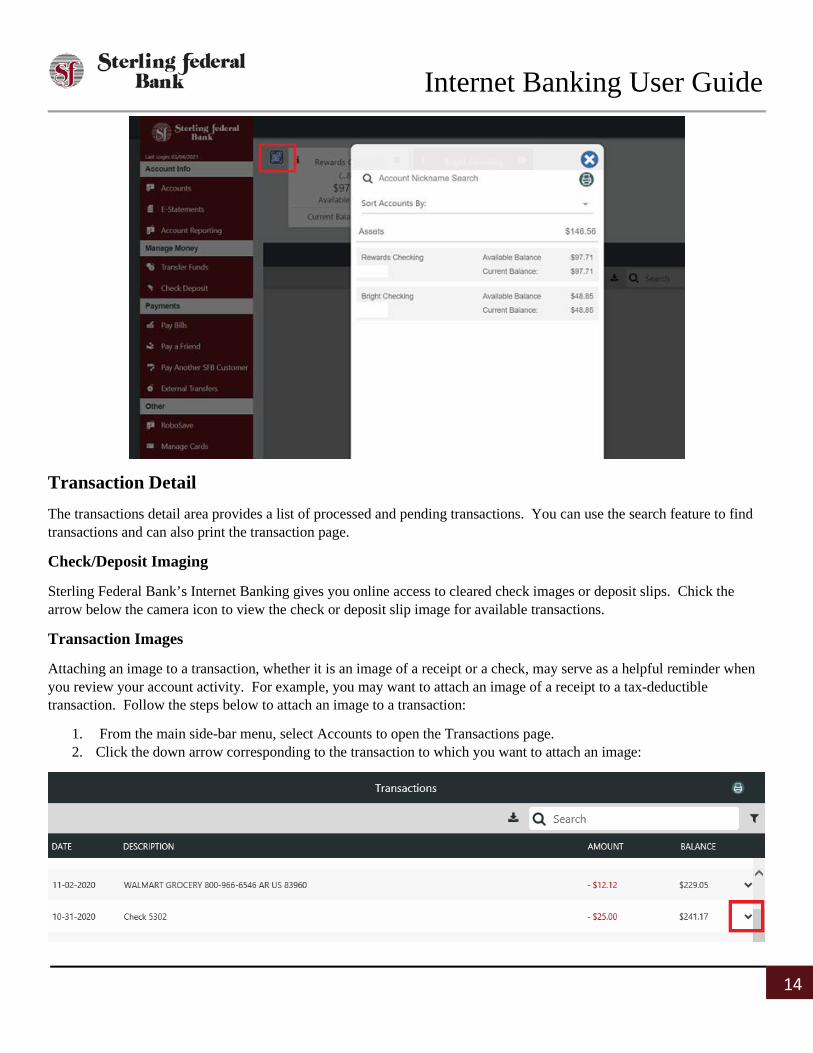
Transaction Detail The transactions detail area provides a list of processed and pending transactions. You can use the search feature to find transactions and can also print the transaction page.
Check/Deposit Imaging
Sterling Federal Bank’s Internet Banking gives you online access to cleared check images or deposit slips. Chick the arrow below the camera icon to view the check or deposit slip image for available transactions.
Transaction Images
Attaching an image to a transaction, whether it is an image of a receipt or a check, may serve as a helpful reminder when you review your account activity. For example, you may want to attach an image of a receipt to a tax-deductible transaction. Follow the steps below to attach an image to a transaction:
1. From the main side-bar menu, select Accounts to open the Transactions page. 2. Click the down arrow corresponding to the transaction to which you want to attach an image:

Internet Banking User Guide
15
3. Click the paper clip icon to open the dialog box and find the image you want to attach:
Viewing and Exporting Account Details
To view details of a particular transaction, click the downward arrow on the right side of the specific transaction for which you want to view more detail. To search for specific transactions, enter search criteria in the Search toolbar.
You can click on the Export icon (visible in the screenshot below), to Export transactions to a Comma Delimited (CSV) file, QuickBooks Web Connect (QBO), and Quicken Web Connect (QFX):

Internet Banking User Guide
16
Account Reporting The Account Reporting option opens the Account History Report page. This page enables you to view account history information using parameters you can define on the page.

Internet Banking User Guide
17
1. Populate the fields in the Account History Report Advanced Search fields based on the Account you want details about. The following fields can also be used to further narrow down search results:
• Check number • Amount range • Transaction date range • Transaction type
2. Click Apply to view the history results. 3. After the Account History Report populates use the Collapse/Expand button to move back to the Advanced
Search page:
Saving a Report
1. From the left side-bar menu, click Account Reporting to open the Account History Report page. 2. Select your search criteria; then click Apply to view the history results. 3. After the Account History Report populates use the Collapse button to move back to the Advanced Search
page. 4. Click Save Report to save the history results. 5. Type the name of your report in the history results.
Retrieving a Saved Report
1. From the left side-bar menu, click Account Reporting to open the Account History Report page. 2. Navigate to the Choose Saved Report filter. 3. Click on the name of the saved report you wish to review. Then click on Apply.

Internet Banking User Guide
18
Printing Account History
1. From the left side-bar menu, click Account Reporting to open the Account History Report page. 2. Select your search criteria, then click Apply to view the history results. 3. Click the Print button toward the top right to print the history results. 4. After the Account History Report populate use the Expand/Collapse button to move back to the Advanced
Search page.
Account Statements
Statement Delivery Preferences
Account holders can change the way they want their statements to be delivered.
1. Open the Statements feature from the left side-bar menu. 2. Click on Delivery Preferences.
3. A list opens with the choices All Accounts or Select Accounts.

Internet Banking User Guide
19
Selecting “All Accounts” applies a statement preference (Mail, Paper) to all your accounts. Selecting “Select Accounts” allows you to apply different statement preferences to one or more of your accounts.
Retrieving Statements
Account statements are available for all online banking accounts.
1. Click Statements from the side-bar main menu to view account statement information. On the next screen, click one of the available accounts to view monthly statements.
2. Select View to view the statement in a new window. 3. Select Save to save the statement to the workstation.
Internet Banking User Guide
20
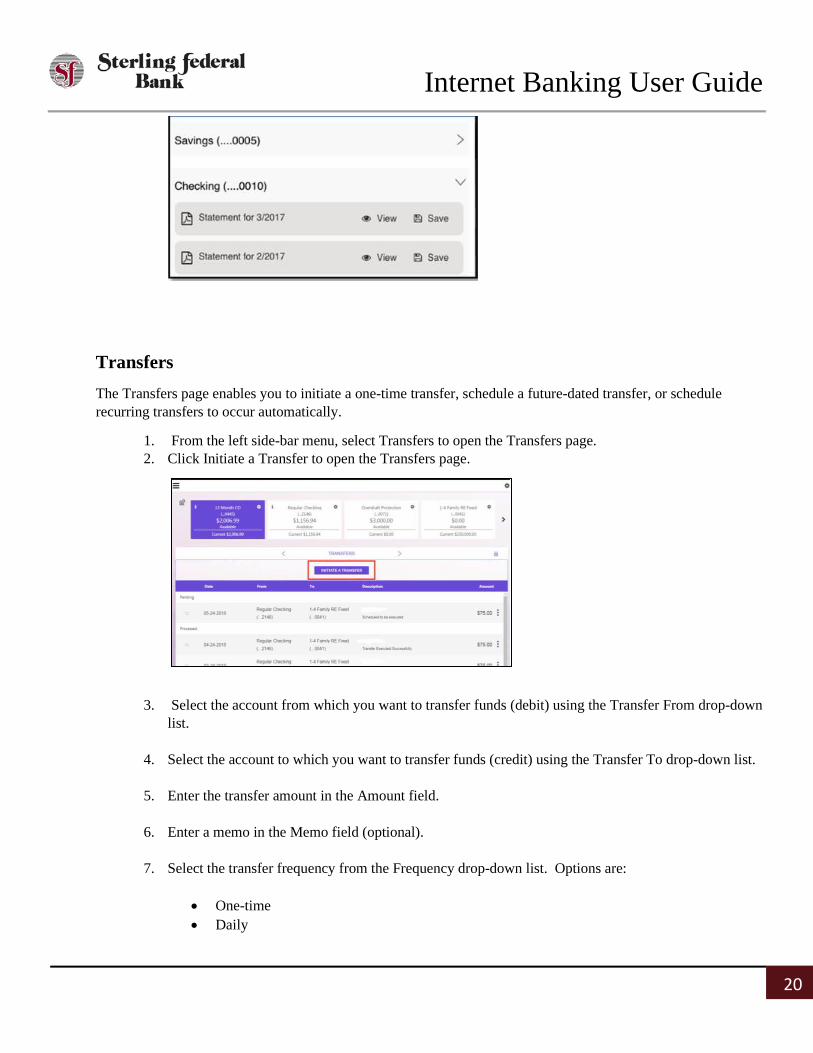
Transfers The Transfers page enables you to initiate a one-time transfer, schedule a future-dated transfer, or schedule recurring transfers to occur automatically.
1. From the left side-bar menu, select Transfers to open the Transfers page. 2. Click Initiate a Transfer to open the Transfers page.
3. Select the account from which you want to transfer funds (debit) using the Transfer From drop-down list.
4. Select the account to which you want to transfer funds (credit) using the Transfer To drop-down list.
5. Enter the transfer amount in the Amount field.
6. Enter a memo in the Memo field (optional).
7. Select the transfer frequency from the Frequency drop-down list. Options are:
• One-time • Daily

Internet Banking User Guide
21
• Weekly • Every two weeks • Monthly • Every three months • Annually
8. To set up a recurring transfer: • Choose the Frequency of the transfer from the drop-down list. • Choose the Recurrence from the drop-down list. • Enter an end date of total number of transfers.
9. Click Submit.
The Authorize Payment confirmation opens.
10. Click Confirm.
The transfer scheduled successfully confirmation opens.
11. Click Close to close the message or click View Transfer Details to view transfer information.
Managing Transfers
The Transfers page enables you to view, edit, and delete existing transfers.

Internet Banking User Guide
22
1. From the side-bar main menu, select Transfers to open the Transfers page.
2. Click the icon to the right of the transfer you want to manage.
3. From the drop-down list, you can:
• Click Details to view additional information about a specific transfer. • Click Delete Next Occurrence to cancel the next transfer is a series. • Click Delete All Occurrences to cancel an entire series of transfers.
Depositing a Check You can deposit checks via Internet Banking Deposit Capture directly from your desktop. However, most account holders find it easier to deposit checks via the mobile app.
If you have saved the check you want to deposit to your personal computer or laptop, follow the steps below to deposit a check (Note: This process requires front and back images saved on your PC to complete the deposit. Sterling Federal Bank recommends that you delete the images after completing your deposit):
1. From the side-bar main menu, click Deposits.

Internet Banking User Guide
23
2. Click Made a Deposit to open the Deposits page.
3. Select the account to which you want to deposit funds from the Deposit To drop-down list.
4. Enter the amount of the check in the Amount field.
5. Click the Upload a Check Image (Front); then, browse to and select the check image on your PC.
6. Select the file, then click Open. 7. Repeat the steps above for the back side of the check.
IMPORTANT! The back of the check must include a signature to be deposited. You are then notified whether your check images have been successfully captured.
8. Click Submit.

Internet Banking User Guide
24
The next screen summarizes your check deposit.
9. Click Confirm to submit your deposit for review.
Deposits appear as a pending transaction in your receiving account until approved. A message is sent to confirm that the deposit information has been successfully submitted.
My Cards The My Cards feature allows you to enable or disable cards associated with your account, as necessary.
You can also enable or disable merchant categories, enable transaction categories, edit limits, and enable travel and location controls.
Turning Cards On/Off
The Card On/Off feature allows you to enable or disable cards associated with your accounts. Follow the instructions below to turn cards on or off for an account.
1. From the main side-bar menu, click My Cards. 2. Click the three ellipses icon on the right to open the options menu.
3. Choose Disable Card (or Enable Card).
4. Click confirm to authorize the action.
Internet Banking User Guide
25
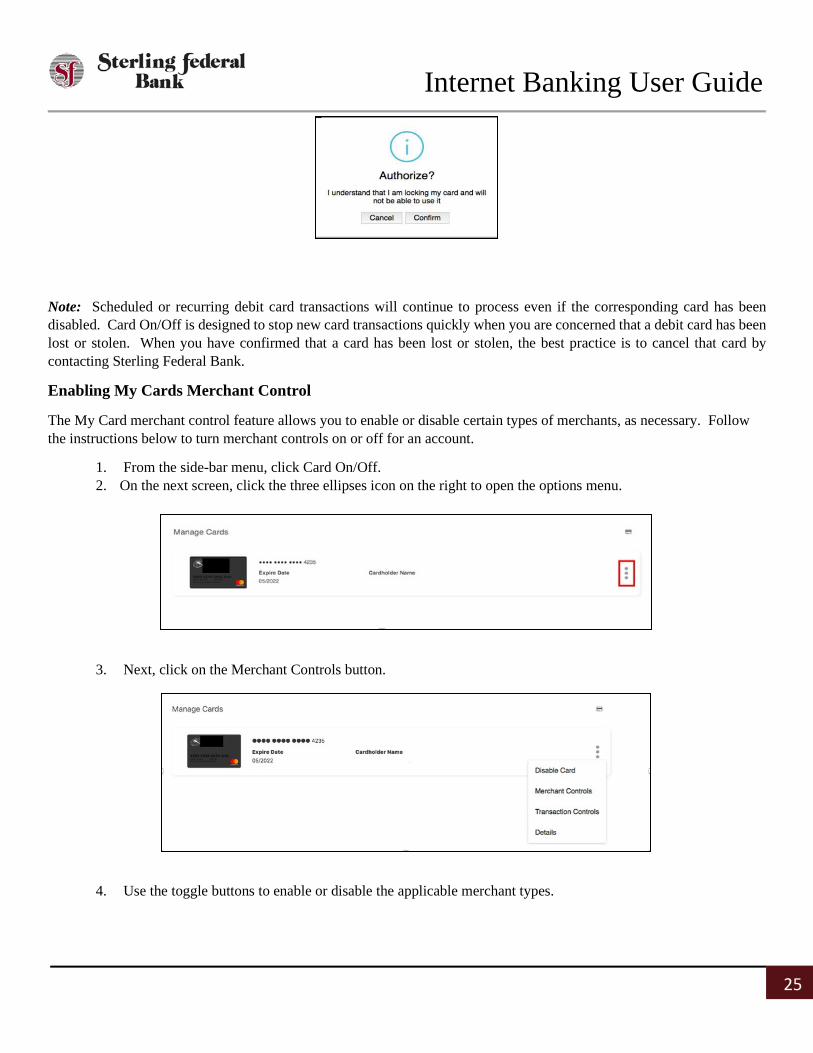
Note: Scheduled or recurring debit card transactions will continue to process even if the corresponding card has been disabled. Card On/Off is designed to stop new card transactions quickly when you are concerned that a debit card has been lost or stolen. When you have confirmed that a card has been lost or stolen, the best practice is to cancel that card by contacting Sterling Federal Bank.
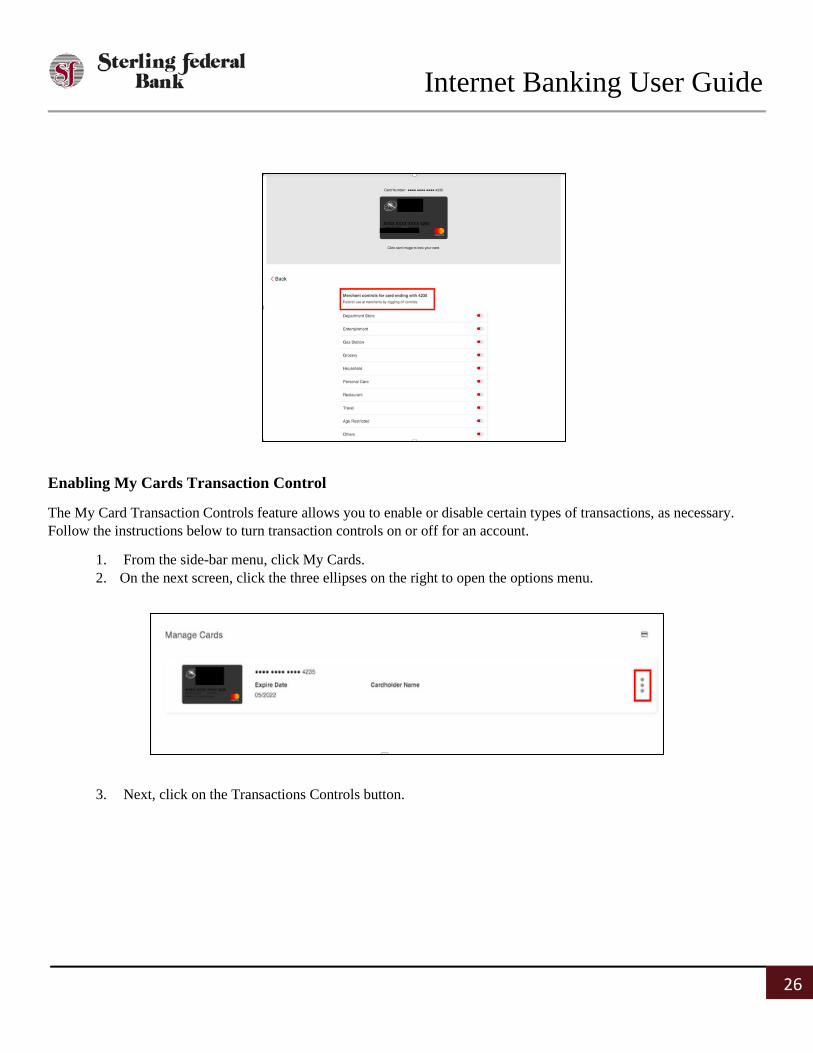
Enabling My Cards Merchant Control
The My Card merchant control feature allows you to enable or disable certain types of merchants, as necessary. Follow the instructions below to turn merchant controls on or off for an account.
1. From the side-bar menu, click Card On/Off. 2. On the next screen, click the three ellipses icon on the right to open the options menu.
3. Next, click on the Merchant Controls button.
4. Use the toggle buttons to enable or disable the applicable merchant types.
Internet Banking User Guide
26
Enabling My Cards Transaction Control
The My Card Transaction Controls feature allows you to enable or disable certain types of transactions, as necessary. Follow the instructions below to turn transaction controls on or off for an account.
1. From the side-bar menu, click My Cards. 2. On the next screen, click the three ellipses on the right to open the options menu.
3. Next, click on the Transactions Controls button.

Internet Banking User Guide
27
4. Use the toggle buttons to enable or disable the applicable transaction types.
Enabling Limits in My Cards
The My Card Limits control feature allows you to adjust your daily spending limits as needed. Follow the instructions below to adjust spending limits.
1. From the main side-bar menu, click My Cards. 2. Click on the Spending Limit icon. 3. Default limit should be visible. Use the slider tool to lower or raise your limits as needed.
Note: If Sterling Federal Bank has changed your card spending limit for a limited purpose, that new limit will not be impacted by changes that you made using the limit feature in the mobile application or Internet Banking platform.
4. When the adjusted spending limit is no longer necessary, you should disable the limit by clicking on the “Disable Spending Limit” button at the top of the screen.

Internet Banking User Guide
28
Bill Pay
Bill Pay – Creating a Payee
The person or company to which you send funds is known as the payee. A payee can be almost any company or person you would normally send a written check, such as a department store, a TV provider, or even a relative. It may be convenient to set up a payee to receive payments on a regular basis.
1. From the main side-bar menu, click Bill Pay to open the Bill Pay page. 2. Click Create a Payee to open the Create Payee window. 3. Select the payee using the Merchant Name drop-down list or click Add new merchant to enter a
merchant not included in the list. Then click next.
4. Enter the Account Number for the bill you want to pay, then click Next. 5. Enter the payee’s account information:
• Address 1 (required) • Address 2 (optional) • City (required) • State (required) • Zip Code (required)

Internet Banking User Guide
29
• Phone Number (required) 6. Click Next.
The payee is created and added to the list of payees on the Bill Pay page.
Bill Pay – Editing a Payee
You can edit details for exiting payees on the Bill Pay page if their contact information or account number changes.
1. From the main side-bar menu, click Bill Pay to open the Bill Pay page. 2. Click the icon corresponding to the payee; then select Details. 3. Click the icon to open the Edit Payee window. 4. Edit the information; then click Submit.
Bill Pay – Deleting a Payee
If you no longer need a payee, you can easily delete the record on the Bill Pay page.
1. From the main side-bar menu, click Bill Pay to open the Bill Pay page. 2. Click the icon corresponding to the payee, then select Details. 3. Click the icon.
A confirmation message below opens.
4. Click Confirm.
Bill Pay – Making a New Payment
After you create a payee, you can begin paying bills online without the hassle of cash or checks. The Bill Pay feature enables you to effortlessly pay a single bill or schedule future payments so you never miss a due date. Follow the instructions below to make a Bill Pay payment.
1. From the main side-bar menu, click Bill Pay to open the Bill Pay page. 2. Select an account using the From Account drop-down list.

Internet Banking User Guide
30
3. Click in the Deliver On/Send On field to select the date that the payment should be delivered/sent.
4. Click Ok. 5. Enter the payment amount in the Amount field. 6. Click the Pay button corresponding to the Payee. 7. The payment or scheduled payment will be visible in the Activity tab.
Bill Pay – Editing a Payment
You can easily edit scheduled payments on the Bill Pay page. This feature gives you the freedom to change payment amounts and dates, as necessary.
1. From the main side-bar menu, click Bill Pay to open the Bill Pay page. 2. Click the Activity tab. 3. Click the icon corresponding to the payee, then click Details to open the Review Payment
window.

Internet Banking User Guide
31
4. Click Edit Payment to open the Edit Payment window. 5. Edit the payment details.
a. For recurring payments, the system returns the following confirmation message: Do you want to edit next payment only or the entire series?
b. Click either the Next Payment button to edit just the next payment or the Entire Series button to edit the entire series of payments.
6. Click Submit.
Bill Pay – Deleting a Payment
You can delete pending scheduled payments. All pending payments are shown on the Activity tab of the Bill Pay page.
1. From the main side-bar menu, click Bill Pay to open the Bill Pay page. 2. Click the Activity tab. 3. Click the icon corresponding to the payment, then click Details to open the Review
Payment window. 4. Click Delete Payment.
a. For recurring payments, the system returns the following message: What would you like to delete?
b. Click either the Delete This Payment button to delete just the next payment or the Delete Entire Series button to Delete the entire series of payments.
External Transfers with DPX Pay
External Transfer – Adding an External Account
Internet Banking enables you to link accounts at other financial institutions to your Sterling Federal Bank account(s). Linked accounts can transfer funds between Sterling Federal Bank and external accounts.
1. From the side-bar menu, click External Transfers.

Internet Banking User Guide
32
2. Click Add Account.
3. Enter the Routing Number that corresponds to the account to which funds will be transferred. 4. Enter the Account Number that corresponds to the account to which funds will be transferred. 5. Confirm the Account Number. 6. Select the Account Type form the drop-down list. 7. Enter the Name of the Account Holder. 8. Enter the account Nickname. 9. Click Submit.
The message below opens:
10. Follow the steps listed to verify the external account and enable external transfers.
External Transfer – Activating an External Account
After you complete the stops in the instructions provided when you add an account, you will need to enter the small transactions that you received via email. Completing this step will activate the external account.
1. Click the icon corresponding to the account, then select Activate Account.

Internet Banking User Guide
33
2. Enter the small amounts that were sent to the external account that is being added.
3. Complete the instructions on the screen to continue activating the external account.
External Transfer – Deleting an External Account
1. From the side-bar main menu, click External Transfers to open the External Transfer page. 2. Click the icon corresponding to the account, then select Delete Account. 3. Click Confirm.
External Transfer – Transferring Funds to an External Account
You can make a one-time or recurring transfer to external accounts.
1. From the side-bar main menu, click External Transfers. 2. Select the accounts to transfer funds between using the From and To drop-down lists. 3. Enter the Amount to transfer. 4. To set up a recurring transfer:
a. Choose the frequency of the transfer. b. Enter a submission date.

Internet Banking User Guide
34
c. Enter an end date, total number of transfers, or until cancelled. 5. Click the Submit button.
External Transfer – Managing External Transfers
The External Transfers page enables you to view, edit, and delete existing external transfers.
1. From the side-bar menu, click External Transfers to open the External Transfers page. 2. Click the Activity tab. 3. Click the icon.
a. Click Details to view additional information about a specific transfer. b. Click Edit Transfer to cancel the next transfer in a series. c. Click Cancel Transfer to cancel the transfer.
Pay a Friend Feature The Pay a Friend feature enables you to transfer money to other individuals. This is like Venmo, PayPal, or other popular person-to-person payment systems.
Pay a Friend – Sending Funds
1. From the main side-bar menu, click Pay a Friend. 2. Click Make a Payment:
3. In the Pay From field, select which account you want to pay from. 4. In the Pay To field, enter the name of the payee. 5. In the Send Method field, choose Email or Mobile phone. This is how the payee will
need to verify their information before receiving the funds. 6. In the Amount field, enter the amount you want to transfer. 7. Click Submit

Internet Banking User Guide
35
The next screen summarizes your payment information. Transactions take 2-3 business days to fund after the recipient performs the required steps to accept the payment.
8. Click Proceed to submit your payment for review. The payment appears in the Pending category on the main Pay a Friend screen until it is delivered.
The system returns a confirmation message that the payment information has been submitted successfully.
Pay a Friend – Requesting Funds
1. From the main side-bar menu, click Pay a Friend. 2. Click Request Money. 3. Select the account to which you want the funds deposited. 4. In the Receive From field, enter the name of the person from whom you are
requesting the payment. 5. In the Receive Method field, choose Email or Mobile phone. This is how the other
party will receive the request to transfer funds to you. 6. In the Amount field, enter the amount you are requesting to be transferred to you. 7. Click Submit. 8. Click Confirm.
Pay a Friend – Deleting a Payee
If you no longer wish to send money to or receive money from a payee, you can easily delete the payee.
1. From the main side-bar menu, click Pay a Friend. 2. Click the icon next to the payee, then click Delete. 3. Click Confirm.

Internet Banking User Guide
36
Pay a Friend – Managing Pay a Friend Transactions
The Pay a Friend page enables you to view, edit, and delete existing Pay a Friend transactions.
1. From the main side-bar menu, click Pay a Friend. 2. Click the Activity tab. 3. Click the icon next to the scheduled payment.
a. Click Details to view additional information about the payment. b. Click Delete Transfer to cancel the payment.
Paying Another SFB Customer Feature The Pay Another SFB Customer feature enables you to transfer money to other Sterling Federal Bank account holders. To pay another SFB customer, you must know the Account Number, Account Type, and Last Name of the payee.
Pay Another SFB Customer – Setting up Payees
1. From the main side-bar menu, click Pay Another SFB Customer. 2. Click Add Payee 3. Enter the payee’s last name. 4. Select the payee’s account type. 5. Enter the payee’s account number. 6. Confirm the payee’s account number. 7. Click Submit
Secure Messages
Composing and Sending
Follow the instructions below to send a secure message to Sterling Federal Bank.
1. From the main side-bar menu, click Secure Messaging. From the page, you can read messages in the inbox and view sent and archived messages.
2. Click the envelope/pencil icon to open a new message in edit mode.

Internet Banking User Guide
37
3. From the drop-down list, select the subject of the message. The default options are: Account Inquiry, Card Blocked/Stolen, Bill Pay Question, Check Reorder, and General Questions.
Note: You do not have the ability to type in your own subject detail. You must choose from the Secure Message subjects.
4. Type the message in the text box. 5. Click the paper clip icon to attach a file to your message if applicable. A window opens
enabling you to select your file.
Note: Attachments must be .pdf, .jpg, or .png files and cannot exceed 2.0 MB in size.
6. Click Send.
Viewing a Secure Message
Sterling Federal Bank Internet Banking displays a numerical indicator to notify you that we have replied to an earlier message or sent you a new message. Follow the instructions below to view a secure message.
1. From the left side-bar menu, click Secure Messaging. 2. The Secure Message inbox opens. You can read messages in the inbox and
view sent and archived messages. 3. Double-click the message in the inbox to open the message.
Deleting a Secure Message
Follow the instructions below to delete a secure message.
1. Click Secure Messaging. From this page, you can read messages in the inbox and view sent and archived messages.
2. Select the check box corresponding to the message.

Internet Banking User Guide
38
3. Click the trans can icon to delete the message.
Stop Payments – Checks
Stopping a Check Payment – Single Check
Follow the instructions below to place a stop payment on a single check.
1. From the left side-bar menu, click Stop Payment:
2. In the Account Number field, select the account on which you want to place the Stop Payment.
3. Select Single Check from the Stop Payment On list, click Next to open the Stop Payments window.

Internet Banking User Guide
39
4. Enter the Check Number, Amount, and Check Date, and Payee in the provided space, then click Submit. A screen summarizing the stop payment displays.
A message is received confirming that the stop payment request has been successfully submitted.
Stopping Check Payments – Multiple Checks
Follow the steps below to place a stop payment on a range of checks.
1. From the main side-bar menu, click Stop Payment.
Internet Banking User Guide
40
2. From the first drop-down list on the screen, select the account from which funds were debited by the checks.
3. Select Range of Check from the second drop-down list. 4. Click Next. 5. Enter the start and end check number range in the Start Number and End Number fields. 6. Click Submit.
A screen summarizing the stop payment details opens.
7. Click Submit.
Internet Banking returns a confirmation message that the stop payment request was submitted successfully.
Secondary Features Menu (Right Sidebar) Settings
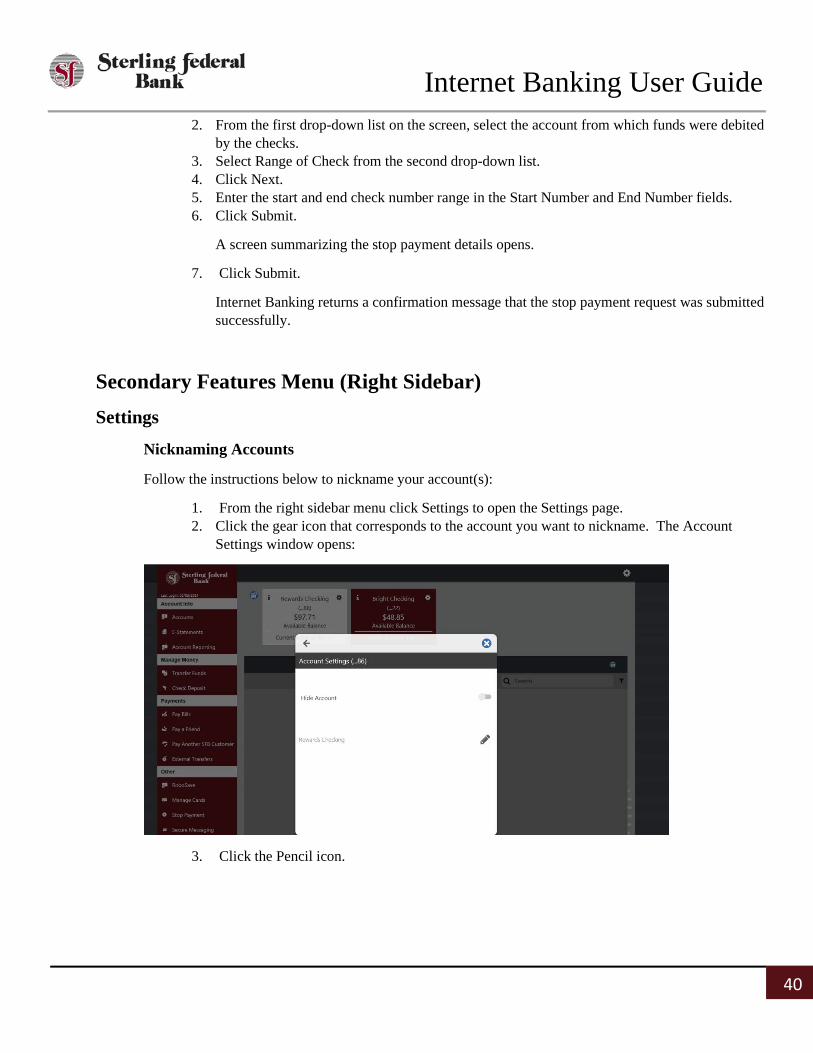
Nicknaming Accounts
Follow the instructions below to nickname your account(s):
1. From the right sidebar menu click Settings to open the Settings page. 2. Click the gear icon that corresponds to the account you want to nickname. The Account
Settings window opens:
3. Click the Pencil icon.

Internet Banking User Guide
41
The text field opens in edit mode:
4. Enter the desired nickname in the text field. 5. Click the Save icon. 6. Repeat this process for each account you want to nickname.
Hiding/Unhiding Accounts
There are two ways to hide accounts: using tiles or Settings. Note: Hidden accounts are not available to process transaction and do not appear in the Account Tiles at the top of the main workspace. To unhide accounts, you must navigate to Settings and follow the steps below:
1. From the right sidebar menu click Settings. 2. Click the gear icon next to the account you want to hide. 3. Click the Hide Account toggle button to the right:

Internet Banking User Guide
42
4. To unhide the account simply click the Toggle icon again. The account will appear in its
original position in the Account Tile panes.
Changing Account Order
The Change Account Order feature enables you to display any unhidden accounts first in the list that appears at the top of Internet Banking. Follow the instructions below to change the order of accounts:
1. From any page, click the gear icon to open the Settings menu. 2. Under Personalize, click Settings, then click Change Account Order. 3. Click the up arrow of an account to move up in the display order. Click the down arrow to
move an account down in the display order. 4. Click Save.
The new primary account displays on the left side of the Account Pane and the transactions that correspond to that account are visible on the transactions page when you navigate back to that page.
Text Banking Step One: Navigate to Settings.
Step Two: Click “Text Banking”:

Internet Banking User Guide
43
Step Three: Click on the field to the left of the pencil icon to add a primary phone number. Enter the phone number to which you want the text banking alerts to be sent:
Step Four: The pone number that was entered will receive a code via text. Enter that code to move forward.
Step Five: After successfully entering the code you will receive a confirmation message.
Step Six: Choose a “From Account” and a “To Account” to setup the option for TRAN alerts.

Internet Banking User Guide
44
Step Seven: After text banking is enabled in settings, you can text to 59217 using the following codes:
• BAL – Account Balances • HIST – Last three transactions on primary account • TRAN – Transfer money FROM selected account TO the selected primary account • HELP • STOP – Cancel service
Profile Update The Profile option enables account holders to update their user profile information. Follow the instructions below to update your user profile:
1. From any page, click the gear icon to open the Settings menu. 2. Under Personalize, click Profile to open the Edit Your Profile page. 3. Update the applicable fields:
• Email • Primary Phone • Secondary Phone • Residential Address • Residential Address 2 • City • State • Zip Code
4. Click Submit
Note: Updates made to your user profile on Internet banking also update the information stored on Sterling Federal Banks system.
Setting Up a Security Alert Email Address or SMS Phone Number

Internet Banking User Guide
45
Follow the instructions below to set up an email address or phone number to receive security alerts.
1. From any page, click the gear icon at the top-right to open the right side-bar menu. 2. Click Alerts. 3. Click Configure to open the Alerts setup page. 4. Enter the email address and an (optional) secondary email address. 5. Enter a phone number and an (optional) secondary phone number if SMS alerts are being
configured. If a phone number is entered, you will be sent an out-of-band authentication code to verify the device.
Setting Up Security Alerts Follow the instructions below to set up user-level security alerts.
1. From the side-bar main menu, click Alerts. 2. Click Security Alerts. 3. To set up email alerts, click the Email icon to the right of the alert or to set up text alerts,
click the SMS/Text icon to the right of the alert. If an alert notification has not been activated, it is greyed out.
4. Click the Email or SMS/Test icon to activate the alert. 5. Click on any applicable dollar amounts and edit as necessary.
Setting Up Account Alerts Follow the instructions below to set up account-level alerts:
1. From any page, click the gear icon to open the Settings menu. 2. Click Alerts.
To set up email alerts, click the Email icon to the right of the specific alert. To set up text alerts, click the SMS/Text icon to the right of the alerts. If an alert notification has not been activated, it is greyed out.
3. Click Save.