Inter-Tel Unified Messaging
98
Inter-Tel ® Unified Messaging Open Standards Edition MITEL Administrator’s Guide
Transcript of Inter-Tel Unified Messaging
Inter-Tel® Unified MessagingOpen Standards Edition
M I T E L
Administrator’s Guide

Issue 2.0, Revised January 2009
Part Number835.3162
Unified Messaging Open Standards EditionAdministrator’s Guide

NoticeThis document is released by Inter-Tel (Delaware), Inc., a Mitel company, as a guide for Unified Messaging Open Standards Edition administrators. It provides information necessary to properly administer the system.
The contents of this document reflect current company standards and are subject to revision or change without notice. Some features or applications mentioned may require a future release and are not available in this release. Future product features are subject to availability and cost. Some features may require additional hardware and/or specific software.
The contents of this guide may include technical or other inaccuracies. Inter-Tel (Delaware), Inc. reserves the right to make revisions or changes without prior notice. Software packages released after the publication of this guide will be documented in addenda to the manual or succeeding issues of the guide.
For sales, service, or technical support,contact you local authorized Inter-Tel or Mitel provider.
If you don't know the contact info for your local provider, use the “Strategic Partners & Resellers – Mitel Partner Locator” link at the top of the Mitel main Web page (www.mitel.com) to locate a nearby office.
If you have any questions or comments regarding this administrator’s guide or other technical documentation, contact Inter-Tel Technical Publications Department (USA) at:
Mitel® is a registered trademark of Mitel Networks Corporation.Inter-Tel® is a registered trademark of Inter-Tel (Delaware), Inc.
All other trademarks mentioned in this document are the property of their respective owners, including Mitel Networks Corporation and Inter-Tel (Delaware) Incorporated. All rights reserved.
© 2007– 2009 Mitel Networks Corporation.Personal use of this material is permitted. However, permission to reprint/republish this material for advertising or promotional purposes or for creating new collective works for resale or redistribution to servers or lists, or to reuse any copyrighted component of this work in other works must be obtained from Mitel Networks Corporation.
Enter provider information above.

Contents
Contents
Overview 1
Introduction . . . . . . . . . . . . . . . . . . . . . . . . . . . . . . . . . . . . . . . . . . . . . . . . . . . . . . . . . . . . . . . . . . . . 2
New Features . . . . . . . . . . . . . . . . . . . . . . . . . . . . . . . . . . . . . . . . . . . . . . . . . . . . . . . . . . . . . . . . . . 3BlackBerry Enhanced Integration . . . . . . . . . . . . . . . . . . . . . . . . . . . . . . . . . . . . . . . . . . . . . . . . 3Upgrading to Version 2.0 . . . . . . . . . . . . . . . . . . . . . . . . . . . . . . . . . . . . . . . . . . . . . . . . . . . . . . 3
Unified Messaging OSE Levels . . . . . . . . . . . . . . . . . . . . . . . . . . . . . . . . . . . . . . . . . . . . . . . . . . . . 4
Component Summary . . . . . . . . . . . . . . . . . . . . . . . . . . . . . . . . . . . . . . . . . . . . . . . . . . . . . . . . . . . . 6Server-Side Components . . . . . . . . . . . . . . . . . . . . . . . . . . . . . . . . . . . . . . . . . . . . . . . . . . . . . . 6Client-Side Components . . . . . . . . . . . . . . . . . . . . . . . . . . . . . . . . . . . . . . . . . . . . . . . . . . . . . . . 7
Requirements . . . . . . . . . . . . . . . . . . . . . . . . . . . . . . . . . . . . . . . . . . . . . . . . . . . . . . . . . . . . . . . . . . 8System Requirements . . . . . . . . . . . . . . . . . . . . . . . . . . . . . . . . . . . . . . . . . . . . . . . . . . . . . . . . . 8User Requirements . . . . . . . . . . . . . . . . . . . . . . . . . . . . . . . . . . . . . . . . . . . . . . . . . . . . . . . . . . . 8
Software Compatibility . . . . . . . . . . . . . . . . . . . . . . . . . . . . . . . . . . . . . . . . . . . . . . . . . . . . . . . . . . 11
Capacities . . . . . . . . . . . . . . . . . . . . . . . . . . . . . . . . . . . . . . . . . . . . . . . . . . . . . . . . . . . . . . . . . . . . 12
Licensing . . . . . . . . . . . . . . . . . . . . . . . . . . . . . . . . . . . . . . . . . . . . . . . . . . . . . . . . . . . . . . . . . . . . . 13
Features 15
Feature Summary . . . . . . . . . . . . . . . . . . . . . . . . . . . . . . . . . . . . . . . . . . . . . . . . . . . . . . . . . . . . . . 16
E-Mail Client Configuration . . . . . . . . . . . . . . . . . . . . . . . . . . . . . . . . . . . . . . . . . . . . . . . . . . . . . . 17Unified Messaging OSE E-mail Messages . . . . . . . . . . . . . . . . . . . . . . . . . . . . . . . . . . . . . . . . 18
Welcome Message. . . . . . . . . . . . . . . . . . . . . . . . . . . . . . . . . . . . . . . . . . . . . . . . . . . . . . . 18New Voice Message. . . . . . . . . . . . . . . . . . . . . . . . . . . . . . . . . . . . . . . . . . . . . . . . . . . . . . 18Error Message . . . . . . . . . . . . . . . . . . . . . . . . . . . . . . . . . . . . . . . . . . . . . . . . . . . . . . . . . . 19New Fax Message . . . . . . . . . . . . . . . . . . . . . . . . . . . . . . . . . . . . . . . . . . . . . . . . . . . . . . . 19Copy of an Outgoing Fax Message . . . . . . . . . . . . . . . . . . . . . . . . . . . . . . . . . . . . . . . . . . 19Fax Delivery Status Message. . . . . . . . . . . . . . . . . . . . . . . . . . . . . . . . . . . . . . . . . . . . . . . 20
Voice Message Access . . . . . . . . . . . . . . . . . . . . . . . . . . . . . . . . . . . . . . . . . . . . . . . . . . . . . . . 20Voice Message Synchronization . . . . . . . . . . . . . . . . . . . . . . . . . . . . . . . . . . . . . . . . . . . . . . . . 21Synchronize MWI with E-Mail Client Option . . . . . . . . . . . . . . . . . . . . . . . . . . . . . . . . . . . . . . . 22IMAP Accounts . . . . . . . . . . . . . . . . . . . . . . . . . . . . . . . . . . . . . . . . . . . . . . . . . . . . . . . . . . . . . 22
Voice Mail Web Interface . . . . . . . . . . . . . . . . . . . . . . . . . . . . . . . . . . . . . . . . . . . . . . . . . . . . . . . . 23Voice Mail Web Interface for Computers . . . . . . . . . . . . . . . . . . . . . . . . . . . . . . . . . . . . . . . . . 23
Voice Messages Tab . . . . . . . . . . . . . . . . . . . . . . . . . . . . . . . . . . . . . . . . . . . . . . . . . . . . . 23Configuration Tab. . . . . . . . . . . . . . . . . . . . . . . . . . . . . . . . . . . . . . . . . . . . . . . . . . . . . . . . 25
Voice Mail Web Interface for Mobile Devices . . . . . . . . . . . . . . . . . . . . . . . . . . . . . . . . . . . . . . 27MWI Operation with the Voice Mail Web Interface . . . . . . . . . . . . . . . . . . . . . . . . . . . . . . . . . . 29
Unified Messaging Open Standards Edition Administrator’s Guide – Issue 2.0, Revised January 2009 Page v
Contents
Outbound Fax . . . . . . . . . . . . . . . . . . . . . . . . . . . . . . . . . . . . . . . . . . . . . . . . . . . . . . . . . . . . . . . . . 30Fax Print Driver . . . . . . . . . . . . . . . . . . . . . . . . . . . . . . . . . . . . . . . . . . . . . . . . . . . . . . . . . . . . . 30Fax Cover Page Options . . . . . . . . . . . . . . . . . . . . . . . . . . . . . . . . . . . . . . . . . . . . . . . . . . . . . . 32
Installing and Starting the Cover Page Editor . . . . . . . . . . . . . . . . . . . . . . . . . . . . . . . . . . 33Editing or Creating a Fax Cover Page . . . . . . . . . . . . . . . . . . . . . . . . . . . . . . . . . . . . . . . . 35Viewing the Cover Page. . . . . . . . . . . . . . . . . . . . . . . . . . . . . . . . . . . . . . . . . . . . . . . . . . . 38Saving the Cover Page File on the EM Server . . . . . . . . . . . . . . . . . . . . . . . . . . . . . . . . . 39
Web Fax Form . . . . . . . . . . . . . . . . . . . . . . . . . . . . . . . . . . . . . . . . . . . . . . . . . . . . . . . . . . . . . 40Copy Fax to Sender Option . . . . . . . . . . . . . . . . . . . . . . . . . . . . . . . . . . . . . . . . . . . . . . . . . . . 41Fax Status Messages . . . . . . . . . . . . . . . . . . . . . . . . . . . . . . . . . . . . . . . . . . . . . . . . . . . . . . . . 41
Success Report Example. . . . . . . . . . . . . . . . . . . . . . . . . . . . . . . . . . . . . . . . . . . . . . . . . . 42Temporary Failure Report Example . . . . . . . . . . . . . . . . . . . . . . . . . . . . . . . . . . . . . . . . . . 43Failure Report Example . . . . . . . . . . . . . . . . . . . . . . . . . . . . . . . . . . . . . . . . . . . . . . . . . . . 43
Inbound Fax . . . . . . . . . . . . . . . . . . . . . . . . . . . . . . . . . . . . . . . . . . . . . . . . . . . . . . . . . . . . . . . . . . 44
Programming 45
Programming Unified Messaging OSE . . . . . . . . . . . . . . . . . . . . . . . . . . . . . . . . . . . . . . . . . . . . . 46Programming Users . . . . . . . . . . . . . . . . . . . . . . . . . . . . . . . . . . . . . . . . . . . . . . . . . . . . . . . . . 46Programming Outbound Fax . . . . . . . . . . . . . . . . . . . . . . . . . . . . . . . . . . . . . . . . . . . . . . . . . . . 53Programming the Unified Messaging System Level Folder . . . . . . . . . . . . . . . . . . . . . . . . . . . 56Configuring EM Field Configuration Utility (FCU) Options . . . . . . . . . . . . . . . . . . . . . . . . . . . . 57
Configuring IMAP Accounts . . . . . . . . . . . . . . . . . . . . . . . . . . . . . . . . . . . . . . . . . . . . . . . . . . . . . 60IMAP Inbox . . . . . . . . . . . . . . . . . . . . . . . . . . . . . . . . . . . . . . . . . . . . . . . . . . . . . . . . . . . . . . . . 60LOGIN Authentication Type . . . . . . . . . . . . . . . . . . . . . . . . . . . . . . . . . . . . . . . . . . . . . . . . . . . 60
Generating TLS Certificates . . . . . . . . . . . . . . . . . . . . . . . . . . . . . . . . . . . . . . . . . . . . . . . . . . . . . 61
Distributing TLS Certificates . . . . . . . . . . . . . . . . . . . . . . . . . . . . . . . . . . . . . . . . . . . . . . . . . . . . . 62
Configuring HTTPS Connections . . . . . . . . . . . . . . . . . . . . . . . . . . . . . . . . . . . . . . . . . . . . . . . . . 63
Setting the Automatic Idle Logout Time . . . . . . . . . . . . . . . . . . . . . . . . . . . . . . . . . . . . . . . . . . . . 63
Enabling Audio Features in a Citrix Environment . . . . . . . . . . . . . . . . . . . . . . . . . . . . . . . . . . . . 64Client Connection Settings . . . . . . . . . . . . . . . . . . . . . . . . . . . . . . . . . . . . . . . . . . . . . . . . . . . . 64Published Application Settings . . . . . . . . . . . . . . . . . . . . . . . . . . . . . . . . . . . . . . . . . . . . . . . . . 66Citrix Policy Settings . . . . . . . . . . . . . . . . . . . . . . . . . . . . . . . . . . . . . . . . . . . . . . . . . . . . . . . . . 67
Page vi Unified Messaging Open Standards Edition Administrator’s Guide – Issue 2.0, Revised January 2009
Contents
Reports 69
Introduction . . . . . . . . . . . . . . . . . . . . . . . . . . . . . . . . . . . . . . . . . . . . . . . . . . . . . . . . . . . . . . . . . . . 70
Generating a Report . . . . . . . . . . . . . . . . . . . . . . . . . . . . . . . . . . . . . . . . . . . . . . . . . . . . . . . . . . . . 70
OAM Commands . . . . . . . . . . . . . . . . . . . . . . . . . . . . . . . . . . . . . . . . . . . . . . . . . . . . . . . . . . . . . . . 71IMAP Connection Status and Statistics Commands . . . . . . . . . . . . . . . . . . . . . . . . . . . . . . . . . 71Unified Messaging OSE Synchronization Status Command . . . . . . . . . . . . . . . . . . . . . . . . . . . 72
Report Structure . . . . . . . . . . . . . . . . . . . . . . . . . . . . . . . . . . . . . . . . . . . . . . . . . . . . . . . . . . . . . . . 73IMAP Connection Status and Statistics Report . . . . . . . . . . . . . . . . . . . . . . . . . . . . . . . . . . . . . 73Unified Messaging OSE Synchronization Status Report . . . . . . . . . . . . . . . . . . . . . . . . . . . . . 76
Troubleshooting 77
Troubleshooting Summary . . . . . . . . . . . . . . . . . . . . . . . . . . . . . . . . . . . . . . . . . . . . . . . . . . . . . . 78
E-mail Client Issues . . . . . . . . . . . . . . . . . . . . . . . . . . . . . . . . . . . . . . . . . . . . . . . . . . . . . . . . . . . . 78
Voice Mail Web Interface Issues . . . . . . . . . . . . . . . . . . . . . . . . . . . . . . . . . . . . . . . . . . . . . . . . . . 80
Fax Issues . . . . . . . . . . . . . . . . . . . . . . . . . . . . . . . . . . . . . . . . . . . . . . . . . . . . . . . . . . . . . . . . . . . . 82
Index 83
Unified Messaging Open Standards Edition Administrator’s Guide – Issue 2.0, Revised January 2009 Page vii

Overview
OverviewIntroduction . . . . . . . . . . . . . . . . . . . . . . . . . . . . . . . . . . . . . . . . . . . . . . . . . . . . . . . . . . . . . . . . . . . . 2
New Features . . . . . . . . . . . . . . . . . . . . . . . . . . . . . . . . . . . . . . . . . . . . . . . . . . . . . . . . . . . . . . . . . . . 3BlackBerry Enhanced Integration . . . . . . . . . . . . . . . . . . . . . . . . . . . . . . . . . . . . . . . . . . . . . . . . 3Upgrading to Version 2.0 . . . . . . . . . . . . . . . . . . . . . . . . . . . . . . . . . . . . . . . . . . . . . . . . . . . . . . 3
Unified Messaging OSE Levels . . . . . . . . . . . . . . . . . . . . . . . . . . . . . . . . . . . . . . . . . . . . . . . . . . . . 4
Component Summary . . . . . . . . . . . . . . . . . . . . . . . . . . . . . . . . . . . . . . . . . . . . . . . . . . . . . . . . . . . . 6Server-Side Components . . . . . . . . . . . . . . . . . . . . . . . . . . . . . . . . . . . . . . . . . . . . . . . . . . . . . . 6Client-Side Components . . . . . . . . . . . . . . . . . . . . . . . . . . . . . . . . . . . . . . . . . . . . . . . . . . . . . . . 7
Requirements. . . . . . . . . . . . . . . . . . . . . . . . . . . . . . . . . . . . . . . . . . . . . . . . . . . . . . . . . . . . . . . . . . . 8System Requirements . . . . . . . . . . . . . . . . . . . . . . . . . . . . . . . . . . . . . . . . . . . . . . . . . . . . . . . . . 8User Requirements . . . . . . . . . . . . . . . . . . . . . . . . . . . . . . . . . . . . . . . . . . . . . . . . . . . . . . . . . . . 8
Software Compatibility . . . . . . . . . . . . . . . . . . . . . . . . . . . . . . . . . . . . . . . . . . . . . . . . . . . . . . . . . . 11
Capacities. . . . . . . . . . . . . . . . . . . . . . . . . . . . . . . . . . . . . . . . . . . . . . . . . . . . . . . . . . . . . . . . . . . . . 12
Licensing . . . . . . . . . . . . . . . . . . . . . . . . . . . . . . . . . . . . . . . . . . . . . . . . . . . . . . . . . . . . . . . . . . . . . 13
Unified Messaging Open Standards Edition Administrator’s Guide – Issue 2.0, Revised January 2009 Page 1
Introduction
IntroductionInter-Tel® Unified Messaging Open Standards Edition (OSE) is a software product integrated with the Enterprise® Messaging (EM) voice processing system. Unified Messaging OSE provides access to voice and fax messages from the user’s desktop computer.
Unified Messaging OSE provides the following ways to access, play, and manage voice mail messages from a computer or mobile device:
• E-mail client: When users are configured for Unified Messaging OSE, their voice mail messages are available in their e-mail clients. The message format may include an audio file attachment, a Uniform Resource Locator (URL) to the Voice Mail Web interface, or both. For more information about e-mail client integration, see page 17.
• Voice Mail Web Interface: Users can manage and listen to their voice mail messages from a Web browser on their computer or mobile device using the Voice Mail Web Interface. For more information about the Voice Mail Web interface, see page 23.
Unified Messaging OSE also provides inbound and outbound fax features. Outbound fax features are supported for computers only. Users cannot send faxes from their mobile devices.
Fax features include:
• Outbound Fax: Unified Messaging OSE provides two methods to send outgoing faxes from computers:
o Fax Print Driver: This software application allows users to send faxes from computers running Microsoft® Windows® 2000 or later operating systems. Any Windows application that supports printing can use this print driver.
o Web Fax Form: Users can send multiple fax documents using a Web-based fax form from a Web browser. Unlike the fax print driver, users do not need to install a software application on their computers to send a fax with the Web Fax Form.
For more information about outbound faxes, see page 30.
• Inbound fax: Inbound faxes are sent to users’ e-mail address for fax delivery, as configured on the EM server. Faxes are sent via e-mail notification messages, which include a Portable Document Format (PDF) or Tagged Image File Format (TIFF) file attachment for the fax transmission. For more information about inbound faxes, see page 44.
Page 2 Unified Messaging Open Standards Edition Administrator’s Guide – Issue 2.0, Revised January 2009
New Features
New FeaturesThe following sections describe new features and enhancements provided with v2.0 Maintenance Release.
Throughout the guide, version 2.0 Maintenance Release new features or changes are indicated by change bars, like the one shown in the margin to the left of this text.
BlackBerry Enhanced IntegrationUnified Messaging (UM) OSE v2.0 Maintenance Release provides integration support for BlackBerry® devices. The devices must be running BlackBerry enterprise server software integrated with the site’s e-mail server. BlackBerry users can now configure their accounts with the new “BlackBerry Enhanced Integration” level to receive voice messages to their e-mail addresses and voice mailboxes. This feature requires a Mitel 5000 v3.1 or later system or an Axxess v11.010 or later system running an EM v2.0 or later system. See page 5 for details.
The new BlackBerry Enhanced Integration level has been added to the Unified Messaging Level folder in Database (DB) Programming underVoice Processor\Devices\Mailboxes\Local\<mailbox>\Unified Messaging.
See page 46 for programming information.
Upgrading to Version 2.0To upgrade to Unified Messaging v2.0 or later, order one of the following Enterprise Messaging v2.0 Upgrade Kits:
• EM v1.2 to 2.0 Upgrade Kit, Without Memory (part number 828.1758).
• EM v1.2 to 2.0 Upgrade Kit, With Memory (part number 828.1763).
• EM v1.0 or 1.1 to 2.0 Upgrade Kit Without Memory (part number 828.1760).
• EM v1.0 or 1.1 to 2.0 Upgrade Kit With Memory (part number 828.1764).
After upgrading to EM v2.0, determine which Unified Messaging level (see page 4) you want to configure for each mailbox. See page 46 for important information about field location changes that may affect which fields you need to configure in DB Programming.
Upgrade steps vary based on which Unified Messaging version you are upgrading from and which Unified Messaging level you are programming the user for.
To upgrade a Unified Messaging OSE v1.0 user to v2.0:
1. If upgrading from v1.0 to v2.0 Enhanced Forward and Copy, Enhanced Integration, or BlackBerry Enhanced Integration, delete the Internet Message Access Protocol (IMAP) account (and IMAP inbox) programmed in the user’s e-mail client. The IMAP inbox is not needed for these Unified Messaging levels.
If upgrading from v1.0 to v2.0 Basic Integration, do not delete the IMAP account programmed in the user’s e-mail client. The IMAP inbox is required for Basic Integration users who want to access voice messages from their e-mail client.
2. Program the user’s voice mailbox using DB Programming, as described in “Programming Users” on page 46.
To upgrade a Unified Messaging v2.3 user to Unified Messaging OSE v2.0:
1. Uninstall the existing Unified Messaging v2.3 Client application from the e-mail client’s computer.
2. Program the user’s voice mailbox using DB Programming, as described in page 46.
Unified Messaging Open Standards Edition Administrator’s Guide – Issue 2.0, Revised January 2009 Page 3
Unified Messaging OSE Levels
Unified Messaging OSE LevelsEnterprise Messaging provides six Unified Messaging configuration levels for system users. These levels are programmed per mailbox in DB Programming (see page 46). The level that is configured for the mailbox determines the following:
• How voice messages are integrated into the e-mail client (see page 17).
• Whether the EM server and e-mail server are synchronized or not (see page 21).
• Which Unified Messaging OSE features are available (see Table 1 on page 5).
The following levels of Unified Messaging are available with the Enterprise Messaging server: Note that only the Enhanced Forward and Copy, Basic Integration, Enhanced Integration, and BlackBerry Enhanced Integration levels apply to Unified Messaging OSE:
• Forward Only1: Delivers a voice message to the user’s e-mail address when they receive a new voice message in their voice mailbox. After the message is sent, the original message is deleted from the mailbox. This level does not provide synchronization between the user’s e-mail client and voice mailbox.
• Forward and Copy1: Delivers a copy of a voice message to the user’s e-mail address when they receive a new voice message in their voice mailbox. The original message can still be retrieved from the mailbox. This level does not provide synchronization between the user’s e-mail client and voice mailbox.
• Enhanced Forward and Copy: Similar to the Forward and Copy level, this level delivers a copy of a voice message to the user’s e-mail address when they receive a new voice message in their voice mailbox. However, with the Enhanced Forward and Copy level, users can configure the voice message format and they can specify the folder to receive voice messages (see page 25). In addition, users receive a Welcome e-mail, and error notification e-mail messages if an error occurs. This level does not provide synchronization between the user’s e-mail client and voice mailbox.
• Basic Integration: Provides direct access into the user’s voice mailbox from their e-mail client when they configure an IMAP account in their e-mail client (see page 60). Voice messages are available from the IMAP folder. This level does provide synchronization between the user’s e-mail client and voice mailbox.
• Enhanced Integration: Delivers new voice messages to the user’s e-mail address and voice mailbox, and synchronizes those messages. For example, if the user deletes a voice message from their e-mail client, the message is also deleted in their voice mailbox. With this level, users can configure voice message format, specify which e-mail client folder that voice messages are delivered, and synchronize their endpoint’s message lamp with their e-mail client (see page 25). In addition, users receive a Welcome e-mail, and error notification e-mail messages, if an error occurs. This level does provide synchronization between the user’s e-mail client and voice mailbox.
1. These levels are provided with Inter-Tel’s legacy Unified Messaging product. Refer to the Unified Messaging v2.3 Administrator’s Guide for information about these levels.
NOTE This functionality was available in the initial release of Unified Messaging OSE and is now known as Basic Integration.
Page 4 Unified Messaging Open Standards Edition Administrator’s Guide – Issue 2.0, Revised January 2009
Unified Messaging OSE Levels
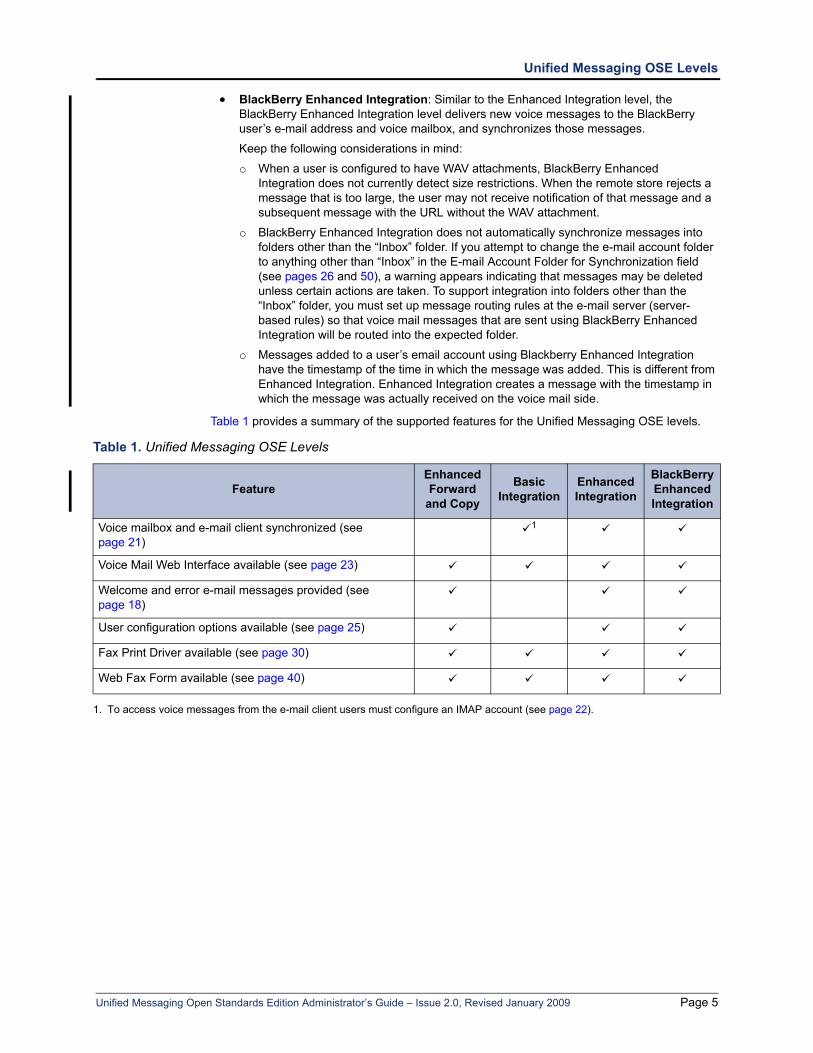
• BlackBerry Enhanced Integration: Similar to the Enhanced Integration level, the BlackBerry Enhanced Integration level delivers new voice messages to the BlackBerry user’s e-mail address and voice mailbox, and synchronizes those messages.
Keep the following considerations in mind:
o When a user is configured to have WAV attachments, BlackBerry Enhanced Integration does not currently detect size restrictions. When the remote store rejects a message that is too large, the user may not receive notification of that message and a subsequent message with the URL without the WAV attachment.
o BlackBerry Enhanced Integration does not automatically synchronize messages into folders other than the “Inbox” folder. If you attempt to change the e-mail account folder to anything other than “Inbox” in the E-mail Account Folder for Synchronization field (see pages 26 and 50), a warning appears indicating that messages may be deleted unless certain actions are taken. To support integration into folders other than the “Inbox” folder, you must set up message routing rules at the e-mail server (server-based rules) so that voice mail messages that are sent using BlackBerry Enhanced Integration will be routed into the expected folder.
o Messages added to a user’s email account using Blackberry Enhanced Integration have the timestamp of the time in which the message was added. This is different from Enhanced Integration. Enhanced Integration creates a message with the timestamp in which the message was actually received on the voice mail side.
Table 1 provides a summary of the supported features for the Unified Messaging OSE levels.
Table 1. Unified Messaging OSE Levels
FeatureEnhanced Forward
and Copy
Basic Integration
Enhanced Integration
BlackBerryEnhanced Integration
Voice mailbox and e-mail client synchronized (see page 21)
1
1. To access voice messages from the e-mail client users must configure an IMAP account (see page 22).
Voice Mail Web Interface available (see page 23)
Welcome and error e-mail messages provided (see page 18)
User configuration options available (see page 25)
Fax Print Driver available (see page 30)
Web Fax Form available (see page 40)
Unified Messaging Open Standards Edition Administrator’s Guide – Issue 2.0, Revised January 2009 Page 5
Component Summary
Component SummaryThis section lists the Unified Messaging OSE server-side and client-side components. Because the Unified Messaging OSE software is included with the Enterprise Messaging software, there is no Unified Messaging OSE-specific software to install on the EM server.
Server-Side ComponentsThe following server-side components are used with Unified Messaging OSE:
• Message Store Manager (MSM) and IMAP Compliance: The central component for all voice message capabilities for the Unified Messaging OSE distribution is the IMAP Server encapsulated within the EM server’s MSM component. MSM’s IMAP implementation supports the following capabilities:
o IMAP port that is exposed to support external IMAP connections (TCP port 143 for non-encrypted connections or TCP port 993 for encrypted connections).
o Secure connections using IMAP SSL (Secure Sockets Layer). It is enabled by default and cannot be disabled.
o Strong security encryption using TLS (Transport Layer Security) certificates.
o RFC 3501 compliance (http://www.faqs.org/rfcs/rfc3501.html).
o MSM is responsible for enforcing Unified Messaging OSE licenses by monitoring concurrent IMAP connections.
o Along with the plain LOGIN command, MSM supports the AUTHENTICATE command allowing for CRAM-MD5 (Challenge-Response Authentication Mechanism with MD5) authentication for those e-mail clients that support it.
• Fax Web Services and SMTP (Simple Mail Transfer Protocol) component: The Web-based fax service component located on EM allows delivery of outbound fax delivery jobs to an e-mail address.
Page 6 Unified Messaging Open Standards Edition Administrator’s Guide – Issue 2.0, Revised January 2009
Client-Side Components
Client-Side ComponentsThe following client-side components are used with Unified Messaging OSE:
• E-Mail Client: Unified Messaging OSE is integrated with the user’s IMAP version 4 RFC 3501 compliant e-mail client. The e-mail client must be able to connect to the EM IMAP Server, which uses the Unified Messaging OSE voice message retrieval capabilities to provide access to voice messages. See Table 3 on page 11 for a list of supported e-mail clients.
• Voice Mail Web Interface: Consists of an HTTP connection to a Web-based interface used to access, manage, and play voice messages from a computer or mobile device. This client-side component mirrors the user’s voice mailbox. The URL for the Voice Mail Web Interface is http://<EM server name>/umosevm, where EM server name is the Enterprise Messaging hostname or IP address.
• Web Fax Form: Consists of an HTTP connection to the Web-based fax service located on EM. This fax client supports outbound faxes that are in TIFF or PDF format only. The URL for the Web Fax client is http://<EM server name>/faxclient, where EM server name is the Enterprise Messaging hostname or IP address.
• Fax Print Driver and Fax Client: The Fax Print Driver is a software application that allows users to send faxes from any computer running the Microsoft Windows 2000 or later operating system. Any application that supports printing can use this print driver. Users must first install the Fax Print Driver application (UMFaxDriver.msi) on their computers. Printing to the print driver launches the Inter-Tel Unified Messaging OSE Fax Client application that allows the user to program fax settings and send the fax.
• Cover Page Editor: The Cover Page Editor is a software application (CoverPage C++ Sample.exe)that you install on your computer. With this application you can create or edit a fax cover page and add it to the cover page template folder, located in the EM server. The cover page is then used in the Inter-Tel Unified Messaging OSE Fax Client application for sending outgoing faxes. Because uploading a new cover page requires access to the EM server, this application should not be distributed to users.
Unified Messaging Open Standards Edition Administrator’s Guide – Issue 2.0, Revised January 2009 Page 7
Requirements
RequirementsThe Unified Messaging OSE system and user requirements are described below.
System RequirementsThe following are system requirements for Unified Messaging OSE v2.0:
• Mitel® 5000 Network Communications Solutions v2.4 or later, or Inter-Tel Axxess® Converged Communications Platform v11.0 or later.
• Inter-Tel EM v1.2 or later.
• An IMAP-compliant, version 4 e-mail server.
• The appropriate software licenses (see page 13).
User RequirementsTo access Unified Messaging OSE full features and functionality users must have an e-mail account with your company’s e-mail system and a voice mailbox on the EM system.
The user requires one of the following hardware devices (and associated software applications) to access Unified Messaging OSE features and functionality:
• A computer with:
o Network access.
o A compatible operating system.
o An HTML-capable browser.
o 20 MB available hard disk space.
o A monitor, mouse, and keyboard.
o A sound card and speakers (or headset/headphones).
o A media player that can play WAV files encoded as 8-bit, 8 kHz, mono, and mu-law.
• A mobile device with:
o Network access.
o A compatible operating system.
o An HTML-capable browser.
o A media player that can play WAV or MP3 files.
See page 11 for the operating systems and software applications that have been validated to interoperate with Unified Messaging OSE.
NOTES• Unified Messaging OSE v2.0 is not supported by the Inter-Tel 7000 Network
Communications Solution.
• To upgrade to EM v1.2, sites must be running EM v1.1.43.2 or later software.
NOTE To view inbound faxes computers and mobile devices must include a graphics software program that is compatible with the TIFF or PDF file formats.
Page 8 Unified Messaging Open Standards Edition Administrator’s Guide – Issue 2.0, Revised January 2009
User Requirements
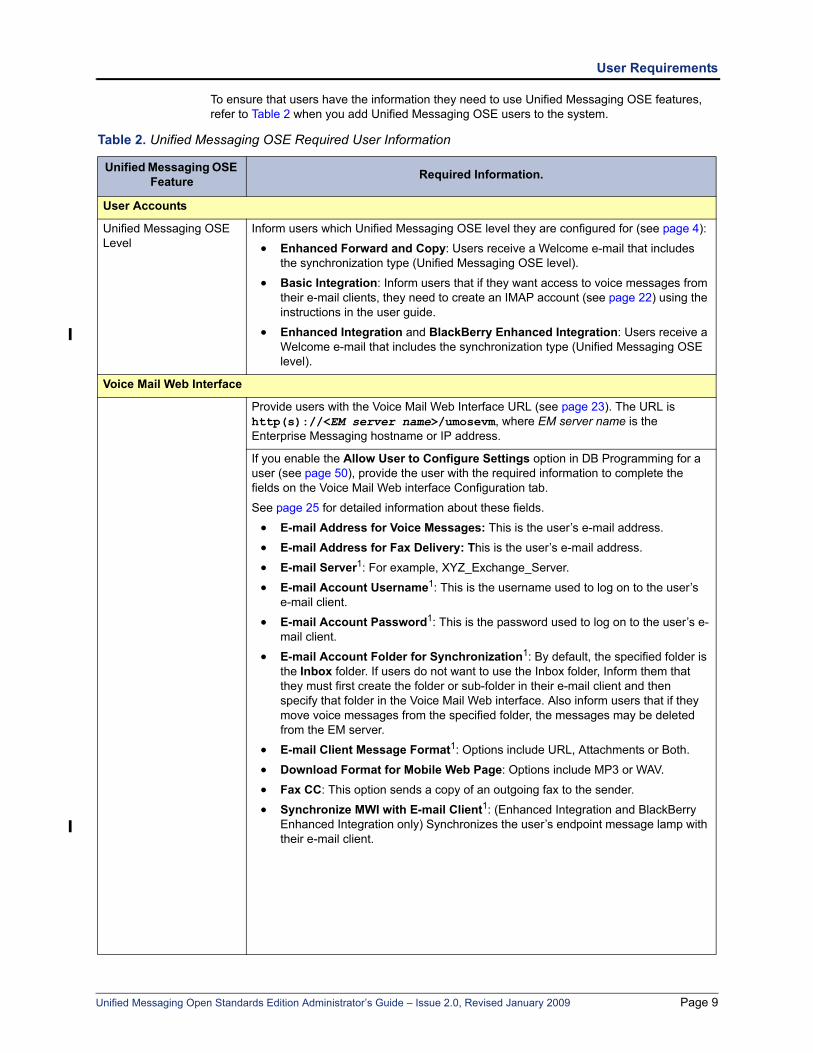
To ensure that users have the information they need to use Unified Messaging OSE features, refer to Table 2 when you add Unified Messaging OSE users to the system.
Table 2. Unified Messaging OSE Required User Information
Unified Messaging OSE Feature Required Information.
User Accounts
Unified Messaging OSE Level
Inform users which Unified Messaging OSE level they are configured for (see page 4):
• Enhanced Forward and Copy: Users receive a Welcome e-mail that includes the synchronization type (Unified Messaging OSE level).
• Basic Integration: Inform users that if they want access to voice messages from their e-mail clients, they need to create an IMAP account (see page 22) using the instructions in the user guide.
• Enhanced Integration and BlackBerry Enhanced Integration: Users receive a Welcome e-mail that includes the synchronization type (Unified Messaging OSE level).
Voice Mail Web Interface
Provide users with the Voice Mail Web Interface URL (see page 23). The URL is http(s)://<EM server name>/umosevm, where EM server name is the Enterprise Messaging hostname or IP address.
If you enable the Allow User to Configure Settings option in DB Programming for a user (see page 50), provide the user with the required information to complete the fields on the Voice Mail Web interface Configuration tab.
See page 25 for detailed information about these fields.
• E-mail Address for Voice Messages: This is the user’s e-mail address.
• E-mail Address for Fax Delivery: This is the user’s e-mail address.
• E-mail Server1: For example, XYZ_Exchange_Server.
• E-mail Account Username1: This is the username used to log on to the user’s e-mail client.
• E-mail Account Password1: This is the password used to log on to the user’s e-mail client.
• E-mail Account Folder for Synchronization1: By default, the specified folder is the Inbox folder. If users do not want to use the Inbox folder, Inform them that they must first create the folder or sub-folder in their e-mail client and then specify that folder in the Voice Mail Web interface. Also inform users that if they move voice messages from the specified folder, the messages may be deleted from the EM server.
• E-mail Client Message Format1: Options include URL, Attachments or Both.
• Download Format for Mobile Web Page: Options include MP3 or WAV.
• Fax CC: This option sends a copy of an outgoing fax to the sender.
• Synchronize MWI with E-mail Client1: (Enhanced Integration and BlackBerry Enhanced Integration only) Synchronizes the user’s endpoint message lamp with their e-mail client.
Unified Messaging Open Standards Edition Administrator’s Guide – Issue 2.0, Revised January 2009 Page 9
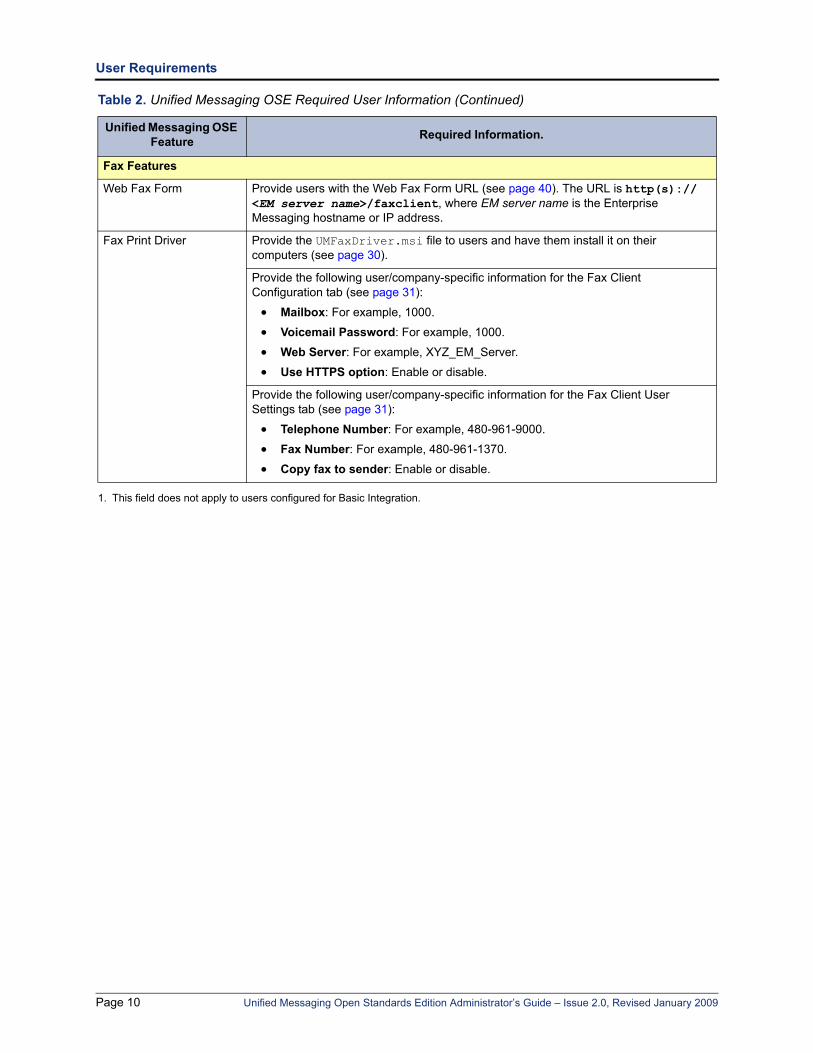
User Requirements
Fax Features
Web Fax Form Provide users with the Web Fax Form URL (see page 40). The URL is http(s)://<EM server name>/faxclient, where EM server name is the Enterprise Messaging hostname or IP address.
Fax Print Driver Provide the UMFaxDriver.msi file to users and have them install it on their computers (see page 30).
Provide the following user/company-specific information for the Fax Client Configuration tab (see page 31):
• Mailbox: For example, 1000.
• Voicemail Password: For example, 1000.
• Web Server: For example, XYZ_EM_Server.
• Use HTTPS option: Enable or disable.
Provide the following user/company-specific information for the Fax Client User Settings tab (see page 31):
• Telephone Number: For example, 480-961-9000.
• Fax Number: For example, 480-961-1370.
• Copy fax to sender: Enable or disable.
1. This field does not apply to users configured for Basic Integration.
Table 2. Unified Messaging OSE Required User Information (Continued)
Unified Messaging OSE Feature Required Information.
Page 10 Unified Messaging Open Standards Edition Administrator’s Guide – Issue 2.0, Revised January 2009
Software Compatibility
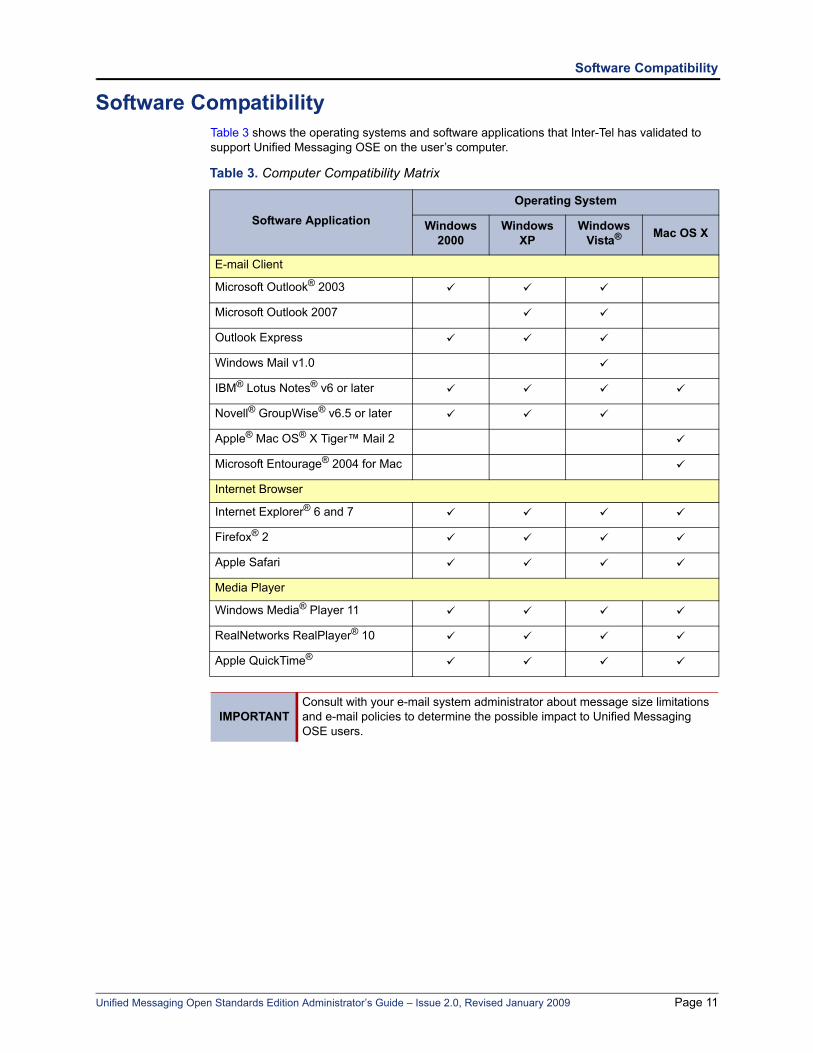
Software CompatibilityTable 3 shows the operating systems and software applications that Inter-Tel has validated to support Unified Messaging OSE on the user’s computer.
Table 3. Computer Compatibility Matrix
Software ApplicationOperating System
Windows 2000
Windows XP
WindowsVista® Mac OS X
E-mail Client
Microsoft Outlook® 2003
Microsoft Outlook 2007
Outlook Express
Windows Mail v1.0
IBM® Lotus Notes® v6 or later
Novell® GroupWise® v6.5 or later
Apple® Mac OS® X Tiger™ Mail 2
Microsoft Entourage® 2004 for Mac
Internet Browser
Internet Explorer® 6 and 7
Firefox® 2
Apple Safari
Media Player
Windows Media® Player 11
RealNetworks RealPlayer® 10
Apple QuickTime®
IMPORTANTConsult with your e-mail system administrator about message size limitations and e-mail policies to determine the possible impact to Unified Messaging OSE users.
Unified Messaging Open Standards Edition Administrator’s Guide – Issue 2.0, Revised January 2009 Page 11
Capacities
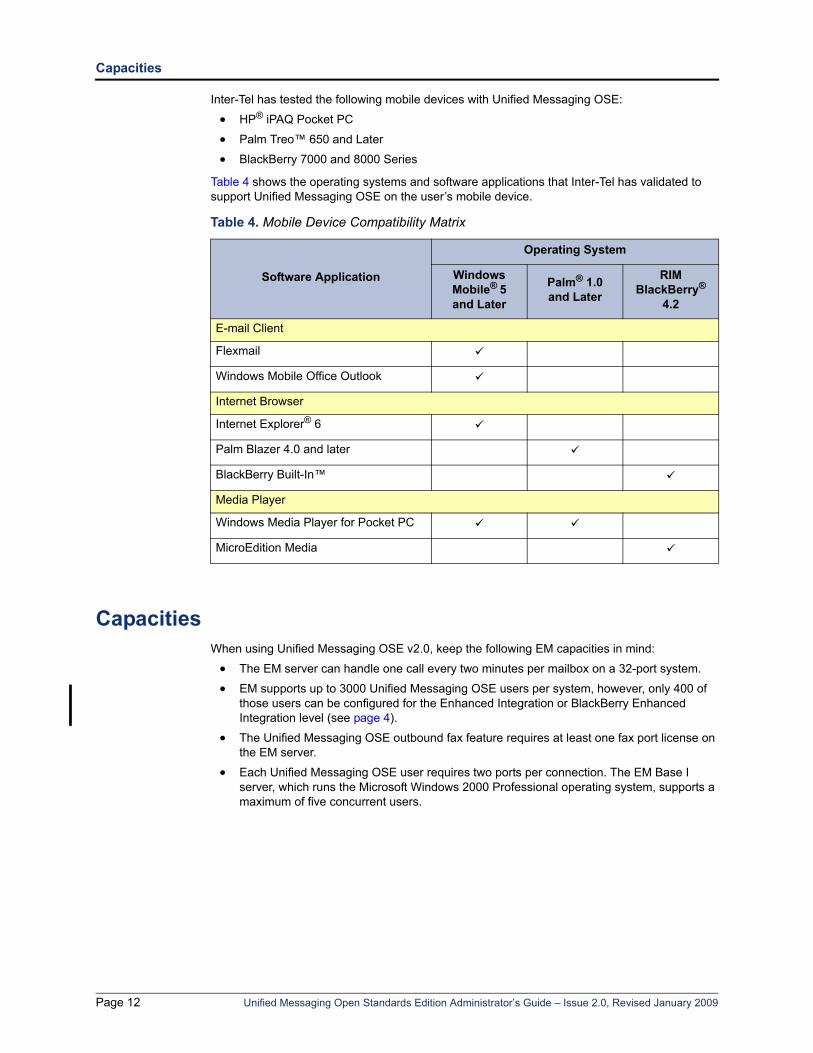
Inter-Tel has tested the following mobile devices with Unified Messaging OSE:
• HP® iPAQ Pocket PC
• Palm Treo™ 650 and Later
• BlackBerry 7000 and 8000 Series
Table 4 shows the operating systems and software applications that Inter-Tel has validated to support Unified Messaging OSE on the user’s mobile device.
CapacitiesWhen using Unified Messaging OSE v2.0, keep the following EM capacities in mind:
• The EM server can handle one call every two minutes per mailbox on a 32-port system.
• EM supports up to 3000 Unified Messaging OSE users per system, however, only 400 of those users can be configured for the Enhanced Integration or BlackBerry Enhanced Integration level (see page 4).
• The Unified Messaging OSE outbound fax feature requires at least one fax port license on the EM server.
• Each Unified Messaging OSE user requires two ports per connection. The EM Base I server, which runs the Microsoft Windows 2000 Professional operating system, supports a maximum of five concurrent users.
Table 4. Mobile Device Compatibility Matrix
Software Application
Operating System
WindowsMobile® 5and Later
Palm® 1.0and Later
RIM BlackBerry®
4.2
E-mail Client
Flexmail
Windows Mobile Office Outlook
Internet Browser
Internet Explorer® 6
Palm Blazer 4.0 and later
BlackBerry Built-In™
Media Player
Windows Media Player for Pocket PC
MicroEdition Media
Page 12 Unified Messaging Open Standards Edition Administrator’s Guide – Issue 2.0, Revised January 2009

Licensing
LicensingThis section describes the Unified Messaging OSE licensing information for EM.
EM comes with a 25-user Unified Messaging license by default. To increase the number of users, you must purchase additional Unified Messaging software licenses.
The EM server determines license capability based on the following usage:
• Users configured for Enhanced Forward & Copy, Enhanced Integration, or BlackBerry Enhanced Integration (see page 4) always consume a user license, whether the user's e-mail client is open or not.
• Users configured for Basic Integration (see page 4) consume a user license when the user starts his or her e-mail client.
• Users downloading MP3 files to their mobile devices from the mobile Voice Mail Web interface consume an MP3 Encoder license.
• Users consume a fax port license when sending an outgoing fax using the Web Fax Form or the Fax Print Driver.
• The EM system consumes a fax port license when it receives an incoming fax via the telephone interface. Users do not need a license to open fax attachments.
The available Unified Messaging software licenses and their associated part numbers are provided in Table 5.
Table 5. Unified Messaging OSE Software Licenses
Unified Messaging Licenses Part Numbers
5 Users 840.0153
10 Users 840.0154
25 Users 840.0155
50 Users 840.0156
100 Users 840.0256
250 Users 840.0257
500 Users 840.0258
1000 Users 840.0153
MP3 Encoder License 840.0832
Fax Licenses Part Number
Enterprise Messaging Single Fax Port 840.0147
Unified Messaging TIFF Converter1
1. Customers upgrading to Unified Messaging OSE from a legacy Unified Messaging product requirethis license. This license allows users to convert PDF files to TIFF files on the server for outgoingfaxes, and TIFF files to PDF files for inbound faxes. New Unified Messaging OSE customers or cus-tomers upgrading from a previous Unified Messaging OSE version do not require this license.
840.0760
Unified Messaging Open Standards Edition Administrator’s Guide – Issue 2.0, Revised January 2009 Page 13

Features
FeaturesFeature Summary . . . . . . . . . . . . . . . . . . . . . . . . . . . . . . . . . . . . . . . . . . . . . . . . . . . . . . . . . . . . . . 16
E-Mail Client Configuration. . . . . . . . . . . . . . . . . . . . . . . . . . . . . . . . . . . . . . . . . . . . . . . . . . . . . . . 17Unified Messaging OSE E-mail Messages . . . . . . . . . . . . . . . . . . . . . . . . . . . . . . . . . . . . . . . . 18
Welcome Message. . . . . . . . . . . . . . . . . . . . . . . . . . . . . . . . . . . . . . . . . . . . . . . . . . . . . . . 18New Voice Message. . . . . . . . . . . . . . . . . . . . . . . . . . . . . . . . . . . . . . . . . . . . . . . . . . . . . . 18Error Message . . . . . . . . . . . . . . . . . . . . . . . . . . . . . . . . . . . . . . . . . . . . . . . . . . . . . . . . . . 19New Fax Message . . . . . . . . . . . . . . . . . . . . . . . . . . . . . . . . . . . . . . . . . . . . . . . . . . . . . . . 19Copy of an Outgoing Fax Message . . . . . . . . . . . . . . . . . . . . . . . . . . . . . . . . . . . . . . . . . . 19Fax Delivery Status Message. . . . . . . . . . . . . . . . . . . . . . . . . . . . . . . . . . . . . . . . . . . . . . . 20
Voice Message Access . . . . . . . . . . . . . . . . . . . . . . . . . . . . . . . . . . . . . . . . . . . . . . . . . . . . . . . 20Voice Message Synchronization . . . . . . . . . . . . . . . . . . . . . . . . . . . . . . . . . . . . . . . . . . . . . . . . 21Synchronize MWI with E-Mail Client Option . . . . . . . . . . . . . . . . . . . . . . . . . . . . . . . . . . . . . . . 22IMAP Accounts . . . . . . . . . . . . . . . . . . . . . . . . . . . . . . . . . . . . . . . . . . . . . . . . . . . . . . . . . . . . . 22
Voice Mail Web Interface. . . . . . . . . . . . . . . . . . . . . . . . . . . . . . . . . . . . . . . . . . . . . . . . . . . . . . . . . 23Voice Mail Web Interface for Computers . . . . . . . . . . . . . . . . . . . . . . . . . . . . . . . . . . . . . . . . . 23
Voice Messages Tab . . . . . . . . . . . . . . . . . . . . . . . . . . . . . . . . . . . . . . . . . . . . . . . . . . . . . 23Configuration Tab. . . . . . . . . . . . . . . . . . . . . . . . . . . . . . . . . . . . . . . . . . . . . . . . . . . . . . . . 25
Voice Mail Web Interface for Mobile Devices . . . . . . . . . . . . . . . . . . . . . . . . . . . . . . . . . . . . . . 27MWI Operation with the Voice Mail Web Interface . . . . . . . . . . . . . . . . . . . . . . . . . . . . . . . . . . 29
Outbound Fax . . . . . . . . . . . . . . . . . . . . . . . . . . . . . . . . . . . . . . . . . . . . . . . . . . . . . . . . . . . . . . . . . 30Fax Print Driver . . . . . . . . . . . . . . . . . . . . . . . . . . . . . . . . . . . . . . . . . . . . . . . . . . . . . . . . . . . . . 30Fax Cover Page Options . . . . . . . . . . . . . . . . . . . . . . . . . . . . . . . . . . . . . . . . . . . . . . . . . . . . . . 32
Installing and Starting the Cover Page Editor . . . . . . . . . . . . . . . . . . . . . . . . . . . . . . . . . . 33Editing or Creating a Fax Cover Page . . . . . . . . . . . . . . . . . . . . . . . . . . . . . . . . . . . . . . . . 35Viewing the Cover Page. . . . . . . . . . . . . . . . . . . . . . . . . . . . . . . . . . . . . . . . . . . . . . . . . . . 38Saving the Cover Page File on the EM Server. . . . . . . . . . . . . . . . . . . . . . . . . . . . . . . . . . 39
Web Fax Form . . . . . . . . . . . . . . . . . . . . . . . . . . . . . . . . . . . . . . . . . . . . . . . . . . . . . . . . . . . . . 40Copy Fax to Sender Option . . . . . . . . . . . . . . . . . . . . . . . . . . . . . . . . . . . . . . . . . . . . . . . . . . . . 41Fax Status Messages . . . . . . . . . . . . . . . . . . . . . . . . . . . . . . . . . . . . . . . . . . . . . . . . . . . . . . . . 41
Success Report Example . . . . . . . . . . . . . . . . . . . . . . . . . . . . . . . . . . . . . . . . . . . . . . . . . . 42Temporary Failure Report Example . . . . . . . . . . . . . . . . . . . . . . . . . . . . . . . . . . . . . . . . . . 43Failure Report Example . . . . . . . . . . . . . . . . . . . . . . . . . . . . . . . . . . . . . . . . . . . . . . . . . . . 43
Inbound Fax . . . . . . . . . . . . . . . . . . . . . . . . . . . . . . . . . . . . . . . . . . . . . . . . . . . . . . . . . . . . . . . . . . . 44
Unified Messaging Open Standards Edition Administrator’s Guide – Issue 2.0, Revised January 2009 Page 15

Feature Summary
Feature SummaryUnified Messaging OSE provides the following features:
• Access to voice and fax messages through the user’s e-mail client (see page 17).
• Access to voice messages through the Unified Messaging OSE Voice Mail Web Interface (see page 23).
• Access to outbound fax features (see page 30).
• Access to inbound fax features (see page 44).
For detailed information about how to use Unified Messaging OSE features, refer to the Unified Messaging Open Standards Edition User Guide (part no. 835.3155).
For information about programming Unified Messaging OSE, see page 46.
Page 16 Unified Messaging Open Standards Edition Administrator’s Guide – Issue 2.0, Revised January 2009
E-Mail Client Configuration
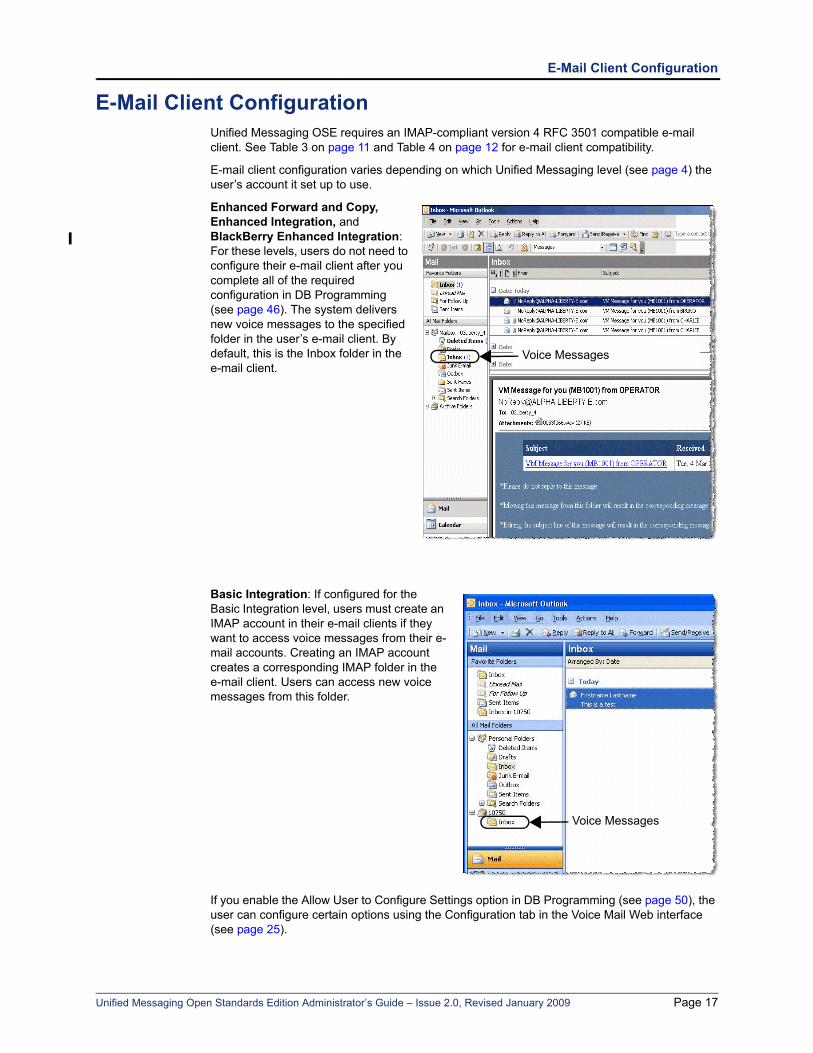
E-Mail Client ConfigurationUnified Messaging OSE requires an IMAP-compliant version 4 RFC 3501 compatible e-mail client. See Table 3 on page 11 and Table 4 on page 12 for e-mail client compatibility.
E-mail client configuration varies depending on which Unified Messaging level (see page 4) the user’s account it set up to use.
Enhanced Forward and Copy, Enhanced Integration, and BlackBerry Enhanced Integration: For these levels, users do not need to configure their e-mail client after you complete all of the required configuration in DB Programming (see page 46). The system delivers new voice messages to the specified folder in the user’s e-mail client. By default, this is the Inbox folder in the e-mail client.
Basic Integration: If configured for the Basic Integration level, users must create an IMAP account in their e-mail clients if they want to access voice messages from their e-mail accounts. Creating an IMAP account creates a corresponding IMAP folder in the e-mail client. Users can access new voice messages from this folder.
If you enable the Allow User to Configure Settings option in DB Programming (see page 50), the user can configure certain options using the Configuration tab in the Voice Mail Web interface (see page 25).
Voice Messages
Voice Messages
Unified Messaging Open Standards Edition Administrator’s Guide – Issue 2.0, Revised January 2009 Page 17
Unified Messaging OSE E-mail Messages
Unified Messaging OSE E-mail MessagesUnified Messaging OSE includes several types of e-mail messages as described in this section.
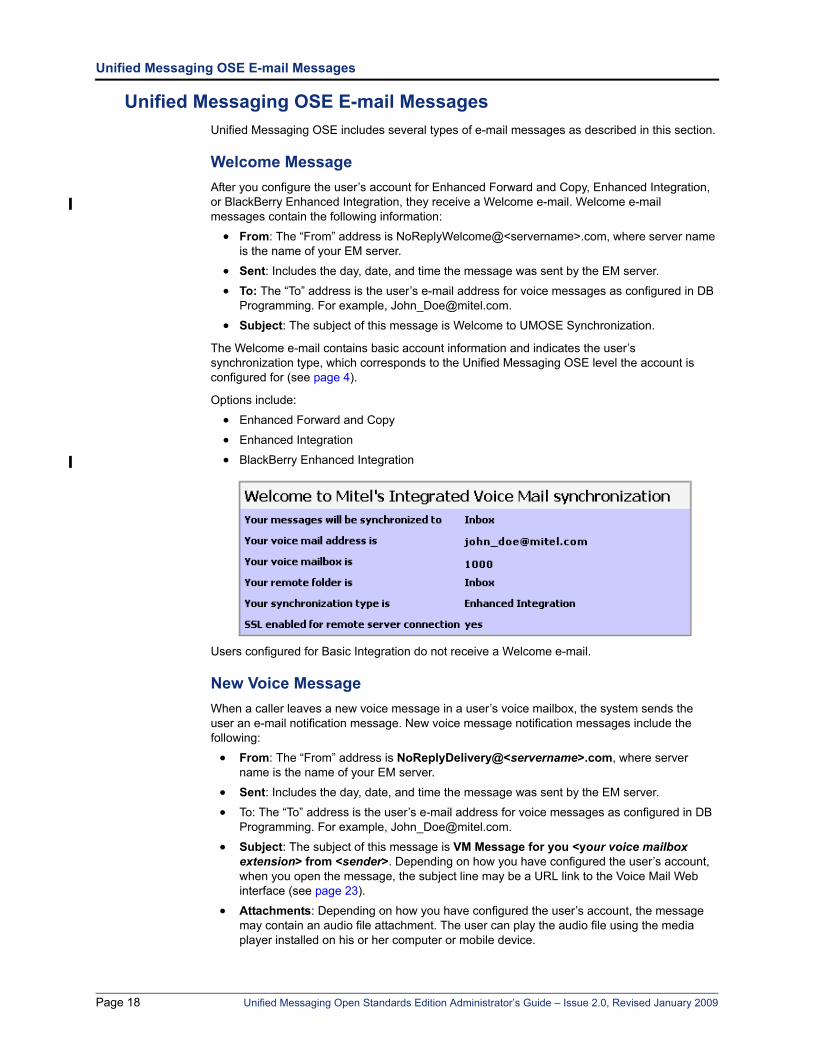
Welcome MessageAfter you configure the user’s account for Enhanced Forward and Copy, Enhanced Integration, or BlackBerry Enhanced Integration, they receive a Welcome e-mail. Welcome e-mail messages contain the following information:
• From: The “From” address is NoReplyWelcome@<servername>.com, where server name is the name of your EM server.
• Sent: Includes the day, date, and time the message was sent by the EM server.
• To: The “To” address is the user’s e-mail address for voice messages as configured in DB Programming. For example, [email protected].
• Subject: The subject of this message is Welcome to UMOSE Synchronization.
The Welcome e-mail contains basic account information and indicates the user’s synchronization type, which corresponds to the Unified Messaging OSE level the account is configured for (see page 4).
Options include:
• Enhanced Forward and Copy
• Enhanced Integration
• BlackBerry Enhanced Integration
Users configured for Basic Integration do not receive a Welcome e-mail.
New Voice MessageWhen a caller leaves a new voice message in a user’s voice mailbox, the system sends the user an e-mail notification message. New voice message notification messages include the following:
• From: The “From” address is NoReplyDelivery@<servername>.com, where server name is the name of your EM server.
• Sent: Includes the day, date, and time the message was sent by the EM server.
• To: The “To” address is the user’s e-mail address for voice messages as configured in DB Programming. For example, [email protected].
• Subject: The subject of this message is VM Message for you <your voice mailbox extension> from <sender>. Depending on how you have configured the user’s account, when you open the message, the subject line may be a URL link to the Voice Mail Web interface (see page 23).
• Attachments: Depending on how you have configured the user’s account, the message may contain an audio file attachment. The user can play the audio file using the media player installed on his or her computer or mobile device.
Page 18 Unified Messaging Open Standards Edition Administrator’s Guide – Issue 2.0, Revised January 2009
Error Message
Error MessageError messages indicate that Unified Messaging encountered a problem delivering a voice message. Error messages contain the following:
• From: The “From” address is NoReplyError@<servername>.com, where server name is the name of your EM server.
• Sent: Includes the day, date, and time the message was sent by the EM server.
• To: The “To” address is the user’s e-mail address for voice messages as configured in DB Programming. For example, [email protected].
• Subject: The subject of this message is Error Synchronizing UMOSE Mailbox. Additional error text is available in the body of the message.
See page 78 for a troubleshooting table that provides a list of error messages, the possible causes, and corrective actions.
New Fax MessageWhen users receive a fax at their e-mail address, the system sends an e-mail notification message with a TIFF or PDF fax attachment. New fax notification messages include the following:
• From: The “From” address is the e-mail address of the fax sender.
• Sent: Includes the day, date, and time the message was sent by the EM server.
• To: The “To” address is the user’s e-mail address for fax delivery as configured in DB Programming. For example, [email protected].
• Subject: The subject of this message is Fax Message for you from <sender>.
• Attachments: The fax transmission is included in the attachment. Depending on the file type configured for the system for inbound faxes, the attachment is either a TIFF or PDF file. Users can view the fax using the graphics software installed on their computer or mobile device.
Copy of an Outgoing Fax MessageYou can enable the Copy Fax to Sender option in DB Programming, which will provide the user with a copy (TIFF attachment) of the outgoing faxes that they send. Fax copy notification messages contain the following:
• From: The “From” address is the user’s e-mail address for fax delivery as configured in DB Programming. For example, [email protected].
• Sent: Includes the day, date, and time the message was sent by the EM server.
• To: The “To” address is the user’s e-mail address for fax delivery as configured in DB Programming. For example, [email protected].
• Subject: The subject of this message is Fax Message for you from <your e-mail address>.
• Attachments: The fax transmission is included as a TIFF attachment. Users can view the fax using the graphics software installed on their computer or mobile device.
Unified Messaging Open Standards Edition Administrator’s Guide – Issue 2.0, Revised January 2009 Page 19
Fax Delivery Status Message
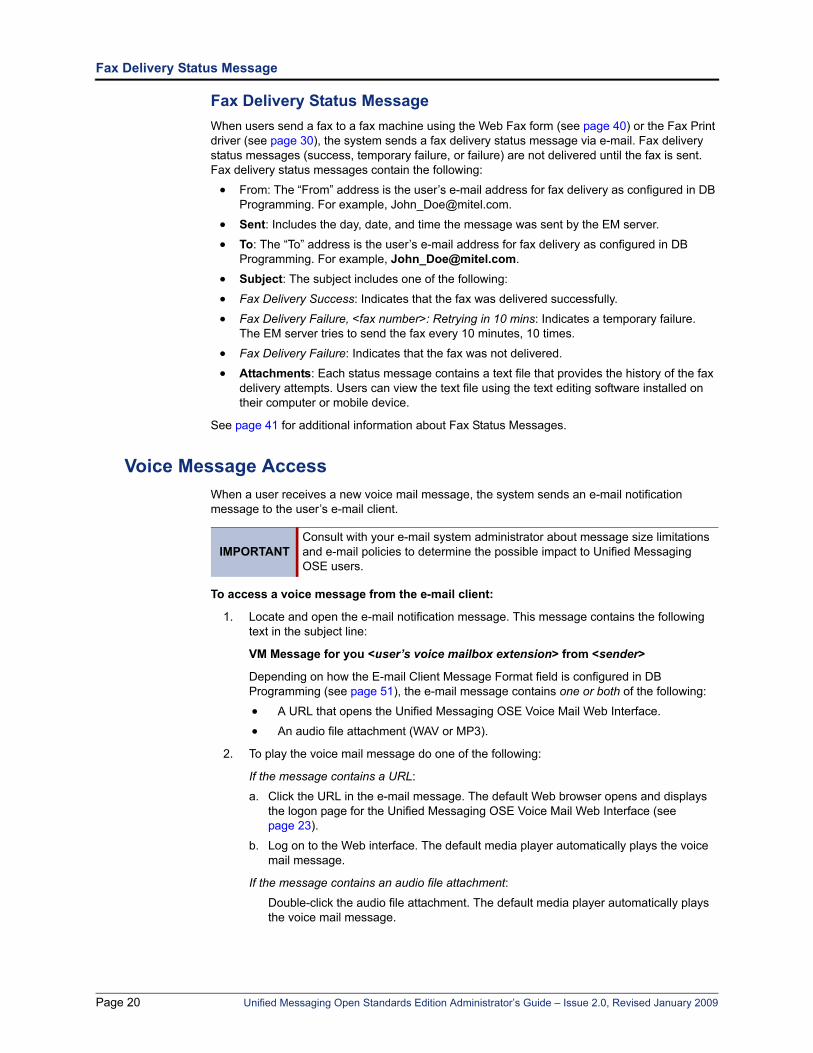
Fax Delivery Status MessageWhen users send a fax to a fax machine using the Web Fax form (see page 40) or the Fax Print driver (see page 30), the system sends a fax delivery status message via e-mail. Fax delivery status messages (success, temporary failure, or failure) are not delivered until the fax is sent. Fax delivery status messages contain the following:
• From: The “From” address is the user’s e-mail address for fax delivery as configured in DB Programming. For example, [email protected].
• Sent: Includes the day, date, and time the message was sent by the EM server.
• To: The “To” address is the user’s e-mail address for fax delivery as configured in DB Programming. For example, [email protected].
• Subject: The subject includes one of the following:
• Fax Delivery Success: Indicates that the fax was delivered successfully.
• Fax Delivery Failure, <fax number>: Retrying in 10 mins: Indicates a temporary failure. The EM server tries to send the fax every 10 minutes, 10 times.
• Fax Delivery Failure: Indicates that the fax was not delivered.
• Attachments: Each status message contains a text file that provides the history of the fax delivery attempts. Users can view the text file using the text editing software installed on their computer or mobile device.
See page 41 for additional information about Fax Status Messages.
Voice Message AccessWhen a user receives a new voice mail message, the system sends an e-mail notification message to the user’s e-mail client.
To access a voice message from the e-mail client:
1. Locate and open the e-mail notification message. This message contains the following text in the subject line:
VM Message for you <user’s voice mailbox extension> from <sender>
Depending on how the E-mail Client Message Format field is configured in DB Programming (see page 51), the e-mail message contains one or both of the following:
• A URL that opens the Unified Messaging OSE Voice Mail Web Interface.
• An audio file attachment (WAV or MP3).
2. To play the voice mail message do one of the following:
If the message contains a URL:
a. Click the URL in the e-mail message. The default Web browser opens and displays the logon page for the Unified Messaging OSE Voice Mail Web Interface (see page 23).
b. Log on to the Web interface. The default media player automatically plays the voice mail message.
If the message contains an audio file attachment:
Double-click the audio file attachment. The default media player automatically plays the voice mail message.
IMPORTANTConsult with your e-mail system administrator about message size limitations and e-mail policies to determine the possible impact to Unified Messaging OSE users.
Page 20 Unified Messaging Open Standards Edition Administrator’s Guide – Issue 2.0, Revised January 2009
Voice Message Synchronization
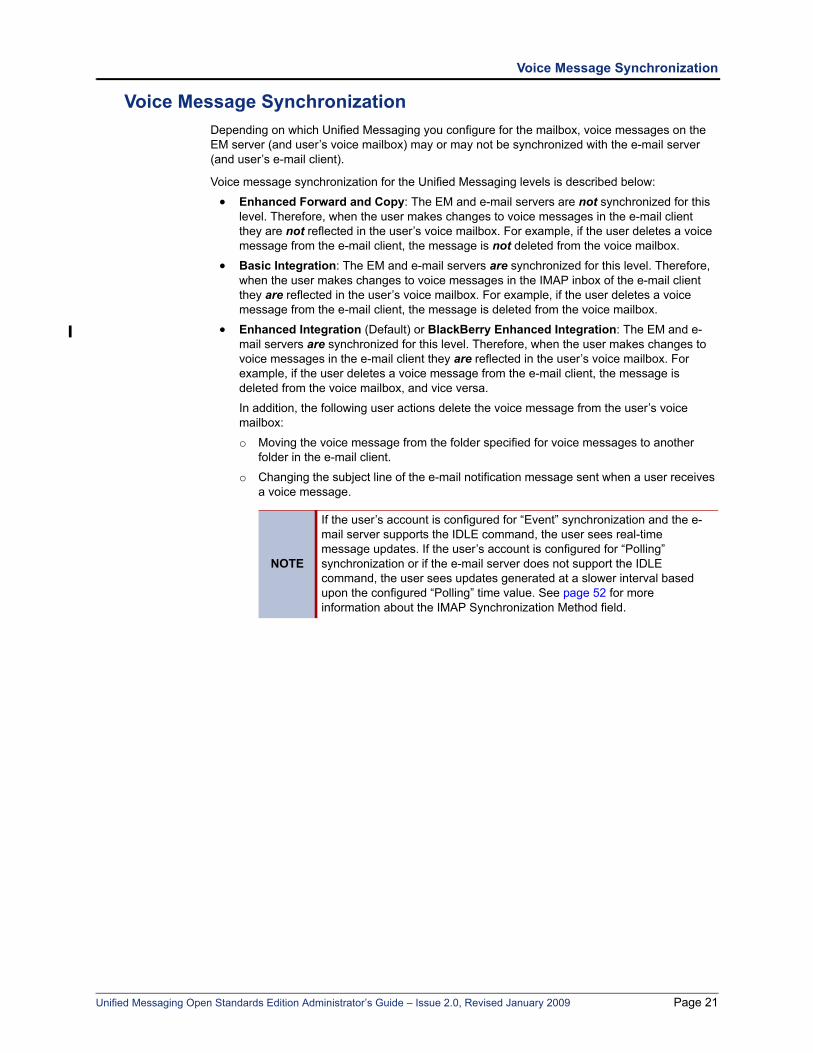
Voice Message SynchronizationDepending on which Unified Messaging you configure for the mailbox, voice messages on the EM server (and user’s voice mailbox) may or may not be synchronized with the e-mail server (and user’s e-mail client).
Voice message synchronization for the Unified Messaging levels is described below:
• Enhanced Forward and Copy: The EM and e-mail servers are not synchronized for this level. Therefore, when the user makes changes to voice messages in the e-mail client they are not reflected in the user’s voice mailbox. For example, if the user deletes a voice message from the e-mail client, the message is not deleted from the voice mailbox.
• Basic Integration: The EM and e-mail servers are synchronized for this level. Therefore, when the user makes changes to voice messages in the IMAP inbox of the e-mail client they are reflected in the user’s voice mailbox. For example, if the user deletes a voice message from the e-mail client, the message is deleted from the voice mailbox.
• Enhanced Integration (Default) or BlackBerry Enhanced Integration: The EM and e-mail servers are synchronized for this level. Therefore, when the user makes changes to voice messages in the e-mail client they are reflected in the user’s voice mailbox. For example, if the user deletes a voice message from the e-mail client, the message is deleted from the voice mailbox, and vice versa.
In addition, the following user actions delete the voice message from the user’s voice mailbox:
o Moving the voice message from the folder specified for voice messages to another folder in the e-mail client.
o Changing the subject line of the e-mail notification message sent when a user receives a voice message.
NOTE
If the user’s account is configured for “Event” synchronization and the e-mail server supports the IDLE command, the user sees real-time message updates. If the user’s account is configured for “Polling” synchronization or if the e-mail server does not support the IDLE command, the user sees updates generated at a slower interval based upon the configured “Polling” time value. See page 52 for more information about the IMAP Synchronization Method field.
Unified Messaging Open Standards Edition Administrator’s Guide – Issue 2.0, Revised January 2009 Page 21
Synchronize MWI with E-Mail Client Option
Synchronize MWI with E-Mail Client OptionThe Message Waiting Indication (MWI) feature provides a flashing message lamp on the user’s endpoint to indicate that a new voice message is in the user’s voice mailbox.
When the user receives a new voice mail message in the e-mail client, the status of the message is UNREAD on the e-mail server, and RECENT on the EM server. The message lamp on the user’s endpoint flashes to indicate that a new message is available.
Enabling the Synchronize MWI with E-Mail Client option provides synchronization between the MWI feature and the user’s e-mail client for users configured for the Enhanced Integration or BlackBerry Enhanced Integration level. This option is not available for users configured for the Enhanced Forward and Copy and Basic Integration levels.
You can enable and disable this option for the user in DB Programming (see page 50). If you enable the Allow User to Configure option in DB Programming (see page 50), the user can also enable and disable this option on the Voice Mail Web interface Configuration tab (see page 25).
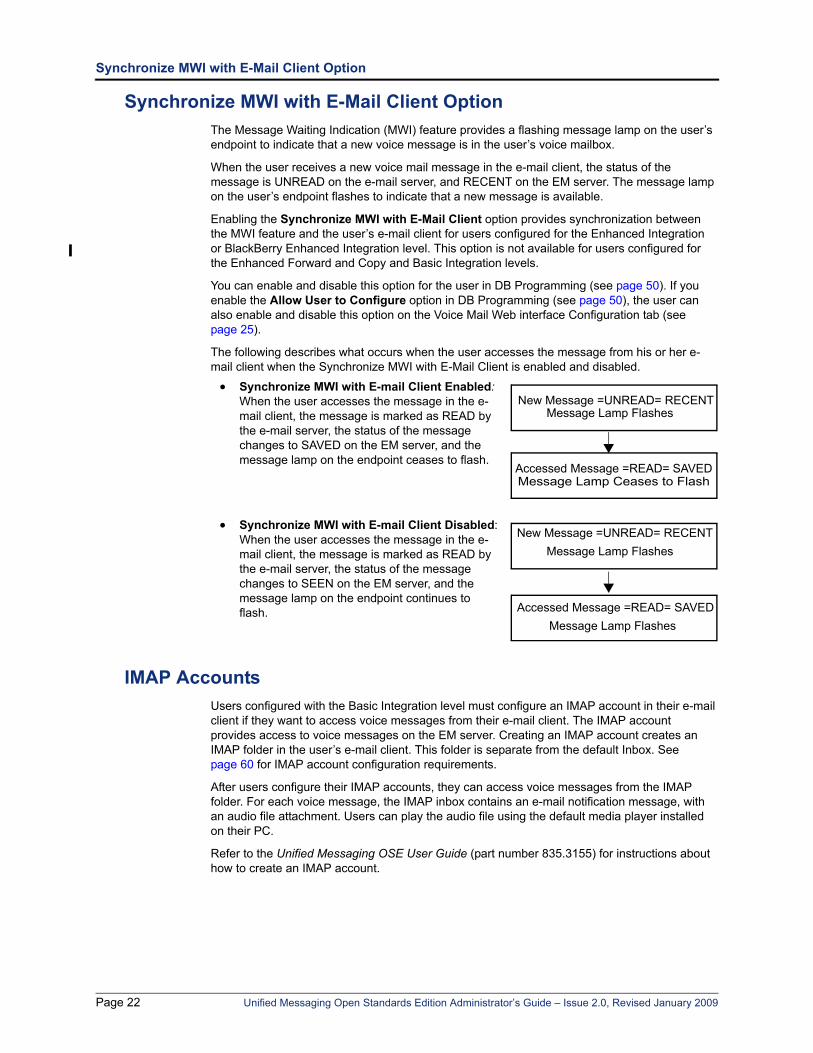
The following describes what occurs when the user accesses the message from his or her e-mail client when the Synchronize MWI with E-Mail Client is enabled and disabled.
• Synchronize MWI with E-mail Client Enabled: When the user accesses the message in the e-mail client, the message is marked as READ by the e-mail server, the status of the message changes to SAVED on the EM server, and the message lamp on the endpoint ceases to flash.
• Synchronize MWI with E-mail Client Disabled: When the user accesses the message in the e-mail client, the message is marked as READ by the e-mail server, the status of the message changes to SEEN on the EM server, and the message lamp on the endpoint continues to flash.
IMAP AccountsUsers configured with the Basic Integration level must configure an IMAP account in their e-mail client if they want to access voice messages from their e-mail client. The IMAP account provides access to voice messages on the EM server. Creating an IMAP account creates an IMAP folder in the user’s e-mail client. This folder is separate from the default Inbox. See page 60 for IMAP account configuration requirements.
After users configure their IMAP accounts, they can access voice messages from the IMAP folder. For each voice message, the IMAP inbox contains an e-mail notification message, with an audio file attachment. Users can play the audio file using the default media player installed on their PC.
Refer to the Unified Messaging OSE User Guide (part number 835.3155) for instructions about how to create an IMAP account.
New Message =UNREAD= RECENTMessage Lamp Flashes
Accessed Message =READ= SAVEDMessage Lamp Ceases to Flash
New Message =UNREAD= RECENTMessage Lamp Flashes
Accessed Message =READ= SAVEDMessage Lamp Flashes
Page 22 Unified Messaging Open Standards Edition Administrator’s Guide – Issue 2.0, Revised January 2009
Voice Mail Web Interface
Voice Mail Web InterfaceUnified Messaging OSE includes a Web-based interface to access, manage, and play voice messages from a computer or mobile device. The Voice Mail Web Interface is available for all levels of Unified Messaging OSE. Users can access the interface in one of the following ways:
• By clicking the URL included in the e-mail notification message that is delivered to their e-mail client (see page 18). This option is only available for users with the Enhanced Forward and Copy, Enhanced Integration, and BlackBerry Enhanced Integration levels.
• By opening a Web browser and navigating directly to the URL associated with voice mail Web access. This option is available for the Enhanced Forward and Copy, Basic Integration, Enhanced Integration, and BlackBerry Enhanced Integration levels.
The Voice Mail Web Interface varies slightly for computers vs. mobile devices. See the following sections for additional details:
• Voice Mail Web Interface for computers, see below.
• Voice Mail Web Interface for mobile devices, see page 27.
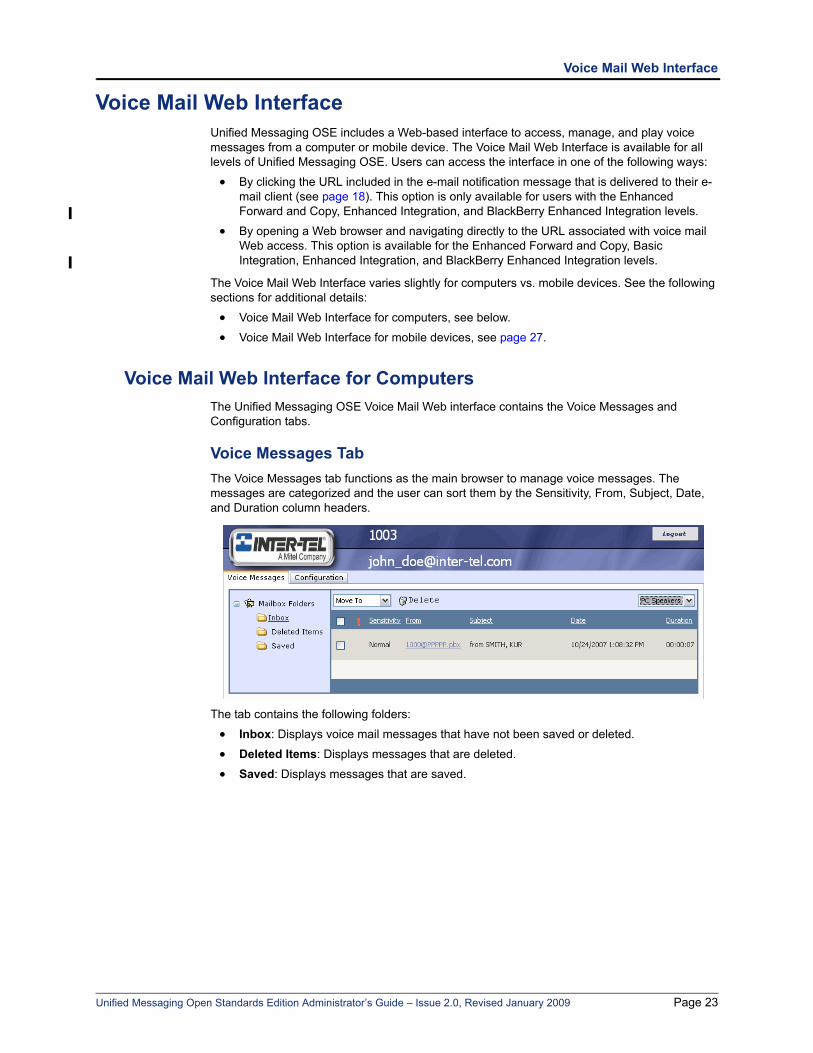
Voice Mail Web Interface for ComputersThe Unified Messaging OSE Voice Mail Web interface contains the Voice Messages and Configuration tabs.
Voice Messages TabThe Voice Messages tab functions as the main browser to manage voice messages. The messages are categorized and the user can sort them by the Sensitivity, From, Subject, Date, and Duration column headers.
The tab contains the following folders:
• Inbox: Displays voice mail messages that have not been saved or deleted.
• Deleted Items: Displays messages that are deleted.
• Saved: Displays messages that are saved.
Unified Messaging Open Standards Edition Administrator’s Guide – Issue 2.0, Revised January 2009 Page 23
Voice Messages Tab
Each folder has the following options:
• Move To: Moves messages to a different folder.
To move a message:
a. Select the message.
b. Select Saved, Deleted Items, or Inbox from the Move To box.
• Delete: Deletes messages.
To delete a message:
Select a message, and then click Delete. If the selected message is in the Saved or Inbox folders, the message is moved to the Deleted Items folder. If the selected message is in the Deleted Items folder, the message is purged permanently.
Messages left in the Deleted Items folder are deleted after the Deleted Message Holder Duration timer in DB Programming has expired. The default value is set to one hour. To change the default setting, refer to the Enterprise Messaging Installation and Maintenance Manual (part no. 780.8006) for instructions about how to change the Deleted Message Hold Duration timer.
• PC Speakers or Phone: (Not applicable to the Deleted Items folder.) Determines how the messages are played. The messages can be played on the PC speaker or through the user’s endpoint. For information about how to listen to a message, see page 20.
Page 24 Unified Messaging Open Standards Edition Administrator’s Guide – Issue 2.0, Revised January 2009
Configuration Tab
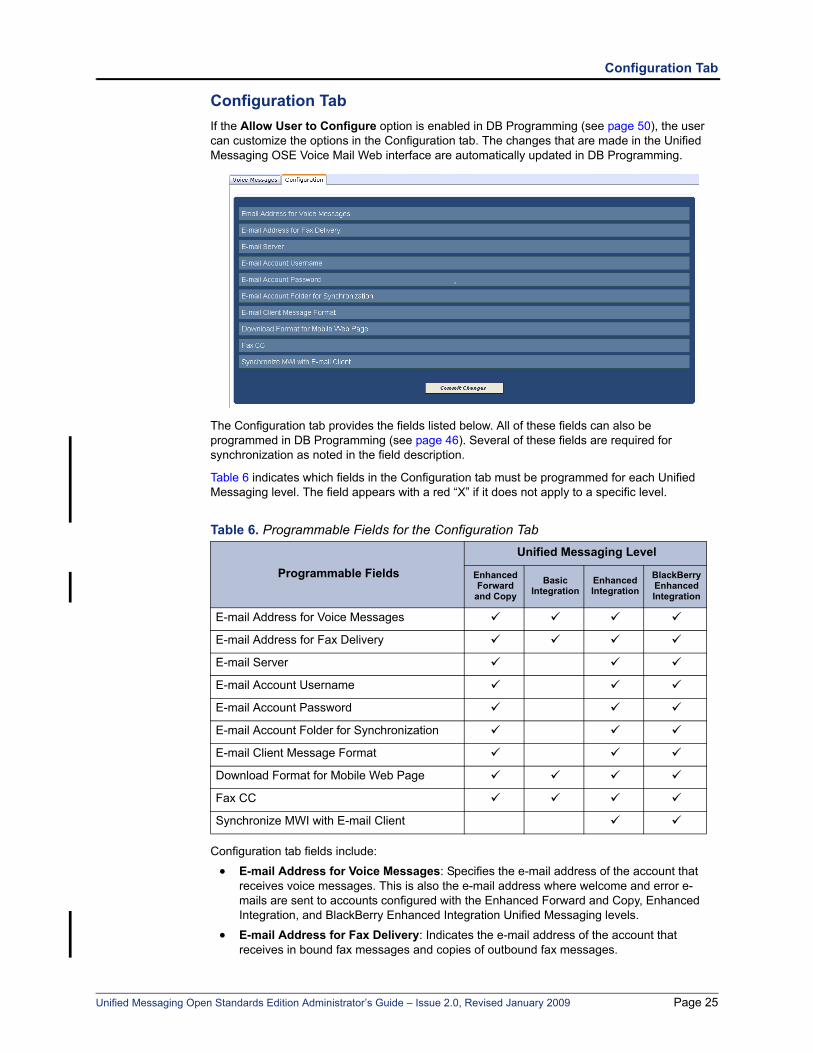
Configuration TabIf the Allow User to Configure option is enabled in DB Programming (see page 50), the user can customize the options in the Configuration tab. The changes that are made in the Unified Messaging OSE Voice Mail Web interface are automatically updated in DB Programming.
The Configuration tab provides the fields listed below. All of these fields can also be programmed in DB Programming (see page 46). Several of these fields are required for synchronization as noted in the field description.
Table 6 indicates which fields in the Configuration tab must be programmed for each Unified Messaging level. The field appears with a red “X” if it does not apply to a specific level.
Configuration tab fields include:
• E-mail Address for Voice Messages: Specifies the e-mail address of the account that receives voice messages. This is also the e-mail address where welcome and error e-mails are sent to accounts configured with the Enhanced Forward and Copy, Enhanced Integration, and BlackBerry Enhanced Integration Unified Messaging levels.
• E-mail Address for Fax Delivery: Indicates the e-mail address of the account that receives in bound fax messages and copies of outbound fax messages.
Table 6. Programmable Fields for the Configuration Tab
Programmable Fields
Unified Messaging Level
Enhanced Forward
and CopyBasic
IntegrationEnhanced Integration
BlackBerry Enhanced Integration
E-mail Address for Voice Messages
E-mail Address for Fax Delivery
E-mail Server
E-mail Account Username
E-mail Account Password
E-mail Account Folder for Synchronization
E-mail Client Message Format
Download Format for Mobile Web Page
Fax CC
Synchronize MWI with E-mail Client
Unified Messaging Open Standards Edition Administrator’s Guide – Issue 2.0, Revised January 2009 Page 25
Configuration Tab
• E-mail Server: Indicates the hostname or IP address of the Internet Message Access Protocol 4 (IMAP4) e-mail server used for account synchronization (for example, XYZ_Exchange_Server). Note that this is not the Enterprise Messaging Voice Mail server.
• E-mail Account Username: Indicates the user’s e-mail username. This username is used to log on to the e-mail client and access e-mail messages from the IMAP4 e-mail server.
• E-mail Account Password: Indicates the user’s e-mail password. This password is used to log on to the e-mail client and access e-mail messages from the IMAP4 e-mail server.
• E-mail Account Folder for Synchronization: Indicates the path and folder in the e-mail client used for synchronization between the EM server and the IMAP4 e-mail server. For example, to send and synchronize voice messages to the e-mail client Inbox, type Inbox in this field. To send and synchronize voice messages to a sub-folder named “Voice Mail” under the “Inbox” folder in the e-mail client account, type Inbox/Voice Mail in this field. A backslash (\) is not a supported character for this field. To indicate a path, use a forward slash (/) instead. Any folder or sub-folders specified in this field must first be created by the user in the e-mail client. If the user moves voice messages to another folder, they are deleted from the EM server.
• E-mail Client Message Format: Indicates whether the e-mail notification message that the user receives contains a URL (a link to the voice message), a file attachment, or both. The default value is attachment.
• Download Format for Mobile Web Page: Specifies which file format to use when downloading voice messages from the mobile device Voice Mail Web page. Options include MP3 or WAV file formats. The default value is MP3.
• Fax CC: Enables a copy of the user’s outbound fax to be sent to his or her e-mail address (TIFF attachment), as specified in the E-mail Address for Fax Delivery field. For details about the Copy Fax to Sender option, see page 41.
• Synchronize MWI with E-mail Client: Synchronizes the Message Waiting Indicator (MWI) feature (see page 22) with the user’s e-mail client.
Options include:
o Enabled: When users access a message in their e-mail client, the message is marked as saved, and the message lamp on their endpoint ceases to flash.
o Disabled: When users access a message in the e-mail client, the message is marked as seen, and the message lamp on their endpoint continues to flash.
After changing fields, users must click Commit Changes.
NOTICEPossible Data Loss. Changing the E-mail Account Folder for Synchronization to anything other than “Inbox” when the account is setup for BlackBerry Enhanced Integration may result in the deletion of messages. To support integration into folders other than the “Inbox” folder, you must set up message routing rules at the e-mail server (server-based rules) so that voice mail messages that are sent using BlackBerry Enhanced Integration will be routed into the expected folder. For information about setting up server-based rules, refer to the appropriate e-mail server’s guide or Help.
NOTE
If your company uses e-mail retention software that automatically moves the e-mail notification message to another location, Inter-Tel recommends that you select File Attachment or Both for your message format. Otherwise users’ voice messages may be deleted from the EM server.
NOTEMost mobile devices do not support the WAV file format. The user should check to see which file format is supported by his or her mobile device and program this field accordingly.
Page 26 Unified Messaging Open Standards Edition Administrator’s Guide – Issue 2.0, Revised January 2009
Voice Mail Web Interface for Mobile Devices
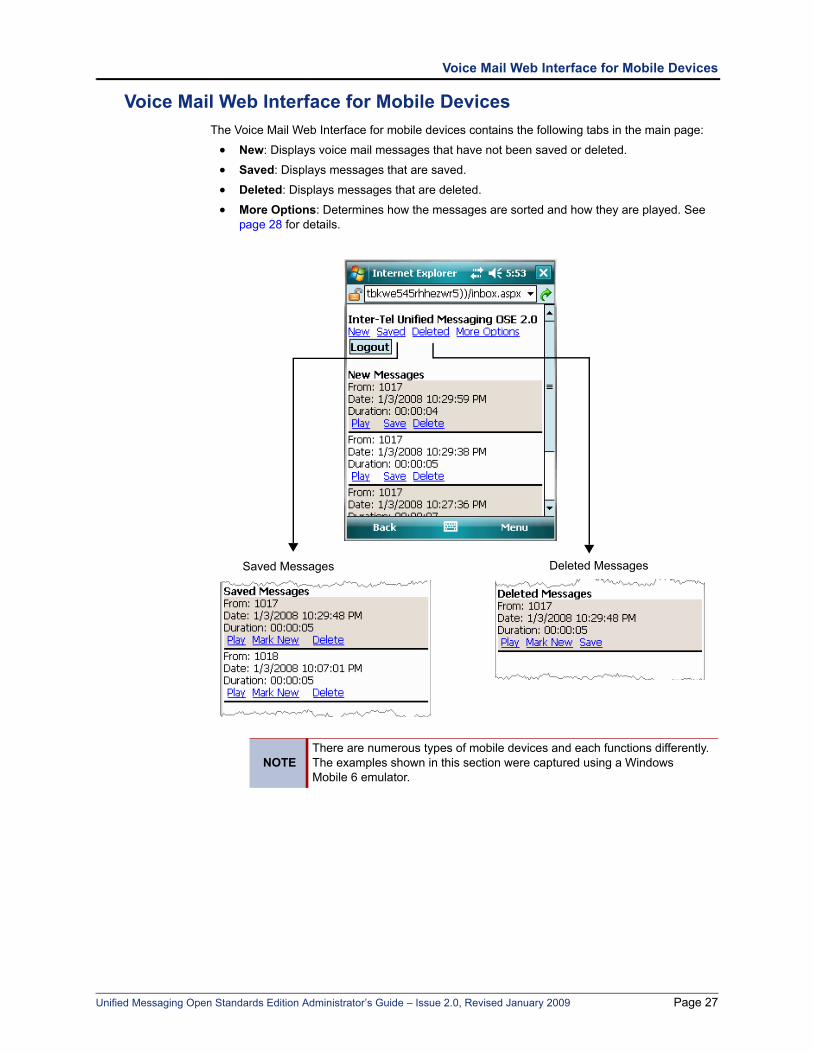
Voice Mail Web Interface for Mobile DevicesThe Voice Mail Web Interface for mobile devices contains the following tabs in the main page:
• New: Displays voice mail messages that have not been saved or deleted.
• Saved: Displays messages that are saved.
• Deleted: Displays messages that are deleted.
• More Options: Determines how the messages are sorted and how they are played. See page 28 for details.
NOTEThere are numerous types of mobile devices and each functions differently. The examples shown in this section were captured using a Windows Mobile 6 emulator.
Saved Messages Deleted Messages
Unified Messaging Open Standards Edition Administrator’s Guide – Issue 2.0, Revised January 2009 Page 27
Voice Mail Web Interface for Mobile Devices
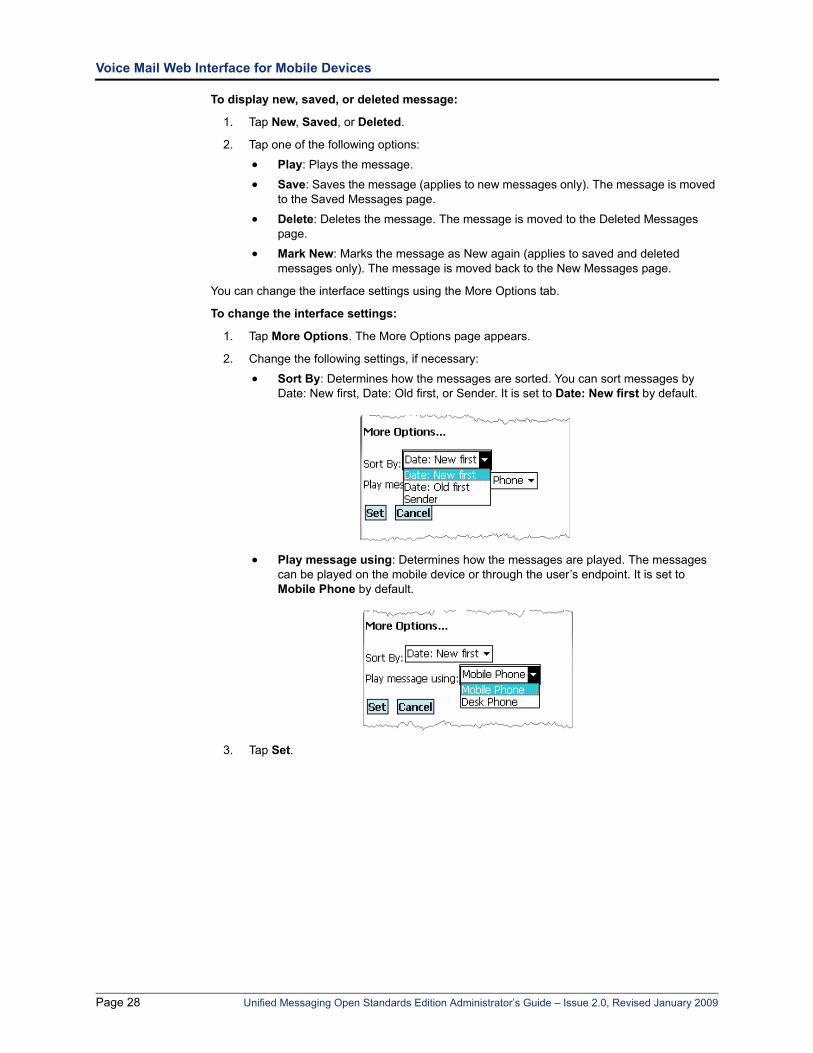
To display new, saved, or deleted message:
1. Tap New, Saved, or Deleted.
2. Tap one of the following options:
• Play: Plays the message.
• Save: Saves the message (applies to new messages only). The message is moved to the Saved Messages page.
• Delete: Deletes the message. The message is moved to the Deleted Messages page.
• Mark New: Marks the message as New again (applies to saved and deleted messages only). The message is moved back to the New Messages page.
You can change the interface settings using the More Options tab.
To change the interface settings:
1. Tap More Options. The More Options page appears.
2. Change the following settings, if necessary:
• Sort By: Determines how the messages are sorted. You can sort messages by Date: New first, Date: Old first, or Sender. It is set to Date: New first by default.
• Play message using: Determines how the messages are played. The messages can be played on the mobile device or through the user’s endpoint. It is set to Mobile Phone by default.
3. Tap Set.
Page 28 Unified Messaging Open Standards Edition Administrator’s Guide – Issue 2.0, Revised January 2009
MWI Operation with the Voice Mail Web Interface
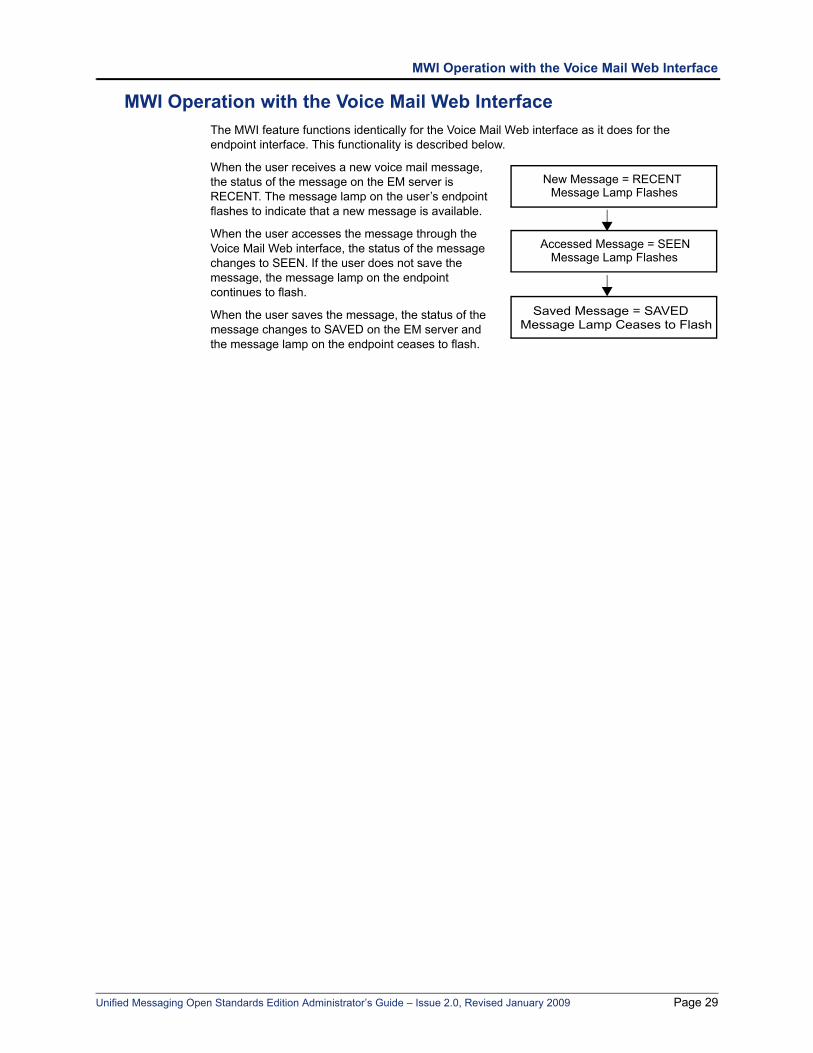
MWI Operation with the Voice Mail Web InterfaceThe MWI feature functions identically for the Voice Mail Web interface as it does for the endpoint interface. This functionality is described below.
When the user receives a new voice mail message, the status of the message on the EM server is RECENT. The message lamp on the user’s endpoint flashes to indicate that a new message is available.
When the user accesses the message through the Voice Mail Web interface, the status of the message changes to SEEN. If the user does not save the message, the message lamp on the endpoint continues to flash.
When the user saves the message, the status of the message changes to SAVED on the EM server and the message lamp on the endpoint ceases to flash.
New Message = RECENTMessage Lamp Flashes
Saved Message = SAVEDMessage Lamp Ceases to Flash
Accessed Message = SEENMessage Lamp Flashes
Unified Messaging Open Standards Edition Administrator’s Guide – Issue 2.0, Revised January 2009 Page 29
Outbound Fax
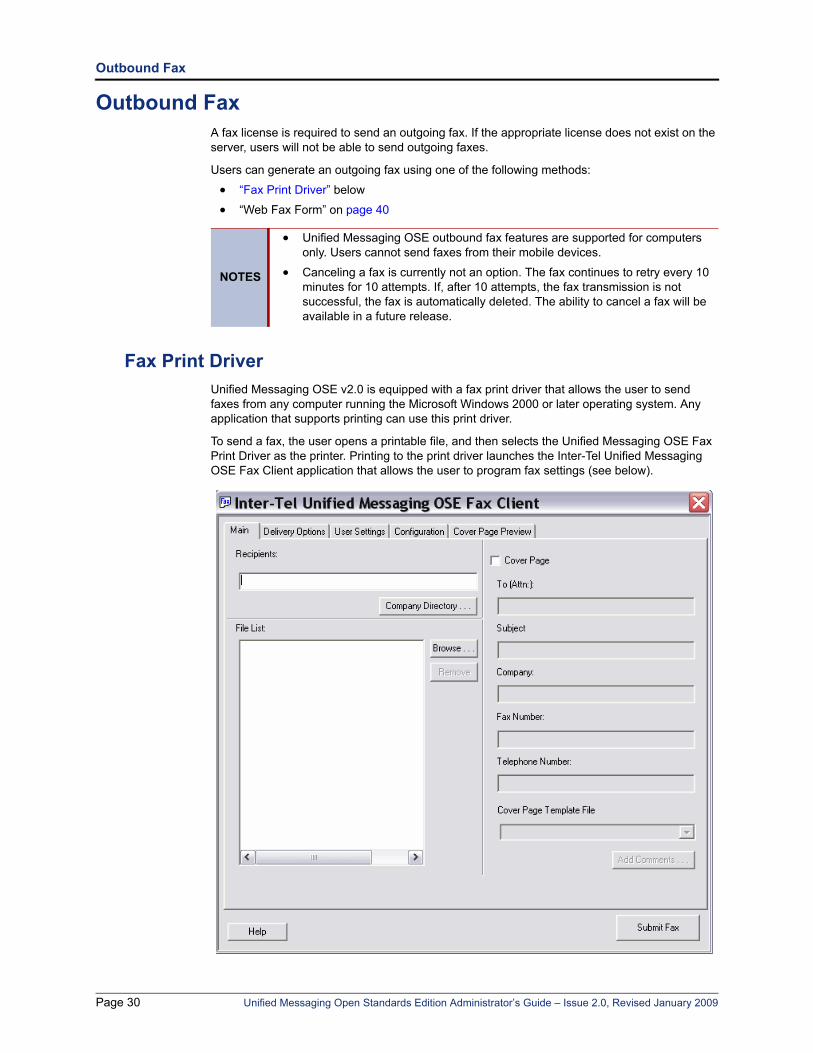
Outbound FaxA fax license is required to send an outgoing fax. If the appropriate license does not exist on the server, users will not be able to send outgoing faxes.
Users can generate an outgoing fax using one of the following methods:
• “Fax Print Driver” below
• “Web Fax Form” on page 40
Fax Print DriverUnified Messaging OSE v2.0 is equipped with a fax print driver that allows the user to send faxes from any computer running the Microsoft Windows 2000 or later operating system. Any application that supports printing can use this print driver.
To send a fax, the user opens a printable file, and then selects the Unified Messaging OSE Fax Print Driver as the printer. Printing to the print driver launches the Inter-Tel Unified Messaging OSE Fax Client application that allows the user to program fax settings (see below).
NOTES
• Unified Messaging OSE outbound fax features are supported for computers only. Users cannot send faxes from their mobile devices.
• Canceling a fax is currently not an option. The fax continues to retry every 10 minutes for 10 attempts. If, after 10 attempts, the fax transmission is not successful, the fax is automatically deleted. The ability to cancel a fax will be available in a future release.
Page 30 Unified Messaging Open Standards Edition Administrator’s Guide – Issue 2.0, Revised January 2009

Fax Print Driver
The Fax Print Driver is an alternative to the existing Inter-Tel Unified Messaging OSE Web Fax Form to send faxes. Unlike the Web Fax Form:
• Users do not have to attach a file to the fax form.
• Users can fax any file that is printable; a fax document can be in any format, not limited to TIFF or PDF.
• Users can create a customized fax cover page or use a cover page template (see page 32).
The Fax Print Driver is available on the EM v1.2 software DVD and on the Inter-Tel edGe® Web site.
To download the Fax Print Driver from the edGe:
1. From an Internet Explorer window, access the Inter-Tel edGe TechCentral Software Downloads (www.inter-tel.com/software) Web site.
2. Select Applications Software – Unified Messaging Software, and then download the Unified Messaging OSE Fax Print Driver (UMFaxDriver.msi).
After you download the zip file, distribute it to users. Users must then install the UMFaxDriver.msi file on their computers.
When using the fax client for the first time an error message prompts the user to configure the settings on the Fax Client Configuration tab. The user is required to configure and confirm these settings one time only. In addition, users need to configure the fields on the User Settings tab one time only. When you distribute the Fax Print Driver to users, make sure you provide the following information to each user.
For the Configuration tab:
• Mailbox: Provide new users with their mailbox extension (for example, 1000).
• Voicemail Password: Provide new users with their default voice mail password (for example, 1000). For security reasons, instruct users to log in to their voice mailbox and change this password as soon as possible.
• Web Server: Provide users with the hostname or IP address of the EM server (for example, XYZ_EM_Server). If the Web Server field is left blank or contains the wrong value, the Fax Client cannot connect to the EM server when the user sends a fax.
• Use HTTPS: Instruct users to select this option only if you have configured and HTTPs connection for the Web-based fax service on the EM server (see page 63). Users receive an error message if they select this option and you have not configured an HTTPS connection. Using the HTTPS protocol prevents user credentials and document information from being transmitted in clear text. Inter-Tel recommends that you use HTTPS.
For the User Settings tab:
• Telephone Number: Provide users with the appropriate company telephone number.
• Fax Number: Provide users with the appropriate company fax number.
• Copy fax to sender: Instruct users to select this option if they want to receive a copy of each fax that they send. This option must also be configured for the user (see page 51).
Installation and usage instructions for the Fax Print Driver are included in the Unified Messaging OSE User Guide.
NOTES
• The Mac OS operating system currently does not support the Inter-Tel Unified Messaging OSE Fax Client application.
• If port 80 (or 443 for HTTPS) is opened to the messaging server, users do not have to be on the local area network to send faxes.
Unified Messaging Open Standards Edition Administrator’s Guide – Issue 2.0, Revised January 2009 Page 31
Fax Cover Page Options
Fax Cover Page OptionsThe following options are available for creating a fax cover page:
• The Cover Page Editor: The Cover Page Editor allows you to create a fax cover page template and then upload it to the EM server. Users can then select the template when they use the Fax Client to send a fax. Cover page templates that you create can only be used with the Fax Client. They cannot be used with the Web Fax Form.
• A Printable File: Users can create their own fax cover page using a printable file. A user who does not want to use any of the existing fax cover page templates, available in the Fax Client may use this method. See the Unified Messaging OSE User Guide (part number 835.3155) for instructions.
The Cover Page Editor is available on the EM v1.2 software DVD and on the Inter-Tel edGe® Web site.
To download the Cover Page Editor from the edGe:
1. From an Internet Explorer window, access the Inter-Tel edGe TechCentral Software Downloads Web page (www.inter-tel.com/software).
2. Select Applications Software – Unified Messaging Software, and then download the Unified Messaging OSE Cover Page Editor (cpedit.zip) file.
This section contains instructions on how to customize a fax cover page using the Cover Page Editor software. See the following sections for details:
• “Installing and Starting the Cover Page Editor” on page 33
• “Editing or Creating a Fax Cover Page” on page 35
• “Viewing the Cover Page” on page 38
• “Saving the Cover Page File on the EM Server” on page 39
Page 32 Unified Messaging Open Standards Edition Administrator’s Guide – Issue 2.0, Revised January 2009
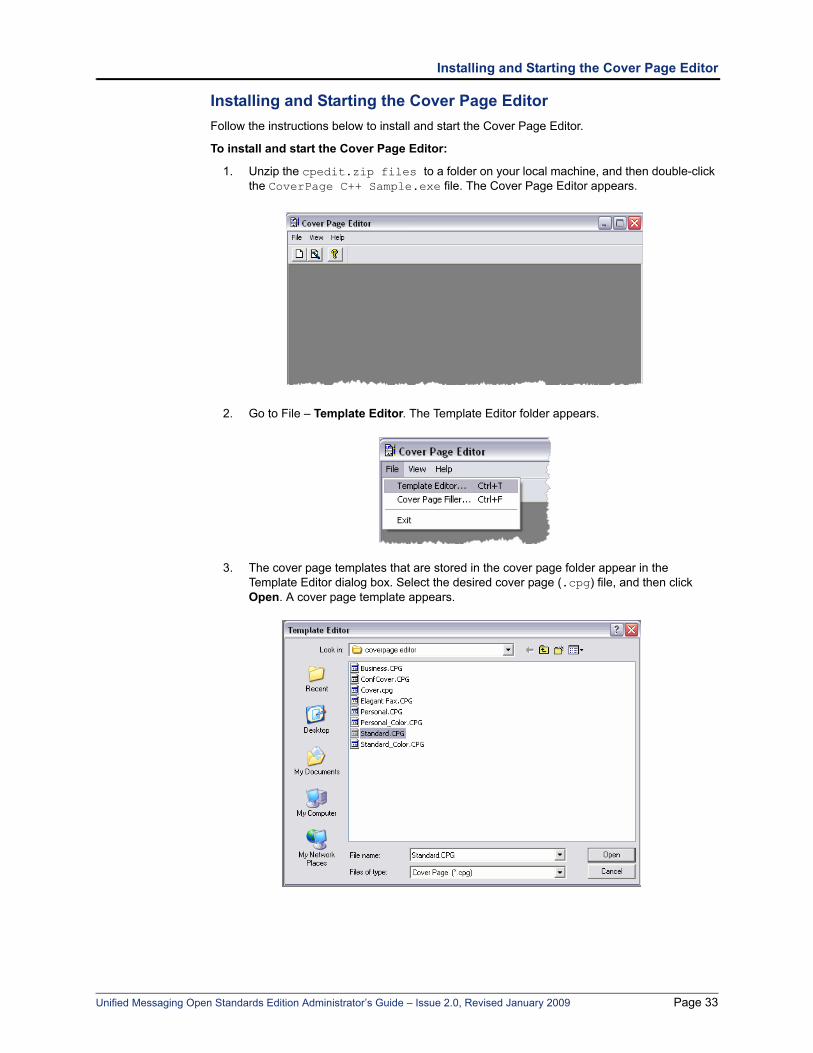
Installing and Starting the Cover Page Editor
Installing and Starting the Cover Page EditorFollow the instructions below to install and start the Cover Page Editor.
To install and start the Cover Page Editor:
1. Unzip the cpedit.zip files to a folder on your local machine, and then double-click the CoverPage C++ Sample.exe file. The Cover Page Editor appears.
2. Go to File – Template Editor. The Template Editor folder appears.
3. The cover page templates that are stored in the cover page folder appear in the Template Editor dialog box. Select the desired cover page (.cpg) file, and then click Open. A cover page template appears.
Unified Messaging Open Standards Edition Administrator’s Guide – Issue 2.0, Revised January 2009 Page 33
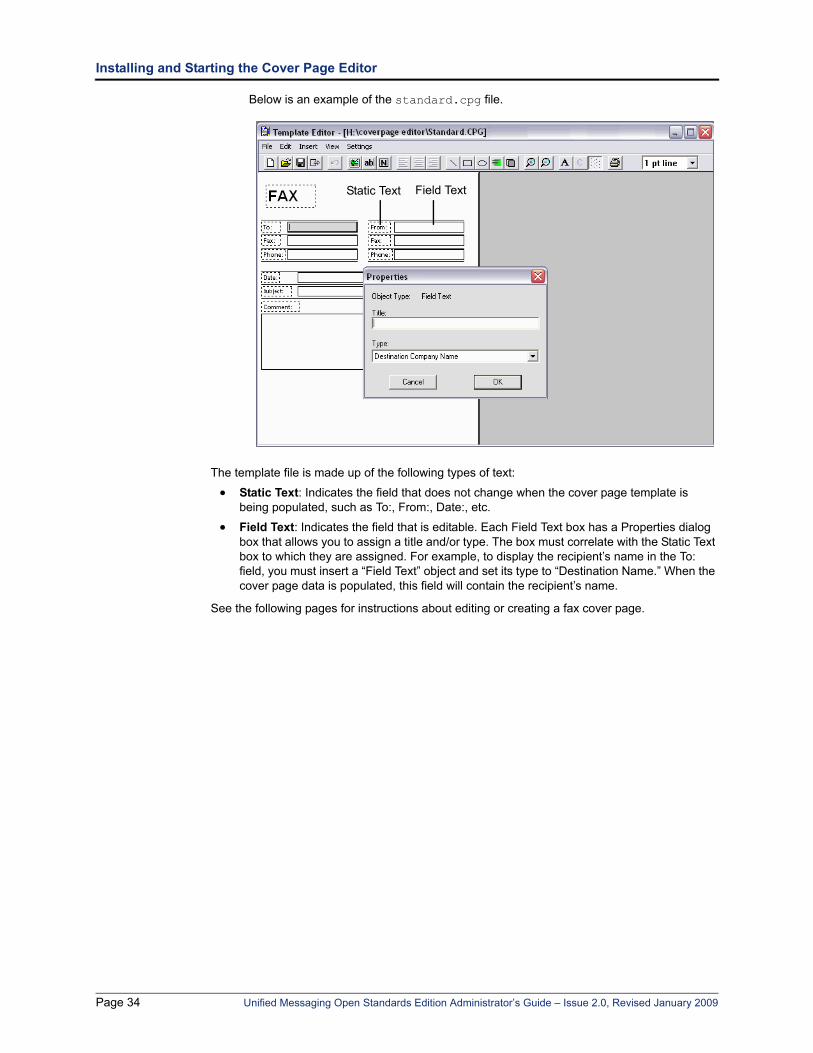
Installing and Starting the Cover Page Editor
Below is an example of the standard.cpg file.
The template file is made up of the following types of text:
• Static Text: Indicates the field that does not change when the cover page template is being populated, such as To:, From:, Date:, etc.
• Field Text: Indicates the field that is editable. Each Field Text box has a Properties dialog box that allows you to assign a title and/or type. The box must correlate with the Static Text box to which they are assigned. For example, to display the recipient’s name in the To: field, you must insert a “Field Text” object and set its type to “Destination Name.” When the cover page data is populated, this field will contain the recipient’s name.
See the following pages for instructions about editing or creating a fax cover page.
Static Text Field Text
Page 34 Unified Messaging Open Standards Edition Administrator’s Guide – Issue 2.0, Revised January 2009
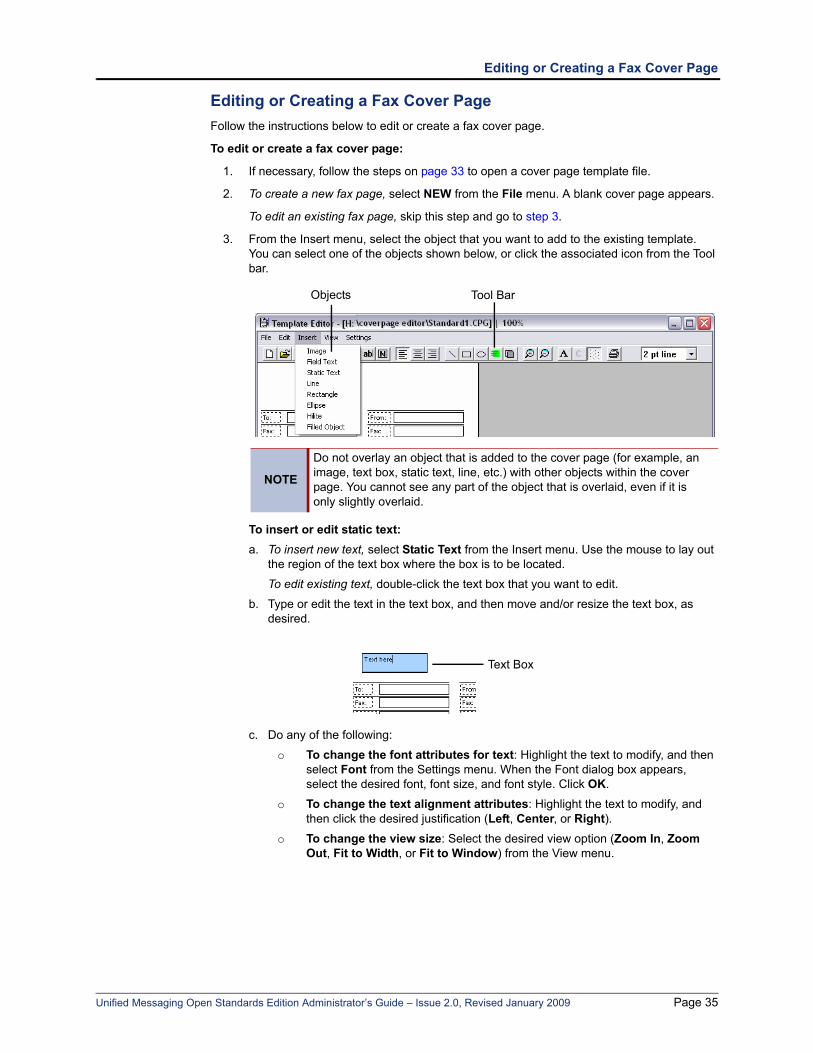
Editing or Creating a Fax Cover Page
Editing or Creating a Fax Cover PageFollow the instructions below to edit or create a fax cover page.
To edit or create a fax cover page:
1. If necessary, follow the steps on page 33 to open a cover page template file.
2. To create a new fax page, select NEW from the File menu. A blank cover page appears.
To edit an existing fax page, skip this step and go to step 3.
3. From the Insert menu, select the object that you want to add to the existing template. You can select one of the objects shown below, or click the associated icon from the Tool bar.
To insert or edit static text:a. To insert new text, select Static Text from the Insert menu. Use the mouse to lay out
the region of the text box where the box is to be located.
To edit existing text, double-click the text box that you want to edit.
b. Type or edit the text in the text box, and then move and/or resize the text box, as desired.
c. Do any of the following:
o To change the font attributes for text: Highlight the text to modify, and then select Font from the Settings menu. When the Font dialog box appears, select the desired font, font size, and font style. Click OK.
o To change the text alignment attributes: Highlight the text to modify, and then click the desired justification (Left, Center, or Right).
o To change the view size: Select the desired view option (Zoom In, Zoom Out, Fit to Width, or Fit to Window) from the View menu.
NOTE
Do not overlay an object that is added to the cover page (for example, an image, text box, static text, line, etc.) with other objects within the cover page. You cannot see any part of the object that is overlaid, even if it is only slightly overlaid.
Tool BarObjects
Text Box
Unified Messaging Open Standards Edition Administrator’s Guide – Issue 2.0, Revised January 2009 Page 35
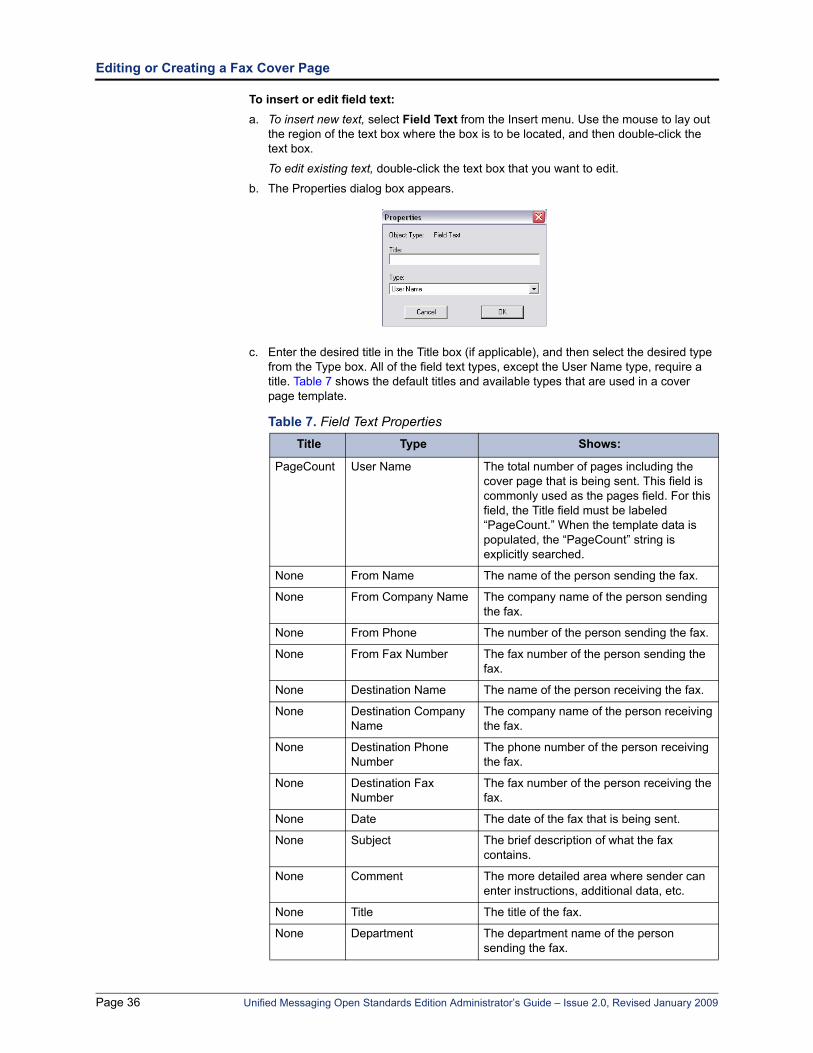
Editing or Creating a Fax Cover Page
To insert or edit field text:a. To insert new text, select Field Text from the Insert menu. Use the mouse to lay out
the region of the text box where the box is to be located, and then double-click the text box.
To edit existing text, double-click the text box that you want to edit.
b. The Properties dialog box appears.
c. Enter the desired title in the Title box (if applicable), and then select the desired type from the Type box. All of the field text types, except the User Name type, require a title. Table 7 shows the default titles and available types that are used in a cover page template.
Table 7. Field Text Properties Title Type Shows:
PageCount User Name The total number of pages including the cover page that is being sent. This field is commonly used as the pages field. For this field, the Title field must be labeled “PageCount.” When the template data is populated, the “PageCount” string is explicitly searched.
None From Name The name of the person sending the fax.
None From Company Name The company name of the person sending the fax.
None From Phone The number of the person sending the fax.
None From Fax Number The fax number of the person sending the fax.
None Destination Name The name of the person receiving the fax.
None Destination Company Name
The company name of the person receiving the fax.
None Destination Phone Number
The phone number of the person receiving the fax.
None Destination Fax Number
The fax number of the person receiving the fax.
None Date The date of the fax that is being sent.
None Subject The brief description of what the fax contains.
None Comment The more detailed area where sender can enter instructions, additional data, etc.
None Title The title of the fax.
None Department The department name of the person sending the fax.
Page 36 Unified Messaging Open Standards Edition Administrator’s Guide – Issue 2.0, Revised January 2009
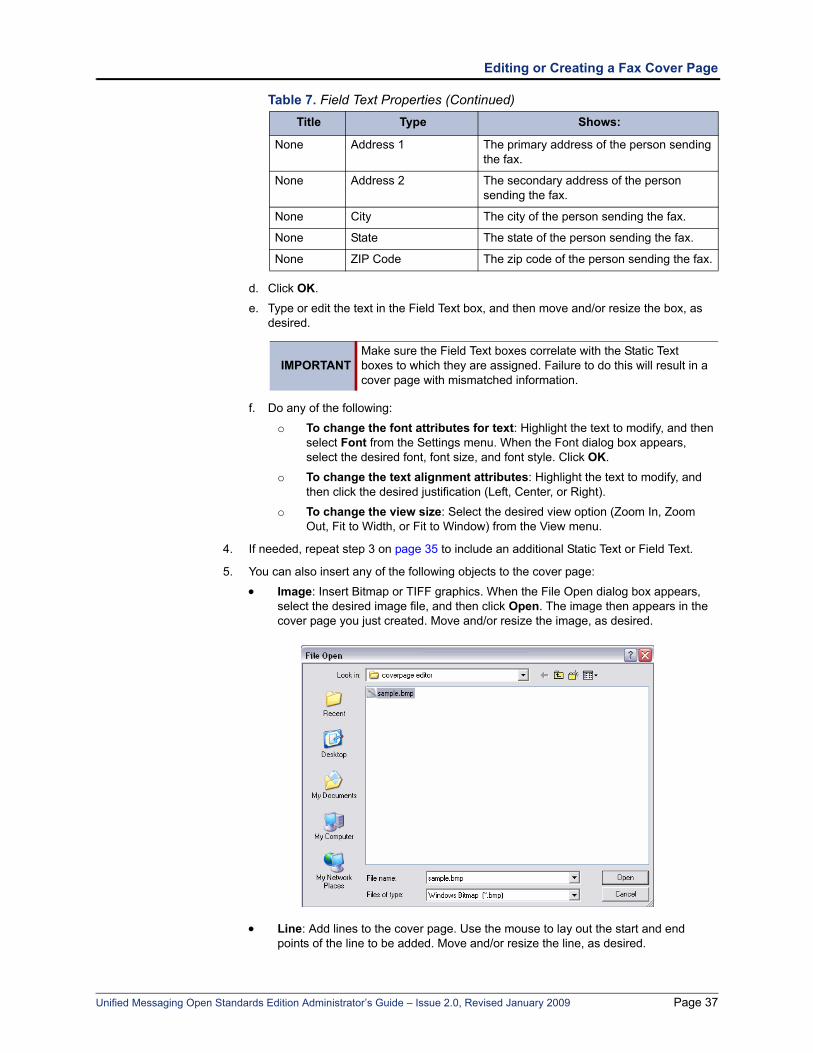
Editing or Creating a Fax Cover Page
d. Click OK.
e. Type or edit the text in the Field Text box, and then move and/or resize the box, as desired.
f. Do any of the following:
o To change the font attributes for text: Highlight the text to modify, and then select Font from the Settings menu. When the Font dialog box appears, select the desired font, font size, and font style. Click OK.
o To change the text alignment attributes: Highlight the text to modify, and then click the desired justification (Left, Center, or Right).
o To change the view size: Select the desired view option (Zoom In, Zoom Out, Fit to Width, or Fit to Window) from the View menu.
4. If needed, repeat step 3 on page 35 to include an additional Static Text or Field Text.
5. You can also insert any of the following objects to the cover page:
• Image: Insert Bitmap or TIFF graphics. When the File Open dialog box appears, select the desired image file, and then click Open. The image then appears in the cover page you just created. Move and/or resize the image, as desired.
• Line: Add lines to the cover page. Use the mouse to lay out the start and end points of the line to be added. Move and/or resize the line, as desired.
None Address 1 The primary address of the person sending the fax.
None Address 2 The secondary address of the person sending the fax.
None City The city of the person sending the fax.
None State The state of the person sending the fax.
None ZIP Code The zip code of the person sending the fax.
IMPORTANTMake sure the Field Text boxes correlate with the Static Text boxes to which they are assigned. Failure to do this will result in a cover page with mismatched information.
Table 7. Field Text Properties (Continued)Title Type Shows:
Unified Messaging Open Standards Edition Administrator’s Guide – Issue 2.0, Revised January 2009 Page 37

Viewing the Cover Page
• Rectangle: Add rectangles to the cover page. Use the mouse to lay out the start and end points of the rectangle to be added. Move and/or resize the object, as desired.
• Ellipse: Add ellipses to the cover page. Use the mouse to lay out the start and end points of the ellipse to be added. Move and/or resize the object, as desired.
• Hilite: This option is currently not supported.
• Filled Object: Fill rectangles or ellipses with black. Select the desired rectangle or ellipse, and then select Filled Object. The object is filled with black. Although you can change the colors on the cover page using the Change Color option, Inter-Tel recommends that you only use black or white. Fax machines do not support colors, and some colors may not display properly.
6. Select Save As from the File menu to rename and save the file.
Viewing the Cover PageFollow the instructions below to view the cover page that you just created.
To view a cover page:
1. In the main Cover Page Editor, select Cover Page Filler from the File menu. The Cover Page Filler dialog box appears.
2. Select the cover page file (.cpg), and then click Open.
TIP
Every time you modify an existing cover page, save it with a different file name. If you have a cover page with text fields that do not display the correct information (that is, the fields are blank), try deleting one of the fields and recreating it.
Page 38 Unified Messaging Open Standards Edition Administrator’s Guide – Issue 2.0, Revised January 2009

Saving the Cover Page File on the EM Server
3. The file you selected appears in the Template Filler dialog box. Complete the fields with the appropriate text.
4. Rename and save the file in TIFF format.
5. Navigate to where you saved the file, and then open it.
Saving the Cover Page File on the EM ServerYou must save the cover page file on the EM server so that users can select it from the OSE Fax Client interface (see page 30).
To add the cover page file to the template folder in the EM server:
1. On the EM server, open Windows Explorer.
2. Save the file to the C:\Inter-Tel\EnterpriseMessaging\FaxService\bin folder.
Unified Messaging Open Standards Edition Administrator’s Guide – Issue 2.0, Revised January 2009 Page 39
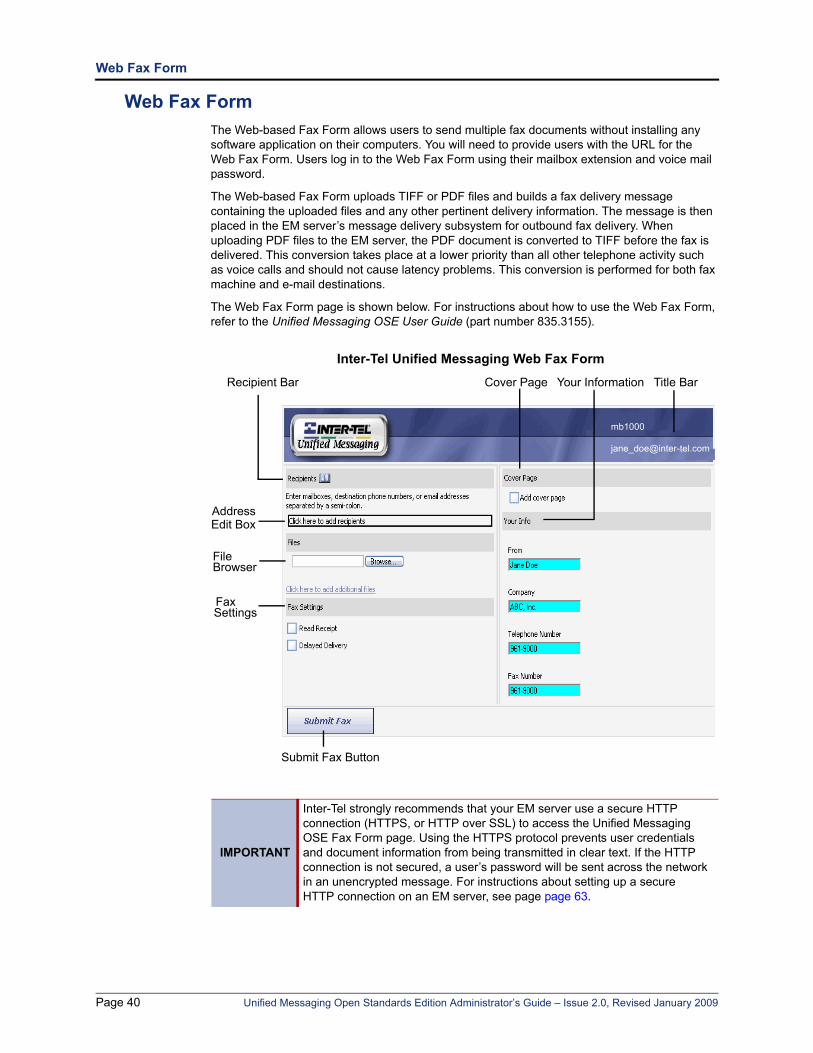
Web Fax Form
Web Fax FormThe Web-based Fax Form allows users to send multiple fax documents without installing any software application on their computers. You will need to provide users with the URL for the Web Fax Form. Users log in to the Web Fax Form using their mailbox extension and voice mail password.
The Web-based Fax Form uploads TIFF or PDF files and builds a fax delivery message containing the uploaded files and any other pertinent delivery information. The message is then placed in the EM server’s message delivery subsystem for outbound fax delivery. When uploading PDF files to the EM server, the PDF document is converted to TIFF before the fax is delivered. This conversion takes place at a lower priority than all other telephone activity such as voice calls and should not cause latency problems. This conversion is performed for both fax machine and e-mail destinations.
The Web Fax Form page is shown below. For instructions about how to use the Web Fax Form, refer to the Unified Messaging OSE User Guide (part number 835.3155).
IMPORTANT
Inter-Tel strongly recommends that your EM server use a secure HTTP connection (HTTPS, or HTTP over SSL) to access the Unified Messaging OSE Fax Form page. Using the HTTPS protocol prevents user credentials and document information from being transmitted in clear text. If the HTTP connection is not secured, a user’s password will be sent across the network in an unencrypted message. For instructions about setting up a secure HTTP connection on an EM server, see page page 63.
Title BarRecipient Bar
Address Edit Box
FileBrowser
Cover Page
FaxSettings
mb1000
Submit Fax Button
Inter-Tel Unified Messaging Web Fax Form
Your Information
Page 40 Unified Messaging Open Standards Edition Administrator’s Guide – Issue 2.0, Revised January 2009
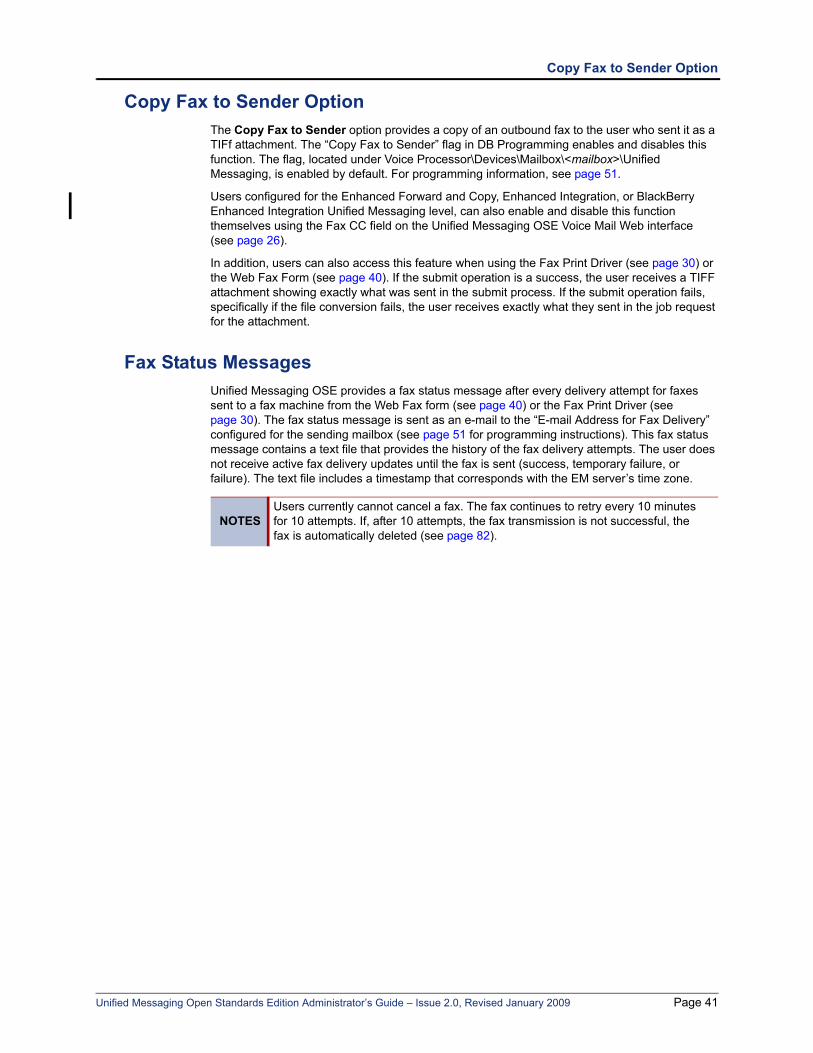
Copy Fax to Sender Option
Copy Fax to Sender OptionThe Copy Fax to Sender option provides a copy of an outbound fax to the user who sent it as a TIFf attachment. The “Copy Fax to Sender” flag in DB Programming enables and disables this function. The flag, located under Voice Processor\Devices\Mailbox\<mailbox>\Unified Messaging, is enabled by default. For programming information, see page 51.
Users configured for the Enhanced Forward and Copy, Enhanced Integration, or BlackBerry Enhanced Integration Unified Messaging level, can also enable and disable this function themselves using the Fax CC field on the Unified Messaging OSE Voice Mail Web interface (see page 26).
In addition, users can also access this feature when using the Fax Print Driver (see page 30) or the Web Fax Form (see page 40). If the submit operation is a success, the user receives a TIFF attachment showing exactly what was sent in the submit process. If the submit operation fails, specifically if the file conversion fails, the user receives exactly what they sent in the job request for the attachment.
Fax Status MessagesUnified Messaging OSE provides a fax status message after every delivery attempt for faxes sent to a fax machine from the Web Fax form (see page 40) or the Fax Print Driver (see page 30). The fax status message is sent as an e-mail to the “E-mail Address for Fax Delivery” configured for the sending mailbox (see page 51 for programming instructions). This fax status message contains a text file that provides the history of the fax delivery attempts. The user does not receive active fax delivery updates until the fax is sent (success, temporary failure, or failure). The text file includes a timestamp that corresponds with the EM server’s time zone.
NOTESUsers currently cannot cancel a fax. The fax continues to retry every 10 minutes for 10 attempts. If, after 10 attempts, the fax transmission is not successful, the fax is automatically deleted (see page 82).
Unified Messaging Open Standards Edition Administrator’s Guide – Issue 2.0, Revised January 2009 Page 41
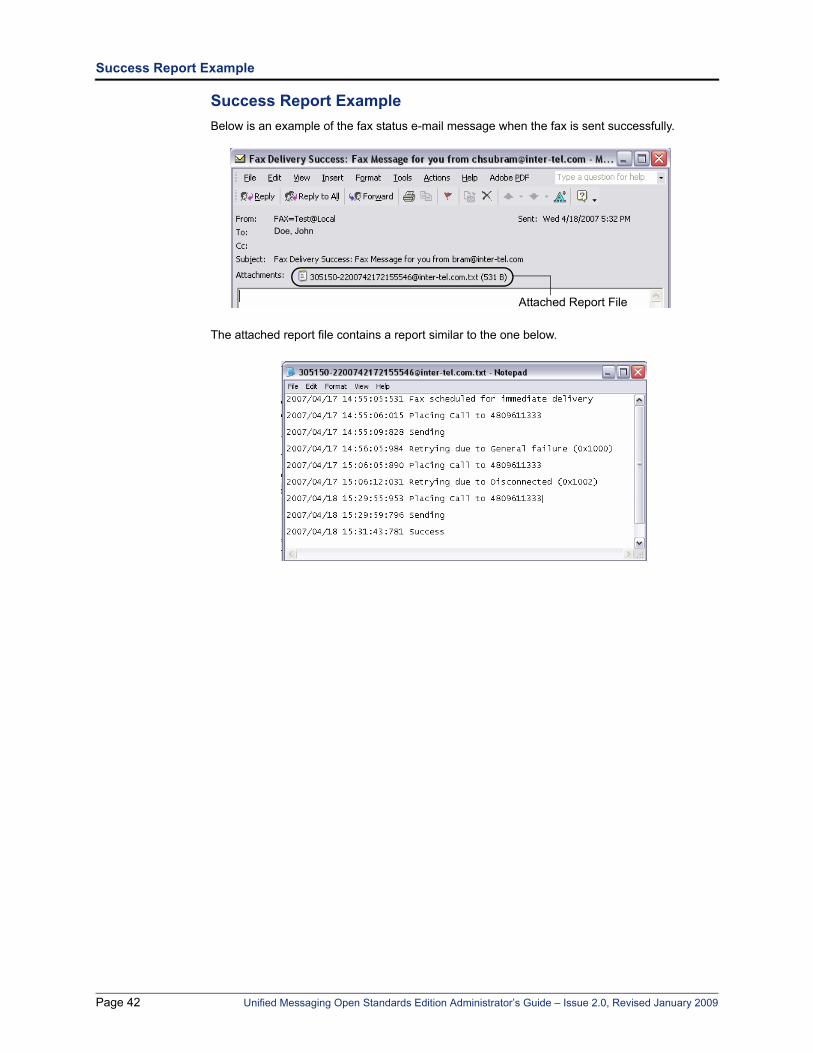
Success Report Example
Success Report ExampleBelow is an example of the fax status e-mail message when the fax is sent successfully.
The attached report file contains a report similar to the one below.
Doe, John
Attached Report File
Page 42 Unified Messaging Open Standards Edition Administrator’s Guide – Issue 2.0, Revised January 2009

Temporary Failure Report Example
Temporary Failure Report ExampleBelow is an example of a fax status e-mail message indicating a temporary failure error. If a failure occurs, the system attempts to resend the fax in 10 minutes.
The attached report file contains a report similar to the one below.
Failure Report ExampleBelow is an example of a fax status e-mail message indicating a delivery failure.
The attached report file contains a report similar to the one below.
Doe, Jane
Attached Report File
Doe, Jane
Attached Report File
Unified Messaging Open Standards Edition Administrator’s Guide – Issue 2.0, Revised January 2009 Page 43
Inbound Fax
Inbound FaxThe user can receive faxes as e-mail messages with TIFF or PDF attachments and then view these attachments using the graphics software installed on their computer or mobile device. All users receive inbound fax as a TIFF attachment by default, however, you can change this format to PDF in DB Programming (see page 56) or in the EM FCU (see page 57).
A Unified Messaging TIFF Converter license is required for receiving faxes as PDF attachments for the existing Unified Messaging v2.3 customers who are upgrading to Unified Messaging OSE. New fax feature users do not have to purchase this license because it is already included in the fax port license.
Page 44 Unified Messaging Open Standards Edition Administrator’s Guide – Issue 2.0, Revised January 2009
Programming
ProgrammingProgramming Unified Messaging OSE . . . . . . . . . . . . . . . . . . . . . . . . . . . . . . . . . . . . . . . . . . . . . 46
Programming Users . . . . . . . . . . . . . . . . . . . . . . . . . . . . . . . . . . . . . . . . . . . . . . . . . . . . . . . . . 46Programming Outbound Fax . . . . . . . . . . . . . . . . . . . . . . . . . . . . . . . . . . . . . . . . . . . . . . . . . . . 53Programming the Unified Messaging System Level Folder . . . . . . . . . . . . . . . . . . . . . . . . . . . 56Configuring EM Field Configuration Utility (FCU) Options . . . . . . . . . . . . . . . . . . . . . . . . . . . . 57
Configuring IMAP Accounts . . . . . . . . . . . . . . . . . . . . . . . . . . . . . . . . . . . . . . . . . . . . . . . . . . . . . . 60IMAP Inbox . . . . . . . . . . . . . . . . . . . . . . . . . . . . . . . . . . . . . . . . . . . . . . . . . . . . . . . . . . . . . . . . 60LOGIN Authentication Type . . . . . . . . . . . . . . . . . . . . . . . . . . . . . . . . . . . . . . . . . . . . . . . . . . . 60
Generating TLS Certificates . . . . . . . . . . . . . . . . . . . . . . . . . . . . . . . . . . . . . . . . . . . . . . . . . . . . . . 61
Distributing TLS Certificates . . . . . . . . . . . . . . . . . . . . . . . . . . . . . . . . . . . . . . . . . . . . . . . . . . . . . 62
Configuring HTTPS Connections. . . . . . . . . . . . . . . . . . . . . . . . . . . . . . . . . . . . . . . . . . . . . . . . . . 63
Setting the Automatic Idle Logout Time . . . . . . . . . . . . . . . . . . . . . . . . . . . . . . . . . . . . . . . . . . . . 63
Enabling Audio Features in a Citrix Environment . . . . . . . . . . . . . . . . . . . . . . . . . . . . . . . . . . . . 64Client Connection Settings . . . . . . . . . . . . . . . . . . . . . . . . . . . . . . . . . . . . . . . . . . . . . . . . . . . . 64Published Application Settings . . . . . . . . . . . . . . . . . . . . . . . . . . . . . . . . . . . . . . . . . . . . . . . . . 66Citrix Policy Settings . . . . . . . . . . . . . . . . . . . . . . . . . . . . . . . . . . . . . . . . . . . . . . . . . . . . . . . . . 67
Unified Messaging Open Standards Edition Administrator’s Guide – Issue 2.0, Revised January 2009 Page 45
Programming Unified Messaging OSE
Programming Unified Messaging OSEThis section provides programming instructions for Unified Messaging OSE and includes the following main topics:
• “Programming Users” below.
• “Programming Outbound Fax” on page 53.
• “Programming the Unified Messaging System Level Folder” on page 56.
• “Configuring EM Field Configuration Utility (FCU) Options” on page 57.
Programming UsersTo program users for Unified Messaging OSE, in DB Programming go to Voice Processor – Devices – Mailboxes – <mailbox>.
The first field in the Unified Messaging folder is the Unified Messaging Level. The level that is programmed in this field specifies the Unified Messaging level of integration. This field was previously known as the E-mail Gateway field and it was located in the Fax/E-mail Forwarding folder.
Options for the Unified Messaging Level field vary depending on the Voice Processor type (see Table 8 on page 47).
IMPORTANT
The Fax/E-mail Forwarding folder in DB Programming has been eliminated and the fields within this folder have been moved to the Unified Messaging folder (see page 49). If previously programmed, the values for these fields remain the same and the fields automatically map to their new location under Voice Processor\Devices\Mailboxes\<mailbox>\Unified Messaging.
Page 46 Unified Messaging Open Standards Edition Administrator’s Guide – Issue 2.0, Revised January 2009

Programming Users
Table 8. Unified Messaging Levels for Basic Voice Mail (BVM), Voice Processing Unit (VPU), and EM
Unified Messaging LevelVoice Processor Type
BVM VPU EM
Disabled: Delivers a voice message to the user’s mailbox just as normal. No e-mail is sent.
Forward Only: Delivers a voice message to the user’s e-mail address when the user receives a new voice message in his or her voice mailbox. After the message is sent, the original message is deleted from the mailbox.
Forward and Copy: Delivers a copy of a voice message to the user’s e-mail address when the user receives a new voice message in the voice mailbox. The original message can be retrieved from the mailbox.
Unified Messaging: Allows the user to use the Unified Messaging v2.2 functionality.
Enhanced Forward and Copy: Provides the user with direct access into the voice mailbox from the e-mail client. This level provides full integration with the e-mail client, but does not provide synchronization between the EM server and the e-mail server. With this level, the user has configuration control over the format of the messages, and can specify the folder in his or her e-mail client to receive voice messages.
Basic Integration: Provides the user with direct access into the voice mailbox from the e-mail client through an IMAP account created by the user (see page 22). With this level, the user has no configuration control over the format of the messages, and cannot specify the folder in his or her e-mail client to receive messages.
Enhanced Integration: Provides full integration for voice messages with the e-mail client, and provides full synchronization between the EM server and the e-mail server. The user has configuration control over the format of the message, can specify the folder to receive voice messages, and can synchronize the Message Waiting Indication (MWI) feature with their e-mail client.
BlackBerry Enhanced Integration: Similar to the Enhanced Integration level, the BlackBerry Enhanced Integration level delivers new voice messages to the BlackBerry user’s e-mail address and voice mailbox, and synchronizes those messages.
Unified Messaging Open Standards Edition Administrator’s Guide – Issue 2.0, Revised January 2009 Page 47
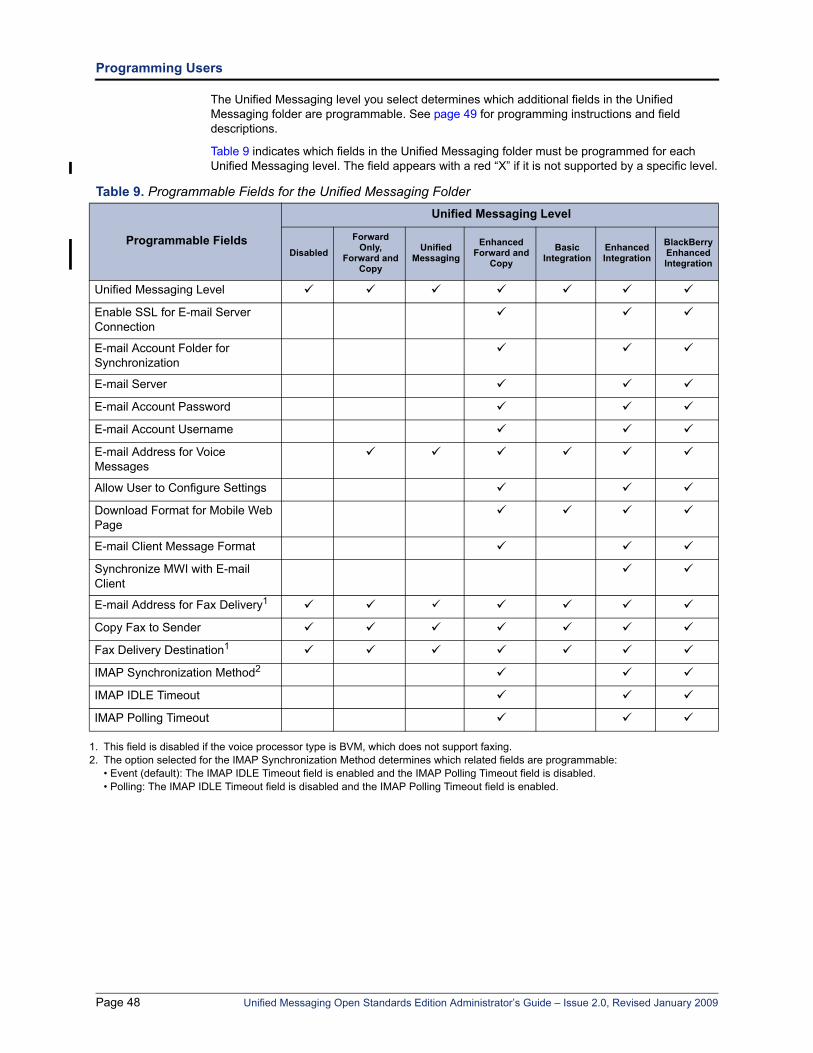
Programming Users
The Unified Messaging level you select determines which additional fields in the Unified Messaging folder are programmable. See page 49 for programming instructions and field descriptions.
Table 9 indicates which fields in the Unified Messaging folder must be programmed for each Unified Messaging level. The field appears with a red “X” if it is not supported by a specific level.
Table 9. Programmable Fields for the Unified Messaging Folder
Programmable Fields
Unified Messaging Level
DisabledForward
Only,Forward and
Copy
Unified Messaging
Enhanced Forward and
CopyBasic
IntegrationEnhanced Integration
BlackBerry Enhanced Integration
Unified Messaging Level
Enable SSL for E-mail Server Connection
E-mail Account Folder for Synchronization
E-mail Server
E-mail Account Password
E-mail Account Username
E-mail Address for Voice Messages
Allow User to Configure Settings
Download Format for Mobile Web Page
E-mail Client Message Format
Synchronize MWI with E-mail Client
E-mail Address for Fax Delivery1
1. This field is disabled if the voice processor type is BVM, which does not support faxing.
Copy Fax to Sender
Fax Delivery Destination1
IMAP Synchronization Method2
2. The option selected for the IMAP Synchronization Method determines which related fields are programmable:• Event (default): The IMAP IDLE Timeout field is enabled and the IMAP Polling Timeout field is disabled.• Polling: The IMAP IDLE Timeout field is disabled and the IMAP Polling Timeout field is enabled.
IMAP IDLE Timeout
IMAP Polling Timeout
Page 48 Unified Messaging Open Standards Edition Administrator’s Guide – Issue 2.0, Revised January 2009
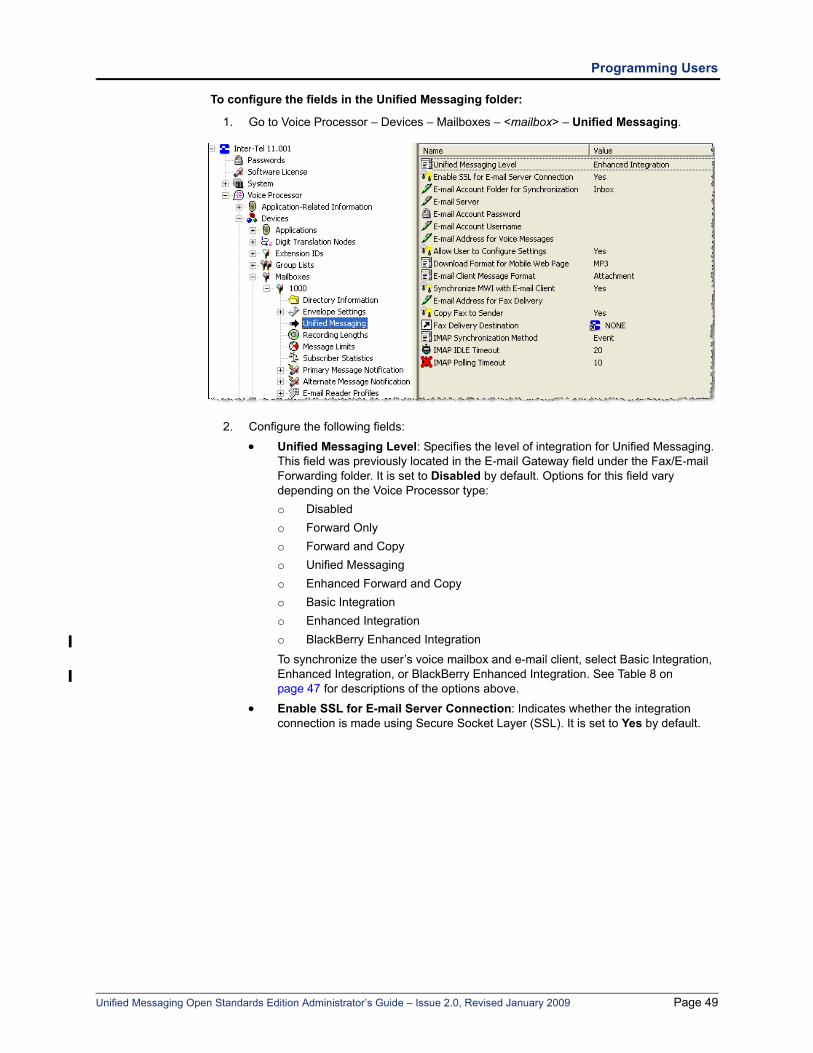
Programming Users
To configure the fields in the Unified Messaging folder:
1. Go to Voice Processor – Devices – Mailboxes – <mailbox> – Unified Messaging.
2. Configure the following fields:
• Unified Messaging Level: Specifies the level of integration for Unified Messaging. This field was previously located in the E-mail Gateway field under the Fax/E-mail Forwarding folder. It is set to Disabled by default. Options for this field vary depending on the Voice Processor type:o Disabledo Forward Onlyo Forward and Copyo Unified Messagingo Enhanced Forward and Copyo Basic Integrationo Enhanced Integrationo BlackBerry Enhanced Integration
To synchronize the user’s voice mailbox and e-mail client, select Basic Integration, Enhanced Integration, or BlackBerry Enhanced Integration. See Table 8 on page 47 for descriptions of the options above.
• Enable SSL for E-mail Server Connection: Indicates whether the integration connection is made using Secure Socket Layer (SSL). It is set to Yes by default.
Unified Messaging Open Standards Edition Administrator’s Guide – Issue 2.0, Revised January 2009 Page 49
Programming Users
• E-mail Account Folder for Synchronization1: Indicates the path to the account folder (such as Inbox, Voice Mail, etc.) on the e-mail server to use for message synchronization. The folder name can be up to 127 characters. For example, to synchronize messages to the folder named “Voice Mail” in the user’s e-mail client account, type Voice Mail in the text box. To synchronize messages to the subfolder named “VM” under the “Inbox” main folder, type Inbox/VM in the text box. This field is set to Inbox by default.
If you are configuring multiple voice mailboxes to synchronize with a single e-mail account, only one voice mailbox can synchronize with the default Inbox folder. Users must create separate folders in their e-mail client for each voice mailbox they want to synchronize.
• E-mail Server1: Indicates the name of the e-mail server for the account synchronization. The server name can be up to 127 characters. This field is blank by default.
• E-mail Account Password1: Indicates the password of the account to use for message synchronization. This is the user’s network password. The password can be up to 40 characters.
• E-mail Account Username1: Indicates the user name of the account to use for message synchronization. This is the user’s network username. The username can be up to 127 characters. This field is blank by default.
• E-mail Address for Voice Messages1: Specifies the e-mail address to which the voice mail messages will be forwarded. This is also the e-mail address where welcome and error e-mails are sent for the Enhanced Forward and Copy, Enhanced Integration, and BlackBerry Enhanced Integration Unified Messaging levels. The content and format of the field depends on the e-mail system being used. The address can be up to 127 characters. If you enter an invalid character (: ; “ \ | ( ) , < > ‘), an error tone occurs. For example, when using Lotus Notes, this field could be set to John Doe/Chandler/Mitel, and when using e-mail, it would be [email protected]. This field was originally located in the Fax/E-mail Forwarding folder.
• Allow User to Configure Settings: Delegates account configuration control to the individual account users. The users may configure their accounts through the Unified Messaging OSE Voice Mail Web interface (see page 25). It is set to Yes by default.
• Download Format for Mobile Web Page1: Specifies which file format to use when downloading voice messages from the mobile device Voice Mail Web page. Options include MP3 or WAV file formats. The default value is MP3.
1. This field can also be configured in the Voice Mail Web interface. Not all fields apply to all levels. See page 23 for more information.
NOTICEPossible Data Loss. Changing the E-mail Account Folder for Synchronization to anything other than “Inbox” when the account is setup for BlackBerry Enhanced Integration may result in the deletion of messages. To support integration into folders other than the “Inbox” folder, the user must set up message routing rules at the e-mail server (server-based rules) so that voice mail messages that are sent using BlackBerry Enhanced Integration will be routed into the expected folder. For information about setting up server-based rules, refer to the appropriate e-mail server’s guide or Help.
NOTEMost mobile devices do not support the WAV file format. Check to see which file format is supported by the user’s mobile device and program this field accordingly.
Page 50 Unified Messaging Open Standards Edition Administrator’s Guide – Issue 2.0, Revised January 2009
Programming Users
• E-mail Client Message Format1: Indicates whether the message that the user receives contains a URL (a link to the message), a file attachment, or both. It is set to Attachment by default.
• Synchronize MWI with E-mail Client1: Synchronizes message waiting indicator (MWI) support with the e-mail client. If set to “Yes” (default), the message lamp is turned off when the e-mail message is read. See page 22 for additional information about this feature.
• E-mail Address for Fax Delivery1: Specifies the e-mail address of the account that will receive incoming faxes (TIFF or PDF attachment) and copies of outbound faxes, if enabled (TIFF attachment). The address can be up to 127 characters. If you enter an invalid character (: ; " \ | ( ) , < > ‘), an error tone occurs. Prior to EM v1.2, this field was located in the Fax/E-mail Forwarding folder.
• Copy Fax to Sender1: Sends a copy of a fax (TIFF attachment) via e-mail to a user’s e-mail address as specified in the E-mail Address for Fax Delivery field (see above). The flag is enabled by default. For complete information about this feature, see page 41.
• Fax Delivery Destination: Specifies the extension of the fax machine that receives incoming faxes routed through this mailbox. This field appears with a red “X” if the Voice Processor type is BVM because BVM does not support faxing. This field was originally located in the Fax/E-mail Forwarding folder.
To program the extension number, use one of the following methods:Method A1.) Select the current value and enter the new value in the text box.2.) Press ENTER. A screen displays what is associated with the number you
entered.3.) Click OK. The new number appears in the field.
Method B1.) Right-click on the existing extension number. An option box appears.2.) Click Change Fax Delivery Destination. A window appears prompting you to
select the type of device to include. 3.) Select the type of device and then click Next. The list of devices appears.
(You can view them in a list by selecting the List button or view details by selecting the Details button.)
4.) Highlight the extension number associated with the fax machine then click Finish. Your selection appears in Fax Delivery Destination field.
1. This field can also be configured in the Voice Mail Web interface. Not all fields apply to all levels. See page 23 for more information.
NOTE
If your company uses e-mail retention software that automatically moves the e-mail notification message to another location, Inter-Tel recommends that you select File Attachment or Both for your message format. Otherwise users’ voice messages may be deleted from the EM server.
Unified Messaging Open Standards Edition Administrator’s Guide – Issue 2.0, Revised January 2009 Page 51
Programming Users
• IMAP Synchronization Method: Determines how the IMAP server synchronizes messages between the server and an IMAP client account. By default, it is set to Event. This allows message changes on the remote IMAP server to be automatically recognized by the Inter-Tel synchronization client, as they occur. If the IMAP server does not support the IMAP IDLE command, select Polling. This will force the Inter-tel synchronization client to query for changes on the account on the remote server. If you do not know if the remote IMAP server supports the IDLE command, default to Event. At run time the Inter-Tel synchronization client automatically detects if the IDLE command is supported. If not supported, the client will use the Polling method. Polling can be used as default to reduce load on the EM unit.
• IMAP IDLE Timeout: Determines the maximum length that the IDLE command will wait for the IMAP server. The field appears with a red “X” if the Integration Synchronization Method is set to “Polling.” The range is 1–30 minutes; the default value is 20 minutes. This field appears with a red “X” if the IMAP Synchronization Method is set to “Polling” as it only applies for Event or unless Unified Messaging Level is set to Enhanced Forward & Copy, Enhanced Integration, or BlackBerry Enhanced Integration.
• IMAP Polling Timeout: Indicates how often the synchronization process polls for message updates. Use this when the server does not support the IDLE command and the user is not concerned about real-time updates. Synchronization occurs much more slowly in this mode, depending on the polling timeout. The range is 1–20 minutes; the default value is 10 minutes. The field appears with a red “X” if the IMAP Synchronization Method is set to “Polling” as it only applies for Event or unless Unified Messaging Level is set to Enhanced Forward & Copy, Enhanced Integration, or BlackBerry Enhanced Integration.
3. Press Enter or click another field to save the change.
Page 52 Unified Messaging Open Standards Edition Administrator’s Guide – Issue 2.0, Revised January 2009
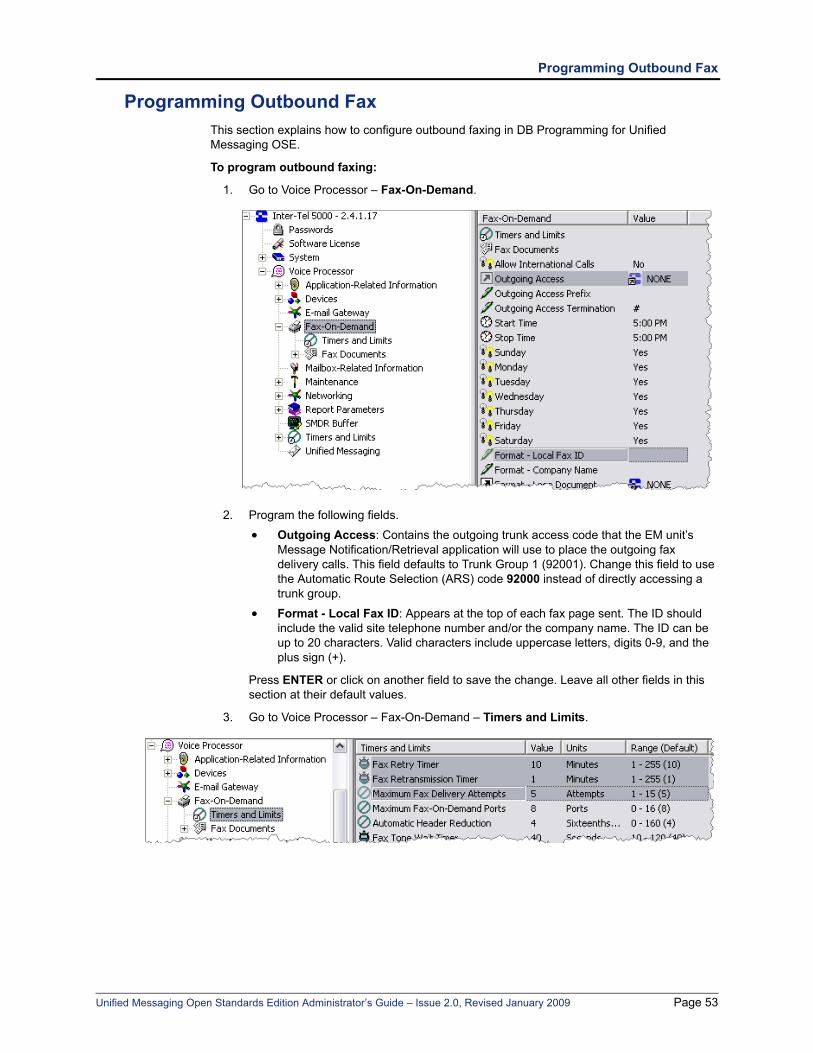
Programming Outbound Fax
Programming Outbound FaxThis section explains how to configure outbound faxing in DB Programming for Unified Messaging OSE.
To program outbound faxing:
1. Go to Voice Processor – Fax-On-Demand.
2. Program the following fields.
• Outgoing Access: Contains the outgoing trunk access code that the EM unit’s Message Notification/Retrieval application will use to place the outgoing fax delivery calls. This field defaults to Trunk Group 1 (92001). Change this field to use the Automatic Route Selection (ARS) code 92000 instead of directly accessing a trunk group.
• Format - Local Fax ID: Appears at the top of each fax page sent. The ID should include the valid site telephone number and/or the company name. The ID can be up to 20 characters. Valid characters include uppercase letters, digits 0-9, and the plus sign (+).
Press ENTER or click on another field to save the change. Leave all other fields in this section at their default values.
3. Go to Voice Processor – Fax-On-Demand – Timers and Limits.
Unified Messaging Open Standards Edition Administrator’s Guide – Issue 2.0, Revised January 2009 Page 53
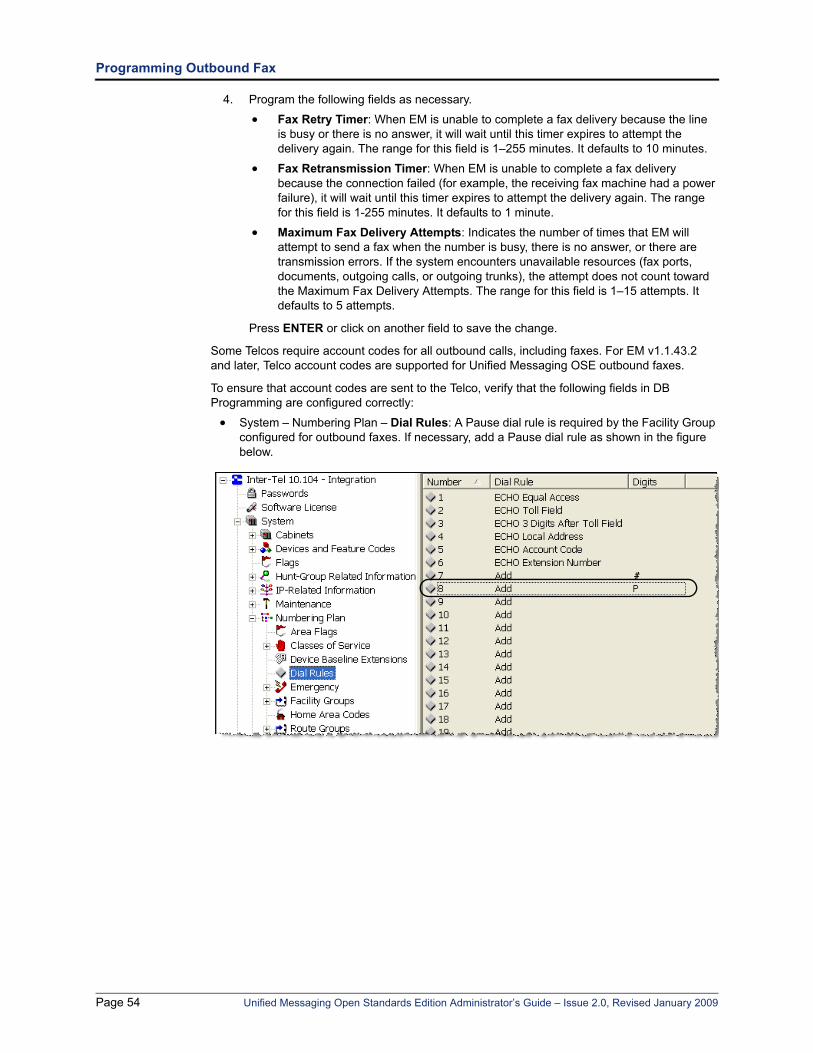
Programming Outbound Fax
4. Program the following fields as necessary.
• Fax Retry Timer: When EM is unable to complete a fax delivery because the line is busy or there is no answer, it will wait until this timer expires to attempt the delivery again. The range for this field is 1–255 minutes. It defaults to 10 minutes.
• Fax Retransmission Timer: When EM is unable to complete a fax delivery because the connection failed (for example, the receiving fax machine had a power failure), it will wait until this timer expires to attempt the delivery again. The range for this field is 1-255 minutes. It defaults to 1 minute.
• Maximum Fax Delivery Attempts: Indicates the number of times that EM will attempt to send a fax when the number is busy, there is no answer, or there are transmission errors. If the system encounters unavailable resources (fax ports, documents, outgoing calls, or outgoing trunks), the attempt does not count toward the Maximum Fax Delivery Attempts. The range for this field is 1–15 attempts. It defaults to 5 attempts.
Press ENTER or click on another field to save the change.
Some Telcos require account codes for all outbound calls, including faxes. For EM v1.1.43.2 and later, Telco account codes are supported for Unified Messaging OSE outbound faxes.
To ensure that account codes are sent to the Telco, verify that the following fields in DB Programming are configured correctly:
• System – Numbering Plan – Dial Rules: A Pause dial rule is required by the Facility Group configured for outbound faxes. If necessary, add a Pause dial rule as shown in the figure below.
Page 54 Unified Messaging Open Standards Edition Administrator’s Guide – Issue 2.0, Revised January 2009
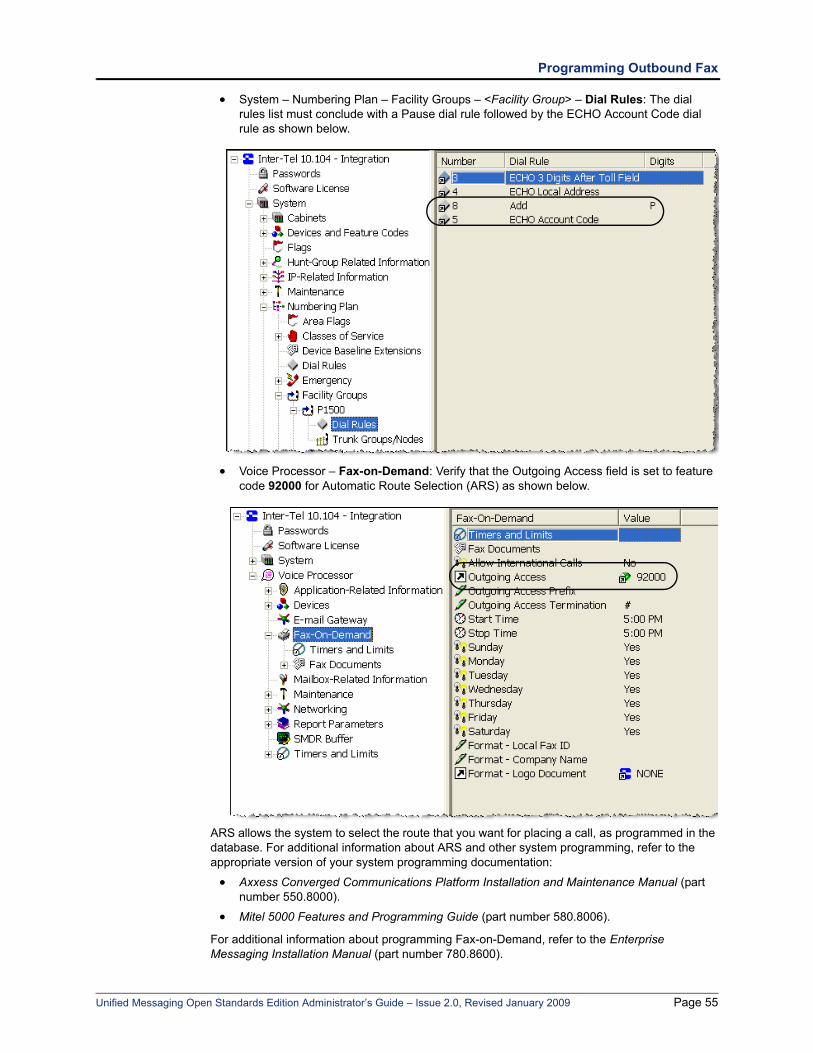
Programming Outbound Fax
• System – Numbering Plan – Facility Groups – <Facility Group> – Dial Rules: The dial rules list must conclude with a Pause dial rule followed by the ECHO Account Code dial rule as shown below.
• Voice Processor – Fax-on-Demand: Verify that the Outgoing Access field is set to feature code 92000 for Automatic Route Selection (ARS) as shown below.
ARS allows the system to select the route that you want for placing a call, as programmed in the database. For additional information about ARS and other system programming, refer to the appropriate version of your system programming documentation:
• Axxess Converged Communications Platform Installation and Maintenance Manual (part number 550.8000).
• Mitel 5000 Features and Programming Guide (part number 580.8006).
For additional information about programming Fax-on-Demand, refer to the Enterprise Messaging Installation Manual (part number 780.8600).
Unified Messaging Open Standards Edition Administrator’s Guide – Issue 2.0, Revised January 2009 Page 55
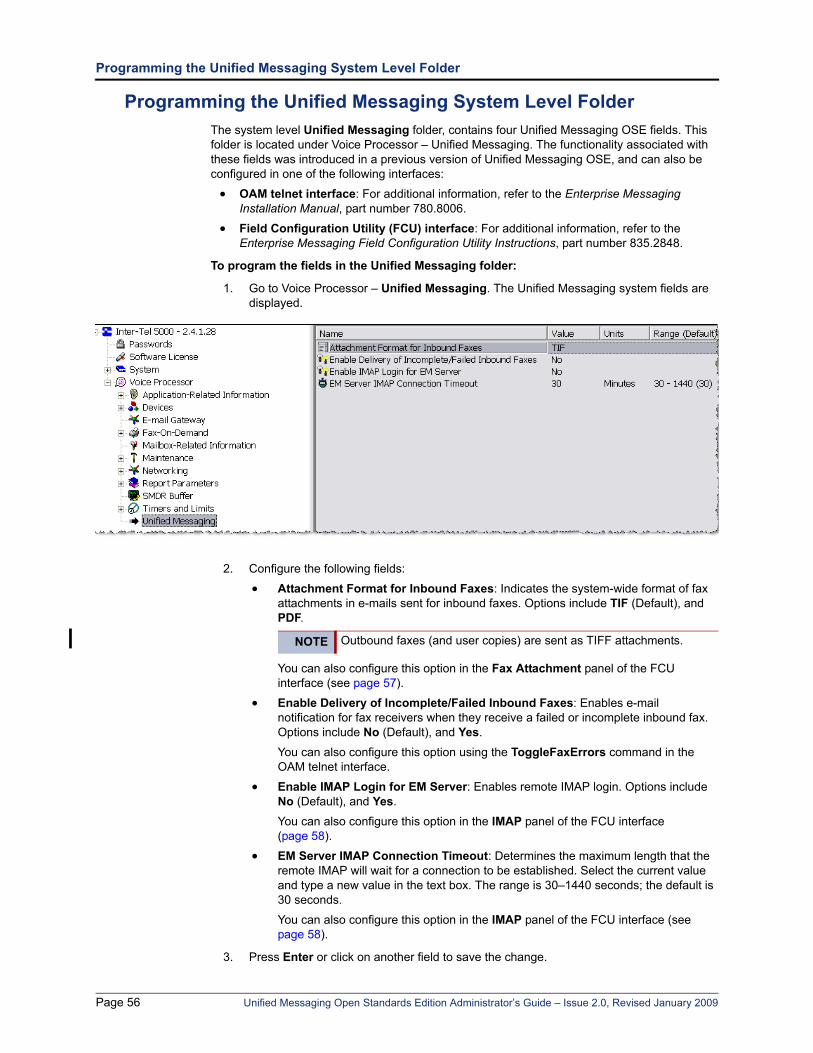
Programming the Unified Messaging System Level Folder
Programming the Unified Messaging System Level FolderThe system level Unified Messaging folder, contains four Unified Messaging OSE fields. This folder is located under Voice Processor – Unified Messaging. The functionality associated with these fields was introduced in a previous version of Unified Messaging OSE, and can also be configured in one of the following interfaces:
• OAM telnet interface: For additional information, refer to the Enterprise Messaging Installation Manual, part number 780.8006.
• Field Configuration Utility (FCU) interface: For additional information, refer to the Enterprise Messaging Field Configuration Utility Instructions, part number 835.2848.
To program the fields in the Unified Messaging folder:
1. Go to Voice Processor – Unified Messaging. The Unified Messaging system fields are displayed.
2. Configure the following fields:
• Attachment Format for Inbound Faxes: Indicates the system-wide format of fax attachments in e-mails sent for inbound faxes. Options include TIF (Default), and PDF.
You can also configure this option in the Fax Attachment panel of the FCU interface (see page 57).
• Enable Delivery of Incomplete/Failed Inbound Faxes: Enables e-mail notification for fax receivers when they receive a failed or incomplete inbound fax. Options include No (Default), and Yes.
You can also configure this option using the ToggleFaxErrors command in the OAM telnet interface.
• Enable IMAP Login for EM Server: Enables remote IMAP login. Options include No (Default), and Yes.
You can also configure this option in the IMAP panel of the FCU interface (page 58).
• EM Server IMAP Connection Timeout: Determines the maximum length that the remote IMAP will wait for a connection to be established. Select the current value and type a new value in the text box. The range is 30–1440 seconds; the default is 30 seconds.
You can also configure this option in the IMAP panel of the FCU interface (see page 58).
3. Press Enter or click on another field to save the change.
NOTE Outbound faxes (and user copies) are sent as TIFF attachments.
Page 56 Unified Messaging Open Standards Edition Administrator’s Guide – Issue 2.0, Revised January 2009
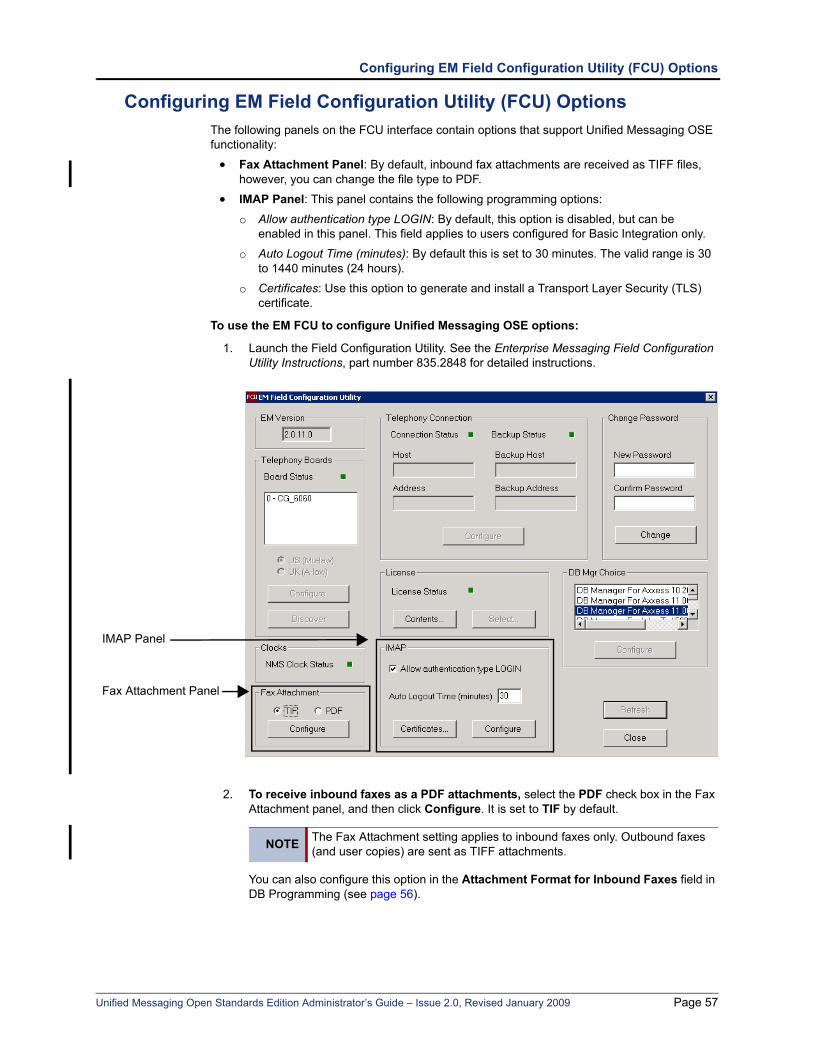
Configuring EM Field Configuration Utility (FCU) Options
Configuring EM Field Configuration Utility (FCU) OptionsThe following panels on the FCU interface contain options that support Unified Messaging OSE functionality:
• Fax Attachment Panel: By default, inbound fax attachments are received as TIFF files, however, you can change the file type to PDF.
• IMAP Panel: This panel contains the following programming options:
o Allow authentication type LOGIN: By default, this option is disabled, but can be enabled in this panel. This field applies to users configured for Basic Integration only.
o Auto Logout Time (minutes): By default this is set to 30 minutes. The valid range is 30 to 1440 minutes (24 hours).
o Certificates: Use this option to generate and install a Transport Layer Security (TLS) certificate.
To use the EM FCU to configure Unified Messaging OSE options:
1. Launch the Field Configuration Utility. See the Enterprise Messaging Field Configuration Utility Instructions, part number 835.2848 for detailed instructions.
2. To receive inbound faxes as a PDF attachments, select the PDF check box in the Fax Attachment panel, and then click Configure. It is set to TIF by default.
You can also configure this option in the Attachment Format for Inbound Faxes field in DB Programming (see page 56).
Fax Attachment Panel
IMAP Panel
NOTE The Fax Attachment setting applies to inbound faxes only. Outbound faxes (and user copies) are sent as TIFF attachments.
Unified Messaging Open Standards Edition Administrator’s Guide – Issue 2.0, Revised January 2009 Page 57
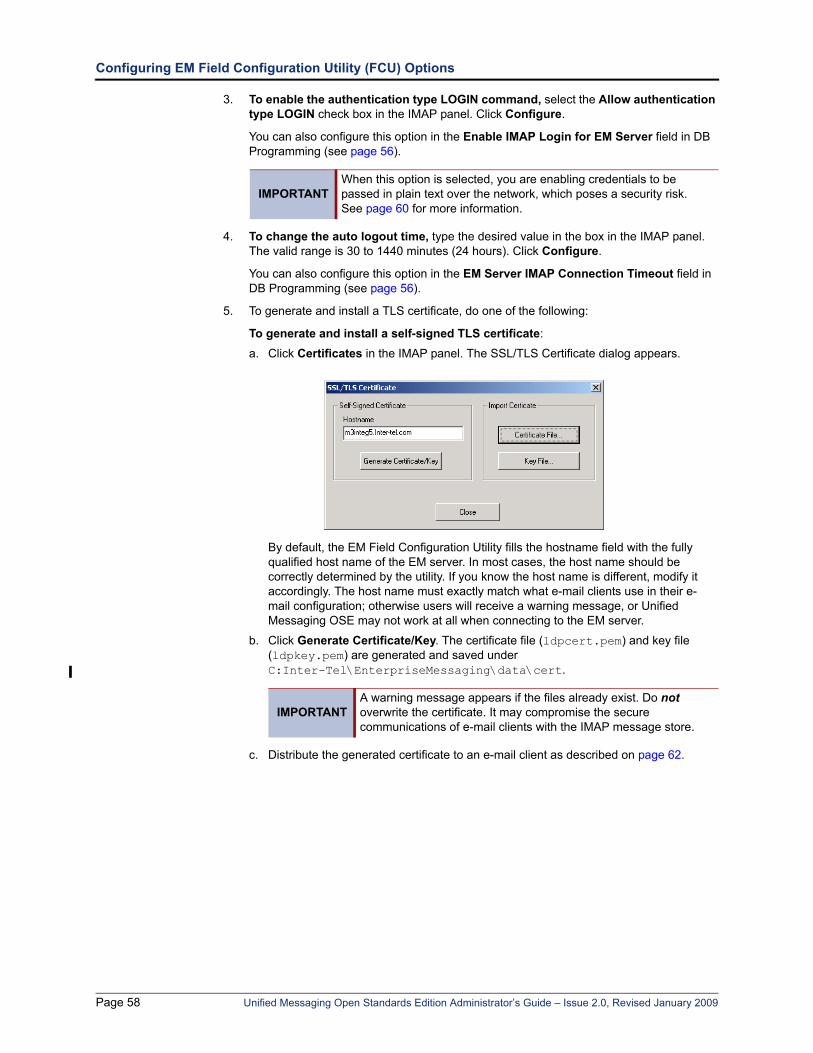
Configuring EM Field Configuration Utility (FCU) Options
3. To enable the authentication type LOGIN command, select the Allow authentication type LOGIN check box in the IMAP panel. Click Configure.
You can also configure this option in the Enable IMAP Login for EM Server field in DB Programming (see page 56).
4. To change the auto logout time, type the desired value in the box in the IMAP panel. The valid range is 30 to 1440 minutes (24 hours). Click Configure.
You can also configure this option in the EM Server IMAP Connection Timeout field in DB Programming (see page 56).
5. To generate and install a TLS certificate, do one of the following:
To generate and install a self-signed TLS certificate:
a. Click Certificates in the IMAP panel. The SSL/TLS Certificate dialog appears.
By default, the EM Field Configuration Utility fills the hostname field with the fully qualified host name of the EM server. In most cases, the host name should be correctly determined by the utility. If you know the host name is different, modify it accordingly. The host name must exactly match what e-mail clients use in their e-mail configuration; otherwise users will receive a warning message, or Unified Messaging OSE may not work at all when connecting to the EM server.
b. Click Generate Certificate/Key. The certificate file (ldpcert.pem) and key file (ldpkey.pem) are generated and saved under C:Inter-Tel\EnterpriseMessaging\data\cert.
c. Distribute the generated certificate to an e-mail client as described on page 62.
IMPORTANTWhen this option is selected, you are enabling credentials to be passed in plain text over the network, which poses a security risk. See page 60 for more information.
IMPORTANTA warning message appears if the files already exist. Do not overwrite the certificate. It may compromise the secure communications of e-mail clients with the IMAP message store.
Page 58 Unified Messaging Open Standards Edition Administrator’s Guide – Issue 2.0, Revised January 2009
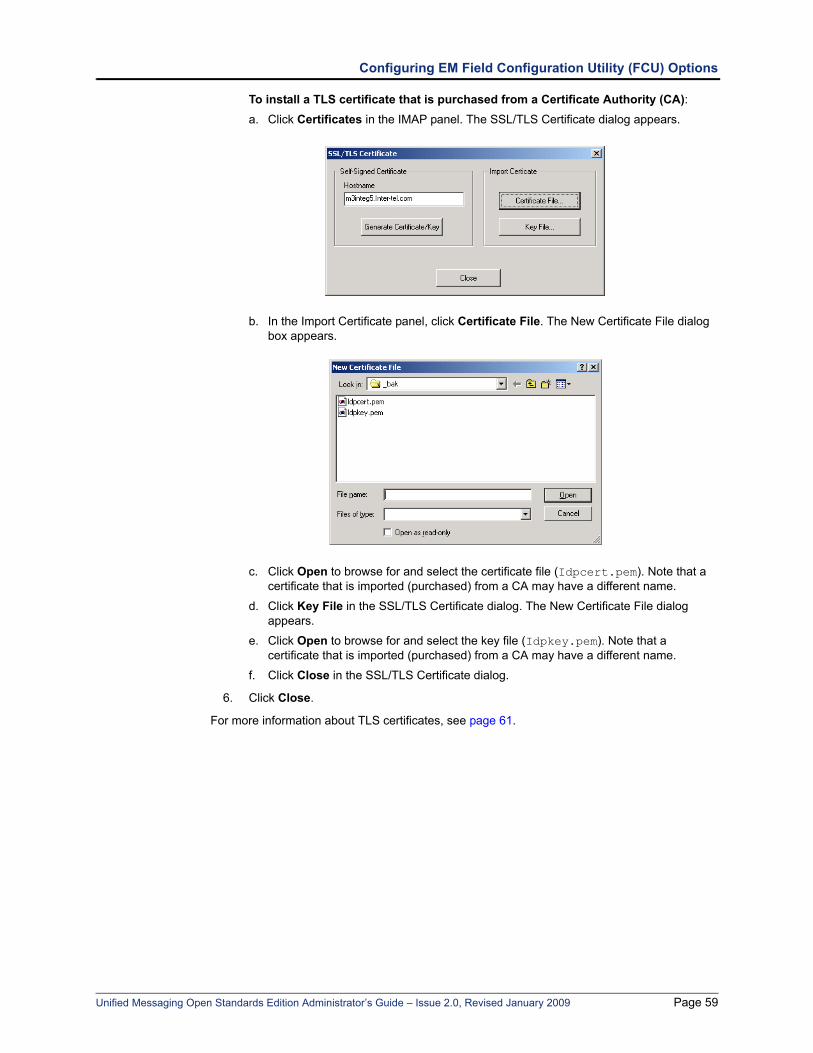
Configuring EM Field Configuration Utility (FCU) Options
To install a TLS certificate that is purchased from a Certificate Authority (CA):a. Click Certificates in the IMAP panel. The SSL/TLS Certificate dialog appears.
b. In the Import Certificate panel, click Certificate File. The New Certificate File dialog box appears.
c. Click Open to browse for and select the certificate file (Idpcert.pem). Note that a certificate that is imported (purchased) from a CA may have a different name.
d. Click Key File in the SSL/TLS Certificate dialog. The New Certificate File dialog appears.
e. Click Open to browse for and select the key file (Idpkey.pem). Note that a certificate that is imported (purchased) from a CA may have a different name.
f. Click Close in the SSL/TLS Certificate dialog.
6. Click Close.
For more information about TLS certificates, see page 61.
Unified Messaging Open Standards Edition Administrator’s Guide – Issue 2.0, Revised January 2009 Page 59
Configuring IMAP Accounts
Configuring IMAP AccountsThis section lists the information that must be configured in an e-mail client to create an IMAP account. An IMAP account is required for users configured with the Basic Integration level. It is not required for users configured with the Enhanced Forward and Copy, Enhanced Integration, and BlackBerry Enhanced Integration levels.
To create an IMAP e-mail account, the following information must be configured in the user’s e-mail client to connect the e-mail client to the IMAP Server:
• Specify the IP address or host name of the EM server as the IMAP server.
• Specify the IP address or host name of the SMTP server.
• Specify the account login name and password for the given mailbox. The account login name is the mailbox number (for example, 1000), and the password is the voice mail password for EM.
• (Optional) Enable IMAP SSL for e-mail clients that support IMAP SSL for a more secure connection.
• (Optional) Download a self-signed TLS certificate (see page 61).
• (Optional) Enable authentication type LOGIN for e-mail clients that support authentication type LOGIN.
For complete configuration instructions for each e-mail client, refer to the Unified Messaging Open Standards Edition User Guide (part no. 835.3155).
IMAP InboxWhen an e-mail client is configured with the IMAP Server and account credentials, the client is able to retrieve voice messages via IMAP. Configuring the e-mail client with an IMAP account creates an additional Inbox within the e-mail client’s folder list. This additional e-mail Inbox is where voice mail messages and fax status e-mail messages for outbound fax appear.
The IMAP account provides a direct connection between the e-mail client and the EM IMAP server. This connection allows Basic Integration users to access their voice messages from their e-mail account.
Messages appear either by clicking the Send/Receive button on the e-mail client or automatically if the e-mail client supports the IMAP IDLE command.
LOGIN Authentication TypeFor security reasons, the EM server by default does not allow IMAP e-mail clients to authenticate with plain text passwords. However, you can allow this option by enabling LOGIN authentication type, which uses plain text credentials. You can configure this option using the EM FCU (see page 58) or DB Programming (see page 56).
When the authentication type LOGIN command is enabled, Unified Messaging OSE allows the IMAP command named “LOGIN.” This command is not secure and if someone is monitoring network traffic, they can obtain the password. If this command is disabled, Unified Messaging OSE disables the LOGIN command and forces the IMAP client to use the AUTHENTICATE command, which is more secure.
You do not have to enable the authentication type LOGIN command if the IMAP client is configured to connect over the secure SSL port. With SSL the entire connection is encrypted, so even though the LOGIN command uses a plain text password, it will be encrypted by virtue of the SSL connection. If the IMAP account is not configured for the appropriate authentication type or encryption type, users will not be able to log into their accounts.
Page 60 Unified Messaging Open Standards Edition Administrator’s Guide – Issue 2.0, Revised January 2009
Generating TLS Certificates
Generating TLS CertificatesTLS certificates are used by the IMAP message store to encrypt a communication between an e-mail client and EM. Although using a TLS certificate is optional, Inter-Tel strongly recommends that you generate a TLS certificate for your system.
When the e-mail client uses a secure connection to the IMAP message store, the server uses the TLS certificate for two purposes:
• Encrypting all communications with the client: This means no one other than the two parties will be able to read the message exchange.
• Authentication of server identity: This proves that the server is really what it says it is, thus making difficult a “man-in-the-middle” attack.
In order for an e-mail client to authenticate the server, it needs to validate the certificate the server provides when the connection is established. For that purpose, most clients have a built-in list of trusted Certificate Authorities (CA) which they can query for validating certificates. There are two types of TLS certificates based on their origin:
• Self-signed: As the name implies, these are certificates that anyone can generate without a fee. For an e-mail client to trust self-signed certificates, the certificates need to be distributed to e-mail clients before being able to establish a secure connection to the server
• Generated by a “trusted” CA, such as VeriSign®: The advantage of these certificates is that they can be validated by e-mail clients automatically, with no user intervention, so they work right out of the box. There is a fee for CA certificates.
Unified Messaging OSE can use either one of the certificate types. It is up to the customer to decide whether to purchase a certificate from a trusted CA or to use a self-signed one.
Whenever a TLS certificate (ldpcert.pem) is generated, another file named a “private key” (ldpkey.pem) is also generated. These two files must be kept together. The files are saved on the EM server under C:\Inter-Tel\EnterpriseMessaging\data\cert.
Note that if the server name changes, the TLS certificate must be renewed. This applies to both types of certificates. There is no need to restart the EM server for the changes to take effect.
To generate and validate self-signed certificates:
1. Generate and install certificates using the EM Field Configuration Utility (see page 58).
2. Distribute self-signed certificates to e-mail clients (see page 62).
To validate certificates generated by a trusted CA:
After you install a certificate from a trusted CA, users’ e-mail clients will automatically validate the certificate against a list of trusted CAs.
Unified Messaging Open Standards Edition Administrator’s Guide – Issue 2.0, Revised January 2009 Page 61
Distributing TLS Certificates
Distributing TLS CertificatesAfter you have generated and validated a self-signed certificate using the Field Configuration Utility (see page 58), you need to distribute the certificate to users. Users’ e-mail clients must authenticate the server by downloading the certificate to their “trusted authorities” list. The downloading method varies depending on where the certificate file is located.
If the certificate file is on an enterprise Web server:
1. Rename the ldpcert.pem file to server.crt in order for a Web browser to recognize the file as a certificate. Note that the private key does not need to be distributed to clients.
2. Make the certificate file available to users by placing it on an enterprise Web server, such as an FTP site, a shared folder, etc.
3. Users can download the certificate using a Web browser. A Web browser automatically recognizes the certificate and prompts the users to download them in their computers’ “root of trusted authorities.”
If the certificate file is on a network server:
1. Rename the ldpcert.pem file to server.crt so that a Web browser can recognize the file as a certificate. Note that the private key does not need to be distributed to clients.
2. Users can download the certificate by going to Control Panel – Internet Options – Content – Certificates – Trusted Root Certification Authorities – Import.
3. Users can select the certificate file from the network server and download it.
If the certificate installation failed or the incorrect certificate was installed, users receive an error message when their e-mail clients attempt to open a secure connection to the IMAP server for the first time. The connection will still be encrypted, but the authentication of the IMAP server will fail. The message may vary from client to client. Below is an example of the message that an e-mail client may receive:
“A certificate chain processed, but terminated in a root certificate which is not trusted by the trust provider. Do you want to continue using this server?”
If the user selects Yes, he or she is not asked again for the duration of that session. However, the error message will reappear when the user’s e-mail client is restarted. The only way to stop the message from reappearing is to properly install the TLS certificate on the server and, if using a self-signed certificate, configure the e-mail client to use it by enabling SSL.
Page 62 Unified Messaging Open Standards Edition Administrator’s Guide – Issue 2.0, Revised January 2009

Configuring HTTPS Connections
Configuring HTTPS ConnectionsAlthough using the HTTPS protocol is optional, Inter-Tel strongly recommends that you use HTTPS to prevent user credentials from being transmitted in clear text when using the Web Fax Form. You can configure HTTPS on the EM server using Internet Information Services (IIS).
The following instructions allow you to configure IIS for setting up a secure HTTP connection (HTTPS) on an EM server.
If using a certificate generated by a trusted CA, follow their instructions for setting up IIS with those certificates. If using a self-signed certificate, follow the instructions below.
To set up an HTTPS connection on the EM server:
1. Generate a self-signed certificate as described on page 61.
2. Using a Web browser, access the Inter-Tel edGe® Technical Software Downloads Web site. To access the Inter-Tel resources, you must log in using your username and password.
3. Select Applications Software – Enterprise Messaging.
4. Locate the Setup HTTPS for Enterprise Messaging v2.x link and download the setuphttps_v1.2.zip file.
5. Extract the files in setuphttps_v1.2.zip to C:\Inter-Tel\EnterpriseMessaging\util.
6. Go to Start – Run. The Run dialog appears.
7. Type C:\Inter-Tel\EnterpriseMessaging\util\SetupHTTPS.bat in the text box, and then click OK. If no errors are reported, click any key and go to step 8. If errors are reported, contact Inter-Tel technical support.
8. Go to Start – Control Panel – Administrative Tools – Internet Services Manager.
9. Navigate to the Default Web Site web site.
10. Right-click the site, and then click Properties. The Properties dialog box appears for the Web site.
11. Click the Directory Security tab.
12. Click Server Certificate in the Secure Communications field. The Web Site Certificate Wizard screen appears.
13. Click Next.
14. Select the Assign an existing certificate option, and then click Next. A screen appears displaying the contents of your computer’s personal certificate store.
15. Select your Web server certificate (denoted by the common name), and then click Next. A summary screen appears providing the details about the certificate you are installing. Be sure that this information is correct or you may have problems using SSL or TLS in HTTP communications.
16. Click Next.
17. Click OK to exit the wizard.
Setting the Automatic Idle Logout TimeThe EM server automatically disconnects e-mail clients that have been idle for a predetermined amount of time. It is set to 30 minutes by default. The valid range is 30 to 1440 minutes (24 hours).The Automatic Idle Logout Time can be configured in the FCU (see page 58) or in DB Programming (see page 56).
Unified Messaging Open Standards Edition Administrator’s Guide – Issue 2.0, Revised January 2009 Page 63
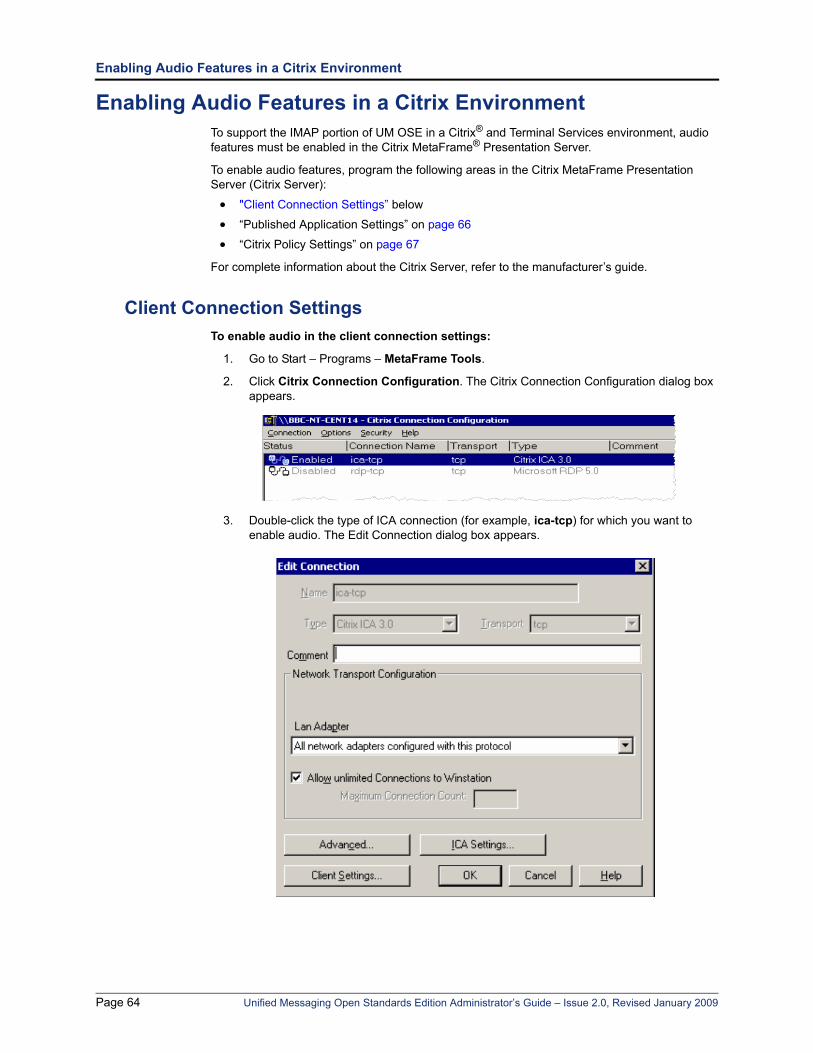
Enabling Audio Features in a Citrix Environment
Enabling Audio Features in a Citrix EnvironmentTo support the IMAP portion of UM OSE in a Citrix® and Terminal Services environment, audio features must be enabled in the Citrix MetaFrame® Presentation Server.
To enable audio features, program the following areas in the Citrix MetaFrame Presentation Server (Citrix Server):
• "Client Connection Settings” below
• “Published Application Settings” on page 66
• “Citrix Policy Settings” on page 67
For complete information about the Citrix Server, refer to the manufacturer’s guide.
Client Connection SettingsTo enable audio in the client connection settings:
1. Go to Start – Programs – MetaFrame Tools.
2. Click Citrix Connection Configuration. The Citrix Connection Configuration dialog box appears.
3. Double-click the type of ICA connection (for example, ica-tcp) for which you want to enable audio. The Edit Connection dialog box appears.
Page 64 Unified Messaging Open Standards Edition Administrator’s Guide – Issue 2.0, Revised January 2009
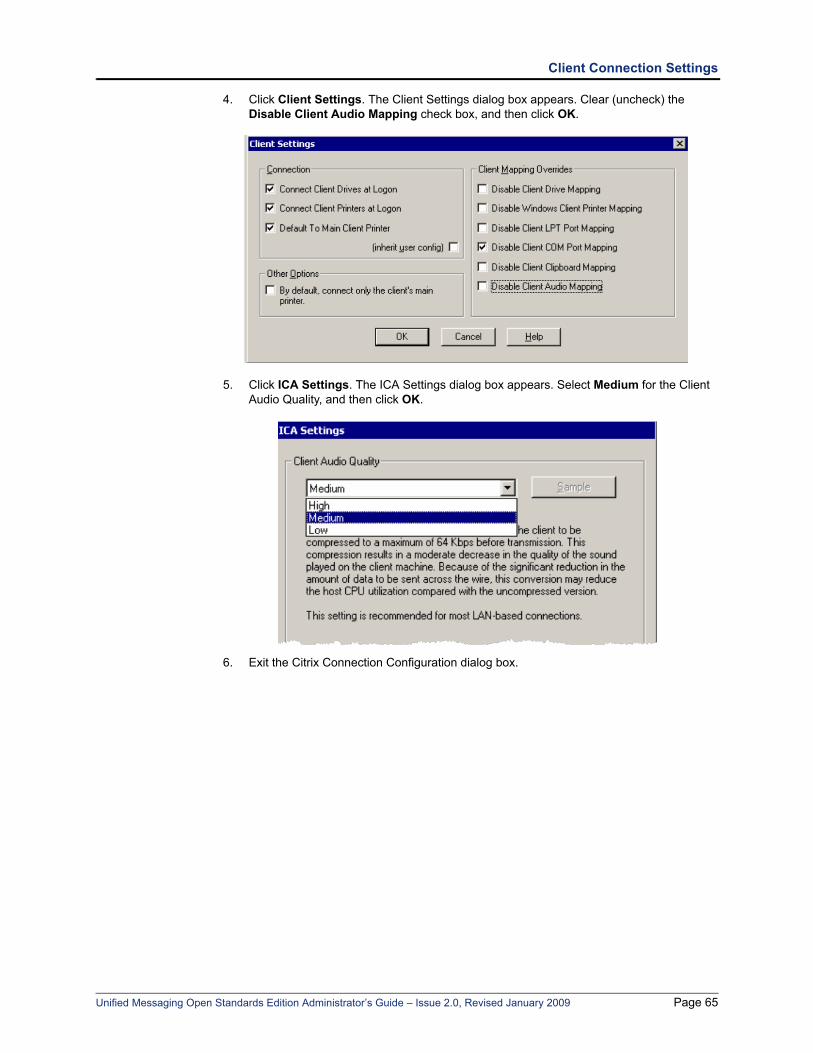
Client Connection Settings
4. Click Client Settings. The Client Settings dialog box appears. Clear (uncheck) the Disable Client Audio Mapping check box, and then click OK.
5. Click ICA Settings. The ICA Settings dialog box appears. Select Medium for the Client Audio Quality, and then click OK.
6. Exit the Citrix Connection Configuration dialog box.
Unified Messaging Open Standards Edition Administrator’s Guide – Issue 2.0, Revised January 2009 Page 65
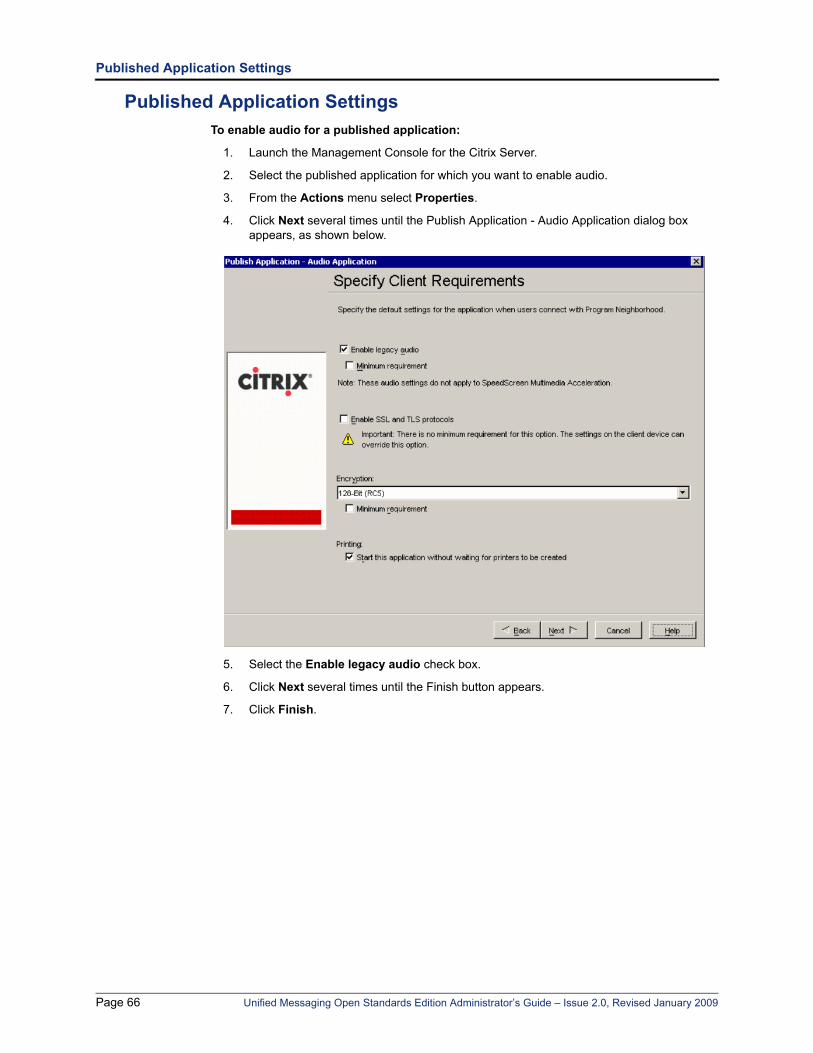
Published Application Settings
Published Application SettingsTo enable audio for a published application:
1. Launch the Management Console for the Citrix Server.
2. Select the published application for which you want to enable audio.
3. From the Actions menu select Properties.
4. Click Next several times until the Publish Application - Audio Application dialog box appears, as shown below.
5. Select the Enable legacy audio check box.
6. Click Next several times until the Finish button appears.
7. Click Finish.
Page 66 Unified Messaging Open Standards Edition Administrator’s Guide – Issue 2.0, Revised January 2009
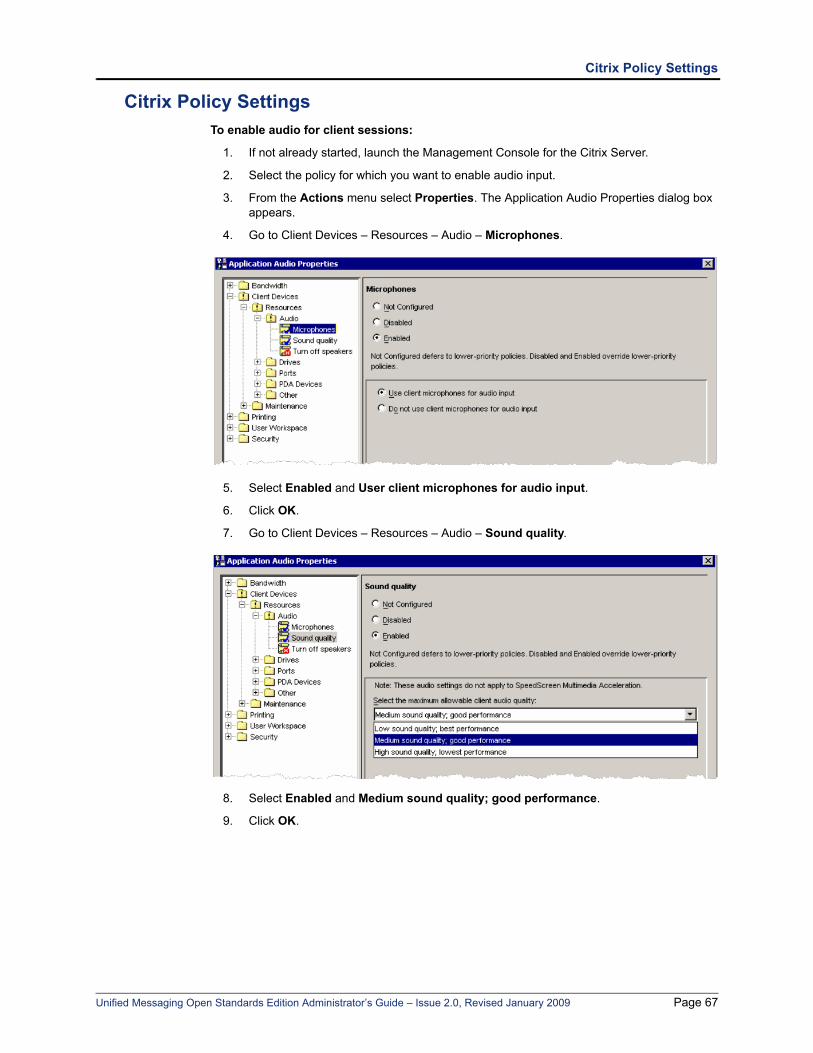
Citrix Policy Settings
Citrix Policy SettingsTo enable audio for client sessions:
1. If not already started, launch the Management Console for the Citrix Server.
2. Select the policy for which you want to enable audio input.
3. From the Actions menu select Properties. The Application Audio Properties dialog box appears.
4. Go to Client Devices – Resources – Audio – Microphones.
5. Select Enabled and User client microphones for audio input.
6. Click OK.
7. Go to Client Devices – Resources – Audio – Sound quality.
8. Select Enabled and Medium sound quality; good performance.
9. Click OK.
Unified Messaging Open Standards Edition Administrator’s Guide – Issue 2.0, Revised January 2009 Page 67

Reports
ReportsIntroduction . . . . . . . . . . . . . . . . . . . . . . . . . . . . . . . . . . . . . . . . . . . . . . . . . . . . . . . . . . . . . . . . . . . 70
Generating a Report . . . . . . . . . . . . . . . . . . . . . . . . . . . . . . . . . . . . . . . . . . . . . . . . . . . . . . . . . . . . 70
OAM Commands . . . . . . . . . . . . . . . . . . . . . . . . . . . . . . . . . . . . . . . . . . . . . . . . . . . . . . . . . . . . . . . 71IMAP Connection Status and Statistics Commands . . . . . . . . . . . . . . . . . . . . . . . . . . . . . . . . . 71Unified Messaging OSE Synchronization Status Command . . . . . . . . . . . . . . . . . . . . . . . . . . . 72
Report Structure . . . . . . . . . . . . . . . . . . . . . . . . . . . . . . . . . . . . . . . . . . . . . . . . . . . . . . . . . . . . . . . 73IMAP Connection Status and Statistics Report . . . . . . . . . . . . . . . . . . . . . . . . . . . . . . . . . . . . . 73Unified Messaging OSE Synchronization Status Report . . . . . . . . . . . . . . . . . . . . . . . . . . . . . 76
Unified Messaging Open Standards Edition Administrator’s Guide – Issue 2.0, Revised January 2009 Page 69
Introduction
IntroductionThe following reports can be generated by System Manager or by an Operations, Administration, and Management (OAM) command through the OAM console (for EM). A report can be delivered to an e-mail address or simply written to a file.
• IMAP Connection Status and Statistics Report: Collects remote IMAP connection statistics. This report is an automatic or manual report.
• Unified Messaging OSE Synchronization Status Report: Collects Unified Messaging OSE integrated inbox functionality. This is an automatic report.
For complete information about OAM, refer to the Enterprise Messaging Installation and Maintenance Manual (document part no. 780.8006).
Generating a ReportTo generate a report using the EM OAM console:
1. Access the OAM console by following the instructions in the Diagnostics and Troubleshooting chapter in the Enterprise Messaging Installation and Maintenance Manual (document part no. 780.8006).
2. Use one of the OAM commands, shown in “OAM Commands” on page 71, to generate the report.
Page 70 Unified Messaging Open Standards Edition Administrator’s Guide – Issue 2.0, Revised January 2009
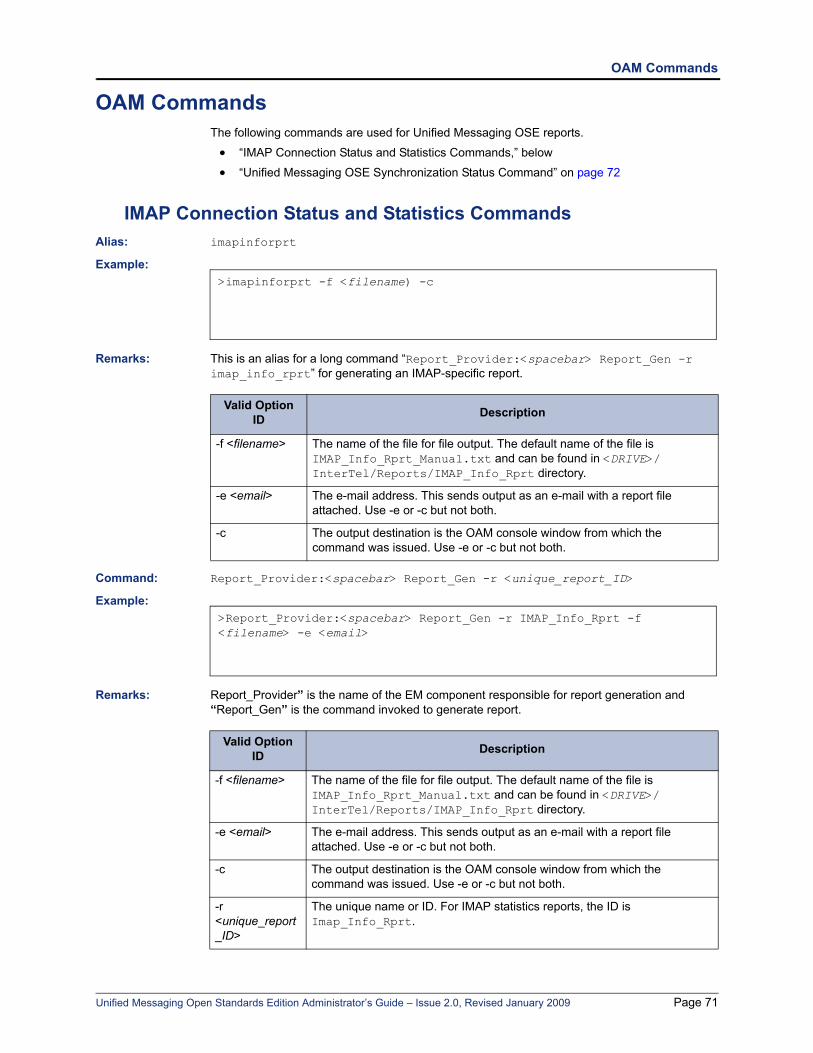
OAM Commands
OAM CommandsThe following commands are used for Unified Messaging OSE reports.
• “IMAP Connection Status and Statistics Commands,” below
• “Unified Messaging OSE Synchronization Status Command” on page 72
IMAP Connection Status and Statistics CommandsAlias: imapinforprt
Example:
Remarks: This is an alias for a long command “Report_Provider:<spacebar> Report_Gen -r imap_info_rprt” for generating an IMAP-specific report.
Command: Report_Provider:<spacebar> Report_Gen -r <unique_report_ID>
Example:
Remarks: Report_Provider” is the name of the EM component responsible for report generation and “Report_Gen” is the command invoked to generate report.
>imapinforprt -f <filename) -c
Valid Option ID Description
-f <filename> The name of the file for file output. The default name of the file is IMAP_Info_Rprt_Manual.txt and can be found in <DRIVE>/InterTel/Reports/IMAP_Info_Rprt directory.
-e <email> The e-mail address. This sends output as an e-mail with a report file attached. Use -e or -c but not both.
-c The output destination is the OAM console window from which the command was issued. Use -e or -c but not both.
>Report_Provider:<spacebar> Report_Gen -r IMAP_Info_Rprt -f <filename> -e <email>
Valid Option ID Description
-f <filename> The name of the file for file output. The default name of the file is IMAP_Info_Rprt_Manual.txt and can be found in <DRIVE>/InterTel/Reports/IMAP_Info_Rprt directory.
-e <email> The e-mail address. This sends output as an e-mail with a report file attached. Use -e or -c but not both.
-c The output destination is the OAM console window from which the command was issued. Use -e or -c but not both.
-r <unique_report_ID>
The unique name or ID. For IMAP statistics reports, the ID is Imap_Info_Rprt.
Unified Messaging Open Standards Edition Administrator’s Guide – Issue 2.0, Revised January 2009 Page 71
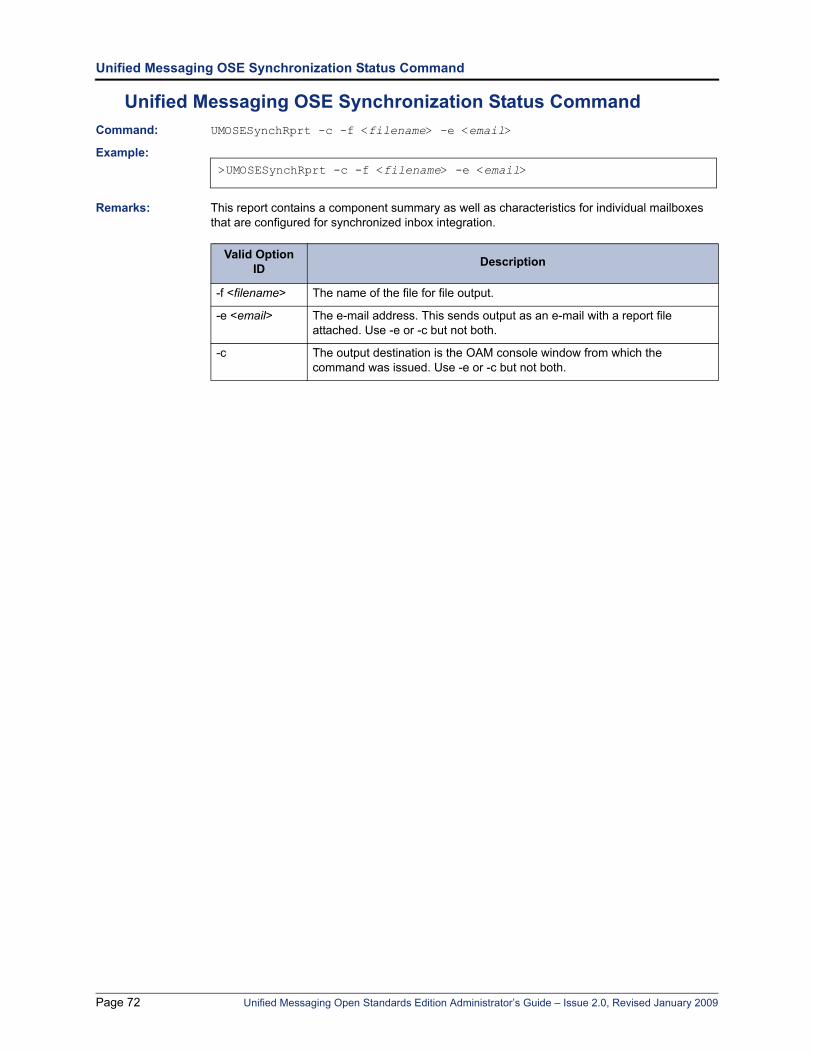
Unified Messaging OSE Synchronization Status Command
Unified Messaging OSE Synchronization Status CommandCommand: UMOSESynchRprt -c -f <filename> -e <email>
Example:
Remarks: This report contains a component summary as well as characteristics for individual mailboxes that are configured for synchronized inbox integration.
>UMOSESynchRprt -c -f <filename> -e <email>
Valid Option ID Description
-f <filename> The name of the file for file output.
-e <email> The e-mail address. This sends output as an e-mail with a report file attached. Use -e or -c but not both.
-c The output destination is the OAM console window from which the command was issued. Use -e or -c but not both.
Page 72 Unified Messaging Open Standards Edition Administrator’s Guide – Issue 2.0, Revised January 2009
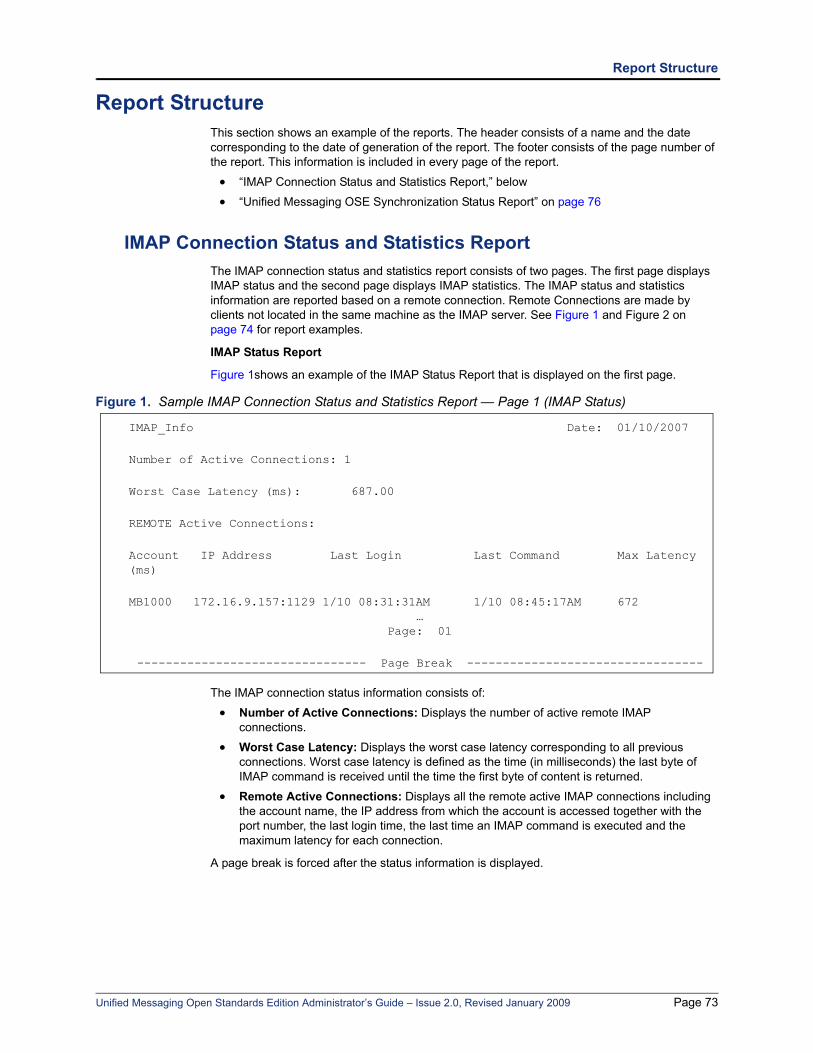
Report Structure
Report StructureThis section shows an example of the reports. The header consists of a name and the date corresponding to the date of generation of the report. The footer consists of the page number of the report. This information is included in every page of the report.
• “IMAP Connection Status and Statistics Report,” below
• “Unified Messaging OSE Synchronization Status Report” on page 76
IMAP Connection Status and Statistics ReportThe IMAP connection status and statistics report consists of two pages. The first page displays IMAP status and the second page displays IMAP statistics. The IMAP status and statistics information are reported based on a remote connection. Remote Connections are made by clients not located in the same machine as the IMAP server. See Figure 1 and Figure 2 on page 74 for report examples.
IMAP Status Report
Figure 1shows an example of the IMAP Status Report that is displayed on the first page.
Figure 1. Sample IMAP Connection Status and Statistics Report — Page 1 (IMAP Status)
The IMAP connection status information consists of:
• Number of Active Connections: Displays the number of active remote IMAP connections.
• Worst Case Latency: Displays the worst case latency corresponding to all previous connections. Worst case latency is defined as the time (in milliseconds) the last byte of IMAP command is received until the time the first byte of content is returned.
• Remote Active Connections: Displays all the remote active IMAP connections including the account name, the IP address from which the account is accessed together with the port number, the last login time, the last time an IMAP command is executed and the maximum latency for each connection.
A page break is forced after the status information is displayed.
IMAP_Info Date: 01/10/2007
Number of Active Connections: 1
Worst Case Latency (ms): 687.00
REMOTE Active Connections:
Account IP Address Last Login Last Command Max Latency (ms)
MB1000 172.16.9.157:1129 1/10 08:31:31AM 1/10 08:45:17AM 672…
Page: 01
-------------------------------- Page Break ---------------------------------
Unified Messaging Open Standards Edition Administrator’s Guide – Issue 2.0, Revised January 2009 Page 73
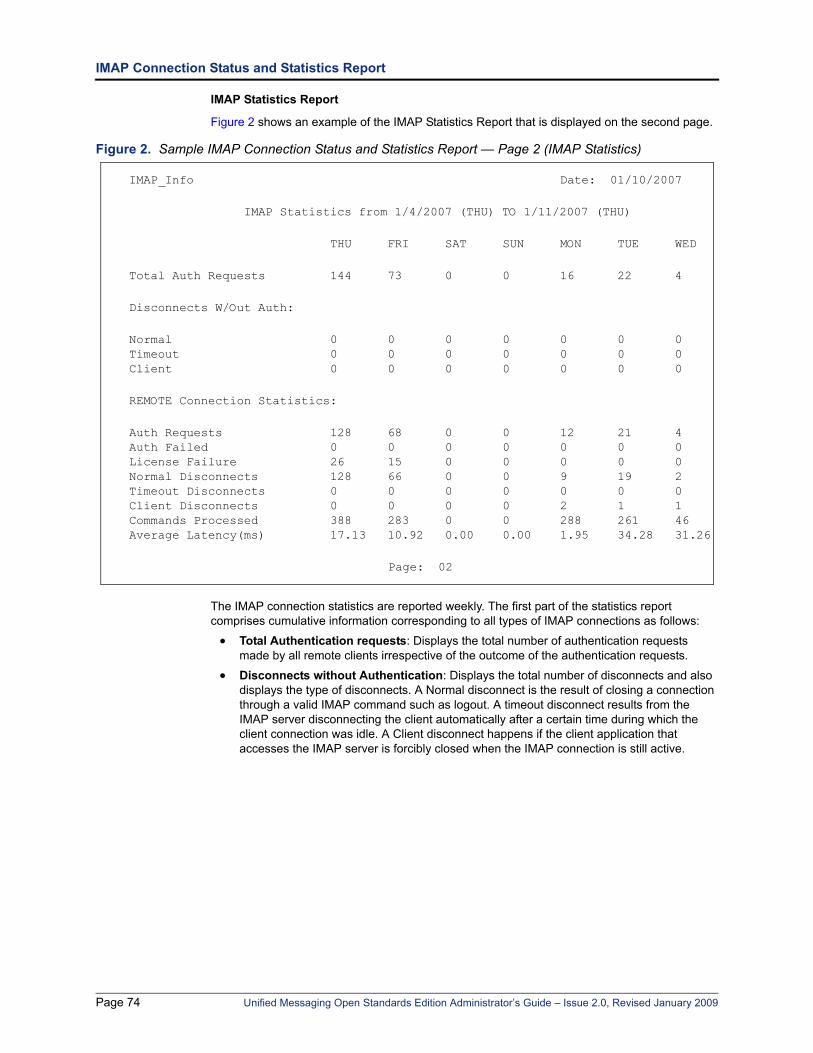
IMAP Connection Status and Statistics Report
IMAP Statistics Report
Figure 2 shows an example of the IMAP Statistics Report that is displayed on the second page.
Figure 2. Sample IMAP Connection Status and Statistics Report — Page 2 (IMAP Statistics)
The IMAP connection statistics are reported weekly. The first part of the statistics report comprises cumulative information corresponding to all types of IMAP connections as follows:
• Total Authentication requests: Displays the total number of authentication requests made by all remote clients irrespective of the outcome of the authentication requests.
• Disconnects without Authentication: Displays the total number of disconnects and also displays the type of disconnects. A Normal disconnect is the result of closing a connection through a valid IMAP command such as logout. A timeout disconnect results from the IMAP server disconnecting the client automatically after a certain time during which the client connection was idle. A Client disconnect happens if the client application that accesses the IMAP server is forcibly closed when the IMAP connection is still active.
IMAP_Info Date: 01/10/2007
IMAP Statistics from 1/4/2007 (THU) TO 1/11/2007 (THU)
THU FRI SAT SUN MON TUE WED
Total Auth Requests 144 73 0 0 16 22 4
Disconnects W/Out Auth:
Normal 0 0 0 0 0 0 0 Timeout 0 0 0 0 0 0 0 Client 0 0 0 0 0 0 0
REMOTE Connection Statistics:
Auth Requests 128 68 0 0 12 21 4 Auth Failed 0 0 0 0 0 0 0 License Failure 26 15 0 0 0 0 0 Normal Disconnects 128 66 0 0 9 19 2 Timeout Disconnects 0 0 0 0 0 0 0 Client Disconnects 0 0 0 0 2 1 1 Commands Processed 388 283 0 0 288 261 46 Average Latency(ms) 17.13 10.92 0.00 0.00 1.95 34.28 31.26
Page: 02
Page 74 Unified Messaging Open Standards Edition Administrator’s Guide – Issue 2.0, Revised January 2009
IMAP Connection Status and Statistics Report
The second part of the statistics report is made up of details for each type of connection as follows:
• Authentication Requests: Displays the number of authentication requests made with the IMAP server.
• Authentication Failure: Displays the number of authentication failures corresponding to all authentication requests with the IMAP server.
• License Failure: Displays the number of failed attempts to acquire a Unified Messaging license. A license failure occurs whenever an e-mail client IMAP connection is attempted but there are already the maximum number of clients connected as permitted by the license. The IMAP server will refuse connections from clients if the maximum connections per the license is exceeded.
• Normal, Timeout, and Client Disconnects: Display the total number of normal, timeout, and client disconnects. See the “Disconnects without Authentication” bullet item for details about normal, timeout, and client disconnects.
• Commands Processed: Displays the number of IMAP commands processed by the server for all clients for a particular type of connection.
• Average Latency: Displays the average latency in milliseconds. All connections of a particular type are reported as the total latency divided by the number of commands processed. If no commands were processed, zero is reported as the latency time.
By default only the remote connection statistics are reported. The details are the same for all type of connections.
Unified Messaging Open Standards Edition Administrator’s Guide – Issue 2.0, Revised January 2009 Page 75
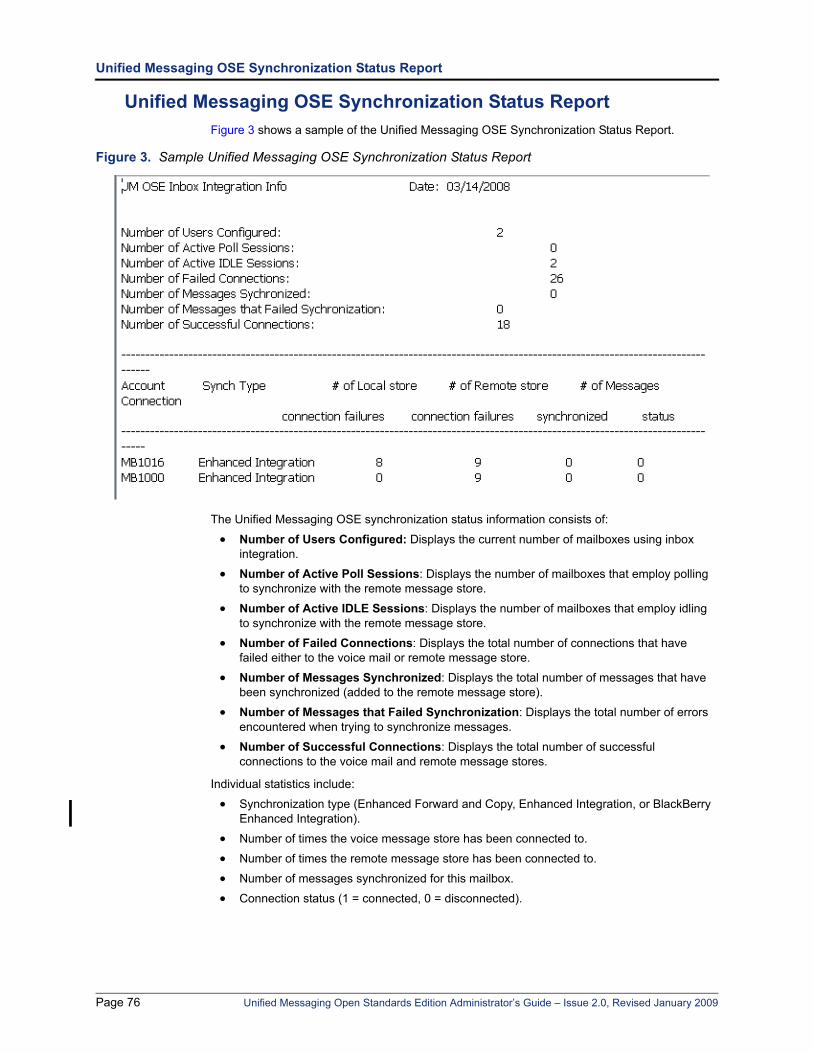
Unified Messaging OSE Synchronization Status Report
Unified Messaging OSE Synchronization Status ReportFigure 3 shows a sample of the Unified Messaging OSE Synchronization Status Report.
Figure 3. Sample Unified Messaging OSE Synchronization Status Report
The Unified Messaging OSE synchronization status information consists of:
• Number of Users Configured: Displays the current number of mailboxes using inbox integration.
• Number of Active Poll Sessions: Displays the number of mailboxes that employ polling to synchronize with the remote message store.
• Number of Active IDLE Sessions: Displays the number of mailboxes that employ idling to synchronize with the remote message store.
• Number of Failed Connections: Displays the total number of connections that have failed either to the voice mail or remote message store.
• Number of Messages Synchronized: Displays the total number of messages that have been synchronized (added to the remote message store).
• Number of Messages that Failed Synchronization: Displays the total number of errors encountered when trying to synchronize messages.
• Number of Successful Connections: Displays the total number of successful connections to the voice mail and remote message stores.
Individual statistics include:
• Synchronization type (Enhanced Forward and Copy, Enhanced Integration, or BlackBerry Enhanced Integration).
• Number of times the voice message store has been connected to.
• Number of times the remote message store has been connected to.
• Number of messages synchronized for this mailbox.
• Connection status (1 = connected, 0 = disconnected).
Page 76 Unified Messaging Open Standards Edition Administrator’s Guide – Issue 2.0, Revised January 2009
Troubleshooting
TroubleshootingTroubleshooting Summary . . . . . . . . . . . . . . . . . . . . . . . . . . . . . . . . . . . . . . . . . . . . . . . . . . . . . . . 78
E-mail Client Issues. . . . . . . . . . . . . . . . . . . . . . . . . . . . . . . . . . . . . . . . . . . . . . . . . . . . . . . . . . . . . 78
Voice Mail Web Interface Issues. . . . . . . . . . . . . . . . . . . . . . . . . . . . . . . . . . . . . . . . . . . . . . . . . . . 80
Fax Issues . . . . . . . . . . . . . . . . . . . . . . . . . . . . . . . . . . . . . . . . . . . . . . . . . . . . . . . . . . . . . . . . . . . . 82
Unified Messaging Open Standards Edition Administrator’s Guide – Issue 2.0, Revised January 2009 Page 77

Troubleshooting Summary
Troubleshooting SummaryThis section describes the following troubleshooting issues to support Unified Messaging OSE:
• “E-mail Client Issues”
• “Voice Mail Web Interface Issues” on page 80
• “Fax Issues” on page 82
E-mail Client IssuesTable 10 includes troubleshooting issues related to e-mail clients and error e-mail message text. The From address for error e-mail messages is NoReplyError@<EM server name>.com, where EM server name is the Enterprise Messaging hostname or IP address.
NOTES
If your company uses e-mail retention software that automatically moves the e-mail notification message to another location, Inter-Tel recommends that you select File Attachment or Both for the E-mail Client Message Format (see page 51). Otherwise users’ voice messages may be deleted from the EM server.
Instruct users to not move voice messages from the specified folder in their e-mail clients (see page 50). If users move voice messages from this folder, the messages may be deleted from the EM server.
Table 10. E-mail Client Troubleshooting Issues
Symptom/Error Message Possible Cause Correction Action
The user’s IMAP account does not work.
Incorrect settings. Do the following:
• Verify that the settings are programmed correctly for the user’s e-mail client (see page 60).
• Verify that the user has programmed the correct host name/IP address of the EM server.
Lotus Notes does not delete e-mail messages in the IMAP Inbox folder.
The view refresh option is not set properly.
Set the refresh option to automatic as described in the Unified Messaging OSE User Guide (part number 835.3155).
The user receives a voice message with the following note:“There was an error appending this message. Check message size to see if it exceeds your e-mail server's configured limit.”
The e-mail attachment is larger than the file size limitation set for the user’s e-mail account on the e-mail server.
Large messages can be rejected due to limitations imposed by the e-mail server configuration. If this occurs, users can still listen to the voice message from the Voice Mail Web interface (see page 23).
The user receives an error message with the following text:“Cannot specify EM server as remote IMAP server.”
The E-mail Server field is programmed incorrectly.
The E-mail Server field should be programmed with the name or IP address of the IMAP4-compliant e-mail server (not the Enterprise Messaging server). This must be either a Domino or Exchange server. See page 11 for a list of compatible e-mail clients.
Page 78 Unified Messaging Open Standards Edition Administrator’s Guide – Issue 2.0, Revised January 2009
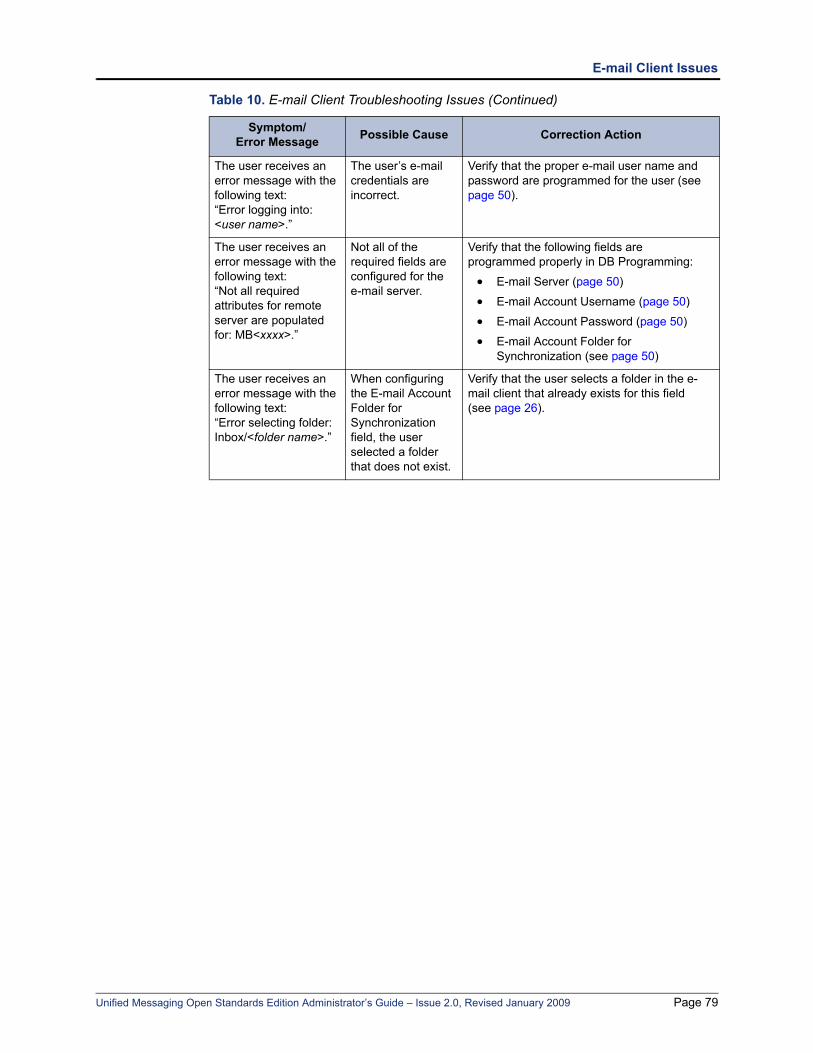
E-mail Client Issues
The user receives an error message with the following text:“Error logging into: <user name>.”
The user’s e-mail credentials are incorrect.
Verify that the proper e-mail user name and password are programmed for the user (see page 50).
The user receives an error message with the following text:“Not all required attributes for remote server are populated for: MB<xxxx>.”
Not all of the required fields are configured for the e-mail server.
Verify that the following fields are programmed properly in DB Programming:
• E-mail Server (page 50)
• E-mail Account Username (page 50)
• E-mail Account Password (page 50)
• E-mail Account Folder for Synchronization (see page 50)
The user receives an error message with the following text:“Error selecting folder: Inbox/<folder name>.”
When configuring the E-mail Account Folder for Synchronization field, the user selected a folder that does not exist.
Verify that the user selects a folder in the e-mail client that already exists for this field (see page 26).
Table 10. E-mail Client Troubleshooting Issues (Continued)
Symptom/Error Message Possible Cause Correction Action
Unified Messaging Open Standards Edition Administrator’s Guide – Issue 2.0, Revised January 2009 Page 79
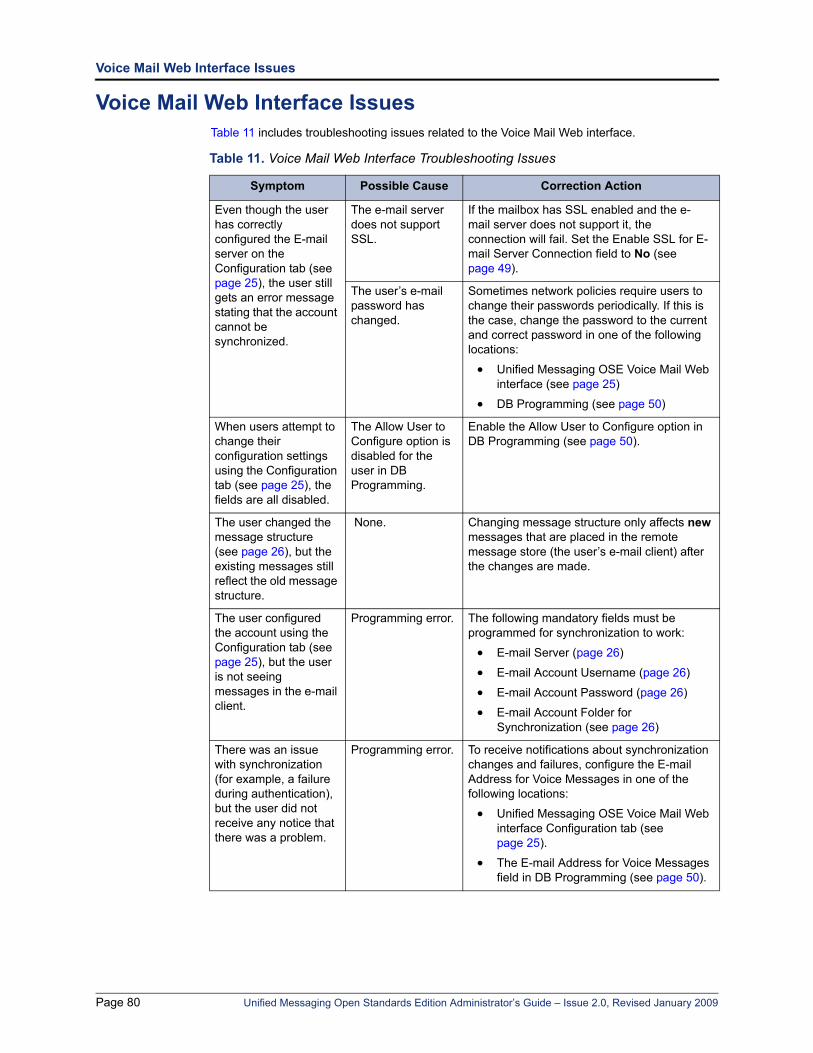
Voice Mail Web Interface Issues
Voice Mail Web Interface IssuesTable 11 includes troubleshooting issues related to the Voice Mail Web interface.
Table 11. Voice Mail Web Interface Troubleshooting Issues
Symptom Possible Cause Correction Action
Even though the user has correctly configured the E-mail server on the Configuration tab (see page 25), the user still gets an error message stating that the account cannot be synchronized.
The e-mail server does not support SSL.
If the mailbox has SSL enabled and the e-mail server does not support it, the connection will fail. Set the Enable SSL for E-mail Server Connection field to No (see page 49).
The user’s e-mail password has changed.
Sometimes network policies require users to change their passwords periodically. If this is the case, change the password to the current and correct password in one of the following locations:
• Unified Messaging OSE Voice Mail Web interface (see page 25)
• DB Programming (see page 50)
When users attempt to change their configuration settings using the Configuration tab (see page 25), the fields are all disabled.
The Allow User to Configure option is disabled for the user in DB Programming.
Enable the Allow User to Configure option in DB Programming (see page 50).
The user changed the message structure (see page 26), but the existing messages still reflect the old message structure.
None. Changing message structure only affects new messages that are placed in the remote message store (the user’s e-mail client) after the changes are made.
The user configured the account using the Configuration tab (see page 25), but the user is not seeing messages in the e-mail client.
Programming error. The following mandatory fields must be programmed for synchronization to work:
• E-mail Server (page 26)
• E-mail Account Username (page 26)
• E-mail Account Password (page 26)
• E-mail Account Folder for Synchronization (see page 26)
There was an issue with synchronization (for example, a failure during authentication), but the user did not receive any notice that there was a problem.
Programming error. To receive notifications about synchronization changes and failures, configure the E-mail Address for Voice Messages in one of the following locations:
• Unified Messaging OSE Voice Mail Web interface Configuration tab (see page 25).
• The E-mail Address for Voice Messages field in DB Programming (see page 50).
Page 80 Unified Messaging Open Standards Edition Administrator’s Guide – Issue 2.0, Revised January 2009
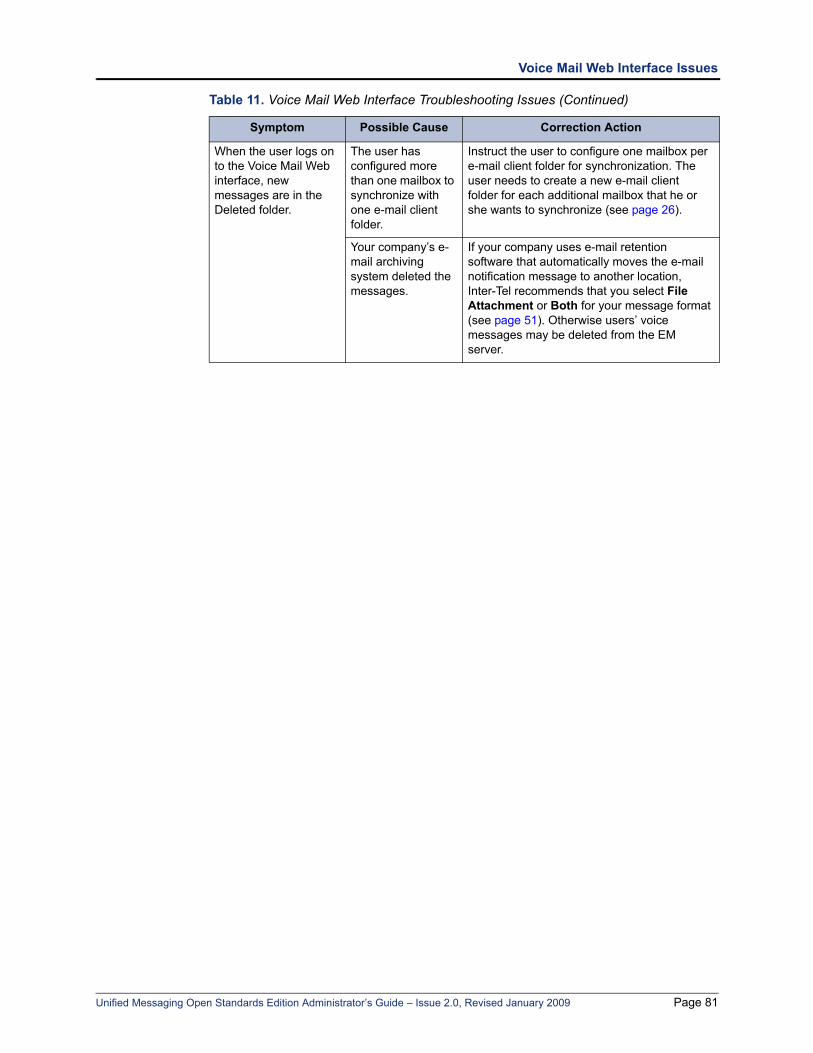
Voice Mail Web Interface Issues
When the user logs on to the Voice Mail Web interface, new messages are in the Deleted folder.
The user has configured more than one mailbox to synchronize with one e-mail client folder.
Instruct the user to configure one mailbox per e-mail client folder for synchronization. The user needs to create a new e-mail client folder for each additional mailbox that he or she wants to synchronize (see page 26).
Your company’s e-mail archiving system deleted the messages.
If your company uses e-mail retention software that automatically moves the e-mail notification message to another location, Inter-Tel recommends that you select File Attachment or Both for your message format (see page 51). Otherwise users’ voice messages may be deleted from the EM server.
Table 11. Voice Mail Web Interface Troubleshooting Issues (Continued)
Symptom Possible Cause Correction Action
Unified Messaging Open Standards Edition Administrator’s Guide – Issue 2.0, Revised January 2009 Page 81
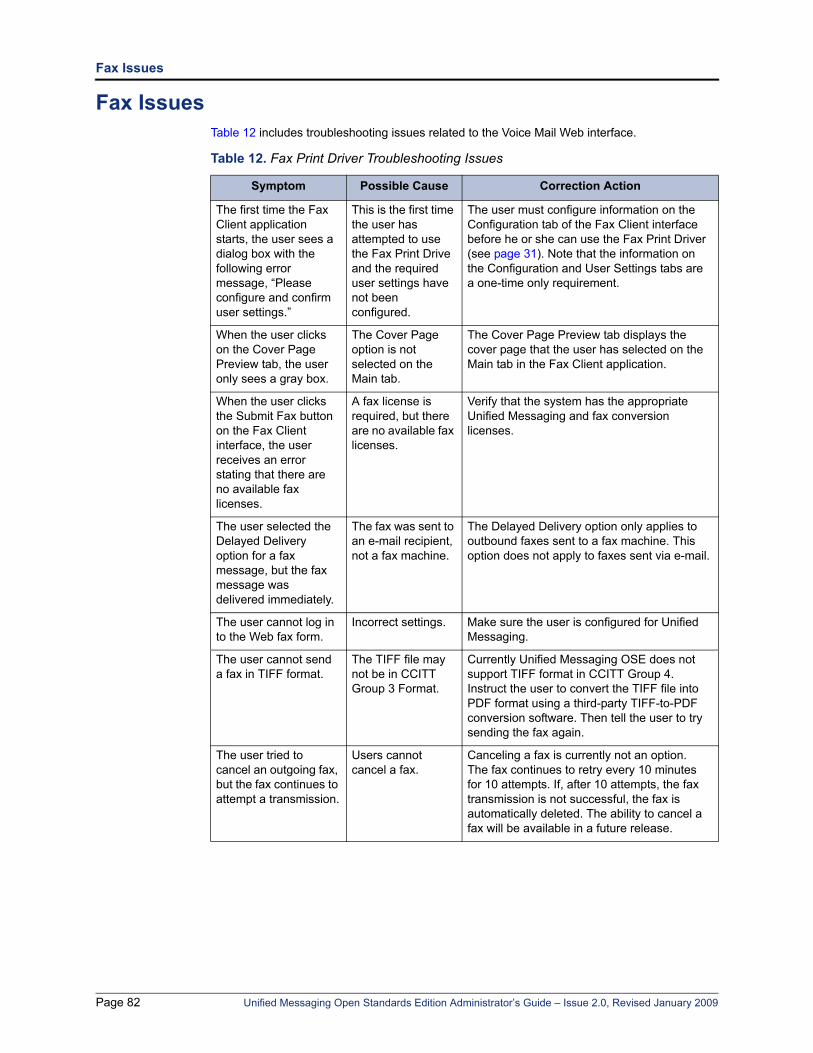
Fax Issues
Fax IssuesTable 12 includes troubleshooting issues related to the Voice Mail Web interface.
Table 12. Fax Print Driver Troubleshooting Issues
Symptom Possible Cause Correction Action
The first time the Fax Client application starts, the user sees a dialog box with the following error message, “Please configure and confirm user settings.”
This is the first time the user has attempted to use the Fax Print Drive and the required user settings have not been configured.
The user must configure information on the Configuration tab of the Fax Client interface before he or she can use the Fax Print Driver (see page 31). Note that the information on the Configuration and User Settings tabs are a one-time only requirement.
When the user clicks on the Cover Page Preview tab, the user only sees a gray box.
The Cover Page option is not selected on the Main tab.
The Cover Page Preview tab displays the cover page that the user has selected on the Main tab in the Fax Client application.
When the user clicks the Submit Fax button on the Fax Client interface, the user receives an error stating that there are no available fax licenses.
A fax license is required, but there are no available fax licenses.
Verify that the system has the appropriate Unified Messaging and fax conversion licenses.
The user selected the Delayed Delivery option for a fax message, but the fax message was delivered immediately.
The fax was sent to an e-mail recipient, not a fax machine.
The Delayed Delivery option only applies to outbound faxes sent to a fax machine. This option does not apply to faxes sent via e-mail.
The user cannot log in to the Web fax form.
Incorrect settings. Make sure the user is configured for Unified Messaging.
The user cannot send a fax in TIFF format.
The TIFF file may not be in CCITT Group 3 Format.
Currently Unified Messaging OSE does not support TIFF format in CCITT Group 4. Instruct the user to convert the TIFF file into PDF format using a third-party TIFF-to-PDF conversion software. Then tell the user to try sending the fax again.
The user tried to cancel an outgoing fax, but the fax continues to attempt a transmission.
Users cannot cancel a fax.
Canceling a fax is currently not an option. The fax continues to retry every 10 minutes for 10 attempts. If, after 10 attempts, the fax transmission is not successful, the fax is automatically deleted. The ability to cancel a fax will be available in a future release.
Page 82 Unified Messaging Open Standards Edition Administrator’s Guide – Issue 2.0, Revised January 2009
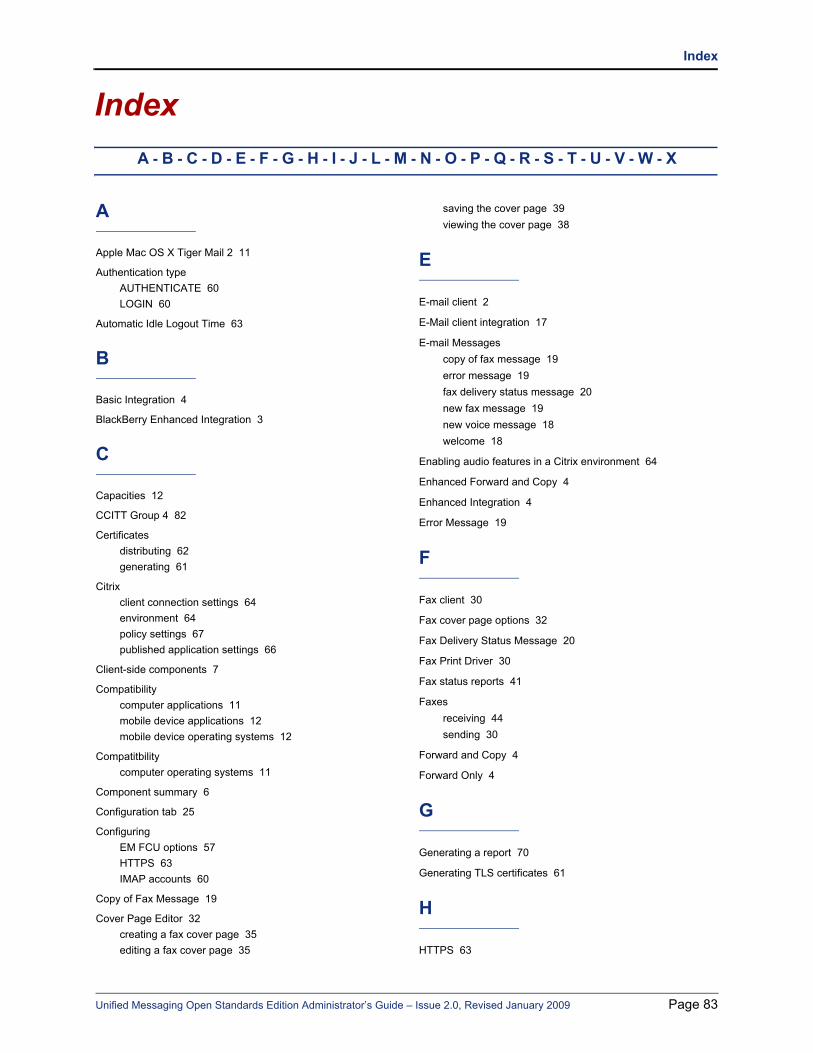
Index
A - B - C - D - E - F - G - H - I - J - L - M - N - O - P - Q - R - S - T - U - V - W - X
Index
A
Apple Mac OS X Tiger Mail 2 11
Authentication typeAUTHENTICATE 60LOGIN 60
Automatic Idle Logout Time 63
B
Basic Integration 4
BlackBerry Enhanced Integration 3
C
Capacities 12
CCITT Group 4 82
Certificatesdistributing 62generating 61
Citrixclient connection settings 64environment 64policy settings 67published application settings 66
Client-side components 7
Compatibilitycomputer applications 11mobile device applications 12mobile device operating systems 12
Compatitbilitycomputer operating systems 11
Component summary 6
Configuration tab 25
ConfiguringEM FCU options 57HTTPS 63IMAP accounts 60
Copy of Fax Message 19
Cover Page Editor 32creating a fax cover page 35editing a fax cover page 35
saving the cover page 39viewing the cover page 38
E
E-mail client 2
E-Mail client integration 17
E-mail Messagescopy of fax message 19error message 19fax delivery status message 20new fax message 19new voice message 18welcome 18
Enabling audio features in a Citrix environment 64
Enhanced Forward and Copy 4
Enhanced Integration 4
Error Message 19
F
Fax client 30
Fax cover page options 32
Fax Delivery Status Message 20
Fax Print Driver 30
Fax status reports 41
Faxesreceiving 44sending 30
Forward and Copy 4
Forward Only 4
G
Generating a report 70
Generating TLS certificates 61
H
HTTPS 63
Unified Messaging Open Standards Edition Administrator’s Guide – Issue 2.0, Revised January 2009 Page 83
Index
A - B - C - D - E - F - G - H - I - J - L - M - N - O - P - Q - R - S - T - U - V - W - X
I
IBM Lotus Notes 11
IMAP accounts 22
IMAP Connection Status and Statistics Commands 71
IMAP Connection Status and Statistics Report 73
IMAP inbox 60
IMAP statistics report 74
IMAP status report 73
Inbound fax 2, 44
L
Licensing 13
M
Mac OS X 11, 12
Message Waiting Indication (MWI) 22, 29
Microsoft Entourage 2004 11
Microsoft Outlook 2003 11
Microsoft Outlook 2007 11
N
New Fax Message 19
New FeaturesUnified Messaging OSE levels 3
New Voice Message 18
Novell GroupWise 11
O
OAM Commands 71
Outbound fax 2, 30
Outbound fax programming 53
Outlook Express 11
P
Part numbers 13
Programmingoutbound fax 53
the Unified Messaging system level folder 56users 46
R
Report examplefailure case 43success 42temporary failure 43
Report structure 73
Requirementscomputer 8mobile device 8system 8user 8
S
Sample IMAP connection status and statistics reportIMAP statistics 74IMAP status 73
Self-signed certificates 61
Server-side components 6
Software compatibility 11
Software license 13
Synchronization Status Command 72
Synchronize MWI with E-Mail Client 22
System requirements 8
T
Telco account codes 54
Troubleshootinge-mail client 78fax 82voice mail Web interface 80
U
Unified Messaging Level 49
Unified Messaging OSE Levels 4
Unified Messaging OSE Synchronization Status Report 76
Upgrades 3
User information 9
User requirements 8
Page 84 Unified Messaging Open Standards Edition Administrator’s Guide – Issue 2.0, Revised January 2009
Index
A - B - C - D - E - F - G - H - I - J - L - M - N - O - P - Q - R - S - T - U - V - W - X
V
Validate certificates generated by a trusted CA 61
Voice Mail Web Interfacefor computers 23for mobile devices 27
Voice message access 20
Voice message synchronization 21
Voice Messages Tab 23
W
Web fax form 40
Welcome Message 18
Windows 2000 11
Windows Mail 11
Windows Vista 11
Windows XP 11
Unified Messaging Open Standards Edition Administrator’s Guide – Issue 2.0, Revised January 2009 Page 85


Part No. 835.3162Issue 2.0, Revised January 2009
A946/4273A