Instrument Panel - General Motors · Your vehicle’s instrument panel is equipped with this...
20
Instrument Panel . . . . . . . . . . . . . . . . . . . . . . . . . .2 Instrument Panel Cluster . . . . . . . . . . . . . . . . . . .3 Seat Controls . . . . . . . . . . . . . . . . . . . . . . . . . . . . .4 Passenger Air Bag Status Indicator . . . . . . . . . .5 Center Console Features . . . . . . . . . . . . . . . . . . .5 Audio System Operation . . . . . . . . . . . . . . . . . . .6 Multiple-Disc CD Player . . . . . . . . . . . . . . . . . . . .8 XM Satellite Radio . . . . . . . . . . . . . . . . . . . . . . . . .9 DVD Radio . . . . . . . . . . . . . . . . . . . . . . . . . . . . . . .9 OnStar ® ..................................9 Steering Wheel Controls . . . . . . . . . . . . . . . . . . .10 Traction Control System . . . . . . . . . . . . . . . . . . .10 Automatic Headlamp System . . . . . . . . . . . . . . .11 Horn Operation . . . . . . . . . . . . . . . . . . . . . . . . . .11 Turning or Removing the Ignition Key . . . . . . .11 Compass Calibration . . . . . . . . . . . . . . . . . . . . . .11 Climate Controls . . . . . . . . . . . . . . . . . . . . . . . .12 Windshield Wipers and Washer . . . . . . . . . . . . .12 Power Windows . . . . . . . . . . . . . . . . . . . . . . . . . .13 Sunroof . . . . . . . . . . . . . . . . . . . . . . . . . . . . . . . . .13 Rear Window Wind Effects . . . . . . . . . . . . . . . . .14 Saturn Security System/ Remote Keyless Entry . . . . . . . . . . . . . . . . . . . .14 Entry Lighting . . . . . . . . . . . . . . . . . . . . . . . . . . .14 Footwell Light Switches . . . . . . . . . . . . . . . . . . .15 Lockout Prevention . . . . . . . . . . . . . . . . . . . . . . .15 Rear Door Security Locks . . . . . . . . . . . . . . . . .15 Towing Your Vehicle . . . . . . . . . . . . . . . . . . . . . .15 Automatic Door Locking and Unlocking . . . . . .15 Removing and Securing the Fuel Cap . . . . . . .16 Fuel Economy . . . . . . . . . . . . . . . . . . . . . . . . . . .16 Resetting the “Change Oil Soon” Light . . . . . .17 Tire Pressure . . . . . . . . . . . . . . . . . . . . . . . . . . . .17 Fold-Down Passenger Seatback . . . . . . . . . . . .17 Fold-Down Rear Seats . . . . . . . . . . . . . . . . . . . .17 Rear Cargo Organizer . . . . . . . . . . . . . . . . . . . . .18 Removing the Spare Tire . . . . . . . . . . . . . . . . . .19 Driving Off Paved Roads . . . . . . . . . . . . . . . . . .19 Vehicle Symbols Glossary . . . . . . . . . . . . . . . . .19 Roadside Assistance . . . . . . . . . . . . . . . . . . . . .20 My Saturn . . . . . . . . . . . . . . . . . . . . . . . . . . . . . . .20 Congratulations on your purchase of a Saturn VUE. Please read this information and your Owner Manual to ensure an outstanding ownership experience. Note that your vehicle may not include all the features described in this booklet. Keep this booklet with your Owner Manual for easy reference.
Transcript of Instrument Panel - General Motors · Your vehicle’s instrument panel is equipped with this...
Instrument Panel . . . . . . . . . . . . . . . . . . . . . . . . . .2Instrument Panel Cluster . . . . . . . . . . . . . . . . . . .3Seat Controls . . . . . . . . . . . . . . . . . . . . . . . . . . . . .4Passenger Air Bag Status Indicator . . . . . . . . . .5Center Console Features . . . . . . . . . . . . . . . . . . .5Audio System Operation . . . . . . . . . . . . . . . . . . .6Multiple-Disc CD Player . . . . . . . . . . . . . . . . . . . .8XM Satellite Radio . . . . . . . . . . . . . . . . . . . . . . . . .9DVD Radio . . . . . . . . . . . . . . . . . . . . . . . . . . . . . . .9OnStar® . . . . . . . . . . . . . . . . . . . . . . . . . . . . . . . . . .9Steering Wheel Controls . . . . . . . . . . . . . . . . . . .10Traction Control System . . . . . . . . . . . . . . . . . . .10Automatic Headlamp System . . . . . . . . . . . . . . .11Horn Operation . . . . . . . . . . . . . . . . . . . . . . . . . .11Turning or Removing the Ignition Key . . . . . . .11Compass Calibration . . . . . . . . . . . . . . . . . . . . . .11Climate Controls . . . . . . . . . . . . . . . . . . . . . . . .12Windshield Wipers and Washer . . . . . . . . . . . . .12Power Windows . . . . . . . . . . . . . . . . . . . . . . . . . .13Sunroof . . . . . . . . . . . . . . . . . . . . . . . . . . . . . . . . .13Rear Window Wind Effects . . . . . . . . . . . . . . . . .14
Saturn Security System/Remote Keyless Entry . . . . . . . . . . . . . . . . . . . .14Entry Lighting . . . . . . . . . . . . . . . . . . . . . . . . . . .14Footwell Light Switches . . . . . . . . . . . . . . . . . . .15Lockout Prevention . . . . . . . . . . . . . . . . . . . . . . .15Rear Door Security Locks . . . . . . . . . . . . . . . . .15Towing Your Vehicle . . . . . . . . . . . . . . . . . . . . . .15Automatic Door Locking and Unlocking . . . . . .15Removing and Securing the Fuel Cap . . . . . . .16Fuel Economy . . . . . . . . . . . . . . . . . . . . . . . . . . .16Resetting the “Change Oil Soon” Light . . . . . .17Tire Pressure . . . . . . . . . . . . . . . . . . . . . . . . . . . .17Fold-Down Passenger Seatback . . . . . . . . . . . .17Fold-Down Rear Seats . . . . . . . . . . . . . . . . . . . .17Rear Cargo Organizer . . . . . . . . . . . . . . . . . . . . .18Removing the Spare Tire . . . . . . . . . . . . . . . . . .19Driving Off Paved Roads . . . . . . . . . . . . . . . . . .19Vehicle Symbols Glossary . . . . . . . . . . . . . . . . .19Roadside Assistance . . . . . . . . . . . . . . . . . . . . .20 My Saturn . . . . . . . . . . . . . . . . . . . . . . . . . . . . . . .20
Congratulations on your purchase of a Saturn VUE. Please read this information and your Owner Manual toensure an outstanding ownership experience. Note that your vehicle may not include all the featuresdescribed in this booklet. Keep this booklet with your Owner Manual for easy reference.
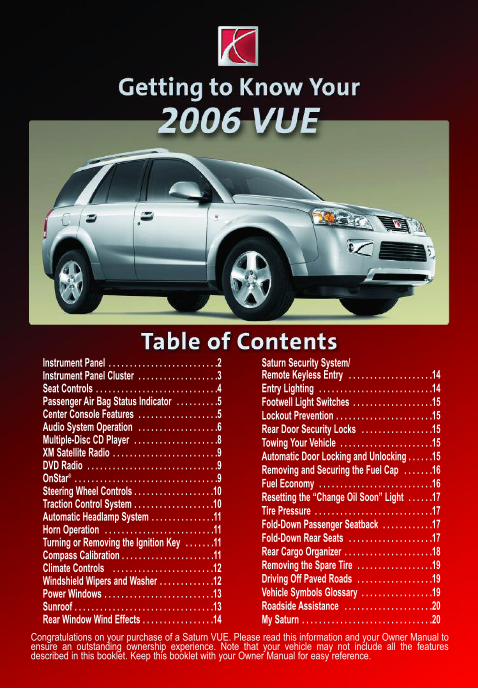
A. Turn Signal/Malfunction LeverB. Instrument Panel ClusterC. Windshield Wiper LeverD. Audio SystemE. Instrument Panel Brightness
ControlF. Hazard Warning Flasher ButtonG. Passenger Air Bag Status
Indicator
H. Fog Lamps ButtonI. Climate ControlsJ. Hood ReleaseK. Storage CompartmentL. Cruise Control ButtonsM.Tilt LeverN. Horn
O. Audio Steering Wheel ControlsP. Ignition SwitchQ. Power Mirror ControlsR. Rear Window Defogger ButtonS. Heated Seat ButtonsT. Shift LeverU. Accessory Power OutletV. Glove Box
Getting to Know
YourVUE
2Instrument Panel
See Section 3 of your Owner Manual.
D G H IFB
Q
EA
RJ K M ON
C
PL U VTS
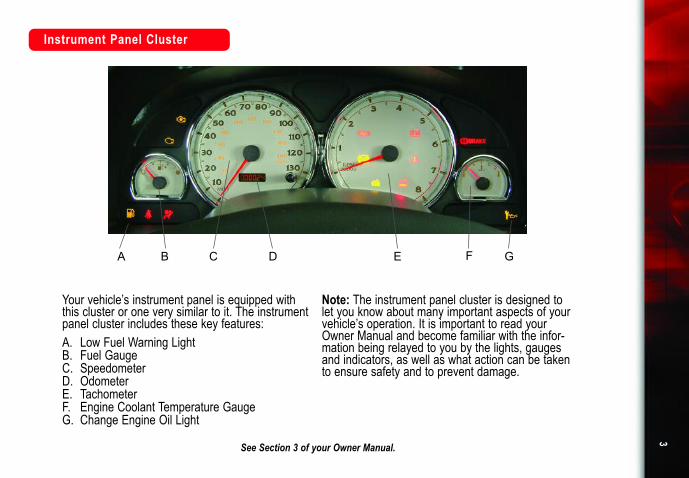
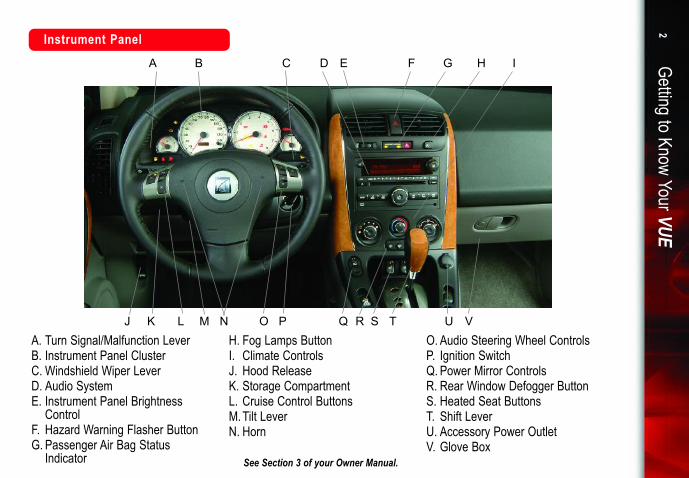
Your vehicle’s instrument panel is equipped withthis cluster or one very similar to it. The instrumentpanel cluster includes these key features:A. Low Fuel Warning LightB. Fuel GaugeC. SpeedometerD. OdometerE. TachometerF. Engine Coolant Temperature GaugeG. Change Engine Oil Light
Note: The instrument panel cluster is designed tolet you know about many important aspects of yourvehicle’s operation. It is important to read yourOwner Manual and become familiar with the infor-mation being relayed to you by the lights, gaugesand indicators, as well as what action can be takento ensure safety and to prevent damage.
3
See Section 3 of your Owner Manual.
B F GEDCA
Instrument Panel Cluster

Getting to Know Your VUE4
Seat Controls
One of the best things about the VUE isthe way it makes you feel when sitting init. Below are a few seat adjustment fea-tures that will help make the seats feeljust right for you and your passengers.Manual Driver’s Seat HeightAdjustment (if equipped)The driver’s seatheight adjuster islocated on the left-front side of yourseat cushion.To raise the seat:• Ratchet the lever upward until you
reach the desired height.To lower the seat:• Ratchet the lever downward until you
reach the desired height.Manual Driver’s Seat LumbarAdjustment (if equipped)
The driver’s seat lumbar control knob islocated below the front-right side of yourseat cushion (see “A” above). Rotate the knob to adjust lower back (lumbar)support of the seat.
Power Seats (if equipped)If your VUE is equipped with powerseats, you will find the power seat con-trol on the door side of the driver seat,just below your thigh (see “B” above).You can raise or lower the front or backof the seat cushion by moving the end ofthe control up or down. To move theseat forward or rearward, slide the con-trol toward the front or back. To adjustthe height of the seat, move the entirecontrol up or down.Manual Front Seatback ReclinerAdjustmentTo adjust the seatback, lift the leverlocated on the left-rear side of the seatcushion (see “C” above); then move theseat to the desired position.Heated Seats (if equipped)Your VUE’s heat-ed seats haveseparate switchesfor the driver andfront passenger.The switches arelocated just belowthe climate con-trols. Each switchincludes two settings to heat the seatcushion and the lower seatback.
A
BC

5
Center Console FeaturesPosition 1 warms the seats, whilePosition 2 heats the seats to a slightlyhigher temperature.SeatbeltsBoth front seat positions include height-adjustable shoulder belts. You canadjust them so that they are centered on your shoulder or your passenger’sshoulder. The adjusters are locatedabove the shoulder belt turning loop.Squeeze the buttons to adjust to thepositions that are right for each of you.VUE’s backseats include seatbelt comfort guides for children who haveoutgrown car seats and for smalleradults. The guides are located on theback of the seatbacks.See Section 1 of your Owner Manual.
Your vehicle isequipped with aPassengerSensing Systemlocated in thefront passengerseat for the front passenger frontal airbag, and a passenger air bag statusindicator located on the instrument panelcenter stack.
See Sections 1 and 3 of your Owner Manual.
Passenger Air Bag StatusIndicator
Note: It is recommended that childrennot be placed in the front passengerseat, even with the Passenger SensingSystem. All children should be securedin a rear seat, including an infant ridingin a rear-facing infant seat, a child ridingin a forward-facing child seat and anolder child riding in a booster seat.
The center console between the frontseats features cupholders, a storagearea and front and rear accessory poweroutlets. To access the cupholders, slideback the cover on top of the console.Pull out the cupholder insert for addition-al storage space.The accessory power outlet located inthe storage area is convenient for charging your cell phone. A depressionin the side of the storage area allows theconsole cover to be closed withoutpinching the charging cell phone cord.See Section 2 of your Owner Manual.
Getting to Know Your VUE6
Audio System Operation
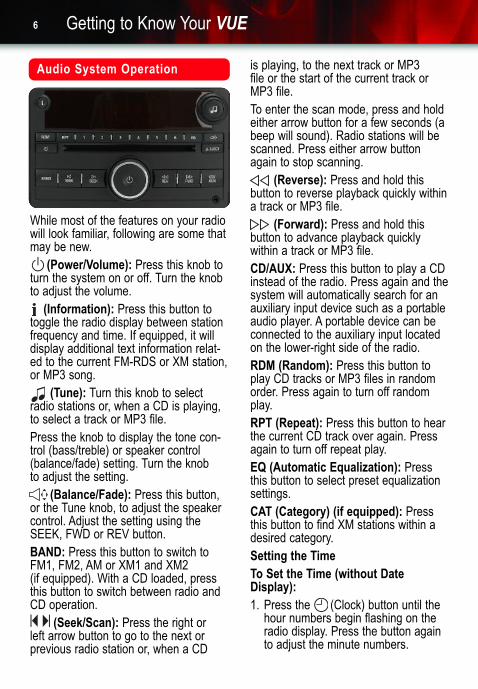
While most of the features on your radiowill look familiar, following are some thatmay be new.
(Power/Volume): Press this knob toturn the system on or off. Turn the knobto adjust the volume.
(Information): Press this button totoggle the radio display between stationfrequency and time. If equipped, it willdisplay additional text information relat-ed to the current FM-RDS or XM station,or MP3 song.
(Tune): Turn this knob to selectradio stations or, when a CD is playing,to select a track or MP3 file. Press the knob to display the tone con-trol (bass/treble) or speaker control(balance/fade) setting. Turn the knobto adjust the setting.
(Balance/Fade): Press this button,or the Tune knob, to adjust the speakercontrol. Adjust the setting using theSEEK, FWD or REV button.BAND: Press this button to switch toFM1, FM2, AM or XM1 and XM2 (if equipped). With a CD loaded, pressthis button to switch between radio andCD operation.
(Seek/Scan): Press the right or left arrow button to go to the next or previous radio station or, when a CD
is playing, to the next track or MP3 file or the start of the current track orMP3 file.To enter the scan mode, press and holdeither arrow button for a few seconds (abeep will sound). Radio stations will bescanned. Press either arrow buttonagain to stop scanning.
(Reverse): Press and hold this button to reverse playback quickly withina track or MP3 file.
(Forward): Press and hold this button to advance playback quickly within a track or MP3 file.CD/AUX: Press this button to play a CDinstead of the radio. Press again and thesystem will automatically search for anauxiliary input device such as a portableaudio player. A portable device can beconnected to the auxiliary input locatedon the lower-right side of the radio.RDM (Random): Press this button toplay CD tracks or MP3 files in randomorder. Press again to turn off randomplay.RPT (Repeat): Press this button to hearthe current CD track over again. Pressagain to turn off repeat play.EQ (Automatic Equalization): Pressthis button to select preset equalizationsettings.CAT (Category) (if equipped): Pressthis button to find XM stations within adesired category.Setting the TimeTo Set the Time (without DateDisplay):1. Press the (Clock) button until the
hour numbers begin flashing on the radio display. Press the button again to adjust the minute numbers.
7
2. With either the hour or minute numbers flashing, use the Tune knob to select the time.
3. Press the Clock button again to set the currently displayed time.
To Set the Time (with Date Display, if equipped):1. Press the (Clock) button. Or,
if equipped, press the MENU button until the clock option is displayed; and then press the pushbutton located under the clock option label. The HR, MIN, MM, DD, YYYYlabels will appear on the display.
2. Press the pushbutton under any of the labels to be changed.
3. Press the pushbutton again or the FWD button to increase the numbers.Press the REV button to decrease the numbers. Rotating the Tune knob also will increase or decrease the selected label.
4. Press the Clock or MENU button again to set the currently displayed time and date.
Setting Preset or Favorite StationsBefore setting your preset or favoritestations, shift the vehicle into Park.
Preset StationsTo Store up to 18 Preset Stations:1. Turn on the radio.2. Press BAND to select FM1, FM2
or AM.3. Tune in the desired radio station.4. Press and hold one of the six num-
bered pushbuttons until a beep sounds to store the station.
Favorite StationsFAV (Favorite) (if equipped): Press thisbutton to go through up to six pages ofany combination (AM, FM or XM, ifequipped) of preset favorite radio sta-tions. On each page, up to six stationsare available by using the six pushbut-tons below the radio station frequencylabels on the radio display.To Set Up the Number of FavoriteStation Pages:1. Press the MENU button to display the
radio setup menu.2. Press the pushbutton located below
the FAV 1–6 label on the radio display.
3. Select the desired number of favorite station pages.
4. Press the FAV button. You may now begin storing your favorite stations forthe chosen amount of numbered pages.
To Store Favorite Stations:1. Tune to the desired radio station.2. Press the FAV button to display the
page where the station is to be stored.
3. Press and hold one of the six push-buttons until a beep sounds to store the station.
4. Repeat the steps for each pushbuttonon each page.
Note: Choosing to engage in extendedsearching for specific audio stations orsongs by using buttons and knobs — orto give extended attention to entertain-ment tasks — can lead you to lookaway from the road frequently or longerthan usual. Looking away from the roadfor prolonged periods may cause you tomiss seeing things on the road that youneed to see. Be sure to keep your eyeson the road and mind on the drive —and avoid engaging in extended search-ing for specific items while driving.
Getting to Know Your VUE8
Setting the Speed CompensatedVolume (if equipped)With Speed Compensated Volume, theradio automatically adjusts the volumeto compensate for road noise as vehiclespeed changes.To Set Speed Compensated Volume:1. Set the radio volume to the desired
level.2. Press the MENU button to display the
radio setup menu.3. Press the pushbutton below the auto
volume label on the radio display.4. Press the pushbutton under the
desired setting (Off, Low, Medium or High) to select the level of compensation.
5. The compensation will be set once the display times out after 10 seconds.
MP3 Capability (if equipped)If your AM/FM stereo with CD has MP3playing capability, a CD-R or CD-RWcontaining MP3 audio tracks will playautomatically when inserted into the CDplayer. An MP3 symbol will be displayed.Portable Audio PlayerA portable audio player can be connect-ed to the auxiliary input jack located onthe radio. When connected, the radioautomatically begins playing audio fromthe player over the vehicle speakers.Radio Data System (if equipped)When you tune to a Radio Data System(RDS) station, the station name and callletters will appear on the display insteadof the frequency. RDS stations may alsoprovide the time of day, a program type
for current programming and the nameof the program being broadcast.RDS features are available for use onlyon FM stations that broadcast RDSinformation. RDS relies on receivingspecific information from these stationsand will work only when the informationis available.See Section 3 of your Owner Manual.
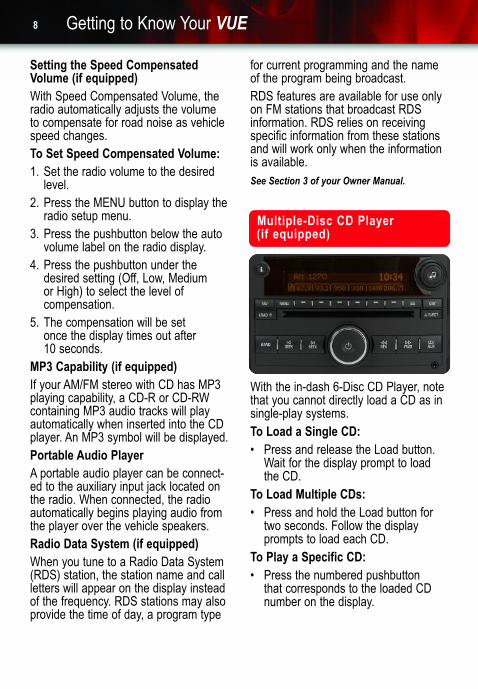
Multiple-Disc CD Player (if equipped)
With the in-dash 6-Disc CD Player, notethat you cannot directly load a CD as insingle-play systems.To Load a Single CD:• Press and release the Load button.
Wait for the display prompt to load the CD.
To Load Multiple CDs:• Press and hold the Load button for
two seconds. Follow the display prompts to load each CD.
To Play a Specific CD:• Press the numbered pushbutton
that corresponds to the loaded CD number on the display.
9
To Eject a CD:• To eject the CD that is currently
playing, press the button once. • To eject all CDs, press and hold the
button for two seconds.If a CD is not removed after several sec-onds, it will be automatically pulled backinto the player.See Section 2 of your Owner Manual.
Note: CDs with any labels may jam inthe CD player. Label a CD using a per-manent marker. If more than one CD isinserted into the slot at one time, or ifscratched or damaged CDs are played,the CD player could be damaged. Whenusing the CD player, use only CDs ingood condition without added labels;load one CD at a time; and keep the CDplayer and the loading slot free of for-eign materials, liquids and debris.
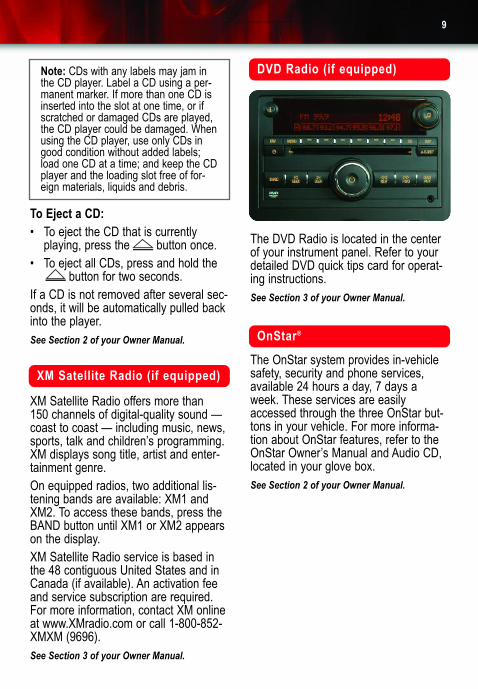
DVD Radio (if equipped)
XM Satellite Radio (if equipped)
The DVD Radio is located in the centerof your instrument panel. Refer to yourdetailed DVD quick tips card for operat-ing instructions.See Section 3 of your Owner Manual.
XM Satellite Radio offers more than 150 channels of digital-quality sound —coast to coast — including music, news,sports, talk and children’s programming.XM displays song title, artist and enter-tainment genre.On equipped radios, two additional lis-tening bands are available: XM1 andXM2. To access these bands, press theBAND button until XM1 or XM2 appearson the display.XM Satellite Radio service is based inthe 48 contiguous United States and inCanada (if available). An activation feeand service subscription are required.For more information, contact XM onlineat www.XMradio.com or call 1-800-852-XMXM (9696).See Section 3 of your Owner Manual.
OnStar®
The OnStar system provides in-vehiclesafety, security and phone services,available 24 hours a day, 7 days aweek. These services are easilyaccessed through the three OnStar but-tons in your vehicle. For more informa-tion about OnStar features, refer to theOnStar Owner’s Manual and Audio CD,located in your glove box.See Section 2 of your Owner Manual.
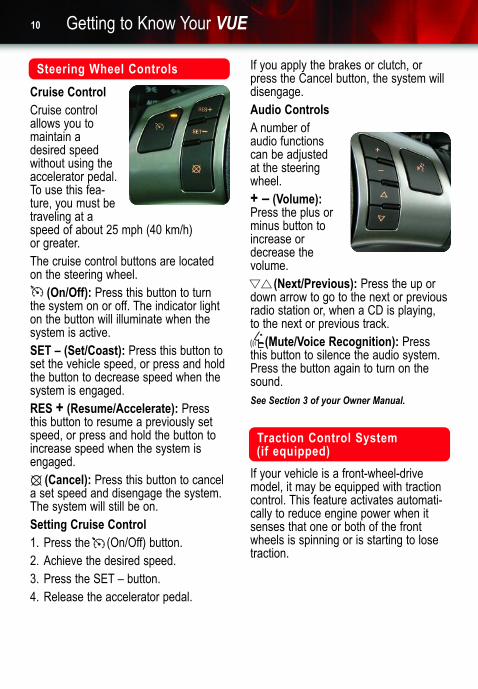
Cruise Control Cruise controlallows you tomaintain adesired speedwithout using theaccelerator pedal.To use this fea-ture, you must betraveling at aspeed of about 25 mph (40 km/h) or greater.The cruise control buttons are locatedon the steering wheel.
(On/Off): Press this button to turnthe system on or off. The indicator lighton the button will illuminate when thesystem is active.SET – (Set/Coast): Press this button toset the vehicle speed, or press and holdthe button to decrease speed when thesystem is engaged.RES + (Resume/Accelerate): Pressthis button to resume a previously setspeed, or press and hold the button toincrease speed when the system isengaged.
(Cancel): Press this button to cancela set speed and disengage the system.The system will still be on.Setting Cruise Control1. Press the (On/Off) button.2. Achieve the desired speed.3. Press the SET – button.4. Release the accelerator pedal.
Getting to Know Your VUE10
If you apply the brakes or clutch, orpress the Cancel button, the system willdisengage.Audio Controls A number ofaudio functionscan be adjustedat the steeringwheel.+ – (Volume):Press the plus orminus button toincrease ordecrease the volume.
(Next/Previous): Press the up ordown arrow to go to the next or previousradio station or, when a CD is playing, to the next or previous track.
(Mute/Voice Recognition): Pressthis button to silence the audio system.Press the button again to turn on thesound. See Section 3 of your Owner Manual.
Traction Control System (if equipped)
If your vehicle is a front-wheel-drivemodel, it may be equipped with tractioncontrol. This feature activates automati-cally to reduce engine power when itsenses that one or both of the frontwheels is spinning or is starting to losetraction.
Steering Wheel Controls
11
Automatic Headlamp System
When it is dark enough outside, yourautomatic headlamp system will turn onyour headlamps at the normal bright-ness and will also illuminate the tail-lamps, side-markers, parking lamps andinstrument panel lights. The radio lightswill also dim.The system has a light sensor locatedon top of the instrument panel. Be sureit is not covered, or the automatic head-lamps will be on whenever the ignition ison. The system may also turn on yourheadlamps when driving through a park-ing garage, heavy overcast weather or atunnel. This is normal.See Section 3 of your Owner Manual.
Horn Operation
VUE’s horn controls are located on thesteering wheel. For optimum sound,press either one of the bugle iconslocated in the center area of the steeringwheel. See Section 3 of your Owner Manual.
Turning or Removing theIgnition Key
If you are having difficulty either turningthe ignition key or removing it from thesteering column, try this: Rotate thesteering wheel back and forth slightly asyou turn the key.See Section 2 of your Owner Manual.
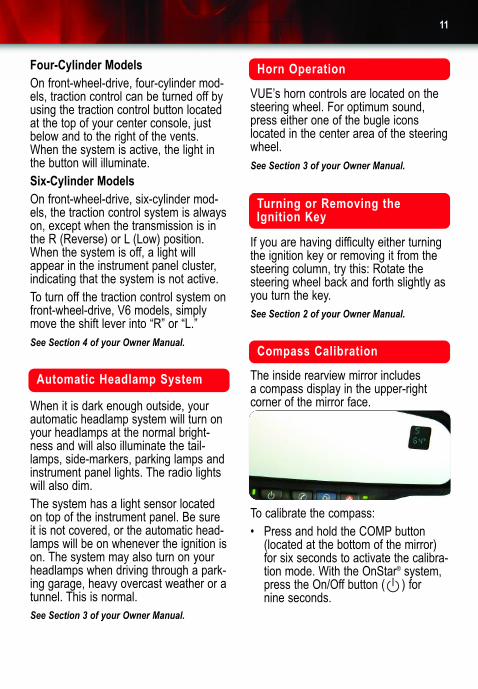
Compass Calibration
The inside rearview mirror includes a compass display in the upper-rightcorner of the mirror face.
To calibrate the compass:• Press and hold the COMP button
(located at the bottom of the mirror)for six seconds to activate the calibra-tion mode. With the OnStar® system,press the On/Off button ( ) for nine seconds.
Four-Cylinder ModelsOn front-wheel-drive, four-cylinder mod-els, traction control can be turned off byusing the traction control button locatedat the top of your center console, justbelow and to the right of the vents.When the system is active, the light inthe button will illuminate. Six-Cylinder ModelsOn front-wheel-drive, six-cylinder mod-els, the traction control system is alwayson, except when the transmission is inthe R (Reverse) or L (Low) position.When the system is off, a light willappear in the instrument panel cluster,indicating that the system is not active. To turn off the traction control system onfront-wheel-drive, V6 models, simplymove the shift lever into “R” or “L.”See Section 4 of your Owner Manual.

Getting to Know Your VUE12
Climate Controls
Your VUE has a climate control systemthat is intuitive and easy to use.The large knob on the left controls thefan speed. The center knob controls theinterior air temperature. The large knobon the right controls the direction of theairflow. This knob provides five air direc-tion settings, but you can also blend theflow of air by positioning the knobbetween the settings.
(Air Conditioning): Press this but-ton to activate your air conditioning sys-tem. When the system is on, an indica-tor light above the button will illuminate.
(Rear Defog): Use this control toturn your rear defogger on or off. Whenthe system is on, an indicator lightabove the button will illuminate. Thedefogger shuts off automatically after aset period of time.
Windshield Wipers and Washer
The windshield wipers on your VUE arecontrolled by a single lever located onthe right side of your steering column.The lever operates both the front wind-shield wipers and washer and the rearwiper and washer. The front wiper/washer system providesyou with these settings:MIST (Mist): Pull the lever down andrelease it for a single wiping cycle. Foradditional cycles, hold the lever downbefore releasing it.
AB
(Recirculation): Press this buttonwhen you want to recirculate air in yourvehicle instead of using outside air. Inthis mode, the air cools more quicklyand prevents outside odors from enter-ing your vehicle.Preventing Window FoggingTo help keep your windows fog-free,place your climate control system’smode knob in the Defog ( ) orDefrost ( ) mode. In cold weather,glass fogging may be reduced by slightlyopening a window to allow moisture andhumidity to escape from the passengercabin.It is also important to clean the interiorglass surfaces often, using GM GlassCleaner or a liquid household glasscleaner.See Section 3 of your Owner Manual.
Then, do one of the following:• Drive your vehicle in circles at 5 mph
(8 km/h) or less until the “CAL” display disappears, or
• Drive the vehicle on your everydayroutine (this method may take longerto calibrate).
Compass Variance• At times, it will be necessary to adjust
the compass to account for compass variance. See your Owner Manual for the proper adjustment procedure.
See Section 2 of your Owner Manual.

13
Power Windows
The power window switches are locatedon either side of the gear shifter — twoon the left and two on the right.There are power window switches onthe backseat door panels as well.However, these switches can be dis-abled by using the LOCK switch locatedon the driver’s side of the shifter.Express Down Window FeatureYou may notice that the driver windowswitch has the word AUTO on it. This isyour Express Down Window control. Bypressing this switch fully down, the win-dow will automatically go all the waydown until it is fully open. To stop theexpress function while it is operating,simply lift up and release the switch.See Section 2 of your Owner Manual.
Sunroof (if equipped)Your vehicle’s sunroof switch is locatedabove your rearview mirror. Keep inmind that the ignition key must be in the“RUN” or “ACC” position to operate thisfeature.
Opening the SunroofAs with the power driver window, yoursunroof has an express-open feature. To express-open the sunroof glass paneland sunshade, press the switch rear-ward and hold it before releasing it. Thiswill open the sunroof to the “Full Open”position.
OFF (Off): Move the lever to this posi-tion to turn off your wipers.INT (Intermittent): Place the lever inthis position to set a delay betweenwipes.The Intermittent position allows you tochoose the amount of time betweenwipes by rotating the dial marked withthe large arrow (see “A” on previouspage) to one of the following settings:1 — Long delays between wipes.2 — Medium delays between wipes.3 — Short delays between wipes.LO (Low Speed): Move the lever to thisposition for slow, steady wiping cycles.HI (High Speed): Move the lever to thisposition for rapid wiping cycles.
(Washer Fluid): Pull the windshieldwiper lever toward you to squirt washerfluid onto the windshield. The wipers willcycle several times to clear the wind-shield. For additional wash cycles, sim-ply pull the lever toward you and hold it.
Rear Wiper/WasherYour rear wiper and washer are con-trolled by the same lever used for thefront wiper system. You can choose from three wiper settings by turning theband on the inner portion of the lever,closer to the steering column (see “B”on previous page).
(Off): Turn the band to this positionto turn off the wiper.
(On): Place the band in this positionfor continuous operation with a delaybetween wipes.
(Wash): Rotate the band to thisposition to squirt a stream of washerfluid onto the rear window. It will contin-ue to provide fluid until you release theband. When you select this position, the
wipers will automatically start and stayon until you rotate the band to the Offposition.See Section 3 of your Owner Manual.

Getting to Know Your VUE14
Rear Window Wind Effects
On occasion when one of the rear win-dows is down, you may hear a beatingor pulsing sound. While this may be dis-tracting to some people, it does not indi-cate a problem, nor is it dangerous inany way. If this condition is objection-able, simply open or close the rear win-dow slightly, or open the front window onthe same side of the vehicle. This willeliminate the wind effect immediately.See Section 2 of your Owner Manual.
Saturn Security System/RemoteKeyless Entry
You can use your key chain remotetransmitter (or “key fob”) to lock andunlock your doors and liftgate from adistance of up to 30 ft. (9.7 m).
When using the key fob, be sure there isnothing between you and the vehiclethat could block the transmitter’s signal.If the key fob does not work in the nor-mal range, it is probably time to changethe battery. Under normal use, the bat-tery should last several years. Regard-less of the battery, the range of thetransmitter will vary over time and fromone location to another.Additional features of the SaturnSecurity System include active securitysystem arming, programmable passivesecurity system arming and illuminatedentry.See Section 2 of your Owner Manual.
Entry Lighting
When you press the UNLOCK button on your key fob, the dome lamps andexterior lamps will illuminate for 20 sec-onds. After a door is opened, the domelamps will remain on as long as the dooris open. Once you close the door, thelamp will darken after 20 seconds oruntil you turn the ignition key to the Runposition. This feature allows you to seeinside and around your vehicle beforeyou open the door and provides extend-ed illumination once inside the vehicle.See Section 3 of your Owner Manual.
If you want to stop the sunroof in a par-tially opened position, press the switchto activate the express-open feature;then press the switch again when thesunroof reaches the desired partiallyopened position.
Closing the SunroofTo close the glass panel, just press andhold the switch forward. The sunshadecan be closed only by hand and cannotbe closed with the glass panel open.
Vent PositionYou can also choose a vent position foryour sunroof. With the sunshade openand the glass panel closed, rotate theswitch upward for the vent position. See Section 2 of your Owner Manual.

15
Lockout Prevention
The lockout prevention feature makes it difficult for you to lock your key in thevehicle. If you leave the key in the ignition with either of the front doorsopen and a power door lock switch isdepressed, all the doors will lock.However, because the key is in the igni-tion, the driver’s door will unlock auto-matically within one second.See Section 2 of your Owner Manual.
Footwell Light Switches (if equipped)
A special feature available only on RedLine models is ambient footwell lighting.This feature displays a subdued amberor blue light from the footwell area.
(Footwell Light): Press this three-position light switch, located on eachside of the center console near the gear-shift lever, to turn the footwell light on oroff. Switch position 1 is amber lightingand switch position 2 is blue lighting.The center position on the switch is Off.See Section 3 of your Owner Manual.
Rear Door Security LocksEach of the rear passenger doors onyour VUE is equipped with a securitylock that makes it impossible to openthe doors from the inside. This is espe-cially important if you have young chil-dren in the back. The locks are locatedon the rear-inside edge of each door. To activate the lock, insert a flat screw-driver or key into the slot and turn it sothat the line is in a horizontal position.
Towing Your VehicleThe following are the recommendedtowing methods for your VUE. Note thatalternate towing methods can be usedon models equipped with the manual, 4-speed automatic or 5-speed automatictransaxle.Manual, 4-Speed Automatic or 5-Speed Automatic ModelsThese models can be towed from thefront with the front wheels placed on adolly or from the front with all fourwheels on the ground. For 5-speed automatic transaxle mod-els, the towing method with all fourwheels on the ground is limited to 520miles (837 km) at speeds below 65 mph(105 km/h).
See Section 4 of your Owner Manual.
Automatic Door Locking and Unlocking
Automatic Door LockingAutomatic Transaxle-Equipped Vehicles:All of the doors will automatically lockwhen the shift lever is moved out of “P”(Park), the ignition key is in the Runposition and all the doors are closed.
When activated, the doors can only beopened from the outside. To deactivatethis feature, turn the lock so that the lineis in a vertical position. See Section 2 of your Owner Manual.
Note:Towing your vehicle from the rearcould cause damage. Repairs would notbe covered by the warranty. Never haveyour vehicle towed from the rear.
Getting to Know Your VUE16
In the following two situations, when adoor is opened, all doors will lock again:• The brake pedal is applied, a door is
opened and closed, and the brakepedal is released.
• A door is opened and closed withoutthe brake pedal applied while thevehicle is moving more than 3 mph (5 km/h).
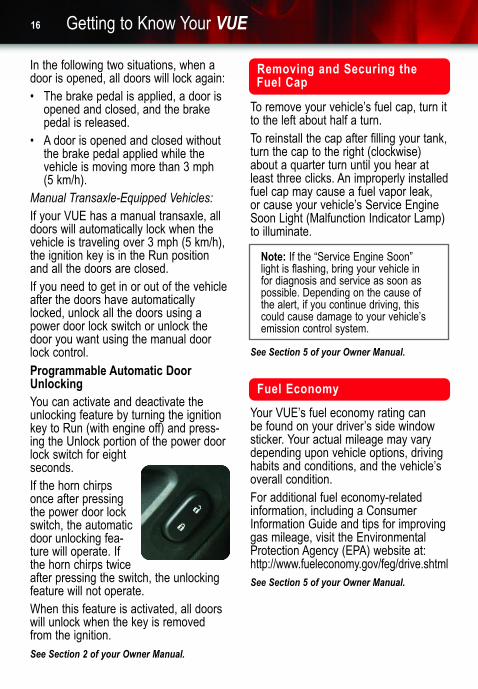
Manual Transaxle-Equipped Vehicles:If your VUE has a manual transaxle, alldoors will automatically lock when thevehicle is traveling over 3 mph (5 km/h),the ignition key is in the Run positionand all the doors are closed.If you need to get in or out of the vehicleafter the doors have automaticallylocked, unlock all the doors using apower door lock switch or unlock thedoor you want using the manual doorlock control.Programmable Automatic DoorUnlockingYou can activate and deactivate theunlocking feature by turning the ignitionkey to Run (with engine off) and press-ing the Unlock portion of the power doorlock switch for eightseconds.If the horn chirpsonce after pressingthe power door lockswitch, the automaticdoor unlocking fea-ture will operate. Ifthe horn chirps twiceafter pressing the switch, the unlockingfeature will not operate.When this feature is activated, all doorswill unlock when the key is removedfrom the ignition.See Section 2 of your Owner Manual.
Removing and Securing theFuel Cap
To remove your vehicle’s fuel cap, turn itto the left about half a turn.To reinstall the cap after filling your tank,turn the cap to the right (clockwise)about a quarter turn until you hear atleast three clicks. An improperly installedfuel cap may cause a fuel vapor leak, or cause your vehicle’s Service EngineSoon Light (Malfunction Indicator Lamp)to illuminate.
See Section 5 of your Owner Manual.
Note: If the “Service Engine Soon” light is flashing, bring your vehicle in for diagnosis and service as soon as possible. Depending on the cause ofthe alert, if you continue driving, thiscould cause damage to your vehicle’semission control system.
Fuel Economy
Your VUE’s fuel economy rating can be found on your driver’s side windowsticker. Your actual mileage may varydepending upon vehicle options, drivinghabits and conditions, and the vehicle’soverall condition.For additional fuel economy-relatedinformation, including a ConsumerInformation Guide and tips for improvinggas mileage, visit the EnvironmentalProtection Agency (EPA) website at:http://www.fueleconomy.gov/feg/drive.shtmlSee Section 5 of your Owner Manual.
17
Resetting the “Change OilSoon” Light
Your VUE has a light in the lower-rightcorner of the instrument cluster that isshaped like an oilcan. This is theChange Oil Soon Light. It is controlledby a computer system that measures oillife, based on engine revolutions andengine temperature. When the lightcomes on, change your oil as soon aspossible, preferably within the next fewtimes that you stop for fuel. After changing the oil, you need to resetthe system. You can do so by followingthese steps:1. Turn the ignition key to the Run
position, but don’t start the engine. 2. Fully depress the accelerator pedal
three times within five seconds.The next time you turn the key to theRun position, the light should go off.See Section 5 of your Owner Manual.
Tire PressureThe Tire-Loading Information label(located on the rear edge of the driver’sdoor) provides you with informationabout the size, speed rating and recom-mended inflation pressure for yourVUE’s tires. Overinflated tires can pro-duce a harsh ride, while underinflatedtires can reduce fuel economy and pro-mote tire wear.Both overinflated and underinflated tirescan affect the handling characteristics ofyour vehicle.See Section 5 of your Owner Manual.
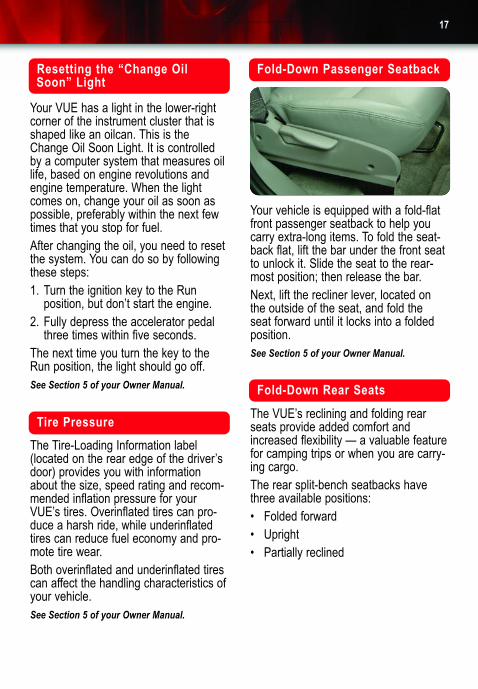
Fold-Down Passenger Seatback
Your vehicle is equipped with a fold-flatfront passenger seatback to help youcarry extra-long items. To fold the seat-back flat, lift the bar under the front seatto unlock it. Slide the seat to the rear-most position; then release the bar.Next, lift the recliner lever, located onthe outside of the seat, and fold the seat forward until it locks into a foldedposition.See Section 5 of your Owner Manual.
Fold-Down Rear SeatsThe VUE’s reclining and folding rearseats provide added comfort andincreased flexibility — a valuable featurefor camping trips or when you are carry-ing cargo. The rear split-bench seatbacks havethree available positions:• Folded forward• Upright• Partially reclined
Getting to Know Your VUE18
Rear Cargo OrganizerYour vehicle’s rear cargo organizerhelps you store small, light items in therear of the vehicle. To access andassemble the rear cargo organizer:1. Pull up on the latch of the rear panel
lid of the rear cargoorganizer to open it.
2. Lift the front of thecargo organizer and fold out the end panels.
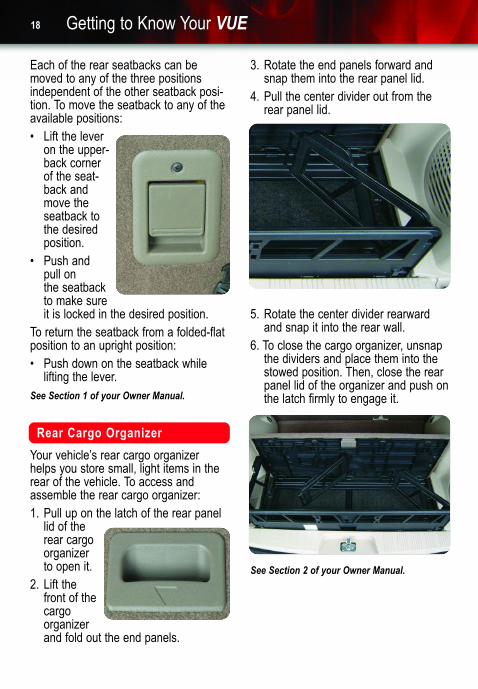
3. Rotate the end panels forward and snap them into the rear panel lid.
4. Pull the center divider out from the rear panel lid.
5. Rotate the center divider rearward and snap it into the rear wall.
6. To close the cargo organizer, unsnap the dividers and place them into the stowed position. Then, close the rear panel lid of the organizer and push onthe latch firmly to engage it.
See Section 2 of your Owner Manual.
Each of the rear seatbacks can bemoved to any of the three positionsindependent of the other seatback posi-tion. To move the seatback to any of theavailable positions:• Lift the lever
on the upper-back corner of the seat-back and move the seatback to the desired position.
• Push and pull on the seatbackto make sureit is locked in the desired position.
To return the seatback from a folded-flatposition to an upright position:• Push down on the seatback while
lifting the lever.See Section 1 of your Owner Manual.
19
Removing the Spare TireYour vehicle’s spare tire is locatedbeneath the load floor cargo organizer inthe rear cargo area of the vehicle. All ofthe tools you need to replace a flat tireare located in the storage compartment,on the driver’s side of the cargo area.After use, it is important to secure the spare tire, jack and tools properly.See your Owner Manual for detailedinstructions.See Section 5 of your Owner Manual.
Vehicle Symbols GlossaryFollowing are examples of symbolsyou may find on your vehicle. It isimportant to become familiar withthem, as they alert you to variousvehicle operating conditions.
Air Bag Readiness Light
Air Conditioning (A/C)
Antilock Brake System WarningLight
Battery Warning Light
Brake System Warning Light
Cruise Control On/Off
Headlamps
Instrument Panel Brightness Control
Malfunction Indicator Lamp (Check Engine Light)
Oil Pressure Warning Light
Off
Off/On
On
Parking Lamps
Rear Window Defogger
Reduced Engine Power Light
Safety Belt Reminder Light
Security Light
Traction Control Off Light
Driving Off Paved RoadsYour VUE has been designed primarilyfor use on pavement. However, if youdrive it off paved roads, keep the follow-ing things in mind:• If your vehicle does not have all-
wheel drive, you should not drive it off-road unless you’re on a level, solid surface.
• If your VUE is equipped with all-wheel drive, you may travel on unpaved roads to campgrounds, picnic sites and similar sites on occasion.
Many of the same design features that help make the VUE responsive onpaved roads during poor weather condi-tions — features like all-wheel drive —help make it much better suited for off-road use than a conventional passenger car. Its higher ground clear-ance also helps your vehicle step oversome off-road obstacles. But your vehi-cle does not have features like specialunderbody shielding and a transfer caselow gear range, things that are usuallythought necessary for extended orsevere off-road use.See Section 4 of your Owner Manual.

Getting to Know Your VUE20
06VUEGTK A
Roadside Assistance
My Saturn
1-800-553-6000TTY users: 1-888-889-2438As the proud owner of a new Saturnvehicle, you are automatically enrolledin the Saturn Roadside Assistance program. This value-added service isintended to provide you with peace ofmind as you drive in the city or travelthe open road.Saturn’s Roadside Assistance toll-freenumber is staffed by courteous andcapable Roadside Assistance represen-tatives who are available 24 hours aday, 365 days a year.We will provide the following servicesduring the Bumper-to-Bumper warrantyperiod, at no expense to you:• Fuel delivery• Lockout service (identification
required)• Tow to nearest Saturn retailer for
warranty service or in the event of avehicle-disabling accident
• Flat tire assistance• Jump starts• Minor repairs to disabled vehicles• Assistance when the vehicle is mired
in sand, mud or snow• Saturn retailer locator service
As your home away from home on theInternet, you can take advantage of My Saturn’s numerous owner benefits,including vehicle maintenance schedule,service reminders, frequently askedquestions, retailer information and more.So visit the My Saturn owner site atSaturn.com and enjoy the ride.
For prompt and efficient assistancewhen calling, please provide the follow-ing information to the RoadsideAssistance representative:• Location of the vehicle• Telephone number and your location• Vehicle model, year and color• Vehicle mileage• Vehicle Identification Number (VIN)• Vehicle license plate numberSaturn reserves the right to limit serviceor reimbursement to an owner or driverwhen, in Saturn’s judgment, the claimsbecome excessive in frequency or typeof occurrence.Roadside Assistance and OnStarPress the blue OnStar button and thevehicle will send your current GPS loca-tion to an OnStar Advisor who will speakto you, assess your condition, contactRoadside Assistance and relay yourexact location so you will get the helpyou need.
Certain restrictions, precautions and safety procedures apply to your vehicle. Please read your OwnerManual for complete instructions. All information contained herein is based on information available at thetime of printing and is subject to change without notice. Copyright 2005 by GM Corp. All rights reserved.
!06VUEGTK=A!