
Get To Know Guide,3573 Escalade - Owner Center Home€¢ Instrument Panel • Instrument Cluster...
20
2004 C USTOMER C ONVENIENCE /P ERSONALIZATION G UIDE
-
Upload
hoangnguyet -
Category
Documents
-
view
215 -
download
0
Transcript of Get To Know Guide,3573 Escalade - Owner Center Home€¢ Instrument Panel • Instrument Cluster...

2 0 0 4
C U S TO M E R C O N V E N I E N C E / P E R S O N A L I Z AT I O N G U I D E
3573 Escalade 9/3/03 7:11 PM Page 1

E S C A L A D E E X T
DRIVER INFORMATION• Instrument Panel• Instrument Cluster
SEATS AND MIRRORS• Heated Front Seats• Power Lumbar/Bolster Front Seats• Second Row Seat Features• Passenger Automatic Locking
Restraint (ALR)• Power Folding Mirrors• Automatic Dimming Rearview
Mirror with OnStar®, Compass andTemperature Display
AUTOMATIC CLIMATE CONTROLS• Dual-Zone Climate Control System• Sunroof
ENTERTAINMENT/CONVENIENCEFEATURES• AM/FM Stereo with CD and
Cassette Player• Six-Disc CD Changer• Navigation Radio System• HomeLink® Transmitter • Steering Wheel Controls
(OnStar®/Radio)• Automatic Headlamp Controls
DRIVE AND SECURITY SYSTEMS• StabiliTrak® System • Ultrasonic Rear Parking Assist
(URPA)• Tire Pressure Monitor• Content Theft-Deterrent System
VEHICLE PERSONALIZATION• Memory Positions for Driver’s Seat,
Mirrors, Pedals, Radio and ClimateControls
• Driver Information CenterPersonalization
• Odometer/Trip Settings
UTILITY ENHANCEMENT SYSTEM• Midgate™ Components• Cargo Area Midgate Panel• Midgate Operation• Cargo Cover System
VEHICLE SYMBOLS GLOSSARY
OWNER PRIVILEGESTM
TABLE OF CONTENTS
3573 Escalade 9/3/03 7:11 PM Page 2
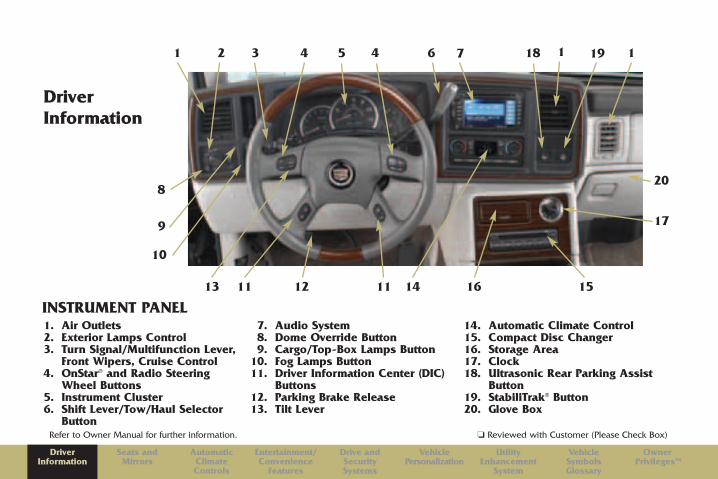
❏ Reviewed with Customer (Please Check Box)Refer to Owner Manual for further information.
DriverInformation
1. Air Outlets2. Exterior Lamps Control3. Turn Signal/Multifunction Lever,
Front Wipers, Cruise Control4. OnStar® and Radio Steering
Wheel Buttons5. Instrument Cluster6. Shift Lever/Tow/Haul Selector
Button
7. Audio System8. Dome Override Button9. Cargo/Top-Box Lamps Button
10. Fog Lamps Button11. Driver Information Center (DIC)
Buttons12. Parking Brake Release13. Tilt Lever
14. Automatic Climate Control 15. Compact Disc Changer16. Storage Area17. Clock18. Ultrasonic Rear Parking Assist
Button19. StabiliTrak® Button20. Glove Box
INSTRUMENT PANEL13 11
8
17
1112
20
151614
9
21 3 4
10
6 7 19185 4 1 1
Drive andSecuritySystems
VehiclePersonalization
UtilityEnhancement
System
OwnerPrivilegesTM
Entertainment/Convenience
Features
AutomaticClimateControls
Seats andMirrors
DriverInformation
VehicleSymbolsGlossary
3573 Escalade 9/3/03 7:11 PM Page 3

E S C A L A D E E X T
21 12 3 14 15
19
20
3 16
INSTRUMENT CLUSTER1. Security Light2. Malfunction Indicator Lamp (MIL)/Service Engine
Soon Light3. Turn Signal Indicator4. Cruise Control Light5. Air Bag Readiness Light6. Safety Belt Reminder Light7. Headlamp High Beam Indicator Light8. Transmission Temperature Gauge9. Tachometer
10. Antilock Brake System Warning Light11. Brake System Warning Light12. Speedometer/Gear Selector Indicator13. Driver Information Center (DIC) Display14. Tow/Haul Mode Light 15. Traction Off Light16. Charging System Light17. Oil Pressure Gauge18. Fuel Gauge19. Voltmeter20. Engine Coolant Temperature Gauge21. Cargo Lamp Indicator Light
8
4
10 11
9
5
67
13 1817
21
Important: The instrument cluster is designed to let you know aboutmany important aspects of yourvehicle’s operation. The messagecenter can provide critical information
to prevent damage to your vehicle. It is important to read your OwnerManual and become familiar with theinformation that is being relayed toyou by the lights, gauges and
indicators, particularly the messagecenter, and what action can be takento ensure your safety and to preventdamage.
3573 Escalade 9/3/03 7:11 PM Page 4

❏ Reviewed with Customer (Please Check Box)Refer to Owner Manual for further information.
HEATED FRONT SEATSThis featureallows you toheat the frontseatbacks andseat cushionssimultaneouslyor just theseatbacks. Threeheat settings are
available. The controls are located onthe driver and front passenger doorpanels.Select a heat setting for both theseatback and seat cushion1 Press and release the horizontal button
until the indicator light shows the desired setting.
Select a heat setting for the seatbackonly2 Press and release the vertical button
until the indicator light shows the desired setting.
POWER LUMBAR/BOLSTER FRONTSEATS Adjust lumbarsupport• Press the front or
rear of the controllocated on the sideof the seat cushionnear the door.Release at thepreferred setting.
Adjust side bolster support• Press the top or bottom of the lumbar
control. Release at the preferredsetting.
SECOND ROW SEAT FEATURESUse the button located on the back ofthe center console to select one oftwo heat settings for the second rowseat cushion• Press the button once for High; twice
for Low. Press it again to turn off theheat feature.
Fold either side of the second-rowbench seatBoth sides of the second row seat canbe folded down for extra cargo capacityor access to the Midgate™.
To fold, follow these steps:
1 Pull up on the strap at the rear of the seat cushion and pull the cushion forward into an upright position.
• Pull the seatback forward so that itfolds down into a flat position.
Return seat to occupant position• Lift and move the seatback into the
upright position. • Return the cushion to the seating
position until it latches.
PASSENGER AUTOMATIC LOCKINGRESTRAINT (ALR)The safety belt is designed to lock duringan accident, but it will also lock if it ispulled out all the way during initialbuckling, and you may be unaware thatthis has happened. If the safety belt doeslock, unbuckle it and allow it to retractfully, then pull it out and re-buckle thebelt.
Seats and Mirrors
21
1
Drive andSecuritySystems
VehiclePersonalization
UtilityEnhancement
System
OwnerPrivilegesTM
Entertainment/Convenience
Features
AutomaticClimateControls
Seats andMirrors
DriverInformation
VehicleSymbolsGlossary
3573 Escalade 9/3/03 7:11 PM Page 5

E S C A L A D E E X T
POWER FOLDING MIRRORSFold mirrors1 Move the selector switch located
above the mirror control to the center position.
2 Press the right side of the four-way control pad to fold the mirrors in.
• Press the left side of the four-waycontrol pad to fold the mirrors out.
If the mirrors have been foldedmanually, they must be moved throughthe power folding cycle three times toreset them in their tracks.
AUTOMATIC DIMMING REARVIEWMIRROR WITH ONSTAR®,COMPASS AND TEMPERATUREDISPLAY When on, the automatic interiordimming rearview mirror automaticallydims to the proper level to minimizeglare from lights behind you when it’sdark outside.Turn the self-dimming function on oroff1 Press and hold this button for
approximately eight seconds. Use the OnStar® Communicationssystem 3 Press to connect to an OnStar® Advisor.2 Press to answer or end a call from the
OnStar® Center.4 Press in an emergency to connect to
an OnStar® Advisor who can contact
the nearest emergency services provider.
Turn the outside temperature displaysand compass readings on or off1 Press this button.
Display temperature1 Press and hold for four seconds to
toggle between °C and °F. Once the desired °C or °F is displayed, release the button. Wait four seconds and the temperature will be displayed.
1
21 2 3 4
3573 Escalade 9/3/03 7:11 PM Page 6

❏ Reviewed with Customer (Please Check Box)Refer to Owner Manual for further information.
DUAL-ZONE CLIMATE CONTROLSYSTEM
EXT’s Dual-Zone Automatic ClimateControl System features dual zoneoperation for the front passengers.Adjust settings for automaticoperation1 Push the AUTO button and adjust the
temperature knob (2) to the desired temperature to set automatic air delivery mode, fan speed, A/C and recirculation functions for the driver. (Note: Because this is an automatic system, the A/C mode is the default setting.)
Set same temperature for driver andfront passenger 1 Press and hold the AUTO button for
four seconds.
Select air distribution manually 3 Press and release the MODE button
until the desired source of air is indicated on the display.
Manually raise or lower fan speed4 Press the upper or lower portion of the
FAN control button.Adjust settings for operation3 Adjust air delivery location with mode
control button.2 Adjust driver/passenger temperatures
with knobs as shown.4 Press fan speed button to desired
setting.Additional Climate Control SystemFunctions
: Recirculates interior air while inVent, Bi-Level positions. To preventwindow fogging, Recirculation will notoperate in the Defog, Defrost or Floormode.
: Clears windshield and front sidewindows of fog/frost.
: Clears rear glass of fog/frost andactivates heated outside rearviewmirrors.
: Turns the air conditioning system onand off. This symbol ( ) appears on thedisplay when the A/C system is turnedoff.
SUNROOF (if equipped)
Close the sunroof1 Hold the front portion of the button
down until the sunroof motor stops. The sunroof will tilt up slightly to seal. This is normal.
Automatic Climate Controls
Note: When the climate control system is in theOFF position ( ), outside air will continue toenter the vehicle and will be directed according tothe mode position selected. This is normal climatecontrol operation.2
4
1
3
1
Drive andSecuritySystems
VehiclePersonalization
UtilityEnhancement
System
OwnerPrivilegesTM
Entertainment/Convenience
Features
AutomaticClimateControls
Seats andMirrors
DriverInformation
VehicleSymbolsGlossary
3573 Escalade 9/3/03 7:12 PM Page 7
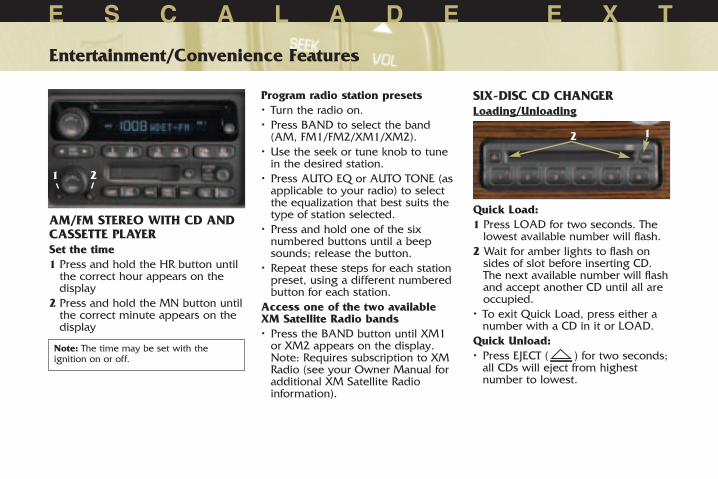
AM/FM STEREO WITH CD ANDCASSETTE PLAYERSet the time 1 Press and hold the HR button until
the correct hour appears on the display
2 Press and hold the MN button untilthe correct minute appears on the display
Program radio station presets• Turn the radio on.• Press BAND to select the band
(AM, FM1/FM2/XM1/XM2).• Use the seek or tune knob to tune
in the desired station.• Press AUTO EQ or AUTO TONE (as
applicable to your radio) to selectthe equalization that best suits thetype of station selected.
• Press and hold one of the sixnumbered buttons until a beepsounds; release the button.
• Repeat these steps for each stationpreset, using a different numberedbutton for each station.
Access one of the two availableXM Satellite Radio bands • Press the BAND button until XM1
or XM2 appears on the display.Note: Requires subscription to XMRadio (see your Owner Manual foradditional XM Satellite Radioinformation).
SIX-DISC CD CHANGERLoading/Unloading
Quick Load:1 Press LOAD for two seconds. The
lowest available number will flash.2 Wait for amber lights to flash on
sides of slot before inserting CD. The next available number will flashand accept another CD until all are occupied.
• To exit Quick Load, press either anumber with a CD in it or LOAD.
Quick Unload:• Press EJECT ( ) for two seconds;
all CDs will eject from highestnumber to lowest.
E S C A L A D E E X T
Entertainment/Convenience Features
Note: The time may be set with theignition on or off.
1 2
2 1
3573 Escalade 9/3/03 7:12 PM Page 8
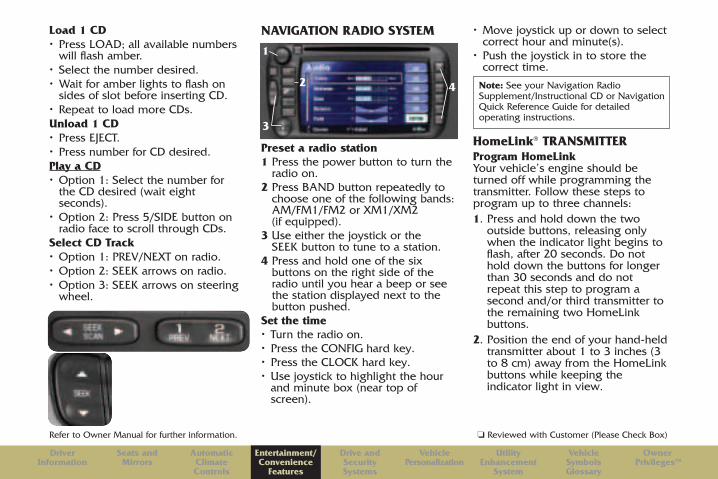
Load 1 CD• Press LOAD; all available numbers
will flash amber. • Select the number desired.• Wait for amber lights to flash on
sides of slot before inserting CD.• Repeat to load more CDs.Unload 1 CD• Press EJECT.• Press number for CD desired.Play a CD• Option 1: Select the number for
the CD desired (wait eightseconds).
• Option 2: Press 5/SIDE button onradio face to scroll through CDs.
Select CD Track• Option 1: PREV/NEXT on radio.• Option 2: SEEK arrows on radio.• Option 3: SEEK arrows on steering
wheel.
NAVIGATION RADIO SYSTEM
Preset a radio station1 Press the power button to turn the
radio on.2 Press BAND button repeatedly to
choose one of the following bands:AM/FM1/FM2 or XM1/XM2 (if equipped).
3 Use either the joystick or the SEEK button to tune to a station.
4 Press and hold one of the six buttons on the right side of the radio until you hear a beep or see the station displayed next to the button pushed.
Set the time• Turn the radio on.• Press the CONFIG hard key. • Press the CLOCK hard key.• Use joystick to highlight the hour
and minute box (near top ofscreen).
• Move joystick up or down to selectcorrect hour and minute(s).
• Push the joystick in to store thecorrect time.
HomeLink® TRANSMITTER Program HomeLinkYour vehicle’s engine should beturned off while programming thetransmitter. Follow these steps toprogram up to three channels:1. Press and hold down the two
outside buttons, releasing only when the indicator light begins to flash, after 20 seconds. Do not hold down the buttons for longer than 30 seconds and do not repeat this step to program a second and/or third transmitter to the remaining two HomeLink buttons.
2. Position the end of your hand-heldtransmitter about 1 to 3 inches (3 to 8 cm) away from the HomeLinkbuttons while keeping the indicator light in view.
❏ Reviewed with Customer (Please Check Box)Refer to Owner Manual for further information.
Note: See your Navigation RadioSupplement/Instructional CD or NavigationQuick Reference Guide for detailedoperating instructions.
1
2
3
4
Drive andSecuritySystems
VehiclePersonalization
UtilityEnhancement
System
OwnerPrivilegesTM
Entertainment/Convenience
Features
AutomaticClimateControls
Seats andMirrors
DriverInformation
VehicleSymbolsGlossary
3573 Escalade 9/3/03 7:12 PM Page 9

3. Simultaneously press and hold both the desired button on HomeLink and the hand-held transmitter button. Do not release the buttons until Step 4 has been completed.
4. The indicator light will flash slowly at first and then rapidly after HomeLink successfully receives the frequency signal from the hand-held transmitter.Release both buttons.
5. Press and hold the newly trained HomeLink button and observe the indicator light. If the indicator light stays on constantly, programming is complete and your device should activate when the HomeLink button is pressed and released.
To program the remaining twoHomeLink buttons, begin with Step 2under “Program HomeLink.”Do not repeat Step 1, as this will eraseall of the programmed channels.
STEERING WHEEL CONTROLS(OnStar®/Radio) 1 This button will activate “personal
calling.” Pressing this button also acts as a “barge in” for voice mail.
2 PROG: Sequence through stored presets for AM, FM and XM radio.
3�SOURCE�: To select AM, FM1, FM2, XM1, XM2 Satellite Radio, cassette, CD, in-dash 6-Disc CD Changer, RSE
4�SEEK�: Seek radio stations, CD tracks
5�VOL�: Adjust Radio volume
AUTOMATIC HEADLAMP CONTROLSTurn off Daytime Running Lamps (DRL)and automatic headlamps• Turn the exterior lamps knob (located
to the left of the steering wheel) toOFF (��).
Activate the automatic headlampsystem• Turn the exterior lamps knob to
AUTO. The automatic headlampsystem will turn on the front and rearlamps.
Manually illuminate the parkinglamps, taillamps, instrumentpanel/radio lights, license plate lamps • Turn the exterior lamps knob to the
parking lamp position ( ).Manually activate the headlamps, allexterior tail/marker lamps and theinstrument panel/radio lights• Turn the exterior lamps knob to this
position ( ).Turn the fog lamps on or off1 Press the fog lamp button located on
the left side of the instrument panel.An indicator lamp will illuminate whenthe fog lamps are on.
2 Press to turn cargo lamp on or off
E S C A L A D E E X T
Note: If your transmitter has a “rolling code”feature, the above process may not work. Pleaserefer to your Owner Manual or contact HomeLinkat 1-800-335-3515 (www.homelink.com).
1
2
31
2
4
5
3573 Escalade 9/3/03 7:12 PM Page 10

❏ Reviewed with Customer (Please Check Box)Refer to Owner Manual for further information.
STABILITRAK®
SYSTEMStabiliTrak helps youmaintain directioncontrol during mostdriving conditions. In some drivingsituations, such as becoming stuck onslippery terrain and vehicle “rocking” isrequired to free it, it may be necessaryto limit StabiliTrak control. The StabiliTraklimit button decreases the amount ofTraction Control engagement anddisables the lateral and yaw sensors.Limit StabiliTrak• Press the StabiliTrak button (shown
above) located on the instrumentpanel.
ULTRASONIC REARPARKING ASSIST(URPA)This feature helps youdetermine how close anobject is to your rearbumper. Both a variableaudible chime and avisual display located in the center of therear upper trim panel convey distance toan object.
Disable URPA• Press the URPA on/off button located
near the climate control system andradio.
TIRE PRESSURE MONITORThis feature alerts you when a largechange in pressure occurs in one of yourvehicle’s tires. If this occurs, a CHECKTIRE PRESSURE message will appear inthe instrument panel cluster. Thismessage will remain on until you resetthe system.Reset the tire pressure monitor• To reset the tire pressure message,
you must fill the tires with the correctamount of air.
• Pressing the cluster stem button onyour instrument panel cluster or theReset button on your steering wheelwill temporarily eliminate themessage. However, at the next vehiclestart-up, the message will reappear.The tire pressure must be corrected topermanently eliminate the message.
CONTENT THEFT-DETERRENTSYSTEM Arm the System• Lock the doors using the power door
lock switch or the Keyless EntrySystem transmitter. The alarm isactivated when the symbol ( ) goesoff (approximately 30 seconds).
Use the Driver Information Center toprogram the alarm to one of thefollowing• Both Horn/Headlamps • Horn only• Lamps only• Off
Drive and Security Systems
Note: The Tire Pressure Monitor can alert youabout low tire pressure, but it doesn’t replacenormal tire maintenance.
Note: Your vehicle’s factory default setting isHorn and Lamps. See the VehiclePersonalization section of this booklet for moreinformation.
Drive andSecuritySystems
VehiclePersonalization
UtilityEnhancement
System
OwnerPrivilegesTM
Entertainment/Convenience
Features
AutomaticClimateControls
Seats andMirrors
DriverInformation
VehicleSymbolsGlossary
3573 Escalade 9/3/03 7:12 PM Page 11

MEMORY POSITIONS FORDRIVER’S SEAT, MIRRORS, PEDALS,RADIO AND CLIMATE CONTROLS Use the driver’sdoor mountedcontrols to:• Adjust driver seat,
including lumbaradjustment
• Adjust gas andbrake pedals
• Adjust the outside rearview mirrors
• Set the radio presets and climate control temperature
1 To store the above settings, press and hold Memory 1 or 2 until two chimes sound (about four seconds). To set up for another driver, repeat the process with the other memory button.
These settings can be restored bypressing the Memory 1 or 2 button onthe driver’s door, or by using theRemote Keyless Entry (RKE) transmitter.Note: The vehicle memory settings will correspond to the number on theRKE: 1 or 2. Set Easy Exit Driver Seat position1. Briefly press memory button 1 or 2
(depending on which RKE you have)2. Adjust the seat to the desired exit
position.3. Press and hold the exit button ( )
on the driver’s door until two chimes sound. (Note: Seat Exit must be “On”in your programmed settings.)
DRIVER INFORMATION CENTERPERSONALIZATION You can personalize your vehicle withthe following features:• Automatic Locking• Delayed Locking• Automatic Unlocking• Remote Lock Feedback• Remote/Unlock Feedback• Headlamps On at Exit• Perimeter Lighting
• Seat Position Recall• Easy Exit Driver Seat• Curb View Assist• Alarm Warning Type• Display Language• Display UnitsSelect Options To cycle through the features below, usethe Menu button ( ) located on yoursteering wheel.Use the Select button ( ) to chooseyour desired setting. The last settingremaining on the display will be theselection of choice. Continue cyclingthrough the menu to set otherpreferences.Automatic Door Locking1. Lock Doors Out of Park2. Lock Doors Manually3. Lock Doors with Speed
(approx. 8 mph)Delayed Locking1. Delayed Locking ON2. Delayed Locking OFFAutomatic Door Unlocking1. Unlock All in Park2. Unlock All at Key Out of Ignition
E S C A L A D E E X T
Vehicle Personalization
Note: Memory 1 or 2 is dependent on the RKEtransmitter being used and the key being in theignition during programming.
1
3573 Escalade 9/3/03 7:12 PM Page 12

3. Unlock Manually4. Unlock Driver Only in ParkRemote Lock Feedback1. Flash Lamps2. Sound Horn3. Both Lamps and Horn4. OffRemote Unlock Feedback1. Flash Lamps2. Sound Horn3. Both Lamps and Horn4. OffSeat Position Recall Options1. Seat Position Recall Off (Memory
Seat position will only be recalled when you press the memory button 1 or 2 on the driver’s door)
2. Seat Position Recall at Key In3. Seat Position Recall On RemoteEasy Exit Driver Seat position1. Easy Exit Seat ON2. Easy Exit Seat OFFCurb View Assist Options1. Curb View Off2. Curb View Passenger3. Curb View Driver4. Curb View Both
The Curb View Assist featureautomatically tilts your outside mirrorsdownward to allow you to see curbswhen backing up (Default setting).Set Curb View Assist position• Enable one of the four selections
above. • Adjust the mirrors while the vehicle is
in reverse. When the vehicle is shiftedout of reverse, your selection is savedin Memory 1 or 2.
ODOMETER/TRIP SETTINGSYour vehicle’spersonal trip andbusiness tripodometersoperate onlywhen they areturned on.
Enable the system1 Press the Trip button until the words
“Personal” or “Business” appear. 2 Then press Select to turn the Personal
or Business trip computer on or off. • Press the Trip button again to monitor
your mileage.Reset trip information • Press and hold the Select button for
two seconds while viewing any of thetrip modes on the Driver Information Center.
Use the above procedure to monitor thefollowing settings:• Personal/Business: Miles• Personal/Business: Gal• Personal/Business: MPG• Personal/Business: Average MPH• Personal/Business: Annual % Usage• Business: Hourmeter (Total Engine
Run Time)• Business: Timer• Business: Annual Log
Access fuel information3 Press the Fuel information button to
view the following:• RANGE: The remaining distance you
can drive without refueling. (Fuel range cannot be reset.)
• AVG ECON: How many miles per gallon your vehicle is getting based on current and past driving conditions. To reset AVG ECON, pressand hold the Select button for two seconds while AVG ECON is displayedin the Driver Information Center.
• INST ECON: How many miles per gallon your vehicle is getting at the particular moment in time. (Instant Fuel Economy cannot be reset.)
❏ Reviewed with Customer (Please Check Box)Refer to Owner Manual for further information.
1
3 2
Note: You can select and reset trip features byusing the Trip Odometer Reset Stem locatedon the instrument panel cluster.
Drive andSecuritySystems
VehiclePersonalization
UtilityEnhancement
System
OwnerPrivilegesTM
Entertainment/Convenience
Features
AutomaticClimateControls
Seats andMirrors
DriverInformation
VehicleSymbolsGlossary
3573 Escalade 9/3/03 7:12 PM Page 13

MIDGATETM COMPONENTS
1 Latch Levers2 Grab Handles3 Glass-Catch Release Button4 Glass Lock Knobs5 Midgate Release Handle6 Window Retaining Tabs
CARGO AREA MIDGATE PANELYour vehicle is equipped with aMidgate Panel and removable rearwindow. The Midgate allows you tosubstantially extend the length of thevehicle’s cargo area.
MIDGATE OPERATIONRemove and store rear window Fold rear seats down. 1 Squeeze and pull down latch
levers at each upper corner of rearwindow to release window.
Hold glass in place and press “glass-catch” release button, allowing window to tilt forward.Lift window from lower window frame channel using grab handles.
2 Lower window into Midgate storage pocket, using lower edge of glass to guide it behind the three rear glass retaining tabs. With grab handles facing you, holdglass against storage pocket until next step.
E S C A L A D E E X T
Utility Enhancement System
1
2
3
4
5
6
1 2
3
3573 Escalade 9/3/03 7:12 PM Page 14

3 While pressing window flat into storage pocket, turn lock knobs clockwise until arrows align with “lock” symbols. (You may have to push the corner of the window slightly to allow the knob to fully lock.)Return rear-window latch levers toclosed position until hearing a “click.”With window securely stored, return seat to normal position. Press down on seat cushion and forward on the seatback to ensure it is locked.
Reinstall the rear windowSqueeze and pull down on rear-window latch levers.Hold window in place and turn lockknobs to unlocked position.Use grab handles to lift window fromstorage well behind retaining tabs.With rear window tilted toward you,place window into lower channel ofwindow frame.
4 Make sure arrows at bottom of rear window and top of Midgate crossbar are aligned. Apply downward pressure to push window into channel. Using grab handles, press window flat againstframe.
5 Holding glass firmly in place, pushlatch levers up until hearing a click, indicating latch is secured.
Lower the MidgateThe Midgate can be lowered from itsnormal position to extend the cargoarea into the rear of the cab. TheMidgate can be lowered with therear window installed in the normalposition or removed and stored inthe Midgate storage pocket. Beforelowering the Midgate, fold rear seatsdown.With Rear Window Installed6 Stand outside vehicle and, with
one hand against the midgate below the crossbar, support the Midgate.
7 With other hand, turn Midgate handle clockwise to release Midgate and pull it toward you. Gently lower Midgate forward until lying flat on folded rear seat.
❏ Reviewed with Customer (Please Check Box)Refer to Owner Manual for further information.
4
57
6
Drive andSecuritySystems
VehiclePersonalization
UtilityEnhancement
System
OwnerPrivilegesTM
Entertainment/Convenience
Features
AutomaticClimateControls
Seats andMirrors
DriverInformation
VehicleSymbolsGlossary
3573 Escalade 9/3/03 7:13 PM Page 15

With Rear Window Stored1 Stand outside vehicle and, with
one hand against crossbar, supportthe Midgate.
2 With other hand, turn Midgate handle clockwise to release it. Gently lower Midgate forward until lying flat on folded rear seat.
Raise the MidgateRaise Midgate with a firm swingingmotion to engage latches and secure
Midgate in its normal position. If rearwindow has been stored, it can bereturned to its normal position byfollowing “Reinstall the rear window”instructions.CARGO COVER SYSTEMYour vehicle is equipped with athree-piece cargo cover system. Anynumber of the three panels can beinstalled to provide the exactconfiguration of space and security tomeet your cargo-loadingrequirements. See your OwnerManual for more information.
Remove cargo cover panelsUnlatch panels and slide them out ofthe cargo box rails. Panel #1 hasfour latches; panels #2 and #3 havetwo each. The reinstallationprocedure is a reversal of theremoval procedure.Store cargo cover panelsThe cargo cover panels can be storedon either side of cargo bed using thestorage bag provided. To avoiddamage, store panels as shownbelow. The bag’s anchor hooks mustbe attached to tie-down locations incargo bed.
E S C A L A D E E X T
Caution: With the rear window stored andthe crossbar being lowered with theMidgate, the Midgate will be noticeablyheavier. Use extra care. Note: This convenience guide provides
only brief cargo cover operationinstructions. See your Owner Manual formore detailed instructions.
1 2
3573 Escalade 9/3/03 7:13 PM Page 16

❏ Reviewed with Customer (Please Check Box)Refer to Owner Manual for further information.
Following are examples of symbols you may find on your vehicle. It is important to become familiar with them,as they alert you to various vehicle operating conditions.
Vehicle Symbols Glossary
Air Bag Readiness Light
Air Conditioning (A/C)
Antilock Brake System Warning Light
Brake System Warning Light
Cargo Lamp
Content Theft Deterrent
Cruise Control Set
Dome Lamps Override Button
DIC Trip Information Button (on steering wheel)
DIC Fuel Information Button (on steering wheel)
DIC Personalization Button (on steering wheel)
DIC Select Button (on steering wheel)
Fog Lamps
Headlamps
Instrument Panel Brightness Control
Malfunction Indicator Lamp (Check Engine Light)
Off
Off/On
On
Parking Lamps
Rear Door Security Locks
Rear Window Defogger
Safety Belt Reminder Light
Tow/Haul Mode Light
Traction Off Light
Drive andSecuritySystems
VehiclePersonalization
UtilityEnhancement
System
OwnerPrivilegesTM
Entertainment/Convenience
Features
AutomaticClimateControls
Seats andMirrors
DriverInformation
VehicleSymbolsGlossary
3573 Escalade 9/3/03 7:13 PM Page 17

E S C A L A D E E X T
Roadside Service1-800-882-1112Roadside Service provides everyCadillac owner with the advantage ofcontacting a Cadillac advisor and,when appropriate, a Cadillac-traineddealer technician who can provideon-site services.• Towing Service• Battery Jump-Starting• Lockout Assistance• Fuel Delivery• Flat Tire Change
(covers change only)Trip Interruption – If your trip isinterrupted due to a componentfailure covered under warranty,incidental expenses may bereimbursed, including hotel, mealsand rental car.
Courtesy Transportation may alsobe provided for warranted repairs,including shuttle service for same-day repairs and loaner transportationfor overnight repair. Roadside Serviceis also available to Cadillac customersbeyond the warranty period for acharge.Customer Assistance1-800-458-8006 Should you need to ask questions,make a comment or requestadditional information, the exclusiveCadillac Customer Assistance Centeris staffed around the clock withprofessionals to serve you.When you call Cadillac RoadsideService or Customer Assistance,when possible, please provide thephone advisor with:
• Your telephone number• Your location• Your Cadillac’s location• A description of the problem• Vehicle ID number• Year and model of your Cadillac• Delivery date• Current mileageThis book contains the latestinformation available to Cadillac atthe time of printing. Cadillac reservesthe right to make changes to theproduct after that time withoutfurther notice.EXT is a registered trademark ofCadillac Motor Car Division andGeneral Motors Corporation.Copyright 2003 by Cadillac MotorDivision. All rights reserved.
Owner PrivilegesTM
3573 Escalade 9/3/03 7:13 PM Page 18

Drive andSecuritySystems
VehiclePersonalization
UtilityEnhancement
System
OwnerPrivilegesTM
Entertainment/Convenience
Features
AutomaticClimateControls
Seats andMirrors
DriverInformation
VehicleSymbolsGlossary
04EEXTGTK
3573 Escalade 9/3/03 7:13 PM Page 19

3573 Escalade 9/3/03 7:13 PM Page 20


