Instructions Manual - FAB Defense · 5 Step 3 Step 4 Step 5 Once the grip is free, remove it...
12
1 AR-Podium ™ Instructions Manual • Make sure your weapon is unloaded before you begin any assembly or disassembly procedures! • Ammunition should never be present while assembling accessories on a firearm! • Always keep your gun pointed in a safe direction. This ensures that even if your gun were to discharge no one will be killed or injured • Always keep your finger off the trigger until ready to shoot • Always keep your gun unloaded until ready to use • Do not store a firearm in a loaded condition • If you use a firearm for home protection, take extra precaution in the storage of that gun. Store it so that it is not accessible to unauthorized persons. GENERAL SAFETY INSTRUCTIONS Thank you for purchasing another quality product by FAB-Defense ®. The AR-Podium™ implements a bi-pod support for the AR platform in a new and innovative way. With the AR-Podium™, the operator is able to install a steady and durable bi-pod platform without adding weight to the front of the rifle and while saving valuable rail space. The AR-Podium™ is easily deployed with the main shooting hand, without having to change your grip on the weapon, or lose the sight picture. The AR-Podium™ is easily installed, no Gunsmith involvement is required, just follow the detailed instructions below. Please note that the AR-Podium™ will only fit M-16 / AR-15 , 5.56x45 lower receiver variants, with a standard magazine well. FAB Defense is a registered trademark of FAB Manufacturing & Import of Industrial Equipment, Ltd. in the United States and other countries. The AR-Podium is covered by one or more of the following patents or pending patent applications: US 9,354,012. 2016© FAB Manufacturing & Import of Industrial Equipment, Ltd. All rights reserved.
-
Upload
dangkhuong -
Category
Documents
-
view
216 -
download
3
Transcript of Instructions Manual - FAB Defense · 5 Step 3 Step 4 Step 5 Once the grip is free, remove it...
1
AR-Podium™Instructions Manual
• Make sure your weapon is unloaded before you begin any assembly or disassembly procedures!
• Ammunition should never be present while assembling accessories on a firearm!• Always keep your gun pointed in a safe direction. This ensures that even if your
gun were to discharge no one will be killed or injured• Always keep your finger off the trigger until ready to shoot• Always keep your gun unloaded until ready to use• Do not store a firearm in a loaded condition• If you use a firearm for home protection, take extra precaution in the storage
of that gun. Store it so that it is not accessible to unauthorized persons.
GENERAL SAFETY INSTRUCTIONS
Thank you for purchasing another quality product by FAB-Defense ®.
The AR-Podium™ implements a bi-pod support for the AR platform in a new and innovative way. With the AR-Podium™, the operator is able to install a steady and durable bi-pod platform without adding weight to the front of the rifle and while saving valuable rail space. The AR-Podium™ is easily deployed with the main shooting hand, without having to change your grip on the weapon, or lose the sight picture. The AR-Podium™ is easily installed, no Gunsmith involvement is required, just follow the detailed instructions below.
Please note that the AR-Podium™ will only fit M-16 / AR-15 , 5.56x45 lower receiver variants, with a standard magazine well.
FAB Defense is a registered trademark of FAB Manufacturing & Import of Industrial Equipment, Ltd. in the United States and other countries. The AR-Podium is covered by one or more of the following patents or pending patent applications: US 9,354,012. 2016© FAB Manufacturing & Import of Industrial Equipment, Ltd. All rights reserved.

2
Your AR-Podium™ includes the following parts:
Getting To Know The AR-Podium
A
B
C
D
E F
G
2
2
1
1
1
2

3
A. Podium
1. Braces insert
2. Pistol Grip insert
B. Support Braces for AR
1. Left Brace
2. Right Brace
C. AGR-43 pistol grip
D. Hex Key:
1 * 3 mm Hex Key
1 * 2.5 mm Hex Key
E. 1 * M5 Cap socket screw and nut
F. 1 * Polymer drive-pin
G. 3 * M3 socket screws
You will also need:
• Flat-Head screwdriver (do not use any power tools)
• Soft-Face hammer
• Flat and stable working surface
Make sure your weapon is unloaded before you begin any assembly or disassembly procedures. Ammunition should never be present while assembling accessories on a firearm!
WARNING
Before installation you must first remove the existing pistol grip and replace it with the supplied AGR-43(C) pistol grip. This procedure should be done while the firearm is placed upside-down on a stable working surface. Use your choice of vise and support to ensure your AR is stable and stationary.
Note: If your AR already has the AGR-43 installed, remove the hinged door by tapping out the polymer drive-pin using a Soft-Face hammer and polymer punch.

4
Step 1 Make sure your safety selector is on the “Safe” position. Turn the rifle upside down and place it on a firm and stable working surface (Fig 1).
Installing the AGR-43 pistol grip
Step 2 Using a flat head screwdriver, unscrew the pistol grip from the AR receiver (Fig 2).
Fig 2
Fig 1

5
Step 3
Step 4
Step 5
Once the grip is free, remove it carefully, making sure you retain the selector detent spring. (Fig 3).Place the selector detent spring in the appropriate hole of the AGR-43 pistol grip and insert the washer and pistol grip screw to the correct hole in the AGR-43 pistol grip (Fig 4).
Without moving the AR, make sure your safety selector is on “Safe” position. Place the AGR-43 pistol grip on the AR while ensuring that the selector detent spring enters the appropriate hole in the receiver. Press the pistol grip down on the receiver and tighten firmly using the screwdriver (Fig 5).
- use a manual screwdriver, do not use any power tools
Fig 5
Fig 3 Fig 4

6
Step 1
Step 2
Place the supplied M5 nut (E) into the appropriate slot in the Podium (Fig 6).
Insert the Podium into the base of the AGR-43 pistol grip, while ensuring the nut stays in place (Fig 7).
Installing the Podium
During the following steps, place the AR sideways on a stable working surface.
Fig 7
Fig 6

7
Step 3 Screw the cap socket screw(E) only halfway through the dedicated hole in the AGR-43 using the 3mm Hex Key(D1) (Fig 8).
Step 4 Take the polymer drive-pin(F) and push it firmly into the appropriate hole in the AGR-43 grip. Using the hammer, tap the pin into place with precise and light taps, until the pin is fully inserted (Fig 9).
Fig 9
Fig 8
8
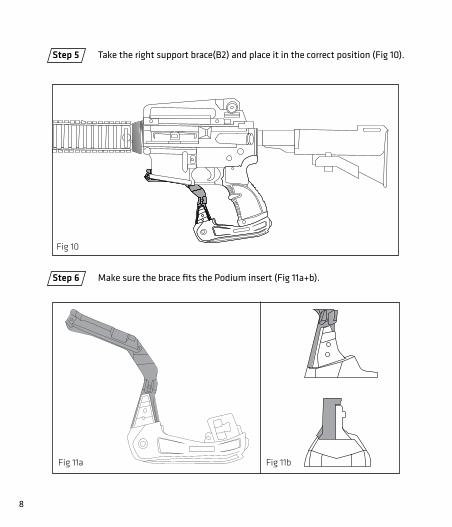
Step 6 Make sure the brace fits the Podium insert (Fig 11a+b).
Step 5 Take the right support brace(B2) and place it in the correct position (Fig 10).
Fig 11a Fig 11b
Fig 10

9
Step 8 Place the left brace(B1) opposite to the right one (Fig 13).
Step 7 Make sure the magazine well of your AR fits into the correct slot on the brace (Fig 12).
Fig 12
Fig 13
10
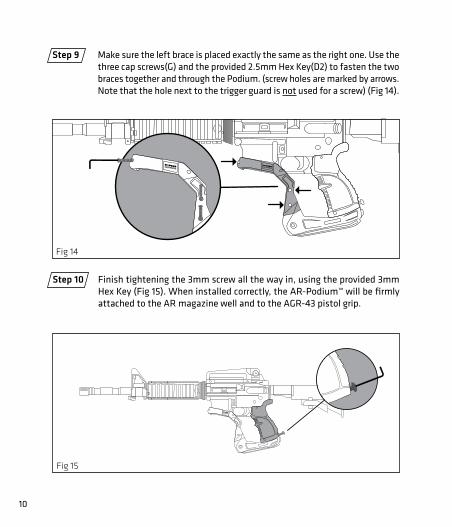
Step 9 Make sure the left brace is placed exactly the same as the right one. Use the three cap screws(G) and the provided 2.5mm Hex Key(D2) to fasten the two braces together and through the Podium. (screw holes are marked by arrows. Note that the hole next to the trigger guard is not used for a screw) (Fig 14).
Step 10 Finish tightening the 3mm screw all the way in, using the provided 3mm Hex Key (Fig 15). When installed correctly, the AR-Podium™ will be firmly attached to the AR magazine well and to the AGR-43 pistol grip.
Fig 14
Fig 15

11
Step 1 To deploy the Podium, push the button, placed under the pistol grip of the AR. The Podium is easily deployed with the main shooting hand, without having to change your grip on the gun. (Fig 16+17)
Using the AR-Podium™
Fig 16
Fig 17

12
Step 3 Even with the AR-Podium™ installed, you can still open the trigger guard using the dedicated hole in the braces, as seen below. (Fig 19)
Fig 19
Step 2 To fold the Podium, use you’re off hand and swipe-in both legs, until a positive click is heard. (Fig 18)
Fig 18