INSTRUCTION MANUAL - The CoolBot by Store It Cold
28
INSTRUCTION MANUAL
Transcript of INSTRUCTION MANUAL - The CoolBot by Store It Cold

INSTRUCTION MANUAL

Rev: 2020 – 3A ©2020 Store It Cold, LLC 1
INDEX
DISCLAIMER AND WARRANTY ....................................................................................................................................... 2
WHAT’S IN THE BOX? ..................................................................................................................................................... 3
TECHNICAL DATA ........................................................................................................................................................... 3
KNOWING YOUR COOLBOT PRO .................................................................................................................................... 4
HOW DOES THE COOLBOT PRO WORK WITH YOUR A/C? ............................................................................................. 6
HOW DOES THE JUMPER WORK WITH YOUR COOLBOT PRO? ...................................................................................... 6
BEFORE INSTALLING YOUR COOLBOT PRO .................................................................................................................... 7
INSTALLING YOUR COOLBOT PRO ................................................................................................................................. 8
CONNECTING YOUR COOLBOT PRO TO YOUR WI-FI NETWORK ............................................................................... 8
CONNECTING YOUR COOLBOT PRO TO YOUR AIR CONDITIONER ............................................................................ 9
CHANGING SETTINGS ON THE COOLBOT PRO ............................................................................................................. 12
ROOM TEMPERATURE SETTING .............................................................................................................................. 12
FINS SETTING ........................................................................................................................................................... 12
HEATER DELAY SETTING .......................................................................................................................................... 12
SWITCHING BETWEEN FAHRENHEIT AND CELSIUS ................................................................................................. 13
REBOOTING YOUR COOLBOT PRO........................................................................................................................... 13
THE COOLBOT PRO APP ............................................................................................................................................... 13
WEB APP FEATURES ................................................................................................................................................ 13
PUTTING YOUR APP ON YOUR HOME SCREEN ........................................................................................................ 13
THE STATUS TAB – Default Screen .......................................................................................................................... 14
THE DEVICES TAB..................................................................................................................................................... 16
THE ACCOUNT TAB .................................................................................................................................................. 21
ERROR CODES ON YOUR COOLBOT PRO ..................................................................................................................... 22
“Er” FLASHES ON MY COOLBOT DISPLAY ................................................................................................................ 23
“Ef” FLASHES ON MY COOLBOT DISPLAY ................................................................................................................ 23
“EH” FLASHES ON THE COOLBOT DISPLAY .............................................................................................................. 24
“EE” FLASHING ON THE COOLBOT DISPLAY ............................................................................................................ 24
REBOOTING THE COOLBOT PRO .................................................................................................................................. 24
CHECKS ON YOUR COOLBOT PRO ................................................................................................................................ 25
MY COOLBOT PRO HAS A BLANK DISPLAY BUT THE POWER LIGHT IS ON .............................................................. 25
MY HEATER DOES NOT SEEM TO BE WORKING ...................................................................................................... 25
TEMPERATURE SENSORS CALIBRATION TEST ......................................................................................................... 25
THE COOLBOT PRO HAS NO LIGHTS AND NO DISPLAY. ........................................................................................... 25
CHECKS ON YOUR A/C UNIT ........................................................................................................................................ 26
DIRTY FINS ............................................................................................................................................................... 26
PROPER INSTALLATION AND SETTINGS ................................................................................................................... 26
DOUBLE YOUR WARRANTY! ........................................................................................................................................ 27

Rev: 2020 – 3A ©2020 Store It Cold, LLC 2
DISCLAIMER AND WARRANTY DISCLAIMER By using the CoolBot Pro temperature controller, you (the “User”) acknowledge there are inherent hazards in getting an air-conditioner (“A/C”) to do something it was not originally designed to do, and that these inherent hazards cannot be ameliorated, mitigated or obviated while still maintaining the essential functionality of the CoolBot Pro. User accepts all responsibility in the use of and monitoring of the CoolBot Pro and A/C. User assumes all risk of loss of property or product due to improper functioning of the CoolBot Pro (or A/C). User assumes all risk of injury and warrants that he/she will defend, indemnify and hold the seller harmless for any direct or consequential harm or damage that may result from the use of this product. Users that don’t accept this responsibility must return the CoolBot Pro for a FULL REFUND before use. LIMITED WARRANTY: The CoolBot Pro is warranted against defects for 1 year, not including damage due to misuse or accidents. To double the warranty on your CoolBot Pro see page 27 for details. HAPPY CUSTOMER GUARANTEE: Return the CoolBot Pro in its original condition within 45 days if you are not fully satisfied for a full refund (shipping not included). Credit only given if you email us at [email protected] or call 888-871-5723 before shipping.
Rev: 2020 – 3A ©2020 Store It Cold, LLC 3
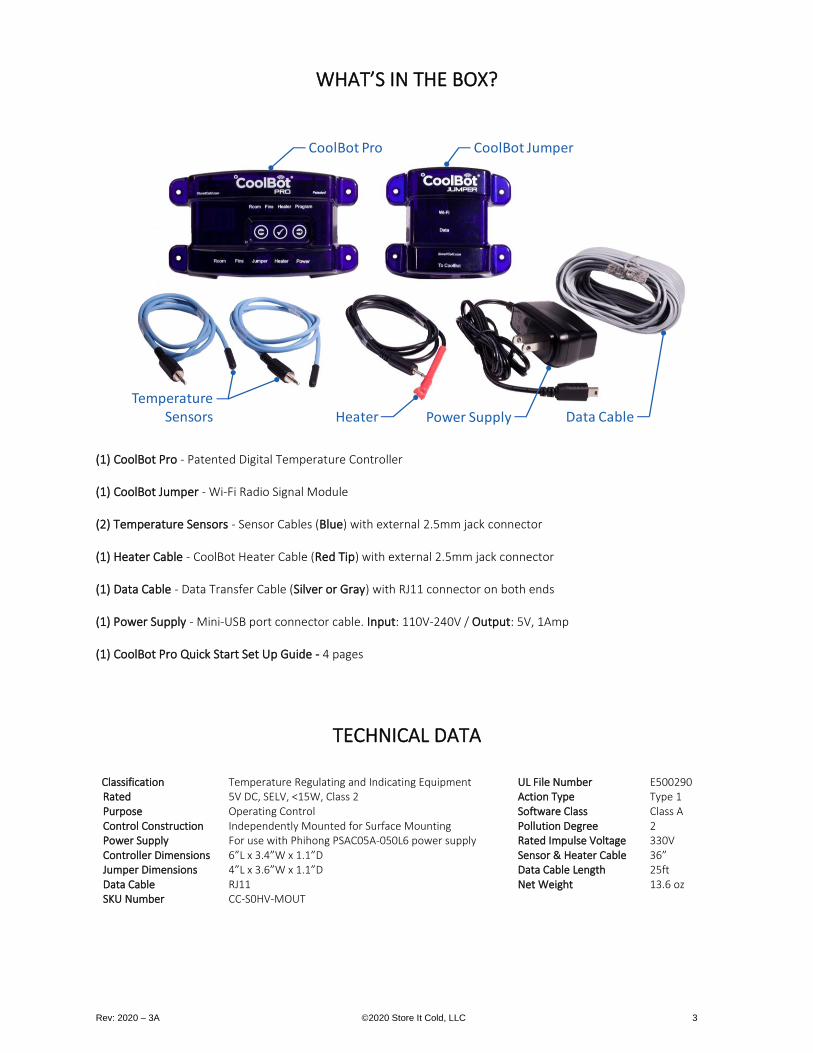
WHAT’S IN THE BOX?
(1) CoolBot Pro - Patented Digital Temperature Controller
(1) CoolBot Jumper - Wi-Fi Radio Signal Module
(2) Temperature Sensors - Sensor Cables (Blue) with external 2.5mm jack connector
(1) Heater Cable - CoolBot Heater Cable (Red Tip) with external 2.5mm jack connector
(1) Data Cable - Data Transfer Cable (Silver or Gray) with RJ11 connector on both ends
(1) Power Supply - Mini-USB port connector cable. Input: 110V-240V / Output: 5V, 1Amp
(1) CoolBot Pro Quick Start Set Up Guide - 4 pages
TECHNICAL DATA
Classification Temperature Regulating and Indicating Equipment UL File Number E500290 Rated 5V DC, SELV, <15W, Class 2 Action Type Type 1 Purpose Operating Control Software Class Class A Control Construction Independently Mounted for Surface Mounting Pollution Degree 2 Power Supply Controller Dimensions Jumper Dimensions Data Cable SKU Number
For use with Phihong PSAC05A-050L6 power supply 6”L x 3.4”W x 1.1”D 4”L x 3.6”W x 1.1”D RJ11 CC-S0HV-MOUT
Rated Impulse Voltage Sensor & Heater Cable Data Cable Length Net Weight
330V 36” 25ft 13.6 oz
CoolBot Pro
Temperature Sensors
CoolBot Jumper
Heater Power Supply Data Cable

Rev: 2020 – 3A ©2020 Store It Cold, LLC 4
KNOWING YOUR COOLBOT PRO
FIG 1

Rev: 2020 – 3A ©2020 Store It Cold, LLC 5
DISPLAY: The display changes depending on which Mode Indicator Light is illuminated. MODE INDICATOR LIGHT: Shows which mode you are currently using. Change modes by pressing the left or right arrow keys.
Room Mode: While in normal operation, the display shows the current room temperature and the Room Mode Indicator Light is solid (no blinking). Fins Mode: From the Room Mode, press the right arrow once to access the Fins Mode. The light above “Fins” will turn on solid (no blinking). The display will show the current fins’ (A/C’s coil) temperature. Heater Mode: From the Room Mode, press the right arrow twice to access the Heater Mode. The light above “Heater” will turn on solid (no blinking). The display will show an “F” for Fahrenheit or a “C” for Celsius. Program Mode: From the Room Mode, press the right arrow 3 times to access the Program Mode. The light above “Program” will turn on solid (no blinking). The display will show a number (e.g. 7.9), which will be the firmware version on your CoolBot Pro.
POWER INDICATOR LIGHT: This light is constantly on (solid), as long as your CoolBot Pro is plugged in and getting the correct power supply (110V-230V). HEATER ACTIVITY INDICATOR: When the CoolBot Pro is “calling for cooling” this light will blink slowly. It will stop blinking if the room temperature has reached the “set point” or the fins are reaching the defrost set point. INPUT TOUCH KEYS
CHECKMARK KEY: Press to enter the setup menu, save values, and exit each particular mode. RIGHT ARROW KEY: Press to move the Mode indicator light in between modes from left to right. LEFT ARROW KEY: Press to move the Mode indicator light in between modes from right to left.
ROOM AND FIN SENSOR CABLES: These two cables are interchangeable. They monitor the room temperature and the temperature of the fins on the A/C unit. DATA CABLE: This cable connects your CoolBot Pro and your Jumper. HEATER CABLE: This cable (red tip) heats up the A/C’s temperature sensor when cooling is needed. POWER CORD: This standard Mini USB cable brings power to your CoolBot and the Jumper. JUMPER: This is a radio signal device that connects your CoolBot to your Wi-Fi and to the Internet. WI-FI STATUS: Flashes when a message has come in from the server - from the Internet. DATA STATUS: Flashes when data is received from the CoolBot Pro controller.

Rev: 2020 – 3A ©2020 Store It Cold, LLC 6
HOW DOES THE COOLBOT PRO WORK WITH YOUR A/C? The CoolBot Pro uses 2 temperature sensors (ROOM and FINS), the HEATER cable (red tip) and a programmed micro-controller to direct your air conditioner to operate in such a way as to cool the room to a set temperature in between 33°F/0.5°C and 65°F/18°C without freezing up. How does it do this? The HEATER cable (red tip) is keeping your A/C’s temperature sensor warm to make the A/C “think” it is warmer than the actual room temperature. By doing this, the compressor on your A/C keeps running and cools down the space. The ROOM and the FINS sensors tell the CoolBot Pro when to turn off the HEATER cable. This will happen when:
• The room temperature reaches the set value. The HEATER will stop and your A/C’s temperature sensor will cool down and shut the compressor off. Note: The fan of the A/C should keep running.
• The fins of your A/C reach the defrost set point (33°F factory default). The HEATER will stop and your A/C’s temperature sensor will cool down and shut the compressor off to allow for a defrost cycle. This can happen even if the room has not reached its set point. Note: The fan of the A/C should keep running.
A slowly blinking Heater Activity Light is completely normal during operation. It indicates that the CoolBot is “Calling for Cooling” and the HEATER cable is keeping warm.
The defrost cycle does not use heat; The A/C is defrosted by turning your compressor off and circulating air over the frosted coil.
HOW DOES THE JUMPER WORK WITH YOUR COOLBOT PRO? The Jumper is the “middle man” in between your CoolBot Pro controller and your Wi-Fi Network. It allows the CoolBot Pro App to receive data from the controller and vice versa. The Jumper does not need batteries. It gets power through the Data Cable from the CoolBot Pro controller.
IMPORTANT! An available Wi-Fi Network with access to the Internet is required for the Jumper to operate.
Mount the Jumper outside of your cooler in a place where you have a strong Wi-Fi signal. Connect your Jumper to the CoolBot Pro using the supplied Data Cable.
IMPORTANT NOTE! The CoolBot Pro works without the Jumper just like previous CoolBot versions. Just install the CoolBot Pro without the Data Cable and Jumper connected to it. Your CoolBot Pro will keep your cooler cold but you won’t be able to access data or change settings from the CoolBot Pro App.

Rev: 2020 – 3A ©2020 Store It Cold, LLC 7
BEFORE INSTALLING YOUR COOLBOT PRO
• Should I read this manual? Yes! We highly recommend reading this Manual entirely to ensure proper installation and to familiarize yourself with your new CoolBot Pro. We also encourage you to visit our library section at www.storeitcold.com/support-library to ensure you have the latest version of this Manual.
• What if I don’t have Internet OR Wi-Fi? No problem! You can still use the CoolBot Pro without the CoolBot Jumper and without a Wi-Fi connection just like the previous generation CoolBot. If you have a window A/C, go straight to the “CONNECTING YOUR COOLBOT PRO TO YOUR AIR CONDITIONER” Section (page 9). NOTE: Your CoolBot Pro will keep your cooler cold but you won’t be able to access online data or change settings from the CoolBot Pro App.
• I have an Internet connection AND Wi-Fi. Awesome! Then you will enjoy all of the benefits of the CoolBot Pro and its app. First start with “CONNECTING YOUR COOLBOT PRO TO YOUR WI-FI NETWORK” (page 8), and then move to the “CONNECTING YOUR COOLBOT PRO TO YOUR AIR CONDITIONER” Section (page 9).
• I have a Mini Split A/C! Please visit our library at www.storeitcold.com/support-library for a detailed Installation Guide on compatible Mini-Split air conditioners and follow along this Manual.
• I am replacing my existing CoolBot with the new CoolBot Pro. No biggie! To ensure your cooler will continue performing just as well as always grab a pen and write down the settings from your old CoolBot:
✓ Room Set Point: _______ Push either arrow key on your CoolBot until the Room Mode light is lit. Press the checkmark and the current setpoint will blink.
✓ Fins Setting: _______ Push either arrow key on your CoolBot until the Fins Mode light is lit. Press the checkmark and the current Fins Setting will blink.
✓ Heater delay: _______ Push either arrow key on your CoolBot until the Heater Mode light is lit. Press the checkmark three times and the current Heater Delay Setting will blink.
Please go through the following checklist before installing your CoolBot Pro:
❏ The A/C Unit:
❏ Has digital display only.
❏ Has Automatic Restart.
❏ Is properly sized in BTUs. To check A/C sizing visit: https://www.storeitcold.com/support
❏ Is a recommended model. To check A/C compatibility visit: https://www.storeitcold.com/support
❏ The A/C is installed:
❏ High up on the cooler wall.
❏ On a short wall if it is a rectangular room.
❏ Tipped backwards (at least 1 inch) and level from side to side to allow for proper draining.
❏ The Room:
❏ Ceiling and walls are insulated to R25 using Rigid Foam or Spray Foam (NO fiberglass batt insulation!).
❏ Seams, corners, door and around the A/C gaskets are tightly sealed.
❏ Is airtight. When I close the door of my room (standing inside), I see no light through any cracks.
❏ Floor is insulated (only if it’s a mobile cooler, trailer, container, deck, raised floor, or if trying to cool below 38°F/3°C).

Rev: 2020 – 3A ©2020 Store It Cold, LLC 8
INSTALLING YOUR COOLBOT PRO Watch our CoolBot Pro Installation Video at www.storeitcold.com/support
CONNECTING YOUR COOLBOT PRO TO YOUR WI-FI NETWORK Skip this section if you are using the CoolBot Pro without a Wi-Fi connection
IMPORTANT!
A Wi-Fi with Internet connection is required in order to access and use the CoolBot Pro App
CoolBot Pro and CoolBot Jumper Set Up STEP 1 Unpack the CoolBot Pro in an area with good Wi-Fi reception (outside of your cooler and close to your
Router is best). Plug in the Temperature Sensors and the Heater Cable into the corresponding ports (See diagram on page 11). Don’t connect the cables to your A/C and don’t plug in the power supply yet.
STEP 2 Connect the CoolBot Jumper to the CoolBot Pro using ONLY the provided silver/grey Data Cable. STEP 3 Plug in the CoolBot Pro’s Power Supply. You should see codes and flashing mode lights for several seconds.
These should settle down to one flashing Program light, and the code “E0” alternating with the current room temperature.
Wi-Fi Configuration and Web App Set Up STEP 4 Start the CoolBot Pro App by scanning the QR Code on your smartphone or go to the web
page https://cb.storeitcold.com on a device that has Wi-Fi (PC, tablet, phone, etc.). The CoolBot Pro App is a web-based app and is not available from your mobile App Store.
STEP 5 On the first screen, fill in your email address, create a password and select the gray button
“Create New Account”. The email address will be used for notifications, as well as to link your data to your account. Continue to follow the prompts and the app will guide you through configuring the CoolBot Pro to talk to the CoolBot server using your Wi-Fi Network
STEP 6 When prompted, you will need to change the Wi-Fi settings on your device (PC, tablet, phone, etc.) to
connect to the Wi-Fi network called “CoolBot”. On most smartphones use Settings > Wi-Fi, and on most PCs use the network or Wi-Fi status icon.
STEP 7 After connecting your device (PC, tablet, phone, etc.) to the “CoolBot” network, the next prompt on the
app will ask you to choose (or type in) the Wi-Fi network you want the CoolBot Pro to use. This is usually the same network your devices (PC, tablet, phone, etc.) use, but it can be a different network if you prefer. Enter the Wi-Fi password for the network and press Next. CAUTION - Some devices may change the first letter of your password to a Capital letter, ensure that your password is correct. NOTE: The CoolBot will not connect to unsecure networks (networks without a password).
STEP 8 Once the CoolBot Pro is connected to the network, you should see no codes flashing on the CoolBot Pro
display. If your device (PC, tablet, phone, etc.) did not automatically switch back to your usual Wi-Fi settings use the method outlined in Step 6 to switch them back.
STEP 9 Press the “Refresh” button on your browser screen. You should now see temperatures on the app. You are all set up! Unplug your CoolBot Pro from the power supply and proceed to “CONNECTING YOUR COOLBO PRO TO YOUR A/C” Section of this guide (page 9) and then to THE COOLBOT PRO APP Section (page 13) to learn about the amazing features of your web base app.
IMPORTANT!
Unplug the CoolBot Pro before connecting or disconnecting the Data Cable.

Rev: 2020 – 3A ©2020 Store It Cold, LLC 9
CONNECTING YOUR COOLBOT PRO TO YOUR AIR CONDITIONER See installation diagram on page 11. NOTE: If you are connecting the CoolBot Pro to a Wi-Fi network follow procedure on page 8 first
ATTENTION!
We understand how important this investment is for you, and we understand the value behind the product that you will store in your cooler. We highly recommend that you read your A/C and CoolBot Pro installation manual, follow the setup guide step by step, and familiarize yourself with the use and troubleshooting of the CoolBot Pro as well as your A/C unit. After installing your CoolBot, we strongly advise you to run your cooler for a test period (at least 24 hours) and place some buckets of water or non-perishables to add mass. This is to assure the system is performing correctly and to your needs.
If you are installing your CoolBot Pro to a Mini Split air conditioner system please use this step by step guide along with our Mini Split Installation Guide available at our library at: www.storeitcold.com/support-library
STEP 1 Plug the cables into the corresponding labeled ports at the bottom of the CoolBot Pro except for the Data
Cable. Plug the cables in and out a couple times as sometimes they don't always “seat” all the way the first time. If you are replacing an existing CoolBot with removable Temperature Sensors and Heater Cables, you can leave them in place and connect them to the CoolBot Pro. The CoolBot Pro works with both black and blue Temperature Sensor Cables. The Room Sensor should hang free in the room.
STEP 2 Mount the CoolBot Pro on the wall next to the control panel side of the A/C to make it easier to connect
the cables. CAUTION! Make sure the wall fasteners are smaller in diameter than the hole in the CoolBot Pro tabs or you will break the plastic tabs.
STEP 3 Remove the air filter from the front of the A/C unit. DO NOT use it!
The filters drastically reduce cooling power and increase your chances of icing up. Clean your fins two times a month. Remove the front plastic grill of the A/C if you can. Some A/C units have a “fresh air vent” tab. This allows some mix of outside air inside the room. If applicable, make sure it is closed.
STEP 4 Find and free your A/C’s Temperature Sensor. It’s the only thing attached to the front fins/grill of your air
conditioner. On Mini Split air conditioning units this sensor is often not in front of the fins of the indoor unit. It may be tucked into a plastic cover underneath or to the side of the unit. For pictures and examples of Mini Split installations please visit our library section at: www.storeitcold.com/support-library If your A/C has a clip built into the sensor to hold the sensor in the fins, remove the sensor from the clip and free it enough to reach the side of the A/C - DO NOT use the plastic mounting clip for this installation!
Rev: 2020 – 3A ©2020 Store It Cold, LLC 10
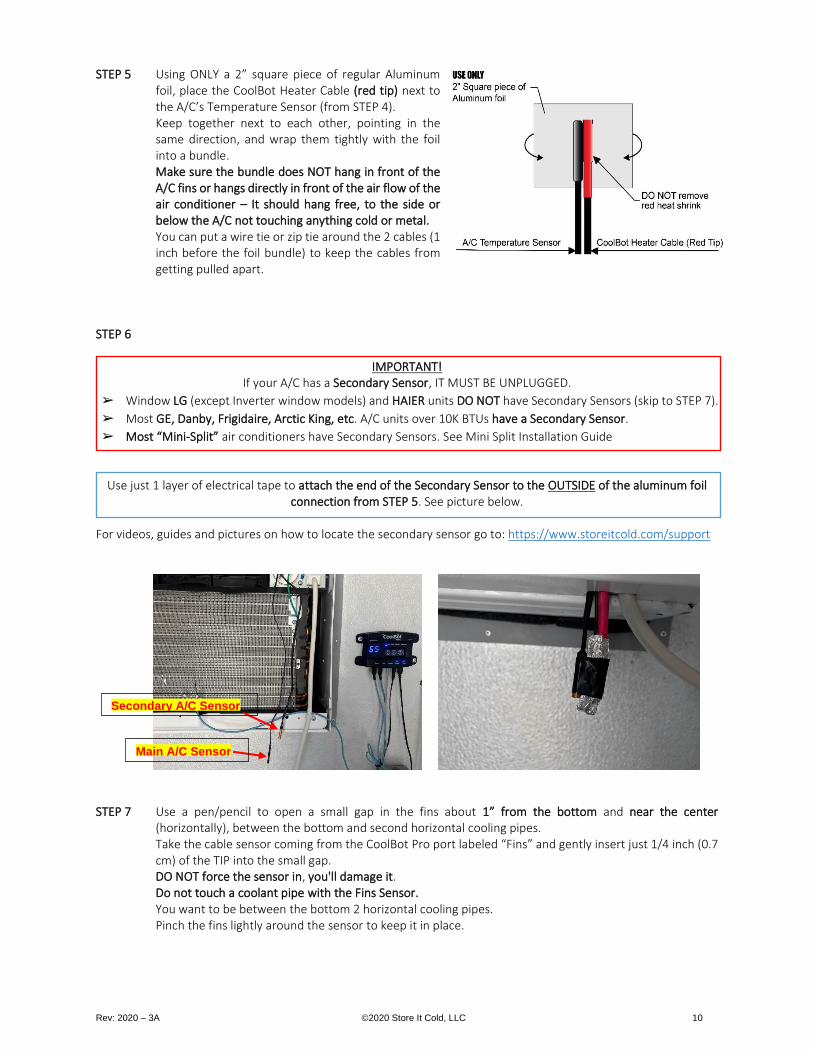
STEP 5 Using ONLY a 2” square piece of regular Aluminum foil, place the CoolBot Heater Cable (red tip) next to the A/C’s Temperature Sensor (from STEP 4). Keep together next to each other, pointing in the same direction, and wrap them tightly with the foil into a bundle. Make sure the bundle does NOT hang in front of the A/C fins or hangs directly in front of the air flow of the air conditioner – It should hang free, to the side or below the A/C not touching anything cold or metal. You can put a wire tie or zip tie around the 2 cables (1 inch before the foil bundle) to keep the cables from getting pulled apart.
STEP 6
IMPORTANT! If your A/C has a Secondary Sensor, IT MUST BE UNPLUGGED.
➢ Window LG (except Inverter window models) and HAIER units DO NOT have Secondary Sensors (skip to STEP 7).
➢ Most GE, Danby, Frigidaire, Arctic King, etc. A/C units over 10K BTUs have a Secondary Sensor.
➢ Most “Mini-Split” air conditioners have Secondary Sensors. See Mini Split Installation Guide
Use just 1 layer of electrical tape to attach the end of the Secondary Sensor to the OUTSIDE of the aluminum foil
connection from STEP 5. See picture below.
For videos, guides and pictures on how to locate the secondary sensor go to: https://www.storeitcold.com/support
STEP 7 Use a pen/pencil to open a small gap in the fins about 1” from the bottom and near the center
(horizontally), between the bottom and second horizontal cooling pipes. Take the cable sensor coming from the CoolBot Pro port labeled “Fins” and gently insert just 1/4 inch (0.7 cm) of the TIP into the small gap. DO NOT force the sensor in, you'll damage it. Do not touch a coolant pipe with the Fins Sensor. You want to be between the bottom 2 horizontal cooling pipes. Pinch the fins lightly around the sensor to keep it in place.
Main A/C Sensor
Secondary A/C Sensor

Rev: 2020 – 3A ©2020 Store It Cold, LLC 11
STEP 8 If you do not have Wi-Fi skip this step and go to STEP 9. Mount the CoolBot Jumper outside of your cooler in a location close enough for the provided Data Cable to connect the CoolBot Pro to the CoolBot Jumper. The CoolBot Jumper is not weatherproof. If it is to be mounted outdoors where rain, snow, and sunlight may get to it, then install it inside of a weatherproof nonmetallic container. After your CoolBot Jumper is mounted, connect the CoolBot Pro and the CoolBot Jumper using the provided Data Cable.
STEP 9 Turn your Air Conditioner ON. Set the A/C on “COOL” Mode and set the Fan on “HIGH” speed. Set the A/C
temperature to the lowest setting. If your A/C has a separate Economy Mode make sure is OFF. The Fan should run continuously!
STEP 10 Plug in your CoolBot Pro power supply. To set the temperature on your CoolBot Pro, press the checkmark
button – the current set temperature will blink. Use the right or left arrows to set the temperature to the desired value. Press the checkmark to save the value.

Rev: 2020 – 3A ©2020 Store It Cold, LLC 12
CHANGING SETTINGS ON THE COOLBOT PRO
The CoolBot Pro will always remember all your last settings even if it has been unplugged for a long time.
ROOM TEMPERATURE SETTING
This setting is the average temperature you want to maintain in your cooler. NOTE: The factory default temperature is set at 42°F/5.6°C. To set a new value for the Room temperature:
● Make sure the Mode Indicator Light is in the Room position (Room Mode).
● Press the checkmark ✓ button. The “set-temperature” will blink on the display. ● Use the arrow buttons to increase or decrease the temperature.
● Press the checkmark ✓ button to program (save) your new setting into memory. ● The display will go back to Room Mode showing the current room temperature.
FINS SETTING
This setting adjusts the initiate-defrost temperature to prevent freeze ups. NOTE: The factory default setting is “1.” Adjust this setting ONLY if you are experiencing icing problems. A higher setting is more “conservative.” Some users need to bump it up to “3” or “4” to keep from icing up. 95% of CoolBot installations work well with setting values shown in the GREEN zone.
FIN SETTING 0 1 2 3 4 5 6 7 8 9
To adjust the Fins setting:
● Press the right arrow until the Mode Indicator Light is in the Fins position (Fins Mode).
● Press the checkmark ✓ button. The current Fins setting will blink on the Display. ● Press the left/right arrow to lower/raise the setting value.
● Press the ✓ button again to save your new setting into memory. ● The display will go back to the Fins Mode and after 20 seconds of inactivity it will go back to the Room Mode.
HEATER DELAY SETTING
This setting allows you to increase or decrease the defrost cycle time. NOTE: The factory default Heater Delay setting is “d1” If you are experiencing ice ups and the problem has not been solved by increasing your Fins setting, then raise your Heater Delay setting to increase the time of the defrost cycles. 95% of CoolBot installations work well with settings in the GREEN zone.
HEATER SETTING d0 d1 d2 d3 d4 d5 d6 d7 d8
To change the Heater Delay setting:
● Press the right arrow until the Mode Indicator Light is in the Heater position (Heater Mode).
● Press the checkmark ✓ button 3 times. The current Heater Delay setting will blink on the display. ● Press the right/left arrow to increase/decrease the value of the setting.
● Press the checkmark ✓ button to save your new setting into memory. ● The display will go back to the Heater Mode and after 20 seconds of inactivity, it will go back to the Room
Mode.

Rev: 2020 – 3A ©2020 Store It Cold, LLC 13
SWITCHING BETWEEN FAHRENHEIT AND CELSIUS
This setting allows you to switch your CoolBot Pro from displaying °F to °C NOTE: The factory default temperature scale is in °F To change the scale of the temperature display:
● Press the right arrow until the Mode Indicator Light is in the Program position (Program Mode).
● Press the checkmark ✓ button 5 times. You'll see a blinking “P1”. ● Press the right arrow once or until you see “P2” blinking on the display.
● Press the checkmark ✓ button once to enter the “P2” menu. You’ll see an “°F” blinking. ● Press the right arrow once or until you see a “°C” blinking on the display.
● Press the checkmark ✓ button once to save the value. ● The display will go back to a “P2” blinking and after 20 seconds of inactivity, it will go back to the Room Mode.
REBOOTING YOUR COOLBOT PRO
See page 24.
THE COOLBOT PRO APP
WEB APP FEATURES
The web-based app shows the most recent Room temperature, and a graph of its recent history on the default screen – Status Tab. You can drag to pan, pinch or scroll to zoom into the graph, mouse-over or tap to see precise readings and times, and select different time periods. You can also see the current system state of the Sensors, Heater, and Network connection under this Status Tab. Under the Devices and Account Tabs you can adjust CoolBot Pro settings, set temperature ranges and notifications and reset your CoolBot Pro among other features. NOTE: Features and user interface on the CoolBot web-based app may change without notice. Screenshots of the CoolBot app on this manual may differ from your current app version and are only for representation and educational purposes.
PUTTING YOUR APP ON YOUR HOME SCREEN
The CoolBot Pro App is a web-based app and is not available from your mobile phone App Store. On most devices you can add a link to your home screen for the CoolBot Pro App so you can access it just like any other app. While in the CoolBot Pro App on your browser do the following:
• In Chrome on Android: Open the menu at the upper right and choose “Add to Home Screen.”
• In Safari on iOS: Tap the Share button at the bottom of the screen and choose “Add to Home Screen.”
• In most desktop browsers, you can drag the icon at the left of the URL bar at the top of the browser and drop it onto your desktop to create a shortcut.
NOTE: You may be prompted for your user ID and password the first time you access the app from the icon on the home screen.

Rev: 2020 – 3A ©2020 Store It Cold, LLC 14
THE STATUS TAB – Default Screen
This is the default tab. Every time you open your app, it will default to this screen.
1. Current Tab (in blue) – Status Tab
2. Current Room Temperature
3. CoolBot Pro Name – Set by the user
4. Current System State
(see System States below)
5. Temperature History Graph
(see Hysteresis below)
Drag to pan, pinch or scroll to zoom
6. History Time Presets – click to choose
What Is Temperature Hysteresis?
As you watch your Temperature History Graph on your app, you may see that the air temperature in your cooler
behaves like a “wave” that goes up and down around your set point. This is completely normal for any refrigeration
system. Hysteresis is the difference in the On and Off temperatures of your cooler as it cycles.
On a perfect scenario, as soon as the refrigeration system reaches the set point (e.g. 38°F) it would turn off
immediately, warm up a bit (e.g. 38.01°F), and then turn on again, and at 38°F it would turn off again. The end result
would be something that is continually turning on and off. This constant starting and stopping would wear the
refrigeration system out and it would fail in a short period of time.
Hysteresis is not only normal but necessary to avoid this frequent On and Off cycling. Hysteresis is dependent of
many factors including calibration of equipment, response time of temperature probes, CoolBot settings, etc.
The hysteresis value on a CoolBot cooler that has been designed following our recommendations and with a
controller set to factory settings is normally around +/- 2°F from the set point.
Hysteresis in your cooler may be of a higher value and that is not a bad thing. Just adjust your set temperature so
that the high and low values stay within acceptable ranges for your product. Remember that the sensors of the
CoolBot are very sensitive to air changes, and the fact that the air temperature changes rapidly at a given point,
doesn’t mean that your product is changing temperature at the same rate.
Your product has significantly more mass than the CoolBot sensors and it will take a much longer time to gain
temperature when exposed to higher air temperatures.
If you were to measure your product temperature you would see that it remains essentially constant while the air
temperature in your cooler fluctuates up and down.

Rev: 2020 – 3A ©2020 Store It Cold, LLC 15
System States
These are the possible states for the system as a whole, from the app’s point of view:
Light-shaded display texts (gold and salmon) indicate situations that might (gold) or do (salmon) need the user’s
attention.
Dark-shaded display texts (raspberry) indicate that we know for sure the cooler is not performing as desired.
Display text Notes User actions
All hardware OK
None
Starting up
Wait
Thermostat disabled On user request Turn Power On/ Off at
Device - Settings Tab
Updating firmware Update time is normally less than one minute Wait
Weak Wi-Fi signal
Move radio module or Wi-Fi
access point
Connecting Provisioning or initial connection is completed, but
server haven’t heard from the device yet. Typically
flashes too briefly to see; if it shows for longer, could
indicate a server or device issue.
Wait
Disconnected from server E.g., timed out Try reconnecting
Room temp briefly high Temp is over the high threshold but the device hasn’t
flagged it for notification yet (takes 30 minutes
consistently above, 60 minutes since last notification)
Check A/C, room, etc. - or
wait to see how long it
persists
Room temp briefly low Same as “briefly high”, but under the low threshold Check A/C, room, etc. - or
wait to see how long it
persists
Room temp was high Temp is under the high threshold now, but the device is
still waiting to clear the notification (takes 30 minutes
or a fall of 3 °F)
Check A/C, room, etc. - or
wait to see how long it
persists
Room temp was low Same as “was high”, but now above the low threshold Check A/C, room, etc. - or
wait to see how long it
persists
CoolBot briefly offline Device is disconnected, but for less than 30 minutes Check A/C, room, etc. - or
wait to see how long it
persists
Can't connect to server It tried but it's not resolvable or not accepting
connections
Check Internet connection
on app device
Rev: 2020 – 3A ©2020 Store It Cold, LLC 16
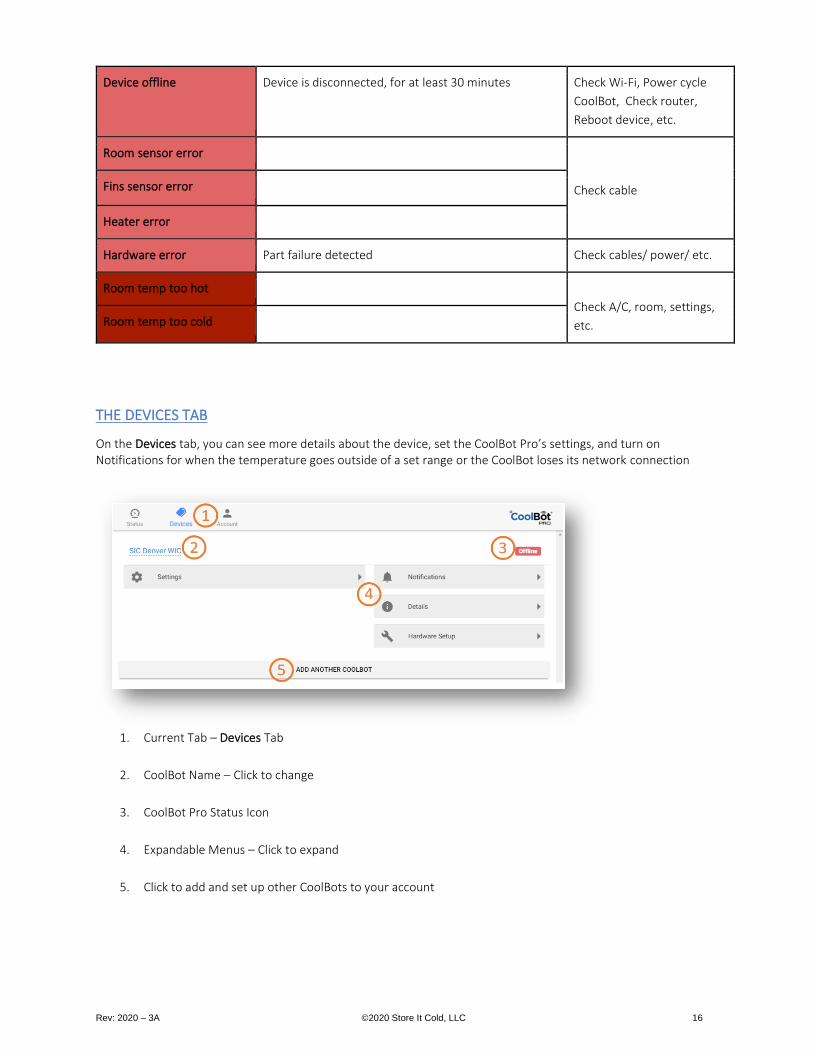
Device offline Device is disconnected, for at least 30 minutes Check Wi-Fi, Power cycle
CoolBot, Check router,
Reboot device, etc.
Room sensor error
Check cable Fins sensor error
Heater error
Hardware error Part failure detected Check cables/ power/ etc.
Room temp too hot
Check A/C, room, settings,
etc. Room temp too cold
THE DEVICES TAB
On the Devices tab, you can see more details about the device, set the CoolBot Pro’s settings, and turn on Notifications for when the temperature goes outside of a set range or the CoolBot loses its network connection
1. Current Tab – Devices Tab
2. CoolBot Name – Click to change
3. CoolBot Pro Status Icon
4. Expandable Menus – Click to expand
5. Click to add and set up other CoolBots to your account

Rev: 2020 – 3A ©2020 Store It Cold, LLC 17
Settings Menu
Click on the Settings Expandable Menu and click the Edit button to enter the edit screen
1. Current Menu – Settings
2. Set Point – Slide to adjust.
Set to the desired cooler temperature.
3. Target temperature range – Slide to adjust.
Set the Low and High Temperature thresholds
for your alarm notifications
No less than 3°F (+/-) from the Set Point
4. Fins adjustment – Slide to adjust
Please see CHANGING SETTINGS ON
THE COOLBOT PRO (p.12) before adjusting
5. Heater delay – Slide to adjust
Please see CHANGING SETTINGS ON
THE COOLBOT PRO (p.12) before adjusting
6. Power ON/OFF CoolBot Pro – click to choose
NOTE: This will ONLY turn ON and OFF your CoolBot Pro
Your A/C unit will keep running and the Room
will be held at 60°F (or the lowest setting of your A/C)
7. Action Icons – click to confirm changes (save), restore or cancel
Notifications Menu
1. Current Menu – Notifications
2. Enable notifications – Slide to select
ON (blue) / OFF (gray)
3. Notify by e-mail – Slide to select
ON (blue) / OFF (gray)
4. Notify by text message – Slide to select
ON (blue) / OFF (gray)
5. TEST – Push to test your email and/or
text notifications.
NOTE: An email or phone number must be
registered to receive notifications (see Account Tab)

Rev: 2020 – 3A ©2020 Store It Cold, LLC 18
Details Menu
Clicking on the Details Expandable Menu gives you Information about the most recent information the app obtained
from the CoolBot Pro and general information of the app and Wi-Fi signal.
Room temp – your last room temperature reading registered by your CoolBot Room Sensor
Fins temp – your last air conditioner fins’ temperature reading registered by your CoolBot Fins Sensor
Last Activity – last time the sever (and app) obtained information from the Jumper
App version – the current version of your web-based app. The CoolBot Pro App automatically updates when logging
in and out of the app if a new version is available.
Jumper firmware version – the current firmware version stored in the JUMPER. This is not the firmware version of
your CoolBot controller (the CoolBot firmware version cannot be changed - it is fixed from the factory). The
firmware version of the JUMPER will update automatically when a new version is detected after logging in and out or
if manually done at the Hardware Setup menu (see Hardware Setup menu).
Wi-Fi Strength - This value is a percentage of an absolute scale value. Don’t worry if you don’t have 100%!
• Over 35% Wi-Fi Strength should be reliable and experience almost no disconnections or none
• 25% to 35% Wi-Fi Strength is OK but you may experience occasional disconnections (not a big deal)
• Below 25% there is a good chance you may experience constant (or long) disconnections.
Note: Remember that Wi-Fi disconnections will not affect the functioning of the CoolBot and the A/C. Your cooler
should keep cooling as normal.
If you are experiencing constant disconnections (or long ones), please relocate your JUMPER to see if you can
get a better [stronger] signal. Sometimes moving it a few feet from the original spot would do the trick.

Rev: 2020 – 3A ©2020 Store It Cold, LLC 19
Hardware Setup Menu
Clicking on the Hardware Setup Expandable Menu gives you choices for resetting your CoolBot Pro, downloading latest firmware for the CoolBot JUMPER, and reconfigure you Wi-Fi connection.
1. Factory Reset – Use this option to reset your CoolBot to Factory Settings (Wi-Fi configuration will be kept) A confirmation screen will pop before resetting.

Rev: 2020 – 3A ©2020 Store It Cold, LLC 20
2. Update Firmware – This option downloads the latest Firmware version to your CoolBot JUMPER. The tab will become gray and the Status Icon will indicate “updating” in yellow until done.
3. Reconfigure Wi-Fi – This option will walk you step by step through the entire Wi-Fi configuration process (just like the first time you set up your CoolBot Pro to connect to your Wi-Fi Network). Here by mistake? Press the left arrow to go back to the Devices menu tab and exit the Wi-Fi set up. Got permanently disconnected? Replacing your Router? Changed password on your Wi-Fi? If you are setting up your Wi-Fi again, then a Jumper reset “CJ” or an “Fr” will be necessary. This need to be done directly at the CoolBot controller first (see page 24), so the Jumper resets and the CoolBot displays “E0” meaning that it is ready for a Wi-Fi set up again.

Rev: 2020 – 3A ©2020 Store It Cold, LLC 21
THE ACCOUNT TAB
On the Account tab, you can manage your account info and manage your profile settings.
1. Account - Name registered on the account
2. Email address – Email address associated with the account
3. MULTIPLE EMAILS - Click to add other email addresses to receive Notifications
4. Mobile number- Phone number associated with the account
5. MULTIPLE NUMBERS- Click to add other phone number to receive text notifications
6. Temperature unit - Scale of Temperature that displays on your app. This will ONLY change the app temperature scale not the CoolBot’s display temperature.
7. Diagnostics- Click to access support information
8. LOG OUT – click to exit your app and log out of your account.

Rev: 2020 – 3A ©2020 Store It Cold, LLC 22
ERROR CODES ON YOUR COOLBOT PRO
The following error codes Er, Ef and EH apply to CoolBot Pro, CoolBot (Blue) and CoolBot (Red) -
ERROR PROBLEM WITH WHAT IT MEANS AND WHAT TO DO
Er Room Sensor A problem with the Room Cable or port. See solution on the following page
Ef Fins Sensor A problem with the Fins Cable or port. See solution on the following page
EH Heater Cable A problem with the Heater Cable or port. See solution on the following page
The following error codes apply ONLY to CoolBot Pro and CoolBot (Blue) and describe problems with the Jumper and go with a blinking Program Mode Indicator Light on the CoolBot controller. Unless otherwise
noted, if you see the same error code for more than a minute, reboot the CoolBot (see page 3)
EE CoolBot Jumper The Jumper is not talking to the CoolBot Pro at all. Check Data Cable connection. Try power-cycling the CoolBot Pro (unplug -wait 6 sec- plug again). If you are NOT using Wi-Fi see solution at end of page 24
E0 Jumper/Wi-Fi The Jumper is in Wi-Fi Configuration mode, or it is completely disconnected. If you see this during normal operation for more than a few seconds, try reconfiguring Wi-Fi. Check Data Cable connection.
E1 Jumper/Wi-Fi The Jumper is in the middle of getting Wi-Fi configuration from the mobile app. If you see this for a long time try power-cycling the CoolBot Pro (unplug -wait 6 sec- plug again)
E2 Jumper/Wi-Fi
The Jumper is connecting to the Wi-Fi network. If you see this for a long time, first check that your Wi-Fi router is working for other devices, and that it has access to the Internet. Then power-cycle the CoolBot Pro (unplug -wait 6 sec- plug again), as for E1. If that doesn’t help, unplug the CoolBot Pro and the Wi-Fi router, then plug in the router, then the CoolBot Pro. Otherwise, reconfigure Wi-Fi.
E3 Jumper/Wi-Fi The Jumper is connecting the server used for storing data. If you see this for more than a minute, follow the same steps as for E2.
E4 Jumper/Wi-Fi The Jumper is running normally (You should never see this as an error code).
E5 Jumper/Wi-Fi The Jumper is updating its connection configuration from a server.
E6 Jumper/Wi-Fi The Jumper is saving new configuration to permanent storage, OR it’s trying to reboot.
E7 Jumper/Wi-Fi The Jumper is looking for new firmware or downloading and installing it.
E8 Jumper/Wi-Fi The Jumper is powering on and trying to set itself up as a Wi-Fi access Point (WAP) so that it can enter Wi-Fi Configuration mode. If you see this for more than a few seconds, reboot the CoolBot Pro.
E9 Jumper/Wi-Fi
The Jumper had a problem connecting to the Wi-Fi network, or to the server, or some other error. It will reboot itself after a short wait. If you see this and the network is OK for other devices, you may need to reboot the CoolBot Pro and reconfigure Wi-Fi. Check that your Wi-Fi password is correct.
EA Jumper/Wi-Fi The radio is resetting its configuration.

Rev: 2020 – 3A ©2020 Store It Cold, LLC 23
“Er” FLASHES ON MY COOLBOT DISPLAY
Er is a communication error with the Room Sensor. The Room Mode Indicator Light flashes rapidly if you press the right arrow to move to the Fins Mode.
● Unplug the Room Sensor from the CoolBot. ● Inspect the cable for possible damages in the cord or on the tip. Inspect the port connection as well. ● Clean the plug end of the sensor (jack connector) with a cotton cloth and plug it back in the CoolBot Pro port
a couple times making sure it goes all the way in. It should sit firm and snug- shouldn’t wiggle or feel loose. ● If the error persists after 20 seconds, unplug the sensor from the Room port and switch ports with the Fins
Sensor by plugging the Room Sensor in the Fins port and the Fins Sensor in the Room port. ● If the “Er” message is gone and now you have a flashing “Ef” while the Fins Mode light blinks rapidly, then
your Room Sensor cable (currently plugged in the Fins port) is bad and needs replacement. ● Plug the Fins Sensor back into the Fins port. ● Discard your Room Sensor. ● “Er” will still show on the display (because there is nothing plugged in the Room port). That is all right.
- SAFETY MODE-
The CoolBot Pro can work with one (1) good sensor plugged in to the Fins port while your replacement sensor is being shipped. DO NOT plug anything in the Room port!
Since the CoolBot won’t display the room temperature while running in the “Safety Mode,” the Room temperature will have to be monitored with the aid of an external thermometer. To order a replacement sensor under warranty (1 year) please contact our support team at [email protected]. To purchase new sensors please visit our parts page at: https://www.storeitcold.com/replacement-parts/
“Ef” FLASHES ON MY COOLBOT DISPLAY
Ef is a communication error with the Fins Sensor. The Fins Mode Indicator Light flashes rapidly
● Unplug the Fins Sensor from the CoolBot. ● Inspect the cable for possible damages in the cord or on the tip. Inspect the port connection as well. ● Clean the plug end (jack connector) of the sensor with a cotton cloth and plug it back in the CoolBot port a
couple times making sure it goes all the way in. It should sit firm and snug- shouldn’t wiggle or feel loose. ● If the error persists after 20 seconds, the sensor is bad and needs replacement. ● Unplug the Fins Sensor and discard. ● Unplug your Room Sensor and plug into the Fins port. ● You will see an “Er” message on the screen (because there is nothing plugged in the Room port). That is all
right. ● If the “Ef” message stopped flashing and the Fins Mode Indicator Light stopped flashing rapidly you are now
working in the “Safety Mode”. ● Insert the tip of the sensor into the fins of the A/C (center bottom) following the same recommendations as
in the installation guide (STEP 7- Page 10).
- SAFETY MODE- The CoolBot Pro can work with one (1) good sensor plugged in to the Fins port while your replacement
sensor is being shipped. DO NOT plug anything in the Room port!
Since the CoolBot won’t display the room temperature while running in the “Safety Mode,” the Room temperature will have to be monitored with the aid of an external thermometer. To order a replacement sensor under warranty (1 year) please contact our support team at [email protected]. To purchase new sensors please visit our parts page at: https://www.storeitcold.com/replacement-parts/

Rev: 2020 – 3A ©2020 Store It Cold, LLC 24
“EH” FLASHES ON THE COOLBOT DISPLAY
EH means there is a problem with the Heater Cable (red tip cable) or the Heater port. The Heater Mode Indicator Light flashes rapidly.
● Unplug the Heater Cable from the CoolBot. ● Inspect the cable for possible damages in the cord or in the tip. Inspect the Heater port as well. ● Clean the plug end of the Heater (jack connector) with a cotton cloth and re plug in the CoolBot a couple
times making sure it goes all the way in the port. It should sit firm and snug- shouldn’t wiggle or feel loose. ● If the error persists after 20 seconds, the HEATER cable is bad and needs replacement.
ATTENTION!
The CoolBot does not have a workaround mode for a bad Heater Cable. DO NOT plug anything other than a replacement Heater Cable in the Heater port- a sensor cable won’t work!
To order a replacement Heater under warranty (1 year) please contact our support team at [email protected]. To purchase a new Heater please visit our parts page at: https://www.storeitcold.com/replacement-parts/
“EE” FLASHING ON THE COOLBOT DISPLAY
Applies ONLY to the CoolBot Pro and CoolBot (Blue) IMPORTANT! If you are NOT using Wi-Fi and you have an EE showing on the display follow these steps:
1. Unplug the CoolBot from the power supply. 2. Disconnect the Jumper from the CoolBot and disconnect the Data Cable (if they were connected). 3. Plug your CoolBot back in. You will see EE. 4. On the CoolBot, press the left arrow button until the Program light is solidly lit. You will see the firmware
version on the display (7.8, 7.9, etc.).
5. Press the Checkmark button five times slowly, until you see “P1” on the display.
6. Press the Left Arrow a few times to get to the reset option “CE”.
7. Once on the “CE” option press checkmark to select.
8. Press the Left or Right Arrow until a “Y” shows on the display.
9. Press Checkmark. Your CoolBot Pro should stop blinking “EE” and revert back to show only the Room
Temperature (It is ready to use in the “No Wi-Fi Mode”).
REBOOTING THE COOLBOT PRO
From the CoolBot Pro Controller. You can also reboot the CoolBot Pro Settings and Wi-Fi from the app (see page 19).
1. On the CoolBot Pro, press the left arrow button until the Program light is solidly lit. You will see the firmware version on the display (7.8, 7.9, etc.).
2. Press the Checkmark button five times slowly, until you see “P1” on the display. 3. Press the Left Arrow a few times to get to the reset option you want:
• P1: resets all settings (Same as Fr) ▪ Full factory reset of CoolBot and Jumper if the Jumper is connected. ▪ Factory Reset of the CoolBot only, if the Jumper is disconnected.
• ES: escapes from this menu and returns to normal operation
• CJ: clears the Jumper’s (Wi-Fi radio) settings only. The Jumper HAS to be connected to the CoolBot Pro.
• CE: Wi-Fi Mode disabled: Y=Not using Wi-Fi, N=Using Wi-Fi (See NOTE below)
• CS: clears the CoolBot settings to defaults but keeps the Wi-Fi settings the same.
• Fr: resets all settings (Same as P1) 4. Press Checkmark to select that reset option.

Rev: 2020 – 3A ©2020 Store It Cold, LLC 25
5. You will see a blinking “n” for “no”. Press one of the arrow keys to change it to “y” for “yes.” 6. Press Checkmark. The CoolBot will reset the selected settings. 7. If you chose P1, CJ, or Fr with the Jumper connected to the CoolBot, the CoolBot will switch to its Wi-Fi
Configuration mode. You should see the code “E0” on the display. This means the CoolBot pro and the Jumper are ready to reconfigure the Wi-Fi connection.
8. The CoolBot set temp has been reset to factory setting of 42°F, change it to your desired room temp.
CHECKS ON YOUR COOLBOT PRO
MY COOLBOT PRO HAS A BLANK DISPLAY BUT THE POWER LIGHT IS ON
The most likely cause is that your CoolBot is in Sleep mode. Either press any button on the CoolBot Pro, or change the Power setting on the Devices tab in the app.
MY HEATER DOES NOT SEEM TO BE WORKING
Checking the HEATER is very simple: ● Pull the HEATER out of the aluminum foil. Hold the red tip against the inside of your wrist with your fingers. ● Unplug the POWER to the CoolBot, then plug it back in. In ~5 seconds the Heater Activity Indicator light will
come on SOLID for about 20 seconds. ● The HEATER should get Warm/Hot within the first 10-30 seconds of the CoolBot being plugged in. If not,
unplug/plug the HEATER a couple times and repeat the test. ● If it STILL doesn't get warm contact us at [email protected].
NOTE: During normal operation, the Heater light blinks and you may not feel the warmth.
TEMPERATURE SENSORS CALIBRATION TEST
Checking the Calibration of your sensors is very simple: ● Gently slip the Fins Sensor tip out of the fins of the A/C. Let the tip of the sensor hang right next to the tip of
your Room sensor cable. ● Allow 2 minutes for the sensor to adjust its temperature reading. ● Compare the Room temperature reading with the Fins temperature reading using the arrows to toggle back
and forth between the Room Mode and the Fins Mode. ● Your Room Sensor and your Fins Sensor should read within 3 degrees of each other. If one of the sensors is
more than 3 degrees away from the other, compare the readings against a calibrated external thermometer and replace the faulty sensor.
THE COOLBOT PRO HAS NO LIGHTS AND NO DISPLAY.
1. Make sure that there is proper power supply to the outlet where the CoolBot is plugged in (120V). 2. If proper power is supplied and the CoolBot has no lights and no display the power supply needs replacement.
If this is an emergency, you can get a generic Mini-USB power supply rated at 5VDC / 1 amp (or higher amp) until you get the original power supply shipped to you.
To order a replacement Power Supply under warranty (1 year) please contact us at [email protected]. To purchase a new Heater please visit our parts page at: https://www.storeitcold.com/replacement-parts/

Rev: 2020 – 3A ©2020 Store It Cold, LLC 26
CHECKS ON YOUR A/C UNIT
DIRTY FINS
• This is a very common problem! Dirty front fins drastically reduce cooling power and waste electricity. Clean the fins 2 times a month.
• For the inside coils use a plastic brush with bristles long enough to go all the way through the fins. Depending on the make of your A/C, a dish brush or paintbrush might work well.
• Use plain water. DO NOT use soap! Soap residue attracts more dirt!
• Dunk bristles in water then swipe down the fins. Rinse the bristles in the water and repeat, working your way across until all the fins have been brushed. Change out the water as needed if it gets murky.
• A/C supply stores also sell “Foaming Coil Cleaner”. This works great for the outside coil.
• Squished fins greatly reduce the cooling power of the A/C. Use a “Fin Comb” (available at most hardware stores) to straighten them.
• Fins on the back side (outside coil) should be cleaned at least once a year. Also, make sure no leaves or debris are blocking the vent louvres of your A/C on the back.
PROPER INSTALLATION AND SETTINGS
• Make sure your A/C is on “COOL” Mode and the Fan on “HIGH”
• If your A/C has a separate Economy Mode make sure is OFF. The Fan should run continuously!
• Make sure your A/C is a compatible brand. Check compatibility at: https://www.storeitcold.com/support
• Make sure that the A/C is draining properly. The back of the A/C should be lower (at least 1 inch) than the front (inside) and the unit should be level from side to side, so condensation can drain out the back. This is very important!
• Check the insulation around your A/C opening. This is a critical spot in your cooler for condensation.
• Make sure your A/C unit does NOT have a Secondary Sensor. If the cooler is stuck around 45-50⁰F/7-10⁰C, or if the compressor comes off and does not cycle ON back for a while, or if it cools down and then waits a long time to start cooling again, look for a Secondary Sensor on your A/C (See CONNECTING YOUR COOLBOT TO YOUR A/C, Step 6- page 10). NOTE: This can happen even if your A/C has been installed for some time and was working correctly before – please ensure your A/C does not have a secondary sensor if you are experiencing these problems (See CONNECTING YOUR COOLBOT TO YOUR A/C, Step 6 - page 10).
FOR TROUBLESHOOTING AND QUESTIONS Visit our support page at https://www.storeitcold.com/support
Or contact us at [email protected]

Rev: 2020 – 3A ©2020 Store It Cold, LLC 27
DOUBLE YOUR WARRANTY!
We’d love to hear how your CoolBot is doing and learn more about how you are using it. Just fill out our Testimonials Form online, and as a way to say “Thanks!”, we will double your CoolBot Pro warranty from 1 to 2 years! You can find the Testimonials Form at: https://www.storeitcold.com/testimonials-form/ FOLLOW US:
https://www.storeitcold.com https://www.facebook.com/thecoolbot https://www.instagram.com/storeitcold https://twitter.com/storeitcold https://www.youtube.com/storeitcold