INSTITUTO DE COMPUTAÇÃOreltech/PFG/2016/PFG-16-20.pdf · 2 Instituto de Computação Universidade...
18
INSTITUTO DE COMPUTAÇÃO UNIVERSIDADE ESTADUAL DE CAMPINAS REST Client generation using RAML API documentation Andre Vitor Terron Guido Araújo Relatório Técnico - IC-PFG-16-20 - Projeto Final de Graduação December - 2016 - Dezembro The contents of this report are the sole responsibility of the authors. O conteúdo do presente relatório é de única responsabilidade dos autores.
Transcript of INSTITUTO DE COMPUTAÇÃOreltech/PFG/2016/PFG-16-20.pdf · 2 Instituto de Computação Universidade...

INSTITUTO DE COMPUTAÇÃO UNIVERSIDADE ESTADUAL DE CAMPINAS
REST Client generation using RAML API documentation
Andre Vitor Terron Guido Araújo
Relatório Técnico - IC-PFG-16-20 - Projeto Final de Graduação
December - 2016 - Dezembro
The contents of this report are the sole responsibility of the authors. O conteúdo do presente relatório é de única responsabilidade dos autores.

REST Client generation using RAML API documentation
Andre Terron1, Guido Araujo2
1 [email protected] 2 Instituto de Computação Universidade Estadual de Campinas (UNICAMP), Caixa Postal 6176
13083-970 Campinas-SP, Brasil [email protected]
Abstract. In the past few years, mobile devices and apps have become more and
more popular. This increased the demand for mobile development in multiple platforms, more than there are developers available.
A common development pattern used by such projects is to have a central
server, and multiple clients in different platforms, like Android, iOS and web. The server exposes an API (Application Program Interface), and the clients send http requests to the API to interact with the business logic of the app. For multiplatform apps, having to implement the API client for every platform can be very time consuming, and the work needed grows with the size of the api, and number of supported platforms. Also, with every refactor of the API, it’s needed to review all other platforms’ clients.
The first step to improve the client develpment, is to have good documentation
and communication between the server developers, and client developers. There are several ways of documenting an API, but the most common frameworks are: RAML, Swagger and API Blueprint. These frameworks are a structured way of documenting an API, but also can be visualized as a more human-readable way, and even be used to generate client code for the applications, saving a lot of time and mistakes for the developer.
In this project, I built an Android client generator based on the RAML framework.
It uses other common patterns in Android, like Dependency Injection with Dagger 2, Promises with Bolts, and the Spring Rest Template for the actual requests. It reads the RAML documentation, and generates Android code to communicate with the API.
Key-Words: API, Client, Mobile, Android, RAML, Code Generation.
1

Summary Abstract 2
Key-words 2
Introduction 4
Objectives 4 API path transparency 4 Mock API responses locally 5 Authenticate Requests 5 Execute requests in background 5 Typed responses 5
Development 6 Sample app server API 6 Android Template 10 Generator 13
Results 14
Conclusion 15
Future Work 16 Other platforms 16 Different areas of app development 16 Tests and full coverage 16 GUI 17
References 18
2

1. Introduction In the first years of the internet, most of the web content was focused on
communicating with humans, and through the screen of computers. That has been changing to an internet where services can interact with each other using structured communication standards, and even when a service needs to interact with humans, mobile interfaces are being used a lot more frequently than desktop ones, and each mobile interface has its own design patterns, and programming needs, resulting in a multitude of different platforms to interact with the same service.
This plurality of platforms for the same service is usually handled by creating a
central server and clients for each supported platform. The server is responsible for maintaining the data of the service, and interacting with this data as requests are received. The client is what the regular user interacts with, and with each interaction, the client sends requests to the server. The requests can result in any action with the data, but the most common are to create, read, update and delete data.
When a developer wants to build an app, it’s needed to write code for the server
API, and for each platform client. Not only more work is needed as the API gets bigger, but also each platform needs it’s own code. It also means that each API refactor will need to be adapted to all the supported platforms, and communicated between developers from different teams.
APIs are supposed to be a well structured interface, and saving all this time
spent adapting communications between client and server, can help apps be launched faster, receiving feedback from the user earlier in the building process.
2. Objectives The objective of this project is to create a code generator to create a transparent
API client in Android. Here are the requirements of the generated API client code:
2.1. API path transparency If the developer wants to make a request to a specific endpoint, it should follow
an intuitive development pattern. For example:
3
GET /users/123456/entries Should have an Android equivalent to the path, for instance:
api.users.userId.entries.get(“123456”);
Using this pattern, it’s possible to have only one documentation for the API, and an Android developer will know which method to use based on that documentation.
2.2. Mock API responses locally By mocking the API responses locally, the developer is allowed to move on to
implementing the UI and the interactions with the API without the need for internet, or even before the API is built on the server.
The mocks will only work if the API has well documented examples for the
endpoints. And can be turned on or off by code.
2.3. Authenticate Requests Authenticating requests is extremely important for most apps to have a more
specific user control, and know exactly who is interacting with the service.
2.4. Execute requests in background Not only Android requires that requests are sent in background, but it’s also a lot
better for the application and the user. So the resulting generated code should altomatically execute the requests in background, and allow an easy interface for the developer to interact with it.
2.5. Typed responses Java is a typed language, and to keep the same development pattern, responses
should be converted to Java Objects before the developer can interact with the data. Also, for common types, like a User, it should be the same class, even if returned from different endpoints.
4

3. Development The project was separated into three steps. The documentation and development
of the server API, the Android client Template, and the code generator. To show the functionality of the app, a sample app was built. It is an app for the
input of calories. Simply allowing users to input consumed calories, see the list of calories, edit and delete each entry. There are also different user roles that allow to manage other users or other users’ calories entries.
3.1. Sample app server API First, to follow an API-first approach to the development, all the functionality of
the app was written. With the app’s backlog, it was possible to define which APIs endpoints would be necessary for the application. The needed API endpoints were documented using RAML.
RAML is a language for the definition of HTTP-based APIs that embody most or all of
the principles of Representational State Transfer (REST). The RAML specification
provides mechanisms for defining practically-RESTful APIs, creating client/server
source code, and comprehensively documenting the APIs for users.
RAML definition on its’ specification document
Each endpoint is documented with its relative path, the HTTP method, usually a description, what’s expected on the request, and what’s expected on the response. For the request, it’s possible to define the request body schema, an example of the data, and query parameters accepted on this endpoint. For the response, it’s needed to specify which status codes are possible. And for each status code, it’s possible to specify the response schema, and an example response.
In the document, the authentication method was also documented. The API used
an authentication token to identify which user is sending the request. The client calls the login or signup endpoint with the credentials (the email and password), and the API responds with the access token that the client should use to authenticate the next requests. In the RAML document, it was specified that the Authorization request header should be used with the token for the authentication.
5

/entries: description: Collection of available entries. get: description: Get a list of entries. responses: 200: body: application/json: schema: entry example: !include examples/entry-collection.json /{entryId}: description: Entity representing an entry get: description: | Get the entry with entryId = {entryId} responses: 200: body: application/json: Schema: entry example: !include examples/entry.json post: body: application/json: schema: entry example: !include examples/entry.json description: | Updates the entry with entryId = {entryId} responses: 200: body: application/json: example: | !include examples/entry.json delete: description: | Deletes the entry with entryId = {entryId} responses: 204: description: | Succesfully deleted entry
Code Snippet 1: Entry endpoints example
6

In the actual RAML file, resourceTypes were used to reuse code for different
endpoints, but the end result is very similar. With this feature, it’s possible to define a pattern for a type of endpoint, and just apply it to the determined path with the desired parameters.
As can be observed on the example, RAML allows including other files for the
specification, to improve maintenance of the code. The common resources schemas were written using JSON Schema, and this is very important so that the generator can create the typed Android Java class.
Once the full API was documented, then the development of the actual
application started. Since the the API specifications were ready, the first step was to implement the endpoints to allow every action to be performed through the API.
For this step, the TDD (Test Driven Development) methodology was used with
abao. But the tests implemented were very simple, and mostly focused in checking if the status codes were being returned correctly, and if the responses conformed with the specified JSON Schema for that endpoint.
Further manual testing was made using the tool Postman, which is a GUI
platform to make your API development faster & easier, from building API requests through testing, documentation and sharing. Postman was able to directly load the RAML specification, and prepared all the endpoints, making it a lot easier to make requests to the API, and manually checking the results.
For the development of the API, the Node.js javascript runtime was used, and the
code written in coffeescript, which is a language that compiles to javascript, but it’s a lot more clean. On top of the Node.js, the Express framework was used to keep the API code structured.
Express is a minimal and flexible Node.js web application framework that
provides a robust set of features for web and mobile applications. To store the app’s data, a MongoDB database was used. Each API endpoint
performs a specific action to the data. Either creating, reading, updating or deleting data. And once every endpoint was ready and interacting with the database, the core of the app was ready, and could be fully used through the API.
7

A web app was also built to ensure the API had everything needed by an application consuming it. By using Angular and Angular Material, the web app front-end was quickly built, and served as an example to build the Android app later on.
Image 1: Web App Landing Page
Image 2 and 3: Authentication screen and Meals list screen for the web app
8
3.2. Android Template With an API ready and documented, it was time to build the template that will
result in the generated Android API client. First, the client code was written manually for a few endpoints. This was important to make sure the client would meet the goals of this project.
To meet the first goal, the API client was structure with each endpoint path
having its own class. This class has public variables to access sub-paths of the current path, and functions to perform http methods on the specified API path.
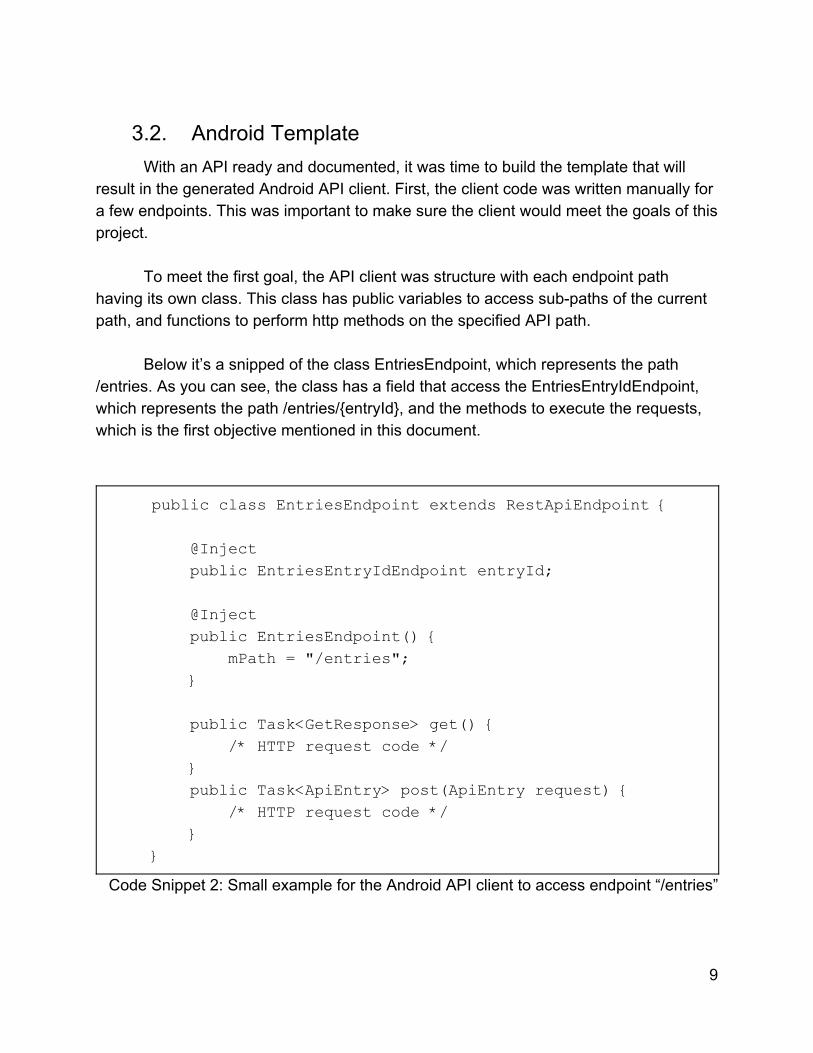
Below it’s a snipped of the class EntriesEndpoint, which represents the path
/entries. As you can see, the class has a field that access the EntriesEntryIdEndpoint, which represents the path /entries/{entryId}, and the methods to execute the requests, which is the first objective mentioned in this document.
public class EntriesEndpoint extends RestApiEndpoint { @Inject public EntriesEntryIdEndpoint entryId; @Inject public EntriesEndpoint() { mPath = "/entries"; } public Task<GetResponse> get() { /* HTTP request code */ } public Task<ApiEntry> post(ApiEntry request) { /* HTTP request code */ } }
Code Snippet 2: Small example for the Android API client to access endpoint “/entries”
9
The second objective, which is to allow mocked requests, is achieved by overriding the default request executor, and when a new request is made, it’s first checked if it was defined as mocked, and if it is, it will return the document specified in the example property of that endpoint in the RAML documentation of the API.
For the third goal, API authentication, two methods are possible. Either
authenticating each separate request, or having a default authentication method for every request performed. To authenticate every request by default, there’s a method in the API base class, that the developer can call with the credentials, which depend on the defined authentication methods on the RAML file, or create a custom authentication method.
To independtly authenticate a request, it’s needed to use a request builder. Which consists in instead of calling .get() on the desired endpoint, it is .getBuilder(). With the builder, the developer can customize the request with information like authentication or query parameters before calling .run() to execute the request.
The fourth objective is to make the requests in a background thread. Using
background threads in Android without a helper lib is very troublesome, and the goal of the API client is to be as straightfoward and simple as possible. So the library Bolts was chosen. Bolts uses the concept of Tasks, which make organization of complex asynchronous code more manageable. A task is kind of like a JavaScript Promise, but available for Android.
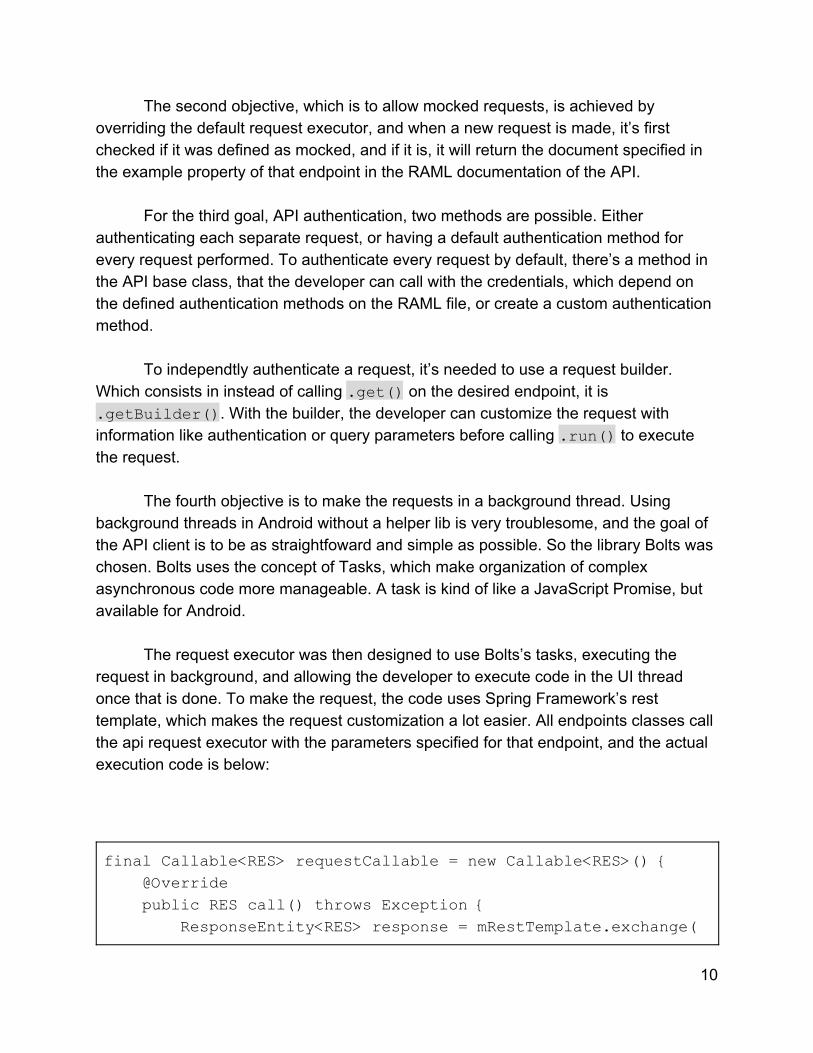
The request executor was then designed to use Bolts’s tasks, executing the
request in background, and allowing the developer to execute code in the UI thread once that is done. To make the request, the code uses Spring Framework’s rest template, which makes the request customization a lot easier. All endpoints classes call the api request executor with the parameters specified for that endpoint, and the actual execution code is below:
final Callable<RES> requestCallable = new Callable<RES>() { @Override public RES call() throws Exception { ResponseEntity<RES> response = mRestTemplate.exchange(
10

url, method, request, responseType, urlParams); if (response.getStatusCode().series() != HttpStatus.Series.SUCCESSFUL) { throw new HttpServerErrorException(response.getStatusCode(), response.getStatusCode().getReasonPhrase()); } return response.getBody(); } };
Task<RES> task = Task.callInBackground(requestCallable);
Code Snippet 3: Demonstration of the use of Tasks for the request executor To achieve typed responses and requests, which is the fifth objective, it is
needed to specify the schema for each request or response. These schemas are written using JSON Schema, and the generator will parse them to create classes that represent that schema in Java, and can be converted to and from JSON by the Spring Rest Template.
The client also uses JAVA generics for the typed requests. In the above example
code, RES is a generic type, and each endpoint will define what type RES will be by calling the function with the right parameters. For example, to call GET /user/{userId}, which returns an ApiUser, this is the code:
private <REQ> Task<ApiUser> runInternal(REQ request, MediaType mediaType) { return mRestApi .requestBuilder(getPath(), HttpMethod.GET, request, ApiUser.class) .mediaType(mediaType) .authentication(mAuthentication) .execute(mUrlParams); }
11

Code Snippet 4: User endpoint returning a custom generated class for the response With the API ready for a few endpoints, the next step was to transform them into
templates that change based on the API endpoints and parameters. That was achieved using Nunjucks, which is a rich and powerful templating language for JavaScript. Here’s a small example of the Endpoint template:
@Singleton public class {$ className $} extends {$ java.type('.service.api.RestApiEndpoint') $} { /* ... */ @Inject public {$ className $}() { mPath = "{$ path $}{$ res.relativeUri $}"; } /* ... */ }
Code Snippet 5: Nunjucks template example for an Endpoint The bold text in the template is what will be substituted by data provided by the
generator, in this case, the java class name and its constructor. Nunjucks also allow the use of other programming features, like conditionals, loops, includes and functions. These templates are used by the generator to build the API client code.
3.3. Generator The generator is the part of the project that is responsible to parse and
understand the RAML documentation, and to use this data to generate the Android API client code.
To parse the documentation, the generator uses RAML Parser, a javascript library that will parse the RAML documentation file and also any included files, and provide a javascript object with the parsed information.
After parsing the documentation, the generator will walk the templates folder, and
access every file with a .njk in its name to apply the data to the template. The
12

templates have the freedom to generate more than one file per template. This is useful to use one Endpoint template to generate on class for each endpoint, for example.
To render the templates, it was needed to extend the nunjucks renderer. The first
extension built, was to allow a single template file to generate more than one file, needed by the Endpoint template to generate one file for each endpoint path.
Also some filters were built for capitalizing and concatenating strings,needed to
build variables and class names. And one last to parse JSON strings, since the RAML parser didn’t do it for the JSON schemas.
With that, the generator was successful in building a full API client for Android
using the templates.
4. Results Once the RAML documentation, the client templates and the API generator were
ready, it was time to use the resulting API client in an actual application. A new Android project was created, the resulting API code was added to the
project, and the development of the front-end of the app started and was time tracked to measure how long it would take to develop this app.
In less than 6 hours, the app was built with a login and signup flow, and a full
CRUD of meals and calories consumed. And the API client followed all the mentioned objectives of the project.
The resulting generator code is now on github, and can be found on this url:
https://github.com/andreterron/raml-android-generator
The app’s screenshots are shown below:
13

Images 4 and 5: Screenshots of the basic app built with the generated API.
5. Conclusion Documenting the API helps maintaining the code and the consistency of the API
requests and responses. It’s specially useful when team working because the API developer will know exactly what he needs to implement, and so does the app developer.
And with a good documentation, tests and API clients can be generated or at
least kickstarted for the application. This not only can make development time faster, but also significantly reduces the chances of human mistakes in the code.
14

By using existing tools, like templating, rest templating libs, and API documentations, it is possible to build an API client generator. The generated API was placed directly on the Android project, and used to consume the API without much effort.
Using code generators can make development a lot faster and consistent for
most cases, and it should be used whenever it’s possible. In this project we demonstrated generating code for Android API clients, but this concept can be applied to many technologies and development areas.
6. Future Work This project can be expanded in many ways, listed below:
6.1. Other platforms Even though this project was focused in Android, the same principles can be
used to generate an API client for iOS or web for example. Having a multi-platform generator is useful to keep both platforms’ codes with a similar structure, and up to date with the latest API docs easier.
6.2. Different areas of app development APIs are a great area to start developing code generators because they are very
structured and not very customized between different applications, but the concept of code generation could be applied to different areas of an application development. Like databases, tests, or even basic UI and user flow.
6.3. Tests and full coverage This project can benefit a lot from tests, since writing templates is usually not
supported by IDEs, it’s important to aways be sure that the generator will work for all cases. Also, RAML specification could be fully covered by this, making sure that it would be possible to generate a client for every API documentation written in RAML.
15

6.4. Submit to RAML Once covering all of RAMLs specifications, this project can be submitted to the
RAML official supporters. Right now they only have an official support for JavaScript, so this could become the official Android API Client generator for RAML.
6.5. GUI Since the generator is a tool apart from the common Android development
workflow, a Graphic User Interface would allow for every Android developer to use the tool, without the need to install some requirements, like node.js.
16

7. References RAML: http://raml.org/ ABAO: https://github.com/cybertk/abao JSON Schema: http://json-schema.org/ Postman: https://www.getpostman.com/ Node.js: https://nodejs.org/en/ Coffeescript: http://coffeescript.org/ Express.js: http://expressjs.com/ MongoDB: https://www.mongodb.com/ Angular: https://angularjs.org/ Angular Material: https://material.angularjs.org/latest/ Bolts for Android: https://github.com/BoltsFramework/Bolts-Android Promises: https://promisesaplus.com/ Spring: http://projects.spring.io/spring-android/
Nunjucks: https://mozilla.github.io/nunjucks/ Raml Parser: https://github.com/raml-org/raml-js-parser
17