Living The Wired Life in the Wired Suburb: Netville, Glocalization

Quick Installation Guide
Installing Neutron Series ezMasterTM
Before you beginFor ezMaster to manage an AP or Switch, the device must be able to communicate with the ezMaster server. Make sure that the ezMaster server; EWS AP and EWS Switch can all be reachable via HTTP/HTTPS from outside your internal network.
Firewall ConfigurationDepending on how your network is designed, you may need to open ports on your firewall.
The following outbound ports MUST be opened in the firewall at the site where the ezMaster server is located in order for ezMaster to register with the ezReg server.
The following inbound ports MUST be opened in the firewall at the site where the ezMaster server is located in order for remote access points to communicate with the ezMaster server.
The following outbound ports MUST be opened in the firewall at the remote site where the AP/Switch is deployed in order to communicate with ezMaster.
System RequirementsRecommended environment for managing up to 500 APs
CPU: Intel® Core™ i3 3.6 GHz dual-core or above
RAM: 4GB minimum
HDD: 500 GB (actual requirement is dependent on log size)
OS: Microsoft® Windows® 7 or later + VMware® Player 7 (or similar virtualization products)
Recommended environment for managing up to 1,000+ APs
CPU: Intel® Core™ i5 3.2 GHz quad-core or above
RAM: 4 GB minimum
HDD: 500 GB (actual requirement is dependent on log size)
OS: Microsoft® Windows® 7 or later + VMware® Player 7 (or similar virtualization products)
Browser Requirements
Internet Explorer 10 or better
Firefox 34.0 or better
Chrome 31.0 or better
Safari 8.0 or better
Network Topology Requirements
At sites where APs are deployed: A DHCP-enabled network for APs to obtain IP address
ezMaster Image Installation InstructionsThe instructions below will guide you through the process of installing ezMaster VM.
EzMaster VM is distributed as an Open Virtualization Appliance (OVA), which should be compatible with these virtual machine products.
I. Getting the ezMaster Virtual Machine Image The ezMaster VM file can be downloaded at EnGenius’ website.
Port DescriptionUDP 1234 Custom port, CAPWAP protocol
TCP 80 (default) HTTP port, Captive Portal, port can be defined by user
Port DescriptionTCP 80 HTTP port, ezReg communication
UDP 53 DNS port, ezReg communication
Port DescriptionUDP 1234 Custom port, CAPWAP protocol
TCP 80 HTTP port, ezReg communication
UDP 53 DNS port, ezReg communication
TCP 80 (default) HTTP port, Captive Portal, port can be defined by user
2
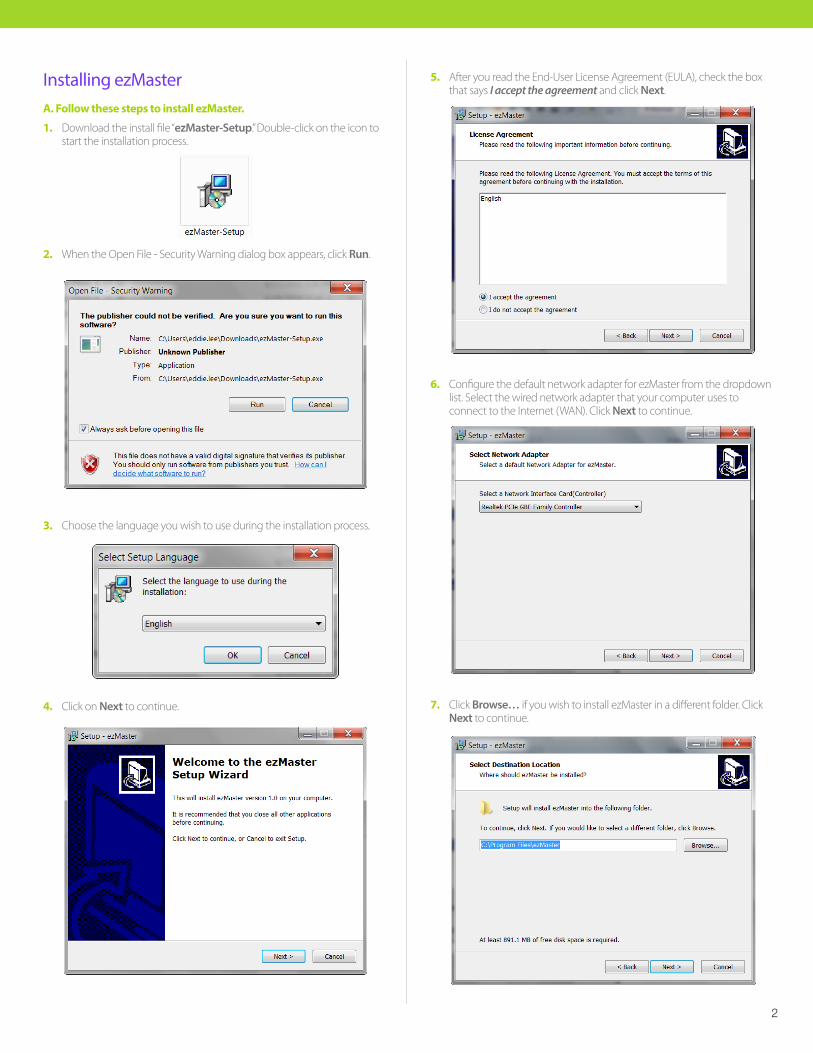
5. After you read the End-User License Agreement (EULA), check the box that says I accept the agreement and click Next.
6. Configure the default network adapter for ezMaster from the dropdown list. Select the wired network adapter that your computer uses to connect to the Internet (WAN). Click Next to continue.
7. Click Browse… if you wish to install ezMaster in a different folder. Click Next to continue.
Installing ezMasterA. Follow these steps to install ezMaster.
1. Download the install file “ezMaster-Setup.” Double-click on the icon to start the installation process.
2. When the Open File - Security Warning dialog box appears, click Run.
3. Choose the language you wish to use during the installation process.
4. Click on Next to continue.

3
11. Once setup is complete, the following screen will appear. Click Finish to exit the setup wizard and launch ezMaster.
12. Click OK to continue.
B. Setting up ezMaster Server
1. Once the installation script finishes running, you will be prompted to enter the login and password for ezMaster.
System login: admin
Password: password
8. Click Next.
9. On this screen, you will see a summary of the installation. Click Install.
10. The setup wizard will now start downloading and installing ezMaster to your hard drive. This will take some time to complete, depending on your network connection speed.

4
b. Enter the subnet mask.
c. Enter the default gateway.
d. Enter DNS Server 1. Press Enter if you wish to skip this and ezMaster will automatically assign DNS Server 1: 8.8.8.8.
2. Your current system time and time zone will be displayed. Enter no if you wish to configure ezMaster time settings, or enter yes to continue.
3. You will now be prompted to enter network settings for your ezMaster server. You can check your network adapter from Network Adapter Properties.
Note: Network settings below are for reference only and will vary according to your network environment.
a. Enter ezMaster Server IP Address. Note that the IP Address must be an unused IP address. For example, the LAN Adapter IP is 10.0.89.199 so an unused IP Address (10.0.89.200) is chosen to be used as ezMaster’s server IP address.

5
4. You have completed installing ezMaster. Open a web browser and type the IP address of (referring to Ste 3a) the ezMaster server. Once the login screen appears, enter the username and password to log in.
Registering ezMaster to the ezReg ServerIn order to manage remote devices using ezMaster, you must first register ezMaster to the ezRegistration server. You may skip this section if you are managing only local devices or if you are manually redirecting each AP to ezMaster.
1. Under Admin Account, fill in the fields and click Apply to register your ezMaster to the ezReg server. Take note that a valid email address is required for you to unregister your devices in the event of an ezMaster server failure.
2. Under Connectivity Test, click Test to ensure that your network is setup correctly for use and confirm that ezRegister servers are reachable from your network.
e. Enter DNS Server 2. Press Enter if you wish to skip this and ezMaster will automatically assign DNS Server 2: 0.0.0.0.
f. Once network settings have been completed, you’ll be prompted to enter the login and password.
System login: admin
Password: password
g. The CLI wizard will display a summary of network settings configured.

6
Getting Started with ezMasterBefore ezMaster is able to manage a Neutron device, the Access Point/Switch must be running with the required firmware version. All Neutron devices will need to be running firmware version c.1.7.x or later. Refer to the AP/Switch user manual for detailed instructions on firmware upgrading.
Adding Devices to ezMaster Device InventoryBefore managing a remote AP/Switch, you must first bind the AP to ezMaster’s Device Inventory by ‘registering’ the device.
1. Once ezMaster has been registered with the ezRegistration server, you can start registering your APs and adding them to ezMaster’s device inventory by clicking on the Device Inventory icon.
2. Next, click on the Add Device button.
3. Enter the MAC Address, Check Code and Description of the device you want to register using a semi-colon (;) to separate each field. eg. MAC Address;Check Code;Description
To register more than one device at the same time, enter the information of one device per row by pressing Enter. Click the Register button once you are done.
Note: The ‘check code’ of the AP can be found on the device label at the bottom of the AP. Or, access the AP’s user interface and find it under the Management > Controller Settings. Contact your local dealer if you are having problems locating the check code.
4. The message below will be displayed upon successfully claiming an AP. Click on OK to proceed.
5. The registered AP will be listed in your Device Inventory.
Managing Neutron Devices using ezMaster1. Make sure that your Neutron device is connected to a network with a DHCP server and can access the Internet.
2. Click on the Project icon to create a new project. A ‘Project’ is similar to a ‘profile’ which can be used to classify/represent different sites or floors of your deployment.

7
Maximum data rates are based on IEEE 802.11 standards. Actual throughput and range can vary depending on many factors including environmental conditions, distance between devices, radio interference in the operating environment, and mix of devices in the network. Features and specification subject to change without notice. Trademarks and registered trademarks are the property of their respective owners. Copyright © 2015 EnGenius. All rights reserved.
EnGenius Technologies | 1580 Scenic Ave. Costa Mesa, CA 92626Email: [email protected] | Phone: 888-735-7888 | Website: engeniustech.com
Features and specifications subject to change without notice. Trademarks and registered trademarks are the property of their respective owners. For United States of America: Copyright © 2015 EnGenius Technologies, Inc. All rights reserved.
Version 1.0 - 11/17/15
Managing Neutron Devices using ezMaster continued3. Click on Create New Project and enter a project name and description. Click on Apply when you are done.
4. You’ll be automatically redirected to the Pending Approval list after successfully creating a profile. The Pending Approval list will display a list of AP/Switches in your local network (same network as ezMaster) and also remote AP/Switches claimed by ezMaster.
5. Select the AP(s) you wish to add to your profile by selecting the checkbox and click on the Add button.
6. You’ll be automatically redirected to the device page. Once the AP is online (green), to configure your AP, click on the Device Name link of your AP to bring up the configuration menu.
Important: In order to manage an EWS Switch, the Controller State of the EWS Switch must be set to Disabled in the EWS Switch web interface. A Switch with Controller State Enabled will not be discovered by ezMaster.