![MASH: tool integration made easy - Semantic Scholar · 2017-12-16 · Modern integrated development environments (IDEs) such as Eclipse [1], Netbeans [2], or ... JUnit can execute](https://static.fdocuments.in/doc/165x107/5bbab87809d3f2323f8e015e/mash-tool-integration-made-easy-semantic-scholar-2017-12-16-modern-integrated.jpg)
Installing GTKmm on Windows (with Dev-C++ and Eclipse IDEs)
33
Installing GTKmm on Windows: Version 1.1 Refer to original documentation here: http://www.gtkmm.org/docs/gtkmm-2.4/docs/tutorial/html/sec-windows-installation.html Introduction The guide above did not entirely work for me, so I have provided my experiences of how to get GTKmm working with Dev-C++ below. Also included is how to get the Eclipse IDE to work. I cannot guarantee that what worked for me will work for you – these are suggestions NOT instructions so use what works for you. The operating system I tested this on was a standard Windows XP SP2 install running in a Sun VirtualBox window on Ubuntu 8.04... Yes, that's right, it's Windows on Linux. That said, there's no difference running virtualised OSes anyway. Let's move on. What worked for me... DEV-C++ Firstly, I downloaded Dev-C++ from here: http://www.bloodshed.net/dev/devcpp.html Out of the available choices, I selected the following package: Dev-C++ 5.0 beta 9.2 (4.9.9.2) (9.0 MB) with Mingw/GCC 3.4.2 Once this had downloaded, I installed the program to C:\Dev-Cpp (the default)
Transcript of Installing GTKmm on Windows (with Dev-C++ and Eclipse IDEs)
Installing GTKmm on Windows:
Version 1.1
Refer to original documentation here:http://www.gtkmm.org/docs/gtkmm-2.4/docs/tutorial/html/sec-windows-installation.html
Introduction
The guide above did not entirely work for me, so I have provided my experiences of how to get GTKmm working with Dev-C++ below.
Also included is how to get the Eclipse IDE to work.
I cannot guarantee that what worked for me will work for you – these are suggestions NOT instructions so use what works for you.
The operating system I tested this on was a standard Windows XP SP2 install running in a Sun VirtualBox window on Ubuntu 8.04... Yes, that's right, it's Windows on Linux. That said, there's no difference running virtualised OSes anyway. Let's move on.
What worked for me...
DEV-C++
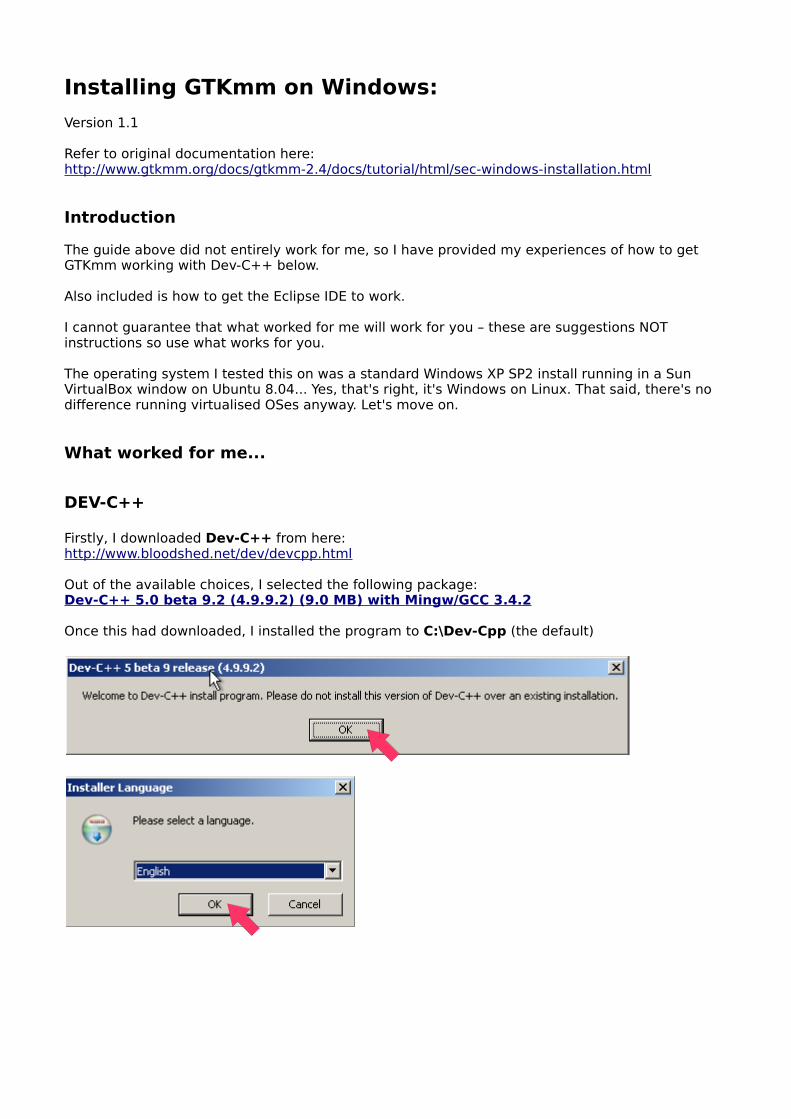
Firstly, I downloaded Dev-C++ from here:http://www.bloodshed.net/dev/devcpp.html
Out of the available choices, I selected the following package:Dev-C++ 5.0 beta 9.2 (4.9.9.2) (9.0 MB) with Mingw/GCC 3.4.2
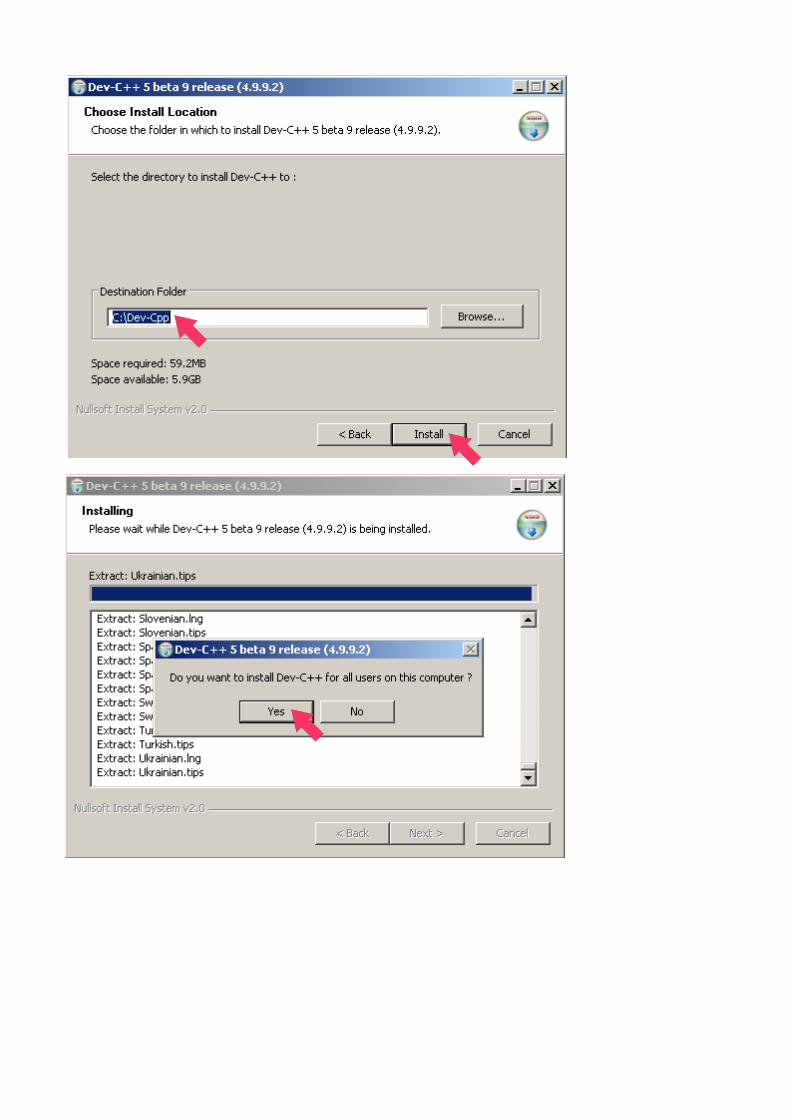
Once this had downloaded, I installed the program to C:\Dev-Cpp (the default)

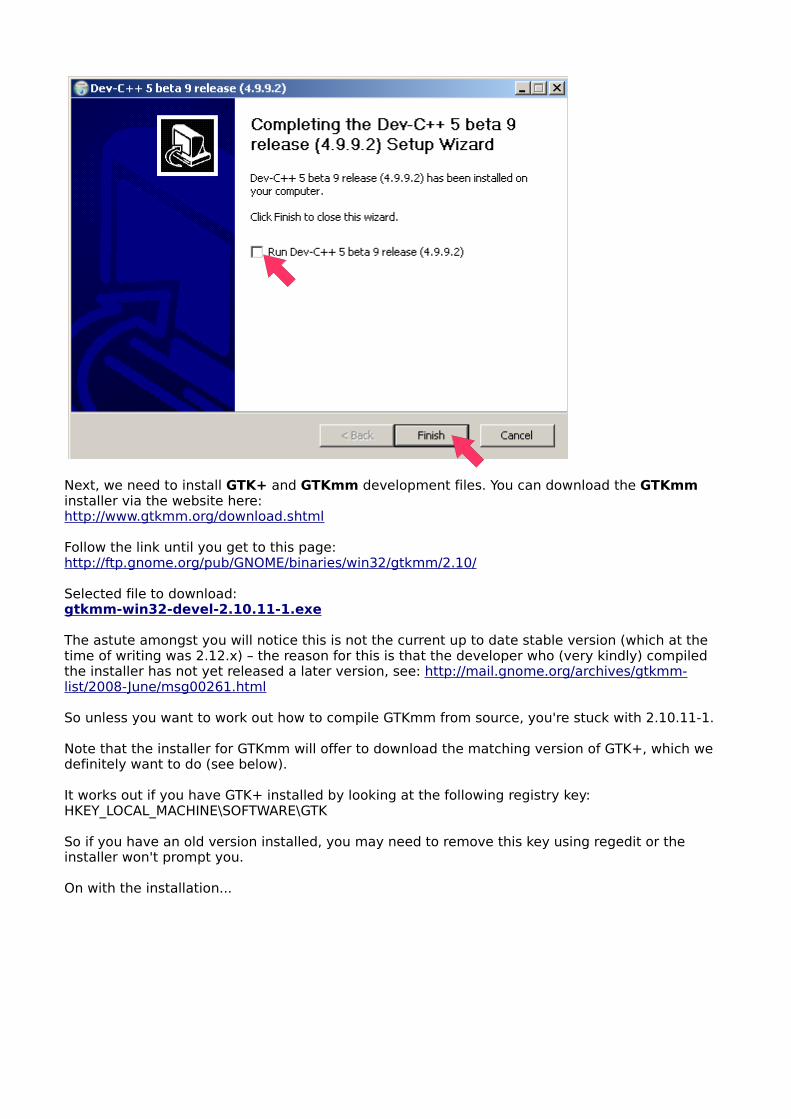
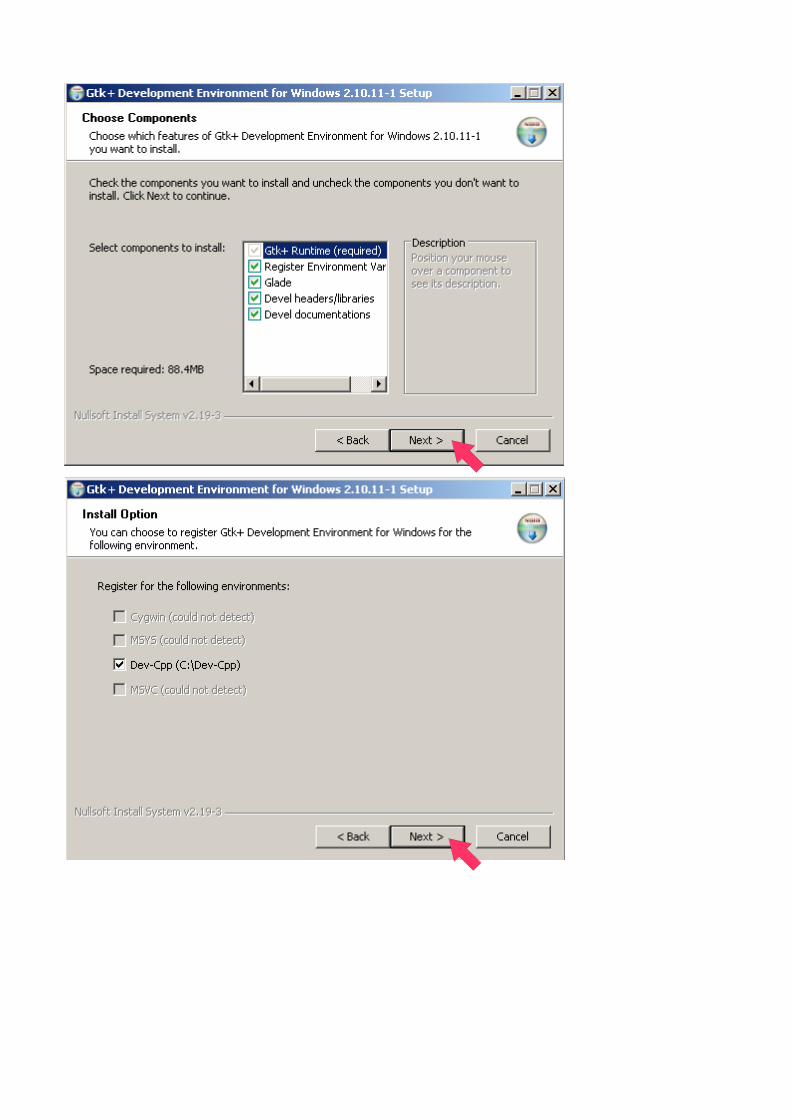
Next, we need to install GTK+ and GTKmm development files. You can download the GTKmm installer via the website here:http://www.gtkmm.org/download.shtml
Follow the link until you get to this page:http://ftp.gnome.org/pub/GNOME/binaries/win32/gtkmm/2.10/
Selected file to download:gtkmm-win32-devel-2.10.11-1.exe
The astute amongst you will notice this is not the current up to date stable version (which at the time of writing was 2.12.x) – the reason for this is that the developer who (very kindly) compiled the installer has not yet released a later version, see: http://mail.gnome.org/archives/gtkmm-list/2008-June/msg00261.html
So unless you want to work out how to compile GTKmm from source, you're stuck with 2.10.11-1.
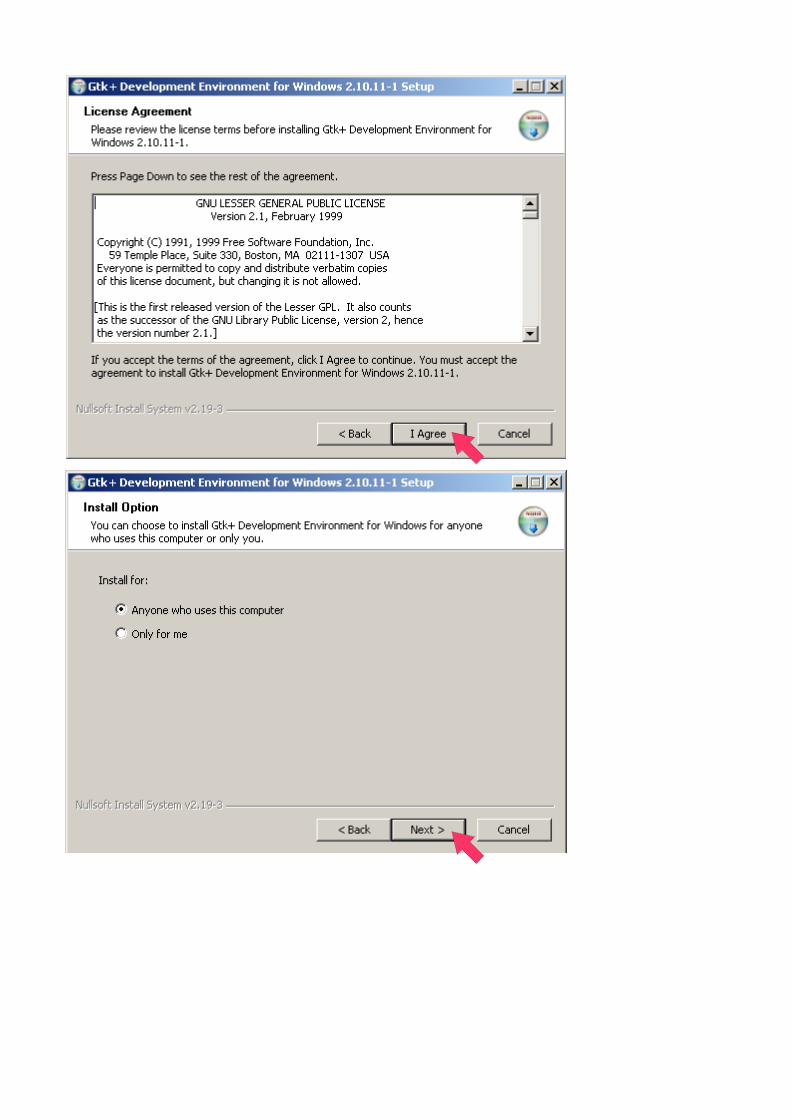
Note that the installer for GTKmm will offer to download the matching version of GTK+, which we definitely want to do (see below).
It works out if you have GTK+ installed by looking at the following registry key: HKEY_LOCAL_MACHINE\SOFTWARE\GTK
So if you have an old version installed, you may need to remove this key using regedit or the installer won't prompt you.
On with the installation...

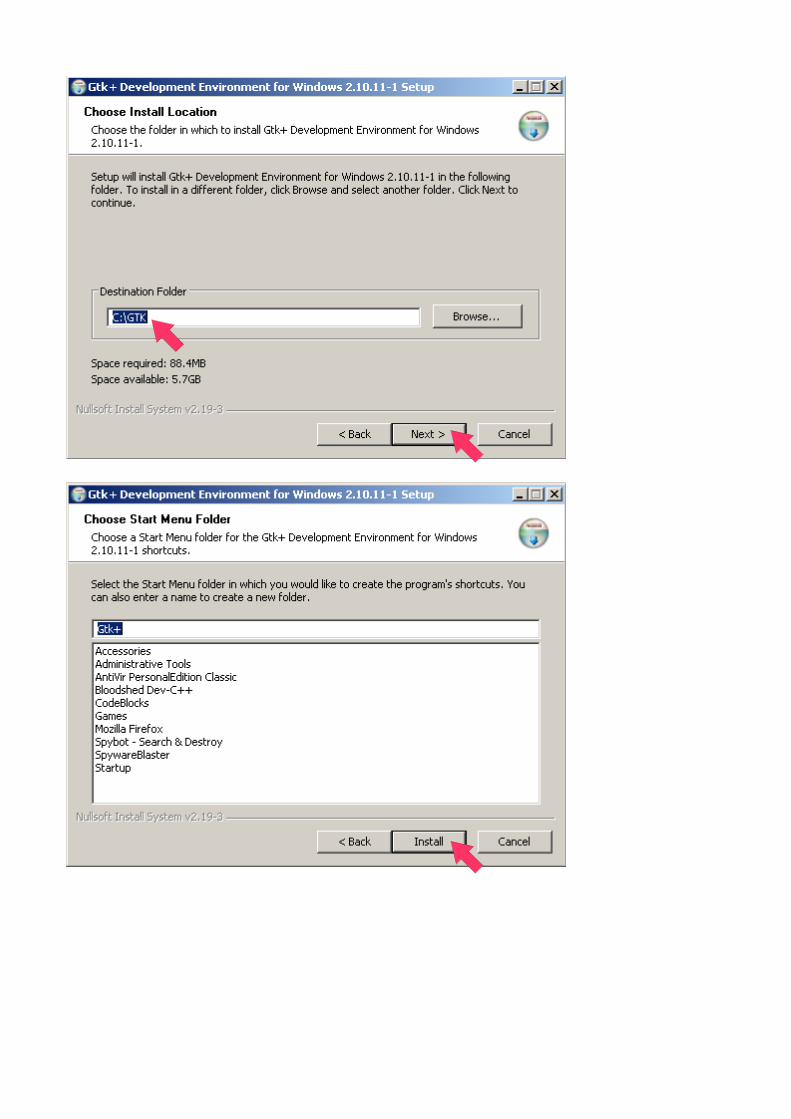
As noted above, you can also download the GTK+ development files from: http://sourceforge.net/projects/gladewin32
You can download GTK+ development and runtime versions from there. Obviously, use the development version for developing and the runtime version for... running. Yes that was a little bit obvious but the point is you don't need both versions at once. Anyway, don't worry about this if you're using the automated download / install, it's just for reference.
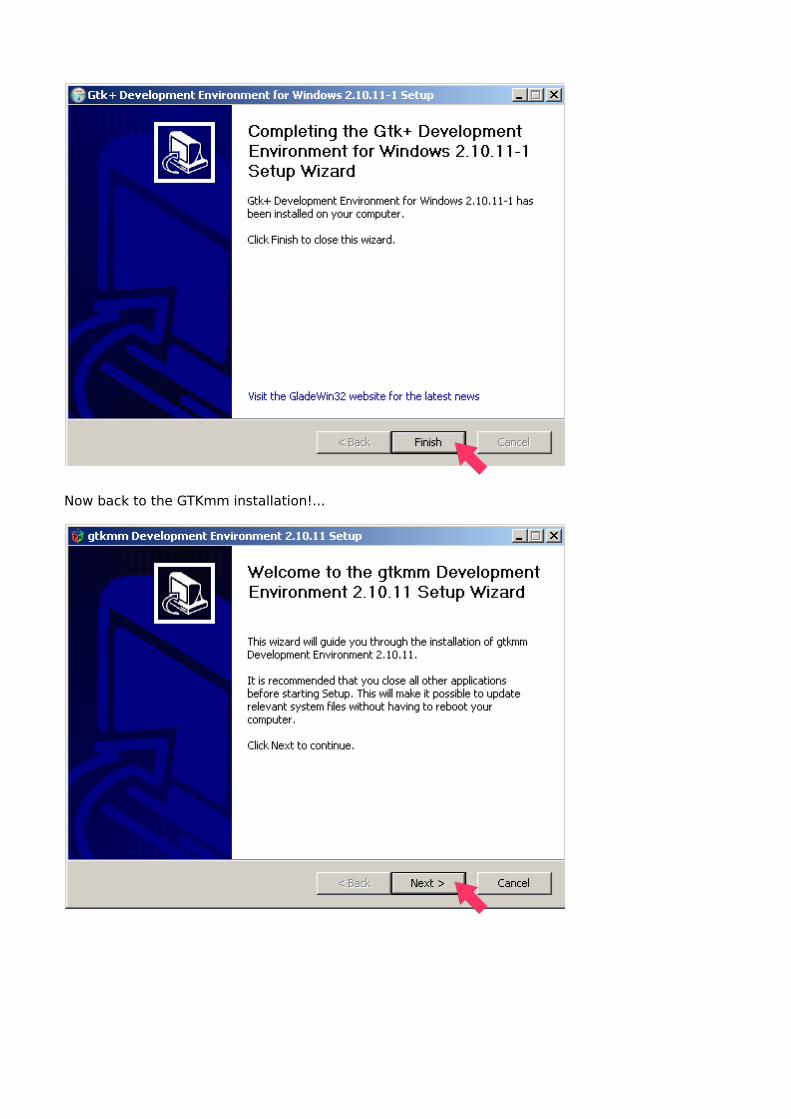
Now back to the GTKmm installation!...

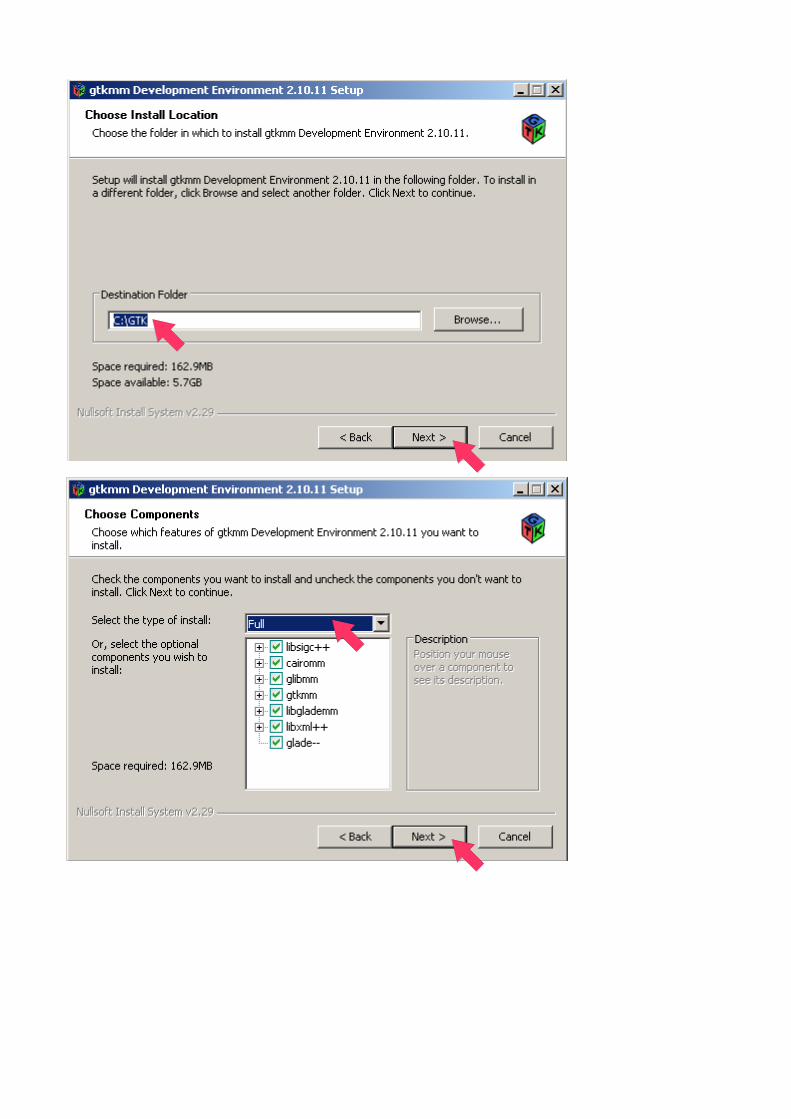
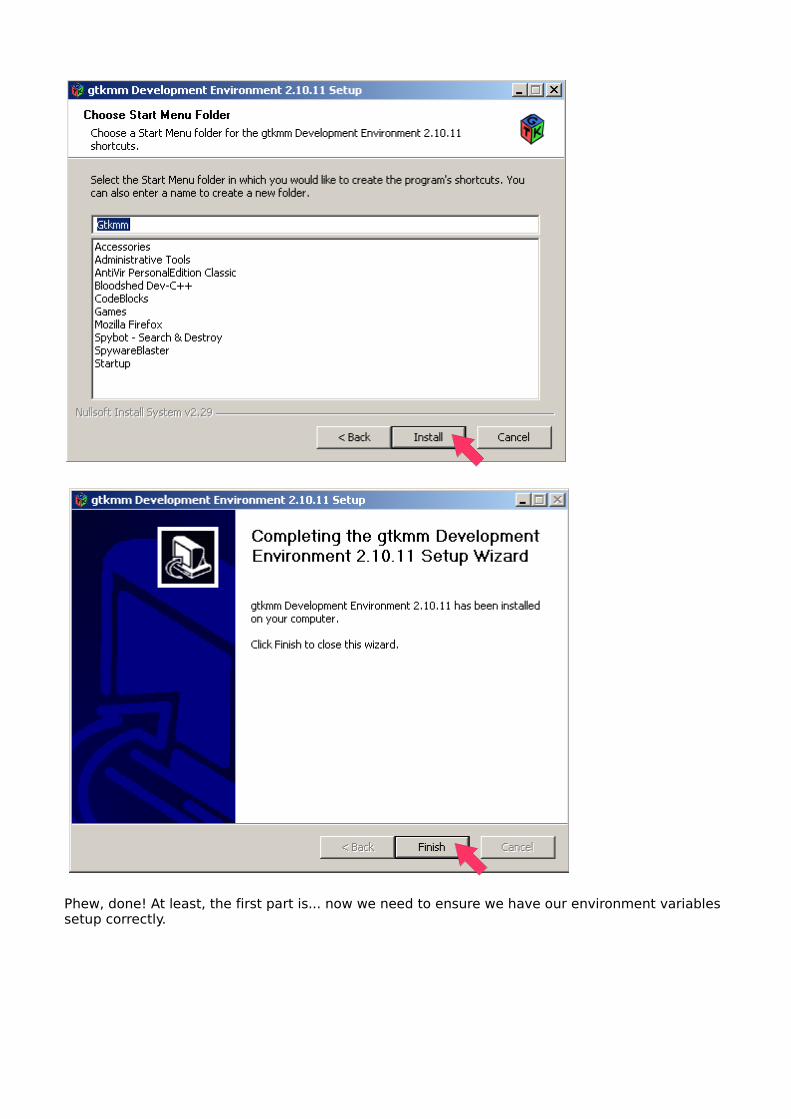
Phew, done! At least, the first part is... now we need to ensure we have our environment variables setup correctly.
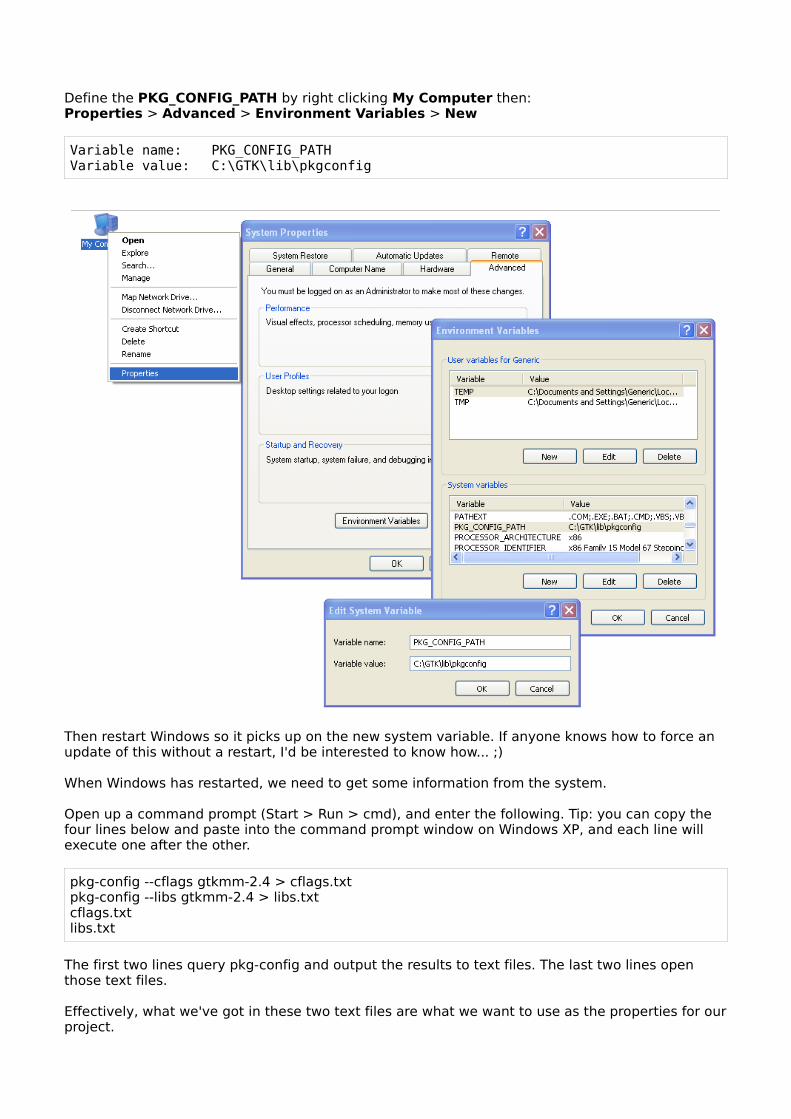
Define the PKG_CONFIG_PATH by right clicking My Computer then: Properties > Advanced > Environment Variables > New
Variable name: PKG_CONFIG_PATHVariable value: C:\GTK\lib\pkgconfig
Then restart Windows so it picks up on the new system variable. If anyone knows how to force an update of this without a restart, I'd be interested to know how... ;)
When Windows has restarted, we need to get some information from the system.
Open up a command prompt (Start > Run > cmd), and enter the following. Tip: you can copy the four lines below and paste into the command prompt window on Windows XP, and each line will execute one after the other.
pkg-config --cflags gtkmm-2.4 > cflags.txtpkg-config --libs gtkmm-2.4 > libs.txtcflags.txtlibs.txt
The first two lines query pkg-config and output the results to text files. The last two lines open those text files.
Effectively, what we've got in these two text files are what we want to use as the properties for our project.
You should see something similar to:
cflags.txt
-mms-bitfields -IC:/GTK/include/gtkmm-2.4 -IC:/GTK/lib/gtkmm-2.4/include -IC:/GTK/include/glibmm-2.4 -IC:/GTK/lib/glibmm-2.4/include -IC:/GTK/include/gdkmm-2.4 -IC:/GTK/lib/gdkmm-2.4/include -IC:/GTK/include/pangomm-1.4 -IC:/GTK/include/atkmm-1.6 -IC:/GTK/include/gtk-2.0 -IC:/GTK/include/sigc++-2.0 -IC:/GTK/lib/sigc++-2.0/include -IC:/GTK/include/glib-2.0 -IC:/GTK/lib/glib-2.0/include -IC:/GTK/lib/gtk-2.0/include -IC:/GTK/include/cairomm-1.0 -IC:/GTK/include/pango-1.0 -IC:/GTK/include/cairo -IC:/GTK/include/freetype2 -IC:/GTK/include -IC:/GTK/include/atk-1.0
NOTE:Add -IC:/GTK/include/libglademm-2.4 if you are using glade (ensuring you separate from last entry using space).
libs.txt
-user32 -Wl,-luuid -LC:/GTK/lib -lgtkmm-2.4 -lgdkmm-2.4 -latkmm-1.6 -lgtk-win32-2.0 -lpangomm-1.4 -lcairomm-1.0 -lglibmm-2.4 -lsigc-2.0 -lgdk-win32-2.0 -lgdi32 -limm32 -lshell32 -lole32 -latk-1.0 -lgdk_pixbuf-2.0 -lpangowin32-1.0 -lpangocairo-1.0 -lcairo -lpangoft2-1.0 -lfontconfig -lfreetype -lz -lpango-1.0 -lm -lgobject-2.0 -lgmodule-2.0 -lglib-2.0 -lintl -liconv
NOTE:Add -lglademm-2.4 if you are using glade (ensuring you separate from last entry using space).
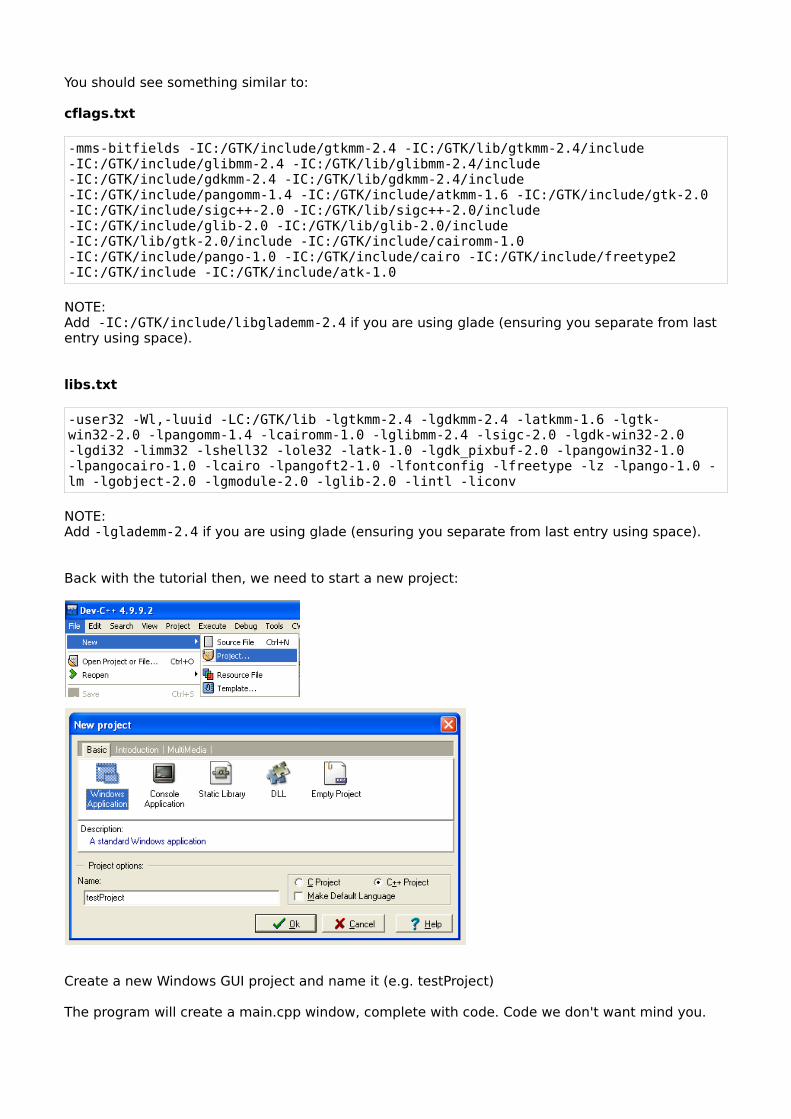
Back with the tutorial then, we need to start a new project:
Create a new Windows GUI project and name it (e.g. testProject)
The program will create a main.cpp window, complete with code. Code we don't want mind you.
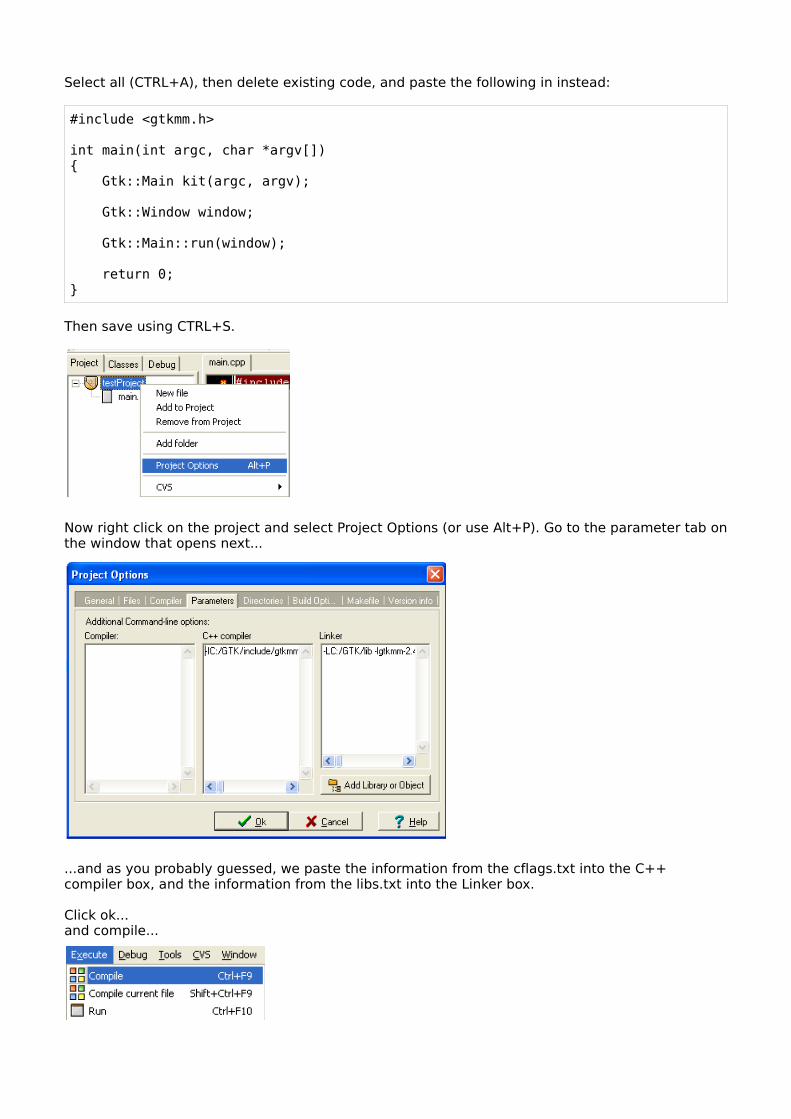
Select all (CTRL+A), then delete existing code, and paste the following in instead:
#include <gtkmm.h>
int main(int argc, char *argv[]){ Gtk::Main kit(argc, argv);
Gtk::Window window;
Gtk::Main::run(window); return 0;}
Then save using CTRL+S.
Now right click on the project and select Project Options (or use Alt+P). Go to the parameter tab on the window that opens next...
...and as you probably guessed, we paste the information from the cflags.txt into the C++ compiler box, and the information from the libs.txt into the Linker box.
Click ok...and compile...
(or use CTRL+F9)
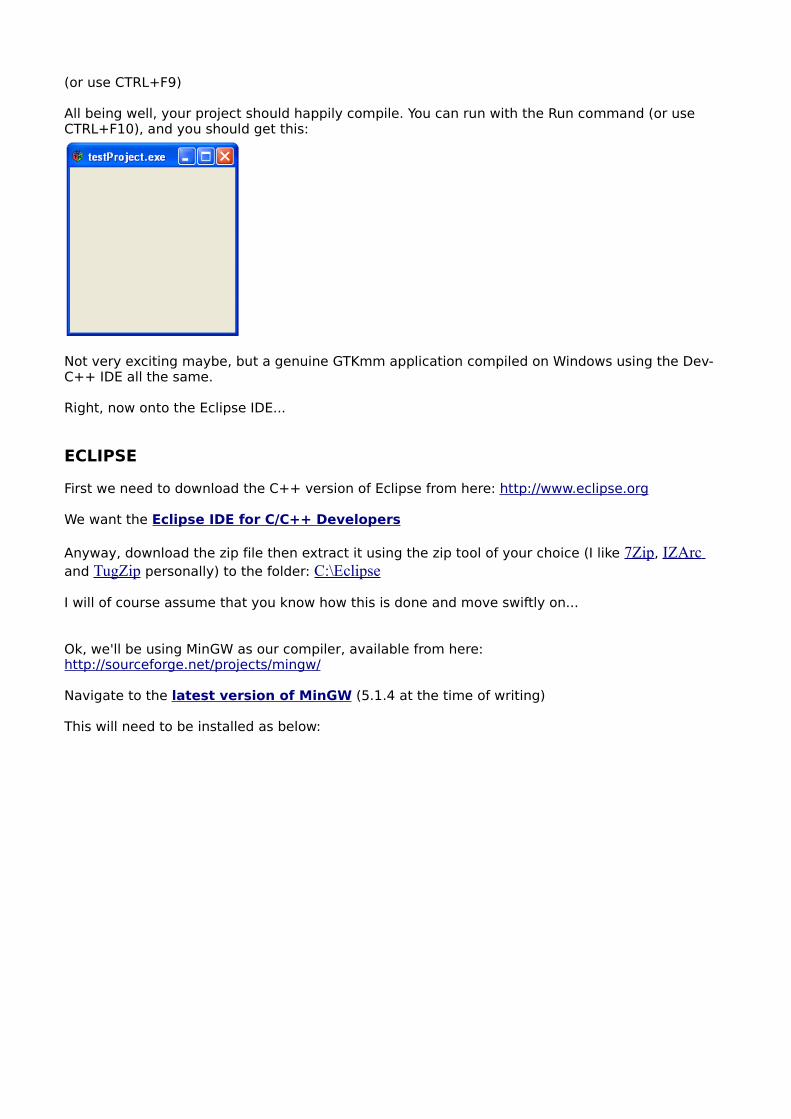
All being well, your project should happily compile. You can run with the Run command (or use CTRL+F10), and you should get this:
Not very exciting maybe, but a genuine GTKmm application compiled on Windows using the Dev-C++ IDE all the same.
Right, now onto the Eclipse IDE...
ECLIPSE
First we need to download the C++ version of Eclipse from here: http://www.eclipse.org
We want the Eclipse IDE for C/C++ Developers
Anyway, download the zip file then extract it using the zip tool of your choice (I like 7Zip, IZArc and TugZip personally) to the folder: C:\Eclipse
I will of course assume that you know how this is done and move swiftly on...
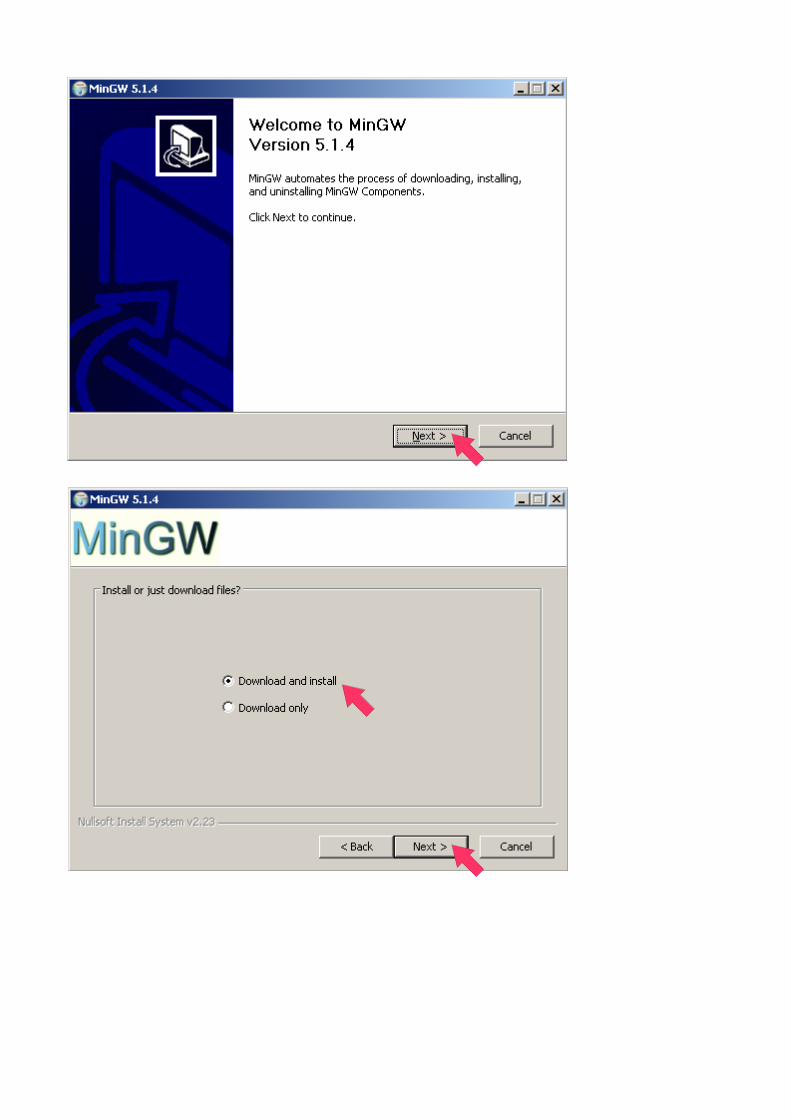
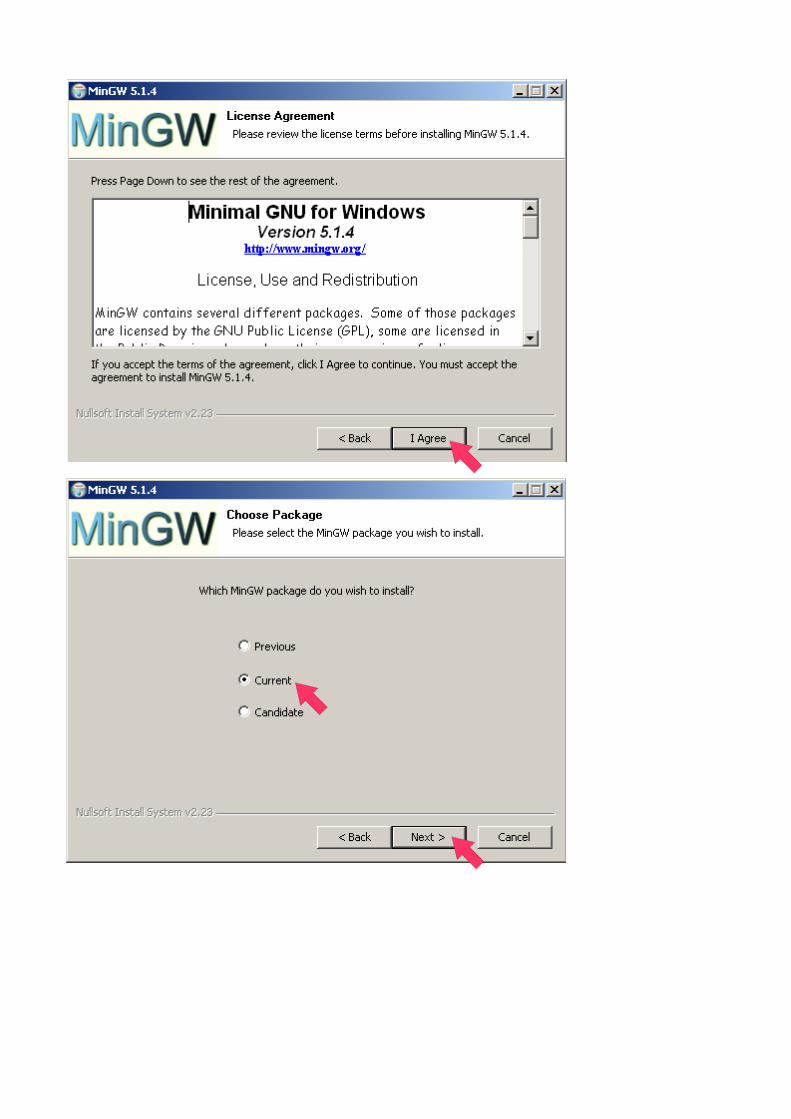
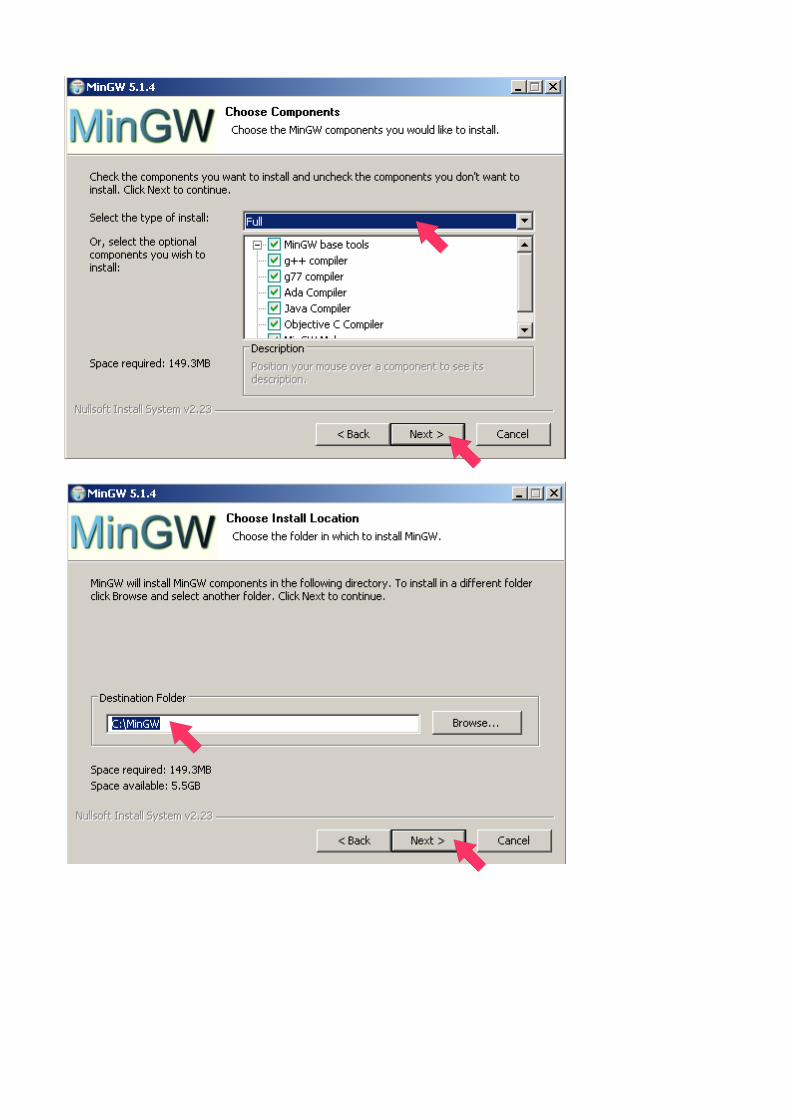
Ok, we'll be using MinGW as our compiler, available from here: http://sourceforge.net/projects/mingw/
Navigate to the latest version of MinGW (5.1.4 at the time of writing)
This will need to be installed as below:

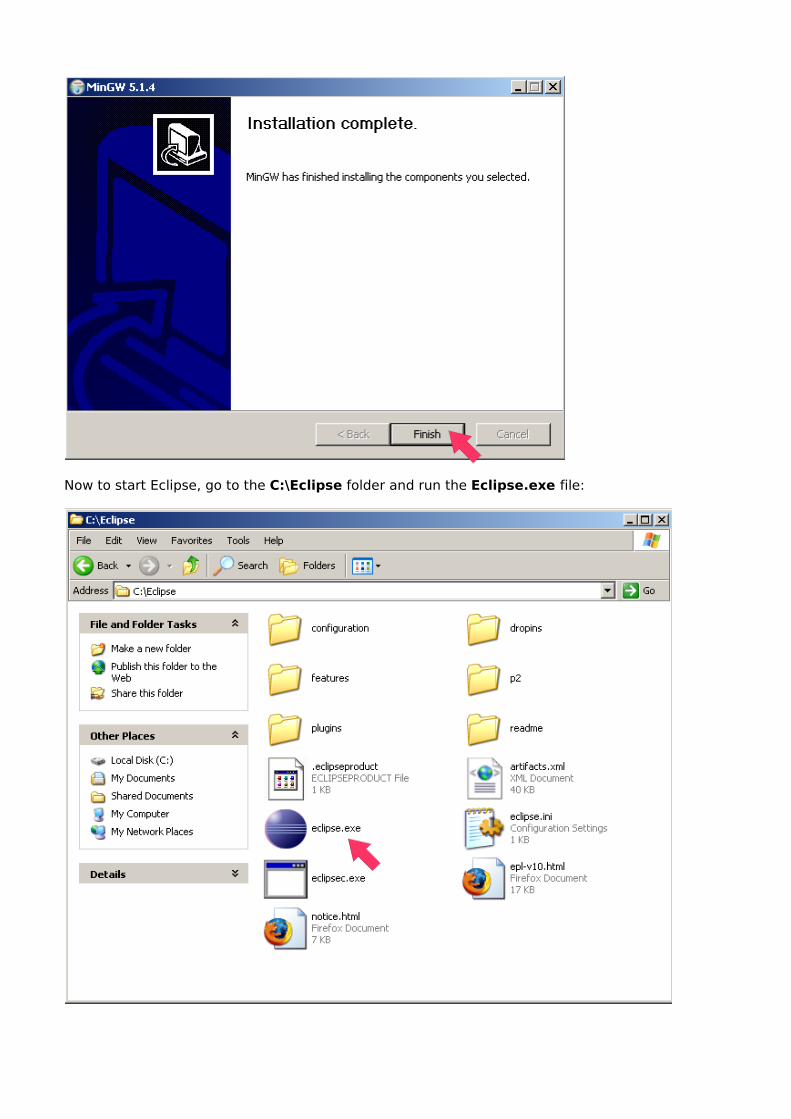
Now to start Eclipse, go to the C:\Eclipse folder and run the Eclipse.exe file:
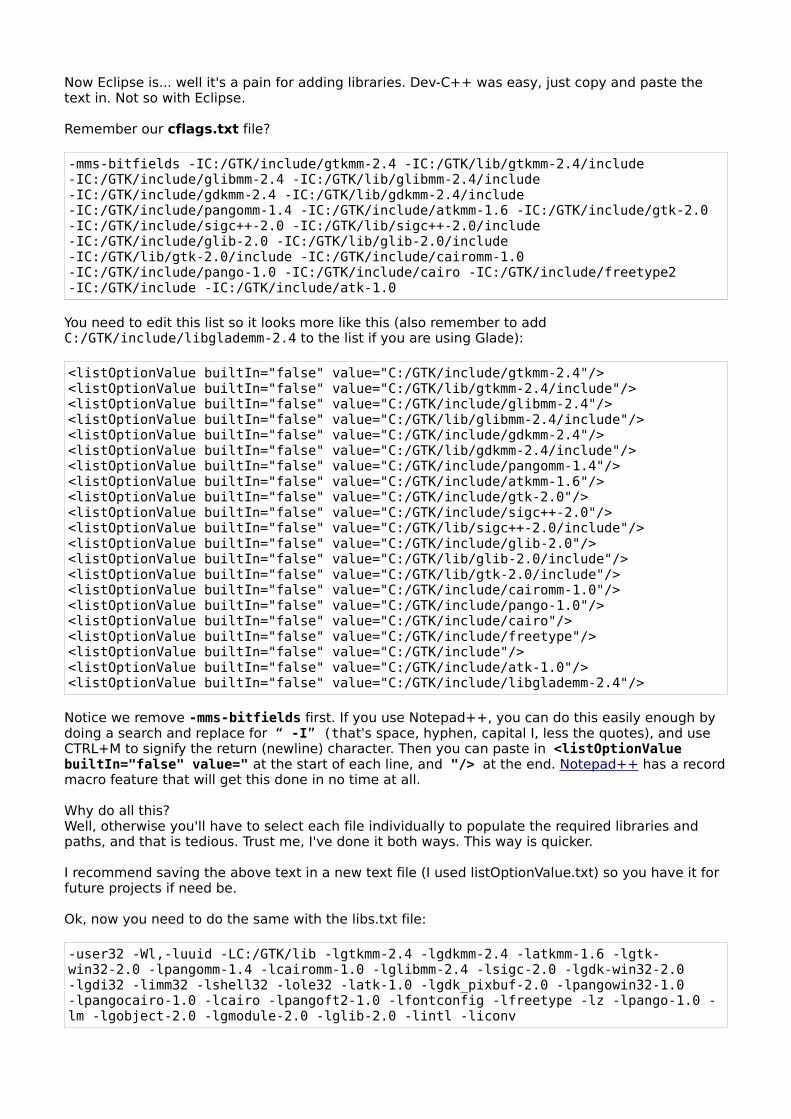
Now Eclipse is... well it's a pain for adding libraries. Dev-C++ was easy, just copy and paste the text in. Not so with Eclipse.
Remember our cflags.txt file?
-mms-bitfields -IC:/GTK/include/gtkmm-2.4 -IC:/GTK/lib/gtkmm-2.4/include -IC:/GTK/include/glibmm-2.4 -IC:/GTK/lib/glibmm-2.4/include -IC:/GTK/include/gdkmm-2.4 -IC:/GTK/lib/gdkmm-2.4/include -IC:/GTK/include/pangomm-1.4 -IC:/GTK/include/atkmm-1.6 -IC:/GTK/include/gtk-2.0 -IC:/GTK/include/sigc++-2.0 -IC:/GTK/lib/sigc++-2.0/include -IC:/GTK/include/glib-2.0 -IC:/GTK/lib/glib-2.0/include -IC:/GTK/lib/gtk-2.0/include -IC:/GTK/include/cairomm-1.0 -IC:/GTK/include/pango-1.0 -IC:/GTK/include/cairo -IC:/GTK/include/freetype2 -IC:/GTK/include -IC:/GTK/include/atk-1.0
You need to edit this list so it looks more like this (also remember to add C:/GTK/include/libglademm-2.4 to the list if you are using Glade):
<listOptionValue builtIn="false" value="C:/GTK/include/gtkmm-2.4"/><listOptionValue builtIn="false" value="C:/GTK/lib/gtkmm-2.4/include"/><listOptionValue builtIn="false" value="C:/GTK/include/glibmm-2.4"/><listOptionValue builtIn="false" value="C:/GTK/lib/glibmm-2.4/include"/><listOptionValue builtIn="false" value="C:/GTK/include/gdkmm-2.4"/><listOptionValue builtIn="false" value="C:/GTK/lib/gdkmm-2.4/include"/><listOptionValue builtIn="false" value="C:/GTK/include/pangomm-1.4"/><listOptionValue builtIn="false" value="C:/GTK/include/atkmm-1.6"/><listOptionValue builtIn="false" value="C:/GTK/include/gtk-2.0"/><listOptionValue builtIn="false" value="C:/GTK/include/sigc++-2.0"/><listOptionValue builtIn="false" value="C:/GTK/lib/sigc++-2.0/include"/><listOptionValue builtIn="false" value="C:/GTK/include/glib-2.0"/><listOptionValue builtIn="false" value="C:/GTK/lib/glib-2.0/include"/><listOptionValue builtIn="false" value="C:/GTK/lib/gtk-2.0/include"/><listOptionValue builtIn="false" value="C:/GTK/include/cairomm-1.0"/><listOptionValue builtIn="false" value="C:/GTK/include/pango-1.0"/><listOptionValue builtIn="false" value="C:/GTK/include/cairo"/><listOptionValue builtIn="false" value="C:/GTK/include/freetype"/><listOptionValue builtIn="false" value="C:/GTK/include"/><listOptionValue builtIn="false" value="C:/GTK/include/atk-1.0"/><listOptionValue builtIn="false" value="C:/GTK/include/libglademm-2.4"/>
Notice we remove -mms-bitfields first. If you use Notepad++, you can do this easily enough by doing a search and replace for “ -I” (that's space, hyphen, capital I, less the quotes), and use CTRL+M to signify the return (newline) character. Then you can paste in <listOptionValue builtIn="false" value=" at the start of each line, and "/> at the end. Notepad++ has a record macro feature that will get this done in no time at all.
Why do all this?Well, otherwise you'll have to select each file individually to populate the required libraries and paths, and that is tedious. Trust me, I've done it both ways. This way is quicker.
I recommend saving the above text in a new text file (I used listOptionValue.txt) so you have it for future projects if need be.
Ok, now you need to do the same with the libs.txt file:
-user32 -Wl,-luuid -LC:/GTK/lib -lgtkmm-2.4 -lgdkmm-2.4 -latkmm-1.6 -lgtk-win32-2.0 -lpangomm-1.4 -lcairomm-1.0 -lglibmm-2.4 -lsigc-2.0 -lgdk-win32-2.0 -lgdi32 -limm32 -lshell32 -lole32 -latk-1.0 -lgdk_pixbuf-2.0 -lpangowin32-1.0 -lpangocairo-1.0 -lcairo -lpangoft2-1.0 -lfontconfig -lfreetype -lz -lpango-1.0 -lm -lgobject-2.0 -lgmodule-2.0 -lglib-2.0 -lintl -liconv
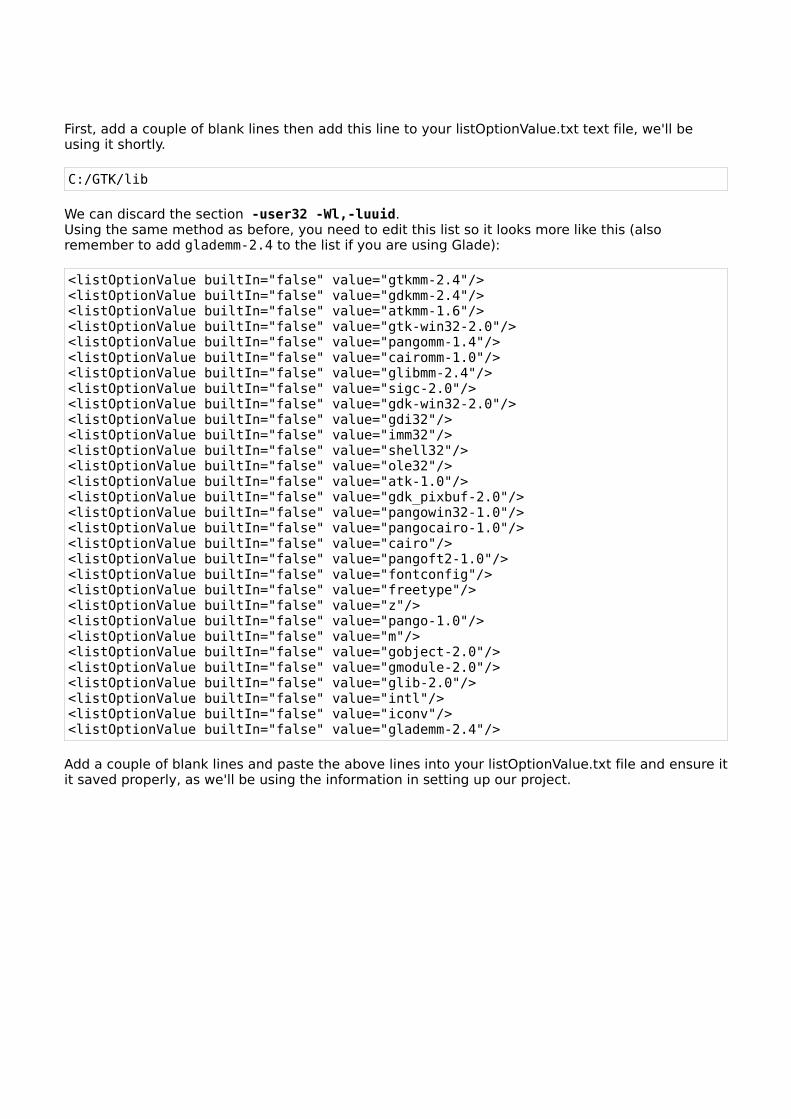
First, add a couple of blank lines then add this line to your listOptionValue.txt text file, we'll be using it shortly.
C:/GTK/lib
We can discard the section -user32 -Wl,-luuid.Using the same method as before, you need to edit this list so it looks more like this (also remember to add glademm-2.4 to the list if you are using Glade):
<listOptionValue builtIn="false" value="gtkmm-2.4"/><listOptionValue builtIn="false" value="gdkmm-2.4"/><listOptionValue builtIn="false" value="atkmm-1.6"/><listOptionValue builtIn="false" value="gtk-win32-2.0"/><listOptionValue builtIn="false" value="pangomm-1.4"/><listOptionValue builtIn="false" value="cairomm-1.0"/><listOptionValue builtIn="false" value="glibmm-2.4"/><listOptionValue builtIn="false" value="sigc-2.0"/><listOptionValue builtIn="false" value="gdk-win32-2.0"/><listOptionValue builtIn="false" value="gdi32"/><listOptionValue builtIn="false" value="imm32"/><listOptionValue builtIn="false" value="shell32"/><listOptionValue builtIn="false" value="ole32"/><listOptionValue builtIn="false" value="atk-1.0"/><listOptionValue builtIn="false" value="gdk_pixbuf-2.0"/><listOptionValue builtIn="false" value="pangowin32-1.0"/><listOptionValue builtIn="false" value="pangocairo-1.0"/><listOptionValue builtIn="false" value="cairo"/><listOptionValue builtIn="false" value="pangoft2-1.0"/><listOptionValue builtIn="false" value="fontconfig"/><listOptionValue builtIn="false" value="freetype"/><listOptionValue builtIn="false" value="z"/><listOptionValue builtIn="false" value="pango-1.0"/><listOptionValue builtIn="false" value="m"/><listOptionValue builtIn="false" value="gobject-2.0"/><listOptionValue builtIn="false" value="gmodule-2.0"/><listOptionValue builtIn="false" value="glib-2.0"/><listOptionValue builtIn="false" value="intl"/><listOptionValue builtIn="false" value="iconv"/><listOptionValue builtIn="false" value="glademm-2.4"/>
Add a couple of blank lines and paste the above lines into your listOptionValue.txt file and ensure it it saved properly, as we'll be using the information in setting up our project.

Start Eclipse (if you haven't already done so, this is a good time to add a desktop shortcut to C:\Eclipse\Eclipse.exe). First it asks you where you want your workspace to be. Select an appropriate location and click OK.
When Eclipse has loaded, choose File > New > C++ Project.
Enter a Project name, then choose Executable > Empty Project, then click Next.
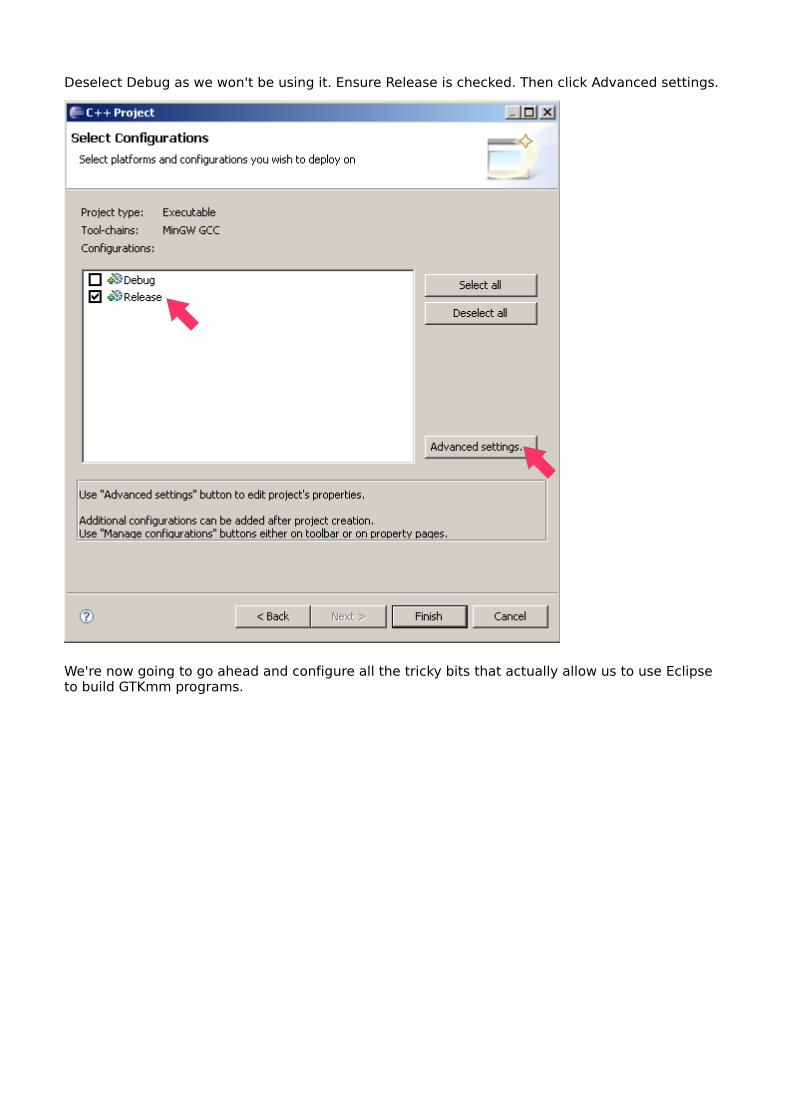
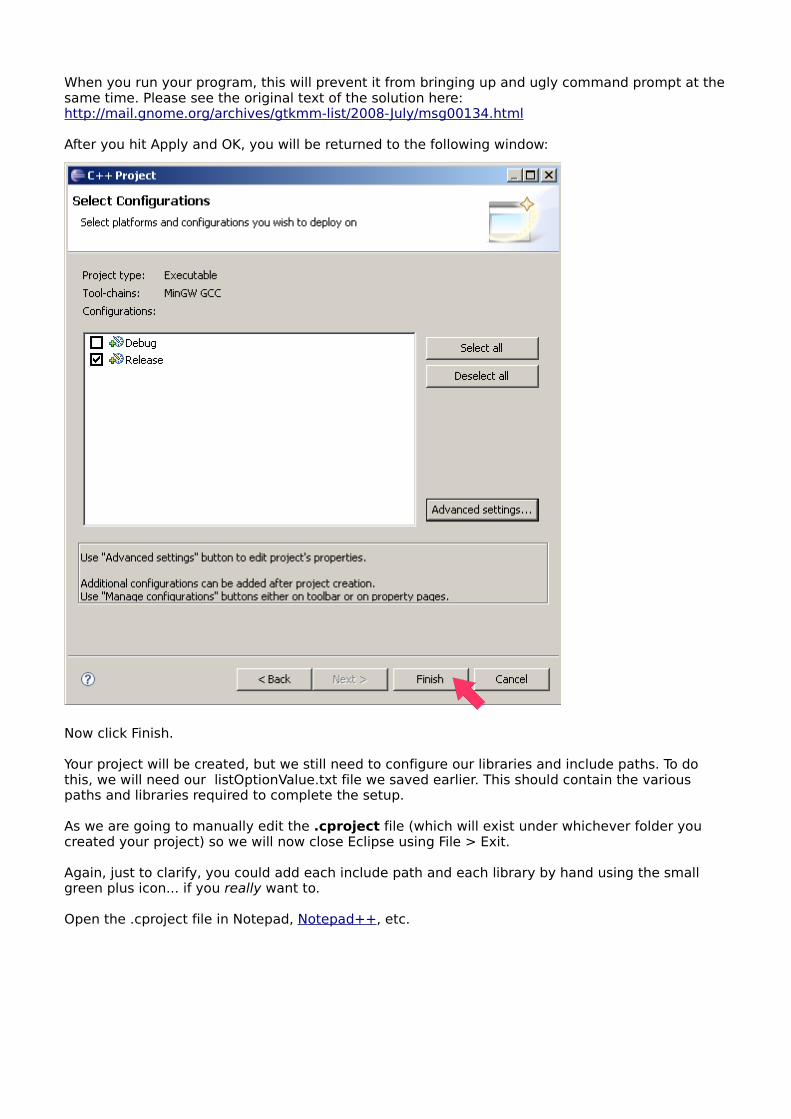
Deselect Debug as we won't be using it. Ensure Release is checked. Then click Advanced settings.
We're now going to go ahead and configure all the tricky bits that actually allow us to use Eclipse to build GTKmm programs.
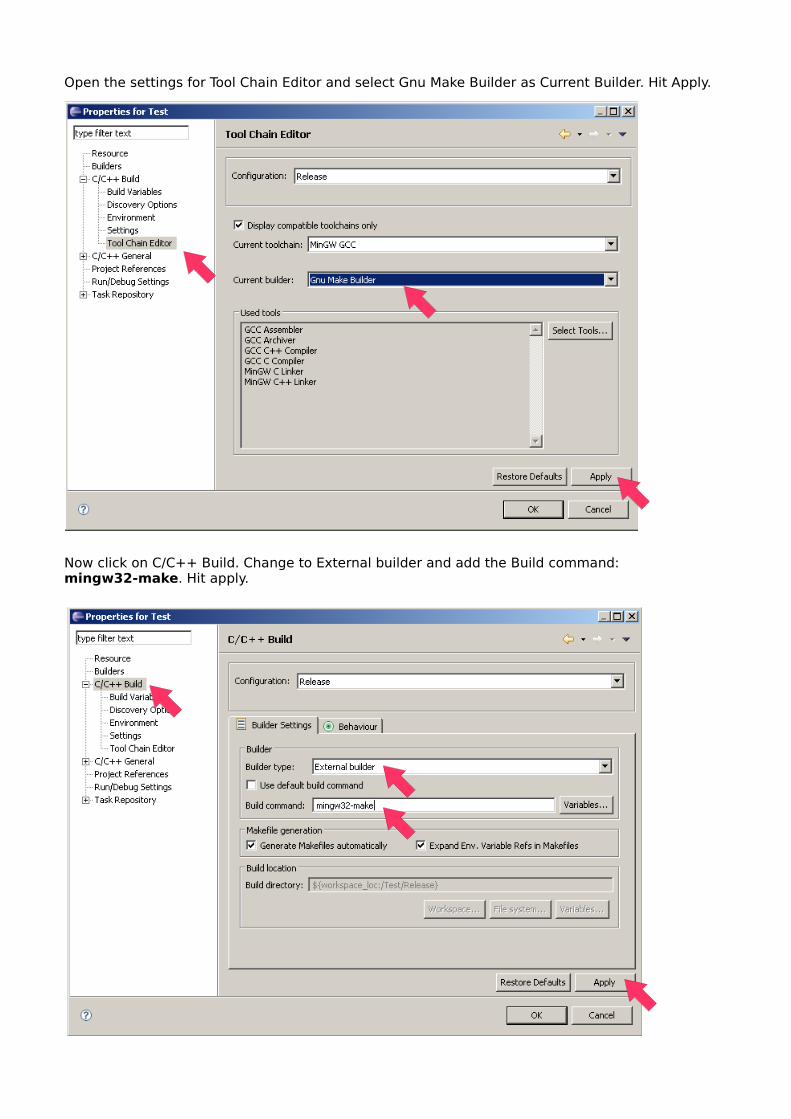
Open the settings for Tool Chain Editor and select Gnu Make Builder as Current Builder. Hit Apply.
Now click on C/C++ Build. Change to External builder and add the Build command: mingw32-make. Hit apply.
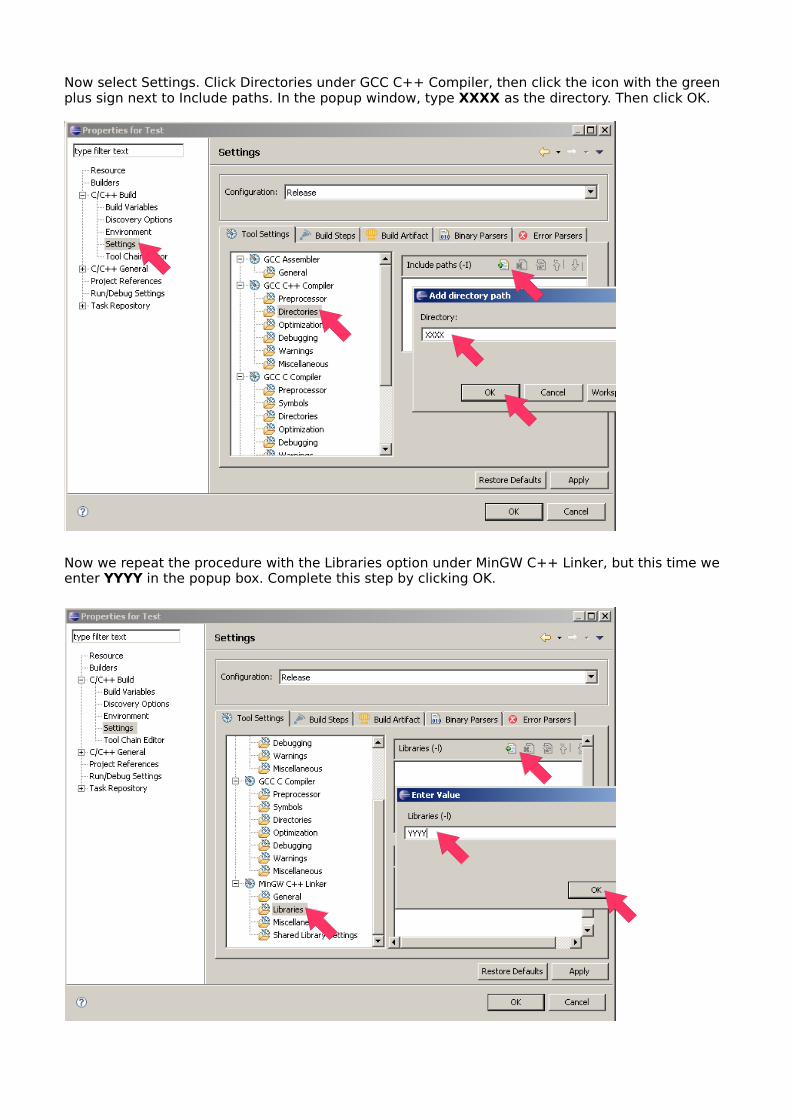
Now select Settings. Click Directories under GCC C++ Compiler, then click the icon with the green plus sign next to Include paths. In the popup window, type XXXX as the directory. Then click OK.
Now we repeat the procedure with the Libraries option under MinGW C++ Linker, but this time we enter YYYY in the popup box. Complete this step by clicking OK.
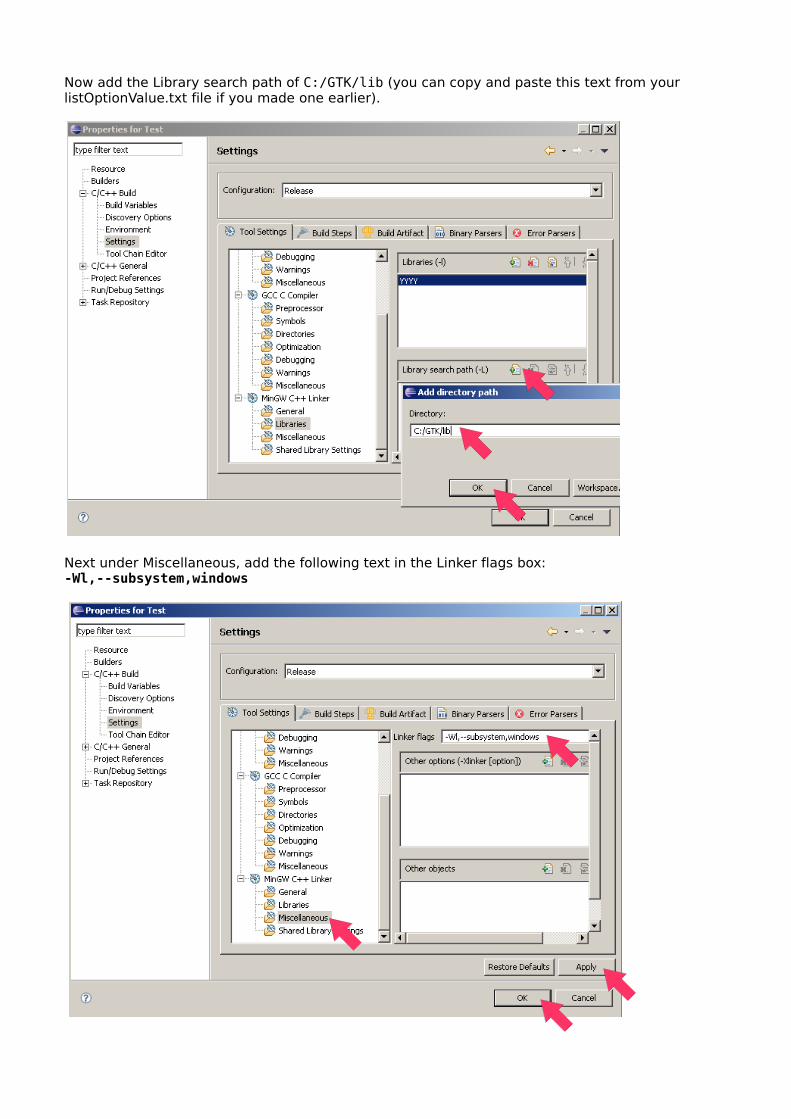
Now add the Library search path of C:/GTK/lib (you can copy and paste this text from your listOptionValue.txt file if you made one earlier).
Next under Miscellaneous, add the following text in the Linker flags box: -Wl,--subsystem,windows
When you run your program, this will prevent it from bringing up and ugly command prompt at the same time. Please see the original text of the solution here: http://mail.gnome.org/archives/gtkmm-list/2008-July/msg00134.html
After you hit Apply and OK, you will be returned to the following window:
Now click Finish.
Your project will be created, but we still need to configure our libraries and include paths. To do this, we will need our listOptionValue.txt file we saved earlier. This should contain the various paths and libraries required to complete the setup.
As we are going to manually edit the .cproject file (which will exist under whichever folder you created your project) so we will now close Eclipse using File > Exit.
Again, just to clarify, you could add each include path and each library by hand using the small green plus icon... if you really want to.
Open the .cproject file in Notepad, Notepad++, etc.
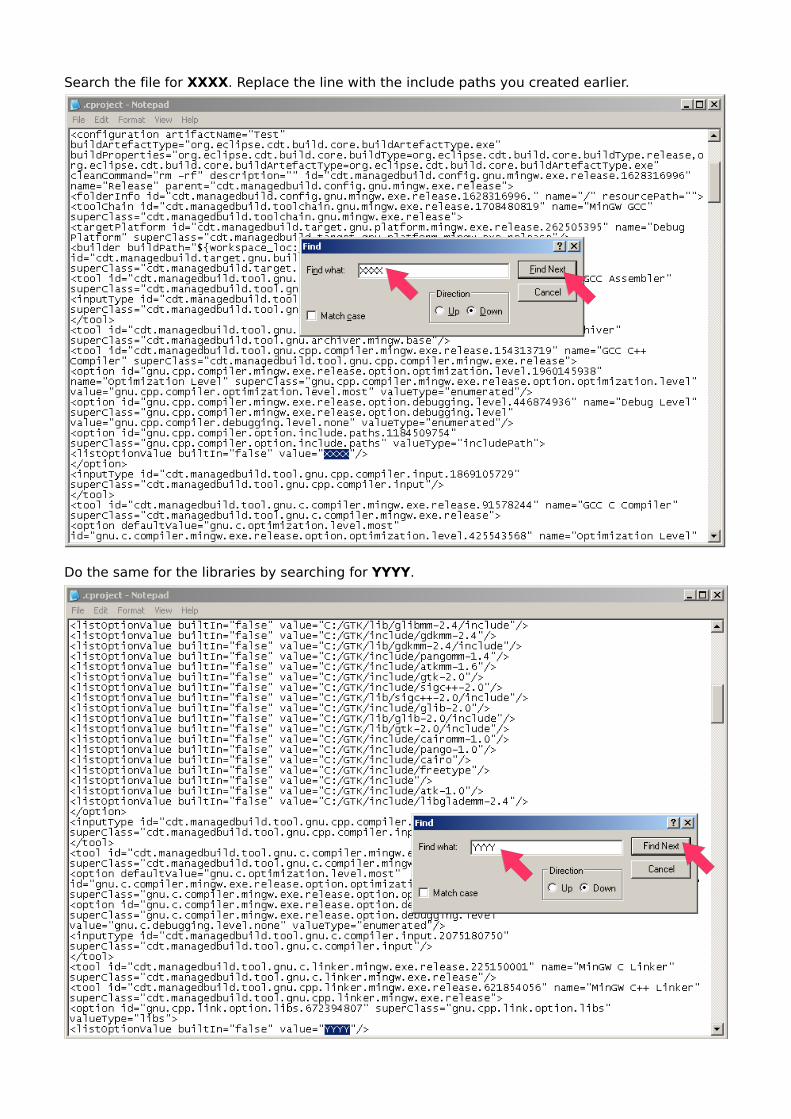
Search the file for XXXX. Replace the line with the include paths you created earlier.
Do the same for the libraries by searching for YYYY.

Save your .cproject file. It may be a good idea to create a backup file in case anything goes awry.
Now reload Eclipse. You should find your project now shows your Include paths under Includes.
Ok, finally we can create our C++ file. Go to File > New > Source File.
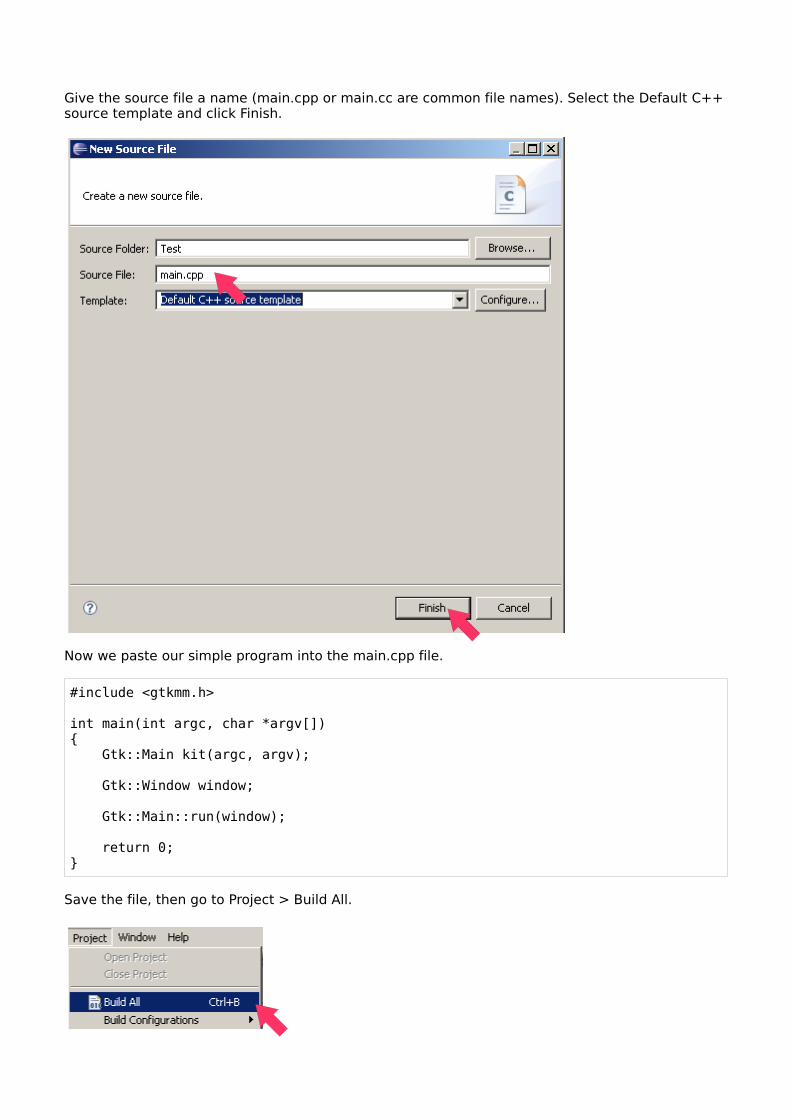
Give the source file a name (main.cpp or main.cc are common file names). Select the Default C++ source template and click Finish.
Now we paste our simple program into the main.cpp file.
#include <gtkmm.h>
int main(int argc, char *argv[]){ Gtk::Main kit(argc, argv);
Gtk::Window window;
Gtk::Main::run(window); return 0;}
Save the file, then go to Project > Build All.

Ensuring that the main.cpp file is selected, click the green run arrow shown below. Your test.exe file should appear.
Tada! It works. OK, it takes a lot of effort to setup but it is possible and if you prefer Eclipse to Dev-C++ then it may be worth the effort.
Excuses, excuses...
I should point out that I am new to GTKmm, and know very little. The purpose of this document is just to get the development environment up and running in the first place!
Likewise, although I've put some basic screen shots above, please don't assume that I know much about Dev-C++... or Eclipse.
Assume instead that I'm a complete idiot (albeit a tenacious one that refuses to give up) and you'll be much closer to the truth...
;)
Need more help..?
Aside from the official site, you could also check the following site for solutions to any problems you encounter: http://mail.gnome.org/archives/gtkmm-list/
Rob Whalley29th July 2008
Last edited: 17th August 2008