INSTALLAZIONE PAVIMENTO GALLEGGIANTE IN GRES · 1) Before installing the SelFloor module on the...
9
FL OOR SISTEMA PER PAVIMENTI ESTERNI | OUTDOOR FLOORING SYSTEM | SYSTÈME POUR SOLS D’EXTÉRIEUR | SYSTEM FÜR BÖDEN IN AUSSENBEREICHEN
Transcript of INSTALLAZIONE PAVIMENTO GALLEGGIANTE IN GRES · 1) Before installing the SelFloor module on the...

FLOORSISTEMA PER PAVIMENTI ESTERNI | OUTDOOR FLOORING SYSTEM | SYSTÈME POUR SOLS D’EXTÉRIEUR | SYSTEM FÜR BÖDEN IN AUSSENBEREICHEN

Spianare il terreno di posa.Applicare uno spessore non inferiore a 2 centimetri di pietrisco (granulometria da 2 a 5 mm), pareggiando la superfi-cie con una livella.
Level off the substrate to make it ready for installation. Cover with at least a 2cm layer of pebbles (granulometry ranging from 2mm to 5 mm), making sure to flatten the surface using a level.
Aplanir le terrain. Répandre au moins 2 cm de matériau pierreux (granulo-métrie de 2 à 5 mm) en égalisant la surface avec un niveau à bulle.
Den Verlegebereich ebnen. Eine ca.2 cm (nicht niedriger) hohe Kiesschicht mit 2-5 mm Körnung auslegen. Die Oberfläche mit einer Wasserwaage ausgleichen.
Staccare un tassello e conservare per il successivo aggancio dei moduli.
Remove one of the supports and keep it to one side for use later for the anchoring of the modules.
Détacher un des raccords et le conserver pour l’accrocher par la suite aux modules.
Einen Dübel lösen und für das nächste Einhängen des Moduls aufbewahren.
Infilare un angolo della piastrella in uno degli angoli del supporto. Seguendo i lati della sagoma del supporto, fare pressione affinché la piastrella aderisca al supporto.
Insert an edge of the tile into one of the angles of the support. Following the sides of the support profiling, exert slight pressure until the tile adheres to the support.
Placer un des angles de la dalle dans un des angles du support. En suivant les bords du profil de support, ap-puyer pour faire adhérer la dalle au support.
Eine Ecke der Fliese in eine Ecke des Trägers legen, ebenso mit den Seiten verfahren und sie auf den Umriss des Trägers bringen. Die Fliesen kräftig auf den Träger drücken bis sie haften.
poSa Su terreno, ghiaia o pietriScoInstallation onto ground or gravel - Pose sur terre ou gravier - Verlegung auf Erde, Kies oder Schotter
Self. Old. Olmo Grip45x45 - 18”x18”

Completare l’operazione agganciando il supporto ai rimanenti lati della piastrella.
Anchor the support to the remaining tile edges.
Terminer l’opération en accrochant le support aux autres côtés de la dalle.
Die Aktion abschließen, indem der Träger an die restlichen Seiten der Fliese anhängt wird.
Una volta ottenuti i moduli agganciare gli stessi con gli appositi tasselli.
Once this has been done with all the modules,anchor them together using the appropriate pegs.
Une fois que les modules ont été composés, fixez-les les uns aux autres à l’aide des raccords prévus.
Die so erhaltenen Module mithilfe derentsprechenden Dübel anhängen.
Per far aderire i moduli allo strato di pietrisco sottostante, battere con accortezza le superfi ci conun martello di gomma.
In order to make the modules adhere to the under-laying pebbles, care-fully tap the surface using a rubber hammer.
Pour faire adhérer les modules à la couche de matériau pierreux sous-jacente, marteler délicatement leur surface à l’aide d’un marteau en caoutchouc.
Zur besseren Haftung der Module auf der Kiesschicht sollte mit einem Gummihammer vorsichtig auf die Oberflächen geklopft werden.
poSa Su guainaInstallation onto insulating sleeve - Pose sur gaine isolante - Verlegung auf der Isolierfolie
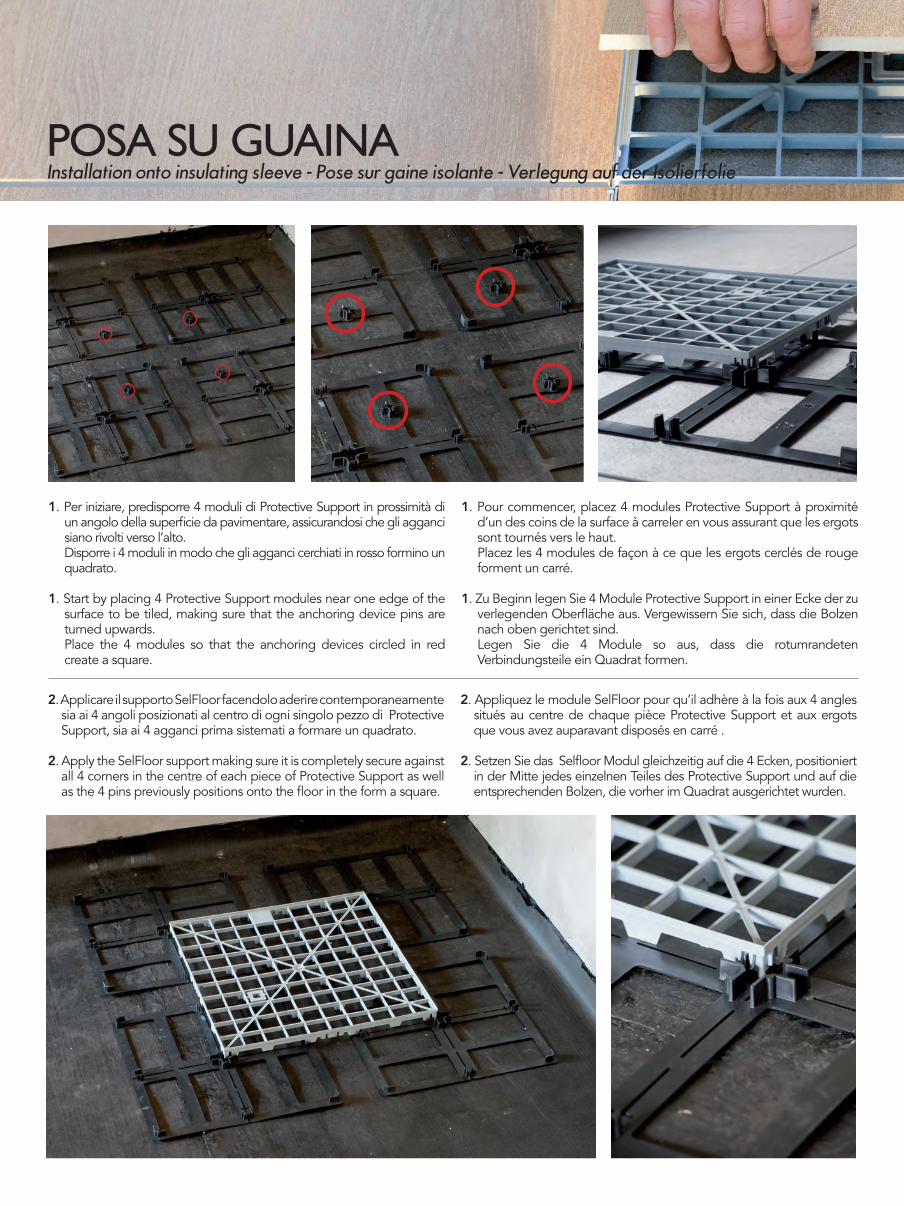
1. Per iniziare, predisporre 4 moduli di Protective Support in prossimità di un angolo della superficie da pavimentare, assicurandosi che gli agganci siano rivolti verso l’alto.
Disporre i 4 moduli in modo che gli agganci cerchiati in rosso formino un quadrato.
1. Start by placing 4 Protective Support modules near one edge of the surface to be tiled, making sure that the anchoring device pins are turned upwards.
Place the 4 modules so that the anchoring devices circled in red create a square.
1. Pour commencer, placez 4 modules Protective Support à proximité d’un des coins de la surface à carreler en vous assurant que les ergots sont tournés vers le haut.
Placez les 4 modules de façon à ce que les ergots cerclés de rouge forment un carré.
1. Zu Beginn legen Sie 4 Module Protective Support in einer Ecke der zu verlegenden Oberfläche aus. Vergewissern Sie sich, dass die Bolzen nach oben gerichtet sind.
Legen Sie die 4 Module so aus, dass die rotumrandeten Verbindungsteile ein Quadrat formen.
2. Applicare il supporto SelFloor facendolo aderire contemporaneamente sia ai 4 angoli posizionati al centro di ogni singolo pezzo di Protective Support, sia ai 4 agganci prima sistemati a formare un quadrato.
2. Apply the SelFloor support making sure it is completely secure against all 4 corners in the centre of each piece of Protective Support as well as the 4 pins previously positions onto the floor in the form a square.
2. Appliquez le module SelFloor pour qu’il adhère à la fois aux 4 angles situés au centre de chaque pièce Protective Support et aux ergots que vous avez auparavant disposés en carré .
2. Setzen Sie das Selfloor Modul gleichzeitig auf die 4 Ecken, positioniert in der Mitte jedes einzelnen Teiles des Protective Support und auf die entsprechenden Bolzen, die vorher im Quadrat ausgerichtet wurden.

4. Tagliare la parte di Protective Support che impedisce al modulo SelFloor di aderire al perimetro. Posizionare il supporto così ottenuto a contatto con il perimetro della superficie da pavimentare.
4. Cut the excess Protective Support that prevents the Selfloor module from resting against the perimeter. Then place the trimmed support along the edge of the surface to be tiled.
4. Coupez la partie du Protective Support qui empêche le module SelFloor de correspondre aux bords. Placez le support ainsi obtenu de façon à ce qu’il touche les bords de la surface à carreler.
4. Schneiden Sie die überstehenden Teile des Protective Support, die das Selfloor Modul daran hindern bündig an der Wand zu liegen, ab. Schieben Sie den Support mit dem Modul ganz an die Wand.
3. Proseguire con il posizionamento dei Protective Support e dei moduli SelFloor lungo i lati perimetrali dell’area da pavimentare.
3. Proceed with the application of the Protective Support and the SelFloor modules along the sides of the perimeter surface to be tiled.
3. Continuez de mettre en place les Protective Support et les modules SelFloor le long des bords extérieurs de la surface à carreler.
3. Fahren Sie in dieser Weise mit dem Auslegen der Protective Supports und den SelFloor Modulen entlang der Außenseiten der zu verlegenden Fläche fort.

5. Una volta completato il perimetro, procedere con la posa dei moduli assemblati ricoprendo l’intera area da pavimentare.
5. Once the perimeter has been completed, proceed with the installation of assembled modules covering the entire surface to be tiled.
5. Quand vous fini les bords, continuez de poser les modules assemblés pour recouvrir toute la surface à carreler.
5. Wenn die Module auf der Außenseite platziert sind fahren Sie mit der Verlegung der zusammengesetzten Module auf der gesamten Fläche fort.
6. Infine inserire le piastrelle nei moduli assemblati. Infilare quindi un angolo della piastrella in uno degli angoli del modulo e, seguendo i lati della sagoma del supporto grigio di plastica, fare pressione affinchè la piastrella aderisca completamente.
6. Finally, place the tile onto the installed SelFloor module. Start by placing one corner of the tile into one corner of the module and, following the sides of the grey plastic support shape, press on it until the tile has completely adhered.
6. Pour finir, placez les carreaux dans modules assemblés. Placez l’angle du carreau dans un des angles du module et, en suivant les bords du support gris en plastique, exercer une pression pour que le carreau soit bien fixé.
6. Legen Sie dann die Fliesen in die zusammengesetzten Module. Beginnen Sie die Ecke der Fliese in die Ecke des Moduls zu legen und fahren mit den Seiten auf dem Kunststoffgitter fort. Drücken Sie die Fliese fest, so dass sie gut haftet.
poSa Su guainaInstallation onto insulating sleeve - Pose sur gaine isolante - Verlegung auf der Isolierfolie

• Modulo SelFloor con piastrella inserita: 29.00 mm• Modulo SelFloor con piastrella inserita + tassello per posa standard: 29.50 mm• Protective Support: 3.50 mm
• SelFloor module with integrated ceramic slab: 29.00mm• SelFloor module with integrated ceramic slab + base for standard installation: 29.50mm• Protective Support: 3.50mm
• Module SelFloor avec céramique montée: 29.00 mm• Module SelFloor avec céramique montée + support de montage standard: 29.50 mm• Protective Support: 3.50 mm
• SelFloor modul mit aufgesteckter Keramik: 29.00 mm• SelFloor modul mit aufgesteckter Keramik + Fuß für Standardverlegung: 29.50 mm• Protective Support: 3.50 mm
SPESSORI (MEDI)(AVERAGE) THICKNESS - éPAISSEuRS (MOYENNES) - STÄRKEN (DuRCHSCHNITT)
Caratteristica tecnica - Technical features Caracteristiques techniques - Technische Eigenschaften
Características técnicas - Tехнические характеристики
Norma Norms NormeNormValor
Hормативы
Valore richiesto dalle normeRequired standards
Valeur prescrite par les normesNormvorgabe ido por las normas
Значение требуемое нормативами
Valore medioAverage value
Valeur Moyenne Durchschnittswert
Valor Mediano Среднее значение
OLDWOOD NEXT WAY
Caratt. meccaniche massiveBulk mechanical Characteristics
Caractéristiques mécaniques massiquesMechanische Eigenschaften des Scherben
Características mecánicasМеханические свойства массы
Sforzo di rottura - Breaking strenght - Force de rupture Bruchlast - Esfuerzo de ruptura - Усилие на излом
ISO 10545-4
S ≥ 1300 N S ≥ 2000 N S ≥ 2000 N
Resistenza alla flessione - Breaking strength Résistance a la flexion - Biegefestigkeit
Resistencia a la flexión - Прочность на изгиб R ≥ 35 N/mm2 R ≥ 45 N/mm2 R ≥ 40 N/mm2

poSa Su guainaInstallation onto insulating sleeve - Pose sur gaine isolante - Verlegung auf der Isolierfolie
a) Elementi complementari quali sassi colorati, ghiaia, vasi, erba sintetica, ecc.b) Posa di battiscopac) Taglio del modulo SelFloor a misura
1) Prima della posa del modulo SelFloor su guaina, accertarsi che la superficie della stessa sia perfettamente planare2) Le soluzioni di finitura perimetrale sopra citate, sono indicate come soluzioni per superfici non perfettamente modulari alla dimensione
del modulo SelFloor3) È necessario posare il pavimento (il modulo SelFloor) in modo che abbia una pendenza minima del 2% (20.00 mm di abbassamento per
ogni metro lineare)
a) Complementary elements such as coloured pebbles, gravel, vases, synthetic grass, etc.b) Skirting installationc) Cut SelFloor module according to required size
1) Before installing the SelFloor module on the sleeve, make sure that the surface of the sleeve is perfectly planar. 2) The outer finishes solutions mentioned above are recommended for surfaces which are not perfectly modular to the SelFloor module size.3) The flooring (SelFloor) must be laid so that there is a minimum slope of 2% (20.00 mm lower for each meter in length)
a) Des accessoires comme des pierres colorées, du gravier, des vases, du gazon synthétique, etc.b) La pose d’une plinthec) La coupe sur mesure du module SelFloor
1) Avant de mettre en place le module SelFloor sur la membrane, vérifier que la surface est parfaitement plane.2) Nous conseillons d’adopter pour la finition latérale les solutions indiquées ci-dessus quand la dimension de la surface ne correspond pas
exactement à celle qu’on peut obtenir avec les modules SelFloor.3) Il faut poser le sol (SelFloor) de sorte qu’il y ait une inclinaison minimun de 2% (20.00 mm d’abaissement pour chaque mètre linéaire).
a) Ergänzende Elemente wie bunte Steine, Kies, Vasen, Kunstrasen etc.b) Verlegung des Sockelleistec) Schnitt der Module SelFloor nach Maß
1) Vor der Verlegung des Moduls SelFloor auf der Hülle, vergewissern Sie sich bitte dass die Oberfläche perfekt eben ist. 2) Die Lösungen für den Außenbelag, wie oben aufgeführt, sind als Lösungen für Oberflächen geeignet, die in der Größe des Moduls SelFloor
nicht perfekt modular sind.3) Es ist notwendig die Bodenfliesen so zu verlegen , daβ diese eine Neigung von mindestens 2% (20.00 mm Senkung pro liniarem Meter) haben.
FINITuRE PERIMETRAlI CONSIGlIATERECOMMENDED OuTER FINISHES - FINITIONS lATéRAlES CONSEIlléES - EMPFOHlENES AuSSENFINISH
AVVERTENZEWARNING - PRéCAuTIONS - HINWEISE